Use Et Care Guide
Q-Touch TMFron t-Loa d Washer
Guia de uso y cuidado
Lavadora de carga frontal _O-Touch Mc
Guide d'utilisation et d'entretien
Laveuse _ chargement frontal _Q-Touch Ms

Finding Information
Please read and save this guide
Thank you for choosing Electrolux, the new premium brand in home appliances. This Use & Care Guide
is part of our commitment to customer satisfaction and product quality throughout the service life of your
new appliance.
We view your purchase as the beginning of a relationship. To ensure our ability to continue serving you,
please use this page to record important product information.
Keep a record for quick reference
Purchase date
Electrolux model number
Electrolux serial number
For toll-free telephone support in the U.S. and Canada: 1-877-4ELECTROLUX {1-877-435-3287)
For online support and product information visit http://www.electroluxappliances.com
Table of contents
Finding information ......................................................... 2
SAFETY ..................................................................... 3-5
Features .......................................................................... 6
Operating instructions ............................................... 7-18
• Getting Started ........................................................... 7
Normal Operating Sounds .......................................... 7
Operating Your Washer .......................................... 8-13
Cycle Selection .................................................... 14-17
Washing/Rinsing Temperature ............................. 17-18
Spin Speed ...................................................................
18
Soil Level .................................................................. 18
Options ..................................................................... 19
Washer Features ....................................................... 20
Cycle Chart ................................................................... 21
Stain Removal Guide ............................................... 22-23
Stain Removal Procedures ....................................... 22
Stain Removal Suggestions ...................................... 23
Care & Cleaning ....................................................... 24-26
Solutions to Common Problems ............................. 27-30
Common Washing Problems ............................... 27-28
Service Prevention Checklist ............................... 29-30
Warranty information .................................................... 31
Notes ............................................................................ 32
©2008 Electrolux Major Aplliances All rights reserved.

Safety
[mpoAant Safety Instructions
Recognize safety symbols, words and
labels
Your safety and the safety of others is very
important.
We have provided many important safety messages
in the Use and Care Guide, Installation Instructions
and on your appliance. Always read and obey all
safety messages.
Safety items throughout this manual are labeled
with a WARNING or CAUTION based on the risk
type as described below:
/_ WARNING This symbol alerts you to situa-
tions that may cause serious body
harm, death or property damage.
/_ CAUTION This symbol alerts you to situa-
tions that may cause bodily injury
or property damage.
Do not store or use gasoline or other
flammable vapors and liquids in the
vicinity of this or any other appliance.
WHAT TO DO IF YOU SMELL GAS:
,, Do not try to light any appliance.
,, Do not touch any electrical switch; do
not use any phone in your building.
,, Clear the room, building or area of all
occupants.
,, Immediately call your gas supplier from
a neighbor's phone. Follow the gas
supplier's instructions.
,, If you cannot reach your gas supplier,
call the fire department.
Installation and service must be
performed by a qualified installer,
service agency or the gas supplier.
Save these instructions for future reference.
Safety
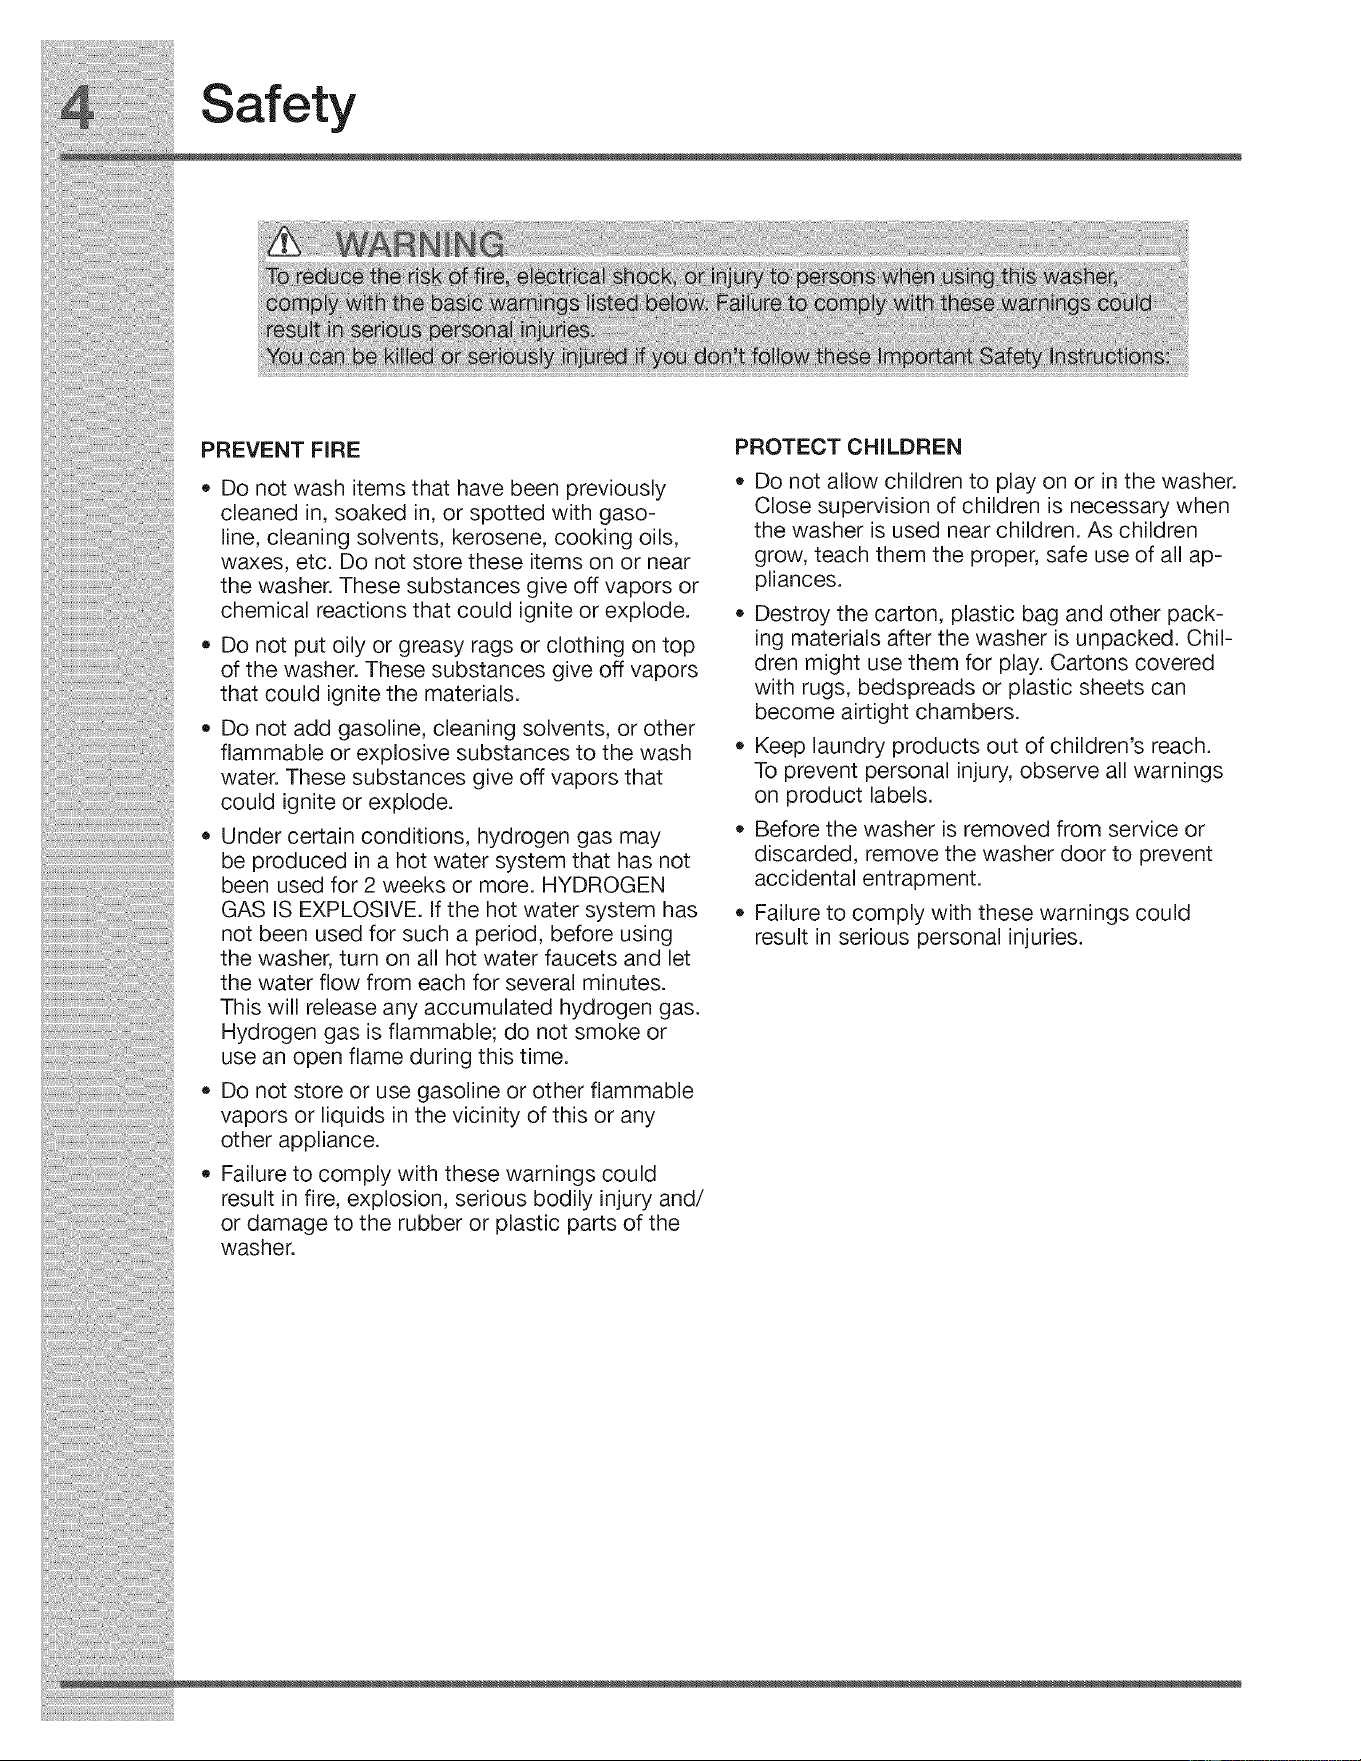
PREVENT FiRE
• Do not wash items that have been previously
cleaned in, soaked in, or spotted with gaso-
line, cleaning solvents, kerosene, cooking oils,
waxes, etc. Do not store these items on or near
the washer. These substances give off vapors or
chemical reactions that could ignite or explode.
Do not put oily or greasy rags or clothing on top
of the washer. These substances give off vapors
that could ignite the materials.
Do not add gasoline, cleaning solvents, or other
flammable or explosive substances to the wash
water. These substances give off vapors that
could ignite or explode.
Under certain conditions, hydrogen gas may
be produced in a hot water system that has not
been used for 2 weeks or more. HYDROGEN
GAS IS EXPLOSIVE. If the hot water system has
not been used for such a period, before using
the washer, turn on all hot water faucets and let
the water flow from each for several minutes.
This will release any accumulated hydrogen gas.
Hydrogen gas is flammable; do not smoke or
use an open flame during this time.
Do not store or use gasoline or other flammable
vapors or liquids in the vicinity of this or any
other appliance.
Failure to comply with these warnings could
result in fire, explosion, serious bodily injuryand/
or damage to the rubber or plastic parts of the
washer.
PROTECT CHILDREN
Do not allow children to play on or in the washer.
Close supervision of children is necessary when
the washer is used near children. As children
grow, teach them the proper, safe use of all ap-
pliances.
Destroy the carton, plastic bag and other pack-
ing materials after the washer is unpacked. Chil-
dren might use them for play. Cartons covered
with rugs, bedspreads or plastic sheets can
become airtight chambers.
Keep laundry products out of children's reach.
To prevent personal injury, observe all warnings
on product labels.
Before the washer is removed from service or
discarded, remove the washer door to prevent
accidental entrapment.
Failure to comply with these warnings could
result in serious personal injuries.
Safety
important Safety instructions, con't
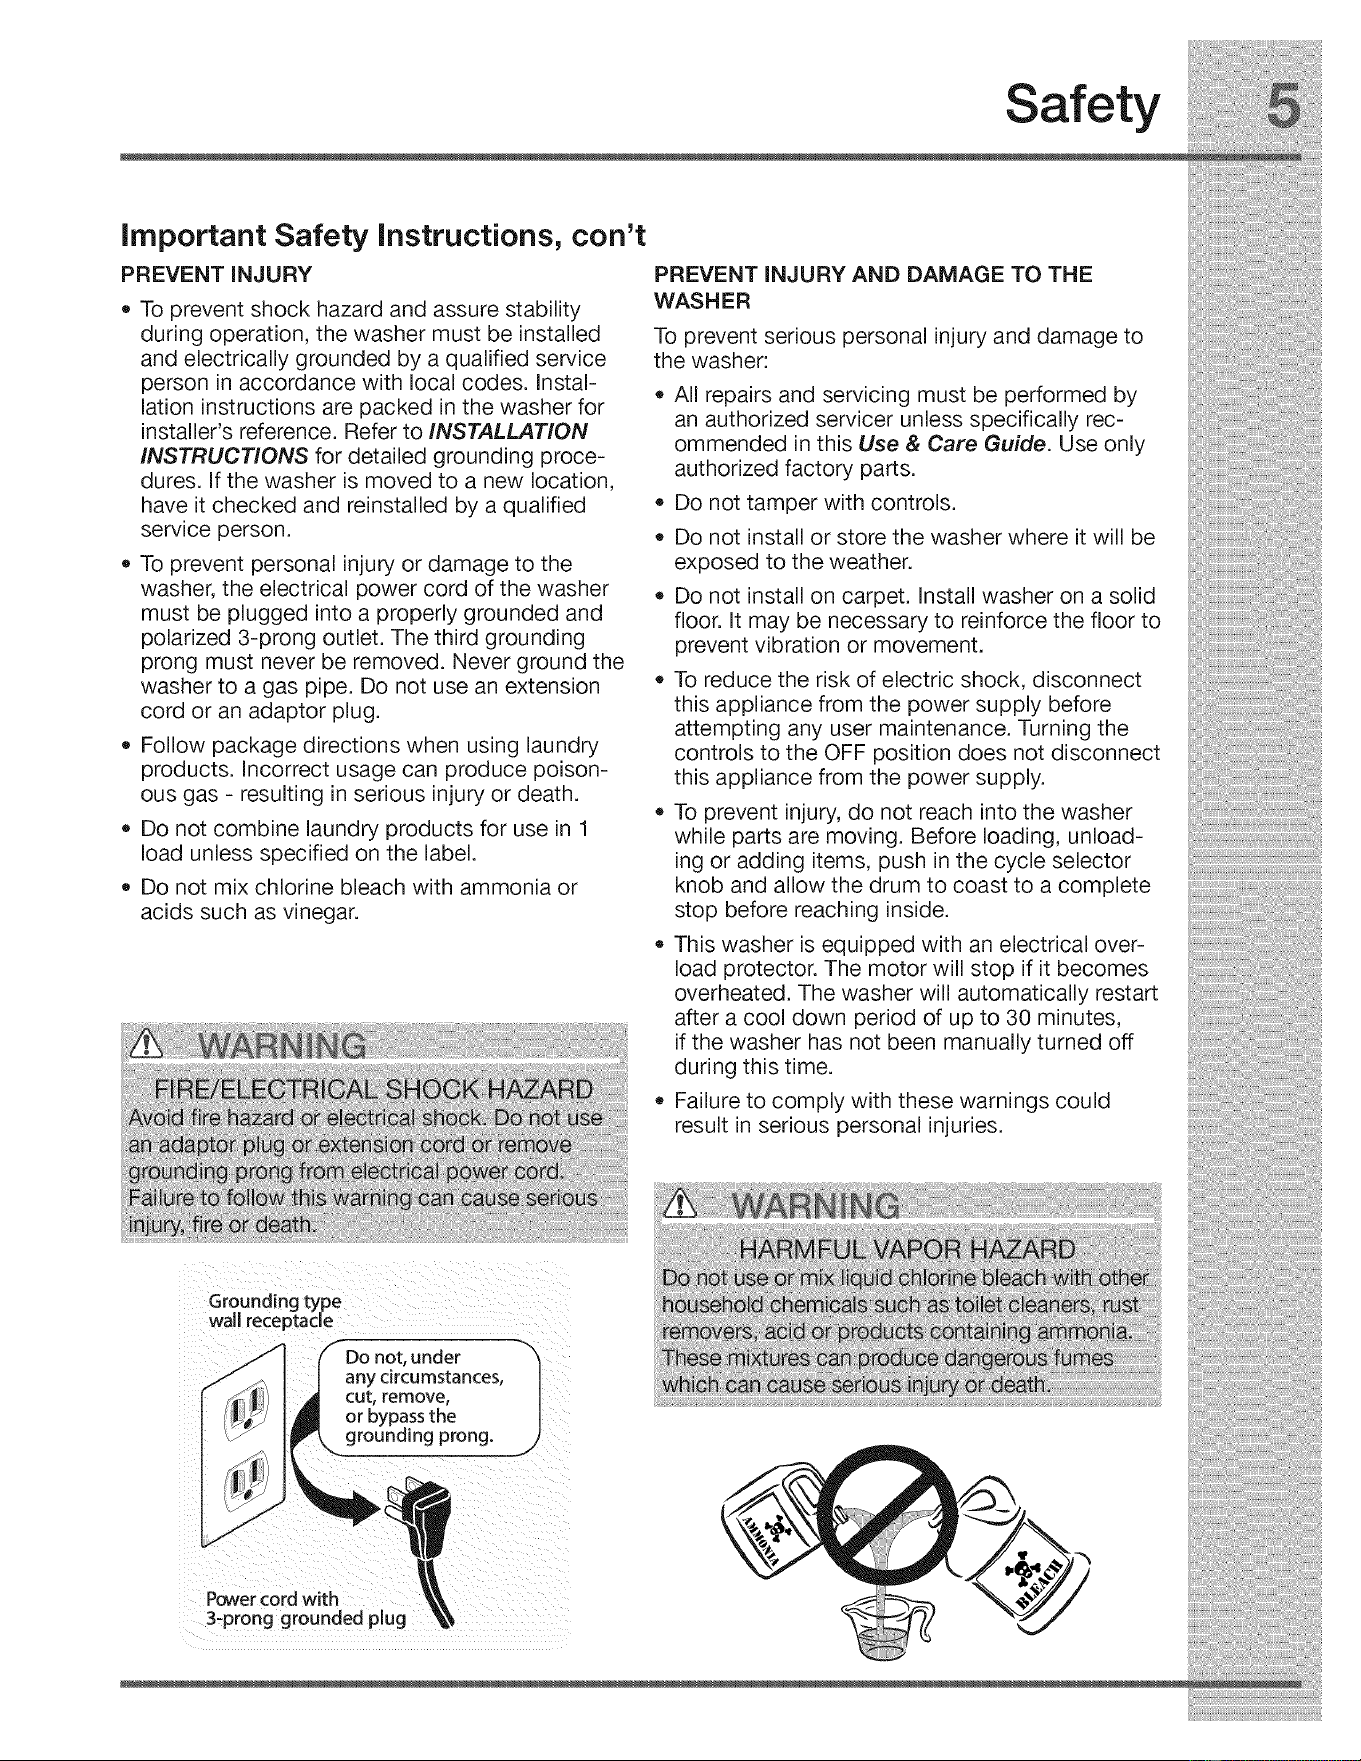
PREVENT INJURY
• To prevent shock hazard and assure stability
during operation, the washer must be installed
and electrically grounded by a qualified service
person in accordance with local codes. Instal-
lation instructions are packed in the washer for
installer's reference. Refer to INSTALLATION
INSTRUCTIONS for detailed grounding proce-
dures. If the washer is moved to a new location,
have it checked and reinstalled by a qualified
service person.
• To prevent personal injury or damage to the
washer, the electrical power cord of the washer
must be plugged into a properly grounded and
polarized 3-prong outlet. The third grounding
prong must never be removed. Never ground the
washer to a gas pipe. Do not use an extension
cord or an adaptor plug.
• Follow package directions when using laundry
products. Incorrect usage can produce poison-
ous gas - resulting in serious injury or death.
• Do not combine laundry products for use in 1
load unless specified on the label.
• Do not mix chlorine bleach with ammonia or
acids such as vinegar.
PREVENT INJURY AND DAMAGE TO THE
WASHER
To prevent serious personal injury and damage to
the washer:
• All repairs and servicing must be performed by
an authorized servicer unless specifically rec-
ommended in this Use & Care Guide. Use only
authorized factory parts.
• Do not tamper with controls.
• Do not install or store the washer where it will be
exposed to the weather.
• Do not install on carpet. Install washer on a solid
floor. It may be necessary to reinforce the floor to
prevent vibration or movement.
• To reduce the risk of electric shock, disconnect
this appliance from the power supply before
attempting any user maintenance. Turning the
controls to the OFF position does not disconnect
this appliance from the power supply.
• To prevent injury, do not reach into the washer
while parts are moving. Before loading, unload-
ing or adding items, push in the cycle selector
knob and allow the drum to coast to a complete
stop before reaching inside.
• This washer is equipped with an electrical over-
load protector. The motor will stop if it becomes
overheated. The washer will automatically restart
after a cool down period of up to 30 minutes,
if the washer has not been manually turned off
during this time.
• Failure to comply with these warnings could
result in serious personal injuries.
Grounding type
wall receptacle
/
Do not, under
any circumstances,
cut, remove,
Power cordw_th
3-pr;ng gr;_nded plug
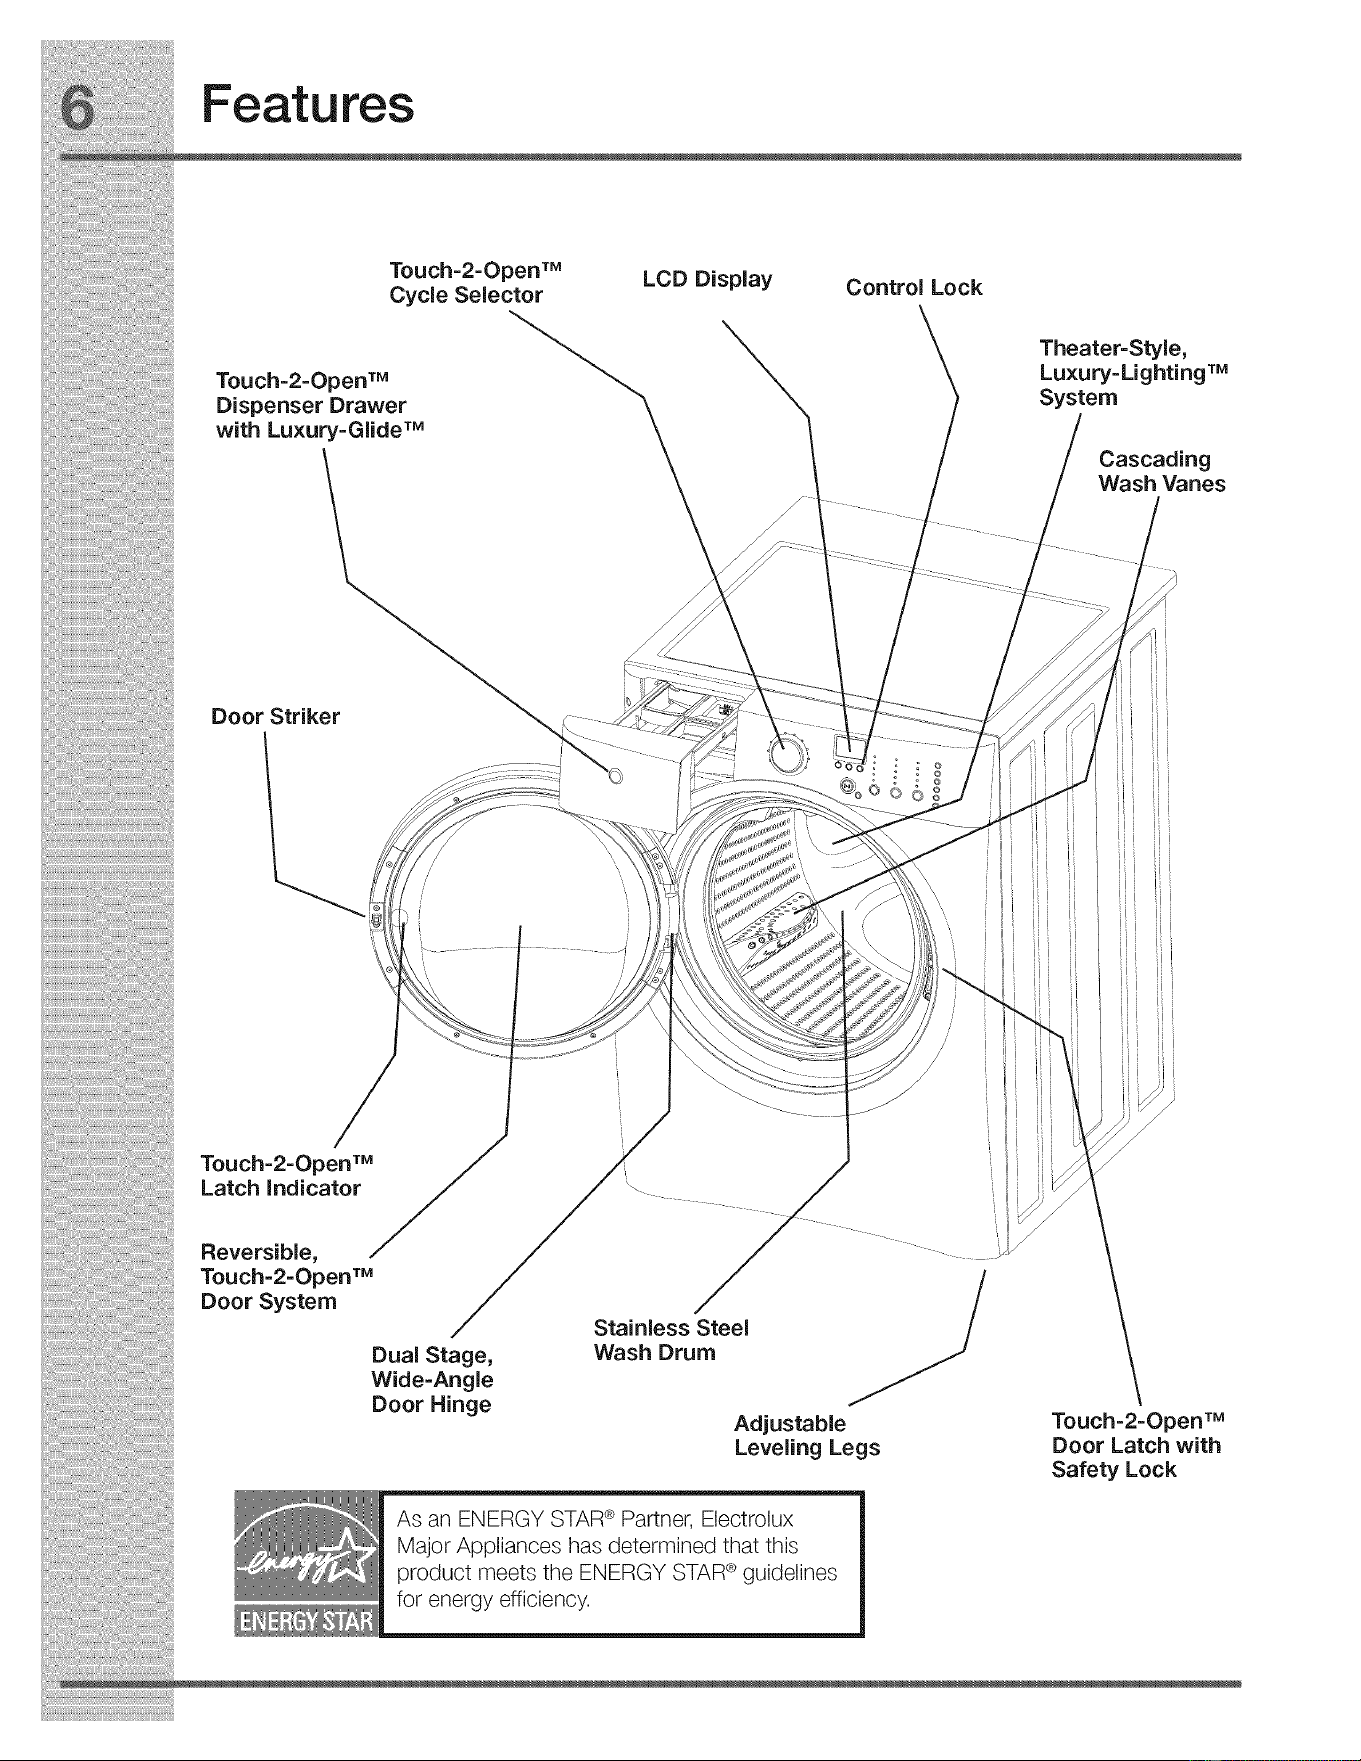
Features
Touch=2=Open_M
Cycle Selector LCD Display
Control Lock
TOsUCh-2-OpenT,4
Penser Drawer
with Luxury=G|ideT_
Door Strike
/
Touch=2=OpenT_
Latch indicator
Reversible,
Touch-2-OpenT_
Door System
Dual Stage,
Wide-Angle
Door Hinge
q\..
Stainless Steel
Wash Drum
Y
Adjustable
Leveling Legs
Theater=Style,
Luxury-Lighting TM
System
Cascading
Wash Vanes
Touch-2-OpenTM
Door Latch with
Safety Lock
Operating Instructions
Getting Started
heavy qti? _
duty _ "J
deep clean _+0
sanitize
casual
@ _=(j) fast
0 _/ wash
o_ delicate
3 I_J hand
wash
@@ spin
only
_
,@
my delay control
favorite start lock
Temperature Spin Speed Soil
autotemp
_÷ @ sanitize/cold @ max
@ hot/cold @ high @ heavy
0 warm/warm 0 medium @ medium
© warm/cold @ low @ light
0 cold/cold @ no spin
Options
To run your washer, follow these basic steps:
1. Sort laundry into loads that can be washed
together. (See page 8.)
2. Prepare items for washing. (See page 8.)
3. Pretreat stains and heavy soil. (See page 9.)
4. Add laundry load to the washer. (See page 9.)
5. Add laundry products to the dispenser. (See
page 10-11 .)
6. Select the appropriate cycle and settings for the
load. (See page 12.)
7. Start the washer. (See pages 12-13.)
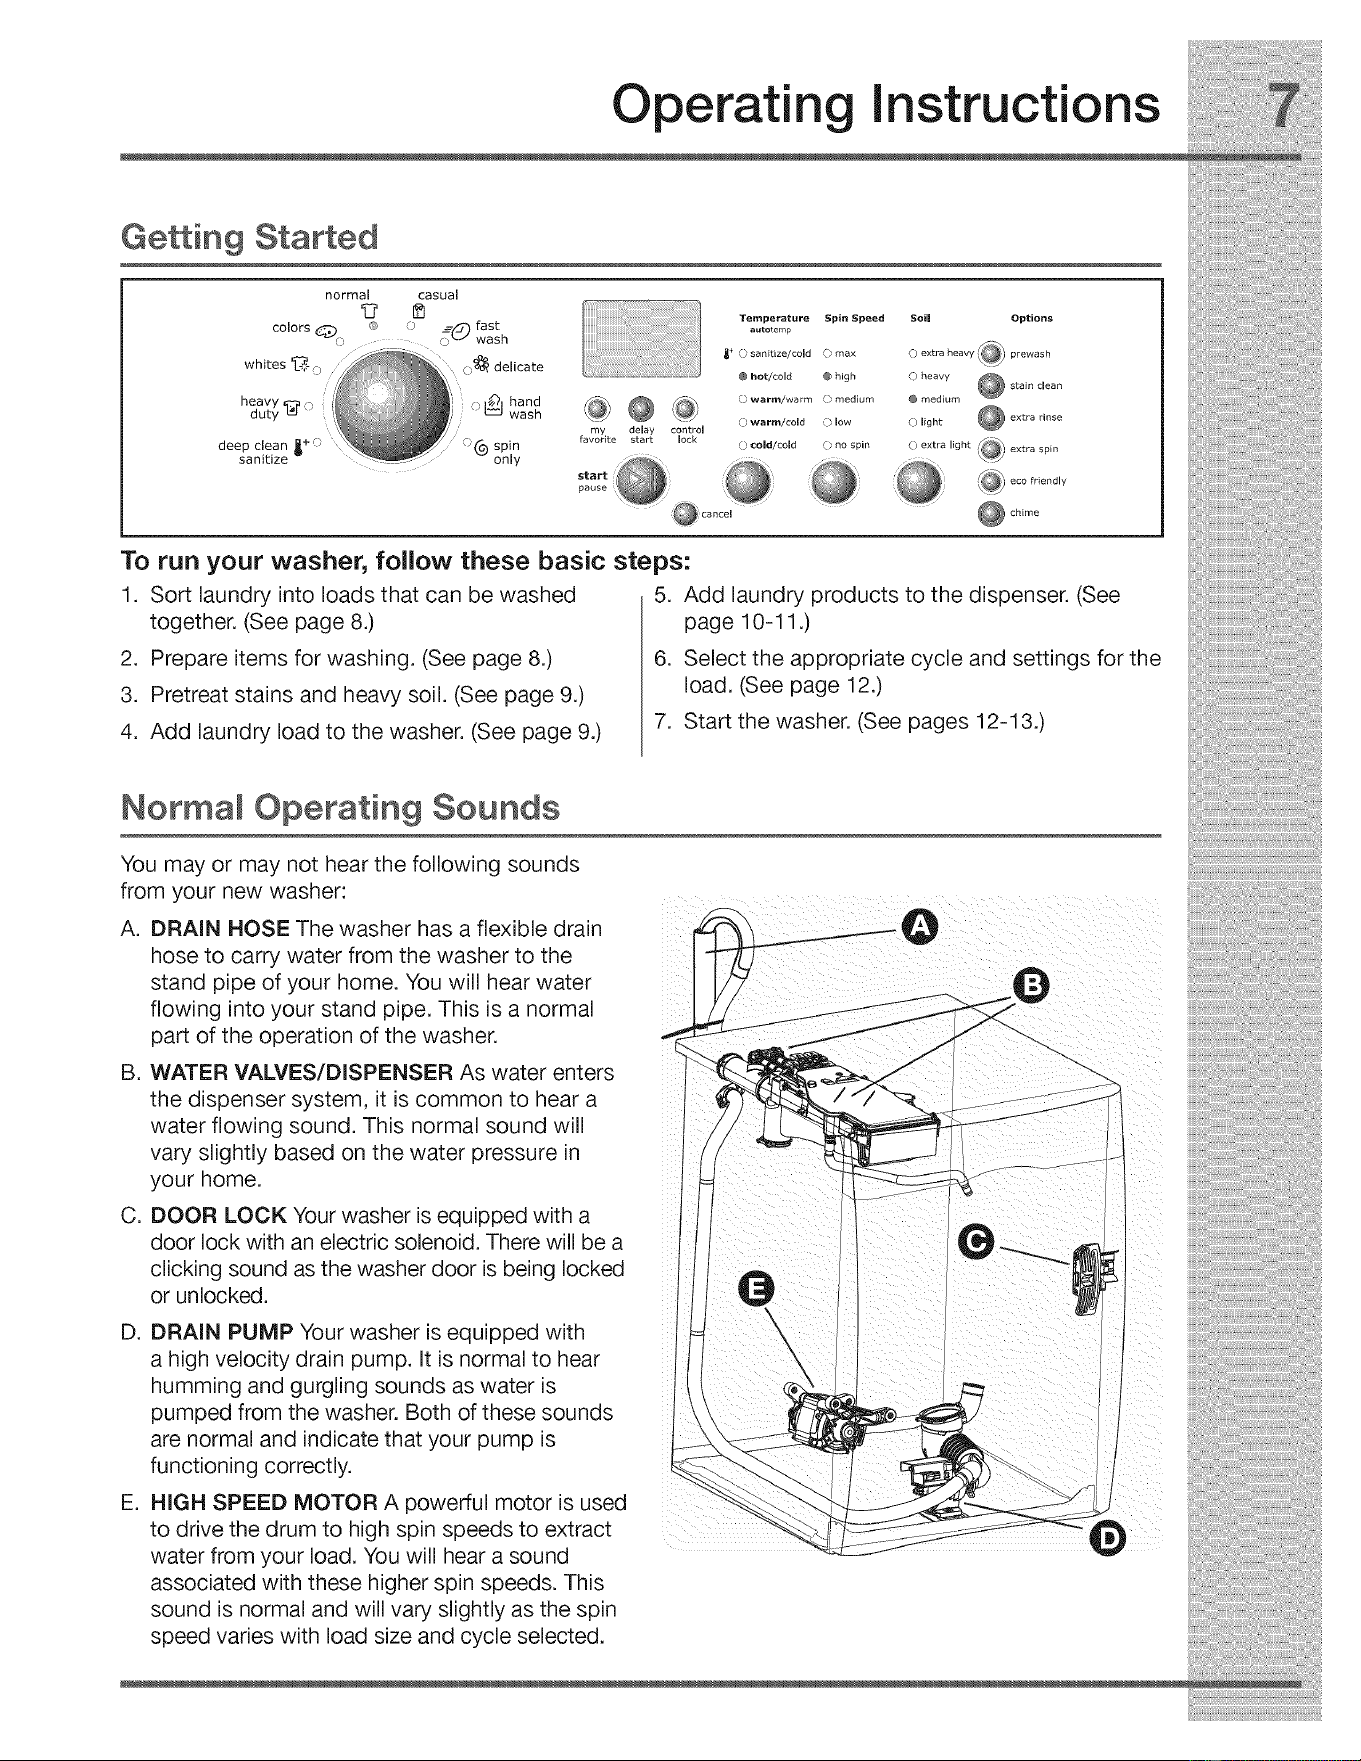
Normal Operating Sounds
You may or may not hear the following sounds
from your new washer:
A. DRAIN HOSE The washer has a flexible drain
hose to carry water from the washer to the
stand pipe of your home. You will hear water
flowing into your stand pipe. This is a normal
part of the operation of the washer.
B. WATER VALVES/DISPENSER As water enters
the dispenser system, it is common to hear a
water flowing sound. This normal sound will
vary slightly based on the water pressure in
your home.
C. DOOR LOCK Your washer is equipped with a
door lock with an electric solenoid. There will be a
clicking sound as the washer door is being locked
or unlocked.
D. DRAIN PUMP Your washer is equipped with
a high velocity drain pump. It is normal to hear
humming and gurgling sounds as water is
pumped from the washer. Both of these sounds
are normal and indicate that your pump is
functioning correctly.
E. HIGH SPEED MOTOR A powerful motor is used
to drive the drum to high spin speeds to extract
water from your load. You will hear a sound
associated with these higher spin speeds. This
sound is normal and will vary slightly as the spin
speed varies with load size and cycle selected.
Operatin
Instructions
Operating Your Washer
BEFORE USING YOUR WASHER
Read the important instructions in this section of
the Use and Care Guide before operating your
washer.
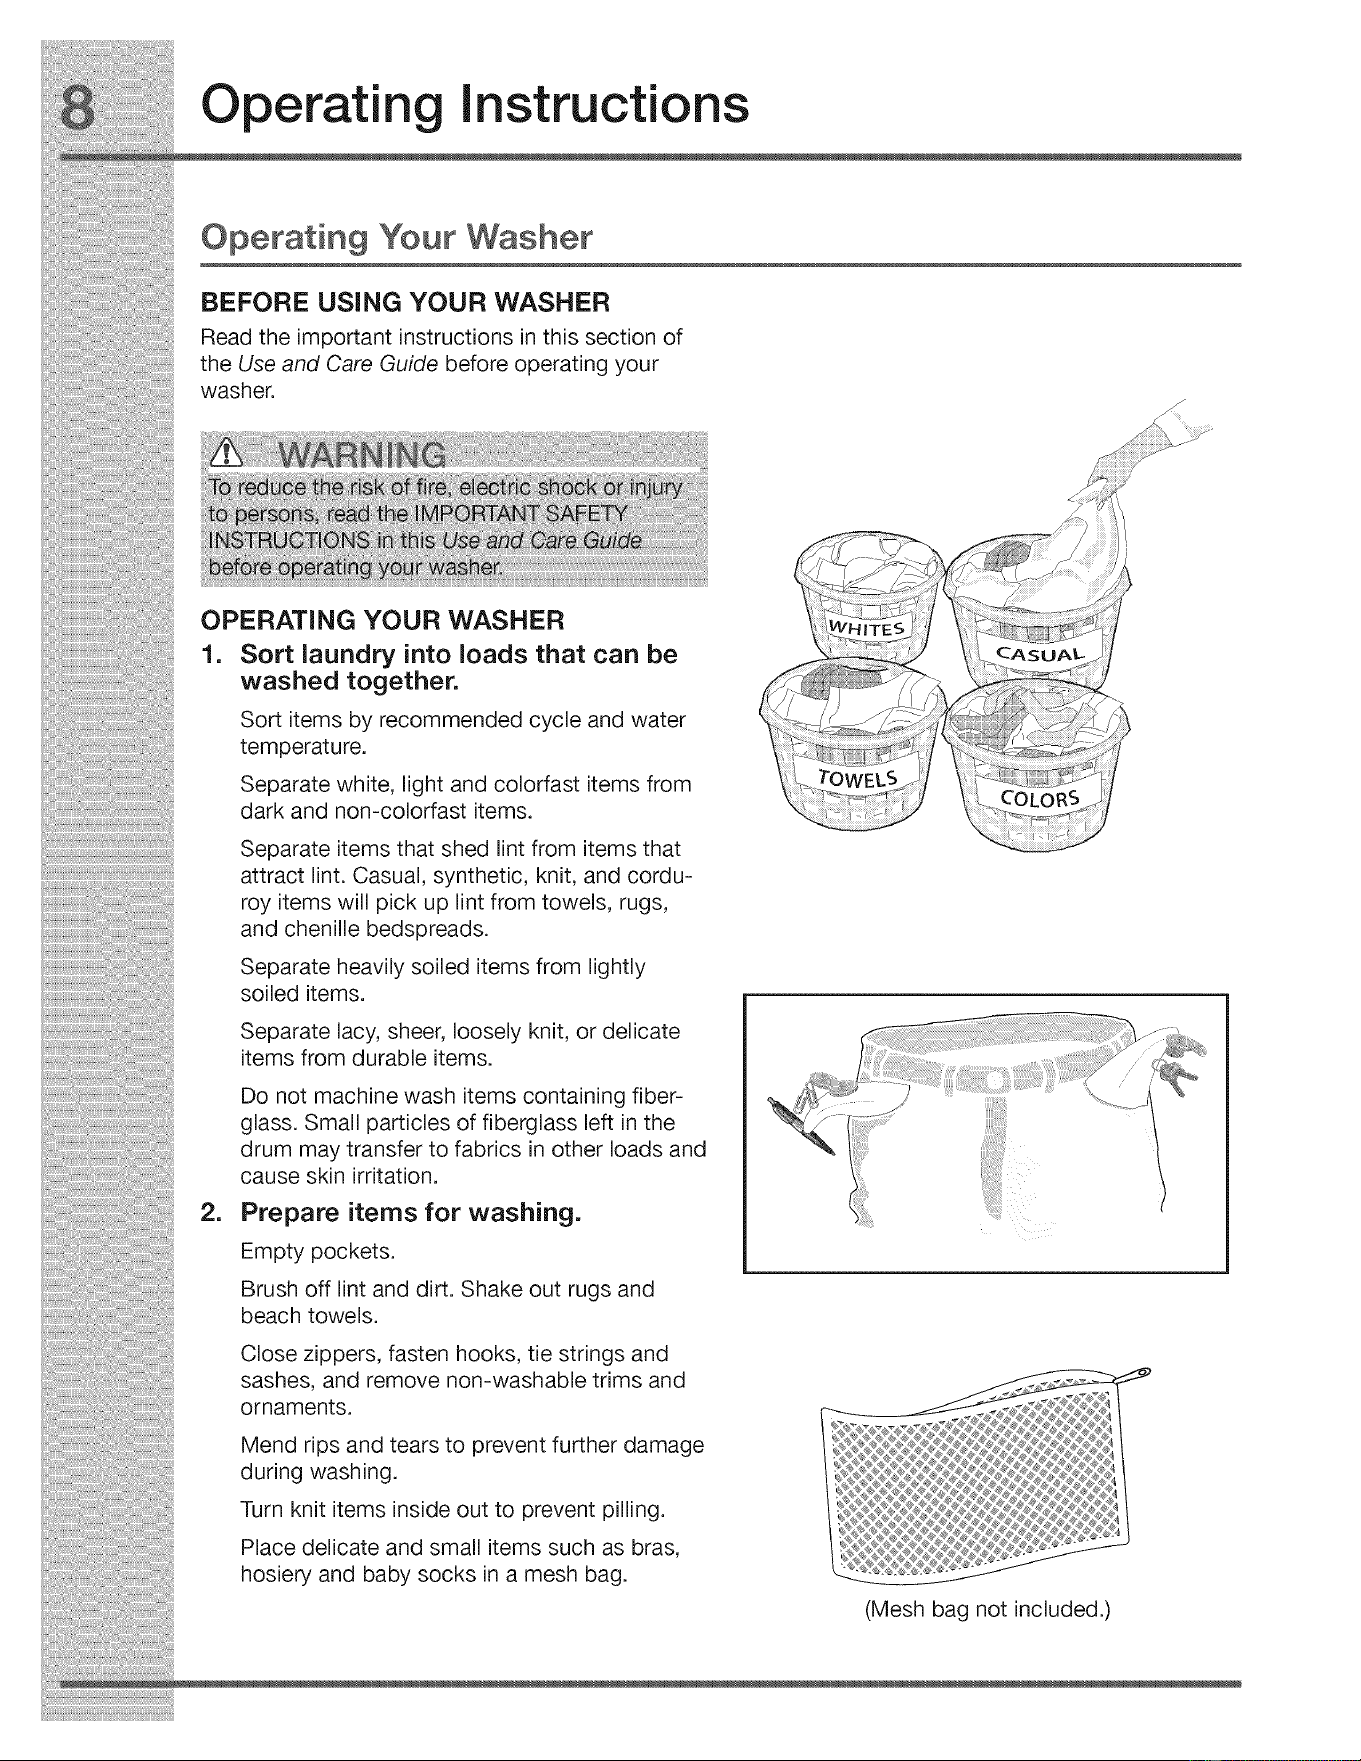
OPERATING YOUR WASHER
1. Sort laundry into loads that can be
washed together.
Sort items by recommended cycle and water
temperature.
Separate white, light and colorfast items from
dark and non-colorfast items.
Separate items that shed lint from items that
attract lint. Casual, synthetic, knit, and cordu-
roy items will pick up lint from towels, rugs,
and chenille bedspreads.
Separate heavily soiled items from lightly
soiled items.
Separate lacy, sheer, loosely knit, or delicate
items from durable items.
2_
Do not machine wash items containing fiber-
glass. Small particles of fiberglass left in the
drum may transfer to fabrics in other loads and
cause skin irritation.
Prepare items for washing.
Empty pockets.
Brush off lint and dirt. Shake out rugs and
beach towels.
Close zippers, fasten hooks, tie strings and
sashes, and remove non-washable trims and
ornaments.
Mend rips and tears to prevent further damage
during washing.
Turn knit items inside out to prevent pilling.
Place delicate and small items such as bras,
hosiery and baby socks in a mesh bag.
(Mesh bag not included.)
Operating Instructions
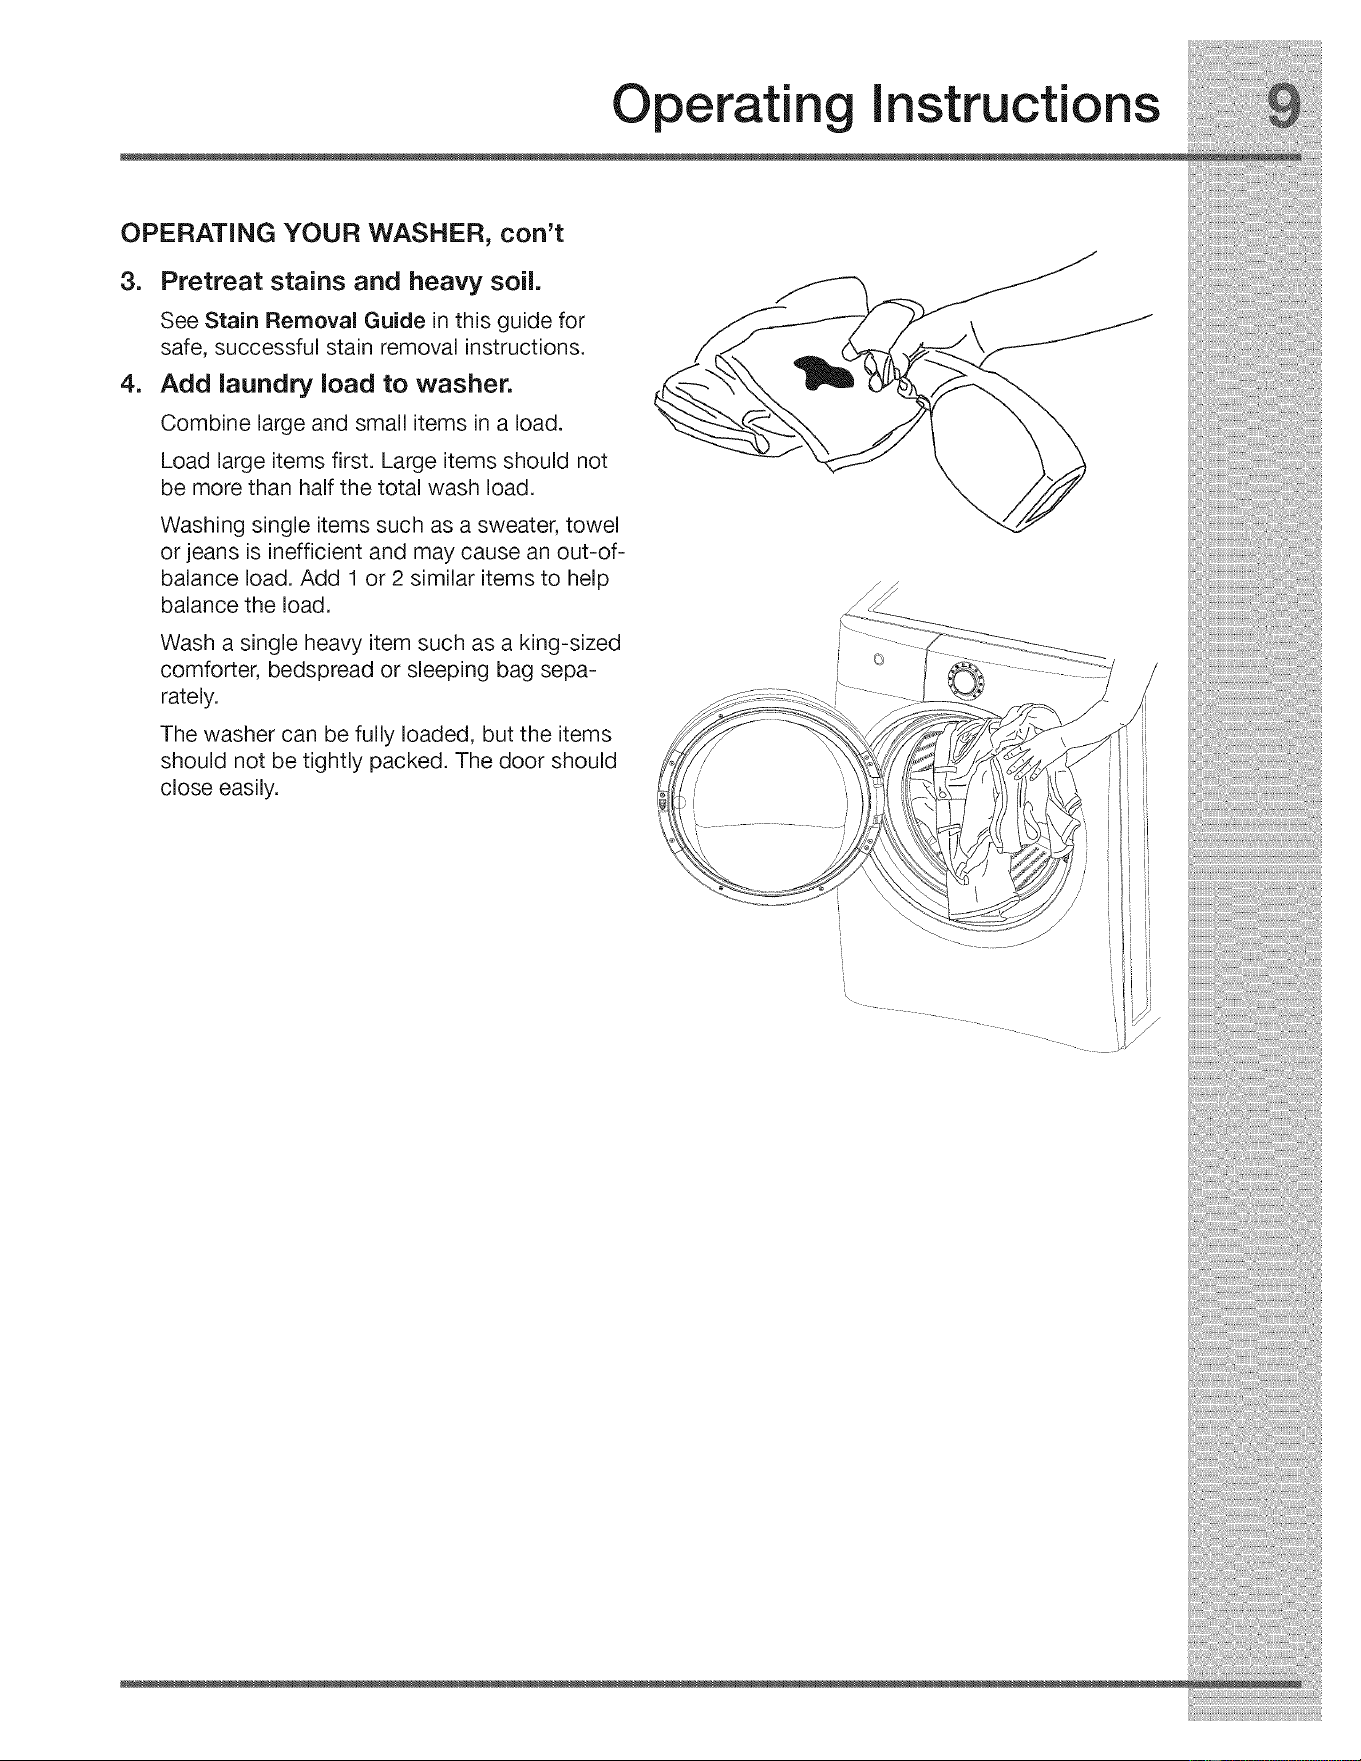
OPERATING YOUR WASHER, con't
3. Pretreat stains and heavy soil.
See Stain Removal Guide in this guide for
safe, successful stain removal instructions.
4. Add laundry load to washer.
Combine large and small items in a load.
Load large items first. Large items should not
be more than half the total wash load.
Washing single items such as a sweater, towel
or jeans is inefficient and may cause an out-of-
balance load. Add 1 or 2 similar items to help
balance the load.
Wash a single heavy item such as a king-sized
comforter, bedspread or sleeping bag sepa-
rately.
The washer can be fully loaded, but the items
should not be tightly packed. The door should
close easily.
Operatin
instructions
OPERATING YOUR WASHER, con't
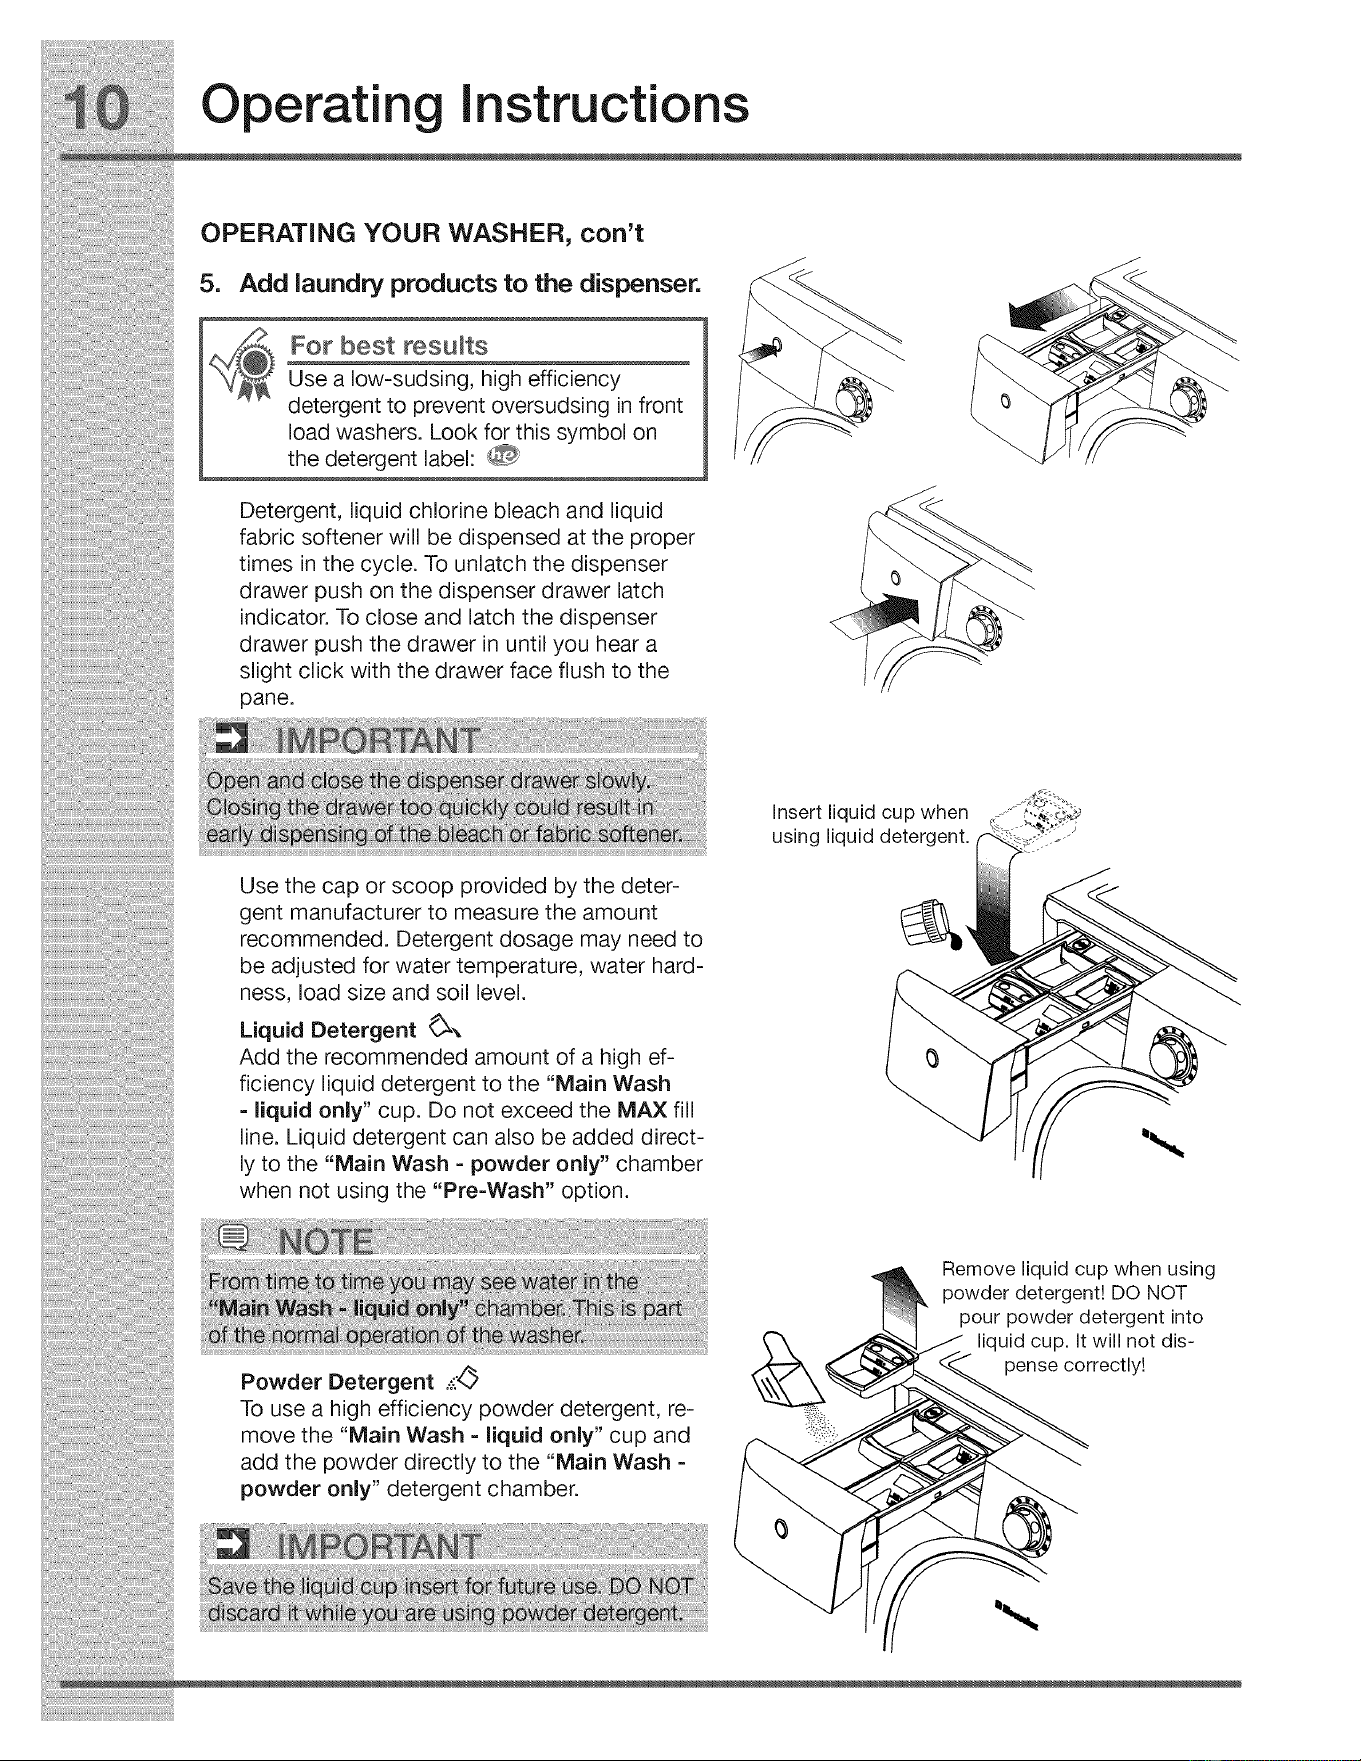
5. Add laundry products to the dispenser.
For best results
Use a low-sudsing, high efficiency
detergent to prevent oversudsing in front
load washers. Look for this symbol on
the detergent label:
Detergent, liquid chlorine bleach and liquid
fabric softener will be dispensed at the proper
times in the cycle. To unlatch the dispenser
drawer push on the dispenser drawer latch
indicator. To close and latch the dispenser
drawer push the drawer in until you hear a
slight click with the drawer face flush to the
pane.
Use the cap or scoop provided by the deter-
gent manufacturer to measure the amount
recommended. Detergent dosage may need to
be adjusted for water temperature, water hard-
ness, load size and soil level.
Liquid Detergent _,,
Add the recommended amount of a high ef-
ficiency liquid detergent to the "Main Wash
=liquid only" cup. Do not exceed the MAX fill
line. Liquid detergent can also be added direct-
ly to the "Main Wash - powder only" chamber
when not using the "Pre=Wash" option.
insert liquid cup when
using liquid detergent.
Powder Detergent -.'._
To use a high efficiency powder detergent, re-
move the "Main Wash = liquid only" cup and
add the powder directly to the "Main Wash =
powder only" detergent chamber.
Remove liquid cup when using
powder detergent! DO NOT
pour powder detergent into
liquid cup. It will not dis-
pense correctly!
Operating instructions
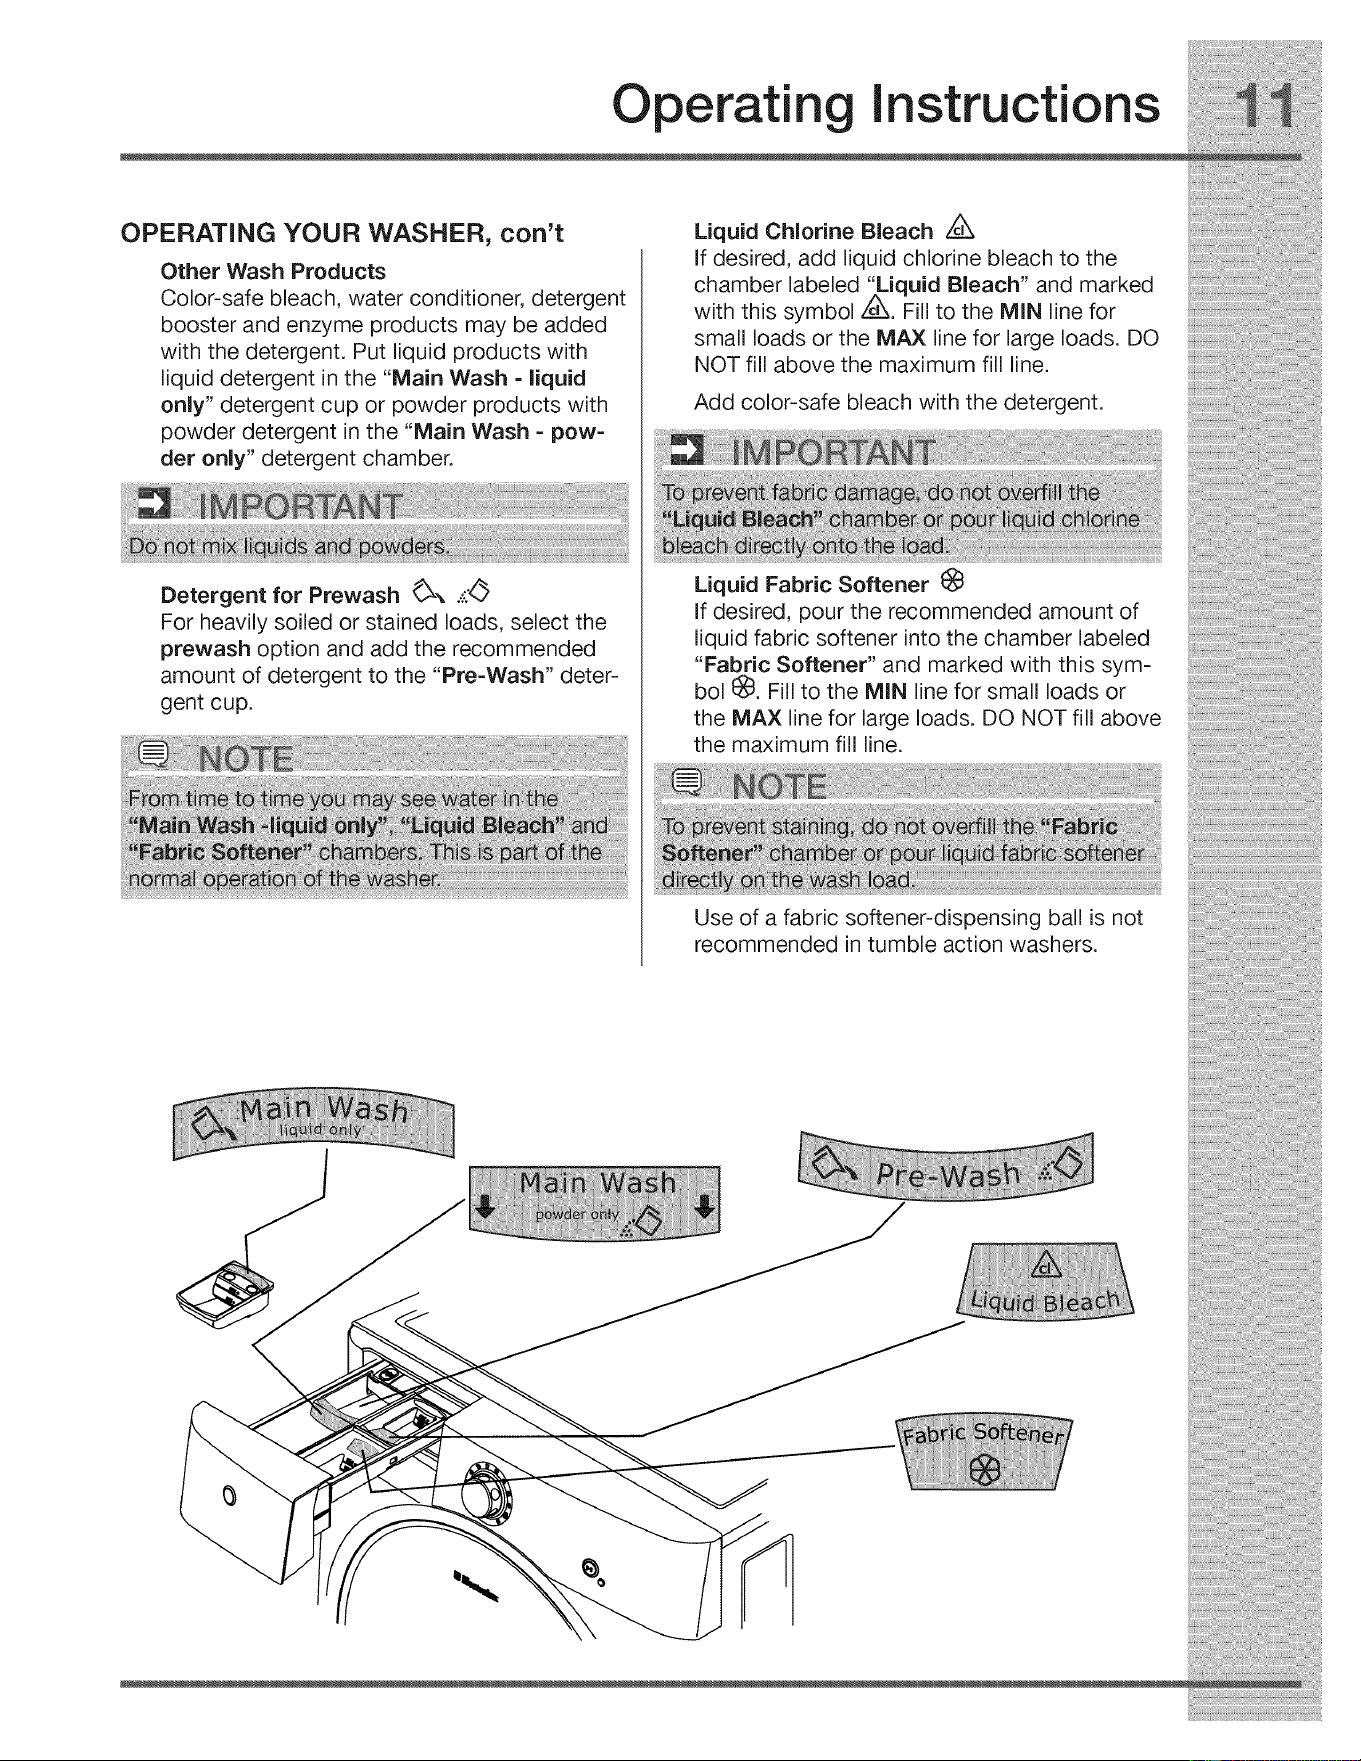
OPERATING YOUR WASHER, con't
Other Wash Products
Color-safe bleach, water conditioner, detergent
booster and enzyme products may be added
with the detergent. Put liquid products with
liquid detergent in the "Main Wash - liquid
only" detergent cup or powder products with
powder detergent in the "Main Wash = pow=
der only" detergent chamber.
Detergent for Prewash _-, -_'_
For heavily soiled or stained loads, select the
prewash option and add the recommended
amount of detergent to the "Pre=Wash" deter-
gent cup.
Liquid Chlorine Bleach Z_
if desired, add liquid chlorine bleach to the
chamber labeled '_iquid Bleach" and marked
with this symbol _L_. Fill to the MIN line for
small loads or the MAX line for large loads. DO
NOT fill above the maximum fill line.
Add color-safe bleach with the detergent.
Liquid Fabric Softener I_
If desired, pour the recommended amount of
liquid fabric softener into the chamber labeled
"Fabric Softener" and marked with this sym-
bol _. Fill to the MIN line for small loads or
the MAX line for large loads. DO NOT fill above
the maximum fill line.
Use of a fabric softener-dispensing ball is not
recommended in tumble action washers.
Operatin
Instructions
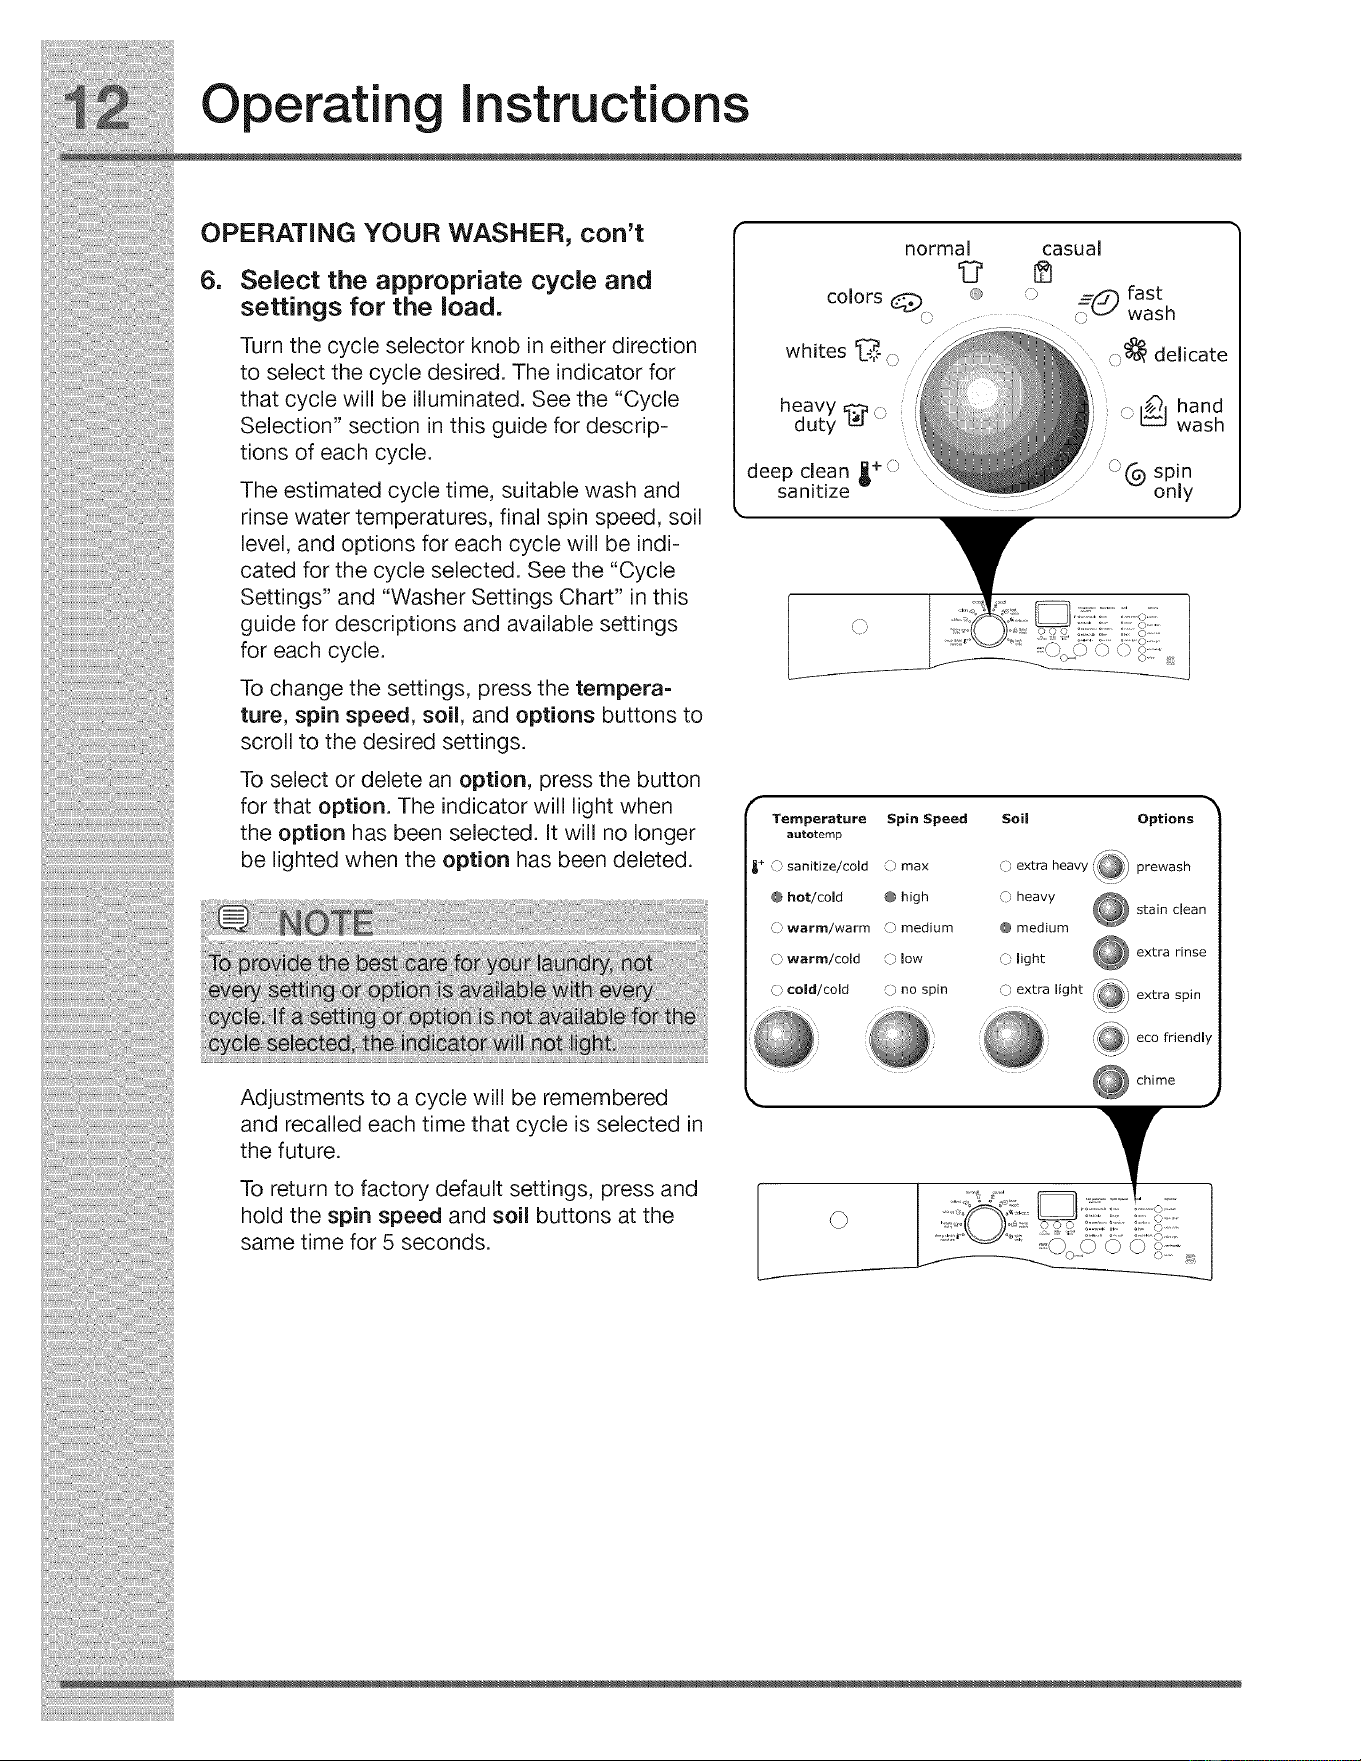
OPERATING YOUR WASHER, con't
=
Select the appropriate cycle and
settings for the load.
Turn the cycle selector knob in either direction
to select the cycle desired. The indicator for
that cycle will be illuminated. See the "Cycle
Selection" section in this guide for descrip-
tions of each cycle.
The estimated cycle time, suitable wash and
rinse water temperatures, final spin speed, soil
level, and options for each cycle will be indi-
cated for the cycle selected. See the "Cycle
Settings" and "Washer Settings Chart" in this
guide for descriptions and available settings
for each cycle.
To change the settings, press the tempera-
ture, spin speed, soil, and options buttons to
scroll to the desired settings.
To select or delete an option, press the button
for that option. The indicator will light when
the option has been selected. It will no longer
be lighted when the option has been deleted.
Adjustments to a cycle will be remembered
and recalled each time that cycle is selected in
the future.
To return to factory default settings, press and
hold the spin speed and soil buttons at the
same time for 5 seconds.
heavy _[_ o
duty
o _ hand
wash
deep clean _+ (;
sanitize
°C9 spin
only
f_
\j'
Temperature Spin Speed
autoternp
_+ (_ sanitize/cold () max
@ hot/cold @ high
@ warm/warm @ medium
@ warm/cold @ low
O cold/cold @ no spin
Soil Options
@ extra heavy _/_ prewash
@ heavy
stain clean
@ medium
@ light
extra rinse
@ extra light /_/_
_,_/ extra spin
,_/ eco friendly
chime
©
Operating instructions
OPERATING YOUR WASHER, con't
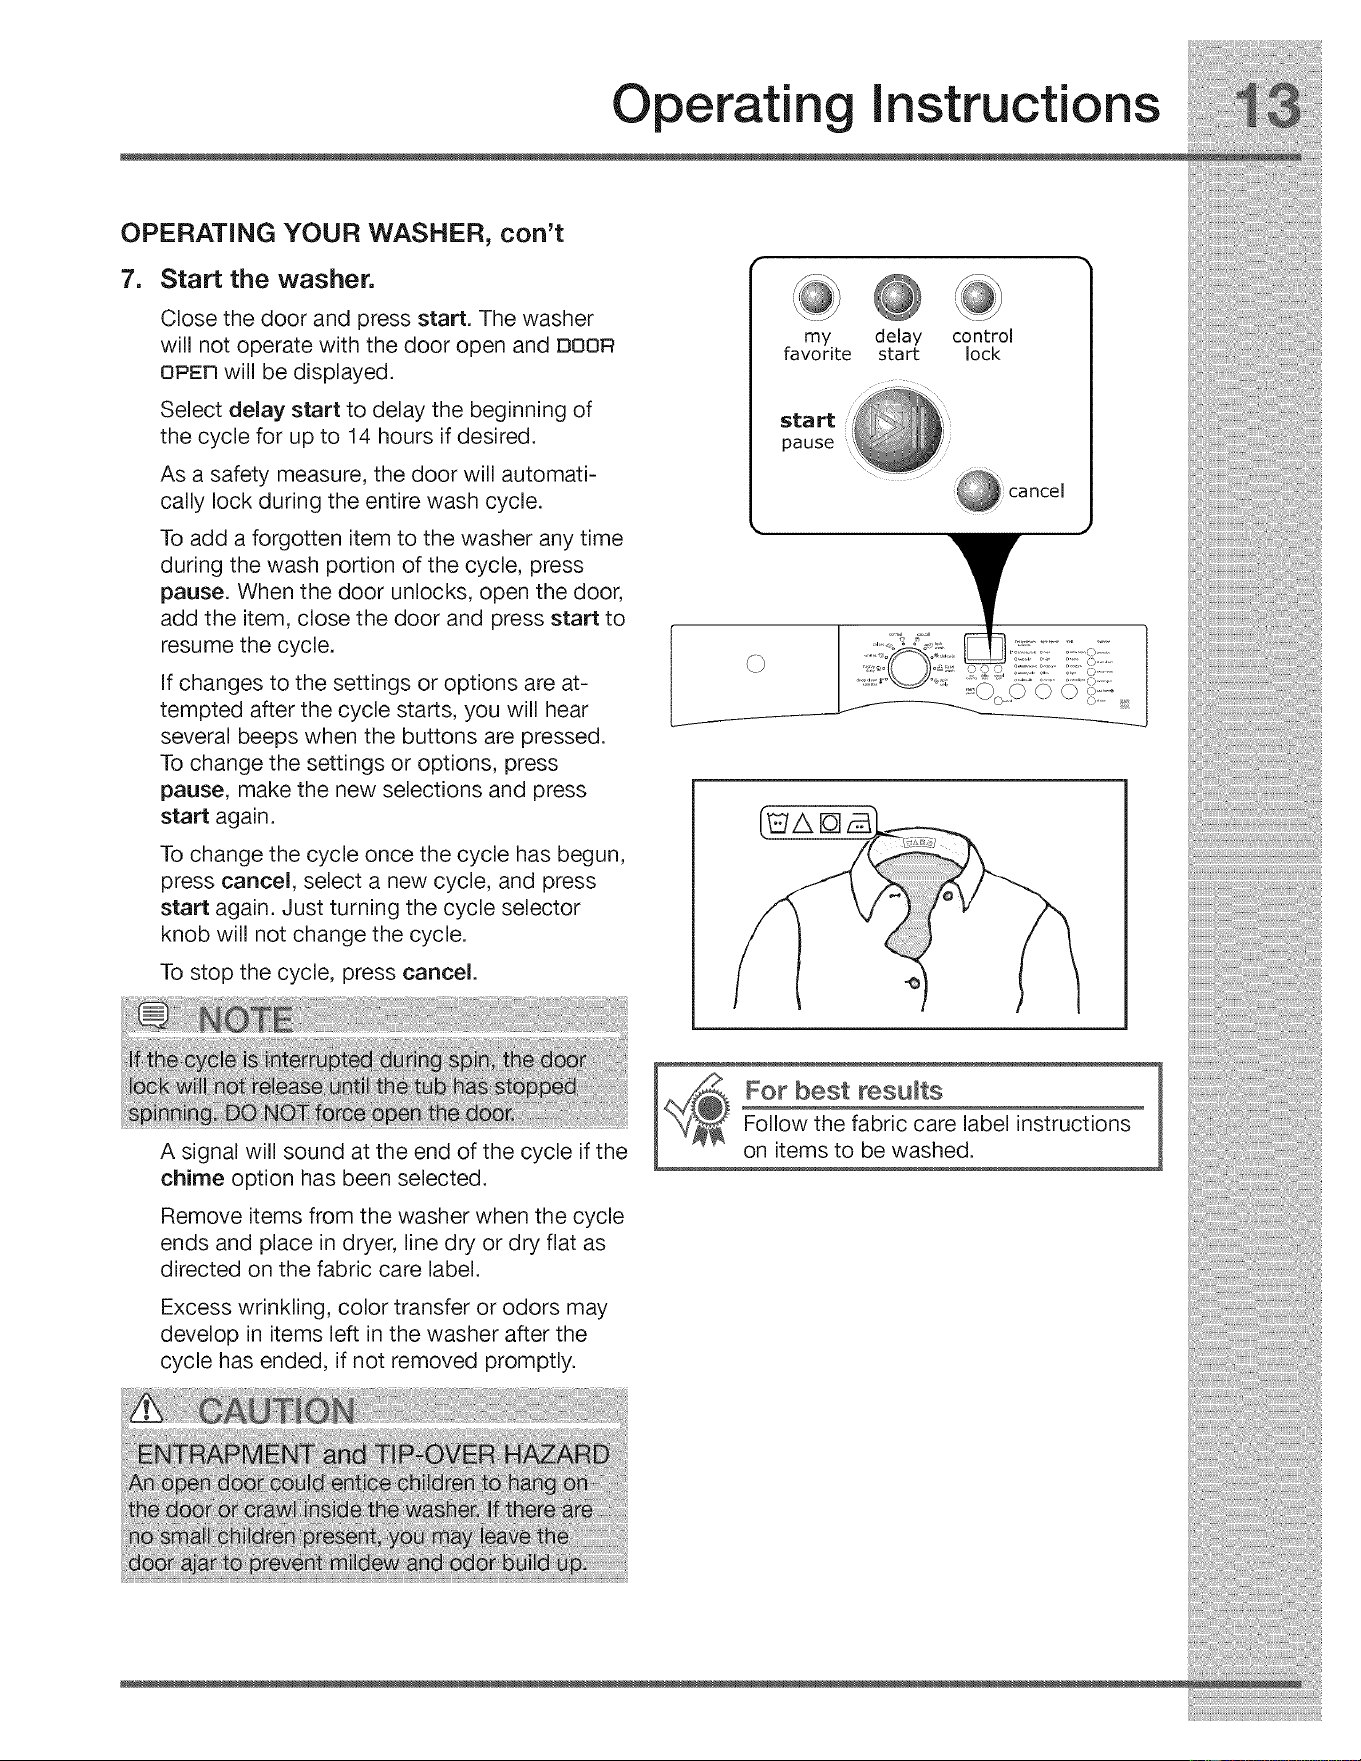
7. Start the washer.
Close the door and press start. The washer
will not operate with the door open and DOOR
OPEn will be displayed.
Select delay start to delay the beginning of
the cycle for up to 14 hours if desired.
As a safety measure, the door will automati-
cally lock during the entire wash cycle.
To add a forgotten item to the washer any time
during the wash portion of the cycle, press
pause. When the door unlocks, open the door,
add the item, close the door and press start to
resume the cycle.
If changes to the settings or options are at-
tempted after the cycle starts, you will hear
several beeps when the buttons are pressed.
To change the settings or options, press
pause, make the new selections and press
start again.
To change the cycle once the cycle has begun,
press cancel, select a new cycle, and press
start again. Just turning the cycle selector
knob will not change the cycle.
To stop the cycle, press cancel.
my delay control
favorite start lock
start
pause
[]
A signal will sound at the end of the cycle if the
chime option has been selected.
Remove items from the washer when the cycle
ends and place in dryer, line dry or dry flat as
directed on the fabric care label.
Excess wrinkling, color transfer or odors may
develop in items left in the washer after the
cycle has ended, if not removed promptly.
For best results
Follow the fabric care label instructions
on items to be washed.
Operatin
instructions
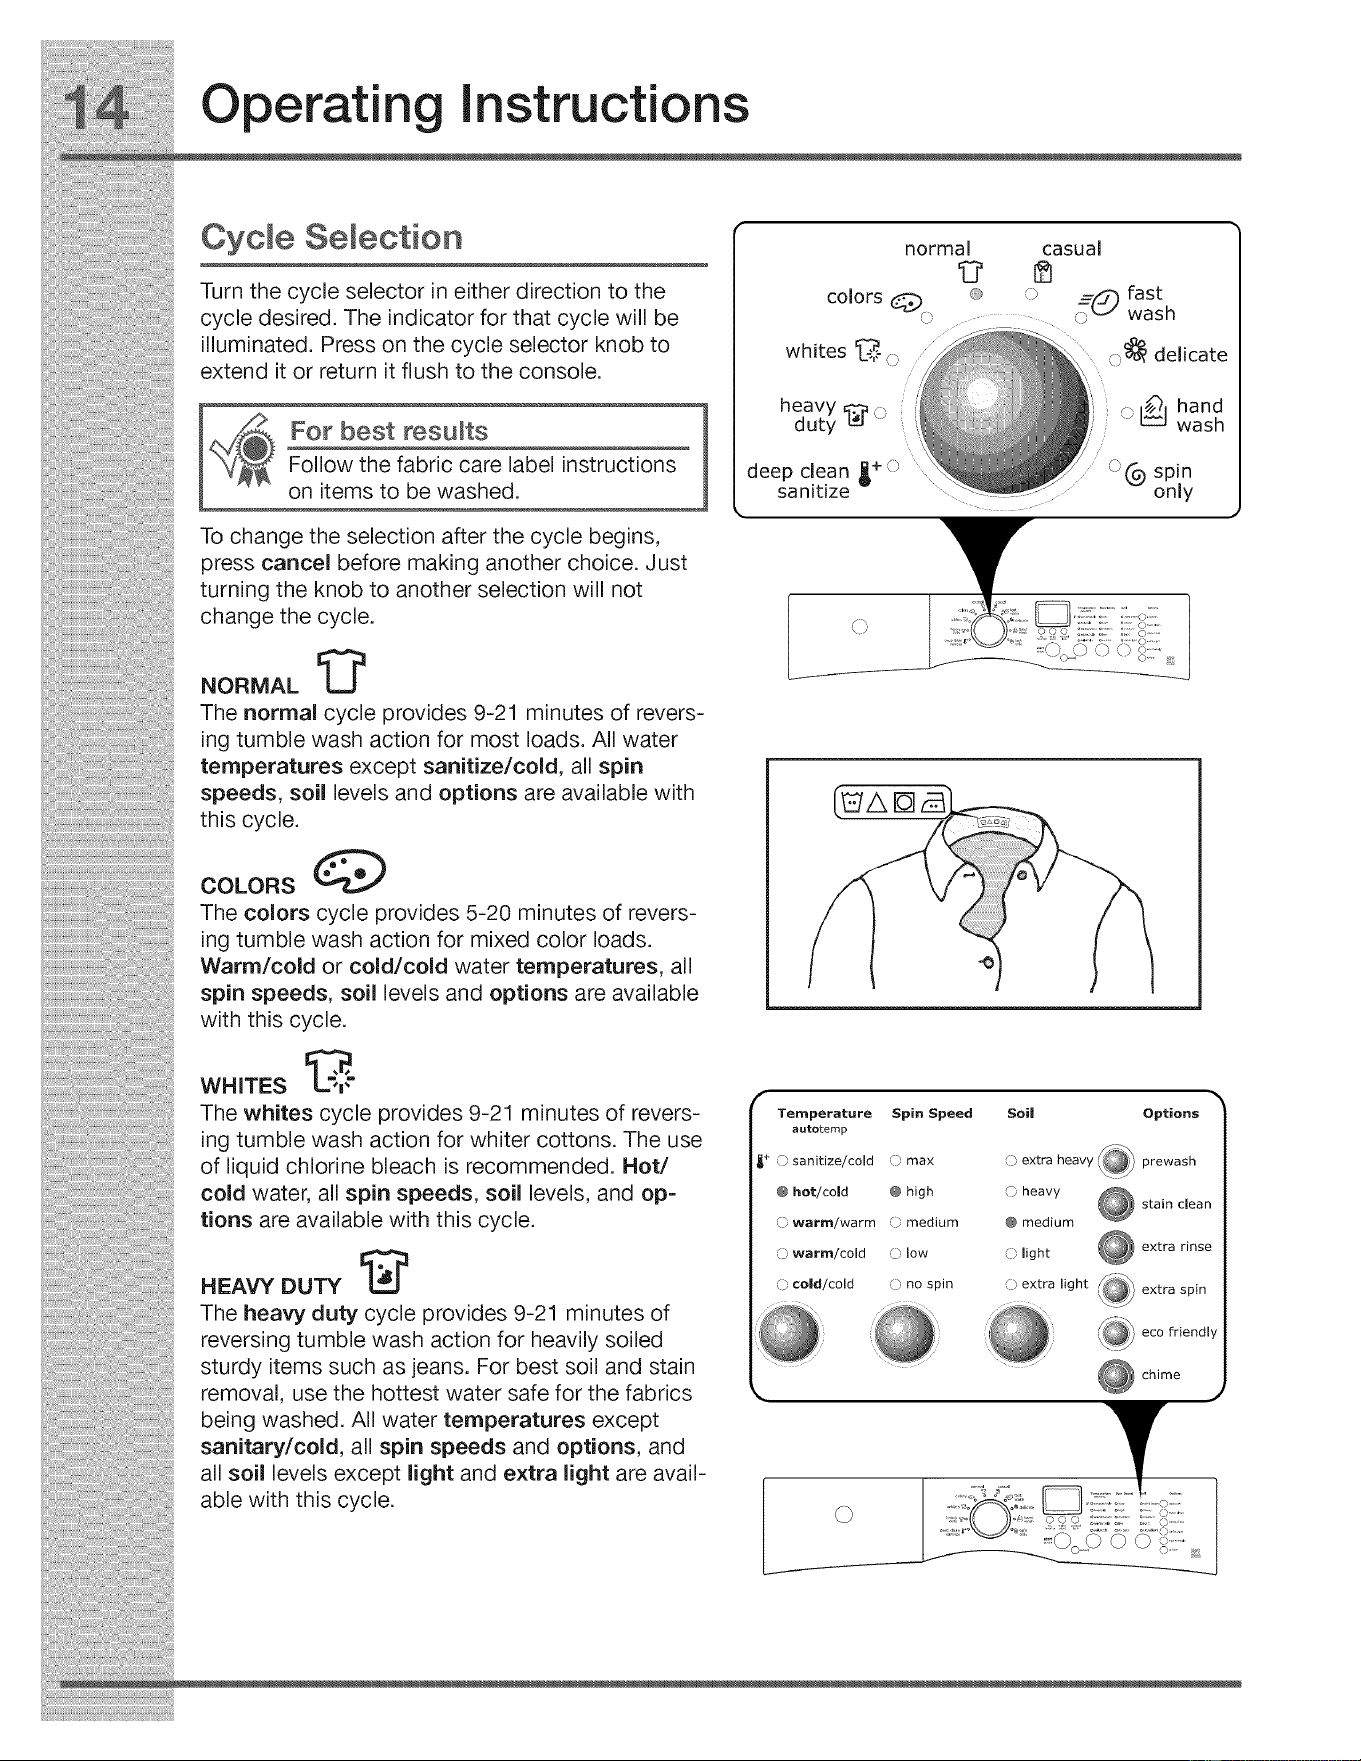
Cycle Selection
Turn the cycle selector in either direction to the
cycle desired. The indicator for that cycle will be
illuminated. Press on the cycle selector knob to
extend it or return it flush to the console.
For best results
Follow the fabric care label instructions
on items to be washed.
To change the selection after the cycle begins,
press cancel before making another choice. Just
turning the knob to another selection will not
change the cycle.
NORMAL I_
The normal cycle provides 9-21 minutes of revers-
ing tumble wash action for most loads. All water
temperatures except sanitize/cold, all spin
speeds, soil levels and options are available with
this cycle.
COLORS @
The colors cycle provides 5-20 minutes of revers-
ing tumble wash action for mixed color loads.
Warm/cold or cold/cold water temperatures, all
spin speeds, soil levels and options are available
with this cycle.
WHITES _%"
The whites cycle provides 9-21 minutes of revers-
ing tumble wash action for whiter cottons. The use
of liquid chlorine bleach is recommended. Hot/
cold water, all spin speeds, soil levels, and op-
tions are available with this cycle.
HEAVY DUTY
The heavy duty cycle provides 9-21 minutes of
reversing tumble wash action for heavily soiled
sturdy items such as jeans. For best soil and stain
removal, use the hottest water safe for the fabrics
being washed. All water temperatures except
sanitary/cold, all spin speeds and options, and
all soil levels except light and extra light are avail-
able with this cycle.
heavy _[_ o
duty
o _ hand
wash
deep clean _+ ()
sanitize
°_.9 spin
only
F_
\j'
f
Temperature Spin Speed
autotemp
_+ C_sanitize/cold _3 max
@ hot/cold @ high
(._ warm/warm O medium
O warm/cold O low
@ cold/cold O no spin
Soil Options
Cb extra heavy (_ prewash
O heavy
stain clean
@ medium
@ light
extra rinse
@extra,ghtS_"_
extra
spin
_eco friendly
chime
©
Operating instructions
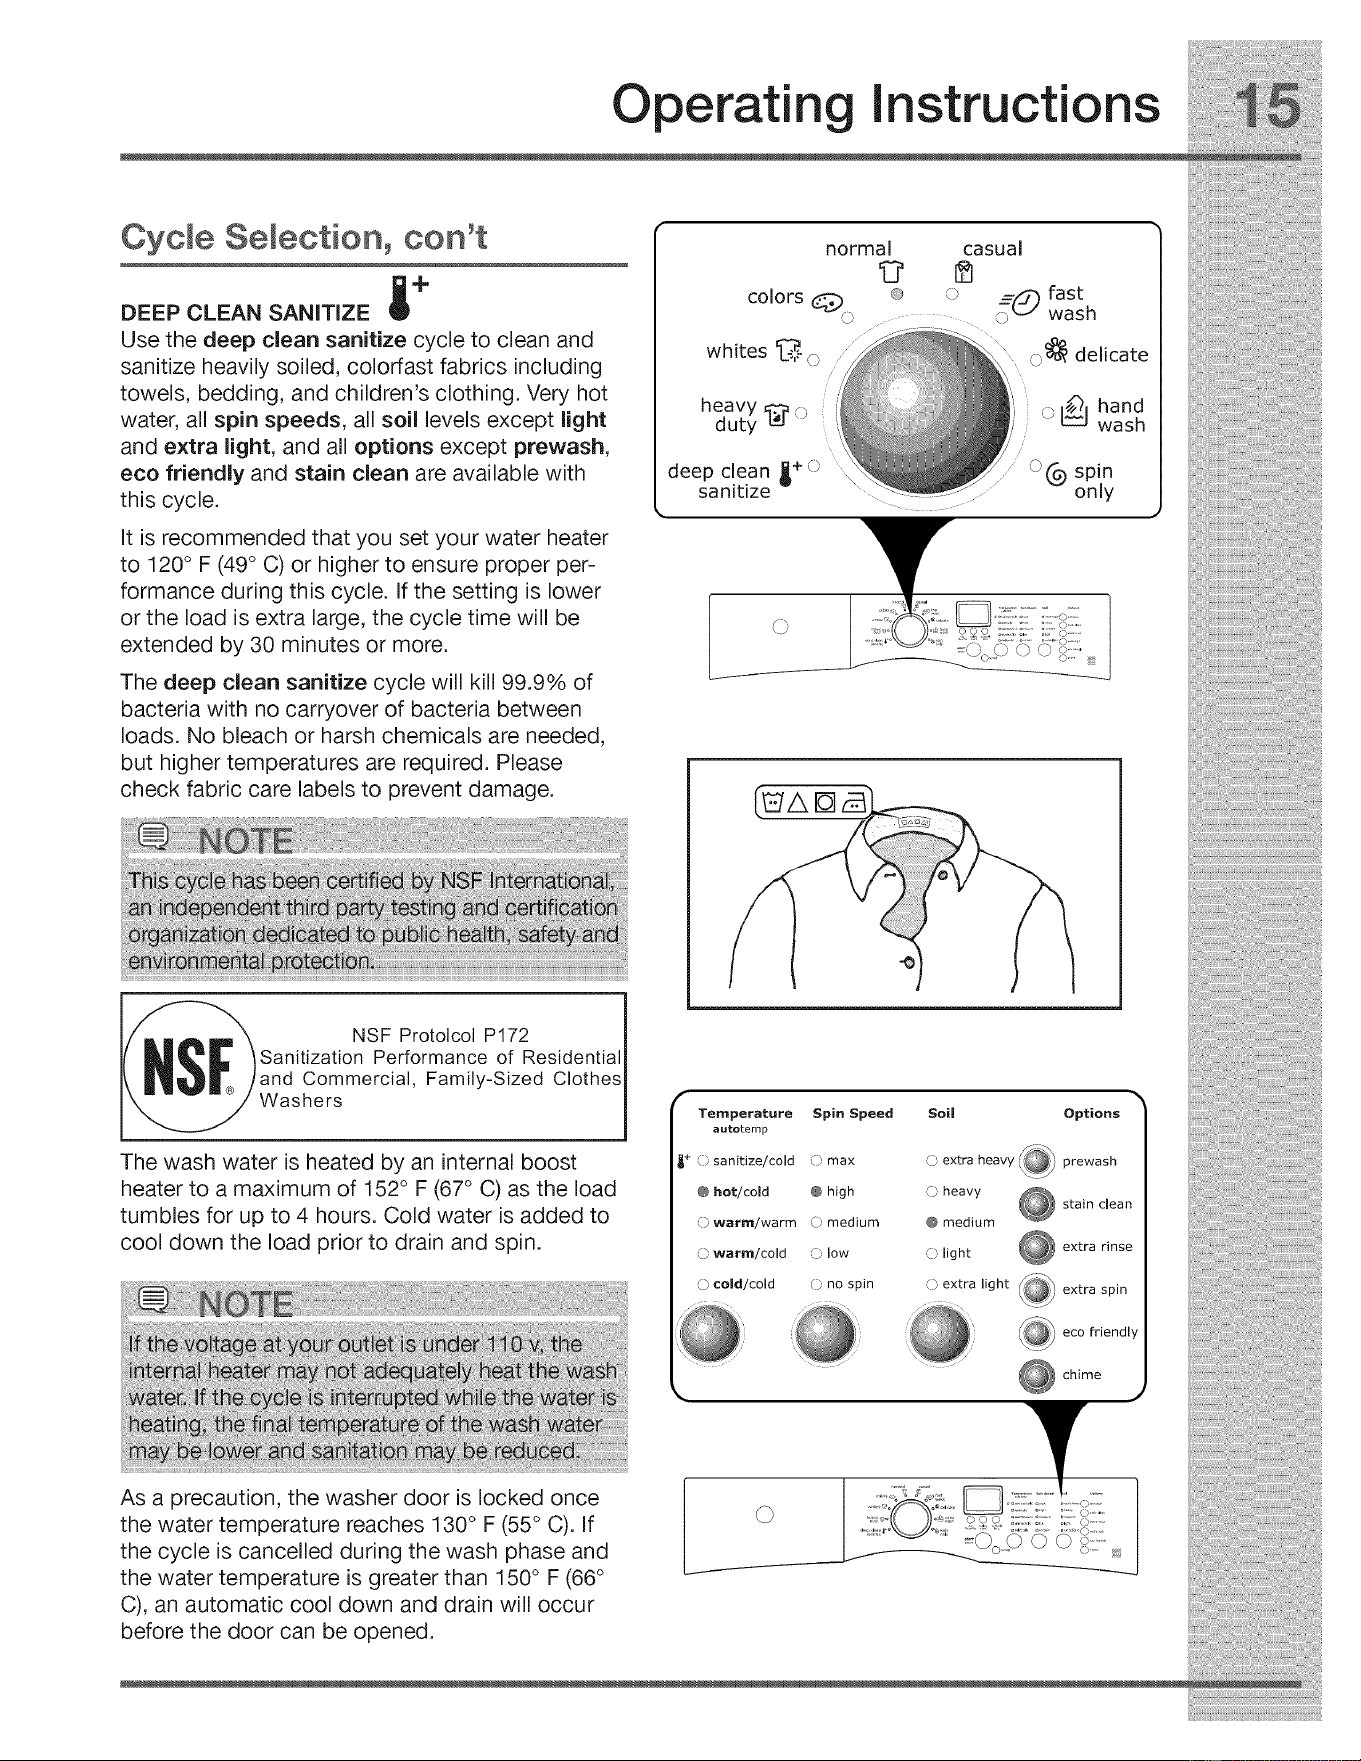
Cycle Selection0 con't
+
DEEP CLEAN SANITIZE
Use the deep clean sanitize cycle to clean and
sanitize heavily soiled, colorfast fabrics including
towels, bedding, and children's clothing. Very hot
water, all spin speeds, all soil levels except light
and extra nght, and all options except prewash,
eco friendly and stain clean are available with
this cycle.
It is recommended that you set your water heater
to 120° F (49° C) or higher to ensure proper per-
formance during this cycle. If the setting is lower
or the load is extra large, the cycle time will be
extended by 30 minutes or more.
The deep clean sanitize cycle will kill 99.9% of
bacteria with no carryover of bacteria between
loads. No bleach or harsh chemicals are needed,
but higher temperatures are required. Please
check fabric care labels to prevent damage.
I_ NSF Protolcol P172
Sanitization Performance of Residential
and Commercial, Family-Sized Clothes
Washers
The wash water is heated by an internal boost
heater to a maximum of 152 ° F (67 ° C) as the load
tumbles for up to 4 hours. Cold water is added to
cool down the load prior to drain and spin.
normal casual
colors @. o tf(_ fast
_; _ wash
whites _,:oo c.I_ delicate
heavy
duty ¢1_o
.o @ hand
wash
deep clean _+o (>(9 spin
sanitize only
Temperature Spin Speed Soil Options
autotemp
_+ O sanitize/cold O max O extra heavy #_ prewash
@ hot/cold @ high ,f} heavy Q stain clean
(} warm/warm () medium @ medium
@ warm/cold (_ low @ light
extra rinse
(7 cold/cold @ no spin ,{) extra light _
extra
spin
,¢@ eco
,_' friendly
As a precaution, the washer door is locked once
the water temperature reaches 130° F (55° C). If
the cycle is cancelled during the wash phase and
the water temperature is greater than 150° F (66°
C), an automatic cool down and drain will occur
before the door can be opened.
©
Operatin
instructions
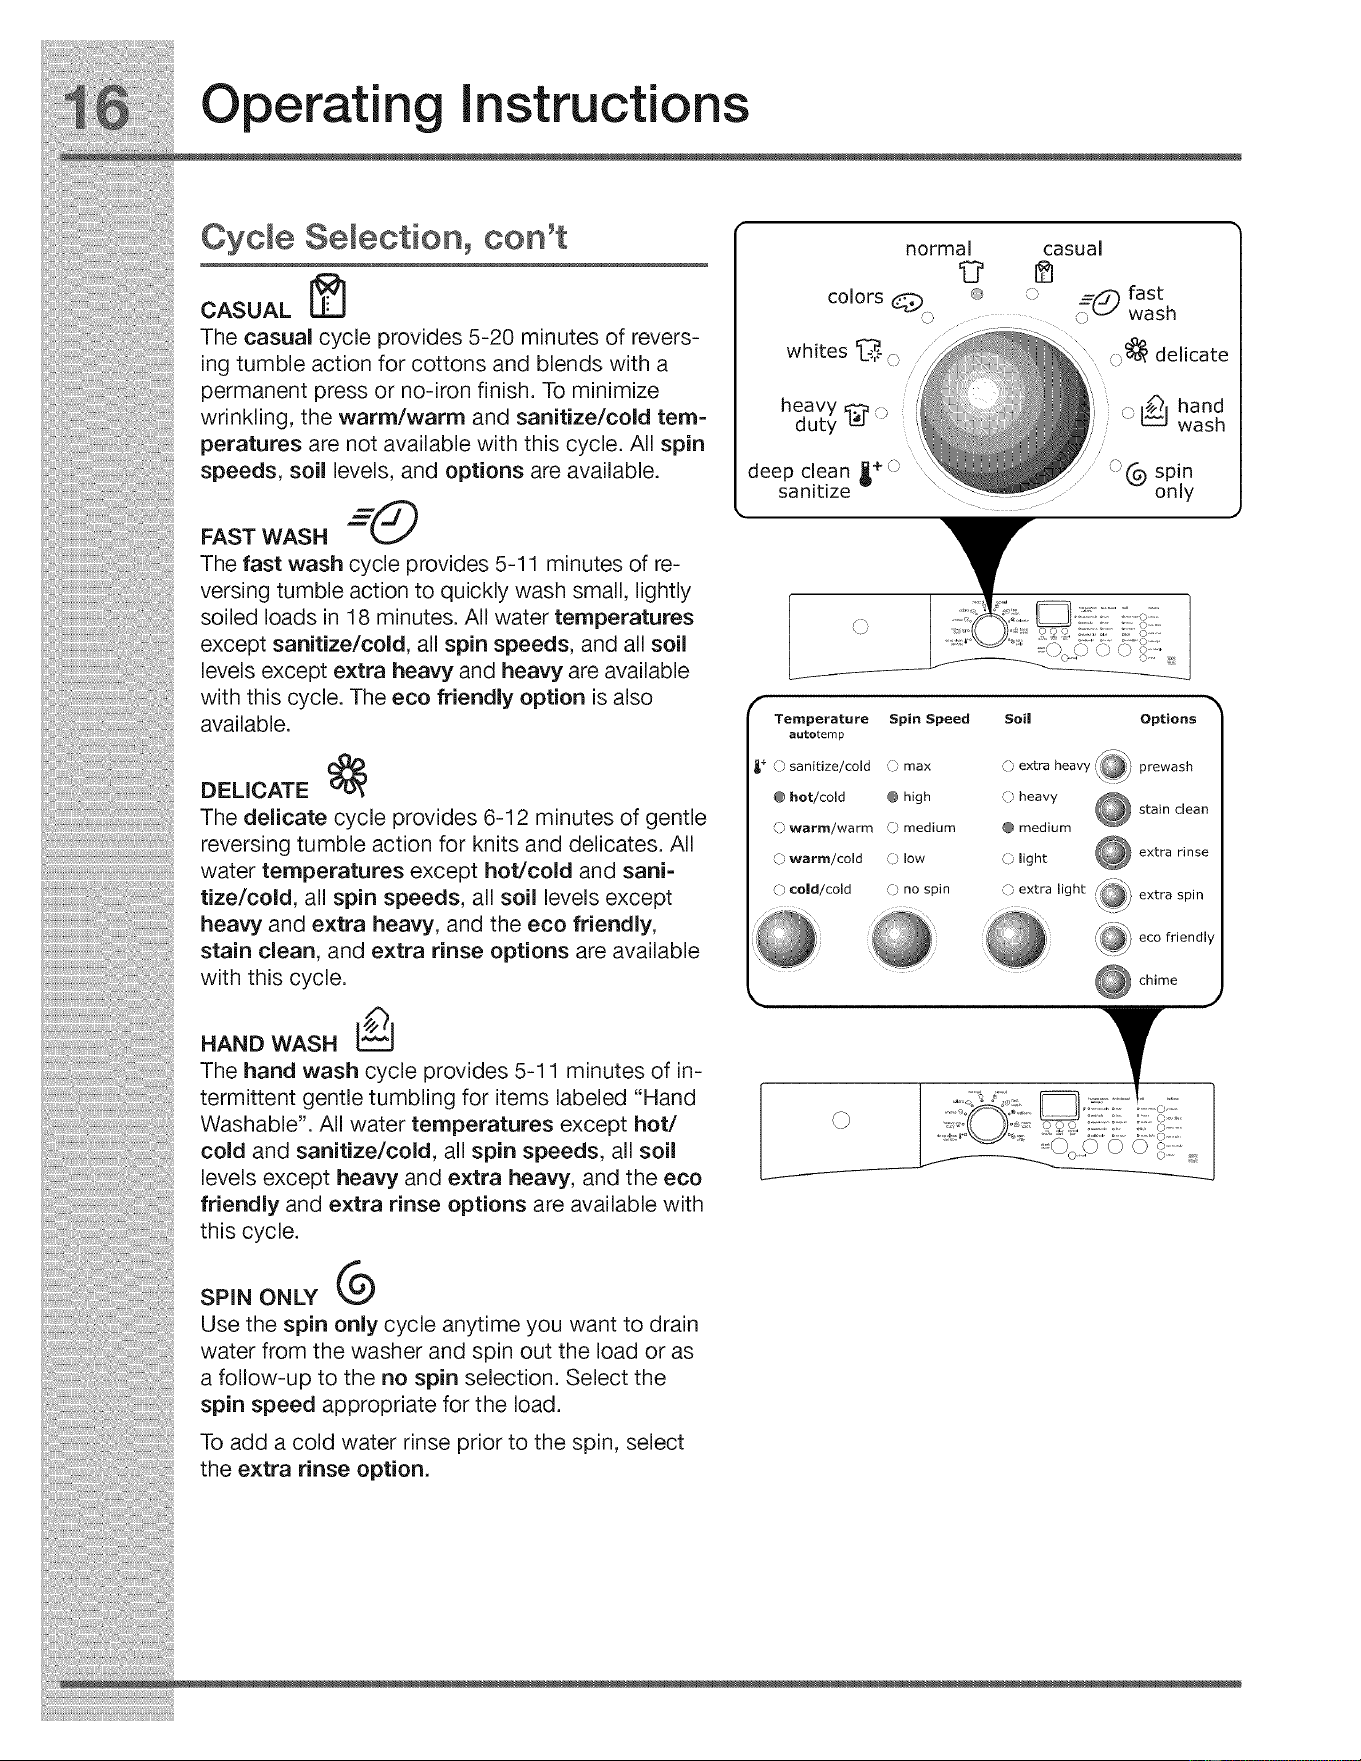
Cycle Selection0 con't
CASUAL _]
The casual cycle provides 5-20 minutes of revers-
ing tumble action for cottons and blends with a
permanent press or no-iron finish. To minimize
wrinkling, the warm/warm and sanitize/cold tem-
peratures are not available with this cycle. All spin
speeds, soil levels, and options are available.
FAST WASH --=O
The fast wash cycle provides 5-11 minutes of re-
versing tumble action to quickly wash small, lightly
soiled loads in 18 minutes. All water temperatures
except sanitize/cold, all spin speeds, and all soil
levels except extra heavy and heavy are available
with this cycle. The eco friendly option is also
available.
DELICATE _I_
The delicate cycle provides 6-12 minutes of gentle
reversing tumble action for knits and delicates. All
water temperatures except hot/cold and sani-
tize/cold, all spin speeds, all soil levels except
heavy and extra heavy, and the eco friendly,
stain clean, and extra rinse options are available
with this cycle.
HAND WASH [_J
The hand wash cycle provides 5-11 minutes of in-
termittent gentle tumbling for items labeled "Hand
Washable". All water temperatures except hot/
cold and sanitize/cold, all spin speeds, all soil
levels except heavy and extra heavy, and the eco
friendly and extra rinse options are available with
this cycle.
SPiN ONLY _._
Use the spin only cycle anytime you want to drain
water from the washer and spin out the load or as
a follow-up to the no spin selection. Select the
spin speed appropriate for the load.
To add a cold water rinse prior to the spin, select
the extra rinse option.
normal casual
colors @. o tf(_ fast
_; L wash
f
Temperature Spin Speed
autotemp
_+ _) sanitize/cold O max
Soil Options
@ hot!cold @ high
O warm/warm O medium
O warm/cold © low
O cold/cold O no spin
©
heavy _'FT_
C' extra ,_// prewash
C, heavy @ stain clean
@ medium
C light @ extra rinse
C, extra light /_\
[_/j extra spin
_ eco friendly
chime
J
Operating Instructions
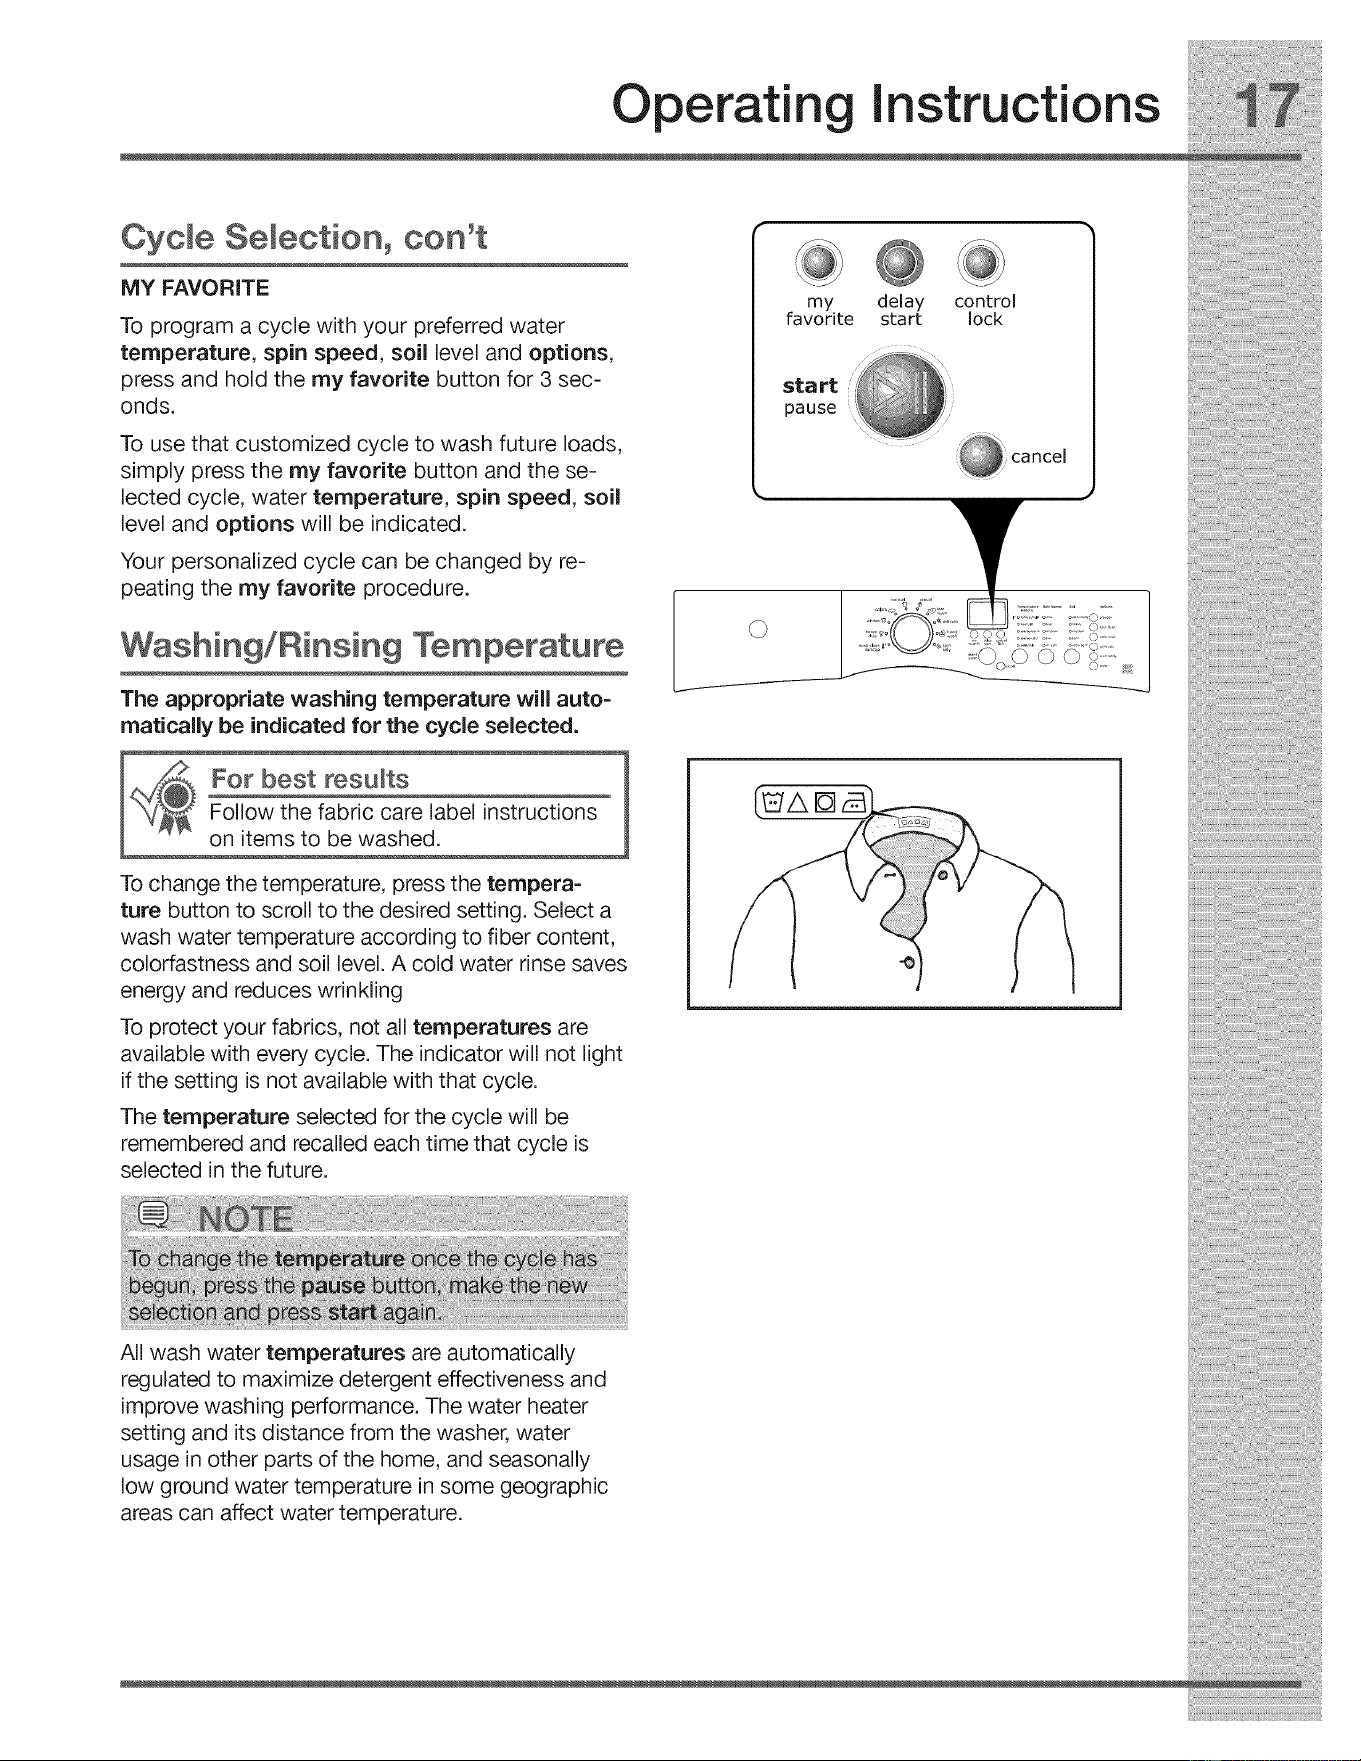
Cycle Semection0 con't
MY FAVORITE
To program a cycle with your preferred water
temperature, spin speed, soil level and options,
press and hold the my favorite button for 3 sec-
onds.
To use that customized cycle to wash future loads,
simply press the my favorite button and the se-
lected cycle, water temperature, spin speed, soil
level and options will be indicated.
Your personalized cycle can be changed by re-
peating the my favorite procedure.
Washing/Rinsing Temperature
The appropriate washing temperature will auto-
matically be indicated for the cycle selected.
For best results
Follow the fabric care label instructions
on items to be washed.
To change the temperature, press the tempera=
ture button to scroll to the desired setting. Select a
wash water temperature according to fiber content,
colorfastness and soil level. A cold water rinse saves
energy and reduces wrinkling
To protect your fabrics, not all temperatures are
available with every cycle. The indicator will not light
if the setting is not available with that cycle.
The temperature selected for the cycle will be
remembered and recalled each time that cycle is
selected in the future.
my delay control
favorite start lock
sta rt
pause
©
All wash water temperatures are automatically
regulated to maximize detergent effectiveness and
improve washing performance. The water heater
setting and its distance from the washer, water
usage in other parts of the home, and seasonally
low ground water temperature in some geographic
areas can affect water temperature.
Operatin
instructions
Temperature° oon't
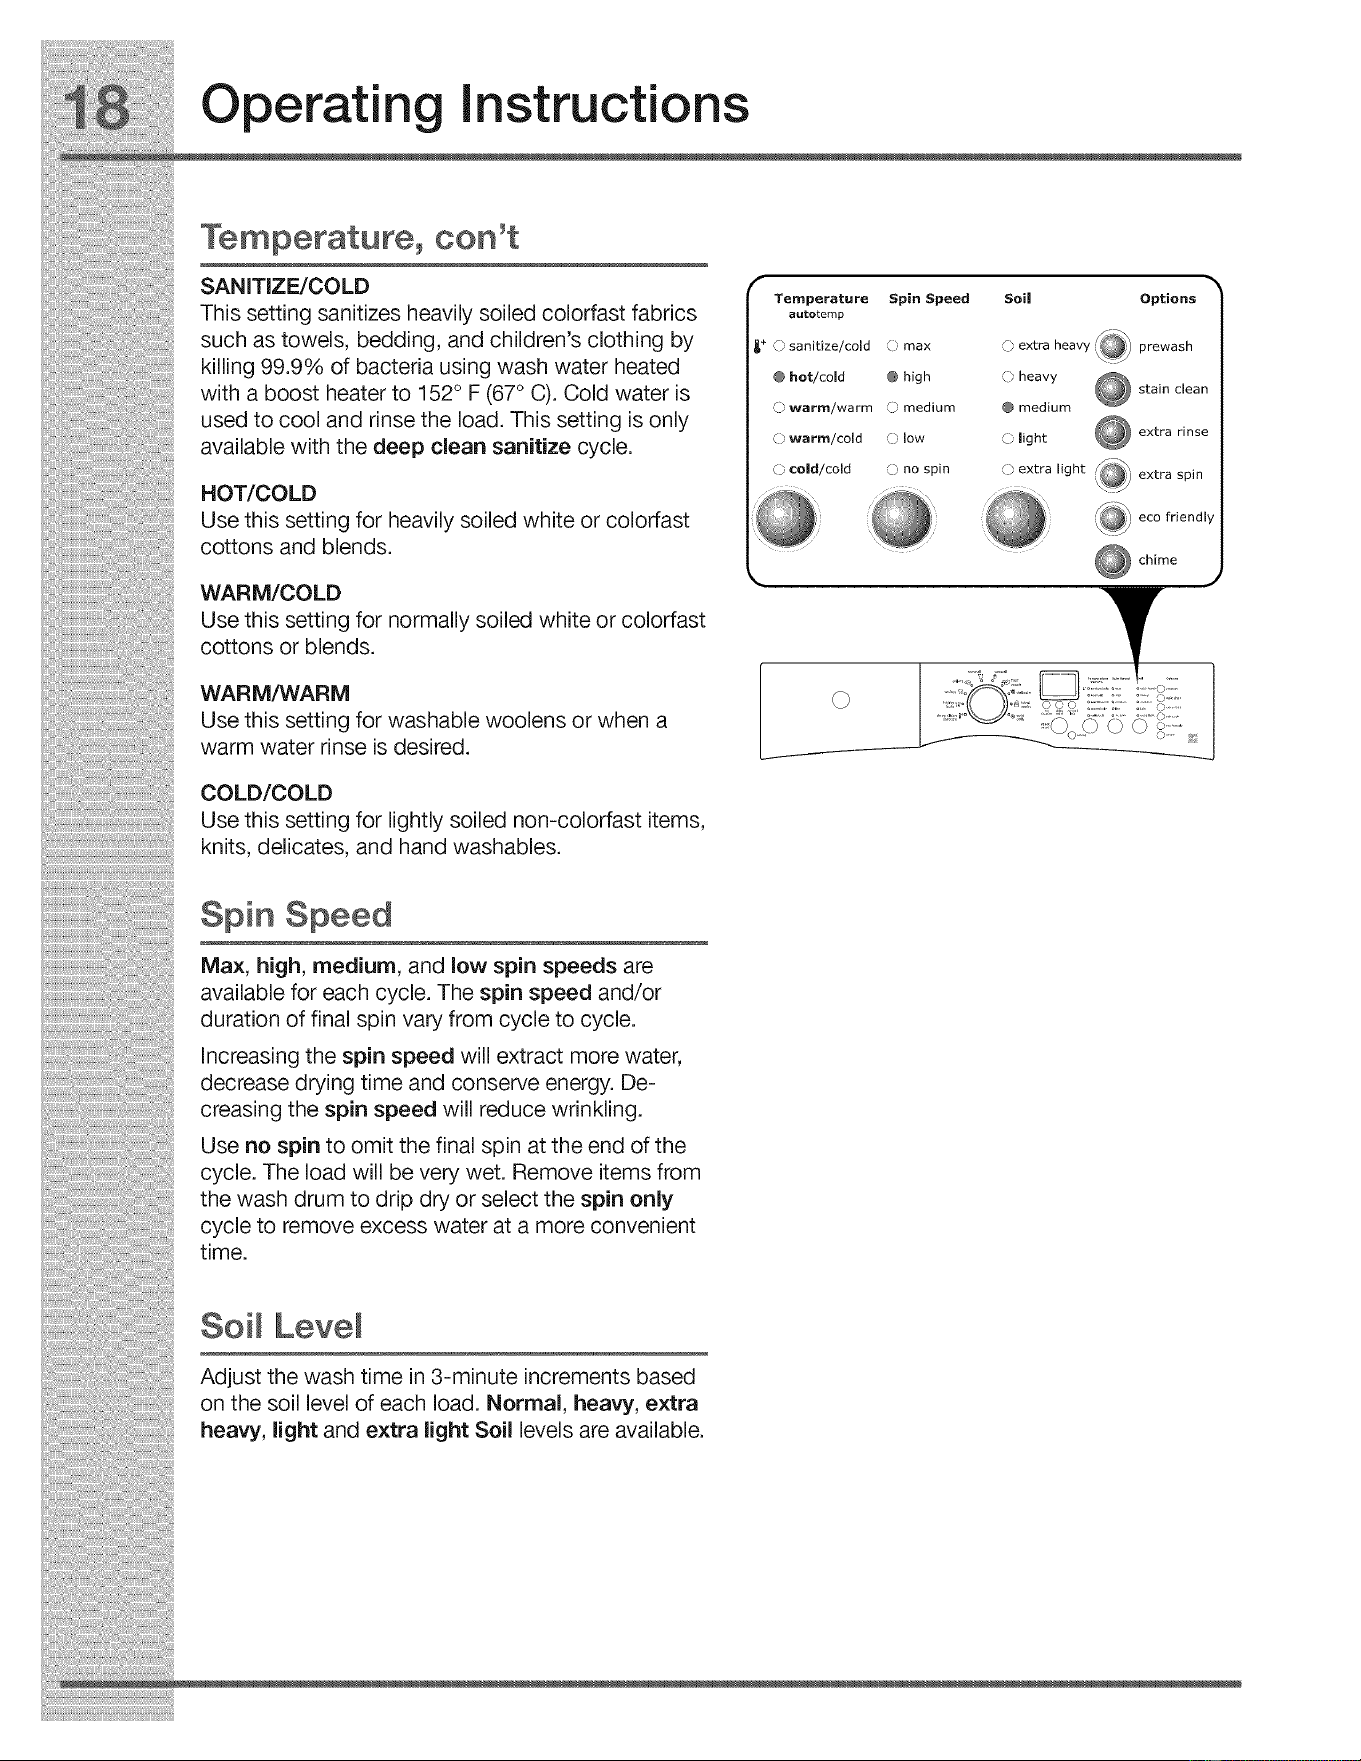
SANITIZE/COLD
This setting sanitizes heavily soiled colorfast fabrics
such as towels, bedding, and children's clothing by
killing 99.9% of bacteria using wash water heated
with a boost heater to 152° F (67° C). Cold water is
used to cool and rinse the load. This setting is only
available with the deep clean sanitize cycle.
HOT/COLD
Use this setting for heavily soiled white or colorfast
cottons and blends.
WARM/COLD
Use this setting for normally soiled white or colorfast
cottons or blends.
WARM/WARM
Use this setting for washable woolens or when a
warm water rinse is desired.
COLD/COLD
Use this setting for lightly soiled non-colorfast items,
knits, delicates, and hand washables.
f
Temperature Spin Speed
agtotemp
_+ (_ sanitize/cold (" max
@ hot/cold @ high
() warm/warm O medium
O warm/cold O low
O cold/cold O no spin
Soil Options
C) extra heavy _ prewash
() heavy @ stain clean
@ medium
O light @ extra rinse
(b extra light ?,_ extra spin
i eco friendly
chime
©
Spin Speed
Max, high, medium, and low spin speeds are
available for each cycle. The spin speed and/or
duration of final spin vary from cycle to cycle.
Increasing the spin speed will extract more water,
decrease drying time and conserve energy. De-
creasing the spin speed will reduce wrinkling.
Use no spin to omit the final spin at the end of the
cycle. The load will be very wet. Remove items from
the wash drum to drip dry or select the spin only
cycle to remove excess water at a more convenient
time.
Soil Level
Adjust the wash time in 3-minute increments based
on the soil level of each load. Normal, heavy, extra
heavy, light and extra light Soil levels are available.

Operating Instructions
Suitable options will automatically be indicated
when the cycle is selected.
To add options, press the corresponding options
buttons to illuminate the selections desired. To de-
lete options, press the options buttons again and
the indicator lights will turn off.
Not all options are available with every cycle. The
indicator will not light if the option is not available
with that cycle.
The options selected for the cycle will be remem-
bered and recalled each time that cycle is selected
in the future.
PREWASH
Select this option to add a short initial wash peri-
od to a cycle. Heavily soiled and stained loads will
prewash for approximately 5 minutes. The water
will drain and the load will automatically advance
to the regular wash cycle.
See step 5 in "Operating Your Washer" section in this
guide for details on adding detergent to the dispenser.
STAIN CLEAN
Use the stain clean option to add a 5-minute soak
in the middle of the wash portion of the heavy duty,
whites, colors, normal, casual, and delicate cycles.
EXTRA RINSE
Use this option when additional rinsing is desired
to remove excess dirt and detergent. It is recom-
mended for heavily soiled loads or if household
members have sensitive skin. Extra rinse occurs
before the final rinse when the liquid fabric soft-
ener is dispensed.
EXTRA SPiN
Use this option to add minutes to the final spin at
the selected Spin Speed. This will improve water
extraction, decrease drying time and save energy.
ECO FRIENDLY
The eco friendly option reduces the hot and warm
water temperature a few degrees to save energy. It is
available with all cycles except deep clean sanitize
and spin only.
CHIME
A chime will sound at the end of the cycle when
this option is selected. The signal has an adjust-
able volume level or can be turned off.
f
Temperature Spirt Speed
autotemp
_+ ,_ sanitize/cold (:? max
@ hot/cold @ high
O warm/warm (? medium
0 warm/cold ([) low
(_ cold/cold _ no spin
Soil Options
0 extra heavy _@'_ prewash
() heavy Q stain clean
@ medium
('_ light
extra rinse
O extra light K_, extra spin
i_ eco friendly
chime
©
Operatin
Instructions
Washer Features
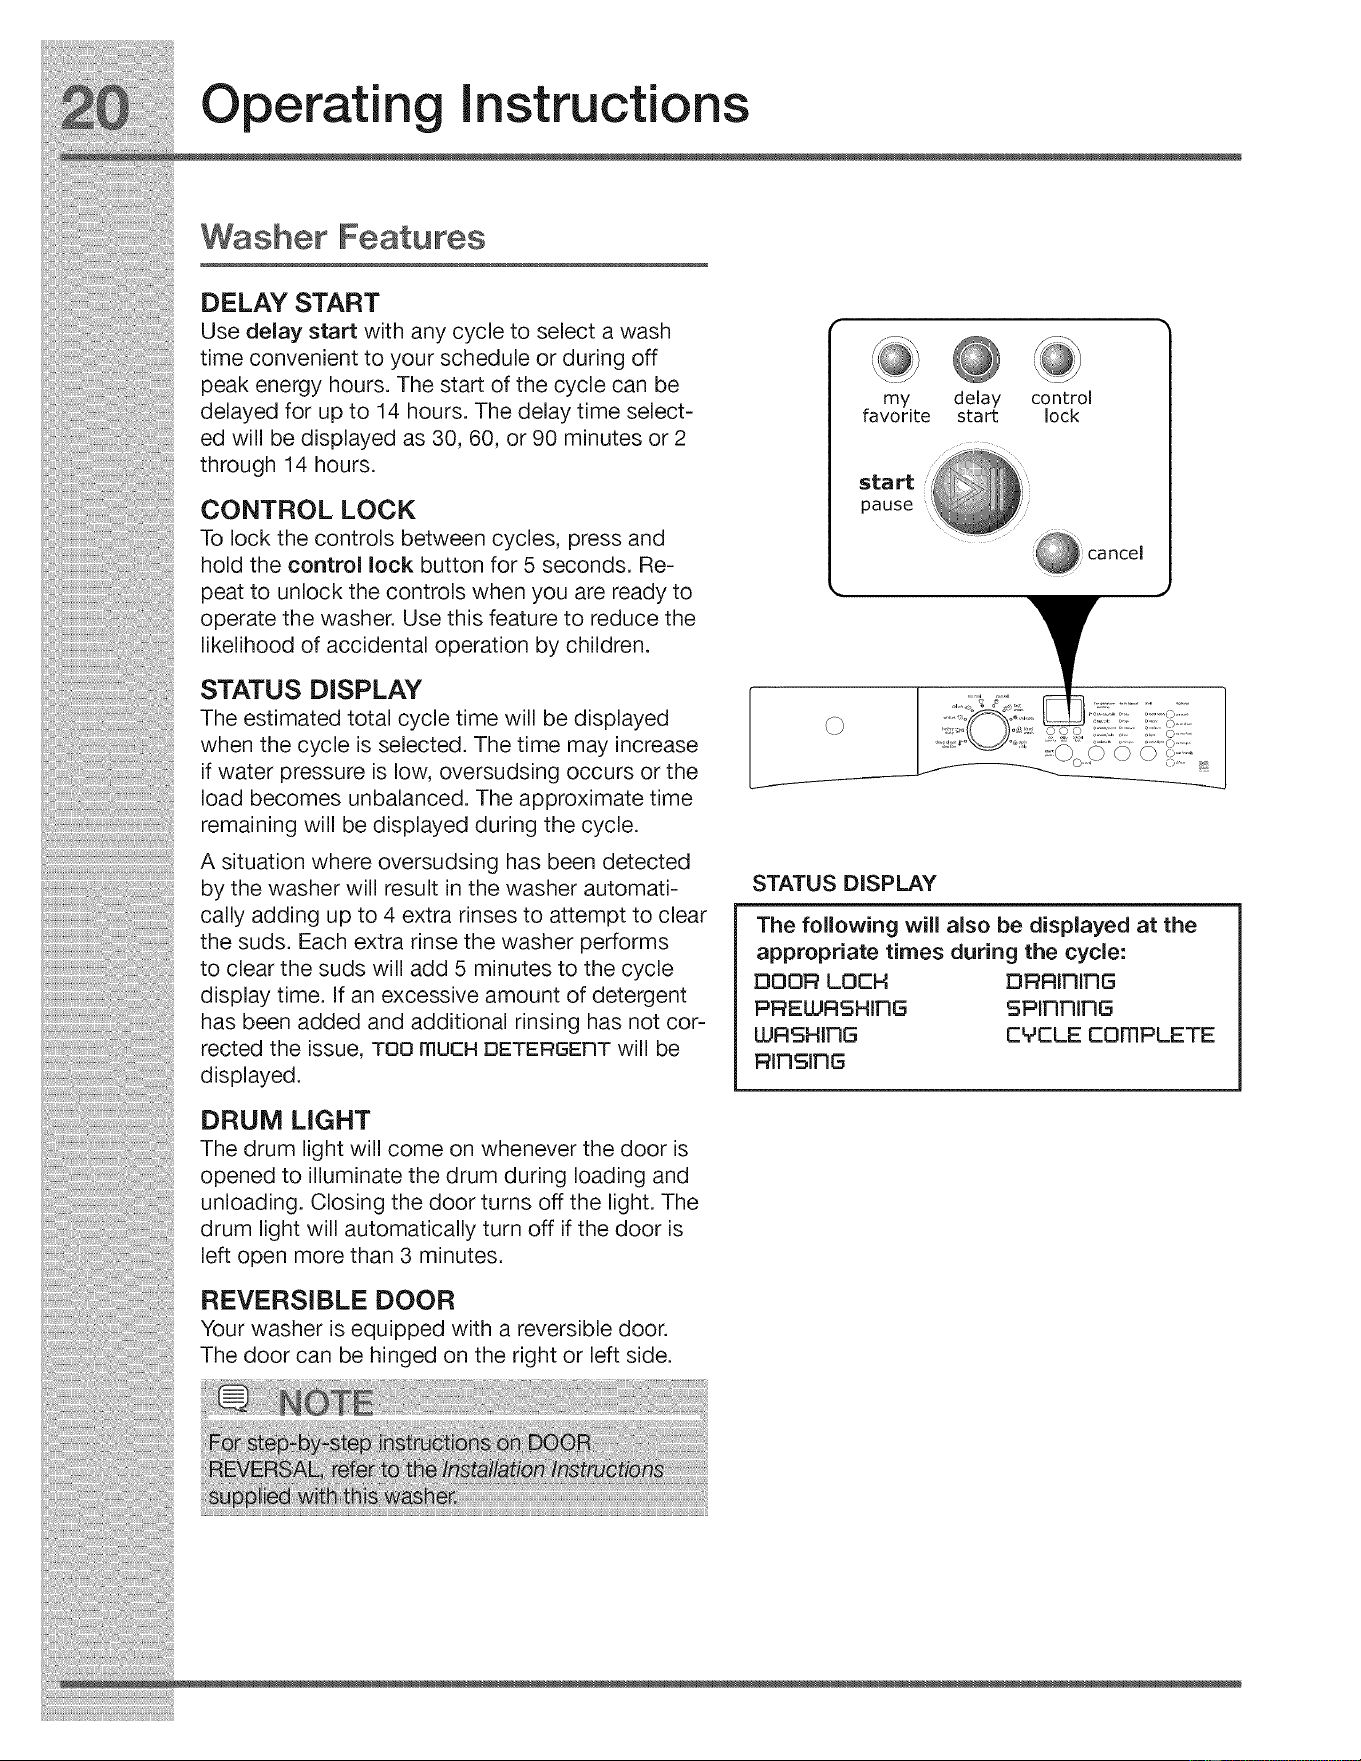
DELAY START
Use delay start with any cycle to select a wash
time convenient to your schedule or during off
peak energy hours. The start of the cycle can be
delayed for up to 14 hours. The delay time select-
ed will be displayed as 30, 60, or 90 minutes or 2
through 14 hours.
CONTROL LOCK
To lock the controls between cycles, press and
hold the control lock button for 5 seconds. Re-
peat to unlock the controls when you are ready to
operate the washer. Use this feature to reduce the
likelihood of accidental operation by children.
STATUS DISPLAY
The estimated total cycle time will be displayed
when the cycle is selected. The time may increase
if water pressure is low, oversudsing occurs or the
load becomes unbalanced. The approximate time
remaining will be displayed during the cycle.
A situation where oversudsing has been detected
by the washer will result in the washer automati-
cally adding up to 4 extra rinses to attempt to clear
the suds. Each extra rinse the washer performs
to clear the suds will add 5 minutes to the cycle
display time. If an excessive amount of detergent
has been added and additional rinsing has not cor-
rected the issue, TOO mUCH DETERGENT will be
displayed.
DRUM LIGHT
The drum light will come on whenever the door is
opened to illuminate the drum during loading and
unloading. Closing the door turns off the light. The
drum light will automatically turn off if the door is
left open more than 3 minutes.
REVERSIBLE DOOR
Your washer is equipped with a reversible door.
The door can be hinged on the right or left side.
my delay control
favorite start lock
start
pause
©
STATUS DISPLAY
The following will also be displayed at the
appropriate times during the cycle:
DOOR LOCH DRRIFItFIG
PREWRSHInG sPinninG
WRS;HIFIG CMCLE cOmPLETE
Rinsing
Cycle Chart
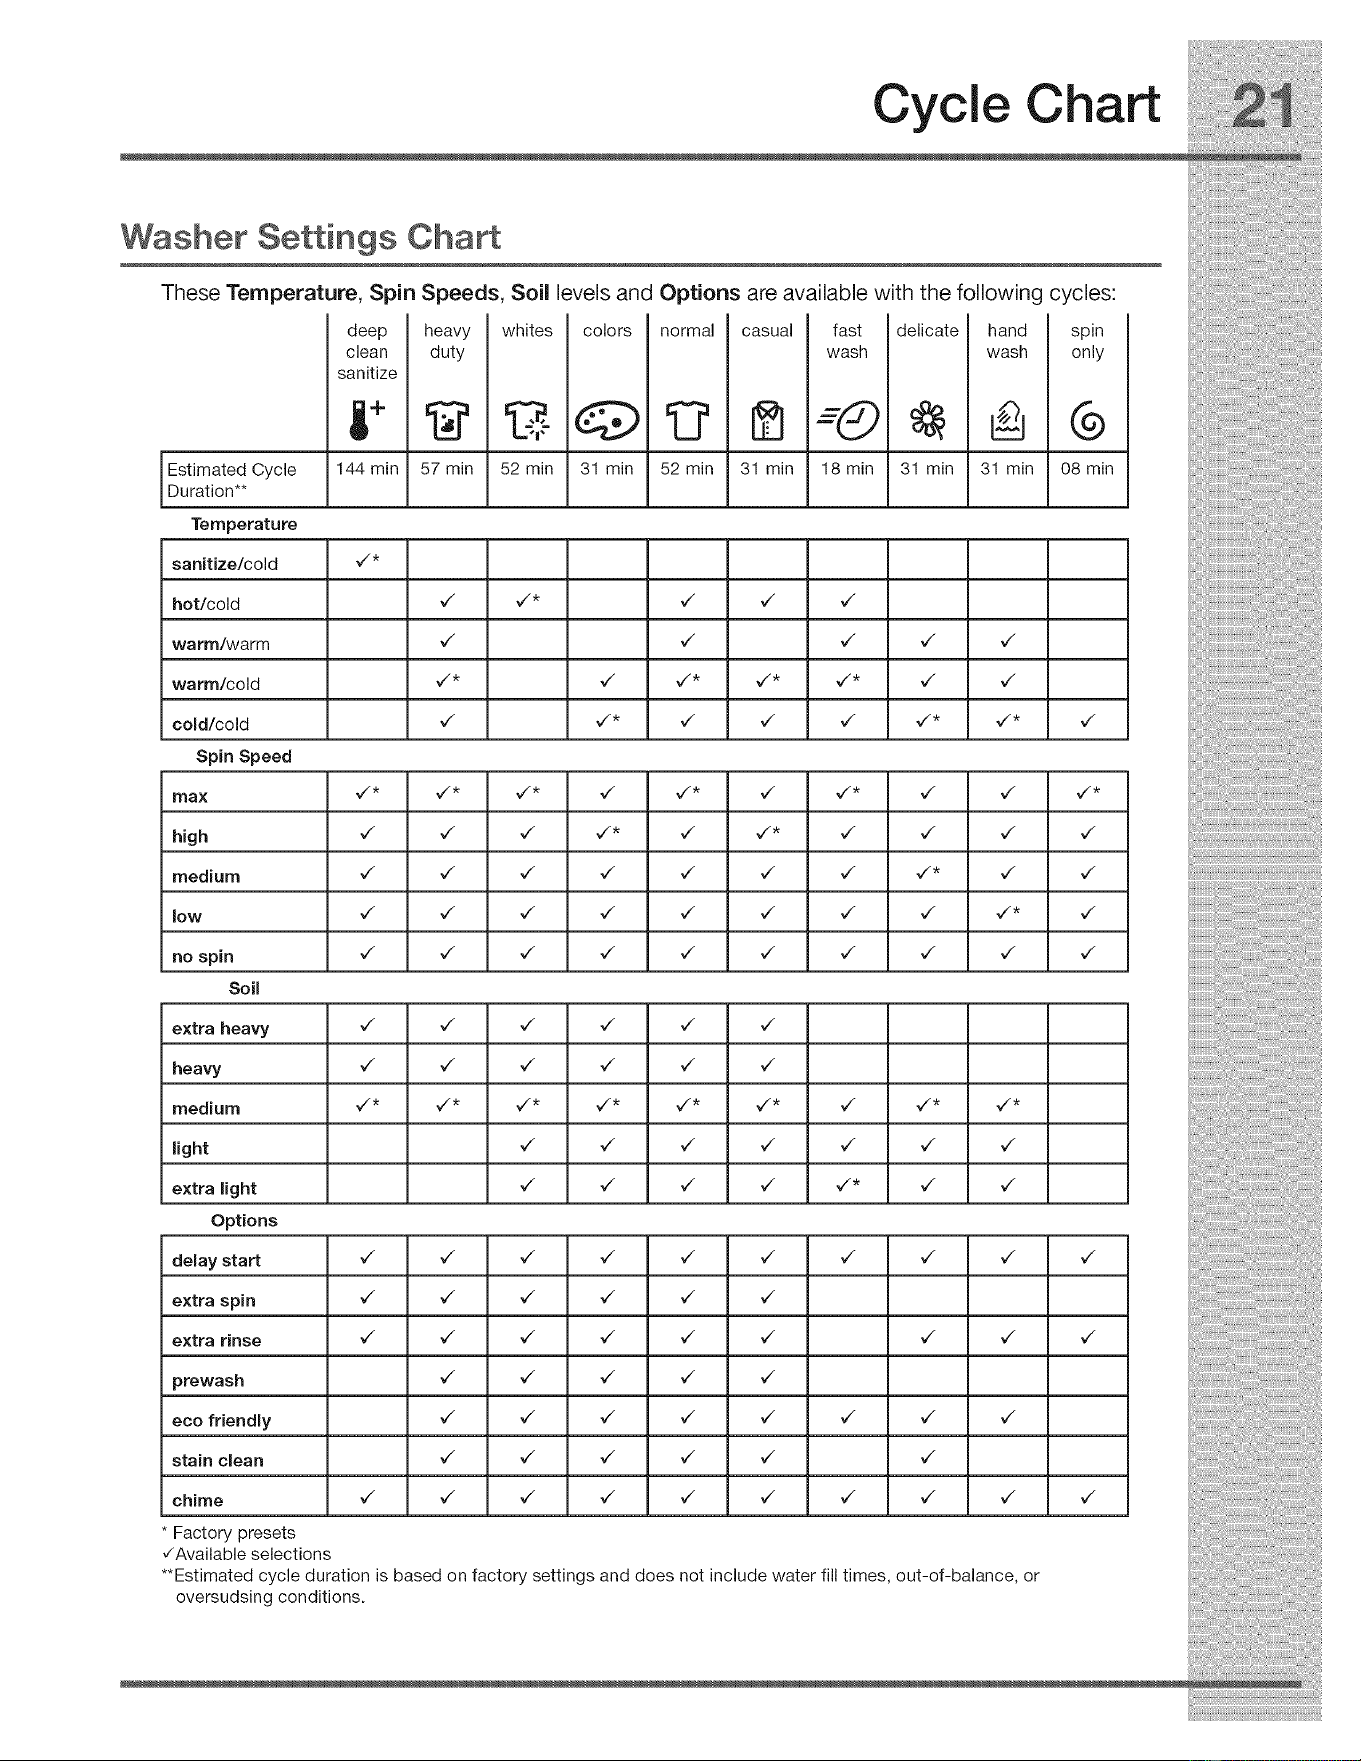
Washer Settings ChaA
These Temperature, Spin Speeds, Soil levels and Options are available with the following cycles:
deep
clean
sanitize
heavy
duty
whites
52 min
m _
m
colors
@
31 min
normal
52 min
casual
a
31 min
fast
wash
=-d)
18 min
delicate
31 min
hand
wash
I'//11
spin
only
(0%
v
**Estimated cycle duration is based on factory settings and does not include water fill times, out-of-balance, or
oversudsing conditions.
IEstimated Cycle 144 min 57 min 31 min 08 min
Duration**
Temperature
sanitize/cold _/*
hot/cold '/ '/* '/ '/ '/
warm/warm ,/ ,/ ,/ ,/ ,/
warm/cold ¢_* ¢_ ¢_* ¢_* ¢_* ¢_ ¢_
cold/cold _/ _/* _/ _/ _/ _/* _/* _/
Spin Speed
max ¢_* ¢_* ¢_* ¢_ ¢_* ¢_ ¢_* ¢_ ¢_ ¢_*
high '/ '/ '/ _* _ _* _ _ _
medium _/ _/ _/ _/ _/ _/ _/ _/* _/ _/
low ¢_ ¢_ ¢_ ¢_ ¢_ ¢_ ¢_ ¢_ ¢_* ¢_
no spin _ _ _ _ _ _ _ _ _
Soil
extra heavy ,/ ,/ ,/ ,/ ,/ ,/
heavy _/ _/ _/ _/ _/ _/
medium ¢_* ¢_* ¢_* ¢_* ¢_* ¢_* ¢_ ¢_* ¢_*
light _ _ _ _ _ _
extra light _/ _/ _/ _/ ¢_* ¢_ ¢_
Options
delay start _ _ _ _ _ _ _ _ _
extra spin ,/ ,/ ,/ ,/ ,/ ,/
extra rinse _/ _/ _/ _/ _/ _/ _/ _/ _/
prewash ,/ ,/ ,/ ,/ ,/
eco friendly ,/ ,/ ,/ ,/ ,/ ,/ ,/ ,/
stain clean _ _ _ _ _
chime ,/ ,/ ,/ ,/ ,/ ,/ ,/ ,/ ,/ ,/
Factory presets
¢Available selections
Stain Removal Guide
Stain Removal Procedures
SAFE STAIN REMOVAL PROCEDURES
To reduce the risk of fire or serious injury to per-
sons or property, comply with the basic warnings
listed below:
• Read and comply with all instructions on stain
removal products.
o
o
Keep stain removal products in their original
labeled containers and out of children's reach.
Thoroughly wash any utensils used.
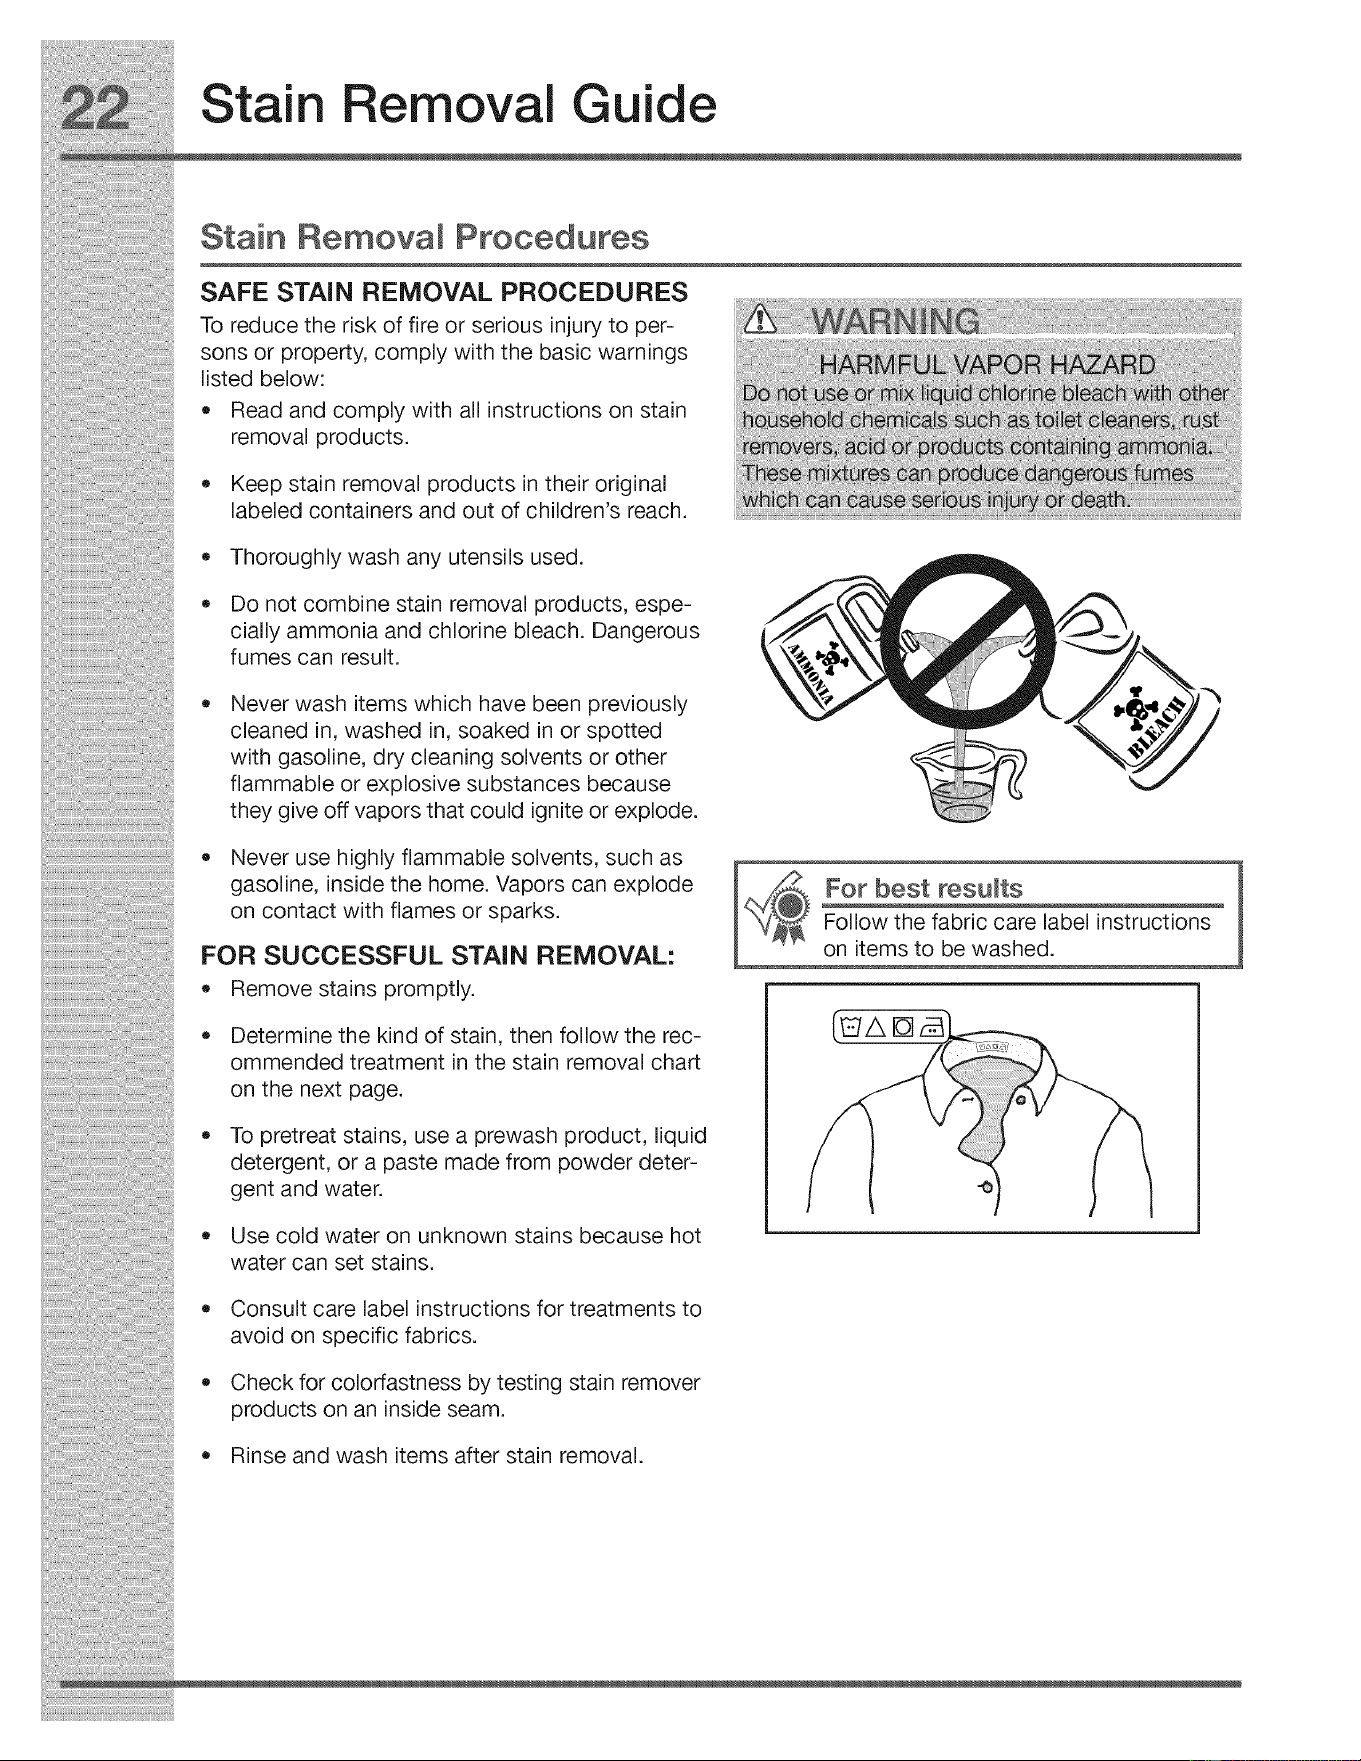
Do not combine stain removal products, espe-
cially ammonia and chlorine bleach. Dangerous
fumes can result.
Never wash items which have been previously
cleaned in, washed in, soaked in or spotted
with gasoline, dry cleaning solvents or other
flammable or explosive substances because
they give off vapors that could ignite or explode.
Never use highly flammable solvents, such as
gasoline, inside the home. Vapors can explode
on contact with flames or sparks.
FOR SUCCESSFUL STAIN REMOVAL:
Remove stains promptly.
o
o
For best results
Follow the fabric care label instructions
on items to be washed.
Determine the kind of stain, then follow the rec-
ommended treatment in the stain removal chart
on the next page.
To pretreat stains, use a prewash product, liquid
detergent, or a paste made from powder deter-
gent and water.
Use cold water on unknown stains because hot
water can set stains.
Consult care label instructions for treatments to
avoid on specific fabrics.
Check for colorfastness by testing stain remover
products on an inside seam.
Rinse and wash items after stain removal.
Stain Removal Guide
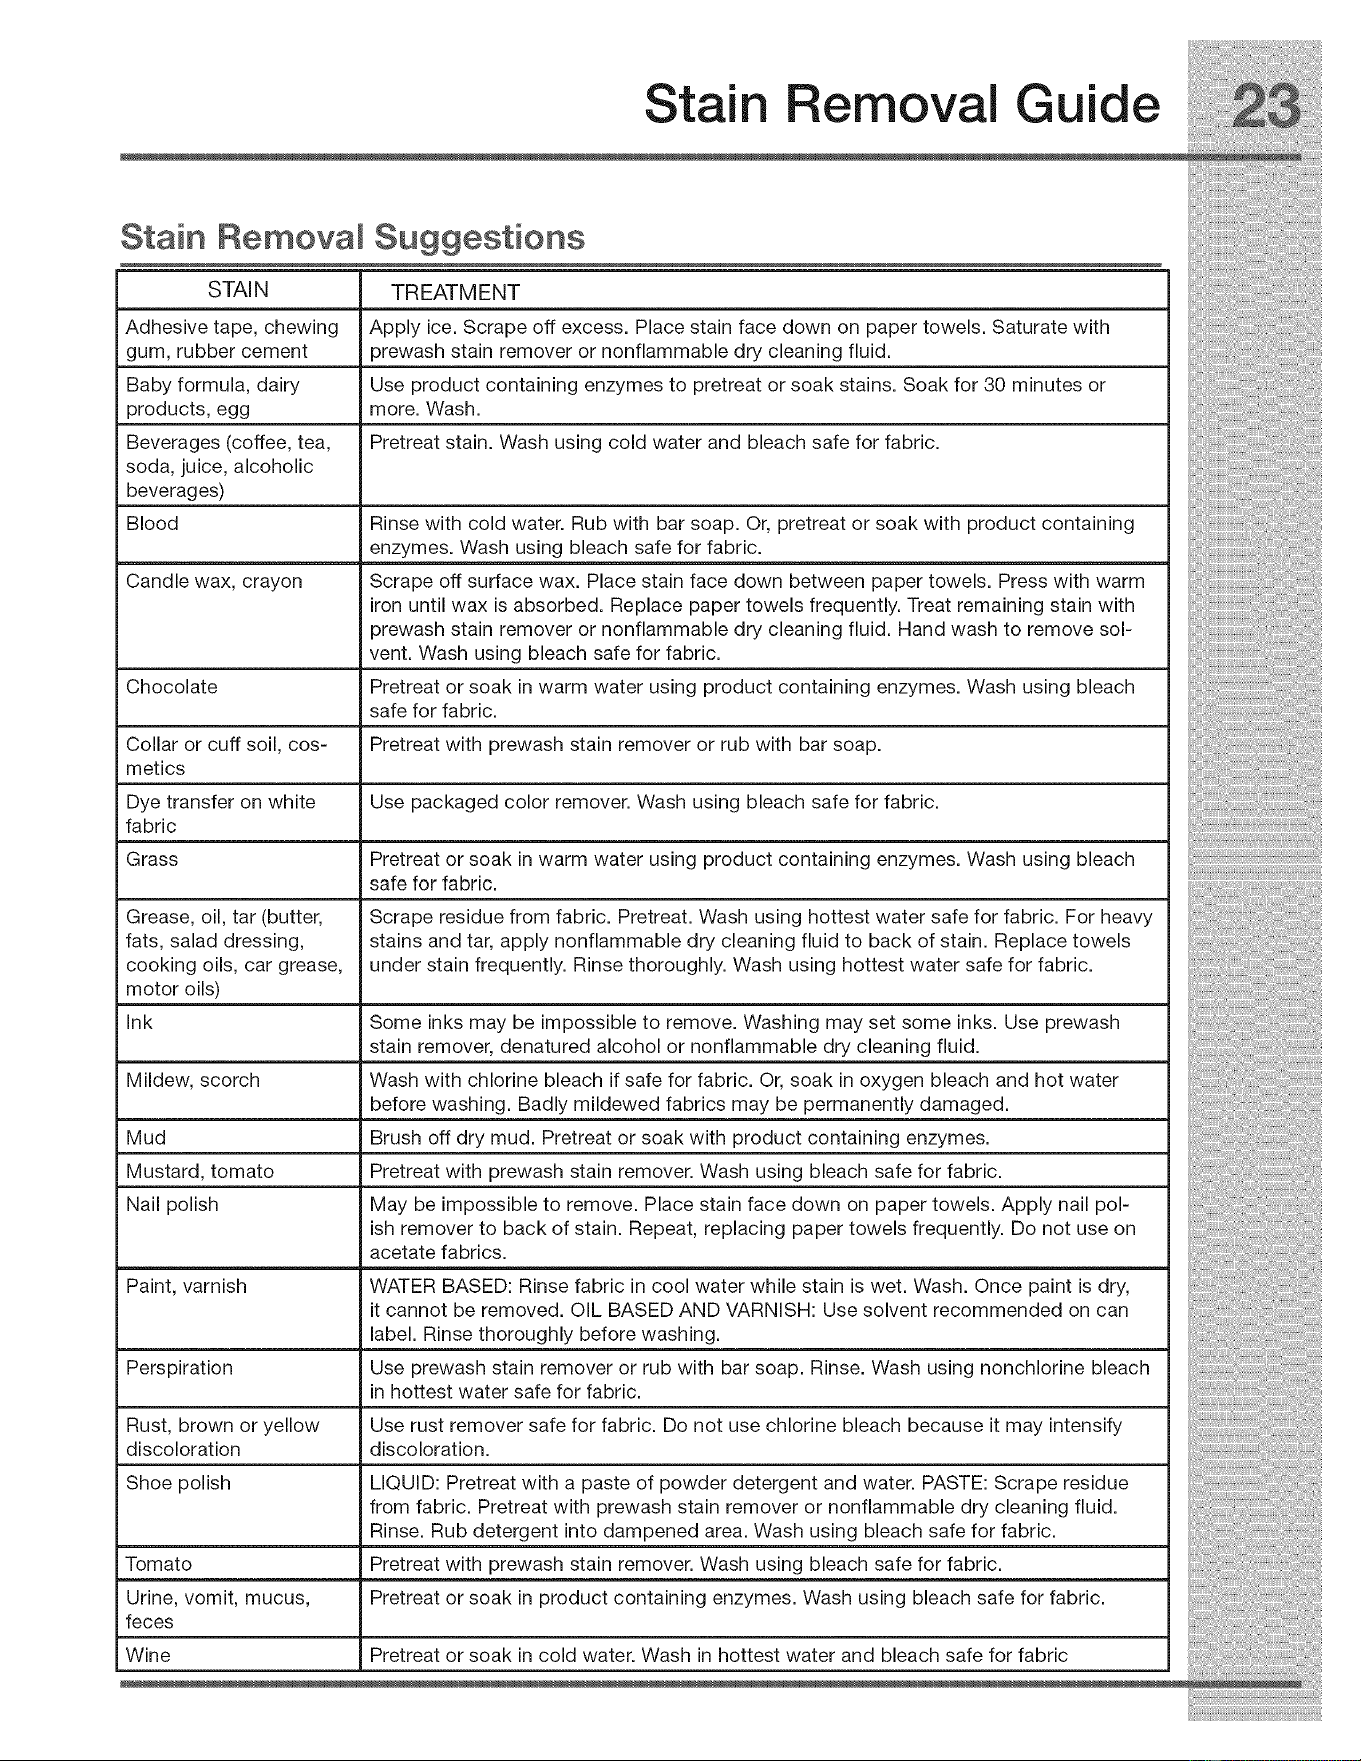
Stain Removal Suggestions
STAI N TREATM ENT
Adhesive tape, chewing Apply ice. Scrape off excess. Place stain face down on paper towels. Saturate with
gum, rubber cement prewash stain remover or nonflammable dry cleaning fluid.
Baby formula, dairy Use product containing enzymes to pretreat or soak stains. Soak for 30 minutes or
products, egg more. Wash.
Beverages (coffee, tea, Pretreat stain. Wash using cold water and bleach safe for fabric.
soda, juice, alcoholic
beverages)
Blood Rinse with cold water. Rub with bar soap. Or, pretreat or soak with product containing
enzymes. Wash using bleach safe for fabric.
Candle wax, crayon Scrape off surface wax. Place stain face down between paper towels. Press with warm
iron until wax is absorbed. Replace paper towels frequently. Treat remaining stain with
prewash stain remover or nonflammable dry cleaning fluid. Hand wash to remove sol-
vent. Wash using bleach safe for fabric.
Chocolate Pretreat or soak in warm water using product containing enzymes. Wash using bleach
safe for fabric.
Collar or cuff soil, cos- Pretreat with prewash stain remover or rub with bar soap.
metics
Dye transfer on white Use packaged color remover. Wash using bleach safe for fabric.
fabric
Grass Pretreat or soak in warm water using product containing enzymes. Wash using bleach
safe for fabric.
Grease, oil, tar (butter, Scrape residue from fabric. Pretreat. Wash using hottest water safe for fabric. For heavy
fats, salad dressing, stains and tar, apply nonflammable dry cleaning fluid to back of stain. Replace towels
cooking oils, car grease, under stain frequently. Rinse thoroughly. Wash using hottest water safe for fabric.
motor oils)
Ink Some inks may be impossible to remove. Washing may set some inks. Use prewash
stain remover, denatured alcohol or nonflammable dry cleaning fluid.
Mildew, scorch Wash with chlorine bleach if safe for fabric. Or, soak in oxygen bleach and hot water
before washing. Badly mildewed fabrics may be permanently damaged.
Mud Brush off dry mud. Pretreat or soak with product containing enzymes.
Mustard, tomato Pretreat with prewash stain remover. Wash using bleach safe for fabric.
Nail polish May be impossible to remove. Place stain face down on paper towels. Apply nail pol-
ish remover to back of stain. Repeat, replacing paper towels frequently. Do not use on
acetate fabrics.
Paint, varnish WATER BASED: Rinse fabric in cool water while stain is wet. Wash. Once paint is dry,
it cannot be removed. OIL BASED AND VARNISH: Use solvent recommended on can
label. Rinse thoroughly before washing.
Perspiration Use prewash stain remover or rub with bar soap. Rinse. Wash using nonchlorine bleach
in hottest water safe for fabric.
Rust, brown or yellow Use rust remover safe for fabric. Do not use chlorine bleach because it may intensify
discoloration discoloration.
Shoe polish LIQUID: Pretreat with a paste of powder detergent and water. PASTE: Scrape residue
from fabric. Pretreat with prewash stain remover or nonflammable dry cleaning fluid.
Rinse. Rub detergent into dampened area. Wash using bleach safe for fabric.
Tomato Pretreat with prewash stain remover. Wash using bleach safe for fabric.
Urine, vomit, mucus, Pretreat or soak in product containing enzymes. Wash using bleach safe for fabric.
feces
Wine Pretreat or soak in cold water. Wash in hottest water and bleach safe for fabric
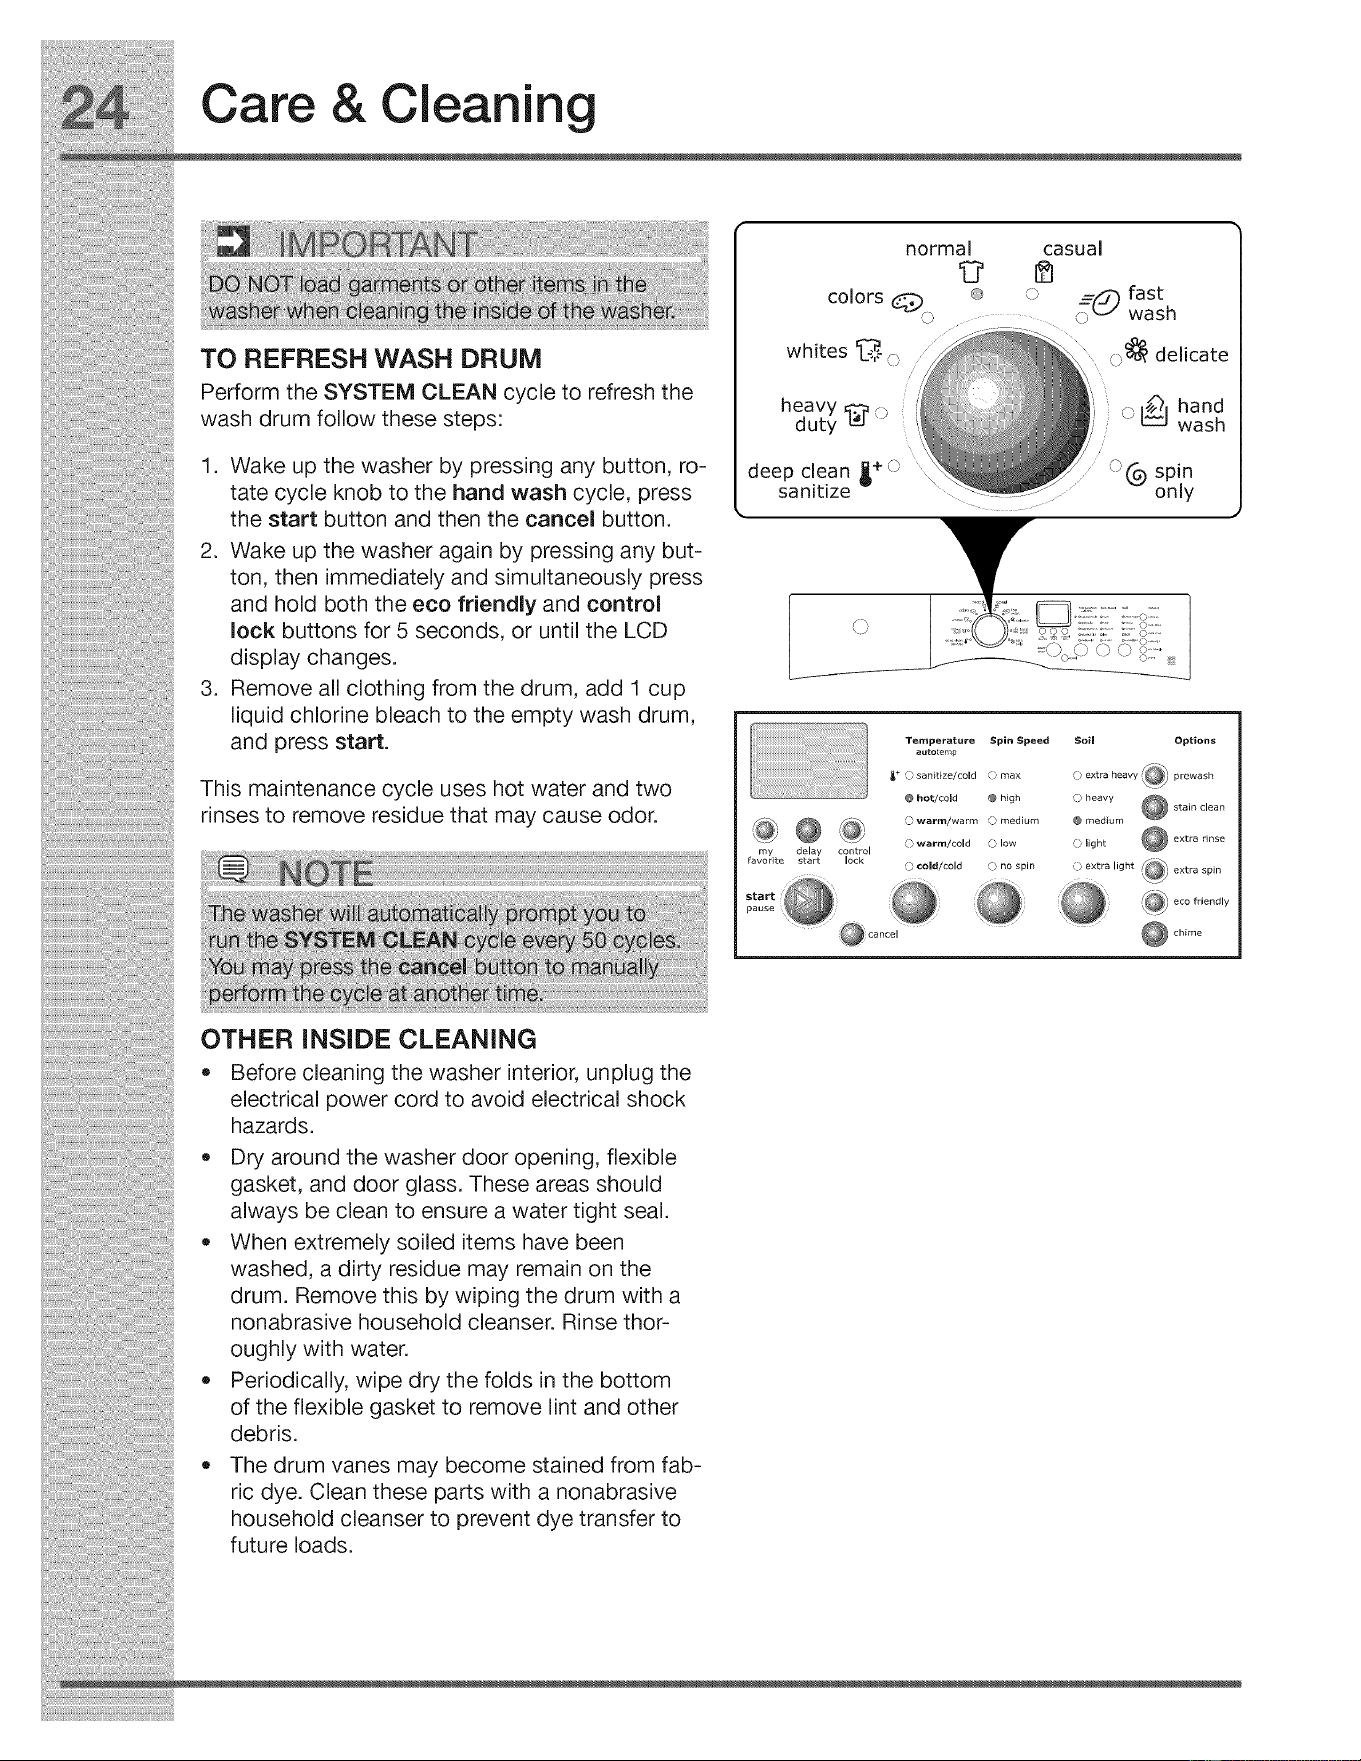
Care & Cleaning
TO REFRESH WASH DRUM
Perform the SYSTEM CLEAN cycle to refresh the
wash drum follow these steps:
1. Wake up the washer by pressing any button, ro-
tate cycle knob to the hand wash cycle, press
the start button and then the cancel button.
2. Wake up the washer again by pressing any but-
ton, then immediately and simultaneously press
and hold both the eco friendly and control
lock buttons for 5 seconds, or until the LCD
display changes.
3. Remove all clothing from the drum, add 1 cup
liquid chlorine bleach to the empty wash drum,
and press start.
This maintenance cycle uses hot water and two
rinses to remove residue that may cause odor.
OTHER iNSiDE CLEANING
my deley control
favorite start lock
normal casual
Temperature Spin Speed
auto_emp
_+ } sanitize/cold _ max
@ her/cold @ high
@warm/warm @ medium
© warm/cold © low
@ cold/cold @ no spin
Soil Options
_@ prewash
@ extra heavy _, ,
@ heavy
@ medium
@ light
() extra light S_ extra spin
Before cleaning the washer interior, unplug the
electrical power cord to avoid electrical shock
hazards.
Dry around the washer door opening, flexible
gasket, and door glass. These areas should
always be clean to ensure a water tight seal.
When extremely soiled items have been
washed, a dirty residue may remain on the
drum. Remove this by wiping the drum with a
nonabrasive household cleanser. Rinse thor-
oughly with water.
Periodically, wipe dry the folds in the bottom
of the flexible gasket to remove lint and other
debris.
The drum vanes may become stained from fab-
ric dye. Clean these parts with a nonabrasive
household cleanser to prevent dye transfer to
future loads.
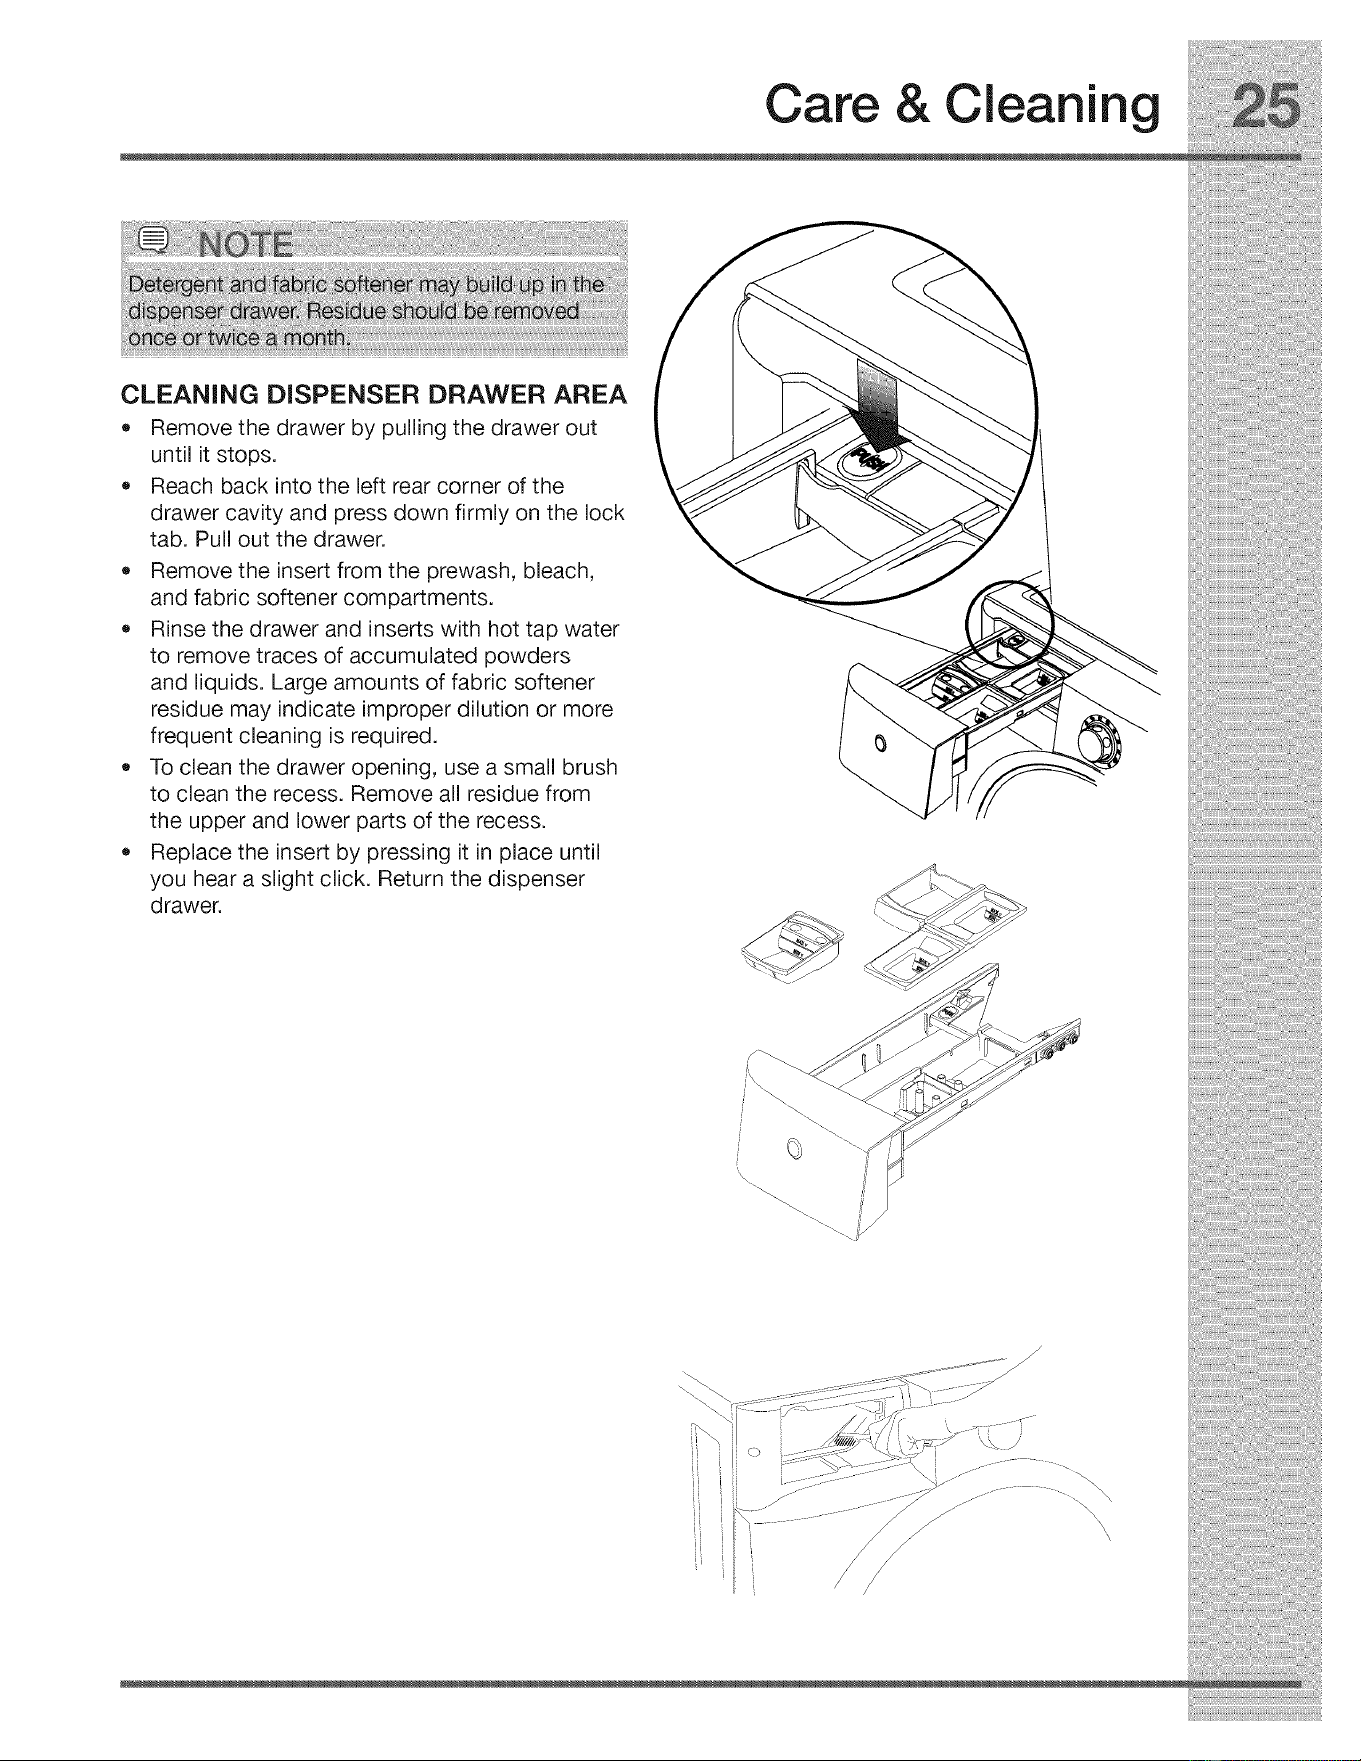
Care & Cleaning
CLEANING DISPENSER DRAWER AREA
• Remove the drawer by pulling the drawer out
until it stops.
Reach back into the left rear corner of the
drawer cavity and press down firmly on the lock
tab. Pull out the drawer.
Remove the insert from the prewash, bleach,
and fabric softener compartments.
Rinse the drawer and inserts with hot tap water
to remove traces of accumulated powders
and liquids. Large amounts of fabric softener
residue may indicate improper dilution or more
frequent cleaning is required.
To clean the drawer opening, use a small brush
to clean the recess. Remove all residue from
the upper and lower parts of the recess.
Replace the insert by pressing it in place until
you hear a slight click. Return the dispenser
d rawer.
I]
i
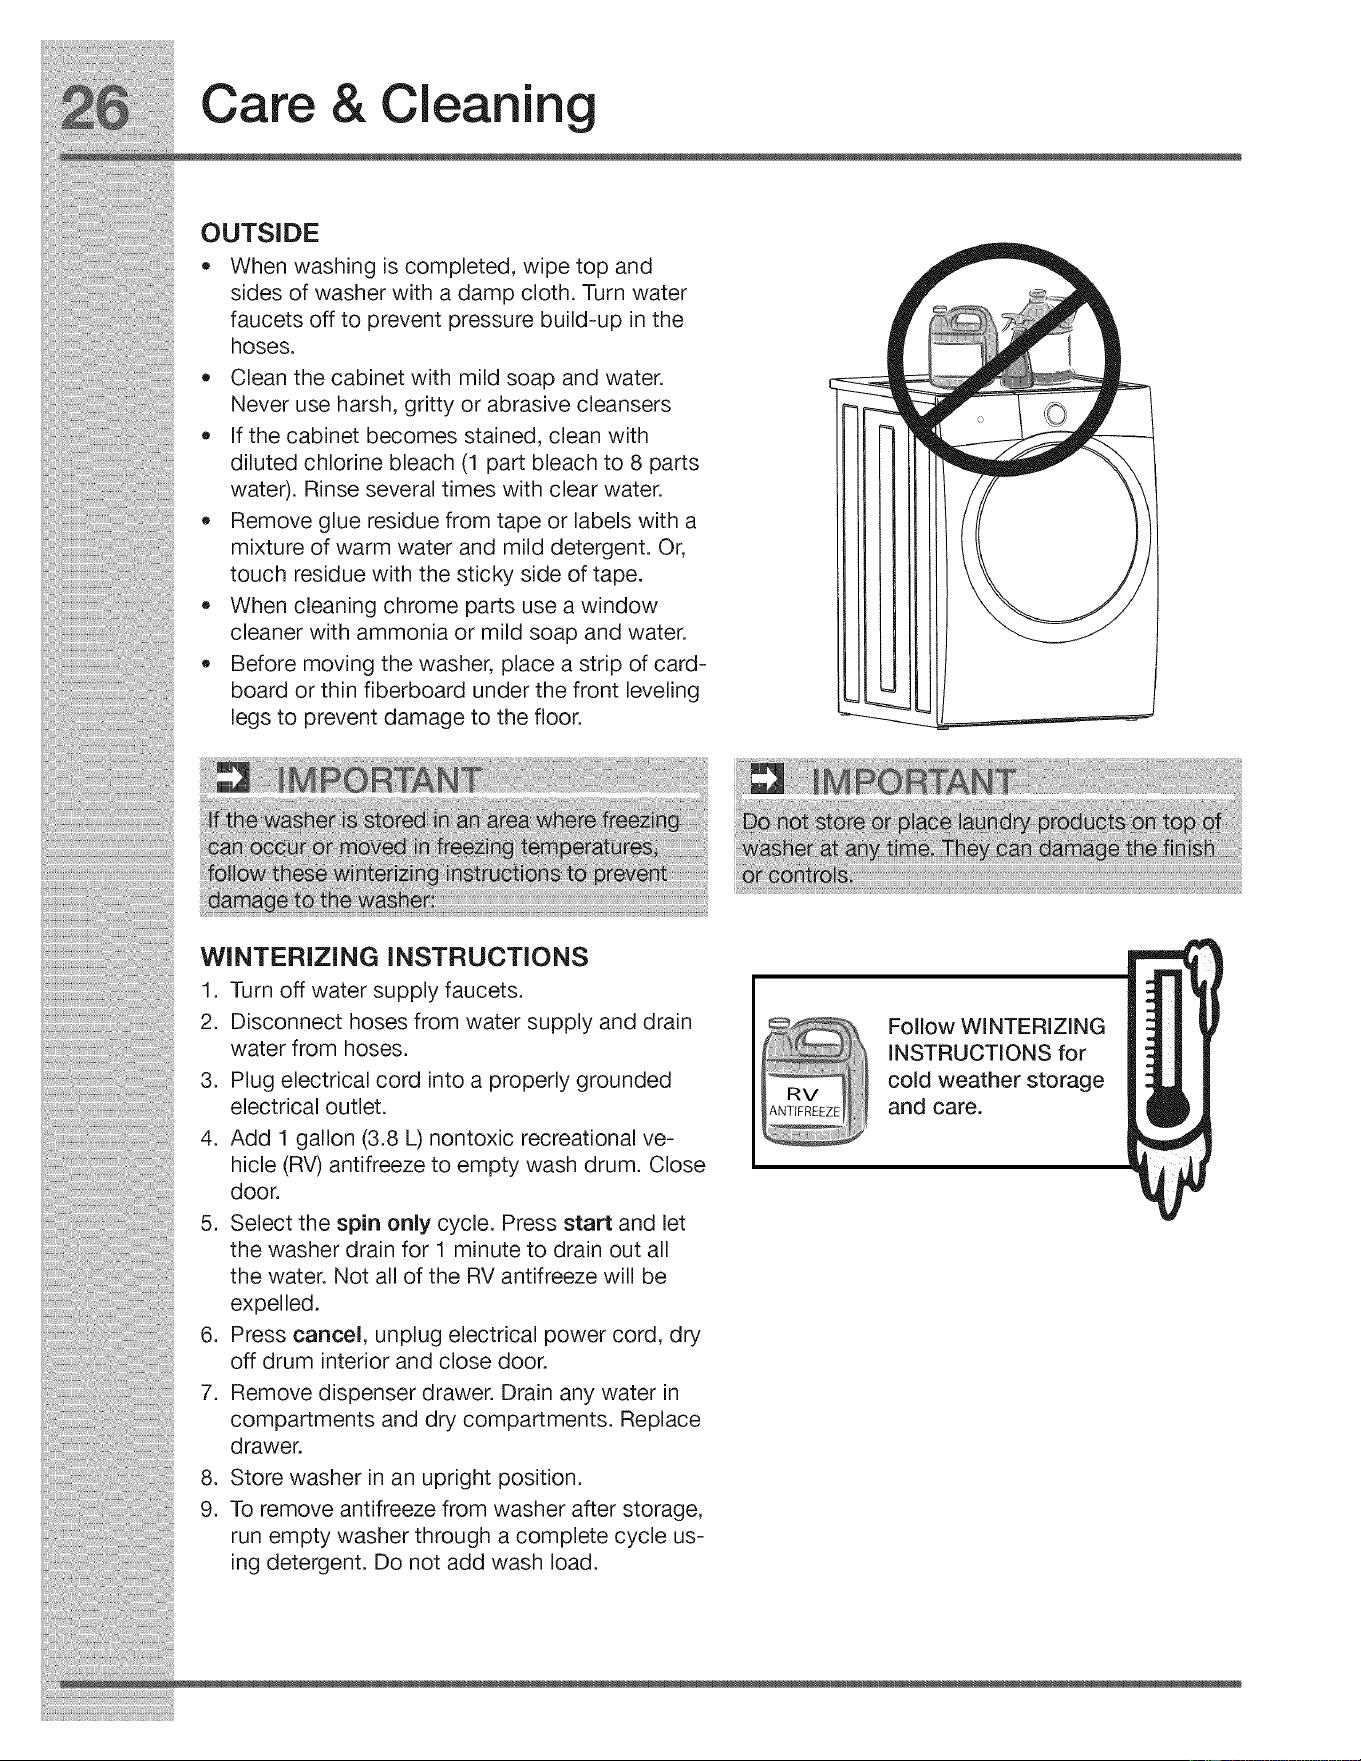
Care & Cleaning
OUTSIDE
• When washing is completed, wipe top and
sides of washer with a damp cloth. Turn water
faucets off to prevent pressure build-up in the
hoses.
Clean the cabinet with mild soap and water.
Never use harsh, gritty or abrasive cleansers
If the cabinet becomes stained, clean with
diluted chlorine bleach (1 part bleach to 8 parts
water). Rinse several times with clear water.
Remove glue residue from tape or labels with a
mixture of warm water and mild detergent. Or,
touch residue with the sticky side of tape.
When cleaning chrome parts use a window
cleaner with ammonia or mild soap and water.
Before moving the washer, place a strip of card-
board or thin fiberboard under the front leveling
legs to prevent damage to the floor.
WINTERIZING INSTRUCTIONS
1. Turn off water supply faucets.
2. Disconnect hoses from water supply and drain
water from hoses.
3. Plug electrical cord into a properly grounded
electrical outlet.
4. Add 1 gallon (3.8 L) nontoxic recreational ve-
hicle (RV) antifreeze to empty wash drum. Close
door.
5. Select the spin only cycle. Press start and let
the washer drain for 1 minute to drain out all
the water. Not all of the RV antifreeze will be
expel led.
6. Press cancel, unplug electrical power cord, dry
off drum interior and close door.
7. Remove dispenser drawer. Drain any water in
compartments and dry compartments. Replace
d rawer.
8. Store washer in an upright position.
9. To remove antifreeze from washer after storage,
run empty washer through a complete cycle us-
ing detergent. Do not add wash load.
Follow WiNTERiZING
iNSTRUCTiONS for
cold weather storage
and care.
Solutions to Common Problems
Common Washing Problems
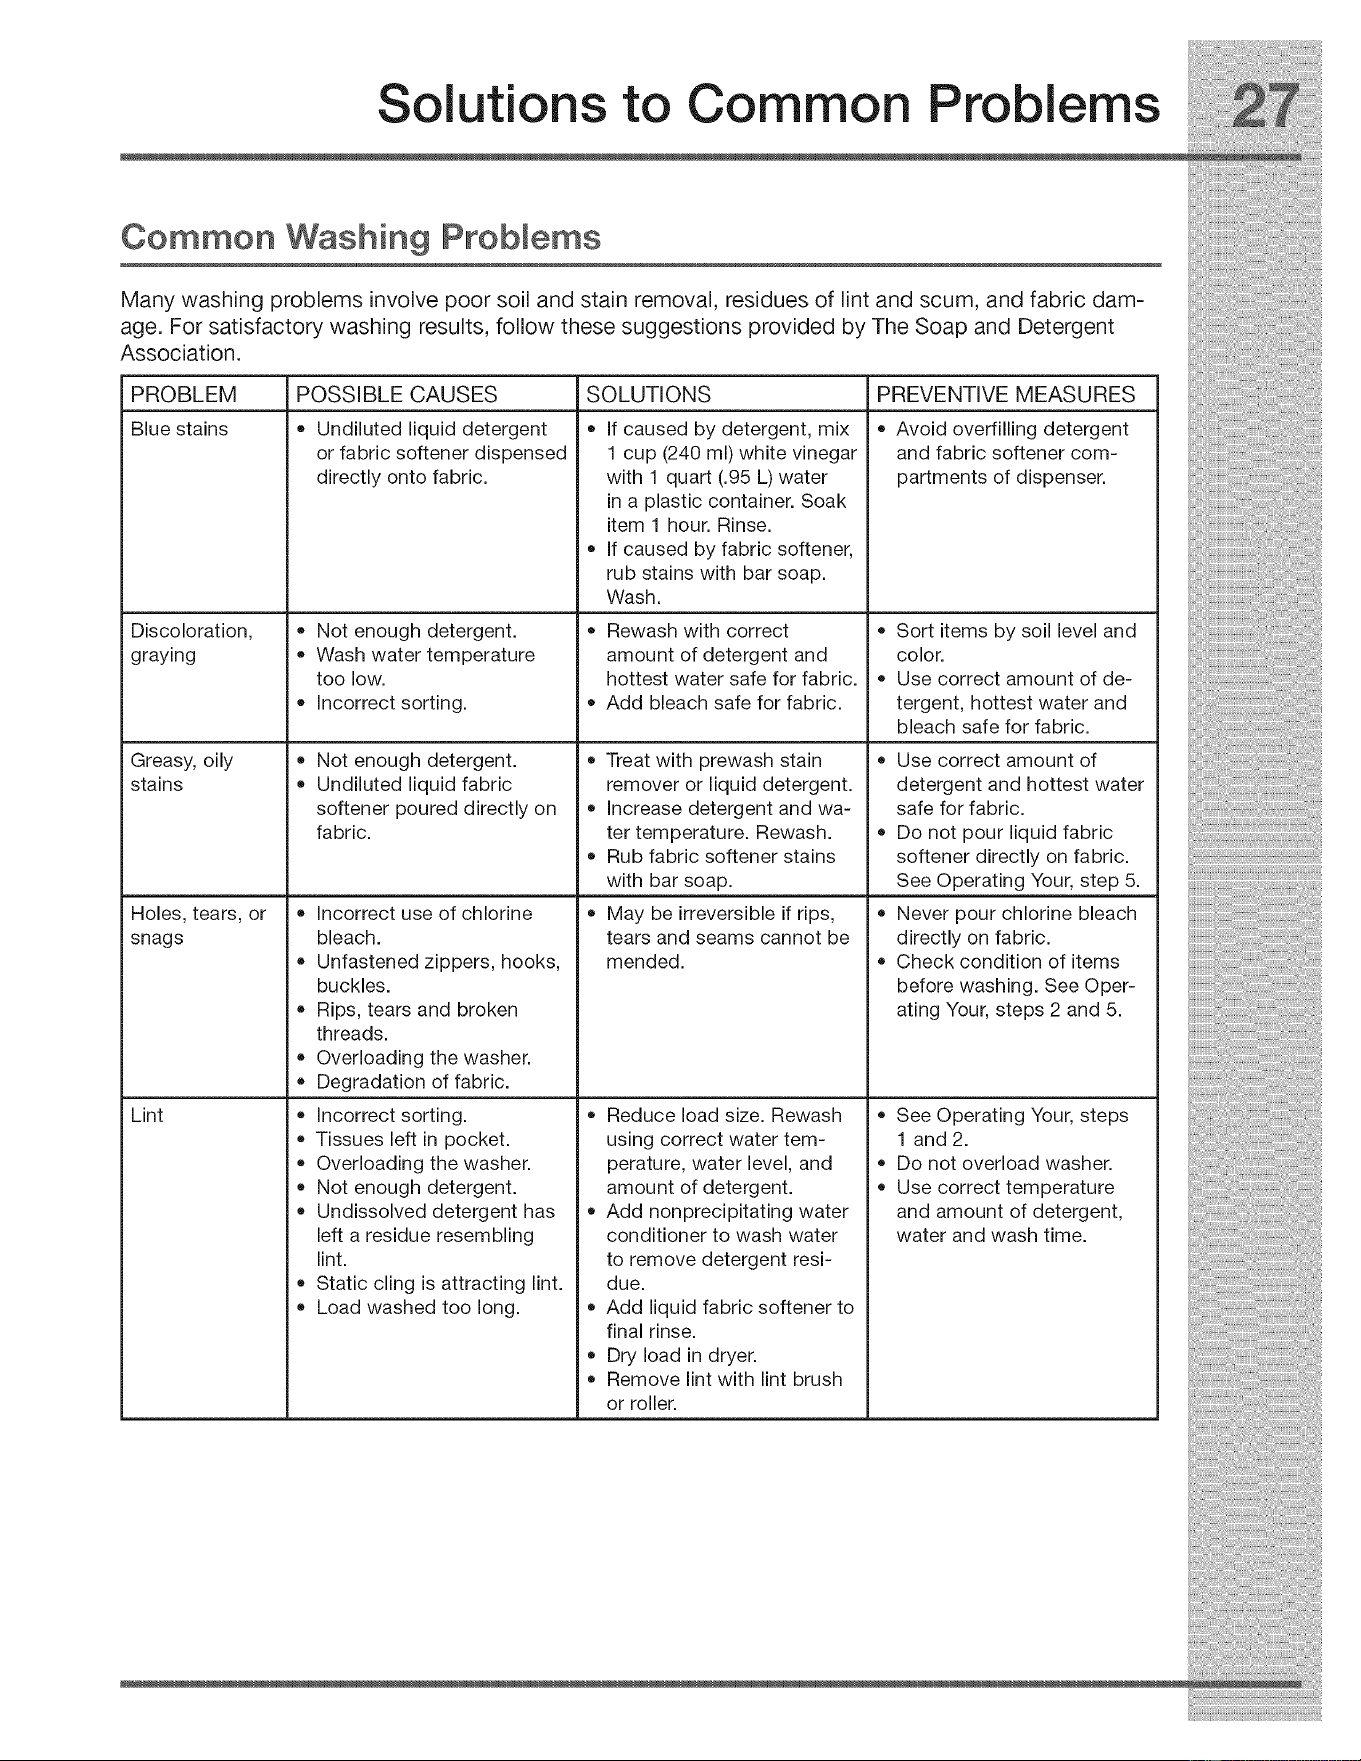
Many washing problems involve poor soil and stain removal, residues of lint and scum, and fabric dam-
age. For satisfactory washing results, follow these suggestions provided by The Soap and Detergent
Association.
PROBLEM POSSIBLE CAUSES SOLUTIONS
Blue stains • Undiluted liquid detergent
Discoloration,
graying
Greasy, oily
stains
Holes, tears, or
snags
Lint
or fabric softener dispensed
directly onto fabric.
Not enough detergent.
Wash water temperature
too low.
incorrect sorting.
Not enough detergent.
Undiluted liquid fabric
softener poured directly on
fabric.
incorrect use of chlorine
bleach.
Unfastened zippers, hooks,
buckles.
Rips, tears and broken
threads.
Overloading the washer.
Degradation of fabric.
incorrect sorting.
Tissues left in pocket.
Overloading the washer.
Not enough detergent.
Undissolved detergent has
left a residue resembling
lint.
Static cling is attracting lint.
Load washed too long.
if caused by detergent, mix
1 cup (240 ml) white vinegar
with 1 quart (.95 L) water
in a plastic container. Soak
item 1 hour. Rinse.
if caused by fabric softener,
rub stains with bar soap.
Wash.
Rewash with correct
amount of detergent and
hottest water safe for fabric.
Add bleach safe for fabric.
o
o
o
o
PREVENTIVE MEASURES
Avoid overfilling detergent
and fabric softener com-
partments of dispenser.
o
o
Treat with prewash stain
remover or liquid detergent.
increase detergent and wa-
ter temperature. Rewash.
Rub fabric softener stains
with bar soap.
May be irreversible if rips,
tears and seams cannot be
mended.
Reduce load size. Rewash
using correct water tem-
perature, water level, and
amount of detergent.
Add nonprecipitating water
conditioner to wash water
to remove detergent resi-
due.
Add liquid fabric softener to
final rinse.
Dry load in dryer.
Remove lint with lint brush
or roller.
Sort items by soil level and
color.
Use correct amount of de-
tergent, hottest water and
bleach safe for fabric.
Use correct amount of
detergent and hottest water
safe for fabric.
Do not pour liquid fabric
softener directly on fabric.
See Operating Your, step 5.
Never pour chlorine bleach
directly on fabric.
Check condition of items
before washing. See Oper-
ating Your, steps 2 and 5.
See Operating Your, steps
1 and 2.
Do not overload washer.
Use correct temperature
and amount of detergent,
water and wash time.
Solutions to Common Problems
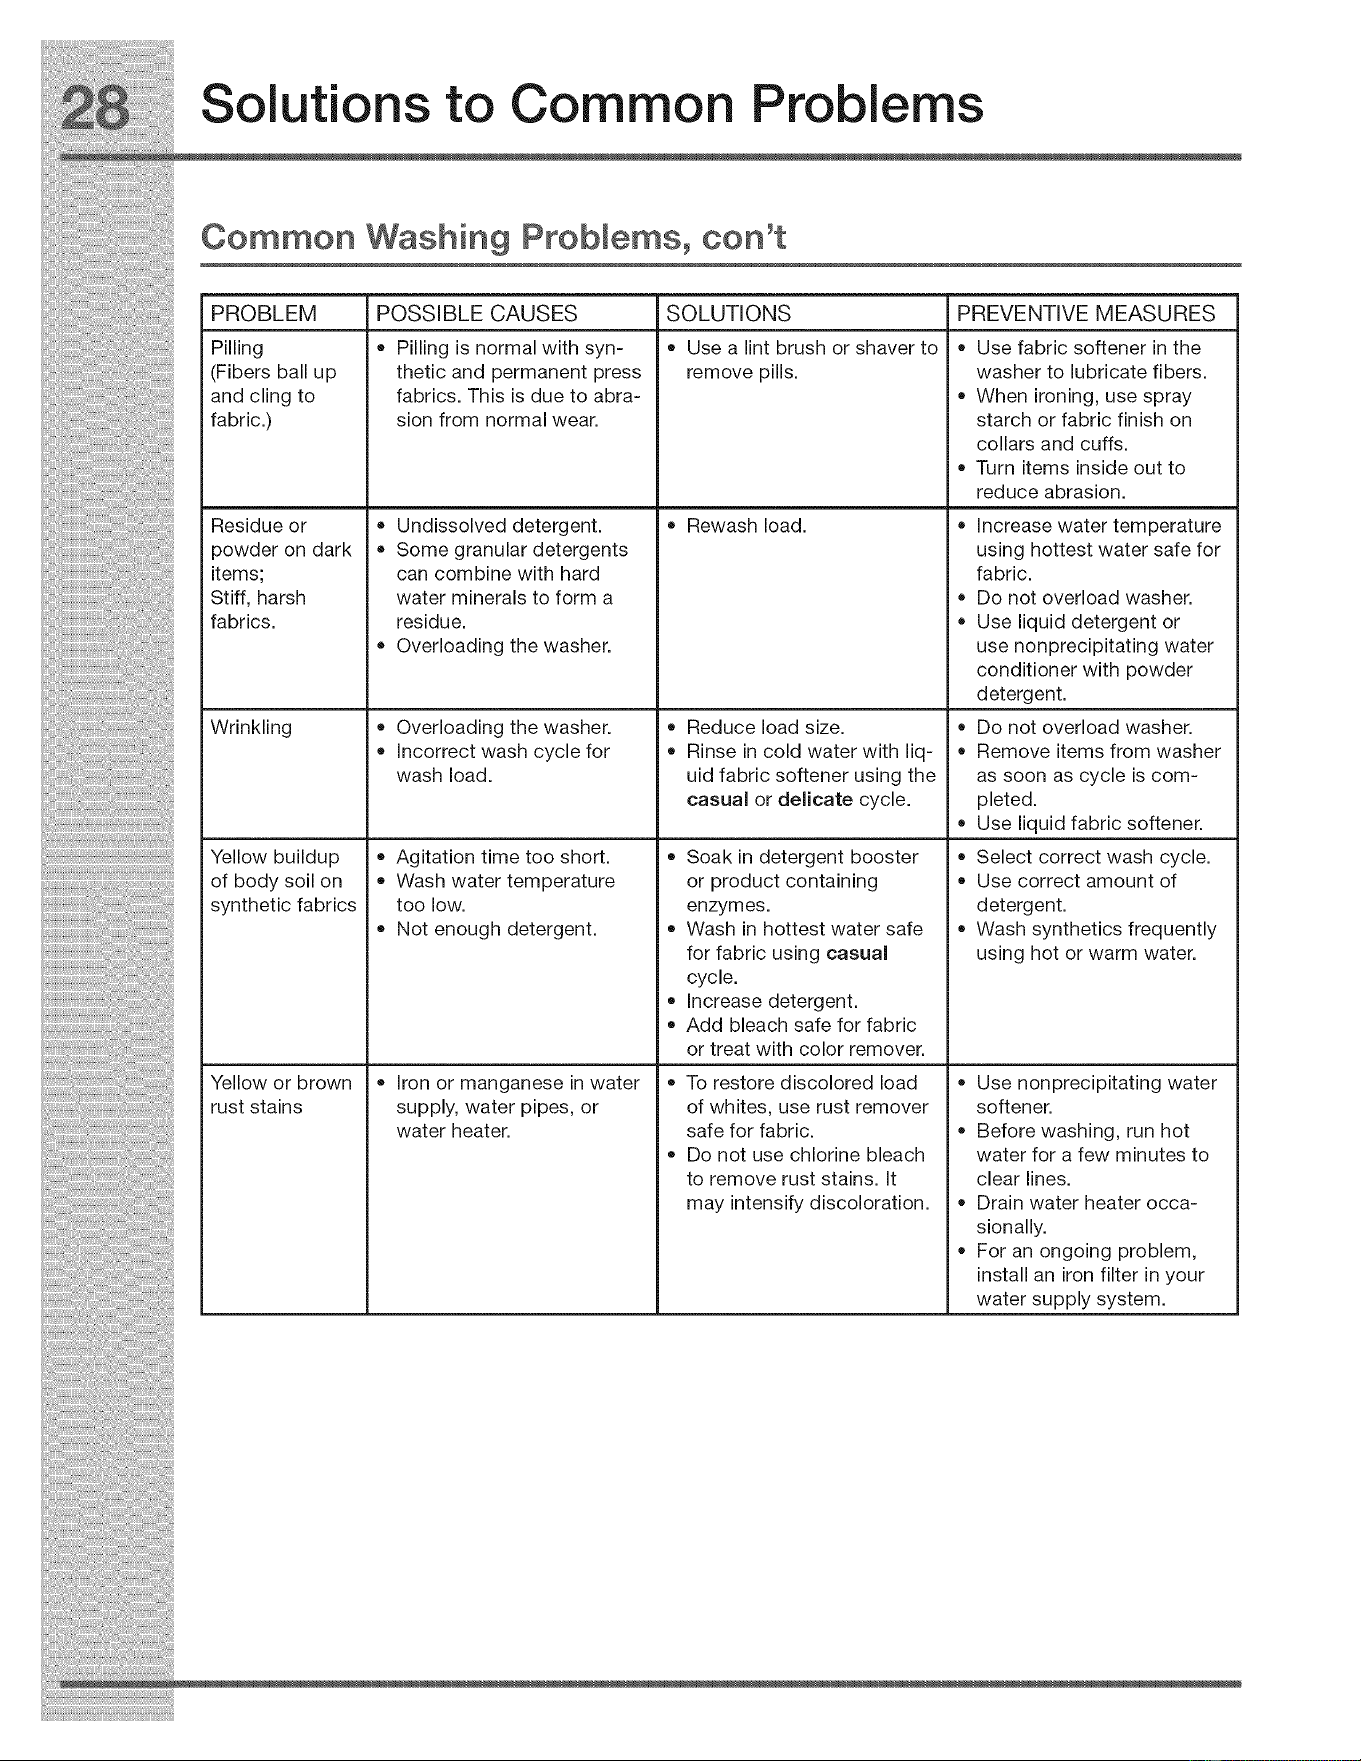
Common Washing Problems0 con't
PROBLEM POSSIBLE CAUSES PREVENTIVE MEASURES
o
Pilling
(Fibers ball up
and cling to
fabric.)
Residue or
powder on dark
items;
Stiff, harsh
fabrics.
Wrinkling
Yellow buildup
of body soil on
synthetic fabrics
Yellow or brown
rust stains
Pilling is normal with syn-
thetic and permanent press
fabrics. This is due to abra-
sion from normal wear.
• Undissolved detergent.
Some granular detergents
can combine with hard
water minerals to form a
residue.
Overloading the washer.
Overloading the washer.
incorrect wash cycle for
wash load.
Agitation time too short.
Wash water temperature
too low.
Not enough detergent.
iron or manganese in water
supply, water pipes, or
water heater.
SOLUTIONS
Use a lint brush or shaver to
remove pills.
Rewash load.
Reduce load size.
Rinse in cold water with liq-
uid fabric softener using the
casual or delicate cycle.
Soak in detergent booster
or product containing
enzymes.
Wash in hottest water safe
for fabric using casual
cycle.
increase detergent.
Add bleach safe for fabric
or treat with color remover.
To restore discolored load
of whites, use rust remover
safe for fabric.
Do not use chlorine bleach
to remove rust stains. It
may intensify discoloration.
Use fabric softener in the
washer to lubricate fibers.
When ironing, use spray
starch or fabric finish on
collars and cuffs.
Turn items inside out to
reduce abrasion.
increase water temperature
using hottest water safe for
fabric.
Do not overload washer.
Use liquid detergent or
use nonprecipitating water
conditioner with powder
detergent.
Do not overload washer.
Remove items from washer
as soon as cycle is com-
pleted.
Use liquid fabric softener.
Select correct wash cycle.
Use correct amount of
detergent.
Wash synthetics frequently
using hot or warm water.
Use nonprecipitating water
softener.
Before washing, run hot
water for a few minutes to
clear lines.
Drain water heater occa-
sionally.
For an ongoing problem,
install an iron filter in your
water supply system.
Solutions to Common Problems
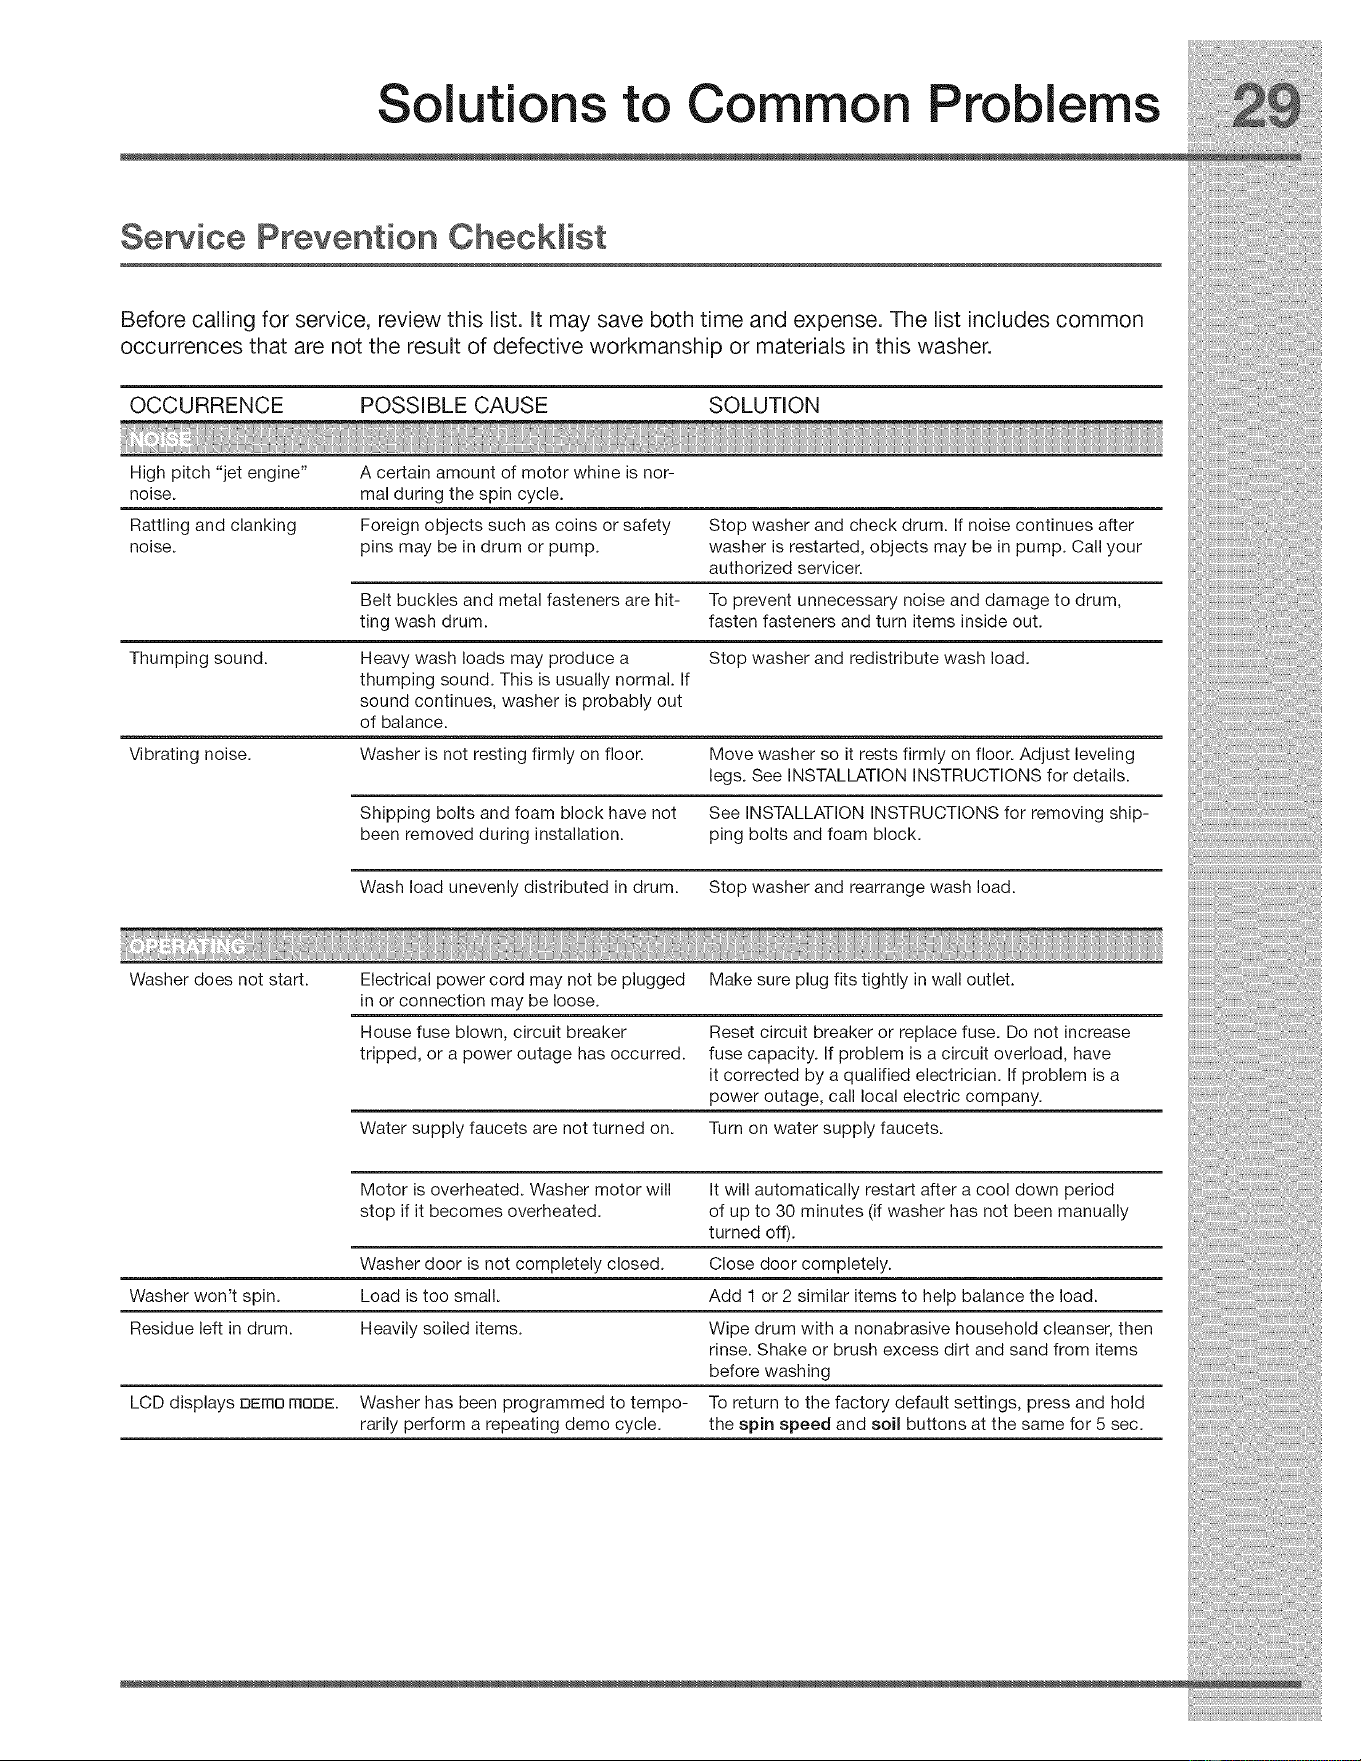
Semite Prevention Checklist
Before calling for service, review this list. It may save both time and expense. The list includes common
occurrences that are not the result of defective workmanship or materials in this washer.
OCCURRENCE POSSIBLE CAUSE SOLUTION
High pitch "jet engine" A certain amount of motor whine is nor-
noise, mal during the spin cycle.
Rattling and clanking Foreign objects such as coins or safety Stop washer and check drum. If noise continues after
noise, pins may be in drum or pump. washer is restarted, objects may be in pump. Call your
authorized servicer.
Belt buckles and metal fasteners are hit- To prevent unnecessary noise and damage to drum,
ting wash drum. fasten fasteners and turn items inside out.
Thumping sound. Heavy wash loads may produce a Stop washer and redistribute wash load.
thumping sound. This is usually normal. If
sound continues, washer is probably out
of balance.
Vibrating noise. Washer is not resting firmly on floor. Move washer so it rests firmly on floor. Adjust leveling
legs. See INSTALLATION INSTRUCTIONS for details.
Shipping bolts and foam block have not See INSTALLATION INSTRUCTIONS for removing ship-
been removed during installation, ping bolts and foam block.
Wash load unevenly distributed in drum. Stop washer and rearrange wash load.
Washer does not start. Electrical power cord may not be plugged Make sure plug fits tightly in wall outlet.
in or connection may be loose.
House fuse blown, circuit breaker Reset circuit breaker or replace fuse. Do not increase
tripped, or a power outage has occurred, fuse capacity. If problem is a circuit overload, have
it corrected by a qualified electrician. If problem is a
power outage, call local electric company.
Water supply faucets are not turned on. Turn on water supply faucets.
Motor is overheated. Washer motor will It will automatically restart after a cool down period
stop if it becomes overheated, of up to 30 minutes (if washer has not been manually
turned off).
Washer door is not completely closed. Close door completely.
Washer won't spin. Load is too small. Add 1 or 2 similar items to help balance the load.
Residue left in drum. Heavily soiled items. Wipe drum with a nonabrasive household cleanser, then
rinse. Shake or brush excess dirt and sand from items
before washing
LCD displays uErno mouE. Washer has been programmed to tempo- To return to the factory default settings, press and hold
rarily perform a repeating demo cycle, the spin speed and soil buttons at the same for 5 sec.
Solutions to Common Problems
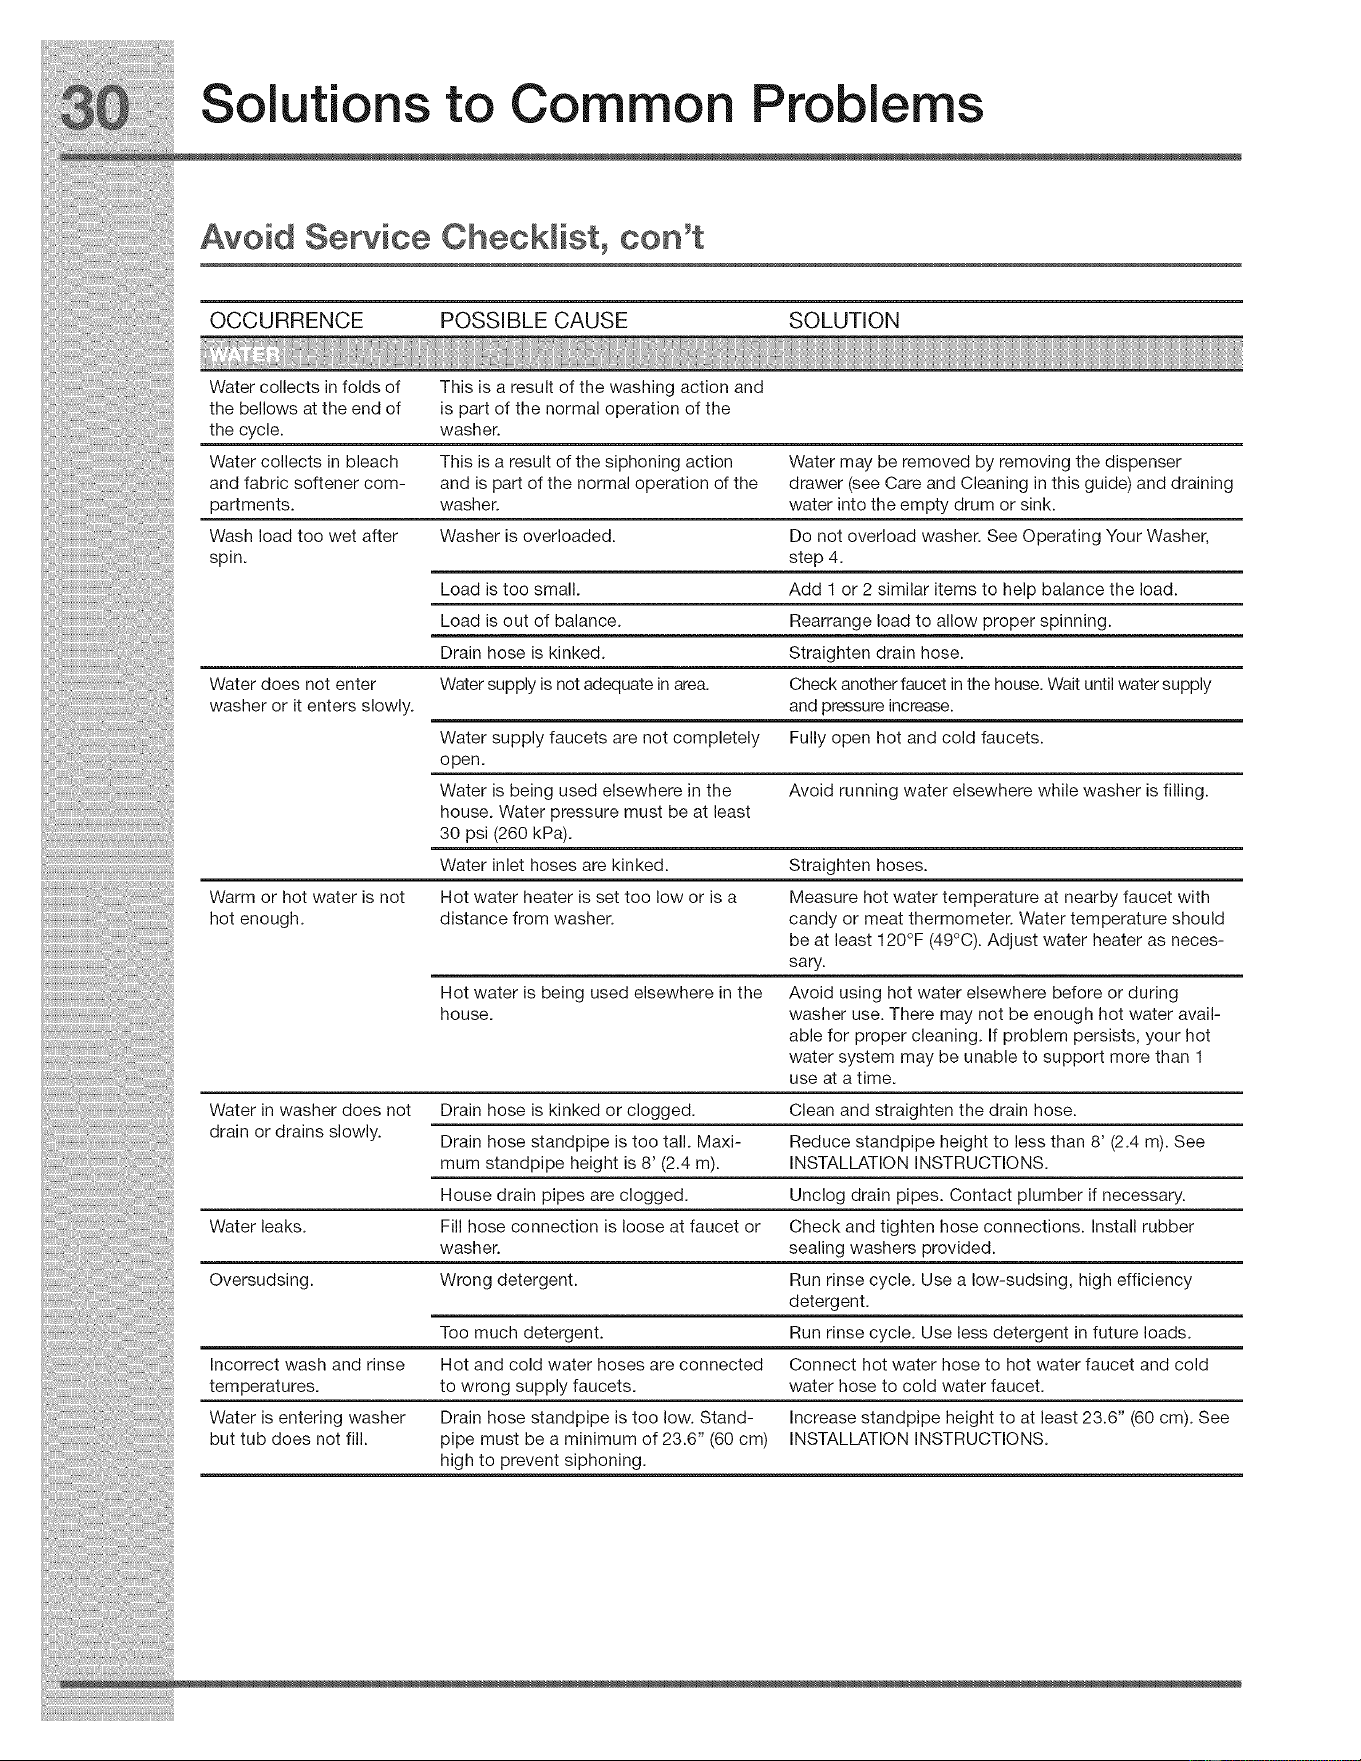
Avoid Service Checklist0 con't
OCCURRENCE POSSIBLE CAUSE SOLUTION
Water collects in folds of This is a result of the washing action and
the bellows at the end of is part of the normal operation of the
the cycle, washer.
Water collects in bleach This is a result of the siphoning action Water may be removed by removing the dispenser
and fabric softener com- and is part of the normal operation of the drawer (see Care and Cleaning in this guide) and draining
partments, washer, water into the empty drum or sink.
Wash load too wet after Washer is overloaded. Do not overload washer. See Operating Your Washer,
spin. step 4.
Load is too small. Add 1 or 2 similar items to help balance the load.
Load is out of balance. Rearrange load to allow proper spinning.
Drain hose is kinked. Straighten drain hose.
Water does not enter Water supply is not adequate in area. Check another faucet in the house. Wait until water supply
washer or it enters slowly, and pressure increase.
Water supply faucets are not completely Fully open hot and cold faucets.
open.
Water is being used elsewhere in the Avoid running water elsewhere while washer is filling.
house. Water pressure must be at least
30 psi (260 kPa).
Water inlet hoses are kinked. Straighten hoses.
Warm or hot water is not Hot water heater is set too low or is a Measure hot water temperature at nearby faucet with
hot enough, distance from washer, candy or meat thermometer. Water temperature should
be at least 120°F (49°C). Adjust water heater as neces-
sary.
Hot water is being used elsewhere in the Avoid using hot water elsewhere before or during
house, washer use. There may not be enough hot water avail-
able for proper cleaning. If problem persists, your hot
water system may be unable to support more than 1
use at a time.
Water in washer does not Drain hose is kinked or clogged. Clean and straighten the drain hose.
drain or drains slowly. Drain hose standpipe is too tall. Maxi- Reduce standpipe height to less than 8' (2.4 m). See
mum standpipe height is 8' (2.4 m). INSTALLATION INSTRUCTIONS.
House drain pipes are clogged. Unclog drain pipes. Contact plumber if necessary.
Water leaks. Fill hose connection is loose at faucet or Check and tighten hose connections. Install rubber
washer, sealing washers provided.
Oversudsing. Wrong detergent. Run rinse cycle. Use a low-sudsing, high efficiency
detergent.
Too much detergent. Run rinse cycle. Use less detergent in future loads.
Incorrect wash and rinse Hot and cold water hoses are connected Connect hot water hose to hot water faucet and cold
temperatures, to wrong supply faucets, water hose to cold water faucet.
Water is entering washer Drain hose standpipe is too low. Stand- Increase standpipe height to at least 23.6" (60 cm). See
but tub does not fill. pipe must be a minimum of 23.6" (60 cm) INSTALLATION INSTRUCTIONS.
high to prevent siphoning.
Warranty Information
Your appliance is covered by a one year limited warranty. For one year from your original date of purchase, Electrolux will
repair or replace any parts of this appliance that prove to be defective in materials or workmanship when such appliance is
installed, used, and maintained in accordance with the provided instructions. In addition, your appliance is covered by an
additional one year, parts only, limited warranty. During the 2nd year from your original date of purchase, Electrolux will pay
for parts needed for this appliance that have proven to be defective in materials or workmanship when your appliance is
installed, used, and maintained in accordance with the provided instructions.
Exclusions
This warranty does not cover the following:
1. Products with original serial numbers that have been removed, altered or cannot be readily determined.
2. Product that has been transferred from its original owner to another party or removed outside the USA or Canada.
3. Rust on the interior or exterior of the unit.
4. Products purchased "as-is" are not covered by this warranty.
5. Products used in a commercial setting.
6. Service calls which do not involve malfunction or defects in materials or workmanship, or for appliances not in ordinary
household use or used other than in accordance with the provided instructions.
7. Service calls to correct the installation of your appliance or to instruct you how to use your appliance.
8. Expenses for making the appliance accessible for servicing, such as removal of trim, cupboards, shelves, etc., which
are not a part of the appliance when it is shipped from the factory.
9. Service calls to repair or replace appliance light bulbs, air filters, water filters, other consumables, or knobs, handles,
or other cosmetic parts.
10. Pickup and delivery costs; your appliance is designed to be repaired in the home.
11. Surcharges including, but not limited to, any after hour, weekend, or holiday service calls, tolls, ferry trip charges, or
mileage expense for service calls to remote areas, including the state of Alaska.
12. Damages to the finish of appliance or home incurred during transportation or installation, including but not limited to
floors, cabinets, walls, etc.
13. Damages caused by: services performed by unauthorized service companies; use of parts other than genuine Elec-
trolux parts or parts obtained from persons other than authorized service companies; or external causes such as
abuse, misuse, inadequate power supply, accidents, fires, or acts of God.
DISCLAIMER OF IMPLIED WARRANTIES; LIMITATION OF REMEDIES
CUSTOMER'S SOLE AND EXCLUSIVE REMEDY UNDER THiS LIMITED W/ARRANTYSHALL BE REPAIROR REPLACE-
MENT AS PROVIDED HEREIN. CLAIMS BASED ON IMPLIED WARRANTIES, INCLUDING WARRANTIES OF MER-
CHANTABILITY OR FITNESS FOR A PARTICULAR PURPOSE, ARE LIMITED TO ONE YEAR OR THE SHORTEST
PERIOD ALLOWED BY LAW, BUT NOT LESS THAN ONE YEAR. ELECTROLUX SHALL NOT BE LIABLE FOR CONSE-
QUENTIAL OR iNCiDENTAL DAMAGES SUCH AS PROPERTY DAMAGE AND INCIDENTAL EXPENSES RESULTING FROM
ANY BREACH OF THiS WRITTEN LIMITED WARRANTY OR ANY iMPLIED WARRANTY. SOME STATESAND PROVINCES
DO NOT ALLOW THE EXCLUSION OR LIMiTATiON OF iNCiDENTAL OR CONSEQUENTIAL DAMAGES, OR LIMITATIONS
ON THE DURATION OF IMPLIED WARRANTIES, SO THESE LIMITATIONS OR EXCLUSIONS MAY NOT APPLY TO YOU.
THiS WRITTEN WARRANTY GIVES YOU SPECiFiC LEGAL RIGHTS. YOU MAY ALSO HAVE OTHER RIGHTS THAT VARY
FROM STATETO STATE.
If You Need Service
Keep your receipt, delivery slip, or some other appropriate payment record to establish the warranty period should service
be required. If service is performed, it is in your best interest to obtain and keep all receipts. Service under this warranty
must be obtained by contacting Electrolux at the addresses or phone numbers below.
This warranty only applies in the USA, Puerto Rico and Canada. In the USA and Puerto Rico, your appliance is warranted
by Electrolux Major Appliances North America, a division of Electrolux Home Products, Inc. In Canada, your appliance
is warranted by Electrolux Canada Corp. Electrolux authorizes no person to change or add to any obligations under this
warranty. Obligations for service and parts under this warranty must be performed by Electrolux or an authorized service
company. Product features or specifications as described or illustrated are subject to change without notice.
USA
1-877-435-3287
Electrolux Major Appliances North America
North America
P.O. Box 212378
Augusta, GA 30907
Canada
1-800-265-8352
Electrolux Canada Corp.
5855 Terry Fox Way
Mississauga, Ontario, Canada
L5V 3E4

Notes