
Owner's Manual
®
ROTARY LAWN
625 Series Briggs &
Power-Propelled
22" Multi-Cut
OWER
Stratton Engine
Model No.
917.376658
• Espa5ol, p. 19
CAUTaON:
Read and follow all
Safety Rules and Instructions
before operating this equipment
Sears, Roebuck and Co., Hoffman Estates,
Visit our Craftsman website: www,,sears.com/craftsman
IL 60179
UoS.A.

Warranty .........................................................................2
Safety Rules ............................................. 2-4
Product Specifications .................................. 4
Assembly / Pre-Operation ...............................6
Operation ................................................. 7-1t
Maintenance Schedule ............................... 12
Maintenance ..................................................12-15
Service and Adjustments .................... 15-16
Storage .................................................. 16-I 7
Troubleshooting ....................................... 17-18
Repair Parts ........................................ 36-45
Sears Service ............................... Back Cover
2-YEAR FULL WARRANTY ON CRAFTSMAN LAWN MOWER
If this Craftsman Lawn Mower fails due to manufacturer defects in material or
workmanship within two years from the date of purchase, return it to any Sears store,
Parts & Repair Center or other Craftsman outlet for free repair (or replacement if repair
proves impossible).
Tills warranty applies for only 90 days from the date of purchase if this Lawn Mower is
ever used for commercial or rental purposes,
This warranty does not cover:
Expendable items that become worn during normal use, such as rotary mower
blades, blade adapters, belts, air cleaners and spark plug.
Repairs necessary because of operator abuse or negligence, including bent
crackshafts and the failure to assemble, operate or maintain this Lawn Mower
according to all supplied product instructions.
This warranty applies only while this product is used in the United States.
This warranty gives you specific legal rights, and you may also have other rights which
vary from state to staten
Sears, Roebuck and Co., Hoffman Estates, IL 60179
IMPORTANT: This cutting machine is capable of amputating hands and feet and throw-
ing objects. Failure to observe the following safety instructions could result in serious
injury or death
`&Look for this symbol to point out impor-
tant safety precautions,. It means
CAUTION!H BECOME ALERT!H
YOUR SAFETY IS INVOLVED.
`& WARNING: In order to prevent ac-
cidental starting when setting up, trans-
porting, adjusting or making repairs,
always disconnect spark plug wire and
place wire where it cannot come in contact
with plug.
,&WARNING: Engine exhaust, some of its
constituents, and certain vehicle components
contain or emit chemicals known to the State
of California to cause cancer and birth defects
or other reproductive harm.
`&WARNING: Battery posts, terminals and
related accessories contain lead and lead
compounds, chemicals known to the State
of California to cause cancer and birth
defects or other reproductive harm. Wash
hands after handling.
2
`& CAUTION: Muffler and other engine
parts become extremely hot during
operation and remain hot after engine has
stopped, To avoid severe burns on contact,
stay away from these areas.

1.GENERAL OPERATION
o Read,understand,andfollowall
instructionson the machineand in the
manual(s)beforestarting..Bethoroughly
familiarwith thecontrolsand theproper
use of themachinebeforestarting.
° Do not put handsor feet near or under
rotatingparts_Keepclearof the dis-
chargeopeningat all times.
o Only allowresponsibleindividuals,who
are familiarwith the instructions,to oper-
ate the machine,.
o Clearthe areaof objectssuchas rocks,
toys, wire, bones,sticks,etc. which
couldbe pickedup andthrownbyblade,.
° Besure theareais clear ofother people
beforemowing.Stopmachineif anyone
entersthe area.
° Do notoperatethe mowerwhen bare-
foot or wearingopensandals.Always
wear substantialfootwear_
° Do notpull mowerbackwardsunless
absolutelynecessary.Alwayslookdown
and behindbeforeand whilemoving
backwards°
o Neverdirectdischargedmaterialtoward
anyone°Avoiddischargingmaterial
againsta wallor obstruction. Material
may richochetbacktowardthe opera-
tor. Stopthebladewhen crossinggravel
surfaces.
o Do not operatethe mowerwithout
properguards,plates,grasscatcheror
other safetyprotectivedevicesin place.
° See manufacturer'sinstructionsfor
properoperationand installationof
accessories.Onlyuseaccessoriesap-
provedby themanufacturer_
° Stop the blade(s)when crossinggravel
drives,walks,or roads.
° Stop the engine(motor)wheneveryou
leavetimeequipment,beforecleaningthe
moweror uncloggingthechute.
o Shutthe engine(motor)off andwait until
the bladecomesto completestopbefore
removinggrasscatcher.
• Mowonlyin daylightor goodartificial
lighL
o Do not operatethe machinewhile under
the influenceof alcoholor drugs.
• Neveroperatemachinein wetgrass.
Alwaysbe sureof your footing:keep a
firm holdon the handle;walk, neverrun.
o Disengagethe self-propelledmech-
anismor driveclutchon mowersso
equippedbeforestartingthe engine.
o If the equipmentsllould startto vibrate
abnormally,stopthe engine(motor)and
check immediatelyfor the causerVibra-
tion isgenerallya warningof trouble.
o Alwayswear'safetygogglesor safety
glasseswith sideshieldswhenoperating
mower,
!i. SLOPE OPERATION
Slopesare a majorfactorrelatedto slip&
fall accidentswhichcan resultin severein-
jury_All slopesrequireextracaution,if you
feel uneasyon a slope,do not mowit.
DO:
° Mowacrossthe faceof slopes:never
up and down.Exerciseextremecaution
whenchangingdirectionon slopes.
• Remove obstacles such as rocks, tree
limbs, etc.
° Watch for holes, ruts, or bumps. Tall
grass can hide obstacles,
DO NOT:
,, Do not trim near drop-offs, ditches or
embankments° The operator could lose
footing or balance.
° Do not trim excessively steep stopes.
° Do not mow on wet g_ass_ Reduced foot-
ing could cause slipping.
III. CHILDREN
Tragic accidents can occur" if the operator
is not alert to the presence of children.
Children are often attracted to the machine
and the mowing activity. Never assume
that children will remain where you last
saw them,
,, Keep children out of the trimming area
and under the watchful care of another
responsible adull.
• Be alert and turn machine off if children
enter the area.
• Before and while walking backwards,
look behind and down for small children.
• Never allow children to operate the ma-
chine.
,, Use extra care when approaching blind
corners, shrubs, trees, or olher objects
that may obscure vision°
IV. SAFE HANDLING OF GASOLINE
Use extreme care in handling gasoline°
Gasoline is extremely flammable and the
vapors are exptosive_
,, Extinguish all cigarettes, cigars, pipes
and other sources of ignition..
,, Use only an approved container,.
• Never remove gas cap or add fuel with
the engine running.. Allow engine to coot
before refueling.
,, Never refuel the machine indoors_
° Never store time machine or fuel contain-
er where there is an open flame, spark
or pilot light such as a water heater or on
other appliances.
3
• Never fill containers inside a vehicle, on
a truck or trailer bed with a plastic liner,
Always place containers on the ground
away from your vehicle before filling.
° Remove gas-powered equipment from
tile truck or trailer and refuel it on the
ground° if this is not possible, then
refuel such equipment with a portabb
container, rather than from a gasoline
dispenser nozzle.
,, Keep the nozzle in contact with the rim
of the fuel tank or container' opening at
all times until fueling is complete. Do
not use a nozzle lock-open device.
° If fuel is spilled on clothing, change
clothing immediately.
° Never overfill fuel tank. Replace gas
cap and tighten securely.
V. GENERAL SERVICE
o Never run a machine inside a closed
area°
,, Never make adjustments or repairs with
the engine (motor) running. Disconnect
the spark plug wire, and keep the wire
away from the plug to prevent accidental
starting.
o Keep nuts and bolts, especially blade
attachment bolts, tight and keep equip-
ment in good condition_
, Never tamper with safety devices. Check
their proper operation regularly.
° Keep machine free of grass, leaves, or
other debris build-up. Clean oil or fuel
spillage. Allow machine to cool before
storing.
,' Stop and inspect the equipment if you
strike an object. Repair, if necessary,
before restarting_
° Never attempt to make wheel height
adjustments while the engine is running.
o Grass catcher components are subject
to wear, damage, and deterioration,
which could expose moving parts or
allow objects to be thrown. Frequently
check components and replace with
manufacturer's recommended parts,
when necessary,.
o Mower blades are sharp and can cut°
Wrap the blade(s) or wear gloves, and
use extra caution when servicing them
o Do not change the engine governor set-
ting or overspeed the engine.
o Maintain or replace safety and instruc-
tion labels, as necessary°
,_WARNING: This lawn mower is equipped with an internal combustion engine and
should not be used on or near any unimproved forest-covered, brush-covered or
grass-covered land unless the engine's exhaust system is equipped with a spark
arrester meeting applicable local or state laws (if any). tf a spark arrester is used, it
should be maintained in effective working order by the operator.
In the state of California the above is required by law (Section 4442 of tile California
Public Resources Code). Other states may have similar lawso Federal laws apply on
federal lands. A spark arrester for the muffler is available through your nearest Sears
Parts & Repair Center (See the REPAIR PARTS section of this manual).
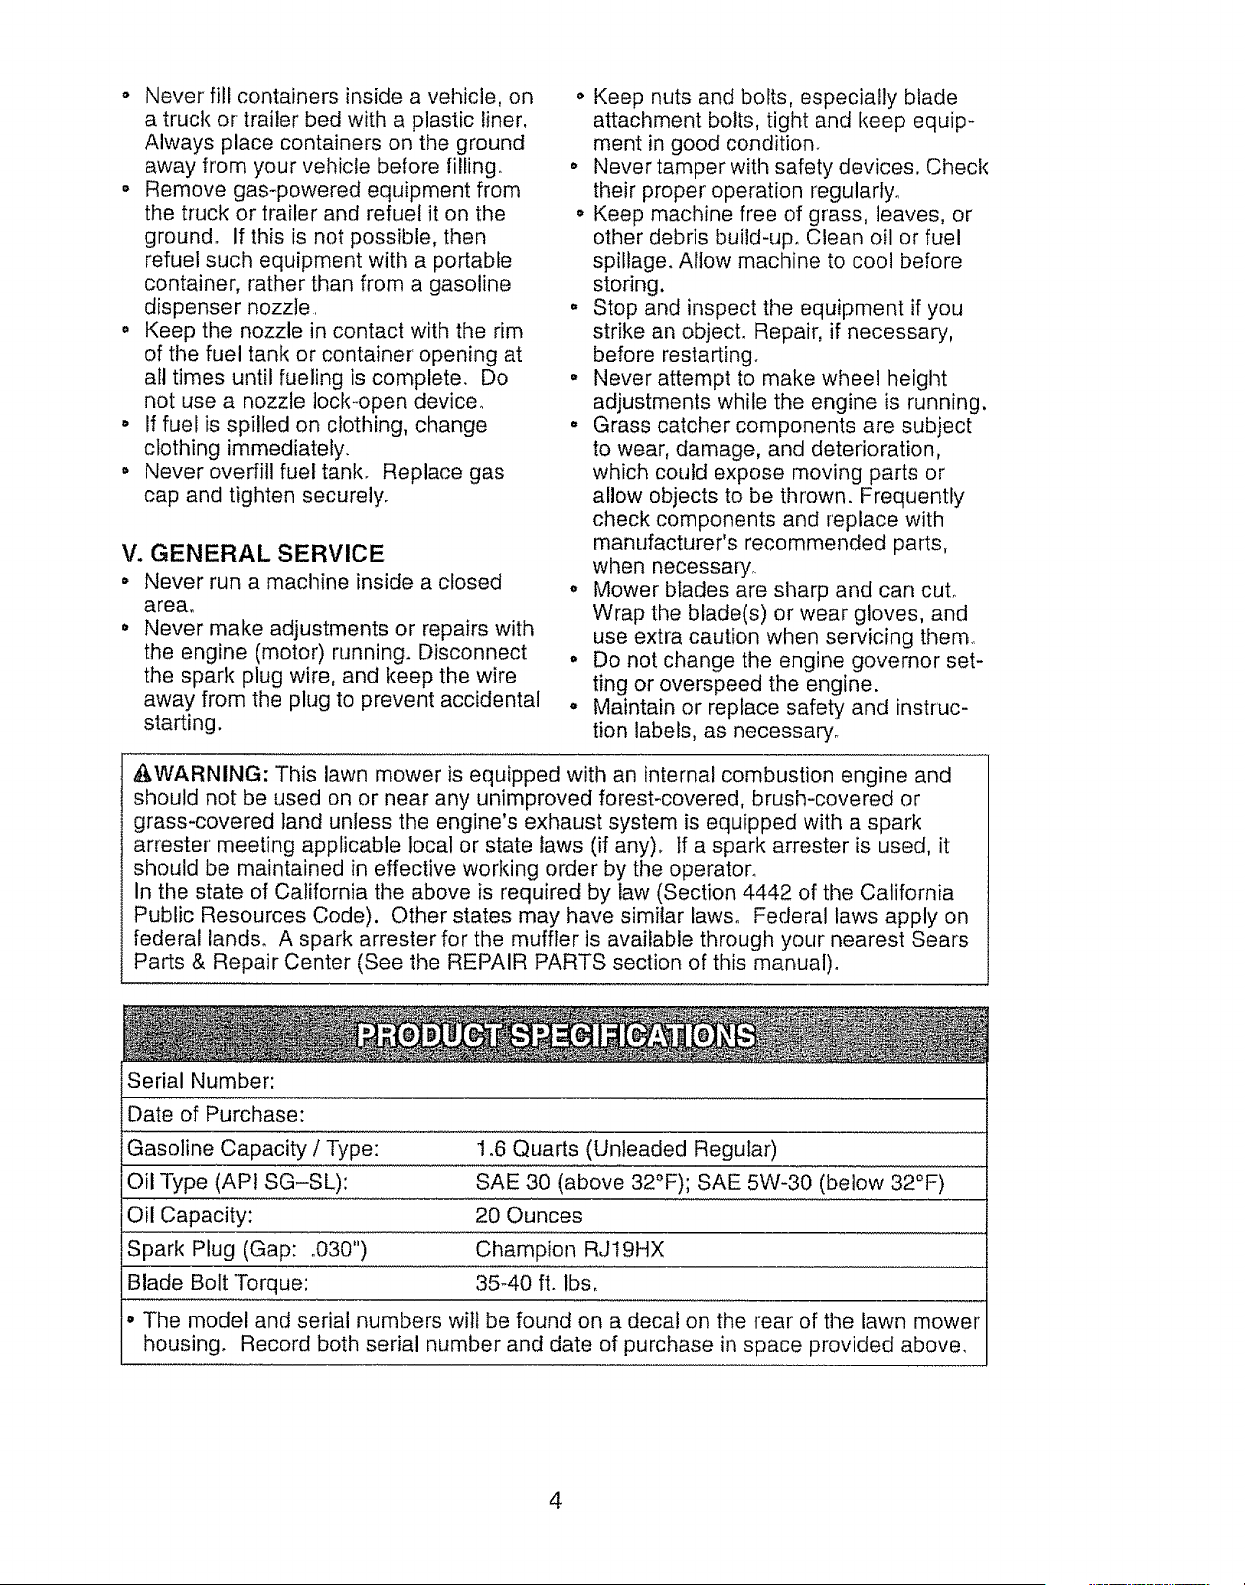
Serial Number:
Date of Purchase:
Gasoline Capacity / Type: 1o6 Quarts (Unleaded Regular)
Oil Type (APt SG-SL): SAE 30 (above 32°F); SAE 5W-30 (below 32°F)
Oil Capacity: 20 Ounces
Spark Plug (Gap: .030") Champion RJI9HX
Blade Bolt Torque: 35_40 ft. Ibs,
• The model and serial numbers will be found on a decal on the rear of tile lawn mower
housing. Record both serial number and date of purchase in space provided above.
4

Repair Protection Agreements
Congratulations on making a smart pur-
chase, Your new Craftsman@ product is
designed and manufactured for years of
dependable operation° But like all prod-
ucts, it may require repair from time to
time. That's when having a Repair Protec-
tion Agreement can save you money and
aggravation°
Purchase a Repair Protection Agreement
now and protect yourself from unexpected
hassle and expense.
Here's what's included in the Agreement:
o Expert service by our 12,000 profe-
sional repair specialists°
o Unlimited service and no charge for
parts and labor on all covered repairs.
o Product replacement if your covered
product can't be fixed.
* Discount of 10% from regular price of
service and service-related parts not
covered by the agreement; also, 10%
off regular price of preventive mainte-
nance check°
° Fast help by phone-phone sup-
port from a Sears representative on
products requiring in-home repair, plus
convenient repair scheduling.
Once you purchase the Agreement, a
simple phone call is all that it takes for you
to schedule service. You can call anytime
day or night, or schedule a service ap-
pointment online,
Sears has over 12,000 professional repair
specialists, who have access to over 4.5
million quality parts and accessories.
That's the kind of professionalism yOU can
count on to help prolong the life of your
new purchase for years to come. Purchase
your Repair Protection Agreement today!
Some limitations and exclusions apply.
For prices and additional information
call 1-800-827-6655.
Sears Installation Service
For Sears pmfessionaf installation of home
appliances, garage door openers, water
heaters, and other major home items, in
the U.SoA. call 1-800-44V]Y-HOME@.
These accessories were available when this lawn mower was produced,, They are not
shipped with your mower. They are also available at most Sears retail outlets and
service centers° Some of these accessories may not apply to your lawn mower,
LAWN MOWER PERFORMANCE
CLIPPING
DEFLECTORS
FOR
REAR DISCHARGE
LAWN MOWERS
GRASS CATCHERS
FOR
REAR DISCHARGE
LAWN MOWERS
,_ STABILIZER GAS
CANS
GRASS CATCHERS
FOR
SIDE DISCHARGE
LAWN MOWERS
LAWN MOWER MAINTENANCE
MUFFLERS AIR FILTERS
G
SPARK PLUGS
BELTS BLADES BLADE ADAPTERS WHEELS ENGINE OIL
5

Read these instructions and this manual in its entirety before you attempt to assemble or
operate your new lawn mower.
iMPORTANT: This lawn mower is shipped WITHOUT OIL OR GASOLINE in the engine.
Your new lawn mower has been assembled at the factory with the exception of those parts
left unassembled for shipping purposes, To ensure safe and proper operation of your lawn
mower, all parts and hardware you assemble must be tightened securely° Use the correct
tools as necessary to ensure proper tightness. All parts such as nuts, wasllers, bolts, etc.
necessary to complete the assembly have been placed in the parts bag.
TO REMOVE MOWER FROM CARTON
1o Remove loose parts includedwith mower.,
2. Cut down two end corners of carton
and lay end panel down flat.
3. Remove al! packing materials except
padding between upper and lower
handle and padding holding operator
presence control bar to upper handle.
4. Roll lawn mower out of carton and
check carton thoroughly for additional
loose parts°
HOW TO SET UP YOUR MOWER
TO ASSEMBLE GRASS CATCHER
1_ Put grass catcher frame into grass bag
with rigid part of bag on the bottom,
Make sure the frame handle is outside
of the bag top_
2o Slip vinyl bindings over frame.,
NOTE: If vinyl bindings are too stiff, hold
them in warm water for a few minutes. If
bag gets wet, let it dry before using,
TO UNFOLD HANDLE
IMPORTANT: Unfold handle carefully so
as not to pinch or damage control cables.
1o Raise handles until loweR handle sec- J-
tion locks into place in mowing position,
2. Remove protective padding, raise up-
per handle section into place on lower
handle and tighten both handle knobs,
3. Remove llandle padding holding operator
presence control bar to upper handle.
Your lawn mower handle can be adjusted Vinyl
for your mowing comfort. Refer to "AD- bindings
JUST HANDLE" in the Service and Adjust-
ments section of this manual.
Frame
opening
TO INSTALL ATTACHMENTS
Your lawn mower was shipped ready to be
used as a mulcher. To convert mower to
bagging or discharging, see "TO CON-
VERT MOWER" in the Operation section
of this manual.
Handle
knob
Lower handle
6

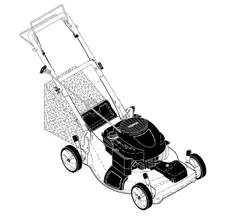
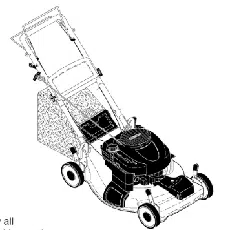
KNOW YOUR LAWN MOWER
READ THIS OWNER'S MANUAL AND ALL SAFETY RULES BEFORE OPERATING
YOUR LAWN MOWER, Compare the illustrations with your lawn mower to familiarize
yourself with the location of various controls and adjustments, Save this manual for
future reference,
Tliese Symbols may appear on your lawn mower Or in literature supplied witCh-the-
product. Learn and understand their meaning.
CAUTION ENGINE ENGINE FAST SLOW CHOKE
OR WARNING ON OFF
FUEL OIL DANGER, KEEP HANDS
AND FEET AWAY
Drive
control
bar
Operator presence control bar
Handle knob
Starter
handle
Engine oil cap with dipstick
Grass
catcher
Gasoline filler cap
Primer
IVluffler
3ark
plug
Air
\
Mulcher door
Housing
Drive cover
Wheel adjuster
(on each wheel)
IMPORTANT." This lawn mower is shipped WITHOUT OIL OR GASOLINE in the engine,
MEETS CPSC SAFETY REQUIREMENTS
Sears rotary walk-behind power lawn mowers conform to the safety standards of the
American National Standards Institute and the U.S. Consumer Product Safety Com-
mission, The blade turns when the engine is running.
Operator presence control bar - must
be held down to the handle to start the
engine, Release to stop the engine,
Primer- pumps additional fuel frorn the
carburetor to the cylinder for use when
starting a cold engine.
7
Starter handle - used for starting engine°
Mulcher door - allows conversion to
discharging or bagging operation
Drive control bar - used to engage
power-propelled forward motion of mower.
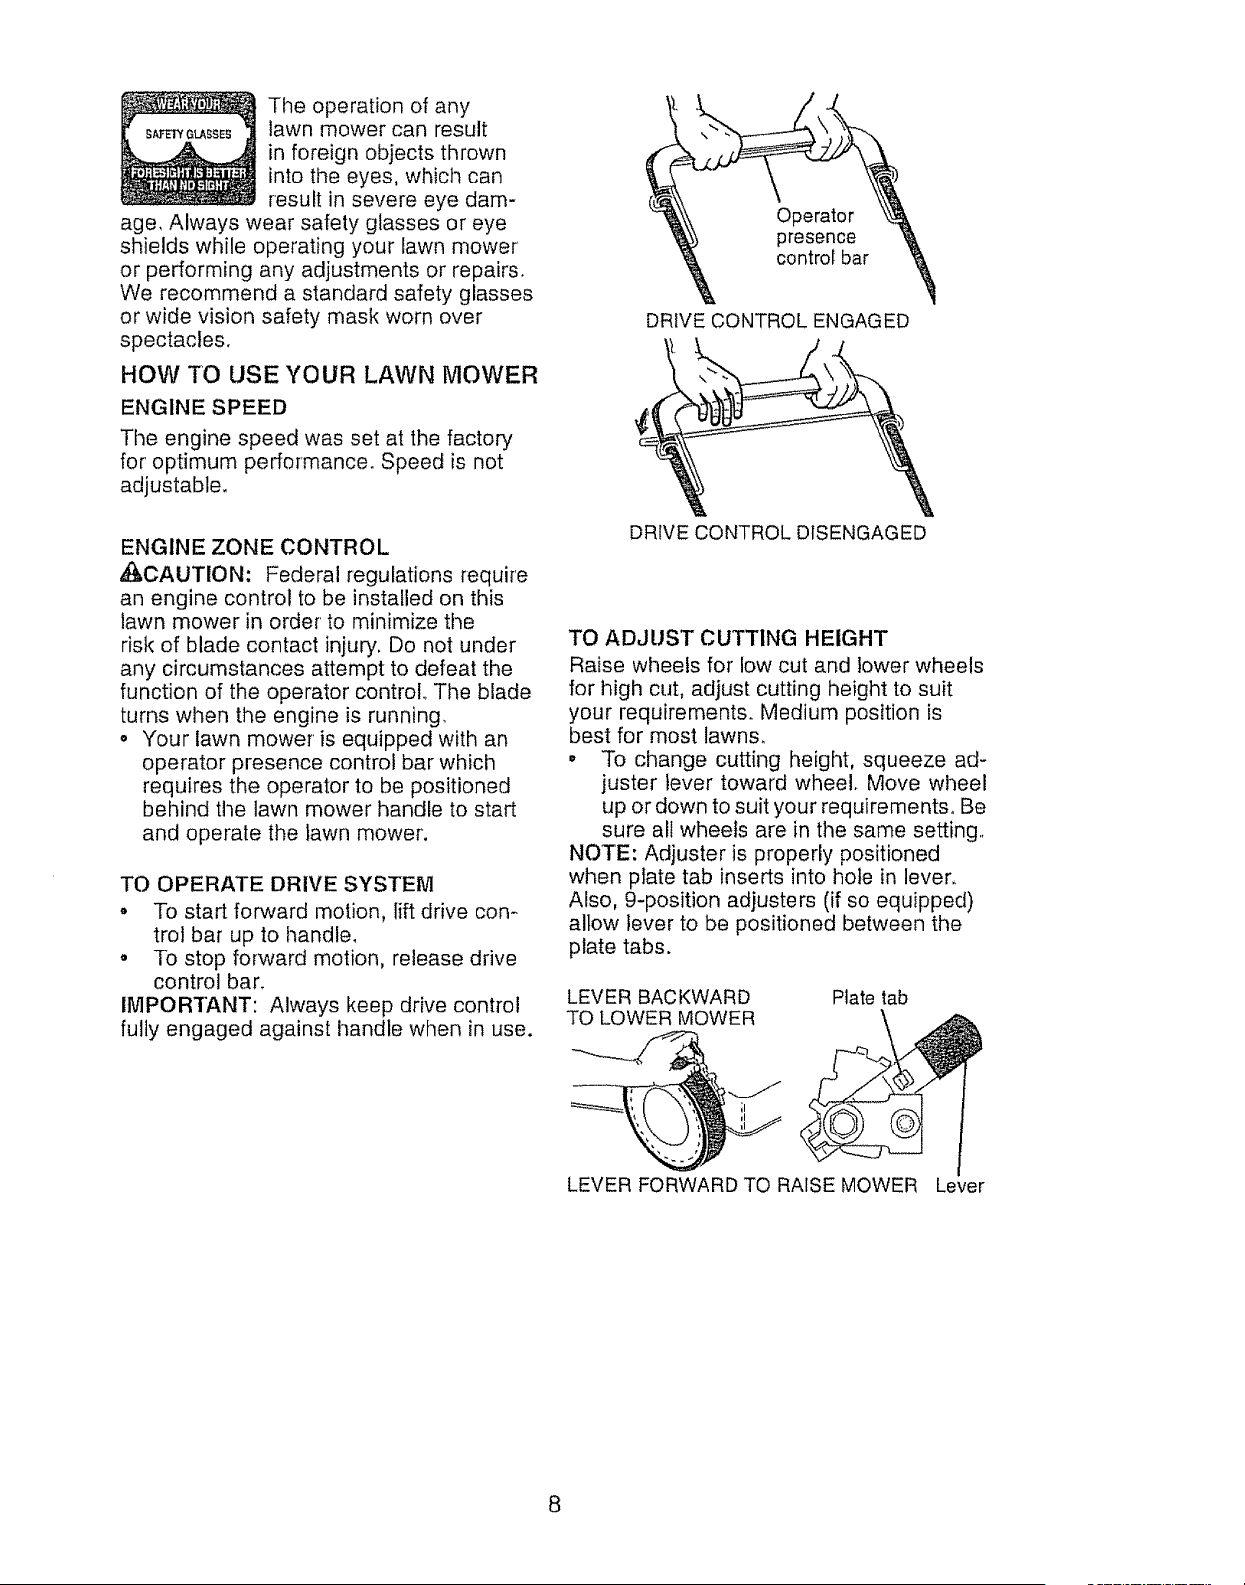
The operationof any
sA_r_G_sEslawnmowercan result
in foreignobjectsthrown
into theeyes,whichcan
resultin severeeyedam-
age,Alwayswear safetyglassesor eye
shieldswhile operatingyour lawnmower
or performingany adjustmentsor repairs.
We recommenda standardsafetyglasses
orwidevision safetymaskwornover
spectacles.
HOW TO USE YOUR LAWN MOWER
ENGINE SPEED
The engine speed was set at the factory
for optimum performance. Speed is not
adjustable.
ENGINE ZONE CONTROL
_,CAUTION: Federal regulations require
an engine control to be installed on this
lawn mower in order to minimize the
risk of blade contact injury. Do not under
any circumstances attempt to defeat the
function of the operator control. Tile blade
turns when the engine is running,
o Your lawn mower is equipped with an
operator presence control bar which
requires the operator to be positioned
behind tile lawn mower handle to start
and operate the lawn mower.
TO OPERATE DRIVE SYSTEM
o To start forward motion, lift drive con-
trol bar up to handle.
° To stop forward motion, release drive
control bar,
IMPORTANT: Always keep drive control
fully engaged against handle when in use.
Operator
presence
control bar
DRIVE CONTROL ENGAGED
DRIVE CONTROL DISENGAGED
TO ADJUST CUTTING HEIGHT
Raise wheels for low cut and lower wheels
for high cut, adjust cutting height to suit
your requirements, Medium position is
best for most lawns.
• To change cutting height, squeeze ad-
juster lever toward wheel. Move wheel
up or down to suit your requirements. Be
sure all wheels are in the same setting,,
NOTE: Adjuster is properly positioned
when plate tab inserts into hole in lever,,
Also, 9-position adjusters (if so equipped)
allow lever to be positioned between the
plate tabs.
LEVER BACKWARD
TO LOWER MOWER
Plate tab
LEVER FORWARD TO RAISE MOWER Lever
8
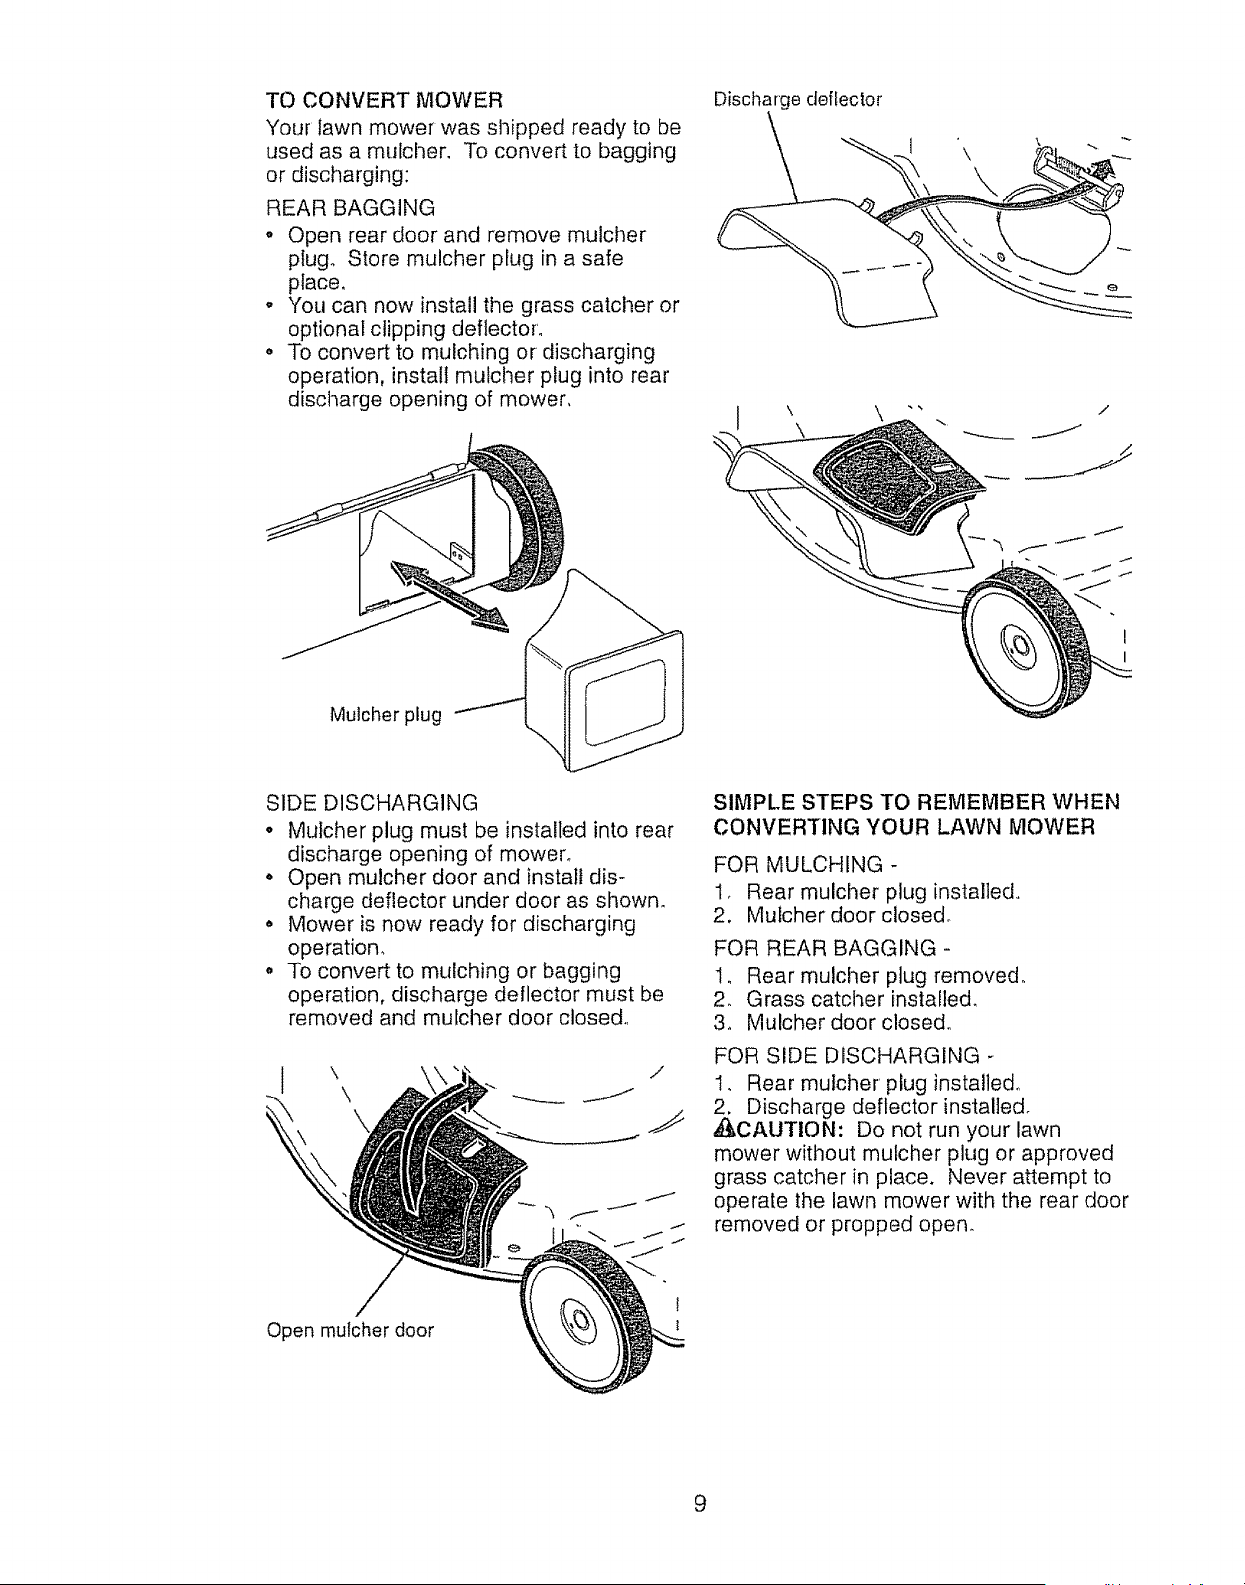
TO CONVERT MOWER
Your lawn mower was shipped ready to be
used as a mutcher, To convert to bagging
or discharging:
REAR BAGGING
o Open rear door and remove mulcher
plug. Store mulcher plug in a safe
place,
° You can now install the grass catcher or
optional clipping deflector'.
o To convert to mulching or discharging
operation, install mulcher plug into rear
discharge opening of mower,
Discharge deflector
I
I
Mulcher plug
SIDE DISCHARGING
o Mulcher plug must be installed into rear
discharge opening of mower°
• Open mulcher door and install dis-
charge deflector under door as shown.
o Mower is now ready for discharging
operation.
o To convert to mulching or bagging
operation, discharge deflector must be
removed and mulcher door closed.,
\ /
SIMPLE STEPS TO REMEMBER WHEN
CONVERTING YOUR LAWN MOWER
FOR MULCHING -
1, Rear mulcher plug installed,.
2. Mulcher door closed°
FOR REAR BAGGING -
1. Rear mulclter plug removed,,
2. Grass catcher installed,
3_ Mulcher door closed,,
FOR SIDE DISCHARGING -
1, Rear mulcher plug installed.,
2, Discharge deflector installed.
&CAUTION: Do not run your lawn
mower without mulcher plug or approved
grass catcher in place. Never attempt to
operate the lawn mower with the rear door
removed or propped open.
Open rnulcher door
9
TO EMPTY GRASS CATCHER
!. Lift up on grass catcher using the
frame handle.
2. Remove grass catcher with clippings
from under lawn mower handle.
3o Empty clippings from bag.
NOTE: Do not drag the bag when empty-
ing; it will cause unnecessary wear.
'1_,/ _X. Grass
rk,A----._ catcher
'l "" _._'/handle
•_,\__-_+\.4:_
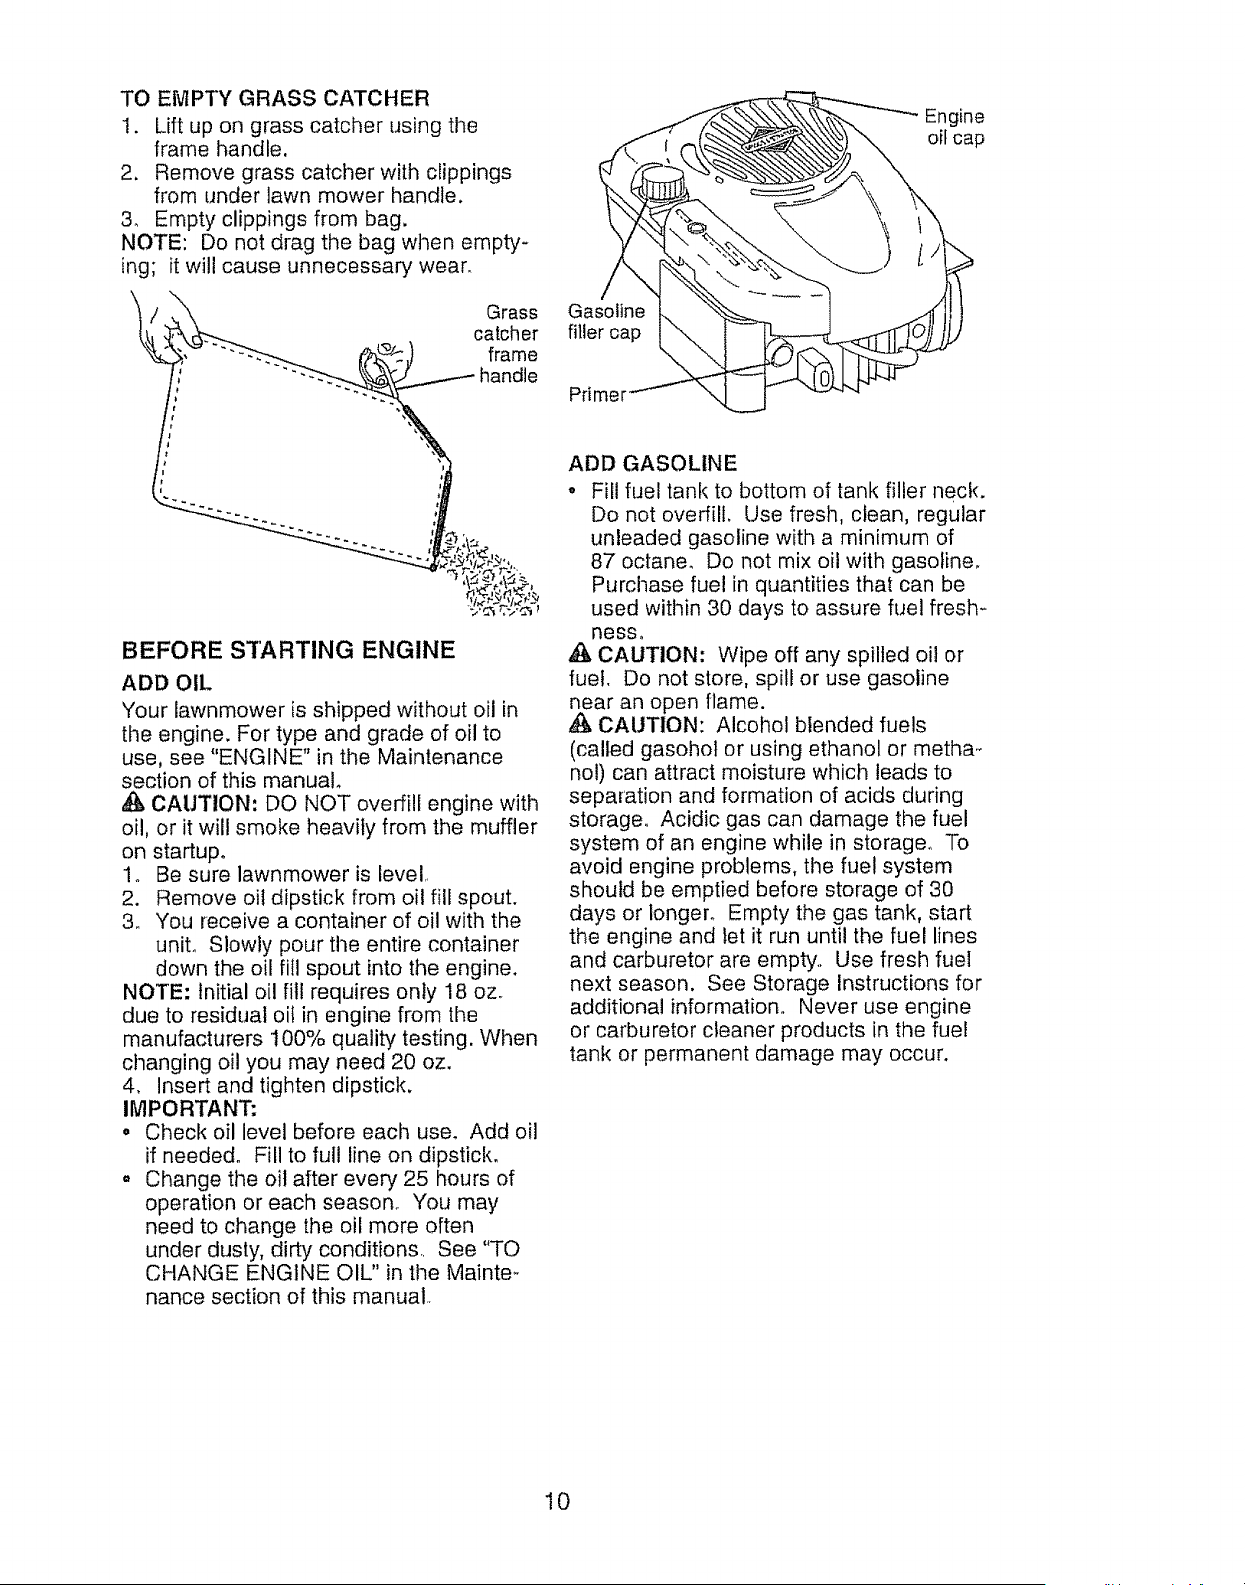
BEFORE STARTING ENGINE
ADD OIL
Your lawnmower is shipped without oil in
the engine. For type and grade of oil to
use, see "ENGINE" in the Maintenance
section of this manual°
CAUTION: DO NOT overfill engine with
oil, or it will smoke heavily from the muffler
on startupo
1o Be sure lawnmower is level,,
2. Remove oil dipstick from oil fill spout.
3,, You receive a container of oil with the
uniL Slowly pour the entire container
down the oil fill spout into the engine.
NOTE: Initial oil fill requires only 18 oz.
due to residual oil in engine from the
manufacturers 100% quality testing. When
changing oi! you may need 20 oz.
4, Insert and tighten dipstick.
IMPORTANT:
• Check oil level before each use. Add oil
if needed° Fill to full line on dipstick°
o Change the oil after every 25 hours of
operation or each season° You may
need to change the oil more often
under dusty, dirty conditions See "TO
CHANGE ENGINE OIL" in the Mainte_
nance section of this manual
Engine
oif cap
Gasoline
filler cap
Prime r
ADD GASOLINE
° Fill fuel tank to bottom of tank filler neck.
Do not overlie Use fresh, clean, regular
unleaded gasoline with a minimum of
87 octane. Do not mix oil with gasoline.
Purchase fuel in quantities that can be
used within 30 days to assure fuel fresh-
nesso
,_ CAUTION: Wipe off any spilled oil or
fuel. Do not store, spill or use gasoline
near an open flame.
,_ CAUTION: Alcohol blended fuels
(called gasohol or using ethanol or metha-
nol) can attract moisture which leads to
separation and formation of acids during
storage° Acidic gas can damage the fuel
system of an engine while in storage° To
avoid engine problems, the fuel system
should be emptied before storage of 30
days or longer_ Empty the gas tank, start
the engine and let it run until the fuel lines
and carburetor are empty,. Use fresh fuel
next season. See Storage Instructions for
additional information, Never use engine
or carburetor cleaner products in the fuel
tank or permanent damage may occur,
10
TO STOP ENGINE
o To stop engine, release operator pres-
ence control bar.
TO START ENGINE
NOTE: Due to protective coatings on the
engine, a small amount of smoke may be
present during the initial use of the product
and should be considered normal.
1o To start a cold engine, push primer
three (3) times before trying to start°
Use a firm push. This step is not
usually necessary when starting an
engine which has already run for a few
minutes,
2. Hold operator presence control bar
down to the handle and pull starter
handle quickly° Do not allow starter
rope to snap back.
NOTE: In cooler weather it may be
necessary to repeat priming steps, in
warmer weather over priming may cause
flooding and engine will not start° If you do
flood engine, wait a few minutes before
attempting to start and do not repeat
priming steps.
MOWING TIPS
,_, CAUTION: Do not use de-thatcher
blade attachments on your mower. Such
attachments are hazardous, wilt damage
your mower and could void your warranty°
o Under certain conditions, such as very
tall grass, it may be necessary to raise
the height of cut to reduce pushing
effort and to keep from overloading the
engine and leaving clumps of grass clip-
pings. It may also be necessary to re-
duce ground speed and/or run the lawn
mower over the area a second time.
o For extremely heavy cutting, reduce the
width of cut by overlapping previously
cut path and mow slowly.
o For better grass bagging and most cut-
ting conditions, the engine speed should
be set in the FAST position.
o Pores in cloth grass catchers can be-
come filled with dirt and dust with use
and catchers will collect less grass° To
prevent this, regularly hose catcher off
with water and let dry before using,,
o Keep top of engine around starter clear
and clean of grass clippings and chaff°
This will help engine air flow and extend
engine life,
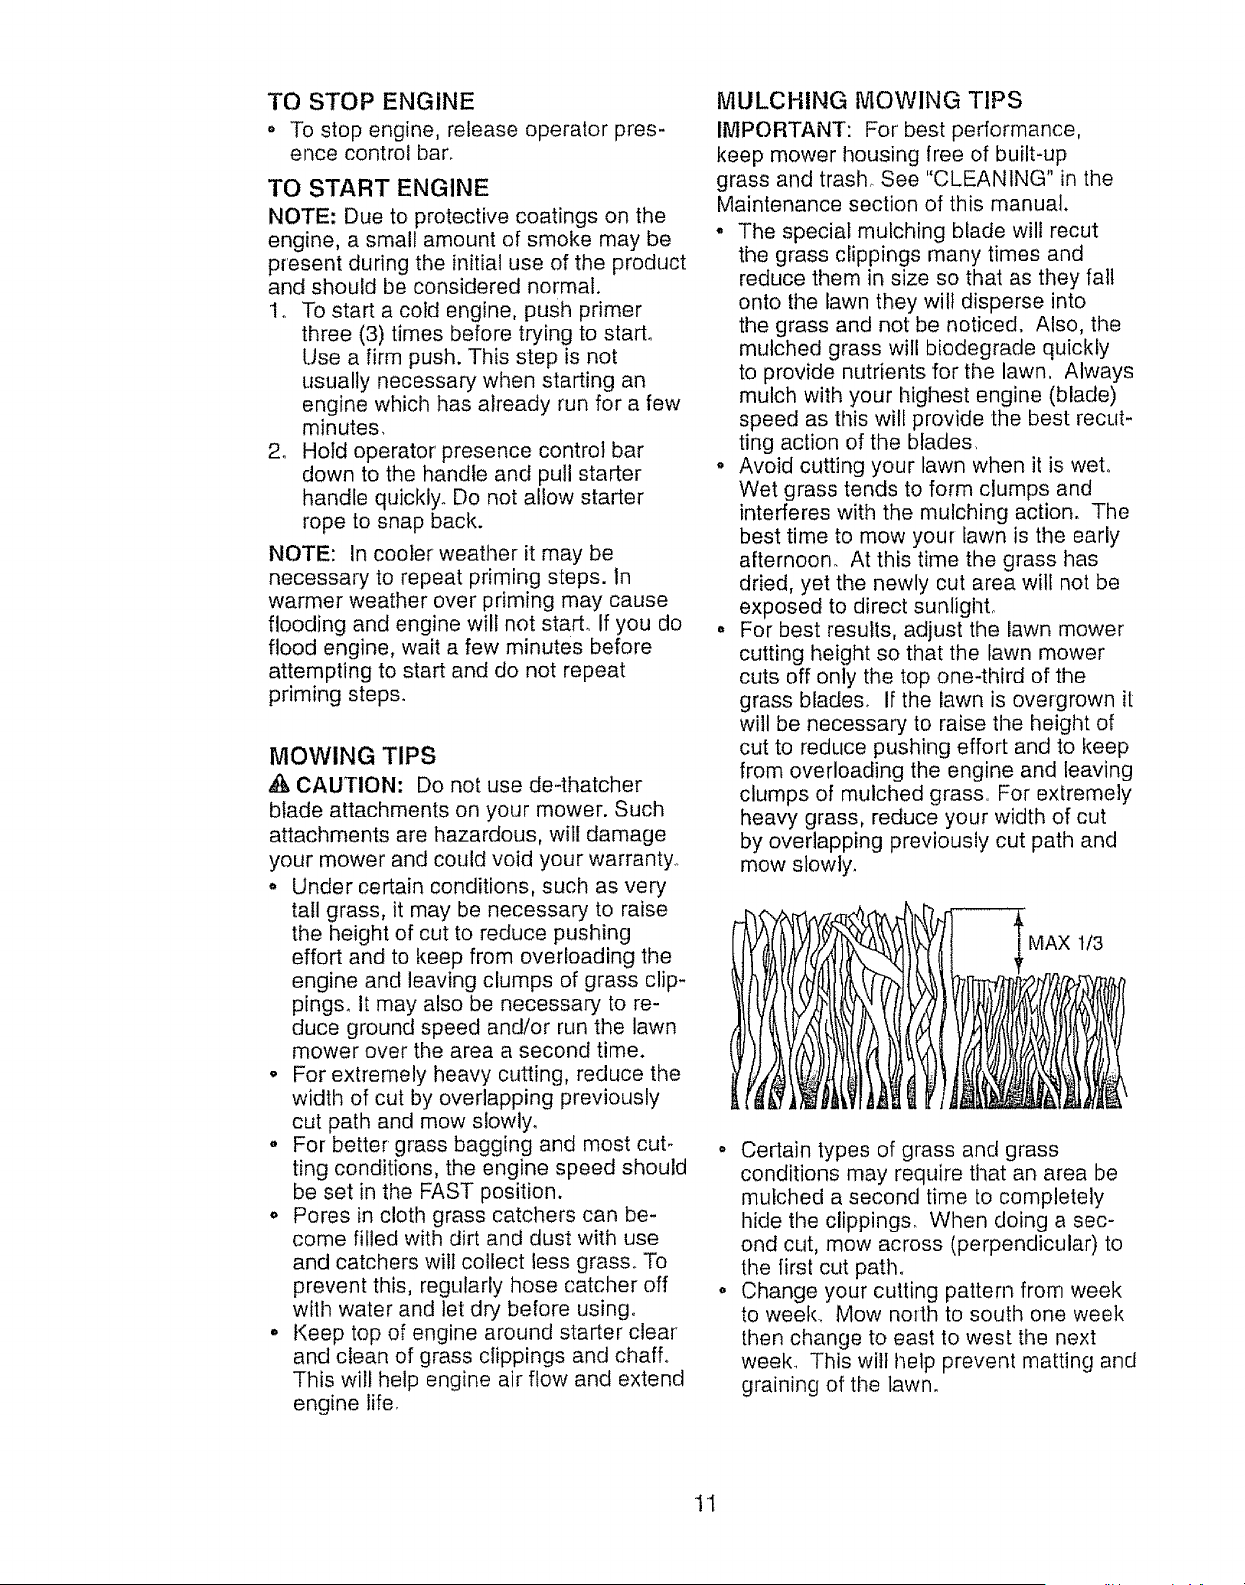
MULCHING MOWING TIPS
IMPORTANT: For best performance,
keep mower housing free of built-up
grass and trash_ See "CLEANING" in the
Maintenance section of this manual.
° The special mulching blade will recut
the grass clippings many times and
reduce them in size so that as they fall
onto the lawn they will disperse into
the grass and not be noticed. Also, the
mulched grass will biodegrade quickly
to provide nutrients for the lawn. Always
mulch with your highest engine (blade)
speed as this will provide the best recut-
ting action of the blades.
° Avoid cutting your lawn when it is wet,
Wet grass tends to form clumps and
interferes with the mulching action. The
best time to mow your fawn is the early
afternoon_ At this time the grass has
dried, yet the newly cut area will not be
exposed to direct sunlight,
o For best results, adjust the lawn mower
cutting height so that the lawn mower
cuts off only the top one-third of the
grass blades. If the lawn is overgrown it
will be necessary to raise the height of
cut to reduce pushing effort and to keep
from overloading the engine and leaving
clumps of mulched grass, For extremely
heavy grass, reduce your width of cut
by overlapping previously cut path and
mow slowly.
tf3
• Certain types of grass and grass
conditions may require that an area be
mulched a second time to completely
hide tile clippings. When doing a sec-
ond cut, mow across (perpendicular) to
the first cut path°
o Change your cutting pattern from week
to week_ Mow north to south one week
then change to east to west the next
week, This will help prevent matting and
graining of the lawn.
11
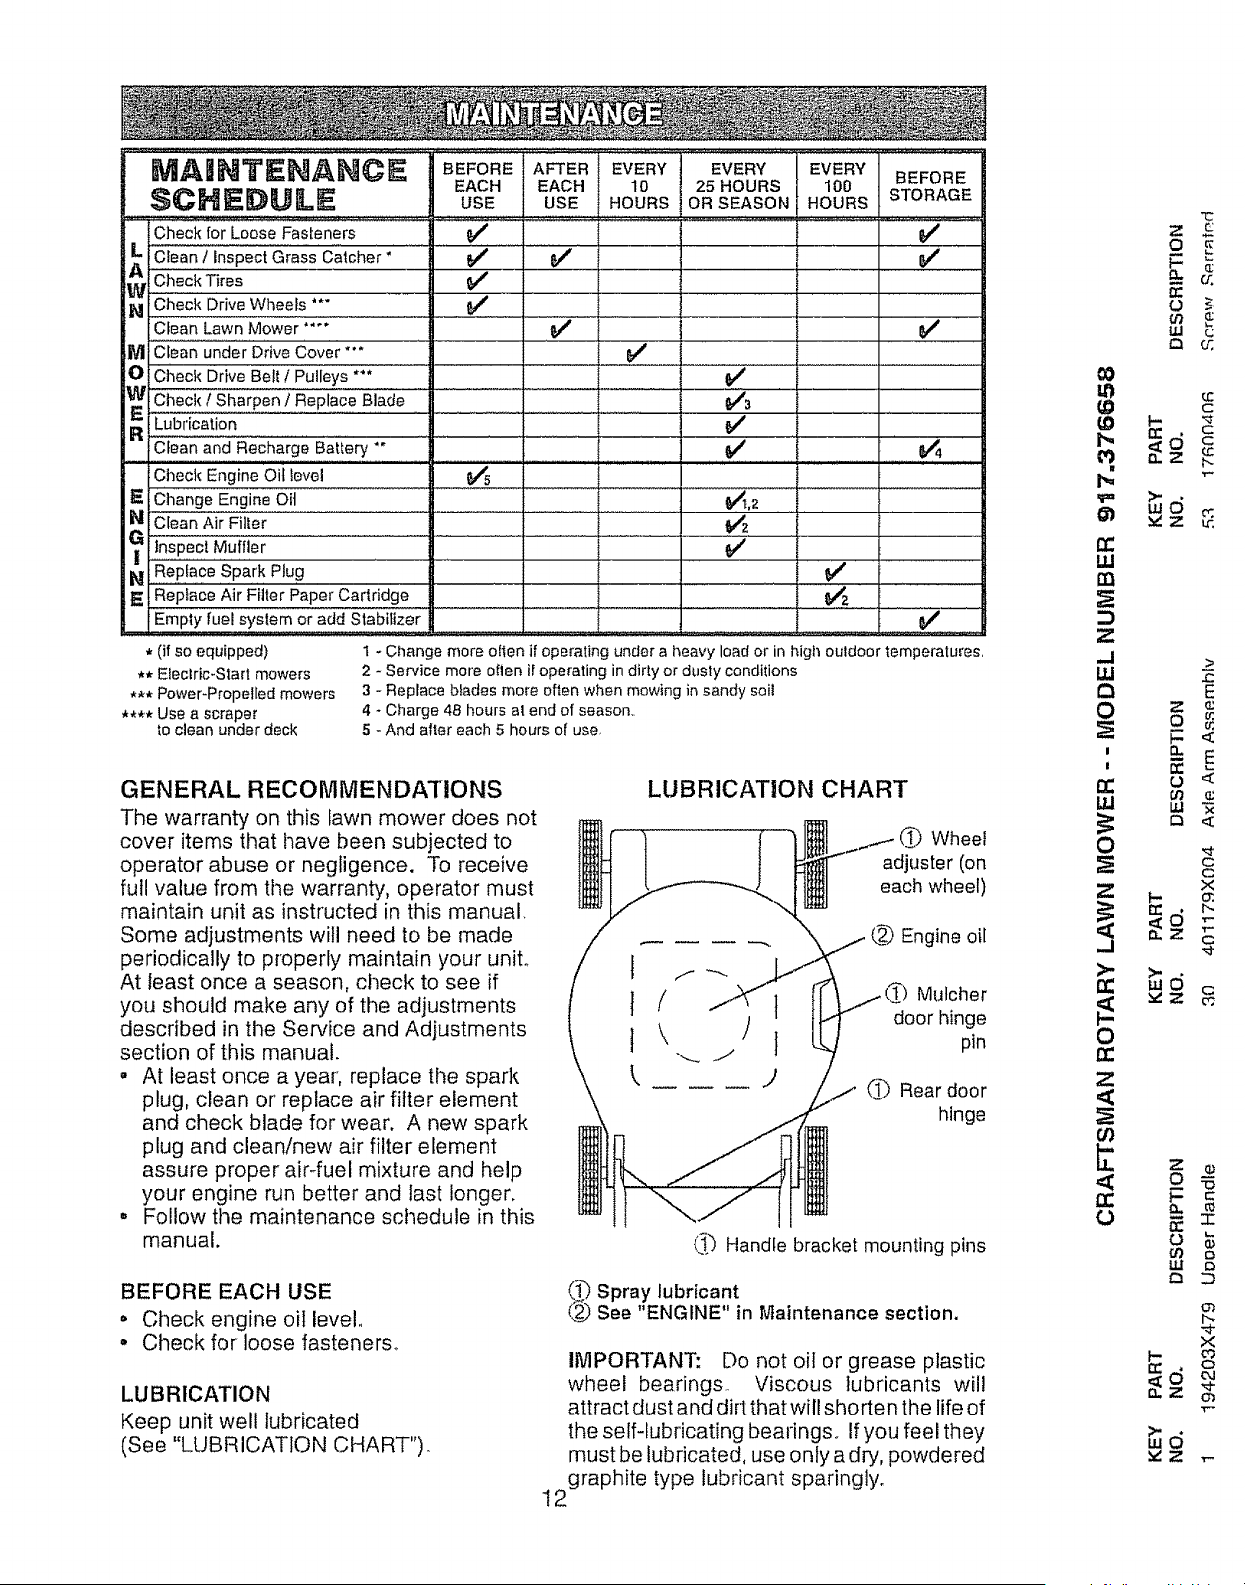
MA, NT NANCE EVE " E O.E
EAC, EAC, 1o =.OURS 100
SCHEDULE USE USE .OURSORSEASON.OURSSTORAGE
Check for Loose Fas[eners 6/ 6/
ciean/,nspectGrass Catcher" _' j 6/ 6/
"c'_';;,'oriveWheels"" _ 6/ I .
Clean Lawn Mower ....
M Clean under Drive Cover***
O Check Drive Belt t Pulleys *'*
6/
_ Checkl Sharpen/ ReplaceBlade
R [ubi:ication
6/
• Clean and Recharge Battery "" . . . .
Check Engine oil level 6,_
E Change Engine oii
N Clean Air Filter .....
_ Inspect Muffler
N "R'ep'i'a'ce'Spark Plug
_' Replace Air Filter Paper Cartridge
Empty fuel system or add Stabilizer
6/
v'
v' _4
_4
v'
6/
_4
. 6/
* (if so equipped)
** Electric-Start mowers
*** Power-Propelled mowers
**** Use a scraper
to clean under deck
I - Change more often if operating under a heavy load or in high ouldoor temperatures,
2 - Service more oflen if operating in dirty or dusty conditions
3 - Replace blades more often when mowing in sandy soil
4 - Charge 48 hours at end of season,,
5 - And alter each 5 hours of use,
GENERAL RECOMMENDATIONS
The warranty on this lawn mower does not
cover items that have been subjected to
operator abuse or negligence. To receive
full value from the warranty, operator must
maintain unit as instructed in this manual_
Some adjustments will need to be made
periodically to properly maintain your unit°
At least once a season, check to see if
you should make any of the adjustments
described in the Service and Adjustments
section of this manual.
o At least once a year', replace the spark
plug, clean or replace air filter element
and check blade for wear. A new spark
plug and clean/new air filter element
assure proper air4uel mixture and help
your engine run better and fast longer.
° Follow the maintenance schedule in this
manual.
BEFORE EACH USE
° Check engine oil level,,
• Check for loose fasteners°
LUBRICATION
Keep unit well lubricated
(See "LUBRICATION CHART").
t
1
I
k
LUBRICATION CHART
('_ Wheel
adjuster (on
each wheel)
/
\
@_]Engine oil
Mulcher
door hinge
pin
_3 Rear door
hinge
(_') Handle bracket mounting pins
(,_')Spray lubricant
(_ See "ENGINE" in f_atntenance section,
IMPORTANT: Do not oil or grease plastic
wheel bearings.. Viscous lubricants wil!
attract dust and dirt that will shorten the life of
the self-lubricating bearings., If you feel they
must be lubricated, use only a dry, powdered
2graphite type lubricant sparingly.
1
@@
It;
rr
l.LI
rn
:3
Z
,-I
LU
0
0
I
!
LU
0
Z
-1
m
o
m
<
m
<
n-
0
"12
z _
o E
_" cc
rr"
O
l,U
I-
n-
_d
",'z
O
p.
O
69
uJ
m
rr'
_6
Z
_d
v, Z
Z
O
o
cO
ILl
r_
F-
rr'
_d
Z
wO
C
2
E
c
x
E
I
X
Q

\
\
LAWN MOWER
Always observe safety rules when per-
forming any maintenance_
TIRES
° Keep tires free of gasoline, oil, or insect
control chemicals which can harm rubber.
o Avoid stumps, stones, deep ruts, sharp
objects and other hazards that may
cause tire damage.
DRIVE WHEELS
Check front drive wheels each time before
you mow to be sure they move freely.
The wheels not turning freely means trash,
grass cuttings, etco are in the drive wheel area
and must be cleaned to free drive wheels.
If necessary to clean the drive wheels, be
sure to clean both front wheels.
1. Remove hubcaps, locknuts & washers.
2o Remove wheels from wheel adjusters.
3_ Remove any trash or grass cuttings
from inside the dust cover, pinion and/
or drive wheel gear teeth°
4.. Put wheels back in place..
NOTE: If after cleaning, the drive wheels
do not turn freely, contact a Sears or other
qualified service center..
BLADE CARE
For best results, blade must be kept sharp.
Replace a bent or damaged blade.
CAUTION: Use only a replacement blade
approved by the manufacturer of your mower°
Using a blade not approved by the manu-
facturer of your mower is hazardous, could
damage your mower and void yourwarranty.
TO REMOVE BLADE
1. Disconnect spark plug wire from spark
plug and place wire where it cannot
come in contact with plug,
2. Turn lawn mower on its side. Make
sure air filter and carburetor are up.
3. Use a wood block between blade and
mower housing to prevent blade from
turning when removing blade bolt.
NOTE: Protect your hands with gloves
and/or wrap blade with heavy cloth,.
4. Remove blade bolt by turning counter-
clockwise°
5. Remove blade & attaching hardware
(bolt, lock washer& hardened washer).
TO REPLACE BLADE
t, Position blade on the blade adapter
aligning the two (2) holes in the blade
with the raised lugs on the adapter..
2. Be sure the trailing edge of blade (oppo-
site sharp edge) is up toward the engine.
3_ Install the blade bolt with the lock
washer and hardened washer into
blade adapter and crankshaft,
4. Use block of wood between blade and
lawn mower housing and tighten the
blade bolt, turning clockwise
Recommendedtighteningtorque:35-40ft,lbs.
IMPORTANT: Blade bolt is heat treated,
If bolt needs replacing, replace only with
approved bolt shown in the Repair Paris
section of this manual.
Blade adapter Key Crankshaft
Lockwasher
Blade
Blade
bolt Hardened
/,
washer Trailing edge Crankshaft
TO SHARPEN BLADE
NOTE: We do not recommend sharpening
the blade - but if you do, be sure the blade
is balanced, Care should be taken to keep
the blade balanced_ An unbalanced blade will
cause eventual damage to mower or engine.
o The blade can be sharpened with a file
or on a grinding wheel.. Do not attempt
to sharpen while on the mower,
- To check blade balance, drive a nail into
a beam or wall. Leave about one inch of
the straight nail exposed° Place center
hole of blade over the head of the nail,
If blade is balanced, it should remain in
a horizontal position. If either end of the
blade moves downward, sharpen the
heavy end until the blade is balanced.
GRASS CATCHER
o The grass catcher may be hosed with
water, but must be dry when used.
= Check your grass catcher often for dam-
age or deterioration,. Through normal
use it will wear. If catcher needs replac-
ing, replace only with approved replace_
menl catcher shown in the Repair Parts
section of this manual, Give the lawn
mower model number when ordering,
GEAR CASE
° To keep your drive system working
properly, the gear case and area around
the drive should be kept clean and free
of trash build-up,. Clean under the drive
cover twice a season.
o The gearcase is filled with lubricant to the
proper level at the factory° The only time
the lubricant needs attention is if service
has been performed on the gear case.
If lubricant is required, use Total Multis
EP00 semi-liquid Grease or comparable
grade (quantity 1,15oz),.

ENGINE
LUBRICATION
Use only high quatity detergent oil rated with
API service classification SG-SL. Select the
oil's SAE viscosity grade according to your
expected operating temperature
SAEWSCOSi_GRADES
l
TEMPEnATURERANQEA.TICIPATEDBEFORE.E×T01LC.A.OE
NOTE: Although multi-viscosity oils
(5W30, 10W30 etc.) improve starting in
cold weather, these multi-viscosity oils will
result in increased oil consumption when
used above 32°F. Check your engine oil
level more frequently to avoid possible
engine damage from running low on oil.
Change the oil after every 25 hours of op-
eration orat least once a year if the mower
is not used for 25 hours in one year_
Check the crankcase oil level before
starting the engine and after each five (5)
hours of continuous use. Tighten oil plug
securely each time you check the oil level
TO CHANGE ENGINE OIL
NOTE: Before tipping lawn mower to drain
oil, empty fuel tank by running engine until
fuel tank is empty.
to Disconnect spark plug wire from spark
plug and place wire where it cannot
come in contact with plugo
2_ Remove engine oil cap; lay aside on a
clean surface.
3o Tip lawn mower on its side as shown
and drain oil into a suitable container.
Rock lawn mower back and forth to re-
move any oil trapped inside of engine.
Container
4. Wipe off any spilled oil from lawn
mower or side of engine.
5. Slowly pour oil down the oil fill spout,
stopping every few ounces to check the
oil level with the dipstick,
6, Stop adding oil when you reach the
FULL mark on the dipstick. Wait a
minute to allow oil to settle.
7. Continue adding small amounts of oil,
rechecking the dipstick until oil level
settles at FULL DO NOT overfill, or
engine will smoke heavily from the
muffler on startup,
8. Always be sure to retighten oil dipstick
before starting engine
9, Reconnectspark ptugwireto spark plug,
AIR FILTER
Your engine will not run properly and
may be damaged by using a dirty air
filter_ Replace the air filter cartridge every
I00 hours of operation or every season,
whichever occurs first, Service air cleaner
more often under dusty conditions
TO CLEAN AIR FILTER
I,, Loosen screw and tilt cover to remove.
2. Carefully remove cartridge.
3. Clean by gently tapping on a flat sur-
face., If very dirty, replace cartridge°
&CAUTION: Petroleum solvents, such
as kerosene, are not to be used to clean
cartridge. They may cause deterioration
of the cartridge. Do not oil cartridge. Do
not use pressurized air to clean or dry
cartridge.
4. Install cartridge, then replace cover
making sure the tabs are aligned with
the slots in the back plate. Fasten
screw securely_
__ , Back plate
./ X,.,
Slot
-c]_T_-x'--,.)I _ Cover
Cover tab
MUFFLER
Inspect and replace corroded muffler as it
could create a fire hazard and/or damage.
SPARK PLUG
Replace spark plug at the beginning of
each mowing season or after every 100
hours of operation, whichever occurs
firsL Spark plug type and gap setting
are shown in the "PRODUCT SPECIFIC-
ATIONS" section of this manual.
CLEANING
IMPORTANT: For best performance,
keep mower housing free of built-grass
and trash. Clean the underside of your
mower after each use.
14
SOLUCION
est_ dirigid,
PROBLEMA
Falta de
fuerza
Mal corte-
disparejo
Vibraci6n
excestva
Cord6n
arrancador
dif[cil de tira
Recogedor {
c_sped no s
llena (si vier
equipado)
Dificii de
empujar
P6rdida de
impulsi6n
o retardase
de la
vetocidad

ente)yc_.mbielo
_"MOTOR"enEa
temanuaL)
Lceitea trav_s
cilindro,
entamente unas
r el aceite_
Jifa,
temporada a la
,_,CAUTION: Disconnect spark plug wire
from spark plug and place wire where it
cannot come in contact with plug.
o Clean the underside of your lawn mower
by scraping to remove build-up of grass
and trash_
o Clean engine often to keep trash from
accumulating. A clogged engine runs
hotter and shortens engine life,
o Keep finished surfaces and wheels free
of all gasoline, oil, etco
• We do not recommend using a garden
hose to clean lawn mower unless the
electrical system, muffler, air filter and
carburetor are covered to keep water
out° Water in engine can result in short-
ened engine lire.
CLEAN UNDER DRIVE COVER
Clean under drive cover at least twice a sea-
son° Scrape underside of cover with putty
knife or similar tool to remove any build-up
of trash or grass on underside of drive cover,
lina si se emp-
o la mugre en
_mas,
_d en un recinto
feda contra el
protector
tumedad. No
lede respirar, 1o
=ondensaci6n,
de su unidad.
segadora
, escape todavia
;ene la
anque dentro
:s pueden
ma chispa,
Lntesde
rrado,
amenos que
de aire.
combustible.
vuetva a Ilenar-
npio y nuevo
vuelva a ltenar-
npio y nuevo
Lla buj[a.
Lcuchi!la
de ]a cuchill&
control
ontrol,
;ombustible
motor.
_, WARNING: To avoid serious injury,
before performing any service and
adjustments:
I. Release control bar and stop engine,
2 Make sure the blade and all moving
parts have completely stopped.
3. Disconnect spark plug wire from spark
plug and place wire where it cannot
come in contact with plugo
LAWN MOWER
TO ADJUST CUTTING HEIGHT
See "TO ADJUST CUTTING HEIGHT" in
the Operation section of this manual,
REAR DEFLECTOR
The rear deflector, attached between the
rear wheels of your mower, is provided to
minimize the possibility that objects will
be thrown out of the rear of the mower
into the operator mowing position, tf the
deflector becomes damaged, it should be
replaced_
TO REMOVE DRIVE BELT
I, Remove drive cover,
2. Remove belt from gearcase pulley by
pushing down on arm and rolling belt
off pulley.,
3, Turn lawn mower on its side with air
filter and carburetor down,
4_ Remove blade, engine pulley and
debris sltield.
5. Remove engine pulley and belt from
debris shield.
PUSH
Drive
cove r
Pullel
Engine pulley
Drive belt
Belt
retainer
Debris shield
TO REPLACE DRIVE BELT
1. Place new drive belt in engine pulley
and belt retainer of debris shield,
2, Route the other end of the new drive
belt through hole in housing.
3. Reinstall debris shield,
4_ Reinstall blade,
5, Return mower to upright position°
6, Push down on arm, install new belt on
gearcase pulley_ Release arm slowly,
NOTE: Always use factory approved belt
to assure proper fit and tong life,,
7, Reinstall drive cover.
.
3,
4.
5o
6.
'15
TO ADJUST HANDLE
The handle can be mounted in a high or
low position, The mounting holes in the
bottom of lower handle are off center for
raising or lowering the handle.
I. Remove upper handle and wire tie(s)
securing cable(s) to lower handle,
Remove hairpin cotters from lower
handle bracket mounting pin_
Squeeze lower handle in to remove it
from mounting pins,
Turn lower handle over to raise or
lower handle,
Squeezelowerhandleinandposition holes
onto mounting pins on handle bracket.,
Reassemble upper handle and all parts
removed from lower handle,

Mowing r -__ Mowing r-,--_
position I position / I
I I I 1 I "
p...! I C"-! ! ,"
• _---.
Hal rp,_"-._'-'_ t Hand,2_'_"_C?l
cotter __...._ '_'-'bracket //_'-_!i @' !
M.ountingf
ptn
LOW POSITION HIGH POSITION
Lower _,
handlE;
ENGINE
ENGINE SPEED
Your engine speed has been factory set.
Do not attempt to increase engine speed
or it may result in personal injury_ If you
believe that engine is running too fast or
too slow, take your mower to a Sears or
other qualified service center for repair
and adjustment.
CARBURETOR
Your carburetor is not adjustable, If your
engine does not operate properly due to sus-
pected carburetor problems, take your lawn
mower to a Sears or other qualified service
center for repair and/or adjustment.
IMPORTANT: Never tamper with the
engine governor, which is factory set
for proper engine speed,, Overspeeding
the engine above the factory high speed
setting can be dangerous,, If you think
tile engine-governed high speed needs
adjusting, contact a Sears or other
qualified service center, which has proper
equipment and experience to make any
necessary adjustments.
Immediately prepare your lawn mower for storage at the end of the season or if the unit
will not be used for 30 days or more.
LAWN MOWER
When lawn mower is to be stored for a
period of time, clean it thoroughly, remove
a!! dirt, grease, leaves, etc. Store in a
clean, dry area.
1. Clean entire lawn mower (See
"CLEANING" in the Maintenance sec-
tion of this manual).
2. Lubricate as shown in the Maintenance
section of this manual.
3. Be sure that all nuts, bolls, screws, and
pins are securely fastened. Inspect
moving parts for damage, breakage
and wear. Replace if necessary°
4. Touch up all rusted or' chipped paint
surfaces; sand lightly before painting.
HAl.IDLE
You can fold your mower' handle for storage.
1o Squeeze the bottom ends of the lower
handle toward each other until the
lower handle clears the handle bracket,
then move handle forward.
2. Loosen upper handle mounting bolts
enough to allow upper handle to be
folded back.
IMPORTANT: When folding the handle for
storage or transportation, be sure to fold
the handle as shown or you may damage
the control cables. 16
When setting up your handle from the
storage position, the lower handle will
automatically lock into mowing position.
__.__._ SQUEEZE
TO FOLD
Lower handle'l
i
L
0
pr
control bar
FOLD
FORWARD
FOR
STORAGE
MOWING
POSITION
Upper
handle
Handle
knob
Lower handfe
6. Vuelva a r
las pades
Posici6n
pay sega
Ctavija
de horquitta
Cfavija de
montaj
POS
fvl
in
MOTOR
VELOCIDAD
La velocidad €
la f_.bricao No
lnmediatamer
almacenamie_
la unidad no
SEGADORI
Cuando se va
perfodo de tie
remueva toda
Gu_rdela en L
1. Limpie toe
en la secc
manual).
2. Lubrfquefz
de Mantel
3 AsegtTres_
clavijas y
apretados
las partes
est_tn daft
CAmbiela,
4. Retoque t,
oxidadas
Ilia antes €
MANGO
Puede doblar
almacenamiet
1. Apriete Io,
inferior en
quede se!c
luego rnu<_
2. Suelte los
superior k
que el ma
hacia atr_.
IMPORTANTI
almacenamie_
Io doble segOi
cables de con

Jasy lasrue-
unamanguera
:loraamenos
enciador,el
stuntapados
iua.Elaguaen
_,ci6nde6ste.
,:RTA DE LA
la impulsi6n pot
rada, Raspe de-
illo para masitta
_, para remover
_sura en la parte
Isi6n.
,qmotor
Correa de
mando
IMPULSION
7nandoen la
_e ia pantalla
e la nueva
;I orificio en el
.ra del desperdF
ci6n vertical.
stale la correa
le engranajes.
)robada por la
_e y dure
_pulsi6n.
una posici6n
ntaje en el
)ntro para
/ conexi6ne(s) el
mango inferior.
quilla de fa
i det mango.
;ia dentro para
montaje
_cima para
de horquilla por
_ntaje,
ENGINE
FUEL SYSTEM
IMPORTANT: It is important to prevent
gum deposits from forming in essential fuel
system parts such as carburetor, fuel filter,
fue! hose, or tank during storage. Alcohol
blended fuels (called gasohol or using
ethanol or methanol) can attract moisture
which leads to separation and formation
of acids during storage_ Acidic gas can
damage the fuel system of an engine while
in storage_
o Empty tile fue! tank by starting the en-
gine and letting it run until the fuel lines
and carburetor are empty,
• Never use engine or carburetor cleaner
products in the fuel tank or permanent
damage may occur.
o Use fresh fuel next season°
NOTE: Fuel stabilizer is an acceptable al-
ternative in minimizing the formation of fuel
gum deposits during storage, Add stabilizer
to gasoline in fuel tank or storage container,
Always follow the mix ratio found on stabilize r
container. Run engine at least 10 minutes
after adding stabilizer to allow the stabilizer to
reach the carburetor. Do not empty the gas
tank and carburetor if using fuel stabilizer,
ENGINE OIL
Drain oil (with engine warm) and replace
with clean engine oil. (See "ENGINE" in
tile Maintenance section of this manual),
CYLINDER
1, Remove spark plug,
2, Pour one ounce (29 ml) of oil througi7
spark plug hole into cylinder°
3, Pull starter handle slowly a few times
to distribute oil,
4, Replace with new spark plug.
OTHER
o Do not store gasoline from one season
to another°
• Replace your gasoline can if your can
starts to rust. Rust and/or dirt in your
gasoline will cause problems.
o If possible, store your unit indoors and
cover it to protect it from dust and dirt.
° Cover your unit with a suitable protec-
tive cover that does not retain moisture.
Do not use plastic.. Plastic cannot
breathe, which allows condensation to
form and will cause your unit to rusL
IMPORTANT: Never cover mower while
engine and exhaust areas are still warm.
_CAUTION: Never store the lawn mower
with gasoline in the tank inside a building
where fumes may reach an open flame
or spark, Allow the engine to cool before
storing in any enclosure.
TROUBLESHOOTING - See appropriate section in manual unless directed
to a Sears Parts & Repair Center.
PROBLEM CAUSE
Does not start
1. Dirty air filter°
2. Out of fuel.
3. Stale fuelo
4. Water in fuel.
5. Spark plug wire is
disconnected.
6o Bad spark plug,
7., Loose blade or broken
blade adapter.
8. Control bar in released
position.
9. Control bar defective.
I0,, Fuel valve lever (if so
equipped) in OFF position.
11_Weak battery (if equipped).
12. Disconnected battery
connector' (if equipped)°
I.
2_
3.
4,
5.
6_
7,,
8.
9.
17
CORRECTION
Cleanlreplace air filter.
Fill fuel tank.
Empty fuel tank and refill tank
with fresh, clean gasoline.
Empty fue! tank and refill tank
with fresh, clean gasoline.
Connect wire to plug,
Replace spark plug.
Tighten blade bolt or
replace blade adapter_
Depress control bar to
handle,
Replace control bar°
lO.Turn fuel valve lever
to the QN position.
11. Charge battery.
12.Connect battery to engine.
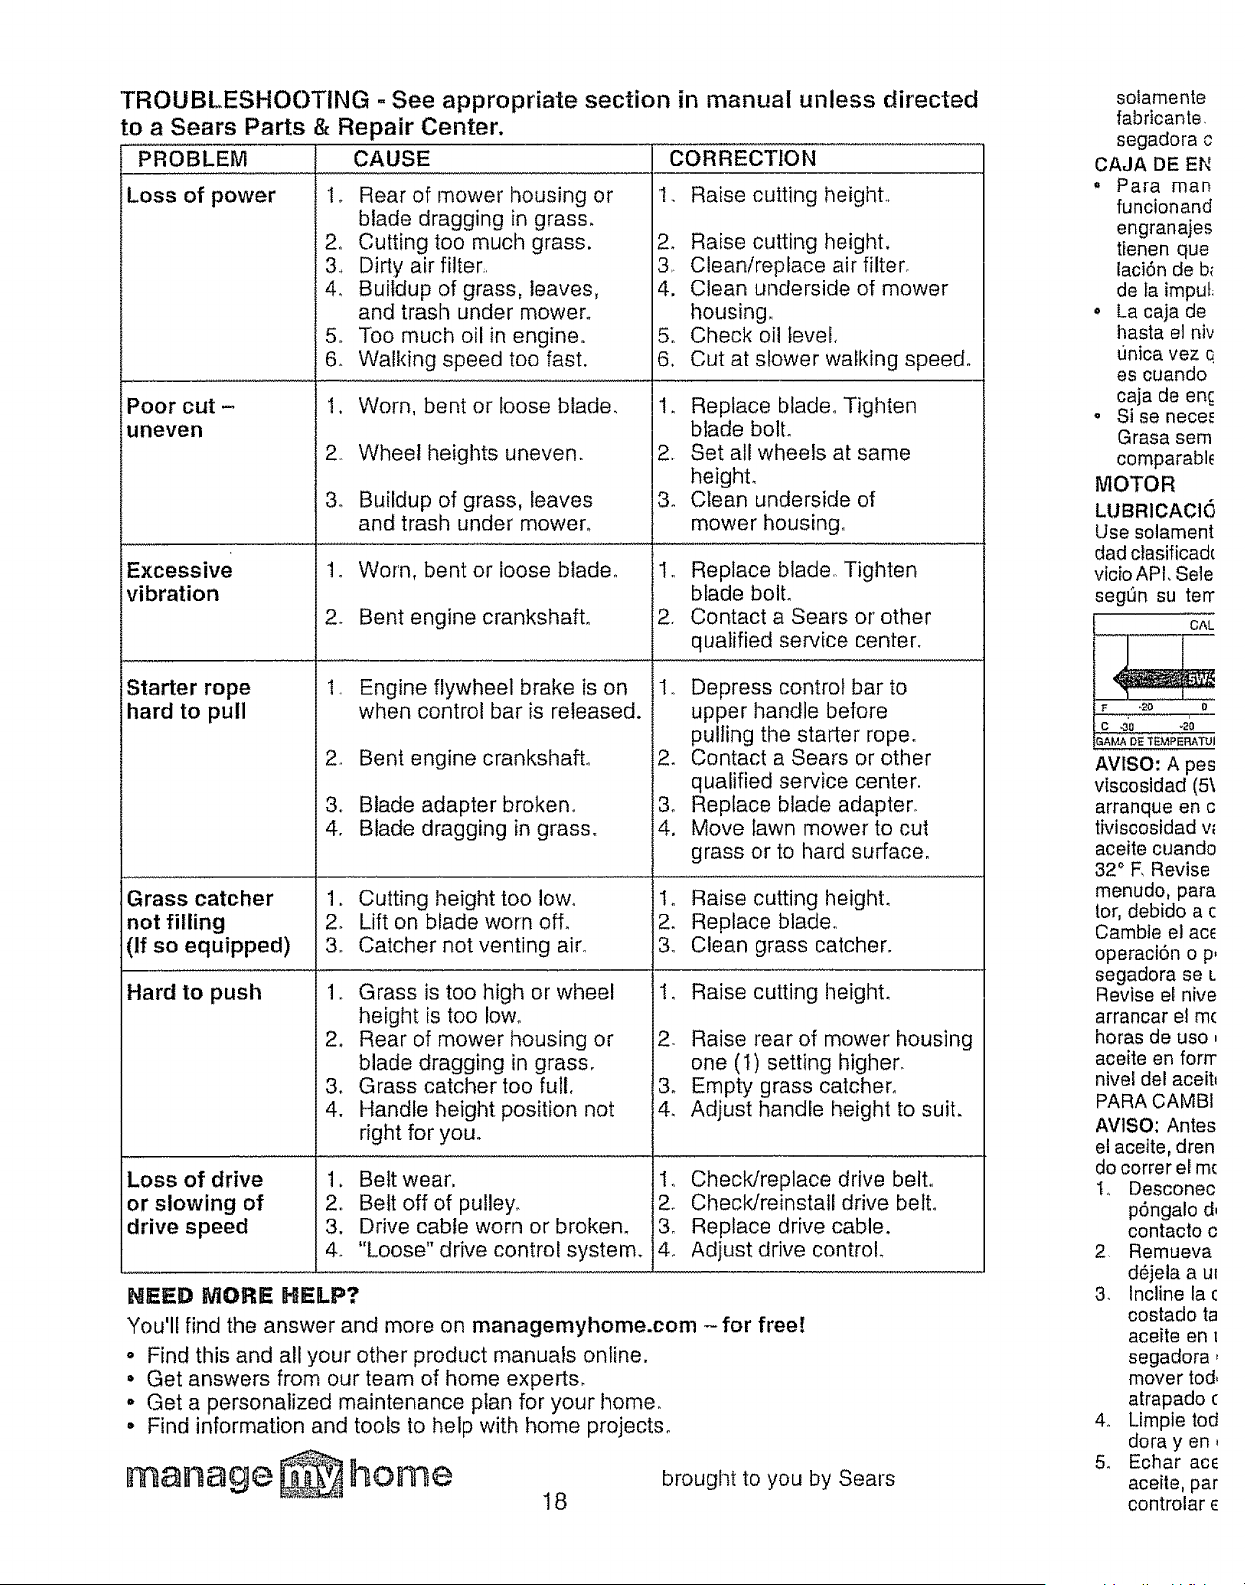
TROUBLESHOOTING - See appropriate section in manual unless directed
to a Sears Parts & Repair Center.
PROBLEr_ CAUSE
Loss of power io Rear of mower housing or
blade dragging in grass.
2. Cutting too much grass.
3, Dirty air filter
4. Buildup of grass, leaves,
and trash under mower.
5. Too much oil in engine.
6. Walking speed too fast.
!, Worn, bent or loose blade.
Poor cut -
uneven
Excessive
vibration
CORRECTION
1. Raise cutting height,
2_ Raise cutting height.
3 Clean/replace air filter.
4. Clean underside of mower
housing,
5. Check oil level,
6, Cut at slower walking speed.
,,
3_
Wheel heights uneven.
Buildup of grass, leaves
and trash under mower.
1. Worn, bent or loose blade_
2. Bent engine crankshaft.
!. Replace blade. Tighten
blade boll
2, Set all wheels at same
height.
3. Clean underside of
mower housing°
1, Replace blade. Tighten
blade bolt.
2. Contact a Sears or other
qualified service center,
Starter rope
hard to pull
,,
2_
3_
4.
Engine flywheel brake is on
when control bar is released.
Bent engine crankshaft.
Blade adapter broken°
Blade dragging in grass.
1. Depress control bar to
upper handle before
pulling the starter rope°
2. Contact a Sears or other
qualified service center.
3o Replace blade adapter.
4. Move lawn mower to cut
grass or to hard surface.
Grass catcher 1.
not filling 2_
(If so equipped) 3o
Hard to push
Cutting height too low,
Lift on blade worn off.
Catcher not venting air°
1. Grass is too high or wheel
height is too low.
2. Rear of mower housing or
blade dragging in grass.
3. Grass catcher too full,
4. Handle height position not
right for you.
Loss of drive
or slowing of
drive speed
1. Belt wear,
2. Belt off of pulley.
3. Drive cable worn or broken_
4. "Loose" drive control system.
Io Raise cutting height.
2. Replace blade°
3. Clean grass catcher.
1, Raise cutting height.
2. Raise rear of mower housing
one (I) setting higher.
3o Empty grass catcher.
4. Adjust handle height to suit.
1. Check/replace drive belt,,
2. Checldreinstatl drive belt.
3. Replace drive cable.
4. Adjust drive control
HEED MORE HELP?
You'll find the answer and more on managemyhome.com - for free!
. Find this and all your other product manuals online.
° Get answers from our team of home experts.
° Get a personalized rnaintenance plan for your home.
° Find information and tools to help with home projects°
anage home
18
brought to you by Sears
solamente
fabricante
segadora c
CAJA DE EIX
° Para man
funcionand
engranajes
tienen que
iaci6n de b_
de ta imput;
• La caja de
haste el niv
Onica vez Q
es cuando
caja de en_
o Sise nece_
Grasa sem
comparabl_
MOTOR
LUBRICAC!(]
Use solament
dad clasificadc
vicio API, Sele
segL_n su ten"
IGAMA DE TE_PERAT'JI
AVISO: A pes
viscosidad(5\
arranque en c
tiviscosidad vl
aceite cuando
32 ° F, Revise
menudo, pare
for, debido a c
Cambie el ac_
operaci6n o p,
segadora se L
Revise el nive
arrancar et m(
horas de uso,
aceite en forrr
nivel del aceit_
PARA CAMBI
AVtSO: Antes
el aceite, dren
do correr el mc
I. Desconec
p6ngalo d,
contacto c
2 Remueva
d6jela a u_
3. Incline la c
costado ta
aceite en
segadora,
mover tod,
atrapado (
4o Limpie tod
dora y en,
5. Echar ac_
aceite, par
controlar €

chilla en el
se que la ranura
=.terodel cigue-
.tador de _sta
os en la cuchilla
n el adaptador.
de satida de
afilado) est_
a con la aran-
lela endureclda
a y el cigue_a!
ntre la cuchilta
)riete el perno
I sentido en que
lendada es de
Chavetero del
rCiguena!
Cigu_nal
uchilla es
sustituir fos
nos aprobados
de Reparaci6n
Garanfla ...................................................................19
Reglas de Seguridad ................................... 19-21
Especificaclones def Producto ......................... 21
Montaje / Pre-Operaci6n ......................................23
Operaci6n ................................................... 24-27
Mantenimiento ...................................................29-32
Programa de Mantenimiento ..............................29
Servicio y Adjustes ...................................... 32-33
Almacenamiento .......................................... 33-34
Identificaci6n de problemas .............................34-35
Partes de repuesto ............................................3&45
Servicio Sears .........................................Contratapa
GARANTiA TOTAL DE LA CORTADORA DE CESPED CRAFTSMAN POR 2 AltOS
Siesta Segadora Craftsman Ilega a presentar algL_n desperfecto por defectos de materiales
o fabricaci6n durante un pfazo de dos a5os a partir de la fecha de compra, 116velade vuelta a
cualquiera de tas tiendas Sears, al Centro de Repuestos y Reparaci6n, o a otro comercio donde se
vendan los equipos Craftsman, a efectos de que se la reparen sin costo (o bien se la reemplacen,
en caso que no sea posible repararla)_
Siesta Segadora Ilega a ser utilizada con fines comerciales o arrendada, la presente garanfia tendr&
vigencia por s61o 90 dfas a partir de la fecha de compra.
La presente garantfa no cubre:
,, Aquellas ptezas fungibles que se desgastan por el uso normal, tales como las cuchlllas rotatorias
de ta cortadora, los adaptadores de las cuchillas, las correas, los filtros de atre y las buj[as,
o Aquellas reparaciones que haya que hacer debido a real uso o negligencia por parte det operador,
incluidos el _,rbol del cigOe5al torcido u omisiones relativas al armado, manejo o mantenimieno de
la Segadora en un todo de acuerdo a las instrucciones provistas con el equipo.
La presente garantfa se aplicar_ solamente en tanto el artfcuto sea usado en los Estados Unidos
Esta garantia le otorga a usted derechos legales especificos; puede que usted tenga, ademAs, otros
derechos, los cuales varfan de estado a estado.
Sears_ Roebuck and Co., Hoffman Estates, IL 60179
filar la cuchilla
que quede
•' cuidado de
ichilla que no
wentualmente
tor.
una lima o en
ate de afilarla
segadora
cuchilla, clave
,oared. Deje
un ctavo recto
.,entral de la
flavo. Si la
e permanecer
,.ualquiera de
mueve hacia
hasta que _sta
Je ser rociado
3ero tiene que
usar.
,ed a menudo
o deteriorado.
normal Si se
_r,cAmbielo
IMPORTANTE: Esta maquina cortadaora es capaz de amputar las manos y los manos y los pies y
de lanzar objetos. Si no se observan las instrucciones de seguridad siguientes se pueden producir
lesiones graves o la muerte_
_(_Busque este s[mbolo que sefiala las precau-
ciones de seguridad de importancia. Quiere
decir - i iiATENclONtli i ti ESTE ALERTO!!!
SU SEGURIDAD ESTA COMPROMETIDA
_,ADVERTENCIA: Siempre desconecte el
alambre de la bujia y p6ngalo donde no pueda
entrar en contacto con la bujfa, para evitar el
arranque por accidente, durante la preparaci6n,
e! transporte, el ajuste o cuando se hacen
reparaciones.
,_ADVERTENClA: Los bornes, terminates y
accesorios relativos de la bateria contienen
plomo o compuestos de plomo, productos
qufmicos conocidos en el Estado de California
como causa de cancer y defectos al nacimiento
u otros daRos reproductivos. Lavar las manos
despu_s de manlpularlos.
_,PRECAUCl6N: El tubo de escape del motor,
algunos de sus constituyentes y algunos com-
ponentes del veh[culo contienen o desprenden
productos qufmicos conocidos en el Estado de
California como causa de cancer y defectos al
nacimiento u otros dafios reproductivos,.
,_PRECAUCI6N: Et silenciador y otras piezas
del motor ilegan a sre extremadamente caiien-
tes durante la operaci6n y siguen siendo cali-
entes despu_s de que el motor haya parado.
Para evitar quemaduras severas, permanezca
lejos de estas _reas.
19
!. OPERACION
• Antes de empezar, debe familiarizarse
completamente con los controles y el use
correcto de ta maquina, Para esto, debe leer
y comprender todas fas instrucciones que
aparecen en la maquina yen los manuales
de operaciSn
• No ponga fas manes o los pies cerca o
debajo de las partes rotatorias. Mant_ngase
siempre tejos de la abertura de la descarga.
• Permita que solamente las personas re-
sponsabtes que est_n familiarizadas con 1as
instrucciones operen la m_.quina.
° Despeje el Area de objetos tales como pie-
dras, juguetes, alambres, huesos, palos, etc.
que pueden ser recogidos y lanzados por las
cuchillas.
° Aseg0rese que el #.tea no se halfen per-
sonas, antes de segar. Pare la mAquina si
alguien entra en el #,rea.
° No opere la maquina sin zapatos o con
sandalias abiertaso P6ngase siempre zapatos
s61idos..
• No tire de la segadora hacia atr_s a menos
que sea absolutamente necesario. Mire
siempre hacia abajo y hacia detr,_s antes y
mientras que se mueve hacia atr#.s.
° Nunca dirigir el material descargado hacia
las personas. Evitar descargar material
contra paredes o barreras. E! material puede
retornar at operador. Para la cuchilla cuando
se pasa por superficies de grava.
o No opere la segadora sin los respectivos
resguardos, las placas, el recogedor de
c_sped u otros aditamentos dise ados para
su protecci6n y seguridad.
• Refi6rase alas instrucciones del fabricante
para el funcionamiento e instalaciSn de
accesorios. Use 0nicamente accesorios
aprobados pot el fabricante.
. Detenga la cuchilla o las cuchillas cuando
cruce por calzadas, calles o caminos de
grava.
° Parar el motor cada vez que se abandona et
aparato, antes de limpiar la segadora o de
remover residuos del tubo.
o Apagar el motor y esperar hasta que las
cuchillas est6n completamente paradas
antes de remover el receptor de hierba.
o Segar solamente con luz del d(a o con una
buena luz artificial,
, No opere la m_.quina bajo la influencia del
alcohol o de las drogas.
o Nunca opere la maquina cuando la hierba
est,, mojad& Aseg0rese siempre de tener
buena traccidn en sus pies; mantenga el
mango firmemente y camine; nunca corra.
° Desconectar el mecanismo de propulsi6n
autSnoma o et embrague de transmisi6n en
tas segadoras que Io tienen antes de poner
en marcha el motor.,
. St el equipo empezara a vibrar de una
manera anormal, pare el motor y revise de
inmediato para averiguar la causa.. General°
mente la vibraci6n suele indicar que existe
alguna averfa.
° Siempre use galas de seguridad o anteojos
con protecciSn lateral cuando opere la sega-
dora.
il, OPERACION SOBRE LAS CUESTAS
Los accidentes ocurren con m_s frecuencia en
las cuestaso Estos accidentes ocurren debido a
resbaladas o cafdas, las cuales pueden resultar
en graves lesiones,. Operar la recortadora en
cuestas requiere mayer concentraci6n, Si se
siente inseguro en una cuesta, no la recorte.
HACER:
° Puede recortar a trav6s de la superficie de
la cuesta, nunca hacia arriba y hacia abajo.
Proceda con extrema preeauciSn cuando
cambie de direcciSn en las cuestas.
• Renueva todos los obietos extraSos, tales
como guijarros, ramas, etc.
° Debe prestar atenci6n a hoyos, baches o
protuberancias_ Recuerde que la hierba alta
puede esconder obst&cuios.
NO HACER:
o No recorte cerca de pendientes, zanjas o
terraplenes. El operador puede perder la
tracci6n en los pies o el equilibrio_
• No recorte cuestas demasiado inclinadas.
• No recorte en hierba mojadao La reducciSn
en la tracci6n de la pisada puede causar
resbalones.
I!1. NIt(lOS
Se pueden producir accidentes tr_.gicos si el
operador no presta atenci6n a la presencia
de los niSos. A menudo, los niRos se sienten
atrafdos por la m#.quina y por la actividad de
la siega. Nunca suponga que los nifios van a
permanecer en e! mismo lugar donde los vie
per ultima vez.
° Mantenga a los niP,os alejados del Area de
la siega y bajo el cuidado estricto de otra
persona adulta responsable.
• Est_ aterta y apague la mAquina si hay niSos
que entran al #.tea,
° Antes y cuando este retrocediendo, mire
hacia atr_s y hacia abaje para verificar si hay
niRos pequeRos
° Nunca permita que los ni_,os operen la m_-
quina.
. Tenga un cuidado extra cuando se acerque
a esquinas donde no hay visibitidad, a los
arbustos, &rboles u otros objetos que pueden
interferir con su lfnea de visi6n.
IV. MANEJO SEGURO DE GASOLINA
Usar mucha atenciSn cuando se maneja gaso-
lina_.La gasolina es extremamente inflamable y
los vapores son explosivos_
° Apagar todos los cigarrillos, cigarros, pipas y
otras fuentes de igniciSno
o Usar solo un conteneder apropiado.
° Nunca quitar et tap6n de la gasolina o aRadtr
carburante con el motor en marcha. Esperar
que el motor se enfrfe antes de repostar ta
gasotina..
2O
PROG
MAN3
Ravisar s) hay
S I Limpiar/tnspel
E IConlrolar los I
G I Conlrolar las i
A [ Limplar la Se_;
D I Limpiar debajl
O I Revisr_r las C_
a I Revisar I Alila
A I LubricaciSn
Limpiar I Rec_
t
Revisar el nM
IV] l Camb{ar e[ Ac
O ! Limpiar et Filh
"_ ' Inspeccionar
O lOarnblar la Bu
a ICambtar el C_
Vaciar el sfsle
o a#,adi_ un es
* _sl vien_ equip
** Segadoras cot'
*_* Segadoras cot
_*** Ul_liz._r una ra_
deba{o ,_te la cubior
RECOMEN[
La garantIa d_
art[culos que
la negligencia
el valor de fa !
mantener la s
descritas en
Hay algunos
en forma ped{
unidad adecu
AI menos una
si es necesari
en las seccior
manual,.
= Unavez al
cambie e! E
si la cuchill_
nueva y un
nuevo asec
bustible ad,
funcione m,
• Siga el pro!
manual
ANTES DE C
° Revise el n
• Revise si h,
LUBRICACI()
Mantenga la L
(yea ia 'q'ABL
Y ACOL-
mejor
e Jasegadora
_sura..Vea
_ntenimento de
cial va a volver
._dmuchas
_o,de modo que
in a dispesar
r. Tambi_n, el
shacer rb,pidam-
nutritivas para
,'on la velocidad
pues asf se
ecorte de las
) est_ mofado.
rmar montones
tcolchado.
_sped es
_ora 6ste se ha
da no quedar,_
ultados, ajuste
Jora de modo
ercio superior
I caso de que el
_do, puede ser
lel corte para
para empujar ta
_argar el motor,
_sde c_sped.
, reduzca el an-
cima del lugar
Je lentamenteo
MAX 1/3
• Nunca repostar la m_.quina a{ interior de un
local
o Nunca guardar la m&quina o el contenedor
de gasolina donde hay una llama abierta,
chispa o luz piloto como una caldera u otros
dispositivos.
• Nunca Ilenar contenedores en un vehfcuto,
en un cami6n o caravana con un forro de
pl#,stico. Cofocar siempre los contenedores
en el suelo lejos de su vehfculo antes de
Ilenar.
° Quitar equipos que funcionan con gasolina
del cami6n o caravana y repostar en el suelo
Si esto no es posible, repostar dicho equipo
con un contenedor portb,til, m_s bien que con
una tobera de gasolina.
o Mantener la tobera en contacto con el bordo
det dep6sito de carburante o de la apertura
del contenedor siempre hasta terminar el
abastecimiento. No usar un dispositivo de
cierre-apertura de la tobera.
• Si et carburante cae en la ropa que se Ileva,
cambi&rsefa inmediatamenteo
• Nunca Ilenar en exceso el dep6sito de
carburante. Cofocar el tap6n de la gasolina y
apretar de modo seguro_
Vt
e
SERVIClO
Nunca haga funcionar una mb,quina dentro
de un _.rea cerrada..
Nunca haga ajustes o reparaciones mientras
el motor est6 en marcha Desconecte el
cable de la bujia, y mant_ngato a cierta
distancia de 6sta para prevenir un arranque
accidental
o Mantenga fas tuercas y los pernos, espe-
cialmente los pernos del accesorio de la
cuchi!la, apretados y mantenga el equipo en
buenas condiciones..
° Nunca manipule de forma indebida los
dispositivos de seguridad. Controle regular-
mente su funcionamiento correcto,
, Mantenga {a m_.quina libre de hierba, hojas
u otras acumutaciones de desperdicio.
Limpie los derrames de aceite o combustible°
Permtta que la m_.quina se enfrie antes de
almace narla.
,, Pare e inspeccione el equipo si le pega a un
objeto. Rep_reto, si es necesario, antes de
hacerlo arrancar.
, En ning0n caso hay que regular la altura de
las ruedas mientras el motor est#. en march&.
o Los componentes del receptor de la hierba
van sujetos a desgaste, da_,os y deterioro,
que pueden exponer las partes en mow
imiento o permitir que objetos sean dispara-
dos. Controlar frecuentemente y cuando sea
necesario sustituir con partes aconsejadas
por el fabricante
o Las cuchillas de la segadora es!_.n afiladas
y pueden cortar. Cubrir las hojas o Ilevar
guantes, y utilizar precauciones especiales
cuando se efectt_a mantenimiento sobre las
mismas.
° No cambie et ajuste del regulador del motor
ni exceda su velocida&
, Mantener o sustituir las etiquetas de
seguridad e instrucciones, cuando sea
necesario.
_,ADVERTENClA: Este segadora viene equipado con un motor de combusti6n interna y no se
debe usar sobre, o cerca, de un terreno no desarrollado cubierto de bosques, de arbustos o de
c6sped, o menos que el sistema de escape del motor venga equipado con un amortiguador de
chispas que cumpla con las teyes locales o estatales (si existen). Si se usa un amortiguador de
chispas, el operador debe mantenerlo en condiciones de trabajo eficientes.
En el estado de California, ta tey exige 1oanterior (Secci6n 4442 del "California Public Re-
sources Code"). Qtros estados pueden contar con otras leyes parecidas Las ieyes federales
se aptican en ta tierras federales. Su centro de Servicio m_s cercano tiene disponible amor-
tiguadores de chispas para el silenciador (Vea la secci6n de PARTES DE REPUESTO en el
manual ingles det due5o)_
; condiciones
"lga que ser
_ara esconder
Cuando se haga
vesado (en
_adadel primer
; semana a
ur una semana
;te la prdxima
:_sped se
I.
NQmero de Serie:
Fecha de Compra:
Capacidad y Tipo de Gasolina: 1_6 Cuartos (Regular sin Plomo)
Tipo de Aceite (API SG-SL): SAE 30 (Sobre 32°F); SAE 5W-30 (Debajo 32°F)
Capacidad de Aceite: 20 Onzas
Bujia (Abertura: ,030") Champion RJ19HX
Torsi6n del Perno de Ia Cuchilla; 35-40 ft, Ibs.
- El nr_mero del nodelo y el de serie se encuentran en la calcomania adjunta a la parle trasera
de la caja de la segadora, Debe registrar tanto el numero de serie come la fecha de compra y
mantengalos en un lugar seguro para refencia en el futuro,
2"1
Acuerdos de Protecci6n para la Reparaci6n
Congratulaciones per su buena compra. Su
nuevo producto Craftsman® est,. diseSado
y fabricado para funcionar de mode fiabte per
touches ares. Pero come redes los productos,
puede necesftar alguna reparaci6n de tanto
en tanto, En este case tener un Acuerdo de
Protecci6n para ta Reparaci6n puede hacerfes
ahorrar dinero y fastidios.
Cornpre ahora un Acuerdo de Protecaidn para
ta Reparacidn y prot6gese de molestias y gas-
tos inesperados.
Un Acuerdo incluye los puntos siguientes:
• Servicto experto de nuestros 12.000 espe-
ciafistas profesionales en la reparaci6no
o Servicio ilimitado sin cargo alguno para
las pares y fa mane de obra sobre todas las
reparaciones garantizadas,
° Sustituci6n del producto si su producto
garantizado no puede ser arreglado.
° Descuento de110% sobre el precio cor-
riente dei servicio y de las partes relativas al
servicio no cubiertas per el acuerdo; tambi_n
el t0% menos sobre el precio corriente de
un control de mantenimiento preventive.
• Ayuda r_pida per tel6fono - soporte tele-
f6nico per parte de un representante Sears
sobre productos que requieren un arreg!o en
casa, y adem_s una programaci6n sobre los
a regfos m#,s convenientes
Cuande se ha comprado el Acuerdo, basta con
una llamada telef6nica para programar el semi-
CiOoPuede llamar cuando quiera, dfa y noche o
fijar en lfnea una cita para obtener el servicio.
Sears tiene m_s de 12.000 especialistas
profesionales en la reparaci6n, que tienen
acceso a m&s de 4.5 mi!lones de partes y
accesorios de cafidado Este es el tipo de
profesionalidad con que puede contar para
ayudar a alargar ta vida del producto que acaba
de comprar, por muchos aflos, iComp_e hoy su
Acuerdo de Protecci6n para la Reparaci6n[
Se aplican algunas limltaciones y exclu-
siones. Para conocer los precios y tener
m&s informaci6n, Ilame al 1-800-827-6655.
Servicio de lnstalaci6n Sears
Para la instalacidn profesionat Sears de
aparatos de casa, puertas de garaje,
catentadores de agua y otros importantes
art[culos para ta casa, en U..S,A_Itamar a
I_800-4-MY-HOME®,
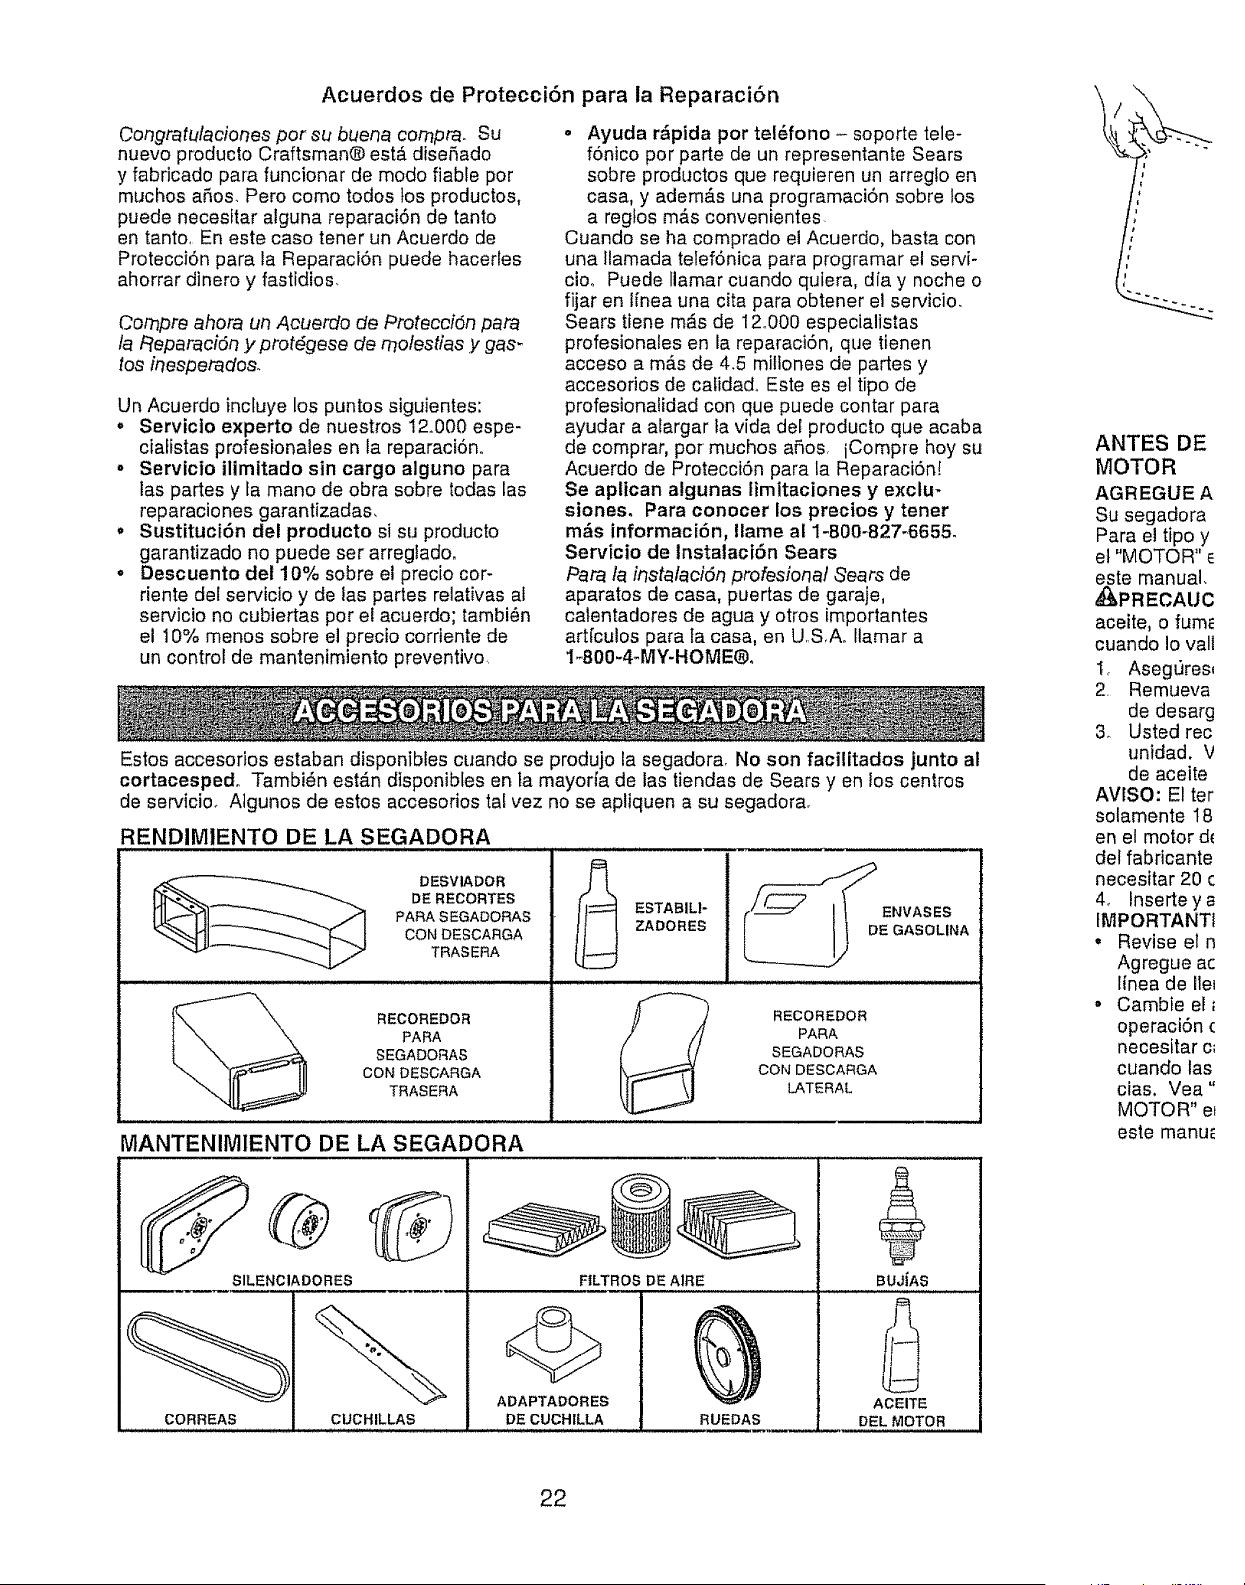
Estos accesofios estaban disponibles cuando se produjo la segadora. No son facilitados junto al
cortacespedo Tambi_n est_.n disponibfes en ta mayoria de las tiendas de Sears yen los centros
de servicio. Algunos de estos accesorios taf vez no se apliquen a su segadora.
RENDIMIENTO DE LA SEGADORA
.................................... i ........... i
DE RECORTES i
ESTABILI- i _ ENVASES :
t conoEso,,RGA11 ,.ou.== lI G,sou.,,
__ RECOREDOR _ 1 RECOREDOR
PARA PARA
SEGADORAS SEGADORAS
CON DESCARGA CON DESCARGA
TRASERA LATERAL
MANTENIMIENTO DE LA SEGADORA
SILENCIADORES
CUOHILLAS
FtLTROS DE A1RE
ADAPTADORES
DE CUCHILLA RUEDAS
BUJIAS
ACEITE
DEL MOTOR
ANTES DE
MOTOR
AGREGUE A
Su segadora
Para el tipo y
el "MOTOR"
este manual.
_PRECAUC
aceite, o fum_
cuando Io vail
1,_ AsegtJrest
2. Remueva
de desarg
3. Usted rec
unidad. V
de aceite
AVISO: El ter
solamente I8
en el motor d_
del fabricante
necesitar 20 c
4_ Inserteya
fMPORTANTt
• Revise el n
Agregue ac
lfnea de Ile_
• Cambie ell
operaci6n (
necesitar c_
cuando las
cias. Vea"
MOTOR" e_
este manu_
22
J
J
I
I
)AR
_ADORA
_era instalada..
arga cerrad&
:-RO -
',era removida,.
lado.
arga cerrada.
_erainstalada.
_instalada..
"_cionar su
._hadora o sin
en su tugar,
)ra cuando se
o cuando se
_uando est,, un
)R DE CESPED
_pedusando el
._.sped,con los
go de la sega-
_a,
ando la vacle;
._sario,
Lea estas instrucciones y este manual completamente antes de tratar de montar u operar su sega-
dora nueva.
IMPORTANTE: Este cortac6sped viene SIN ACEITE O GASOLINA en el motor
Su segadora nueva ha sido montada en fa f_.brica con ia excepci6n de aquellas partes que se de-
jaron sin montar pot razones de envfo. Todas las partes como las tuercas, tas arandelas, los pernos,
etc., que son necesarias para completar el montaje han sido colocadas en la bolsa de partes. Para
asegurarse que su segadora functone en forma segura y adecuada, todas las partes y los artfculos
de ferreterfa que se monten tienen que ser apretados seguramente. Use las herramientas correctas,
como sea necesario, para asegurar que se aprieten adecuadamente
PARA REMOVER LA SEGADORA DE
LA CAJA DE CARTON
1o Remueva las partes sueltas que se incluyen
con la segadora.
2.. Cortelasdosesquinasdetos extremosdelacaja
de cart6n y tienda et panel de] extremo planoo
3o Remueva todo el material de empaque, ex-
cepto la cu5a entre el mango superior y 61
inferior, y la cu5a que sujeta la barra de los
control que exige la presencia del operador
junto con et mango superior,
4. Haga rodar la segadora hacta afuera de ta
caja de cart6n y revfsela cuidadosamente
para verificar si todavfa quedan partes
sueltas adicionales.
COMO PREPARAR SU SEGADORA
PARA DESDOBLAR EL MANGO
IMPORTANTE: Despliegue el mango con
mucho cuidado para no pellizcar o dariar los
cables de control,
1o Levante los mangos basra que la secciSn
del mango inferior se asegure en su lugar,
en la posici6n para segar.
2o Remuevala curia prolectora, levanteta secci6n
del mango superior hasta su lugar en el mango
inferior, y apriete ambas manillas del mango..
3o Remueva la curia del mango que sujeta ]a
barra de los control que exige la presencia
del operador junto con el mango superior.
El mango de la segadora puede ajustarse
segC_nle acomode para segar. Refi_rase a
"AJUSTE DEL MANGO" en la secci6n de
Servicio y Ajustes de este manual.
Barra de
clue sxige la
presencia del
operador
LEVANTAR
PARA MONTAR EL RECOGEDOR DE
C .F-'-SPED
1, Ponga el bastidor del recogedor de c6sped
en fa bolsa del c_sped con la parte rigida
de ta bolsa en la parte inferior, Asegurese
que el mango del bastidor estO en el exte-
rior de la parte superior de la bolsao
2. Deslice los sujetadores de vinilo sobre el
bastidor.
AVlSO" Si !os sujetadores de vinilo est#,n muy
duros, m_talos en agua caliente pot algunos
minutos, Si se moja ta bolsa, d_jela que se
seque antes de usaria,
_>t IVlango del
× bastidordel
recogedor
Sujetadore _rlura
de vinilo del baslidor
PARA INSTALAR LOS ACCESORtOS
Su segadora rue enviada lista para usarse
como una acolchadora de capa vegetal Para
convertirla de modo que pueda ensacar o
descargar, refi_,rase a "PARA CONVERTIR LA
SEGADORA" en la secci6n de Operaci6n de
este manual.
Manitla del
mango
Mango Inferior
23

FAMILIARICESE CON SU SEGADORA
LEA ESTE MANUAL DEL DUENO Y LAS REGLAS DE SEGURIDAD ANTES DE OPARAR SU
SEGADORAo Compare las ilustraciones con su segadora para familiarizarse con la ubicaciSn de
los diversos controles y ajusteso Guarde este manual para referencia en el futuro,
Estos simbolos pueden apareser sobre su segadora o en la titeratura proporcionada con el
produoto. Aprenda y comprenda sus significados,
AI-t'ENCI(_N O MOTOR MOTOR R/_PIDO LENTO ESTRANGU
ADVERTENC1A ENCENDIDO APAGADO LACION
COM-
BUSTIBLE
ACEITE PELIGRO. GUARDE LAS
MANOS Y LOS PIES LEJOS
Barra de
control de la
impulsi6n
Barra de control que exige la
presencia del operador
Manilla del mango
Cord6n
arrancador
Tapa del deposito de
aciete del motor con vari!ia
indicadora de nivel
Recogedor
de
Cebador
Silenciador
Tapa del deposito
de la gasolina
fa
use anteojos
los ojos mienI
haga ajustes,
galas o una n
amplia de sec
COMO USA
VELOC]DAD
La veiocidad
brica para un
no se puede
NTROL D
PRECAU(
exigen que s_
en esta segac
riesgo de lesit
cuchitla, Por
ta funci6n del
gira cuando e
o Su segadol
de controle
operador, h
est_ detr_.s
hacerla arn
PARA EL IMF
• Para comel
levantar la
• Para parar
alivie la bat
IMPORTANTI
siempre ta ba
contra del ma
Filtro de aire
Puerta de la acolchadora Cubierta de
la imputsi6n
Caja Ajustador de
la rueda (en
cada rueda)
tMPORTANTE: Este cortac_sped viene SIN ACEITE O GASOLINA en motor_
CUMPLE CON LOS REQUISITOS DIE SEGURIDAD DE LA CPSC
Las segadoras a motor, que se conducen desde la parte de atr_,s, rotatorias, Sears, cumplen con
los est_.ndares de seguridad del American National Standards Institute y de la U°S..Consumer
Product Safety Commission La cuchilla gira cuando el motor est,. funcionando.
Barra de control que exige la presencla del
operador - tiene que sujetarse abajo, junto
con el mango, para hacer arrancar et motor°
SuSItela para parar el motor.
Cebador - bombea combustible adicionaf
desde el carburador al cilindro para uso cuando
se necesita hacer arrancar un motor frfoo
Puerta de la acolchadora - permite la conver-
si6n para la operaci6n de descarga o ensacado.
Barra de control de la impulsion - se usa
para enganchar la segadora para movimiento
hacia adelante impulsada a motor.
Cord6n arrancador - se usa para hacer ar-
rancar el motor.
24

PARAR SU
a ubtcaci6n de
ionada con el
tGRO, GUARDE LAS
IS Y LOS PIES LEJOS
e
1varilla
fenciador
"" Cubierta de
la imputsi6n
Jstador de
rueda (en
da rueda)
La operaci6n de cualquier
segadora puede hacer que
salten objetos extrafios dentro de
sus ojos, 1oque puede producir
dafios graves en _stos. Siempre
use anteojos de seguridad o protecci6n para
los ojos mientras opere su segadora o cuando
haga ajustes o reparaciones. Recomendamos
gafas o una mascara de seguridad de visi6n
amplia de seguridad usada sobre las gafas.
COMO USAR SU SEGADORA
VELOClDAD DEL MOTOR
La velocidad del motor se estableci6 en la f#.-
bflca para un rendimiento 6ptimo_ La velocidad
no se puede ajustar.
NTROL DE ZONA DEL MOTOR
PRECAUClON: Las regulaciones federates
exigen que se instale un control para el motor
en esta segadora para reducir a un mfnimo el
riesgo de iesionarse debido al contacto con la
cuchilla. Por ning0n motivo trate de elimlnar
la funci6n del control del operadoro La cuchilla
gira cuando el motor est& funcionando.
o Su segadora viene equipada con una barra
de controles que exigen la presencia del
operador, Io que requiere que et operador
est_ detr_s del mango de ia segadora para
hacerla arrancar y operarta.
PARA EL IMPULSION
• Para comenzar la marcha hacia adelante,
levantar la barra de mando hasta el mango.
" Para parar el movimiento hacia adelante,
alivie la barra de control de la impulsi6n_
IMPORTANTE: Durante fa utilizaciSn, guarde
siempre la barra de control de la impu!sion en
contra del mango
Barra con control
que exige la
presencia del
operador
CONTROL DE LA IMPULSION ENGRANCHAR
CONTROL DE LA IMPULSION DESENGANCHADO
PARA AJUSTAR LA ALTURA DE CORTE
Levante las ruedas para el corte bajo y baje las
ruedas para el corte alto., ajuste la altura de
corte para que se acomode a sus requisitos. La
posiciSn del medio es ia mejor para la mayorfa
de los c_spedes.
o Para cambiar la altura de code, empuje la
palanca del ajustador hacia la rueda, Mueva
la rueda hacia arriba o hacia abajo de modo
que se acomode a sus requisitos. Asegt)rese
que todas las ruedas queden igualmente
ajustadas.
AVlSO: Et ajustador esta correctamente
colocado cuando las orejas de la placa est#,n
insertadas en el agujero del mango. Tambi_n,
los aiustes de 9 posiciones (si equipado) per-
miten que el mango pueda ser movido entre [as
orejas de ia placa.
PALANCA HACIA ATRAS
PARA BAJAR EL CORTACI_SPED
PALANC__
Mango,
as
de ia
placa
HACfA
ADELANTE PARA LEVANTAR EL CORTACF_SPED
cumpfen con
Consumer
rmite ta conver-
rga o ensacado..
3n - se usa
a movimiento
or,
_ra hacer ar-
25
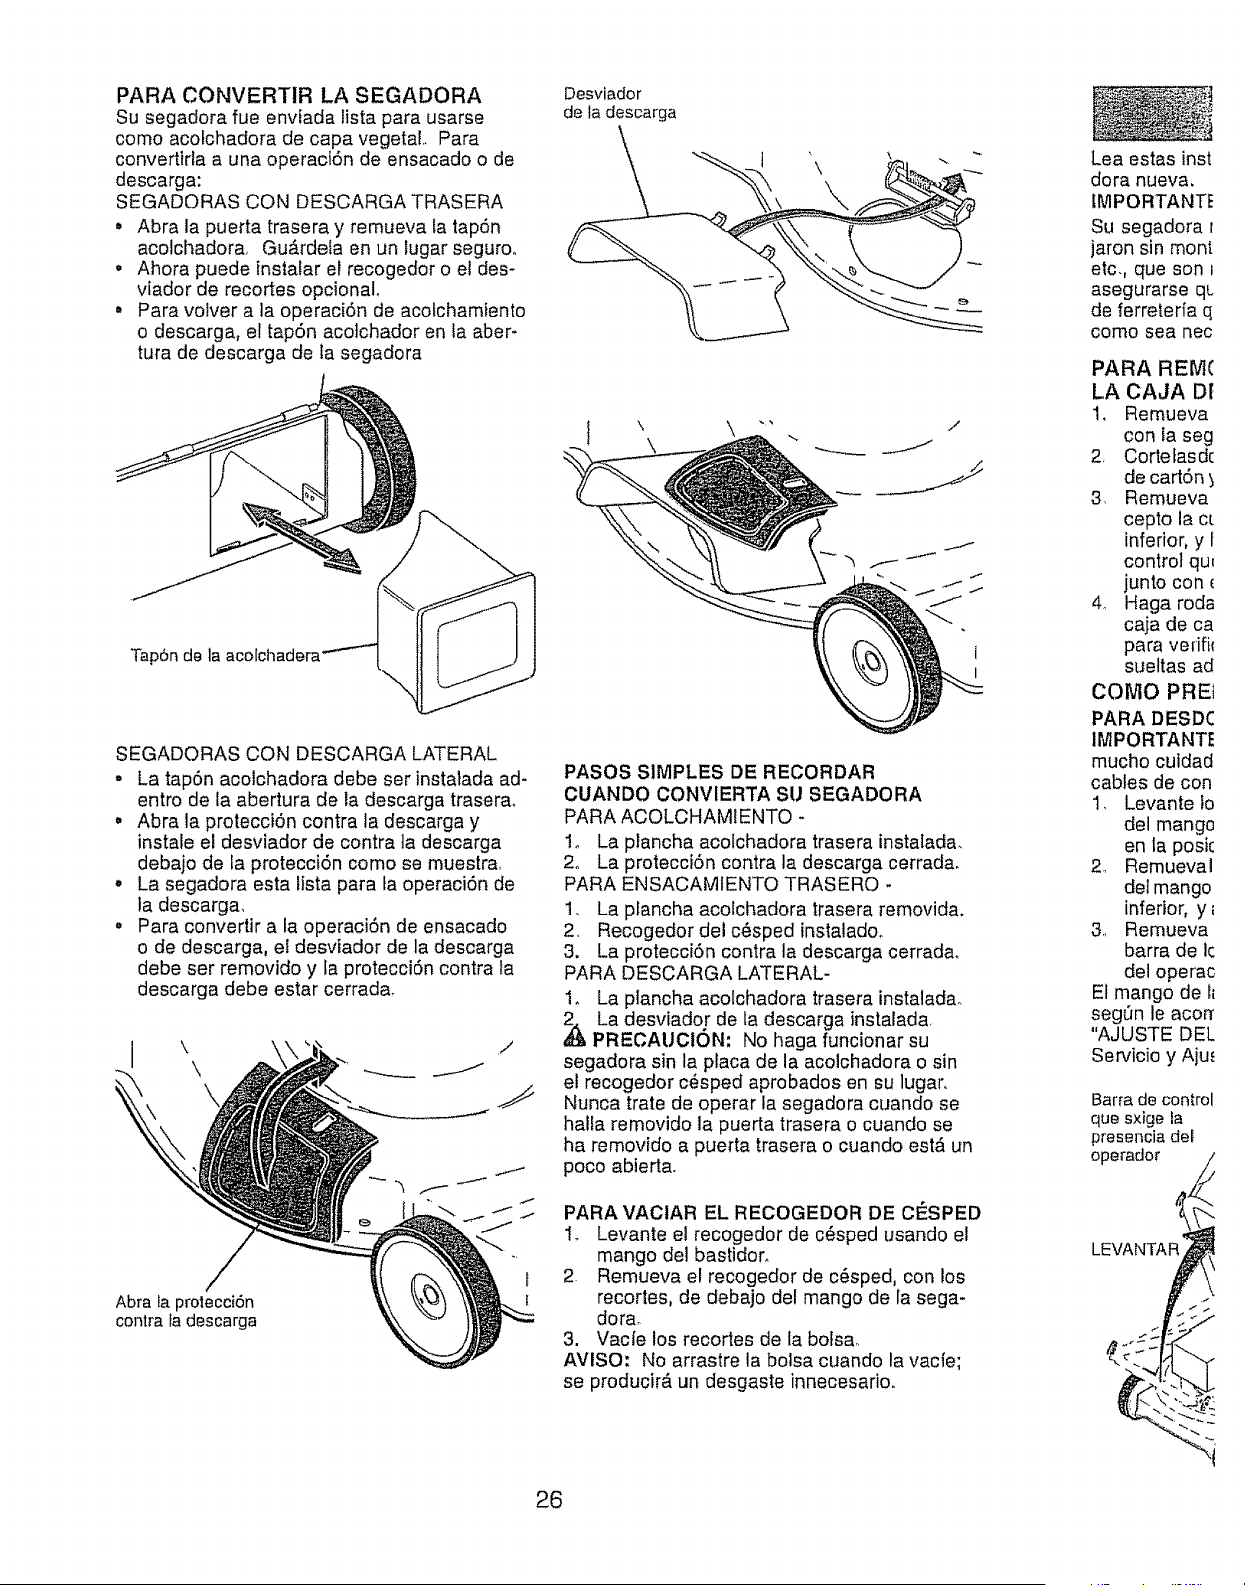
PARA CONVERTIR LA SEGADORA
Su segadora fue enviada lista pare usarse
como acofchadora de cape vegetal Pare
convertiria a una operaci6n de ensacado o de
descarga:
SEGADORAS CON DESCARGA TRASERA
, Abra la puerta trasera y remueva ta tap6n
acolchadora. Gu_.rdela en un lugar seguroo
, Ahora puede instalar el recogedor o el des-
viador de recortes opcionalo
° Pare volver ala operaci6n de acotchamiento
o descarga, el tap6n acotchador en ia aber-
tufa de descarga de la segadora
Tap6n de
SEGADORAS CON DESCARGA LATERAL
, La tap6n acolchadora debe set instalada ad-
entro de ta abertura de la descarga trasera.
• Abra la protecci6n contra la descarga y
instale el desviador de contra ta descarga
debajo de la protecci6n oomo se muestra.
° La segadora esta lista para ta operaci6n de
la descarga.
° Pare convertir ala operaci6n de ensacado
o de descarga, el desviador de la descarga
debe ser removido y la protecci6n contra ta
descarga debe ester cerradar
Abra la prolecci6n
contra la descarga
Desviador
de la descarga
PASOS SIMPLES DE RECORDAR
CUANDO CONVIERTA SU SEGADORA
PARA ACOLCHAMIENTO -
1. La plancha acolchadora trasera instalada.
2o La protecci6n contra la descarga cerrada.
PARA ENSACAMfENTO TRASERO -
1. La plancha acolchadora trasera removida.
2. Recogedor del c_sped instaladoo
3. La protecci6n contra la descarga cerrada.
PARA DESCARGA LATERAL-
1. La plancha acolchadora trasera instalada°
,_La desviador de la descarga instalada,
PRECAUCtON: No haga funcionar su
segadora sin lapiaca de la acolchadora o sin
el recogedor c6sped aprobados en su lugar,
Nunca trate de operar la segadora cuando se
halta removido la puerta trasera o cuando se
ha removido a puerta trasera o cuando est_ un
poco abierta°
PARA VACtAR EL RECOGEDOR DE CF_SPED
1. Levante el recogedor de c#sped usando el
mango del bastidor.
2. Remueva el recogedor de c6sped, con los
recortes, de debajo del mango de la sega-
dora.
3. Vacfe los recortes de la bolsa.
AVISO; No arrastre la bolsa cuando la vacfe;
se producir_, un desgaste innecesario.
Lea estas inst
dora nueva,
tMPORTANTF
Su segadora t
jaron sin mont
etc., que son i
asegurarse qL
de ferreteda q
como sea nec
PARA REM(
LA CAJA D!
1_ Remueva
con Ia seg
2, Cortefasdc
de cart6n
3, Remueva
cepto la ct
inferior, y f
control qut
junto con €
4. Haga roda
caja de ca
para verifi_
sueltas ad
COMO PRE_
PARA DESDC
IMPORTANTE
mucho culdad
cables de con
1, Levante to
del mango
en la posk
2_ Remueval
del mango
inferior, y_
3, Remueva
barra de lc
del operac
El mango de I_
seg_n le acorr
"AJUSTE DEL
Servicio y Aju.,
Barra de control
que sxige la
presencia del
operador
LEVANTAR
26
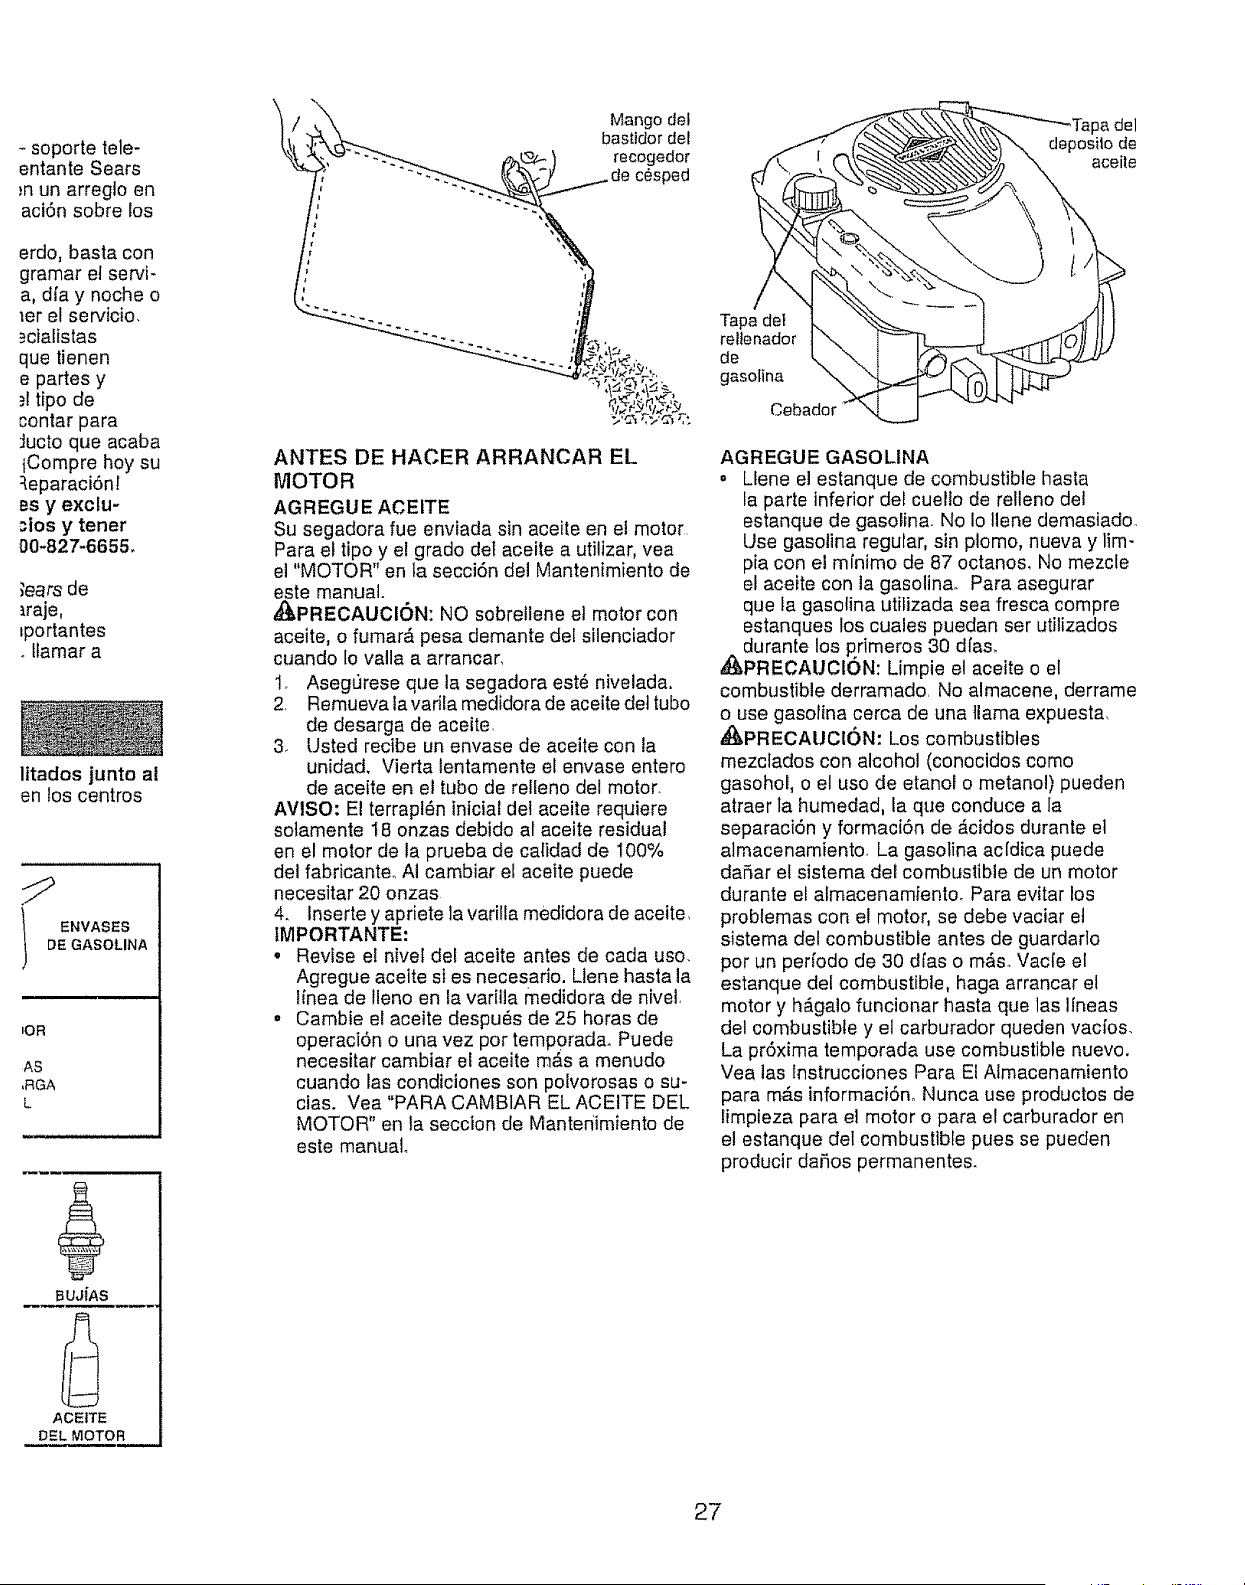
soporte tele-
entante Sears
;nun arregto en
aci6n sobre los
erdo, baste con
gramar et servi-
a, dfa y noche o
_er ei servicio,
_=ctalistas
que tienen
e partes y
._1tipo de
contar para
:lucto que acaba
iCompre hoy su
:{eparaci6n!
Bs y exclu-
=tosy tener
00-827-6655.
_earsde
_raje,
_portantes
otlamar a
litados junto al
en los centros
ENVASES
DE GASOLINA
,
_OR
AS
,RGA
L
BUJiAS
ACEtTE
DEL MOTOR
'_ i "X Mangodel
'_. _._kg--_.--:.-._._.:..._ _,_._L2z.-_ recogedor
,,V_, :\__
ANTES DE HACER ARRANCAR EL
MOTOR
AGREGUE ACEITE
Su segadora rue enviada sin aceite en el motor
Para el tipo y el grado del aceite a utilizar, vea
el "MOTOR" en ta secci6n del Mantenimiento de
este manual.
_I_PRECAUCION: NO sobrellene el motor con
aceite, o fumar& pesa demante del silenciador
cuando to valla a arrancar.
1_ Asegt)rese que la segadora est_ nivelada.
2. Remueva lavarila medidora de aceite det tubo
de desarga de aceite
3. Usted rectbe un envase de aceite con la
unida& Vierta tentamente et envase entero
de aceite en el tubo de relleno del motor.
AVISO: E1terrapl_n inicial del aceite requiere
sotamente 18 onzas debido al aceite residual
en el motor de la prueba de calidad de I00%
del fabricanteo AI cambiar et aceite puede
necesitar 20 onzas
4. Inserte y apriete la varitla medidora de aceite,
tMPORTANTE:
• Revise el nivel det aceite antes de cada uso.
Agregue aceite si es necesario. Liene hasta la
linea de lleno en la varilla medidora de nivel,
= Cambie el aceite despu_s de 25 horas de
operaci6n o una vez por temp0rada. Puede
necesitar cambiar el aceite mb.s a menudo
cuando las oondiciones son polvorosas o su-
clas. Vea "PARA CAMBtAR EL ACEITE DEL
MOTOR" en la seccion de Manterfimiento de
este manual°
Tape del
deposito de
aceite
Tape det
reltenador
de
gasoline
Cebador
AGREGUE GASOLINA
• Llene el estanque de combustible hasta
la parte inferior del cuello de relleno del
estanque de gasolina. No Io Ilene demasiado.
Use gasolina regular, sin plomo, nueva y lim-
pia con el mfnimo de 87 octanos, No mezcle
el aceite con la gasolin& Pare asegurar
que Ia gasotina utilizada sea fresca compre
estanques los cuales puedan ser utilizados
durante los p rimeros 30 dfas,
PRECAUClON: Limpie el aceite o el
combustible derramado. No almacene, derrame
o use gasoline cerca de una llama expuesta.
_PRECAUCl6N: Los combustibles
mezctados con alcohol (conocidos como
gasohol, o el uso de etanol o metanol) pueden
atraer la humedad, la que conduce a la
separaci6n y formaci6n de _cidos durante el
almacenamiento, La gasolina acfdica puede
daP,ar el sistema del combustible de un motor
durante el almacenamiento. Pare evitar los
problemas con el motor, se debe vaciar et
sistema del combustible antes de guardado
por un per[odo de 30 d[as o m,_s. Vac[e el
estanque det combustible, haga arrancar el
motor y h_.ga!ofuncionar hasta que las I[neas
del combustible y el carburador queden vacios.
La pr6xima temporada use combustible nuevo.
Vea las fnstrucciones Pare El Almacenamiento
para m_.s informaci6no Nunca use productos de
limpieza para el motor opara el carburador en
el estanque del combustible pues se pueden
producir da_os permanentes.
27

PARA PARAR EL MOTOR
• Pare parar ef motor, suelte la barra de con-
troles que exigen la presencia del operador,
PARA HACER ARRANCAR EL MOTOR
AVISO: Debido alas capas protectoras del mo-
tor, una cantidad pequefa de humo puede es-
ter presente durente el uso inicial de] producto
y se debe considerar normal.
1 Pare hacer arrancar un motor frlo, empuje
el cebador tres (3) veces antes de tratarlo.
Empuje firmemente. Este paso normal-
mente no es necesario cuando se hace
arrancar un motor que ya ha estado funcio-
nando por unos cuantos minutos,
2. Sujete la barra de controles que exigen ta
presencia del operador abajo en el mango
y tire el mango del arrancador rofipidamente.
No permita que el cord6n arrancador se
devuelva abruptamente.
AVlSO: En climes m_.sfr[os puede que sea
necesario repetir los pesos del cebado. En cli-
mes m#.scalurosos el cebar demasiado puede
producir el ahogo y el motor no va a arrancar,
Si se ahoga el motor espere unos cuantos
minutos antes de tratar de hacerlo errancar y
no repita los pesos del cebado.
CONSEJOS PARA SEGAR
_{_,PRECAUCION: No utilizer dispositivos anti-
paja de la hoja en la segadora ya que estos
accesorios son peligrosos, pueden daRar su
segadora y anutar su garanUa.
• Bajo ciertas condiciones, tel como c6sped
muy alto, puede ser necesario et etevar la
altura del corte pare reducir el esfuerzo
necesado para empujar la segadora y para
evitar sobrecargar el motor, dejando mon-
tones de recortes de c_sped. Puede que sea
necesario reducir la vefocidad de] recorrido
y/o haga funcionar la segadora sobre el #.tea
por segunda vez.
• Pare un corte muy pesado, reduzca el ancho
del corte pasando parcialmente por encima
del lugar anteriormente cortado y siegue
lentamenteo
• Pare un mejor ensacado del c6sped y pare Ea
mayorfa de las condiciones de corte, ia veto-
cidad del motor debe ajustarse ala posici6n
de Ri_,PtDO.
o Los poros en los recogedores de c6sped de
tela pueden llenarse con mugre y polvo con
el uso y los recogedores recaudar#tn menos
c_sped_ Para evitar 6ste, rocfe el recogedor
con la manguera de ague regularmente y
d_jelo secarse antes de usarto
° Mantenga la parte superior del motor, alred-
edor del arrancador, despejada y sin recortes
de c_sped y paja. Esto ayudarb, el fiujo del
aire del motor y extender& su duraci6n
CONSEJOS PARA SEGAR Y ACOL-
CHAR
IMPORTANTE: Para obtener el mejor
rendimiento mantenga la caja de la segadora
sin acumulacion de cesped y basurao Vea
"LIMPIEZA" en la seccion de Mantenimento de
este manual.
° La cuchilla acolchadora especial va a volver
a cortar los recortes de c_sped muchas
veces, y los reduce en tama_,o, de modo que
si se caen en el c_sped se van a dispesar
entre 6ste y no se van a notar. Tambi6n, el
c6sped acoichado se vaa deshacer rApidam-
ente entregando substancias nutritivas pare
el c_spe& Siempre acobhe con la velocidad
del motor (cuchilla) m6s alta, pues asf se
obtendr,_ la mejor acci6n de recorte de las
cuchilfa&
° Evite cortar e] c_sped cuando est_ mojado,
Et c6sped mojado tiende a former montones
e inteffiere con ia acci6n de acolchado
La mejor hora para segar el c6sped es
temprano en Laterde A esa hora _ste se ha
secado y el Area reci6n cortada no quedar#.
expuesta at sot directo,
°Para obtener los mejores resu_tados, ajuste
la altura del corte de la segadora de modo
que 6sta corte sotamente el tercio superior
de las hojas de c6sped. En el caso de que el
c_sped haya crecido demasiado, puede ser
necesario el elevar la altura det code para
reducir el esfuerzo necesario pare empujar la
segadora y para evitar sobrecargar el motor,
dejando montones de recortes de c6sped.
Pare un c6sped muy pesado, reduzca el an-
cho del corte pasando por encima del lugar
antedormente cortado y siegue lentamente_
'MAX 1/3
• Ciertos tipos de c_sped y sus condiciones
pueden exfgir que un Area tenga que set
acolchada por segunda vez para esconder
completamente los recortes. Cuando se haga
el segundo corte, siegue atrevesado (en
forma perpendicular) a la pasada del primer
corte.
o Cambie su patr6n de corte de semana a
semana Siegue de node a sur una semana
y luego cambie de este a oeste ta pr6xima
semana Esto evitar_, que el c_sped se
enrede y cambie de direcci6n
° Nunca repc
local
" Nunce gua
de gasoline"
chispa o lu
dispositivo.,
° Nunca IIen_
en un cami
ptAstico_ C{
en el suelo
Itenar,
• Quitar equi
del cami6n
Si esto no €
con un con
una tobera
• Mantener h
del dep6sit,
del conten_
abastecimi_
clerre-aper
• Si el carbut
cambi_.rsel
° Nunca Ilen_
carburante
epretar de
V, SERVICI(
• Nunca hag_
de un Area
° Nuncahag_
el motor es
cable de la
distancia d{
accidental,
_ADVERTI
debe user sc
c_sped, o m
chispas que
chispas, el o
En e[ estado
sources Coc
se aplican ei
tiguadores d
manual lng!_
NOmero de
Fecha de C
Capacidad ,.
Tipo de Ace
Capacidad t
Bujia (Aberl
Torsi6n del
• El n0mero €
de la caja d
mantengalc
t . ..
28

dad o anteojos
) opere la sega-
kS CUESTAS
s frecuencia en
curren debido a
pueden resultar
_=cortadoraen
traci6n. Sise
no la recorte_
superficie de
y hacta abajo,
ciSn cuando
Jesta&
draflos, tales
)s, baches o
ie la hierba alta
:es, zanjas o
de perder ra
ibrio.
Jo inclinadas,
La reducci6n
zede causar
........PROGRAMADE
MANTENUMRENTO uso
Re..vFsars} hay Sujeladmes Sueltes .............................
S Li,'_p_nrZ),,_pec_on_r_)ae_ogeaor_!JeCa_ped" e"
E Centrolar tos NeurnAlices _'
G Controtar _asRuedas Mortices "*" ................
A Limptar la Segadora "''_'_.......
D Limpiar debaio In Cubierta de la Transmision "*
...... ====
ANTES DESPUES CADA CADA CADA ANTES DEL
DE CADA DE CADA 10 25 HORAS O 100 ALMACE-
USO HORAS TEMPORADA HORAS NAMIENTO
v'
v'
j
iO Revisor los Cerreas y las Poleas [inpulsadas ""
R Re,,i.n,;A[il._,/ C.mbi_,I.'€,,_.i_Jo ......................... e"3
A Lubdcaci6n : V"
L[i'nplnrI Recnrgar la Bated° "; 6/'
Revlsnr el niveI deI Aceite, .............. _5
IV1: Cnmb{ar el Aceffe def molar 1_,2
Oi Umpl.r elFi)l_'° de A;_';......... I_
T tnspeccionar et £1[enciador
O i ,Cambtar la Bujfa .......................
R ICambIare)Cartuch,.!_e..Pap°)de)FimodeAire _#_
Vnolar el stslema dot ca_buran_e
o aSadir un eslabi[izader de carburanie, _/
. (si v_eneequtpsdo) I - Cnmbtnt m_s a menudo cuand° se epe[e bajo cargo pesada o en ambienles con alias lempe_nluras
** Segadoras con Arranq_e Et_ctficL_2 - Oar servicio m&s a menudo cu[_ndo se epern en condicienes sucias o potvorosas
*** 8egadoras con Poder P_opulsor 3 _Cambie las cuchii_as m&s n manudo cuando siegue en left°no arenoso
**** UHliza¢una rasquela #ara timpiar 4 - Cmgnr per 48 horas al [in de la lemporada
debaio _:teIn cl_b{erla d_tlco;ts, c_sped 5 - Y despu6s de 5 horns de funcionar'nier4o
trAgicos si el
a presencia
os se sienten
actividad de
s ni5os van a
:londe los vio
)s del #.rea de
ricto de otra
)in° si hay niflos
liendo, mire
a verificar si hay
operen la m_.-
do se acerque
bilidad, a los
_tos que pueden
in
GASOLINA
_=maneja gaso-
nte inflamable y
;igarros, pipas y
_piado,
asolina o aSadir
}archa, Esperar
de repostar la
RECOMENDAClONES GENERALES
La garant[a de esta segadora no cubre los
artfculos que han estado sujetos al abuso o a
la negligencia del operador Para recibir todo
el valor de la garant[a, et operador tiene que
mantener la segadora seg0n Ias instrucciones
descritas eneste manual.
Hay algunos ajustes que se tienen que hacer
en forma peri6dica para poder mantener su
unidad adecuadamente.
Af menos una vez coda estaciSn comprobar
si es necesario efectuar los ajustes descritos
en tas secciones de Servicio y Ajustes de este
manual,
• Una vez al a5o, cambie la bujia, timpie o
cambie el elemento deI filtro de aire y revise
si la cuchilla °st.5 desgastada. Una buj[a
nueva y un elemento del filtro de °ire timpio/
nuevo aseguran fa mezcla de aire-com-
bustible adecuada y ayudan a que su motor
funcione mejor y que dure mAs_
° Siga et programa de mantenimiento en este
manual.
ANTES DE CADA USO
o Revise el nivel det aceite del motor.
, Revise si hay sujetadores sueltos
LUBRICAClON
Mantenga la unidad bien lubricada
(veala "TABLA DE LUBRICACION")
TABLA DE LUBRICAClON
_) Ajustador
de ia rueda
(_) Aceite det
motor
Bisagra
la puerta
de la acol-
chadora
(_ Bisagra
de la
puerta
traser
L-_ Cfavija de montaje del puntal del mango
_1) Roof° el lubrican'te
(_ Vea "MOTOR" en la seccion de Mantenimiento
IMPORTANTE: No aceite o engrase los roda-
mientos de la rueda de ptastico Los lubricantes
viscosos ate°ran polvo y mugre, to acortara la
duracion de los rodamientos autolubricantes Si
cree que tienen que lubricarse, use Iosamente
un lubricante [ipo crafito, de polvo seco, en
forma moderada.
29
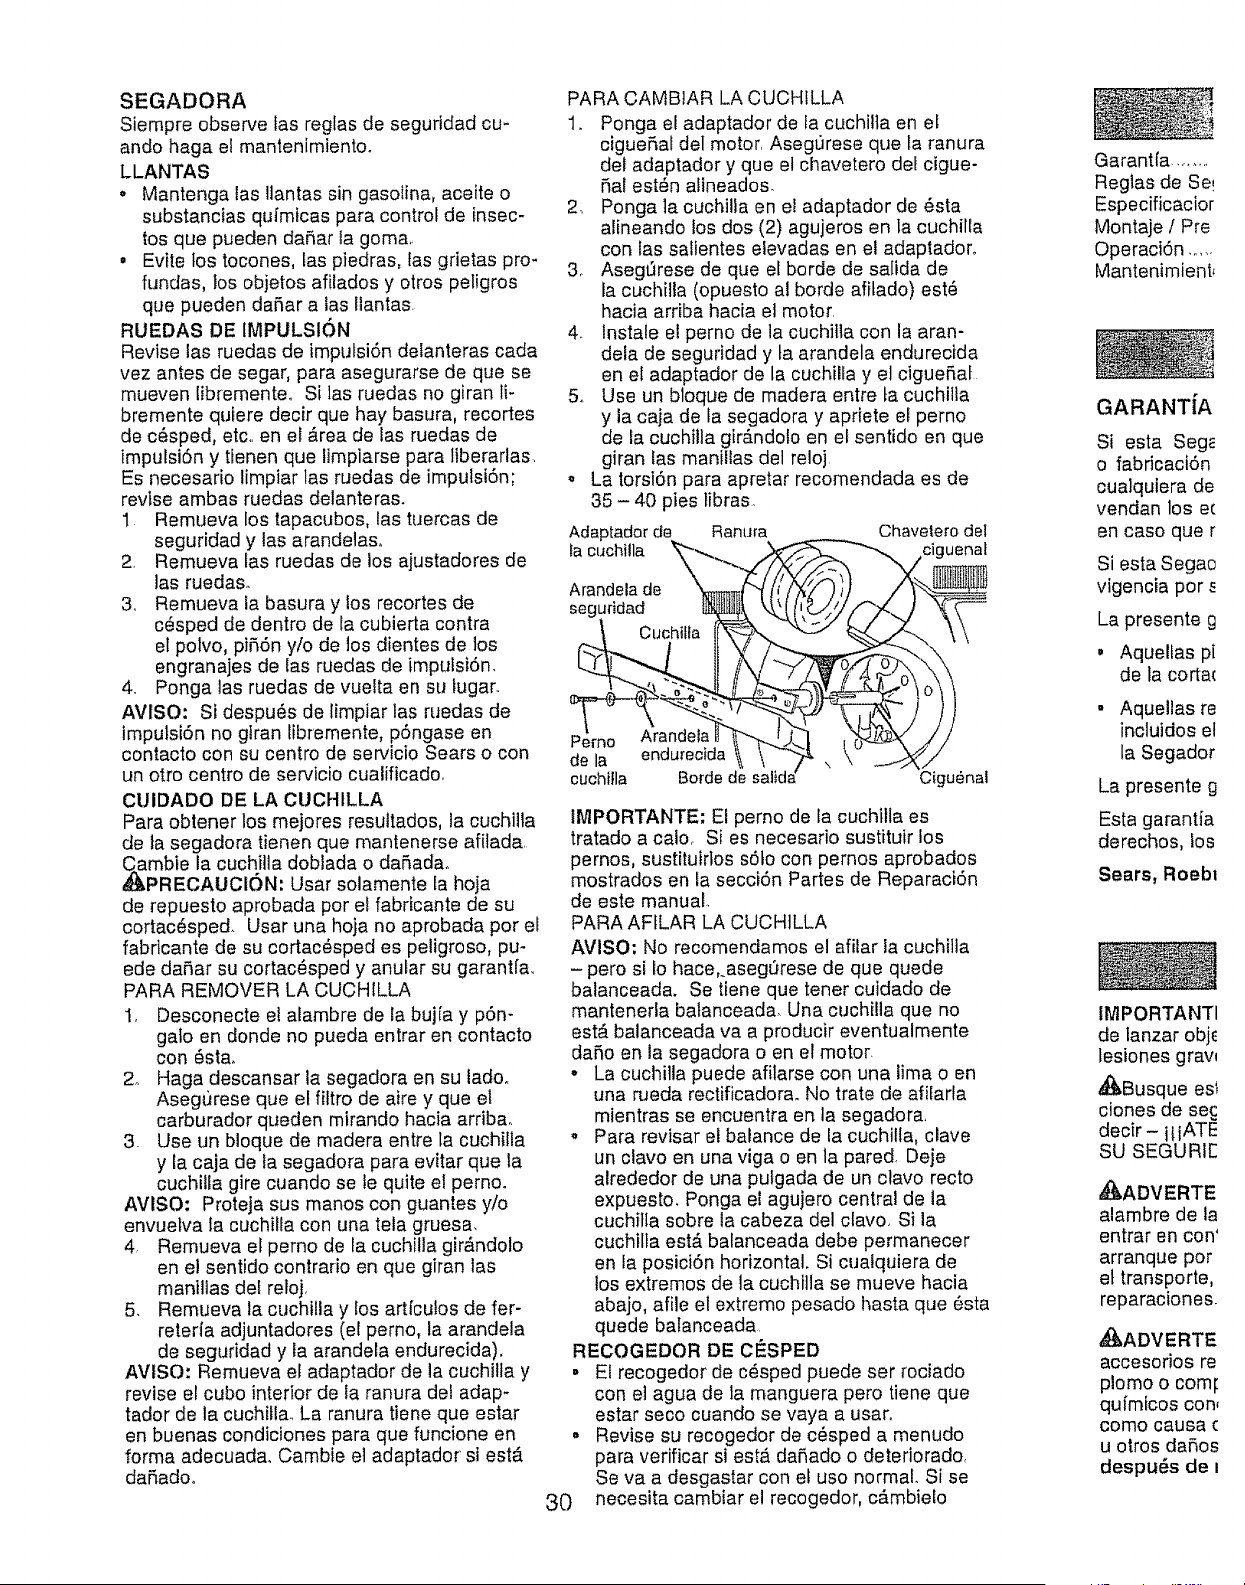
SEGADORA
Siempre observe fas reglas de segufidad cu-
ando haga el mantenimiento.
LLANTAS
• Mantenga las ltantas sin gasotina, aceite o
substancias quimtcas para control de insec-
tos que pueden dahar la goma,.
• Evite tos tocones, fas piedras, fas grietas pro-
fundas, los objetos afilados y otros petigros
que pueden dahar a las Ilantas.
RUEDAS DE IMPULSION
Revise las ruedas de imputsi6n detanteras cada
vez antes de segar, para asegurarse de que se
mueven libremente.. Si las ruedas no giran Ii-
bremente quiere decir que hay basura, recortes
de c6sped, etc. en el _.rea de tas ruedas de
impulsihn y tienen que limpiarse para tiberadas.
Es necesario limpiar las ruedas de impulsi6n;
revise ambas ruedas delanteras.
1 Remueva los tapacubos, las tuercas de
seguridad y las arandelas,.
2, Remueva las ruedas de los ajustadores de
las ruedas.
3. Remueva ia basura y los recortes de
c_sped de dentro de la cubierta contra
el polvo, pih6n ylo de los dientes de los
engranajes de las ruedas de imputsihn.
4. Ponga las ruedas de vuelta en su lugar.
AVtSO: Si despu6s de limpiar las ruedas de
impulsi6n no glran tibremente, phngase en
contacto con su centro de servicio Sears o con
un otro centro de servicio cualificado,
CUIDADO DE LA CUCHILLA
Para obtener los mejores resuttados, la cuchilla
de ta segadora tienen que mantenerse afitada,
Cambie la cuchiIla doblada o daRada.
_PRECAUCi6N" Usar solamente la hoja
de repuesto aprobada por el fabricante de su
cortac_sped. Usar una hoja no aprobada por el
fabricante de su cortac6sped es peligroso, pu-
ede dahar su cortac6sped y anufar su garantla.
PARA REMOVER LA CUCHILLA
1, Desconecte e! alambre de la bujia y p6m
galo en donde no pueda entrar en contacto
con _sta.
2° Haga descansar la segadora en su lado.
Asegt)rese que el filtro de aire y que el
carburador queden mirando hacia arriba.
3. Use un bloque de madera entre ta cuchilla
y la caja de la segadera para evitar que la
cuchitla gire cuando se le quite el perno.
AVISO: Proteja sus manos con guantes y/o
envuelva la cuchilla con una tela gruesa,
4. Remueva el perne de la cuchilla gir_ndolo
en el sentido contrario en que giran las
manillas def reloj.
5. Remueva la cuchilla y los arflcutos de fer-
reterla adjuntadores (el perno, la arandela
de seguridad y la arandela endurecida).
AVtSO: Remueva et adaptador de la cuchilla y
revise el cubo interior de la ranura del adap-
tador de la cuchilta., La ranura tiene que estar
en buenas condiciones para que funcione en
forma adecuada. Cambie el adaptador siestA
dahadoo
PARA CAMB1AR LA CUCH1LLA
1. Ponga el adaptador de ta cuchilta en el
ciguehal del motor. AseglJrese que la ranura
del adaptador y que el chavetero del cigue-
hal est_n aIlneados.
2. Ponga la cuchilla en el adaptador de 6sta
alineando los dos (2) agujeros en la cuchilla
con las satientes elevadas en el adaptadon
3_ Asegt_rese de que el horde de salida de
la cuchilla (opuesto al borde afitado) est6
hacia arriba hacia el motor.
4. lnstate el perno de la cuchitla con la aran-
dela de seguridad y ta arandela endurectda
en el adaptador de la cuchilla y el ciguehaf
5o Use un bloque de madera entre ta cuchilla
y la caja de la segadora y apriete el perno
de la cuchilla girAndoto en el sentido en que
giran tas manillas del reloj.
o La torsihn para apretar recomendada es de
35 - 40 pies libras.
Adaptador de
,a cuchilla _...._
A aod l do /'i
seguridad _,tf_l}l_)_k,._[1[?..////''24,,. j
Pemo _'_._u_!_ _-'_-LJ,.Iir_
cucht_ Bordede salida"
Ranura Chavelero del
ciguenal
Cigu_nal
IMPORTANTE; El pemo de la cuchilta es
tratado a calo. Si es necesario sustituir los
pernos, sustituirtos shto con pernos aprobados
mostrados en la seccihn Partes de Reparacihn
de este manual..
PARA AFtLAR LA CUCHILLA
AVlSO: No recomendamos el afilar la cuchilta
- pero si Io hace,.asegt_rese de que quede
balanceada. Se tiene que tener cuidado de
rnantenerla batanceada. Una cuchiHa que no
est#. balanceada va a producir eventualmente
daho en la segadora o en el motor.
° La cuchilla puede afilarse con una lima o en
una rueda rectificadora. No trate de afilarla
mientras se encuentra en la segadora,
o Para revisar el balance de la cuchitla, clave
un clavo en una viga o en la pared, Deje
alrededor de una pulgada de un clavo recto
expuesto. Ponga el agujero central de ta
cuchilla sobre ia cabeza del clavo. Si la
cuchilla est#. balanceada debe permanecer
en la posicihn horizontal. Si cuaiquiera de
los extremos de la cuchilta se mueve hacia
abajo, afile el extremo pesado hasta que r_sta
quede batanceada
RECOGEDOR DE CESPED
• El recogedor de c_sped puede set rociado
con eI agua de la manguera pero tiene que
estar seco cuando se vaya a usan
• Revise su recogedor de c_sped a menudo
para verificar si esta dahado o deteriorado,
Se va a desgastar con el uso normal. Si se
necesita cambiar el recogedor, c_mbielo
3O
Garantfa ........
Reglas de Se!
Especificacior
Montaje / Pre
Operaci6n ......
Mantenimient,
GARANT[A
Siesta Seg_
o fabdcaci6n
cualquiera de
vendan los e(
en caso que r
Siesta Segao
vigencia por E
La presente g
, Aquellas pi
de la cortac
• Aquellas re
incluidos el
la Segador
La presente g
Esta garantia
derechos, los
Sears,Roebl
IMPORTANTI
de lanzar objE
lesiones gray,
_Busque est
clones de sec
dec#- tlIATE
SU SEGURIE
*_q_ADVERTE
alambre de la
entrar en con'
arranque por
et transporte,
reparaciones
_ADVERTE
accesorios re
plomo o comf
qufmicos con,
como causa (
u otros dahos
despu_s de I

_ss directed
NghL
_ight.
fir filter
e of mower
alking speed.
Tighten
it same
e of
Tighten
or other
,_.center°
1bar to
_=fore
er rope.
or other
center.
_dapter.
ver to cut
I surface.
,=ight
ower housing
Hgher_
tcher.
eight to suit°
Jrive belt.
drive belto
able.
_trolo
Sears
solamente por uno que sea aprobado por e!
fabricante. D_ el numero det mode]o de la
segadora cuando lo ordene.
CAJA DE ENGRANAJES
, Para mantener el sistema de impulsi6n
funcionando en forma adecuada, la caja de
engranajes y el _,rea alrededor de ta imputsi6n
tienen que mantenerse limpias y sin acumu-
laci6n de basura. Limpie debajo de la cubierta
de fa imputst6n dos veces por temporada,
• La caja de engranajes se llena con iubricante
hasta el nivel adecuado en ta f_.brica La
0nica vez que el fubricante necesita atenci6n
es cuando se le ha prestado servicio a la
caja de engranajes.
, Si se necesita lubricante, use solamente
Grasa semi-liquid Total Muttis EP00 o grado
comparable (1 15oz cantidad).
MOTOR
LUBRICACtON
Use solamente aceite de detergente de alta calf
dad clasificado con la clasificaci6n SG-SL de ser-
vicio APL Seleccione la calidad de viscosidad SAE
segun su temperatura de operaci6n esperadao
CALIDADES DE VISCOSIDAD DE SAE
I
i6k,_,4A6E 'TEMPERA_RA ANTIC_P.&DAANTES DEL P66kii_O CAraBaO DE ACE#E
AVlSO: A pesar de que los aceites de multi-
viscosidad (5W30, 10W30, etc.) mejoran el
arranque en clima frio, estos aceites de mul-
tiviscosidad van ha aumentar et consumo de
aceite cuando se usan en temperaturas sobre
32° E Revise el nivel del aceite del motor m#.s a
menudo, para evitar un posible da5o en et mo-
tor, debido a que no tiene suficiente aceite,
Cambie el aceite despu6s de 25 horas de
operaci6n o por Io menos una vez al aRo si fa
segadora se utiliza menos 25 horas el afio.
Revise el nivel de! aceite del c,_rter antes de
arrancar el motor y despu_s de cada cinco (5)
horas de uso continuado, Apriete el tap6n det
aceite en forma segura cada vez que revise et
nivel del aceite.
PARA CAMBfAR EL ACEITE DEL MOTOR
AVlSO: Antes de inclinar la segadora para drenar
el aceite, drene el tanque de combustible hacien-
do correr el motor hasta que el tanque est_ vacio.
I Desconecte ei alambre de la bujia y
p6ngalo de modo que no pueda entrar en
contacto con 6sta,
2. Remueva la tapa del dep6sito del aceite;
d6jela a un lado en una superficie limpi&
3o Incline la cortadora de c_sped por este
costado tal como se muestra y purgue el
aceite en un recipiente idSneo. Mueva la
segadora de arras para adelante para re-
mover todo el aceite que se haya quedado
atrapado dentro def motor
4, Limpie todo el aceite derramado en la sega-
dora y en el lado del motor.
5, Echar aceite despacio en el conducto del
aceite, par_.ndose a intervalos regulares para
controlar el nivel del aceite con la varilla. 31
6. Parar de a5adir aceite cuando se alcanza ta
se5al de Ileno (FULL) en la varitla, Esperar un
minuto para dejar que et aceite se arregle
7. Continue agregando cantidades pequeas
de aceite y vuelva a inspeccionar la varilla
medidora settles del nivel de aciete en lleno
(FULL). NO sobreltene el motor con aceite,
o fumar_, pesa demante det silenciador
cuando 1ovalta a arrancar,
8. AsegQrese de apretar la varilla medidora
del aceite antes de arrancar el motor,
9. Vuelva aconectar el alambre de la bujia a 6sta
Envase
FILTRO DE AIRE
Su motor puede sufrir averias y funcionar de
manera incorrecta con un fittro del aire sucio..
Sustituir el papel del cartucho una vez al a5o
o tras 100 horas de funcionamiento, mAs a
menudo si se utitiza en condiciones de sucie-
dad y polvo particulares.
PARA LIMPIAR EL FILTRO DE AtRE
1_ Suelte el tornitlo e incline la cubierta para
remover]o.
2. Cuidadosamente, remueva el cartucho
3. L[mpielo golpe&ndolo suavemente en una
superficie plana Si est,. muy sucio cambie
el cartucho,
_PRECAUCION: Los sotventes de petr6feo,
tales como el keroseno, no se deben usar para
limpiar el cartucho. Pueden producir el deterioro
de 6ste. No aceite el cartucho No use atre a
presi6n para timpiado o secarto.
4o Instale el cartucho, luego vuetva a poner la
cubierta asegur_ndose que ]as oreJas est6n
alineadas con las ranuras en la plancha
traserao Apriete el tornitlo en forma segura
Labio. | _ Plancha
- _ __ "Orejas de
"Cubierta la cubierta
SILENCIADOR
lnspeccione y cambie el sifenciador si est_ corroF
do puede producir un petigro de incendio y/o da_o.
BUJiA
Cambie el bujla al comienzo de cada tempo-
rada de siega o despu6s de cada i00 horas
de operaciSn, fo que suceda primero_ El tipo de
bujia y el ajuste de la abertura aparecen en "ES-
PECIFtCAClQNES DEL PRQDUCTO" secci6n
de este manual,
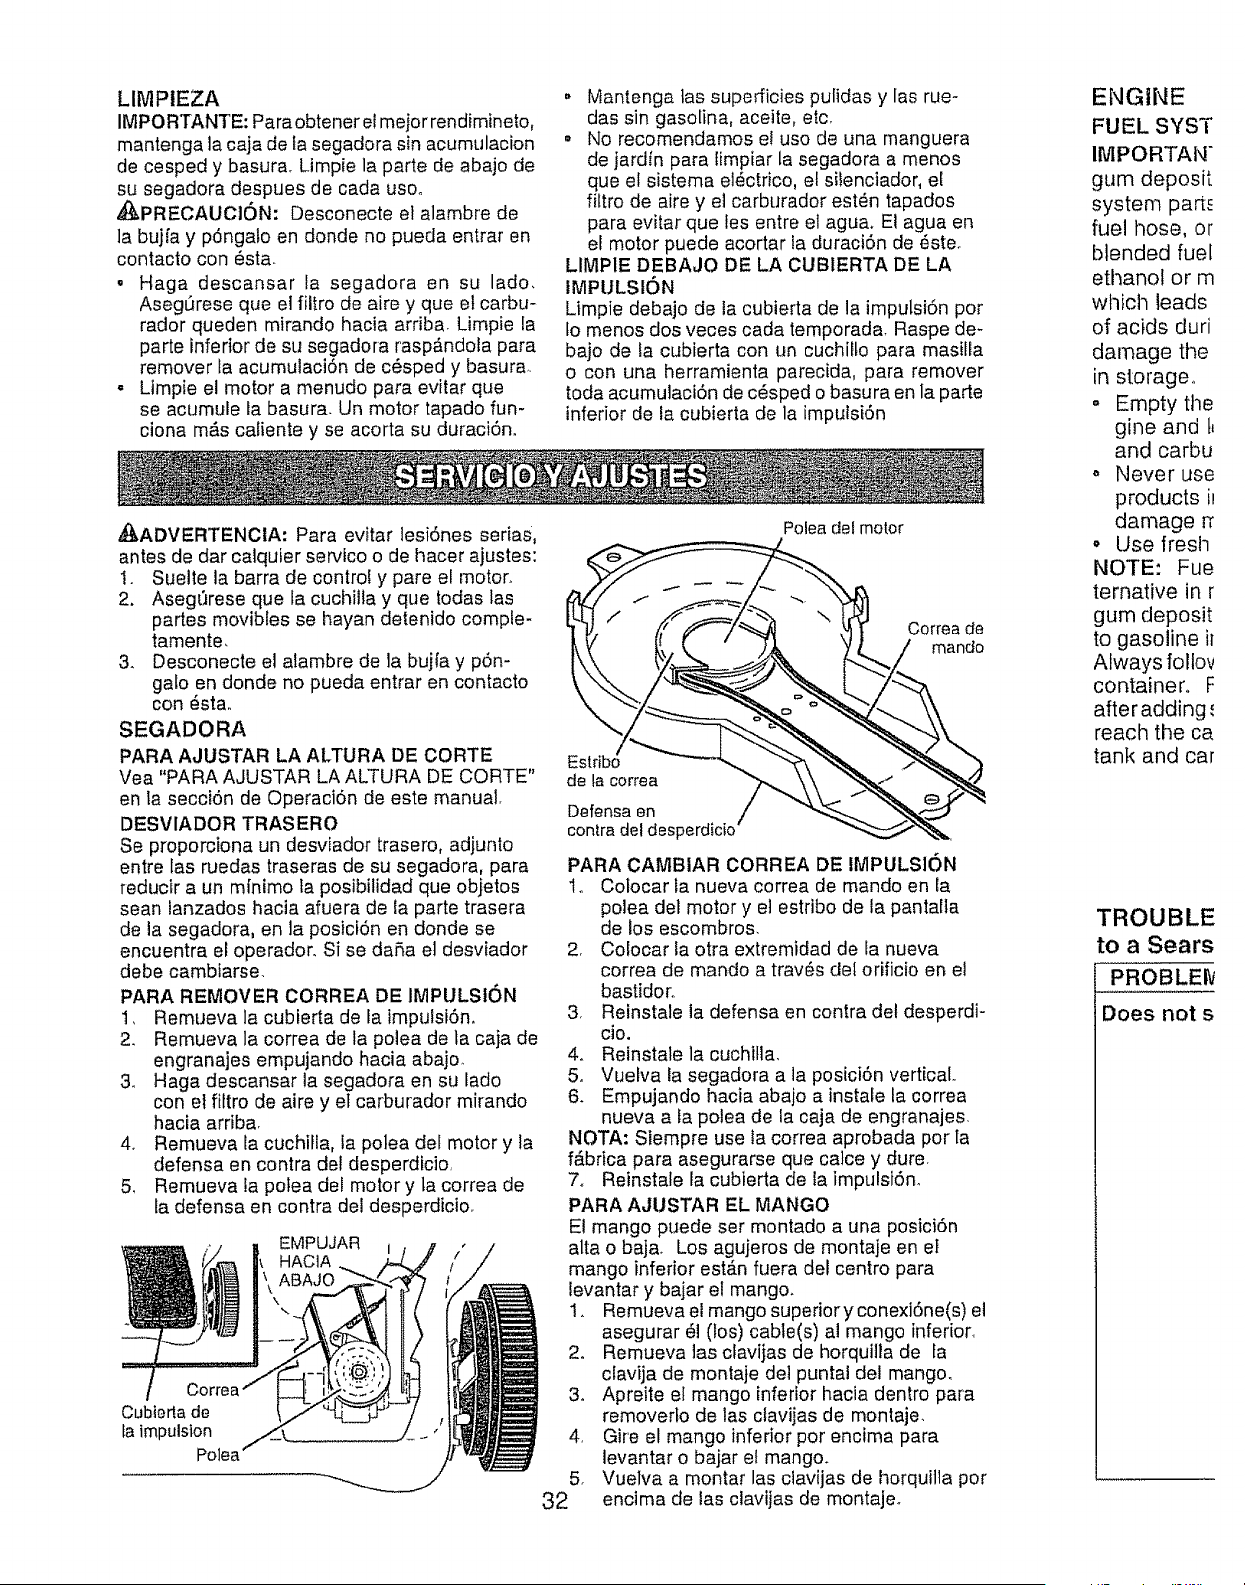
LIMPIEZA
IMPOR1rANTE:Paraobteneretmejorrendimineto,
mantengalacajadetasegadorasinacumulacion
decespedy basura_Limpielapartedeabajode
susegadoradespuesdecadausoo
_PRECAUCt6N:Desconecteetalambrede
la bujfay p6ngatoendondenopuedaentraren
contactocon_sta.
o Hagadescansarla segadoraen su lado,
AsegIJresequeelfiltrodeairey queetcarbu-
radorquedenmirandohaciaarriba,Limpiela
parteinferiordesusegadorarasp,_ndolapara
removerlaacumulaci6ndec6spedy basura..
• Limpieel motoramenudoparaevitar que
se acumule la basura- Un motor tapado fun-
ciona m&s caliente y se acorta su duraci6n.
,_I_ADVERTENCiA: Para evitar lesi6nes serias,
antes de dar calquier ser.4co o de hacer ajustes:
1. Suelte la barra de control y pare el moton
2. Asegt:lrese que la cuchilta y que todas las
partes movibles se hayan detenido comple-
tamente,
3. Desconecte el alambre de la bujia y pSn-
galo en donde no pueda entrar en contacto
con 6sta,,
SEGADORA
PARA AJUSTAR LA ALTURA DE CORTE
Vea "PARA AJUSTAR LA ALTURA DE CORTE"
en la secci6n de Operaci6n de este manual
DESVlADOR TRASERO
Se proporciona un desviador trasero, adjunto
entre las ruedas traseras de su segadora, para
reducir a un minimo la posibilidad que objetos
sean ianzados hacia afuera de ia parte trasera
de la segadora, en la posici6n en donde se
encuentra el operador. Si se da5a el desviador
debe cambtarse.
PARA REMOVER CORREA DE IMPULSION
1, Remueva la cubierta de la impulsiSn.
2. Remueva la correa de la polea de ta caja de
engranajes empujando hacia abajo.
3o Haga descansar la segadora en su lado
con el filtro de aire y et carburador mirando
hacia arriba,
4. Remueva la cuchifla, ta polea del motor y la
defensa en contra del desperdicio,
5, Remueva ta potea del motor y la correa de
la defensa en contra dei desperdicio_
EMPUJAR I
HACIA
CorreE
Cubiertade
faimpulsion
Polea
Mantenga tas superficies pulidas y las rue-
das sin gasolina, aceite, etc.
o No recomendamos el uso de una manguera
de jardin para limpiar la segadora a menos
que el sistema et_ctrico, el silenciador, el
filtro de aire y el carburador est_n tapados
para evitar que les entre el agua. El agua en
el motor puede acortar Ia duraci6n de _ste.
LIIvlP1E DEBAJO DE LA CUBIERTA DE LA
IMPULSI6N
Limpie debajo de la cubierta de la impulsiSn por
fo menos dos veces cada temporada, Raspe de-
bajo de fa cubierta con un cuchilto para masilla
o con una herramienta parecida, para remover
toda acumulaciSn de c6sped o basura en la parte
inferior de la cubierta de la impulsi6n
Polea del motor
Correa de
mando
Estrib(_
de la correa
Defensa en
contra del desperdicio
PARA CAMBIAR CORREA DE IMPULSION
1o Colocar la nueva correa de mando en la
polea del motor y el estribo de la pantalla
de los escombros,
2, Colocar ta otra extremidad de fa nueva
correa de mando a trav_s del orificio en el
bastidor..
3, Reinstale la defensa en contra del desperdi-
cio.
4. Reinstale la cuchilla,
5. Vuelva la segadora a la posici6n vertical,,
6. Empujando hacia abajo a instale la correa
nueva a la potea de la caja de engranajes,
NOTA: Siempre use la correa aprobada por la
f&brica para asegurarse que calce y dure
7o Reinstale la cubierta de la impulsiSn.
PARA AJUSTAR EL MANGO
El mango puede ser montado a una posici6n
alta o baja. Los agujeros de montaje en et
mango inferior est&n fuera del centro para
tevantar y bajar el mango.
1. Remueva el mango superiory conexi6ne(s) el
asegurar 61 (los) cable(s) al mango inferior,
2. Remueva las clavijas de horquilla de fa
clavija de montaje det puntal del mango.
3_ Apreite el mango inferior hacia dentro para
removerlo de las clavijas de montaje.
Gire el mango inferior por encima para
levantar o bajar el mango.
Vuelva a montar las clavijas de horquilla por
encima de las clavijas de montajeo
,
5_
32
ENGINE
FUEL SYST
IMPORTAN"
gum deposit
system part_
fuel hose, or
blended fuel
ethanol or m
which leads
of acids duri
damage the
in storage,
,, Empty the
gine and t_
and carbu
,, Never use
products it
damage rr
,, Use fresh
NOTE: Fue
ternative in r
gum deposit
to gasoline i_
Always follov
container, F
after adding ,,
reach the ca
tank and car
TROUBLE
to a Sears
PROBLEI_
Does not s
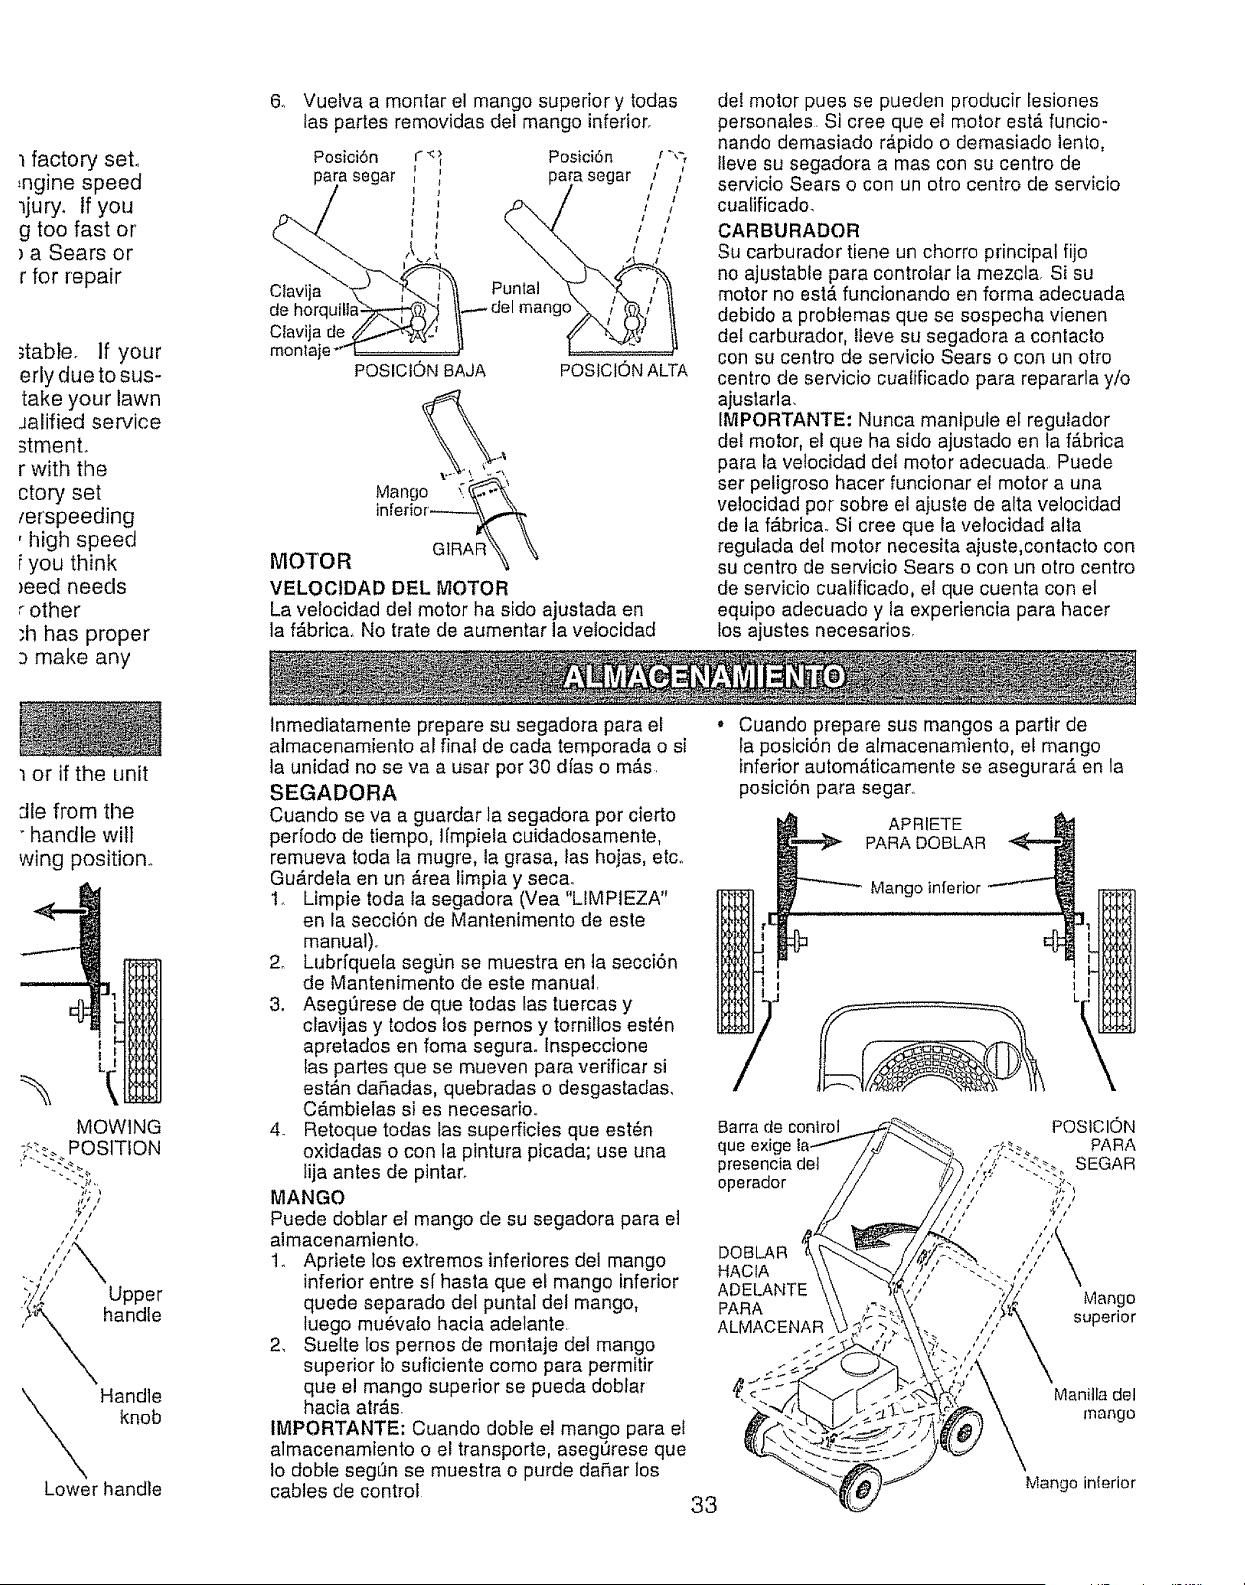
factoryset°
:ngine speed
ljury. If you
g too fast or
) a Sears or
r for repair
_table. If your
erly due to sus-
take your lawn
Jalified service
_tment.,
r with the
ctory set
_erspeeding
, high speed
Fyou think
)eed needs
r other
;h has proper
make any
1 or if the unit
& Vuelva a montar el mango superior y todas
las partes removidas del mango inferiorr
Pomc+6n F Pos+c+6n , + "_
para segar I _ parasegar i ]
/ , _ i / t
U. if ',"
i , 111 /
Claviia _" iL.:_. ;1t Puntal _" N !' _'_
eehomum ' ' ft--'-de maogo&,,' /'
Ctavija de_..1-"_'_' t_ ,/¢/ _.j I
montaje +'-t_ _' ! "'_+
POSICtONBAJA POSICIONALTA
Mango '?._.
inirerior'_
MOTOR
VELOCtDAD DEL MOTOR
La velocidad del motor ha side ajustada en
]a f_.brica+ No Irate de aumentar la ve!ocidad
del motor pues se pueden producir [esiones
personates Si cree que et motor estA funcio+
nando demasiado rApido o demasiado lento,
lleve su segadora a mas con su centre de
sewicio Sears o con un otro centre de servicio
cuafificado.
CARBURADOR
Su carburador tiene un chorro principal fijo
no ajustable para controtar la mezcla. Si su
motor no estfi funcionando en forma adecuada
debido a probtemas que se sospecha vienen
del carburador, lleve su segadora a contacto
con su centre de servicio Sears o con un otro
centre de servicio cualificado para repararla yio
ajustarla.
IMPORTANTE: Nunca manipule el regulador
del motor, el que ha side ajustado en la f_.brica
para la ve!ocidad del motor adecuada.. Puede
set peligroso hacer funcionar el motor a una
veiocidad per sobre el ajuste de alta velocidad
de la ffibrica. Si cree que la velocidad alia
regulada del motor necesita ajuste,contacto con
su centre de servicio Sears o con un otro centre
de servicio cualificado, el que cuenta con el
equipo adecuado y la experiencia para hacer
los ajustes necesarios
die from tile
+handle will
wing position.
1
1
Handle
knob
Lower handle
inmediatamente prepare su segadora para el
almacenamiento al final de cada temporada o si
la unidad no se va a usar per 30 dfas o m#,s.
SEGADORA
Cuando se va a guardar la segadora per cierto
perlodo de tiempo, lfmpiela cuidadosamente,
remueva toda fa mugre, la grasa, las hojas, etc.
Gu_rdela en un #_reaIimpia y secao
1_ Limpie toda Ia segadora (Vea "LIMPIEZA"
en la secci6n de Mantenimento de este
manual).
2_ Lubrfqueta segun se muestra en ta secci6n
de Mantenimento de este manual.
3. AsegQrese de que todas las tuercas y
clavijas y redes los pernos y torniilos est_n
apretados en foma segura, tnspeccione
Ias partes que se mueven para verificar si
est_n da5adas, quebradas o desgastada&
C_.mbielas si es necesario+
4+ Retoque todas las superficies que est6n
oxidadas o con la pintura picada; use una
tija antes de pintaro
MANGO
Puede doblar et mango de su segadora para ei
almacenamiento.
t+ Apriete los extremes inferiores del mango
inferior entre sf hasta que et mango inferior
quede separado del puntaI del mango,
luego mu6va!o hacia adelante
2, Suette los pernos de montaje del mango
superior io suficiente come para permit#
que el mango superior se pueda doblar
hacia atr_,s.
IMPORTANTE: Cuando doble e! mango para el
almacenamiento o el transporte, asegQrese que
Io doble segQn se muestra o purde da5ar los
cables de control 33
Cuando prepare sus mangos a partir de
ia posici6n de almacenamiento, el mango
inferior autom_ticamente se asegurar_, en la
posici6n para segar_,
APRIETE
PARA DOBLAR
Mango inferior
Barra de control
que exige
presencia de]
operador
DOBLAR
HACIA
ADELANTE
PARA
ALMACENAR
POSICION
PARA
SEGAR
¢t 7
Mango
superior
Manilla del
mango
Mango interior
MOTOR
SISTEMA DE COMBUSTIBLE
IMPORTANTE: Es importante evitar que
se formen depositos de coma en partes
fundamentales del sistemade combustible tates
como el carburador, et fittro del combustible,
fa mangura det combustible o en e! estanque
durante el atmacenamiento. Los combustibles
mezclados con alcohol (conocido come
gasohol o que tienen etanol o metanol)
Pueden atraer humedad, Io que conduce a la
separacion y a la formaciSn de acidos durante
el almacenamiento_ La gasolina acida puede
danar el sistema de combustible de un motor
durante el perido de almacenamiento,.
. Vaciar el dep6sito del carburante poniendo
en marcha el motor y dej&ndofo funcionar
hasta que el carburante termine y el
carburador est_ vacfo
• Nunca use los productos para limpieza del
carburador o del motor en et estanque de
combustible pues se pueden producir daSos
permanentes,
• Use combustible nuevo la pr6xima tempo-
rada.
AVlSO: El estabilizador de combustible es una
alternativa aceptable para reducer a un mfnimo
la formaci6n de depSsitos de goma en el com-
bustible durante el perfodo de almacenamlento,
Agregue estabitizador a la gasolina en el
estanque de combustible o en et envase para e!
almacenamiento, Siempre siga la proporciSn de
mezcla que se encuentra en el envase det esta-
bilizador Haga funcionar el motor por Io menos
t0 minutos despuSs de agregar el estabitizador,
para permitir que este llegue at carburadoro No
drene la gasolina del estanque de gasolina y e]
carburador si se est_ usando estabilizador de
combustible,
ACEITE DEL MOTOR
Drene el aceite (con el motor caliente) y c_tmbie[o
con aceite de motor limpio. (Yea "MOTOR" en la
secci6n de Mantenimento de este manual,)
ClLINDRO
1 Remueva la buj[a,
2. Vac[e una onza (29 ml) de aceite a trav_s
del agujero de la bujfa en el cilindro.
3. Tire ta manilla de arranque lentamente unas
cuantas veces para distribuir el aceite.
4. Vuelva a montar la nueva bujia_
OTROS
• No guarde la gasotina de una temporada a la
otr&
° Cambie et envase de la gasolina si se emp-
ieza a oxidar. La oxidaci6n y/o la mugre en
su gasolina producirAn problemas
o Si es posibfe, guarde su unidad en un recinto
cerrado y c_brala para protegerla contra el
polvo y la mugre.
,, Cubra su unidad con un forro protector
adecuado que no retenga la humedad No
use pl#,stico. El plAstico no puede respirar, 1o
que permite la formaciSn de condensaci6n,
lo que producir_ la oxidaciSn de su unidad,
IMPORTANTE: Nunca cubra la segadora
mtentras el motor y las areas de escape todavia
estan calientes..
,_PRECAUCI6N: Nunca almacene la
segadora con gasolina en el estanque dentro
de un edificio en donde los gases pueden
atcanzar una llama expuesta o una chispa,
Permita que se enfde el motor antes de
almacenarla en algun recinto cerrado.
SOLUCiON DE PROBLEMAS * Vea la secci6n apropiada en el manual amenos que
est6 dirigido a un centro de servico Sears.
PROB|.EMA CAUSA
Filtro de aire sucio_
Sin combustible,
Combustible rancioo
Agua en el combustible.
Alambre de la bujfa desconectadoo
No arranca I.
2.
3
4.
5.
6.
7o
&
9.
I0.
11.
12.
Io
2.
3,
44
,,
CORRECClON
Limpie/cambie el filtro de aire.
Llene el estanque de combustible,
Vaciar el estanque y vuelva a Ilenar-
Io con combustible limpio y nuevo_
Vaciar el estanque y vuelva a lfenar-
Io con combustible limpio y nuevo.
Conecte et afambre a la bujfa.
Bujia mala.
Cuchilla suelta o adaptador
de la cuchilla quebrado,
Barra de control en la
posici6n suelta,
Barra de control defectuosa.
V,_tvula del combustible (si equ-
ipada) est,. en la posiciSn OFE
Baterfa d_bi (si equipada).
Desconecte el conector
de la baterfa (si equipada).
64 Cambie la bujia_
7. Apriete el perno de la cuchilta
cambie el adaptador de la cuchitla,
& Presione la barra de control
hacia el mango,
9. Cambie la barra de control.
10, Gire a la v_lvula del combustible
a la posici6n ON
11, Cague ta bated&
I2, Conecte la bater[a al motor,
34
_CAUTIOt_
from spark r:
cannot come
o Clean the
by scrapir
and traslq,
,, Clean ens
accumuia
hotter anc
° Keep finis
of all gasc
,_ WARNIN
before perfo
adjustments
1. Release
2. Make su
parts ha_
3. Disconn_
plug and
come in
LAWN MO
TO ADJUS'I
See "TO AD
the Operatic
REAR DEFI
The rear def
rear wheels
minimize th_
be thrown o_
into the ope
deflector be,
replace&
TO REMOV
1. Remove
2_ Remove
pushing
off pulle_
3. Turn law
filter and
4. Remove
debris st
5. Remove
debris st
Bel!
Drive
cover
Pulley
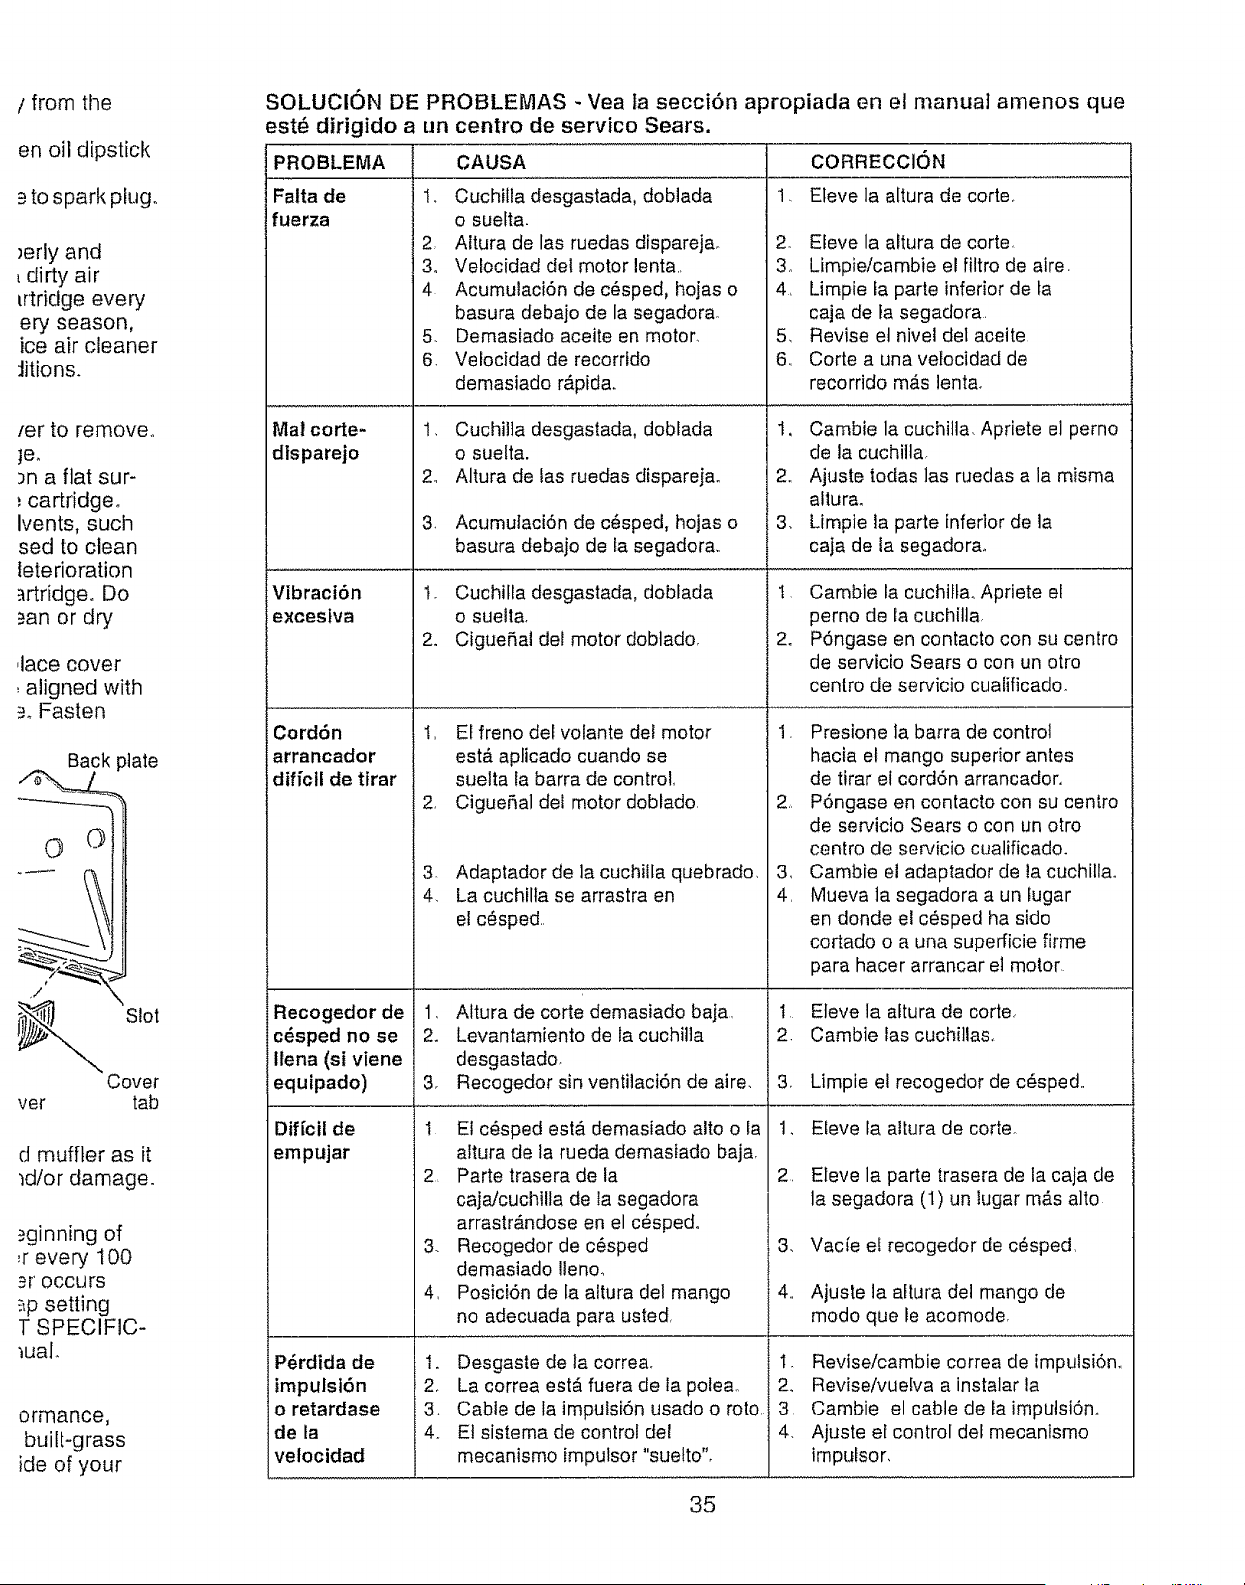
/ from the SOLUClON DE PROBLEMAS - Vea la secci6n apropiada en el manual amenos que
en oil dipstick
to spark plug.
_erly and
dirty air
lrtridge every
ery season,
ice air cleaner
:litions.
[er to remove..
je.
3n a flat sur-
; cartridge°
Ivents, such
sed to clean
Ieterioration
._rtridgeo Do
)an or dry
,lace cover
, aligned with
=._Fasten
Back plate
\\.._ Slot
Cover
ver tab
d muffler as it
_dlor damage.
_ginning of
,r every 100
_r occurs
_p setting
T SPECIFIC-
_ual.
ormance,
built-grass
ide of your
est_ dirigido a un centro de servico Sears.
PROBLEMA CAUSA
Falta de 1. Cuchilla desgastada, doblada
fuerza o suetta.
2 Altura de las ruedas dispareja_ 2.
3o Velocidad del motor lent& 3_
4 Acumulaci6n de c_sped, hojas o 4,
basura debajo de la segadora.
5. Demasiado aceite en motor. 5,
6. Velocidad de recorrido 6,,
demasiado rapid&
Mal eorte-
disparejo
1, Cuchilla desgastada, doblada
o suelta.
2, Altura de las ruedas disparejao
3 Acumutaci6n de c_sped, hojas o
basura debajo de ta segadora,,
CORRECClON
1. Eleve la altura de corteo
Eieve la altura de corte
Limpie/cambie el filtro de aire.
Limpie fa parte inferior de ta
caja de fa segadora,
Revise et nivel del aceite
Corte a una velocidad de
recorrido m&s lenta.
Vibraci6n t. Cuchilla desgastada, doblada
excestva o suelta.
2. CigueSal del motor dobtado,
Cord6n
arrancador
diffcll de ttrar
Recogedor de
c_sped no se
llena (st viene
equipado)
1, Cambie la cuchilla. Apriete el perno
de la cuchilta.
2,, Ajuste todas ]as ruedas a la misma
a!tura.
3. Limpie la parte inferior de la
caja de la segadora_
Dif[cil de
empujar
t, Cambie la cuchiila., Apriete el
perno de la cuchilla
2. P6ngase en contacto con su centro
de servicto Sears o con un otro
centro de servicio cualificado.
1, El freno del volante del motor
est#. aplicado cuando se
suelta la barra de control,
2 Cigue5al del motor doblado,
3. Adaptador de la cuchilla quebrado,
4_ La cuchilta se arrastra en
et c_sped,
1, Altura de corte demasiado baja,
2. Levantamiento de la cuchilla
desgastado_
3_ Recogedor sin ventilaci6n de aire.
I El c_sped est& demasiado alto o la
altura de la rueda demasiado baja.
2, Parte trasera de la
caja/cuchilla de la segadora
arrastr_.ndose en el c_spedo
3. Recogedor de c_sped
demasiado Ileno.
4, Posici6n de la aftura del mango
no adecuada para usted,
Desgaste de la correa.
La correa est& fuera de la poleao
Cable de la imputsi6n usado o roto,
El sistema de control del
mecanismo impulsor "suelto".
I Presione la barra de control
hacia el mango superior antes
de tirar el cord6n arrancador,
2, P6ngase en contacto con su centro
de servicio Sears o con un otro
centro de ser',!icio cualificado.
3, Cambie el adaptador de ia cuchillao
4 Mueva ]a segadora a un lugar
en donde el c_sped ha sido
cortado o a una superficie firme
para hacer arrancar el motor
t Eleve la aftura de corte_
2. Cambie las cuchillas.
3. Limpie el recogedor de c6sped..
1, Eleve la altura de corte.
2, Eieve la parte trasera de la caja de
la segadora (1) un lugar m&s alto
3. Vacte e! recogedor de c6sped,
4,, Ajuste la altura del mango de
modo que le acomode
PSrdida de t. I.
impulsi6n 2_ 2.
o retardase 3. 3
de la 4o 4.
velocidad
Revise/cambie correa de impulsi6n,,
Revise/vuetva a instalar la
Cambie el cable de la imputsi6n_
Ajuste et control del mecanismo
impulsor,
35
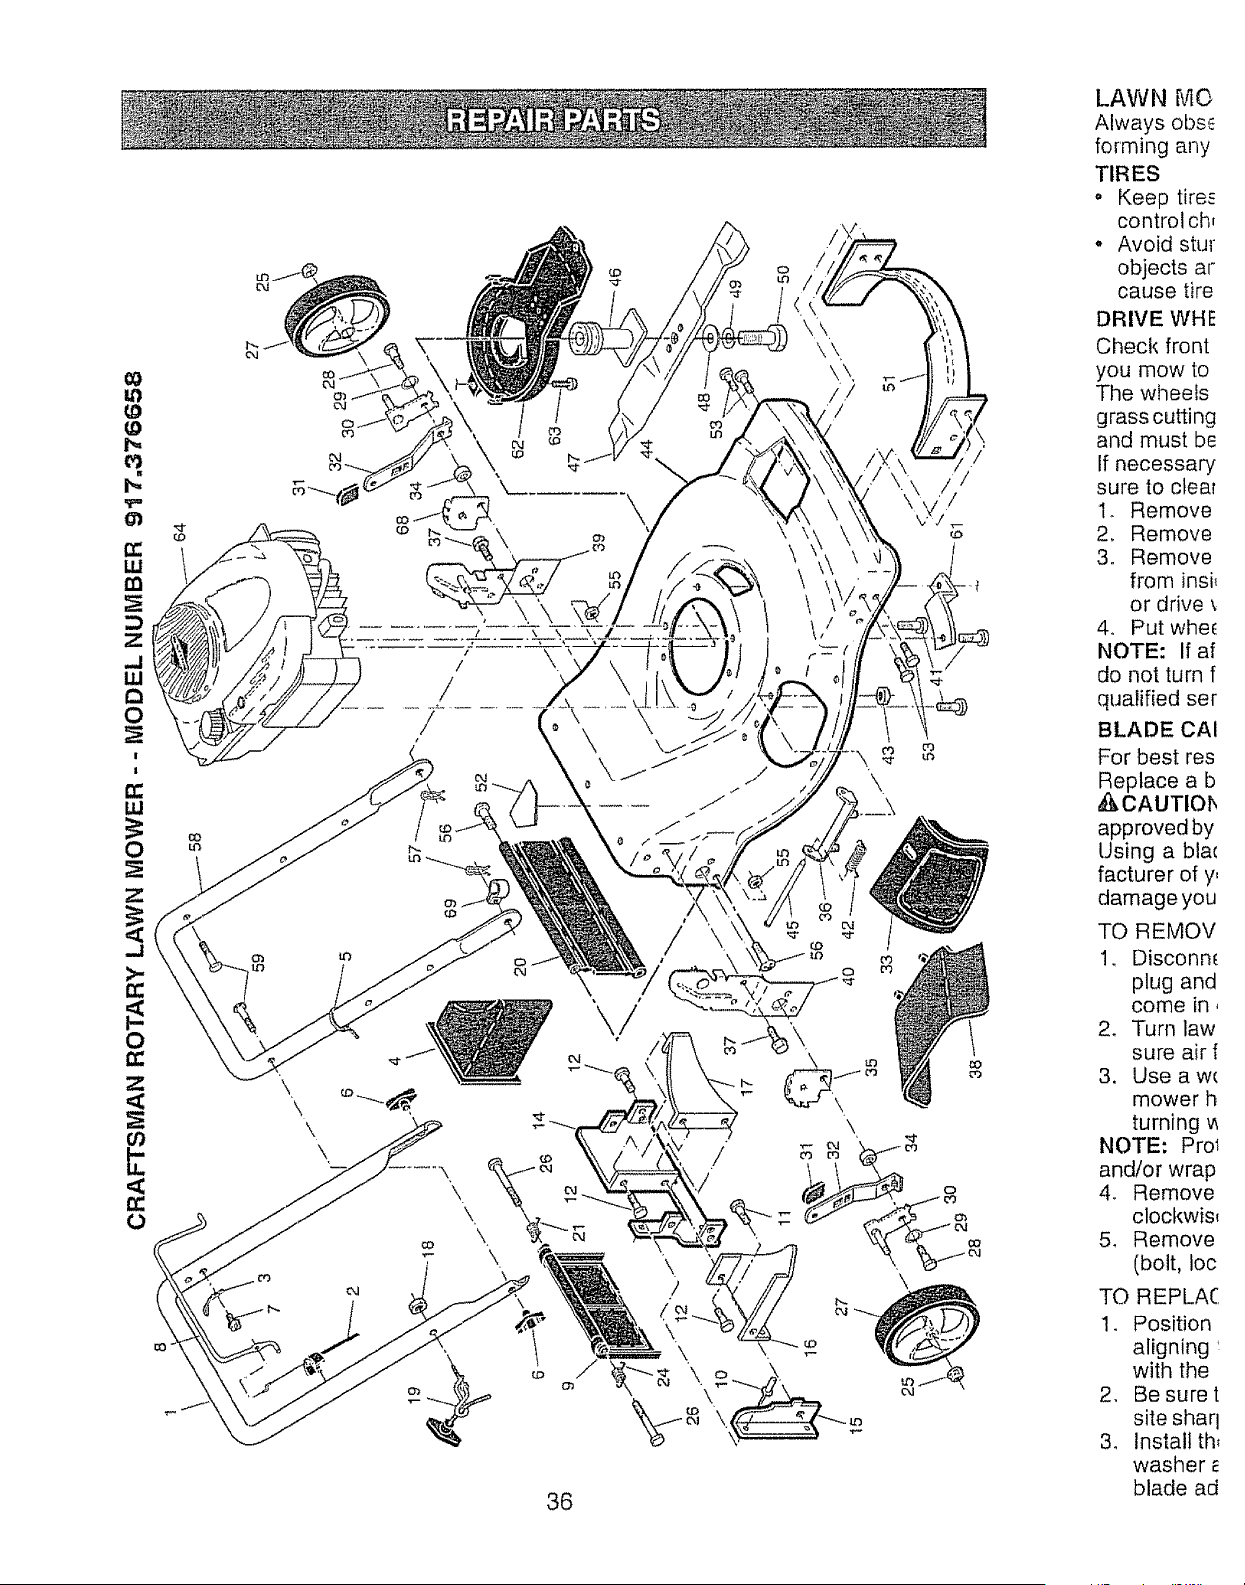
z
.J
ILl
O
;Z
.J
O
Z
03
O
\
\
\.
O
/
/
\X
\\
\\,
//
/
36
LAWN MO
Always obs_
forming any
TIRES
,, Keep tire_
control ch_
o Avoid stur
objects ar
cause tire
DRIVE WHE
Check front
you mow to
The wheels
grass cutting
and must be
If necessary
sure to cteal
1. Remove
2. Remove
3o Remove
from insi_
or drive
4o Put whe_
NOTE: If af
do not turn f
qualified ser
BLADE CAI
For best res
eptace a b
CAUTIOI_
approved by
Using a bla_
facturer of y,
damageyou
TO REMOV
1. Disconn_
plug and
come in,
2. Turn law
sure air f
3, Use aw_
mower h
turning v_
NOTE: Pro_
and/or wrap
4. Remove
clockwis_
5. Remove
(bolt, Ioc
TO REPLAC
1. Position
aligning _
with the
2. Be sure t
site sharl
3. Install th,
washer
blade ad
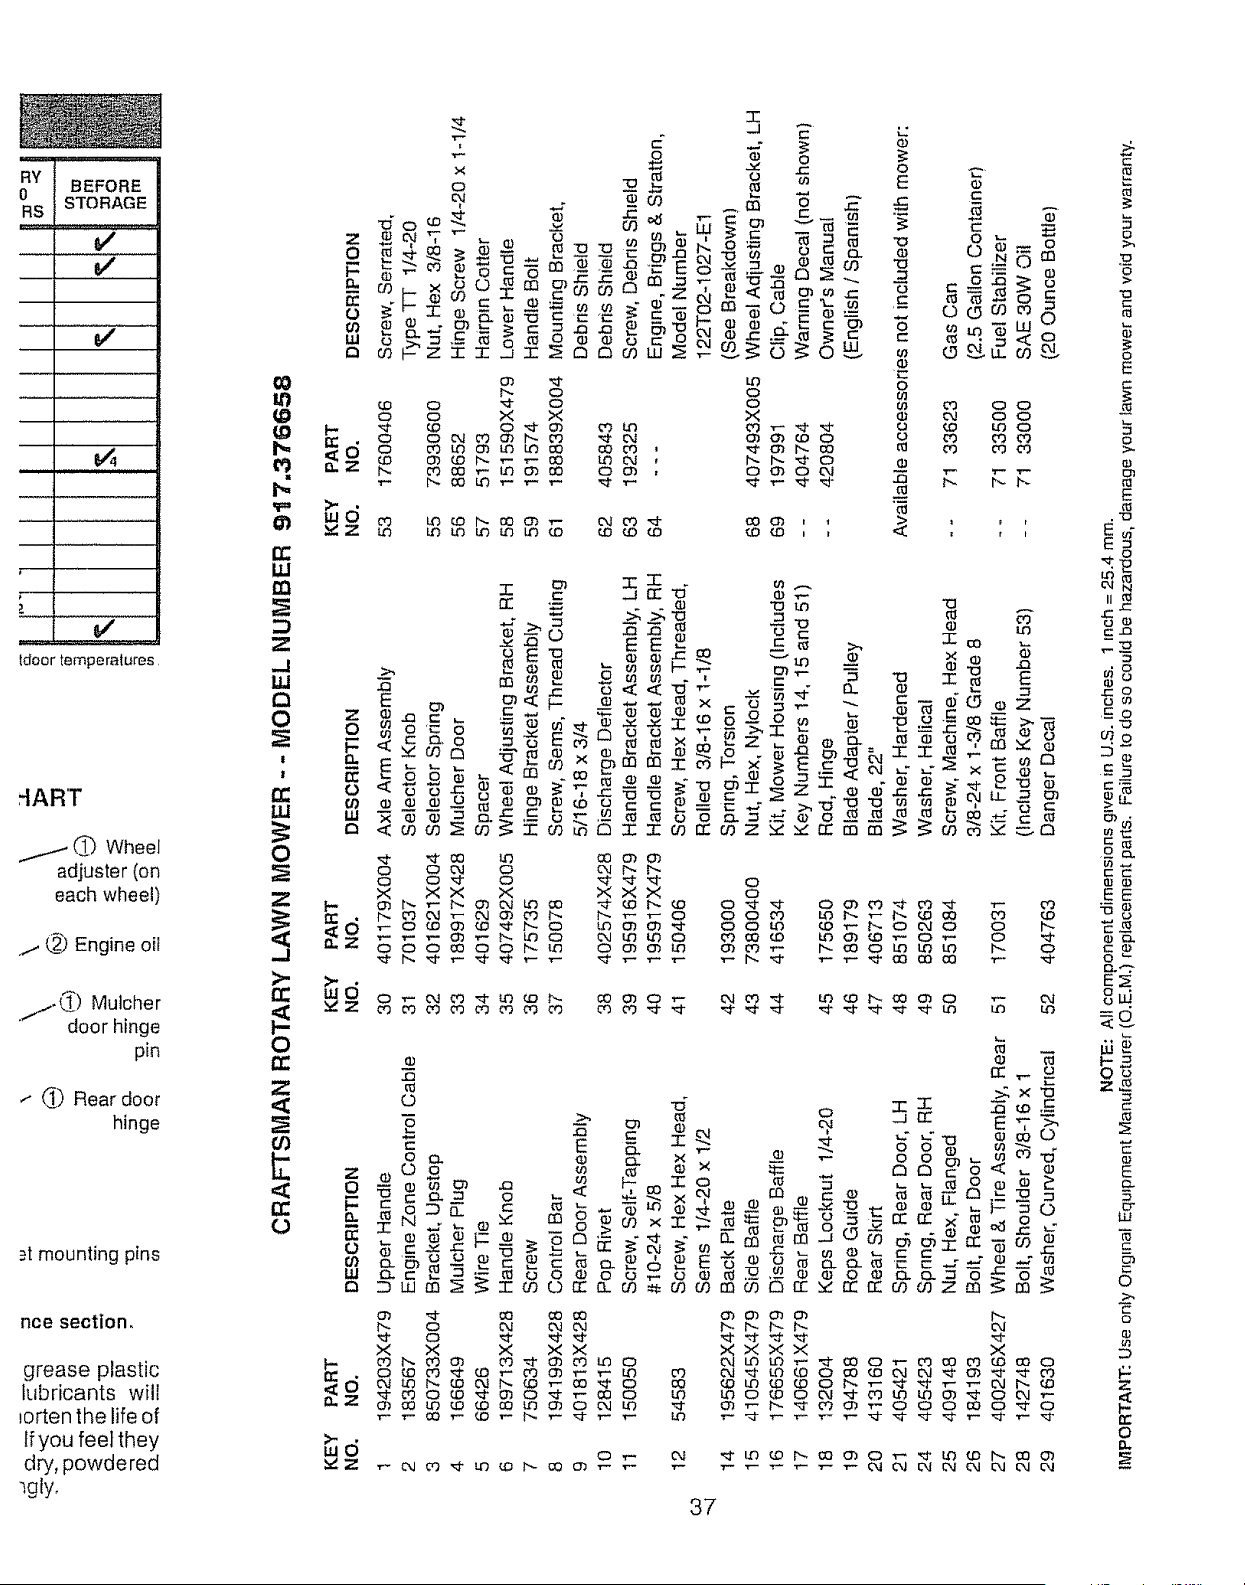
tdeor temperatures,
HART
('_'_)Wheel
adjuster (on
each wheel)
..i (_) Engine oil
1IC) Mulcher
door hinge
pin
i _) Rear door
hinge
_t mounting pins
rice section,
grease plastic
lubricants will
iorten the life of
Ifyou feel they
dry, powdered
lgly,
m
f_
h,
re"
m
m
z
-1
LU
a
0
!
it
ILl
0
Z
-,!
>..
la::
0
im
Z
<
o
"7
x
o
t ._r
do_ 8
z e_'T'- ,.. "_
o _ _=_.,..,_
W ._ N o
Q O0 II JI_
m
_Z
w
o
O _ O
o o X X
_ o_
O o__
T
G::
o_'u
>, ,_
E co co<r c-
O o o =_
_.F"2: ,,. oo,-,,_ _-._
o 8_ o°
o
X XX X
OOO_OO_
_O O___
_Z ___
>.
_ud
0
o
z o_o
r- O.., O
0 _,-x=
m
r-
e
coo
0 _
X X X X
I
r_
03
o2_o3 _rn r-
.c:__ =..E. m
co _co
r-O_ ,-_
o
o
x
_@ _,_
_ _,,
)<
CO
"7
ix:
03
EE2:_
@ @
N11z_e_
Dm r_ :I:: m
o_ 03
o
LL
03
0 _,,
E 03
0 _ 0
03 t) N __] rrl
N c:=_
r'.
o_ 8
03
o
ul
fit 03 o o
1 r I
03 _
_ O3
03 X
,- _ "o I rd
,_ _ n 03
2 'r""
m °?,m x: m
-o_ NN___
x:_rr NN_ _:m_ca
_ o
_ O_
_O OO_
__ OO_
O_ _
_O_ _
#- =o
CO
co o_
('4
x x
LO o3 ¢,J
T'" 03 O h'3 LO
O041.0 _d" O_
O _-* 04 "45"
37
O__ _
_ _O O
__O_ O
03 _d
rr,__
_×"O
O II "_ t,O ,L::_
£4 _a:: e,.Tr _
D_c _Crr_Zm N
XXX X
_O___
__OOO_O_O
__O_ __
c
i..
_u
o
o
>
x3
o
E
o
t11
m
E
E
u_
r-o
,-. o
COo
c_
>
r- _
mm
EE
g_
E_
8_
E
©
Q
m
0
D..
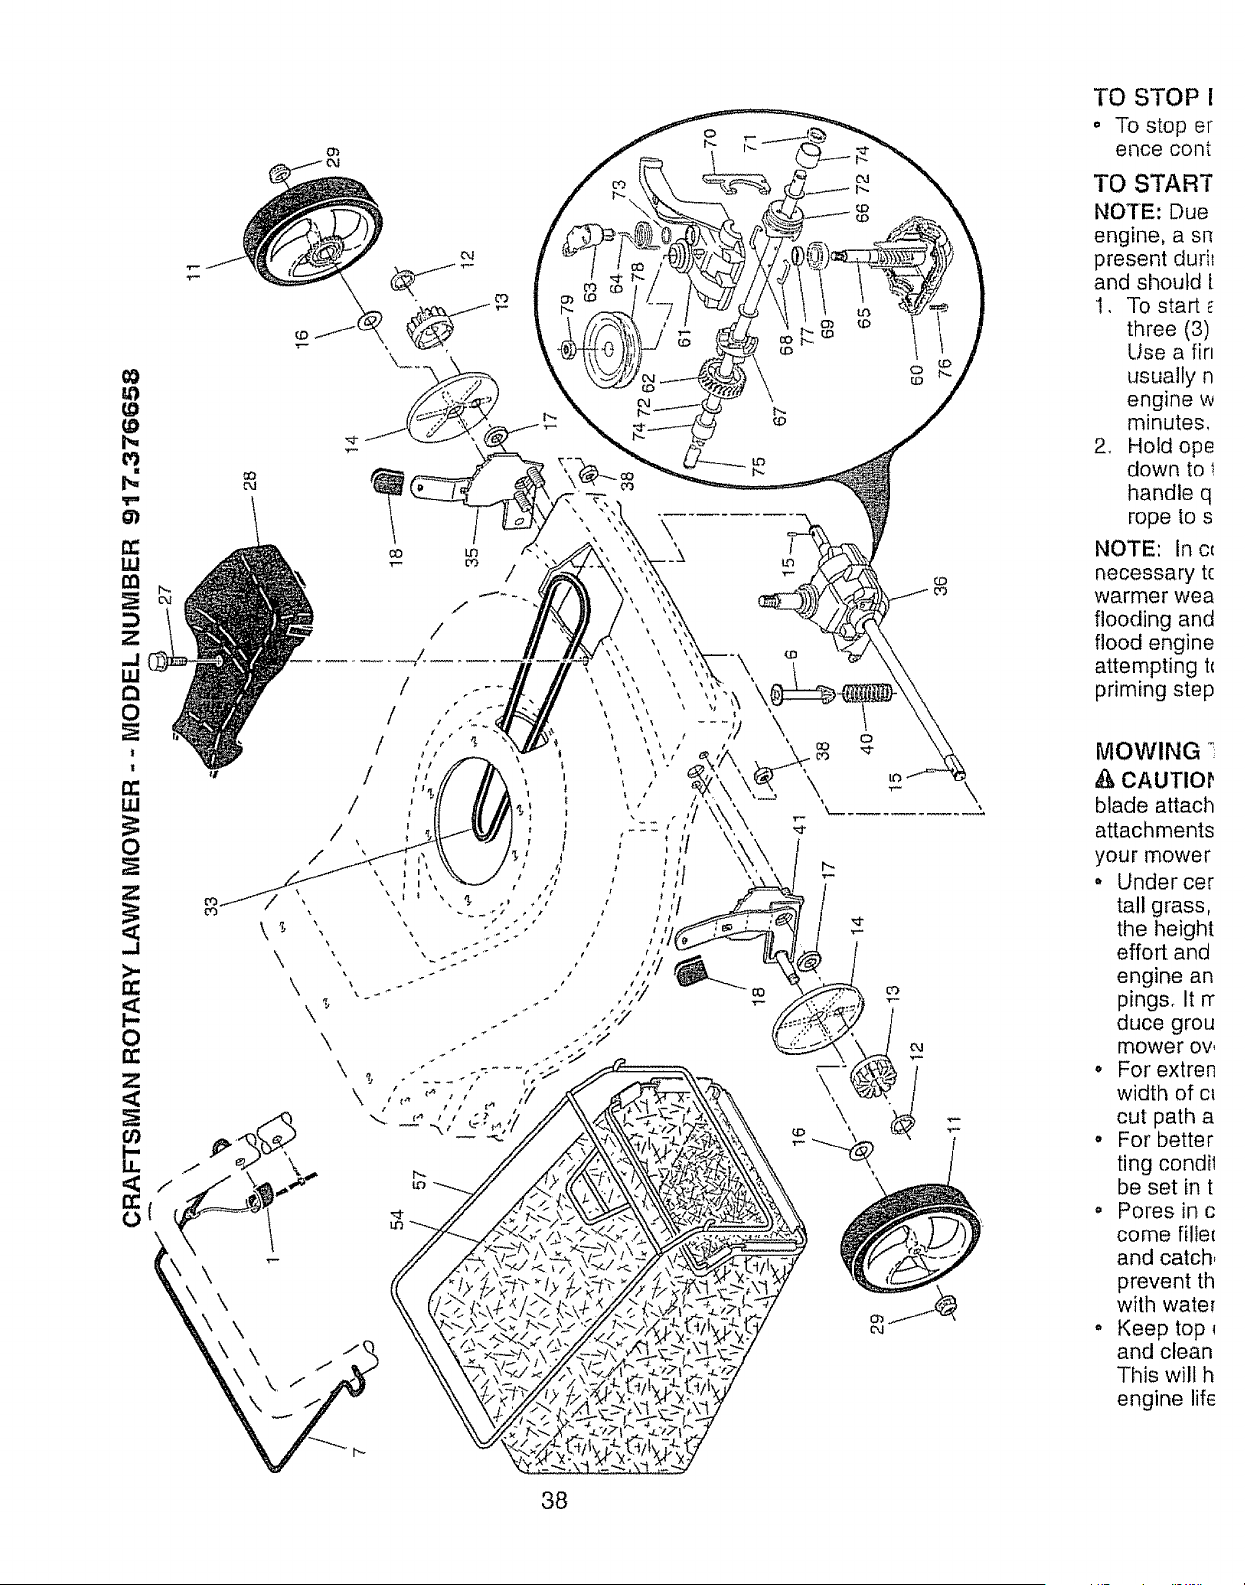
38
TO STOP I
o To stop er
ence COl'l[
TO START
NOTE: Due
engine, asn
present duri_
and shoutd [
!. To start
three (3)
Use a fin
usually n
engine w
minutes,
2. Hold ope
down to I
handle q
rope to s
NOTE: In c_
necessary tc
warmer wea
flooding and
flood engine
attempting t_
priming step
MOWING _
_k CAUTIOn'
blade attach
attachments
your mower
° Under cer
tall grass,
the height
effort and
engine an
pings. It rr
duce grou
mower ov,
° For extren
width of c_
cut path a
° For better
ting condi_
be set in t
o Pores in c
come fille_
and catch,
prevent th
with wate_
° Keep top
and clean
This will h
engine life

_nkfiller neck.
clean,regular
ninimumof
with gasoline.
;that can be
ure fuel fresh-
spilledoi! or
e gasoline
ed fuels
{nolor metha-
._hleadsto
_cidsduring
_agethe fuel
storage,.To
ue!system
)[age of 30
_stank, start
thefuel lines
sefreshfuel
)structionsfor
r use engine
ts in the fuel
nayoccur.
oO
m
n.,
w
rn
z
u.l
m
0
I
U4
0
Z
.J
>.
n"
P
0
Z
,<
03
n-
O
.c_ 03
o _'--_ .o- = -_ _ _o_
- _J_ _ _ _ o_ >
wd
_Z
z
F-
n-
O
O3
W
13
wd
_z
1:3
.cr o
-;" kr_
E _.
O_ ,r,,-
w m
o"
oD
m N
N o.
_ o
O r0
Z_
0 x
'*o
= *d o m
___ u_ _ '- o
r_ r_ _ o JO0 _ fro0
E E z og _. _ >,
F- p- ' <
1D >, O_ t,,O _ _'* (1)
> _- o::l 0 - (D O.) _ O_ _ _
> 03
_ o
XX_ X o
__0__ _ _00_
_0_0__ _ _ __ 0
_0_
0
0
>
o
m
,'t3
u_
,'O
.2_u-
ID ID
r_-,
z_
01
12L
o
r-
121
ffl
o
39

BRIGGS & STRATTON 4-CYCLE ENGINE MODEL NUMBER 122T02-1027-E1
5O
383
7
635
5
[133o.EPA,RMANUAq I_8
306
TO CONVE}
Your' lawn IT
used as a m
or dischargil
REAR BAGI
o Open real
plug. Sto
place°
° You can r
optional c
o To conver
operation_
discharge
Mulch
SIDE DISCt
o Mulcher p
discharge
° Open mul
charge de
° Mower is
operation
° TO conve[
operation,
removed ;
I \
Open mulche
40

_AGED
dGAGED
3HT
t lower wheels
:ight to suit
_osition is
, squeeze ad-
L Move wheel
tuirements° Be
same setting°
_ositioned
_le in lever.
so equipped)
_etween the
ate tab
AOWER Lever
BRIGGS & STRATTON 4-CYCLE ENGINE MODEL NUMBER 122T02-1027-E1
425
968
445
443_,
977 CARBURETOR
GASKET SET
t59_
97o%
29
163_
1°3
130 95 (,_
617
137
I
4'I
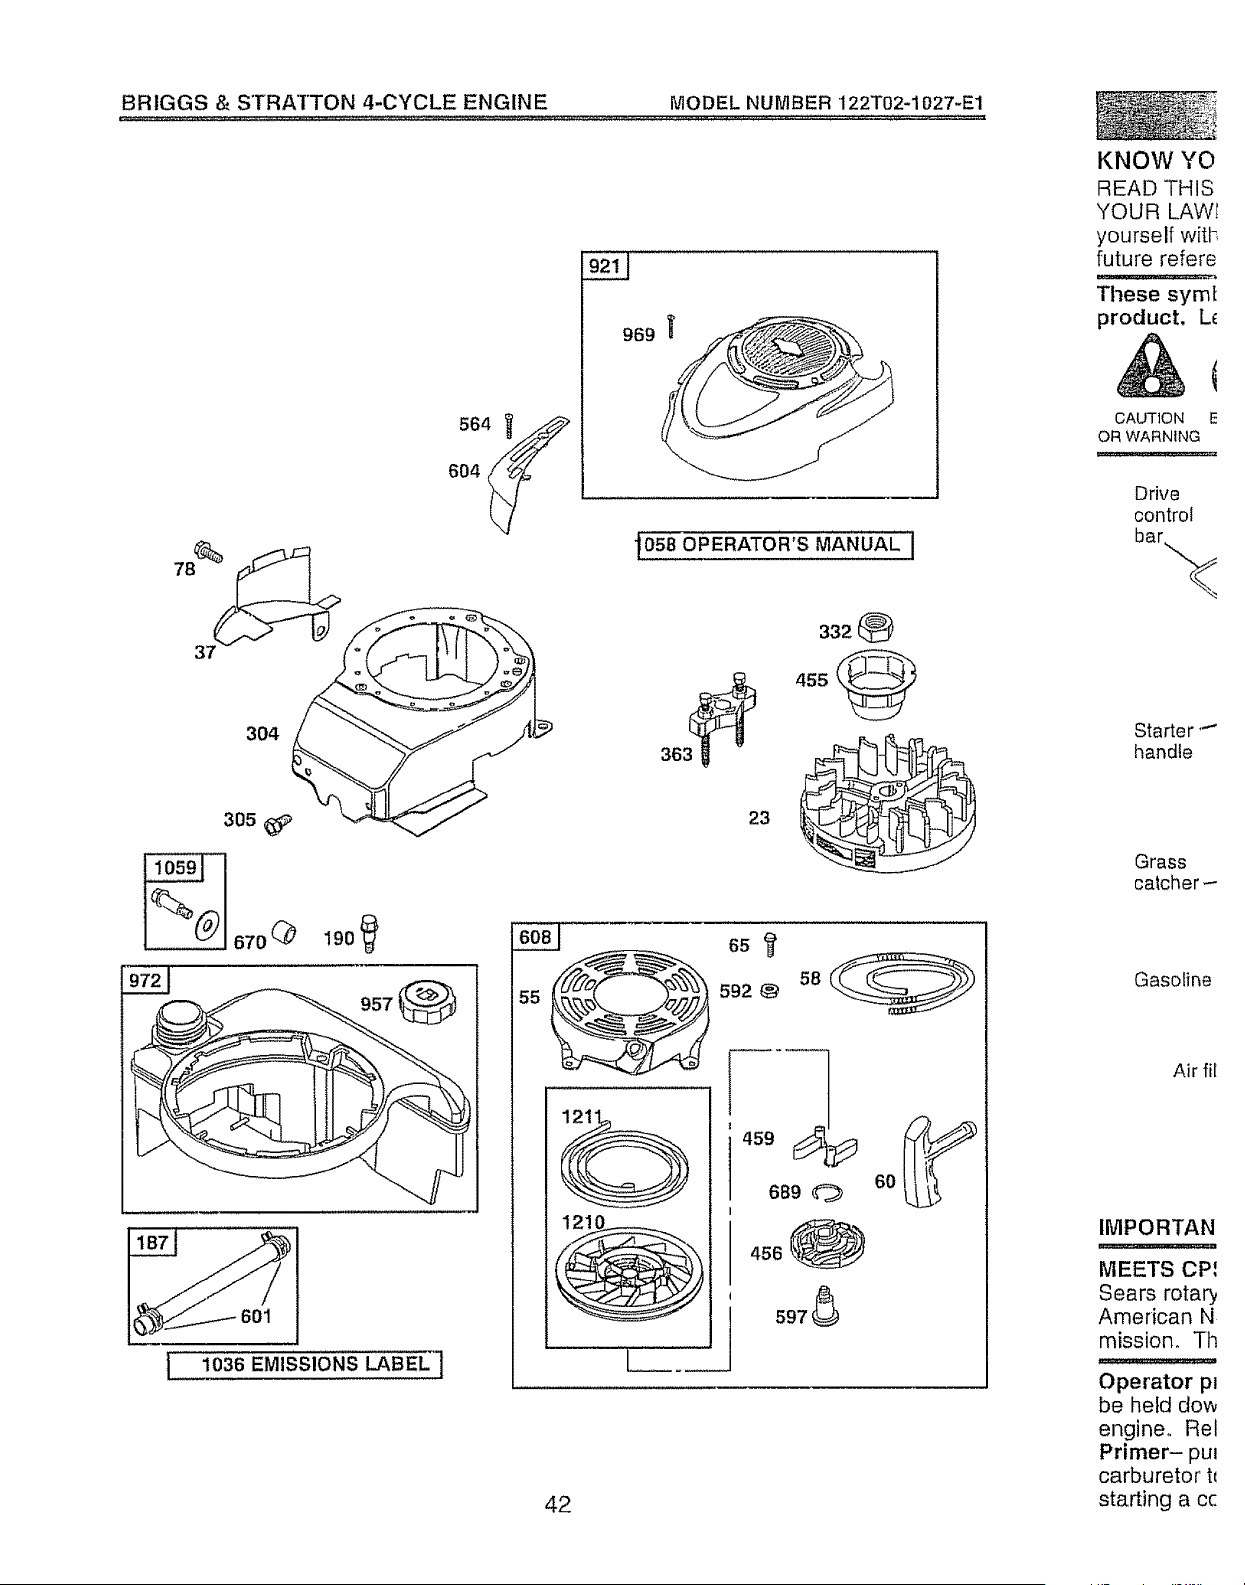
BRIGGS & STRATTON 4-CYCLE ENGINE MODEL NUMBER 122T02-1027-E1
304
[ 1036 EMISSIONS LABEL ]
969
1058 OPERATOR'S MANUAL I
3320
455
592 @
450 1
689 O
456 @
597
42
KNOW YO
READ THIS
YOUR LAWI
yourself witi-,
future refere
These symt
product, L_
CAUTION E
OR WARNING
Drive
control
bar,_.
Starter ""
handle
Grass
catcher
Gasoline
Air fil
IMPORTAN
MEETS CPI
Sears rotary
American N
mission. Ttq
Operator pJ
be held dow
engine° Rel
Primer- pul
carburetor t_
starting acc
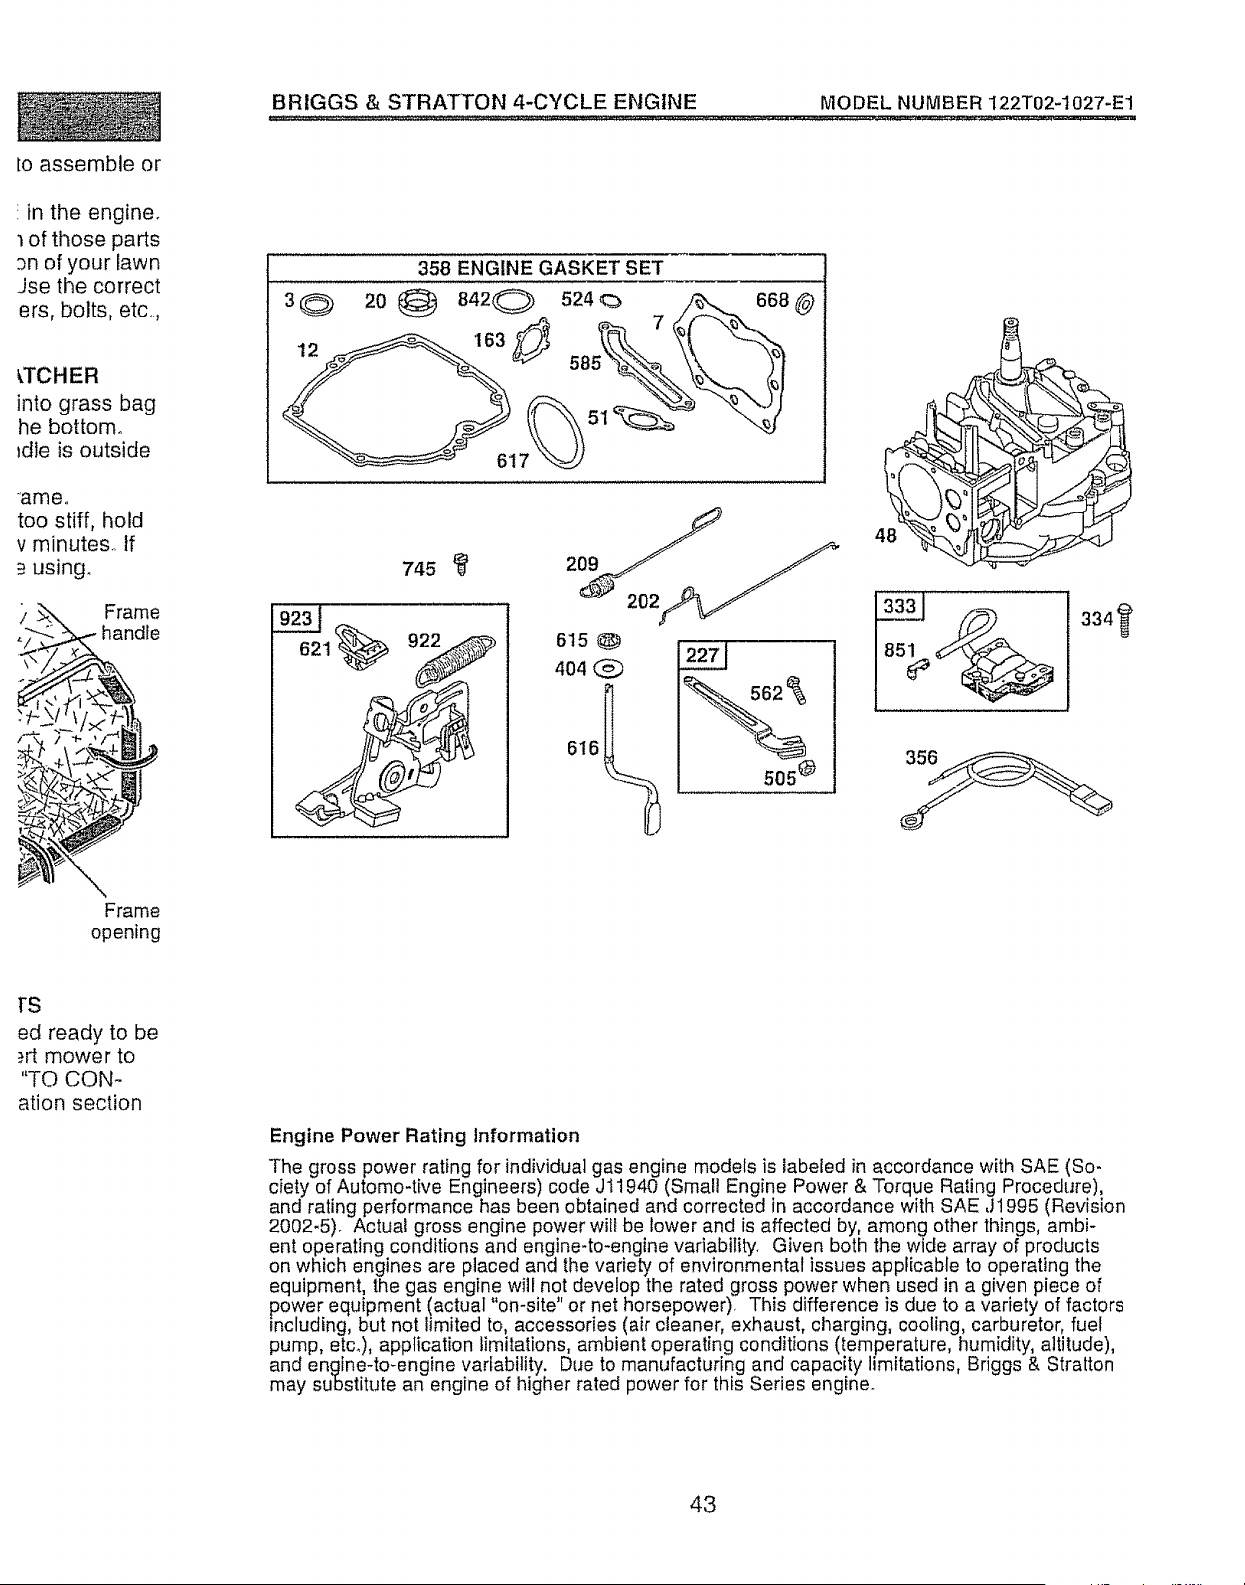
io assemble or
BRIGGS & STRATTON 4-CYCLE ENGINE MODEL NUMBER 122T02-1027-E1
:.in the engine°
of those parts
Dn of your lawn
Jse the correct
ers, bolts, etc.
_,TCHER
into grass bag
he bottom°
_dle is outside
'ame°
too stiff, hold
v minute&. If
_=using.
Frame
handle
3@
358 ENGINE GASKET SET
20 @ 842(_ 524<b /_,668
d " _b
617
745
615
404 @
616_
334_
Frame
opening
rs
ed ready to be
_rt mower to
"TO CON-
ation section
Engine Power Rating Information
The gross power rating for individual gas engine models is labeled in accordance with SAE (So-
ciety of Automo-tive Engineers) code Jl1940 (Small Engine Power & Torque Rating Procedure),
and rating performance has been obtained and corrected in accordance with SAE J1995 (Revision
2002-5)_ Actual gross engine power will be lower and is affected by, among other things, ambi-
ent operating conditions and engine-to-engine variability. Given both the wide array of products
on which engines are placed and the variety of environmental issues applicable to operating the
equipment, the gas engine will not develop the rated gross power when used in a given piece of
power equipment (actual "on-site" or net horsepower), This difference is due to a variety of factors
including, but not limited to, accessories (air cleaner, exhaust, charging, cooling, carburetor, fuel
pump, etc.), application fimitations, ambient operating conditions (temperature, humidity, altitude),
and engine-to-engine variability. Due to manufacturing and capacity limitations, Briggs & Stratton
may substitute an engine of higher rated power for this Series engine.
43

BRIGGS & STRATTON 4-CYCLE ENGINE MODEL NUMBER 122T02-1027-E1
KEY PART KEY PART
NO. NO. DESCRIPTION NO, NO, DESCRIPTION
1 697322 Cylinder Assembly 65 690837 Screw (Rewind Starter)
2 399269 Kit-Bushing/Seal 78 691108 Screw (Flywheel Guard)
3 299819s • Seal-Oil (Magneto Side) 81 691740 Lock-Muffler Screw
4 493279 Sump-Engine 95 691636 Screw (Throttle Valve)
5 691160 Head-Cylinder 97 696565 Shaft-Throttle
7 692249 • Gasket-Cylinder Head !04 691242 O Pin-Float Hinge
8 695250 Breather Assembly !I7 494870 Jet-Main (Standard)
9 696125 Gasket-Breather 118 498667 Jet-Main (High Altitude)
10 691!25 Screw (Breather Assembly) !21 498260 Kit-Carburetor Overhaul
11 691781 Tube-Breather 125 790821 Carburetor
12 692232 ° Gasket-Crankcase 127 694468 _ Plug-Welch
13 690912 Screw (Cylinder Head) 130 696564 Valve-Throttle
t5 691680 Plug-Oil Drain I33 398187 Float-Carburetor
16 691450 Crankshaft 134 398188 O Valve-Needle/Seat
20 399781s • Seal-Oil (PTO Side) I37 693981 O_: Gasket-Float Bowl
22 691092 Screw (Engine Sump) 159 691753 Bracket-Air Cleaner Primer
23 691987 Flywheel 163 272653s°a$ Gasket-Air Cleaner
24 222698s Key-Flywheel I87 791766 Line-Fuel
25 790359 Piston Assembly (Standard) (Cut to Required Length)
26 790360 Ring Set-Piston (Standard) 188 693399 Screw (Control Bracket)
27 691866 Lock-Piston Pin 190 690940 Screw (Fuel Tank)
28 499423 Pin-Piston 202 691829 Link*Mechanical Governer
29 499424 Rod-Connecting 209 699056 Spring-Governor
32 691664 Screw (Connecting Rod) 222 793754 Bracket-Control
32A 695759 Screw (Connecting Rod) 227 690783 Control Lever-Governor
33 262651s Valve-Exhaust 276 271716 _:l: Sealing Washer
34 262652s Valve-lntake 287 690940 Screw (Dipstick Tube)
35 691270 Spring-Valve (Intake) 300 692038 Muffler
36 691270 Spring-Valve (Exhaust) 304 695892 Housing-Blower
37 694086 Guard-Flywheel 305 691108 Screw (Blower Housing)
40 692194 Retainer-Valve 308 690450 Shield-Cylinder
43 691997 Slinger-GovernodOil 307 690345 Screw (Cylinder Shield)
45 690548 Tappet-Valve 332 690662 Nut (Flywheel)
46 691449 Camshaft 333 802574 Armature-Magneto
48 792741 Short Block 334 69'1061 Screw (Armature Magneto)
50 497465 Manifold-Intake 337 802592s Plug-Spark
51 272199s • Gasket-Intake 356 692390 Wire-Stop
54 691650 Screw (Intake Manifold) 358 794307 Engine Gasket Set
55 691421 Housing-Rewind Starter 363 19069 Flywheel Puller
58 697316 Rope-Starter 365 692524 Screw (Carburetor)
(Cut to Required Length) 383 89838s Wrench-Spark Plug
60 281434s Grip_Starter Rope 404 690272 Washer (Governor Crank)
44
Congratulati,
chase. Your
designed an,
dependable
ucts, it may i
time. That's '
tion Agreem_
aggravation.
Purchase a ,
now and pro
hassle and
Here's what'
° Expert s
sional re_
• Unlimite
parts anc
o Product
product c
o Discoun
service a
covered i
off regul_
nance ch
These acoe._
shipped wit
service cent_
LAWN MO\
LAWN MO_
BELTS

BR|GGS & STRATTON 4-CYCLE ENGINE MODEL NUMBER 122T02-1027-E1
..... : = - =-:.........
cially blade
J keep equip-
fevices. Check
Jlarlyo
;s, leaves, or
tn oil or fuel
cool before
_ment if you
necessary,
_eel height
ine is running.
s are subject
_rioration,
_g parts or
. Frequently
place with
_ded parts,
nd can cut.
gloves, and
,tricing them_
governor set-
he,,
and instruc-
.mgine and
'ered or
a spark
is used, it
California
iws apply on
_=arest Sears
!low 32°F)
=_.lawn rnower i
/ided above.
KEY PART KEY
NO. NO. DESCRIPTION NO.
425 690670 Screw (Air Cleaner Cover) 869
443 692523 Screw 870
(Air Cleaner Primer Base) 871
445 491588s Filter-Air Cleaner Cartridge
455 791960 Cup-Flywheel 921
456 692299 Plate-Pawl Friction 922
459 281505s Pawf-Ratchet 923
505 691251 Nut 957
(Governor Control Lever) 966
523 499621 Dipstick 968
524 692296 . Seal-DipstickTube 969
525 495265 Tube-Dipstic k
529 691923 Grommet 970
562 691119 Bolt
(Governor Control Lever) 972
564 698589 Screw (Control Cover) 975
584 697734 Cover-Breather Passage 976
585 691879 • Gasket-Breather Passage 977
592 690800 Nut (Rewind Starter) 1036
597 691696 Screw (Pawl Friction Plate)
601 791850 Clamp-Hose
604 790703 Cover-Control 1058
608 497680 Starter-Rewind 1059
613 691340 Screw (Muffler) !210
615 690340 Retainer-Governor Shaft
616 698801 Crank-Governor 1211
617 270344s .O5 Seal-Q Ring
(Intake Manifold) 1329
621 692310 Switch-Stop
633 691321 O5 Seal-Throttle Shaft
635 66538s Boot-Spark Plug
668 493823 - Spacer (includes 2)
670 692294 Spacer-FueITank 1330
684 690345 Screw ""
(Breather Passage Cover)
689 691855 Spring-Friction
718 690959 PimLocating
741 790345 Gear-Timing
745 69t 648 Screw (Brake)
842 691031 ,, Seal-O Ring (Dipstick Tube)
847 692047 Assembly-Dipstick/Tube
85I 493880s Terminal-Spark Plug
868 697338 Seal-Valve
PART
NO. DESCRIPTION
691155 Seat-Valve (Intake)
690380 Seat-Valve (Exhaust)
262001 Bushing-Guide (Exhaust)
63709 Bushing-Guide (Intake)
790701 Cover-Blower Housing
692135 Spring-Brake
695891 Brake
699985 Cap-Fuel Tank
792040 Base-Air Cleaner Primer
692298 Cover-Air Cleaner
690700 Screw
(Blower Housing Cover)
691669 Screw (Air Cleaner
Primer Bracket)
699374 Tank-Fuel
493640 Bowl-Float
496115 Primer-Carburetor
498261 Set-Carburetor Gasket
-- - Label-Emissions (Available
from an Authorized Briggs
& Stratton Service Dealer)
277039TRI Operator's Manual
692311 KibScrewiWasher
498144 Assembly-Pulley/Spring
(Pulley)
498144 Assembly- Pulley/Spring
(Spring)
126T02-0025 Replacement Engine
(Replacement Engine listed
is not available in the State
of California Repair with
individual parts.)
270962 Repair Manual
398067 Spark Arrester
(available accessory)
o Included in Engine Gasket Set, Key No,,358
Included in Carb, Overhaul Kit, Key No_ 121
5 Included in Carb. Gasket Set, Key No. 977
NOTE: All component dimensions given in U.S.
inches. ! inch = 25.4 mm
45

46
I, GENER,
° Read, un
instructio
manual(s
familiar v,
use of th_
,, Do not p(
rotating I:
charge ol
° Only allo,
are famili
ate the rT
, Clear the
toys, wire
could be
Be sure t
before m
enters th
o Do not or:
foot or w!
wear sub
o Do not pl
absolute_
and behi_
backwar(
• Never dir
anyone_
against a
may rich(
toro Stop
sudaces,
° Do not o_
proper gL
other sal,
° See man
proper ol
accessol
proved b,
° Stop the
drives, w
° Stop the
leave the
mower ol
° Shut the
the blade
removin£
° Mow onl_
light.
. Do not o!
the influe
° Never op
Always b
firm hold
• Disenga!
anism or
equipped
° If the eqL
abnorma
check im
tion is ge

$ERVnCE HOTES
..................I2-!5
.............. 15-16
............... 16-17
................ 17-18
.............. 36-45
.... Back Cover
I or
;ears store,
-nent if repair
_in Mower is
_/mower
g bent
Mower
rights which
_et and throw-
tin serious
terminals and
ead and lead
n to the State
and birth
harm. Wash
her engine
during
._r engine has
'ns on contact,
47
NESD MORE HELP?
You'll find the answer and more on managemyhome.com - for free!
!?
ii:
i:i
ii::
, Find this and a[[ your other product manuals online..
- Get answers from our team of home experts.
, Get a personalized maintenance plan for your home..
- Find information and tools to help with home projects.
manage _ home
brought to you by Sear_
Get :it fixed,lat yourhome oroursI
Your Home
For repair - in your home - of all major brand appliances,
lawn and garden equipment, or heating and cooling systems,
no matter who made it, no matter who sold iti
For the replacement parts, accessories and
owner's manuals thai you need to do-it-yoursetL
For Sears professional installation of home appliances
and items like garage door openers and water heaters.
1.8004-MY-HOME L_ Anytime, day or nighl
(1-800-4694663) (U S A and Canada)
www.sears,com www.sears°ca
Owne
ROT
625 S,
Powel
22" MI
Model I_
917o37_
Our Home
For repair of carry-in products like vacuums, lawn equipment,
and eiectronics, call or go on-line for the nearest
Sears Parts and Repair Center,
1-800-4884222 Anytime. day or night (U S.A, only)
www_sears_com
To purchase a oro|ection agreement (U,S A,,)
or maintenance agreement (Canada) on a product serviced by Sears:
1-800-827-6655 (u.sA) 1..800-361-6665 (Canada)
• EspaSol,
420804
Para pedir servicio de reparaci6n
a domicitio, y pare ordena[ piezas:
I-SBB-SU44OGAR C";'
(1.-aBB-184*F-,'427)
Au Canada pour service en franqais:
1.80O-LE.FOYER _c
{ t -800,,5334_937)
WWW Saar_, ca
@SeamBtar_. LLC
® Registered Trademark ! TM Trademark t "_' Sen,Ice Mark of Sears Brands, LLC
® Marca Rerjish'ada f rL_ Marca de F_bdca / su Marca de Servicfe da Seers Brands. LLC
_ Marque de commerce / _,_eMm'que d#,pes#e de Sea?s Brands. LLC
04,2&08 BY Printed in U_S.A,
CAUTK
Read an(
Safety Rl
before o1:
Seat's, R(
Visit our Craft