Preparation
Unpacking
4
Part names and functions
5
Earphones
5
Charging case
6
List of operation methods
7
Charge/Power
8
Before charging
8
Charging the charging case
9
Charging the earphones
10
Checking the remaining battery power of the charging case
12
Powering on the earphones
13
Powering off the earphones
13
Wearing
14
Wearing the earphones
14
Replacing the ear tips
15
Connections
Bluetooth operation
16
Pairing
16
Connecting
16
Connecting to the earphones for the first time
17
Pairing with other Bluetooth devices
19
Changing the Bluetooth device connected to the earphones
22
Operation
Listening to music
23
Listening to music using a Bluetooth connection
23
Playing in one earphone only
24
Setting the noise cancelling mode or the ambient sound mix
mode
25
Conducting phone calls
26
Making a call
26
Answering an incoming call
27
Ignoring an incoming call
28
Switching the mic on/off (mute)
28
Using the call waiting function
29
Using the voice assistant function (Siri/Google Assistant)
31
Information
32
Audio Playback and Phone Calls on a Bluetooth Device
32
Contents Preparation Connections Operation Troubleshooting Appendix
2
Troubleshooting
Troubleshooting
33
Power does not turn on
33
The earphones/charging case cannot be charged
33
Cannot play media using Bluetooth
34
No sound comes out
35
Cannot hear sound from one earphone
35
Sound is distorted, noisy, or cuts in and out
36
Cannot make a phone call
36
Resetting factory settings
37
Appendix
Precautions for Use
38
Disposal of these earphones
39
Trademark information
39
Specifications
40
Contents Preparation Connections Operation Troubleshooting Appendix
3
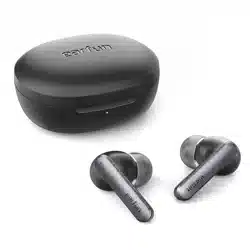
Thank you for purchasing this product.
To ensure proper operation, please read this Owner’s Manual carefully before using the product.
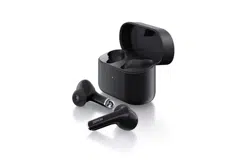
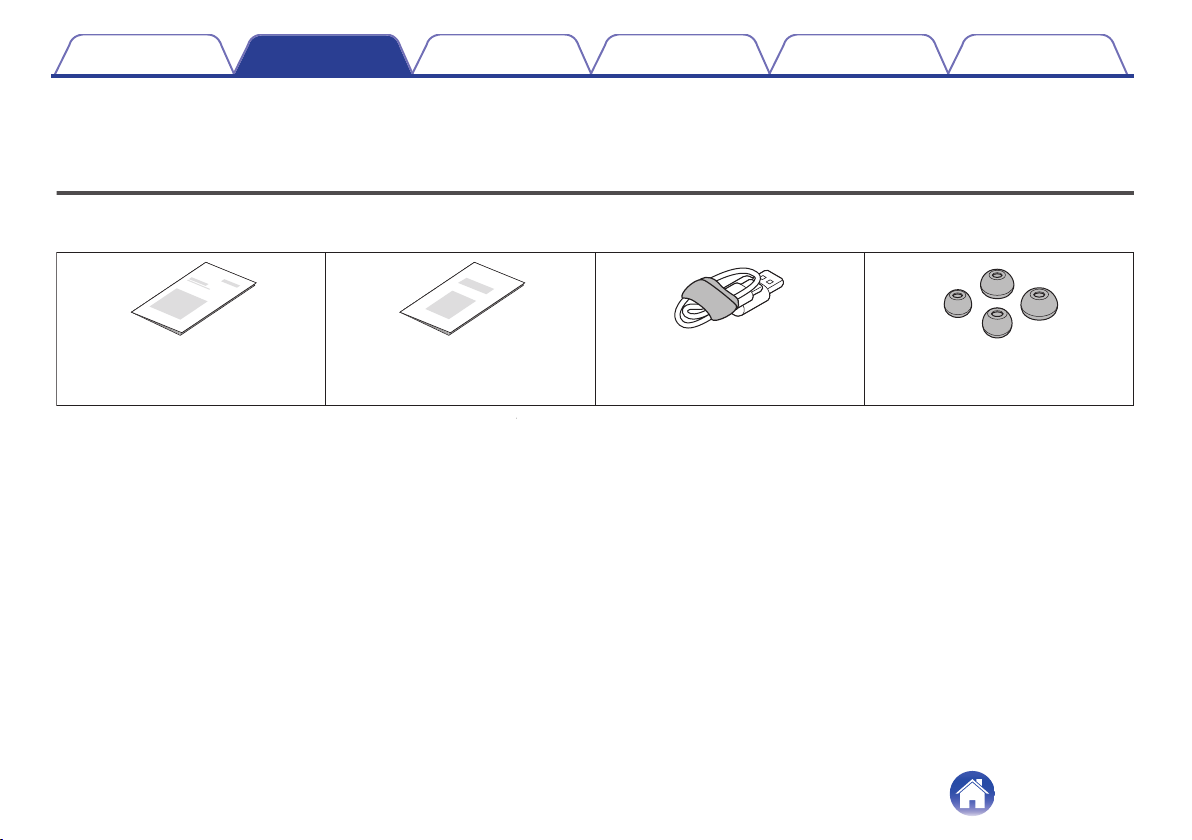
Unpacking
Check that all of these are present before using this device.
.
Quick Start Guide
USB cable
(Type-A to Type-C connector,
approx. 0.2 m)
Safety Instructions
Eartip㸦S/L size㸧
Contents Preparation Connections Operation Troubleshooting Appendix
4
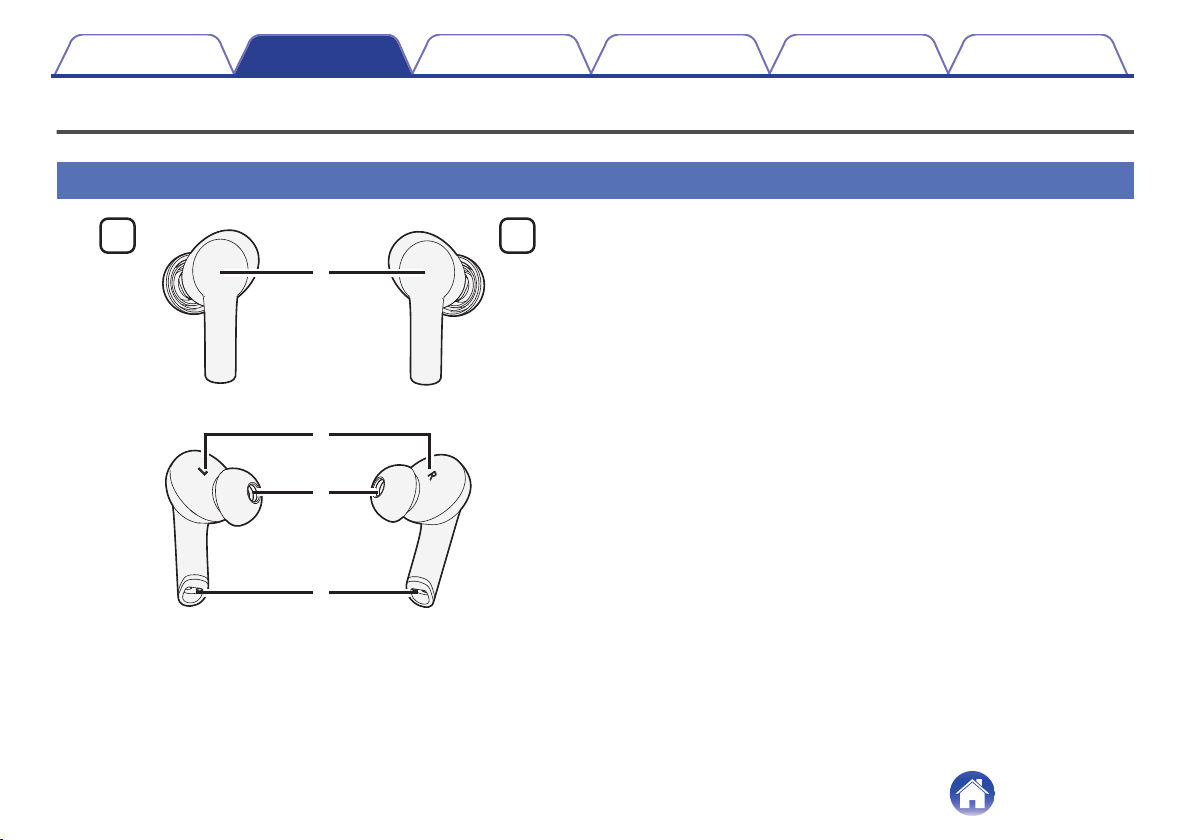
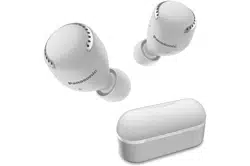
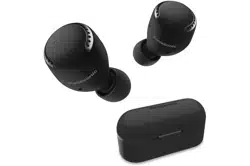
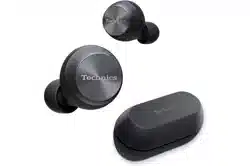
Part names and functions
Earphones
.
r
q
e
R
L
w
A
Touch sensor
The earphones can be operated by touching them with your finger.
0
“Changing the Bluetooth device connected to the
earphones” (v p. 22)
0
“Listening to music” (v p. 23)
0
“Setting the noise cancelling mode or the ambient sound mix
mode” (v p. 25)
0
“Conducting phone calls” (v p. 26)
0
“Using the voice assistant function (Siri/Google
Assistant)” (v p. 31)
B
L/R Indicators
C
Eartip (M size)
D
Charging port
Contents Preparation Connections Operation Troubleshooting Appendix
5

Charging case
.
tyqrw
e
A
Charging port (USB Type-C)
Connect the supplied USB cable to charge.
B
Multi-function button
Performs various operations.
0
“Checking the remaining battery power of the charging
case” (v p. 12)
0
“Pairing with other Bluetooth devices” (v p. 19)
0
“Resetting factory settings” (v p. 37)
C
Lid
By opening and closing the lid, it turns on and off the earphones,
charges them, and displays the remaining battery power of the
charging case.
0
“Charge/Power” (v p. 8)
D
Left earphone charging unit
E
Right earphone charging unit
F
Status LED
Displays various statuses such as the charge status, rechargeable
battery level, and Bluetooth connection status.
Contents
Preparation Connections Operation Troubleshooting Appendix
6
List of operation methods
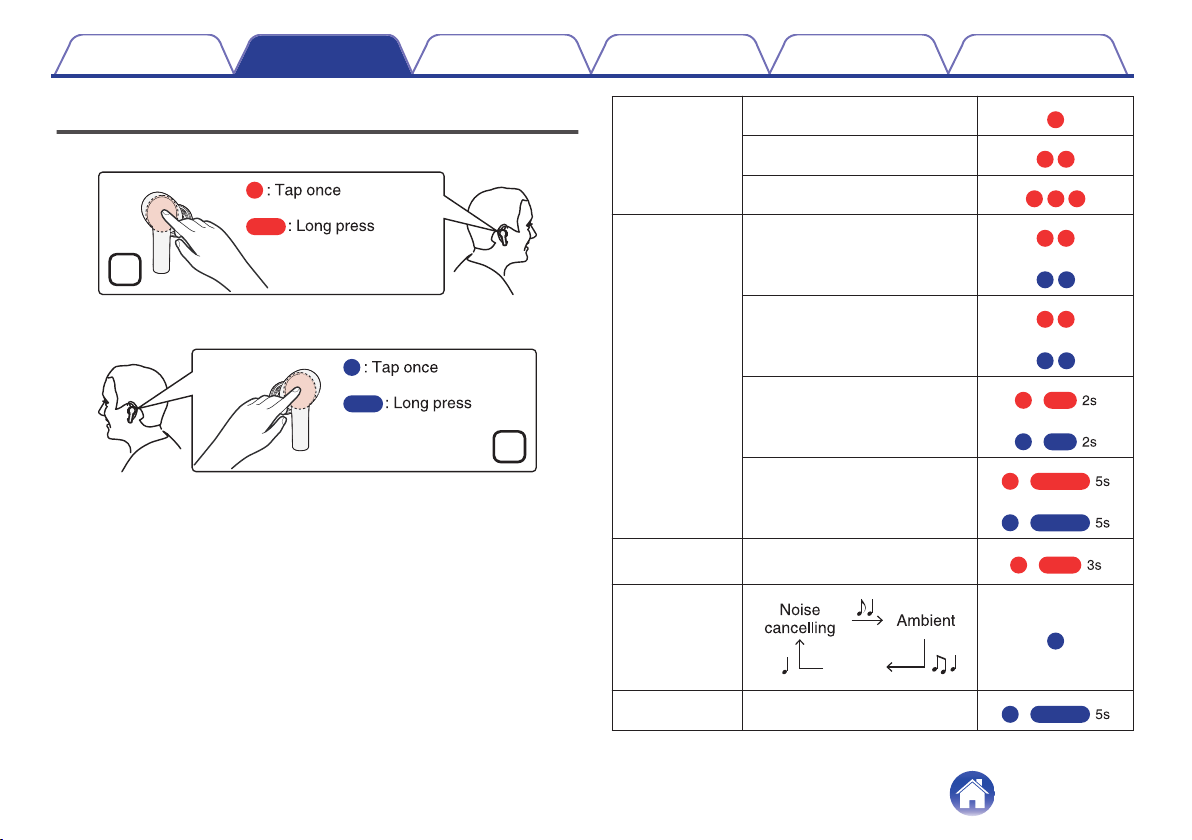
The main operation methods of the earphones are as follows.
.
R
L
Music control Play/Pause
.
Next track
.
Previous track
.
Call operation Answer the call
.
or
Hang up the call
.
or
Ignore the call
.
or
Mute/Unmute mic
(Call is active, no second call)
.
or
Voice assistant Enter/Cancel Siri or Google
Assistant
.
Sound mode
setting
.
Off
.
Pairing Enter Bluetooth pairing mode
.
Contents Preparation Connections Operation Troubleshooting Appendix
7
Charge/Power
A rechargeable battery is built into the earphones and charging case. Use the supplied USB cable to connect to the computer or a USB AC adapter
(commercially available) for charging.
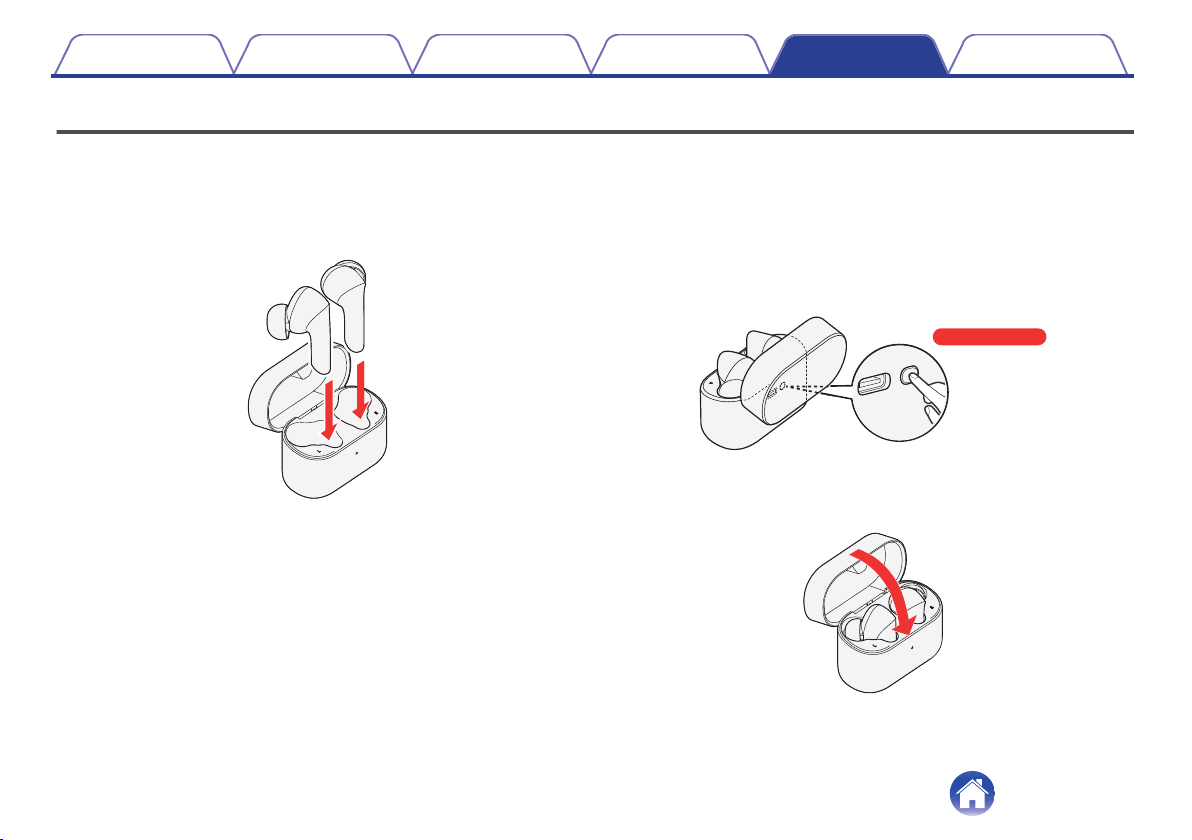
Before charging
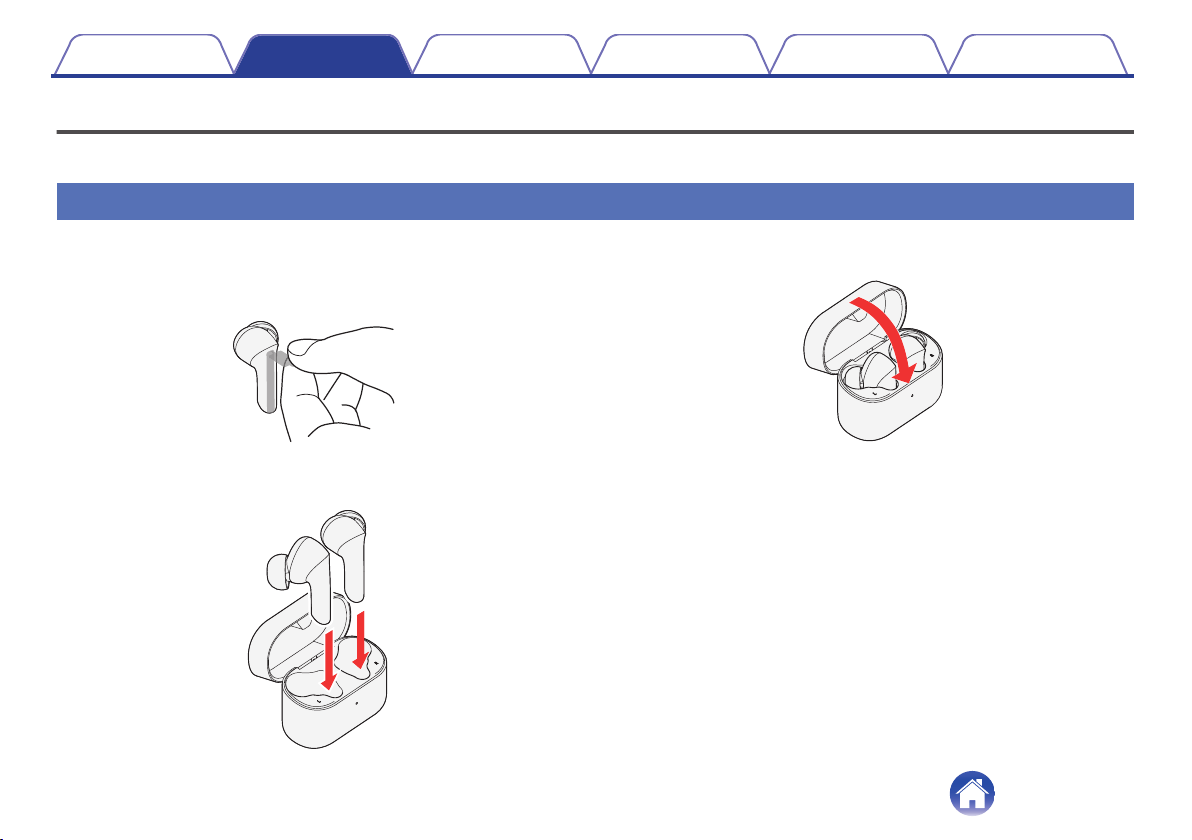
1
Remove the power supply prevention film from the
earphones.
0
Do this when using for the first time.
.
2
Put the earphones in the charging case (supplied).
.
3
Close the lid of the charging case.
.
Contents Preparation Connections Operation Troubleshooting Appendix
8
Charging the charging case
If the charging case is charged with the earphones in it, both the charging
case and earphones are charged.
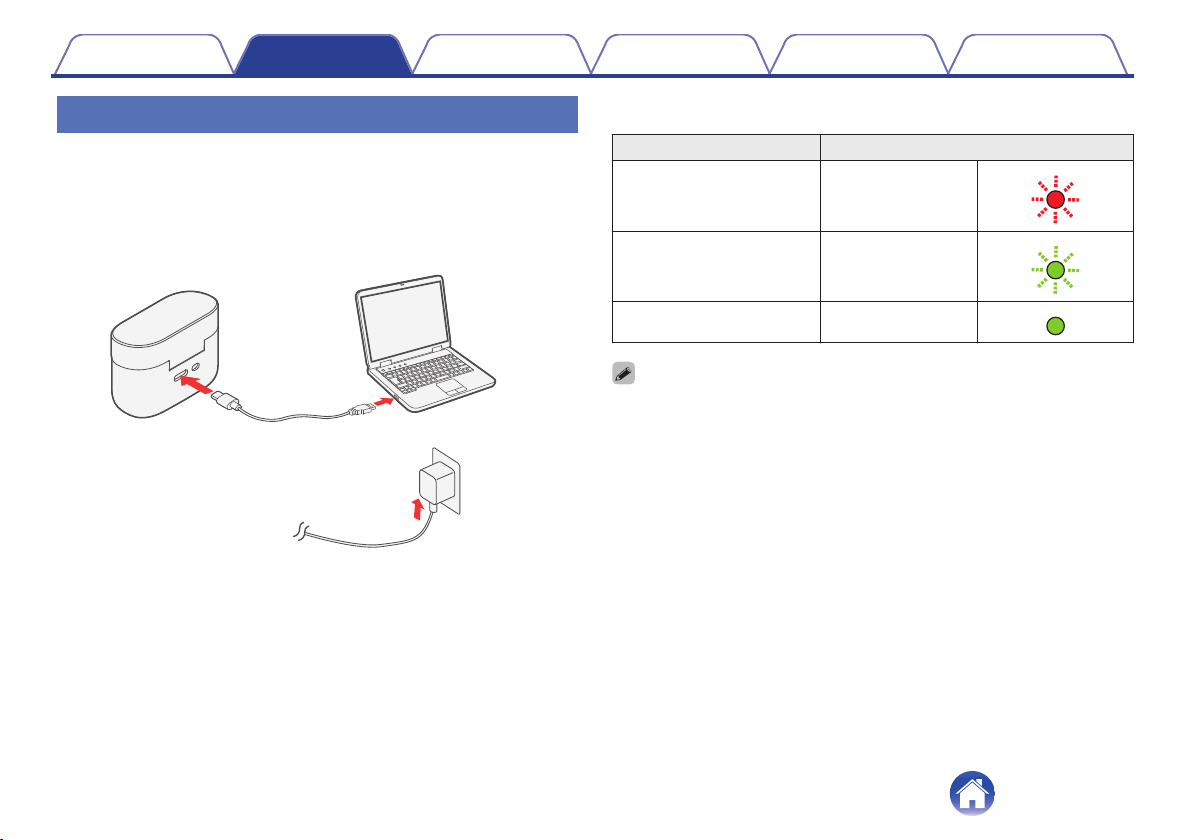
1
Connect the charging case to the USB AC adapter
(commercially available) or a PC with the USB cable
(supplied).
.
or
PC
USB AC
adapter
(commercially
available)
USB cable
(supplied)
The charging status can be checked from the status LED on the charging
case.
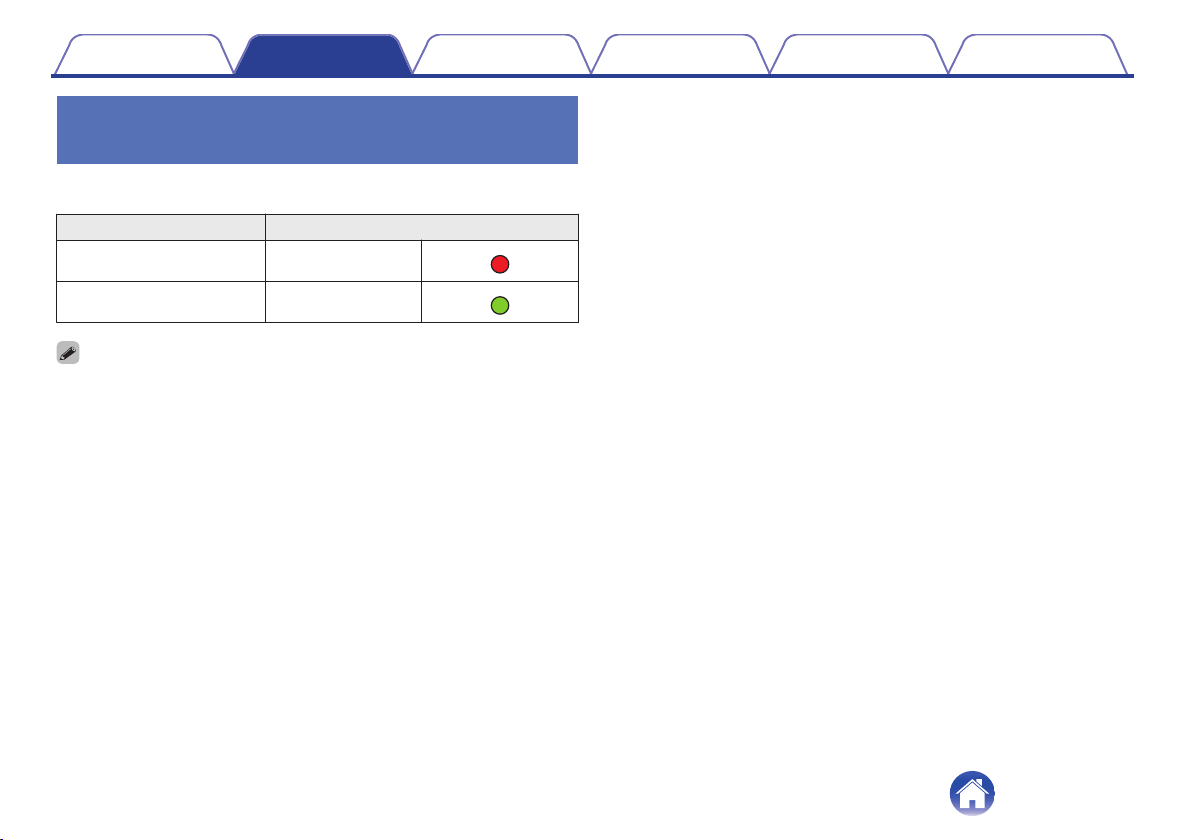
Charging status Color of status LED
Charging
(20 % or less)
Blinks in red
.
Charging
(more than 20 %)
Blinks in green
.
Fully charged Solid green
.
0
When using the earphones for the first time after purchase or when the remaining
power of the rechargeable battery is low, charge the battery. When the level of the
rechargeable battery is low, a notification sound is heard from the earphones.
0
The earphones can be used for approximately 4.8 hours of music playback (noise
cancelling mode) of music playback when fully charged.
0
It takes approximately 2 hours to fully charge the rechargeable battery from the
state of no remaining battery power.
0
The usable time of the earphones differs depending on the temperature of the
environment in which they are used and method of use.
Contents Preparation Connections Operation Troubleshooting Appendix
9
NOTE
0
When connecting the USB cable to the USB port, be sure to match the cable
connector with the shape of the socket. Forcing the connector into the socket will
cause damage.
0
The rating of the charging output should be DC 5 V, 2.4 A or less.
0
If the charging ports of the earphones and charging case are dirty, charging may
not be possible. Wrap a clean cloth soaked with anhydrous ethanol around a
toothpick and gently wipe the ports regularly.
0
If the earphones get any moisture, thoroughly wipe it off before inserting them in
the charging case.
0
When you are charging your earphones by connecting them to your computer,
even if the computer displays an error message indicating that the USB device is
not recognized, they will be charged. For the charge state, check the status LED.
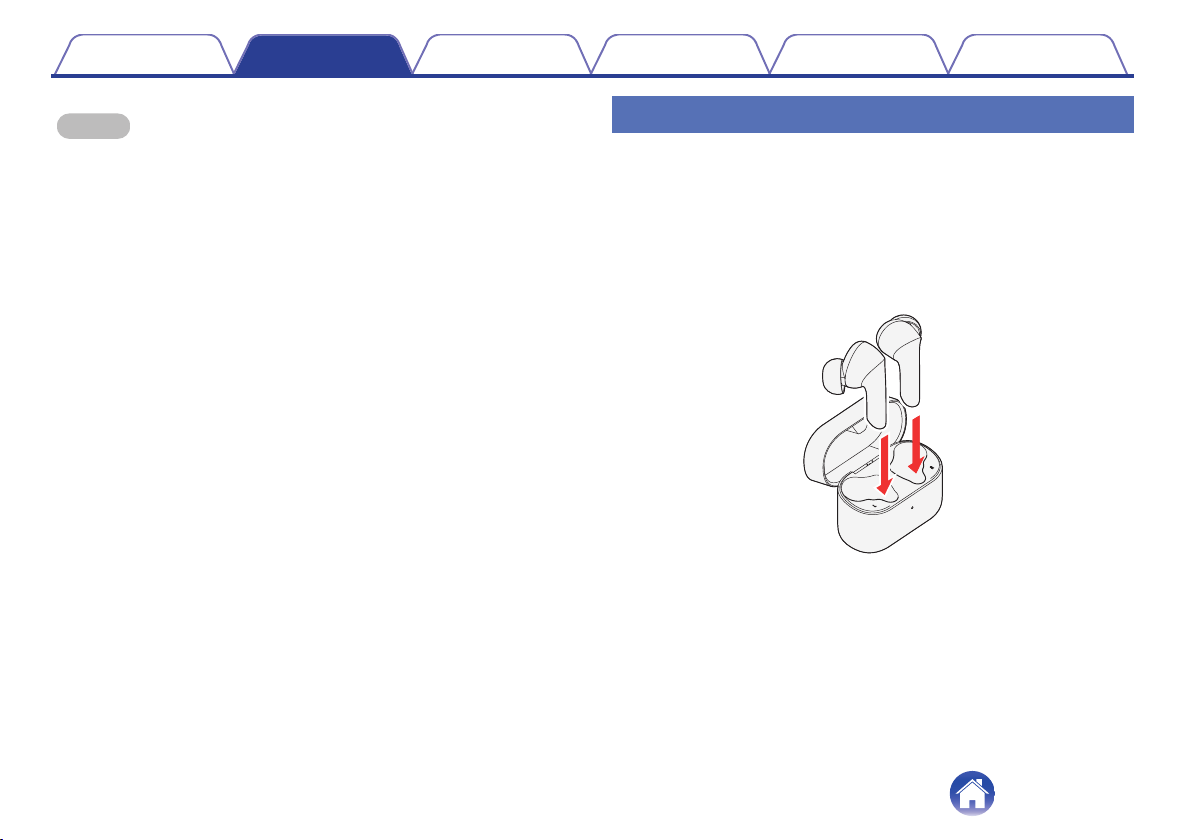
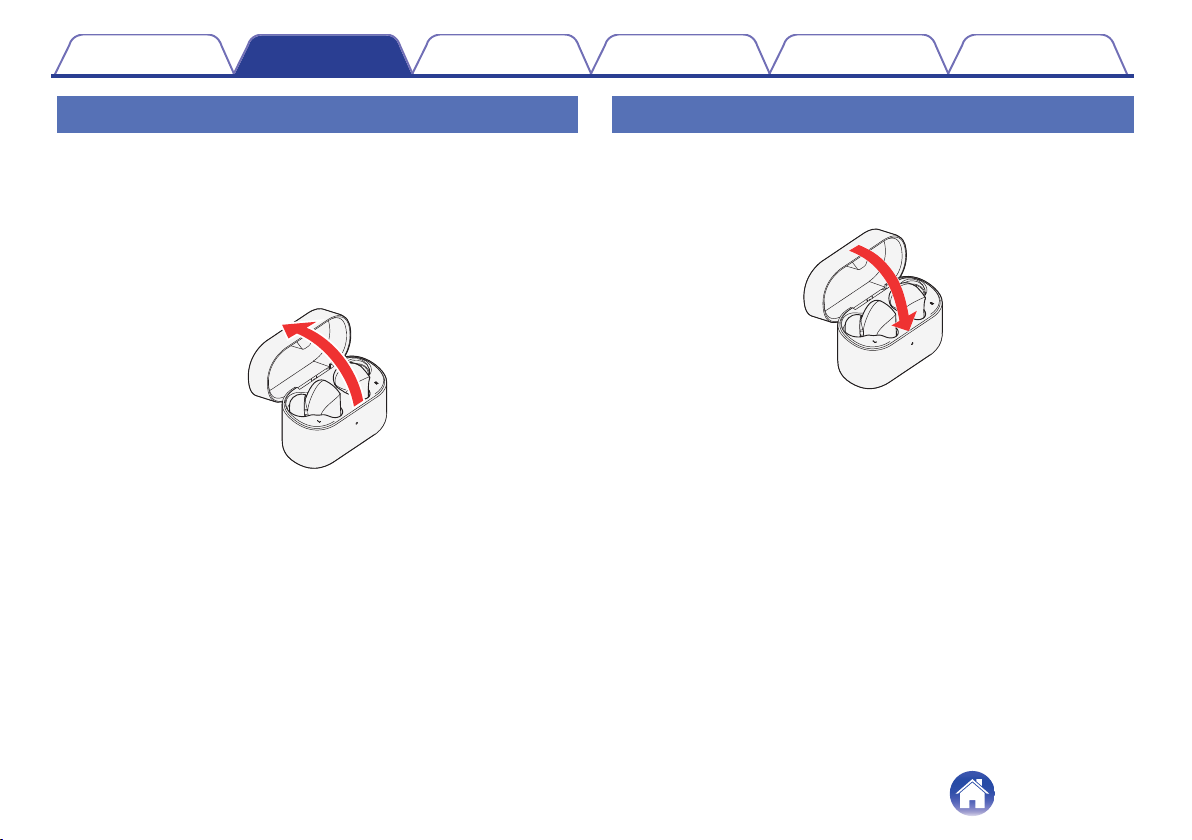
Charging the earphones
The earphones are charged from the charging case simply by inserting
them in the charged charging case. Even if there is no access to power
when on the go, the earphones can be charged.
1
Insert the earphones in the charged charging case.
0
If you open the lid of the charging case, the status LED displays
the amount of charge remaining in the charging case.
(v p. 12)
.
Contents
Preparation Connections Operation Troubleshooting Appendix
10
2
Close the lid of the charging case.
Charging begins.
0
If you close the lid of the charging case, the status LED displays
the amount of charge remaining in the charging case.
(v p. 12)
.
0
A fully charged charging case can fully recharge earphones that have zero
remaining charge three times.
0
It takes approximately 2 hours to fully charge the rechargeable battery from the
state of no remaining battery power.
0
When the rechargeable battery built into the earphones is low, a notification
sounds. Charge the earphones.
0
Even if you insert only one earphone into the charging case, it can be charged.
NOTE
0
If the charging ports of the earphones and charging case are dirty, charging may
not be possible. Wrap a clean cloth soaked with anhydrous ethanol around a
toothpick and gently wipe the ports regularly.
0
If the earphones get any moisture, thoroughly wipe it off before inserting them in
the charging case.
0
Check the remaining battery power of the earphones on the screen of the
connected Bluetooth device.
Contents Preparation Connections Operation Troubleshooting Appendix
11
Checking the remaining battery power
of the charging case
If you open or close the lid of the charging case, the status LED displays
the rechargeable battery level of the charging case as shown below.
Remaining battery power Color of status LED
20 % or less Lights up red
.
More than 20 % Lights up green
.
0
The rechargeable battery level of the charging case can also be checked by
pressing the multi-function button.
Contents Preparation Connections Operation Troubleshooting Appendix
12
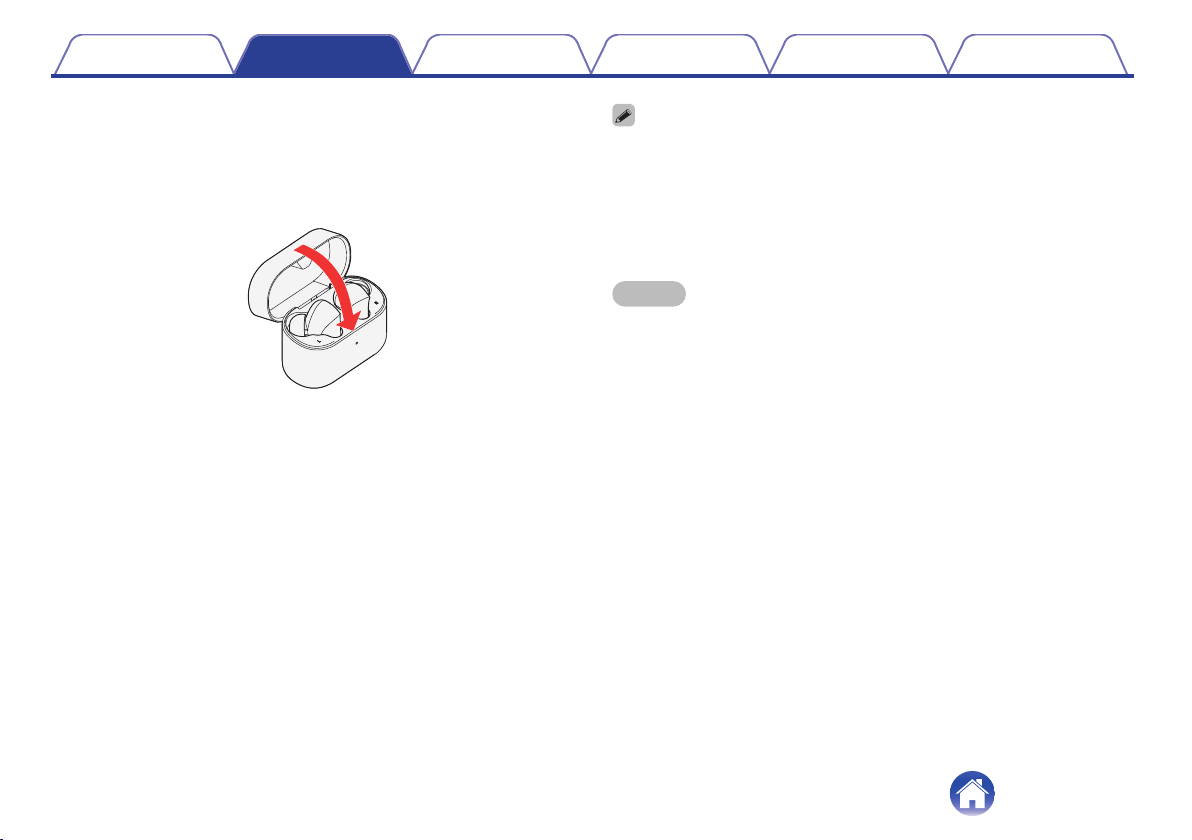
Powering on the earphones
1
With the earphones in the charging case, open the lid
of the charging case.
The earphones are automatically turned on and started the
Bluetooth connection.
0
When connecting to a Bluetooth device for the first time, the
earphones are in the pairing mode after the power is turned on.
Make the Bluetooth connection. (v p. 17)
.
Powering off the earphones
1
With the earphones in the charging case, close the lid
of the charging case.
The earphones are turned off and charging begins. (v p. 10)
.
Contents Preparation Connections Operation Troubleshooting Appendix
13
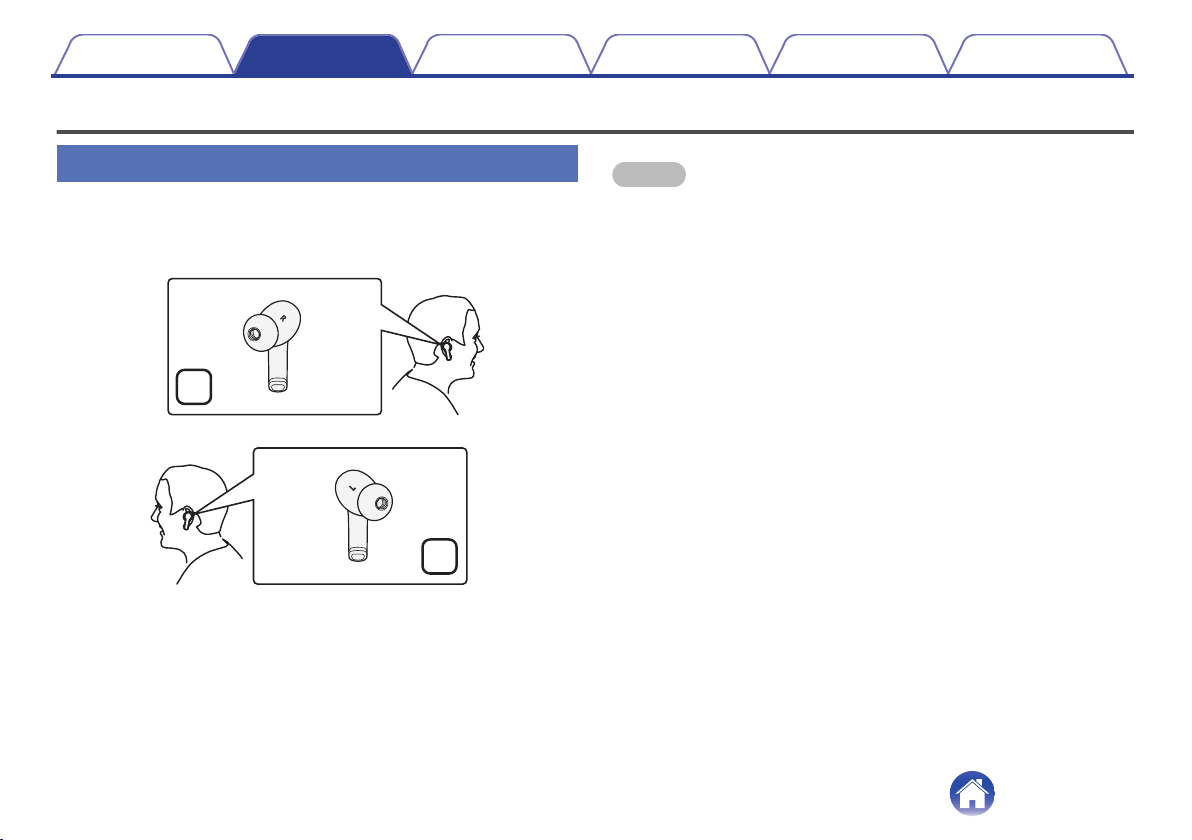
Wearing
Wearing the earphones
1
Put the earphones in your ears.
0
Put the earphone marked with L (left) in your left ear and the one
marked with R (right) in your right ear.
.
R
L
NOTE
0
Different ear tip sizes are included. If the ear tips do not fit your ear, replace them
with an appropriate size. (v p. 15)
0
If you accidently touch the touch sensors while wearing the earphones, they will
activate. Be careful not to accidently touch the touch sensors.
o
About the wear detection function
With the wear detection sensor built-in the earphones, playback is
paused when the earphones are removed from your ears and
playback resumes when they are worn again.
Contents Preparation Connections Operation Troubleshooting Appendix
14

Replacing the ear tips
When purchased, the M size ear tips are attached to the earphones.
If they do not fit well in your ears due to the size of the ear tips, replace
them with the supplied ear tips (S/L sizes).
NOTE
0
If you use ear tips other than those included, the earphones may not fit into the
charging case, or may not charge. Be sure to use the included ear tips.
1
Remove the ear tips.
0
Hold the ear tip and pull while tilting it.
.
2
Attach the ear tips.
0
Align the nozzle with the ear tip attachment part and push it all the
way in using a small amount of force.
.
Contents Preparation Connections Operation Troubleshooting Appendix
15
Bluetooth operation
You can enjoy listening to music wirelessly by connecting the earphones to your Bluetooth device.
Pairing
Pairing (registration) is an operation that is required in order to connect a
Bluetooth device to the earphones. When using Bluetooth for the first time,
you need to pair the earphones and your Bluetooth device so they can
communicate with each other. Once a Bluetooth device has been paired
with your earphones, pairing does not need to be performed again for
future Bluetooth connections with that device.
0
Pairing needs to be done again in the following cases.
0
When 9 or more devices have been paired with the earphones
These earphones can store pairing information from a maximum of 8 devices.
When 9 or more devices are paired, the new pairing information overwrites the
oldest pairing information in order from the oldest information onwards.
0
Multiple Bluetooth devices cannot be played back at the same time.
o
About the Fast Pair function (Android device
support)
The earphones support Fast Pair. If your Bluetooth device is an
Android device with Android OS 6.0/Google Play 11.7 or later, the
earphones and Bluetooth device can be paired simply by bring them
close to each other.
Connecting
There are three methods for connecting with Bluetooth devices:
1
Connecting to the earphones for the first time
(v p. 17)
2
Pairing with other Bluetooth devices
(v p. 19)
3
Changing the Bluetooth device connected to
the earphones (v p. 22)
Contents Preparation Connections Operation Troubleshooting Appendix
16
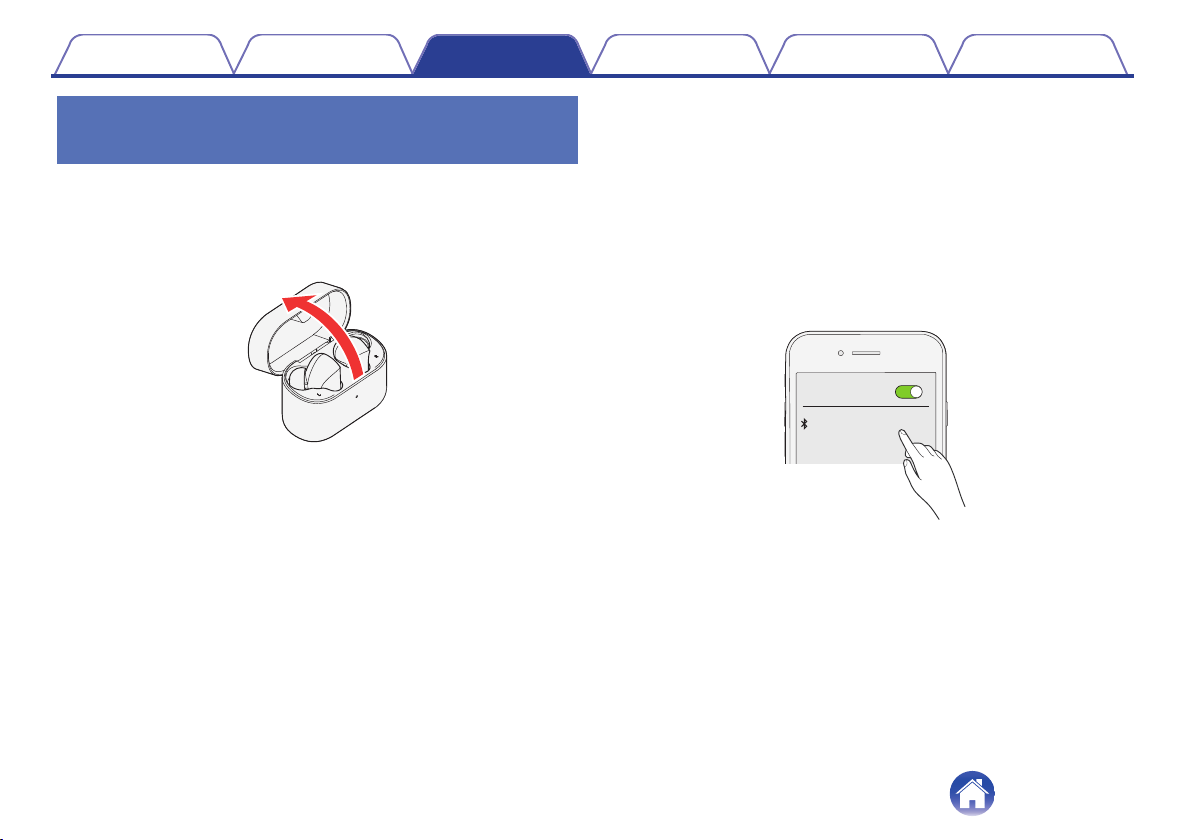
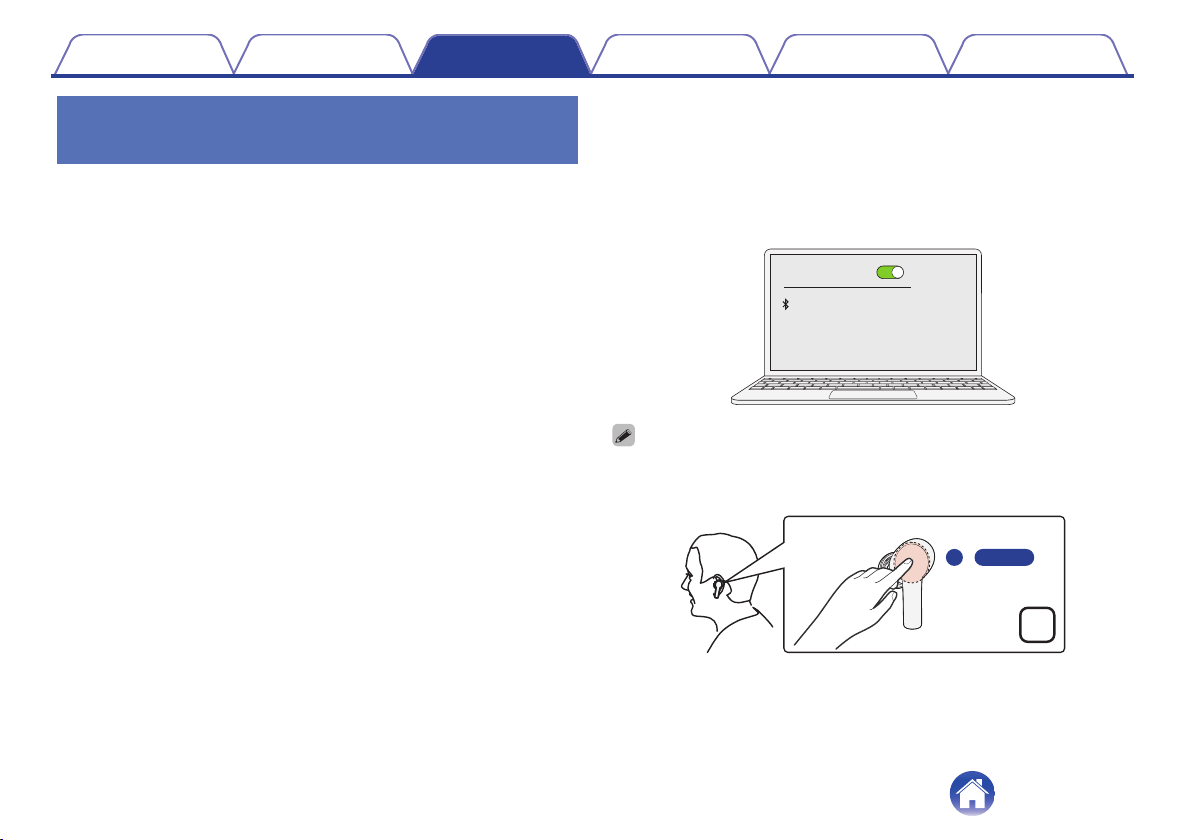
Connecting to the earphones for the
first time
1
With the earphones in the charging case, open the lid
of the charging case.
The pairing mode will be activated.
0
During the pairing mode, the status LED flashes slowly in white.
.
2
Turn on the Bluetooth function of your Bluetooth
device.
0
For details, see the Owner’s Manual of the Bluetooth device that
you want to connect.
3
Select “DENON AH-C830NCW” from the list of devices
displayed on the screen of your Bluetooth device.
The Bluetooth connection is established.
0
On the screen of the Bluetooth device, confirm that a connection
has been made.
.
Bluetooth
ON
DENONAH-C830NCW
Contents
Preparation Connections Operation Troubleshooting Appendix
17
4
Playing back music on the Bluetooth device.
Music played back on the connected Bluetooth device is output from
the earphones.
NOTE
0
Before playing music, check the volume setting of the used Bluetooth
device and enjoy it at the appropriate volume. Volume operation cannot be
performed with the earphones.
0
If you put the earphones in the charging case and open the lid of the
charging case again, earphones automatically connects to the last
Bluetooth device that was connected.
0
The earphones pairing mode is canceled if pairing is not completed within 2
minutes. In this case, if the lid of the charging case is opened after closing it, the
earphones perform a pairing again.
0
If the status LED does not flash in white even when you open the lid of the
charging case, the earphones are not in the pairing mode. With the lid of the
charging case left open, long press the multi-function button on the back of the
charging case for approximately 2 seconds to switch to the pairing mode.
.
2s
0
If you are requested to enter a PIN code (pass key), enter “0000” (four zeros).
Contents
Preparation Connections Operation Troubleshooting Appendix
18
Pairing with other Bluetooth devices
To pair the earphones to two or more Bluetooth devices, you must
manually change the earphones to the pairing mode. There are two ways
to manually change the earphones to the pairing mode, from the charging
case and from the earphones.
o
Operating the charging case
1
Insert the earphones in the case.
0
Do not close the lid of the charging case.
.
2
With the lid of the charging case open, long press the
multi-function button for approximately 2 seconds.
If the LED on the charging case is slowly flashing in white, the
earphones are in the pairing mode.
.
2s
Contents Preparation Connections Operation Troubleshooting Appendix
19
3
Turn on the Bluetooth function of your Bluetooth
device.
0
For details, see the Owner’s Manual of the Bluetooth device that
you want to connect.
4
Select “DENON AH-C830NCW” from the list of devices
displayed on the screen of the Bluetooth device.
The Bluetooth connection is established.
0
On the screen of the Bluetooth device, confirm that a connection
has been made.
.
Bluetooth
ON
DENONAH-C830NCW
o
Operating the earphones
1
Tap the touch sensor of the left earphone, and then
press again for approximately 5 seconds.
The pairing mode will be activated with a notification sound from the
earphones.
.
L
5s
Contents Preparation Connections Operation Troubleshooting Appendix
20

2
Turn on the Bluetooth function of your Bluetooth
device.
0
For details, see the Owner’s Manual of the Bluetooth device that
you want to connect.
3
Select “DENON AH-C830NCW” from the list of devices
displayed on the screen of the Bluetooth device.
The Bluetooth connection is established.
0
On the screen of the Bluetooth device, confirm that a connection
has been made.
.
Bluetooth
ON
DENONAH-C830NCW
Contents
Preparation Connections Operation Troubleshooting Appendix
21
Changing the Bluetooth device
connected to the earphones
Disconnect the earphones from the connected Bluetooth device and
switch the connection to another Bluetooth device. When you are
connecting to a previously paired device, the earphones can be
connected by operating the Bluetooth device.
1
From the currently connected Bluetooth device,
disconnect the earphones.
2
Turn on the Bluetooth function of the Bluetooth device
you want to connect to.
0
For details, see the Owner’s Manual of the Bluetooth device that
you want to connect.
3
From the list of devices displayed on the Bluetooth
device you want to connect to, choose “DENON AH-
C830NCW”.
The Bluetooth connection is established.
0
On the screen of the Bluetooth device, confirm that a connection
has been made.
.
Bluetooth
ON
DENONAH-C830NCW
0
If the earphones cannot be connected, tap the touch sensor of the left earphone,
and then press again for approximately 5 seconds to put the earphones into
pairing mode. During the pairing mode, perform steps 2 to 3 again.
.
L
5s
Contents Preparation Connections Operation Troubleshooting Appendix
22
Listening to music
Listening to music using a Bluetooth
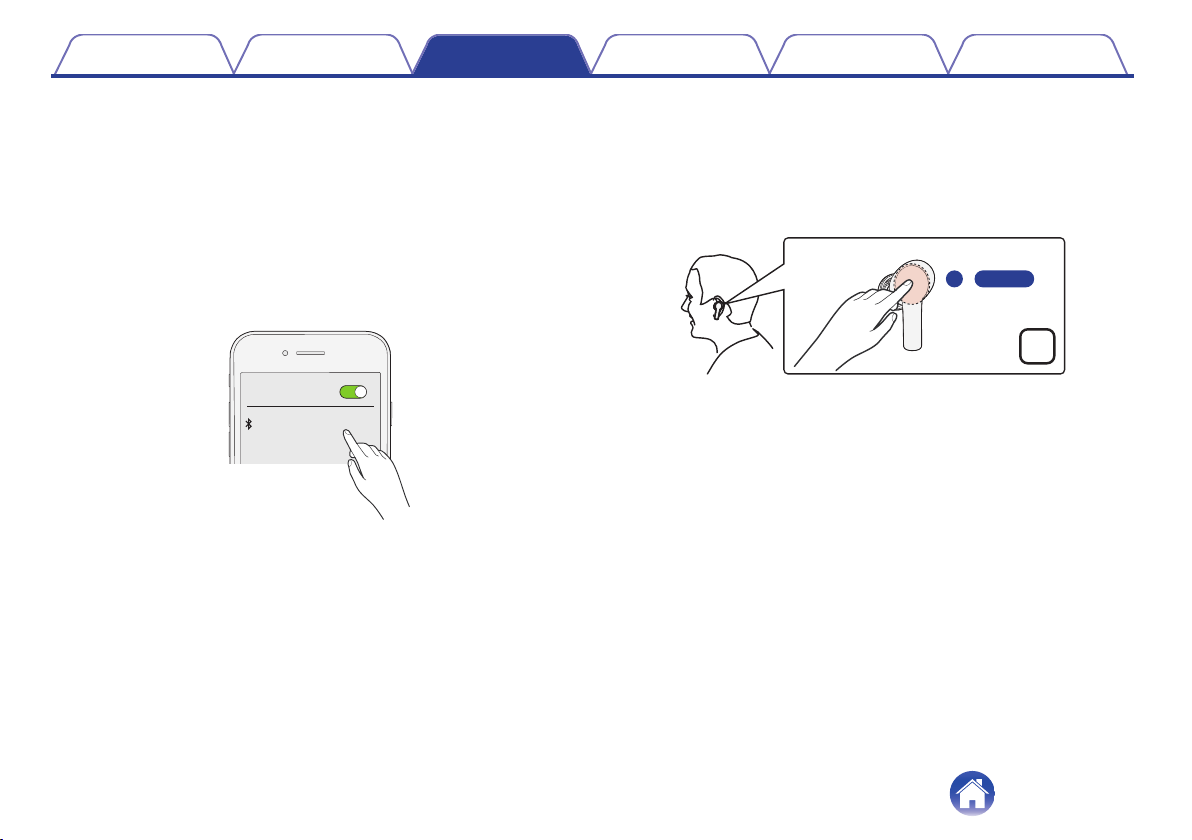
connection
First check that the earphones and Bluetooth device are connected via
Bluetooth. (v p. 16)
Playback operations can be performed from both the Bluetooth device and
earphones. Here we will explain the operations using the earphones.
NOTE
0
Before playing music, check the volume setting of the used Bluetooth device and
enjoy it at the appropriate volume. Volume operation cannot be performed with the
earphones.
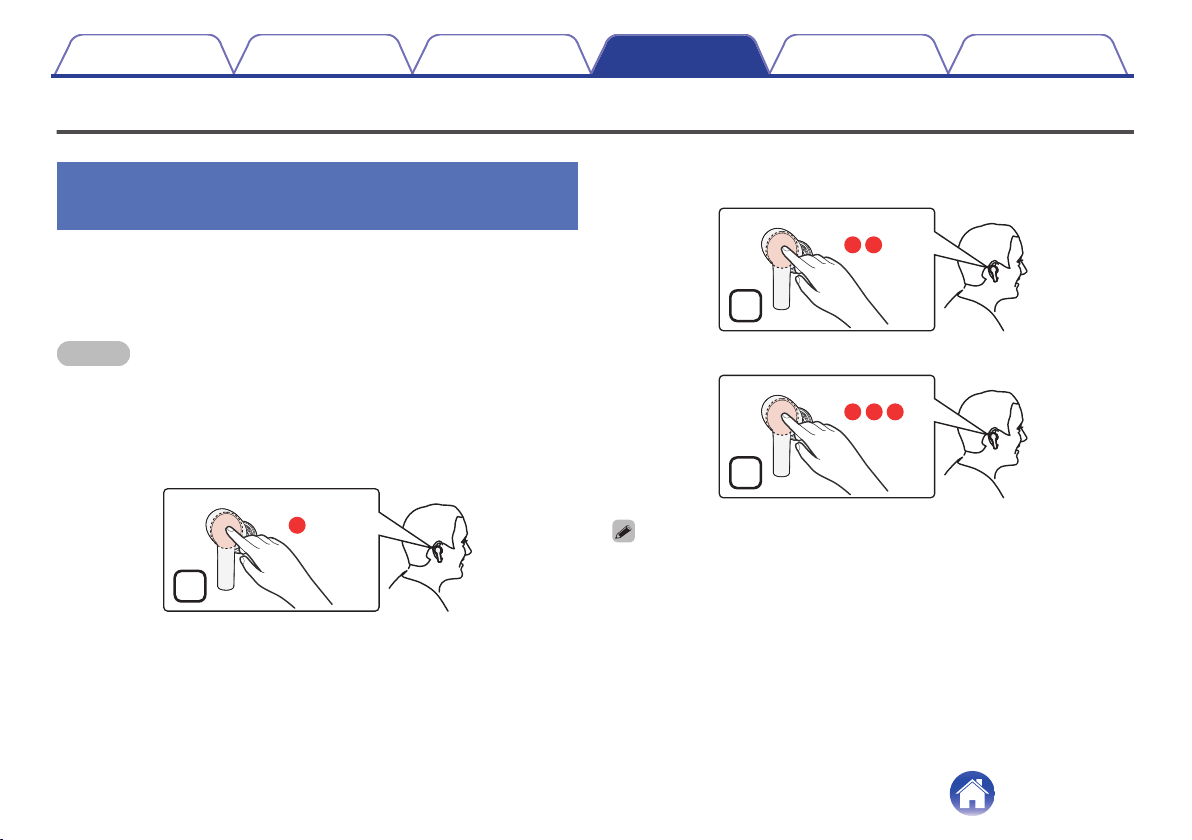
Playback/pause
Tap the touch sensor of the right earphone once.
.
R
Select track
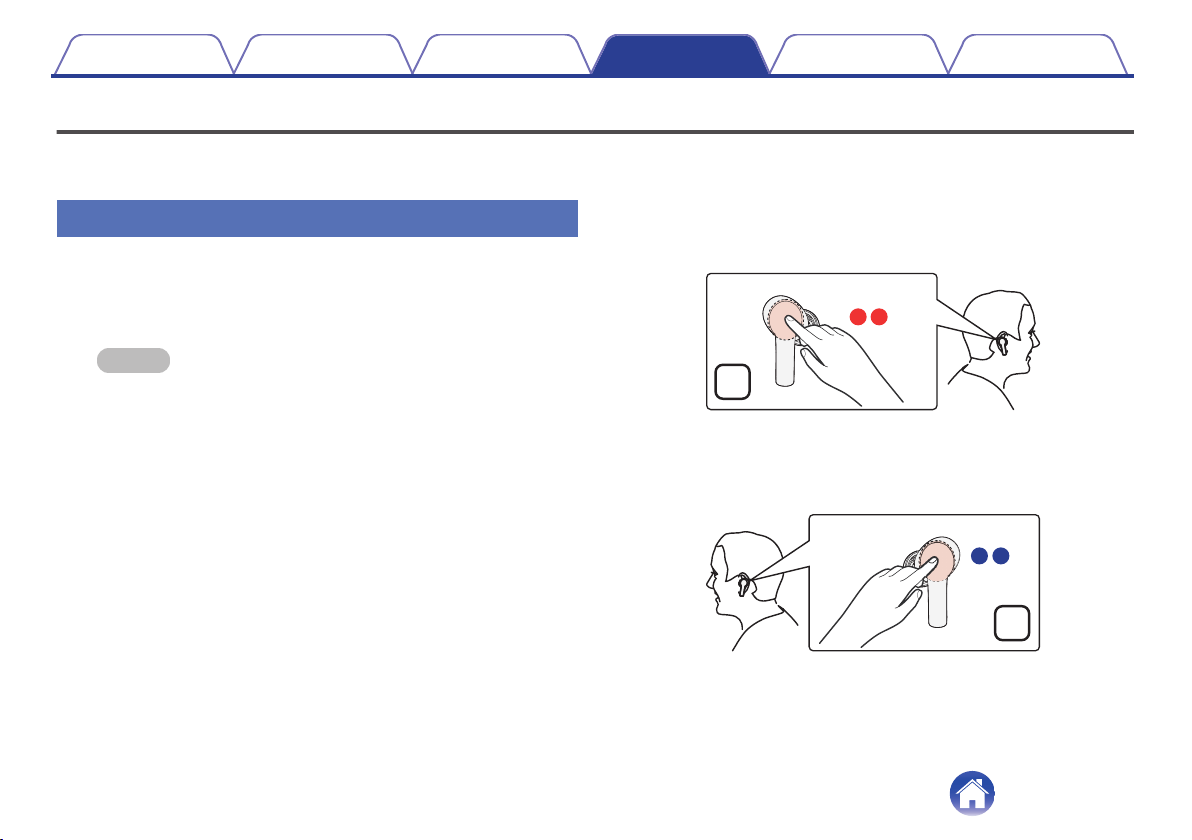
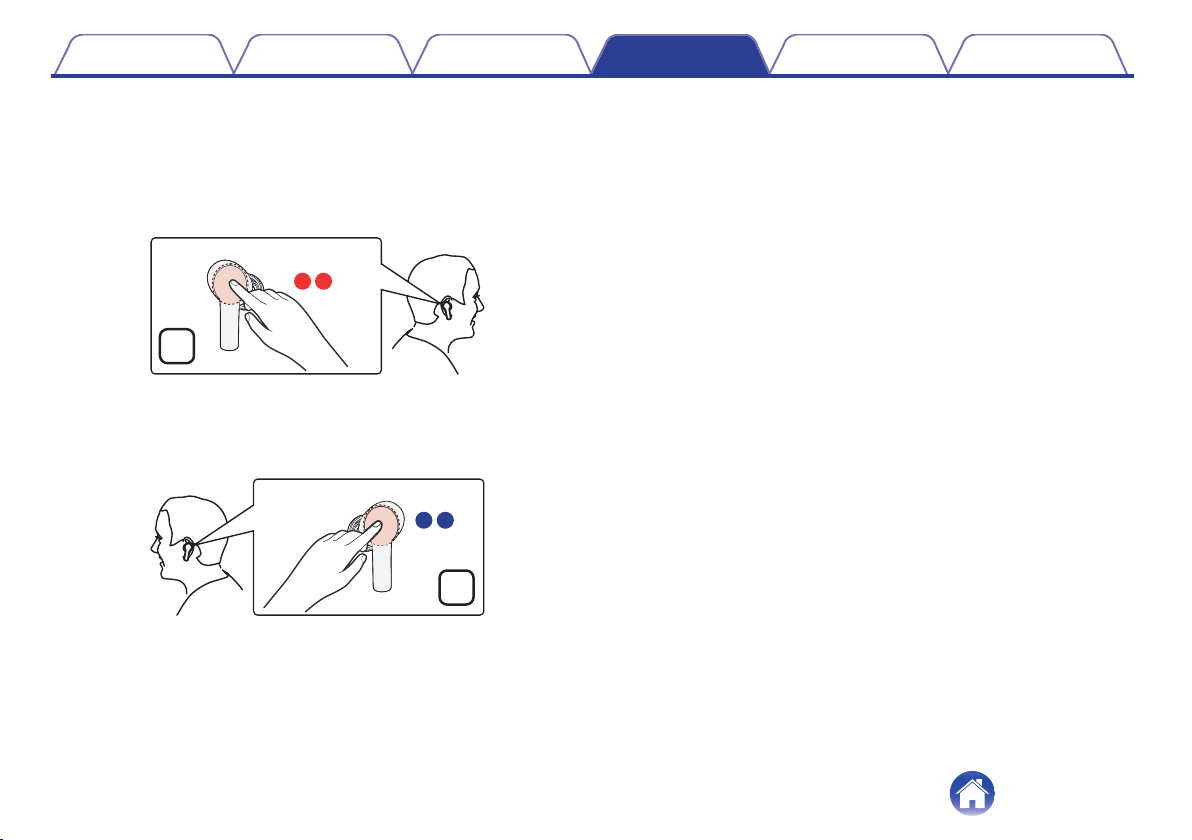
Next track: Tap the touch sensor of the right earphone twice.
.
R
Previous track: Tap the touch sensor of the right earphone 3 times.
.
R
0
With the wear detection sensor built-in the earphones, playback is paused when
the earphones are removed from your ears and playback resumes when they are
worn again.
0
You can also wear just a single earphone on one side.
0
If one of the earphones is out of charge, you can continue playback with the other
earphone only. In this case, playback is in monaural sound.
Contents Preparation Connections Operation Troubleshooting Appendix
23
Playing in one earphone only
The earphones can be used on one side only. If stereo sound is played on
one side only, the sound is automatically converted to play monaural
sound.
1
Wear the earphone you want to use.
0
Place the unused earphone in the charging case.
NOTE
0
When you place the right earphone in the charging case, you can perform
playback operation from the left earphone. (v p. 23)
.
Contents Preparation Connections Operation Troubleshooting Appendix
24
Setting the noise cancelling mode or the ambient sound mix mode
The earphones can be matched to the used environment by setting the
noise cancelling mode or the ambient sound mix mode.
0
Noise cancelling mode
If the noise cancelling mode is set when you are listening to music, the
ambient noise is reduced so that you can focus better on the music. In
addition, the noise cancelling function can be used on its own without
playing music so that you can concentrate in quiet environments.
0
Ambient sound mix mode
When the ambient sound mix mode is set when you are listening to
music, ambient sounds are captured from the mic of this device and are
mixed with the music you are listening to. The surrounding sounds can
be heard even during music playback, so you can enjoy listening to
music while checking the surrounding sounds.
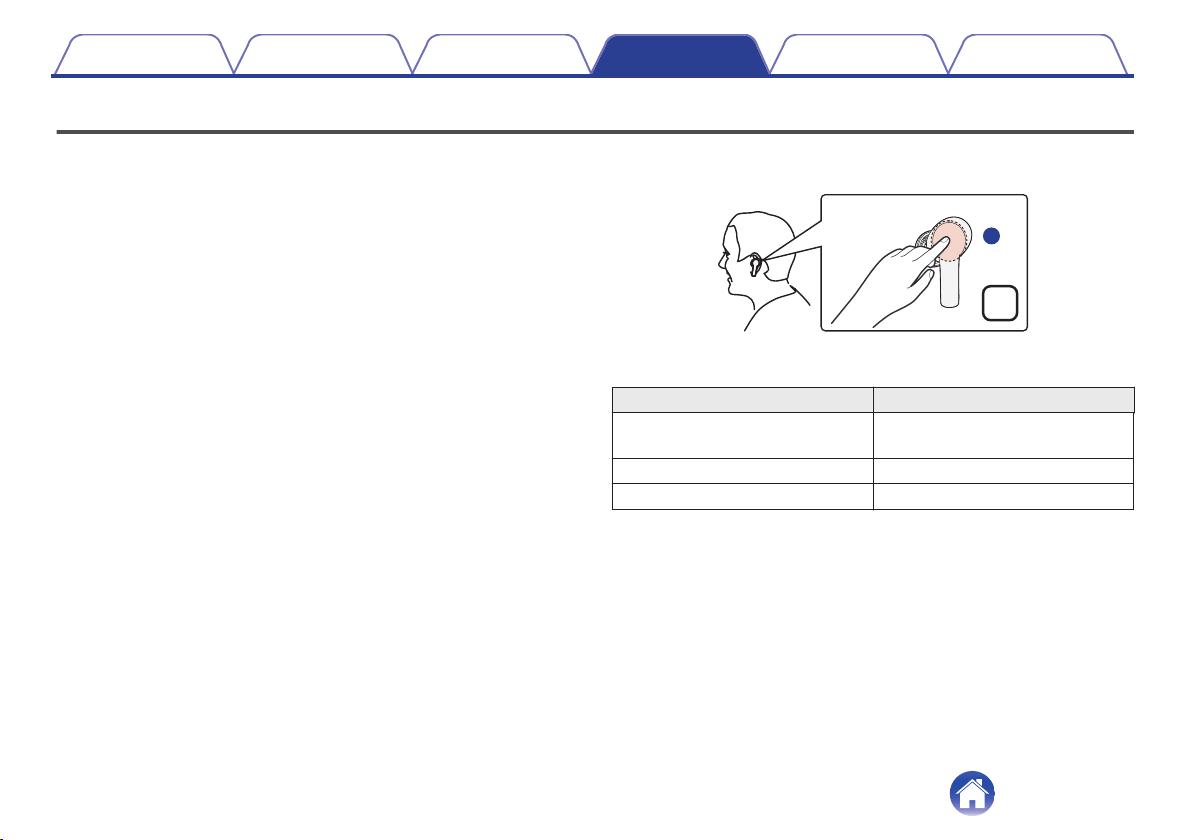
1
Tap the touch sensor on the left earphone.
.
L
Each time you tap, a notification sound is heard, and the earphones are
switched to the next mode.
Mode Number of notification sounds
Noise cancelling mode
(Default)
Once
Ambient sound mix mode Twice
Normal mode (mode off) Three times
Contents Preparation Connections Operation Troubleshooting Appendix
25
Conducting phone calls
Calls can be made while you are wearing the earphones. You can hear the caller’s voice through the earphones, and your voice is picked up by the built-in
microphone in the earphones. Bluetooth supported mobile phones that are connected can be operated with the touch sensor on the right or left earphone.
Making a call
1
Calls can be made by operating your currently used
mobile phone.
Music playback is paused and the call is connected.
NOTE
0
Adjust the volume from the mobile phone.
0
While the dial tone can be heard, double tap the touch sensor on the right or
left earphone to cancel the call.
2
To finish a call, double tap the touch sensor on the
right or left earphone.
When a call is hanged up, playback of the paused track is restarted.
.
R
L
or
Contents
Preparation Connections Operation Troubleshooting Appendix
26
Answering an incoming call
1
If you receive an incoming call, double tap the touch
sensor on the right or left earphone to answer the call.
Music playback is paused and the call is connected.
.
R
L
or
NOTE
0
Adjust the volume from the mobile phone.
2
To finish a call, double tap the touch sensor on the
right or left earphone.
When a call is hanged up, playback of the paused track is restarted.
.
R
L
or
Contents
Preparation Connections Operation Troubleshooting Appendix
27
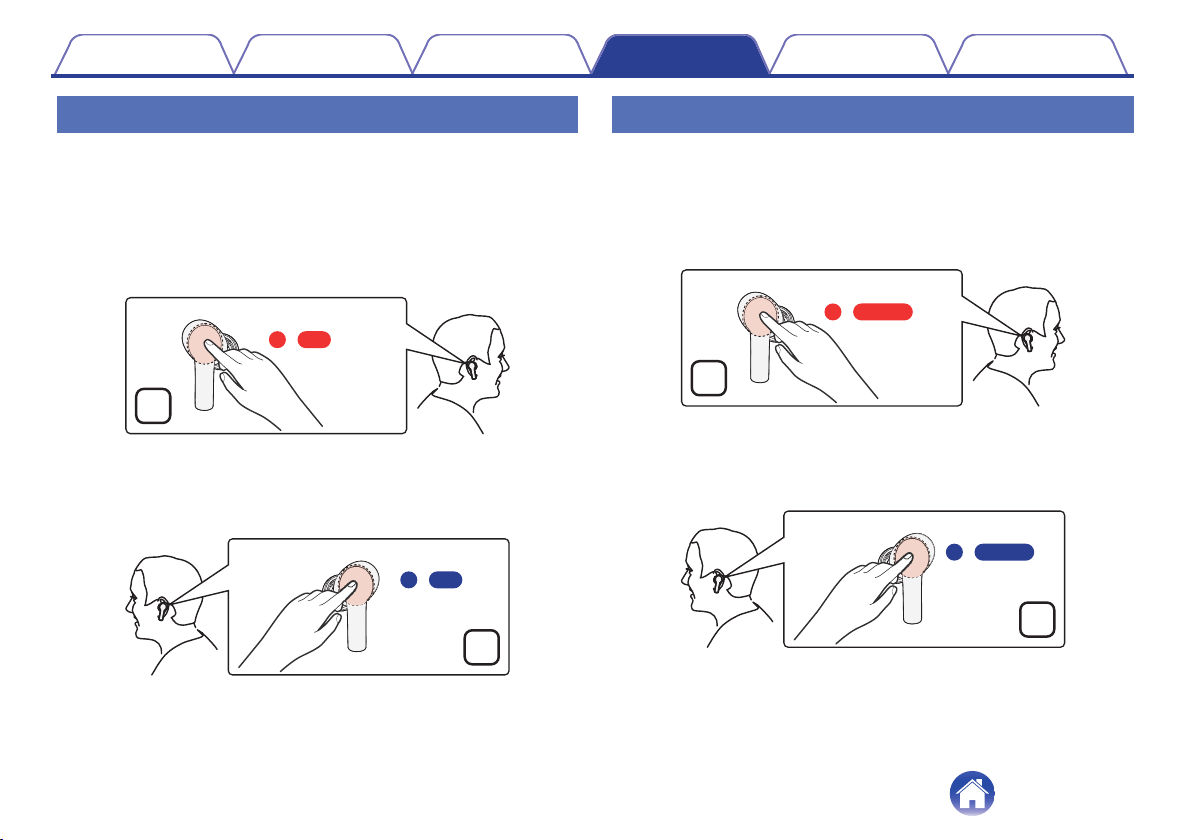
Ignoring an incoming call
1
If you receive an incoming call, tapping the touch
sensor on the right or left earphone, and then press
again for approximately 2 seconds.
The phone will hang up.
0
When a call is hanged up, playback of the paused track is
restarted.
.
L
R
or
2s
2s
Switching the mic on/off (mute)
1
During a call, tap the touch sensor of the right or left
earphone, and then press again for approximately 5
seconds.
Each you operate it and the mode of the mic switches on/off (mute)
with a notification sound from the earphones.
.
L
R
or
5s
5s
Contents
Preparation Connections Operation Troubleshooting Appendix
28
Using the call waiting function
If you receive a call while another call is already in progress, you can place
the current call (call A) on hold and switch to the new call (call B).
0
Some of mobile phones may not be compatible with these functions.
1
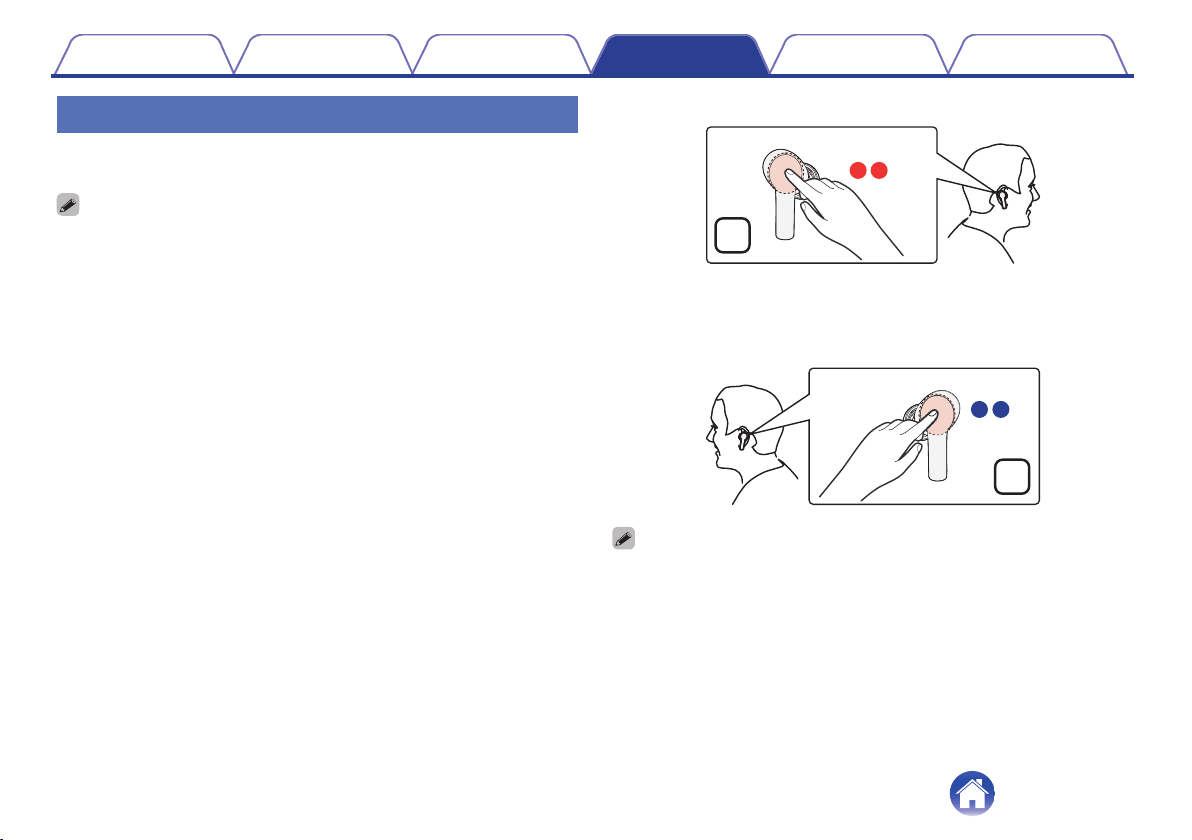
If you receive a call while on a call, double tap the
touch sensor on the right or left earphone.
0
This places the current call (call A) on hold and switches to the
new call (call B).
0
When the new call (call B) ends, the earphones return to the call
that is on hold (call A).
.
R
L
or
0
If you long press the touch sensor on the right or left earphone for approximately 2
seconds while receiving a call, you can reject the call.
Contents Preparation Connections Operation Troubleshooting Appendix
29
Using the voice assistant function
(Siri/Google Assistant)
The voice assistant function (Siri/Google Assistant) built-in devices can be
started and can be used to operate devices by voice from the mic of the
earphones.
1
Connect to devices via Bluetooth. (v p. 16)
2
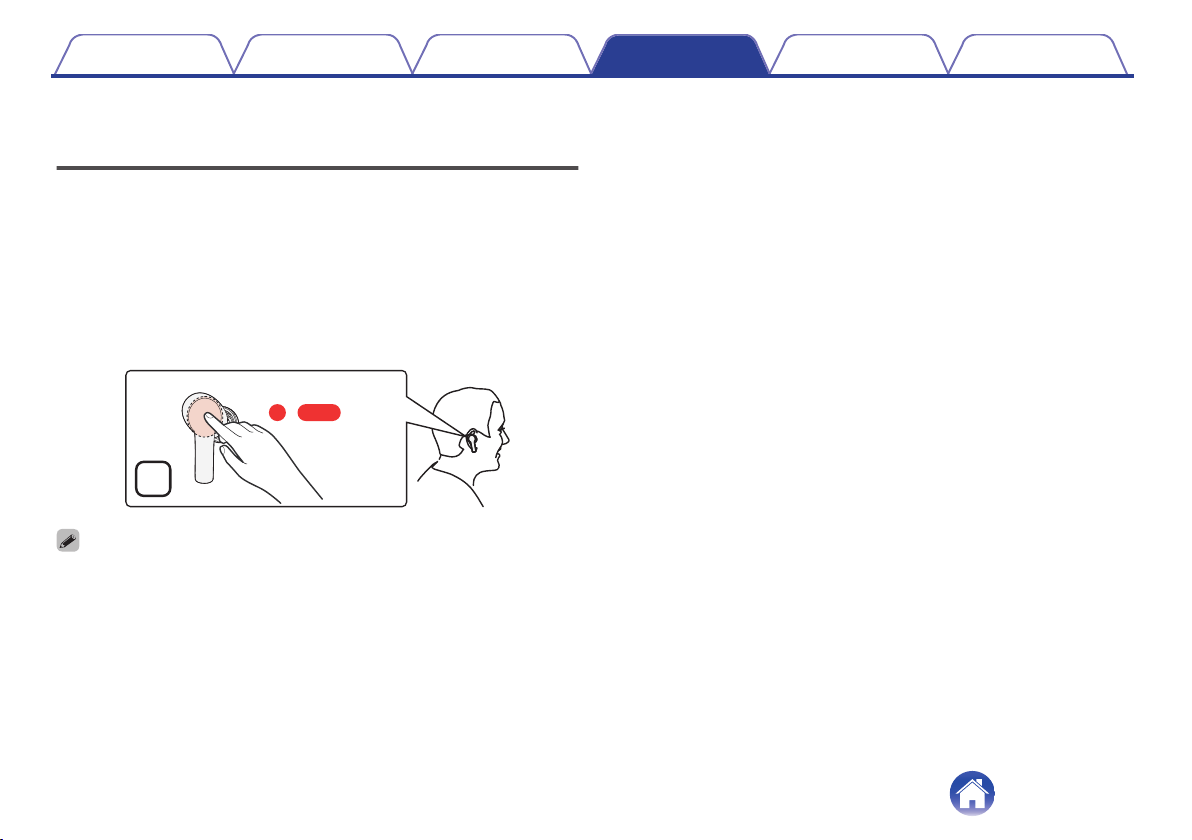
Tap the touch sensor of the right earphone, and then
press again for approximately 3 seconds.
The voice assistant function is started.
.
R
3s
0
To close the voice assistant function, tap the touch sensor of the right earphone
again and then long press for approximately 3 seconds.
Contents Preparation Connections Operation Troubleshooting Appendix
31
Information
Audio Playback and Phone Calls on a
Bluetooth Device
0
These earphones are compatible with SCMS-T content security
standards. You can use these earphones with SCMS-T compatible
mobile phones or devices.
0
In order to listen to music via a Bluetooth connection, the connected
Bluetooth device needs to be A2DP (Advanced Audio Distribution
Profile) compatible. (*)
0
In order to control playback of the Bluetooth device using the
earphones, the connected Bluetooth device needs to be AVRCP (Audio
Video Remote Control Profile) compatible. (*)
0
The connected Bluetooth device needs to be compatible with either
HSP (Headset Profile) or HFP (Hands-free Profile) in order to use the
earphones for conducting phone calls. (*)
0
The Bluetooth device needs to be compatible with either HFP or HSP
and A2DP in order to conduct calls during audio playback. (*)
z
For details on profiles that the Bluetooth device is compatible with, see the
Bluetooth device Owner’s Manual.
Contents
Preparation Connections Operation Troubleshooting Appendix
32
Troubleshooting
First, check the following.
1. Are all of the connections correct?
2. Were the instructions in the manual followed correctly?
3. Is the connected device being operated correctly?
If the earphones do not operate properly, check the corresponding issue here.
If the issue is not covered here, there may be a malfunction. Contact the store where you purchased the earphones. If the staff at the store where you
purchased the earphones also do not know how to resolve the issue, contact the Denon Customer Service Center or your nearest Repairs Center.
Power does not turn on
Power does not turn on.
0
When the rechargeable battery has no power remaining, put the earphones in the charging case and connect the charging case to an AC adapter or
computer using the supplied USB cable to charge the battery. (v p. 9)
The earphones/charging case cannot be charged
The earphones cannot be charged.
0
Remove the power supply prevention film from the earphones. (Do this when using for the first time) (v p. 8)
0
Make sure the charging case is charged in advance.
0
Wrap a clean cloth soaked with anhydrous ethanol around a toothpick and gently clean the dirt stuck to the ports on the earphones and charging case.
The charging case cannot be charged.
0
Make sure the supplied USB cable is connected correctly from the charging case to a USB AC adapter or a computer.
0
If the charging case are connected to the computer via the USB port, check that the computer is powered on.
Contents
Preparation Connections Operation Troubleshooting Appendix
33
Cannot play media using Bluetooth
Cannot connect using Bluetooth.
0
Check that the power of the Bluetooth device is on and the Bluetooth function is enabled.
0
Check whether the Bluetooth device is in sleep status.
0
Bring the earphones and the Bluetooth device closer together.
0
Turn the Bluetooth device off and back on and try again.
0
If the status LED does not flash in white even when you open the lid of the charging case, the earphones are not in the pairing mode. With the lid of the
charging case left open, long press the multi-function button on the back of the charging case for approximately 2 seconds to switch to the pairing
mode.
0
Select A2DP as the Bluetooth connection profile on the transmitting Bluetooth device. For details, see the Owner’s Manual of the Bluetooth device.
Sound is not output from the earphones when connected using Bluetooth.
0
Check that audio is being played back on the Bluetooth device.
0
Volume operation cannot be performed with the earphones. Raise the volume on the Bluetooth device side.
0
Make sure the earphones are not connected to another Bluetooth device. If they are connected, switch the connection to the Bluetooth device you want
to use. (v p. 22)
Contents
Preparation Connections Operation Troubleshooting Appendix
34
No sound comes out
No sound comes out.
0
Pair the earphones with the Bluetooth device. (v p. 16)
0
Check that the connected device are powered on.
0
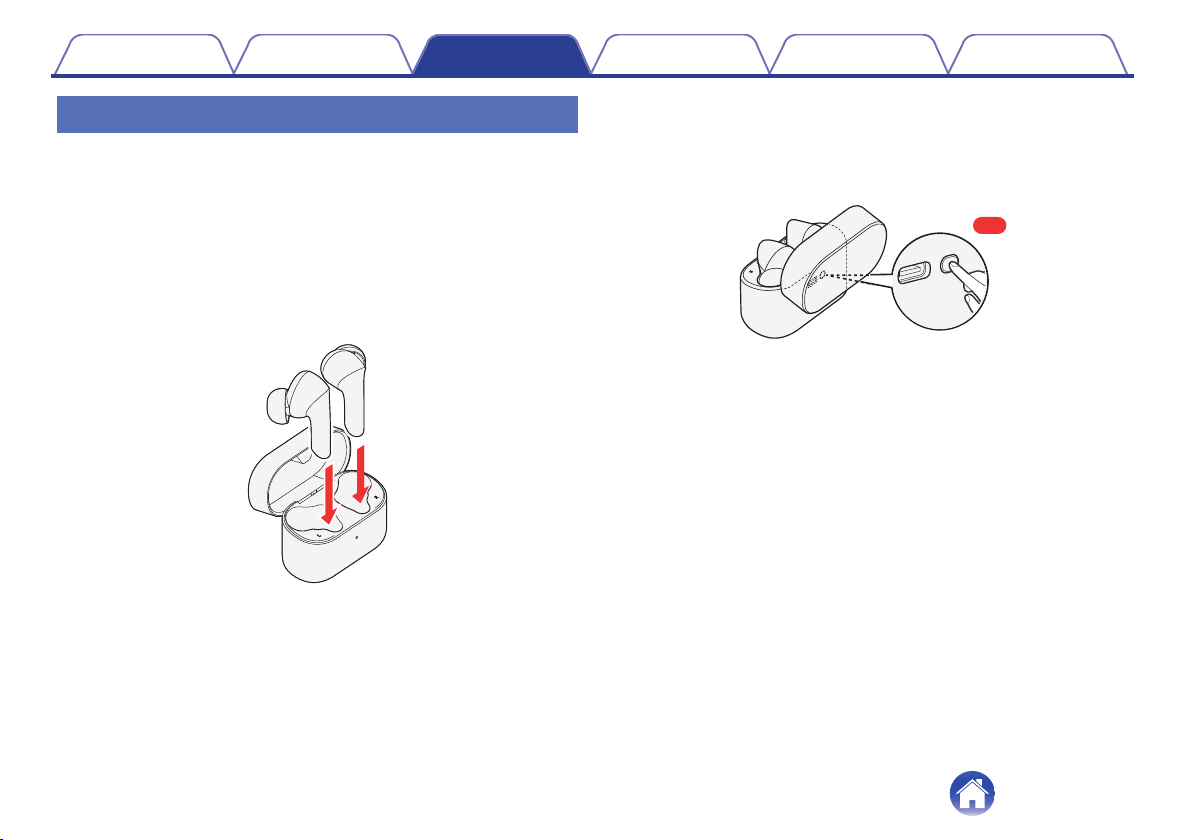
Adjust the volume of the connected device to a suitable level.
Cannot hear sound from one earphone
Cannot hear sound from one earphone.
0
The left and right earphones are charged independently from the other. Depending on how you use your earphones, battery consumption differs in the
left and right earphones.Therefore, the amount of charge remaining in one of earphones may run out before the other. Put the earphones in the
charging case and connect the charging case to an AC adapter or computer using the supplied USB cable to charge the battery. (v p. 9)
0
The pairing between the left and right earphones has been cancelled. Insert the earphones in the charging case and pair the left and right earphones by
pressing the multi-function button on the charging case twice while the lid is open.
Contents
Preparation Connections Operation Troubleshooting Appendix
35
Sound is distorted, noisy, or cuts in and out
Sound is distorted, noisy, or cuts in and out.
0
Adjust the volume of the connected device to a suitable level.
0
The Bluetooth device is out of range. Bring the Bluetooth device closer to the earphones.
0
The Bluetooth connection is experiencing wireless interference. Move the earphones away from appliances such as microwave ovens and other
wireless devices.
0
Power cycle the device and try again.
Cannot make a phone call
Cannot make a phone call.
0
Some smartphones and phone apps do not support hands-free calls.
Cannot hear the caller’s voice.
0
When there is an incoming call, double tap the touch sensor on the right or left earphone to answer the call.
0
Check that the power of the Bluetooth device is on and the Bluetooth function is enabled.
0
Select HSP or HFP as the Bluetooth connection profile on the transmitting Bluetooth device. For details, see the Owner’s Manual of the Bluetooth
device.
0
Check that the Bluetooth device is set to handle calls through the earphones. For details, see the Owner’s Manual of the Bluetooth device.
0
Raise the earphones volume on the Bluetooth device side. Volume operation cannot be performed with the earphones.
Your voice cannot be heard by the other party.
0
If the built-in mic function is off (mute), your voice is muted. Turn on the mic function. (v p. 28)
Contents
Preparation Connections Operation Troubleshooting Appendix
36
Resetting factory settings
If the earphones are not working properly, reset them.
The various settings are reset to the factory default. Configure the settings again.
1
Insert the earphones in the charging case.
0
Do not close the lid of the charging case.
.
2
With the lid of the charging case left open, long press
the multi-function button for approximately 10
seconds.
After the status LED blinks for 3 seconds alternating between red
and green.
.
10s
3
Close the lid of the charging case.
All the settings are reset to the factory default.
.
Contents
Preparation Connections Operation Troubleshooting Appendix
37

Precautions for Use
0
Be sure to read the Owner’s Manual of the device that you want to connect.
0
Check the volume settings when using the earphones on public transport or in public places and make sure you do not disturb people around you.
0
These earphones are not guaranteed to work with all combinations of Bluetooth devices/mobile phones.
0
These earphones do not support connection with all Bluetooth devices/mobile phones.
0
Bluetooth wireless technology can communicate over a distance of approximately 10 m. However, obstructions (people, metallic objects, walls, etc.)
and radio wave conditions affect the range in which communication is possible.
0
The Bluetooth device that you want to connect must support the same profile as these earphones in order to use the Bluetooth function. For details on
profiles that the Bluetooth device is compatible with, see the Bluetooth device Owner’s Manual.
0
Due to features of Bluetooth wireless technology, playback of audio on the earphones is slightly delayed compared to the voice/audio playback on the
transmitting device.
Contents Preparation Connections Operation Troubleshooting Appendix
38
Disposal of these earphones
The rechargeable battery built into these earphones can be recycled.
Contact the Denon Customer Service Center for details on disposing of
these earphones.
Trademark information
.
The Bluetooth
®
word mark and logos are registered trademarks owned
by the Bluetooth SIG, Inc. and any use of such marks by D&M Holdings
Inc. is under license. Other trademarks and trade names are those of
their respective owners.
Contents Preparation Connections Operation Troubleshooting Appendix
39
Specifications
o
Earphone section
Type: Dynamic type
Drive units: φ11×10 mm, Oval
Playback frequency: 20 – 20,000 Hz
o
Bluetooth section
Compatible standards: Bluetooth 5.0
Transmission power class: Class1
Compatible profiles: A2DP/AVRCP/HSP/HFP
A2DP codec support: AAC/SBC
Continuous playback time
Noise cancellation function OFF: Approx. 6 hours
Approx. 24 hours (with 3 × recharge via the changing case)
Noise cancellation function ON: Approx. 4.8 hours
Approx. 19.2 hours (with 3 × recharge via the changing case)
Contents Preparation Connections Operation Troubleshooting Appendix
40
o
General
Operating temperature range: 5 ℃ - 40 ℃
Rating of the charging input to the charging case: DC 5 V, 2.4 A or less
Power supply: DC 3.8 V
(internal lithium polymer rechargeable battery for earphones)
DC 3.7 V
(internal lithium polymer rechargeable battery for charging case)
Weight: 5.3 g×2 (earphones)
43 g (charging case)
z
For purposes of improvement, specifications and design are subject to change without notice.
Contents Preparation Connections Operation Troubleshooting Appendix
41

www.denon.com
3520 10823 00AD
© 2021 Sound United. All Rights Reserved.
42