
Use & Care Guide
Manual de Uso Y Culdado
English / EspaFml
ModelsiModelos: 116.31040
Ke
_ii _i__ _ _ _ _ _ _
P/N C01ZDKJIOU_I_ - KC_IZDI<JZOU_
Sears Brands Management
Corporation, Hoffman Estates_
tL 60179 U.S_A
www_seors,com
Before Using Your New
Vacuum Cleaner ................. 2
Packing List ................... 2
Vacuum Cleaner Help Line ......... 3
Kenmore Vacuum Cleaner Warranty . 3
Important Safety instructions ....... 4
Parts and Features ............... 5
Assembly instructions ............. 6
Handle ...................... 6
Attachment Assembly ........... 7
Power Cord ................... 8
Operating Instructions ............. 9
Power Cord ................... 9
Releasing the Handle ........... 10
OFF/FLOOR/CARPET Switch ..... 10
Pile Height Selection ............ 11
Attachments .................. 12
Attachment Use Table .......... 13
Vacuuming Tips ............... 13
Performance/Safety Features .... 1,4-15
Vacuum Cleaner Care ............ 16
Vacuum Cleaner Storage ........ 16
Cleaning Exterior and Attachments .16
Dust Cup Emptying ............ 17
Dust Cup Cleaning ............. 18
Pre-Fiiter Cleaning ............. 19
Primary Filter Cleaning .......... 20
Exhaust Filter Replacement ....... 21
Agitator Cleaning ............. 21
Clog Removal ............. 22-23
Troubleshooting ................ 24
Master Protection Agreements ...... 25
RequestingAssislance
Or Service ............... Back page
Please read this guide. It will help you assemble and operate your new Kenmore vacuum
cleaner in the safest and most effective way.
For more information about vacuum cleaner care and operation, call your nearest Sears
Parts and Repair Center or the Vacuum Cleaner Help Line listed on the cover of this guide.
You will need the complete model and serial numbers when requesting information. Your vac-
uum cleaner's model and serial numbers are located on the Model and Serial Number Plate.
Use the space below to record the model number and serial number of your new Kenmore
vacuum cleaner.
Model No.
Serial No.
Date of Purchase
Keep this book and your sales check (receipt) in a safe place for future reference.
I PACKING LiST J
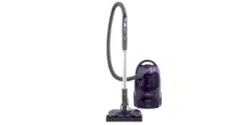
Your KENMORE VACUUM CLEANER is packaged with the following parts and compo-
nents assembled separately in the carton:
1 Upright Vacuum Cleaner 1 Pet Handi Mate TM
1 Handle I Telescoping Wand
1 Crevice Tool 1 Use & Care Guide
1 Combination Brush t Repair Parts List
Each of the above assemblies are shown in detail inside the Repair Parts List.
Vacuum Cneaner Help Line:
1-877-531-7321
One Year Limited Warranly
8.00am-5.00pm EST, M-F
(U.S.A. and Canada)
When assembled, operated and maintained according to all instructions supplied with
the product, if this vacuum cleaner fails due to a defect in material or workmanship
within one year from the date of purchase, return it to any Sears store, Sears Parts &
Repair Center or other Kenmore outlet for free repair.
If this vacuum cleaner is used for other than private family purposes, this warranty
applies for only 90 days from the date of purchase.
This warranty covers only defects in material and workmanship. Sears will NOT pay
for:
1. Expendable items that can wear out from normal use, including but not limited to
filters, belts, light bulbs, and bags.
2. A service technician to instruct the user in correct product assembly, operation or
maintenance.
3. A service technician to clean or maintain this product.
4. Damage to or failure of this product if it is not assembled, operated or maintained
according to all instructions supplied with the product.
5. Damage to or failure of this product resulting from accident, abuse, misuse or use for
other than its intended purpose.
6. Damage to or failure of this product caused by the use of detergents, cleaners,
chemicals or utensils other than those recommended in all instructions supplied with
the product.
7. Damage to or failure of parts or systems resulting from unauthorized modifications
made to this product.
Disclaimer of implied warranties; limitation of remedies
Customer s sole and exclusive remedy under this hmlted warranty shall be product
repair as provided herein. Implied warranties, including warranties of merchantability or
fitness for a particular purpose, are hmlted to one year or the shortest period allowed
by law. Sears shall not be liable for incidental or consequential damages. Some states
and provinces do not allow the exclusion or limitation of incidental or consequential
damages, or limitations on the duration of implied warranties of merchantability or
fitness, so these exclusions or limitations may not apply to you.
This warranty applies only while this vacuum cleaner is used in the United States and
Canada.
This warranty gives you specific legal rights, and you may also have other rights which
vary from state to state.
Sears, Roebuck and Co., Hoffman Estales, IL 60179
Sears Canada Inc., Toronto, Ontario, Canada MSB 2B8
Readail instructionsin this_;ulde before_a_s'semblingor using_You'rVacuum cleaner. .............
4kWAR ING:
Your safely is important to us. To reduce the risk of fire, electrical shock, injury to
persons or damage when using your vacuum cleaner, follow basic safety precau-
tions including the following:
Use your vacuum cleaner only as
described in this manual. Use only with
Sears recommended attachments.
Disconnect electrical supply before ser-
vicing or cleaning out the brush area.
Failure to do so could result in the brush
unexpectedly starting, causing personal
injury from moving parts.
Do not leave vacuum cleaner when
plugged in. Unplug from outlet when
not in use and before performing main-
tenanceo
To reduce the risk of electrical shock -
Do not use outdoors or on wet surfaces.
Do not allow to be used as a toy. Close
attention is necessary when used by or
near children.
Do not use with a damaged cord or
plug. If vacuum cleaner is not working
as it should, has been dropped, dam-
aged, left outdoors, or dropped tn
water, return it to a Sears Service
Center for assessment before using
again.
Do not pull or carry by cord, use cord
as a handle, close a door on cord, or
pull cord around sharp edges or cor-
ners. Do not run vacuum cleaner over
cord. Keep cord away from heated
surfaces.
Do not unplug by pulling on cord. To
unplug, grasp the plug, not the cord.
Do not handle plug or vacuum cleaner
with wet hands_
Do not put any objects into openings°
Do not use with any opening blocked;
keep free of dust, lint, hair, and any-
thing that may reduce air flow.
Keep hair, loose clothing, fingers, and
all parts of body away from openings
and moving parts.
Turn off all controls before unplugging.
Use extra care when cleaning on stairs.
Do not put on chairs, tables, etc. Keep
on floor.
Do not use vacuum cleaner to .pick up
flammable or combustible liquids (gaso-
line, cleaning fluid, perfumes, etc.), or
use in areas where they may be pre-
sent. The fumes from these substances
can create a fire hazard or explosion.
Do not pick up anything that is burning
or smoking, such as cigarettes, matches,
or hot ashes.
Do not use vacuum cleaner without dust
cup and/or filters in place.
Always clean the dust cup after vacu-
uming carpet cleaners or freshener,
powders, and fine dust. These products
clog the filters, reduce airflow and can
cause damage to the vacuum cleaner.
Failure to clean the dust cup could
cause permanent damage to the vacu-
um cleaner.
Do not use the vacuum cleaner to pick
up sharp hard objects, small toys, pins,
paper clips, etc. They may damage the
vacuum cleaner or dust cup.
Unplug before connecting Pet Handi
Mate TM
You are responsible for making sure
that your vacuum cleaner is not used by
anyone unable to operate it properly.
SAVE THESE INSTRUCTIONS
Proper assembly and safe use of your vacuum cleaner are your responsibilities. Your
vacuum cleaner is intended for Household use. Read this Use & Care Guide carefully for
important use and safety information. This guide contains safety statements under
warning and caution symbols.
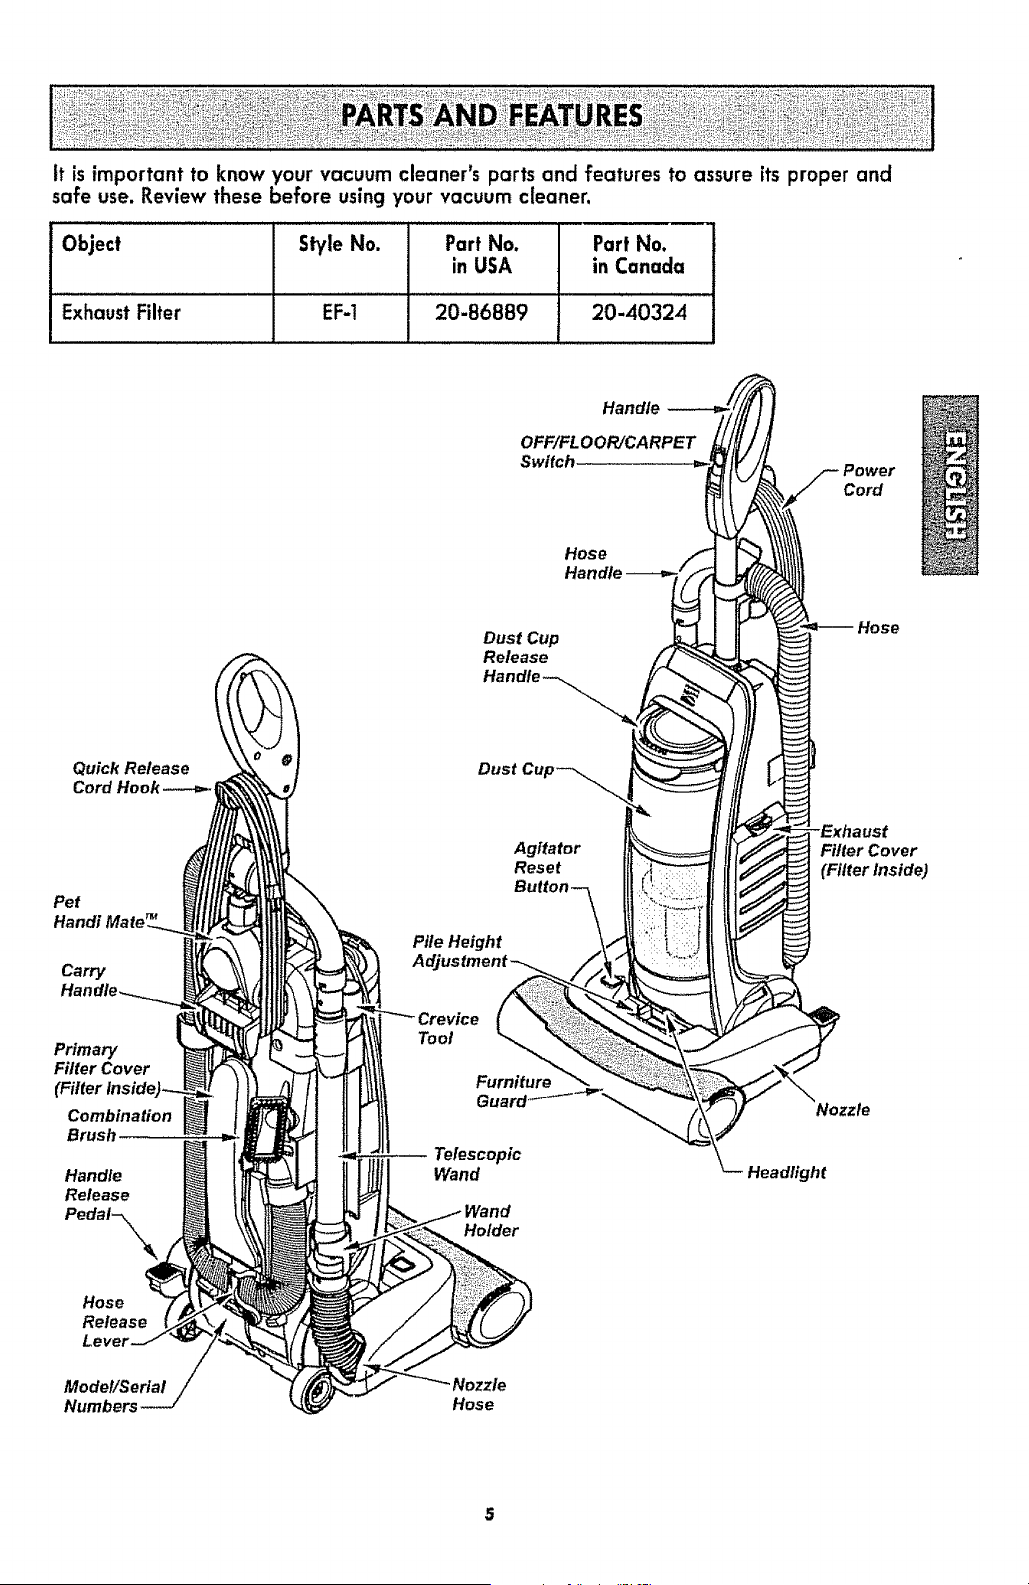
it isimportantto knowyour vacuumcleaner'spartsandfeaturesto assureffs proper and
safe use. Review these before using your vacuum cleaner.
Object Sh/le No. Part No. Part No.
in USA in Canada
Exhaust Filter EF-! 20-86889 20-40324
Quick Release
Cord Hook ---_.t
Pet
Handi
Carry
Primary
Filter Cover
Combination
Brush
Handle
Release
Pedal-_
Handle
OFF/FLOOR/CARPET
Switch ="_ F Power
CorO
Hose _
Dust Cup _.- _ Hose
Release
Dust Cup_
AgHator E;h_r_tver
Reset
Iter inside)
Pile Height
Tool
Furniture _Nazzle
WandTelesc°pic _Q'_ Headlight
Holder
Hose
Release
Model/Serial
Numbers
Nozzle
Hose
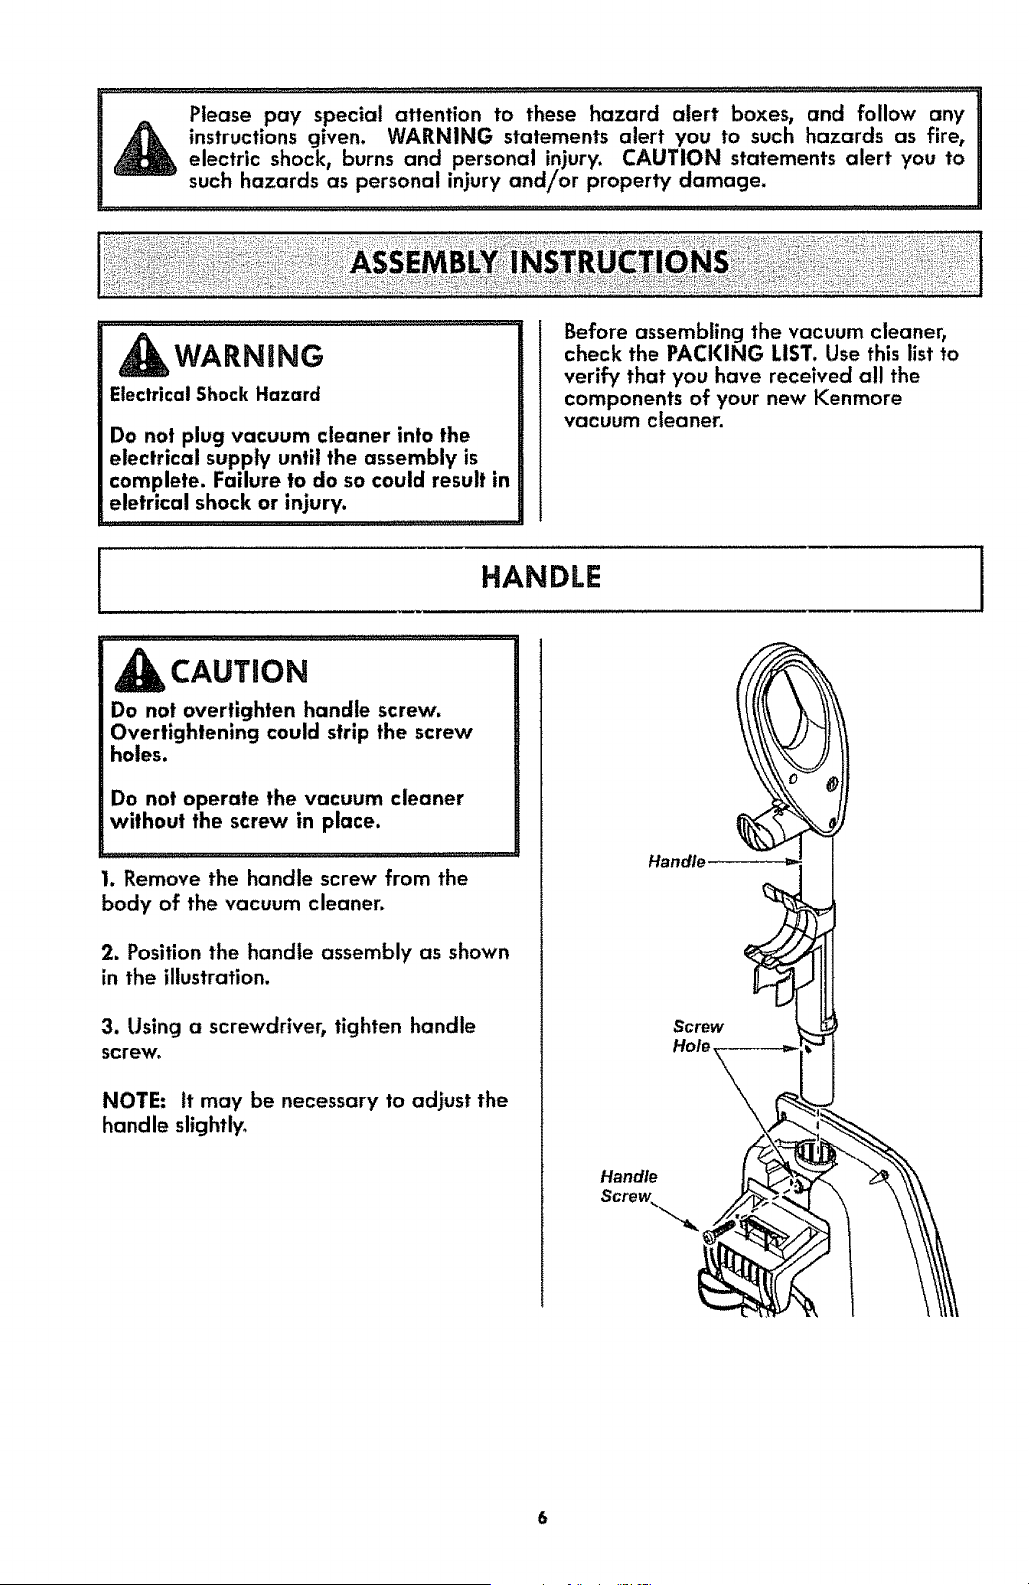
....A Please--;ay special a"enfion to these hazard alert boxesl and foll0w any_i
,_ instructions given. WARNING statements alert you to such hazards as fire, I_
electric shock, burns and personal injury. CAUTION statements alert you to
such hazards as personal injury and/or property damage.
I
WARNING
Electrical Shock Hazard
Do not plug vacuum cleaner into the
electrical supply until the assembly is
complete. Failure to do so could result in
eletrical shock or injury.
Before assembling the vacuum cleaner,
check the PACKING LIST. Use this list to
verify that you have received all the
components of your new Kenmore
vacuum cleaner.
HANDLE
CAUTION
Do not overtighten handle screw.
Overtighlening could strip the screw
holes.
Do not operate the vacuum cleaner
without the screw in place.
I. Remove the handle screw from the
body of the vacuum cleaner.
2. Position the handle assembly as shown
in the illustration.
3. Using a screwdriver, tighten handle
screw°
NOTE: It may be necessary to adjust the
handle slightly°
Handle
Handle
i ATTACHMENT ASSEMBLY
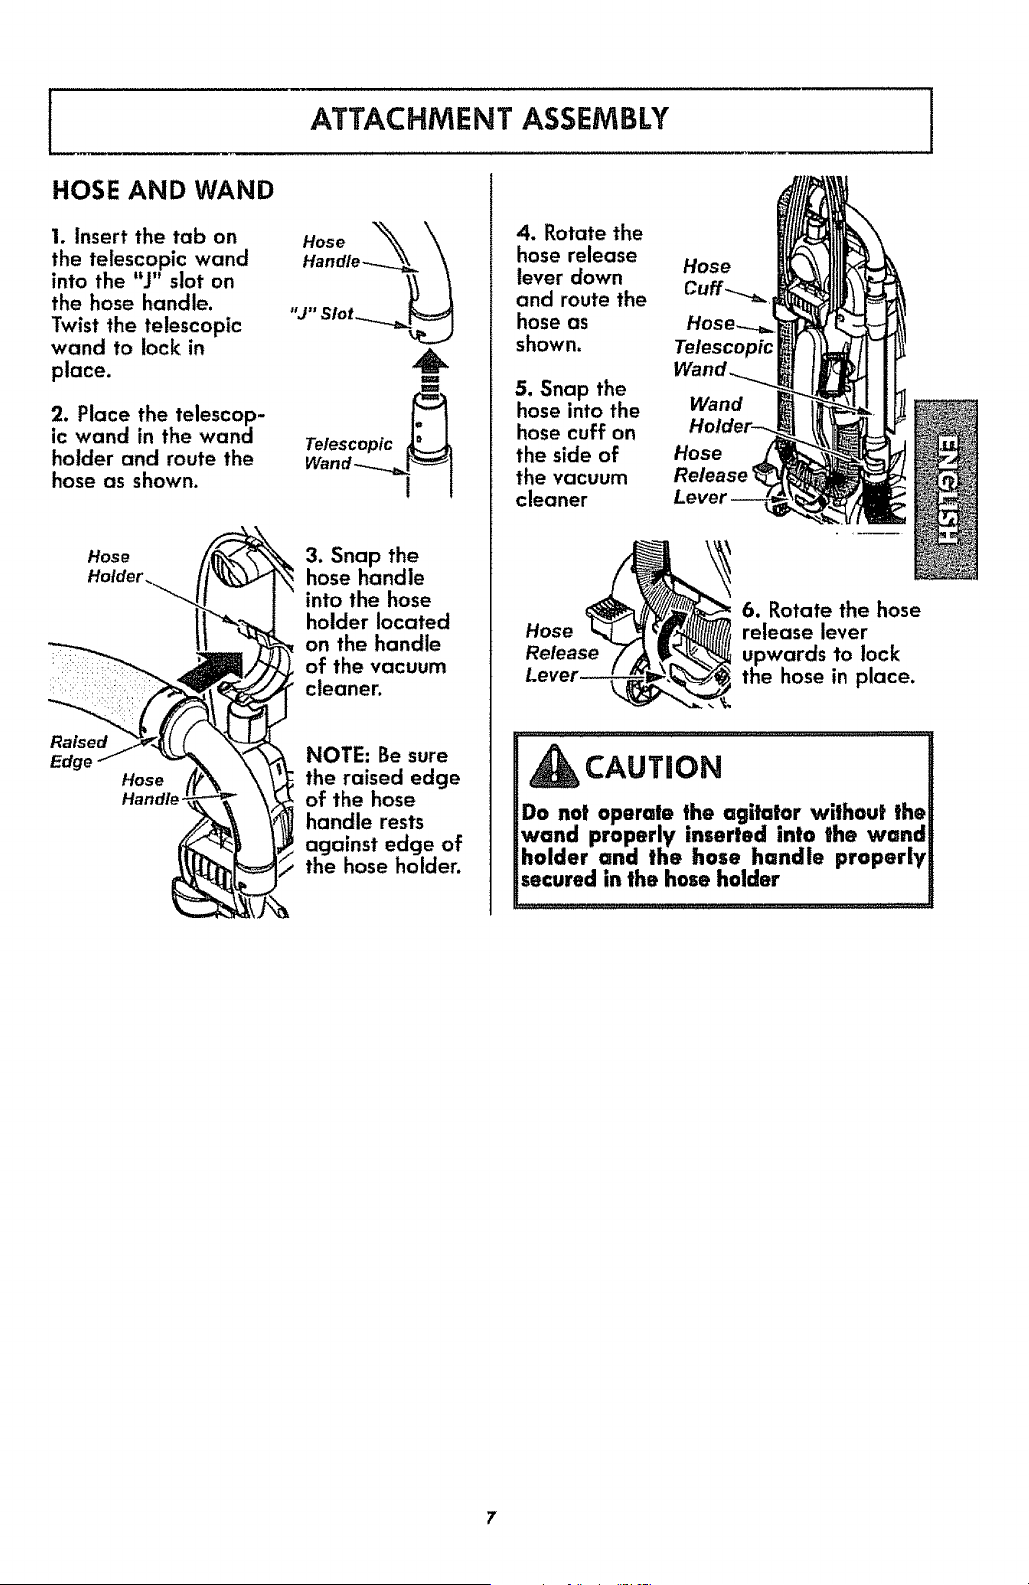
HOSE AND WAND
1. Insert the tab on
the telescopic wand
into the "J" slot on
the hose handle.
Twist the telescopic
wand to lock in
place.
2. Place the telescop-
ic wand in the wand
holder and route the
hose as shown.
"J" Slot__
Telescopic
Wand'_[!_ 1
Hose [__ 3. Snap the
Hotder_ II_"_T_ hose handle
_._ intothe hose
holder located
on the handle
i:= : :_ of the vacuum
cleaner.
Raised
Edge
Hose
NOTE: Be sure
the raised edge
of the hose
handle rests
against edge of
the hose holder.
4. Rotate the
hose release
lever down
and route the
hose as
shown,
5. Snap the
hose into the
hose cuff on
the side of
the vacuum
cleaner
Hose
Telescopic
Wand
Hose
6. Rotate the hose
Hose release lever
Release upwards to lock
the hose in place.
CAUTION
Do not operate the agitator without the
wand properly ,nserted into the wand
holder and the hose handle properly
secured in the hose holder
7
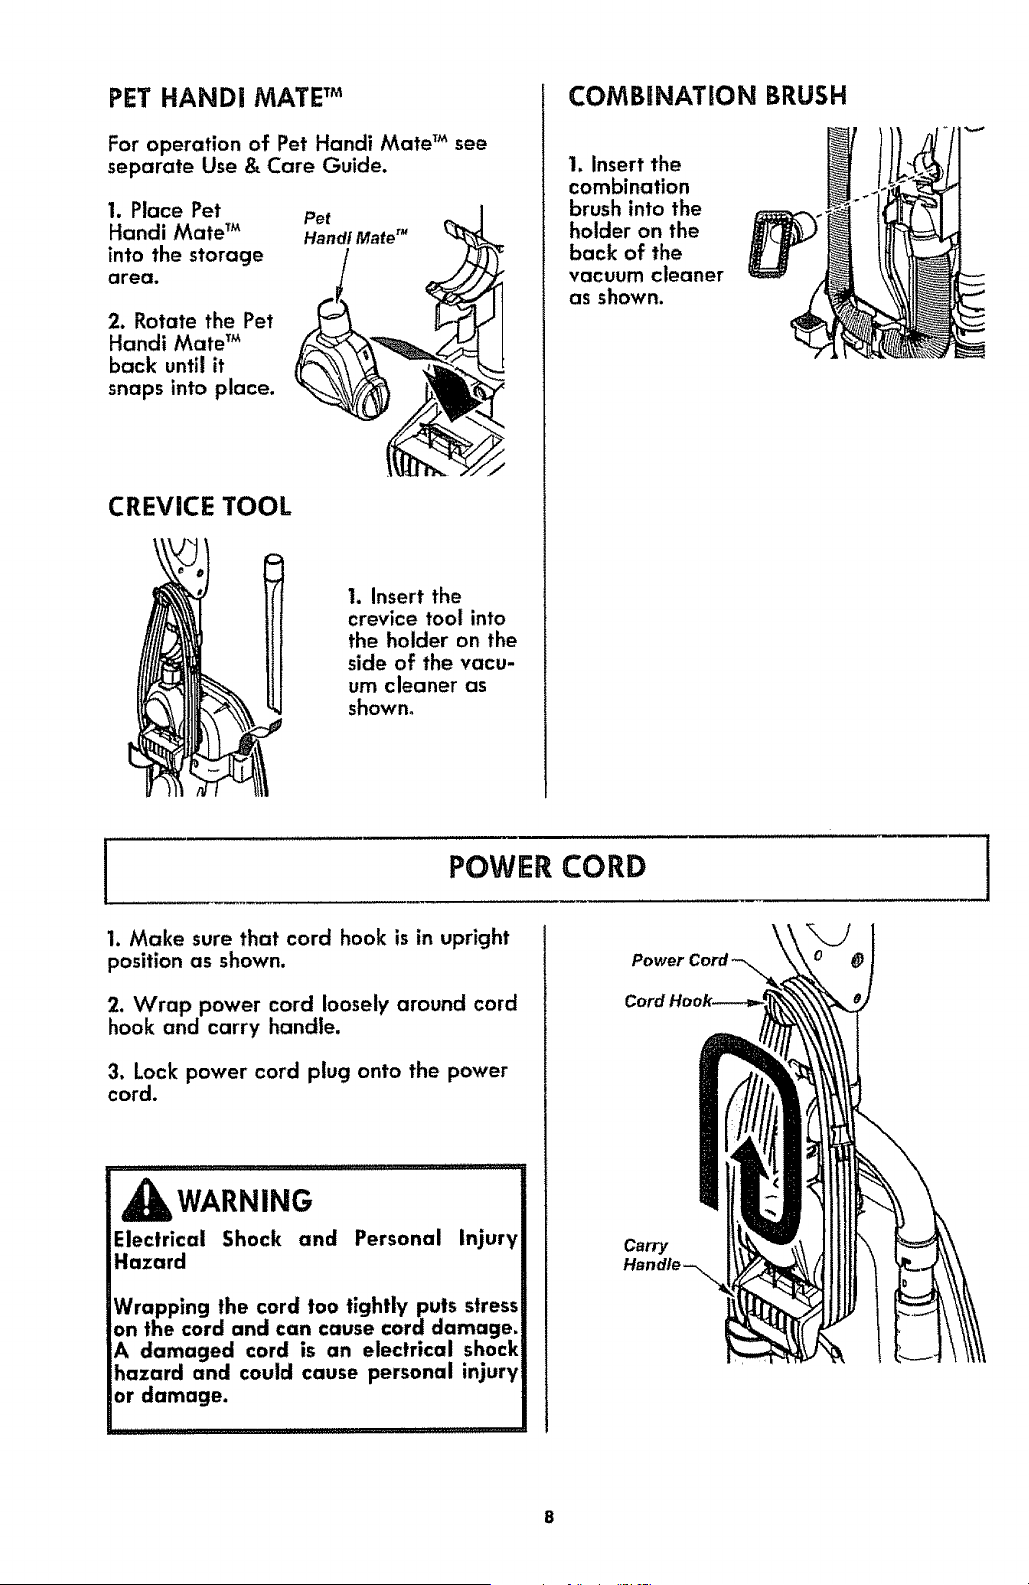
PET HAND| MATE TM
For operation of Pet Handi Mate _Msee
separate Use & Care Guide.
1. Place Pet
Handi Mate T_
into the storage
area.
2. Rotate the Pet
Handi Mate TM
back until it
snaps into place.
Pet
Handi Mate r"
CREVICE TOOL
1. Insert the
crevice tool into
the holder on the
side of the vacu-
um cleaner as
shown°
COMBINATION BRUSH
1. Insert the
combination
brush into the
holder on the
back of the
vacuum cleaner
as shown.
POWER CORD
1. Make sure that cord hook is in upright
position as shown.
2. Wrap power cord loosely around cord
hook and carry handle.
3. Lock power cord plug onto the power
cord.
,_ 7¸¸¸¸7--¸¸-¸¸¸¸¸7 ,, .............
WARNING
Electrical Shock and
Hazard
Personal Injury
Wrapping the cord too tightly puts stress
on the cord and can cause cord damage.
A damaged cord is an electrical shock
hazard and could cause personal injury
or damage.
Power
Carry
1
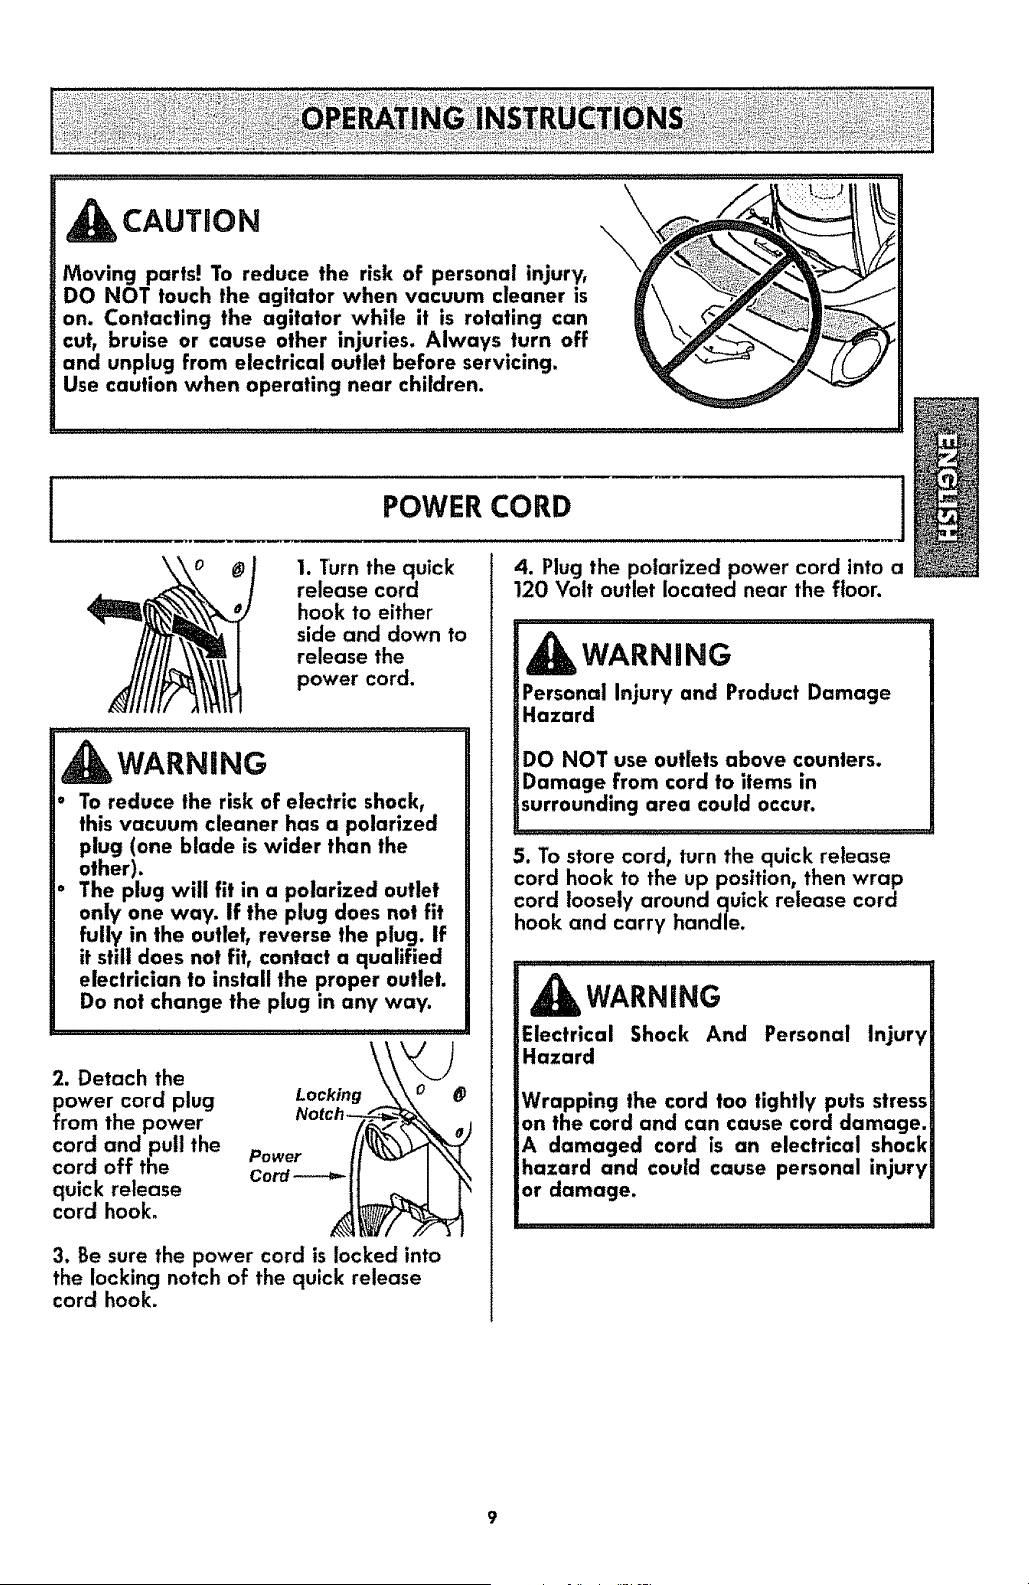
CAUTION
Moving parts! To reduce the risk of personal injury,
DO NOT touch the agitator when vacuum cleaner is
on. Contacting the agitator while it is rotating can
cut_ bruise or cause other injuries. Always turn off
and unplug from electrical outlet before servicing.
Use caution when operating near children.
l
I. Turn the quick
release cord
hook to either
side and down to
release the
power cord.
POWER CORD 1
4. Plug the polarized power cord into a
120 Volt outlet located near the floor.
WARNING
Personal Injury and Product Damage
Hazard
WARNING
° To reduce the risk of electric shock,
this vacuum cleaner has a polarized
plug (one blade is wider than the
other).
The plug will fit in a polarized outlet
only one way. If the plug does not fit
fully in the outlet, reverse the plug. If
it still does not fit, contact a qualified
electrician to install the proper outlet.
Do not change the plug in any way.
\
2. Detach the \
ower cord plug Locking
ram the power
cord and pull the Power
cord off the Cord---_
quick release
cord hook.
3. Be sure the power cord is locked into
the locking notch of the quick release
cord hook.
DO NOT use outlets above counters.
Damage from cord to items in
surrounding area could occur.
5. To store cord, turn the quick release
cord hook to the up position, then wrap
cord loosely around quick release cord
hook and carry handle.
,,,,,,,,,,,,, ,,,,,,, , ill ,,
WARNING
Electrical Shock And Personal Injury
Hazard
Wrapping the cord too tightly puts stress
on the cord and can cause cord damage.
A damaged cord is an electrical shock
hazard and could cause personal injury
or damage.
9
[
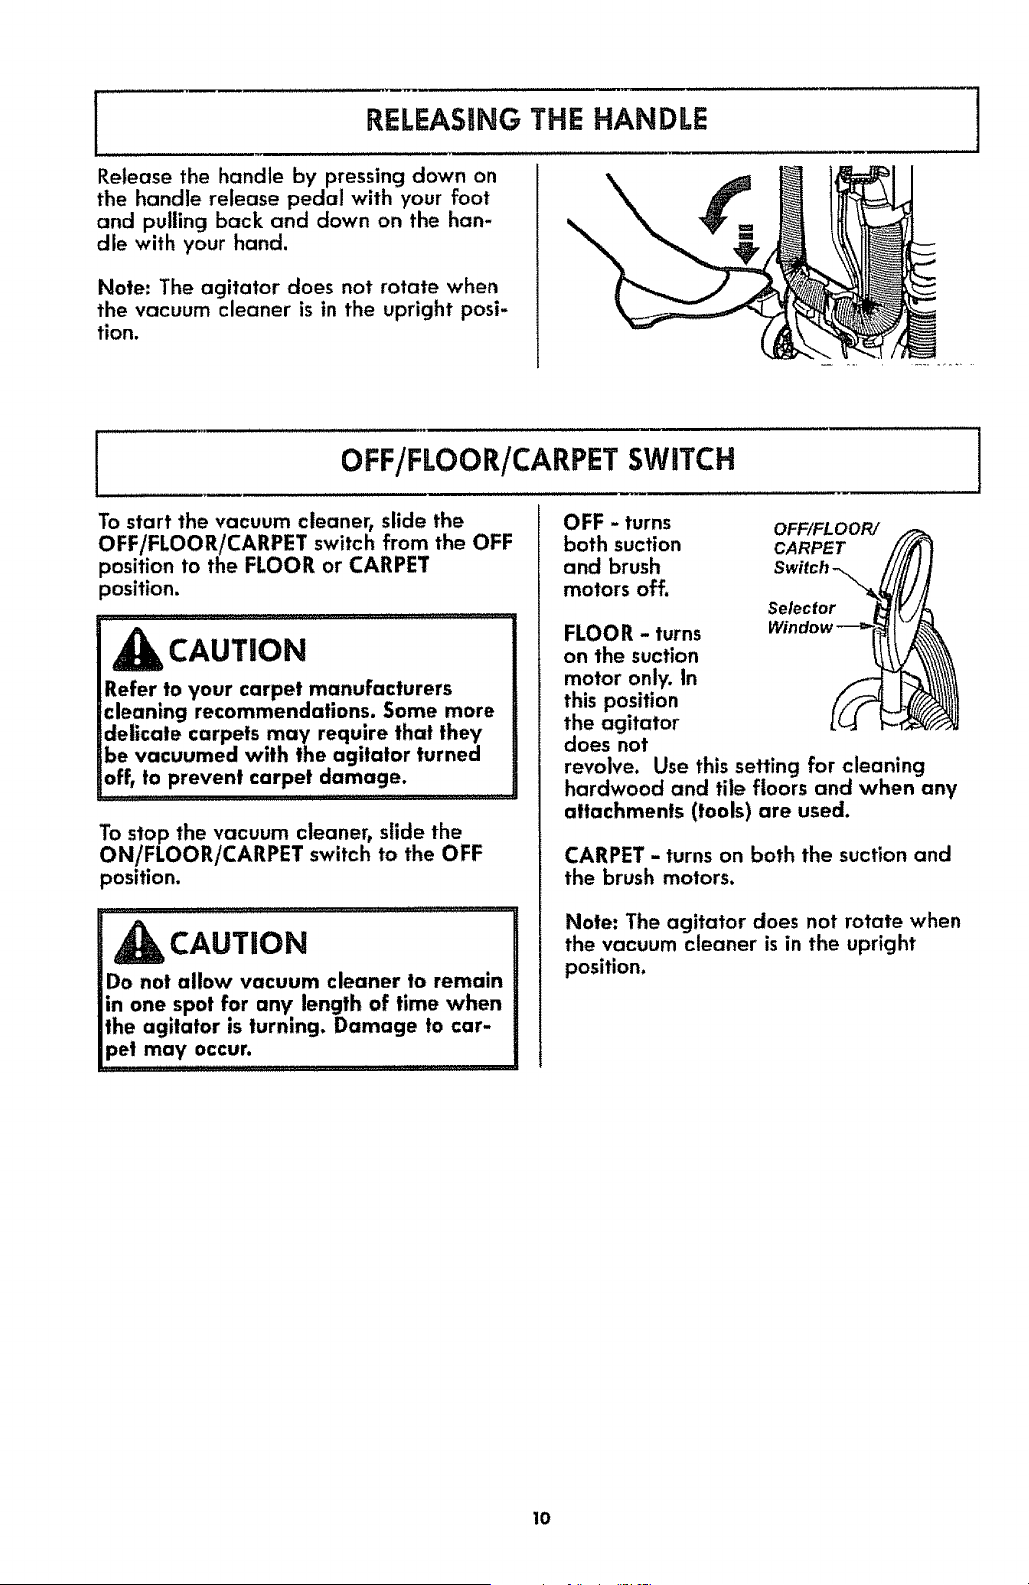
RELEASING THE HANDLE
Release the handle by pressing down on
the handle release pedal with your foot
and pulling back and down on the han-
dle with your hand.
Note: The agitator does not rotate when
the vacuum cleaner is in the upright posi-
tion.
\
I
OFF/FLOOR/CARPET SWITCH
To start the vacuum cleaner, slide the
OFF/FLOOR/CARPET switch from the OFF
position to the FLOOR or CARPET
position.
,,,,_r
CAUTION
Refer to your carpet manufacturers
cleaning recommendations. Some more
delicate carpets may require that they
be vacuumed with the agitator turned
off, to prevent carpet damage.
To stop the vacuum cleaner_ slide the
ON/FLOOR/CARPET switch to the OFF
position.
CAUTION
Do not allow vacuum cleaner to remain
in one spot for any length of time when
the agitator is turning. Damage to car-
pet may occur.
OFF - turns OFF/FLOOR/
both suction CARPET
and brush
motors off.
Selector
FLOOR - turns
on the suction
motor only. In
this position
the agitator
does not
revolve. Use this setting for cleaning
hardwood and tile floors and when any
attachments (tools) are used.
CARPET - turns on both the suction and
the brush motors.
Note: The agitator does not rotate when
the vacuum cleaner is in the upright
position.
l
10
PaLEHERGHT SELECTION 1
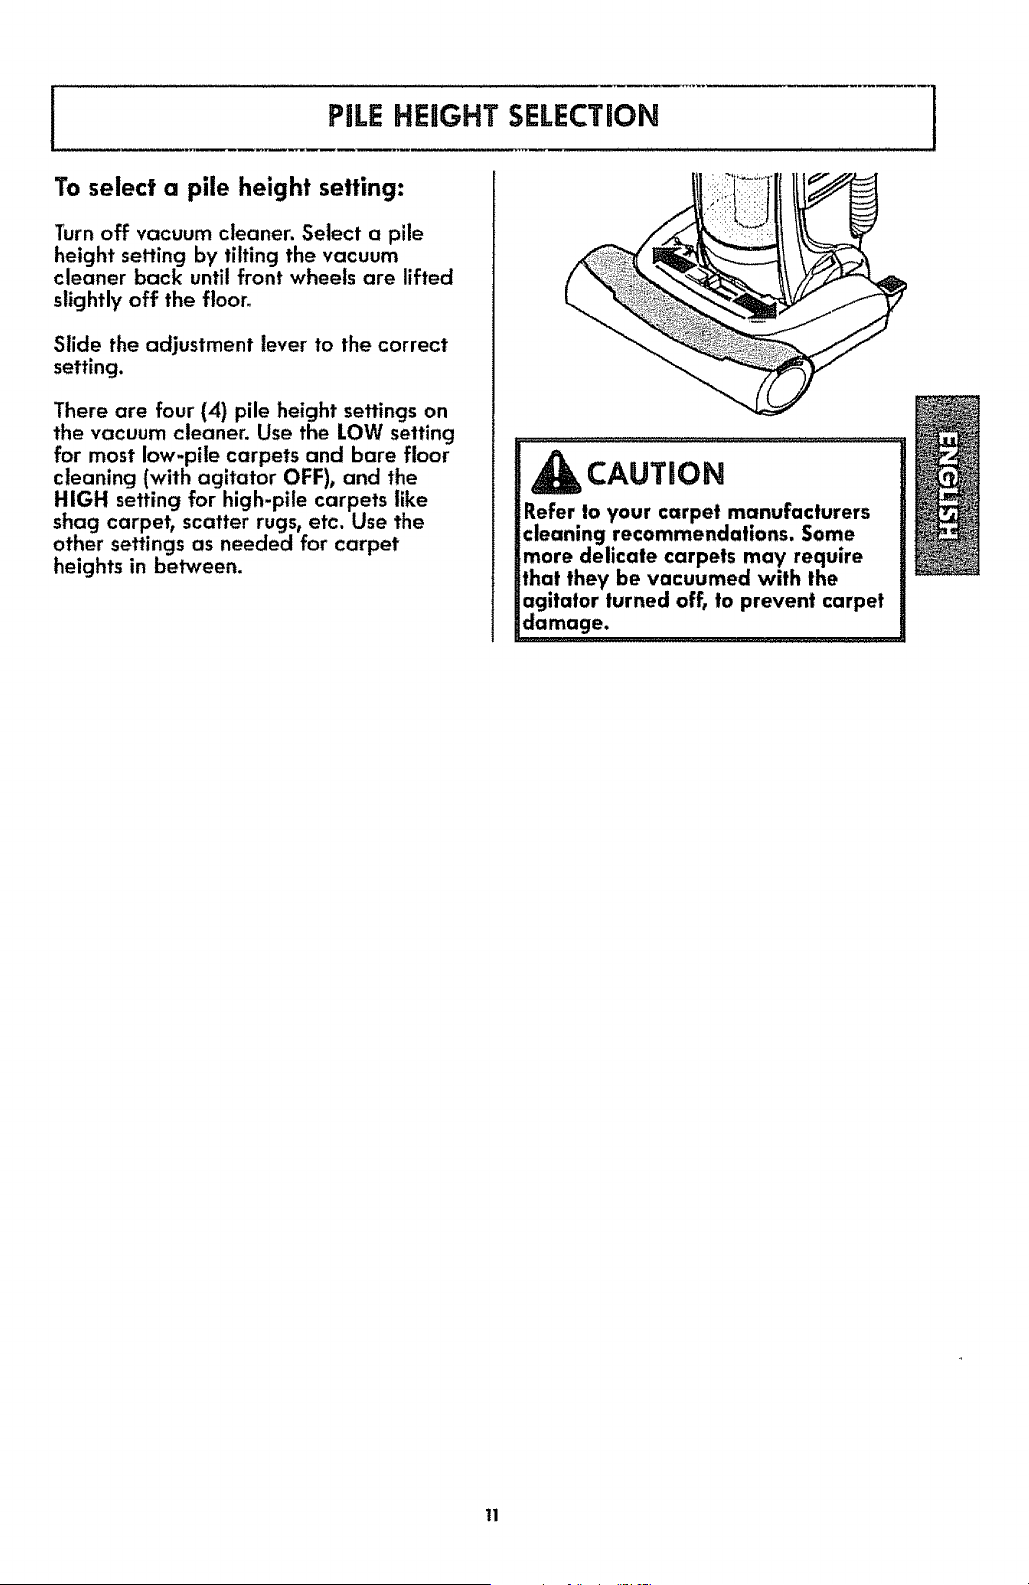
To select a pile height setting:
Turn off vacuum cleaner. Select a pile
height setting by tilting the vacuum
cleaner back until front wheels are lifted
slightly off the floor°
Slide the adjustment lever to the correct
setting.
There are four (4) pile height settings on
the vacuum cleaner. Use the LOW setting
for most low-pile carpets and bare floor
cleaning (with agitator OFF), and the
HIGH setting for high-pile carpets like
shag carpet, scatter rugs, etc. Use the
other settings as needed for carpet
heights in between.
CAUTION
Refer to your carpet manufacturers
cleaning recommendations. Some
more delicate carpets may require
that they be vacuumed with the
agitator turned off, to prevent carpet
damage.
11
I
ATTACHMENTS
I
,_ CAUTION
DO NOT use the hose when vacuum cleaner
handle is tilled back into the floor cleaning
_osltion.
_lways return the vaccum cleaner to the
upright position before using the hose and
attachments.
Failure to do so may result in overheating of
the agitator motor and can cause the thermal
protector to trip
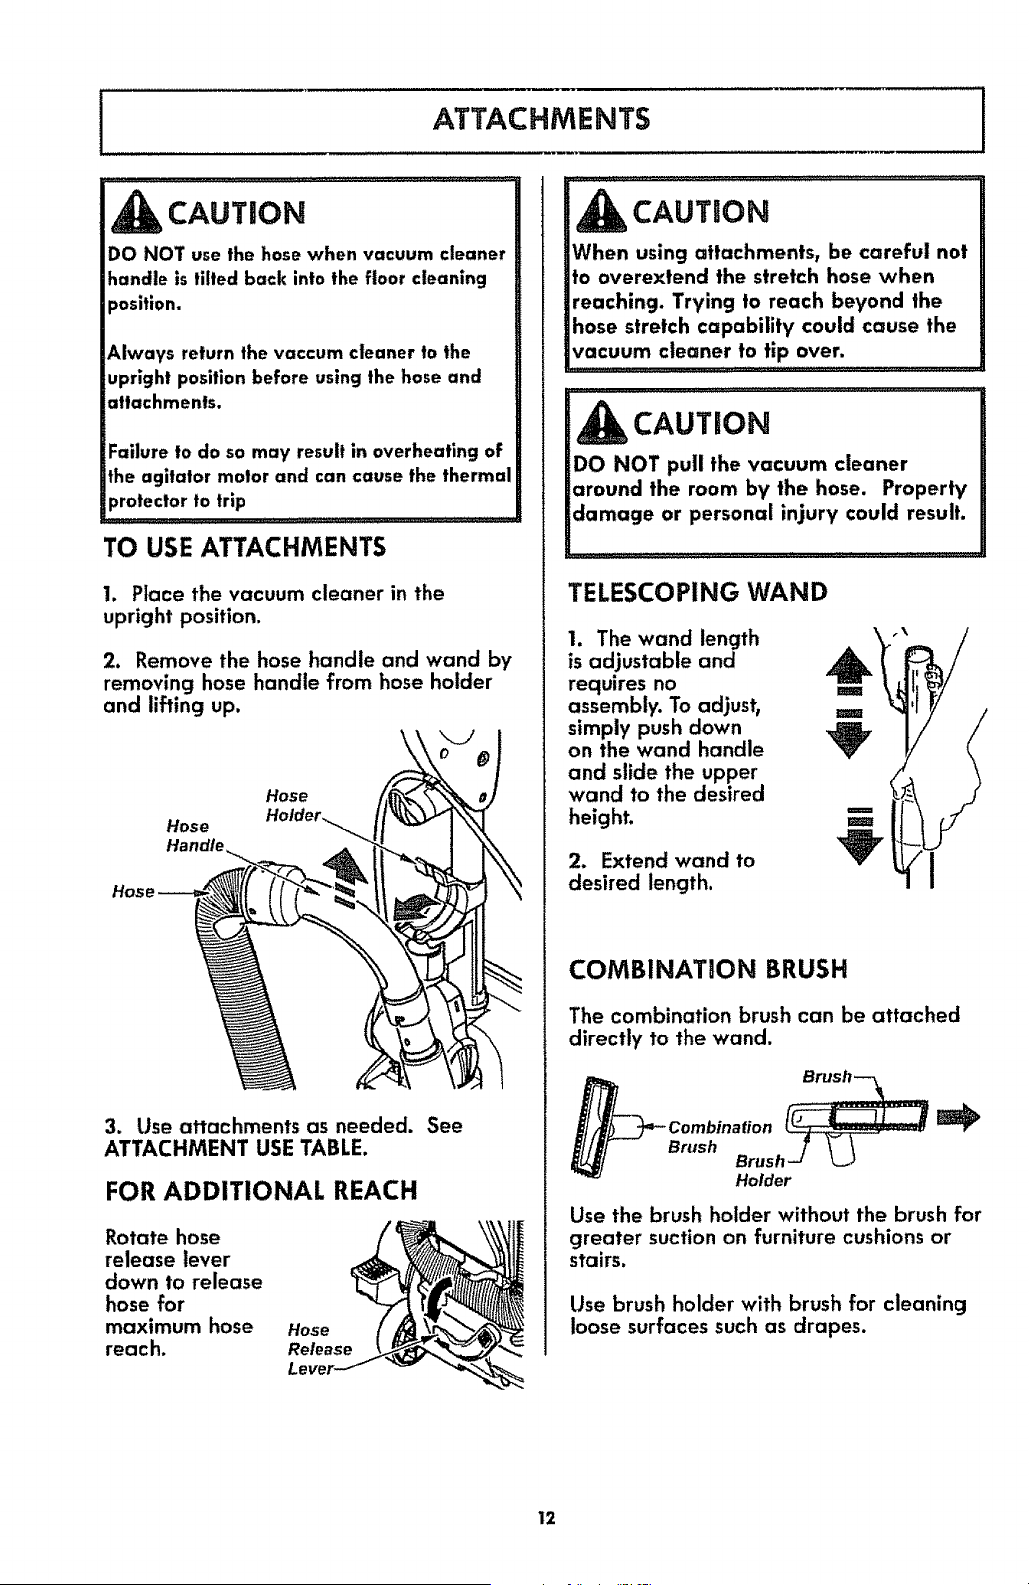
TO USE ATTACHMENTS
I. Place the vacuum cleaner in the
upright position.
2. Remove the hose handle and wand by
removing hose handle from hose holder
and lifting up.
Hose
Hose
3. Use attachments as needed. See
ATTACHMENT USE TABLE.
FOR ADDITIONAL REACH
Rotate hose
release lever
down to release
hose for
maximum hose
reach.
Hose
Release
CAUTION
When using attachments, be careful not
to overextend the stretch hose when
reaching. Trying to reach beyond the
hose stretch capability could cause the
vacuum cleaner to tip over.
CAUTION
DO NOT pull the vacuum cleaner
around the room by the hose. Property
damage or personal injury could result.
TELESCOPING WAND
1. The wand length
is adjustable and
requires no ,,,,,,
"-ffir
assembly. To adjust, u
simply push down
on the wand handle _V"
and slide the upper
wand to the desired
height.
2. Extend wand to
desired length.
I
COMBINATION BRUSH
The combination brush can be attached
directly to the wand.
Brush
Brush -J L_.J
Holder
Use the brush holder without the brush for
greater suction on furniture cushions or
stairs.
Use brush holder with brush for cleaning
loose surfaces such as drapes.
12
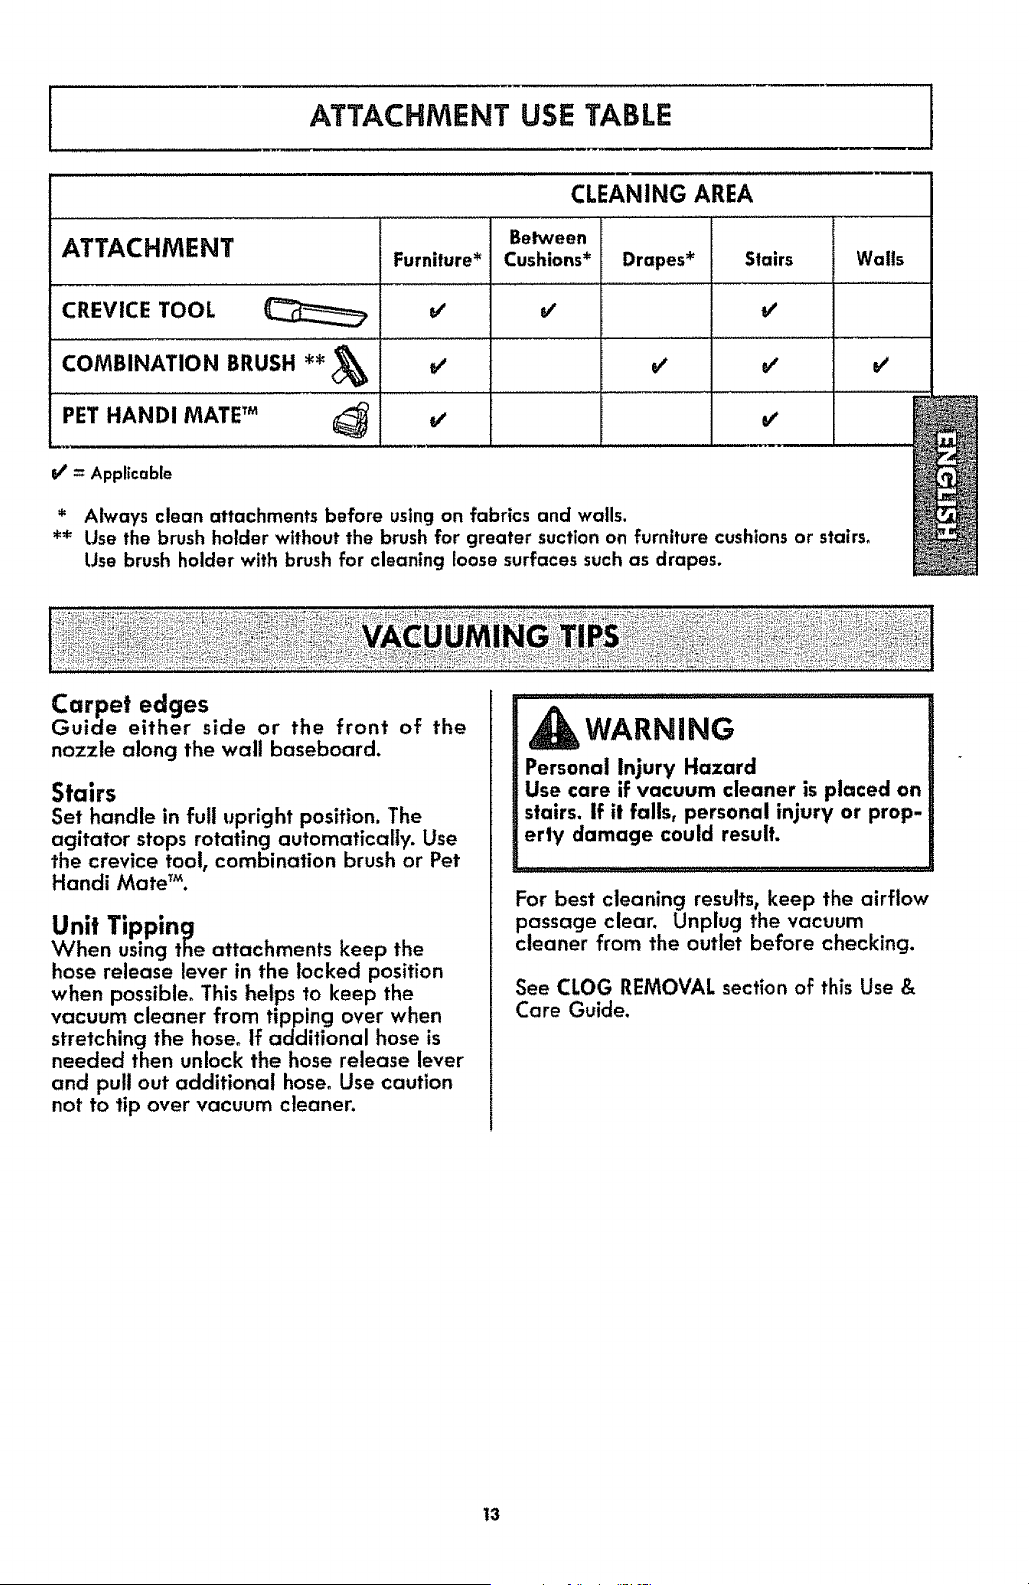
I ATTACHMENT USE TABLE
CLEANING AREA
Between
ATTACHMENT Furniture* Cushions* Drapes* Stairs Wails
CREVICE TOOL v' v' v'
COMBINATION BRUSH **_ _ _ _' v'
PET HANDI MATE TM _
V_'= Applicable
* Always clean attachments before using on fabrics and walls.
** Use the brush holder without the brush for greater suction on furniture cushionsor stairs_
Use brush holder with brush for cleaning loose surfaces such as drapes.
Carpet edges
Guide either side or the front of the
nozzle along the wall baseboard.
Stairs
Set handle in full upright position. The
agitator stops rotating automatically. Use
the crevice tool, combination brush or Pet
Handi Mate TM.
Unit Tipping
When using the attachments keep the
hose release lever in the locked position
when possible_ This helps to keep the
vacuum cleaner from tipping over when
stretching the hose° if additional hose is
needed then unlock the hose release lever
and pull out additional hose. Use caution
not to tip over vacuum cleaner.
WARNING
Personal Injury Hazard
Use care if vacuum cleaner is placed on
stairs, if it falls, personal injury or prop-
erty damage could result.
For best cleaning results, keep the airflow
passage clear. Unplug the vacuum
cleaner from the outlet before checking.
See CLOG REMOVAL section of this Use &
Care Guide.
t3
MOTOR PROTECTION SYSTEM
Thermal Protector - Suction Motor
This vacuum cleaner has a thermal
protector which automatically trips to
protect the vacuum cleaner suction motor.
If a clog prevents the normal flow of air
to the motor, the thermal protector turns
the motor off automatically. This allows
the motor to cool in order to prevent
possible damage to the vacuum cleaner.
Thermal Protector - Agitator Motor
This vacuum cleaner has a thermal
protector which automatically trips to
protect the agitator motor. The thermal
protector turns the motor off
automatically. This allows the motor to
cool in order to prevent possible damage
to the vacuum cleanen
To reset thermal protector: Turn the
vacuum cleaner off and unplug the power
cord from the outlet to allow the vacuum
cleaner to cool and the thermal protector
to reset.
CAUTION
Always return the vaccum cleaner to the
upright position before using the hose
and attachments. Failure to do so may
result in overheating of the agitator
motor and can cause the thermal
protector to trip.
Check for and remove clogs, and replace
bag if necessary. See CLOG REMOVAL
section. Also check and replace any
clogged filters. Wait approximately 40-
50 minutes before restarting vacuum
cleaner.
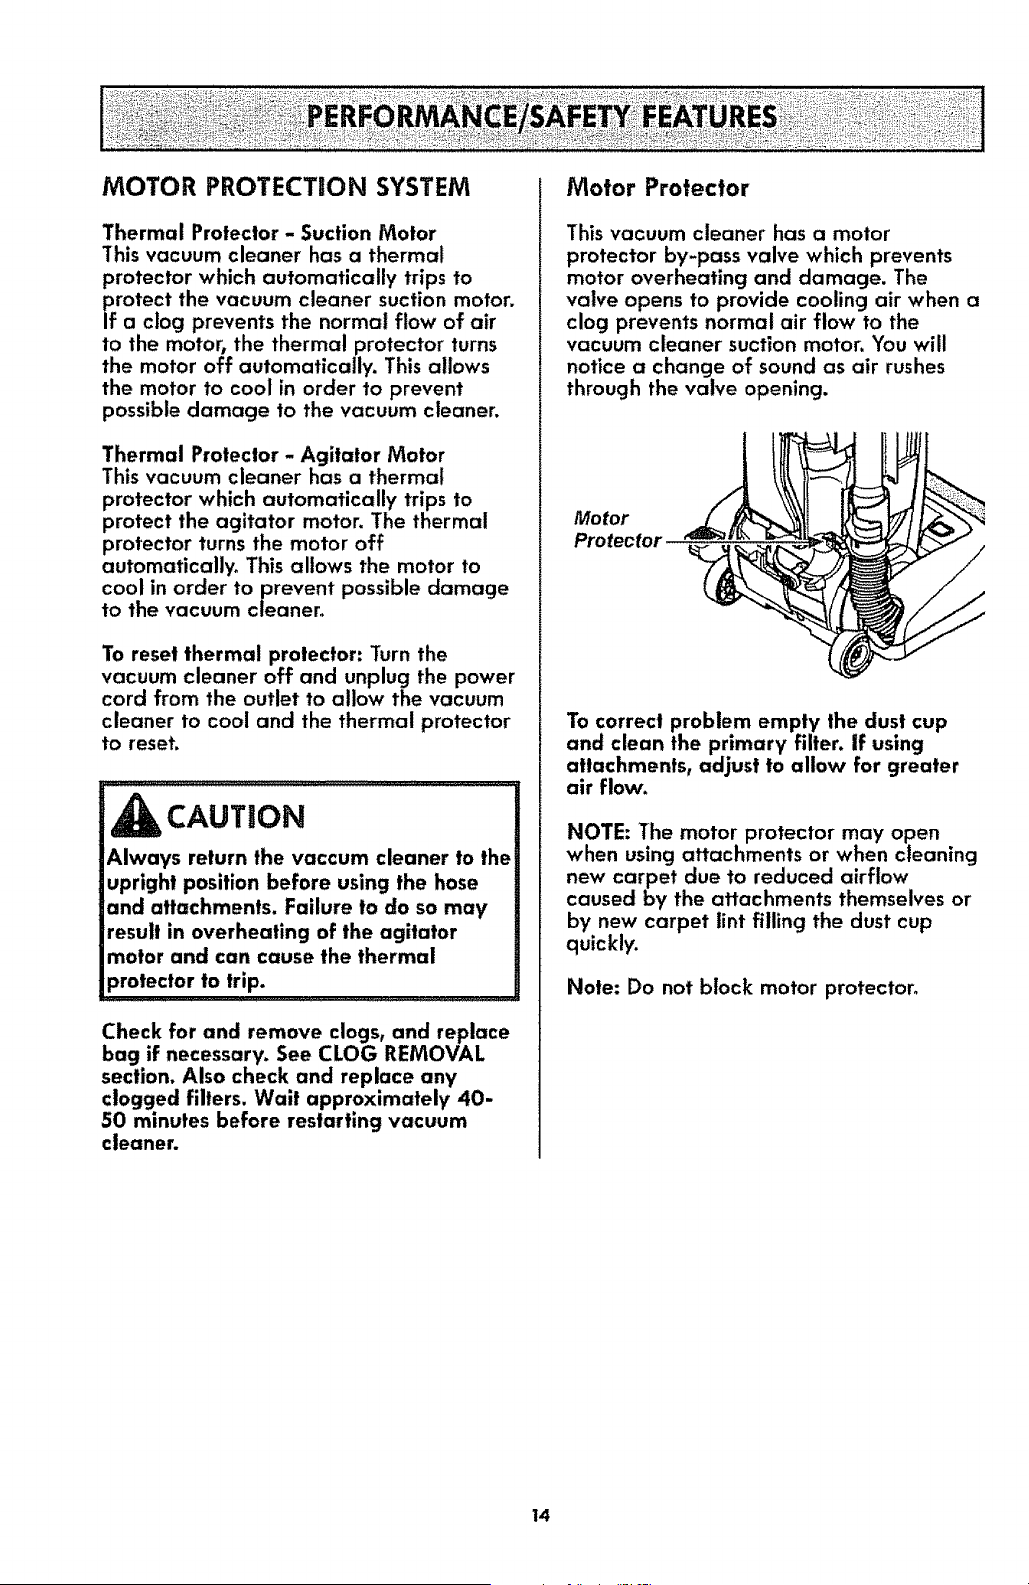
Motor Protector
This vacuum cleaner has a motor
protector by-pass valve which prevents
motor overheating and damage. The
valve opens to provide cooling air when a
clog prevents normal air flow to the
vacuum cleaner suction motor. You will
notice a change of sound as air rushes
through the valve opening.
Motor
ProtectoJ
To correct problem empty the dust cup
and clean the primary filter. If using
attachments, adjust to allow for greater
air flow.
NOTE: The motor protector may open
when using attachments or when cleaning
new carpet due to reduced airflow
caused by the attachments themselves or
by new carpet lint filling the dust cup
quickly.
Note: Do not block motor protector°
14
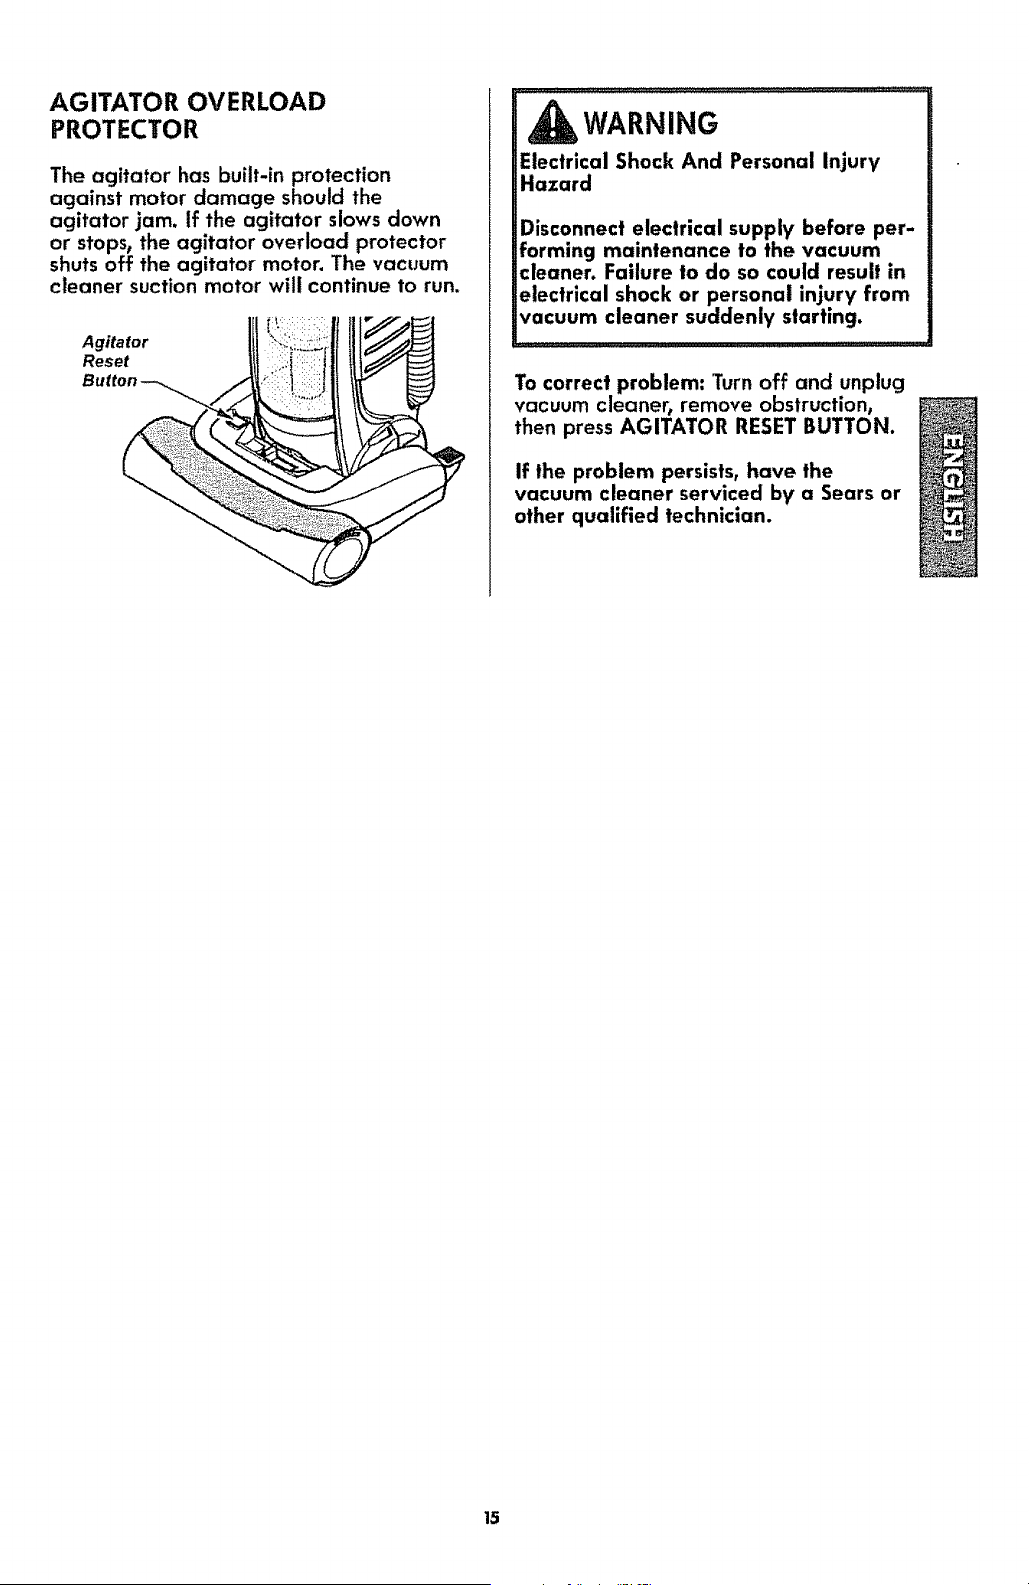
AGITATOR OVERLOAD
PROTECTOR
The agitator has built-in protection
against motor damage should the
agitator jam. If the agitator slows down
or stops, the agitator overload protector
shuts off the agitator motor. The vacuum
cleaner suction motor will continue to run.
Agitator
Reset
WARNING
Electrical Shock And Personal Injury
Hazard
Disconnect electrical supply before per-
forming maintenance to the vacuum
cleaner. Failure to do so could result in
electrical shock or personal injury from
vacuum cleaner suddenly starting.
To correct problem: Turn off and unplug
vacuum cleaner, remove obstruction,
then press AGITATOR RESET BUTTON.
If the problem persists, have the
vacuum cleaner serviced by a Sears or
other qualified technician.
15
Always follow all safety precautions
when performing maintenance to the
vacuum
cleaner.
WARNING
Electrical Shock And Personal Injury
Hazard
Disconnect electrical supply before
servicing or cleaning the vacuum
cleaner. Failure to do so could result in
electrical shock or personal injury from
vacuum cleaner suddenly starting.
[
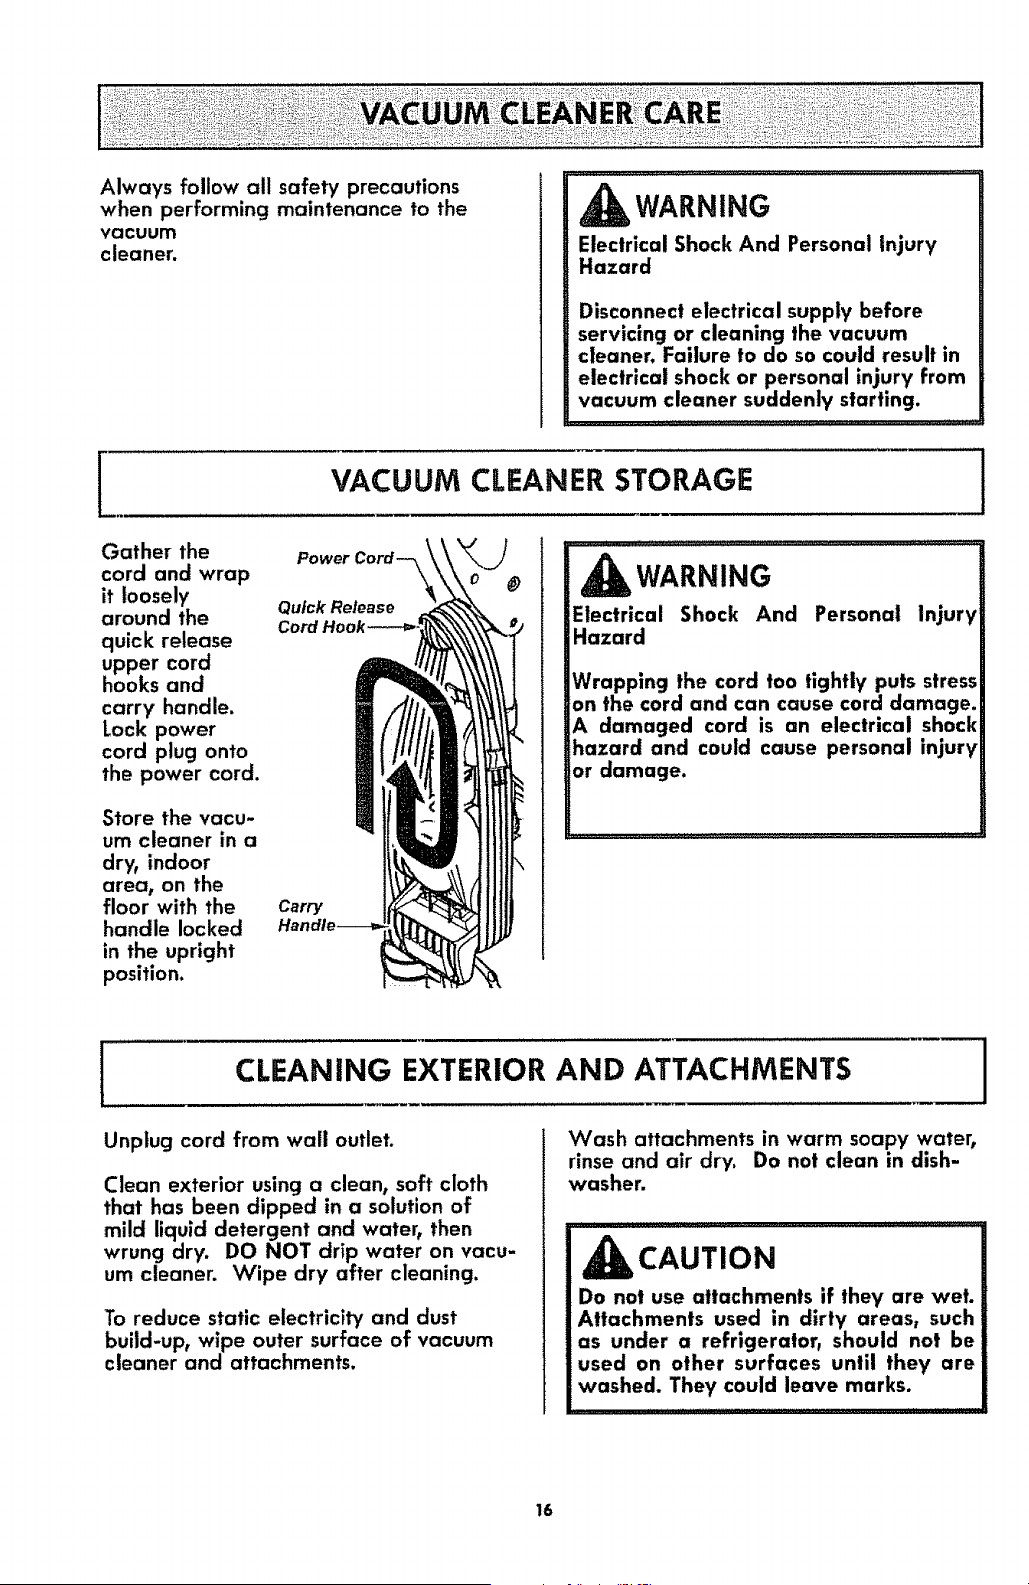
Gather the
cord and wrap
it loosely
around the
quick release
upper cord
hooks and
carry handle.
Lock power
cord plug onto
the power cord.
Store the vacu-
um cleaner in a
dry, indoor
area, on the
floor with the
handle locked
in the upright
position.
VACUUM CLEANER STORAGE
1
Power Cord-_\
Quick Release
Cord Hook----_;
Carry
WARNING
Electrical Shock And Personal
Hazard
Injury
Wrapping the cord too lightly puts stress
on the cord and can cause cord damage.
A damaged cord is an electrical shock
hazard and could cause personal injury
or damage.
CLEANING EXTERIOR AND ATTACHMENTS
]
Unplug cord from wall outlet.
Clean exterior using a clean, soft cloth
that has been dipped in a solution of
mild liquid detergent and water, then
wrung dry. DO NOT drip water on vacu-
um cleaner. Wipe dry after cleaning.
To reduce static electricity and dust
build-up, wipe outer surface of vacuum
cleaner and attachments.
Wash attachments in warm soapy water,
rinse and air dry. Do not clean in dish-
washer.
CAUTION
Do not use attachments if they are wet.
Attachments used in dirty areas, such
as under a refrigerator, should not be
used on other surfaces until they are
washed. They could leave marks.
16
i
DUST CUP EMPTYnNG
1
WARNING
Always unplug power cord from
electrical outlet before performing any
service on vacuum cleaner.
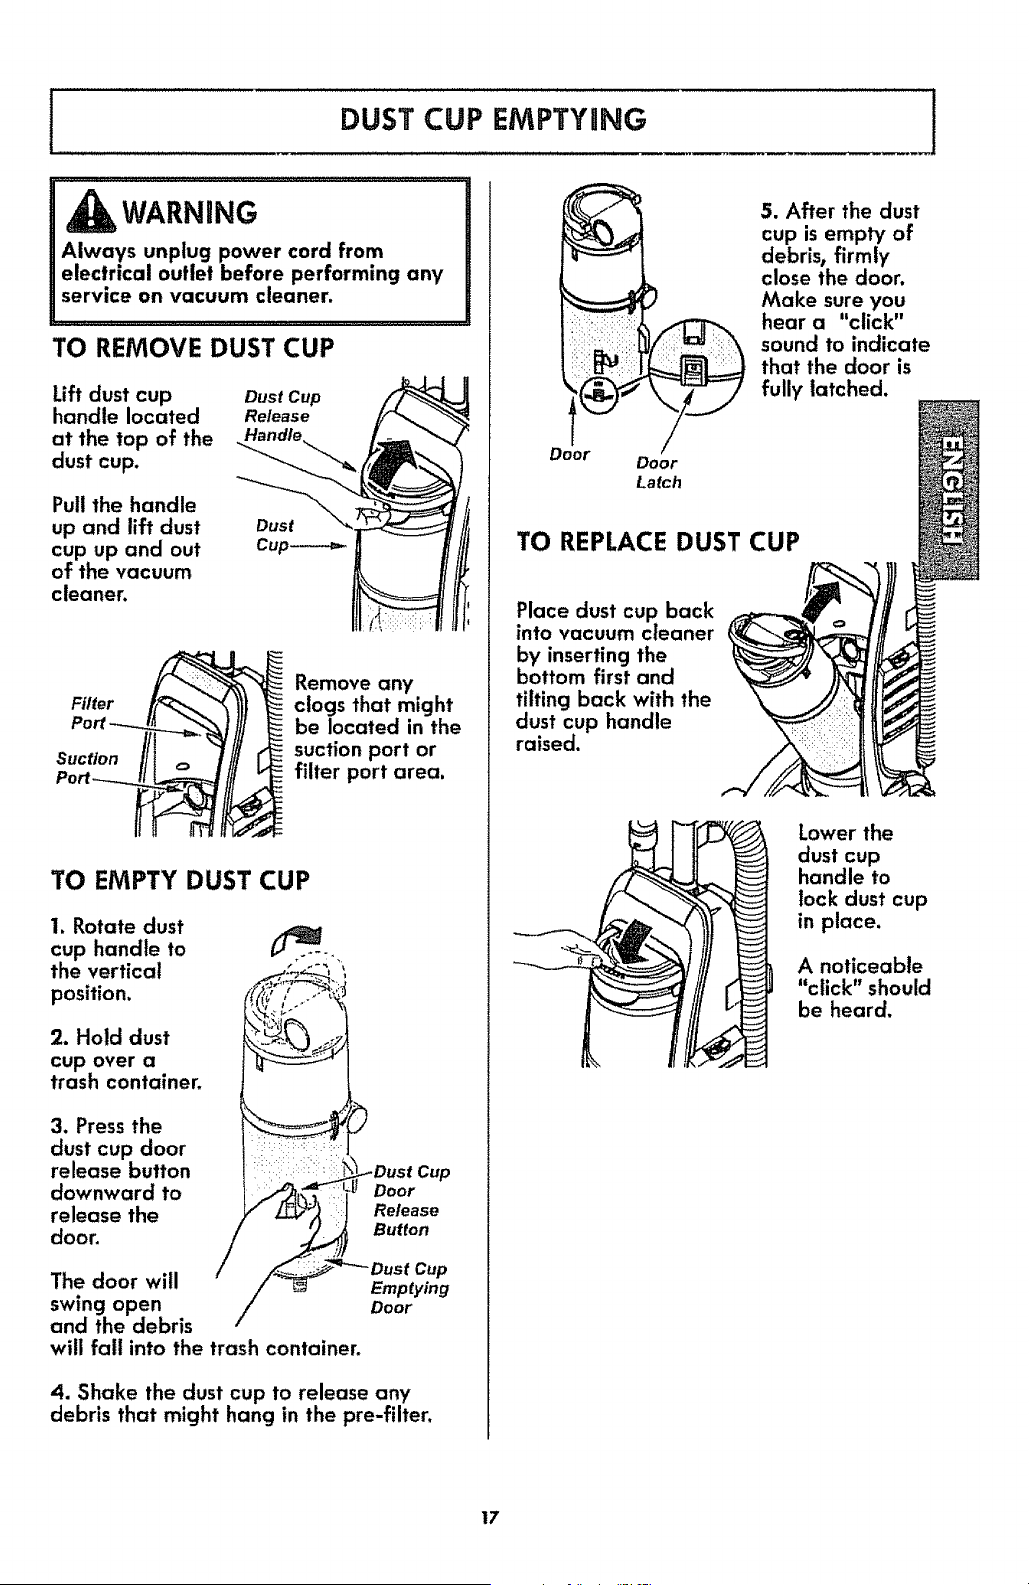
TO REMOVE DUST CUP
Lift dust cup
handle located
at the top of the
dust cup.
Pull the handle
up and lift dust
cup up and out
of the vacuum
cleaner.
Dust Cup
Release
Filter
Suction I/J o
Remove any
clogs that might
be located in the
suction port or
filter port area.
TO EMPTY DUST CUP
1, Rotate dust
cup handle to
the vertical
position.
2. Hold dust
cup over a
trash container.
3. Press the
dust cup door
release button
downward to
release the
door.
Door
Release
Button
Cup
The door will Emptying
swing open Door
and the debris /
will fall into the trash container.
4. Shake the dust cup to release any
debris that might hang in the pre-filter,
Door
/
Door
Latch
5. After the dust
cup is empty of
debris, firmly
close the door.
Make sure you
hear a "click"
sound to indicate
that the door is
fully latched.
TO REPLACE DUST CUP
Place dust cup back
into vacuum cleaner
by inserting the
bottom first and
tilting back with the
dust cup handle
raised.
Lower the
dust cup
handle to
lock dust cup
in place,
A noticeable
"click" should
be heard.
17
f
DUST CUP CLEANING
1
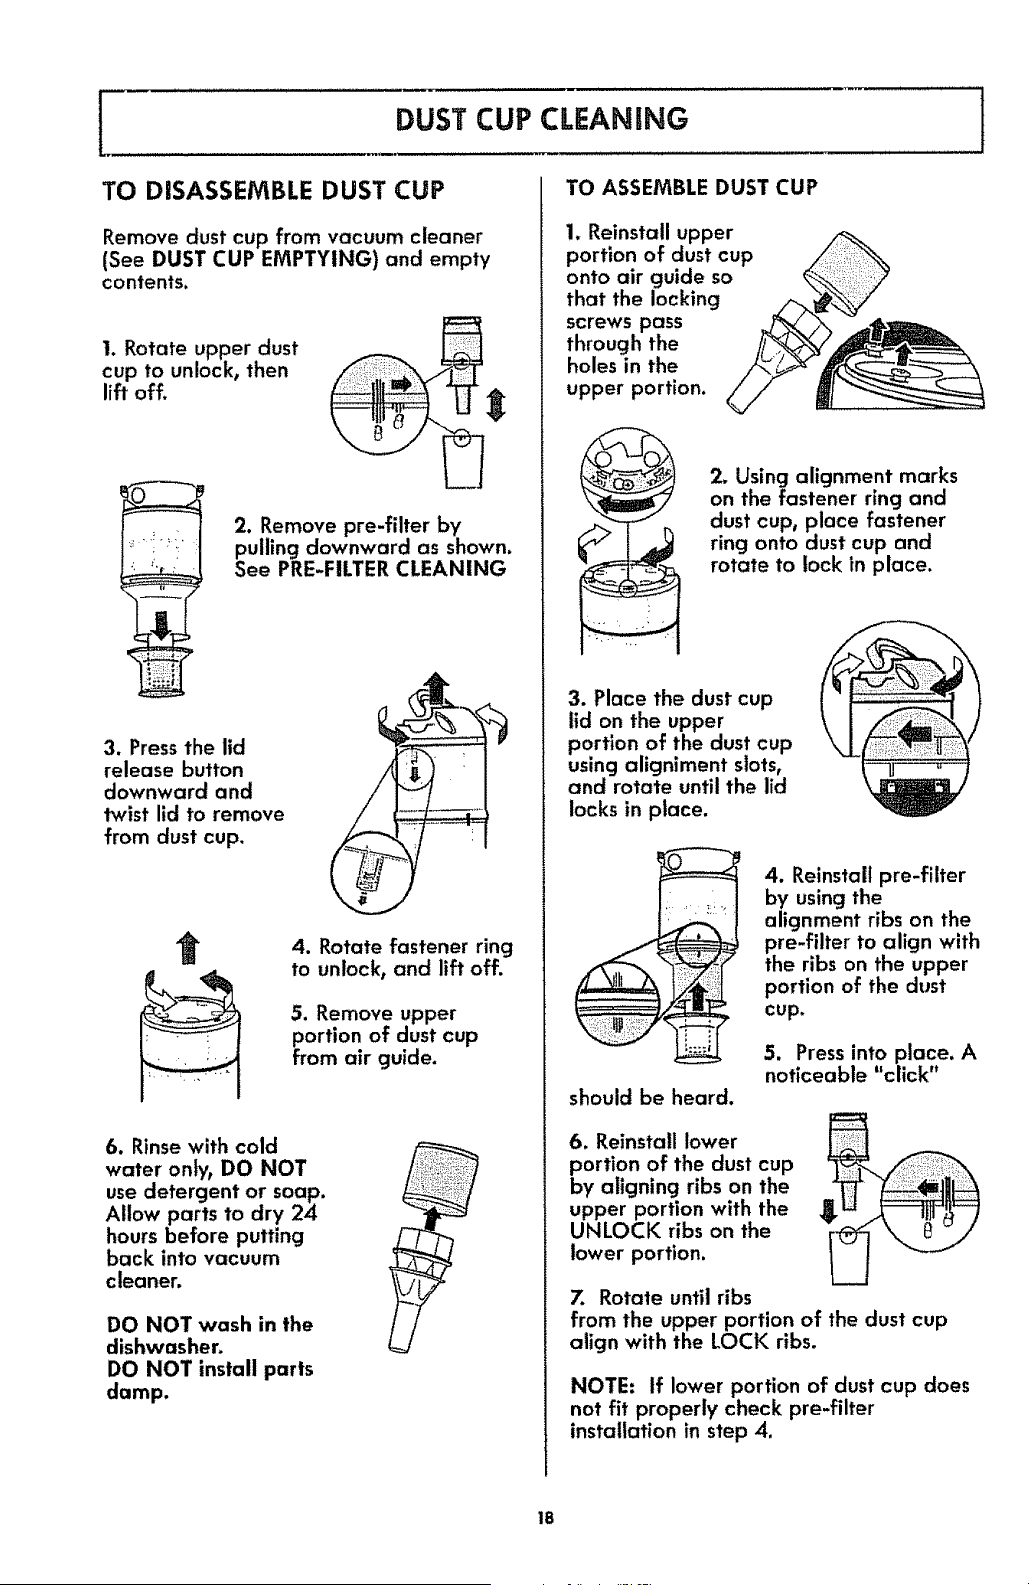
TO DISASSEMBLE DUST CUP
Remove dust cup from vacuum cleaner
(See DUST CUP EMPTYING) and empty
contents.
1. Rotate upper dust
cup to unlock, then
lift off.
2. Remove pre-filter by
pulling downward as shown.
See PRE-FILTER CLEANING
3. Press the lid
release button
downward and
twist lid to remove
from dust cup.
4. Rotate fastener ring
to unlock, and lift off.
5. Remove upper
portion of dust cup
from air guide.
6. Rinse with cold
water only, DO NOT
use detergent or soap.
Allow parts to dry 24
hours before putting
back into vacuum
c lea ner.
DO NOT wash in the
dishwasher.
DO NOT install parts
damp.
TO ASSEMBLE DUST CUP
1. Reinstall upper
portion of dust cup
onto air guide so
that the locking
screws pass
through the
holes in the
upper portion.
2. Using alignment marks
on the fastener ring and
dust cup, place fastener
ring onto dust cup and
rotate to lock in place.
3. Place the dust cup
lid on the upper
portion of the dust cup
using aligniment slots,
and rotate until the lid
locks in place.
4. Reinstall pre-filter
by using the
alignment ribs on the
pre-filter to align with
the ribs on the upper
portion of the dust
cup.
5. Press into place. A
noticeable "click"
should be heard.
6. Reinstall lower F_
portion of the dust cup
by aligning ribs on the
upper portion with the
UNLOCK ribs on the r_
lower portion.
L2
7. Rotate until ribs
from the upper portion of the dust cup
align with the LOCK ribs.
NOTE: If lower portion of dust cup does
not fit properly check pre-filter
installation in step 4.
18
PRE-RLTER CLEANWNG 1
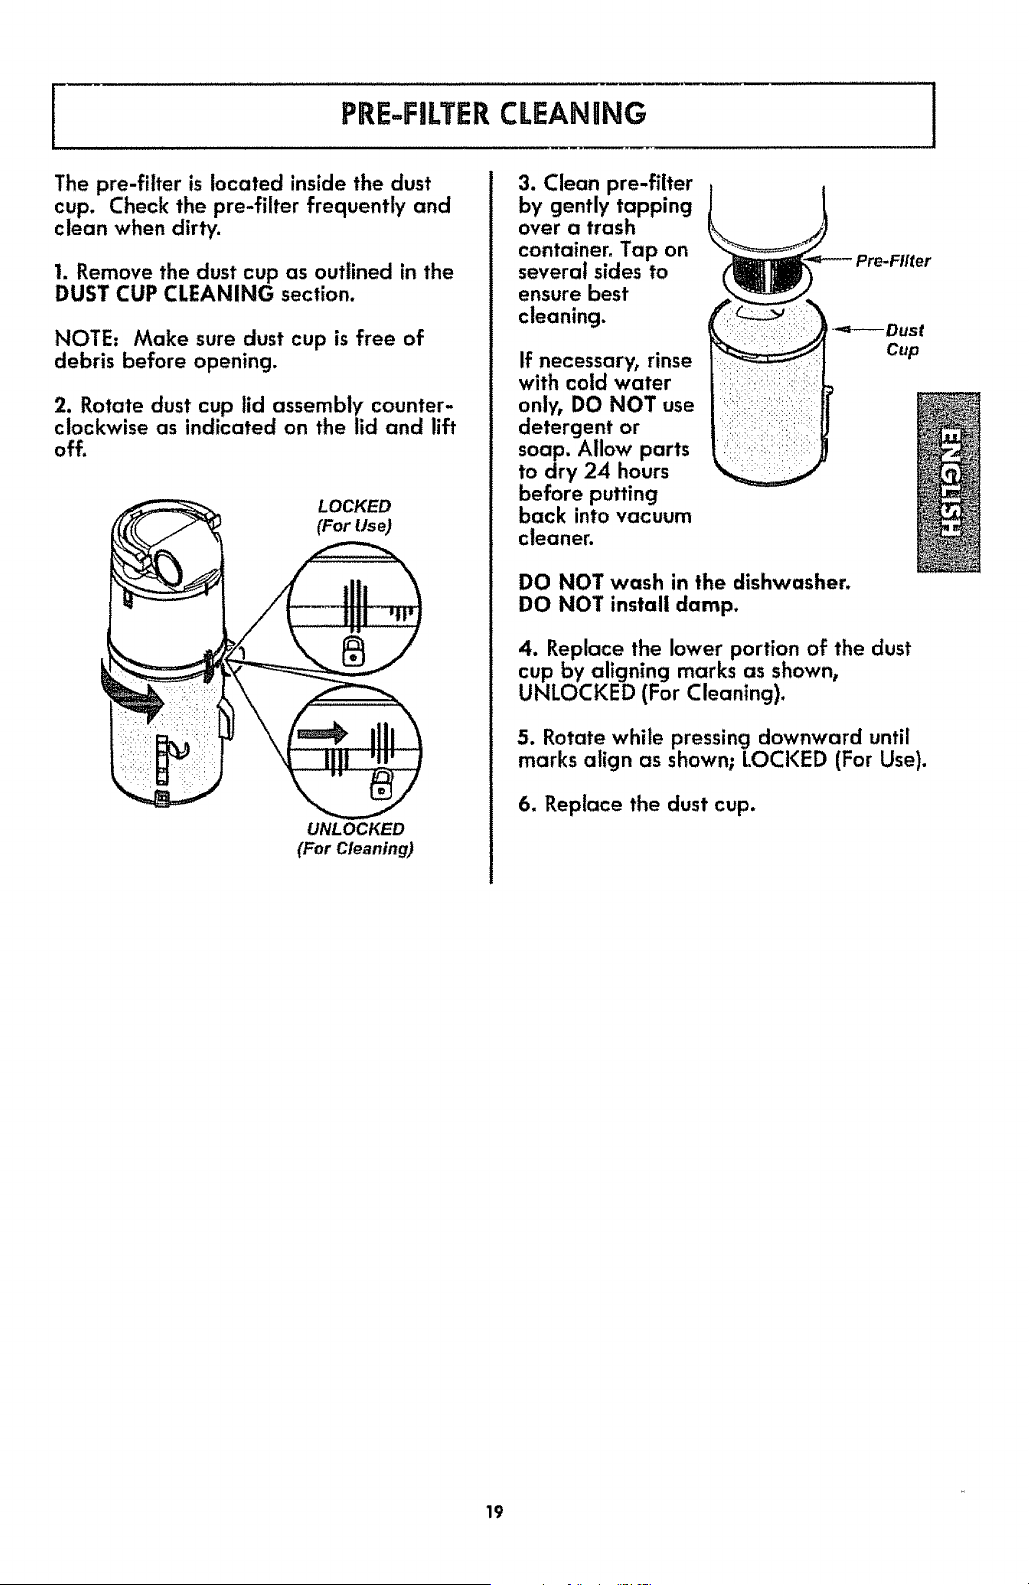
The pre-filter is located inside the dust
cup. Check the pre-filter frequently and
clean when dirty.
i. Remove the dust cup as outlined in the
DUST CUP CLEANING section.
NOTE= Make sure dust cup is free of
debris before opening.
2. Rotate dust cup lid assembly counter-
clockwise as indicated on the lid and lift
off.
LOCKED
(For Use)
UNLOCKED
(For Cleaning)
3. Clean pre-filter
by gently tapping
over a trash
container. Tap on
several sides to
ensure best
cleaning.
If necessary, rinse
with cold water
only, DO NOT use
detergent or
soap. Allow parts
to dry 24 hours
before putting
back into vacuum
cleaner.
DO NOT wash in the dishwasher.
DO NOT install damp.
4. Replace the lower portion of the dust
cup by aligning marks as shown,
UNLOCKED (For Cleaning).
5. Rotate while pressing downward until
marks align as shown; LOCKED (For Use).
6. Replace the dust cup.
19
I
PRIMARY FnLTERCLEANRNG
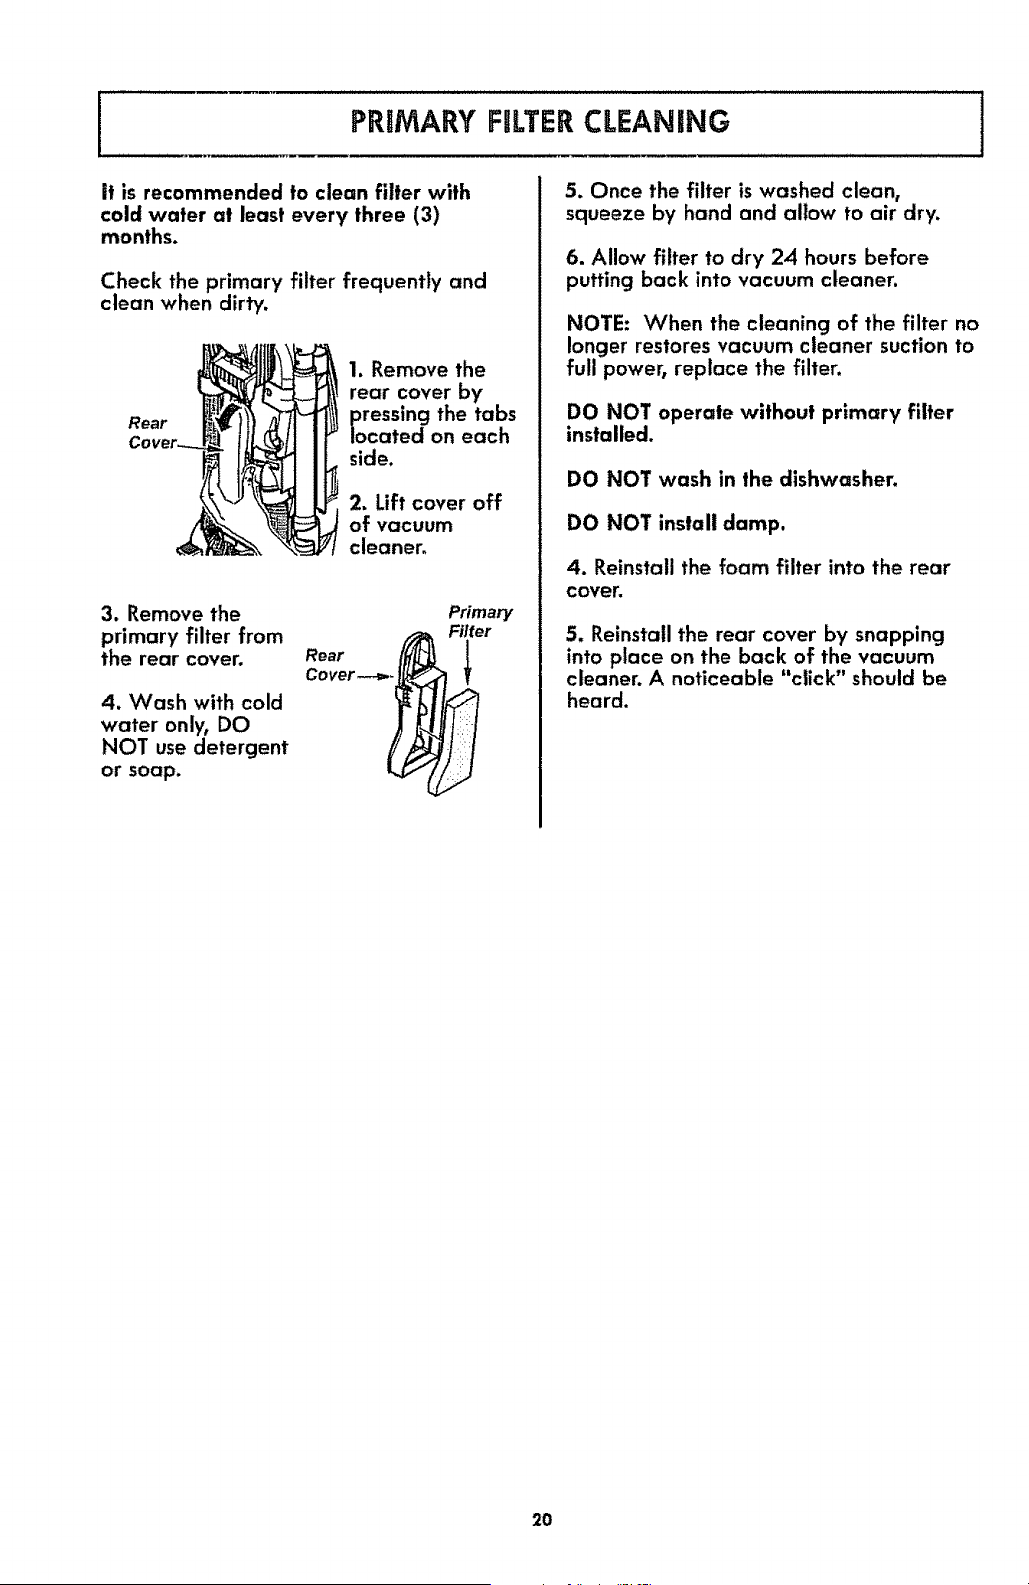
it is recommended to clean filter with
cold water at least every three (3)
months.
Check the " filter frequently and
clean whenpr=mary
dirty.
Rear
1. Remove the
rear cover by
reSsing the tabs
cated on each
side.
2, Lift cover off
of vacuum
cleaner_
3. Remove the
primary filter from
the rear cover.
4. Wash with cold
water oniywDO
NOT use detergent
or soap.
Primary
5. Once the filter is washed clean,
squeeze by hand and albw to air dry.
6. Allow filter to dry 24 hours before
putting back into vacuum cleaner.
NOTE: When the cleaning of the filter no
longer restores vacuum cleaner suction to
full power, replace the filter.
DO NOT operate without primary filter
installed.
DO NOT wash in the dishwasher.
DO NOT install damp.
4. Reinstall the foam filter into the rear
cover.
5. Reinstall the rear cover by snapping
into place on the back of the vacuum
cleaner. A noticeable "click" should be
heard.
2O
EXHAUST FILTERREPLACEMENT
i
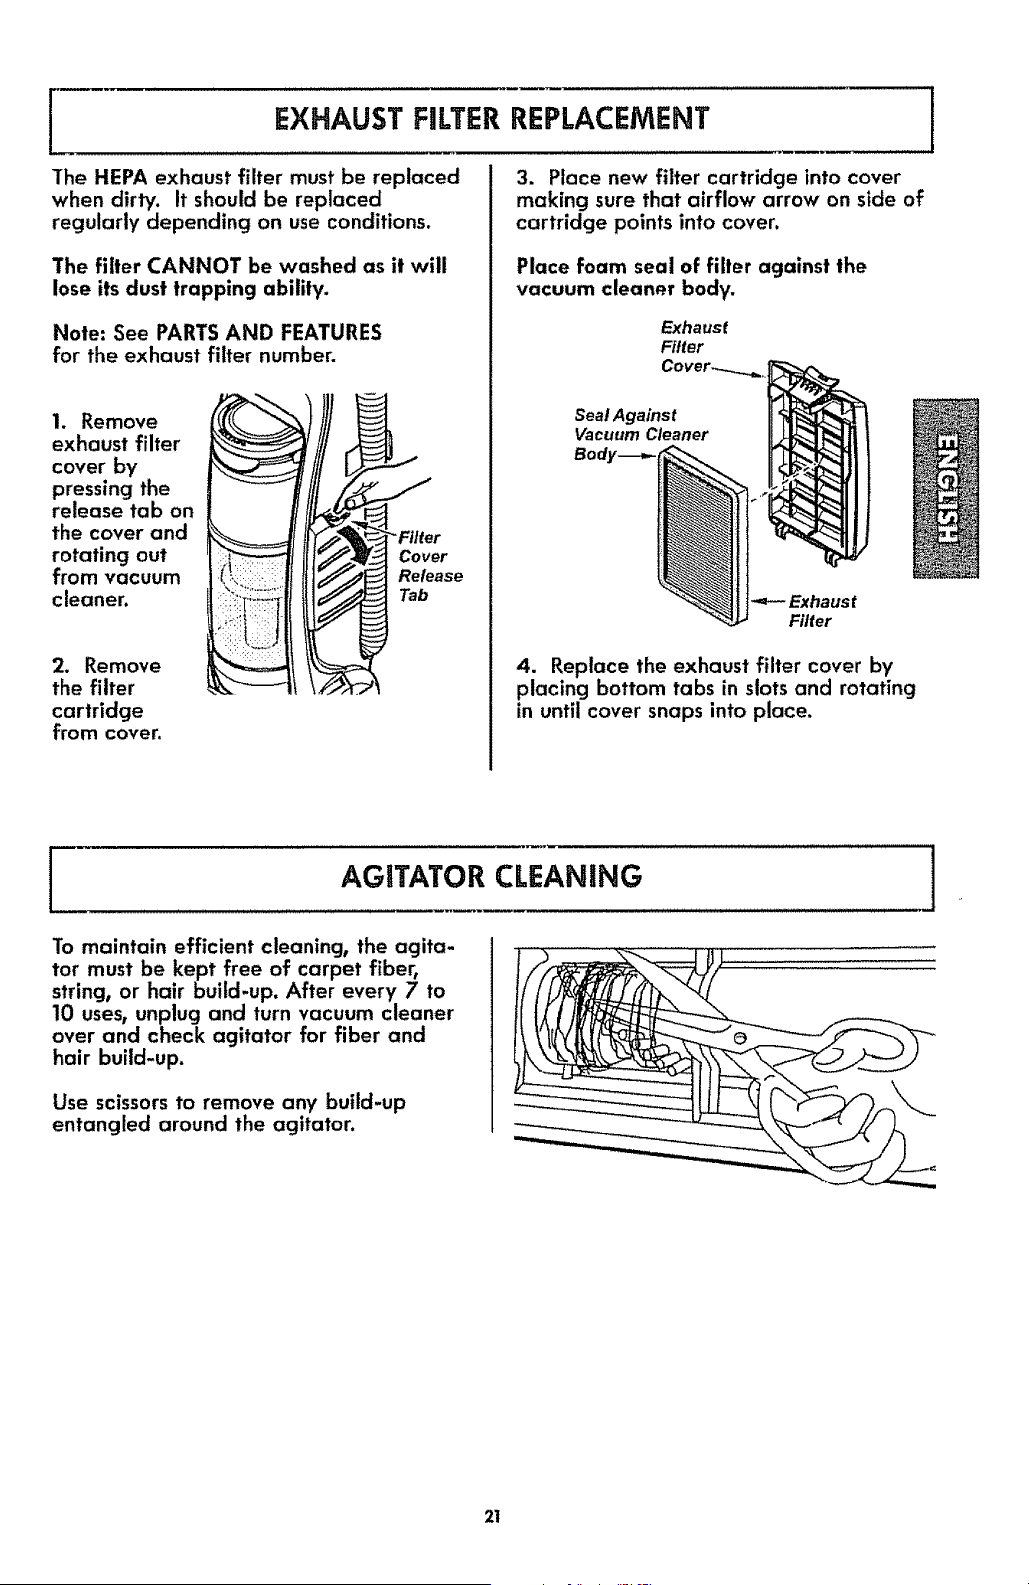
The HEPA exhaust filter must be replaced
when dirty. It should be replaced
regularly depending on use conditions.
The filter CANNOT be washed as it will
3. Place new filter cartridge into cover
making sure that airflow arrow on side of
cartridge points into cover.
Place foam seal of filter against the
lose its dust trapping ability.
Note: See PARTS AND FEATURES
for the exhaust filter number.
1. Remove
exhaust filter
cover by
pressing the
release tab on
the cover and
rotating out
from vacuum
cleaner.
2. Remove
the filter
cartridge
from cover.
Cover
Release
Tab
vacuum cleaner body.
Exhaust
Filter
Seat Against
Vacuum Cleaner
Body---.-
_-- Exhaust
Filter
4. Replace the exhaust filter cover by
placing bottom tabs in slots and rotating
in until cover snaps into place.
I AGITATOR CLEANING i
To maintain efficient cleaning, the agita-
tor must be kept.free of carpet fiber,
string, or hair build-up. After every 7 to
10 uses, unplug and turn vacuum cleaner
over and check agitator for fiber and
hair build-up.
Use scissors to remove any build-up
entangled around the agitator.
21
I CLOG REMOVAL J
HOSES
Always follow all safety precautions when
performing maintenance to the vacuum
cleaner.
WARNING
Electrical Shock Or Personal Injury
Hazard
Disconnect electrical supply before
performing maintenance to the vacuum
cleaner. Failure to do so could result in
electrical shock or personal injury from
the vacuum cleaner suddenly starting.
if the vacuum cleaner does not seem to
have adequate suction, first check if the
dust cup is full or if a filter is clogged.
See DUST CUP CLEANING section.
If the dust cup and filter areas are free of
clogs, check the extension hose.
TO REMOVE CLOG FROM HOSE
1. Rotate the extension hose release lever
counter-clockwise to release extension
hose.
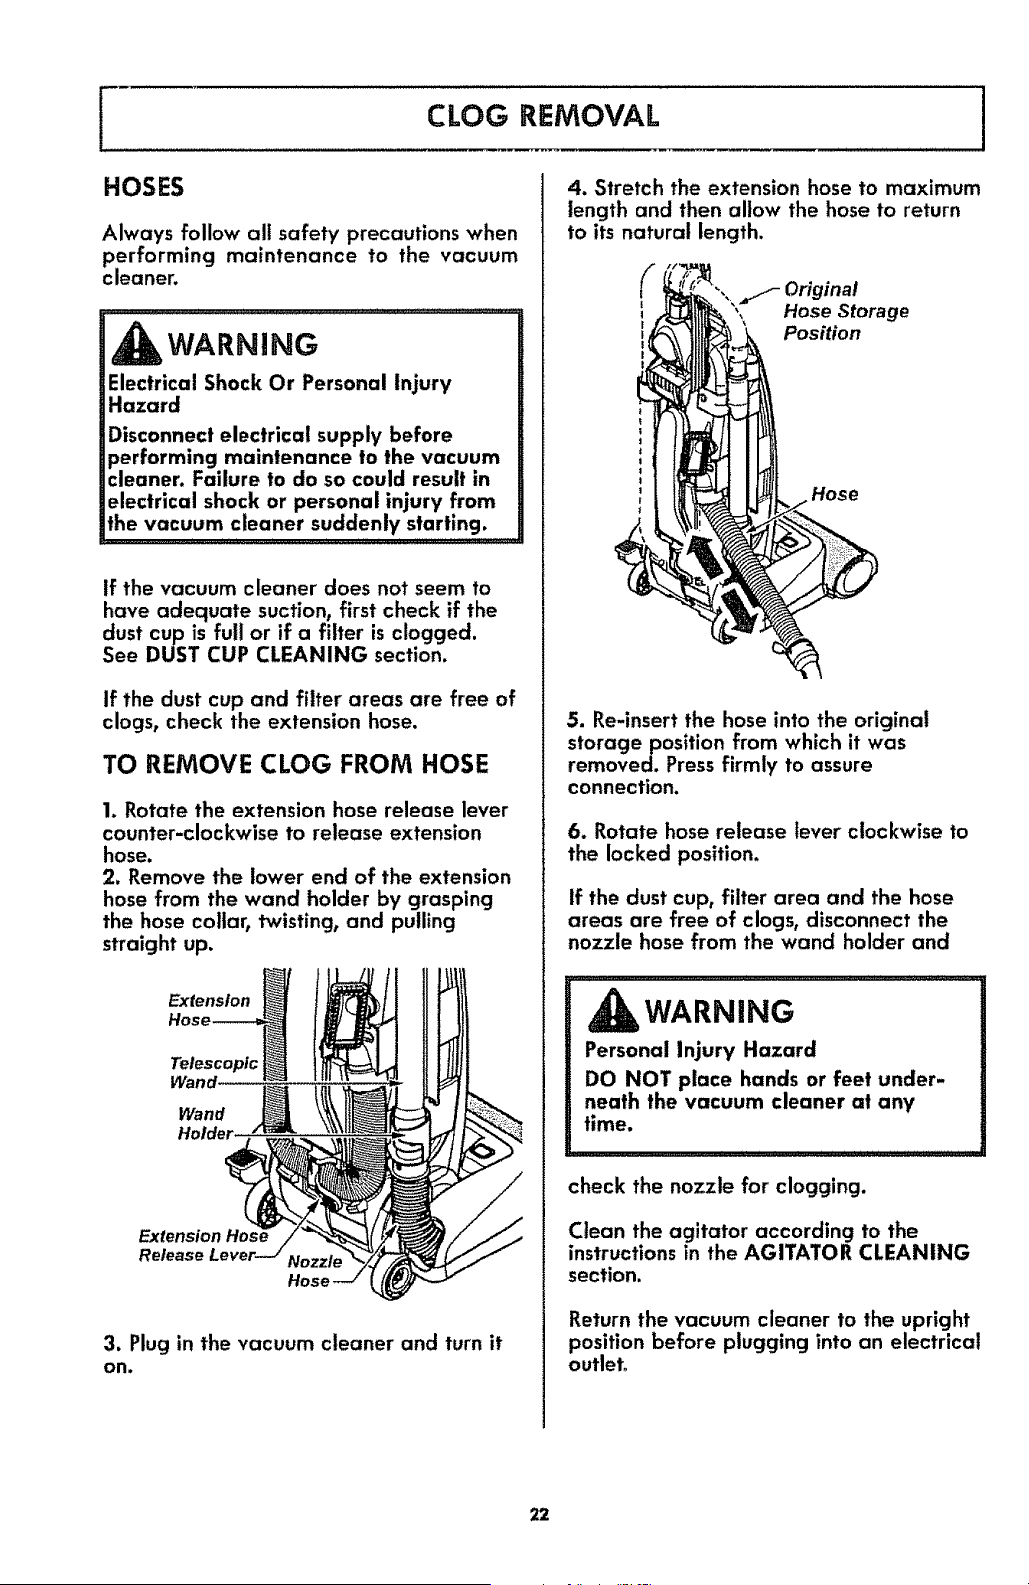
2. Remove the lower end of the extension
hose from the wand holder by grasping
the hose collar, twisting, and pulling
straight up.
Extension
Telescopic
Wand.
Wand _
Holder
Extension Hoc.
Release
3. Plug in the vacuum cleaner and turn it
on.
4. Stretch the extension hose to maximum
length and then allow the hose to return
to its natural length.
Original
t
Hose Storage
r Position
Hose
5. Re-insert the hose into the original
storage position from which it was
removed. Press firmly to assure
connection.
6. Rotate hose release lever clockwise to
the locked position.
If the dust cup, filter area and the hose
areas are free of clogs, disconnect the
nozzle hose from the wand holder and
WARNING
Personal Injury Hazard
DO NOTplace hands or feet under-
neath the vacuum cleaner at any
time.
check the nozzle for clogging.
Clean the agitator according to the
instructions in the AGITATOR CLEANING
section.
Return the vacuum cleaner to the upright
position before plugging into an electrical
outlet.
22
WARNnNG
Electrical Shock Or Personal Injury Hazard
Disconnect electrical supply before
performing maintenance to the vacuum
cleaner. Failure to do so could result in
electrical shock or personal injury from the
vacuum cleaner suddenly starting.
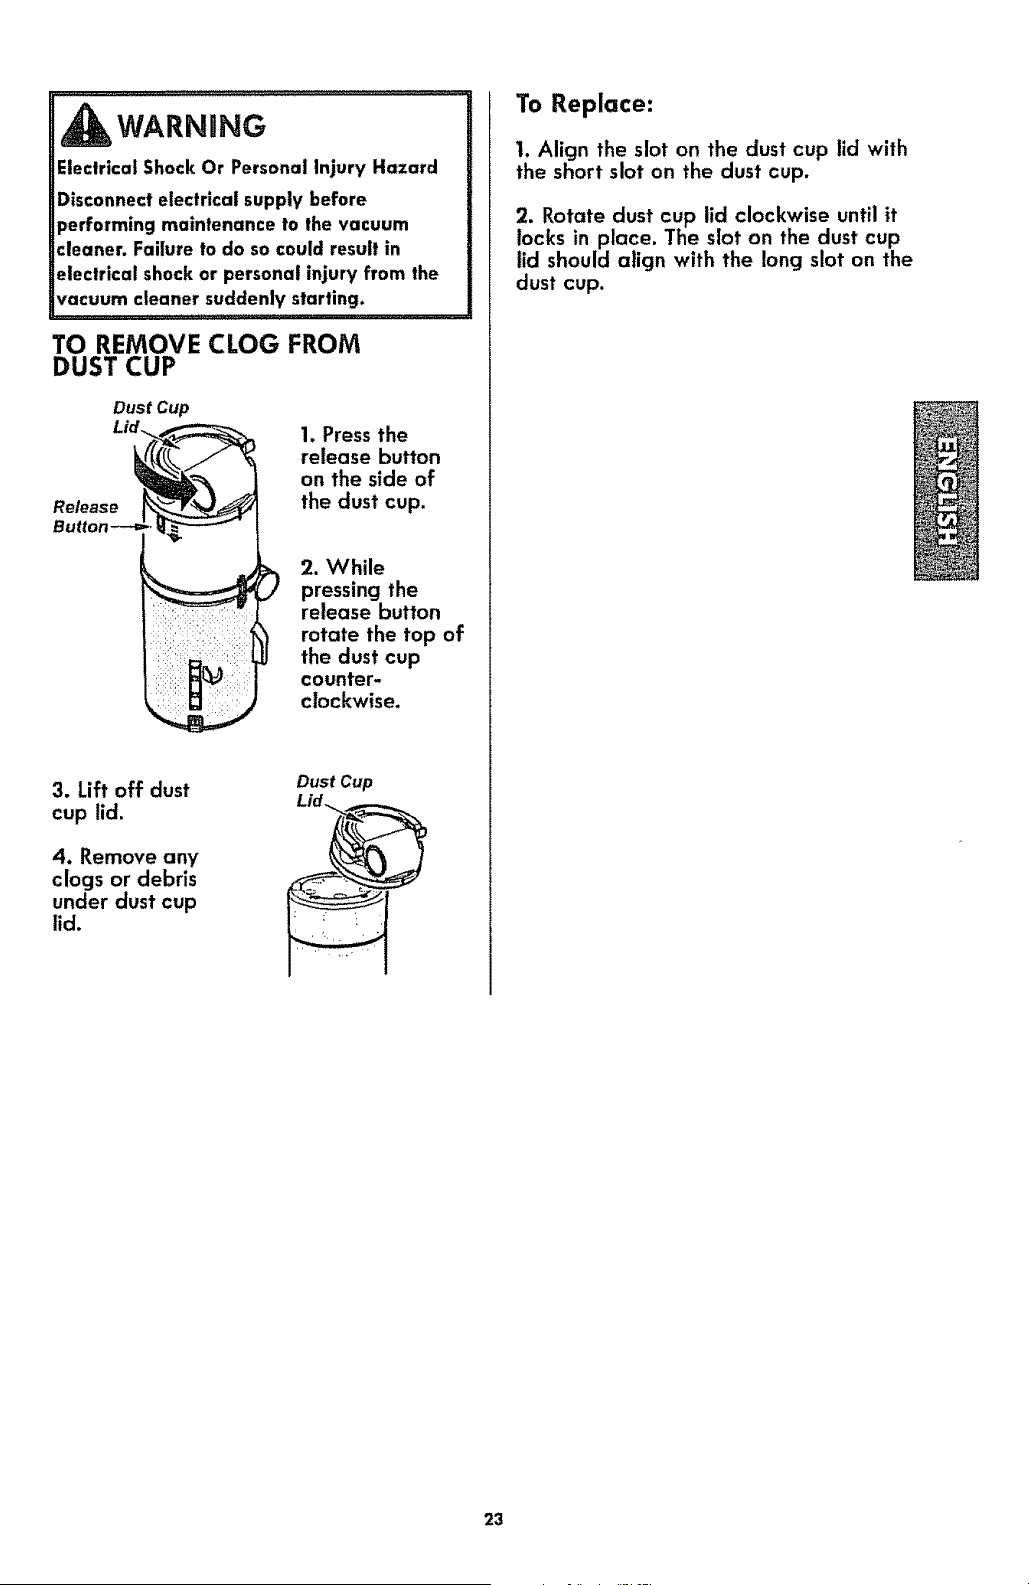
TO REMOVE CLOG FROM
DUST CUP
Dust Cup
Lid,
Release
1. Press the
release button
on the side of
the dust cup.
2. While
pressing the
release button
rotate the top of
the dust cup
counter-
clockwise.
3. Lift off dust
cup lid.
4. Remove any
clogs or debris
under dust cup
lid.
Dust Cup
Lid _
To Replace:
1. Align the slot on the dust cup lid with
the short slot on the dust cup.
2. Rotate dust cup lid clockwise until it
locks in place. The slot on the dust cup
hd should align with the long slot on the
dust cup.
23
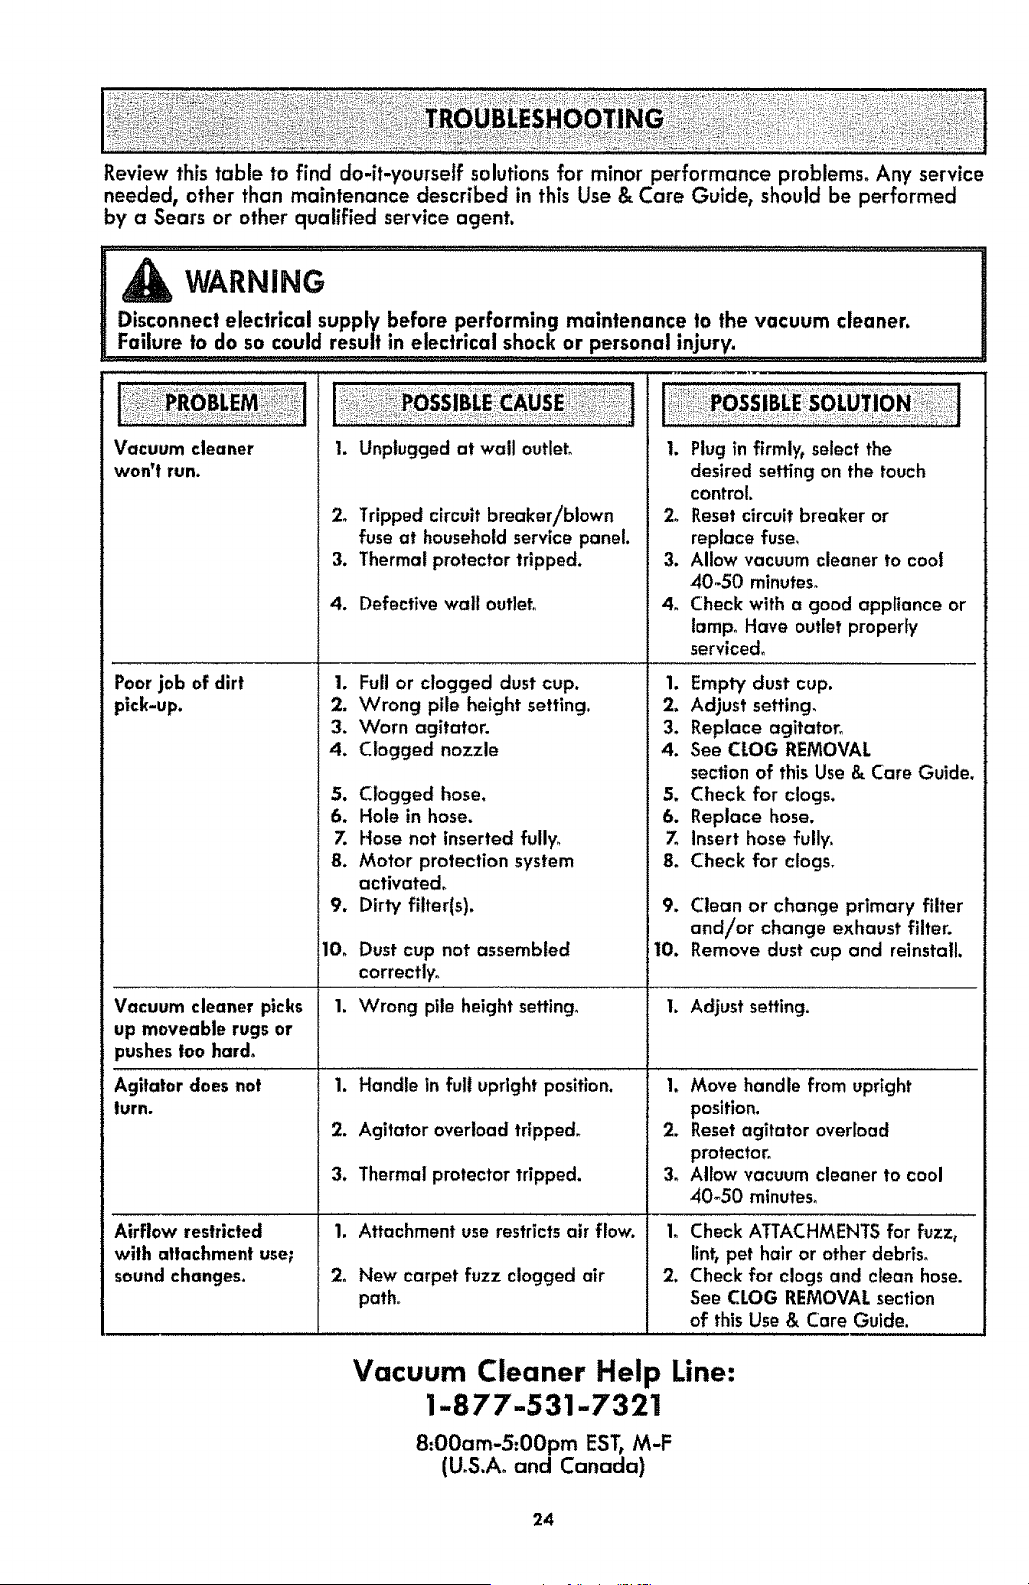
Review this table to find do-it-yourself solutions for minor performance problems, Any service
needed, other than maintenance described in this Use & Care Guide, should be performed
by a Sears or other qualified service agent.
WARNING
Disconnect electrical supply before performing maintenance to the vacuum cleaner.
Failure !0 dose could result in e!_ectrioca!shock or persona ! injury: ..............
1. Unplugged at wail outlet,
Vacuum cleaner
won't run.
Poorjob of dirt 1.
pick-up. 2.
3.
4.
5.
6.
7.
8.
9,
10,
Vacuum cleaner picks 1.
up moveable rugs or
pushestoo hard_
Agitator does not
turn.
Airflow restricted
with attachment use;
soundchanges.
2_ Tripped circuit breaker/blown 2o
fuse at householdservice panel.
3. Thermal protector tripped. 3.
4. Defective wall outlet°
Full or clogged dust cup,
Wrong pile height setting.
Worn agitator.
Clogged nozzle
Clogged hose,
Hole in hose.
Hose not inserted fully_
Motor protection system
activated,
Dirty filter(s).
Dust cup not assembled
correctly,
Wrong pile height setting°
1. Handle in full upright position.
2. Agitator overload tripped.
3. Thermal protector tripped.
1. Attachment use restrictsair flow.
2o New carpet fuzz clogged air
path°
I. Plug in firmlyt select the
desired setting on the touch
control.
Resetcircuit breaker or
replace fuse_
Allow vacuum cleaner to cool
40-50 minutes_
4, Check with a good appliance or
lampoHave outlet properly
serviced°
1. Empty dust cup.
2, Adjust setting,
3. Replace agitator°
4. See CLOG REMOVAL
section of this Use & Care Guide.
5. Check for clogs.
6. Replace hose.
7. insert hose fully_
8. Check for clogs,
9, Clean or change primary filter
and/or change exhaust filter.
10. Remove dust cup and reinstall,
1. Adjust setting.
1, Move handle from upright
position.
2, Resetagitator overload
protector,
3_ Allow vacuum cleaner to cool
40_50 minutes°
1, Check ATTACHMENTS for fuzz,
lint,pet hair or other debris°
2. Check for clogs and clean hose.
See CLOG REMOVALsection
of thisUse & Care Guide.
Vacuum Cleaner Help Line:
1-877-531-7321
8:00am-5:00pm EST0M-F
(UoS.Aoand Canada)
24
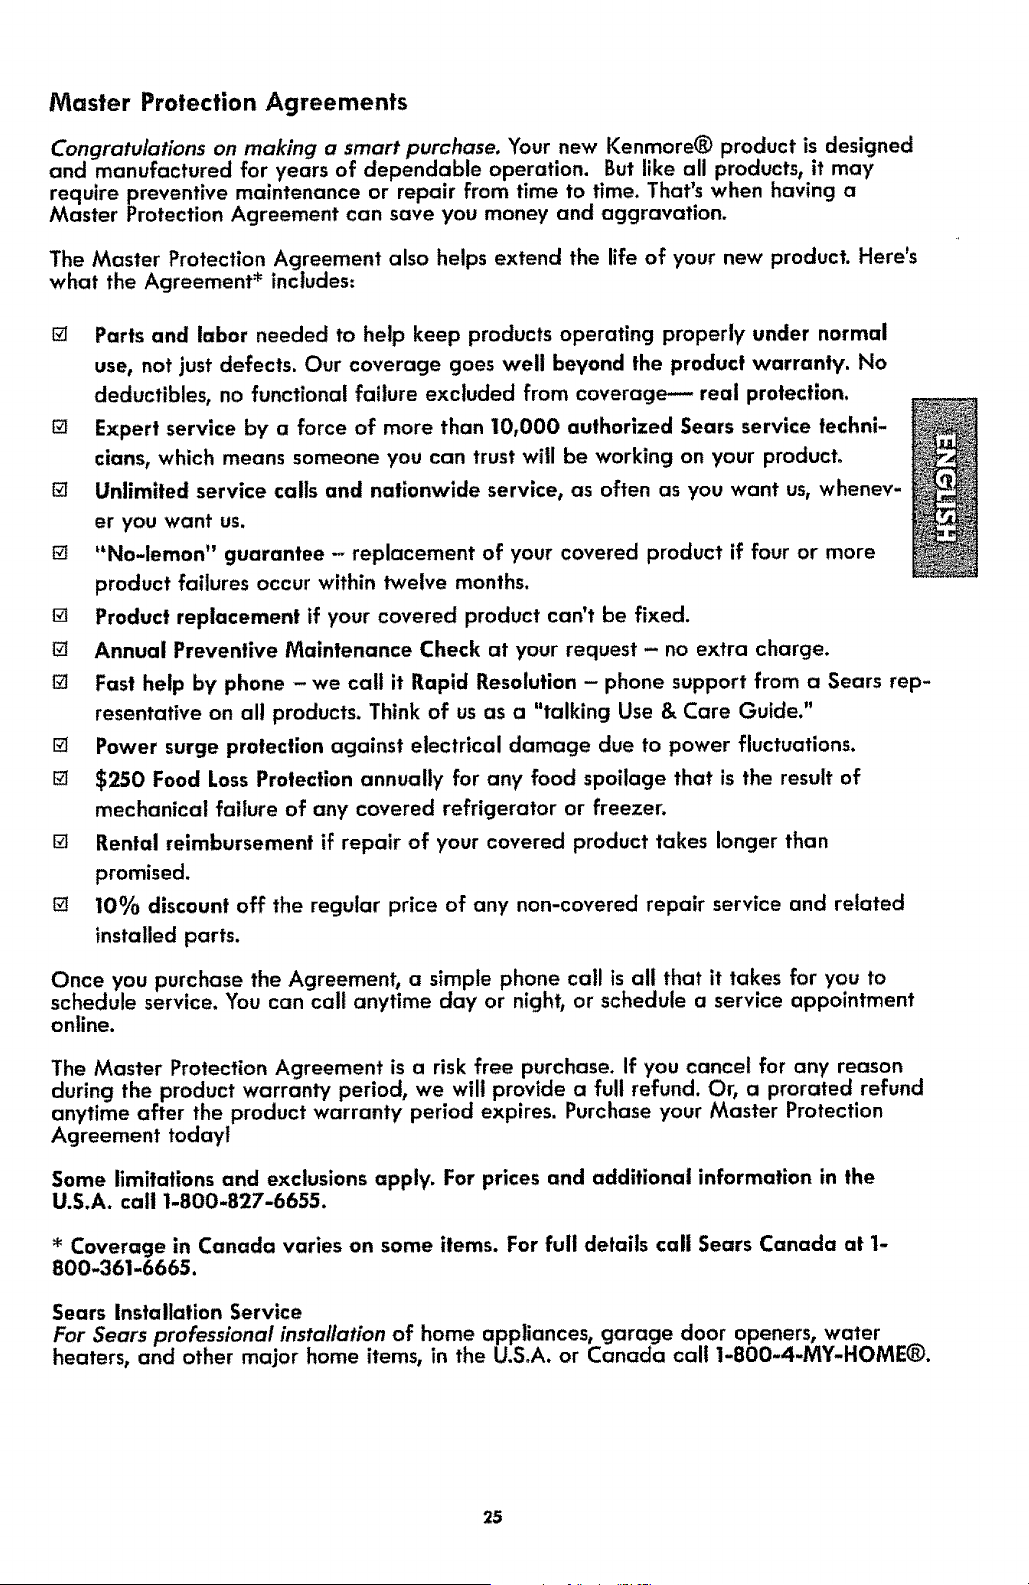
Master Protection Agreements
Congratulations on making a smart purchase. Your new Kenmore® product is designed
and manufactured for years of dependable operation. But like all products, it may
require preventive maintenance or repair from time to time. That's when having a
Master Protection Agreement can save you money and aggravation.
The Master Protection Agreement also helps extend the life of your new product. Here's
what the Agreement "_includes:
[]
[]
[]
[]
[]
[]
[]
[]
[]
[]
[]
Parts and labor needed to help keep products operating properly under normal
use, not just defects. Our coverage goes well beyond the product warranty. No
deductibles, no functional failure excluded from coverage-- real protection.
Expert service by a force of more than 10,000 authorized Sears service techni-
cians, which means someone you can trust will be working on your product.
Unlimited service calls and nationwide service, as often as you want us, whenev-
er you want us.
'*No-leman" guarantee - replacement of your covered product if four or more
product failures occur within twelve months.
Product replacement if your covered product can't be fixed.
Annual Preventive Maintenance Check at your request - no extra charge.
Fast help by phone - we call it Rapid Resolution - phone support from a Sears rep-
resentative on all products. Think of us as a "talking Use & Care Guide."
Power surge protection against electrical damage due to power fluctuations.
$250 Food Loss Protection annually for any food spoilage that is the result of
mechanical failure of any covered refrigerator or freezer.
Rental reimbursement if repair of your covered product takes longer than
promised.
10% discount off the regular price of any non-covered repair service and related
installed parts.
Once you purchase the Agreement, a simple phone call is all that it takes for you to
schedule service. You can call anytime day or night, or schedule a service appointment
online.
The Master Protection Agreement is a risk free purchase. If you cancel for any reason
during the product warranty period, we will provide a full refund. Or, a prorated refund
anytime after the product warranty period expires. Purchase your Master Protection
Agreement todayt
Some limitations and exclusions apply. For prices and additional information in the
U.S.A. call 1-800-827-6655.
Coverage in Canada varies on some items. For full details call Sears Canada at 1-
800-361-6665.
Sears Installation Service
For Sears professional installation of home appliances, garage door openers, water _
heaters, and other major home items, in the U.SoA. or Canada call 1-800-4-MY-HOME®.
25
Antesdeusarsuaspiradoranueva.......... 1
Lista de embalaje ......................... 1
Linea de ayuda de asplradora ............... 2
Garanfia de la asplradora de i(enmore ...... 2
Instrucciones importantes de
seguridad ................................. 3
Piezas y caracteristicas de aspiradora
vertical .................................. 4
Instrucclones de ensamble .................... 5
Montaje del mango ....................... 5
Montaje del accesorios ................... 6
Cord6n el_ctrico ......................... 7
instrucciones de operaci6n ................. 8
Cord6n el_ctrteo ........................ 8
Desprendimlentodel mango ............... 9
tnterruptorOFF/PISO/ALFROMBRA .......... 9
Ajuste y selecci6n de nlvelde pelo de la
alfrombra ............................. 10
Sugerenciassobre el ajuste de nivetde pelo
de ta alfrombra ......................... 10
Accesarios............................. 11
Cuadro de usa de losaccesorlos ........... 12
Sugerenctaspare aspirar ................. 12
Caracterfsficasde rendlmlenlo ........... 13-14
Cuidado de la asplradora ................. 15
A|macenamtentode la aspiradora .......... t5
Limpieza de| exterior y de los accesorias ..... 15
Vactar el contenedor de polvo ............. t6
Limptarel contenedor de potvo ............ 17
Limpiar e_sistema de pre fillraci6n .......... t8
Limpiar el filtra prtmarlo .................. t9
Filtro de escape ......................... 20
Limpieza dei aditador .................... 20
C6mo elimlnar los residuos de basura
en los conductos ..................... 21,.22
Reconacimiento de problemas ............. 23
Acuerdos maestros de prolecci6n .......... 24
lnformaci6n de assistancia
o servicio ..................... paglna posterior
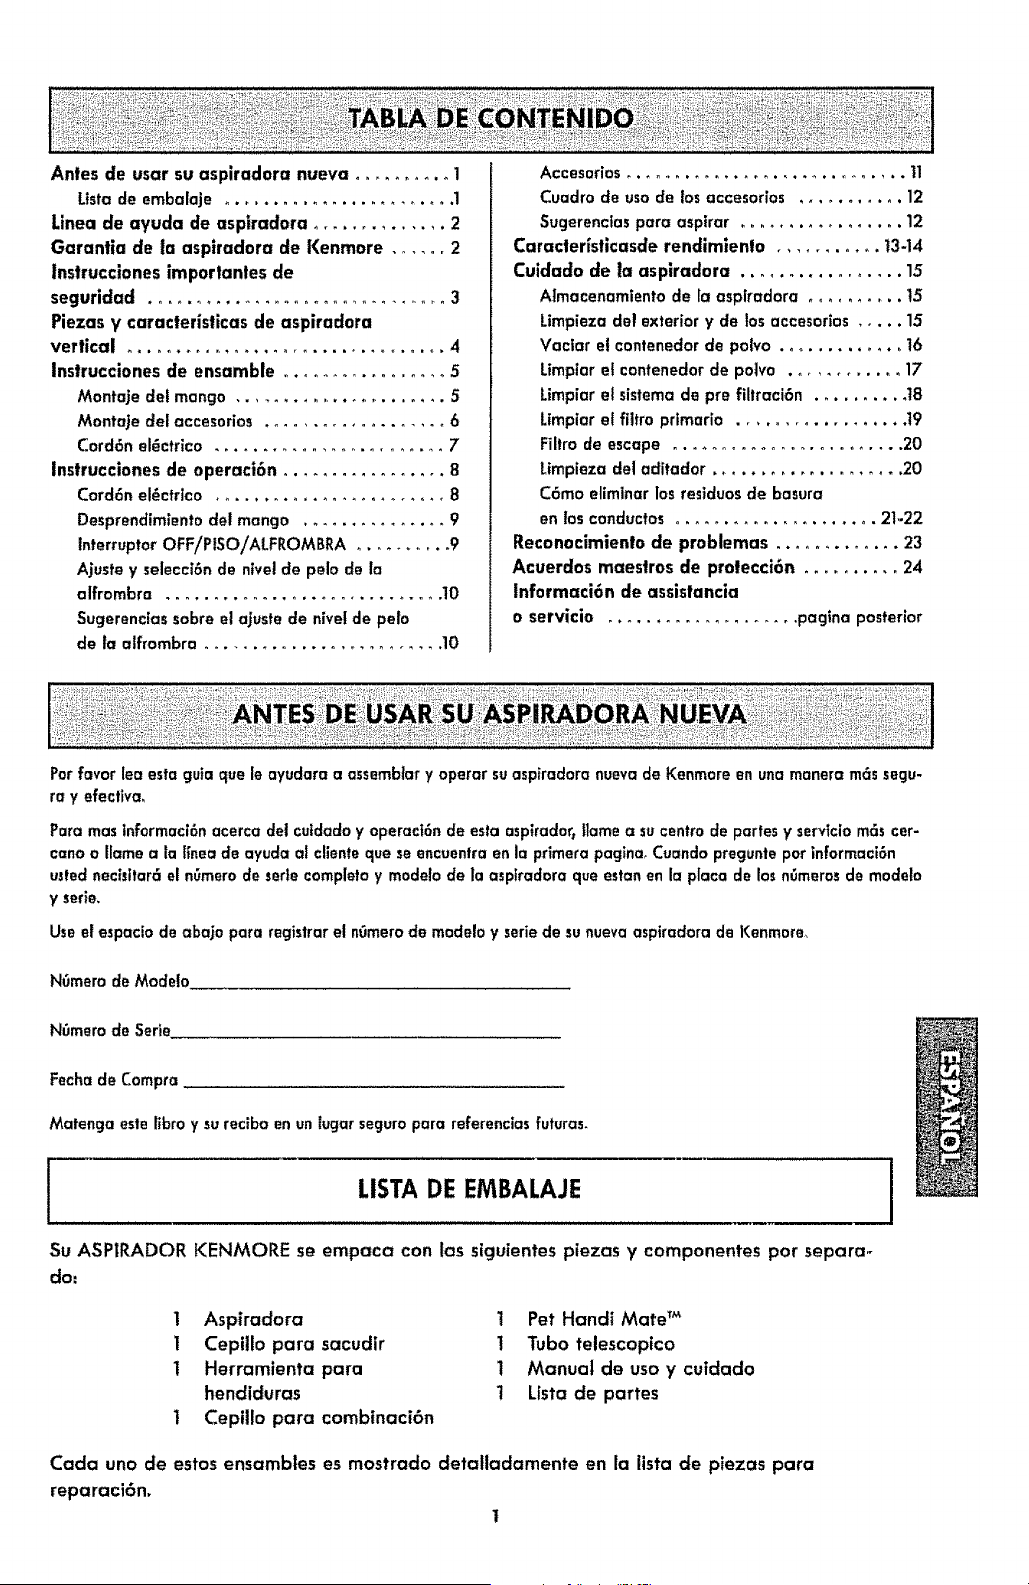
Porfavor lea esta gula que le ayudara a assemblery operar suasp_radoranuevade Kenmoreen una manera m6ssegu-
ray efective.
Para mas tnformaci6nacerca del cutdado y operact6nde esta aspffadortflame a sucentro de partes y servtciorn6s cer-
cano o Ilame ala ffnea de ayuda al clienteque se encuentra en la primerapagina_Cuandopreguntepar infarmaci6n
ustednecisitar6el n_merode serle complete y modelode |a aspiradora queestanen la plata de losnOmerosde modelo
y serie,
Use et espacio de abajo para registrar el n0mero de modelo y serie de su nueva aspiradora de Kenmore_
N6mero de Moclelo
N0mero de Serle
Fechade Compra
Matenga este libroy sureciba enun lugar seguropare referenciasfuturas.
LISTA DE EMBALAJE
Su ASPIRADOR KENMORE se empaca con las siguientes piezas y componentes por separa-
do:
1 Aspiradora 1 Pet Handi Mate TM
i Cepitlo para sacudir 1 Tuba telescopico
1 Herramienta para I Manual de uso y cuidado
hendiduras 1 Lista de partes
1 Cepiilo para combtnaci6n
Cada uno de estos ensembles es mostrado detalladamente en la lista de piezas pare
reparaci6n.
1
i
Linea de ayuda de aspiradora
1-877-531-7321
B.OOam-5.0Opm EST, M-F
(U.S.A. and Canada)
Garantia limltada de un afio
Si esta aspiradora falla por un defecto en sus materiales o fabricaci6n en el perlodo de un afio
desde la fecha de compra, cuando se instala, maneja y manttene siguiendo todas las
instrucctonesincluidas con el producto, devu_lvala a cualquier tienda Sears, Sears Parts & Repair
Center (Centro de Reparaciones y Piezas Sears) u a otro distribuidor Kenmore para que reparen
el aparato de forma gratuita_
Siesta aspiradora se uttltza para otros fines que no sea uso famiJiar privado, esta cjaranffa as
v6;ida solamente durante 90 d_asdesde la fecha de compra.
Esta garantia cubre exclusivamente los defeclos de materiales y fabricaci6no Sears NO pagar6:
1. Los elementos desechables que puedan desgastarse con un uso normal, inctuyendo sin
car_cter excluyente, filtros, correas, l_mparas y bolsaso
2. A un t6cnico del servlclo t_cnlco para que ensefie al usuarlo a instalar, manejar o mantener
correctamente el producto_
3. A un t_cnico del servlclo t_cnico para llmpiar o mantener este producto.
zl. Dafios o aveHa de este producto s| no se ha instalado, manejado o mantenido siguiendo
todas los instrucciones incluidas con el producto.
5. Dafios o averia de este producto orlglnados por accidente, abuso, uso incorrecto u uso del
producto para otros fines distlntos de los indicados.
6. Dafios o aver|a de este producto causados pot el uso de detergentes, llmpiadorest productos
quimlcos o utensljios diferentes a los recomendados en todas los instrucciones que se Incluyen
con el producto.
7. Dafios o averla de las piezas o slstemas causados por modiflcaclones no autorizadas que se
hayan hecho a este producto.
Limitaci6n de responsabilidad de los garantias implicitas; llmitaci6n de remedios
I_lOntcoy exclusivo remedio del cliente bajo esta garanfla iimitada ser6 la reparaci6n del
producto secjOnIo indicado en este documento. Las cjaranffas tmplicitas, tncluyendo 1asgaranffas
de comerciabilidad o idoneidad para un prop6sito especffico, se limitan a un afio o el periodo
m6s corto permitido por la ley_Sears no set6 responsable por dafios tncidentales nl
consecuenciates.Alcjunosestados o provinclas no permiten la exclusi6n o llmitaci6n de dafios
incidentales o consecuenciales, ni limitaciones en la duract6n de los garanfias irnpllcitas de
comerclabilidad o tdonetdad, par io qua estas exclusiones o iimitaclones podrlan no aplicar an su
caso_
Esta garantt'a aplica solamente cuando esta aspiradora se utillza en Estados Unidos o Canadcl.
Estacjarantfa le otorga derechos iegales especfficos, y usted podria tener otros derechos qua
vaHan en funci6n de cada estado_
Sears, Roebuck and Coo,Hoffman Estates, IL 60179
Sears Canada Inco,Toronto, Ontario, Canada M5B 2BB
Lea todas las ;nstruccionesen este manual antes de armar o usar su aspiradera.
ADVE NCIA
5u segur|dad es muy importante para nosotros. Para reduclr el riesgo de incendio, cheque
el_ctrico, lesi6n corporal o dafios al utilizar su aspiradora, act0e de acuerdo con las
precauciones b6sicas de segurldad, entre elias:
Use su aspiradora solamente come se
describe en este manual. Use solamente
con los accesorios Sears recomendados.
Desconecte la fuente de electricidad
antes de hacer el servlcio o limpiar el
6rea del cepillo. La falla de hater esto
puede resuitar en cheque el_ctrico o el
s0blto arranque del cepillo.
No deje la aspiradora cuando est6
enchufada. Desenchufe del
tomacorriente cuando no est6 en use y
antes de hacer el servicio.
Para reducir el riesgo de cheque
el_ctrico - No la use afuera o sobre
superficies mojadas.
No permita que se le use come un
juguete. Especial atenci6n es necesaria
cuando es usada per o cerca de nifios.
No la use con un cord6n o clavija
dafiados. Si la aspiradora no est6
trabajando come debe, se le ha dejado
caer, dafiado, dejada afuera, o volteada
en el agua, ret6rnela a un Centre de
Servicio Sears.
No la tire o arrastre del cord6n, no use
el cord6n come una manija, no cierre
una puerta sobre el cord6n, o tire del
cord6n airededor de hordes afilados o
esquinas. No pase la aspiradora sobre
el cord6n. Mantenga el cord6n lejos de
superficies calientes.
No desenchufe tirando del cord6n_ Para
desenchufar, tome la clavija, no el
cord6n.
No tome la clavija o la aspiradora con
las manes mojadas,
No ponga ningOn objeto en las
aberturas.
No la use con ninguna abertura
bloqueada; mant_ngala libre de polvo,
hilachas, pelo, y cualquier cosa que
pueda reducir la circulaci6n del aire.
Mantenga los cabellos, ropas sueitas,
dedos, y todas las partes del cuerpo
lejos de aberturas y partes movibles.
Apague todos los controles antes de
desenchufar.
Use cuidado extra cuando limpie
escaleras. No la ponga sobre sillas,
mesas, etc. Mant6ngala sobre el piso.
No use la aspiradora para levantar
ffquidos inflamables o combustibles
(gasolina, fluido de limpiar, perfumes,
etc.), o la use en 6teas donde puedan
estar presentes. Los vapores de estas
substancias pueden crear un peligro de
incendio o explosi6n.
No levante nada que est_ ardiendo o
echando humo, tal come cigarrillos,
f6sforos, o cenlzas calientes.
No use la aspiradora sin el canasto del
polvo y/o filtros en su lugar.
Siempre limpie el canasto dei polvo
despu_s de limpiar la alfombra,
limpiadores o refrescantes, pelves, y
polvo fine. Estos productos obstruyen los
filtros, reducen la circulaci6n del aire y
pueden causar dafio a la aspiradora.
La falta en limpiar el canasto de ]a
basura puede causar dafio permanente
a la aspiradora.
No use la aspiradora para levantar
objetos duros afilados, pequefios
juguetes, alfileres, sujetapapeles, etc.
EIIos pueden dafiar la aspiradora o el
canasto de la basura.
Desenchufe antes de conectar el Pet
Handi Mate TM
Usted es responsable de estar seguro de
que su aspiradora no es usada per
alguien incapaz de operarla
correctamente.
GUARDE ESTASINSTRUCCIONES
E! armado y use seguro de su asplradora son su responsabilidad. Esta aspiradora ha side dlse-
fiada exctusivamente para use dom_stico. Lea este Manual del propietario detenidamente, pues
contiene informaci6n irnportante sobre seguridad y use. Esta guia contiene informaci6n sobre
seguridad debajo de simbo!osde advertiencia o cuidado.
3
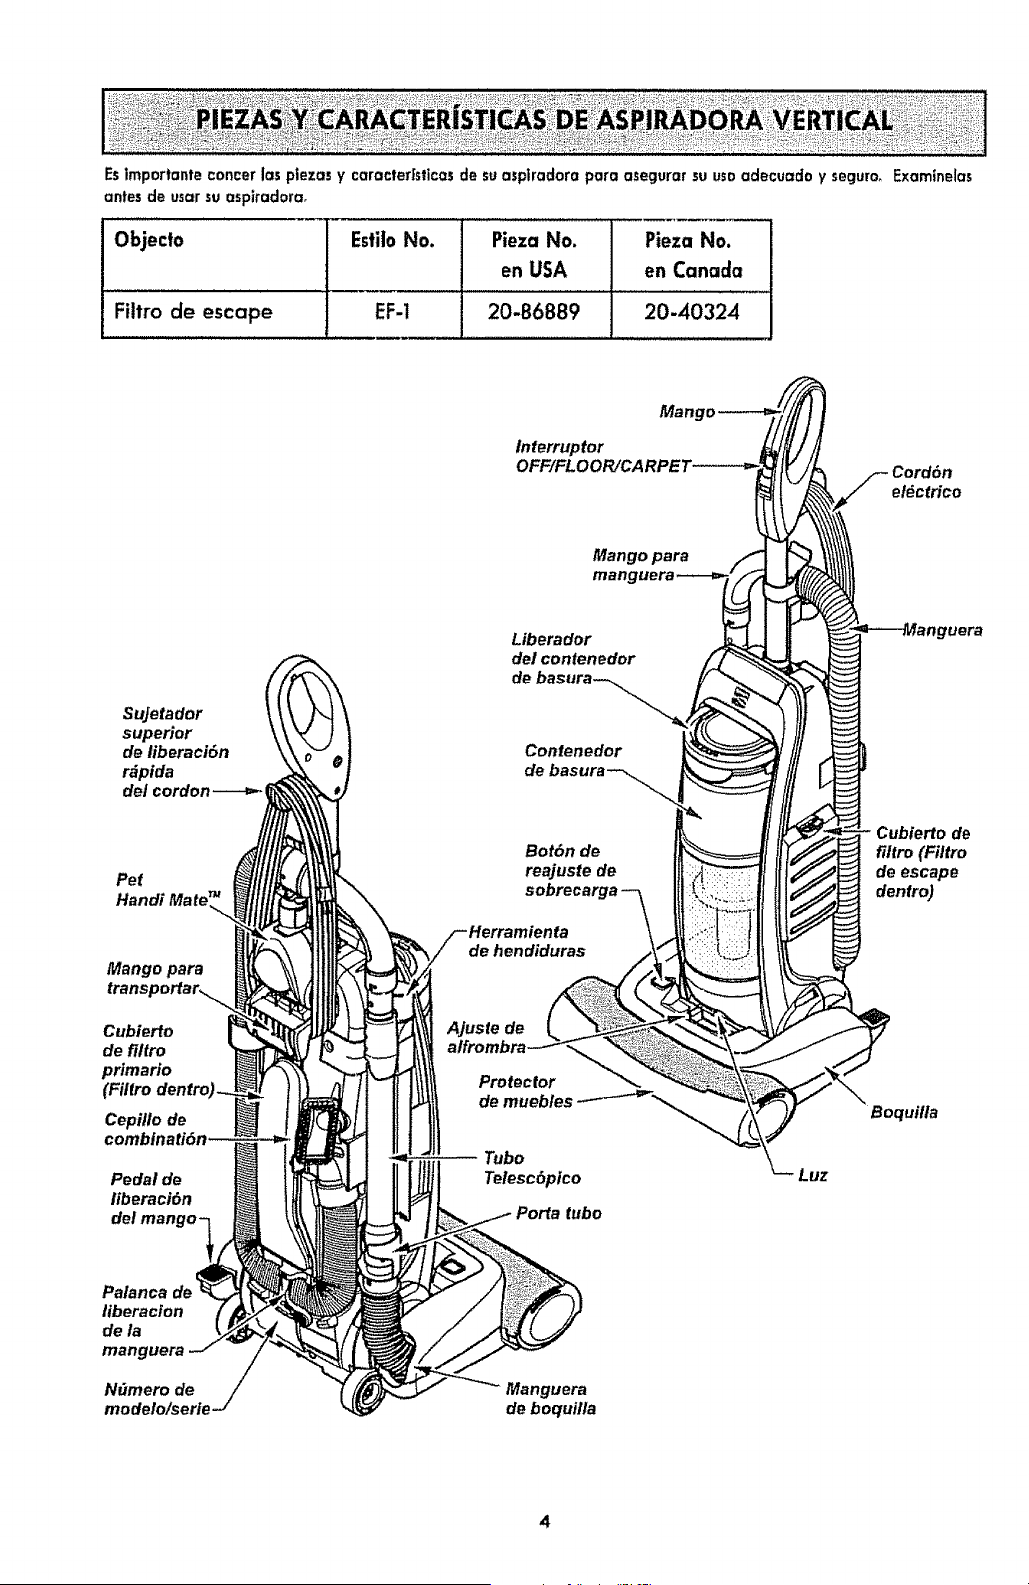
Es|mporlante concerJaspiezas y caracter_sticasde suaspiradora para asegurarsu usoadecuadoy seguro_ExamtneJas
antesde usarsu aspiradora_
Objecto Estilo No. Pieza No. Pieza No.
en USA en Canada
Rltro de escape EF-1 20-B6889 20-40324
SuJetador
superior
de iiberacidn
rdpida
del cordon
Pet
Handi Mate
Mango para
Cubierfo
de filtro
primario
Cepillo de
Pedal de
liberaci6n
Mango para I _
mang _
de basura--._
Contenedor _/ ///
de basura- I_
Bot6n de ( /[_'_
reajus,ode 'ltt_
oobrooor_: rll_
,m,oo,o
de hendiduras t _{_
Ajuste de _ I'_
alfrombra _
Protecfor
de muebles
-- Tubo
Telesc6ptco
Po_atubo
Cord6n
etdctrico
Cubierto de
fitlro (Filtro
de escape
denfro)
1uilla
Palanca de
llberacion
dela
manguera
N_mero de
modelo!serie
Manguera
de boquilla
4
Potfavorpongaatenci6nespecialaloscuadrosquelealertarandep0sibies peligros
Advertencia:Estetnformaci6nle aiertar_ide pellgrode fuecjo_choquesefectricos, quemadasy
lesiones. Cuidado: Esteinformaci6nle alertara de peligroscomo lesionesy dafiosde
proptedad.
ADVERTENCIA
Peligro de lesi6n personal y daEo al producto
No conecte la aspiradora hasta que termine
de armarla_ De Io contrario podria causar un
choque el_ctrico o lesi6n corporal.
Antes de armar la aspiradora, revise la LISTA
DE EMBALAJE. Use esta lista para verificar
que ha recibido todos los componentes de su
nueva aspiradora Kenmore_
MONTAJE DEL MANGO
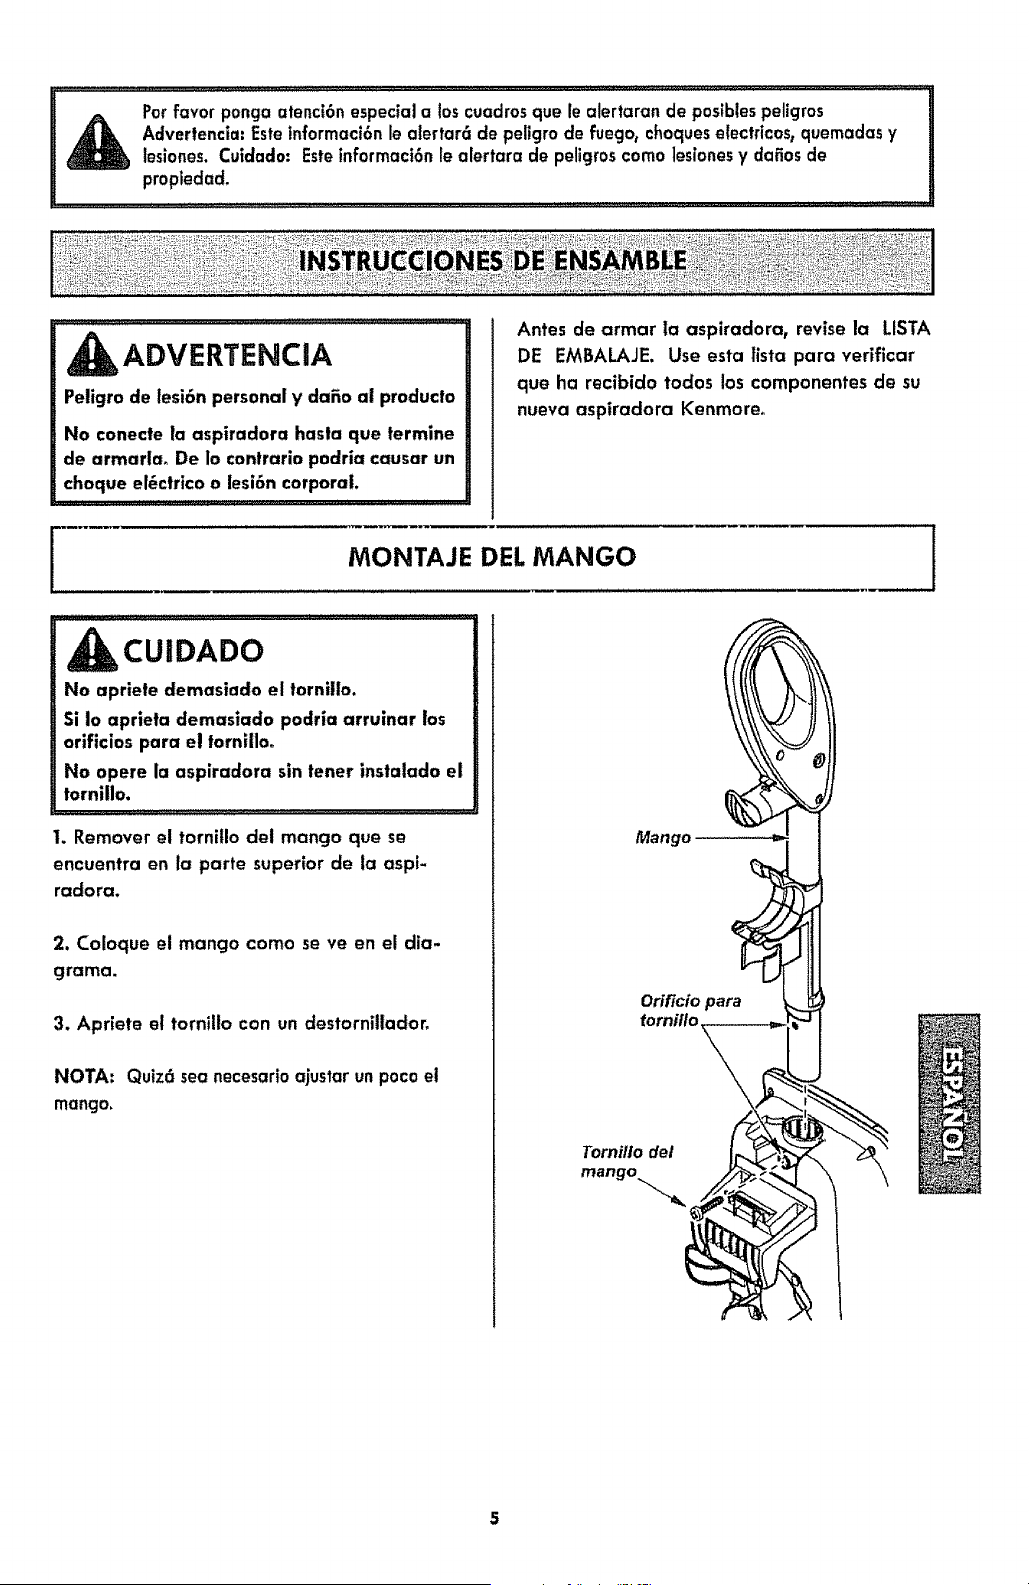
CUIDADO
No aprlele demasiado el torni!lo.
Si Io aprieta demasiado podria arruinar los
orificios para el tornilloo
No opere la aspiradora sin tener instalado el
tornillo.
I. Remover el tornillo det mango que se
encuentra en la parte superior de la aspi-
radora.
2. Coloque el mango como se ve en el dia-
grama.
3. ApHete el tornillo con un destornillador.
NOTA: Quiz6 seanecesarioajustarun pocoel
mango.
Mango
Orificio para
tornillo
Tornitlo del
mango
MONTAJE DEL ACCESORIOS 1
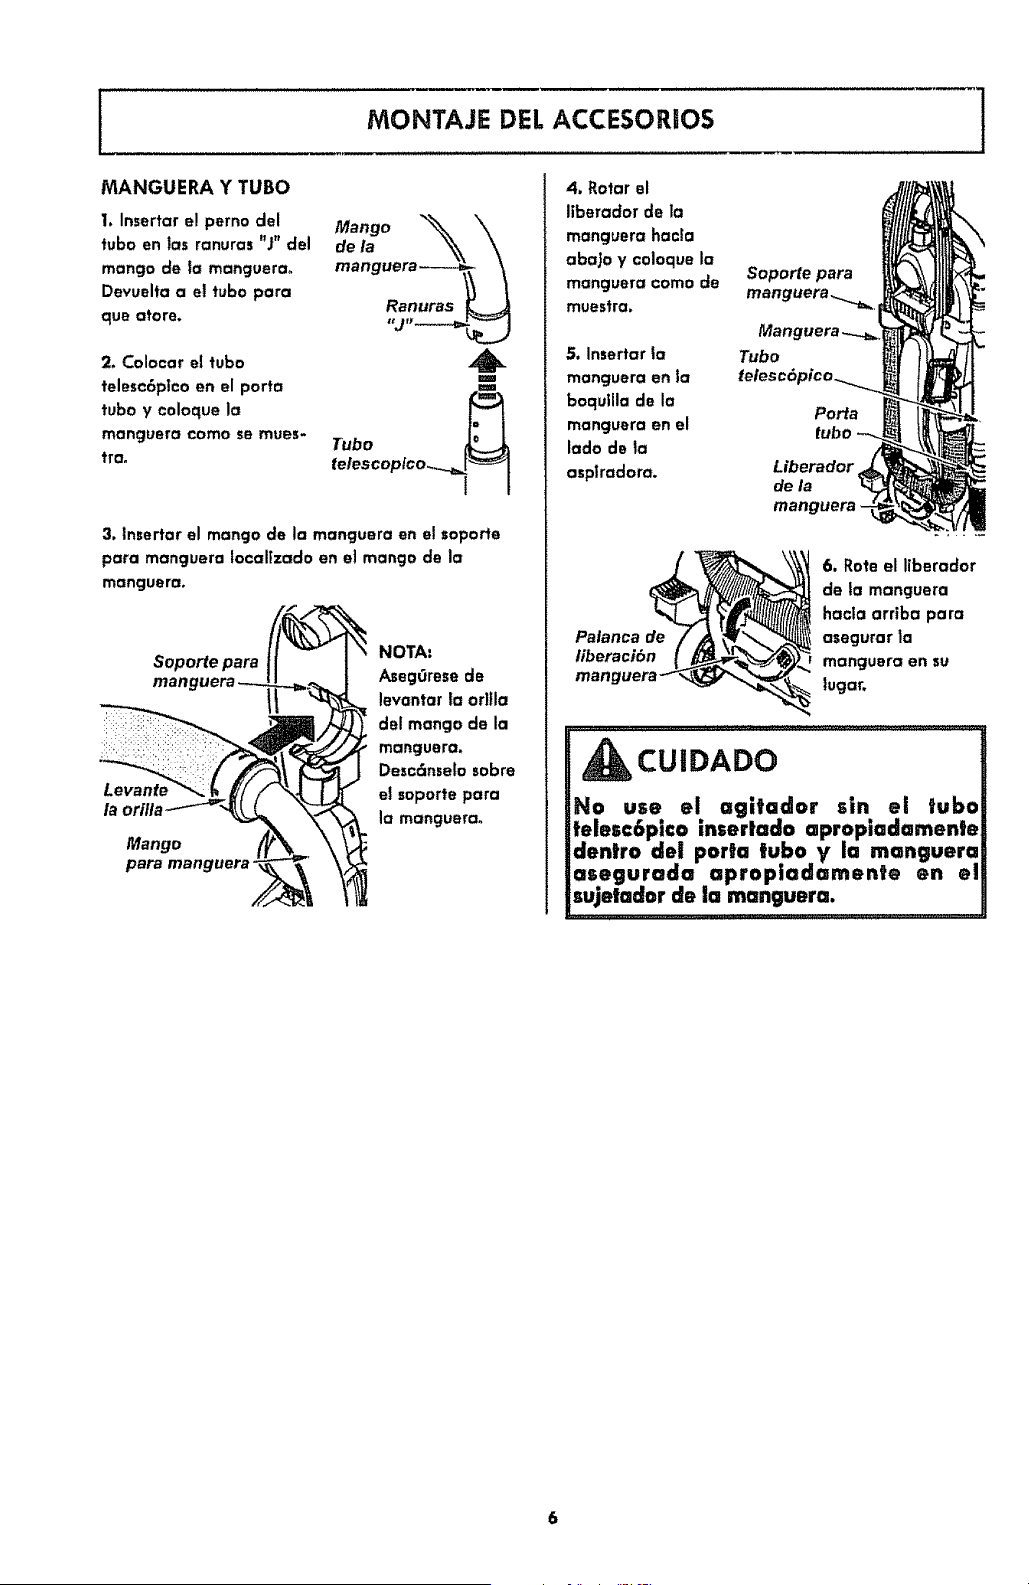
MANGUERA Y TuBa
1. Insertar e! pemo del
tuba en las ranuras "J" del
mango de la manguera.
Devuelta a et tuba para
qua afore.
2. Colocar el tuba
telesc6pico on el porta
tuba y coloque la
manguera como se mues-
tra,
Mango"% X.
ooo ooro--- 1
Ranuras [_
Tuba
telescoplco_ 1
3, Insertar el mango de la manguera en el soporte
para manguera Iocallzado en el mango de la
manguera.
Soporte para
man
Mango
para man_
NOTA.
AsegOresede
levantar la orltla
del mango de la
manguera.
Desc6nselo sabre
el soporte para
la manguera_
4, Rotar el
liberador de la
manguera hacla
abaJo y coloque la
manguera coma de
muestra,
5, Insertar la
manguera en la
boqullla de la
manguora en el
lado de ta
asplradora.
Soporte para
manguera _'"_' !
Manguera
Tuba
PaPa
Liberador
de la
Palanca de
liberaci6n
6, Rote el Ilberador
de la manguera
hacta arrtba para
asegurar ta
manguora on SU
lugar.
CUIDADO
No use el agitador sin el tuba
telesc6pico mserlado apropiadamente
denlro del porta tuba y I0 rnanguera
asegurada apropiaclarnente en el
sujelador de la manguer=.
6
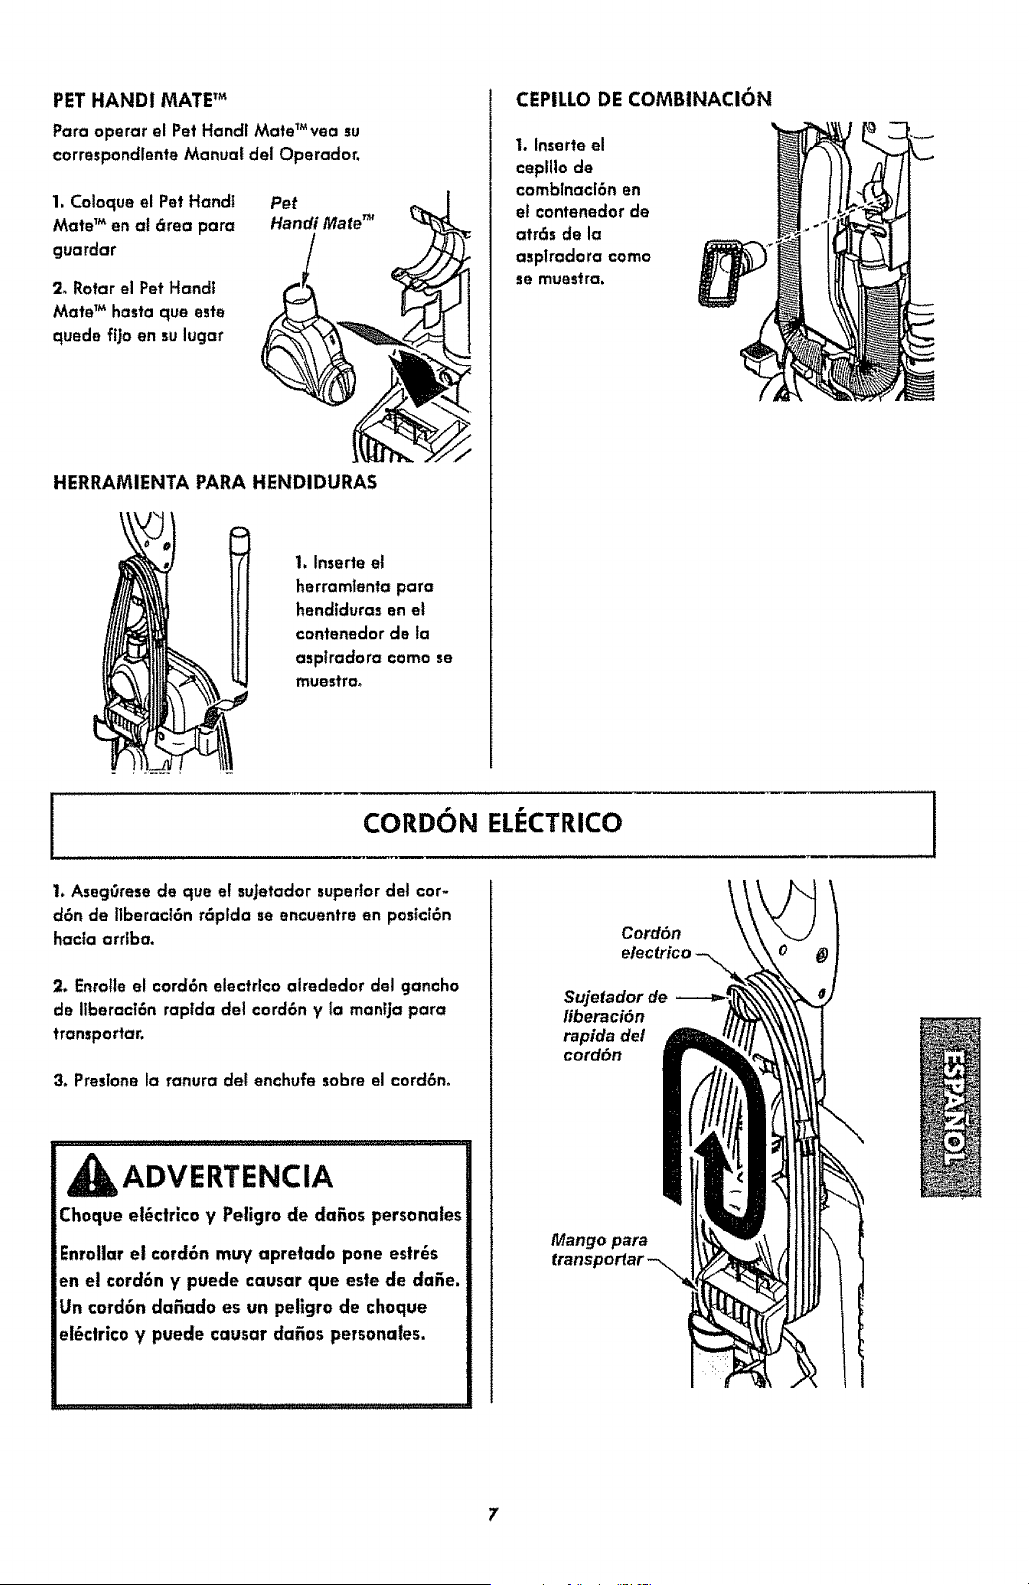
PETHANDIMATE TM
Para operar el Pet Handl Mate_Mvea su
correspondlente Manuat del Operador.
1. Coloque el Pet Hand!
Mate _Men at _rea para
guardar
2_ Rotor el Pet Handt
Mate TMhasta que este
quede fljo en su lugar
Pet
Handi Mate _
HERRAMIENTA PARA HENDIDURAS
1. Inserte el
herrarntenta para
hendtduras en el
contenedor de la
aspffadora coma se
rnuestra_
CEPILLODE COMBINACION
I. Inserte el
ceplllo de
carnbrnaci6n en
el contenedor de
atr6s de la
asplradara coma
se muestra.
CORDON EL :CTRICO
1. Aseg0rese de que e! suJetador superlor del cor-
d6n de I|beracl6n r6plda se encuentre en pos_cr6n
hac_a arrlba,
2. Enrotte el cord6n electrlco alrededor del gancho
de IlberactBn raptda del cord6n y la rnantja para
transportar.
3. Preslone la ranura det enchufe sabre el cord6n,
ADVERTENCIA
Choque el6ctrico y Peligro de daEos personales
Enrallar el cord6n muy apretada pone estr_s
en el cord6n y puede causar que este de dafie.
Un cord6n dafiado es un peligro de choque
el_ctrlco y puede causar da_os personales.
Cord6n
Sujetador de
liberaci6n
rapida del
cord6n
Mango para
I

CUIDADO
iPartes en movimientol Para reduclr el riesgo de dafio= corporales, no
toque el agitador cuando la aspiradora est6 encendlda. E! focar el
agitodor mtentras que est6 glrando puede cotter, contuslonar o
causer otras lesiones. $|empre desconecte del tomacorr|ente antes de
dar mantentmiento.
Tenga cuidado a| asplrar cerca de ni_oso
\
CORDON ELIF-CTRICO 1
\
1, Glre el sujetador
del cord6n hada
abajo para liberar el
cord6n el6ctrlco.
ADVERTENCIA
Peligro de lei;6n personal y dafio al producto
v 3are reducir el riesgo de choTue el6ctrico, esta
asptradora cuenta con una €lavija polarizada
(uno de los contados es m6s ancho que el otto),
v La clavija s61o suede Introducirse de una pan-
era en el enchufe. S| la clavija no cabe bien en
el enchufe, tnvi6rtala. 51 at_n no cabe, Ilame a
un electric|sla pare que |nsla]e un enchufe cor-
recto. No altere la clavlja de n|nguna munera,
2. Desprenda el
enchufe del cord6n
el6ctrtco y quite el
cord6n del sujetador
superior.
Hendidura
Cord6n
el6ctrlca
3. Est_seguro de que
el cord6n electdco re
mantle en fljo en la
hendidura de fijacion del gancho.
4. Conecte el cord6n el6ctrtco poladzado en un
enchufe de 120 volt;oFque re encuentre cerca del
pfso,
ADVERTENCIA
PelJgrode lesl6n personal y dare al producto
N I use los enchufes tocalizados sobre los mue-
hies. los objetos cercanos podr[an resultar da_a-
dos,
5. Para guardar el cord6n_ gire el suJetador del
cord6n hac;a ardva y enredelo_
ADVERTENCIA
Cheque elicit|co y Peligro de claEos person-
ales
Enrollar el cord6n muy apretado pone estr_s
en el cord6n y puede causar que este se
da_e. Un cord6n daEado es un peligro de
cheque el_ctrico y puede causar da6os per-
sonales.
B
[
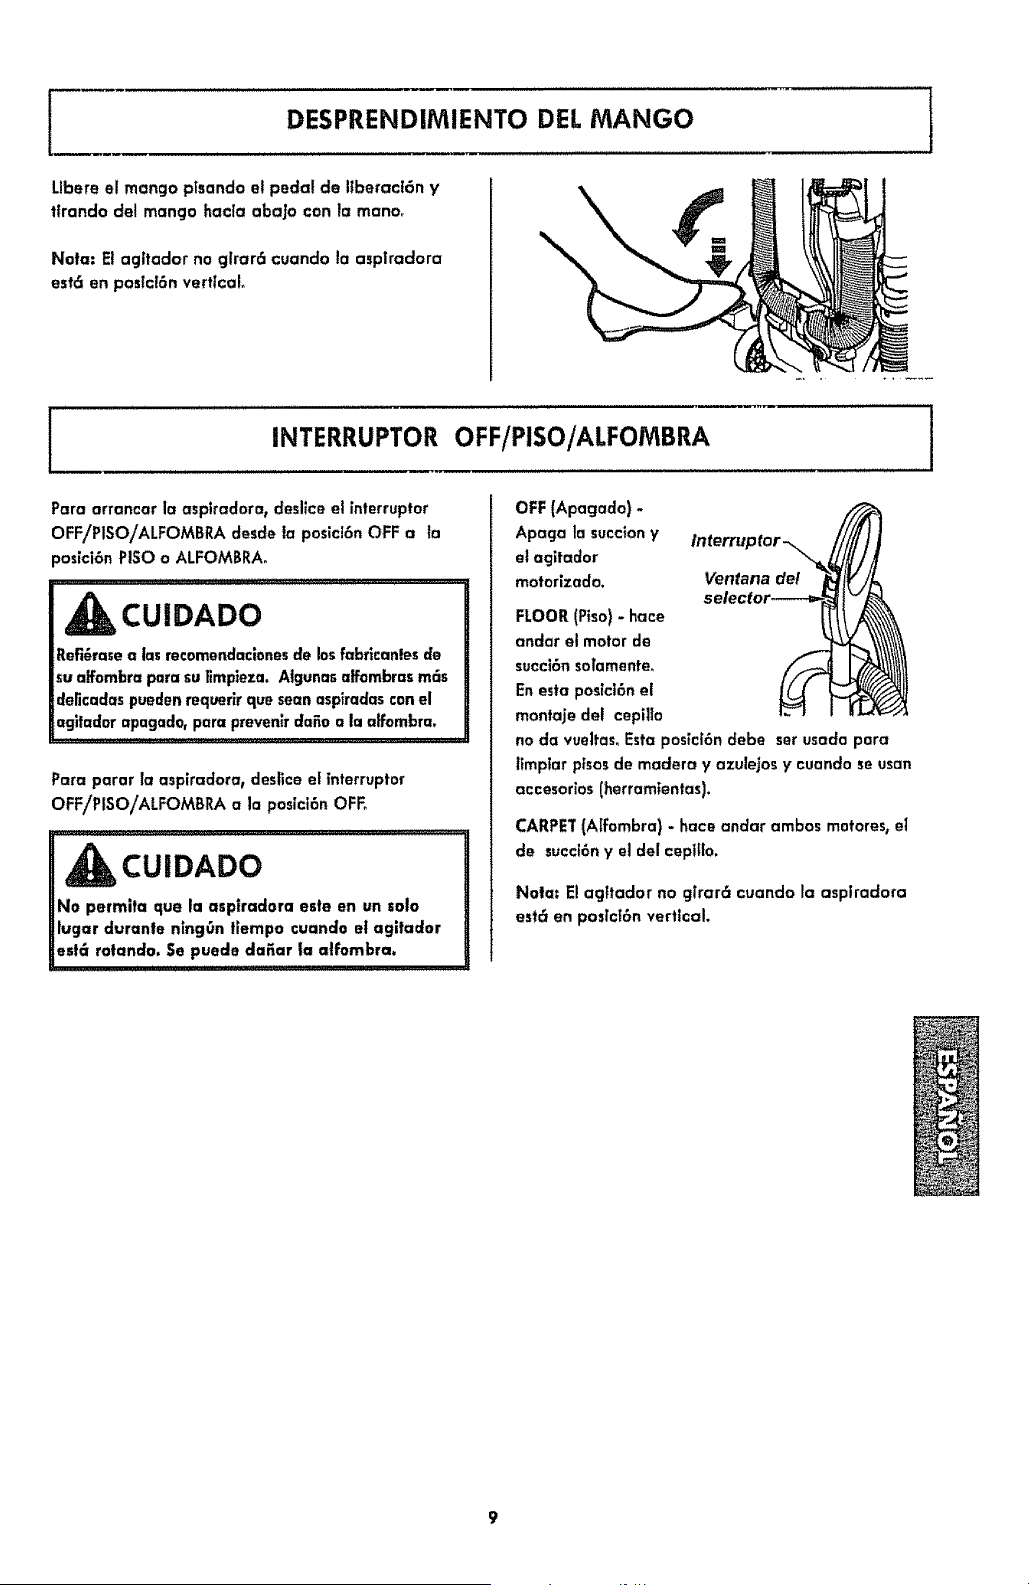
DESPRENDIMIENTO DEL MANGO
l
Ltbere el mango plsando el pedal de liberact6n y
tIrando del mango hac[a aba]o con la manor
Nora: El agltador no glrar6 cuando la aeplradora
est_ en postcl6n vertical
I INTERRUPTOR OFF/PISO/ALFOMBRA
Para arrancar la asptradora_deslice el interrupter
OFF/PISOiALFOMBRA desde la posici6n OFF a la
0osici6n PISO o ALFOMBRA.
CUIDADO
Refi6rama |as recomendacionesde losfabricanlesde
su ulfombrapara suEmp_eza.AJgunasalfombrusm6s
delicadaspuedenrequerlrque seanaspiradasconel
agiiador apagado, para prevenffclafioa la atfombra.
Para parar la aspiradora, deslice et interrupter
OFF/PISOiALFOMBRA a la poslct6n OFF°
o permlfa que la asp!radora este en un solo
lugar duranfe nmg0n hempo cuando el agitador
est6 rotando. Se puede daEar ta alfombra.
OFF (Apagado) -
Apaga la succiony
el agitador
motorlzado.
Ventana del
FLOOR (Piso) - hace
andar el motor de
succi6n so;amente,
En esta pos[ci6n el
montaje del cepillo
no do vuettas_ Esto pos;ci6n debe set usada para
ltmptar p;sos de madera y azulejos y cuando se usan
accesorios (herramientas).
CARPET(Aifombra) -hace andar ambos motores,el
de succl6ny el del cepiffo,
Norm El agitador no g;rar6 cuando la aspiradora
est6 en pos;c_6nvertical.
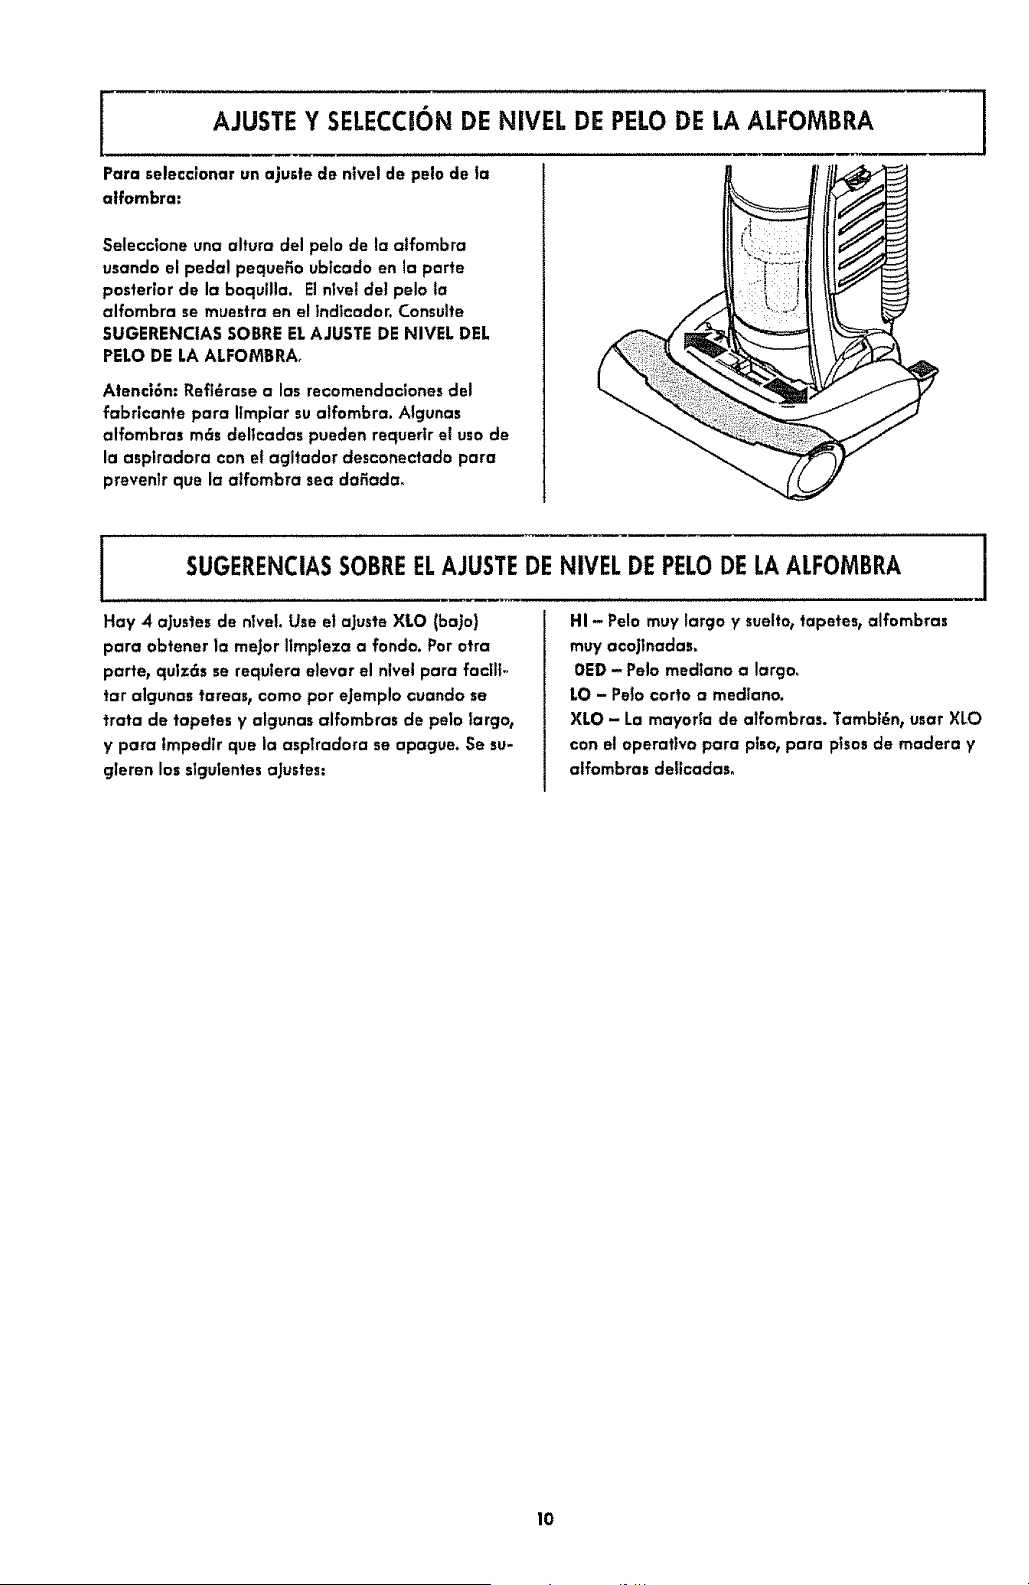
AJUSTE Y SELECCI6N DE NIVEL DE PELODE LA ALFOMBRA J
Para selecctonar un ajusfe de n|vel de pelo de ta
alfombra.
Selecclone una altura del pelo de la atfombra
usando el pedal pequefio ublcado en la parte
poster;or de la boqullla. El nlvel del pelo ta
alfombra se mue_tra en el tndicador. Consulte
5UGEffENCIA5 5OBRE ELAJUSTE DE NIVEL DEL
PELO DE LA ALFOMBRAo
Alenc|6n: Reft6rase alas recomendaciones del
fabdcante para Itmpiar sualfombra. Algunas
atfombras m6s deltcadas pueden requerlr el use de
la asplradora con et agitador desconectado para
preventr que la alfombra sea da_ada_
SUGERENCIASSOBREELAJUSTEDE NIVEL DE PELODE LAALFOMBRA
Hay 4 aJuslesde n_veLUse et aJusteXLO (baJo)
para obtener la meJor IlmpTeza a rondo. Per otra
parte, qulz6s se requtera e_evar el nlvel para facilt-
tar algunas tarea_, come per ejemp!o cuando se
trata de tapetes y algunas alfombras de pelo largo,
y para tmpedTr que la aspiradora se apague. Se su-
gleren los s|guientes aJustes:
i
HI - Pelo muy largo y suelte_ tapetes, alfombras
muy acojlnadas.
OED- Pelo med_anoa largo.
LO - Pete corto a med;ano.
XLO - La mayoria de alfombras. Tamb_6n,usar XLO
con el operatNo para pisot para ptsosde madera y
alfombras dellcadas.
10
ACCESORIOS 1
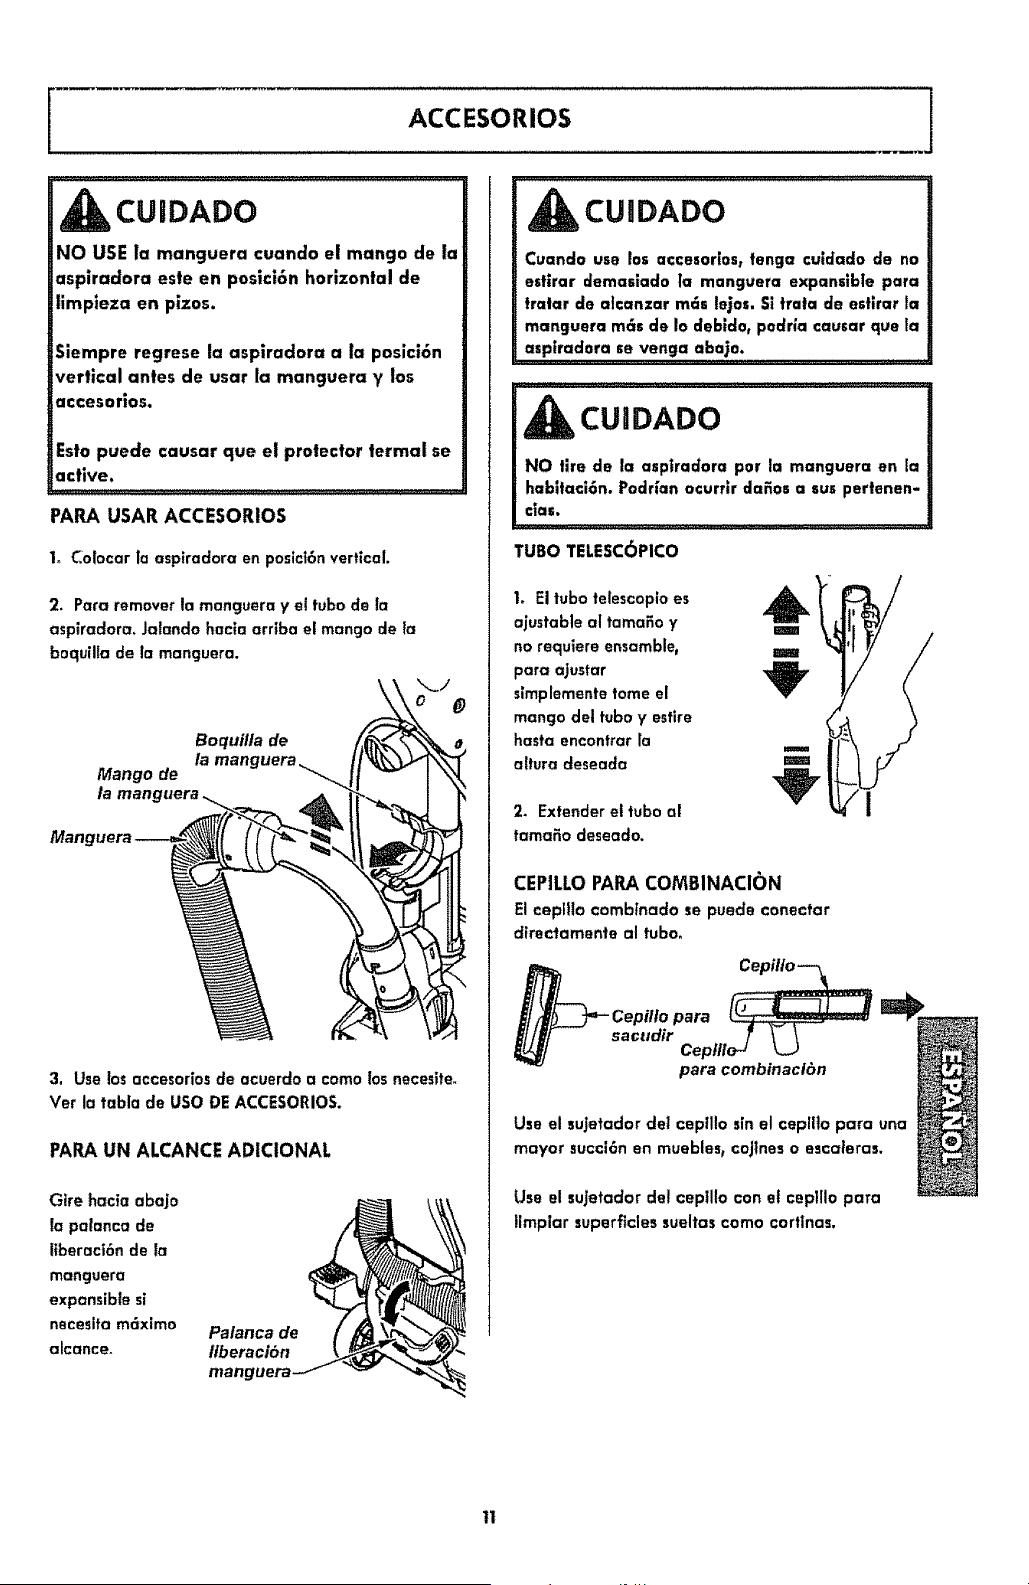
CUIDADO
NO USE la manguera cuando el mango de la
aspiradora este en posici6n horizontal de
limpleza en pizos.
Siempre regrese la aspiradora ala posici6n
vertical antes de usar la manguera y los
accesorios.
Esto puede causar que el protector fermal se
active.
PAPA USAR ACCESORIOS
1_ Colocar la aspiradora en posict6nvertical.
2. Para remover la manguera y eI tuba de la
aspiradora. Jalando hacia arriba el mango de ta
boquilla de la mancjuera.
Boquilla de
Mango de la manguera,_ ._
la mane
Man
3. Use los accesoriosde acuerdo a coma los necesite.
Vet la tabla de usa DE ACCESORIOS.
PARAUN ALCANCE ADICIONAL
Gire hacia abajo
la palanca de
liberaci6n de la
manguera
expansible sl
necesita m6xlmo
alcance.
Palanca de
tiberacibn
nlan[
CUIDADO
Cuando use los accesor[os, tenga culdado de no
esfirar demaslado Ta manguera expanflble pare
tratar de alcanzar m6s lejas, S! trata de esfirar la
manguera m6s de Io debldo, pedrfa causer que la
asp_radera se venga aba_a. .....
CUaDADO
NO tire de la aspffadora par le manguera en la
habitaci6n. Podr{an ocurrlr darer a sus pertenen-
c|as.
TUBO TELESC_PICO
1. El tuba telescoploes
ajustable al tamaEo y
no requiere ensemble,
pare ajustar
slmplementetome el
mango del tuba y estire
haste encontrar la
altura deseada
2. Extender et tuba al
tamaEo deseado.
CEPILLO PAPA COMBINACIC)N
El ceplilo combTnado se puede conectar
direc_amen_e al tubo_
para combinacf6n
Use el sujetodor det ceplllo sin el cepllto pare una
mayor succi6n en muebles_cojtnes o escaleras.
Use el sujetodor del cepillo con el ceplllo para
limplar superficles sueltas coma cortlnas.
11
I
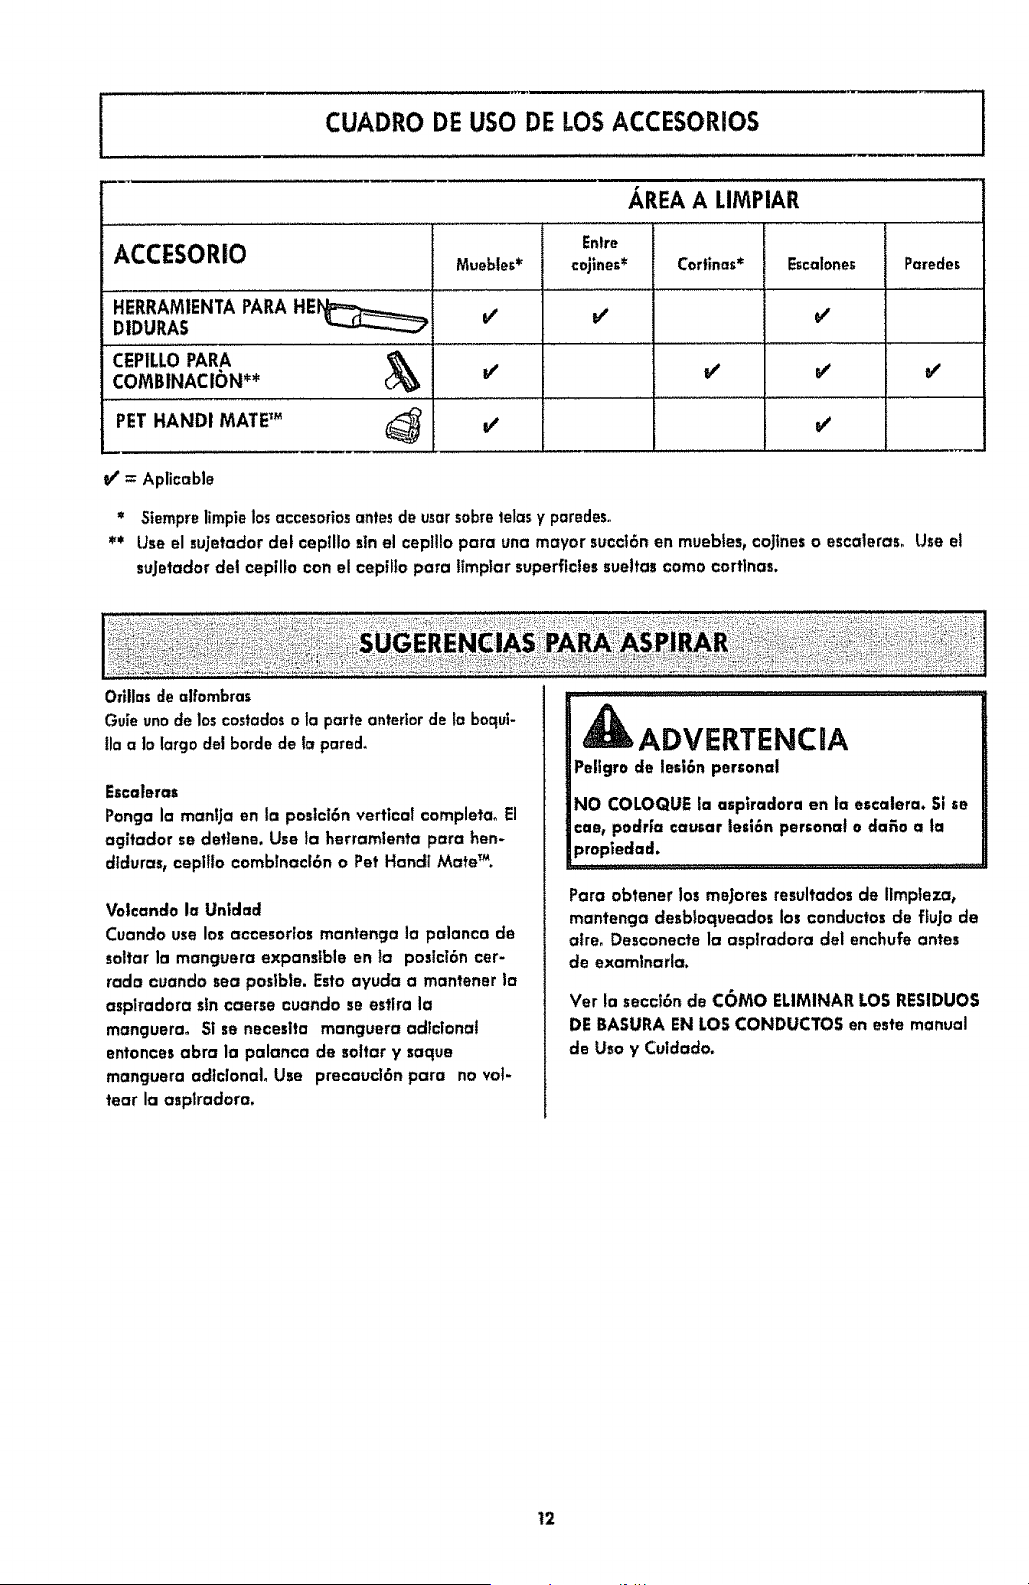
I CUADRO DE use DE LOS ACCESORIOS 1
AREA A LIMPIAR
Entre
ACCESORIO Muobte,* cojines* Corfinas* E_calene_ Paredes
HERRAMIENTA PARA
HEi'_ V' v' v'
DIDURAS
CEPILLO PARACOMBINACIC)N** V' V' v' v'
PET HANDI MATE TM (_ V' _'
= AplicubJe
* 51emprelimplelosaccesoriosantesde usarsabretelas y paredeso
** Use el sujetador del eepIIio sin el cepll!o para una mayor succl6n en muebles, coj_neso escaleras_ Use e!
sujetador deI cepillo con el cepil_opara tTmptar superficies sueltas coma cortlnas.
O_)llasde affombras
Gale uno de loscostadoso la parte anterior de la boqut-
lla a to largo det hordede la pared.
Escaleras
Ponga la manUa en la poslcl6n vertica! completao El
agitador se deflene. Use _a herramlenta para hen-
dtduras, cepllto ¢omblnae[6n o Pet Hand| Mate TM.
Volcando la Un|da8
Cuando use los accesortos mantenga la palanca de
soltar la manguera expansible en la poslcl6n cer-
rada cuando sea poslble. Esto ayuda a mantener la
asplradora sin caerse cuando se esflra la
manguerao S| se neceslta manguera adteional
ententes abra la palanca de sottar y saque
manguera adlclonaL Use precaucl6n para no vo!-
tear la aspkadora.
ADVERTENCRA
Peligro de lesi6n personal
NO COLOQUE la aspiradora en la escalera. Sl se
cae_ podrfa causar lesi6n personal a dafio a |a
propiedad.
Para obtener los meJores resultados de Ilmpteza_
mantenga desbloqueados los canductos de ffujo de
alre. Desconecte la asptradora del enehufe antes
de examtnarla.
Ver la secct6n de CliMe ELIMINAR LOS RESIDUES
DE BASURA EN LOS CONDUCTOS en este manual
de Usa y Cuidado.
12
SISTEMA DE PROTECTION
DE MOTOR
Protector Termal - Succi6n del Motor
Esta asp]lradara ttene un protector termal que se
aJusta autom6tlcamente para protecjer a la
asp[radara del sobrecalentamlento_ SI una
obstrucd6n Implcle el flujo normal de aim al motor_
el protector formal apaga el motor
autom6tlcamente para permltlr que ei motor se
enfrfe a fin de evttar postbles ctaEosa la asp_radorao
Protector Termal- Motor del agltador
Esta asplradora esta equlpada con protector de
sabre calentamtento en et motor del agitador que se
actlvan autom6tlcamente para la protecd6n del
motor. Este protector desconectan de toda car|lento
el_ctrTca al motor autom6tlcamente cuando extste
un sobrecalentamlentoo Esto perrnffe que el motor se
enfr[en y que no se vayan a fundff o sufdr un
desperfecto_
_r,,:. ,,rj
CUIDADO
Siempre regrese la asplradora a la posici6n
vertical antes de usar la manguera y los
accesorlos. La falla de este es el resultado
del sabre calentamiento del motor del
agitador. Esto puede causar que el protector
terrnal se adive.
i
Para corregir el problema: S! esta ocurret apacjue la
aspIradora y desenchufe el cord6n del
tomacorriente para permltff que Ja aspffadora se
enfri'e y que el protector termal se rea_usteo Busque
V saque los obstrucciones o combie la balsa, sl es
necesario. Examine tambi_n y reemplace cualquier
firtro obstruido. Espere aproximadamente 40-50
mlnulos ¥ enchufe Ja aspffadora y pr_ndala para
vet si el protector det motor se ha reajudada.
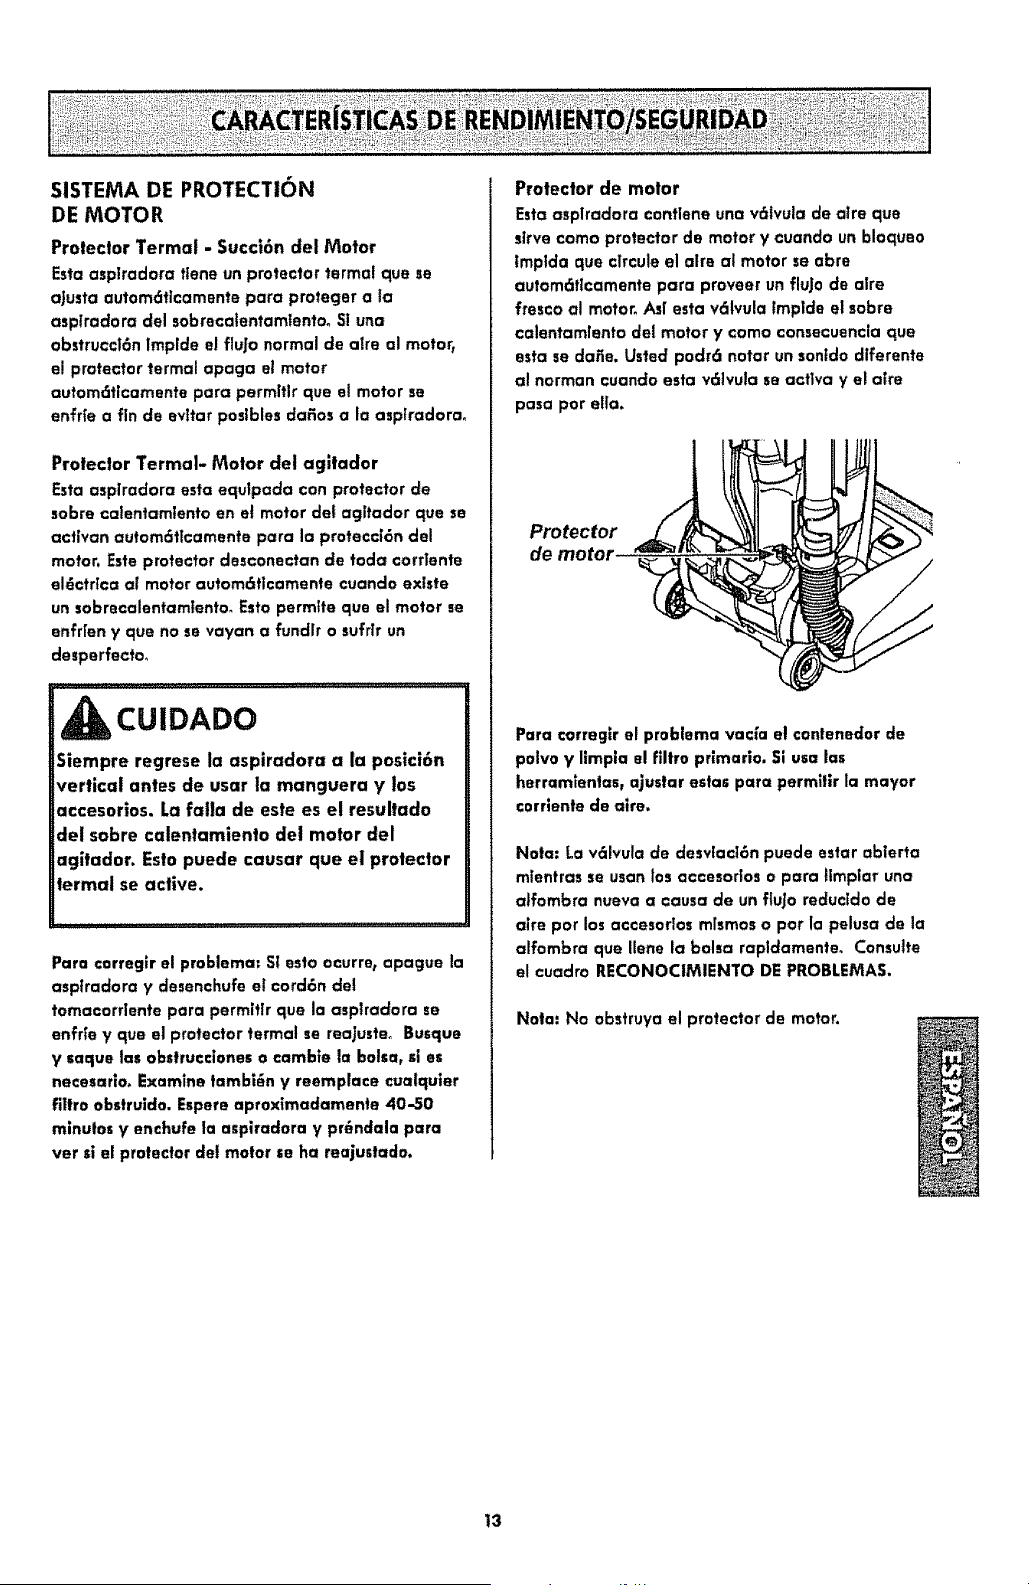
Protector de motor
Esta asplradara confiene una v61vula de atre que
slrve coma protector de motor y cuando un bloqueo
Imptda ctueclrcule el alre al motor se abre
autom6ttcamente para proveer un flujo de alre
fresco al motor° Asf esta v61vula _mplde el sabre
calentamtento del motor y coma consecuencla que
esta we dafie. Usted podr6 notar un sontdo dlferente
al norman cuando esta v6ivula se actlva y el a|re
paso par ella.
Protector
de motor
Para €orreglr el problema vac{a et contenedor de
polvo y llmpla el filtro pr_maria. St usa los
herram|entas, ajustar esta_ para permillr la mayor
corrlente de aire.
Nolo: La v61vulade desvtad6n puede estar ablerta
mlentras seusan los accesortos o para limplar una
atfombra nueva a causa de un flu]o reductdo de
atre par los accesorlos mlsmoso par la pelusa de la
alfombra que Ilene la balsa rapldamente, Consutte
e! cuadro RECONOCIMIENTO DE PROBLEMAS.
Nora: No obstruya el protector de motor,
t3
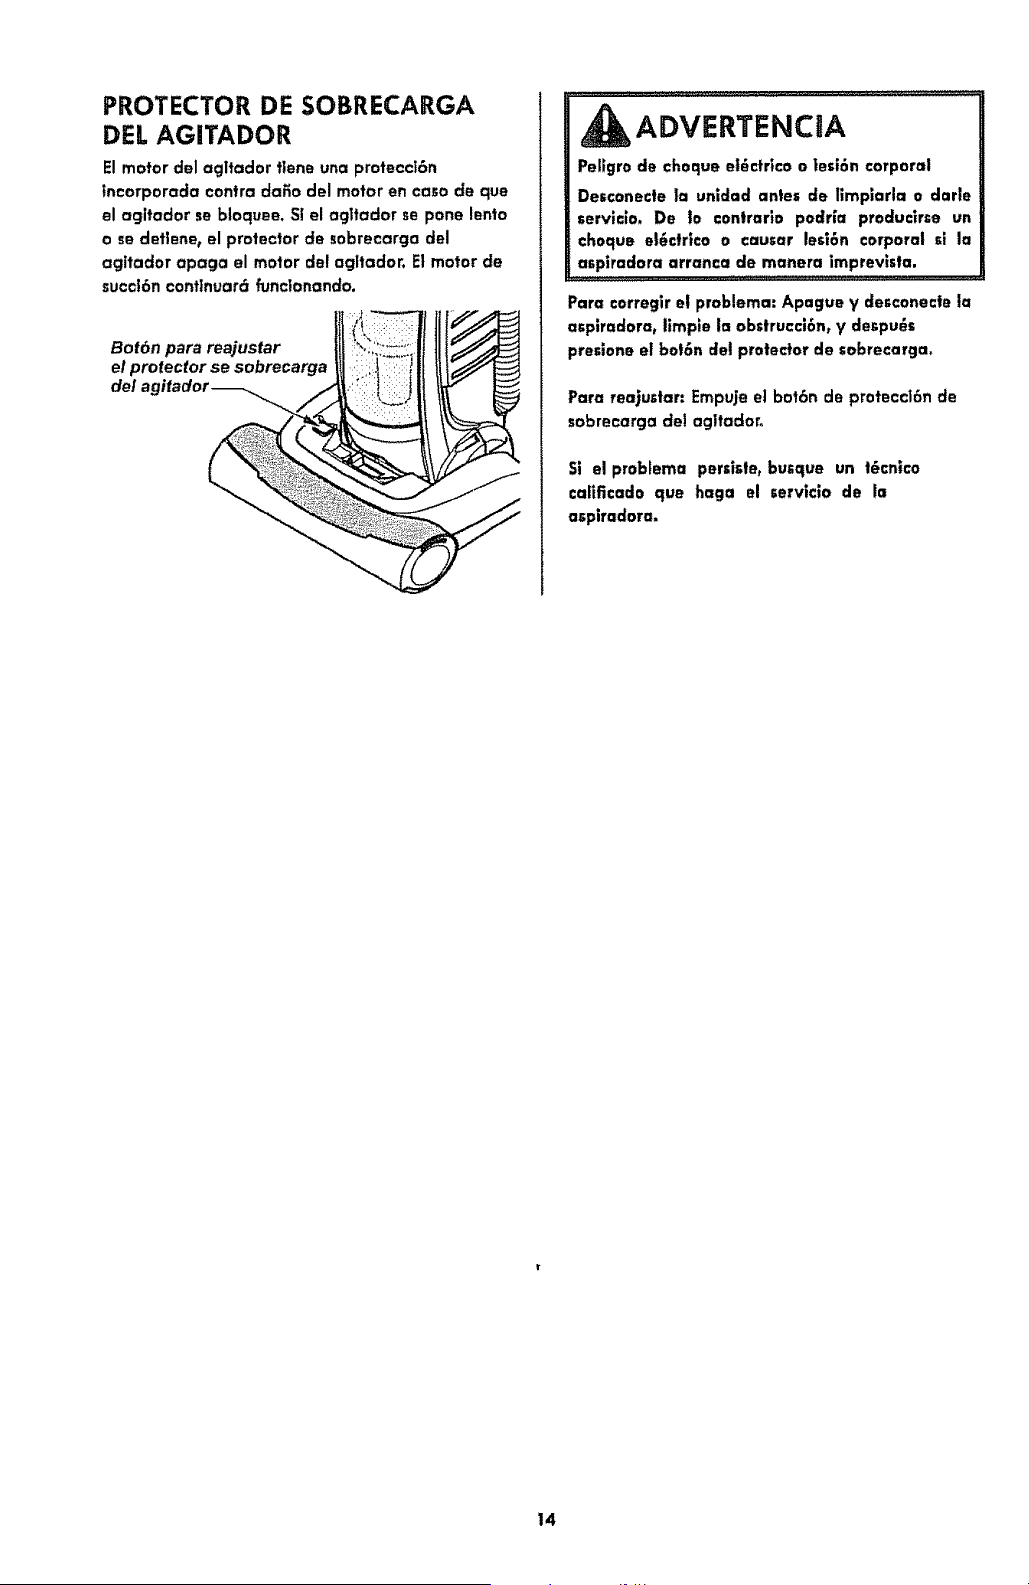
PROTECTOR DE SOBRECARGA
DEL AGITADOR
El motor del agltador tlene una protecct6n
tncorporada contra dafio del motor en caso de que
el agltador se bloquee. SI el agltador re pone lento
o se det;ene, el protector de sobrecarga del
agttador apaga el motor del agltador. Et motor de
succt6ncontlnuar6 funclonancto.
Bot6n pare reajustar
et protector se sobrecarga
del agitador _
ADVERTENCIA
Pefigro de choque e|6cfrlco o |est6n corporal
Desconecte la unldad antes de llmpiarla o darle
servicio. De |o contrarlo podrla proclucirse un
choque el6ctrfco o causclr lesi6n corporal sila
asplradora arranca de manera lmprevlsta.
Pare €orregir el problema: Apague y desconecte la
asplradora, limp;e la obstrucci6n, y despu_s
preslone el bot6n de] protector de sobrecarga.
Para reajustar: Empuje e] bot6n de proteccl6n de
sobrecarga de! agltadoro
St el problema peri|ste, bu_que un t6cnlco
caffficado que haga el Gervlcio de la
asplradora.
14
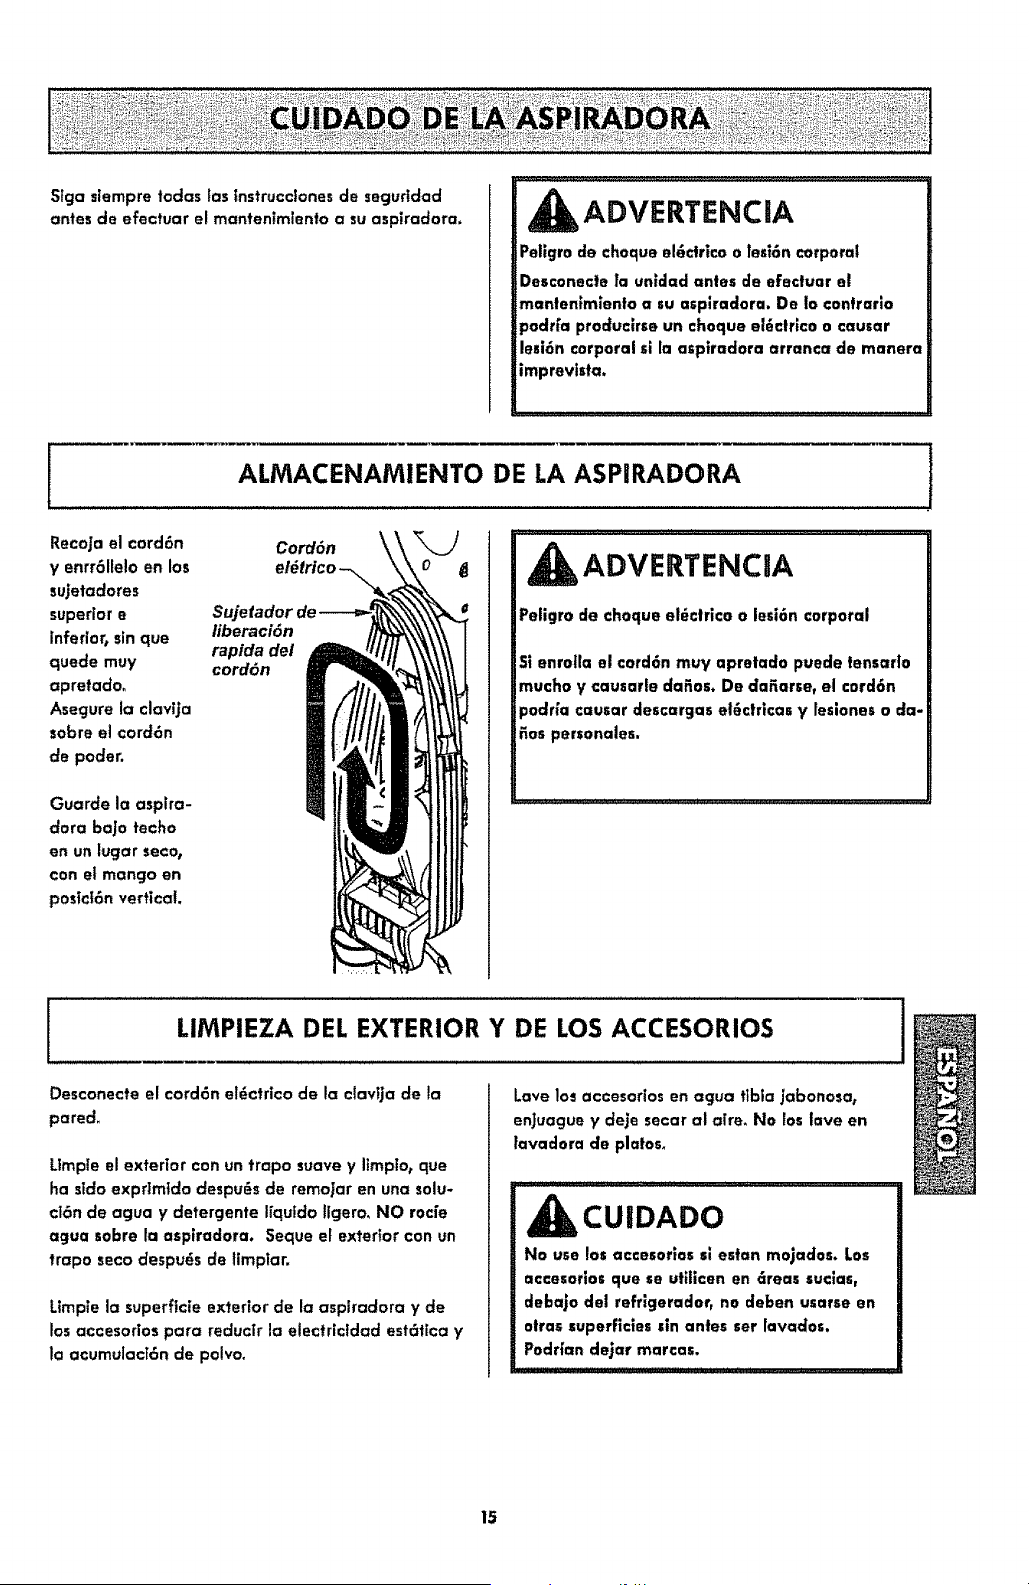
Stgaslempre todas tas instrucctonesde segurtdad
antes de efectuar el mantentmiento a su aspiradora,
ADVERTENCIA
Pellgro de choque el6drico o fesi6n corporal
Desconecle la un_dadantes de efectuar el
mantenlmlento a su asplradora. De !o confrarlo
podr[a produclrse un cheque el6ctrlco o cousar
lesi6n corporal si [a a_plrudora arranca de manera
imprevista.
ALMACENAMIENTO DE LA ASPIRADORA 1
i .... r ,, ,......................
cord_. ADVERTENCIA
RecoJael cord6n
y enrr611eloen los
sujetadores
superior e
Inferior, sin que
quede may
apretadoo
Asegure la clavija
sobre el cord6n
de poder.
Guarde la aspira-
dora baJo techo
en un lugar seco,
con et mango en
postci6n vertical.
iiberaci6n
rapida del
cord6n
Petigro de cheque el_ctrico o lesi6n corporal
51 enrolla el cord6n muv apretado puede tensarlo
mucho y causarle dafios. De daRarse, el cord6n
_odr{a causar descargas el6ctrlcos y feslones o da-
nos personales.
LIMPIEZA DEL EXTERIOR Y DE LOS ACCESORIOS j
Desconecte el cord6n eldctrico de la clavtja de la
pared.
Ltmpieel exterior con un trapo suave y Iimpio, que
ha s|do exprimido despu_s de remo,_aren una solu-
cl6n de agua y detergente ffquido llgero_ NO rocfe
agua sobre la aspiradora. Seque el exterior con un
trapo seco despu_s de limpiar.
Limple la superficie exterior de la asplradora y de
los accesorios para reduc|r la electrictdad est6tica y
la acumulaci6n de polvoo
Lave los accesortos en agua tibia jabonosa,
enJuaguey deje secar al aire. No los lave en
lavadora de platos_
CUIDADO
No use los accesorlas si estan mojados. Los
accesorlos que se utilicen en dreas suclas,
debajo del refrlgeradar, no deben usarse en
otras superficies sin antes set tavados.
Podrfan dejar marcas.
15
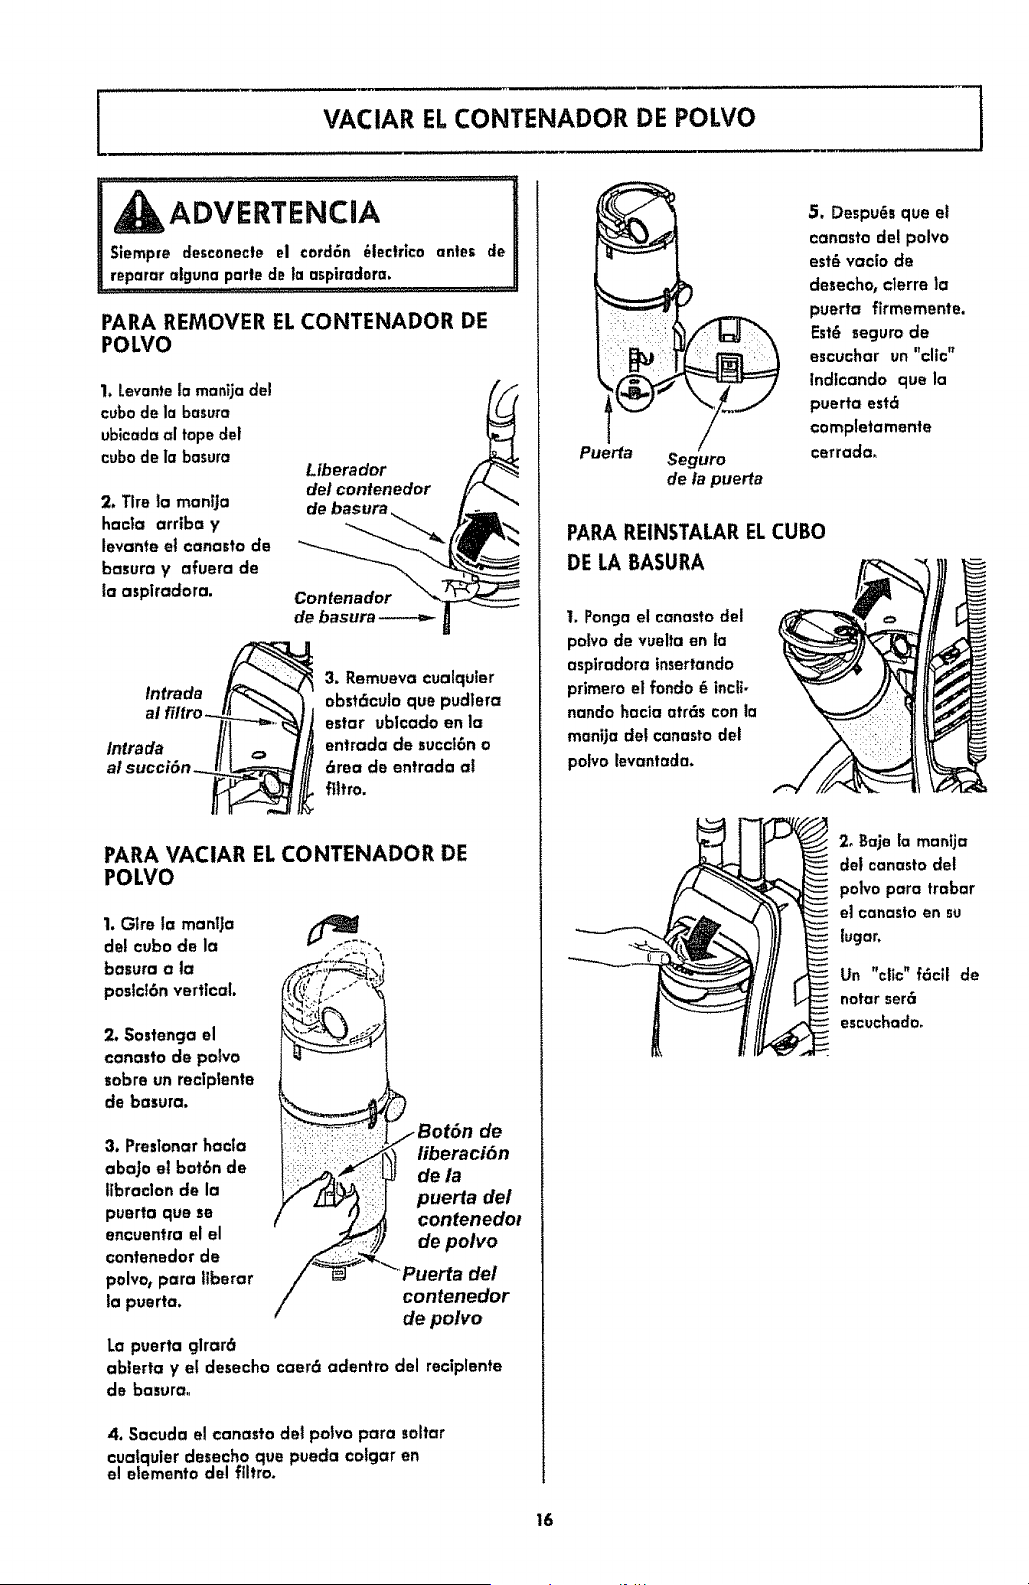
VACIAR EL CONTENADOR DE POLVO ]
, ,,L,_, LLLL,,LUU_LJL ..... ,'P,_,...... • _ L
Siempre desconecte el cord6n _lectrlco antes de
PARA REMOVER EL CONTENADOR DE
POLVO
1, Levantela manija del
cubode la basuro
ubicodoal tope del
cubode Io basura
2. Tire la mantJa
hacTa arrtba y
levante el canasto de
basura y afuera de
la aspiradora.
Liberador
del conlenedor
de basura
Contenador
de basura
tntrada
at succlort I__ /t
3. Remueva cualquier
obst6culo qua pudlera
estar ublcado en la
entrada de succl6n o
6rea de entrada al
filtro.
PARA VACIAR EL CONTENADOR DE
POLVO
de
3. Preslonar hacla liberaci6n
abojo el bo!6n de de la
llbraclon de la puerto del
puerto que se contenedot
encuentra el el de polvo
contenedor de
polvo, para llberar del
la puerta, contenedor
de polvo
La puerta glrar6
abterta y el desecho caer6 adentro del reciplente
de basura_
4. Sacuda e! canosto del polvo pare soltar
cualquier desecho que pueda cotgar en
el elemento del flltro.
Pue_a
Seguro
de _ pue_a
5, Despots que el
canasto del polvo
est_ vacio de
desecho, clerre la
puerto flrmemente.
Est_ segum de
escuchar un "cllc"
Indlcancio que la
puerto est_l
completamente
cerrada.
PARA REINSTALAR EL CUBO
DE LA BASURA
1. Ponga el canasto del
polvo de vuelta en ia
asplradoro tnsertando
primero el rondo 6 incll-
nando hacla otr6s con la
manila de! canasto del
polvo levantada.
2, 8aje to manija
del canasto det
potvo para trabar
el canasto an su
i lugor,
Un "clic" f6cil de
notar ser6
escuchado.
16

LINtPIAR ELCONTENADOR DE POLVO J
PARA ARMAR EL CONTENEDOR DE POLVO
COMO DESARMAR EL CONTENEDOR DE
POLVO
Desprender el contenedar de palvo de Io
aspffadora (ver coma IlmpTar et contenedor de
polvo) y vaclar et contenido
1. Rotar la porte superior
del contenedor de polvo
para abrlr, y levantar
hacla arrlba
2, Remover el pre-flttro Jalando
hac[a abaJo come re muestra.
3. Prestonar ei bot6n
de Ilberacl6n de ta
tapa hocla aba_o y
rotor la tape pare
removerla del
contenedor de polvo
t
4. Rotar el anillo clerre para
abdr, y desprender_o
5. Remover la parte superior
del contenedor de potvo do
la gufa de affe.
6. Enjuacjuecon acjua ffTa
On|cementerNO use nlngt)n
detercjenteo jab6n. Dejar que
las portes sequenper Io
menos 2-4 hares antes de
ponerEasen la arpiradoro.
NO lavarlas en la lavodora de Irasles
NO |asinslale hOmedos
1. lnrtalar la porto superior del
contenedor de potvo en [a
gura de o|re, de era manera
los torntllos pasaran a
tray, s de los hayes
In ta parte ruperior_
2, Usando los marcas do
allneamlento del anlllo de cierre y
el contenedor do polvot coloque el
anillo do cterre en el contenedor
de polvo y r6telo pore asegurarlo
en su lucjor
3. Poner la tapa del
contenedar de polvo en la
parte superior del corttenedor
de polvo y rote hasta que la
tape clerre.
4. Retnstoleel pre-flltro
usando las gu[ar de
alfneamiento el el pre-ffftro
para alinearlo con tas guias
de allneamiento de la
parte supertor del
centenedor de polvo.
5. Preslone pare que
quede en su iucjanlJn
san[do de "click" se debe
de eli.
6. Relnrtale la parte
inferior del contenedor de
polvo allneando las gules
de la porto superior con
las de UNLOCK gules en
la parct6n inferior,
7, Rotar hasta que tas
gut'as de ia porte superior
del contenedor de potvo
seallnean con las LOCK guFaso
NOTA" SI la porcl6n 10ajadel contenedor de polvo
no queda pmptamente armada revtrar la tnstalact6n
de pre-flltro en et paso 4,
17
I
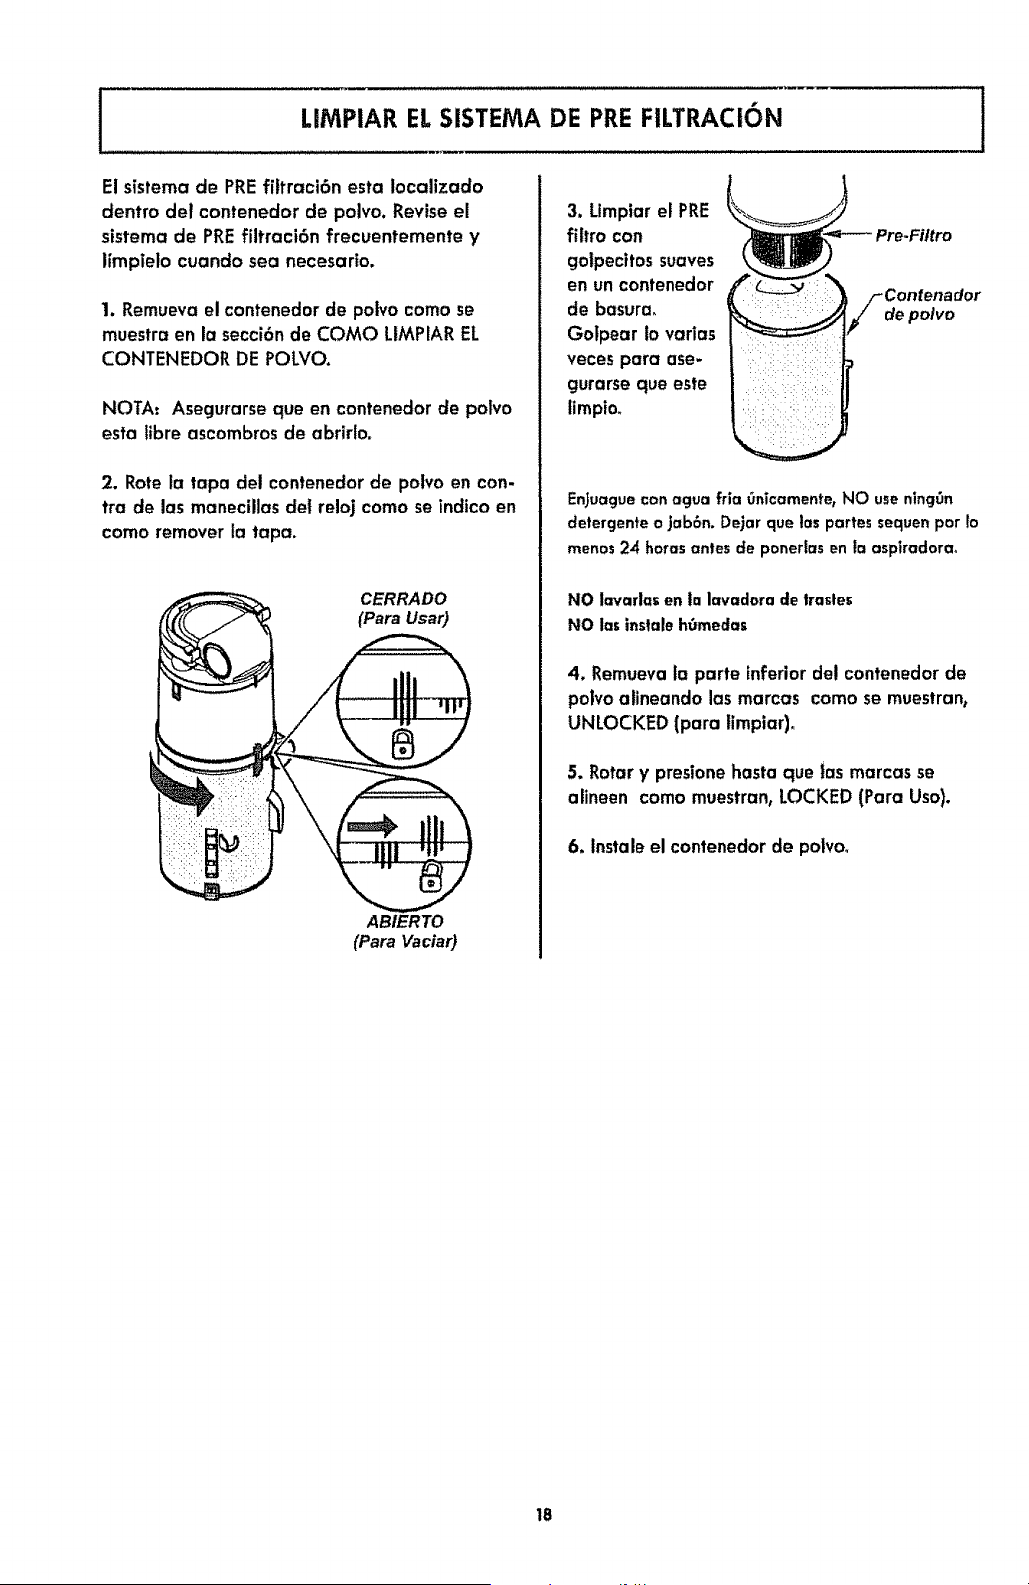
LIMPIAR EL SISTEMA DE PRE FILTRACION
1
El sistema de PREfittraci6n esta Iocalizado
dentin del contenedor de polvo. Reviseel
sistema de PREfiltraci6n frecusntemente y
ffmpielo cuando sea necesario,
1. Remusva el contenedor de polvo coma se
muestraen la secci6nde COMO LIMPIAREL
CONTENEDOR DE POLVO.
NOTA: Asegurarse qus en contenedor de potvo
esta tibre ascombros de abrirlo.
2. Rote la tapa del contsnsdor de polvo sn con-
tra de las manecillasdel rsloj como se indico en
como remover la taps.
CERRADO
(Para Usar)
ABIERTO
(Pars Vaciar)
3. Umpiar el PRE
filtro con
golpscitossuaves
snun contenedor
de basura_
Golpsar to varias =__:_:_:_:
vecsspara ase- i_::i__:_ :; i_!
gurarse que este
Pre-Fi/tro
de polvo
Enjuaguecon agua fria Onlcamente,NO usenlncjOn
detergents o jab_n. Dejar que los partes sequen pot Io
menos24 horas antes de ponerlasen la asptradorao
NO I=varlas en la lavadora de trades
NO las instale hOmedaE
4. Remuevala parts inferior dsl contenedor de
potvo alinsando las marcas como se muestran_
UNLOCKED (para limpiar)_
5. Rotary presionehasta qus ias marcas se
alineen come muestran, LOCKED (Para Uso).
6. Instals el contenedor de polvo,
18
[
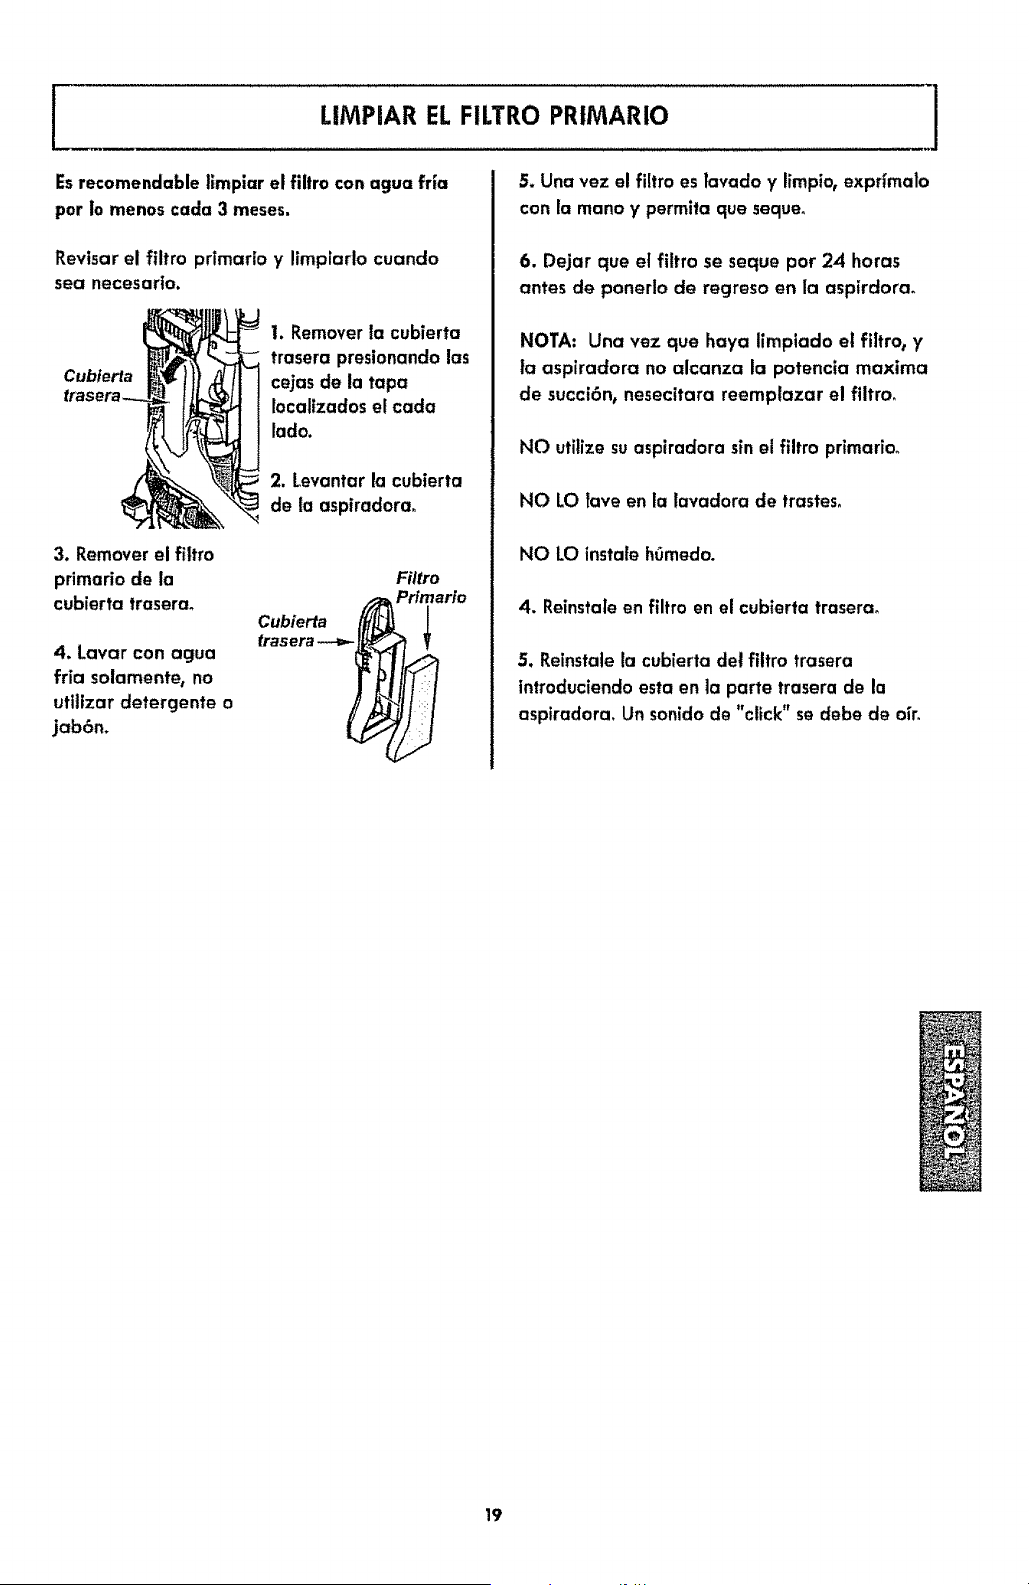
LiMPIAR EL FILTRO PRtMARIO
Esrecomendable llmplar el filtro con agua fr{a
por io menos cada 3 meses.
Revisar el filtro primario y Iimplarlo cuando
sea necesario.
Cubierfa
1. Removerla cubierta
trasera presionando las
cejas de la tapa
Iocallzados el cada
lado.
3. Removerel filtro
pdmario de la
cubierta traserao
4. Lavar con agua
fria solamente, no
utiltzar detergente o
jab6n.
2. Levantar la cubierta
de {a aspiradora.
Filtro
Prtmarfo
5. Una vez el filtro es tavado y limpio,expr{malo
con la mano y permita que seque_
6. Dejar que el filtro se seque pot 24 horas
antes de ponerlo de regreso en la aspirdora.
NOTA. Una vez que haya limplado el filtro, y
la aspiradora no alcanza la potencia maxima
de succi6n_ nesecitara reemplazar el filtro.
NO utilize suaspiradora sin el filtro primario.
NO LO Tave en la lavadora de trastes.
NO LO instatehOmedo.
4. Reinstaleen filtro en el cubierta traserao
5. Relnstatela cubierta del fiitro trasera
introduciendoesta en la parte trasera de la
aspiradoraoUn sonidode "click" se debe de o_r.
19
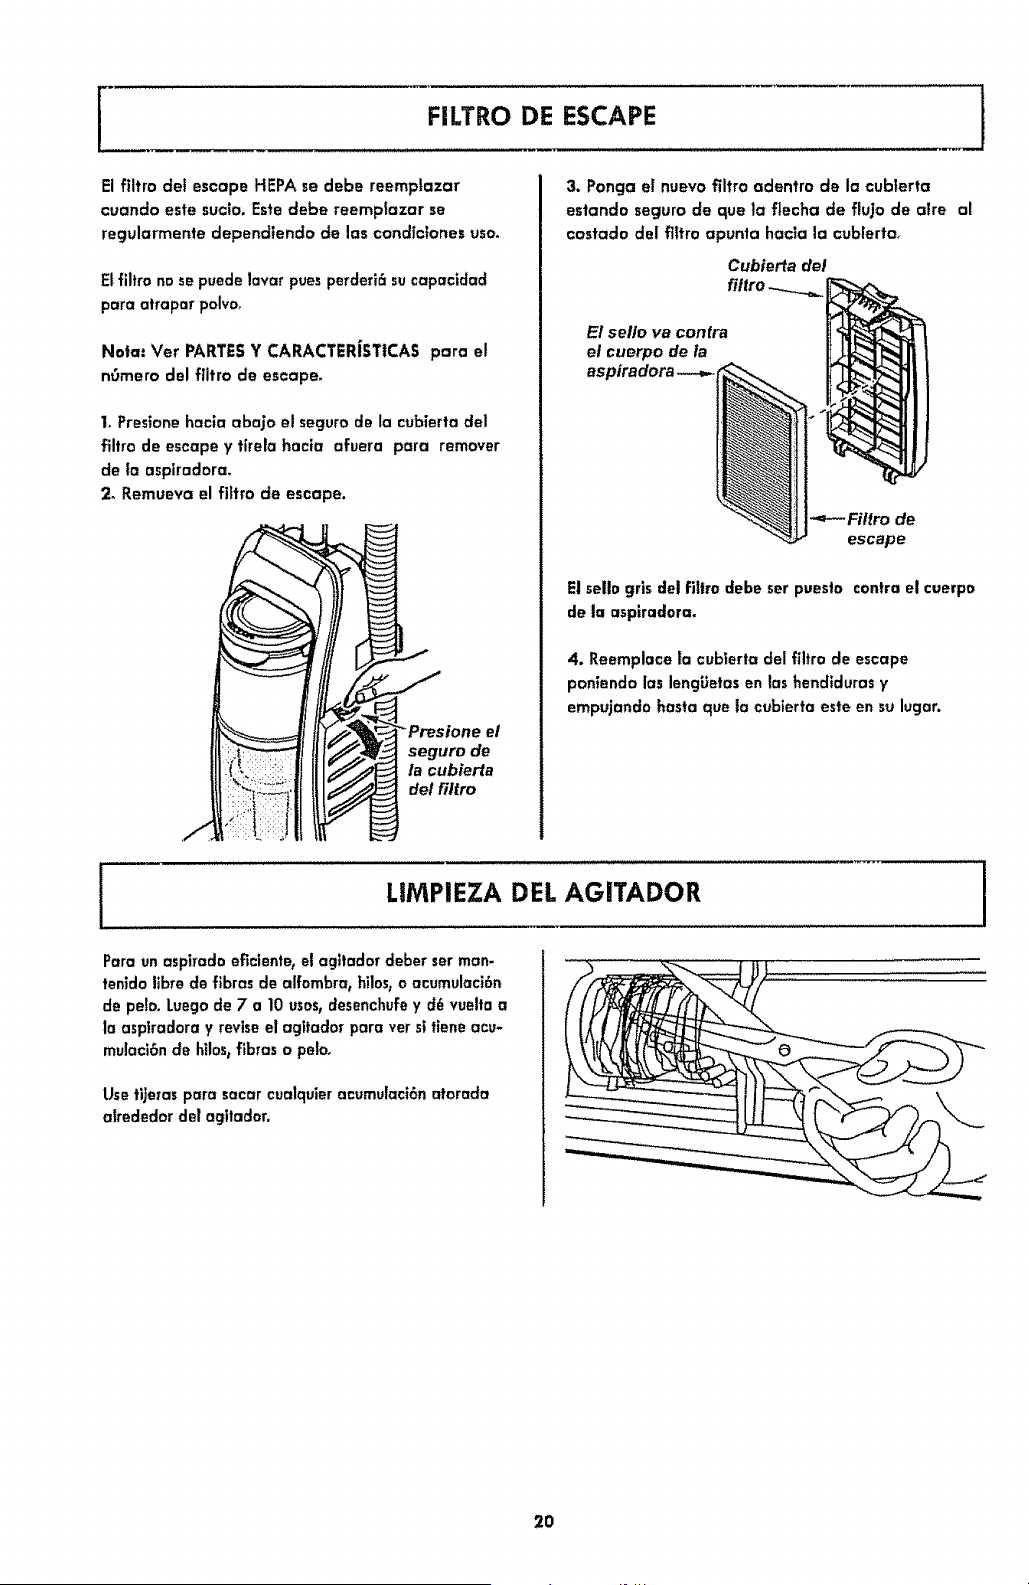
[
FILTRO DE ESCAPE
El filtro del escape HEPAse debe reemptazar
cuando este sucto. EsCedebe reemptazar se
regularmente dependtendo de las condictonesuse.
Et filtm no sepuede!avar pues perderic_sucapacidad
para atrapar polvo°
Note: Vet PARTE5 Y CARACTER|STtCAS para el
n0mero del flltro de escape°
1. Preslonehacia abajo el seguro de la cubierta del
filtro de escape y ttrela hacia afuera para remover
de la aspiradora.
2o Remueva el flltro de escape.
Presione el
seguro de
la cubierta
del fiitro
3. Ponga el nuevo filtro adentro de la cub|erta
estando seguro de que ta flecha de flujo de atre al
castado del filtro apunta hacta la cublerta.
Cubierta del
E! seflo va contra
el cuerpo de la
aspiradora--_
<--Filtro de
escape
El selle grls del fi|lro debe ser puesto contra el cuerpe
de la asplradora.
4. Reemplace la cubterta del filtro de escape
ponisndo las lencjUetasen los hendidurasy
empujando basraque la cublerta este en su lugar.
!
I LIMPIEZA DEL AGITADOR i
Para un asptrado eficiente,el agitador deber serman-
tenido libre de flbras de alfombra, hilos_o acumulaci6n
de pelo. Luegode 7 a 10 uses,desenchufey d6 vuelta a
la asptradoray revise el acjttadorpara vet sl tiene acu-
mulaci6nde httos_fib_'aso pelOo
UsetijeTaspara sacar cualquieracumulaci6natorada
alrededor de| agltador.
2O
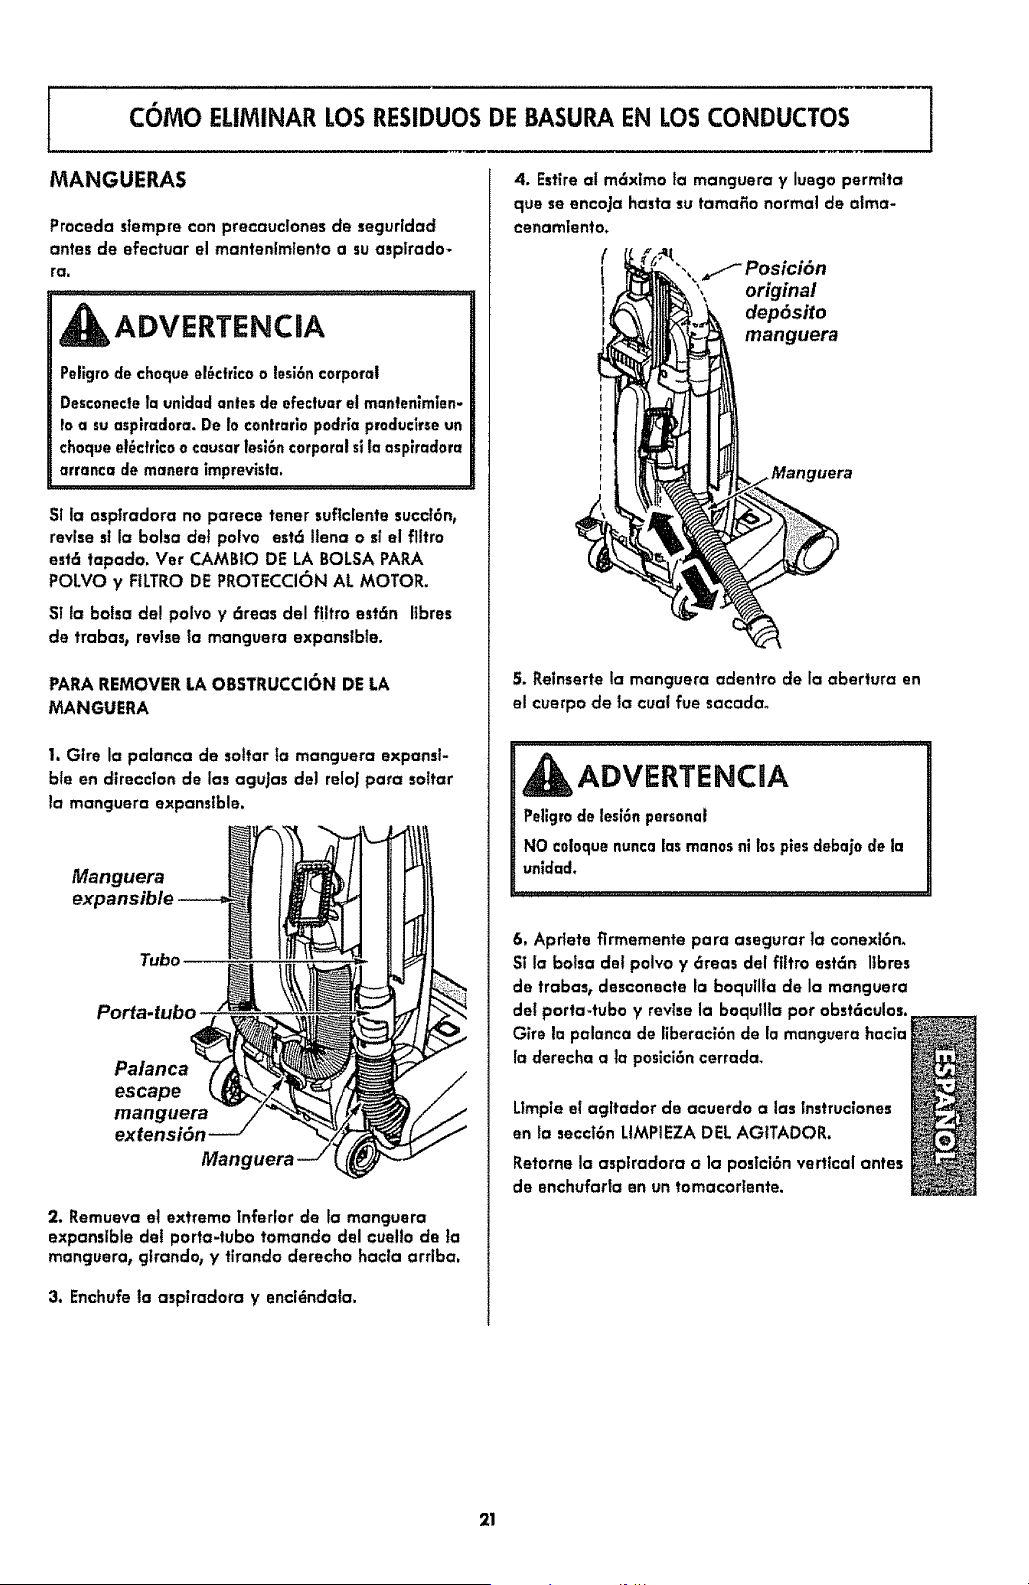
1
coma ELIMINAR LOS RESIDUOSDE BASURA EN LOS CONDUCTOS i
MANGUERAS
Proceda stempre con precauclones de secjurldad
antes de efectuar el mantenlmiento a su asplrado-
re,
ADVERTENCnA
Pellgrode choqueel_ctrlcoo lesi6ncorpora|
Desconeclela unldad antes de efectuar el manlenlmlen-
Io a su aspffadora.De locontrariopodHa preducirseun
choqueel_cfflco o causer|esi6ncorporalsila asplradora
arranca de manera imprevisfa,
SIla aspffadora no parece tenor suflclente succi6n,
revises_ la balsa det polvo est6 Ilena o sl el flltro
est6 tapado. Ver CAMBIO DE LA BALSA PARA
POLVO y RLTRO DE PROTECCION AL MOTOR,
S! la balsa del polvo y 6teas del flltro est6n ltbres
de trabas, revise la manguera expansible.
PARA REMOVER LA OBSTRUCCIC)N DE LA
MANGUERA
I. Gtre la palanca de soltar la manguera expansi-
ble en dlrecclon de las aguJas del relo] para so?tar
la manguera expansible.
Manguera
Tuba
Porfa.tubo
Palanca
escape
manguera
extensi6n
Mang
2. Remueva et extreme |nferior de la mancjuera
expansible de! porta-tubo tomando del cuetlo de ]a
manguera, gtrando, y tiranclo derecho hacla arrlloa,
3. Enchufe la aspiradora y encl_ndala.
4, Esttreal m6ximo la manguera y luego permlta
que se encoja haste su tamaEo normal de alma-
cenamlento.
(
,, _/-Posicibn
', original
dep6sito
manguera
5, Relnserte la manguera adentro de la abertura en
el cuerpo de ]a cual rue sacadao
ADVERTENCIA
Pellgrode les;6npersonal
NO coloque nunca losmanosnl lospies debajo de la
un;dad,
6. Apdete flrmemente pare asegurar la conexl6n,
S| la balsa del polvo y 6teas del ftltm estSn ltbres
de trabas, desconecte la boquilta de la manguera
de! porta,tubo y revise la boqu111apar obst6culos.
Gire la palanca de liberac|6n de la manguera hacia
la derecha a]a posici6ncorrode,
Umpie el agitador de acuerdo alas Instruclones
en la seccl6n LtMPIEZA DEL AGITADOR.
Retorne la asptradora ala poslci6n vertical antes
de onchufarta en un tomacorlente.
21
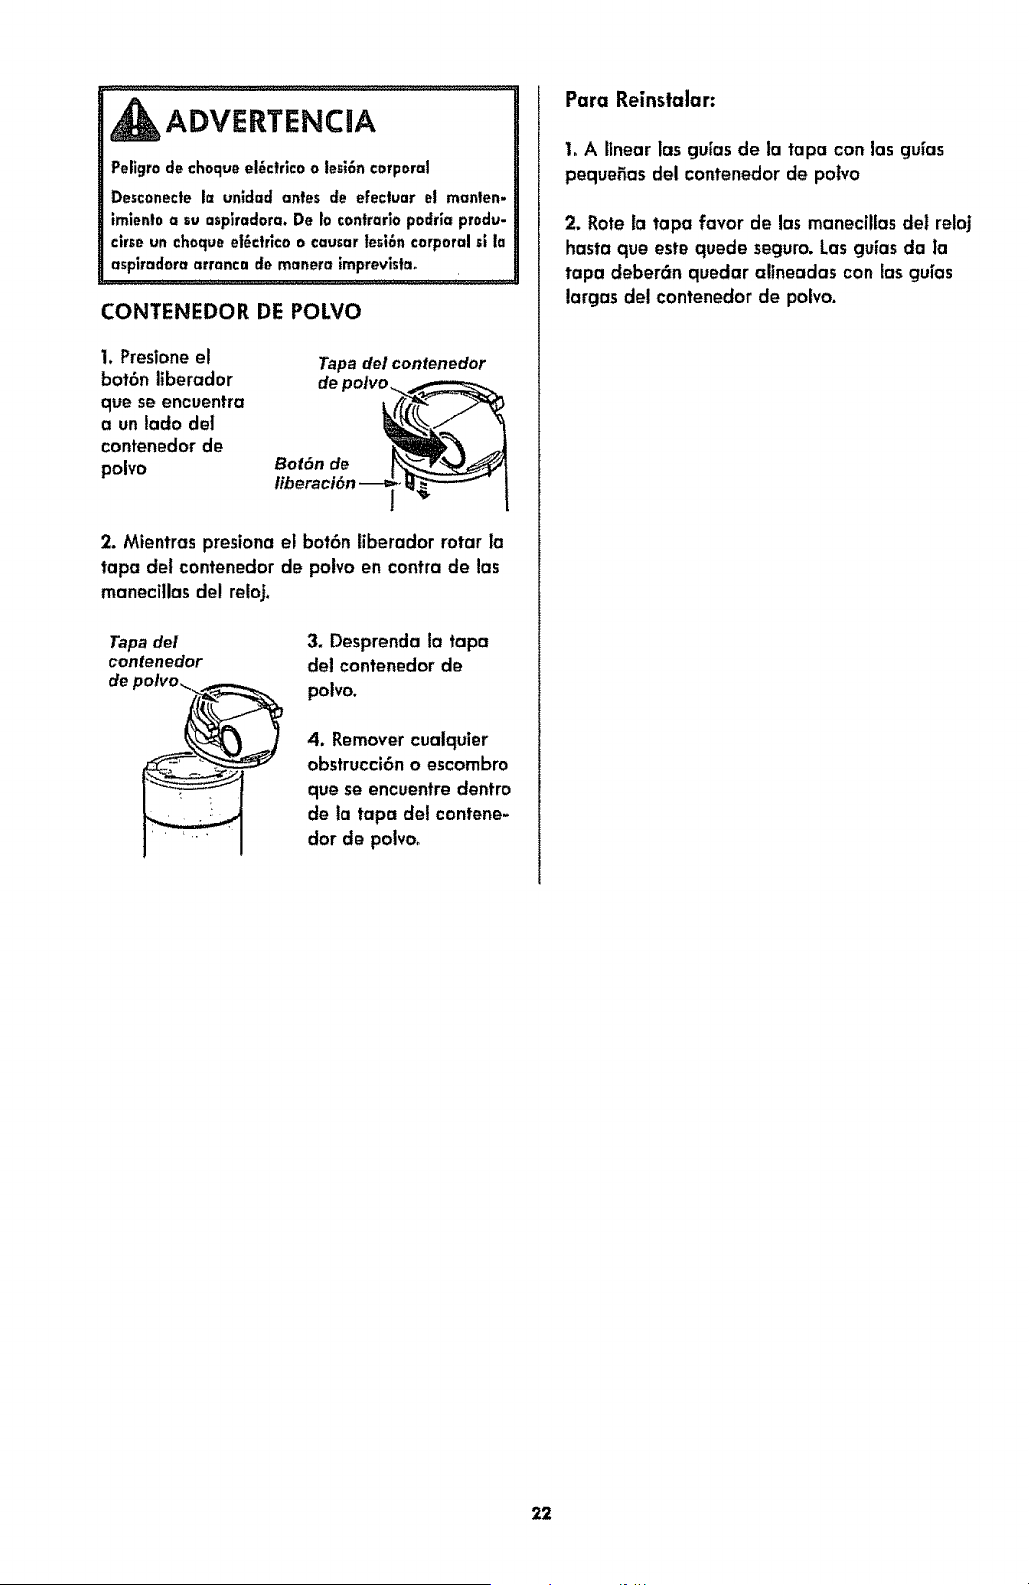
ADVERTENCIA
Peligrodechequeel_ctricoo le_i6ncorporaJ
Desconecteh: unidadantesde efecluarel manten-
;mienl0a sua_piradora.De Io conirariopedriaprodu-
c|r_eun chequee|_ctr;coo causerte_i6ncorporalsl la
asplradoraarrancademaneraimprevistao
CONTENEDOR DE POLVO
1. Presione el Tape del contenedor
bot6n liberador de polvo_
que se encuentra
a un lade dei
contenedor de
polvo Bol6n de
2. Mientras preslona el bot6n liberador tatar la
tape det contenedor de polvo en contra de las
manecitlas del reloj.
Tape dei 3. Desprenda ta tapa
contenedor del contenedor de
de po/vo_ poivo.
4. Removercualquier
obstrucci6no escombro
que se encuentredentro
de ia tapa del contene-
dor de polvo.
Para Reinstalar:
1. A linear las gufas de la tape con las guias
pequaSas del contenedor de potvo
2. Rotela tapa favor de las manecillasdet reloj
hasta que este quede segum. Las guias dala
tapa deber6n quedar attneadas con las cju[as
largas del contenedor de polvo.
22
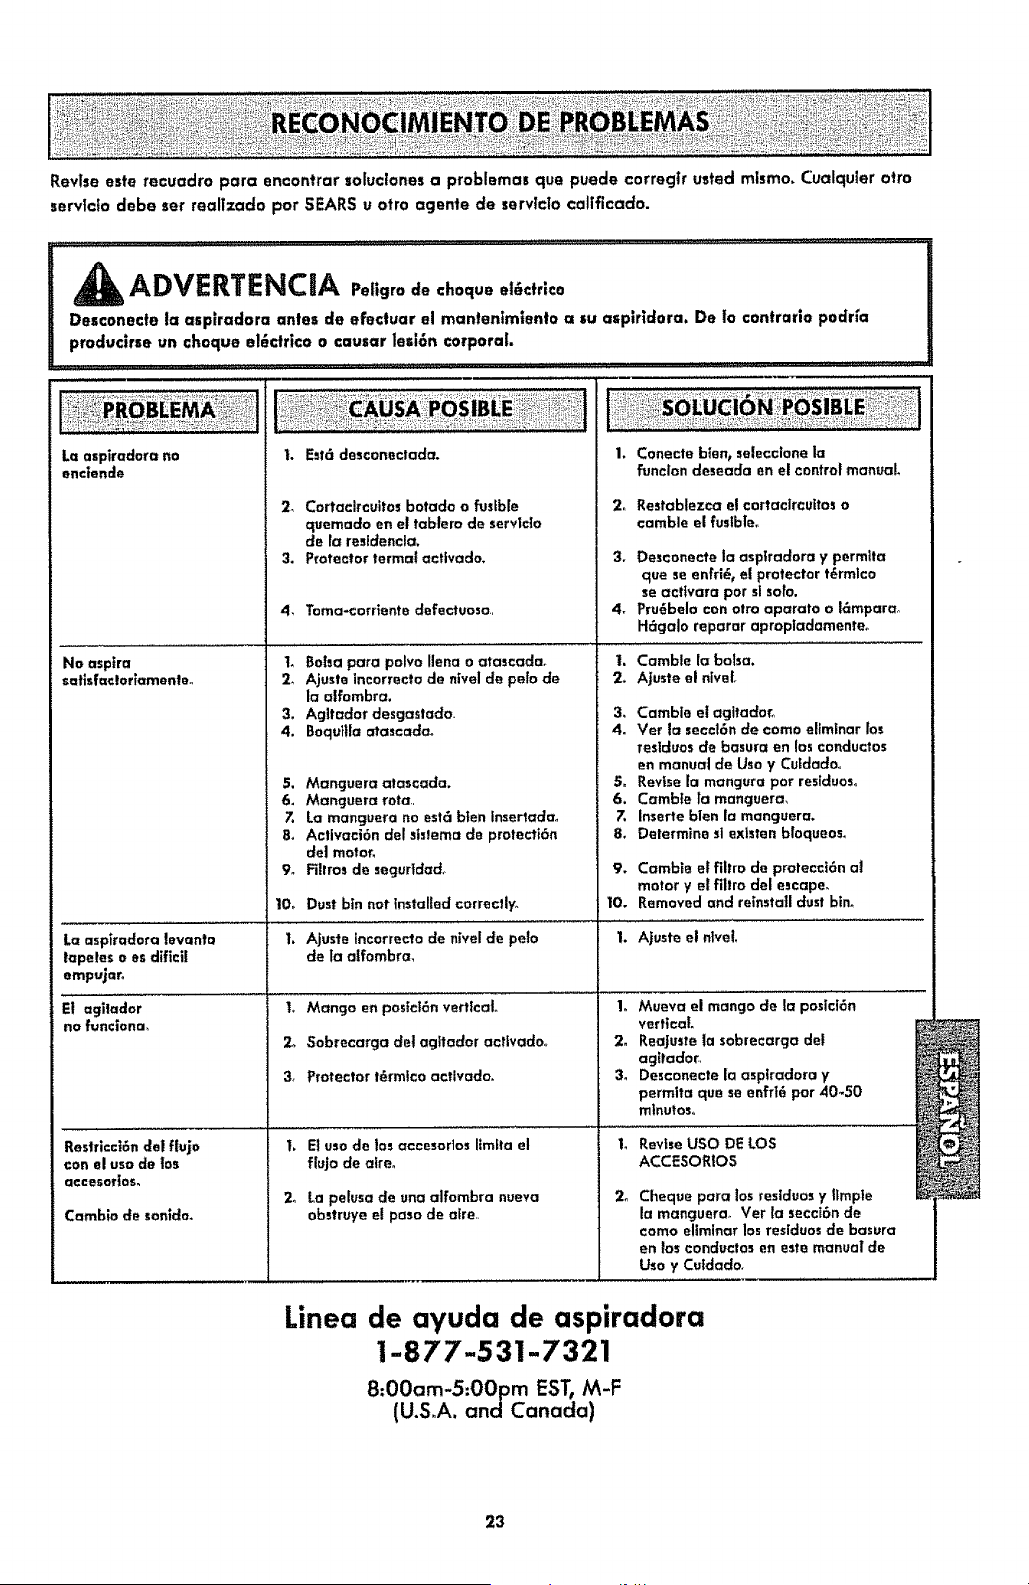
Reviseesterecuadroparaencontrarsoluctones a problemas que puede corregk usted mlsmo. Cualquler afro
servTctodebe ser reallzado par SEARS u otro agente de servtdo calfficado.
ADVERTENCIA Pei|gro de cheque e|6ctr|co
Desconecto la asplrodora antes de efectuar el mantenimiento = su osplridora. De to contrarlo podrfa
producirse un cheque el6ctrico o causer led6n corporal.
LQospiradara no
encieode
J, _,,,,,,,......................................
1. Esf6 desconectada,
No aspire 1_
satisf-€IoHamente_ 2,
3.
4.
5.
6.
7.
8,
9_
10_
1,
2, Cortaclrcuttos botado o fusible
quemado en el tabfero de servldo
de fa residencla,
3. Protector formal acflvado.
4, Toma-,corriente defectuoso.,
Boha pare polvo flena o atascadao
Ajusfe incorrecto de nivel de pete de
la a|fumbra,
Agltador desgastado
Baqutila ataseadao
Manguera atascada.
Manguera rata,
La manguera no est_ bien Insertadao
Activaci6n del stslema de protecfi6n
del motor,
Fiffrosde seguridad_
Dust bin not Installed correctly,
Ajuste incorrecto de nivel de pelo
de la alfombra,
I, Mango en posfct6n vet'flcato
2o 5obrecarga de! agftador aeflvadoo
3_ Protector t_rmlco acflvado.
1. El usa de los accesodos limlta el
ffujo de alreo
La aspiradora levanto
tapeles o es diflcll
empujc=ro
Et agiladar
no f,Jnclana_
2o La pelusa de una alfombra nueva
obstruye el paso de eke
Resfficct6n dot ffujo
con el usa de los
oecesor|os,
Cambio de son{do.
1. Conecte bien, se|ecclane la
funclon deseada en el control manual,
2, Restablezca e! cortaelrcuffos o
eatable el fusible°
3, Desconecte la asptradora y permlta
que se enffi_, el protector t_rmlco
se acflvara par si sofa.
4, Pru_bela con otto operate o I_mparao
H6galo reparar apropladamenteo
1. Camble la balsa.
2. Ajuste el niveL
3, Camble el agitador.,
4, Ver la secel6n de coma elimlnar los
reslduos de basura an los conductos
en manual de Usa y Cutdadoo
S_ Revise la mangura par residuoso
6. Camb[e la manguera_
7. Ir_serteblen la manguera.
8, Determine si ex_stenbfoqueos,
9, Cambla el fillra de pratecct6n al
motor y el fillro del eseape_
10, Removed and reinstall dust bin_
I. Ajuste el nlveL
1, Mueva el mango de la poslci6n
vertical
2, ReaJustela sobrecarga del
ag[tador,
3o Desconecte la aspiradora y
permlta que se enfrl_ par AO-50
mtnutos,
I. Revise USO DE LOS
ACCESORIOS
2_ Cheque pare los residues y Ifmple
la manguerao Ver fa secct6n de
coma eltminar los residues de basura
en los conductos en este manual de
Usa y Cu_dadoo
Linea
de ayuda de aspiradora
1-877-531-7321
8:00am-5:OOpm EST, M-F
(U.S.A. andCanada)
23

Acuerdos Maestros de Protecci6n
Enhorobuena par hacer una co.pro Intetigente. Su nuevo producto Kenmore® est6 dtse_ado y fabrlcado para
ofrecerle aRos de func|onamtento conflable. Pero a! [gual que todos los productos pueden precisar un
mantentmtento preventtvo o alguna reparact6n de vez en cuando. Par este motlvo, tener un Acuerdo Maestro
de Protecc;6n puede ahorrarle dlnero e Inconvenlentes.
El Acuerdo Maestro de Protecc;6n tambl_n le ayuda a prolonger la vlda Otti de su nuevo producto. A
conttnuact6n Indlcamos Io que el Acuerdo* ;ncluye:
[]
[]
[]
r_
[]
[]
[]
[]
[]
[]
[]
Partes ¥ mane de obra necesarlos para ayudar a que estos productos funclone correctamente bajo
condlc;onales normales de usa, no simplemente defectos. Nuestra cobertura va touche m6s allB de ta
garantla del producto. Nlng0n deducible, nlnguna aver[a funclonal queda exclulda de la cobertura-
protecci6n real.
Servic;o experto ofrectdo par una I|sta de m6s de 10,000 tScnlcos autorlzados del servic;o t6cnlco de
Sears, Io que slgniflca que algulen en quten usted puede conflar estar6 trabajando en su productoo
N0mero film|fade de llamadas al serviclo t_cn|co y servlc;o en tocla la naciBn, tan continua coma usted
has 1osol;clte, sin tmportar donde estS.
Garant[a seria de sust;tuci6n de| produc!oo La sustitucl6n de su producto cublerto sl se producen cuatro o
m6s aver|as en dace meses.
Sustltuc;6ndel producto per otto nuevo s! su producto cubierto no puede repararse.
Revlsi6n y manlenimlento anual preventive slempre que Io desee y sin cargo alguno,
Ayuda r6p;da par telSfone - Nosotros Io Ilamamos ResoluciSn r6picla. Soporte telef6n[co de un
representante de Sears en redes los productos. P;enseen nosotros coma un "manual de usa y cuidado"_
Prolecc;6n centre subidas de tenst6n que provoquen dafios el_ctricos causados par las fluctuaclones de la
corr;ente.
$250 de protecci6n contra la p_rdlda de alfmentos anuatmente en case de que se estropee alg0n
altmento coma resultado de una aver!a mecSnfca de cualquler congelador o refr[gerador cub|erto,
Reembolso del a|quiler sl ta reparacl6n de su producto cubierto !area m6s tiempo del promet|do,
10% de descuento en el precto regular de cualquter serv!clo de reparaci6n no cublerto y de las plezas
lnstaladas relactonadas,
Una vez que compre el Acuerdo, s61o bastar6 una simple llamada telef6n;ca pare que pueda programar un
serv;c!o_ Puede Ilamar a cualquier hera del die o de la nochet o concertar una clta de servicto en i!neao
El Acuerdo maestro de proteccI6n es una compra fibre de rtesgos. SI par cualquler raz6n se cancela durante el
per|ado de garant!a de! productot le devolveremos todo el dtneroo O_ un reembolso prorrateado despu_s del
per|ode de vencimlento de la garant!a. )Compre su Acuerclo maestro hoyl
Aplican algunas limitaciones y excluslones. Pare precios y m6s informac;6n en EE.UU., ltame al 1-800-827-
6655.
* La cobertura en Caned6 var[a en algunos arffculos. Para obtener todos los detaties, flame a Sears Canada al
1-800-361-6665.
Servic|o de instalaci6n de Sears
Para la lnstatact6n profeslona! par parte de Sears de electrodom_stlcost abrldores de puertas de garaJes,
calentadores de agua y arras articu!os princ!pales para el hogar_ en EE,UU_o Canad6 flame at 1-800-4-MY-
HOME®.
24
iiii,i:i!ii_ii!i:;i!i:¸_¸
%!:i!:}i';_:
!!_¢!i_iil
i!_!!;i!;!i:!}iii
i:i!ii:::!ii:_i_!•i
ii!:ili!i
Your Home
For troubleshooting, product manuals and home solutions advice:
manage home
www.managemyhome.com
For repair _ in your home - of all major brand appliances,
lawn and garden equipment, or heating and cooling systems,
no matter who made it, no matter who sold it!
For the replacement parts, accessories and
owner's manuals that you need to do-it-yourself.
For Sears professional installation of home appliances
and items like garage door openers and water heaters,
1-800-4-MY-HOME ® call anytime, day or night
(1-800-4694663) (U,S.A, and Canada)
www.sears,com www.sears,ca
Our Home
For repair of carry-in items like vacuums, lawn equipment,
and electronics, call anytime for the location of the nearest
Sears Parts & Repair Service Center
1-800-488-1222 (UoSoA.) 1-800-469-4663 (Canada)
www.sears.com www.sears.ca
To purchase a protection agreement on a product serviced by Sears:
1-800-827-6655 (U.SA.) 1-800-361-6665 (Canada)
Para pedir servicio de reparaci6n
a domicilio, y para ordenar piezas:
1-888.SU-HOGAR®
(1-888-784_27)
::i!:_i;!i
: _¢':i
_:::: iii
?i::;ii:i:ili
';t:i
Au Canada poursewiceenfran_is:
1.800.LE.FOYER _c :::::::::::::::::::::
(1-800-533-6937) _'::_;!'
,:c? !;:i_}:/!_;_!;
Se /r
T_
® Registered Trademark t Trademark of KCD IP. LLC in the Untied States, or Sears Brands, LLC in other countries
® Marca Registrada I TM Marca de F&brica de KCD IP. LLC en Estados Unidos, o Sears Brands, LLC in otros palses
_c Marque de commerce 1_ Marque d6pos6e de Sears Brands, LLC