
Operating and Installation
Instructions
Refrigerators
To prevent accidents and machine damage, read these instructions
before installation or use.
en-US, CA M.-Nr. 11 508 620

Contents
2
IMPORTANT SAFETY INSTRUCTIONS ............................................................ 5
Caring for the environment .............................................................................. 14
Installation.......................................................................................................... 15
Installation location ............................................................................................. 15
Climate class .................................................................................................. 15
Installation notes ................................................................................................. 16
Adjoining cabinetry/units................................................................................ 16
Load-bearing capacity of the niche floor ....................................................... 17
Ventilation....................................................................................................... 17
Door hinge...................................................................................................... 17
Side-by-side................................................................................................... 18
Installation dimensions........................................................................................ 20
Position of the electrical connection .............................................................. 20
Dimensions when the appliance door is open (opening angle 90°/115°)....... 23
Building in the appliance ..................................................................................... 24
Before starting................................................................................................ 24
Tools required................................................................................................. 24
Aligning the installation niche......................................................................... 25
Checking the installation niche ...................................................................... 25
Before installation........................................................................................... 26
Preparing the installation niche ...................................................................... 27
Pushing the appliance into the niche ............................................................. 29
Aligning the refrigeration appliance................................................................ 31
Securing the appliance in the niche ............................................................... 33
Securing the toe-kick board and cover.......................................................... 34
Aligning the appliance door............................................................................ 34
Limiting the opening angle of the appliance door.......................................... 37
Electrical connection ........................................................................................... 38
Saving energy .................................................................................................... 40
Guide to the appliance...................................................................................... 42
Main screen......................................................................................................... 44
Settings mode ................................................................................................ 45
Accessories ....................................................................................................... 47
Accessories supplied .......................................................................................... 47
Optional accessories........................................................................................... 47

Contents
3
Before first use .................................................................................................. 48
Choosing the right Door Assistant (Push2Open/Pull2Open) ........................ 48
Inserting the Active AirClean filters ................................................................ 49
Miele@home ................................................................................................... 49
Operating the refrigeration appliance.................................................................. 50
Starting up for the first time ........................................................................... 50
Switching on and off ......................................................................................... 52
Switching off for longer periods of time .............................................................. 53
Selecting additional settings............................................................................ 54
Switching Keypad Lock/ on or off .............................................................. 54
Adjusting the temperature in the MasterFresh zone (dry compartment) ....... 55
Switching Eco Modeon or off........................................................................ 55
Performing a Self Test..................................................................................... 56
Switching on the Door Assistant ..................................................................... 57
Switching off the Door Assistant ..................................................................... 59
Miele@home ........................................................................................................ 59
Switching off Demo Mode................................................................................ 61
Resetting the settings to their default settings.............................................. 62
Switching Sabbath Mode on or off .................................................................. 64
Switching on, switching off, or resetting the Display Active AirClean Filter ... 65
The correct temperature................................................................................... 67
...in the refrigerator section and in the MasterFresh zone .................................. 67
Automatic cold air circulation (DynaCool) ...................................................... 67
Setting the temperature....................................................................................... 68
Adjusting the temperature in the dry compartment of the MasterFresh zone 68
Temperature range ......................................................................................... 68
Using Automatic SuperCool............................................................................. 69
Door alarm ......................................................................................................... 70
Adjusting the interior fittings............................................................................ 71
Removing or moving the door shelves................................................................ 71
Removing or moving the shelves ........................................................................ 71
Removing the hanging drawer ............................................................................ 72
Removing compartments from the Fridge Zone ................................................. 73
Storing food in the refrigerator section........................................................... 74
Different storage zones ....................................................................................... 74
Food which is not suitable for storage in the fridge zone ................................... 75
Notes on buying food.......................................................................................... 76
Storing food correctly.......................................................................................... 76

Contents
4
Storing food in the MasterFresh zone ............................................................. 77
MastertFresh zone............................................................................................... 77
Humidity-controlled compartment with moisture adjustment........................ 77
Dry compartment with adjustable temperature.............................................. 79
Automatic defrosting ........................................................................................ 81
Cleaning and care ............................................................................................. 82
Cleaning agents................................................................................................... 82
Before cleaning the appliance............................................................................. 83
Interior and accessories ...................................................................................... 83
Cleaning the door seal ........................................................................................ 84
Cleaning the ventilation gaps .............................................................................. 84
Replacing the Active AirClean filters ................................................................... 85
Frequently Asked Questions ............................................................................ 86
Causes of noises ............................................................................................... 91
Customer Service.............................................................................................. 92
Contact in the event of a fault ............................................................................. 92
Appliance warranty and product registration ...................................................... 92
Declaration of conformity................................................................................. 93
Copyrights and licenses ................................................................................... 94
IMPORTANT SAFETY INSTRUCTIONS
5
This refrigeration appliance complies with current safety require-
ments. Inappropriate use can, however, lead to personal injury and
material damage.
Please read the operating and installation instructions carefully be-
fore using the refrigeration appliance for the first time. They con-
tain important information on safety, installation, use, and mainte-
nance. This is to protect yourself from injury, and from damaging
your refrigeration appliance.
In accordance with standard IEC60335-1, Miele expressly and
strongly advises that you read and follow the instructions in the
chapter on installing the refrigeration appliance as well as in the
“IMPORTANT SAFETY INSTRUCTIONS”.
Miele cannot be held liable for injury or damage caused by non-
compliance with these instructions.
Keep these instructions in a safe place and pass them on to any
future owner.
Risk of injury and damage due to tipping refrigeration appli-
ance.
This refrigeration appliance is very heavy and can tip forward when
the door is open.
Keep the appliance door shut until the refrigeration appliance has
been built in and secured in its housing in accordance with the op-
erating and installation instructions.
IMPORTANT SAFETY INSTRUCTIONS
6
Appropriate use
This appliance is intended for use in domestic households and
similar residential environments such as
– staff kitchen areas in shops, offices and other working environ-
ments
– farm houses and by clients in hotels, motels and other residential
type environments
– bed and breakfast type environments
– catering and similar non-retail applications.
This appliance is not intended for use outdoors, in damp environ-
ments or in places exposed to rain.
This refrigeration appliance is intended for domestic use only for
the cool storage of food and drink.
Any other usage is at the owner’s risk and could be dangerous.
This refrigeration appliance is not suitable for storing and keeping
cool medicines, blood plasma, laboratory preparations, or other simi-
lar substances or products that are subject to the Medical Device Di-
rective. Incorrect use of the refrigeration appliance for such purposes
may cause deterioration of the items stored. The refrigeration appli-
ance is also not suitable for use in areas where there is a risk of ex-
plosion.
Miele cannot be held liable for damage resulting from incorrect or
improper use or operation.
This refrigeration appliance may only be used by people (including
children) with reduced physical, sensory, or mental capabilities or
lack of experience and knowledge if they are supervised while using
it.
The refrigeration appliance may only be used by these people with-
out supervision if they have been shown how to use it in a safe way
and recognize and understand the consequences of incorrect opera-
tion.
IMPORTANT SAFETY INSTRUCTIONS
7
Safety with children
To reduce the risk of injury, do not allow children to play in, on or
near the appliance.
The door hinges can cause injury. Keep children well away at all
times.
Ensure that any packing material is disposed of safely and kept
out of the reach of children. DANGER of suffocation!
Technical safety
The coolant circuit has been checked for leaks. The refrigeration
appliance complies with statutory and regulatory requirements.
This refrigeration appliance contains the coolant Isobutane
(R600a), a natural gas which is environmentally friendly. Although it is
combustible, it does not damage the ozone layer and does not con-
tribute to the greenhouse effect.
The use of this coolant has, however, led to a slight increase in the
noise level of the appliance. In addition to the noise of the compres-
sor, you might be able to hear the coolant flowing around the cooling
circuit. Unfortunately, this cannot be avoided, but it does not affect
the performance of the refrigeration appliance.
When transporting and installing the refrigeration appliance, ensure
that no parts of the cooling circuit are damaged. Splashes of coolant
can damage the eyes.
In the event of damage:
- Avoid open flames or anything which creates a spark.
- Disconnect the refrigeration appliance from the power supply.
- Ventilate the room where the refrigeration appliance is located for
several minutes.

IMPORTANT SAFETY INSTRUCTIONS
8
- Contact Miele Customer Service.
The more coolant there is in a refrigeration appliance, the larger
the room it should be installed in. In the event of a leakage, if the ap-
pliance is in a small room, there is the danger of a combustible gas/
air mixture building up. For every 11g of coolant, at least 1m
3
of
room space is required. The amount of coolant in the refrigeration
appliance is stated on the data plate inside the appliance.
To avoid the risk of damage to the appliance, make sure that the
connection data (fuse rating, frequency and voltage) on the data
plate corresponds to the household supply.
Check that this is the case before connecting the appliance. Consult
a qualified electrician if in any doubt.
The electrical safety of the appliance can only be guaranteed
when correctly grounded. It is essential that this standard safety re-
quirement is met. If in any doubt please have the electrical installa-
tion tested by a qualified electrician.
Reliable and safe operation of this appliance can only be assured
if it has been connected to the electricity supply.
The outlet must not be concealed behind the appliance and must
be easily accessible so that the appliance can be quickly discon-
nected from the electrical supply in case of an emergency.
If the power cord supplied is damaged, it must only be replaced
by an original part to prevent a hazard for the user. Miele can only
guarantee the safety of the appliance when original Miele parts are
used.
The electrical outlet must be properly grounded.
Do not connect the appliance to the electrical supply with a power
bar or extension cord. These are a fire hazard and do not guarantee
the required safety of the appliance.

IMPORTANT SAFETY INSTRUCTIONS
9
If moisture gets into electrical components or into the power cord,
it could cause a short circuit. Therefore, do not operate the machine
in areas where there may be moisture or splashing water (e.g.,
garages, laundry rooms).
This appliance must not be installed and operated in mobile in-
stallations (e.g. on a ship).
Do not use a damaged appliance. It could be dangerous. Check
the appliance for visible signs of damage.
For safety reasons, this appliance may only be used after it has
been built in.
During installation, side-by-side heater installation, maintenance
and repair work, the appliance must be disconnected from the elec-
trical power supply. It is only completely isolated from the electricity
supply when:
- the circuit breaker has been tripped, or
- the screw-type fuses on the electrical service panel have been re-
moved or
- the power cord has been unplugged. Pull on the plug and not on
the cord when removing it from the outlet.
Installation, repair, and maintenance work should only be per-
formed by a Miele-authorized service technician.
Work by unqualified persons could be dangerous and may void the
warranty.
Any manufacturer's warranty will be void if the appliance is not re-
paired by a Miele approved service technician.
Faulty components must only be replaced by genuine Miele re-
placement parts. Miele can only guarantee the safety standards of
the appliance when Miele replacement parts are used.

IMPORTANT SAFETY INSTRUCTIONS
10
Correct use
The refrigeration appliance is designed for use within a specific
climate class (room temperature range). Do not use in a climate class
for which it is not designed. A lower room temperature will cause the
compressor to switch off for longer periods, meaning that the refrig-
eration appliance is unable to maintain the required temperature.
WARNING! DANGER of overheating! Do not cover or block the air
vents. This can impair the efficiency of the appliance, increase the
power consumption and cause damage to the appliance.
If storing food which contains a lot of fat or oil in the appliance,
make sure that it does not come into contact with plastic compo-
nents as this could cause stress cracks or break the plastic.
Risk of fire and explosion. Do not store any explosive materials or
products containing flammable propellants (e.g., spray cans) in the
appliance. Electrical components can cause flammable mixes of
gases to ignite.
Risk of explosion. Do not operate any electrical equipment (e.g.,
an electric ice-cream maker) inside the refrigeration appliance. Risk
of sparking and explosion.
When eating stored food, there is a danger of food poisoning.
Storage times will depend on several factors, including the freshness
and quality of the food, as well as the temperature at which it is
stored. Observe the manufacturer's “use-by” dates and storage in-
structions.
Use only genuine original Miele parts. If parts or accessories from
other manufacturers are used, the warranty may become invalid.

IMPORTANT SAFETY INSTRUCTIONS
11
Stainless steel machines:
Adhesives will damage the coated stainless steel surface and
cause it to lose its dirt-repellent protective coating. Do not use sticky
notes, transparent adhesive tape, masking tape, or other types of
adhesive on the stainless steel surface.
The surface is easily scratched. Even magnets can cause scratch-
ing.

IMPORTANT SAFETY INSTRUCTIONS
12
Cleaning and maintenance
Do not use any oil or grease on the door seals.
They can cause the seals to deteriorate over time.
Never use a steam cleaner to clean the appliance.
The steam can reach the electrical components and cause a short
circuit.
Sharp edged or pointed objects will damage the evaporator, caus-
ing irreversible damage to the appliance. Do not use sharp edged or
pointed objects to
- remove frost or ice,
- separate frozen foods or remove ice trays.
Transport
To avoid damage to the appliance, always transport it upright and
in its packaging.
Risk of injury and damage. The refrigeration appliance is very
heavy and must be transported by two people.

IMPORTANT SAFETY INSTRUCTIONS
13
Disposal of your old appliance
Children could become trapped in the machine and could suffo-
cate.
- Remove the machine doors.
- Remove the drawers.
- Leave the adjustable shelves in the machine so children cannot
climb inside.
DANGER of electric shock!
- Cut the plug off the power cord.
- Cut the power cord off the old appliance.
Dispose of them separately from the appliance.
Ensure that the appliance is not stored in the vicinity of gasoline or
inflammable gases and liquids during and after disposal.
Make sure that the coolant pipework is not damaged during dis-
posal to avoid uncontrolled leakage of oil and coolant (see data plate
for coolant type).
Splashes of coolant can cause damage to the eyes. Be careful not
to damage any part of the pipework while awaiting disposal, e.g. by
- puncturing the coolant channels in the evaporator,
- kinking any pipework,
- scratching the surface coating.
Caring for the environment
14
Disposal of packaging material
The packaging is designed to protect
the appliance from damage during
transportation. The packaging materials
used are selected from materials which
are environmentally friendly for disposal
and should be recycled.
Ensure that any plastic wrappings,
bags, etc. are disposed of safely and
kept out of the reach of children. Return
the packaging to your dealer.
Disposing of your old appli-
ance
Electronic and electrical appliances
contain many valuable materials. They
also contain certain materials, com-
pounds, and components which were
essential for their correct functioning
and safety. These could be hazardous
to your health and to the environment if
disposed of with general waste or if
handled incorrectly. Please do not,
therefore, dispose of your old appliance
with general waste.
Instead, please make use of officially
designated collection and disposal
points to dispose of and recycle electri-
cal and electronic appliances. By law,
you are solely responsible for deleting
any personal data from the appliance
prior to disposal.
Take care not to damage your refrigera-
tion appliance’s pipework before or dur-
ing transportation to an authorized col-
lection depot.
This is to ensure that coolant in the
cooling circuit and oil in the compressor
is contained, and will not leak into the
environment.
Please ensure that your old appliance
poses no risk to children while being
stored for disposal. For additional infor-
mation, see “IMPORTANT SAFETY IN-
STRUCTIONS” in these operating and
installation instructions.
Installation
*INSTALLATION*
15
Installation location
This appliance should be installed in a
dry, well-ventilated room.
When deciding where to install your re-
frigeration appliance, please bear in
mind that it will use more energy if in-
stalled near to a heater, a range, or an-
other appliance that gives off heat. Di-
rect sunlight should also be avoided.
The higher the room temperature, the
longer the compressor runs and the
higher the energy consumption of the
refrigeration appliance.
When installing the refrigeration appli-
ance, please note the following:
- The electrical socket must be easily
accessible in an emergency and not
concealed behind the appliance.
- The plug and power cord must not
touch the rear of the refrigeration ap-
pliance as they could be damaged by
vibrations from the appliance.
- Do not plug in other appliances be-
hind the refrigeration appliance.
If installation near a heat source is un-
avoidable, observe the following mini-
mum distances between the appliance
and the heat source:
- At least 1 1/4" (3cm)
to electric or gas stoves
- At least 11 3/4" (30cm)
to oil or coal-based stoves
If it is not possible to observe these
minimum distances, an isolation plate
must be installed between the refrigera-
tion appliance and the heat source.
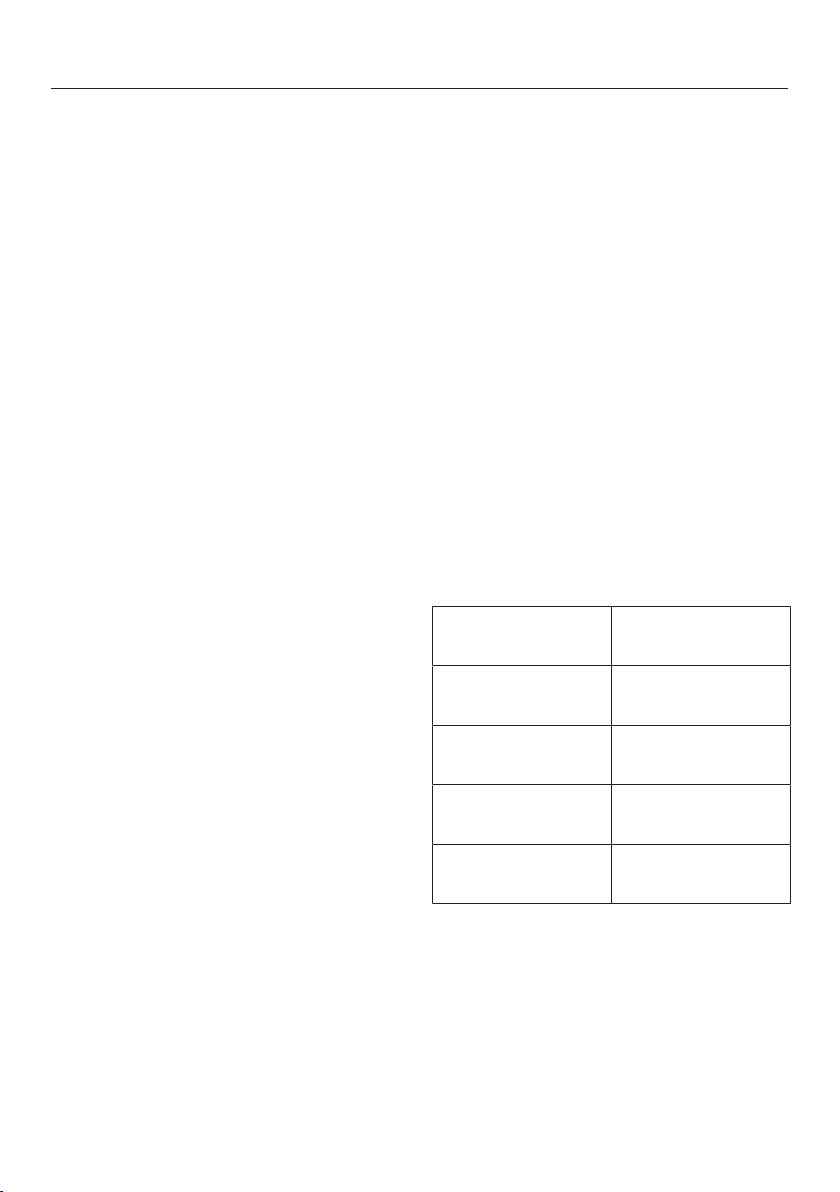
Climate class
The refrigeration appliance is designed
for use within the climate class (room
temperature range) SN-T. Do not use in
a climate class for which it is not de-
signed.
Climate class Room tempera-
ture
SN 50°F to 90°F /
10°C to 32°C
N 60°F to 90°F /
+16°C to +32°C
ST 60°F to 100°F /
+16to +38°C
T 60°F to 109°F /
+16to +43°C
A lower room temperature will cause
the compressor to switch off for longer
periods. This can cause the internal
temperature in the refrigeration appli-
ance to rise with the risk of food deteri-
orating and going off.
Installation
*INSTALLATION*
16
Risk of damage due to high hu-
midity.
In environments with high humidity,
condensation can build up on exter-
nal refrigeration appliance panels,
which can cause corrosion.
Install the refrigeration appliance in a
dry and/or air-conditioned room with
sufficient ventilation.
After installation, make sure that the
appliance door closes properly, the
ventilation gaps are not covered, and
that the refrigeration appliance has
been installed in accordance with the
operating and installation instruc-
tions.
Installation notes
Risk of damage and injury due to
the refrigeration appliance tipping
over.
This refrigeration appliance is very
heavy and can tip forwards when the
appliance door(s) is (are) open.
Keep the appliance door(s) shut until
the refrigeration appliance has been
built in and secured in its housing in
accordance with these operating and
installation instructions.
Due to its weight and size, the refrig-
eration appliance must be installed
by two people.
Adjoining cabinetry/units
The appliance is screwed to the adjoin-
ing cabinetry/units to the side and
above. For this reason, it is essential
that all cabinets/units are fixed to the
ground and/or wall.
Installation
*INSTALLATION*
17
Load-bearing capacity of the niche
floor
To ensure the safe installation of the re-
frigeration appliance and to guarantee
its correct functioning, the floor of the
niche where the appliance is to be in-
stalled must be smooth and even.
It must be made from strong, rigid ma-
terial.
Because the refrigeration appliance is
extremely heavy when fully loaded, it is
essential that the floor it stands on is
able to bear its weight. If necessary,
seek the advice of an architect or con-
struction expert.
When fully loaded, the weight of the re-
frigeration appliance is approx.:
K 2602 SF 776 lbs
(352 kg)
K 2802 SF, K 2812 SF 899 lbs
(408 kg)
K 2902 SF, K 2912 SF 1042 lbs
(473 kg)
Ventilation
Risk of fire and damage due to
insufficient ventilation.
If the refrigeration appliance is not
ventilated sufficiently, the compres-
sor will run more frequently and for
longer periods.
This causes increased energy con-
sumption and an increased com-
pressor operating temperature,
which can result in damage to the
compressor.
Please ensure that there is adequate
ventilation around the refrigeration
appliance.
Do not block the ventilation gaps.
The ventilation gaps must never be
obstructed.
Door hinge
Risk of damage and injury when
changing the door hinges.
Changing the door hinges single-
handedly can cause damage to the
appliance and injury.
The refrigeration appliance is sup-
plied with a fixed hinge. On no ac-
count should you attempt to change
the door hinge yourself.
If you need to change the door hinge
to the other side, please contact the
Miele Service department.
Installation
*INSTALLATION*
18
Side-by-side
This appliance can be installed side-by-
side with another refrigeration appli-
ance. The following overview will show
you which side-by-side options you
have with your appliance:
A side-by-side merging kit and a top
frame (KTF) are required for this. Both
are available from your Miele dealer or
Miele Service.
Instructions for installing appliances
side-by-side can be found in the side-
by-side merging kit instruction man-
ual.
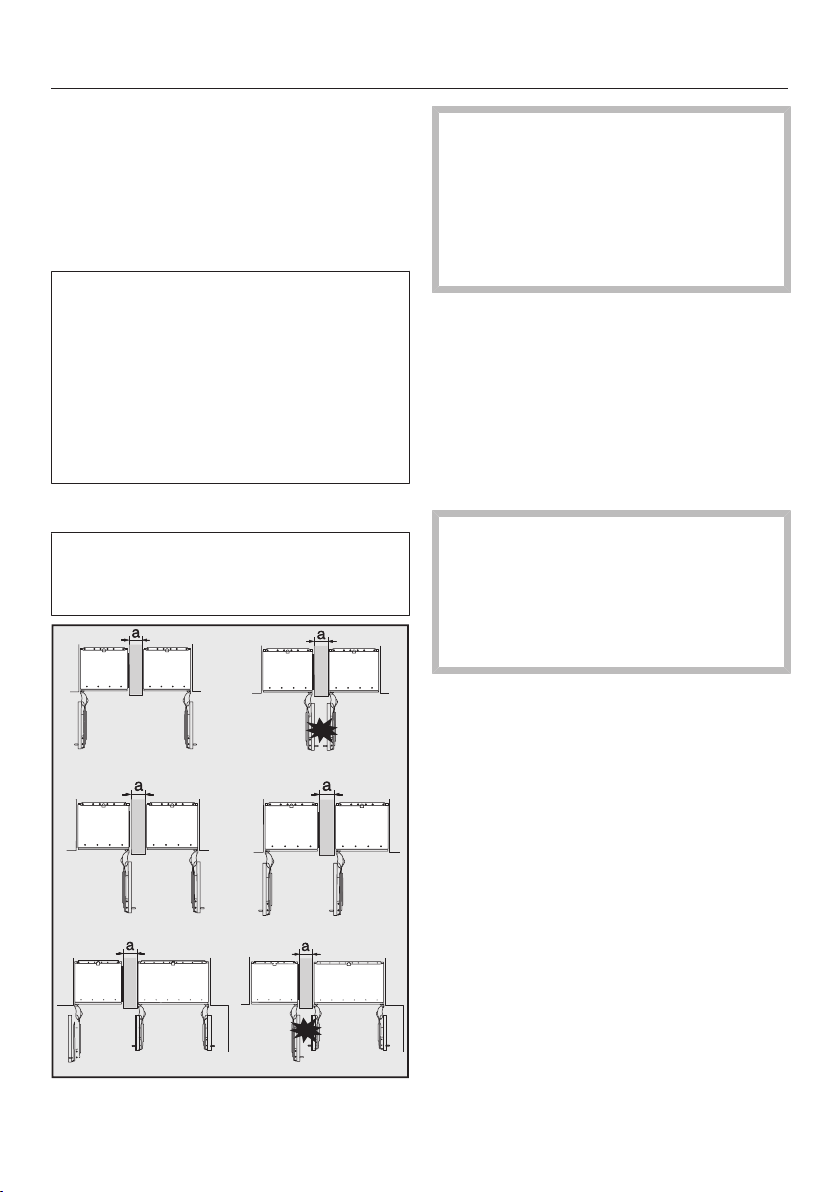
. . . with partition wall
The wall a between the side-by-side
appliances must be at least
5/8" (16mm) thick.
If the door hinges of the refrigeration
appliances are next to each other,
you must take into account the thick-
ness of the cabinet fronts and door
handles so that the appliance doors
do not collide and become damaged
if they are opened at the same time.
The refrigeration appliances are secured
individually in their installation niche us-
ing the supplied installation material.
If the partition wall a is narrower than
6 5/16" (160mm), you will need the
side panel heater from the side-by-side
installation kit to prevent condensation
from forming and any resulting damage.
When planning installation niches,
please note that the niche into which
the refrigeration appliance with the
side panel heater is installed must be
3/16" (4mm) wider (see “Installation
– Building-in dimensions”).
If the partition wall a is thicker than
6 5/16" (160mm), you do not need the
side-by-side installation kit, nor the side
panel heater.

Installation
*INSTALLATION*
19
. . .without partition wall
If the appliances are to be installed next
to each other without a partition wall
between them, they will need to be
joined together with the side-by-side in-
stallation kit. In addition, you must in-
stall the side panel heater to prevent
condensation from forming and any re-
sulting damage.
Installation
*INSTALLATION*
20
Installation dimensions
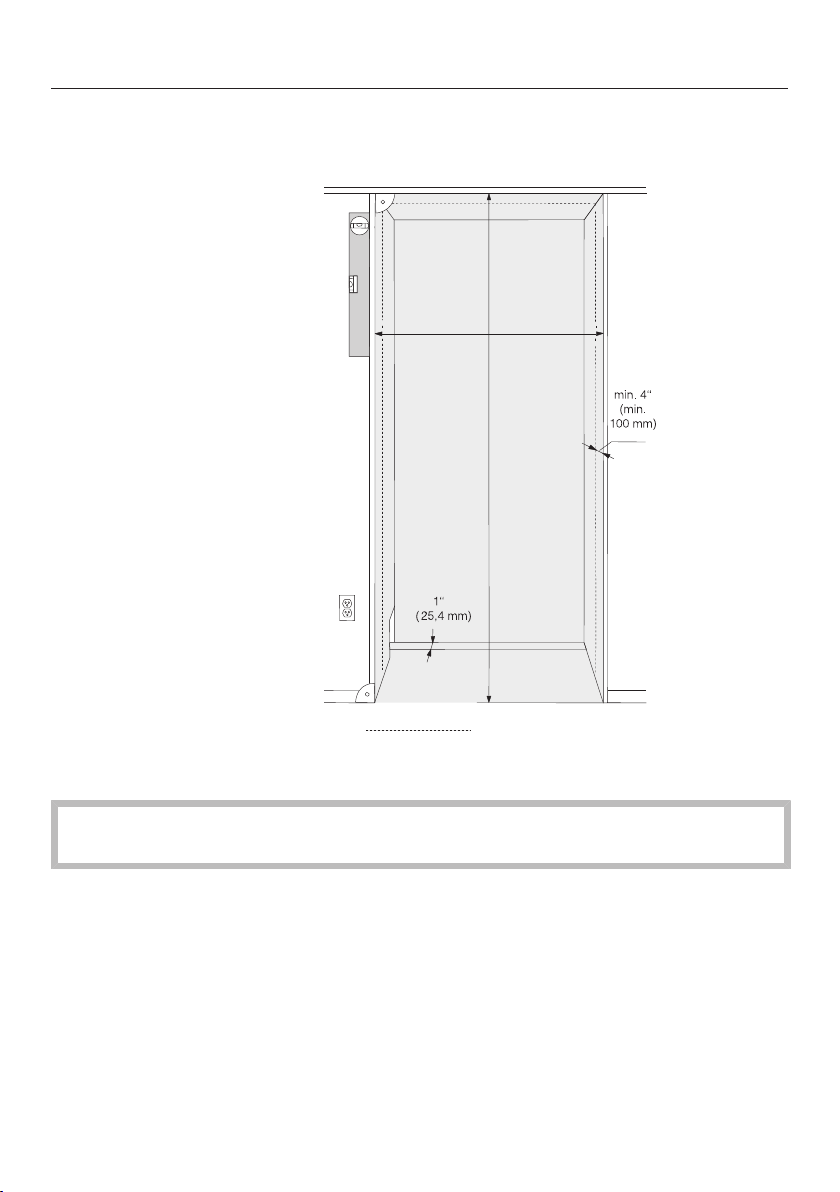
Position of the electrical connection
- The electrical connection must not be positioned higher than 9" (228 mm) above
the floor.
The electrical socket must not be concealed behind the appliance and must be
easily accessible in an emergency.

Installation
*INSTALLATION*
21
A
B
C
D
A B C D
K2602SF,
K2612SF
84"–85 3/16"
(2,134–2,164mm)
24" (610mm) 24" (610mm) 3/4" (19mm)
K2802SF,
K2812SF
84"–85 3/16"
(2,134–2,164mm)
30" (762mm) 24" (610mm) 3/4" (19mm)
K2902SF,
K2912SF
84"–85 3/16"
(2,134–2,164mm)
36" (915mm) 24" (610mm) 3/4" (19mm)
Installation
*INSTALLATION*
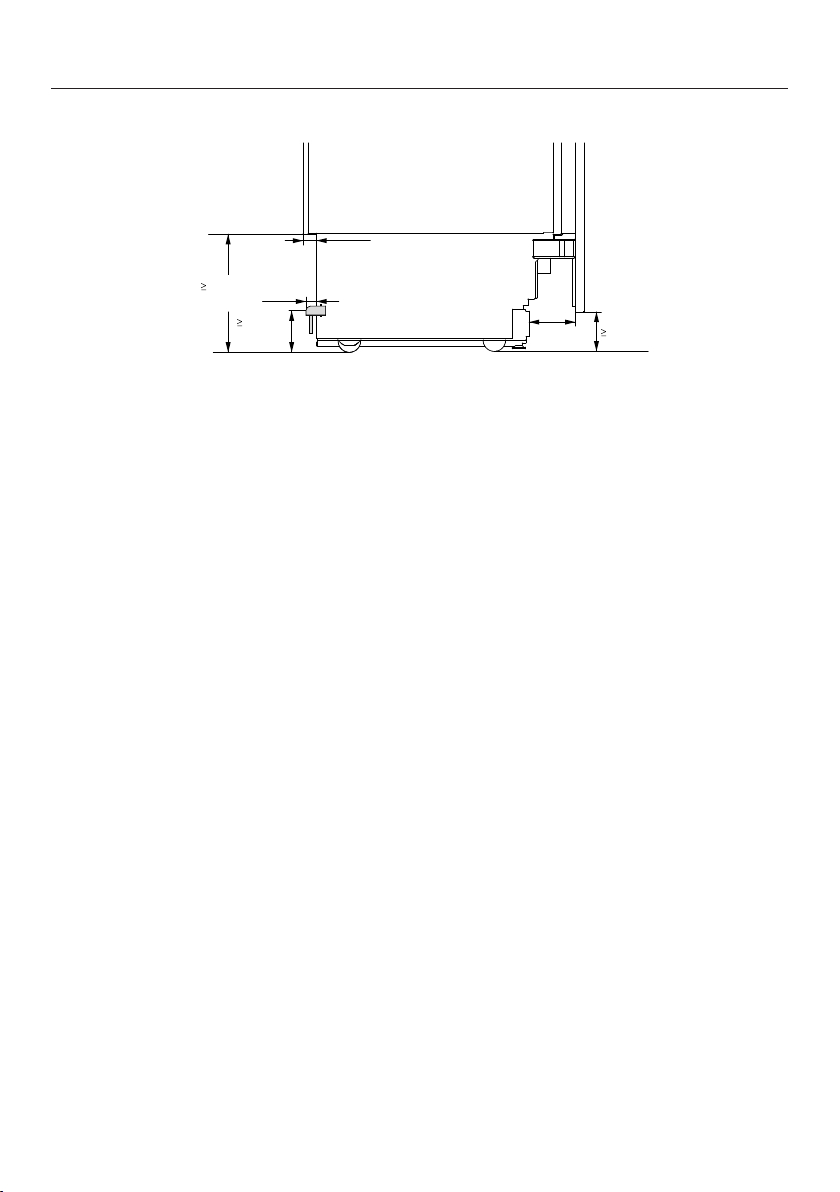
22
1 3/16"
(30 mm)
7/8"
(22 mm)
10 5/16"
(262 mm)
4"
(102 mm)
4"
(102 mm)
3 3/8"
(85 mm)
Side view
Installation
*INSTALLATION*
23
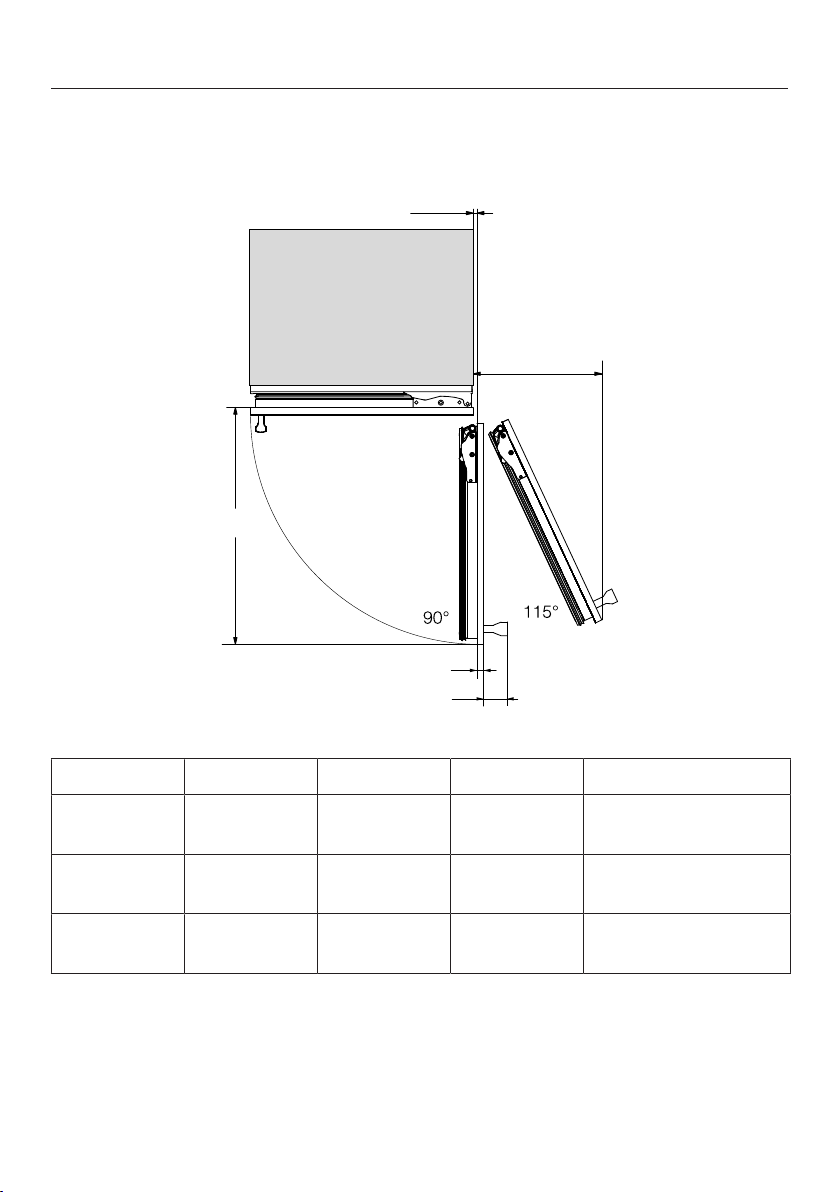
Dimensions when the appliance door is open (opening angle 90°/115°)
3/8" (10 mm)
A
D
B
C
A B C D
K26x2SF 26 5/8"
(677mm)
Cabinet front Door handle 11 5/8" (296mm)
K28x2SF 32 5/8"
(829mm)
Cabinet front Door handle 14 5/16" (363mm)
K29x2SF 38 11/16"
(982mm)
Cabinet front Door handle 16 7/8" (428mm)

Installation
*INSTALLATION*
24
Building in the appliance
Before starting...
It is essential to read these installa-
tion instructions carefully before
starting to install the appliance.
The appliance should be installed by
a suitably qualified tradesman in ac-
cordance with these installation in-
structions. Safe operation of the ap-
pliance is only assured if it has been
installed and connected in accor-
dance with the installation instruc-
tions.
Risk of damage and injury!
This appliance is very heavy and can
tip forwards when the door is open.
Keep the appliance door shut until
the appliance has been built in and
secured in its housing in accordance
with the operating and installation in-
structions.
The appliance is both large and
heavy. Installation must be carried
out by two people.
The appliance must be installed in ac-
cordance with local regulations. If local
regulations are not available, the follow-
ing regulations must be observed:
- in the USA: the National Electric
Code, ANSI/NFPA 70 - latest edition/
State and Municipal codes and/or lo-
cal codes.
- in Canada: the Canadian Electric
code C22.1 - latest edition/Provincial
and Municipal codes and/or local
codes.
Tools required
- Cordless drill
- TX20 screwdriver
- Hammer drill
- Drill bits in various sizes, depending
on materials
- Hammer
- Open-ended wrench
- Ratchet wrench, attachment: socket,
5/16" (8mm)
- Adhesive tape
- Utility knife
- Pipe wrench
- Level
- Tape measure
- Pencil
Other
- Step ladder
- Hand truck
Installation
*INSTALLATION*
25
Aligning the installation niche
The building-in niche must be carefully
aligned using a spirit level before the re-
frigeration appliance is installed. The
niche corners must be at 90° angles to
each other, otherwise the cabinet front
will not sit straight on all 4corners of
the building-in niche.
Checking the installation niche
Check the installation dimensions
(see “Installation – Installation dimen-
sions”).
Check the position of the electrical
connection. The length of the power
cord is 9' 10" (3m).
The electrical socket must not be
concealed behind the appliance and
must be easily accessible in an
emergency.
Check the surroundings for possible
collisions (see “Installation – Dimen-
sions with appliance door open”).
Only install the refrigeration appliance
in stable, solid installation niches, po-
sitioned on an even and level floor.
Also check the installation niche for
the following criteria:
- The side panels of the installation
niche must be even.
- The surrounding walls of the installa-
tion niche must be at least
5/8" (16mm) thick.
- The surrounding walls must be se-
curely fixed to the floor or wall.
- Shortened side walls must be at least
4" (100mm) deep.
Installation
*INSTALLATION*
26
Before installation
Before installation, remove any ac-
cessories from the back of the appli-
ance.
Check the refrigeration appliance for
damage during transportation.
Do not install a damaged appliance.
Check that all parts at the back of the
appliance are unhindered.
To protect the floor during installation,
secure an off-cut of flooring or similar
material to the floor in front of the in-
stallation area.
Risk of damage and injury due to
the refrigeration appliance tipping
over.
As soon as you unscrew the brack-
ets that fix the refrigeration appliance
to the pallet, the appliance is no
longer secured.
Due to its weight and size, the refrig-
eration appliance must be installed
by two people.
Unscrew the fixing brackets.
With the help of several people as re-
quired, carefully lift the refrigeration
appliance from the pallet, starting
with the back of the appliance.
Risk of damaging the floor from
the load.
Moving the refrigeration appliance
can cause damage to the floor.
Move the refrigeration appliance
carefully on floors that are sensitive
to scratching.
As soon as you have set the appliance
upright, you can move it using the
rollers on the bottom.
Installation
*INSTALLATION*
27
Preparing the installation niche
Risk of damage and injury due to
the refrigeration appliance tipping
over.
This refrigeration appliance is very
heavy and can tip forwards when the
doors are open.
The installation niche must be se-
cured to the wall behind it and/or
above it with several screws. Only
this will prevent the refrigeration ap-
pliance from tipping over after being
installed.
In addition, use the provided anti-tip
brackets to secure the installation
niche.
The parts required for installation are
supplied with the refrigeration appli-
ance. The plastic bags supplied are
marked with letters for easy identifica-
tion.
When performing the individual as-
sembly steps, observe the letters
specified and use the matching plas-
tic bag with the required installation
equipment.
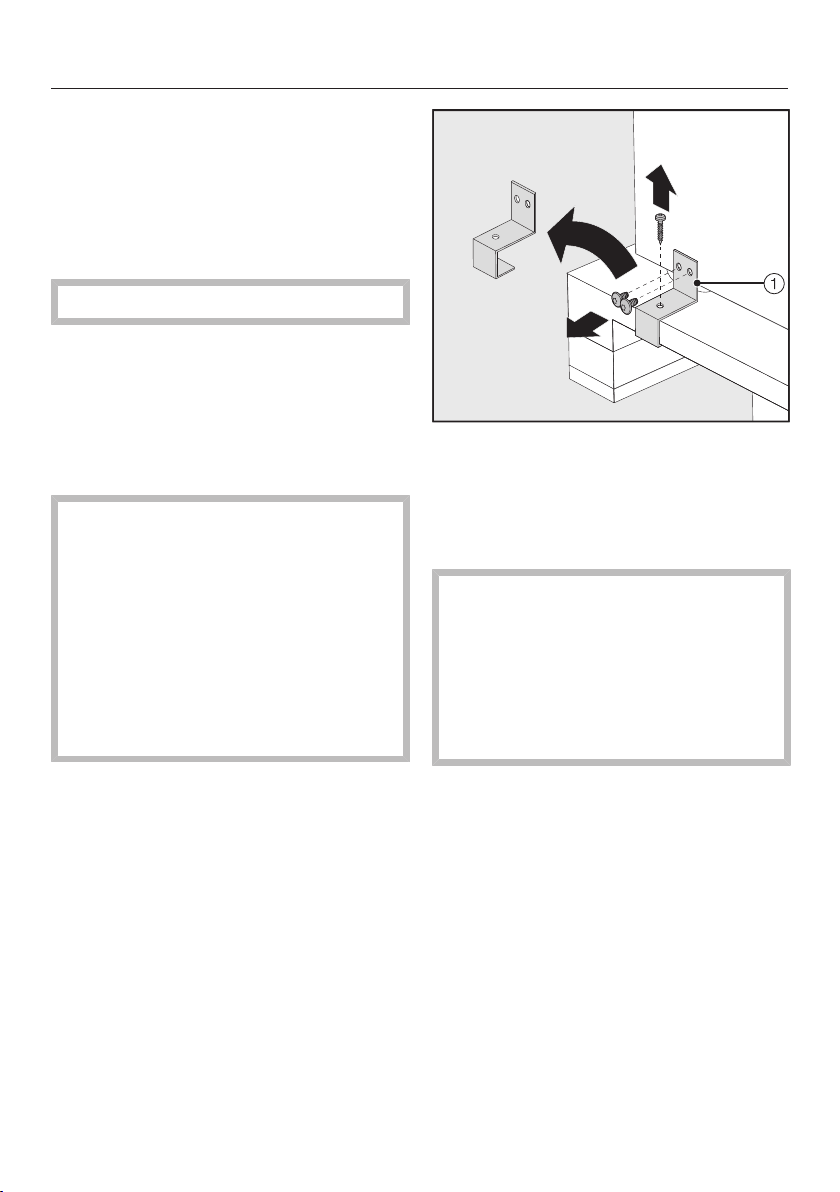
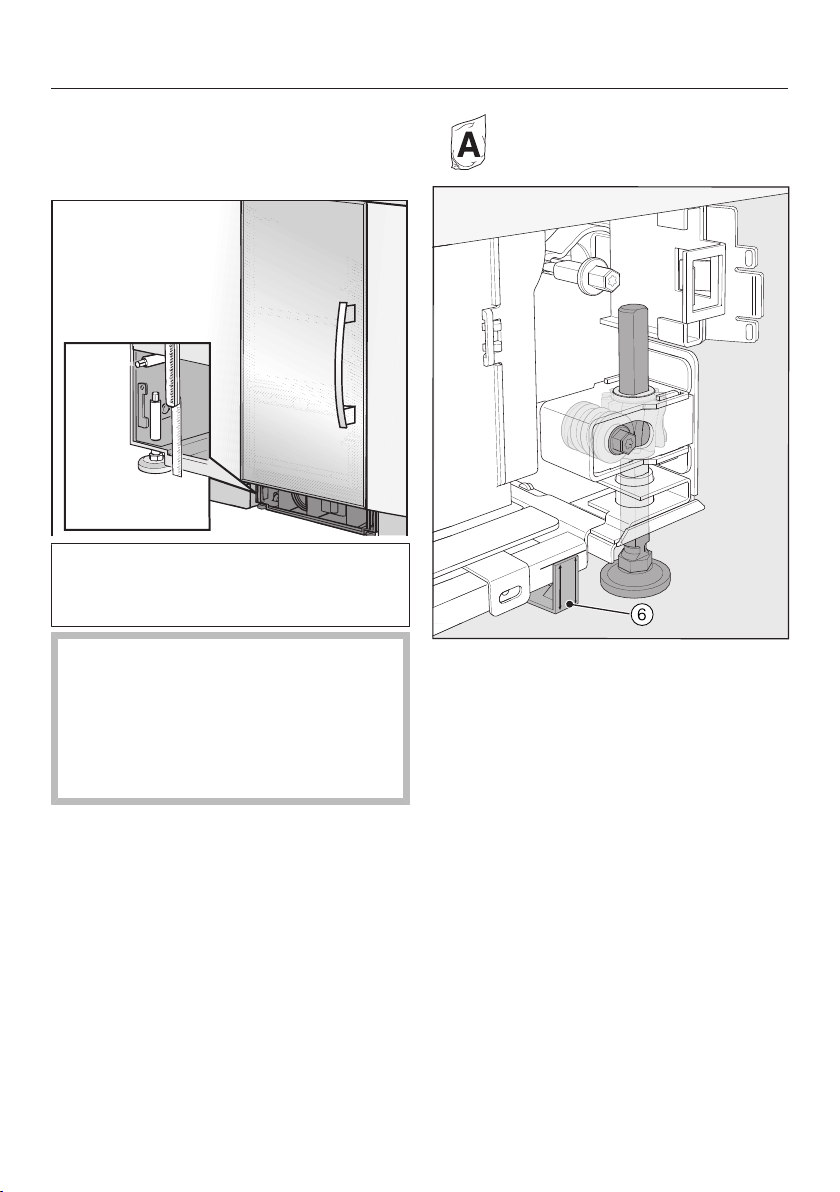
The anti-tip brackets prevent the refrig-
eration appliance from tipping.
The anti-tip brackets are also used to fix
the installation niche securely to the
surrounding walls.
2
Use 2 anti-tip brackets for each in-
dividual appliance or 4 anti-tip brack-
ets for each (side-by-side) combina-
tion of 2 appliances.
Position the anti-tip brackets on
the left and right of the niche.
Depending on the subsequent adjust-
ment of the feet, the anti-tip brackets
are positioned 84"-85 3/16" (2,134–
2,164mm) from the floor of the niche.
Installation
*INSTALLATION*
28
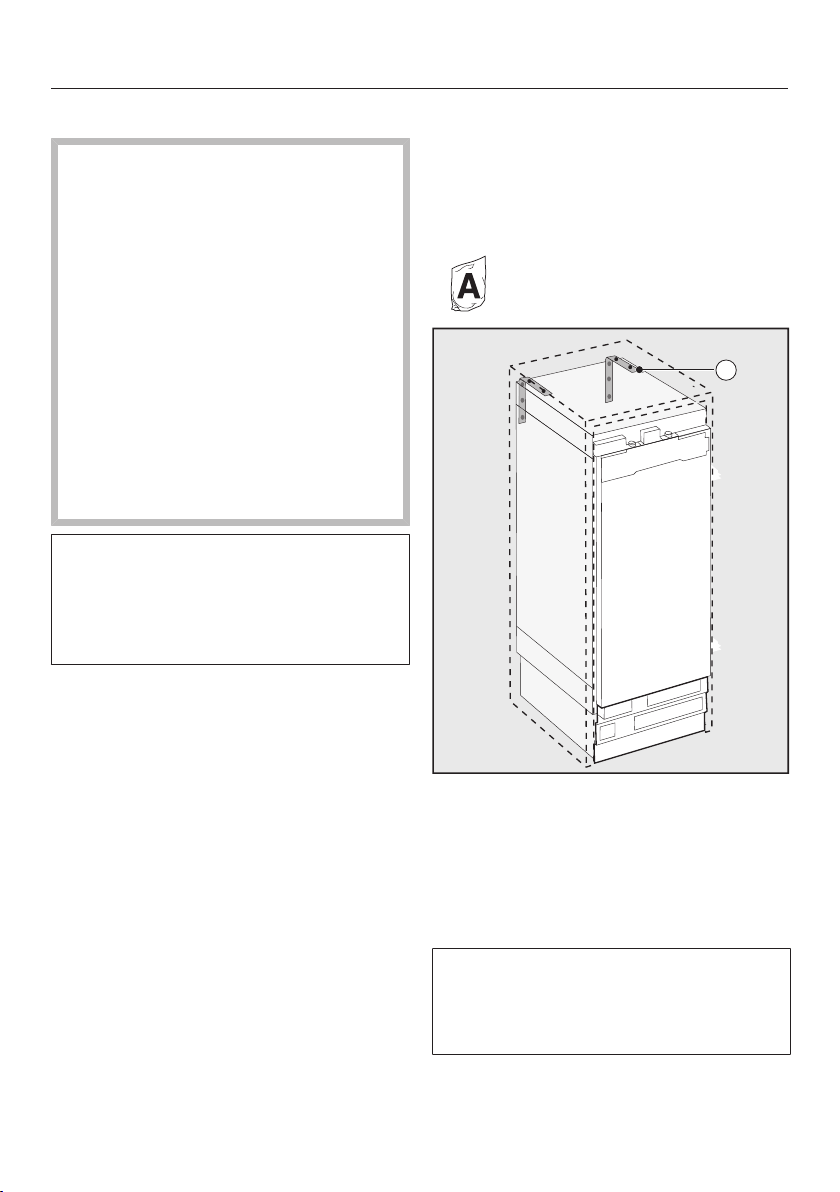
Risk of damage and injury due to
the refrigeration appliance tipping
over.
If the anti-tip brackets are fixed too
high up, they cannot be used to se-
cure the refrigeration appliance.
The distance between the
anti-tip brackets and the refrigeration
appliance must not exceed
5/16" (8mm).
2
2
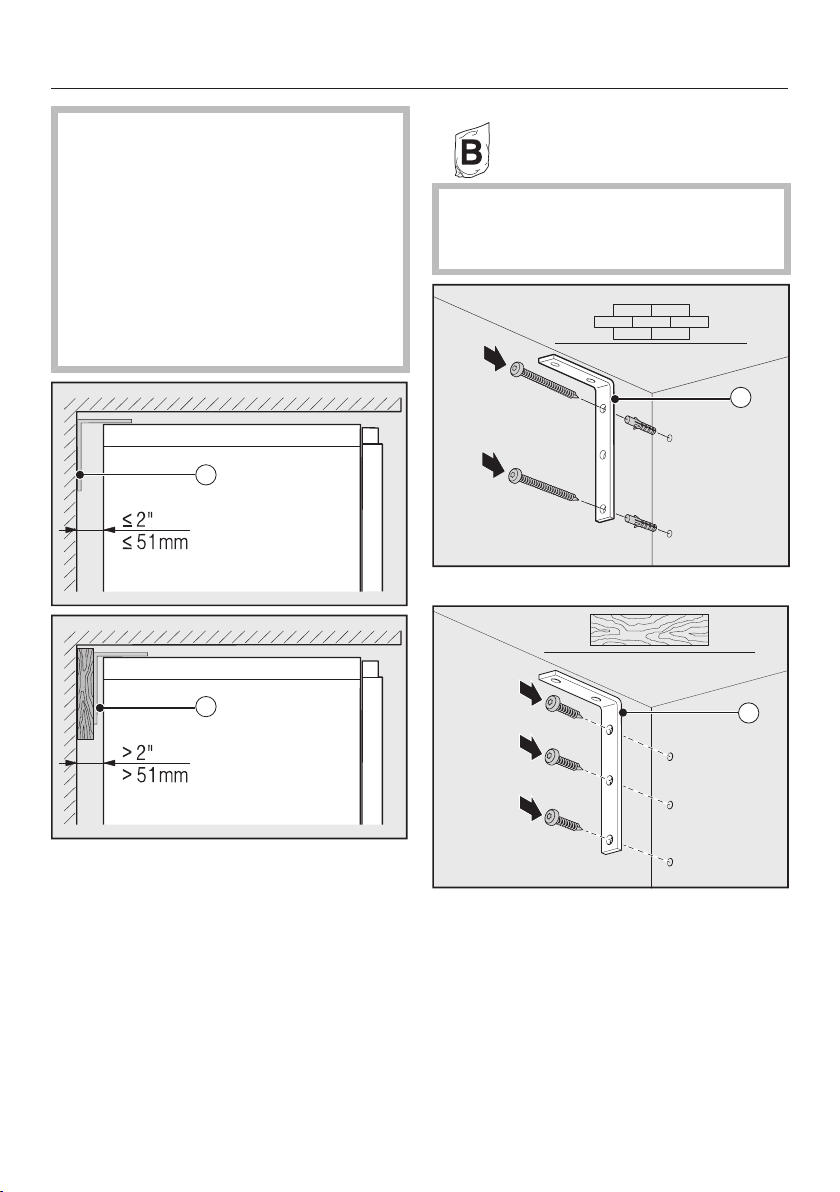
Make sure that the gap between the
refrigeration appliance‘s rear wall and
the installation niche does not exceed
2" (51mm).
Place a wooden wedge behind the
anti-tip brackets if necessary.
While holding the anti-tip brackets in
place, mark the necessary drill holes
on the rear wall of the installation
niche.
Retaining screws for different uses
and types of material are supplied in
the accompanying pack.
2
Securing to a concrete wall
2
Securing to a wooden wall

Installation
*INSTALLATION*
29
2
Securing with a wooden wedge
Secure the installation niche to the
wall behind it and/or above it as re-
quired using the anti-tip brackets.
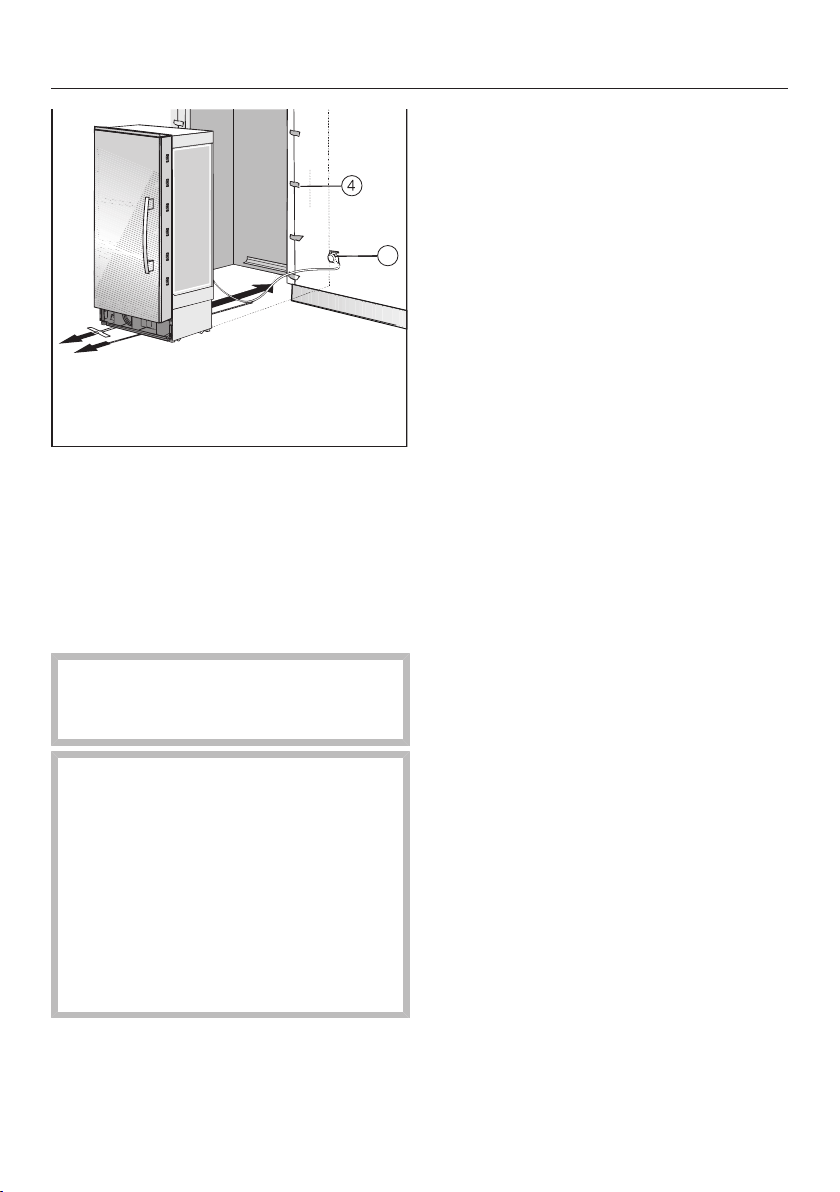
Pushing the appliance into the niche
Then push the appliance into the
niche, taking care not to damage the
electrical connection!
If you are installing several refrigera-
tion appliances side by side, now se-
cure the appliances to one another
(see the installation instructions for the
side-by-side installation kit).
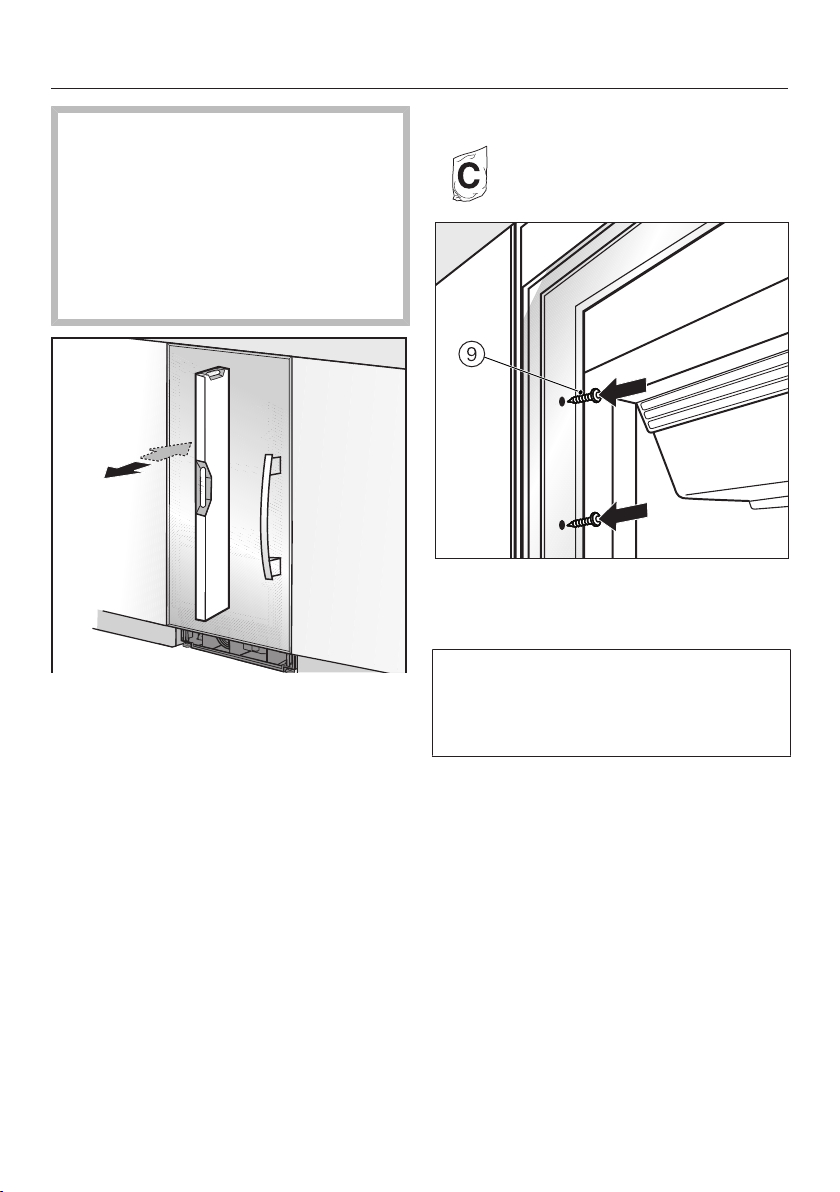
To ensure that the refrigeration appli-
ance can then be aligned correctly,
the toe-kick ventilation grille must be
removed from the appliance toe kick:
Carefully guide a flat-head screw-
driver through the toe-kick ventilation
grille on both sides and use it to
push the internal plastic latches out-
wards to release the toe-kick ventila-
tion grille.
Place the toe-kick ventilation grille to
one side.
Installation
*INSTALLATION*
30
5
Affix edge protection to the adja-
cent cabinet fronts.
Insert the plug connector at the back
of the refrigeration appliance (see “In-
stallation – Electrical connection”).
Insert the plug into the electrical
socket.
The electrical socket must be close
to the refrigeration appliance and
easily accessible.
Risk of damage due to electrical
overload.
If the refrigeration appliance is elec-
trically overloaded, this can cause a
short circuit and thus damage your
refrigeration appliance.
When you install appliances side by
side, each refrigeration appliance
must have its own separate electrical
socket.
Tip: Secure the power cord to prevent it
becoming caught: tie a piece of string
to the middle of the power cord and as
the refrigeration appliance is being
pushed into the niche, pull the cord for-
ward underneath the appliance.
Carefully push the refrigeration appli-
ance into the niche.
If the refrigeration appliance cannot
be pushed into the niche (because
the floor is uneven, for example), un-
screw the rear feet slightly (see “In-
stallation – Aligning the refrigeration
appliance”) and slide the refrigeration
appliance into the installation niche.
Remove the edge protection from
the adjacent cabinet fronts.
Installation
*INSTALLATION*
31
Aligning the refrigeration appliance
Align the appliance with neighboring
cabinet fronts as described below.
The adjustable feet at the front and
back of the appliance can all be ad-
justed from the front of the appliance.
Risk of damage due to incorrect
feet adjustment.
You may damage the adjustable feet
if you use a cordless screwdriver.
Always adjust the front and rear feet
by hand.
Position the supplied spacers on
both sides on the markings next to
the adjustable feet at the front of the
appliance.

Installation
*INSTALLATION*
32
Adjust the rear feet with a ratchet (at-
tachment: socket, 8mm) or a TX20
screwdriver.
Adjust the front feet with a ratchet (at-
tachment: socket, 8mm) or a TX20
screwdriver.
Tip: Proceed carefully when adjusting
the feet, alternating between the left
and right feet.
Unscrew the adjustable feet and
on both sides at least until the
marking on the toe-kick is aligned
with the required 1 1/4" (32mm) on
the spacer. The standard dimen-
sion of 1 1/4" (32mm) relates to a
niche height of 84" (2,134mm).
It is important to adjust the feet to a
height of at least 1 1/4" (32mm) so
that the ventilation of the refrigeration
appliance via the toe-kick functions
correctly.
Installation
*INSTALLATION*
33
Risk of damage if the feet are
adjusted too much.
The rear adjustable feet can be dam-
aged.
Unscrew the feet only until the
marking on the toe-kick is aligned to
a maximum of 2 7/16" (62mm) (max.
niche height of 85 3/16" (2,164mm)).
Use a level to check the alignment of
the appliance.
Securing the appliance in the niche
Use the screws supplied to secure
the refrigeration appliance on both
sides.
In a side-by-side combination, only
the external panels of the two appli-
ances can be secured to the cabinet
wall.
Installation
*INSTALLATION*
34
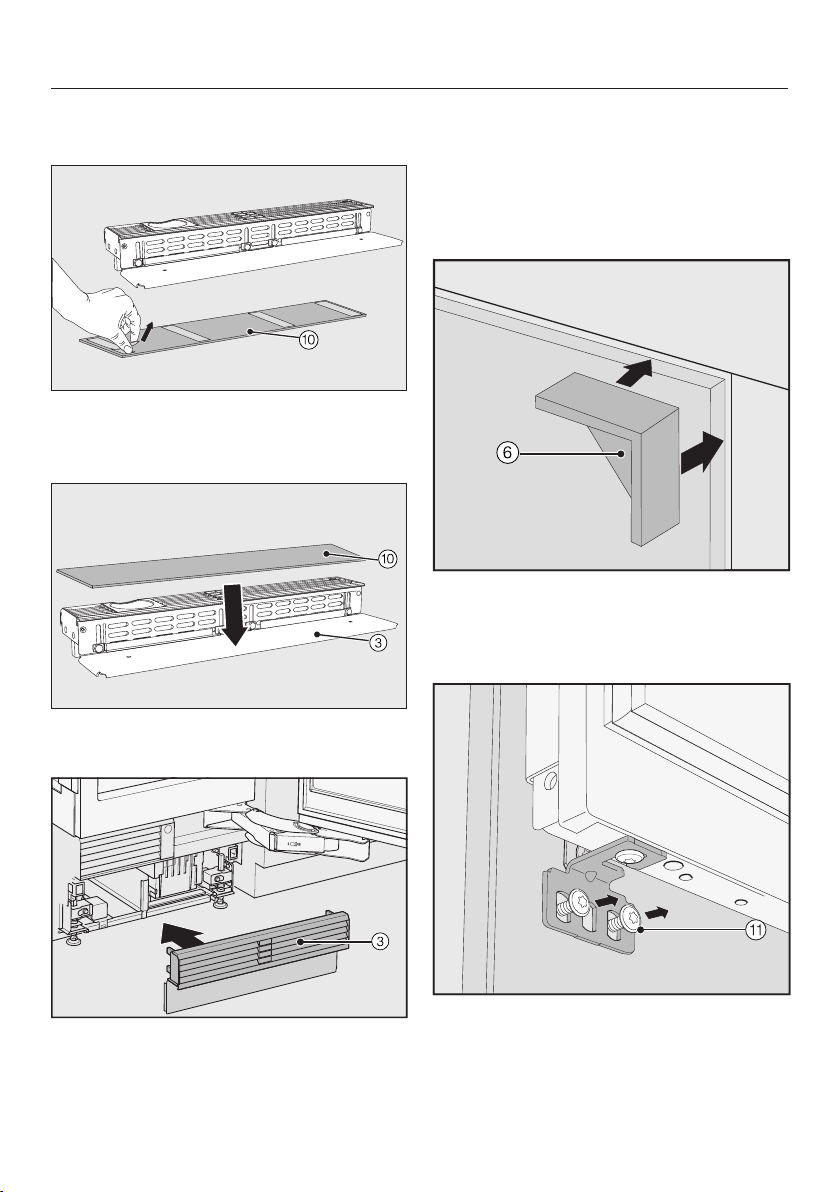
Securing the toe-kick board and
cover
Remove the film from the adhesive
strips on the toe-kick cover provided
.
Secure the toe-kick cover to the
toe-kick board .
Click the toe-kick board onto the
bottom of the appliance toe-kick.
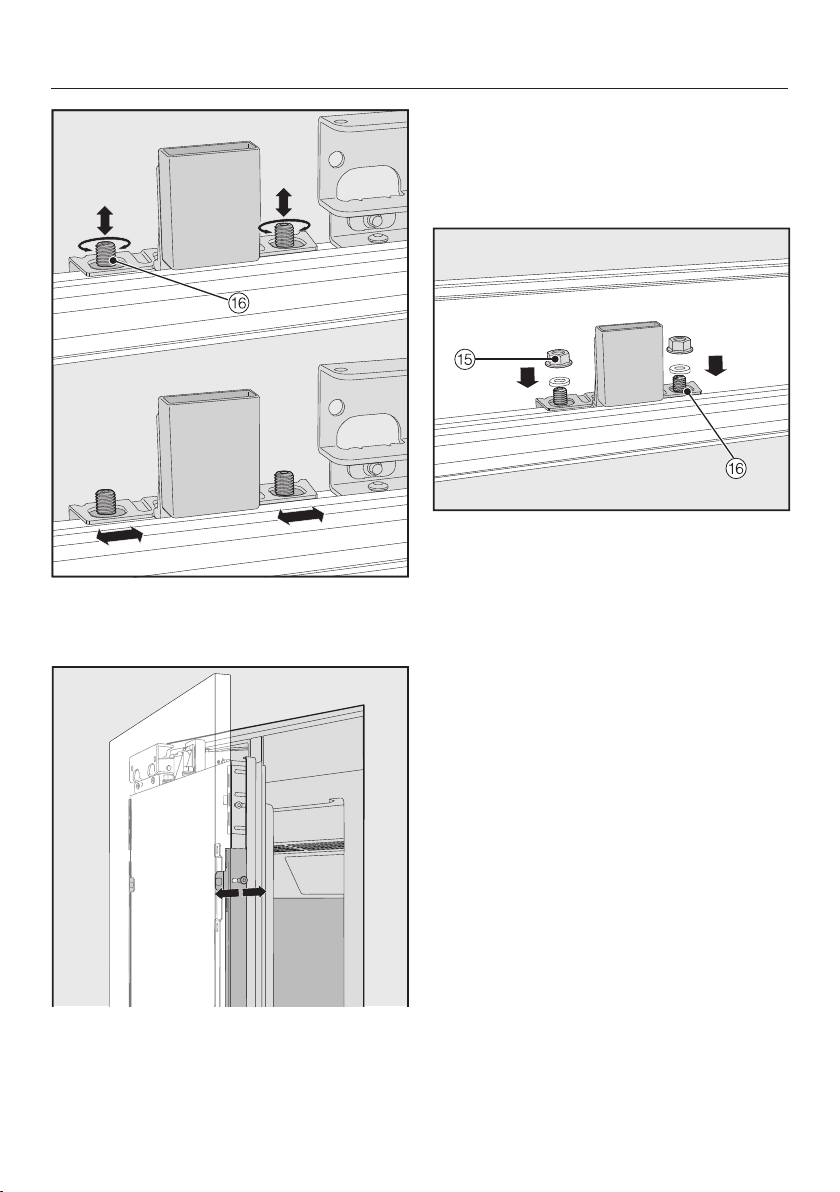
Aligning the appliance door
Following installation, align the appli-
ance door with adjacent cabinet fronts.
To do this, check the gaps to the adja-
cent cabinet fronts.
If necessary, use the spacers pro-
vided and place them on both
sides of the appliance door at the
top.
Slightly loosen the screws on the
fixing bracket.
Installation
*INSTALLATION*
35
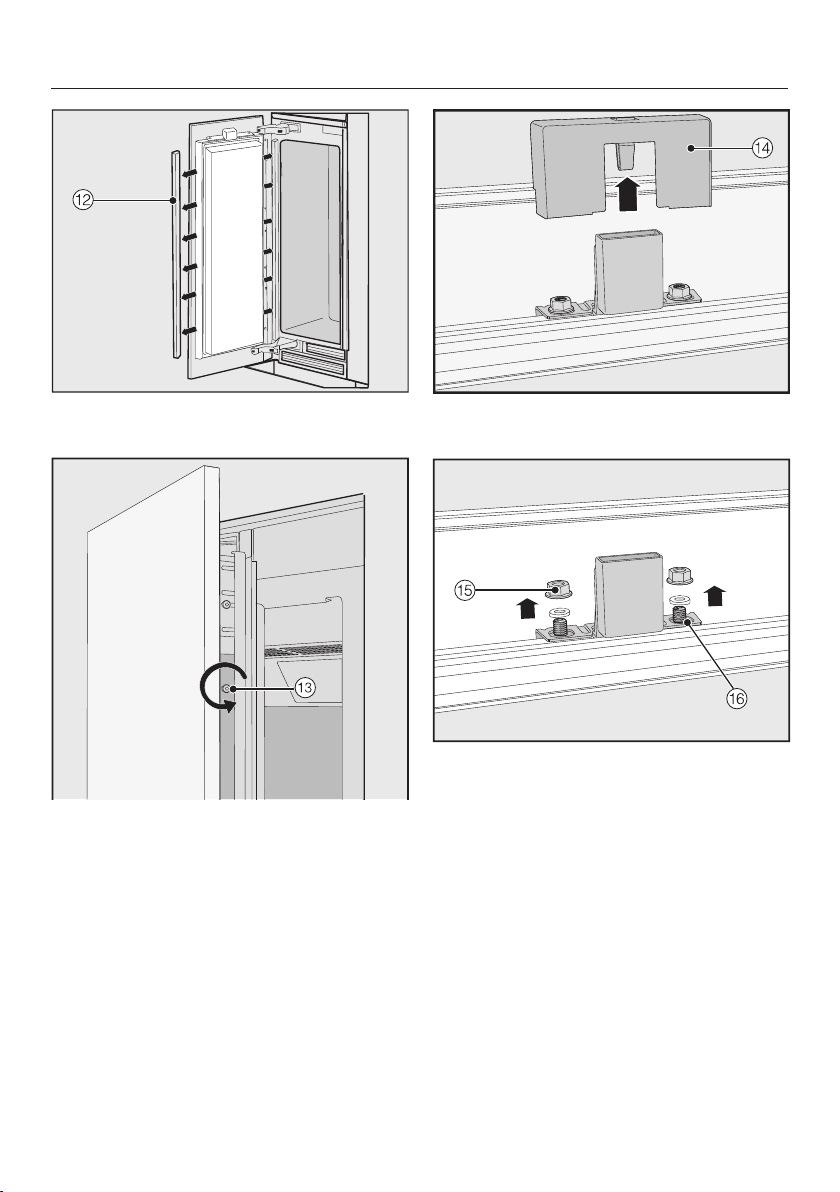
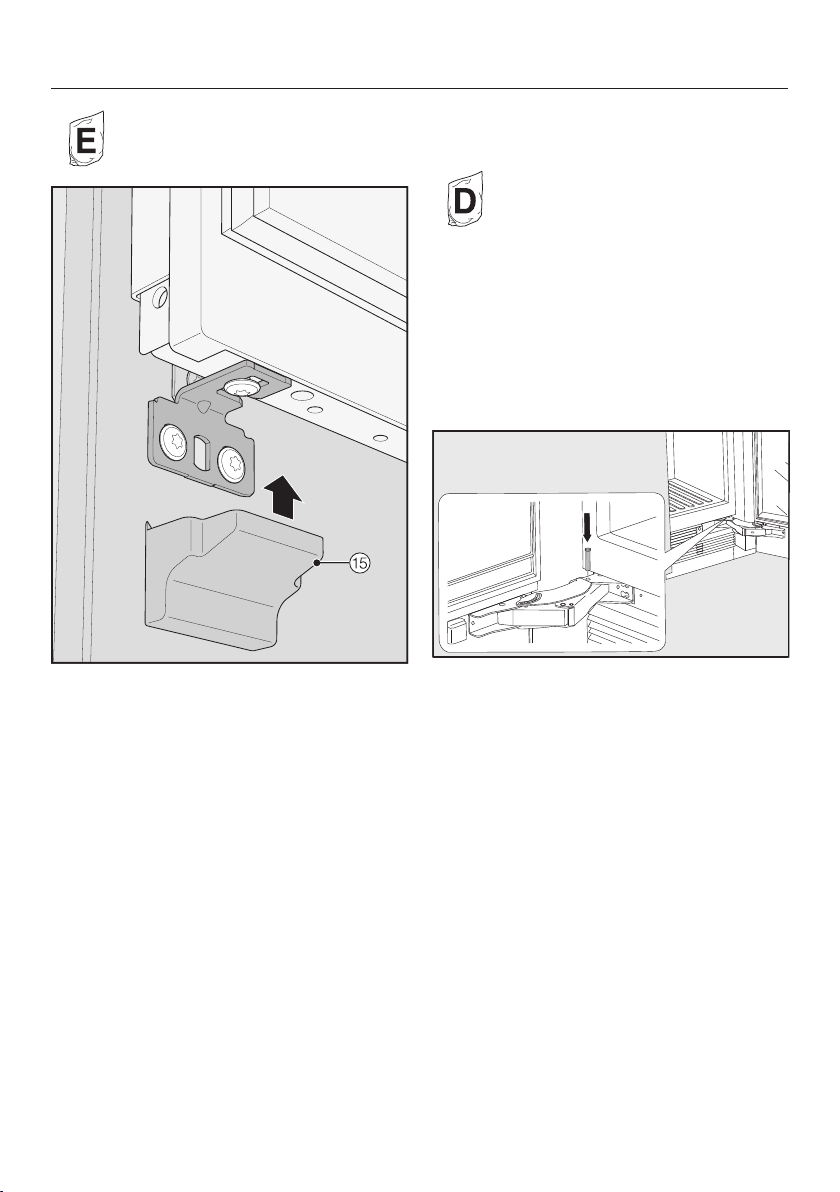
Remove the covers from both
sides of the appliance door.
Slightly loosen the screws in the
angle trims on both sides.
Remove the cover from the light
contact switch.
Remove the nuts and washers
from the threaded bolts.
Installation
*INSTALLATION*
36
Align the height and sides of the ap-
pliance door using the threaded
bolts.
If necessary, also align the depth of
the appliance door via the gaps in the
angle trims.
Close the appliance door and check
the distance between the door and
adjacent cabinet fronts again.
Then re-tighten all screws and .
Place the washers and nuts back
on the threaded bolts and tighten
the nuts. The appliance door is now
secured.
Reattach covers and.
Installation
*INSTALLATION*
37
Place the covers provided on the
fixing brackets.
Remove the spacers from the ap-
pliance door.
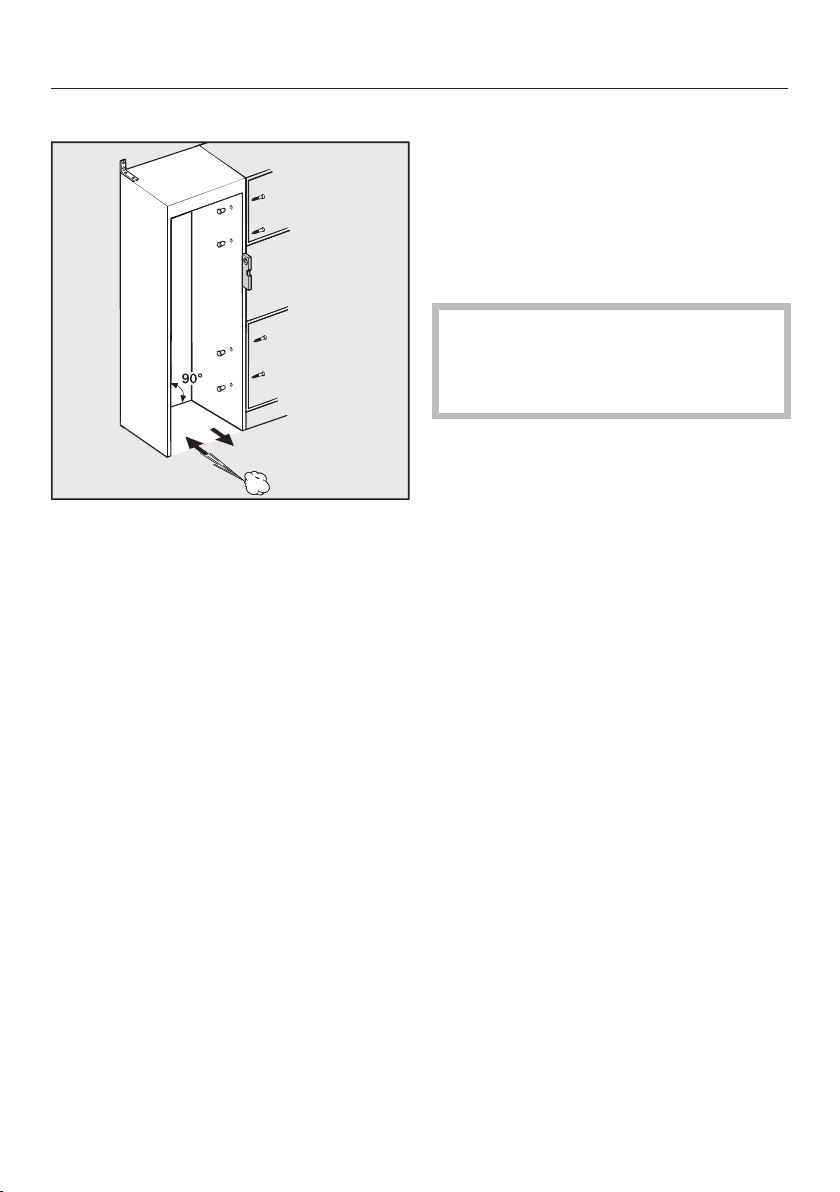
Limiting the opening angle of the ap-
pliance door
The door hinges are set ex works to en-
able the appliance door to be opened
wide.
If, for example, the appliance door hits
an adjacent wall when it is opened, you
should limit the opening angle of the
appliance door to 90°:
Open the appliance door.
Insert the pin into the lower hinge
from above.
This will limit the opening angle of the
appliance door to 90°.

Installation
*INSTALLATION*
38
Electrical connection
Risk of electric shock!
The appliance must only be switched
on when it has been installed in ac-
cordance with the installation in-
structions.
Ground the appliance.
The appliance must not be grounded
via a gas pipe.
If in doubt, have a suitably qualified
and experienced electrician check
that the installation complies with rel-
evant regulations.
Do not install a fuse into neutral cur-
rent or grounding electrical circuit.
Do not use extension cords or un-
grounded (two prong) adapters.
Do not use a frayed or damaged
power cord.
Risk of electric shock!
For protection against electric shock,
this appliance is equipped with a
pole-free plug which is protected
against reverse polarity. The electri-
cal outlet must be properly
grounded.
Do not remove the round grounding
connector pin from the plug.
Use only a grounded plug adapter.
Wait for 1hour after installation before
plugging the appliance into the power
supply. This allows coolant and refriger-
ator oil to settle in accordance with reg-
ulations.
Ensure that the voltage of the power
supply corresponds with the connection
voltage of the appliance. A power sup-
ply of 110–120V, 60Hz and 10–
16Amp, which is protected by a power
switch or a fuse, is required to operate
the appliance.
The manufacturer recommends operat-
ing the appliance on a dedicated circuit
to avoid overloading the electrical cir-
cuit.
All relevant legal electrical, fire, and
building regulations must be observed
when installing the electrical outlet and/
or the appliance.
In certain countries, appliances are re-
quired to be connected to the electrical
supply via a wall-mounted ON/OFF
switch.
To avoid the risk of fire, electric shock,
or other injuries, the appliance must be
installed and connected by a suitably
qualified electrician in accordance with
all relevant local and national regula-
tions and standards, including fire pre-
vention.
The socket must not be concealed be-
hind the appliance and must be easily
accessible so that the appliance can be
quickly disconnected from the electrical
supply in case of an emergency.
Installation
*INSTALLATION*
39
If the outlet is no longer accessible after
installation, an additional means of dis-
connection must be provided for all
poles. Suitable means of disconnection
include switches with an all-pole dis-
connect device with a contact opening
of at least 1/8" (3mm). These can be
circuit breakers, fuses, and relays.
The plug and power cord must not
come into contact with the back of the
appliance as vibrations can cause dam-
age to these components. This could
result in a short circuit.
Do not plug other appliances into elec-
trical outlet behind this appliance.
Do not connect the appliance to a
stand-alone inverter such as those used
with an autonomous energy source e.g.,
solar power.
When the appliance is turned on, power
surges could result in a safety switch-
off. This can damage the electronics.
The appliance must not be used with
so-called energy saving devices ei-
ther. These reduce the amount of en-
ergy supplied to the appliance, causing
it to overheat.
If the power cord needs to be replaced,
this must be performed by a qualified
technician.
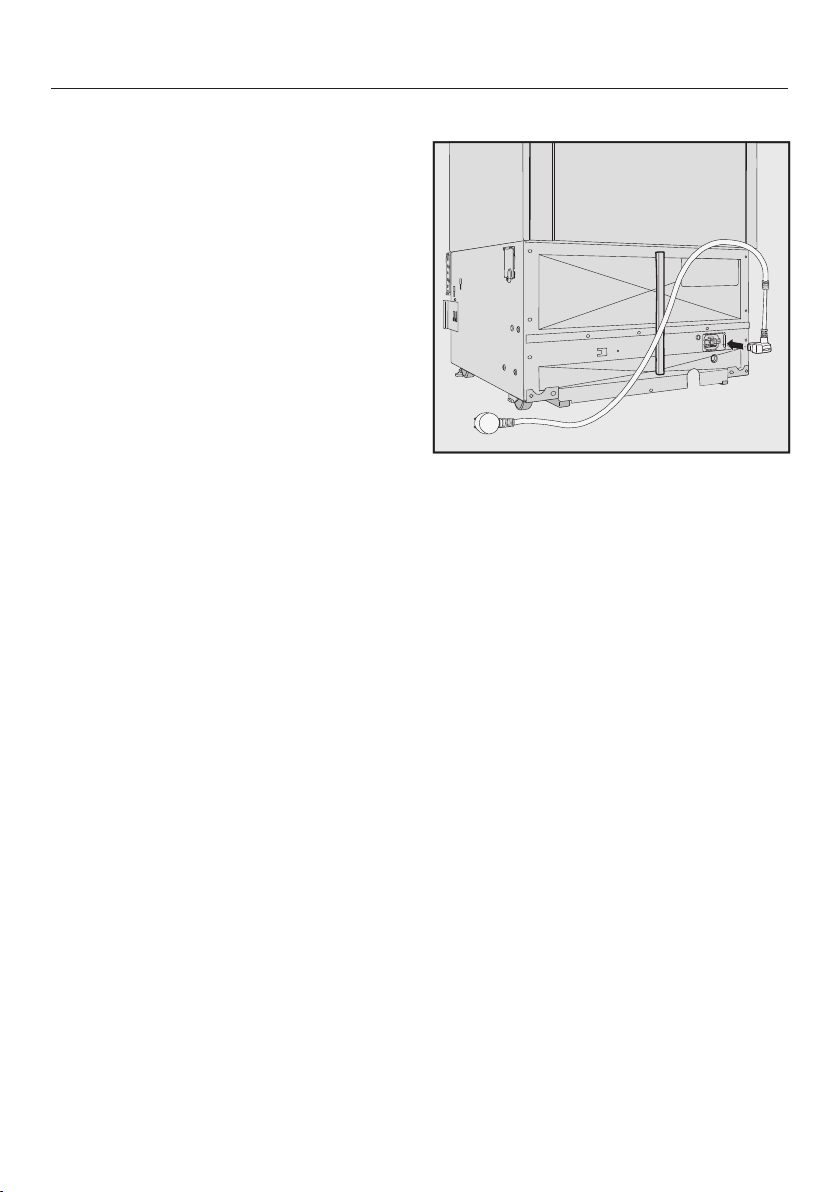
Connecting the appliance
Insert the plug into the back of the
appliance.
Make sure that the plug has clicked into
position correctly.
Insert the plug into the electrical out-
let and switch on.
The appliance is now connected to the
electricity supply.

Saving energy
40
Normal
energy consumption
Increased
energy consumption
Installation /
Maintenance
In a well-ventilated room. In an enclosed, poorly venti-
lated room.
Protected from direct sun-
light.
In direct sunlight.
Away from heat sources (ra-
diator, range/oven).
Near a heat source (radiator,
oven).
Where the ideal room tem-
perature is approx. 68°F
(20°C).
Where the ambient room
temperature is above 77°F
(25°C).
Air vents uncovered and
dusted regularly.
Where the ventilation open-
ings are blocked and full of
dust.
Temperature
setting
39°F to 41°F (4°C to 5°C) in
the refrigerator section
The lower the temperature in
the appliance, the higher the
energy consumption.
Dry compartment in the
MasterFresh zone approx.
32°F (0°C).

Saving energy
41
Normal
energy consumption
Increased
energy consumption
Use The drawers, and shelves
are arranged as they were
when the appliance was de-
livered.
Only open the door when
necessary and for as short a
time as possible. Store food
in an organized way.
Frequent opening of the
door for long periods will
cause a loss of coldness.
The appliance will try to cool
down and the compressor
will run for longer periods.
When shopping, use a
cooler bag and place the
food in the appliance as
soon as possible.
Replace any food removed
as quickly as possible, be-
fore it warms up too much.
Allow hot food and drinks to
cool down before placing
them in the appliance.
Hot food or food at room
temperature raises the tem-
perature inside the refrigera-
tion appliance. The appli-
ance will try to cool down
and the compressor will run
for longer periods.
Store food well packaged or
covered.
The evaporation or conden-
sation of liquids in the refrig-
erator section will cause a
loss of coldness.
Place frozen food in the re-
frigerator section to defrost.
Do not overfill the appliance
in order to allow the air to
circulate.
Poor air circulation will
cause a loss of coldness.
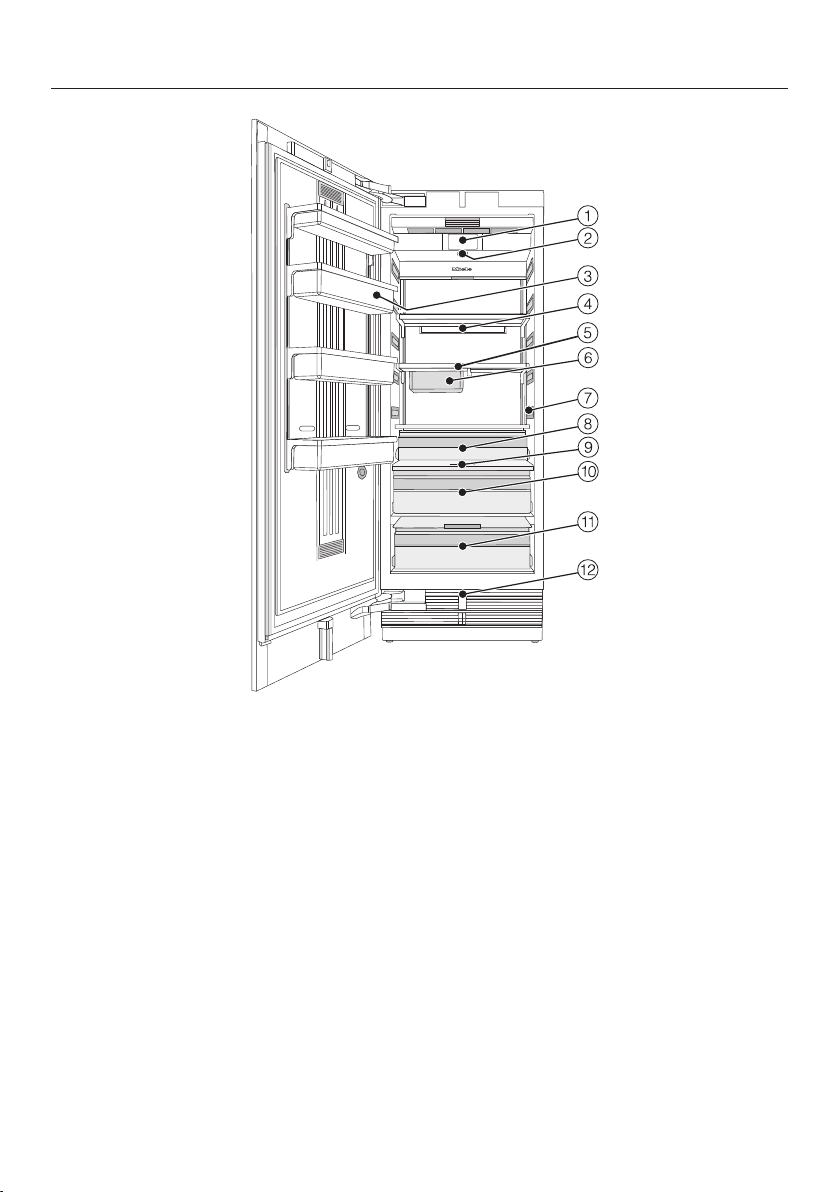
Guide to the appliance
42
a
Display
b
On/Off switch
c
Door shelves in the appliance door
d
Holder for the Active AirClean filter
e
Shelves
f
Hanging drawer for storing small food items
g
Interior lighting
h
Fruit and vegetable drawer
i
Moisture regulator
j
Humidity-controlled compartment with moisture regulator for fruit and vegeta-
bles
k
Dry compartment with temperature adjustment for meat and fish
l
Automatic door opening (Push2open/Pull2open)

Guide to the appliance
43
The dry compartment in the MasterFresh zone fulfills the requirements of a cold
storage compartment according to ENISO15502.
Guide to the appliance
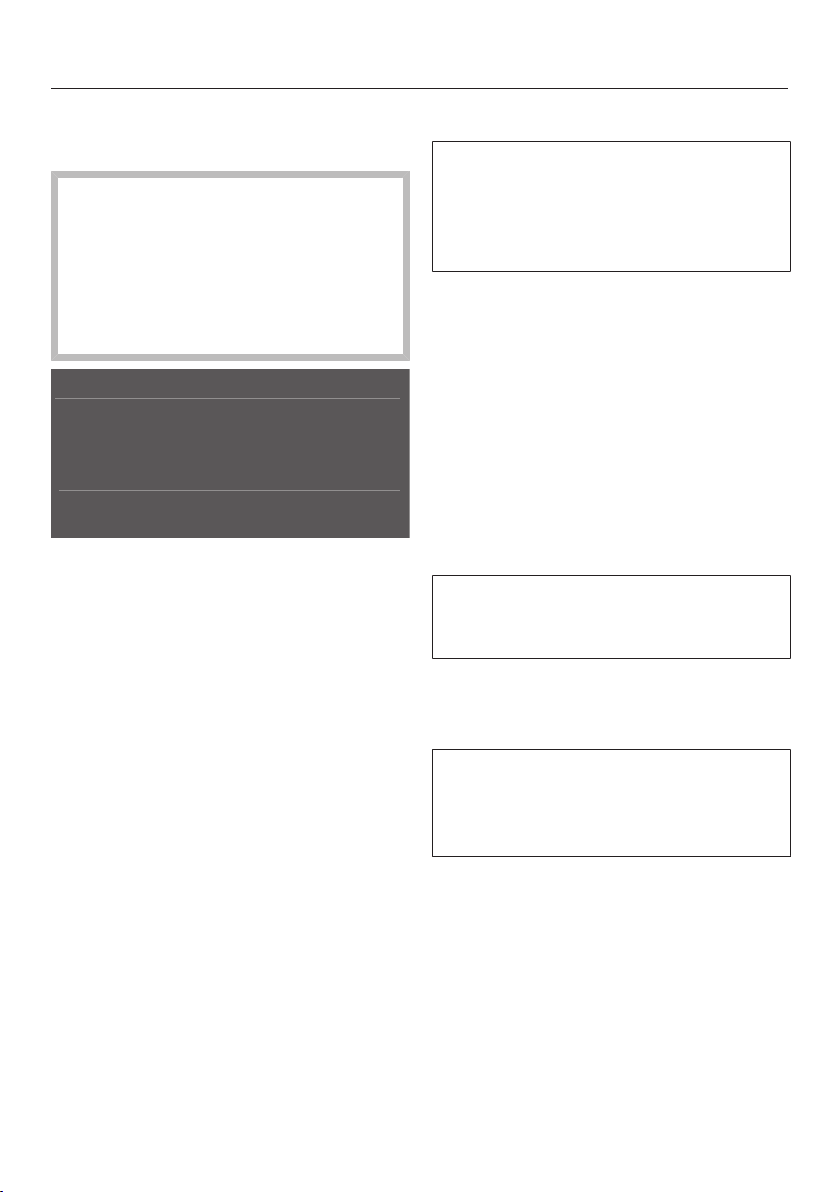
44
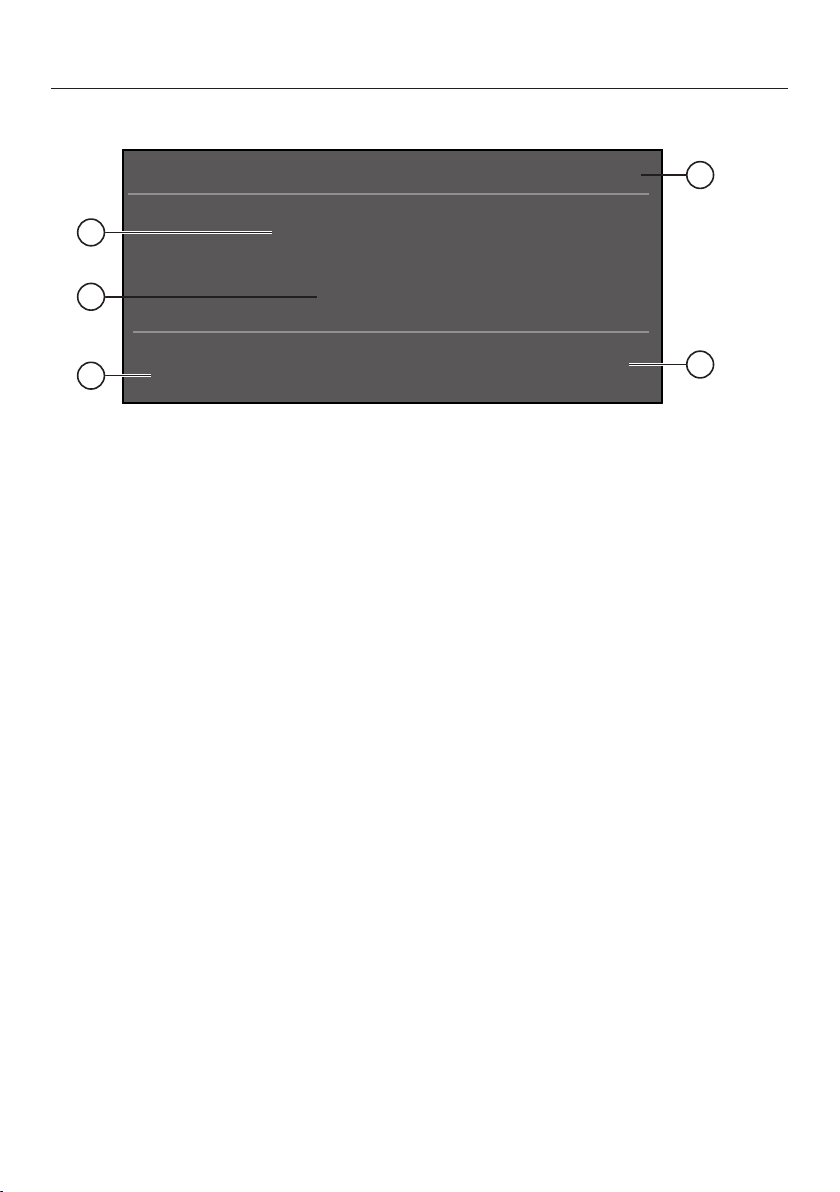
Main screen
°F
39
1
2
3
4
5
a
Automatic SuperCool display
(only visible when the Automatic SuperCool function has been switched on)
b
Temperature display (target temperature)
c
Sensor control
for setting the temperature
d
Display for Miele@home connection status
(only visible when the Miele@home function has been set up)
e
Settings mode sensor control
for adjusting various settings in Settings mode
Guide to the appliance
45
Settings mode
In Settings mode, you can select the following appliance functions and alter their
settings to some extent:
Symbol Function
Language Set
Display Brightness Adjust (darker to brighter)
Color Scheme Set (dark or bright)
/ Buzzer Tones Adjust the volume or switch off the Buzzer Tones
completely (e.g., for the door alarm)
/
Keypad Tone Adjust the volume or switch off the Keypad Tone
completely
°F / °C Temperature Unit Set (°Fahrenheit or °Celsius)
/ Keypad Lock Switch on or off
(see “Selecting additional settings”)
MasterFresh Adjust the temperature in the dry compartment
(see “Selecting additional settings”)
Eco Mode Switch on or off
(see “Selecting additional settings”)
Self Test The system restarts and is checked for faults or
malfunctions
(see “Selecting additional settings”)
Door Assistant Switch on (Push2Open or Pull2Open) or switch off
(see “Selecting additional settings”)
Miele@home Set up, deactivate, or query WiFi connection sta-
tus (see “Selecting additional settings”)

Guide to the appliance
46
* Demo Mode Switch off
* (only visible when Demo Mode, is switched on
see “Selecting additional settings”)
Factory Default Reset to default settings
(see “Selecting additional settings”)
Sabbath Mode Switch on or off
(see “Selecting additional settings”)
Display Active Air-
Clean Filter
Switch on or off or reset
(see “Selecting additional settings”)
Symbols in settings mode
/ Scroll in settings mode or select a setting
/ Change a setting (e.g., display brightness)
OK Confirm a setting
Exit the menu level
Accessories
47
Accessories supplied
Appliance plug
Active AirClean filters
The Active AirClean filters neutralize un-
pleasant odors in the refrigerator sec-
tion and stop odors from being trans-
ferred to the food.
Insert the supplied Active AirClean fil-
ters as described under “Cleaning and
care – Replacing the Active AirClean
filters”.
We recommend replacing the Active
AirClean filters every 6months.
Toe-kick cover in stainless steel look
The toe-kick cover in stainless steel
look ensures a uniform stainless steel
appearance.
Optional accessories
A range of useful Miele accessories and
care products are available for your ap-
pliance.
Active AirClean filters
See “Accessories supplied” for a de-
scription.
Active AirClean filters with holder
The Active AirClean filters neutralize un-
pleasant odors in the fridge zone and
stop odors from being transferred to the
food.
The holder for the Active AirClean filters
can be fixed under any shelf in the
fridge zone.
Side-by-side installation kit and Top
Frame
To install two or more refrigeration ap-
pliances next to one another, you will
need the side-by-side installation kit
(see “Installation – Side-by-side”).
You also need a cover (Top Frame KTF)
to connect the appliances and to cover
the gap above the tops of the appli-
ances.
Hinge pocket
If the door hinging needs to be changed
on your refrigeration appliance, the up-
per toe-kick ventilation grille must be
converted. A new hinge pocket is re-
quired in order to do this.
The door hinging must only be replaced
by Miele Technical Service.
Accessories are available to order via
the Miele Webstore, from Miele di-
rectly (see back cover for contact de-
tails) or from your Miele dealer.
Before first use
48
Before first use
Allow the appliance to stand for ap-
prox. 1hour prior to connecting it to
the power supply.
This will help prevent any malfunc-
tions.
Packaging material
Remove all packaging material from
the inside of the appliance.
Leftover tape residue.
Always remove all packaging mate-
rial, including adhesive tape, before
switching on the appliance.
Cleaning
Please refer to the relevant instruc-
tions in “Cleaning and care”.
Clean the inside of the appliance and
the accessories.
Choosing the right Door Assistant
(Push2Open/Pull2Open)
The Door Assistant helps you to open
the appliance door.
You can choose between the two Door
Assistants Push2Open and Pull2Open
(see “Selecting additional settings –
Switching on the Door Assistant ”).
The default Door Assistant is
Push2Open.
Select the
Pull2Open Door Assistant if your appli-
ance has a cabinet front with a han-
dle.
Select the
Push2Open Door Assistant if your ap-
pliance has a handle-free cabinet
front.

Before first use
49
Inserting the Active AirClean filters
Your refrigeration appliance is equipped
with 2Active AirClean filters which neu-
tralize unpleasant odors in the refrigera-
tor section.
Insert the Active AirClean filters sup-
plied as described under “Cleaning
and care – Replacing the Active Air-
Clean filters”.
Miele@home
Your refrigeration appliance is
equipped with an integrated WiFi
module.
Networking is deactivated at the fac-
tory.
To use this feature, you will need:
- a WiFi network
- the Miele app
- a Miele user account You can create
a user account via the Miele app.
The Miele app will guide you as you
connect your refrigeration appliance to
your home WiFi network.
Once the refrigeration appliance is con-
nected to your WiFi network, you can
use the app to carry out the following
activities, for example:
- Call up information on the operating
status of your refrigeration appliance.
- Change the settings on your refriger-
ation appliance.
Connecting your refrigeration appliance
to your WiFi network will increase en-
ergy consumption, even when the ap-
pliance is switched off.
Make sure that the signal of your
WiFi network is sufficiently strong in
the place where you want to set up
your refrigeration appliance.
Availability of the WiFi connection
The WiFi connection shares a frequency
range with other appliances (including
microwave ovens and remote control
toys). This can cause sporadic or even
complete connection failures. There-
fore, the availability of featured func-
tions cannot be guaranteed.
Miele@home availability
The ability to use the Miele app de-
pends on the availability of the
Miele@home service in your country.
The Miele@home service is not avail-
able in every country.
For information about availability,
please visit www.miele.com.
Miele App
The Miele App is available to download
free of charge from the Apple App
Store
®
or from the Google Play Store™.
Before first use
50
Operating the refrigeration ap-
pliance
The touch display can be scratched
by pointed or sharp objects, e.g.,
pens.
Only touch the display with your fin-
gers.
If your fingers are cold, the touch
display may not react.
°F
39
The sensor controls underneath the
temperature display can be selected
directly by touch; the symbols and text
in or above the temperature display can
only be displayed.
Settings mode
In Settings mode, you can select
different refrigeration appliance func-
tions and alter their settings to some
extent (see “Selecting additional set-
tings”).
Touch the sensor control to open
Settings mode.
Use the and sensor controls to
select the function for which you wish
to adjust the settings.
Confirm your selection with OK.
Adjust the settings using either the
and sensor controls or the and
sensor controls.
Confirm your selection with OK.
The setting with the colored back-
ground is always the selected setting;
it can be confirmed directly with OK.
Touch the sensor control if you
wish to switch to the previous menu
level or terminate the process.
Every touch of the display is con-
firmed with an audible keypad tone.
You can switch off this keypad tone in
Settings mode.
Starting up for the first time
Open the appliance door.
Before first use
51
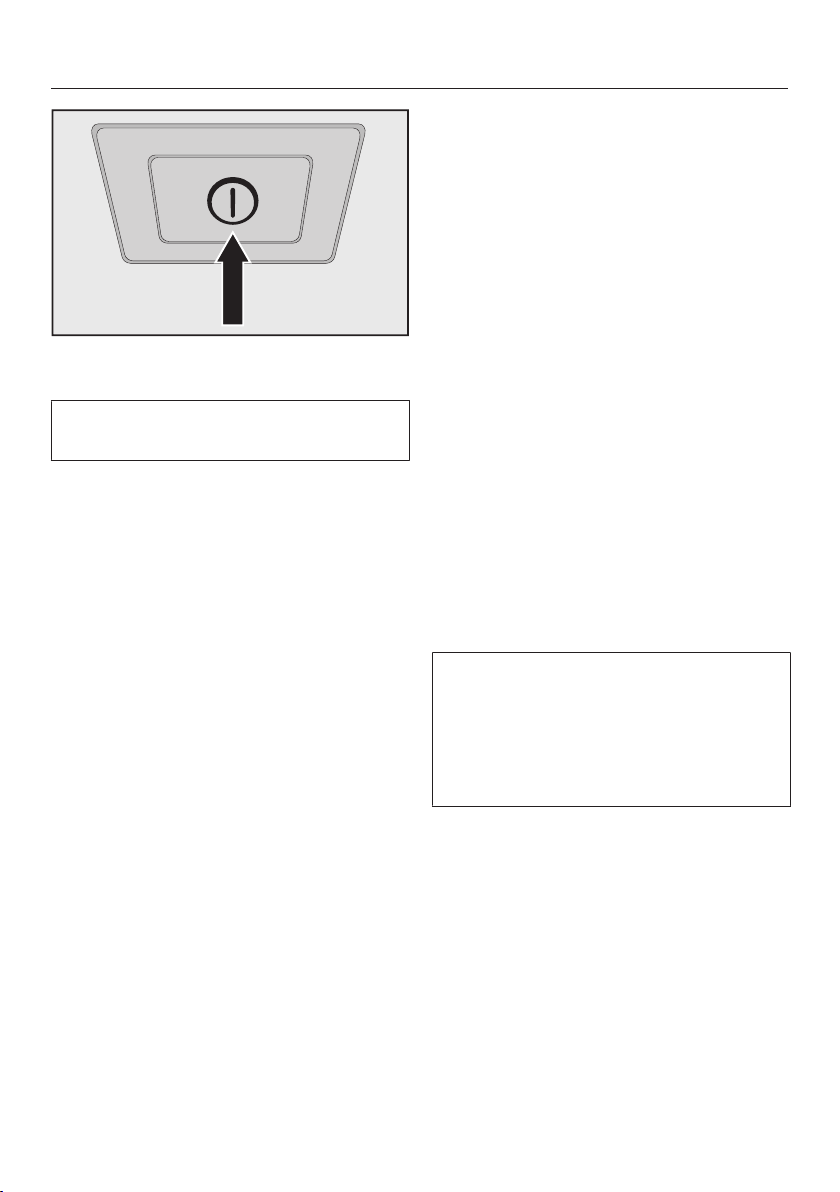
Turn the refrigeration appliance on by
pressing the On/Off switch.
The On/Off switch is located below
the display.
The refrigeration appliance will start to
cool and the interior lighting will come
on when the appliance door is opened.
Miele will appear in the refrigeration ap-
pliance display.
When you turn the appliance on for
the first time, you will be asked to
configure the following settings:
- Set the Language
(if you accidentally select the wrong
Language, return to Settings
mode and use the symbol to
change the language)
- Set the Temperature Unit:
°C (degrees Celsius) or °F (degrees
Fahrenheit)
- Set up Miele@home:
Select Continue if you would like to set
up Miele@home now. You will then be
guided by the display and the Miele
app.
As soon as your refrigeration appliance
has been integrated into your WiFi net-
work, the message Connection successful
will appear on your refrigeration appli-
ance‘s display.
Confirm the process with OK again.
If the WiFi connection is active, will
appear in the display.
Select Skip if you would prefer to set
up Miele@home later.
Touch the sensor control if you
want to return to the previous menu
level.
Set-up Successful will appear in the dis-
play.
Confirm the initial start-up with OK.
The main screen will appear on the dis-
play (see “Appliance description – Main
screen”).
You cannot terminate the initial start-
up process. The only way to terminate
the process is to switch off the refrig-
eration appliance, though the process
will continue when the appliance is
switched back on.

Switching on and off
52
Switching on the appliance
Open the appliance door.
Turn the refrigeration appliance on by
pressing the On/Off switch.
The refrigeration appliance will start to
cool and the interior lighting will come
on when the appliance door is opened.
Miele will appear, followed by the main
screen on the refrigeration appliance
display:
°F
39
To enable the temperature to get suf-
ficiently cold inside the appliance, al-
low the appliance to run for a few
hours before placing food in it.
Risk of damage due to high hu-
midity.
In environments with high humidity,
condensation can build up on exter-
nal refrigeration appliance panels.
This condensation can cause corro-
sion and lead to damage on external
appliance panels.
Install the refrigeration appliance in a
dry and/or air-conditioned room with
sufficient ventilation.
Do not switch the refrigeration appli-
ance on if you are going to be away
for a long period of time.
Do not leave the refrigeration appli-
ance unattended for a long period of
time while it is switched on.
Switching off the appliance
Turn the refrigeration appliance off by
pressing the On/Off switch.
The cooling and interior lighting are
switched off.
Please note: the refrigeration appli-
ance is not disconnected from the
power supply when the On/Off
switch is in the “Off” position.

Switching on and off
53
Switching off for longer peri-
ods of time
If the appliance is not going to be used
for a longer period of time:
Turn the appliance off.
Unplug the appliance or trip the cir-
cuit breaker.
Clean the refrigeration appliance.
Leave the door ajar to air the refriger-
ation appliance and avoid odors
building up inside the appliance.
If, during a long absence, the refrig-
eration appliance is switched off but
not cleaned and the door(s) left shut,
there is a danger of bacteria building
up inside the appliance.
It is essential to clean the refrigera-
tion appliance.
Selecting additional settings
54
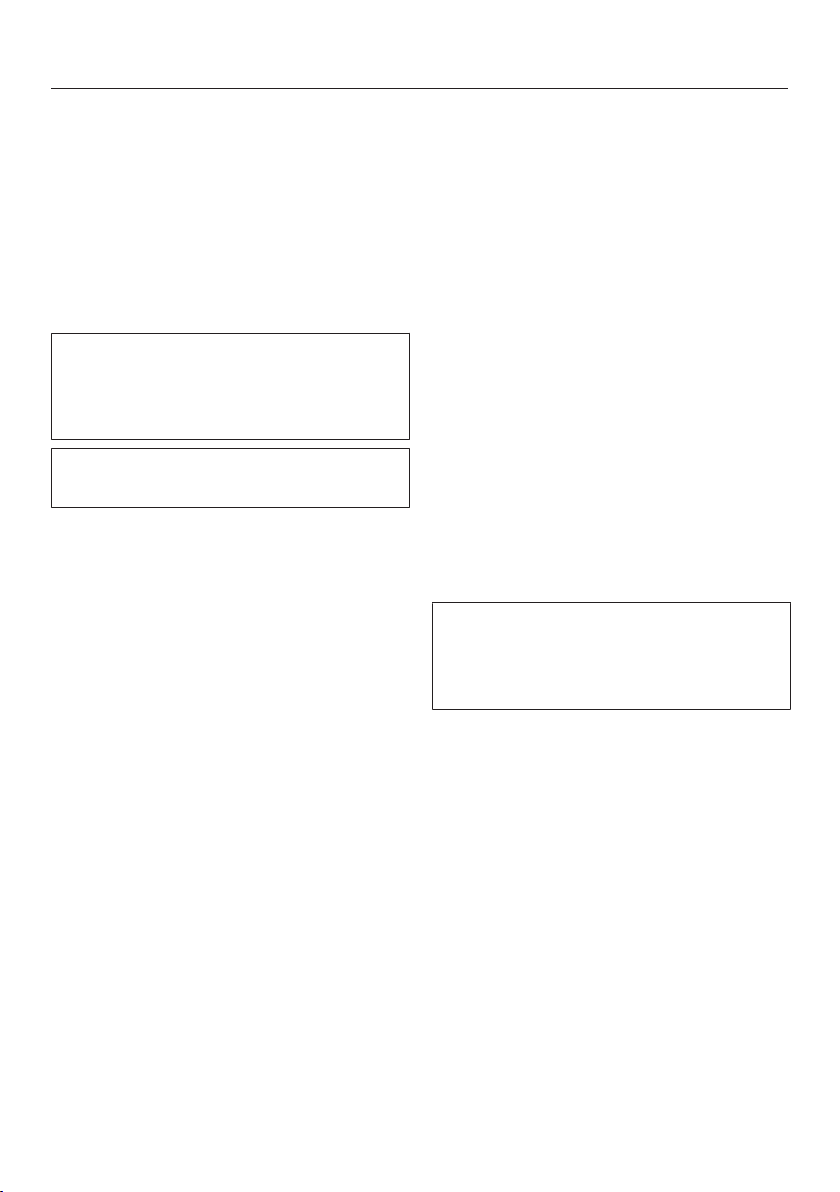
In settings mode, certain settings
can be adjusted and functions selected,
allowing you to adjust the machine to
suit your requirements.
The following section only describe the
functions in settings mode that re-
quire further explanation.
The door alarm and other warnings
are automatically disabled when the
appliance is in settings mode .
Switching Keypad Lock/
on or off
Switch Keypad Lock on if you wish to
protect your refrigeration appliance
from unwanted temperature changes or
other unintentional adjustments in Set-
tings mode .
In Settings mode, use the and
sensor controls to select Keypad
Lock and select OK to confirm your
selection.
Use the and sensor controls to
switch the sensor lock On or Off and
select OK to confirm your selection.
The keypad lock will not be activated
until you close the appliance door.
Nothing will appear on the display to in-
dicate that the keypad lock is switched
on.
The message Press OK for 6 seconds to
unlock will appear on the display if you
select a sensor control while the sensor
lock is switched on.
Follow the instructions on the display.
The display is unlocked briefly so you
can adjust the setting as required. Clos-
ing the appliance door will reactivate
the sensor lock.
Selecting additional settings
55
Adjusting the temperature in
the MasterFresh zone (dry
compartment)
In Settings mode, use the and
sensor controls to select Master-
Fresh and select OK to confirm your
selection.
Use the and sensor controls to
select the desired temperature and
touch OK to confirm your selection.
Touch the sensor control if you
wish to terminate the process.
The segment bar displays 5 segments;
the temperature is adjusted in incre-
ments of approx. 34°F (1°C).
The factory default setting for the tem-
perature in the dry compartment is
32°F (0°C).
Switching Eco Modeon or
off
Eco Mode is useful when going on vaca-
tion, for example, if you do not wish to
switch off the appliance completely or
do not need a high degree of cooling.
Energy consumption in Eco Mode is
lower than in normal operation.
The refrigerator section is thereby regu-
lated to a temperature of 43°F (6°C) and
the dry compartment in the Master-
Fresh zone to approx. 34°F (1°C).
If the AutomaticSuperCool function
is switched on, this will be automatically
switched off when Eco Mode is selected.
In Settings mode, use the and
sensor controls to select Eco Mode
and select OK to confirm your selec-
tion.
Use the and sensor controls to
switch Eco Mode On or Off and select
OK to confirm your selection.
Only the changed temperature on the
display indicates that Eco Mode is
switched on.
Tip: You can also switch off the Eco
Mode function by directly adjusting the
temperature (see “The correct tem-
perature”) – Setting the temperature”).
Storing food at a temperature of 43°F
(6°C) for an extended period of time
may impair the shelf life and quality
of the food.

Selecting additional settings
56
Performing a Self Test
Perform a Self Test if you are concerned
that your refrigeration appliance is not
working properly and want to check if it
is suffering from any problems.
In Settings mode, use the and
sensor controls to select Self Test
and select OK to confirm your selec-
tion.
Touch the sensor control if you
wish to terminate the process.
The Self Test starts and the appliance is
checked for any faults or malfunctions.
- The message System restart will ap-
pear on the display if the Self Test
does not discover any faults or mal-
functions.
- If the Self Test does discover any
faults or malfunctions, they are indi-
cated as error messages on the dis-
play.
An alarm will also sound.
If you find the alarm disruptive, you
can switch it off in advance by touch-
ing the sensor control.
Make a note of the error message(s)
displayed.
Contact Miele Service and inform
them of the error message(s) on the
display.
Confirm the message with OK.
System restart will appear on the display.
The refrigeration appliance briefly
switches off and then back on automat-
ically.
Self test completed will appear on the dis-
play.
Confirm the message with OK.
The main screen appears on the display
again.
Selecting additional settings
57
Switching on the Door Assis-
tant
You can choose between the two Door
Assistants Push2Open and Pull2Open.
The default Door Assistant is
Push2Open.
The Push2Open Door Assistant is suit-
able for cabinet fronts without handles.
The door will then open automatically
when you gently press against it.
The Pull2Open Door Assistant is suitable
for cabinet fronts with handles. The ap-
pliance door can be opened easily with
little force.
Risk of damage if the appliance
door is closed prematurely.
When the Door Assistant is switched
on, repeatedly closing the appliance
door early can lead to damage or
malfunctions.
Refrain from holding onto or closing
the appliance door while automatic
door opening is still extended. If you
have indeed closed the appliance
door, leave it closed for 5minutes.
Automatic door opening resets itself.
Switching on Push2Open
In Settings mode, use the and
sensor controls to select Door As-
sistant and select OK to confirm your
selection.
Use the and sensor controls to
select Mode and select OK to confirm
your selection.
Use the and sensor controls to
select Push2Open and select OK to
confirm your selection.
Touch the sensor control to return
to the previous menu level.
– Adjusting the intensity
You can also adjust the intensity of the
Push2Open function. The lower the set
intensity, the less force required when
you push against the appliance door.
In Settings mode, use the and
sensor controls to select Door As-
sistant and select OK to confirm your
selection.
In Settings mode, use the and
sensor controls to select Intensity
and select OK to confirm your selec-
tion.
Use the and sensor controls to
select the right intensity (Low, Medium,
High) and select OK to confirm your
selection.
Selecting additional settings
58
– Adjusting the duration of the Auto-
Close function
You can also adjust the duration for
how long the appliance door will remain
open until it closes automatically.
In Settings mode, use the and
sensor controls to select Door As-
sistant and select OK to confirm your
selection.
In Settings mode, use the and
sensor controls to select AutoClose
and select OK to confirm your selec-
tion.
Use the and sensor controls to
select the duration (5 to 30seconds)
and touch OK to confirm your selec-
tion.
To protect against inadvertent open-
ing: if you do not pull the appliance
door open, it will close again by itself
after a duration defined by you.
Switching on Pull2Open
In Settings mode, use the and
sensor controls to select Door As-
sistant and select OK to confirm your
selection.
Use the and sensor controls to
select Mode and select OK to confirm
your selection.
Use the and sensor controls to
select Pull2Open and select OK to
confirm your selection.
Touch the sensor control to return
to the previous menu level.
– Adjusting the intensity
You can also adjust the intensity of the
Pull2Open function. The lower the set in-
tensity, the less force required when
you pull the appliance door.
In Settings mode, use the and
sensor controls to select Door As-
sistant and select OK to confirm your
selection.
In Settings mode, use the and
sensor controls to select Intensity
and select OK to confirm your selec-
tion.
Use the and sensor controls to
select the right intensity (Low, Medium,
High) and select OK to confirm your
selection.

Selecting additional settings
59
Switching off the Door Assis-
tant
In Settings mode, use the and
sensor controls to select Door As-
sistant and select OK to confirm your
selection.
Use the and sensor controls to
select Mode and select OK to confirm
your selection.
Use the and sensor controls to
select Off and select OK to confirm
your selection.
Touch the sensor control to return
to the previous menu level.
Miele@home
Setting up Miele@home
The message Set up Miele@home only
appears if the refrigeration appliance
has not yet been connected to a WiFi
network.
Connect your refrigeration appliance
as described in “Before using for the
first time”.
Deactivating Miele@home
In Settings mode, use the and
sensor controls to select
Miele@home and select OK to confirm
your selection.
Use the and sensor controls to
select Deactivate and select OK to
confirm your selection.
Deactivation successful will appear on the
display.
Confirm the message with OK.
Your refrigeration appliance is now dis-
connected from your WLAN network.
The symbol will go out on the dis-
play.
Selecting additional settings
60
Activating Miele@home
If you have already activated
Miele@home and then disconnected
the connection, you will need to reac-
tivate the connection.
In Settings mode, use the and
sensor controls to select
Miele@home and select OK to confirm
your selection.
Use the and sensor controls to
select Activate and select OK to con-
firm your selection.
Activation successful will appear on the
display.
Confirm the message with OK.
If the WLAN connection is active, will
appear on the display.
Checking the WLAN connection sta-
tus
In Settings mode, use the and
sensor controls to select
Miele@home and select OK to confirm
your selection.
Use the and sensor controls to
select Connection status and select OK
to confirm your selection.
Information about the WLAN connec-
tion status will then appear on the dis-
play:
- connected: there is a strong con-
nection
- connected: there is an average
connection
- connected: there is a weak con-
nection
- disconnected
Setting up Miele@home again
If you have changed your WiFi network,
you can set up Miele@home again for
your appliance.
In Settings mode, use the and
sensor controls to select
Miele@home and select OK to confirm
your selection.
Use the and sensor controls to
select Set up again and select OK to
confirm your selection.
Reset configuration? will appear on the
display.
Use the and sensor controls to
select Yes or No and select OK to
confirm your selection.
Resetting the network configuration
Reset the refrigeration appliance’s set-
tings to the default settings when dis-
posing of your refrigeration appliance,
selling it, or putting a used refrigera-
tion appliance into operation. This will
reset the network configuration so that
all personal data is deleted from the
refrigeration appliance. This will also
ensure that a previous owner is no
longer able to access the refrigeration
appliance.
Reset the settings of the refrigeration
appliance as described under “Reset-
ting the settings to their default set-
tings”.

Selecting additional settings
61
Switching off Demo Mode
Demo mode allows the appliance to
be presented in the showroom with-
out the cooling system being
switched on. Do not activate this set-
ting for domestic use.
If Demo mode has been switched on
as a default setting, will show on the
display.
In Settings mode, use the and
sensor controls to select Demo
Mode and select OK to confirm your
selection.
Press OK for 4 seconds to deactivate will
appear on the display.
Follow the instructions on the display.
The countdown Demo Mode will deacti-
vate in seconds. appears on the display.
Demo Mode deactivated. The appliance will
cool down. will appear on the display.
Confirm the message with OK.
The main screen appears on the display
again.

Selecting additional settings
62
Resetting the settings to their default settings
You can reset the refrigeration appliance‘s settings to their default settings.
Reset the refrigeration appliance’s settings to the default settings when disposing
of your refrigeration appliance, selling it, or putting a used refrigeration appliance
into operation. This will reset the network configuration so that all personal data
is deleted from the refrigeration appliance. This will also ensure that a previous
owner is no longer able to access the refrigeration appliance.
In Settings mode, use the and sensor controls to select Factory Default
and select OK to confirm your selection.
Use the and sensor controls to select Reset and select OK to confirm your
selection.
After a brief delay, Settings reset appears on the display.
Confirm the message with OK.
The initial commissioning process restarts (see “Before first use – Starting up for
the first time”).
Selecting additional settings
63
The refrigeration appliance‘s settings will be reset to the following values:
Function Default settings
Language English
Display Brightness Average value
(4 of 7 segments)
Color Scheme Dark
/ Buzzer Tones Average value
(4 of 7 segments)
/
Keypad Tone Average value
(4 of 7 segments)
°F / °C Temperature Unit °Fahrenheit
/ Keypad Lock Switched off
MasterFresh 32°F (0°C)
(2 of 5 segments)
Eco Mode Switched off
Door Assistant Push2open
Miele@home Switched off
Sabbath Mode Switched off
Display Active AirClean Filter Switched on
Temperature in the refrigera-
tor section
37°F (4°C)
Temperature in the dry com-
partment
32°F (0°C)
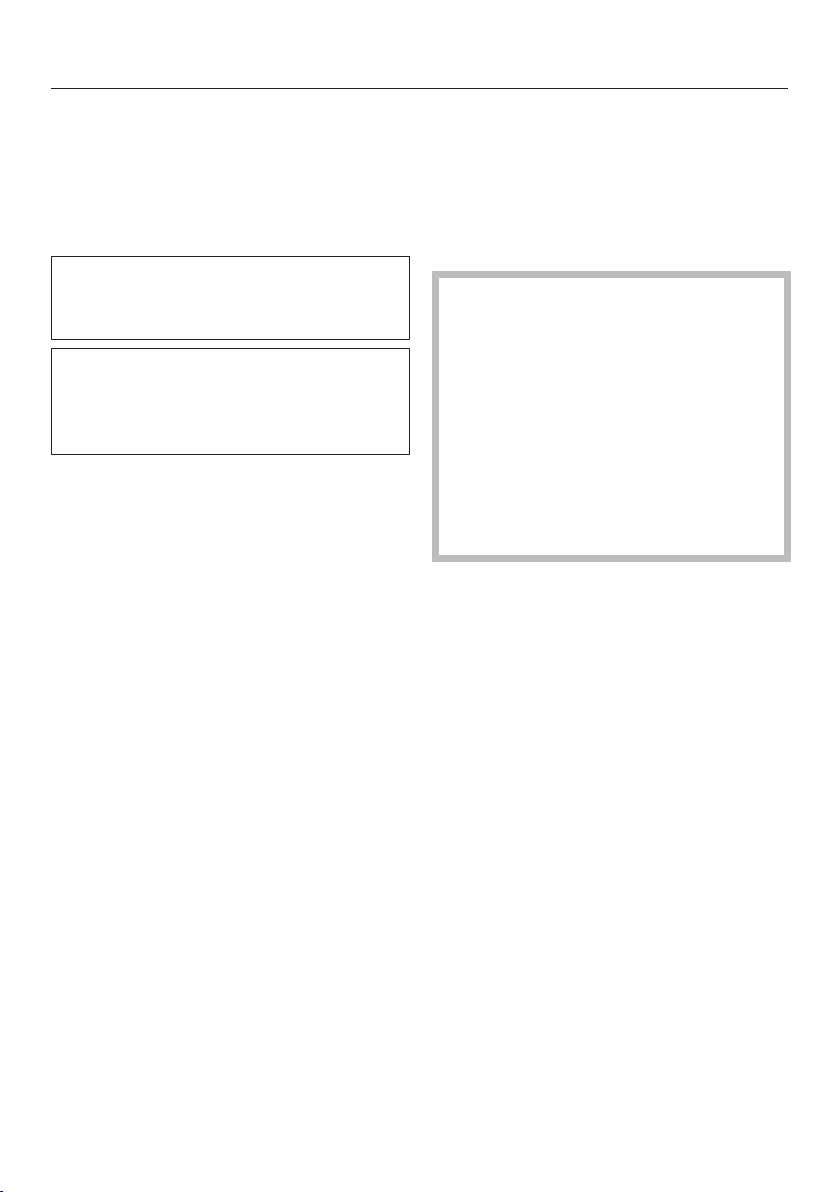
Selecting additional settings
64
Switching Sabbath Mode on
or off
The refrigeration appliance has a Sab-
bath Mode to support the observance of
religious customs.
When Sabbath Mode is switched on,
you cannot make any settings on your
refrigeration appliance.
Ensure that the appliance door is
properly closed, as visual and audible
alarms are switched off in Sabbath
Mode.
In Settings mode, use the and
sensor controls to select Sabbath
Mode and select OK to confirm your
selection.
Use the and sensor controls to
select On or Off and select OK to con-
firm your selection.
When Sabbath Mode is switched on,
will appear on the display and the
display brightness will be reduced (the
display does not change when the ap-
pliance door is closed).
When Sabbath Modeis switched on,
the following functions are switched off:
- Door Assistant
(for cabinet fronts without handles,
the appliance door will have to be
pulled from the bottom or side)
- Lighting
- All audible and visual signals,
- Temperature display
- The Automatic SuperCool function (if
previously switched on)
You can still select:
- the sensor control for Settings
mode so that Sabbath Mode can be
switched off
The Sabbath Mode function will switch it-
self off automatically after approx.
125hours.
Danger of food poisoning!
Any power failure during Sabbath
Mode will not be shown on the dis-
play. After a power failure, the appli-
ance will restart in Sabbath Mode.
When power is restored, no notifica-
tion of the power failure will appear
on the display.
If there is a power failure during Sab-
bath mode, check the quality of the
food.
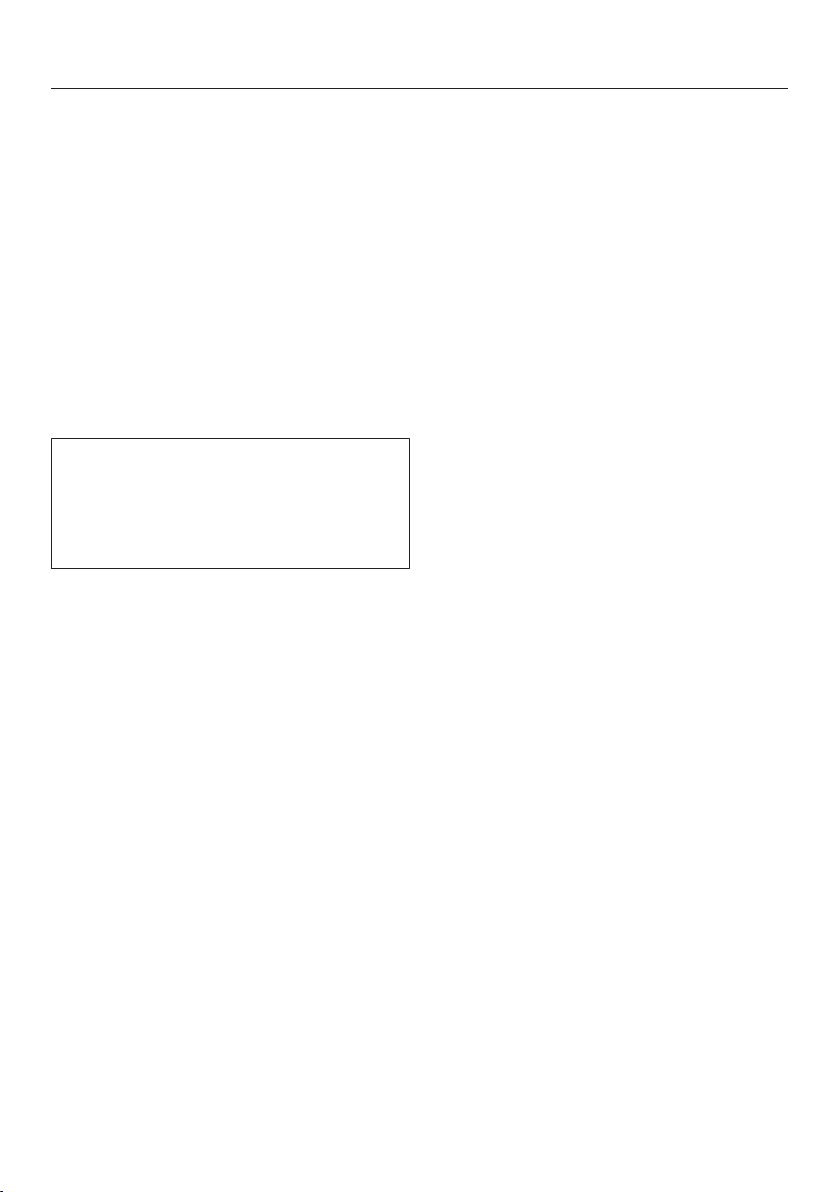
Selecting additional settings
65
Switching on, switching off, or
resetting the Display Active
AirClean Filter
The Display Active AirClean Filter will re-
mind you approx. every 6months that
the Active AirClean filters have to be re-
placed. Change Active AirClean Filter will
appear on the display.
See “Cleaning and care – Replacing the
Active AirClean filters” for instructions
on how to replace the Active AirClean
filters.
The first time the Active AirClean filters
need to be replaced, the display will
remind you automatically; the re-
minder does not need to be switched
on separately.
Switching on the Display Active Air-
Clean Filter
If the Display Active AirClean Filter has
been switched off once, it must be
switched on again if required.
In Settings mode, use the and
sensor controls to select the Display
Active AirClean Filter and select OK to
confirm your selection.
Use the and sensor controls to
select On and select OK to confirm
your selection.
The Display Active AirClean Filter has been
switched on.
Switching off the Display Active Air-
Clean Filter
If you do not require theDisplay Active
AirClean Filter, you can switch it off.
In Settings mode, use the and
sensor controls to select the Display
Active AirClean Filter and select OK to
confirm your selection.
Use the and sensor controls to
select Off and select OK to confirm
your selection.
The Display Active AirClean Filter has been
switched off.

Selecting additional settings
66
Resetting the Display Active AirClean
Filter
After you have replaced the Active Air-
Clean filters, you must reset the Display
Active AirClean Filter so that it can be dis-
played again after 6months.
If you do not reset the display, it ap-
pears again and again.
In Settings mode, use the and
sensor controls to select the Display
Active AirClean Filter and select OK to
confirm your selection.
Use the and sensor controls to
select Reset and select OK to confirm
your selection.
The Change Active AirClean Filter message
disappears from the display.
The Display Active AirClean Filter to re-
place the Active AirClean filters has
been activated.

The correct temperature
67
It is very important to set the correct
temperature for storing food in the ap-
pliance. Bacteria will cause food which
is not stored at the correct temperature
to deteriorate rapidly. Temperature influ-
ences the growth rate of these bacteria.
Reducing the temperature reduces their
growth rate.
The temperature in the appliance will
rise:
- the more often the appliance door is
opened and the longer it is kept open
- the more food that is stored in it
- the warmer the food is that is being
put into it
- the higher the ambient temperature
surrounding the refrigeration appli-
ance is. The appliance is designed
for use within specific ambient tem-
peratures (climate range). Do not use
in ambient temperatures for which it
is not designed
...in the refrigerator section
and in the MasterFresh zone
We recommend a temperature of 39°F
(4°C) in the refrigerator section.
We recommend a temperature of 32°F
(0°C) in the dry compartment of the
MasterFresh zone.
Automatic cold air circulation (Dyna-
Cool)
The fan automatically turns on when the
cooling system for the refrigerator sec-
tion turns on. It distributes the tempera-
ture in the refrigerator section to all ar-
eas evenly so that all the food inside will
be chilled to about the same degree.
The correct temperature
68
Setting the temperature
Touch the sensor control to set the
temperature.
The previously set temperature will ap-
pear.
Use the and sensor controls to
set the temperature. Keeping your fin-
ger on the sensor control changes
the temperature continuously.
Confirm the temperature setting with
OK or wait approx. 8seconds after
the last touch of the sensor. This tem-
perature will be automatically
adopted.
Tip: The new temperature setting can
also be confirmed and adopted by clos-
ing the appliance door.
The temperature display always shows
the required temperature.
If you have adjusted the temperature,
wait for approximately 6hours if the
appliance is not very full and for ap-
proximately 24hours if the appliance
is full before checking the temperature
display. It will take this long for an accu-
rate reading to be given.
If, after this time, the temperature is
still too high or too low, adjust it
again.
Adjusting the temperature in the dry
compartment of the MasterFresh
zone
The temperature in the dry compart-
ment of the MasterFresh zone is main-
tained at approx. 32°F (0°C).
However, if you would like it to be
warmer or colder, you can adjust the
temperature slightly (see “Selecting ad-
ditional settings – Adjusting the temper-
ature in the MasterFresh zone (dry com-
partment)”).
Tip: You can select a lower setting for
storing, for example, particularly deli-
cate fish. A slightly higher temperature
is preferable for storing ready-to-eat
food, for example.
Temperature range
The temperature in the refrigerator sec-
tion can be set between 36°F (2°C) and
46°F (8°C).
The temperature in the dry compart-
ment in the MasterFresh zone can be
set between 30°F (-1°C) and 37°F (3°C).

Using Automatic SuperCool
69
AutomaticSuperCool func-
tion
The AutomaticSuperCool function can
be used to rapidly reduce the tempera-
ture in the refrigerator section to its low-
est setting (depending on the room
temperature).
AutomaticSuperCool is particularly rec-
ommended for the rapid chilling of large
amounts of fresh food or drink.
Switching on AutomaticSuperCool
Touch the sensor control to set the
temperature.
Touch the sensor control to switch
the AutomaticSuperCool function on.
The symbol is highlighted in color
and the newly set temperature value of
36°F (2°C) appears on the display.
Confirm the setting with OK or wait
approx. 8seconds after the last press
of the button. The setting will be au-
tomatically adopted.
The symbol is now illuminated on the
display.
The appliance will now run at maximum
power.
Switching off AutomaticSuperCool
Touch the sensor control to set the
temperature.
The symbol is highlighted in color
and the temperature value of 36°F (2°C)
is shown on the display.
Touch the sensor control to switch
the AutomaticSuperCool function off.
The symbol is no longer highlighted
in color and the previous temperature
setting appears again on the display.
Confirm the setting with OK or wait
approx. 8seconds after the last press
of the button. The setting will be au-
tomatically adopted.
The symbol disappears from the
temperature display.
The refrigeration appliance will continue
running at normal power.
If you do not turn off the AutomaticSu-
perCool function, it will turn itself off au-
tomatically after approx. 6hours. The
appliance will then run at normal power
again.
Tip: To save energy, the AutomaticSu-
perCool function can be turned off once
food and drinks are sufficiently chilled.

Door alarm
70
The appliance is fitted with a warning
system to avoid increased energy con-
sumption if the door is left open.
Door alarm
An alarm will sound if the appliance
door has been left open for longer than
approx. 2minutes.
The Close the door message also ap-
pears on the display.
As soon as the door is closed, the
alarm will stop and the message on the
display will disappear.
Turning the door alarm off early
If the alarm disturbs you, it can be
turned off early.
Touch the OK sensor control in the
display.
The alarm stops and the message dis-
appears from the display.
After a certain time the alarm will sound
again and the message will reappear in
the display until the appliance door is
closed.
Adjusting the interior fittings
71
Removing or moving the door
shelves
Only move or remove the door
shelves when they are empty.
Hold the shelf on the frame with both
hands and lift it slightly so that it can
be lifted with the catches on both
sides over the guide.
Remove the shelf or place it in the re-
quired position with the catches in
the guides at the same height again.
Make sure that the shelf is straight.
Tip: For the purposes of loading and
unloading or cleaning, the clip-in con-
tainers in the shelves can be removed
from their holders completely.
Removing or moving the
shelves
Hold the shelf on both sides and raise
it slightly so that it can be lifted with
the catches over the guide at the
back.
Pull the shelf forward.
Remove the shelf or place it in the re-
quired position, with the catches en-
gaged at the back.
Make sure that the shelf is straight.
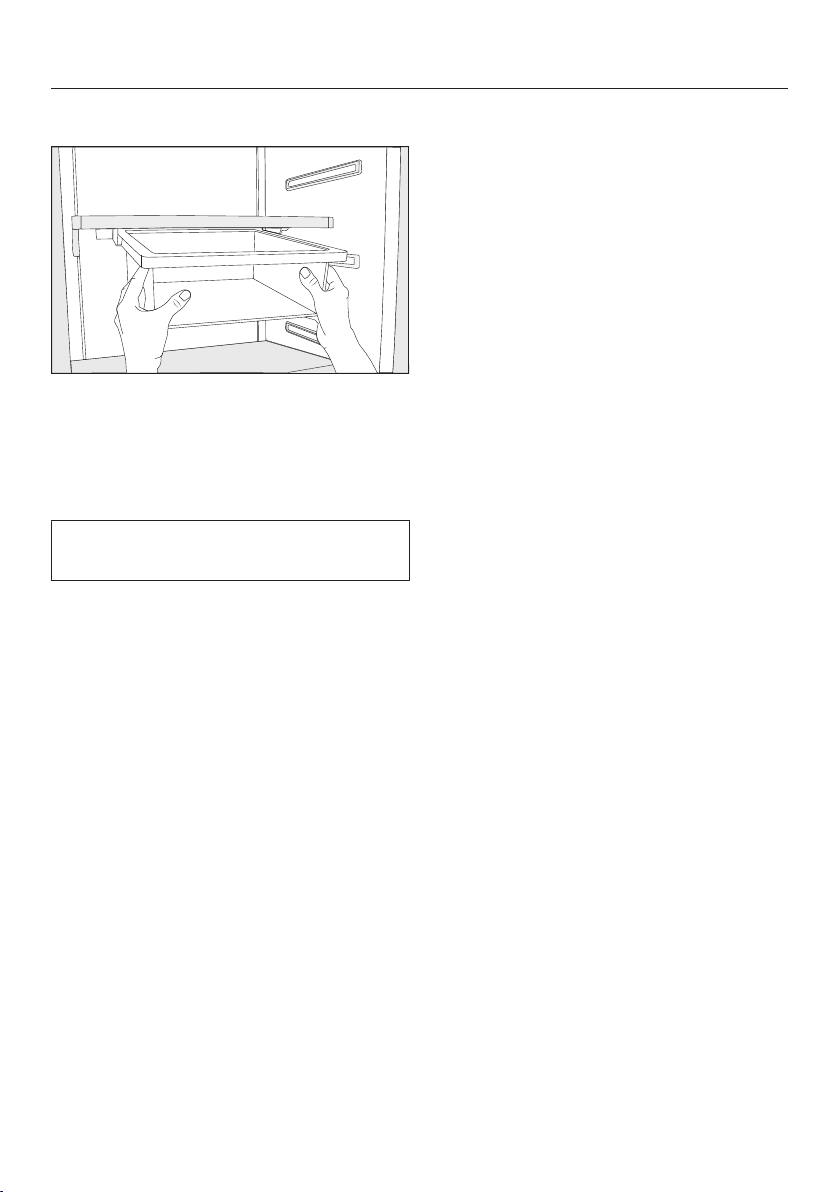
Adjusting the interior fittings
72
Removing the hanging drawer
Pull the hanging drawer straight out
to lift it over the pull-out stops on
both sides.
To reinsert the hanging drawer, push
it straight into the guide.
The hanging drawer can be moved to
the left or right if required.
Moving the hanging drawer
The hanging drawer can be fixed under
any shelf in the refrigerator section.
Pull the hanging drawer out.
To remove the holder for the hanging
drawer, press against the retainers on
both sides of the holder from the rear
and pull the holder downwards diag-
onally from the frame.
To replace the holder, press against
the retainers on both sides of the
holder from the rear and clamp it into
the gap on the frame from below.
Put the hanging drawer back in.
Tip: Alternatively, you can move the
shelf together with the hanging drawer.
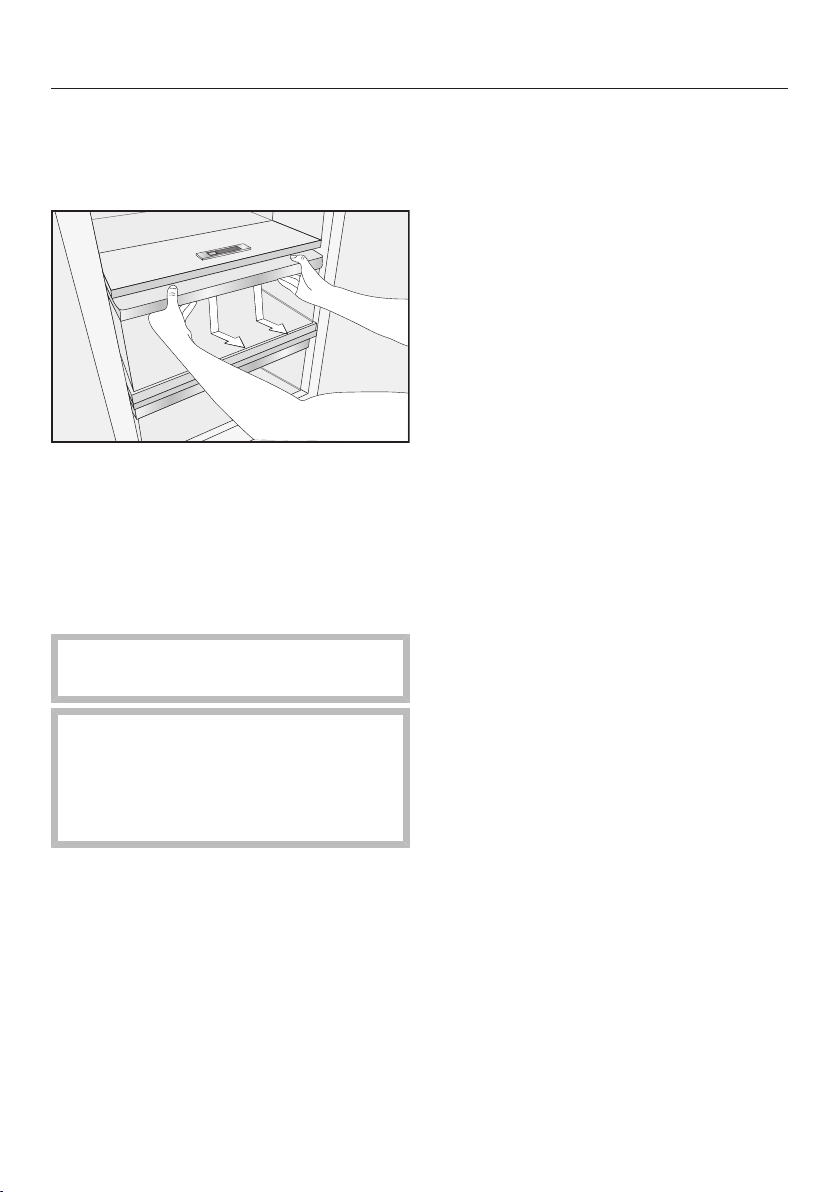
Adjusting the interior fittings
73
Removing compartments from
the Fridge Zone
Pull the compartment out a little bit.
Using both hands, grasp the com-
partment frame from below and push
the compartment downwards so that
the rear end disengages and lifts up-
wards.
Pull the compartment forwards to re-
move it.
Push the runners back in again to
avoid damaging them!
Be careful not to wash away the spe-
cial lubricant in the telescopic run-
ners during cleaning.
Wipe the telescopic runners with a
damp cloth to clean them.
To reinsert the compartment, position
it on the telescopic runners so that it
clicks into place.
Storing food in the refrigerator section
74
Always observe USDA food safety
guidelines.
Risk of fire from electrical appli-
ances.
Operating electrical devices in the
appliance can cause sparks to form.
Do not operate any electrical devices
inside the appliance.
Risk of explosion due to
flammable mixes of gases.
Electrical components can cause
flammable mixes of gases to ignite.
Do not store any explosive materials
or products containing flammable
propellants (e.g., spray cans) in the
appliance. The spray cans in ques-
tion can be identified by the contents
printed on the can or by a flame
symbol. Electrical components can
cause escaping gases to ignite.
Risk of damage due to greasy or
oily foods.
If storing food which contains a lot of
fat or oil in the appliance or the door,
make sure that it does not come into
contact with plastic components as
this could cause stress cracks or
break the plastic.
Make sure that no fat or oil leaks
onto the plastic parts of the appli-
ance.
Different storage zones
Due to natural air circulation, there are
different temperature zones in the re-
frigerator section.
Cold, heavy air sinks to the lowest sec-
tion of the refrigeration section. Make
use of the different zones when placing
food in the appliance.
Tip: To allow air to circulate efficiently,
do not pack food too closely together in
the refrigerator.
If there is insufficient air circulation,
the cooling performance will de-
crease and energy consumption will
increase.
Do not cover the fan in the rear wall
of the appliance.
Tip: Do not store food in such a way
that it touches the rear wall of the refrig-
erator section as it may freeze to the
rear wall.
This appliance has DynamicCooling,
which helps to keep an even tempera-
ture when the fan is running. When
DynamicCooling is turned on, the dif-
ference between the various zones is
less pronounced.

Storing food in the refrigerator section
75
Warmest area
The warmest area in the refrigerator
section is in the top section of the door.
Use this for storing butter so that it re-
mains spreadable and cheese so that it
retains its flavor.
Coldest area
The coldest area in the fridge zone is di-
rectly above the MasterFresh zone and
at the back of the appliance. The tem-
perature in the dry compartment of the
MasterFresh zone is even colder.
Use this area in the fridge zone and in
the dry compartment of the Master-
Fresh zone for all delicate and highly
perishable food, e.g.:
- fish, meat, poultry
- cold cuts, ready-made meals
- dishes or baked goods containing
eggs or cream
- fresh dough, cake mixtures, pizza
dough, or pie dough
- raw milk cheese and other raw milk
products
- pre-packed vegetables and other
fresh food with a best-before date
that requires storage at a temperature
of at least 39°F (4°C)
Tip: This compartment is ideal for all
home-cooked meals as any micro-
organisms that may still be present can-
not multiply.
Food which is not suitable for
storage in the fridge zone
Not all food is suitable for refrigeration
at temperatures below 40°F (5°C) be-
cause it is sensitive to cold.
Foods which are sensitive to cold in-
clude:
- pineapples, avocados, bananas,
pomegranates, mangoes, melons,
papayas, passion fruit, citrus fruits
such as lemons, oranges, mandarins,
grapefruits
- fruit (which is not yet ripe)
- eggplant, cucumbers, potatoes, pep-
pers, tomatoes, zucchini
- hard cheeses (e.g., Parmesan)

Storing food in the refrigerator section
76
Notes on buying food
The freshness of the food when it is first
placed in the appliance is the most im-
portant factor for how long it stays
fresh.
Take into account the use-by date and
the correct storage temperature.
Time out of the fridge, e.g., transporting
food in a warm car, should be kept to a
minimum.
Storing food correctly
Ensure that food stored in the fridge
zone is in packaging or covered prop-
erly (some exceptions apply in the Mas-
terFresh zone). This will prevent food
smells from affecting other food, food
from drying out, and also any cross-
contamination of bacteria. This is par-
ticularly important when storing meat
products. Make sure that foods such as
raw meat and fish in particular do not
come into contact with other food.
By ensuring that the temperature set-
tings are correct and by taking appro-
priate hygiene measures you can pro-
long the storage life of your food con-
siderably and avoid food waste.
Fruit and vegetables
Fruit and vegetables can be stored
loose in the fruit and vegetable drawer.
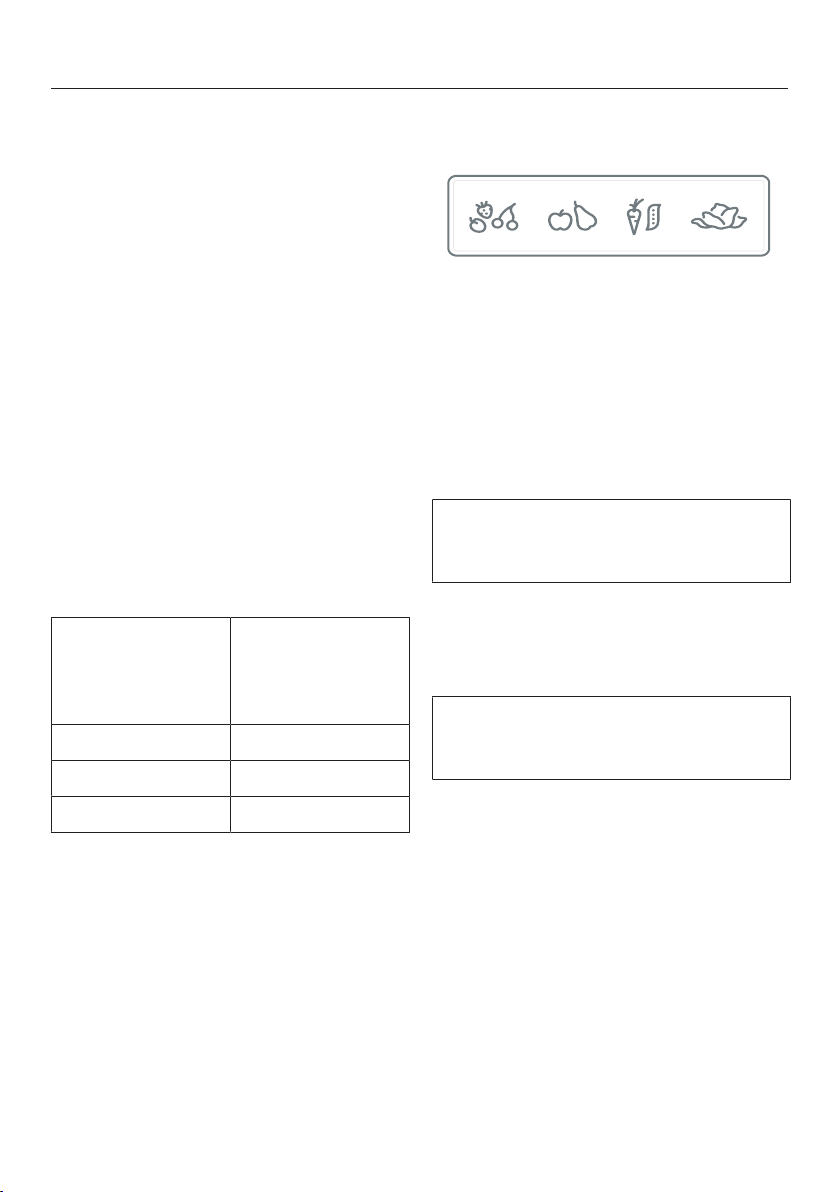
Storing food in the MasterFresh zone
77
MastertFresh zone
The MastertFresh zone provides ideal
storage conditions for fruit, vegetables,
fish, meat, and dairy products. Food
stays fresh considerably longer while
retaining both flavor and vitamins.
The MasterFresh zone comprises a hu-
midity-controlled and a dry compart-
ment.
- Depending on the moisture-regulator
setting, the humidity-controlled
compartment is particularly suitable
for storing fruit and vegetables.
- The dry compartment is suitable for
storing perishable foods such as
fish, meat, and dairy products.
Any type of food can in fact be stored
in this compartment, as long as it is
packaged.
Max. load of the
drawers in the
MasterFresh
zone
K26x2Vi/SF 55 lb (25kg)
K28x2Vi/SF 77 lb (35kg)
K29x2Vi/SF 100 lb (45kg)
Humidity-controlled compartment
with moisture adjustment
The moisture released by food in stor-
age is kept within the humidity-con-
trolled compartment drawer. The closer
the air humidity in the humidity-con-
trolled compartment is to the humidity
content of the food, the crisper and
fresher the food remains over a longer
period, as the water content of the food
is largely retained.
The moisture level greatly depends on
the type and quantity of food being
stored, if stored unwrapped.
The temperature in the humidity-con-
trolled compartment is approximately
equivalent to the temperature in the
conventional fridge zone.
Remember that the fresher the food
when it is placed in the appliance, the
longer it will stay fresh.
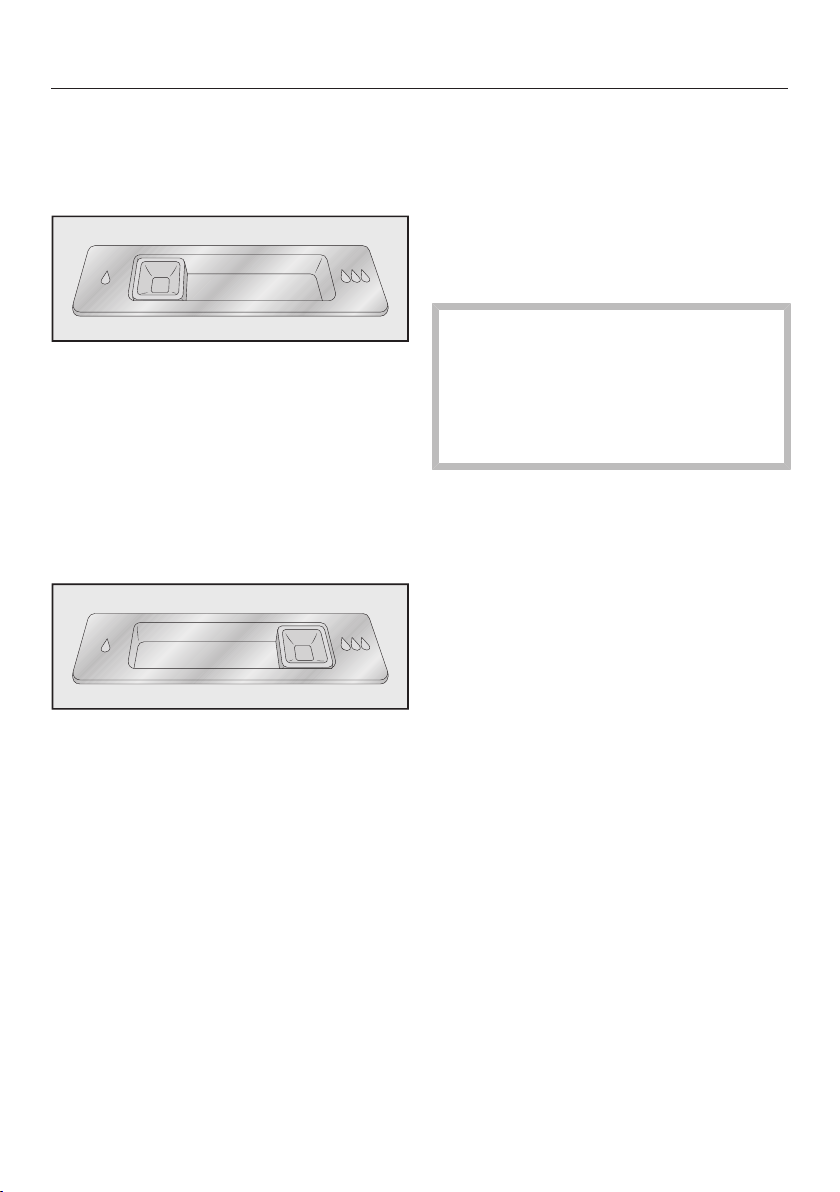
Storing food in the MasterFresh zone
78
The moisture regulator is used to regu-
late the amount of moisture in the hu-
midity-controlled compartment with
settings to .
Position of the moisture regulator
= slightly increased humidity
Select this setting if you store very
large quantities of fruits and vegeta-
bles in the humidity-controlled com-
partment. The moisture regulator par-
tially closes the vents in the compart-
ment so that some of the moisture
present is retained.
Position of the moisture regulator
= increased humidity
Select this setting if you store small
to large quantities of fruits and vegeta-
bles in the humidity-controlled com-
partment. The moisture regulator closes
the vents in the compartment com-
pletely so that all of the moisture
present is retained.
Tip: If the humidity level is too high and
a lot of moisture has collected in the
compartment, select the setting.
If the quantity of food being stored in
this compartment is small, the moisture
level may be too low. If you are only
storing a small amount of food, wrap it
in airtight packaging.
Increased moisture in the humidity-
controlled compartment can, in
some circumstances, cause a build-
up of condensate.
Wipe off any condensate with a
cloth.
Regulating the humidity level in the
humidity-controlled compartment
Slide the moisture regulator to the
left or right depending on the
setting required.
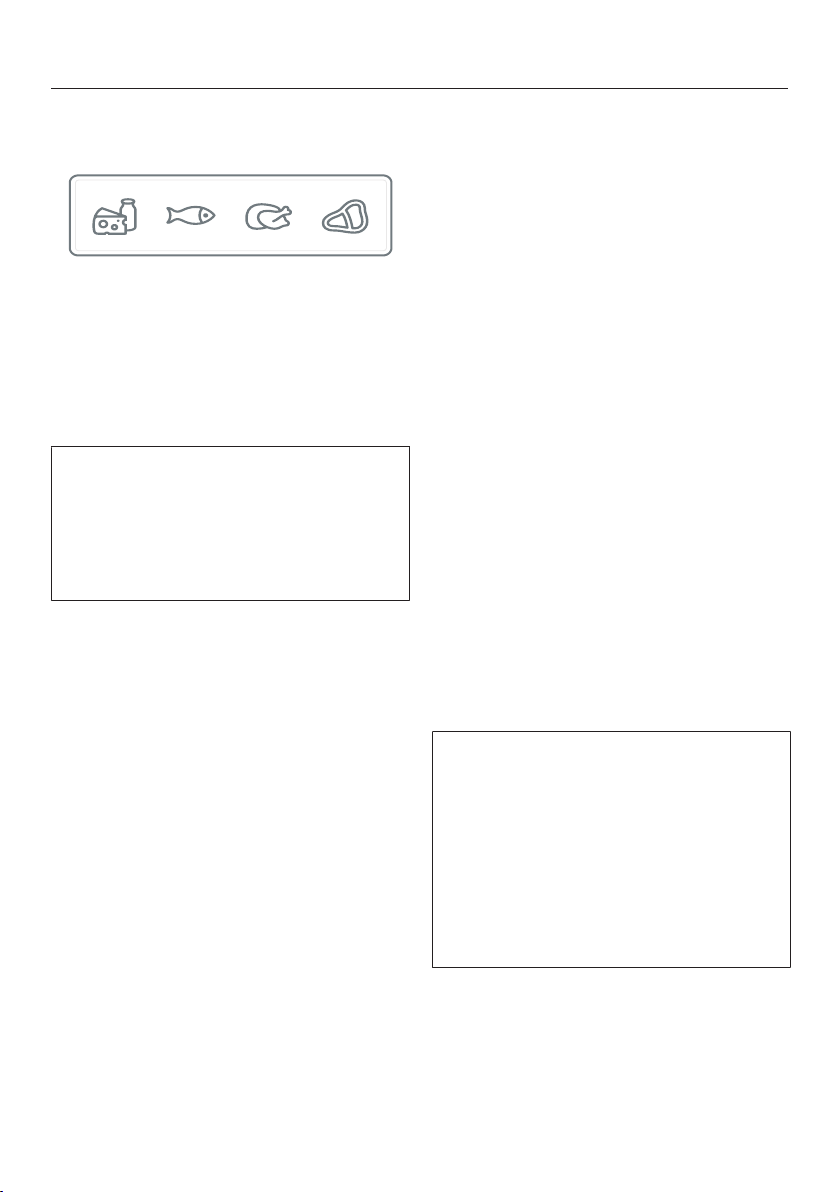
Storing food in the MasterFresh zone
79
Dry compartment with adjustable
temperature
The temperature in the dry compart-
ment is maintained at 30 to 37°F (-1 to
3°C). While lower than the temperature
in a standard refrigerator section, this is
the optimum temperature range for
storing fresh food which is not sensitive
to cold.
The deterioration process is deceler-
ated at this temperature range so food
can be stored without loss of fresh-
ness for considerably longer than in a
standard refrigerator and you do not
need to shop as often.
However, if you would like it to be
warmer or colder, e.g., when storing
fish, you can adjust the temperature
slightly (see “Selecting additional set-
tings – Adjusting the temperature in the
MasterFresh zone (dry compart-
ment)”).
The humidity level is similar to that in
the conventional refrigerator section.
Tip: This compartment is ideal for all
home-cooked meals as any micro-
organisms that may still be present can-
not multiply.
The dry compartment is ideal for storing
perishable foods such as:
- dairy products such as yogurt,
cheese, cream, etc.
- deli salads
- meat, poultry, and sausage
- fresh fish and shellfish
- Any type of food can in fact be stored
in this compartment, as long as it is
packaged.
Please note that foods rich in protein
deteriorate faster than others.
Shellfish, for example, deteriorates
faster than fish, and fish deteriorates
faster than meat.
For hygiene reasons, always keep these
foods covered or wrapped in this
compartment.
Take food out of the dry compartment
approximately 30to60minutes before
using it. The aroma and taste do not
fully develop until the food has
reached room temperature.
At high room temperatures, delicate
food should preferably be kept in the
refrigerator section for a period of
time.

Storing food in the MasterFresh zone
80
The following tips may help if you find that food you have stored does not
keep well (for example, the food wilts or becomes withered after only a short
storage time):
Only place fresh food in the appliance as the initial condition of the food is cru-
cial to maintaining freshness.
Clean the MasterFresh zone before storing food in it.
Very wet food should be dried off before storing it in the humidity-controlled
compartment.
Do not store food which is sensitive to cold in the dry compartment (see “Stor-
ing food in the refrigerator section – Food which is not suitable for storage in the
refrigerator section”).
Allocate the appropriate settings to food you wish to store (e.g., humid or dry
storage).
Store food loose in the humidity-controlled compartment.
A high humidity level in the humidity-controlled compartment is achieved by the
moisture present in the food being stored.
If the humidity level is not high enough (e.g., too little food is being stored), it can
be increased by placing a damp sponge in the drawer.
If you think that the temperature in the dry compartment is too high or too low,
adjust the temperature in the compartment (see “The correct temperature – Tem-
perature range”). If ice crystals start to form at the bottom of the dry compart-
ment, increase the temperature as otherwise the cold temperature will damage
the food.
If too much water collects at the bottom of the humidity-controlled compart-
ment, dry it with a cloth. If necessary, dry food before placing it in the appliance
or place a wire rack at the bottom of the humidity-controlled compartment to al-
low water to drain off.

Automatic defrosting
81
WARNING! DANGER of injury
and damage!
Do not use any mechanical or other
types of aids which are not recom-
mended by the manufacturer to ac-
celerate the defrosting process.
Refrigerator section and Mas-
terFresh drawer
The refrigerator section and the Master-
Fresh drawer defrost automatically.
Condensate and frost can build up on
the back wall of the refrigerator section
and the MasterFresh drawer while in
use. You do not need to remove this, as
it will defrost and evaporate automati-
cally with the warmth generated by the
appliance.
Cleaning and care
82
WARNING! DANGER of electric
shock!
Unplug the appliance or trip the cir-
cuit breaker.
WARNING! Fire hazard!
Do not damage the coolant
pipework.
Do not let water get into the elec-
tronic or the lighting.
Risk of damage due to moisture
penetration.
The steam from a steam cleaner can
damage plastic and electrical com-
ponents.
Do not use a steam cleaner to clean
the refrigeration appliance.
The data plate located inside the inte-
rior cabinet of the refrigeration appli-
ance must not be removed. It contains
information which is required in the
event of a service call.
Cleaning agents
To avoid damaging the surfaces of your
appliance, do not use:
- cleaning agents containing soda, am-
monia, acids, or chloride
- cleaning agents containing lime scale
remover
- abrasive cleaning agents, such as
scouring powder, scouring liquid, or
pumice stones
- cleaning agents containing solvents
- stainless steel cleaning agents
- dishwasher cleaner
- oven sprays
- glass cleaner
- hard, abrasive sponges and brushes,
such as pot scrubbers
- eraser sponges
- sharp metal scrapers
Cleaning and conditioning agents
used in the interior cabinet of the re-
frigeration appliance must be food
safe.
We recommend using lukewarm water
and a little liquid dish soap for cleaning.
Cleaning and care
83
Before cleaning the appliance
Turn the appliance off completely by
pressing the On/Off switch.
Take any food out of the appliance
and store it in a cool place.
Take out all other removable parts for
cleaning (see “Adjusting the interior
fittings”).
Interior and accessories
Clean the appliance regularly, or at
least once a month.
Clean up any spills, stains, or food
immediately. Do not allow them to
dry and stick to the appliance.
Clean the appliance with a solution of
lukewarm water and liquid dish soap.
Rinse all parts by hand. Do not wash
in a dishwasher.
After cleaning, wipe with clean water
and dry with a soft cloth.
Leave the door open to air the appli-
ance sufficiently for a short while and
to prevent odor buildup.
Aluminum frames
The frames to the shelves inside the ap-
pliance and the door shelves are par-
tially made from aluminum.
Aluminum is a dynamic material. The re-
flection and appearance of aluminum
changes in different lights and environ-
ments and depending on the angle you
observe it from. It is also susceptible to
scratching.
The aluminum frames may become
discolored or damaged if soiling is left
on for too long. Remove any soiling
immediately.
Cleaning and care
84
Appliance front
The appliance front has a special high-
quality finish (Clean Touch Steel). This is
resistant to soiling and is very easy to
clean.
Do not use stainless steel
cleaning agent on these surfaces,
as it will damage the finish.
Do not use Miele stainless steel
conditioning agent on these sur-
faces, as it will cause noticeable
smearing.
If soiling is allowed to sit for any
length of time, it may become im-
possible to remove.
Surfaces may become discolored or
damaged.
It is therefore best to remove soiling
from the appliance front immediately.
All surfaces are easily scratched.
Contact with unsuitable cleaning
agents can alter or discolor the sur-
faces.
See the information on “Cleaning
agents” at the beginning of this sec-
tion.
Clean the surfaces with a clean
sponge and a solution of warm water
and liquid dish soap. A clean, damp
microfiber cloth without cleaning
agent can also be used for cleaning.
After cleaning, wipe with clean water
and dry with a soft cloth.
Cleaning the door seal
Risk of damage as a result of in-
correct cleaning.
If you treat the door seal with oil or
grease, it can become porous.
Do not use oil or grease on the door
seal.
The door seals should be cleaned
regularly with clean water, and then
wiped dry with a soft cloth.
Cleaning the ventilation gaps
A build-up of dust will increase the en-
ergy consumption of the appliance.
The ventilation gaps should be
cleaned on a regular basis with a
brush or vacuum cleaner (you could
use a Miele Vacuum Cleaner dust
brush, for example).
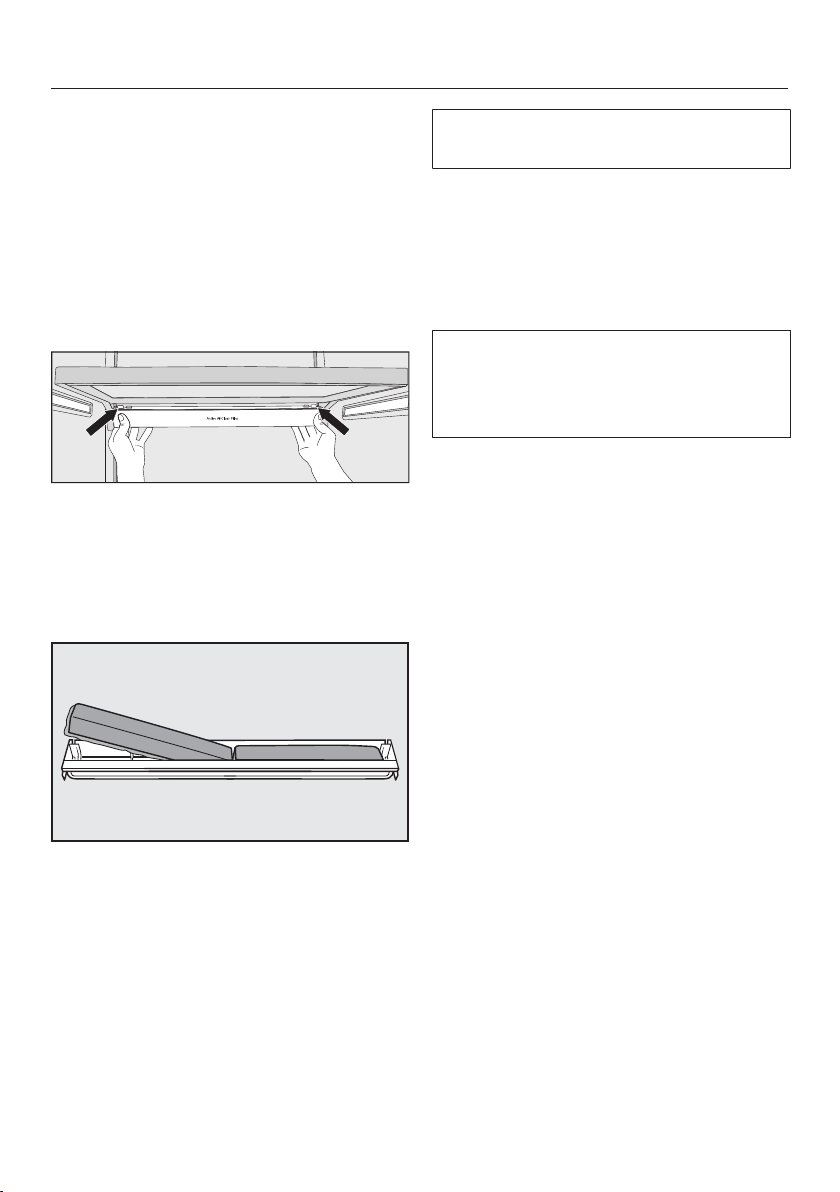
Cleaning and care
85
Replacing the Active AirClean
filters
The Active AirClean filters in the refrig-
erator section need to be replaced ap-
prox. every 6months.
Change Active AirClean Filter will appear
on the display.
Confirm the message with OK.
To remove the holder for the Active
AirClean filters, press against the re-
tainers on both sides of the holder
from the rear and pull the holder
downwards diagonally from the
frame.
Remove the used Active AirClean fil-
ters and place the new Active Air-
Clean filters with the surrounding
edge pointing downwards in the
holder.
To replace the holder, press against
the retainers on both sides of the
holder from the rear and clamp it into
the gap on the frame from below.
The holder can be fixed under any
shelf in the refrigerator section.
Once the Active AirClean filters have
been replaced, the Active AirClean filter
display must be reset using Settings
mode on the display (see “Selecting
additional settings – Resetting the Dis-
play Active AirClean Filter”).
New Active AirClean filters (both with
and without a holder) can be obtained
from Miele Service, your local dealer,
or via the Miele website.
After cleaning
Replace all shelves and accessories
in the appliance.
Switch the appliance back on.
Switch on the SuperCool function for
a while so that the refrigerator section
can cool down quickly.
Place food back in the appliance and
close the door.
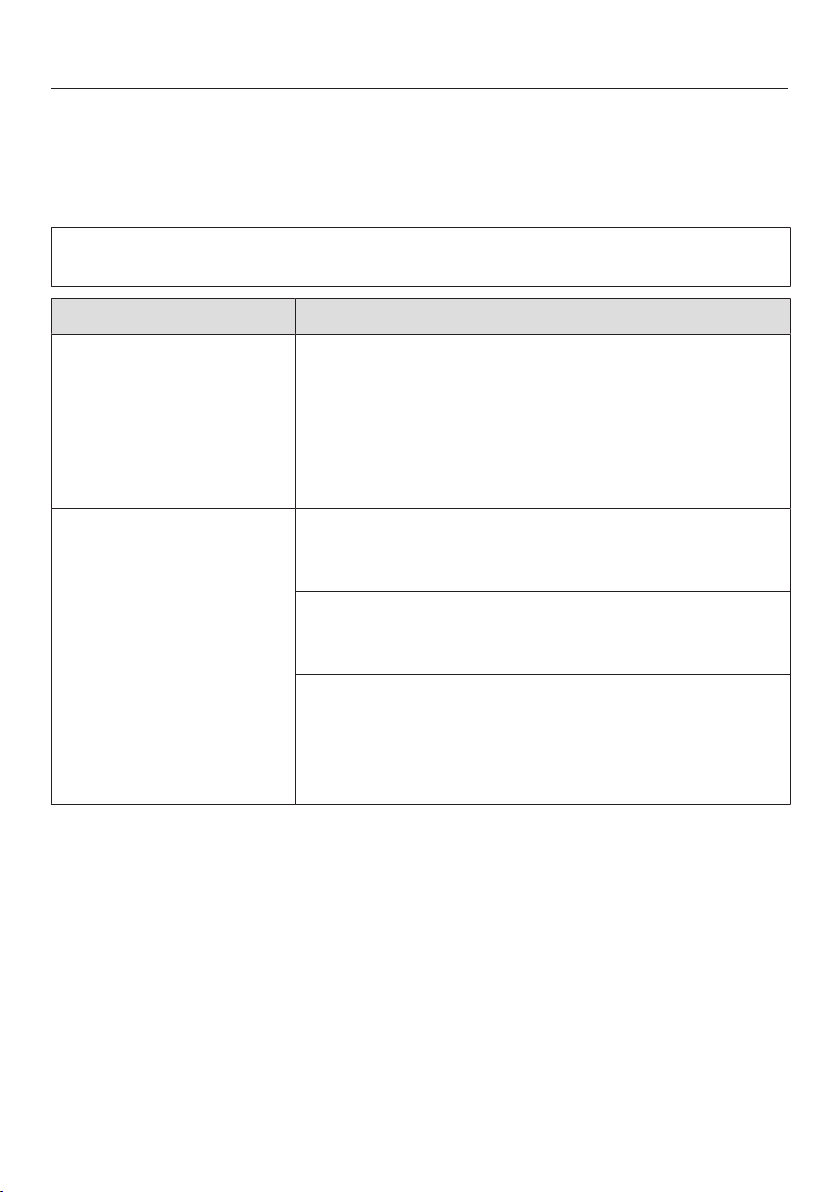
Frequently Asked Questions
86
With the help of the following guide minor faults in the performance of the ma-
chine, some of which may result from incorrect operation, can be remedied with-
out contacting the Service Department.
This guide may help you to find the reason for the fault, and how to correct it.
To prevent cold from escaping, open the appliance doors as little as possible un-
til the fault has been corrected.
Problem Possible cause and solution
If you are concerned
that your appliance is
not working properly,
you can perform a Self
Test. Your appliance will
be checked for any
faults or malfunctions.
Any errors identified during the Self Test are shown
on the display.
Perform a Self Test (see “Additional settings”, sec-
tion “Performing a Self Test ”).
Contact Miele Service and inform them of the error
message(s) on the display.
The appliance is not
getting cold and the in-
terior lighting does not
come on when the ap-
pliance door is opened.
The appliance has not been turned on.
Turn the appliance on. The temperature appears in
the display.
The plug is not properly plugged into the electrical
outlet.
Insert the plug into the outlet.
The fuse has tripped. There could be a fault with the
appliance, the household electrical wiring, or another
appliance.
Contact a technician or the Miele Service depart-
ment.
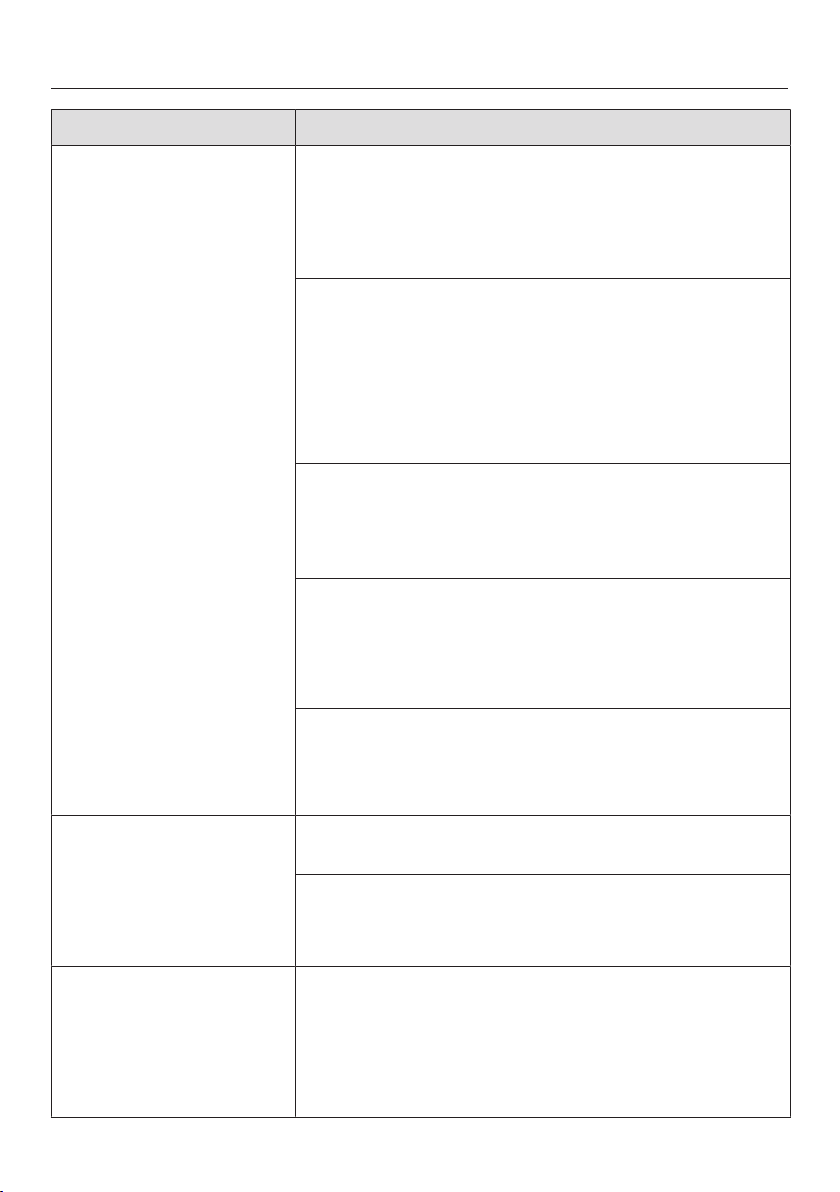
Frequently Asked Questions
87
Problem Possible cause and solution
The compressor is turn-
ing on more frequently
and for longer periods
of time; the temperature
in the refrigeration ap-
pliance is too low.
The ventilation gaps in the cabinetry have been cov-
ered or become too dusty.
Do not block the ventilation gaps.
Clean the ventilation gaps on a regular basis to re-
move any dust.
The appliance door has been opened too frequently,
or a large number of bottles have been put inside the
unit all at once.
Only open the appliance door when necessary and
for as short a time as possible.
After a while, the temperature will return to normal by
itself.
The appliance door is not properly closed.
Close the door.
After a while, the temperature will return to normal by
itself.
The ambient temperature is too high. The higher the
ambient temperature, the longer the compressor has
to run.
See the information in the section on “Installation –
Installation location”.
The refrigeration appliance was not properly installed
in the building-in niche.
See the information in “Installation – Installing the
refrigeration appliance”.
The compressor is turn-
ing on more frequently
and for longer periods
of time; the temperature
in the appliance is too
low.
The temperature setting is too low.
Correct the temperature setting.
The SuperCool function is still turned on.
To save energy, you can turn SuperCool off early
yourself.
The compressor comes
on less and less often
and for shorter periods
of time. The tempera-
ture in the appliance
rises.
This is not a fault. The temperature is too high.
Correct the temperature setting.
Check the temperature again after 24hours.
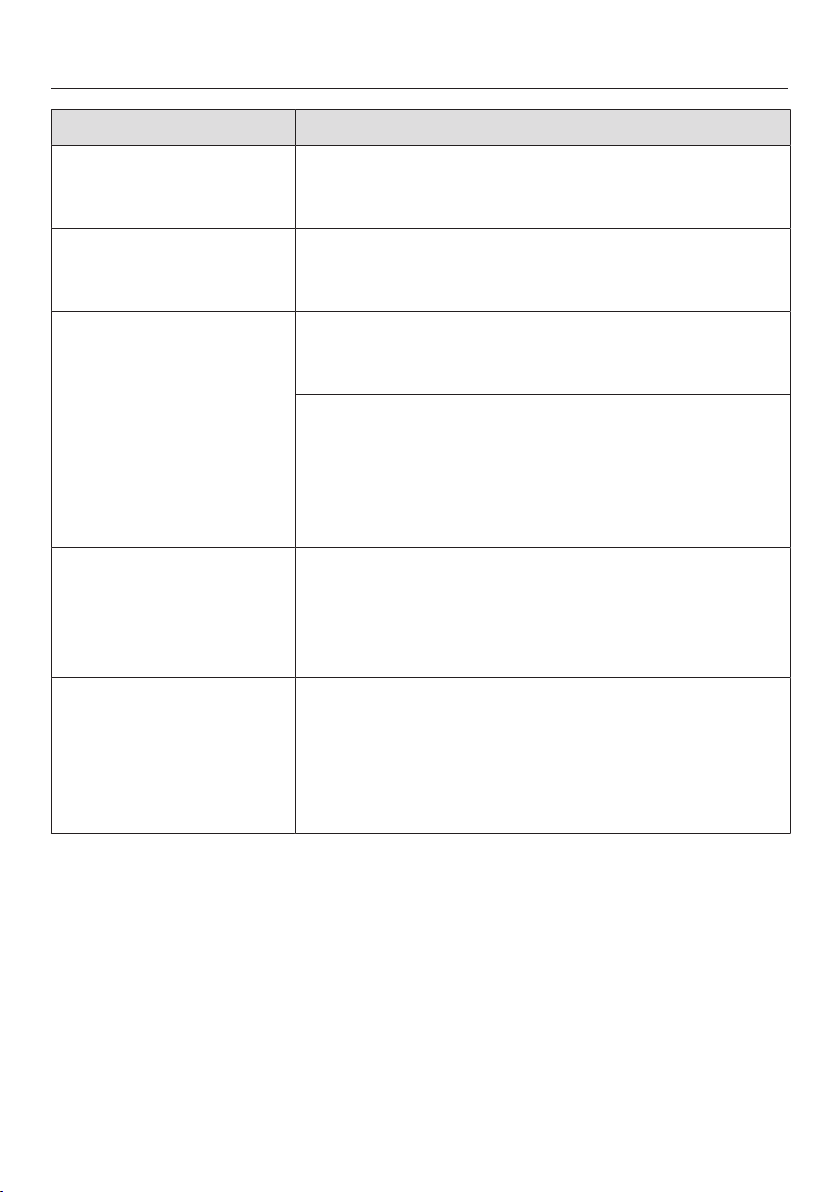
Frequently Asked Questions
88
Problem Possible cause and solution
The compressor runs
continuously.
Not a fault. To save energy, the compressor runs at
a lower speed when less cooling is required. This
increases the compressor run time.
An alarm sounds. The appliance door has been open for longer than
3minutes.
Close the appliance door.
No alarm sounds de-
spite the appliance door
being open.
You have switched off the audible signal.
Switch the audible signal back on using Settings
mode.
The Sabbath Mode function is switched on: the tem-
perature display is dark and the symbol is shown
on the display.
You can switch off Sabbath mode at any time (see
“Selecting additional settings – Switching Sabbath
Mode on or off”).
The appliance door
cannot be opened.
The Pull2OpenDoor Assistant is switched on but the
appliance has a handle-free cabinet front.
For handle-free cabinet fronts, switch on the
Push2OpenDoor Assistant (see “Switching on the
Door Assistant” in “Selecting additional settings”).
The appliance door
cannot be opened when
Sabbath Mode is
switched on.
The Push2OpenDoor Assistant is switched on at the
same time as Sabbath Mode.
When Sabbath Mode is switched on, the Door As-
sistant is deactivated.
Pull the appliance door open from below or from
the side.
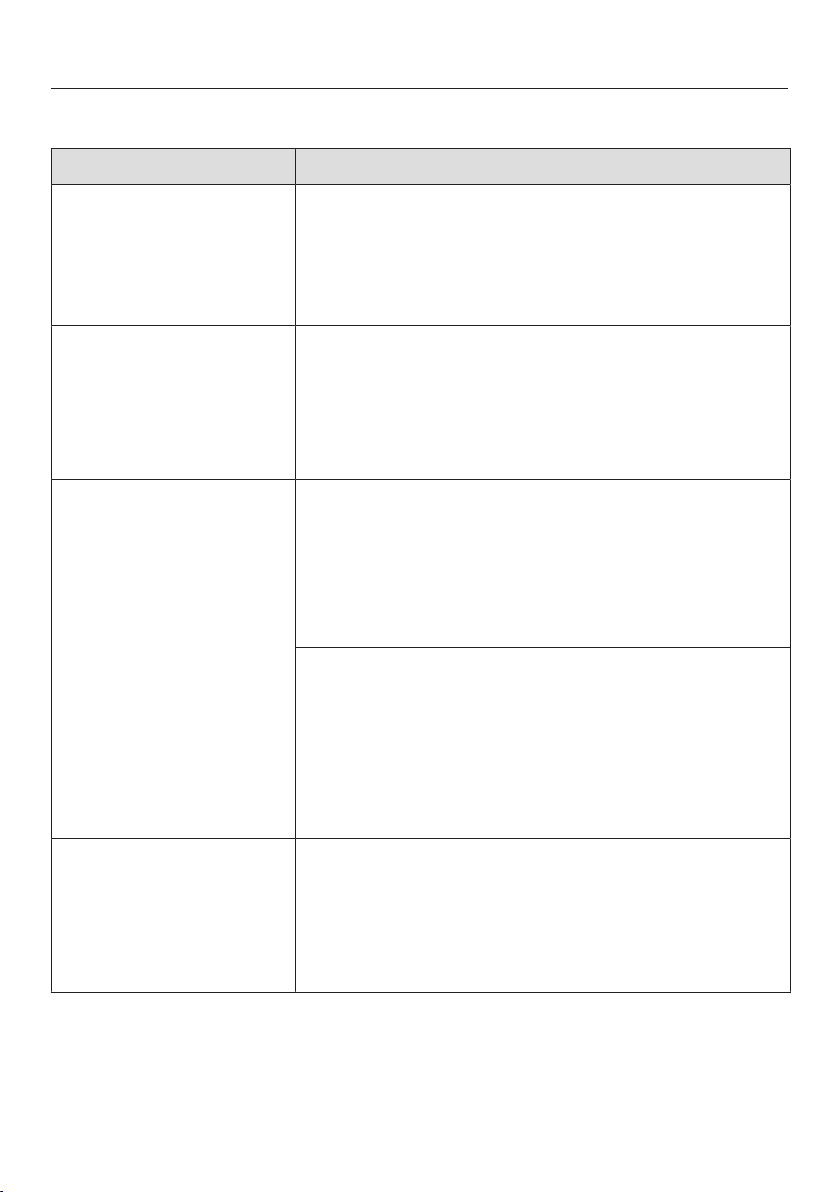
Frequently Asked Questions
89
Messages in the display
Message Possible cause and solution
The warning sounds
and the message Close
the door appears on the
display.
The appliance door is open.
Close the appliance door.
If you wish to turn the alarm off early, touch the
sensor control OK on the display.
The alarm will stop.
The temperature display
is dark and the sym-
bol is shown on the dis-
play.
The Sabbath Mode function is switched on. The in-
terior lighting is switched off and the refrigeration ap-
pliance is cooling down.
You can switch off Sabbath mode at any time (see
“Selecting additional settings – Switching Sabbath
Mode on or off”).
“F Please contact Miele
Technical Service.” ap-
pears in the display and
an alarm sounds.
There is a fault.
Make a note of the fault message if necessary.
Contact Miele Service.
To turn the alarm off, touch the symbol.
The error message does not disappear from the dis-
play until the error has been rectified.
The voltage level is too high/low.
Observe the connection data under “Electrical
connections”.
Contact Miele Service if necessary.
To turn the alarm off, touch the symbol.
The error message does not disappear from the dis-
play until the error has been rectified.
is shown in the dis-
play. The machine does
not get cold, but the
machine controls are
working.
Demo Mode is switched on. Demo mode allows the
appliance to be presented in the showroom without
the cooling system being turned on. Do not activate
this setting for domestic use.
Switch off Demo mode (see “Selecting additional
settings”, section “Switching off Demo Mode ”).
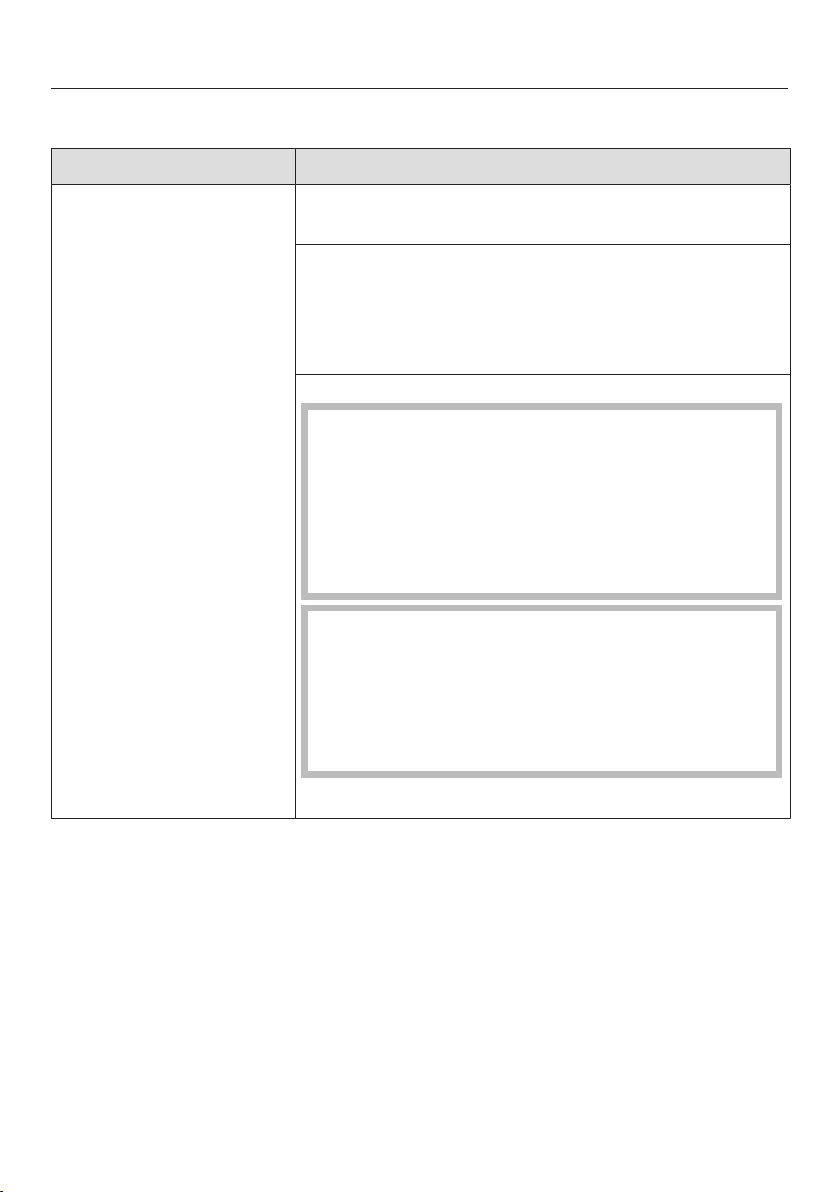
Frequently Asked Questions
90
The interior lighting is not working.
Problem Possible cause and solution
The interior lighting is
not working.
The refrigeration appliance has not been turned on.
Turn the refrigeration appliance on.
The Sabbath Modefunction is switched on: the tem-
perature display is dark and the symbol is shown
on the display.
You can switch off Sabbath Mode at any time via
the Settings mode.
There is a fault.
Risk of electric shock due to exposed, live
electrical components.
When removing the lighting cover, there is a risk of
coming into contact with live electrical compo-
nents.
Do not remove the lighting cover. The LED lighting
may only be repaired or replaced by Miele Service.
Risk of injury from LED lighting.
This lighting corresponds to risk group RG2. If the
cover is defective, there is a risk of eye injury.
If the lighting cover is defective, do not look from a
close range directly into the lighting with optical in-
struments (e.g., magnifying glass or similar).
Contact Miele Service.
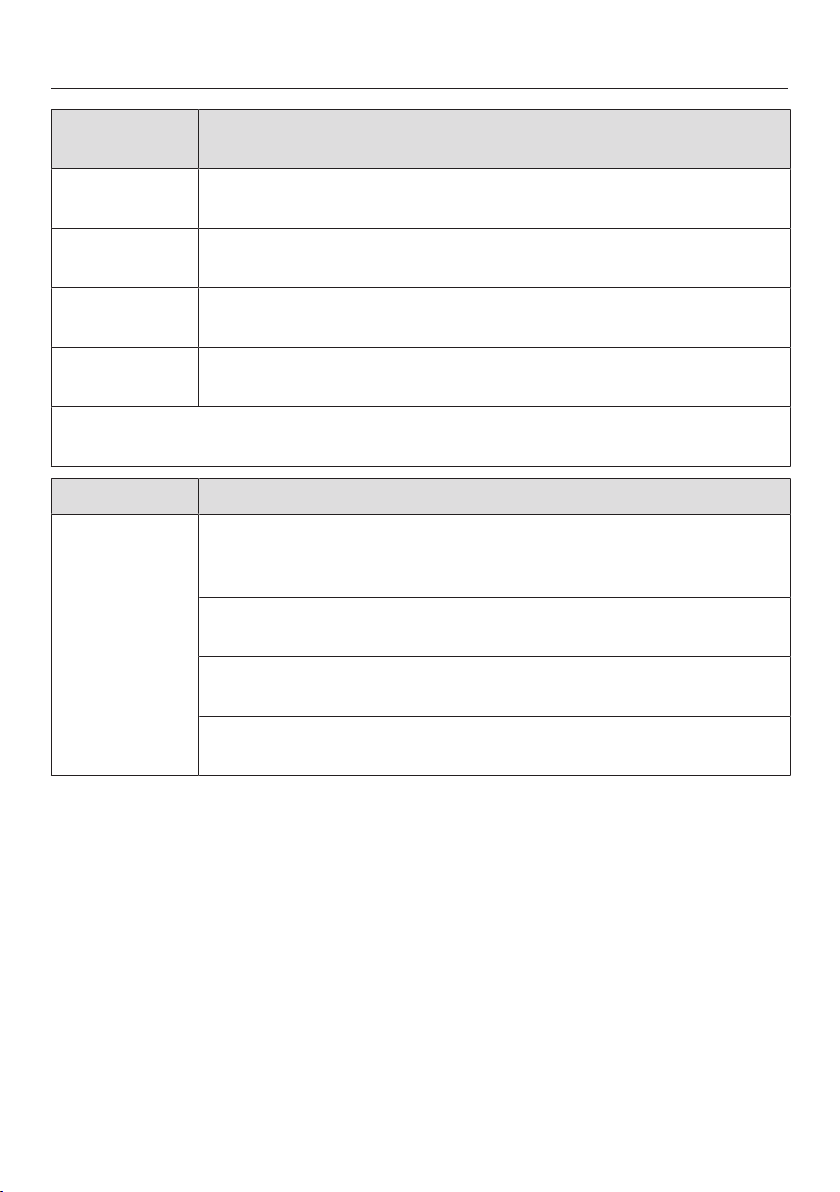
Causes of noises
91
Normal
noises
Cause
Brrrrr... A humming noise is made by the motor (compressor). This noise
can get louder for brief periods when the motor switches on.
Blub, blub... A gurgling noise can be heard when the coolant circulates
through the pipes.
Click... Clicking sounds occur whenever the thermostat switches the
motor on or off.
Crack... A cracking sound can be heard when materials expand inside
the appliance.
Please bear in mind that a certain amount of noise is unavoidable (from the com-
pressor and the coolant circulating through the system).
Noises Cause and solution
Rattling,
clinking
The appliance is uneven. Realign the appliance using a level by
raising or lowering the adjustable feet underneath the refrigera-
tion appliance.
The appliance is touching another machine or piece of cabi-
netry. Move it away.
Drawers, baskets, or shelves are jiggling or are stuck. Check all
removable parts and reinsert them correctly if required.
Bottles or containers are touching each other. Separate them a
little.

Customer Service
92
Contact in the event of a fault
In the event of a fault which you cannot
remedy yourself, please contact your
Miele dealer or Miele Customer Service.
You can book a Miele Service Call on-
line at www.miele.com/service.
Contact information for Miele Cus-
tomer Service can be found at the end
of this document.
Please quote the model identifier and
serial number of your appliance (SN)
when contacting Miele Customer Ser-
vice. Both pieces of information can be
found on the data plate.
You will find the data plate inside your
appliance.
Appliance warranty and prod-
uct registration
You can register your product and/or
view the manufacturer´s warranty terms
and conditions for Miele appliances and
vacuum cleaners at
www.mieleusa.com.

Declaration of conformity
93
Frequency range 2.412 GHz –
2.462 GHz
Maximum trans-
mitting power
< 100 mW

Copyrights and licenses
94
Miele uses their own and third party software which is not subject to any so-called
open source license for the operation and control of the device/appliance. This
software/these software components are protected by copyright. The copyright
powers of Miele and third parties have to be respected.
Furthermore, this device/appliance contains software components which are dis-
tributed under open source license conditions. Please refer to the document
“Open Source Information and Licenses” for the Open Source components con-
tained therein, together with the corresponding copyright notices, copies of the li-
censing conditions valid at the time, and any further information. The liability and
warranty provisions of the open source licensing conditions as stated therein apply
only in relation to the respective rights holders.
In particular, the device/appliance contains software components licensed by the
copyright holders under the GNU General Public License, Version 2, or the GNU
Lesser General Public License, Version 2.1. For a period of at least 3 years from
the date of purchase or delivery of the device/appliance respectively, Miele offers
to provide you or third parties with a machine-readable copy of the source code of
the Open Source components contained in the device/appliance and licensed un-
der the terms of the GNU General Public License, Version 2, or the GNU Lesser
General Public License, Version 2.1, on a data carrier (CD-ROM, DVD or USB
stick). Please contact us via e-mail ([email protected]) or the below postal address
and state the product name, the serial number and the date of purchase to obtain
this source code.
Miele & Cie. KG
Open Source
GTZ/TIM
Carl-Miele-Straße 29
33332 Gütersloh
Please note the limited warranty in favor of the rights holders under the terms of
the GNU General Public License, Version 2, and the GNU Lesser General Public Li-
cense, Version 2.1:
This program is distributed in the hope that it will be useful, but WITHOUT ANY
WARRANTY, without even the implied warranty of MERCHANTABILITY of FITNESS
FOR A PARTICULAR PURPOSE. See the GNU General Public License and GNU
Lesser General Public License for more details.

9 Independence Way
Princeton, NJ 08540
U.S.A.
Miele, Inc.
National Headquarters
Please have the model and serial number
of your appliance available when
contacting Customer Service.
Canada
Importer
Miele Limited
Headquarters and Miele Centre
Customer Service & Support
Phone: 888-99-MIELE(64353)
www.mieleusa.com
161 Four Valley Drive
Vaughan, ON L4K 4V8
www.miele.ca
Customer Care Centre
Phone:
800-565-6435
905-532-2272
International Headquarters
Miele & Cie. KG
Carl-Miele-Straße 29
33332 Gütersloh
Germany

M.-Nr. 11 508 620 / 01en-US, CA
K 2602 SF, K 2802 SF, K 2812 SF, K 2902 SF, K 2912 SF