Loading ...
Loading ...
Loading ...
additional safety instructions for radial saws
removed from the saw arbor before using the Therefore, rip with the finished side down (next to
accessory shaft (rear end of the saw motor). NEVER the table) and be especially attentive to following
operate the saw with cutting tools iincluding sanding
accessories) installed on both ends of the saw arbor.
(B} RIPPING
Ripping is cutting with the grain or the tong way of the
board - it is performed by pushing the workpiece
along the fence and thru the sawblade (sawblade
parallel to the fence).
1. Never apply the feed force to the section of the
workpiece that will become the cut-off (free) piece.
Feed force when ripping must always be applied
between the saw blade and the fence . . . use a
"PUSH STICK" (see pg. 26) for narrow or short
work.
2. Whenever possible, use the in-rip position - this
provides minimum obstruction for feeding by hand
or push stick as appropriate.
3. Do not release the workpiece before operation is
complete - push the workpiece atl the way past the
rear (outfeed or exit) of the sawblade.
4. Make sure by trial before starting the cut that the
antikickback pawls will stop a kickback once it has
started. Keep points of pawls SHARP!
5. Use a push stick when ripping short (under 12
inches) or narrow (under 6 inches wide) workpieces.
6. CAUTION: Never reposition the Guard or
antikickback with power "ON".
7. A "KICKBACK" occurs during a rip-type operation
when a part or all of the workpiece is thrown back
violently toward the operator. It can occur when
the workpiece closes in on the rear (outfeed side) of
the sawblade (pinching), binds between the fence
and the sawblade (heel), or is grabbed by the
sawblade teeth (wrong-way feed) at the outfeed
side. "PINCHING" is generally avoided by
utilization of the spreader, and a sharp sawblade of
the correct type for the workpiece being cut.
"HEEL" can be avoided by maintaining the
sawblade exactly parallel to the fence. Grabbing by
the sawblade teeth can be caused by heel or by
feeding from the wrong direction (see "DANGER"
warning on guard) - it can be avoided by
maintaining parallelism of sawblade to fence,
feeding into the sawblade from the nose of the
guard only, by positioning the spreader and
antikickback properly, and keeping the workpiece
clown on the table and against the fence.
8. Position the nose of the guard to just clear the
workpiece, and position/adjust the antikickback
and spreader devices as instructed.
9. NEVER cut more than one piece at a time by
stacking workpieces vertically.
10. NEVER feed a workpiece thru the saw with another
piece (butting second piece against trailing edge of
piece being cut), even if of the same thickness. Feed
each workpiece individually thru the sawblade, and
completely beyond the sawblade, before ripping the
next workpiece. Use push stick if the rip cut is less
than 6'" wide.
11, DO NOT pul! the workpiece thru the sawblade
- position your body at the nose (in-feed) side of the
guard: start and complete the cut from that same
side. This will require added table support for long
pieces.
12. Plastic and composition (like hardboard) materials
may be cut on your saw. However, since these are
usually quite hard and slippery, the antikickback
pawls may not stop a kickback.
proper set-up and cutting procedures. Do not stand,
or permit anyone else to stand, in line with a
potential kickback.
13. When sawing 1/4" or thinner materials, follow at!
normal ripping procedures except set sawblade into
table top at least 1/8". DO NOT let go of or stop
feeding the workpiece between the blade and fence
until you have pushed it completely past the
antikickbaek pawls. Otherwise the workpiece could
get into the back of the sawblade and be thrown
violently from the saw in the direction opposite to
the feed direction. This is the same action that
would occur if the instructions of the DANGER
warning on the guard is aborted. Do not stand, or
permit anyone else to stand, in line with the path of
a workpiece that may be thrown from the saw in
this manner.
14. Position the saw so neither you, a helper, or a casuat
observer is forced to stand in line with the
sawblade.
15. Use extra care when ripping wood that has a twisted
grain or is twisted or bowed it may rock on the
table and/or pinch the sawblade.
16. Shaping of wood with a dado head or a molding
head can be performed "top-side" (cutting tool
basically vertical and employing sawblade guard}, or
"edge" (saw arbor vertical -- cutting tool horizontal
- and employing the Accessory molding head
guard).
Ploughing
(Grooving with the grain)
Top side rabbeting
Top side molding
(shaping)...
17.
18.
resawing, gaining, coving, with the grain, are
examples of rip-type cuts, The same basic setup
procedures including rotation of the guard and
adjusting and positioning of the AKB/Spreader
device as for in-rip or out-rip cutting, apply.
However, since none of these operations involve
thru-sawing (sawing through the workpiece), there
is no kerf. Therefore the spreader and AKB pawls
can only be lowered to a position where the
spreader just clears the workpiece.
CAUTION: The AKB/Spreader device will not
stop a kickback in this position, but will act as a
holddown and as a guard of the out-feed side of
the sawblade.
For rip or rip-type cuts, the following end of a
workpiece to which a push stick or push board is
applied must be square (perpendicular to the
fence) in order that feed pressure applied to the
workpiece by the push stick or block does not
cause the workpiece to come away from the fence,
and possibly cause a kickback.
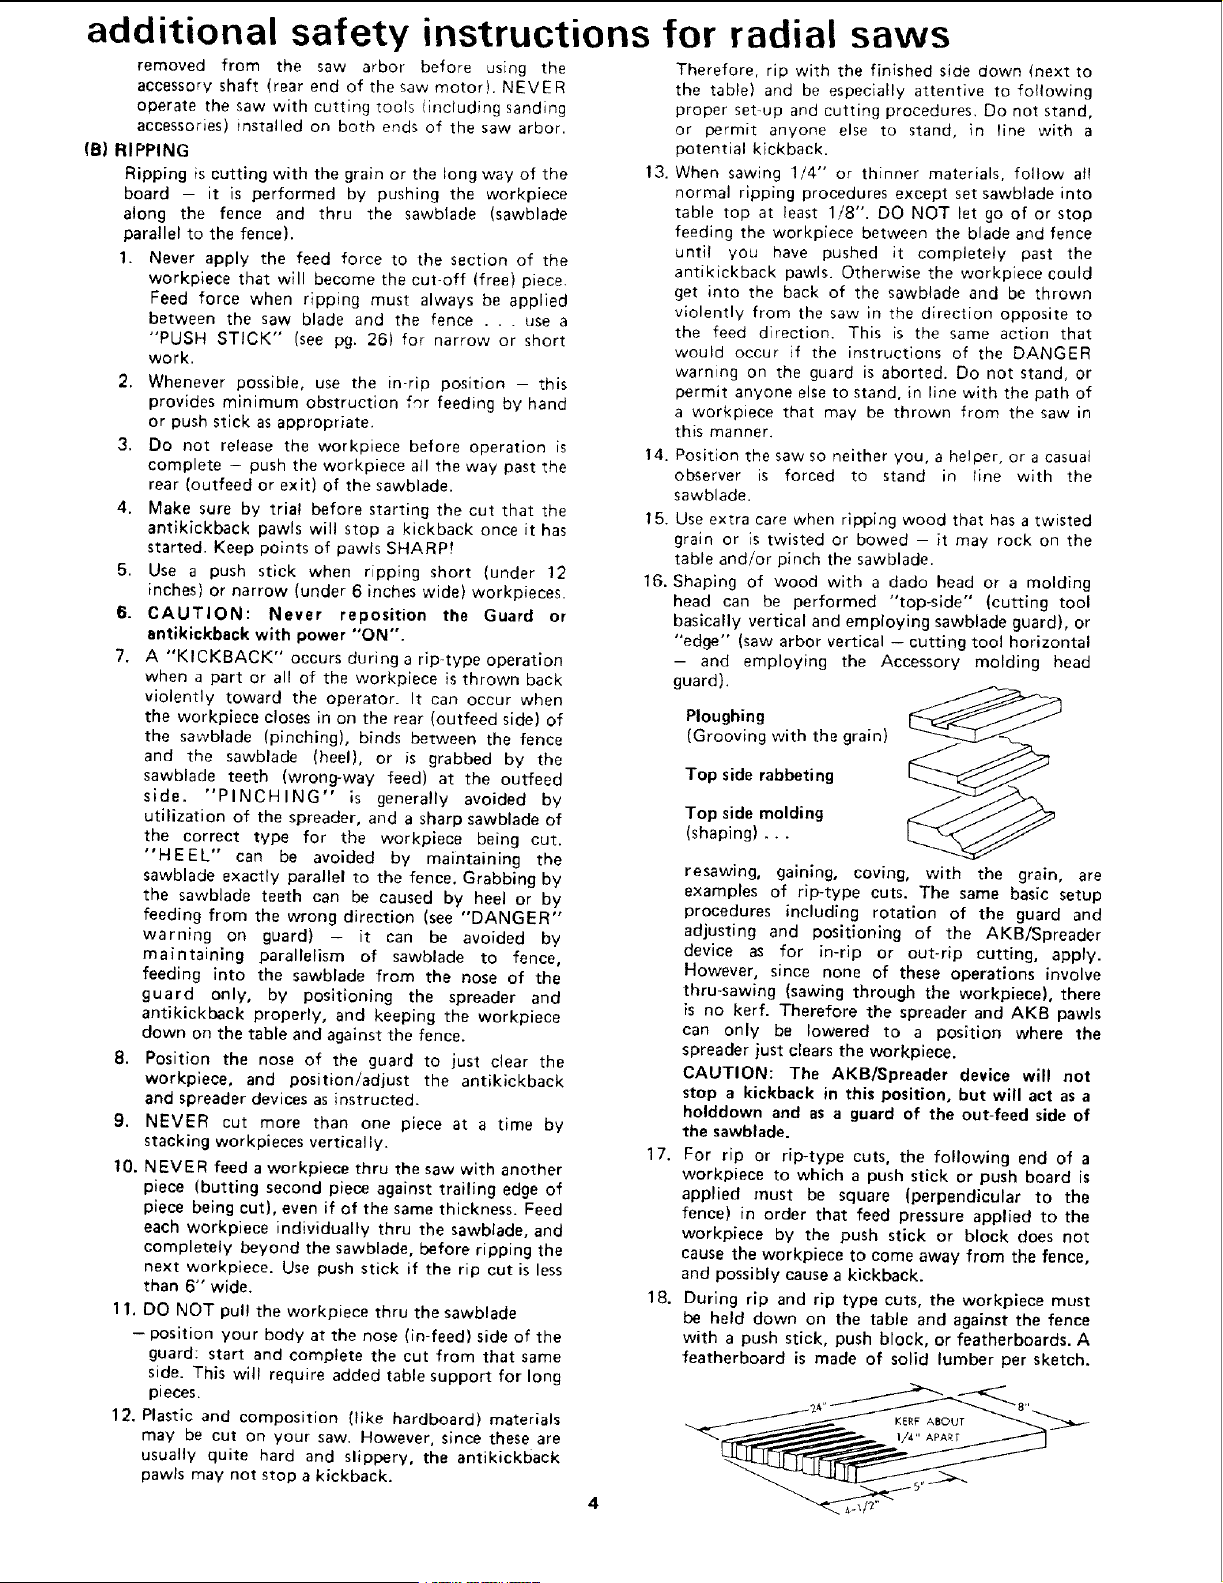
During rip and rip type cuts, the workpiece must
be held down on the table and against the fence
with a push stick, push block, or featherboards. A
featherboard is made of solid lumber per sketch.
Loading ...
Loading ...
Loading ...