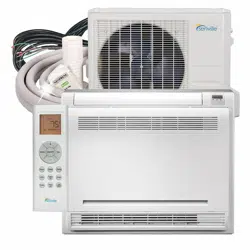
User Gudie Senville SENA-18HF-IF25 Air Conditioner
Safety Precautions
- If an abnormal situation arises (like a burning smell), immediately turn off the unit and disconnect the power. Call your dealer for instructions to avoid electric shock, fire or injury.
- Do not insert fingers, rods or other objects into the air inlet or outlet. This may cause injury, since the fan may be rotating at high speeds.
- Do not use flammable sprays such as hair spray, lacquer or paint near the unit. This may cause fire or combustion.
- Do not operate the air conditioner in places near or around combustible gases. Emitted gas may collect around the unit and cause explosion.
- Do not
- Do not expose your body directly to cool air for a prolonged period of time.
- If the air conditioner is used together with burners or other heating devices, thoroughly ventilate the room to avoid oxygen deficiency.
Safety Precautions
- Do not allow children to play with the air conditioner. Children must be supervised around the unit at all times. operate your air conditioner in a wet room such as a bathroom or laundry room. Too much exposure to water can cause electrical components to short circuit.
- In certain functional environments, such as kitchens, server rooms, etc., the use of specially designed air-conditioning units is highly recommended.
Unit Specifications and Features
- Different models have different front panel and display window. Not all the indicators describing below are available for the air conditioner you purchased. Please check the indoor display window of the unit you purchased.
- Illustrations in this manual are for explanatory purposes. The actual shape of your indoor unit may be slightly different. The actual shape shall prevail.
Operating temperature
- FOR OUTDOOR UNITS
- WITH AUXILIARY
- ELECTRIC HEATER
- Inverter Split Type
- When outside temperature is below 0°CF ), we strongly recommend keeping the unit plugged in at all time to ensure smooth ongoing performance.
NOTE:
- Room relative humidity less than 80%. If the air conditioner operates in excess of this figure, the surface of the air conditioner may attract condensation.
- Please sets the vertical air flow louver to its maximum angle (vertically to the floor), and set HIGH fan mode.
To further optimize the performance of your unit, do the following:
- Keep doors and windows closed.
- Limit energy usage by using TIMER ON and TIMER OFF functions.
- Do not block air inlets or outlets.
- Regularly inspect and clean air filters.
Auto-Restart
- If the unit loses power, it will automatically restart with the prior settings once power has been restored.
- Set temperature 1hr 1hr
- Keep running
- SLEEP Operation
- Saving energy during sleep
- Heat mode( -1 C/2 F) per hour for the first two hours
- Cool mode(+1 C/2 F) per hour for the first two hours
- A guide on using the infrared remote is not included in this literature package. Not all the functions are available for the air conditioner, please check the indoor display and remote control of the unit you purchased.
NOTE:
- For multi-split air condtioners, the following functions are not available:
- Active clean function, Silence feature, Breeze away function, Refrigerant leakage detection function and Eco feature.
- Anti-mildew
When turning off the unit from COOL, AUTO
- COOL), or DRY modes, the air conditioner will continue operate at very low power to dry up condensed water and prevent mildew growth.
Wireless Control
- Wireless control allows you to control your air conditioner using your mobile phone and a wireless connection.
- For the USB device access, replacement, maintenance operations must be carried out by professional staff.
Louver Angle Memory
- When turning on your unit, the louver will automatically resume its former angle.
Active Clean function
- The Active Clean Technology washes away dust, mold, and grease that may cause odors when it adheres to the heat exchanger by automatically freezing and then rapidly thawing the frost. A “pi-pi” sound will be heard.
- The Active clean operation is used to produce more condensed water to improve the cleaning effect, and the cold air will blow out. After cleaning, the internal wind wheel then keeps operating with hot air to blow-dry the evaporator, thus preventing the growth of mold and keeping the inside clean.
- When this function is turned on, the indoor unit display window appears “CL ” , after 20 to 45 minutes, the unit will turn off automatically and cancel Active Clean function.
Breeze Away
- This feature avoids direct air flow blowing on the body and make you feel indulging in silky coolness.
- Refrigerant Leakage Detection
- The indoor unit will automatically display “EL0C” when it detects refrigerant leakage.
ECO Intelligent eye
- The system is controlled intelligently under
- Intelligent eye mode. It can detect the people’s activities in the room. In cooling mode, when you are away for 30 minutes, the unit will automatically lower the frequency to save energy(for Inverter models only).
- And the unit will automatically start and resume operation if sensing human activity again.
Sleep Operation
- The SLEEP function is used to decrease energy use while you sleep (and don’t need the same temperature settings to stay comfortable).
- This function can only be activated via remote control. And the Sleep function is not available in FAN or
DRY mode.
- When in COOL mode, the unit will increase the temperature by 1°C (2°F) after 1 hour, and will increase an additional 1°C (2°F) after another hour.
- When in HEAT mode, the unit will decrease the temperature by 1°C (2°F) after 1 hour, and will decrease an additional 1°C (2°F) after another hour.
- The sleep feature will stop after 8 hours and the system will keep running with the final temperature reached.
Setting vertical angle of air flow
- While the unit is on, use the SWING button on remote control to set the direction vertical angle) of airflow. Please refer to the
- Remote Control Manual for details.
- The horizontal angle of the airflow can be set by remote control. please refer to the Remote Control
NOTE ON LOUVER ANGLES
- When using COOL or DRY mode, do not set louver at too vertical an angle for long periods of time. This can cause water to condense on the louver blade, which will drop on your floor or furnishings.
- When using COOL or HEAT mode, setting the louver at too vertical an angle can reduce the performance of the unit due to restricted air flow.
NOTE:
- According to the relative standards requirement, please sets the vertical air flow louver to its maximum angle under heating capacity test.
Cleaning Your Indoor Unit
Cleaning Your Air Filter
A clogged air filter can reduce the cooling efficiency of your unit, can also make the air flow irregular and too much noisy, so please clean the air filter as often as necessary. Once the abnormal noise of air flow is heard, please clean the air filter immediately.
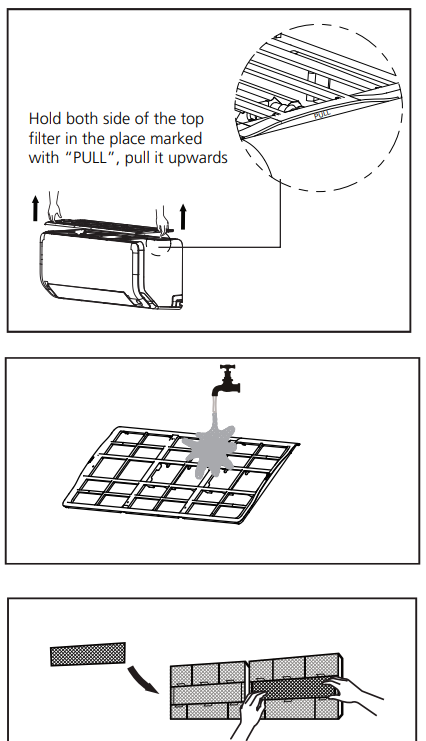
1. The air filter is on the top of the air conditioner.
2. Hold both side of the top filter in the place marked with “PULL”, then pull it upwards.
3. If your filter has small air freshening filters, unclip them from the larger filter. Clean these air freshening filters with a hand-held vacuum.
4. Clean the large air filter with warm, soapy water. Be sure to use a mild detergent.
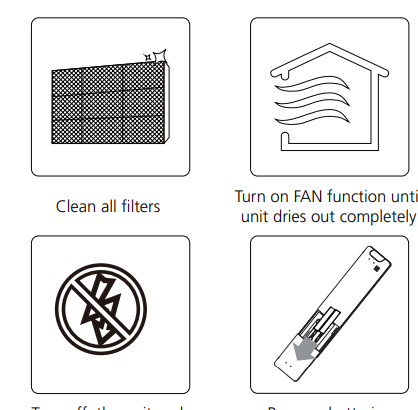
- Rinse the filter with fresh water, then shake off excess water.
- Dry it in a cool, dry place, and refrain from exposing it to direct sunlight.
- When dry, re-clip the air freshening filter to the larger filter, then install it back on the indoor unit.
Air Filter Cleaning Reminder
- After 240 hours of use, the display window on the indoor unit will flash “CL.” This is a reminder to clean your filter. After 15 seconds, the unit will revert to its previous display.
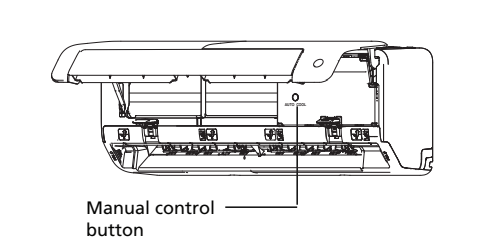
- To reset the reminder, press the LED button on your remote control 4 times, or press the
- MANUAL CONTROL button 3 times. If you don’t reset the reminder, the “CL” indicator will flash again when you restart the unit.
Air Filter Replacement Reminder
- After 2,880 hours of use, the display window on the indoor unit will flash “nF.” This is a reminder to replace your filter. After 15 seconds, the unit will revert to its previous display.
- To reset the reminder, press the LED button on your remote control 4 times, or press the
- MANUAL CONTROL button 3 times. If you don’t reset the reminder, the “nF” indicator will flash again when you restart the unit
Troubleshooting
Unit does not turn on when pressing ON/OFF button
- The Unit has a 3-minute protection feature that prevents the unit from overloading. The unit cannot be restarted within three minutes of being turned off.
- The unit changes from COOL/HEAT mode to FAN mode
- The unit may change its setting to prevent frost from forming on the unit. Once the temperature increases, the unit will start operating in the previously selected mode again. The set temperature has been reached, at which point the unit turns off the compressor. The unit will continue operating when the temperature fluctuates again.
The indoor unit emits white mist
- In humid regions, a large temperature difference between the room’s air and the conditioned air can cause white mist.
- Both the indoor and outdoor units emit white mist
- When the unit restarts in HEAT mode after defrosting, white mist may be emitted due to moisture generated from the defrosting process.
The indoor unit makes noises
- A rushing air sound may occur when the louver resets its position. A squeaking sound may occur after running the unit in HEAT mode due to expansion and contraction of the unit’s plastic parts.
- Both the indoor unit and outdoor unit make noises
Low hissing sound during operation:
- This is normal and is caused by refrigerant gas flowing through both indoor and outdoor units. Low hissing sound when the system starts, has just stopped running, or is defrosting:
- This noise is normal and is caused by the refrigerant gas stopping or changing direction. Squeaking sound: Normal expansion and contraction of plastic and metal parts caused by temperature changes during operation can cause squeaking noises.
The outdoor unit makes noises
- The unit will make different sounds based on its current operating mode.
- Dust is emitted from either the indoor or outdoor unit
- The unit may accumulate dust during extended periods of non-use, which will be emitted when the unit is turned on. This can be mitigated by covering the unit during long periods of inactivity.
The unit emits a bad odor
- The unit may absorb odors from the environment (such as furniture, cooking, cigarettes, etc.) which will be emitted during operations. The unit’s filters have become moldy and should be cleaned.
- Operation is erratic, unpredictable, or unit is unresponsive
- Interference from cell phone towers and remote boosters may cause the unit to malfunction. In this case, try the following:
- Disconnect the power, then reconnect.
- Press ON/OFF button on remote control to restart operation.
Poor Cooling Performance
Temperature setting may be higher than ambient room temperature
- Lower the temperature setting The heat exchanger on the indoor or outdoor unit is dirty
Clean the affected heat exchanger
- The air filter is dirty Remove the filter and clean it according to instructions
The air inlet or outlet of either unit is blocked
- Turn the unit off, remove the obstruction and turn it back on
Doors and windows are open
- Make sure that all doors and windows are closed while operating the unit
Excessive heat is generated by sunlight
- Close windows and curtains during periods of high heat or bright sunshine
- Too many sources of heat in the room (people, computers, electronics, etc.)
Reduce amount of heat sources
- Low refrigerant due to leak or long-term use Check for leaks, re-seal if necessary and top off refrigerant SILENCE function is activated (optional function) SILENCE function can lower product performance by reducing operating frequency. Turn off SILENCE function
The unit is not working
Power failure Wait for the power to be restored
Turn on the power
- The fuse is burned out Replace the fuse
Remote control batteries are dead
- Replace batteries The Unit’s 3-minute protection has been activated Wait three minutes after restarting the unit Timer is activated Turn timer off
The unit starts and stops frequently
There’s too much or too little refrigerant in the system
- Check for leaks and recharge the system with refrigerant. Incompressible gas or moisture has entered the system.
Evacuate and recharge the system with refrigerant
- The compressor is broken Replace the compressor The voltage is too high or too low Install a m
Poor heating performance
- The outdoor temperature is extremely low Use auxiliary heating device Cold air is entering through doors and windows
- Make sure that all doors and windows are closed during use Low refrigerant due to leak or long-term use
- Check for leaks, re-seal if necessary and top off refrigerant
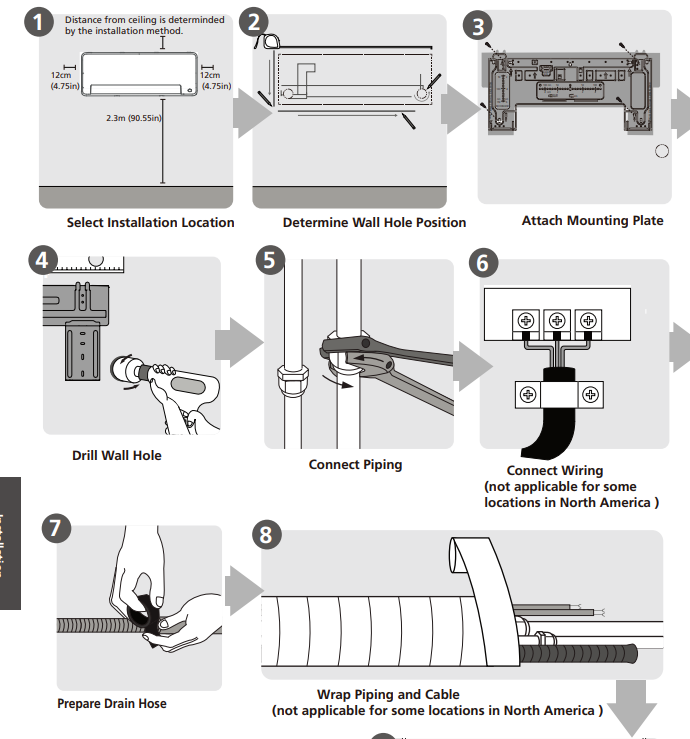
Installation Summary
[IMAGE]
- If the back holder is not needed to prop up the unit:
- Finishing the pipe and cable connections before mount the indoor unit on the wall.
- If the installation height is limited, 5cm from the ceiling is allowable, but this can lower product performance. To ensure enough space to install and remove the top air filter, keep at least 10cm or more from the ceiling.
- The back holder is needed to prop up the unit: If connecting pipe and cable with front panel open, the minimum distance from ceiling is 22cm or more, if connecting pipe and cable without front panel(remove it) , the minimum distance from ceiling is 11cm or more.
- Drill wall hole for connective piping Unit: mm(inch)
- Determine the location of the wall hole based
CAUTION:
- The Bubble level on the mounting plate can’t be removed. If it is broken, make sure to clean up the leaking liquid.
Vertical direction ruler
- Horizontal direction ruler on the position of the mounting plate. Refer to Mounting Plate Dimensions.
Indoor Outdoor mm7-5(0.2-0.275in)
Fig.3.2
- MOUNTING PLATE DIMENSIONS
- Different models have different mounting plates.
- For the convenience of installation, there are bubble level, carved dimensions on the mounting plate. Please install the plate and drill wall hole according to the information of the mounting plate. See the figures below.
Correct orientation of Mounting Plate
- Using a 65mm (2.5in) or 90mm(3.54in) depending on models )core drill, drill a hole in the wall. Make sure that the hole is drilled at a slight downward angle, so that the outdoor end of the hole is lower than the indoor end by about 5mm to mm (0.2-0.275in).
- This will ensure proper water drainage.
Connect drain hose
- By default, the drain hose is attached to the lefthand side of unit (when you’re facing the back of the unit). However, it can also be attached to the right-hand side.
- To ensure proper drainage, attach the drain hose on the same side that your refrigerant piping exits the unit.
NOTE:
- In some locations of US, if the machine has installed the conduit panel, please choose right-hand side drainage.
- Wrap the connection point firmly with Teflon tape to ensure a good seal and to prevent leaks.
- Remove the air filter and pour a small amount of water into the drain pan to make s