Operating and Installation
Instructions
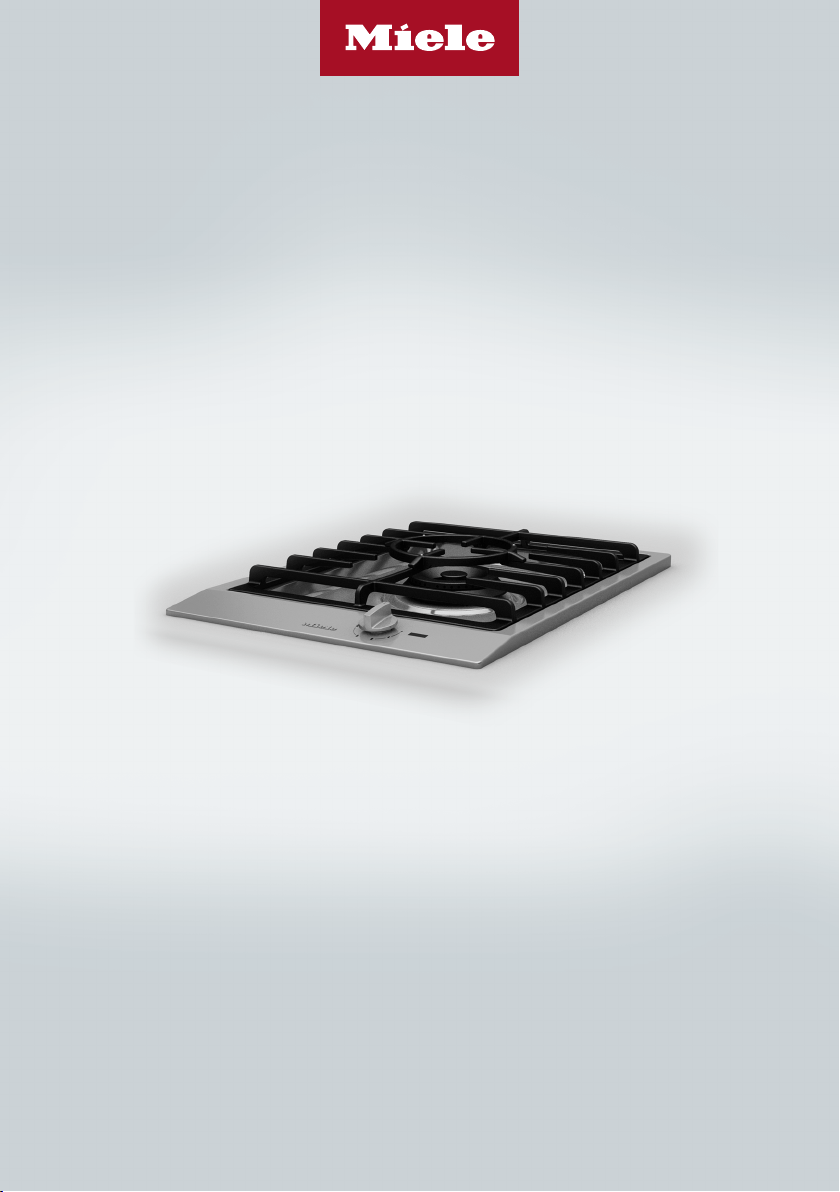
ProLine Gas Wok
To prevent accidents and machine damage, read these instructions
before installation or use.
en-US M.-Nr. 11 881 950
IMPORTANT SAFETY INSTRUCTIONS
2
WARNING: If the information in this manual is not followed exactly, a fire or
explosion may result causing property damage, personal injury, or death.
- Do not use or store gasoline or other combustible liquids or vapors in the vicinity
of this or any other appliance.
- WHAT TO DO IF YOU SMELL GAS
– Do not try to light any appliance.
– Do not touch any electric switches.
– Do not use any phones inside your building.
– Immediately call your gas supplier from a neighbor's phone. Follow the gas
supplier's instructions.
– If you are unable to reach your gas provider, call the fire department.
- Installation and service must be performed by a qualified installer, qualified ser-
vice agency or your gas provider.
(In Massachusetts, installation must be performed by a licensed installer / gas
fitter.)
- Note to the installer:
Please give these installation instructions to the consumer for the local electri-
cal/gas inspector.
WARNING: Never Operate the Top Surface Cooking Section of this Appli-
ance Unattended.
- Failure to follow this warning statement could result in fire, explosion, or burn
hazard that could cause property damage, personal injury, or death.
- If a fire sould occur, keep away from the appliance and immediately call your fire
department.
DO NOT ATTEMPT TO EXTINGUISH AN OIL/GREASE FIRE WITH WATER.
®
®

Contents
3
IMPORTANT SAFETY INSTRUCTIONS ............................................................ 2
IMPORTANT SAFETY INSTRUCTIONS ............................................................ 5
Caring for the environment .............................................................................. 16
Overview............................................................................................................. 17
Wok ..................................................................................................................... 17
Indicators............................................................................................................. 17
Knob.................................................................................................................... 18
Burner.................................................................................................................. 19
Included accessories........................................................................................... 20
Before first use .................................................................................................. 21
Cleaning the ProLine element for the first time ................................................... 21
Switching on the ProLine element for the first time ............................................ 21
Cookware ........................................................................................................... 22
Energy saving tips ............................................................................................ 24
Operation............................................................................................................ 25
Rapid ignition system.......................................................................................... 25
Turning the appliance on ..................................................................................... 25
Adjusting the flame.............................................................................................. 26
Switching off........................................................................................................ 26
In-operation/residual-heat indicators .................................................................. 27
Safety features................................................................................................... 28
Cleaning and care ............................................................................................. 29
Cleaning the stainless-steel cooktop .................................................................. 30
Cleaning the knob(s)............................................................................................ 31
Cleaning the grates ............................................................................................. 31
Cleaning the burner............................................................................................. 32
Assembling the burner ........................................................................................ 33
Frequently Asked Questions ............................................................................ 35
Optional accessories ........................................................................................ 37
Customer Service.............................................................................................. 38
Contact in the event of a fault ............................................................................. 38
Appliance warranty and product registration ...................................................... 38

Contents
4
Installation.......................................................................................................... 39
IMPORTANT SAFETY INSTRUCTIONS - INSTALLATION ................................... 39
Safety distances.................................................................................................. 40
Installation notes ................................................................................................. 41
Installation dimensions........................................................................................ 42
Countertop cut-out for several ProLine elements ............................................... 43
Installation ........................................................................................................... 45
Gas connection ................................................................................................... 49
Burner ratings...................................................................................................... 52
Electrical connection ........................................................................................... 53
IMPORTANT SAFETY INSTRUCTIONS
5
This wok complies with all current local and national safety re-
quirements. Inappropriate use can, however, lead to personal in-
jury and material damage.
Read the operating and installation instructions carefully before
using the wok. They contain important information on safety, in-
stallation, use, and maintenance. This prevents both personal in-
jury and damage to the wok.
Miele expressly and strongly advises that you read and follow the
instructions in the chapter on installing the wok as well as in the
“IMPORTANT SAFETY INSTRUCTIONS”.
Miele cannot be held liable for injury or damage caused by non-
compliance with these instructions.
Keep these instructions in a safe place and pass them on to any
future owner.
SAVE THESE INSTRUCTIONS AND REVIEW THEM PERIODICALLY

IMPORTANT SAFETY INSTRUCTIONS
6
Appropriate use
This wok is designed for domestic use and for use in similar envi-
ronments.
This wok is not intended for outdoor use.
This wok is intended for domestic use only to cook food and keep
it warm. All other types of use are not permitted.
This wok can only be used by people with reduced physical, sen-
sory, or mental capabilities or lack of experience and knowledge if
they are supervised while using it. They may only use it unsupervised
if they have been shown how to do so in a safe manner. They must
be able to understand and recognize the possible dangers caused
by incorrect operation.

IMPORTANT SAFETY INSTRUCTIONS
7
Safety with children
Do not leave children unattended: Children should not be alone or
unsupervised in the area where the appliance is installed. Do not al-
low them to sit or stand on the appliance.
Children should be supervised in the vicinity of the wok. Never al-
low children to play with the wok.
The wok gets hot when in use and remains hot for quite a while
after being switched off. Keep children well away from the wok until
it has cooled down and there is no danger of burning.
Danger of burning. Do not store anything which might spark a
child’s interest in storage areas above or behind the wok. Otherwise
they could be tempted to climb onto the wok.
Risk of burning or scalding. Turn pot and pan handles inward, so
children cannot pull them down and be burned.
Danger of suffocation. While playing, children may become entan-
gled in packaging material (such as plastic wrapping) or pull it over
their head, presenting the risk of suffocation. Keep packaging mate-
rial away from children.

IMPORTANT SAFETY INSTRUCTIONS
8
Technical safety
Proper installation: Make sure that your appliance has been in-
stalled correctly and that it has been grounded by a qualified techni-
cian.
Maintenance by the user: Never repair or replace any part of the
appliance unless the instructions specifically recommend doing so.
Service work should only be performed by a qualified technician.
Unauthorized installation, maintenance, and repairs can cause
considerable danger for the user. Installation, maintenance, and re-
pairs must only be carried out by a Miele authorized technician.
Damage to the wok can compromise your safety. Check the wok
for visible signs of damage. Do not use a damaged wok.
Temporary or permanent operation on an autonomous power sup-
ply system or a power supply system that is not synchronized with
the grid power supply (e.g., island networks, back-up systems) is
possible. A prerequisite for operation is that the power supply sys-
tem complies with national and local codes.
The function and operation of the protective measures provided in
the domestic electrical installation and in this Miele product must
also be maintained in isolated operation or in operation that is not
synchronized with the grid power supply, or these measures must be
replaced by equivalent measures in the installation.
The electrical safety of this appliance can only be guaranteed
when correctly grounded. It is essential that this basic safety require-
ment is fulfilled. If in doubt, the electrical installation should be
checked by a qualified electrician.
The connection data (voltage and frequency) on the data plate of
the wok must match the domestic electrical supply in order to avoid
the risk of damage to the wok.
Compare this data before connecting the appliance. If in any doubt,
consult a qualified electrician.

IMPORTANT SAFETY INSTRUCTIONS
9
Power bars and extension cords do not guarantee the required
safety of the appliance (risk of fire). Do not use these to connect the
wok to the domestic electrical supply.
For safety reasons, this wok may only be used after it has been
built in.
This wok must not be used in a non-stationary location (e.g., on a
ship).
Any contact with live connections or tampering with the electrical
or mechanical components of the wok will endanger your safety and
may lead to appliance malfunctions.
Do not open the wok housing under any circumstances.
While the appliance is under warranty, repairs should only be un-
dertaken by a service technician authorized by Miele Customer Ser-
vice. Otherwise the warranty will be invalidated.
Defective components should be replaced by Miele original parts
only. Only with these parts can safety of the appliance be assured as
intended by the manufacturer.
The wok is not intended for use with an external timer switch or a
remote-control system.
The connection to the gas supply must be carried out by a suit-
ably qualified and competent person in accordance with current lo-
cal and national safety regulations. If the electrical plug has been re-
moved or the power cord is not supplied with an electrical plug, the
wok must be connected to the power supply by a qualified electri-
cian.
If the power cord is damaged, it must only be replaced by a quali-
fied service technician (see “Installation–Electrical connection”).
During installation, maintenance, and repair work, the wok must
be completely disconnected from the domestic electrical supply. The
gas inlet valve must be closed. It is only completely isolated from the
supply when:

IMPORTANT SAFETY INSTRUCTIONS
10
- The breakers have been switched off.
- The screw-out breakers have been completely removed.
- The electrical plug (if present) is removed from the socket. To do
this, pull the plug, not the power cord.
- The gas inlet valve is closed.
Danger of electric shock.
Do not use the wok if it is damaged or if it suffers damage during
use. Switch it off immediately. Disconnect it from the power and gas
supply. Contact Miele Customer Service.
If the wok is built in behind a cabinet front (e.g., a door), do not
close the door while the wok is in use. Heat and moisture can build
up behind the cabinet front when closed. This can result in damage
to the wok, the housing unit, and the floor. Do not close the cabinet
front until the residual-heat indicators go out.

IMPORTANT SAFETY INSTRUCTIONS
11
Correct use
Keep the wok and the area around it clear and free from com-
bustible materials, gasoline, and other flammable vapours and liq-
uids.
Wind can blow curtains over the wok, causing them to catch fire.
If the wok is installed near a window, do not use long curtains.
Only certain types of glass, ceramic or other enamel cookware
can be used on a gas wok without breaking as a result of sudden
temperature changes.
Fire hazard! Loose-fitting or hanging garments can catch fire. Be
sure to wear appropriately fitting clothing when cooking. Never allow
loose clothing or flammable materials to come into contact with the
burners while the burners are in use.
When you have finished cooking, make sure that the burners are
turned off by checking the position of the knobs.
The grates, burner cap, bottom parts of the burner, and any other
parts located near the burner flame can still be very hot after cooking
and cause burns. Do not touch these components when using the
wok.
Ensure that the igniters are clean and dry to allow the burners to
ignite and burn properly.
Wet sponges or cloths can cause burns due to hot steam if they
are used to wipe spilled food off a hot wok. Some cleaning agents
can emit hazardous vapors if they are applied to a hot surface. Be
careful when cleaning the wok.
WARNING
NEVER use this wok as a space heater to heat or warm the room.
Doing so may result in carbon monoxide poisoning and overheat-
ing of the appliance.

IMPORTANT SAFETY INSTRUCTIONS
12
Never leave the appliance unattended at high heat settings–
Boilover causes smoking and greasy spillovers that may ignite.
Do Not Use Water on Grease Fires–Smother fire or flame or use
dry chemical or foam-type extinguisher.
An air curtain or other overhead range hood, which operates by
blowing a downward airflow onto an appliance, shall not be used in
conjunction with the appliance.
The wok gets hot when in use and remains hot for quite a while
after being switched off. There is a danger of burning until the resid-
ual-heat indicators go out.
Oils and fats are a fire hazard if allowed to overheat. Never leave
the wok unattended when cooking with oil or fats. Never attempt to
put out oil or grease fires with water. Switch the wok off.
Extinguish the flames carefully with a lid or fire blanket.
The flames could set the grease filters of a ventilation hood on fire.
Do not flambé under a ventilation hood.
Spray canisters, aerosols, and other inflammable substances can
ignite when heated. Therefore do not store such items or substances
in a drawer under the wok. Utensil inserts must be heat-resistant.
Never heat empty cookware.
Canning food and heating it up in closed containers results in an
increase in pressure which can cause them to explode. Do not use
the wok for canning food or for heating up food in cans.
If the wok is covered, there is a risk that the material of the cover
will ignite, explode, or melt if the wok is still hot or if it is turned on in-
advertently. Never cover the wok with a cover, cloth, or protective
film.

IMPORTANT SAFETY INSTRUCTIONS
13
If the appliance is switched on by mistake, or if there is residual
heat present, there is the risk of any metal items placed on the wok
heating up. Other materials can melt or catch fire when the appliance
is switched on. Do not use the wok as a resting place for anything.
You could burn yourself on the hot wok. Protect your hands with
heat-resistant pot holders or gloves when handling hot items. Do not
let them get wet or damp. Heat transfers through damp and wet ma-
terial more quickly with the risk of scalding or burning yourself. En-
sure that they do not come into contact with the flames. Do not use
large cloths, tea towels, or similar as the ends could touch the
flames and catch fire.
When using an electrical appliance (e.g., a hand mixer) near the
wok, make sure that the power cord does not come into contact with
the hot wok. The cord’s insulation could become damaged.
Cookware made of plastic or aluminum foil will melt at high tem-
peratures. Do not use any plastic or aluminum foil cookware.
Pressing the knob generates a spark on the ignitor. Do not press
the knob while you are cleaning or touching the wok or a burner in
the vicinity of an ignitor.
A ventilation hood installed above the wok can become damaged
or catch fire as a result of intense heat. Do not use the wok burner
without cookware.
Only light the burners after all burner parts have been properly as-
sembled.
If the cookware is too small, it will not sit properly on the burner
grate. If the cookware is too large, heat emitted from the bottom of
the cookware may damage the countertop, walls with poor heat-re-
sistance (e.g. paneled walls) or portions of the cooktop.
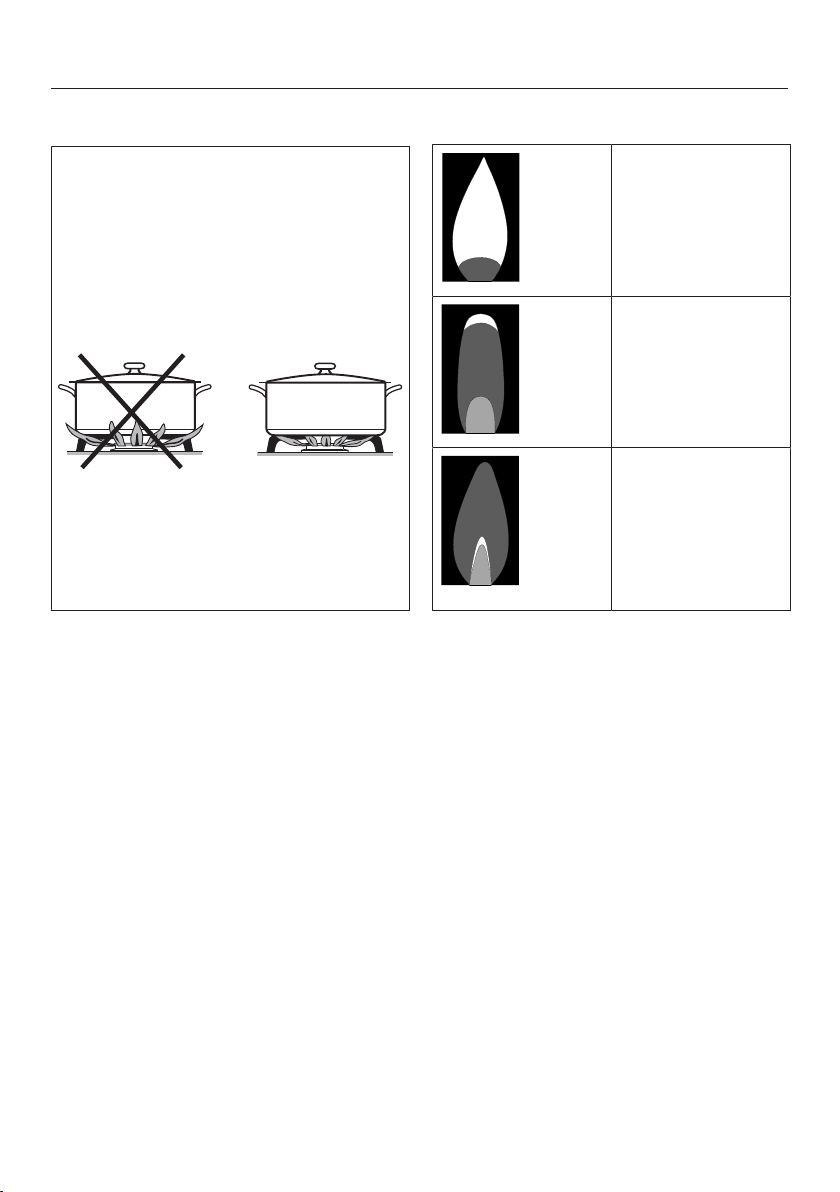
Make sure that the burner flames do not extend beyond the bot-
tom of the cookware and rise up its sides.

IMPORTANT SAFETY INSTRUCTIONS
14
Only use cookware with a thick enough bottom. Failure to do so
may result in damage to the cooktop.
Always use the burner grates supplied with the cooktop. Never
place cookware directly on the burner.
Install the burner grates in an upright position to avoid scratching
the cooktop.
Remove all grease splatters and other combustible (food) residues
on the wok. They are a fire hazard.
Avoid allowing liquids or foods containing salt to spill onto the
cooktop. If salty foods or liquids do get on the cooktop, they should
be removed as soon as possible to avoid the risk of corrosion.
Using a wok causes heat, moisture, and products of combustion
to build up in the room in which it is installed. Make sure that your
kitchen is well ventilated, especially when the appliance is in use.
Keep any natural means of ventilation open or install a mechanical
ventilation system (e.g., a ventilation hood).
If the wok is used for very long periods of time, additional ventila-
tion of the room may be necessary, e.g., by opening windows or
doors, or running the ventilation on the highest setting.
If the wok has not been used for a long period of time, be sure to
thoroughly clean it and have it inspected by an authorized technician
before using it again.
Where several ProLine elements are installed side by side:
Hot objects can damage the seal of the spacer bar. Do not place hot
pans near or on the spacer bar.

IMPORTANT SAFETY INSTRUCTIONS
15
Cleaning and maintenance
The steam from a steam cleaner could reach live electrical com-
ponents and cause a short circuit.
Do not use a steam cleaner to clean the wok.
Miele will guarantee to supply functional parts for a minimum of
10years and up to 15years following the discontinuation of your
ProLine element.
Caring for the environment
16
Disposal of the packing mate-
rial
The cardboard box and packing materi-
als protect the appliance during ship-
ping. They have been designed to be
biodegradable and recyclable.
Ensure that any plastic wrappings,
bags, etc. are disposed of safely and
kept out of the reach of children. Dan-
ger of suffocation!
Disposal of your old appliance
Electrical and electronic appliances
contain valuable materials. They also
contain certain substances, compounds
and components which were essential
for the proper functioning and safe use
of the equipment. Handling these mate-
rials improperly by disposing of them in
your household waste can be harmful to
your health and the environment. There-
fore, please do not dispose of your old
appliance with regular household waste
and follow local regulations on proper
disposal.
Consult with local authorities, dealers or
Miele in order to dispose of and recycle
electrical and electronic appliances.
Miele assumes no responsibility for
deleting any personal data left on the
appliance being disposed. Please en-
sure that your old appliance is kept
away from children until removal. Ob-
serve safety requirements for appli-
ances that may tip over or pose an en-
trapment hazard.
Overview
17
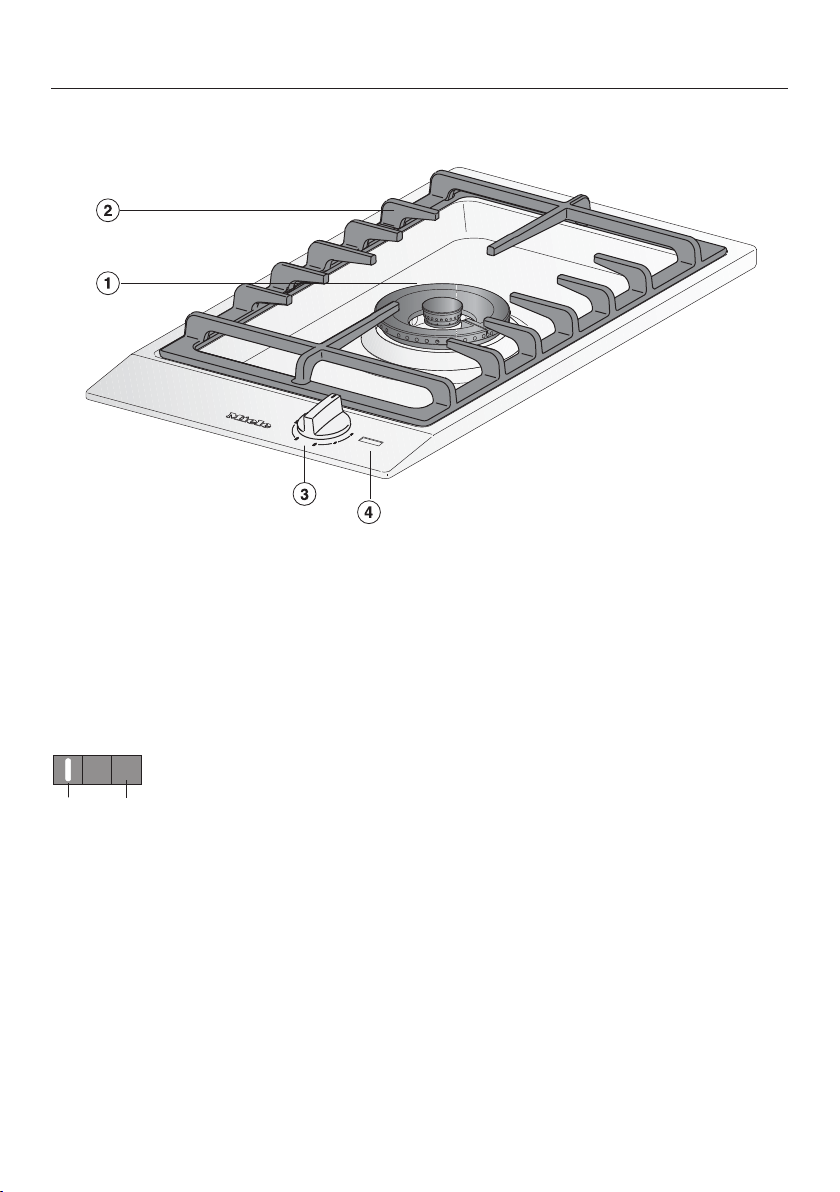
Wok
a
Wok burner
b
Grates
c
Knob
d
Indicators
Indicators
a
b
a
In operation
b
Residual heat
Overview
18
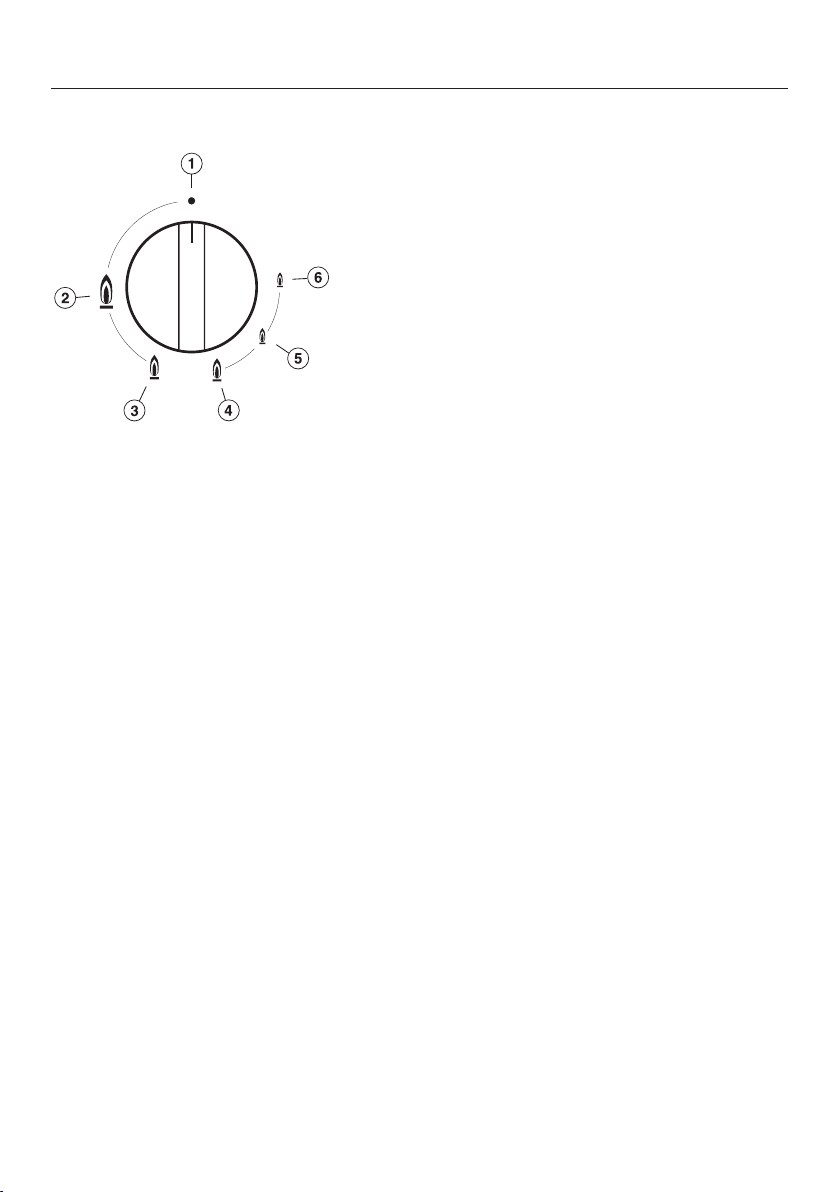
Knob
a
Burner off
The gas supply is turned off
b
Strongest flame
The outer and inner burners are on the highest setting
c
Strong flame
The outer burner is on the lowest setting, the inner burner on the highest setting
d
Over-ignition position
The outer burner is ignited by changing from the lowest to the highest setting
e
Weak flame
The outer burner is off, the inner burner is on the highest setting
f
Weakest flame
The outer burner is off, the inner burner is on the lowest setting
Overview
19
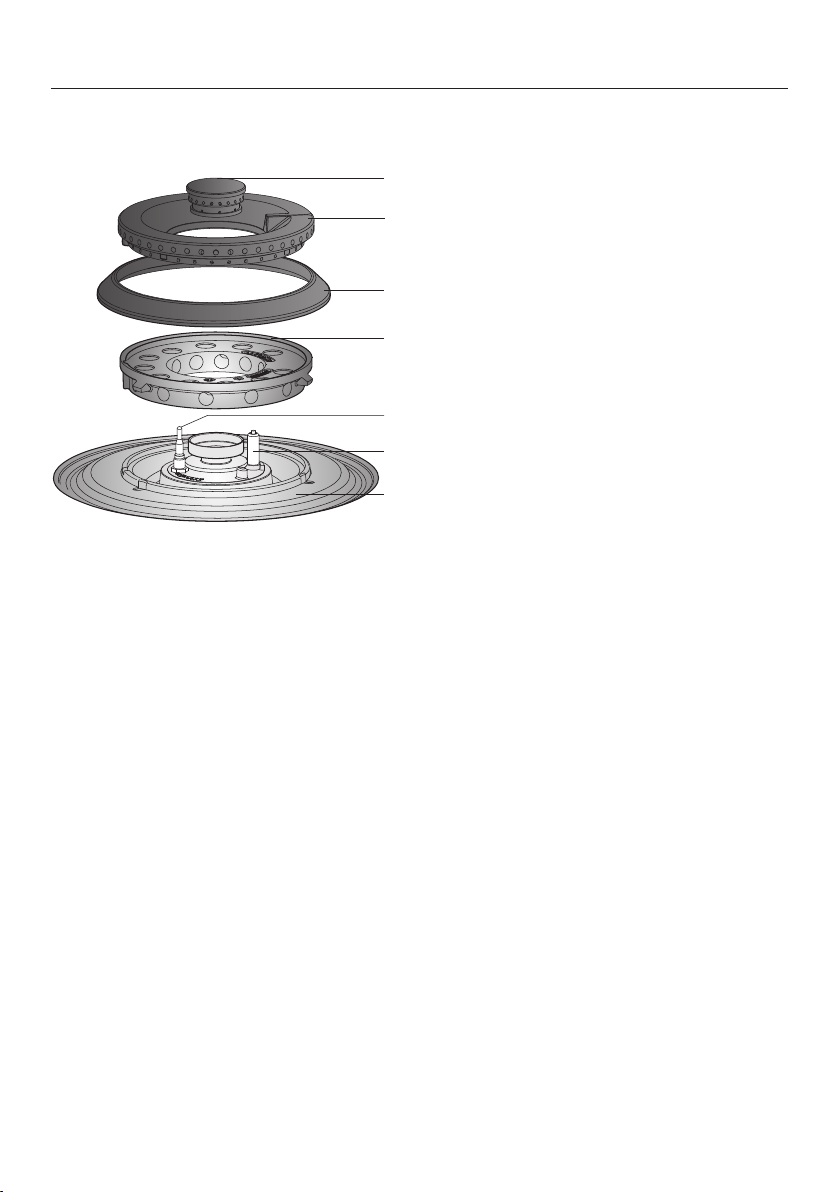
Burner
a
b
c
d
f
e
g
a
Inner burner cap
b
Outer burner cap
c
Burner ring
d
Burner head
e
Ignition safety device
f
Ignitor
g
Burner base
Overview
20
Included accessories
The accessories supplied with your ap-
pliance, as well as a range of optional
ones, are available to order from Miele
(see “Optional accessories”).
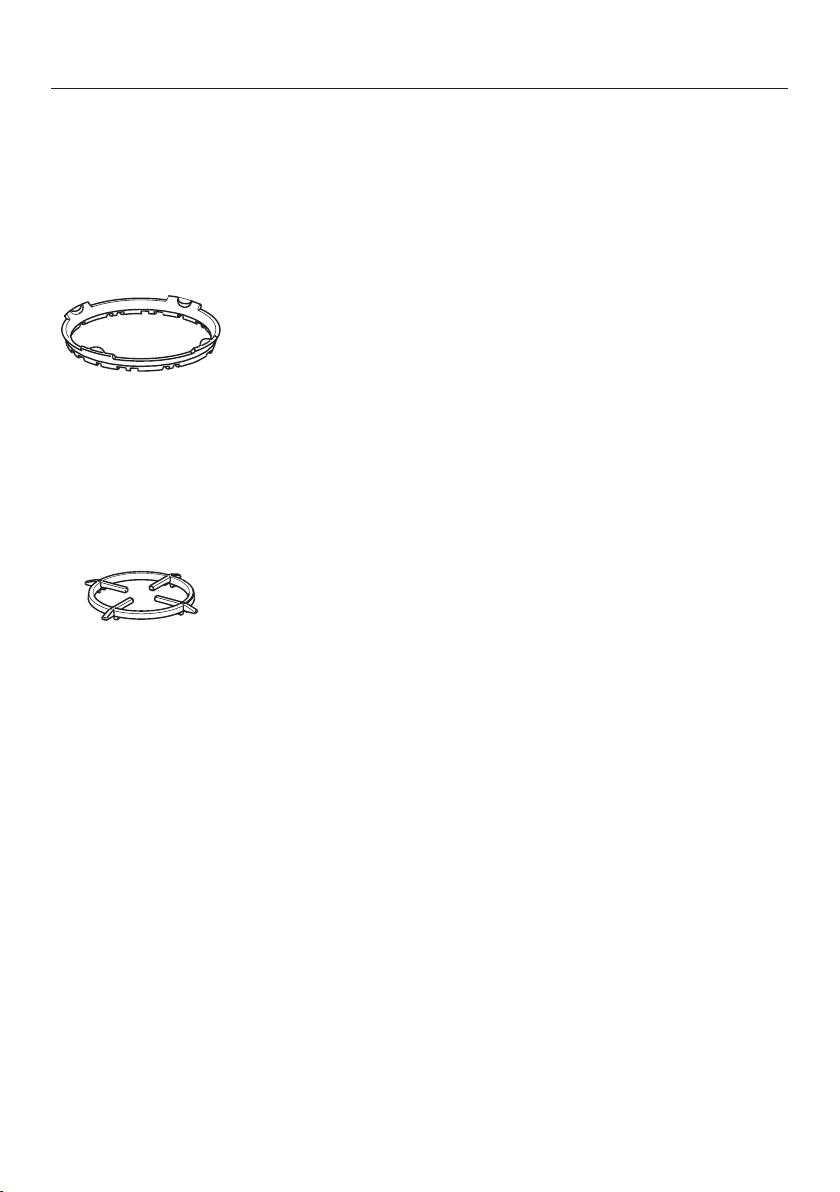
Wok ring
The Wok ring supplied with your appli-
ance can be used in instances where
extra stability is required. It is particu-
larly suitable for wok pans with rounded
bases.
Combi-trivet
For small cookware (see “Cookware”).

Before first use
21
Cleaning the ProLine element
for the first time
Using a soft sponge, clean all remov-
able burner parts with a solution of
warm water and a small amount of
liquid dish soap. Dry the parts thor-
oughly after cleaning and reassemble
the burners (see “Cleaning and
care”).
Clean the stainless-steel trough with
a damp cloth, and then wipe dry.
Switching on the ProLine ele-
ment for the first time
The metal components have a protec-
tive coating. When the cooktop is used
for the first time, this causes a smell
and possibly also vapor.
The smell and any vapors do not indi-
cate a faulty connection or a defective
appliance and are not harmful to your
health.
Cookware
22
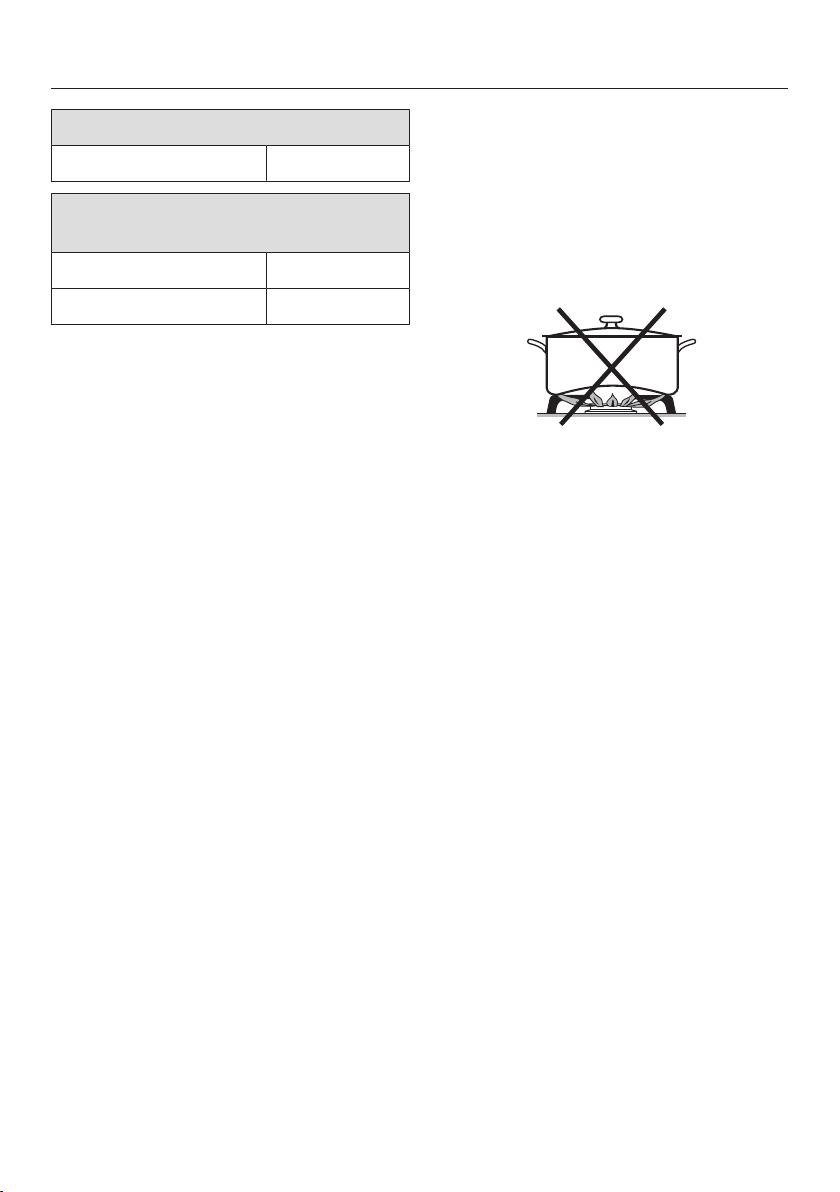
Minimum cookware base diameter
Pots/pans 6" (15 cm)
Maximum diameter at top of cook-
ware
Pots/pans 11" (28cm)
Wok pan 16" (40cm)
- Observe the dimensions given in the
charts above. Using cookware that is
too large can cause the flames to
spread out and damage the sur-
rounding countertop or other appli-
ances. Choosing the right cookware
size improves efficiency.
Any cookware that has a diameter
smaller than the grates or which does
not rest in a stable position on the
grates (without wobbling) is danger-
ous and should not be used.
- Ensure that the base of the wok pan
does not come into contact with the
burner. There must be a gap of at
least 1cm between the burner and
the base of the pan.
- When purchasing pots and pans,
keep in mind that the diameter indi-
cated is typically the top diameter,
not the bottom diameter.
- All heat-resistant cookware is suitable
for use.
- Cookware with a thick bottom is
preferable, as it distributes heat more
evenly. Cookware with a thin bottom
may cause food to overheat in certain
spots. To avoid this, stir the food fre-
quently.
- Always place the cookware on the
grates supplied. Do not place cook-
ware directly on the burner.
- Position the cookware on the grates
so that it cannot tip. There is always a
possibility of a slight tilt, despite the
proper position.
- Do not use pots or pans that have
bottoms with pronounced edges.
Cookware
23
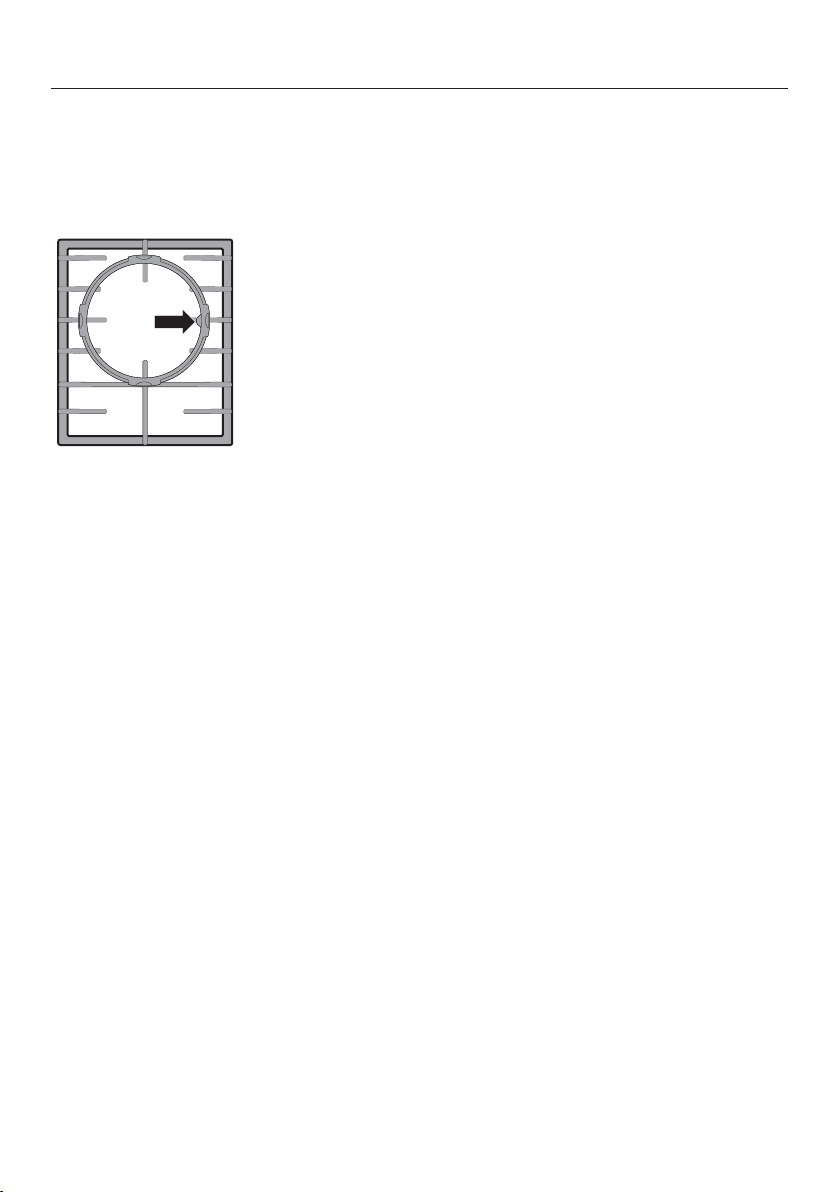
Wok ring
Use the wok ring supplied to give ad-
ditional stability to cookware, espe-
cially to woks with a rounded base.
Place the wok ring on the pan sup-
port so that it sits securely in position
and cannot move (see diagram).
Combi-trivet
You must use the combi-trivet if you
wish to use cookware with a smaller di-
ameter base than the minimum given in
the chart.

Energy saving tips
24
- Whenever possible, keep pots and
pans covered while cooking. Doing
so will prevent unnecessary heat loss.
- Wide, shallow cookware heats up
faster and is therefore preferable to
tall, narrow cookware.
- Cook with as little water as possible.
- Reduce the power setting once the
water has come to a boil or the oil/fat
is hot enough for frying.
- Use a pressure cooker to reduce the
cooking time.

Operation
25
Fire hazard due to overheated
food.
Unattended food can overheat and
ignite.
Do not leave the wok unattended
while it is being used.
Rapid ignition system
The wok is supplied with a rapid ignition
system with the following features:
- Rapid ignition without the need to
hold the knob.
- Automatic re-ignition
If the flame is extinguished by a draft,
for example, the burner is automati-
cally relit. If re-ignition is unsuccess-
ful, the gas supply is automatically
cut off (see “Safety features” – “Igni-
tion safety”).
If there has been a power outage, the
automatic re-ignition feature will not
work properly.
Turning the appliance on
Press the knob lightly and turn it
counterclockwise to the large flame
symbol.
Then press it down firmly to open the
gas supply.
The ignitor “clicks” and ignites the gas.
If the burner does not ignite, turn the
knob to the position. Ventilate the
room or wait for at least 1minute be-
fore trying again.
If the burner does not ignite the sec-
ond time, turn the knob back to the
position and see “Frequently asked
questions”.
Brief re-ignition may occur during
switch-on (1–2x clicks), e.g., if there is
a draft.
Switching on during a power outage
In case of a power outage, the flame
can be ignited manually.
Press in the relevant control knob and
turn it counterclockwise to the large
flame symbol.
Hold the control knob pressed down
and light the gas at the burner with a
match.
Keep the control knob pressed down
for an additional 5–10seconds and
then release it.
Operation
26
Adjusting the flame
As the outer part of the flame is much
hotter than the center, the tips of the
flames should stay beneath the pan
base. Flame tips which extend beyond
the sides of the pan merely warm up
the air in the room and can damage
pan handles and increase the risk of
injury.
There is a stopper at the 6 o’clock po-
sition to prevent you turning the knob
to the high or low setting unintention-
ally. Press the knob down to move
past this resistance.
Adjust the flame so that it does not
spread out beyond the sides of the
pan.
To move from the high to the low set-
ting, turn the knob counterclockwise
until it stops. Then press it down and
continue to turn it past the resistance
before releasing it. You can now se-
lect the setting you require.
To move from the low to the high set-
ting, turn the knob clockwise until it
stops. Then press it down and con-
tinue to turn it past the resistance be-
fore releasing it. You can now select
the setting you require.
Visual features of gas flames
Yellow flames
Call Customer
Service.
Yellow tips on
the outer cone
Normal for LP gas
Pale blue flames
possibly with yel-
low tips on the in-
ner cone
Normal for natural
gas
Switching off
Turn the control knob clockwise to
the position.
This stops the flow of gas and the flame
goes out.
Operation
27
In-operation/residual-heat indi-
cators
The in-operation indicator will light up
when you ignite the burner. A short
while later the residual-heat indicator
will also light up. The in-operation indi-
cator will go out when the burner is
switched off. The residual-heat indica-
tor will remain on while there is residual
heat present.
If the residual-heat indicator is flash-
ing, there is a fault (see “Frequently
asked questions”).
Danger of burning due to hot
surfaces.
The grates, burner, and wok will be
hot after use.
Do not touch the grates, burner, or
wok while the residual-heat indicator
is on.

Safety features
28
Ignition safety
The wok is equipped with an ignition
safety device. If a gas flame is extin-
guished (e.g., by food boiling over or by
a draft) and re-ignition does not work,
the gas supply is switched off. This pre-
vents the release of gas. If you turn the
knob to the position, the burner is
ready for use again.
The flame failure device operates inde-
pendently from the electricity supply.
This means that it will still work if the
wok is used during a power outage.
Cleaning and care
29
Danger of burning due to hot
surfaces.
The wok surface, grates, and burner
will be hot after use.
Allow the surfaces to cool down be-
fore cleaning the wok.
Risk of damage due to moisture
ingress.
The steam from a steam cleaner
could reach live electrical compo-
nents and cause a short circuit.
Do not use a steam cleaner to clean
the wok.
All surfaces could become discol-
ored or damaged if unsuitable clean-
ing agents are used. All surfaces are
susceptible to scratching.
Remove any residual cleaning agent
immediately.
Do not clean with any abrasive
cleaning agents or sharp pointed ob-
jects.
Food boiling over can cause discol-
oration of the burner components.
Remove any soiling and salt and
sugar splashes immediately.
Pressing the knob generates a spark
on the ignitor. Do not press the knob
while you are cleaning or touching
the wok or a burner in the vicinity of
an ignitor.
Unsuitable cleaning agents
To avoid damaging the surfaces of the
appliance, do not use:
- cleaning agents containing soda, al-
kalines, ammonia, acids, or chlorides,
- cleaning agents containing lime scale
remover
- stain or rust removers
- abrasive cleaning agents, such as
scouring powder, scouring liquid, or
pumice stones
- cleaning agents containing solvents
- dishwasher cleaner
- grill and oven sprays
- glass cleaners
- hard, abrasive brushes or sponges
(e.g., pot scourers), or sponges which
have been previously used and still
contain abrasive cleaning agents
- eraser sponges

Cleaning and care
30
Allow the ProLine element to cool
down before cleaning.
Clean the ProLine element and ac-
cessories after each use.
Dry the ProLine element thoroughly
after cleaning it with water to avoid
limescale residue.
Cleaning the stainless-steel
cooktop
Risk of damage caused by
pointed objects.
The seal between the cooktop and
the countertop could be damaged.
Do not use pointed objects for clean-
ing.
Damage due to soiling.
Soiling, particularly salty food or liq-
uid and olive oil, can cause damage
if left on the printed surfaces for a
long time.
Remove such soiling immediately.
Damage due to incorrect clean-
ing.
Stainless-steel cleaners rub off the
printed symbols.
Do not use stainless-steel cleaners
on printed symbols.
Clean the stainless-steel cooktop
with a solution of warm water and a
little liquid dish soap applied with a
soft sponge. Soften any stubborn
soiling beforehand. If necessary, the
rough side of a kitchen sponge can
be used.
Finally, dry with a clean soft cloth.

Cleaning and care
31
Cleaning the knob(s)
Use a soft sponge, warm water, and
a small amount of liquid dish soap to
clean the knob(s). Soften any stub-
born soiling beforehand.
Dry the knob(s) with a clean cloth.
Cleaning the grates
Remove the grates.
Clean the grates in a dishwasher or
with a solution of warm water and a
little liquid dish soap applied with a
soft sponge. Soften any stubborn
soiling beforehand.
Dry the the grates thoroughly with a
clean cloth.
Cleaning and care
32
Cleaning the burner
Do not clean any parts of the burner
in a dishwasher.
The burner should be dismantled and
then cleaned only by hand using a
solution of warm water and a small
amount of liquid dish soap applied
with a soft sponge.
Clean any soiling from the flame
openings with the brush supplied.
Risk of explosion.
Blocked flame openings can cause a
dangerous build-up of gas in the
base of the cooktop, which could ig-
nite and cause an explosion. This
can lead to damage to the appliance
and injury.
Ensure that the flame openings are
kept clean at all times.
Parts of the burner that cannot be re-
moved should be wiped clean with a
damp cloth only.
The ignitor and ignition safety device
should be very carefully wiped clean
using a well wrung-out cloth.
Do not let the ignitor get wet. If it gets
wet, it will not spark.
Finally dry everything thoroughly with
a clean cloth. Make sure that the
flame openings are completely dry.
The surface of the burner cap will be-
come more matte with time. This is
quite normal and does not indicate
damage to the material.
Cleaning and care
33
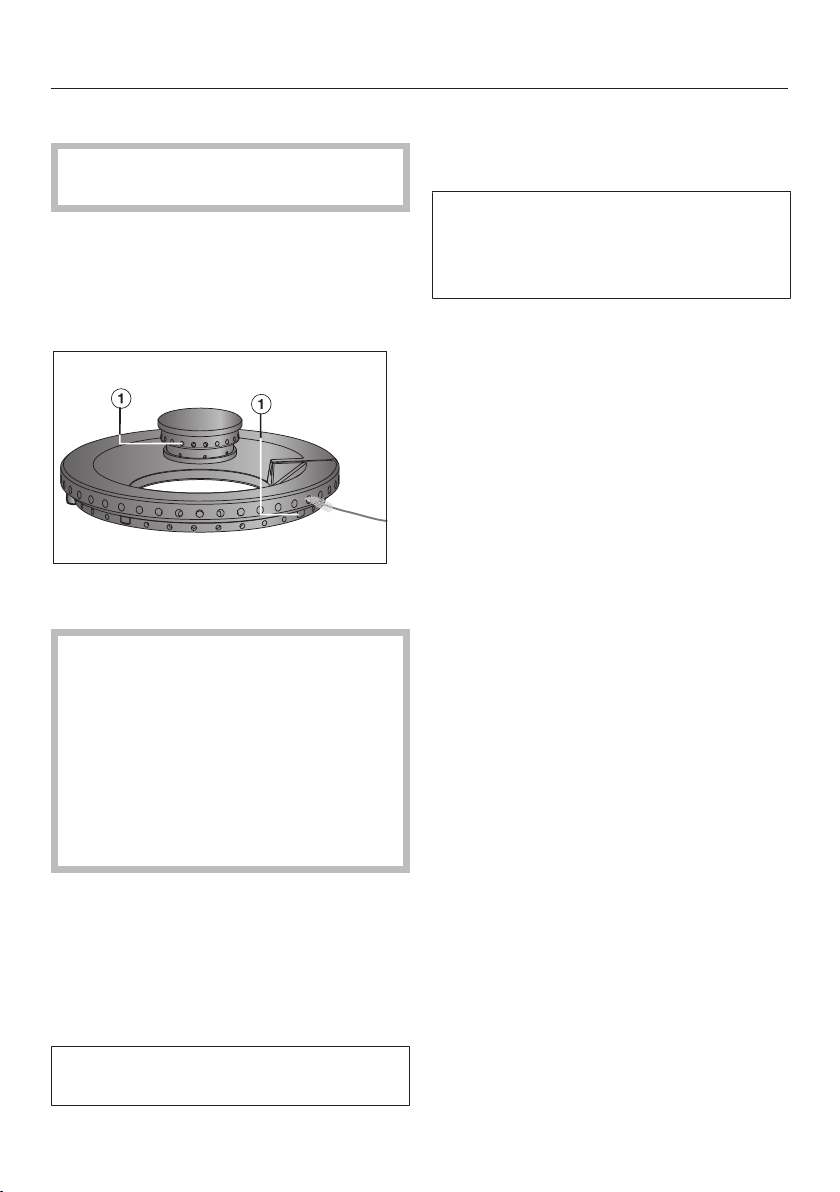
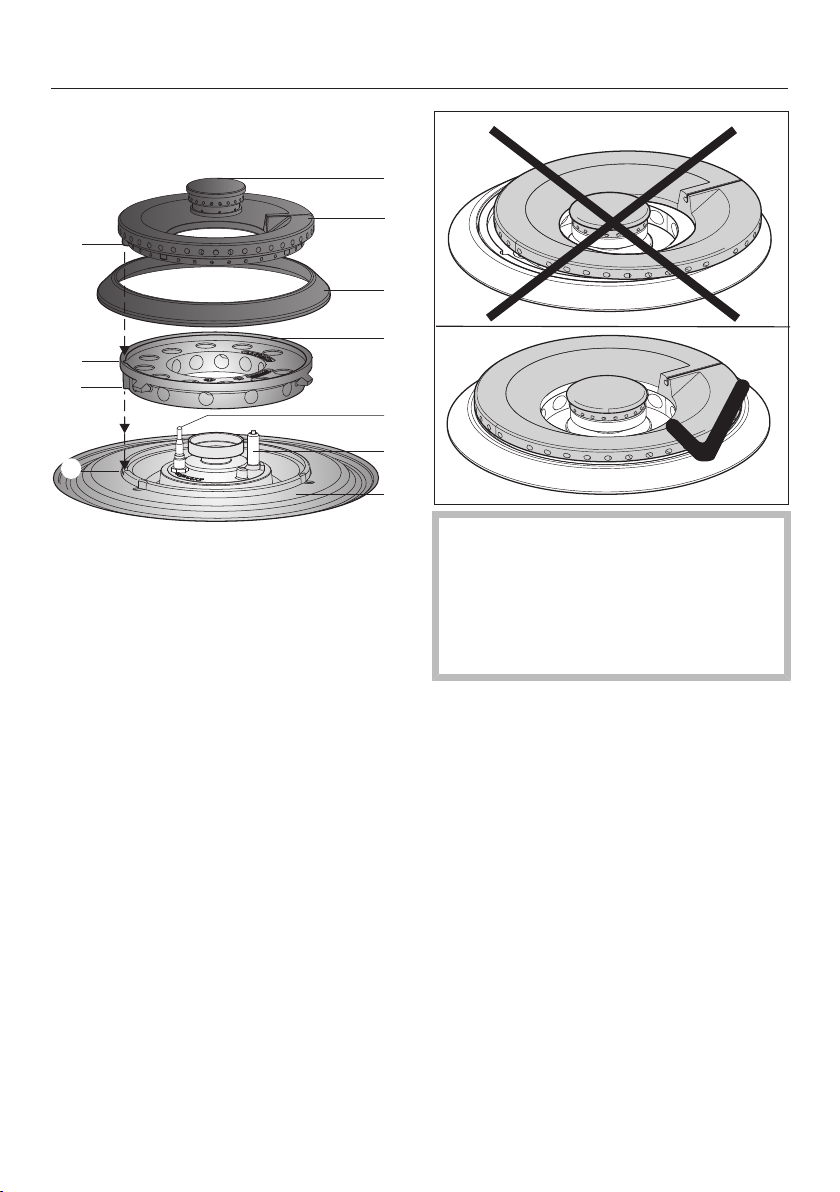
Assembling the burner
a
b
c
a
b
c
d
f
e
g
d
Place the burner head onto the
burner base so that the ignition
safety device and the ignitor ex-
tend through their respective holes in
the burner head.
The lobe on the burner cap must
fit into the recess on the burner
head. The lobe on the burner head
must fit into the recess on the
burner base.
Replace the burner ring.
Then place the burner caps and
in position.
Burners cannot function cor-
rectly if they are incorrectly assem-
bled. This can lead to damage to the
appliance and injury.
Ensure that all parts of the burner are
reassembled in the correct order.

Cleaning and care
34
Checking burning properties
Ignite all burners to check that they
are operating correctly:
- The flame must not go out on the
lowest setting, or when the knob is
turned quickly from the highest to the
lowest setting.
- On the highest setting, the flame
must have a distinctive and visible
core.
Frequently Asked Questions
35
With the help of the following guide minor faults in the performance of the ma-
chine, some of which may result from incorrect operation, can be remedied with-
out contacting the Service Department.
This guide may help you to find the reason for the fault, and how to correct it.
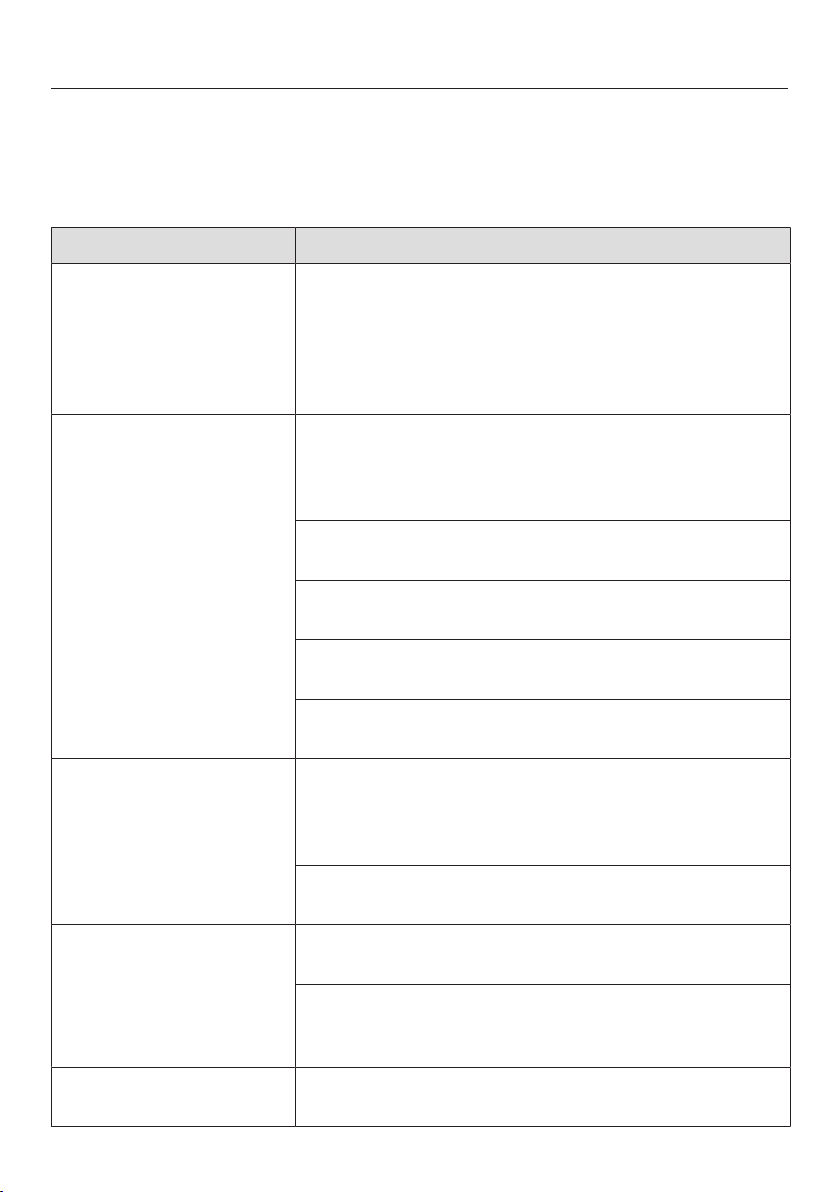
Problem Possible cause and solution
The burners do not ig-
nite when the cooktop
is being used for the
first time or after it has
been out of use for a
longer period.
There may be air in the gas line.
Try to light the burner again, making several at-
tempts if necessary.
The burner does not
light after several at-
tempts.
There is a technical fault.
Turn all of the control knobs clockwise to the po-
sition and interrupt the power supply to the cook-
top for a few seconds.
The burner is not properly assembled.
Assemble the burner correctly.
The gas shut-off valve is closed.
Open the gas shut-off valve.
The burner is wet and/or dirty.
Clean and dry the burner.
The flame holes are clogged and/or wet.
Clean and dry the flame holes.
The gas flame goes out
after being lit.
The flames do not touch the ignition safety device
and the burner does not get hot enough:
The burner parts are not positioned correctly.
Assemble the burner components correctly.
The thermocouple is dirty.
Remove any dirt or grime.
The shape/color of the
gas flame changes.
The burner parts are not in the proper position.
Position the burner parts correctly.
The burner cap itself or the holes in the burner cap
are dirty.
Remove any dirt or grime.
The gas flame goes out
during use.
The burner parts are not in the proper position.
Assemble the burner components correctly.
Frequently Asked Questions
36
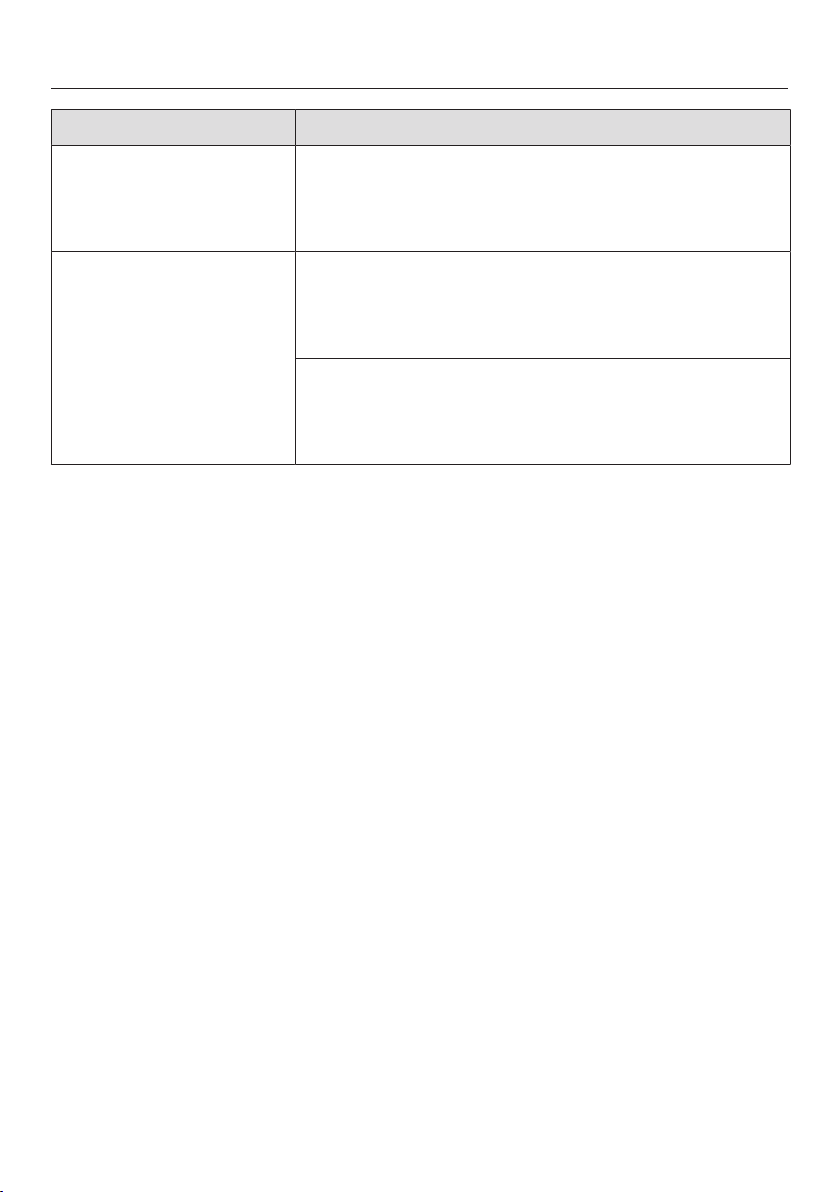
Problem Possible cause and solution
The in-operation/resid-
ual-heat indicator for a
burner is flashing.
There has been a power outage.
Turn all knobs clockwise to the position. When
the power supply is restored, the cooktop can be
operated again as usual.
The ignitor does not
function properly.
The circuit breaker in the building’s wiring system
was tripped.
If necessary, contact a qualified service technician
or Technical Service for assistance.
There is food residue stuck between the ignitor and
the burner cap.
The thermocouple is dirty.
Remove any soiling (See “Cleaning and care”).

Optional accessories
37
Miele offers a range of useful acces-
sories, as well as cleaning and condi-
tioning products for your appliance.
These products can be easily ordered
from the Miele webshop.
These products can also be ordered
from Miele Technical Service (see the
end of these operating instructions) or
your Miele dealer.
Ceramic and stainless steel
cleaner 250mL
Removes heavy soiling, lime scale, and
aluminum residue.

Customer Service
38
Contact in the event of a fault
In the event of a fault which you cannot remedy yourself, please contact your
Miele dealer or Miele Customer Service.
You can book a Miele Service Call online at www.miele.com/service.
Contact information for Miele Customer Service can be found at the end of this
document.
Please quote the model identifier and serial number of your appliance (SN) when
contacting Miele Customer Service. Both pieces of information can be found on
the data plate.
Appliance warranty and product registration
You can register your product and/or view the manufacturer´s warranty terms and
conditions for Miele appliances and vacuum cleaners at www.mieleusa.com.
Installation
*INSTALLATION*
39
IMPORTANT SAFETY INSTRUCTIONS - INSTALLATION
Risk of damage caused by incorrect installation.
Incorrect installation can cause damage to the ProLine element.
The ProLine element must only be installed by a qualified person.
Damage from falling objects.
Take care not to damage the ProLine element when installing upper cabinets or
a ventilation hood above it.
Install the upper cabinets and ventilation hood before installing the ProLine ele-
ment.
The room in which the ProLine element is installed must conform
to all relevant local and national building regulations and safety regu-
lations.
The countertop must be heat-resistant (up to 212°F / 100°C), so
that it does not become deformed or the veneer detached. The wall
strips must be heat-resistant as well.
A gas cooktop/wok must not be installed directly next to a broiler/
fryer as the gas flames could ignite the fat in the fryer. It is essential
to maintain a distance of at least 11 5/16" (288mm) between the gas
appliance and a broiler/fryer.
The ProLine element must not be installed above refrigerators/
freezers, dishwashers, or washers/dryers.
When installing the ProLine element, make sure that the gas pipe
and power cord cannot come into contact with hot appliance parts.
The power cord and any flexible gas connection pipes must be in-
stalled in such a way that they do not come into contact with any
moving kitchen parts (e.g., a drawer), and cannot become trapped.
Observe carefully the safety clearances listed on the following
pages.
Installation
*INSTALLATION*
40
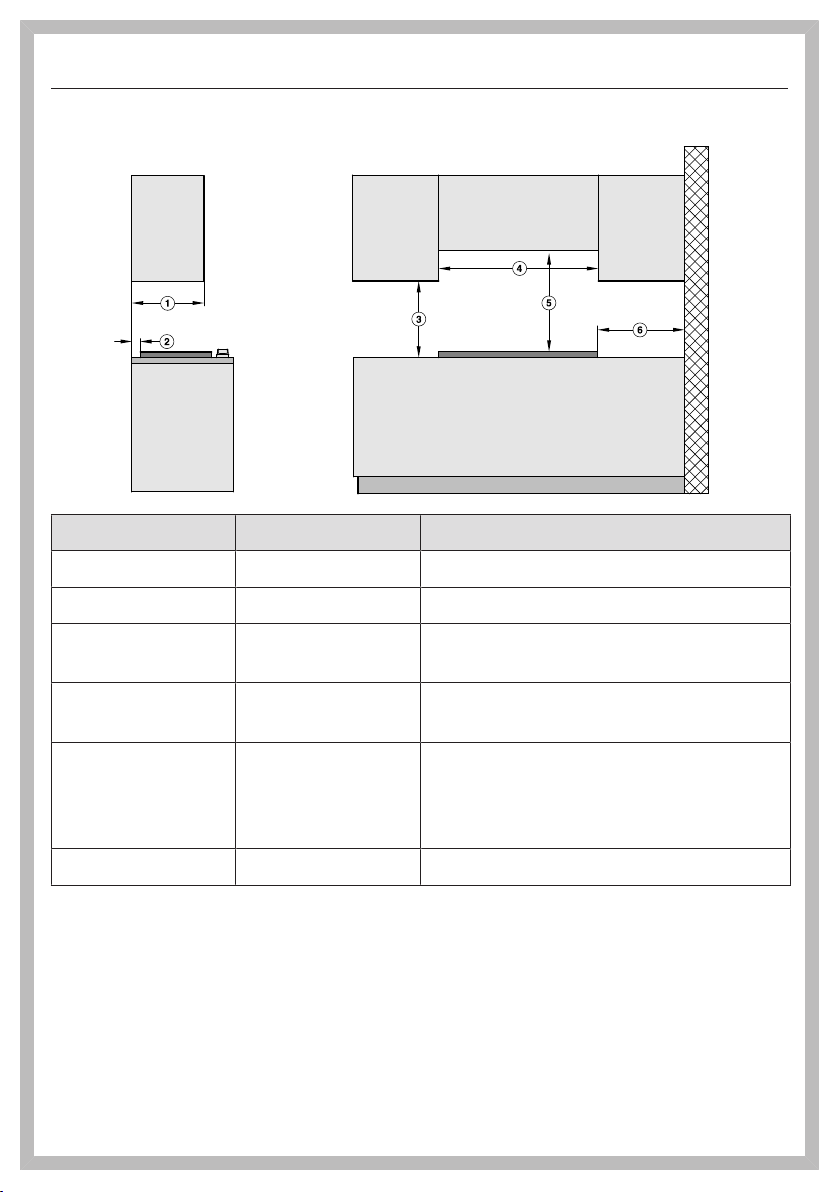
Safety distances
No. Dimensions Description
13" (330mm) Maximum depth of upper cabinet
2" (50mm) Minimum distance to back wall
18" (457mm) Minimum safety distance to bottom
edge of adjacent cabinet
≥cooktop width See “Installation –
Installation dimensions”
30" (762mm)
1
Minimum safety distance between the
top of the cooktop surface and the bot-
tom of an unprotected combustible
surface.
10" (250mm) Minimum distance to a side wall
1
The minimum safety distance given by the hood manufacturer must be maintained be-
tween the cooktop and the hood above it. See the installation instructions supplied with the
hood for these safety measurements.
If there is more than one appliance beneath a hood (e.g., gas cooktop and electric cooktop)
and they have different minimum safety distances, always observe the greater distance.
Installation
*INSTALLATION*
41
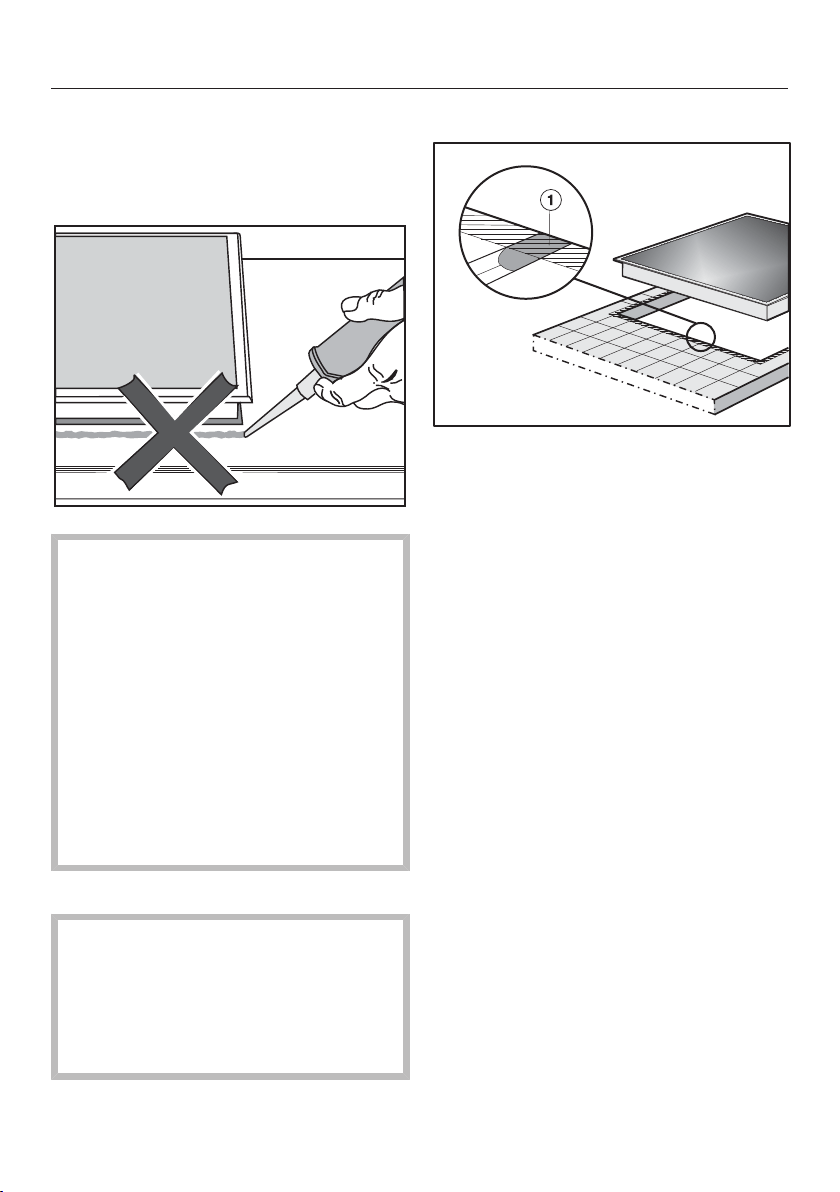
Installation notes
Sealing strip between the ProLine el-
ement and the countertop
Damage caused by incorrect in-
stallation.
Using sealant under the ProLine ele-
ment could result in damage to the
ProLine element and the countertop
if the ProLine element ever needs to
be removed for servicing.
Do not use sealant between the Pro-
Line element and the countertop.
The sealing strip under the edge of
the top part of the appliance pro-
vides a sufficient seal for the coun-
tertop.
Sealing strip
Dismantling the ProLine element for
service purposes may damage the
sealing strip underneath the edge of
the ProLine element.
Always replace the sealing strip be-
fore reinstalling the ProLine element.
Tiled countertop
The grouting and the shaded area
under the frame of the ProLine element
must be smooth and flat so that the
frame will sit evenly on the countertop
and so that the sealing strip under the
top edge of the ProLine element can
provide an adequate seal with the
countertop.
Installation
*INSTALLATION*
42
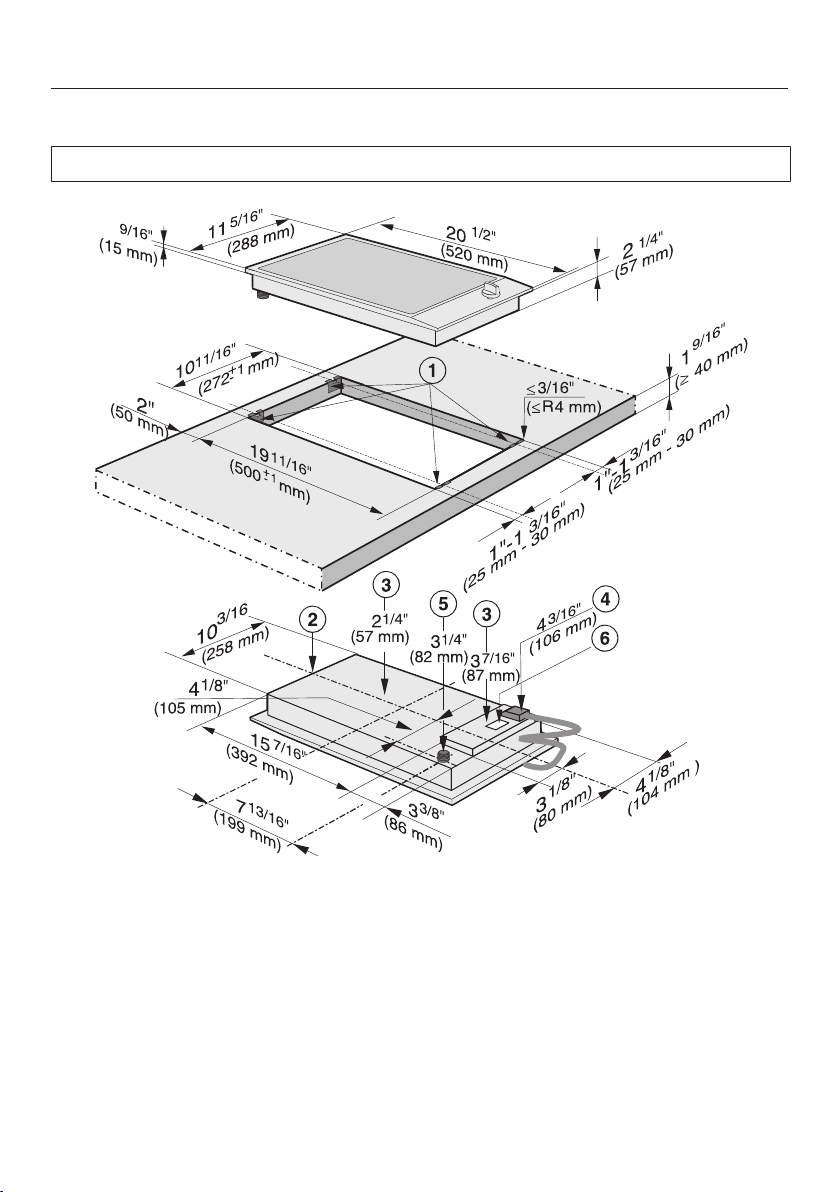
Installation dimensions
All dimensions in this instruction booklet are given in mm and inches.
a
Spring clips
b
Front
c
Height
d
Installation height for electrical supply connection box with power cord
Power cord L=4' (1,200mm)
e
Installation height for gas connection R½" NPT
f
Data plate
Installation
*INSTALLATION*
43
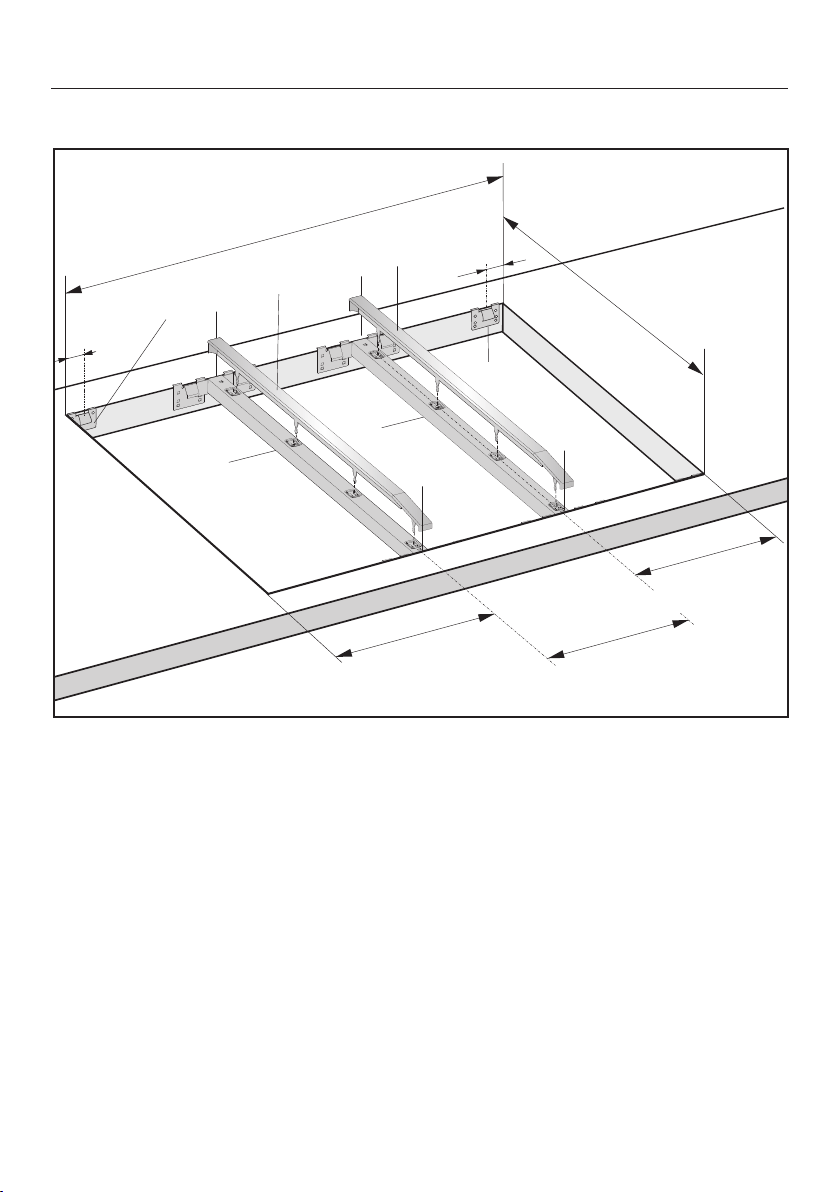
Countertop cut-out for several ProLine elements
25-30
25-30
280/372/568
280/372/568
a
a
b
b
19 11/16"
c
c
c
c
d
288/380/576
h
d
e
f
g
11"/14 5/8"/22 3/8"
11 5/16"/14 15/16"/22 11/16"
11"/14 5/8"/22 3/8"
1"-1 3/16"
1"-1 3/16"
500
Example: 3 ProLine elements
a
Spring clips
b
Spacer bars
c
Gap between spacer bar and countertop
d
Cover
e
ProLine element width minus 5/16" (8mm)
f
ProLine element width
g
ProLine element width minus 5/16" (8mm)
h
Countertop cut-out

Installation
*INSTALLATION*
44
Calculating the countertop cut-out
The frames of the ProLine elements overlap the countertop at the outside right
and left by 5/16" (8mm) on each side.
Add up the widths of the ProLine elements and subtract 5/8" (16mm) from this
sum.
Example:
115/16" + 11 5/16" + 14 15/16" = 37 5/8" - 5/8" = 37"
(288mm+288mm+380mm = 956mm-16mm = 940mm)
The ProLine elements are 11 5/16", 14 15/16" or 22 11/16" (288mm, 380mm or
576mm) wide depending on the model (see “Installation” – “Installation dimen-
sions”).
Spacer bars
When installing several ProLine elements, a spacer bar must be installed between
the individual appliances. The position for securing the spacer bar will depend on
the width of the ProLine element.
Installation
*INSTALLATION*
45
Installation
Preparing the countertop
Make the countertop cut-out as
shown in the illustration in “Installa-
tion dimensions” or as calculated
(see “Installation” – “Installing several
ProLine elements”). Remember to
maintain the minimum safety dis-
tances (see “Installation” – “Safety
distances”).
Seal any cut surfaces on wooden
countertops with a special varnish,
silicone rubber, or resin to prevent the
wood from swelling as a result of
moisture. The sealant must be tem-
perature-resistant.
Ensure that the sealant does not get
on the top surface of the countertop.
The sealing strip ensures that the
cooktop will sit securely in the cut-out
without slipping. Any gap between the
frame and countertop will become
smaller over time.
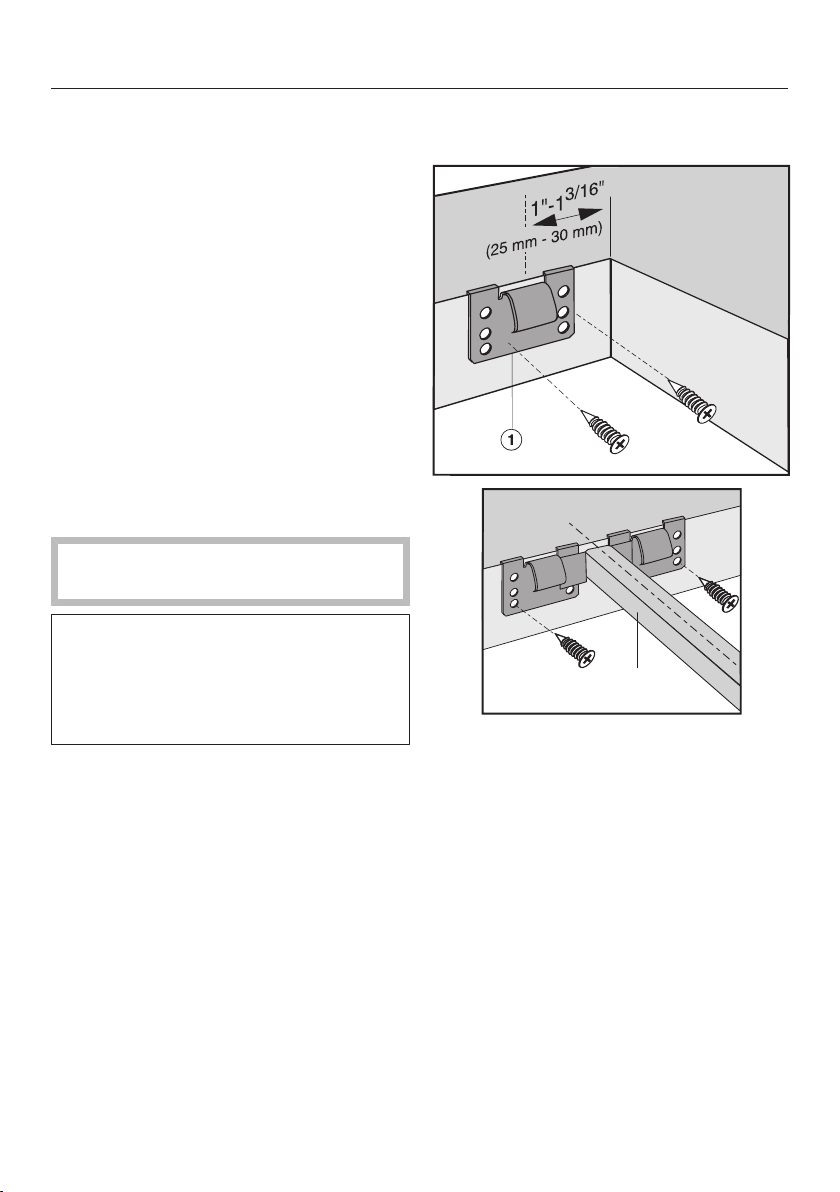
Securing the spring clamps and
spacer bars – wooden countertops
b
Position the spring clips or spacer
bars at the top edge of the cut-out
in the positions shown in the illustra-
tions.
Secure the spring clips or spacer
bars with the
1/8"x1" (3.5x25mm) wood screws
supplied.

Installation
*INSTALLATION*
46
Securing the spring clamps and
spacer bars – granite and marble
countertops
You will need heavy-duty double-sided
adhesive tape (not supplied with the
appliance) to fasten the spring clips or
spacer bars.
a
b
1"-1
3/16"
(25 mm - 30 mm)
c
a
Attach the adhesive tape along the
top edge of the cut-out in the posi-
tions shown in the cooktop illustra-
tion.
Position the spring clips or spacer
bars on the top edge of the cut-
out and press them firmly into place.
a
b
Apply silicone adhesive to the side
edges and bottom edge of the spring
clips or spacer bars.
Then fill the gap between the
spacer bars and the countertop
with silicone.
Installation
*INSTALLATION*
47
Installing the ProLine element
Feed the power cord down through
the cut-out in the countertop.
Starting at the front, position the Pro-
Line element in the cut-out.
Using both hands, press down evenly
on the sides of the ProLine element
until it clicks into position. When do-
ing this make sure that the seal of the
appliance sits flush with the counter-
top on all sides. This is important to
ensure an effective seal all round.
Do not use any additional sealant
(e.g., silicone) on the ProLine ele-
ment.
If during installation the seal around
the frame does not sit flush with the
countertop in the corners, the corner
radius (≤R4) can be carefully filed
down to fit.
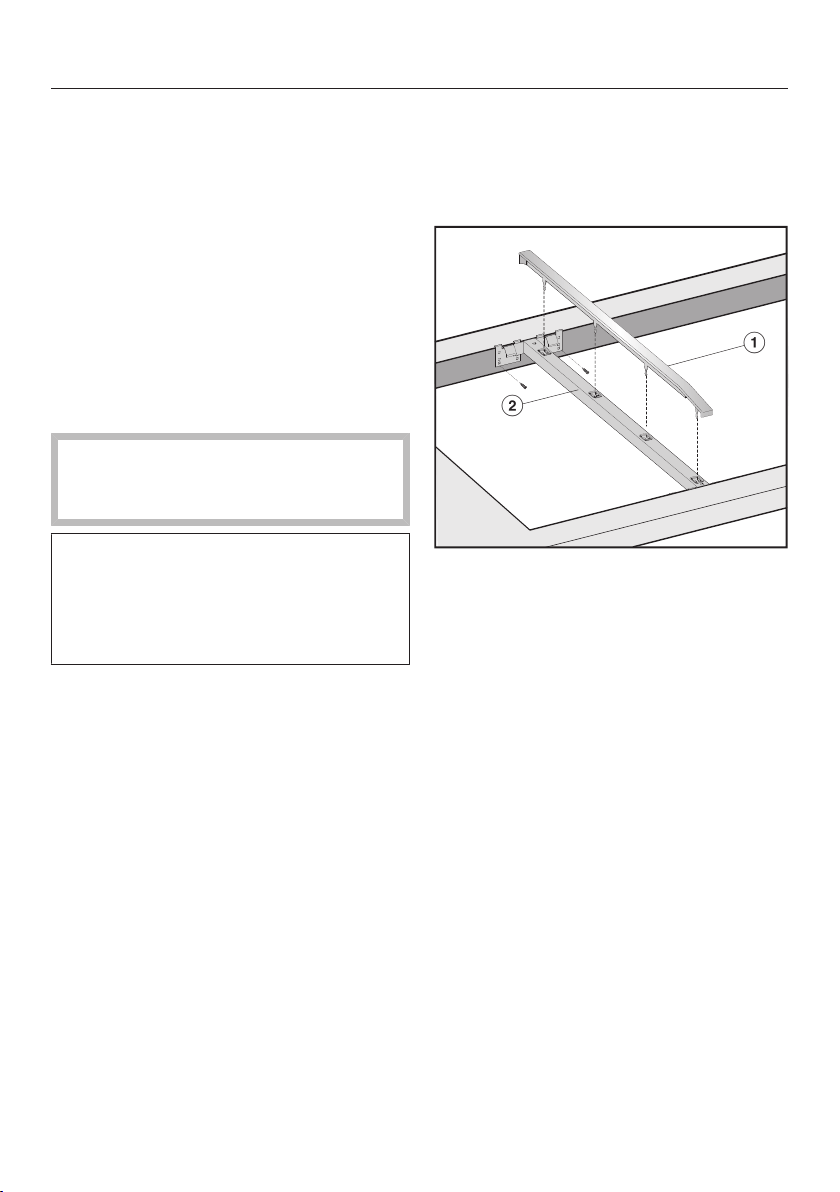
Installing several ProLine elements
Push the built-in ProLine element to
the side until the holes in the spacer
bar can be seen.
a
b
Push the cover into the designated
holes in the spacer bar.
Starting at the front, position the next
ProLine element in the countertop
cut-out.
Proceed as described previously.

Installation
*INSTALLATION*
48
Connecting the ProLine element
Connect the ProLine element(s) to the
domestic power supply and to the
gas supply (see “Installation“ – “Elec-
trical connection” and “Gas connec-
tion”).
Checking for proper function
After installing the appliance, ignite all
burners to check that they are operat-
ing correctly:
- The flame must not go out on the
lowest setting, or when the knob is
turned quickly from the highest to the
lowest setting.
- On the highest setting, the flame
must have a distinctive and visible
core.
Removing a ProLine element
If the ProLine element is accessible
from below, push it up to remove it.
Push the back of the appliance out
first.
If the ProLine element is not accessi-
ble from below, take hold of it with
both hands at the back, pull it for-
ward, then lift it up and out.
Installation
*INSTALLATION*
49
Gas connection
Connection to the gas supply
may only be performed by a duly au-
thorized technician. This technician is
responsible for proper function at the
installation site.
In Massachusetts, the gas connec-
tion may be performed only by a cer-
tified gas installer.
The appliance must be connected
with its own shut-off valve.
The shut-off valve must be accessi-
ble and visible, after the opening of a
cabinet door, if necessary.
The gas connection can be to natural
gas or propane gas according to the
model.
Ask your gas company what kind of
gas is used and compare it with the
specifications on the data plate.
The appliance is not connected to an
exhaust vent.
During the setup and connection of
the appliance, observe the applica-
ble installation conditions, especially
suitable ventilation measures.
Arrange the gas connections in such
a way that they are not heated and
damaged by the operation of the ap-
pliance.
In particular, make sure that the gas
hose lines and connection fittings on
the applinace do not come into con-
tact with hot exhaust gases
The gas hose and power cord could
be damaged by hot spots on the ap-
pliance.
Make sure that the gas hose and
power cord do not come into contact
with hot spots on the appliance.
Flexible connection lines can be
damaged by incorrect routing.
Attach flexible connecting lines in
such a way so that they do not come
into contact with any moving kitchen
parts (e.g., a drawer) and are not ex-
posed to mechanical stress.
Disconnect the appliance and the
shut-off valve from the gas supply
before performing a gas pressure
test at a pressure of more than ½psi
(3.5kPA). Close the shut-off valve of
the gas supply before performing a
gas pressure test at a pressure of
less than or equal to ½psi (3.5kPA).
Incorrectly sealed gas lines can lead
to a gas leak and thus to an explo-
sion.
Seal all gas lines with a suitable
thread sealant.
Seal tightness tests on the appliance
must be performed according to
manufacturer specifications.

Installation
*INSTALLATION*
50
The gas connection must be made in
accordance with local codes or, in
the absence of local codes, with:
National Fuel Gas Code
ANSIZ223.1 / NFPANo.54 for the
United States or the current Natural
Gas and Propane Installation Code,
CSAB149.l. for Canada.
The gas pressure may not under-
shoot or exceed certain values.
Make sure that the maximum gas
pressure upstream of the gas pres-
sure controller does not amount to
more than ½psi (3.5kPA) for natural
and propane gas.
Make sure that the minimum gas
supply pressure amounts to 6"w.c.
for natural gas and 10"w.c. for
propane gas.
The gas connection of the appliance is
designed for natural gas or propane gas
according to the ordered model (see
adhesive label on the appliance).
If the appliance is not equipped with the
correct connection for the gas type in
your household, contact your Miele
dealer.
Installation
*INSTALLATION*
51
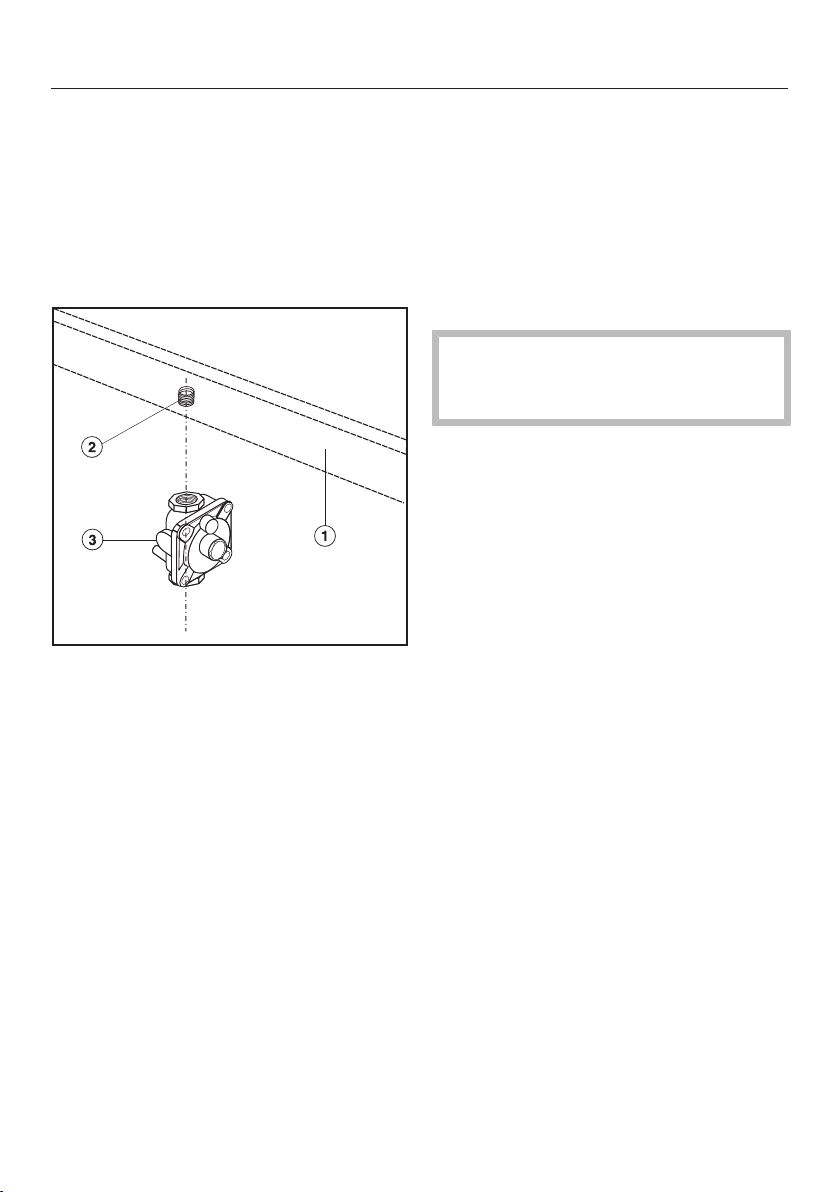
Gas pressure regulator
The included pressure regulator corre-
sponds with the gas type of the appli-
ance. Verify before installing.
The adjusted pressure is:
Natural gas 4“w.c.
LP gas 10”w.c.
a
Appliance
b
½" NPT gas connection
c
Regulator
The regulator must be installed as
shown in the diagram when you con-
nect the Miele appliance to your gas
connection. The regulator has been
adapted by Miele to meet all statutory
safety requirements. The regulator must
be easily accessible after the appliance
has been installed.
A flexible steel hose approved by the
AGA or CGA can be used between the
gas connection and the regulator. This
flexible hose enables the appliance to
be lifted out of the cut-out for mainte-
nance or repair work. Check to make
sure that no drawers, doors, or similar
come into contact with this flexible
hose.
Gas leak due to unsuitable regulator.
Only use the regulator supplied by
Miele.
If you are in any doubt, contact Miele
Customer Service.
Leakage test
After connecting the appliance check
all fittings for gas leaks e.g. with
soapy water.

Installation
*INSTALLATION*
52
Burner ratings
Gas type kW BTU/hr
Natural gas 5.2 17,500
Liquid propane 5.2 17,500
Installation
*INSTALLATION*
53
Electrical connection
ATTENTION:
During installation, maintenance and
repair work, the appliance must be
disconnected from the electricity
supply. It is only completely isolated
from the electricity supply if the plug
fuses have been fully unscrewed
(where applicable), the main circuit
breaker has been tripped or the
power cable has been unplugged
from the wall outlet.
Do not cut off the plug on the power
cord. If the plug does not fit in the
outlet, have an electrician install an
appropriate outlet.
The socket must be easily accessible
after the appliance has been in-
stalled.
Work by unqualified persons can
cause considerable danger to users.
Miele cannot be held liable for any
damage arising as a result of such
work.
Installation, repair and maintenance
work should only be performed by a
Miele authorized service technician.
To avoid damaging the appliance,
the information (voltage and fre-
quency) on the data plate must cor-
respond to the building's power sup-
ply.
Compare these informations before
connecting the appliance. When in
doubt, consult a qualified electrician.
The plug must be inserted into a suit-
able outlet that has been installed
and grounded in compliance with all
applicable local regulations.
To guarantee the electrical safety of
this appliance, continuity must exist
between the appliance and an effec-
tive grounding system. It is impera-
tive that this basic safety require-
ment be met. If there is any doubt,
have the electrical system of the
house checked by a qualified electri-
cian.
Installation, repair and maintenance
work should only be performed by a
Miele-authorized qualified electrician
in compliance with local regulations
and the ANSI National Electrical
Code / NFPA 70 in the United States
or the Canadian Electric Code, CSA
C22.1-02. in Canada.

Installation
*INSTALLATION*
54
Power cord and plug
The appliance is equipped with a flexi-
ble power cord and a 3-prong ground-
ing plug for your protection against
shock hazard. The plug must be in-
serted into a properly grounded outlet.
Do not cut or remove the grounding
prong from this plug.
Total output
See data plate
Connection data
The connection data is given on the
data plate. Please ensure these match
the household electrical supply.
Important –Save these instructions
for the local electrical inspector’s use.

9 Independence Way
Princeton, NJ 08540
www.mieleusa.com
U.S.A.
Miele, Inc.
National Headquarters
Please have the model and serial number
of your appliance available when
contacting Customer Service.
Canada
Importer
Miele Limited
Headquarters and Miele Centre
Customer Support
Phone: 888-99-MIELE (64353)
161 Four Valley Drive
Vaughan, ON L4K 4V8
www.miele.ca
Customer Care Centre
Phone:
1-800-565-6435
905-532-2272
International Headquarters
Miele & Cie. KG
Carl-Miele-Straße 29
33332 Gütersloh
Germany

M.-Nr. 11 881 950 / 01en-US
CS1011-1