ectric
Estufa e
®
ange
t
ctrica
_i!_ _ ................_,_,_ _
Models, Modelos
790.9 *
535,9536*
• = color number,
n0mero de color
\
www,sears,com
Sears Roebuck and Co., Hoffman Estates, IL 60179 U.S.A. pin 316417298
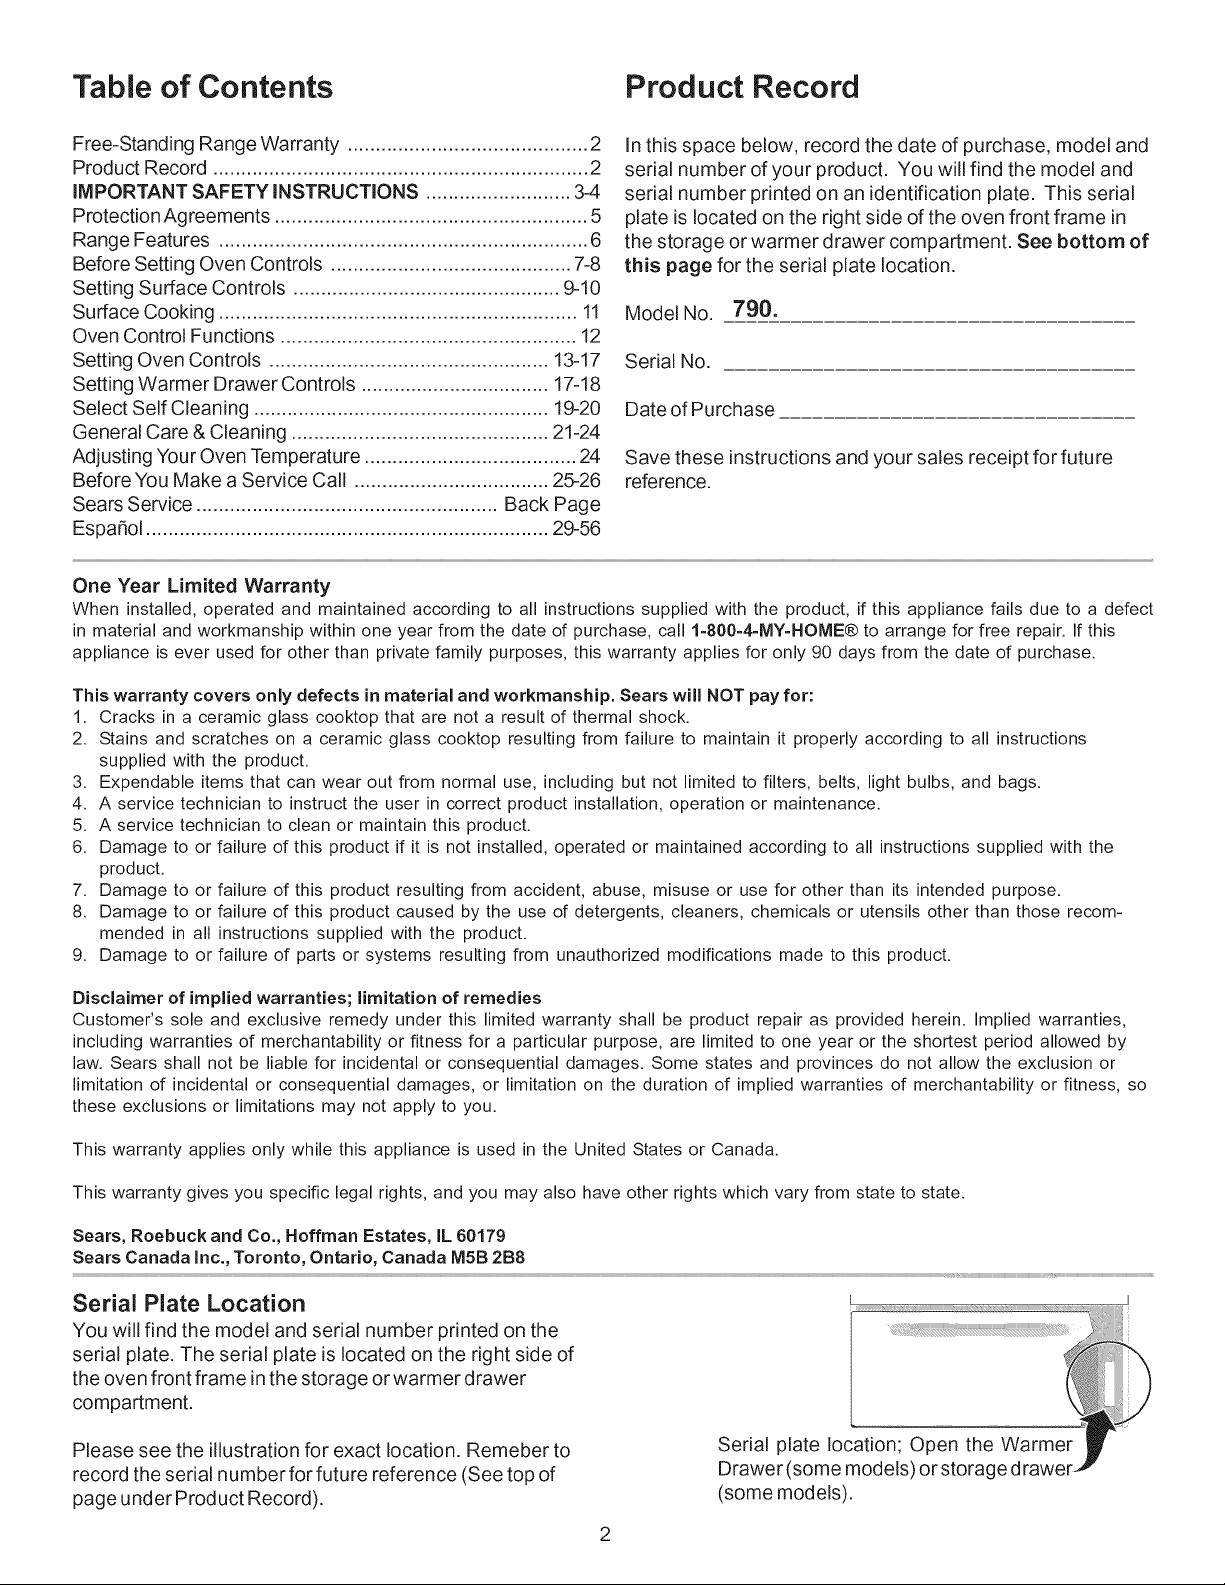
Table of Contents Product Record
Free-Standing Range Warranty ........................................... 2
Product Record ................................................................... 2
IMPORTANT SAFETY INSTRUCTIONS .......................... 3-4
ProtectionAgreements ........................................................ 5
Range Features .................................................................. 6
Before Setting Oven Controls ........................................... 7-8
Setting Surface Controls ................................................ 9-10
Surface Cooking ................................................................ 11
Oven Control Functions ..................................................... 12
Setting Oven Controls .................................................. 13-17
Setting Warmer Drawer Controls .................................. 17-18
Select Self Cleaning ..................................................... 19-20
General Care & Cleaning .............................................. 21-24
Adjusting Your Oven Temperature ...................................... 24
Before You Make a Service Call ................................... 25-26
Sears Service ...................................................... Back Page
Espa_ol ........................................................................ 29-56
In this space below, record the date of purchase, model and
serial number of your product. You will find the model and
serial number printed on an identification plate. This serial
plate is located on the right side of the oven front frame in
the storage or warmer drawer compartment. See bottom of
this page for the serial plate location.
Model No. 790.
Serial No.
Date of Purchase
Save these instructions and your sales receipt for future
reference.
One Year Limited Warranty
When installed, operated and maintained according to all instructions supplied with the product, if this appliance fails due to a defect
in material and workmanship within one year from the date of purchase, call 1=800=4=MY=HOME® to arrange for free repair. If this
appliance is ever used for other than private family purposes, this warranty applies for only 90 days from the date of purchase.
This warranty covers only defects in material and workmanship. Sears will NOT pay for:
1. Cracks in a ceramic glass cooktop that are not a result of thermal shock.
2. Stains and scratches on a ceramic glass cooktop resulting from failure to maintain it properly according to all instructions
supplied with the product.
3. Expendable items that can wear out from normal use, including but not limited to filters, belts, light bulbs, and bags.
4. A service technician to instruct the user in correct product installation, operation or maintenance.
5. A service technician to clean or maintain this product.
6. Damage to or failure of this product if it is not installed, operated or maintained according to all instructions supplied with the
product.
7. Damage to or failure of this product resulting from accident, abuse, misuse or use for other than its intended purpose.
8. Damage to or failure of this product caused by the use of detergents, cleaners, chemicals or utensils other than those recom-
mended in all instructions supplied with the product.
9. Damage to or failure of parts or systems resulting from unauthorized modifications made to this product.
Disclaimer of implied warranties; limitation of remedies
Customer's sole and exclusive remedy under this limited warranty shall be product repair as provided herein. Implied warranties,
including warranties of merchantability or fitness for a particular purpose, are limited to one year or the shortest period allowed by
law. Sears shall not be liable for incidental or consequential damages. Some states and provinces do not allow the exclusion or
limitation of incidental or consequential damages, or limitation on the duration of implied warranties of merchantability or fitness, so
these exclusions or limitations may not apply to you.
This warranty applies only while this appliance is used in the United States or Canada.
This warranty gives you specific legal rights, and you may also have other rights which vary from state to state.
Sears, Roebuck and Co., Hoffman Estates, IL 60179
Sears Canada Inc., Toronto, Ontario, Canada MSB 2B8
Serial Plate Location
You will find the model and serial number printed on the
serial plate. The serial plate is located on the right side of
the oven front frame in the storage or warmer drawer
compartment.
Please see the illustration for exact location. Remeber to
record the serial number for future reference (See top of
page under Product Record).
Serial plate location; Open the Warmer_"
Drawer (some models) or storage d rawer
r_P
(some models).
important Safety instructions
Read all instructions before using this appliance. Save these instructions for future reference.
This manual contains importantsafety symbols and instructions.Please pay attention to these symbols and follow all instructionsgiven.
This symbol will help alert you to situations that may cause sedous bodily harm: death or property damage:
This symbol Will help alert you to situations that may cause bodily injury or pr0perty damagel
. Remove all tape and packaging before using the range.
Destroy the carton and plastic bags after unpacking the
range. Never allow children to play with packaging material.
. Proper Installation--Be sure your appliance is properly
installed and grounded by a qualified technician in
accordance with the National Electrical Code ANSI!
NFPA No. 70 latest edition and local electrical code
requirements, installonly per installation instructions provided
in the literature package for this range.
Ask your dealer to recommend a qualified technician and an
authorized repair service. Know howtodisconnect the power
to the range at the circuit breaker or fuse box in case of an
emergency.
. User servicing--Do not repair or replace any part of the
appliance unless specifically recommended in the
manuals. All other servicing should be done only by a
qualified technician. This may reduce the risk of personal
injury and damage to the range.
. Never modify or alter the construction of a range by
removing leveling legs, panels, wire covers, anti=tip
brackets/screws, or any other part of the product.
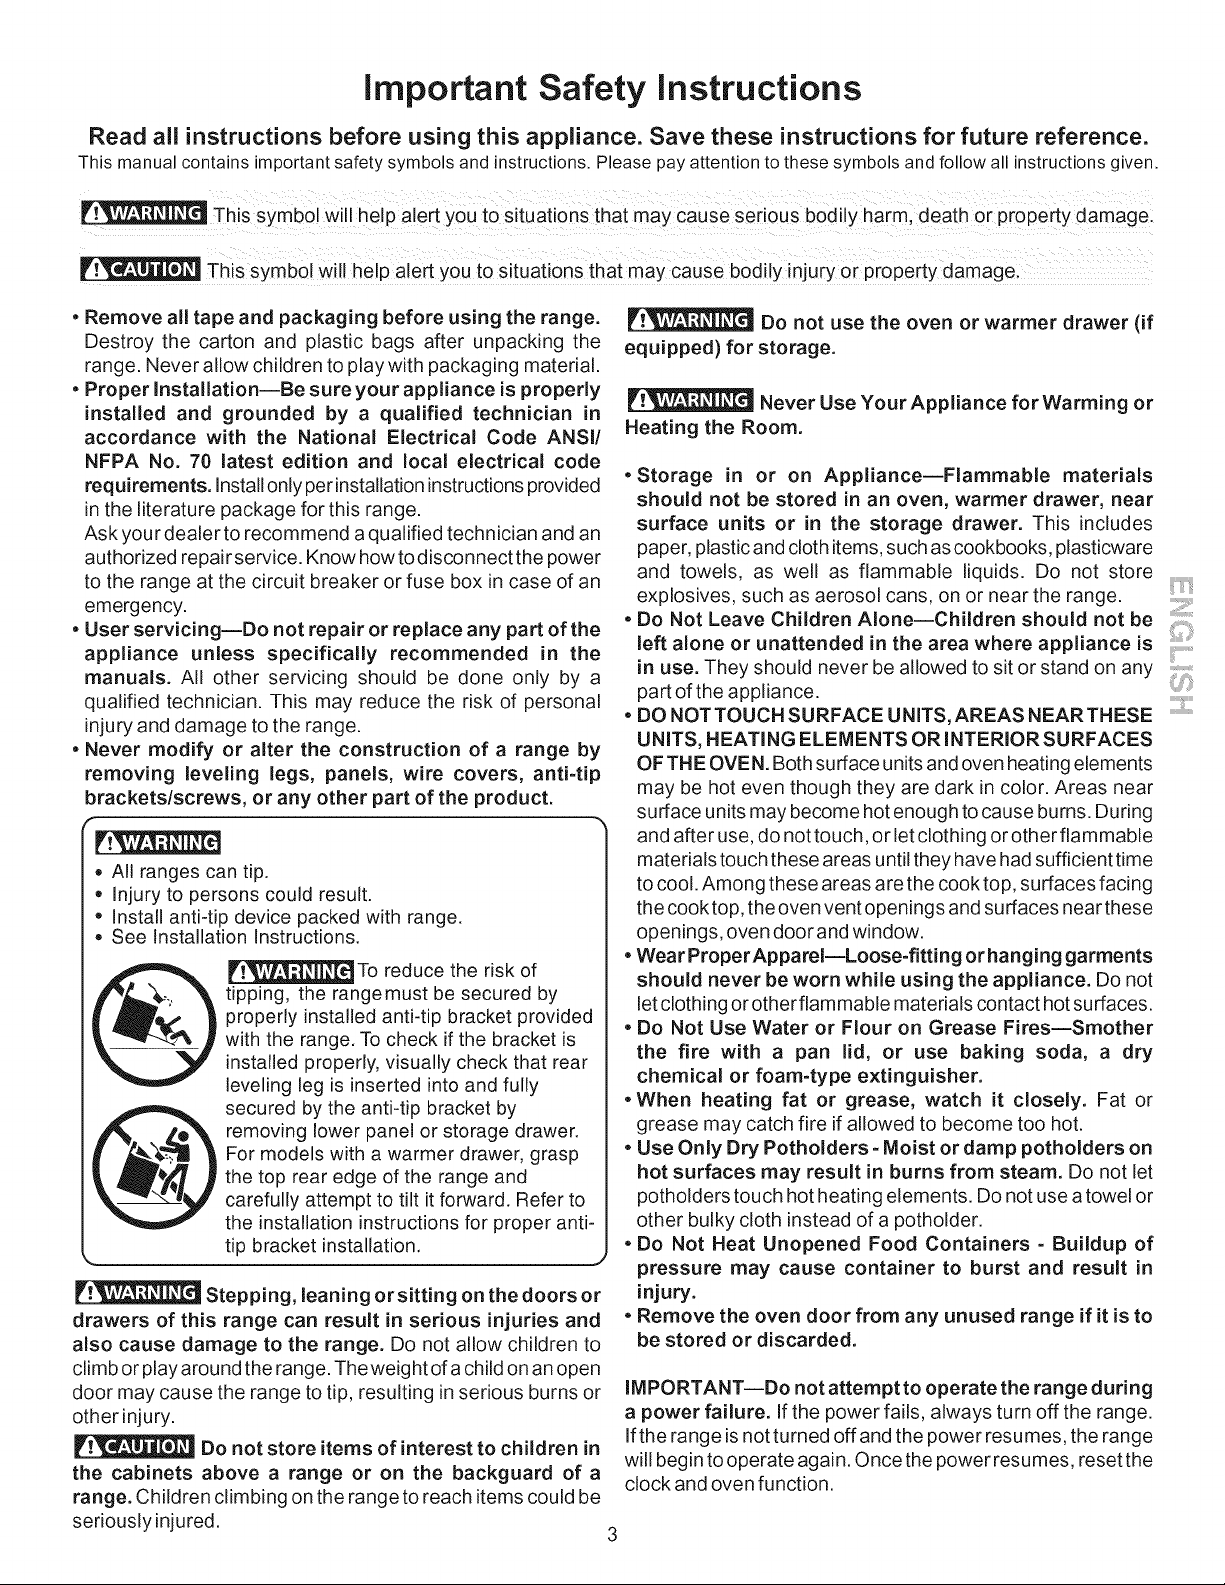
• All ranges can tip.
• Injury to persons could result.
, Install anti-tip device packed with range.
, See Installation Instructions.
IF__ To reduce the risk of
tipping, the rangemust be secured by
properly installed anti-tip bracket provided
with the range. To check if the bracket is
installed properly, visually check that rear
leveling leg is inserted into and fully
secured by the anti-tip bracket by
removing lower panel or storage drawer.
For models with a warmer drawer, grasp
the top rear edge of the range and
carefully attempt to tilt it forward. Refer to
the installation instructions for proper anti-
tip bracket installation.
%,, J
Stepping, leaning orsitting on the doors or
drawers of this range can result in serious injuries and
also cause damage to the range. Do not allow children to
climb or play around the range. Theweight of a child on an open
door may cause the range to tip, resulting in serious burns or
other injury.
Do not store items of interest to children in
the cabinets above a range or on the backguard of a
range. Children climbing on the range to reach items could be
seriously injured.
Do not use the oven or warmer drawer (if
equipped) for storage.
Never Use Your Appliance for Warming or
Heating the Room.
. Storage in or on Appliance--Flammable materials
should not be stored in an oven, warmer drawer, near
surface units or in the storage drawer. This includes
paper, plastic and cloth items, such as cookbooks, plasticware
and towels, as well as flammable liquids. Do not store
explosives, such as aerosol cans, on or near the range.
. Do Not Leave Children Alone--Children should not be
left alone or unattended in the area where appliance is
in use. They should never be allowed to sit or stand on any ,,
part of the appliance.
, DO NOTTOUCH SURFACE UNITS, AREAS NEARTHESE ""
UNITS, HEATING ELEMENTS OR INTERIOR SURFACES
OF THE OVEN. Both surface units and oven heating elements
may be hot even though they are dark in color. Areas near
surface units may become hot enough to cause burns. During
and after use, do not touch, or let clothing or other flammable
materials touch these areas until they have had sufficient time
to cool. Among these areas are the cook top, surfaces facing
the cook top, the oven vent openings and surfaces near these
openings, oven door and window.
• Wear ProperAppareI--Loose=fitting orhanging garments
should never be worn while using the appliance. Do not
let clothing or otherflammable materials contact hot surfaces.
• Do Not Use Water or Flour on Grease Fires--Smother
the fire with a pan lid, or use baking soda, a dry
chemical or foam=type extinguisher.
• When heating fat or grease, watch it closely. Fat or
grease may catch fire if allowed to become too hot.
• Use Only Dry Potholders =Moist or damp potholders on
hot surfaces may result in burns from steam. Do not let
potholders touch hot heating elements. Do not use a towel or
other bulky cloth instead of a potholder.
. Do Not Heat Unopened Food Containers = Buildup of
pressure may cause container to burst and result in
injury.
. Remove the oven door from any unused range if it is to
be stored or discarded.
IMPORTANT--Do not attempt to operate the range during
a power failure. If the power fails, always turn off the range.
If the range is not turned off and the power resumes, the range
will begin to operate again. Once the power resumes, reset the
clock and oven function.
important Safety instructions
iMPORTANT iNSTRUCTiONS FOR USING YOUR
COOKTOP
• Knowwhich knob controls each surface heating unit. Place a
pan of food on the unit before turning it on, and turn the unit off
before removing the pan.
• Use Proper Pan Size--This appliance is equipped with one or
more surface units of different sizes. Select utensils having flat
bottoms large enough to cover the surface unit heating element.
The use of undersized utensils will expose a portion of the
heating element to direct contact and may result in ignition of
clothing. Proper relationship of utensil to element will also
improve efficiency.
• Utensil Handles Should Be Turned Inward and Not Extend Over
Adjacent Surface Elements--To reduce the risk of burns, ignition
of flammable materials, and spillage due to unintentional contact
with the utensil, the handle of the utensil should be positioned so
that it is turned inward, and does not extend over adjacent surface
units.
• Never Leave Surface Elements Unattended at High Heat
Settings--Boilovers cause smoking and greasy spillovers that
may ignite, or a pan that has boiled dry may melt.
• Do Not Immerse or Soak Removable Heating Elements--
Heating elements should never be immersed in water. Heating
elements clean themselves during normal operation.
• Glazed Cooking Utensils--Only certain types of glass, glass/
ceramic, ceramic, earthenware, or other glazed utensils are
suitable for cook top service without breaking due to the sudden
change in temperature. Check the manufacturer's
recommendations for cook top use.
• When flaming foods underaventilating hood, turn the fan on.
IMPORTANT INSTRUCTIONS FOR USING YOUR
OVEN
• Use Care When Opening Oven Door or Warmer Drawer (if
equipped)--Stand to the side of the range when opening the door
of a hot oven. Let hot air or steam escape before you remove or
replace food in the oven.
• Keep Oven Vent Ducts Unobstructed. The oven vent is located
under the left rear surface element if your model is equipped with
coil elements. The oven vent is located below the backguard for
models equipped with ceramic-glass cook tops. Touching the
surfaces in this area when the oven is operating may cause
severe burns. Also, do not place plastic or heat-sensitive items
on or near the oven vent. These items could melt or ignite.
• Placement of Oven Racks. Always place oven racks in desired
location while oven is cool. If rack must be moved while oven is
hot use extreme caution. Use potholders and grasp the rack with
both hands to reposition. Do not let potholders contact the hot
heating elements in the oven. Remove all utensils from the rack
before moving.
• Do not use the broiler pan without its insert. The broiler pan and
its insert allow dripping fat to drain and be kept away from the high
heat of the broiler.
• Do not cover the broiler insertwith aluminum foil. Exposed fat
and grease could ignite.
• Protective Liners--Do not use aluminum foil to line the oven
bottom. Only use aluminum foil as recommended in this manual.
Improper installation of these liners may result in risk of electric
shock, or fire.
SELF CLEANING OVENS
• Clean in the self=cleaning cycle only the parts listed in this Use & Care Manual. Before self cleaning the oven, remove the broiler
pan and any utensils or foods from the oven.
• Do Not Use Oven Cleaners--No commercial oven cleaner or oven liner protective coating of any kind should be used in or around
any part of the oven.
• Do Not Clean Door Gasket--The door gasket is essential for a good seal. Care should be taken not to rub, damage or move the gasket.
•The health of some birds is extremely sensitive to the fumes given off during the self-cleaning cycle of any range. Move birds to another
well-ventilated room.
IMPORTANT INSTRUCTIONS FOR CLEANING YOUR RANGE
• Clean the range regularly to keep all parts free of grease that could catch fire. Pay particular attention to the area underneath each
surface element. Do not allow grease to accumulate.
• Kitchen cleaners and aerosols--Always follow the manufacturer's recommended directions for use. Be aware that excess
residue from cleaners and aerosols may ignite causing damage and injury.
• Clean Ventilating Hoods Frequently--Grease should not be allowed to accumulate on the hood orfilter. Follow manufacturer's
instructions for cleaning.
FOR CERAMIC-GLASS COOK TOP MODELS
• Do Not Cook on Broken Cook Top--If cook top should break, cleaning solutions and spillovers may penetrate the broken cook top
and create a risk of electric shock. Contact a qualified technician immediately.
• Clean Cook Top with Caution--If a wet sponge or cloth is used to wipe spills on a hot cooking area, be careful to avoid a steam burn.
Some cleaners can produce noxious fumes if applied to a hot surface.
important Safety Notice
The California Safe Drinking Water and Toxic Enforcement Act requires the Governor of California to publish a list of
substances known to the state to cause cancer, birth defects or other reproductive harm, and requires businesses to warn
customers of potential exposure to such substances,
4
Protection Agreements Acuerodes de protecci6n
Master Protection Agreements
Congratulations on making a smart purchase. Your new Kenmore ®
product is designed and manufactured for years of dependable operation.
But like all products, it may require preventive maintenance or repair from
time to time. That's when having a Master Protection Agreement can
save you money and aggravation.
The Master Protection Agreement also helps extend the life of your new
product. Here's what the Agreement* includes:
[] Parts and labor needed to help keep products operating properly
under normal use, not just defects. Our coverage goes well
beyond the product warranty. No deductibles, no functional failure
excluded from coverage - real protection.
[] Expert service by a force of more than 10,000 authorized Sears
service technicians, which means someone you can trust will be
working on your product.
[] Unlimited service calls and nationwide service, as often as you
want us, whenever you want us.
[] "No-lemon" guarantee - replacement of your covered product if
four or more product failures occur within twelve months.
[] Product replacement if your covered product can't be fixed.
[] Annual Preventive Maintenance Check at your request - no extra
charge.
[] Fast help by phone - we call it Rapid Resolution - phone support
from a Sears representative on all products. Think of us as a "talking
owner's manual".
[] Power surge protection against electrical damage due to power
fluctuations.
[] $250 Food Loss Protection annually for any food spoilage that is
the result of mechanical failure of any covered refrigerator or
freezer.
[] Rental reimbursement if repair of your covered product takes
longer than promised.
[] 10% discount off the regular price of any non-covered repair
service and related installed parts.
Once you purchase the Agreement, a simple phone call is all that it takes
for you to schedule service. You can call anytime day or night, or
schedule a service appointment online.
The Master Protection Agreement is a risk free purchase. If you cancel
for any reason during the product warranty period, we will provide a full
refund. Or, a prorated refund anytime after the product warranty period
expires. Purchase your Master Protection Agreement today!
Some limitations and exclusions apply. For prices and additional
information in the U.S.A. call 1-800-827-6655.
* Coverage in Canada varies on some items. For full details call
Sears Canada at 1-800-361-6665.
Sears Installation Service
For Sears professional installation of home appliances, garage door
openers, water heaters, and other major home items, in the U.S.A. or
Canada call 1-800-4-MY-HOME ®.
Acuerdos maestros de proteccion
Enhorabuena por haber hecho una compra inteligente, Su nuevo
producto Kenmore®esta disefiado y fabricado para brindarle afios de
funcionamiento fiable, Pero, como cualquier producto, puede necesitar
mantenimiento preventivo o reparaciones peri6dicas, Es por eso que
tener un Acuerdo maestro de protecci6n podria ahorrarle dinero y
molestias,
El Acuerdo maestro de protecci6n tambien sirve para prolongar la
durabilidad de su nuevo producto, El acuerdo* incluye Io siguiente:
[] Piezas y mano de obra necesarias para contribuir a mantener el
funcionamiento adecuado de los productos utilizados en
condiciones normales de uso, no s61oen caso de defectos de los
productos. Nuestra cobertura va mucho mas alia que la garantia
del producto. No se aplican deducibles ni exclusiones por fallas del
funcionamiento: es decir, verdadera proteccibn.
[] Servicio t6cnico por expertos (mas de 10000 t6cnicos
autorizados de Sears), Io cual significa que quien repare o realice
el mantenimiento de su producto sera un profesional de confianza.
[] Servicio t6cnico a escala nacional y numero ilimitado de
Ilamadas de solicitud de servicio t6cnico: se puede poner en
contacto con nosotros cuantas veces Io desee y cuando Io desee.
[] Garantia "sin sorpresas": se reemplaza el producto cubierto por el
acuerdo si ocurren cuatro o mas fallas del producto en un periodo
de 12 meses.
[] Reemplazo del producto: en caso de que no se pueda reparar el
producto cubierto por el acuerdo.
[] Revisibn anual preventiva de mantenimiento del producto:
puede solicitarla en cualquier momento, sin costo alguno.
[] Rapida asistencia telefbnica, la cual denominamos Soluci6n
rapida: es decir, asistencia telef6nica a traves de cualquiera de
nuestros representantes de Sears, sobre cualquiera de nuestros
productos. Piense en nosotros como en un "manual parlante del
usuario".
[] Proteccibn contra fallas el6ctricas, contra dafios debidos a
fluctuaciones de la corriente electrica.
[] $250 al aho para cubrir cualquier posible deterioro de
alimentos que haya tenido que desechar debido a una falla
mec&nica de cualquiera de nuestros refrigeradores o congeladores
cubiertos por este acuerdo.
[] Devolucibn de gastos de alquiler de electrodom6sticos si la
reparaci6n de su producto asegurado toma mas que el tiempo
prometido.
[] 10% de descuento aplicable tanto a los costos del servicio de
reparaci6n, como de las piezas instaladas relacionadas que no
hayan quedado cubiertos por este acuerdo.
Una vez que haya realizado el pago de este acuerdo, bastara una simple
Ilamada telef6nica para concertar una visita de servicio. Puede Ilamar a
cualquier hora del dia o de la noche, o bien concertar una visita de
servicio por Internet.
La adquisici6n del Acuerdo maestro de protecci6n es una inversi6n
exenta de riesgos. Si por cualquier motivo decide cancelar dicho acuerdo
durante el periodo de garantia del producto, le haremos un reintegro total
del valor. O bien un importe proporcional si cancela el acuerdo en
cualquier otro momento posterior al vencimiento del periodo de garantia
del producto, iAdquiera hoy mismo su Acuerdo maestro de protecci6n!
Algunas limitaciones y exclusiones podrian aplicarse. Para solicitar
precios e informaci6n adicional, Ilame al 1-800-827-6655 (en los
EE.UU.).
* La cobertura en Canada varia en el caso de algunos articulos. Para
obtener detalles completos al respecto, Ilame al 1-800-361-6665 de
Sears de Canada.
Servicio de instalacion de Sears
Para soficitar la instalacidn por profesionales de Sears de
electrodomesticos, abridores de puertas de garaje, calentadores de agua
y otros articulos de uso prioritario en el hogar, Ilame al 1-800-4-MY-
HOME en los EE.UU. o Canada.
Range Features
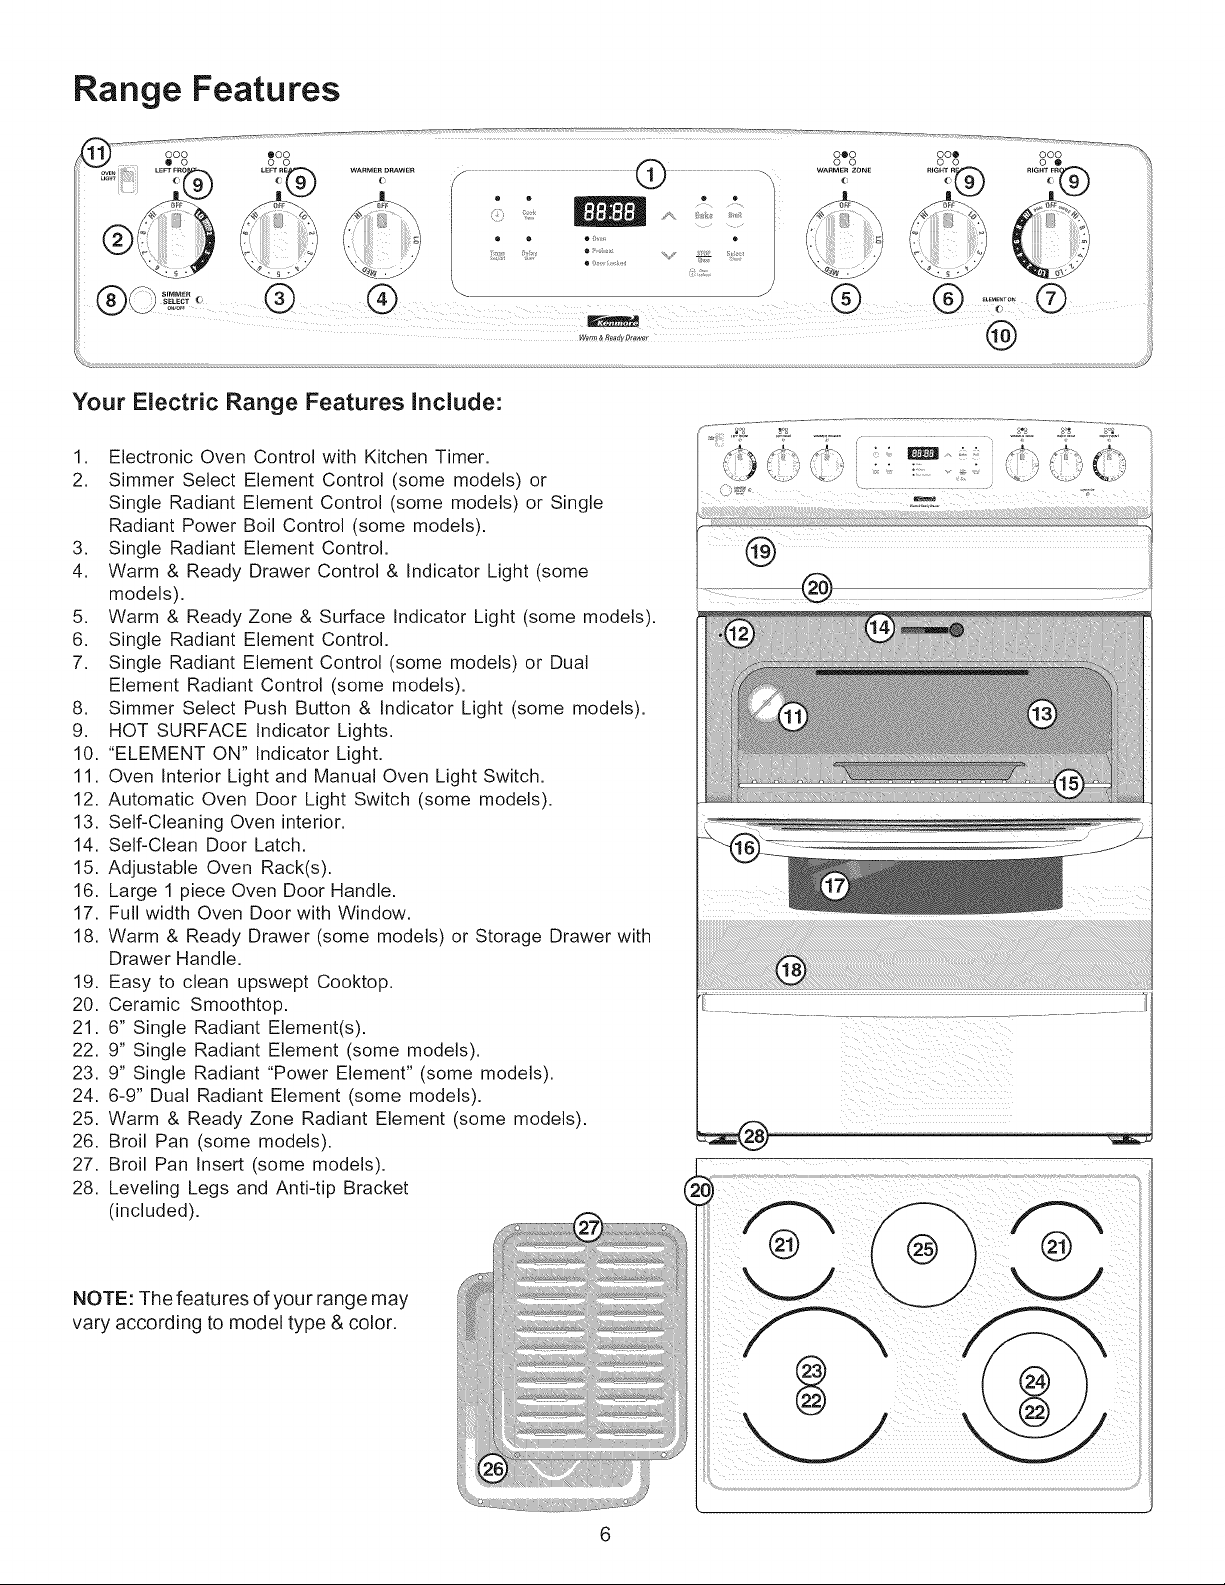
Your Electric Range Features include:
1. Electronic Oven Control with Kitchen Timer.
2. Simmer Select Element Control (some models) or
Single Radiant Element Control (some models) or Single
Radiant Power Boil Control (some models).
3. Single Radiant Element Control.
4. Warm & Ready Drawer Control & Indicator Light (some
models).
5. Warm & Ready Zone & Surface Indicator Light (some models).
6. Single Radiant Element Control.
7. Single Radiant Element Control (some models) or Dual
Element Radiant Control (some models).
8. Simmer Select Push Button & Indicator Light (some models).
9. HOT SURFACE Indicator Lights.
10. "ELEMENT ON" Indicator Light.
11. Oven Interior Light and Manual Oven Light Switch.
12. Automatic Oven Door Light Switch (some models).
13. Self-Cleaning Oven interior.
14. Self-Clean Door Latch.
15. Adjustable Oven Rack(s).
16. Large 1 piece Oven Door Handle.
17. Full width Oven Door with Window.
18. Warm & Ready Drawer (some models) or Storage Drawer with
Drawer Handle.
19. Easy to clean upswept Cooktop.
20. Ceramic Smoothtop.
21. 6" Single Radiant Element(s).
22. 9" Single Radiant Element (some models).
23. 9" Single Radiant "Power Element" (some models).
24. 6-9" Dual Radiant Element (some models).
25. Warm & Ready Zone Radiant Element (some models).
26. Broil Pan (some models).
27. Broil Pan Insert (some models).
28. Leveling Legs and Anti-tip Bracket
(included).
NOTE: The features of your range may
vary according to model type & color.
i_i i i ii ii ii iii
Before Setting Oven Controls
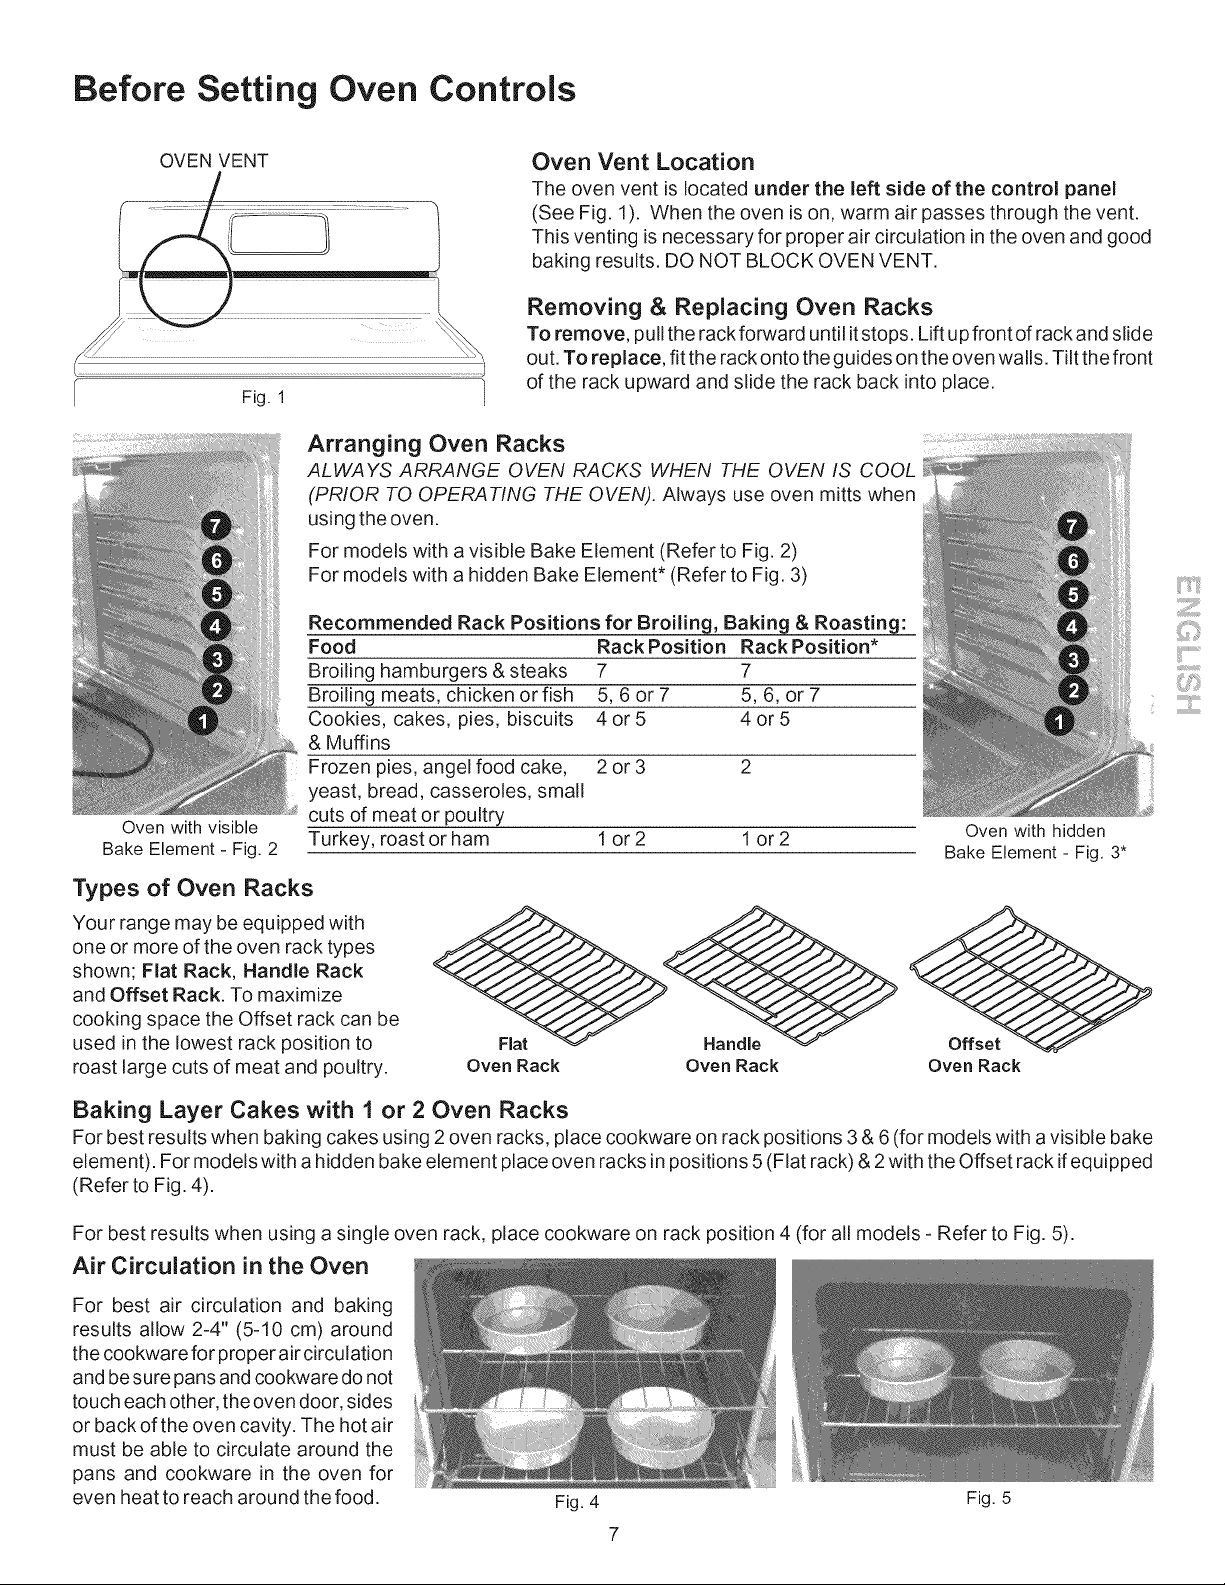
OVEN VENT Oven Vent Location
The oven vent is located under the left side of the control panel
(See Fig. 1). When the oven is on, warm air passes through the vent.
This venting is necessary for proper air circulation in the oven and good
baking results. DO NOT BLOCK OVEN VENT.
Fig. 1
Oven with visible
Bake Element - Fig. 2
Removing & Replacing Oven Racks
To remove, pullthe rack forward until it stops. Lift up front of rack and slide
out. To replace, fit the rack onto the guides on the oven walls. Tilt the front
of the rack upward and slide the rack back into place.
Arranging Oven Racks
ALWAYS ARRANGE OVEN RACKS WHEN THE OVEN IS COOL
(PRIOR TO OPERATING THE OVEN). Always use oven mitts when
using the oven.
For models with a visible Bake Element (Refer to Fig. 2)
For models with a hidden Bake Element* (Refer to Fig. 3)
Recommended Rack Positions for Broiling, Baking & Roasting:
Food Rack Position Rack Position*
Broiling hamburgers & steaks 7 7
Broiling meats, chicken or fish 5, 6 or 7 5, 6, or 7
Cookies, cakes, pies, biscuits 4 or 5 4 or 5
& Muffins
Frozen pies, angel food cake, 2 or 3 2
yeast, bread, casseroles, small
cuts of meat or poultry
Turkey, roast or ham 1 or 2 1 or 2
Types of Oven Racks
Your range may be equipped with
one or more of the oven rack types
shown; Flat Rack, Handle Rack
and Offset Rack. To maximize
cooking space the Offset rack can be
used in the lowest rack position to
roast large cuts of meat and poultry,
Oven with hidden
Bake Element - Fig. 3*
Oven Rack Oven Rack Oven Rack
Baking Layer Cakes with 1 or 2 Oven Racks
For best results when baking cakes using 2 oven racks, place cookware on rack positions 3 & 6 (for models with a visible bake
element). For models with a hidden bake element place oven racks in positions 5 (Flat rack) & 2with the Offset rack if equipped
(Refer to Fig. 4).
For best results when using a single oven rack, place cookware on rack position 4 (for all models - Refer to Fig. 5).
Air Circulation in the Oven
For best air circulation and baking
results allow 2-4" (5-10 cm) around
the cookware for proper air circulation
and be sure pans and cookware do not
touch each other, the oven door, sides
or back of the oven cavity. The hot air
must be able to circulate around the
pans and cookware in the oven for
even heat to reach around the food.
Fig. 4 Fig. 5
i{iJ...................
7i!!:::i
Before Setting Oven Controls (conrd)
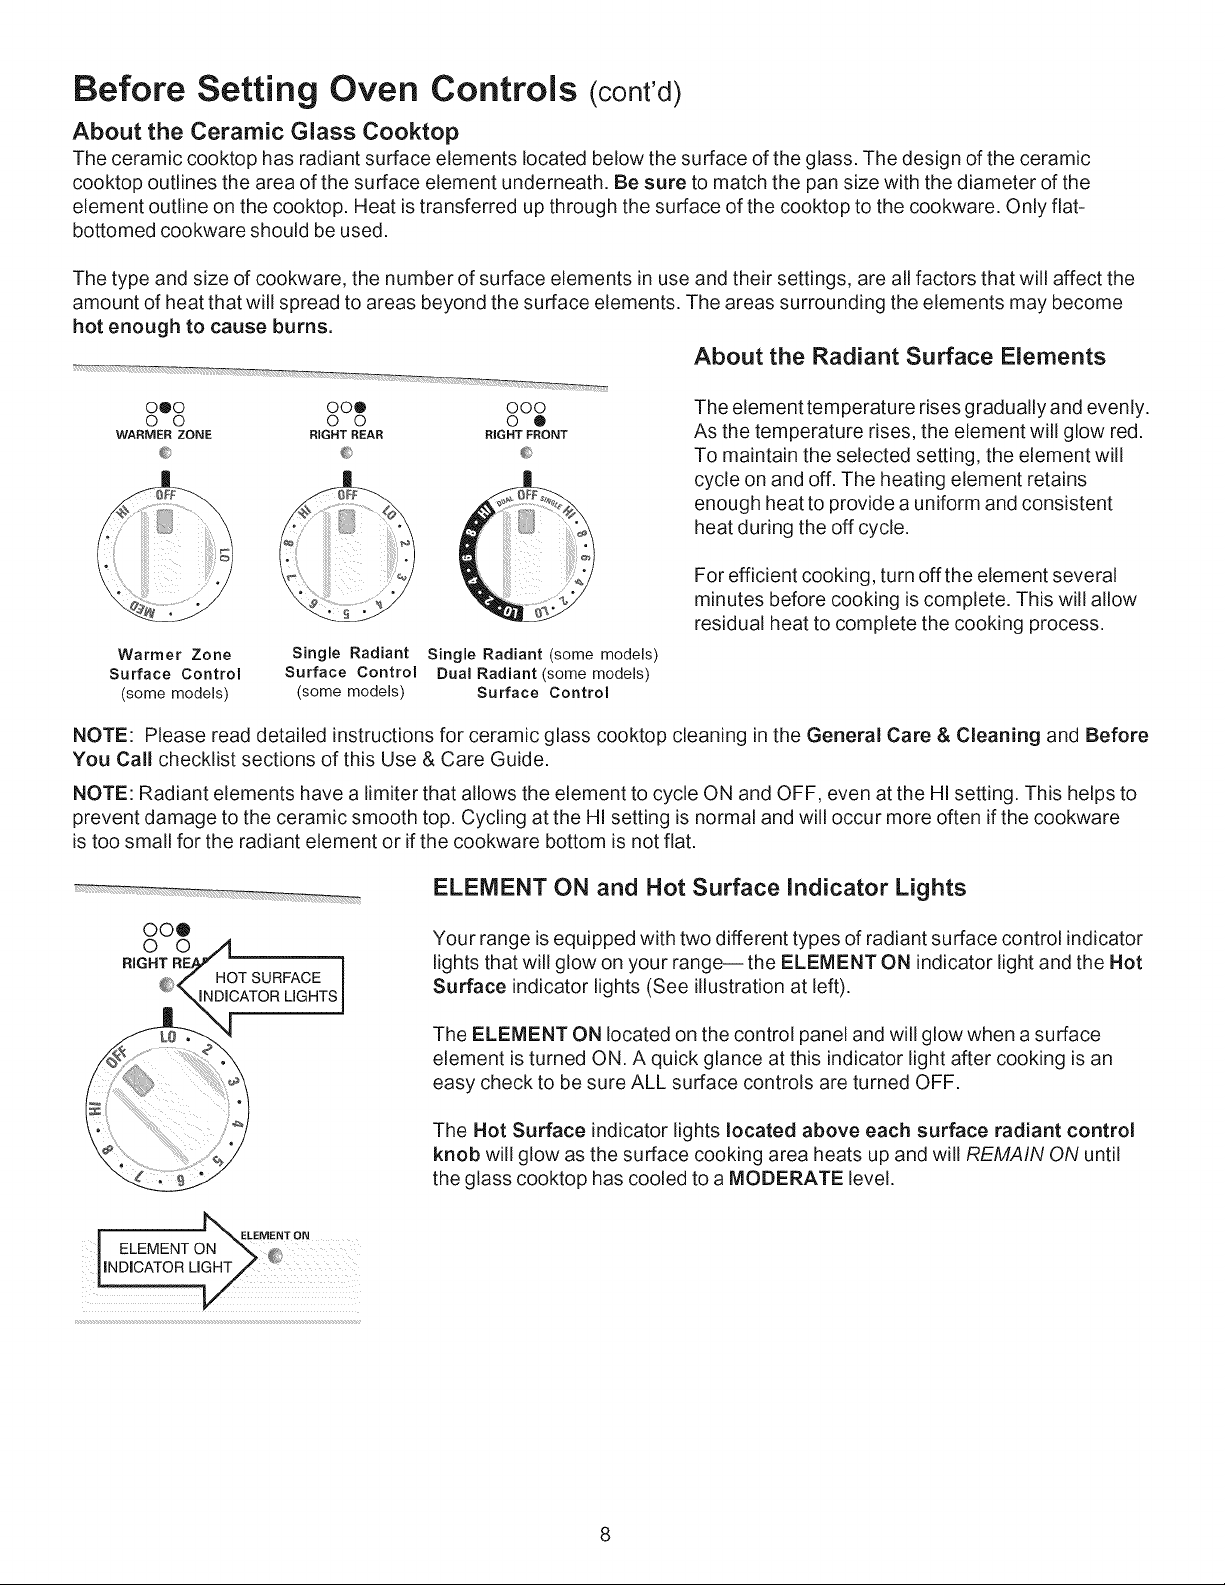
About the Ceramic Glass Cooktop
The ceramic cooktop has radiant surface elements located below the surface of the glass. The design of the ceramic
cooktop outlines the area of the surface element underneath. Be sure to match the pan size with the diameter of the
element outline on the cooktop. Heat is transferred up through the surface of the cooktop to the cookware. Only fiat-
bottomed cookware should be used.
The type and size of cookware, the number of surface elements in use and their settings, are all factors that will affect the
amount of heat that will spread to areas beyond the surface elements. The areas surrounding the elements may become
hot enough to cause burns.
About the Radiant Surface Elements
000 OOQ 000
0 0 0 0 0 ®
WARMER ZONE RIGHT REAR RIGHT FRONT
iiiiiiiiiii_ ii
Warmer Zone
Surface Control
(some models)
Single Radiant
Surface Control
(some models)
Single Radiant (some models)
Dual Radiant (some models)
Surface Control
The element temperature rises gradually and evenly.
As the temperature rises, the element will glow red.
To maintain the selected setting, the element will
cycle on and off. The heating element retains
enough heat to provide a uniform and consistent
heat during the off cycle.
For efficient cooking, turn off the element several
minutes before cooking is complete. This will allow
residual heat to complete the cooking process.
NOTE: Please read detailed instructions for ceramic glass cooktop cleaning in the General Care & Cleaning and Before
You Call checklist sections of this Use & Care Guide.
NOTE: Radiant elements have a limiter that allows the element to cycle ON and OFF, even at the HI setting. This helps to
prevent damage to the ceramic smooth top. Cycling at the HI setting is normal and will occur more often if the cookware
is too small for the radiant element or if the cookware bottom is not flat.
ELEMENT ON and Hot Surface Indicator Lights
Your range is equipped with two different types of radiant surface control indicator
lights that will glow on your range-- the ELEMENT ON indicator light and the Hot
Surface indicator lights (See illustration at left).
The ELEMENT ON located on the control panel and will glow when a surface
element is turned ON. A quick glance at this indicator light after cooking is an
easy check to be sure ALL surface controls are turned OFF.
| _ELEMENT ON
I ELEMENT ON _ _
The Hot Surface indicator lights located above each surface radiant control
knob will glow as the surface cooking area heats up and will REMAIN ON until
the glass cooktop has cooled to a MODERATE level.
Setting Surface Controls
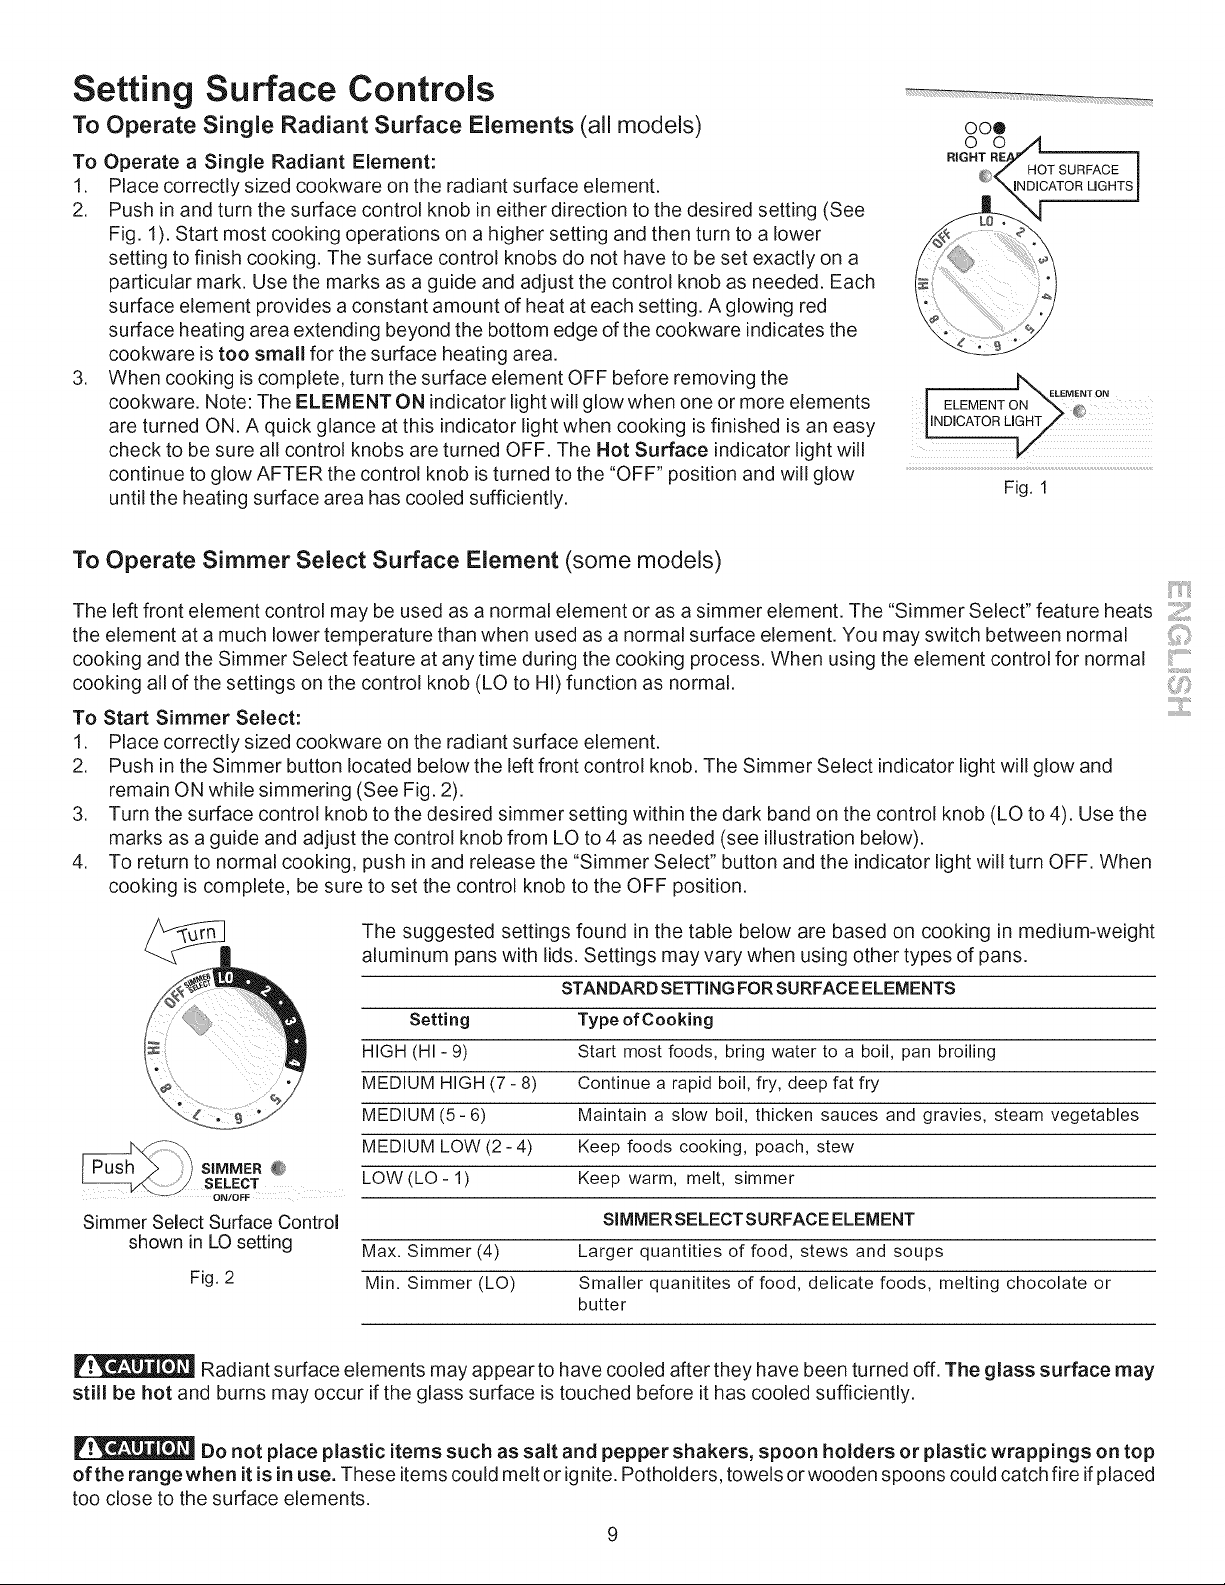
To Operate Single Radiant Surface Elements (all models)
To Operate a Single Radiant Element:
1. Place correctly sized cookware on the radiant surface element.
2. Push in and turn the surface control knob in either direction to the desired setting (See
Fig. 1). Start most cooking operations on a higher setting and then turn to a lower
setting to finish cooking. The surface control knobs do not have to be set exactly on a
particular mark. Use the marks as a guide and adjust the control knob as needed. Each
surface element provides a constant amount of heat at each setting. A glowing red
surface heating area extending beyond the bottom edge of the cookware indicates the
cookware is too small for the surface heating area.
3. When cooking is complete, turn the surface element OFF before removing the
cookware. Note: The ELEMENT ON indicator light will glow when one or more elements
are turned ON. A quick glance at this indicator light when cooking is finished is an easy
check to be sure all control knobs are turned OFF. The Hot Surface indicator light will
continue to glow AFTER the control knob is turned to the "OFF" position and will glow
until the heating surface area has cooled sufficiently.
oo®
o o
HOT SURFACE ]
INDICATOR LIGHTSI
ELEMENT °"
LNDICATOR LIGHT :
Fig. 1
To Operate Simmer Select Surface Element (some models)
The left front element control may be used as a normal element or as a simmer element. The "Simmer Select" feature heats ]
the element at a much lower temperature than when used as a normal surface element. You may switch between normal
cooking and the Simmer Select feature at any time during the cooking process. When using the element control for normal _:................
i
cooking all of the settings on the control knob (LO to HI) function as normal.
To Start Simmer Select:
1. Place correctly sized cookware on the radiant surface element.
2. Push in the Simmer button located below the left front control knob. The Simmer Select indicator light will glow and
remain ON while simmering (See Fig. 2).
3. Turn the surface control knob to the desired simmer setting within the dark band on the control knob (LO to 4). Use the
marks as a guide and adjust the control knob from LO to 4 as needed (see illustration below).
4. To return to normal cooking, push in and release the "Simmer Select" button and the indicator light will turn OFF. When
cooking is complete, be sure to set the control knob to the OFF position.
S|MMER @
SELECT
Simmer Select Surface Control
shown in LO setting
Fig. 2
The suggested settings found in the table below are based on cooking in medium-weight
aluminum pans with lids. Settings may vary when using other types of pans.
STANDARD SETTING FOR SURFACE ELEMENTS
Setting Type of Cooking
HIGH (HI - 9) Start most foods, bring water to a boil, pan broiling
MEDIUM HIGH (7 - 8) Continue a rapid boil, fry, deep fat fry
MEDIUM (5-6) Maintain a slow boil, thicken sauces and gravies, steam vegetables
MEDIUM LOW (2- 4) Keep foods cooking, poach, stew
LOW (LO - 1) Keep warm, melt, simmer
SIMMERSELECTSURFACE ELEMENT
Max. Simmer (4) Larger quantities of food, stews and soups
Min. Simmer (LO) Smaller quanitites of food, delicate foods, melting chocolate or
butter
Radiant surface elements may appear to have cooled after they have been turned off. The glass surface may
still be hot and burns may occur if the glass surface is touched before it has cooled sufficiently.
Do not place plastic items such as salt and pepper shakers, spoon holders or plastic wrappings on top
of the rangewhen it is in use. These items could melt or ignite. Potholders, towels or wooden spoons could catch fire if placed
too close to the surface elements.
Setting Surface Controls (cont'd)
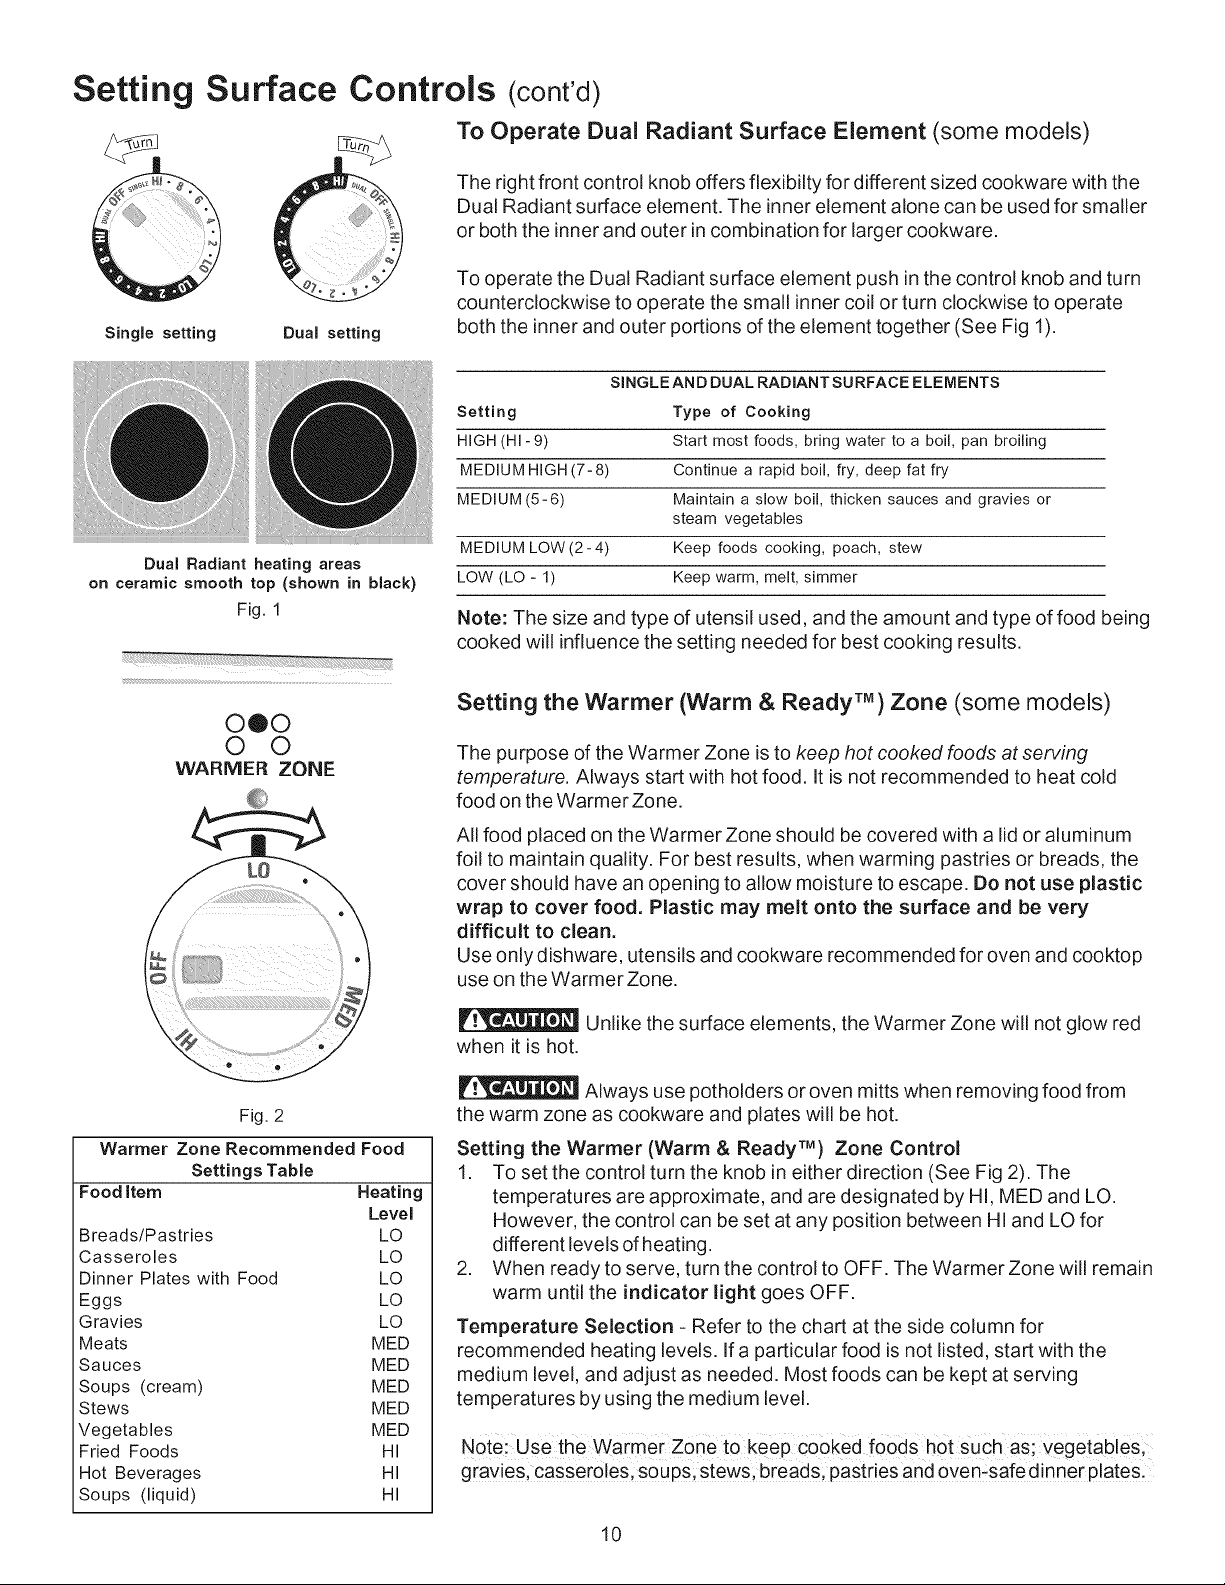
Single setting Dual setting
To Operate Dual Radiant Surface Element (some models)
The right front control knob offers flexibilty for different sized cookware with the
Dual Radiant surface element. The inner element alone can be used for smaller
or both the inner and outer in combination for larger cookware.
To operate the Dual Radiant surface element push in the control knob and turn
counterclockwise to operate the small inner coil or turn clockwise to operate
both the inner and outer portions of the element together (See Fig 1).
Dual Radiant heating areas
on ceramic smooth top (shown in black)
Fig. 1
0®0
0 0
WARMER ZONE
Fig. 2
Warmer Zone Recommended Food
Settings Table
Food Item Heating
Level
Breads/Pastries LO
Casseroles LO
Dinner Plates with Food LO
Eggs LO
Gravies LO
Meats MED
Sauces MED
Soups (cream) MED
Stews MED
Vegetables MED
Fried Foods HI
Hot Beverages HI
Soups (liquid) HI
SINGLE AND DUAL RADIANT SURFACE ELEMENTS
Setting Type of Cooking
HIGH (HI-9) Start most foods, bring water to a boil, pan broiling
MEDIUM HIGH (7-8) Continue a rapid boil, fry, deep fat fry
MEDIUM (5-6) Maintain a slow boil, thicken sauces and gravies or
steam vegetables
MEDIUM LOW (2- 4) Keep foods cooking, poach, stew
LOW (LO - 1) Keep warm, melt, simmer
Note: The size and type of utensil used, and the amount and type of food being
cooked will influence the setting needed for best cooking results.
Setting the Warmer (Warm & Ready TM) Zone (some models)
The purpose of the Warmer Zone is to keep hot cooked foods at serving
temperature. Always start with hot food. It is not recommended to heat cold
food on the Warmer Zone.
All food placed on the Warmer Zone should be covered with a lid or aluminum
foil to maintain quality. For best results, when warming pastries or breads, the
cover should have an opening to allow moisture to escape. Do not use plastic
wrap to cover food. Plastic may melt onto the surface and be very
difficult to clean.
Use only dishware, utensils and cookware recommended for oven and cooktop
use on the Warmer Zone.
Unlike the surface elements, the Warmer Zone will not glow red
when it is hot.
Always use potholders or oven mitts when removing food from
the warm zone as cookware and plates will be hot.
Setting the Warmer (Warm & Ready TM) Zone Control
1. To set the control turn the knob in either direction (See Fig 2). The
temperatures are approximate, and are designated by HI, MED and LO.
However, the control can be set at any position between HI and LO for
different levels of heating.
2. When ready to serve, turn the control to OFF. The Warmer Zone will remain
warm until the indicator light goes OFF.
Temperature Selection - Refer to the chart at the side column for
recommended heating levels. If a particular food is not listed, start with the
medium level, and adjust as needed. Most foods can be kept at serving
temperatures by using the medium level.
Note:use the warmer Zone to keep Cooked foods hOt such as; Vegetables;
gravies, casseroles, soups, stews, breads, pastries and oven:safe dinner plates.
10
Surface Cooking
Using Power Element (some models)
The "Power Element" feature uses a higher wattage surface radiant element which
can bring food items to boil much quicker. The left front radiant element will be
o,ea. mar.e ,.th,s.eatore,sava.a ,eon oorran0e/See ,01t"e o,0.e w,t.
the "Power Element" feature, place the cookware to boil on the left front surface
f
element and follow the instructions "To Operate a Single Radiant Element" in the
Settings Surface Controls section. Fig. 1
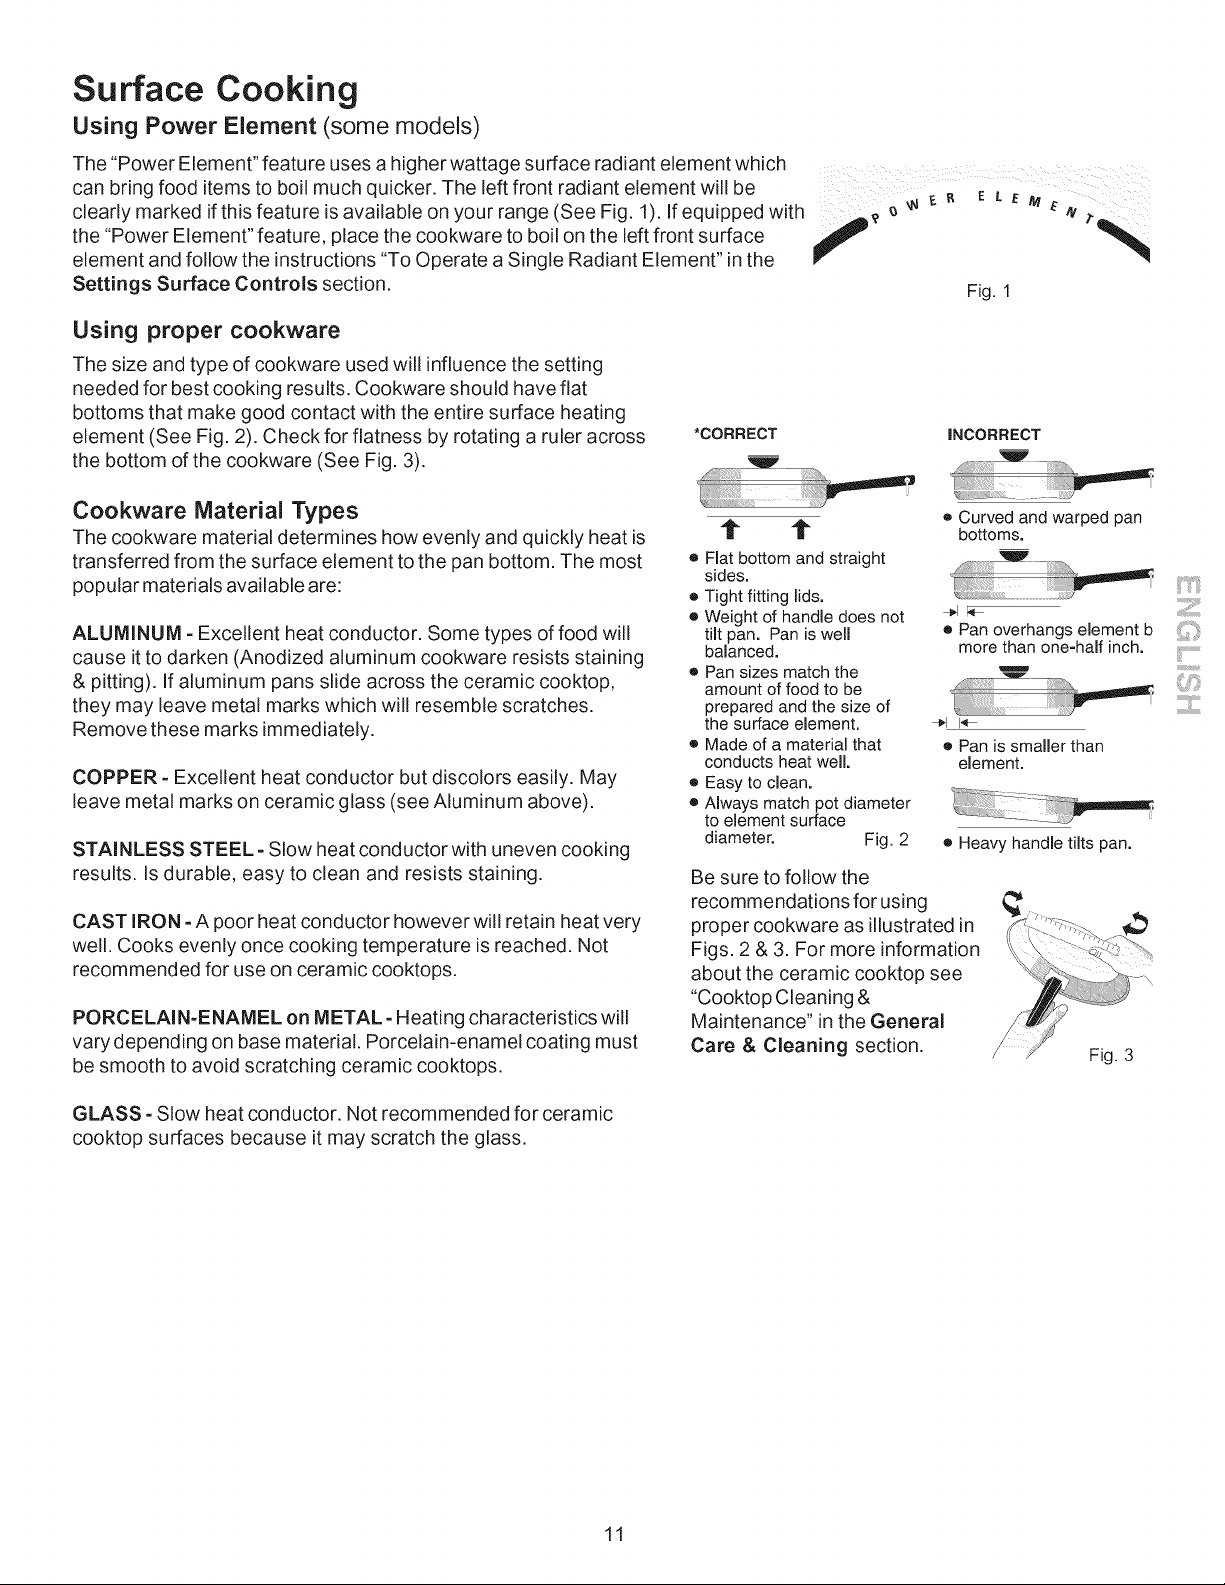
Using proper cookware
The size and type of cookware used will influence the setting
needed for best cooking results. Cookware should have flat
bottoms that make good contact with the entire surface heating
element (See Fig. 2). Check for flatness by rotating a ruler across
the bottom of the cookware (See Fig. 3).
*CORRECT iNCORRECT
Cookware Material Types
The cookware material determines how evenly and quickly heat is
transferred from the surface element to the pan bottom. The most
popular materials available are:
ALUMINUM =Excellent heat conductor. Some types of food will
cause it to darken (Anodized aluminum cookware resists staining
& pitting). If aluminum pans slide across the ceramic cooktop,
they may leave metal marks which will resemble scratches.
Remove these marks immediately.
COPPER =Excellent heat conductor but discolors easily. May
leave metal marks on ceramic glass (see Aluminum above).
STAINLESS STEEL =Slow heat conductor with uneven cooking
results. Is durable, easy to clean and resists staining.
CAST IRON =A poor heat conductor however will retain heat very
well. Cooks evenly once cooking temperature is reached. Not
recommended for use on ceramic cooktops.
PORCELAIN=ENAMEL on METAL =Heating characteristics will
vary depending on base material. Porcelain-enamel coating must
be smooth to avoid scratching ceramic cooktops.
t" t
• Flat bottom and straight
sides.
• Tightfitting lids.
® Weightof handle does not
tilt pan. Pan is well
balanced.
o Pansizes matchthe
amountof food to be
preparedandthe sizeof
the surfaceelement.
• Made of a materialthat
conductsheat well.
® Easyto clean.
• Always match pot diameter
to elementsurface
diameter. Fig. 2
o Curved and warped pan
bottoms.
• Panoverhangselement b
morethan one-halfinch.
÷1 I'_
o Pan is smaller than
element.
• Heavy handle tilts pan.
Be sure to follow the
recommendations for using
proper cookware as illustrated in
Figs. 2 & 3. For more information
about the ceramic cooktop see
"Cooktop Cleaning &
Maintenance" in the General
Care & Cleaning section.
Fig. 3
GLASS =Slow heat conductor. Not recommended for ceramic
cooktop surfaces because it may scratch the glass.
11
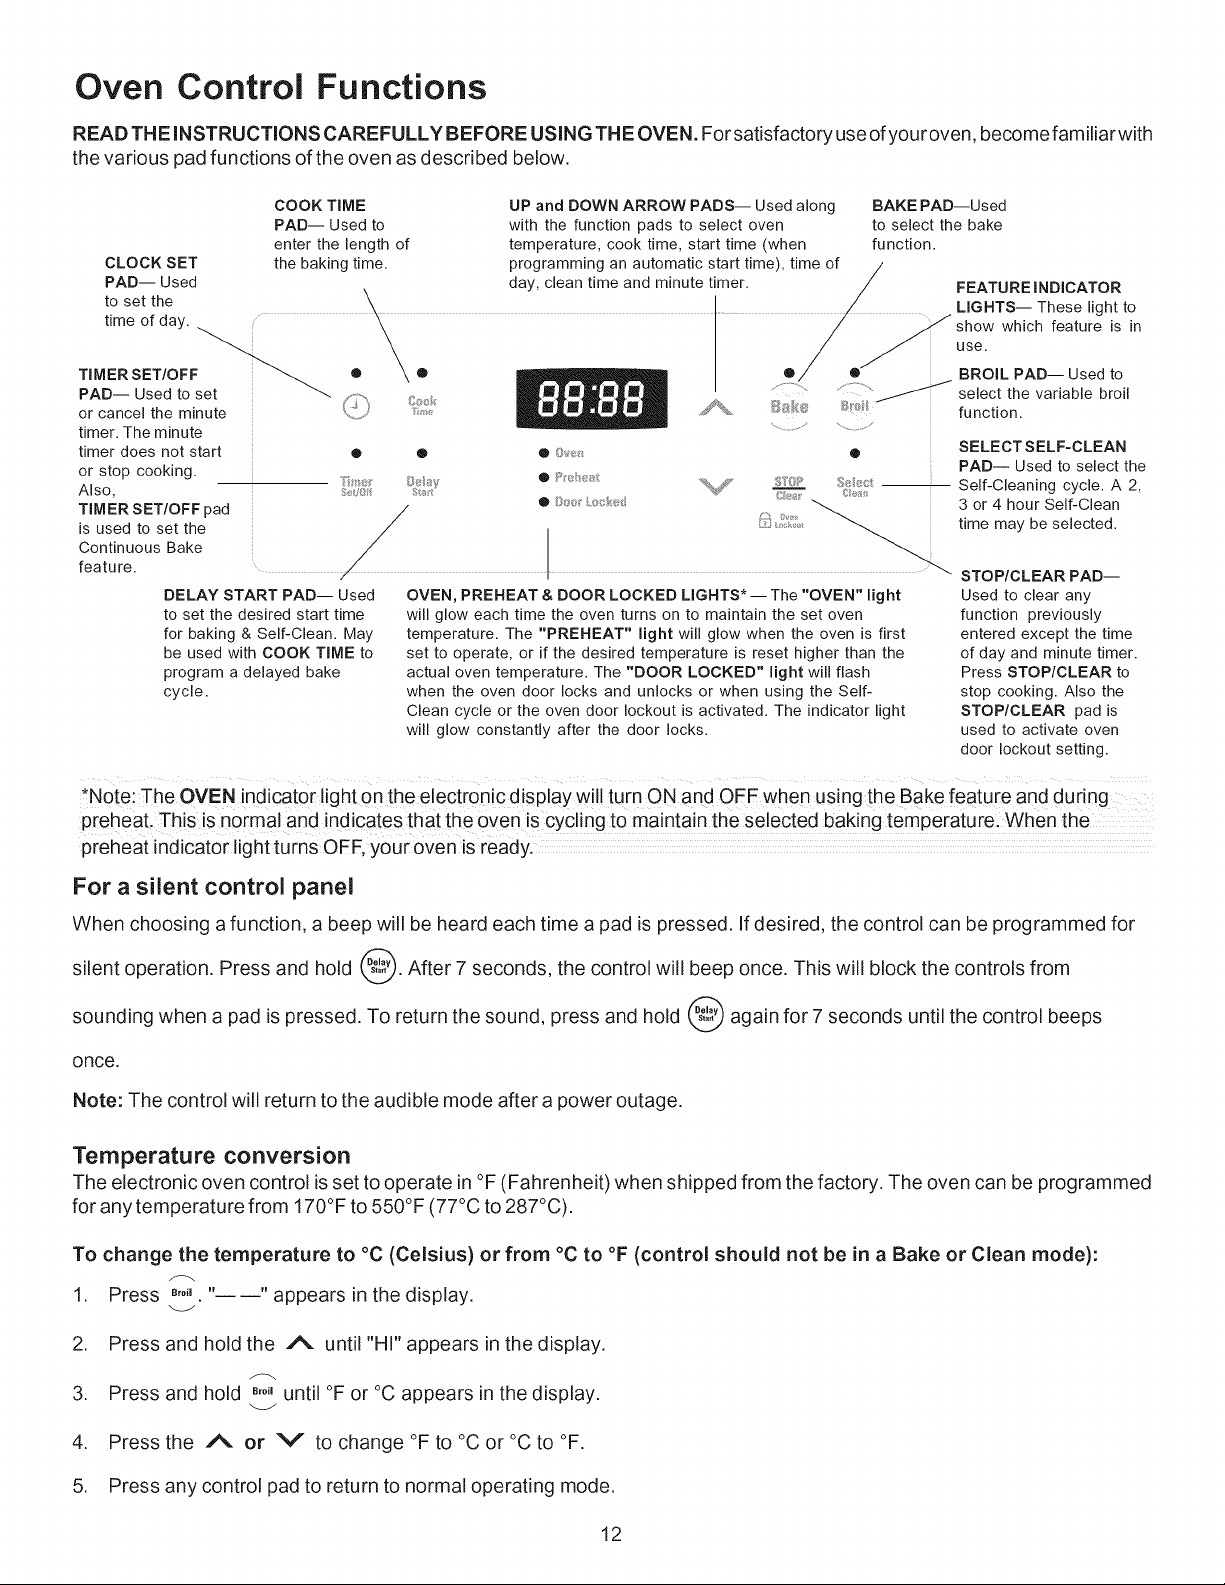
Oven Control Functions
READ THE iNSTRUCTiONS CAREFULLY BEFORE USING THE OVEN. For satisfactory use ofyouroven, become familiar with
the various pad functions of the oven as described below.
CLOCK SET
PAD Used
to set the
time of day.
_-..
TIMER SET/OFF
PAD Used to set
or cancel the minute
timer. The minute
timer does not start
or stop cooking.
Also.
TIMER SET/OFF pad
is used to set the
Continuous Bake
feature
COOK TIME UP and DOWN ARROW PADS-- Used along BAKE PAD--Used
PAD-- Used to with the function pads to select oven to select the bake
enter the length of temperature, cook time, start time (when function.
the baking time. programming an automatic start time), time of
day, clean time and minute timer.
\
/
/
/
/
./
/
DELAY START PAD-- Used
to set the desired start time
for baking & Self-Clean. May
be used with COOK TIME to
program a delayed bake
cycle.
o
, .., - ....o..
o
o
®
FEATURE I NDICATOR
LIGHTS-- These light to
Y show which feature is in
use.
® BROIL PAD-- Used to
select the variable broil
function.
_y
Lit}
OVEN, PREHEAT & DOOR LOCKED LIGHTS* The "OVEN" light
will glow each time the oven turns on to maintain the set oven
temperature. The "PREHEAT" light will glow when the oven is first
set to operate, or if the desired temperature is reset higher than the
actual oven temperature. The "DOOR LOCKED" light will flash
when the oven door locks and unlocks or when using the Self-
Clean cycle or the oven door lockout is activated. The indicator light
will glow constantly after the door locks.
SELECTSELF-CLEAN
PAD-- Used to select the
Self-Cleaning cycle. A 2,
3 or 4 hour Self-Clean
time may be selected.
STOP/CLEAR PAD--
Used to clear any
function previously
entered except the time
of day and minute timer.
Press STOP/CLEAR to
stop cooking. Also the
STOP/CLEAR pad is
used to activate oven
door lockout setting.
*Note: The OVEN indicator light on the electronic display will turn ON and OFF when using the Bake feature and during
preheat, This is normal and indicates that the oven is cycling to maintain the selected baking temperatu re. When the
preheat indicator light turns OFF, y0ur 0yen is ready.
For a silent control panel
When choosing a function, a beep will be heard each time a pad is pressed. If desired, the control can be programmed for
silent operation. Press and hold _b After 7 seconds, the control will beep once. This will block the controls from
sounding when a pad is pressed. To return the sound, press and hold _b again for 7 seconds until the control beeps
once,
Note: The control will return to the audible mode after a power outage.
Temperature conversion
The electronic oven control is set to operate in °F (Fahrenheit) when shipped from the factory. The oven can be programmed
for any temperature from 170°F to 550°F (77°C to 287°C).
To change the temperature to °C (Celsius) or from °C to °F (control should not be in a Bake or Clean mode):
1. Press _,o" "----" appears in the display.
2. Press and hold the A until "HI" appears in the display.
/-_ oc
3. Press and hold B,o,until °F or appears in the display.
4. Press the A or V to change °F to °C or °C to °F.
5. Press any control pad to return to normal operating mode.
12
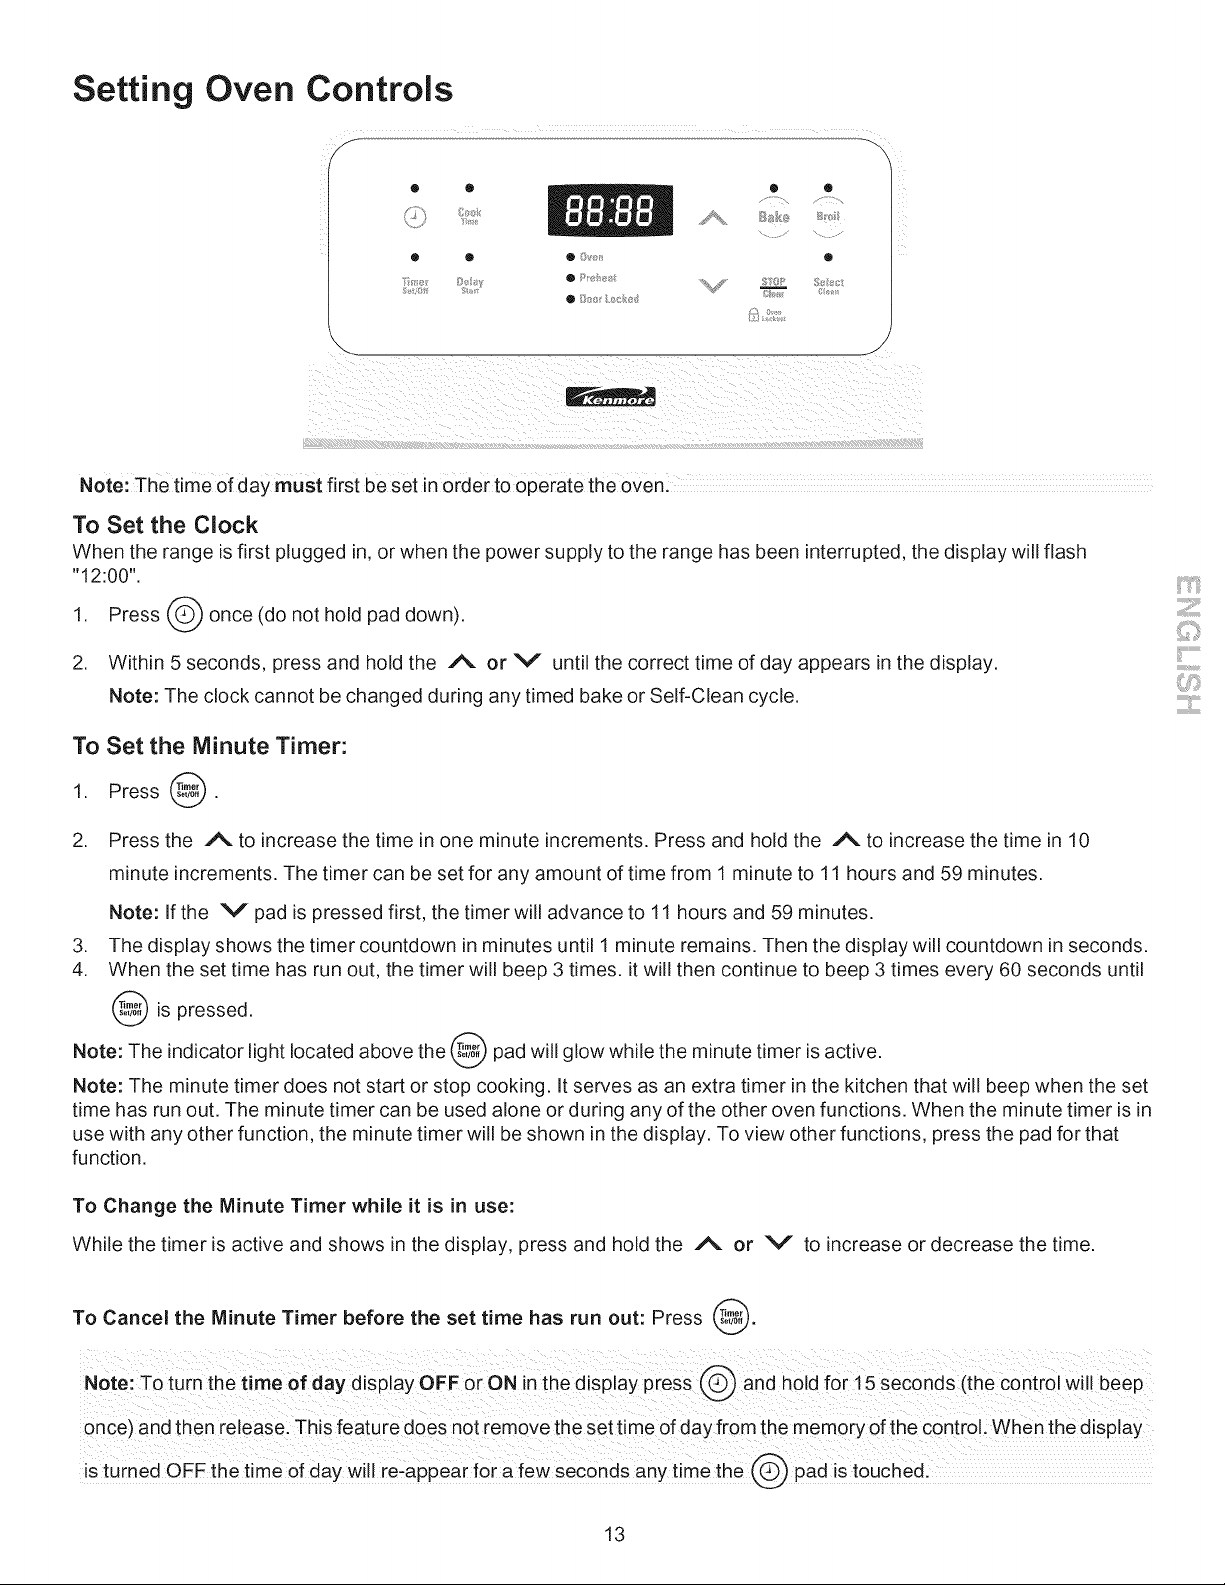
Setting Oven Controls
0 • ®
S, 8_ Styli • _}_/_ LI_4_ _/_s===_ _/_
Note: The time of day must first beset inorder to operate the oven!
To Set the Clock
When the range is first plugged in, or when the power supply to the range has been interrupted, the display will flash
"12:00".
Press _ once (do not hold pad down).
1.
2. Within 5 seconds, press and hold the A or V until the correct time of day appears in the display.
Note: The clock cannot be changed during any timed bake or Self-Clean cycle.
To Set the Minute Timer:
1. Press @.
. Press the _N. to increase the time in one minute increments. Press and hold the _%. to increase the time in 10
minute increments. The timer can be set for any amount of time from 1 minute to 11 hours and 59 minutes.
Note: If the V pad is pressed first, the timer will advance to 11 hours and 59 minutes.
3. The display shows the timer countdown in minutes until 1 minute remains. Then the display will countdown in seconds.
4. When the set time has run out, the timer will beep 3 times, it will then continue to beep 3 times every 60 seconds until
is pressed,
Note: The indicator light located above the _ pad will glow while the minute timer is active.
Note: The minute timer does not start or stop cooking. It serves as an extra timer in the kitchen that will beep when the set
time has run out. The minute timer can be used alone or during any of the other oven functions. When the minute timer is in
use with any other function, the minute timer will be shown in the display. To view other functions, press the pad for that
function.
To Change the Minute Timer while it is in use:
While the timer is active and shows in the display, press and hold the _ or V to increase or decrease the time.
To Cancel the Minute Timer before the set time has run out: Press @.
once) and then release. This feature does not remove the set time of day from the memory of the control. When the display
is ruined OFF the time of day Will [eiappea[ fe[ a few sec0nd s anytim e the pad iS t0uchedl
13
Setting Oven Controls (conrd)
To Set or Change the Temperature for Baking
The oven can be programmed to bake at any temperature from 170°F to 550°F (77°C to 287°C).
To Set the Controls for Baking:
1. Press B,ke. " "appears in the display.
2. Within 5 seconds, pressthe /% or V . The display will show "350°F (177°C)." By pressing and holding the i% or
V, the temperature can then be adjusted in 5°F increments (1°C if the control is set to display Celsius).
3. As soon as the/% or V pad is released, the oven will begin heating to the selected temperature. When the
displayed temperature reaches the desired baking temperature, the preheat indicator light will turn OFF and the control
will beep 3 times.
4. To cancel baking, press @.
To Change the Oven Temperature after Baking has Started:
1. Press B,keand make sure the bake temperature is displayed.
2. Press the/% or V pad to increase or decrease the set temperature.
To Set Control for Continuous Bake or 12 Hour Energy Saving
The oven control has a built-in 12 Hour Energy Saving feature that will shut off the oven if the control is left on for more than
11 hours and 59 minutes. The oven can be programmed to override this feature for continuous baking.
To set control for continuous baking:
1. Press and hold @ down for 5 seconds until tone is heard, "= = hr" will appear in display for continuous cooking.
The current time of day will return to the display.
2. To cancel the Continuous Bake function, press @ and hold for 5 seconds until tone is heard. "12hr" will appear in
display indicating that the control has returned to the 12 Hour Energy Saving feature.
('%
Oven
To Set Control for Oven Lockout []
Lockout
The control can be programmed to lock the oven door and lockout the oven control pads.
To set Control for Oven Lockout feature:
1. Press @ and hold for 3 seconds. "Loc" will appear in display, the "Door Locked" indicator light will flash and the
motor driven door lock will begin to close automatically. DO NOT open oven door while the indicator light is flashing.
Allow about 15 seconds for the oven door to lock. Once the oven door is locked, the current time of day will appear in
the display.
2. To cancel the Oven Lockout feature, press @ and hold for 3 seconds. The control will unlock the oven door and
resume normal operation.
Note:if any control pad is pressed while in the Oven Lockout mode, "Loc" will appear in the display until the
control pad is released.
14
Setting Oven Controls (cont'd)
To Set the Timed Bake and Delay Stag Features
The _ COOK TIME and _t,,'",_DELAY START pads operate the features that will turn the oven ON and OFF at the times
you select in advance. The oven can be programmed to start immediately and shut off automatically (Timed Bake) or to
begin baking at a later time with a delayed start time (Delay Start).
Note: During Timed Bake the preheat indicator light will not function:
To Program the Oven to Begin Baking Immediately and To Shut Off Automatically (Timed Bake):
1. Be sure that the clock shows the correct time of day.
2. Place the food in the oven.
3. Press e_ke."______ o " appears in the display.
4. Within 5 seconds, press the A or V . The display will show "350°F (177°C)." By holding the Aor V,the
temperature can then be adjusted in 5°F increments (1 °C if the control is set to display Celsius).
5. Press _,,_.,_._."0:00" will flash in the display (HR:MIN).
6. Press the A or V until the desired baking time appears in the display.
7. The oven will turn ON and begin heating.
To Program Oven for a Delayed Start Time and to Shut-Off Automatically (Delayed Start Bake):
1. Be sure that the clock shows the correct time of day.
2. Place the food in the oven.
3. Press e_ke."______ o " appears in the display.
4. Within 5 seconds, presstheA or V . The display will show "350°F (177°C)." By holding the A or V , the
temperature can then be adjusted in 5°F increments (1 °C if the control is set to display Celsius).
5. Press @. "0:00" will flash in the display (HR:MIN).
6. Press the A or V until the desired baking time appears.
7. Press _. The earliest possible start time will appear in the display.
8. Press the A or V until the desired start time appears in the display.
9. Once the controls are set, the control calculates the time when baking will stop in order to start at the time you have
set.
10. The oven will turn ON at the delayed start time and begin heating.
When the Set Bake Time Runs Out:
a. "END" will appear in the display window and the oven will shut-off automatically.
b. The control will beep 3 times every 60 seconds until _ is pressed.
To Change the Oven Temperature or Bake Time after Baking has Started:
1. Press the function pad you want to change.
2. Press the A or V to adjust the setting.
Use caution with the Timed Bake and Delayed Start features. Foods that can easily spoil such as milk,
eggs, fish, meat or poultry, should be chilled in the refrigerator first. Even when chilled, they should not stand in the oven for
more than 1 hour before cooking begins, and should be removed promptly when cooking is completed.
15
Setting Oven Controls (conrd)
To Set for Broiling:
.
.
3.
Arrange the oven rack while oven is still cool. Position the rack as
suggested in the Broil Rack Position Table below.
Press _,o, "----"will appear in display.
Press and hold the A or V until the desired broil setting level appears in
the display. Press the A for HI broil or the V for LO broil. Most foods
may be broiled at the HI broil setting. Select the LO broil setting to avoid
excess browning or drying of foods that should be cooked to the well-done
stage.
4. For optimum browning, preheat broil element for 3 =4 minutes
before adding food.
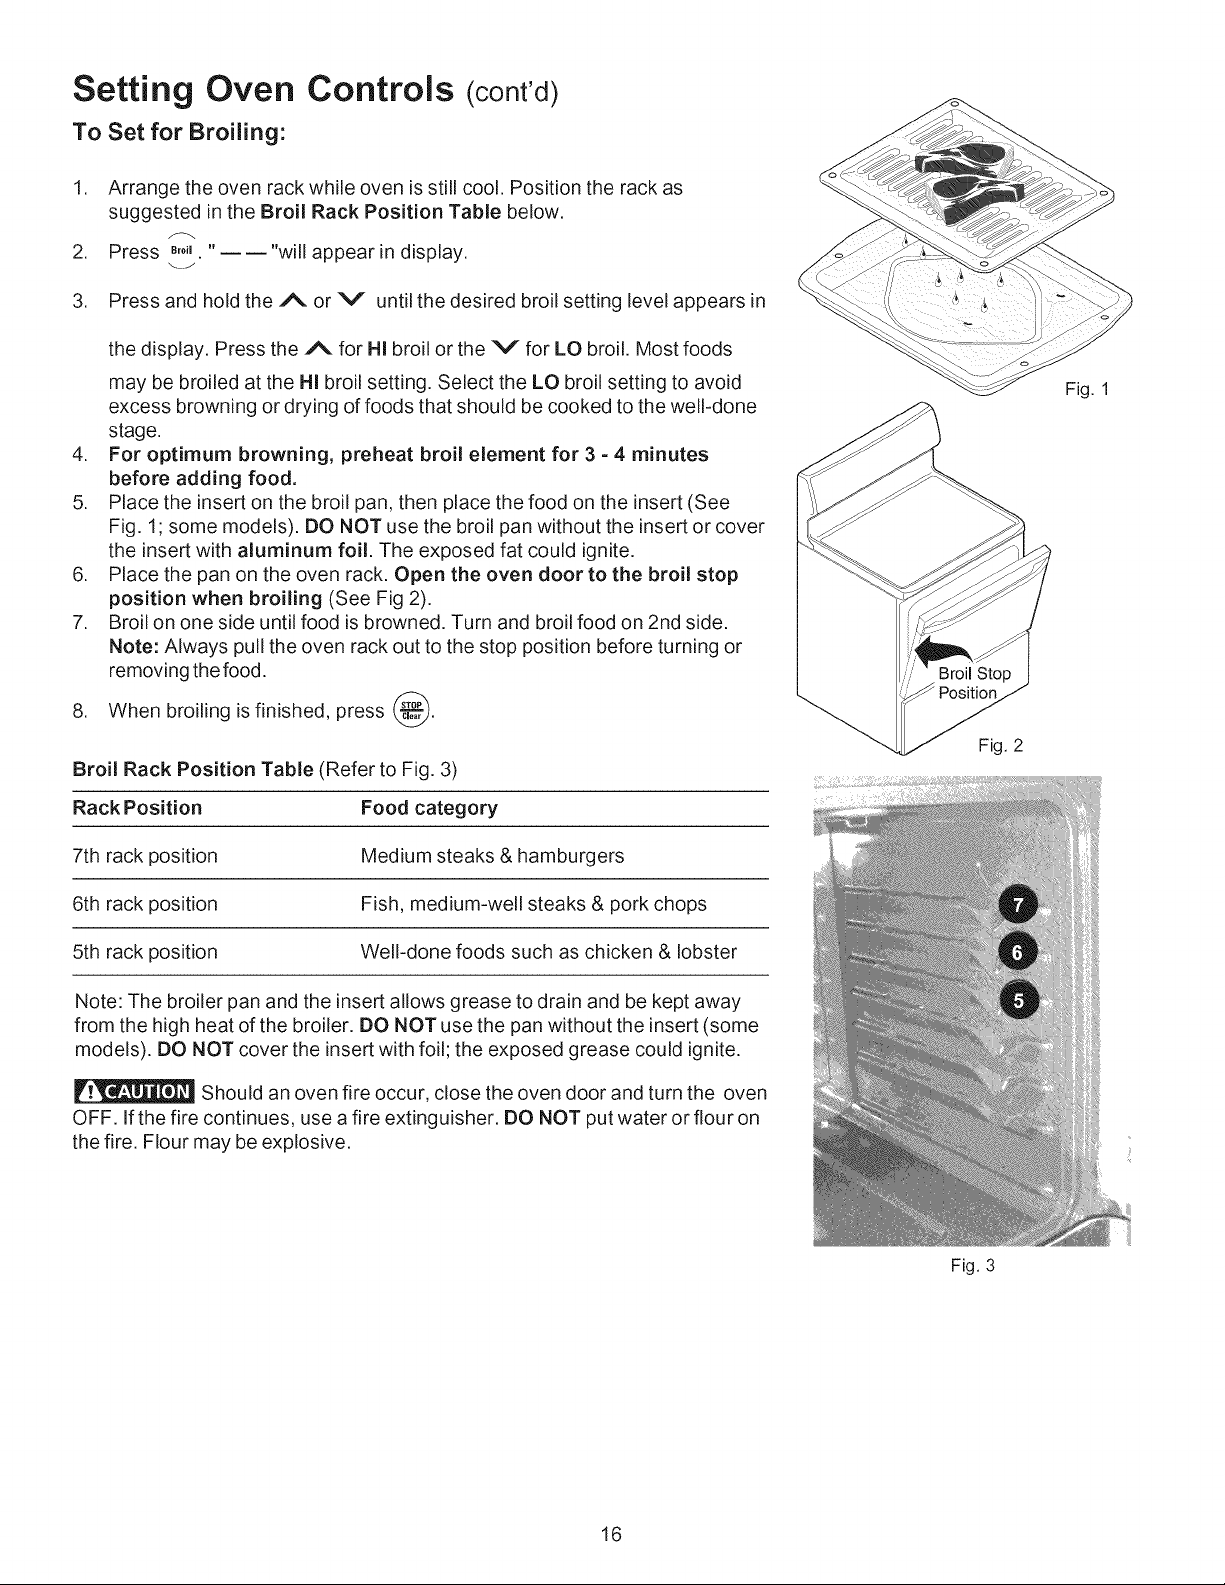
5. Place the insert on the broil pan, then place the food on the insert (See
Fig. 1; some models). DO NOT use the broil pan without the insert or cover
the insert with aluminum foil. The exposed fat could ignite.
6. Place the pan on the oven rack. Open the oven door to the broil stop
position when broiling (See Fig 2).
7. Broil on one side until food is browned. Turn and broil food on 2nd side.
Note: Always pull the oven rack out to the stop position before turning or
removing the food.
8. When broiling is finished, press _.
Broil Rack Position Table (Refer to Fig. 3)
Rack Position Food category
7th rack position Medium steaks & hamburgers
6th rack position Fish, medium-well steaks & pork chops
5th rack position Well-done foods such as chicken & lobster
Note: The broiler pan and the insert allows grease to drain and be kept away
from the high heat of the broiler. DO NOT use the pan without the insert (some
models). DO NOT cover the insert with foil; the exposed grease could ignite.
Should an oven fire occur, close the oven door and turn the oven
OFF. If the fire continues, use a fire extinguisher. DO NOT put water or flour on
the fire. Flour may be explosive.
Fig. 1
Fig. 2
16
Fig. 3
Setting Oven Controls (conrd)
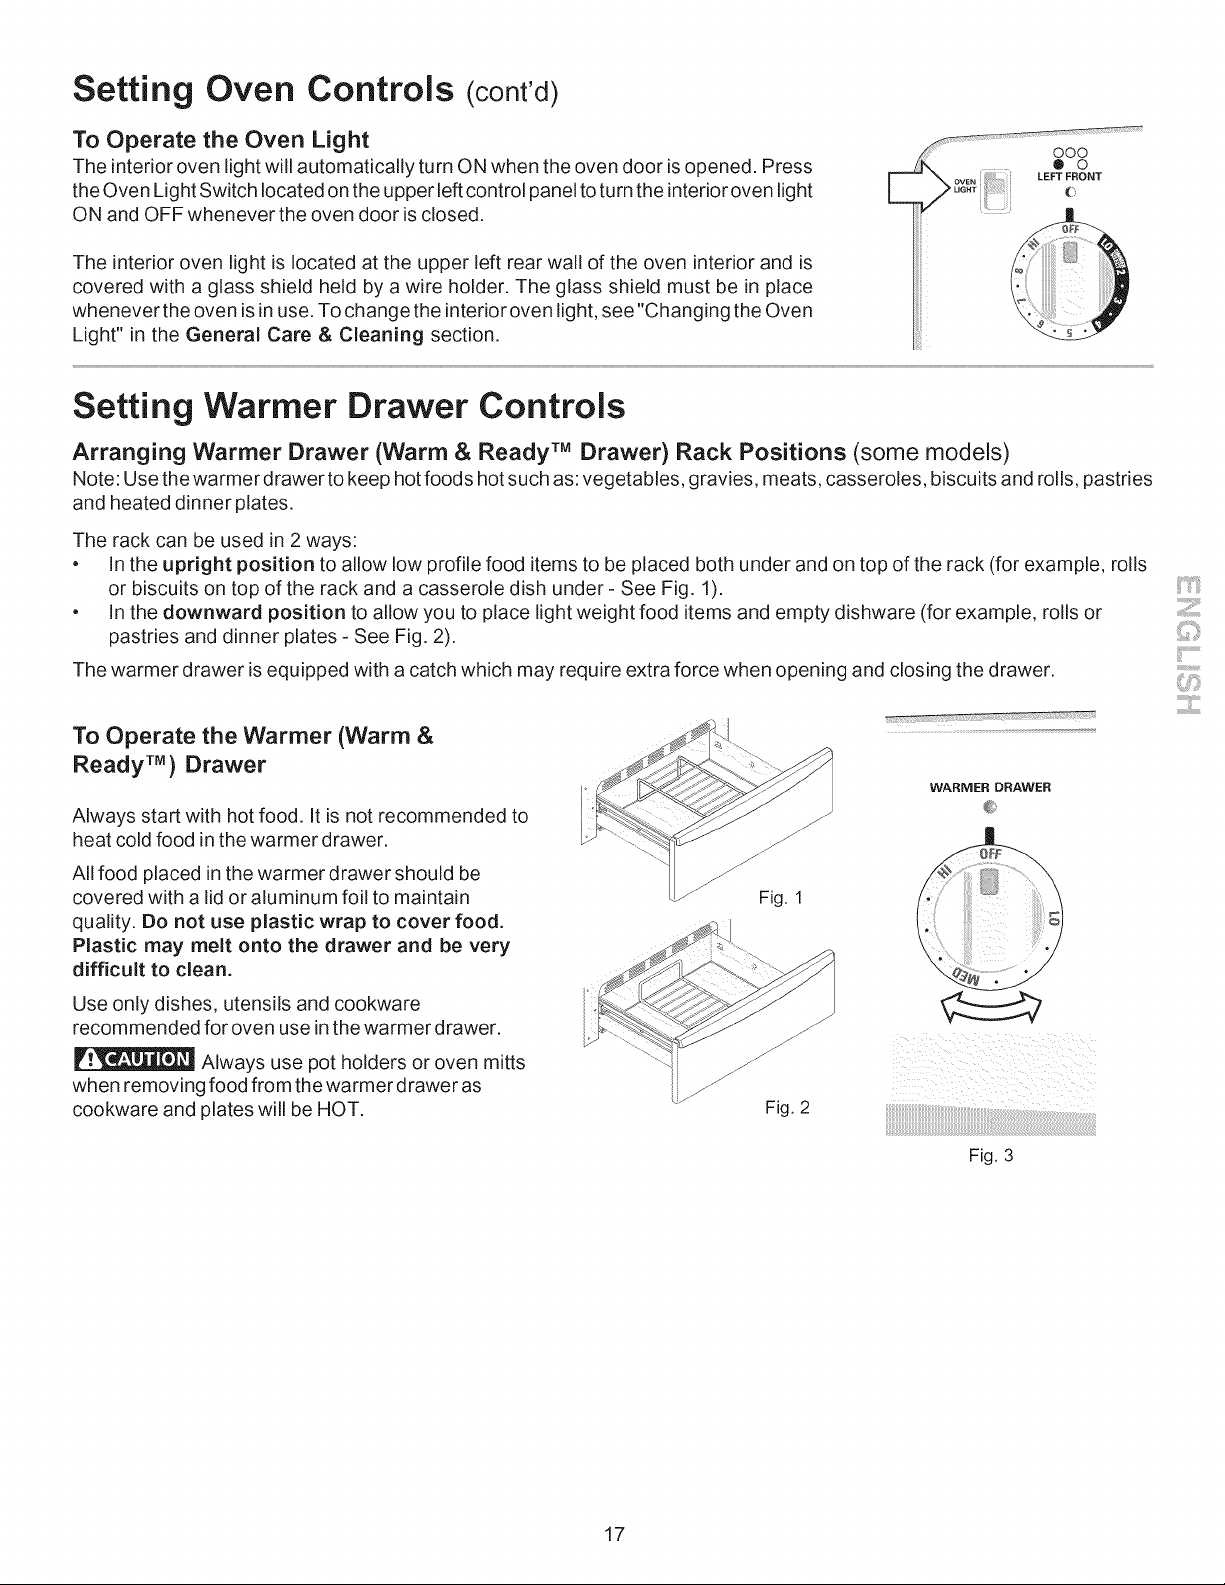
To Operate the Oven Light
The interior oven light will automatically turn ON when the oven door is opened. Press
the Oven Light Switch located on the upper left control panel to turn the interior oven light
ON and OFF whenever the oven door is closed.
The interior oven light is located at the upper left rear wall of the oven interior and is
covered with a glass shield held by a wire holder. The glass shield must be in place
whenever the oven is in use. To change the interior oven light, see "Changing the Oven
Light" in the General Care & Cleaning section.
E
ooo
> .o
OVEN LEFT FRONT
UG.T (:
Setting Warmer Drawer Controls
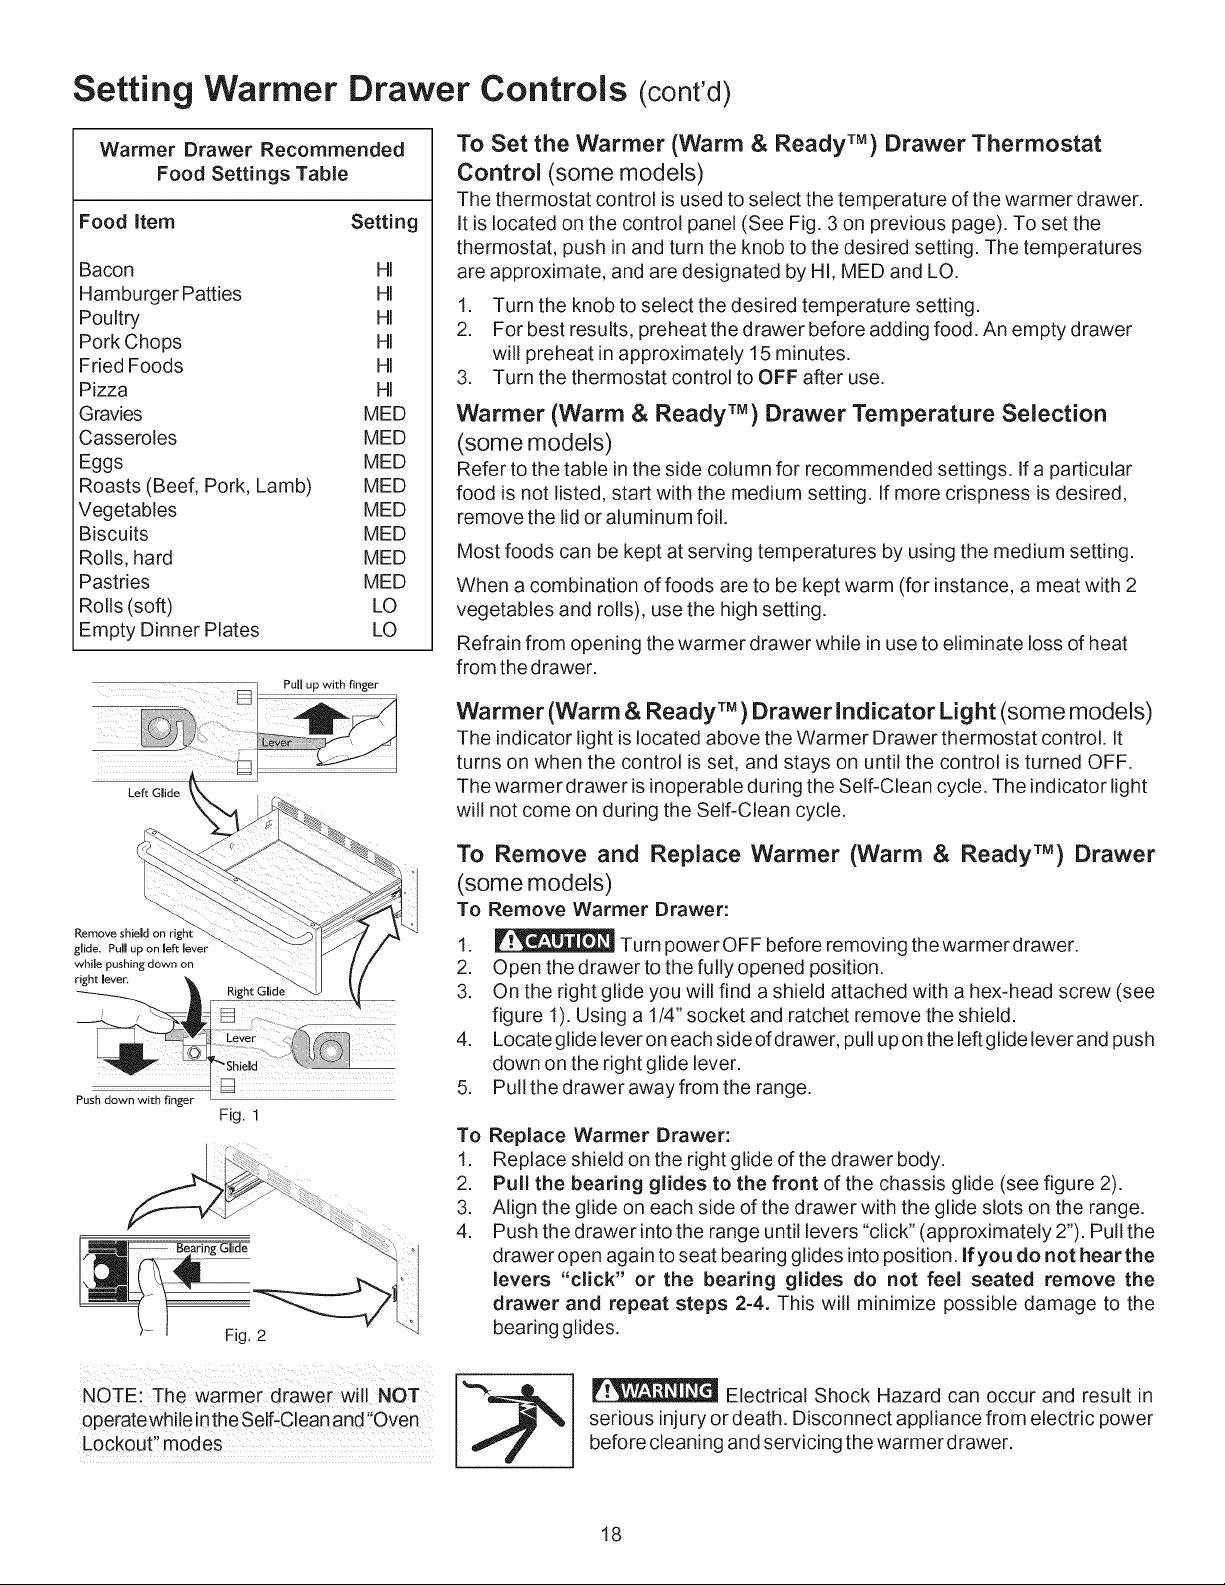
Arranging Warmer Drawer (Warm & Ready TM Drawer) Rack Positions (some models)
Note: Use thewarmer drawer to keep hot foods hot such as: vegetables, gravies, meats, casseroles, biscuits and rolls, pastries
and heated dinner plates.
The rack can be used in 2 ways:
• In the upright position to allow low profile food items to be placed both under and on top of the rack (for example, rolls
or biscuits on top of the rack and a casserole dish under - See Fig. 1).
• In the downward position to allow you to place light weight food items and empty dishware (for example, rolls or
pastries and dinner plates - See Fig. 2).
The warmer drawer is equipped with a catch which may require extra force when opening and closing the drawer.
To Operate the Warmer (Warm &
Ready TM) Drawer
Always start with hot food. It is not recommended to
heat cold food in the warmer drawer.
All food placed in the warmer drawer should be
covered with a lid or aluminum foil to maintain
quality. Do not use plastic wrap to cover food.
Plastic may melt onto the drawer and be very
difficult to clean.
Use only dishes, utensils and cookware
recommended for oven use in the warmer drawer.
Always use pot holders or oven mitts
when removing food from the warmer drawer as
cookware and plates will be HOT.
Fig. 1
Fig. 2
WARMER DRAWER
Fig. 3
17
Setting Warmer Drawer Controls (cont'd)
Warmer Drawer Recommended
Food Settings Table
Food item Setting
Bacon HI
Hamburger Patties HI
Poultry HI
Pork Chops HI
Fried Foods HI
Pizza HI
Gravies MED
Casseroles MED
Eggs MED
Roasts (Beef, Pork, Lamb) MED
Vegetables MED
Biscuits MED
Rolls, hard MED
Pastries MED
Rolls (soft) LO
Empty Dinner Plates LO
Pull up with finger
Left Glide
To Set the Warmer (Warm & Ready TM) Drawer Thermostat
Control (some models)
The thermostat control is used to select the temperature of the warmer drawer.
It is located on the control panel (See Fig. 3 on previous page). To set the
thermostat, push in and turn the knob to the desired setting. The temperatures
are approximate, and are designated by HI, MED and LO.
1. Turn the knob to select the desired temperature setting.
2. For best results, preheat the drawer before adding food. An empty drawer
will preheat in approximately 15 minutes.
3. Turn the thermostat control to OFF after use.
Warmer (Warm & Ready TM) Drawer Temperature Selection
(some models)
Refer to the table in the side column for recommended settings. If a particular
food is not listed, start with the medium setting. If more crispness is desired,
remove the lid or aluminum foil.
Most foods can be kept at serving temperatures by using the medium setting.
When a combination of foods are to be kept warm (for instance, a meat with 2
vegetables and rolls), use the high setting.
Refrain from opening the warmer drawer while in use to eliminate loss of heat
from the drawer.
Warmer (Warm & Ready TM) Drawer Indicator Light (some models)
The indicator light is located above the Warmer Drawer thermostat control. It
turns on when the control is set, and stays on until the control is turned OFF.
The warmer drawer is inoperable during the Self-Clean cycle. The indicator light
will not come on during the Self-Clean cycle.
Remove shield on right
glide. Pull up on left lever
while pushing down on
right lever,
Push down with finger
Fig. 2
To Remove and Replace Warmer (Warm & Ready TM) Drawer
(some models)
To Remove Warmer Drawer:
1. _ Turn powerOFF before removing thewarmerdrawer.
2. Open the drawer to the fully opened position.
3. On the right glide you will find a shield attached with a hex-head screw (see
figure 1). Using a 1/4" socket and ratchet remove the shield.
4. Locate glide lever on each sideofdrawer, pull upon the left glide lever and push
down on the right glide lever.
5. Pull the drawer away from the range.
To Replace Warmer Drawer:
1. Replace shield on the right glide of the drawer body.
2. Pull the bearing glides to the front of the chassis glide (see figure 2).
3. Align the glide on each side of the drawer with the glide slots on the range.
4. Push the drawer into the range until levers "click" (approximately 2"). Pull the
drawer open again to seat bearing glides into position. If you do not hear the
levers "click" or the bearing glides do not feel seated remove the
drawer and repeat steps 2=4. This will minimize possible damage to the
bearing glides.
NOTE: The warmer drawer Will NOT
operate while inthe Self-Clean and !'Oven
Lockout'! modes
Electrical Shock Hazard can occur and result in
serious injury or death. Disconnect appliance from electric power
before cleaning and servicing the warmer drawer.
18

Self-Cleaning
During the Self-Cleaning
cycle, the outside of the range can
become very hot to the touch. DO NOT
leave small children unattended near the
appliance.
The health of some birds
is extremely sensitive to the fumes given
off during the Self-Cleaning cycle of any
range. Move birds to another well-
ventilated room.
DO NOT line the oven
walls, racks, bottom or any other part of
the range with aluminum foil. Doing so
will destroy heat distribution, produce
poor baking results and cause
permanent damage to the oven interior
(aluminum foil will melt to the interior
surface of the oven).
DO NOT force the oven
door open. This can damage the
automatic door locking system. Use
caution when opening the door after the
Self-Cleaning cycle is completed. The
oven may still be VERY HOT.
HAND
CLEAN FRAME
DO HAND
CLEAN DOOR
DO NOT
HAND
OVEN
DOOR GASKET
Note: See additional cleaning information
for the oven door in the General Care &
Cleaning section.
Baking element may be tilted
about 4 or 5 inches to clean
oven bottom (some models)
Self-Cleaning Oven
A Self-Cleaning oven cleans itself with high temperatures (well above cooking
temperatures) which eliminate soils completely or reduces them to a fine
powdered ash you can wipe away with a damp cloth.
Adhere to the following cleaning precautions:
. DO NOT use oven cleaners or oven protective coatings in or around any
part of the Self-Cleaning oven.
. DO NOT clean the oven door gasket. The woven material of the oven door
gasket is essential for a good seal. Care should be taken not to rub,
damage or remove the gasket.
. DO NOT use any cleaning materials on the oven door gasket. Doing so
could cause damage.
. Remove the broiler pan and insert, all utensils and any aluminum
foil. These items cannot withstand high cleaning temperatures.
. Remove oven racks. If they are not removed during the Self-Clean cycle
their color will turn slightly blue and the finish will be dull. After the cycle is
complete and the oven has cooled, rub the sides of the oven racks with
wax paper or a cloth containing a small amount of salad oil (this will make
the racks glide easier into the rack position).
. Remove any excessive spillovers in the oven cavity before starting the
Self-Cleaning cycle. To clean, use hot, soapy water and a cloth. Large
spillovers can cause heavy smoke or fire when subjected to high
temperatures. DO NOT allow food spills with a high sugar or acid content
(such as milk, tomatoes, sauerkraut, fruit juices or pie filling) to remain on
the surface as they may leave a dull spot even after cleaning.
. Clean any soil from the oven frame, the door liner outside the oven door
gasket and the small area at the front center of the oven bottom. These
areas heat sufficiently to burn soil on. Clean with soap and water.
NOTE: Prior to setting the Self-Clean cycle, any spills remaining on the oven
bottom should be removed.
Some models have an exposed Bake element in the lower oven cavity. On
these models the bake element is designed to be tilted up using your hand
from the front of the bake element (See illustration at left). This will allow easier
access to the oven bottom for cleaning. Be careful not to raise the element
more than 4 or 5 inches from the resting position.
The oven bake and broil elements may appear to have cooled after
they have been turned OFF. The elements may still be hot and burns may occur
if these elements are touched before they have cooled sufficiently.
19
Self-Cleaning (cont'd)
Starting the Select Self-Clean Cycle or a Delayed Start Self-Clean Cycle
For satisfactory results, use a 2 hour Self-Clean cycle for light soils and a 3 hour cycle for average or a 4 hour cycle for
heavy soils. NOTE: The kitchen area should be well ventilated using an open window, ventitlation fan or exhaust hood
during the 1st Self-Clean cycle. This will help eliminate the normal odors associated with the 1st Self-Clean cycle.
To Set the Controls for a Self-Clean Cycle or a Delayed Start Self-Clean Cycle:
(Note: If you do not want to start a Delayed Self-Clean Cycle, skips steps 2 & 3.)
1. Be sure the clock shows the correct time of day.
2. Press _. The" : " in the time of day will flash.
3. Press and hold the A pad to scroll to the time to start the delayed Self-Clean cycle. Release the pad when the
desired time is displayed.
4. Press _. "------" appears in the display.
5. Press the A or V once. "3:00" appears in the display for a 3 hour cycle. To change to a 2 hour cycle press V.
,
"2:00" appears in the display or to select a 4 hour cycle press A. "4:00" appears in the display.
As soon as the controls are set, the motor driven lock will begin to close automatically and the "LOCK" indicator light
will flash. DO NOT open the oven door while the light is flashing (it takes about 15 seconds for the oven door to lock).
"CLn" will appear in the display during the Self-Clean cycle and the "LOCK" light will glow until the Self-Cleaning cycle
is complete or cancelled and the oven temperature has cooled.
When the Self-Clean Cycle is Completed:
1. The time of day or "End" will appear in the display window and the "Clean" and "LOCK" light will continue to glow.
2. Once the oven has cooled down for about 1 HOUR and the "LOCK" light has gone out, the oven door can be opened.
3. If "End" is in the display and the Select Clean indicator light remains ON, press _. The time of day will appear in the
display.
NOTE: When the oven is cool, wipe away any residue or powdered ash with a damp cloth or paper towel.
Stopping or Interrupting a Select Self-Cleaning Cycle
If it becomes necessary to stop or interrupt a Self-Cleaning cycle:
1. Press @.
2. Once the oven has cooled down for about 1 HOUR and the "LOCK" light has gone out, the oven door can be opened.
3. Restart the Self-Clean cycle once all conditions have been corrected.
To avoid possible burns use care when opening the oven door after the Self-Cleaning cycle. Stand to the side of
the oven when opening the door to allow hot air or steam to escape.
DO NOT force the oven door open. This can damage the automatic door locking system. Use caution and avoid
possible burns when opening the door after the Self-Cleaning cycle has completed. The oven may still be VERY HOT.
2O
General Care & Cleaning
Cleaning Table
Surfaces How to Clean
Aluminum (Trim Pieces) & Vinyl Use hot, soapy water and a cloth, Dry with a clean cloth,
Painted and Plastic Control Knobs,
Body Parts, and Decorative Trim
For general cleaning, use hot, soapy water and a cloth. Formore difficult soils and
built-up grease, apply a liquid detergent directly onto the soil. Leave on soil for 30
to 60 minutes. Rinse with a damp cloth and dry. DO NOT use abrasive cleaners
on any of these materials; they can scratch. To remove control knobs, turn to the
OFF position; grasp firmly and pull straight off the shaft. To replace knobs after
cleaning, line up the flat sides of both the knob and the shaft; then push the knob
into place.
Stainless Steel, Chrome Control Panel,
Decorative Trim
Before cleaning the controlpanel, turn all controls to OFF and remove the control
knobs. To remove, pull each knob straight off the shaft. Clean using hot, soapy
water and a dishcloth. Rinse with a clean water using a dishcloth. Be sure to
squeeze excess water from the cloth before wiping the panel; especially when
wiping around the controls. Excess water in or around the controls may cause
damage to the appliance.To replace knobs after cleaning, line up the flat sides of
both the knob and the shaft; then push the knob into place.
Clean stainless steel with hot, soapy water and a dishcloth. Rinse with clean
water and a cloth. Do not use cleanerswith high concentrations of chlorides i:..................
i
or chlorines. Do not use harsh scrubbing cleaners. Only use kitchen cleaners
that are especially made for cleaning stainless steel. Always be sure to rinse the .......
cleaners from the surface as bluish stains may occur during heating that cannot
be removed.
Porcelain Enamel Broiler Pan and
Insert, Door Liner, Body Parts, Warmer
Drawer (some models)
Gentle scouring with a soapy scouring pad will remove most spots. Rinse with a
1:1 solution of clear water and ammonia. Ifnecessary, cover difficult spotswith an
ammonia-soaked paper towel for 30 to 40 minutes. Rinse with clean water and a
damp cloth, and then scrub with a soap-filled scouring pad. Rinse and wipe dry with
a clean cloth. Remove all cleaners orthe porcelain may become damaged during
future heating. DO NOT use spray oven cleaners on the cooktop.
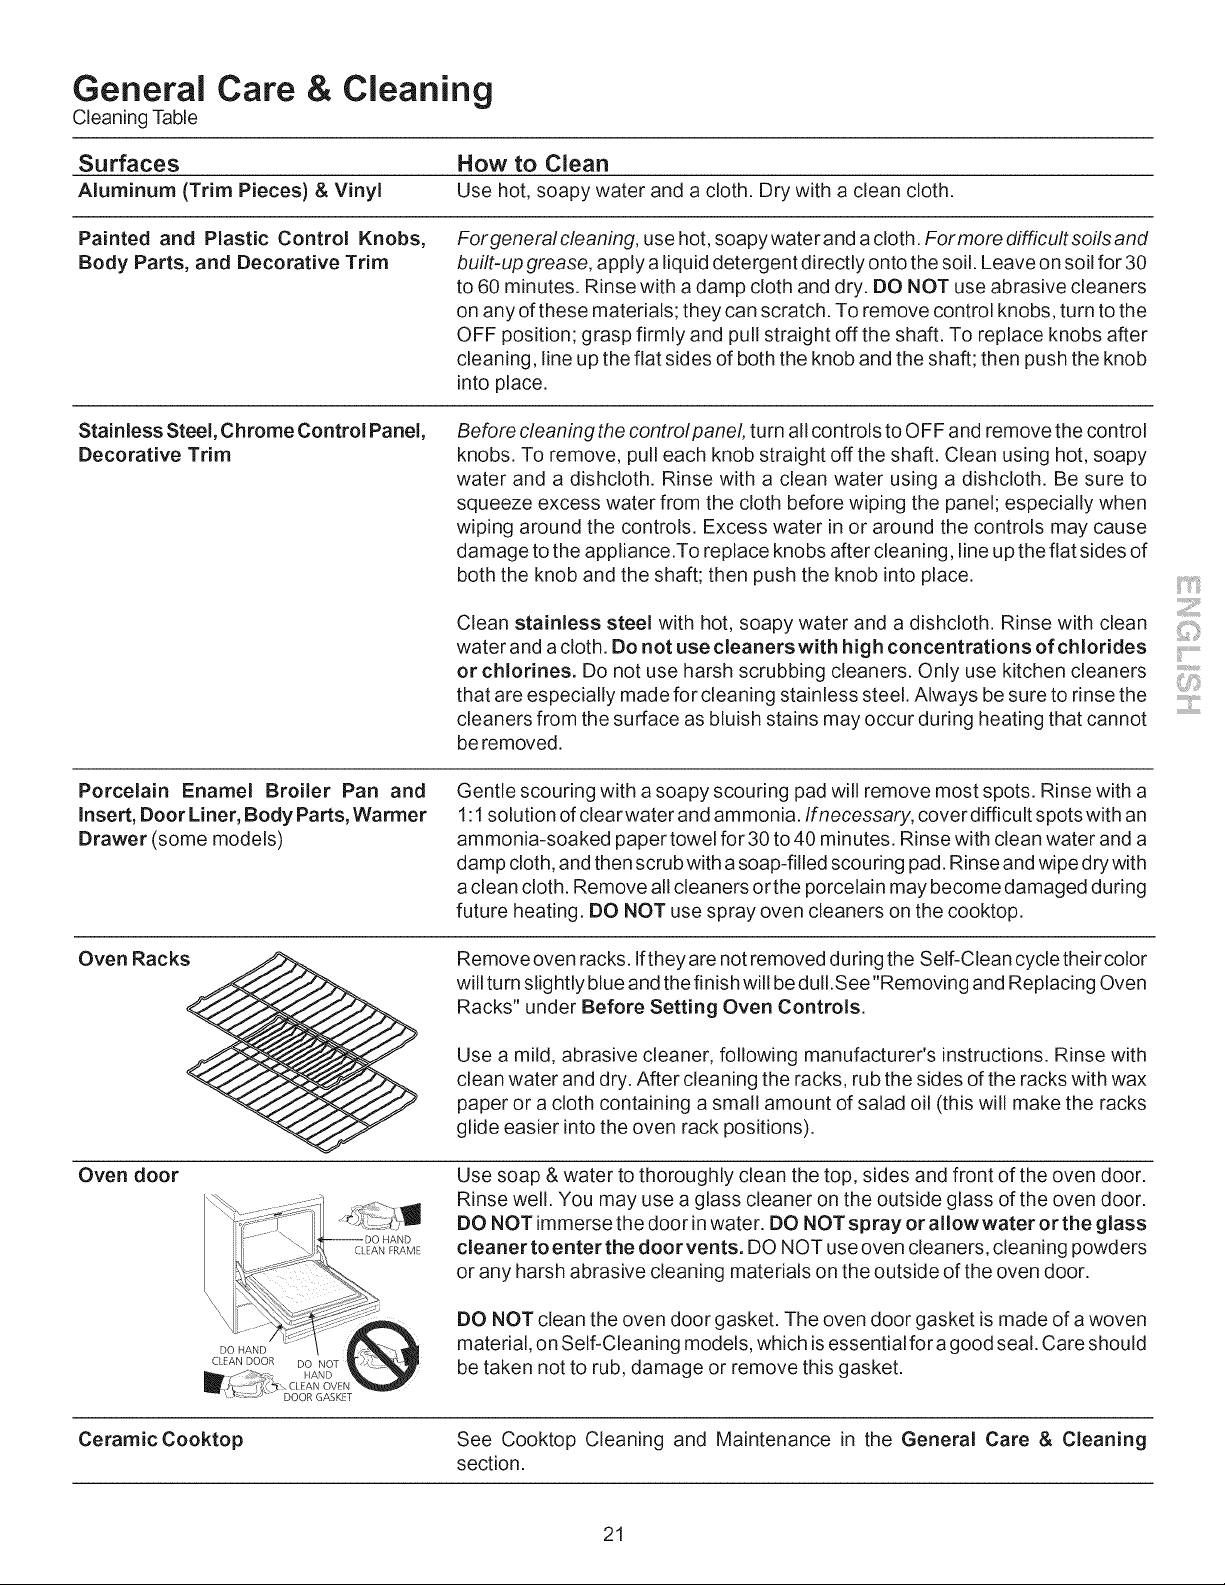
Oven Racks
Oven door
DO HAND
CLEAN DOOR DO NOT
CLEAN FRAME
Remove oven racks. Ifthey are not removed during the Self-Clean cycle their color
will turn slightly blue and the finish will be dulI.See"Removing and Replacing Oven
Racks" under Before Setting Oven Controls.
Use a mild, abrasive cleaner, following manufacturer's instructions. Rinse with
clean water and dry. After cleaning the racks, rub the sides of the racks with wax
paper or a cloth containing a small amount of salad oil (this will make the racks
glide easier into the oven rack positions).
Use soap & water to thoroughly clean the top, sides and front of the oven door.
Rinse well. You may use a glass cleaner on the outside glass of the oven door.
DO NOT immerse the door in water. DO NOT spray or allowwater orthe glass
cleaner to enter the doorvents. DO NOT use oven cleaners, cleaning powders
or any harsh abrasive cleaning materials on the outside of the oven door.
DO NOT clean the oven door gasket. The oven door gasket is made of a woven
material, on Self-Cleaning models, which is essential for a good seal. Care should
be taken not to rub, damage or remove this gasket.
CeramicCooktop See Cooktop Cleaning and Maintenance in the General Care & Cleaning
section.
21
General Care & Cleaning (cont'd)
Cooktop Cleaning and Maintenance
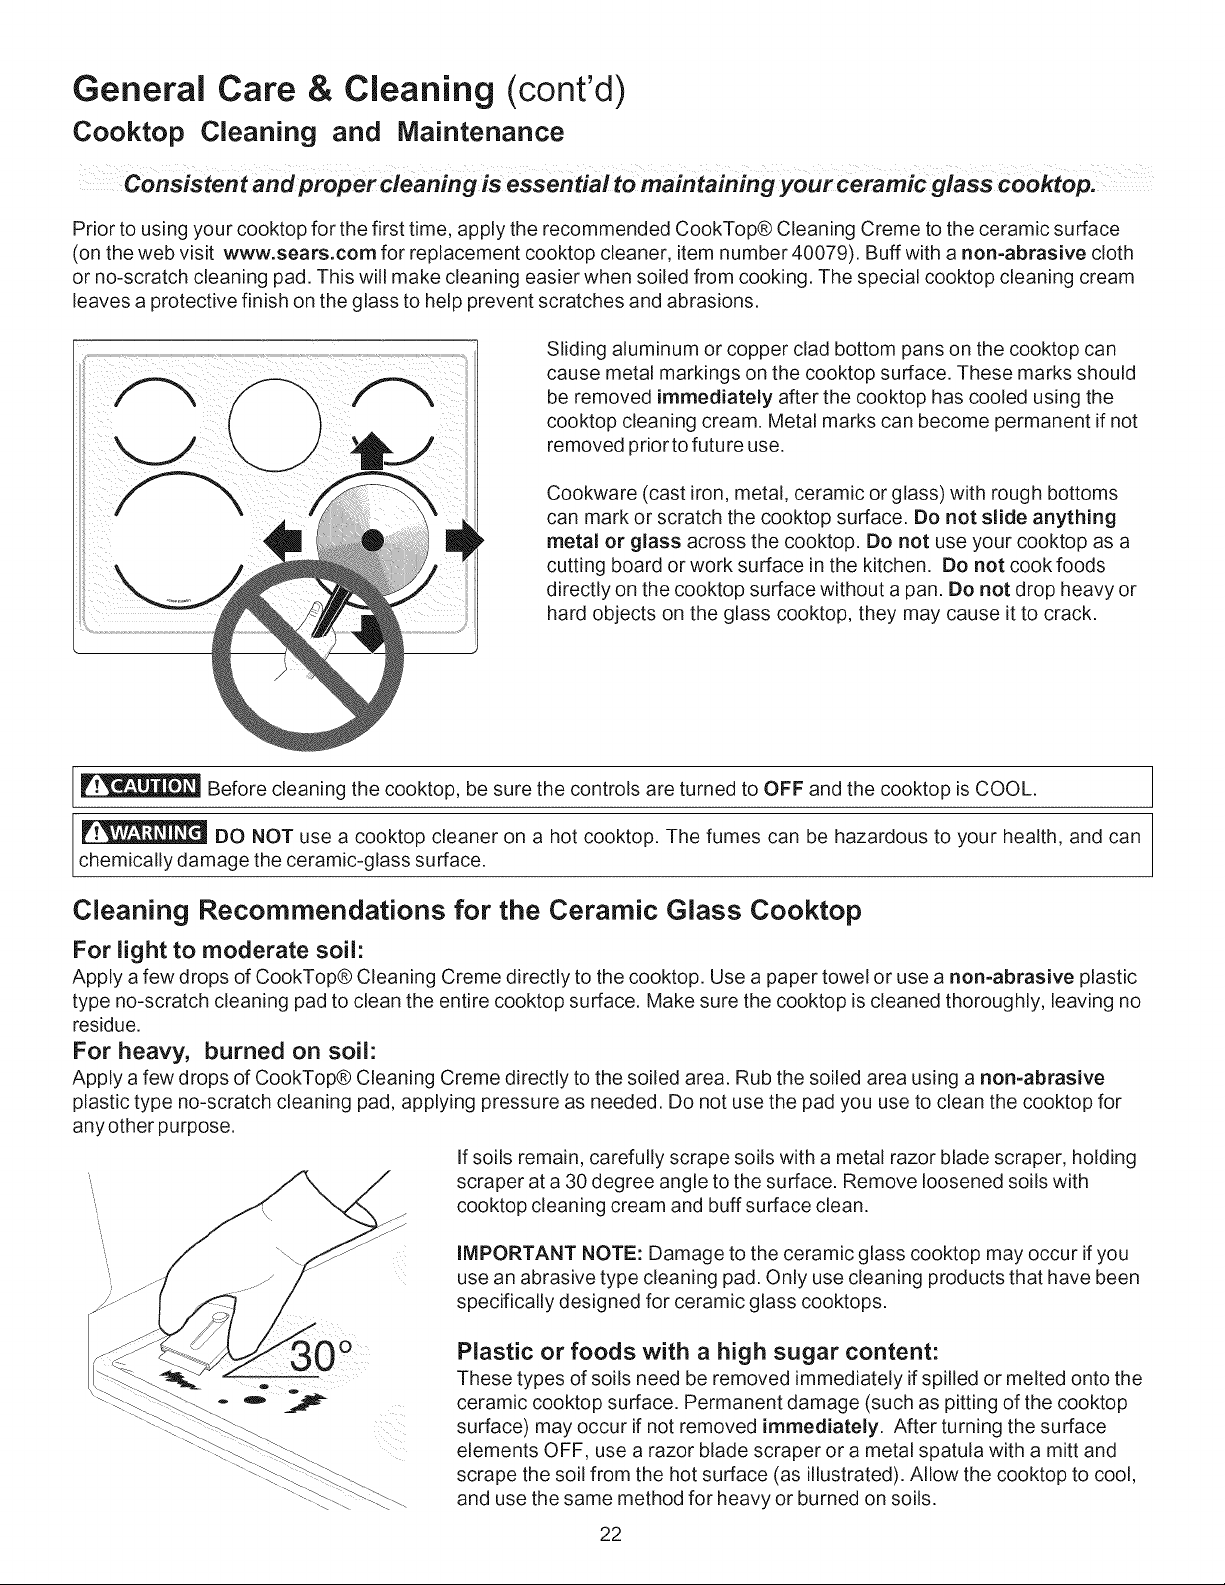
Consistent andpropercleaning is essential to maintaining your ceramic glass cooktop,
Prior to using your cooktop for the first time, apply the recommended CookTop® Cleaning Creme to the ceramic surface
(on the web visit www,sears,com for replacement cooktop cleaner, item number 40079). Buff with a non=abrasive cloth
or no-scratch cleaning pad. This will make cleaning easier when soiled from cooking. The special cooktop cleaning cream
leaves a protective finish on the glass to help prevent scratches and abrasions.
Sliding aluminum or copper clad bottom pans on the cooktop can
cause metal markings on the cooktop surface. These marks should
be removed immediately after the cooktop has cooled using the
cooktop cleaning cream. Metal marks can become permanent if not
removed prior to futu re use.
Cookware (cast iron, metal, ceramic or glass)with rough bottoms
can mark or scratch the cooktop surface. Do not slide anything
metal or glass across the cooktop. Do not use your cooktop as a
cutting board or work surface in the kitchen. Do not cook foods
directly on the cooktop surface without a pan. Do not drop heavy or
hard objects on the glass cooktop, they may cause it to crack.
Before cleaning the cooktop, be sure the controls are turned to OFF and the cooktop is COOL.
DO NOT use a cooktop cleaner on a hot cooktop. The fumes can be hazardous to your health, and can
chemically damage the ceramic-glass surface.
Cleaning Recommendations for the Ceramic Glass Cooktop
For light to moderate soil:
Apply a few drops of CookTop® Cleaning Creme directly to the cooktop. Use a paper towel or use a non=abrasive plastic
type no-scratch cleaning pad to clean the entire cooktop surface. Make sure the cooktop is cleaned thoroughly, leaving no
residue.
For heavy, burned on soil:
Apply a few drops of CookTop® Cleaning Creme directly to the soiled area. Rub the soiled area using a non=abrasive
plastic type no-scratch cleaning pad, applying pressure as needed. Do not use the pad you use to clean the cooktop for
any other purpose.
If soils remain, carefully scrape soils with a metal razor blade scraper, holding
scraper at a 30 degree angle to the surface. Remove loosened soils with
cooktop cleaning cream and buff surface clean.
IMPORTANT NOTE: Damage to the ceramic glass cooktop may occur if you
use an abrasive type cleaning pad. Only use cleaning products that have been
specifically designed for ceramic glass cooktops.
Plastic or foods with a high sugar content:
These types of soils need be removed immediately if spilled or melted onto the
ceramic cooktop surface. Permanent damage (such as pitting of the cooktop
surface) may occur if not removed immediately. After turning the surface
elements OFF, use a razor blade scraper or a metal spatula with a mitt and
scrape the soil from the hot surface (as illustrated). Allow the cooktop to cool,
and use the same method for heavy or burned on soils.
22
General Care & Cleaning
Cleaning Recommendations for Ceramic Glass Cooktops (cont'd)
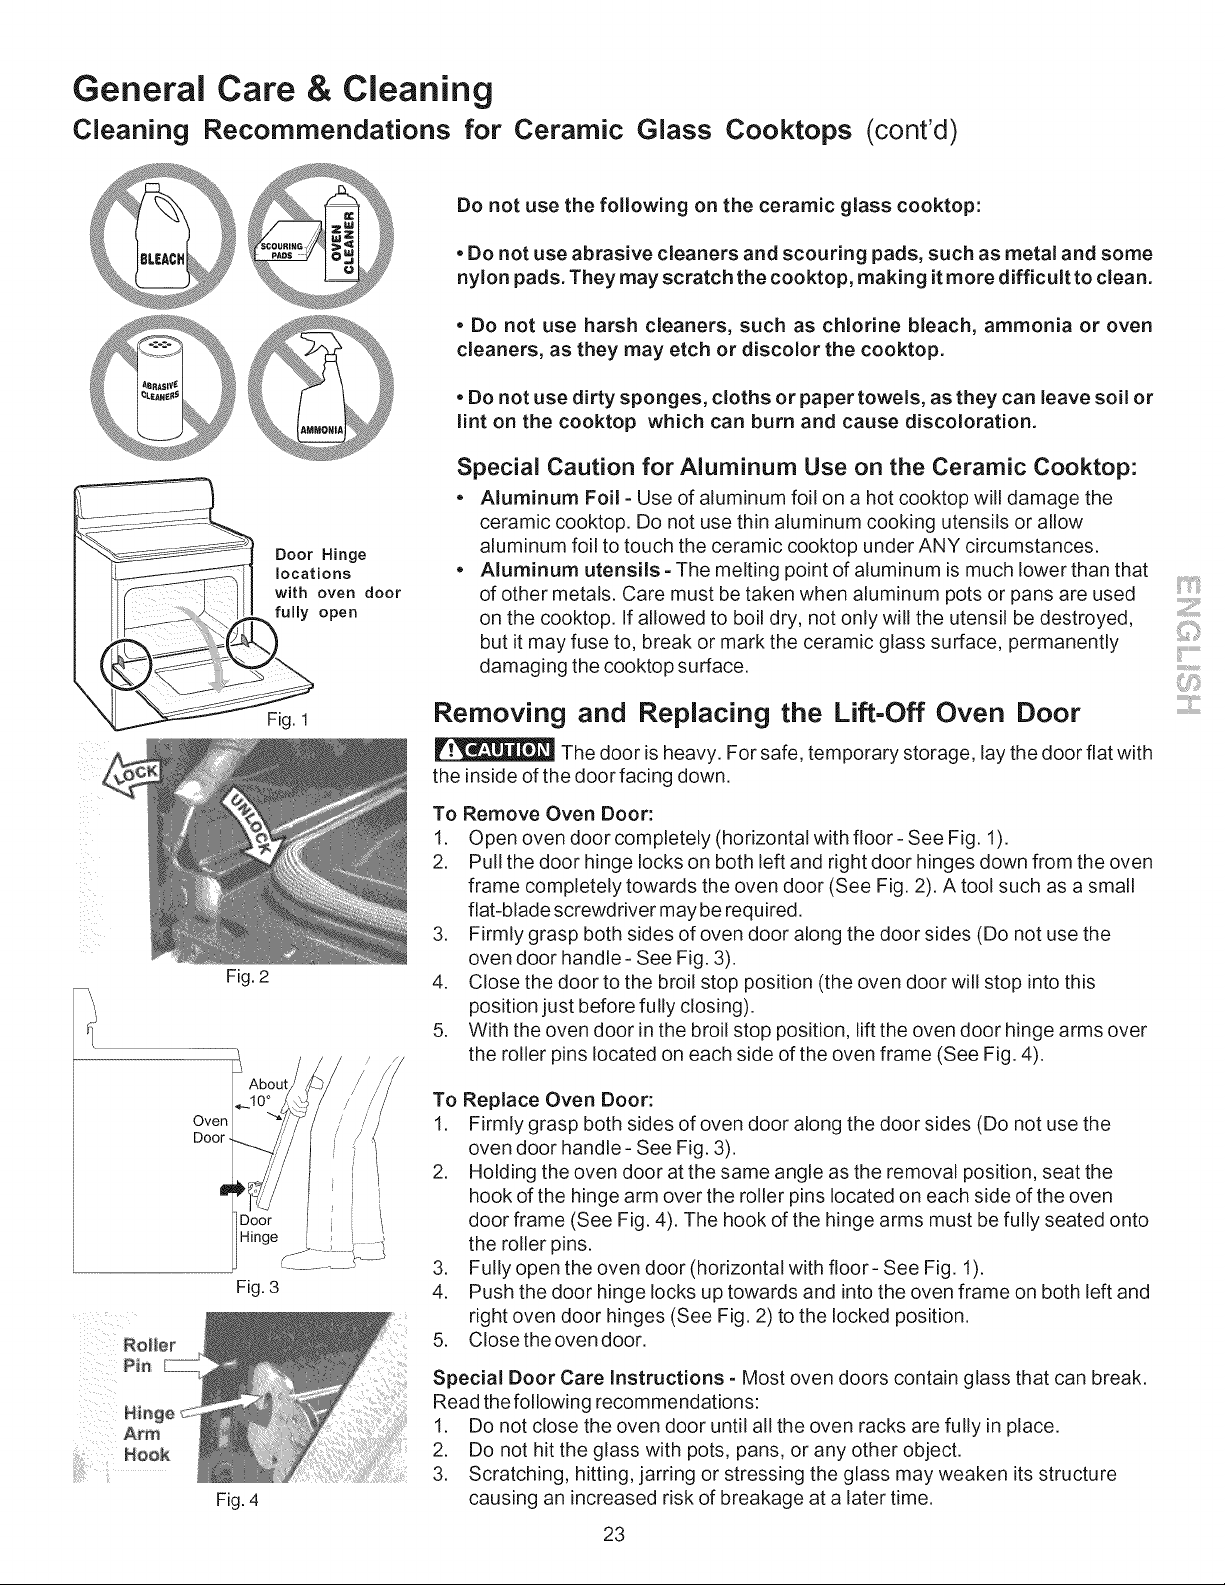
Do not use the following on the ceramic glass cooktop:
Door Hinge
locations
with oven door
fully open
. Do not use abrasive cleaners and scouring pads, such as metal and some
nylon pads. They may scratch the cooktop, making it more difficult to clean.
. Do not use harsh cleaners, such as chlorine bleach, ammonia or oven
cleaners, as they may etch or discolor the cooktop.
. Do not use dirty sponges, cloths or paper towels, as they can leave soil or
lint on the cooktop which can burn and cause discoloration.
Special Caution for Aluminum Use on the Ceramic Cooktop:
. Aluminum Foil =Use of aluminum foil on a hot cooktop will damage the
ceramic cooktop. Do not use thin aluminum cooking utensils or allow
aluminum foil to touch the ceramic cooktop under ANY circumstances.
. Aluminum utensils =The melting point of aluminum is much lower than that
of other metals. Care must be taken when aluminum pots or pans are used
on the cooktop. If allowed to boil dry, not only will the utensil be destroyed,
but it may fuse to, break or mark the ceramic glass surface, permanently
damaging the cooktop surface.
Fig. 1
Fig. 2
Removing and Replacing the Lift-Off Oven Door
The door is heavy. For safe, temporary storage, lay the door flat with
the inside of the door facing down.
To Remove Oven Door:
1. Open oven door completely (horizontal with floor- See Fig. 1).
2. Pull the door hinge locks on both left and right door hinges down from the oven
frame completely towards the oven door (See Fig. 2). A tool such as a small
flat-blade screwdriver may be required.
3. Firmly grasp both sides of oven door along the door sides (Do not use the
oven door handle - See Fig. 3).
4. Close the door to the broil stop position (the oven door will stop into this
position just before fully closing).
5. With the oven door in the broil stop position, lift the oven door hinge arms over
the roller pins located on each side of the oven frame (See Fig. 4).
Oven
Door-
Fig. 3
Fig. 4
Replace Oven Door:
Firmly grasp both sides of oven door along the door sides (Do not use the
oven door handle - See Fig. 3).
Holding the oven door at the same angle as the removal position, seat the
hook of the hinge arm over the roller pins located on each side of the oven
door frame (See Fig. 4). The hook of the hinge arms must be fully seated onto
the roller pins.
Fully open the oven door (horizontal with floor- See Fig. 1).
Push the door hinge locks up towards and into the oven frame on both left and
right oven door hinges (See Fig. 2) to the locked position.
Close the oven door.
Special Door Care Instructions = Most oven doors contain glass that can break.
Read the following recommendations:
1. Do not close the oven door until all the oven racks are fully in place.
2. Do not hit the glass with pots, pans, or any other object.
3. Scratching, hitting, jarring or stressing the glass may weaken its structure
causing an increased risk of breakage at a later time.
23
General Care & Cleaning
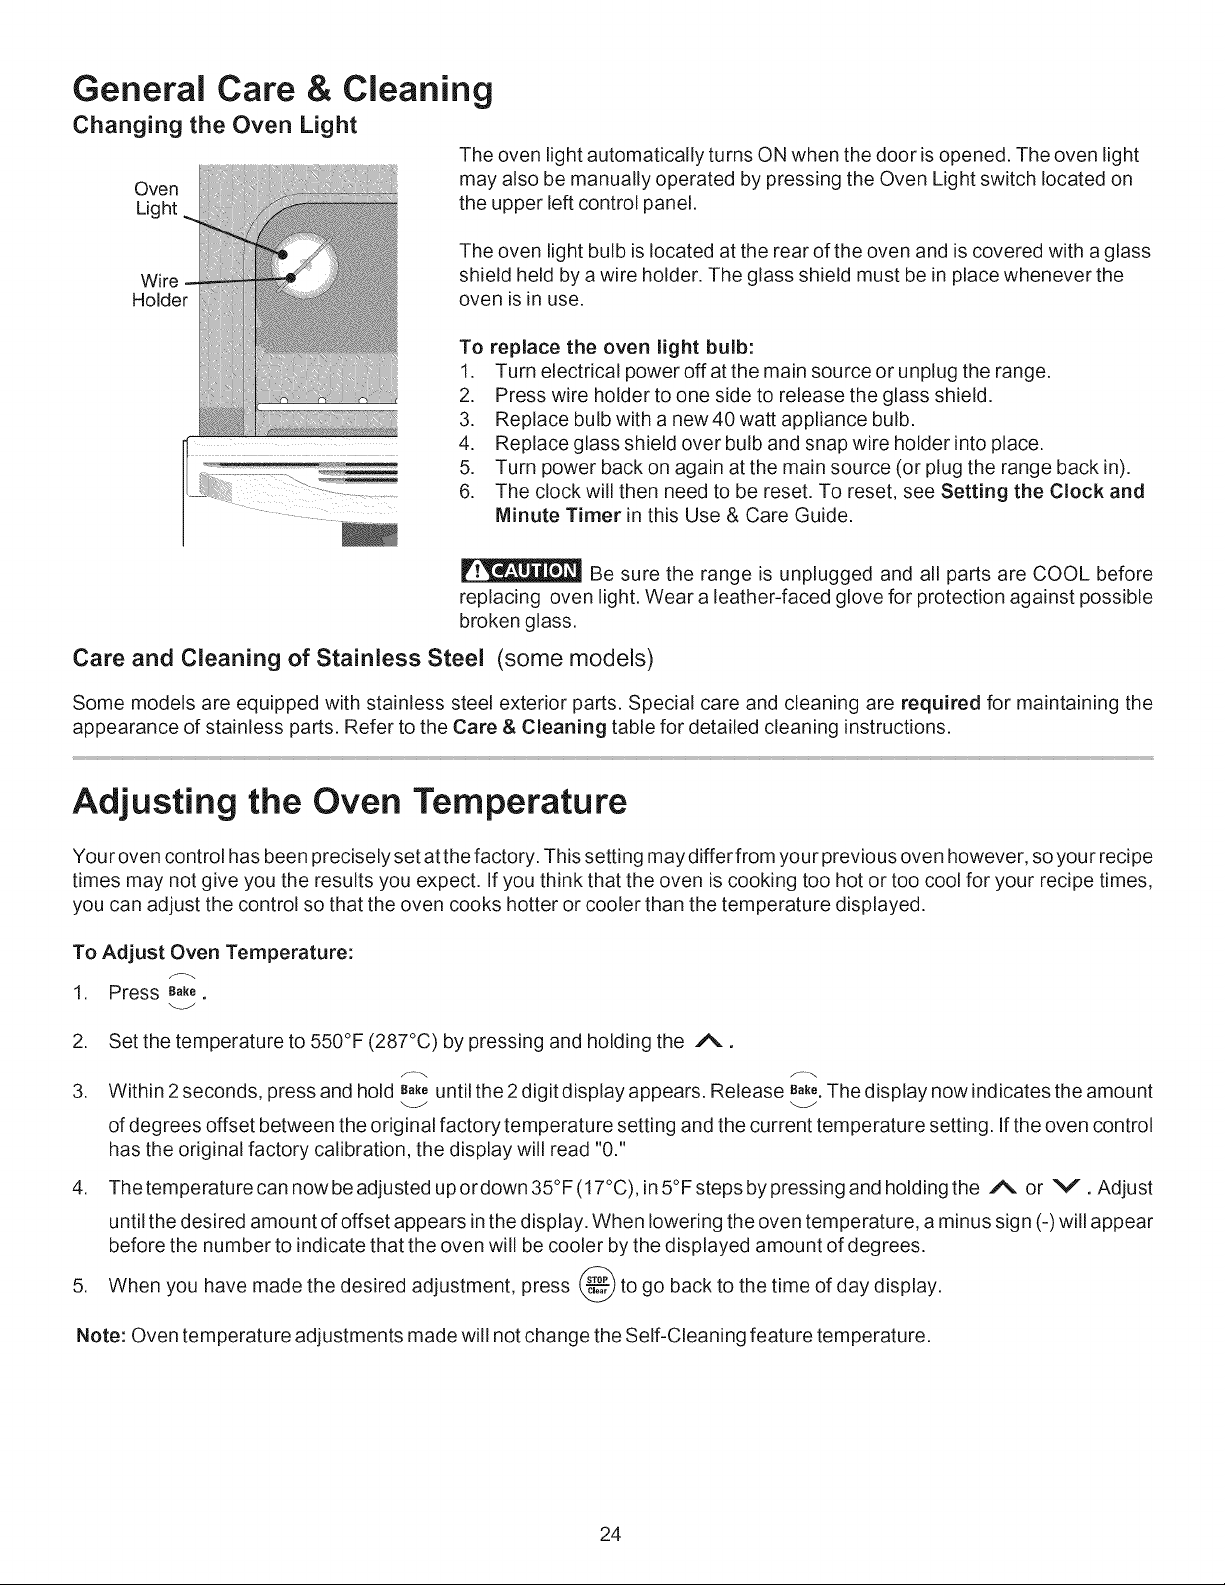
Changing the Oven Light
The oven light automatically turns ON when the door is opened. The oven light
Oven may also be manually operated by pressing the Oven Light switch located on
Light the upper left control panel.
Wire
Holder
The oven light bulb is located at the rear of the oven and is covered with a glass
shield held by a wire holder. The glass shield must be in place whenever the
oven is in use.
To replace the oven light bulb:
1. Turn electrical power off at the main source or unplug the range.
2. Press wire holder to one side to release the glass shield.
3. Replace bulb with a new 40 watt appliance bulb.
4. Replace glass shield over bulb and snap wire holder into place.
5. Turn power back on again at the main source (or plug the range back in).
6. The clock will then need to be reset. To reset, see Setting the Clock and
Minute Timer in this Use & Care Guide.
Be sure the range is unplugged and all parts are COOL before
replacing oven light. Wear a leather-faced glove for protection against possible
broken glass.
Care and Cleaning of Stainless Steel (some models)
Some models are equipped with stainless steel exterior parts. Special care and cleaning are required for maintaining the
appearance of stainless parts. Refer to the Care & Cleaning table for detailed cleaning instructions.
Adjusting the Oven Temperature
Your oven control has been precisely set at the factory. This setting may differ from your previous oven however, so your recipe
times may not give you the results you expect. If you think that the oven is cooking too hot or too cool for your recipe times,
you can adjust the control so that the oven cooks hotter or cooler than the temperature displayed.
To Adjust Oven Temperature:
1. Press B_ke.
2. Set the temperature to 550°F (287°C) by pressing and holding the A.
3. Within 2 seconds, pressand hold B_ untilthe2digitdisplayappears. Release B_k_.Thedisplaynowindicatestheamount
of degrees offset between the original factory temperature setting and the current temperature setting. If the oven control
has the original factory calibration, the display will read "0."
4. Thetemperaturecann_wbeadjustedup_rd_wn35°F(17°C)_in5°Fstepsbypressingandh_ldingthe A or V.Adjust
until the desired amount of offset appears in the display. When lowering the oven temperature, a minus sign (-) will appear
before the number to indicate that the oven will be cooler by the displayed amount of degrees.
5. When you have made the desired adjustment, press _ to go back to the time of day display.
Note: Oven temperature adjustments made will not change the Self-Cleaning feature temperature.
24
Before You Call
Solutions to Common Problems
Before you carl for service, review this list. It may save you time and expense. The list includes common occurrences that
are not the result of defective workmanship or materials in this appliance.
OCCURRENCE POSSIBLE CAUSE/SOLUTION
Range is not level. Poor installation. Place oven rack in center of oven. Place a level on the oven rack. Adjust
leveling legs at base of range until the oven rack is level.
Be sure floor is level and is strong and stable enough to adequately support range.
If floor is sagging or sloping, contact a carpenter to correct the situation.
Kitchen cabinet alignment may make range appear unlevel. Be sure cabinets are
square and have sufficient room for range clearance.
Cannot move appliance easily. Appliance Cabinets not square or are built in too tightly. Contact builder or installer to make
must be accessible for service, appliance accessible.
Carpet interferes with range. Provide sufficient space so range can be lifted over carpet.
Oven control beepsand displays any F code Electronic control has detected a fault condition. Press STOP/CLEAR to clear the display
error (for example Fll). and stop beeping. Reprogram oven. If fault recurs, record fault number. Press STOP/
CLEAR and call I=8O0=4=MY=HOME® for assistance (See back cover).
Surface element too hot or not hot enough. Incorrect control setting. Make sure the correct control is on for the element to be used.
Surface element does not heat. Lightweight orwarped pans used. Use only flat, evenly balanced, medium or heavyweight
cookware. Flat pans heat better than warped pans. Cookware materials and weight of
the material affect heating. Heavy and medium-weight pans heat evenly. Because
lightweight pans heat unevenly, foods may burn easily.
No power to the appliance. Check steps under "Entire Appliance Does Not Operate" in
this Before You Call checklist.
Incorrect control setting. Make sure the correct control is set for the surface element to
be used.
Entire appliance does not operate. Make sure cord/plug is plugged correctly into outlet.
Service wiring is not complete. Call I=8O0=4=MY=HOME® for assistance (See back
cover).
Power outage. Check house lights to be sure. Call your local electric company for
service.
iiiiiiiiiiii!!il
25
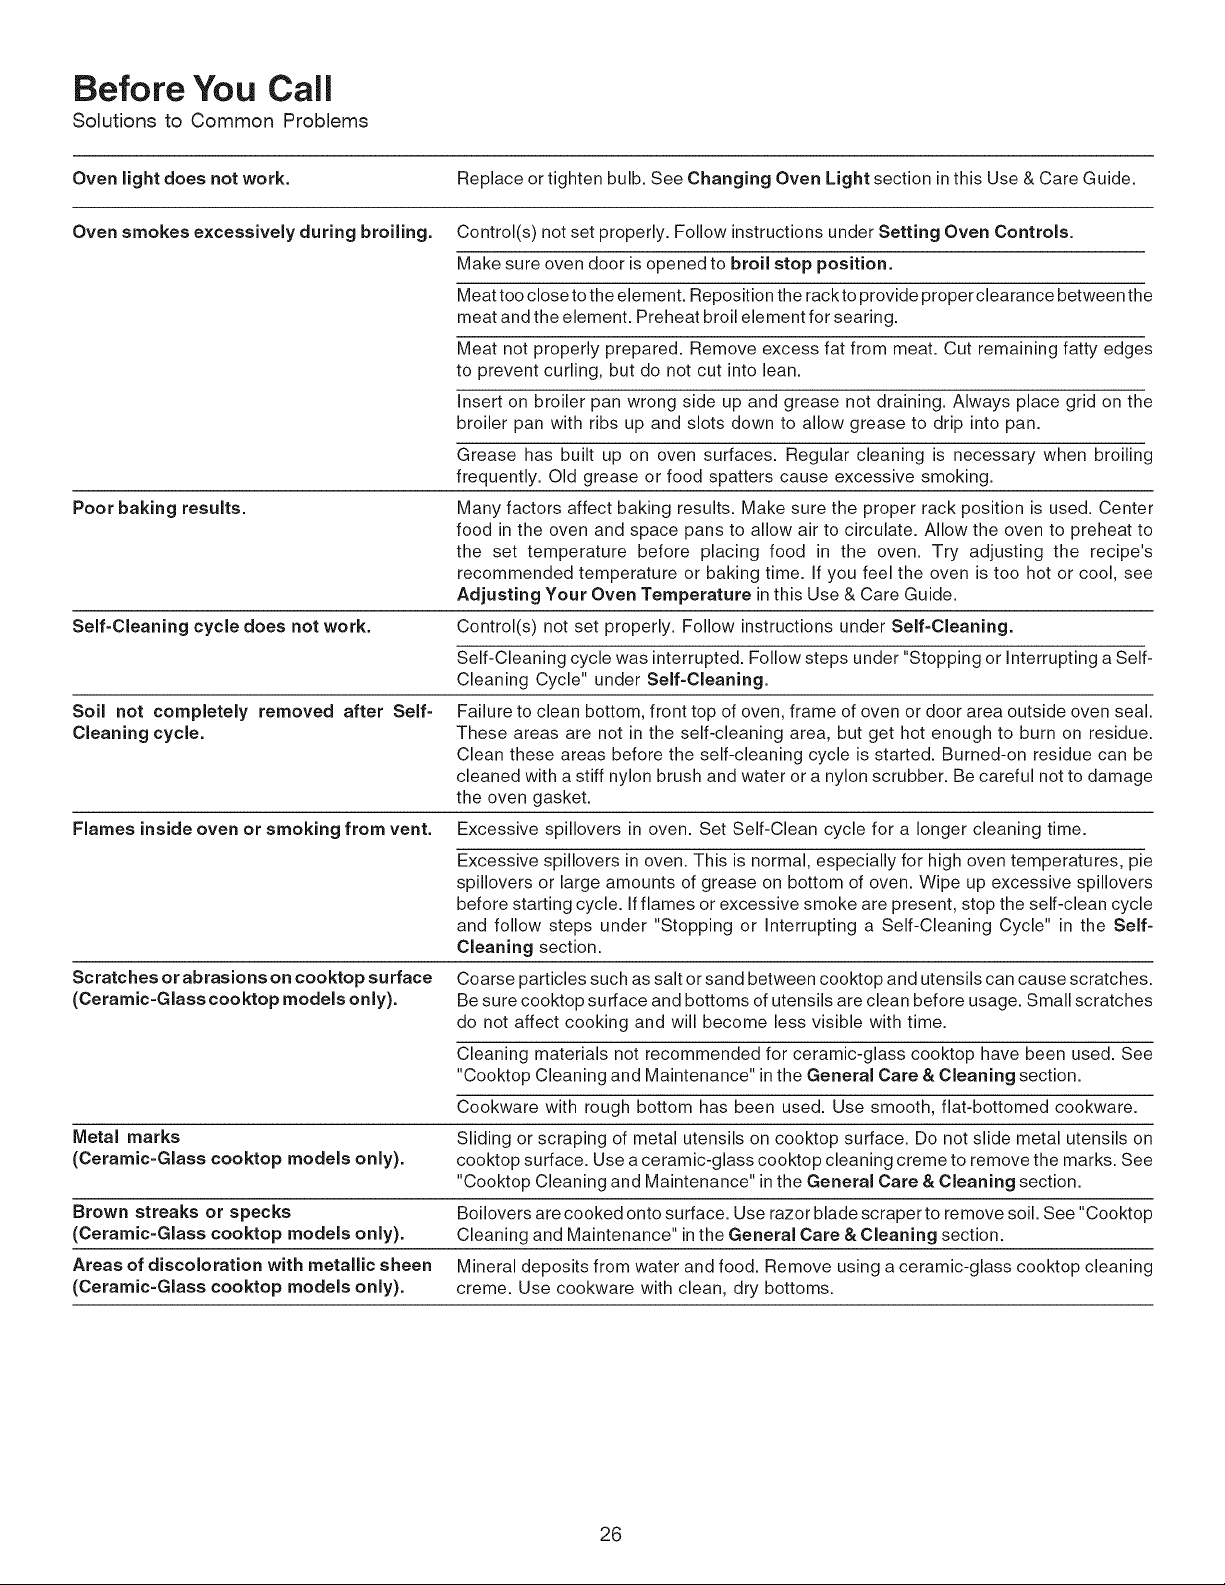
Before You Call
Solutions to Common Problems
Oven light does not work. Replace or tighten bulb. See Changing Oven Light section in this Use & Care Guide.
Oven smokes e×cessively during broiling. Control(s) not set properly. Follow instructions under Setting Oven Controls.
Poor baking results.
Self=Cleaning cycle does not work.
Soil not completely removed after Self=
Cleaning cycle.
Flames inside oven or smoking from vent.
Scratches or abrasions on cooktop surface
(Ceramic=Glass cooktop models only).
Metal marks
(Ceramic-Glass cooktop models only).
Brown streaks or specks
(Ceramic-Glass cooktop models only).
Areas of discoloration with metallic sheen
(Ceramic-Glass cooktop models only).
Make sure oven door is opened to broil stop position.
Meat too close to the element. Reposition the rackto provide proper clearance between the
meat and the element. Preheat broil element for searing.
Meat not properly prepared. Remove excess fat from meat. Cut remaining fatty edges
to prevent curling, but do not cut into lean.
Insert on broiler pan wrong side up and grease not draining. Always place grid on the
broiler pan with ribs up and slots down to allow grease to drip into pan.
Grease has built up on oven surfaces. Regular cleaning is necessary when broiling
frequently. Old grease or food spatters cause excessive smoking.
Many factors affect baking results. Make sure the proper rack position is used. Center
food in the oven and space pans to allow air to circulate. Allow the oven to preheat to
the set temperature before placing food in the oven. Try adjusting the recipe's
recommended temperature or baking time. If you feel the oven is too hot or cool, see
Adjusting Your Oven Temperature in this Use & Care Guide.
Control(s) not set properly. Follow instructions under Self-Cleaning.
Self-Cleaning cycle was interrupted. Follow steps under "Stopping or Interrupting a Self-
Cleaning Cycle" under Self-Cleaning.
Failure to clean bottom, front top of oven, frame of oven or door area outside oven seal.
These areas are not in the self-cleaning area, but get hot enough to burn on residue.
Clean these areas before the self-cleaning cycle is started. Burned-on residue can be
cleaned with a stiff nylon brush and water or a nylon scrubber. Be careful not to damage
the oven gasket.
Excessive spillovers in oven. Set Self-Clean cycle for a longer cleaning time.
Excessive spillovers in oven. This is normal, especially for high oven temperatures, pie
spillovers or large amounts of grease on bottom of oven. Wipe up excessive spillovers
before starting cycle. If flames or excessive smoke are present, stop the self-clean cycle
and follow steps under "Stopping or Interrupting a Self-Cleaning Cycle" in the Self-
Cleaning section.
Coarse particles such as salt or sand between cooktop and utensils can cause scratches.
Be sure cooktop surface and bottoms of utensils are clean before usage. Small scratches
do not affect cooking and will become less visible with time.
Cleaning materials not recommended for ceramic-glass cooktop have been used. See
"Cooktop Cleaning and Maintenance" in the General Care & Cleaning section.
Cookware with rough bottom has been used. Use smooth, flat-bottomed cookware.
Sliding or scraping of metal utensils on cooktop surface. Do not slide metal utensils on
cooktop surface. Use a ceramic-glass cooktop cleaning creme to remove the marks. See
"Cooktop Cleaning and Maintenance" in the General Care & Cleaning section.
Boilovers are cooked onto surface. Use razor blade scraper to remove soil. See "Cooktop
Cleaning and Maintenance" in the General Care & Cleaning section.
Mineral deposits from water and food. Remove using a ceramic-glass cooktop cleaning
creme. Use cookware with clean, dry bottoms.
26

Notes
27

iiiiiiiiiiiiiiiiiiiiiiiiiiiil;.....
iiiiiiiiii_'_'¸'¸¸¸¸ ¥ourHo.1e
iiiiiiiiiiiiiiiiiiiii
For repair- in your home - of all major brand appliances,
lawn and garden equipment, or heating and cooling systems,
iiiiiiiiii °omot,o__.omo_oi,,°omo.o__.o_oi_i_!
iiiiiiiiiiiiiiiiiiiii
For the replacement parts, accessories and
iiiiiiiiii owner's manuals that you need to do-it-yourself.
iiiiiiiiiiiiiiiiiiiii
For Sears professional installation of home appliances
iiiiiiiiii and items like garage door openers and water heaters.
iiiiiiiiii 1-800-4-MY-H 0 ME® (1-800-469-4663)
iiiiiiiiii ca,,anyt,me,dayorn,oht<USAandCanada>
,,,,,,,,,,,.,eo,-,.co,-,,w,,,w.sea,-s.ca
For expert home solutions advice: www,managemyhome.com
iiiiiiiiii o,.,,-H,:,,1,o
Forrepa,ofcar,y-initems,k_vac,.,,ms,lawnequipment.
and electronics, call or go on-line for the location of your nearest
iiiiiiiiii Soot.Po,_8..op,,,,-so_v,_oco._o,-
iiiiiiiiiiiiiiiiiiiii
1-800-4884222 (U.S.A.) 1-800-469-4663 (Canada)
Call anytime, day or night
To purchase a protection agreement on a product serviced by Sears:
1..800-827..6655 (U.S.A.) 1..800-361..6665 (Canada)
Pare pedir servicio de reparaci6n
a domicilio, y pare ordenar piezas:
1-888-SU-HOGAR ®
(1-888-784-6427)
Au Canada pour service en frangais: iiiiiiiiiiiiiiiii
I"800"LE'FOYERMC iiiiiiiiiiiiiiiii
(1-800-533-6937) iiiiiiiiiiiiiiii'
www.sears.ca
!i!i!ii!!:'_
® Registered Trademark / TMTrademark / SMService Mark of Sears Brands, LLC
@ Marca Registrada / TM Marca de Fabrica / SM Marca de Servicio de Sears Brands, LLC
M9
MCMarque de commerce / Marque d6pos6e de Sears Brands, LLC © Sears Brands, LLC
®
ectric Range
,stufa el_ctrica
Models, Modelos 790.9535", 9536*
= color number, nQmero de color
ii,iii,,i,,i,,i,,i,r_
www.sears.com Sears Roebuck and Co., Hoffman Estates, IL 60179 U.S.A. pin 316417298
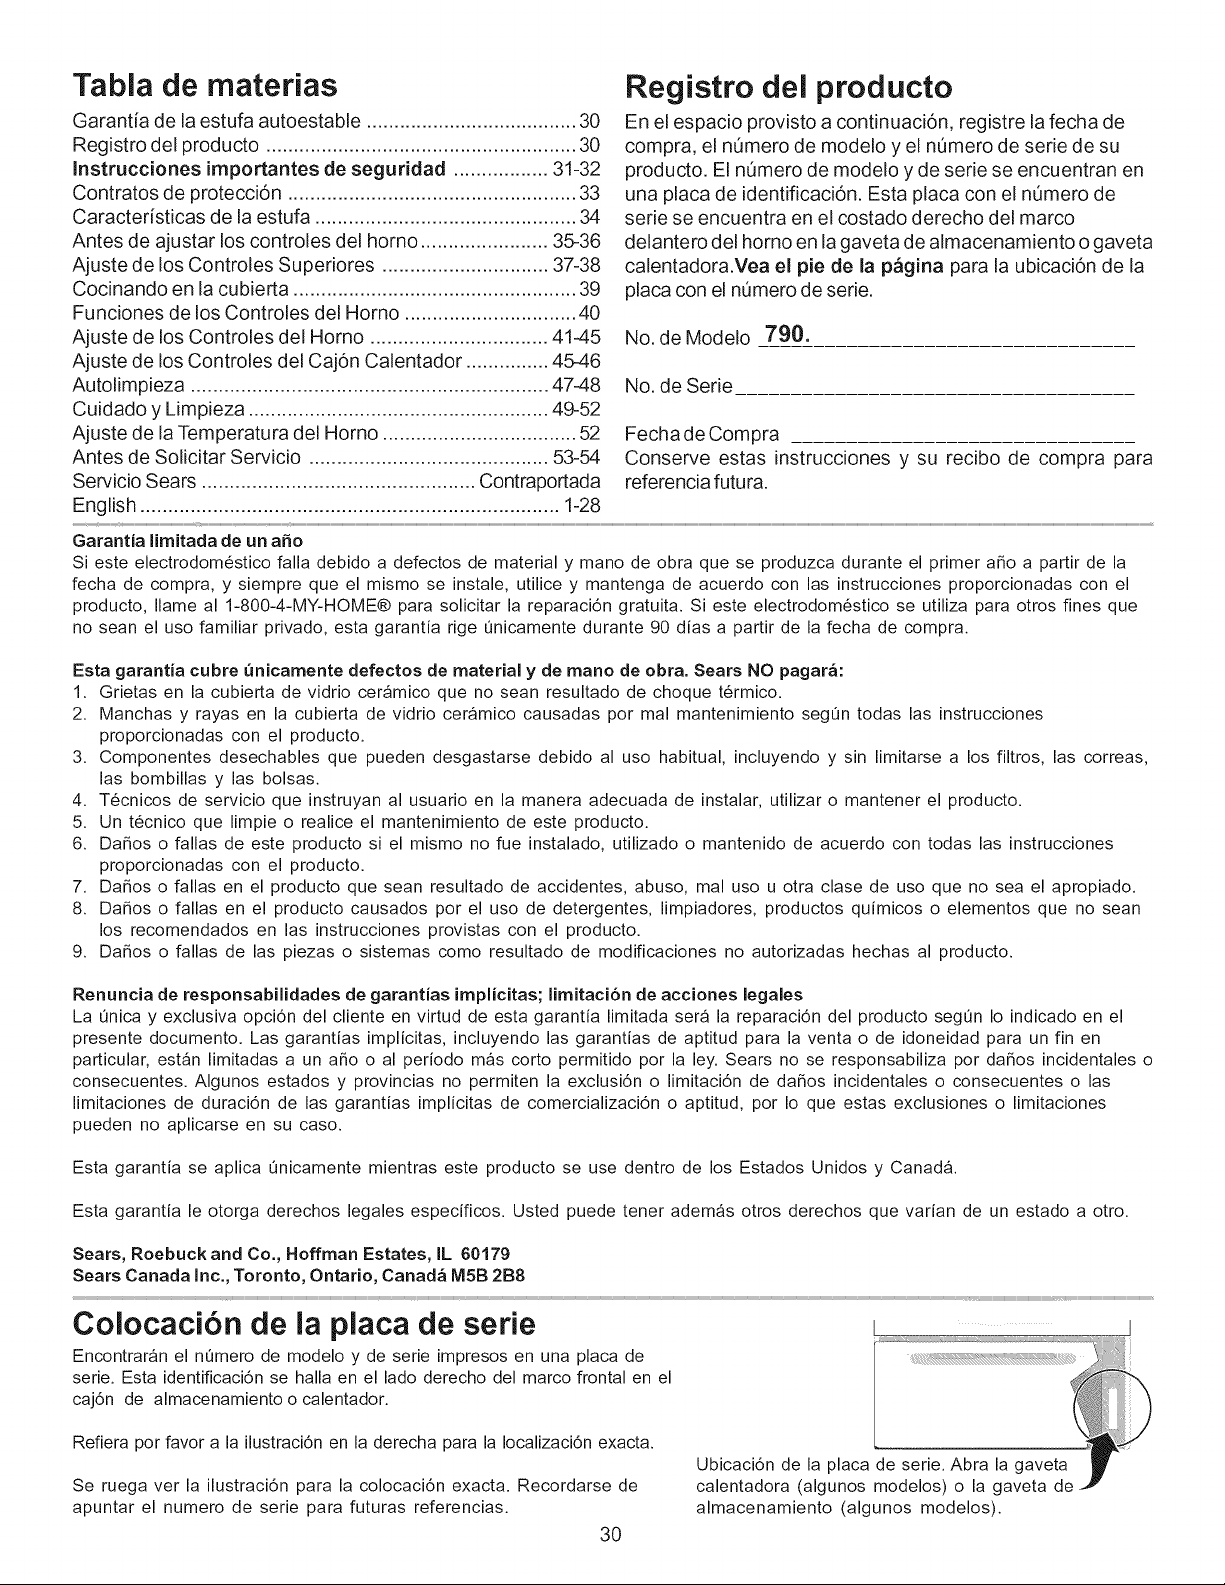
Tabla de materias
Garantia de la estufa autoestable ...................................... 30
Registro del producto ........................................................ 30
Instrucciones importantes de seguridad ................. 31-32
Contratos de protecci6n .................................................... 33
Caractedsticas de la estufa ............................................... 34
Antes de ajustar los controles del horno ....................... 35-36
Ajuste de los Controles Superiores .............................. 37-38
Cocinando en la cubierta ................................................... 39
Funciones de los Controles del Homo ............................... 40
Ajuste de los Controles del Homo ................................ 4145
Ajuste de los Controles del Caj6n Calentador ............... 4546
Autolimpieza ................................................................ 4748
Cuidado y Limpieza ...................................................... 49-52
Ajuste de la Temperatura del Homo ................................... 52
Antes de Solicitar Servicio ........................................... 53-54
Servicio Sears ................................................. Contraportada
English ........................................................................... 1-28
Registro del producto
En el espacio provisto a continuaci6n, registre la fecha de
compra, el nQmero de modelo y el nQmero de serie de su
producto. El nQmero de modelo y de serie se encuentran en
una placa de identificaci6n. Esta placa con el nQmero de
serie se encuentra en el costado derecho del marco
delantero del homo en la gaveta de almacenamiento o gaveta
calentadora.Vea el pie de la p_gina para la ubicaci6n de la
placa con el nQmero de serie.
No.de Modelo 790.
No. de Serie
Fecha de Compra
Conserve estas instrucciones y su recibo de compra para
referencia futu ra.
Garantia lirnitada de un aSo
Si este electrodom6stico falla debido a defectos de material y mano de obra que se produzca durante el primer aSo a partir de la
fecha de compra, y siempre que el mismo se instale, utilice y mantenga de acuerdo con las instrucciones proporcionadas con el
producto, Ilame al 1-800-4-MY-HOME® para solicitar la reparaci6n gratuita. Si este electrodom6stico se utiliza para otros fines que
no sean el uso familiar privado, esta garantia rige t_nicamente durante 90 dias a partir de la fecha de compra.
Esta garantia cubre unicarnente defectos de material y de rnano de obra. Sears NO pagar_:
1. Grietas en la cubierta de vidrio ceramico que no sean resultado de choque t6rmico.
2. Manchas y rayas en la cubierta de vidrio cer_mico causadas por mal mantenimiento segt_n todas las instrucciones
proporcionadas con el producto.
3. Componentes desechables que pueden desgastarse debido al uso habitual, incluyendo y sin limitarse a los filtros, las correas,
las bombillas y las bolsas.
4. T6cnicos de servicio que instruyan al usuario en la manera adecuada de instalar, utilizar o mantener el producto.
5. Un t6cnico que limpie o realice el mantenimiento de este producto.
6. Da_os o fallas de este producto si el mismo no fue instalado, utilizado o mantenido de acuerdo con todas las instrucciones
proporcionadas con el producto.
7. Da_os o fallas en el producto que sean resultado de accidentes, abuso, mal uso u otra clase de uso que no sea el apropiado.
8. Da_os o fallas en el producto causados por el uso de detergentes, limpiadores, productos quimicos o elementos que no sean
los recomendados en las instrucciones provistas con el producto.
9. Da_os o fallas de las piezas o sistemas como resultado de modificaciones no autorizadas hechas al producto.
Renuncia de responsabilidades de garantias irnplicitas; lirnitaci6n de acciones legales
La Onica y exclusiva opci6n del cliente en virtud de esta garantia limitada sera la reparaci6n del producto segOn Io indicado en el
presente documento. Las garantias implicitas, incluyendo las garantias de aptitud para la venta o de idoneidad para un fin en
particular, est_n limitadas a un a_o o al periodo mas corto permitido por la ley. Sears no se responsabiliza por da_os incidentales o
consecuentes. Algunos estados y provincias no permiten la exclusi6n o limitaci6n de da_os incidentales o consecuentes o las
limitaciones de duraci6n de las garantias implicitas de comercializaci6n o aptitud, por Io que estas exclusiones o limitaciones
pueden no aplicarse en su caso.
Esta garantia se aplica t_nicamente mientras este producto se use dentro de los Estados Unidos y Canad&
Esta garantia le otorga derechos legales especificos. Usted puede tener adem_s otros derechos que varian de un estado a otro.
Sears, Roebuck and Co., Hoffrnan Estates, IL 60179
Sears Canada Inc., Toronto, Ontario, Canad_ M5B 2B8
Colocaci6n de la placa de serie
Encontraran el n_mero de modelo y de serie impresos en una placa de
serie. Esta identificaci6n se halla en el lado derecho del marco frontal en el
caj6n de almacenamiento o calentador.
Refiera por favor a la ilustraci6n en la derecha para la Iocalizaci6n exacta.
Se ruega ver la ilustraci6n para la colocaci6n exacta. Recordarse de
apuntar el numero de serie para futuras referencias.
I
: :
Ubicaci6n de la placa de serie. Abra la gaveta_
calentadora (algunos modelos) o la gaveta de
almacenamiento (algunos modelos).
30
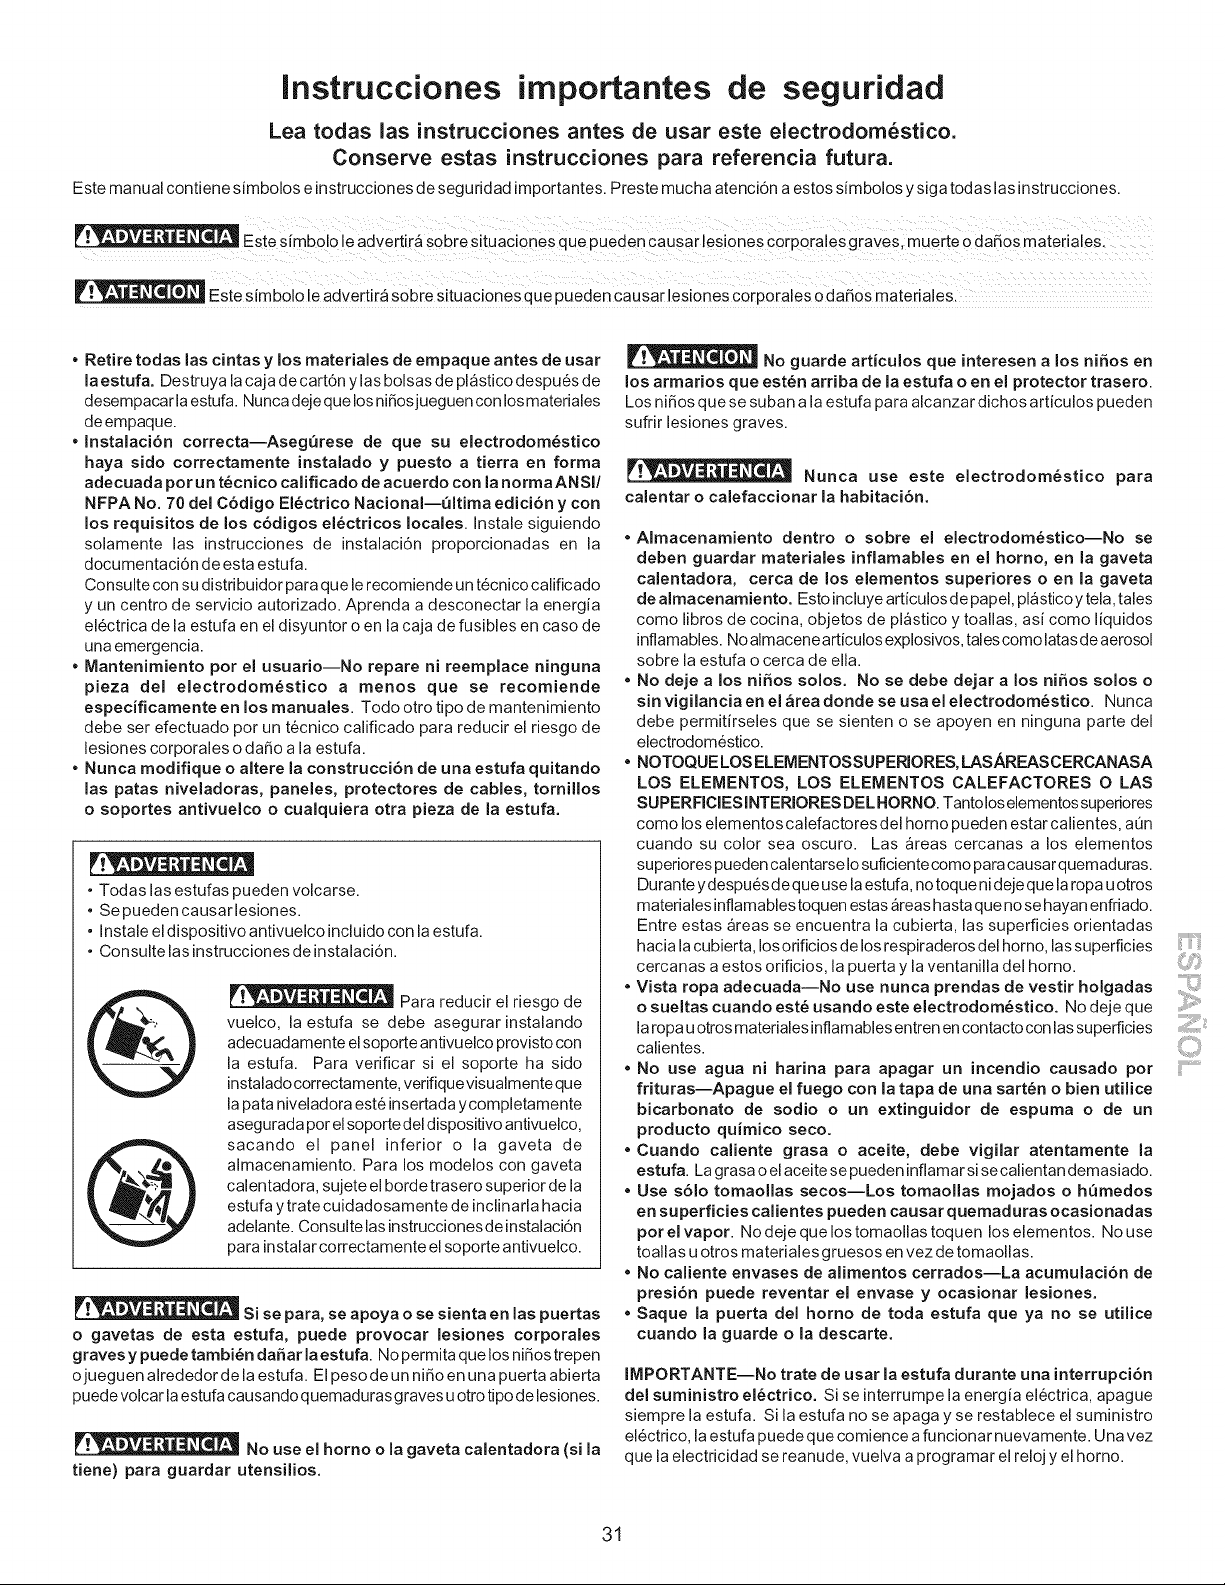
Instrucciones importantes de seguridad
Lea todas las instrucciones antes de usar este electrodom6stico.
Conserve estas instrucciones para referencia futura.
Este manual contiene simbolos e instrucciones de seguridad importantes. Preste mucha atenci6n a estos simbolos y siga todas las instrucciones.
E_ie _[mbo ; e adv;_ r_ sobie s tUac o_e_ que pueden iaUsal ;s ones iorpora ;s graveS mutate o dafio_ mal;i a es
_ iii i_IIL ii i i _i_ii _ i_i_ ii iii iii_ L _ ii_ i i iii i i_ _/_ii_ _ii_!_ i_i i i _ i_ I!L_I ii _ i iiiiiiiiiii
Este Simbolo le advertira Sobre Situaciones ,4_'_u_ _,,_,_.,r"'_'4e_'causar lesiones ,_u, u,_._,-_,,-p,-,,-al_ Oda_0s materialeS:
• Retire todas las cintas y los materiales de empaque antes de usar
la estufa. Destruya la caja de cart6n ylas bolsas de plastico despu6s de
desempacar la estufa. Nunca deje que los nifiosjueguen con los materiales
de empaque.
• Instalaci6n correcta--Aseg_rese de que su electrodom_stico
haya sido correctamente instalado y puesto a tierra en forma
adecuada porun t@cnico calificado de acuerdo con la norma ANSI/
NFPA No. 70 del C6digo El@ctrico Nacional--_ltima edici6n y con
los requisitos de los c6digos el@ctricos locales. Instale siguiendo
solamente las instrucciones de instalaci6n proporcionadas en la
documentaci6n de esta estufa.
Consulte con su distribuidor para que le recomiende un t6cnico calificado
y un centro de servicio autorizado. Aprenda a desconectar la energia
el6ctrica de la estufa en el disyuntor o en la caja de fusibles en caso de
una emergencia.
• Mantenimiento pot el usuario--No repare ni reemplace ninguna
pieza del electrodom@stico a menos que se recomiende
especificamente en los manuales. Todo otro tipo de mantenimiento
debe ser efectuado per un tecnico calificado para reducir el riesgo de
lesiones corporales o dafio a la estufa.
• Nunca modifique o altere la construcci6n de una estufa quitando
las patas niveladoras, paneles, protectores de cables, tomillos
o soportes antivuelco o cualquiera otra pieza de la estufa.
• Todas las estufas pueden volcarse.
• Se pueden causar lesiones.
• Instale el dispositivo antivuelco incluido con la estufa.
• Consulte las instrucciones de instalaci6n.
Para reducir el riesgo de
vuelco, la estufa se debe asegurar instalando
adecuadamente el soporte antivuelco provisto con
la estufa. Para verificar si el soporte ha side
instalado correctamente, vefifique visualmente que
la pata niveladora est6 insertada ycompletamente
asegurada per el soporte del dispositivo antivuelco,
sacando el panel inferior o la gaveta de
almacenamiento. Para los modelos con gaveta
calentadora, sujete el borde trasero superior de la
estufa y trate cuidadosamente de inclinarla hacia
adelante. Consulte las instrucciones de instalaci6n
para instalar correctamente el soporte antivuelco.
Si se para, se apoya o se sienta en las puertas
o gavetas de esta estufa, puede provocar lesiones corporales
graves y puede tambi_n da5ar la estufa. No permita que los nifios trepen
ojueguen alrededor de la estufa. El peso de un nifio en una puerta abierta
puede volcar la estufa causandoquemadurasgraves u otro tipo delesiones.
No use el homo o la gaveta calentadora (si la
tiene) para guardar utensilios.
No guarde articulos que interesen a los niSos en
los armarios que est@n arriba de la estufa o en el protector trasero.
Los nifios que se suban a la estufa para alcanzar dichos articulos pueden
sufrir lesiones graves.
,.= . .-,
,, -,, .4_, - Nunca use este electrodom_stico para
calentar o calefaccionar la habitaci6n.
• Almacenamiento dentro o sobre el electrodom6stico--No se
deben guardar materiales inflamables en el homo, en la gaveta
calentadora, cerca de los elementos superiores o en la gaveta
de almacenamiento. Esto incluye articulosde papel, plasticoytela, tales
come libros de cocina, objetos de plastico y toallas, asi come liquidos
inflamables. No almacene articulos explosives, tales come latas de aerosol
sobre la estufa o cerca de ella.
• No deje a los niSos solos. No se debe dejar a los niSos solos o
sin vigilancia en el &tea donde se usa el electrodom6stico. Nunca
debe permitirseles que se sienten o se apoyen en ninguna parte del
electrodom6stico.
• NOTOQUE LOS ELEMENTOSSUPEPJORES, LASAREASCERCANASA
LOS ELEMENTOS, LOS ELEMENTOS CALEFACTORES O LAS
SUPERFIClESINTERIORES DELHORNO. Tantolos elementos superiores
como los elementos calefactores del homo pueden estar calientes, aQn
cuando su color sea oscuro. Las areas cercanas a los elementos
superiorespueden calentarseIosuficientecomo paracausarquemaduras.
Duranteydespues de que use laestufa,no toque nidejeque laropau otros
materialesinflamablestoquen estas_reashastaque no se hayan enfriado.
Entre estas areas se encuentra la cubierta,lassuperficiesorientadas
hacialacubierta,Iosorificiosde losrespiraderosdelhomo, lassuperficies
cercanas a estos orificios,lapuerta y laventanilladel homo.
• Vista ropa adecuada--No use nunca prendas de vestir holgadas
o sueltas cuando est6 usando este electrodom6stico. No deje que
la ropa u otros materiales inflamables entren en contacto con las superficies
calientes.
• No use agua ni harina para apagar un incendio causado pot
frituras--Apague el fuego con la tapa de una sart_n o bien utilice
bicarbonato de sodio o un extinguidor de espuma o de un
producto quimico seco,
• Cuando caliente grasa o aceite, debe vigilar atentamente la
estufa. La grasa o el aceite se pueden inflamar si se calientan demasiado.
• Use s61o tomaollas secos--Los tomaollas mojados o h_medos
en superficies calientes pueden causar quemaduras ocasionadas
pot el vapor. No deje que los tomaollas toquen los elementos. No use
toallas u otros materiales gruesos en vez de tomaollas.
• No caliente envases de alimentos cerrados--La acumulaci6n de
presi6n puede reventar el envase y ocasionar lesiones.
• Saque la puerta del homo de toda estufa que ya no se utilice
cuando la guarde o la descarte.
IMPORTANTE--No trate de usar la estufa durante una interrupci6n
del suministro el6ctrico. Si se interrumpe la energia el6ctrica, apague
siempre la estufa. Si la estufa no se apaga y se restablece el suministro
el6ctrico, la estufa puede que comience a funcionar nuevamente. Una vez
que la electricidad se reanude, vuelva a programar el reloj y el homo.
31
Instrucciones importantes de seguridad
INSTRUCCIONES IMPORTANTES PARA USAR LA
CUBIERTA
• Familiaricese con cada una de las perillas que controlan los
elementos superiores. Coloque un utensilio con alimento en el
elemento antes de encenderlo y apague el elemento antes de retirar el
utensilio.
• Use utensilios de tama_o adecuado--Este electrodom6stico est_
equipado con uno o mas elementos superiores de diferentes tamaSos.
Seleccione utensilios q ue tengan el fondo piano y suficientemente grande
para cubrir la superficie del elemento. El uso de utensilios demasiado
pequeSos dejara expuesta a contacto directo parte del elemento caiefactor
y se puede quemar la ropa. Debe existir una relaci6n adecuada entre el
tamaSo del utensilio y el tamaSo de la superficie del elemento y de tal modo
tambi6n se mejorara la eficiencia.
• Los mangos de los utensilios deben colocarse hacia adentro y
no dejarlos sobre los elementos superiores contiguos--Para
reducir el riesgo de quemaduras, incendio de materiales inflamables y
derrames debido a contacto accidental con el utensilio, el mango del
utensilio debe colocarse hacia adentro y no sobre los elementos superiores
contiguos.
• Nunca deje sin vigilancia los elementos superiores encendidos
en los ajustes altos--AI hervir se derrama el contenido produciendo
derrames de grasa que se pueden incendiar o bien se puede fundir una
sarten cuyo contenido se haya consumido.
• No sumerja ni ponga en remojo los elementos calefactores
removibles--Los elementos caiefactores no se deben nunca sumergir
en agua. Los elementos se limpian pot si mismos durante el funcionamiento
normal.
• Utensilios de cocina de cer_mica--S61o ciertos tipos de vidrio, vidrio/
ceramica, ceramica, arcilla u otros utensilios de vidrio resultan adecuados
para usar en la cubierta de la estufa sin que se quiebren con el cambio
repentino de temperatura. Consulte las recomendaciones del fabricante
para uso en la cubierta de la estufa.
• Cuando prepare alimentos flameados bajo una campana de
ventilaci6n, encienda el ventilador.
INSTRUCCIONES IMPORTANTES PARA EL USO
DEL HORNO
• Abra con cuidado la puerta del homo o la gaveta calentadora (si
la tiene)--Mantengase al costado de la estufa cuando abra la puerta del
homo caliente. Deje salir el aire caliente o el vapor antes d e retirar o volver
a colocar los alimentos en el homo.
• Evite la obstrucci6n de los conductos de ventilaci6n del homo. El
respiradero del homo se encuentra debajo del elemento superior trasero
izquierdo si su modelo est_ equipado con elementos tubulares. El respiradero
del homo se encuentra debajo del protector trasero para los modelos
equipados con cubiertas de vidrio ceramico. No toque las superficies en
esta area cuando el homo est_ funcionando; se pueden ocasionar
quemaduras graves. Adem_s no coloque objetos de plastico o
termosensibles en el respiradero del homo o cerca de el. Estos objetos
pueden derretirse o incendiarse.
• Colocaci6n de las parrillas del homo. Coloque las parrillas del homo
en la posici6n deseada solamente cuando el homo est6 fdo. Si la parrilla
se debe cambiar cuando el homo est_ caliente, hagalo con sumo cuidado.
Use tomaollas y sujete la parrilla con ambas manos para volver a colocarla.
No deje que los tomaollas toquen la llama del elemento en el homo. Quite
todos los utensilios de la parrilla antes de retirada.
No use la asadera sin el inserto. La asadera yel inserto permiten drenar
la grasa y protegerla contra el calor del asador.
• No cubra el inserto de la asadera con papel de aluminio. La grasa
y el aceite asi e×puestos pueden inflamarse.
• Revestimientos protectores--No use papel de aluminio para revestir
la parte inferior del homo. Use papel de aluminio solamente como se
recomienda en este manual. Cualquier otto uso de revestimientos
protectores puede resultar en un riesgo de choque electrico o incendio.
HORNOS AUTOLIMPIANTES
• Limpie en el ciclo de autolimpieza s61o las piezas que se indican en este manual del usuario. Antes de la autolimpieza del homo, retire la
asadera y todo utensilio o aiimentos que se encuentren en el homo.
• No use agentes de limpieza para homo. No se debe usar agentes de limpieza para homo o revestimiento de protecci6n de ning0n tipo en ninguna
pieza del homo o en su vecindad.
• No limpie la junta de la puerta del homo. Lajunta de la puerta es esencial para que quede sellada en forma correcta. Tenga cuidado de no frotar,
daSar o mover lajunta.
• Los vapores emitidos durante el ciclo de autolimpieza de cualquier estufa pueden afectar la salud de algunos pajaros. Cambie los pajaros a una habitaci6n
bien ventilada.
INSTRUCCIONES IMPORTANTES PARA LA LIMPIEZA DE SU ESTUFA
• Limpie regularmente la estufa para mantener sin grasa todas las piezas que puedan prenderse fuego. Preste atenci6n especial al area
debajo de cada quemador superior. No deje que se acumule grasa.
• Aerosoles y agentes de limpieza para estufas--Siga siempre las instrucciones de uso recomendadas por el fabricante. Tenga presente
que los residuos de los agentes de limpieza y aerosoles pueden inflamarse causando daSo y lesiones.
• Limpie con frecuencia las campanas de ventilaci6n--No deje que se acumule grasa en la campana o en el filtro. Siga las instrucciones
del fabricante para la limpieza.
PARA LOS MODELOS CON CUBIERTAS DE VIDRIO CERAMICO
• No cocine sobre una cubierta que est_ quebrada--Si la cubierta se quiebra, pueden penetrar soluciones de limpieza y derrames ycrear un riesgo
de choque el6ctdco. P6ngase en contacto con un t6cnico calificado inmediatamente.
• Limpie con cuidado la cubierta--Si utiliza una esponja h0meda o un paso para limpiar los derrames en un area de la estufa que est6 caliente, tenga
cuidado a fin de evitar una quemadura con el vapor. AIgunos agentes de fimpieza pueden producir vapores perjudiciaies si se aplican en una superficie
caliente.
AVISO IMPORTANTE SOBRE SEGURIDAD
La Ley del Estado de California sobre Seguridad y Contaminaci6n del Agua Potable (California Safe Drinking Water and Toxic
Enforcement Act) exige que el Gobernador de California publique una lista de las sustancias que segOn el Estado de California
causan cancer, defectos cong6nitos o daSo al sistema reproductor y exige que los negocios adviertan a sus clientes de la
exposici6n potencial a tales sustancias.
32
Protection Agreements Acuerodes de protecci6n
Master Protection Agreements
Congratulations on making a smart purchase. Your new Kenmore ®
product is designed and manufactured for years of dependable operation.
But like all products, it may require preventive maintenance or repair from
time to time. That's when having a Master Protection Agreement can
save you money and aggravation.
The Master Protection Agreement also helps extend the life of your new
product. Here's what the Agreement* includes:
[] Parts and labor needed to help keep products operating properly
under normal use, not just defects. Our coverage goes well
beyond the product warranty. No deductibles, no functional failure
excluded from coverage - real protection.
[] Expert service by a force of more than 10,000 authorized Sears
service technicians, which means someone you can trust will be
working on your product.
[] Unlimited service calls and nationwide service, as often as you
want us, whenever you want us.
[] "No-lemon" guarantee - replacement of your covered product if
four or more product failures occur within twelve months.
[] Product replacement if your covered product can't be fixed.
[] Annual Preventive Maintenance Check at your request - no extra
charge.
[] Fast help by phone - we call it Rapid Resolution - phone support
from a Sears representative on all products. Think of us as a "talking
owner's manual".
[] Power surge protection against electrical damage due to power
fluctuations.
[] $250 Food Loss Protection annually for any food spoilage that is
the result of mechanical failure of any covered refrigerator or
freezer.
[] Rental reimbursement if repair of your covered product takes
longer than promised.
[] 10% discount off the regular price of any non-covered repair
service and related installed parts.
Once you purchase the Agreement, a simple phone call is all that it takes
for you to schedule service. You can call anytime day or night, or
schedule a service appointment online.
The Master Protection Agreement is a risk free purchase. If you cancel
for any reason during the product warranty period, we will provide a full
refund. Or, a prorated refund anytime after the product warranty period
expires. Purchase your Master Protection Agreement today!
Some limitations and exclusions apply. For prices and additional
information in the U.S.A. call 1-800-827-6655.
* Coverage in Canada varies on some items. For full details call
Sears Canada at 1-800-361-6665.
Sears Installation Service
For Sears professional installation of home appliances, garage door
openers, water heaters, and other major home items, in the U.S.A. or
Canada call 1-800-4-MY-HOME ®.
Acuerdos maestros de proteccion
Enhorabuena por haber hecho una compra inteligente, Su nuevo
producto Kenmore®esta disefiado y fabricado para brindarle afios de
funcionamiento fiable, Pero, como cualquier producto, puede necesitar
mantenimiento preventivo o reparaciones peri6dicas, Es por eso que
tener un Acuerdo maestro de protecci6n podria ahorrarle dinero y
molestias,
El Acuerdo maestro de protecci6n tambien sirve para prolongar la
durabilidad de su nuevo producto, El acuerdo* incluye Io siguiente:
[] Piezas y mano de obra necesarias para contribuir a mantener el
funcionamiento adecuado de los productos utilizados en
condiciones normales de uso, no s61oen caso de defectos de los
productos. Nuestra cobertura va mucho mas alia que la garantia
del producto. No se aplican deducibles ni exclusiones por fallas del
funcionamiento: es decir, verdadera proteccibn.
[] Servicio t6cnico por expertos (mas de 10000 t6cnicos
autorizados de Sears), Io cual significa que quien repare o realice
el mantenimiento de su producto sera un profesional de confianza.
[] Servicio t6cnico a escala nacional y numero ilimitado de
Ilamadas de solicitud de servicio t6cnico: se puede poner en
contacto con nosotros cuantas veces Io desee y cuando Io desee.
[] Garantia "sin sorpresas": se reemplaza el producto cubierto por el
acuerdo si ocurren cuatro o mas fallas del producto en un periodo
de 12 meses.
[] Reemplazo del producto: en caso de que no se pueda reparar el
producto cubierto por el acuerdo.
[] Revisibn anual preventiva de mantenimiento del producto:
puede solicitarla en cualquier momento, sin costo alguno.
[] Rapida asistencia telefbnica, la cual denominamos Soluci6n
rapida: es decir, asistencia telef6nica a traves de cualquiera de
nuestros representantes de Sears, sobre cualquiera de nuestros
productos. Piense en nosotros como en un "manual parlante del
usuario".
[] Proteccibn contra fallas el6ctricas, contra dafios debidos a
fluctuaciones de la corriente electrica.
[] $250 al aho para cubrir cualquier posible deterioro de
alimentos que haya tenido que desechar debido a una falla
mec&nica de cualquiera de nuestros refrigeradores o congeladores
cubiertos por este acuerdo.
[] Devolucibn de gastos de alquiler de electrodom6sticos si la
reparaci6n de su producto asegurado toma masque el tiempo
prometido.
[] 10% de descuento aplicable tanto a los costos del servicio de
reparaci6n, como de las piezas instaladas relacionadas que no
hayan quedado cubiertos por este acuerdo.
Una vez que haya realizado el pago de este acuerdo, bastara una simple
Ilamada telef6nica para concertar una visita de servicio. Puede Ilamar a
cualquier hora del dia o de la noche, o bien concertar una visita de
servicio por Internet.
La adquisici6n del Acuerdo maestro de protecci6n es una inversi6n
exenta de riesgos. Si por cualquier motivo decide cancelar dicho acuerdo
durante el periodo de garantia del producto, le haremos un reintegro total
del valor. O bien un importe proporcional si cancela el acuerdo en
cualquier otro momento posterior al vencimiento del periodo de garantia
del producto, iAdquiera hoy mismo su Acuerdo maestro de protecci6n!
Algunas limitaciones y exclusiones podrian aplicarse. Para solicitar
precios e informaci6n adicional, Ilame al 1-800-827-6655 (en los
EE.UU.).
* La cobertura en Canada varia en el caso de algunos articulos. Para
obtener detalles completos al respecto, Ilame al 1-800-361-6665 de
Sears de Canada.
Servicio de instalacion de Sears
Para soficitar la instalacidn por profesionales de Sears de
electrodomesticos, abridores de puertas de garaje, calentadores de agua
y otros articulos de uso prioritario en el hogar, Ilame al 1-800-4-MY-
HOME en los EE.UU. o Canada.
33
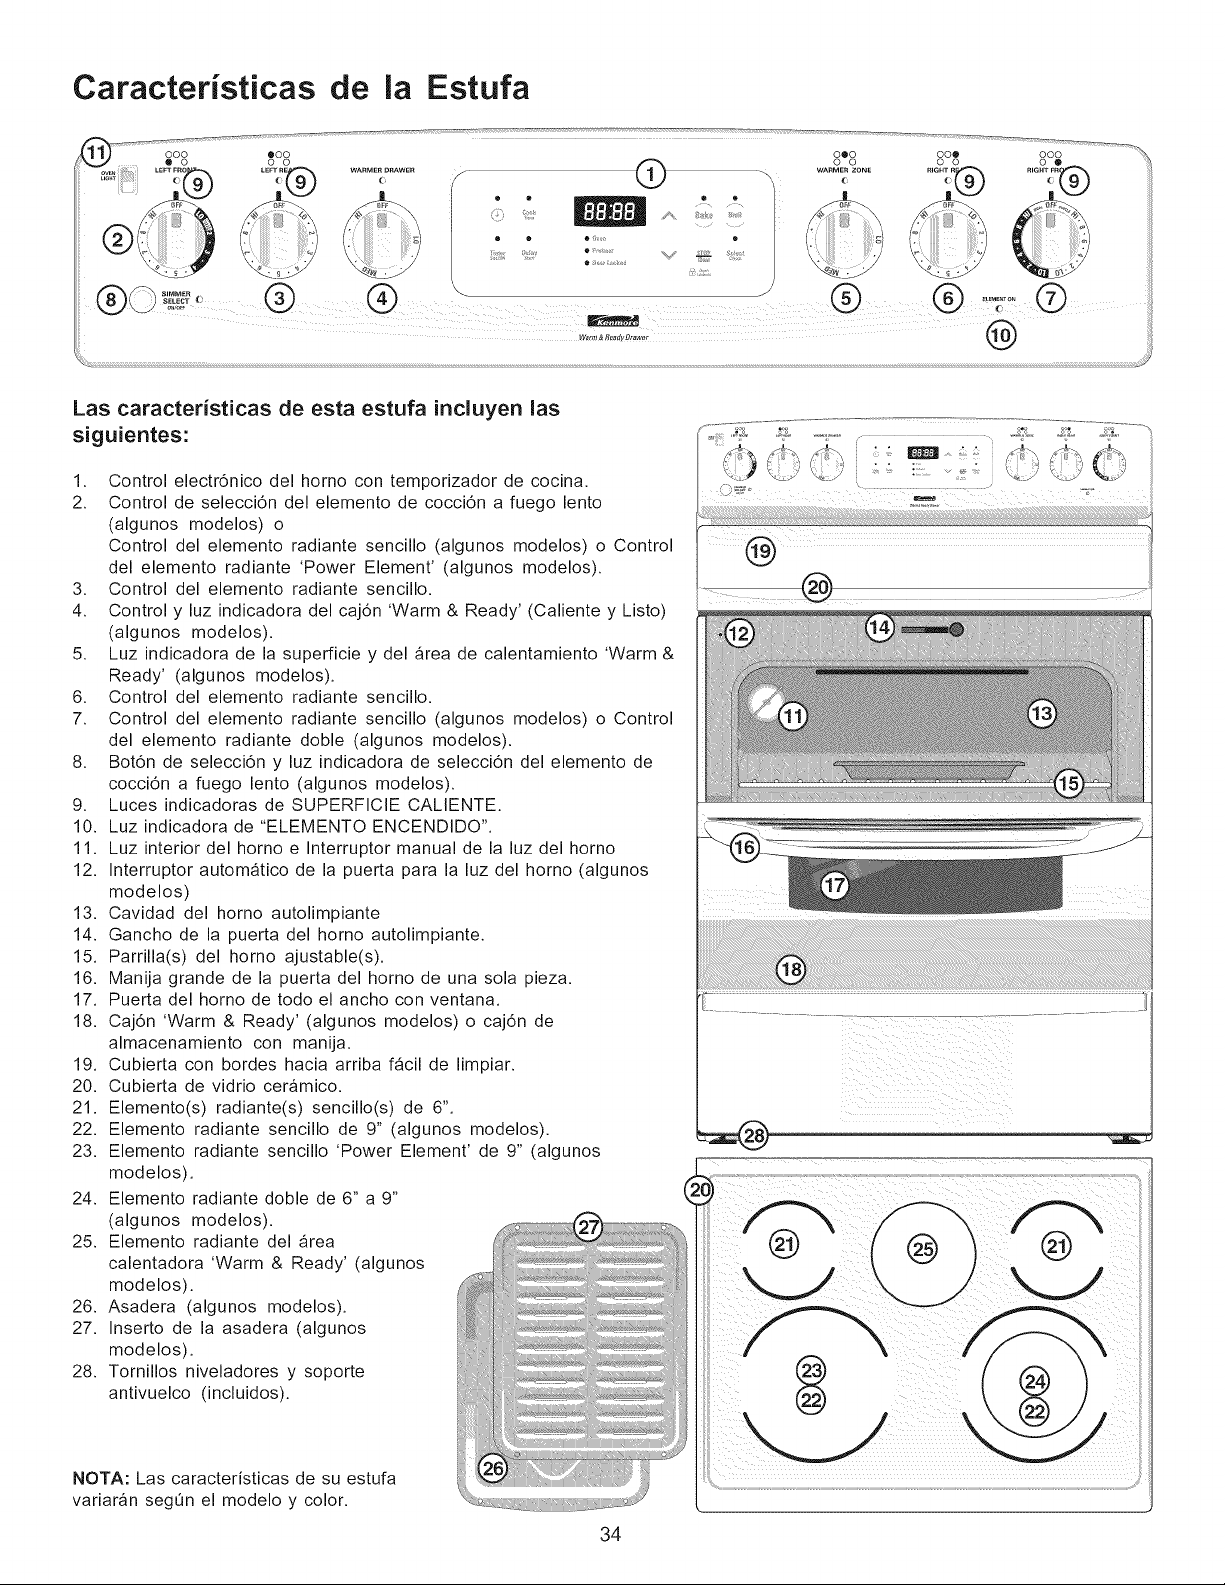
Caracteristicas de la Estufa
-'- ooo _oo _ oooo o%= ooo _',,
ov_i LEFrFRO_'_ EFrREa WARMERDRAWER _ _ _ _ WARMERzor_E RIG_Te_f='% IHTFR_
/@ s_ ....... /_- _:_ \ / {) S Inl=Wllm]l A. !;a£,, I _¢" ...... *o\
• . . o , . s :_
'#",, (_) @ (_) (_) .......o° (_)
@
Las caracteristicas de esta estufa incluyen las
siguientes:
1. Control electr6nico del horno con temporizador de cocina.
2. Control de selecci6n del elemento de cocci6n a fuego lento
(algunos modelos) o
Control del elemento radiante sencillo (algunos modelos) o Control
del elemento radiante 'Power Element' (algunos modelos).
3. Control del elemento radiante sencillo.
4. Control y luz indicadora del caj6n 'Warm & Ready' (Caliente y Listo)
(algunos modelos).
5. Luz indicadora de la superficie y del _rea de calentamiento 'Warm &
Ready' (algunos modelos).
6. Control del elemento radiante sencillo.
7. Control del elemento radiante sencillo (algunos modelos) o Control
del elemento radiante doble (algunos modelos).
8. Bot6n de selecci6n y luz indicadora de selecci6n del elemento de
cocci6n a fuego lento (algunos modelos).
9. Luces indicadoras de SUPERFICIE CALIENTE.
10. Luz indicadora de "ELEMENTO ENCENDIDO".
11. Luz interior del horno e Interruptor manual de la luz del horno
12. Interruptor autom_tico de la puerta para la luz del horno (algunos
modelos)
13. Cavidad del horno autolimpiante
14. Gancho de la puerta del horno autolimpiante.
15. Parrilla(s) del horno ajustable(s).
16. Manija grande de la puerta del horno de una sola pieza.
17. Puerta del horno de todo el ancho con ventana.
18. Caj6n 'Warm & Ready' (algunos modelos) o caj6n de
almacenamiento con manija.
19. Cubierta con bordes hacia arriba f_cil de limpiar.
20. Cubierta de vidrio ceramico.
21. Elemento(s) radiante(s) sencillo(s) de 6".
22. Elemento radiante sencillo de 9" (algunos modelos).
23. Elemento radiante sencillo 'Power Element' de 9" (algunos
modelos).
24. Elemento radiante doble de 6" a 9"
(algunos modelos).
25. Elemento radiante del area
calentadora 'Warm & Ready' (algunos
modelos).
26. Asadera (algunos modelos).
27. Inserto de la asadera (algunos
modelos).
28. Tornillos niveladores y soporte
antivuelco (incluidos).
NOTA: Las caracteristicas de su estufa
variar_n segOn el modelo y color.
34
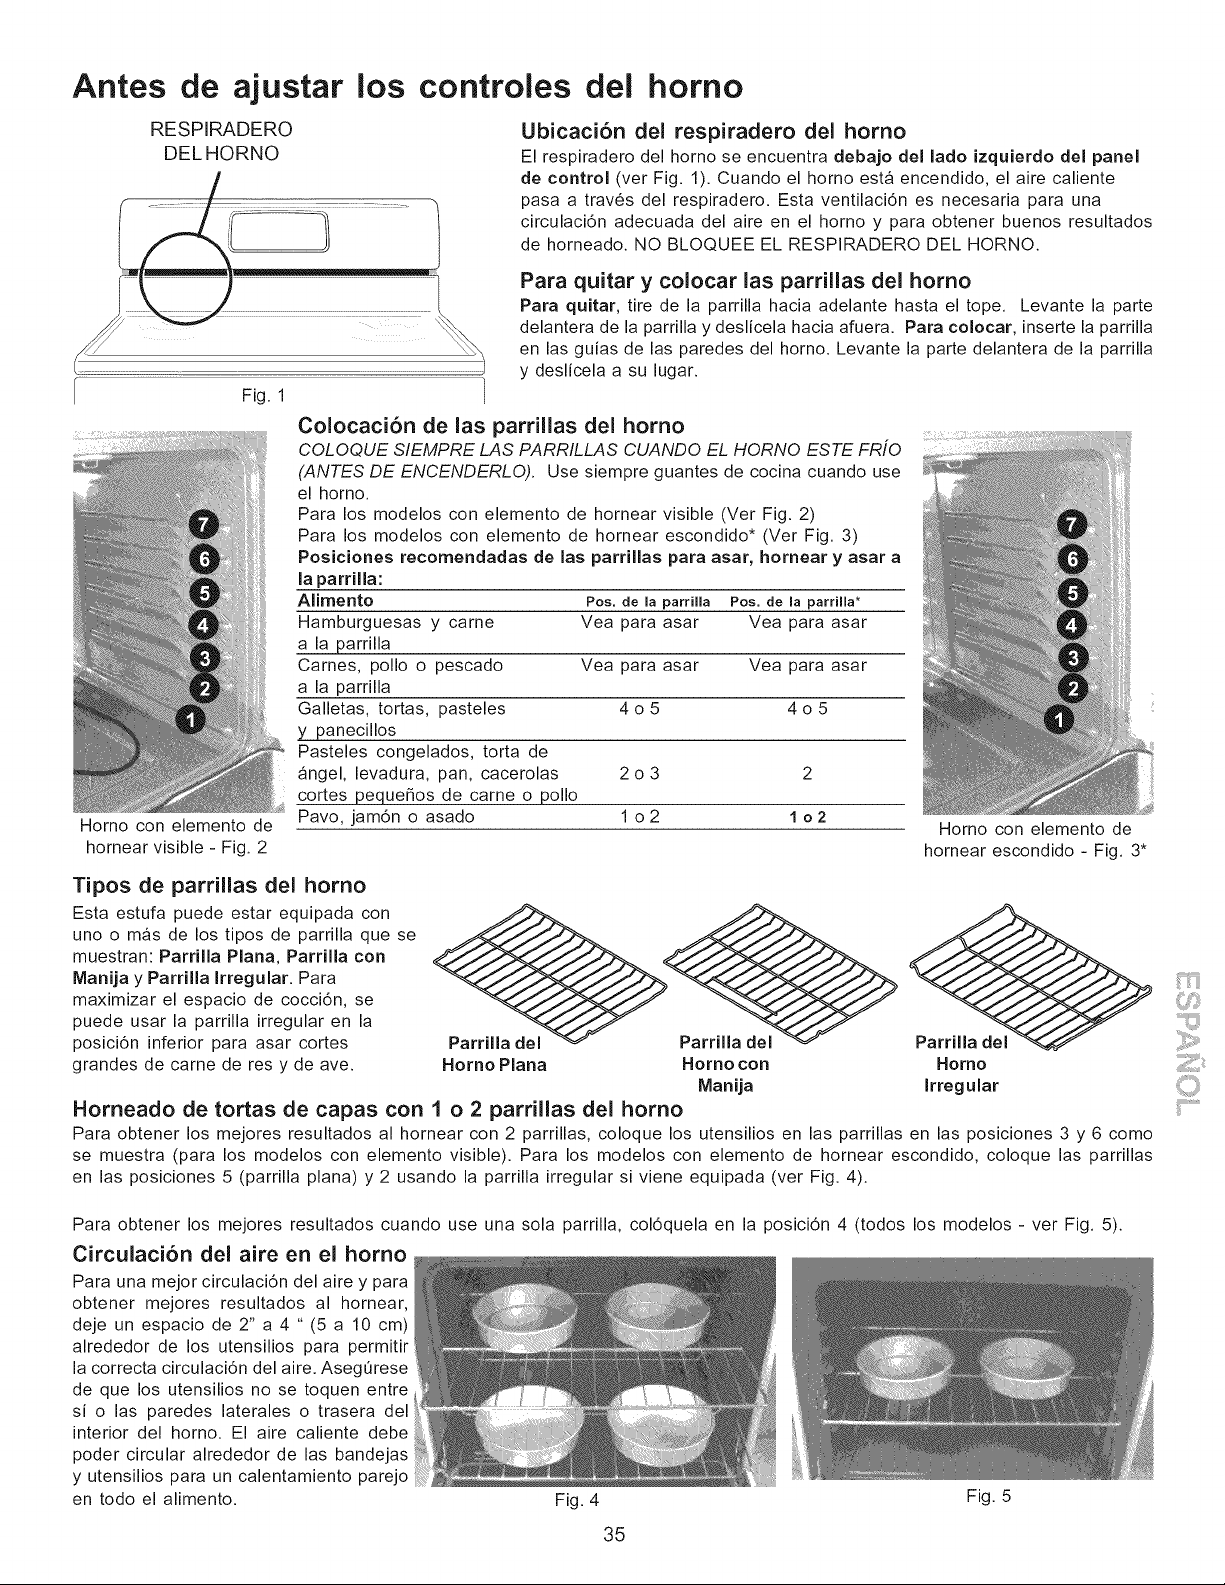
Antes
RESPIRADERO
DELHORNO
de ajustar los controles del homo
Ubicaci6n del respiradero del homo
El respiradero del horno se encuentra debajo del lado izquJerdo del panel
de control (ver Fig. 1). Cuando el horno esta encendido, el aire caliente
pasa a trav6s del respiradero. Esta ventilaci6n es necesaria para una
circulaci6n adecuada del aire en el horno y para obtener buenos resultados
de horneado. NO BLOQUEE EL RESPIRADERO DEL HORNO.
Fig. 1
Horno con elemento de
hornear visible - Fig. 2
Para quitar y colocar las parrillas del homo
Para quJtar, tire de la parrilla hacia adelante hasta el tope. Levante la parte
delantera de la parrilla y deslicela hacia afuera. Para colocar, inserte la parrilla
en las guias de las paredes del horno. Levante la parte delantera de la parrilla
y deslicela a su lugar.
Colocaci6n de las parrillas del homo
COLOQUE S/EMPRE LAS PARR/LLAS CUANDO EL HORNO ESTE FRiO
(ANTES DE ENCENDERLO). Use siempre guantes de cocina cuando use
el horno.
Para los modelos con elemento de hornear visible (Ver Fig. 2)
Para los modelos con elemento de hornear escondido* (Ver Fig. 3)
PosJcJones recomendadas de las parrillas para asar, hornear y asar a
la parrilla:
Alimento Pos. de la parrilla Pos. de la parrilla*
Hamburguesas y came Vea para asar Vea para asar
a la parrilla
Carnes, polio o pescado Vea para asar Vea para asar
a la parrilla
Galletas, tortas, pasteles 4 o 5 4 o 5
y panecillos
Pasteles congelados, torta de
_ngel, levadura, pan, cacerolas 2 o 3 2
cortes pequeSos de carne o polio
Pavo, jam6n o asado 1 o 2 1 o 2
Homo con elemento de
hornear escondido - Fig. 3*
Tipos de parrillas del homo
Esta estufa puede estar equipada con
uno o mas de los tipos de parrilla que se
muestran: Parrilla Piana, Parrilla con
Manija y Parrilla Irregular. Para
maximizar el espacio de cocci6n, se
puede usar la parrilla irregular en la
posici6n inferior para asar cortes
grandes de carne de res y de ave.
ParrJlla del ParrJlla del
Homo Plana Homo con Homo
Manija Irregular
Horneado de tortas de capas con 1 o 2 parrillas del homo
Para obtener los mejores resultados al hornear con 2 parrillas, coloque los utensilios en las parrillas en las posiciones 3 y 6 como
se muestra (para los modelos con elemento visible). Para los modelos con elemento de hornear escondido, coloque las parrillas
en las posiciones 5 (parrilla plana) y 2 usando la parrilla irregular si viene equipada (ver Fig. 4).
Para obtener los mejores resultados cuando use una sola parrilla, col6quela en la posici6n 4 (todos los modelos - ver Fig. 5).
Circulaci6n del aire en el homo
Para una mejor circulaci6n del aire y para
obtener mejores resultados al hornear,
deje un espacio de 2" a 4 " (5 a 10 cm)
alrededor de los utensilios para permitir
la correcta circulaci6n del aire. Aseg0rese
de que los utensilios no se toquen entre
si o las paredes laterales o trasera del
interior del horno. El aire caliente debe
poder circular alrededor de las bandejas
y utensilios para un calentamiento parejo
en todo el alimento. Fig. 4 Fig. 5
35
ii'i......................
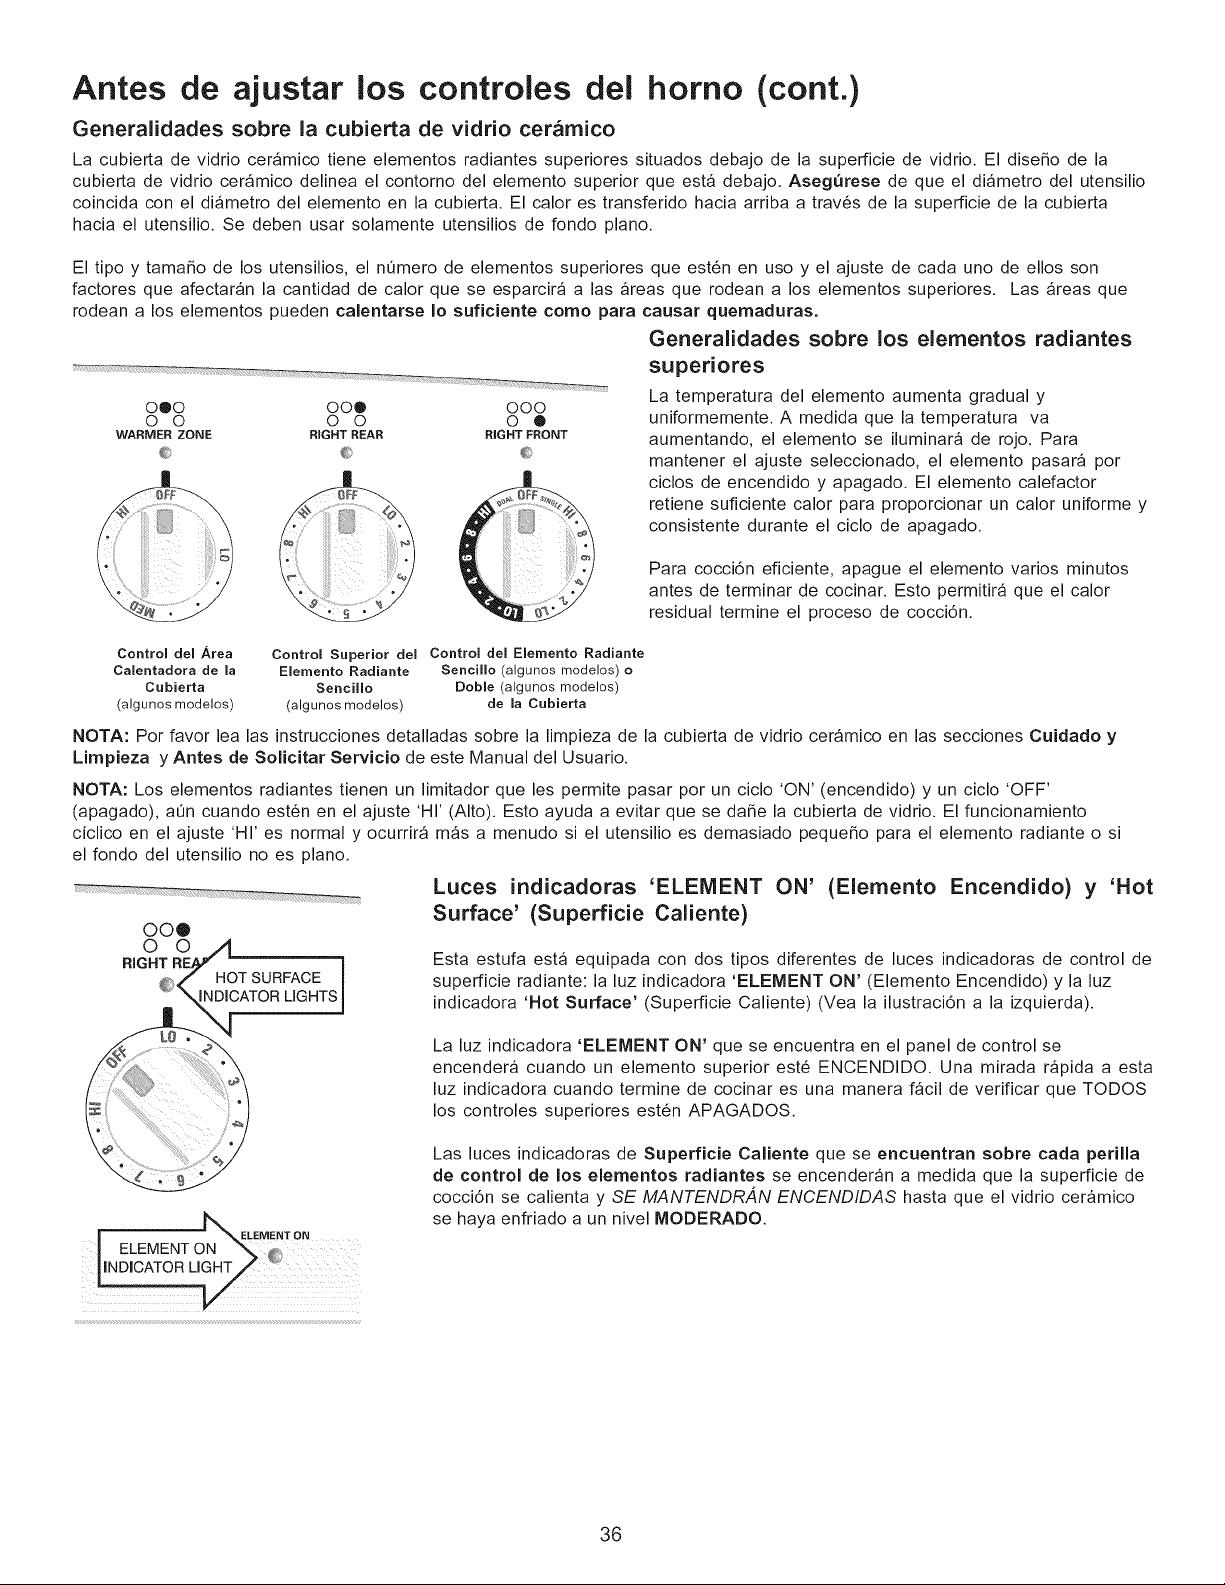
Antes de ajustar los controles del homo (cont.)
Generalidades sobre la cubierta de vidrio cer_mico
La cubierta de vidrio cer_mico tiene elementos radiantes superiores situados debajo de la superficie de vidrio. El dise_o de la
cubierta de vidrio ceramico delinea el contorno del elemento superior que est_ debajo. Asegurese de que el di_metro del utensilio
coincida con el di_metro del elemento en la cubierta. El calor es transferido hacia arriba a trav6s de la superficie de la cubierta
hacia el utensilio. Se deben usar solamente utensilios de fondo piano.
El tipo y tama_o de los utensilios, el nQmero de elementos superiores que est6n en uso y el ajuste de cada uno de ellos son
factores que afectaran la cantidad de calor que se esparcira alas areas que rodean a los elementos superiores. Las _reas que
rodean a los elementos pueden calentarse Io suficiente como para causar quemaduras.
0@0 00@ 000
0 0 0 0 0 ®
WARMER ZONE RIGHT REAR RIGHT FRONT
iiiiiiiiiii_ ii
Generalidades sobre los elementos radiantes
superiores
La temperatura del elemento aumenta gradual y
uniformemente. A medida que la temperatura va
aumentando, el elemento se iluminara de rojo. Para
mantener el ajuste seleccionado, el elemento pasara por
ciclos de encendido y apagado. El elemento calefactor
retiene suficiente calor para proporcionar un calor uniforme y
consistente durante el ciclo de apagado.
Para cocci6n eficiente, apague el elemento varios minutos
antes de terminar de cocinar. Esto permitir_ que el calor
residual termine el proceso de cocci6n.
Control del Area
Calentadora de la
Cubierta
(algunos modelos)
Control Superior del Control del Eiernento Radiante
Eiemento Radiante Sencillo (algunos modelos) o
Sencillo Doble (algunos modelos)
(algunos modelos) de la Cubierta
NOTA: Por favor lea las instrucciones detalladas sobre la limpieza de la cubierta de vidrio cer_mico en las secciones Cuidado y
Limpieza y Antes de Solicitar Servicio de este Manual del Usuario.
NOTA: Los elementos radiantes tienen un limitador que les permite pasar por un ciclo 'ON' (encendido) y un ciclo 'OFF'
(apagado), at_n cuando est6n en el ajuste 'HI' (Alto). Esto ayuda a evitar que se daSe la cubierta de vidrio. El funcionamiento
ciclico en el ajuste 'HI' es normal y ocurrira m_s a menudo si el utensilio es demasiado pequeSo para el elemento radiante o si
el fondo del utensilio no es piano.
OO®
O O
RIGHT O_ '_ i
_,_},_i"" HOTSURFACE I
"_ \ INDICATORLIGHTS1
Luces indicadoras 'ELEMENT ON' (Elemento Encendido) y 'Hot
Surface' (Superficie Caliente)
Esta estufa esta equipada con dos tipos diferentes de luces indicadoras de control de
superficie radiante: la luz indicadora 'ELEMENT ON' (Elemento Encendido) y la luz
indicadora 'Hot Surface' (Superficie Caliente) (Vea la ilustraci6n a la izquierda).
La luz indicadora 'ELEMENT ON' que se encuentra en el panel de control se
encender_ cuando un elemento superior est6 ENCENDIDO. Una mirada r_pida a esta
luz indicadora cuando termine de cocinar es una manera f_cil de verificar que T©DOS
los controles superiores est6n APAGADOS.
| _ELEMENT ON
I ELEMENT ON _ _
Las luces indicadoras de SuperfJcie CaHente que se encuentran sobre carla perilla
de control de los elementos radJantes se encenderan a medida que la superficie de
cocci6n se calienta y SE MANTENDR,4N ENCENDIDAS hasta que el vidrio ceramico
se haya enfriado a un nivel MODERADO.
36
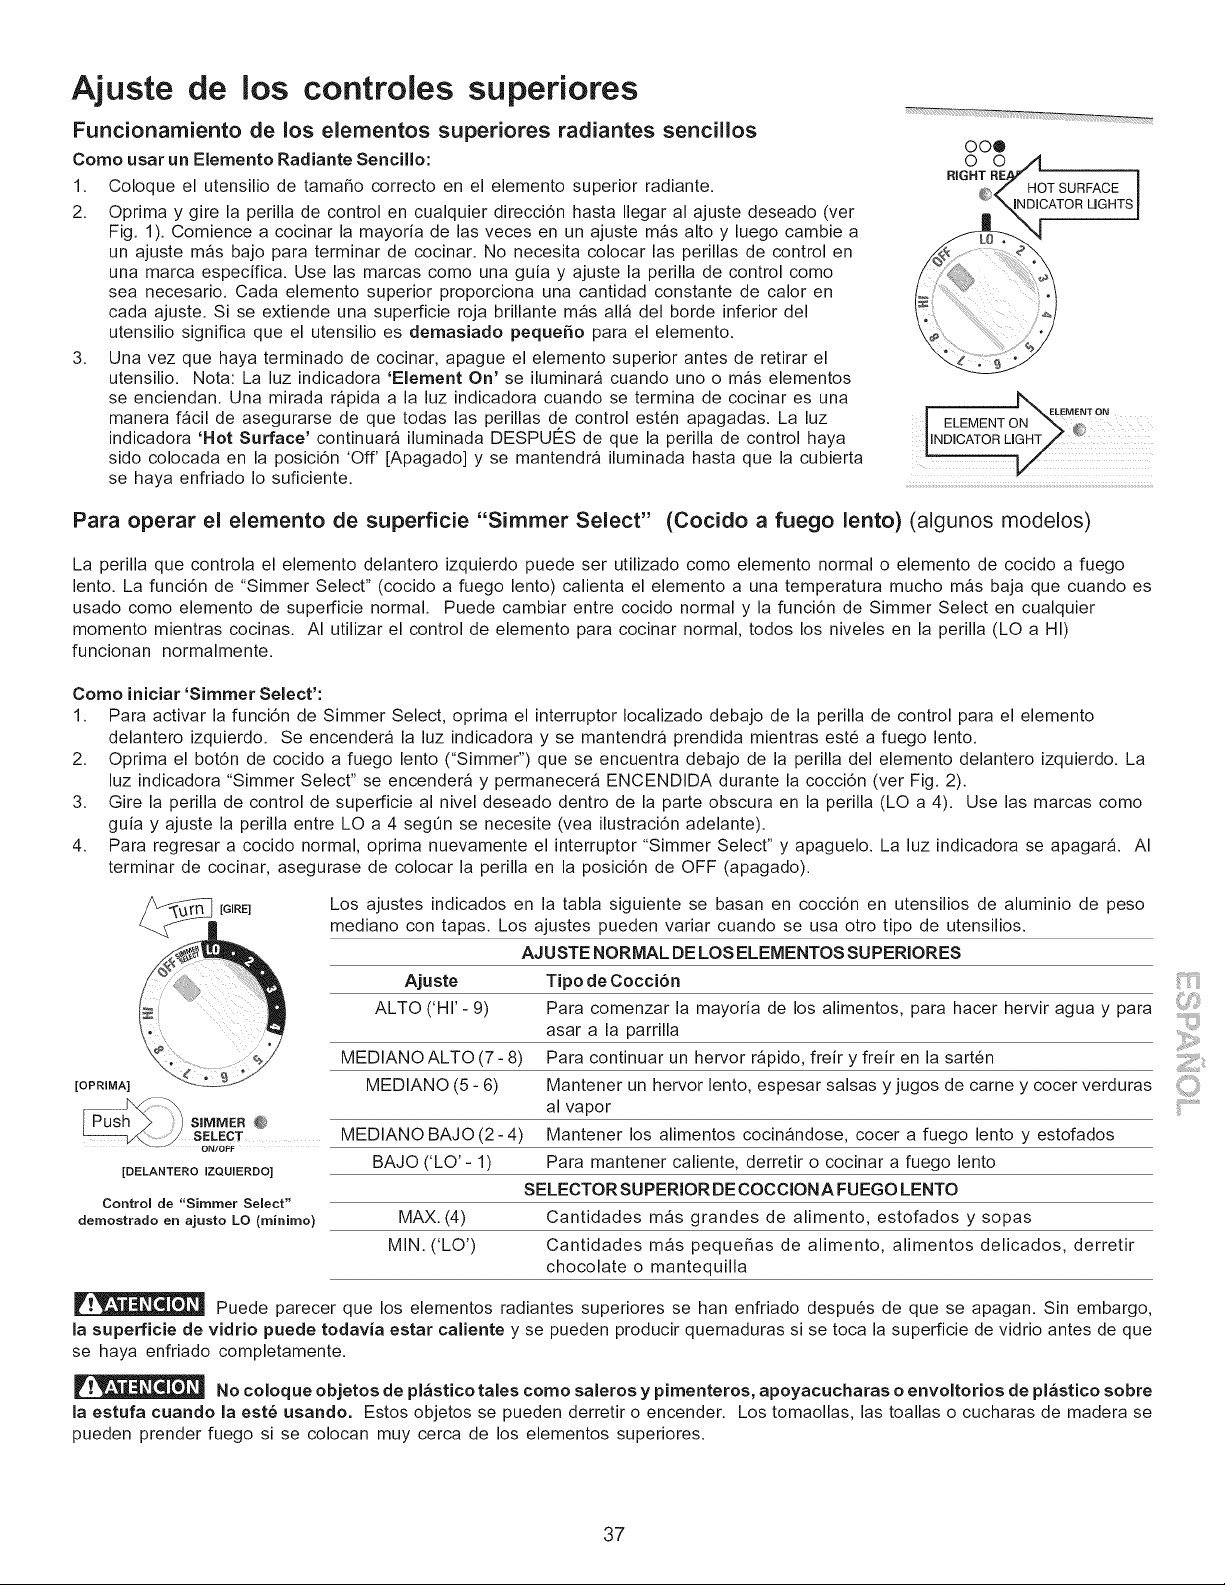
Ajuste de los controles superiores
oo®
Funcionamiento de los elementos superiores radiantes sencillos
Como usar un Elemento Radiante Sencillo:
1. Coloque el utensilio de tamaho correcto en el elemento superior radiante.
2. Oprima y gire la perilla de control en cualquier direcci6n hasta Ilegar al ajuste deseado (ver
Fig. 1). Comience a cocinar la mayoria de las veces en un ajuste mas alto y luego cambie a
un ajuste mas bajo para terminar de cocinar. No necesita colocar las perillas de control en
una marca especifica. Use las marcas como una guia y ajuste la perilla de control como
sea necesario. Cada elemento superior proporciona una cantidad constante de calor en
cada ajuste. Si se extiende una superficie roja brillante mas all_ del borde inferior del
utensilio significa que el utensilio es demasiado pequeSo para el elemento.
3. Una vez que haya terminado de cocinar, apague el elemento superior antes de retirar el
utensilio. Nota: La luz indicadora 'Element On' se iluminara cuando uno o mas elementos
se enciendan. Una mirada rapida a la luz indicadora cuando se termina de cocinar es una b,_
ON"
ELEMENT ON
manera f_cil de asegurarse de que todas las perillas de control est6n apagadas. La luz I ELEMENT _:
indicadora 'Hot Surface' continuar_ iluminada DESPU¢:S de que la perilla de control haya LNDICATORLIGHT _J
sido colocada en la posici6n 'Off' [Apagado] y se mantendr_ iluminada hasta que la cubierta
se haya enfriado Io suficiente. ...........................................................................................................................................................................
Para operar el elemento de superficie "Simmer Select" (Cocido a fuego lento) (algunos modelos)
La perilla que controla el elemento delantero izquierdo puede ser utilizado como elemento normal o elemento de cocido a fuego
lento. La funci6n de "Simmer Select" (cocido a fuego lento) calienta el elemento a una temperatura mucho m_s baja que cuando es
usado como elemento de superficie normal. Puede cambiar entre cocido normal y la funci6n de Simmer Select en cualquier
momento mientras cocinas. AI utilizar el control de elemento para cocinar normal, todos los niveles en la perilla (LO a HI)
funcionan normalmente.
Como iniciar 'Simmer Select':
1. Para activar la funci6n de Simmer Select, oprima el interruptor Iocalizado debajo de la perilla de control para el elemento
delantero izquierdo. Se encendera la luz indicadora y se mantendra prendida mientras est6 a fuego lento.
2. Oprima el bot6n de cocido a fuego lento ("Simmer") que se encuentra debajo de la perilla del elemento delantero izquierdo. La
luz indicadora "Simmer Select" se encender_ y permanecer_ ENCENDIDA durante la cocci6n (ver Fig. 2).
3. Gire la perilla de control de superficie al nivel deseado dentro de la parte obscura en la perilla (LO a 4). Use las marcas como
guia y ajuste la perilla entre LO a 4 segQn se necesite (vea ilustraci6n adelante).
4. Para regresar a cocido normal, oprima nuevamente el interruptor "Simmer Select" y apaguelo. La luz indicadora se apagar& AI
terminar de cocinar, asegurase de colocar la perilla en la posici6n de OFF (apagado).
[OPRIMA]
[GIRE]
[DELANTERO IZQUIERDO]
Controm de "Simmer Semect"
dernostrado en ajusto LO (minirno)
Los ajustes indicados en la tabla siguiente se basan en cocci6n en utensilios de aluminio de peso
mediano con tapas. Los ajustes pueden variar cuando se usa otro tipo de utensilios.
AJUSTE NORMAL DE LOS ELEMENTOS SUPERIORES
Ajuste Tipo de Cocci6n
ALTO ('HI'- 9) Para comenzar la mayoria de los alimentos, para hacer hervir agua y para
asar a la parrilla
MEDIANO ALTO (7- 8) Para continuar un hervor r_pido, freir y freir en la sart6n
MEDIANO (5 - 6) Mantener un hervor lento, espesar salsas y jugos de carne y cocer verduras
al vapor
Mantener los alimentos cocinandose, cocer a fuego lento y estofados
Para mantener caliente, derretir o cocinar a fuego lento
SELECTORSUPERIOR DECOCCIONA FUEGO LENTO
MAX. (4) Cantidades m_s grandes de alimento, estofados y sopas
MIN. ('LO') Cantidades mas pequehas de alimento, alimentos delicados, derretir
chocolate o mantequilla
SIMMER @
SELECT MEDIANO BAJO (2 - 4)
BAJO ('LO' - 1)
Puede parecer que los elementos radiantes superiores se han enfriado despu6s de que se apagan. Sin embargo,
la superficie de vidrio puede todavia estar caliente y se pueden producir quemaduras si se toca la superficie de vidrio antes de que
se haya enfriado completamente.
No coloque objetos de pl_stico tales como saleros y pimenteros, apoyacucharas o envoltorios de pl_stico sobre
la estufa cuando la este usando. Estos objetos se pueden derretir o encender. Los tomaollas, las toallas o cucharas de madera se
pueden prender fuego si se colocan muy cerca de los elementos superiores.
37

Ajuste de
(GIRE)
los
Ajustes elemento sencill
controles
[GIRE]_
Ajustes elementos
combinados
superiores (cont.)
Funcionamiento de los elementos superiores radiantes dobles
(algunos modelos)
Con el elemento de superficie "Dual Radiant", la perrilla de control delantera derecha
ofrece flexibilidad para distintos tamahos de calderos. El elemento interior puede
usarse solo para calderos pequehos o utilizarse ambos elementos, interior y exterior
en combinaci6n para calderos m_s grandes.
Para operar el elemento de superficie Dual Radiant, oprima la perilla de control y gire
en contra del reloj para operar el elemento pequeho o gire a favor del reloj para operar
juntamente las porciones internas y externas del elemento (ver Fig.l).
Areas de calentamiento en la cubierta
de vidrio ceramico (se muestra en negro)
0®0
0 0
WARMER ZONE
(AREA CALENTADORA)
Tabla de Ajustes Recomendados para
Alimentos en la Gaveta Calentadora
Tipo de Alimento Ajuste de
Temperatura
Panes/Pasteles 'LO' (BAJA)
Guisos al Horno 'LO'(BAJA)
Platos Grandes con Alimento 'LO'(BAJA)
Huevos 'LO' (BAJA)
Salsas %0' (BAJA)
Carnes 'MED' (MEDIANA)
Salsas 'MED' (MEDIANA)
Sopas (crema) 'MED' (MEDIANA)
Estofados 'MED' (MEDIANA)
Verduras 'MED' (MEDIANA)
Alimentos Fritos 'HI' (ALTA)
Bebidas Calientes 'HI' (ALTA)
Sopas (liquidas) 'HI' (ALTA)
ELEMENTO SUPERIOR RADIANTE SENCILLO Y DOBLE
Ajuste Tipo de Cocci6n
ALTO ('HI'- 9) Para comenzar la mayoria de los alimentos, para hacer
hervir agua y para asar a la parrilla
MEDIANO ALTO (7- 8) Para continuar un hervor r_pido, freir y freir en la sart6n
MEDIANO (5- 6) Mantener un hervor lento, espesar salsas y jugos de
carney cocer verduras al vapor
MEDIANO BAJO(2-4) Mantener los alimentos cocinandose, cocer a fuego
lento y estofados
BAJO ('LO' - 1) Para mantener caliente, derretir o cocinar a fuego lento
Nota: El tamaho y el tipo del utensilio usado y la cantidad y tipo de alimento que esta
siendo cocinado influira en el ajuste necesario para obtener los mejores resultados.
Empleo del area calentadora 'Warm & Ready MR'(algunos modelos)
Elprop6sito del area calentadora es mantener los alimentoscalientes para servirlos. La comida debe
estar caliente, antes de ponerla en el area calentadora. Nose recomienda calentar comida fda en
elarea calentadora.
Todos los alimentos que se colocan en el _rea calentadora se deben cu brir con un a tapa o con pa pel
de aluminio para mantener la calidad. Para obtener mejores resultados cuando caliente pasteles o
panes, la cubierta debe tenet una abertura para que deje escapar la humedad. No use pl_stico
para cubrir los alimentos. El pl&stico se puede derretir en la superficie y set muy dificil
de limpiar. En el area calentadora use s61o vajilla y utensilios de cocina recomendados para usar
en el homo yen la cubierta de la estufa.
AI contrario de los elementos superiores, el _rea calentadora no se
pondra roja cuando est6 caliente.
Use siempre tomaollas o guantes de cocina cuando retire los alimentos
de la gaveta calentadora, ya que los platos o los utensilios pueden estar calientes.
Ajuste del control del area calentadora ('Warm & Ready MR')
1. Para ajustar el control, oprima y gire la perilla en cualquier direcci6n (ver Fig.2). Las
temperaturas son aproximadas y se han designado como 'HI' (Alta), 'MED' (Mediana)
y 'LO' (Baja). Sin embargo, el control puede ser ajustado en cualquier posici6n entre
'HI' y 'LO' para diferentes niveles de calentamiento.
2. Cuando est6 listo para servir, gire el control a la posici6n 'OFF'. El _rea calentadora
permanecer_ caliente hasta que se apague la luz indicadora.
Selecci6n de la Temperatura - Consulte los ajustes recomendados en la tabla a la
izquierda. Si no figura el alimento que desea, comience con el ajuste de temperatura
mediana y regule despu6s como sea necesario. La mayoria de los alimentos se pueden
mantener a la temperatura adecuada para servir usando el ajuste de temperatura
mediana.
Notai Us e e! are a #a!entado[a paia mantener ca!!entes !os alimento s cocinados; taleS I
como: verduras, salsas, guisos; sopas, estofados, panes, pasteles y platos de servir
que se pueden Usar ene h0rn01
38
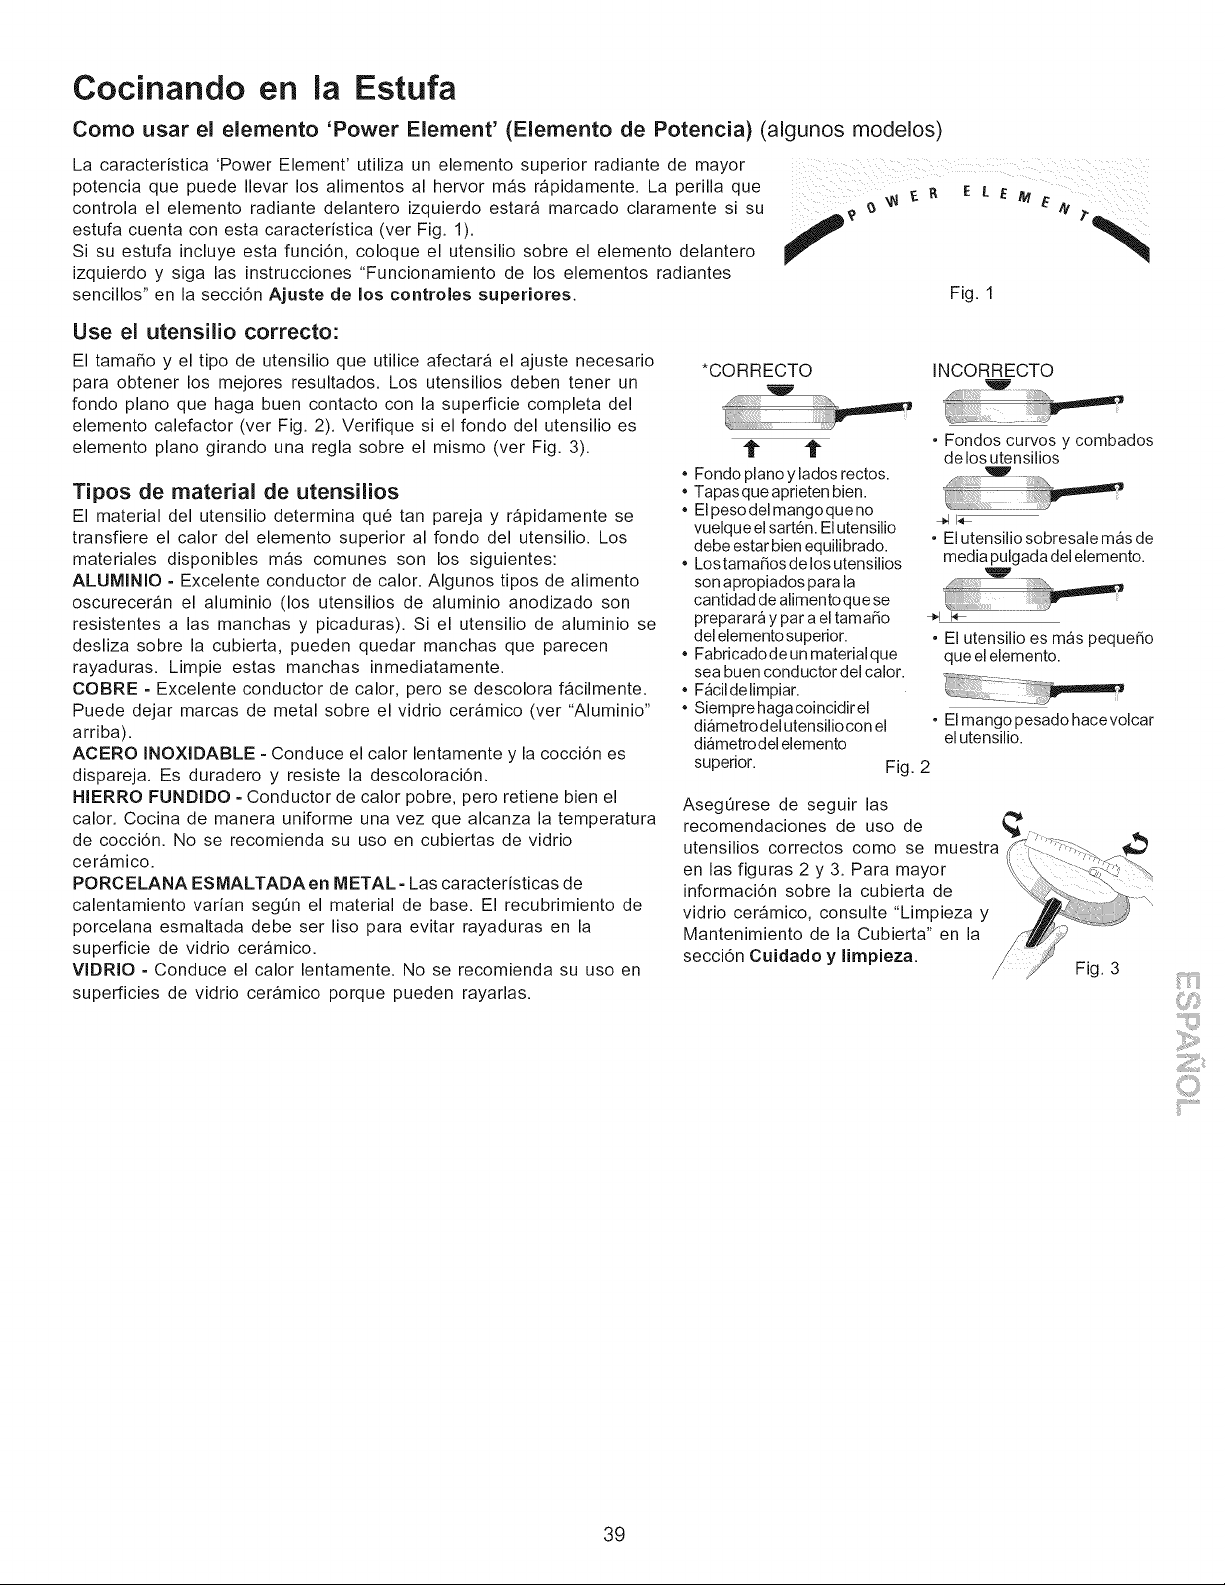
Cocinando en la Estufa
Como usar el elemento 'Power Element' (Elemento de Potencia) (algunos modelos)
La caracteristica 'Power Element' utiliza un elemento superior radiante de mayor
potencia que puede Ilevar los alimentos al hervor m_s rapidamente. La perilla que ..... 11 _- _' E [ E M
r
controla el elemento radiante delantero izquierdo estara marcado claramente si su _ _ _"/it
estufa cuenta con esta caracteristica (ver Fig. 1).
f
Si su estufa incluye esta funci6n, coloque el utensilio sobre el elemento delantero
izquierdo y siga las instrucciones "Funcionamiento de los elementos radiantes
sencillos" en la secci6n Ajuste de los controles superiores. Fig. 1
Use el utensilio correcto:
El tamaSo y el tipo de utensilio que utilice afectara el ajuste necesario
para obtener los mejores resultados. Los utensilios deben tener un
fondo piano que haga buen contacto con la superficie completa del
elemento calefactor (ver Fig. 2). Verifique si el fondo del utensilio es
elemento piano girando una regla sobre el mismo (ver Fig. 3).
Tipos de material de utensilios
El material del utensilio determina qu6 tan pareja y r_pidamente se
transfiere el calor del elemento superior al fondo del utensilio. Los
materiales disponibles mas comunes son los siguientes:
ALUMINIO = Excelente conductor de calor. Algunos tipos de alimento
oscureceran el aluminio (los utensilios de aluminio anodizado son
resistentes a las manchas y picaduras). Si el utensilio de aluminio se
desliza sobre la cubierta, pueden quedar manchas que parecen
rayaduras. Limpie estas manchas inmediatamente.
COBRE = Excelente conductor de calor, pero se descolora f_cilmente.
Puede dejar marcas de metal sobre el vidrio ceramico (ver "Aluminio"
arriba).
ACERO INOXIDABLE =Conduce el calor lentamente y la cocci6n es
dispareja. Es duradero y resiste la descoloraci6n.
HIERRO FUNDIDO =Conductor de calor pobre, pero retiene bien el
calor. Cocina de manera uniforme una vez que alcanza la temperatura
de cocci6n. No se recomienda su uso en cubiertas de vidrio
ceramico.
PORCELANA ESMALTADA en METAL =Las caracteristicas de
calentamiento varian seg0n el material de base. El recubrimiento de
porcelana esmaltada debe ser liso para evitar rayaduras en la
superficie de vidrio ceramico.
VlDRIO = Conduce el calor lentamente. No se recomienda su uso en
superficies de vidrio ceramico porque pueden rayarlas.
*CORRECTO INCORRECTO
t" 1i"
Fondo piano y lados rectos.
Tapasque aprieten bien.
Elpeso del mangoque no
vuelque el sart6n. Elutensilio
debe estar bien equilibrado.
Lostama_os de los utensilios
son apropiados para la
cantidad de alimentoque se
preparara y par a el tama_o
del elemento superior.
Fabricadode un materialque
sea buen conductor del calor.
F_cildelimpiar.
Siempre haga coincidir el
diametro del utensilio con el
diametrodel elemento
superior.
• Fondos curvos y combados
de los utensilios
• El utensilio sobresale mas de
media pulgada del elemento.
• El utensilio es mas peque_o
que el elemento.
• El mango pesado hacevolcar
el utensilio.
Fig. 2
Aseg0rese de seguir las
recomendaciones de uso de
utensilios correctos como se muestra
en las figuras 2 y 3. Para mayor
informaci6n sobre la cubierta de
vidrio ceramico, consulte "Limpieza y
Mantenimiento de la Cubierta" en la
secci6n Cuidado y limpieza.
Fig. 3
,iiii¢"'"i!ii_
ii'i......................
39
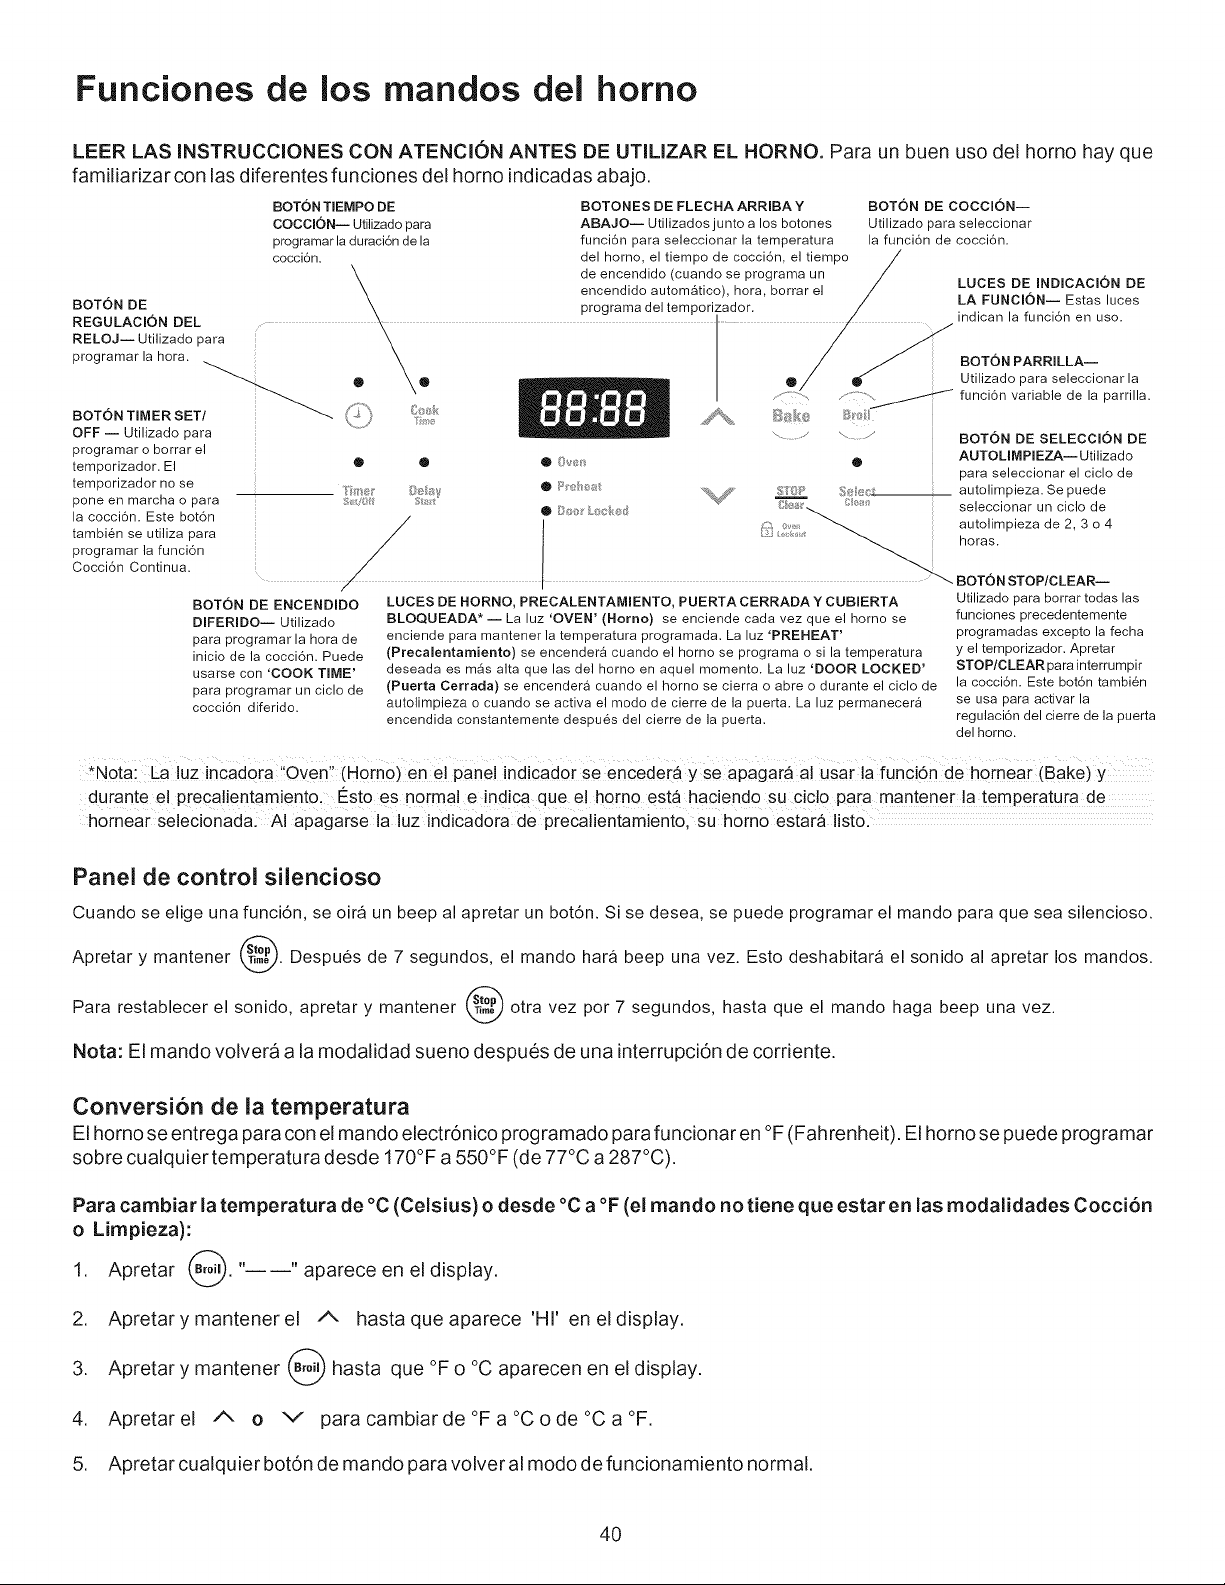
Funciones de los mandos dei homo
LEER LAS INSTRUCCIONES CON ATENCION ANTES DE UTILIZAR EL HORNO. Para un buen uso del horno hay que
familiarizar con las diferentes funciones del homo indicadas abajo.
BOTON TEMPO DE
COCClON-- Utilizado para
programar la duraci6n de la
cocci6n.
BOTON DE
REGULACION DEL
RELOJJ Utilizado para
programar la hora.
BOTON TIMER SET _. /
OFF -- Utilizado para
programar o borrar el
temporizador. El
temporizador no se
pone en marcha o para
la cocci@. Este bot6n
tambi@ se utiliza para
programar la funci6n
Cocci6n Continua.
g_/f
BOTONES DE FLECHA ARRIBA Y
ABAJO-- Utilizados junto a los botones
funci6n para seleccionar la temperatura
del homo, el tiempo de cocci6n, el tiempo
de encendido (cuando se programa un
encendido autom_tico), hora, borrar el
programa del temporizador.
BOTON DE COCCIONJ
Utilizado para seleccionar
la funci6n de cocci6n.
BOTON DE ENCENDIDO
DIFERIDO-- Utilizado
para programar la hora de
inicio de la cocci6n. Puede
usarse con 'COOK TIME'
para programar un ciolo de
cocci@ diferido.
..........::?_
®
LUCES DE HORNO, PRECALENTAMIENTO, PUERTA CERRADA Y CUBIERTA
BLOQUEADA* J La luz 'OVEN' (Homo) se enciende cada vez que el homo se
enciende para mantener la temperatura programada. La hz 'PREHEAT'
(Precalentamiento) se encender_ cuando el horno se programa o si la temperatura
deseada es m_s alta que las del homo en aquel momento. La luz 'DOOR LOCKED'
(Puerta Cerrada) se encender_ cuando el homo se cierra o abre o durante el ciclo de
autolimpieza o cuando se activa el modo de cierre de la puerta. La luz permanecer&
encendida constantemente despues del cierre de la puerta.
LUCES DE INDICAClON DE
LA FUNCIONJ Estas luces
indican la funci6n en uso.
BOTON PARRILLAJ
Utilizado para seleccionar la
funci6n variable de la parrilla.
BOTON DE SELECCION DE
AUTOLIMPIEZA-- Utilizado
para seleccionar el ciclo de
autolimpieza. Se puede
seleccionar un ciclo de
autolimpieza de 2, 3 o 4
horas.
BOTON STOP/CLEAR--
Utilizado para borrar todas las
funciones precedentemente
programadas excepto la fecha
y el temporizador. Apretar
STOP/CLEAR para interrumpir
la cocci@. Este bot6n tambi@
se usa para activar la
regulaci6n del cierre de la puerta
del horno.
,,0tai La luz inCad0ra :!oyen!: (H0[a0)ene! panel indicado[ se enCede[_ Yse aPagar_ ai Usar ia funCi@ de h0mea[ (Bake) y
durante el precalientamiento, I_sto es normal e indica que el homo esta haciendo su ciclo Para mantener la temperatura de
hornear selecionada: AI apagarse la hz indicadora de precalientamiento, su horno estara listo.
Panel de control silencioso
Cuando se elige una funci6n, se oira un beep al apretar un bot6n. Si se @sea, se puede programar el mando para que sea silencioso.
Apretar y mantener @. Despu6s de 7 segundos, el mando hara beep una vez. Esto deshabitara el sonido al apretar los mandos.
Para restablecer el sonido, apretar y mantener @ otra vez por 7 segundos, hasta que el mando haga beep una vez.
Nota: El mando volvera a la modalidad sueno despues de una interrupci6n de corriente.
Conversi6n de la temperatura
El horno se entrega para con el mando electr6nico programado para funcionar en °F (Fahrenheit). El horno se puede programar
sobre cualquier temperatura desde 170°F a 550°F (de 77°C a 287°C).
Para cambiar la temperatura de °C (Celsius) o desde °C a °F (el mando no tiene que estar en las modalidades Cocci6n
o Limpieza):
1. Apretar @. " "aparece en el display.
2. Apretarymantenerel A hastaqueaparece'Hl' eneldisplay.
3. Apretar y mantener @ hasta que °F o °C aparecen en el display,
4. Apretarel A o v paracambiarde°Fa°Code°Ca°F.
5. Apretar cualquier bot6n de mando para volver al modo de funcionamiento normal.
4O
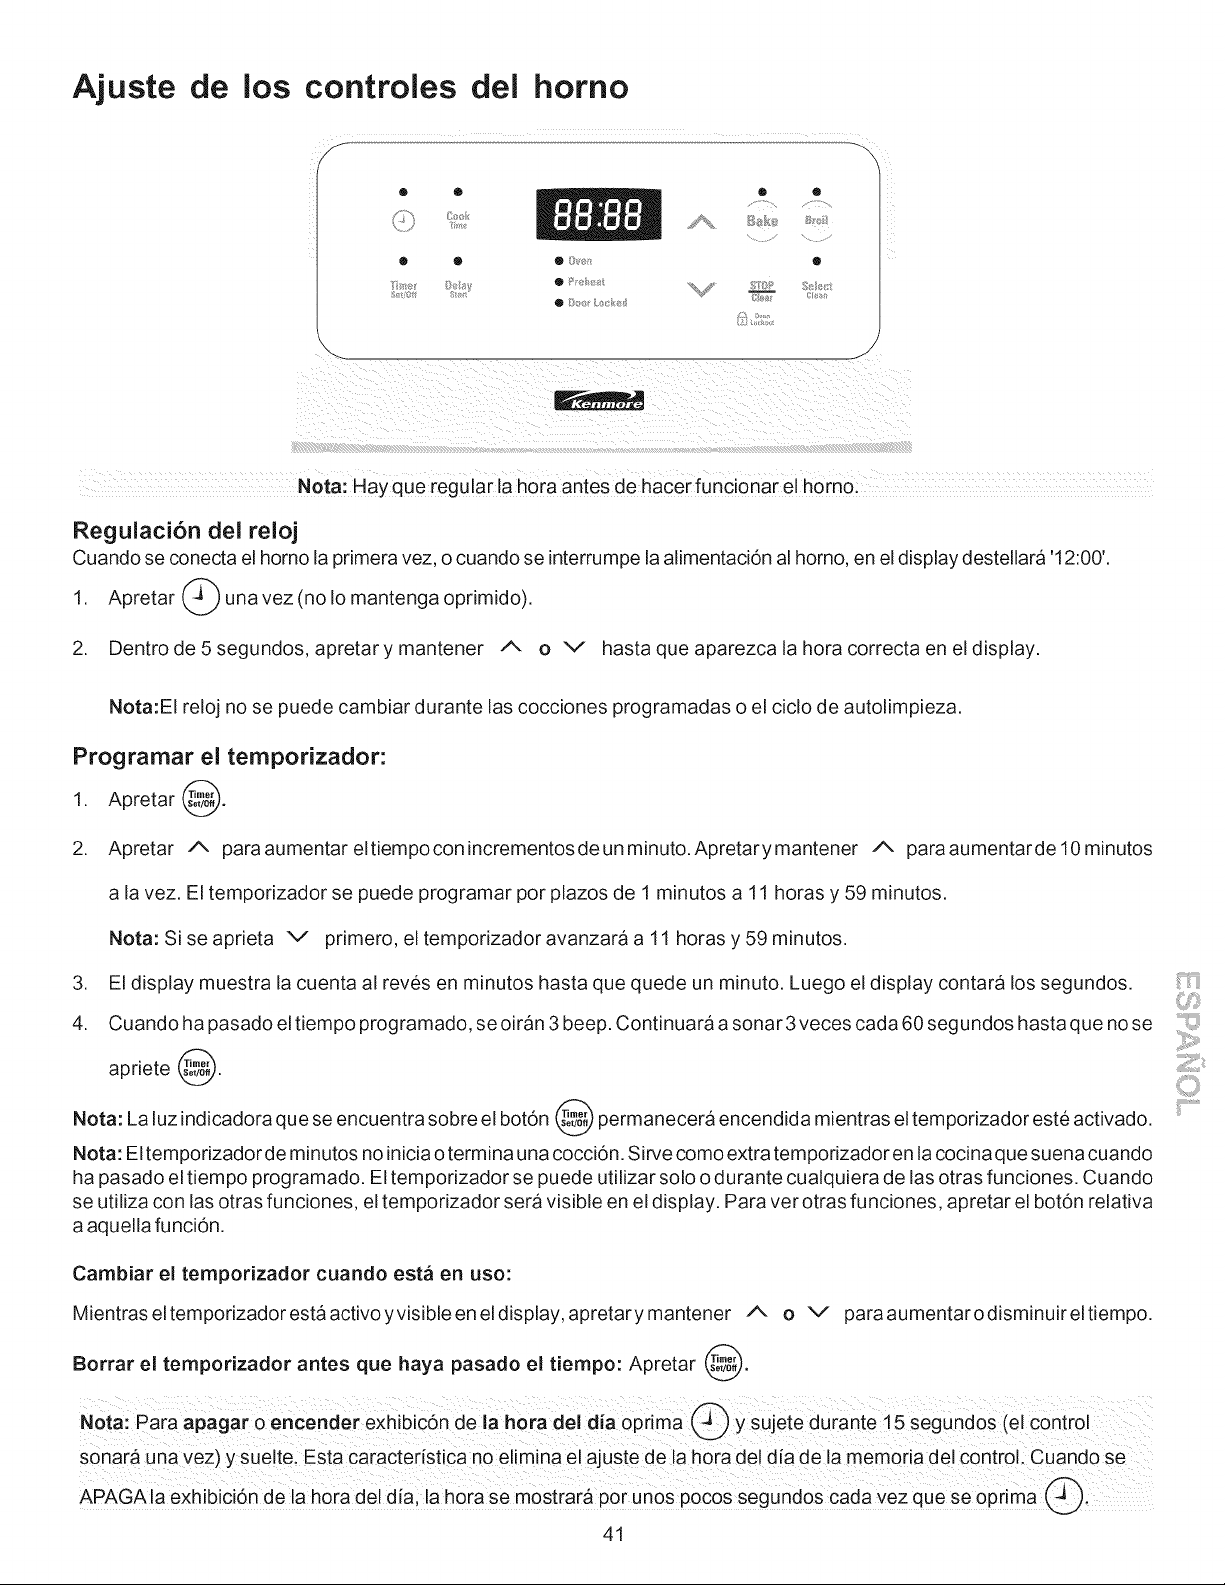
Ajuste de los controles dei homo
O O O
S_.8_ Styli O _}_/_ LI_4:_ _/_s===_ C/_
Nora: Hay que regular la hora antes de hacerfUnci0nar el horno:
Regulaci6n del reloj
Cuando se conecta el horno la primera vez, o cuando se interrumpe la alimentaci6n al homo, en el display destellara '12:00'.
1. Apretar _ una vez (no Io mantenga oprimido).
2. Dentrode5segundos, apretarymantener A O V hastaqueaparezcalahoracorrectaeneldisplay.
Nota:EI reloj no se puede cambiar durante las cocciones programadas o el ciclo de autolimpieza.
Programar el temporizador:
1. Apretar @.
2. Apretar A paraaumentareltiempoconincrementosdeunminuto.Apretarymantener A paraaumentardel0minutos
a la vez. El temporizador se puede programar por plazos de 1 minutos a 11 horas y 59 minutos.
.
4.
Nota: Si se aprieta v primero, el temporizador avanzara a 11 horas y 59 minutos.
El display muestra la cuenta al reves en minutos hasta que quede un minuto. Luego el display contara los segundos.
Cuando ha pasado el tiempo programado, se oiran 3 beep. Continuara a sonar 3 veces cada 60 segundos hasta que no se
apriete @.
Nota: La luz indicadora que se encuentra sobre el botdn @ permanecera encendida mientras el temporizador este activado.
Nota: El temporizador de minutos no inicia o termina una cocci6n. Sirve como extra temporizador en la cocina que suena cuando
ha pasado el tiempo programado. El temporizador se puede utilizar solo o durante cualquiera de las otras funciones. Cuando
se utiliza con las otras funciones, el temporizador sera visible en el display. Para ver otras funciones, apretar el bot6n relativa
a aquella funci6n.
Cambiar el temporizador cuando est_ en uso:
Mientras el temporizador esta activo yvisible en el display, apretary mantener A o v para aumentar odisminuir el tiempo.
Borrar el temporizador antes que haya pasado el tiempo: Apretar @.
Nora: para apagar o encender exhibicdn de la hot adel alia oprima @ y sujete dUrante 15 Segund0s (el €0ntr01
sonar& una vez)y suelte, Esta caractedstica n0 elimina el ajuste de !a hora de! d!a de la memoria del control: Cuando se
APAGAla exhibicidn de hora del dis; Is h0ra se mostrara por unos pocos segund0S cada vez qua se 0prima _i
41
_iiii¢"'"i!ii_
Ajuste de los controles del homo (cont.)
Programar o cambiar la temperatura de cocci6n
El horno se puede programar para cocer a cualquier temperatura entre 170°F y 550°F (77°C y 287°C).
Regular los mandos para cocer:
1. Apretar B,_. " "aparece en el display.
2. Dentrode5segundos, apretar A o v .Eldisplaymostrara'350°F(177°C).'Apretandoymanteniendo A o v ,
la temperatura se podra regular con incrementos de 5°F (1°C si el control esta programado para mostrar grados Celsius)
a la vez.
3. Encuantosesuelta A o v ,elhornoempiezaacalentarsehastalatemperaturaseleccionada. Cuandolatemperatura
visualizada alcanza la temperatura de cocci6n deseada, la luz indicadora de precalentamiento se APAGARA y el mando
hara beep 3 veces.
4. Para cancelar la cocci6n, apretar @.
Cambiar la temperature del horno cuando la coccion ya ha empezado:
1. Apretar _ y asegurarse de que la temperatura de cocci6n este visualizada.
2. Apretar A o v ,paraaumentarodisminuirlatemperaturaprogramada.
Regular el mando pare cocci6n continua o ahorro de energia de 12 horas
El mando del homo tiene una caractedstica de Ahorro de energia de 12que apagara el homo si se deja elhomo encendido pormas de 11
horas y 59 minutos. Elhomo se puede programar para ignorar esta caractedsticas para obtener una cocci6n continua.
Regular el mando pare una cocci6n continua:
1. Apretar y mantener @ por 5 segundos hasta oir un sonido, aparecera"---- hr" en el display para una cocci6n continua.
En el display aparecera otra vez la hora.
2. Para borrar ia funcidn de Coccidn Continua, apretar @ y mantener por 5 segundos hasta oir un sonido, Aparecera"12h"
en el display para indicar que el mando ha restablecido la caractedstica Ahorro de energia de 12 horas.
Oven
Regular el mando pare el cierre del homo []
Lockout
El mando se se puede programar para cerrar la puerta del homo y desactivar los mandos del homo.
Regular el mando pare la caracteristica de cierre del homo:
1. Apretar @ y mantener pot 3 segundos. Aparecera "Loc" en el display, la luz que indica "Puerta cerrada" destellara y el cierre
motorizado de lapuerta se cerra raautomaticamente NO abrir la puerta dei homo mientras laluz de indicaci6n destella. La puerta
se cierra en unos 15 segundos. Una vez cerrada la puerta del homo, en el display aparecera la hora.
2. Para borrar la caractedstica de cierre del homo, apretar @ y mantener pot 3 segundos. El mando abrira ia puerta del
homo y volvera a su funcionamiento normal.
Nota: Si se aprieta cualquier bot6n en la modaiidad Homo Cerrado, aparecera "Loc" en el display hasta que no
se sueite ei bot6n de mando,
42
Ajuste de los controles del homo (cont.)
Para regular las funciones de cocci6n programada y encendido diferido
Los mandos _ TIEMPO DE COCCl0N y _ ENCENDIDO DIFERIDO mandan la cocci6n programada para ENCENDER
i
oAPAGAR el homo a los momentos precedentemente programados. El horno se puede programar para iniciar inmediatamente
y apagarse automaticamente ('Timed Bake') o para iniciar la cocci6n en un momento posterior con un tiempo de encendido
diferido (Delay Start).
Nota: gurante el horneado cr0nometrado (Timed Bake)i la luz indiCad0ra nofUncionar&i
Para programar el horno para que inicie a cocer
programada):
1. Asegurarse de que el reloj muestre la hora correcta.
2. Colocar la comida en el homo,
inmediatamente y se apague autom&ticamente (Cocci6n
3. Apretar _. "
°" se despNega en la pantalla.
4. Dentrode5segundos, apretar A o v ,EIdisplaymostrara"350°F(177°C)."Apretandoymanteniendo A o v ,
.
la temperatura se podra regular con incrementos de 5°F (1°C si el control esta programado para mostrar grados Celsius)
a la vez.
Apretar _. '0:00' destellara en el display (HR:MIN).
6. Apretar A O V hasta que el tiempo de cocci6n deseado no aparece en el display.
7. El horno se ENCIENDE e inicia a calentarse
Regular el homo para un inicio posterior y apagamiento autom&tico Encendido diferido:
1. Asegurarse de que el reloj muestre la hora correcta.
2. Colocar la comida en el homo.
3. Apretar (_).' .... se despNega en la pantalla.
4. Dentrode5segundos, apretar A o v .EIdisplaymostrara"350°F(177°C)."Manteniendoapretado A o v ,la
temperatura puede set regulada con incrementos de 5°F (1 °C si el control esta programado para mostrar grados Celsius)
a la vez.
5. Apretar _. "0:00" destellara en el display (HR:MIN).
6. Apretar A o v hasta que el tiempo de cocci6n deseado no aparece en el display.
7. Apretar _. Destellara en el display el tiempo de encendido mas pr6ximo posible.
8. Apretar A o v hasta que el tiempo de parada deseado no aparece en el display.
9. Unavezreguladoslos mandos, elmandocalculacuandoterminaralacocci6nafindeiniciarala horaqueseha programado.
10. El horno se encendera a la hora de inicio programada y comenzara a calentarse.
Cuando termina el tiempo de coccion programado:
a. aparecera "END" en la ventana del display y el horno se apagara automaticamente.
b. El mando hara beep 3 veces cada 60 segundos hasta que no se apriete @.
ii'i......................
Para cambiar la temperatura del homo despu6s que ha iniciado la cocci6n:
1. Apretar el bot6n funci6n que se desea cambiar.
2. Apretar A o v pararegularlaprogramaci6n.
Tenga cuidado con las caracterfsticas de cocci6n programada y encendido diferido. Las comidas que se
estropean facilmente tales como la leche, los huevos, el pescado, las carnes o la carne de ave deben estar refrigeradas
antes de la cocci6n. Sin embargo, incluso si se han refrigerado, estos alimentos no deberfan estar en le horno por mas de
1 hora antes de empezar la cocci6n y deberfan ser removidos del horno inmediatamente despues de terminar la cocci6n.
43
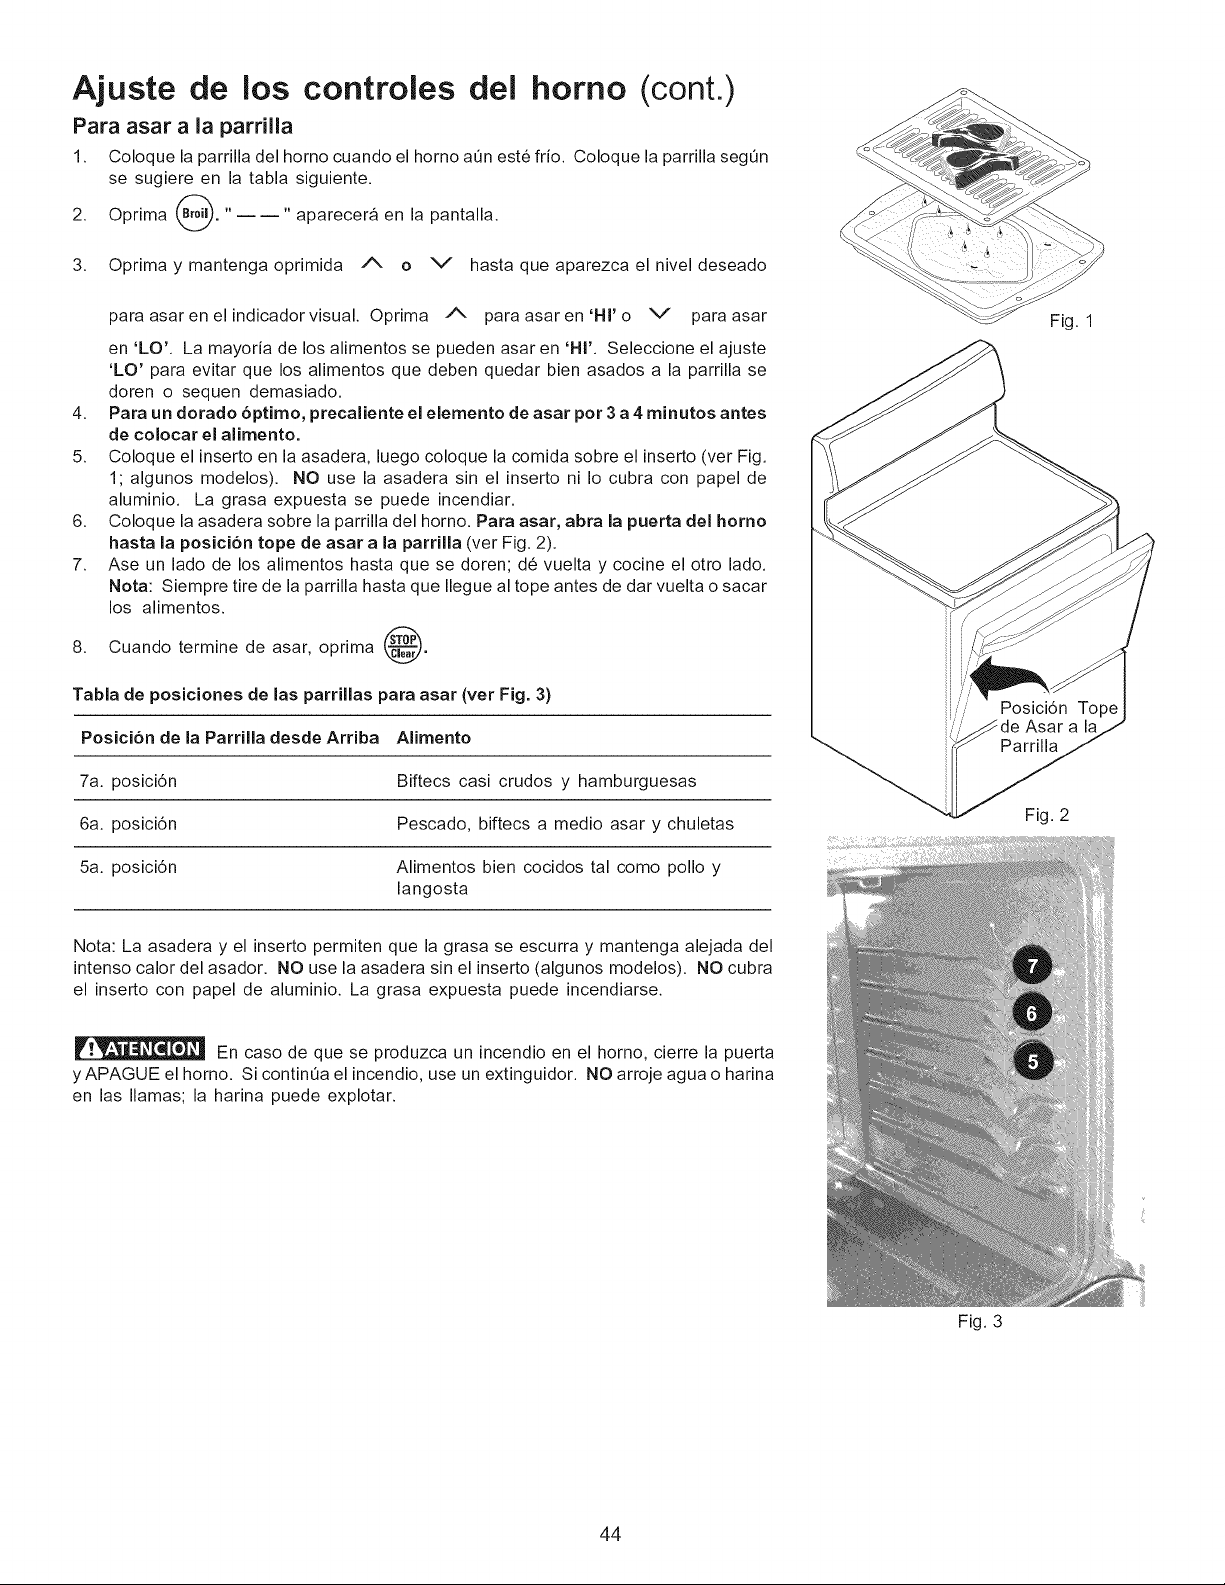
Ajuste de los controles del horno (cont.)
Para asar a la parrilla
1. Coloque la parrilla del horno cuando el horno a0n est6 frio. Coloque la parrilla seg0n
se sugiere en la tabla siguiente.
2. Oprima (Broil. "ii" aparecera en la pantalla.
3. Oprima y mantenga oprimida /X o V hasta que aparezca el nivel deseado
para asaren el indicadorvisual. Oprima /N para asaren'Hl'o V para asar
en 'LO'. La mayoria de los alimentos se pueden asar en 'HI'. Seleccione el ajuste
'LO' para evitar que los alimentos que deben quedar bien asados a la parrilla se
doren o sequen demasiado.
4. Para un dorado 6ptimo, precaliente el elemento de asar por 3 a 4 minutos antes
de colocar el alimento.
5. Coloque el inserto en la asadera, luego coloque la comida sobre el inserto (ver Fig.
1; algunos modelos). NO use la asadera sin el inserto ni Io cubra con papel de
aluminio. La grasa expuesta se puede incendiar.
6. Coloque la asadera sobre la parrilla del horno. Para asar, abra la puerta del homo
hasta la posici6n tope de asar a la parrilla (ver Fig. 2).
7. Ase un lado de los alimentos hasta que se doren; d6 vuelta y cocine el otto lado.
Nora: Siempre tire de la parrilla hasta que Ilegue al tope antes de dar vuelta o sacar
los alimentos.
8.
Cuando termine de asar, oprima @.
Tabla de posiciones de las parrillas para asar (vet Fig. 3)
Posici6n de la Parrilla desde Arriba Alimento
7a. posici6n Biftecs casi crudos y hamburguesas
6a. posici6n Pescado, biftecs a medio asar y chuletas
5a. posici6n Alimentos bien cocidos tal como polio y
langosta
Nota: La asadera y el inserto permiten que la grasa se escurra y mantenga alejada del
intenso calor del asador. NO use la asadera sin el inserto (algunos modelos). NO cubra
el inserto con papel de aluminio. La grasa expuesta puede incendiarse.
En caso de que se produzca un incendio en el homo, cierre la puerta
yAPAGUE el horno. Si continQa el incendio, use un extinguidor. NO arroje agua o harina
en las llamas; la harina puede explotar.
Fig. 3
Fig. 1
Fig. 2
44
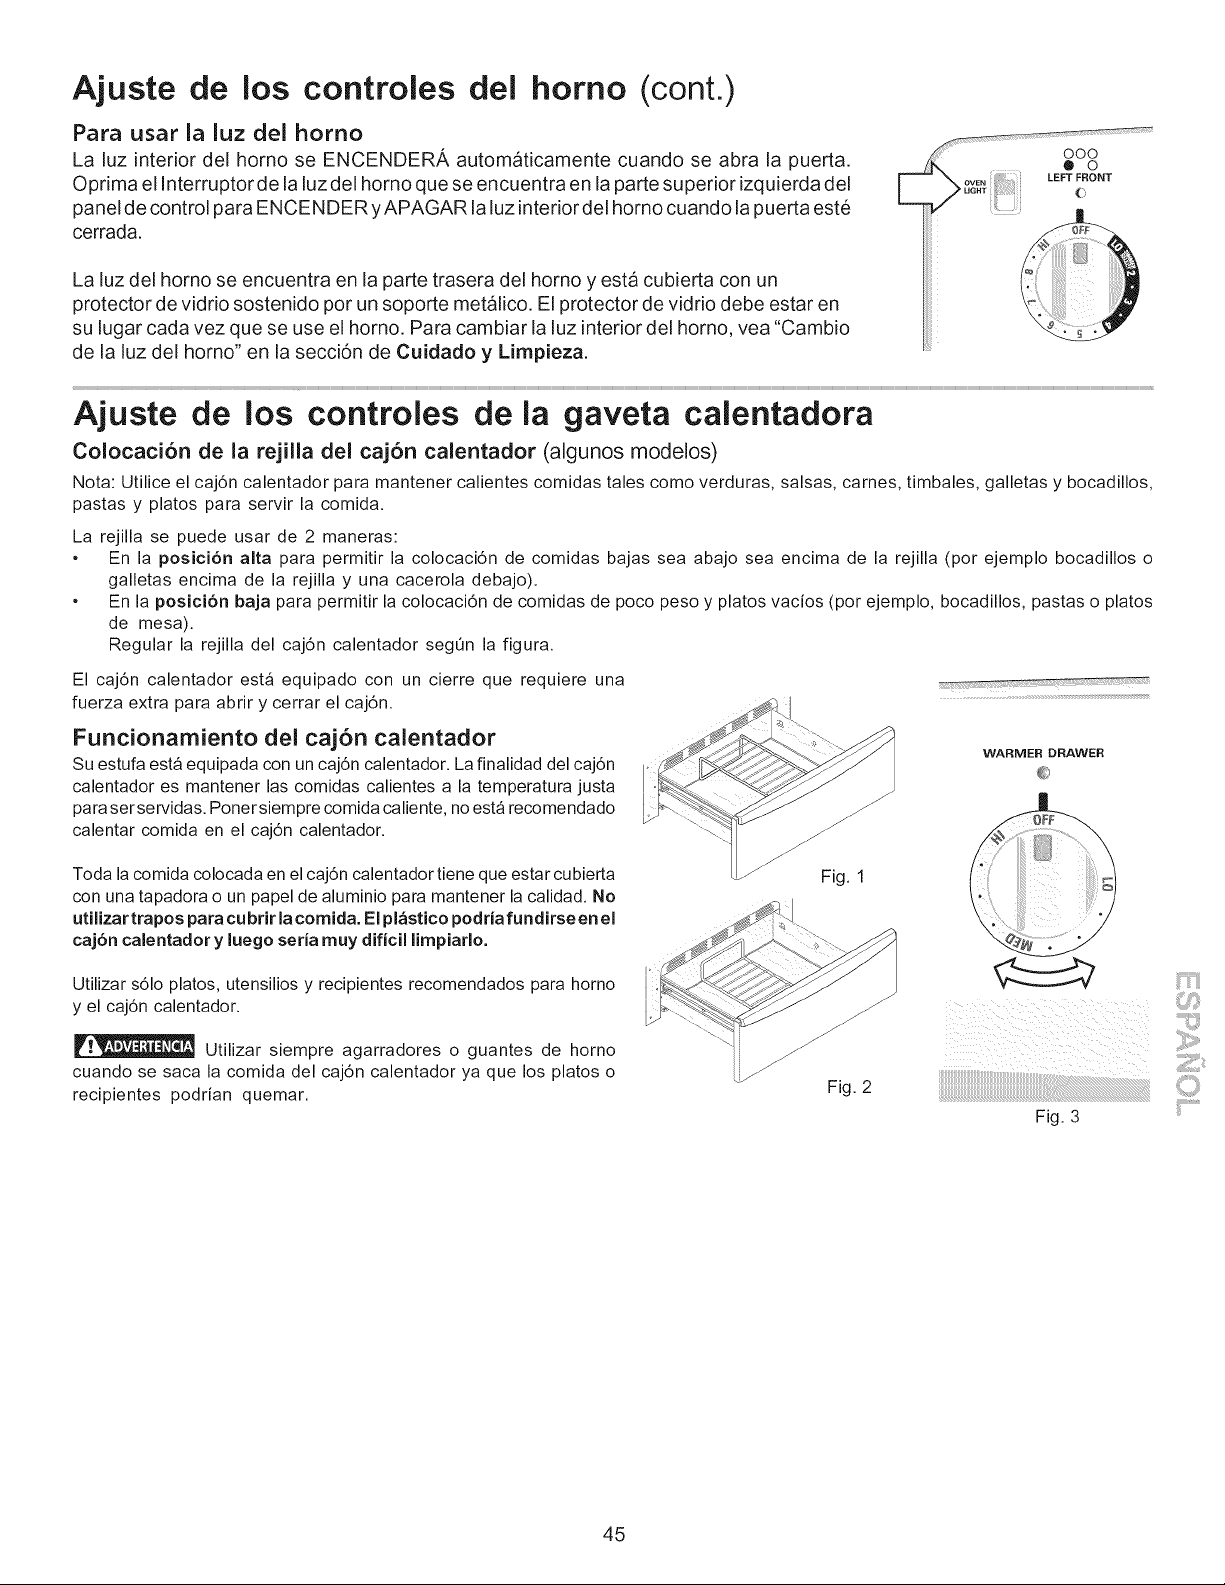
Ajuste de los controles del homo (cont.)
Para usar la luz del homo
La luz interior del homo se ENCENDERA automaticamente cuando se abra la puerta.
Optima el Interruptor de la luz del homo que se encuentra en la parte superior izquierda del
panel de control para ENCENDER yAPAGAR la luz interiordel homo cuando la puerta este
cerrada.
La luz del horno se encuentra en la parte trasera del horno y esta cubierta con un
protector de vidrio sostenido por un soporte metalico. El protector de vidrio debe estar en
su lugar cada vez que se use el homo. Para cambiar la luz interior del homo, vea "Cambio
de la luz del homo" en la secciOn de Cuidado y Limpieza.
C
ooo
.... @ o
Ajuste de los controles de la gaveta calentadora
Colocaci6n de la rejilla del caj6n calentador (algunos modelos)
Nota: Utilice el caj6n calentador para mantener calientes comidas tales como verduras, salsas, carnes, timbales, galletas y bocadillos,
pastas y platos para servir la comida.
La rejilla se puede usar de 2 maneras:
* En la posici6n alta para permitir la colocaci6n de comidas bajas sea abajo sea encima de la rejilla (por ejemplo bocadillos o
galletas encima de la rejilla y una cacerola debajo).
* En la posici6n baja para permitir la colocaci6n de comidas de poco peso y platos vacios (por ejemplo, bocadillos, pastas o platos
de mesa).
Regular la rejilla del caj6n calentador segt_n la figura.
El caj6n calentador est_ equipado con un cierre que requiere una
fuerza extra para abrir y cerrar el caj6n.
Funcionamiento del caj6n calentador
Su estufa est_ equipada con un caj6n calentador. La finalidad del caj6n
calentador es mantener las comidas calientes a la temperatura justa
para ser servidas. Poner siempre comida caliente, no est_ recomendado
calentar comida en el caj6n calentador.
WARMER DRAWER
Toda la comida colocada en el caj6n calentador tiene que estar cubierta
con una tapadora o un papel de aluminio para mantener la calidad. No
utilizar trapos para cu brir la comida. El pl&stico podria fundirse en el
caj6n calentador y luego seria muy dificil limpiarlo.
Fig. 1
Utilizar s61o platos, utensilios y recipientes recomendados para horno
y el caj6n calentador.
Utilizar siempre agarradores o guantes de horno
cuando se saca la comida del caj6n calentador ya que los platos o
recipientes podrian quemar.
Fig. 2
Fig. 3
45
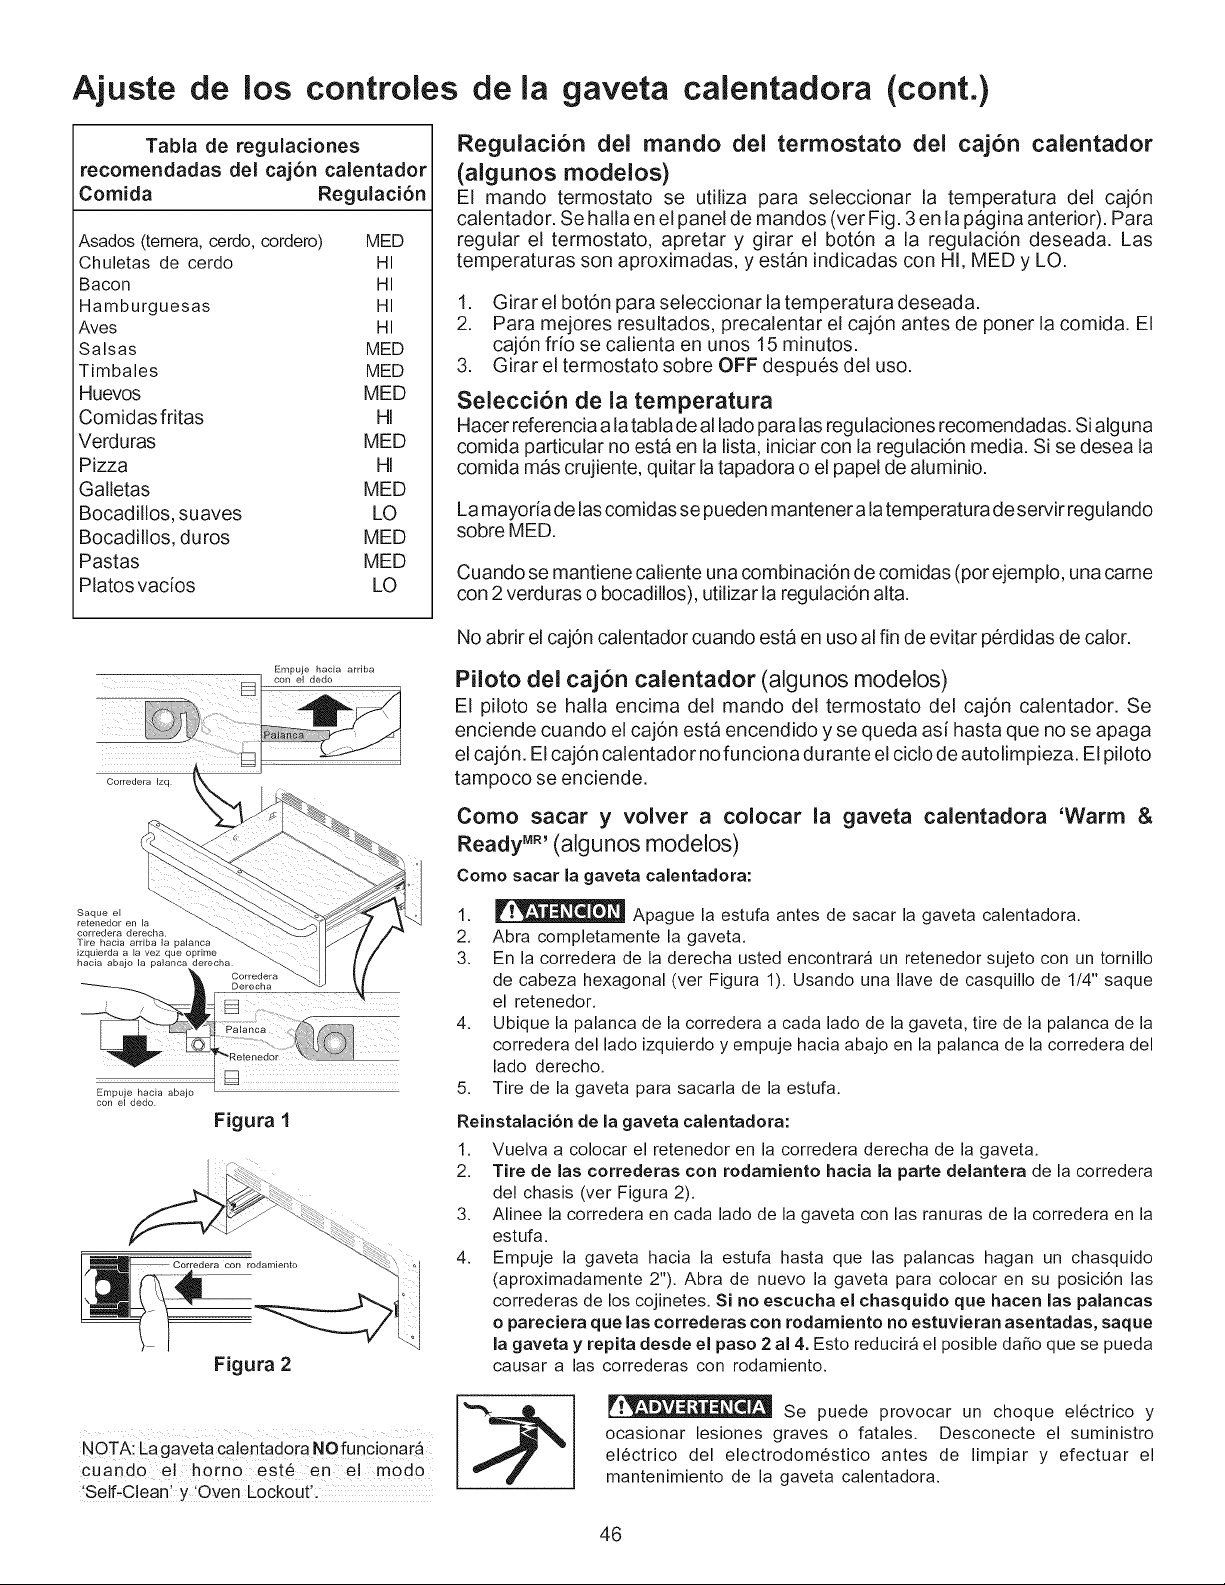
Ajuste de los controles de la gaveta calentadora (cont.)
Tabla de regulaciones
recomendadas del cajon calentador
Comida Regulaci6n
Asados(ternera,cerdo,cordero) MED
Chuletas de cerdo HI
Bacon HI
Hamburguesas HI
Aves HI
Salsas MED
Timbales MED
Huevos MED
Comidas fritas HI
Verduras MED
Pizza HI
Galletas MED
Bocadillos, suaves LO
Bocadillos, duros MED
Pastas MED
Platos vados LO
Regulaci6n del mando del termostato del caj6n calentador
(algunos modelos)
El mando termostato se utiliza para seleccionar la temperatura del caj6n
calentador. Se halla en el panel de mandos (vet Fig. 3 en la pagina anterior). Para
regular el termostato, apretar y girar el bot6n a la regulaci6n deseada. Las
temperaturas son aproximadas, y estan indicadas con HI, MED y LO.
1. Girar el bot6n para seleccionar la temperatura deseada.
2. Para mejores resultados, precalentar el caj6n antes de poner la comida. El
caj6n fdo se calienta en unos 15 minutos.
3. Girar el termostato sobre OFF despues del uso.
Seleccibn de la temperatura
Hacer referencia a la tabla de al lado para las regulaciones recomendadas. Si alguna
comida particular no esta en la list& iniciar con la regulaci6n media. Si se desea la
comida mas crujiente, quitar la tapadora o el papel de aluminio.
La mayoda de las comidas se pueden mantener a la temperatura de servir regulando
sobre MED.
Cuando se mantiene caliente una combinaci6n de comidas (por ejemplo, una came
con 2 verduras o bocadillos), utilizar la regulaci6n alta.
Corredera Izq
Empuje hacia arriba
Saque el
Tire hacia arriba la palanca
izquierda a la vez que oprime
hacia abajo la palanca derecha
Empuje hacia abajo
con el dedo
trq
Figura 1
Figura 2
NOTA: La gaveta calentadora NO funci0nar_
cuando el horno est6 en el modo
'Self-C!eanl y 'Oven L0ck0utl.
No abrir el caj6n calentador cuando esta en uso al fin de evitar 96rdidas de calor.
Piioto del caj6n calentador (algunos modelos)
El piloto se halla encima del mando del termostato del caj6n calentador. Se
enciende cuando el caj6n esta encendido y se queda asi hasta que no se apaga
el caj6n. El caj6n calentador no funciona durante el ciclo de autolimpieza. El piloto
tampoco se enciende.
Como sacar y volver a colocar la
Ready MR'(algunos modelos)
Como sacar la gaveta calentadora:
gaveta calentadora 'Warm &
1. _ Apague la estufa antes de sacar la gaveta calentadora.
2. Abra completamente la gaveta.
3. En la corredera de la derecha usted encontrar_ un retenedor sujeto con un tornillo
de cabeza hexagonal (ver Figura 1). Usando una Ilave de casquillo de 1/4" saque
el retenedor.
4. Ubique la palanca de la corredera a cada lado de la gaveta, tire de la palanca de la
corredera del lado izquierdo y empuje hacia abajo en la palanca de la corredera del
lado derecho.
5. Tire de la gaveta para sacarla de la estufa.
Reinstalacibn de la gaveta calentadora:
1. Vuelva a colocar el retenedor en la corredera derecha de la gaveta.
2. Tire de las correderas con rodamiento hacia la parte delantera de la corredera
del chasis (ver Figura 2).
3. Alinee la corredera en cada lado de la gaveta con las ranuras de la corredera en la
estufa.
4. Empuje la gaveta hacia la estufa hasta que las palancas hagan un chasquido
(aproximadamente 2"). Abra de nuevo la gaveta para colocar en su posici6n las
correderas de los cojinetes. Si no escueha el chasquido que hacen las palaneas
o pareciera que las correderas con rodamiento no estuvieran asentadas, saque
la gaveta y repita desde el paso 2 al 4. Esto reducir_ el posible dafio que se pueda
causar alas correderas con rodamiento.
Se puede provocar un choque el6ctrico y
ocasionar lesiones graves o fatales. Desconecte el suministro
el6ctrico del electrodom6stico antes de limpiar y efectuar el
mantenimiento de la gaveta calentadora.
46
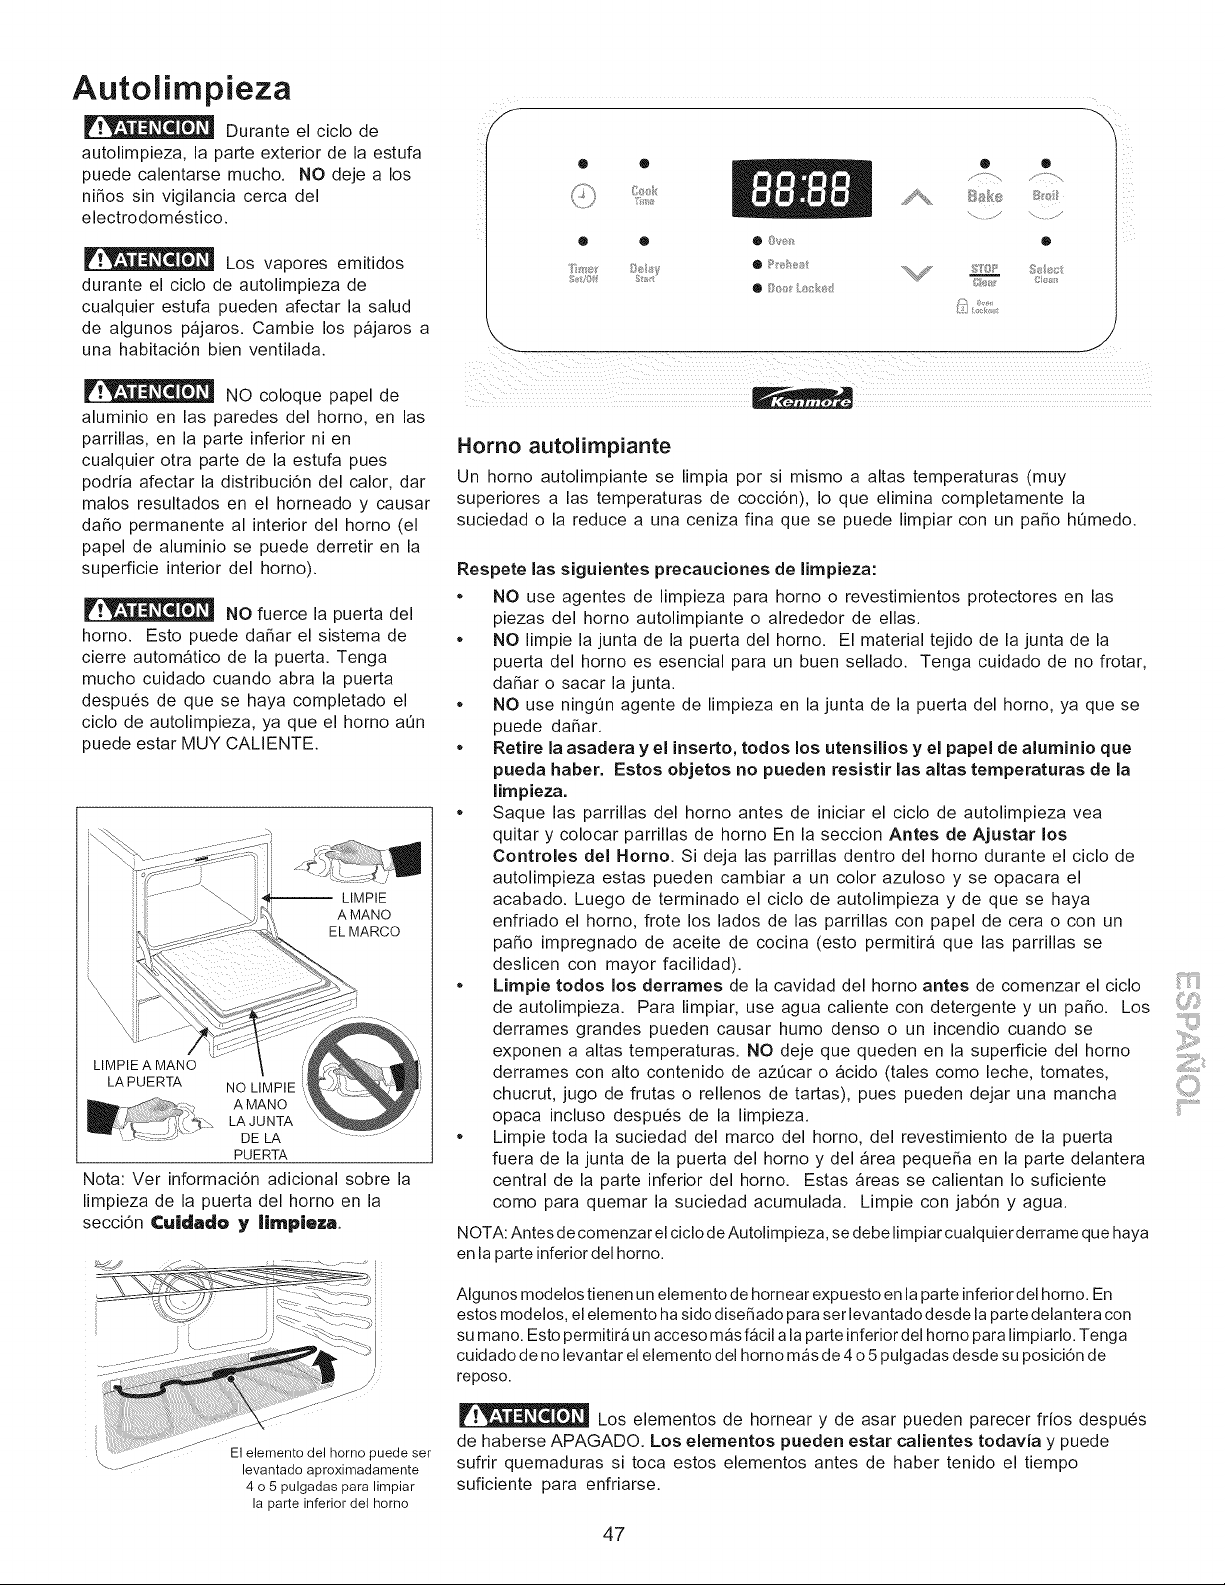
Autolimpieza
Durante el ciclo de
autolimpieza, la parte exterior de la estufa
puede calentarse mucho. NO deje a los
ni_os sin vigilancia cerca del
electrodom6stico.
Los vapores emitidos
durante el ciclo de autolimpieza de
cualquier estufa pueden afectar la salud
de algunos pajaros. Cambie los pajaros a
una habitaci6n bien ventilada.
NO coloque papel de
aluminio en las paredes del homo, en las
parrillas, en la parte inferior ni en
cualquier otra parte de la estufa pues
podria afectar la distribuci6n del calor, dar
malos resultados en el horneado y causar
da_o permanente al interior del horno (el
papel de aluminio se puede derretir en la
superficie interior del horno).
NO fuerce la puerta del
horno. Esto puede da_ar el sistema de
cierre automatico de la puerta. Tenga
mucho cuidado cuando abra la puerta
despu6s de que se haya completado el
ciclo de autolimpieza, ya que el horno a0n
puede estar MUY CALIENTE.
-- LIMPIE
A MANO
EL MARCO
LIMPIE A MANO
LA PUERTA NO LIMPIE
A MANO
LA JUNTA
DE LA
PUERTA
Nota: Ver informaci6n adicional sobre la
limpieza de la puerta del horno en la
secci6n Cuidado y IJmpleza
El elemento del horno puede ser
levantado aproximadamente
4 o 5 pulgadas para limpiar
la parte inferior del homo
® • Q
®
8£5/ }e 8
Homo autolimpiante
Un homo autolimpiante se limpia por si mismo a altas temperaturas (muy
superiores a las temperaturas de cocci6n), Io que elimina completamente la
suciedad o la reduce a una ceniza fina que se puede limpiar con un paso h0medo.
Respete las siguientes precauciones de limpieza:
= NO use agentes de limpieza para horno o revestimientos protectores en las
piezas del horno autolimpiante o alrededor de elias.
• NO limpie la junta de la puerta del horno. El material tejido de la junta de la
puerta del horno es esencial para un buen sellado. Tenga cuidado de no frotar,
da_ar o sacar la junta.
• NO use ningQn agente de limpieza en la junta de la puerta del homo, ya que se
puede da_ar.
• Retire la asadera y el inserto, todos los utensilios y el papel de aluminJo que
pueda haber. Estos objetos no pueden resistir las altas temperaturas de la
limpieza.
• Saque las parrillas del homo antes de iniciar el ciclo de autolimpieza yea
quitar y colocar parrillas de homo En la seccion Antes de Ajustar los
Controles del Homo. Si deja las parrillas dentro del homo durante el ciclo de
autolimpieza estas pueden cambiar a un color azuloso y se opacara el
acabado. Luego de terminado el ciclo de autolimpieza y de que se haya
enfriado el homo, frote los lados de las parrillas con papel de cera o con un
paso impregnado de aceite de cocina (esto permitir_ que las parrillas se
deslicen con mayor facilidad).
• LJmpie todos los derrames de la cavidad del homo antes de comenzar el ciclo
de autolimpieza. Para limpiar, use agua caliente con detergente y un paso. Los
derrames grandes pueden causar humo denso o un incendio cuando se
exponen a altas temperaturas. NO deje que queden en la superficie del homo
derrames con alto contenido de azOcar o acido (tales como leche, tomates,
chucrut, jugo de frutas o rellenos de tartas), pues pueden dejar una mancha
opaca incluso despu6s de la limpieza.
• Limpie toda la suciedad del marco del homo, del revestimiento de la puerta
fuera de la junta de la puerta del homo y del _rea pequeSa en la parte delantera
central de la parte inferior del horno. Estas _reas se calientan Io suficiente
como para quemar la suciedad acumulada. Limpie con jab6n y agua.
NOTA: Antes de comenzar el ciclo de Autolimpieza, se debe limpiar cualquier derrame que haya
en la parte inferior del homo.
Algunos modelos tienen un elemento de hornear expuesto en la parte inferior del homo. En
estos modelos, el elemento ha sido diseSado para ser levantado desde la parte delantera con
su mano. Esto permitir_ un acceso mas facil a la parte inferior del homo para limpiarlo. Tenga
cuidado de no levantar el elemento del homo mas de 4 o 5 pulgadas desde su posici6n de
reposo.
Los elementos de hornear y de asar pueden parecer frios despu_s
de haberse APAGADO. Los elementos pueden estar calientes todavJa y puede
sufrir quemaduras si toca estos elementos antes de haber tenido el tiempo
suficiente para enfriarse.
47
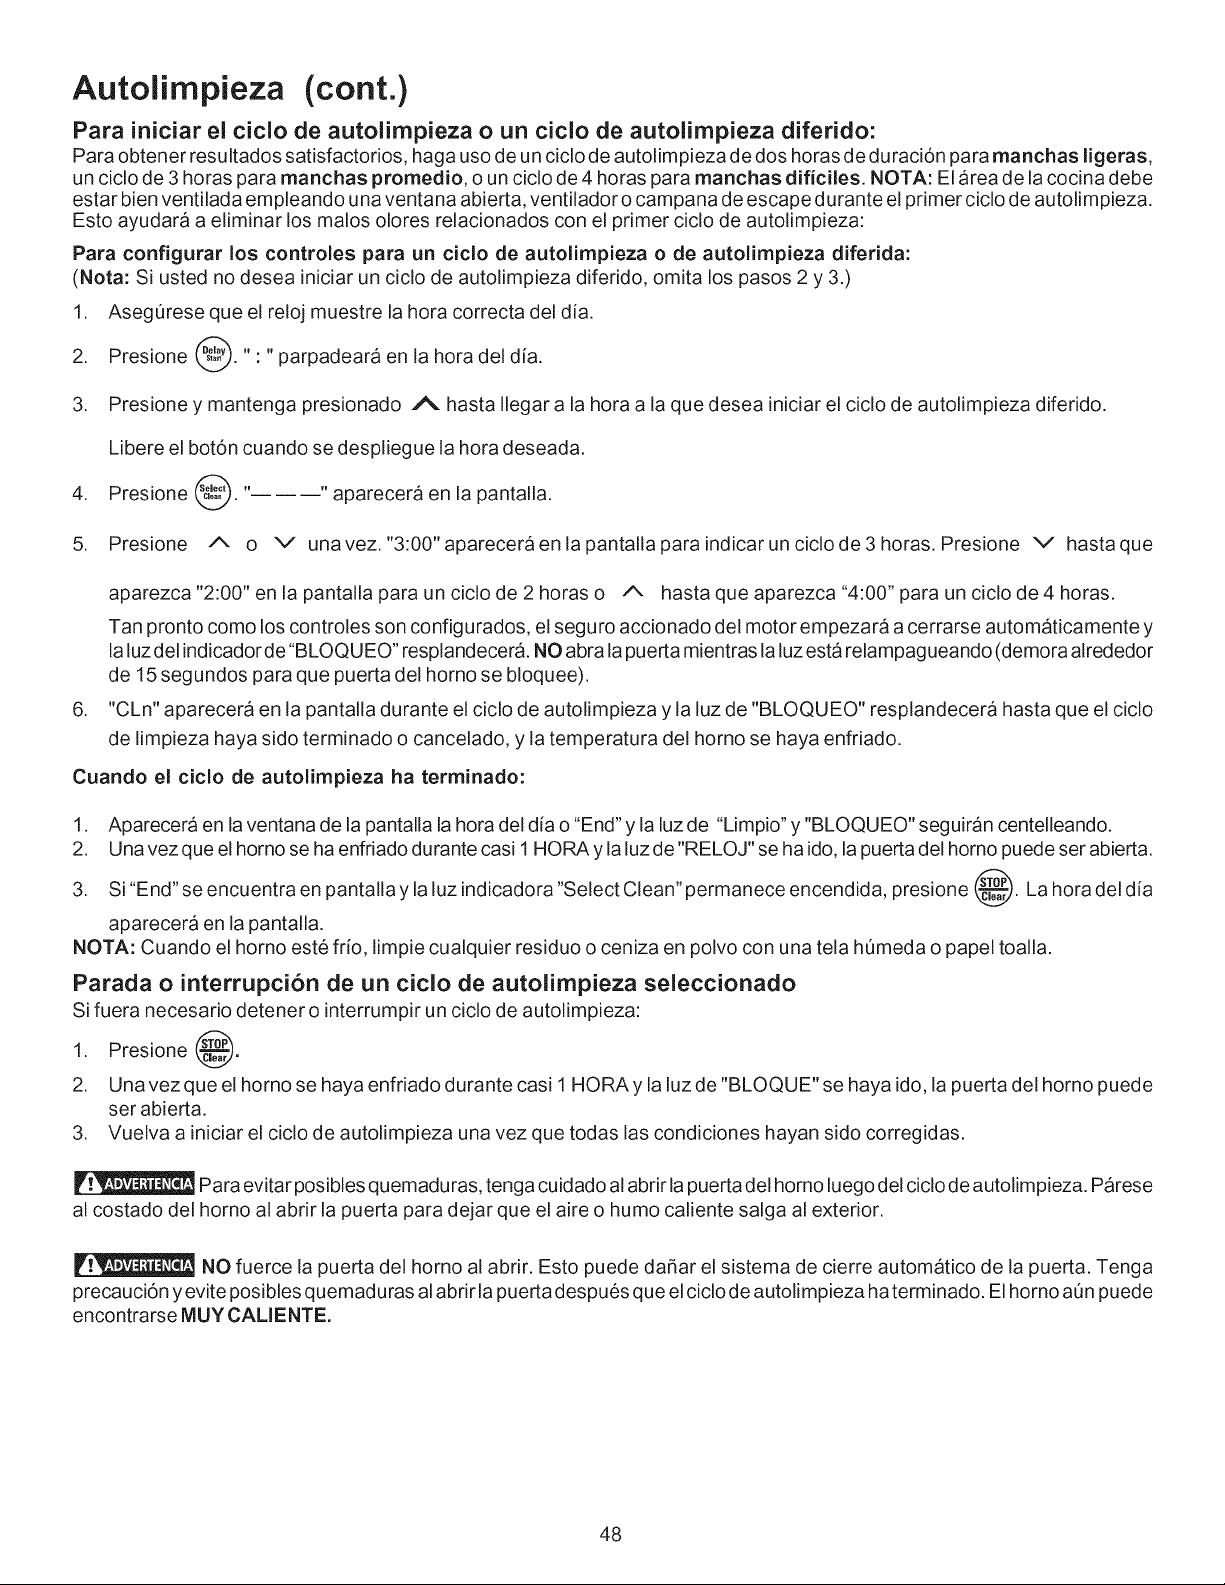
Autolimpieza (cont.)
Para iniciar el ciclo de autolimpieza o un cicio de autolirnpieza diferido:
Para obtener resultados satisfactorios, haga uso de un ciclo de autolimpieza de dos horas de du raci6n para manchas ligeras,
un ciclo de 3 horas para rnanchas promedio, o un ciclo de 4 horas para manchas dificiles. NOTA: El area de la cocina debe
estar bien ventilada empleando una ventana abierta, ventilador o campana de escape durante el primer ciclo de autolimpieza.
Esto ayudara a eliminar los malos olores relacionados con el primer ciclo de autolimpieza:
Para configurar los controles para un ciclo de autoiimpieza o de autolimpieza diferida:
(Nota: Si usted no desea iniciar un ciclo de autolimpieza diferido, omita los pasos 2 y 3.)
1. Aseg0rese que el reloj muestre la hora correcta del dia.
2. Presione _. ": "parpadeara en la hora del dia.
3. Presione y mantenga presionado t%. hasta Ilegar a la hora a la que desea iniciar el ciclo de autolimpieza diferido.
Libere el bot6n cuando se despliegue la hora deseada.
4. Presione _." "aparecera en la pantalla.
5. Presione A o v unavez."3:00"apareceraenlapantallaparaindicarunciclode3horas. Presione v hastaque
.
aparezca "2:00" en la pantalla para un ciclo de 2 horas o A hasta que aparezca "4:00" para un ciclo de 4 horas.
Tan pronto como los controles son configurados, el seguro accionado del motor empezara a cerrarse automaticamente y
la luz del indicador de "BLOQU EO" resplandecera. NO abra la puerta mientras la luz esta relampagueando (demora alrededor
de 15 segundos para que puerta del homo se bloquee).
"CLn" aparecera en la pantalla durante el ciclo de autolimpieza y la luz de "BLOQUEO" resplandecera hasta que el ciclo
de limpieza haya sido terminado o cancelado, y la temperatura del homo se haya enfriado.
Cuando el cicIo de autolimpieza ha terminado:
1. Aparecera en la ventana de la pantalla la hora del dia o "End" y la luz de "Limpio" y "BLOQUEO" seguiran centelleando.
2. Una vez que el homo se ha enfriado durante casi 1HORA y la luz de"RELOJ" se ha ido, la puerta del homo puede ser abierta.
3. Si "End" se encuentra en pantalla y la luz indicadora "Select Clean" permanece encendida, presione @. La hora del dia
aparecera en la pantalla.
NOTA: Cuando el homo este fdo, limpie cualquier residuo o ceniza en polvo con una tela h0meda o papel toalla.
Parada o interrupci6n de un ciclo de autolimpieza seleccionado
Si fuera necesario detener o interrumpir un ciclo de autolimpieza:
1. Presione @.
2. Unavezqueelhomosehayaenfriadodurantecasil HORAylaluzde"BLOQUE"sehayaido, lapuertadelhomopuede
ser abierta.
3. Vuelva a iniciar el ciclo de autolimpieza una vez que todas las condiciones hayan sido corregidas.
Para evitar posibles quemadu ras, tenga cuidado al abrir la puerta del horno luego del ciclo de autolimpieza. Parese
al costado del homo al abrir la puerta para dejar que el aire o humo caliente salga al exterior.
NO fuerce la puerta del horno al abrir. Esto puede dafiar el sistema de cierre automatico de la puerta. Tenga
precauci6n y evite posibles quemad uras alabrir la puerta despues que el ciclo de autolimpieza ha terminado. El homo aQn puede
encontrarse MUY CALIENTE.
48
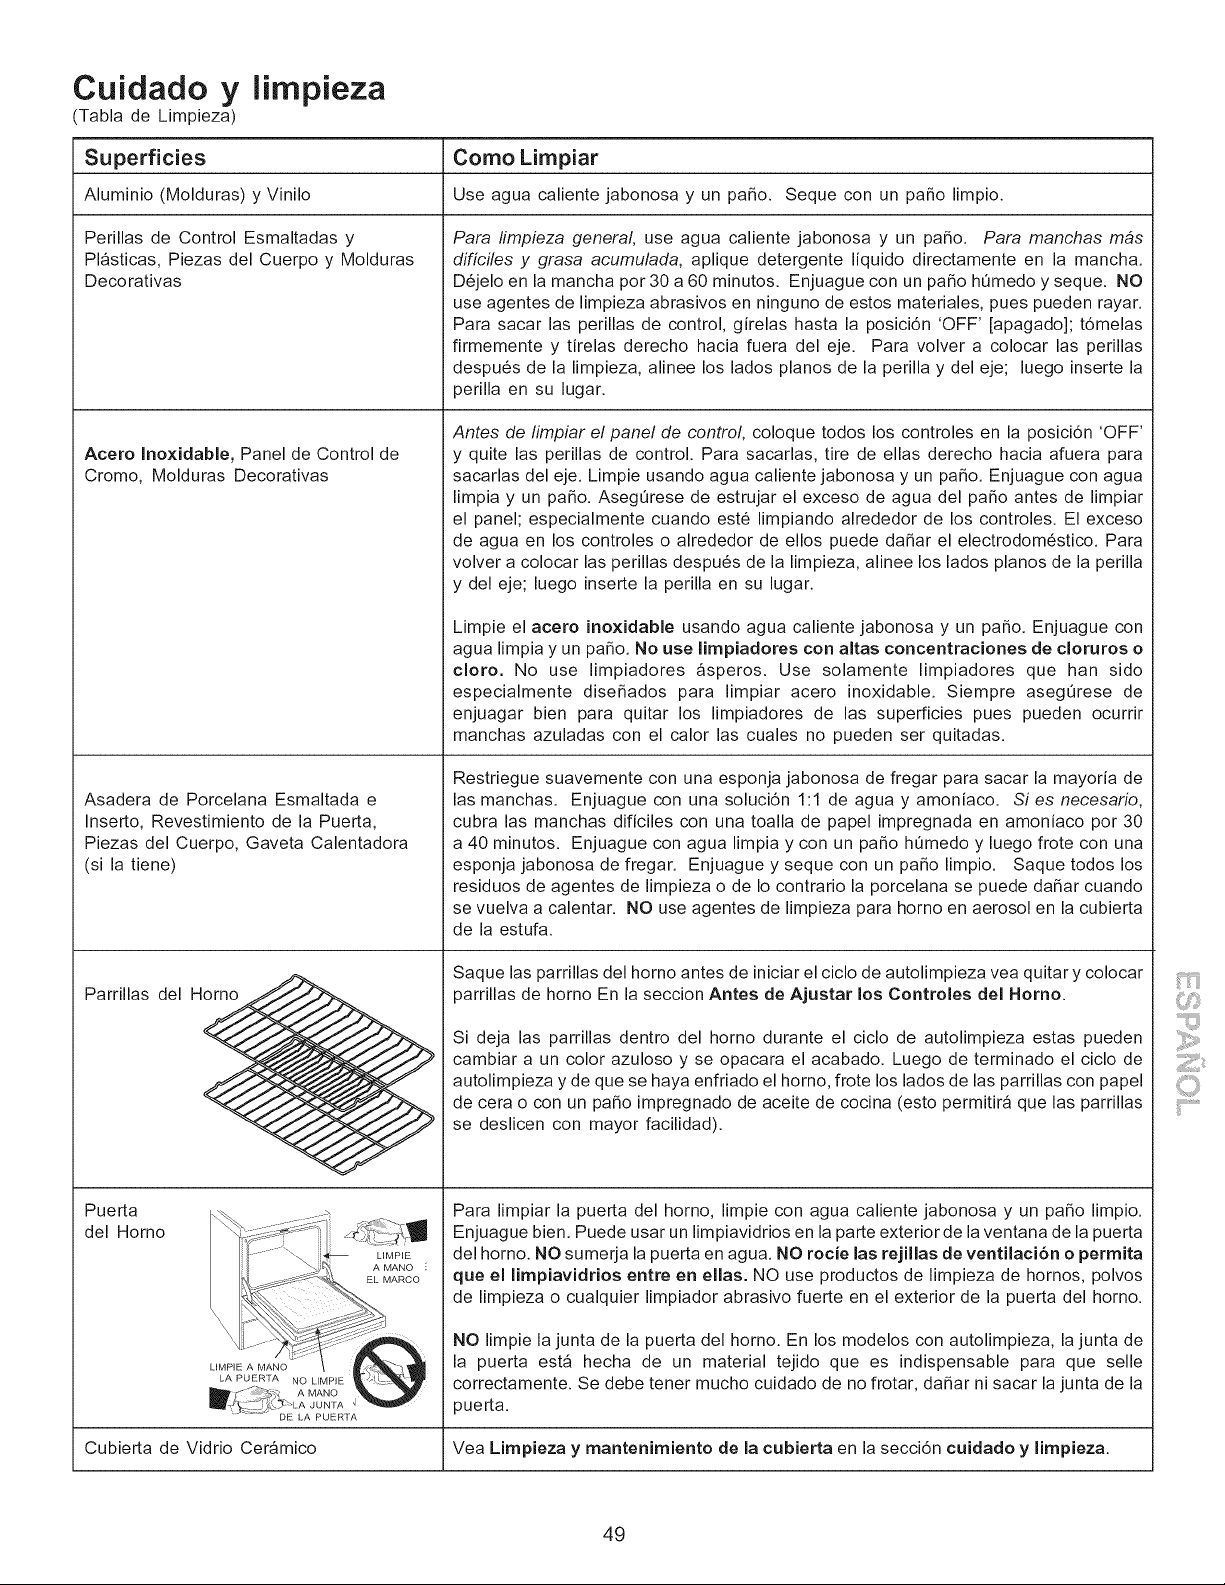
Cuidado y lirnpieza
Tabla de Limpieza)
Superficies Como Limpiar
Aluminio (Molduras) y Vinilo Use agua caliente jabonosa y un patio. Seque con un patio limpio.
Perillas de Control Esmaltadas y
Plasticas, Piezas del Cuerpo y Molduras
Decorativas
Para limpieza general use agua caliente jabonosa y un patio. Para manchas m4s
difici/es y grasa acumulada, aplique detergente liquido directamente en la mancha.
D6jelo en la mancha por 30 a 60 minutos. Enjuague con un patio h0medo y seque. NO
use agentes de limpieza abrasivos en ninguno de estos materiales, pues pueden rayar.
Para sacar las perillas de control, girelas hasta la posici6n 'OFF' [apagado]; t6melas
firmemente y tirelas derecho hacia fuera del eje. Para volver a colocar las perillas
despu6s de la limpieza, alinee los lados pianos de la perilla y del eje; luego inserte la
perilla en su lugar.
Antes de Iimpiar el panel de control, coloque todos los controles en la posici6n 'OFF'
Acero InoxJdable, Panel de Control de y quite las perillas de control. Para sacarlas, tire de elias derecho hacia afuera para
Cromo, Molduras Decorativas sacarlas del eje. Limpie usando agua caliente jabonosa y un patio. Enjuague con agua
limpia y un patio. Aseg0rese de estrujar el exceso de agua del patio antes de limpiar
el panel; especialmente cuando est6 limpiando alrededor de los controles. El exceso
de agua en los controles o alrededor de ellos puede dafiar el electrodom6stico. Para
volver a colocar las perillas despu6s de la limpieza, alinee los lados pianos de la perilla
y del eje; luego inserte la perilla en su lugar.
Asadera de Porcelana Esmaltada e
Inserto, Revestimiento de la Puerta,
Piezas del Cuerpo, Gaveta Calentadora
(si la tiene)
LA PUERTA NO LIMPIE
_ A MANO
_\LA JUNTA
-= " " DE LA PUERTA
Parrillas del Horno
Puerta
del Horno
Limpie el acero inoxJdable usando agua caliente jabonosa y un patio. Enjuague con
agua limpia y un patio. No use IJmpiadores con altas concentraciones de cloruros o
cloro. No use limpiadores asperos. Use solamente limpiadores que han sido
especialmente disefiados para limpiar acero inoxidable. Siempre asegOrese de
enjuagar bien para quitar los limpiadores de las superficies pues pueden ocurrir
manchas azuladas con el calor las cuales no pueden ser quitadas.
Restriegue suavemente con una esponja jabonosa de fregar para sacar la mayoria de
las manchas. Enjuague con una soluci6n 1:1 de agua y amoniaco. Si es necesario,
cubra las manchas dificiles con una toalla de papel impregnada en amoniaco por 30
a 40 minutos. Enjuague con agua limpia y con un patio hQmedo y luego frote con una
esponja jabonosa de fregar. Enjuague y seque con un patio limpio. Saque todos los
residuos de agentes de limpieza o de Io contrario la porcelana se puede dafiar cuando
se vuelva a calentar. NO use agentes de limpieza para horno en aerosol en la cubierta
de la estufa.
Saque las parrillas del horno antes de iniciar el ciclo de autolimpieza vea quitar y colocar
parrillas de horno En la seccion Antes de Ajustar los Controles del Homo.
Si deja las parrillas dentro del horno durante el ciclo de autolimpieza estas pueden
cambiar a un color azuloso y se opacara el acabado. Luego de terminado el ciclo de
autolimpieza y de que se haya enfriado el homo, frote los lados de las parrillas con papel
de cera o con un patio impregnado de aceite de cocina (esto permitir_ que las parrillas
se deslicen con mayor facilidad).
Para limpiar la puerta del homo, limpie con agua caliente jabonosa y un patio limpio.
Enjuague bien. Puede usar un limpiavidrios en la parte exterior de la ventana de la puerta
del horno. NO sumerja la puerta en agua. NO rocJe las rejJllas de ventilacJ6n o permJta
que el IJmpiavJdrios entre en elias. NO use productos de limpieza de hornos, polvos
de limpieza o cualquier limpiador abrasivo fuerte en el exterior de la puerta del horno.
NO limpie la junta de la puerta del horno. En los modelos con autolimpieza, la junta de
la puerta est_ hecha de un material tejido que es indispensable para que selle
correctamente. Se debe tener mucho cuidado de no frotar, dafiar ni sacar la junta de la
puerta.
Cubierta de Vidrio Cer_mico Vea Limpieza y mantenimiento de la cubierta en la secci6n cuidado y limpieza.
49
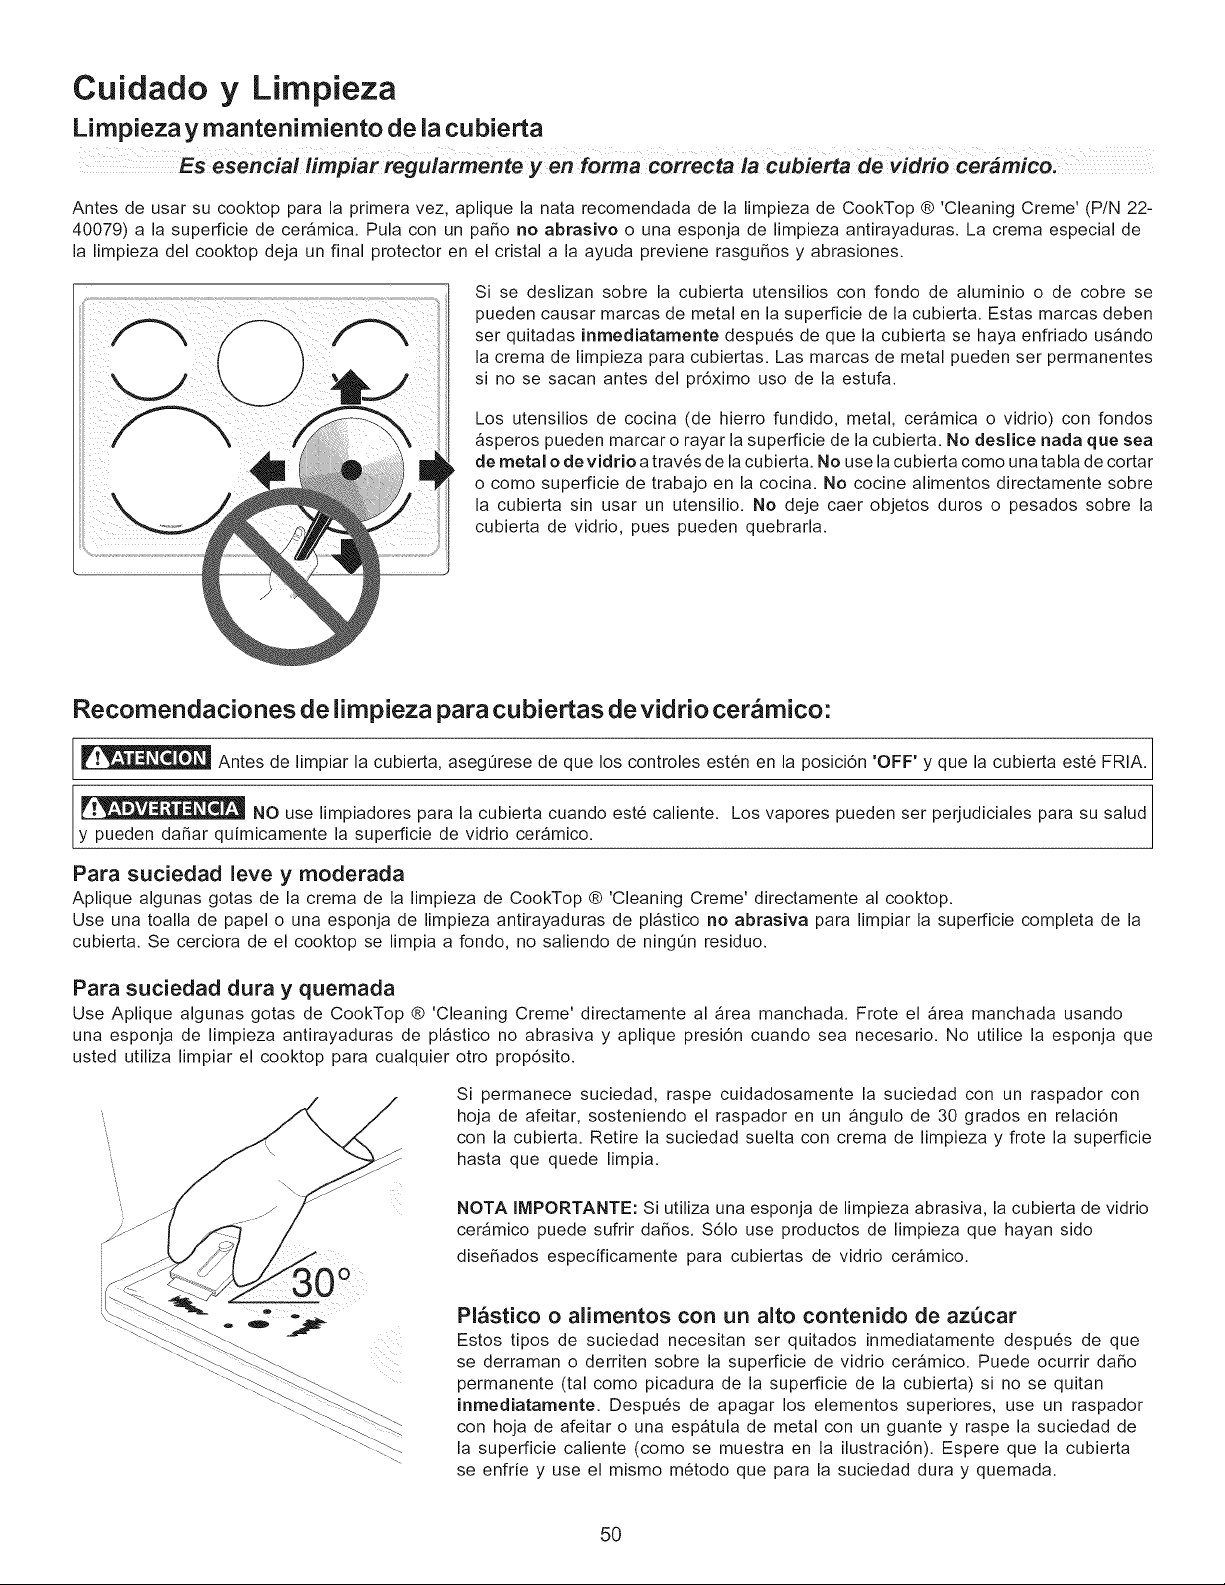
Cuidado y Limpieza
Limpieza y mantenimiento de la cubierta
esencia! forma correcta cubierta de vidrio cer4mico:
Antes de usar su cooktop para la primera vez, aplique la nata recomendada de la limpieza de CookTop ® 'Cleaning Creme' (P/N 22-
40079) a la superficie de cer_mica. Pula con un paso no abrasivo o una esponja de limpieza antirayaduras. La crema especial de
la limpieza del cooktop deja un final protector en el cristal a la ayuda previene rasguSos y abrasiones.
Si se deslizan sobre la cubierta utensilios con fondo de aluminio o de cobre se
pueden causar marcas de metal en la superficie de la cubierta. Estas marcas deben
ser quitadas inmediatamente despu6s de que la cubierta se haya enfriado us_ndo
la crema de limpieza para cubiertas. Las marcas de metal pueden ser permanentes
si no se sacan antes del pr6ximo uso de la estufa.
Los utensilios de cocina (de hierro fundido, metal, ceramica o vidrio) con fondos
_speros pueden marcar o rayar la superficie de la cubierta. No deslJce nada que sea
de metal o devidrJo a trav6s de la cubierta. No use la cubierta como una tabla de cortar
o como superficie de trabajo en la cocina. No cocine alimentos directamente sobre
la cubierta sin usar un utensilio. No deje caer objetos duros o pesados sobre la
cubierta de vidrio, pues pueden quebrarla.
Recomendaciones de limpieza para cubiertas de vidrio cer&mico:
Antes de limpiar la cubierta, aseg_rese de que los controles est6n en la posici6n 'OFF' y que la cubierta est6 FRIA.
NO use limpiadores para la cubierta cuando est6 caliente. Los vapores pueden ser perjudiciales para su salud
y pueden daSar quimicamente la superficie de vidrio cer_mico.
Para suciedad leve y moderada
Aplique algunas gotas de la crema de la limpieza de CookTop ® 'Cleaning Creme' directamente al cooktop.
Use una toalla de papel o una esponja de limpieza antirayaduras de pl_stico no abrasiva para limpiar la superficie completa de la
cubierta. Se cerciora de el cooktop se limpia a rondo, no saliendo de ningt_n residuo.
Para suciedad dura y quemada
Use Aplique algunas gotas de CookTop ® 'Cleaning Creme' directamente al _rea manchada. Frote el _rea manchada usando
una esponja de limpieza antirayaduras de pl_stico no abrasiva y aplique presi6n cuando sea necesario. No utilice la esponja que
usted utiliza limpiar el cooktop para cualquier otro prop6sito.
Si permanece suciedad, raspe cuidadosamente la suciedad con un raspador con
hoja de afeitar, sosteniendo el raspador en un _ngulo de 30 grados en relaci6n
con la cubierta. Retire la suciedad suelta con crema de limpieza y frote la superficie
hasta que quede limpia.
NOTA IMPORTANTE: Si utiliza una esponja de limpieza abrasiva, la cubierta de vidrio
cer_mico puede sufrir da_os. $61o use productos de limpieza que hayan sido
dise_ados especificamente para cubiertas de vidrio ceramico.
Pl_stico o alimentos con un alto contenido de azQcar
Estos tipos de suciedad necesitan ser quitados inmediatamente despu6s de que
se derraman o derriten sobre la superficie de vidrio cer_mico. Puede ocurrir daSo
permanente (tal como picadura de la superficie de la cubierta) si no se quitan
inrnedJatamente. Despu6s de apagar los elementos superiores, use un raspador
con hoja de afeitar o una espatula de metal con un guante y raspe la suciedad de
la superficie caliente (como se muestra en la ilustraci6n). Espere que la cubierta
se enfrie y use el mismo m6todo que para la suciedad dura y quemada.
5O
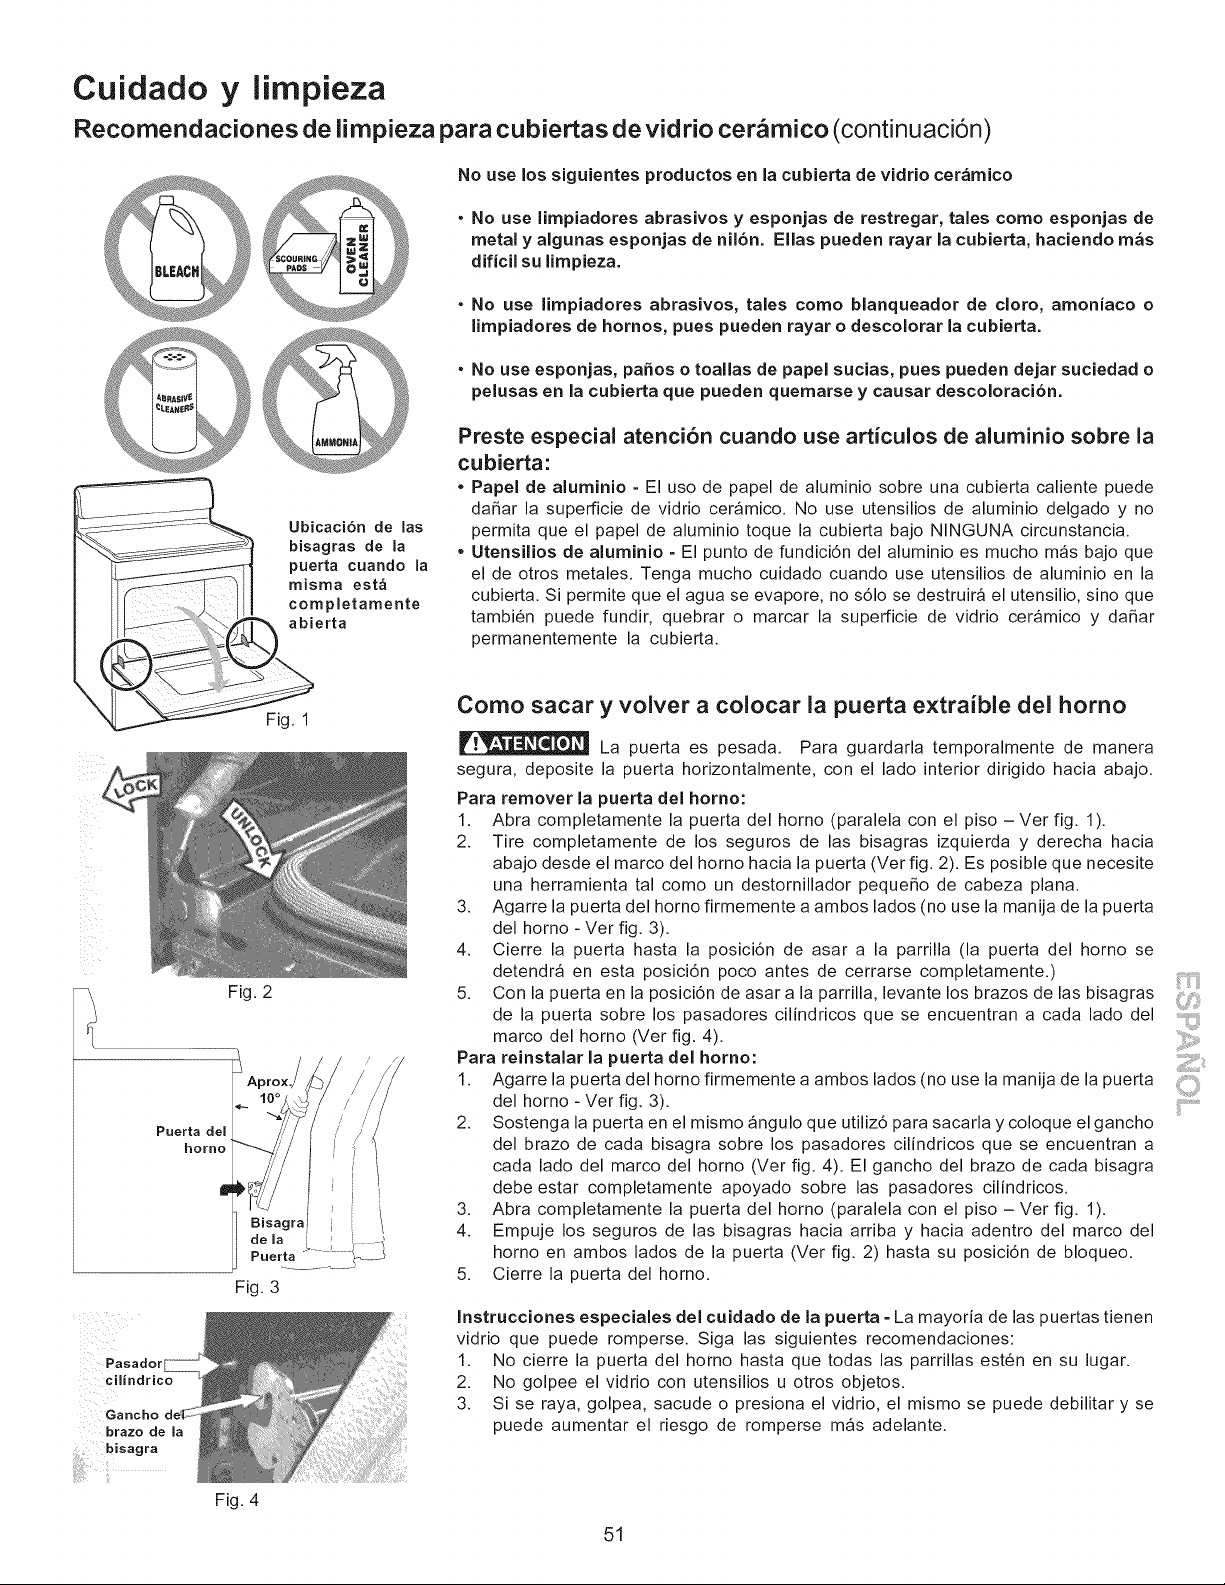
Cuidado y limpieza
Recomendaciones de limpieza para cubiertas de vidrio cer mico (continuaci6n)
Ubicaci6n de las
bisagras de la
puerta cuando la
misma est_
completamente
abierta
No use los siguientes productos en la cubierta de vidrio cer&mico
• No use limpiadores abrasivos y esponjas de restregar, tales como esponjas de
metal y algunas esponjas de nil6n. Elias pueden rayar la cubierta, haciendo m&s
dificil su limpieza.
• No use limpiadores abrasivos, tales como blanqueador de cloro, amoniaco o
limpiadores de hornos, pues pueden rayar o descolorar la cubierta.
• No use esponjas, paSos o toallas de papel sucias, pues pueden dejar suciedad o
pelusas en la cubierta que pueden quemarse y causar descoloraci6n.
Preste especial atenci6n cuando use articulos de aluminio sobre la
cubierta:
• Papel de aluminio = El uso de papel de aluminio sobre una cubierta caliente puede
daSar la superficie de vidrio ceramico. No use utensilios de aluminio delgado y no
permita que el papel de aluminio toque la cubierta bajo NINGUNA circunstancia.
• Utensilios de aluminio = El punto de fundici6n del aluminio es mucho m_s bajo que
el de otros metales. Tenga mucho cuidado cuando use utensilios de aluminio en la
cubierta. Si permite que el agua se evapore, no s61o se destruira el utensilio, sino que
tambi6n puede fundir, quebrar o marcar la superficie de vidrio ceramico y daSar
permanentemente la cubierta.
Puerta del
horno
Pasador
cilindrico
brazo de la
Fig. 1
Fig. 2
Fig. 3
Fig. 4
Como sacar y volver a colocar ia puerta extraible del homo
La puerta es pesada. Para guardarla temporalmente de manera
segura, deposite la puerta horizontalmente, con el lado interior dirigido hacia abajo.
Para remover la puerta del homo:
1. Abra completamente la puerta del homo (paralela con el piso -Vet fig. 1).
2. Tire completamente de los seguros de las bisagras izquierda y derecha hacia
abajo desde el marco del homo hacia la puerta (Vet fig. 2). Es posible que necesite
una herramienta tal como un destornillador pequeSo de cabeza plana.
3. Agarre la puerta del homo firmemente a ambos lados (no use la manija de la puerta
del homo - Vet fig. 3).
4. Cierre la puerta hasta la posici6n de asar a la parrilla (la puerta del homo se
detendra en esta posici6n poco antes de cerrarse completamente.)
5. Con la puerta en la posici6n de asar a la parrilla, levante los brazos de las bisagras
de la puerta sobre los pasadores cilindricos que se encuentran a cada lado del
marco del homo (Vet fig. 4).
Para reinstalar la puerta del homo:
1. Agarre la puerta del hornofirmemente a ambos lados(no use la manija de la puerta
del horno- Ver fig. 3).
2. Sostenga la puerta en el mismo angulo que utiliz6 para sacarla y coloque el gancho
del brazo de cada bisagra sobre los pasadores cilindricos que se encuentran a
cada lado del marco del horno (Ver fig. 4). El gancho del brazo de cada bisagra
debe estar completamente apoyado sobre las pasadores cilindricos.
3. Abra completamente la puerta del horno (paralela con el piso - Ver fig. 1).
4. Empuje los seguros de las bisagras hacia arriba y hacia adentro del marco del
horno en ambos lados de la puerta (Ver fig. 2) hasta su posici6n de bloqueo.
5. Cierre la puerta del horno.
Instrucciones especiales del cuidado de la puerta = La mayoria de las puertas tienen
vidrio que puede romperse. Siga las siguientes recomendaciones:
1. No cierre la puerta del homo hasta que todas las parrillas est6n en su lugar.
2. No golpee el vidrio con utensilios u otros objetos.
3. Si se raya, golpea, sacude o presiona el vidrio, el mismo se puede debilitar y se
puede aumentar el riesgo de romperse m_s adelante.
ii'i......................
51
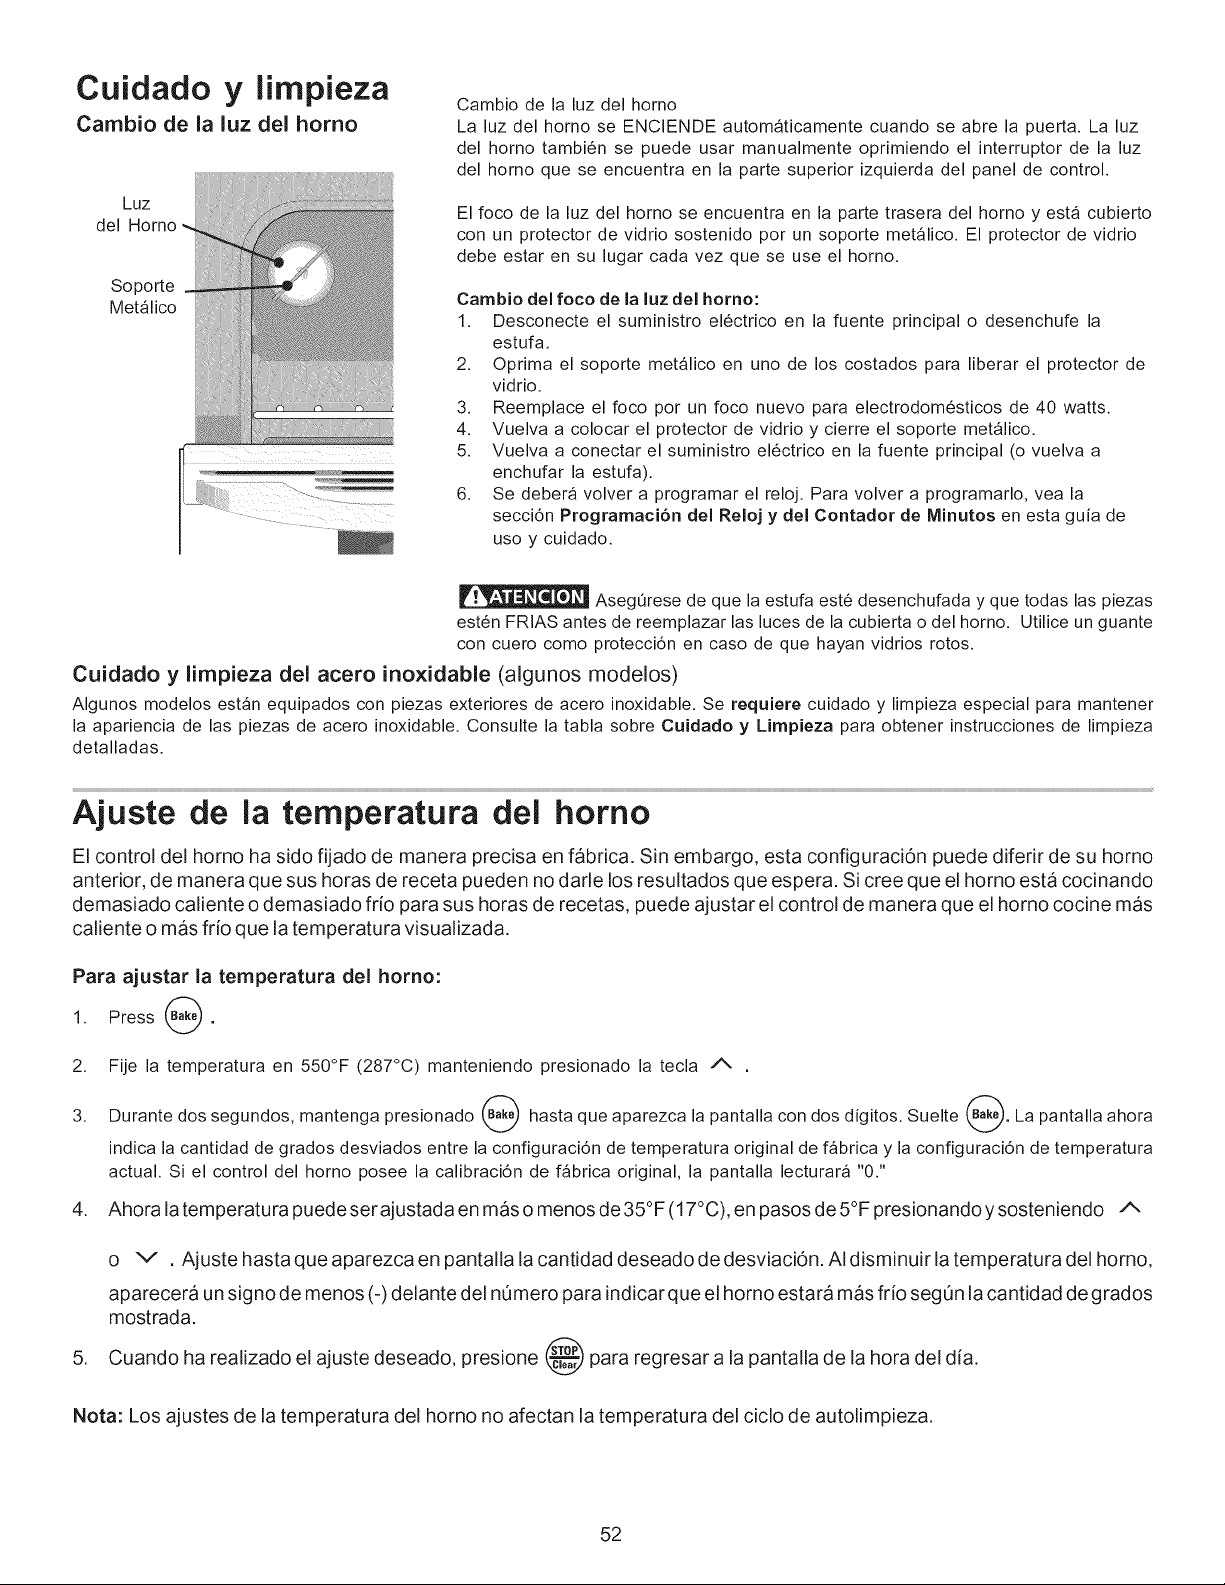
Cuidado y limpieza
Cambio de la luz del homo
Luz
del Homo
Soporte
Met_lico
1; ........
Cambio de la luz del homo
La luz del homo se ENCIENDE autom_ticamente cuando se abre la puerta. La luz
del horno tambi6n se puede usar manualmente oprimiendo el interruptor de la luz
del homo que se encuentra en la parte superior izquierda del panel de control.
El foco de la luz del horno se encuentra en la parte trasera del horno y est_ cubierto
con un protector de vidrio sostenido por un soporte met_lico. El protector de vidrio
debe estar en su lugar cada vez que se use el horno.
Cambio del foco de la luz del homo:
1. Desconecte el suministro el6ctrico en la fuente principal o desenchufe la
estufa.
2. Oprima el soporte met_lico en uno de los costados para liberar el protector de
vidrio.
3. Reemplace el foco por un foco nuevo para electrodom6sticos de 40 watts.
4. Vuelva a colocar el protector de vidrio y cierre el soporte met_lico.
5. Vuelva a conectar el suministro el6ctrico en la fuente principal (o vuelva a
enchufar la estufa).
6. Se debera volver a programar el reloj. Para volver a programarlo, vea la
secci6n Programaci6n del Reloj y del Contador de Minutos en esta guia de
uso y cuidado.
AsegOrese de que la estufa est6 desenchufada y que todas las piezas
est6n FRIAS antes de reemplazar las luces de la cubierta o del horno. Utilice un guante
con cuero como protecci6n en caso de que hayan vidrios rotos.
Cuidado y limpieza del acero inoxidable (algunos modelos)
Algunos modelos est_n equipados con piezas exteriores de acero inoxidable. Se requiere cuidado y limpieza especial para mantener
la apariencia de las piezas de acero inoxidable. Consulte la tabla sobre Cuidado y Limpieza para obtener instrucciones de limpieza
detalladas.
Ajuste de la temperatura del homo
El control del horno ha sido fijado de manera precisa en fabrica. Sin embargo, esta configuraciOn puede diferir de su horno
anterior, de manera que sus horas de receta pueden no darle los resultados que espera. Si cree que el horno esta cocinando
demasiado caliente o demasiado frio para sus horas de recetas, puede ajustar el control de manera que el horno cocine mas
caliente o mas frio que la temperatura visualizada.
Para ajustar la temperatura del homo:
1. Press @.
2.
3.
Fije la temperatura en 550°F (287°C) manteniendo presionado la tecla /_
Durante dos segundos, mantenga presionado ___) hasta que aparezca la pantalla con dos digitos. Suelte _. La pantalla ahora
indica la cantidad de grados desviados entre la configuraci6n de temperatura original de f_brica y la configuraci6n de temperatura
actual. Si el control del horno posee la calibraci6n de f_brica original, la pantalla lecturara "0."
4. Ahora la temperatu ra puede ser ajustada en mas o menos de 35°F (17°C), en pasos de 5°F presionando y sosteniendo A
,
o v , Ajuste hasta que aparezca en pantalla la cantidad deseado de desviaci6n. AI disminuir la temperatura del horno,
aparecera un signo de menos (-) delante del nOmero para indicar que el horno estara mas frio segOn la cantidad de grados
mostrada.
Cuando ha realizado el ajuste deseado, presione @ para regresar a la pantalla de la hora del dia.
Nota: Los ajustes de la temperatura del homo no afectan la temperatura del ciclo de autolimpieza.
52
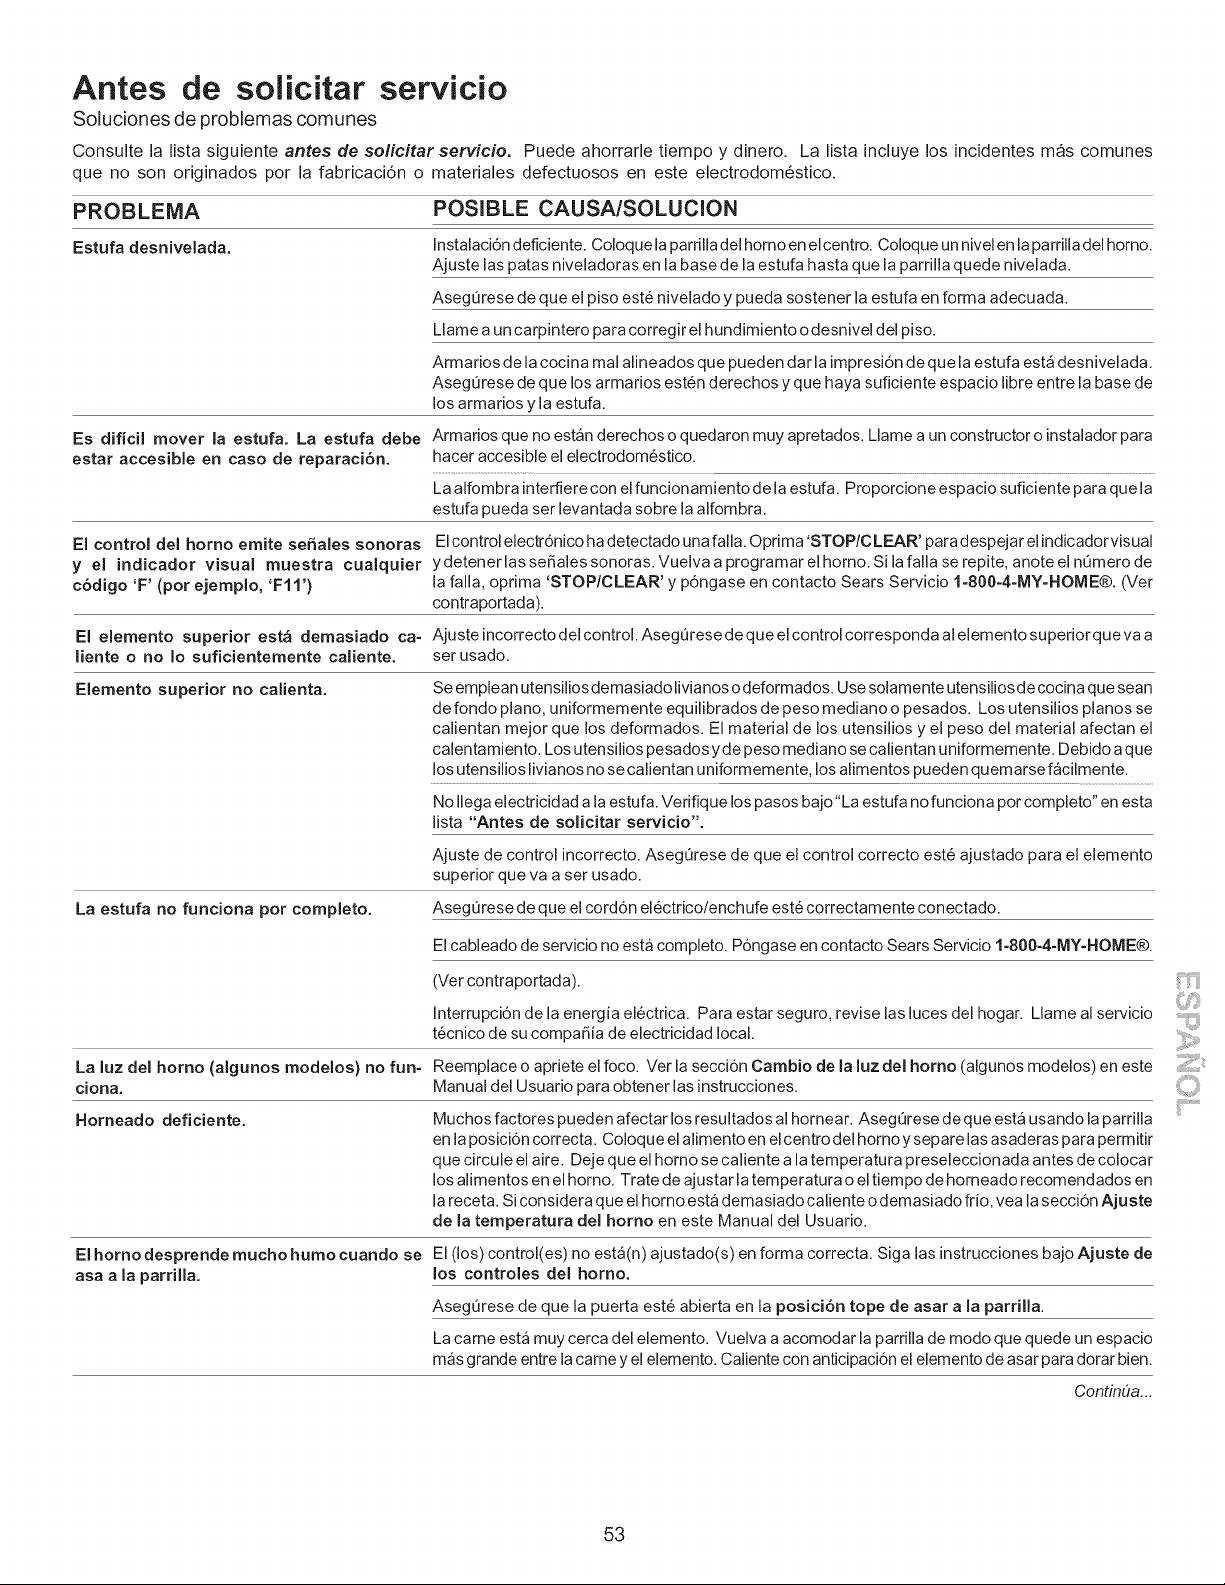
Antes de solicitar servicio
Soluciones de problemas comunes
Consulte la lista siguiente antes de solicitar servicio. Puede ahorrarle tiempo y dinero. La lista incluye los incidentes m_s comunes
que no son originados por la fabricaci6n o materiales defectuosos en este electrodom6stico.
PROBLEMA POSIBLE CAUSA/SOLUCION
Estufa desnivelada.
Es dificil mover la estufa. La estufa debe
estar accesible en caso de reparaci6n.
El control del homo emite se5ales sonoras
y el indicador visual muestra cualquier
c6digo 'F' (por ejemplo, 'FI I'}
Instalaci6n deficiente. Coloque la parrilla del homo en el centro. Coloque un nivel en la parrilla del homo.
Ajuste las patas niveladoras en la base de la estufa hasta que la parrilla quede nivelada.
Aseg0rese de que el piso est6 nivelado y pueda sostener la estufa en forma adecuada.
Llame a un carpintero para corregir el hundimiento o desnivel del piso.
Armarios de la cocina mal alineados que pueden dar la impresi6n de que la estufa est_ desnivelada.
Aseg0rese de que los armarios est6n derechos y que haya suficiente espacio libre entre la base de
los armarios y la estufa.
Armarios que no est_n derechos o quedaron muy apretados. Llame a un constructor o instalador para
hacer accesible el electrodom6stico.
La alfombra interfiere con el funcionamiento de la estufa. Proporcione espacio suficiente para que la
estufa pueda ser levantada sobre la alfombra.
El control electr6nico ha detectado una falla. Optima 'STOP/C LEAR' para despejar el indicador visual
y detener las sefiales sonoras. Vuelva a programar el homo. Si la falla se repite, anote el n0mero de
la falla, optima 'STOP/CLEAR' y p6ngase en contacto Sears Servicio 1=800-4-MY=HOME®. (Ver
contraportada).
El elemento superior est_ demasiado ca- Ajuste incorrecto del control. AsegOrese de que el control corresponda al elemento superior que va a
liente o no Io suficientemente caliente, ser usado.
Elemento superior no calienta. Se emplean utensiliosdemasiadolivianos odeformados. Use solamente utensiliosdecocina que sean
de fondo piano, uniformemente equilibrados de peso mediano o pesados. Los utensilios pianos se
calientan mejor que los deformados. El material de los utensilios y el peso del material afectan el
calentamiento. Los utensilios pesados yde peso mediano se calientan uniformemente. Debido a que
los utensilios livianos no se calientan uniformemente, los alimentos pueden quemarse facilmente.
No Ilega electricidad a la estufa. Verifique los pasos bajo"La estufa no funciona por completo" en esta
lista "Antes de solicitar servicio".
La estufa no funciona pot completo.
Ajuste de control incorrecto. Aseg0rese de que el control correcto est6 ajustado para el elemento
superior que va a ser usado.
Aseg0rese de que el cord6n el6ctrico/enchufe est6 correctamente conectado.
El cableado de servicio no esta completo. P6ngase en contacto Sears Servicio 1=800-4-MY=HOME®.
(Ver contraportada).
Interrupci6n de la energia el6ctrica. Para estar seguro, revise las luces del hogar. Llame al servicio
t6cnico de su compafiia de electricidad local.
La luz del homo (algunos modelos) no fun- Reemplace o apriete el foco. Ver la secci6n Cambio de la luz del homo (algunos modelos) en este
ciona. Manual del Usuario para obtener las instrucciones.
Horneado deficiente. Muchos factores pueden afectar los resultados al hornear. Aseg0rese de que est_ usando la parrilla
en la posici6n correcta. Coloque el alimento en el centro del homo y separe las asaderas para permitir
que circule el aire. Deje que el homo se caliente a la temperatura preseleccionada antes de colocar
los alimentos en el homo. Trate de ajustar la temperatura o el tiempo de homeado recomendados en
la receta. Si considera que el homo esta demasiado caliente o demasiado fdo, vea la secci6n Ajuste
de la temperatura del homo en este Manual del Usuario.
El homo desprende mucho humo cuando se
asa a la parrilla.
El (los) control(es) no est,(n) ajustado(s) en forma correcta. Siga las instrucciones bajo Ajuste de
los controles del homo.
Aseg0rese de que la puerta est6 abierta en la posici6n tope de asar a la parrilla.
La came est_ muy cerca del elemento. Vuelva a acomodar la parrilla de modo que quede un espacio
mas grande entre la came y el elemento. Caliente con anticipaci6n el elemento de asar para dorar bien.
ContinOa...
iiii¢"'"i!ii_
53
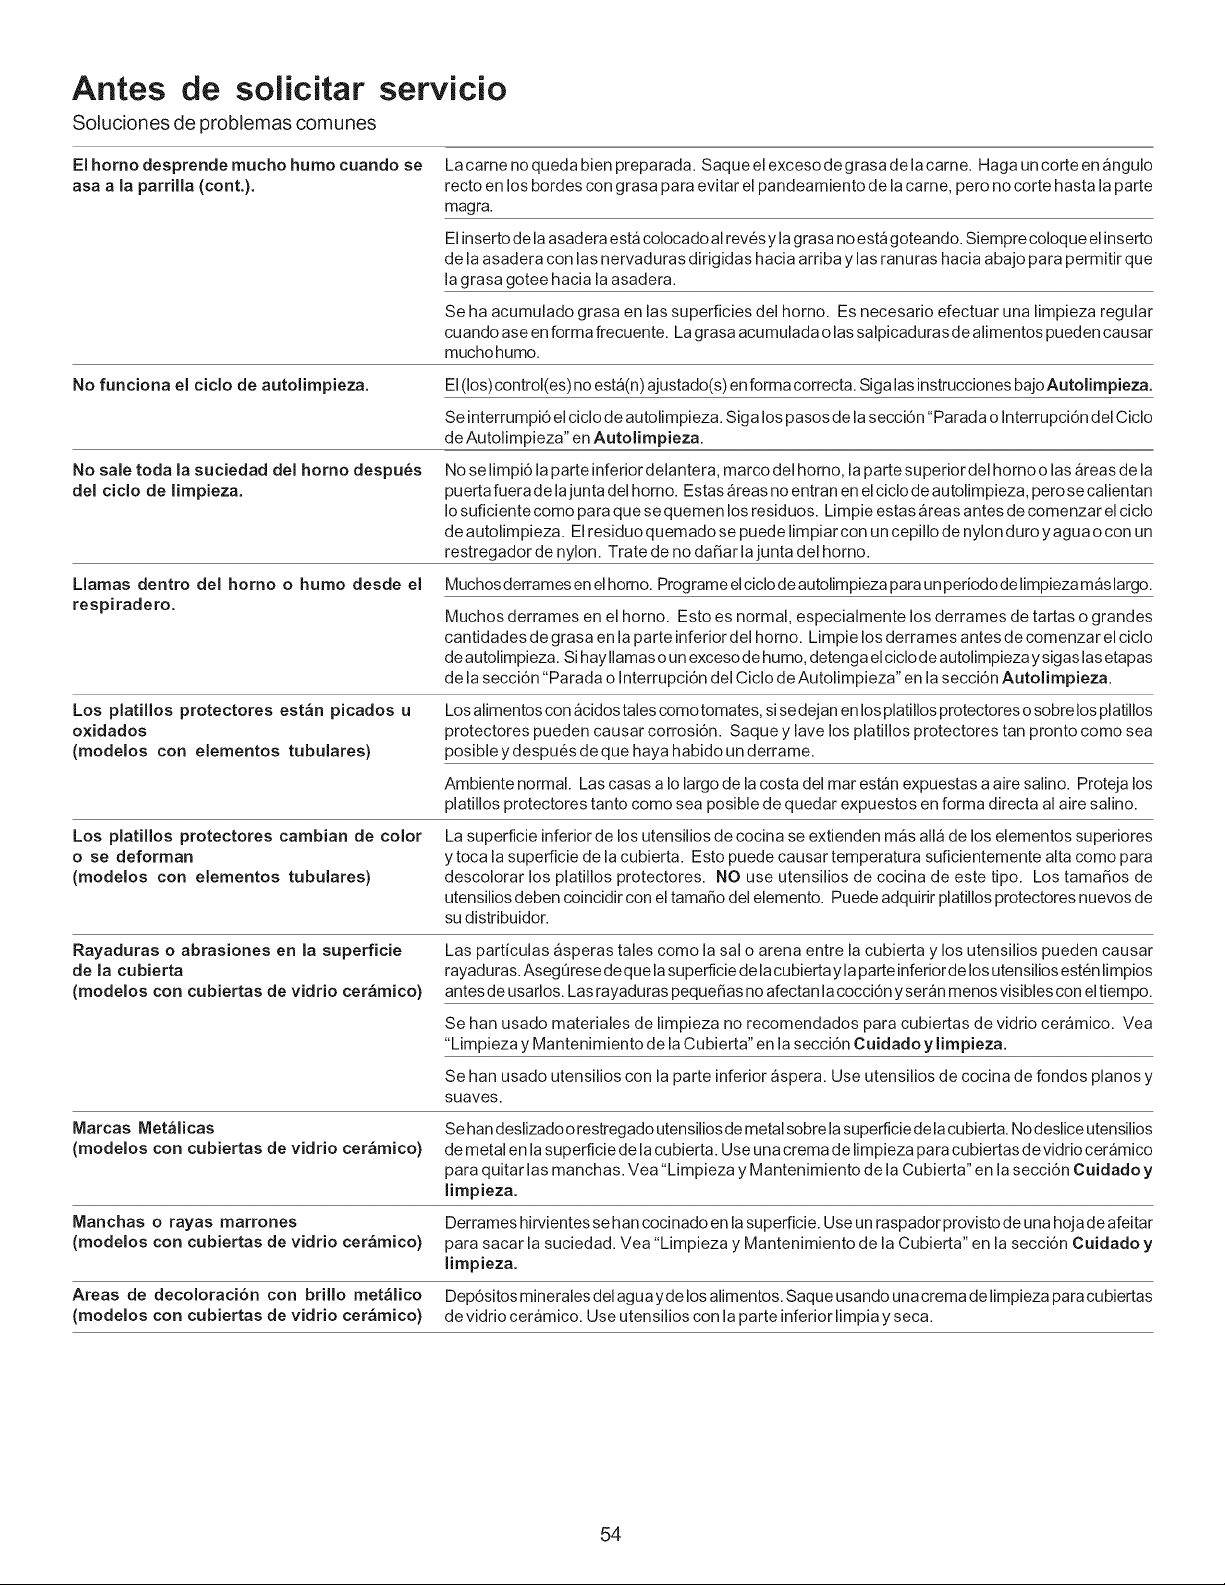
Antes de solicitar servicio
Soluciones de problemas comunes
El homo desprende mucho humo cuando se
asa a la parrilla (cont.).
La came no queda bien preparada. Saque el exceso de grasa de la carne. Haga un corte en angulo
recto en los bordes con grasa para evitar el pandeamiento de la came, pero no corte hasta la parte
magra.
El inserto de la asad era est_ colocado al rev6s y la grasa no est_ goteando. Siempre coloq ue el inserto
de la asadera con las nervaduras difigidas hacia arfiba y las ranuras hacia abajo para permitir que
la grasa gotee hacia la asadera.
Se ha acumulado grasa en las superficies del homo. Es necesafio efectuar una limpieza regular
cuando ase en forma frecuente. La grasa acumulada o las salpicadurasde alimentos pueden causar
muchohumo.
No funciona el ciclo de autolimpieza.
No sale toda la suciedad del homo despu_s
del ciclo de limpieza.
Llamas dentro del homo o humo desde el
respiradero.
Los platillos protectores est&n picados u
oxidados
(modelos con elementos tubulares)
Los platillos protectores cambian de color
o se deforman
(modelos con elementos tubulares)
El (Ios)control(es) no esta(n) ajustado(s) en forma correcta. Siga las instrucciones bajoAutolimpieza,
Se interrumpi6 el ciclo de autolimpieza. Siga los pasos de la secci6n"Parada o Interrupci6n del Ciclo
de Autolimpieza" en Autolimpieza.
No se limpi6 la parte inferior delantera, marco del homo, la parte superior del homo o las areas de la
puerta fuera de lajunta del homo. Estas _reas no entran en el ciclo de autolimpieza, pero se calientan
Io suficiente como para que se quemen los residuos. Limpie estas areas antes de comenzar el ciclo
de autolimpieza. El residuo quemado se puede limpiar con un cepillo de nylon duro y agua o con un
restregador de nylon. Trate de no daSar la junta del homo.
Muchosderrames en el homo. Programe elciclode autolimpieza para un pefiododelimpieza maslargo.
Muchos derrames en el homo. Esto es normal, especialmente los derrames de tartas o grandes
cantidades de grasa en la parte inferior del homo. Limpie los derrames antes de comenzar el ciclo
de autolimpieza. Si hay llamas o un exceso de humo, detenga el ciclo de autolimpieza y sigas las etapas
de la secci6n"Parada o Interrupci6n del Ciclo de Autolimpieza" en la secci6n Autolimpieza.
Los alimentos con acidos tales como tomates, si se dejan en los platillos protectores o sobre los platillos
protectores pueden causar corrosi6n. Saque y lave los platillos protectores tan pronto como sea
posible y despu6s de que haya habido un derrame.
Ambiente normal. Las casas a Io largo de la costa del mar estan expuestas a aire salino. Proteja los
platillos protectores tanto como sea posible de quedar expuestos en forma directa al aire salino.
La superficie inferior de los utensilios de cocina se extienden m_s alia de los elementos supefiores
y toca la superflcie de la cubierta. Esto puede causar temperatura suficientemente alta como para
descolorar los platillos protectores. NO use utensilios de cocina de este tipo. Los tamaSos de
utensilios deben coincidir con el tamaSo del elemento. Puede adquifir platillos protectores nuevos de
su distfibuidor.
Rayaduras o abrasiones en la superficie
de la cubierta
(modelos con cubiertas de vidrio cer_mico)
Las particulas _speras tales como la sal o arena entre la cubierta y los utensilios pueden causar
rayaduras. AsegQrese de que la superficie de la cubierta y la parte inferior de los utensilios est6n limpios
antes de usaflos. Las rayaduras pequeSas no afectan la cocci6n y seran menos visibles con el tiempo.
Se han usado matefiales de limpieza no recomendados para cubiertas de vidfio ceramico. Vea
"Limpieza y Mantenimiento de la Cubierta" en la secci6n Cuidado y Iimpieza,
Se han usado utensilios con la parte inferior aspera. Use utensilios de cocina de fondos pianos y
suaves.
Marcas Met&licas
(modelos con cubiertas de vidrio cer&mico)
Se han deslizadoo restregado utensiliosde metal sobrela superficiedela cubierta. Nodeslice utensilios
de metal en la superficie de la cubierta. Use una crema de limpieza para cubiertas de vidfio ceramico
para quitar las manchas. Vea"Limpieza y Mantenimiento de la Cubierta" en la secci6n Cuidado y
limpieza.
Manchas o rayas marrones Derrames hirvientes se han cocinado en la superficie. Use un raspador provisto de una hojade afeitar
(modelos con cubiertas de vidrio cer_mico) para sacar la suciedad. Vea "Limpieza y Mantenimiento de la Cubierta" en la secci6n Cuidado y
limpieza.
Areas de decoloraci6n con brillo met_lico Dep6sit_sminera_esde_aguayde__sa_iment_s.Saqueusand_unacremade_impiezaparacubiertas
(modelos con cubiertas de vidrio cer_mico) de vidrio ceramico. Use utensilios con la parte inferior limpia y seca.
54

Notas
ii'i......................
55

iiiiiiiiiii_¸_'_..... YourHome
For repair- in your home - of all major brand appliances,
lawn and garden equipment, or heating and cooling systems,
iiiiiiiiiii °o.,ot,o_who.,o_o=t,°omo.o__,o_o=__
For the replacement parts, accessories and
iiiiiiiiiii owner's manuals that you need to do-it=yourself.
iiiiiiiiiiiiiiiiiiiii
For Sears professional installation of home appliances
iiiiiiiiiii and items like garage door openers and water heaters. ......................
1-8 00-4-MY-H O M E® (,-800-469-4663} .................................
iiiiiiiiiii Ca,, anytime, day or night (U.S.A. and Canada)
www,sears,com www,sears,ca
_or°x_e,,orno,o,.,,ons_,v,co:...._o°o_o_,,o_o.oo_
iiiiiiiiiii O_Hom
For repair of carry-in items like vacuums, lawn equipment,
and electronics, call or go on-line for the location of your nearest
iiiiiiiiiii Soor__o_,__.opo=_so,-v=_oco,-,to,-
1-800-488-1222 (U.S.A.) 1-800-469-4663 (Canada)
Call anytime, day or night
::::::::::::::::::::: .................
To purchase a protection agreement on a product serviced by Sears:
1-800-827-6655 (U.S.A.) 1-800-361-6665 (Canada)
Pard pedir servicio de reparacien Au Canada pour service en fran£ais:
a domicilio, y pard ordenar piezas: 1,.800.LE.FOYERMC
l"888"SU-HOGAR® (1-800-533-6937)
..... (1-888-784-6427) www.sears.ca
® Registered Trademark / TMTrademark / SMService Mark of Sears Brands, LLC
® March Registrada / TM March de Fabrica / SM March de Servicio de Sears Brands, LLC
MCMarque de commerce / MD Marque deposed de Sears Brands, LLC © Sears Brands, LLC


