Owner'sManual
ManualDelPropietario
VacuumCleaner
®
Aspiradora
Model, Modelo
CAUTION:
Read and follow all
safety and operating
instructions before first
use of this product.
116.26212
L-
CUIDADO:
Leay siga todas las
instrucciones de operaci6n
y seguridad antes del uso de
este producto.
Sears, Roebuck and Co., Hoffman Estates, IL 60179 U.S.A.
www.sears.com
Printed in Mexico
Part No. CO1ZCZJOOUOO-KCO1ZCZJZOUO Impreso en Mexico
Before UsingYour New
Vacuum Cleaner .................... 2
Kenmore Vacuum Cleaner Warranty ... 2
Important Safety Instructions ......... 3
Parts and Features ................. 4-5
Assembly Instructions ............. 6-7
Operating Instructions ............... 8
How to Start ........................ 8
Vacuuming Tips ..................... 9
Suggested Pile Height Settings ........ 10
Attachments ....................... 10
Attachment UseTable ............... 11
Performance Features ............. 11-12
How Your Vacuum Cleaner Works ....... 12
Canister Care ...................... 13
Bag Changing ..................... 13
Cleaning Exterior and Attachments ..... 13
Motor Safety Filter Changing .......... 14
Exhaust Filter Changing .............. 14
Power-Mate ®Care .................. 15
Belt Changing and Agitator Cleaning .. 15-I6
Light Bulb Changing ................. 17
Agitator Servicing ................... 17
Troubleshooting .................... 18
Requesting Assistance
Or Service .................. Back Cover
Please read this guide. It will help you assemble and operate your new Kenmore vacuum
cleaner in the safest and most effective way.
For more information about vacuum cleaner care and operation, call your nearest Sears store.
You will need the complete model and serial numbers when requesting information.Your vacu-
um cleaner's model and serial numbers are located on the Model and Serial Number Plate.
Use the space below to record the model number and serial number of your new Kenrnore
vacuum cleaner.
Model No.
Serial No.
Date of Purchase
Keep this book and your sales check (receipt) in a safe place for future reference.
LIMITED ONEYEAR WARRANTY ON KENMORE VACUUM CLEANER
This warranty is for one year from the date of purchase, and includes only private household
vacuum cleaner use. During the warranty year, when this vacuum cleaner is operated and
maintained according to the owner's manual instructions, Sears will repair any defects in
material or workmanship free of charge.
This warranty excludes vacuum cleaner bags, belts, light bulbs, and filters, which are
expendable parts and become worn during normal use.
For warranty service, return this vacuum cleaner to the nearest Sears Service Center in
the United States.
This warranty applies only while this product is in use in the United States. This warranty gives
you specific legal rights, and you may also have other rights which vary from state to state.
Sears, Roebuck and Co., D/817 WA, Hoffman Estates, IL 60179
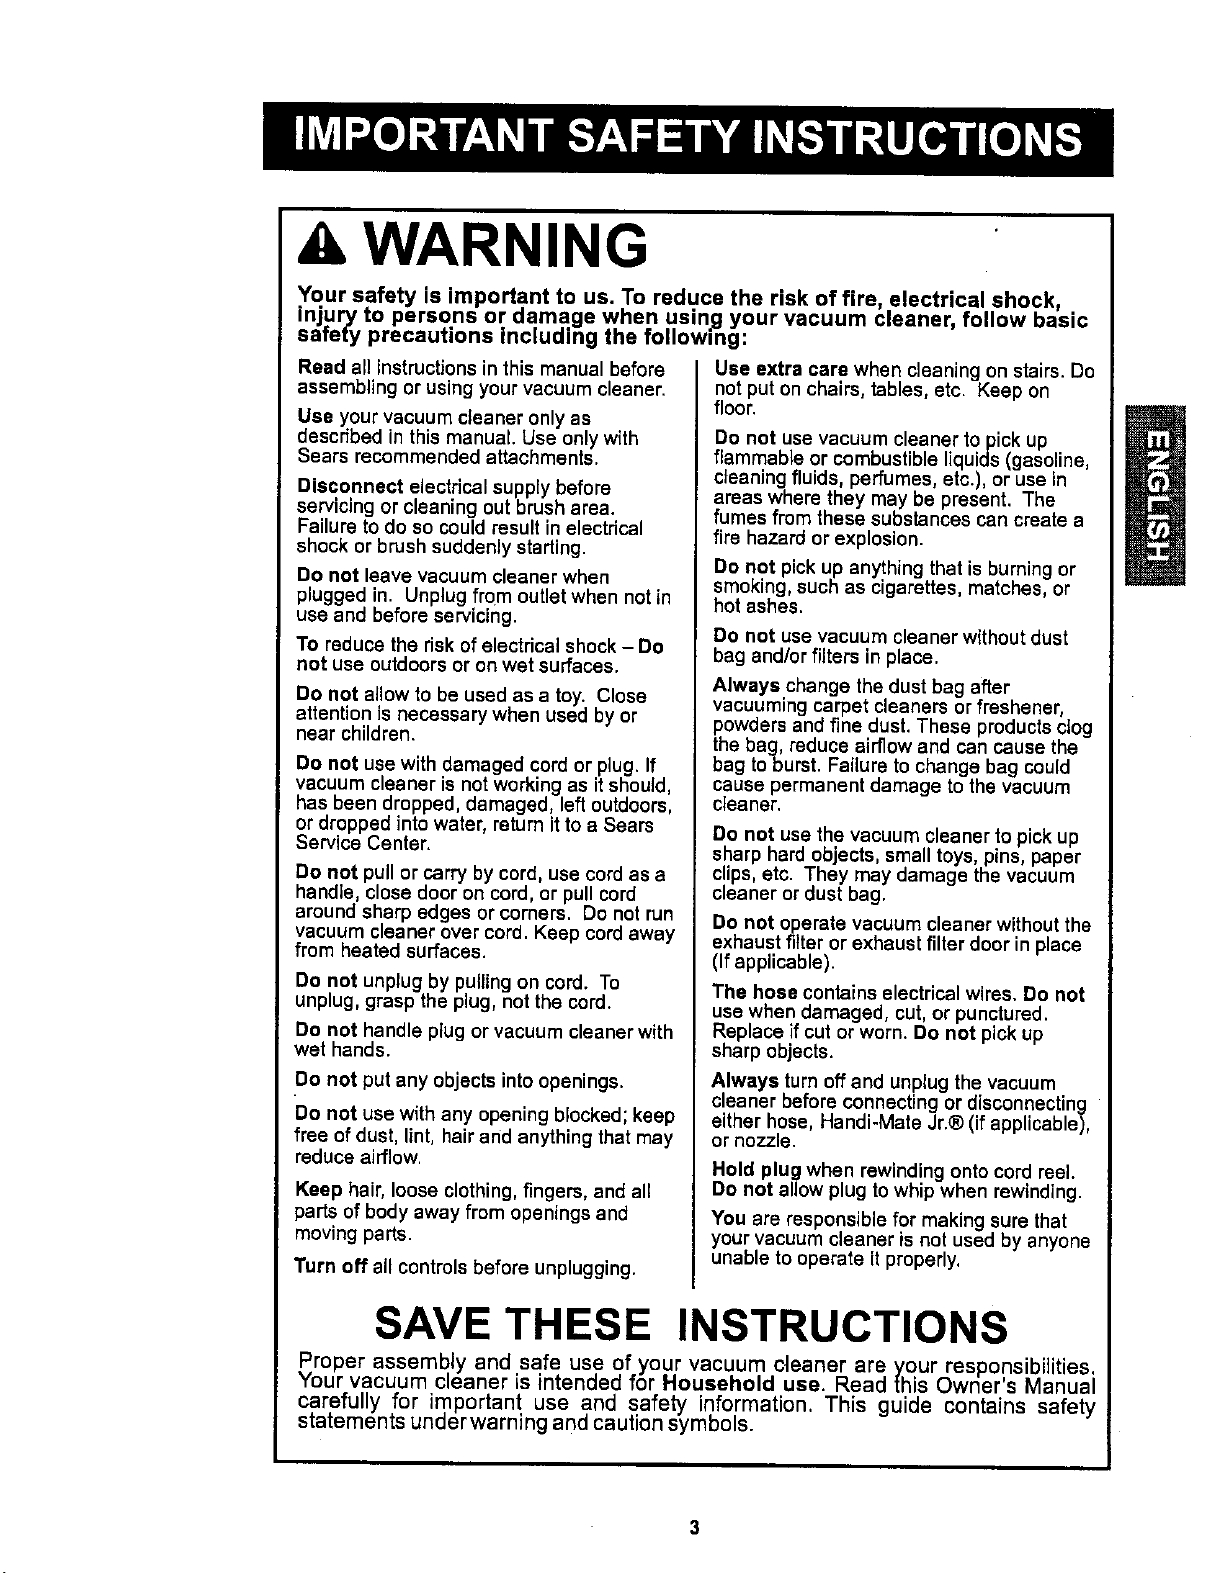
&, WARNING
Your safety is important to us. To reduce the r sk of fire, electrical shock,
injury to persons or damage when usin.g your vacuum c eaner, follow basic
safety precautions including the follow, ng:
Read all instructionsin this manual before
assembling or using your vacuum cleaner.
Use your vacuum cleaner only as
described in this manual. Use onlywith
Sears recommended attachments.
Disconnect electrical supply before
servicing or cleaning out brush area.
Failure to do so could result in electrical
shock or brush suddenly starting.
Do not leave vacuum cleaner when
plugged in. Unplug from outlet when notin
use and before servicing.
To reduce the risk ofelectrical shock - Do
not use outdoors or on wet surfaces.
Do not allow to be used as a toy. Close
attention is necessary when used byor
near children.
Do not use with damaged cord or plug. If
vacuum cleaner is not working as itshould,
has been dropped, damaged, leftoutdoors,
or dropped into water, return itto a Sears
Service Center.
Do not pull or carry by cord, use cord as a
handle, close door on cord, or pull cord
around sharp edges or corners. Do not run
vacuum cleaner over cord. Keep cord away
from heated surfaces.
Do not unplug by pulling on cord. To
unplug, grasp the plug, not the cord.
Do not handle plug or vacuum cleaner with
wet hands.
Do not put any objects into openings.
Do not use with any opening blocked; keep
free of dust, lint, hair and anything that may
reduce airflow.
Keep hair, loose clothing,fingers, and all
parts of body away from openings and
moving parts.
Turn off all controls before unplugging.
Use extra care when cleaning on stairs. Do
not put on chairs, tables, etc. Keep on
floor.
Do not use vacuum cleaner topick up
flammable or combustible liquids(gasoline
cleaning f uds, perfumes, etc.), or use in
areas where they may be present. The
fumes from these substances can create a
fire hazard or explosion.
Do not pick up anything that is burningor
smoking, such as cigarettes, matches, or
hot ashes.
Do not use vacuum cleaner without dust
bag and/or filters in place.
Always.change the dust bag after
vacuuming carpet cleaners or freshener,
powders and fine dust. These productsclog
the bag, reduce airflow and can cause the
bag toburst. Failure to change bag could
cause permanent damage to the vacuum
cleaner.
Do not use the vacuum cleaner to pick up
sharp hard objects, small toys pins, paper
clips,etc. They may damage the vacuum
cleaner or dust bag.
Do not operate vacuum cleaner without the
exhaust filter or exhaust filter door in place
(If applicable).
The hose contains electrical wires. Do not
use when damaged, cut, or punctured.
Replace if cut or worn. Do not pick up
sharp objects.
Always turnoff and unplug the vacuum
cleaner before connecting or disconnecting
either hose, Handi-Mate Jr.® (if applicable),
or nozzle,
Hold plug when rewinding onto cord reel.
Do not allow plug to whip when rewinding.
You are responsible for making sure that
your vacuum cleaner is not used by anyone
unable to operate itproperly.
SAVE THESE INSTRUCTIONS
Proper assembly and safe use of your vacuum cteaner are your responsibilities,
Your vacuum cleaner is intended for Household use. Read this Owner's Manual
carefully for important use and safety information. This guide contains safety
statements under warning and caution symbols.
3

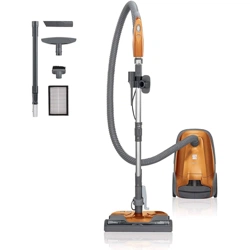
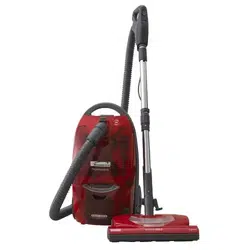
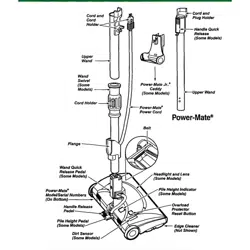
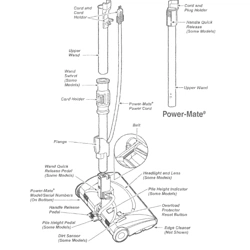
It is important to know your vacuum cleaner's parts and features to assure its proper and safe
use. Review these before using your vacuum cleaner.
Item Part No. Part No.
In U.S. In Canada
Headlight Bulb 20-5240 20-40600
Belt 20-5201 20-40979
POWER-MATE®
Cord
Cord
Holder-- ,.
Cord
Wand
Power Cord
Belt
f
_ or
"-- Handle
Quick
Release
Upper
Wand
Pile Height PedaJP°wer'Mate /
Model/Serial Numbers
(On Bottom)
(Not Shown)
=rotector
Reset Button
4
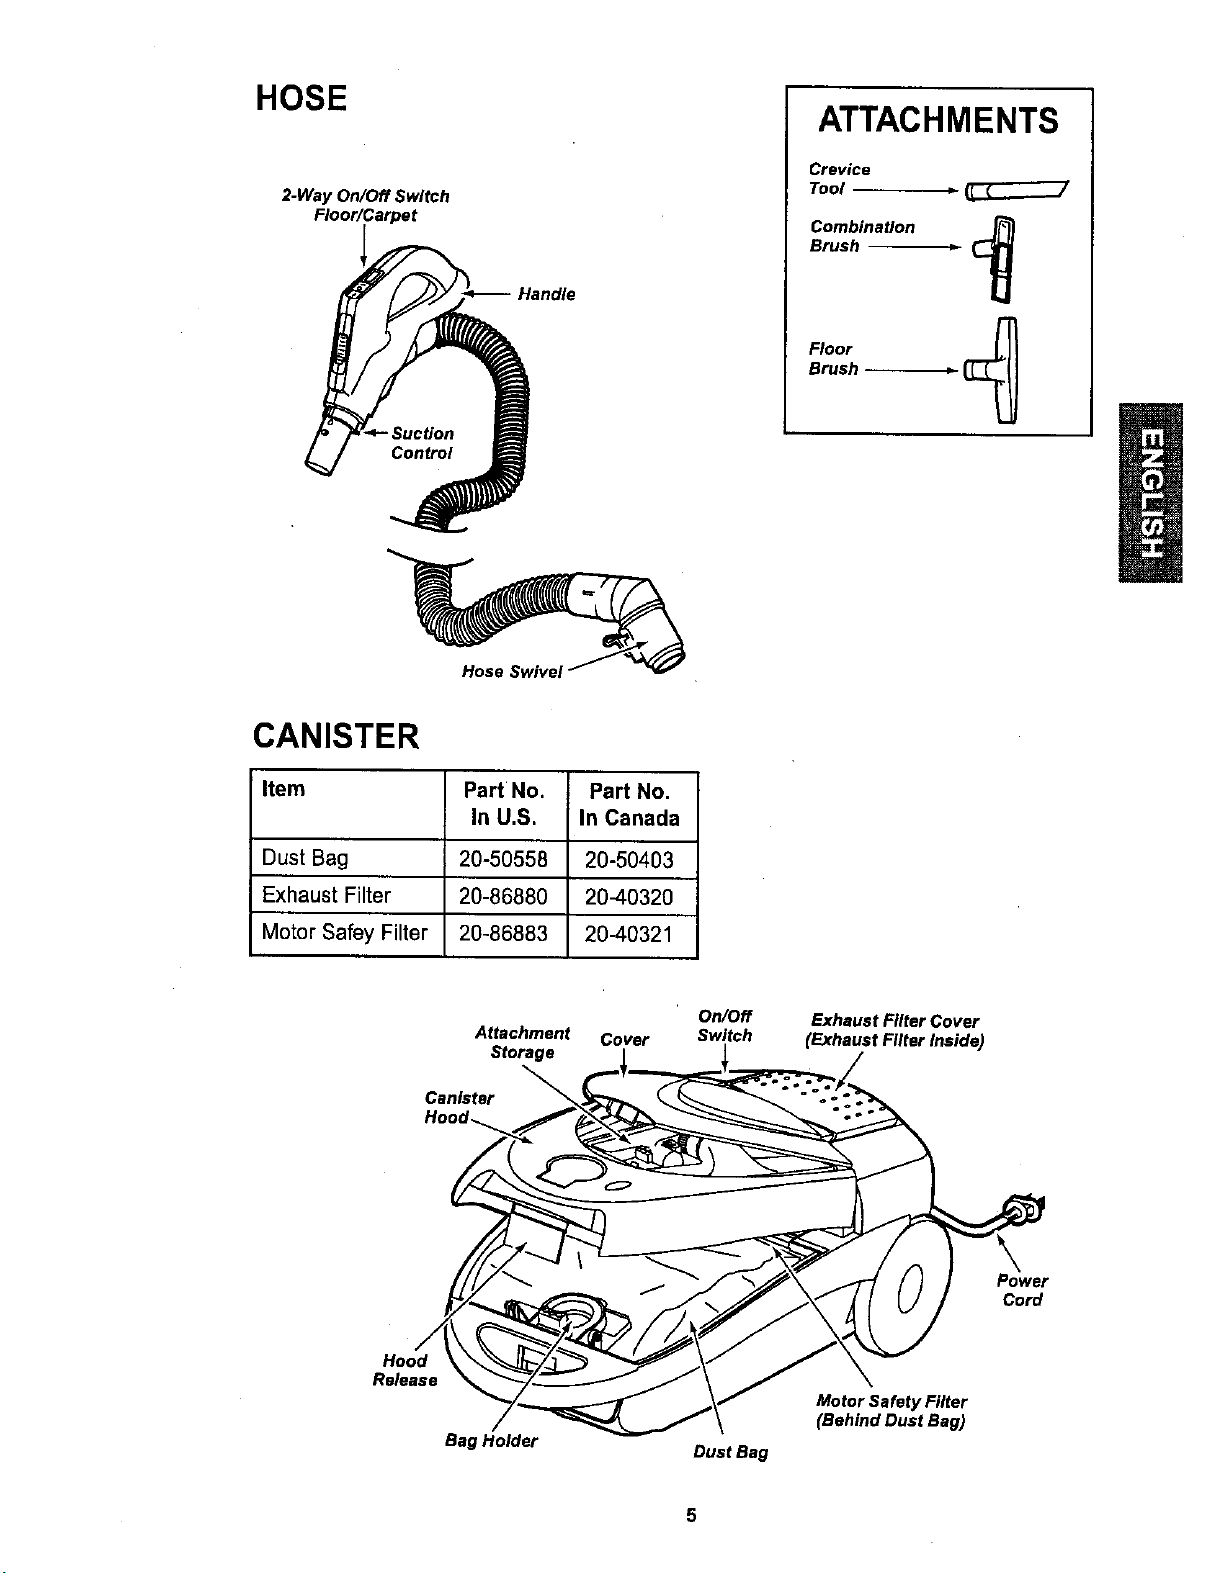
HOSE
2.Way On/Off Switch
Floor/Carpet
ATTACHMENTS
Crevice
Tool
Combination
Brush _-
Floor
Brush _-
Hose SwivaJ
CANISTER
Item Part No. Part No.
In U.S, In Canada
Dust Bag 20-50558 20-50403
Exhaust Filter 20-86880 20-40320
Motor $afey Filter 20-86883 20-40321
On/Off Exhaust Filter Cover
Attachment Cover Switch (Exhaust Filter Inside)
Storage I l /
Canister _:Tp_ (_ _'_ _- ""o " "
"_...._ . "_ Motor S_fety Filter
/ _ (Behindou;tBeg)
Bag Holder Dust Bag

Please pay special attention to these hazard alert boxes, and follow any instruc- I
tions given. WARNING statements alert you to such dangers as fire, electric
I
shock, burns and personal injury. CAUTION statements alert you to such dangers
as personal injury and/or property damage.
kWARNING
Electrical Shock Hazard
DO NOT plug into electrical supply until
assembly is complete. Failure to do so
could result in electrical shock or
injury,
Before assembling vacuum cleaner, check
the PACKING LIST on the cover of the
separate REPAIR PARTS LIST. Use this list
to verify that you have received all the
components of your new Kenmore vacuum
cleaner.
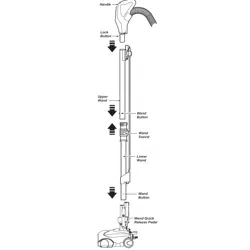
WANDS
Slide wands
together until
wand button
Wand I
Bu"on'_--_L_ I _1 r
Cord
snaps into place.
POWER-MATE ®
1. Insert wands into Power-Mate ®until the
wand button snaps into place.
Area
2. Connect Power-
Mate ®plug and cord
as shown. DO NOT
force. Raised area
of plug must be
toward hand.
3. Secure cord into
cord holder on wand
swivel.
To remove: Disconnect cord, steady Power-
Mate ®with foot and turn wands until the
button disappears, then pull wands out of
Power-Mate ®.
Handle
Lock
Button
Wand
Button_
Cord
Holder -_l"h _L
Wand
Wand I
Button _ J
Cord
6
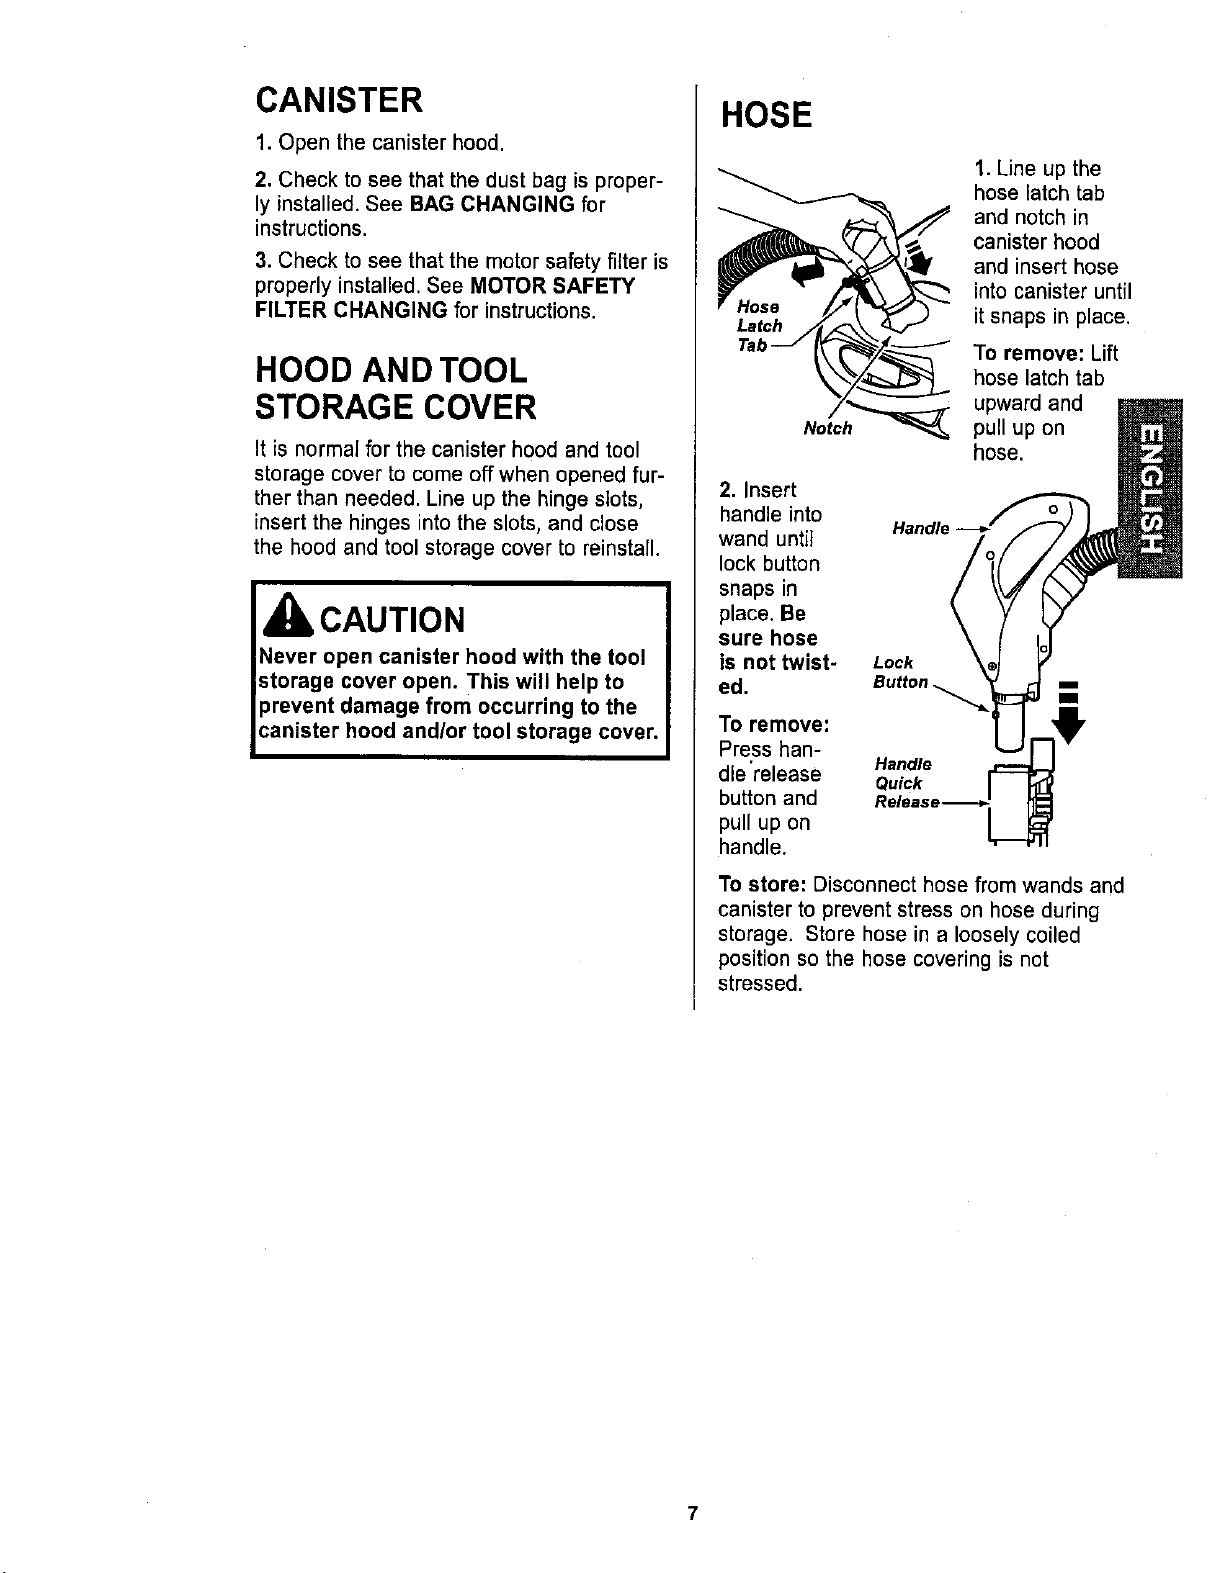
CANISTER
1. Open the canister hood.
2. Check to see that the dust bag is proper-
ly installed. See BAG CHANGING for
instructions.
3. Check to see that the motor safety filter is
properly installed. See MOTOR SAFETY
FILTER CHANGING for instructions.
HOOD AND TOOL
STORAGE COVER
It is normal for the canister hood and tool
storage cover to come off when opened fur-
ther than needed. Line up the hinge slots,
insert the hinges into the slots, and close
the hood and tool storage cover to reinstall.
CAUTION
HOSE
Latch
1. Line up the
hose latch tab
and notch in
canister hood
and insert hose
into canister until
it snaps in place.
To remove: Lift
hose latch tab
upward and
pull up on
hose.
2. Insert
handle into
wand until
lock button
snaps in
place. Be
sure hose
is not twist-
ed,
To remove:
Press han-
dle 'release
button and
pull up on
handle.
Lock
Button
Handle
Quick
To store: Disconnect hose from wands and
canister to prevent stress on hose during
storage. Store hose in a loosely coiled
position so the hose covering is net
stressed.
OPERATING INSTRUCTIONS
kWARNING
Personal Injury and Product Damage
Hazard
DO NOT plug in if switch is in ON
position. Personal injury or property
damage could result.
The cord moves rapidly when
rewinding. Keep children away
and provide a clear path when
rewinding the cord to prevent
personal injury.
DO NOT use outlets above counters.
Damage from cord to items in
surrounding area could occur.
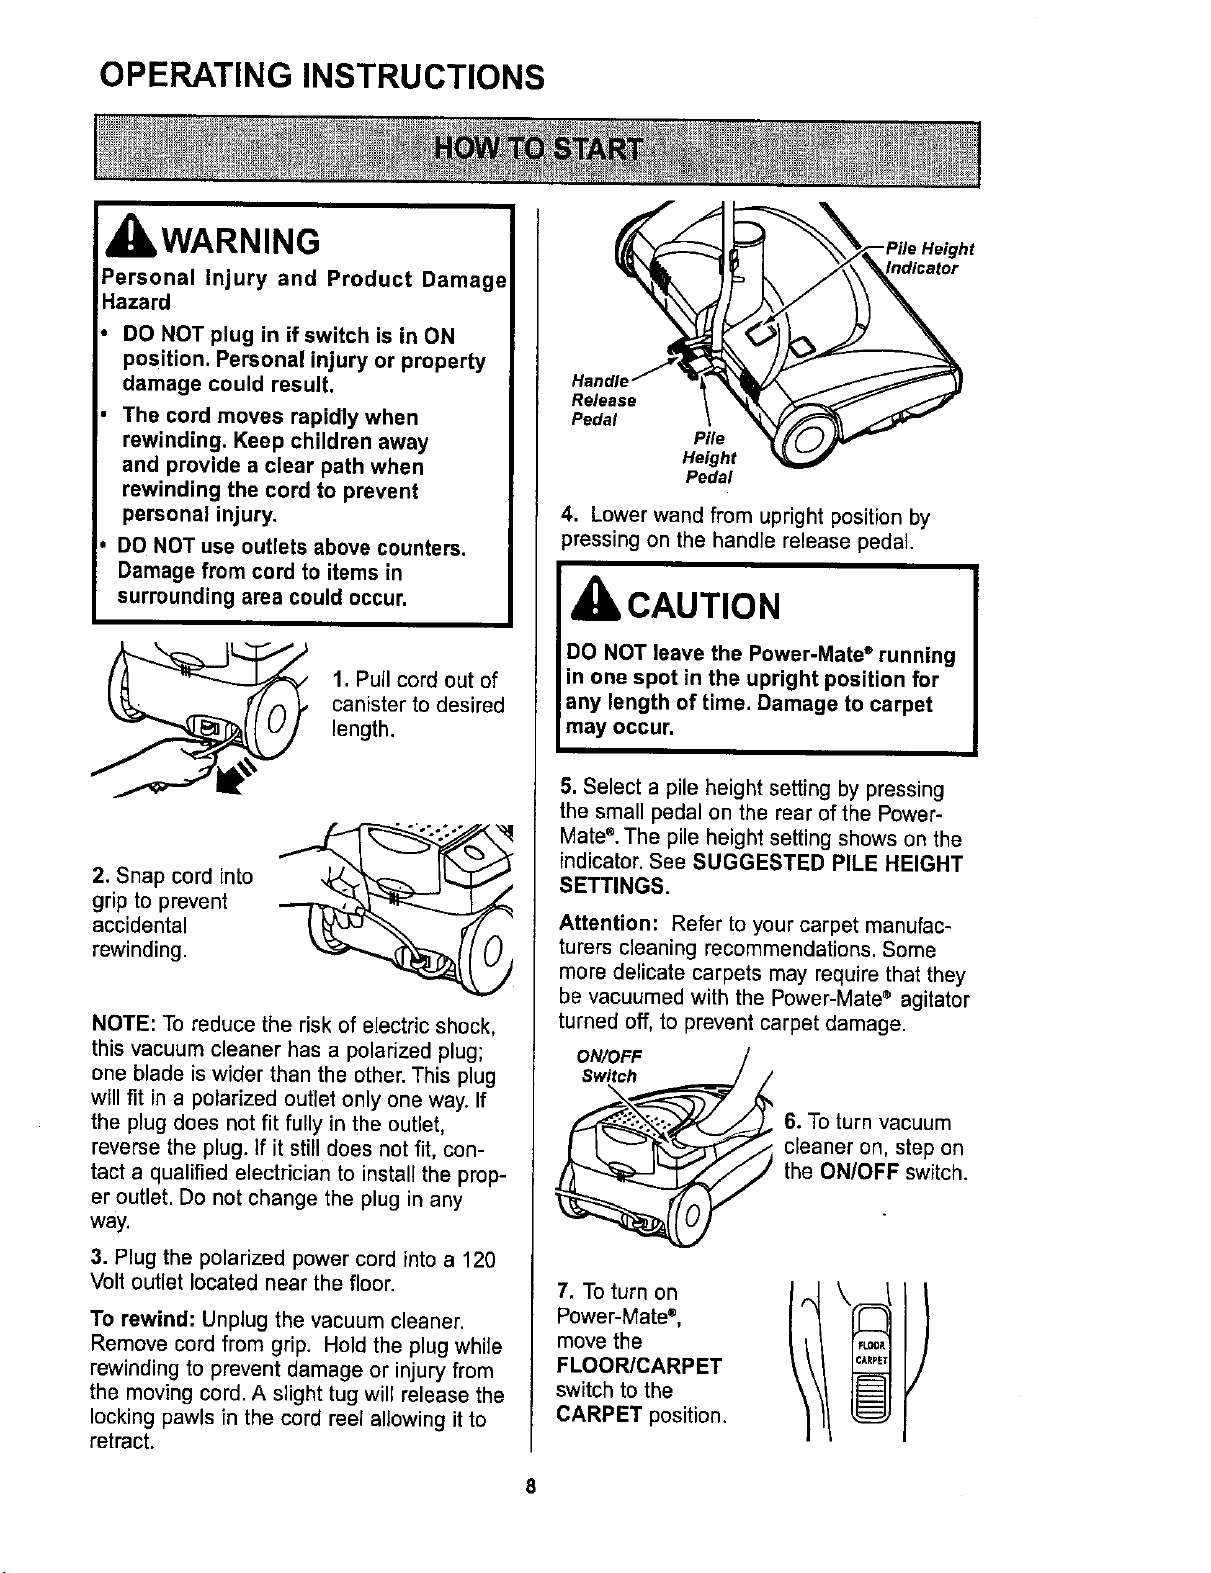
1. Pull cord out of
canister to desired
length.
2. Snap cord into
grip to prevent
accidental
rewinding.
NOTE: To reduce the risk of electric shock,
this vacuum cleaner has a polarized plug;
one blade is wider than the other. This plug
will fit in a polarized outlet only one way. If
the plug does not fit fully in the outlet,
reverse the plug. If it still does not fit, con-
tact a qualified electrician to install the prop-
er outlet. Do not change the plug in any
way.
3. Plug the polarized power cord into a 120
Volt outlet located near the floor.
To rewind: Unplug the vacuum cleaner.
Remove cord from grip. Hold the plug while
rewinding to prevent damage or injury from
the moving cord. A slight tug will release the
locking pawls in the cord reel allowing it to
retract.
Fndicator
Release
Pedal
Pile
Height
Pedal
4. Lower wand from upright position by
pressing on the handle release pedal.
CAUTION
DO NOT leave the Power-Mate" running
in one spot in the upright position for
any length of time. Damage to carpet
may occur.
5. Select a pile height setting by pressing
the small pedal on the rear of the Power-
Mate ®. The pile height setting shows on the
indicator. See SUGGESTED PILE HEIGHT
SETTINGS.
Attention: Refer to your carpet manufac-
turers cleaning recommendations. Some
more delicate carpets may require that they
be vacuumed with the Power-Mate ® agitator
turned off, to prevent carpet damage.
ON/OFF /
6. Toturn vacuum
cleaner on, step on
the ON/OFF switch.
7, To turn on
Power-Mate',
move the
FLOOR/CARPET
switch to the
CARPET position.
I FLOOR
I CARPE"
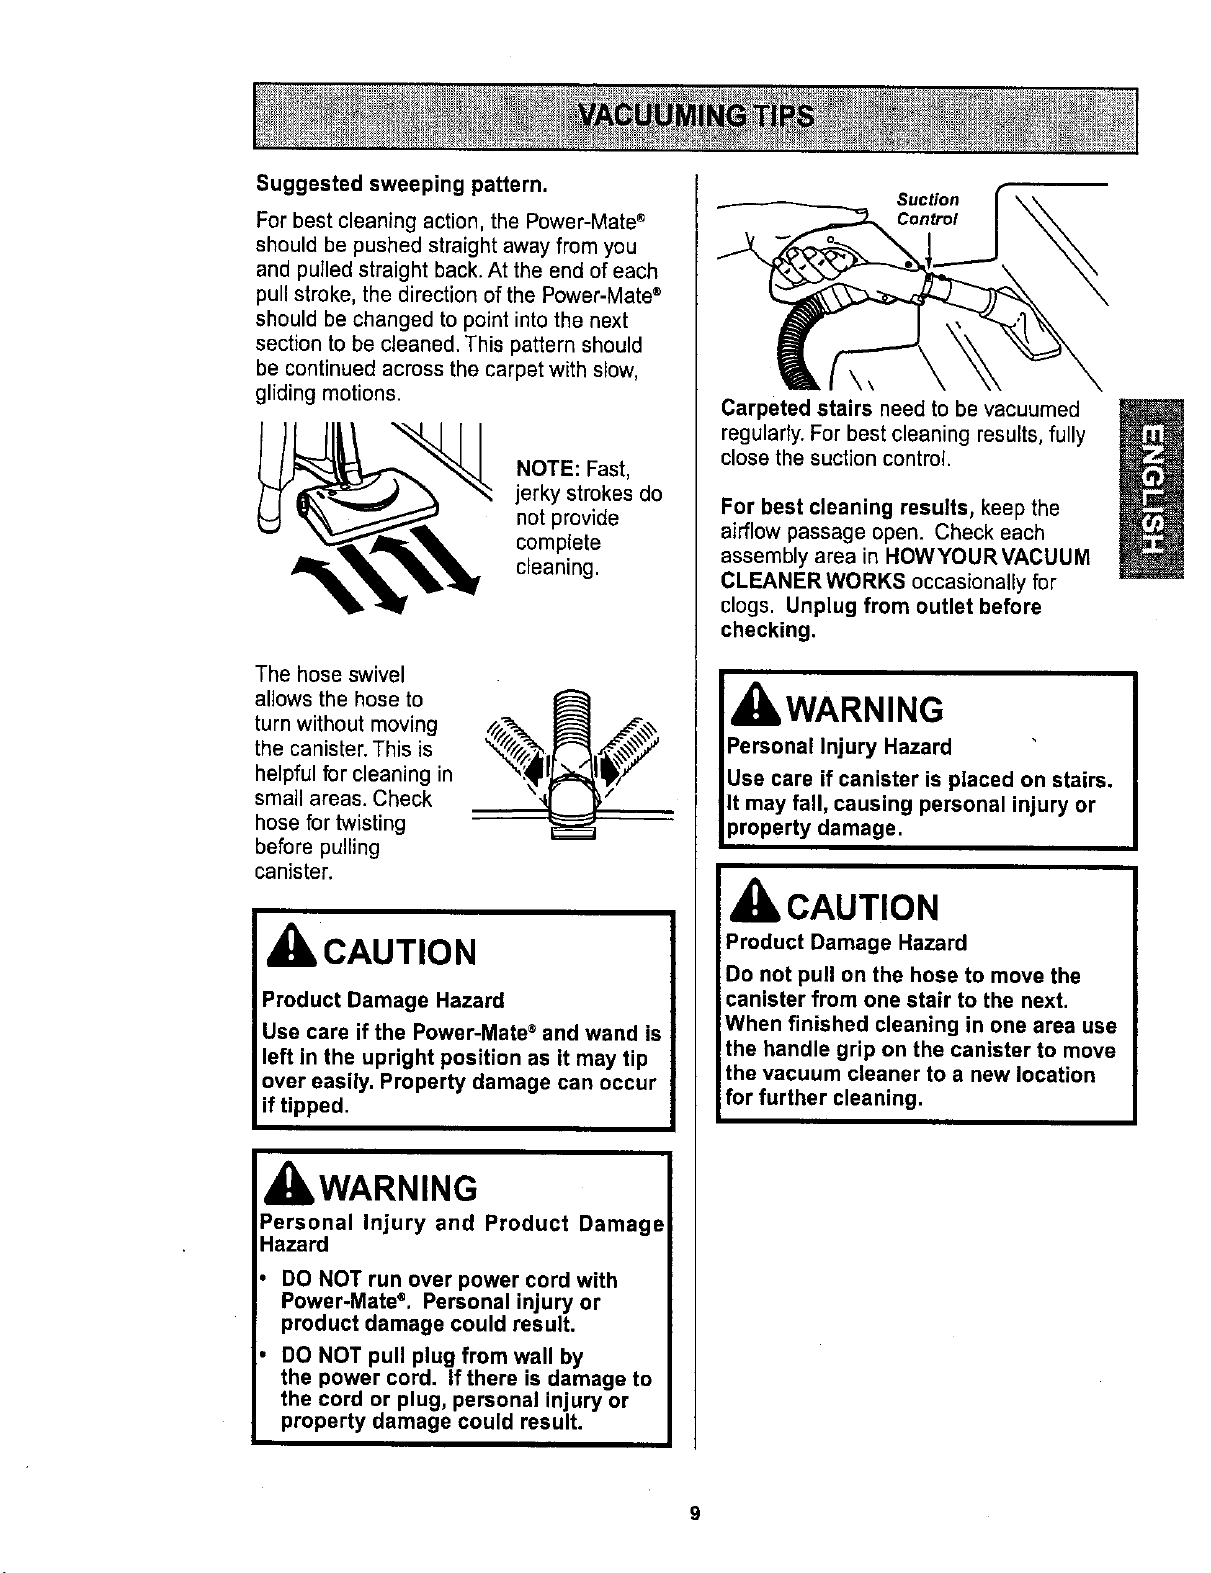
Suggested sweeping pattern.
For best cleaning action, the Power-Mate ®
should be pushed straight away from you
and pulled straight back. At the end of each
pull stroke, the direction of the Power-Mate ®
should be changed to point into the next
section to be cleaned. This pattern should
be continued across the carpet with slow,
gliding motions.
NOTE: Fast,
jerky strokes do
not provide
complete
cleaning.
The hose swivel
allows the hose to
turn without moving
the canister. This is
helpful for cleaning in
small areas. Check
hose for twisting
before pulling
canister.
CAUTION
Product Damage Hazard
Use care if the Power-Mate ®and wand is
left in the upright position as it may tip
over easily. Property damage can occur
if tipped.
d IbWARNING
Personal Injury and Product Damagt
Hazard
DO NOT run over power cord with
Power-Mate ®. Personal injury or
product damage could result.
DO NOT pull plug from wall by
the power cord. If there is damage to
the cord or plug, personal injury or
property damage could result.
Suction
Control
Carpeted stairs need to be vacuumed
regularly. For best cleaning results, fully
close the suction control.
For best cleaning results, keep the
airflow passage open. Check each
assembly area in HOWYOURVACUUM
CLEANER WORKS occasionally for
clogs. Unplug from outlet before
checking.
WARNING
CAUTION
Product Damage Hazard
Do not pull on the hose to move the
canister from one stair to the next.
When finished cleaning in one area use
the handle grip on the canister to move
the vacuum cleaner to a new location
for further cleaning.
9
For best deep down cleaning, use the XLO
setting. However, you may need to raise the
height to make some jobs easier, such as
scatter rugs and some deep pile carpets,
and to prevent the vacuum cleaner from
shutting off. Suggested settings are:
HI - Shag, deep pile, or scatter rugs.
MED - Medium to deep pile.
LO - Low to medium pile.
XLO - Most carpets and bare floors.
CAUTION
DO NOT attach or remove handle or
wands while vacuum cleaner is ON.
This could cause sparking and damage
the electrical contacts.
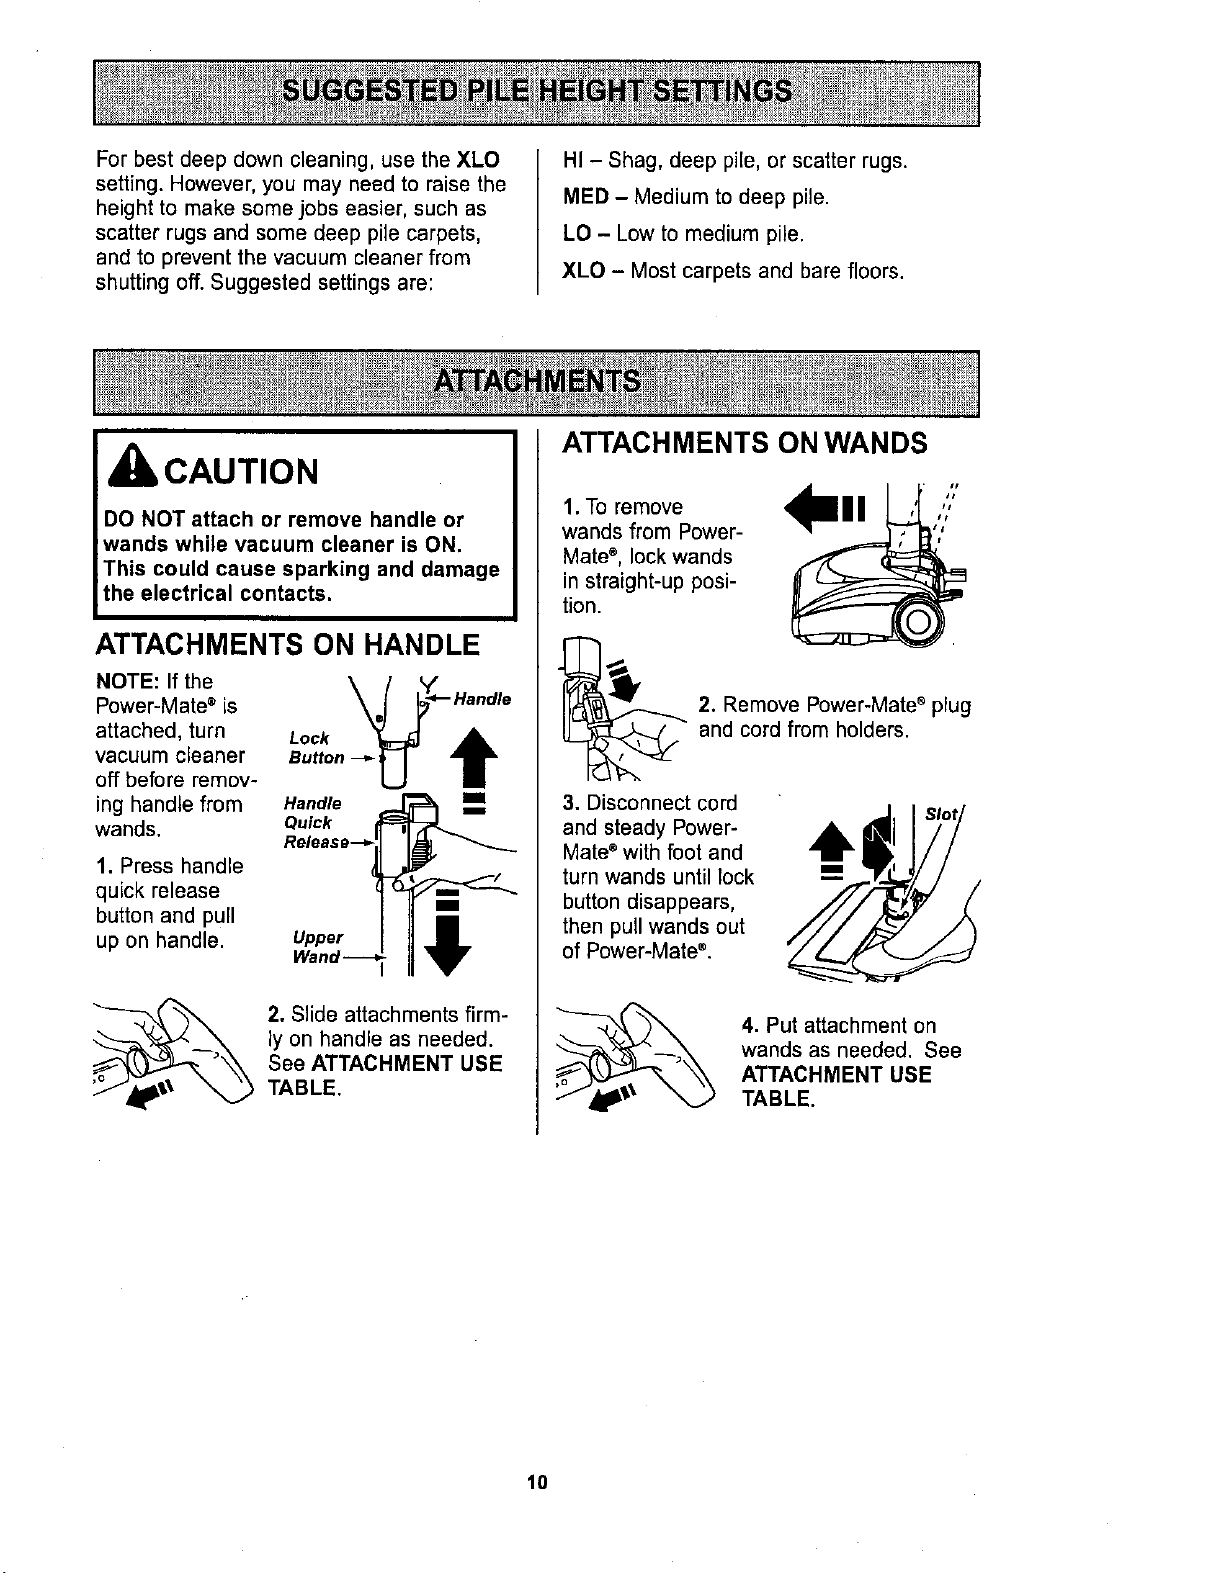
ATTACHMENTS ON HANDLE
NOTE: If the
Power-Mate ®is
attached, turn
vacuum cleaner
off before remov-
ing handle from
wands.
1. Press handle
quick release
button and pull
up on handle.
Handle
Quick
Release--_
t /
Upper
Wand --
2. Slide attachments firm-
ly on handle as needed.
See ATTACHMENT USE
TABLE.
ATTACHMENTS ONWANDS
1. To
remove ,_ l I
wands from Power-
Mate ®, lock wands
in straight-up posi-
tion.
• it
2, Remove Power-Mate ®plug
and cord from holders.
3. Disconnect cord
and steady Power-
Mate ®with foot and
turn wands until lock
button disappears,
then pull wands out
of Power-Mate ®.
i
4. Put attachment on
wands as needed. See
ATTACHMENT USE
TABLE.
10
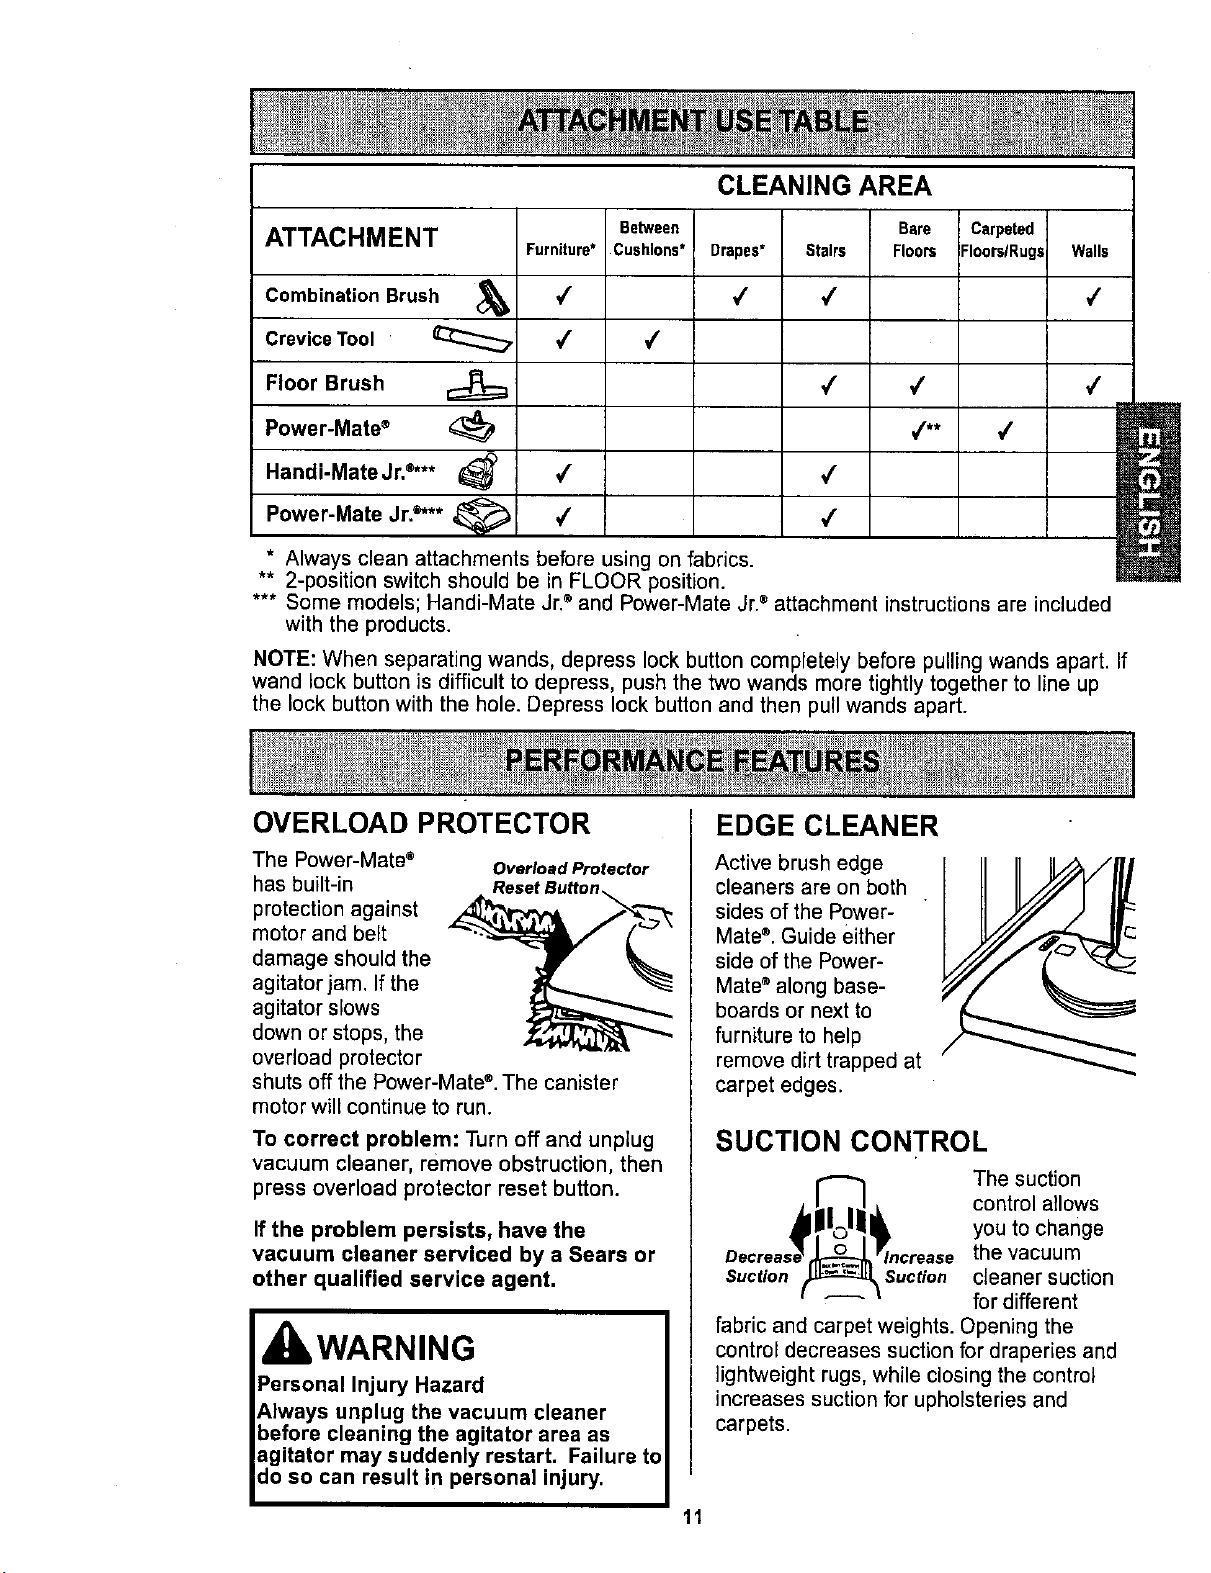
ATTACHMENT
Combination Brush
Crevice Tool
Floor Brush
Power-Mate ®
Handi'Mate Jr.®***
Power-Mate Jr2***
CLEANING AREA
Between
Furniture* Cushions* Drapes*
4 ,/
# 4
,/
/
Bare Carpeted
Stairs Floors FloorstRugs
/
4 4
4** 4
4
4
Walls
#
4
* Always clean attachments before using on fabrics.
** 2-position switch should be in FLOOR position.
*** Some models; Handi-Mate Jr.®and Power-Mate Jr.®attachment instructions are included
with the products.
NOTE: When separating wands, depress lock button completely before pulling wands apart. If
wand lock button is difficult to depress, push the two wands more tightly together to line up
the lock button with the hole. Depress lock button and then pull wands apart.
OVERLOAD PROTECTOR
The Power-Mate ®
has built-in
protection against
motor and belt
damage should the
agitator jam. If the
agitator slows
down or stops, the
overload protector
Overload Protector
shuts off the Power-Mate®.The canister
motor will continue to run.
To correct problem: Turn off and unplug
vacuum cleaner, remove obstruction, then
press overload protector reset button.
If the problem persists, have the
vacuum cleaner serviced by a Sears or
other qualified service agent,
WARNING
EDGE CLEANER
Active brush edge
cleaners are on both
sides of the Power-
Mate ®. Guide either
side of the Power-
Mate ®along base-
boards or next to
furniture to help
remove dirt trapped at
carpet edges.
SUCTION CONTROL
The suction
control allows
you to change
the vacuum
Suction Suction cleaner suction
for different
fabric and carpet weights. Opening the
control decreases suction for draperies and
lightweight rugs, while closing the control
increases suction for upholsteries and
carpets.
11
THERMAL PROTECTOR
This vacuum cleaner has a thermal protector
which automatically trips to protect the
vacuum cleaner from overheating. If a clog
prevents the normal flow of air to the motor,
the thermal protector turns the motor off
automatically. This allows the motor to cool
in order to prevent possible damage to the
vacuum cleaner.
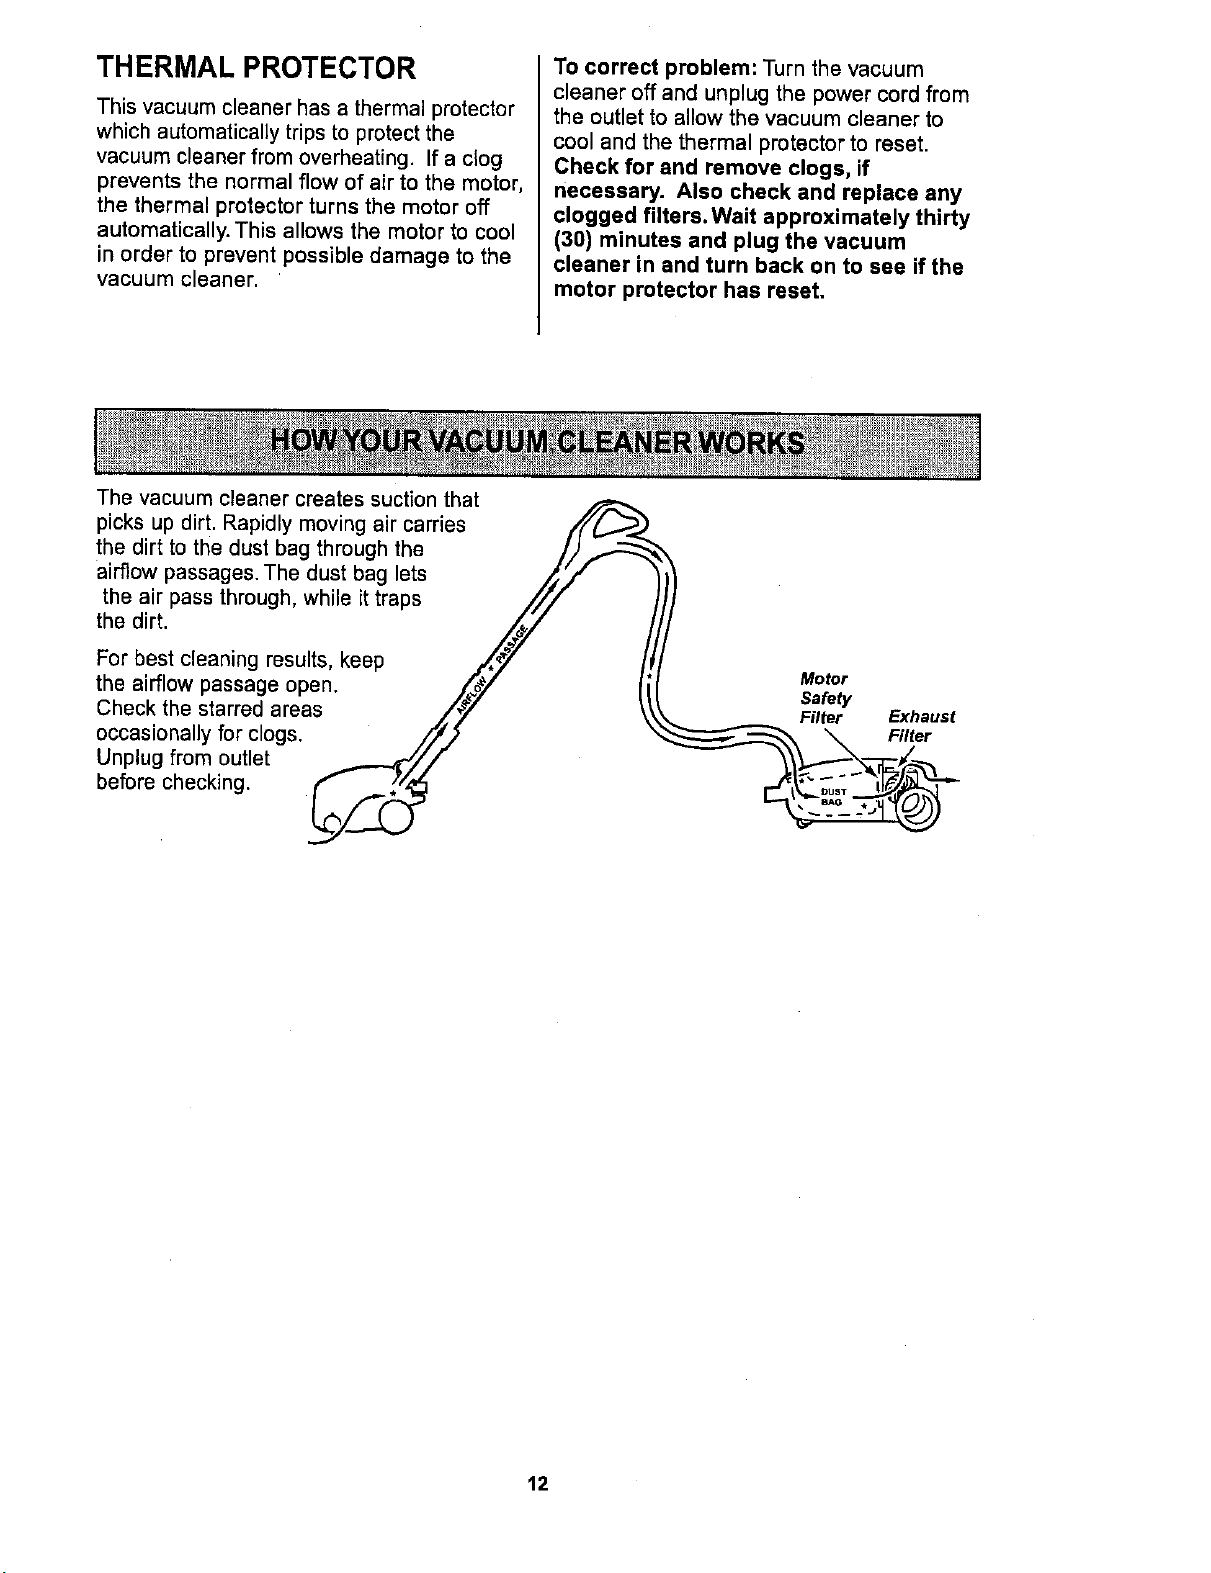
The vacuum cleaner creates suction that
To correct problem: Turn the vacuum
cleaner off and unplug the power cord from
the outlet to allow the vacuum cleaner to
cool and the thermal protector to reset.
Check for and remove clogs, if
necessary. Also check and replace any
clogged filters.Wait approximately thirty
(30) minutes and plug the vacuum
cleaner in and turn back on to see if the
motor protector has reset.
picks up dirt. Rapidly moving air carries t/("_.,,_
the dirt to the dust bag through the /.)_
airflow passages. The dust bag lets ,,_i,_"
the air pass through, while it traps ///
the dirt. _/ /
For best cleaning results, keep ._,_" /j
the airflow passage open. //_% [i
Check the starred areas ,_/'y
occasionally for clogs. /F//j_ "
Unplug from outlet ........_._//
before checking ._._
Motor
Safety
Filter Exhaust
_ _ Filter
12
CANISTER CARE
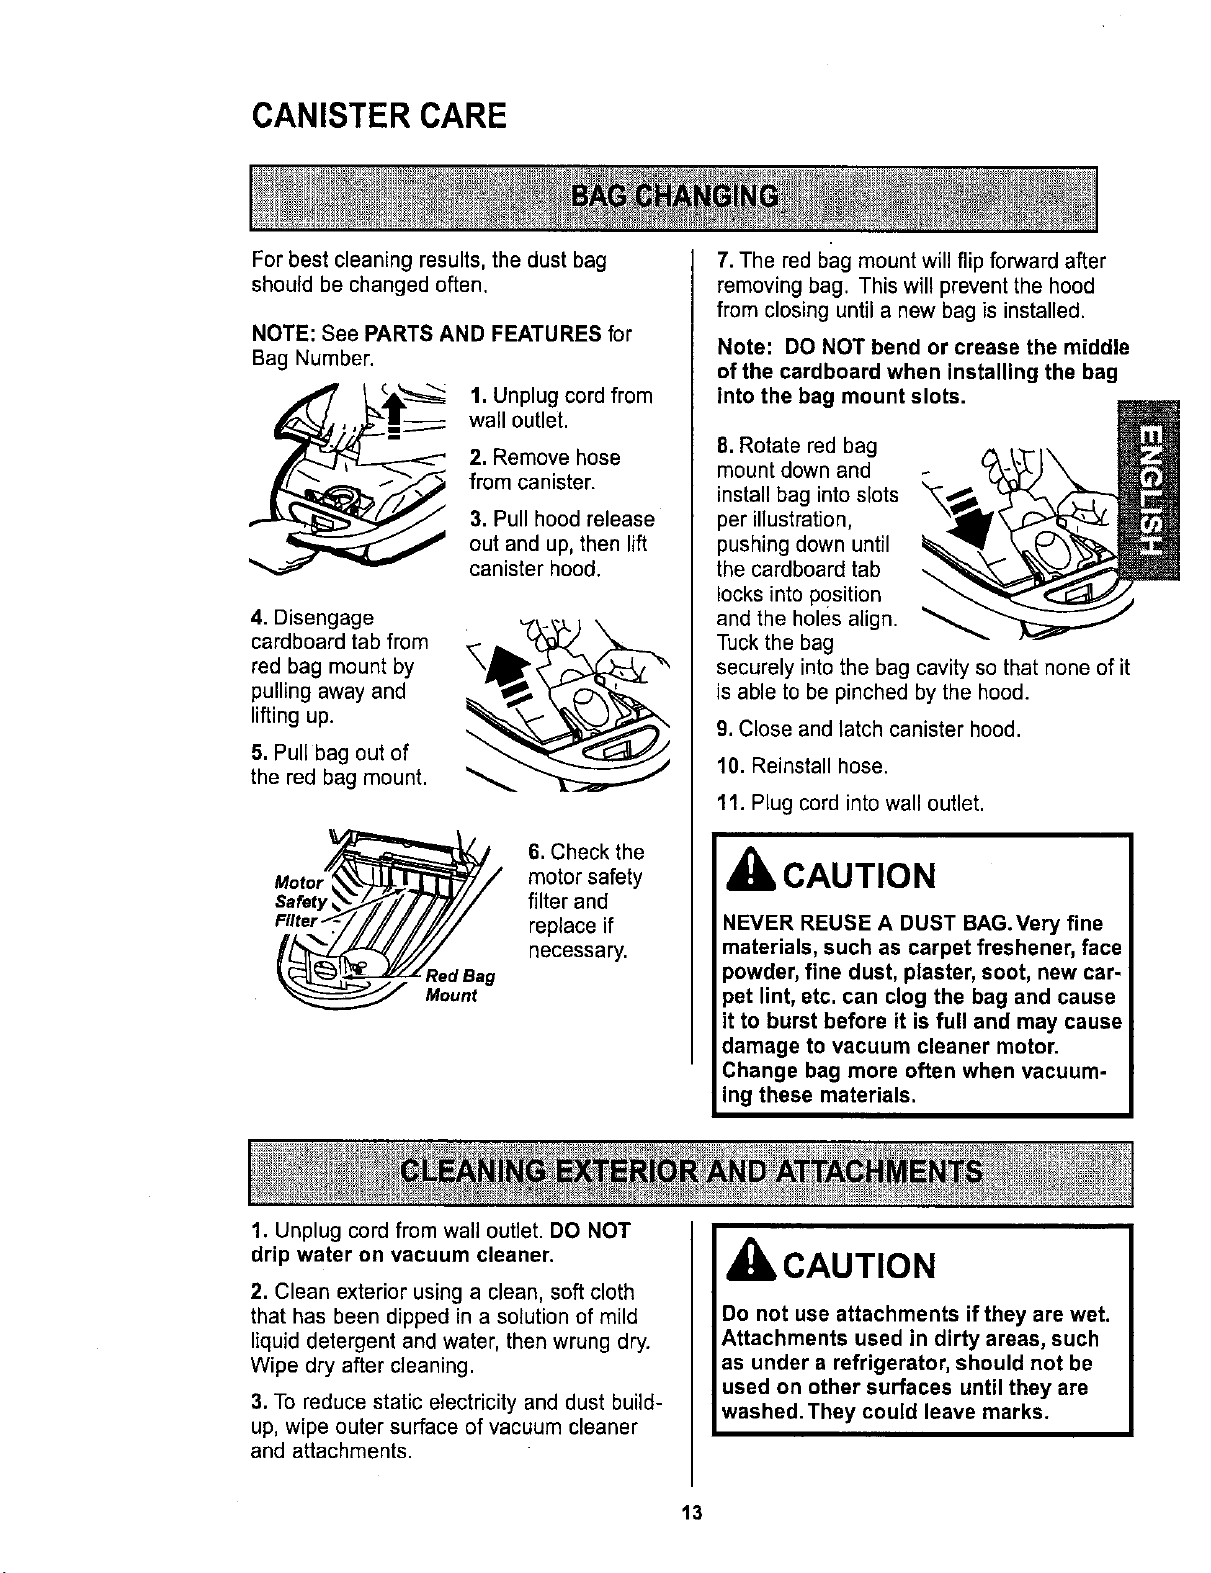
For best cleaning results, the dust bag
should be changed often.
NOTE: See PARTS AND FEATURES for
Bag Number.
1. Unplug cord from
wall outlet.
2. Remove hose
from canister.
3. Pull hood release
out and up, then lift
canister hood.
4. Disengage
cardboard tab from
red bag mount by
pulling away and
lifting up.
5. Pull bag out of
the red bag mount.
Safety
Red Bag
Mount
6. Check the
motor safety
filter and
replace if
necessary.
7. The red bag mount will flip forward after
removing bag. This will prevent the hood
from closing until a new bag is installed.
Note: DO NOT bend or crease the middle
of the cardboard when installing the bag
into the bag mount slots.
8. Rotate red bag
mount down and
install bag into slots
per illustration,
pushing down until
the cardboard tab
locks into p?sition
and the holes align.
Tuck the bag
securely into the bag cavity so that none of it
is able to be pinched by the hood.
9. Close and latch canister hood.
10. Reinstall hose.
11. Plug cord intowall outlet.
CAUTION
NEVER REUSE A DUST BAG.Very fine
materials, such as carpet freshener, face
_owder, fine dust, plaster, soot, new car-
_et lint, etc. can clog the bag and cause
t to burst before it is full and may cause
damage to vacuum cleaner motor.
Change bag more often when vacuum-
ing these materials.
1. Unplug cord from wall outlet. DO NOT
drip water on vacuum cleaner.
2. Clean exterior using a clean, soft cloth
that has been dipped in a solution of mild
liquid detergent and water, then wrung dry.
Wipe dry after cleaning.
3. To reduce static electricity and dust build-
up, wipe outer surface of vacuum cleaner
and attachments.
CAUTION
Do not use attachments if they are wet.
Attachments used in dirty areas, such
as under a refrigerator, should not be
used on other surfaces until they are
washed. They could leave marks.
13
IbWARNING
Electrical Shock Hazard
Unplug power cord from electrical
outlet. Do not operate the vacuum
cleaner without the motor safety filter.
Be sure the filter is dry and properly
installed to prevent motor failure and/or
electrical shock.
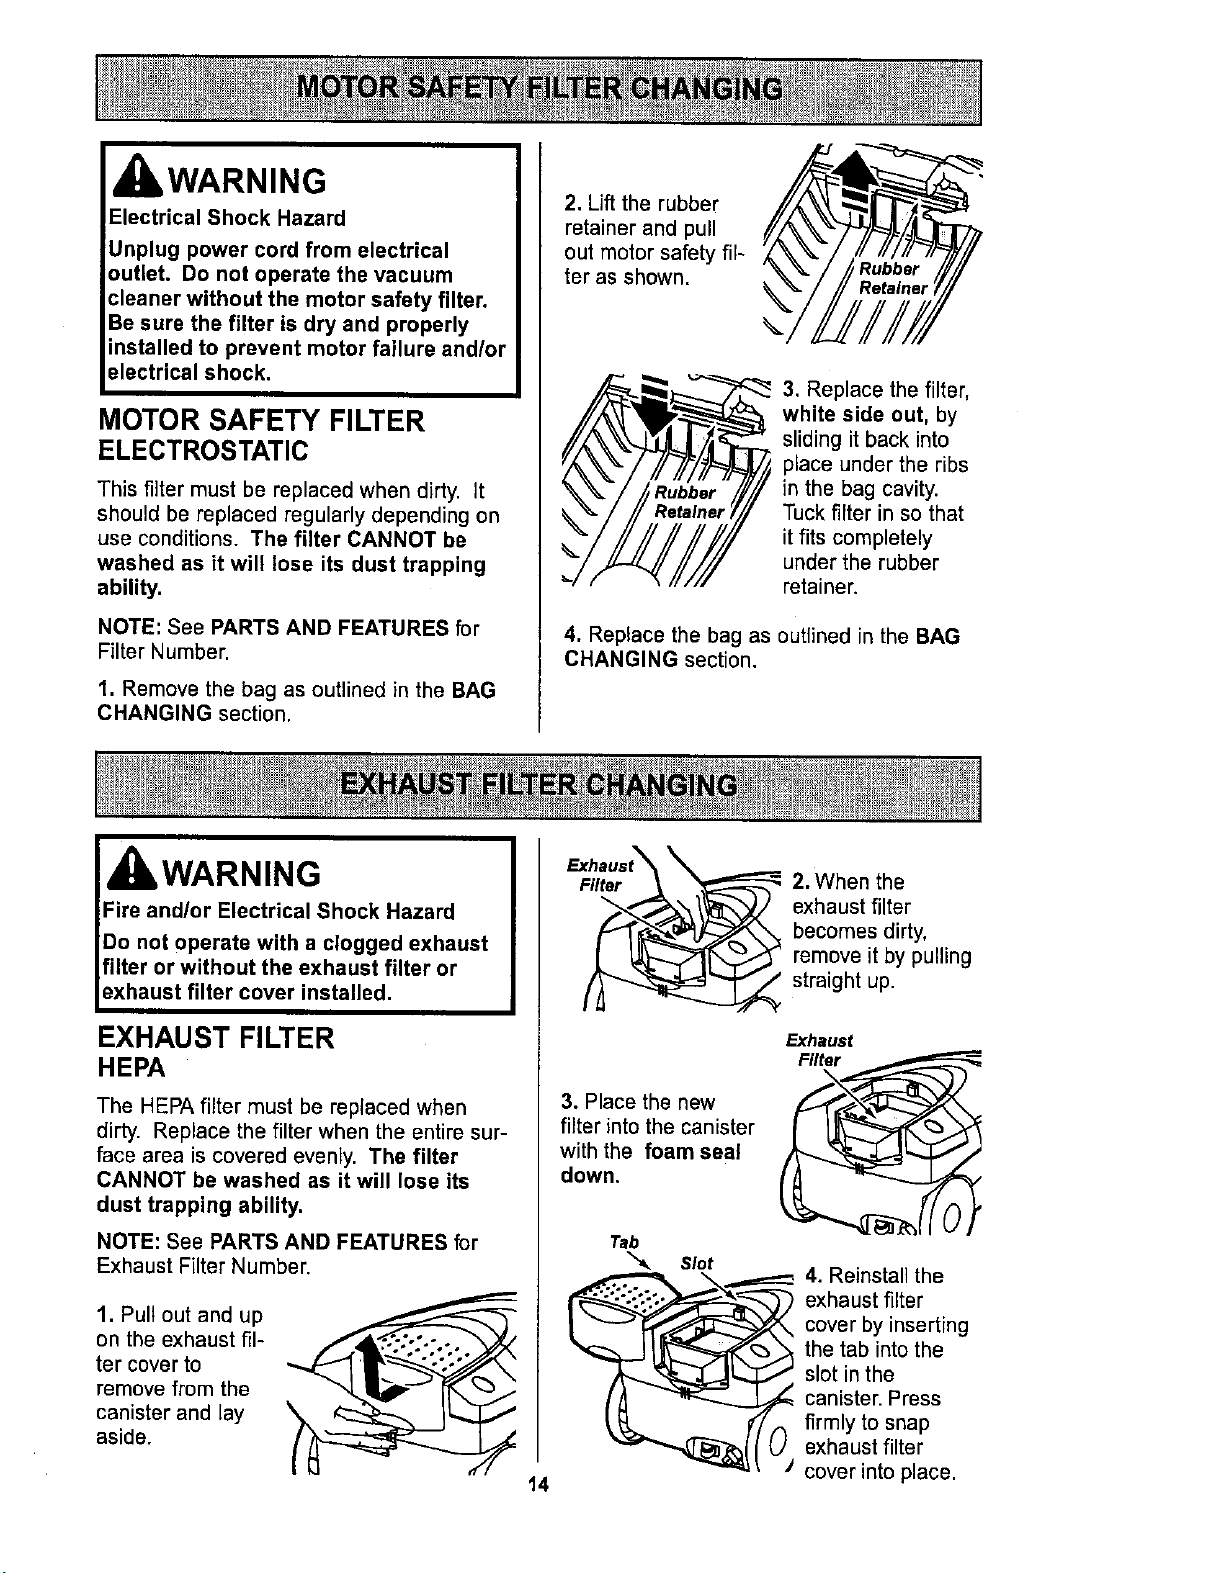
MOTOR SAFETY FILTER
ELECTROSTATIC
This filter must be replaced when dirty, it
should be replaced regularly depending on
use conditions. The filter CANNOT be
washed as it will lose its dust trapping
ability.
NOTE: See PARTS AND FEATURES for
Filter Number.
1. Remove the bag as outlined in the BAG
CHANGING section.
2. Lift the rubber
retainer and pull
out motor safety fil-
ter as shown.
4. Replace the bag as
CHANGING section.
3. Replace the filter,
white side out, by
sliding it back into
place under the ribs
in the bag cavity.
Tuck filter in so that
it fits completely
under the rubber
retainer.
outlined in the BAG
WARNING
EXHAUST FILTER
HEPA
The HEPA filter must be replaced when
dirty. Replace the filter when the entire sur-
face area is covered evenly. The filter
CANNOT be washed as it will lose its
dust trapping ability.
NOTE: See PARTS AND FEATURES for
Exhaust Filter Number.
1. Pull out and up
on the exhaust fil-
ter cover to
remove from the
canister and lay
aside.
14
Exhaust_
Filter _ _ 2. When the
_ xhaust filter
becomes dirty,
remove it by pulling
straight up.
3. Place the new
filter into the canister
with the foam seal
down.
Tab
Slot
Exhaust
4. Reinstall the
exhaust filter
cover by inserting
the tab into the
slot in the
canister. Press
firmly to snap
_ exhaust filter
J cover into place.
POWER-MATE ®CARE
Always follow all safety precautions when
cleaning and servicing the Power-Mate ®.
WARNING
Electrical Shock Or Personal Injury
Hazard
Disconnect electrical supply before
performing maintenance to the vacuum
cleaner. Failure to do so could result in
electrical shock or personal injury from
vacuum cleaner suddenly starting.
I
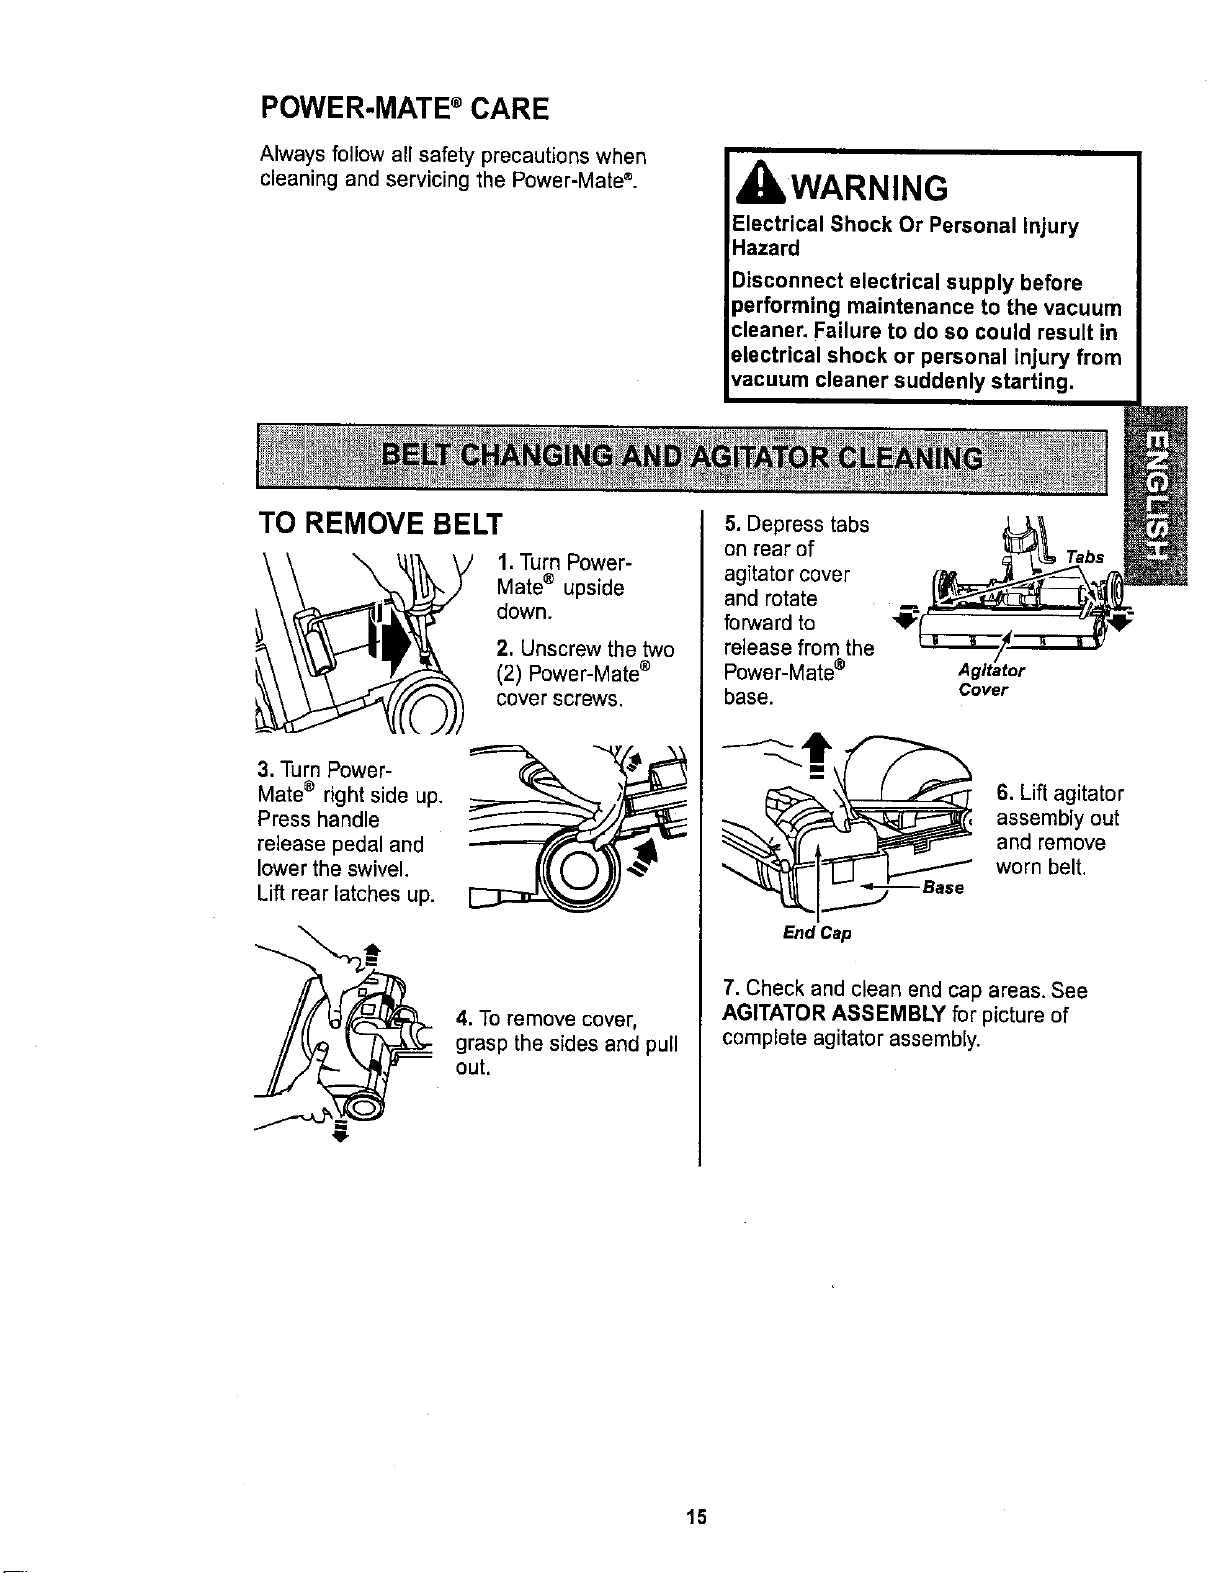
TO REMOVE BELT
3. Turn Power-
Mate ® right side up.
Press handle
release pedal and
lower the swivel.
Lift rear latches up.
._ 1.Turn Power-
Mate® upside
down.
2, Unscrew the two
)_ (2) Power-Mate ®
cover screws.
4. To remove cover,
grasp the sides and pull
out.
5. Depress tabs
on rear of
agitator cover
and rotate
forward to
release from the
Power-Mate ®
base.
Agitator
Cover
Tabs
6. Lift agitator
assembly out
and remove
worn belt.
End Cap
7. Check and clean end cap areas. See
AGITATOR ASSEMBLY for picture of
complete agitator assembly.
15
TO CLEAN AGITATOR:
NOTE: In order to keep cleaning efficiency
high and to prevent damage to your vacuum
cleaner, the agitator must be cleaned every
time the belt is chanqed.
The agitator must also be cleaned according
to the following schedule:
Vacuum Cleaner Use Clean Aaitator
HEAVY -
(used daily)
MODERATE -
(used 2-3 times/week)
LIGHT -
(used 1 time/week)
every week
every month
every 2 months
IMPORTANT
Disconnect vacuum cleaner from
electrical outlet. Check and remove hair,
string and lint build-up frequently in the
Power-Mate ® agitator and end cap areas.
Remove any dirt or debris in the belt path
area or in the brush roller area.
Carefully remove any string or debris
located on the agitator, or end caps.
AGITATOR ASSEMBLY
Belt Pulley_
Brush Unit
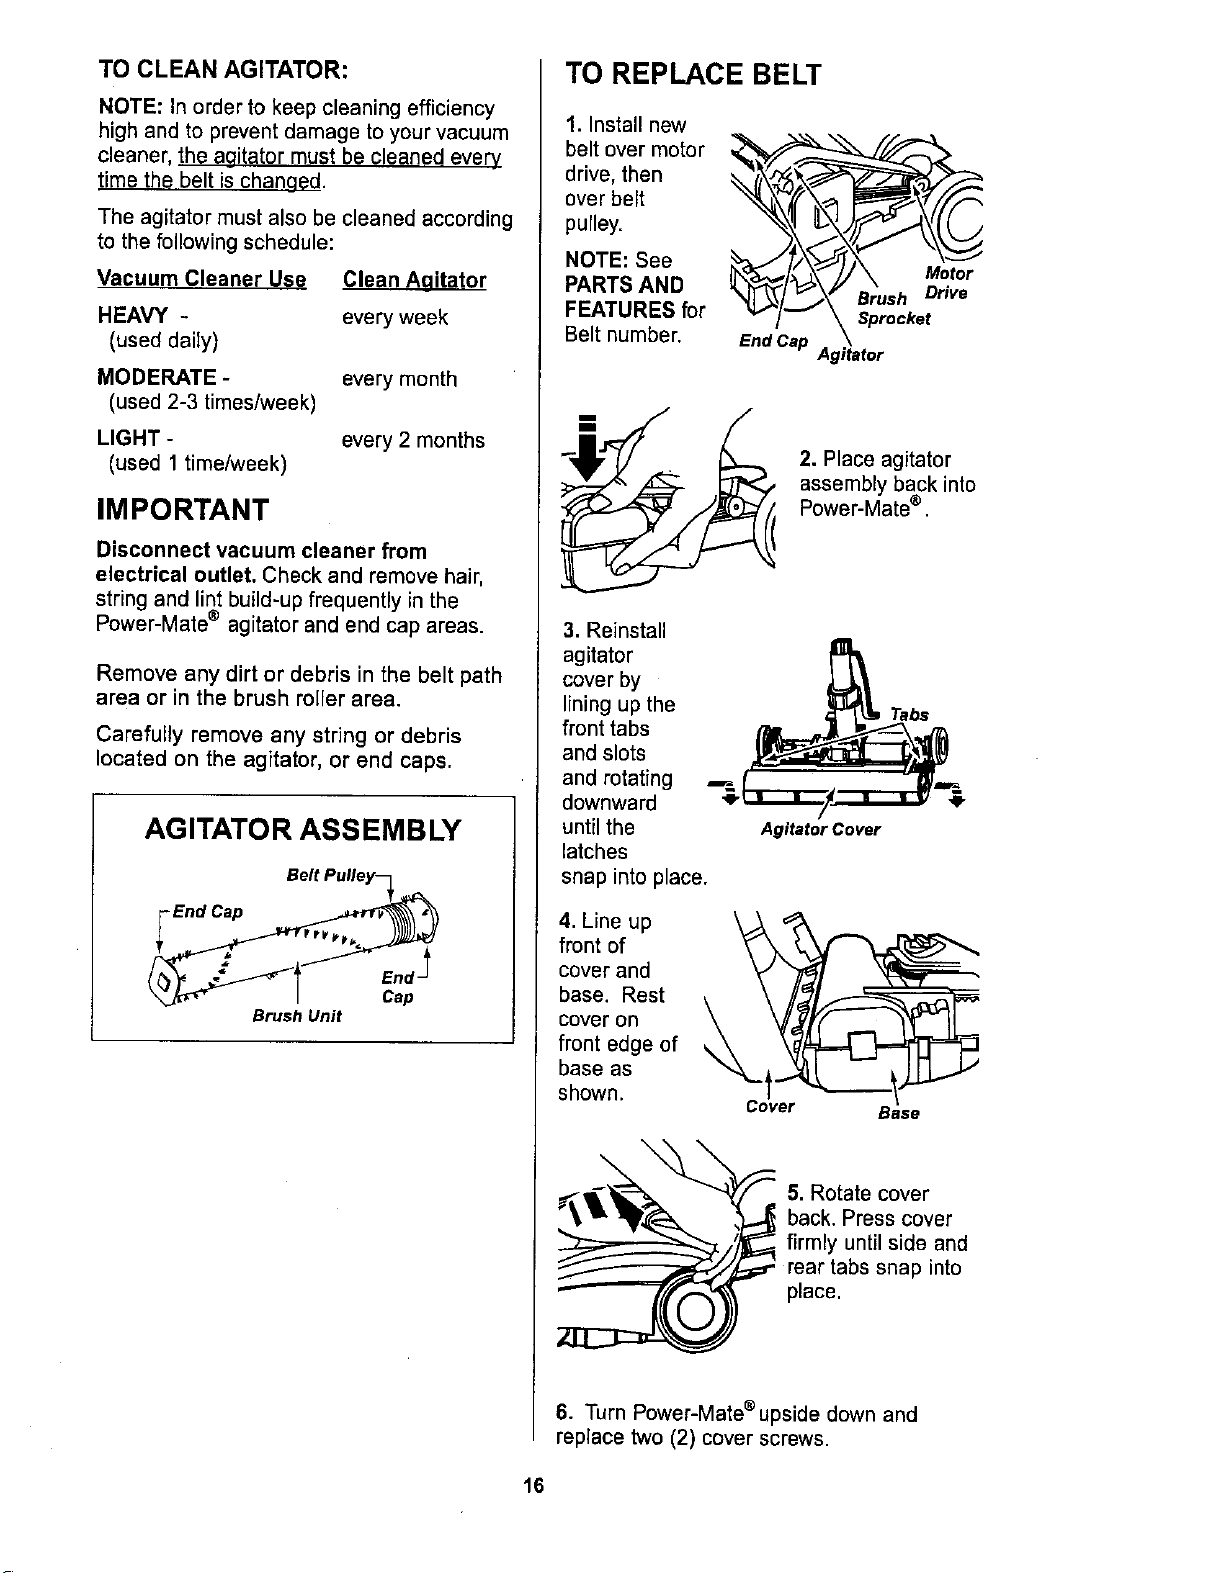
TO REPLACE BELT
1. Install new
belt over motor
drive, then
over belt
pulley.
NOTE: See
PARTS AND
FEATURES for
Belt number.
3. Reinstall
agitator
cover by
lining up the
front tabs
and slots
and rotating
downward
until the
latches
snap into place.
2. Place agitator
assembly back into
Power-Mate ®.
Tabs
Agitator Cover
,,Lineup
front of
cover and
base. Rest
cover on
front edge of
base as
shown.
Cover Base
5. Rotate cover
back. Press cover
firmly until side and
tabs snap into
place.
6. Turn Power-Mate®upsidedown and
replace two (2) cover screws.
16
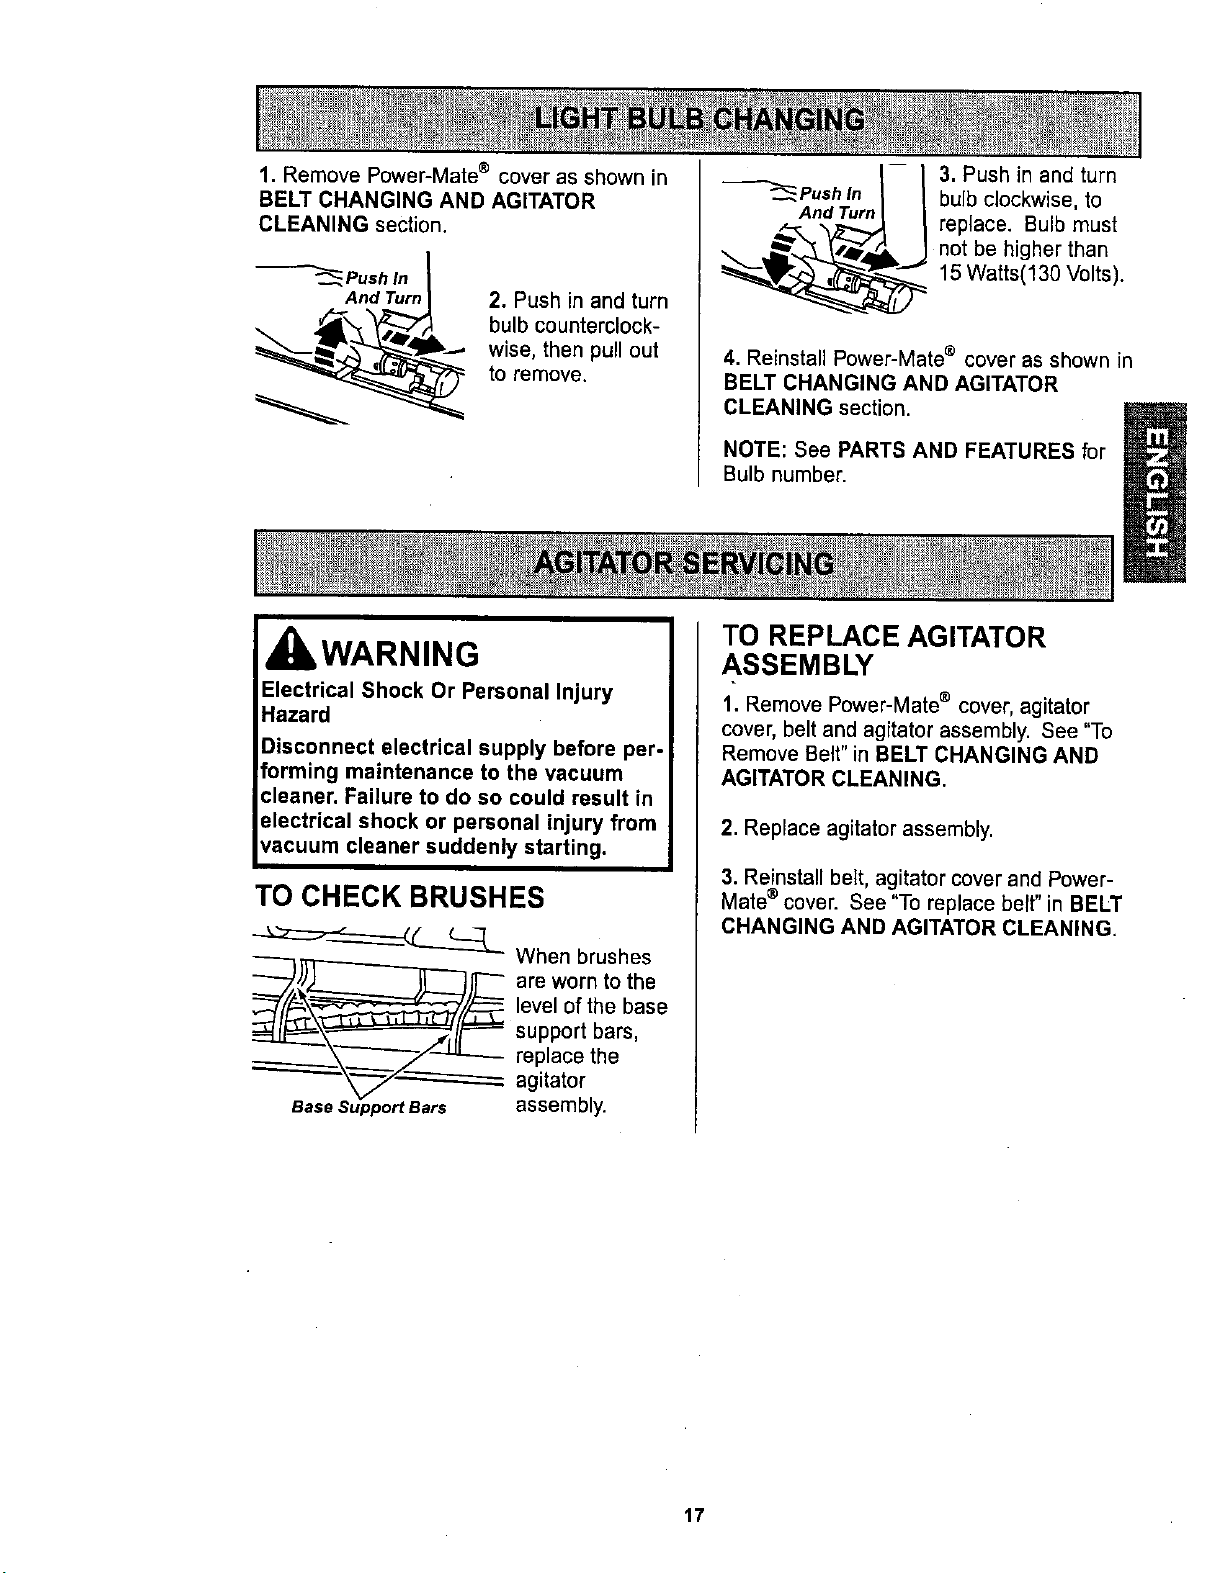
1. Remove Power-Mate ® cover as shown in
BELT CHANGING AND AGITATOR
CLEANING section.
Push In
And Turn
2. Push in and turn
bulb counterclock-
wise, then pull out
to remove.
_Pushlnl-- I
And Turn I I
3. Push in and turn
bulb clockwise, to
replace. Bulb must
not be higher than
15 Watts(130 Volts).
4. Reinstall Power-Mate ® cover as shown in
BELT CHANGING AND AGITATOR
CLEANING section.
NOTE: See PARTS AND FEATURES for
Bulb number.
IbWARNING
Electrical Shock Or Personal Injury
Hazard
Disconnect electrical supply before per-
forming maintenance to the vacuum
cleaner. Failure to do so could result in
electrical shock or personal injury from
vacuum cleaner suddenly starting, i
i
TO CHECK BRUSHES
When brushes
._r--------____[__[l__.are worn to the
level of the base
support bars,
Base Support Bars assembly.
TO REPLACE AGITATOR
ASSEMBLY
1. Remove Power-Mate ® cover, agitator
cover, belt and agitator assembly. See "To
Remove Belt" in BELT CHANGING AND
AGITATOR CLEANING.
2. Replace agitator assembly.
3. Reinstall belt, agitator cover and Power-
Mate ®cover. See "To replace belt" in BELT
CHANGING AND AGITATOR CLEANING.
17
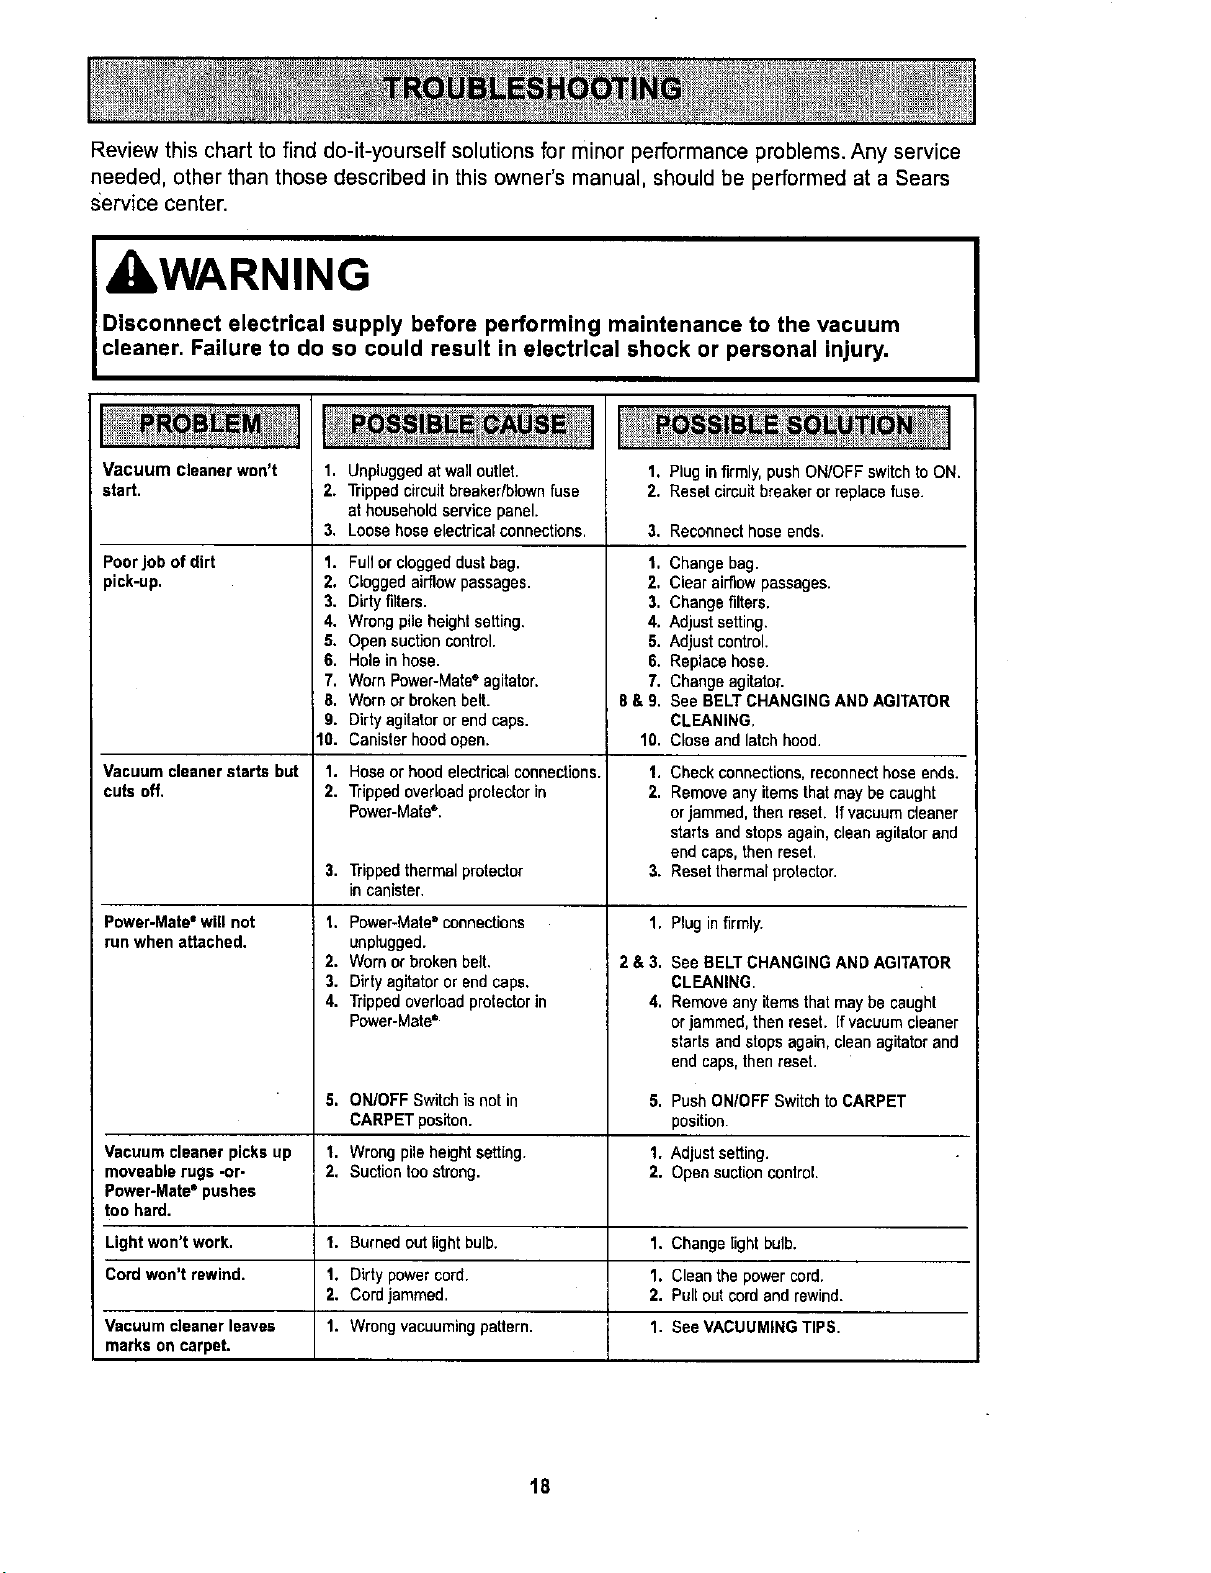
Review this chart to find do-it-yourself solutions for minor performance problems. Any service
needed, other than those described in this owner's manual, should be performed at a Sears
Service center.
WARNING
Disconnect electrical supply before performing maintenance to the vacuum
cleaner, Failure to do so could result in electrical shock or personal injury,
Vacuum cleaner won't 1.
start. 2.
3,
Poorjob of dirt 1.
pick-up, 2,
3.
4.
5,
6.
7,
8.
9.
10.
Vacuum cleanerstarts but 1.
cuts off, 2.
3.
Power-Mate"wig not 1.
runwhen attached.
2.
3.
4,
5,
Vacuumcleaner picksup 1,
moveablerugs -or- 2.
Power-Mate"pushes
too hard.
Lightwon't work, 1.
Cordwon't rewind. 1.
2.
Vacuumcleaner leaves 1.
marks on carpet.
Unpluggedat walloutlet.
Trippedcircuitbreaker/blownfuse
at householdservicepanel.
Loosehoseelectricalconnections.
Fultorcloggeddust bag.
Cloggedairflowpassages.
Dirtyfilters.
Wrong pile height setting.
Opensuctioncontrol.
Holein hose.
Worn Power-Mate"agitator.
Worn or broken belt.
Dirtyagitator or endcaps.
Canisterhood open.
Hoseor hoodelectrical connections.
Trippedoverloadprotectorin
Power-Mate'.
Trippedthermalprotector
in canister.
Power-Mate=connections
unplugged.
Wornorbroken belt.
Dirtyagitatoror endcaps.
Trippedoverloadprotectorin
Power-Mate"
ON/OFF Switchis not in
CARPET positon.
Wrongpileheightsetting.
Suction too strong.
1. Plug infirmly, pushON/OFFswitch to ON.
2. Resetcircuitbreakeror replacefuse.
3, Reconnect hose ends.
1, Change bag.
2, Clear airflow passages.
3. Changefilters.
4. Adjust setting.
5. Adjustcontrol.
6. Replacehose.
7. Changeagitator.
8 & 9. See BELTCHANGINGAND AGITATOR
CLEANING,
10. Closeandlatch hood.
1.
2.
3.
1,
2&3.
4,
Checkconnections,reconnecthose ends.
Removeanyitemsthatmay be caught
orjammed, then reset. Ifvacuum cleaner
starts and stopsagain,cleanagitatorend
endcaps, thenresel.
Resetthermal protector.
Plug infirmly.
See BELTCHANGINGAND AGITATOR
CLEANING.
Removeanyitemsthatmaybe caught
orjammed,thenreset. [f vacuumcleaner
startsandstops again,cleanagitatorand
end caps,thenreset.
5. Push ON/OFFSwitchto CARPET
position.
1. Adjustsetting.
2. Opensuction control.
Burnedout lightbulb. 1. Change lightbulb.
Dirty powercord. 1. Cleanthe powercord.
Cordjammed. 2. Pull outcord and rewind.
Wrongvacuumingpattern. 1. See VACUUMINGTIPS.
18

Antesdeusarsuasplradoranueva ..... 1
Garantia de la aspiradora de Kenmore ... 1
Instrucciones importantes de
seguridad ............................ 2
Piezas y caracteristicas .............. 3-4
Instrucciones de ensemblado ......... 5-6
Instrucciones de operati6n ............. 7
Parscomenzar ....................... 7
Sugerenciaspara aspirar ............... 8
Sugerenciassobre el ajustede nivelde
pelode la alfombra .................... 8
Accesorios........................... 9
Cuadrode usode losaccesorios......... 10
Caracteristicasde rendimiento ........ 10-11
Funcionamientodesuaspiradora......... 11
Cuidado del recept=_culo .............. 12
Cambio de labolsa ................... 12
Limpiezadelexteriory delosaccesorios... 12
Cambio del flltrode seguridaddel motor ... 13
Cambio del filtro de escape ............. 13
Cuidado de la Power-Mate ® ............ 14
Cambio delacorreay limpieza
del cepfllo........................ 14-15
Cambio dela bombilla................. 16
Cuidadodelagitador .................. 16
Reconocimlento de problemas ......... 17
Informacibn de
assistancia o servicio ..... PosteriorCubierta
Potfavorlea estaguia qua le ayudaraa assemblary operar suaspiradoranuevadeKenmoreenuna manera
mas seguray effectiva.
Para mas informaci6nacerca del cuidadoy operacibndeesta aspirador, Ilamea su tienda Searsmas cercana.
Cuando prequnte por informaci6n ustednecisitar&el nL_merocompletode serie y modelode la aspiradoraque
est&Iocado en la p_acade losn_meros de modelo y serie.
Use el espaciode abajopara registrar el n_mero de modelo y serie pars su nueva aspiradorade Kenmore.
N_mero de Modelo
N_mero de Serie
Fecha de Compra
Matenga este libroy su recibo en u tugarseguropara referenciasfuturas.
GARANTiA LIMITADADE UN AI_ODE LA ASPIRADORA KENMORE
Esta garantia es porun aSodesdala fechade compra,e incluyesolamenteel usode la aspiradoraen
hogares privados.Duranteel aSode garant[a, cuando]a aspiradoraesoperada y mantenida de acuerdoal
manual de instruccionesde[ duetlo, Searsreparara cualquier defectoen materialeso fabricaci6nlibre de cargo.
Esta garantfaexcluye las bolsas de colecci6n,correas,lampariflas,y filtros, las cuales son partesgastablesque
se deterioran conel uso normal.
Pars el servicio degarantia, retorneesta sspiradora al Centro de Servicio Searsm_,scercanoen[os
Estados Unidos.
Esta garantiase aplica solamentemientraseste producto est_en usoen los EstadosUnidos.Esta garantfa le
da a usted derechos legalesespecl_cos,y usted puede tenertambien otros derechos tos cualesvarian de
estado a estado,
Sears, Roebuckand Co., D/617WA,Hoffman Estates,IL 60179
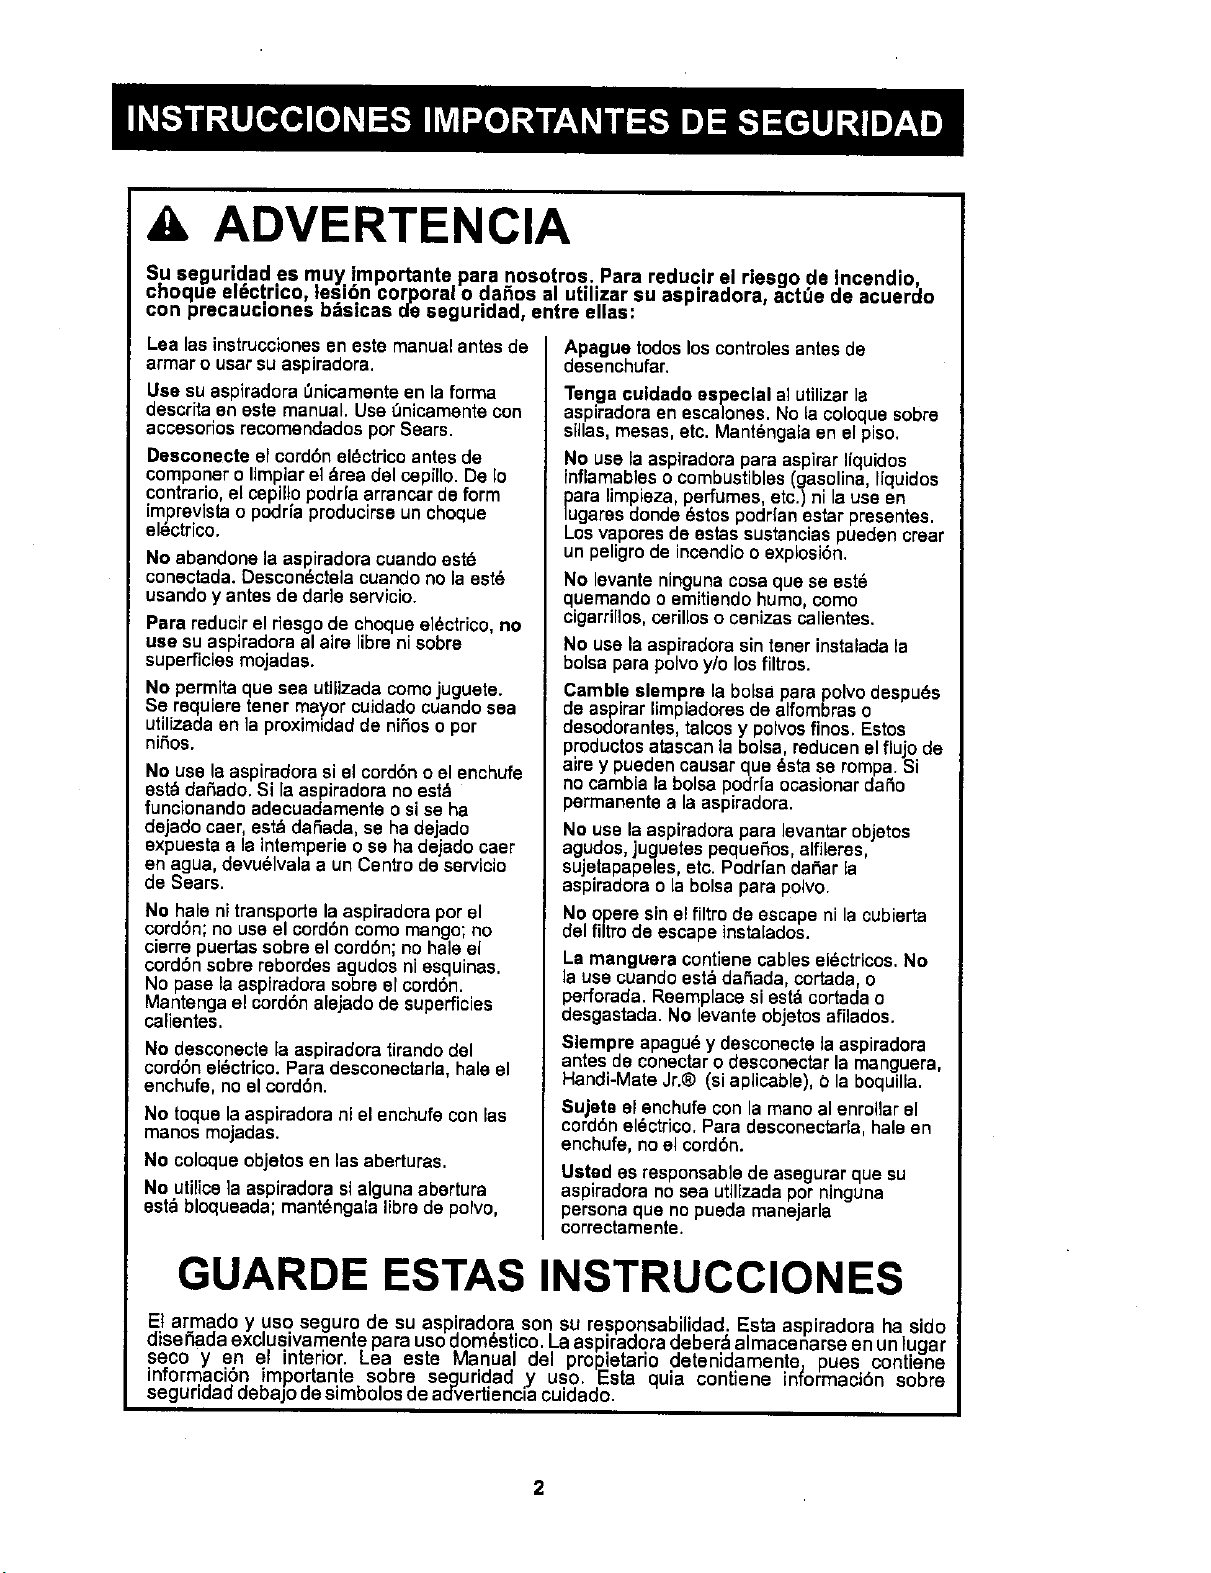
A ADVERTENCIA
Su seguridad es muy importante para nosotros Para reducir el riesgo de ncendio,
choque el_ctrico lesibn corporal o dafios al ut zar su aspiradora, act_e de acuerdo
con precauciones b_s cas de seguridad, entre elias:
Lea lasinstruccionesen este manualantesde
armar o usarsuaspiradora.
Use su aspiradora0nicamente en laforma
descritaeneste manual. Use0nicamente con
accesoriosrecomendadospar Sears.
Desconecte el cord6nel6ctricoantesde
componer olimpiarel _rea del cepillo. De 1o
contrario, el cepillo podrfa arrancar de form
imprevista o podria producirse un choque
electrico.
No abandonela aspiradoracuando este
conectada. Descon_ctela coando no la est_
usandoy antesde dar]eservicio.
Para reducir el riesgode choqueei_ctrico,no
use suaspiradoraalaire libranisabre
superficiesrnojadas.
No permitaqua sea utilizadacomajuguete.
Se requiem tener mayor cuidadocuandosea
utilizada en la proximidadde niSoso par
niSos.
No use la aspiradorasiel cord6n oel enchufe
est:_dat_ado.Si laaspiradorano est&
funcionando adecuadamente o si se ha
dejado caer, est_ dafiada, se ha dejado
expuesta a la intemperie o se ha dejado caer
en agua, devu61vala aun Centro de servicio
de Sears.
No hale ni transportelaaspiradorapar el
cord6n;no useel cord6ncomamango;no
cierrepuertassabre el cord6n;no hale el
cord6nsabre rebordes agudosni esquinas.
No pasela aspfradorasabre el cord6n.
Mantengael cord6nalejado de superficies
calientes.
No desconecte la aspiradoratirandodel
cordbnel_ctrico.Paradesconectarla, hale el
enchufe, no el cord6n.
No toque la aspiradoraniel enchufe con las
manosmojadas.
No coloque objetos en las aberturas.
No utilice la aspiradora sialguna abartura
est:_bloqueada; mant6ngala libra de polvo,
Apague todosloscontroles antes de
desenchufar.
Tenga culdado especial alutilizar la
aspiradoraen escalones. No lacoloque sabre
sillas,mesas, etc. Mant_ngalaen el piso.
No usela aspiradoraparaaspirarliquidos
fnflamables ocombustibles(gasolina, Irquidos
_uaralimpieza,perfumes,etc. ni la use en
gares dondedstos podran estarpresentes.
Losvaporesde estassustanciaspueden crear
un peligrode incendioo explosi6n.
No levanteningunacosaquese est_
quemandoo emitiendohumo,coma
cigarrillos,cerilloso cenizascalientes.
No use laaspiradorasin tarterinstaladala
balsa para polvoy/o losfiltros.
Camble slempre la balsapara polvodespu_s
de aspirarlimpiadores de alfombraso
desodorantes,talcosy polvosfinos. Estos
productosatascanla balsa,reducenelflujo de
aire y pueden causar que dsta se tampa. Si
no cambiala balsa podr[a ocasionardaSo
permanentea laaspiradora.
No usela aspiradorapara levantarobjetos
agudos,juguetes pequefios,alfileres,
sujetapapeles,etc.Podrfandafiarla
aspiradorao labalsa para polvo.
No opera sinelfiltro de escapeni lacubierta
del filtro de escape instalados.
La manguera contienecableseldctdcos.No
la use cuandoest', dat_ada,cortada,o
perforada.Reemplacesi est',cortadao
desgastada. No levanteobjetosafilados.
Siempre apagu_y desconectela aspiradora
antes de conectarodesconectar lamanguera,
Handi-MateJr.® (si aplicable),0 la boquilla.
Sujete elenchufecon lamano al enrollarel
cord6neldctrico.Paradesconectarla,hale en
enchufe,no el cord6n.
Ustad es responsablede asegurarque su
aspiradorano sea utilizadapar ninguna
persona que no puedamanejarla
cor'rectamente.
GUARDE ESTAS INSTRUCClONES
Et armada y usa seguro de su aspiradora son su responsab dad Esta aspiradora ha s do
dise _ladaexclusivamente para usa domdstico. La asp radora deber_ a macenarse on un lugar
seco yen et interior. Lea este Manual del propetaro detendarnente pues contene
informaci6n importante sabre seguridad y usa Esta quia contiene n_ormac6n sabre
seguridad debajo de simbolosde ad-vertiencia cuidado.
2
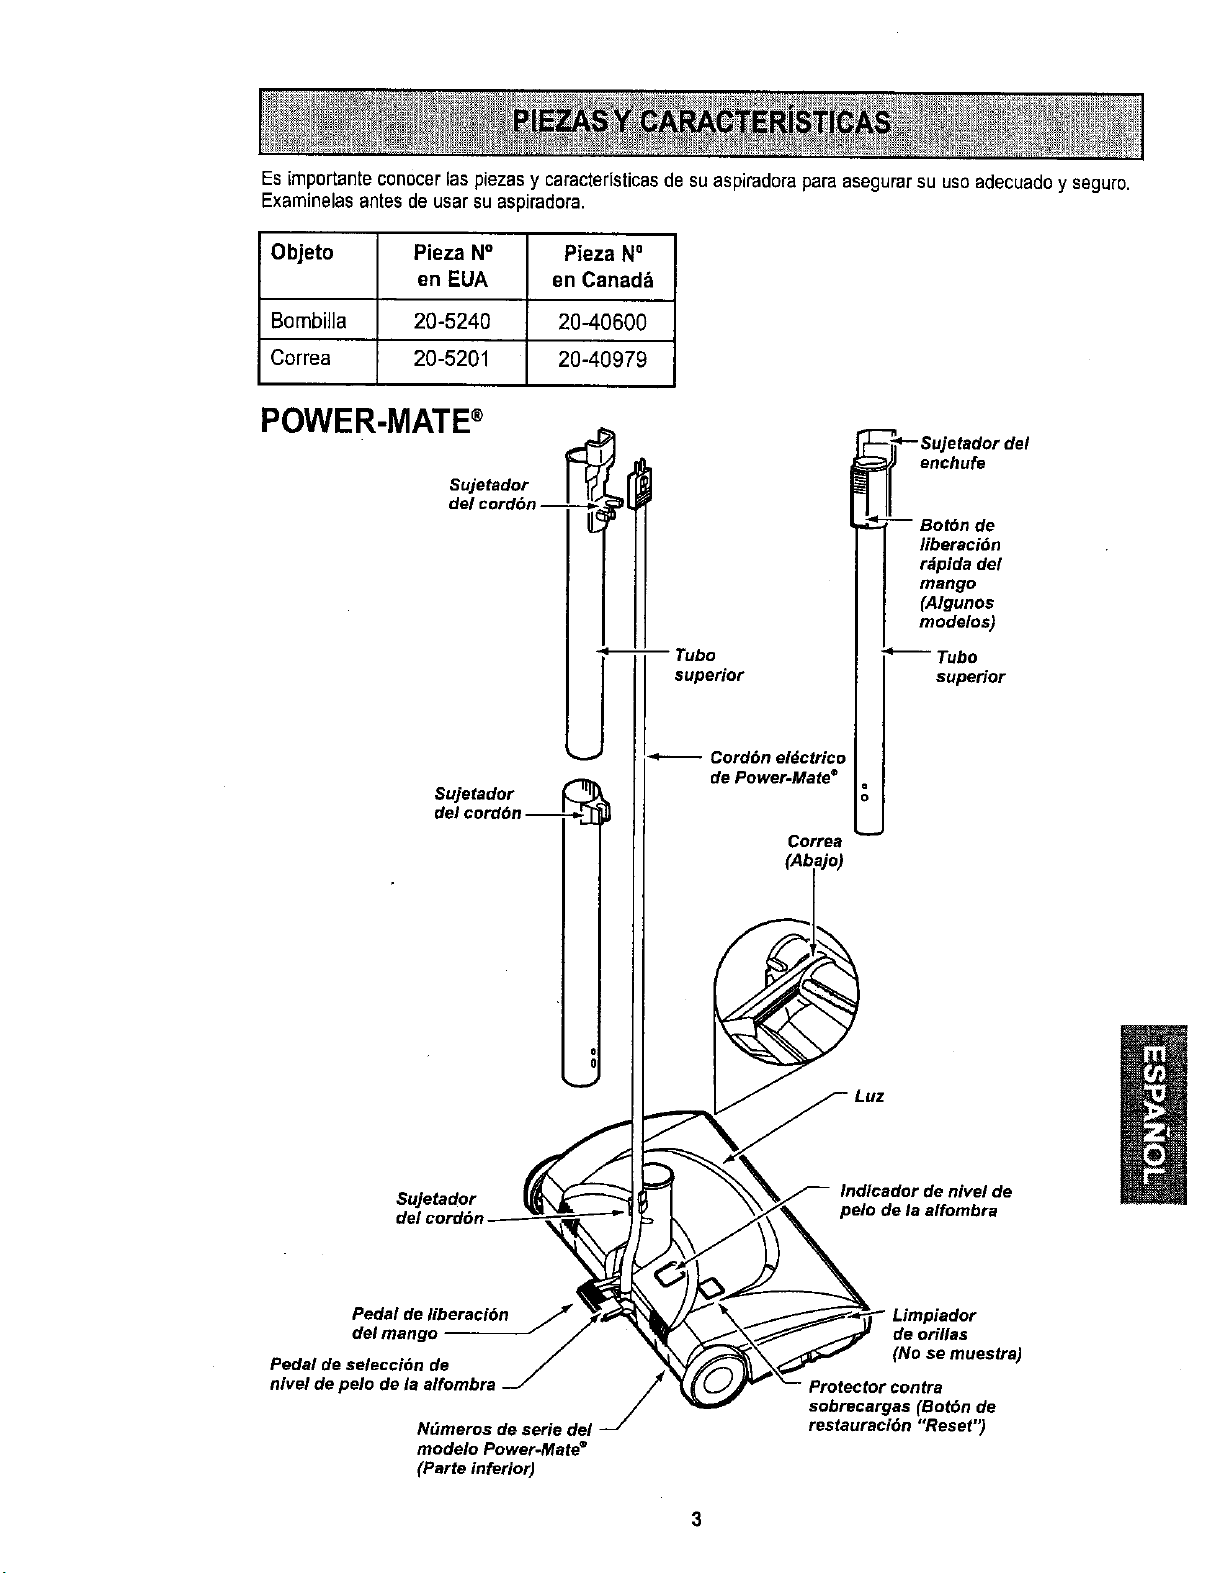
Es [mportanteconocer las piezasy caracteristicasde su aspiradora 9araasegurarsu uso adecuadoy seguro.
Examinelasantes de usar su aspiradora.
Objeto Pieza N° Pieza N°
en EUA en Canada
Bombilla 20-5240 20-40600
Correa 20-5201 20-40979
POWER-MATE®
Sujetador
Sujetador
del cord6n --
Sujetador
superior
Cord6n eldctrico
de Power-Mate =
Correa
(Abij°)
_- Sujetador del
enchufe
=_- -- Bot6n de
liberaci6n
r_pida del
mango
(Algunos
modelos)
_--- Tubo
superior
Luz
Indicador de nivel de
pelo de la alfombra
Pedal de liberaci6n
del mango
Pedal de selecci6n de
nivel de pelo de la alfombra
N(imeros de serie del
modelo Power.Mate ®
(Psrte inferior)
" Limpiador
de orillas
(No se muestra)
Protector contra
sobrecargas (Bot6n de
restauraci6n "Reset")
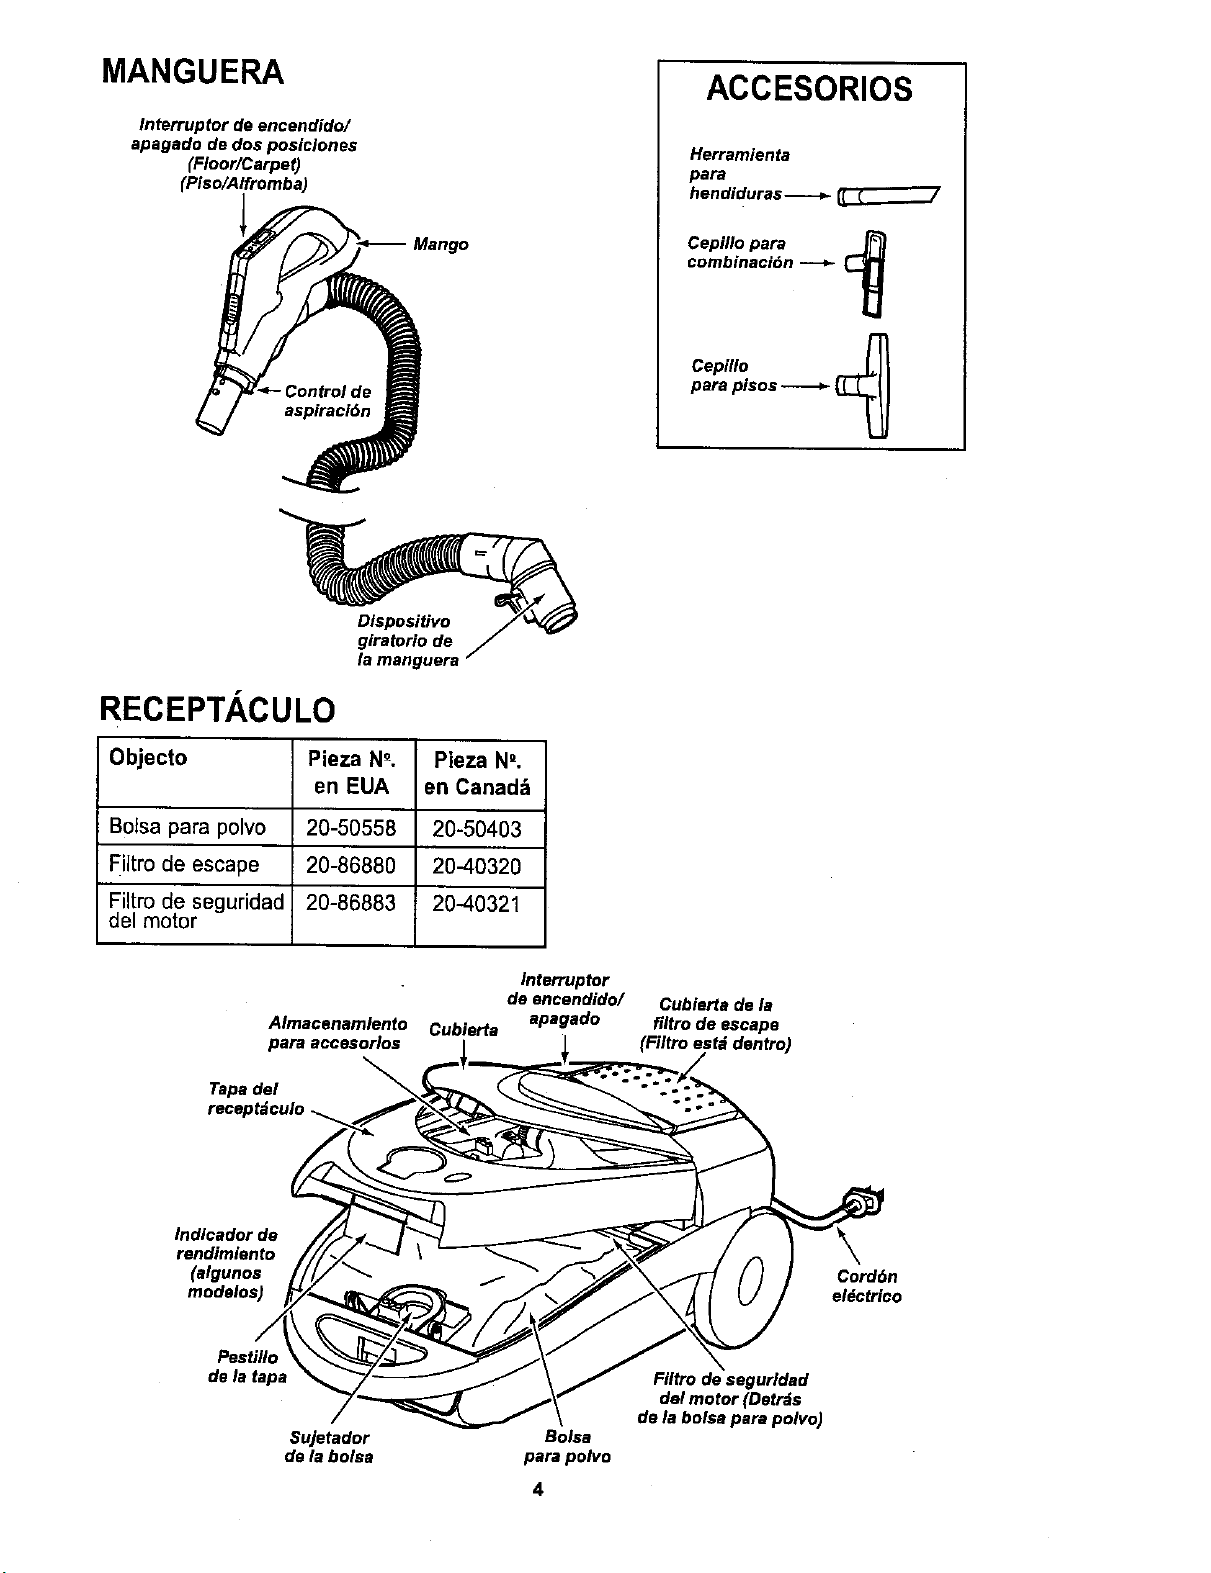
MANGUERA
Interruptor de encendido/
apagado de dos posiclones
(Floor/Carpet)
(Piso/Alfromba)
ACCESORIOS
Herramien ta
pare
hendiduras-----="
Cepillo para
combinaci_n
Cepillo
pare pisos _ LLL[I
-U
Dispositivo
giratorio de
RECEPTACULO
Objecto Pieza N_. Pieza N',
en EUA en Canad_
Boise pare polvo 20-50558 20-50403
Filtro de escape 20-86880 20-40320
Filtro de seguridad 20-86883 20-40321
del motor
Almacenamlento Cubierta
pare accesorlos
Tape del
Interruptor
de encendido/
apagado
Cubierta de la
filtro de escape
Indlcadorde
rendimiento
(algunoa
modelos)
Cord6n
el_ctrico
Pestillo
de la tape
Sujetador
de la bolsa
Boise
pare polvo
4
Filtro de segurldad
del motor (Detrds
de la boise pare polvo)
I
,&
Por favor pongaespecial atenci6n a _stos recuadrosconalerta de riesgo.Advertencia:Este
informaci6n le alertara del peligrodefuego,choques electricos, quemadasy lesiones. Cuidado:
Este informaci6n le alertarade peligroscemo lesiones y dafios de propiedad.
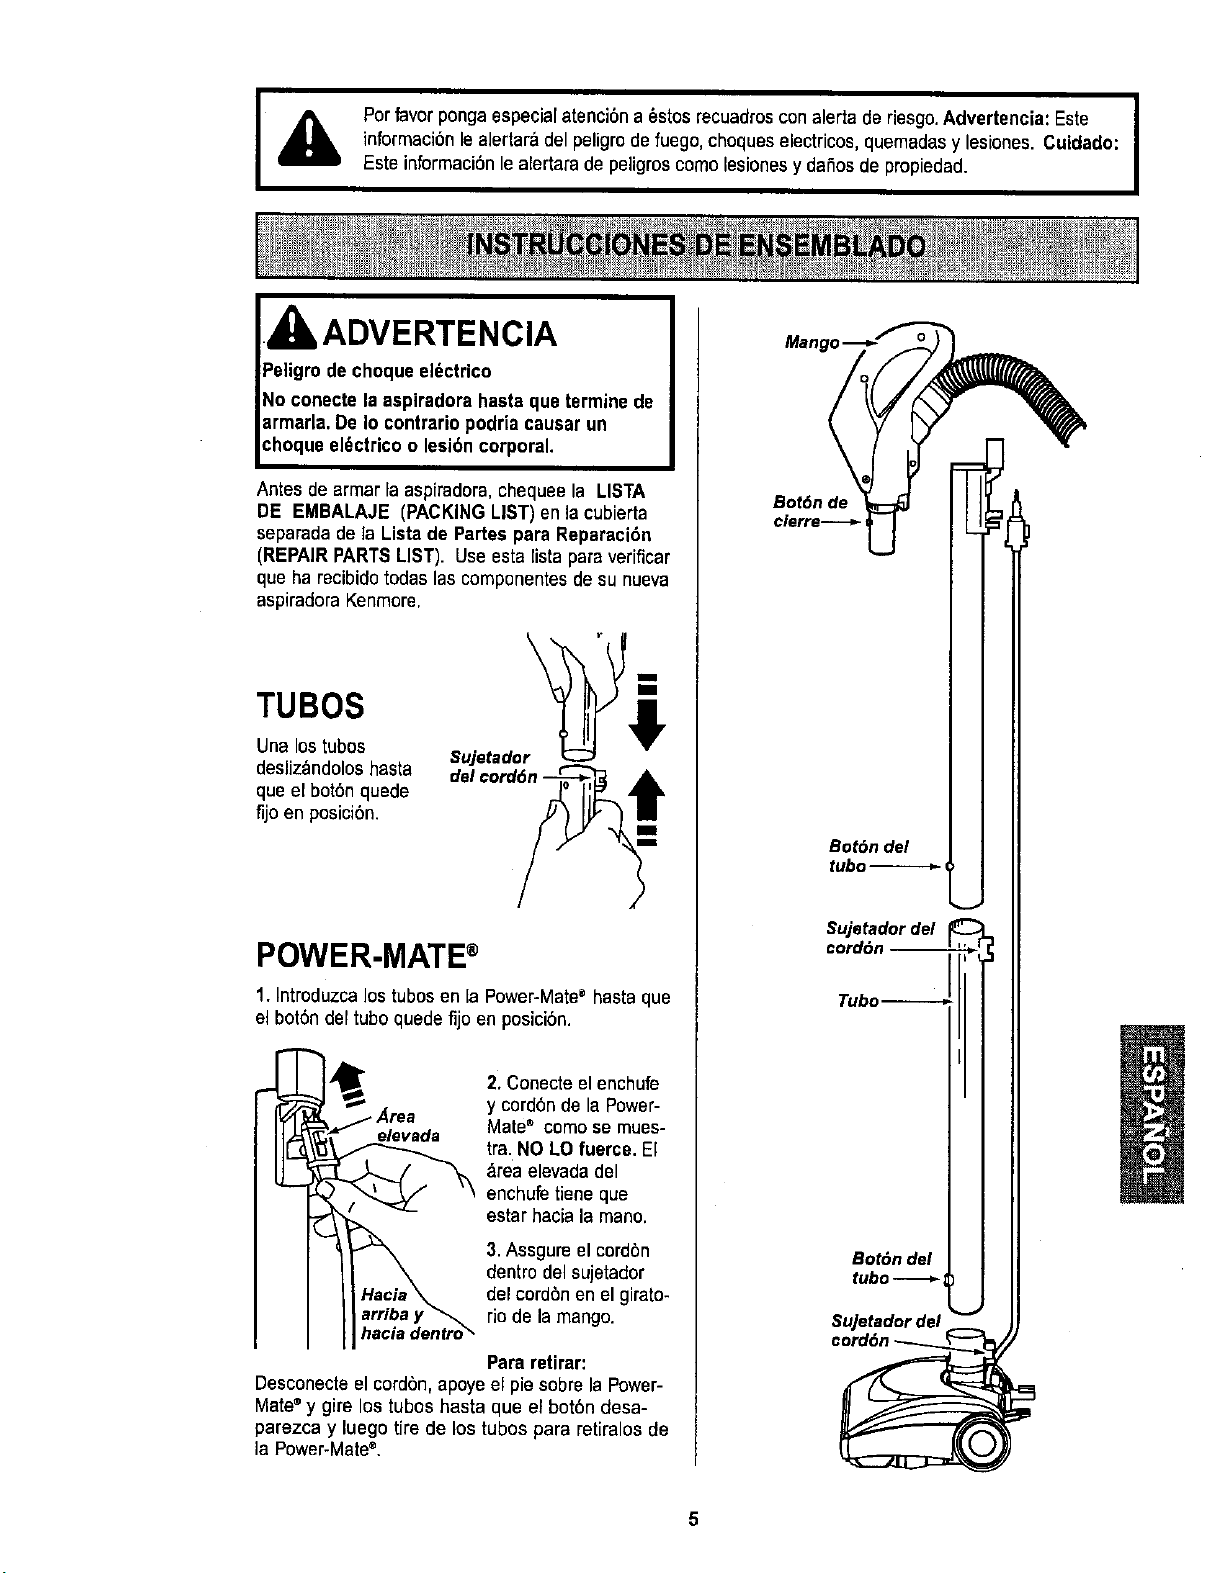
ADVERTENCIA
F_eligmde choqueel_ctrico
No conecte la aspiradora hastaque terminede
armada.De Io contrariopodria causar un
choqueeldctricoo lesibncorporal.
Antes de armar la aspiradora, chequeela LISTA
DE EMBALAJE (PACKINGLIST) en lacubierta
separadadela Lista de Partespara Reparaci6n
(REPAIR PARTSLIST). Useesta lista paraverificar
que harecibidotodaslascomponentesdesu nueva
aspiradora Kenmore.
TUBOS
Una lostubos
desliz_,ndoloshasta
que el bot6n quede
fijo en posicibn.
\
Sujetador
J
POWER-MATE®
1. Introduzcalos tubos en la Power-Mate®hasta que
el bot6n del tubo quedefijo en posici6n.
•,/_rea
elevada
hacia dentro_"
2. Conecte elenchufe
y cord6n de la Power-
Mate®como se mues-
tra. NO LO fuerce. El
Areaelevada del
enchufe tiene que
estar haciala mane.
3.Assgure el cordbn
dentro del sujetador
del cord6nen elgirato-
rio de la mango•
Para retirar:
Desconecte el cordon, apoye el piesobre la Power-
Mate®y gire los tubos hasta que el bot6n desa-
parezca y luego tire de los tubos para retiralos de
la Power-Mate'L
Mango
Bot6n de
clerra----_
Bot6n del
tubo
Sujetadordel
SUJ'rJ:d°rdel
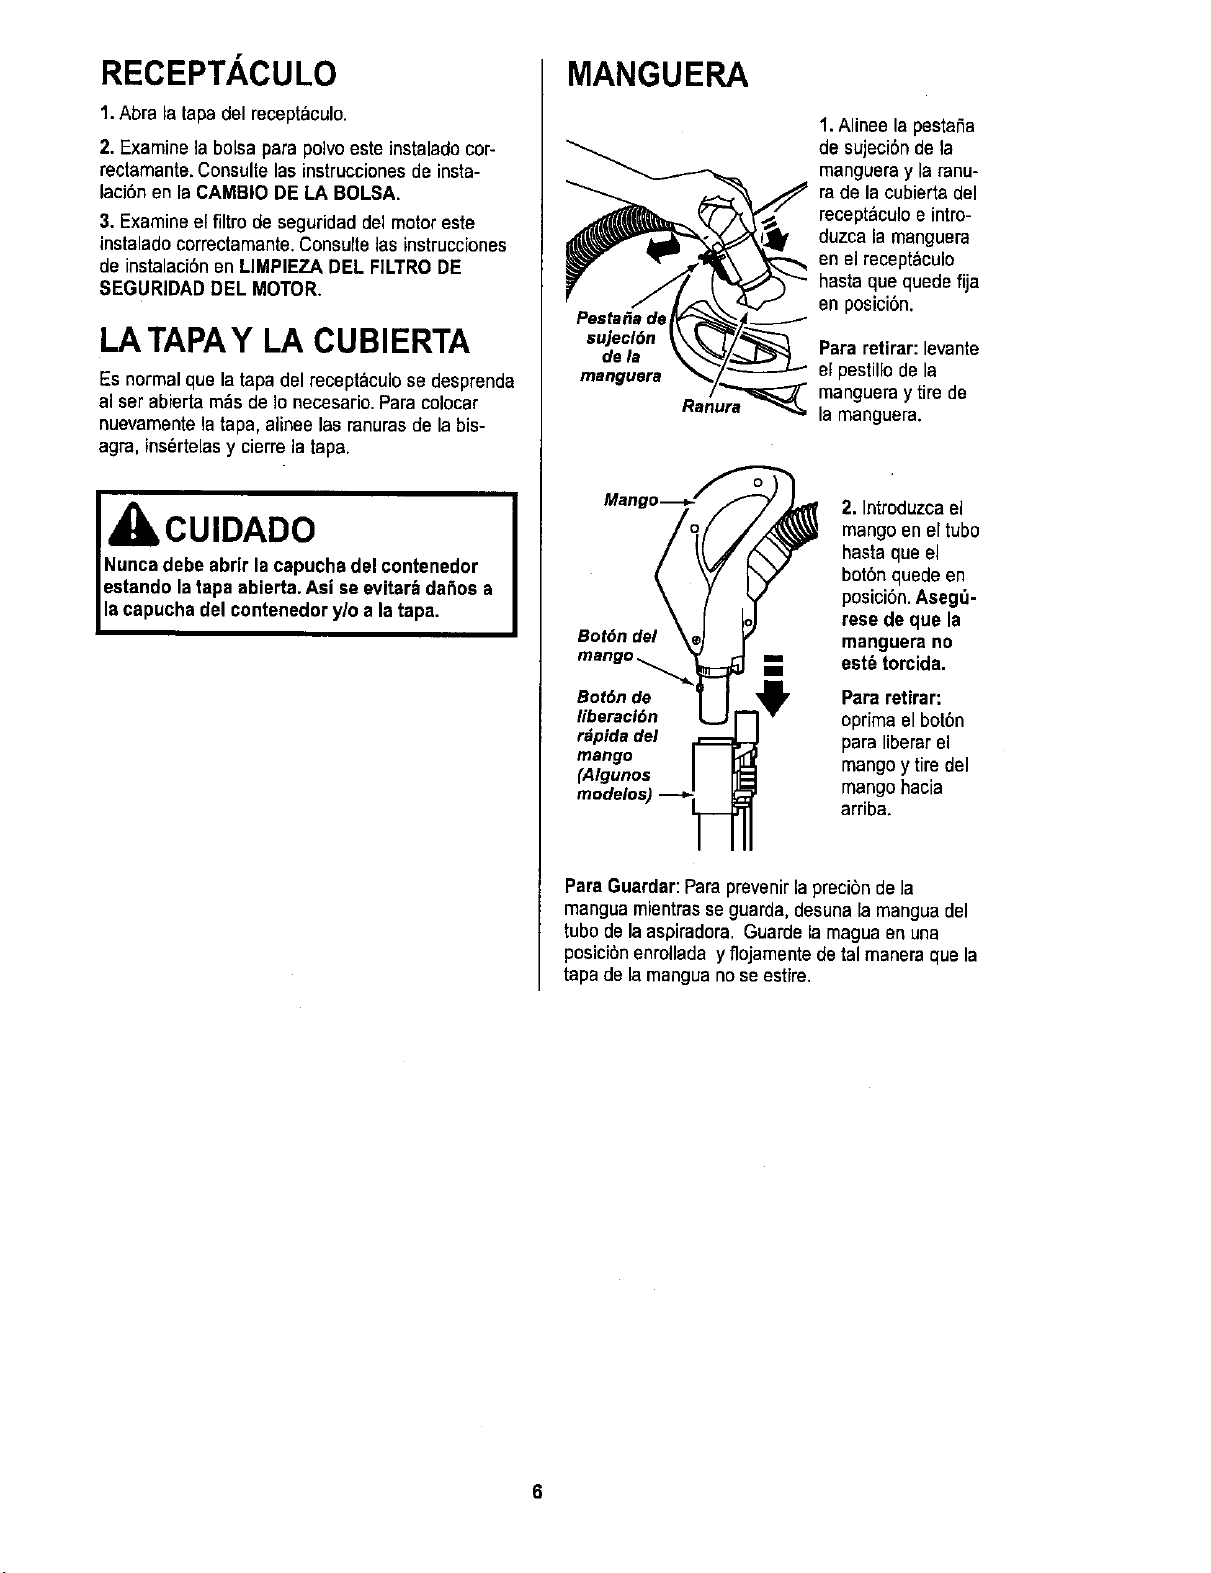
RECEPTACULO
1.Abra la tapadel receptaculo.
2. Examine la bolsa para polvoeste instalado cor-
rectamante.Consulte las instruccionesde insta-
laci6nen la CAMBIO DE LA BOLSA.
3. Examineel filtro deseguridaddel motor este
instalado correctamante.Consulte las instrucciones
de instalaciSnen LIMPIEZA DEL FILTRODE
SEGURIDAD DEL MOTOR.
LA TAPAY LA CUBIERTA
Es normalque latapa delreceptaculo se desprenda
al set abierta m_s de Io necesario.Para colocar
nuevamentela tapa, aiinee las ranuras de la bis-
agra, ins_rtelas y cierre la tapa.
CUIDADO
Nuncadebe abrir lacapucha del contenedor
estando la tapa abierta. Asi se evitar_ dafios a
lacapucha del contenedorylo a latapa.
MANGUERA
manguere "_,
Ranura"_
1. Alinee la pestafia
de sujeci6n de la
mangueray la ranu-
ra de la cubierta del
recept_culoe intro-
duzca la manguera
en el recept_culo
hasta que quede fija
en posici6n.
Pare retirar:levante
el pestillode la
mangueray tirede
la manguera.
Mango-- _
modelos) L_
2. Introduzca el
mangoen el tubo
hasta que el
bot6n quede en
posici6n.Aseg_-
rese de que la
manguera no
est_ torcida.
Pare retirar:
oprima el bot6n
para liberar el
mango y tire del
mango hacia
arriba.
ParaGuardar:Para prevenirla preci6nde la
manguamientrasse guarda,desunala manguadel
tubo de la aspiradora. Guarde la maguaen una
posicibnenrollada y flojamente de tal maneraque la
tapa de la manguano se estire.
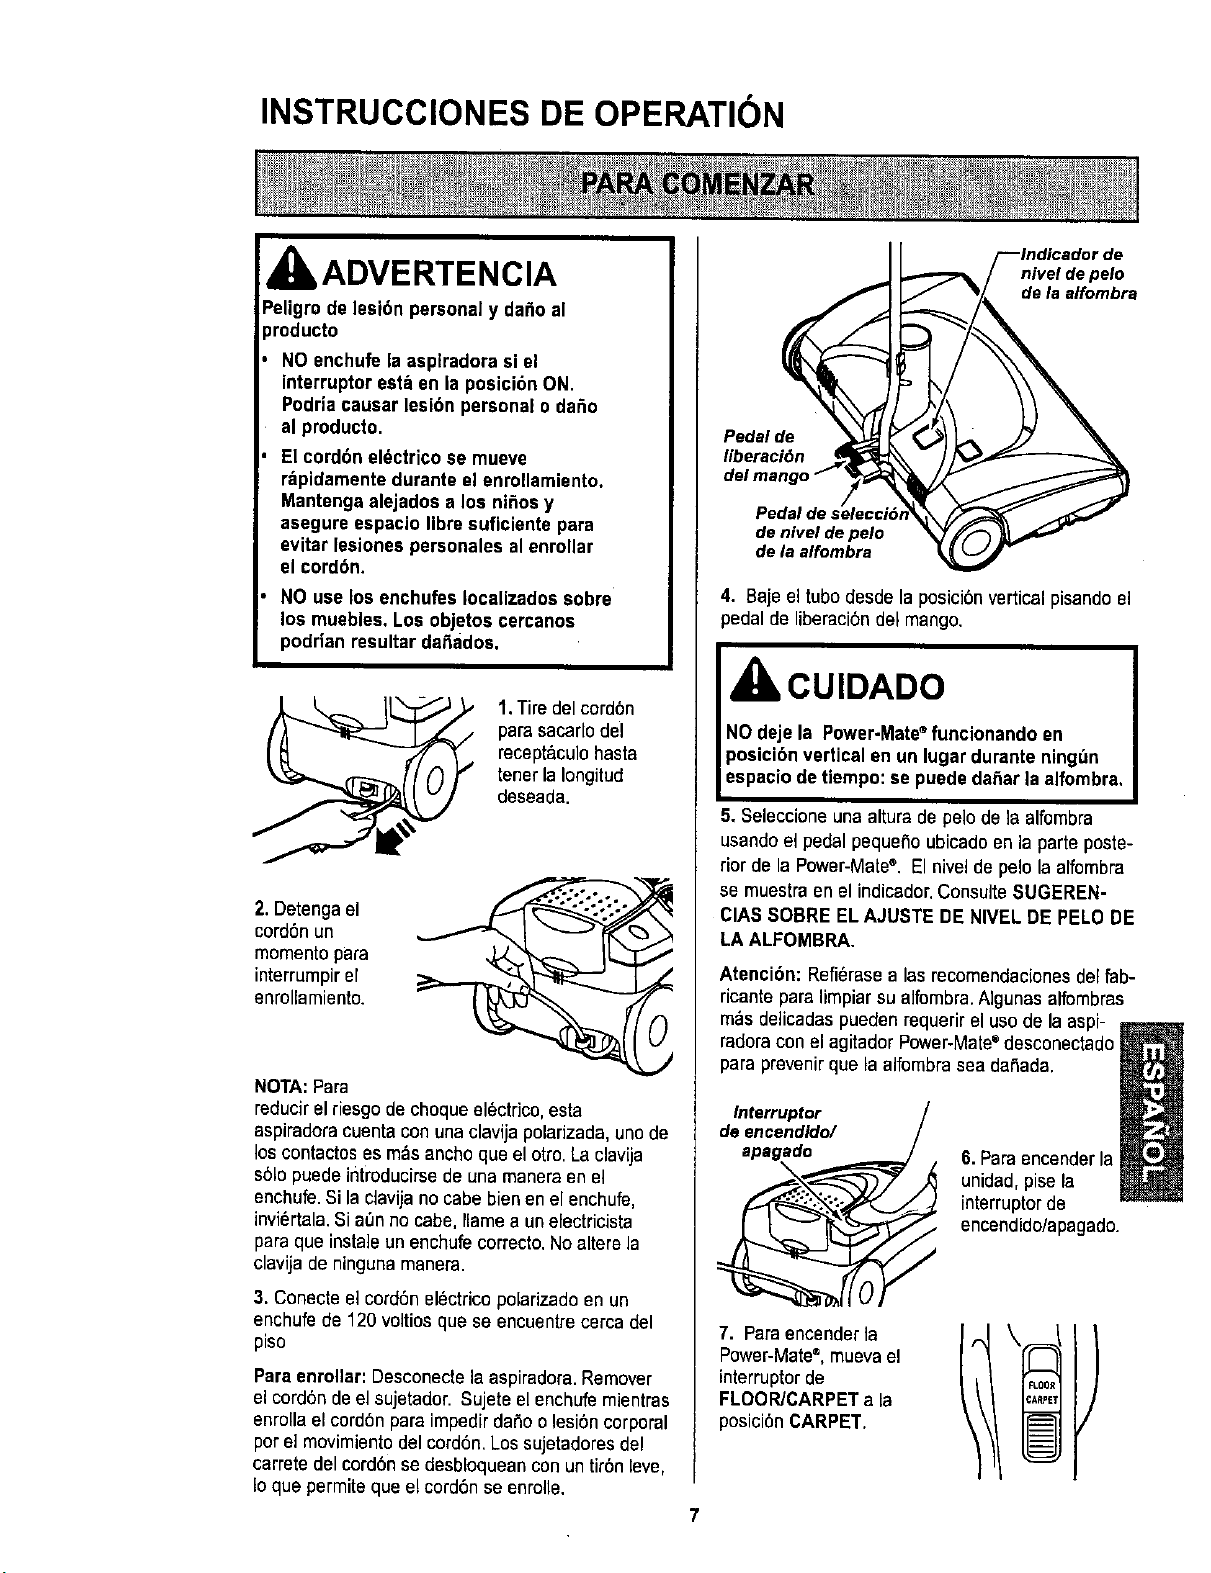
INSTRUCCIONES DE OPERATION
IADVERTENCIA
Peligrode lesibn personal y da_o al
_roducto
NOenchufe ia aspiradora si el
interrupterest_ en la posicibn ON.
Podriacausar lesi6n personal oda_o
al producto.
El cord6n el_ctrico se mueve
r_pidamentedurante el enrollamiento.
Mantenga alejados a los niSosy
asegure espacio libra suficiente para
evitar lesioneepersonales al enrollar
el cordbn.
NO use los enchufes Iocalizadossobre
los muebles, Los objetos cercanos
podrian resultar da_ados.
1.Tiredel cord6n
parasacarlodel
recept&culohasta
tenet la Iongitud
deseada.
/.
2. Detengael
cord6n un
memento para
interrumpir el
enrollamiento.
NOTA:Para
reducirel riesgode chequeel_ctrico, esta
aspiradoracuenta con unaclavija polarizada,uno de
loscontactos es m_s ancho que el otto, La clavija
s61opuede irltroducirsede una maneraen el
enchufe.Si la clavija no cabe bien enel enchufe,
inviertala.Si a,'mno cabe, Ilamea un electricista
para qua insta]eun enchufe correcto. Noaltere la
clavija de ninguna manera.
3. Conecteel cord6n el_ctrico polarizadoen un
enchufe de 120 voltios qua se encuentrecercadel
piso
Paraenrollar',Desconectela aspiradora.Remover
el cord6nde el sujetador. Sujete el enchufe mientras
enrolla el cord6n para impedirdafio o lesi6ncorporal
perel movimiento del cord6n,Lossujetadoresdel
carrete del cord6nse desbloqueancon un tir6n leve,
Ioque permiteque e! cord6nse enrolle.
nivel de pelo
de la alfombra
Pedal de
liberaci6n
de nivel de pale
de la alfombre
4. Baje el tube desde la posici6nverticalpisandoel
)edal de liberaci6ndel mango.
CUIDADO
NOdeje la Power-Mate®funcionando en
posicibn vertical en un lugar durante ning_n
espacio detiempo:se puededaSar la alfombra,
5. Seleccione una alturade pelo de la alfombra
usandoel pedal pequefio ubicadoen laparte poste-
riorde la Power-Mate®. El nivelde pelo la alfombra
se muestraen el indicador.Consulte SUGEREN-
CIASSOBRE ELAJUSTE DE NIVEL DE PELO DE
LA ALFOMBRA.
Atenci6n: Refi6rasealas recomendacionesdel fab-
ricante para limpiar su alfombra.Algunas alfombras
m_s delicadas puedenrequerirel use de la aspi-
radoracon el agitador Power-Mate"desconectado
para prevenirque la alfombra sea daSada.
Interrupter
de encendido/
apegade
\
6.Para encenderla
unidad,pise la
interrupter de
encendido/apagado.
7. Paraencender la
Power-Mate®,muevael
interrupter de
FLOOR/CARPET a la
posici6n CARPET.
7
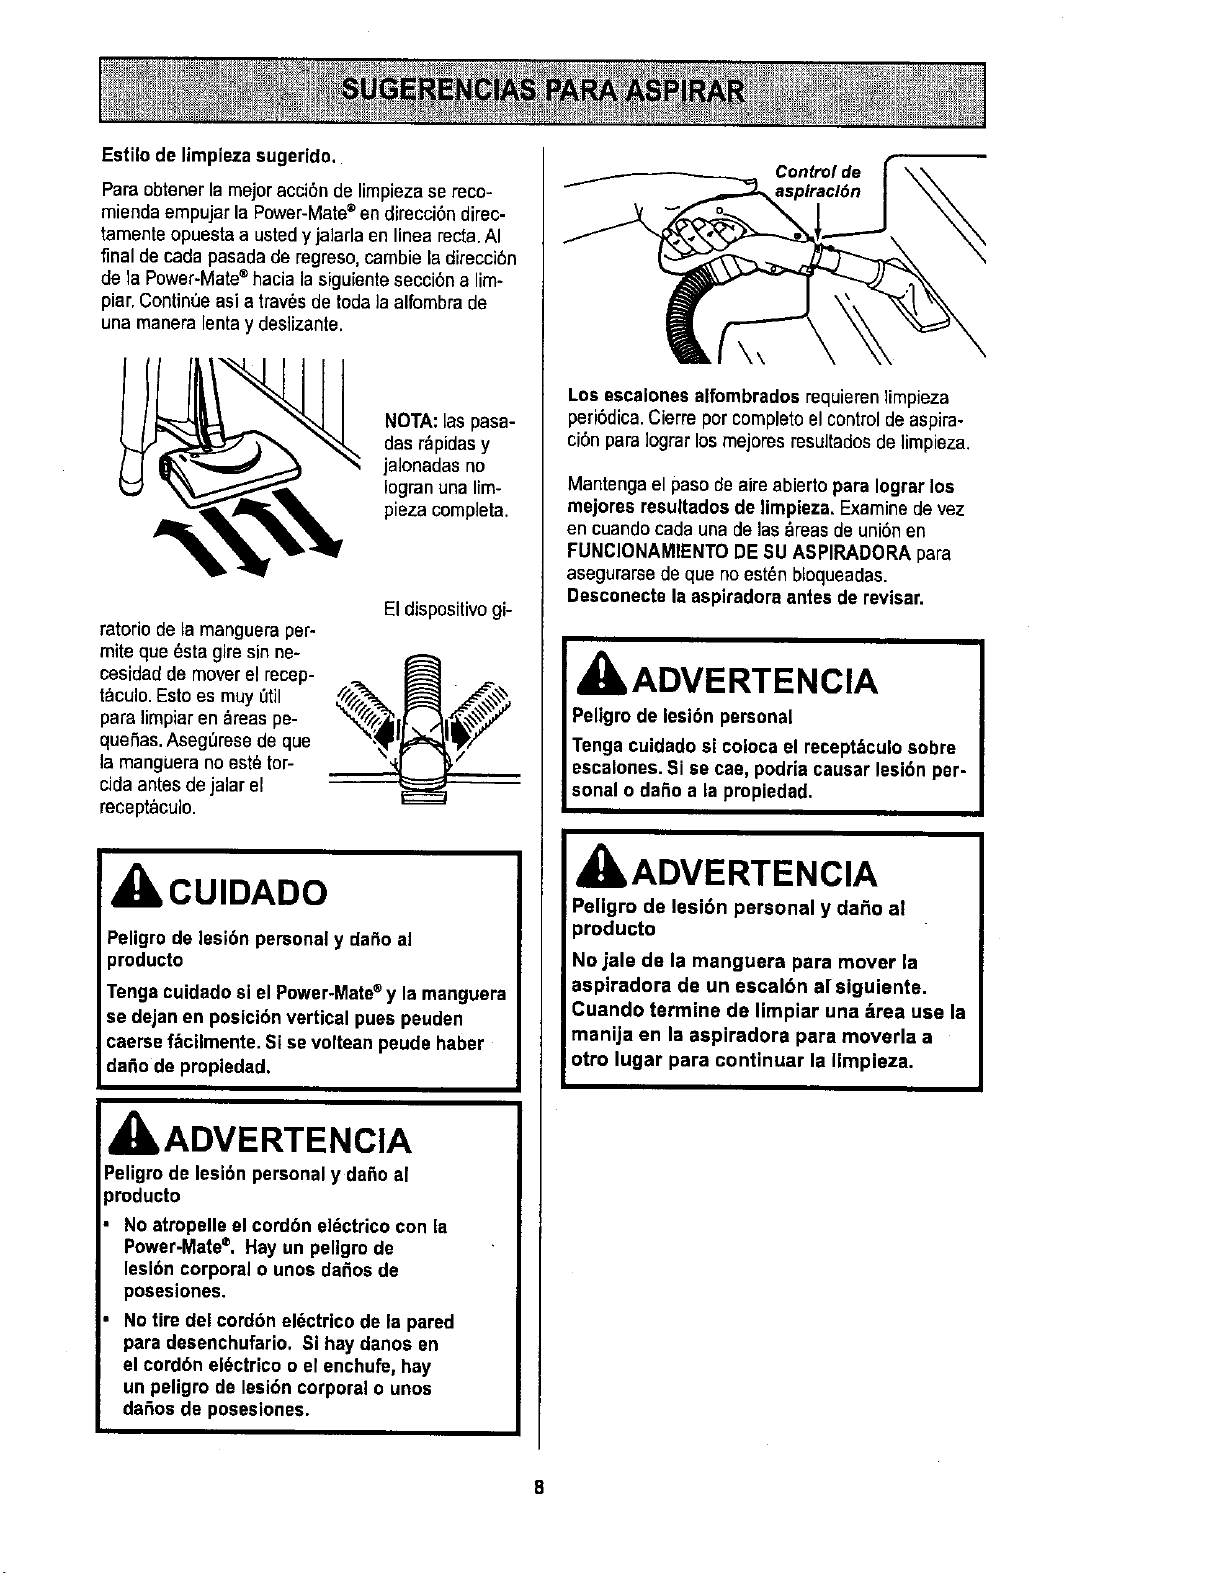
Estilodelimpiazasugerido.
Paraobtenerla mejoracci6nde limpiezase reco-
mienda empujarla Power-Mate®en direcci6n direc-
tamente opuesta a ustedy jalarla en linea recta.AI
final de cada pasadade regreso, cambie la direcci6n
de la Power-Mate®hacia la siguientesecci6n a lim-
piar,Continee asia trav_sde toda]aalfombra de
una manera lentay desiizante.
NOTA:las pasa-
des r_pidasy
jalonadas no
Iogranuna Iim-
piezacompleta.
ratorio de la mangueraper-
mite que 6sta giresin ne-
cesidad de moverel recep-
t_culo. Esto es muy etil
para limpiaren _reas pe-
quefias.Aseg_rese de que
la manguera no est_tor-
cidaantes de jalar el
recept_,culo.
El dispositivogi-
CUIDADO
Peligro de lesibn personal y dafio al
producto
Tengacuidado si el Power-Mate®y lamanguera
se dejan en posici6nvertical pues peuden
caersef_cilmente. Si se voltean peude haber
dafio de propiedad.
ADVERTENCIA
Peligrode lesibn personaly da_o al
)roducto
No atropelleel cord6n el_ctrico con ia
Power-Mate=. Hay un pellgrode
leslbn corporal o unos dafios de
posesiones.
Notire del cord6n el_ctrico de la pared
para desenchufario. Si hay danos en
el cordbn el_ctrico o el enchufe, hay
un peligro de lesi6n corporal o unos
dafios de posesiones.
Control de
\\
Los escalonesalfombradosrequieren limpieza
peri6dica.Cierre por completoelcontrol de aspira-
ci6n para Iograrlos mejores resultadosde limpieza.
Mantenga el paso de aireabierto para Iogrer los
mejores resultados de limpieza. Examinede vez
en cuando cada unadelas _reasde uni6nen
FUNCIONAMIENTODE SU ASPIRADORApara
asegurarsede que noest_nbloqueadas.
Deeconectela aspiradora antesde revisar,
IbADVERTENCIA
Peligrode leai6n personal
Tenga cuidadoel colocael recept_culosobre
eacalones.Si ee cae, podriacausar lesibn per-
sonal o dafio ala propiedad.
IbADVERTENCIA
Pellgro de lesi6n personal y dafio al
producto
No jale de la manguera para mover ia
aspiradora de un escalbn a[ siguiente.
Cuando termine de limpiar una _rea use la
manija en la aspiradora pare moverla a
otro lugar pare continuer la limpieza.
i
8
Use el ajuste XLO (bajo) paraobtener la mejor lim-
pieza a fondo. Pot otra parte,quiz_,sse requiera ele-
var el nivel parafacilitar algunas tareas,come por
ejemplo cuandose trata de tapetes y algunas alfom-
bras de pelo largo,y para impedir que la aspiradora
se apague.Se sugieren lossiguientes ajustes:
HI - Pelomuy largoy suelto,tapetes,alfombras
muy acojinadas.
MED- Pelo mediano a largo.
LO - Pelo cortoa mediano,
XLO - La mayoriade las alfombrasy pisos
descubiertos.
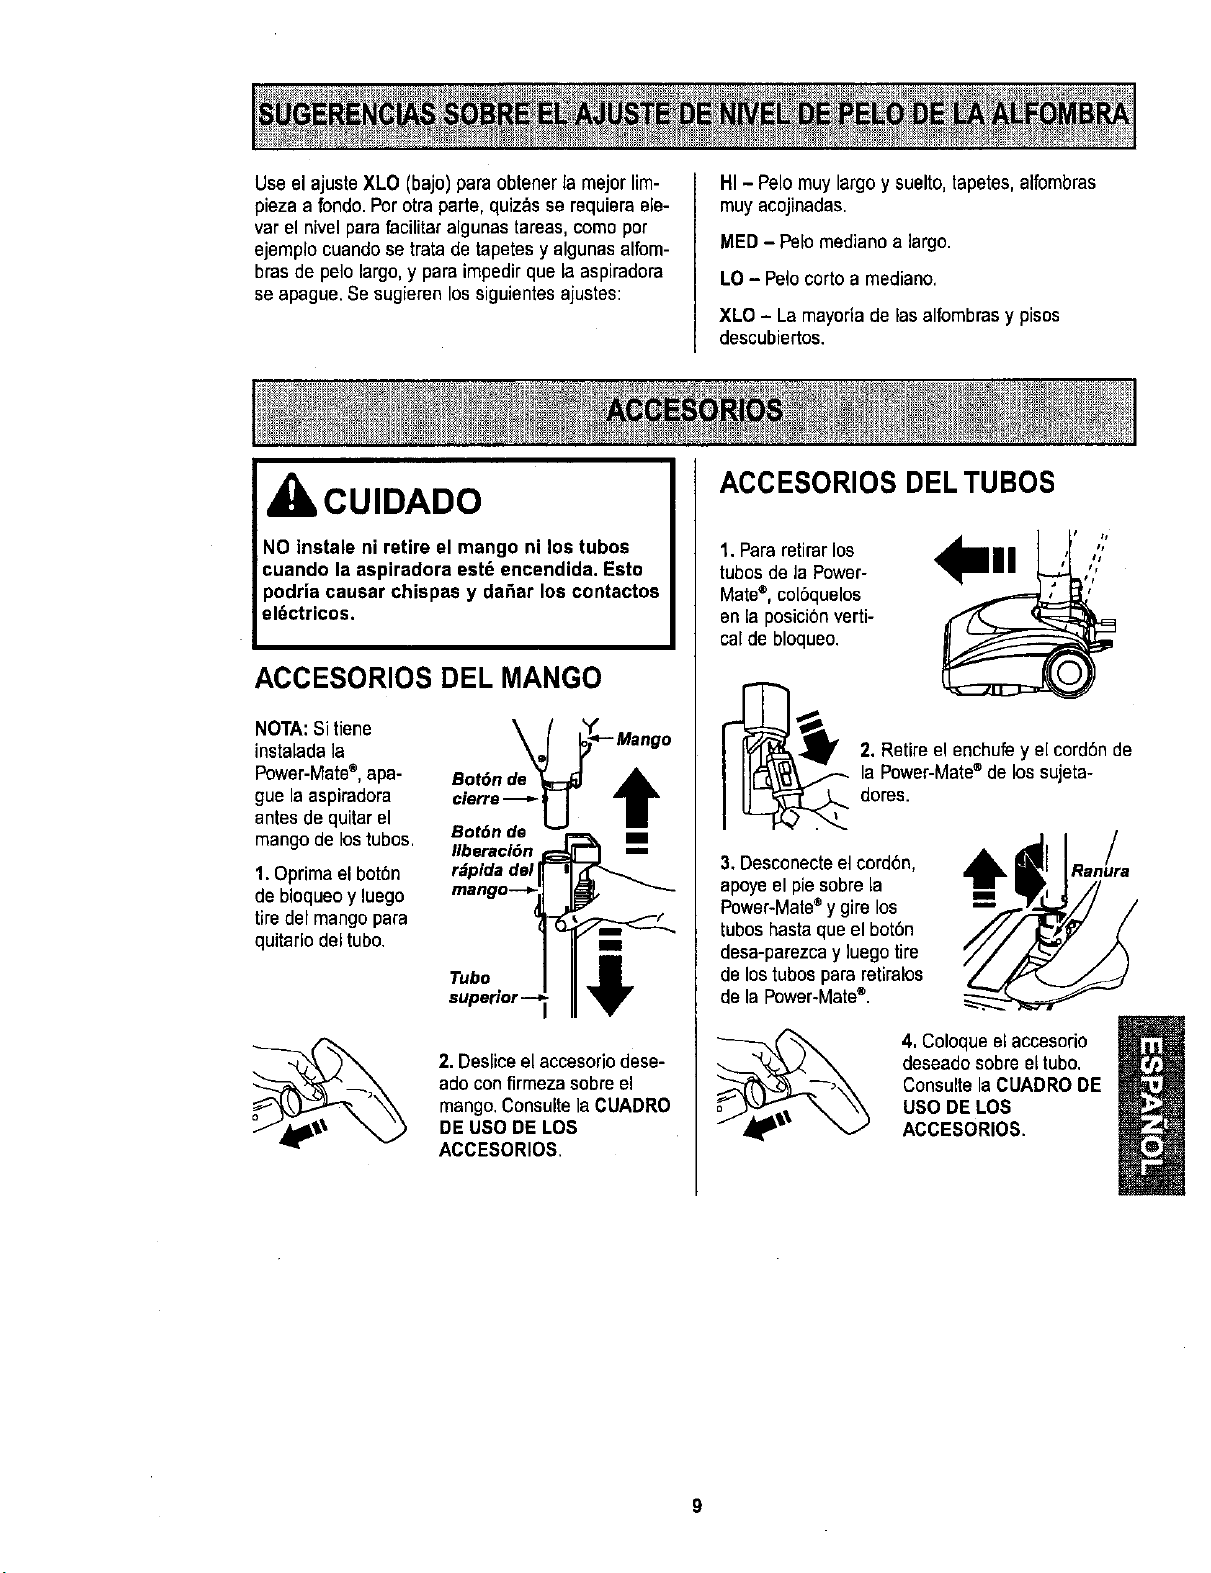
CUIDADO
NO instale ni retire el mango ni los tubos
cuando la aspiradora est_ encendida. Esto
podria causar chispas y da_ar los contactos
el_ctricos.
ACCESORIOS DEL MANGO
NOTA:Si tiene
instaladala
Power-Mate®,apa-
gue la aspiradora
antes de quitarel
mango de lostubos,
1. Oprimael bot6n
de bloqueoy luego
tire del mango para
quiterlo del tubo.
Bot6n d_eI ?;o
cierre ---_
Bot6n de
Ilberacl6n _._rdpida del
mango--+-
superior-
2. Desliceel accesoriodese-
ado con firmezasobre el
mango,Consulte la CUADRO
DE USO DE LOS
ACCESORIOS,
ACCESORIOS DELTUBOS
1. Pararetirar los
tubosde la Power-
Mate®,cot6quelos
en la posici6nverti-
calde bloqueo.
i_ . Retireel enchufey el cord6n de
la Power-Mate®de lossujeta-
dores.
RanLra
n
3. Desconecteel cord6n,
apoyeel piesobrela
Power-Mate®y gire los
tubos hasta queelbot6n
deea-parezcay luegotire
de lostubos para retiralos
de la Power-Mate®.
4, Coloqueel accesorio
deseadosobreel tubo.
ConsultelaCUADRODE
USO DELOS
ACCESORIOS.
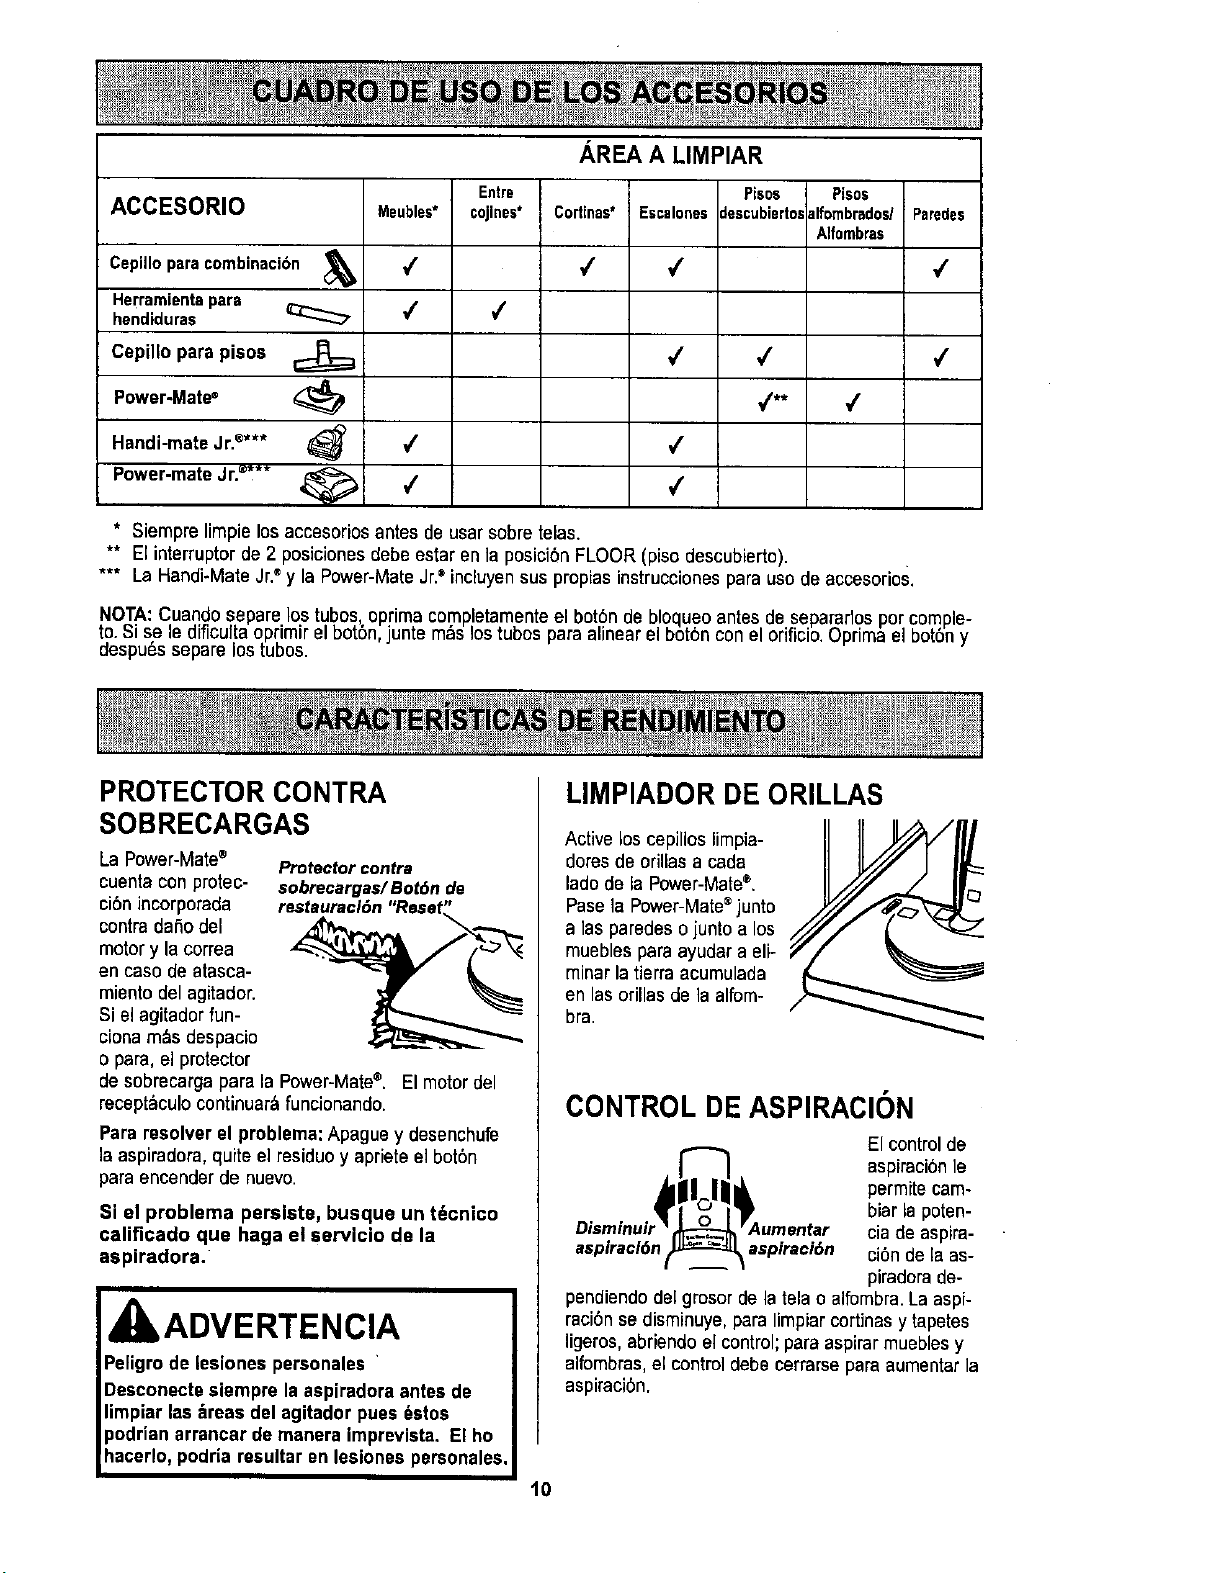
ACCESORIO
Cepilloparacombinacibn
Herramientapare
hendiduras
Cepillo para pisos
Power-Mate"
Handi-mateJr.®***
P°wer'mate Jr'®*-- _i
Meubles*
,/
,(
Entre
cojines*
AREA A LIMPIAR
CoHinas* Escalones
4
4
Pisos
descubierto=
Piso$
alfombrados/
4
#
4
4
4
/
4
t/**
Alfombras
4
* Siempre limpielos accesoriosantes de usar sobretelas.
** El interruptor de 2 posicionesdebe estar en la posici6n FLOOR(piso descubierto).
*** La Handi*MateJr.®y la Power-MateJr.®incluyensus propias instrucciones para usode accesorios.
Paredes
,/
,/
NOTA:Cuando separe los tubos,oprima completamenteel bot6n de bloqueo antesdesepararlos por comple-
to. Si se ledificulta oprimir el bot6n,junte m&slostubos para alinear el bot6n con el orificio,oprimael bot6ny
despu_s separe lostubos.
PROTECTOR CONTRA
SOBRECARGAS
LaPower-Mate® Protectorcontra
cuenta con protec- sobrecarga$/Bot6n de
ci6n incorporada
contra dafio del
motor y la correa
en caso de atasca-
miento del agitador.
Si el agitador fun-
cionam_s despacio
opara, el protector
de sobrecarga pars la Power-Mate®. El motor del
recept_culo continuar_ funcionando.
Pararesolver el problema:Apague y desenchufe
la aspiradora, quite el residuey aprieteelbot6n
para encender de nuevo.
Si el problema persists, busque un t6cnico
calificado que haga el servicio de la
aspiradora.
ADVERTENCIA
LIMPIADOR DE ORILLAS
Active los cepillos limpia- II .,ll/J,,_/ H_
dotes de orillasa cada
lado de la Power-Mate®.
PaselaPower-Mate®junto
a 1asparedes ojunto a los
muebles pare ayudar a eli-
miner la tierra acumulada
en las orillas de ]aalfom-
bra.
CONTROL DE ASPIRACION
El controlde
aspiraci6n le
permitecam-
biar la poten-
cia de aspira-
aspiracl6n _aspiraci6n ci_n de Is as-
piradorade-
pendiendodelgrosordelatelao alfombra.La aspi-
raci6nse disminuye, para limpiarcortinasy tapetes
ligeros,abriendoelcontrol;paraaspirermuebles y
alfombras,el controlciebecerrarsepareaumentarla
aspiraci6n.
lO
PROTECTOR TERMAL
Esta aspiradora tiene un protector termal qua se
ajusta automdticamente para proteger a la
aspiradora del sobrecalentarniento.Si una
obstruccibnfrnpide el flujo normal de aire al
motor, el protectorterrnal apaga el motor
automdticamente para perrnitirqua el motorse
enfrie a fin de evitar posiblesdanos a la
aspiradora.
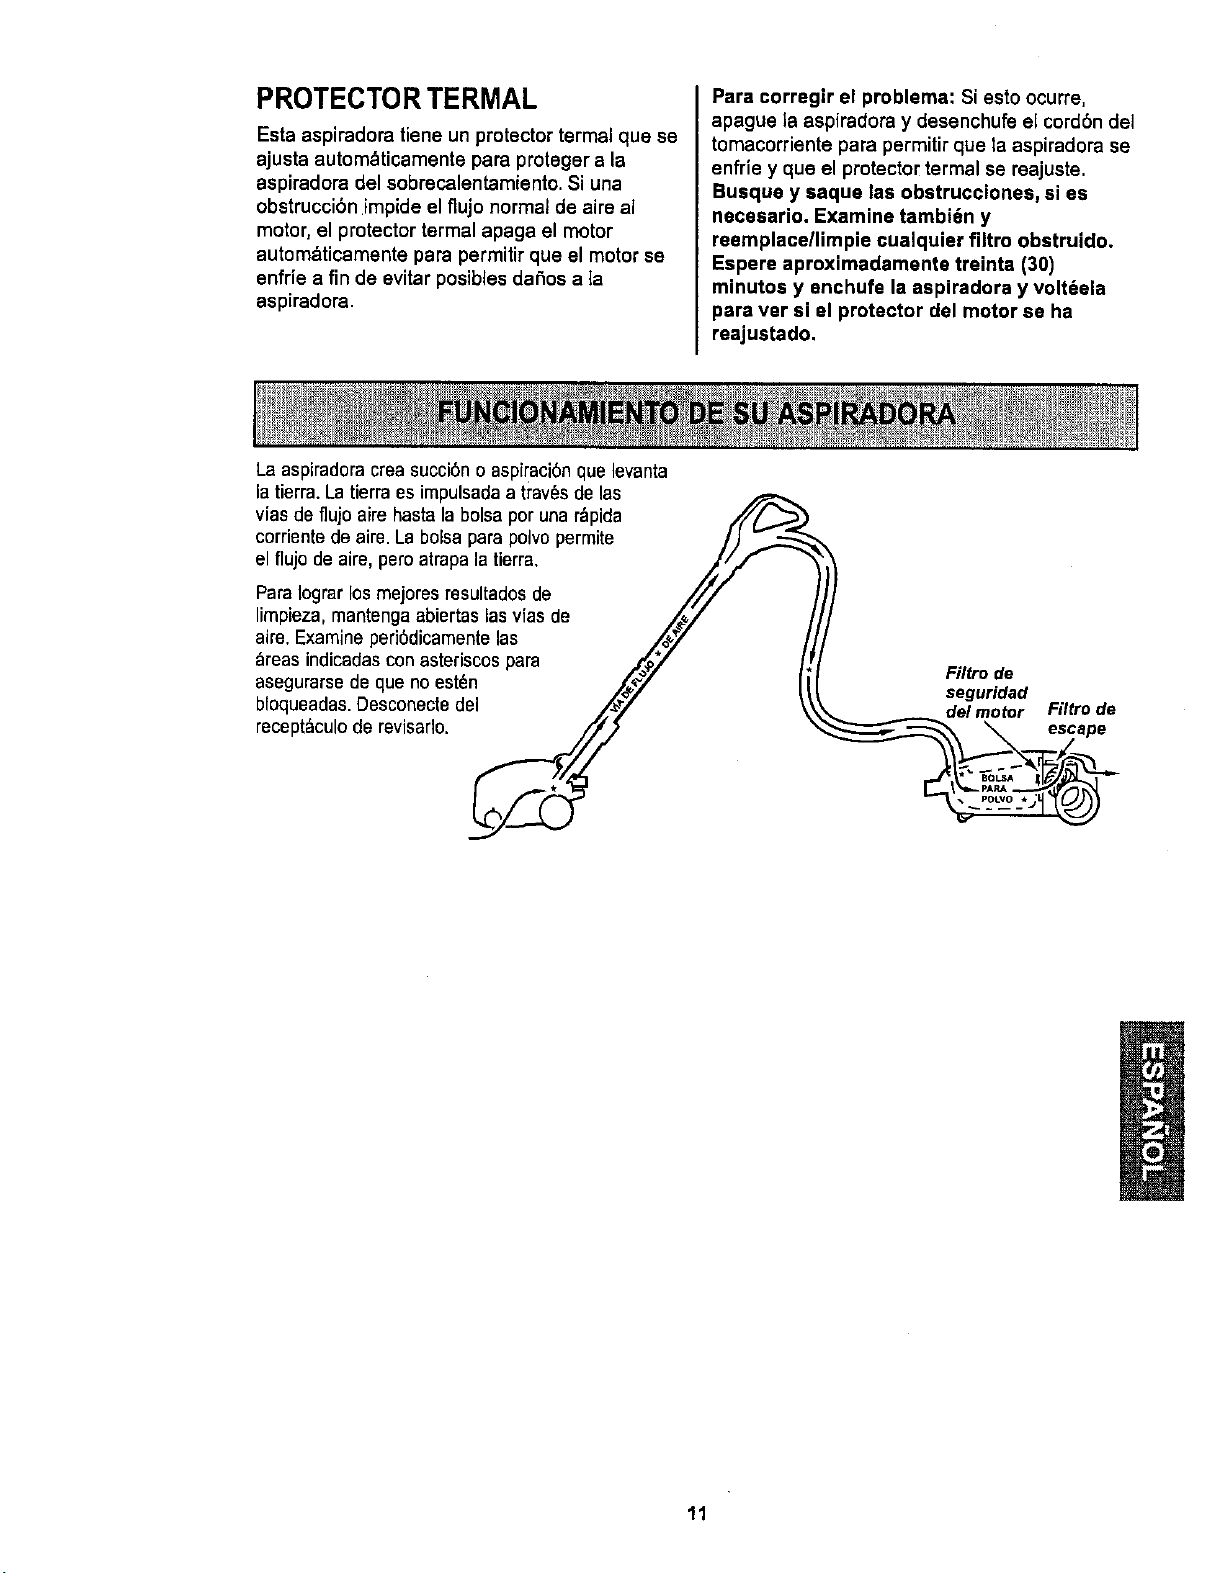
La aspiradoracreasucci6no aspiracibnque levanta
la tierra. Latierra es impulsadaa trav6sde las
Para corregir el problema: Si esto ocurre,
apague la aspiradora y desenchufe el cord6n del
tornacorriente para permitirqua ta aspiradora se
enfrie y qua el protectortermal se reajuste.
Busque y saque las obstrucciones, si es
necesario, Examine tambi6n y
reemplace/limpie cualquier flltro obstruido,
Espere aproximadamenta treinta (30)
minutos y enchufe la aspiradora y volt6ela
para ver si el protector del motor se ha
reajustado.
viasde f]ujo aire basrala bolsa por una r_pida /(/(" _.,_
corriente de aire.La bolsa para polvopermite /)
el flujo de aire,pero atrapa la tierra. _,_/y "_
Para Iograrlos mejores resultados de _
limpieza,mantenga abiertas lasvias de _ j
aire.Examine peri6dicamente las /_'7 /
_reas indicadascon asteriscos para .._._y /.i
asegurarse de que no est6n Z_7 /_
bloqueadas.Desconectedel _"
recept6culode revisarlo. /'/_
Filtrode
seguridad
del motor Filtrode
_ escape
11
CUIDADO DEL RECEPTACULO
CAMBIO DE LA BOLSA
La bolsadebe cambiarse seguidopara lograr los
mejores resultados de limpieza.
NOTA: Consultela PIEZASY CARACTERiSTICAS
para determinar el N°. de la bolsa.
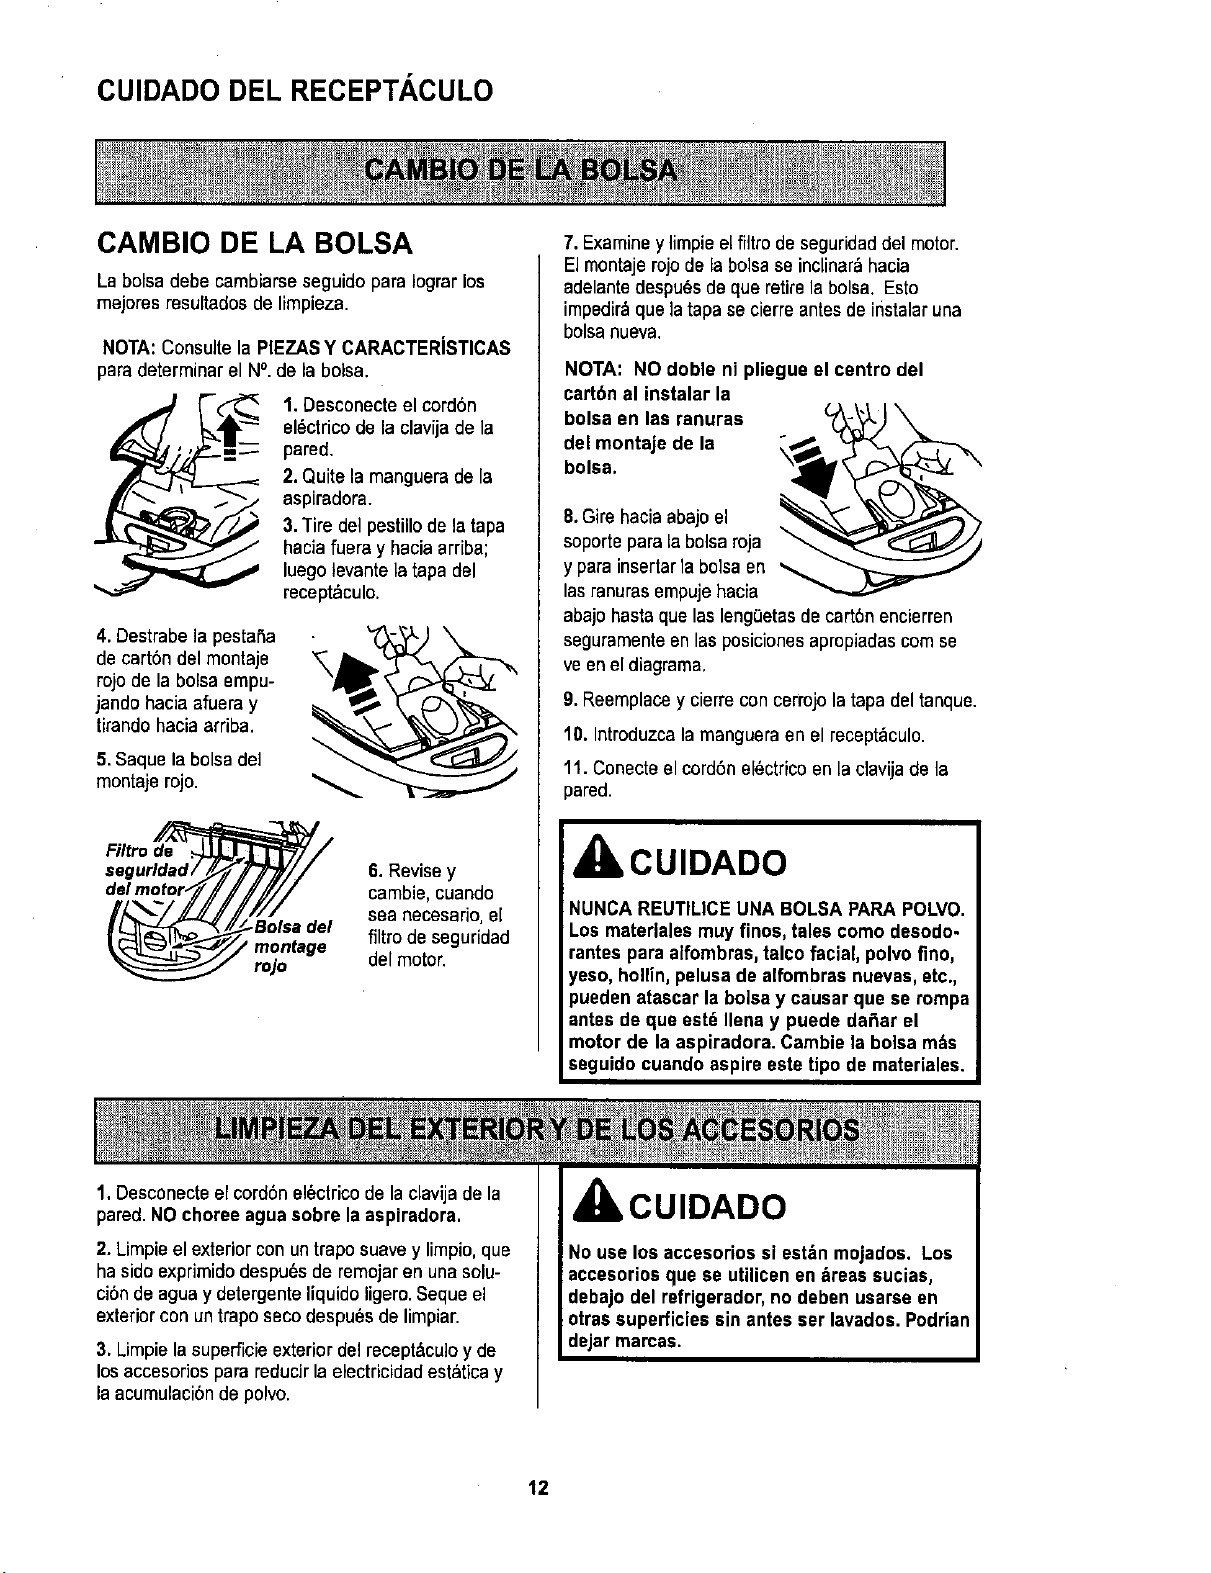
1. Desconecte el cord6n
el_ctricode la clavija de la
pared.
2. Quitelamanguera dela
aspiradora.
3.Tire del pestillode la tapa
haciafuera y haciaarriba;
luegotevantelatapa del
recept&culo.
4. Destrabela pestaSa
de cart6n del montaje
rojo de la balsaempu-
jando hacia afuera y
tirando haciaarriba.
5.Saque la bolsadel
montaje rojo.
Filtro de
montage
rojo
6. Revisey
cambie,cuando
sea necesario,el
filtro deseguridad
del motor.
7. Examiney limpieel filtro de seguridaddel motor.
El montajerojo delabolsa se inclinar_hacia
adelantedespu6s de que retirela bolsa. Esto
impedir_que la tapa se cierreantes de ifistalar una
bolsanueva.
NOTA: NO doble ni pliegue el centro del
cartbn al instalar la
bolsa en las ranuras
del montaje de la
bolsa.
8. Gire haciaabajoel
soporte para labolsa roja
y para insertar labolsaen
las ranurasempujehacia
abajo hasta quelas leng,",etasde cart6n encierren
seguramenteen las posicionesapropiadascornse
ve enel diagrama.
9. Reemplacey cierrecon cerrojo la tapadel tanque.
10. Introduzcala manguera en el recept_,culo.
11. Conecteel cord6n el6ctrico en la clavija de la
pared.
,CUIDADO
NUNCA REUTILICE UNA BOLSA PARAPOLVO.
Los materlales muy finos, tales como desodo-
rantes para alfombras,talco facial, polvo fino,
yeso, hollin,pelusade alfombras nuevas,etc.,
pueden atascar la bolsa y causar que se rompa
antesde que est_ Ilena y puede dafiar el
motor de la aspiradora. Cambie la bolsa m_s
seguidocuando aspire este tipo demateriales.
I
1. Desconecteelcord5nel6ctricode la clavija de la
pared.NO choreeagua sobre laaspiradora.
2. Limpieel exterior con untrapo suavey limpio,que
ha sido exprimidodespu6s de remojaren una solu-
ci6nde agua y detergente liquido ligero.Seque el
exteriorcon untrapo seco despu_s de limpiar.
3. Limpiela superficie exteriordel recept&culoy de
losaccesorios para reducirla electricidadest_lticay
la acumulaci6nde polvo.
CUIDADO
No use los accesorios si est&nmojados. Los
accesoriosque se utilicen en _reas sucias,
debajo del refrigerador,no deben usarse en
otrassuperficies sin antes ser lavados.Podrian
dejarmamas.
12
kADVERTENCIA
Peligrode choqueel_ctrico
Desenchufe el cordbnde la corrienteeldctrica.
No opera la aspiradorasin el filtro de segurl-
dad del motor. Aseg6urese de que el filtro est_
saco e instaladoadecuadamenta para impedir
que el motorfalle y/o que se produzcaun
choque el_ctrico.
FILTRO DE SEGURIDAD DEL
MOTOR ELECTROSTATICO
Este flltrodebeser cambiado cuando astesocio.
Debecambiarseperi6dicamenteseg0n las condi-
clones de uso. El filtro no se puede laver pues
perderia su capacidad para atrapar atrapar
polvo.
NOTA:Consultela PIEZASY CARACTER[STICAS
para determiner el numerodel filtro,
1, Paraquitar la bolsa, siga las instruccionesen
CAMBIO DE LA BOLSA.
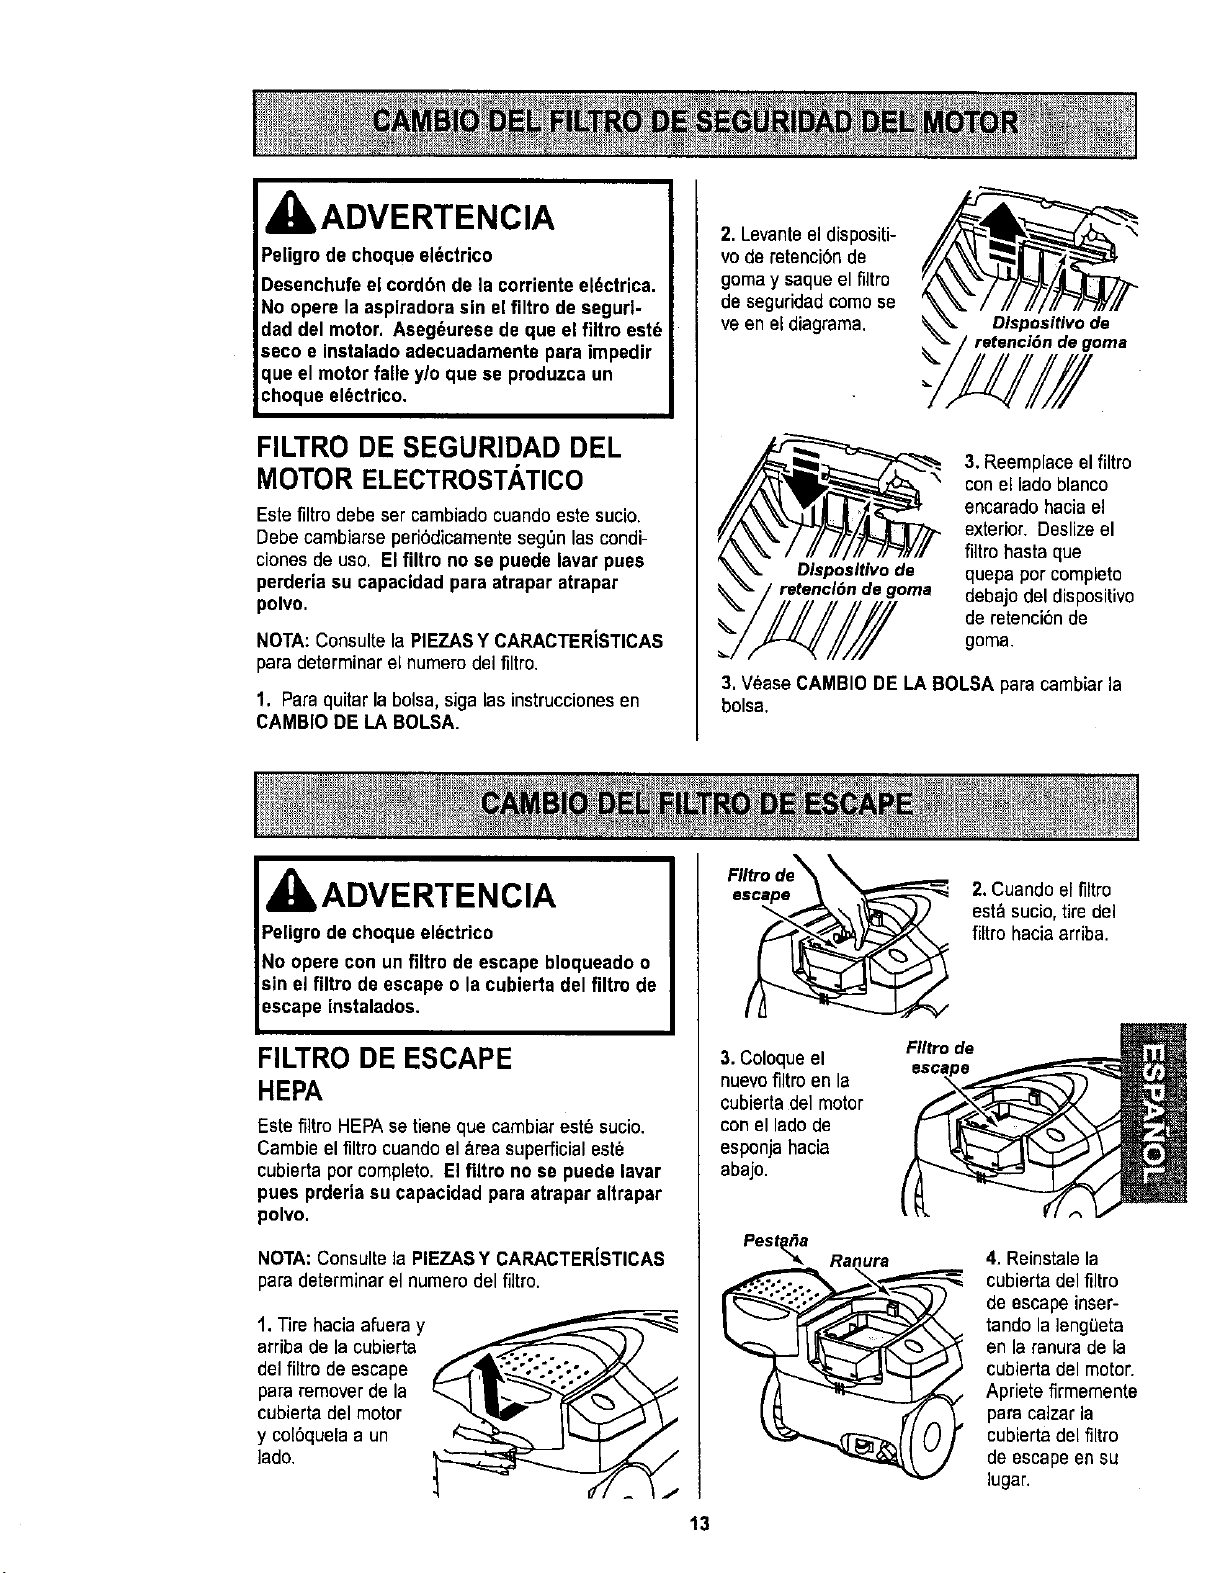
2. Levanteel dispositi-
vode retenci6n de
gomay saqueel filtro
de seguridad como se
ve en el diagrama.
Dispositivode
I retenci6ndegoma
_. Disposltivode
3, Reemplaceelfiltro
conel lado blanco
encaradohaciael
exterior.Deslizeel
filtrohasta qua
quepaporcompleto
debajodel dispositivo
de retencibnde
goma.
3. Vease CAMBIODE LA BOLSA paracambiar la
bolsa.
IADVERTENCIA
Peligrode choque el_ctrico
No opere con un filtro de escape bloqueadoo
sin el filtro de escape o la cubierta del filtro de
escape instalados.
FILTRO DE ESCAPE
HEPA
Este filtro HEPAse tieneque cambiarest_ sucio.
Cambie el flltro cuandoel area superficial est6
cubierta por completo. El filtro no sa puede lavar
puss prderia su capacidad para atrapar altreper
polvo.
NOTA:Consulte la PIEZASY CARACTER[STICAS
para determinar el numerodel filtro.
1. Tire hacia afueray
arriba de la cubierta
del filtro de escape
para remover dela
cubierta del motor
y col6quelaa un
lado.
FIItrode_ _
esc_
3. Coloqueel FIItro de
nuevofiltro en la
cubierta del motor
con el lado de
esponjahacia
abajo.
Pest_a Ranura
13
2.Cuando elfiltro
est_ sucio,tire del
filtro hacia arriba.
4. Reinstalela
cubiertadel filtro
de escape inser-
tando la leng_eta
en la ranura de la
cubierta del motor.
Apriete firmemente
para calzar la
cubierta del filtro
de escape en su
lugar.
CUIDADO DE LA POWER-MATE®
Siempre deber._nseguirse todas las precau-
clones de seguridad al limpiar y dar servicio a
la Power-Mate ®.
kADVERTENCIA
Peligrode choque el_ctrico o lesibncorporal
Desconectela unidadantes de limpiarlao darle
servicio, De Io contrario podria producirseun
choque el_ctrico o causar lesi6n corporal si la
aspiradora arrancade manera imprevista.
PARA RETIRAR LA CORREA
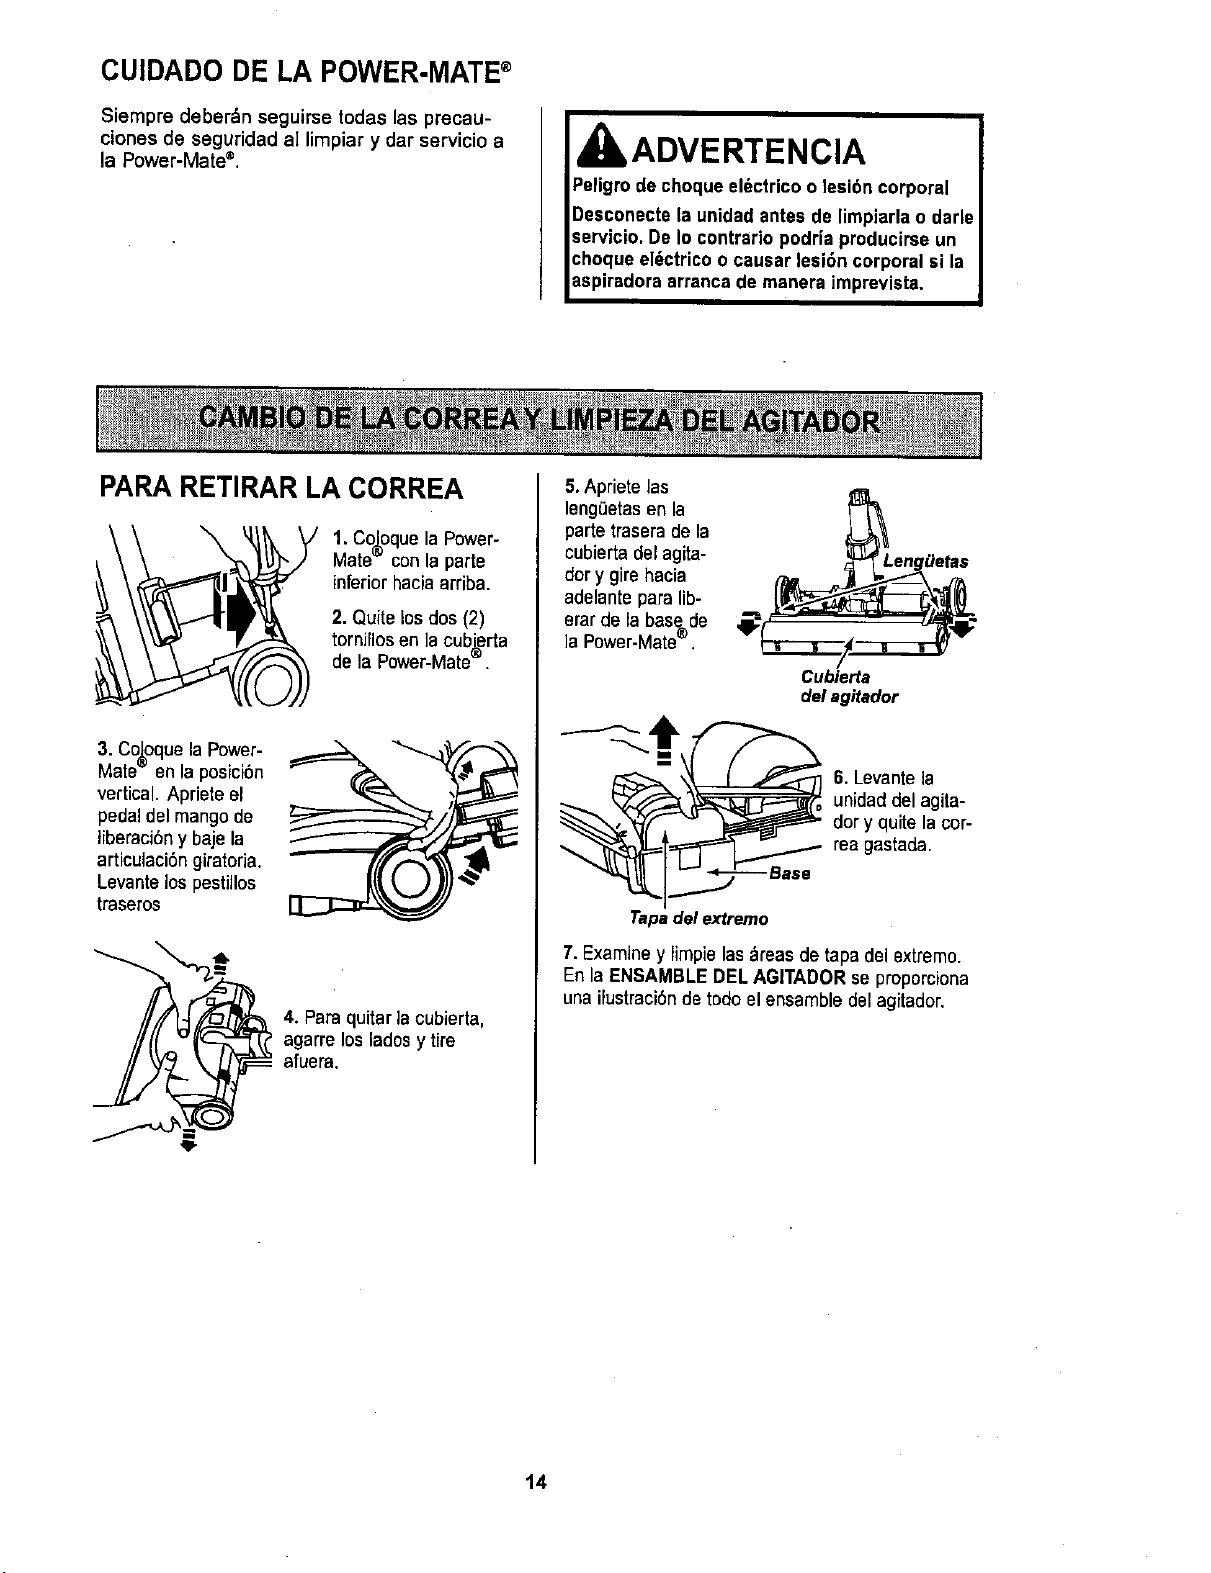
1. Co_oquela Power-
Mate- con la parte
inferior haciaarriba.
2. Quite los dos (2)
tornJllosen la cub_erta
de la Power-Mate .
3. Co_oquela Power-
Mate_ en la posici6n
vertical. Apriete el
pedal del mango de
liberaci6ny baje la
articulaciSngiratoria.
Levante lospestillos
traseros
4. Para quitar la cubierta,
agarre los lados y tire
afuera.
5.Apriete las
leng0etas en la
partetraserade la
cubierta del agita-
dor y gire hacia
adelantepara lib-
erar de la base de
la Power-Mate'm.
Cubierta
del agitador
6. Levantela
unidad del agita-
dory quite la cur-
tea gastada.
Tapa del extremo
7. Examiney limpie lasareas de tapa del extremo.
En la ENSAMBLEDEL AGITADORse proporciona
una ilustraciSnde todo el ensamble del agitador.
14
LIMPIEZADELAGITADOR
NOTA:Paramantener una alta eficiencia de
limpieza y evitar el daSo a la aspiradora, J0a,Y
aue limDiarel agitador cada vez que se cambia
]a_r,.o.[[€_.
Tambi_n hay que limpiar el agitador seg_n el
siguiente horatio:
El uso de la Limjiiiiii_j_
agJtad
Frecuente - cada semana
(usada dirariamente)
Moderado - cada rues
(usada 2 o 3 veces
por semana)
Ligero - cada 2 meses
(usada 1 vez por semana)
IMPORTANTE
Desconectela aspiradora.Examinefrecuente-
mente el cepilloy las _reas de soporte del mismo
de la Power-Mate® y elimine todo cabello, hilo y
pelusaacumulada.Si_aacumulacibn es excesiva,
separe la Power-Mate del tubo y realice los pasos
a continuaci6n.
Retire todo indicio de basura o suciedad de ia
zona de la correa y del rodillo del cepillo.
Con cuidado quite las tapas y quite el hilo o los
restos ubicados en el agitador o en los
soportes del cepillo.
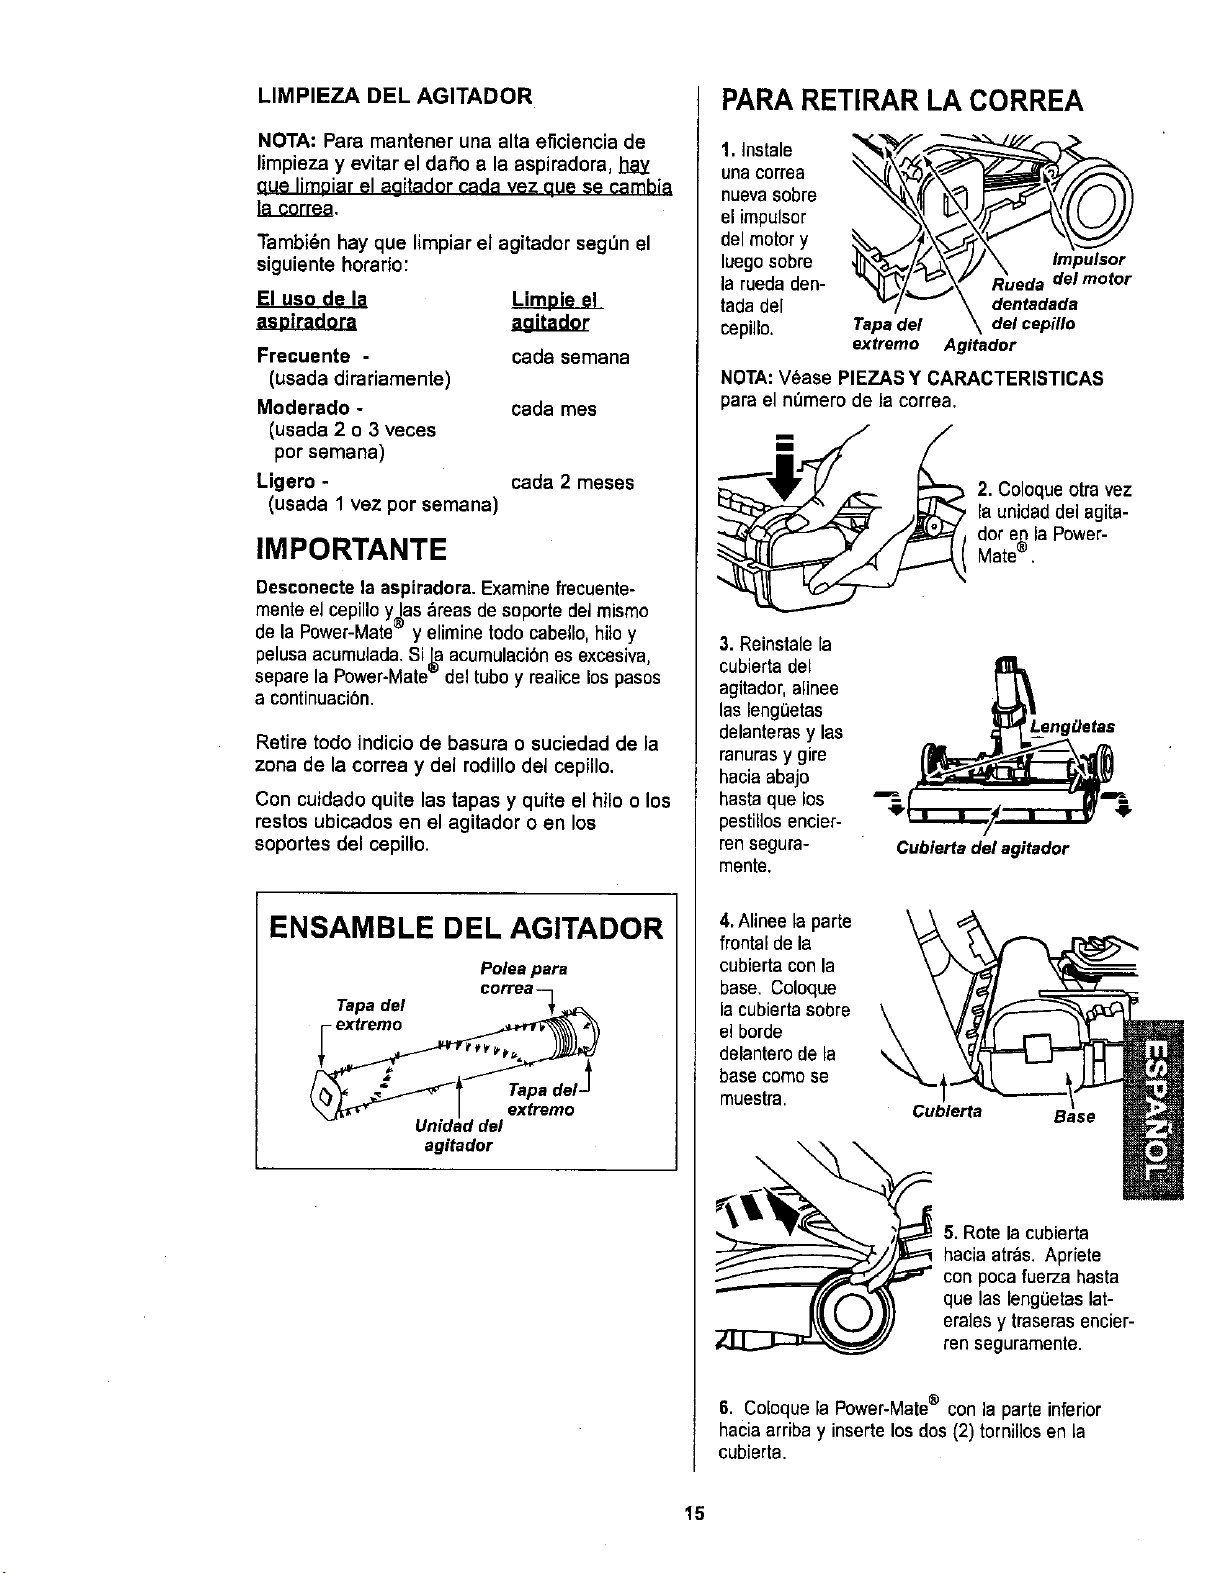
ENSAMBLE DEL AGITADOR
Polea para
corr( a
Tapa del __._
Unidaddal
agitador
PARARETIRAR LA CORREA
1, Instale
unacorrea
nuevasobre
el impulsor
delmotor y
luegesobre
la ruedaden-
tadadel
cepillo.
_*_"_" dentadada
Tap_a_de_l_----_ del cepillo
extremo Agitador
NOTA:V_ase PIEZASY CARACTERISTICAS
para el n_mero de la correa.
2. Coloque otravez
la unidad del agita-
dor e_ la Power-
Mate-.
3. Reinstale la
cubierta del
agitador,alinee
las leng_etas
delanterasy las
ranurasy gire
hacia abajo
hasta que los
pestillosencier-
ren segura-
mente.
--=- , - a-B=
°
Cubiertadel agitador
4,Alinee la parte
frontal de la
cubierta con la
base. Coloque
la cubiertasobre
el horde
delanterode la
basecomose
muestra.
Cub/erta
Base
5. Rote la cubierta
hacia atr_s. Apriete
con poca fuerza hasta
que las leng(Jetaslat-
erales y traseras encier-
ran seguramente.
6. Coloquela Power-Mate® con la parte inferior
haciaarriba y inserte los dos (2) tornilios en la
cubierta.
15
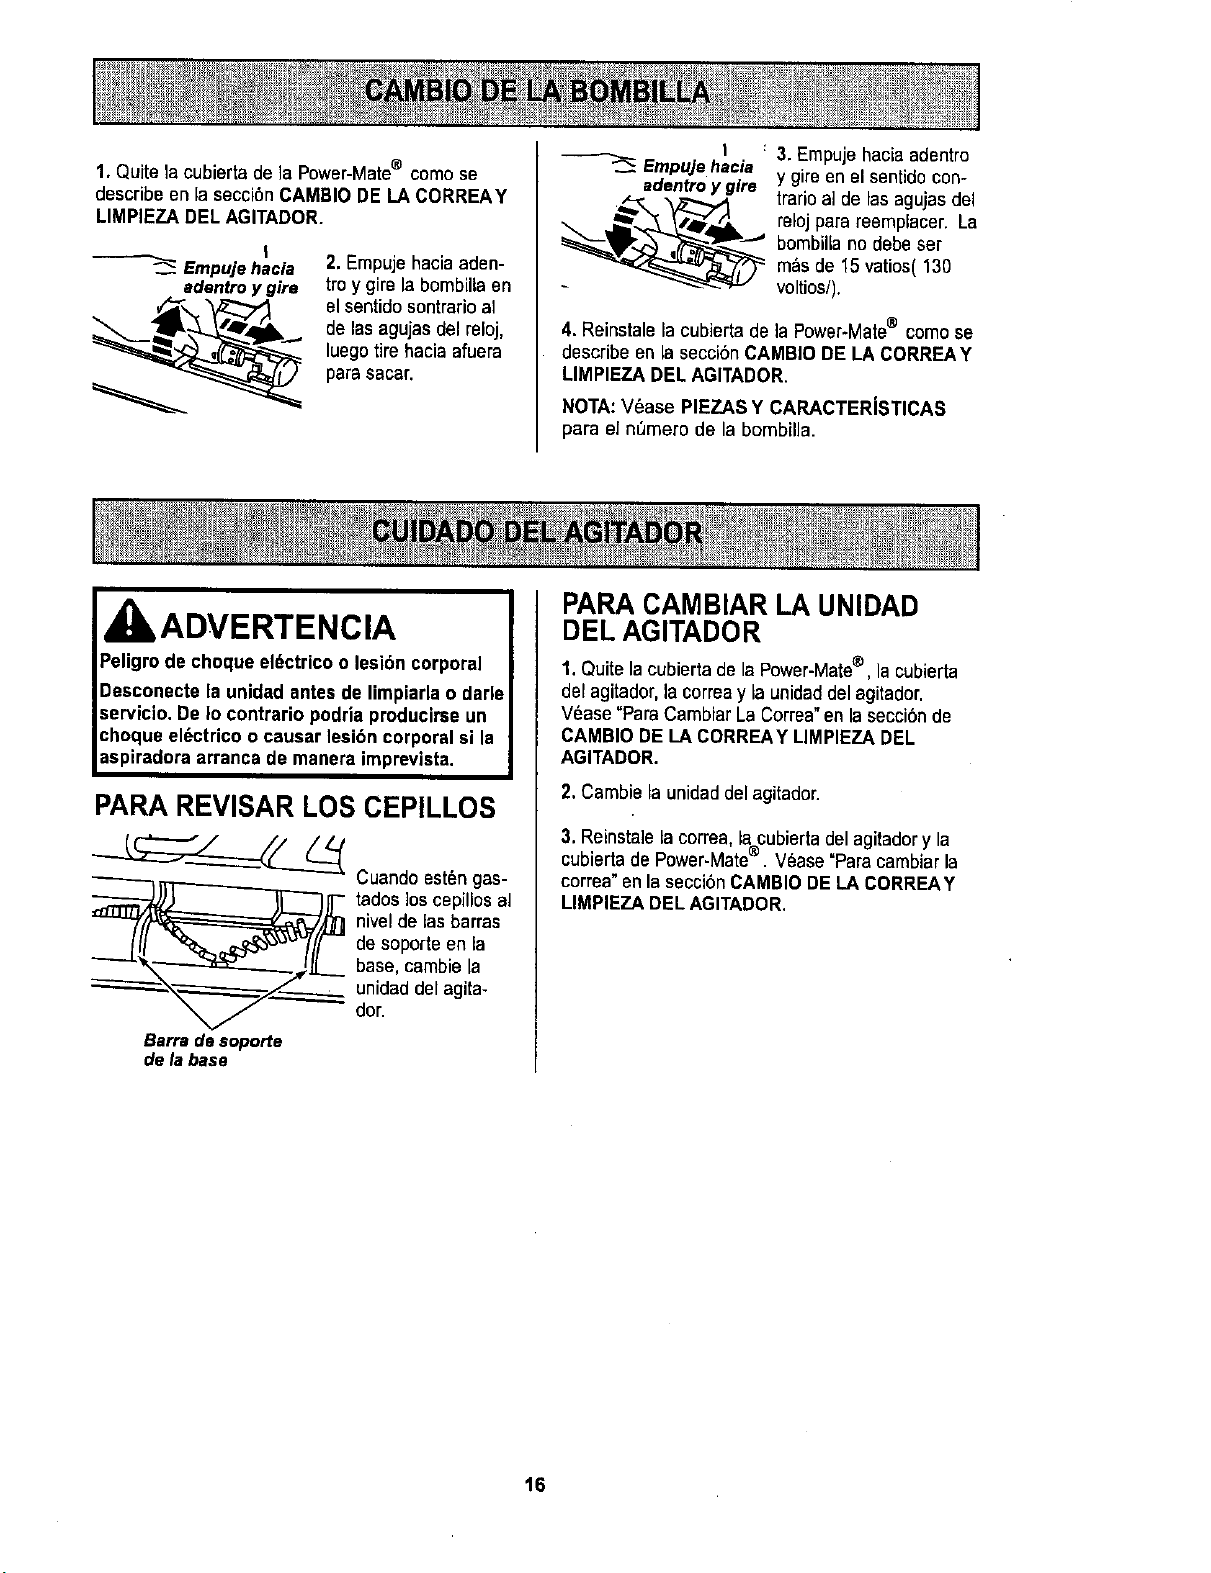
1.Quite la cubierta de la Power-Mate@come se
describe en la seccibnCAMBIO DE LA CORREAY
LIMPIEZA DEL AGITADOR.
!
Empujehacia
adentroy girs
2. Empujehacia aden-
froy gire la bombillaen
el sentido sontrarioal
de las agujas del reloj,
luegotire hacia afuera
parasacar.
I _ 3. Empujehacia adentro
Empujehacia
adentroy glre y gireen elsentido con-
_ trarioa] de las agujasdel
reloj para reemplacer. La
bombillano debe ser
m_s de 15 vatios( 130
voltios/).
4. Reinstalela cubierta de ]a Power-Mate® como se
describe en la secci6n CAMBIO DE LA CORREAY
LIMPIEZA DEL AGITADOR.
NOTA:V6ase PIEZAS Y CARACTERiSTICAS
para el n_mero de la bombilla.
,ADVERTENCIA
Peligrode choque el_ctrico o lesi6n corporal
Desconecte la unidad antesde limpiarla o darle
servicio, De Io contrario podria producirseun
choque el_ctrico o causar lesibn corporal si la
aspiradora arrenca de manera imprevista,
PARA REVISAR LOS CEPILLOS
_k_'_--__ Cuando est6ngas-
_..___ ados los cepillos al
nivelde las barras
de soporte en la
base, cambie la
unidad del agita-
dor.
Barra desoporte
delabase
PARA CAMBIAR LA UNIDAD
DEL AGITADOR
1. Quite la cubierta de la Power-Mate®, la cubierta
del agitador,la correay la unidaddel agitador,
V_ase "ParaCambiar La Correa"en la secci6nde
CAMBIO DE LA CORREAY LIMPIEZA DEL
AGITADOR.
2. Cambie la unidad delagitador.
3. Reinsta]ela correa, la cubierta del agitadory la
cubierta de Power-Mate®. V_ase=Paracambiarla
correa" enla secci6n CAMBIODELA CORREAY
LIMPIEZA DEL AGITADOR.
16
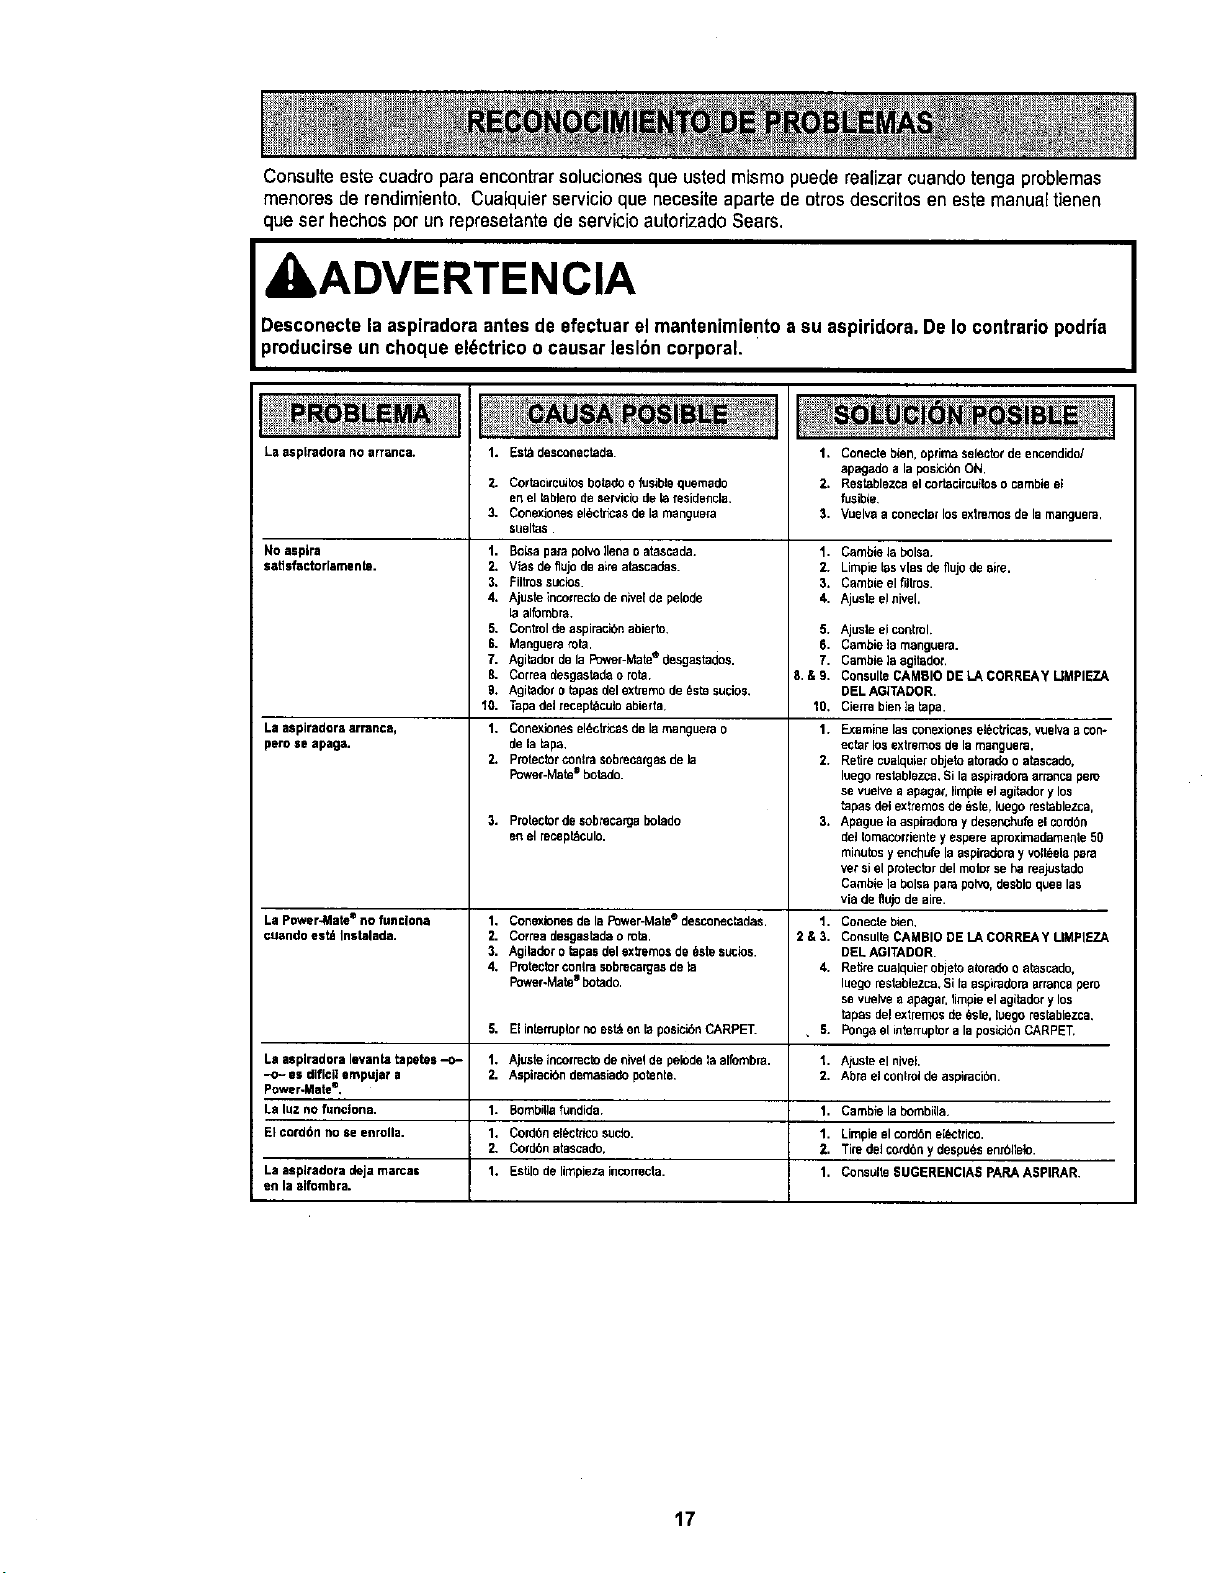
Consulte este cuadro para encontrarsoluciones queustedmismo puede realizarcuando tenga problemas
menores de rendimiento. Cualquier servicioque necesiteaparte de otros descritos en este manualtienen
que ser hechos per un represetantede servicioautorizado Sears.
I ADVERTENCIA
Desconecte la aspiradora antes de efectuar el mantenimiento a su aspiridora. De Io contrario podria
producirse un cheque el_ctrico ocausar lesl6n corporal,
La asplradora no arranca.
No aspire
satlsfactorlamente.
La aspiradora arrance,
pete se apaga,
1.
2.
3.
Est_desconecteda
Cortacircuitosbotedoo fusiblequemado
en el I,'_blem deserviclodete resideflcla.
ConexJonesel_ctri'casde la manguera
sueltes
1. Bo_sapafa polvo]lenao atascada.
2. V]as de flujode airs atescadas.
3. Filtrossucios.
4. Ajusteincorrecte de nh'elde pe]ode
la alfombra.
5, Cordmlde aspiracibnabierto.
6. Manguerarota.
7. Agitedordela Power-Mate® desgastados.
B. Correa desgastedao rots.
9. Agiladoro tepasdel extremede _ste sucios,
10. Tapadel recept_cuteabierte,
1, Conexionesel_ctncasde lamanguera o
de la taps,
2. Protecterconlrasobreeargasde la
Power-Mate= botado.
3,
Protectorde sobtecargabolado
en el recepLdeulo.
1. Conecte bias, optimaselecterde encendido/
apagado ala posicP3nON,
2. Resteblezcael cortecircuitoso cambieel
fusib{e
3. Vuelvaa conecterlos extremesde la manguera,
1. Cambie la bolsa.
2. Limpielasvies de flujo de sire.
3. Cambie elfiltros.
4. Ajuste elnivel.
5. Ajuste elcontrol.
6. Cambie te manguera.
7. Cambie ]aagitadot.
It. & 9. CensuReGAMBle DE LA CORREAY LIMPIEZA
DEL AGFrADOR.
10. Cierrsbien la tapa.
1. Examine lascortex]oneseidebicas,vuelva a con*
ecterlos extremesdela manguera.
2. RetirecuaLquierobjete ateradoo atascado,
luegomsteblezca,Si la aspiradoraarrancapare
se vuelve a apaga¢,]impleel agitedory los
tapes del extremesde _ste, luegorestablezca,
3. Apagueteasp]faders y desenchufeelcord6n
de] Iomacordentey espere aproximadamenle50
minutes y enchufela asp]fedoray volteetepars
vet siel protectordel meterse hareaJustedo
Cambie la boisepars poho,desbloquee las
via deflujo deairs.
1. Conectebias,
2&3. ConsulleCAMBIO DE LA CORREAY UMP]EZA
DEL AGITADOR.
4. Retirecualquierobjeto ateradoo atascado,
luego restebtezca.Si la aspiradoraarranca pete
se vuelve a apagar,limpie elagitedery los
tapes del extremesde_sle, ]uego resrabiezca,
• 5. PongaelinterrupteralaposicibnCARPET,
La Power-Mate® no fun©lena 1, Conexionesde la Power-Mate®desconectedas.
cuando est_ Inslalada. 2. Cortes desgastadae rote,
3. Agitedor otapes delextremesde _ste suctes.
4. Protectorcon4rasobrecargasde la
Power-Mate®botedo.
S. El interruplorno est_ en ra posicibnCARPE_
La asp]radora levsnte tapetes-c- 1. Ajusteincorrectede nive_de pelodeIs alfombra, t. Ajuste el nivel.
•-,o-esdiflcilempujara 2. Aspiracibndemasiadopotente, 2. Abrae]cordro]deaspiracibn.
Power-Mate®,
La luz no funciona, 1. Bombillafundida 1. Cambie la bomb]lie.
El cord6n no se enrolla. 1. CordOnel_cttlcosuclo. 1. Limpieel cordonek_rdrico.
2, Cord6n atescado. 2. TiredeJcoKIt_sy despu_senrbltete.
Laasp_radotadejamarca= 1. EsUlodelimpiezainconrecta. 1. ConsulteSUGERENCIASPARAASPIRAR.
en te sifombra.
17
: : Your Home .....
fill II i_ii i!ii
_ii!ili!iiiii!_'!
_i iii i ii!iiii!
_i i_ii iiii_i _
ii i i _ iii_i i_
For repair - in your home - of all major brand appliances,
lawn and garden equipment, or heating and cooling systems,
no matter who made it, no matter who sold itl
For the replacement parts, accessories and
owner's manuals that you need to do-it-yourself.
For Sears professional installation of home appliances
and items like garage door openers and water heaters.
1-800-4-MY-HOME ® Anytime, day or night
(1-800.469-4663) (U.S.A. and Canada)
www.saars,com www.sears.ca
Our Home
For repair of carry-in products like vacuums, lawn equipment,
and electronics, call or go on-line for the nearest
Sears Parts and Repair Center.
1-800-488-1222 Anytime, day or night (U,S.A, only)
!iii!ii !i!!ili!
_iiiii_i! Para pedir servicio de reparacibn
:!_i__ a domicilio, y para ordenar piezas:
iii;i;;i; l"888-SU-HOGAR s_
iiiiiiiiii_ill
;!i!_iiiiii_i!iii!i!! (1-888-784-6427)
!iii!i_iiiiiiii!i
iiiili_i_!iiiili
i l_iiii_ii_
i ii_iiii_i il_
_?i i i_i_ iii
www.sears.com
iiiiiiii
To purchase a protection agreement (U.S.A.)
or maintenance agreement (Canada) on a product serviced by Sears:
iiii ii ii
1-800-827-6655 (U,S,A,) 1-800-361-6665 (Canada)
i iill iii!il
Au Canada pour serviceen francis: .....
1-800-LE-FOYER Mc
(1-800-533-6937)
i_ii iiill
www.sears.ce
© Seam, Roebuckand Co.
I r T_ SM
®RegsteedTrademarkl Trademark/ Service Mark of Sears, Roebuck and Co.
® Marca Registrada / "mMarca de F_brica / SMMarca de Servlctode Sears, Roebuck and Co.
McMarque de commerce / MDMarque d_pos_e de Sears, Roebuckand Co.