
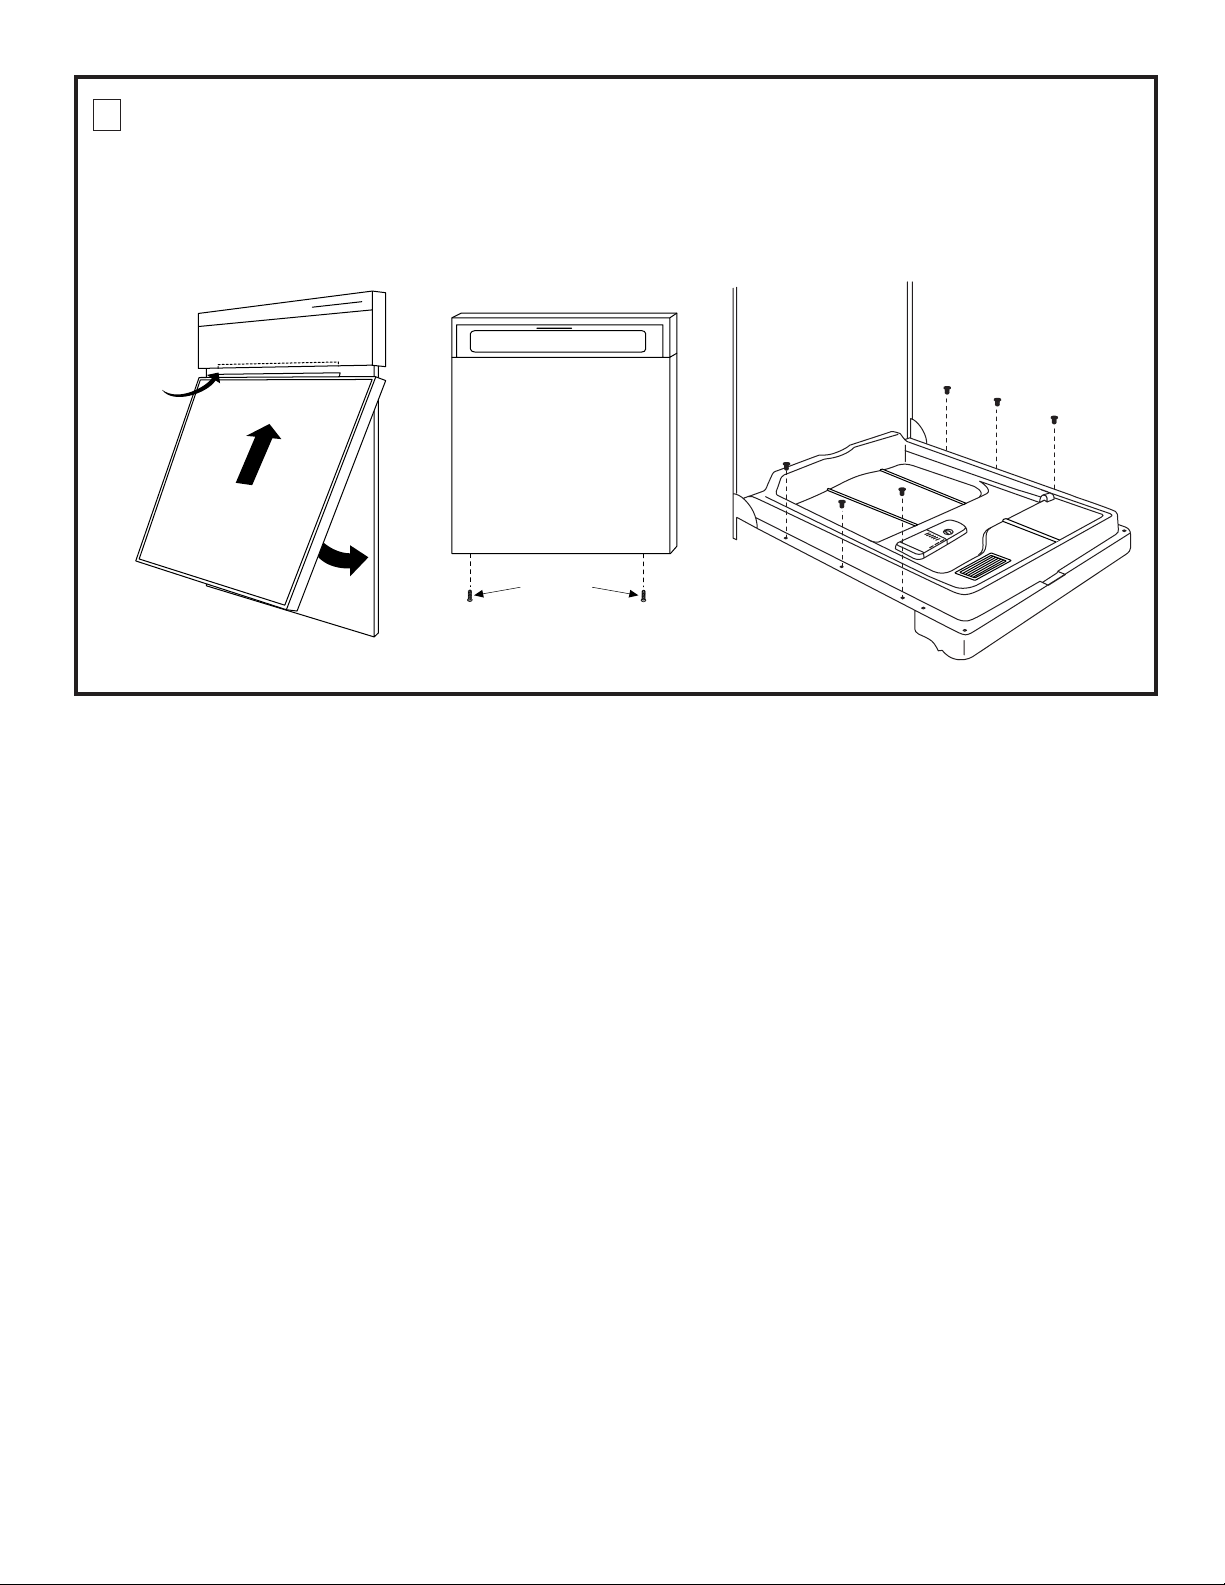
1 REMOVE DOOR PANEL
• Open dishwasher door.
• Remove the 6 Phillips head screws along
the sides of the door (see Figure 1) holding
the inner door to the outer panel. Retain
screws, close door.
Continued on back of page
Installation
Instructions
DOOR REPLACEMENT KITS
WD35X10039/GPF610B/WD31X10053–Flat/Black Door Panel Kit
WD35X10040/GPF610W/WD31X10054–Flat/White Door Panel Kit
WD35X10041/GPF610C/WD31X10055–Flat/Bisque Door Panel Kit
WD35X10042/GPF610S/WD31X10062–Flat/Stainless Door Panel Kit
WD35X10043/GPF710B/WD31X10063–Bowed/Black Door Panel Kit
WD35X10044/GPF710W/WD31X10061–Bowed/White Door Panel Kit
WD35X10045/GPF710C/WD31X10064–Bowed/Bisque Door Panel Kit
WD35X10046/GPF710S/WD31X10060–Bowed/Stainless Door Panel Kit
BEFORE YOU BEGIN
Read these instructions completely
and carefully.
IMPORTANT – Save these instructions
for local inspector’s use.
IMPORTANT – Observe all governing
codes and ordinances.
Note to Installer – Be sure to leave these
instructions with the Consumer.
Note to Consumer – Keep these instructions with
your Owner’s Manual for future reference.
STOP
CAUTION:
On new installations, do not remove wood base
until you are ready to install the dishwasher. The
dishwasher will tip over when the door is
opened.
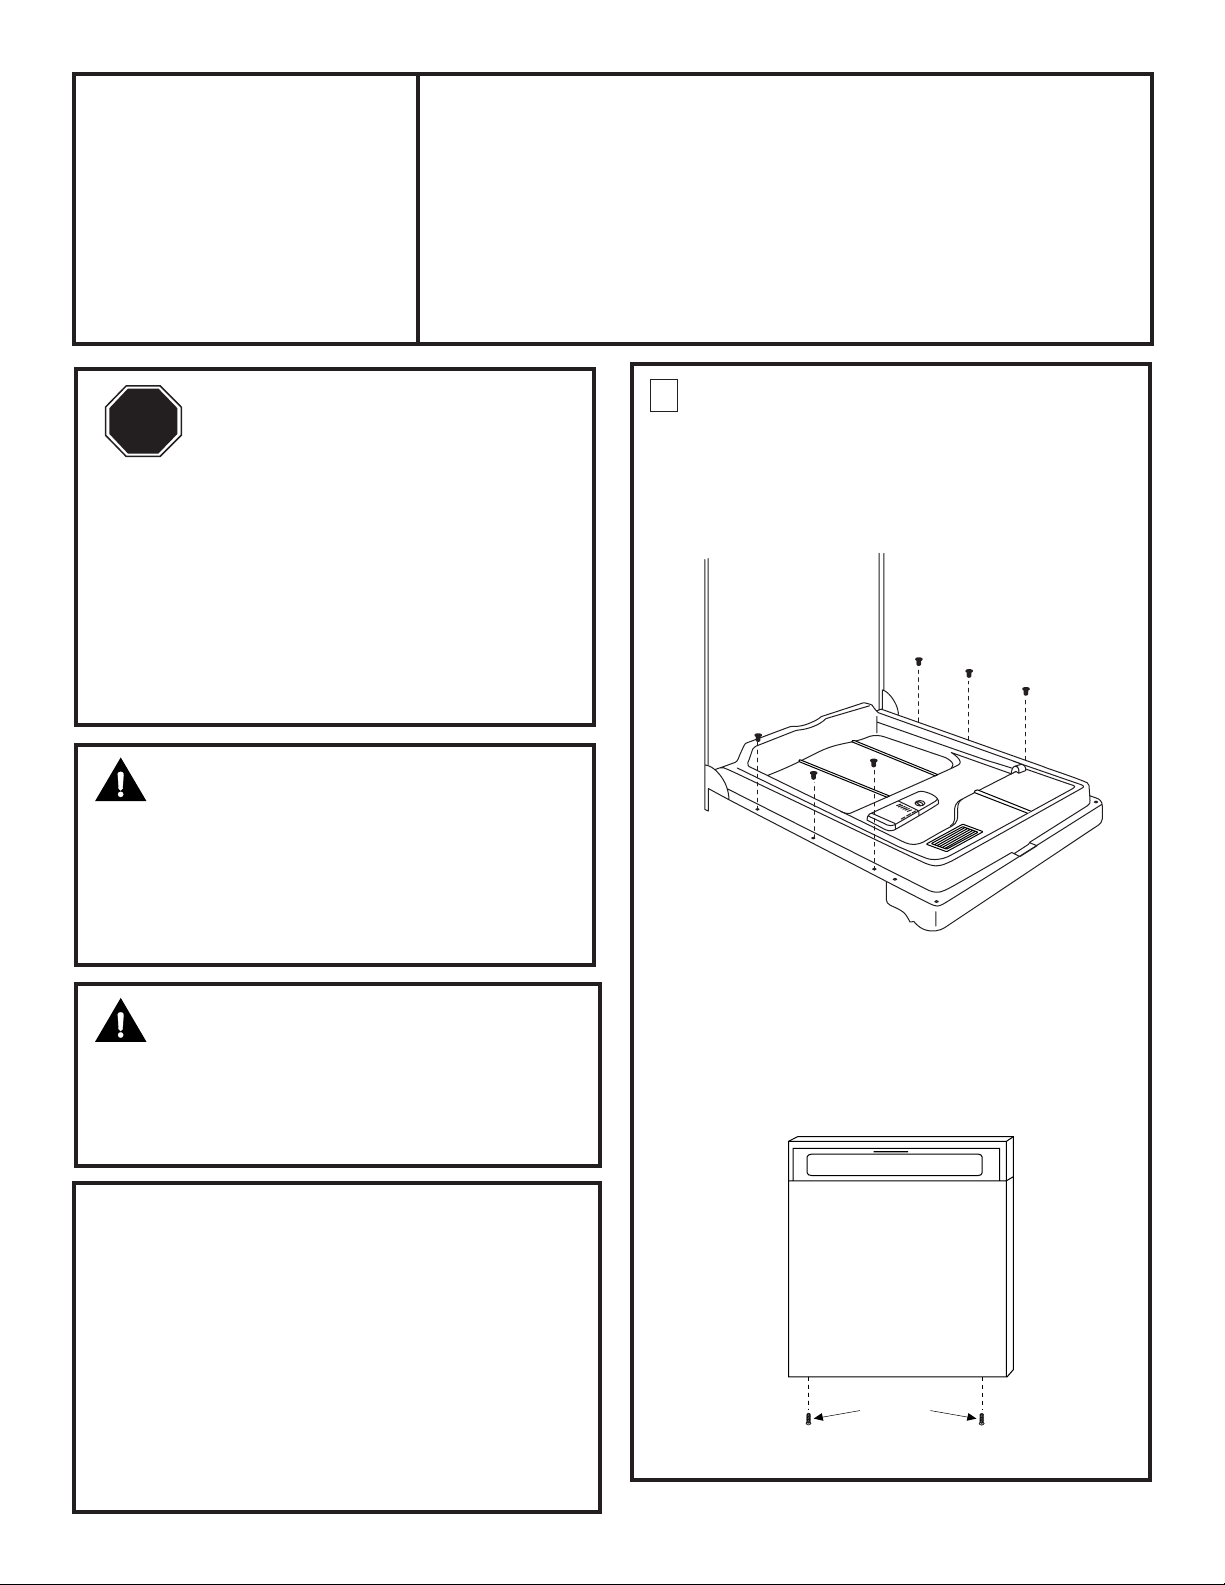
• Remove the two screws on the bottom of
the door panel (Figure 2). Allow door panel
to slide down approximately 1/2". Retain
screws.
• Remove door panel.
The kits listed above are provided for installa-
tion of a replacement door panel.
TOOLS AND MATERIALS
REQUIRED:
• Gloves to protect against sharp edges
• Stubby Phillips screwdriver
KIT CONTAINS:
• Door panel
• Installation Instructions
Figure 2
WARNING:
To prevent electric shock, disconnect
electrical power supply to dishwasher before
changing panels. Do not operate dishwasher
while changing panels or when lower access
panel assembly is removed.
Bottom
Phillips Screws
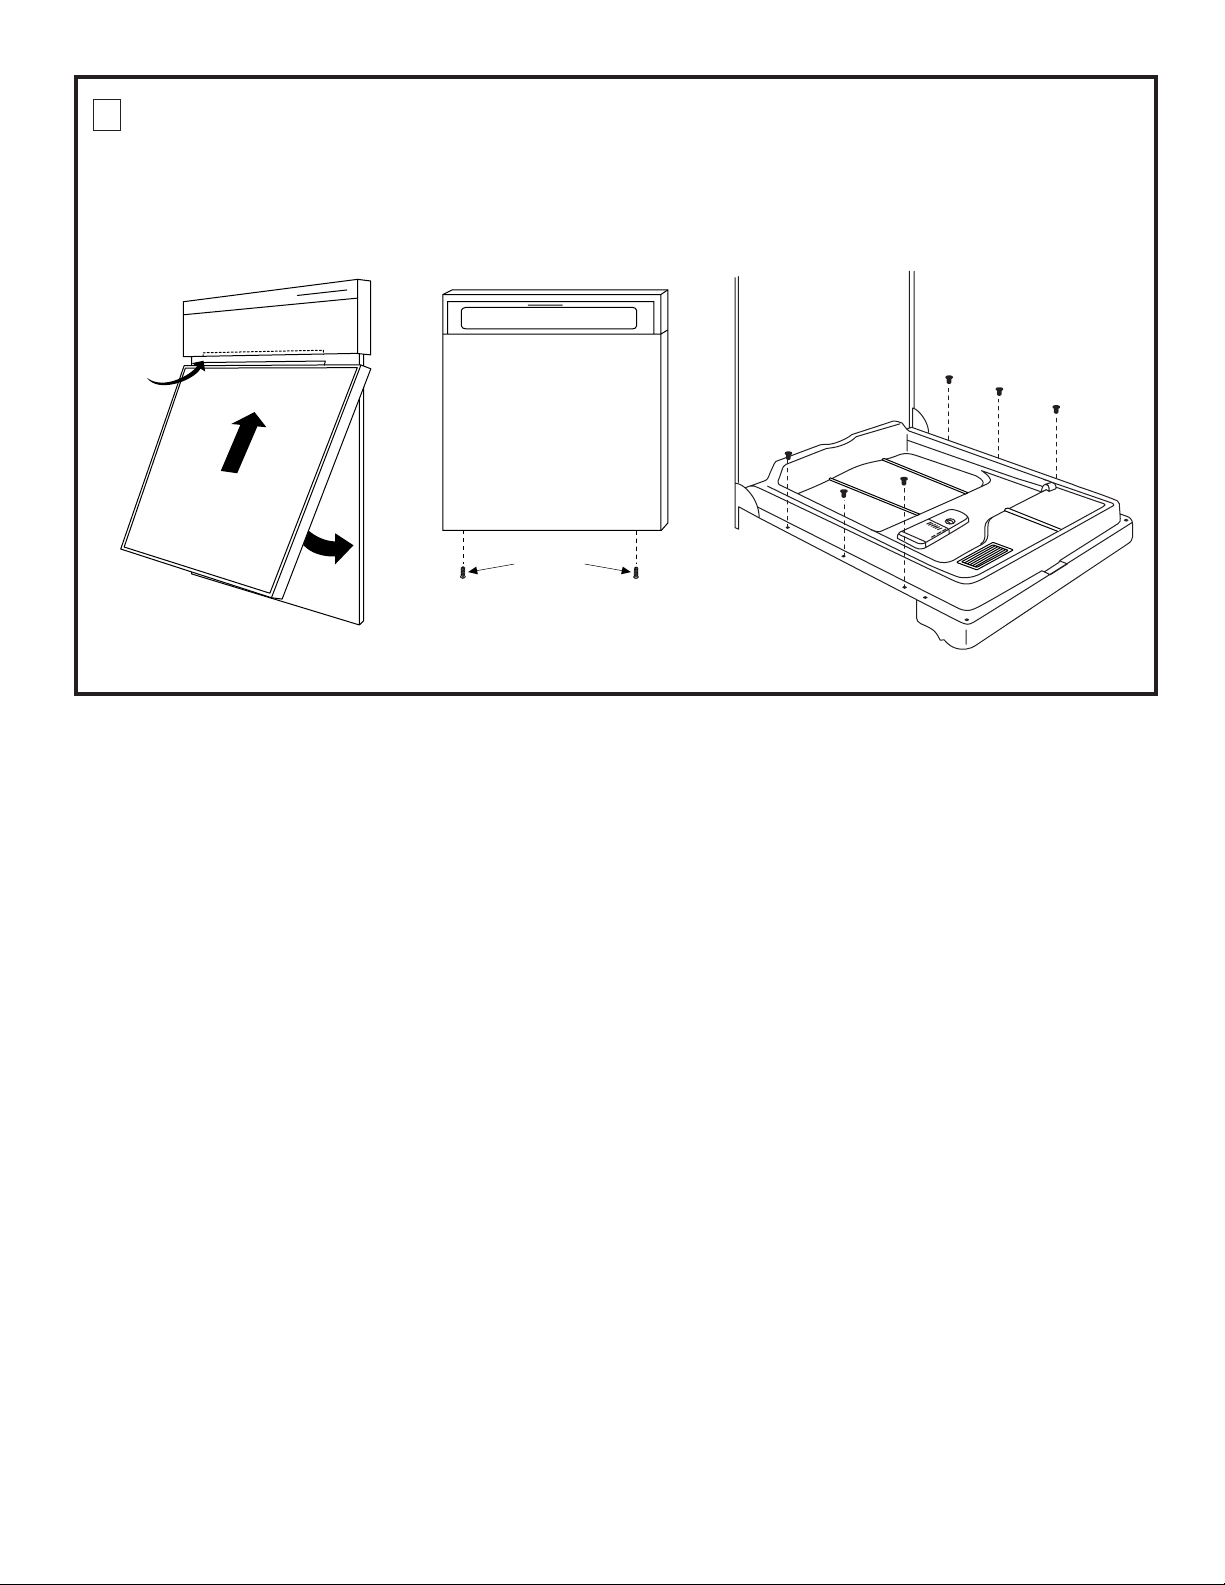
2 INSTALL THE ASSEMBLED PANEL
• Slide the panel assembly into the escutcheon
slot (Figure 3).
• Reinstall the two original screws at the
bottom of the door to hold the assembly to
the hinge arms (Figure 4).
• Open the dishwasher door and reinstall the
original 6 Phillips head screws to hold the inner
door to the trim kit assembly (Figure 5).
Pub. No. 31-30563 SPECIFICATIONS SUBJECT TO CHANGE WITHOUT NOTICE. DWG. NO. 206C1559P103
N.D. 923-18 (3/04)
Escutcheon
Escutcheon
Slot
Bottom
Phillips Screws
1 RETIRE EL PANEL DE PUERTA
• Abra la puerta del lavavajillas.
• Saque los 6 tornillos Phillips de los
costados de la puerta (Figura 1) mientras
sujeta la puerta interior al panel exterior.
Conserve los tornillos. Cierre la puerta.
Continued on back of page
JUEGOS DE REEMPLAZO DE PUERTA
WD35X10039/GPF610B/WD31X10053–Juego de panel de puerta plana/negra
WD35X10040/GPF610W/WD31X10054–Juego de panel de puerta plana/blanca
WD35X10041/GPF610C/WD31X10055–Juego de panel de puerta plana/esmaltada
WD35X10042/GPF610S/WD31X10062–Juego de panel de puerta plana/inoxidable
WD35X10043/GPF710B/WD31X10063–Juego de panel de puerta curva/negra
WD35X10044/GPF710W/WD31X10061–Juego de panel de puerta curva/blanca
WD35X10045/GPF710C/WD31X10064–Juego de panel de puerta curva/esmaltada
WD35X10046/GPF710S/WD31X10060–Juego de panel de puerta curva/inoxidable
PRECAUCIÓN
En instalaciones nuevas, no retire la base de
madera hasta que vaya a instalar el
lavavajillas. El lavavajillas se volteará al abrir
la puerta.
• Retire los dos tornillos que están en la parte
inferior del panel de puerta (Figura 2).
Deslice el panel de puerta aproximadamente
1/2 pulg. (12 mm) hacia abajo. Conserve los
tornillos.
• Retire el panel de puerta.
Los juegos indicados arriba permiten la
instalación de un panel de puerta de
reemplazo.
HERRAMIENTAS Y MATERIALES
REQUERIDOS:
• Guantes para protegerse de bordes afilados
• Destornillador en cruz (Phillips) ancho
EL JUEGO INCLUYE:
• Panel de puerta
• Instrucciones de instalación
Figura 1
Figura 2
Instrucciones
de
instalación
ANTES DE COMENZAR
Lea cuidadosamente todas estas
instrucciones.
IMPORTANTE: Conserve estas
instrucciones para uso del inspector local.
IMPORTANTE: Observe todos los
códigos y reglamentos vigentes.
Nota para el instalador: Asegúrese de dejar
estas instrucciones con el consumidor.
Nota para el consumidor: Conserve estas
instrucciones junto con el Manual del
propietario para futura referencia.
ADVERTENCIA:
Antes de cambiar los paneles, desconecte
el suministro de electricidad al lavavajillas
para prevenir el peligro de electrocución.
No use el lavavajillas mientras cambia los
paneles ni al retirar el conjunto del panel de
acceso inferior.
PARE
Tornillos
Phillips inferiores
2 INSTALE EL PANEL ARMADO
• Deslice el conjunto del panel dentro de la
ranura de la lámina (Figura 3).
• Vuelva a atornillar los dos tornillos originales
en la parte inferior de la puerta para sujetar el
conjunto a los brazos articulados (Figura 4).
• Abra la puerta del lavavajillas y vuelva a
atornillar los 6 tornillos Phillips originales para
sujetar la puerta interior al conjunto de
molduras (Figura 5).
Pub. No. 31-30563 ESPECIFICACIONES SUJETAS A CAMBIO SIN PREVIO AVISO DWG. NO. 206C1559P103
N.D. 923-18 (3/04)
Figura 3
Figura 4
Figura 5
Lámina
Ranura de
la lámina
Tornillos
Phillips inferiores

