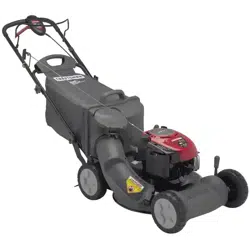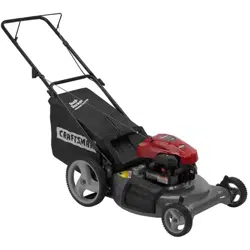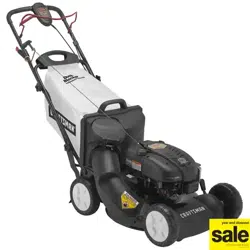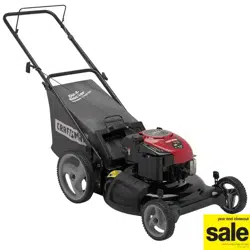

Owner's Manual
[RRFTSMRN°
5.5 HO
21" LTi=CUT
ROTARY LAWN MOWER
_ Model No.
917.388320
, Safety
• Assembly
° Operation
o Maintenance
o EspaSol
° Repair Parts
CAUTION:
Read and follow all
Safety Rules and instructions
before operating this equipment
Sears, Roebuck and Co., Hoffman Estates, IL 60179
Visit our Craftsman website: www.sears.com/craftsman
Warranty 2 Product Specifications 11
Safety Rules 2 Service and Adjustments 13
Assembly 4 Storage 14
Operation 6 Troubleshooting 15
Maintenance Schedule 10 Repair Parts 34
Maintenance 10 Parts Ordering Back Cover
LIMITED TWO YEAR WARRANTY ON CRAFTSMAN POWER MOVVER
For two years from date of purchase, when this Craftsman Lawn Mower is maintained,
lubricated, and tuned up according to the operating and maintenance instructions in
the owner's manual, Sears will repair free of charge any defect in material or workman-
ship.
if this Craftsman Lawn Mower is used for commercial or rental purposes, this warranty
applies for only 90 days from the date of purchase_
This Warranty does not cover:
° Expendable items which become worn during normal use, such as rotary mower
blades, blade adapters, belts, air cleaners and spark plug.
o Repairs necessary because of operator abuse or negligence, including bent
crankshafts and the failure to maintain the equipment according to the instructions
contained in the owner's manual.
Warranty service is available by returning the Craftsman power mower to the nearest
Sears Service Center/Department in the United States. This warranty applies only
while this product is in use in the United States.
This Warranty gives you specific legal rights, and you may also have other rights which
vary from state to state.
SEARS, ROEBUCKAND CO., D/817 WA, HOFFMAN ESTATES, ILLINOIS 60179
Safety standards require operator
presence control to minimize the risk of
injury. Your unit is equipped with cuch
controls, do not attempt to defeat the
function of the operator presence controls
under any circumstances.
TRAINING:
° Read this operator's manual carefully.
Become familiar with the controls and
know how to operate your mower
properly. Learn how to quickly stop
mower.
• Do not allow children to use your
mower. Never allow adults to use
mower without proper instructions.
o Keep the area of operation clear of all
persons, especially small children and
pets.
• Use mower only as the manufacturer
intended and as described in this
manual.
° Do not operate mower if it has been
dropped or damaged in any manner.
Always have damage _epaired before
using your mower.
• Do not use accessory attachments that
are not recommended by the manufac-
turer. Use of such attachments may be
hazardous°
° The blade turns when the engine is
running.
PREPARATION:
° Always thoroughly check the area to be
mowed and clear it of all stones, sticks,
wires, bones, and other foreign objects.
These objects wilt be thrown by the
blade and can cause severe injury.
o Always wear safety glasses or eye
shields when starting and while using
your mower,
Dress properly. Do not operate mower
when barefoot or wearing open
°
2
sandals. Wear onlysolidshoeswith
goodtraction when mowing.
o Checkfuel tank beforestarting engine°
Do not fill gastank indoors,whenthe
engine is runningor whenthe engineis
hot. Allow the engineto coolfor several
minutesbeforefilling the gastank.
Clean off any spilled gasolinebefore
startingthe engine.
o Always makewheel heightadjustments
beforestarting your mower. Never
attemptto dothis whilethe engineis
running.
• Mow only in daylightor good artificial
light.
OPERATION:
o Keepyour eyes and mindon your
mowerandthe areabeing cut. Do not
letother interestsdistractyou.
° Do not mowwet orslipperygrass.
Never run while operatingyour mower°
Alwaysbe sureof your footing- keepa
firm holdon the handlesand walk.
° Do not puthandsorfeet nearor under
rotatingparts. Keepclearof the
dischargeopeningat alL-times.
° Always stop the enginewheneveryou
leaveor are notusing your mower,or
before crossing driveways,walks,
roads, and any gravel-coveredareas.
o Never directdischargeof material
toward bystandersnor allow anyone
near the mowerwhile you are operating
it.
• Beforecleaning, inspecting,or repair-
ing your mower,stopthe engineand
make absolutelysure the blade and all
movingpartshave stopped. Then
disconnectthe spark plugwire and
keepit awayfromthe sparkplugto
preventaccidentalstarting.
o Do notcontinueto runyour mowerif
you hita foreignobject. Followthe
procedureoutlined above,then repair
any damagebefore restartingand
operatingyour mower°
° Do notchange thegovernorsettings or
overspeedthe engine. Engine damage
or personalinjury mayresult.
° Do notoperateyour mowerif it vibrates
abnormally. Excessivevibration is an
indicationof damage; stopthe engine,
safely checkfor the causeof vibration
and repair as required.
° Do not run the engineindoors. Exhaust
fumes are dangerous.
• Nevercut grassby pullingthe mower
towardsyou. Mowacrosstheface of
slopes, neverup anddownoryou
mightloseyour footing. Donot mow
excessivelysteepslopes. Usecaution
when operatingthe moweron uneven
terrain or when changingdirections-
maintaingood footing.
° Neveroperateyour mowerwithout
properguards,plates, grasscatcheror
othersafety devicesin place.
MAINTENANCE AND STORAGE:
• Check the blade and the engine
mounting bolts often to be sure they are
tightened properly.
° Check all bolts, nuts and screws at
frequent inten_als for proper tightness to
be sure mower is in safe working
condition.
° Keep all safety devices in place and
working.
° To reduce fire hazard, keep the engine
free of grass, leaves or excessive
grease and oil.
° Check grass catcher often for deteriora-
tion and wear and replace worn bags.
Use only replacement bags that are
recommended by and comply with
specifications of the manufacturer of
your mower.
• Alwa_,s keep a sharp blade on your
....mower.
• Allow engine to cool before storing in
any enclosure.
° Never store mower with fuel in the tank
inside a building where fumes may
reach an open flame or an ignition
source such as a hot water heater,
space heater, clothes dryer, etc.
Look for this symbol to point out important
safety precautions. It means CAUTION!!!
BECOMEALERT!!! YOUR SAFETY IS
INVOLVED.
p_ugCAUTiON: Always disconnect spark
wire and place wire where it cannot
contact spark plug in order to prevent
accidental starting when setting up,
transporting, adjusting or making repairs.
WARNING: The engine exhaust from
product contains chemicals known to
the State of California to cause cancer,
birth defects, or other reproductive harm.
3
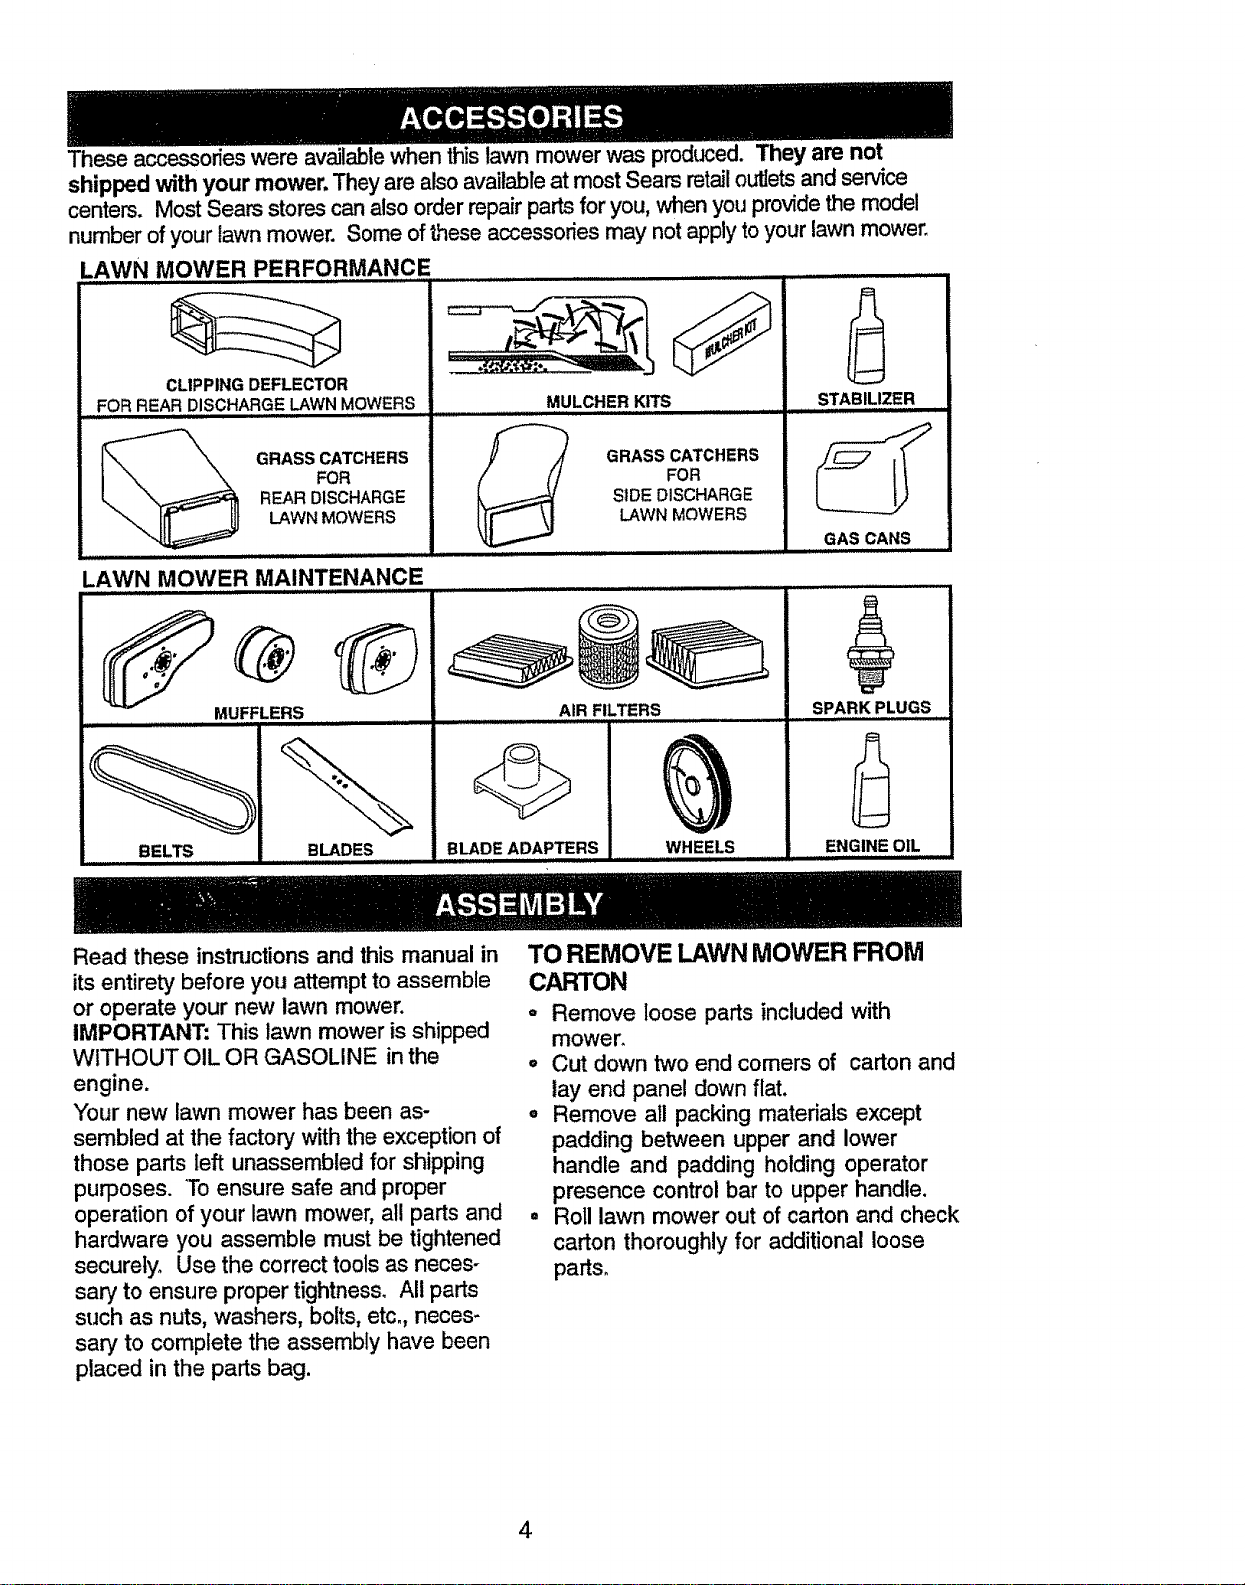
Theseaccessorieswereavailablewhenthislawnmowerwasproduced.They are not
shipped with your mower. They are also available at most Sears retail outlets and se_ce
centers. Most Sears stores can also order repair parts for you, when you provide the model
number of your lawn mower. Some of these accessories may not apply to your lawn mower_
LAWN ,MO,WER PERFORMANCE
CLIPPING DEFLECTOR
FOR REAR D!SCHARGE LAWN MOWERS
GRASS CATCHERS
FOR
REAR DISCHARGE
LAWN MOWERS
J,,, ,,,,,....
MULCHER KITS
ii iiiiiiii III IIIIIIIJ III
GRASS CATCHERS
FOR
SIDE DISCHARGE
LAWN MOWERS
.AWN MOWER MAINTENANCE , ...................
STABILIZER
GAS CANS
.............. ill ill
MUFFLERS
BELTS BLADES
BLADE ADAPTERS
AIR FILTERS
WHEELS
SPARKPLUGS
ENGINE OIL
Read these instructions and this manual in
its entirety before you attempt to assemble
or operate your new lawn mower.
IMPORTANT: This lawn mower is shipped
WITHOUT OIL OR GASOLINE in the
engine.
Your new lawn mower has been as-
sembled at the factory with the exception of
those parts left unassembled for shipping
purposes. To ensure safe and proper
operation of your lawn mower, all parts and
hardware you assemble must be tightened
securely° Use the correct tools as neceso
san] to ensure proper tightness. All parts
such as nuts, washers, bolts, etc. neces-
san] to complete the assembly have been
placed in the parts bag.
TO REMOVE LAWN MOWER FROM
CARTON
o Remove loose parts included with
mower.
o Cut down two end comers of carton and
lay end panel down flat.
° Remove all packing materials except
padding between upper and lower
handle and padding holding operator
presence control bar to upper handle.
. Roll lawn mower out of carton and check
carton thoroughly for additional loose
parts_
4
HOW TO SET UP YOUR LAWN
MOWER
TO UNFOLD HANDLE
o
IMPORTANT: Unfold handle carefully so
as not to pinch or damage control cables.
o Raise lower handle section to operating
position and squeeze the bottom ends
of lower handle towards each other
until the pin in handle can be inserted
into one of the three height adjustment
holes.
Remove protective padding, raise
upper handle section into place on
lower handle and tighten both handle
knobs.
,, Remove any packing material from
around control bar.
= Your handles may be adjusted for your
mowing comfort. Refer to Service and
Adjustments section of this manual.
Operator
presence
control bar
Upper
handle
Lift up
Lower
handle
up
Mowing
position
TO INSTALL ATTACHMENTS
Your lawn mower was shipped ready to
be used as a mulcher. To convert to
bagging or discharging, see '9-oconvert
mower" in the OPERATION section of this
manual_
5
KNOWYOURLAWNMOWER
READ THIS OWNER'S M_NUALAND SAFETY RULES BEFORE OPERATING'/OUR LAWN
MOWER, Compare the illustrations with your lawn mower to familiarize yourself with the
!_tion 0f various contro_ and adjustments. Save _is,m_ual for future reference.
These symbols may appear on your lawn mower or in literature supplied with the
product. Learn and understand their meaning.
CAUTION ENGINE ENGINE FAST SLOW CHOKE FUEL OIL DANGER, KEEP HANDS
OR WARNING ON OFF AND FEET AWAY
J ,, ,,, ,,,,,u,H iii UUlUU'UI'UUU','JL_,'_,_..,, ,_,
Throttle/choke
control
Operator presence control
bar
Starter
Engine zone control cable
Handle knob
Grass
filler cap
valve
Engine oil cap
with dipstick J
Mulcher door Lawn mower housing
IMPORTANT; This lawn mower is shipped
WITHOUT OIL OR GASOLINE in the Wheel adjuster
engine, (on each wheel)
MEETS CPSC SAFETY REQUIREMENTS
Sears rotary walk-behind power lawn mowers conform to the safety standards of the American
National Standards Institute and the U,S° Consumer Product Safety Commission. The blade
tums when the engine is running,
Operator Presence Control Bar- must be Primer- pumps additional fuel from the
held down to the handle to start the engine, carburetor to the cylinder for use when
Release to stop the engine, starting a cold engine.
Starter Handle - used for starting the engine,
6
The operation of any lawn mower can result
in foreign objects thrown into the eyes, which
can result in severe eye damage. Always
wear safety glasses or eye shields while
operating your lawn mower or performing any
adjustments or repairs° We recommend a
wide vision safety mask over spectacles or
standard safety glasses.
HOWTO USEYOUR LAWN MOWER
ENGINE SPEED
The engine speed is controlled by a
throttle control located on the side of the
upper handle. Choke position is for
starting a cold engine and fast position is
for normal cutting, trimming, and better
grass bagging. Slow position is for light
cutting, trimming and fuel economy.
Fast
_ Slow
Choke 1\I ,:-',
,_";;
ENGINE ZONE CONTROL
&CAUTION: Federal regulations
require an engine control to be installed
on this lawn mower in order to minimize
the risk of blade contact injury. Do not
under any circumstances attempt to
defeat the function of the operator control.
The blade turns when the engine is
running.
, "Yourlawn mower is equipped with an
operator presence control bar which
requires the operator to be positioned
behind the lawn mower handle to start and
operate the lawn mower.
TO ADJUST CUTTING HEIGHT
- Raise wheels for low CLrtand lower wheels
for high cut.
• Adjust cutting height to suit your require-
ments. Medium position is best for most
lawns.
• To change cutting height, squeeze adjuster
lever toward wheel. Move wheel up or
down to suit your requirements. Be sure all
wheels are in the same setting.
NOTE: Adjuster is propedy positioned when
plate tab inserts into hole in lever. Also, 9-
position adjusters (if so equipped) allow lever
to be positioned between the plate tabs.
Lower Wheels for High Cut
Lever
Raise Wheels for Low Cut
TO CONVERT MOWER
Your lawn mower was shipped ready to be
used as a mulcher. To convert to bagging or
discharging:
REAR BAGGING
° Lift rear door of the lawn mower and place
the grass catcher frame hooks onto the
door pivot pins.
, To convert to mulching or discharging
operation, remove grass catcher and close
rear door.
Pivot pins
SIDE DISCHARGING
° Rear door must be dosed.
• Open mulcher door and install discharge
deflector under guard as shown.
° Mower is now ready for discharging
operation.
° To convert to mulching or bagging
operation, discharge deflector must be
removed and mulcher door must be
closed.
SIMPLE STEPS TO REMEMBER
WHEN CONVERTING YOUR LAWN
MOWER
FOR MULCHING -
° Rear door closed.
o Mulcher door dosed.
FOR REAR BAGGING-
° Grass catcher installed.
• Mulcher door closed.
FOR SIDE DISCHARGING -
• Rear door dosed.
o Side discharge deflector installed.
CAUTION: Do not runyour lawn mower
out rear door closed or approved grass
catcher in place. Never attempt to operate the
lawn mower with the rear door removed or
propped open.
7
\
Open
Mulcher Door
Mulcher
door
Discharge
deflector
GAS
,, Fill fuel tank. Use fresh, clean, regular
unleaded gasoline with a minimum of
87 octane. Do not mix oil with gasoline.
Purchase fuel in quantities that can be
used within 30 days to assure fuel
freshness.
a_coWARNING: Experience indicates that
hot blended fuels (called gasohot or
using ethanol or methanol) can attract
moisture which leads to separation and
formation of acids during storage. Acidic
gas can damage the fuel system of an
engine while in storage. To avoid engine
problems, the fuel system should be
emptied before storage of 30 days or
longer. Drain the fuel tank, start the
engine and let it run until fuet lines and
carburetor are empty. Use fresh fuel next
season. See Storage Instructions for
additional information. Never use engine
or carburetor cleaner products in fuel tank
or permanent damage may occur.
:Gasoline filler cap
BEFORE STARTING ENGINE
OIL
Your lawn mower is shipped without oil
in the engine.
• Be sure mower is level and area
around oil fill is clean.
• Remove engine oil cap and fill to the
upper limit mark on dipstick.
NOTE: Allow oil to settle down into
engine for accurate dipstick reading.
• Engine holds 18 1/2 ozs. of oil. For
type and grade of oil to use, see
"ENGINE" in Maintenance section of
this manual.
o Pour oil slowly. Do not over fill.
• Check oil level before each use. Add
oil if needed. Fill to the upper limit mark
on dipstick.
• To read proper level, insert the dipstick
into the tube and rest engine oil cap on
the tube. Do pot thread the cap onto
the tube. Remove and read the oil
level.
o Reinstall engine oil cap and tighten.
• Change the oil after ever,./25 hours of
operation or each season. You may
need to change the oil more often
under dusty, dirty conditions_
Oil filler
cap
Oil filler cap/dipstick
8
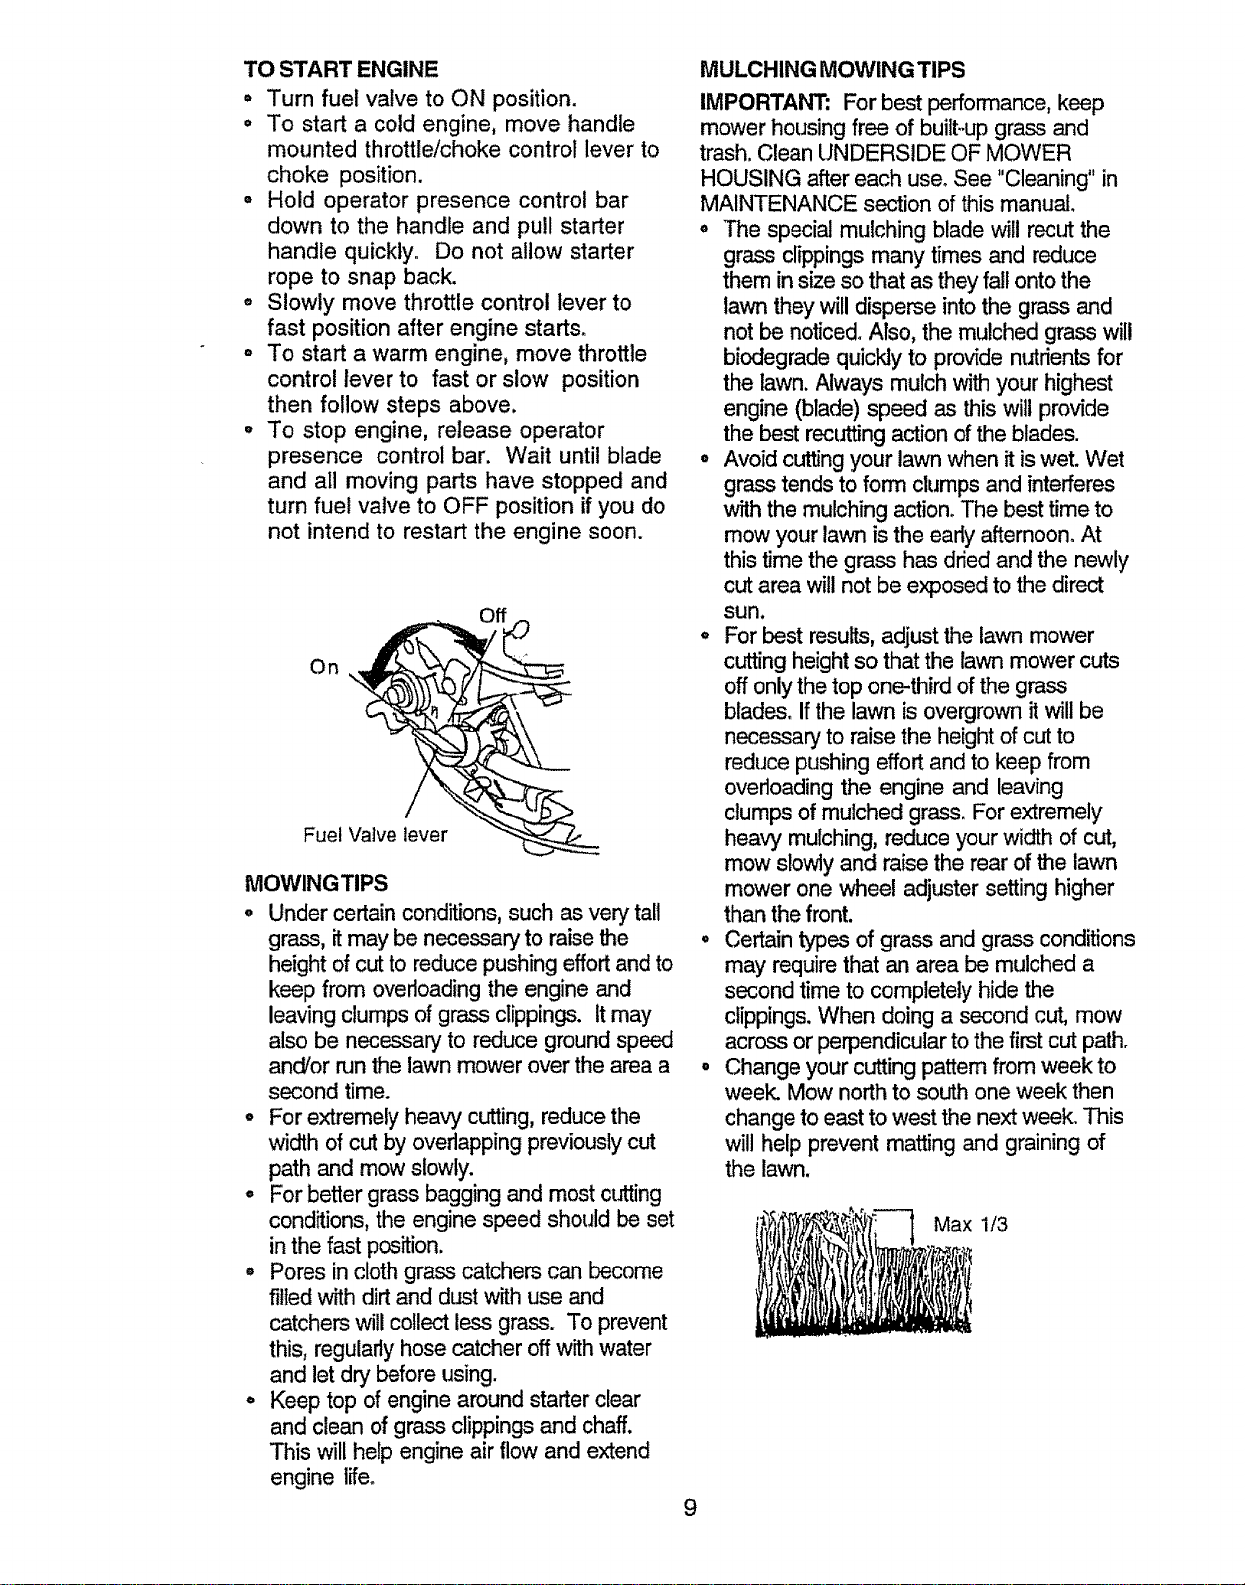
TO START ENGINE
= Turn fuel valve to ON position.
° To start a cold engine, move handle
mounted throttle/choke control lever to
choke position.
o Hold operator presence control bar
down to the handle and pull starter
handle quickly. Do not allow starter
rope to snap back.
o Slowly move throttle control lever to
fast position after engine starts.
= To start a warm engine, move throttle
control lever to fast or slow position
then follow steps above.
• To stop engine, release operator
presence control bar. Wait until blade
and all moving parts have stopped and
turn fuel valve to OFF position if you do
not intend to restart the engine soon.
OI3
Fuel Valve lever
MOWINGTIPS
• Under certain conditions, such as very tall
grass, it may be necessary to raise the
height of cut to reduce pushing effort and to
keep from overloading the engine and
leaving clumps of grass clippings, it may
also be necessary to reduce ground speed
and/or runthe lawn mower over the area a
second time.
• For extremely heavy cutting, reduce the
width of cut by overlapping previously cut
path and mow slowly.
° For better grass bagging and most cutting
conditions, the engine speed should be set
in the fast position.
° Pores in cloth grass catchers can become
fitled with dirt and dust withuse and
catchers will collect less grass. To prevent
this, regularly hose catcher off with water
and let dry before using.
° Keep top of engine around starter clear
and clean of grass clippings and chaff.
This will help engine air flow and extend
engine life.
MULCHING MOWING TIPS
IMPORTANT; For best performance, keep
mower housing free of built-up grass and
trash. Clean UNDERSIDE OF MOWER
HOUSING after each use° See "Cleaning" in
MAINTENANCE section of this manual.
, The special mulching blade will recut the
grass clippings many times and reduce
them in size so that as they fall onto the
lawn they will disperse into the grass and
not be noticed. Also, the mulched grass will
biodegrade quickly to provide nutrients for
the lawn. Always mulch w?[hyour highest
engine (blade) speed as this will provide
the best recutting action of the blades.
° Avoid cutting your lawn when it iswet. Wet
grass tends to form clumps and interferes
with the mulching action. The best time to
mow your lawn is the early afternoon. At
this time the grass has dried and the newly
cut area will not be exposed to the direct
sun.
, For best results, adjust the lawn mower
cutting height so that the lawn mower cuts
off only the top one-third of the grass
blades. If the lawn is overgrown it will be
necessary to raise the height of cut to
reduce pushing effort and to keep from
overloading the engine and leaving
clumps of mulched grass. For extremely
heavy mulching, reduce your width of cut,
mow slowly and raise the rear of the lawn
mower one wheel adjuster setting higher
than the front.
• Certain types of grass and grass conditions
may require that an area be mulched a
second time to completely hide the
clippings. When doing a second cut, mow
across or perpendicular to the first cut path.
• Change your cutting pattern from week to
weeP,.Mow north to south one week then
change to east to west the next week. This
will help prevent matting and graining of
the lawn.
Max I/3
9
MAINTENANCE SCHEDULE
FILL IN DATES
ASYOU COMPLETE
REGULAR SERVICE
Checkfor Loose,.Fasteners
Clean/InspectGrassCatcher
(if Equipped) _ q_'
iM .cZeanLawnMower ...........
iO Clean UnderDdve Cover
(Power-PropelledMowers) 1_' ...........
W Checkdrive belt/pulleys
(P0wer_PropelledMowers) t_'
, , ii --- = , ,
iR CheckJSharpenlRePtace Blade .......... _3
LubricationChart ........................... b#'
,,,,,,,.....................
CleanBatterj/Rechar!e
(Electric Start,Mowers I_
E CheckEngineOil Level ........................._ , ,
N Change EngineOil _1.2
G €iean AirFilter .................=....... , , I_' =
I Inspect Muffler
N cleaner ReplaceSpark Plug
E ReplaceAirFilterPaper Cartridge _2
t - Change more often when operating under a h_vy load orin htcjhambient temperatures°
2 - Service mere ellen when operating in dirty or dustyconditions
3 - Replace bladas more often when mowing in sandy"soil
4 - Charge 48 hours at end of season
SERVICE DATES
I
v"
v',
GENERAL RECOMMENDATIONS
The warrantyon this lawn mowerdoes not
coveritemsthat have been subjected to
operatorabuse or negligence.Toreceivefull
valuefrom the warranty,operatormust
maintain moweras instnJctedinthis manuaJ.
Some adjustments willneed to be made
periodicallyto properly maintain your unit.
All adjustmentsinthe Service and
Adjustments section of this manual shouldbe
checkedat least once each season°
° Once a year, replacethe spark plug,
replaceair filterelement and check blade
for wear. A new spark plug and dean/new
air filterelement assures properair-fuel
mixture and helps your engine run better
and lastlonger.
, Follow the maintenance schedule in this
manual.
BEFORE EACH USE
• Check engine oil level
° Check forloose fasteners.
LUBRICATION
Keep unitwell lubricated(See "LUBRICATION
CHART").,
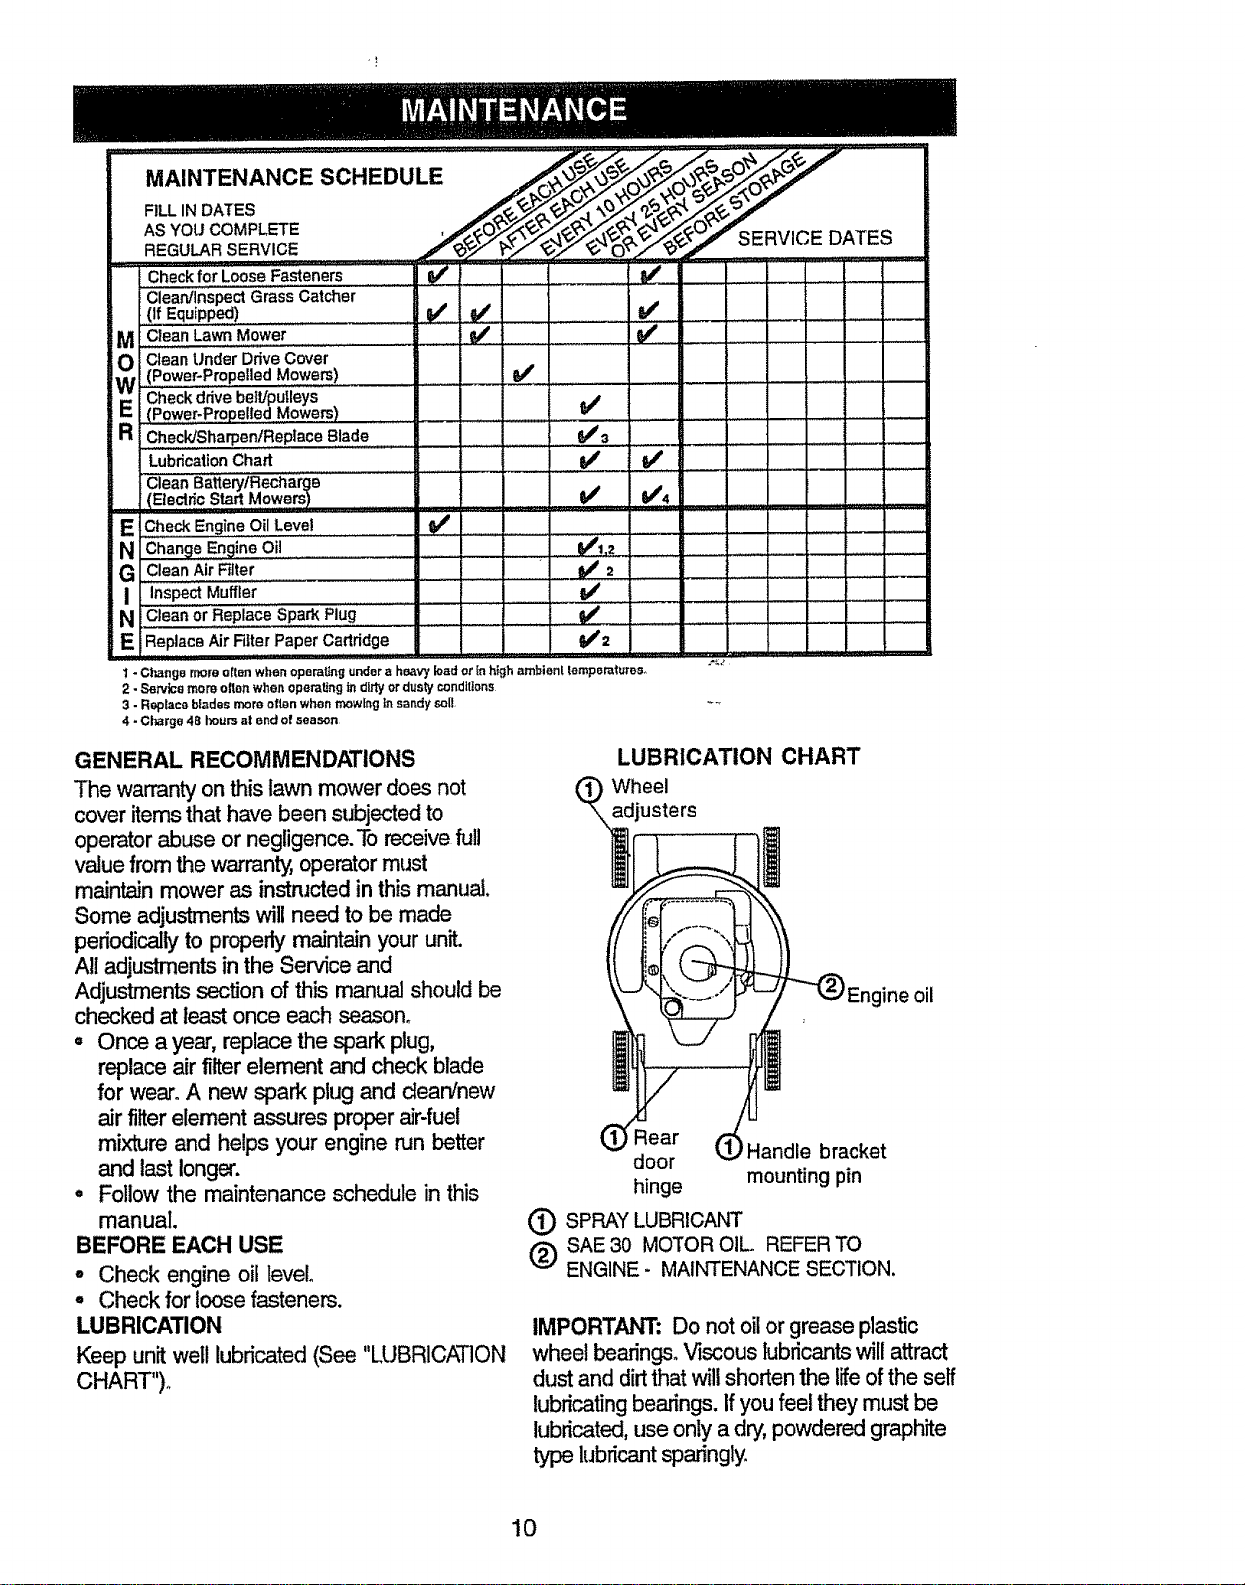
LUBRICATION CHART
Wheel
adjusters
door bracket
hinge mounting pin
(_ SPRAY LUBRICANT
(_) SAE 30 MOTOR OIL. REFER TO
ENGINE - MAINTENANCE SECTION.
IMPORTANT: Do not oil or grease plastic
wheel bearings. Viscous lubricants will attract
dust and dirt that will shorten the life of the self
lubricating bearings. If you feel they must be
lubricated, use only a dry, powdered graphite
type lubricant sparingly.
10
PRODUCT SPECiFiCATiONS
MODEL NUMBER 917,388320
SERIAL NUMBER
DATE OF PURCHASE
IHORSEPOWER: 5.5
GASOLINE CAPACITY/TYPE: 1.0 QUARTS
UNLEADED REGULAR
OILTY'PE (API-SFiSG/SH): SAE 30 (ABOVE 32°F)
SAE 5W-30 (BELOW 32°F)
OIL CAPACITY: 18.50ZS.
SPARK PLUG(GAP: _030") (NGK) BPR6ES
VALVE CLEARANCE: INTAKE: .004 - .007
EXHAUST: .006 - .009
BLADE BOLT TORQUE: 35-40 FT. LBS.
= The model and serial numbers will be found on a decal attached to the rear of the
lawn mower housing. Record both serial number and date of purchase in space
provided above.
LAWN MOWER
Always observe safety ruleswhen performing
any maintenance.
TIRES
o Keep tiresfree of gasoline, oil, or insect
controlchemicalswhich can harm rubber.
o Avoid stumps, stones, deep ruts, sharp
objects and other hazards that may cause
tire damage.
BLADE CARE
For best results, mower blade must be
kept sharp. Replace bent or damaged
blades.
TO REMOVE BLADE
° Disconnect spark plug wire from spark
plug and place wire where it cannot
come in contact with spark plug.
o Turn lawn mower on its side. Make
sure air filter and carburetor are up.
° Use a wood block between blade and
mower housing to prevent blade from
turning when removing blade bolt.
° Protect your hands with gloves and/or
wrap blade with heavy cloth°
° Remove blade bolt by turning counter-
clockwise.
• Remove blade and attaching hardware
(bolt, lock washer and hardened
washer).
NOTE: Remove the blade adapter and
check the key inside hub of blade adapter,
The key must be in good condition to work
properly. Replace adapter if damaged.
TO REPLACE BLADE
o Position the blade adapter on the
engine crankshaft. Be sure key in
adapter and crankshaft keyway are
aligned.
• Position blade on the blade adapter
aligning the two (2) holes in the blade
with the raised lugs on the adapter.
o Be sure the trailing edge of blade
(opposite sharp edge) is up toward the
engine.
• Install the blade bolt with the lock
washer and hardened washer into
blade adapter and crankshaft°
° Use block of wood between blade and
lawn mower housing and tighten the
blade bolt, turning clockwise.
o The recommended tightening torque is
35-40 ft. Ibs.
11
IMPORTANT: Blade bolt is grade 8 heat
treated.
TO SHARPEN BLADE
NOTE: We do not recommend sharpen-
ing blade - but if you do, be sure the blade
is balanced.
Care should be taken to keep the blade
balanced_ An unbalanced blade will
cause eventual damage to lawn mower or
engine.
° The blade can be sharpened with a file
or on a grinding wheel. Do not attempt
to sharpen while on the mower.
• To check blade balance, drive a nail
into a beam or wall. Leave about one
inch of the straight nail exposed. Place
center hole of blade over the head of
the nail. If blade is balanced, it should
remain in a horizontal position, tf either
end of the blade moves downward,
sharpen the heavy end until the blade
is balanced. Crank shaft
Blade keyway
Bolt Crank
Lockwasher Hardened Blade shaft
washer Trailing adapter
edge
GRASS CATCHER
• The gra._scatcher may be hosed with
water, but mt_stbe dry when used.
o Check your grass catcher often for damage
or deterioration. Through normal use itwill
wear. if catcher needs replacing, replace
only with a manufacturer approved
replacement catcher. Give the lawn mower
model number when ordering°
ENGINE
LUBRICATION
Use only high quality detergent oil rated
with API service classification SF, SH or
SG. Select the oil's SAE viscosity grade
according to your expected operating
lemperature. SAEwscosrn,G_DES
°C _30" -20" _I_0" O" 10 = 20' _0' 40'
" T_P_TURE RANGEA_iCIPATED BEFORE NEXT OIL cHANGE
NOTE: Although multi--viscosity oils
(5W30, 10W30 etc.) improve starting in
cold weather, these multi--viscosity oils
will result in increased oil consumption
when used above 32°F. Check your
engine oil level more frequently to avoid
possible engine damage from running
low on oil.
Change the oil after every 25 hours of
operation or at least once a year if the
lawn mower is not used for 25 hours in
one year.
Check the crankcase oil level before
starting the engine and after each five (5)
hours of continuous use. Tighten oil plug
securely each time you check the oil level.
TO CHANGE ENGINE OIL
NOTE: Before tipping lawn mower to
drain oil, drain fuel tank by running
engine until fuel tank is empty,
° Disconnect spark plug wire from spark
plug and place wire where it cannot
come in contact with spark plug.
° Remove engineoil cap; lay aside on a
clean surface.
° Tip lawn mower on its side as shown
and drain oil into a suitable container.
Rock lawn mower back and forth to
remove any oil trapped inside of
engine.
o Wipe off any spilled oil on lawn mower
and on side of engine.
° Fill engine with oil. Fill to the upper
limit mark on the dipstick. DO NOT
OVER FILL.
o To read proper level, insert the dipstick
into the tube and rest oil fill cap on the
tube. Do not thread the cap onto the
tube. Remove and read the oil level
° Replace engine oil cap.
° Reconnect spark plug wire to spark
plug.
Oil filler cap!dipstick
limit
Lower limit
12
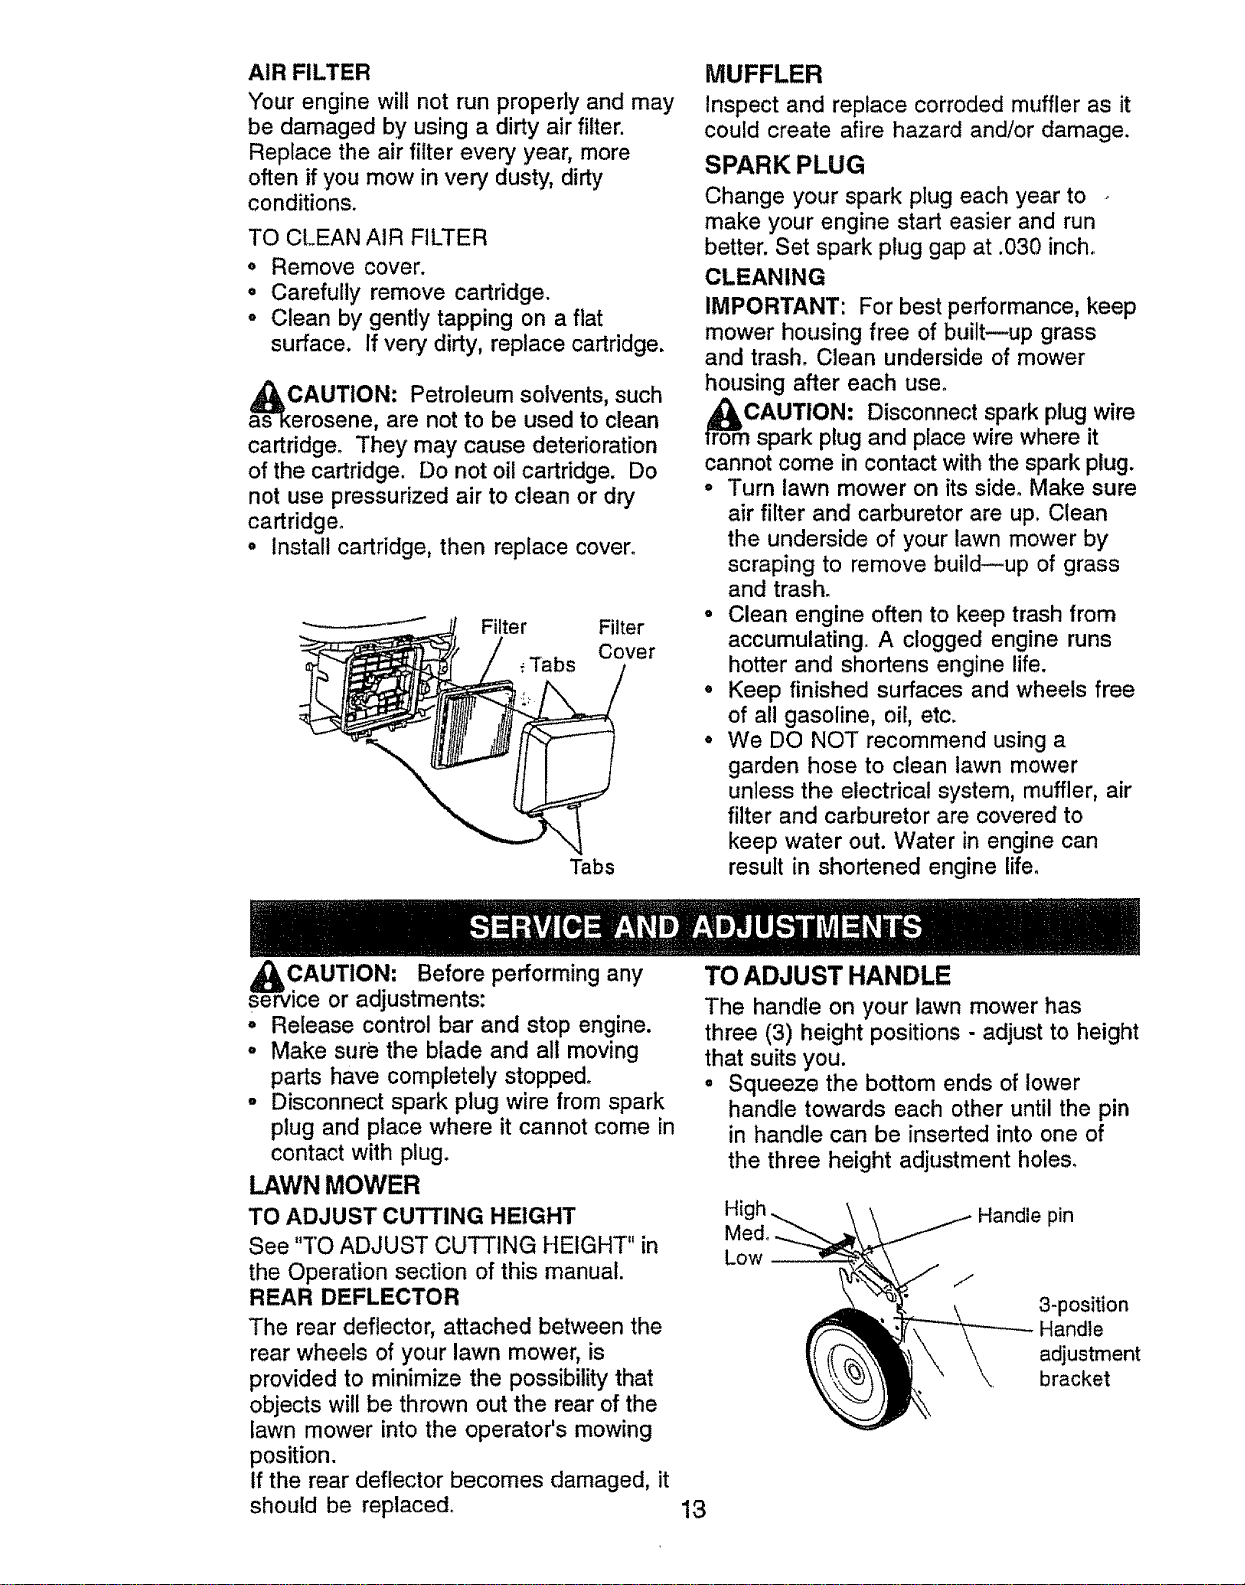
AIR FILTER
"Your engine will not run properly and may
be damaged by using a dirty air filter.
Replace the air filter every year, more
often if you mow in very dusty, dirty
conditions.
TO CLEAN AIR FILTER
• Remove cover.
° Carefully remove cartridge.
o Clean by gently tapping on a flat
surface, if very dirty, replace cartridge.
as_CAUTION: Petroleum solvents, such
erosene, are not to be used to clean
cartridge. They may cause deterioration
of the cartridge. Do not oil cartridge. Do
not use pressurized air to clean or dry
cartridge_
° Install cartridge, then replace cover.
Filter Filter
Cover
_Tabs
Tabs
MUFFLER
Inspect and replace corroded muffler as it
could create afire hazard and/or damage.
SPARK PLUG
Change your spark plug each year to
make your engine start easier and run
better. Set spark plug gap at .030 inch.
CLEANING
IMPORTANT: For best performance, keep
mower housing free of builtmup grass
and trash. Clean underside of mower
housing after each use°
r_omCAUTION: Disconnect spark plug wire
spark plug and place wire where it
cannot come in contact with the spark plug.
o Turn lawn mower on its side. Make sure
air filter and carburetor are up. Clean
the underside of your lawn mower by
scraping to remove build--up of grass
and trash.
o Clean engine often to keep trash from
accumulating. A clogged engine runs
hotter and shortens engine life.
o Keep finished surfaces and wheels free
of all gasoline, oil, etc.
• We DO NOT recommend using a
garden hose to clean lawn mower
unless the electrical system, muffler, air
filter and carburetor are covered to
keep water out. Water in engine can
result in shortened engine life.
,_CAUTION: Before performing any
service or adjustments:
° Release control bar and stop engine.
o Make sure the blade and all moving
parts have completely stopped.
- Disconnect spark plug wire from spark
plug and place where it cannot come in
contact with plug.
LAWN MOWER
TO ADJUST CUTTING HEIGHT
See "3"0 ADJUST CUTTING HEIGHT" in
the Operation section of this manual.
REAR DEFLECTOR
The rear deflector, attached between the
rear wheels of your lawn mower, is
provided to minimize the possibility that
objects will be thrown out the rear of the
lawn mower into the operator's mowing
position.
if the rear deflector becomes damaged, it
should be replaced_
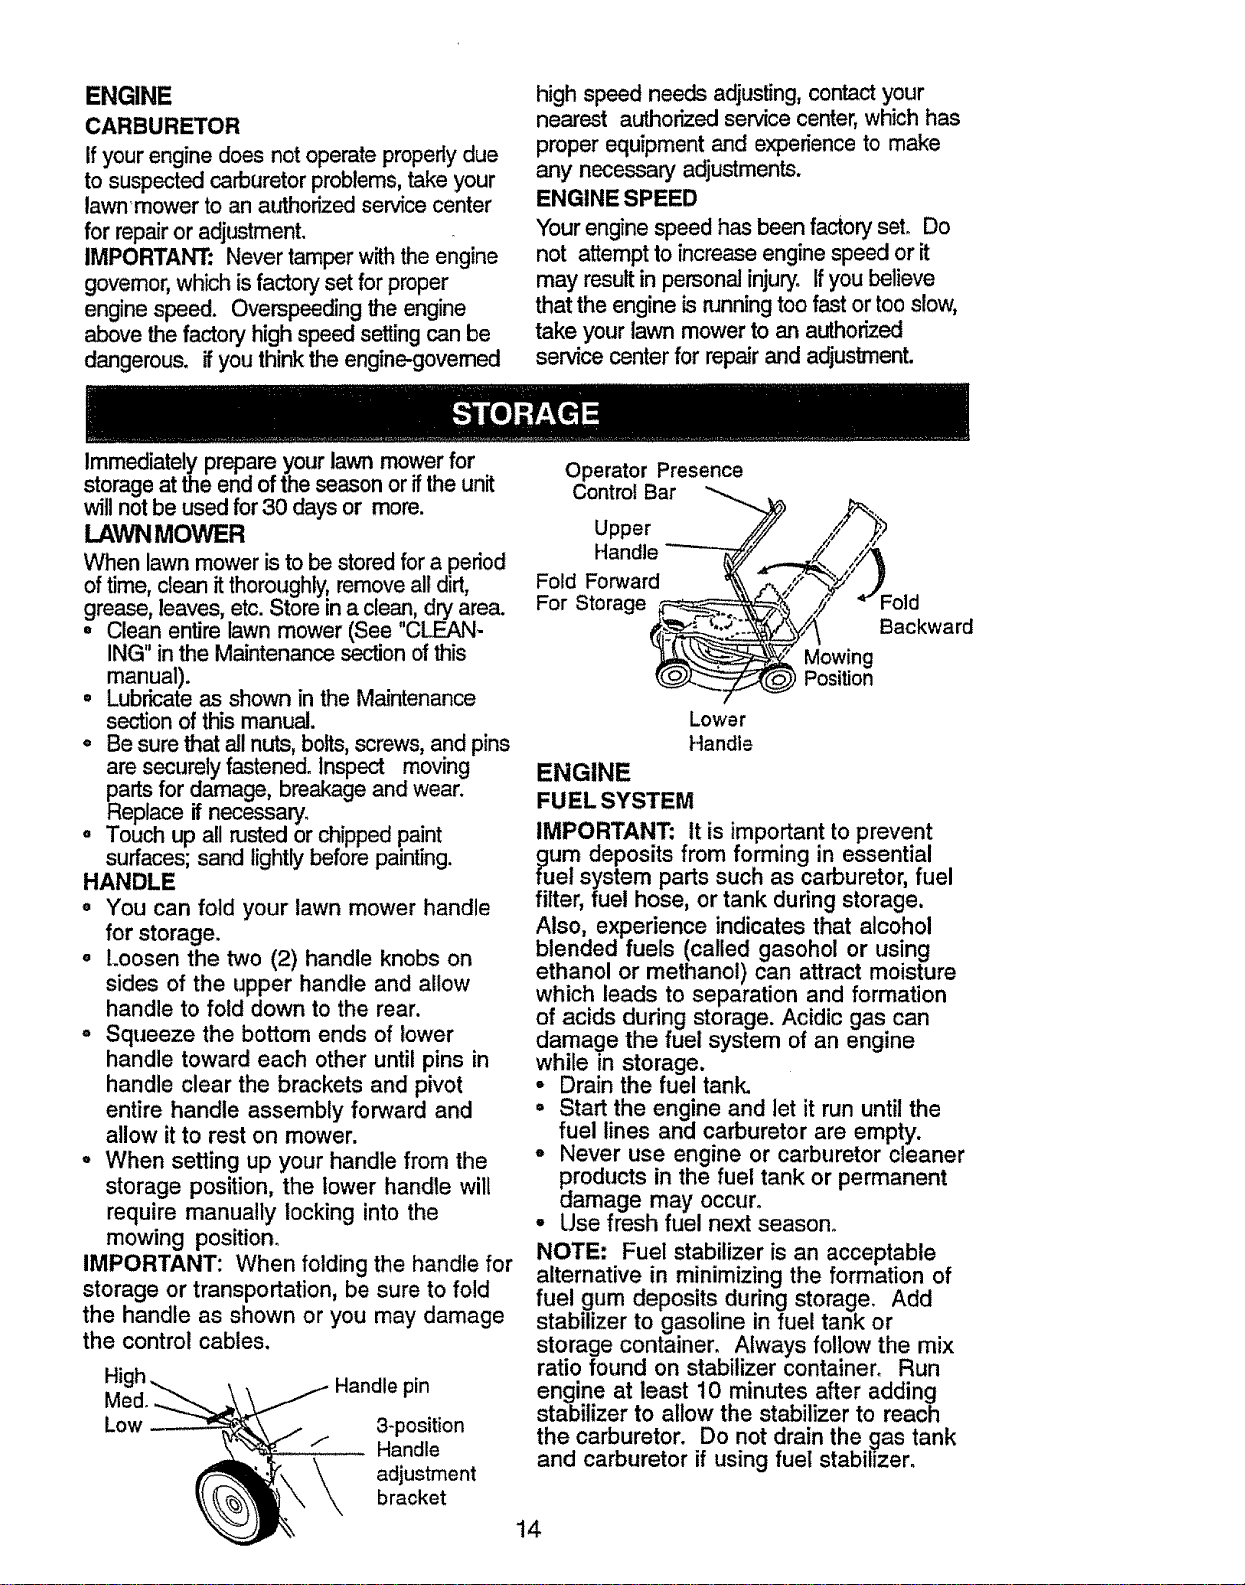
TO ADJUST HANDLE
The handle on your lawn mower has
three (3) height positions - adjust to height
that suits you.
° Squeeze the bottom ends of lower
handle towards each other until the pin
in handle can be inserted into one of
the three height adjustment holes.
Hic
M{
Low
Handle pin
J
_ 3-position
Handle
adjustment
bracket
13
ENGINE
CARBURETOR
Ifyourengine does notoperate properlydue
to suspected carburetor problems, take your
lawnrnower to an authorized service center
for repair or adjustment.
IMPORTANT: Never tamper with the engine
governor, which is factory set for proper
engine speed. Overspeeding the engine
above thefactoryhigh speed setting can be
dangerous, ifyou thinkthe engine-governed
high speed needs adjusting, contactyour
nearest authorized service center,whichhas
proper equipment and experience to make
any necessary adjustments.
ENGINE SPEED
Your enginespeed has been factory set, Do
not attempt to increase enginespeed or it
may resultin personal injury°If you believe
that the engineis runningtoo fast or too slow,
take your lawn mower to an author_zed
service center for repair and adjustment.
Immediately prepare your lawn mower for
storage at the end ofthe season or if the unit
will not be used for 30 days or more.
LAWNMOWER
When lawn mower is to be stored for a period
of time, clean it thoroughly, remove all dirt,
grease, leaves, etc. Store in a clean, dry area.
manual).
= Lubricate as shown in the Maintenance
section of this manual.
o Be sure that all nuts, bolts, screws, and pins
are securely fastened. Inspect moving
parts for damage, breakage and wear.
Replace if necessary.
° Touch up all rustedor chipped paint
surfaces; sand lightly before painting.
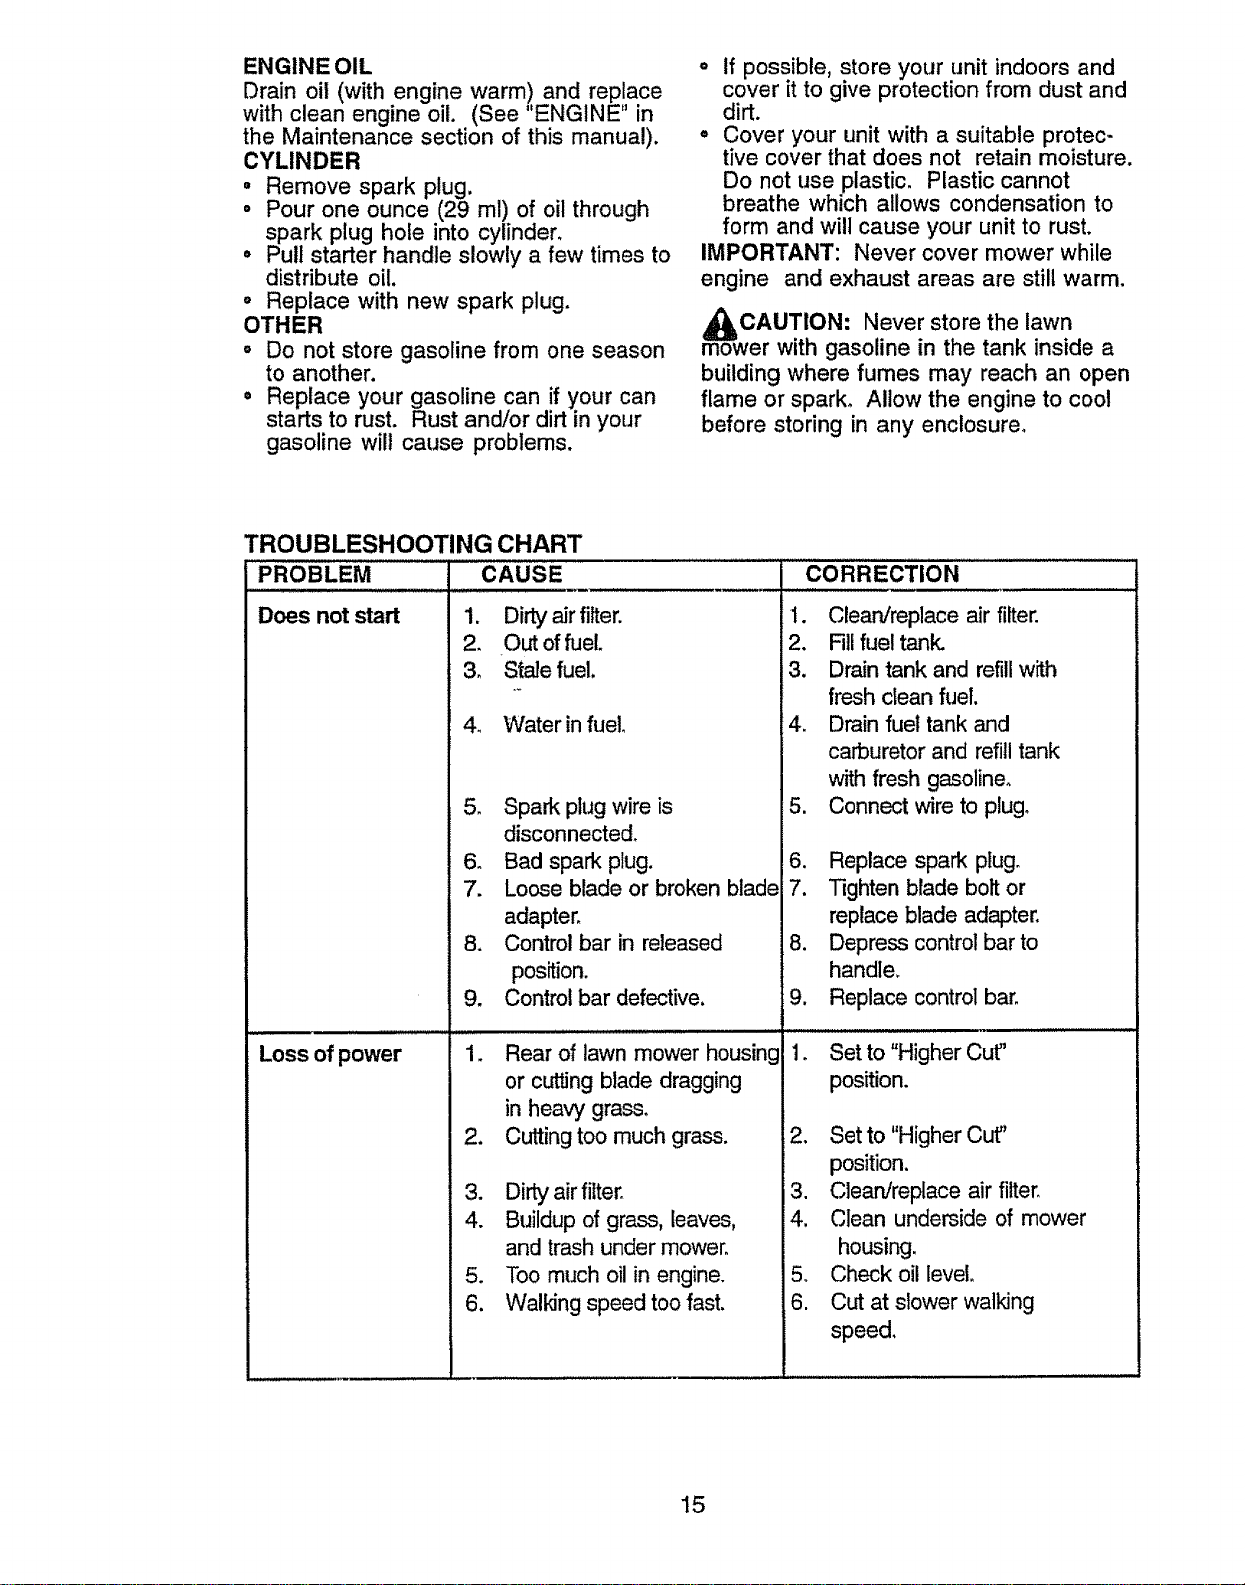
HANDLE
o You can fold your lawn mower handle
for storage.
° Loosen the two (2) handle knobs on
sides of the upper handle and allow
handle to fold down to the rear.
° Squeeze the bottom ends of lower
handle toward each other until pins in
handle clear the brackets and pivot
entire handle assembly forward and
allow it to rest on mower.
° When setting up your handle from the
storage position, the lower handle will
require manually locking into the
mowing position.
IMPORTANT: When folding the handle for
storage or transportation, be sure to fold
the handle as shown or you may damage
the control cables.
High
Handle pin
Low
3-position
Handle
adjustment
bracket
Operator Presence
Control Bar "_ .
o0 e,......
Handle _Y/,// _ ,/2"_
Fold Forward _ _;'_
For Storage_" _:' ,_" '_'Fold
Mo ing
_r.__j._ Position
Lower
Handle
ENGINE
FUEL SYSTEM
IMPORTANT: tt is important to prevent
_uUmdeposits from forming in essential
el system parts such as carburetor, fuel
filter, fuel hose, or tank during storage.
Also, experience indicates that alcohol
blended fuels (called gasohol or using
ethanol or methanol) can attract moisture
which leads to separation and formation
of acids during storage. Acidic gas can
damage the fuel system of an engine
while in storage.
= Drain the fuel tank.
= Start the engine and let it run until the
fuel lines and carburetor are empty.
o Never use engine or carburetor cleaner
products in the fuel tank or permanent
damage may occur.
° Use fresh fuel next season°
NOTE: Fuel stabilizer is an acceptable
alternative in minimizing the formation of
fuel gum deposits during storage. Add
stabilizer to gasoline in fuel tank or
storage container. Always follow the mix
ratio found on stabilizer container° Run
engine at least 10 minutes after adding
stabilizer to allow the stabilizer to reach
the carburetor. Do not drain the gas tank
and carburetor if using fuel stabilizer.
14
ENGINE OIL
Drain oil (with engine warm ! and rep!,ace
with clean engine oil. (See ENGINE in
the Maintenance section of this manual).
CYLINDER
• Remove spark plug.
° Pour one ounce (29 ml) of oil through
spark plug hole into cylinder.
• Pull starter handle slowly a few times to
distribute oil.
o Replace with new spark plug.
OTHER
, Do not store gasoline from one season
to another.
° Replace your gasoline can if rcan
starts to rust. Rust and/or dirtY'°Uyour_n
gasoline wilt cause problems.
,, If possible, store your unit indoors and
cover it to give protection from dust and
dirt.
o Cover your unit with a suitable protec-
tive cover that does not retain moisture.
Do not use plastic. Plastic cannot
breathe which allows condensation to
form and wilt cause your unit to rust,
IMPORTANT: Never cover mower while
engine and exhaust areas are still warm.
_IbCAUTION: Never store the lawn
mower with gasoline in the tank inside a
building where fumes may reach an open
flame or spark° Allow the engine to cool
before storing in any enclosure,
TROUBLESHOOTING CHART
PROBLEM CAUSE
Doesnotstart
5_
6_
Loss of power
1, Dirty airfiiter.
2, Out offuel,
3, Stale fuel.
4, Water in fuel,
Spark plug wire is
disconnected,
Bad spark plug.
CORRECTION
,,..., | J J JJJ. ,,,,,_
1. Clean/replace air filter.
2. Fill fuel tank.
3. Drain tank and refill with
fresh clean fuel.
4. Drain fuel tank and
carburetor and refill tank
with fresh gasoline,
5. Connect wire to plug,
6. Replace spark plug.
.
8.
9,
1.
Loose blade or broken blade
adapter,
Control bar in released
position.
Control bar defective.
Rear of lawn mower housing
or cutting blade dragging
7. Tighten brade bolt or
replace blade adapter.
8. Depress control bar to
handle.
9. Replace control bar.
1. Set to "Higher Cut"
position.
in heavy grass,
2. Cutting too much grass.
3. Dirty air filter.
4. Buildup of grass, leaves,
and trash under mower.
5. Too much oil in engine.
6. Walking speed too fast.
2, Set to "Higher Cut"
position.
3. Clean/replace air filter.
4. Clean underside of mower
housing,
5. Check oil level.
6. Cut at slower walking
speed,
15
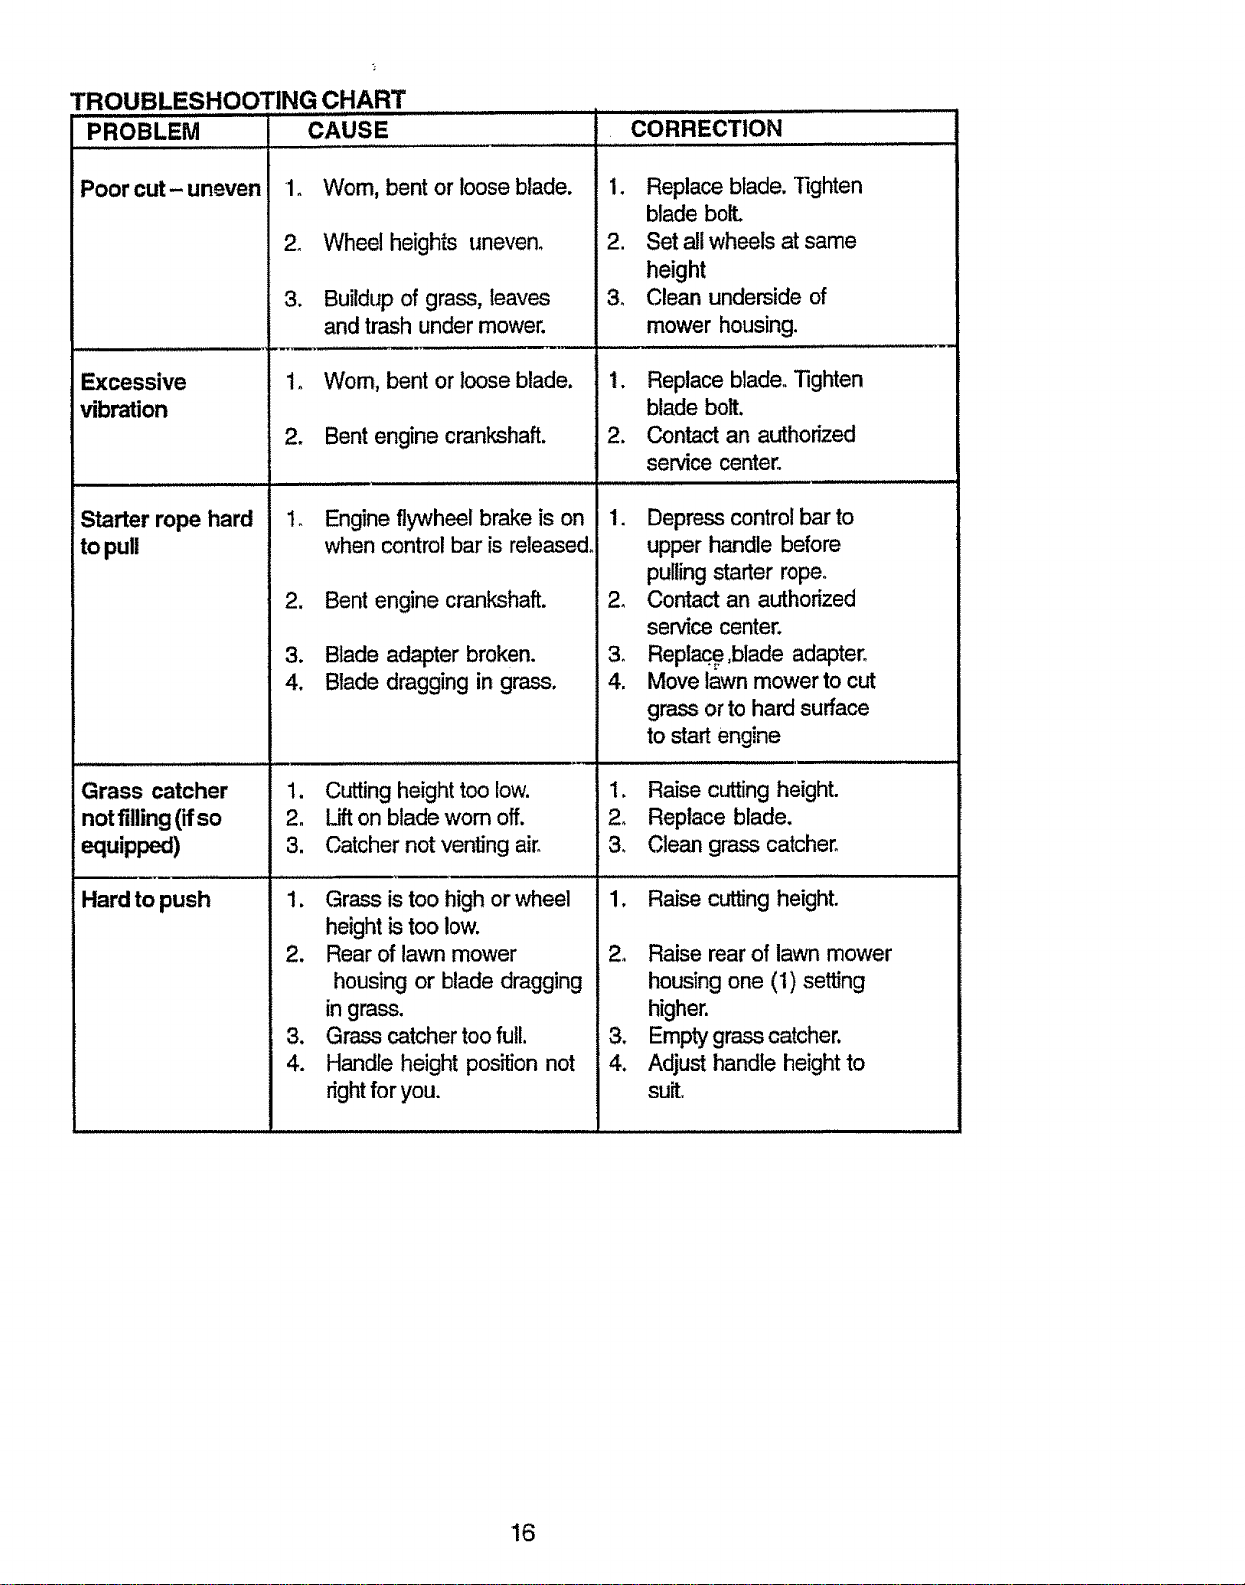
TROUBLESHOOTING CHART
ill iiill ,H,
PROB LEM CORRECTION
Poor cut- uneven
Excessive
vibration
Starter rope hard
topull
Grass catcher
notfilling (ifso
equipped)
Hard to push
i,,. ,,,, ,,,J,,
CAUSE
"1,
2_
3.
2.
2_
3.
4.
Wom, bent or loose blade.
Wheel heights uneven_
Buildup of grass, leaves
and trash under mower.
Wom, bent or loose blade,
Bent engine crankshaft,
1. Replace blade. Tighten
blade boll
2. Set all wheels at same
height
3_ Clean underside of
mower housing.
1, Replace blade. Tighten
blade bolt,
2. Contact an authorized
service center,
J i ,,,,,Hl,,I,,,,,, | I I I ,, ,, ,,.......
Engine flywheelbrake is on
when control bar is released.!
Bent engine crankshaft.
Blade adapter broken.
Blade dragging in grass,
1. Cutting height too low.
2. Lift on blade wom off.
3. Catcher not venting air°
1, Grass is too high or ,wheel
height is too low,
2. Rear of lawn mower
housing or blade dragging
in grass,
3. Grass catcher too full.
4. Handle height position not
right for you.
1. Depress controlbar to
upper handle before
pulling starter rope.
2o Contact an authorized
service center,
3, Repine,blade adapter.
4. Move lawn mower to cut
grass or to hard surface
to start engine
1, Raise cutting height.
2, Replace blade.
3, Clean grass catcher,
1. Raise cuttingheight.
2, Raise rear of lawn mower
housing one (1) setting
higher.
3, Empty grass catcher.
4, Adjust handle height to
suit.
16

Garantfa 17 Especificacfones del Producto 26
Reglas de Seguridad 17 Servicio y Adjustes 28
Montaje 19 Almacenamiento :., 30
Operaci6n 21 Identificaci6n de problemas 3'1
Mantenimiento 25 Partes de repuesto Vea el manual
Programa de Mantenimiento 25 ingles del dueSo
Orden de Partes Contratapa
GARANTfA L1MITADA DE DOS ANOS PARA LA SEGADORAA MOTOR CRAFTSMAN
Pot dos (2) a,fios, a partir de la fecha de compra, cuando esta Segadora Craftsman se mantenga,
lubrique y afine segt3n las instrucciones para la operaci6n y el mantenimiento en et manual del dueSo,
Sears repararA gratis todo defecto en el material y la mano de obra.
Si la Segadora Craftsman se usa para fines comerciales o de arriendo, esta garantfa s61ose aplica por
noventa (90) dfas a partir de la fecha de compra.
Esta Garantfa no cubre:
• Artfculos que se desgastan durante el uso normal tales como las cuchillas segadoras rotatodas, los
adaptadores de la cuchilla, las correas, los filtros de alre y fas bujfas.
, Reparaciones necesadas debido al abuso o a la negligencia del operador, incluy_ndose a los
cigQeSalesdoblados y a lafafla de mantenimiento del equipo segT3nlas ins1_Jccionesque se incluyen
en e! manual del due5oo i
EL SERVICIO DE GARANTiA ESTA DISPONIBLE al devolver la segadpra a motor Craftsman al Cen_o/
Deparlrnento de Servicio Sears mas cercano en los Estados Unidos. Esta garantfa se apiica solamente
mientras el producto este en uso en los Estados Unidoso
Esta Garantfa le otorga derechos legales especfficos, y puede que tambi_n tenga otros derechos que
vafian de estado a estado.
Sears, Roebuck and Co, D/817WA, Hoffman Estates, IL 60179 USA
Los estandrares de segur_dad exigen la presenda
del operator en los conl_oles para reducir a un
minimo el riesgo de lesionarse. S u unidad viene
equipada con dichos con#oles° Por ningun motivo
trate del eliminar la fund6n de los controles que
exJgen la presencia del operador.
ENTRENAMIENTO:
• Lea este manual del operador cuidados&mente.
Familiarfcese con los controles y aprenda a
operar su segadora en forrna adecuada.
Aprenda a parar su segadora r&pidarnente,.
° No perm_ que los niSos usen su segadora_
Nunca permita que !os adultos operen la
segadora sin contar con las instrucciones
adecuadas.
• Mantenga e!&rea de operaci6n despejada de
gente, especialmente de niSos pequeSos y de
animales dom_s_cos.
° Use la segadora sotamente para los fines
propuestos por el fabricante y segt3n las
explicaciones descritas en este manual
° No opere la segadora si se ha cafdo o daSado
en cualquiera forma. Siempre repare los
daRos antes de usa.fla.
° No use accesorios que no hayan sido
recomendados por el fabdcante. El uso de
dichos accesorios puede ser peligroso.
• La cuchilla gira cua.r'rdoel motor est_
funcionando.
PREPARATION:
° Siempre revise cuidadosamente el Area
que se va a segar y desp6jela de todas las
piedras, palos, alambres, huesos y otros
objetos extraSoso Estos objetos ser&n
lanzados con la cuchilla y pueden producir
lesiones graves.
° Siempre use anteojos de seguridad o
protectores de ojos cuando arranque y
durante el tiempo que use la segadora,
° Vfstase en forma adecuada. No opere la
segadora sin zapatos o con sandalias
abiertas_ Use solamente zapatos s6lidos
con buena tracci6n cuando siegue.
17

o Revise el estanque de combustible antes de
hacer arrancar el motor° No llene et
estanque de gasolina en recintos cerrados,
ni cuando e! motor est& funcionando o
cuando est& caliente. Permita que el motor
se'enfrfe por vados minutos antes de Ilenar
el estanque de gasolina. Limpie toda la
gasotina derramada antes de hacer
arrancar el motor.
• Siempre haga los ajustes de altura de las
ruedas antes de hacer arrancar su
segadora. Nunca trate de hacer _sto
mientras que el motor estd funcionando.
• Siegue siempre durante el dfa o con buena
luz artificial.
s
OPERATION:
° Mantenga sus ojos y su mente en la
segadora yen el &rea que se est& cortando.
No permita que otros intereses Io distraigan.
o No corte c_sped mojado o resbaloso. Nunca
corra mientras est6 operando su segadora.
Siempre aseg_rese de mantener et equiiibrio
- mantenga el mango agarrado firmemente y
camine.
° No ponga las manos o los pies cerca odebajo
de las partes rotatorias. Mant_ngase alejado
de ta abertura de descarga en todo momento.
° Siempre pare el motor cuando se vaya
ocuando no est_ usando su segadora, o
antes de atravesar las entradas para autos,
los senderos, caminos y _.reas cubiertas de
ripio.
. Nunca didja la descarga del material hacia los
espectadores ni permita a nadie cerca de la
segadora mientras la est_ operando.
o Antes de limpiar, inspeccionar o de reparar la
segadora, pare el motor y est6
completamente seguro de que la cuchiUa y
que todas las partes que se mueven se
hayan detenidoo Luego, desconecte el
alambre de la bujfa y mant_ngalo alejado de
_sta para evitar el arranque por accidente.
° No continue haciendo funcionar su segadora
si le pega a un objeto extraSo. Siga el
procedimiento descrito anteriorTnente, luego
repare cualquier dafio antes de volver a
arrancar y de operar su segadora.
° No cambie los ajustes del regulador o
hagaque el motor ande a una velocidad
excesiva. Se pueden producir daSos en el
motor y 1esiones personales.
° No opere su segadora si vibra fuera de Io
normal. La vibraci6n excesiva es una
indicaci6n de da,fio; pare el motor, revise en
forrna segura la causa de ta vibraci6n y haga
tas reparaciones segt'm sea necesadoo
° No haga funcionar el motor en
recintoscerrados. Los gases de escape son
petigrososo
• Nunca corte el c_sped tirando la segadora
hacia usted. Siegue a trav_s de la cara de las
pendientes, nunca hacia arriba o hacia abajo
" o
pues puede perder el equilibdo. No siegue
pendientes demasiado empinadas. Tenga
cuidado cuando opere la segadora en terreno
disparejo o cuando cambie de direcci6n -
mantenga un buen equilibdo.
Nunca opere la segadora sin las
protecciones adecuadas, las planchas, et
recogedor de c6sped y otros dispositivos de
seguridad en su lugar.
iVlANTENIMIENTO Y
AIJ_IACENAMIENTO:
° Revise ta cuchilla y los pemos de montaje del
motor a menudo, para asegurarse que estdn
apretados en la forma adecuada.
° Revise todos los pemos, tuercas y tornillos a
intewalos frecuentes, para vedficar si est_,n
apretados en forma adecuada, y
asegurarseque la segadora se encuentra en
condiciones de funcionamiento seguro.
° Mantenga todos los dispositivos de seguridad
en su lugar y listos para funcionar_
° Para reducir el peligro de incendio, mantenga
el motor sin c_sped, hojas y grasa o aceite
en exceso.
° Revise el recogedor de c_sped a menudo
para verificar si hay deterioro y desgaste y
cambie las bols_ desgastadas. Use
solamente tas bolsas de repuesto
recomendadas pot el fabricante de su
segadora o que cumplen con las
especificaciones de _ste.
- Siempre mantenga una cuchiila afilada en su
segadora.
° Siempre permita que el motor se enfrie antes
de guardarta en cualquier recinto cerrado.
° Nunca guarde la segadora con combustible
en el eslanque dentro de un edificio en donde
los gases pueden alcanzar una llama
expuesta o una fuente de ignici6n, tal como el
calentador de agua, la estufa de calefacci6n,
la secadora de ropa, etc.
Busque este sfmbolo que sefiala las
precauciones de segur_dad de impor-tancia.
Quiere decir- iiiATENCION!!! ItiESTE
ALERTO!!! SU SEGURIDAD ESTA
COMPROMETIDA.
a_amPRECAUCI6N: Siempre desconecte el
bre de ia bujia y p6ngalo donde no
pueda entrar en contacto con la bujfa, para
evitar el arranque por accidente, durante la
preparaci6n, el transporte, el ajuste o
cuando se hacen reparaciones.
PRECAUCI6N: Es conocido por el
do de California que los gases de
escape del motor de este productor
contienen qufmicos los cuales a ciertos
niveles, pueden ocasionar, cdncer,
defectos de nacimiento, y otros da_os al
sistema reproductivo.
18

Estos accesorios estaban disponibles cuando se produ]o la segadora. No son facilitados junto al
cortacesped. Est&ndisponibtes en la mayor[a de las _endas de Sears y enlos centros de sen4cio_La
mayon'a de las tiendas Sears t&mbi_n pueden mender a pedir partes de repuesto para usted, s] les
proporciona el n[3merodel modelo de su segadora. Algunos de estos accesorios tal vez no se apliquen a
su segadora.
RENDIMIENTO DE LA SEGADORA "
• ..
DESVIADOR DE RECORTES
PARA SEGADORAS CON DESCARGA TRASERA JUEGOS PARA LA ACOLCHADORA ESTABILIZADORES
ImJlllll.lllHllL IH .l= ..... _ .............. II I IU II IHIH I
RECOREDORpAPA l RECOREDORpA_ _
SEGADORAS SEGADORAS
CON DESCARGA CON DESCARGA
TRASERA LATERAL ENVASES
DE GASOLINA
MANTENIMIENTO DE LA SEGADORA
=
SILENCIADORES
ii ii ii i H_.'_lll ii HHHI
CORREAS
H
RLTROS DE AIRE
ill IHI H JUUHLIL.H
CUCHILLAS
ADAPTADORES
DE CUCHILLA RUEDAS
BuJfAs
ACEITE
DEL MOTOR
Lea estas instruccionesy este manual
completamente antes de tratar de montar u operar
su segadora nueva.
IMPORTANTE: Este cortac_sped viene SIN
ACEITE O GASOLINA en el motor.
Su segadora nueva ha sido montada en la
f_.brica con la excepciSn de aquellas partes
que se dejaron sin montar pot razones de
env_o. Todas las partes como las tuercas, las
arandelas, los pemos, etc, que son
necesarias para comptetar el montaje han sido
colocadas en la bolsa de parteso Pare
asegurarse que su segadora funcione en
forma segura y adecuada, todas las partes y
los artfculos de ferreterfa que se monten
tienen que ser apretados seguramente_ Use
las herramientas correctas, como sea
necesario, para asegurar que se aprieten
adecuadamente.
PARA REMOVER LA SEGADORA DE
LA CAJA DE CARTON
- Remueva las partes sueltas que se incluyen
con la segadora.
• Corte las dos esquinas de los extremos de la
caja de cart6n y 11endael panel del extremo
piano_
Remueva todo el material de empaque, excepto
la cuSa entre el mango superior y _1inferior, y la
cuSa que sujeta la barra de los control que
exige la presencia del operador junto con el
mango superior.
Haga rodar la segadora hacia afuera de ]a caja
de cartbn y revfsela cuidadosamente para
veriflcar si todavfa quedan partes sueltas
adicionales.
COiO PREPARAR SU SEGADORA
PARA DESDOBLAR EL MANGO
tMPORTANTE: Desdoble el mango con
cuidado para no pincher o daSar los cable de
control
• Levante ta secci6n det mango inferior ala
posiciSn de operaci6n y presione las
extremidades inferiores del mando inferior
una en contra una de la otra haste que la
pinza del mando pueda ser insertada en uno
de los tres agujeros del control de la altura.
'19

o Levante la secci6n del mango superior
hasta la posici6n de operaci6n, remueva la
cuSa protectora y apriete las maniitas del
mango en forma segura.
. Remueva el material de empaque de
alrededor de la barra de control.
o Sus mangos pueden ajustarse para que le
acomode al segar. Refi_rase a la secci6n de
Servicio y Ajustes en este manual.
Barra de control que exige ta presencia
del operador--------_
Mango supedor --.--_/f/! Z'/ ?7
Levantar __Levantar
. t_.--_ _ _(/ Post'cidn
para gar
PARAINSTALAR LOS ACCESORIOS
Su segadora fue enviada lista para usarse como
una acolchadora de capa vegetal. Para converlJrla
de modo que pueda ensacar o descargar,
Refi_rase a "Para Convertir ta Segadora" in la
secct6n de este manual.
2O

FAMILIARICESE CON SUSEGADORA
LEA ESTE MANUAL DEL DUENO Y LAS REGLAS DE SEGURIDAD ANTES DE OPERAR SU
SEGADORA. Compare las ilustraciones con su segadora para familiarizarse con ra ubicaci6n de los
diversos controles y ajustes. Guarde este manual para referencia en el fut_Jro.
Estos sfmbolos pueden apareser sobre su segadora o en la literatura proporcionada con el
producto. Aprenda y comprenda sus significados.
A'FT_NCt(_N O MOTOR MOTOR RAPIDO LENTO ESTRANGU COM. ACEITr_ PELIGRO, GUARDE LAS
AOVERTENCIA ENCEND_DO APAGADO LAC!_N BUSTIBLE MANOS Y LOS P1E8LEJOS
Cable de control de la
velocidad del motor
Barra de controlque exigela
presenciadeloperador
Control de aceleraci6ni
estrangulacion
CordSn
arrancador
Recogedorc
c6sped
Manilla del mango
Tapa det relleno de la
asolina
Valvula del
Tapa del deposito de aceite del
motor con vafllla indicadora de
nivel
Puertade la
acolchadora
Ajustadorde la rueda (en
cadarueda)
IMPORTANTE: Este cortac6sped viene SIN
ACEtTE O GASOLINA en el motor,,
CuMPLE C:ON LOS REQUISITOS DE sEGuRIDAD::DE _ CPSC "
Las segadoras a motor, que se conducendesde la parle de at_s, rotatofias,Sears, cumplen con los
est_ares de seguridad del Amedcan National Standards Institute y de la UoS.Consumer Product
Safety' Comm!ssion. La cuchil!agira cuando et motor est&funcionando.
Barra de control que exige la presencia de:i' Cebador_ bombea combustible adicional desde
operador_ tJeneque sujetarse abajo, junto con el el carburador al cilindro para uso cuando se
mango, para hacer arrancar el motor. Su61telapara necesita hacer arrancar un motor frfo.
parar el motor. Cord6n arrancador--se usa para hacer arrancar
el motor.
21
La operaci6n de cualquier segadora puede
hacer que satten objetos exlraSos dentro de sus
ojos, Io que puede producir dafios graves en
_sto& Siempre use anteojos de seguridad o
protecci6n para los ojos mientras opere su
segadora o cuando haga ajustes o reparaciones.
Recomendamos una mascara de segufidad de
visiSn amplia, pard uso espejuelos o anteojos de
seguridad estandarte,,
COMO USAR SUSEGADORA
VELOCIDAD DEL MOTOR
La velocidad del motor se controla por medic
de un control de aceleraci6n ubicado en el lado
del mango superior. La posici6n de
estrangulaci6n se usa pard hacer arrancar el
motor ffio, la posici6n de r&pido es pard el
corte normal, recorte, y un mejor
ensacamiento del c6sped. La posici6n lento es
pard code tMano, recorte y para economizar
combustible.
Fast
._ _ Slow
Choke N "'_"'°"""
/.r_'fL.',"_t.:;'
CONTROL DE ZONA DEL MOTOR
PRECAUCI6N: Las regutaciones
rales exigen que se instale un control
para el motor en esta segadora para
reducir aun mfnimo el riesgo de lesionarse
debido at contacto con la cuchilla. Por
ning_3n motivo trate de eliminar la funciSn
del control del operadoro La cuchilla gira .
cuando el motor est,. funcionandoo
° Su segadora viene equipada con una barra de o
control que exige la presencia del operador, Io
que requiere que el operador est6 delr&s del
mango de la segadora pard hacefla arrancar y
operarla.
PARA AJUSTAR LA ALTURA DE CORTE
• Levante las ruedas pard el corte bajo y baje las
ruedas pard el corte alto.
o Ajuste la allura de code para que se acomode a
sus requisitos.La posict6n del medic es la mejor
pard la mayofia de los c_spedes.
• Para cambiar la altura de code, empuje Ia
palanca de! ajustador hacia la rued& Mueva la
rueda hacia arriba o hada abajo de modo que
se acomode a sus requ[sitos. Asegt3rese que
todas las ruedas queden igualmente ajustadas°
AVI$O: El ajustador esta correctamente
colocado cuando las orejas de la placa est&q
insertadas en el agujero del mango. Tambi_n, los
ai,,stes de 9 posiciones (si equipado) permiten que
'ango pueda ser movido entre las orejas de la
"t.
22
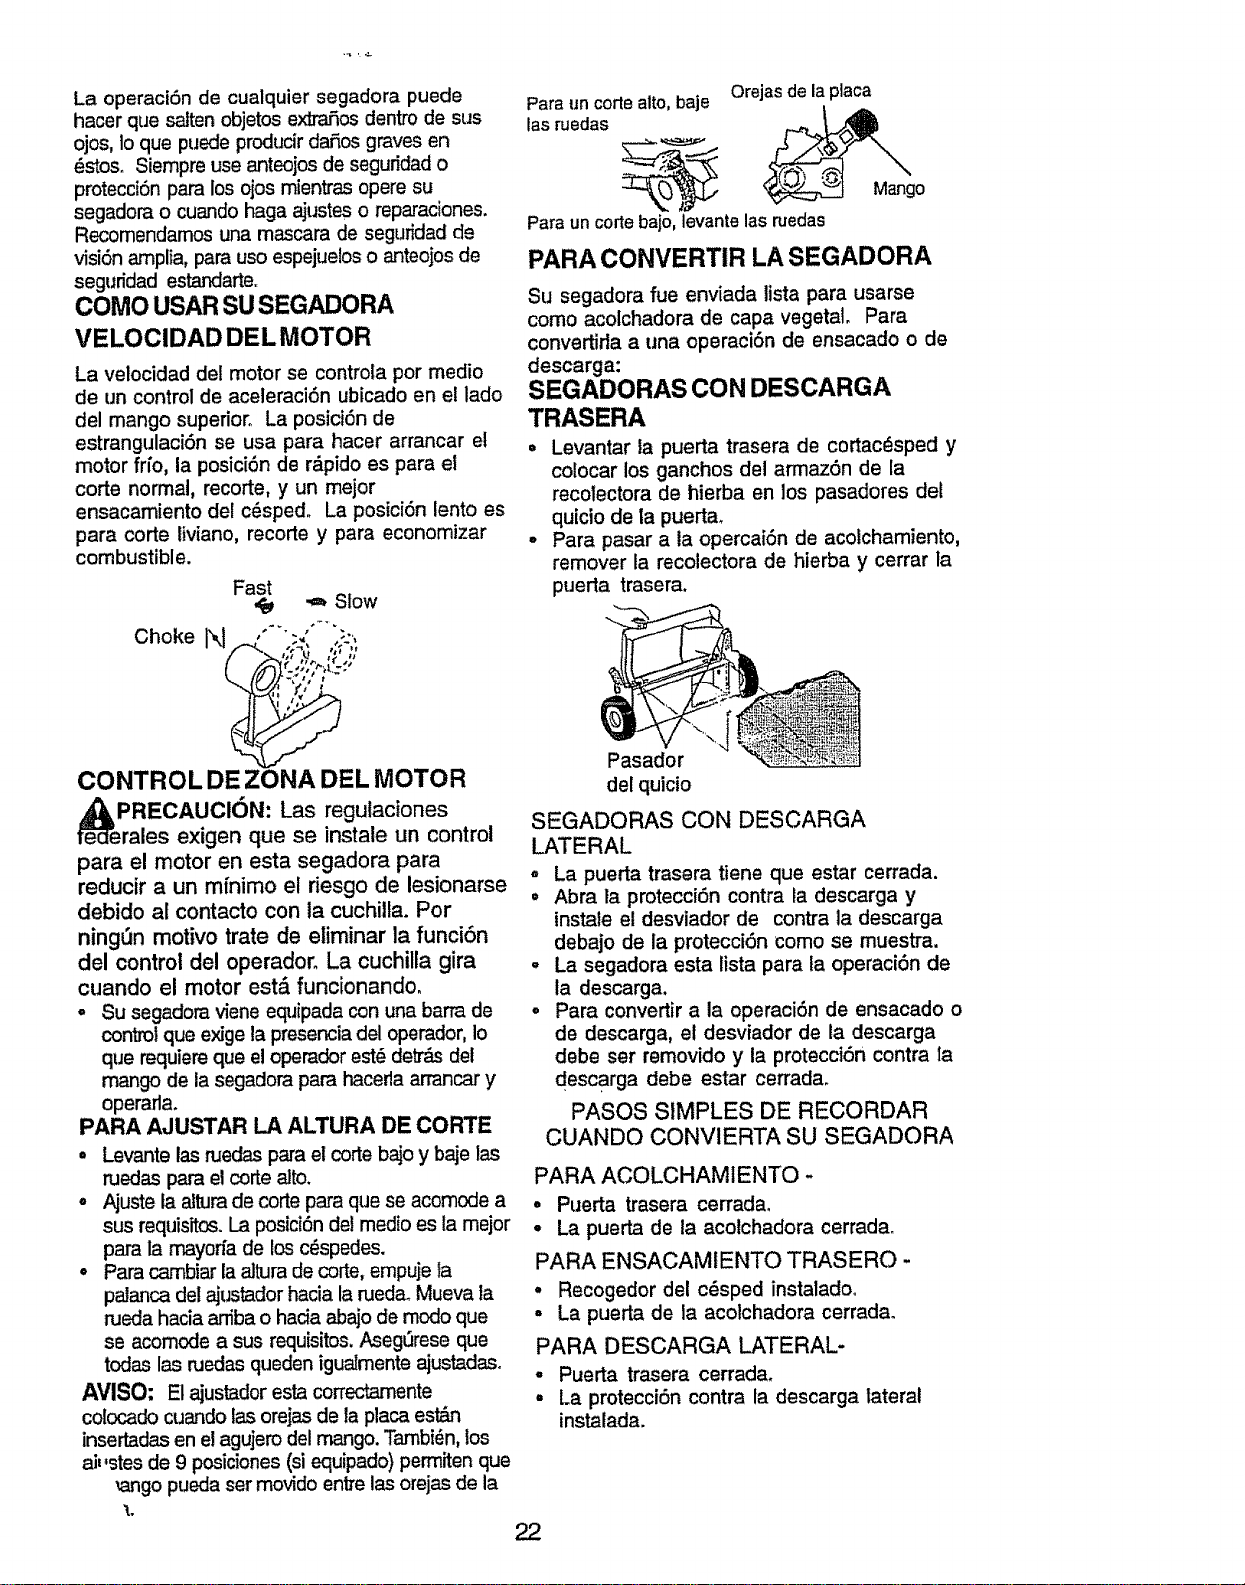
Pard un corte alto, baje Orejas de la placa
las ruedas __ __go
Para un corte bajo, levante las ruedas
PARA CONVERTIR LA SEGADORA
Su segadora fue enviada lista para usarse
como acolchadora de capa vegetal. Para
convertida a una operaci6n de ensacado o de
descarga:
SEGADORAS CON DESCARGA
TRASERA
° Levantar la puena trasera de cortacdsped y
colocar los ganchos del armaz6n de la
recolectora de hierba en los pasadores del
quicio de la puerta_
. Para pasar a la operca[6n de acolchamiento,
remover la recolectora de hierba y cerrarta
puerla trasera.
Pasador
del quicio
SEGADORAS CON DESCARGA
LATERAL
- La puerta trasera tiene que estar cerrada.
° Abra la protecci6n contra la descarga y
instale el desviador de contra la descarga
debajo de la protecci6n como se muestra.
La segadora esta lista para la operaciOn de
la descarga.
Pard convertir a la operaci6n de ensacado o
de descarga, el desviador de la descarga
debe ser removido y ia protecci6n contra Ia
descarga debe estar cerrada.
PASOS SIMPLES DE RECORDAR
CUANDO CONVlERTA SU SEGADORA
PARA ACOLCHAMIENTO -
. Puerta trasera cerrada.
°La puerta de la acolchadora cerrada.
PARA ENSACAMIENTO TRASERO -
• Recogedor del c_sped instaladoo
- La puerta de la acolchadora cerrada.
PARA DESCARGA LATERAL-
- Puerta trasera cerrada.
• La proteccidn contra la descarga lateral
instalada.

e_coPRECAUCI6N:Noponeren marcha
rtac6sped si la puerta trasera no est,.
cerrada o la recolectora de hierba
adecuada no estd colocadao Nunca trate
de operar la segadora cuando se halla
removido la puerta trasera o cuando se ha
removido a puerta trasera o cuando estd
un poco abierta.
Puerta de la
acolchadora
Abra [apuerta
de la
Desviador de la
descarga
ANTES DE HACER ARRANCAR EL
MOTOR
ACEITE
Su segadora fue enviada sin aceite en el
motor.
• Asegurese que la segadora est6 nivelada y
que el &rea alrededor del dep6sito de aceite
est6 limpia.
• Remueva la tapa del dep6sito de aceite del
motor con la varilla indicadora de nivei y
rellene hasta _alinea de lleno en _sta.
Aviso: Permitir quel aceite se asiente bien
en el motor para leer bien su nivel.
° El motor puede contener 20 oz. de nafta..Para
et tipo y la calidad vea "MOTOR" en la secci6n
de las "Maintenance" en este manual.
• Vacfe el aceite lentamente. No Io !lene
demasiado.
• Revise e! nivel del aceite antes de cada uso.
Agregue aceite si es necesado. Llene hasta
la linea de Ileno en la vadtla indicadora de
niveL
23
. Para leer el nivel adecuado, inserte la varilla
indicadora de nivel hacfa dentro del tubo y
deje que el tapa del rellenador de aceite
apenas se descanse sobreo No enrosque el
tap6n en el tubo. Remueva y lea le nivel del
aceiteo
° Vuelva a instatar la tapa del dep6sito de]
aceite y apri_tela
° Cambie el aceite despu6s de 25 horas de
operaci6n o por Io menos una vez al afio si
la segadora se utiliza menos 25 horas al
afio. Puede necesitar cambiar el aceite mils
a menudo cuando las condiciones son
p61vorosas o sucias.
GASOLINA
- Llene el estanque de gasolina. Utilice
gasolina nueva, limpia, sin plomo con
octanaje de mfnimo de 87. No mezcle el
aceite con la gasolinao Compre gasolina en
cantidades las cuales puedan ser utilizadas
en 30 dfas, para asegurar et frescor de [a
gasolina.
ADVERTENCIA: La experiencia ha indicado
que los combustibles mezclados con alcohol
(conocidos como gasohol, o el uso de etanol o
metanol) pueden atraer la humedad, la que
conduce a la separaci6n y formaci6n de &cidos
durante el almacenamientoo La gasolina ac{dica
puede dafiar el sistema det combustible de un
motor durante el alma6enamientoo Para evitar
los problemas con el motor, se debe vaciar el
sistema del combustible antes de guardado por
un perfodo de 30 d[as o m&s. Vacfe el estanque
del combustible, haga arrancar el motor y
h=Sgalofuncionar hasta que las l[neas del
combustible y el carburador queden vacfos. La
pr6xima temporada use combustible nuevo. Vea
las lnstrucciones Para El Almacenamiento para
m,_s informaci6n° Nunca use productos de
limpieza para el motor o para el carburador en
el estanque del combustible pues se pueden
producir dafios permanentes.
_adel relfenador de
Tapa del
depostto de
aceite con
vadlla
indicadora
de nivel
Tapa varilla
indicadora de nivel
de relleno del aceite
Marca __
superior _j
Marca inferior --I"_
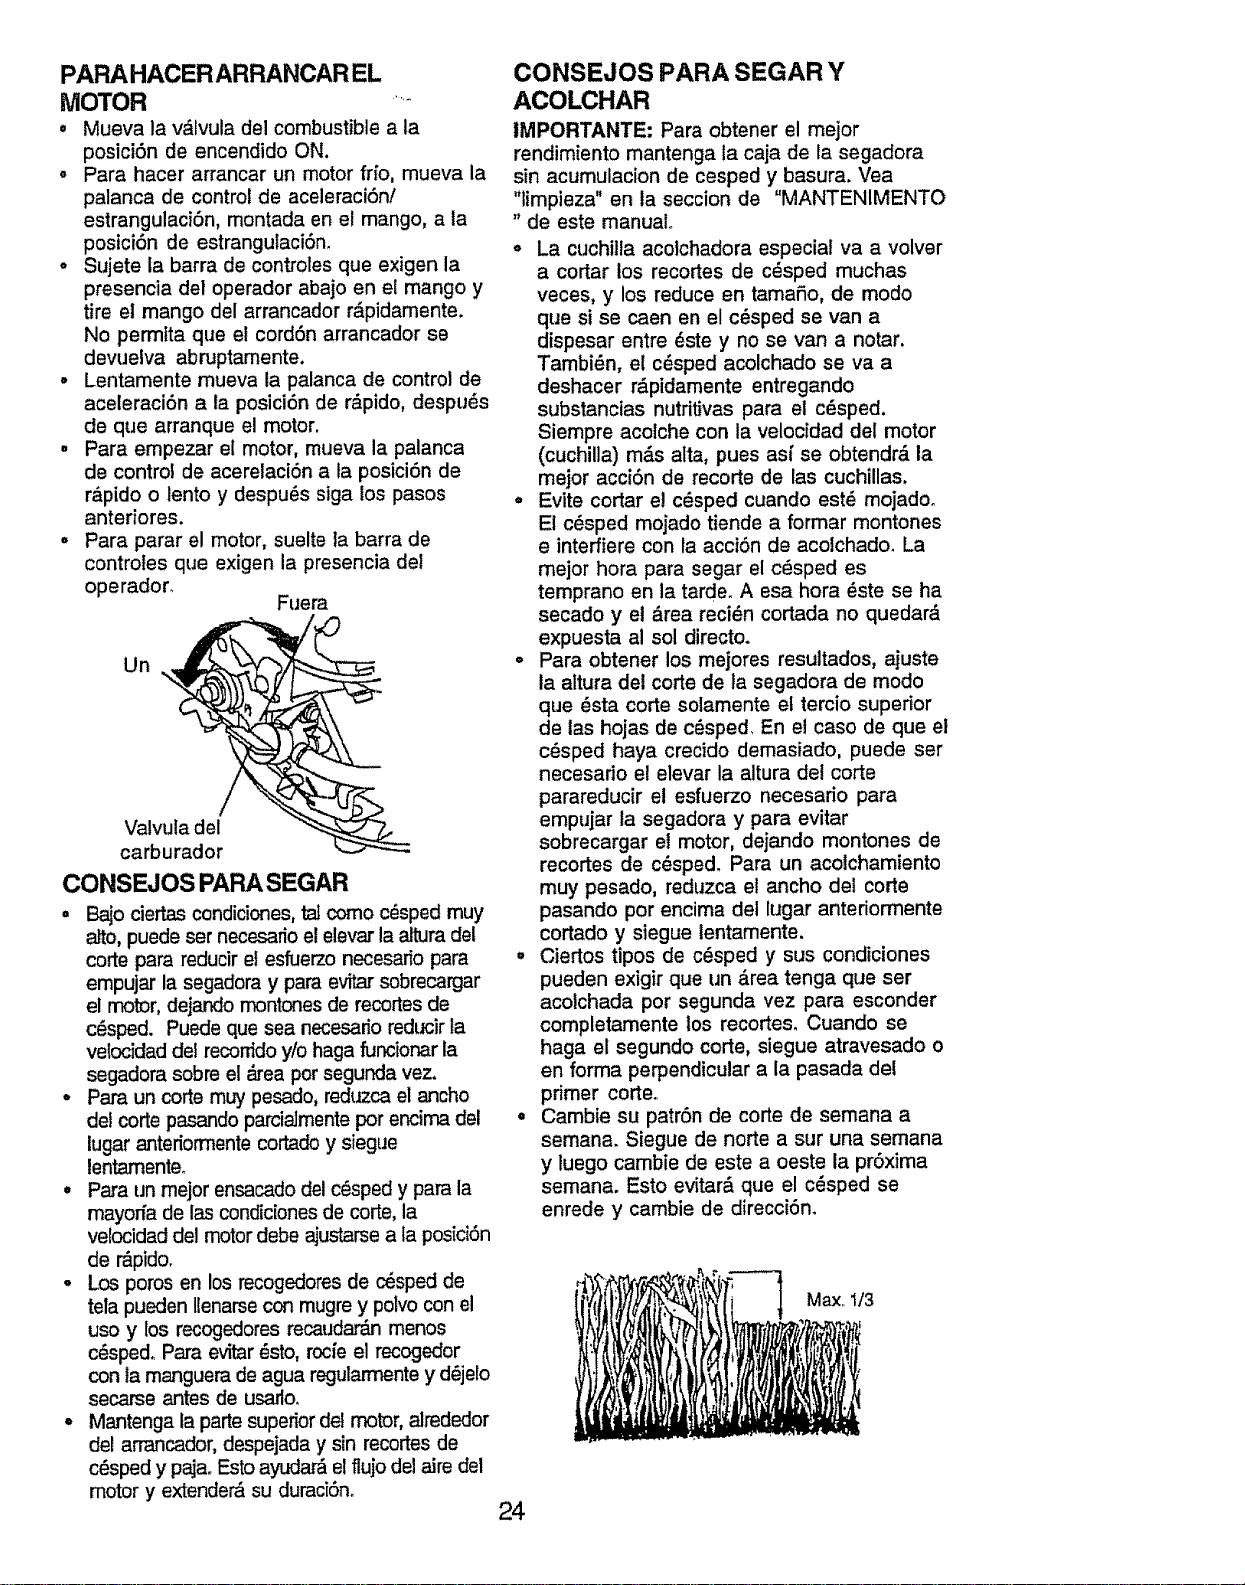
PARA HACER ARRANCAR EL
MOTOR ......
• Mueva la v_Ivula del combustible a la
posici6n de encendido ON.
. Para hacer arrancar un motor ffio, mueva la
palanca de control de aceleraci6n!
estrangulaci6n, montada en el mango, a ta
posici6n de estrangulaci6n.
o Sujete la barra de controles que exigen la
presencia del operador abajo en el mango y
tire el mango del arrancador r&pidamente.
No permtta que el cord6n arrancador se
devuelva abruptamente.
• Lentamente mueva la palanca de control de
aceleraci6n a la posici6n de r&pido, despu_s
de que arranque el motor.
° Para empezar el motor, mueva la palanca
de control de acerelaci6n a la posici6n de
r&pido o lento y despu_s siga los pasos
anteriores.
° Para parar el motor, suelte la barra de
controles que exigen la presencia del
operador_
Fuera
Un
Valvula del
carburador
CONSEJOS PARASEGAR
o Bajo ciertas condiciones,_ como c_sped muy
alto, puede ser necesario el elevar la altura del
corte para reducir el esfuerzo necesar_o para
empujar la segadora y para evitar sobrecargar
el motor, dejando montones de recortes de
c_sped. Puede que sea necesario reducir la
velocidad det recorddo y/o haga funcionar la
segadora sobre el _rea por segunda vez.
° Para un corte muy pesado, reduzca el ancho
del corte pasando parciaJmente pot encima del
lugar anteriormente cortado y siegue
lentarnente.
• Pa_raun mejor ensacado del c_sped y para la
mayofia de las condiciones de corte, la
velocidad del motor debe ajustarse a la posici6n
de r-&pido.
° Los poros en los recogedores de c_sped de
tela pueden llenarse con mugre y polvo con el
uso y los recogedores recaudar&n menos
c_spedo Para evitar _sto, rocfe el recogedor
con la manguera de agua regularmente y d_jelo
secarse antes de usarlo,
• Mantenga la parte superiordel motor, alrededor
del arrancador, despejada y sin recortesde
c_sped y pajaoEsto ayudar& el flujo del aire det
motor y extender_ su duraci6n.
CONSEJOS PARA SEGAR Y
ACOLCHAR
IMPORTANTE: Para obtener el mejor
rendimiento mantenga la caja de la segadora
sin acumulacion de cesped y basura. Vea
"limpieza" en la seccion de "MANTENIMENTO
"de este manual,,
o La cuchilta acolchadora especial va a volver
a cortar los recortes de c_sped muchas
veces, y los reduce en tamaSo, de modo
que si se caen en el c_sped se van a
dispesar entre _ste y no se van a notar.
Tambi_n, el c_sped acolchado se va a
deshacer r&pidamente entregando
substancias nutritivas para el c_sped,
Siempre acolche con la velocidad del motor
(cuchilla) m_,s alta, pues asi"se obtendr_ ia
mejor acci6n de recorte de las cuchillas,
° Evite cortar el c_sped cuando est_ mojadoo
El c_sped mojado tiende a formar montones
e interfiere con la acci6n de acolchado. La
mejor hora para segar el c_.sped es
temprano en la tarde° A esa hora _ste se ha
secado y et &rea reci_n cortada no quedar&
expuesta al sol directo.
• Para obtener los mejores resultados, ajuste
ia altura del corte de la segadora de modo
que _sta corte solamente el tercio superior
de tas hojas de c_sped, En el caso de que el
c_sped haya crecido demasiado, puede ser
necesario el elevar la altura del corte
parareducir et esfuerzo necesario para
empujar la segadora y para evitar
sobrecargar et motor, dejando montones de
recortes de c_sped_ Para un acolchamiento
muy pesado, reduzca el ancho del corte
pasando por encima del lugar antedorrnente
cortado y siegue lentamente.
• Ciertos tipos de c_sped y sus condiciones
pueden exigir que un &rea tenga que ser
acolchada por segunda vez para esconder
completamente los recortes. Cuando se
haga el segundo corte, siegue atravesado o
en forma perpendicular a la pasada del
primer corte.
° Cambie su patr6n de corte de semana a
semana. Siegue de norte a sur una semana
y luego cambie de este a oeste la pr6xima
semana. Esto evitar& que el c_sped se
enrede y cambie de direcci6n.
Max, 1/3
24
,JL,,,.,
Revisar s!haYsuJeladoressuettos i_ i
Umpiar.iinspecclonar el recogedor de
E Umpiar is segadora _ . I_
J Urnptar debajode la cubtertade tatrans-
i mlst6n (segadoras con poder propuisor) , . _4
O Revisar fas corress y lag poleastmpul-
sadas (segadoras con poder propo_sor)
R Revisar 0iafiiarlcambiar la cuch_lla
Tabla de Iub_cadSn
LJmpiari_.bateri_recargar i
(segadoras con arranque e!6clrlco,l fl##
a Revisar eln!vei del acefte I_cambiar etacelte del motor _1,2
R _bmPi_r_eSi=blar'"bujf................ _i'
.....................I...........I.....I I
Cambiar el caducho de papel del liltro _#'2
de atre
1 - Carnblar m_sa menudo cuando se opere baJocarga pesada o an amblentes con _llas temperalutas
2 * Dar servtcIorods _ menudo cuando '_e opera on condictone_ sucf_ o polvoro0as,
3 - Camble las cuchBIas m_s a menudo cuando S{egUean terreno arenOSOr,
4 - Cargar pot 48 horas al fin de la lemporada,
RECOMENDACIONES GENERALES
La garantfa de esta segadora no cubre los
artfculos que hart estado sujetos al abuso o a la
negligencia del operadoro Para recibir todo el valor
de la garantia, e! operador tiene que mantener la
segadora seg_n tas inslrucciones descritas en
este manual.
Hay algunos ajustes que se tienen qua hacer en
forma periSdica para poder mantener su unidad
adecuadamente.
To:los los ajustes en ia secciOn de Servicioy
Ajustes de este manual tJenenque ser revisados
pot !o menos un vez por cada temporada.
• Una vez a] afio, cambie la bujia, Iimpie o cambie
el elemento del filtro de aire y revise si la cuchilla
est-_desgastada. Una bujfa nueva y un
elemento det filtro de aire limpio/nuevo aseguran
la mezcla de alre-combust_ble adecuada y
ayudan a que su motor funcione mejor y que
dure rn_s.
• Siga el programa de mantenimiento en este
manual°
t/!L
B
i
V' "
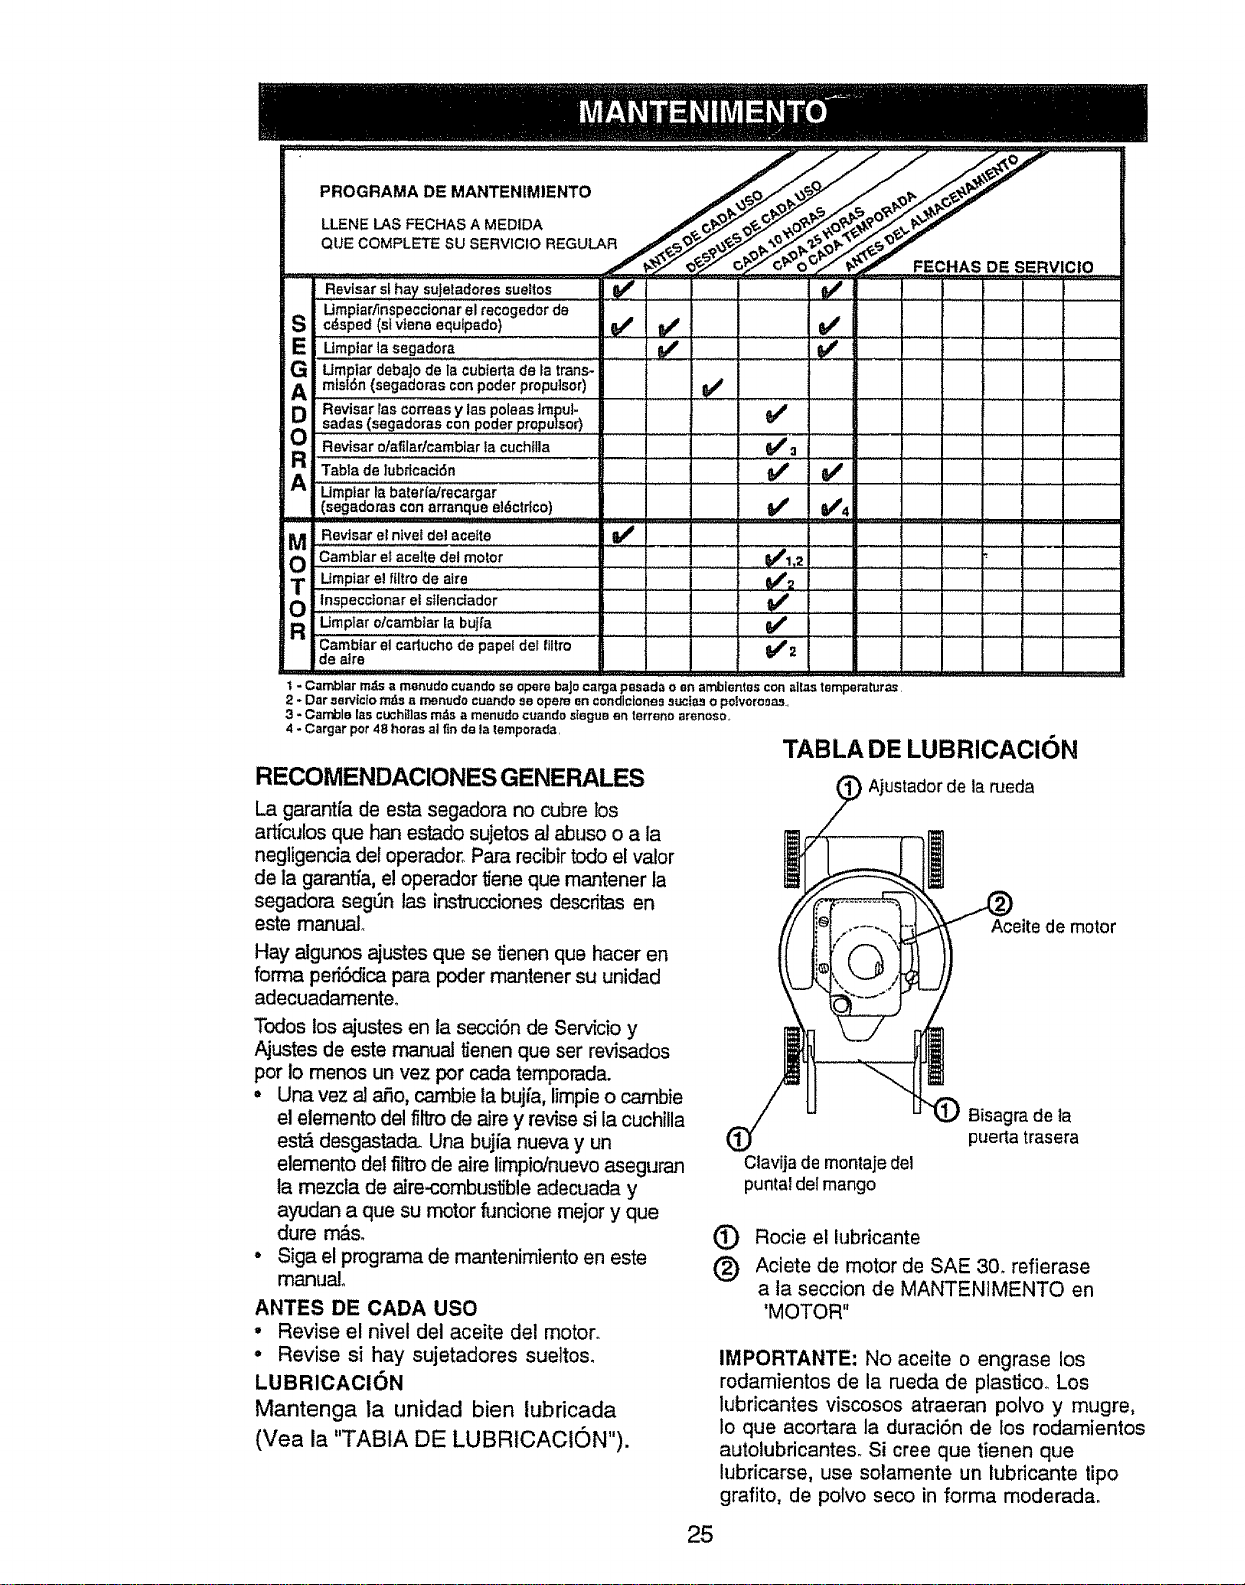
TABLA DE LUBRICACION
Ajustador de la rueda
eite de motor
Clavija de montaje del
puntal del mango
(D Rocie ellubricante
Bisagra de Ia
puerta trasera
(_) Aciete de motor de SAE 30. refierase
a la seccion de MANTENIMENTO en
ANTES DE CADA USO
• Revise el nivel del aceite del motor.
° Revise si hay sujetadores sueltos.
LUBRICACION
Mantenga la unidad bien lubricada
(Vea la "TABIA DE LUBRtCACION").
'MOTOR"
IMPORTANTE: No aceite o engrase los
rodamientos de la rueda de plastJco_ Los
lubricantes viscosos atraeran polvo y mugre,
lo que acortara la duraci6n de los rodamientos
autolubricantes. Si cree que tienen que
lubricarse, use solamente un lubdcante tipo
grafito, de polvo seco in forma moderada.
25
IESPECIFICACIONES DEL PRODUCTO
NUMERO DE MODELO 917.388320
NUMERO DE SERIE
FECHA DE COMPRA
CABALLOS DE FUERZA: 5.5
CAPACIDAD Y TIPO ln0 Cuartos
DE GASOLINA: REGULAR SIN PLOMO
TIPO DE ACEITE: SAE 30 (sobre 32°F)
(APFSF!SH/SG) SAE 5W-30 (debajo 32°F)
CAPACIDAD DE ACEITE:
BUJfA (ABERTURA: .030")
FOLERANCIA DE VALVULA:
FORSI6N DEL PERNO
DE LA CUCHILLA:
18.5 oz. de capacidad
(NGK) BPRSES
ADMISION:
DESCARGA:
35-40 FT. LBS,
.004-,007
.006-,009
• Et num_ro del nodelo y el de serie se encuentran en la calcomania adjunta a la parte
trasera de la caja de la segadora. Debe registrartanto el num6ro de serie come la fecha de
compra y mantengalos en un lugar seguro para refencia en el futuro,
SEGADORA
Siempre observe las reglas de seguridad
cuando haga el mantenimiento.
LLANTAS
o Mantenga las itantas sin gasolina, aceite o
substancias qufmicas para control de
insectos que pueden dahar la goma.
o Evite los tocones, las piedras, las grietas
profundas, los objetos afiiados y otros
petigros que pueden daSar a tas llantaso
CUIDADO DE LA CUCHILLA
Para obtener los mejores resultados, la
cucbitla de la segadora tienen que mantenerse
afilada. Cambie la cuchilla doblada o da5ada.
PARA REMOVER LA CUCHILLA
o Desconecte el alambre de la bujfa y p6ngalo
en donde no pueda entrar en contacto con
_sta.
° Haga descansar la segadora en su lado.
Aseg_3rese que el filtro de aire y que et
carburador queden mirando hacia arriba.
• Use un bloque de madera entre la cuchilla y
la caja de la segadora para evitar que la
cuchilla gire cuando sete quite el pemo.
° Proteja sus manos con guantes ylo
envuelva la cuchilla con una tela gruesa.
• Remueva el perno de la cuchilla gir&ndolo en
el sentido contrario en que giran las manillas
del reloj.
• Remueva la cuchilla y los articulos de
ferreter{a adjuntadores (el pemo, la arandela
de seguridad y la arandela endurecida).
AMISO: Remueva el adaptador de la cuchilla y
revise el cubo interior de la ranura del
adaptador de la cuchilla_ La ranura tiene que
estar en buenas condiciones para que
funcione en forma adecuada. Cambie e[
adaptador si es_ daSado.
PARA CAMBIAR LA CUCHILLA
° Ponga el adaptador de la cuchitla en el
ciguefial del motor. Aseg_rese que la ranura
del adaptador y que el chavetero del
cigueSal est_n alineados_
° Ponga la cuchilla en el adaptador de 8sta
alineando los dos (2) agujeros en la cuchilla
con las salientes elevadas en et adaptadoro
• Asegt_rese de que e! borde de salida de la
cuchilta (opuesto at borde afilado) est6 hacia
arriba hacia el motor.
• lnstale el pemo de la cuchilla con la arandeta
de seguridad y ta arandela endurecida en el
adaptador de la cuchilla y el cigueSaL
26

° Use un bloque de madera entre la cuchilla y
la caja de la segadora y apdete el pemo de
la cuchilla gir&ndolo en el sentido en que
giran las manillas de! re!oj_
- La torsi6n para apretar recomendada es de
35 - 40 pies libraso
IMPORTANTE: EL PERNO DE LA CUCHILLA
ES CLASE 8 TRATADO A CALOR
PARA AFILAR LA CUCHILLA
AVISO: No recomendamos el afilar la cuchitla -
pero si Io hace, asegL_rese de que quede
balanceada.
Se tiene que tener cuidado de manteneda
balanceadao Una cuchilla que no est&
balanceada va a producir eventualmente daP,o
en la segadora o en el motor.
o La cuchilla puede afilarse con una lima o en
una rueda rectificadorao No trate de afilarla
mientras se encuentra en la segadora.
o Para revisar el balance de la cuchilla, clave
un clavo en una viga o en la pare& Deje
alrededor de una pulgada de un clavo recto
expuestoo Ponga el agujero central de la
cuchilla sobre la cabeza del clavo. Si la
cuchilla est,. balanceada debe permanecer
en la posici6n horizontal. Si cuatquiera de los
extremos de la cuchilla se mueve hacia
abajo, afile el extremo pesado hasta que
_sta quede balanceada.
Adaptador de la cuchilla
Ranura
Cuchilla
Pemode
la cuchilla
/
Arandela de
seguddad
enduredda
ChaveterodeI
Adaptador
de la
salida cuchilla
El recogedor de c6sped puede ser rociado
con el agua de ta manguera pero tiene que
estar seco cuando se vaya a usaro
Revise su recogedor de c6sped a menudo
para verificar si est#, dafiado o deteriorado,
Se va a desgastar con el uso normal,, Si se
necesita cambiar el recogedor, c#,mbielo
solamente por uno que sea aprobado por el
fabricante. D6 e! n_mero del modelo de la
segadora cuando Io ordeneo
MOTOR
LUBRICACION
o
27
Use solamente aceite de detergente de a{ta
calidad clasificado con la clasificaci6n SF,SG o
SH de servicio API. Seleccione la catidad de
viscosidad SAE segQn su temperatura de
operaci6n esperada.
CAUDADESOEWSCOS_DADO_SAE
GAMA DE TEMFERATURA ANTICIPN2A ANTES DEL PROXIMo CAMBiO DE ACEiTE
AVISO: A pesar de que los aceites de
multiviscosidad (5W30, 10W30, etc.) mejoran
el arranque en clima frio, estos aceites de
multiviscosidad van a aumentar el consumo de
aceite cuando se usan en temperaturas sobre
32 ° F. Revise el nivet del aceite del motor m_s
a menudo, para evitar un posible dafio en el
motor, debido a que no tiene suficiente aceiteo
Cambie el aceite despu6s de 25 horas de opera-
ci6n o por 1omenos una vez al aSo si la segadora
se utiliza menos 25 horas el aSoo
Revise el nivel del aceite del c_rter antes de
arrancar el motor y despu6s de cada cinco (5)
horas de uso continuado. Apdete el tap6n del
aceite en forma segura cada vez que revise el
nivel del aceite,
PARA CAMBIAR EL ACEITE DEL
MOTOR
AVlSO: Antes de inclinar la segadora para
drenar el aceite, drene el tanque de
combustible haciendo correr el motor
hasta que el tanque est6 vacio.
= Desconecte el alambre de la buji'a y p6ngafo
de modo que no pueda entrar en contacto
con 6stao
° Remueva la tapa del dep6sito del aceite;
d_jela a un lado en una superficie limpia.
. Incline fa cortadora de c_sped por este
costado ta! como se muestra y purgue el
aceite en un recipiente idSneo. Mueva la
segadora de atr&s para adelante para
remover todo el aceite que se haya quedado
atrapado dentro del motor.
° Limpie todo el aceite derramado en la
segadora yen el lado deI motor
* Llene el motor con aceite, Ll_nelo solamente
hasta la I{nea de "LLENO" (FULL) en la
vari[la indicadora de nivel. NO LO LLENE
DEMASIADO.
. Para poder leer el nivel correcto, inserta la
vadlla indicadora a dentro del tubo y deje
quel tap6n se siente sobre el tubo. No
apriete el tap6n al tubo Remueva y lea el
nivel del acieteo
Vuelva a poner la tapa en el depOsito del
aceite.
Vuelva a conectar el alambre de la bujia a
6sta.

Tapa varilla
indicadora de nivel
de relteno del aceite
Marca superior
Marca inferior
FILTRO DE AIRE
Su motor no funcionar& en forma adecuada y
puede sufrir daSos si se usa un filtro de aire
sucio_
Cambie el filtro de aire cada afio, y rods a
menudo, si siega en condiciones muy
polvorosas o sucias.
PARA LIMPIAR EL FILTRO DE AIRE
. Remueva la cubierta.
. Cuidadosamente, remueva el cartuchoo
o Umpielo golpedndolo suavemente en una
superficie ptanao Si est#, rnuy sucio cambie
el cartuchoo
pe_rPREOAUCl6N: Los solventes de
5leo, tales como el keroseno, no se
deben usar para limpiar el cartuchoo
Pueden producir el deterioro de dste. No
aceite el cartucho. No use aire a presiSn
para limpiarlo o secarto.
o Instale el cartucho, luego vuelva a poner la
cubierta.
Cupierta
----------'-'_ Cartucho del filtro
de aire
Orejas
SILENCIADOR
Inspeccione y cambie el silenciador si estd
corroi'do pues producir un peligro de incendio
y/o daSo.
BUJfA
Cambte su bujfa cada a_o para hacer que su
motor arranque m&s f&cilmente y funcione
mejor. Ajuste la abertura de la bujfa en 0,030
pulgada.
LIMPIEZA
IMPORTANTE: Para obtener el mejor
rendimiento, mantengala caja de la segadora
sin acumulaciSn de c6sped y basurao
Limpie la parte de abajo de su segadora
despues de cada uso.
a_amPRECAUCI6N: Desconecte el
bre de la bujfa y pongato en donde no
pueda entrar en contacto con _sta.
° Limpie la parte inferior de su segadora
rasp_ndola para remover la acumulaciSn de
c_sped y basurao
° Limpie el motor a menudo para evitar que se
acumule la basura. Un motor tapado
funciona m&s caliente y se acorta su
duraciSn.
° Mantenga las superficies acabadas y las
ruedas sin gasolina, aceite, etc.
° No recomendamos el uso de una manguera
de jard[n para limpiar la segadora a menos
que el sistema electdco, el silenciador, el
f_ltro de aire y el carburador est_n tapados
para evitar que les entre el agua. El agua en
el motor puede acortar la duraci6n de 6ste.
Orejas
28
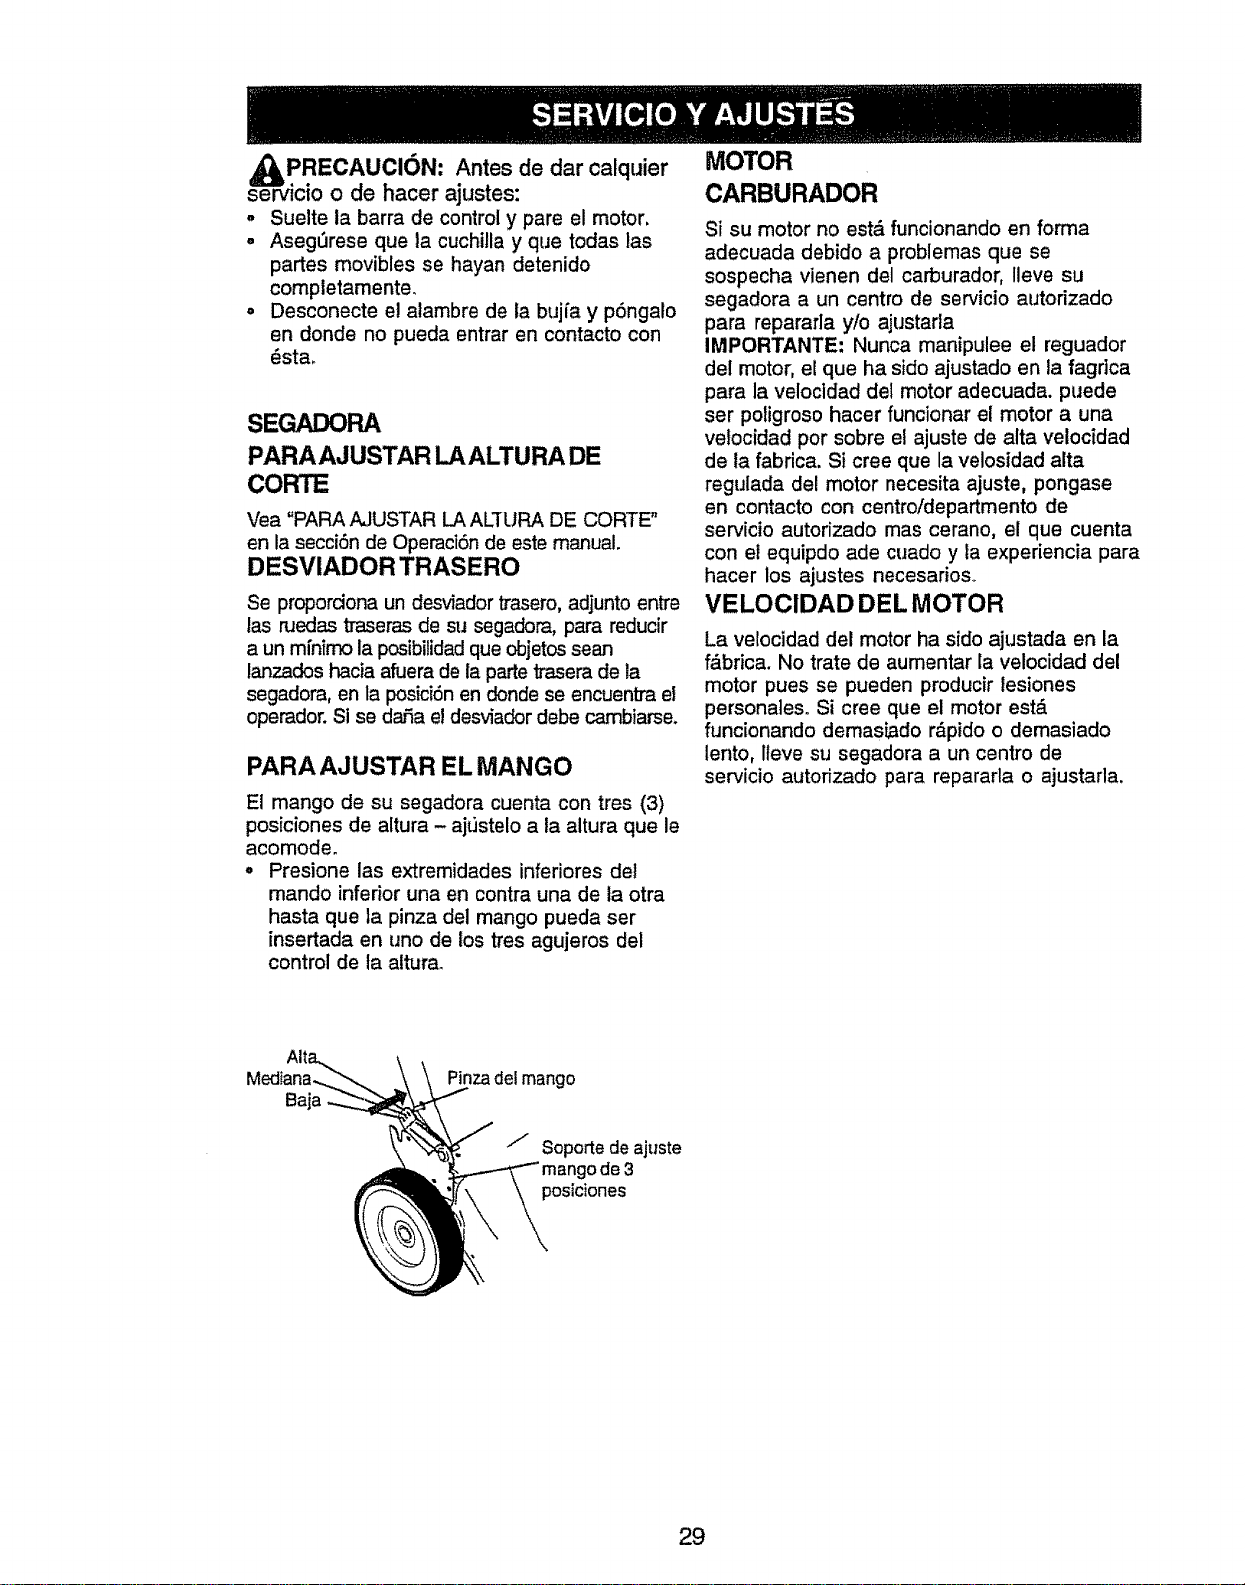
_IP.RECAUCl6N" Antes de dar calquier
serviclo o de hacer ajustes:
° Suelte ia barra de control y pare el motor.
° AsegL_rese que la cuchilla y que todas las
partes movibles se hayan detenido
completamente.
o Desconecte e! alambre de la bujfa y p6ngalo
en donde no pueda entrar en contacto con
_sta_
SEGADOFIA
PARA AJUSTAR LA ALTURA DE
CORTE
Vea "PARA AJUSTAR LA ALTURA DE CORTE"
en la secci6n de Operaci6n de este manual.
DESVIADOR TRASERO
Se propordona un desviador trasero, adjunto entre
las ruedas traseras de su segadora, para reducir
a un minimo la posibilidad que objetos sean
lanzados hacia afuera de la parle basera de la
segadora, en la posici6n en donde se encuentra el
operador. Si se da,fia el desviador debe cambiarse.
PARA AJUSTAR EL MANGO
El mango de su segadora cuenta con tres (3)
posiciones de altura - ajtJstelo a la altura que le
acomode.
° Presione las extremidades inferiores del
mando inferior una en contra una de ia otra
hasta que la pinza del mango pueda ser
insertada en uno de los tres agujeros del
control de ta albJra.
MOTOR
CARBURADOR
Si su motor no est& funcionando en forma
adecuada debido a problemas que se
sospecha vienen del carburador, lleve su
segadora a un centro de servicio autorizado
para repararla y/o ajustarla
IMPORTANTE" Nunca manipulee el reguador
del motor, el que ha sido ajustado en la fagdca
para la velocldad del motor adecuada, puede
ser poligroso hacer funcionar el motor a una
velocidad por sobre el ajuste de alta velocidad
de la fabrica. Si cree que la velosidad alta
regulada del motor necesita ajuste, pongase
en contacto con centro/departmento de
servicio autorizado mas cerano, el que cuenta
con et equipdo ade cuado y la experiencia para
hacer los ajustes necesarios.
VEL.OOIDAD DEL MOTOR
La velocidad del motor ha sido ajustada en la
f&brica. No trate de aumentar la velocidad del
motor pues se pueden producir lesiones
personales. Si cree que el motor estA
funcionando demasiado r_.pido o demasiado
lento, lleve su segadora a un centro de
servicio autorizado para repararla o ajustarla.
Mediana.. Pinza del mango
Baja
/ Soporte de ajuste
29

lnmediatamente prepare su segadora para el
almacenamiento aJfinal de cadatemporada o si la
unidad no se va a usar por 30 d_aso m_.
SEGADORA
Cuando se va a guardar la segadcra por cierto
peffodo de tiempo, timpiela cuidadosarnente,
remueva toda la mugre, la grasa, las hojas, etco
Gu&rdela en un _ea limpiay sect_
° Umpie toda ta segadora (Vea "LIMPIEZA" en la
se_6n de Mantenimento de este manual).
° Lubnquela segSn se muestra en la secci6n de
Mantenimento de este manual.
• Asegerese de que todas las tuercas y clavijas y
todos los pemos y tomillos est_n apretados en
foma segura, tnspeccione las partes que se
mueven para verificar si est_ dar3adas,
quebradas o desgastadas. C_T_bielassi es
necesario.
° Retoque todas las superficies que est_n
oxidadas o con la pintura picada; use una lija
antes de pintar.
tANGO
• Puede doblar el mango de su segadora para
el almacenamiento.
• 8uelte las dos (2) manillas del mango en
cada tado del mango superior y permita que
el mango se doble hacia detras.
° Apriete los extremos inferiores del mango
inferior entre sf hasta que el mango inferior
quede separado del puntal del mango, luego
mu_valo hacia adelante.
• Cuando prepare su mango a partir de la
posici6n de almacenamiento, el mango
inferior nesecitara cerrarlo manualmente
para la posici6n de sega.
IMPORTANTE: Cuando doble el mango para el
almacenamiento o el transporte, asegurese
que Io doble segun se muestra o puede danar
los cables de control.
f_i,',
,# ,k_,
uoblar
_'//.i"!. haciaarras
' PosiciOn para
_ segar
Alta.,_ \ ,
\ dol
Baja ...-._ /
"'_'_" / Soporle de ajuste
..dl_. -_ mango de 3
\ \\._osictones
MOTOR
SISTEMA DE COMBUSTIBLE
tMPORTANTE: Es importante evitar que se
formen depositos de goma en partes
fundamentales del sistema de combustible tales
como el carburador, el filtro del combustible, la
manguera del combustible o en el estanque
durante el atmacenamiento, La experincia
tambien endica que los combustibles Mezclados
con alcohol (conocido como gasohol o que
tienen etanol o metanol) pueden atraer humedad,
1oqueconduce a la separacion y a la formacion
de acidos durante el almacenamientOoLa
gasolina acdica puede danar et sistema de
combustible de un motor durante el periodo de
almacenamiento.
° Drene et estanque de combustible.
° Haga arrancar el motor y d_jelo funcionar
hasta que las Ifneas det combustible y el
carburaclor est_n vacios.
. Nunca use los productos para limpieza del
carburador o del motor en el estanque de
combustible pues se pueden producir dafios
permanenteso
o Use combustible nuevo la pr6xima temporada_
AVISO: E! estabilizador de combustible es una
altemativa aceptable para reducir a un minimo la
formaci6n de dep6sitos de goma en el combus-
tible durante el pedodo de almacenamiento.
Agregue estabilizador a ia gasolina en el
estanque de combustible o en el envase para el
almacenamientoo Siempre siga la proporci6n de
mezcla que se encuentra en el envase del
estabitizador. Haga funcionar el motor por Io
menos I0 minutos despu_s de agregar el
estabilizador, para perrnitir que este Ilegue al
carburador_ No drene la gasolina del estanque
de gasolina y el carburador si se est& usando
estabilizador de combustible.
ACEITE DEL MOTOR
Drene el aceite (con el motor caliente) y
c_bieto con aceite de motor limpio. (Vea
"MOTOR" en ta secci6n de Mantenimento de
este manual.)
CILINDRO
° €lemueva la bujia.
° Vacie una onza (29 ml) de aceite a tray, s del
agujero de la bujfa en el cilindroo
° Tire ta manilla de arranque lentamente unas
cuantas veces para distribuir el aceite,.
° Vuelva a montar la nueva bujra.
OTROS
° No guarde la gasolina de una temporada a la
otra.
° Cambie el envase de la gasolina si se
empieza a oxidar. La oxidaci6n y!o la mugre
en su gasolina producir&n problemas.
° Si esposibte, guarde su unidad en un recinto
cerrado y c_brala para protegerla contra el
polvo y la mugre.
° Cubra su unidad con un forro protector
adecuado que no retenga la humedado No use
pl&stico. El pi_stico no puede respirar, Io que
permite la formaci6n de condensaci6n, to que
producir_ la oxidaci6n de su unidad.
3O
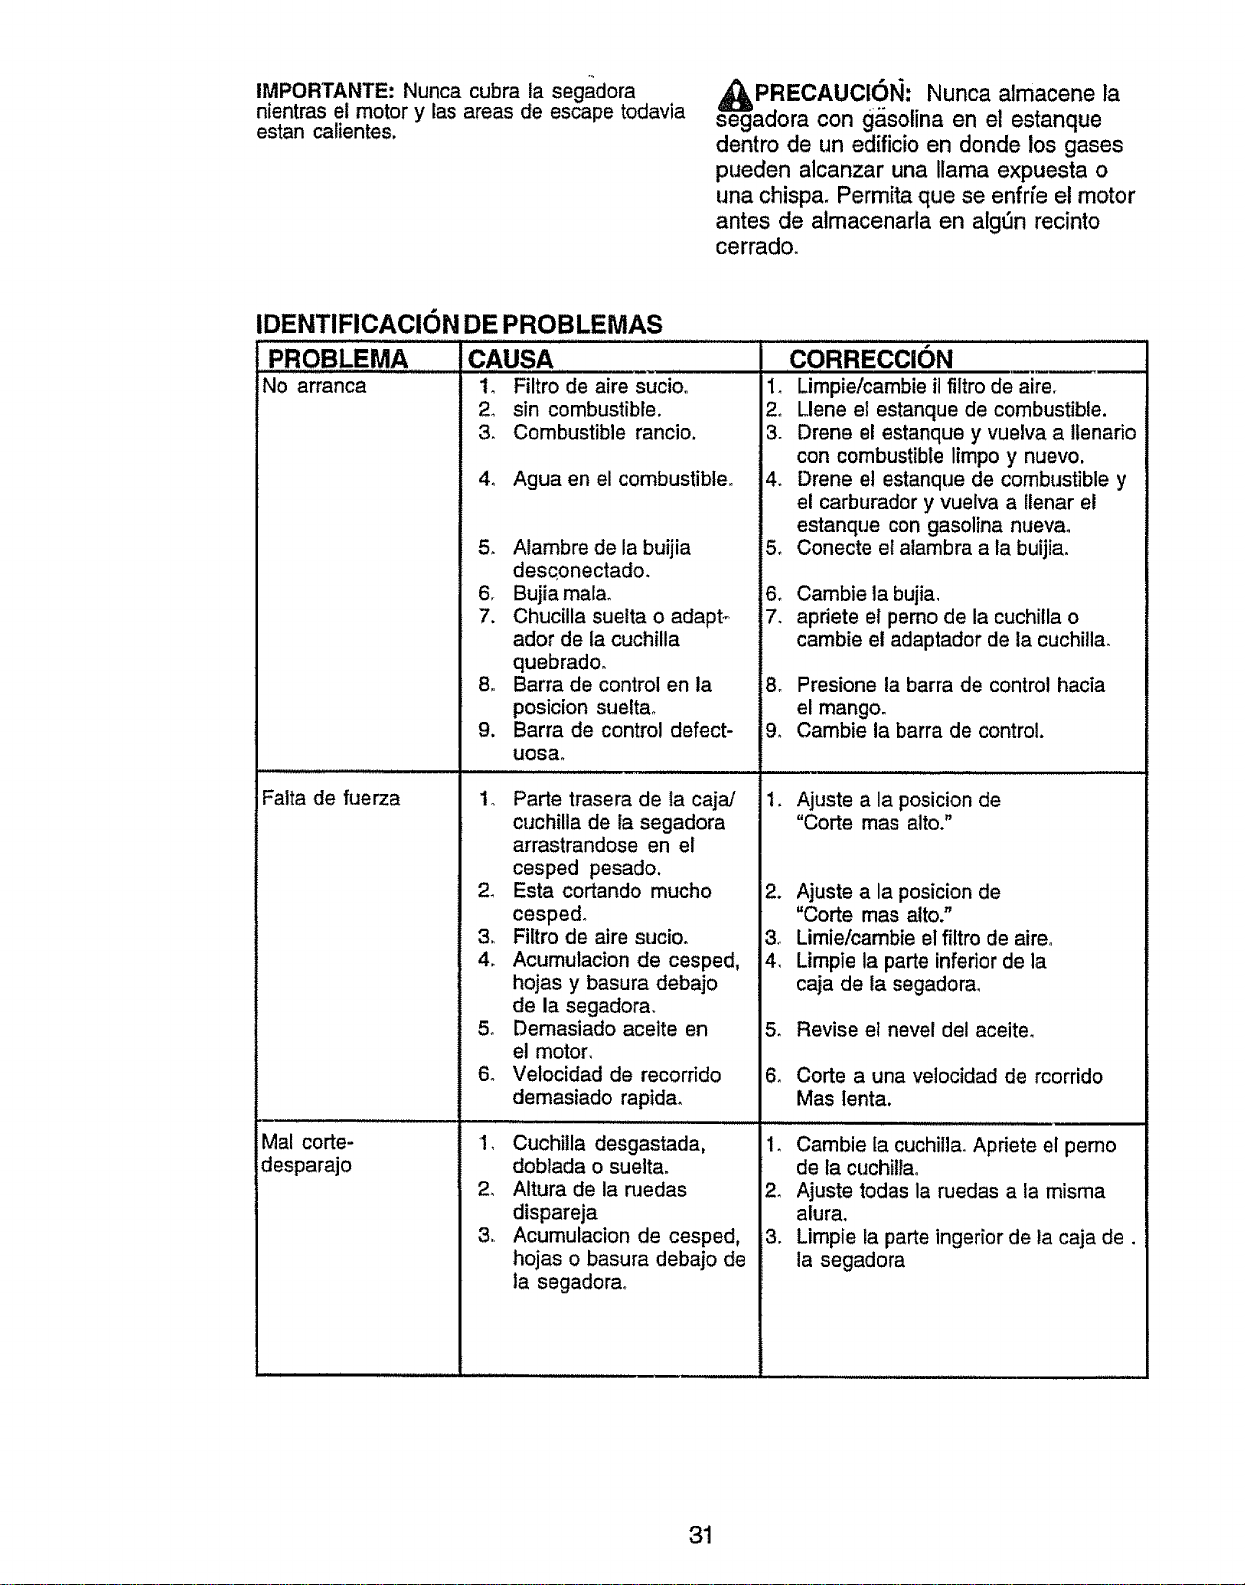
IMPORTANTE: Nunca cubra la segadora
nientras et motor y las areas de escape todavia
estan calientes.
se_gPRECAUCI61_: Nunca almacene la
adora con g_solina en el estanque
dentro de un edificio en donde los gases
pueden alcanzar una llama expuesta o
una chisp& Permita que se enfri'e el motor
antes de atmacenarla en algt3n recinto
cerrado.
IDENTIFICACION DE PROBLEMAS
PROBLEMA ICAUSA
No arranca
Falta de fuerza
Mal corte-
desparajo
1_ Filtro de aire sucioo
2_ sin combustible.
& Combustible rancio.
4. Agua en el combustible°
5. Alambre de la buijia
desconectado.
& Bujia mal&
7. Chucilla suelta o adapF
ador de la cuchilla
quebradoo
8o Barra de control en la
posicion sueltao
9. Barra de control defect-
uosao
1. Parte trasera de la cajaJ
cuchilla de la segadora
arrastrandose en el
cesped pesado.
2. Esta cortando mucho
cespedo
3. Filtro de aire sucio.
4. Acumulacion de cesped,
hojas y basura debajo
de la segadora.
5. Demasiado aceite en
el motor.
6. Velocidad de recorrido
demasiado rapid&
!. Cuchilla desgastada,
doblada o suelt&
2. Altura de la nJedas
dispareja
3. Acumulacion de cesped,
hojas o basura debajo de
la segadorao
C0RRECCION
1_ Lirnnpie/carnbie il filtro de aire,
2o Llene el estanque de combustible.
3. Drene el estanque y vuelva a Itenario
con combustible limpo y nuevo.
4o Drene et estanque de combustible y
el carburador y vuelva a llenar el
estanque con gasolina nueva,
5, Conecte el alambra a la buijia.
6. Cambie la bujia.
7. apriete el pemo de la cuchilla o
cambie et adaptador de la cuchilla.
8o Presione la barra de control hacia
el mango.
9. Cambie la barra de control.
1. Ajuste a la posicion de
"Corte mas alto."
i2. Ajuste a la posicion de
"Corte mas alto."
& Limie/cambie el filtro de aireo
4. Limpie la parte inferior de la
caja de ia segadora.
5o Revise et nevel det aceite.
6. Corte a una velocidad de rcorrido
Mas lenta.
1. Cambie [a cuchilla. Apriete el pemo
de la cuchillao
2. Ajuste todas la ruedas a la misma
alura.
3. Lirnpie la parte ingerior de la caja de.
la segadora
31

IDENTIFICACION DE PROBLEMAS
CAUSA CORRECClON
Vibracion excesiva
IL,,
Cordon arrancador
dificil de tirar
cesped no se Ilena
(si Viene epuipado)
1_ Cuchilla desgastada,
doblada o suelta.,
2. Clguenat del motor
doblado,
!. El freno del volante del
motor esta aplicado
cuando se suelta la
barra de control.
2o Ciguenal del motor
doblado
3. Adaptador de la cuchilla
quebrado.
4. La cuchilla de arrstra en
el cesped,
,i J,,,,,,,,,,,,,,,,,,,,,,,,,,,,,
1_ Altura de corte
demasiado baja,
2. Levantamiento de la
cuchilla desgastado.
3. Recogedor sin ventila-
cion de aim
1o El cesped esta demasiado
alto o la altura de la rueda
demasiado bajao
2_ Parte trasera de la caja/
cuchilla de la segadora
arrastandose en el
cesped.
3. Recogedor de cesped
demasiado ileno.
4o Psicion de ta altura del
mango no adecuada
para usted.
illl
Dificet de empujar
14 Cambie la cuchilla, Apdete el pemo
de la cuchilla.
2, Pngase en contacto con su centro de
servicio autodzado mas cercanoo
1. Presione la barra de control hacia el
mango superior antes de tirar
el cordon arrancadon
2o
3,
4o
Pongase en contacto con su centro
de servicio autorizado mas cercano,
Cambie el adaptador de la cuchitla.
Mueva la segadora a un lugar en
donde el cesped ha sido cortado o a
una Superficie firrne para hacer
arrancar el motor.
I. Eleve la altura de corte,
2. Cambie las cuchillas.
i3. Limpie el recogedor de cesped,
1. Eleva la alturade corte,
24
Eleve ta parte trasera de la caja
de la segadora (1) un lugar mas alto.
3. Vacie el recogedor de cesped.
4. Ajuste la altura del mango de modo
que le acomode
32

33

0
0
cO
cO
r_
Tm
Cv_
d
Z
..I
LU
|
t
LL]
C)
X
..I
t.r.
0
X
t_
€_
34

0
CXl
z
0
-I
ILl
0
I
0
Z
-I
>.,
0
rr
Z
,<
z
Iz o
,< m
l.U
13
"-R
0
"_ _:.,-"
_.,_: = ,_o<._
,r--'r _-- m _ Z=_. a
... " x =.- _.__ _ c_= -°,_
g
_o__o__ _
_ ____o__
¢,
0
.z=
"5
_._'='-a
t'_ _
0..
vZ
35
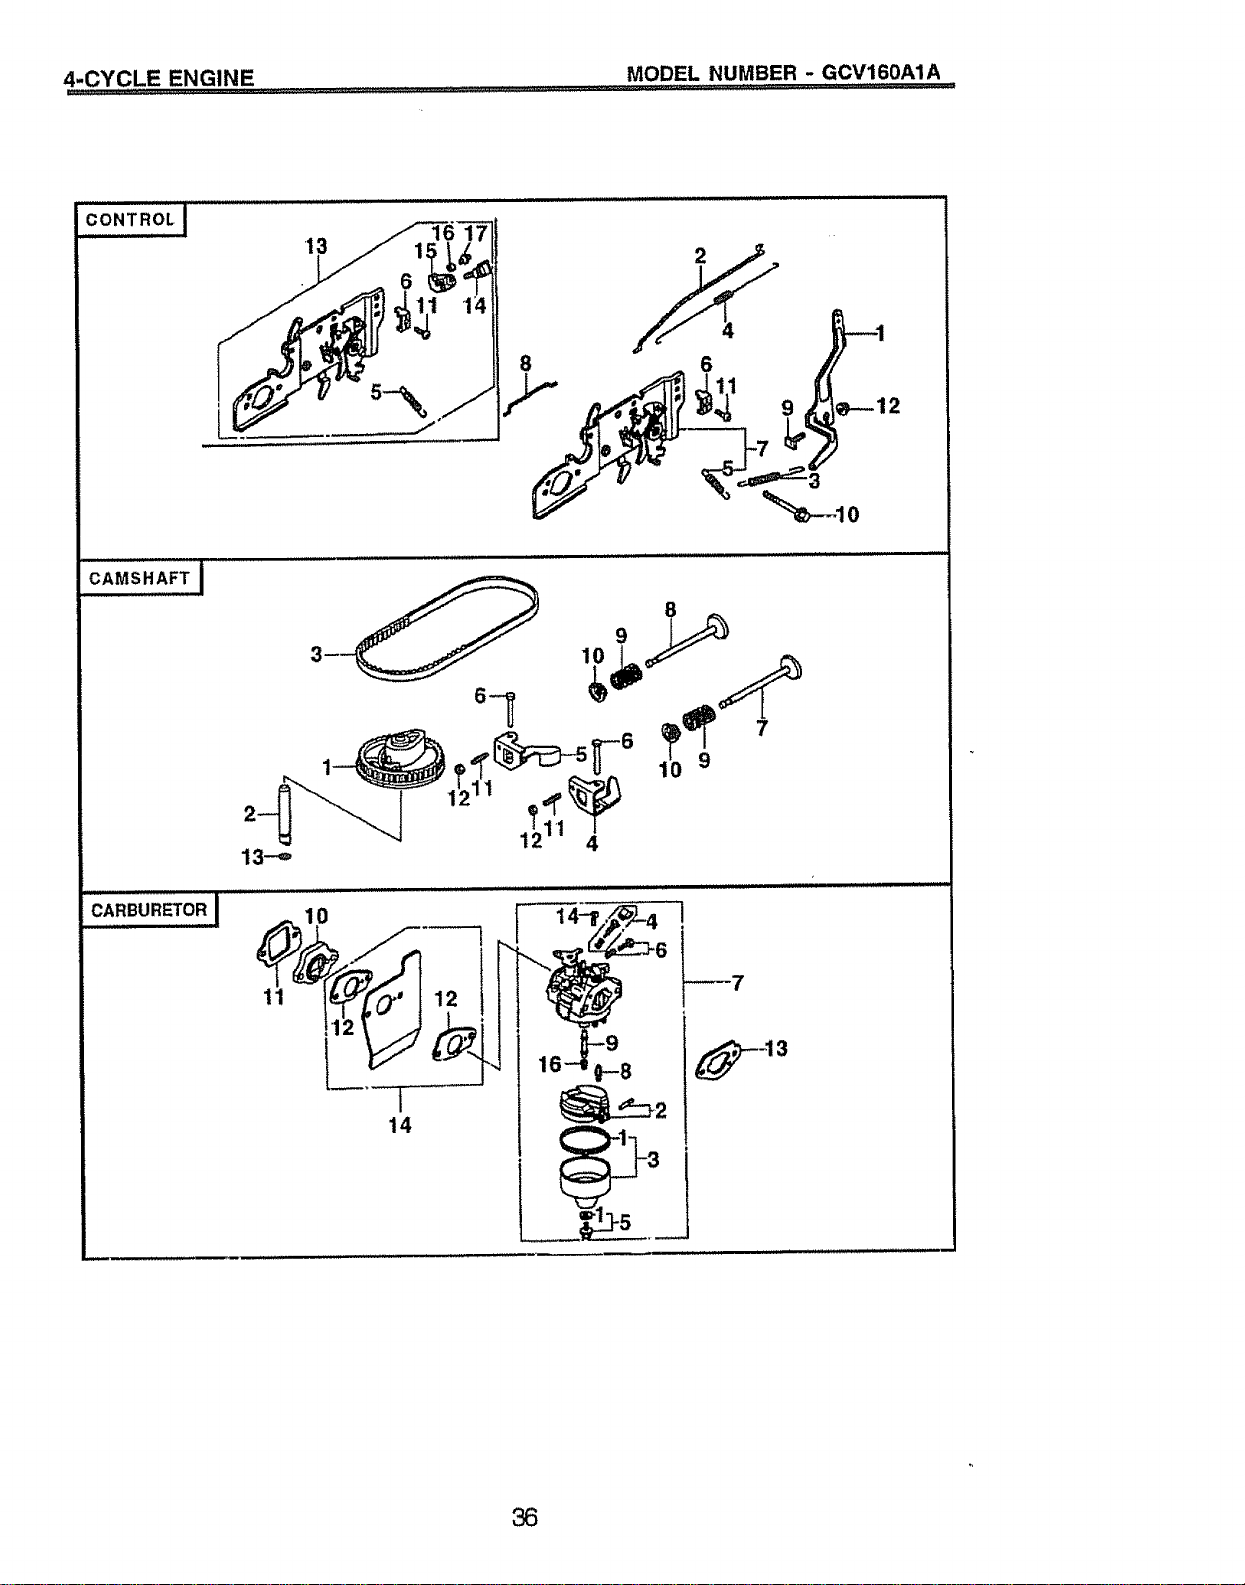
4_€._y.CLE ENGINE .............................................................................M°DEL NUMBER " GCV160AIA ,,,
CONTROL j
13
8
CAMSHAFT j
CARBURETOR J
13"-_
11
12 4
14
36
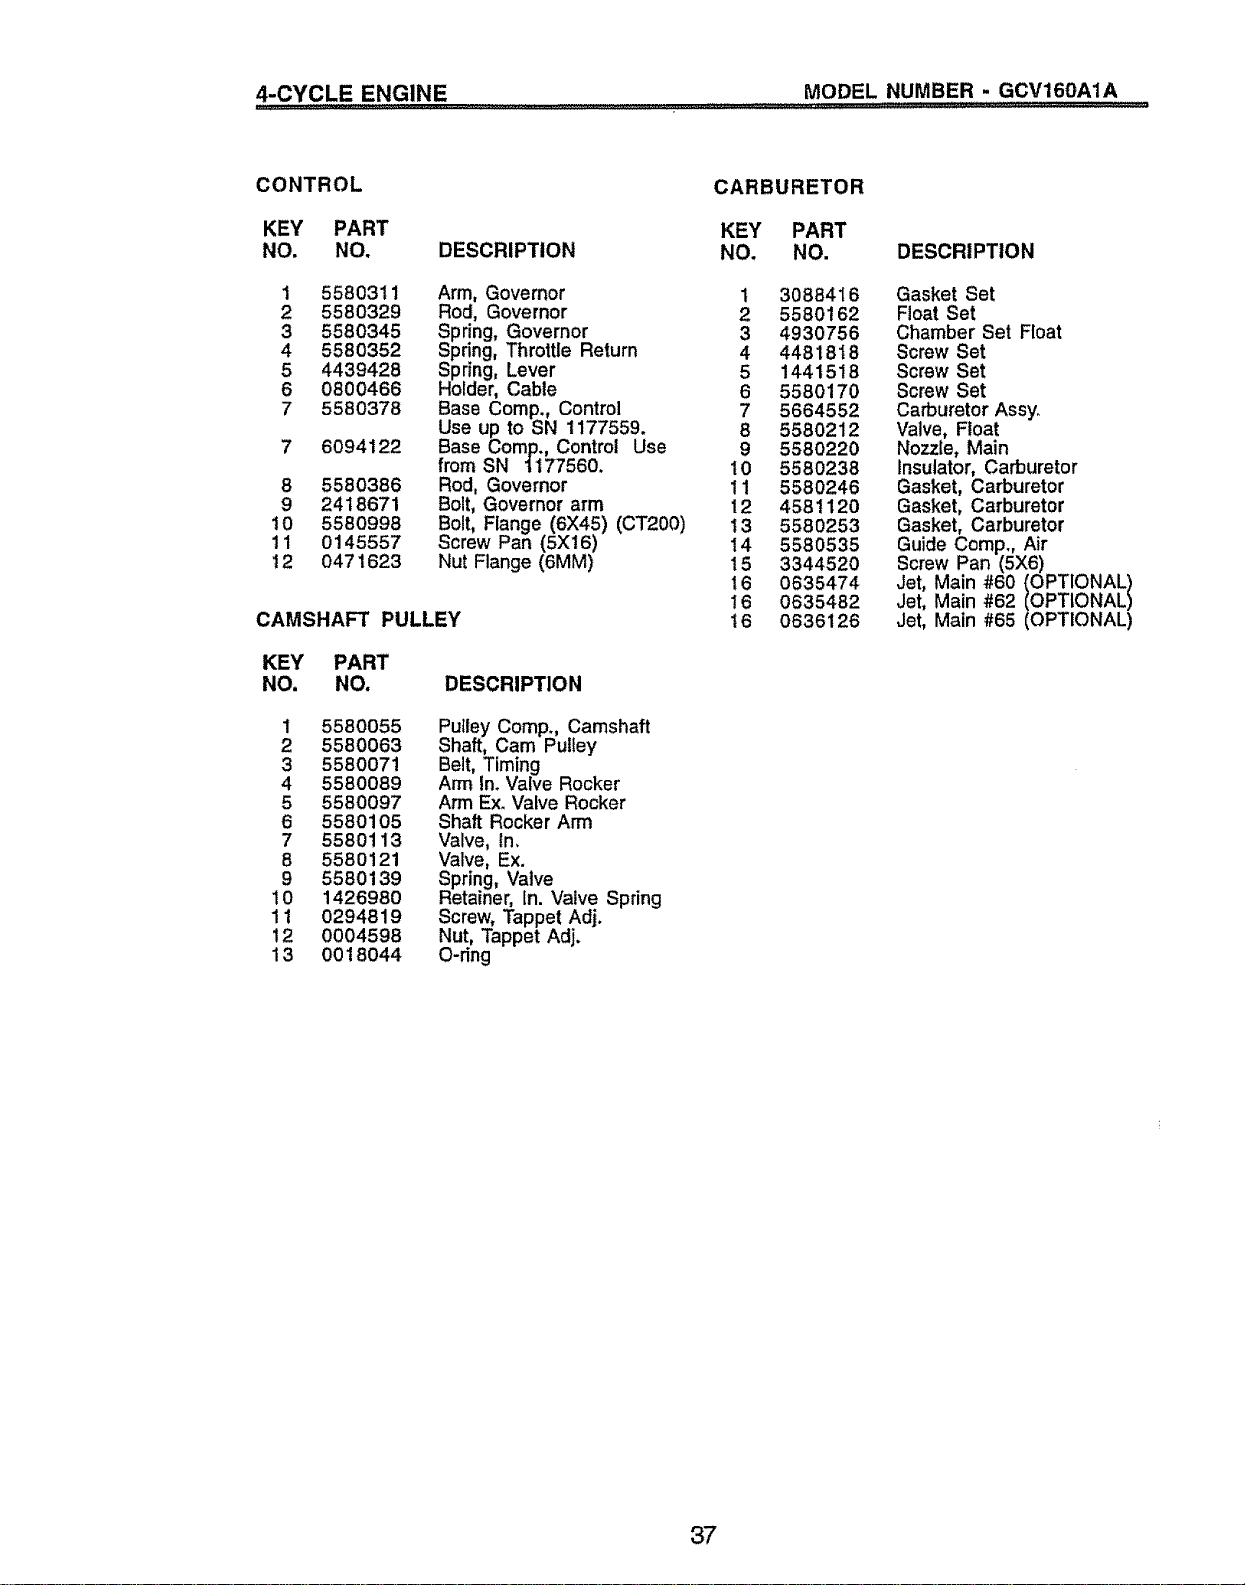
u4...CYCLE ENGINE ................................... MODEL NUMBER ,_.GCV160A1A ........
CONTROL
CARBURETOR
KEY PART KEY PART
NO. NO. DESCRIPTION NO. NO. DESCRIPTION
1 5580311 Arm, Governor 1 3088416 Gasket Set
2 5580329 Rod, Governor 2 5580162 Float Set
3 5580345 Spring, Governor 3 4930756 Chamber Set Float
4 5580352 Spring, Throttle Return 4 4481818 Screw Set
5 4439428 Spring, Lever 5 1441518 Screw Set
6 0800466 Holder, Cable 6 5580170 Screw Set
7 5580378 Base Comp., Control 7 5664552 Carburetor Assy.
Use up to SN 1177559. 8 5580212 Valve, Float
7 6094122 Base Comp., Control Use 9 5580220 Nozzle, Main
from SN 1177560. 10 5580238 insulator, Carburetor
8 5580386 Rod, Governor 11 5580246 Gasket, Carburetor
9 2418671 Bolt, Governor arm 12 4581120 Gasket, Carburetor
10 5580998 Bolt, Flange (6X45) (CT200) 13 5580253 Gasket, Carburetor
11 0145557 Screw Pan (5X16) I4 5580535 Guide Comp., Air
12 0471623 Nut Flange (6MM) 15 3344520 Screw Pan (5X6)
16 0635474 Jet, Main #60 (OPTIONAL)
I6 0635482 Jet, Main #62 (OPTIONAL)
CAMSHAFT PULLEY t6 0636126 Jet, Main #65 (OPTIONAL)
KEY PART
NO. NO. DESCRIPTION
1 5580055 Pulley Comp., Camshaft
2 5580063 Shaft, Cam Pulley
3 5580071 Belt, Timing
4 5580089 Arm In_Valve Rocker
5 5580097 Arm Ex. Valve Rocker
6 5580105 Shaft Rocker Arm
7 5580113 Valve, In.
8 5580121 Valve, Ex.
9 5580139 Spring, Valve
10 1426980 Retainer, In. Valve Spring
11 0294819 Screw, Tappet Adj.
12 0004598 Nut, Tappet Adj.
13 00 ! 8044 O-ring
37
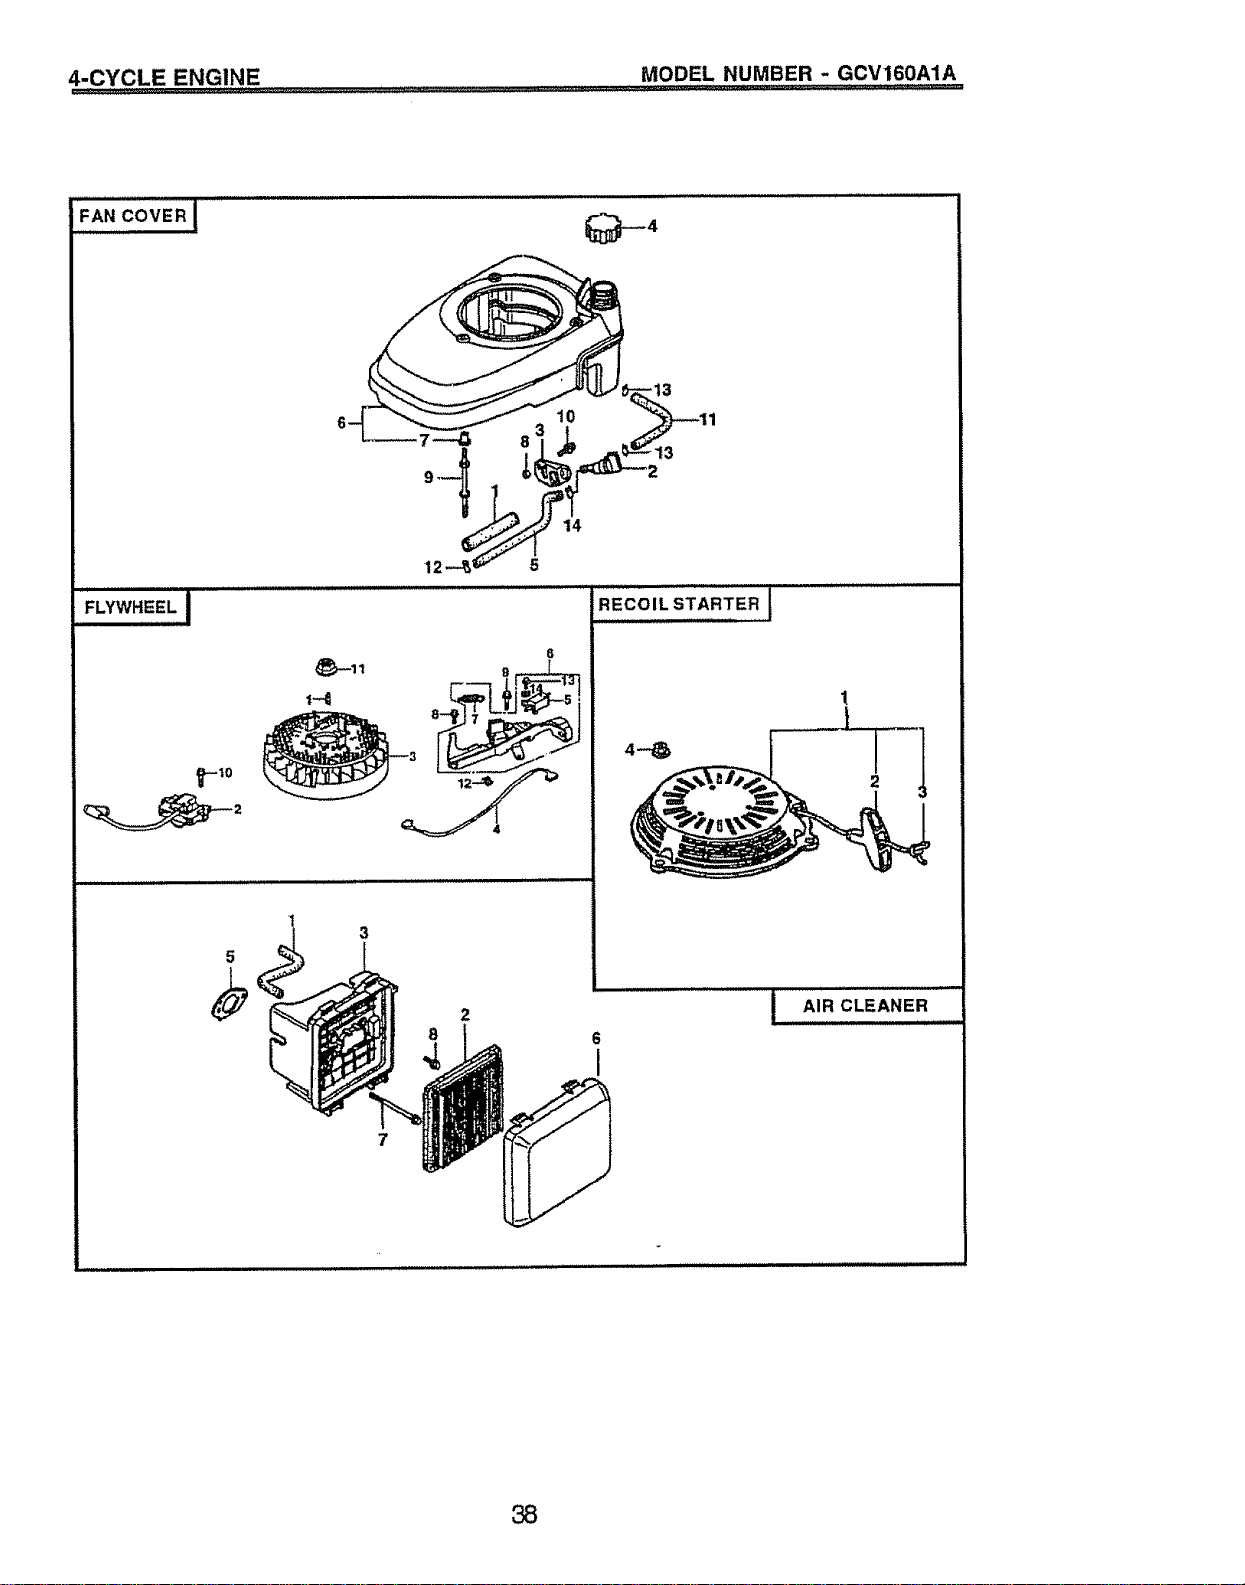
MODEL NUMBER - GCVI60AIA
F,A_,CO_RI
FLYWHEEL I
_.--10
12_
_P-1t
1
3
5
RECOIL STARTER I
4
2
6
I
38
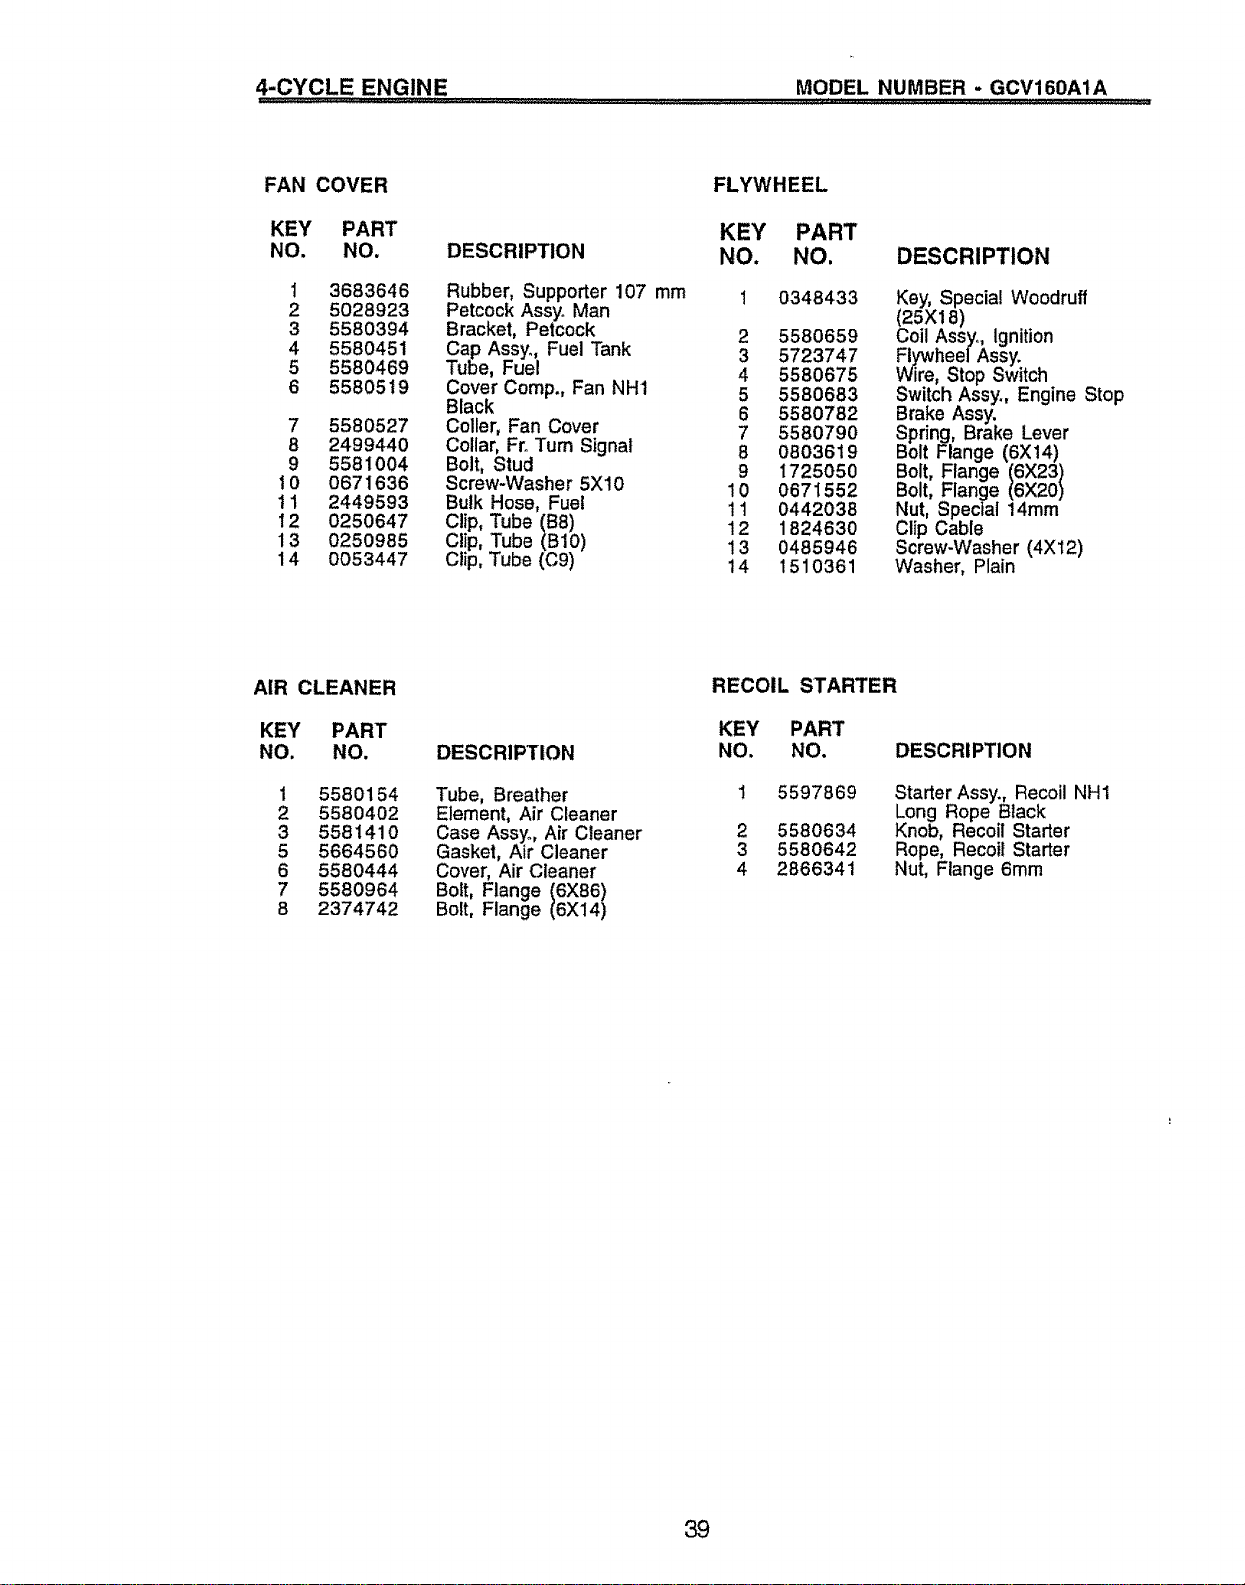
4-CYCLE,,,,ENG!,NE .................................. MODEL NUMBER - GCV160AIA ..........
FAN COVER FLYWHEEL
KEY PART KEY PART
NO. NO. DESCRIPTION NO. NO. DESCRIPTION
1 3683646 Rubber, Supporter 107 mm 1 0348433
2 5028923 Petcock AssyoMan
3 5580394 Bracket, Petcock 2 5580659
4 5580451 Cap Assy. Fuel Tank 3 5723747
5 5580469 Tube, Fuel 4 5580675
6 5580519 Cover Comp. Fan NH1 5 5580683
Black 6 5580782
7 5580527 Coller, Fan Cover 7 5580790
8 2499440 Collar, FroTurn Signal 8 0803619
9 5581004 Bolt, Stud 9 1725050
10 0671636 Screw-Washer 5X10 10 0671552
11 2449593 Bulk Hose, Fue! 11 0442038
12 0250647 Clip, Tube (B8) 12 1824630
13 0250985 Clip, Tube (B10) 13 0485946
14 0053447 Clip, Tube (C9) 14 1510361
Key, Special Woodruff
(_o5x18)
it Assyo, Ignition
FlywheelAssyo
Wire, Stop Switch
Switch Assy. Engine Stop
Brake Assy.
Spring, Brake Lever
Bolt Flange (6X14)
Bolt, Flange (6X23)
Bolt, Flange (6X20)
Nut, Speclal 14ram
Clip Cable
Screw-Washer (4Xt2)
Washer, Plain
AIR CLEANER
RECOIL STARTER
KEY PART KEY PART
NO. NO. DESCRIPTION NO. NO.
Tube, Breather
Element, Air Cleaner
Case Assyo, Air Cleaner
Gasket, Air Cleaner
Cover, Air Cleaner
Bolt, Flange (6X86)
Bolt, Flange (6X14)
1 5580154
2 5580402
3 558141O
5 5664560
6 5580444
7 5580964
8 2374742
DESCRIPTION
5597869
2 5580634
3 5580642
4 2866341
Starter Assy. Recoil NH1
Long Rope Black
Knob, Recoil Starter
Rope, Recoil Starter
Nut, Flange 6mm
39
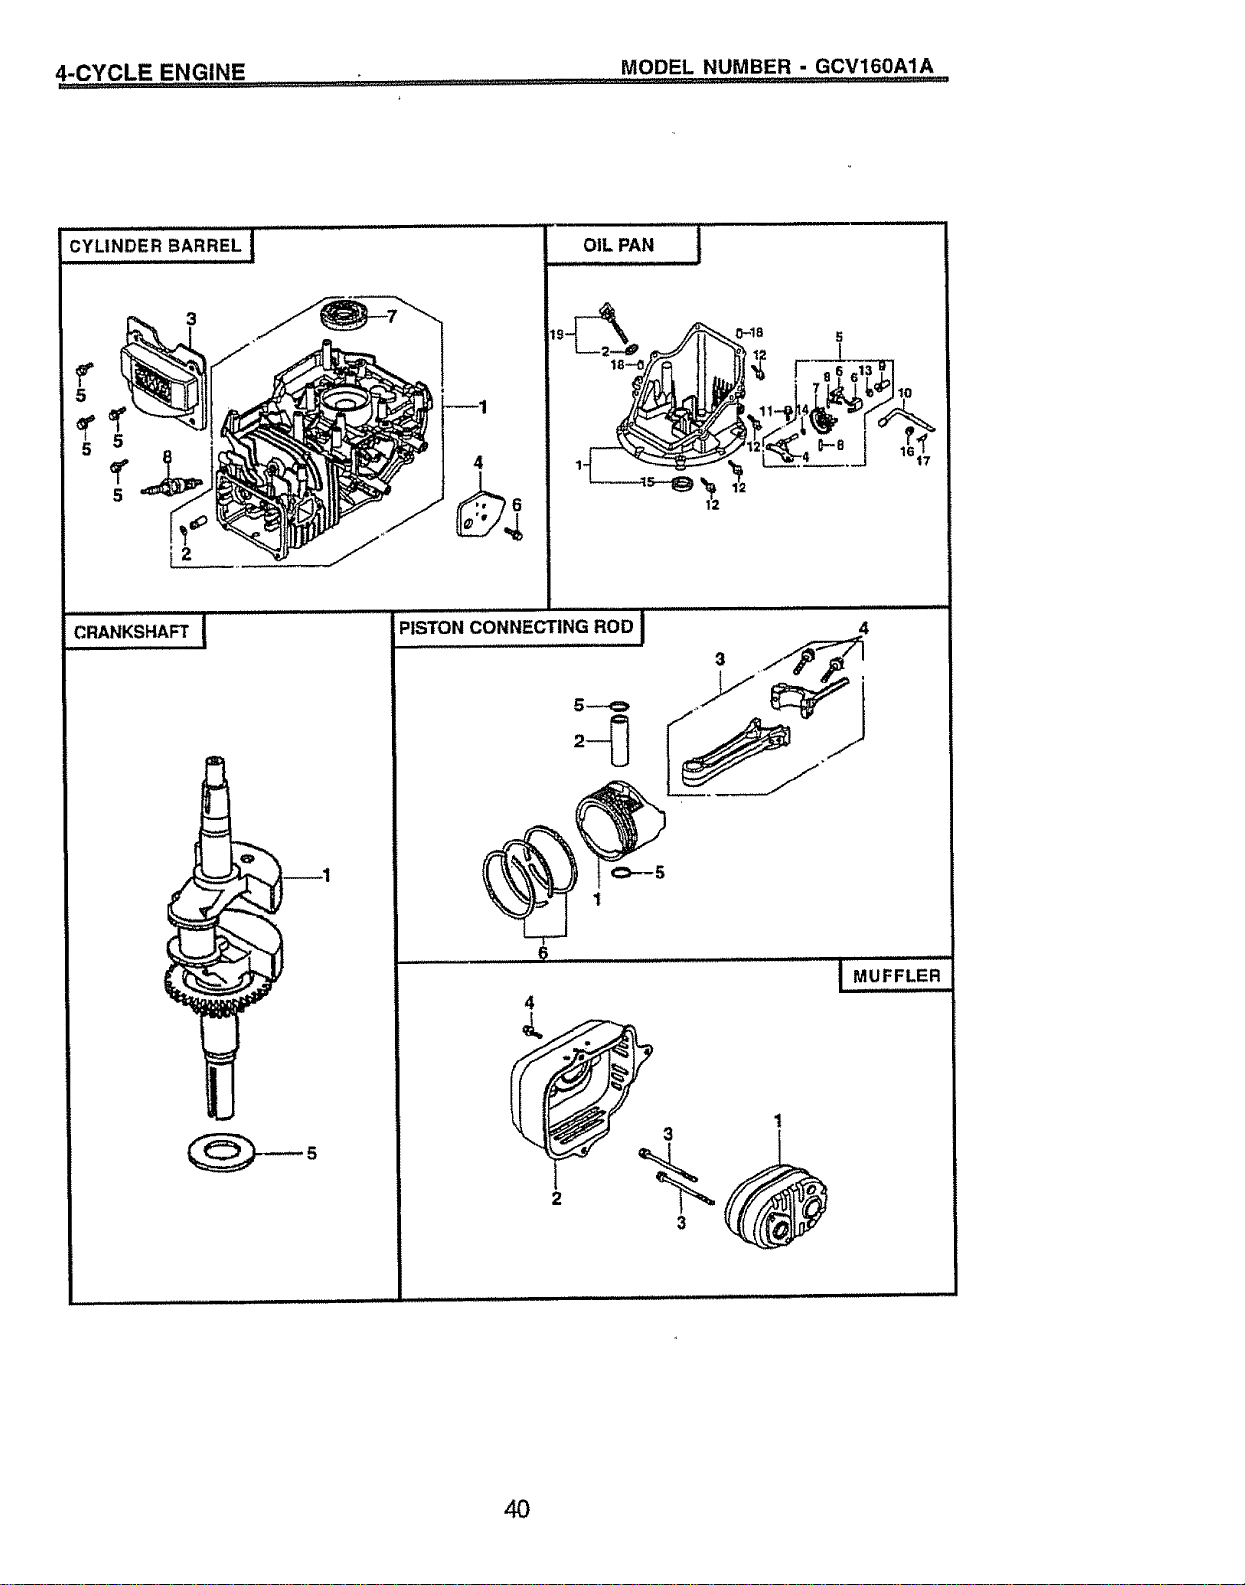
4.CYCLE ENGIN E ................... :........... ..........................................MODEL NUMBER,,,- GCV160AIA
CYLINDER BARREL [
CRANKSHAFT [
OIL PAN
PISTONCONNECTINGROD I
6
4
,k
0-18 5
_3 1
3
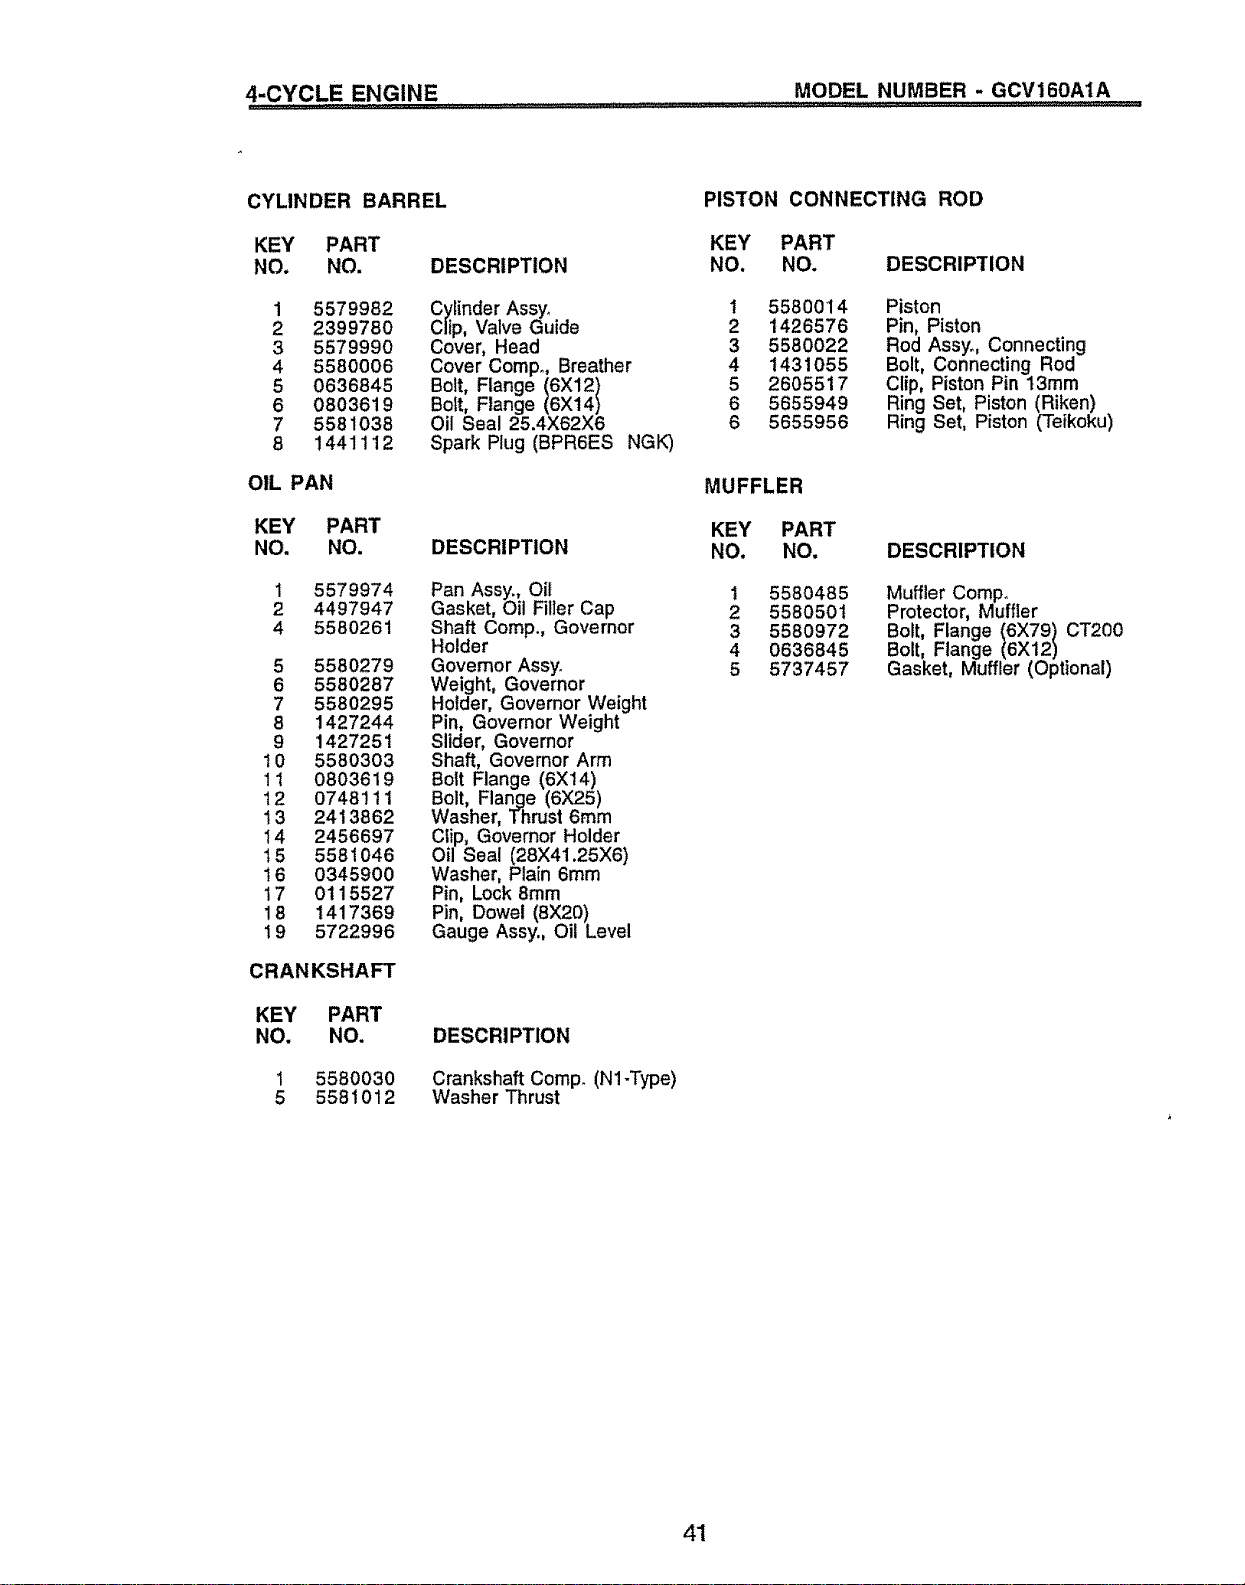
4-CYCLE ENGINE MODEL NUMBER - GCV160A1A
CYLINDER BARREL
KEY PART
NO. NO.
DESCRIPTION
1 5579982
2 2399780
3 5579990
4 5580006
5 0636845
6 0803619
7 5581038
8 1441112
OIL PAN
Cylinder Assy.
Clip, Valve Guide
Cover, Head
Cover Compo, Breather
Bolt, Flange (6X12)
Bolt, Flange (6X14)
Oil Seal 25.4X62X6
Spark Plug (BPR6ES NGK)
KEY PART
NO. NO. DESCRIPTION
1 5579974
2 4497947
4 5580261
5 5580279
6 5580287
7 5580295
8 1427244
9 1427251
10 5580303
11 0803619
12 0748111
13 2413862
14 2456697
t5 5581046
16 O345900
17 0115527
18 1417369
19 5722996
CRANKSHAFT
Pan Assy., Oil
Gasket, Oil Filler Cap
Shaft Comp., Governor
Holder
Govemor Assyo
Weight, Governor
Holder, Governor Weight
Pin, Governor Weight
Slider, Governor
Shaft, Governor Arm
Bolt Flange (6Xt4)
Bolt, Flange (6X25)
Washer, Thrust 6mm
Clip, Governor Holder
Oil Seal (28X41.25X6)
Washer, Plain 6ram
Pin, Lock 8mm
Pin, Dowel (8X20)
Gauge Assy., Oil Level
KEY PART
NO. NO. DESCRIPTION
1 5580030
5 5581O12
Crankshaft Comp. (N1-Type)
Washer Thrust
PISTON CONNECTING ROD
KEY PART
NO. NO. DESCRIPTION
1 5580014 Piston
2 1426576 Pin, Piston
3 5580022 Rod Assy., Connecting
4 1431055 Bolt, Connecting Rod
5 2605517 Clip, Piston Pin 13mm
6 5655949 Ring Set, Piston (Riken)
6 5655956 Ring Set, Piston (Teikoku)
MUFFLER
KEY PART
NO. NO,
1 5580485
2 5580501
3 5580972
4 0636845
5 5737457
DESCRIPTION
Muffler Comp°
Protector, Muffler
Bolt, Flange (6X79) CT200
Bolt, Flange (6X12)
Gasket, Muffler (Optional)
41

42

43

For in-home major brand repair service:
Gall 24 hoursa day, 7 days a week
1-800-4-MY-Home sM(1-800-469-4663)
Para pedir servicio de reparaci6n a domicilio
1-800-676-5811
In Canada for all your service and parts needs call
Au Canada pour tout ie service ou les pi6ces
1-800-665-4455
For the repair or replacement parts you need:
Call 6 am-11pm CST, 7 days a week
PartsDirect sM
1-800-366-PART (1-800-366-7278)
Para ordenar piezas con entrega a domicilio
1-800-659-7084
For the location of a Sears Parts and Repair Center
in your area:
Call 24 Hoursa day, 7 days a week
1-800-488-1222
For information on purchasing a Sears Maintenance
Agreement or to inquire about an existing Agreement:
Call 9 am-5 pm, Monday - Saturday
1-800-827-6655
169864 05.19.99 VB Printed in U.S.A.
........................,i ,i,I u! ................,