Loading ...
Loading ...
Loading ...
BEFORE LIGHTING: ENTIRE SYSTEM MUST BE FILLED WITH WATER AND AIR PURGED FROM ALL LINES
A. This appliancehas.a .pi.Iotwhich islit.by a piezo-
elec_ncsparKgasj,gnluonsystem, uo n_.g.o_qpen
_neinner aoor of me appliance and _ry_oIIgh_
the pilot by hand.
B.BEFORELIGHTINGsmell aII around the appliance
area for gas. Be sure to smell next to the floor
because some gas is heavier than air and will
settle on the floor.
WHAT TO DO IF YOU SMELL GAS
oDo not try to light any appliance.
*Do not touch any electric switch; do not use any
phone in your building.
elmmediately call your gas supplier from a neighbor's
phone. Follow the gas supptier's instructions.
*If you cannot reach your gas supplier, call the fire
department.
C.Use only your hand to push in or turn the gas control
knob. Never use tools. If the knob wilt not push in or
turn by hand, don't try to repair it, call a qualified
service technician. Force or attempted repair may
result in a fire or explosion.
D. Do not use this appliance if any part has been under
water. Immediately contact a qualified installer or
service agency to replace a flooded water heater.
Do not attempt to repair the unit! It must be replaced!
.
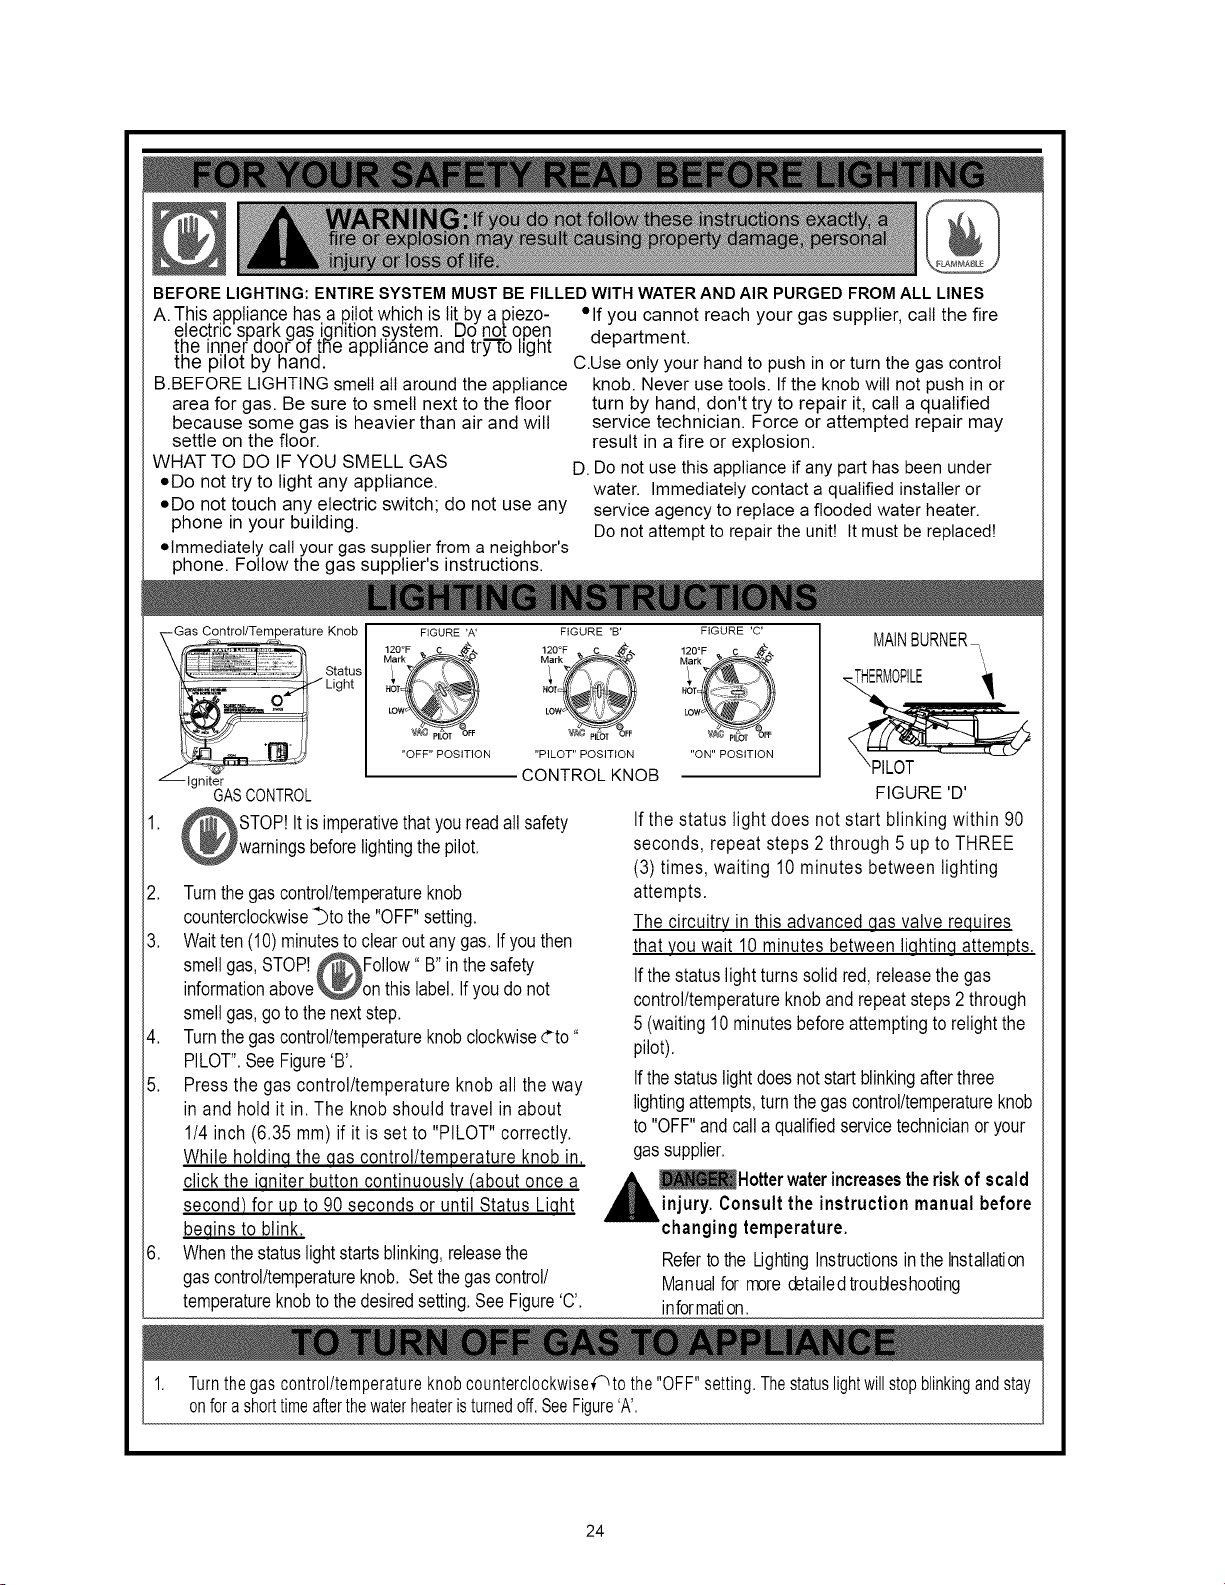
-Gas Control/Temperature Knob
--Igniter
GASCONTROL
STOP!It isim
FIGURE W
120°F C ..,.
Mi;'
HO_
LOW
"OFF" POSITION
FIGURE 'B'
120°F C .-..
HUr_
LOW
"PILOT" POSITION
CONTROL KNOB
youreadall safety
lightingthepilot.
2. Turnthegascontrol/temperatureknob
counterclockwise_to the"OFF"setting.
3. Waitten(10)minutestoclearoutanygas.Ifyouthen
gas,
smell STOP._Follow B in thesafety
informationabove,on thislabel.If youdo not
smellgas,gotothenextstep.
4. Turnthegascontrol/temperatureknobclockwise¢to"
PILOT".SeeFigure'B'.
5. Pressthe gas control/temperature knoball theway
in and hold it in.The knob shouldtravel in about
1/4 inch(6.35 mm) if it is set to "PILOT"correctly.
While holdinq the qas control/temperature knob in,
click the iqniter button continuously (about once a
second) for up to 90 secondsor until Status Liqht
beqinsto blink.
6. Whenthestatuslightstartsblinking,releasethe
gascontrol/temperatureknob. Setthegascontrol/
temperatureknobtothedesiredsetting.SeeFigure'C'.
FIGURE 'C'
MAINBURNER_
"ON" POSITION "PILOT !
FIGURE 'D'
If the status light does not start blinkingwithin 90
seconds, repeat steps 2 through 5 up to THREE
(3) times, waiting 10 minutes betweenlighting
attempts.
The circuitry in this advancedqas valve requires
that you wait 10 minutesbetween liqhtinqattempts.
Ifthestatuslightturnssolidred,releasethegas
control/temperatureknoband repeatsteps2 through
5 (waiting10minutesbeforeattemptingtorelightthe
pilot).
Ifthestatuslightdoesnotstartblinkingafterthree
lightingattempts,turnthegascontrol/temperatureknob
to"OFF"andcalla qualifiedservicetechnicianor your
gassupplier.
_Hotter waterincreasestheriskof scald
injury. Consultthe instructionmanualbefore
changingtemperature.
Refertothe UghtingInstructionsinthe Installation
Manualformoredetailedtroubleshooting
information.
1. Turnthegascontrolltemperatureknobcounterclockwise€_to the"OFF"setting.Thestatuslightwillstopblinkingandstay
onforashorttimeafterthewaterheateristurnedoff.SeeFigure'A'.
24
Loading ...
Loading ...
Loading ...