Use & Care Guide for Kenmore Elite 10674206400
Table of Contents
- WARRANTY
- REFRIGERATOR SAFETY
- Proper Disposal of Your Old Refrigerator
- INSTALLATION INSTRUCTIONS
- Unpack the Refrigerator
- Location Requirements
- Electrical Requirements
- Water Supply Requirements
- Connect the Water Supply
- Refrigerator Doors - Contour
- Adjust the Doors
- Prepare the Water System
- Normal Sounds
- REFRIGERATOR USE
- Ensuring Proper Air Circulation
- Using the Controls
- Water Dispenser
- Water Filter Status Light
- Water Filtration System
- Ice Maker
- REFRIGERATOR FEATURES
- Refrigerator Shelves
- Crispers and Meat Drawers
- Crisper Humidity Control
- Chilled Meat Drawer
- Wine or Can/Bottle Rack
- Utility or Egg Bin
- FREEZER FEATURES
- Freezer Shelf
- Adjustable Half-width Freezer Shelf
- Pull-out Freezer Floor
- DOOR FEATURES
- Tilt-out Freezer Basket
- Snap-on Door Rails
- Door Bins
- Adjustable Utility Compartment & Tray
- Door Chill
- REFRIGERATOR CARE
- Cleaning
- Changing the Light Bulbs
- Power Interruptions
- Vacation and
- Moving Care
- TROUBLESHOOTING
- PROTECTION AGREEMENTS
- In the U.S.A
- In Canada
- Accessories
- WATER FILTER CERTIFICATIONS
- PRODUCT DATA SHEETS
- SERVICE NUMBERS
REFRIGERATOR USE
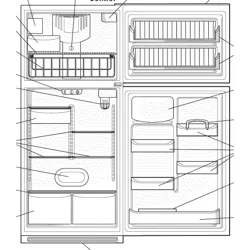
Ensuring Proper Air Circulation
In order to ensure proper temperatures, you need to permit airflow between the refrigerator and freezer sections. As shown in the illustration, cool air from the refrigerator enters through the bottom of the freezer section and moves up. Most of the air then flows through the freezer section vents and recirculates under the freezer floor. The rest of the air enters the refrigerator section through the top vent and flows down the back of the refrigerator compartment. This air is then evenly distributed throughout the refrigerator compartment through the eight vents.
Do not block any of these vents with food packages. If the vents are blocked, airflow will be prevented and temperature and moisture problems may occur.
IMPORTANT: Because air circulates between both sections, any odors formed in one section will transfer to the other. You must thoroughly clean both sections to eliminate odors. To prevent odor transfer and drying out of food, wrap or cover foods tightly.
Using the Controls
IMPORTANT:
• The Refrigerator control adjusts the refrigerator compartment temperature. The Freezer control adjusts the freezer compartment temperature.
• Wait 24 hours after you turn on the refrigerator before you put food into it. If you add food before the refrigerator has cooled completely, your food may spoil. Adjusting the Refrigerator and Freezer controls to a lower (colder) setting will not cool the compartments any faster.
• If the temperature is too warm or too cold in the refrigerator or freezer, first check the air vents to be sure they are not blocked, before adjusting the controls.
• The preset settings should be correct for normal household usage. The controls are set correctly when milk or juice is as cold as you like and when ice cream is firm.
Digital Controls
For your convenience, your controls are preset at the factory. When installing your refrigerator, make sure that the controls are still preset to the "set points" as shown.
IMPORTANT:
• The display in the power on mode indicates the freezer and refrigerator set points.
• The factory recommended set points are 0°F (-18°C) for the freezer and 37°F (3°C) for the refrigerator.
To Turn the Refrigerator Power On/Off and View Set Points:
• Press and hold ON/OFF for 2 seconds to turn on/off the digital control panel and the refrigerator cooling.
IMPORTANT: Pressing the power on/off button, while in the power on mode, turns off the display and product cooling.
NOTE: If the freezer set point is below zero, the indicator light next to the freezer display will light up.
To View the Celsius Set Points:
• Press the °C SELECT touch pad. The indicator will light up.
Adjusting Digital Controls
To Adjust Set Point Temperatures:
• Press the refrigerator or freezer up or down arrow until the desired temperature is reached.
NOTE: Wait at least 24 hours between adjustments and then recheck the temperatures before other adjustments are made.
• The set point range for the freezer is -5°F to 5°F (-21°C to -15°C) and 33°F to 45°F (1°C to 7°C) for the refrigerator.
Additional Digital Control Panel Features
Additional features are located on the control panel at the top of the refrigerator compartment.
GrocerySavor TM
The GrocerySavor TM feature assists with periods of high refrigerator use, full grocery loads, or temporarily warm room temperatures.
• Press GROCERY SAVOR TM to set the temperatures to the lowest temperature for the freezer and for the refrigerator. The GrocerySavor TM indicator light will remain on for 24 hours unless manually turned oft.
NOTE: The temperature display will not change. After 24 hours, the refrigerator and freezer compartments return to the previous temperature set points.
Acceler Ice Production
This feature assists with temporary periods of heavy ice use by increasing ice production.
• Press the Acceler Ice_i touch pad to turn on the feature. The accelerated ice setting will remain on until manually turned off.
NOTE: When the Acceler Ice _i feature is on, the freezer temperature will cool to the lowest temperature. When the ice storage bin is full, the freezer temperature will return to the normal set point.
Control Lockout
This feature will disable the control touch pads to prevent unintentional control setting changes.
NOTE: Control lockout does not shut oft power to the refrigerator.
• To disable the controls, press and hold the LOCK touch pad for 2 seconds. To reactivate the controls, press and hold the LOCK touch pad for 2 seconds.
Water Dispenser
IMPORTANT:
- If you did not flush the water system when the refrigerator was first installed, press the water dispenser paddle with a glass or jar until you draw and discard 2 to 3 gal. (8 to 12 L) or approximately 5 minutes of water after water begins dispensing. It will take 3 to 4 minutes for the water to begin dispensing. The water you draw and discard cleans the system and helps clear air from the lines. Allow several hours for the refrigerator to cool down and chill water.
NOTE: After 4 minutes of continuous dispensing, the dispenser will stop dispensing to avoid flooding. To continue dispensing, remove the glass and press the dispensing paddle again.
- When the refrigerator compartment door is open, the dispenser will not dispense water and the dispenser control panel will not display or receive input. The previous settings will be retained.
Dispense Water
1. Press a sturdy glass against the paddle to start dispensing.
2. Release pressure on the paddle and be sure the water has stopped dispensing before removing the glass.
NOTE: Water may have an off-flavor if you do not use the dispenser periodically. Dispense enough water every week to maintain a fresh supply.
Remove and Replace Dispenser Paddle
The removable paddle is designed to catch small spills and allow for easy cleaning. There is no drain in the paddle. The paddle can be removed from the dispenser to be emptied or cleaned.
IMPORTANT: Press and hold LOCK OUT for 2 seconds to activate the dispenser lock feature before removing the dispenser paddle. See "The Dispenser Lock."
1. Press up on the dispenser paddle, as shown, to release.
2. Pull down on the dispenser paddle to remove.
3, Replace the dispenser paddle by firmly snapping it into the dispenser cover as shown.