Loading ...
Loading ...

WiFi is a trademark of the Wi-Fi Alliance.
BEFORE YOU BEGIN:
• The EcoNet WiFi Kit is intended for use with EcoNet Enabled
Electric Water Heaters and Hybrid Heat Pump Water Heaters
only. Do not attempt to use this kit with other equipment.
• The EcoNet WiFi Kit requires a broadband home Internet connection
and WiFi network in order to operate. Use a mobile phone
or other WiFi capable device to ensure that the home’s WiFi network
is accessible from the Water Heater’s location.*
STEP 1: Record the MAC Address
• Locate the MAC Address on the back of your module as depicted in Figure 1,
and record it. You will need this information in the future and may be asked
for it during the setup process. Take a digital photo using a mobile device,
or write it in the space provided below.
MAC Address: _____-_____-_____-_____-_____-_____
STEP 2: Connect the Communication Cable
• Insert one end of the Communication Cable into the jack found on
the bottom of the WiFi module as depicted in Figure 2.
• Insert the other end of the Communication Cable into the EcoNet port on your Water
Heater as depicted in Figure 3. Refer to your unit’s Use and Care Manual for exact location.
STEP 3: Permanently Attach the WiFi Module
• Ensure that both plugs on the Communication Cable
are securely attached as described above.
• Remove the protective paper from one side of the Adhesive Tape and affix it
to the back of the WiFi Module above the label with the MAC Address.
• Select a location for attaching the WiFi Module to the Water Heater Tank
which does not cause severe tension in the Communication Cable.
• Remove the protective paper from the remaining side of the Adhesive Tape and press the
Module against a clean flat surface of the Water Heater Tank as depicted in Figure 4.
STEP 4: Install the Water Sensing Cable
• Locate the Water Sensing Cable provided with your Water Heater and install
it by following the steps described in your unit’s Use and Care Manual.
STEP 5: Connecting to the Internet
• After the WiFi Module is installed and the Water Heater is powered, all three LEDs should
blink simultaneously, indicating that the module is ready to be configured for use on the
home network. [NOTE: In this state the module is operating as a WiFi Access Point.]
• If you haven’t already, download the free EcoNet App from
the Apple App Store or Google Play store.
• Ensure that you have the MAC Address you captured in Step 1 above.
• While near the WiFi module, open the EcoNet app and follow the instructions presented
within the app. [NOTE: Some mobile devices may fail to re-launch the EcoNet app after
the first network connection step is completed. In order to continue installation, manually
return to the EcoNet app and follow the remaining instructions.]
For additional assistance,
call 1-800-255-2388
*If your WiFi signal strength is too weak at your Water Heater’s location, you may still be able to use the
WiFi Kit by using a WiFi Range Extender. Contact your favorite electronics retailer for more information.
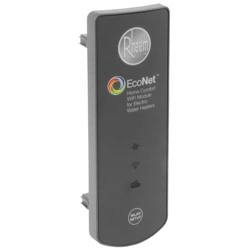
Middle LED indicates
WiFi connection.
Top LED indicates power and
connection to equipment.
Lower LED indicates an active
connection to the cloud/server.
The WLAN SETUP button
is used to reset the WiFi
configuration/connection.
Fig. 5
WiFi est une marque de commerce de la WiFi Alliance.
AVANT DE COMMENCER:
• Le kit WiFi EcoNet est conçu uniquement pour une utilisation
avec les chauffe-eau électriques et les chauffe-eau
hybrides à thermopompe qui acceptent EcoNet. N’essayez
pas d’utiliser ce kit avec un autre équipement.
• Pour fonctionner, le kit WiFi EcoNet requiert une connexion Internet
à large bande avec un réseau WiFi. Utilisez un téléphone mobile
ou autre dispositif à capacité WiFi pour assurer que le réseau WiFi
résidentiel est accessible de l’emplacement du chauffe-eau.*
ÉTAPE1: Enregistrer l’adresse MAC
• Trouvez l’adresse MAC au dos de votre module tel qu’illustré à la
Figure1 et enregistrez-la. Vous aurez besoin de ces renseignements à
l’avenir et il se peut qu’ils vous soient réclamés pendant le processus
d’installation. Prenez une photo numérique au moyen d’un appareil
mobile ou écrivez-la dans l’espace fourni ci-dessous.
Adresse MAC: _____-_____-_____-_____-_____-_____
ÉTAPE2: Brancher le câble de communication
• Insérez une extrémité du câble de communication dans la prise située
en bas du module WiFi comme illustré dans la Figure2.
• Insérez l’autre extrémité du câble de communication dans le port EcoNet de
votre chauffe-eau comme illustré dans la Figure3. Reportez-vous au guide
d’utilisation et d’entretien de votre unité pour l’emplacement exact.
ÉTAPE3: Installer le module WiFi de façon permanente
• Assurez-vous que les deux fiches du câble de communication
sont solidement branchées, tel que décrit ci-dessus.
• Retirez la pellicule protectrice d’un côté du ruban adhésif et placez-le au dos
du module WiFi, au-dessus de l’étiquette portant l’adresse MAC.
• Choisissez un emplacement pour installer le module WiFi sur le réservoir du chauffe-eau,
qui ne puisse pas causer une tension excessive du câble de communication.
• Retirez la pellicule protectrice de l’autre côté du ruban adhésif et appuyez le module contre
une surface propre et plane du réservoir du chauffe-eau, tel qu’illustré à la Figure4.
ÉTAPE4: Installer le câble du détecteur d’eau
• Repérez le câble du détecteur d’eau fourni avec votre chauffe-eau et installez-le
en suivant les étapes décrites dans votre guide d’utilisation et d’entretien.
ÉTAPE5: Connecter à l’internet
• Une fois que votre module WiFi est installé et votre chauffe-eau est alimenté en
énergie, les trois voyants DEL clignoteront tous simultanément pour indiquer que le
module WiFi est prêt à être configuré pour une utilisation sur le réseau résidentiel.
[REMARQUE: Dans cette situation, le module fonctionne en tant que point d’accès WiFi.]
• Si vous ne l’avez pas déjà fait, téléchargez l’application EcoNet gratuite
du magasin d’applications Apple ou du magasin Google Play.
• Assurez-vous que vous avez l’adresse MAC saisie à l’étape1 ci-dessus.
• Tandis que vous êtes à proximité du module WiFi, ouvrez l’application EcoNet et
suivez les instructions énoncées dans l’application. [REMARQUE: Il se peut que
certains appareils mobiles ne lancent pas l’application EcoNet une fois la première
étape de connexion au réseau achevée. Afin de poursuivre l’installation, retournez
manuellement à l’application EcoNet et suivez le reste des instructions.]
Conseil pratique supplémentaire
Pour répéter le processus de configuration ou modifier les paramètres de connexion Internet à tout moment, il vous suffit d’appuyer sur
le bouton WLAN SETUP du module WiFi. Ceci réinitialisera le module à ses valeurs par défaut d’usine. Une fois que le bouton est pressé,
les trois voyants à DEL commenceront à clignoter simultanément pour indiquer que le module a été réinitialisé.
Pour obtenir une assistance
supplémentaire, veuillez
composer le 1800255-2388
*Si la puissance de votre signal WiFi est trop faible à l’emplacement de votre chauffe-eau, vous pourrez
peut-être continuer à utiliser le kit WiFi au moyen d’un prolongateur d’autonomie WiFi. Contactez
votre détaillant d’appareils électroniques préféré pour de plus amples renseignements.
Le voyant DEL du milieu
indique une connexion WiFi.
Le voyant DEL supérieur
indique l’alimentation et la
connexion à l’équipement.
Le voyant DEL inférieur indique
une connexion active au
nuage/serveur.
Le bouton WLAN SETUP
(CONFIGURATION DU RÉSEAU
LOCAL SANS FIL) sert à
réinitialiser la configuration/
connexion WiFi.
Fig. 5
Additional Tip
To repeat the setup process or change the Internet connection settings at any time, simply press the WLAN SETUP button on the
WiFi Module. This will reset the module to its factory defaults. Once pressed, all three LEDs will start blinking simultaneously,
indicating that the module has been reset.
RCPN-ALT04-0014031401-0002
RCPN-ALT04-0014031401-0002
Fig. 4
Fig. 2
Fig. 3
Fig. 4
Fig. 2
Fig. 3
Fig. 1
Media Access Control (MAC)
Address location
Sample
Fig. 1
Exemple
Emplacement de l’adresse
MAC de commande d’accès
au support
Loading ...