Loading ...
Loading ...
Loading ...
5
INTRODUCTION
Thank you for choosing a De’Longhi product. Please take a few
moments to read the instructions to avoid risks or damage to the
appliance.
DESCRIPTION
Description of the appliance (see page 3 - A)
A1
air outlet flap
A2
control panel
A3
handles
A4
castors
A5
BioSilver filter
A6
air intake grille
A7
air exhaust hose housing
A8
air intake grille
A9
power cable
A10
drainage hose with cap
A11
CST remote control compartment
Description of the accessories (see page 3 - B)
B1
adapter for window bracket
B2
air exhaust hose
B3
hose adaptor
B4
additional window bracket
B5
window bracket with wing nut
B6
window bracket cap
B7
CST (Cool Surround Tecnology) remote control
B8
end of season accessories bag (*not on all models)
B9
end of season dust cover
(*not on all models)
B10
stripping foam
ELECTRICAL CONNECTION
Before plugging the appliance into the outlet, check that:
•
The outlet’s power supply corresponds to the value
indicated on the rating label on the back of the appliance.
•
The outlet and electrical circuit are adequate for the
appliance.
•
The outlet is a 3-hole grounded outlet
. If this is not
the case, you must choose another outlet. Failure to follow
these important safety instructions absolves the manufac-
turer of all liability.
If it becomes necessary, the power cable must be re-
placed by a qualified professional only.
USE
The instructions below will enable you to prepare your air con-
ditioner for operation as efficiently as possible. Before use, make
sure the air intake and air outlet flap are unobstructed.
Please note:
This appliance is provided with an auto-evapora-
tion feature for condensate removal during cooling and dehu-
midifying modes.
AIR
CONDITIONING
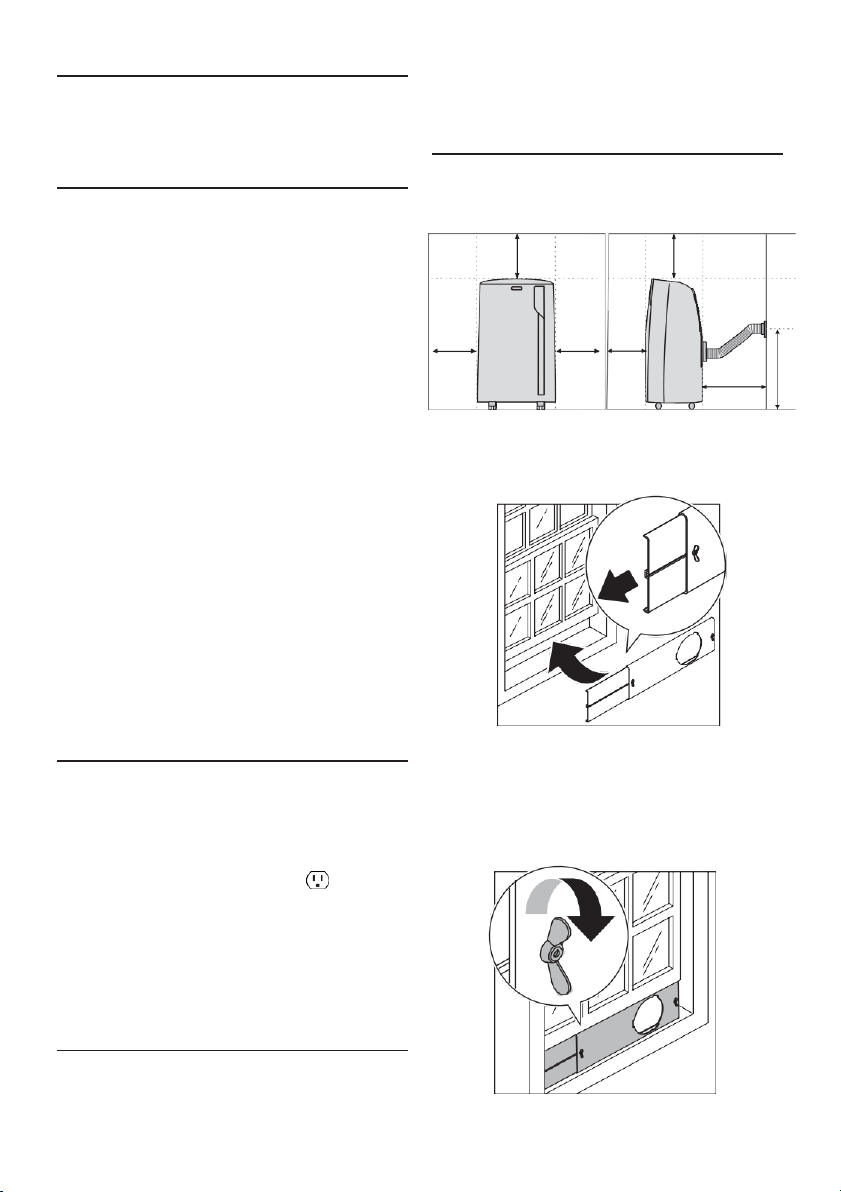
INSTALLATION
For optimal results see the figures below for the
suggested minum distances.
DOUBLE-HUNG
WINDOW
•
Place the window bracket (B5) in the window sill, extend
the bracket fully within the window frame (fig. 1).
•
Fix the bracket by the wing nut (fig. 2). Attach the provided
stripping foam (
B10
) to the top of the window bracket and
then lower the window onto the bracket. (Should the win-
dow bracket be too large for the window the plastic can be
cut with a saw by a qualified professional.)
1
20 in
50 cm
20 in
50 cm
20 in
50 cm
20 in
20 in
50 cm
50 cm
32 in
36 in
90 cm
80 cm
2
Loading ...
Loading ...
Loading ...