Loading ...
Loading ...
Loading ...
9
ENGLISH
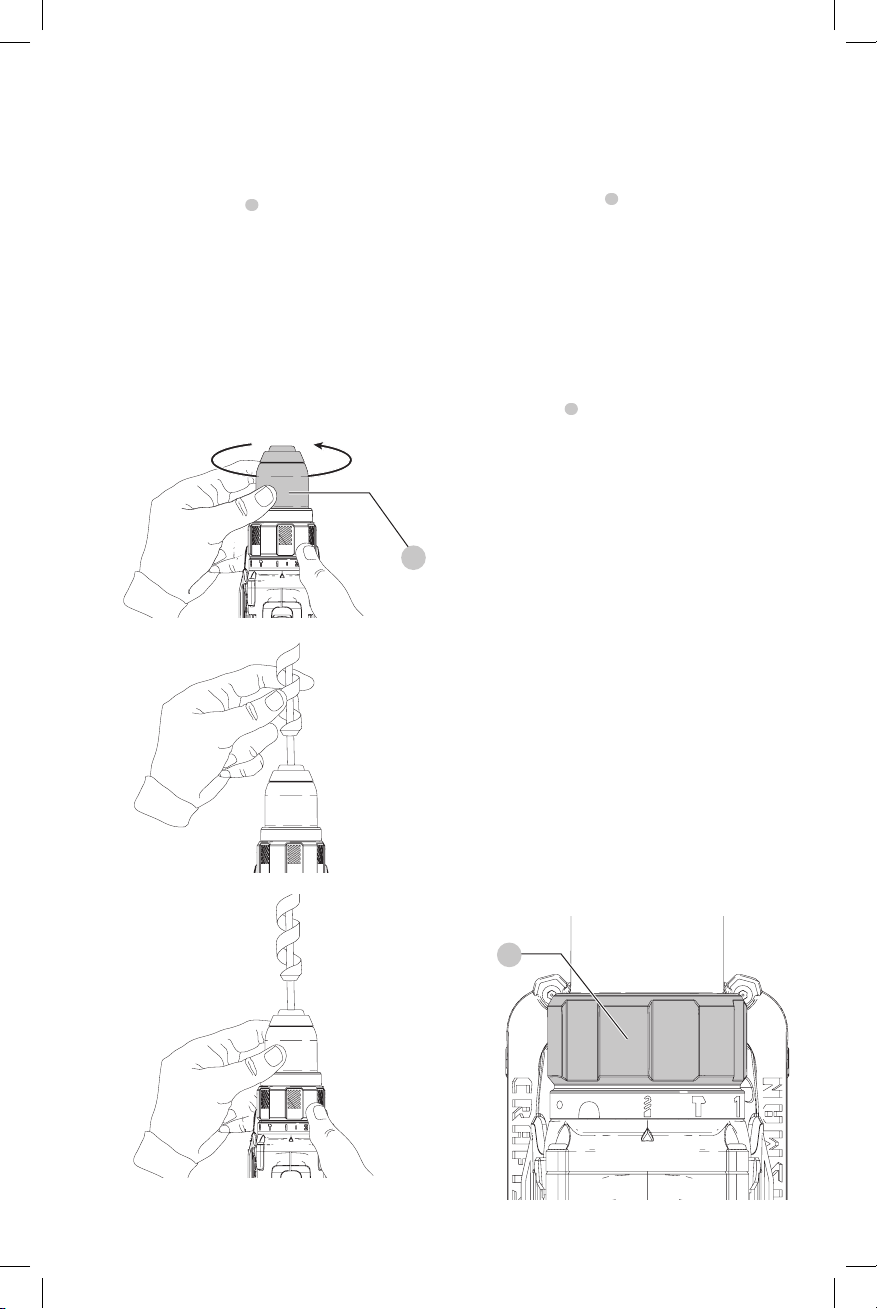
Keyless Chuck (Fig. G–I)
WARNING: Make certain the battery pack is removed
to prevent tool actuation before installing or
removingaccessories.
To insert a drill bit or other accessory:
1. Grasp the keyless chuck
6
and rotate it in the
counterclockwise direction, as viewed from the
chuckend.
2. Insert the bit or other accessory fully into the chuck, and
tighten securely by rotating the chuck in the clockwise
direction as viewed from the chuck end.
WARNING: Do not attempt to tighten or loosen drill
bits (or any other accessory) by gripping the front
part of the chuck and turning the tool on. Damage
to the chuck and personal injury may occur when
changingaccessories.
Fig.G
6
Fig.H
Fig.I
LED Work Light (Fig. A)
WARNING: Do not place the light in a position
which may cause anyone to intentionally or
unintentionally stare into the light. Serious eye
injury couldresult.
There is an LED worklight
5
. The worklight is activated
when the trigger switch is depressed, and will automatically
turn off approximately 20 seconds after the trigger switch
is released. If the trigger switch remains depressed, the
worklight will remainon.
NOTE: The worklight is for lighting the immediate work
surface and is not intended to be used as aflashlight.
Drilling (Fig. J)
NOTICE: If drilling thin material, use a wood “back-
up” block to prevent damage to thematerial.
1. Turn the collar
3
to the drillsymbol.
2. Use sharp drill bits only. For MASONRY, such as brick,
cement, cinder block, etc., use carbide-tipped bits rated
for percussiondrilling.
3. Always apply pressure in a straight line with the bit. Use
enough pressure to keep drill biting, but do not push
hard enough to stall the motor or deflect thebit.
4. Hold tool firmly with both hands to control the twisting
action of the drill. If model is not equipped with side
handle, grip drill with one hand on the handle and one
hand on the batterypack.
WARNING: Drill may stall if overloaded causing a
sudden twist. Always expect the stall. Grip the drill
firmly to control the twisting action and avoidinjury.
5. IF DRILL STALLS, it is usually because it is being
overloaded or improperly used. RELEASE TRIGGER
IMMEDIATELY, remove drill bit from work, and
determine cause of stalling. DO NOT DEPRESS
TRIGGER ON AND OFF IN AN ATTEMPT TO START A
STALLED DRILL — THIS CAN DAMAGE THEDRILL.
6. To minimize stalling or breaking through the material,
reduce pressure on drill and ease the bit through the
last fractional part of thehole.
7. Keep the motor running when pulling the bit back out
of a drilled hole. This will help preventjamming.
Fig.J
3
Loading ...
Loading ...
Loading ...