Loading ...
Loading ...
Loading ...
Emptying Dust Drum
WARNING: To avoid injury from acci-
dental starting, unplug power cord
before emptying the drum.
I. To remove lid to empty contents of
drum, simply pull the flexible latches
outward on each side of the lid to
release from the drum.
2.While holding the latches out, lift the
top assembly up and away from the
drum.
3. Lay top assembly upside down on a
clean area while emptying drum or
changing filter.
4. Dump the drum contents into the
proper waste disposal container.
5. Another option is to use the drain pro-
vided in the drum for easy emptying of
liquids. Simply unscrew the drain cap
and tilt the drum in a manner so the liq-
uid flows out the drain hole.
WARNING: To avoid back injury or]
fails, do not lift a vac heavy with liq-I
uid or debris. Scoop or drain enough I
contents out to make the vac light_
enough to lift comfortably. I
Cord Wrap
When vacuuming is complete, unplug the
cord and wrap it around the motor cover.
Moving the Vac
Should it become necessary to pick the
vac up to move it, DO NOT pick the vac
up by the lid handles. To avoid dropping
the vac due to latches releasing, or possi-
ble part breakage, pick up the vac by the
lip of the dust drum.
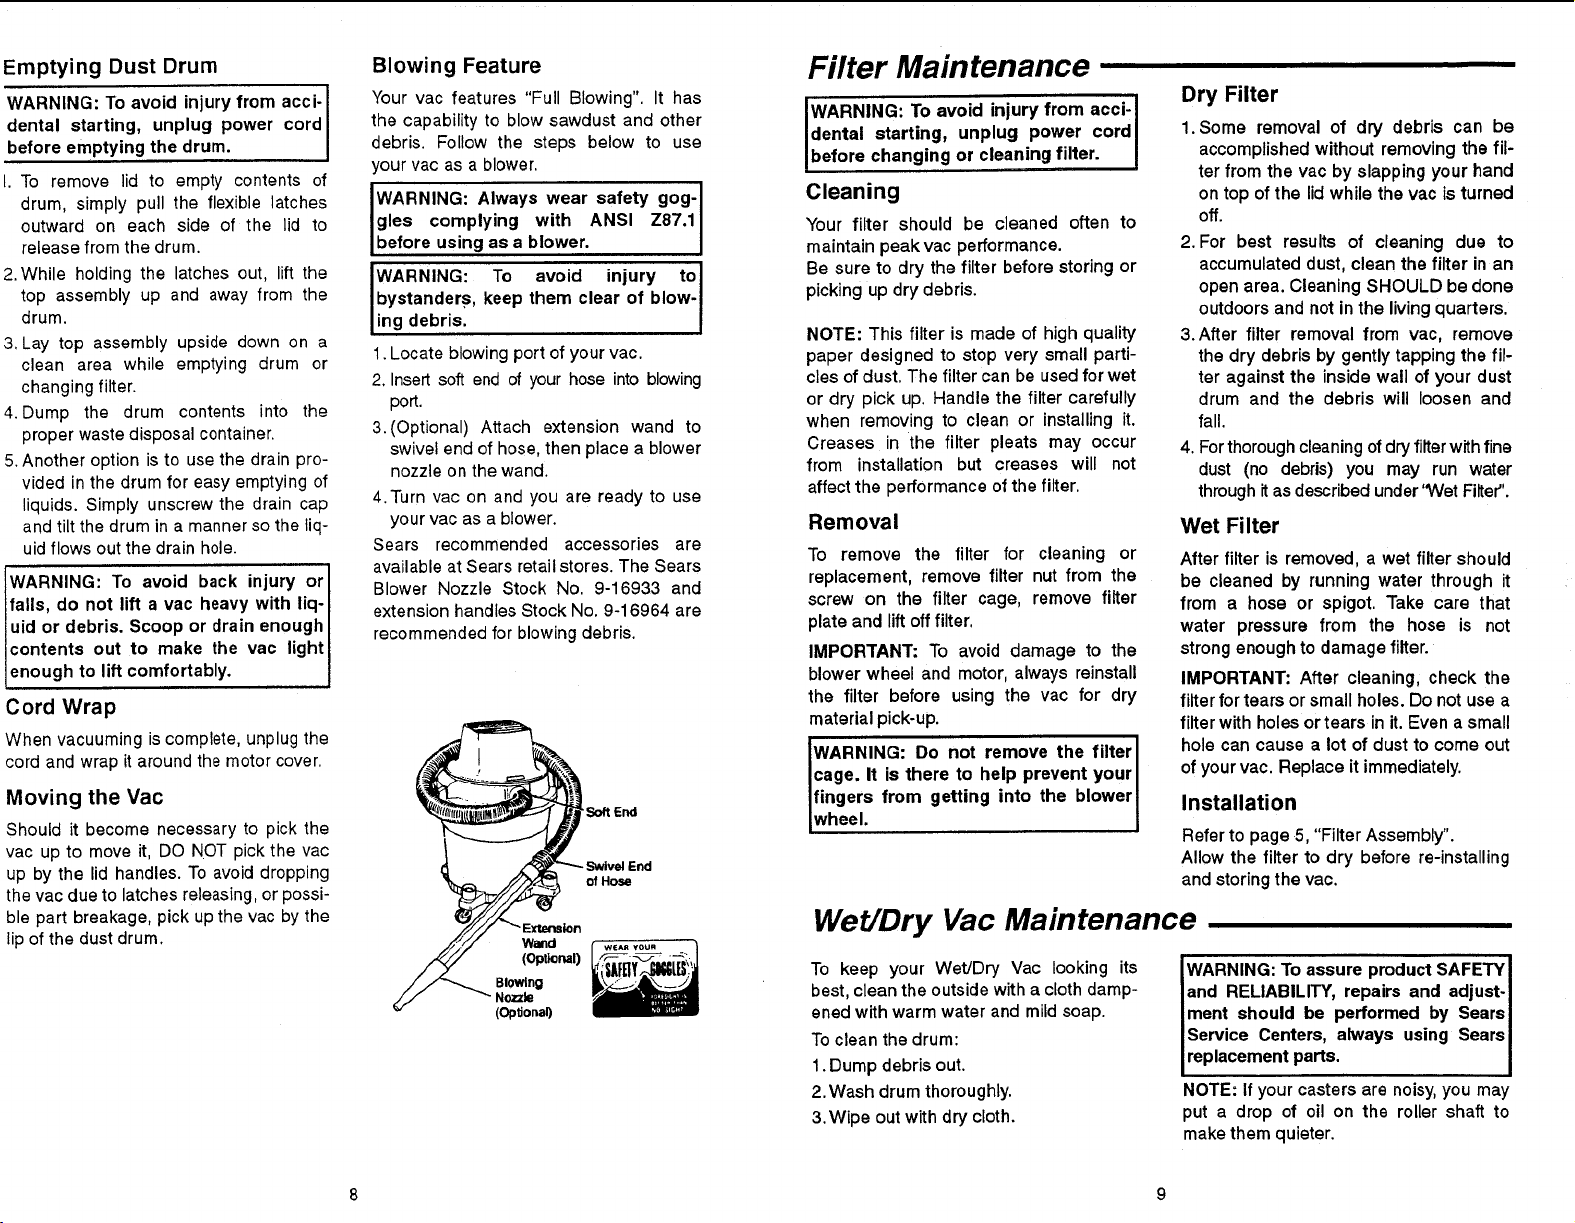
Blowing Feature
Your vac features "Full Blowing". It has
the capability to blow sawdust and other
debris. Follow the steps below to use
your vac as a blower.
WARNING: Always wear safety gog- I
gles complying with ANSI Z87.1 I
before using as a blower. I
WARNING: To avoid injury toI
bystanders, keep
them clear of blow- I
Iling debris.
1. Locate blowing port of your vac.
2. Insert soft end of your hose into blowing
port.
3.(Optional) Attach extension wand to
swivel end of hose, then place a blower
nozzle on the wand.
4.Turn vac on and you are ready to use
your vac as a blower.
Sears recommended accessories are
available at Sears retail stores. The Sears
Blower Nozzle Stock No. 9-16933 and
extension handles Stock No. 9-16964 are
recommended for blowing debris.
of Hose
Wand
(Optional)
Blowing
Nozzle
(Optional)
Filter Maintenance
WARNING: To avoid injury from acci- I
starting,
unplug power cordI
dental
before changing or cleaning filter. I
Cleaning
Your filter should be cleaned often to
maintain peak vac performance.
Be sure to dry the filter before storing or
picking up dry debris.
NOTE: This filter is made of high quality
paper designed to stop very small parti-
cles of dust. The filter can be used for wet
or dry pick up. Handle the filter carefully
when removing to clean or installing it.
Creases in the filter pleats may occur
from installation but creases will not
affect the performance of the filter.
Removal
To remove the filter for cleaning or
replacement, remove filter nut from the
screw on the filter cage, remove filter
plate and lift off filter.
IMPORTANT: To avoid damage to the
blower wheel and motor, always reinstall
the filter before using the vac for dry
material pick-up.
WARNING: Do not remove the filter I
cage. It is there to help prevent yourI
from getting into the blower Ifingers
wheel. I
I
Dry Filter
1. Some removal of dry debris can be
accomplished without removing the fil-
ter from the vac by slapping your hand
on top of the lid while the vac is turned
off.
2. For best results of cleaning due to
accumulated dust, clean the filter in an
open area. Cleaning SHOULD be done
outdoors and not in the living quarters.
3.After filter removal from vac, remove
the dry debris by gently tapping the fil-
ter against the inside wall of your dust
drum and the debris will loosen and
fall.
4. Forthorough cleaning of dry filter with fine
dust (no debris) you may run water
throughit as described under''Wet Filter'.
Wet Filter
After filteris removed, a wet filter should
be cleaned by running water through it
from a hose or spigot. Take care that
water pressure from the hose is not
strongenoughtodamagefilter.
IMPORTANT: After cleaning,check the
filter fortearsor smallholes.Do notusea
filter with holesortears init.Evena small
holecancausea lot of dusttocomeout
ofyour vac.Replaceitimmediately.
Installation
Refer to page 5, "Filter Assembly".
Allow the filter to dry before re-installing
and storing the vac.
Wet/Dry Vac Maintenance
To keep your Wet/Dry Vac looking its
best, clean the outside with a cloth damp-
ened with warm water and mild soap.
To clean the drum:
1. Dump debris out.
2.Wash drum thoroughly.
&Wipe out with dry cloth.
WARNING: To assure product SAFETY I
and RELIABILITY, repairs and adjust- I
ment should be performed by SearsI
Service Centers, always using SearsI
replacement parts. I
NOTE: If your casters are noisy, you may
put a drop of oil on the roller shaft to
make them quieter.
8 9
Loading ...
Loading ...