EN FREEZER / REFRIGERATOR USE AND CARE GUIDE
................................... FR REFRIGERATEUR/CQNGELATEUR GUIDE D:UTILISATION ETD:ENTRETIEN
:i:i:iiiiiiiii iiiiiiiiiiiiiiiiiiiiiiiiiiiiiiiiiiiiiiiiiiiiiiii
_i:_i_ii_i_!_!_i@!_!:ii!_!:ii!_!_!ii_!_ii_i!_!!_!i_ii_i!ii_iii@_i_i_i_iii_ii
Finding information
Please read and save this guide Tabmeof contents
Thank you forchoos ng E ectro ux our new prem um Fin in Inf rm i n 2
[J g 0 at 0 ..............................................
brand in home appliances.This Use & Care Guide is
part of our comm tment to customer sat sfact on and f
Sa ety ............................................................... 3
product qualitythroughoutthe service life of your new
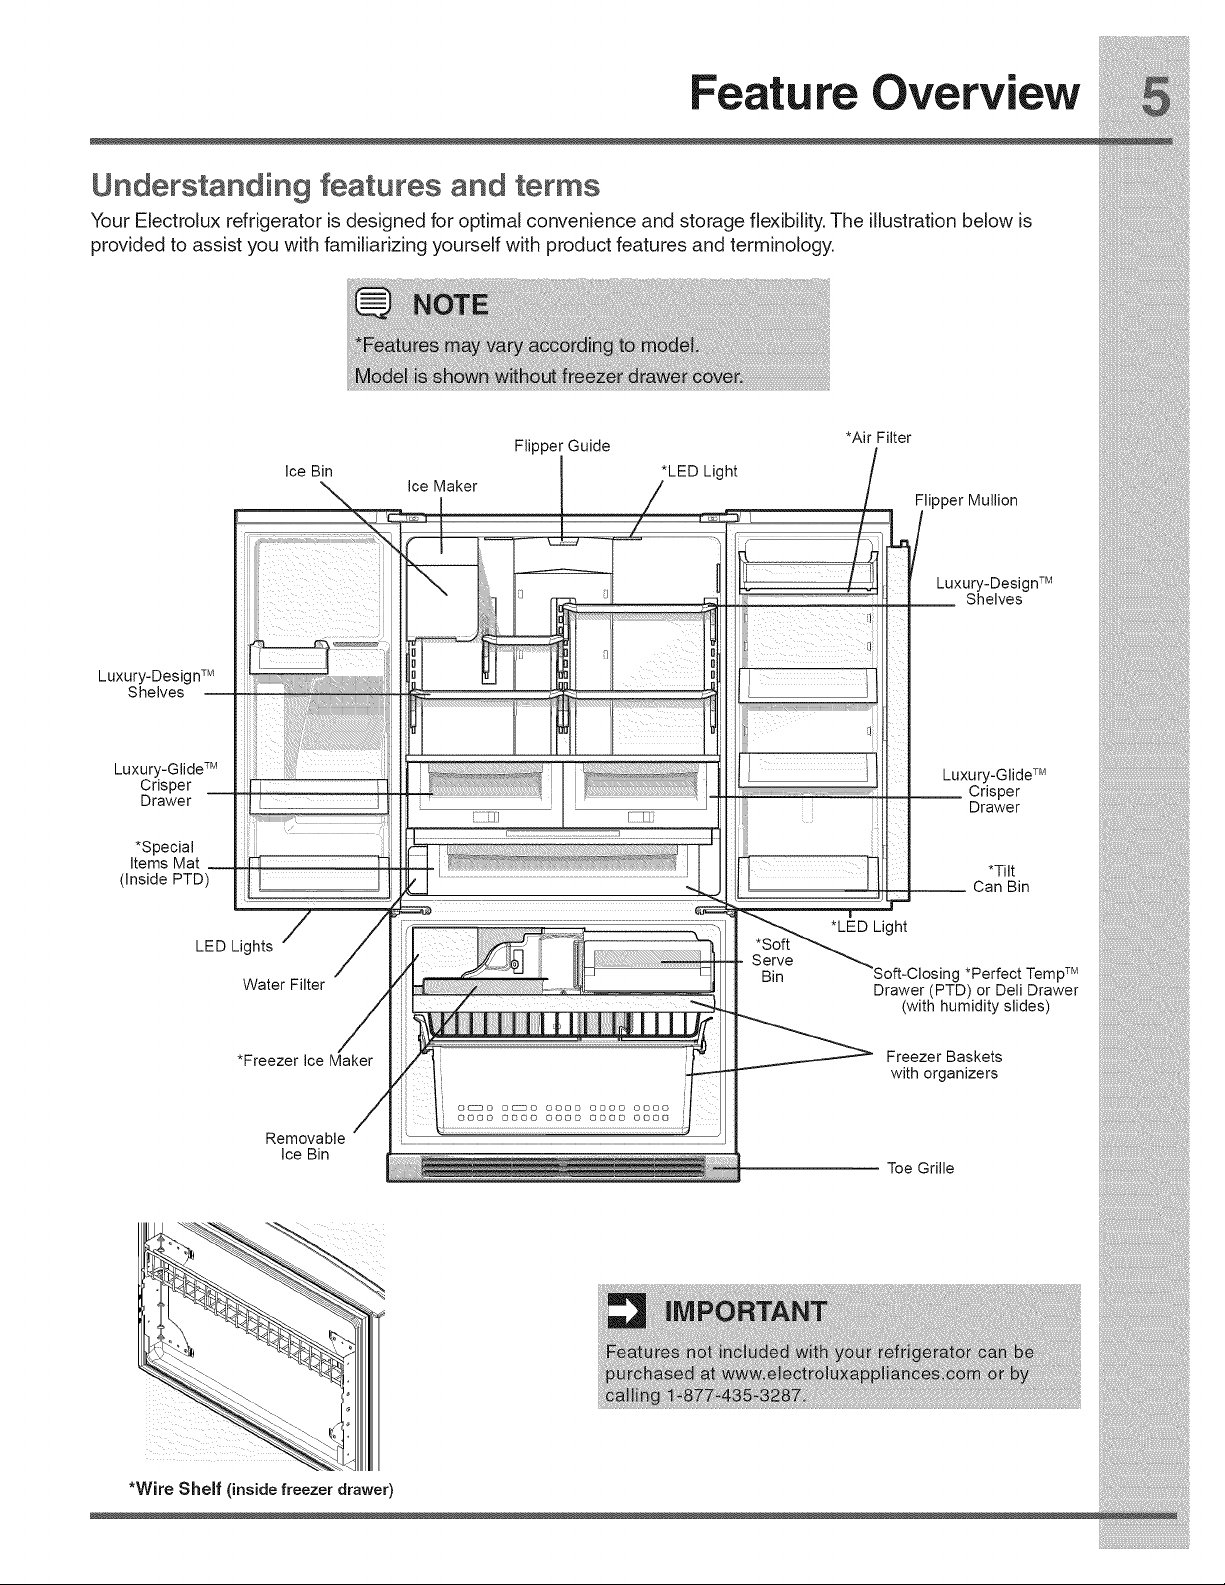
appliance. FeatureOverview................................................. 5
Keep a record for quick Installation ......................................................... 6
reference
::::::::, : Removing the Doors ............................................ 11
^ nn "in "h W" r^ I 14
_o ecl gl e ale _uppy ..................................
__ controls..........................................................._
Electrolux model number
A.tornatieleelVlaker............................................ 17
___ StorageFeatures ................................................ 18
St0,.gF00_._S_,_.gE.0,gv..............................23
..........................
24
Changing the Water andAir Filters........................... 25
i!_!_i!i_ii_!i!_!_i!i_ii_!i!_!_i!i_ii_!i!_!_i!i_ii_!i!_!_i!i_ii_!i!_!_i!i_ii_!i!_!_i!i_ii_!i!_!_i@ii_i
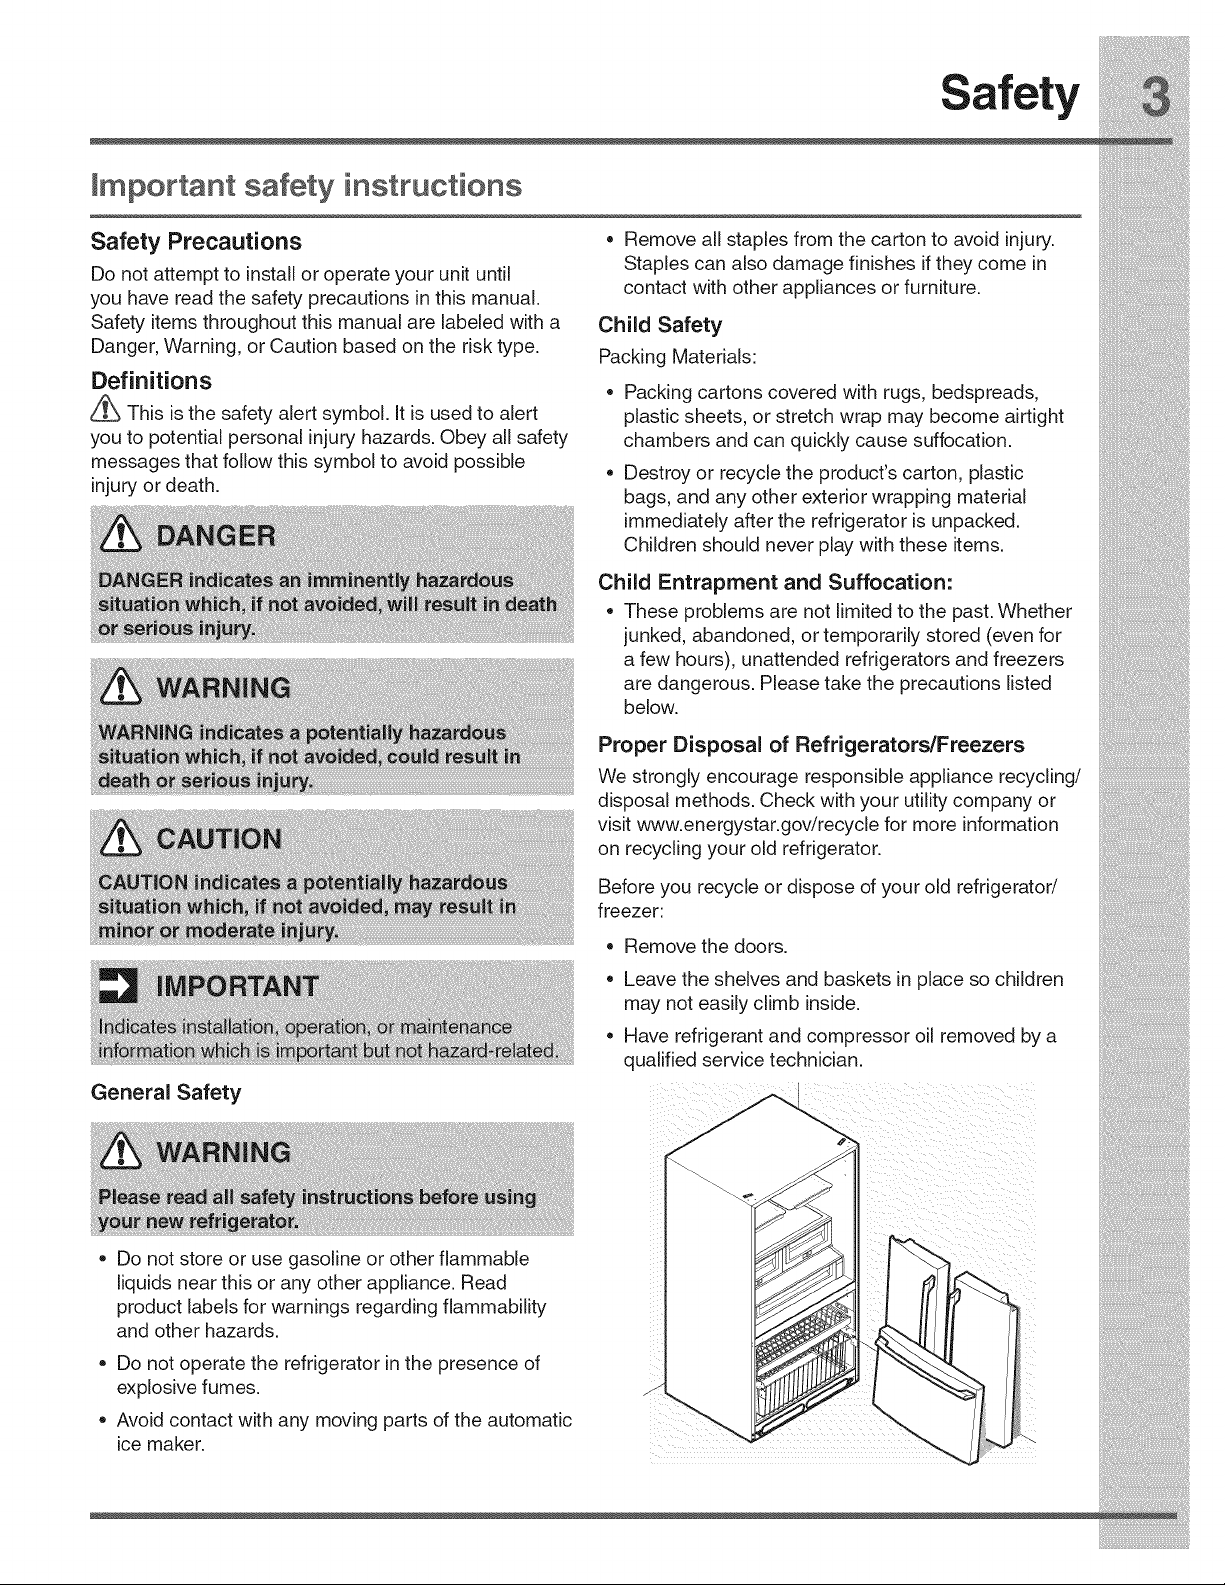
Westronglyencourageresponsibleappliancerecycling/
Safety
Emectricaminformation
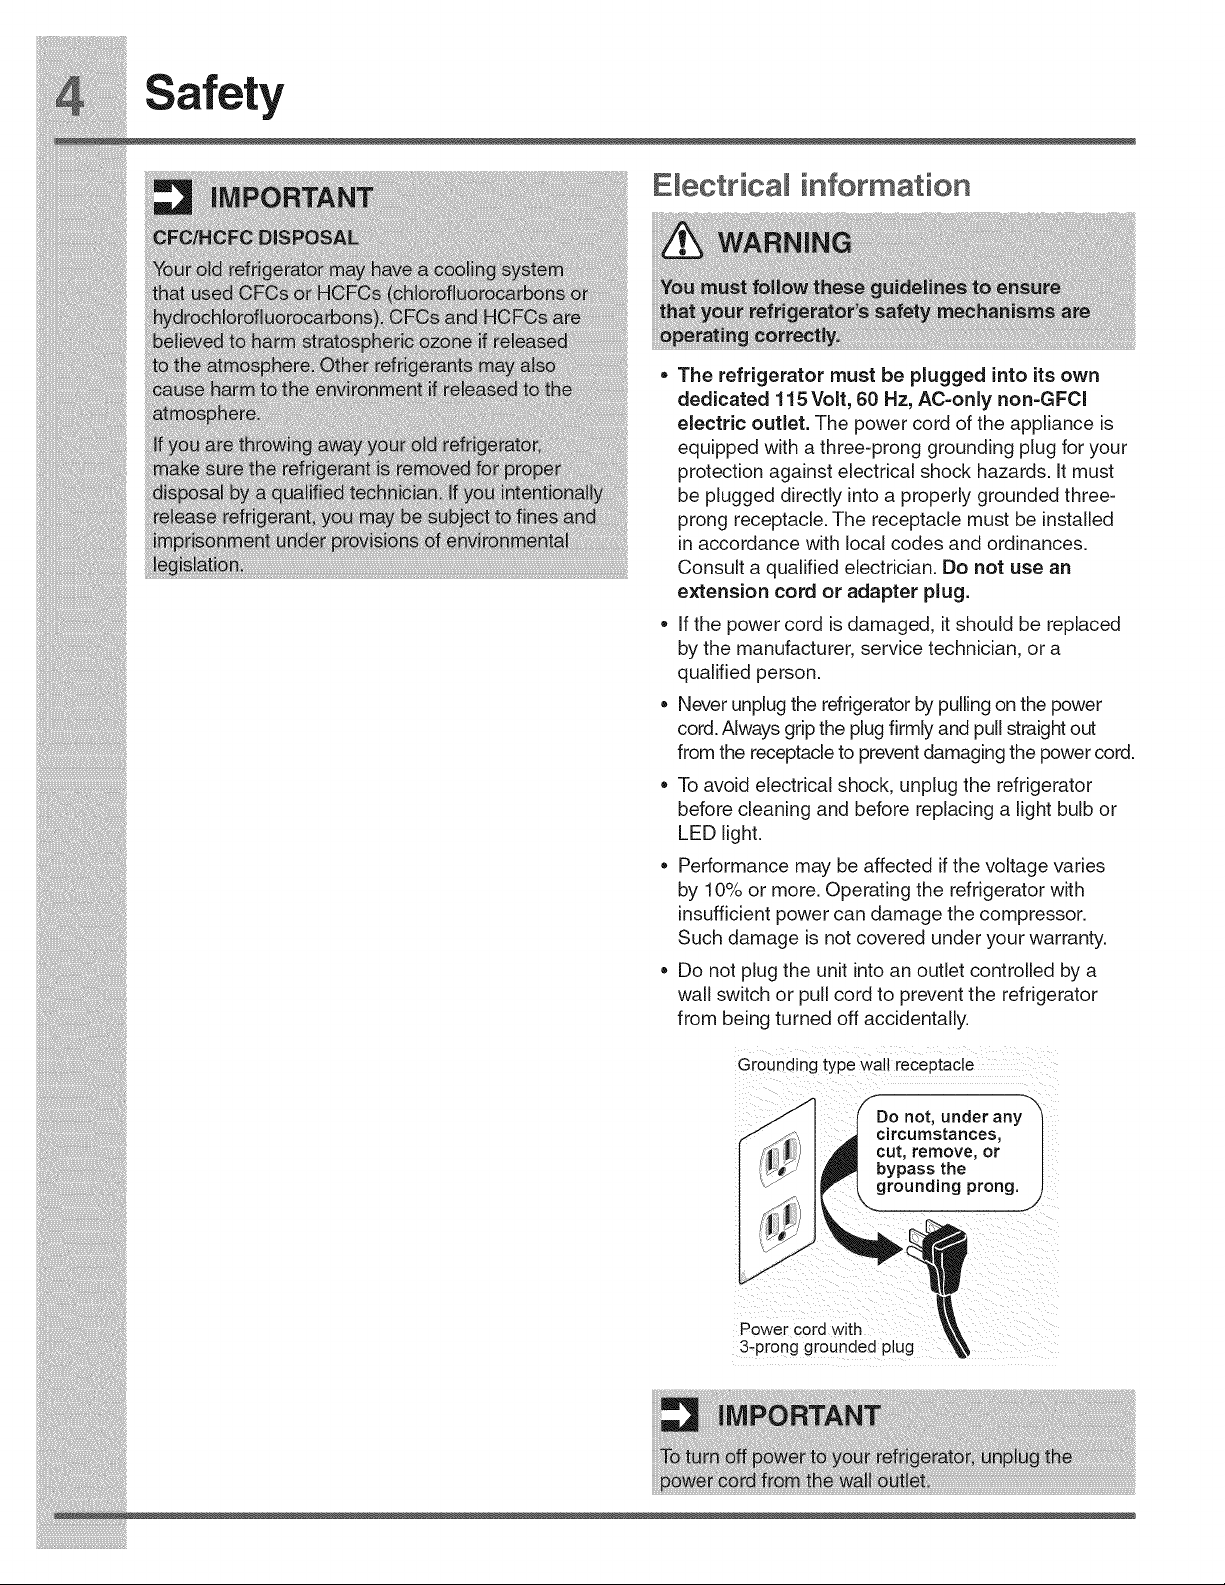
• The refrigerator must be plugged into its own
dedicated 115 Volt, 60 Hz, AC-only non-GFCl
electric outlet. The power cord of the appliance is
equipped with a three-prong grounding plug for your
protection against electrical shock hazards. It must
be plugged directly into a properly grounded three-
prong receptacle. The receptacle must be installed
in accordance with local codes and ordinances.
Consult a qualified electrician. Do not use an
extension cord or adapter plug.
= If the power cord is damaged, it should be replaced
by the manufacturer, service technician, or a
qualified person.
= Never unplug the refrigerator by pulling on the power
cord. Always grip the plug firmly and pull straight out
from the receptacle to prevent damaging the power cord.
To avoid electrical shock, unplug the refrigerator
before cleaning and before replacing a light bulb or
LED light.
Performance may be affected if the voltage varies
by 10% or more. Operating the refrigerator with
insufficient power can damage the compressor.
Such damage is not covered under your warranty.
Do not plug the unit into an outlet controlled by a
wall switch or pull cord to prevent the refrigerator
from being turned off accidentally.
Grounding type wall receptacle
SDo not, under any"_
f ._i_. [ .,_ circumstances, [
_cut, remove, or |
1 i!_ [_ll_ bypass the |
3-'prong grounded plug _I_
T, turn _ _er _ur r_frige_r, unplug t"e
p )_er c_a f_ the_ll _Ut!_
Luxury-Glide TM
Crisper
Luxury-Glide TM
Crisper
i_i!_!_i!i_ii_!i!_!_i!i_ii_!i!_!_i!i_ii_!i!_!_i!i_ii_!i!_!_i!i_ii_!i!_!_i!i_ii_!i!_!_i!i_ii_!i!_!_i!i_i@:_
Installation
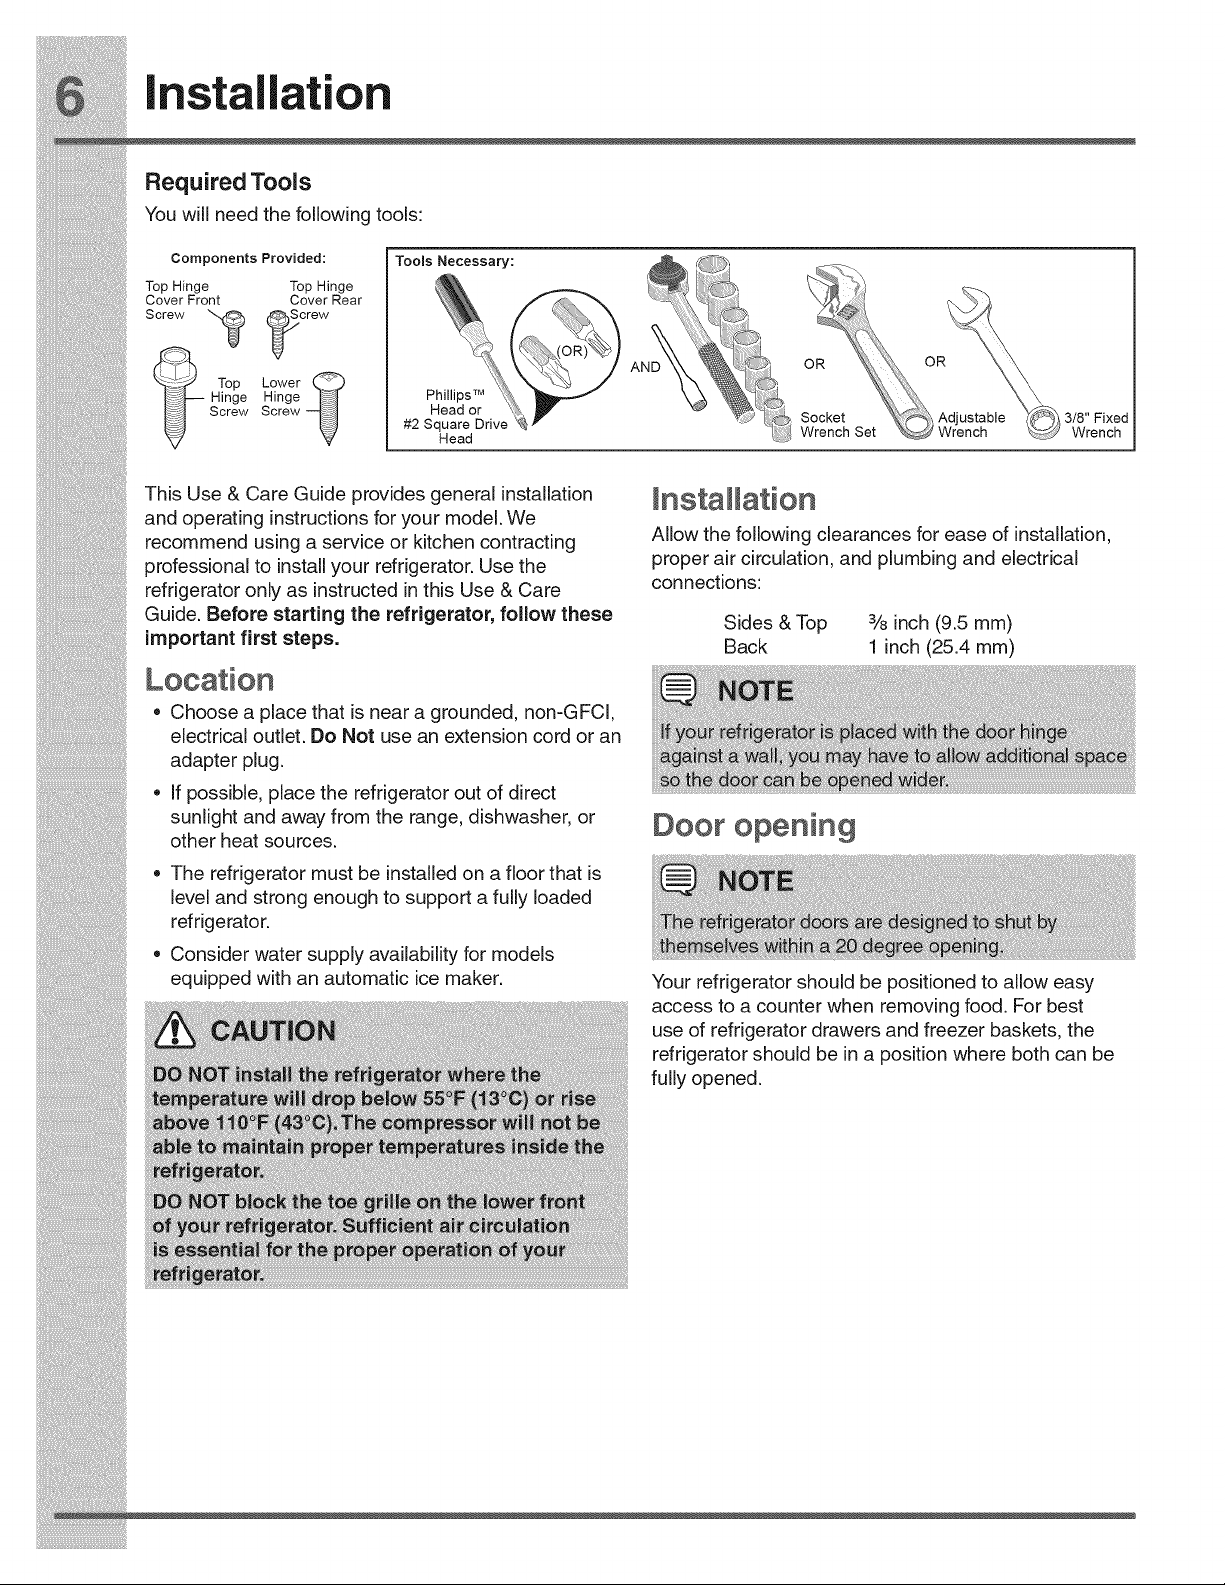
Required Tools
You wiii need the following tools:
Components Provided:
Top Hinge Top Hinge
Cover Front Cover Rear
Screw _ _crew
__ Top Lower
Hinge Hinge _
Screw Screw _
Tooms Necessary:
Phillips TM
Head or
#2 Square Drive
Head
OR
Socket
Wrench Set
3/8" Fixed
Wrench
This Use & Care Guide provides general installation
and operating instructions for your model. We
recommend using a service or kitchen contracting
professional to install your refrigerator. Use the
refrigerator only as instructed in this Use & Care
Guide. Before starting the refrigerator, follow these
important first steps.
Allow the following clearances for ease of installation,
proper air circulation, and plumbing and electrical
connections:
Sides & Top 3/8inch (9.5 mm)
Back 1 inch (25.4 mm)
* Choose a place that is near a grounded, non-GFCl,
electrical outlet. Do Not use an extension cord or an
adapter plug.
* if possible, place the refrigerator out of direct ..............................................................................................................................................................................................................................................................................................
sunlight and away from the range, dishwasher, or D_r nn_nine
other heat sources. _ _r_
The refr gerator must be nsta ed on a f oor that s :_.....................................................
level and strong enough to support a fully loaded
refrigerator.
, _emsel_e_ _J_ln a 28 degree eRea_a8
Consider water supply availability for models
equipped with an automatic ice maker. Your refrigerator should be positioned to allow easy
[ : access to a counter when removing food. For best
} use of refrigerator drawers and freezer baskets, the
refrigerator should be in a position where both can be
E fu y opened
i
r_ i_NNr.)) ) ) ) ) ) ) ) ) )
Installation
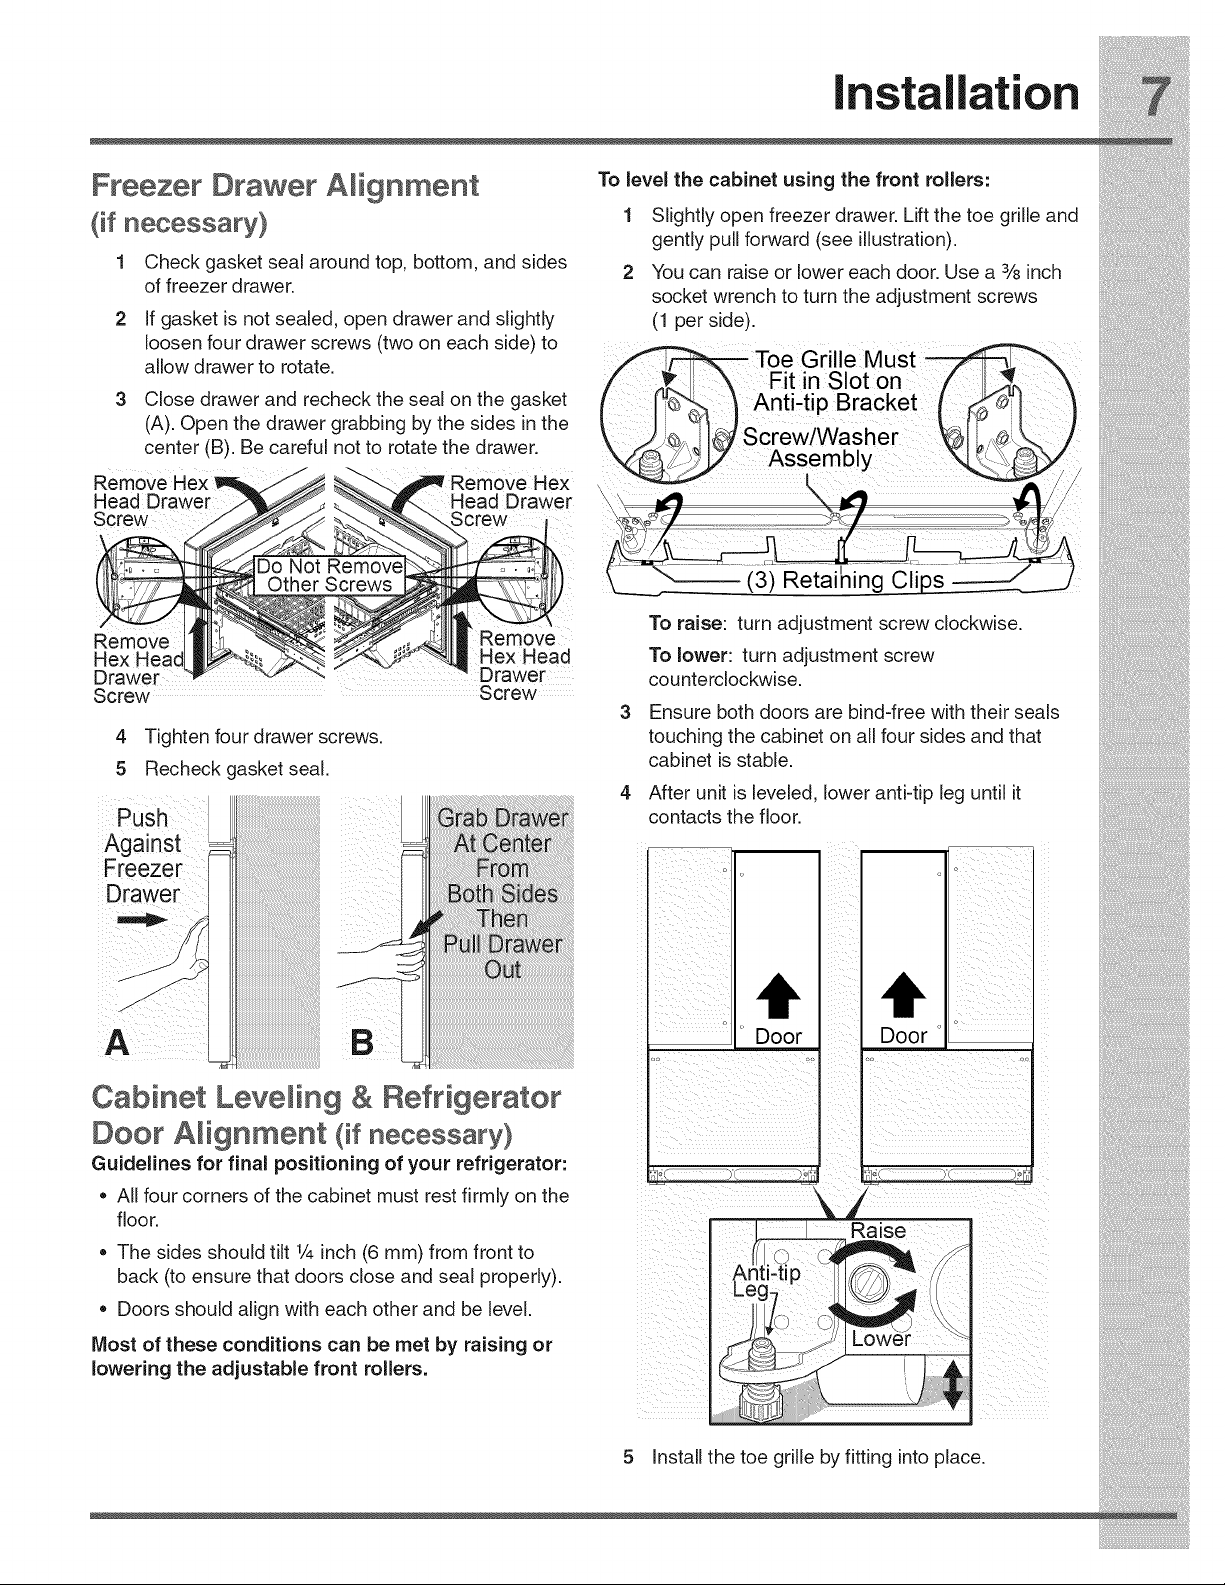
Freezer Drawer Amignment
(if necessary)
1 Check gasket seal around top, bottom, and sides
of freezer drawer.
2 If gasket is not sealed, open drawer and slightly
loosen four drawer screws (two on each side) to
allow drawer to rotate.
3 Close drawer and recheck the seal on the gasket
(A). Open the drawer grabbing by the sides in the
center (B). Be careful not to rotate the drawer.
Remove H ex
: Head Drawer
Screw:
To level the cabinet using the front rollers:
1 Slightly open freezer drawer. Lift the toe grille and
gently pull forward (see illustration).
2 You can raise or lower each door. Use a 3/sinch
socket wrench to turn the adjustment screws
(1 per side).
Toe Grille Must _
• " _1
Ft nSoton / I_',7.
Antiitip Bracket (_. _"
\_Z_ 12" Assembly _J,_ BY
_" / /
______'_---- (3) Retaining Clips
Remove Remove
Hex Head
Drawer Drawer
Screw Screw
4 Tighten four drawer screws.
5 Recheck gasket seal.
To raise: turn adjustment screw clockwise.
To lower: turn adjustment screw
counterclockwise.
Ensure both doors are bind-free with their seals
touching the cabinet on all four sides and that
cabinet is stable.
4 After unit is leveled, lower anti-tip leg until it
contacts the floor.
Against , ,, ,,
Freezer : o :
Drawer
b h
o_ _ o_ _
Cabinet Leve_in 9 & Refrigerator I
DOOr Amignment (if necessary)
Guidelines for final positioning of your refrigerator" :: , :: : :::::::::
All four corners of the cabinet must rest firmly on the _ ,j
f oor
= The sides should tilt 1/4inch (6 mm)from front to _ (/,O '_ /y'_
back (to ensure that doors c ose and sea proper y) I Anti-tip _'q /,/
Leg /i
• Doors should align with each other and be level. _/_!\ I
Most of these conditions can be met by raising or _
lowering the adjustable front rollers.
g. y..g. p .

Installation
i!_!_i!i_ii_!i!_!_i!i_ii_!i!_!_i!i_ii_!i!_!_i!i_ii_!i!_!_i!i_ii_!i!_!_i!i_ii_!i!_!_i!i_ii_!i!_!_i!i_ii_!i!_!_i!i_ii_!i!_!_ii_i
To adjust the door stop:
Door stop is adjustable between 85 to 145 degrees.
Adjustable Door Stop
1 Open door to provide access to screw.
2 Loosen screw.
3 Adjust door to desired location.
5 Retighten screw.
Stoic
Re-tighten
Screw
6 Ensure door stops in desired location before
resuming normal use.
To level the doors using the adjustable lower hinge
(select models):
1 Remove all food items from door bins on door
being adjusted.
2 Open doors to 90 degrees.
3 Loosen or remove screw.
i!_!_i!i_ii_!i!_!_i!i_ii_!i!_!_i!i_ii_!i!_!_i!i_ii_!i!_!_i!i_ii_!i!_!_i!i_ii_!i!_!_i!i_ii_!i!_!_i!i_ii_!i!_!_i!i_ii_!i!_!_ii_i
iiiiiiiiii!;ili_i_ili'iii_i¸i_i_i_i_!i_!i_!i_!i_!i_!_i_i!i_!_!!!_i!i!i_i_i_i_!_!_!_!i!i_ii_ii_i_ii_i_!_!!i_!_!_i_ii!_i_i_iiii!_!i_i;_
Installation
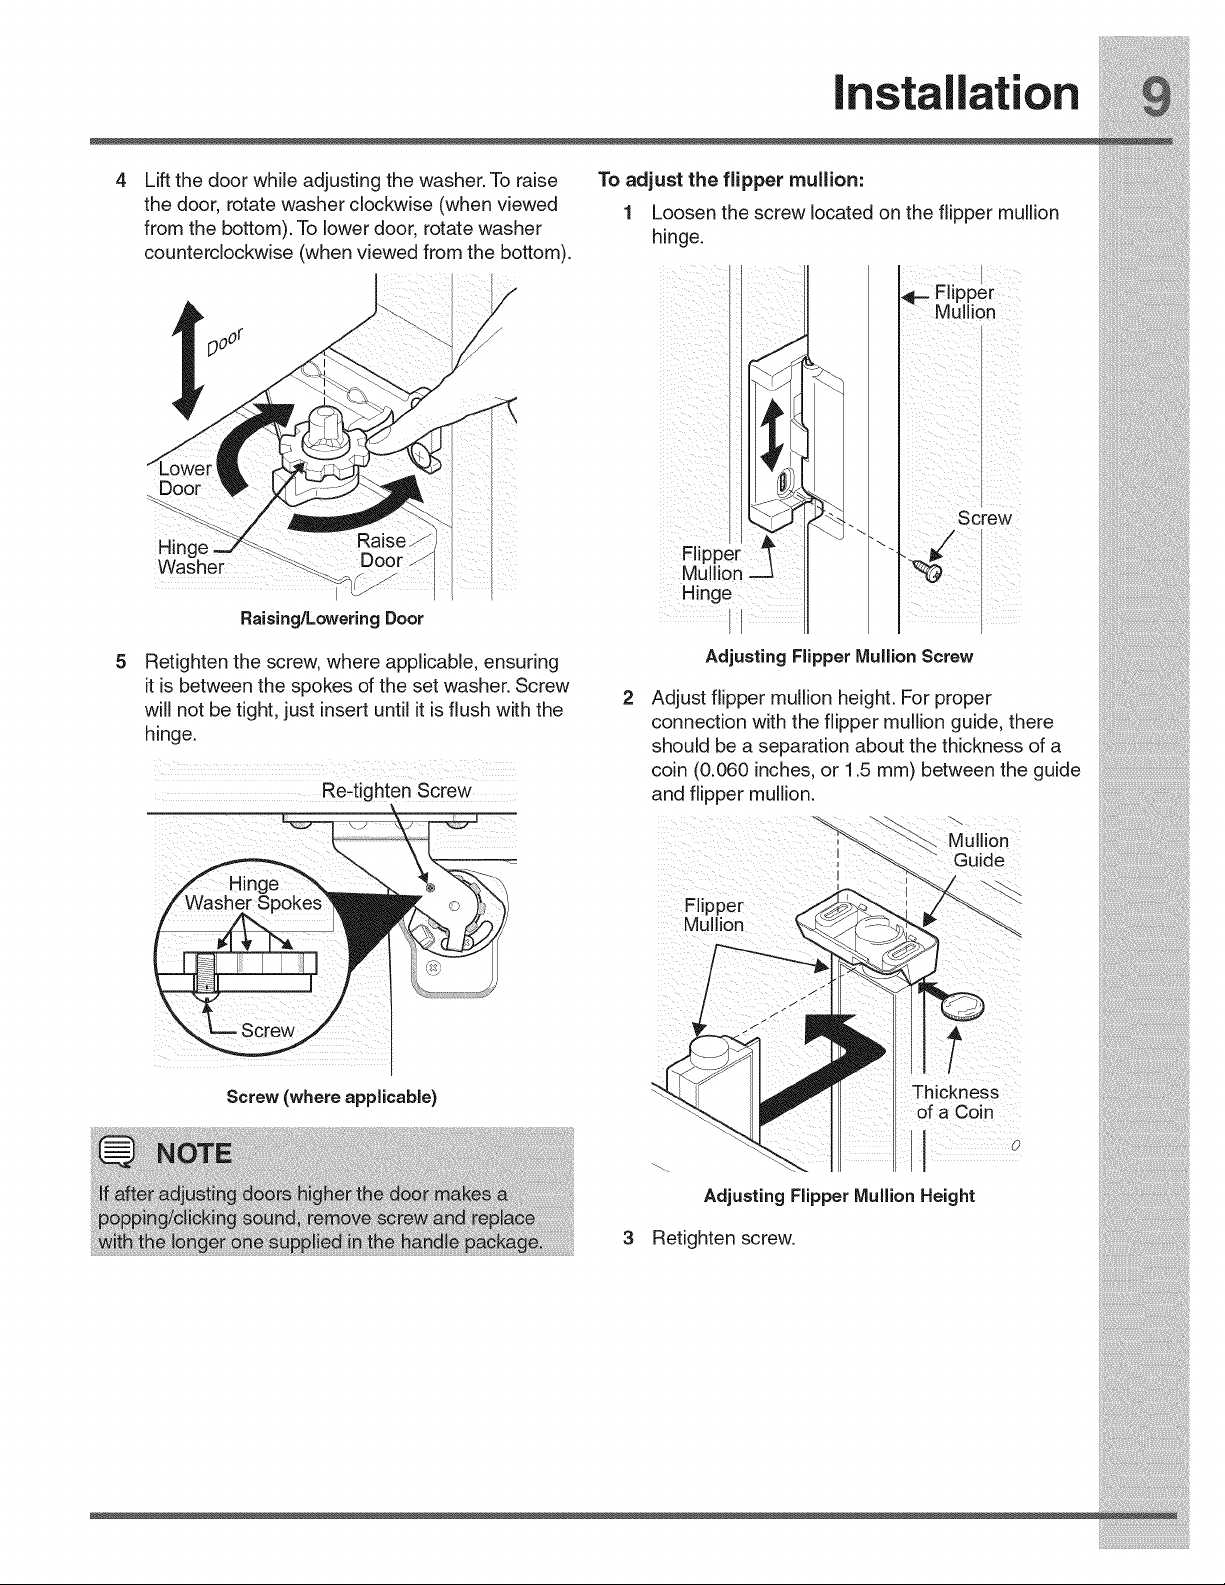
4 Lift the door while adjusting the washer. To raise To adjust the flipper mullion:
!he door, rotate washer clockwise !when viewed 1 Loosen the screw located on the flipper mullion
from [ne bottom), io lower aoor ro[ate wasner hin-e
y .
counterc!ockwlse (when wewed from the bottom).
Flipper
_oOr ..
Door
.. Screw
in e _....... ..
Mullion---] II I |_ I
II I I
Ro_s_°g/Lowo.°gDoor I I II I | I
Adjusting Fhpper MulhonScrew
s Ret_ghtenthescrew,whereapplicable,ensuring ....
t s between the spokes of the set washer Screw ........
..... . ........ ' . . 2 AdjustTppermu onneght For proper
will not De tight, just insert untHit is nusn with the ....... :_. :....^ ,,:.... _., ,. .... :.,^ ._.^.^
_, £;UIIII_L;I.IUII VVlLII tilt:# lll_|Jlc:_i IIIUlIIUII yUlUt:# I.II_I_
n nge
" should be a separation about the thickness of a
coin(o.oooinches,or_.5mm)betweentheguide
Re-tighten Screw and flipper mullion.
Installation
i!_!_i!i_ii_!i!_!_i!i_ii_!i!_!_i!i_ii_!i!_!_i!i_ii_!i!_!_i!i_ii_!i!_!_i!i_ii_!i!_!_i!i_ii_!i!_!_i!i_ii_!i!_!_i!i_ii_!i!_!_ii_i
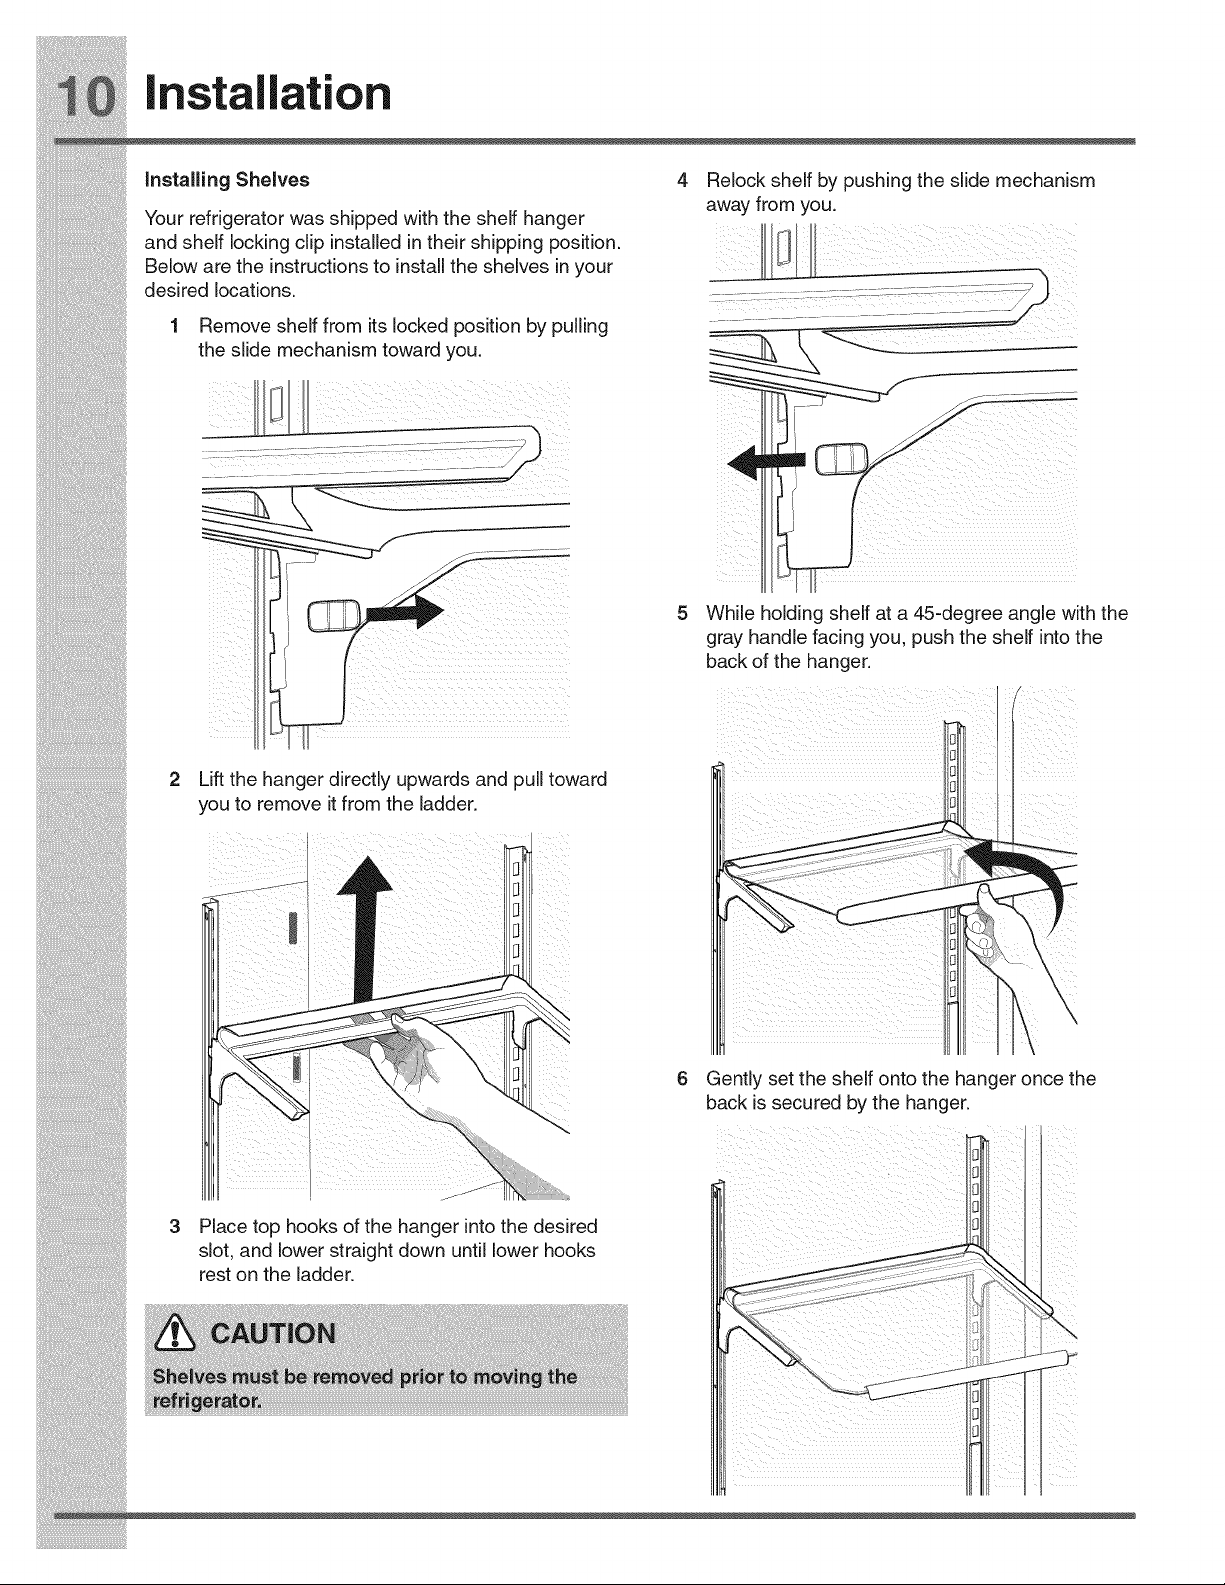
Installing Shelves
Your refrigerator was shipped with the shelf hanger
and shelf lockingdip installed in their shipping position.
Below are the instructionsto installthe shelves in your
desired locations.
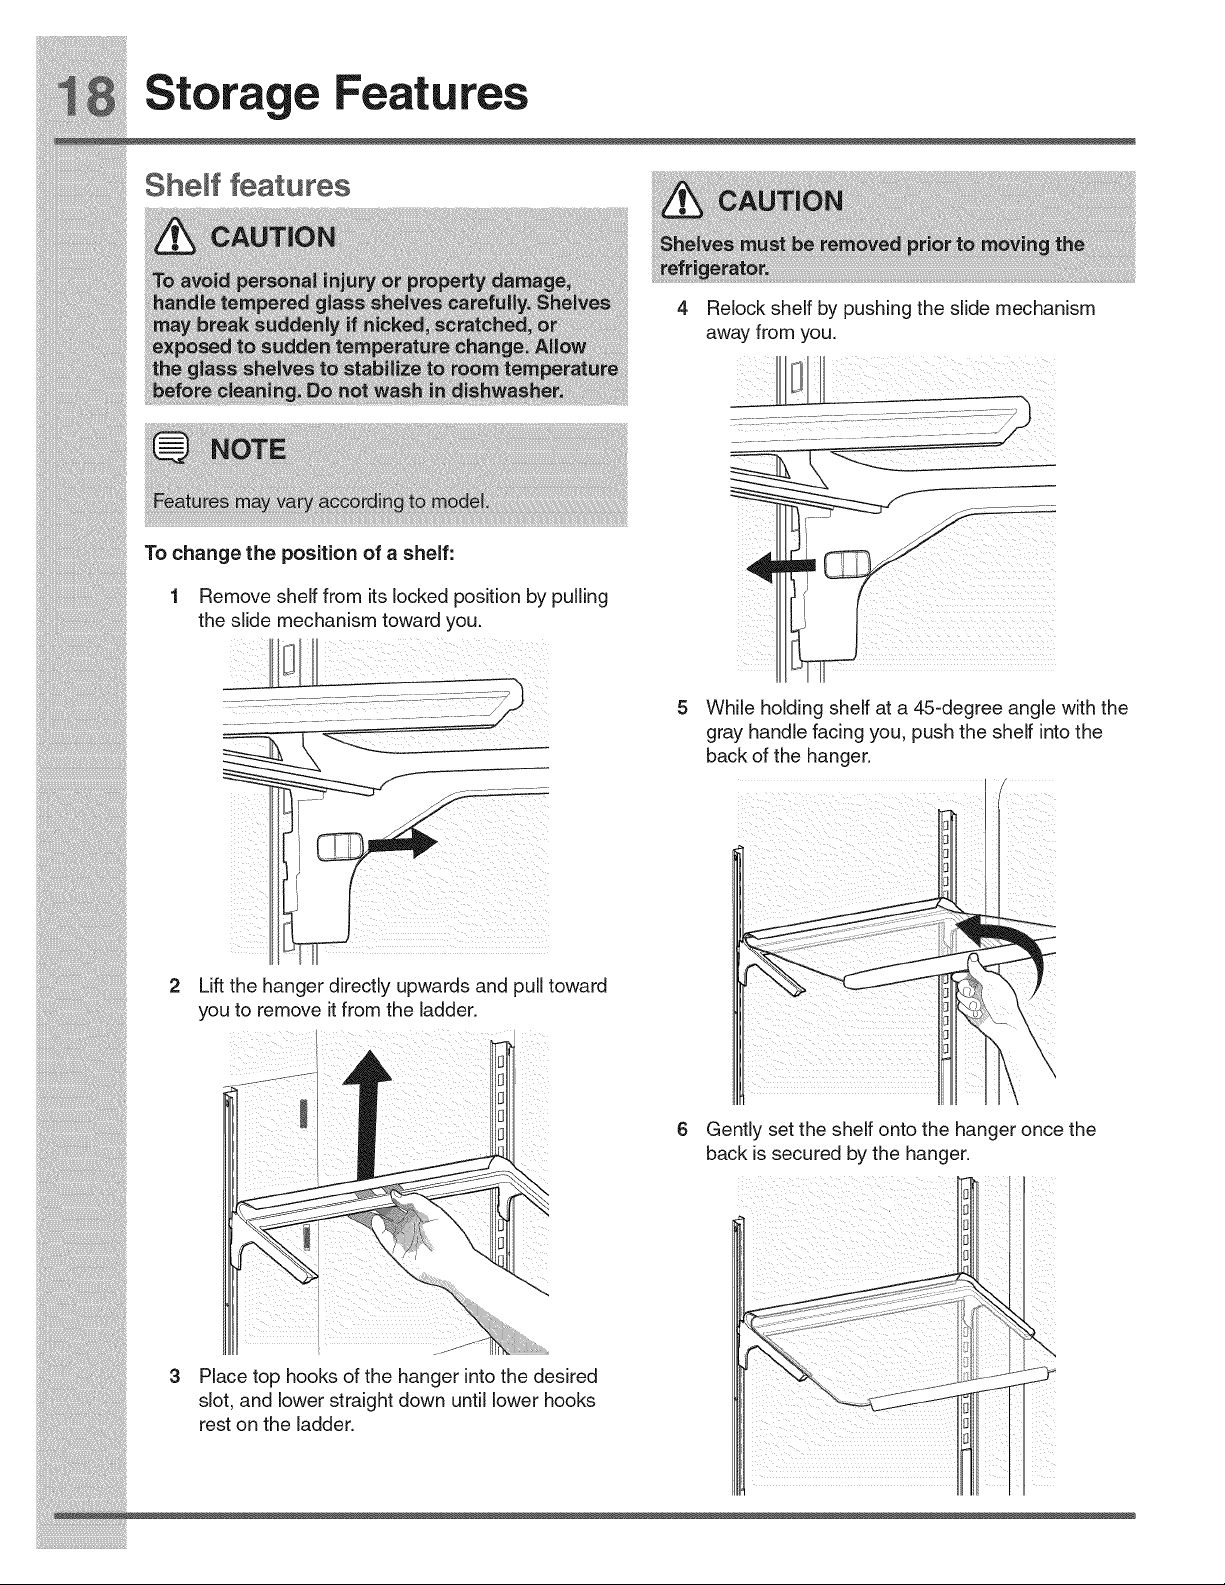
1 Remove shelf from its locked position by pulling
the slide mechanism toward you.
2 Lift the hanger directly upwards and pull toward
Relock shelf by pushing the slide mechanism
away from you.
While holding shelf at a 45-degree angle with the
gray handle facing you, push the shelf into the
back of the hanger.
i!_!_i!i_ii_!i!_!_i!i_ii_!i!_!_i!i_ii_!i!_!_i!i_ii_!i!_!_i!i_ii_!i!_!_i!i_ii_!i!_!_i!i_ii_!i!_!_i!i_ii_!i!_!_i!i_ii_!i!_!_ii_i
Removing the Doors
Getting through narrow spaces
If your refrigerator will not fit through an entrance area,
you can remove the doors. Check first by measuring the
entrance.
To reinstall the right door, reverse the above steps.
Lower Hinge Removal
To prepare for removing the doors:
1 Make sure the electrical power cord is unplugged
from the wall outlet.
2 Open the freezer drawer and remove the toe
grille (see "installation" section).
3 Remove any food from the door shelves and
close the doors.
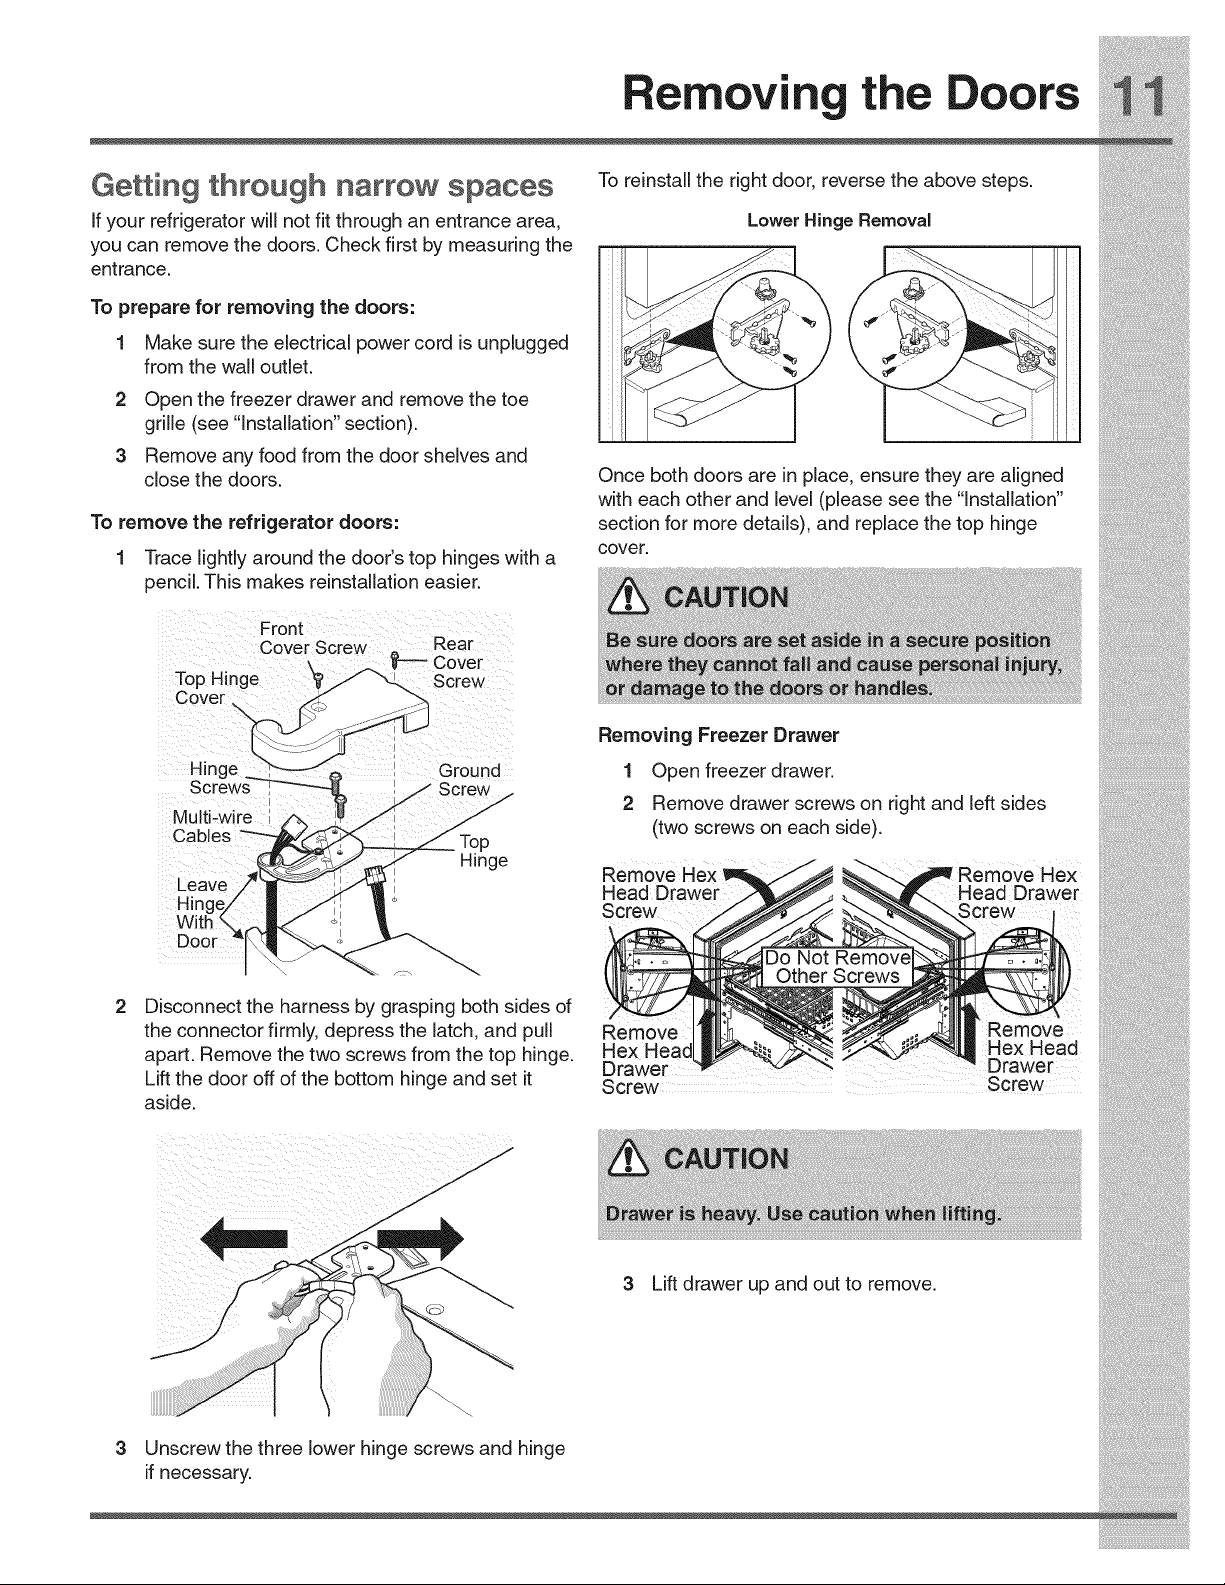
To remove the refrigerator doors:
1 Trace lightlyaround the door's top hinges with a
pencil. This makes reinstallation easier.
Once both doors are in place, ensure they are aligned
with each other and level (please see the "Installation"
section for more details), and replace the top hinge
cover.
Front
, Rear
Top Hinge
Cover \
Removing Freezer Drawer
Hinge. Ground 1 Open freezer drawer.
Screws
• . // 2 Remove drawer screws on right and left sides
{,woscrewsooeochs "e/
Hinge /-
Leave _ Remove Hex !_,_.,-'/_ _%_-__,j_w F_emove Hex
,. _/ Head Drawer /_h_//_ _'_JF.. Head Drawer
Hi.nge/ ° Screw /_/'_ _'_-_,_--_ Screw ,
vvl[n "_ _ A_.._ _#_./__ __ Im...,_ I
| _ _ .... /I_Do Not_- o '--Remcve__l_
2 Disconnect the harness by grasping both sides of I Hlli;
the connector firmly, depress the latch, and pull __ _tHIIll Remove
• Hex Head Hex Head
apart. Remove the two screws from the top hinge. _'_ HexwHea€
• . • Drawer urawer
L ft the door off of the bottom h nge and set t Screw Screw
aside.
_ 3 Lift drawer up and out to remove.
3 Unscrew the three lower hinge screws and hinge
if necessary.
moving the Doors
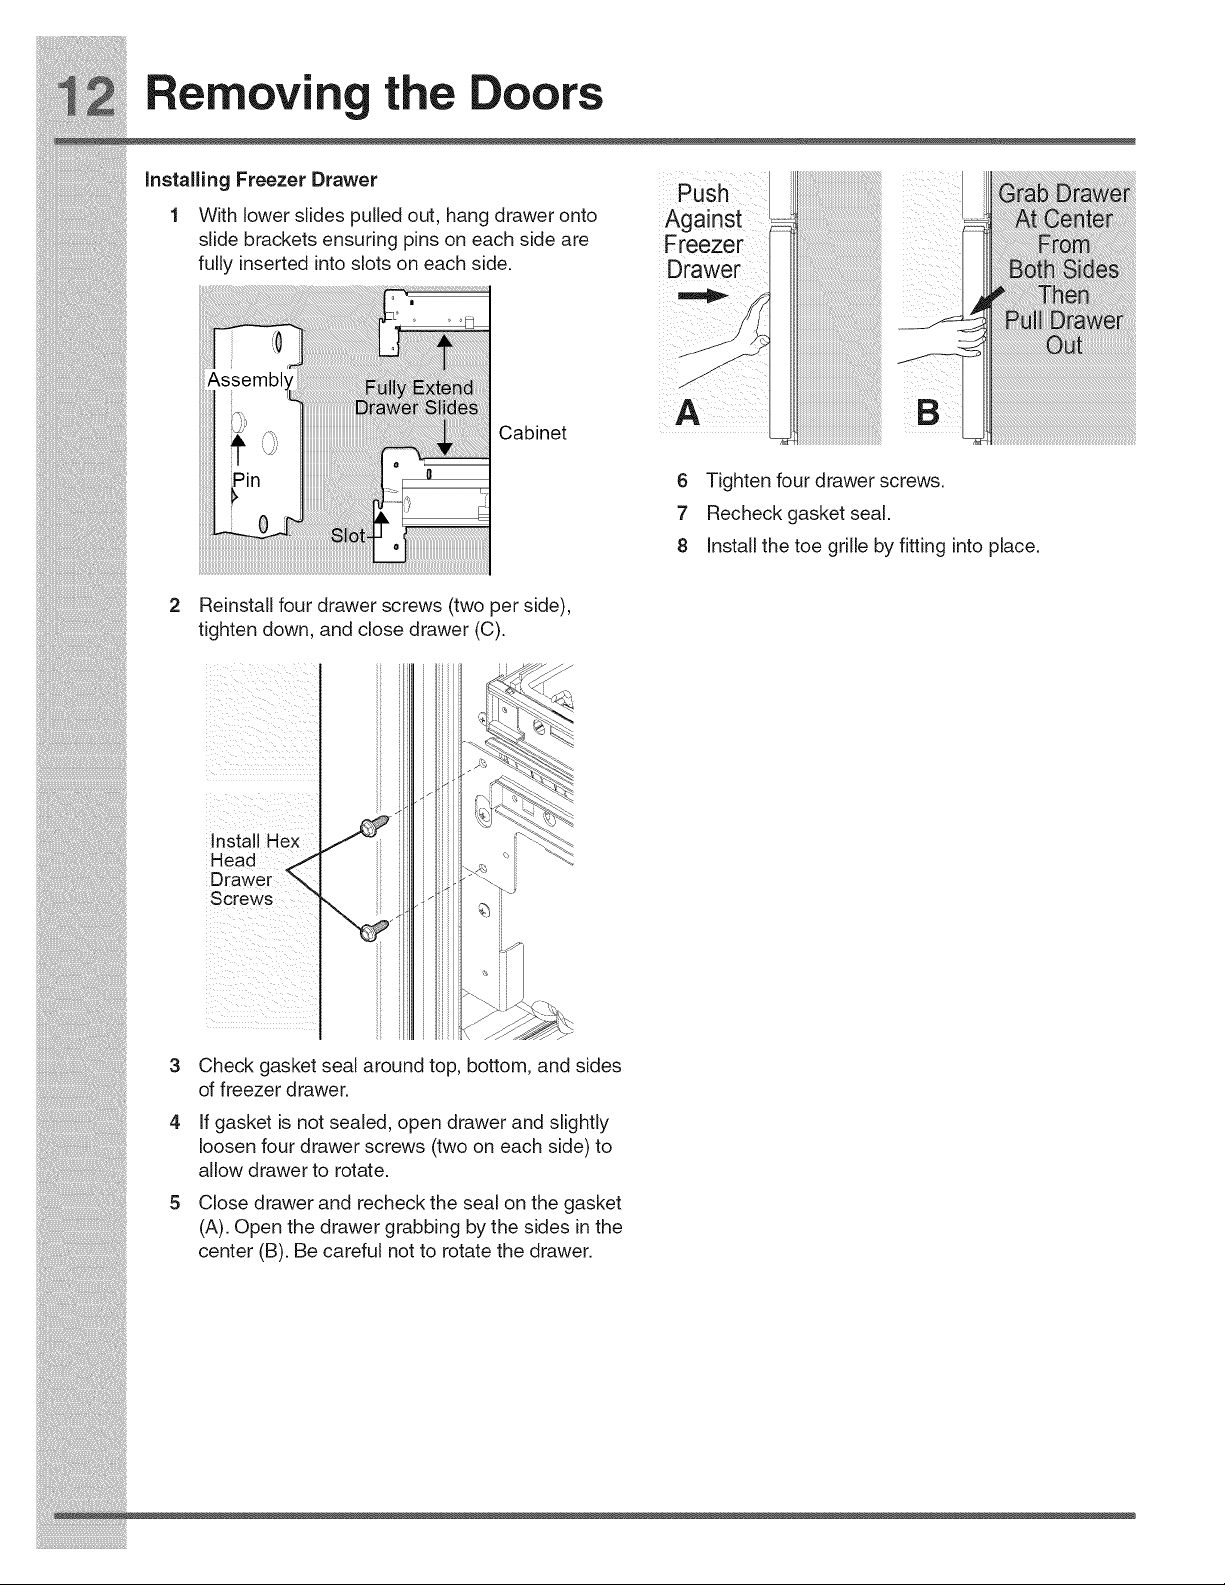
installing Freezer Drawer
1 With lower slides pulled out, hang drawer onto
slide brackets ensuring pins on each side are
fully inserted into slots on each side.
Cabinet
Drawer
6 Tighten four drawer screws.
7 Recheck gasket seal.
8 Install the toe grille by fitting into place.
i!_!_i!i_ii_!i!_!_i!i_ii_!i!_!_i!i_ii_!i!_!_i!i_ii_!i!_!_i!i_ii_!i!_!_i!i_ii_!i!_!_i!i_ii_!i!_!_i!i_ii_!i!_!_i!i_ii_!i!_!_ii_i
Reinstall four drawer screws (two per side),
tighten down, and close drawer (C).
i!_!_i!i_ii_!i!_!_i!i_ii_!i!_!_i!i_ii_!i!_!_i!i_ii_!i!_!_i!i_ii_!i!_!_i!i_ii_!i!_!_i!i_ii_!i!_!_i!i_ii_!i!_!_i!i_ii_!i!_!_ii_i
installing Door Hanq _s
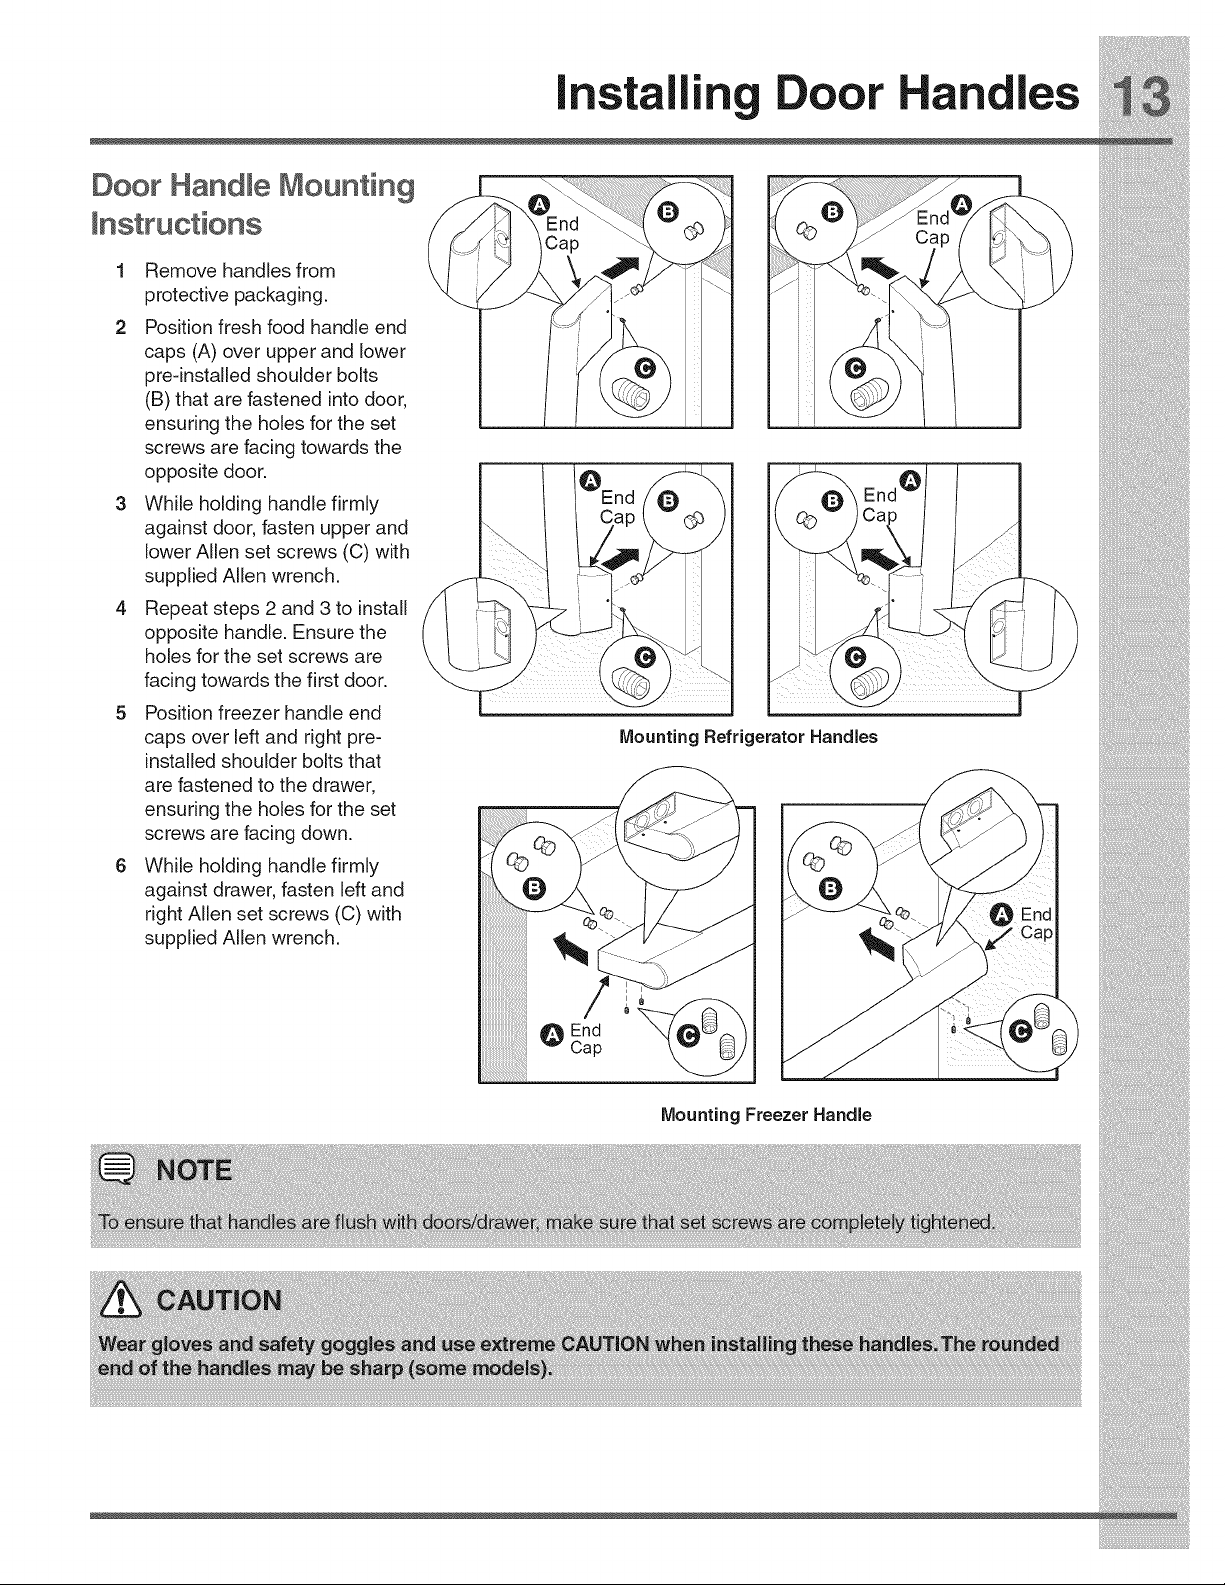
Door Handle Mounting
1 Remove handles from
protective packaging.
2 Position fresh food handle end
caps (A) over upper and lower
pre-installed shoulder bolts
(B) that are fastened into door,
ensuring the holes for the set
screws are facing towards the
opposite door.
3 While holding handle firmly
against door, fasten upper and
lower Allen set screws (C) with
supplied Allen wrench.
4 Repeat steps 2 and 3 to install
opposite handle. Ensure the
holes for the set screws are
facing towards the first door.
5 Position freezer handle end
caps over left and right pre-
installed shoulder bolts that
are fastened to the drawer,
Mounting Refrigerator Handles
ensuring the holes for the set
screws are facing down.
6 While holding handle firmly
against drawer, fasten left and
right Allen set screws (C) with
supplied Allen wrench.
_End __
"" Cap
Mounting Freezer Handl
tl
):
li !iIi Iiii!iiiiili
li _ i i:
_:_i!_!_i!_i_!_i_!}_!;_i_!ii_!_!_i_i%_i_ii_!_!_!_!_!i!_!_!;_ii_i_ii!ii!_i!i!_!_!!ii_!_i!_!_iiii
"14 Connectin theWater upply
1. Disconnect refrigeratorfrom electric power source.
2. Placeendofwatersupplylineintosinkorbucket.
TurnONwatersupplyandflushsupplylineuntil
waterisclear.TurnOFFwatersupplyatshutoffvalve.
3. aemoveplasticcapfromwatervalveinletand
discardcap.
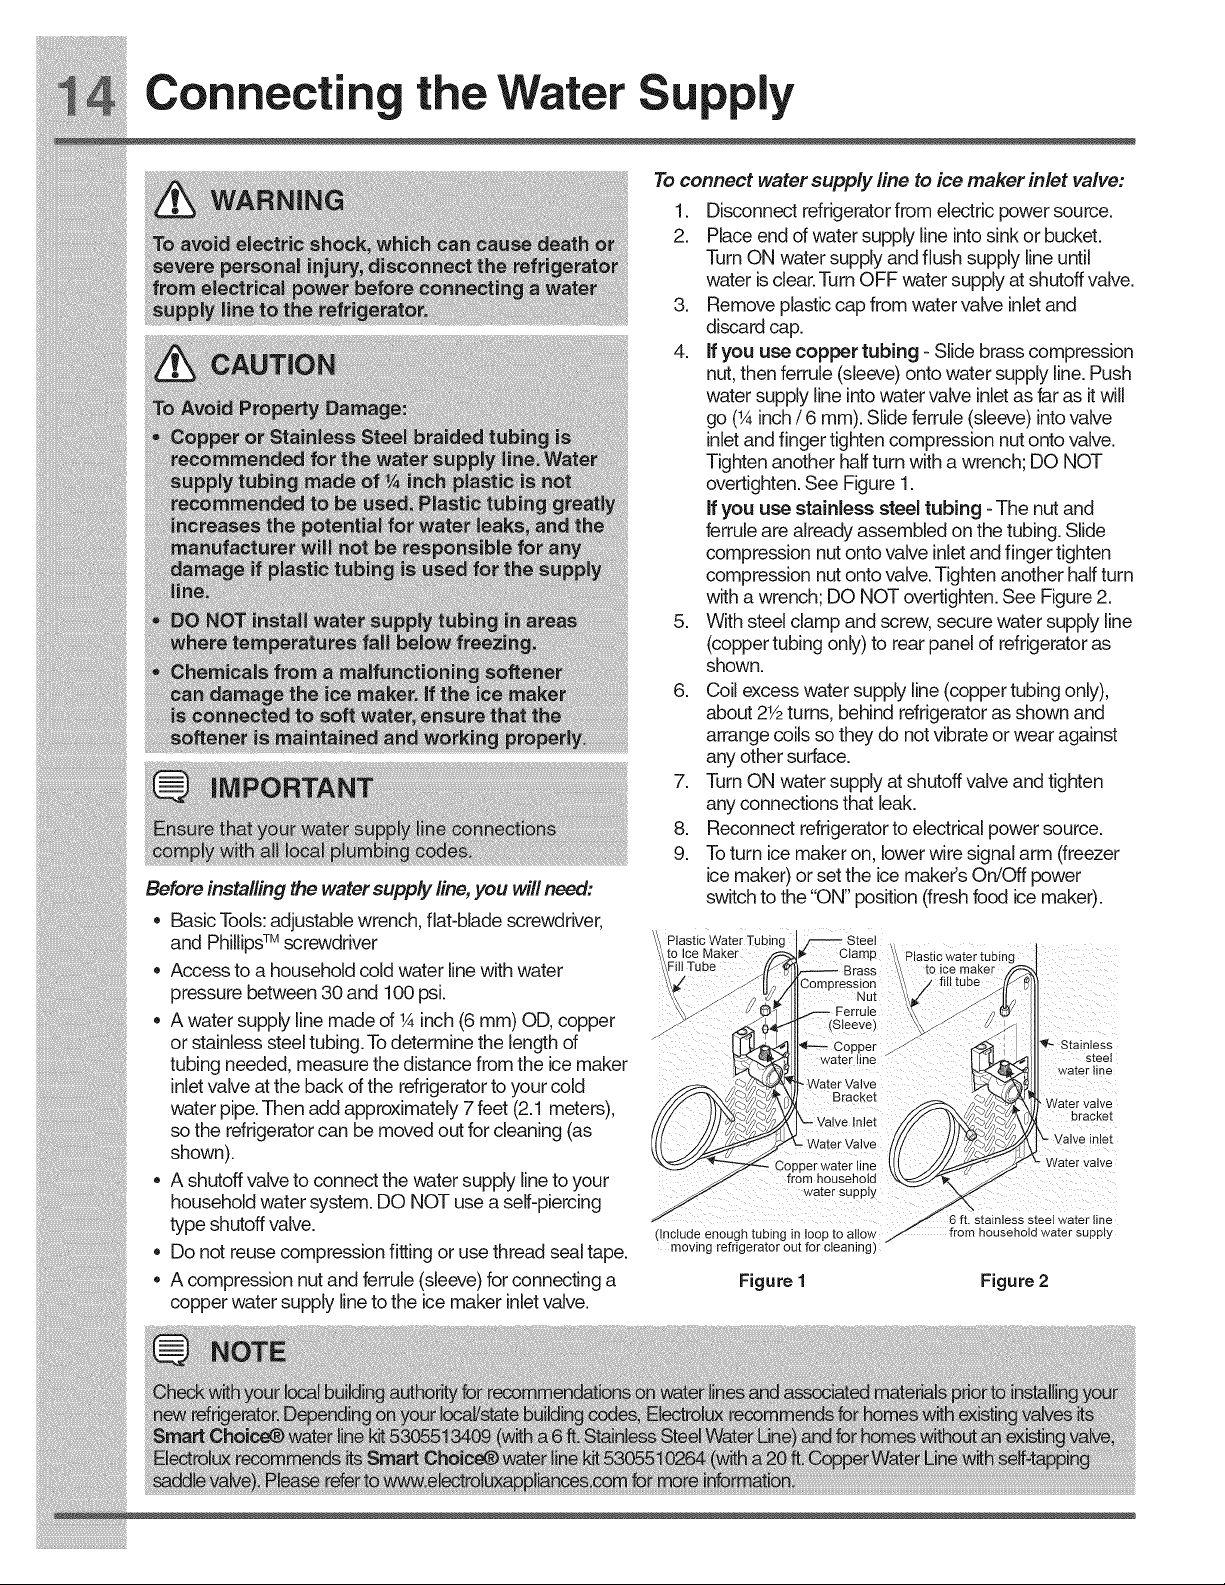
4. Ifyouusecoppertubing-Slidebrasscompression
nut,thenferrule(sleeve) ontowatersupplyline. Push
watersupplylineintowatervalveinletasfarasitwill
go(_A inch/6 mm).Slideferrule(sleeve)intovalve
inletandfingertightencompressionnutontovalve.
Tightenanotherhalfturnwithawrench;UONOT
overtighten.SeeFigure 1.
Ifyouusestainlesssteeltubing-Thenutand
ferrulearealreadyassembledonthetubing. Slide
compression nutontovalveinletandfingertighten
compression nutontovalve.Tightenanotherhalfturn
withawrench;UONOTovertighten.SeeFigure2.
5. Withsteelclampandscrew, securewatersupplyline
(coppertubingonly) torearpanelofrefrigeratoras
shown.
6. Coilexcesswatersupplyline(coppertubingonly),
about2V2turns, behind refrigeratorasshownand
arrangecoilssotheydonotvibrateorwearagainst
anyothersurface.
7. Turn ON watersupplyat shutoffvalveandtighten
i!_!_i!i_ii_!i!_!_i!i_ii_!i!_!_i!i_ii_!i!_!_i!i_ii_!i!_!_i!i_ii_!i!_!_i!i_ii_!i!_!_i!i_ii_!i!_!_i!i_ii_!i!_!_i!i_ii_!i!_!_ii_i
Controls
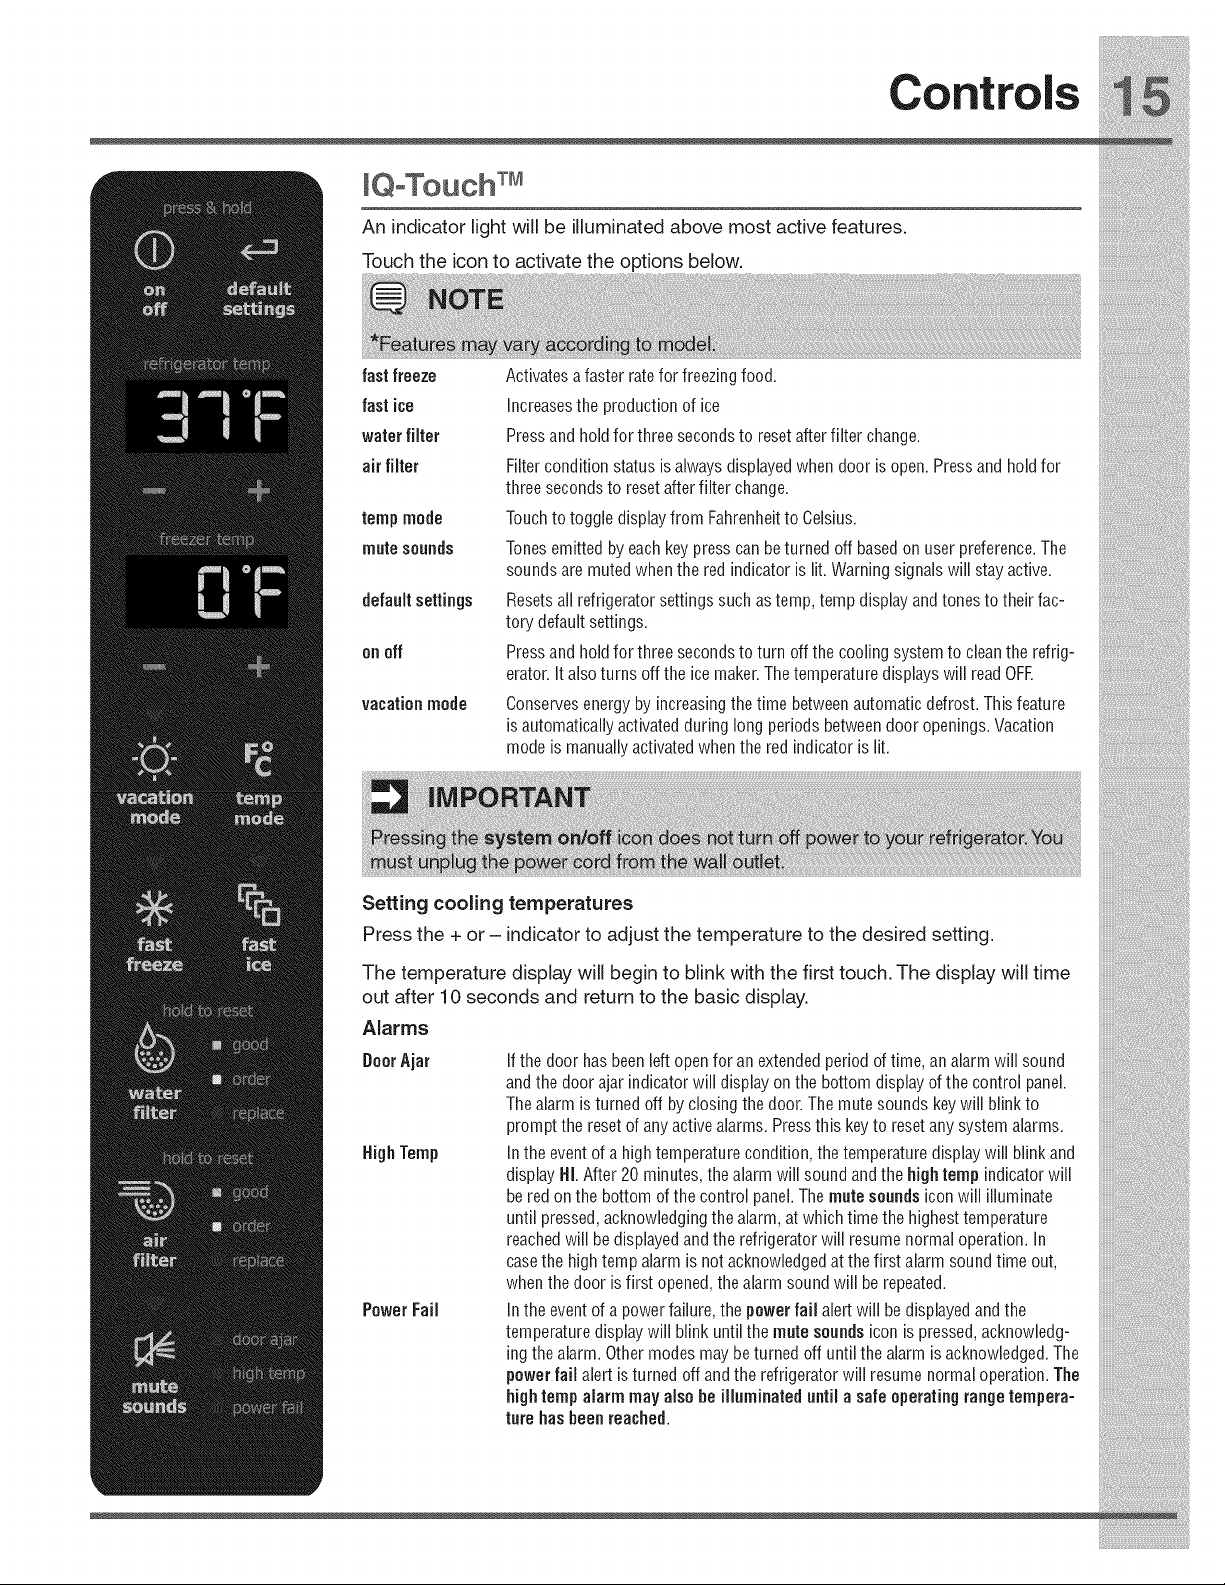
An indicator light will be illuminated above most active features.
Touch the icon to activate the options below.
fast freeze
fast ice
water filter
air filter
defauJtsettings
on off
vacationmode
Activates a faster rate for freezing food.
Increasesthe production of ice
Pressand hold for three seconds to reset afterfilter change.
Filter condition status is always displayedwhen door is open.Press and hold for
three seconds to resetafter filter change.
Touchto toggle display from Fahrenheitto Celsius.
Tonesemitted by eachkey press can beturned off based on user preference.The
sounds are mutedwhen the red indicator is lit. Warning signalswill stay active.
Resetsall refrigerator settings such as temp, temp display andtones to their fac-
tory default settings.
Pressand hold for three seconds to turn off the cooling system to clean the refrig-
erator.It also turns off the ice maker.The temperature displays will read OFE
Conservesenergy by increasingthe time betweenautomatic defrost. This feature
is automatically activated during long periods betweendoor openings.Vacation
mode is manuallyactivatedwhen the red indicator is lit.
IQoTouch Sabbath Mode
TheSabbathModeisafeaturethatdisablesportions
oftherefrigeratoranditscontrolsforIQ-Touch TM, in
accordancewithobservanceoftheweeklySabbath
andrelJgious holJdayswJthJntheOrthodoxdewJsh
community.
SabbathModeisturnedONandOFFbypressingand
holdingthefreezertemp - andtherefrigeratortemp
"+" indicatorsforfiveseconds.Thedisplayshows"Sb
while in Sabbath mode.
IntheSabbathMode, theHighTempalarmisactivefor
healthreasons. Ifahightemperaturealarm is
activatedduringthistime, forexampleduetoa
/_ door left ajar, the alarm will sound intermittently
forabouttwo minutes.The alarm will then
silenceon itsownandared hightemperatureicon
wJlldJsplay.The hJghtemp iconwillcontinuetodJsplay,
even if the door is closed until the Sabbath mode is
exitedandtheiconreset.Therefrigeratorwillfunction
normallyoncethedoorisclosed, withoutanyviolation
oftheSabbath/Holidays.
Forfurtherassistance, guidelinesforproperusageand
a complete list of models with the Sabbath feature,
i!_!_i!i_ii_!i!_!_i!i_ii_!i!_!_i!i_ii_!i!_!_i!i_ii_!i!_!_i!i_ii_!i!_!_i!i_ii_!i!_!_i!i_ii_!i!_!_i@ii_i
A Ut0 m at iC ICe
Ice maker operation & care
After the refrigerator is installed properly, the ice maker
can produce ice within 24 hours. It can completely fill an
ice bin in about three days.
When using the ice maker for the first time and in order
for the ice maker to work properly, it is necessary to
clear air from water filter tubing. Once ice maker begins
making ice, allow the bucket to fill completely, then
discard the first TWO FULL buckets of ice. It will take at
least two days to completely fill the bucket on regular
ice making mode or 11/2days on fast ice mode.
The ice maker produces approximately four pounds of
ice every 24 hours depending on usage conditions.
• The following sounds are normal when the ice maker
is operating:
Motor running
Ice dropping into ice bin
Water valve opening or closing
Running water
• Ice cubes stored too long may develop an odd flavor.
Empty the ice bin as explained below.
Fast Ice Function
Your refrigerator is equipped with a Smart Fast Ice
Function, that will, if activated at your user interface,
allow an increase in ice production. You do not need to
deactivate it, if not needed, your refrigerator will operate
on normal conditions.
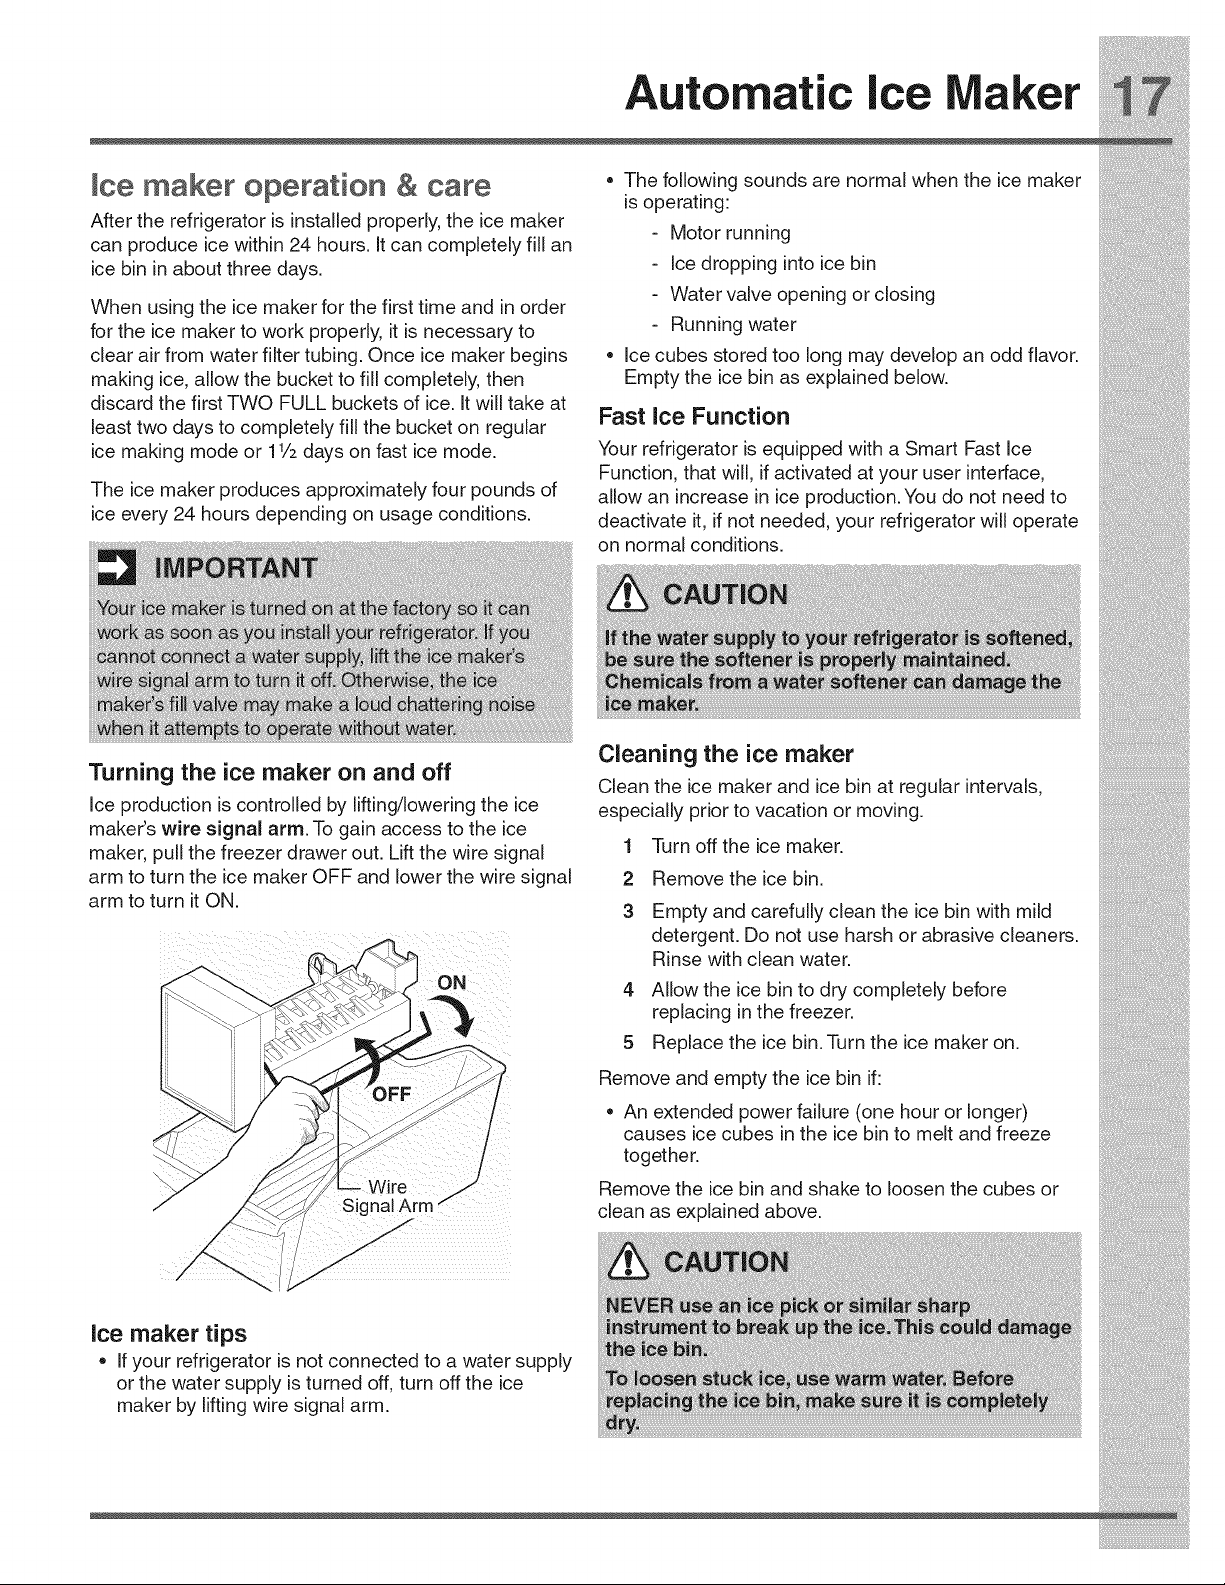
Turning the ice maker on and off
Ice production is controlled by lifting/lowering the ice
maker's wire signal arm. To gain access to the ice
maker, pull the freezer drawer out. Lift the wire signal
arm to turn the ice maker OFF and lower the wire signal
arm to turn it ON.
Ice maker tips
• If your refrigerator is not connected to a water supply
or the water supply is turned off, turn off the ice
maker by lifting wire signal arm.
Cleaning the ice maker
Clean the ice maker and ice bin at regular intervals,
especially prior to vacation or moving.
1 Turn off the ice maker.
2 Remove the ice bin.
3 Empty and carefully clean the ice bin with mild
detergent. Do not use harsh or abrasive cleaners.
Rinse with clean water.
4 Allow the ice bin to dry completely before
replacing in the freezer.
5 Replace the ice bin. Turn the ice maker on.
Remove and empty the ice bin if:
• An extended power failure (one hour or longer)
causes ice cubes in the ice bin to melt and freeze
together.
Remove the ice bin and shake to loosen the cubes or
clean as explained above.
i!_!_i!i_ii_!i!_!_i!i_ii_!i!_!_i!i_ii_!i!_!_i!i_ii_!i!_!_i!i_ii_!i!_!_i!i_ii_!i!_!_i!i_ii_!i!_!_i!i_ii_!i!_!_i!i_ii_!i!_!_ii_i
Storage Features
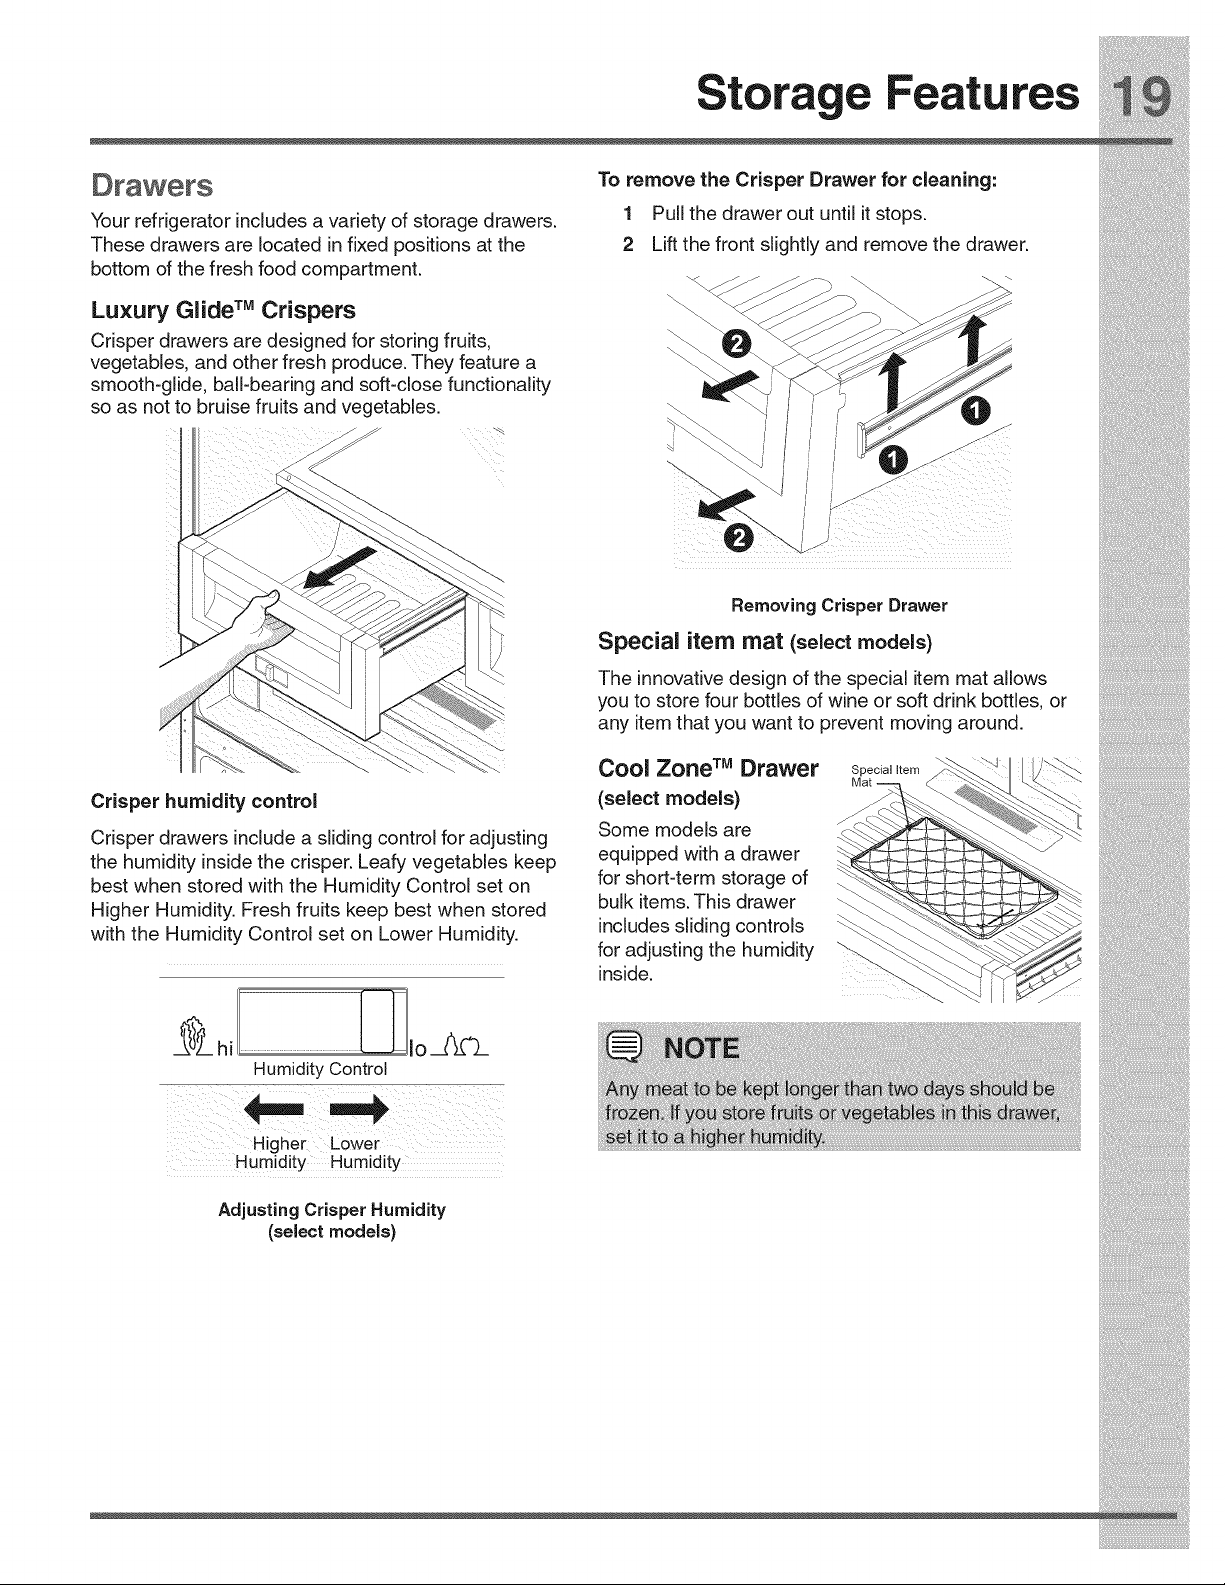
Your refrigerator includes a variety of storage drawers.
These drawers are located in fixed positions at the
bottom of the fresh food compartment.
Luxury Glide TMCrispers
Crisper drawers are designed for storing fruits,
vegetables, and other fresh produce. They feature a
smooth-glide, ball-bearing and soft-dose functionality
so as not to bruise fruits and vegetables.
To remove the Crisper Drawer for cleaning:
1 Pull the drawer out until it stops.
2 Lift the front slightly and remove the drawer.
Removing Crisper Drawer
Special item mat (select models)
The innovative design of the special item mat allows
you to store four bottles of wine or soft drink bottles, or
any item that you want to prevent moving around.
Cool Zone TMDrawer
(select models)
Special item
Mat
i_i!i!i:iil;ii!i_iiii!i_!ii;;j_ii_i¸_i_!:!iii;_i:ii!i_i;i!i_i;i!i_ii_%!!_!_!_!_ii_!_;_!_i_i_!i;i:i!i_i_!i!i_:_!_
Storage Features
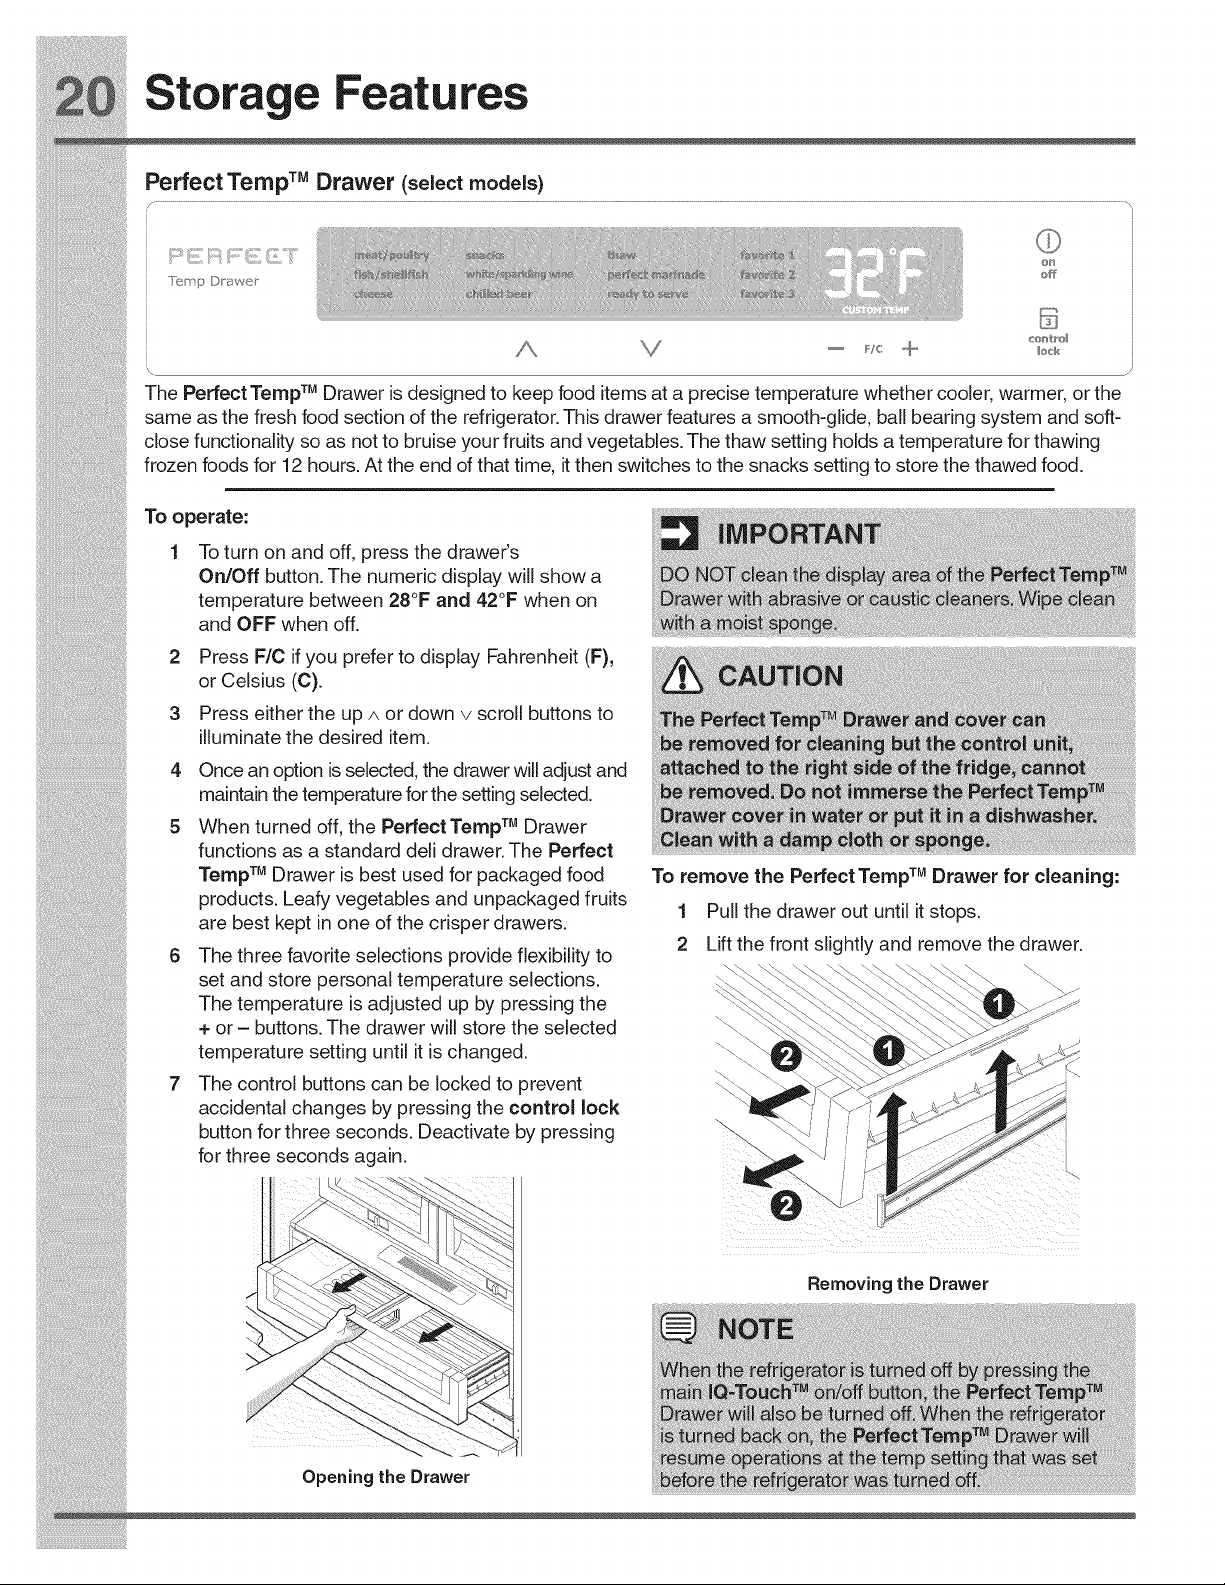
Perfect Temp TM Drawer (selectmodels)
) i N
.... eo_tro_
l /X V _ /c @ _ock
,\
The Perfect Temp TM Drawer Js designed to keep food items at a precise temperature whether cooler, warmer, or the
same as the fresh food section of the refrigerator. This drawer features a smooth-glide, ball bearing system and soft-
close functionality so as not to bruise your fruits and vegetables. The thaw setting holds a temperature for thawing
frozen foods for 12 hours. At the end of that time, it then switches to the snacks setting to store the thawed food.
Toopo_to.
Toturnon_doff,p_es_thed_we_s
On/Offbutton.The numericdisplay°willshow a
temperature between 28 F and 42 F when on
and OFF when off.
2 Press F/C if you prefer to display Fahrenheit (F),
or Celsius (C).
3 Press either the up/x or down v scroll buttons to
illuminate the desired item.
4 Once an option is selected, the drawer will adjust and
maintain the temperature for the setting selected.
i!_!_i!i_ii_!i!_!_i!i_ii_!i!_!_i!i_ii_!i!_!_i!i_ii_!i!_!_i!i_ii_!i!_!_i!i_ii_!i!_!_i!i_ii_!i!_!_i!i_ii_!i!_!_i!i_ii_!i!_!_ii_i
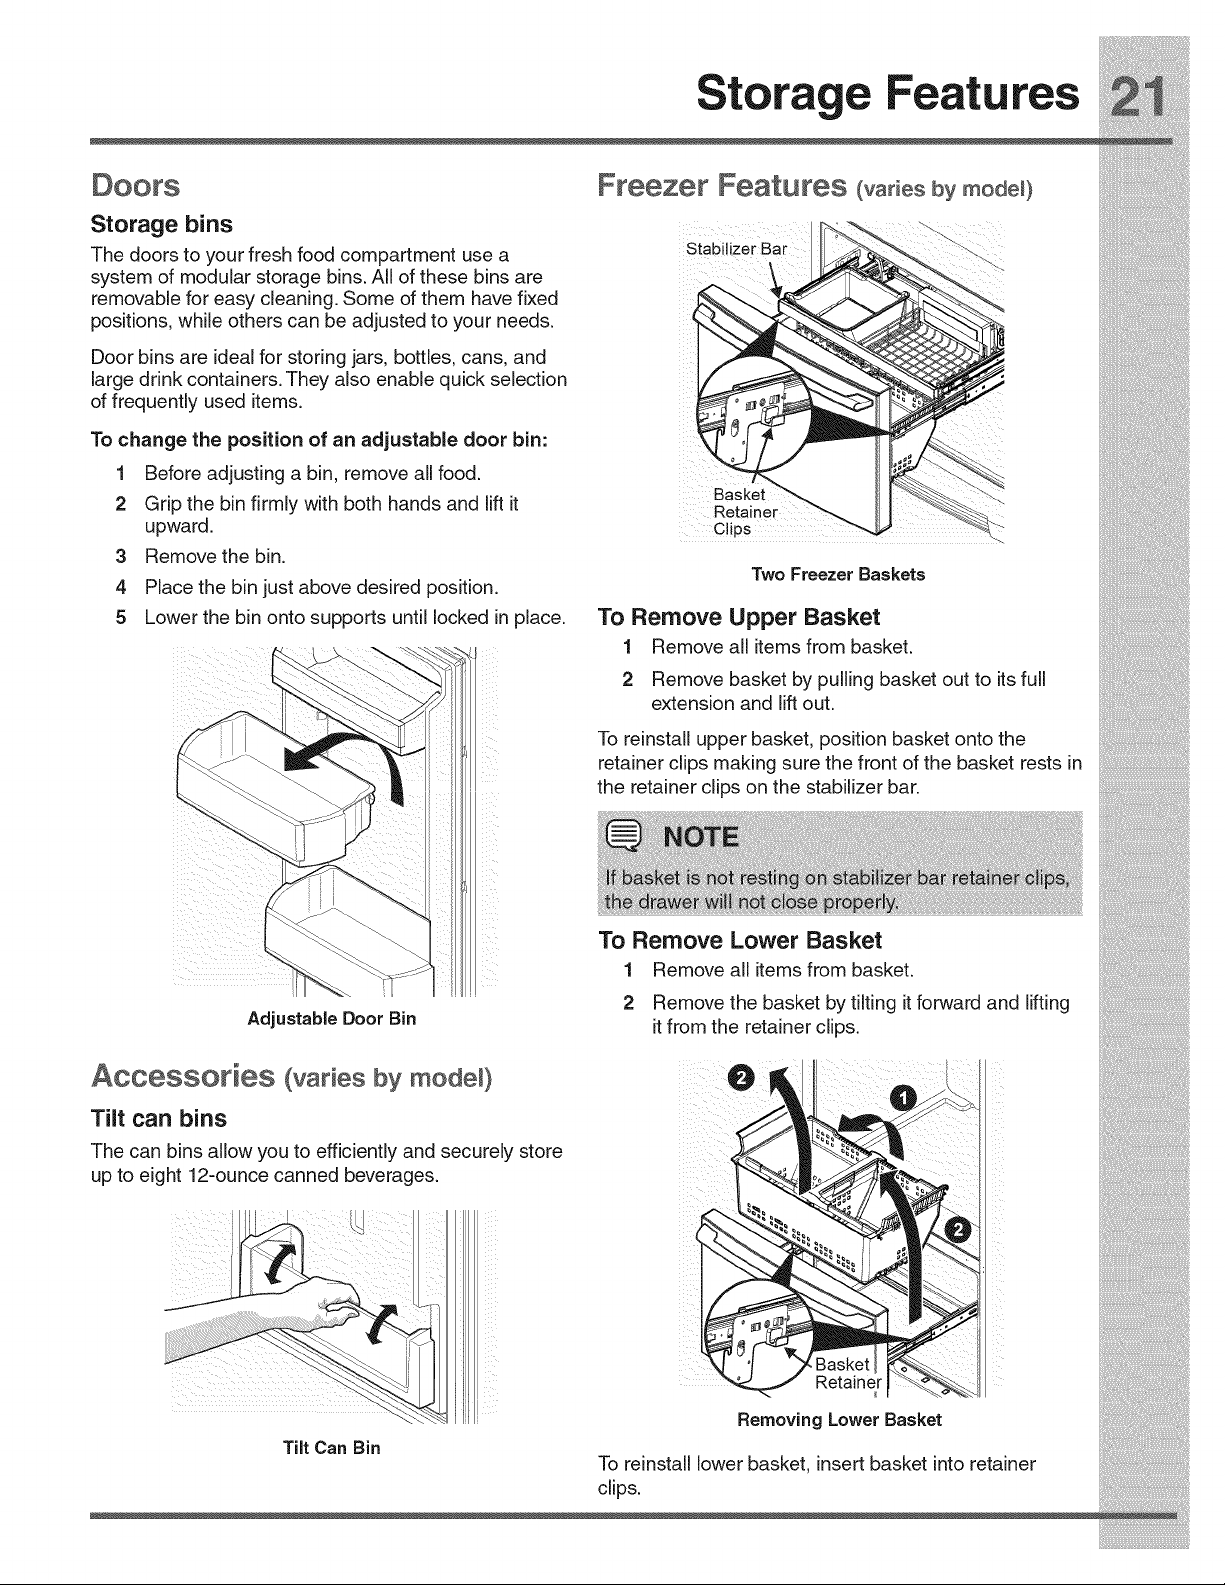
Adjustable Door Bin
i_ill
Accessories (varies by model}
Tilt can bins
The can bins allow you to efficiently and securely store
up to eight 12-ounce canned beverages.
Tilt Can Bin
the retainer clips on the stabilizer bar.
To Remove Lower Basket
1 Remove all items from basket.
2 Remove the basket by tilting itforward and lifting
it from the retainer clips.
Removing Lower Basket
To reinstall lower basket, insert basket into retainer
clips.
i_i!_!_i!i_ii_!i!_!_i!i_ii_!i!_!_i!i_ii_!i!_!_i!i_ii_!i!_!_i!i_ii_!i!_!_i!i_ii_!i!_!_i!i_ii_!i!_!_i!i_ii_!i!_!_i!i_ii_!i!_!_iii_:_
Storage Features
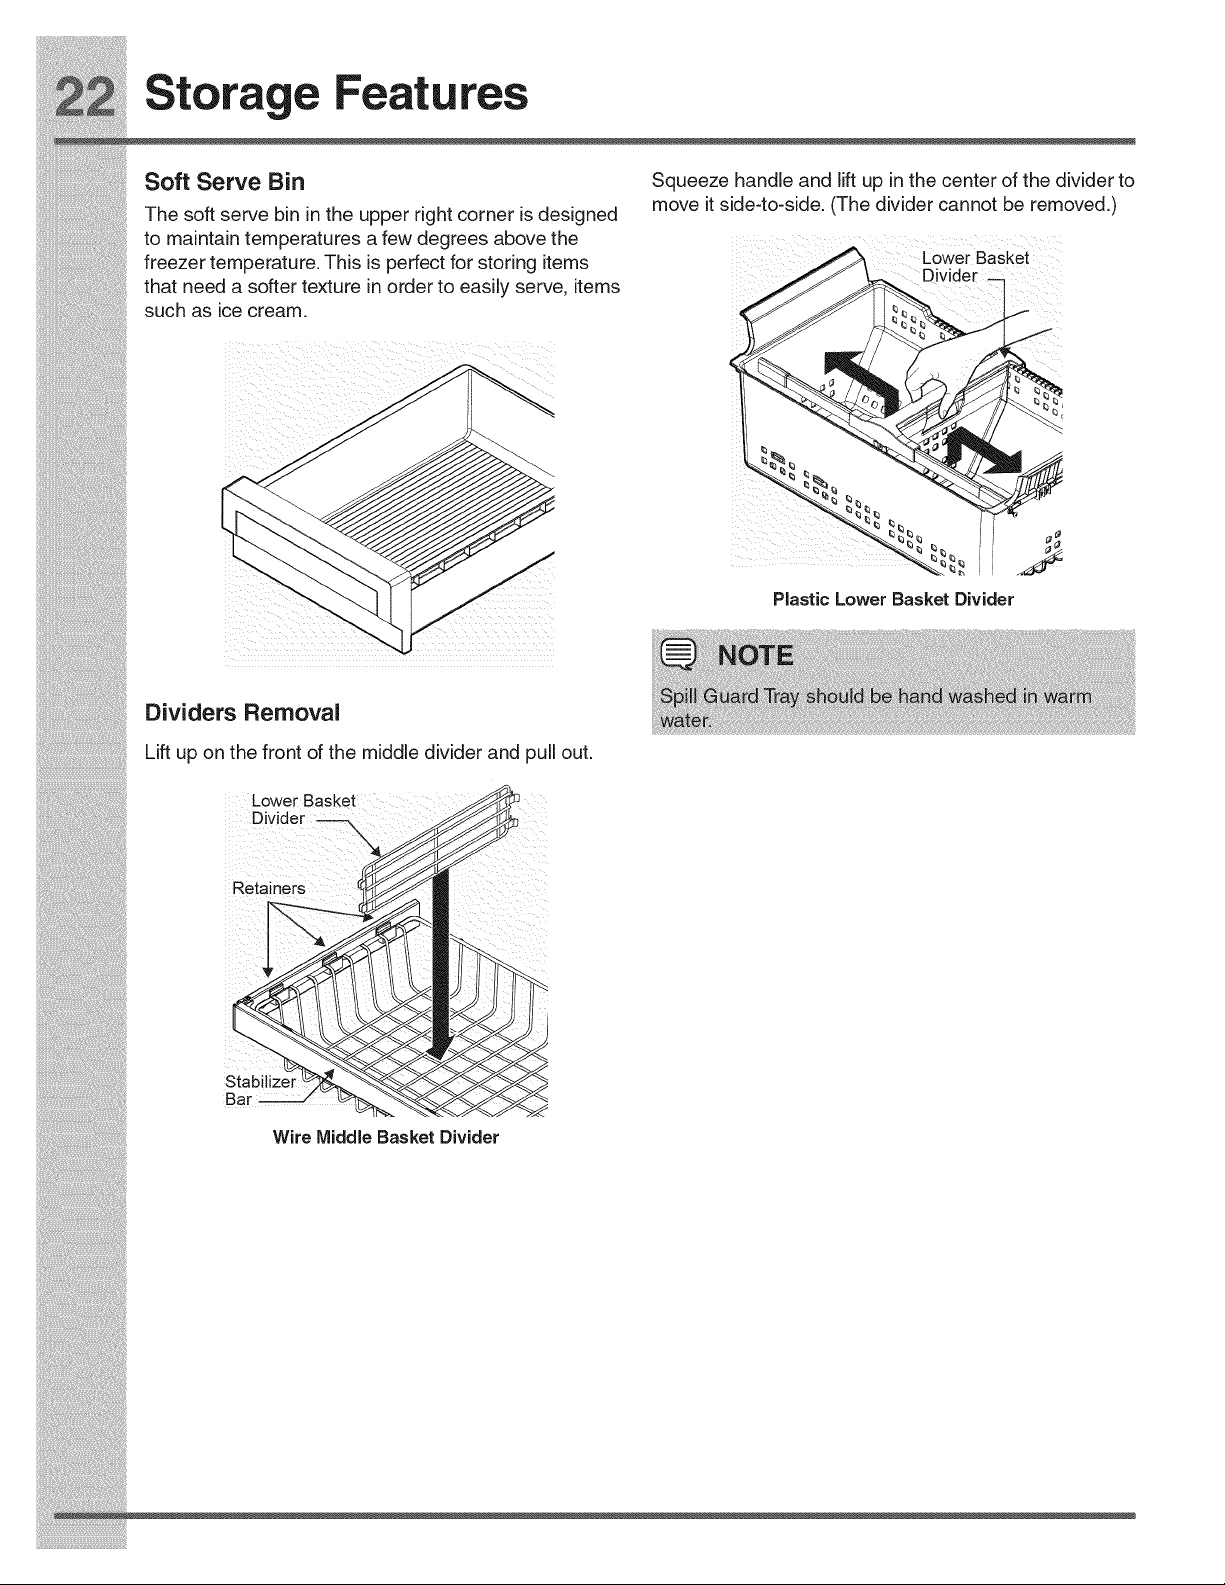
Soft Serve Bin
The soft serve bin inthe upper right corner is designed
to maintain temperatures a few degrees above the
freezer temperature. This is perfect for storing items
that need a softer texture in order to easily serve, items
such as ice cream.
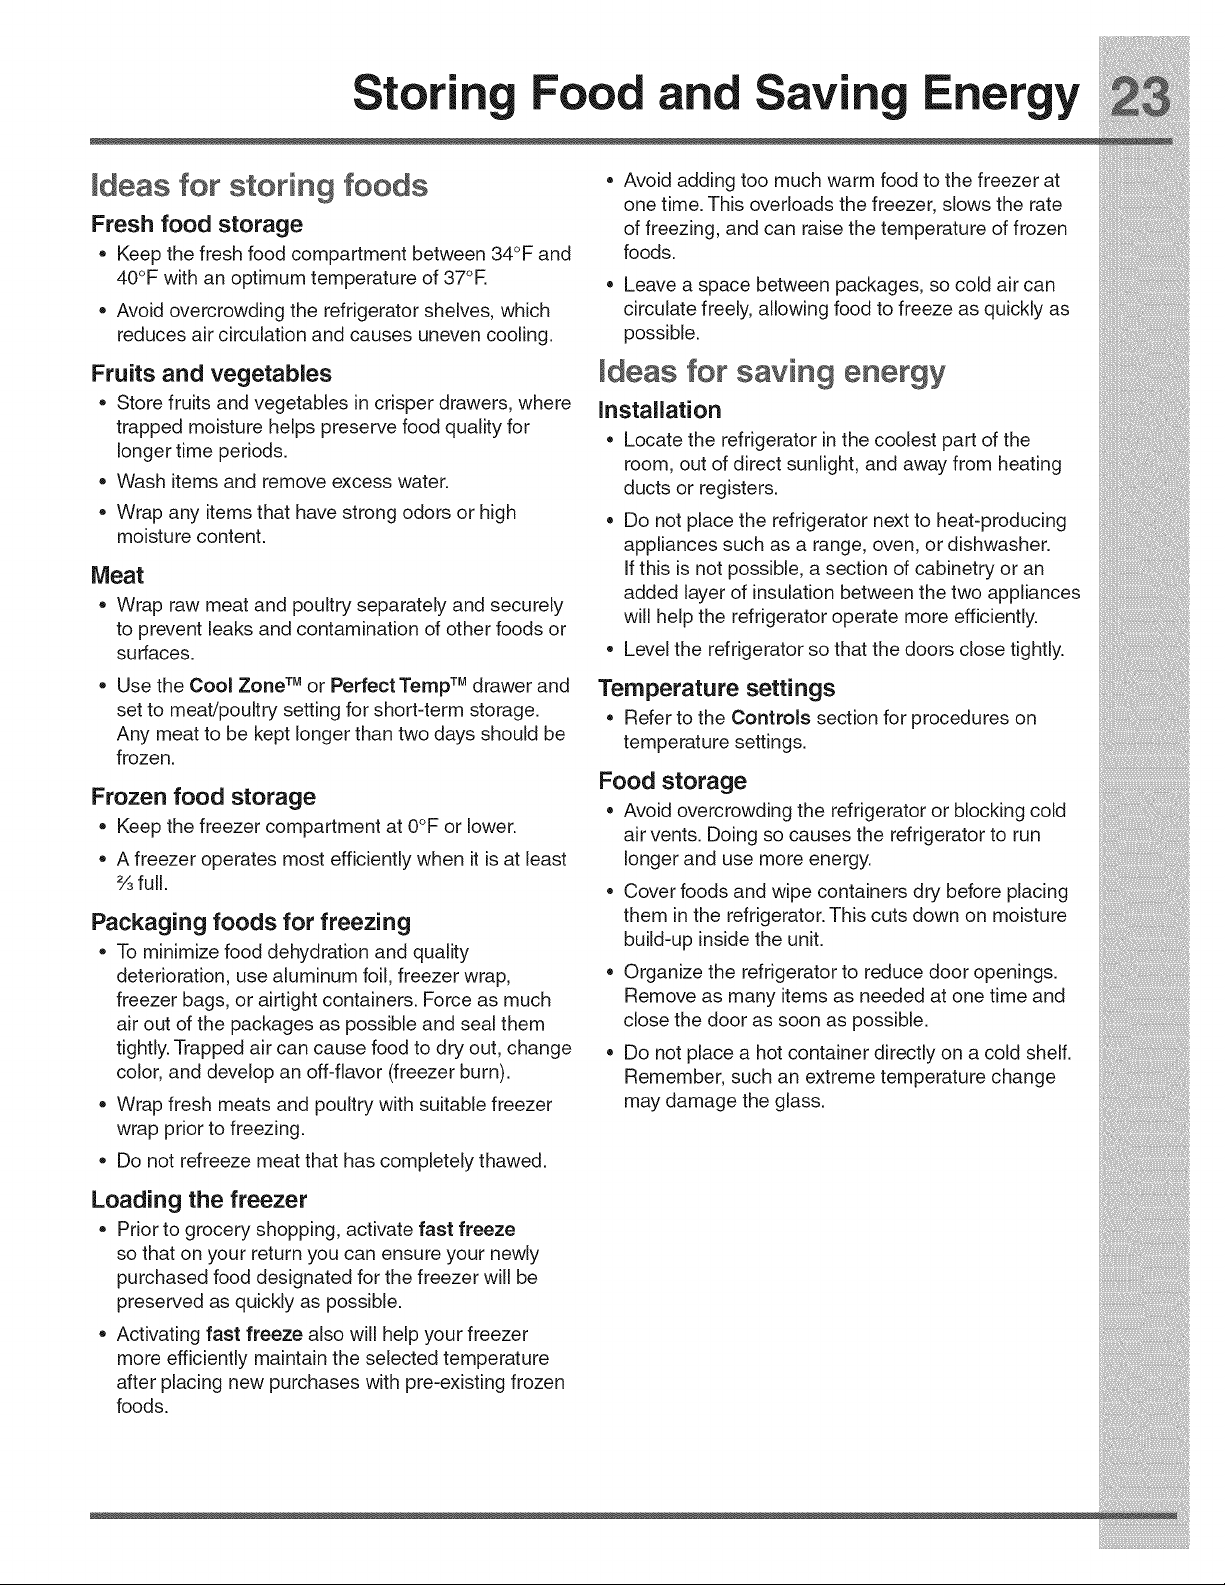
Squeeze handle and lift up in the center of the divider to
move it side-to-side. (The divider cannot be removed.)
Lower Basket
Divider
Plastic Lower Basket Divider
i!_!_i!i_ii_!i!_!_i!i_ii_!i!_!_i!i_ii_!i!_!_i!i_ii_!i!_!_i!i_ii_!i!_!_i!i_ii_!i!_!_i!i_ii_!i!_!_i!i_ii_!i!_!_i!i_ii_!i!_!_ii_i
Dividers Removal
Lift up on the front of the middle divider and pull out.
i!_!_i!i_ii_!i!_!_i!i_ii_!i!_!_i!i_ii_!i!_!_i!i_ii_!i!_!_i!i_ii_!i!_!_i!i_ii_!i!_!_i!i_ii_!i!_!_i!i_ii_!i!_!_i!i_ii_!i!_!_ii_i
Anymeattobekeptlongerthantwodaysshouldbe
frozen.
Frozen food storage
temperature settings.
Food storage
i_i!_!_i!i_ii_!i!_!_i!i_ii_!i!_!_i!i_ii_!i!_!_i!i_ii_!i!_!_i!i_ii_!i!_!_i!i_ii_!i!_!_i!i_ii_!i!_!_i!i_ii_!i!_!_i!i_ii_!i!_!_iii_
Normal Operatin Sounds
Understanding the sounds you
N E
may hear t _ _i
gt e [iCien _am i _Ur r_rige_toi iS not
Your new high-efficiency refrigerator may introduce d in_,u[at_r.
unfamiliar sounds. These sounds normally indicate
your refrigerator is operating correctly. Some surfaces
on floors, walls, and kitchen cabinets may make these /\
sounds more noticeable. _ '_.....
--..
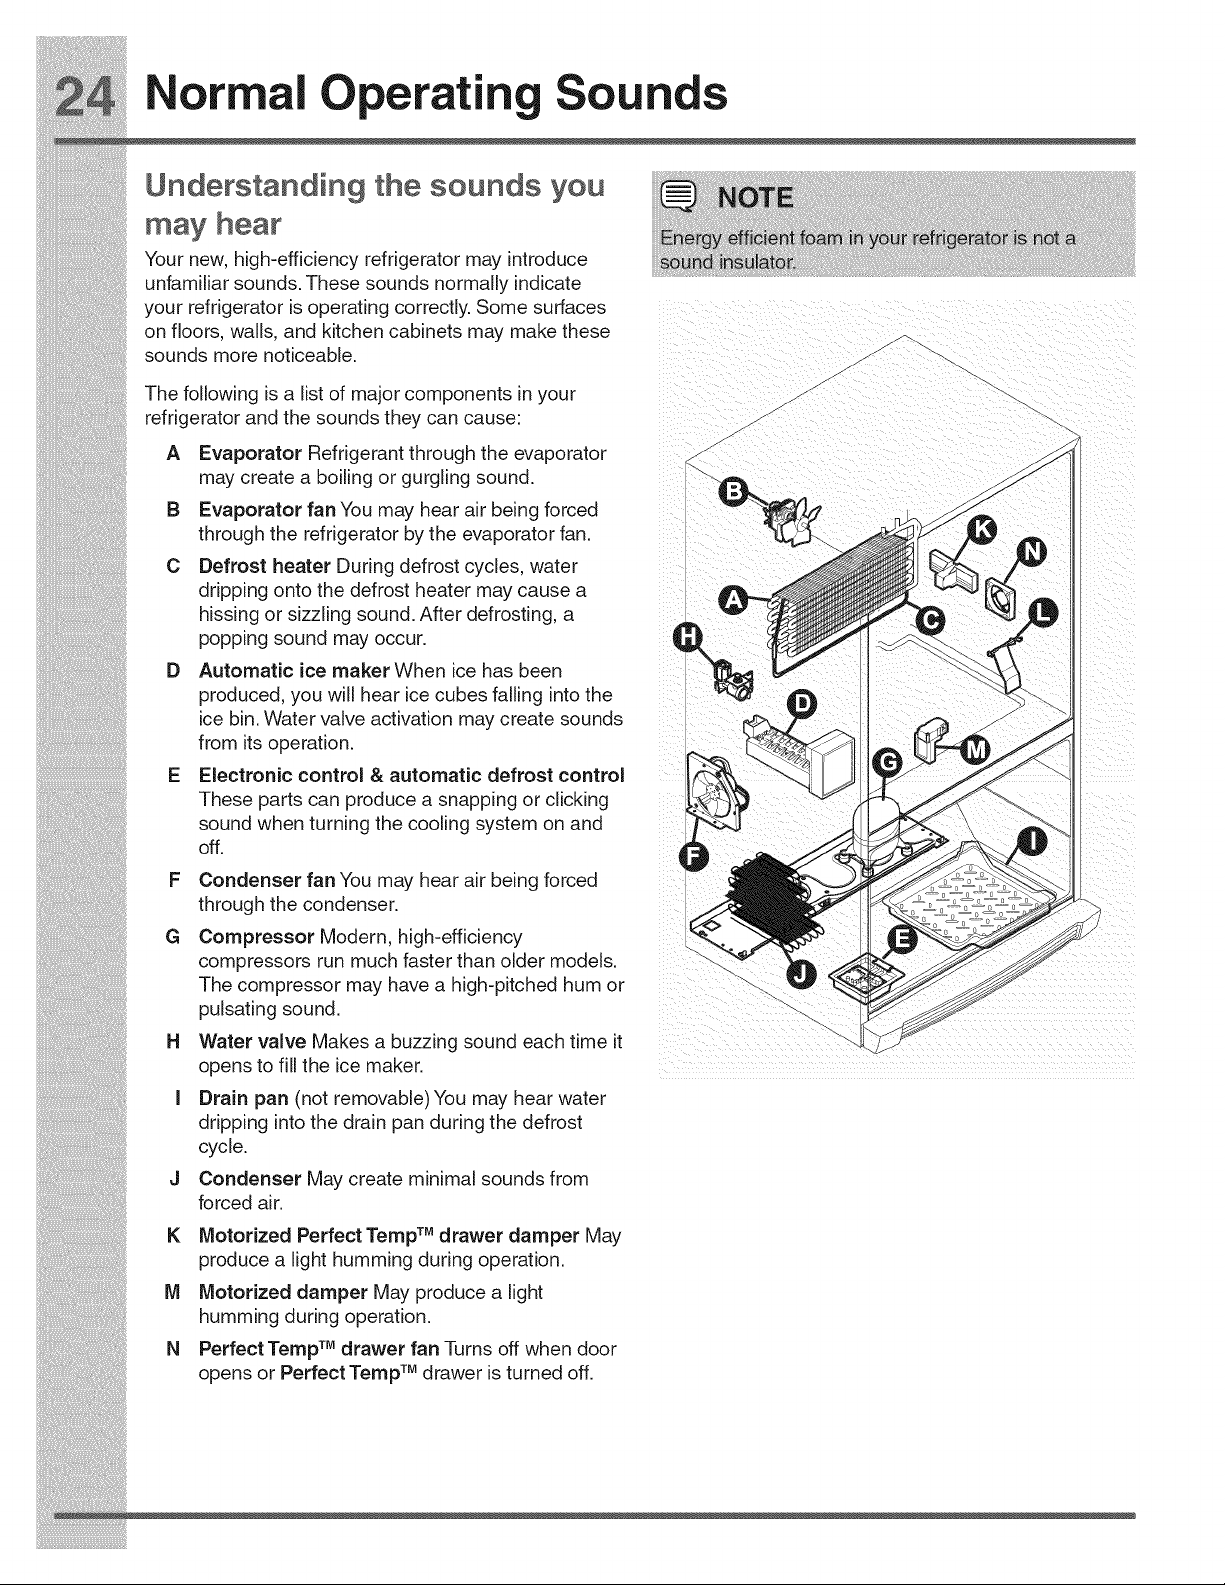
The following is a list of major components in your _ -...
refrigerator and the sounds they can cause: / "-..
A Evaporator Refrigerant through the evaporator
may create a boiling or gurgling sound.
B Evaporator fan You may hear air being forced
through the refrigerator by the evaporator fan.
C Defrost heater During defrost cycles, water
dripping onto the defrost heater may cause a
hissing or sizzling sound. After defrosting, a
popping sound may occur.
D Automatic ice maker When ice has been
produced, you will hear ice cubes falling into the
ice bin. Water valve activation may create sounds
from its operation.
E Electronic control & automatic defrost control
i!_!_i!i_ii_!i!_!_i!i_ii_!i!_!_i!i_ii_!i!_!_i!i_ii_!i!_!_i!i_ii_!i!_!_i!i_ii_!i!_!_i!i_ii_!i!_!_i!i_ii_!i!_!_i!i_ii_!i!_!_ii_i
• Rated Capacity - 240 gallons
• Rated service flow - .5 gallons per minute
the housing and discard it.
i_i!_!_i!i_ii_!i!_!_i!i_ii_!i!_!_i!i_ii_!i!_!_i!i_ii_!i!_!_i!i_ii_!i!_!_i!i_ii_!i!_!_i!i_ii_!i!_!_i!i_ii_!i!_!_i!i_ii_!i!_!_iii_
Changin
the Water and Air Filters
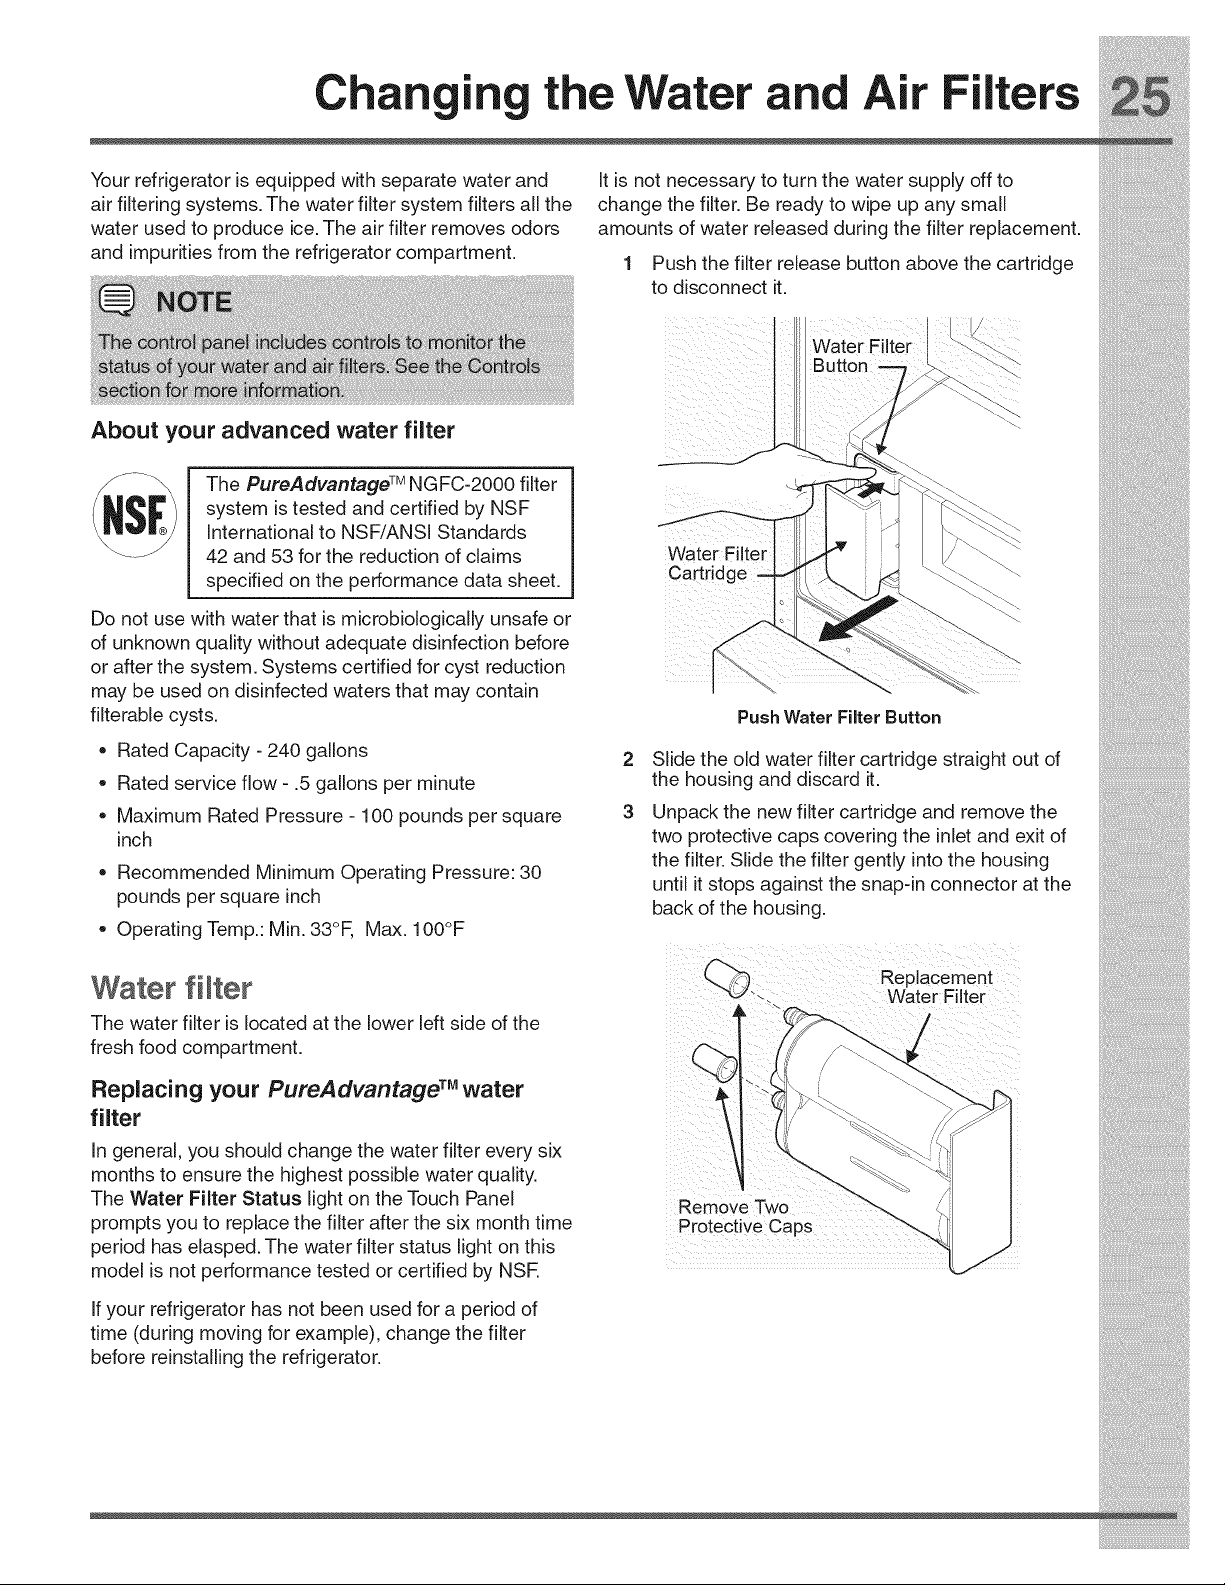
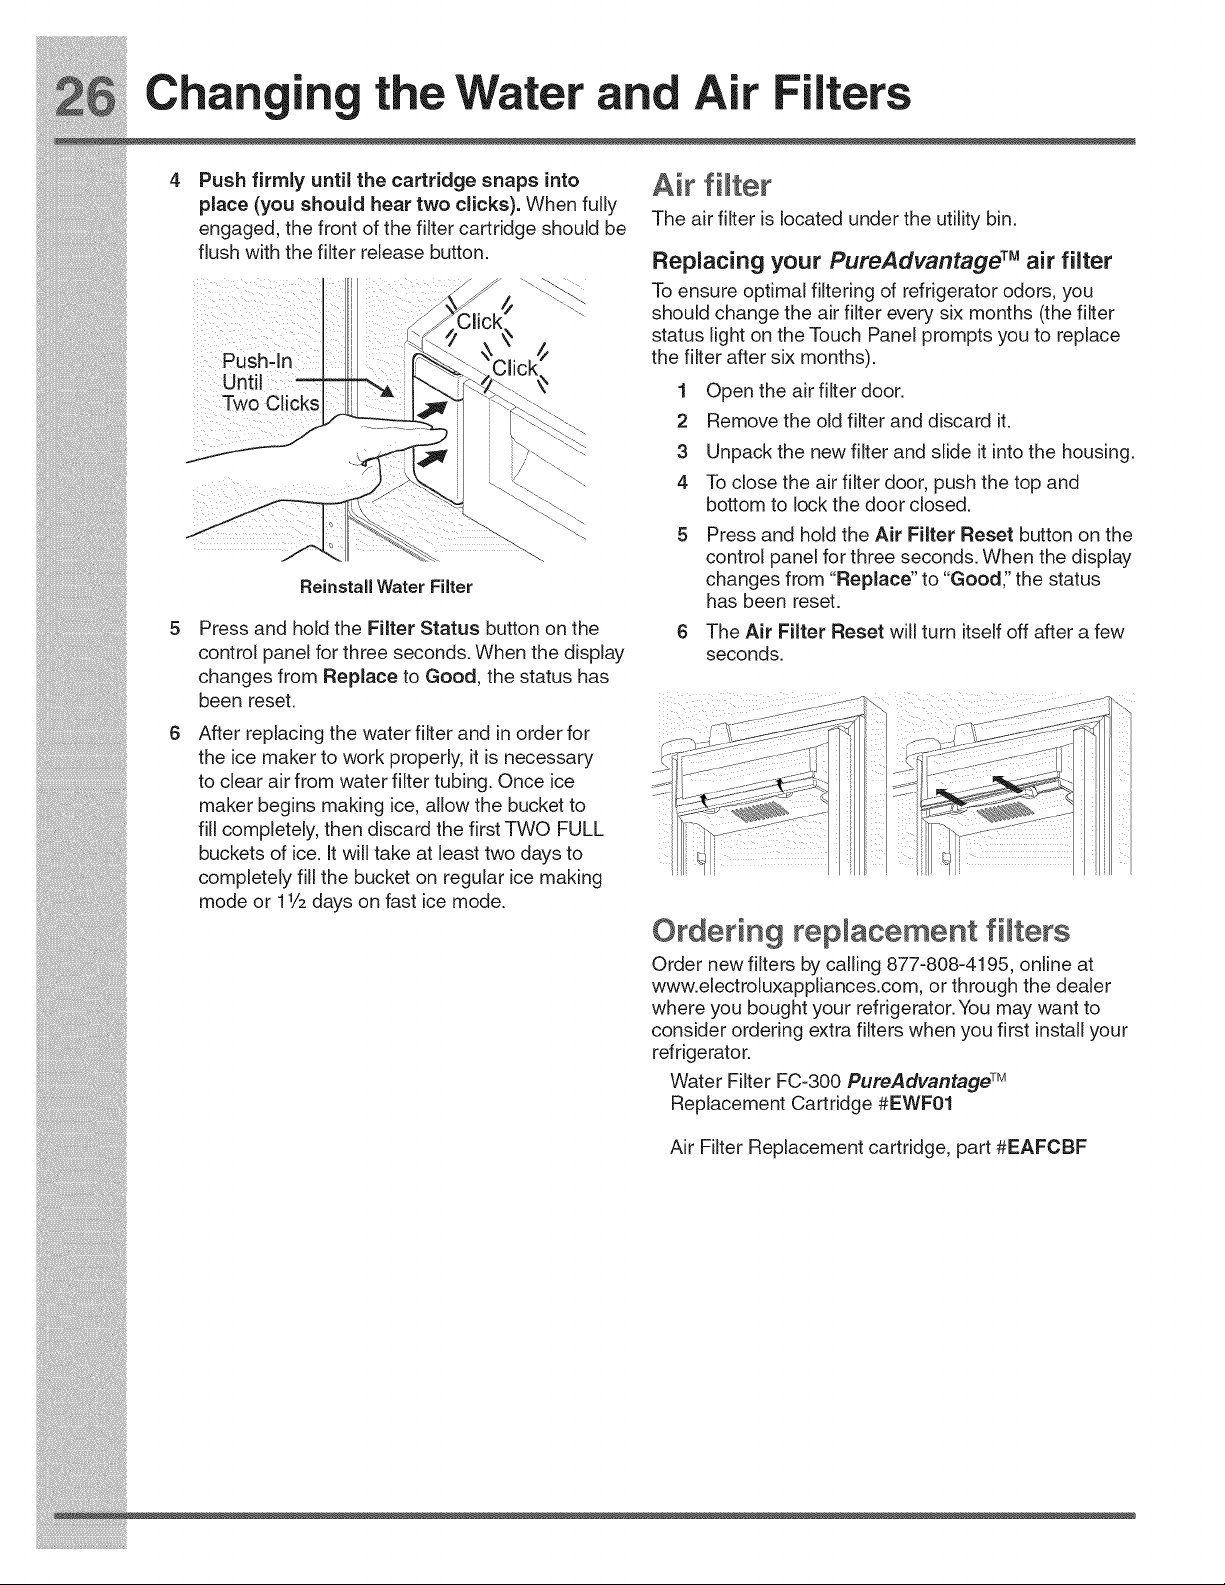
Push firmly until the cartridge snaps into
place (you should hear two clicks). When fully
engaged, the front of the filter cartridge should be
flush with the filter release button.
Pushqn
Until
Two Clicks
Reinstall Water Filter
Press and hold the Filter Status button on the
control panel for three seconds. When the display
changes from Replace to Good, the status has
been reset.
After replacing the water filter and in order for
the ice maker to work properly, it is necessary
to clear air from water filter tubing. Once ice
Air fi ter
The air filter is located under the utility bin.
Replacing your PureAdvantage TM air filter
To ensure optimal filtering of refrigerator odors, you
should change the air filter every six months (the filter
status light on the Touch Panel prompts you to replace
the filter after six months).
1 Open the air filter door.
2 Remove the old filter and discard it.
3 Unpack the new filter and slide it into the housing.
4 To close the air filter door, push the top and
bottom to lock the door closed.
Press and hold the Air Filter Reset button on the
control panel for three seconds. When the display
changes from "Replace" to "Good," the status
has been reset.
6 The Air Filter Reset will turn itself off after a few
seconds.
i!_!_i!i_ii_!i!_!_i!i_ii_!i!_!_i!i_ii_!i!_!_i!i_ii_!i!_!_i!i_ii_!i!_!_i!i_ii_!i!_!_i!i_ii_!i!_!_i!i_ii_!i!_!_i!i_ii_!i!_!_ii_i
floorfrombeingdamaged.
Refertotheguideonthenextpagefordetailsoncaringandcleaningspecificareasofyourrefrigerator.
i_i!_!_i!i_ii_!i!_!_i!i_ii_!i!_!_i!i_ii_!i!_!_i!i_ii_!i!_!_i!i_ii_!i!_!_i!i_ii_!i!_!_i!i_ii_!i!_!_i!i_ii_!i!_!_i!i_ii_!i!_!_iii_
Care and C nin
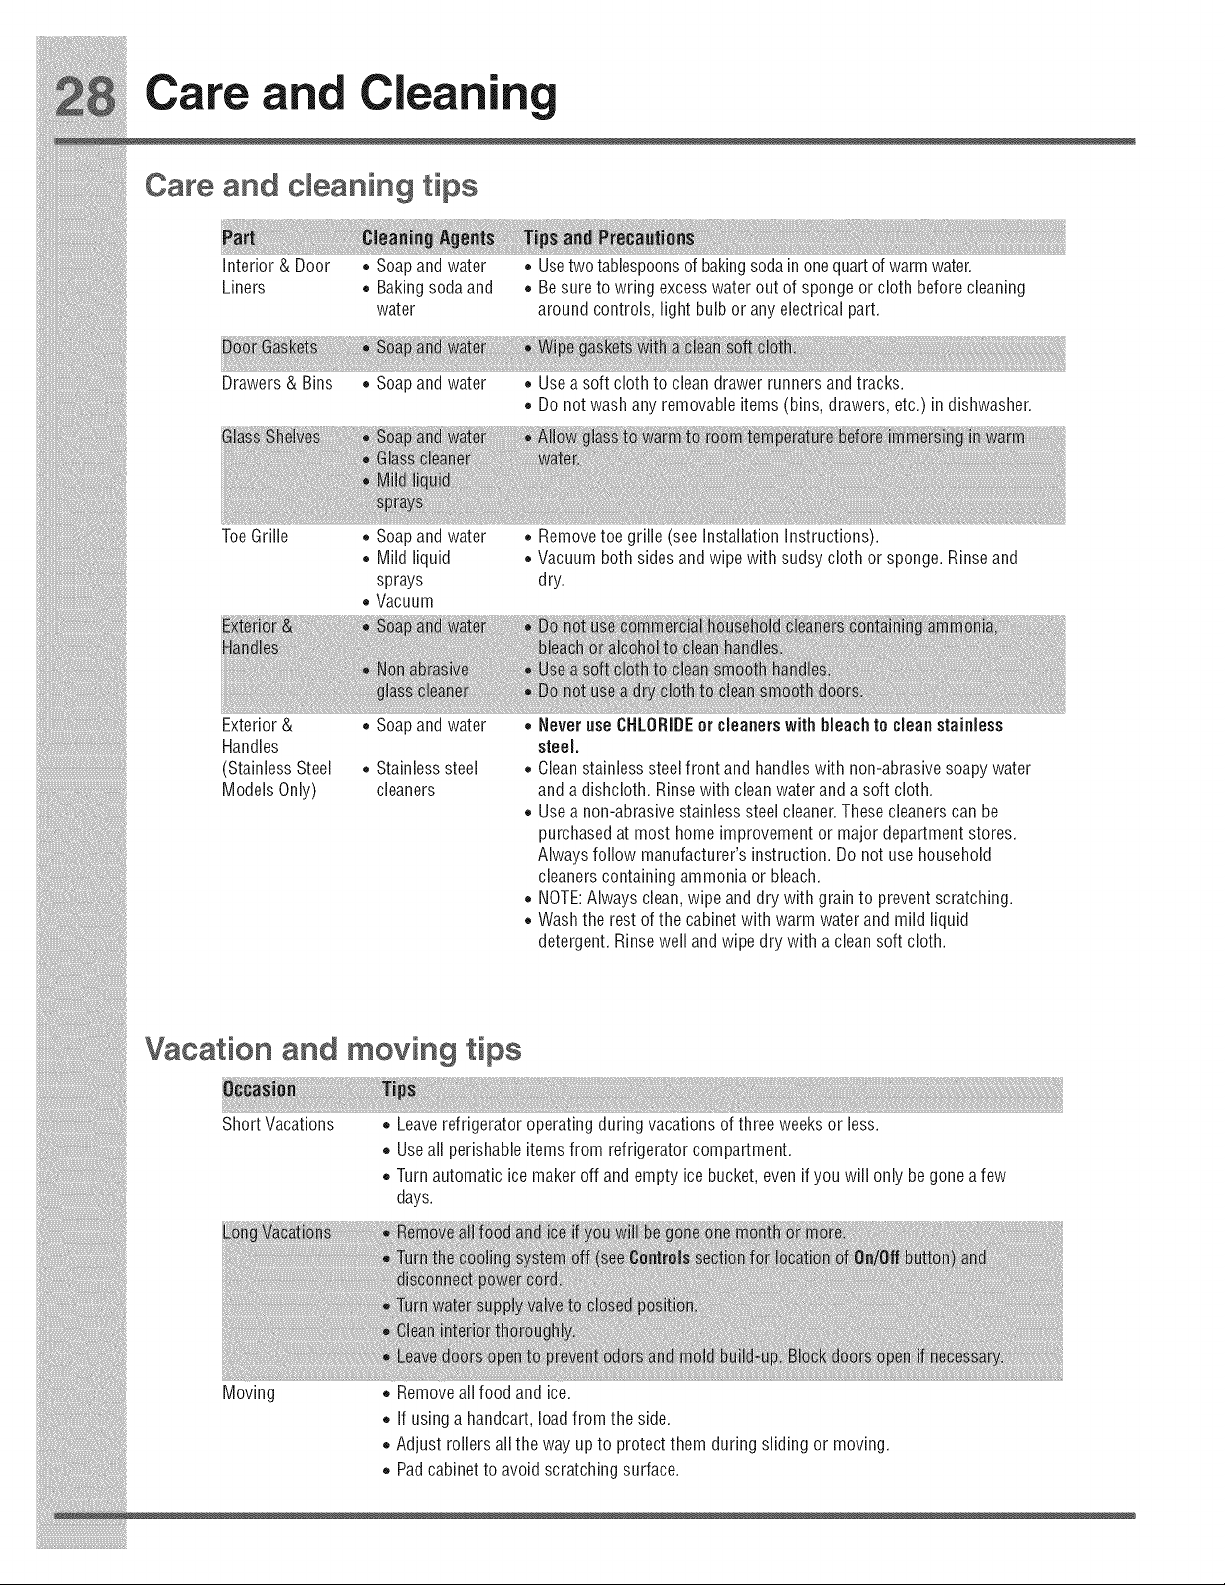
Care and cleaning tips
Interior & Door _,Soap and water
Liners _,Baking soda and
water
• Usetwo tablespoons of baking sodain one quart of warm water.
_,Be sure to wring excess water out of sponge or cloth before cleaning
around controls, light bulb or any electrical part.
Drawers & Bins _,Soap and water
_,Usea soft cloth to clean drawer runners andtracks.
_,Do not wash any removable items (bins, drawers, etc.) in dishwasher.
Toe Grille
Soap and water
_,Mild liquid
sprays
,, Vacuum
Remove toe grille (see Installation Instructions).
_,Vacuum both sides and wipe with sudsy cloth or sponge. Rinseand
dry.
i!_!_i!i_ii_!i!_!_i!i_ii_!i!_!_i!i_ii_!i!_!_i!i_ii_!i!_!_i!i_ii_!i!_!_i!i_ii_!i!_!_i!i_ii_!i!_!_i!i_ii_!i!_!_i!i_ii_!i!_!_ii_i
Exterior &
Handles
(Stainless Steel
Models Only)
• Soap and water
,, Stainless steel
cleaners
= Never use CHLORIDEor cleaners with bleach to clean stainless
steel.
,, Clean stainless steel front and handles with non-abrasive soapy water
and a dishcloth. Rinsewith cleanwater and a soft cloth.
i!_!_i!i_ii_!i!_!_i!i_ii_!i!_!_i!i_ii_!i!_!_i!i_ii_!i!_!_i!i_ii_!i!_!_i!i_ii_!i!_!_i!i_ii_!i!_!_i!i_ii_!i!_!_i!i_ii_!i!_!_ii_i
i_i!_!_i!i_ii_!i!_!_i!i_ii_!i!_!_i!i_ii_!i!_!_i!i_ii_!i!_!_i!i_ii_!i!_!_i!i_ii_!i!_!_i!i_ii_!i!_!_i!i_ii_!i!_!_i!i_ii_!i!_!_iii_
Common Solutions for Concerns
Before you camm°°o
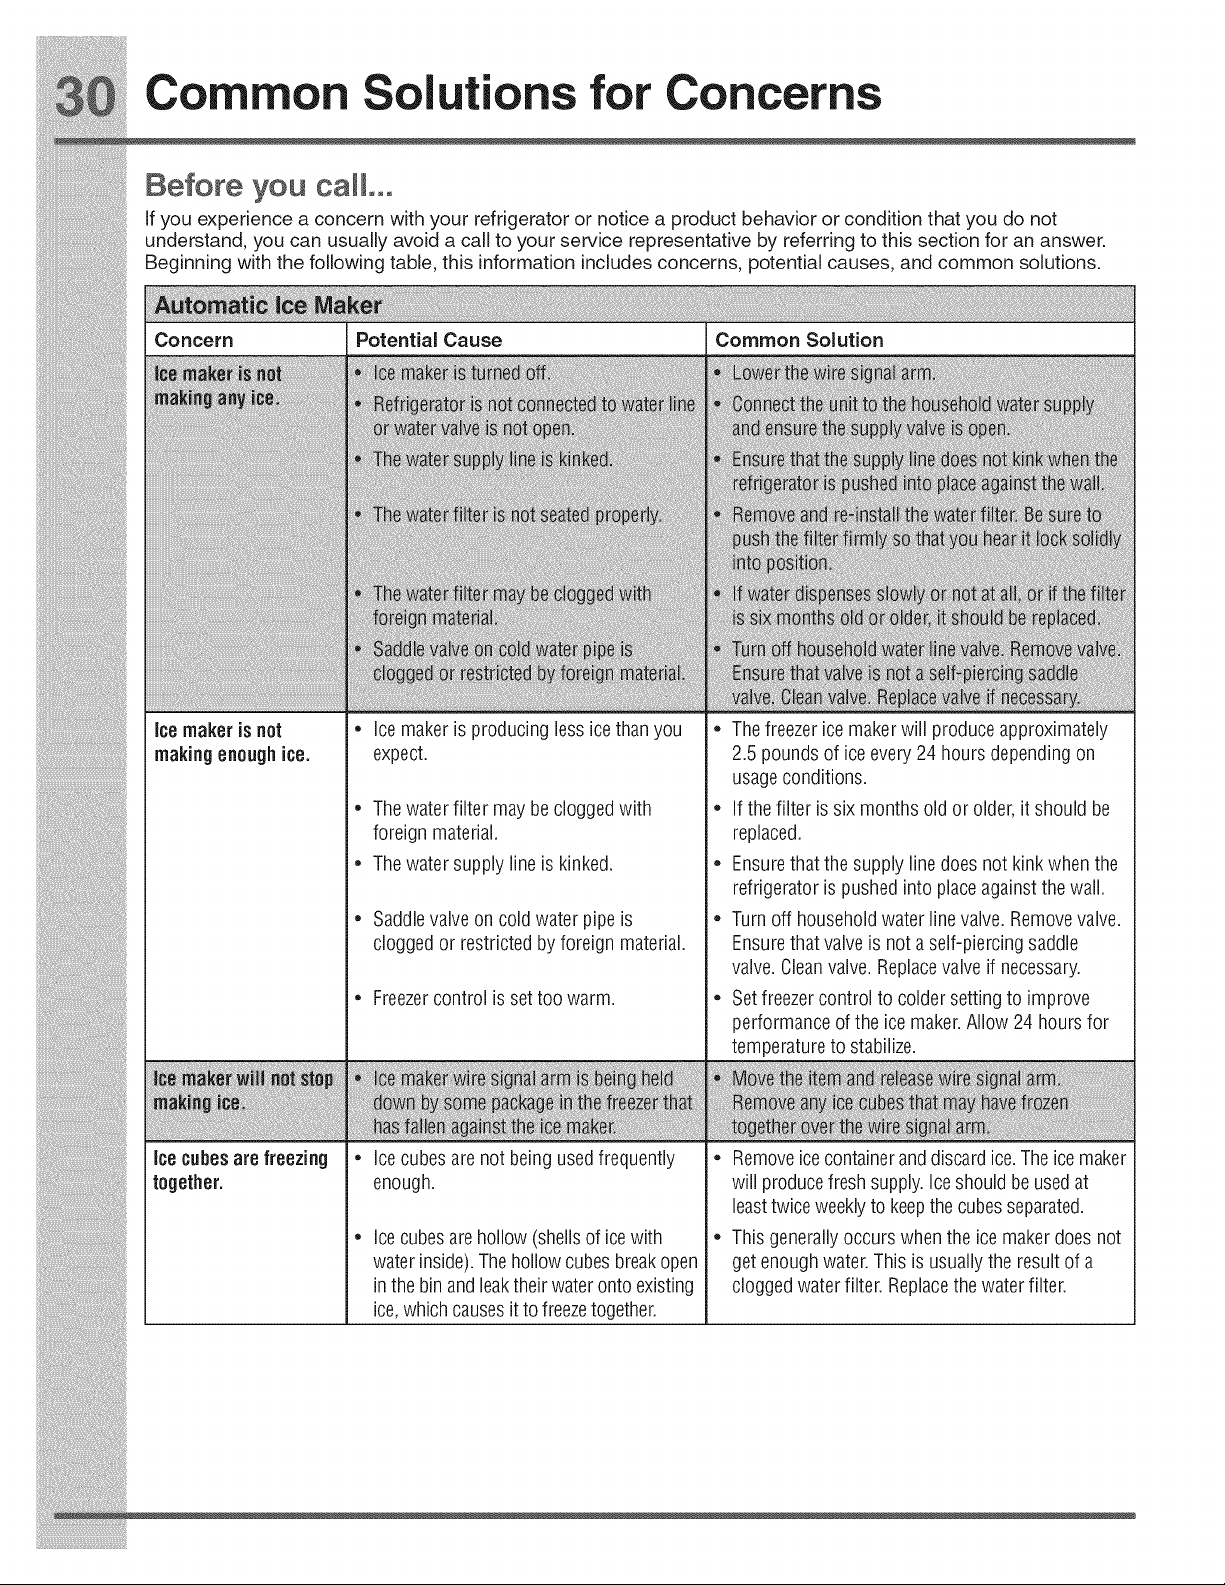
if you experience a concern with your refrigerator or notice a product behavior or condition that you do not
understand, you can usuafly avoid a carl to your service representative by referring to this section for an answer.
Beginning with the following table, this information includes concerns, potential causes, and common solutions.
Concern Potential Cause Common Solution
ice maker is not
making enough ice.
• Ice maker is producing less ice than you
expect.
• The freezer ice maker will produceapproximately
2.5 pounds of ice every24 hours dependingon
usageconditions.
• Thewaterfiltermaybecloggedwith • Ifthefilterissixmonthsoldorolder, itshould be
, foreignmaterial. , replaced.
Thewatersupplylineiskinked. Ensurethatthesupplylinedoesnotkinkwhenthe
, , refrigeratorispushedintoplaceagainstthewall.
Saddlevalveoncoldwaterpipeis Turnoffhouseholdwaterlinevalve. Removevalve.
clogged orrestricted byforeign material. Ensurethatvalve is notaself-piercingsaddle
[ • • valve. Cleanvalve. meplacevalveif necessary.
Freezercontrol issettoowarm. Setfreezercontroltocoldersettingtoimprove
performanceofthe ice maker.Allow24 hoursfor
temperaturetostabilize.
_rn
] ] ...........
_oeoubesarefreez_ng- __ =
together, enough, will producefresh supply.Iceshould be used at
, , leasttwiceweeklytokeepthecubesseparated.
Icecubesarehoflow(sheflsoficewith Thisgenerallyoccurswhentheicemakerdoesnot
waterinside).The hoflowcubes breakopen getenoughwater. This is usuallythe resultofa
inthebinandleaktheirwaterontoexisting cloggedwaterfilter, meplacethewaterfilter.
ice,whichcausesittofreezetogether.
Drawersare difficult to • Foodis touching shelf on top of drawer.
move.
• Keepless food in drawer.
i_i!_!_i!i_ii_!i!_!_i!i_ii_!i!_!_i!i_ii_!i!_!_i!i_ii_!i!_!_i!i_ii_!i!_!_i!i_ii_!i!_!_i!i_ii_!i!_!_i!i_ii_!i!_!_i!i_ii_!i!_!_iii_
Ji:iiii:ii_;,iiiii_ii!i!iii_i_ili_@i@@iiii!iiiii!iiiii
Common Solutions for Concerns
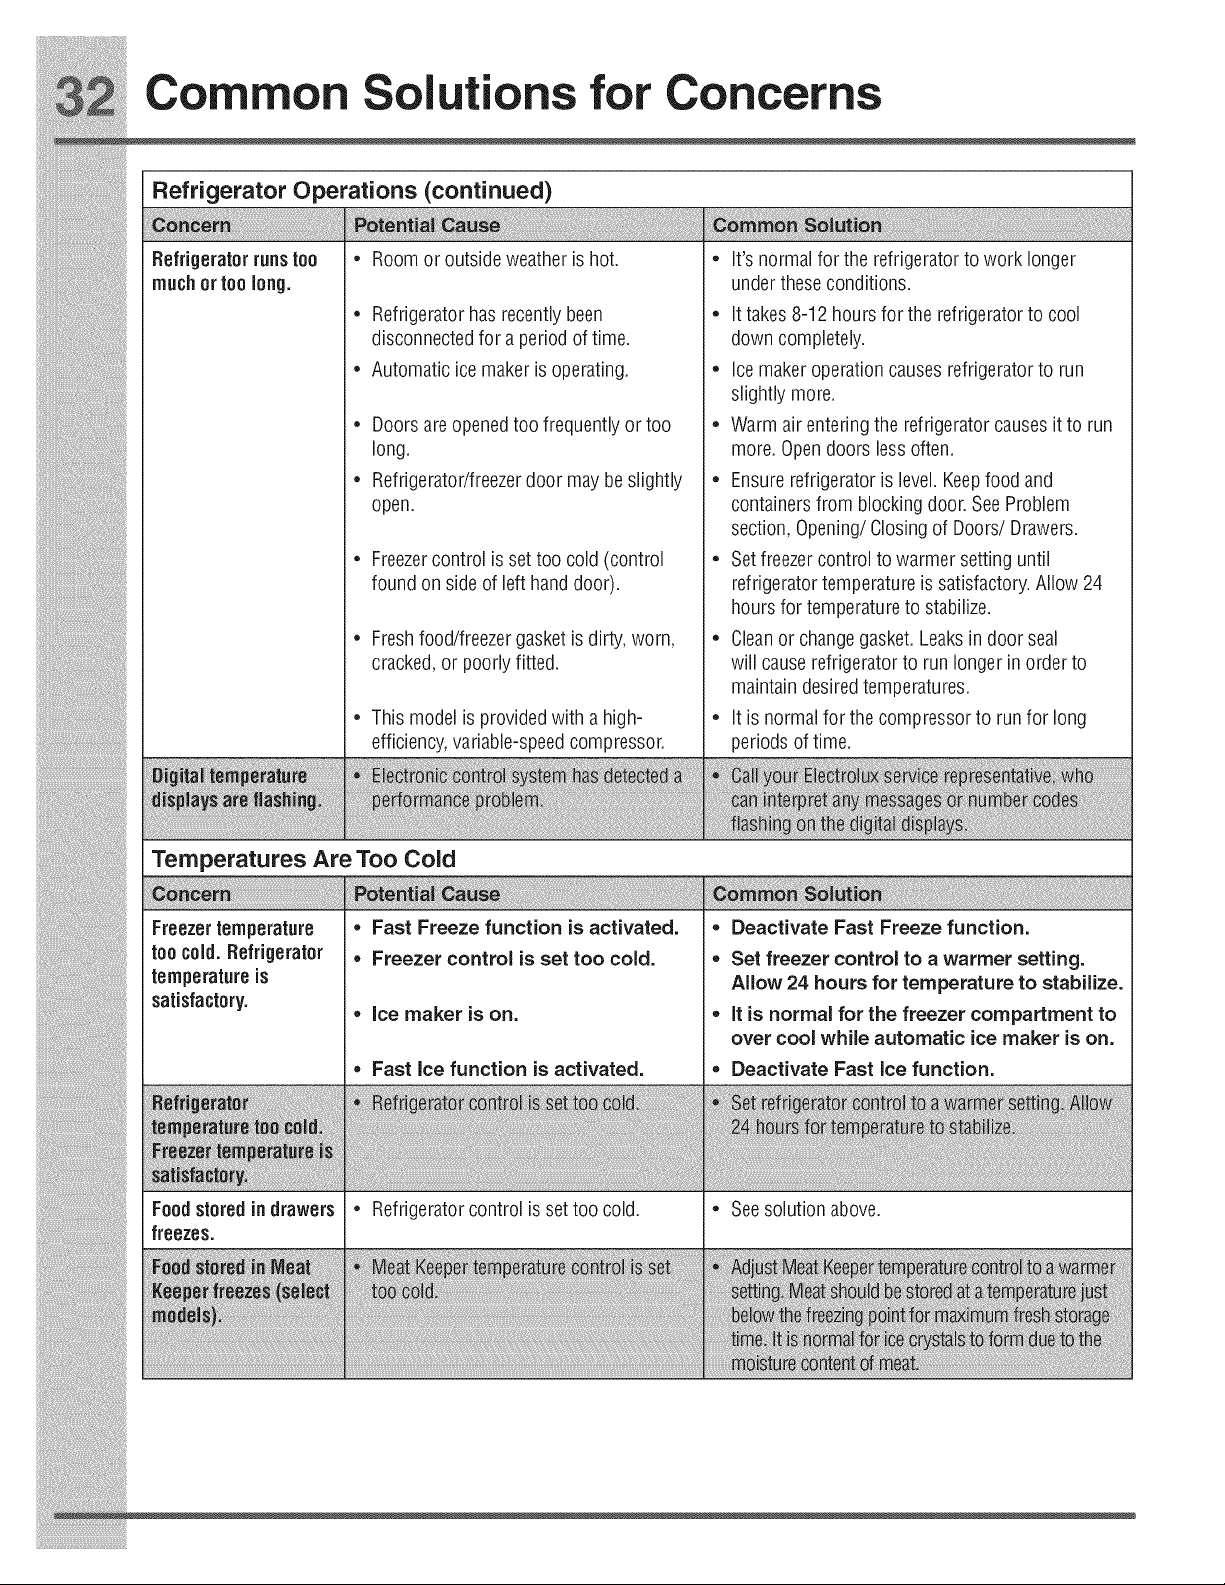
Refrigerator Operations (continued)
Refrigerator runstoo * Room or outside weather is hot. * its normal for the refrigeratorto work longer
rnuch0rt00 10ng. . . undertheseconditions.
Refrigeratorhasrecentlybeen Ittakes8-12hoursfortherefrigeratortocool
• disconnectedforaperiod of time. , downcompletely.
Automaticicemakerisoperati% Icemakeroperationcausesrefrigeratortorun
. . slightlymore.
Doorsareopenedtoofrequentlyortoo Warmairenteringtherefrigeratorcausesittorun
• long. • more. Opendoors lessoften.
Refrigerator/freezerdoormaybeslightly Ensurerefrigeratorislevel. Keepfoodand
open. containersfrom blockingdoor. SeeProblem
• • section, Opening/ClosingofDoors/Drawers.
Freezercontrolissettoocold(control Setfreezercontroltowarmersettinguntil
foundonside oflefthand door), refrigeratortemperature issatisfactory. AIIow24
• • hoursfortemperatureto stabilize.
Freshfood/freezergasketisdirty, worn, Cleanorchangegasket. Leaksindoorseai
cracked,orpooriyfitted, will causerefrigeratorto run iongerinorderto
maintain desiredtemperatures.
• Thismodelisprovidedwithahigh- * Itisnormalforthecompressortorunforlong
efficiency,variable-speedcompressor, periodsoftime.
i!_!_i!i_ii_!i!_!_i!i_ii_!i!_!_i!i_ii_!i!_!_i!i_ii_!i!_!_i!i_ii_!i!_!_i!i_ii_!i!_!_i!i_ii_!i!_!_i@ii_i
insideof refrigerator
waiJs.
* Door is slightly open.
i_i!_!_i!i_ii_!i!_!_i!i_ii_!i!_!_i!i_ii_!i!_!_i!i_ii_!i!_!_i!i_ii_!i!_!_i!i_ii_!i!_!_i!i_ii_!i!_!_i!i_ii_!i!_!_i!i_ii_!i!_!_iii_
_i!i_i!_!i!_!_!i!_!i!_!i!_!_!_!i_!i_;_i!;_i!i_;_i!i_;_i!i_;_i!i_;_i!i_i!_i!i_i_i!!!i_i!_!_!_!!i_i_i_i_i;ii!_!_!_i!;_;_:_;;i_!;i;_:i
Warranty
Major Appliance Warranty Information
Your appliance is covered by a one year limited warranty. For one year from your original date of purchase, Electrolux will repair or
replace any parts of this appliance that prove to be defective in materials or workmanship when such appliance is installed, used, and
maintained in accordance with the provided instructions. In addition, the cabinet liner and sealed refrigeration system (compressor,
condenser, evaporator, dryer or tubing) of your appliance is covered by a two through five year limited warranty. During the 2nd through
5th years from your original date of purchase, Electrolux will repair or replace any parts in the cabinet liner and sealed refrigeration
system which prove to be defective in materials or workmanship when such appliance is installed, used, and maintained in accordance
with the provided instructions.
Exclusions
This warranty does not cover the following:
1. Products with original serial numbers that have been removed, altered or cannot be readily determined.
2. Product that has been transferred from its original owner to another party or removed outside the USA or Canada.
3. Rust on the interior or exterior of the unit.
4. Products purchased "as-is" are not covered by this warranty.
5. Food loss due to any refrigerator or freezer failures.
6. Products used in a commercial setting.
7. Service calls which do not involve malfunction or defects in materials or workmanship, or for appliances not in ordinary
household use or used other than in accordance with the provided instructions.
8. Service calls to correct the installation of your appliance or to instruct you how to use your appliance.
9. Expenses for making the appliance accessible for servicing, such as removal of trim, cupboards, shelves, etc., which are not a
part of the appliance when it is shipped from the factory.
10. Service calls to repair or replace appliance light bulbs, air filters, water filters, other consumables, or knobs, handles, or other
cosmetic parts.
11. Pickup and delivery costs; your appliance is designed to be repaired in the home.
12. Surcharges including, but not limited to, any after hour, weekend, or holiday service calls, tolls, ferry trip charges, or mileage
expense for service calls to remote areas, including the state of Alaska.
13. Damages to the finish of appliance or home incurred during transportation or installation, including but not limited to floors,
cabinets, walls, etc.
..........................................................14. Damages caused by: services performed by unauthorized service companies; use of parts other than genuine Electrolux
............................... parts or parts obtained from persons other than authorized service companies; or external causes such as abuse, misuse,
inadequate power supply, accidents, fires, or acts of God.
DISCLAIMER OF IMPLIED WARRANTIES; LIMITATION OF REMEDIES
CUSTOMER'S SOLE AND EXCLUSIVE REMEDY UNDER THIS LIMITED WARRANTY SHALL BE REPAIR OR REPLACEMENT
AS PROVIDED HEREIN. CLAIMS BASED ON IMPLIEDWARRANTIES INCLUDING WARRANTIES OF MERCHANTABILITY OR
FITNESS FOR A PARTICULAR PURPOSE ARE LIMITED TO ONE YEAR OR THE SHORTEST PERIOD ALLOWED BY LAW
BUT NOT LESS THAN ONE YEAR. ELECTROLUX SHALL NOT BE LIABLE FOR CONSEQUENTIAL OR INCIDENTAL DAMAGES
SUCH AS PROPERTY DAMAGE AND INCIDENTAL EXPENSES RESULTING FROM ANY BREACH OF THIS WRITTEN LIMITED
WARRANTY OR ANY IMPLIED WARRANTY. SOME STATES AND PROVINCES DO NOT ALLOW THE EXCLUSION OR LIMITATION
OF INCIDENTAL OR CONSEQUENTIAL DAMAGES OR LIMITATIONS ON THE DURATION OF IMPLIED WARRANTIES SO THESE
LIMITATIONS OR EXCLUSIONS MAY NOT APPLY TO YOU. THIS WRITTEN WARRANTY GIVES YOU SPECIFIC LEGAL RIGHTS.
YOU MAY ALSO HAVE OTHER RIGHTS THAT VARY FROM STATE TO STATE.
If You Need Service
Keep your receipt, delivery slip, or some other appropriate payment record to establish the warranty period should service be required.
If service is performed, it is in your best interest to obtain and keep all receipts. Service under this warranty must be obtained by
contacting Electrolux at the addresses or phone numbers below.
This warranty only applies in the USA, Puerto Rico and Canada. In the USA and Puerto Rico, your appliance is warranted by Electrolux
Major Appliances North America, a division of Electrolux Home Products, Inc. In Canada, your appliance is warranted by Electrolux
Canada Corp. Electrolux authorizes no person to change or add to any obligations under this warranty. Obligations for service and parts
under this warranty must be performed by Electrolux or an authorized service company. Product features or specifications as described
or illustrated are subject to change without notice.
USA Canada
1-877-435-3287 1-800-265-8352
Electrolux Major Appliances North America Electrolux Canada Corp.
10200 David Taylor Drive 5855 Terry Fox Way
Charlotte, NC 28262 Mississauga, Ontario, Canada L5V 3E4


