Loading ...
Loading ...
Loading ...
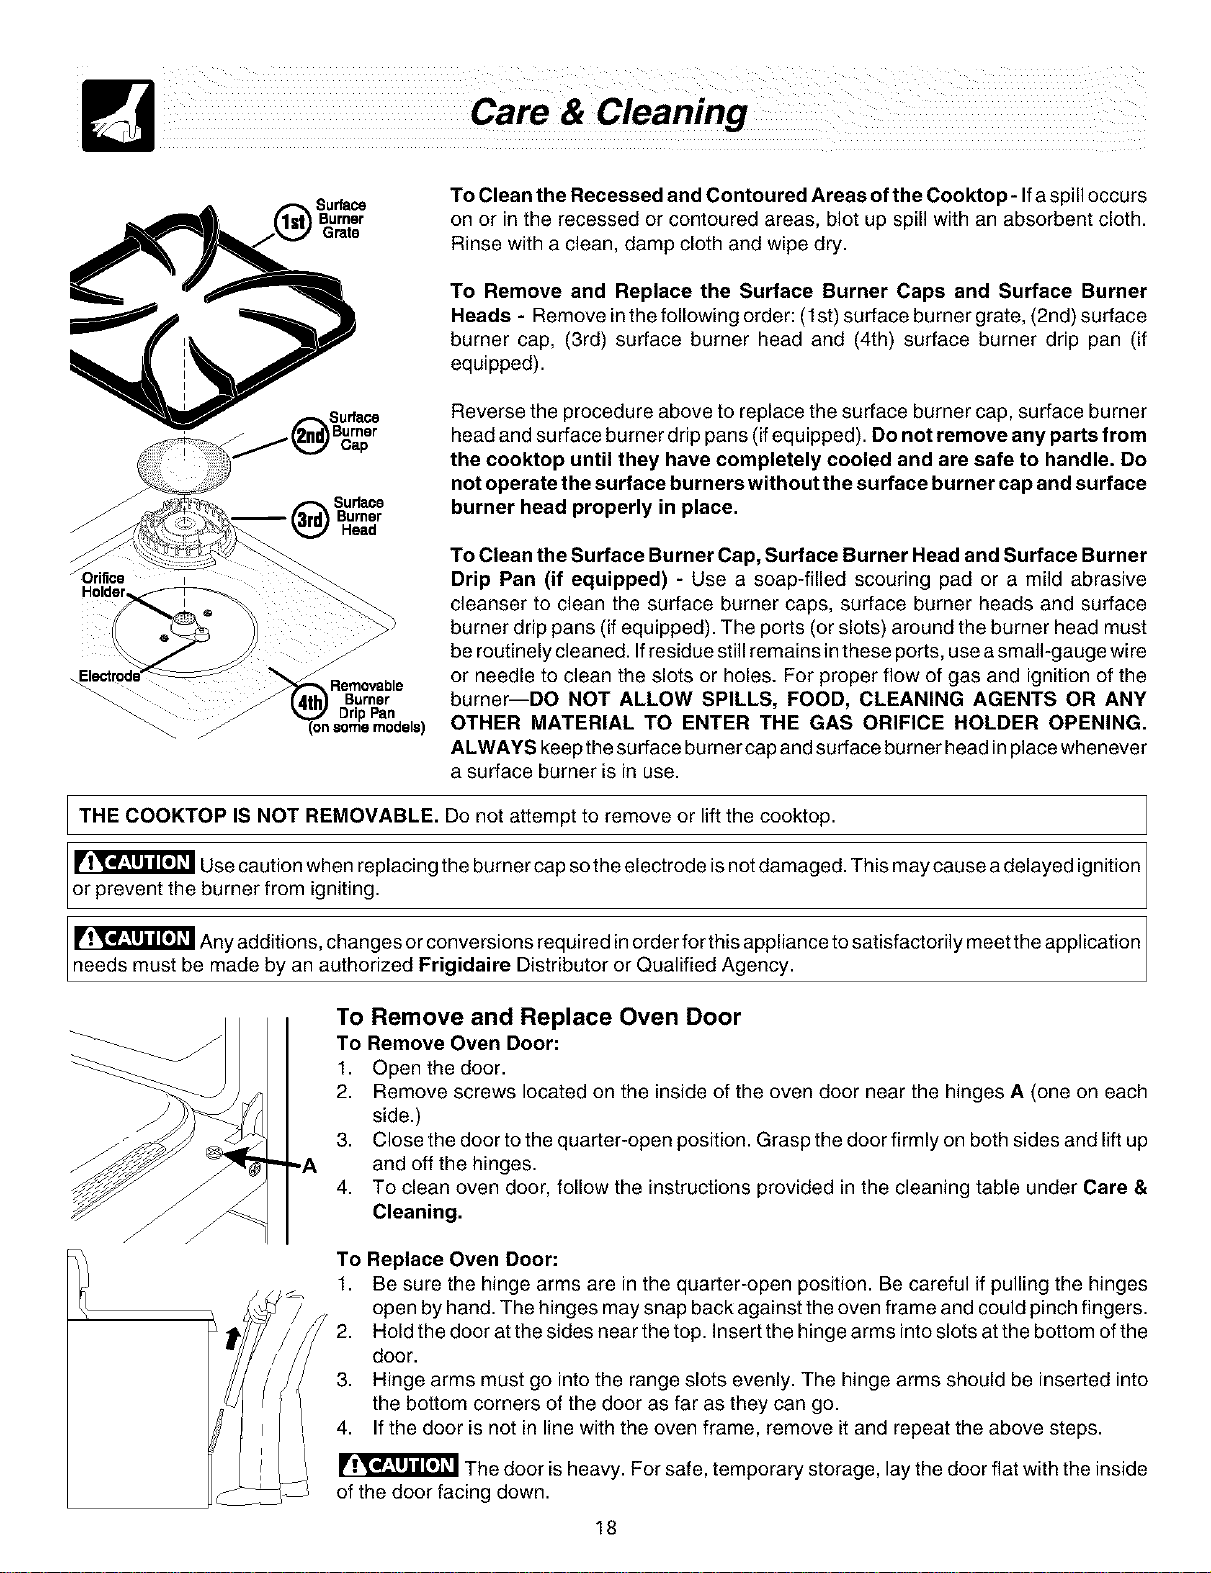
Surface
Burner
Head
_iOrilice
Holder
Removable
Burner
Drip Part
To Clean the Recessed and Contoured Areas of the Cooktop - If a spill occurs
on or in the recessed or contoured areas, blot up spill with an absorbent cloth.
Rinse with a clean, damp cloth and wipe dry.
To Remove and Replace the Surface Burner Caps and Surface Burner
Heads - Remove in the following order: (1st) surface burner grate, (2nd) surface
burner cap, (3rd) surface burner head and (4th) surface burner drip pan (if
equipped).
Reverse the procedure above to replace the surface burner cap, surface burner
head and surface burner drip pans (ifequipped). Do not remove any parts from
the cooktop until they have completely cooled and are safe to handle. Do
not operate the surface burners without the surface burner cap and surface
burner head properly in place.
To Clean the Surface Burner Cap, Surface Burner Head and Surface Burner
Drip Pan (if equipped) - Use a soap-filled scouring pad or a mild abrasive
cleanser to clean the surface burner caps, surface burner heads and surface
burner drip pans (if equipped). The ports (or slots) around the burner head must
be routinely cleaned. If residue still remains inthese ports, use a small-gauge wire
or needle to clean the slots or holes. For proper flow of gas and ignitionof the
burner--DO NOT ALLOW SPILLS, FOOD, CLEANING AGENTS OR ANY
OTHER MATERIAL TO ENTER THE GAS ORIFICE HOLDER OPENING.
ALWAYS keep the surface burner cap and surface burner head inplace whenever
a surface burner is in use.
I THE COOKTOP IS NOT REMOVABLE. Do not attempt to remove or lift the cooktop.
iIr_'=lp[_l'_ use caution when replacing the burner cap so the electrode isnot damaged. This may cause a delayed ignition
or prevent the burner from igniting.
Any additions, changes or conversions required inorder for this appliance to satisfactorily meet the application
needs must be made by an author zeal Fr gda re D str butor or Qua fed Agency.
To Remove and Replace Oven Door
To Remove Oven Door:
1. Open the door.
2. Remove screws located on the inside of the oven door near the hinges A (one on each
side.)
3. Close the door to the quarter-open position. Grasp the door firmly on both sides and lift up
and off the hinges.
4. To clean oven door, follow the instructions provided in the cleaning table under Care &
Cleaning.
To Replace Oven Door:
1. Be sure the hinge arms are in the quarter-open position. Be careful if pulling the hinges
open by hand. The hinges may snap back against the oven frame and could pinch fingers.
2. Hold the door at the sides near the top. Insert the hinge arms intoslots at the bottom of the
door.
3. Hinge arms must go intothe range slots evenly. The hinge arms should be inserted into
the bottom corners of the door as far as they can go.
4. If the door is not in line with the oven frame, remove itand repeat the above steps.
ilr_ [p"_'_I"j"_'T_The door isheavy. For safe, temporary storage, lay the door flat with the inside
of the door facing down.
18
Loading ...
Loading ...
Loading ...