Loading ...
2
SAFETY INFORMATION
Your safety and the safety of others are very important. We have provided important safety
messages in this manual. Always read and obey all safety messages.
• Never clean the cabinet with flammable fluids. These fumes can create a fire hazard or explosion.
And do not store or use gasoline or other flammable vapors and liquids in this cabinet. The fumes can
create a fire hazard or explosion.
• Do not overload your cabinets.
• Caution - Do not store items of interest to children in cabinets. Children climbing to reach items in the
cabinet could be seriously injured.
• It is important that the cabinet be leveled in order to work properly. You may need to make several
adjustments to level it.
• Proper Installation - Be sure your cabinet is properly installed, per the manufacturer instructions.
Risk of child entrapment
Child entrapment and suffocation are not problems of the past. Junked or abandoned cabinets are still
dangerous, even if they will “just sit in the garage a few days.”
• Before you throw away your old cabinet: Take off the doors. Leave the shelves in place so
that children may not easily climb inside.
• Never allow children to operate, play with, or crawl inside the cabinet.
- SAVE THESE INSTRUCTIONS –
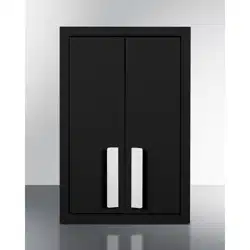
INSTALLATION INSTRUCTIONS
The following installation tips are intended to provide a general guideline for installation and not
intended as a substitute for installation by a professional. Please have a trained professional install
your cabinet if you are not experienced in installation matters.
Parts Included:
① Phillips screw ST5x30: 3pcs
② Mounting bracket: 1pcs
③ Plastic anchors: 3pcs
④ Wall storage cabinet: 1pcs
⑤ Screw M5x8: 2pcs
Installation
1. Use a standard level to mark the locations of the 2 holes of the mounting bracket on the
wall.
NOTE: The wall mounting bracket should face upward so the cabinet mounting bracket can
slide down into the wall mount.
2. Use a 5/16” masonry drill bit, and insert plastic anchors ③ into the drilled holes.
Loading ...
Loading ...