bluestarcooking.com
Electric Wall Oven
User Manual
Installation and
Use and Care Information
Part # 100135 — revision 1 © Prizer-Painter Stove Works, Blandon, PA 19510

2 (800) 449-8691

bluestarcooking.com 3
Thank You and Welcome
Thank you for your purchase and welcome to the BlueStar® family!
BlueStar® appliances are designed for discerning home chefs who demand restaurant-quality results in their own kitchens. As the
owner of a new BlueStar® appliance, you can look forward to years of precise and even cooking in your home kitchen.
Here are a few ps to get started:
1. Review this User Manual, which includes instrucons and ps for geng the most out of your new appliance.
2. Register your product online at www.bluestarcooking.com/support/product-registraon to stay in touch and allow us to send
you valuable product news and updates.
3. Review our products and help us spread the word at hps://www.bluestarcooking.com/inspiraon/reviews. We’ll send you
some BlueStar® gear to thank you for your me.
Thank you again for choosing BlueStar®.
The BlueStar® Team

4 (800) 449-8691
Contents
Model Informaon .................................................................. 5
Safety Informaon .................................................................. 6
Single Oven Site Preparaon
— Specicaons and Dimensions ......................................... 10
— Cabinet Dimensions .......................................................... 12
Double Oven Site Preparaon
— Specicaons and Dimensions ......................................... 13
— Cabinet Dimensions .......................................................... 15
Installaon Instrucons ........................................................ 16
Single Oven ............................................................................ 18
Double Oven .......................................................................... 19
Before Your First Use
— Oven Burn-O Procedure ................................................. 20
— Baking Stone Pre Dry Procedure ...................................... 21
— Touch Screen Controls ...................................................... 22
Cooking Modes ...................................................................... 29
— Bake .................................................................................. 30
— Roast ................................................................................. 33
— Broil .................................................................................. 35
— StoneBake™ ...................................................................... 36
— Proof ................................................................................. 38
— Dehydrate ......................................................................... 40
— Clean ................................................................................. 42
Operaon
— Standard Oven Racks ........................................................ 43
— Full Extension Rack ........................................................... 44
— Temperature Probe and Baking Stone ............................. 45
Cooking Guide and Tips
— Convecon Cooking .......................................................... 46
— Food Handling .................................................................. 47
— Recommended Cookware and Oven Use ......................... 48
— Food Placement in the Ovens ........................................... 49
— Broiler ............................................................................... 50
Care and Cleaning ................................................................. 51
Troubleshoong .................................................................... 53
Warranty ............................................................................... 54

bluestarcooking.com 5
Please complete the informaon below for warranty purposes
and for future reference:
Model Number ______________________________________
Serial Number _______________________________________
Installaon Date _____________________________________
Dealer’s Name _______________________________________
Dealer’s Phone Number _______________________________
Date of Purchase _____________________________________
Register your appliance online at www.bluestarcooking.com/
support/product-registraon or call customer service at
(800) 449-8691.
If service is required under the warranty, it must be performed
by authorized service personnel. BlueStar® also recommends
using authorized service personnel if service is required aer
the warranty expires. To locate authorized service personnel in
your area, go to www.bluestarcooking.com/support/nd-a-
service-center or call customer service at (800) 449-8691.
You can nd the model and serial numbers on the front face of
the oven behind the door.
Model Informaon
Model and Serial Number
informaon
6 (800) 449-8691
Safety Informaon
Please read and comply with the following safety messages to
ensure your cooking product is installed and operated as safely
as possible:
This appliance is designed for easy installaon and operaon,
however we recommend that you read all secons of this
manual before installaon and rst use.
Electrical Requirements and Grounding Instrucons
Installaon and service must be performed by a qualied
installer, service agency, or ulity company.
Important: Installaon must conform with local codes or, in
the absence of local codes, to the Naonal Fuel Gas Code, ANSI
Z223.1/NFPS54, and Naonal Electrical Code NFPA70.
The installaon of appliances designed for manufactured
(mobile) home installaon must conform to the Manufactured
Home Construcon and Safety Standard, Title 24 CFR, Part
3280, or, when this standard is not applicable, refer to: ANSI/
NCSBCS A225.1 or with local codes as applicable.
The installaon of appliances designed for Recreaon Park
Trailers must conform with state and local codes, or, in the
absence of such codes, to the standard for Recreaonal Park
Trailers ANSI A119.5.
Can cause minor injury or product damage if instrucons are
not followed.
CAUTION
Can cause serious injury or death if instrucons are not
followed.
WARNING
Will cause serious injury or death if instrucons are not
followed.
DANGER
If the informaon in this manual is not followed, re or
explosion may result causing property damage, personal
injury, or death.
WARNING
Do not install or use this appliance near water or outdoors, for
example, near a kitchen sink, in a wet basement or near a
swimming pool.
WARNING
To reduce the risk of re, electric shock, serious injury, or
death when using your appliance, follow basic safety
precauons, including the following:
• Read the provided user manual before operang this
appliance.
• This product is to be used only for cooking tasks expected
of a home appliance. This product is not intended for
commercial use.
• If your product is found to be damaged upon receipt,
contact your dealer or builder immediately. Do not install
or use a damaged appliance or if the conduit is damaged.
• Do not install, repair, or replace any part of the product
yourself unless specically recommended in the literature
accompanying it. All other service must be performed by a
qualied service technician.
• Only an authorized service technician should perform
service. Technicians must disconnect the power supply
before servicing this unit.
• Electric power to the product must be turned o at the
circuit breaker or fuse box prior to performing any type of
service or installaon.
• This product must be properly installed and grounded by a
qualied installer according to these installaon
instrucons prior to use. The installer must show the
customer the locaon of the circuit breaker panel or fuse
box so that they know where and how to turn o electric
power to the product. BlueStar® is not responsible for
service required to correct a faulty installaon. The owner
is responsible to make sure this appliance is properly
installed.
• Have the installer demonstrate how to use this appliance
and show you where the circuit breaker is located so that
you know how and where to turn o electricity to the
product.
• To avoid electric shock hazard, do not install this
appliance outside or near water. Do not install or use this
appliance if it has been exposed to water.
• Do not obstruct any venng areas or slots. The cooking
product must be installed in a manner which will keep the
area below the door unobstructed to allow free air ow.
• Do not tamper with the controls. Do not adjust or alter
any part of the appliance unless specically instructed to
do so by this manual.
• Secure the appliance to the cabinet following the
direcon in the installaon instrucons to prevent injury
due to the unit pping forward.
WARNING

bluestarcooking.com 7
To reduce the risk of re, electric shock, serious injury, or death
when using your appliance, follow basic safety precauons,
including the following:
• To prevent damage, do not use the oven handles as li
points or for moving the product.
• Do not climb or sit on any part of the appliance.
• Do not use the oven door for stepping, leaning, or sing
on at any me, Damage to the appliance and/or personal
injury can occur.
• A child or adult can p the appliance and be injured or
killed.
• Keep packaging materials away from children. Plasc
sheets and bags can cause suocaon.
• Do not leave children or pets alone or unaended in the
area around the product. Do not allow children to play
with the controls, pull on the handle, or touch other parts
of the product.
• Do not store items of interest to children above the
appliance. Children can be burned or injured while
climbing on the appliance.
• Install a smoke detector or near the kitchen.
• Do not use water on grease res. Smother any ames with
a lid, cookie sheet, or at tray. Use baking soda or a foam
re exnguisher to exnguish aming grease. If a re
occurs, keep the oven door closed.
• Keep ammable items, such as paper, cardboard, plasc,
and cloth away from hot surfaces. Do not put such items in
the oven. Do not allow potholders to touch hot surfaces.
• Only use dry potholders to prevent steam burns when
moving items in or out of the appliance. Do not use a
towel or other bulky cloth in place of potholders.
• When using the oven: Do not touch the interior surfaces of
the oven or the exterior area immediately surrounding the
door. Interior oven surfaces can become hot enough to
cause burns.
• Wear proper are. Do not wear loose or hanging apparel
while using the appliance. Do not allow clothing to come
into contact with or within close proximity of any element
or the interior of the oven and the surrounding areas
during and immediately aer use. Some synthec
materials are highly ammable and should not be worn
while cooking.
• Do not use the oven for storage.
• Do not store combusble, ammable, or explosive
materials in the oven or in adjacent cabinets.
• Never use the appliance for warming or heang the room.
• Do not line the oven with aluminum foil or other materials
while cooking or cleaning.
• Do not leave metal objects, such as aluminum foil, the
meat probe, cookie sheets, etc., on the boom of the
oven. Objects le on the boom of the oven could damage
the oven and the object.
• Use cauon when opening the oven door. Let hot air or
steam escape before removing or replacing food in the
oven.
• Use cauon when adding liquids to food or containers in a
hot oven. Steam can cause serious burns or scalding.
• Do not heat unopened food containers. Build up of
pressure may cause the container to burst and result in
injury.
• Grease is ammable. Let hot grease cool before
aempng to handle it. Avoid leng grease deposits
collect. Clean aer each use.
• Light lenses must always be in place when the oven is in
use to protect the light bulbs from breakage.
• Oven racks are to be posioned when the oven is cool to
prevent burns. If a rack must be moved while the oven is
hot, do not let the potholder contact hot heang elements
in the oven.
• Be sure all appliance controls are turned o and the
cooking product is cool before using any type of aerosol
cleaner on or around the appliance. The chemical that
produces the spraying acon could, in the presence of
heat, ignite or cause metal parts to corrode.
• Clean parts only as listed in the user manual.
• Do not clean the oven door gaskets. The door gaskets are
essenal for a good seal of the oven. Care is to be taken
during cleaning to prevent rubbing, damaging, or moving
the gasket from its installed posion.
WARNING
Safety Informaon (connued)

8 (800) 449-8691
Renseignements sur la sécurité
Veuillez lire et respecter les messages de sécurité suivants pour
vous assurer que votre produit de cuisson est installé et ulisé
de la façon la plus sécuritaire possible :
Cet appareil est conçu pour faciliter l’installaon et l’ulisaon,
mais nous vous recommandons de lire toutes les secons de ce
manuel avant l’installaon et la première ulisaon.
Exigences électriques et instrucons de mise à la terre
L’installaon et le service doivent être eectués par un
installateur, une agence de service ou une entreprise de
services publics qualié.
Important: L’installaon doit être conforme aux codes locaux
ou, en l’absence de codes locaux, au Code naonal du gaz
combusble, à la norme ANSI Z223.1/NFPS54 et au Code
naonal de l’électricité NFPA70.
L’installaon d’appareils conçus pour l’installaon d’une
maison fabriquée (mobile) doit être conforme à la norme de
construcon et de sécurité des maisons préfabriquées, tre 24
CFR, pare 3280 ou, lorsque cee norme ne s’applique pas,
faire référence à: ANSI / NCSBCS A225.1 ou avec des codes
locaux, le cas échéant.
L’installaon d’appareils conçus pour les remorques de parc de
loisirs doit être conforme aux codes d’État et locaux ou, en
l’absence de tels codes, à la norme pour les remorques de parc
récréaf ANSI A119.5.
Peut causer des blessures mineures ou des dommages au
produit si les instrucons ne sont pas suivies.
Peut causer des blessures graves ou la mort si les instrucons
ne sont pas suivies.
Causera des blessures graves ou la mort si les instrucons ne
sont pas suivies.
DANGER
Si l’informaon contenue dans ce manuel n’est pas suivie, un
incendie ou une explosion peut causer des dommages
matériels, des blessures corporelles ou la mort.
N’installez pas ou n’ulisez pas cet appareil près de l’eau ou à
l’extérieur, par exemple, près d’un évier de cuisine, dans un
sous-sol humide ou près d’une piscine.
Pour réduire le risque d’incendie, de choc électrique, de
blessure grave ou de décès lors de l’ulisaon de votre
appareil, suivez les précauons de sécurité de base,
notamment les suivantes :
• Lisez le manuel d’ulisaon fourni avant d’uliser cee
appliance.
• Ce produit ne doit être ulisé que pour les tâches de
cuisson aendues d’un appareil ménager. Ce produit n’est
pas desné à un usage commercial.
• S’il s’avère que votre produit est endommagé à la
récepon, communiquez immédiatement avec votre
concessionnaire ou votre constructeur. N’installez ni
n’ulisez un appareil endommagé ou si le conduit est
endommagé.
• N’installez, ne réparez pas ou ne remplacez pas vous-
même une pare du produit, sauf indicaon parculière
dans la documentaon qui l’accompagne. Tous les autres
services doivent être eectués par un technicien de
service qualié.
• Seul un technicien de service autorisé devrait eectuer le
service. Les techniciens doivent débrancher le bloc
d’alimentaon avant d’entretenir cee unité.
• L’alimentaon électrique du produit doit être coupée au
niveau du disjoncteur ou de la boîte à fusibles avant
d’eectuer tout type de service ou d’installaon.
• Ce produit doit être correctement installé et mis à la terre
par un installateur qualié conformément à ces
instrucons d’installaon avant d’être ulisé.
L’installateur doit montrer au client l’emplacement du
panneau de disjoncteur ou de la boîte à fusibles an qu’il
sache où et comment couper l’alimentaon électrique du
produit. BlueStar® n’est pas responsable du service requis
pour corriger une installaon défectueuse. Le propriétaire
est responsable de s’assurer que cet appareil est
correctement installé.
• Demandez au programme d’installaon de démontrer
comment uliser cet appareil et de vous montrer où se
trouve le disjoncteur an que vous sachiez comment et où
couper l’électricité au produit.
• Pour éviter les chocs électriques, n’installez pas cet
appareil à l’extérieur ou près de l’eau. N’installez ni
n’ulisez cet appareil s’il a été exposé à de l’eau.
• N’obstruez pas les zones de venlaon ou les fentes. Le
produit de cuisson doit être installé de manière à ce que
la zone située sous la porte ne soit pas obstruée pour
permere la libre circulaon de l’air.
• Ne pas altérer les contrôles. N’ajustez ni ne modiez
aucune pare de l’appareil, à moins d’y être
expressément invité par le présent manuel.
• Fixez l’appareil à l’armoire en suivant la direcon des
instrucons d’installaon pour éviter les blessures dues au
basculement de l’unité vers l’avant.
AVERTISSEMENT
AVERTISSEMENT
AVERTISSEMENT
AVERTISSEMENT
MISE EN GARDE

bluestarcooking.com 9
• N’ulisez pas le four pour le stockage.
• N’entreposez pas de maères combusbles, inammables
ou explosives dans le four ou dans des armoires
adjacentes.
• N’ulisez jamais l’appareil pour réchauer ou chauer la
pièce.
• Ne tapissez pas le four avec du papier d’aluminium ou
d’autres matériaux pendant la cuisson ou le neoyage.
• Ne laissez pas d’objets métalliques, tels que du papier
d’aluminium, la sonde de viande, des plaques à biscuits,
etc., sur le fond du four. Les objets laissés au fond du four
pourraient endommager le four et l’objet.
• Soyez prudent lorsque vous ouvrez la porte du four.
Laissez l’air chaud ou la vapeur s’échapper avant de rerer
ou de remplacer les aliments dans le four.
• Soyez prudent lorsque vous ajoutez des liquides à des
aliments ou à des contenants dans un four chaud. La
vapeur peut causer de graves brûlures ou échaudages.
• Ne pas chauer les contenants alimentaires non ouverts.
L’accumulaon de pression peut provoquer l’éclatement
du conteneur et entraîner des blessures.
• La graisse est inammable. Laissez la graisse chaude
refroidir avant de tenter de la manipuler. Évitez de laisser
les dépôts de graisse s’accumuler. Neoyez après chaque
ulisaon.
• Les lenlles lumineuses doivent toujours être en place
lorsque le four est ulisé pour protéger les ampoules
contre les bris.
• Les grilles de four doivent être posionnées lorsque le four
est frais pour éviter les brûlures. Si une grille doit être
déplacée pendant que le four est chaud, ne laissez pas le
porte-pot entrer en contact avec les éléments chauants
chauds du four.
• Assurez-vous que toutes les commandes de l’appareil sont
éteintes et que le produit de cuisson est frais avant
d’uliser tout type de neoyant pour aérosols sur ou
autour de l’appareil. Le produit chimique qui produit
l’acon de pulvérisaon pourrait, en présence de chaleur,
enammer ou faire corroder des pièces métalliques.
• Neoyez les pièces uniquement comme indiqué dans le
manuel d’ulisaon.
• Ne neoyez pas les joints de porte du four. Les joints de
porte sont essenels pour un bon joint du four. Des
précauons doivent être prises pendant le neoyage pour
éviter de froer, d’endommager ou de déplacer le joint de
sa posion installée.
Pour réduire le risque d’incendie, de choc électrique, de
blessure grave ou de décès lors de l’ulisaon de votre
appareil, suivez les précauons de sécurité de base,
notamment les suivantes :
• Pour éviter les dommages, n’ulisez pas les poignées du
four comme points de levage ou pour déplacer le produit.
• Ne grimpez pas et ne vous asseyez sur aucune pare de
l’appareil.
• N’ulisez pas la porte du four pour marcher, vous pencher
ou vous asseoir à tout moment, des dommages à l’appareil
et / ou des blessures corporelles peuvent survenir.
• Un enfant ou un adulte peut donner un pourboire à
l’appareil et être blessé ou tué.
• Gardez les matériaux d’emballage loin des enfants. Les
bâches et les sacs en plasque peuvent causer de la
suocaon.
• Ne laissez pas les enfants ou les animaux domesques
seuls ou sans surveillance dans la zone autour du produit.
Ne laissez pas les enfants jouer avec les commandes, rer
sur la poignée ou toucher d’autres pares du produit.
• Ne stockez pas d’arcles d’intérêt pour les enfants au-
dessus de l’appareil. Les enfants peuvent être brûlés ou
blessés en grimpant sur l’appareil.
• Installez un détecteur de fumée ou près de la cuisine.
• N’ulisez pas d’eau sur les feux de graisse. Étouez toutes
les ammes avec un couvercle, une plaque à biscuits ou un
plateau plat. Ulisez du bicarbonate de soude ou un
exncteur à mousse pour éteindre la graisse enammée.
En cas d’incendie, gardez la porte du four fermée.
• Gardez les arcles inammables, comme le papier, le
carton, le plasque et le ssu, à l’écart des surfaces
chaudes. Ne meez pas de tels arcles dans le four. Ne
permeez pas aux détenteurs de pot de toucher les
surfaces chaudes.
• N’ulisez que des porte-pots secs pour éviter les brûlures
de vapeur lorsque vous déplacez des arcles à l’extérieur
ou à l’extérieur de l’appareil. N’ulisez pas de serviee ou
d’autre chion encombrant à la place des porte-pot.
• Lorsque vous ulisez le four: Ne touchez pas les surfaces
intérieures du four ou la zone extérieure entourant
immédiatement la porte. Les surfaces intérieures du four
peuvent devenir assez chaudes pour causer des brûlures.
• Portez une tenue vesmentaire appropriée. Ne portez pas
de vêtements amples ou suspendus lorsque vous ulisez
l’appareil. Ne laissez pas les vêtements entrer en contact
avec un élément ou à proximité de tout élément ou de
l’intérieur du four et des zones environnantes pendant et
immédiatement après ulisaon. Certains matériaux
synthéques sont hautement inammables et ne doivent
pas être portés pendant la cuisson.
WARNING
AVERTISSEMENT
Renseignements sur la sécurité (connued)

10 (800) 449-8691
Oven Interior
26 1/4” W x 20” D x 15” H
(666.8 mm W x 508 mm D x 381 mm H)
Oven Elements
Oven Broiler Element Rang: 5000 Was
Oven Bake Element Rang: 2500 Was
Oven Heat Assist Element: 1800 Was
Electrical Requirements
The Electrical Appliance Rang: 240V, 60Hz, 24 AMPS, 1PH
Recommended: 30 amp circuit
Note: The doors on the single oven can either be French doors
(as shown on the right) or a drop-down door. These dimensions
apply regardless of the door conguraon chosen.
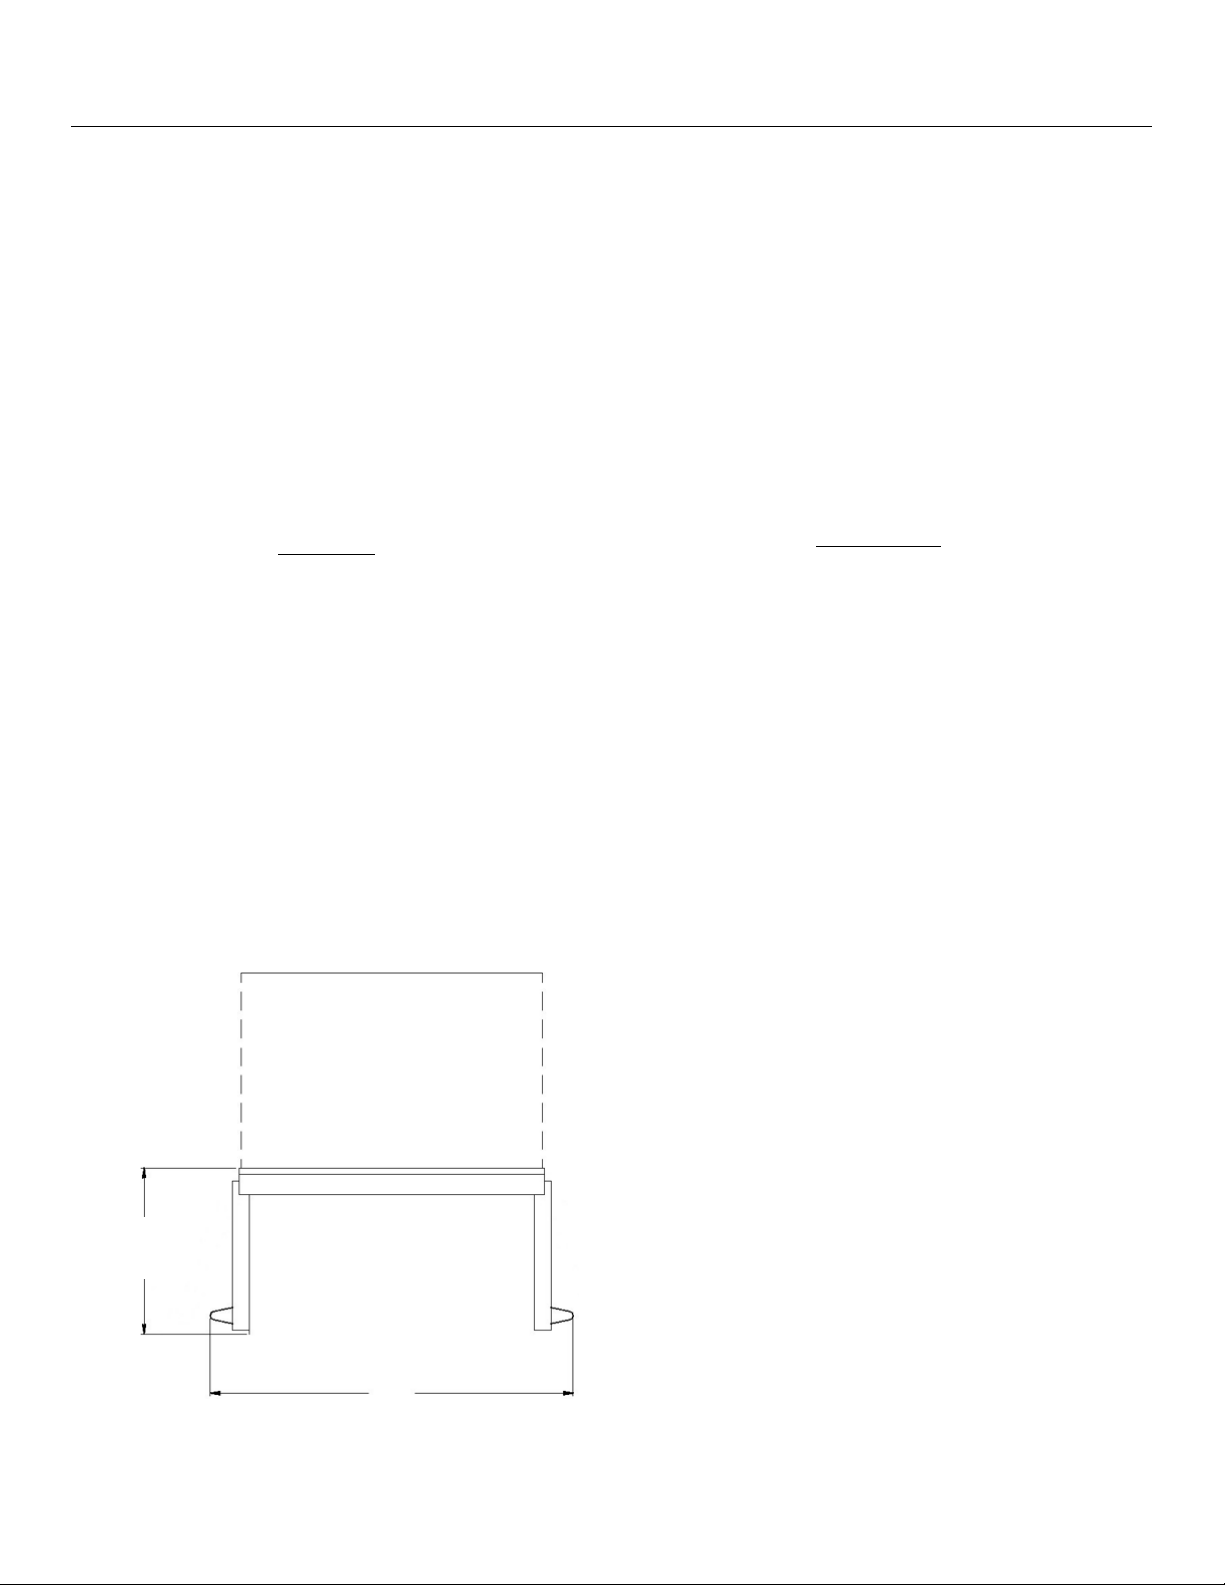
Front Dimensions
Back Dimensions
Front frame not shown
Single Oven Site Preparaon — Specicaons and Dimensions
26 3/4” (679.5 mm)
29 1/2” (749.3 mm)
Locaon of Electrical Connecon.
Aached to 20” (508 mm) Flexible
Conduit
30” (762 mm)
27” (685.8 mm)
French Door
bluestarcooking.com 11
Side Dimensions
Top Dimensions
Important: You must allow at least 3/4” (19.1 mm) from the
side of the wall oven to the cabinet drawer or door side for the
french door to open correctly.
19 1/2”
(495.3 mm)
36 3/4” (933.5 mm)
open 90°
25 7/8” (657.2 mm)
22 7/8” (581 mm)
3”
(76.2 mm)
3/8” (9.5 mm)
3/8” (9.5 mm)
26 3/4”
(679.5 mm)
Drop-Down Door
5 3/8”
(136.5 mm)
25 7/8” (657.2 mm)
22 7/8” (581 mm)
3/8” (9.5 mm)
3/8” (9.5 mm)
26 3/4”
(679.5 mm)
French Doors
Single Oven Site Preparaon — Specicaons and Dimensions (connued)

12 (800) 449-8691
Cabinet Front Dimensions
Single Oven Site Preparaon — Cabinet Dimensions
Cabinet Top Dimensions
Front
22 3/4”
(577.9 mm)
2 11/16”
(68.3 mm)
29 5/8” (752.5 mm)
24” (609.6 mm)
Locaon of
Electrical Inlet
33” (838.2 mm)
Recommended cabinet width
24” (609.6 mm)
29 5/8” (753.7 mm)
27”
(685.8 mm)
2” (50.8 mm)
or more

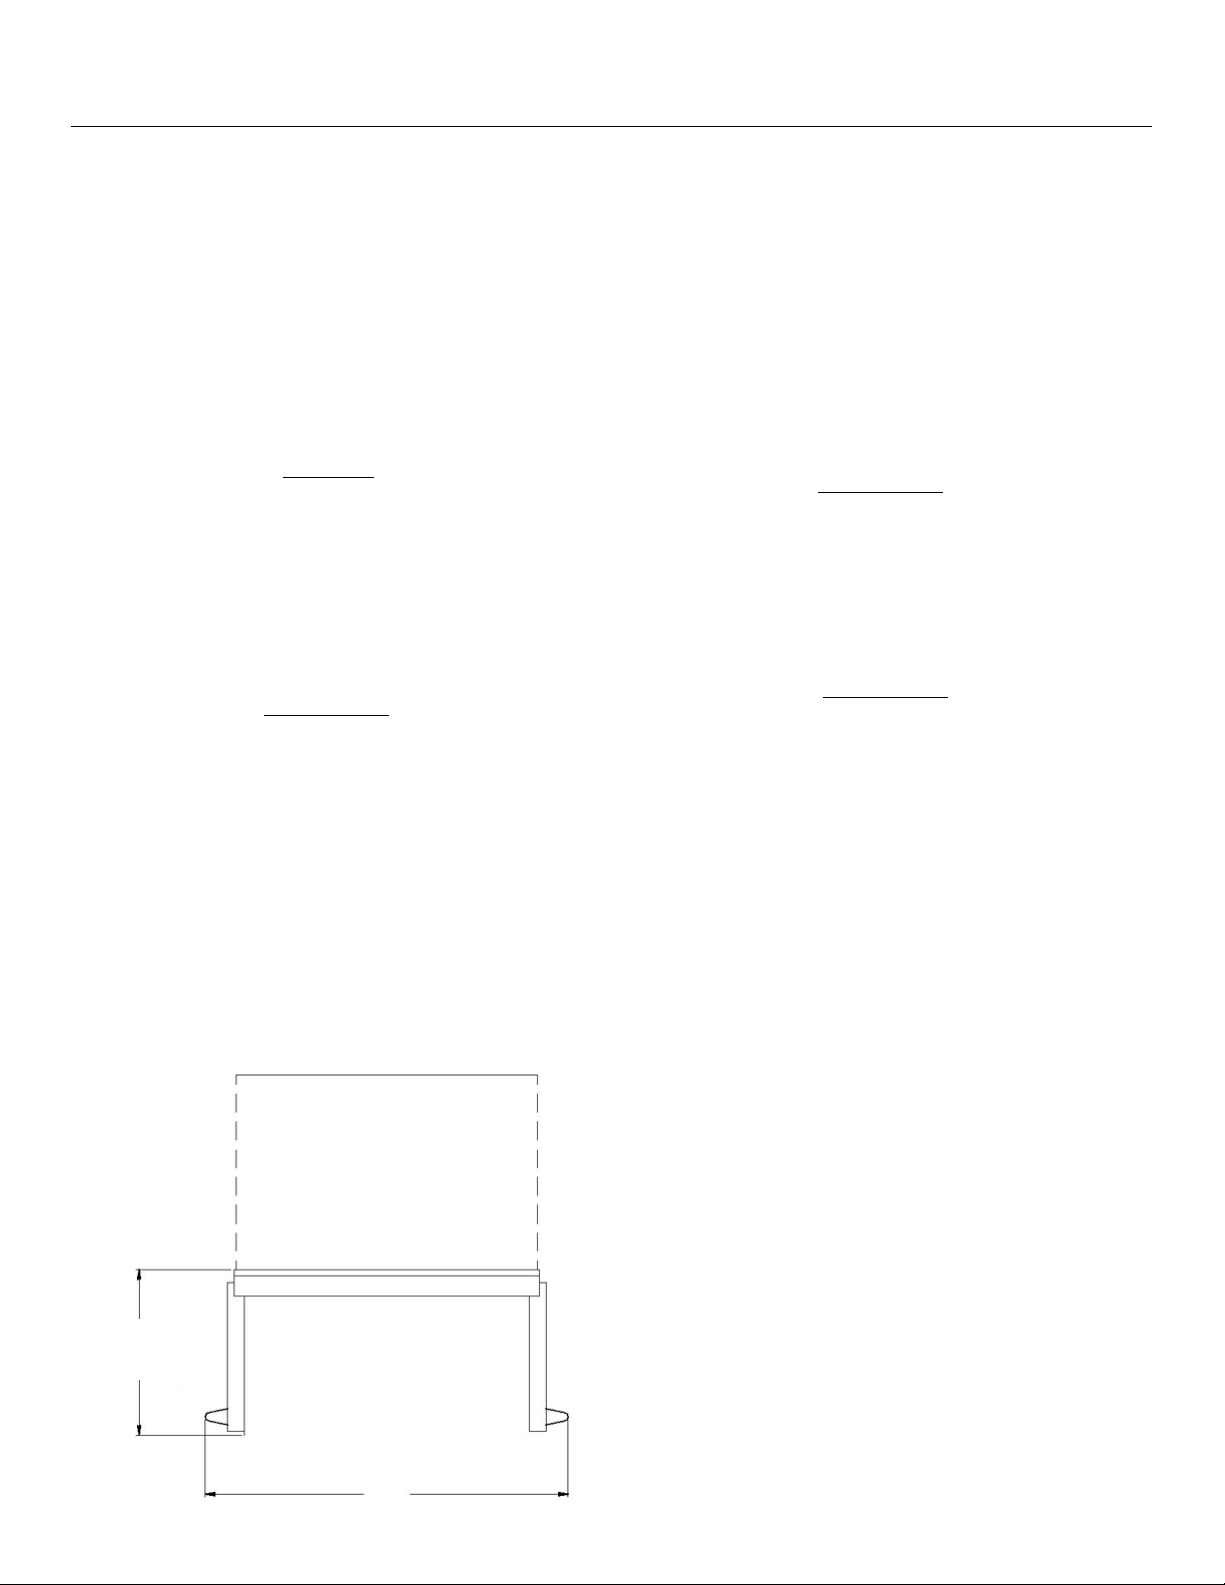
bluestarcooking.com 13
Back Dimensions
Front frames not shown
Locaon of Electrical Connecon.
Aached to 20” (508 mm)
Flexible Conduit
49” (1244.6 mm)
29 1/2” (749.3 mm)
Oven Interior
26 1/4” W x 20” D x 15” H
(666.8 mm W x 508 mm D x 381 mm H)
Upper Oven Elements
Oven Broiler Element Rang: 5000 Was
Oven Bake Element Rang: 2500 Was
Oven Heat Assist Element: 1800 Was
Lower Oven Elements
Oven Broiler Element Rang: 2500 Was
Oven Bake Element Rang: 2500 Was
Oven Heat Assist Element: 1800 Was
Electrical Requirements
The Electrical Appliance Rang: 240V, 50Hz, 50 AMPS, 1PH
Recommended: 50 amp circuit
Note: The doors on the upper oven can either be French doors
(as shown below) or a drop-down door. The lower oven can
only be a drop-down door. These dimensions apply regardless
of the door conguraon chosen.
Front Dimensions
30” (762 mm)
49 3/4”
(1263.7 mm)
Double Oven Site Preparaon — Specicaons and Dimensions
14 (800) 449-8691
Side Dimensions
Top Dimensions
Important: You must allow at least 3/4” (19.1 mm) from the
side of the oven to the cabinet drawer or door side for the ov-
en french door to open correctly.
19 1/2”
(495.3 mm)
36 3/4” (933.5 mm)
open 90°
Double Oven Site Preparaon — Specicaons and Dimensions (connued)
5 3/8”
(136.5 mm)
25 7/8” (657.2 mm)
22 7/8” (581 mm)
3/8” (9.5 mm)
3/8” (9.5 mm)
49”
(1244.6 mm)
French Door
Drop-Down Door
26 5/32” (664.4 mm)
23 1/8” (587.4 mm)
3 1/32”
(77 mm)
3/8” (9.5 mm)
49”
(1244.6 mm)
3/8” (9.5 mm)
Drop-Down Door
Drop-Down Door

bluestarcooking.com 15
Cabinet Top Dimensions
Double Oven Site Preparaon — Cabinet Dimensions
Cabinet Front Dimensions
Front
22 3/4”
(577.9 mm)
2 11/16”
(68.3 mm)
29 5/8” (752.5 mm)
24” (609.6 mm)
Locaon of
Electrical Inlet
24” (609.6 mm)
29 5/8” (753.7 mm)
49 1/2”
(1250.1 mm)
33” (838.2 mm)
Recommended cabinet width
2” (50.8 mm)
or more
16 (800) 449-8691
3. Aer the hinges are locked, use care to slightly li the
door, then pull the hinge arms out of the hinge receptacles
to remove the door.
4. Lean the door against a wall or cabinet with the handle
towards the oor and facing the wall to prevent the hinge
latches from coming unlatched.
Important: Use padding beneath the door to prevent
scratching or damage. Keep ngers away from the door hinges
aer removing the door. The hinges have strong springs that
can snap closed if impacted, which can cause injury.
Step 3 — Take Out the Oven Racks
Take out all the removable parts (including the oven racks and
the extension rack) and wash them with hot soapy water.
Make sure these items are well rinsed and wiped dry, then set
them aside.
Step 4 — Move the Wall Oven into Posion
Remove the wood base with a 1/2” socket or open end wrench
and discard the shipping bolts and brackets. Use an appliance
cart to move the wall oven near the front of the enclosure.
Important: If the wall oven was on its back or side, it must
stand upright for at least 24 hours before geng power.
Move the wall oven into posion but do not slide it into the
cabinet unl aer the electrical connecon in the next step.
Step 5 — Electrical Connecon
The appliance is equipped with a 4” handy box for a single oven
or a 5” handy box for a double oven. Observe all local and
other codes regarding electrical connecons.
Important: All electrical wiring should be free and clear. Wires
or cables should not be pinched or otherwise obstructed.
Important: The appliance must be on a dedicated circuit
breaker rated as noted in the installaon instrucons.
Tools and Materials
• Phillips and Flat blade screwdrivers
• 1/2” socket wrench and 1/2” open-end wrench
• 5/16” hex head socket
• Gloves and safety glasses
Step 1 — Uncrate and Inspect the Wall Oven
Before starng the installaon, uncrate and inspect the wall
oven. Remove the packing materials, but do not discard the
associated hardware.
Step 2 — Detach the Drop-Down Door
Important: Do not aempt this on the French Door model.
On wall ovens with a drop-down door, you can take the door
o the oven to prevent damage to the appliance while liing
and installing.
1. Open the drop-down door all the way.
2. Holding onto the door, push the latch at the top of each
hinge downwards to lock the hinge for door removal.
Pourboire sur le danger
Le four mural est lourd et se pointe facilement lorsqu’il n’est
pas complètement installé. Ulisez deux personnes ou plus
pour déplacer et installer le four mural. Le non-respect de ces
instrucons peut entraîner la mort ou des blessures graves.
AVERTISSEMENT
Tip Over Hazard
The wall oven is heavy and ps easily when not completely
installed. Use two or more people to move and install the wall
oven. Failure to follow these instrucons can result in death or
serious injury.
WARNING
Installaon Instrucons
Push this latch down to lock the
drop-down door hinge for door
removal
This appliance must be grounded. Do not cut, remove, or
disregard the grounding wire in this appliance. If the appliance
is not grounded, severe shock hazards can exist.
WARNING

bluestarcooking.com 17
1. Complete the wiring connecons in the handy box.
2. Insert the wall oven into the cabinet unl the front frame
of the wall oven is ush against the cabinet.
3. Level the wall oven using a carpenter-type level. Place the
level on the surface three ways: side to side, front to back,
and diagonally.
4. Remove the control panel in the wall oven and insert a
screw through the side ange in the wall oven into the
side of the cabinet.
5. Test the funconality of the wall oven.
Step 6 — Reaach the Drop-Down Door
Important: Do not aempt this on the French Door model.
1. Hold the door with the handle side facing the ground.
2. Align and insert the door hinges with the openings on the
wall oven.
3. Push up the latch at the top of each hinge to secure each
hinge. The drop-down door should close easily.
4. Test the funconality of the wall oven.
Cet appareil doit être mis à la terre. Ne coupez pas, n’enlevez
pas ou ne négligez pas le l de mise à la terre de cet appareil.
Si l’appareil n’est pas mis à la terre, des risques de choc graves
peuvent exister.
AVERTISSEMENT
Push up on the latch to secure
the door hinge
Installaon Instrucons (connued)

18 (800) 449-8691
Single Oven
1 Cooking mode knob
2 Touch screen
3 Oven temperature control knob
4 French doors
5 Drop-down doors
1 Rack guide (both sides)
2 Oven lights (two)
3 Baking stone
4 Full extension rack (one)
5 Standard racks (two)
6 Broil element
7 Convecon fan
8 Temperature probe socket
5
1
3
4
5
6
7
8
2
4
1
2
3

bluestarcooking.com 19
Double Oven
1 Cooking mode knob
2 Touch screen
3 Temperature control knob
Note: This illustraon includes french doors on the upper oven
and a drop-down door on the lower oven. For the upper oven,
the french doors are interchangeable with a drop-down door.
1 Rack guides (both sides in each oven)
2 Baking stone (upper oven)
3 Temperature probe socket (lower oven)
4 Full extension rack (one in each oven)
5 Oven lights (two in each oven)
6 Standard racks (two in each oven)
7 Broil element (one in each oven)
8 Convecon fan (one in each oven)
5
8
7
6
4
3
2
1
1
2
3

20 (800) 449-8691
Before Your First Use — Oven Burn-O Procedure
Important: Before you use the wall oven, it is essenal that you
complete the oven burn-o procedure. You should also do the
baking stone pre dry procedure to condion the baking stone
before use.
This oven burn-o procedure uses the Clean Mode, can take
about 90 minutes to complete, will heat up the appliance, and
will remove all factory oils and residue from its internal parts.
Important: Failure to complete this procedure before rst
using the oven may result in undesirable odors, avors,
excessive smoke, and create smells dicult to remove.
1. Take out the baking stone from the upper oven and set it
aside for the pre dry procedure. If you do not remove the
stone, it could shaer.
2. Take out the oven racks, the extension rack, and the
temperature probe.
3. On the touch screen control, tap Clean on the Select Mode
screen.
4. Tap Start on the Select Clean screen to start the cleaning
cycle, which will take 90 minutes.
5. The Cleaning in Progress mer will start counng down
from “1:30”. You can tap OFF at any me to stop the
process.
6. When the me is up, listen for a tone to indicate the Clean
cycle is complete. The oven will sll be hot at this point,
but you will be able to use it.
7. Wait for the oven to cool completely before you put back
the oven racks, the extension rack, and the other items.
Important: During this process, you may noce a strong odor,
some smoke, and/or condensaon on the front of the oven
(including the oven doors, oven windows, control panel, and
side panel) as any oils and solvents on internal parts are
burned o. This is normal and is the primary reason for this
burn-o.

bluestarcooking.com 21
Before Your First Use — Baking Stone Pre Dry Procedure
This pre dry procedure will take six hours and you must follow
these steps in exact order. You must pre dry your baking stone
before you use it to prevent it from warping and to maximize
its life. If the stone is not properly dried before its rst use, it
could crack or shaer.
Important: Keep the oven door closed throughout the enre
process, especially between sengs. You might noce odors
and vapors during the inial heat-up, which is normal as the
stone adjusts to its environment.
Make sure the baking stone is at room temperature and the
stone temperature probe is inserted into the hole in the back
of the stone before you start.
First Seng — 200° F (93° C) for Three Hours
1. Tap Stone on the Select Mode screen.
2. Tap Other on the Set Temperature screen.
3. Use the keypad on the Stone—Set Temp screen to enter
200 (or “93” if using Celsius), tap Start, then wait three
hours.
Second Seng — 300° F (149° C) for One Hour
4. Aer three hours, tap the Stone icon next to the
temperature, use the keypad on the Stone—Set Temp
screen to enter 300 (or “149” if using Celsius), tap Start,
then wait an hour.
Third Seng — 400° F (204° C) for One Hour
5. Aer an hour, tap the Stone icon next to the temperature,
use the keypad on the Stone—Set Temp screen to enter
400 (or “204” if using Celsius), tap Start, then wait an hour.
Fourth Seng — 500° F (260° C) for One Hour
6. Aer an hour, tap the Stone icon next to the temperature,
use the keypad on the Stone—Set Temp screen to enter
500 (or “260” if using Celsius), tap Start, then wait an hour.
7. Your baking stone will be ready for use.

22 (800) 449-8691
Before Your First Use — Touch Screen Controls
Note: For documentaon purposes, touch screen control
illustraons are for the double oven. Instrucons apply to both
single and double ovens unless otherwise noted.
You can use the following controls as they appear on the touch
screen control on either side or in the boom row.
Idle Display
All oven funcons are operated from the touch screen control.
When you are not using the ovens, the control uses an Idle
Display to show the me.
Tap the Idle Display screen to start any oven operaon. Any
me the touch screen control is in use, a fan will automacally
start to keep the oven components and hardware cool.
Oven Light
To turn on the oven light, tap the light bulb icon. Tap the
same icon again to turn it o.
Important: Keeping the oven light on while cooking will
increase the oven temperature approximately 15° F
(-9° C).
Previous Screen
Tap the Previous icon to go to a previous screen.
Idle
Display
Upper
oven
Upper oven light
Split
Screen
Sengs
Clock
Timers
Previous
Lower
oven
Lower oven light

bluestarcooking.com 23
Kitchen Timers
You can use the mers on the boom row of the touch screen
control separate from the oven mer.
1. Tap either Timer 1 or Timer 2 in the boom row.
2. On the Set Kitchen Timer screen, use the keypad to enter
the hours, minutes, and seconds, then tap Start. The mer
countdown will appear in the boom row in the inial
Timer box.
3. When me is expired, you will hear a tone for two minutes
or unl you respond.
• Tap the Timer box with “00:00:00” in red, then tap
Cancel to stop the mer and close the Set Kitchen
Timer screen.
• Tap the X in the keypad to stop the mer or change the
mer seng.
4. Tap the mer box unl you return to the original “Timer”
screen.
Split Screen
Note: The following informaon applies to the double oven
only. This does not apply to the single oven.
By default, the system starts with the upper oven. Tap the
lower oven icon on the right to use the lower oven instead.
Aer tapping Start on any operaon, you can tap the oven icon
on the opposite side (in the black) to set up the second oven
for addional cooking.
To see both ovens on the touch screen control, tap the
Split Screen icon in the boom row.
Sengs
Tap the Sengs icon to do any of the following:
• Set the me for the Idle Display clock
• Change the temperature scale (Fahrenheit/Celsius)
• Set the Sabbath mode
• Change the appearance of the clock in Idle Display
• Adjust the loudness of the tone heard
• Lock the touch control screen from use
Idle Display
Tap the BlueStar® logo in the boom right corner to
return to the Idle Display.
Before Your First Use — Touch Screen Controls (connued)

24 (800) 449-8691
Note: For documentaon purposes, touch screen control
illustraons are for the double oven. Instrucons apply to both
single and double ovens unless otherwise noted.
Set Time
1. Tap the Sengs icon in the boom row.
2. Tap Set Time on the Sengs screen.
3. On the Enter Current Time screen, use the keypad to enter
the hours and minutes, tap 12 or 24 for civilian vs. military,
tap AM or PM for before noon vs. aer noon, then tap Set
to conrm your selecons.
4. Tap the Idle Display icon to see the change made.
Note: If you select “24” for military me, the AM/PM opon
will be disabled.
F° /C° (Temperature Scale)
To switch between °F (Fahrenheit) and °C (Celsius):
1. Tap the Sengs icon on the Main Screen.
2. Tap °F/°C on the Sengs screen.
3. Tap °F (Fahrenheit) or °C (Celsius) on the Select
Temperature Scale screen.
4. Tap the Idle Display icon, then connue tapping unl you
get to a temperature screen to see the change made.
Before Your First Use — Touch Screen Controls (connued)

bluestarcooking.com 25
Note: For documentaon purposes, touch screen control
illustraons are for the double oven. Instrucons apply to both
single and double ovens unless otherwise noted.
Sabbath
In Sabbath mode, the oven maintains a set cooking
temperature in Bake, Convect Bake, Roast, Convect Roast, or
Dehydrate mode unl you tap OFF to cancel the Sabbath mode
and turn o the oven. Oven lights, alarms (except error codes),
and control knob operaon are disabled unl the Sabbath
mode is canceled.
When in Sabbath mode, you can tap either arrow to increase
or decrease the temperature in 10-degree increments.
Note: You will have to wait at least a minute before you can
change the temperature again. When you adjust the
temperature, there will be no indicaon the oven temperature
did change. You should leave a thermometer in the oven to
monitor the temperature.
DOUBLE OVENS ONLY: If seng the Sabbath mode in both
ovens, do step #1 for both ovens, then do steps #2 through #6.
Important: Remove the temperature probe from the oven
when not using it to avoid damage.
1. Select a cooking mode and get it started.
2. Tap the Sengs icon in the boom row.
3. Tap Sabbath on the Sengs screen.
4. Tap ON to operate the oven using Sabbath guidelines.
5. Tap Set to iniate the Sabbath mode.
6. Tap OFF to cancel the Sabbath mode. The oven will
operate normally aer Sabbath is cancelled.
DOUBLE OVENS ONLY: When one oven is set in operaon for
Sabbath, but the other oven is not used, you will see the
following screen. When both ovens are set for Sabbath, you
will see a split screen.
Before Your First Use — Touch Screen Controls (connued)

26 (800) 449-8691
Note: For documentaon purposes, touch screen control
illustraons are for the double oven. Instrucons apply to both
single and double ovens unless otherwise noted.
Idle Display
When the touch screen control is not in use, you will see a
clock on the touch screen.
The clock displayed is available either as digital or as analog.
You can change its appearance using any of the opons
available within Sengs.
1. Tap the Sengs icon in the boom row.
2. Tap Idle Display on the Sengs screen.
3. Tap Analog or Digital to select the type of clock you want.
4. Tap any of the opons available.
5. Tap the Idle Display icon to see the change made.
Before Your First Use — Touch Screen Controls (connued)

bluestarcooking.com 27
Note: For documentaon purposes, touch screen control
illustraons are for the double oven. Instrucons apply to both
single and double ovens unless otherwise noted.
Screen Lock
When the touch screen control is locked, informaon is sll
displayed, but cannot be altered, thus prevenng anyone from
changing the oven sengs. This is useful when you are
cleaning the oven.
1. Tap the Sengs icon on the boom row.
2. Tap Screen Lock on the Sengs screen.
3. Tap ON to lock the touch control screen.
When the screen is unlocked, you can use the oven normally
unl the control returns to the Idle Display screen, where the
screen will lock again. This will happen each me the control
returns to the Idle Display screen unl you turn o the screen
lock.
1. Tap the Sengs icon on the boom row.
2. Tap Screen Lock on the Sengs screen.
3. Tap OFF to turn o the screen lock and return the control
to normal funcon.
Before Your First Use — Touch Screen Controls (connued)

28 (800) 449-8691
Note: For documentaon purposes, touch screen control
illustraons are for the double oven. Instrucons apply to both
single and double ovens unless otherwise noted.
Sound
You can adjust the volume of the tone you hear when using the
touch screen, from quiet to medium to loud.
1. Tap the Sengs icon on the boom row.
2. Tap Sound on the Sengs screen.
3. Tap any of the volume opons on the Select Volume
screen to listen its the sound level.
4. Tap Set aer selecng the volume you want.
Calibrate
Important: The oven is factory-calibrated and should be
completed by an authorized service company. For assistance in
locang an authorized service company, please call BlueStar®
Customer Service at (800) 449-8691 for informaon and/or
service.
Before Your First Use — Touch Screen Controls (connued)

bluestarcooking.com 29
Single Oven Cooking Modes
Your single oven has the following operang modes. Each
mode has pre-set minimum and maximum temperature
ranges.
Double Oven Cooking Modes
Your double oven has the following operang modes. Each
mode has pre-set minimum and maximum temperature
ranges.
Upper Oven
Lower Oven
Temperature Operang Ranges
Important: Entering a temperature outside the range given for
an applicable cooking mode will result in an error message.
The following cooking modes operate at temperatures
between 95° F and 500° F (27° C and 260° C). Each mode has a
default temperature seng at which the temperature starts
when you rst select a cooking mode.
Control Knobs
You can use the control knobs to either select a cooking mode
or change the oven temperature.
1. Tap the touch screen to begin.
2. Turn and hold the le control knob to scroll the mode
opons on the screen. Let go when your mode is
highlighted, then the oven will switch over to that mode.
3. Turn and hold the right knob to change the temperature in
ve-degree increments on the screen. Le will decrease
the temperature and right will increase it.
4. Tap Start to begin.
• Bake • Convecon Bake
• Roast • Convecon Roast
• Broil • StoneBake™
• Proof • Dehydrate
• Clean
Cooking Modes
• Bake • Convecon Bake
• Roast • Convecon Roast
• Broil • StoneBake™
• Proof • Dehydrate
• Clean
• Bake • Convecon Bake
• Roast • Convecon Roast
• Broil • Proof
• Dehydrate • Clean
Mode Temp. Set Range Default Temp.
Bake 100° F - 500° F (38° C - 260° C) 350° F (177° C)
Convect Bake 100° F - 500° F (38° C - 260° C) 350° F (177° C)
Roast 100° F - 500° F (38° C - 260° C) 375° F (191° C)
Convect Roast 100° F - 500° F (38° C - 260° C) 375° F (191° C)
Broil 100° F - 500° F (38° C - 260° C) HIGH
StoneBake™ 100° F - 500° F (38° C - 260° C) 500° F (260° C)
Proof 95° F - 125° F (35° C - 52° C) 95° F (35° C)
Dehydrate 95° F - 155° F (35° C - 68° C) 145° F (63° C)
Temperature
Probe
100° F - 200° F (38° C - 93° C) None
Clean 500° F (260° C) 500° F (260° C)

30 (800) 449-8691
Cooking Modes — Bake
Note: For documentaon purposes, touch screen control
illustraons are for the double oven. Instrucons apply to both
single and double ovens unless otherwise noted.
Important: Do not put food in the oven before or during
preheat as the bake element, the broiling element, and the
convecon fan are used to reach the set temperature.
Important: Remove the temperature probe from the oven
when not using it to avoid damage.
Preheat the Oven
1. Tap Bake or Convect Bake on the Select Mode screen.
2. Tap Start on the Bake - Set Temp (or Convect Bake) screen
to preheat the oven at the default seng, or use the
keypad to enter the temperature you want, then tap Start.
3. When done, you will hear a tone to indicate the preheat
cycle is complete and your oven is ready to cook.
4. Put your food in the oven, then do any of the following:
• Go to Set the Cooking Time to set the cooking me.
• If you want to postpone the bake start me, go to Set
the Delay Time for instrucons.
• If you are using the temperature probe and need to
set its temperature, go to Set the Probe Temperature
for instrucons.
If Preheang is Not Required
Tap OFF on the Bake—Set Temp (or Convect Bake) screen.
Heang the oven to the set temperature without preheang
will use less heat, but will take longer.

bluestarcooking.com 31
Set the Cooking Time
1. Tap the Bake (or Convect Bake) icon next to the
temperature, tap Opons on the Bake—Set Temp (or
Convect Bake) screen, then tap Timed on the Select Bake
Opon screen.
2. Use the keypad on the Set Cook Time screen to set the
cooking me in hours and minutes, then tap Set.
3. Tap Start to conrm the seng and begin cooking (or tap
the Previous icon to change something).
4. At the end of the selected cook me, listen for a tone to
indicate the Timed cooking is complete.
Cooking Modes — Bake (connued)
Set the Delay Time
Important: If you want a delayed start, you should set the
delay me before you tap Start on the Conrm Seng screen.
Note: Using Delay Time will turn o the Preheat feature to
prevent burning food.
1. Tap Delay on the Conrm Seng screen.
2. Use the keypad on the Set Delay Clock screen to set the
hours/minutes, then tap Set.
3. Tap Start to conrm the seng.

32 (800) 449-8691
Set the Probe Temperature
Important: You should set the probe temperature before you
tap Start on the Conrm Seng screen.
1. Tap Probe on the Conrm Seng screen.
2. Use the keypad on the Set Probe Temp screen to set the
temperature, then tap Set.
3. Tap Start to conrm the seng.
Cooking Modes — Bake (connued)

bluestarcooking.com 33
Cooking Modes — Roast
Note: For documentaon purposes, touch screen control
illustraons are for the double oven. Instrucons apply to both
single and double ovens unless otherwise noted.
Important: Do not put food in the oven before or during
preheat as the bake element, the broiling element, and the
convecon fan are used to reach the set temperature.
Important: Remove the temperature probe from the oven
when not using it to avoid damage.
Preheat the Oven
1. Tap Roast (or Convect Roast) on the Select Mode screen.
2. Tap ON, then tap Start on the Roast - Set Temp (or
Convect Roast) screen to set the oven at the default
seng; or use the keypad to enter the temperature you
want, then tap Start.
3. When done, you will hear a tone to indicate the preheat
cycle is complete and your oven is ready to cook.
4. Put your food in the oven, then do any of the following:
• Go to Set the Cooking Time to set the cooking me.
• If you want to postpone when the oven is to start
baking, tap Delay and go to Set the Delay Time for
instrucons.
If Preheang is Not Required
Tap OFF on the Roast—Set Temp (or Convect Roast) screen.
Heang the oven to the set temperature without preheang
will use less heat, but will take longer.

34 (800) 449-8691
Set the Cooking Time
1. Tap the Roast (or Convect Roast) icon next to the
temperature, tap Opons on the Roast—Set Temp (or
Convect Roast) screen, then tap Timed on the Select Roast
Opon screen.
2. Use the keypad on the Set Cook Time screen to set the
cooking me in hours and minutes, then tap Set.
3. Tap Start to conrm and begin cooking (or tap the
Previous icon to change anything).
4. At the end of the selected cook me, listen for a tone to
indicate the Timed cooking is complete.
Cooking Modes — Roast (connued)
Set the Delay Time
Important: If you want a delayed start, you should set the
delay me before you tap Start on the Conrm Seng screen.
Note: Using Delay Time will turn o the Preheat feature to
prevent burning food.
1. Tap Delay on the Conrm Seng screen.
2. Use the keypad on the Set Delay Clock screen to set the
hours/minutes, then tap Set.
3. Tap Start to conrm the seng.

bluestarcooking.com 35
Cooking Modes — Broil
Note: For documentaon purposes, touch screen control
illustraons are for the double oven. Instrucons apply to both
single and double ovens unless otherwise noted.
Important: Do not leave food unaended when using the Broil
mode This is an intensive high heat mode and foods can
quickly burn or catch re.
Important: Do not use the temperature probe with the Broil
mode as it will damage the probe. An error will occur if the
probe remains inserted aer you start the Broil mode.
Important: Keep the oven door shut while broiling.
Start the Oven
1. Tap Broil on the Select Mode screen.
2. Tap a predened High or Med broil opon on the Select
Temperature screen, then tap Start.
3. Monitor the food while it is cooking in Broil so it does not
burn.
4. Take out the food when it is done broiling.
Set Another Temperature
Tap Other on the Select Temperature screen, use the keypad
to set your temperature, then tap Start.

36 (800) 449-8691
Note: For documentaon purposes, touch screen control
illustraons are for the double oven. Instrucons apply to both
single and double ovens unless otherwise noted.
Important: The baking stone weighs approximately 35 lbs
(15.88 kg). Make sure the stone is cool and use extreme
cauon when removing it from the oven.
Important: You must pre dry your baking stone before you use
it to prevent warping and to maximize its life. If the stone is not
properly dried before its rst use, it could crack or shaer. See
the Before Your First Use - Baking Stone Pre Dry Procedure
topic for details.
Important: Do not put food in the oven before or during
preheat as the bake element, the broiling element, and the
convecon fan are used to reach the set temperature.
Preheat the Oven
1. Tap Stone on the Select Mode screen.
2. Tap ON, tap a predened temperature on the Select
Temperature screen, then tap Start.
3. When done, listen for a tone to indicate the preheat cycle
is complete and your oven is ready to cook.
4. Put your food in the oven, then go to Set the Cooking Time
to set the cooking me.
If Preheang is Not Required
Tap OFF on the Select Temperature screen. Heang the oven
to the set temperature without preheang will use less heat,
but will take longer.
Set Another Temperature
Tap Other on the Select Temperature screen, use the keypad
to set your temperature, then tap Start.
Cooking Modes — StoneBake™

bluestarcooking.com 37
Tips
During StoneBake™ mode, both the boom bake element and
the broiler turn on to maintain the oven cavity temperature. If
there is too much browning on what you are cooking, put a
baking sheet on the second rack from the top. If you are baking
bread, you may already have a broiler pan with water in this
place.
Food Placement
You can use either the side of the stone (rough or smooth) for
the baking surface. Experiment with your recipes and take
notes for future baking. The rough side of the stone is beer
for doughs as it is more like a non-sck surface.
Set the Cooking Time
1. Tap the Stone icon next to the temperature, tap Opons
on the Set—Stone Temp screen, then tap Timed on the
Select Stone Opon screen.
2. Use the keypad on the Set Cook Time screen to set the
cooking me in hours and minutes, then tap Set.
3. Tap Start to conrm and begin cooking (or tap the
Previous icon to change anything).
4. At the end of the selected cook me, listen for a tone to
indicate the Timed cooking is complete.
Cooking Modes — StoneBake™ (connued)

38 (800) 449-8691
Cooking Modes — Proof
Note: For documentaon purposes, touch screen control
illustraons are for the double oven. Instrucons apply to both
single and double ovens unless otherwise noted.
Important: Do not put food in the oven before or during
preheat as the bake element and the convecon fan are used
to reach the set temperature.
Preheat the Oven
1. Tap Proof on the Select Mode screen.
2. Tap ON, tap a predened temperature on the Select
Temperature screen, then tap Start.
3. When done, you will hear a tone to indicate the preheat
cycle is complete and your oven is ready to cook.
4. Put your food in the oven, then do any of the following:
• Go to Set the Cooking Time to set the cooking me.
• If you want to postpone when the oven is to start
baking, tap Delay and go to Set the Delay Time for
instrucons.
Set Another Temperature
Tap Other on the Select Temperature screen, use the keypad
to the temperature you want, then tap Start.

bluestarcooking.com 39
Set the Cooking Time
1. Tap the Proof icon next to the temperature, tap Opons
on the Proof—Set Temp screen, then tap Timed on the
Select Proof Opon screen.
2. Use the keypad on the Set Cook Time screen to set the
cooking me in hours and minutes, then tap Set.
3. Tap Start to conrm the seng and begin cooking (or tap
the Previous icon to change something).
4. At the end of the selected cook me, listen for a tone to
indicate the Timed cooking is complete.
Cooking Modes — Proof (connued)
Set the Delay Time
Important: If you want a delayed start, you should set the
delay me before you tap Start on the Conrm Seng screen.
Note: Using Delay Time will turn o the Preheat feature to
prevent burning food.
1. Tap Delay on the Conrm Seng screen.
2. Use the keypad on the Set Delay Clock screen to set the
hours/minutes, then tap Set.
3. Tap Start to conrm the seng.

40 (800) 449-8691
Cooking Modes — Dehydrate
Note: For documentaon purposes, touch screen control
illustraons are for the double oven. Instrucons apply to both
single and double ovens unless otherwise noted.
Important: Foods must be dried to below 0.60 water acvity or
dry to the touch for safe storage with no danger of mold,
yeasts, or bacteria growing.
Important: Do not put food in the oven before or during
preheat as the bake element and the convecon fan are used
to reach the set temperature.
Important: An error will occur if the probe remains inserted
aer you start the Proof mode.
Preheat the Oven
1. Tap Dehyd on the Select Mode screen.
2. Tap ON, tap a predened temperature on the Select
Temperature screen, then tap Start.
3. When done, you will hear a tone to indicate the preheat
cycle is complete and your oven is ready to cook.
4. Put your food in the oven, then do any of the following:
• Go to Set the Cooking Time to set the cooking me.
• If you want to postpone when the oven is to start
baking, tap Delay and go to Set the Delay Time for
instrucons.
If Preheang is Not Required
Tap OFF on the Select Temperature screen. Heang the oven to
the set temperature without preheang will use less heat, but
will take longer.
Set Another Temperature
Tap Other on the Select Temperature screen, use the keypad to
enter the temperature you want, then tap Start.

bluestarcooking.com 41
Set Cooking Time
1. Tap the Dehyd icon next to the temperature, tap Opons
on the Dehydraon—Set Temp screen, then tap Timed on
the Select Dehydrate Opon screen.
2. Use the keypad on the Set Cook Time screen to set the
cooking me in hours and minutes, then tap Set.
3. Tap Start to conrm the seng and begin cooking (or tap
the Previous icon to change something).
4. At the end of the selected cook me, listen for a tone to
indicate the Timed cooking is complete.
Cooking Modes — Dehydrate (connued)
Set the Delay Time
Important: If you want a delayed start, you should set the
delay me before you tap Start on the Conrm Seng screen.
Note: Using Delay Time will turn o the Preheat feature to
prevent burning food.
1. Tap Delay on the Conrm Seng screen.
2. Use the keypad on the Set Delay Clock screen to set the
hours/minutes, then tap Set.
3. Tap Start to conrm the seng.

42 (800) 449-8691
Cooking Modes — Clean
Note: For documentaon purposes, touch screen control
illustraons are for the double oven. Instrucons apply to both
single and double ovens unless otherwise noted.
• Turn on the kitchen venlaon to remove any excess
smoke or fumes that might occur.
• Remove any large built-up food parcles and grease
before you start the Clean mode.
• Do not use water or other solvents to clean the baking
stone.
Important: Take out the temperature probe and oven racks
and wash the racks by hand. If the baking stone was pre dried,
you can leave it in the oven while the oven is cleaning.
1. Tap Clean on the Select Mode screen.
2. Tap Start on the Select Clean screen to start the cleaning
cycle, which will take an hour and a half.
3. The Cleaning in Progress mer will start counng down
from “1:30”. You can tap OFF at any me to stop the
process.
4. When the me is up, listen for a tone to indicate the Clean
cycle is complete. The oven will sll be hot at this point,
but you will be able to use it.

bluestarcooking.com 43
Note: Each oven comes equipped with two standard oven
racks. Follow your recipe guidelines to determine the best rack
posion for your dish.
Take Out the Standard Rack
1. Grasp both sides of the front of the rack.
2. Slightly li the rack up, then pull the rack unl the ball tabs
on the boom of the rack clear the rack guide.
3. Connue to pull the rack all the way out of the oven.
Put the Standard Rack Back in the Oven
1. Hold both sides of the rack and align the rack onto the rack
guide posion you want to use.
2. Push in the rack up to the ball tabs, then slightly li the
rack unl the ball tabs are past the front of the rack guide.
3. Set the rack onto the rack guide, then push the rack into
the oven the rest of the way unl the rear hook tab stops
at the rear vercal rack guide bar.
Operaon — Standard Oven Racks
Ball tab
Rear hook tab
Rack guide posion
Rack guide
Standard rack
Guide rack
Rear hook tab stopped at
rear vercal rack guide bar
Standard rack
fully inserted

44 (800) 449-8691
Important: The slides should be fully closed during this
procedure.
Put the Extension Rack Back in the Oven
1. To make sure the extension rack is fully closed, rmly hold
the front ends of the rack at your waist, then touch the
back of the extension rack to the oor. Slide the front end
of the rack downward unl all the slides are fully in place.
2. Firmly grasp all of the slides on each side of the extension
rack, slightly elevate the rack above the rack guide you
want to use, then gently nudge the rack onto the rack
guide.
3. Connue to slightly li the extension rack over the rack
guide as each tab reaches the rack guide.
4. When the extension rack is pushed in all the way, make
sure it is securely locked in posion, or it will slide out
when the door is opened.
Operaon — Full Extension Rack
Locking tabs
Slides touching
the oor
Slides fully in place
Note: Each oven comes equipped with an extension rack that
you can pull out 100% from the oven to load or unload your
larger baking dishes more easily. Follow your recipe guidelines
to determine the best rack posion for your dish.
Important: Make sure your oven is level before your rst use.
Extension racks move very easily and an unlevel oven can
cause the extension rack to roll out of the oven when the door
is opened. This can cause spills, burns, and other injuries.
Take the Extension Rack from the Oven
1. Push the extension rack all the way into the oven.
2. Firmly grasp all of the slides on both sides of the extension
rack. You will need to pull everything out at the same me.
3. As you pull, be sure to slightly li each me you need to
clear the tabs on the rack from the rack guide.
4. Carefully pull the extension rack all the way out of the
oven.
Important: Be aware the extension rack is heavy and could
drop unexpectedly aer you pull it completely from the oven.
Back of oven
Rack pulled out
all the way
bluestarcooking.com 45
Baking Stone
DOUBLE OVENS ONLY: You can only use the baking stone in the
upper oven.
Note: With each use, the stone will seasoned and darker
(which can happen unevenly based on use).
• Do not wash the baking stone as that will damage the
stone and cause it to absorb moisture. Do not ever
submerge the baking stone in liquid.
• Handle the baking stone carefully. If the stone clips a hard
surface, it may crack or develop hairline fractures. While
the stone is sll usable, these cracks or fractures could
eventually expand and lead to premature failure.
Important: Failure to follow the installaon instrucons and
warnings regarding liquids contacng the stone and the stone
being immersed in liquid may result in the baking stone
disintegrang with explosive force.
• Do not thaw foods directly on the baking stone—that
would subject the stone to thermal shock.
• Never place the baking stone over an open ame.
• Only bake dough-based foods like pizza or bread directly
on the rough stone surface. To use the baking stone with
other foods, put the food in a cooking vessel, then put the
vessel on the stone.
• The baking stone weighs approximately 35 lbs (16 kg), so
do use extreme care when moving the baking stone. Make
sure the stone’s probe socket is seated on the stone
temperature probe in the oven.
TIP: Sprinkle a light dusng of baking our on the stone to
season before baking the rst me. The our allows air to ow
between the stone and the item to be baked. Never use any
type of oil on the stone.
1. Posion the baking stone over the baking stone heang
element.
2. Align the stone’s probe socket with the temperature probe
on the heang element.
3. Make sure the stone is fully connected when it is seated.
Operaon — Temperature Probe and Baking Stone
Temperature Probe
The internal temperature probe monitors the core
temperature of meat and poultry. In a double oven, the probe
is only available in the upper oven. Operaon is managed
within all but the Broil and StoneBake™ cooking modes.
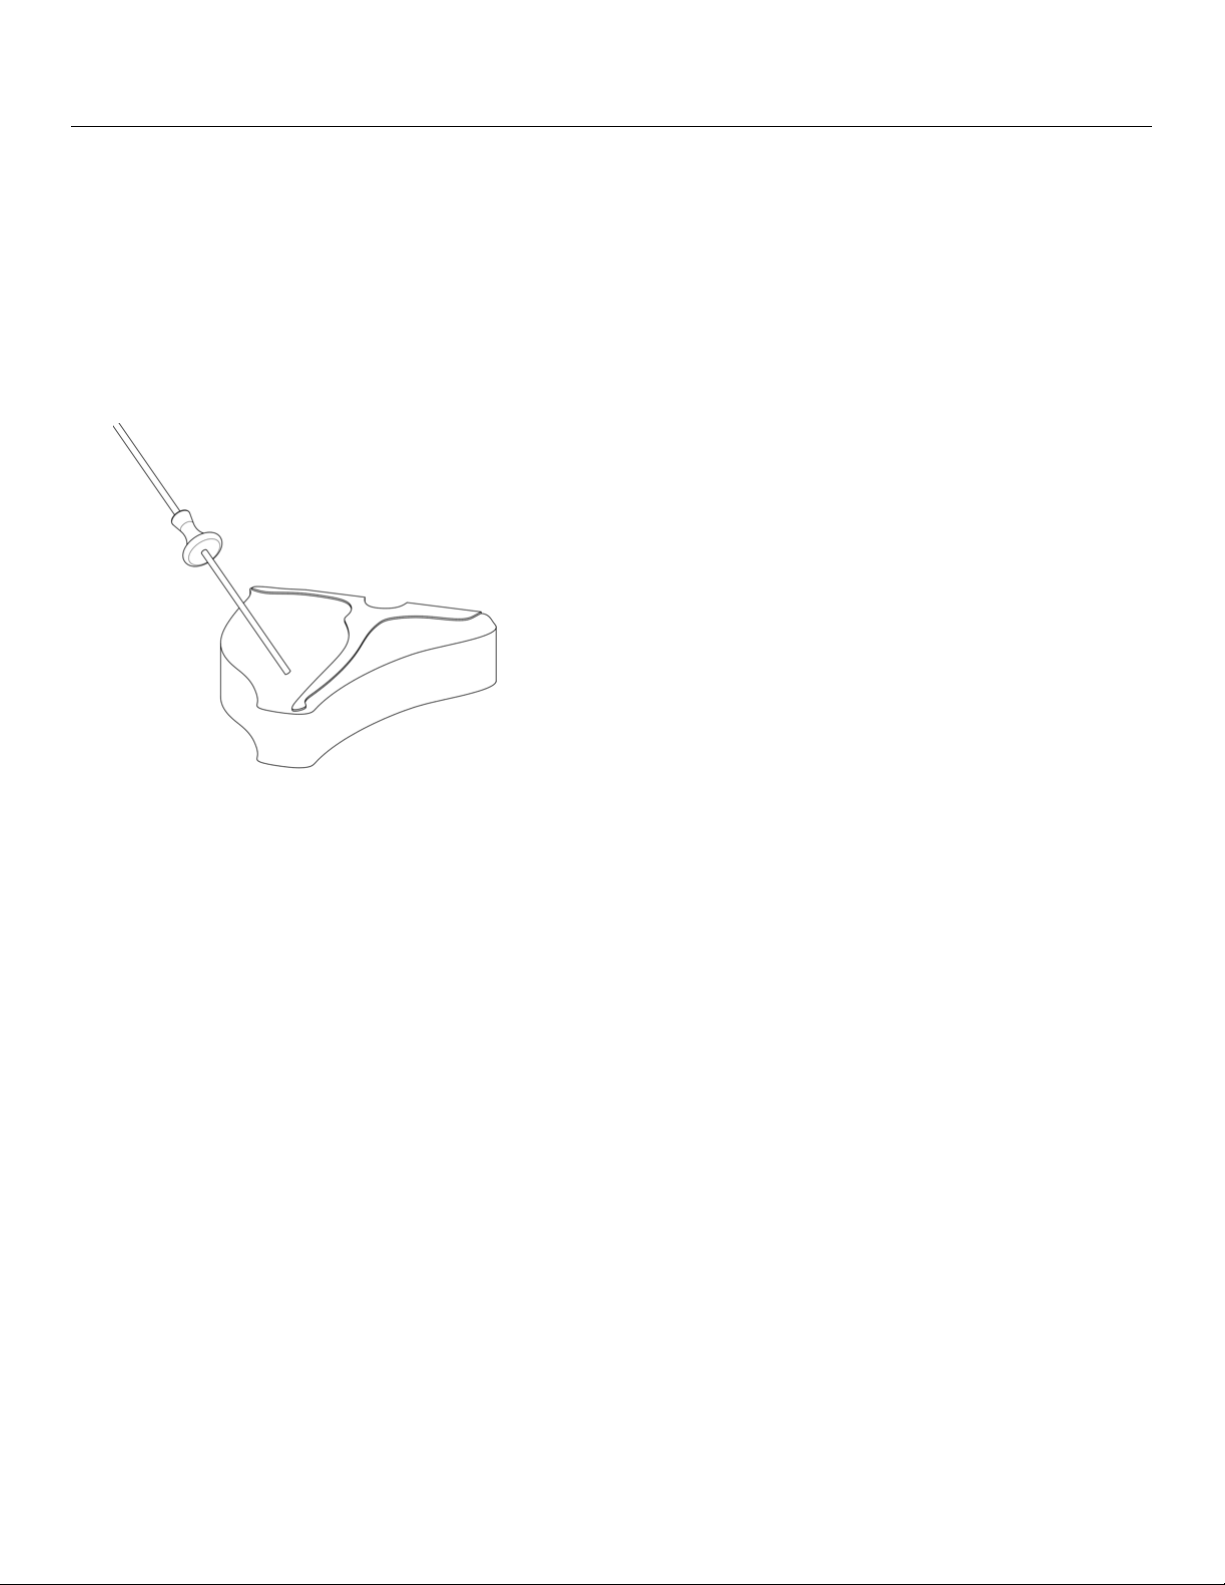
1. Insert the long pointed end of the temperature probe into
the thickest poron of the meat.
2. Insert the short end of the temperature probe into the
temperature probe socket located on the right front of the
interior oven wall.
Important: Make sure the temperature probe is fully inserted
into the item being cooked. Failure to do so could result in an
incorrect temperature reading or indicate the meat is fully
cooked before it actually reaches the correct temperature.
Important: Remove the temperature probe from the oven
when not using it to avoid damage.

46 (800) 449-8691
Cooking Guide and Tips — Convecon Cooking
Important: When preheang the oven, do not turn on the
convecon fan.
Convecon Cooking
Convecon cooking uses a fan inside the oven to circulate the
heated air more evenly, resulng in beer heat distribuon
and a more consistent temperature. In general, convecon
roasng takes less me at lower temperatures than tradional
roasng.
For best results:
• As a general rule, reduce the temperature 25° F (-4° C) or
reduce the amount of me by 25% from that used in a
standard/convenonal oven. Cooking me may also be
shorter. Closely monitor the rst batch of each recipe
prepared.
• Cooking mes and temperatures will vary depending upon
such factors as size of the load, temperature, mixture of
ingredients (parcularly moisture), and density.
• Center pans on racks and load each shelf evenly to allow
for proper air circulaon within the oven.
• Select a roasng dish that has no or low sides like a broiler
pan so that the air can circulate freely around the food.
• When thawing frozen casseroles, preheat the oven 100° F
(38° C) over the suggested temperature. Return the
cooking temperature to the normal seng once the oven
is loaded. This will help compensate for the large frozen
casserole.
• Covered dishes do not benet from convecon baking or
roasng.
• Place mun pans in the oven back to front or with the
short side of the pans facing the front. This will result in
the most evenly baked food.
Convecon Baking
Convecon ovens can handle larger loads than standard ovens
with a high degree of consistency. In a convecon oven, cool
air is quickly and consistently replaced by hot air, which
provides beer browning of baked goods and poultry. Meats
are seared and self-basted, which result in more avor and less
shrinkage as well as quicker cooking mes.
Important: You may nd that your new oven cooks dierently
than the old one. Take a few weeks to get comfortable and
familiar with your new oven. Do not use thermostats such as
those found in grocery stores to check your oven
temperatures. These thermostats may vary by 40° F (4° C) or
more.

bluestarcooking.com 47
Cooking Guide and Tips — Food Handling
Safe steps in food handling, cooking, and storage are essenal in prevenng food-borne illness. You can't see, smell, or taste
harmful bacteria that may cause illness. In every step of food preparaon, follow these four guidelines to keep food safe:
• Clean—Wash hands and surfaces oen
• Separate—Keep raw meat apart from other foods
• Cook—Cook to the right temperature
• Chill—Refrigerate food promptly
Cook all food to these minimum internal temperatures as measured with a food thermometer before removing food from the heat
source. You may choose to cook food to higher temperatures. A holding temperature of 140° F (60° C) or higher is recommended
for food safety.
Source: FoodSafety.gov, United States Food Safety and Inspecon Service, as of April 2019.
High Altudes
For helpful informaon on cooking in high altudes, visit: hps://www.fsis.usda.gov/food-safety/safe-food-handling-and-
preparaon/food-safety-basics/high-altude-cooking.
Category Food Temperature Rest Time
Ground Meat, Stung, and
Meat Loaf
Beef, Pork, Veal, Lamb
160° F (71° C)
None
Turkey, Chicken
165° F (74° C)
None
Fresh Beef, Veal, Lamb Steaks, Roasts, Chops
145° F (63° C)
3 minutes
Poultry Chicken & Turkey (breasts, whole bird, legs,
thighs, wings, ground poultry, giblets, and
stung)
165° F (74° C)
Whole: 10-15 minutes
Breasts: 5 minutes
Pork and Ham Fresh Pork
145° F (63° C)
3 minutes
Fresh Ham (raw)
146° F (63° C)
3 minutes
Precooked Ham (to reheat)
Note: Reheat cooked hams packaged at
USDA-inspected plants .
140° F (60° C)
165° F (74° C) if not from USDA-
inspected plants
None
Egg Dishes Egg Dishes (such as friata, quiche)
160° F (74° C)
None
Leovers and Casseroles Leovers and Casseroles
165° F (74° C)
None
Seafood Fish with ns
145° F (63° C) or cook unl esh is
opaque and separates easily with a fork.
None
Shrimp, Lobster, Crabs, Scallops
Cook unl esh is pearly or white, and
opaque.
None
Clams, Oysters, Mussels
Cook unl shells open during cooking.
None

48 (800) 449-8691
Cooking Guide and Tips — Recommended Cookware and Oven Use
Recommended Cookware
You will want cookware that has a combinaon of both
stainless steel and an aluminum core for performance and
durability. You will want something with oven compability of
up to 500° F (260° C).
Only certain types of glass, heat-proof glass ceramic, ceramic
earthenware, or other glazed utensils are suitable for appliance
use. If not suitable for high heat, the utensils may break with
sudden temperature changes. Use only on low or medium heat
sengs according to the manufacturer's direcons.
Oven Use
• Do not operate the convecon fan while the oven is
preheang or while broiling.
• Do not store food, pots or pans, cooking equipment, or
containers in the oven when not in use.
• Center items on oven racks evenly for even baking.
• When loading the oven, work as quickly as possible to
prevent loss of heat.
• When praccal, rst cook the item that requires the lowest
temperature, then gradually raise the temperature for
each addional item.
• Roast meat with the fat side facing up to self-baste and
shrink less.
• Keep the oven free from grease buildup to avoid re.
• Aer using the oven, do not touch the appliance unl it is
completely cooled.
Cooking Soluons
Problem Soluon
If the cake is dark on the sides and
not done in the center…
Lower the oven temperature.
If the cake edge is too brown... Reduce the number of pans or
lower the oven temperature.
If the cake has a light outer
color...
Raise the oven temperature.
If the cake seles slightly in the
center...
Bake longer or raise the oven
temperature slightly. Do not open
the doors too oen or for long
periods of me.
If the cake ripples... You may be overloading the pans
or the cake baer may be too thin.
If the cake is too coarse... Lower the oven temperature
If the pie has an uneven color... Reduce the number of pies per
rack or do not use bake pans.
If the cupcakes crack on top... Lower the oven temperature.
If the meat is browned and not
done in the center…
Lower the oven temperature and
roast the meat longer.
If the meat is well done and
browned…
Reduce the cooking me.
If the meat develops a hard
crust...
Lower the oven temperature
If the rolls have uneven color... Reduce the number or size of
pans.

bluestarcooking.com 49
Cooking Guide and Tips — Food Placement in the Ovens
Moving your oven rack, especially when baking, can make or
break a recipe. Bake a pizza on the top rack of your oven and
you just won't get that crispy boom crust. Bake a tray of
cookies on the boom rack, and it's prey likely you'll have
burnt booms. But move the rack to the right place, and your
food will likely cook right.
When in doubt (or when your recipe fails to menon a rack
posion), here are some general guidelines to follow:
Top Level
For rich and even browning, sck with the top rack. Once the
oven is preheated, the heang element on the boom of the
oven turns o and on throughout baking to maintain an even
temperature. Meanwhile, heat rises from the heang element
at the boom of the oven and collects at the top, so it's
actually more consistently hoer up there. All that top-level
heat is ideal for dishes you want to brown on top, like
casseroles, grans, and crisps. For even more color, turn the
broiler on during the last minute or so of cooking.
Middle Level
When in doubt, sck with the middle ground. For most baking
and cooking situaons, the middle rack will cook and bake food
more evenly. But keep in mind, this rule applies only when
you're baking on one rack at a me. When baking on several
racks or when using two baking sheets at once, consider
arranging the racks on the top and boom thirds of the oven.
Then, halfway through cooking, rotate the trays and swap
them to ensure even cooking. This move is especially useful
when baking mulple batches of cookies.
Boom Level
If you want to brown the underside of your roasted vegetables,
bread, or crusty pizza, move the rack to the lowest posion
closest to the heat source.
Source: Epicurious.com, Recipes, Menu Ideas, Videos &
Cooking Tips
Top
level
Middle
level
Boom
level

50 (800) 449-8691
Cooking Guide and Tips — Broiler
Important: Always leave the oven doors closed when broiling.
Broiler Tips
• The broiler is an extremely hot burner. It is recommended
you monitor this broiler at all mes while it is in use (do
not walk away and always keep an eye on the food. Things
can burn quickly at that temperature).
• Start on a lower rack, then move the food up if it is not
searing to your expectaons. The third rack from the top is
a safe start. Do not place food closer than 2” (50.8 mm)
from the surface of the broiler to prevent burning. Be
careful when moving a rack in a hot oven!
• It is best to cook foods of even thickness. Dierent
thickness cuts of food can cook at dierent rates. Those
foods closest to the surface of the burner will cook (and
can burn) quicker.
• Do not use foil to line greasy food when cooking under the
broiler. Fats and grease can melt o and can quickly catch
re.
• Use cauon when cooking with parchment paper. The
auto ignion temperature of paper is around 450° F
(232° C). Top rack temperatures when broiling under an
infrared burner can quickly reach 750° F to 850° F
(399° C to 454° C) or higher depending on the height of
cooking pan and food. Be cauous of parchment with high
end appliances as they tend to have much more power
and run hoer than standard appliances.
• Using the broiler will quickly sear the exterior of food but
can leave the center uncooked. Always use a food
thermometer to check the center temperature of your
food to prevent illness from undercooked food.
Item How Done Temperature Cooking Time Rack Posion
Steak Rare
High
6-8 minutes per side Top
Medium
High
8-10 minutes per side Middle
Hamburger Medium
High
6-8 minutes per side Top
Medium-Well
High
8-10 minutes per side Middle
Fish 1” (25.4 mm) thick
Medium-High
10-15 minutes Middle
1/2” (12.7 mm) thick Medium-High 8-10 minutes Top
Chicken Boneless Breast
Medium
15 minutes per side Middle
Leg & Thigh Lower Medium 25 minutes per side
Garlic Bread Medium 3-5 minutes Lower
• When cooking very large cuts of meat that require a sear,
broil them unl the outer poron is seared to your liking,
then cook them in the oven unl the center temperature is
within 10° F (-12° C) of where you want it to be. Remove
the meat from the oven and loosely tent in aluminum foil
for ten minutes to allow the juices to distribute evenly.
Cung too soon will result in less juicy foods.
Suggested Broiler Sengs
Note: Cook mes in the following table will vary due to food
thickness and preference.

bluestarcooking.com 51
Care and Cleaning
Important: Make sure the appliance is cool before you clean.
Part
(Material)
Cleaning NEED TO KNOW
Oven Exterior
(Brushed Stainless Steel)
• In extreme condions, use a microber cloth soaked in
hot water to sit on the soiled area to soen the residue
so it can be safely cleaned o.
• If necessary, you may use light scraping with a rubber
or nylon spatula to nish liing residue o.
• Use a quality stainless steel cleaner or warm soapy
water.
• Do not use a metal knife, spatula, or something
similar or any metal tool to scrape these surfaces.
• Do not permit citrus or tomato juices to sit and dry
on these surfaces as citric acid will discolor the
surface. Wipe such spills immediately.
• Do not use paper towels or other coarse cloths.
• Do not polish across the grain or in circles.
Oven Exterior
(Polished Brass/Copper,
Brushed Brass/Copper,
Anque Brass/Copper,
Pewter, Oil-Rubbed Bronze)
• In extreme condions, use a cloth soaked in hot water
to sit on the soiled area to soen the residue so it can
be safely cleaned o.
• If necessary, you may use light scraping with a rubber
or nylon spatula to nish liing residue o.
• The exterior was treated with a protecve clear coat to
prevent aging or discoloraon. This clear coat will last
the life of the appliance unless the coang is removed.
• Clean with a microber cloth using Endust, Pledge, or
something similar.
• Do not use a metal knife, spatula, or something
similar or any metal tool to scrape these surfaces.
• Do not permit citrus or tomato juices to sit and dry
on these surfaces as citric acid will discolor the
surface. Wipe such spills immediately.
• Do not use harsh cleaners (such as Brite Boy) as
these will remove the coang and cause the metals
to age.
Oven Exterior
(Painted Gloss Finishes)
• In extreme condions, use a cloth soaked in hot water
to sit on the soiled area to soen the residue so it can
be safely cleaned o.
• If necessary, you may use light scraping with a rubber
or nylon spatula to nish liing residue o.
• Use a so cloth and a quality glass cleaner or warm
soapy water.
• Do not use a metal knife, spatula, or something
similar or any metal tool to scrape these surfaces.
• Do not permit citrus or tomato juices to sit and dry
on these surfaces as citric acid will discolor the
surface. Wipe such spills immediately.
Oven Window
• When the oven is cool, and aer each use, use a cloth
and warm soapy water to clean the interior oven door
window. Rinse with clear water and dry thoroughly.
• Do not rub or scrub on the door gasket material.
Damage to the material or the door seal may occur.
Oven Doors
• May require periodic lubricaon to work smoothly.
• Open the oven door fully and apply a small amount of
lubricant (such as food-grade light oil or grease) to the
ball visible in the hinge slot on the door.
• Note: When closing french doors, be sure to push in the
le door to securely latch both doors.
• Do not use sprays like WD-40 or CRC that may get
onto the oven door surface.
• Do not use cooking oil or mineral oil.
Oven Door Gasket
• Do not clean the oven door gaskets. The door gaskets
are essenal for a good seal of the oven.
• Do not apply commercially available oven cleaners
to the oven door gasket.
• Do not rub or scrub the gasket since it may damage
the oven door seal.
Oven Interior
(Porcelain-Enamel)
• The oven interior is coated with porcelain enamel you
can clean using a commercial oven cleaner. Be sure to
follow the cleaner manufacturer’s instrucons before
you start.
• To loosen tough baked-on stains, lay a cloth soaked in
hot water on the area for several minutes.
• Make sure the area is well-venlated when using a
commercially available oven cleaner.
• Make sure cleaning chemicals do not come in contact
with any stainless steel or painted surfaces.
• Do not use the commercial oven cleaner on the
door gasket, igniter, or ceramic broiler.
• Do not use steel wool or metal pads to clean the
interior oven walls as they may damage or scratch
the enamel coang.
• Do not use soap and do not turn on the oven.
Broiler
• N/A • Do not try to clean the broiler surface or
permanent damage may occur.

52 (800) 449-8691
Part
(Material)
Cleaning NEED TO KNOW
Convecon Fan Guard
(Porcelain-coated)
• Remove obstrucons such as aluminum foil or other
parcles.
• Clean the oven fan guard periodically and make sure
your room is well venlated when you clean .
• Apply a commercial oven cleaner to a cloth (not directly
to the fan guard) to remove grease build-up and food
parcles. Be sure to follow the manufacturer’s cleaning
instrucons before you start.
• Do not use steel wool, metal pads, or abrasive
cleaners as they may scratch and damage the
coang.
• Do not operate the convecon fan during the inial
oven preheat or while broiling.
Standard Oven Racks
• Make sure the oven is cool before you take out the
standard oven racks.
• Wash the racks in hot, soapy water, rinse in clear water,
then dry thoroughly.
• N/A
Full Extension Rack
• Make sure the oven is cool before you take out the
extension rack.
• Wash the extension rack in hot, soapy water, rinse in
clear water, then dry thoroughly.
• N/A
Baking Stone
• When completely cool, use a nylon spatula or a grill
brush to scrape o the baked-on food.
• Do not wash the baking stone as this will damage
the stone and cause it to absorb moisture.
• Do not submerge the baking stone in water or
liquid.
Temperature Probe
• When the temperature probe is cool, wipe the probe
clean with mild soapy water, rinse, then dry thoroughly.
• Do not put the temperature probe in the
dishwasher.
• Do not immerse in water.
Care and Cleaning (connued)

bluestarcooking.com 53
Troubleshoong
Check these helpful ps for any problems with your oven. If addional help or service is needed, please call BlueStar® Customer
Service at (800) 449-8691. You will need to have the model and serial numbers for your appliance ready before you contact them.
See Model Informaon at the beginning of this manual for informaon on nding these numbers.
Problem Possible Cause Soluon
Touch control screen is not lit
• No electrical power to the appliance • Check and reset the breaker/fuse
Convecon fan does not turn
• No electrical power to the appliance
• Fan guard is obstructed or clogged
• Check and reset the circuit breaker for the appliance
• When the oven is cool, remove any obstrucons such
as baked-on food or aluminum foil
Oven is on, but producing no heat
• Breaker may not be working properly • The oven over the temperature safety switch may have
been acvated
• If this connues, turn the appliance o at the breaker
Oven light is not on
• No electrical power to the appliance
• Oven light bulb is burned out
• Check and reset the circuit breaker for the wall outlet
used for the appliance
The oven light lens is cracked or
missing.
• Light lenses must always be in place when
the oven is in use to protect the light bulbs
from breaking.
• N/A
Convecon fan is making noise
• Aluminum foil or other material stuck in
fan
• Mounng screws on the fan cover are
loose
• Fan cover is bent
• Make sure the oven is cool the and fan is o, then
remove debris
• Tighten screws
• Call for a replacement fan cover
The fan behind the control panel is
running when the oven is turned o
• Oven has not cooled to 200° F (93° C) or
lower
• Let the oven cool down
The oven is cool, but the fan behind
the control panel is running
• Fan relay is stuck in the “on” posion • Check and reset the electrical breaker connected to the
appliance

54 (800) 449-8691
Warranty
Prizer-Painter Stove Works, Inc. (“Prizer-Painter”) warrants
your BlueStar® appliance (“product”) purchased in the U.S. and
Canada and installed in residenal properes for normal
residenal use.
What Is Covered
Subject to the specic condions and limitaons below, this
warranty covers parts and/or labor necessary to repair or
replace any part of the product that contains defects in
materials and workmanship.
Two Year Warranty. For two (2) years from the date of
installaon, this warranty covers all parts and labor necessary
to repair or replace any part on the product except for the
Cosmec Component Warranty below.
Cosmec Component Warranty. For thirty (30) days from the
date of installaon, this warranty covers scratches and dents,
paint and porcelain blemishes, visible chips, etc.
Limitaons of Coverage
• Floor Models. For one (1) year from the date of
installaon, this warranty covers all parts and labor
necessary to repair or replace any part on the product
except for cosmec parts for which there is no warranty.
• The replacement of a part under this warranty does not
extend the warranty period.
• Warranty service outside normal business hours and in
areas beyond 50 miles one way from an authorized
BlueStar® retailer or service provider. The owner will be
responsible for any and all costs associated with addional
mileage, non-standard service or overme, and special
equipment required to remove the product so service may
be performed.
This warranty is void:
• If the product is removed from where it was originally
installed.
• If the original factory installed serial number is altered or
removed from the product.
• If gas cooking products are converted by someone other
than a BlueStar® authorized service company.
What Is Not Covered
This warranty does not cover, and specically excludes:
• Product installed or used in any commercial or other
non-residenal property such as, but not limited to, day
care facilies, re staons, hotels, nursing homes, etc.
• Installaon related issues including improper badge
placement or installaon inconsistent with the product
specicaons/installaon instrucons.
• Damage or repairs caused by alteraons or modicaons,
abuse, misuse, neglect, or improper installaon, mounng,
handling, operaon, maintenance, or storage.
• Normal adjustments aer installaon and setup.
• Normal wear, care, and maintenance of the product as
described in the user manual.
• Service calls to educate the customer on the proper use
and care of the product.
• Consumable parts such as water lters.
• Damage or repairs caused by unauthorized service or
repairs, including unauthorized adjustments or calibraons
performed on the product.
• Accidental or intenonal damage.
• Damage or repairs as a result of natural disasters, res,
oods, earthquakes, winds, lightning, corrosive
atmosphere, loss of electrical power to the product for any
reason, or other condions beyond Prizer-Painter’s
control.
• Damage or repairs caused by alteraon for outdoor use.
• Damage or repairs caused by the use of harsh chemicals or
cleaning products improperly applied.
• Liability or responsibility for damage to surrounding
property including cabinetry, oors, ceilings, etc.
• Consequenal or incidental damage, including but not
limited to food or medicine loss, me away from work,
restaurant meals, etc.
The terms of this warranty provide for repair of the product
only. If the product cannot be repaired, Prizer-Painter, at its
sole discreon, will determine whether to exchange the
product.
Please see the Arbitraon Clause and Related Provisions, which
aect your legal rights. The Arbitraon Clause is available at
www.bluestarcooking.com.

bluestarcooking.com 55