Loading ...
Loading ...
Loading ...
5
¡ The appliance can only be used safely if it
is correctly installed according to the
safety instructions. The installer is re-
sponsible for ensuring that the appliance
works perfectly at its installation location.
¡ This instruction manual is intended for the
installer of the optional accessory.
¡ Only a licensed expert may connect the
appliance.
¡ Switch off the power supply before carry-
ing out any work.
Safe installation
Observe the safety instructions when installing the
optional accessory.
WARNING‒Risk of suffocation!
Children may put packaging material over their
heads or wrap themselves up in it and suffocate.
▶ Keep packaging material away from children.
▶ Do not let children play with packaging material.
WARNING‒Risk of injury!
Components inside the appliance may have sharp
edges.
▶ Wear protective gloves.
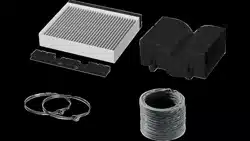
Included with the appliance
After unpacking all parts, check for any damage in
transit and completeness of the delivery.
→Fig.
1
, →Fig.
2
Installing the circulating-air guide
1. Remove the flue duct.
You can find information on how to remove the
flue duct in the installation instructions for your ap-
pliance.
2. Fit the circulating-air guide into the angle brackets.
→Fig.
3
3. Use the 2 hose clips to secure the hose to the cir-
culating-air guide and the air-pipe connector.
→Fig.
4
4. Tighten and, if required, shorten the hose.
5. Fit the flue duct.
The slots on the inner flue duct section point up-
wards.
You can find information about the installation of
the flue duct in the installation instructions for your
appliance.
Odour filter for circulating-air mode
Odour filters bind odorous substances in air recircu-
lation mode. Regularly replaced odour filters guaran-
tee a high level of odour removal.
With normal use (approx.onehour a day), the odour
filter must be replaced every 6 months. The odour
filter cannot be cleaned or regenerated.
Replacing the odour filter
1. Remove the grease filters.
You can find information about removing the
grease filters in the operating instructions for your
appliance.
2. Insert the filter holder.
→Fig.
5
, →Fig.
6
3. Position the odour filter, push it upwards and fold
it up.
→Fig.
7
The foam must be compressed when you insert it.
When inserting the odour filter, ensure that the ar-
rows indicating the air flow direction are pointing
upwards.
a Once the odour filter remains in place in the appli-
ance without falling out, it has been inserted cor-
rectly.
→Fig.
8
4. Insert the grease filters.
You can find information about installing the
grease filters in the operating instructions for your
appliance.
5. Dispose of the old odour filter with the residual
waste.
The odour filter does not contain any harmful sub-
stances.
et
Üldised juhised
¡ Lugege juhend hoolikalt läbi.
¡ Hoidke juhend ja tooteinfo alles hili-
semaks kasutamiseks või järgmistele
omanikele.
¡ Turvaline kasutamine on tagatud ainult
siis, kui paigaldamine toimub vastavalt
paigaldusjuhendile. Paigaldatud seadme
veatu töö eest vastutab paigaldaja.
¡ Käesolev juhend on ette nähtud eritarviku
paigaldajale.
¡ Seadet tohib vooluvõrguga ühendada ai-
nult litsentseeritud elektrik.
¡ Enne mis tahes tööde teostamist lülitage
vool välja.
Ohutu paigaldamine
Eritarviku paigaldamisel järgige ohutusnõudeid.
HOIATUS‒Lämbumisoht!
Lapsed võivad pakkematerjalid üle pea tõmmata või
end sinna sisse kerida ja lämbuda.
▶ Hoidke pakkematerjalid lastest eemal.
▶ Ärge laske lastel pakkematerjaliga mängida.
HOIATUS‒Vigastusoht!
Seadme sisedetailid võivad olla teravate servadega.
▶ Kandke kaitsekindaid.
Tarnekomplekt
Kontrollige pärast lahtipakkimist kõiki osi transpordi-
kahjustuste ja tarne komplektsuse suhtes.
→Joonis
1
, →Joonis
2
Õhuringlusjuhiku paigaldamine
1. Võtke maha lõõrikate.
Teabe lõõrikatte eemaldamise kohta leiate sead-
me paigaldusjuhendist.
2. Kinnitage õhuringlusjuhik kinnitusnurgikusse.
→Joonis
3
3. Kinnitage voolik 2 vooluklambriga õhuringlusjuhi-
ku ja õhuliitmiku külge.
→Joonis
4
4. Tõmmake voolik pingule ja vajaduse korral lü-
hendage seda.
5. Paigaldage lõõrikate.
Loading ...
Loading ...
Loading ...