TOP F
Guide
Please read this guide thoroughly
'e operating and keep it handy for
at all times.
iiiiiiiiiiiiiiiiiiiiiiiiiiiiiiiiiiiiiiiiiiiiiiiiiiiiiiiiiiiiiiil_
P/No,3828JL8007A
REV.2
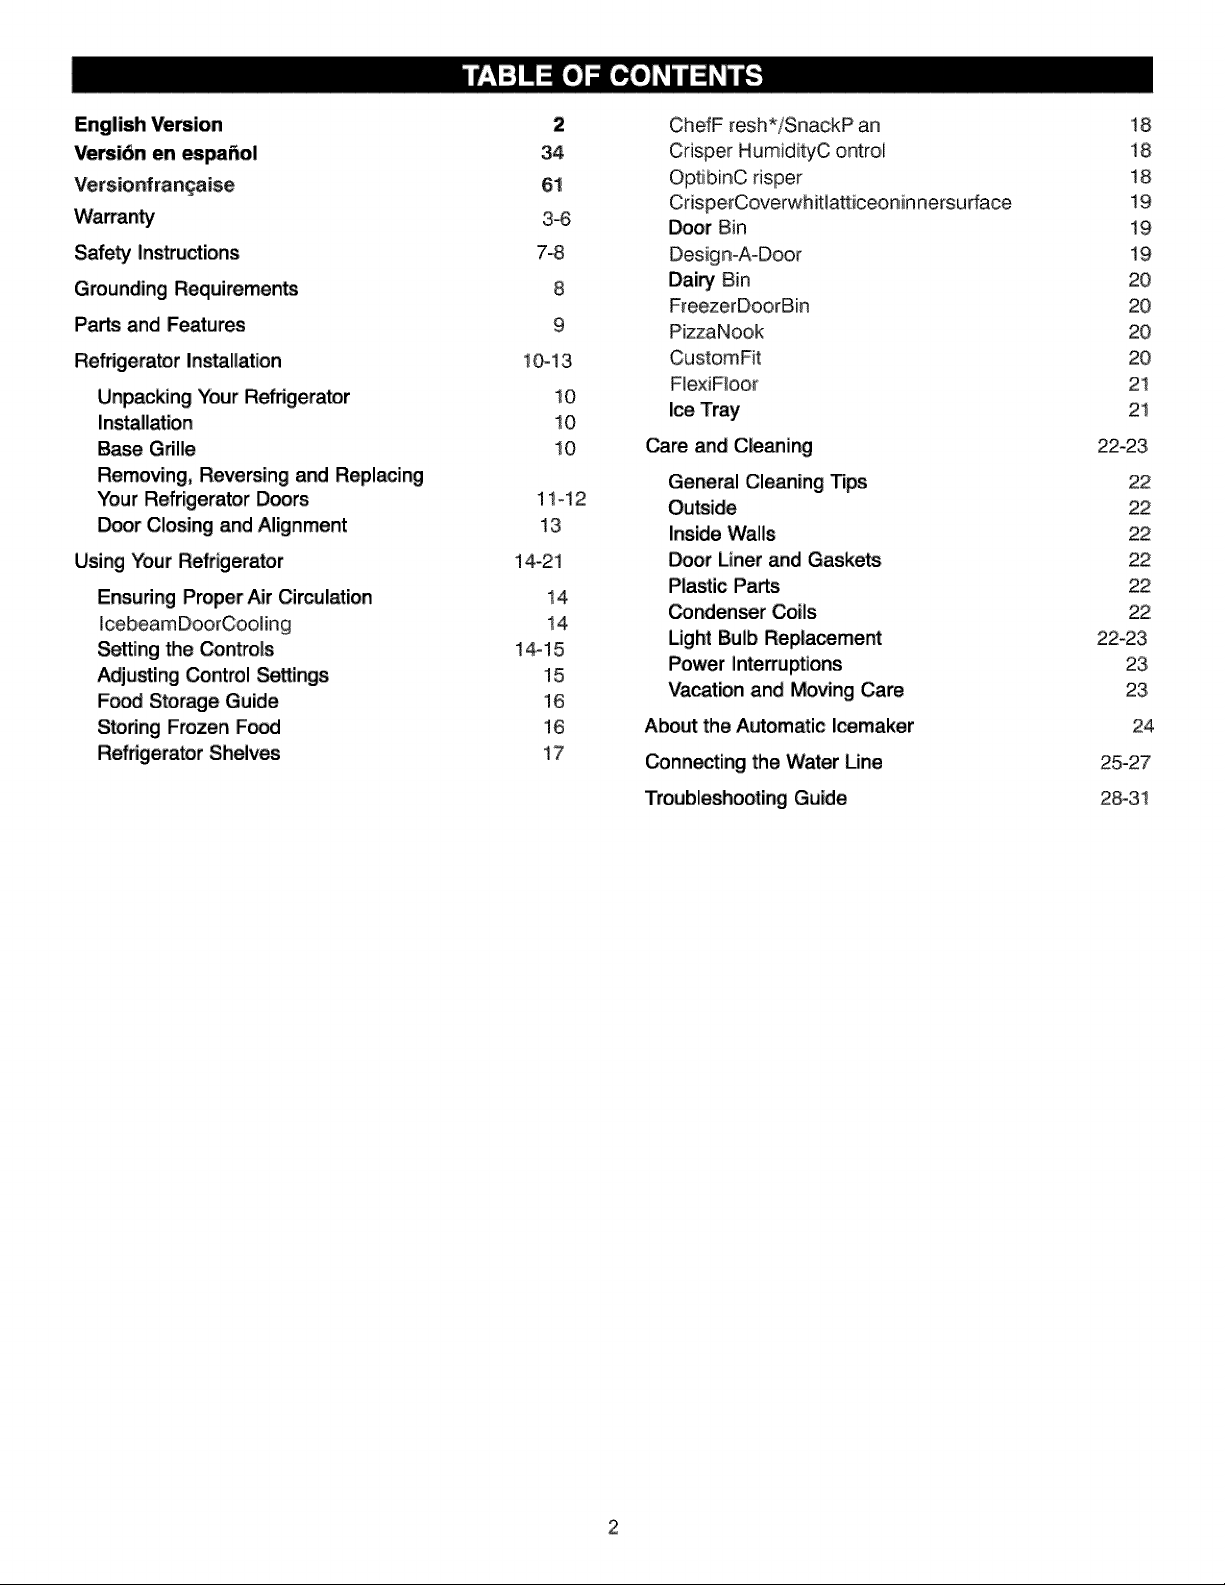
English Version
Versi6n en _pai_ol
Versionfran_aise
Safe_ Instructions
Grounding Requirements
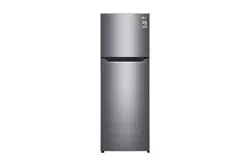
Parts and Features
Refrigerator Installation
Unpacking Your Refrigerator
Installation
Base Grille
Removing, Reversing and Replacing
Your Refrigerator Doors
Door Closing and Alignment
Using Your Refrigerator
Ensuring Proper Air Cimulation
Iceb,eamDoorCooling
Setting the Controls
Adjusting _ntrol Settings
Fo_ Storage Guide
Storing Frozen Fad
Refrigerator Shelves
2
34
61
3-6
7-8
8
9
10-13,
10
10
10
11q2
13
14_21
14,
14,
14,-15,
15,
16
16
17
ChefF resh*iSnac:kP an
Crisper HumidityC ontroi
Op¢:ibinC risper
CrisperCoverwhitiatt:iceonin nersu dace
Door Bin
Design-A-Door
Dairy Bin
F_eezerDoorBin
PizzaNook
CustomFit
FiexiFIoor
Ice Tray
Care and Clea-ling
General Cleaning Tips
Outside
Inside Walls
Door Liner and Gaskets
Plastic Parts
_ndenser Coils
Light Bulb Replacement
Power Inte_uptions
Vacation and Moving Care
Abo_ the Automatic Icemaker
_nnecting the Water Line
Troubleshooting Guide
!8
18
!8
!9
19
19
20
20
20
20
21
21
22-23
22
22
22
22
22
22
22_23
23
23
24
25-27
2:8-3!
visitou rwe bsi telhttp::flwww..Igserv_ce..com
LIMITEDW ARRANTY
U nitedS tateso f America
LGE iectronicsi
LGE lectronicsw iH repairo ra ti tso ptionr eplace, withoutc harge, yourp roductw hichp rovest ob ed efective
in rnateria|o two rkmans.hipu ndern ormalu s.ed uringth ewa rran_p, er_odl iistedb,elow fromt hed ateof
o,riginalp urchase.
This warranty is good only to. the originai purchaser of the product during the warranty period as long as it is
in theU. S°i ncluding Aiaska, Ha waii,an dU. S°Territo.ries°
LGR efrigeratodF
Product: Parts
RefdgeratorlF reezer lye ar
SealedS ystem 7ye ars
(Compressor;Co ndenser;Ev aporator)
ree zerW arrantyP eriod
LiabQ_[
lye ar[ ImHomeSe rvice(E xceptMo delGR _051),]
lye ar[ ImHomeSe rvice(E, xceptMo delGR _051)]
Noo there xpressw arran_isa pplicabletot hispr oducL THEDU RATIONO F ANYIM PUEDW ARRANTIES.
iNCLUDiNG THEIM P'UEDW ARRANTYOF ME RCHANTABILITY, I SU MiTED TO THEDU RATIONO F
THEEX PRESSW ARRANTYHE REIN.LG ELECTRONiCSSH ALLNO TBEL IABLEFO R THELO SSO F
USEOF THEPR ODUCT, I NCONVlENCE,LO SSO R ANYOT HERDA MAGES,D IRECTOR
CONSEQUENTIAL, ARISINGO UTOF THEUS EOF ORI NABILI_ TOUS E, THISP RODUCTORF OR
ANYBR EACHO F ANYEX PRESSORI MPLEDW ARRANTY, I NCLUDING THEIM PLIEDW ARRA.N_
OF MERCHANTABILITY APPLICABLE TO THiSP RODUCT.
SomeS tatesdon ota IIowt hee xclusiono rii mitationo fin cidentalio rco nsequentialida magesorl imiitat:iionsonho w
Ionga him pliedwa rrantyl asts;sot hesel imitationso rex clusionsm ayn ota pplyt oyo u. Thisw arrantygi vesyo u
specificl egalr ightsan dyo urea yal sob aveot herri ghtsw hichv aryfr ores tatet ost ate.
THE ABOVEW AR NTYD OESN OT APPLYT O:
1. Servicetr ip,stoyourho met ode iiveran dpi ckup,in staiU nstruct,o rre placebo usefu sesorc orrecthousew iringor
plumbing,orc orrectionofu nauthorizedre pairs;.
2. Damageroth epr oductca usedb yac cident,pe sts,f ire,f Ioods,o rac tso fGo d..
3,. Rep,ai_wheny ourLGp roduc_ sus edi not:herin ann ormaLs ingle4amilyhousehold_ se
4. Damageresultingf romaccident,al teration,mi suse_abuse,o dm properi nstallation,
Therefere,t hes.ec ostsa rep aidb yth eco nsumer.
Ift he pro,ducti si ns$alled outside _e no,rmals ervice, area,a nyc osto ft ransportation involved in the rep,airo f!:he p,rod[_ct:,ort he
repiacementufd efectivep arts,sh alibeb omeb yth eow net.
CUSTOMER ASSISTANCEN UMBERS:
Too btainW arrantyCo verage:: Retain yourB i||o fSa let op roved ateofp urchase.
ACo pyo fyo urS alesR eceiptm ustbes ubmitteda tt her ime
warrantys ervicei spr ovided.
Too, b_inPr o,ducto,rC usito,mer
S,e_ice Assistance,:
Ca!l 1_77-714-7_6
(24.hr sada y,7da ysp e_ eek,3 65d ayspe rye ar)
P_sst:h eap propriateme nuo ption,a ndh aveyo urp roductt ype
(Refrigerator),mo delnu mber;se rialn umber, an dZl P/Postai
Coder eady:
Too btainth erie arest
AuthorizedS er¢iceC enter::
Call 1-877=714i=7_6
(24.hr sada y,7da ysp e_ eek,3 65d ays,pe rye at)
P_ssth eap propriateop tion,an dha vey ourpr _uctt ype
(Refrigerator),mo delnu mber;se riain umber, an dZl P/ipostai
Coder eady:
Visitenuestrositioweblhttp:llwww
LGE lectronics
GARANTIA LIMITADA
EstadosUnidosde America
LG Electronics reparara o en su defecto reemplazar_ sin cargo, el producto defectuoso en material o mano de
obra bajo uso normal durante el periodo de garantia que se menciona a continuacibn desde la fecha original de
compra,
Esta garantla es v_lida solo para el comprador original del producto durante el periodo de garantia mientras
permanezca en los E.E.U.U. Incluyendo Alaska, Hawaii y otros territorios de E.E.U.U.
Refdge_odCmgelador 1 argo
SistemaSellado 7 aSos
(Compresor, Condensador, Evaporador)
1 ar_o[Servicb a domicilio (ExceptoModeloGR-051)]
1 aSo[Servicioa domicilio (_ceptoModeloGR-051)]
No se aplicar_ otro tipo de garantfa a este preducto. LA DURAC]ON DE OTRAS GARANTIAS ,
INCLUYENDO LA DE COMPRA, ESTAN L]M]TADAS A LA DURAC]ON DE ESTA GARANTIA. LG
ELECTRONICS NO SE HACE RESPONSABLE POR LA PERD]DA EN EL USO DEL PRODUCTO,
POR ]NCONVEN]ENC]A O CUALQUIER OTRO DAI_O DIRECTO O CONSECUENTE QUE PROVENGA
DEL USO Y/O NO USO DE ESTE PRODUCTO O POR ALGUNA V]OLAClON ALAS GARANTIAS
IMPLEMENTADAS ]NCLUYENDO LA GARANT]A DE COMPRA APUCADA A ESTE PRODUCTO.
AIgunos estados no _rmiten la exclusi6n o I[mitac[6n de daSos [ncidentaleso _nsecuenciales o limitaciones
en cuanto al tiem_ que dura una garant[a impl[cita; por Io que algunas de estas limitaciones o exclus[ones
pueden no apl[carse a ust_. Esta garant[a le otorga derechos legales espec[fi_s y usted puede adem,Cstener
otros derechos los cuales varfan de Estado a Estado.
LAGARANTIA ANTERIORNO APLICAA:
1. Servicio a su _sa para entregar, recoger, [nsta]aro reemp]azar fusib]es caseros, corregir cableado casero o
plomeria correccidn de reparaciones no autofizadas.
2. Dafio al producto causado por accidente, p]agas, incendios, inundaciones o actos por naturaleza.
3 Reparaciones cuando su producto LG sea usado diferente a Io normal.
4, Dafio resu]tante de accidente, a]teraci6n, ma] uso o instalac[6n inadecuada.
Porlotanto,estoscostosser_n pagadosporelconsu midor
Si el producto es instalado iuera de] Area normal de ser¢icio, cualquier _sto de transpor[aci6n relacionado en la
reparaci6n del producto, o e] reemp]azo de partes defectuosas, seran cargados a] propietado.
NUMEROSDE ASISTENCIA ALCLIENTE:
Parao btenerc obertaurad el aG arantia: Conservesufacturaparacomprobarlafechade
Para obtener informaci6n:
Servicio de Asistencia:
Para obtener el Centro de Servicio Autorizado
mas cercano:
compra.
Unacopiadesurecibodecompradebeserentregad a
cuandoseleproporcioneelserviciodegarant fa.
Llameal 1_77=714W486
(24hr said ia,7dl asp ors emana,3 65d [asala rio)
Presionelaopci6ndemen_apropiado,ytengasuti pode
producto(Refrigerador),nemerodemodelo,ne merode
serie,yZlP C6digoPos_llistos.
Uameal 1_77-714W486
(24hr said [a,7di asp ors emana,3 65d [asala _o)
Presionelaopci6nadecuada,ytengasutipode
producto(Refrigerador),n_merodemodelo,n6mero
deserie,yZlP /c6digoPostallistos.
Visitetnotres, iteweb,:http,:ltwww °lgse_ice,com
GARANTIEL IMIT E
Canada
LGE Ilectronics
LG Electronics r_parera ou remplaoera, _ sa discr6tion, sans frais, le produit pr6sentant des d6fauts de mat_riaux ou de
fabrication, darts des conditions normales d'utilisation _ndant la p6riode de garantie indiqu6e ci_essous _ partir de la
date d'achat d'odgine.
Cette garantie est valide paur seulement I'acheteur d'odgine du produit pendant la p6ri_e de garantie en autant que cela
soit aux _.-U., incluant Alaska, Hawaii, territoires am6ricains et toutes les provinces canadiennes.
P_riode de garantie du refrig_rateudcong(_lateur LG
Produ t Pi6ces
R_fdg6rateur/cong61ateur 2 ans
Systame scell6 5 ans
(compresseur, condensateur,
Ma n-d'_uv re
2 arts (service a domicile, sauf mod6le GR-051 )
2 arts (service a domicile, saul module GR051 )
Aucune autre garantie expresse est applicable _ ce p_duit. LA DURE DE TOUTE GARANTIE IMPLICITE, INCLUANT LA
GARANTIE IMPLICITE DE COMMERCIALISATION, EST LIMITE A LA DUR_E DE LA GARANTIE EXPRESSE. LG
ELECTRONICS NE POURRA #_TRETENUE RESPONSABLE POUR TOUTE PERTE OU UTILISATION DE CE
PRODUIT, INCONVENIENT, PERTE OU TOUT AUTRE DOMMAGE, INDIRECT OU ACCESSOIRE, SURVENANT DE
L'UTILISATION OU DE L'INHABILITE A UTILISER CE PRODUIT OU POUR TOUT BRIS DE GARANTIE EXPRESSE
OU IMPLICITE, INCLUANT _ GARANTIE IMPLICITE DE COMMERCIALISATION APPLICABLE ACE PRODUIT.
Certains 6tats ne _rmettent pas rexclusion ou la limitation de dommages accessoires ou indirects ou les limitations sur
la durkee d'une garantie implicite, par consequent ces limitations ou exc|usions peuvent ne pas s'appliquer. Cette garantie
donne des droits 16gaux et ron peut en avoir d'autres qui varient d'un 6tat ,_ un autre ou d'une province _ une autre.
LA GARANTIE CI-DESSU$ NE'S APPLIQU_ PAS :
1. Les d6placements de service _ domicile pour la livraison ou la cueillette, I'installation, le remplacement de fusibles ou
de c_blage r_sidentiel appropri& plom_rie ou correction de r_parations non autoris_es.
2_ Dommage au produit caus6 par accident, parasite& incendie, inondation ou actes de Dieu,
& R6parations !o_que le produit LG est utilis6 a d'autres fins qu'une utilisation domestique unifamiliale normale,
4, Dommage r6sultant d'accidents, de _difications, de mauvaise utilisation, d'abus ou d'une installation inad6quate
Par consequent, les frais encourus sont imputes au consommateur.
Si ce preduit est install6 _ I'ext6rieur d'une zone de service normale, tous frais de d6pla_ment requis _ur la r6paration
du produit ou le rempiacement de pi_ces d_fectueuses seront imputes au propri_ire.
NUMEROS D'E AI_
Pourobtenir_negarantie Conserver la facture comme preuve de la date d'achat
Un exemplaire de la facture doit 6tre pr_sent_ au moment oQ un service sous
garantie est fourni.
Peurobteni ru_p,rod_ito,_
del'ai_e
T_16phoner au 1-888-542-2623 (lun. au ven. 7 h _ 20 h Central)
(sam. 8 h _ 17 h Central)
Presser I'option du menu appropri_e et avoir le type de produit (r_frig_rateur),
num6ro de module, num_ro de s6rie et code postal.
Pe,_ro,btenirlece_tredesewice
ieplusproche
T_16phoner au 1-888-542-2623 (24 heures par jour, 7 jours par semaine)
Presser I'option du menu appropri_e et avoir le type de produit (r_frig6rateur),
num6ro de module, num_ro de s_rie et code postal.
Visitemotres, iteweb:http,:#_ Agse_ice_com
LIMITEDW ARRANTY
Canada
LGE, Ilectronics
LGE I_tronicsw illre pairo rati tso pfionre place,w im_hc harge,yo urp roductw hichp roves¢ob ede fccfivdn
materialo rwo rkmanshipun derno rma/u se,du ringt hew arram'ype riodl istedbe Iowfr omt hed ateofo riginal
pt_chase. Thisw arramyisg oodon lyt oth cor iNnNp urchasem t_h cpr oductdu rmgt hew arrantype rioda s
longa siti sina nyC anadianPr ovince.
WAR NTYPERIOD
MODEL# : LABOR: 2 Years PARTS : 2 Years
SERIALNUMBER :
SEALED SYSTEM : 5 Years (Compresso_ condense_; and evaporator)
HOW SERVICE IS HANDLED : Ca/1 i_88-542-2623(1-888-LG-CANADA)and choose the appropriate
prompt. Please have product type (refrigerator)and ZIP Code ready.
See our websi_c a_ http://ww_lg.ca
This wa_mtyprovides in-home service.
No olhcr exprcsswammtyis applicableto fffisproduct THE DURATION OFANY IMPLIED'WARRANTIES,
INCLUDING THE IMPLIED WARRANTY OF MERC HANTABILIT_ IS LIMITED TO THE
DURATION OF THE EXPRESS WARRANTY HEREIN. LG ELECTRONICS USA, IN(2. SHAM.._NOT
BE LIABLE FOR THE LOSS OF THE USE OF THE PRODUC_ INCONVIENCE,LOSS OR ANY
OTHER DAMAGES, DIRECT OR CONSEQUENTIAL,ARISING OUT OF THE USE OF, OR
INABILITYTO USE, THIS PRODUCTOR FOR ANY BREACH OFANY EXPRESS OR IMPHED
WARRANT_; INCLUDINGTHE IMPLIED WARRANTY OF MERCHANT_.BIHTYAPPt.,ICABt.,ETO
THIS PRODUCZ
Some provinces do not allow the exclusion or limitationofincidenml or con_zquenfialdamages or limitation_on
how long an implied wammty ias_s; so these iimitafiortsor exclusionsmay not apply to you. This warrantygives
you specific legal fights and you may also have o_herrig/its wNch wtry |:?omprovince to provin_:e.
THE ABOVE B XI ANTY DOES NOT APPLY TO:
!..... Se_,ice tripsto yourhome to deli,,er oandpk:kup,........insm[l,instmc_,or.....rephce_hour,.'filse_or correct wiring_.,plumbing_.
or corre_z_ionof m:muthofizedrepairs,
2, Damagem theproduct caa_d by accidenLvermin, fire, flo_, altemtkm,misues,abuse, improperinstallation,or ac_s
ofGod,
3. Commercialuse or use tbr other than the hlmndedpurpose.
The_tbl_, these costs are the responsibilityof the consumer
CUS'IOMERASSISTANCE NUMBERS:
To Prove Warranty Coverage:
To Obtain Product, Customer; or
Servi_ Assistance by phone:
or by lnternet:
Retain your Sales Receipt to p_ve date of purcha_.
A cop2_of your Sales Receipt must be snbmi|lcd at the thole
wammty service is pmvidcd.
Call 1-888-542-2623(1-888-LG-CANADA)and choose the
appropriateprompt
http://w_3_lg.ca
To Obtain Nearest Authorized
Servi_ Center; Parts Distributor"
or Sales Dealer by phone:
Call 1-888-542-2623(1-888-LG-CANADA)and choose the
appropriateprompt Please have your product t_q_e
(ret_geramr)and ZIP Cod e ready
or by Internee: http://ww_lg.ca
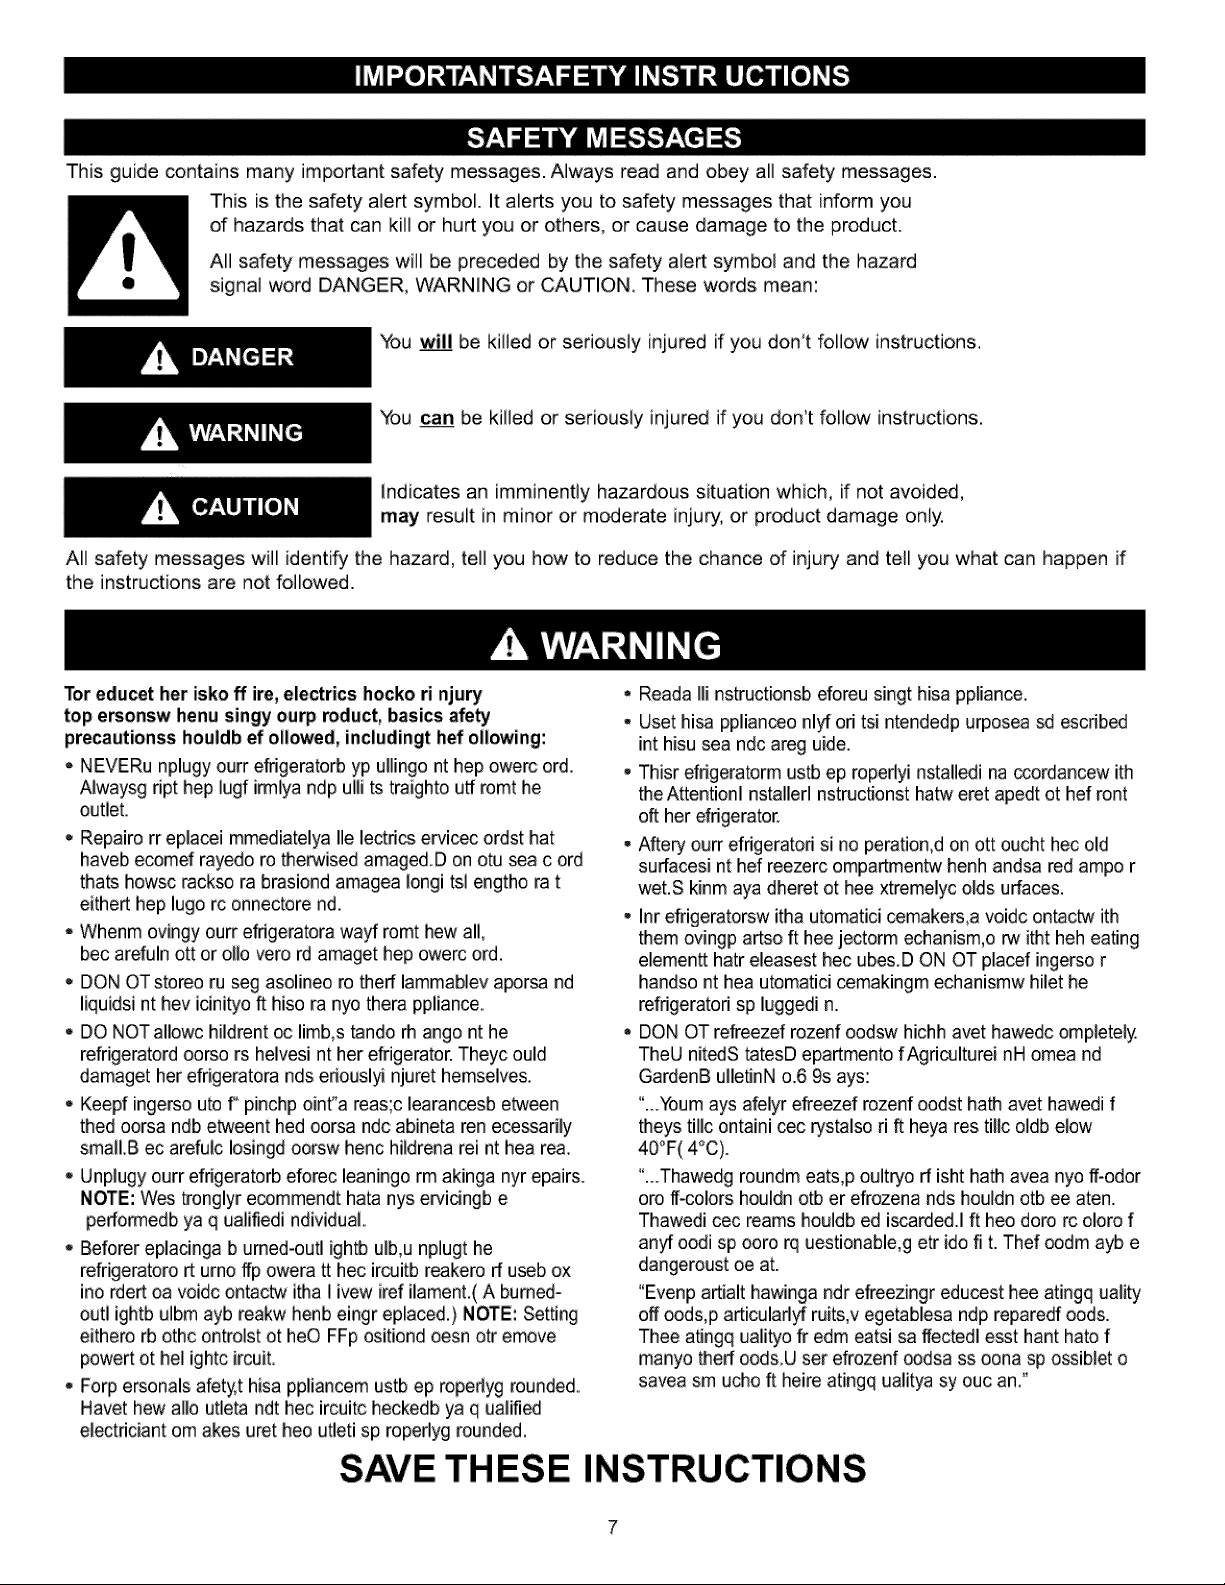
This guide contains many important safety messages. Always read and obey aft safety messages.
This is the safety alert symbol. It alerts you to safety messages that inform you
of hazards that can kill or hurt you or others, or cause damage to the product.
Aft safety messages will be preceded by the safety alert symbol and the hazard
signal word DANGER, WARNING or CAUTION, These words mean:
You _ be killed or seriously injured if you don't follow instructions.
You can be killed or seriously injured if you don't follow instructions.
Indicates an imminently hazardous situation which, if not avoided,
may result in minor or m_erate injury, or product damage only,
All safety messages will identify the hazard, tell you how to reduce the chance of injury and tell you what can happen if
the instructions are not followed.
Tot educet her isko ff ire, electrics hocko ri njury •
top e_onsw henu singy ourp roduct, basics afe_
precautionss houldb ef ollowed, includingt hef ollowing:
. NEVERu nplugy ourr efrigeraterb yp ullingo nt hep owerc ord. .
Alwaysg ript hep lugf imllya ndp ulli ts traighto utf romt he
outlet_
Repairo rr eplacei mmediatelya lie lectdcs ervicec ordst hat
haveb ecomef rayedo re therwised amaged D on otu _a cord
thats howsc rack_ ra brasiond amagea longi tsl engtho rat
either hep lugo rc onnectore nd.
- Whenm ovingy ourr effigeratora wa_ romt hew all,
bec arefuln ott or o11overo rd amaget hep owerc ord.
DON OT stereo ru seg asolineo re theft lammablev a_rsa nd
liquidsi nt hey icinityo ft hiso ra nyo thera ppliance.
• DO NOT allowc hildrent oc limb,s tando rh ango nt he
refrigeratord oorso rs heivesi nt her efrigerater. Theyc ould
damaget her efrigeratora nds eriouslyi njuret hemselves,
• Keepf ingerso ute f" pinchp oint°a reas;c learanc_sb eb_veen
thed oorsa ndb etweent bed oorsa ndc abineta ren ecessarily
smalI.B ec arefulc Iosingd oorsw henc hildrena reint hea tea.
, Unpiugy ourr efrigeraterb eforec leaningo rm akinga nyr epairs.
NOTE: Wes trenglyr ecommendt hata nys ewicingb e
perfomledb ya q ualifiedi ndividuaL
, Beferer eplacinga b urned-outl ightb ulb,u nplugt he
refrigeratoro rt urno ffp owera tt hec ircJJitbreakere ft useb ox
ino rdert oa voidc ontactw itha l ivew iref ilament,( A burned-
outl ightb ulbm ayb reakw henb eingr eplaced,) NOTE: Setting
eithero rb othc onb-olstot bee FFp ositiond oesn oh-emove
powert othel ightc ircuit.
- Forp ersonals afety,t hisa ppliancem ustb ep ropertyg rounded.
Hayer hew allo utleta ndt hec ircuitc heckedb ya q ualified
electdciant om akes uret bee utleti sp roperlyg rounded.
SAVE THESE
Reada Ill nstructionsb eforeu singt hisa ppliance.
User hisa pplianceo nlyf ori tsi ntendedp urposea _ escribed
int hisu sea ndc areg uide.
Thisr efrigeratorm ustb ep roperlyi nstalledi na ccordancew ith
the Attentionl nstallerl nstrucflonst hatw eret apedt ot hef rent
oft her efrigerator.
Aftery ourr efdgeratoH si no peration,d on ott oucht hec old
suftacesi nt hef reezerc ompa_entw henh andsa red ampo r
wet.S kinm aya dheret ot hee xtremelyc olds urfaces.
Inr efrigeratorsw itha utomatici cemakers,a voidc ontactw ith
them ovingp artso ft hee jectorm echanism,o rw itht heh eating
elementt hatr eleasest hec ubes.D ON OT placef ingerso r
handso nt hea utomatici cemakingm echanismw hilet he
refrigeratori sp luggedi n.
DON OT refreezef rozenf oodsw hichh avet hawedc ompieteiy.
TheU nitedS tatesD epartmento fAgriculturei nH omea nd
GardenB ulleflnN o.6 9s ays:
"...Youmays afeiyr efreezef rozenf oodst hath avet hawedi f
theys tillc ontaini cec rystalso rift heya res tillc oldb elow
40°F(4°C).
"...Thawedg roundm eats,p oultryo rf isht hath avea nyo ff-odor
ore if-colors houldn orb er efrozena rids houldn otb ee aten.
Thawedi cec reams houldb ed iscarded.I ft bee dote rc oloro f
an:y_oodi sp ooro rq uestionable,g etr ido fi t. Thef ®dm ayb e
dangeroust oe at.
"Evenp artialt hawinga ndr efreezingr educest hee atingq ualib!
off oods,p articularlyf ruits,v egetablesa ndp repare_ oods.
Thee aflngq ualityo fr edm eatsi sa ffectedl esst hant hate f
manyo theft oods.U set efrozenf oodsa ss oona sp ossiblet o
savea sm u_o ft heire atingq ualitya sy ouc an."
INSTRUCTIONS
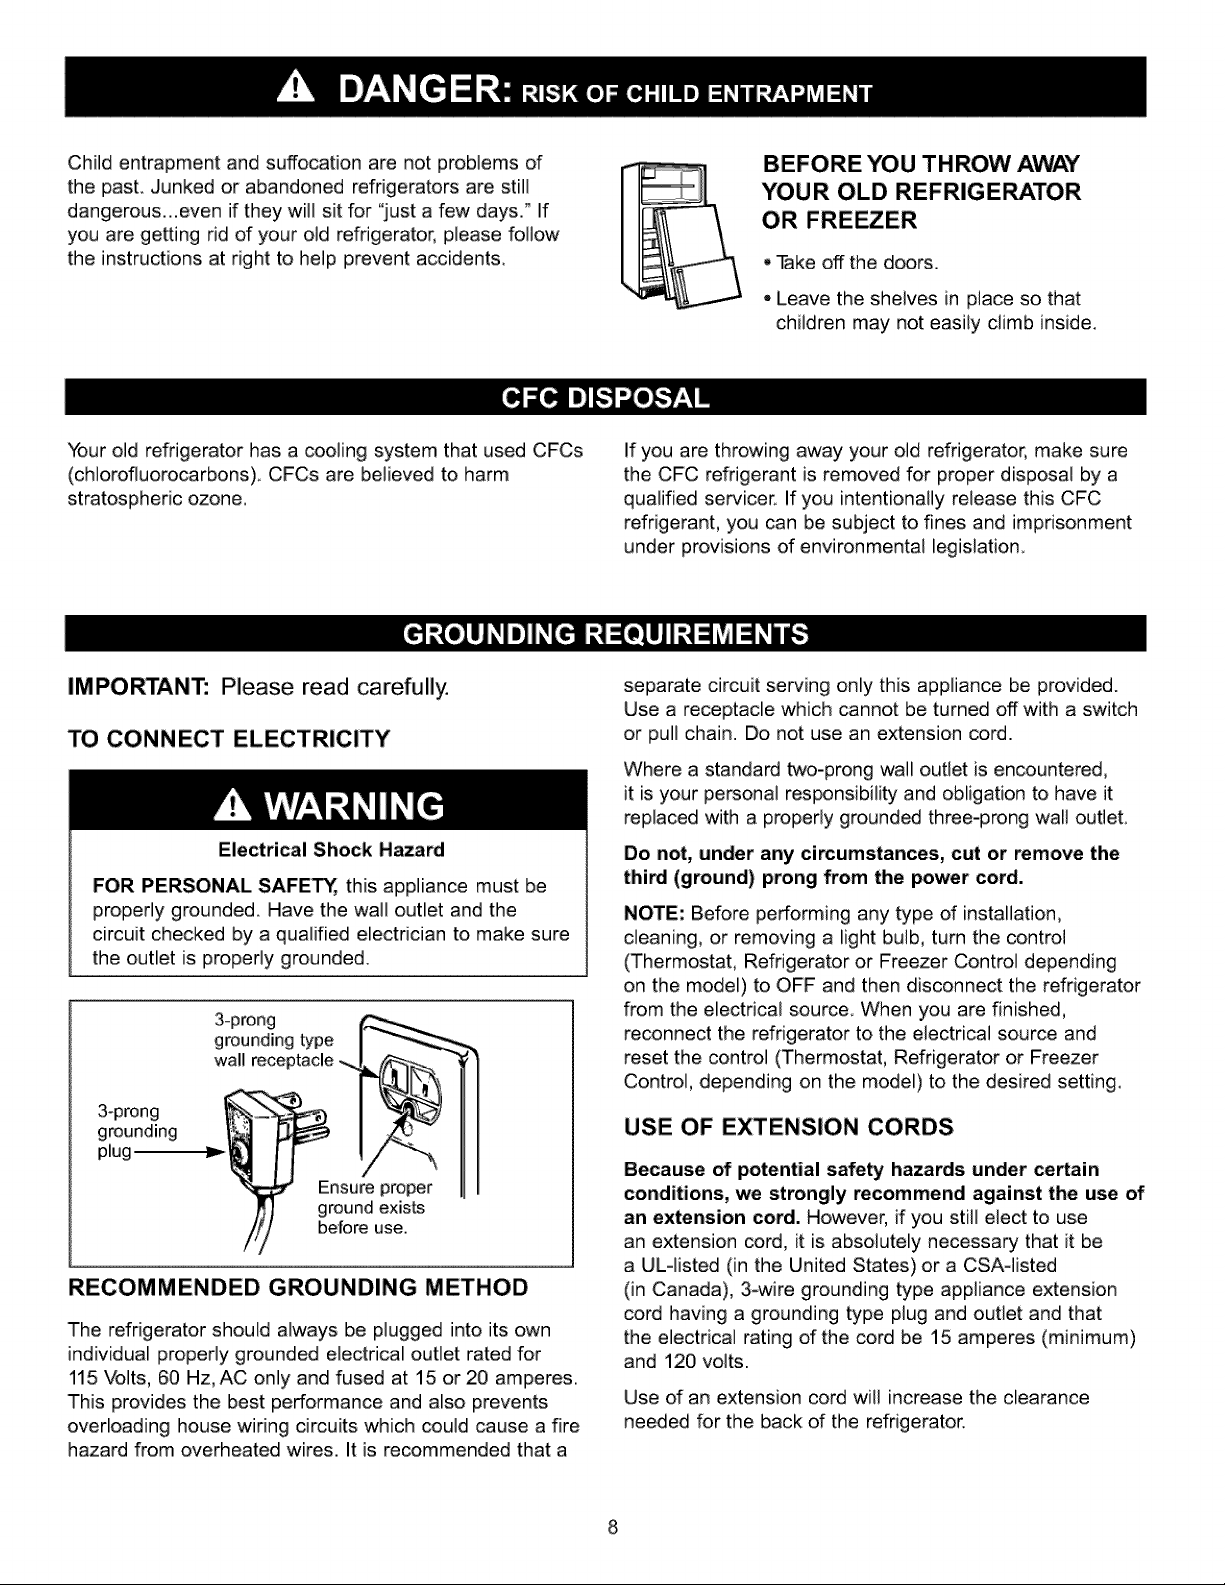
Child entrapment and suffocation are not problems of
the past. Junked or abandoned refrigerators are still
dangerous...even if they will sit for "just a few days." If
you are getting rid of your old refrigerator, please follow
the instructions at right to help prevent accidents.
BEFORE YOU TH ROW AWAY
YOUR OLD REFRIGERATOR
OR FREEZER
, Take off the doors.
- Leave the shelves in place so that
children may not easily climb inside.
Your old refrigerator has a cooling system that used CFCs
(chiorofluorocarbons). CFCs are believed to harm
stratospheric ozone.
If you are throwing away your old refrigerator, make sure
the CFC refrigerant is removed for proper disposal by a
qualified servicer.. If you intentionally release this CFC
refrigerant, you can be subject to fines and imprisonment
under provisions of environmental legislation
IMPORTANT: Please read carefully.
TO CONNECT ELECTRICITY
Electrical Shock Hazard
FOR PERSONAL SAFETY, this appliance must be
properly grounded. Have the wail outlet and the
circuit checked by a qualified electrician to make sure
the outlet is properly grounded.
3-prong
grounding type
wall _ceptacle
3-prong
grounding
plug
Ensure proper
ground exists
before use.
RECOMMENDED GROUNDING METHOD
The refrigerator should always be plugged into its own
individual properly grounded electrical outlet rated for
115 "volts,60 Hz, AC only and fused at 15 or20 amperes.
This provides the best performance and also prevents
overloading house wiring circuits which could cause a fire
hazard from overheated wires. It is recommended that a
separate circuit serving only this appliance be provided.
Use a receptacle which cannot be turned off with a switch
or pull chain. Do not use an extension cord.
Where a standard two-prong wail outlet is encountered,
it is your persona] responsibility and obligation to have it
replaced with a properiy ground_ three-prong wail out]eL
Do not, under any circumstances, cut or remove the
third (ground) prong from the power cord.
NOTE: Before performing any type of installation,
cleaning, or removing a light bulb, turn the control
(Thermostat, Refrigerator or Freezer Control depending
on the model) to OFF and then disconnect the refrigerator
from the electrical source. When you are finished,
reconnect the refrigerator to the electrical source and
reset the control (Thermostat, Refrigerator or Freezer
Control, depending on the model) to the desired setting.
USE OF EXTENSION CORDS
Because of potential safety hazards under ce_ain
conditions, we strongly recommend against the use of
an extension cord. However, if you still elect to use
an extension cord, it is absolutely necessary that it be
a ULqisted (in the United States) or a CSA-]isted
(in Canada), 3-wire grounding type appliance extension
cord having a grounding type plug and outlet and that
the electrical rating of the cord be 15 amperes (minimum)
and 120 volts.
Use of an extension cord will increase the clearance
needed for the back of the refrigerator.
O
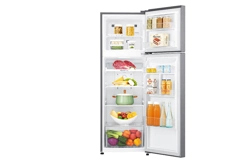
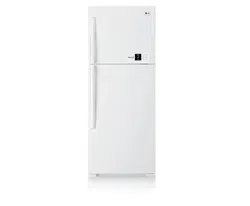
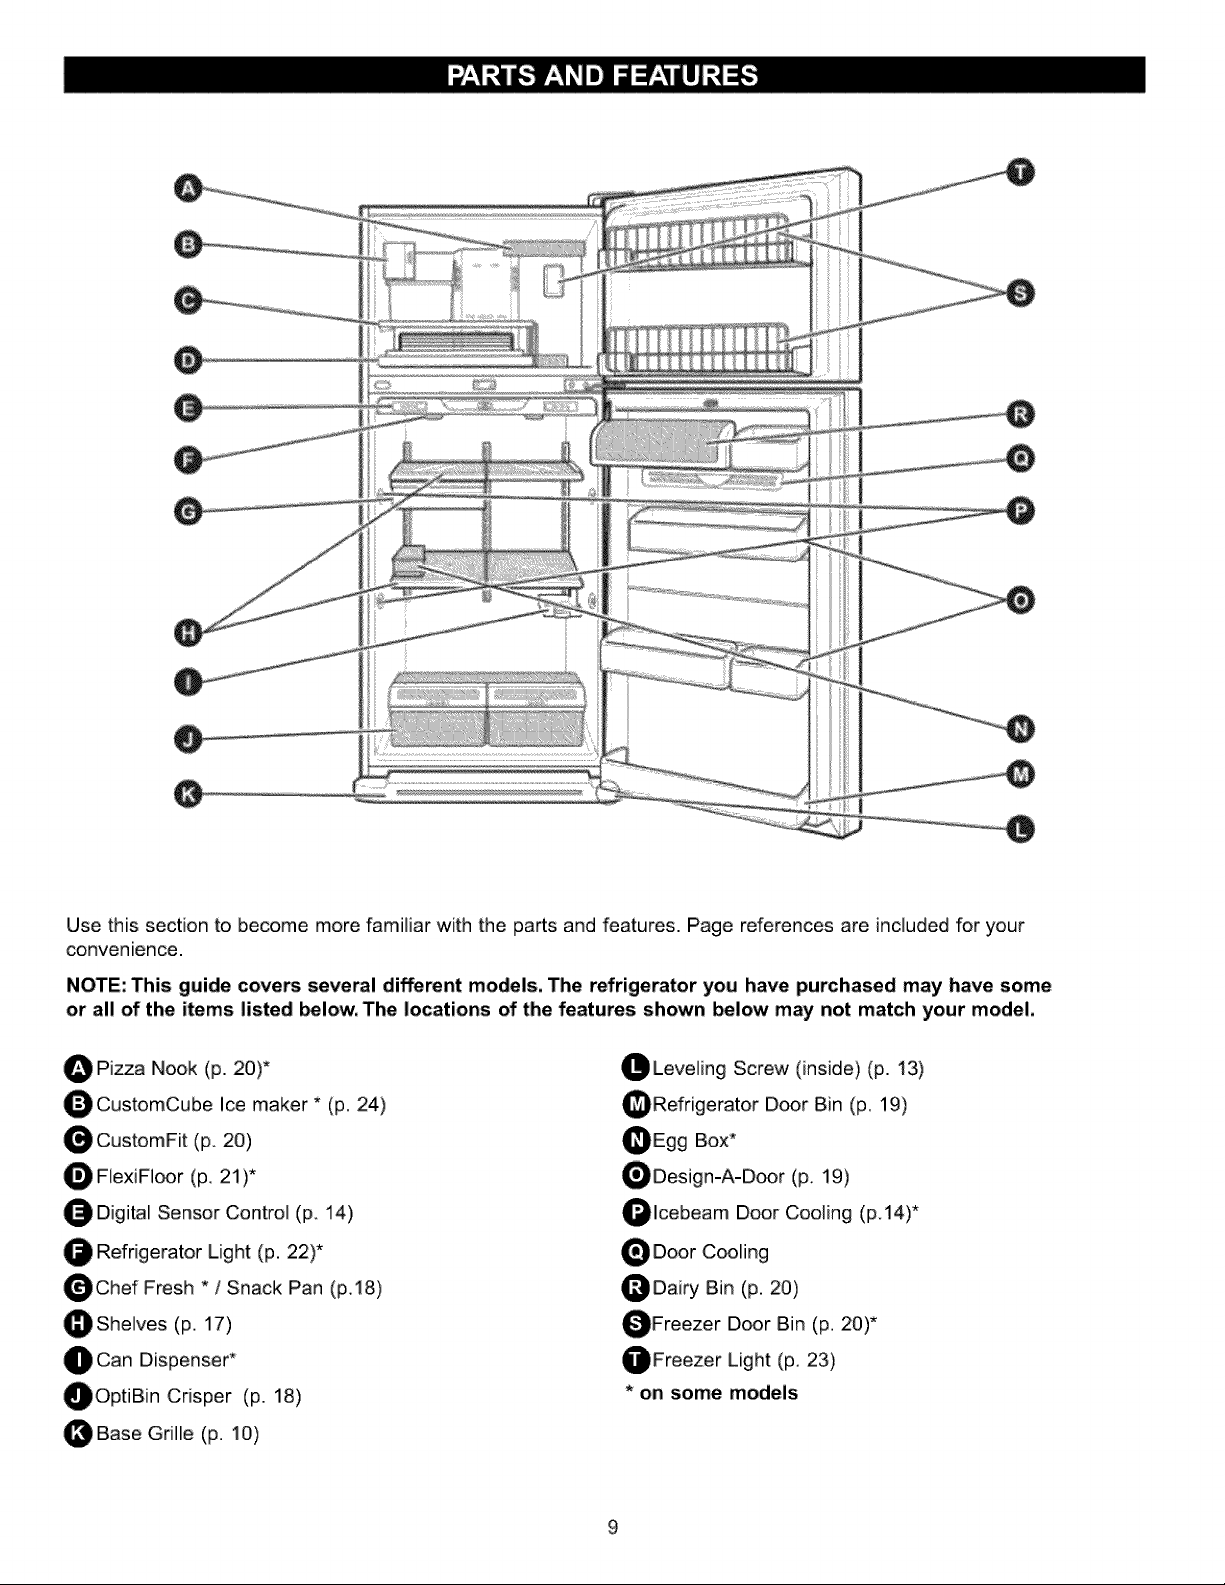
Use this section to become more familiar with the parts and features. Page references are included for your
convenience.
NOTE: This guide covers several different models, The refrigerator you have purchased may have some
or all of the items listed _low, The locations of the features shown below may not match your model,
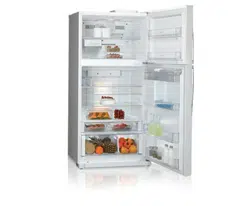
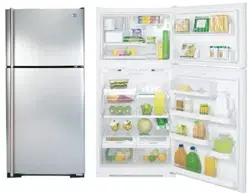
O Pica Nook (p. 20)*
O CustomCube Ice maker * (p, 24)
O CustomFit (p. 20)
FlexiF]oor (p, 21)*
O Digital Sensor Control (p. 14)
Refrigerator Light (p. 22)*
O Chef Fresh * / Snack Pan (p,,t8)
_She]ves (p. 17)
O Can Dispenser*
OOptiB[n Crisper (p. 18)
OBase Gr[fle (p. 10)
OLeve][ng Screw (inside) (p. 13)
_Refrigerator Door Bin (p. 19)
OEgg Box*
ODesign-A-Door (p, 19)
Olcebeam Door Cooling (p.14)*
O Door C_fing
_Dairy Bin (p. 20)
OFreezer Door Bin (p. 20)*
OFreezer Light (p. 23)
* on some models
Excessive Weight Hazard
Use two or more people to move and install
refrigerator_
Failure to do so can result in back or other injury.
U N_CKING YOUR REFRIGERATOR
Remove tape and any temporary labels from your
refrigerator before using. Do not remove any warning-
type labels, the model and serial number label or the
TechSheet that is attached to back wall of the refrigerator.
remove any remaining tape or glue, rub the area
briskly with your thumb. Tape or glue residue can also be
easily removed by rubbing a small amount of liquid dish
soap over the adhesive with your fingers, Wipe with warm
water and dry.
Do not use sharp instruments, rubbing alcohol, flammable
fluids or abrasive cleaners to remove tape or glue. These
products can damage the surface of your refrigerator. For
more information, see the Important Safety Instructions
section.
Refrigerator shelves are installed in the shipping position.
Please reinstall shelves according to your individual
storage needs.
When Moving Your Refrigerator:
Your refrigerator is hea W. When moving the
refrigerator for cleaning or service, be sure to protect
the floor. Always pull the refrigerator straight out when
moving it. Do not wiggle or walk the refrigerator when
trying to move it, as floor damage could occur.
Explosion Hazard
Keep flammable materials and vapors, such as
gasoline, away from refrigerator.
Failure to do so can result in death, explosion or fire.
1, Avoid placing the unit near heat sources, direct sunlight
or moisture.
.
m
To avoid vibration, the unit must be level, if required,
adjust the leveling screws to compensate for
unevenness of the floor. The front should be slightly
higher than the rear to aid in d_r closing. Leveling
screws can be turned easily by tipping the cabinet
slightly.T urn the leveling screws clockwise ("_) to
raise the unit, counterclockwise (_) to lower it.
Install this appliance in an area where the temperature
is between 55°F (13°C) and 110°F (43°C,) if the
temperature around the appliance is too low or high,
cooling ability may lessen
.
w
.
Clean your refrigerator thoroughly and wipe off all dust
accumulated during shipping.
Install accessories such as ice cube bin, drawers,
shelves, etc. in their proper places, They are packed
t_ether to prevent possible damage during shipment,
Let your refrigerator run for 2 or 3 hours before putting
food in it, Check the flow of cold air in the freezer
compartment to ensure proper c_ling. "(our refrigerator
is now ready for use.
CAUTION'.
- Be careful when you ,work with hinge, base grille,
stopper etc. You may be injured.
, Do not put hands or metal sticks into air vents, base
grille or bottom of refrigerator. You may be injured or
receive an electrical shock
BASE GRILLE
To a_ach the base grille:
1, Open the refrigerator door.
2. There are two plastic flaps. Fold only the plastic flap
on same side as door hinge.
3. Push clips in opening on metal panel toward refrigerator
until it snaps firmly.
To remove the base grille:
1. Open the refrigerator door.
2, Grasp the grille with both hands.
3. Pull the grille toward you.
10
REMOVING, REVERSING (OPTIONAL)AND
REPLACING REFRIGERATOR DOORS
TOOLSNEEDED: 1/4 hex-head socket wrench,
NO, 2 Phillips screwdriver, flat-head screwdriver, 1/4-inch
O_n-end wrench, flat 2-inch u_ knife.
IMPORTANT: Before you begin, turn the refrigerator OFF
and unplug it. Remove food and any adjustable door or
utility bins from doors.
HOW TO REVERSE DOOR OPENING DIRECTION
(when converting from the left.o_ning ty_ to right-
opening ty_)
1. Removing Freezer Door
- Remove the top hinge cover (t),
. Remove the 3 screws and lift off the top hinge (2).
- Lift the freezer d_r (3) slightly and remove it.
, Pry off the cover (4) using a slotted screwdriver and
attach it on the right.
- L_sen the screw (5), remove (6), (7), (8), Reverse (6)
(7), (8) as illustrated exactly and attach it to the left
of the door.
2o Removing Refrigerator Door
- Loosen the screws (9) and lift off the middle
Hinge (10),
, Lift the door (11) slightly and remove it.
• Take offthe base grille (12).
. Loosen the screw (14) and remove the pin (15) from
right side on hinge (20) to left side on hinge (20),
,, Remove screw (17) on left side of the base.
• Loosen 3 screws (18) on right side of the base,
Remove the bottom hinge (20) and replace it on the
Leftside of the base.
- Attach screw (17) on right side of the base,
. Loosen 2 screws (22) and reverse (16) and (23) as
illustrated exactly and attach it to the left side
- Pry off the cover (24) using a slotted screwdriver and
attach it on the right,
3. Moving Freezer Handle
A=TYPE,B =TYPE
•=Remove cap (3) and cover (4).
- Loosen the screws (1) (two on the top
and two on the bottom), take off the handle (2), and
attach it on the right.
• Attach the removed cover (4) on the left.
- Attach cap (3) on the top right side.
A_TYPE
11
4, Moving Refrigerator Handle
A.TYPE
, Remove caps (8) and (9).
- Pull cover (5) downward and take it off.
,, Loosen 3 screws (6) (two on the top and one on the
center), take off handle (7) and attach it on the right.
•, Attach the cover (5) by pushing it up.
•. Take off cap (10) and attach it on the right.
"Attach the removed caps (8) and (9) on the left side.
B-TYPE
•, Remove cap (7) and cap (8).
,, Loosen the screws (5) (two on the top and two on the
bottom), take off the handle (5), and attach it on the
right,
•, Attach the removed cap (8) on the left.
"Attach cap (7) on the top right side.
5. Attaching Refrigerator Door
" Attach the base grille (1)_
- Remove screw (2) from left side to right side.
= Attach the d_r (3) to the bottom hinge pin.
- Attach the middle hinge (4) on the opposite side with the
3 screws (5).
6. Attaching Freezer Door
- Place the door (8) onto the middle
hinge pin (7).
= Attach the top hinge (10) with 3 screws.
,, Reinstall top hinge cover (11).
7. After Completing the Job
- Make sure that the four corners of the door gasket are
not folded over. To ensure a good seal, apply a small
amount of silicon grease on the corner gaskets.
@
12
DOOR CLOSING AND ALIGNMENT
Door Closing
Your refrigerator has two front leveling screws--one on
the right and one on the left. If your refrigerator seems
unsteady or you want the doors to dose easier, adjust the
Refrigerator's tilt using the instructions below:
i. Plug refrigerator power cord into a 3-prong grounded
outlet. Move the refrigerator into its final position.
2. Remove the base grille by pulling it straight out.
The two leveling screws are located at the bottom of
the refrigerator on either side.
3. insert a flat screwdriver in slots to adjust the leveling
screws.Turn the leveling screw clockwise to raise that
side of the refrigerator or counterclockwise to lower iL
It may take several turns d the leveling screw to adjust
the tilt d the refrigerator.
NOTE: Having someone push against the top of the
refrigerator takes some weight off the leveling screws.
This makes it easier to adjust the screws.
If the space between your d_rs is uneven, follow the
instructions below to align the d_rs:
t, Pry off the top hinge cover.
2. Loosen the top hinge screws using a 10ram socket
or wrench.
3, Have someone hold the door in place or put a
spacer between the doors while you tighten the
top hinge screws,
4. Replace the top hinge cover.
4. Open both doors again and check to make sure that
they close easily. If not, tilt the refrigerator slightly more
to the rear by turning both leveling screws clockwise, it
may take several more turns, and you should turn both
leveling screws the same amount.
5. Replace the base grille.
13
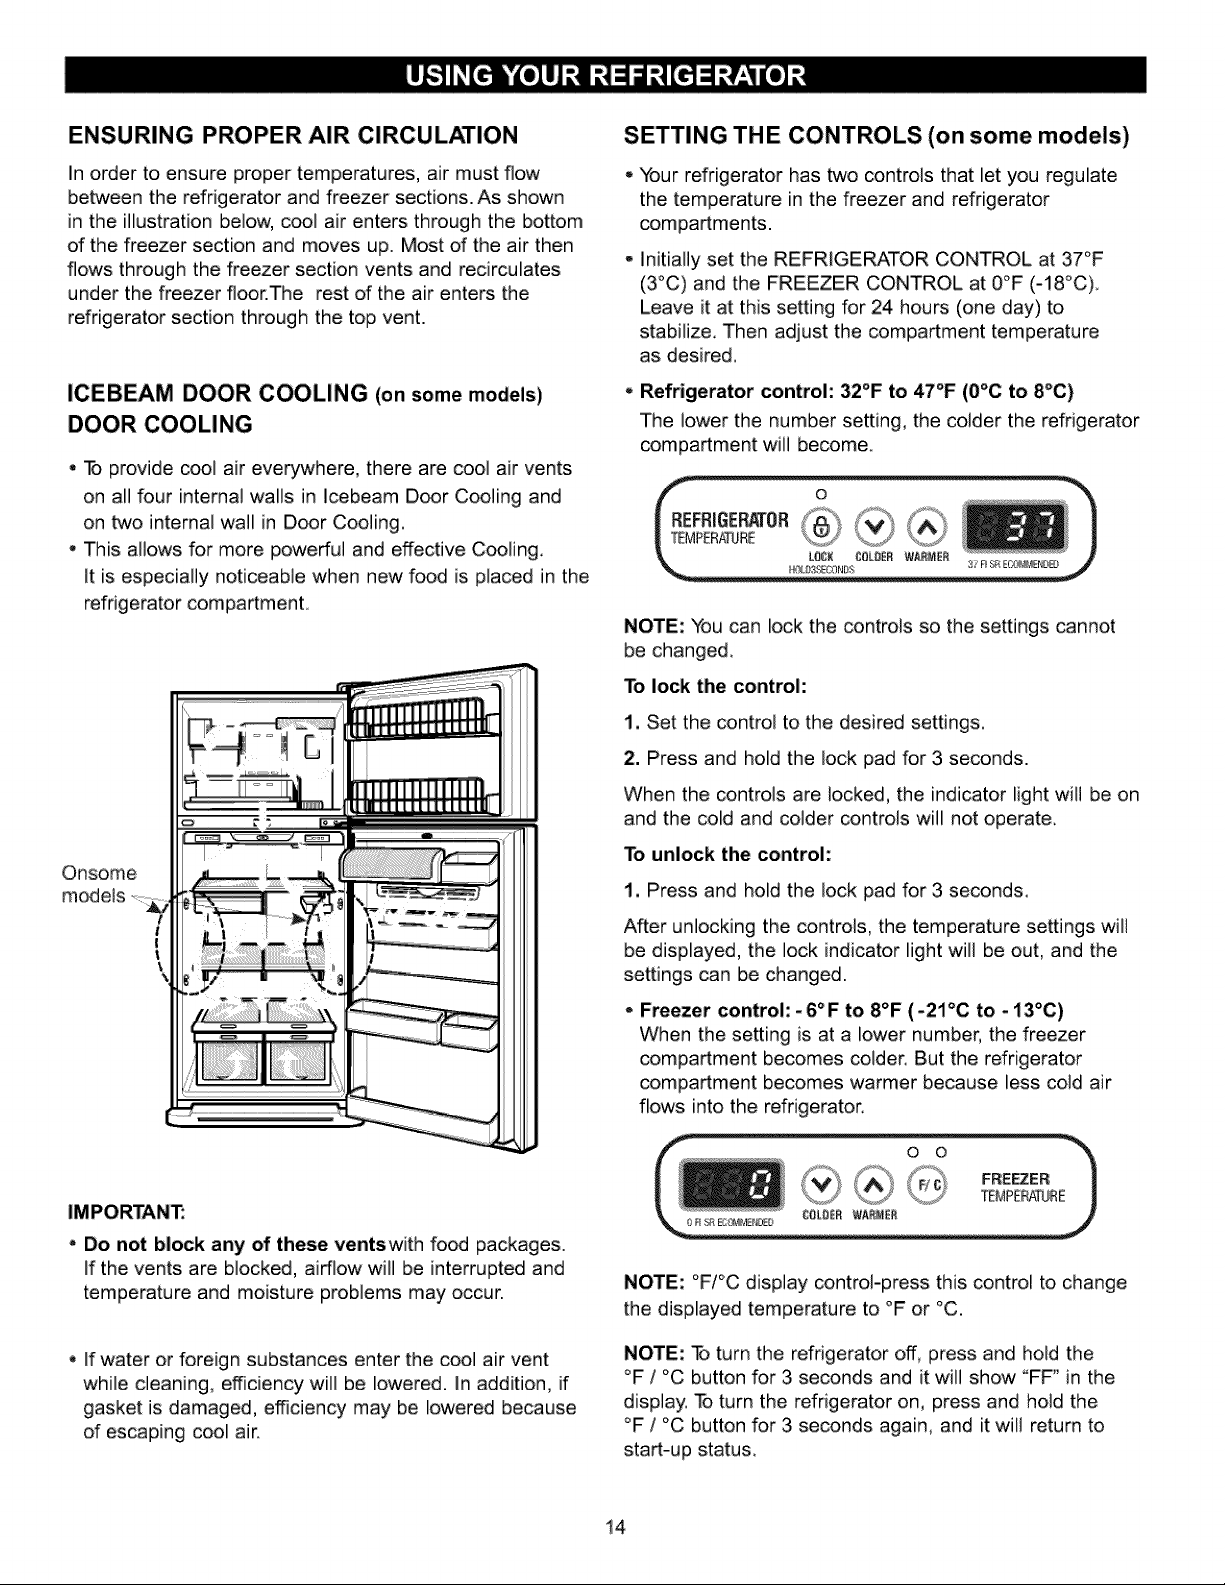
ENSURING PROPER AIR CIRCULATION
In order to ensure proper temperatures, air must flow
between the refrigerator and freezer sections. As shown
in the illustration below, cool air enters through the bottom
of the freezer section and moves up. Most of the air then
flows through the freezer section vents and recirculates
under the freezer floor.The rest of the air enters the
refrigerator section through the top vent.
ICEBEAM DOOR COOLING (on some models)
DOOR COOLING
•, To provide cool air everywhere, there are cool air vents
on all four internal walls in lcebeam Door Cooling and
on two internal wall in Door Cooling.
This allows for more powerful and effective Cooling.
it is especially noticeable when new food is placed in the
refrigerator compartment.
Onsome
models
t
|
I
\
SETTING THE CONTROLS (on some models)
Your refrigerator has two controls that let you regulate
the temperature in the freezer and refrigerator
compartments.
Initially set the REFRIGERATOR CONTROL at 37°F
(3°C) and the FREEZER CONTROL at 0°F (-18°C)
Leave it at this setting for 24 hours (one day) to
stabilize. Then adjust the compartment temperature
as desired.
Refrigerator control: 32°F to 47°F (0°C to 8°C)
The lower the number setting, the colder the refrigerator
compartment will become
NOTE: You can lock the controls so the settings cannot
be changed.
To lock the control:
1, Set the control to the desired settings.
2. Press and hold the lock pad for 3 seconds.
When the controls are locked, the indicator light wiil be on
and the cold and colder controls will not operate.
To unlock the control:
1, Press and hold the iock pad for 3 seconds.
After unlocking the controls, the temperature settings will
be displayed, the lock indicator light will be out, and the
settings can be changed.
- Freezer control:-6°F to 8°F (-21°C to -i3°C)
When the setting is at a lower number, the freezer
compartment becomes colder. But the refrigerator
compartment becomes warmer because less cold air
flows into the refrigerator.
IMPORTANT:
Do not block any of these ventswith food packages.
if the vents are blocked, airflow will be interrupted and
temperature and moisture problems may occur.
- If water or foreign substances enter the cool air vent
while cleaning, efficiency will be lowered, in addition, if
gasket is damaged, efficiency may be lowered because
d escaping cool air.
NOTE: °F/°C display control-press this controi to change
the displayed temperature to °F or °C.
NOTE: _ turn the refrigerator off, press and hoid the
°F / °C button for 3 seconds and it will show "FF _in the
display. To turn the refrigerator on, press and hold the
°F / °C button for 3 seconds again, and it will return to
start-up status.
14
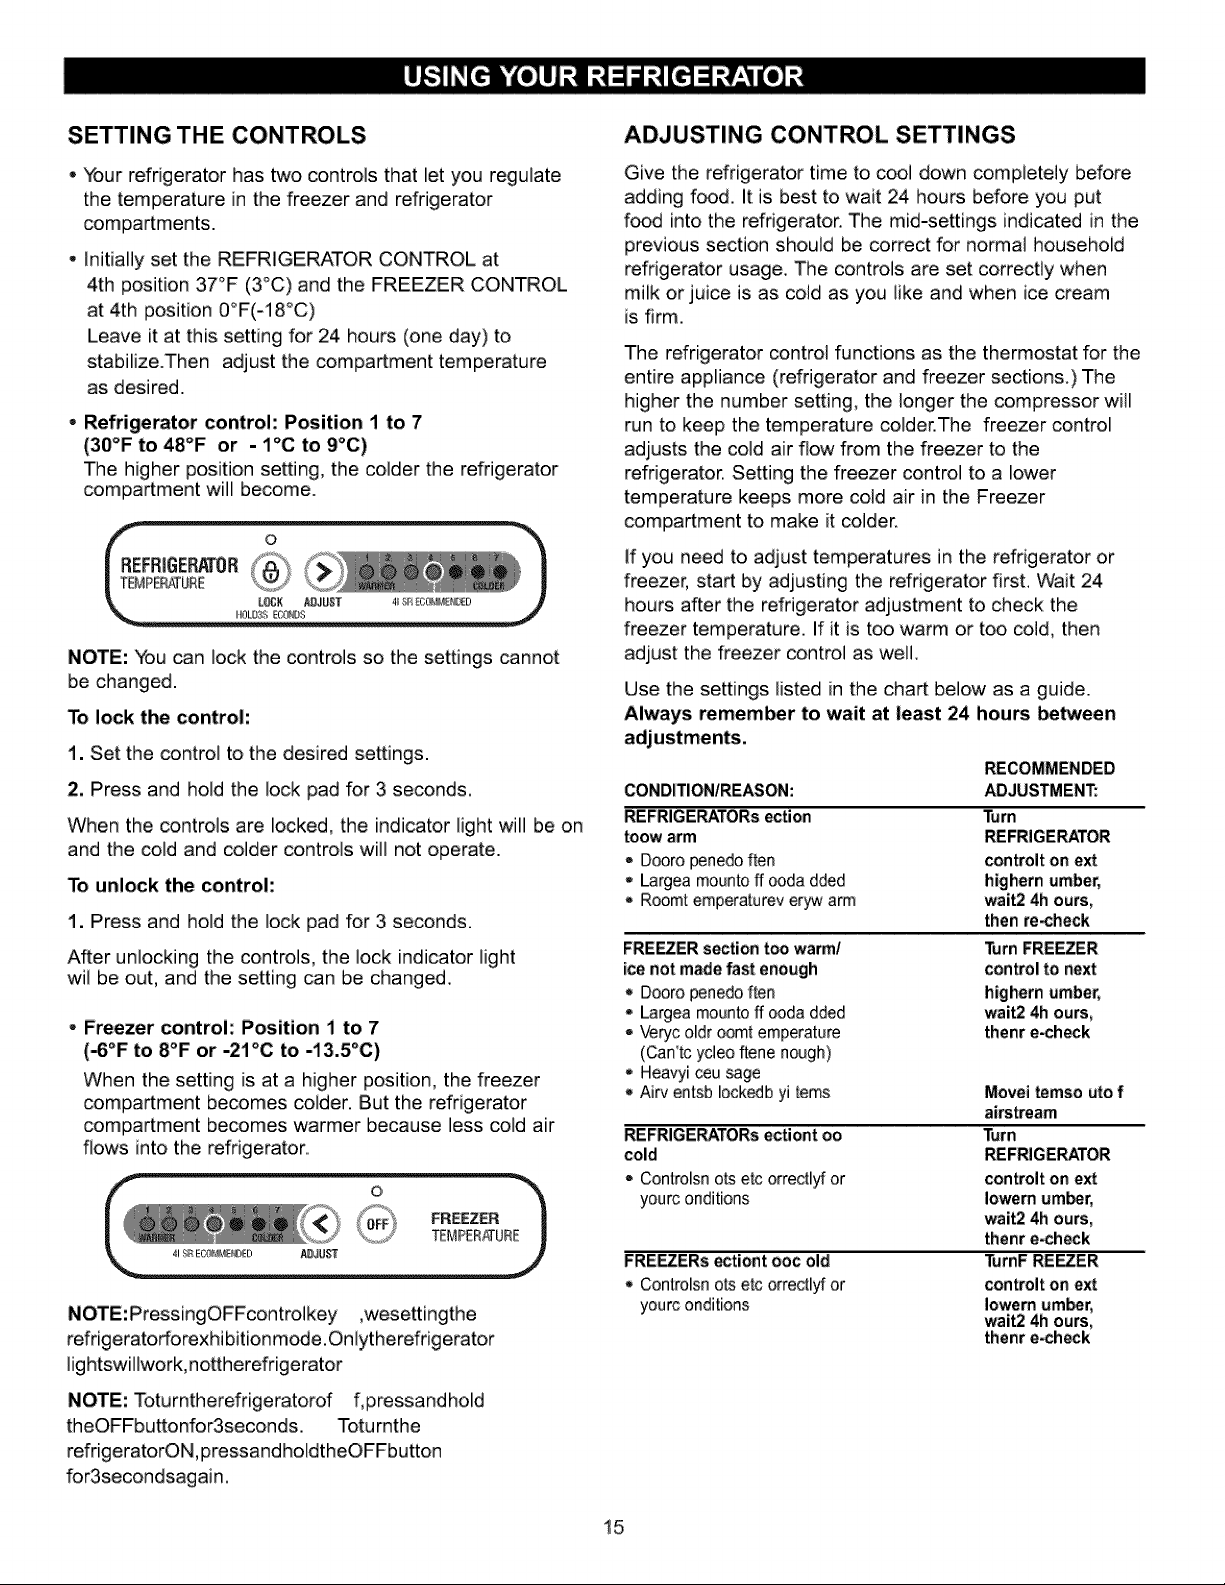
SETTING THE CONTROLS
Your refrigerator has two controls that let you regulate
the temperature in the freezer and refrigerator
compartments.
- initially set the REFRIGERATOR CONTROL at
4th position 37°F (3°C) and the FREEZER CONTROL
at 4th position O°F(-18°C)
Leave it at this setting for 24 hours (one day) to
stabilize.Then adjust the compartment temperature
as desired.
- Refrigerator control: Position 1 to 7
(30°F to 48°F or - 1°C to 9°C)
The higher position setting, the colder the refrigerator
compartment will become.
NOTE: You can lock the controls so the settings cannot
be changed.
To lock the control:
1. Set the control to the desired settings.
2, Press and hold the lock pad for 3 seconds.
When the controls are locked, the indicator light will be on
and the cold and colder controls will not operate.
To unlock the control:
1. Press and hold the lock pad for 3 seconds.
After unlocking the controls, the lock indicator light
wil be out, and the setting can be changed..
- Freezer control: Position 1 to 7
(_°F to 8°F or -21°C to -13.5°C)
When the setting is at a higher position, the freezer
compartment becomes colder. But the refrigerator
compartment becomes warmer because less cold air
flows into the refrigerator..
NOTE:PressingOFFcontrolkey ,wesettingthe
refrigeratorforexhibitionm_e.Onlytherefrigerator
lightswillwork,nottherefrigerator
NOTE: Toturntherefrigeratorof f, pressandhold
theOFFbuttonfor3seconds. Toturnthe
refrigeratorON,pressandholdtheOFFbutton
for3secondsagain.
ADJUSTING CONTROL SETTINGS
Give the refrigerator time to cool down compietely before
adding food. It is best to wait 24 hours before you put
food into the refrigerator. The mid-settings indicated in the
previous section should be correct for normal househoid
refrigerator usage.. The controls are set correctly when
milk or juice is as cold as you like and when ice cream
is firm.
The refrigerator control functions as the thermostat for the
entire appliance (refrigerator and freezer sections.) The
higher the number setting, the longer the compressor will
run to keep the temperature colder.The freezer control
adjusts the cold air flow from the freezer to the
refrigerator. Setting the freezer control to a lower
temperature keeps more cold air in the Freezer
compartment to make it colder.
If you need to adjust temperatures in the refrigerator or
freezer, start by adjusting the refrigerator first. Wait 24
hours after the refrigerator adjustment to check the
freezer temperature. If it is too warm or too cold, then
adjust the freezer control as well
Use the settings listed in the chart below as a guide.
Always remember to wait at least 24 hours between
CONDITIONtREASON:
REFRIGERATORs ection
toow arm
• Dooro penedoften
, Largea mounto ff 0oda dded
,, Roomt emperaturev eryw arm
FRE_ER section too warm/
ice not made fast enough
• Dooro penedo 'ffen
Largea mounto ff ooda dded
- Veryc oldr oomt ernperature
(Can'tc ydeo ftene nough)
- Heavyi ceu sage
,_Air_#entsb Iockedb yi terns
REFRIGERATORs ectiont oo
cold
- Controlsn ots etc orrecti_ or
yourc onditions
FRE_ERs ectiont ooc old
• Controlsn ors etc orrecti_ or
yourc onditions
RECOMMENDED
ADJUSTMENT:
Turn
REFRIGERATOR
controlt on ext
bighern umber,
wait2 4h ours,
then re-check
Turn FREEZER
control to next
bighern umber,
wait2 4h ours,
thenr e_heck
Movei temso uto f
airstream
Turn
REFRIGERATOR
controlt on ext
Iowem um_r,
wait2 4h ours,
thenr e_heck
11JrnFREEZER
controit on ext
Iowem um_r,
wait2 4h ours,
thenr e_heck
15
FOOD STORAGE GUIDE
Storing Fresh Food
Wrap or store food in the refrigerator in airtight and
moisture-proof material unless otherwise noted. This
prevents food odor and taste transfer throughout the
refrigerator_. For dated products, check code date to
ensurefreshness.
Butterormar garine
Keepopenedbutterinacovereddishorclosed
compartment. When storing an extra supply, wrap
in freezer packaging and freeze.
Cheese
Store in the original wrapping until you are ready to
use it. Once opened, rewrap tightly in plastic wrap or
aluminumfoiL
Milk
Wipe milk cartons. For best storage, place milk on interior
shelf, notondoorshelL
Store in original carton on interior shelf, not on door shelf.
Fruit
Wash, let dry, and store in refrigerator in plastic bags or
crisper.. Do not wash or hull berries until they are ready
to use. Sort and keep berries in odginal container in a
crisper, or store in a loosely closed paper bag on a
refrigeratorshelf.
Removestorewrappingandtrimortearof fbruisedand
discoloredareas.W ashincoldwateranddrain.Placein
plasticbagorplasticcontainerandstoreincrisper
_getableswithskins(carr ors, _ppers)
Placei nplasticbagsorplasticcontainera ndstore
incrisper.
Fish
Use fresh fish and shellfish the same day purchased.
Meat
Store most meat in original wrapping as long as it is
airtight and moisture-proof. Rewrap if necessary. See the
following chart for storage times. When storing meat
longer than the times given, freeze the meat.
Chicken ............................................................................................t-2 days
Ground beef .....................................................................................1-2 days
Organ meats (liver, heart, etc,) ..............................................1-2 days
Cold cuts ..........................................................................................3-5 days
Steaks/roasts ................................................. 3-5 days
Cu redmeats .................................................. Z- 10days
Leftovers
Cover leftovers with plastic wrap or aiuminum foil
STORING FROZEN FOOD
NOTE: For further information about preparing food for
freezing or food storage times, check a freezer guide or
reliable cookbook.
Successful freezing depends on the correct packaging.
When you close and seal the package, it must not allow
air or moisture in or out. If you do, you could have food
odor and taste transfer throughout the refrigerator, and
also dry out frozen food_
Packaging recommendations:
- Rigid plastic containers with tight-fitting lids
,. Straight-sided canning/freezing jars
, Heavy-duty aluminum foil
• Plastic-coated paper
• Non-permeable plastic wraps
- Specified freezer-grade self-sealing plastic bags
Follow package or container instructions for proper
freezing methods.
Do not use:
,. Bread wrappers
* Non-polyethylene plastic containers
, Containers without tight lids
,. Wax paper or wax-coated freezer wrap
- Thin, semi-permeable wrap
Your freezer will not quick-freeze any large quantity of
food. Do not put more unfrozen food into the freezer than
will freeze within 24 hours (no more than 2 to 3 Ibs of food
per cubic foot [907-1350 g per liter] of freezer space).
Leave enough space in the freezer for air to circulate
around packages. Be careful to leave enough room at
the front so the door can close tightly
Storage times will vary according to the quality and type
of food, the type of packaging or wrap used (airtight and
moisture-proof) and the storage temperature ice crystais
inside a sealed package are normal This simply means
that moisture in the food and air inside the package have
condensed, creating ice crystals
NOTE; Allow hot foods to cool at room temperature for
30 minutes, then package and freeze. Cooling hot foods
before freezing saves energy.
NOTE: Do not store food near the sensor; it may cause
the sensor to malfunction.
Suffocation Hazard
When using dry ice, provide adequate ventilation.
Dry ice is frozen carbon dioxide (CO2). When it
vaporizes, it can displace oxygen, causing dizziness,
light-headedness, unconsciousness and death by
suffocation. Open a window and do not breathe
the vapors.
16

REFRIGERATOR SHELVES
The shelves in your refrigerator are adjustable to meet
your individual storage needs. Your model may have
glass or wire shelves.
Storing similar food items t_ether in your refrigerator and
adjusting the shelves to fit different heights of items will
make finding the exact item you want easier; it wi/also
reduce the amount of time the refrigerator door is open,
saving energy.
IMPORTANT: Do not dean glass shelves with warm
water when they are cold. Shelves may break if exposed
to sudden temperature changes or impact, such as
bumping. For your protection, glass shelves are made
with tempered glass, which w/] shatter into smal pebble-
sized pieces.
NOTE: Glass shelves are heavy. Use special care when
removing them to avoid dropping them.
Adjustable Shelves
Remove shelves from the shipping positon and replace
shelves in the position you wahL.
, To remove a shelfT- it up the front of the shelf in the
direction of (1) and lift it in the direction of (2). Pu/the
shelf out.
- To replace a shelf--_]t the front of the shelf up and
place the shelf hooks into metal slots at desired position
Then lower the front of the shelf so that the h_ks drop
into the slots,.
Slide Out Shelves
You can slide some glass shelves in and out of your
refrigerator as follows.
• To slide the shelf out, carefully pull front of sheif
toward you.
• To slide shelf in, push shelf in until it stops.
s
To remove a sliding shelf from its metal frame:
1. Pull the shelf toward you until it stops.
2, Tilt the front of the shelf up and pull it past the stop
3. Lift up the shelf to remove.
Replace the shelf by reversing the above steps.
Slide-Under Shelf (on some models)
- Slide-Under Shelf:Y ou can store taler items such as a
gallon container or bottles by simply pushing in front half
of shelf underneath back half of shelf. Pull toward you to
return to a full shelf.
i
ii}
NOTE: Make sure that shelves are level from one side to
the other. Failure to do so may result in the shelf falling or
spilling food.
17
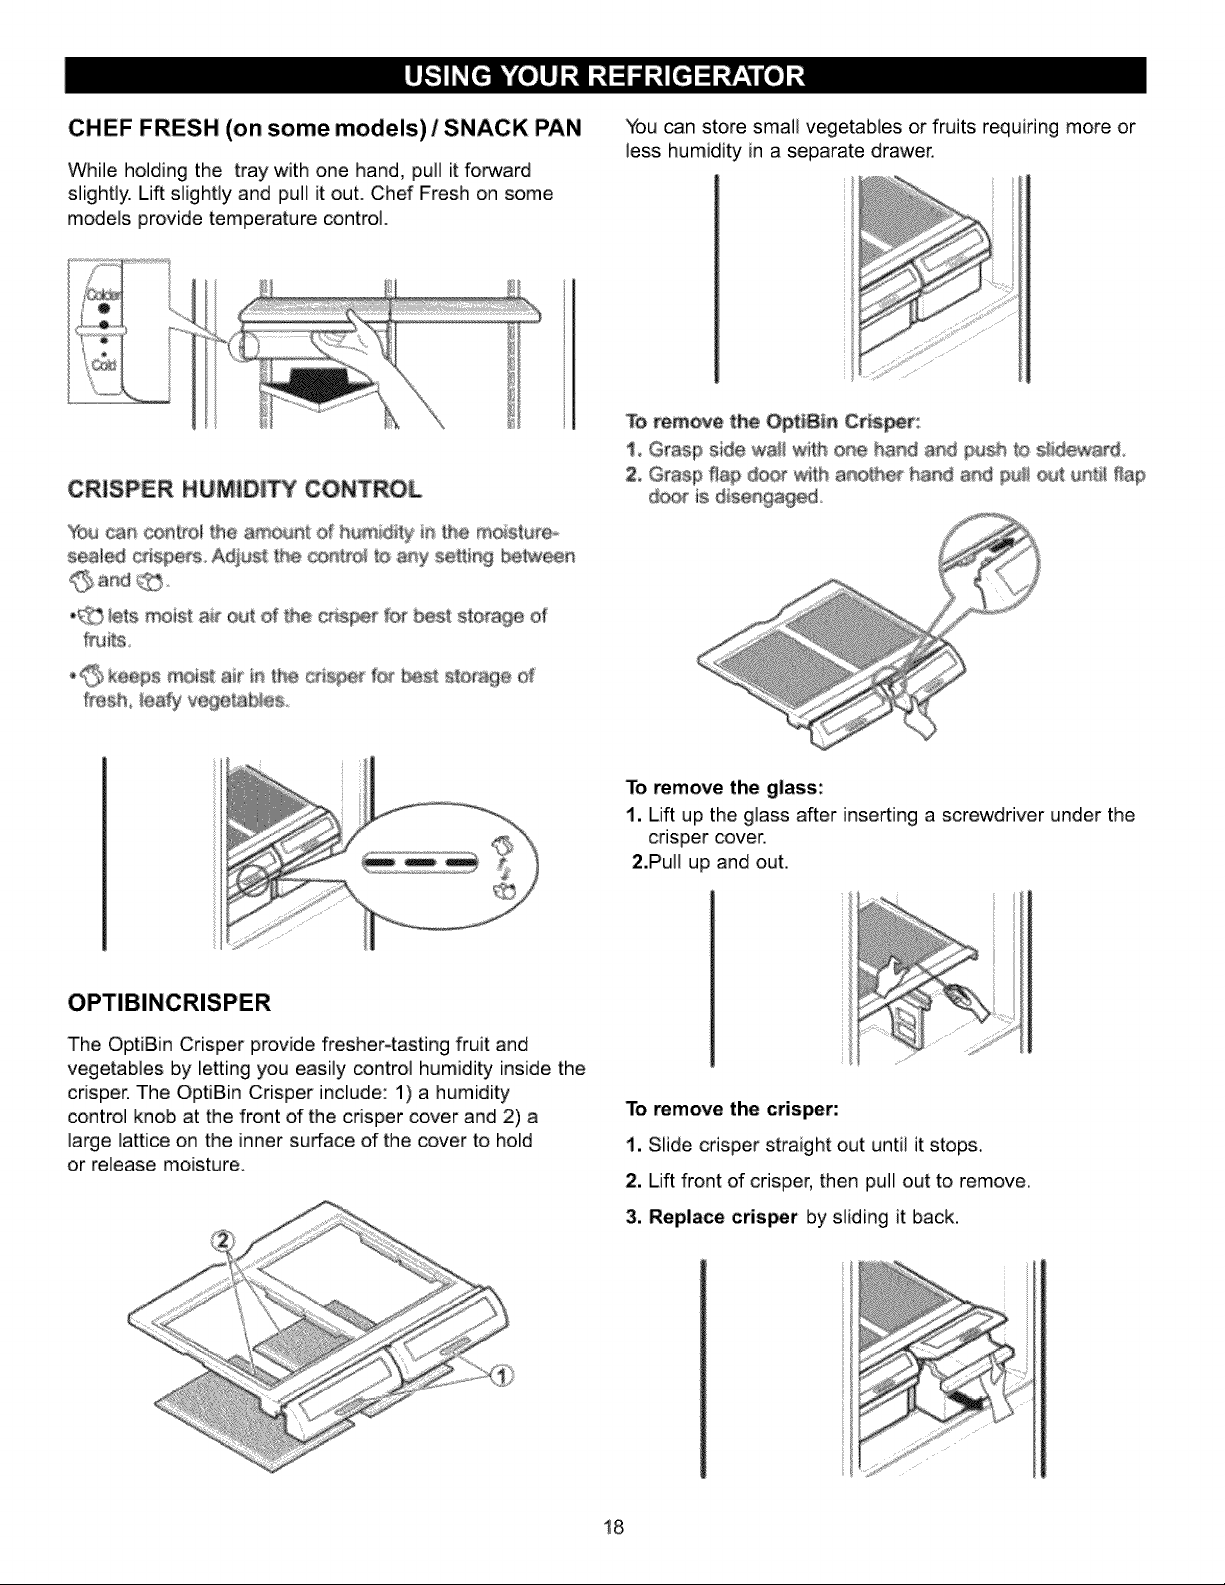
CHEF FRESH (on some models) / SNACK PAN
While holding the tray with one hand, pull it forward
slightly. Lift slightly and pull it out. Chef Fresh on some
models provide temperature control.
You can store small vegetables or fruits requiring more or
less humidity in a separate drawer,
CRISPER HUMIDITY CON
You can ce_[roi the a_ Of _ #'_e rr_istureo
sea_ed crispers, Adjust the _n#el to amy se_ing
,_ _e_smoist ai_ outd the t for 9e of
fruits
_,_,,keeps moi®t air _ #_e ctisl;_ fo_ bes_ s_orage o_
f_esh _eafy vegetat_es
To remove the OptJBin C
!, Grasp side wail one _o
2, Grasp Hap d_ wi_h ha_d and ¢_J_u_ti! flap
ts d_se ed_
To remove the glass:
1. Lift up the glass after inserting a screwdriver under the
crisper cover.
2.Pull up and out.
OPTIBINCRISPER
The OptiBin Crisper provide fresher4asting fruit and
vegetables by letting you easily control humidity inside the
crisper. The OptiBin Crisper include: 1) a humidity
control knob at the front of the crisper cover and 2) a
large lattice on the inner surface of the cover to hold
or release moisture.
To remove the crisper:
1, Slide crisper straight out until it stops.
2. Lift front of crisper, then pull out to remove.
3, Replace crisper by sliding it back.
18
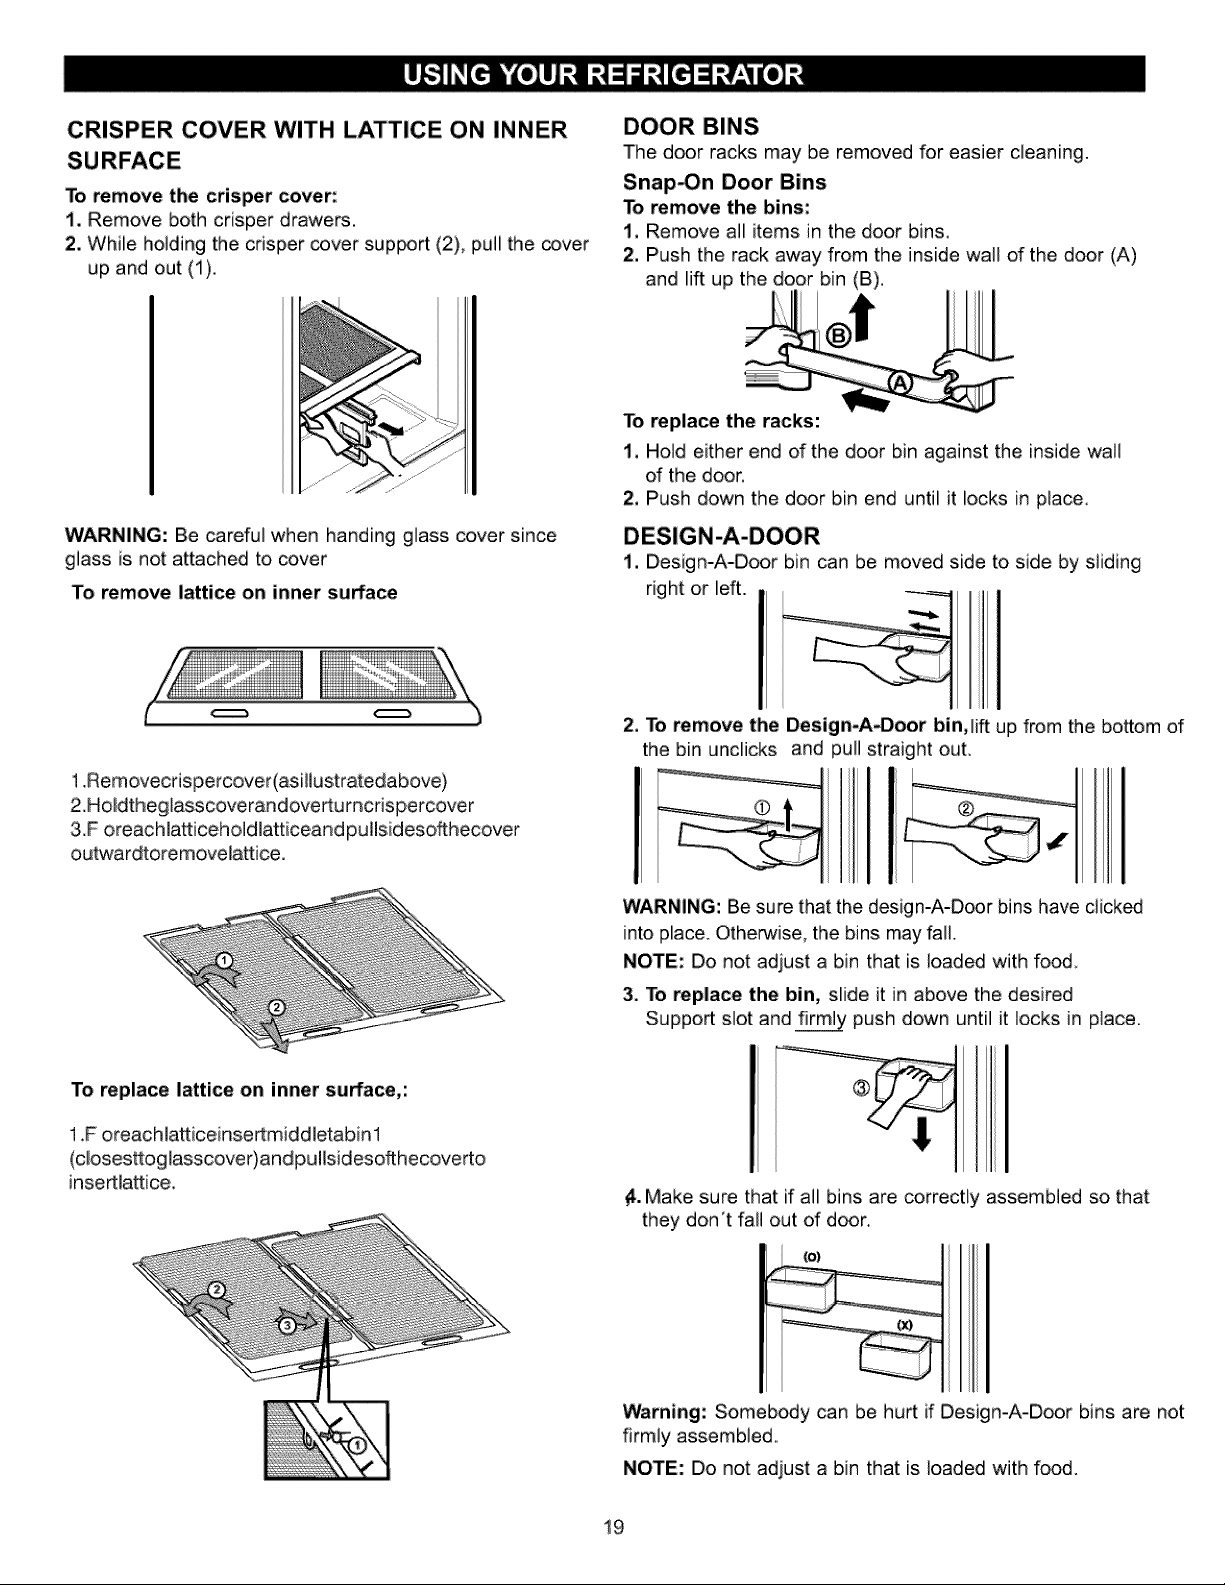
CRISPER COVER WITH LATTICE ON INNER
To remove the crisper cover:
i. Remove both crisper drawers.
2, While holding the crisper _ver support (2), pull the cover
up and out (1).
DOOR BINS
The door racks may be removed for easier cleaning
Snap_n Door Bins
To remove the bins:
1. Remove all items in the door bins.
2. Push the rack away from the inside wall of the door (A)
and lift up the door bin (B)
WARNING: Be careful when handing glass cover since
glass is not attached to cover
To remove lattice on inner surface
To replace the racks:
1. Hold either end of the door bin against the inside wa]I
of the door.
2, Push down the door bin end until it locks in piace.
DESIGN-A-DOOR
1, Design-A-Door bin can be moved side to side by sliding
right or left.
1,Removecdspercover(asillustratedabove)
2.Holdtheg]asscoverandovertumcrispercover
3,.Foreachlatticeholdlatticeand pullsidesofthecover
outwardtoremovela_ice,
2, To remove the Design-A-Door bin, lift up from the bottom of
the bin undicks and pull straight out.
WARNING: Be sure that the design-A-Door bins have clicked
into place. Otherwise, the bins may fall
NOTE: Do not adjust a bin that is loaded with food
3. To replace the bin, slide it in above the desired
Support slot and_ push down until it locks in place
To replace lattice on
1F oreachlatticeinsertmiddletabinl
(closesttoglasscover) andpullsideso_hecoverto
insertlatt[ce,
_. Make sure that if all bins are correctly assembled so that
they don't fall out of door,
(e)
Warning: Somebody can be hurt if Design-A-Door bins are not
firmly assembled.
NOTE: Do no;: adjust a bin that is ]oaded with food.
19
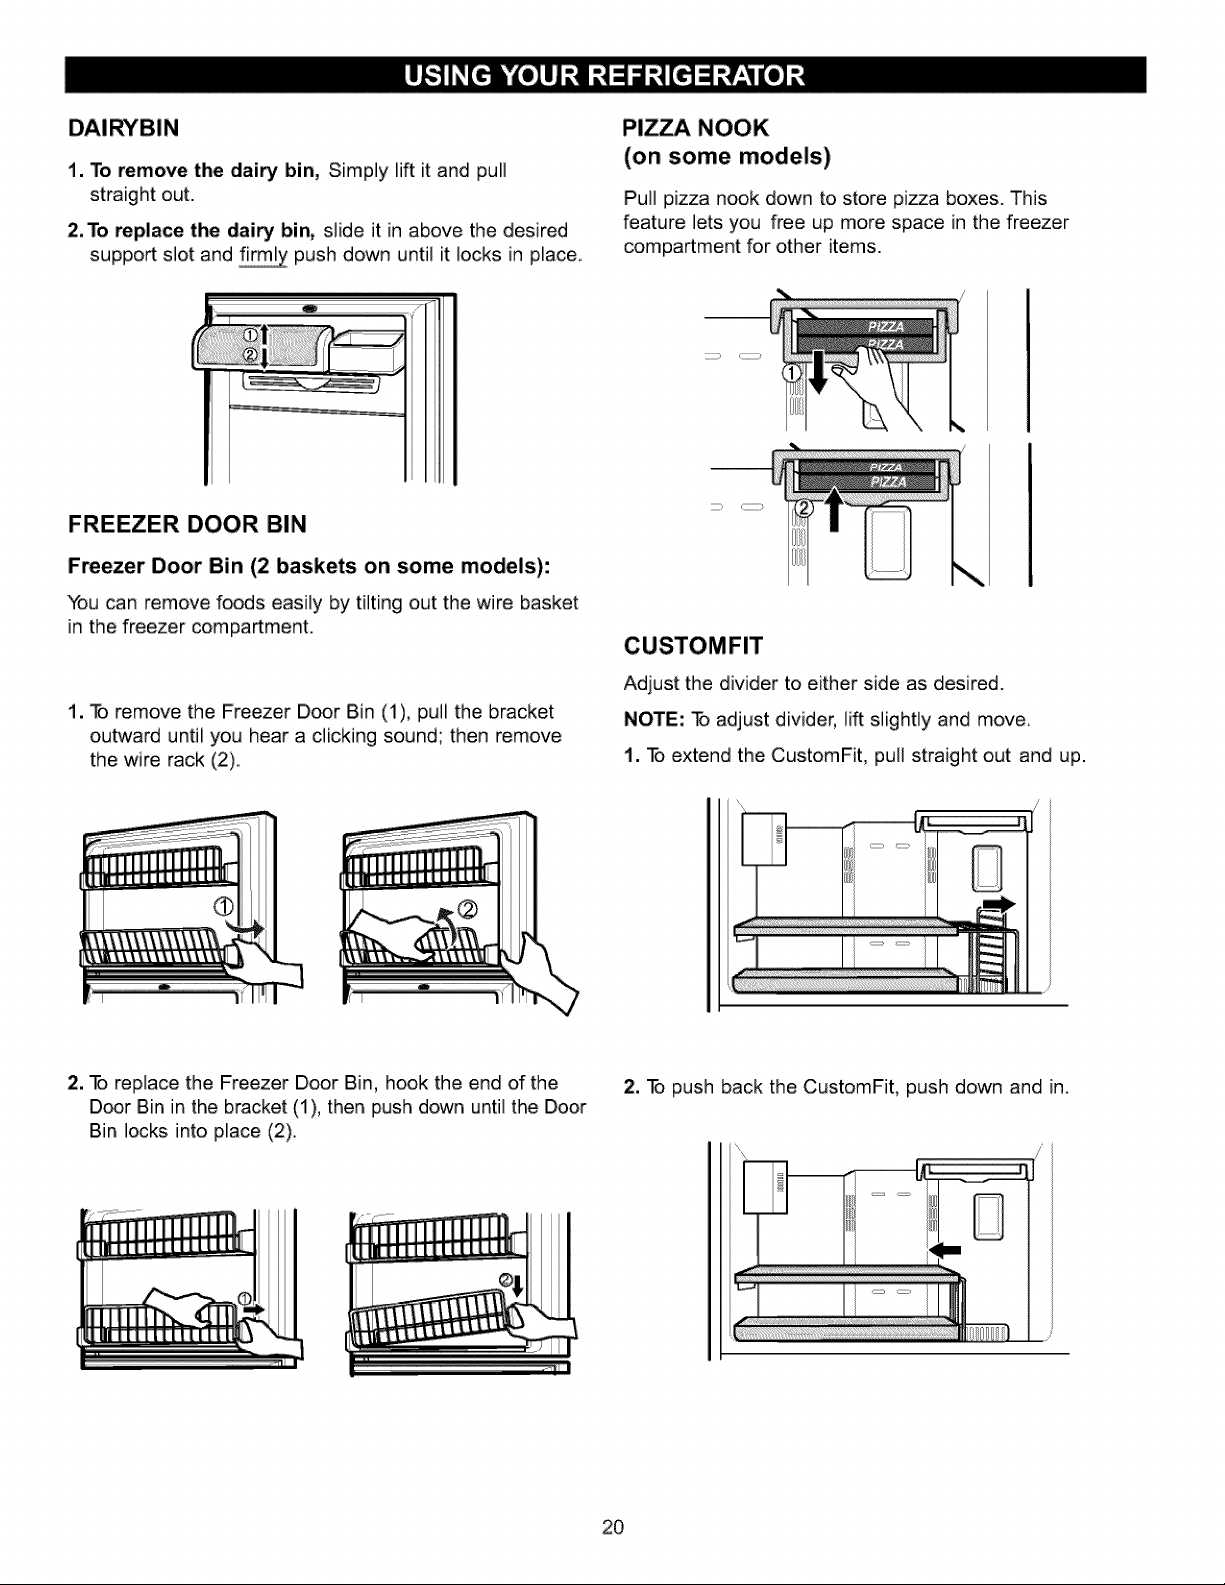
1. To remove the dairy bin, Simply lift it and pull
straight out.
2. To replace the (]airy bin, slide it in above the desired
support slot and f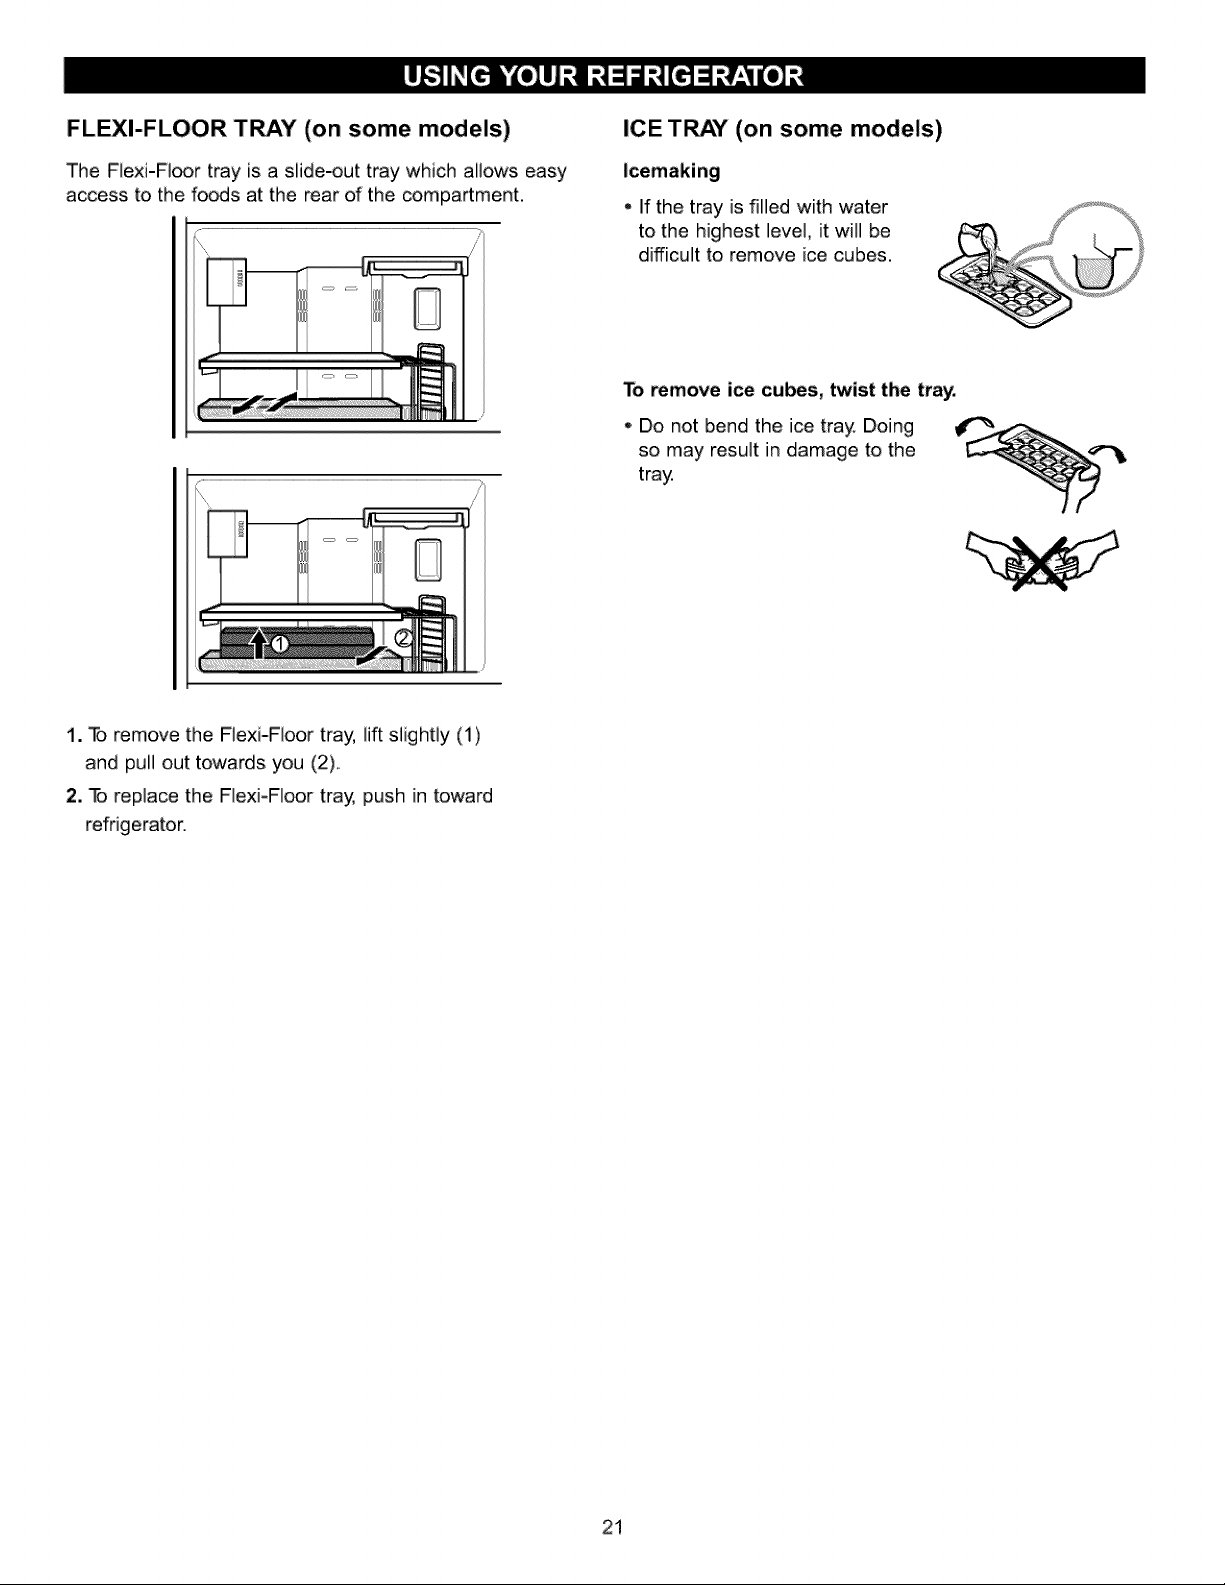
FLEXI-FLOOR TRAY (on some models)
The Flexi-Fi_r tray is a slide-out tray which allows easy
access to the fo_s at the rear of the compartment,
ICE TRAY" (on some models)
, if the tray is filled with water
to the highest ]eve], it will be
difficult to remove ice cubes.
To remove ice cubes, twist the tray.
Do not bend the ice tray Doing
so may result in damage to the
tray
1. To remove the FJexi-Floor tray, lift sJight]y (t)
and pull out towards you (2)..
2. To replace the FlexJ-F]oor tra_ push in toward
refrigerator.
21
Explosion Hazard
Use non-flammable cleaner.
Failure to do so can result in death, explosion or fire.
Both the refrigerator and freezer sections defrost
automatically. However, clean both sections about once
a month to prevent _ors,. Wipe up spills immediately,
GENE_L CLEANING TIPS
, Unplug refrigerator or disconnect power.
•, Remove all removable parts, such as shelves,
crispers, etc.
, Use a clean sponge or soft cloth and a mild detergent in
warm water. Do not use abrasive or harsh cleaners.
•, Hand wash, rinse and dry all surfaces thoroughly.
• Plug in refrigerator or reconnect power.
Waxing external painted metal surfaces helps provide rust
protedion,. Do not wax plastic parts, Wax painted metal
surfaces at least twice a year using appliance wax (or
auto paste wax), Apply wax with a clean, soft cloth,
For produds with a stainless steel exterior, use a clean
sponge or soft cloth and a mild detergent in warm water.
Do not use abrasive or harsh cleaners. Dry thoroughly
with a soft cloth.
INSIDE WALLS (allow freezer to warm up so
cloth won't stick)
To help remove odors, you can wash the inside of the
refrigerator with a mixture of baking soda and warm water.
Mix 2 tablespoons baking soda to 1 quart of water (26 g
soda to 1 liter water.) Be sure the baking soda is
completely dissolved so does it not scratch the surfaces
of the refrigerator.
DOOR LINERS AND GASKETS
Do not use cleaning waxes, concentrated detergents,
bleaches or cleaners containing petroleum on plastic
parts.
PLASTIC PARTS (covers and panels)
Do not use paper towels, window sprays, abrasive
cleansers or flammable fluids. These can scratch or
damage the material.
CONDENSER COILS
Remove base grille. (See the base grille section on
page 11.)
Use a vacuum cleaner with an extended attachment to
clean condenser coils.
"Vacuum coils when dusty or dirty. Coils may need to be
cleaned as often as every other month.
Replace base grille,
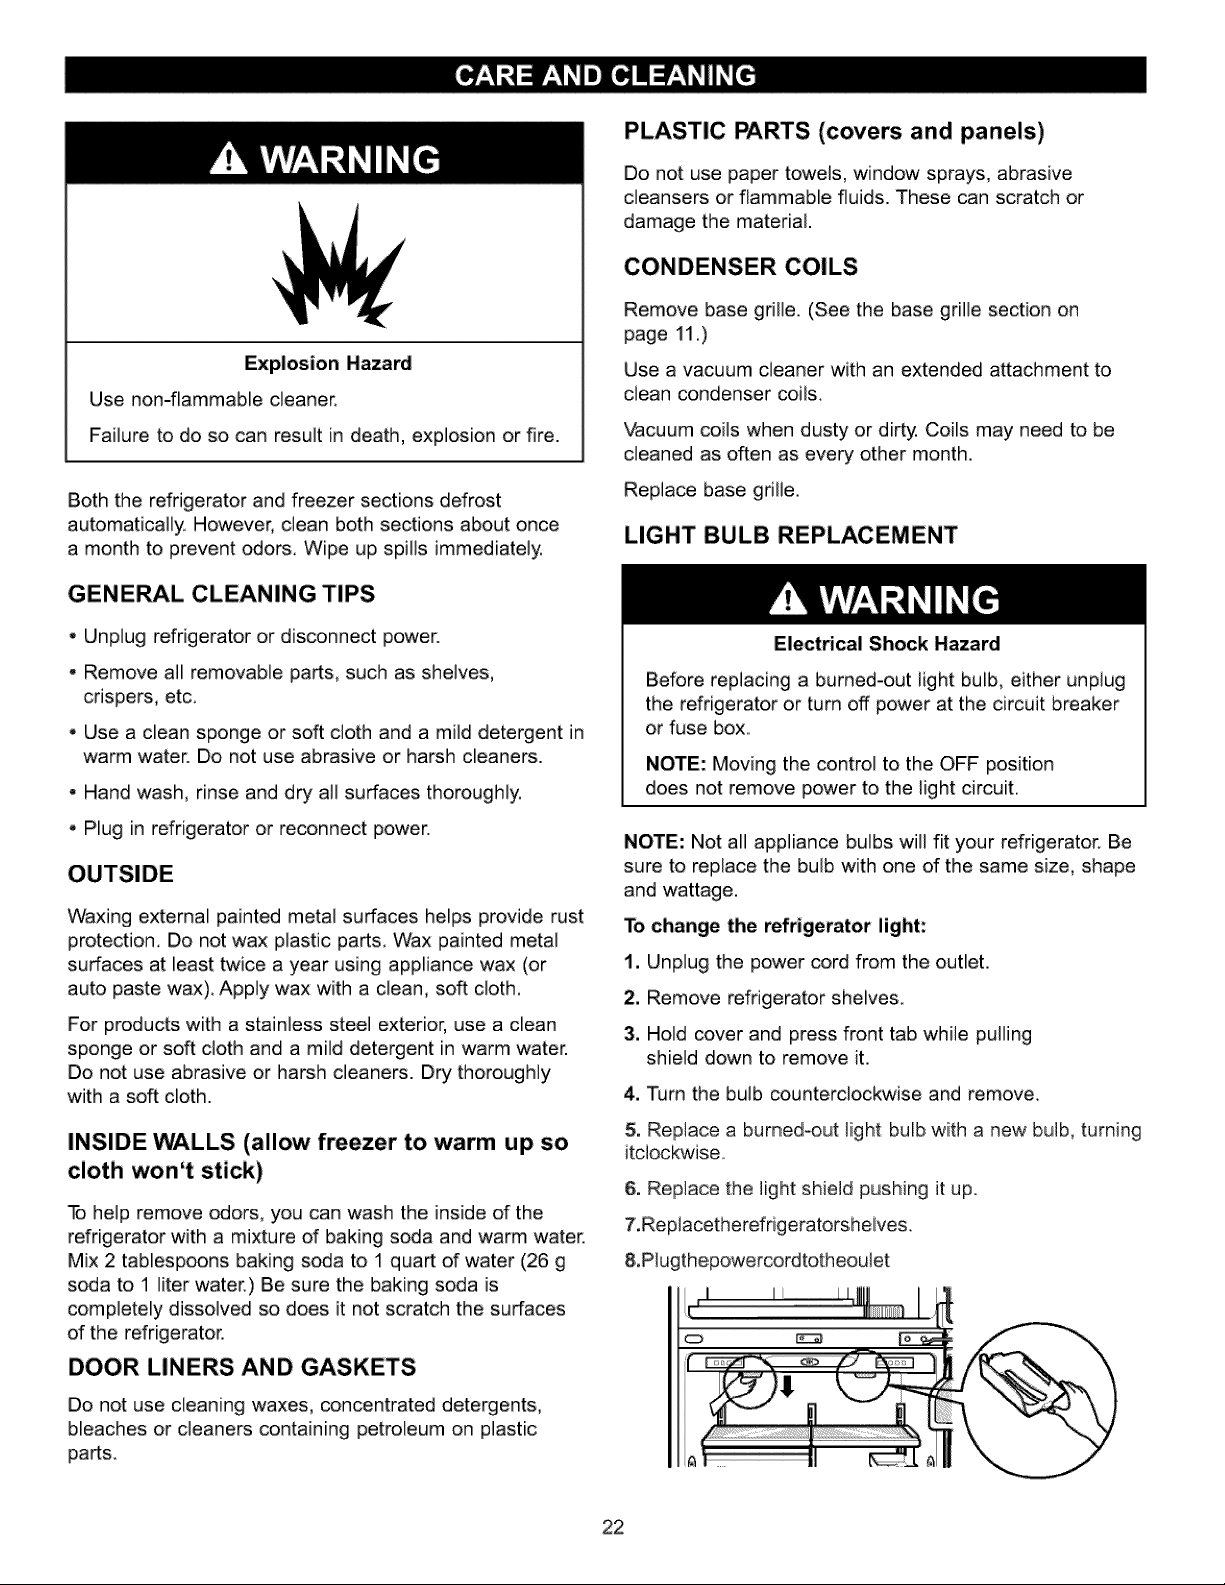
LIGHT BULB REPLACEMENT
Electrical Shock Hazard
Before replacing a burned-out light bulb, either unplug
the refrigerator or turn off power at the circuit breaker
or fuse box,,
NOTE: Moving the control to the OFF position
does not remove power to the light circuit.
NOTE: No;: all appliance bulbs will fit your refrigerator. Be
sure to replace the bulb with one of the same size, shape
and wattage.
1-ochange the refrigerator light:
1. Unplug the power cord from the outlet,
2, Remove refrigerator shelves,
3. Hold cover and press front tab while pulling
shield down to remove it,
4. Turn the bulb counterclockwise and remove,
5. Replace a burned-,out light: bulb with a new bulb, turning
itcJockwise,,
6. Replace the light:s,hie]d pushing it up.
7,Rep]acetherefrigeratorsheives,
8,,P]ugthepowercordtot:heou]et
22

To change the freezer light:
1. Unplug refrigerator or disconnect power.
2. Remove the light shield and remove bulb.
3. Replace with a 40 watt appliance bulb and replace light
shield.
4o Plug in refrigerator or reconnect power.
r'
/Pressdown
right:and
ieftside
L
POWER INTERRUPTIONS
If the electricity in your house goes off, call the power
company and ask how long it will be off,
1. if the power will be out for 24 hours or less, keep
both refrigerator doors closed to help foods stay
cold and frozen.
2. If the power will be out for more than 24 hours:
a) Remove all frozen food and store it in a frozen
food locker.
OR
b) Place 2 Ibs (ca. lkg) of dry ice in the freezer for
every cubic foot (28 L) of freezer space. This will
keep the food frozen for two to four days. While
handling dry ice, wear gloves to protect your hands
from ice burns.
OR
c) if neither a food locker nor dry ice is available,
consume or dispose of food at once.
REMEMBER: In a power failure, a full freezer stays
cold longer than a partially filled one. A freezer full of
meat stays cold longer than a freezer full of baked
goods. If you see that food contains ice crystals, it may
be safely refrozen, although the quality and flavor may
be affected. If the condition of the food is poor, or if you
feel it is unsafe, dispose of iL.
WHEN YOU GO ON VACATION
If you choose to leave the refrigerator on while you
are away, follow these steps to prepare your refrigerator
before you leave.
t, Use up any perishables and freeze other items.
2. Empty the ice bin.
If you choose to turn the refrigerator off before you
leave, follow these steps,
1. Remove all food from the refrigerator.
2, Depending on your m_el, set the thermostat control
(refrigerator control) to OFR See the °Setting the
Controls" section,
.
4,
Clean refrigerator, wipe it and dry well.
Tape rubber or wo_ blocks to the tops d both doors to
prop them open far enough for air to get in This stops
_or and mold from building up.
WHEN YOU MOVE
When you are moving },our refrigerator to a new home,
follow these steps to prepare it for the move.
.
w
Remove all food from the refrigerator and pack all
frozen food in dry ice.
Depending on your m_el, turn the thermostat control
(refrigerator controi) to OFE See the °Setting the
Controls" section.
3. Unplug the refrigerator.
4. Empty water from the defrost pan.
5. Clean, wipe and dry thoroughly.
6. Take out all removable parts, wrap them well and tape
them together so they don't shift and rattle during the
move..
.
am
Depending on the model, raise the front of the
refrigerator so it rolls more easily OR screw in the
leveling legs all the way so they don't scrape the floor.
See the "Door Closing" section.
Tape the doors shut and tape the power cord to the
refrigerator cabinet.
When you get to },our new home, put everything back
and refer to the "lnstallingYour Refrigeratod section for
preparation instructions.
23
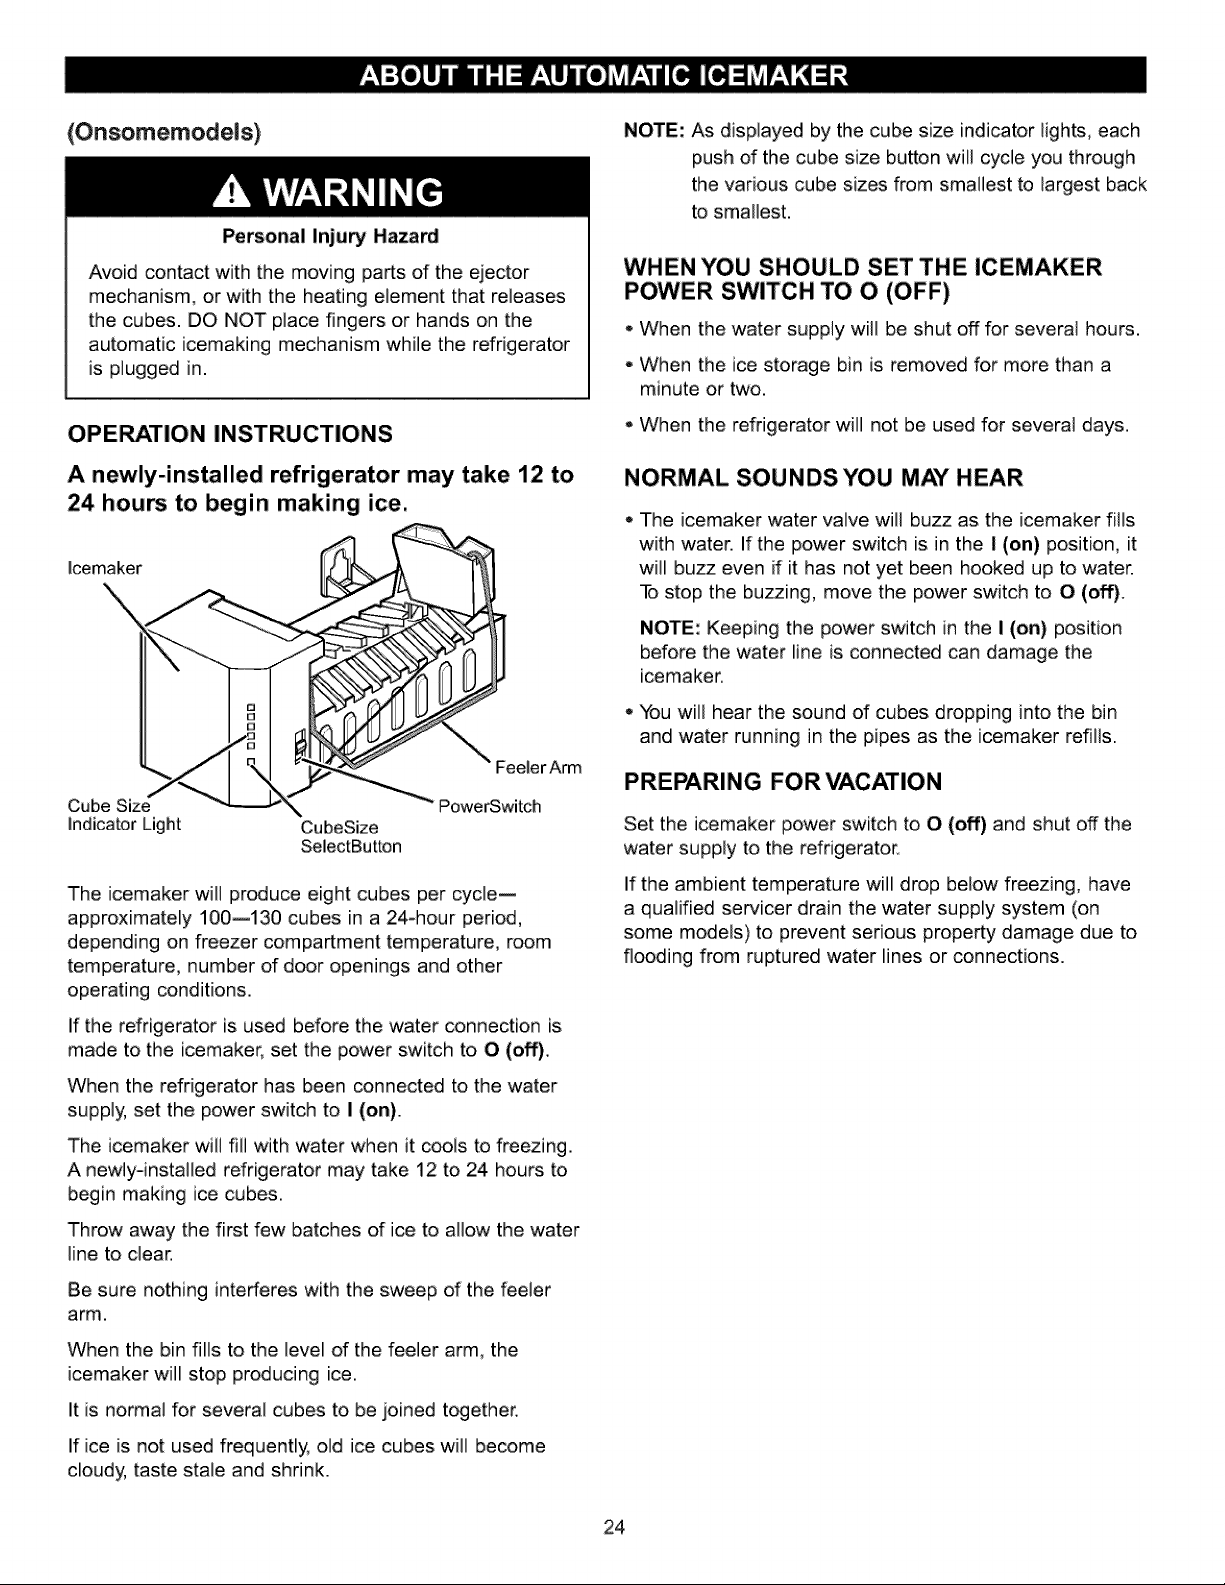
(Onsomemodeis)
Personal Injury Hazard
Avoid contact with the moving parts of the ejector
mechanism, or with the heating element that releases
the cubes. DO NOT place fingers or hands on the
automatic icemaking mechanism while the refrigerator
is plugged in.
OPERATION INSTRUCTIONS
A newly-installed refrigerator may take 12 to
24 hours to begin making ice,
lcemaker
Cube Size
indicator Light CubeSize
SelectButLon
FeelerArm
PowerSwitch
The icemaker will produce eight cubes per cycle--
approximately 100--130 cubes in a 24-hour period,
depending on freezer compartment temperature, room
temperature, number of door openings and other
operating conditions.
If the refrigerator is used before the water connection is
made to the icemaker, set the power switch to O (off),
When the refrigerator has been connected to the water
supply, set the power switch to I (on).
The icemaker will ill] with water when it c_ls to freezing
A newiyqnstalied refrigerator may take 12 to 24 hours to
begin making ice cubes,
Throw away the first few batches of ice to allow the water
line to clear.
Be sure nothing interferes with the sweep of the feeler
arm.
When the bin fills to the level of the feeler arm, the
icemaker will stop producing ice.
It is normal for several cubes to be joined t_ether..
If ice is not used frequently, old ice cubes will become
cloudy, taste stale and shrink.
NOTE: As displayed by the cube size indicator iights, each
push of the cube size button will cycle you through
the various cube sizes from smallest to iargest back
to smallest.
WHEN YOU SHOULD SET THE ICEMAKER
POWER SWITCH TO O (OFF)
* When the water supply will be shut off for several hours.
- When the ice storage bin is removed for more than a
minute or two,
When the refrigerator will not be used for several days.
NORMAL SOUNDS YOU MAY HEAR
The icemaker water valve will buzz as the icemaker fills
with water. If the power switch is in the I (on) position, it
will buzz even if it has not yet been hooked up to water.
To stop the bu_ing, move the power switch to 0 (off).
NOTE: Keeping the power switch in the I (on) position
before the water line is connected can damage the
icemaker.
You will hear the sound of cubes dropping into the bin
and water running in the pipes as the icemaker refills.
PREPARING FOR VACATION
Set the icemaker power switch to O (off) and shut off the
water supply to the refrigerator.
If the ambient temperature will drop below freezing, have
a qualified servicer drain the water supply system (on
some models) to prevent serious property damage due to
flooding from ruptured water lines or connections.
24
BEFORE YOU BEGIN
Un]es.sitisiperformedbySearsservicethiswat:erline
instal]at:ion[s.notwarranted!bytherdrigeratororicemaker
manufacturer
Followt:hes.einstructionscareful]ytominimizetheriskof
expensivewaterdamage,
Water hammer (water banging in the pipes) in house
plumbing can cause damage to refrigerator parts and lead
to water leakage or fl_ding. Call a qualified plumber to
correct water hammer before installing the water supply
line to the refrigerator.
To prevent burns and product damage, do not hook up
the water line to the hot water line.
if you use your refrigerator before connecting the water
line, make sure the icemaker power switch is in the O
(off) position.
Do not install the icemaker tubing in areas where
temperatures fall below freezing.
When using any electrical device (such as a power
drill) during installation, be sure the device is double-
insulated or grounded in a manner to prevent the hazard
of electric shock, or is battery-powered.
All installations must be in accordance with local plumbing
code requirements.
WHAT YOU WILL NEED
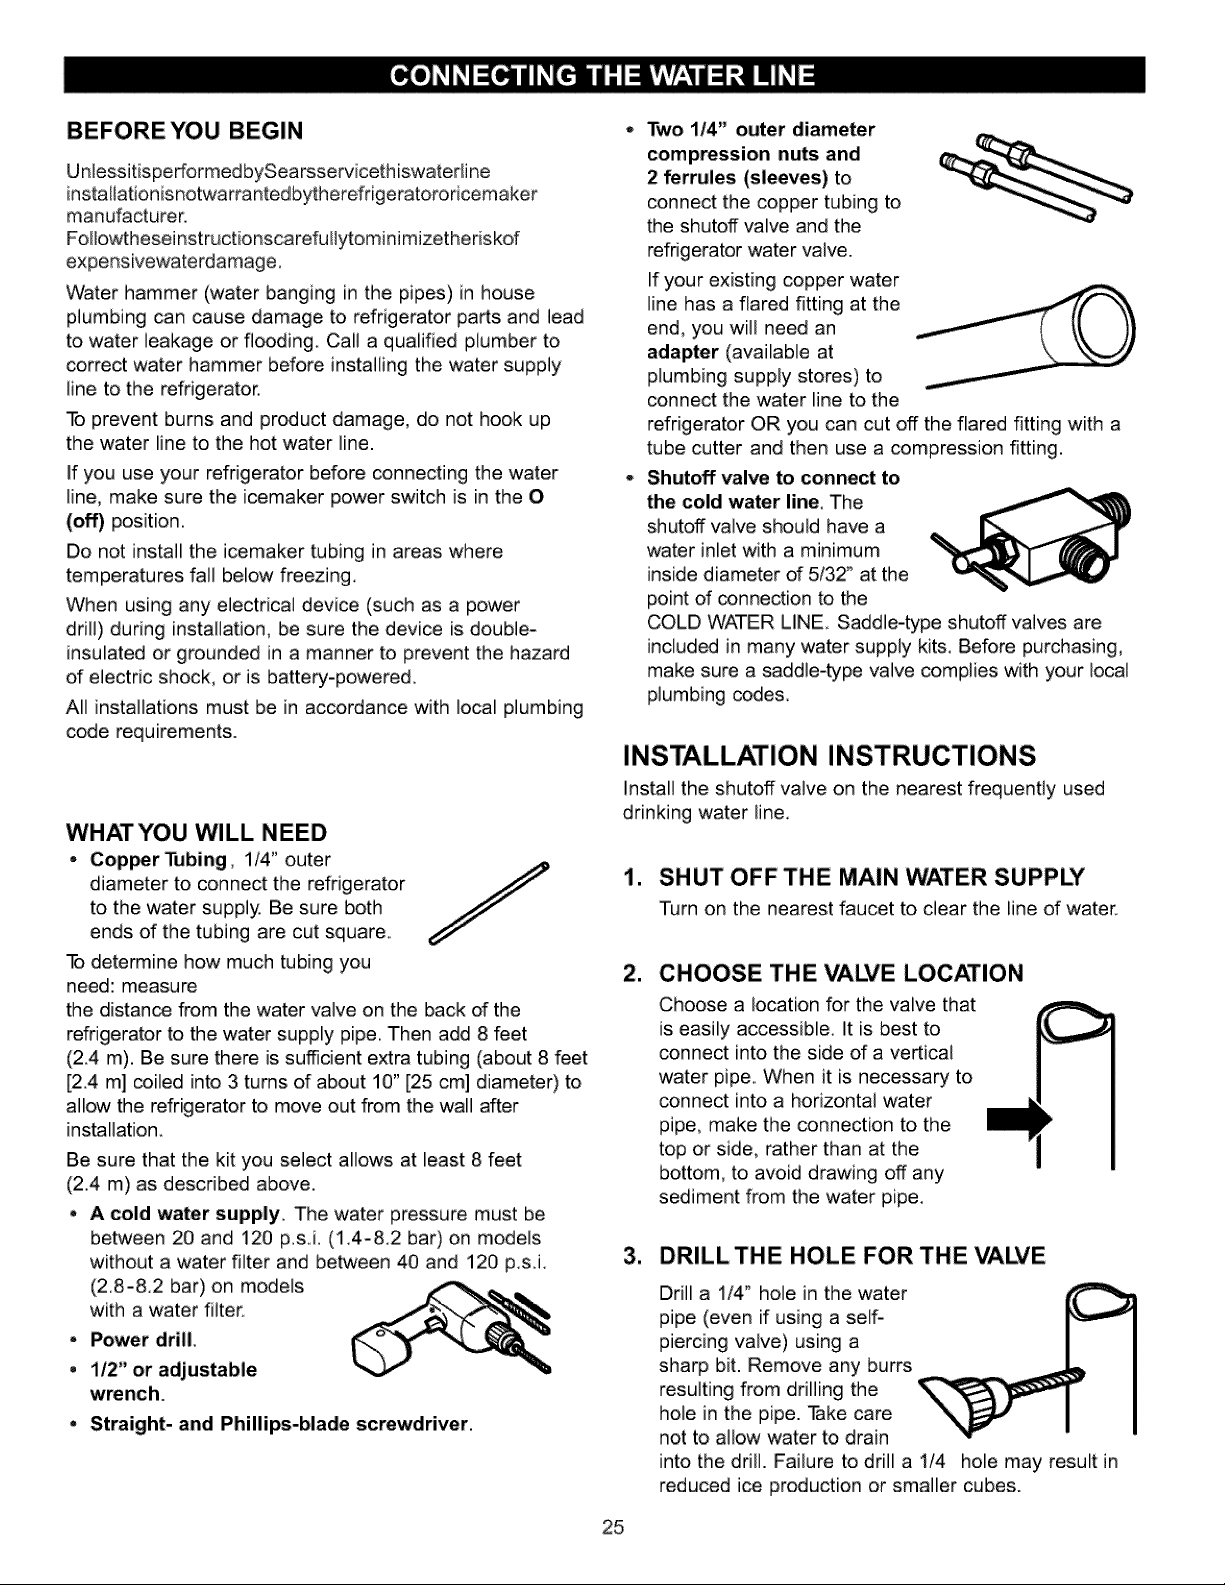
• Cop_r'PJbing, 1/4" outer
diameter to connect the refrigerator
to the water supply. Be sure both
ends of the tubing are cut square.
To determine how much tubing you
need: measure
the distan_ from the water valve on the back of the
refrigerator to the water supply pipe. Then add 8 feet
(2.4 m). Be sure there is sufficient extra tubing (about 8 feet
[2.4 m] coiled into 3 turns of about 10" [25 cm] diameter) to
allow the refrigerator to move out from the wall after
installation.
Be sure that the kit you select allows at least 8 feet
(2.4 m) as described above.
• A cold water supply, The water pressure must be
between 20 and t20 p,sJ, (1.4-8,2 bar) on models
without a water filter and between 40 and 120 p.s,L
(2,8-8.2 bar)on models
with a water filter..
• Power drill,
= il2" or adjustable
wrench.
- Straight- and Phillips-blade screwdriver.
Two i/4" outer diameter
compression nuts and
2 ferrules (sleeves) to
connect the copper tubing to
the shutoff valve and the
refrigerator water valve.
If your existing copper water
line has a flared fitting at the
end, you will need an
adapter (available at
plumbing supply stores) to
connect the water line to the
refrigerator OR you can cut off the flared fitting with a
tube cutter and then use a compression fitting.
Shutoff valve to connect to
the cold water line, The
shutoff valve should have a
water inlet with a minimum
inside diameter of 5/32" at the
point of _nnection to the
COLD WATER LINE. Saddle-type shutoff valves are
included in many water supply kits. Before purchasing,
make sure a saddle-type valve complies with your iocat
plumbing codes.
INSTALLATION INSTRUCTIONS
Install the shutoff valve on the nearest frequently used
drinking water line.
1. SHUT OFF THE MAIN WATER SUPPLY
Turn on the nearest faucet to clear the line of water_
CHOOSE THE VALVE LOCATION
Choose a location for the valve that
is easily accessible, it is best to
connect into the side of a vertical
water pipe. When it is necessary to
connect into a horizontal water
pipe, make the connection to the
top or side, rather than at the
bottom, to avoid drawing off any
sediment from the water pipe.
3. DRILLTHE HOLE FOR THE VAI2¢E
Drill a 1/4_ hole in the water
pipe (even if using a self-
piercing valve) using a
sharp bit. Remove any burrs
resulting from drilling the
hole in the pipe. Take care
not to allow water to drain
into the drill. Failure to drill a 1/4 hole may result in
reduced ice production or smaller cubes.
25
INSTALLATION INSTRUCTIONS
(CONTINUED)
=
FASTEN THE SHUTOFF VAI2¢E
Fasten the shutoff valve to the cold water pipe with
the pipe damp.
PipeClamp --
7, CONNECT THE TUBING TO THE MALYE
Place the compression nut and ferrule (sleeve)
for copper tubing onto the end of the tubing and
connect it to the shutoff valve. Make sure the tubing is
fully inserted into the valve. -Iqghten the compression
nut securely.
Saddle-Type Compression
Shutoff Valve Nut
m
Saddle-Type _ Vertical Cold
Shutoff Valve Water Pipe
NOTE: Commonwealth of Massachusetts Plumbing
Codes 248CMR shall be adhered to. Saddle valves
are illegal and use is not permitted in Massachusetts.
Consult with your licensed plumber.
TIGHTEN THE PIPE CLAMP
-Iqghten the clamp screws until the sealing washer
begins to swell.
NOTE: Do not overtighten or you may crush
the tubing, Washer
Pipe Clamp End
ClampScrew
Packing --
Nut
Outlet Ferrule (sleeve)
Valve
NOTE: Commonwealth of Massachusetts Plumbing
Codes 248CMR shall be adhered to. Saddle vaives
are illegal and use is not permitt_ in Massachusetts.
Consult with your licensed plumber.
8. FLUSH OUT THE TUBING
Turn the main water supply on
and flush out the tubing until the
water is clear.
Shut the water off at the water
valve after about one quart (1
liter) of water has been flushed
through the tubing.
6. ROUTE THE TUBING
Route the tubing between the cold water line and the
refrigerator.
Route the tubing through a hole drilled in the wall or
floor (behind the refrigerator or adjacent base cabinet)
as close to the wall as possible.
NOTE: Be sure there is sufficient extra tubing (about
8 feet [244 cm] coiled into 3 turns of about 10" [25
cm] diameter) to allow the refrigerator to move out
from the wall after installation.
26
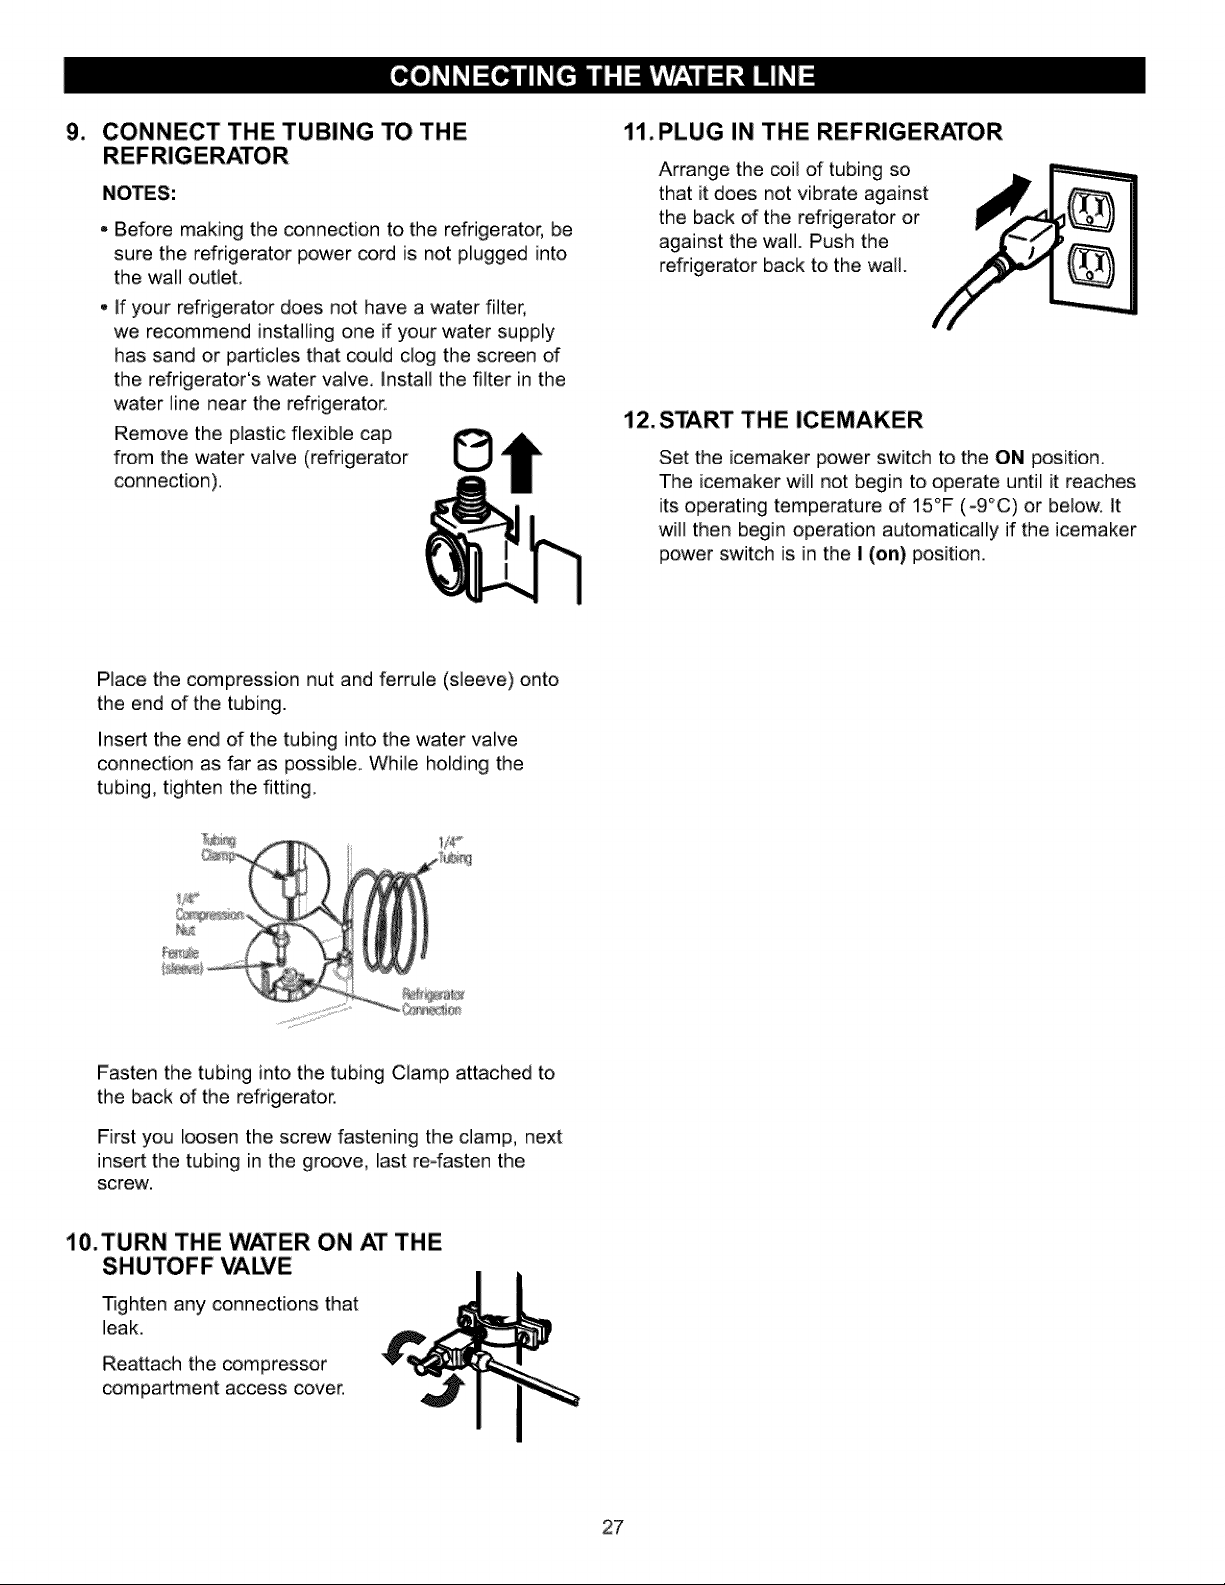
9. CONNECT THE TUBING TO THE
NOTES:
Before making the connedion to the refrigerator, be
sure the refrigerator power cord is not plugged into
the wall outlet,
if your refrigerator does not have a water filter,
we recommend installing one if your water supply
has sand or particles that could clog the screen of
the refrigerator's water valve, Install the filter in the
water line near the refrigerator,
Remove the plastic flexible cap
from the water valve (refrigerator
connection).
1i. PLUG IN THE REFRIGERATOR
Arrange the coil of tubing so
that it does not vibrate against
the back of the refrigerator or
against the wall. Push the
refrigerator back to the wall.
12. START THE ICEMAKER
Set the icemaker power switch to the ON position.
The icemaker will not begin to operate until it reaches
its operating temperature of 15°F (-9°C) or below, it
will then begin operation automatically if the icemaker
power switch is in the I (on) position.
Place the compression nut and ferrule (sleeve) onto
the end of the tubing.
Insert the end of the tubing into the water valve
connedion as far as possible, While holding the
tubing, tighten the fitting,
Fasten the tubing into the tubing Clamp attached to
the back of the refrigerator.
First you loosen the screw fastening the clamp, next
insert the tubing in the groove, last reofasten the
screw.
10.TURN THE WATER ON AT THE
SHUTOFF VALVE
Tighten any connections that
leak.
Reattach the compressor
compartment access cover,
27
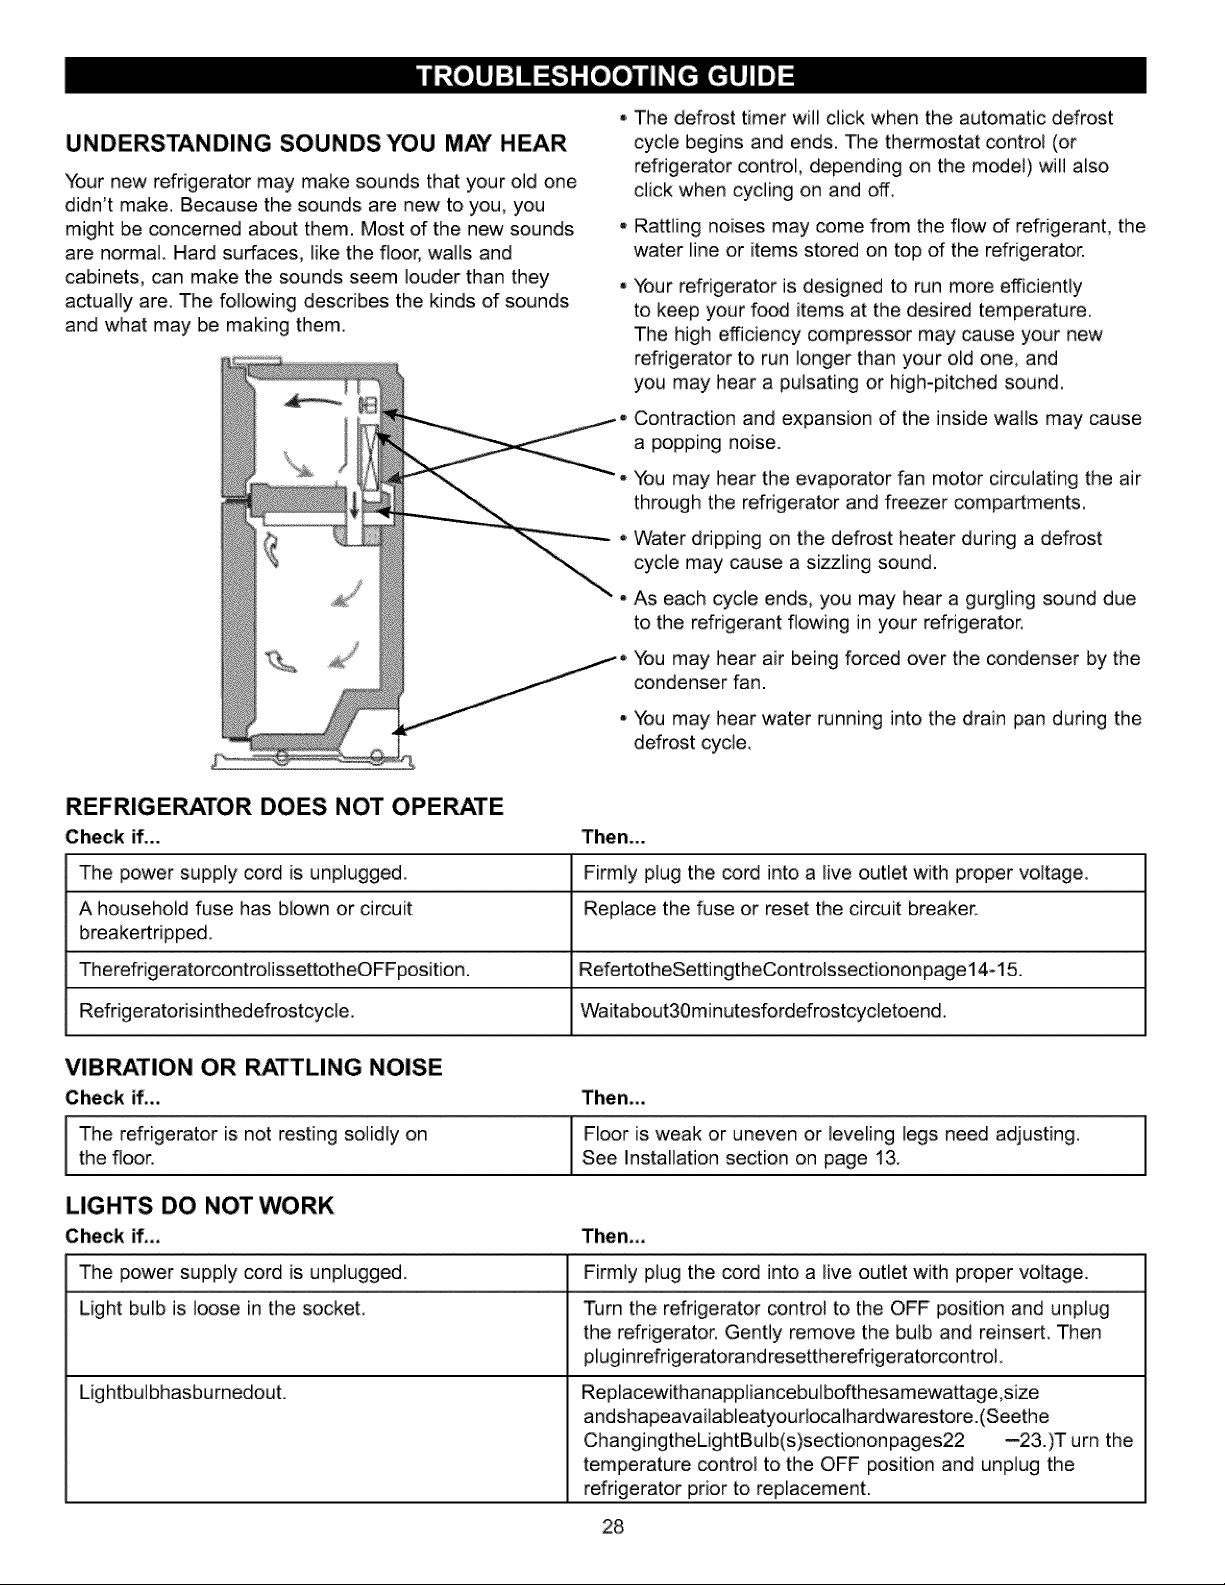
UNDERSTANDING SOUNDS YOU MAY HEAR
Your new refrigerator may make sounds that your old one
didn't make. Because the sounds are new to you, you
might be concerned about them. Most of the new sounds
are normal Hard surfaces, like the floor, wails and
cabinets, can make the sounds seem louder than they
actually are. The following describes the kinds of sounds
and what may be making them.
The defrost timer will dick when the automatic defrost
cycle begins and ends, The thermostat controi (or
refrigerator control, depending on the mode]) wii] aiso
click when cycling on and off.
Railing noises may come from the flow of refrigerant, the
water line or items stored on top of the refrigerator.
Your refrigerator is designed to run more efficientiy
to keep your food items at the desired temperature,
The high efficiency compressor may cause your new
refrigerator to run longer than your old one, and
you may hear a pulsating or high-pitched sound,
Contraction and expansion of the inside wails may cause
a popping noise.
You may hear the evaporator fan motor circulating the air
through the refrigerator and freezer compartments,
Water dripping on the defrost heater during a defrost
cycle may cause a sizzling sound.
As each cycle ends, you may hear a gurgling sound due
to the refrigerant flowing in your refrigerator,
You may hear air being forced over the condenser by the
condenser fan.
You may hear water running into the drain pan during the
defrost cycie,
REFRIGERATOR DOES NOT OPERATE
Check if...
The power supply cord is unplugged.
A household fuse has blown or circuit
breakertripped,
TherefrigeratorcontrolissettotheOFFposition.
Refrigeratofisinthedefrostcycle.
Then...
Firmly plug the cord into a live outlet with proper voltage.
Replace the fuse or reset the circuit breaker.
RefertotheSettingtheControissectiononpage14-15.
Waitabout30m inutesfordefrostcycietoend.
Then.,,
Floor is weak or uneven or leveling legs need adjusting.
See Installation section on page 13.
VIBRATION OR RATTLING NOISE
Check if,,,
I The refrigerator is not resting solidly onthe floor.
LIGHTS DO NOT WORK
Check if,,,
The power supply cord is unplugged.
Light bulb is loose in the socket,
Then,,,
Firmly plug the cord into a live outlet with proper voltage.
Turn the refrigerator control to the OFF position and unpiug
the refrigerator. Gently remove the bulb and reinsert. Then
pluginrefrigeratorandresettherefrigeratorcontroL
Lightbuibhasburnedout. Replacewithanapp]iancebuibofthesamewattage,size
andshapeavailableatyourlocalhardwarestore.(Seethe
ChangingtheLightBuib(s)sectiononpages22 --23.)T urn the
temperature control to the OFF position and unplug the
refrigerator prior to replacement.
28
I
COMPRESSOR MOTOR SEEMS TO RUN TOO MUCH
Check if... Then...
The refrigerator that was replaced was an
older model.
The room temperature is hotter than normal
The door is opened often or a large amount
of food has just been added.
Modern refrigerators with more storage space require
more operating time.
The motor will run longer under warm conditions. At normal
roomtem peratu res,expectyou rmotortorunabout40%to
80%ofthetime Underwa rmerconditions,expectittorun
evenmoreoften.
Adding food and opening the door warms the refrigerator.
It is normal for the refrigerator to run longer in order to cool
therefrigeratorbackdown. Addingalargeamou ntoffood
warmstherefrigerator .SeetheFo_StorageGuidesection
onpage 16. Inordertoconserceenergy ,trytogeteverything
youneedoutoftherefrigeratoratonce,keepfoodorganized
soitiseasytofi ndandclosethedoorass_nasthefo_
isremoved.
The refrigerator was recently plugged in and The refrigerator will take up to 24 hours to cool
the refrigerator control was set correctly, completely.
The refrigerator control is not set correctly for the See the Setting the Controls section on page 14-15.
surroundingcondJtions.
The doors are not closed completely. Push the doors firmly shut. if they will not shut all the way, see
°Doors will not close completely" below.
The condenser coils are dirty. This prevents air transfer and makes the motor work harder.
Clean the condenser coils. Refer to the Care and Cleaning
section on page 22.
Then...
See the Installation section on page 13 to level refrigerator.
Rearrangefoodcontainerstocieardooranddoorshelves.
DOORS WILL NOT CLOSE COMPLETELY
Check if.,,
The refrigerator is not level.
Foodpackagesareblockingthedooropen.
Theicebin,crispercover ,pans,shelves,doorbins
orbasketsareoutofposition.
The gaskets are sticking.
Therefrigeratorwobblesorseemsu nstable.
Thedoorswereremovedduringproductinstallation
andnotproperlyreplaced..
Pushbinsallthewayinandputcrispercover ,pans,shelves
and basketsintotheircorrectpositions.SeetheUsing Your
Refrigeratorsectiononpages17 -21.
Clean gaskets and the surface that they touch Rub a thin coat
ofparaf finwaxonthegasketsaftercleaning.
Leveltherefngerator .RefertotheD_rClosingand Alignment
section on page 13.
RemoveandreplacethedoorsaccordingtotheRemoving,
Reversing(optJonaJ)andReplacingRefrigeratorDoorssection
onpagest t-12, or call a qualified service technician
FROST OR ICE CRYSTALS ON FROZEN FOOD
Check if.,, Then,,,
The door is not closing properly. See "Doors will not close completely" above.
The door is opened often. When the door is opened, warm, humid air is allowed in
the freezer resulting in frost.
29
ICE HAS OFF-TASTE OR ODOR
Check if.,, Then,,,
The icemaker was recently installed. Discard first few batches of ice to avoid discolored or
off-flavored ice.
Theicehasbeenstoredfortoolong, ThrowawayoldiceandmakenewsuppLy
Thefoodhasnotbeenwrappedtightlyin Rewrapfoodssinceodorsmaymigratetotheiceiffood
either compartment, is not wrapped properly.
The water supply contains minerals such as sulfur,, A filter may need to be installed to eliminate taste and
odorproblems,
Theinteriorofrefrigeratorneedscleaning. SeeCareandCleaningsectiononpage22.
Icestoragebinneedscleaning, Emptyandwashbin,Discardoldcubes.
THERE IS WATER IN THE DEFROST DRAIN PAN
Check if.,, Then,,,
The refrigerator is defrosting. The water will evaporate. It is normal for water to drip into the
defrostpan.
Itismorehumidthannormal, Expectthatthewatefinthedefrostpanwilltakelongerto
evaporate. Thisisnormalwhenitishotorh umid
THE REFRIGERATOR SEEMS TO MAKE TOO
Check if...
The sounds may be normal for your refrigerator,
MUCH NOISE
Then...
Refer to the Understanding Sounds You May Hear section on 1
page 28,
1
THE ICEMAKER !S NOT PRODUCING ICE OR ICE CUBES ARE FREEZING TOO SLOWLY
Check if,,, Then,,,
I
The freezer temperature is cold enough to produce ice t
1
Door]eftopen.
/
Wait 24 hours after hook-up for ice production. See the Setting /
theControlssectiononpage14-15.
t
Checktoseeifsomethingisholdingdooropen.
CUBES PRODUCED BY ICEMAKER ARE TOO SMALL
Check iL, Then,,,
Smaller cube size level is selected, Select larger cube size using cube size selector.
Water shutoff valve connecting refrigerator to water Call a plumber to clear the valve.
line may be clogged.
THE DOORS ARE DIFFICULT TO OPEN
Check if,,, Then,,,
Clean gaskets and the surfaces that they touch. Rub a thin
coat of paraffin wax on the gaskets following cleaning.
The gaskets are dirty or sticky
The door is reopened within a short time after having
been opened.
When you open the door, warmer air enters the refrigerator.
As the warm air cools, it can create a vacuum. If the door is
hard to open, wait 5 minutes to allow the air pressure to
equalize, then see if it opens more easily.
3O
AUTOMATIC ICEMAKER DOES NOT WORK
Check if.,,
lcemaker power switch in the O (oft') position,
Water supply turned off or not connected.
Freezercom partmenttoowarm,
Pi]edupcubesinthestoragebincausetheicemaker
toshutof f.
Then,,,
Move the switch to the I (on) position_
See the Connecting the Water Line section on page 25.
Wait24hou rsforthefreezertoreachitsidea]tem peratu re,
Leve]cu besbyhand.
TEMPERATURE IS TOO WARM OR THERE IS INTERIOR MOISTURE BUILDUP
Check if... Then...
The air vents are blocked,, Cold air circulates
from the freezer to the flesh fo_ section and
back again through air vents in the wall dividing
the two sections,
Thedoorsareopenedoften.
Thecontro]isnotsetcorrectlyforthesurrounding
cond itions,
Locate air vents by using your hand to sense airflow and
move all packages that block vents and restrict airfiow, Refer
to lcebeam Door Cooling On Page 14 for the location ofair
vents.
Whenthedoodsopened,warmhumidairisallowedinto
therefdgerator. Themorethed_risopened,thefasterthe
humiditybuildsup,andthemorewarmairtherefrigerator
mustcool. Inordertokeeptherefrigeratorcool,trytoget
everythingyouneedoutoftherefrigeratoratonce,keep
foodorganizedsoitiseasytofi ndanddosethedooras
soonast hefoodisremoved.
RefertotheSettingtheControlssectiononpage14-15.
Wait24hoursfortemperaturestostabilizeorevenout.lfthe
tem peratu reistooco]dortoowarm,movethedia]one
numberatatime..
A largeamountoffoodhasjustbeenadded Addingfoodwarmstherefdgerator .Itcantakeafewhours
totherefrigeratororfreezer fortherefrigeratortoretu rntonormaltemperature.
Thefoodisnotpackagedcorrectly Wrapfoodtig ht]yandwipeof fdampcontainerspfiorto
storingintherefrigeratortoavoidmoistu reaccum ulation If
necessary0repackagefoodaccordingtotheguidelines[nthe
Fo_StorageGuidesectiononpage16.
Thedoorsarenotdosingcomplete]y See "Doors will not close completely _ on page 29.
The weather is humid, In humid weather, air carries moisture into refrigerator
whend_rsareopened,
A self-defrostcydewascompleted. Itisnorma]ford ropletstoformonthebackwallafterthe
refrigeratorself-defrosts.
31

32:

33

L_ ® @s