INSTALLATION INSTRUCTIONS FOR PART 95-3304 or 99-3304
ApplicAtions
METRA. The World’s best kits.
™
metraonline.com1-800-221-0932
© COPYRIGHT 2004-2013 METRA ELECTRONICS CORPORATION
REV. 11/1/2013 INST-3304
CAUTION: Metra recommends disconnecting the
negative battery terminal before beginning any
installation. All accessories, switches, and especially
air bag indicator lights must be plugged in before
reconnecting the battery or cycling the ignition.
NOTE: Refer to the instructions included with the
aftermarket radio.
WiRinG & AntEnnA connEctions (sold separately)
Wiring Harness:
•GMOS-01-GMOnStar&chimeharness2002-up
•GMOS-04-GMOnStar&chimeandampharness
2002-up
Antenna Adapter:
•40-GM10-GMantennaadapter1988-up
•Panelremovaltool•Phillipsscrewdriver
•Socketwrench
tools REQUiRED
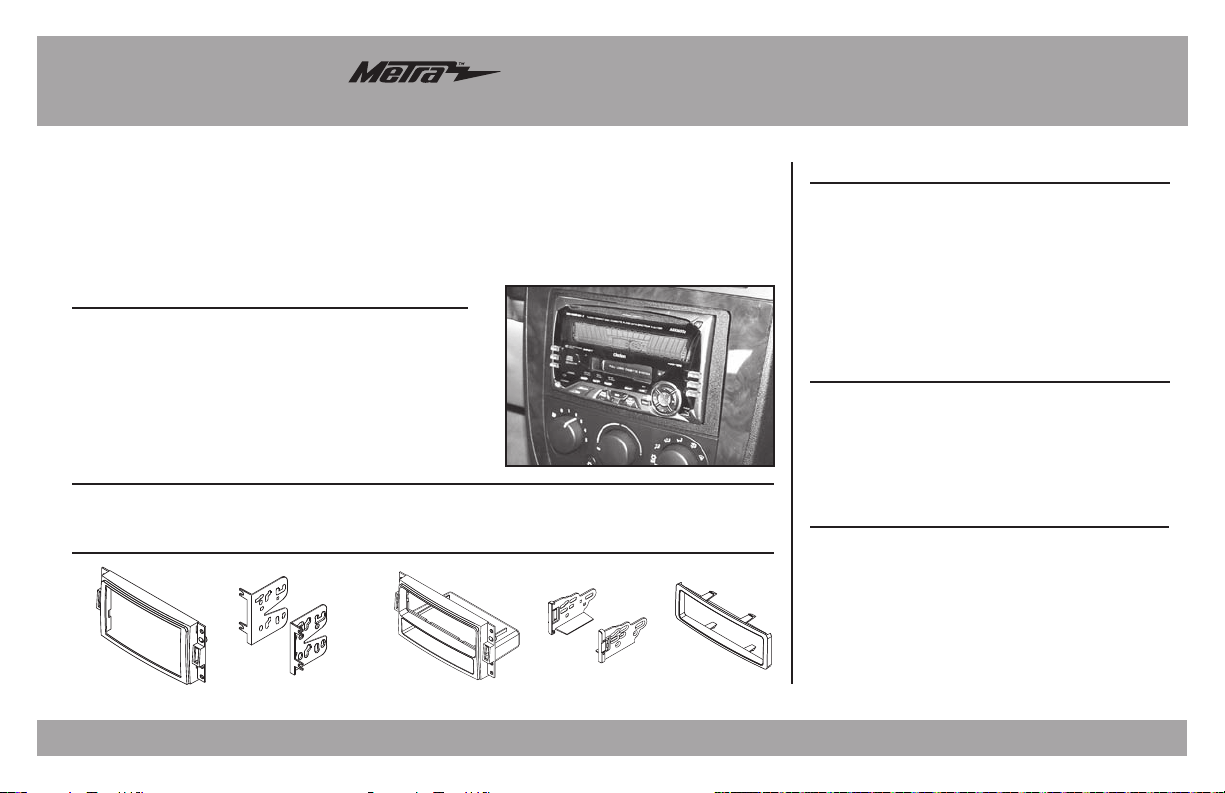
Buick/Chevy/Hummer/Pontiac/
Saturn multi-kit 2005-2013
95-3304 or 99-3304
See application list inside
95-3304:
•DoubleDINradioprovision
•StackedISODINradioprovision
99-3304:
•DINradioprovisionwithpocket
•ISO DINradioprovisionwithpocket
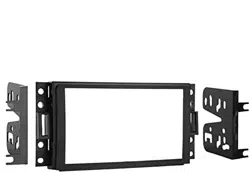
95-3304: •A1)Trimplate•B1)ISObrackets
99-3304: •A2)Radiohousing•B2)ISObrackets
•C2)Trimplate
Kit FEAtUREs
Kit coMponEnts
A2B1A1 B2 C2
2
Applications
Buick
Terraza ..................................................... 2005-2008
Chevrolet
Corvette ................................................... 2005-2013
Uplander ................................................... 2005-2008
Hummer
H3 ............................................................ 2006-2010
Pontiac
Montana(SV6only) .................................. 2005-2006
Saturn
Relay ........................................................ 2005-2007
Table of Contents
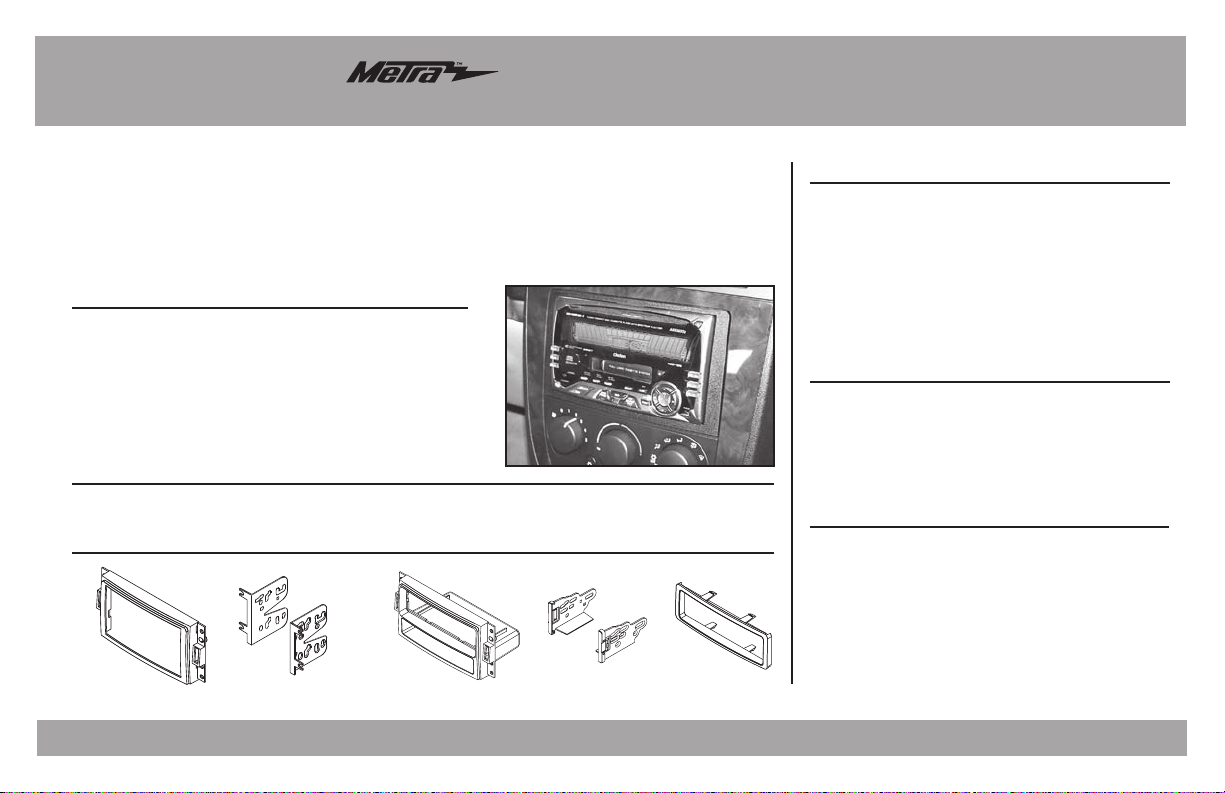
(Figure A)
Dash Disassembly
-BuickTerraza2005-2008 .......................................2
-ChevroletCorvette2005-2013 ...............................3
-ChevroletUplander2005-2008 ..............................2
-HummerH32006-2013 .........................................3
-PontiacMontana
(SV6 only) 2005-2006 ...................2
-SaturnRelay2005-2007 ........................................2
Kit Assembly
– DoubleDINradioprovision .....................................4
– StackedISODINradioprovision .............................4
– DINradioprovisionwithpocket ..............................5
– ISODINradioprovisionwithpocket ........................5
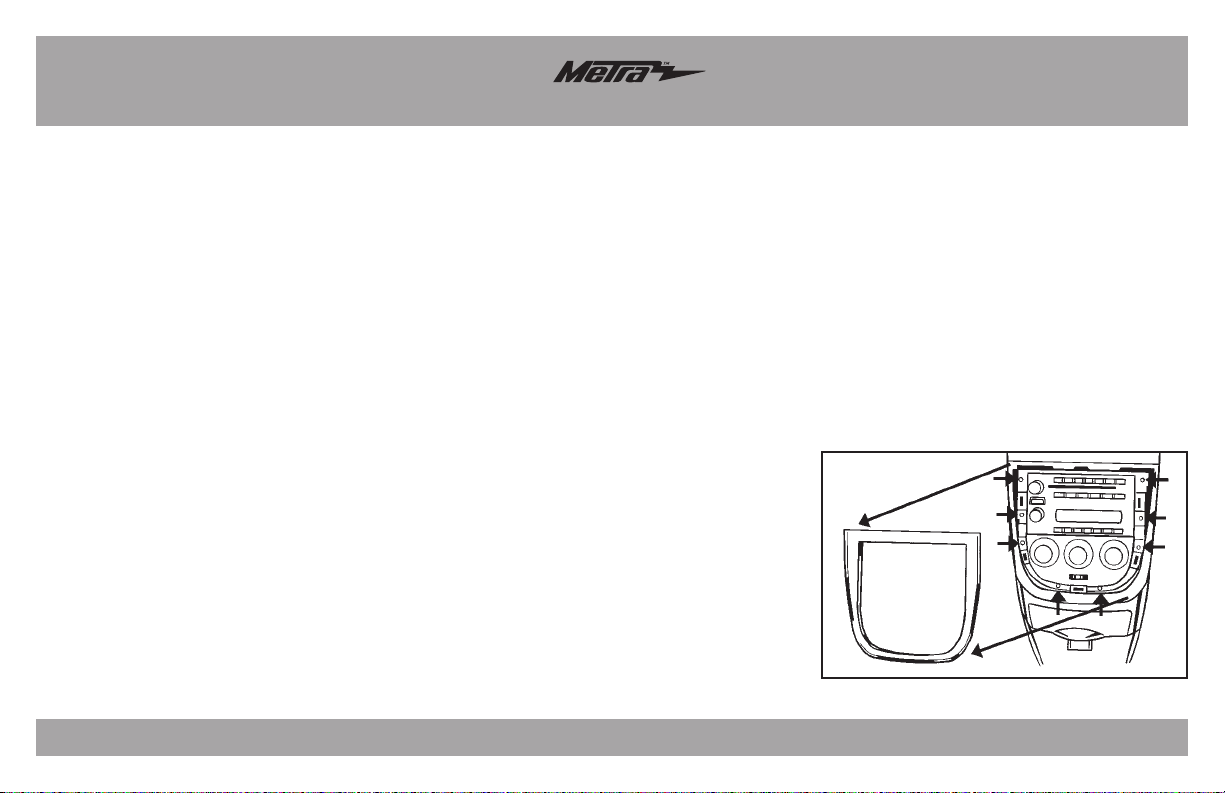
Buick Terraza/Chevy
Uplander 2005-2008,
Pontiac Montana SV6
(SV6
only) 2005-2006, Saturn
Relay 2005-2007
1. UnclipandremovetrimpanelaroundradioandA/C
control.(FigureA)
2. Remove(8)9/32”screwstoextractradioandA/C
controlfromsubdash.
Continue to kit assembly
3
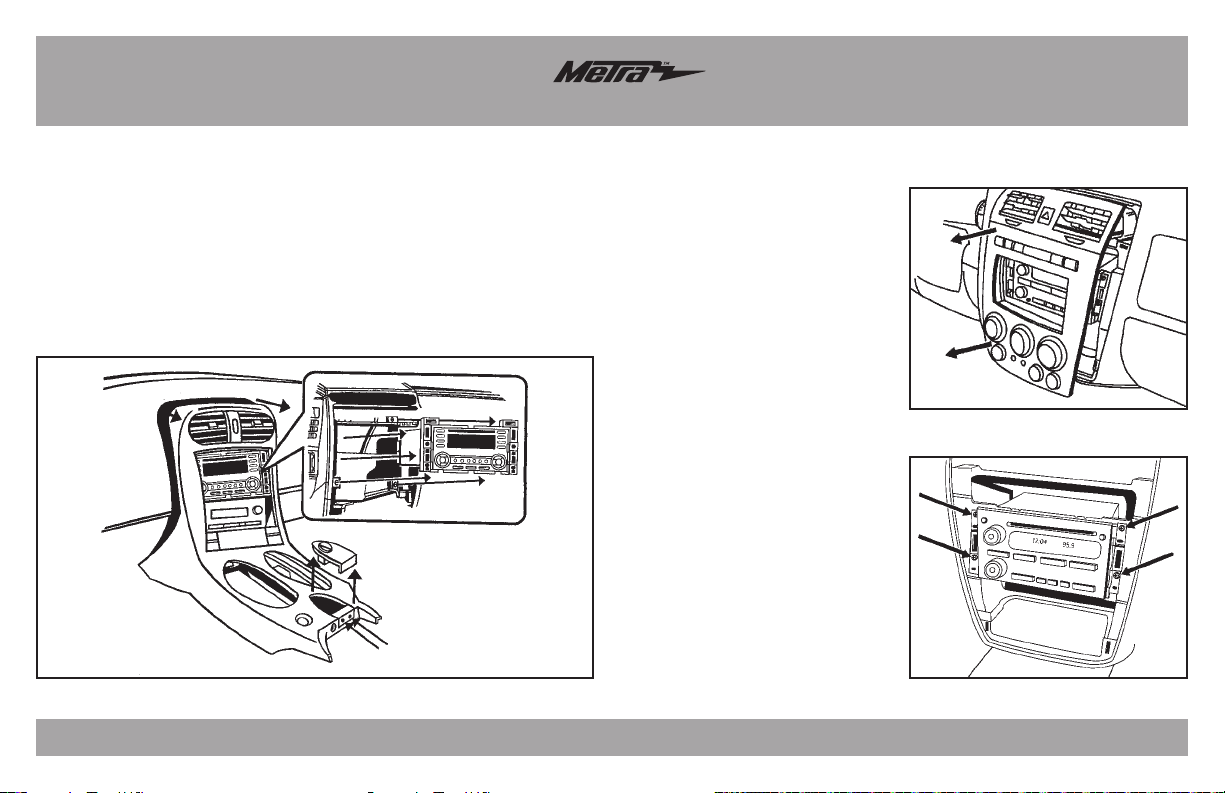
Dash Disassembly
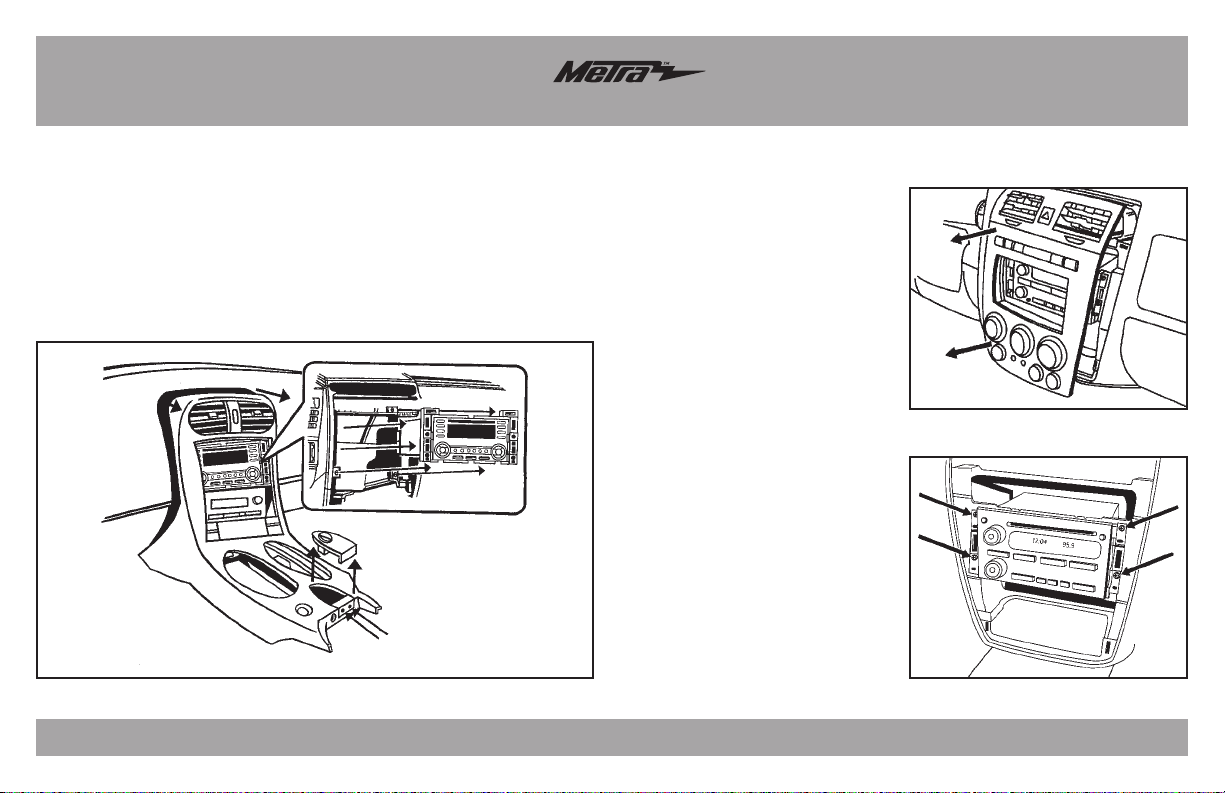
Chevrolet Corvette 2005-2013
1. Unclipandremoveridecontrol
switch/blankplateatfrontedgeof
centerconsolelid.(FigureA)
2. Remove(2)9/32”screwsfrom
undertheremovedblankplate.
(FigureB)
3. Unclipandremoveentirepanel
surroundingradioandincludingA/C
controls.(FigureC)
4. Remove(4)9/32”screwssecuring
radiotoextractfromsubdash.
(FigureD)
Continue to kit assembly
(Figure A, B, C, D)
(A)
(B)
(C)
(D)
Hummer H3 2006-2013
1. Unclipandremovetrimpanel
aroundradioandA/Ccontrols.
(FigureA)
2. Remove(4)9/32”screws
securingradio.(FigureB)
3. Unplugandremoveradio.
Continue to kit assembly
(Figure A)
(Figure B)
4
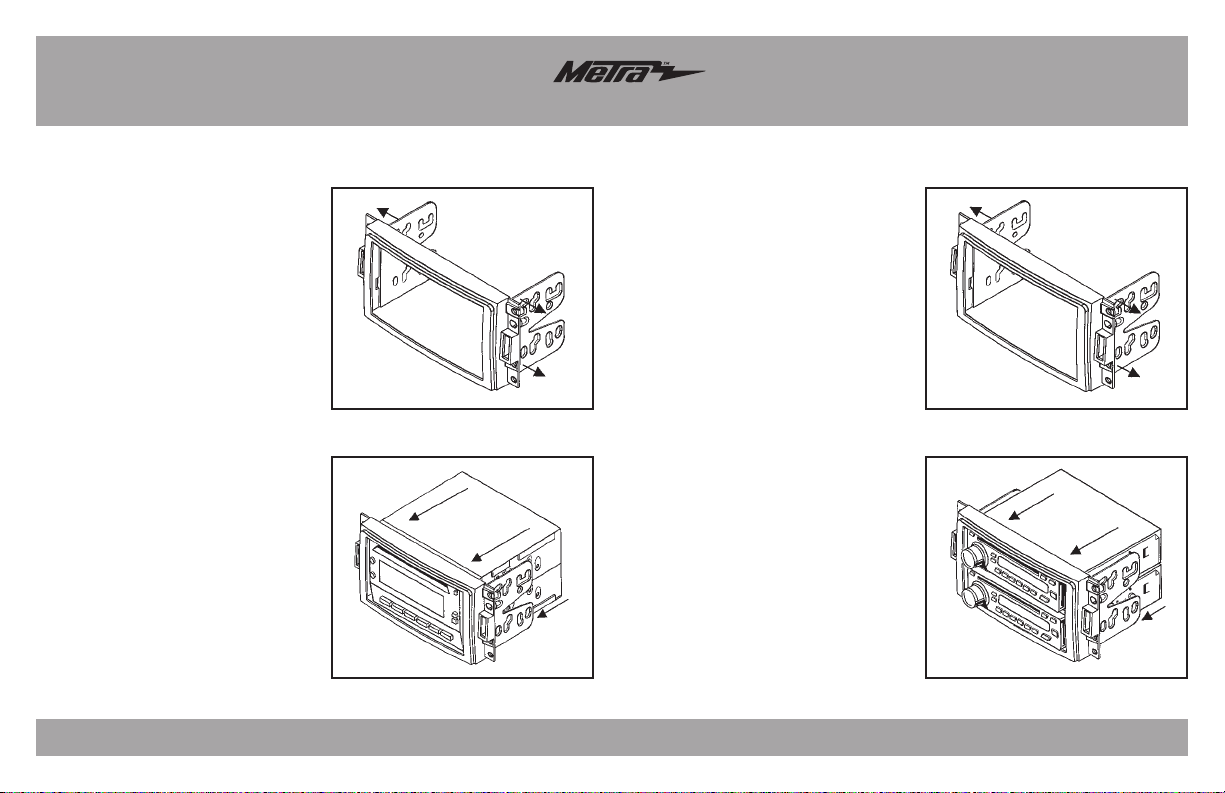
Kit Assembly 95-3304
1. Slidetheappropriatebracketinto
thetrimplatealigningtheholesin
thetrimplatetotheclipsonthe
bracket.(FigureA)
2. SlidetheDDINradiounitintothe
trimplatebracketassemblyand
securetheunittothekitusingthe
screwssuppliedwiththehead
unit.(FigureB)
3. Locatethefactorywiringharness
inthedash.Metrarecommends
usingthepropermatingadapter
fromMetraorAXXESS.Re-connect
thenegativebatteryterminaland
testtheunitforproperoperation.
4. Reassembledashinreverseorder
ofdisassembly.
Double DIN radio provision
1. Slidetheappropriatebracketinto
thetrimplatealigningtheholesin
thetrimplatetotheclipsonthe
bracket.(FigureA)
2. SlidethestackedISODINunitsinto
thetrimplatebracketassembly
andsecuretheunittothekitusing
thescrewssuppliedwiththehead
unit.(FigureB)
3. Locatethefactorywiringharness
inthedash.Metrarecommends
usingthepropermatingadapter
fromMetraorAXXESS.Re-connect
thenegativebatteryterminaland
testtheunitforproperoperation.
4. Reassembledashinreverseorder
ofdisassembly.
Stacked ISO DIN radio provision
(Figure A)
(Figure B)
(Figure A)
(Figure B)
5
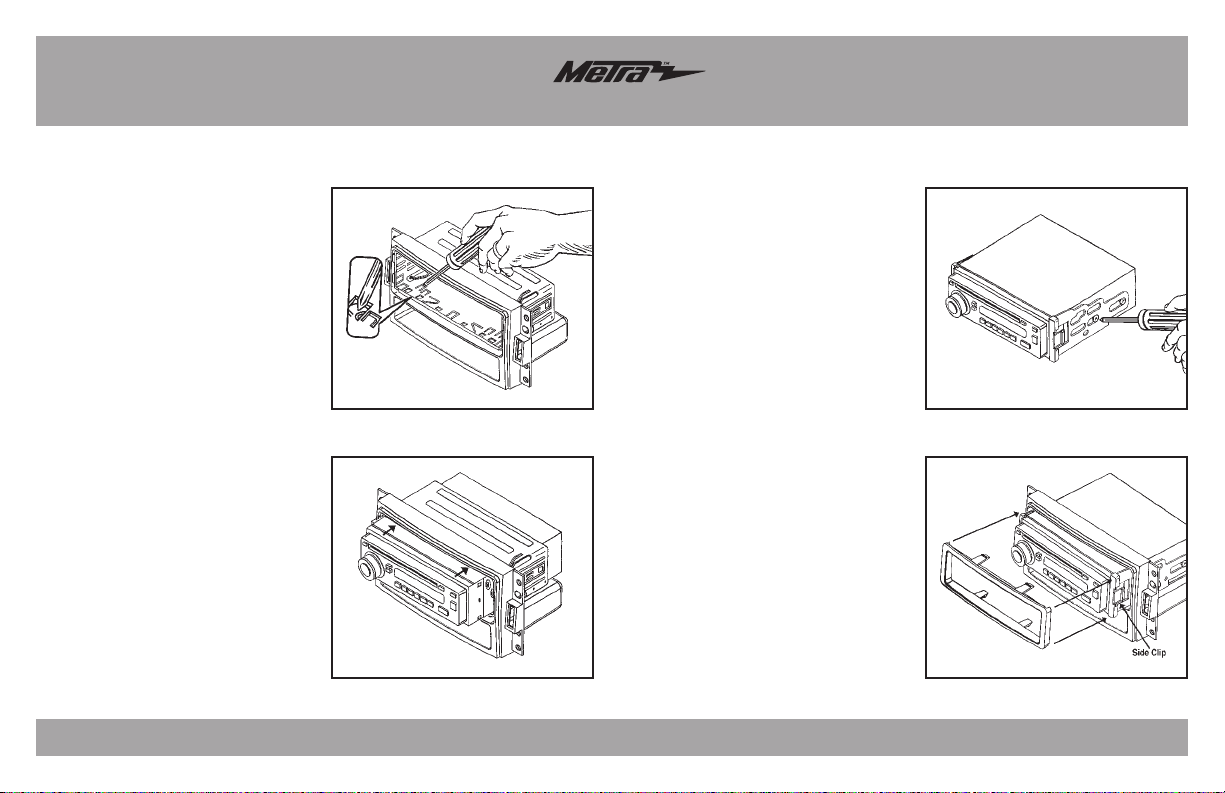
Kit Assembly 99-3304
1. SlidetheDINcageintotheradio
housingandsecurebybending
themetallockingtabsdown.
(FigureA)
2. Slidetheaftermarketheadunitinto
thecageandsecure.(FigureB)
3. Locatethefactorywiringharness
inthedash.Metrarecommends
usingthepropermatingadapter
fromMetraorAXXESS.Re-connect
thenegativebatteryterminaland
testtheunitforproperoperation.
4. Reassembledashinreverseorder
ofdisassembly.
DIN radio provision with pocket
1. MounttheISObracketstothehead
unitwiththescrewssuppliedwith
theunit.(FigureA)
2. Slidetheheadunitintotheradio
openinguntilthesideclipsengage.
(FigureB)
3. Snapthetrimplateintotheradio
housing.(FigureB)
4. Locatethefactorywiringharness
inthedash.Metrarecommends
usingthepropermatingadapter
fromMetraorAXXESS.Re-connect
thenegativebatteryterminaland
testtheunitforproperoperation.
5. Reassembledashinreverseorder
ofdisassembly.
ISO DIN radio provision with pocket
(Figure A)
(Figure B)
(Figure A)
(Figure B)

Notes

Notes

INSTALLATION INSTRUCTIONS FOR PART 95-3304 or 99-3304
METRA. The World’s best kits.
™
metraonline.com1-800-221-0932
© COPYRIGHT 2004-2013 METRA ELECTRONICS CORPORATION
REV. 11/1/2013 INST-3304
KNOWLEDGE IS POWER
Enhance your installation and fabrication skills by
enrolling in the most recognized and respected
mobile electronics school in our industry.
Log onto www.installerinstitute.com or call
800-354-6782 for more information and take steps
toward a better tomorrow.
Metra recommends MECP
certified technicians
INSTRUCCIONES DE INSTALACIÓN PARA LA PIEZA 95-3304 o 99-3304
APLICACIONES
METRA. The World’s best kits.
™
metraonline.com1-800-221-0932
© COPYRIGHT 2004-2013 METRA ELECTRONICS CORPORATION
REV. 11/1/2013 INST-3304
PRECAUCIÓN: Metra recomienda desconectar el terminal
negativo de la batería antes de comenzar cualquier
instalación. Todos los accesorios, interruptores y,
especialmente, las luces indicadoras de airbag deben
estar enchufados antes de volver a conectar la batería o
comenzar el ciclo de ignición.
NOTA: Remítase a las instrucciones incluidas con el
radio de postventa.
CABLEADO Y CONEXIONES DE ANTENA
Arnés de cableado:
• GMOS-01-GMOnStaryarnésdetonos2002ymás
•GMOS-04-GMOnStaryarnésdetonosy
amplificador2002ymás
Adaptadordeantena:
•40-GM10-AdaptadordeantenaGM1988ymás
•Destornilladordehojaplana
•DestornilladorPhillips•Llavedetubo
HErrAmIENTAS rEquErIDAS
Buick/Chevy/Hummer/Pontiac/
Saturn multi-kit 2005-2013
95-3304 or 99-3304
Interior lista de aplicaciones
95-3304:
•ProvisiónderadiodobleDIN
•ProvisiónderadioISODINvertical
99-3304:
•ProvisiónderadioDINconbolsillo
•ProvisiónderadioISODINconbolsillo
95-3304: •A1)Placademoldura•B1)SoportesISO
99-3304: •A2)Alojamientodelradio•B2)SoportesISO
•C2)Placademoldura
CArACTEríSTICAS DEL kIT
COmPONENTES DEL kIT
A2B1A1 B2 C2
(sevendenporseparado)

2
Aplicaciones
Buick
Terraza ..................................................... 2005-2008
Chevrolet
Corvette ................................................... 2005-2013
Uplander ................................................... 2005-2008
Hummer
H3 ............................................................ 2006-2010
Pontiac
Montana(SV6only) .................................. 2005-2006
Saturn
Relay ........................................................ 2005-2007
Índice
(Figura A)
Desmontaje del tablero
-BuickTerraza2005-2008 .......................................2
-ChevroletCorvette2005-2013 ...............................3
-ChevroletUplander2005-2008 ..............................2
-HummerH32006-2013 .........................................3
-PontiacMontana
(SV6 sólo) 2005-2006 ...................2
-SaturnRelay2005-2007 ........................................2
Ensamble del kit
– ProvisiónderadiodobleDIN...................................4
– ProvisiónderadioISODINvertical .........................4
– ProvisiónderadioDINconbolsillo ..........................5
– ProvisiónderadioISODINconbolsillo ...................5
Buick Terraza/Chevy
Uplander 2005-2008,
Pontiac Montana SV6
(SV6
sólo) 2005-2006, Saturn
Relay 2005-2007
1. Suelteyretireelpaneldelamolduraquerodeael
radioyelcontroldelaireacondicionado.(FiguraA)
2. Retirelos(8)tornillosde9/32”paraextraerel
radioyelcontroldelaireacondicionadoA/Cdel
subtablero.
Continuará al ensamble del kit
3
Desmontaje del tablero
Chevrolet Corvette 2005-2013
1. Suelteyretireelinterruptorde
controldemovimiento/laplaca
decorativadelbordefrontaldela
tapadelaconsolacentral.(FiguraA)
2. Retirelos(2)tornillosde9/32”
dedebajodelaplacaqueretiró.
(FiguraB)
3. Suelteyretiretodoelpanelque
rodeaelradioyqueincluyelos
controlesdelaireacondicionado.
(FiguraC)
4. Retirelos(4)tornillosde9/32”que
sujetanelradioparaextraerlodel
subtablero.(FiguraD)
Continuará al ensamble del kit
(Figura A, B, C, D)
(A)
(B)
(C)
(D)
Hummer H3 2006-2013
1. Suelteyretireelpanelderecorte
alrededordelaradioylos
controlesdelclima.(FiguraA)
2. Retirelos(4)tornillosde9/32”que
sostienenelradio.(FiguraB)
3. Desconecteyretireelradio.
Continuará al ensamble del kit
(Figura A)
(Figura B)

4
Ensamble del kit 95-3304
1. Desliceelsoportecorrespondiente
enlaplacadelamoldura,
alineandolosorificiosdelaplaca
conlosganchosdelsoporte.
(FiguraA)
2. DeslicelaunidaddelradioDDINen
elensambledelsoportedelaplaca
delamolduraysujetelaunidadal
kitconlostornillossuministrados
conlaunidadcentral.(FiguraB)
3. Ubiqueelarnésdelcableado
defábricaeneltablero.Metra
recomiendausareladaptadorde
acoplamientoadecuadodeMetra
oAXXESS.Vuelvaaconectarel
terminalnegativodelabateríay
pruebelaunidadparaverificarque
funcionecorrectamente.
4. Vuelvaamontareltableroen
formainversaaldesmontaje.
Provisión de radio doble DIN
1. Desliceelsoportecorrespondiente
enlaplacadelamoldura,
alineandolosorificiosdelaplaca
conlosganchosdelsoporte.
(FiguraA)
2. DeslicelaISODINverticalenel
ensambledelsoportedelaplaca
delamolduraysujetelaunidadal
kitconlostornillossuministrados
conlaunidadcentral.(FiguraB)
3. Ubiqueelarnésdelcableado
defábricaeneltablero.Metra
recomiendausareladaptadorde
acoplamientoadecuadodeMetra
oAXXESS.Vuelvaaconectarel
terminalnegativodelabateríay
pruebelaunidadparaverificarque
funcionecorrectamente.
4. Vuelvaamontareltableroen
formainversaaldesmontaje.
Provisión de radio ISO DIN vertical
(Figura A)
(Figura B)
(Figura A)
(Figura B)

5
Ensamble del kit 99-3304
1. DeslicelajaulaDINenlacaja
deradioyasegurardoblandolas
lengüetasdefijacióndemetal
haciaabajo.(FiguraA)
2. Deslicelaunidadprincipaldel
mercadodeaccesoriosenlajaula
yseguro.(FiguraB)
3. Ubiqueelarnésdelcableado
defábricaeneltablero.Metra
recomiendausareladaptadorde
acoplamientoadecuadodeMetra
oAXXESS.Vuelvaaconectarel
terminalnegativodelabateríay
pruebelaunidadparaverificarque
funcionecorrectamente.
4. Vuelvaamontareltableroen
formainversaaldesmontaje.
Provisión de radio DIN con bolsillo
1. MontelossoportesISOala
unidadprincipalconlostornillos
suministradosconlaunidad.
(FiguraA)
2. Deslicelaunidadprincipalenla
aperturadelaradiohastaque
losganchoslateralesencajen.
(FiguraB)
3. Coloquelaplacademontajeala
carcasadelaradio.(FiguraB)
4. Ubiqueelarnésdelcableado
defábricaeneltablero.Metra
recomiendausareladaptadorde
acoplamientoadecuadodeMetra
oAXXESS.Vuelvaaconectarel
terminalnegativodelabateríay
pruebelaunidadparaverificarque
funcionecorrectamente.
5. Vuelvaamontareltableroen
formainversaaldesmontaje.
Provisión de radio ISO DIN con bolsillo
(Figura A)
(Figura B)
(Figura A)
(Figura B)
clip lateral

Notas

Notas

INSTRUCCIONES DE INSTALACIÓN PARA LA PIEZA 95-3304 o 99-3304
METRA. The World’s best kits.
™
metraonline.com1-800-221-0932
© COPYRIGHT 2004-2013 METRA ELECTRONICS CORPORATION
REV. 11/1/2013 INST-3304
KNOWLEDGE IS POWER
Enhance your installation and fabrication skills by
enrolling in the most recognized and respected
mobile electronics school in our industry.
Log onto www.installerinstitute.com or call
800-354-6782 for more information and take steps
toward a better tomorrow.
Metra recomienda técnicos
con certificación del Programa
de Certificación en Electrónica
Móvil (Mobile Electronics
Certification Program, MECP).
EL CONOCIMIENTO ES PODER
Mejoresushabilidadesdeinstalacióny
fabricacióninscribiéndoseenlaescuelade
dispositivoselectrónicosmóvilesmásreconocida
yrespetadadenuestraindustria.Regístreseen
www.installerinstitute.comollameal
800-354-6782paraobtenermásinformacióny
avancehaciaunfuturomejor.