
Write the model and serial
numbers here:
Model # _________________
Serial # _________________
You can find them on a label
on the inside of the hood.
ESPAÑOL
Para consultar una version en
español de este manual de
instrucciones, visite nuestro sitio de
internet GEAppliances.com.
RANGE HOOD
49-2000720 Rev. 0 04-20 GEA
GE is a trademark of the General Electric Company. Manufactured under trademark license.
UVW7241SNSS
OWNER’S MANUAL &
INSTALLATION
INSTRUCTIONS
Wall-Mount
SAFETY INFORMATION .............3
USING THE HOOD
Features ..................................5
Controls ..................................5
CARE AND CLEANING
Exterior Surfaces ......................... 6
Metal Grease Filter ........................ 6
Charcoal Filter ........................... 6
Replacing a Lamp ......................... 6
INSTALLATION INSTRUCTIONS ....7
TROUBLESHOOTING TIPS ..........13
LIMITED WARRANTY ...............14
CONSUMER SUPPORT ..............16

2 49-2000742 Rev. 0
THANK YOU FOR MAKING GE APPLIANCES A PART OF YOUR HOME.
Whether you grew up with GE Appliances, or this is your first, we’re happy to have you in the family.
We take pride in the craftsmanship, innovation and design that goes into every GE Appliances
product, and we think you will too. Among other things, registration of your appliance ensures that we
can deliver important product information and warranty details when you need them.
Register your GE appliance now online. Helpful websites and phone numbers are available in the
Consumer Support section of this Owner’s Manual. You may also mail in the pre-printed registration
card included in the packing material.
49-2000742 Rev. 0 3
SAFETY INFORMATION
IMPORTANT SAFETY INFORMATION
READ ALL INSTRUCTIONS BEFORE USING
READ AND SAVE THESE INSTRUCTIONS
WARNING
TO REDUCE THE RISK OF FIRE,
ELECTRIC SHOCK OR INJURY TO PERSONS,
OBSERVE THE FOLLOWING:
A. Use this unit only in the manner intended by the
manufacturer. If you have questions, contact the
manufacturer.
B. Before servicing or cleaning unit, switch power off
at service panel and lock the service disconnecting
means to prevent power from being switched
on accidentally. When the service disconnecting
means cannot be locked, securely fasten a
prominent warning device, such as a tag, to the
service panel.
C. Do not use this unit with any solid-state speed
control device.
D. This unit must be grounded.
CAUTION
FOR GENERAL VENTILATING USE
ONLY. DO NOT USE TO EXHAUST HAZARDOUS
OR EXPLOSIVE MATERIALS AND VAPORS.
CAUTION
TO REDUCE RISK OF FIRE AND
TO PROPERLY EXHAUST AIR, BE SURE TO DUCT
AIR OUTSIDE. DO NOT VENT EXHAUST AIR INTO
SPACES WITHIN WALLS OR CEILINGS OR INTO
ATTICS, CRAWL SPACES OR GARAGES.
WARNING
TO REDUCE THE RISK OF INJURY
TO PERSONS IN THE EVENT OF A RANGE TOP
GREASE FIRE, OBSERVE THE FOLLOWING*:
A. SMOTHER FLAMES with a close-fitting lid, cookie
sheet or metal tray, then turn off the burner. BE
CAREFUL TO PREVENT BURNS. If the flames do
not go out immediately, EVACUATE AND CALL
THE FIRE DEPARTMENT.
B. NEVER PICK UP A FLAMING PAN—You may be
burned.
C. DO NOT USE WATER, including wet dishcloths or
towels—a violent steam explosion will result.
D. Use an extinguisher ONLY if:
1. You know you have a Class ABC extinguisher,
and you already know how to operate it.
2. The fire is small and contained in the area where
it started.
3. The fire department is being called.
4. You can fight the fire with your back to an exit.
* Based on “Kitchen Fire Safety” published by NFPA.
4 49-2000742 Rev. 0
How to Remove Protective Shipping Film and Packaging Tape
Carefully grasp a corner of the protective shipping film
with your fingers and slowly peel it from the appliance
surface. Do not use any sharp items to remove the film.
Remove all of the film before using the appliance for the
first time.
To assure no damage is done to the finish of the
product, the safest way to remove the adhesive from
packaging tape on new appliances is an application of
a household liquid dishwashing detergent. Apply with a
soft cloth and allow to soak.
NOTE: The adhesive must be removed from all parts.
NOTE: For further cleaning instructions/suggestions,
please refer to the Care And Cleaning section.
SAFETY INFORMATION
IMPORTANT SAFETY INFORMATION
READ ALL INSTRUCTIONS BEFORE USING
READ AND SAVE THESE INSTRUCTIONS
WARNING
TO REDUCE THE RISK OF A
RANGE TOP GREASE FIRE:
A. Never leave surface units unattended at high
settings. Boilovers cause smoking and greasy
spillovers that may ignite. Heat oils slowly on
medium settings.
B. Always turn hood ON when cooking at high heat or
when flambéing food (i.e. Crepes Suzette, Cherries
Jubilee, Peppercorn Beef Flambé).
C. Clean ventilating fans frequently. Grease should not
be allowed to accumulate on fan or filter.
D. Use proper pan size. Always use cookware
appropriate for the size of the surface element.
WARNING
TO REDUCE THE RISK OF FIRE,
ELECTRIC SHOCK OR INJURY TO PERSONS,
OBSERVE THE FOLLOWING:
A. Installation work and electrical wiring must be
done by qualified person(s) in accordance with all
applicable codes and standards, including fire-rated
construction.
B. Sufficient air is needed for proper combustion and
exhausting of gases through the flue (chimney) of
fuel burning equipment to prevent back drafting.
Follow the heating equipment manufacturer’s
guidelines and safety standards such as those
published by the National Fire Protection
Association (NFPA), the American Society for
Heating, Refrigeration and Air Conditioning
Engineers (ASHRAE) and the local code authorities.
C. When cutting or drilling into wall or ceiling, do not
damage electrical wiring and other hidden utilities.
D. Ducted fans must always be vented to the outdoors.
E. When applicable, install any makeup (replacement)
air system in accordance with local building
code requirements. Visit GEAppliances.com for
available makeup air solutions.
F. Turn off breaker to adjacent rooms while working.
WARNING
TO REDUCE THE RISK OF FIRE,
USE ONLY METAL DUCTWORK.
Ŷ'RQRWDWWHPSWWRUHSDLURUUHSODFHDQ\SDUWRI\RXU
hood unless it is specifically recommended in this
manual. All other servicing should be referred to a
qualified technician.

49-2000742 Rev. 0 5
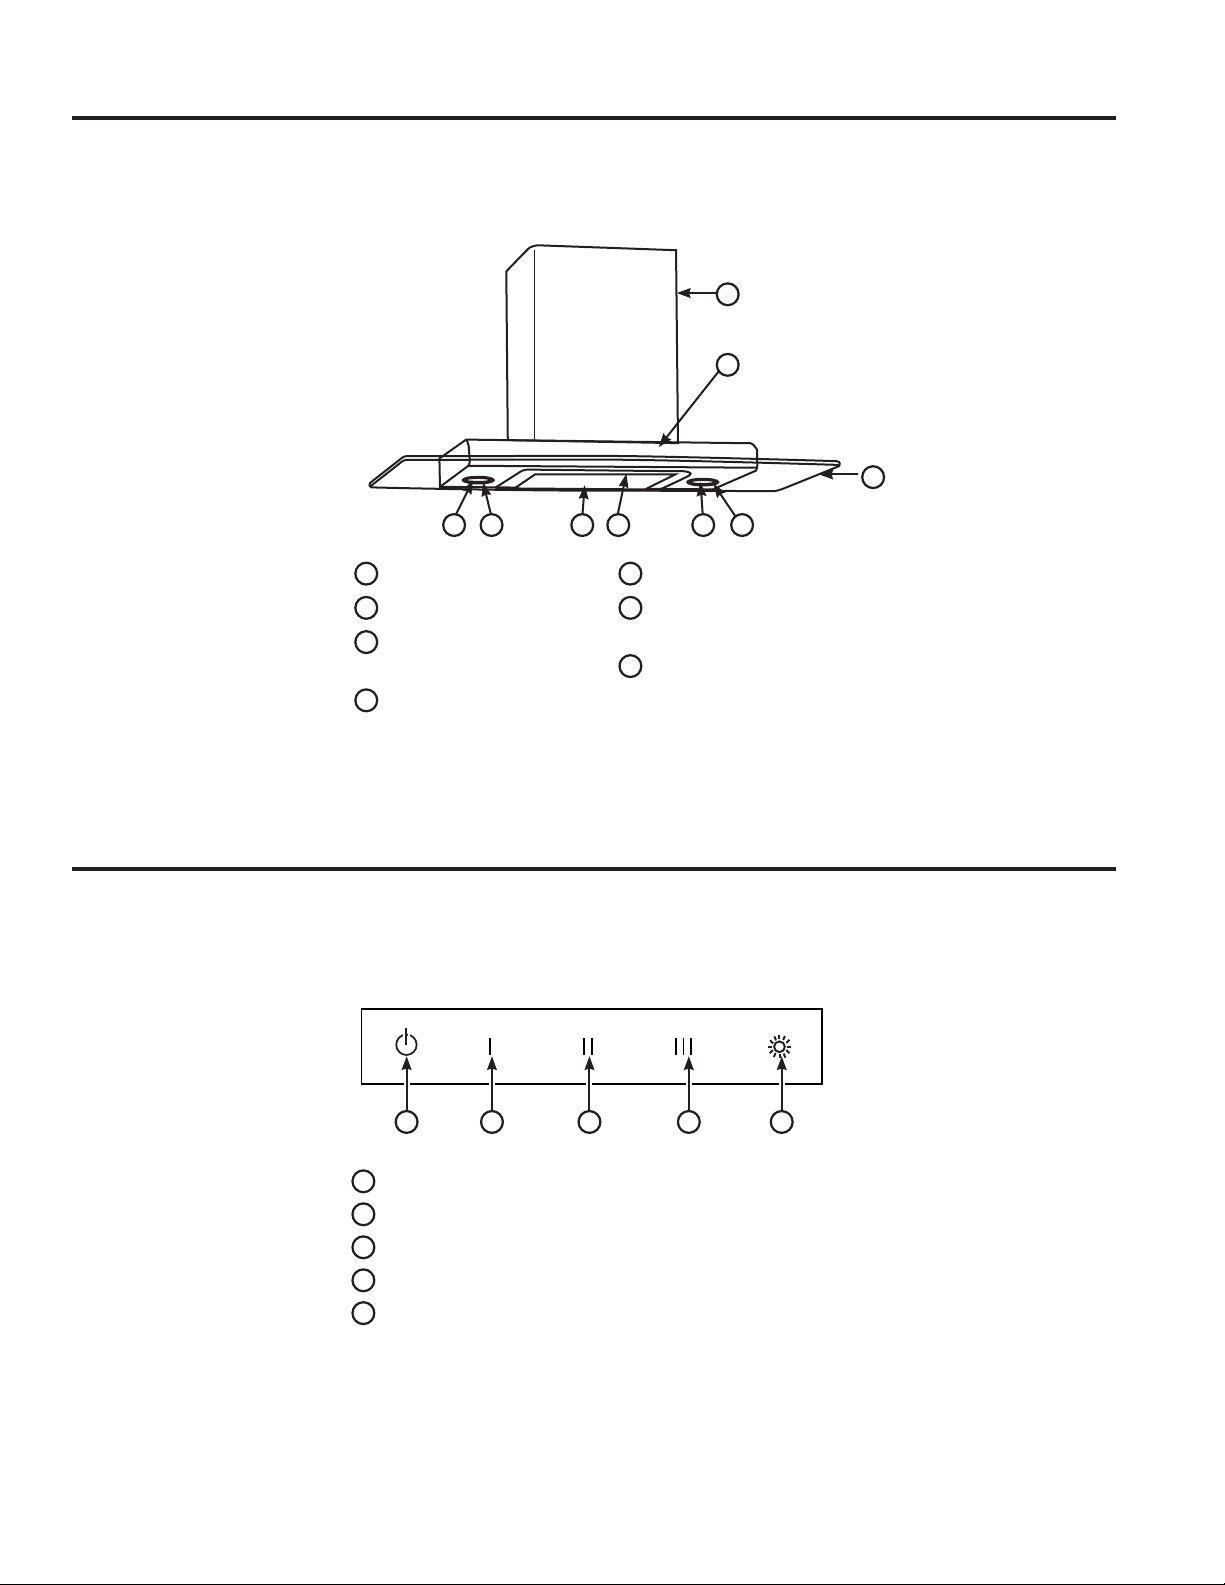
Features
Controls
USING THE HOOD: Features / Controls
The range hood is designed to remove smoke, cooking vapors and odors from the cooktop area. For best results,
start the hood before cooking and allow it to operate 15 minutes after the cooking is complete to clear all smoke and
odors from the kitchen.
A
Duct cover
B
Control panel
C
Glass canopy
D
Lamp cover
E
Halogen Bulb
F
Grease filter release
G
Grease filter
A
B
C
DD EE F
G
A B C D E
A
Power/Off - Turns the blower on and off.
B
Speed 1 - Blower speed HI
C
Speed 2 - Blower speed Medium
D
Speed 3 - Blower speed Lo
E
Light - The light button controls both lights. Press once
for On and again for Off.
6 49-2000742 Rev. 0
Care and Cleaning
CARE AND CLEANING
IMPORTANT: Clean the hood and grease filters
frequently according to the following instructions. Replace
grease filters before operating hood.
EXTERIOR SURFACES:
To avoid damage to the exterior surface, do not use steel
wool or soap-filled scouring pads.
Always wipe dry to avoid water marks.
Cleaning Method:
• Liquid detergent soap and water, or all-purpose
cleanser
• Wipe with damp soft cloth or nonabrasive sponge, then
rinse with clean water and wipe dry.
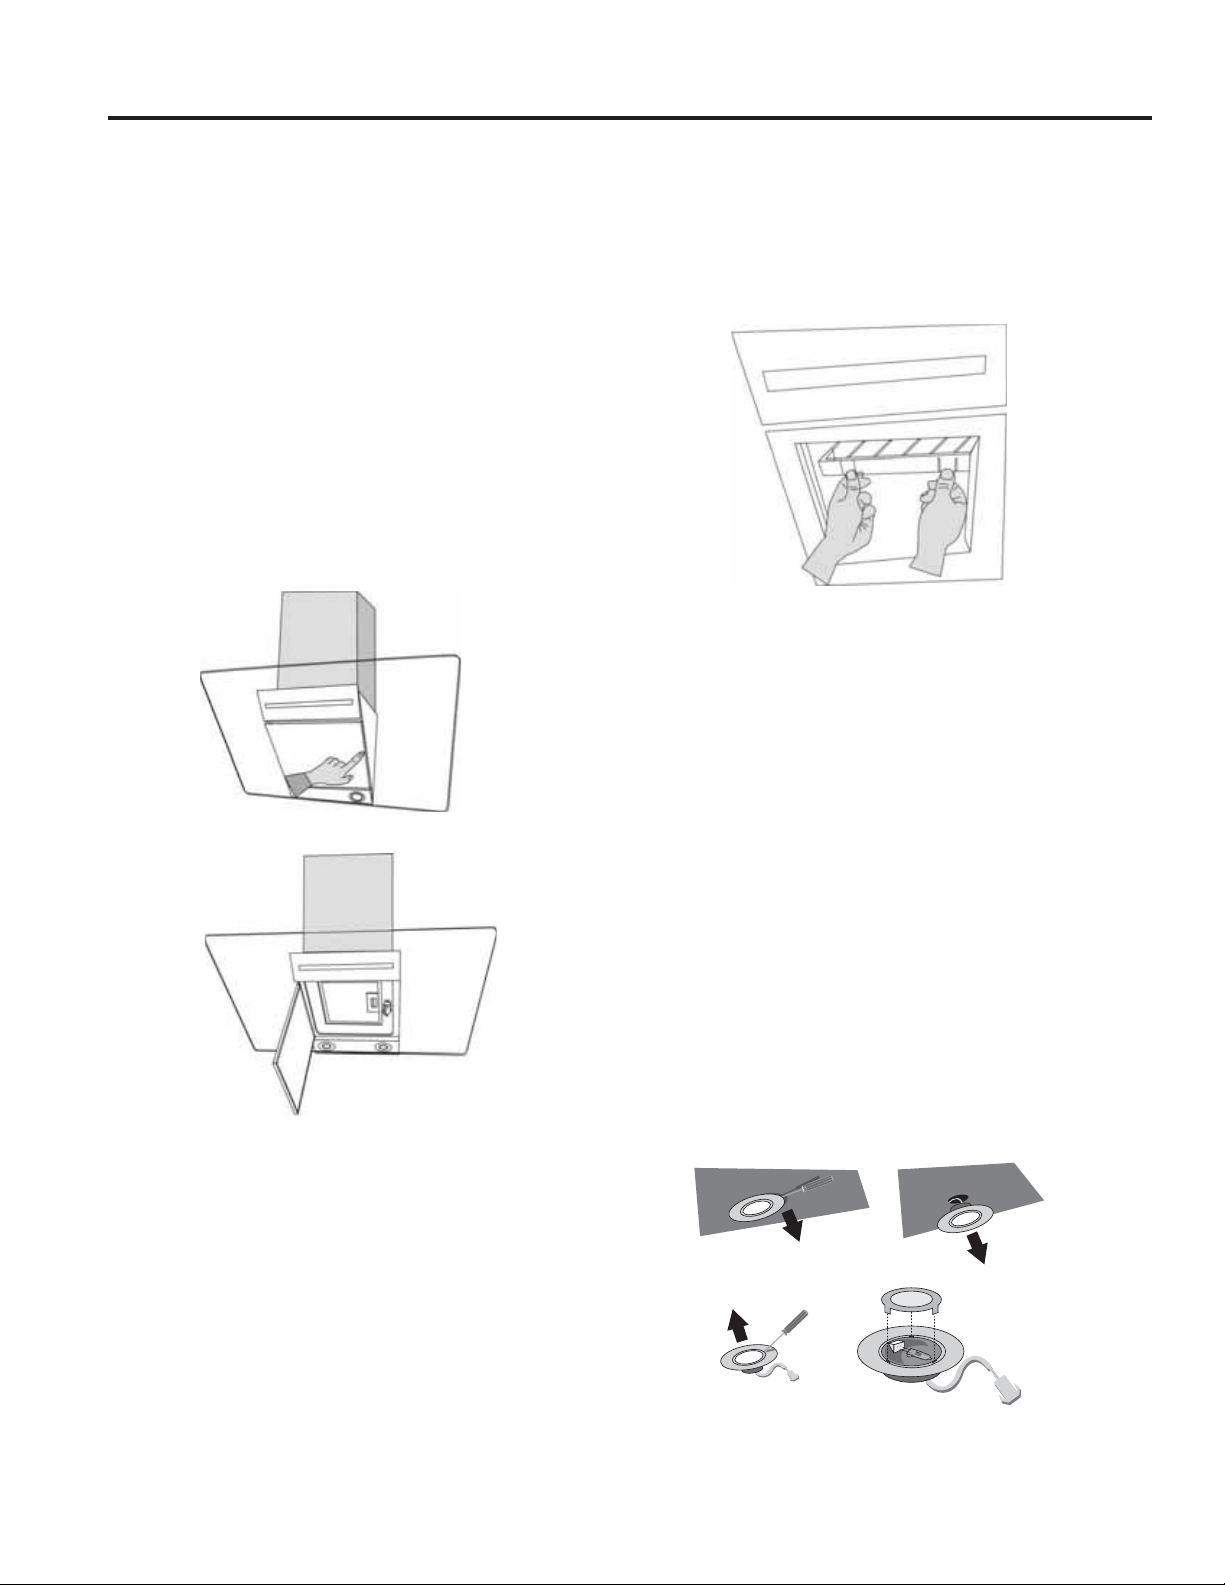
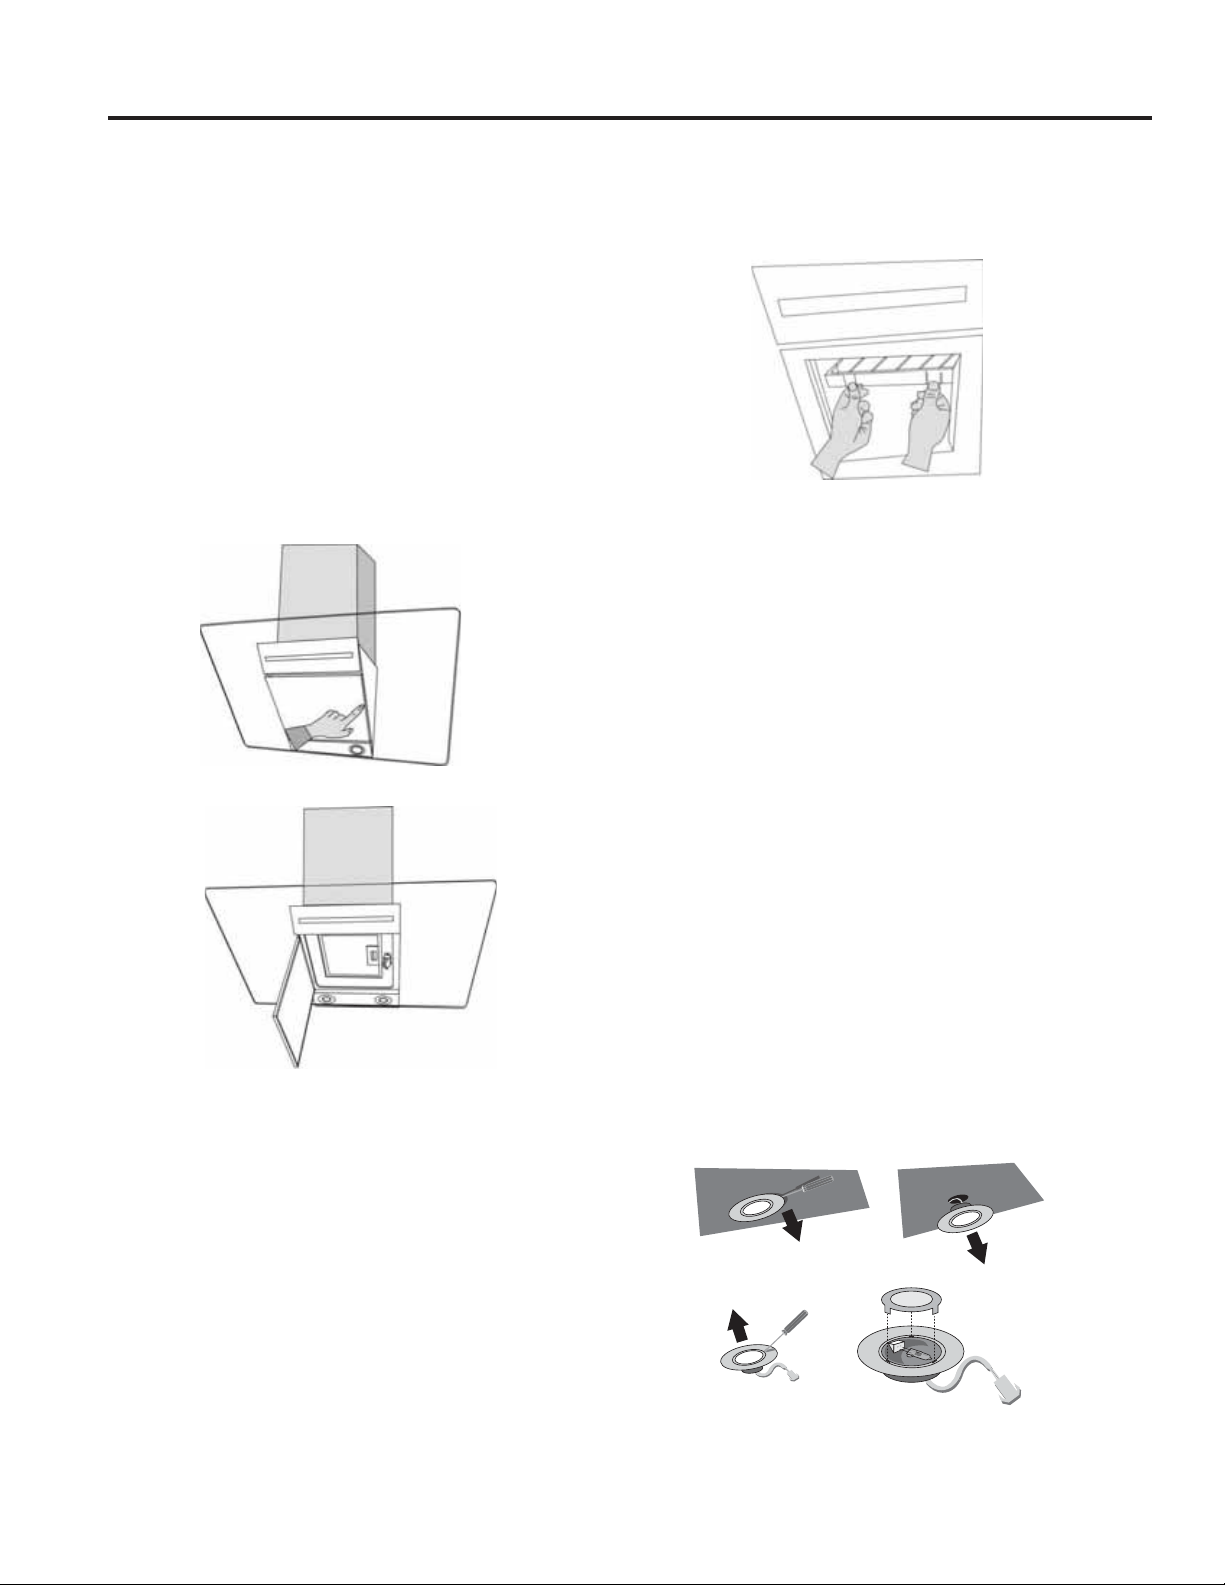
METAL GREASE FILTER
1. Push up on the middle, right side of the decorative
glass to open the door.
2. Remove the metal filter.
3. Wash metal filters as needed in dishwasher or hot
detergent solution.
4. Replace metal grease filters.
CHARCOAL FILTER
The charcoal filter is not washable. It should last up to 6
months with normal use.
To replace charcoal filter:
1. Remove metal grease filter from range hood. See
“Metal Grease Filter” in this section.
2. Bend spring clips away from metal grease filter.
3. Place charcoal filter into top side of metal filter.
4. Bend spring clips back into place to secure the
charcoal filter to the metal filter.
5. Replace metal grease filter. See “Metal Grease Filter”
in this section.
REPLACING A LAMP
Turn off the range hood and allow the lamp to cool. To
avoid damage or decreasing the life of the new bulb, do
not touch bulb with bare fingers. Replace bulb, using
tissue or wearing cotton gloves to handle bulb.
If new lamps do not operate, make sure the lamps are
inserted correctly before calling service.
1. Disconnect power.
2. Use a flat-blade screwdriver to pry open the light cover.
3. Avoiding contact with skin, replace the used bulb with
a new halogen bulb, of the same size, shape and
wattage.
4. Replace the light shield and snap closed.
5. Reconnect power.
49-2000742 Rev. 0 7
Installation
Instructions
“If you have questions, call GE Appliances at 800.GE.CARES (800.432.2737)
or visit our website at: GEAppliances.com”
BEFORE YOU BEGIN
Read these instructions completely and carefully.
Ŷ
IMPORTANT — Save these
instructions for local inspector’s use.
Ŷ
IMPORTANT — Observe all governing
codes and ordinances.
Ŷ
Note to Installer – Be sure to leave these
instructions with the Consumer.
Ŷ
Note to Consumer – Keep these instructions for
future reference.
Ŷ
Skill level – Installation of this vent hood requires
basic mechanical and electrical skills.
Ŷ
Completion time – Approximately 1 to 3 hours
Ŷ
Proper installation is the responsibility of the
installer.
Ŷ
Product failure due to improper installation is not
covered under the Warranty.
FOR YOUR SAFETY
WARNING
Before beginning the installation,
switch power off at service panel and lock the
service disconnecting means to prevent power from
being switched on accidentally. When the service
disconnecting means cannot be locked, securely
fasten a prominent warning device, such as a tag,
to the service panel.
CAUTION
Due to the weight and size of
these vent hoods and to reduce the risk of personal
injury or damage to the product, TWO PEOPLE
ARE REQUIRED FOR PROPER INSTALLATION.
WARNING
Disconnect all electrical power
at the main circuit breaker or fuse box before
installing.
WARNING
TO REDUCE THE RISK OF FIRE,
ELECTRIC SHOCK OR INJURY TO PERSONS,
OBSERVE THE FOLLOWING:
A. Installation work and electrical wiring must be
done by qualified person(s) in accordance with
all applicable codes and standards, including
fire-rated construction.
B. Sufficient air is needed for proper combustion
and exhausting of gases through the flue
(chimney) of fuel burning equipment to prevent
back drafting. Follow the heating equipment
manufacturer’s guidelines and safety standards
such as those published by the National Fire
Protection Association (NFPA), the American
Society for Heating, Refrigeration and Air
Conditioning Engineers (ASHRAE) and the local
code authorities.
C. When cutting or drilling into wall or ceiling, do
not damage electrical wiring and other hidden
utilities.
D. Ducted fans must always be vented to the
outdoors.
E. Turn off breaker to adjacent rooms while
working.
WARNING
TO REDUCE THE RISK OF FIRE,
USE ONLY METAL DUCT WORK.
24” Wall-Mount
Range Hood
UVW7241SNSS
INSTALLATION INSTRUCTIONS
8 49-2000742 Rev. 0
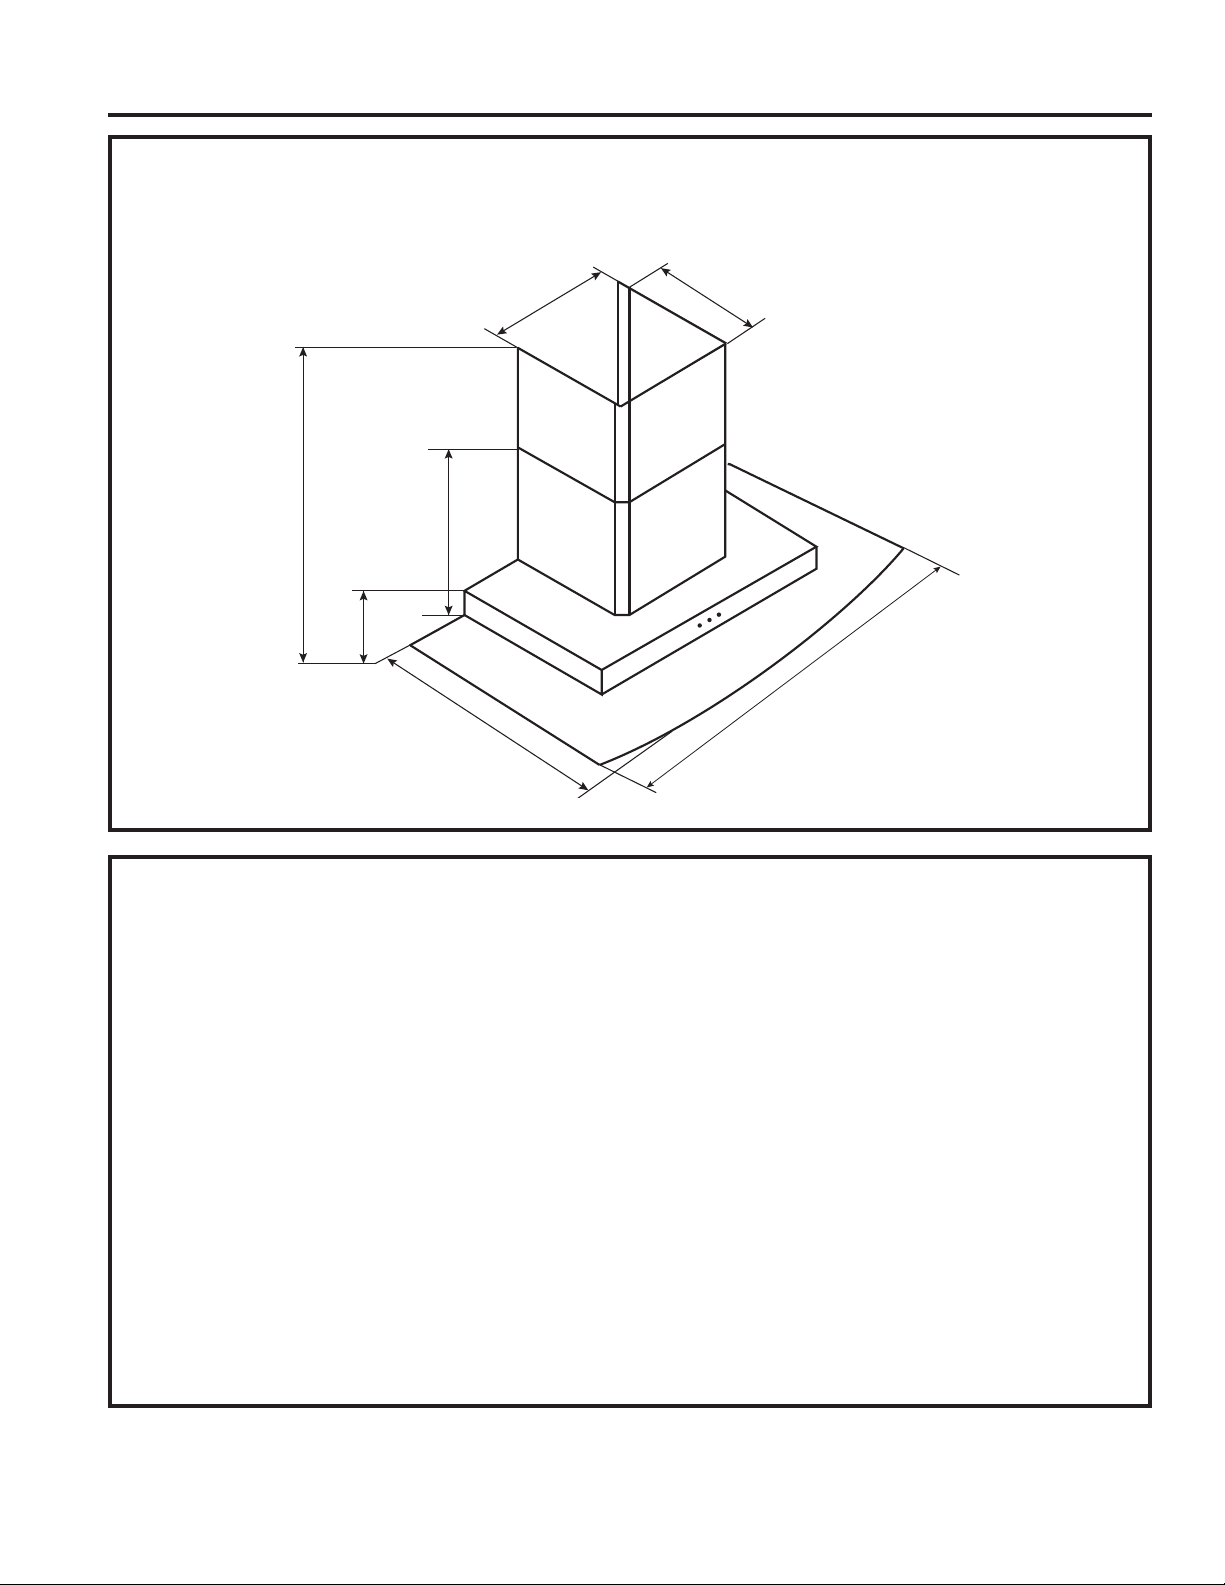
Installation Preparation
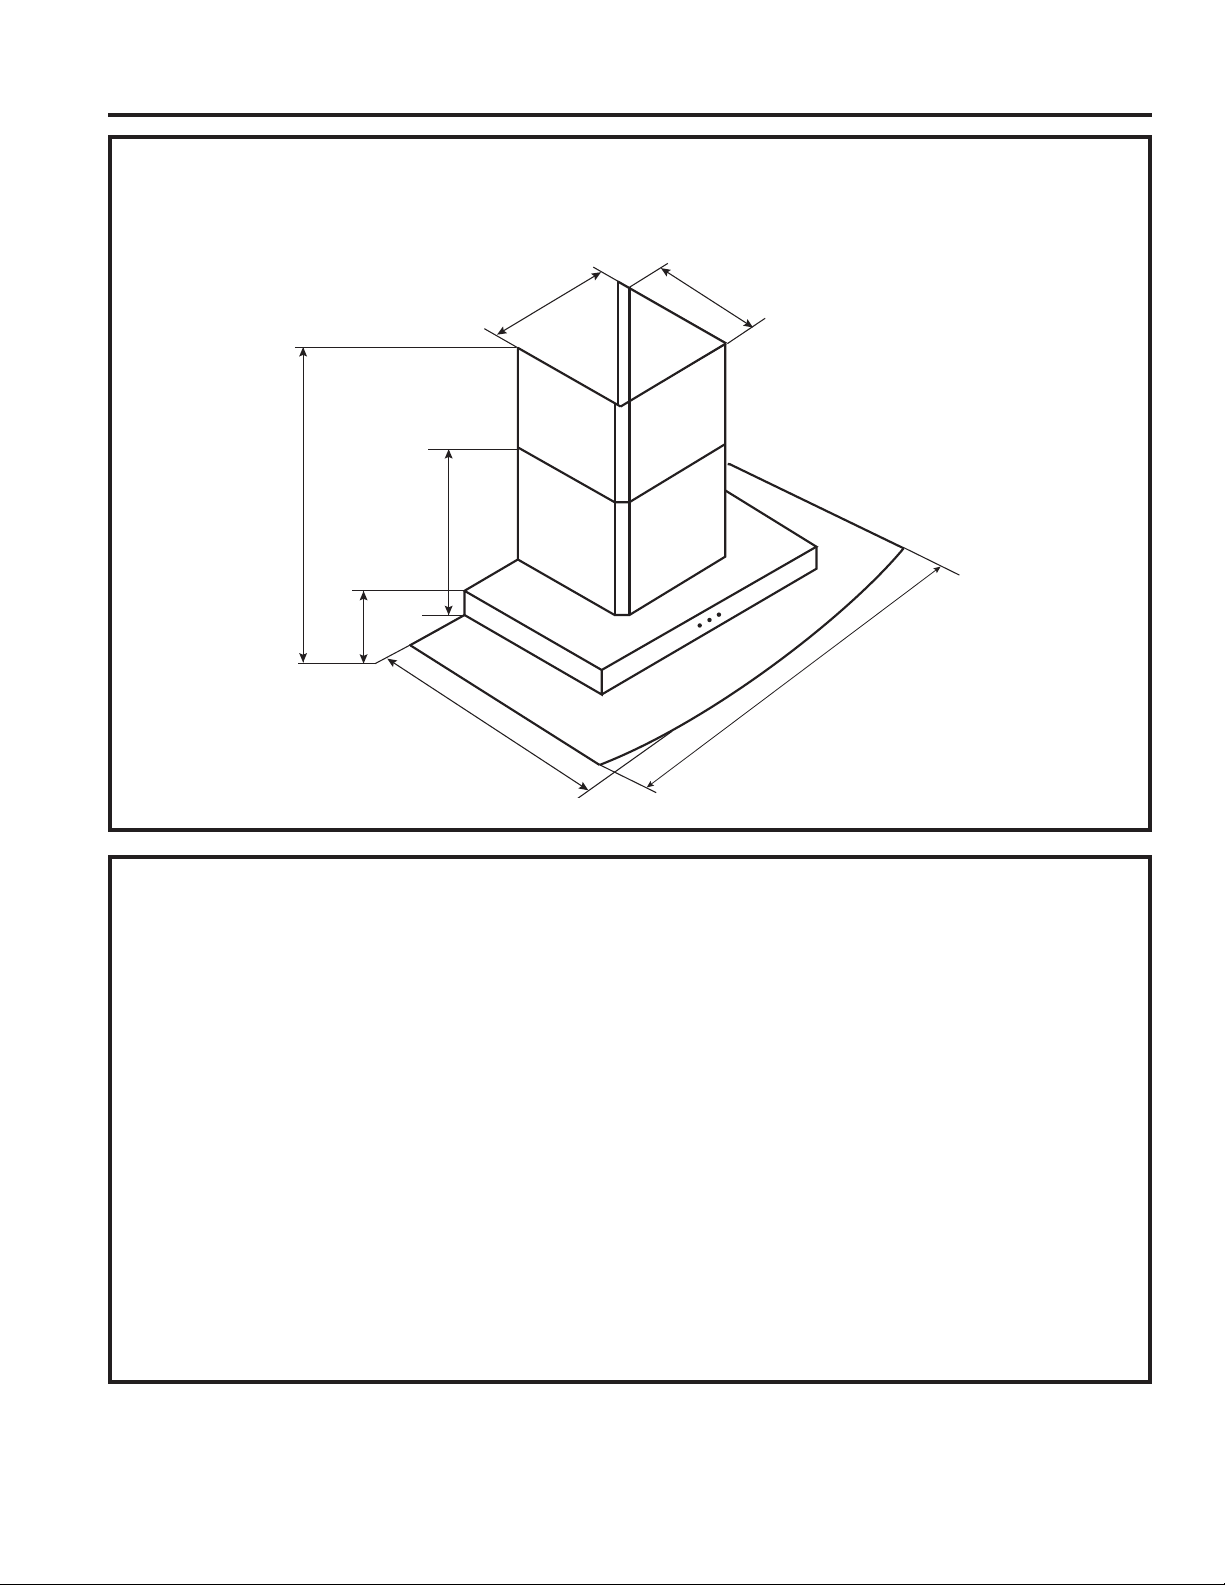
PRODUCT DIMENSIONS
24”
610 mm
279 mm
19”
480 mm
2-3/8”
34”
18-3/8”
60 mm
466 mmm
866 mm (max)
11”
298 mm
11-3/4”
LOCATION REQUIREMENTS
IMPORTANT: Observe all governing codes and
ordinances.
Have a qualified technician install the range hood. It is
the installer’s responsibility to comply with installation
clearances specified on the model/serial rating plate.
The model/serial rating plate is located behind the left
filter on the rear wall of the vent hood.
Canopy hood location should be away from strong
draft areas, such as windows, doors and strong
heating vents.
Grounded electrical outlet is required. See “Electrical
Requirements” section.
The canopy hood is factory set for venting through the
roof or wall. For non-vented (recirculating) Installation
see “For non- vented (recirculating) installation only” in
the “Connect Vent System” section.
All openings in ceiling and wall where canopy hood will
be installed must be sealed.
FOR MOBILE HOME INSTALLATIONS
The installation of this range hood must conform to the
Manufactured Home Construction Safety Standards,
Title 24 CFR, Part 328 (formerly the Federal
Standard for Mobile Home Construction and Safety,
Title 24, HUD, Part 280) or when such standard
is not applicable, the standard for Manufactured
Home Installation 1982 (Manufactured Home Sites,
Communities and Setups) ANSI A225.1/NFPA 501A,
or latest edition, or with local codes.
INSTALLATION PREPARATION
49-2000742 Rev. 0 9
INSTALLATION INSTRUCTIONS
Installation Preparation
TOOLS AND MATERIALS REQUIRED
(NOT SUPPLIED)
Gather the required tools and parts before starting
installation. Read and follow the instructions
provided with any tools listed here.
Tools needed
• Level
• Drill with 1-1/4” (3.0 cm), 1/8” (3.2 mm), and 5/16”
(7.9 mm) drill bits
• Pencil
• Wire stripper or utility knife
• Tape measure or ruler
• Pliers
• Caulking gun and weatherproof caulking
compound
• Vent clamps
• Jigsaw or keyhole saw
• Flat-blade screwdriver
• Metal snips
• Phillips screwdriver
• Metric hex key set
For non-vented (recirculating) installations, you will
also need:
• 6” (15.2 cm) dia. round metal vent duct - length
required is determined by ceiling height.
PARTS SUPPLIED
Remove parts from packages. Check that all parts
are included.
• 120 V power cord with 3 prong plug
• Hood canopy assembly with blower, vent
transition, light bulb and canopy glass already
installed
• Metal grease filter
• Vent cover support bracket
• Mounting template
• 2-piece vent cover
• 4 - 4 x 8 screws
• 6 - 5 x 45 mm mounting screws
• 2 - 8 x 40 mm wall anchors
• 4 - 10 x 50 mm wall anchors
10 49-2000742 Rev. 0
Installation Preparation
ELECTRICAL REQUIREMENTS
Observe all governing codes and ordinances.
Ensure that the electrical installation is adequate
and in conformance with National Electrical Code,
ANSI/NFPA 70 (latest edition), or CSA Standards
C22.1-94, Canadian Electrical Code, Part 1 and
C22.2 No. 0-M91 (latest edition) and all local codes
and ordinances.
If codes permit and a separate ground wire is
used, it is recommended that a qualified electrician
determine that the ground path is adequate.
A copy of the above code standards can be
obtained from:
National Fire Protection Association
1 Batterymarch Park
Quincy, MA 02169-7471
CSA International
8501 East Pleasant Valley Road
Cleveland, OH 44131-5575
It is important to make sure you have the proper
electrical connection.
RECOMMENDED GROUNDING
METHOD
A 120 volt, 60 Hz, AC only, 15-amp fused,
grounded electrical supply is required. Use an outlet
that cannot be turned off by a switch. Do not use an
extension cord.
NOTE: Before cleaning, or removing a light bulb,
turn vent hood off, and then disconnect the vent
hood from the electrical source. When you are
finished, reconnect the vent hood to the electrical
source.
PREPARE LOCATION
• It is recommended that the vent system be
installed before hood is installed.
• Before making cutouts, make sure there is proper
clearance within the ceiling or wall for exhaust
vent.
• Check your ceiling height and the hood height
maximum before you select your hood.
1. Disconnect power.
2. Determine which venting method to use: roof,
wall, or nonvented.
3. Select a flat surface for assembling the range
hood. Place covering over that surface.
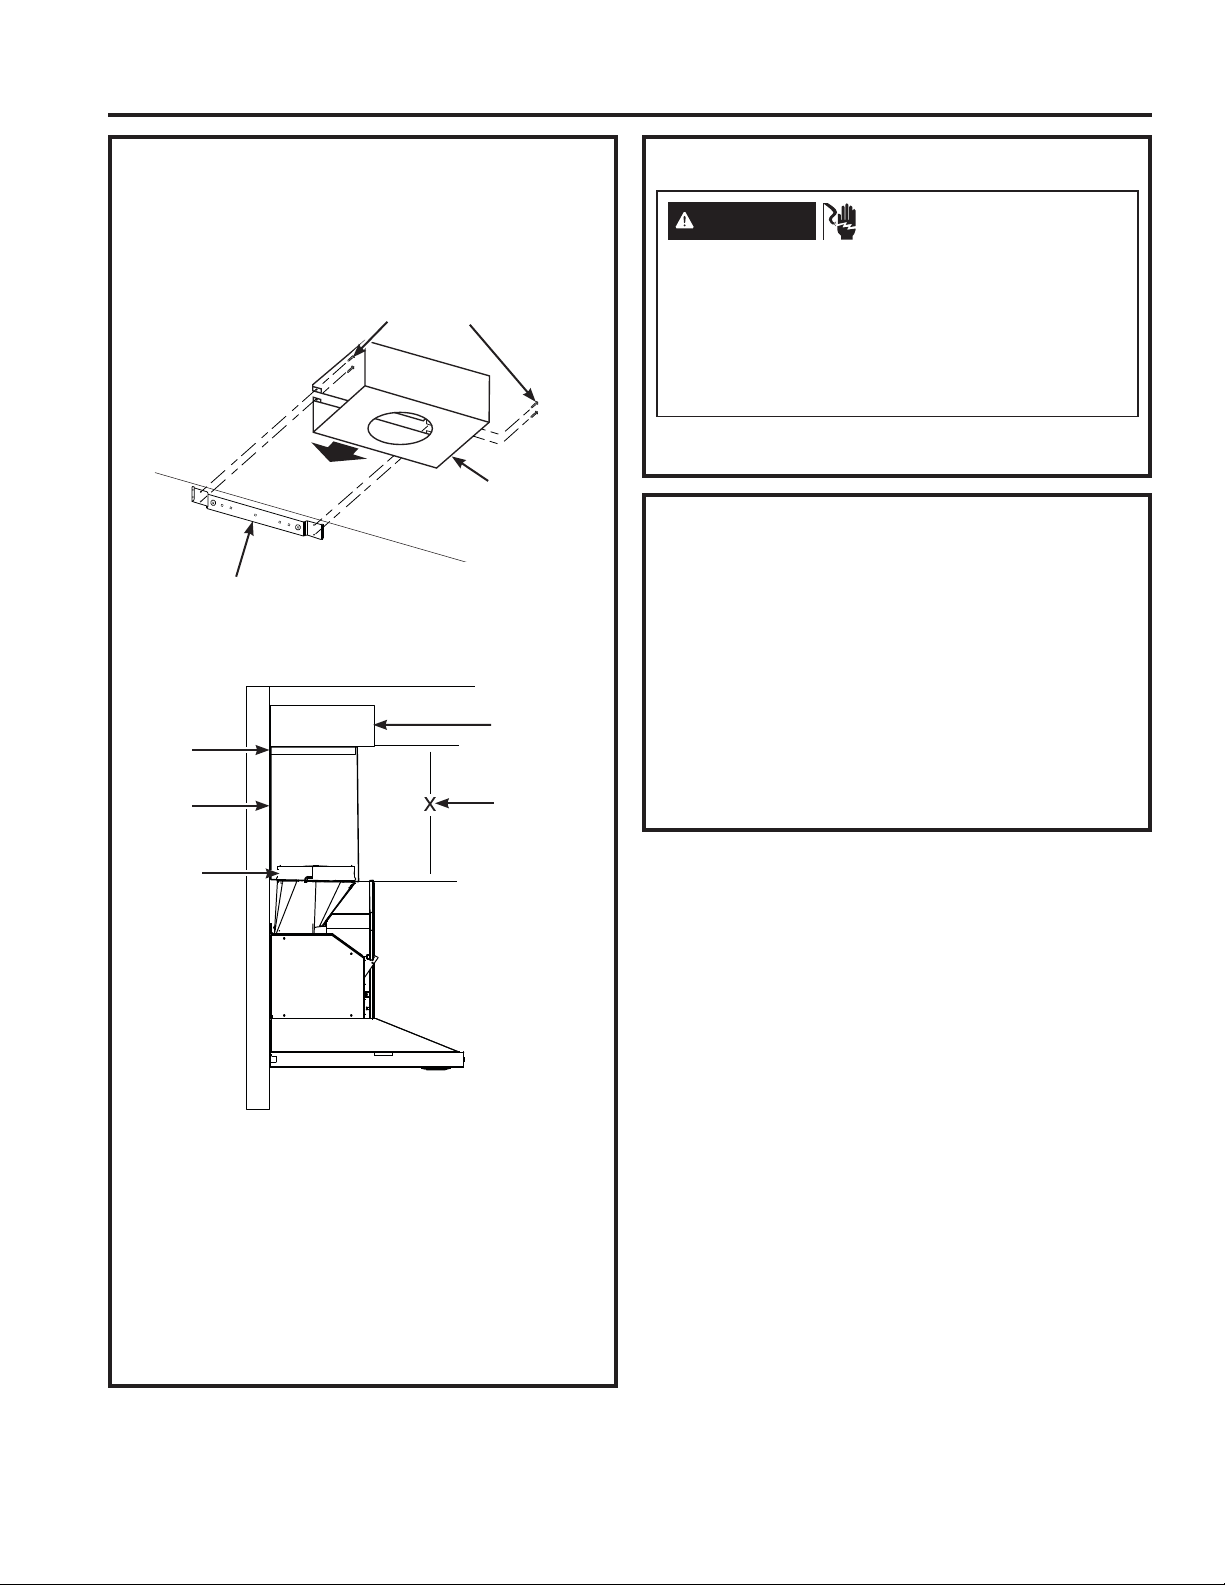
WARNING
Excessive Weight Hazard
Use two or more people to move and install range
hood. Failure to do so can result in death or
personal injury.
4. Using 2 or more people, lift range hood onto
covered surface.
INSTALLATION PREPARATION
49-2000742 Rev. 0 11
INSTALLATION
MOUNT RANGE HOOD TO THE WALL
1. Determine and mark the centerline on the wall
where the canopy hood will be installed.
2. Select a mounting height between a minimum of
24” (61.0 cm) for an electric cooking surface, a
minimum of 27” (68.6 cm) for a gas cooking surface,
and a suggested maximum of 36” (91.4 cm)
above the range to the bottom of the hood. Mark a
reference line on the wall.
3. Place the vent hood on the wall, adjust to align and
fasten with screws and screw anchors suited to the
wall type (reinforced concrete, plasterboard etc.)
4. Mark centers of the fastener locations through the
template to the wall.
IMPORTANT: All screws must be installed into
wood. If there is no wood to screw into, additional
wall framing supports may be required.
Remove the template.
5. Drill 3/16" (4.8 mm) pilot holes at all locations where
screws are being installed into wood.
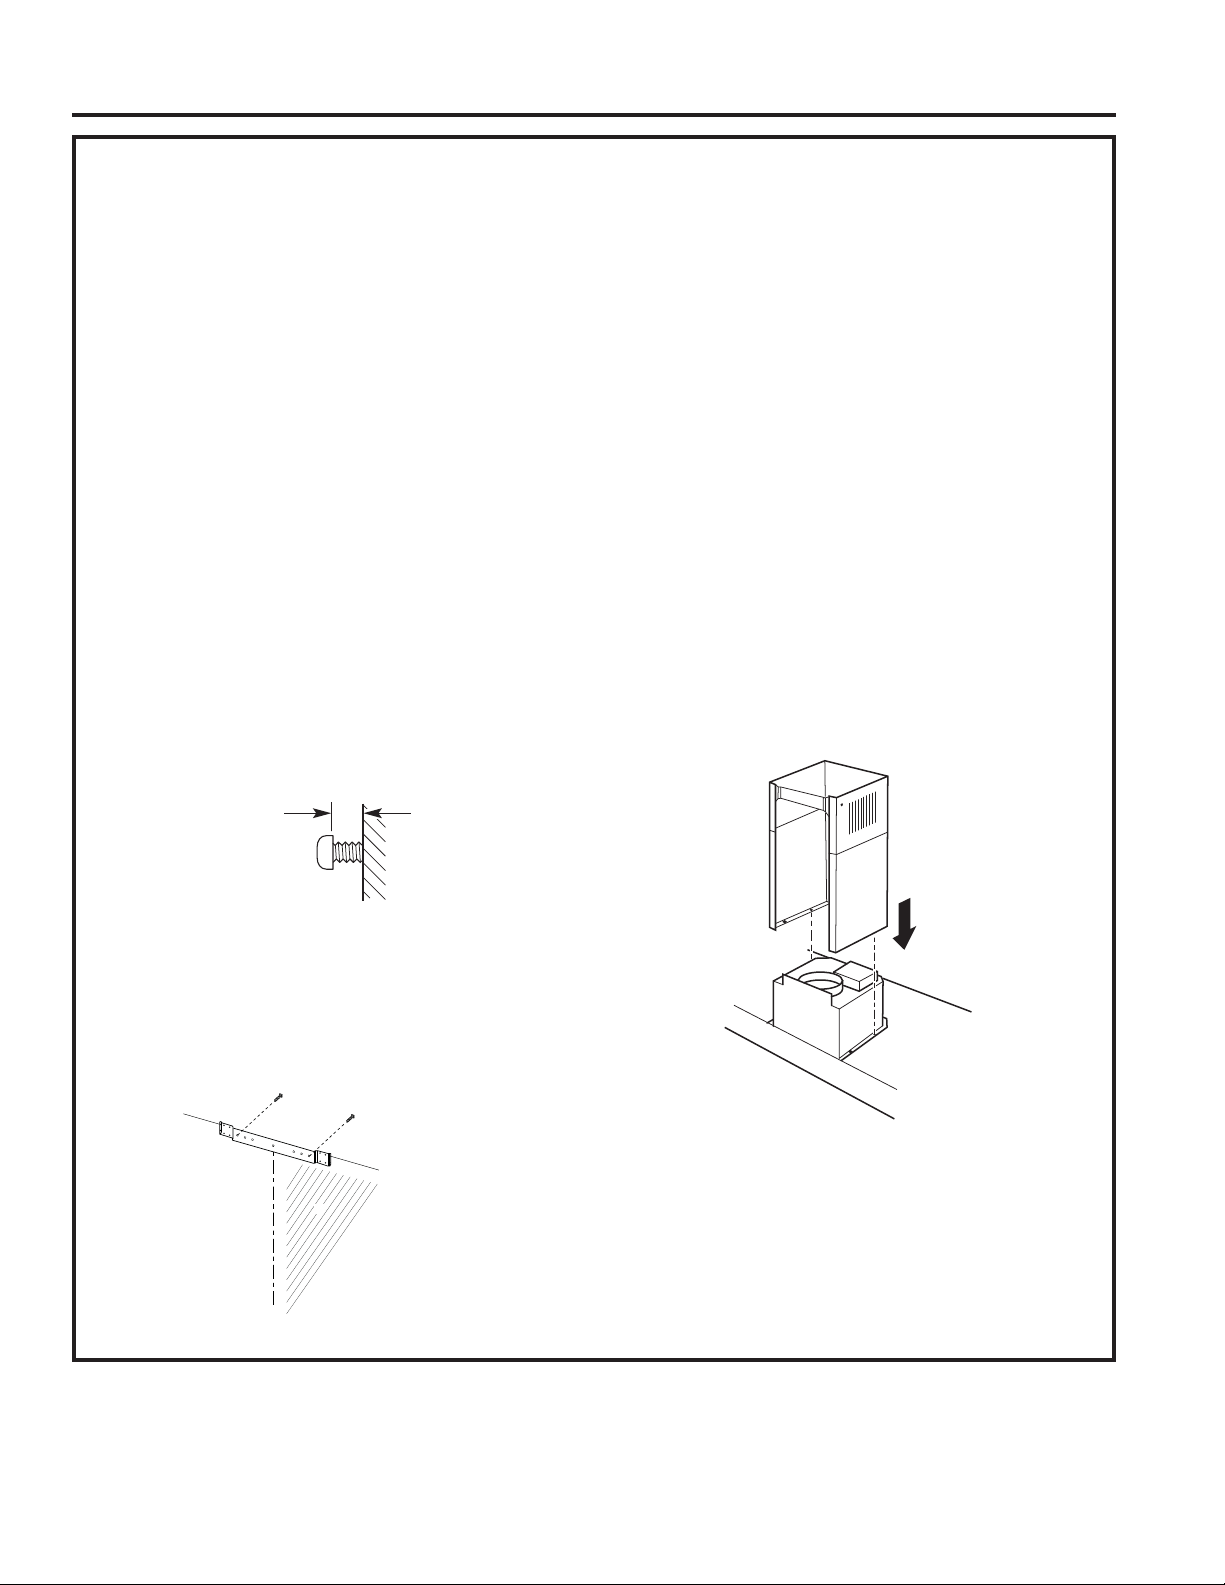
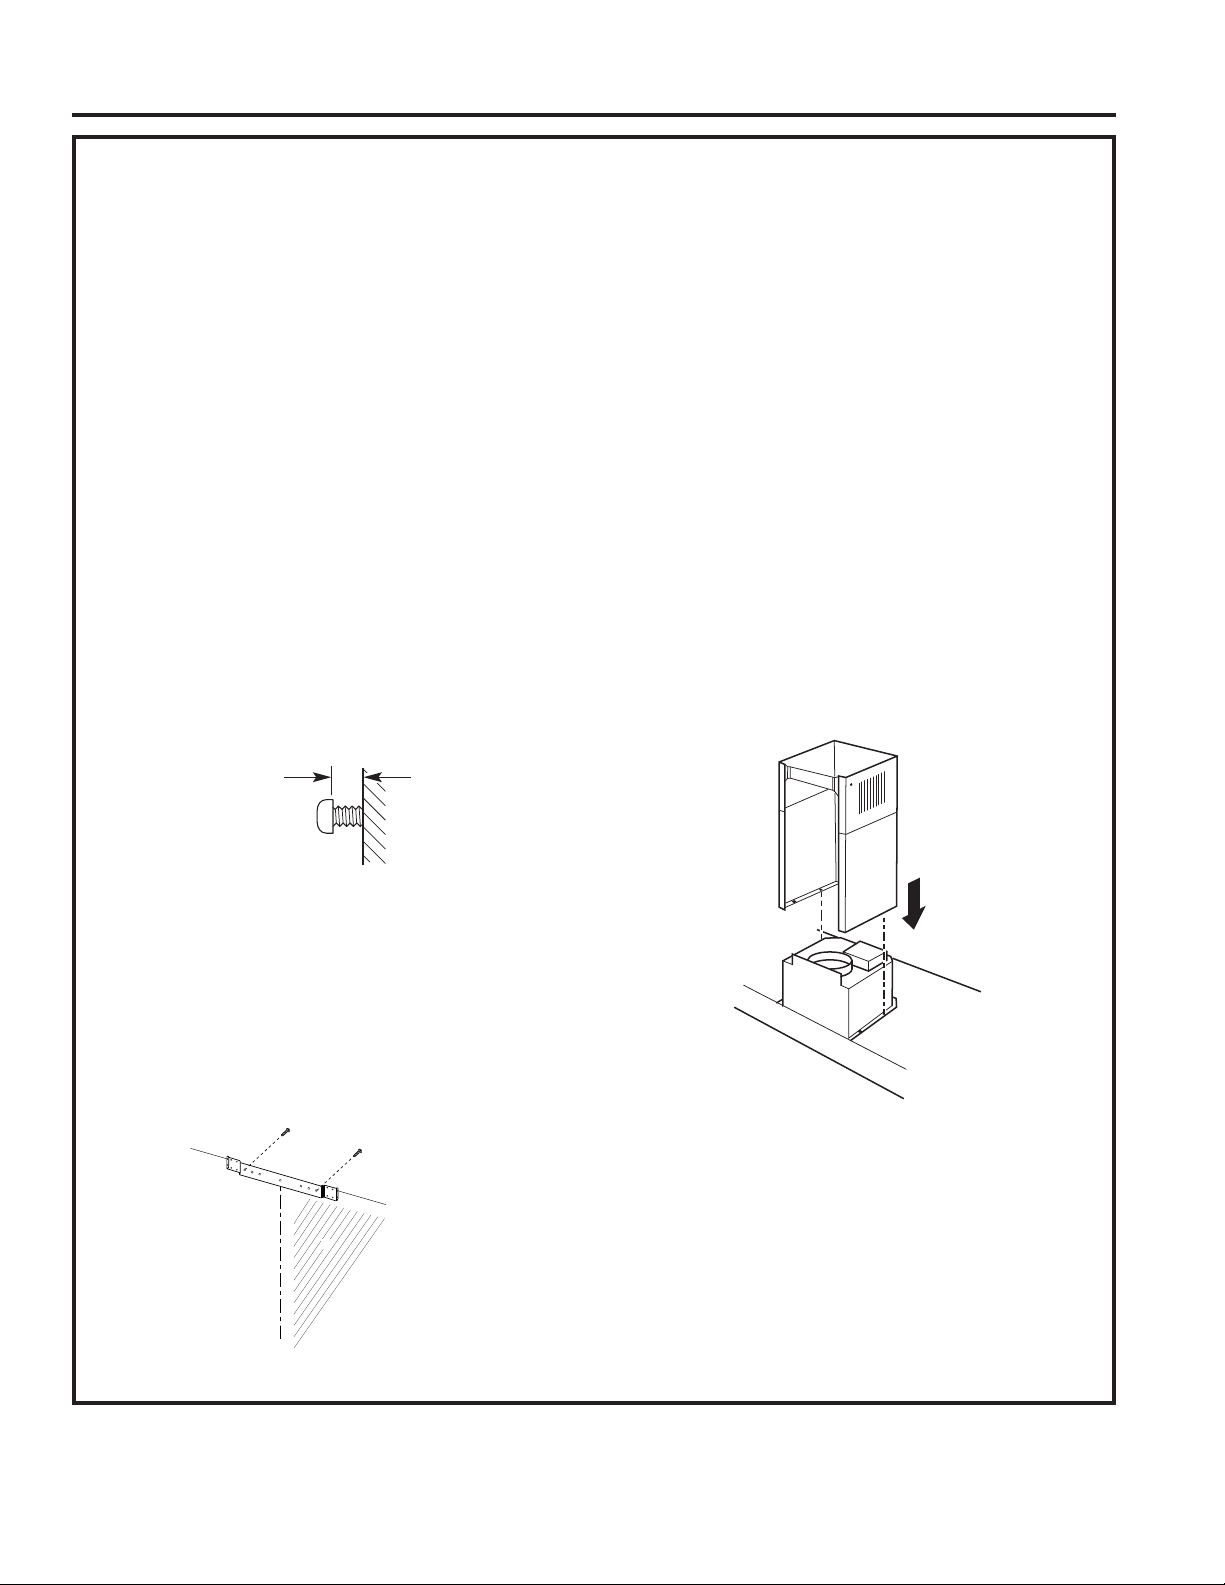
6. Install the 2 - 5 x 45 mm mounting screws. Leave a
1/4" (6.4 mm) gap between the wall and the back of
the screw head to slide range hood into place.
VENT COVER BRACKET
INSTALLATION
1. Attach vent cover bracket to wall flush to the ceiling
using 2 - 5 x 45 mm screws.
COMPLETE PREPARATION
1. Determine and make all necessary cuts in the wall
for the vent system. Install the vent system before
installing the hood. See “Venting Requirements”
section.
2. Determine the required height for the home power
supply cable and drill a 1-1/4” (3.2 cm) hole at this
location.
3. Run the home power supply cable according to the
National Electrical Code or CSA Standards and
local codes and ordinances. There must be enough
1/2” conduit and wires from the fused disconnect (or
circuit breaker) box to make the connection in the
hood’s electrical terminal box.
NOTE: Do not reconnect power until installation is
complete.
4. Use caulk to seal all openings.
INSTALL RANGE HOOD
1. Using 2 or more people, hang range hood on 2
mounting screws through the mounting slots on
back of hood.
2. Remove the grease filter. See Care and Cleaning
section.
3. Level the range hood and tighten upper mounting
screws.
4. Install 2 - 5 x 45 mm lower mounting screws and
tighten.
Installation
1/4"
(6.4 mm)
a
b
c
12 49-2000742 Rev. 0
Installation
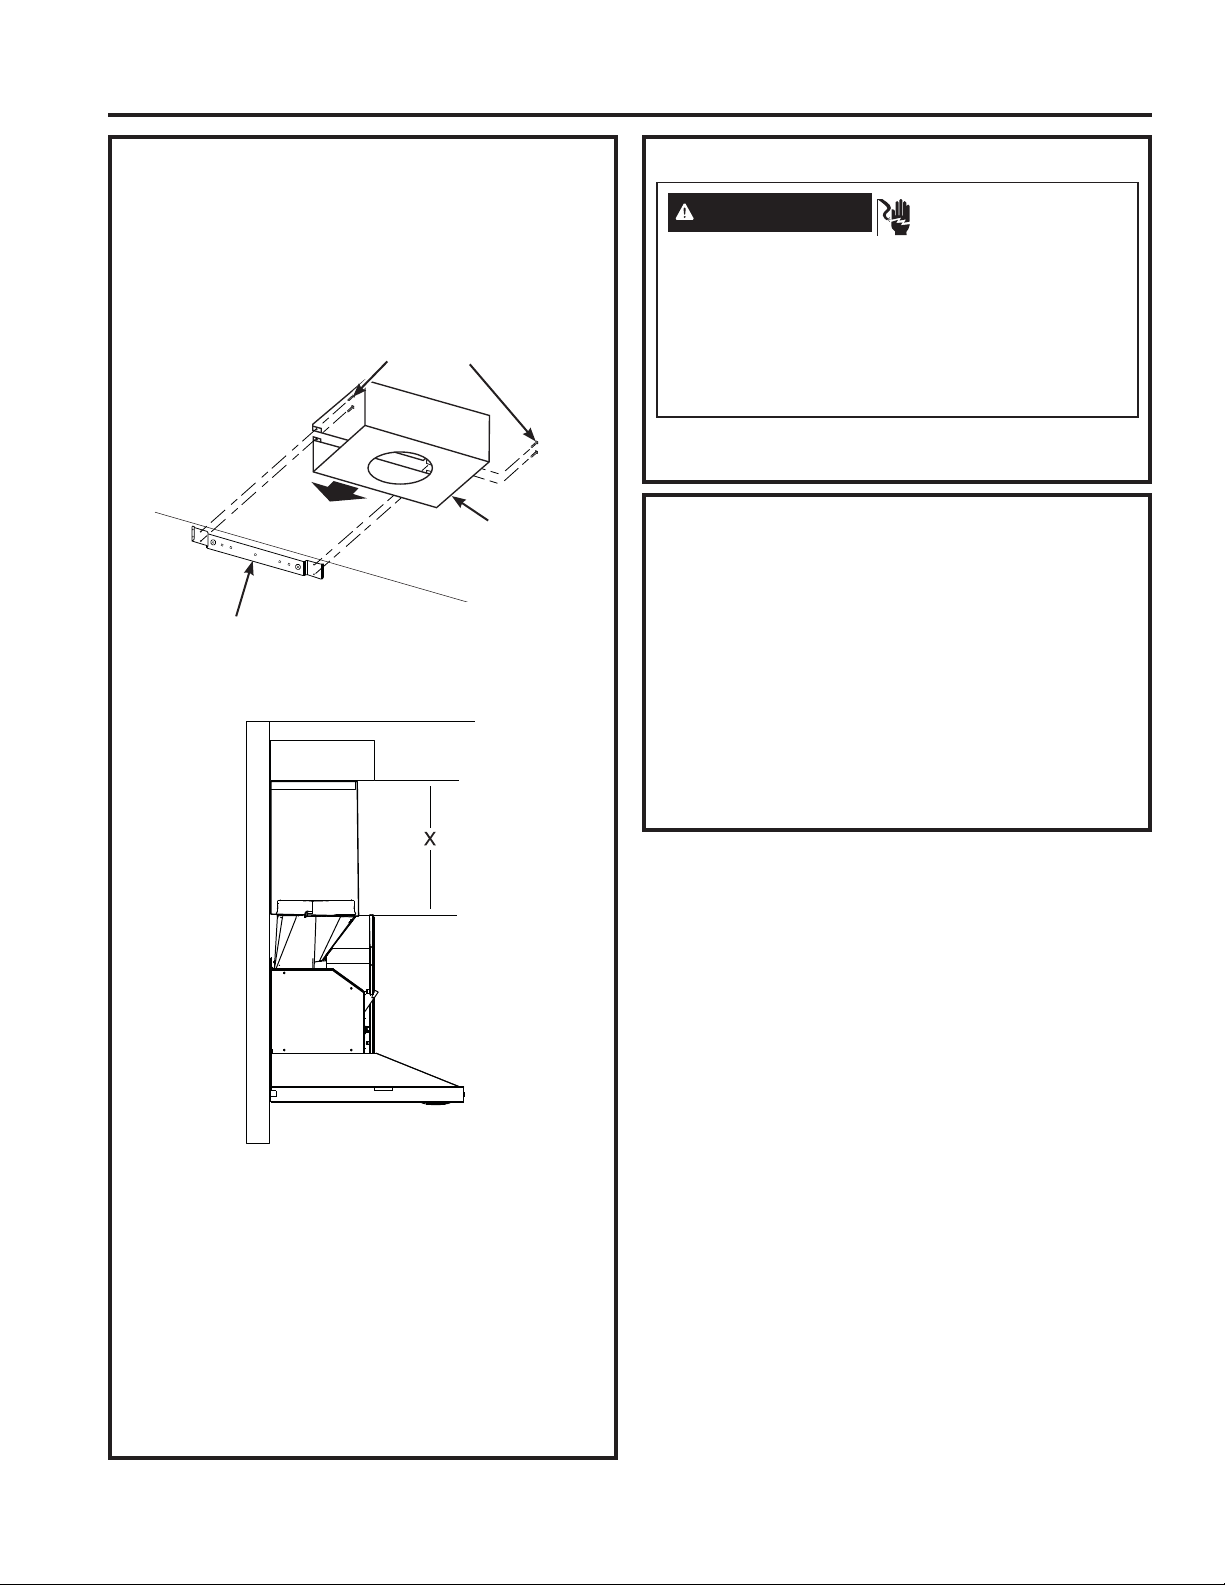
CONNECT VENT SYSTEM
For non-vented (recirculating) installation only:
1. Assemble the air deflector with the duct cover
bracket with 4 - assembly screws provided with
the Recirculation Kit.
2. Measure from the bottom of the air deflector to
the bottom of the hood outlet.
3. Cut the duct to the measured size (X).
4. Remove the air deflector.
5. Slide the duct onto the bottom of the air deflector.
6. Place the assembled air deflector and duct over
the exhaust outlet from the hood.
7. Reassemble the air deflector to the duct cover
bracket with 4 assembly screws.
8. Seal connections with vent clamps.
COMPLETE INSTALLATION
1. For non-vented (recirculating) installations only,
install charcoal filters over metal grease filter. See
the Care and Cleaning section.
2. Install metal filters. See the Care and Cleaning
section.
3. Check the operation of the range hood blower
and light. See the Using the Hood section.
NOTE: To get the most efficient use from your new
range hood, read the Using the Hood section.
MAKE ELECTRICAL CONNECTION
Plug into a grounded 3-prong outlet.
Assembly Screws
Duct Cover Bracket
Air Deflector
Air Deflector
Vent
Clamp
Vent
Duct
Exhaust
Outlet
X = length to
cut vent duct
WARNING
ELECTRICAL SHOCK
HAZARD
Plug into a grounded 3-prong outlet
Do not remove the ground prong
Do not use an adapter
Do not use an extension cord.
Failure to follow these instructions can result in
death, fire, or electrical shock.
INSTALLATION PREPARATION
49-2000742 Rev. 0 13
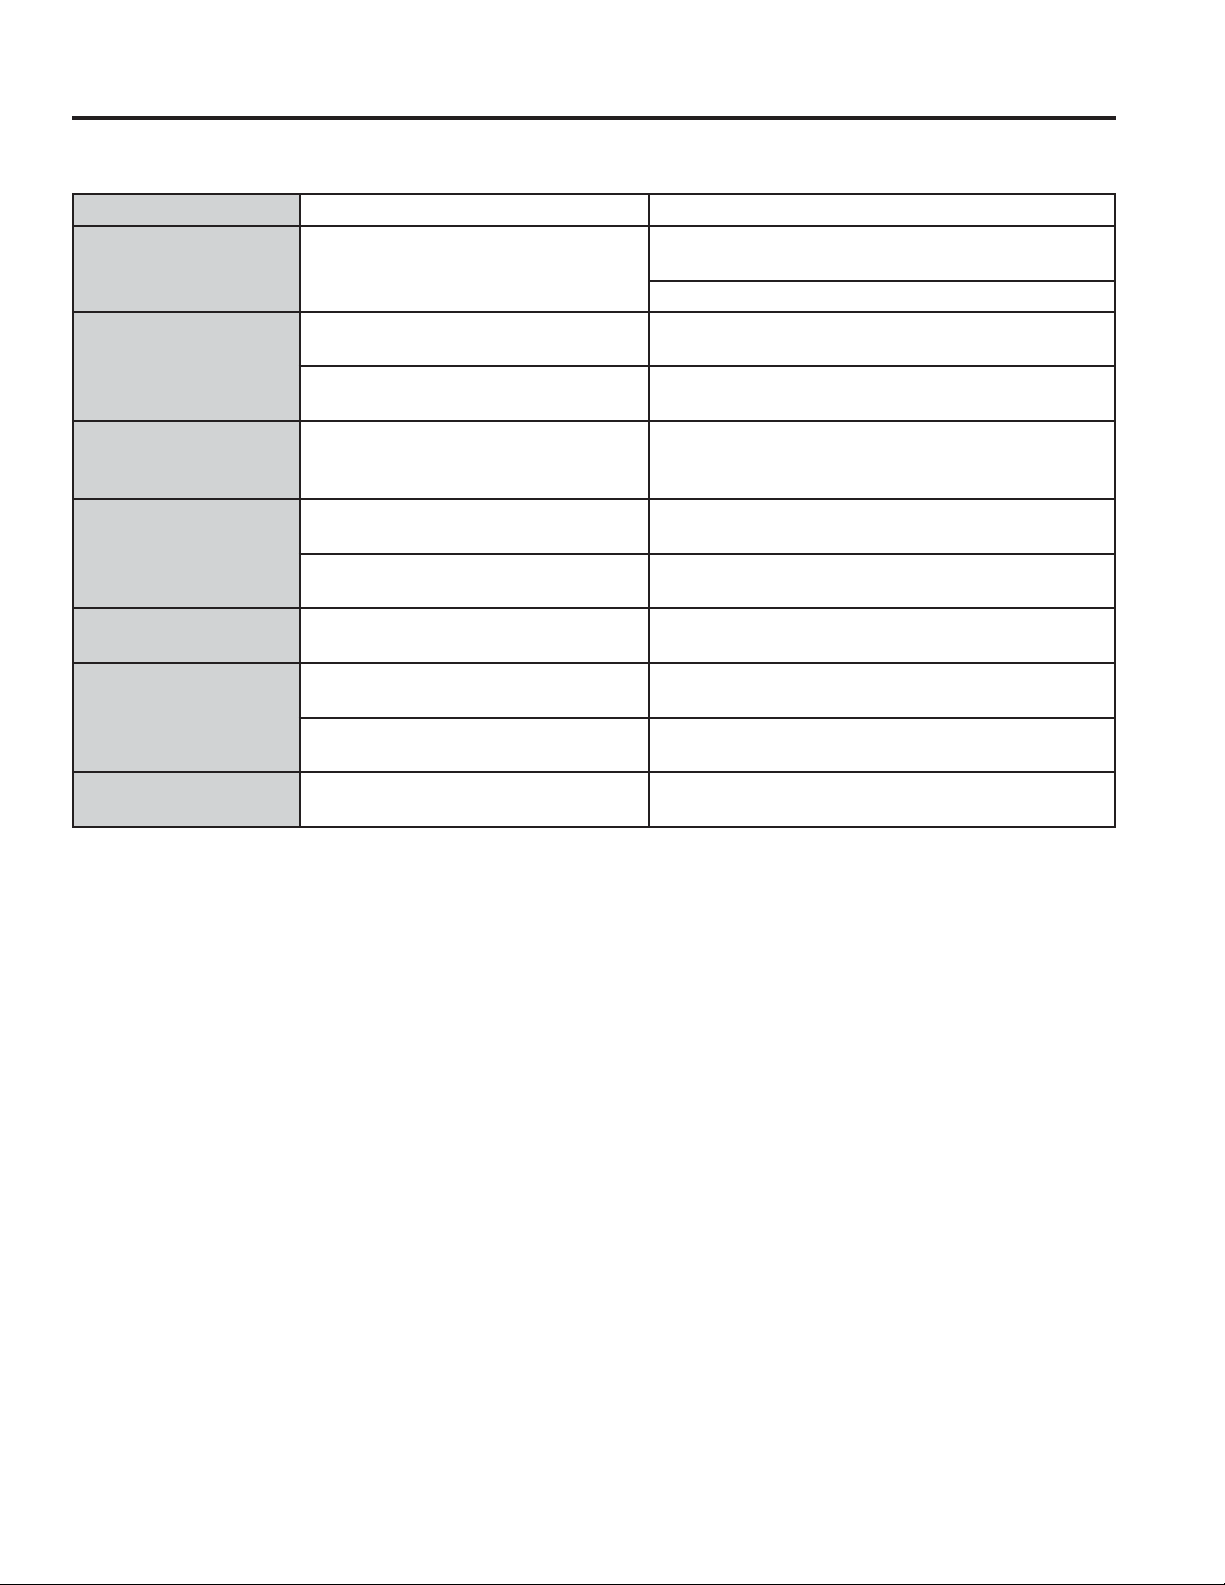
Save time and money! Review the charts on the following pages first and you may not need to call for service. For
more help, visit GEAppliances.com or call 800.GE.Cares (800-432-2737).
Problem Possible Cause What To Do
Hood doesn’t work Electric Supply Check that the hood is plugged into a receptacle.
Check that the power is turned on.
Poor Airflow Aluminum grease filters are
clogged
Clean and dry the filters, and then reassemble
Charcoal filters are clogged Replace the charcoal filters.
Motor running, but no
airflow
Butterfly valve jammed Call for service.
After running for
a while, the motor
stops.
The high temperature safety
device is activated.
The kitchen is not sufficiently ventilated.
The hood is installed to close to
the stove
The hood must be a minimum of 25 5/8” (65 cm)
above the stove.
Strong cooking smell Charcoal filters are not installed In re-circulating mode, charcoal filters must be
installed.
Oil dripping onto
stove
Oil cup missing or not installed Replace aluminum filter and replace oil cup.
Aluminum grease filter saturated Wash the aluminum grease filters
Whirring sound Fan blade problem Call for service
Troubleshooting tips ... Before you call for service
TROUBLESHOOTING TIPS
14 49-2000742 Rev. 0
Staple your receipt here. Proof of the original purchase
date is needed to obtain service under the warranty.
GEAppliances.com
All warranty service is provided by our Factory Service Centers, or an authorized Customer Care
®
technician. To schedule
service online, visit us at www.geappliances.com/service_and_support/, or call GE Appliances at 800.GE.CARES
(800.432.2737). Please have your serial number and your model number available when calling for service.
Servicing your appliance may require the use of the onboard data port for diagnostics. This gives a GE Appliances factory
service technician the ability to quickly diagnose any issues with your appliance and helps GE Appliances improve its
products by providing GE Appliances with information on your appliance. If you do not want your appliance data to be
sent to GE Appliances, please advise your technician not to submit the data to GE Appliances at the time of service.
What GE Appliances will not cover:
Ŷ Service trips to your home to teach you how to use
the product.
Ŷ Improper installation, delivery, or maintenance.
Ŷ Failure of the product if it is abused, misused,
modified, or used for other than the intended purpose
or used commercially.
Ŷ Replacement of house fuses or resetting of circuit
breakers.
Ŷ Damage to the product caused by accident, fire,
floods, or acts of God.
Ŷ Damage to finish, such as surface rust, tarnish, or small
blemishes not reported within 48 hours of delivery.
Ŷ Incidental or consequential damage caused by
possible defects with this appliance.
Ŷ Damage caused after delivery.
Ŷ Product not accessible to provide required service.
WARRANTY
GE Appliances Vented Range Hood Warranty
EXCLUSION OF IMPLIED WARRANTIES
Your sole and exclusive remedy is product repair as provided in this Limited Warranty. Any implied warranties,
including the implied warranties of merchantability or fitness for a particular purpose, are limited to one year or
the shortest period allowed by law.
This warranty is extended to the original purchaser and any succeeding owner for products purchased for home use
within the USA. If the product is located in an area where service by a GE Appliances Authorized Servicer is not available,
you may be responsible for a trip charge or you may be required to bring the product to an Authorized GE Appliances
Service location for service. In Alaska, the warranty excludes the cost of shipping or service calls to your home.
Some states do not allow the exclusion or limitation of incidental or consequential damages. This warranty gives you
specific legal rights, and you may also have other rights which vary from state to state. To know what your legal rights
are, consult your local or state consumer affairs office or your state’s Attorney General.
Warrantor: GE Appliances, a Haier company
Louisville, KY 40225
Extended Warranties: Purchase a GE Appliances extended warranty and learn about special discounts that are
available while your warranty is still in effect. You can purchase it online anytime at
www.geappliances.com/service_and_support/shop-for-extended-service-plans.htm
or call 800.626.2224 during normal business hours. GE Appliances Service will still be there after your warranty expires.
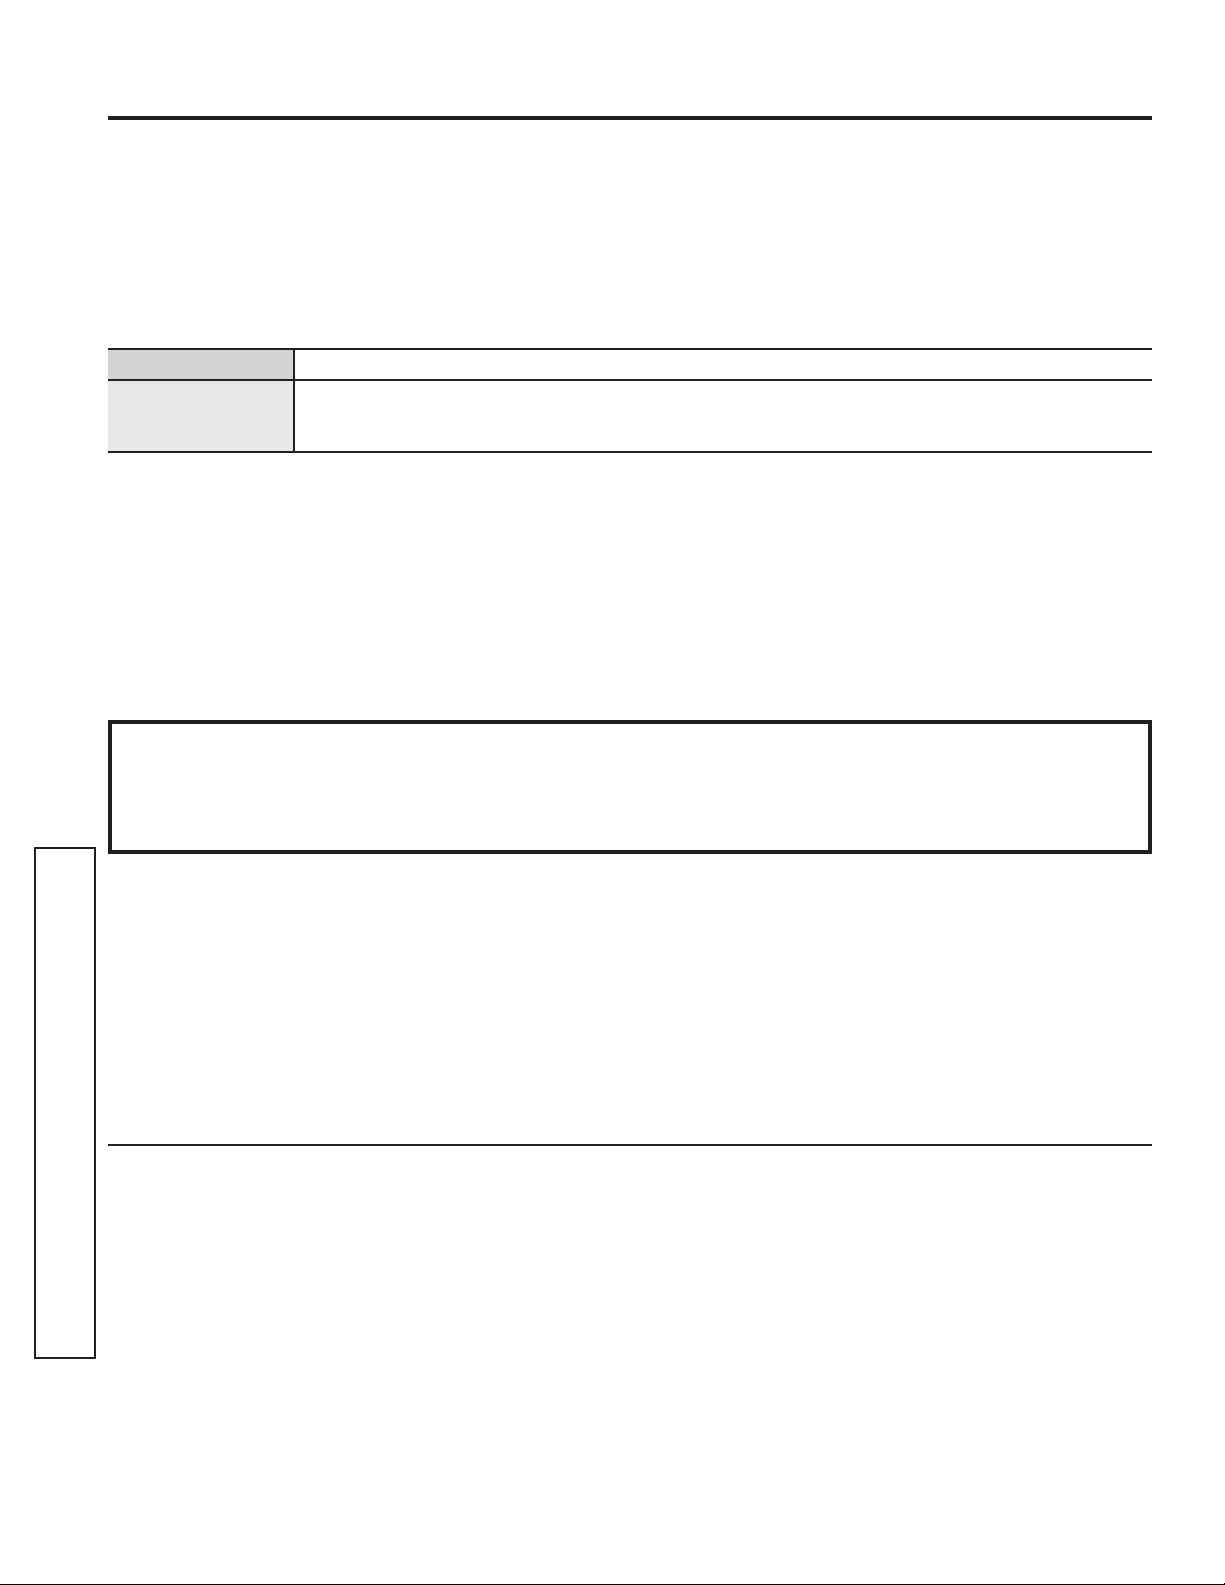
For the period of GE Appliances will replace
One year
From the date
of the original
purchase
Any part of the cooking product which fails due to a defect in materials or workmanship.
During this limited one-year warranty, GE Appliances will provide, free of charge, all labor
and related service costs to replace the defective part.

49-2000742 Rev. 0 15
Notes

16 49-2000742 Rev. 0
Consumer Support
CONSUMER SUPPORT
Printed in China
GE Appliances Website
Have a question or need assistance with your appliance? Try the GE Appliances Website 24 hours a day, any day
of the year! You can also shop for more great GE Appliances products and take advantage of all our on-line support
services designed for your convenience. In the US: GEAppliances.com
Register Your Appliance
Register your new appliance on-line at your convenience! Timely product registration will allow for enhanced
communication and prompt service under the terms of your warranty, should the need arise. You may also mail in
the pre-printed registration card included in the packing material. In the US: GEAppliances.com/register
Schedule Service
Expert GE Appliances repair service is only one step away from your door. Get on-line and schedule your service at
your convenience any day of the year. In the US: GEAppliances.com/service
or call 800.432.2737 during normal business hours.
Extended Warranties
Purchase a GE Appliances extended warranty and learn about special discounts that are available while your
warranty is still in effect. You can purchase it on-line anytime. GE Appliances Services will still be there after your
warranty expires. In the US: GEAppliances.com/extended-warranty
or call 800.626.2224 during normal business hours.
Remote Connectivity
For assistance with wireless network connectivity (for models with remote enable),
visit our website at GEAppliances.com/connected-home-smart-appliances/ or call 800.220.6899 in the US.
Parts and Accessories
Individuals qualified to service their own appliances can have parts or accessories sent directly to their homes
(VISA, MasterCard and Discover cards are accepted). Order on-line today 24 hours every day.
In the US: GEApplianceparts.com or by phone at 877.959.8688 during normal business hours.
Instructions contained in this manual cover procedures to be performed by any user. Other servicing
generally should be referred to qualified service personnel. Caution must be exercised, since improper
servicing may cause unsafe operation.
Contact Us
If you are not satisfied with the service you receive from GE Appliances, contact us on our Website with all the
details including your phone number, or write to:
In the US: General Manager, Customer Relations | GE Appliances, Appliance Park | Louisville, KY 40225
GEAppliances.com/contact

Escriba los números de modelo y
de serie aquí:
Nº de Modelo ____________
Nº de Serie ______________
Los encontrará en una etiqueta
dentro de la campana.
ESPAÑOL
Para consultar una version en
español de este manual de
instrucciones, visite nuestro sitio de
internet GEAppliances.com.
CAMPANA DE COCINA
49-2000720 Rev. 0 04-20 GEA
GE es una marca registrada de General Electric Company. Fabricado bajo licencia de marca.
UVW7241SNSS
MANUAL DEL
PROPIETARIO E
INSTALACIÓN
con Montaje de Pared
INFORMACIÓN DE SEGURIDAD ....3
USO DE LA CAMPANA
Funciones ................................5
Controles .................................5
CUIDADO Y LIMPIEZA
Superficies Exteriores ..................... 6
Filtro de Grasa Metálico ................... 6
Filtro de Carbón .......................... 6
Reemplazo de una Lámpara ................ 6
INSTRUCCIONES
DE INSTALACIÓN ....................7
CONSEJOS PARA LA SOLUCIÓN
DE PROBLEMAS .....................13
GARANTÍA LIMITADA ..............14
SOPORTE PARA
EL CONSUMIDOR ....................16

2 49-2000742 Rev. 0
GRACIAS POR HACER QUE GE APPLIANCES SEA PARTE DE SU HOGAR.
Ya sea que haya crecido usando GE Appliances, o que ésta es su primera vez, nos complace
tenerlo en la familia.
Sentimos orgullo por el nivel de arte, innovación y diseño de cada uno de los electrodomésticos de
GE Appliances, y creemos que usted también. Entre otras cosas, el registro de su electrodoméstico
asegura que podamos entregarle información importante del producto y detalles de la garantía
cuando los necesite.
Registre su electrodoméstico GE ahora a través de Internet. Sitios Web y números telefónicos útiles
están disponibles en la sección de Soporte para el Consumidor de este Manual del Propietario.
También puede enviar una carta en la tarjeta de inscripción preimpresa que se incluye con
el material embalado.
49-2000742 Rev. 0 3
INFORMACIÓN DE SEGURIDAD
INFORMACIÓN IMPORTANTE DE SEGURIDAD
LEA TODAS LAS INSTRUCCIONES ANTES DE USAR
LEA Y GUARDE ESTAS INSTRUCCIONES
ADVERTENCIA
PARA REDUCIR EL RIESGO
DE INCENDIO, DESCARGA ELÉCTRICA O LESIONES A
PERSONAS, CUMPLA CON LOS SIGUIENTES PUNTOS:
A. Utilice esta unidad sólo de la manera concebida por el
fabricante. Si tiene alguna pregunta, comuníquese con el
fabricante.
B. Antes de realizar reparaciones o limpiar la unidad,
desconecte la energía del panel de servicio y bloquee los
medios de desconexión para evitar el accionamiento de
la energía de manera accidental. Cuando los medios de
desconexión de servicio no pueden bloquearse, coloque
sobre el panel de servicio un dispositivo de advertencia
bien visible, como una etiqueta.
C. No utilice esta unidad con ningún dispositivo de control
de velocidad de estado sólido.
D. Esta unidad debe estar conectada a tierra.
PRECAUCIÓN
SÓLO PARA USO DE
VENTILACIÓN GENERAL. NO LO UTILICE PARA
ELIMINAR MATERIALES Y VAPORES PELIGROSOS O
EXPLOSIVOS.
PRECAUCIÓN
PARA REDUCIR EL RIESGO
DE INCENDIO Y PARA ELIMINAR EL AIRE DE ESCAPE
CORRECTAMENTE, ASEGÚRESE DE DIRIGIR EL AIRE
DEL CONDUCTO HACIA EL EXTERIOR. NO VENTILE EL
AIRE DE ESCAPE EN ESPACIOS DENTRO DE PAREDES
O CIELORRASOS O EN ÁTICOS, HUECOS SANITARIOS
O GARAJES.
ADVERTENCIA
PARA REDUCIR EL RIESGO DE
LESIONES A PERSONAS EN CASO DE UN INCENDIO
DE GRASA SOBRE UNA ESTUFA, CUMPLA CON LOS
SIGUIENTES PUNTOS*:
A. APAGUE LAS LLAMAS con una tapa que ajuste bien,
una plancha para galletas o una bandeja de metal, y
luego apague el quemador. TENGA MUCHO CUIDADO
A FIN DE EVITAR QUEMADURAS. Si las llamas no
se apagan de inmediato, SALGA DE LA VIVIENDA Y
LLAME AL DEPARTAMENTO DE BOMBEROS.
B. NUNCA LEVANTE UNA SARTÉN EN LLAMAS—
Usted puede quemarse.
C. NO UTILICE AGUA, incluyendo repasadores o toallas
húmedos—se provocará una violenta explosión de vapor.
D. Utilice un extintor SÓLO si:
1. Usted sabe que cuenta con un extintor Clase ABC y
ya sabe cómo utilizarlo.
2. El incendio es pequeño y se contuvo en el área donde
comenzó.
3. Se está llamando al departamento de bomberos.
4. Usted puede combatir el incendio con su espalda
dirigida hacia una salida.
* Basado en “Kitchen Fire Safety” publicado por NFPA.
4 49-2000742 Rev. 0
ADVERTENCIA
PARA REDUCIR EL RIESGO DE
UN INCENDIO DE GRASA SOBRE UNA ESTUFA:
A. Nunca deje unidades de superficie desatendidas en
configuraciones de calor elevadas. Los alimentos que
hierven y se derraman provocan humo y derrames
grasosos que pueden prenderse fuego. Caliente los
aceites lentamente en configuraciones bajas o medias.
B. Siempre encienda el sistema de ventilación cuando
cocine con configuraciones de calor elevadas o cuando
flambee alimentos (por ej., Crepes Suzette, cerezas
Jubilee, carne flambeada a la pimienta en grano).
C. Limpie los ventiladores con frecuencia. No debe
permitirse la acumulación de grasa en el ventilador o en
el filtro.
D. Utilice el tamaño de recipiente adecuado. Siempre utilice
recipientes de cocción apropiados para el tamaño del
elemento de superficie.
ADVERTENCIA
A FIN DE REDUCIR EL
RIESGO DE INCENDIOS, DESCARGAS ELÉCTRICAS
O LESIONES PERSONALES, CUMPLA CON LO
SIGUIENTE:
A. El trabajo de instalación y el cableado eléctrico deben
ser realizados por una persona(s) calificada de acuerdo
con todos los códigos y estándares aplicables, incluyendo
construcciones resistentes al fuego.
B. Es necesario contar con suficiente cantidad de aire
para una combustión y salida de gases adecuadas a
través del conducto (chimenea) del equipo de consumo
de combustible, a fin de evitar ráfagas de aire. Siga las
pautas del fabricante del equipo de calefacción y los
estándares de seguridad, tales como aquellos publicados
por la Asociación Nacional de Protección contra
Incendios (National Fire Protection Association, NFPA), la
Sociedad Estadounidense para la Calefacción (American
Society for Heating), los Ingenieros de Refrigeración
y Acondicionadores de Aire (Refrigeration and Air
Conditioning Engineers, ASHRAE) y las autoridades de
los códigos locales.
C. Al cortar o perforar una pared o un cielorraso, no dañe el
cableado eléctrico y de otros servicios ocultos.
D. Los ventiladores con conducto siempre deben contar con
ventilación hacia el exterior.
E. Cuando corresponda, instale un sistema de reposición
(reemplazo) de aire de acuerdo con los requisitos
del código local de construcción. Para acceder a
soluciones relacionadas con la reposición de aire, visite
GEAppliances.com.
F. Desconecte el disyuntor de habitaciones adyacentes
mientras esté trabajando.
ADVERTENCIA
A FIN DE REDUCIR EL RIESGO
DE INCENDIOS, USE SÓLO CONDUCTOS DE METAL.
Ŷ1RLQWHQWHUHSDUDURUHHPSOD]DUQLQJXQDSDUWHGHOD
cocina, a menos que esto se recomiende específicamente
en este manual. Cualquier otra reparación deberá ser
realizada por un técnico calificado.
Cómo Retirar la Película Protectora de Envío y la Cinta de Embalaje
Con cuidado tome un extremo de la película protectora
de envío con los dedos y lentamente retire la misma de la
superficie del electrodoméstico. No utilice ningún producto
filoso para retirar la película. Retire toda la película antes de
usar el electrodoméstico por primera vez.
Para asegurar que no haya daños sobre el acabado del
producto, la forma más segura de retirar el adhesivo de la cinta
de embalaje en electrodomésticos nuevos es aplicando un
detergente líquido hogareño para lavar platos. Aplique con una
tela suave y deje que se seque.
NOTA: El adhesivo deberá ser eliminado de todas las partes.
No se puede retirar si se hornea con éste dentro.
NOTA: Para más instrucciones/ sugerencias sobre la limpieza,
por favor consulte la sección de Cuidado y Limpieza.
INFORMACIÓN DE SEGURIDAD
INFORMACIÓN IMPORTANTE DE SEGURIDAD
LEA TODAS LAS INSTRUCCIONES ANTES DE USAR
LEA Y GUARDE ESTAS INSTRUCCIONES
49-2000742 Rev. 0 5
Funciones
Controles
USO DE LA CAMPANA : Funciones / Controles
La campana de cocina fue diseñada para eliminar humo, vapores de cocción y olores del área de la superficie de
cocción. Para obtener mejores resultados, inicie la campana antes de cocinar y deje que funcione durante 15 minutos
una vez completada la cocción, a fin de eliminar todo el humo y olores de la cocina.
A
Tapa del conducto
B
Panel de control
C
Base de vidrio de la
campana
D
Tapa de la lámpara
E
Lámpara halógena
F
Retiro del filtro de
grasa
G
Filtro de grasa
A
B
C
DD EE F
G
A B C D E
A
Encendido/ Apagado – Enciende y apaga el ventilador.
B
Velocidad 1 – Velocidad de ventilador Alta
C
Velocidad 2 – Velocidad de ventilador Media
D
Velocidad 3 – Velocidad de ventilador Baja
E
Luz – El botón de la luz controla ambas luces.
Presione una vez para Encender y nuevamente
para Apagar.
6 49-2000742 Rev. 0
Cuidado y Limpieza
CUIDADO Y LIMPIEZA
IMPORTANTE: Limpie la campana y los filtros de grasa
con frecuencia de acuerdo con las siguientes instrucciones.
Reemplace los filtros de grasa antes de utilizar la campana.
SUPERFICIES EXTERIORES:
A fin de evitar daños sobre la superficie exterior, no use
estropajos ni almohadillas adherentes con jabón.
Siempre seque para evitar marcas de agua.
Método de Limpieza:
• Jabón detergente líquido y agua, o limpiador multiuso.
• Limpie con una tela húmeda o una esponja no adherente, y
luego enjuague con agua limpia y seque.
FILTRO DE GRASA METÁLICO
1. Empuje hacia arriba en la parte media, del lado derecho del
vidrio decorativo para abrir la puerta.
2. Retire el filtro metálico.
3. Lave los filtro metálicos según sea necesario en el
lavavajillas o con una solución de detergente caliente.
4. Reemplace los filtros de grasa metálicos.
FILTRO DE CARBÓN
El filtro de carbón no es lavable. Deberá durar hasta 6
meses bajo un uso normal.
Para reemplazar el filtro de carbón:
1. Retire el filtro de grasa metálico de la campana de
cocina. Consulte sobre el “Filtro de Grasa Metálico” en
esta sección.
2. Doble los sujetadores con resorte del filtro de grasa
metálico.
3. Coloque el filtro de carbón en la parte superior del filtro
metálico.
4. Vuelva a doblar los sujetadores con resorte sobre
su posición para asegurar el filtro de carbón al filtro
metálico.
5. Reemplace el filtro de grasa metálico. Consulte sobre
el “Filtro de Grasa Metálico” en esta sección.
REEMPLAZO DE UNA LÁMPARA
Apague la campana de cocina y espere hasta que la lámpara
se enfríe. Evite daños o reducción de la vida útil de la lámpara
nueva; no toque la lámpara con los dedos descubiertos.
Reemplace la lámpara usando un pañuelo de papel o guantes
de algodón para manipular la lámpara.
Si las lámparas nuevas no funcionan, asegúrese de que las
mismas hayan sido insertadas de forma correcta antes de
llamar al servicio técnico.
1. Desconecte el encendido.
2. Use un destornillador de punta plana para abrir la tapa de la
luz haciendo palanca.
3. Evitando el contacto con la piel, reemplace la lámpara usada
por una lámpara halógena nueva, del mismo tamaño, forma
y voltaje.
4. Reemplace la tapa de la luz y calce la misma haciendo
presión.
5. Vuelva a conectar la corriente.
49-2000742 Rev. 0 7
Ante cualquier duda, llame a GE Appliances al 800.GE.CARES (800.432.2737)
o visite nuestro sitio Web en: GEAppliances.com
ANTES DE COMENZAR
Lea estas instrucciones por completo y con
detenimiento.
Ŷ
IMPORTANTE — Guarde estas
instrucciones para el uso de inspectores locales.
Ŷ
IMPORTANTE — Cumpla con todos los
códigos y ordenanzas vigentes.
Ŷ
Nota al instalador – Asegúrese de dejar estas
instrucciones con el Consumidor.
Ŷ
Nota al consumidor – Conserve estas instrucciones
para referencia futura.
Ŷ
Nivel de capacidad – La instalación de esta campana
de ventilación requiere capacidades mecánicas y
eléctricas básicas.
Ŷ
Tiempo de compleción – Aproximadamente entre
1 y 3 horas
Ŷ
El instalador tiene la responsabilidad de efectuar una
instalación adecuada.
Ŷ
La Garantía no cubre las fallas del producto debido a
una instalación incorrecta.
PARA SU SEGURIDAD
ADVERTENCIA
Antes de comenzar la
instalación, desconecte la energía del panel de servicio
y bloquee los medios de desconexión para evitar el
accionamiento de la energía de manera accidental.
Cuando los medios de desconexión de servicio no
pueden bloquearse, coloque sobre el panel de servicio un
dispositivo de advertencia bien visible, como una etiqueta.
PRECAUCIÓN
Debido al peso y tamaño de
estas campanas de ventilación, y a fin de reducir el
riesgo de lesiones personales o daños sobre el producto
- SE DEBERÁ CONTAR CON DOS PERSONAS PARA
UNA INSTALACIÓN ADECUADA.
ADVERTENCIA
Desconecte toda la corriente
eléctrica del disyuntor principal o de la caja de fusibles
antes de la instalación.
ADVERTENCIA
PARA REDUCIR EL RIESGO
DE INCENDIO, DESCARGA ELÉCTRICA O LESIONES A
PERSONAS, CUMPLA CON LOS SIGUIENTES PUNTOS:
A. El trabajo de instalación y el cableado eléctrico
deben ser realizados por una persona(s) calificada de
acuerdo con todos los códigos y estándares aplicables,
incluyendo construcciones resistentes al fuego.
B. Es necesario contar con suficiente cantidad de aire
para una combustión y salida de gases adecuadas
a través del conducto (chimenea) del equipo de
consumo de combustible, a fin de evitar ráfagas de
aire. Siga las pautas del fabricante del equipo de
calefacción y los estándares de seguridad, tales como
aquellos publicados por la Asociación Nacional de
Protección contra Incendios (National Fire Protection
Association, NFPA), la Sociedad Estadounidense
para la Calefacción (American Society for Heating),
los Ingenieros de Refrigeración y Acondicionadores
de Aire (Refrigeration and Air Conditioning Engineers,
ASHRAE) y las autoridades de los códigos locales.
C. Al cortar o perforar una pared o un cielorraso, no dañe
el cableado eléctrico y de otros servicios ocultos.
D. Los ventiladores con conducto siempre deben contar
con ventilación hacia el exterior.
E. Desconecte el disyuntor de habitaciones adyacentes
mientras esté trabajando.
ADVERTENCIA
A FIN DE REDUCIR EL RIESGO
DE INCENDIOS, USE SÓLO CONDUCTOS DE METAL.
Instrucciones
de instalación
INSTRUCCIONES DE INSTALACIÓN
Campanas de Pared
UVW9301, UVW9361
8 49-2000742 Rev. 0
DIMENSIONES DEL PRODUCTO
24”
610 mm
279 mm
19”
480 mm
2-3/8”
34”
18-3/8”
60 mm
466 mmm
866 mm (max)
11”
298 mm
11-3/4”
REQUISITOS DE UBICACIÓN
IMPORTANTE: Cumpla con todos los códigos y ordenanzas
gubernamentales.
Solicítele a un técnico calificado que instale la campana de
cocina. Es responsabilidad del instalador cumplir con los
espacios libres de instalación especificados en la placa de
especificaciones técnicas del modelo/ serie. La placa de
especificaciones técnicas del modelo/ serie está ubicada
detrás del filtro izquierdo, sobre la pared trasera de la
campana de ventilación.
La base de la campana deberá estar alejada de áreas
con corrientes de aire, tales como ventanas, puertas y
ventilaciones de calor altas.
Se requiere un tomacorriente eléctrico con conexión a tierra.
Consulte la sección de “Requisitos Eléctricos”.
La base de la campana fue configurada de fábrica para
ventilar a través del techo o pared. Para una instalación sin
ventilación (recirculación), consulte la sección de “Instalación
sin ventilación únicamente” en "Conexión del Sistema de
Ventilación".
Todas las aberturas en el cielorraso y la pared donde la
campana con base se instalará deberán estar selladas.
PARA INSTALACIONES EN CASAS
RODANTES
La instalación de esta campana de cocina deberá ser
realizada de acuerdo con los Estándares de Seguridad para
la Construcción de Casas Prefabricadas 24 CFR, Parte 328
(anteriormente el Estándar Federal para la Construcción y
Seguridad de Casa Rodantes, Título 24, HUD, Parte 280)
o, cuando dicho estándar no corresponda, el Estándar para
Instalaciones de Casas Rodantes de 1982 (Fabricación de
Casas, Comunidades y Organizaciones) ANSI A225.1/NFPA
501A, o la última edición, o con códigos locales.
Preparación para la instalación
INSTRUCCIONES DE INSTALACIÓN
49-2000742 Rev. 0 9
INSTRUCCIONES DE INSTALACIÓN
Preparación para la instalación
HERRAMIENTAS Y MATERIALES
REQUERIDOS (NO SUMINISTRADOS)
Reúna las herramientas y piezas requeridas antes de
comenzar con la instalación. Lea y siga las instrucciones
provistas con cualquiera de las herramientas de que
figuran aquí.
Herramientas que necesitará
• Nivel
• Taladro con brocas de 1 ¼” (3.0 cm), 1/8” (3.2 mm), y
5/16” (7.9 mm)
• Lápiz
• Pelacables o cuchillo multiuso
• Cinta de medición o regla
• Pinzas
• Pistola para cartuchos y compuesto para juntas
impermeable
• Abrazaderas para ventilación
• Sierra de corte vertical o sierra de punta
• Destornillador de punta plana
• Pinzas corta metales
• Destonillador Phillips
• Juego de llaves hexagonales métricas
Para instalaciones sin ventilación (recirculación), usted
también necesitará:
• Conducto de ventilación metálico redondo de 6”
(15.2 cm) de diámetro – la longitud requerida está
determinada por la altura del cielorraso.
PIEZAS PROVISTAS
Retire las piezas de los embalajes. Controle que
todas las piezas estén incluidas.
• Cable de corriente de 120 V con enchufe de 3
clavijas
• Ensamble de la base de la campana con
ventilador, transición de ventilación, lámpara de
luz y vidrio de la base ya instalado
• Filtro de grasa metálico
• Soporte de la tapa de ventilación
• Plantilla de montaje
• Tapa de ventilación de 2 piezas
• 4 tornillos de 4 x 8
• 6 tornillos de montaje de 5 x 45 mm
• 2 anclajes de pared de 8 x 40 mm
• 4 anclajes de pared de 10 x 50 mm
10 49-2000742 Rev. 0
Preparación para la instalación
REQUISITOS ELÉCTRICOS
Cumpla con todos los códigos y ordenanzas
gubernamentales.
Asegúrese de que la instalación eléctrica sea correcta y
en cumplimiento con el Código de Electricidad Nacional,
ANSI/NFPA 70 (última edición), o con los Estándares
CSA C22.1-94, Código de Electricidad Canadiense, Parte
1 y C22.2 Nº 0-M91 (última edición) y con todos los
códigos y ordenanzas locales.
Si el código lo permite y se utiliza un cable a tierra
separado, se recomienda que un electricista calificado
determine que el recorrido a tierra sea adecuado.
Se podrá obtener una copia de los estándares del código
en:
National Fire Protection Association
(Asociación Nacional de Protección Contra Incendios)
1 Batterymarch Park
Quincy, MA 02169-7471
CSA International
8501 East Pleasant Valley Road
Cleveland, OH 44131-5575
Es importante que se asegure de contar con la conexión
eléctrica adecuada.
MÉTODO RECOMENDADO DE
CONEXIÓN A TIERRA
Se requiere un suministro eléctrico con fusible y conexión
a tierra de 120 voltios, 60 Hz, sólo CA, con fusible de 15
amperes. Use un tomacorriente que no se pueda apagar
desde un interruptor. No use un prolongador.
NOTA: Antes de limpiar o retirar una lámpara de luz,
apague la campana y luego desconecte la campana de
ventilación desde la fuente eléctrica. Al finalizar, vuelva a
conectar la campana de ventilación a la fuente eléctrica.
PREPARE LA UBICACIÓN
• Se recomienda instalar el sistema de ventilación antes
que la campana.
• Antes de realizar espacios de despeje, asegúrese de
que haya suficiente espacio dentro del cielorraso o la
pared para el extractor.
• Controle la altura del cielorraso y la altura máxima de la
campana antes de seleccionar la campana.
1. Desconecte el encendido.
2. Determine qué método de ventilación usará: techo,
pared o sin ventilación.
3. Seleccione una superficie plana para ensamblar la
campana de cocina. Coloque una cobertura sobre
dicha superficie.
ADVERTENCIA
Riesgo de Peso Excesivo
Cuente con la ayuda de dos o más personas para mover
e instalar la campana de cocina. Si esto no se cumple,
se podrán sufrir lesiones personales graves o la muerte.
4. Contando con 2 o más personas, levante la campana
de cocina sobre la superficie cubierta
.
INSTRUCCIONES DE INSTALACIÓN
49-2000742 Rev. 0 11
INSTRUCCIONES DE INSTALACIÓN
MONTE LA CAMPANA DE COCINA
SOBRE LA PARED
1. Determine y marque la línea central sobre la pared, donde
la base de la campana será instalada.
2. Seleccione una altura de montaje de entre un mínimo de
24” (61.0 cm) para una superficie de cocción eléctrica, un
mínimo de 27” (68.6 cm) para una superficie de cocción
a gas, y un máximo sugerido de 36” (91.4 cm) sobre la
cocina y hasta la parte inferior de la campana. Marque
una línea de referencia sobre la pared.
3. Coloque la campana de ventilación sobre la pared, realice
la alineación y ajuste con tornillos y anclajes de tornillos
adecuados para el tipo de pared (concreto reforzado,
planchas de yeso, etc.).
4. Marque los centros de las ubicaciones del sujetador a
través de la plantilla sobre la pared.
IMPORTANTE: Todos los tornillos se deberán instalar
en madera. Si no hay madera para atornillar, es posible
que sean necesarios soportes de estructuras de pared
adicionales.
Retire la plantilla.
5. Perfore agujeros piloto de 3/16" (4.8 mm) en todas
las ubicaciones donde se instalarán los tornillos sobre
madera.
6. Instale los 2 tornillos de montaje de 5 x 45 mm. Deje una
brecha de ¼” (6.4 mm) entre la pared y la parte trasera
de la cabeza del tornillo, a fin de deslizar la campana de
cocina sobre su posición.
INSTALACIÓN DEL SOPORTE DE LA
TAPA DE VENTILACIÓN
1. Adhiera el soporte de la tapa de ventilación nivelado
sobre la pared con el cielorraso, usando 2 tornillos de 5 x
45 mm.
COMPLETE LA PREPARACIÓN
1. Determine y marque todos los cortes necesarios en la
pared para el sistema de ventilación. Instale el sistema
de ventilación antes de instalar la campana. Consulte la
sección de “Requisitos de Ventilación”.
2. Determine la altura requerida para el cable de suministro
de corriente del hogar y perfore un agujero de 1 ¼” (3.2
cm) en esta ubicación.
3. Haga circular el cable de suministro de corriente hogareña
de acuerdo con el Código de Electricidad Nacional o los
Estándares CSA y los códigos y ordenanzas locales.
Deberá haber suficiente conducto de ½” y cables desde
la caja de desconexión del fusible (o disyuntor) para
realizar la conexión en la caja de la terminal eléctrica de
la campana.
NOTA: No vuelva a conectar la corriente hasta haber
completado la instalación.
4. Use masilla para sellar todas las aberturas.
INSTALE LA CAMPANA DE COCINA
1. Contando con 2 o más personas, cuelgue la campana
de cocina sobre los 2 tornillos de montaje a través de las
ranuras de montaje sobre la parte trasera de la campana.
2. Retire el filtro de grasa. Consulte la sección de Cuidado y
Limpieza.
3. Nivele la campana de cocina y ajuste los tornillos del
montaje superior.
4. Instale 2 tornillos de montaje inferior de 5 x 45 mm y
ajuste.
Instrucciones de Instalación
1/4"
(6.4 mm)
a
b
c
12 49-2000742 Rev. 0
Instrucciones de Instalación
CONECTE EL SISTEMA DE
VENTILACIÓN
Para instalaciones sin ventilación (recirculación)
únicamente:
1. Ensamble el deflector de aire con el soporte de la tapa
del conducto con los 4 tornillos de ensamble provistos
con el Kit de Recirculación.
2. Mida desde la parte inferior del deflector de aire hasta
la parte inferior del tomacorriente de la campana.
3. Corte el conducto hasta el tamaño medido (X).
4. Retire el deflector de aire.
5. Deslice el conducto sobre la parte inferior del deflector
de aire.
6. Coloque el deflector de aire ensamblado y el conducto
sobre la salida del extractor de la campana.
7. Vuelva a ensamblar el deflector de aire hasta el soporte
de la tapa del conducto con los 4 tornillos de ensamble.
8. Selle las conexiones con las abrazaderas de
ventilación.
COMPLETE LA INSTALACIÓN
1. Para instalaciones sin ventilación (recirculación)
únicamente, instale el filtro de carbón sobre el filtro de
grasa metálico. Lea la sección de Cuidado y Limpieza.
2. Instale los filtros metálicos. Lea la sección de Cuidado
y Limpieza.
3. Controle el funcionamiento del ventilador y la luz de la
campana de cocina. Consulte la sección de Uso de la
Campana.
NOTA: Para obtener el uso más eficiente de su nueva
campana de ventilación, lea la sección de Uso de la
Campana.
REALICE LA CONEXIÓN ELÉCTRICA
Enchufe en un tomacorriente con conexión a tierra de 3
cables.
Tornillos de Ensamble
Soporte de la Tapa del Conducto
Deflector de Aire
Deflector
de Aire
Abrazadera
de Ventilación
Conducto de
Ventilación
Salida del
Extractor
X = longitud
para cortar el
conducto de
ventilación
ADVERTENCIA
RIESGO DE
DESCARGA ELÉCTRICA
Enchufe en un tomacorriente con conexión a tierra de 3
cables.
No elimine el cable de conexión a tierra.
No use un adaptador.
No use un prolongador.
Si no se siguen estas instrucciones, se podrá producir la
muerte, incendios o descargas eléctricas.
INSTRUCCIONES DE INSTALACIÓN
49-2000742 Rev. 0 13
¡Ahorre tiempo y dinero! Primero revise los cuadros que aparecen en las siguientes páginas y es posible que no necesite solicitar
reparaciones. Para más información, visite GEAppliances.com o llame al 800. GE.CARES (800.432.2737).
Problema Causas posibles Qué hacer
La campana no
funciona
Suministro Eléctrico Controle que la campana se encuentre enchufada
en un receptáculo.
Controle que el encendido esté activado.
Flujo de Aire Bajo Los filtros de grasa de aluminio
están atascados
Limpie y seque los filtros, y vuelva a ensamblarlos
Los filtros de carbón están
atascados
Reemplace los filtros de carbón.
El motor está en
funcionamiento, pero
no hay flujo de aire
Válvula mariposa atorada Llame al servicio técnico.
Luego de funcionar
por unos momentos,
el motor se detiene.
El dispositivo de seguridad de
temperatura alta está activado.
Lo cocina no está lo suficientemente ventilada.
La campana está instalada
demasiado cerca de la estufa
La campana deberá contar con un mínimo de 25
5/8” (65 cm) sobre la estufa.
Fuerte olor a comida Los filtros de carbón no están
instalados
En el modo de recirculación, se deberán instalar
los filtros de carbón.
Goteo de aceite en la
estufa
Taza de aceite faltante o no
instalada
Reemplace el filtro de aluminio y reemplace la
tapa de aceite.
Filtro de grasa de aluminio
saturado
Lave los filtros de grasa de aluminio
Zumbido Problema con las paletas del
ventilador
Llame al servicio técnico
Consejos para la Solución de Problemas... Antes de solicitar el servicio técnico
CONSEJOS PARA LA SOLUCIÓN DE PROBLEMAS
14 49-2000742 Rev. 0
Abroche su recibo aquí. Para acceder al servicio técnico de acuerdo con
la garantía deberá contar con la prueba de la fecha original de compra.
GEAppliances.com
Todo el servicio de garantía es provisto por nuestros Centros de Servicio de Fabricación, o un técnico autorizado de Customer
Care®. Para programar una visita del servicio técnico a través de Internet, visítenos en geappliances.com/service, o llame al 800.
GE.CARES (800.432.2737). Cuando llame para solicitar el servicio, tenga los números de serie y modelo disponibles.
Para realizar el servicio técnico de su electrodoméstico, se podrá requerir el uso de datos del puerto de abordaje para su diagnóstico.
Esto da al técnico del servicio de fábrica de GE Appliances la habilidad de diagnosticar de forma rápida cualquier problema con
su electrodoméstico, y de ayudar a GE Appliances a mejorar sus productos al brindarle a GE Appliances la información sobre su
electrodoméstico. Si no desea que los datos de su electrodoméstico sean enviados a GE Appliances, solicitamos que le indique a su
técnico no entregar los datos a GE Appliances en el momento del servicio.
Qué no cubrirá GE Appliances:
Ŷ Viajes del técnico del servicio a su hogar para enseñarle
sobre cómo usar el producto.
Ŷ ,QVWDODFLyQHQWUHJDRPDQWHQLPLHQWRLQDGHFXDGRV
Ŷ )DOODVGHOSURGXFWRHQFDVRGHDEXVRPDOXVRPRGLILFDFLyQ
o uso para propósitos diferentes al original o uso comercial.
Ŷ 5HHPSOD]RGHIXVLEOHVGHODFDVDRUHLQLFLRGHGLV\XQWRUHV
Ŷ 'DxRVRFDVLRQDGRVVREUHHOSURGXFWRSRUDFFLGHQWH
incendio, inundaciones o catástrofes naturales.
Ŷ 'DxRVVREUHHODFDEDGRWDOHVFRPRy[LGRVREUHOD
superficie, deslustres o manchas pequeñas no informadas
dentro de las 48 horas luego de la entrega.
Ŷ 'DxRVLQFLGHQWDOHVRFRQVHFXHQWHVFDXVDGRVSRUSRVLEOHV
defectos sobre este producto.
Ŷ 'DxRFDXVDGRGHVSXpVGHODHQWUHJD
Ŷ 3URGXFWRQRDFFHVLEOHSDUDEULQGDUHOVHUYLFLRUHTXHULGR
GARANTÍA LIMITADA
Garantía Limitada de la GE Appliances
EXCLUSIÓN DE GARANTÍAS IMPLÍCITAS
Su única y exclusiva alternativa es la reparación del producto, como se indica en la Garantía Limitada. Las
garantías implícitas, incluyendo garantías implícitas de comerciabilidad o conveniencia sobre un propósito
particular, se limitan a un año o al período más corto permitido por la ley.
Esta garantía se extiende al comprador original y a cualquier dueño subsiguiente de productos comprados para
uso hogareño dentro de EE.UU. Si el producto está en un área donde no se encuentra disponible un Proveedor
Autorizado del Servicio Técnico de GE Appliances, usted será responsable por el costo de un viaje o se podrá
requerir que traiga el producto a una ubicación del Servicio Técnico de GE Appliances autorizado para recibir el
servicio. En Alaska, la garantía excluye el costo de envío o llamadas del servicio a su hogar. Algunos estados
no permiten la exclusión o limitación de daños fortuitos o consecuentes. Esta garantía le da derechos legales
específicos y es posible que tenga otros derechos legales que varían entre un estado y otro. Para conocer cuáles son
sus derechos legales, consulte a la oficina de asuntos del consumidor local o estatal o al Fiscal de su estado.
Garante: GE Appliances, a Haier company
Louisville, KY 40225
Garantías Extendidas: Adquiera una garantía extendida de GE Appliances y conozca los descuentos especiales que
están disponibles mientras su garantía aún está vigente. Puede acceder a la misma a través de Internet en cualquier
momento en
geappliances.com/extended-warranty
o llamando al 800.626.2224 durante el horario comercial. Los Servicios para los GE Appliances aún estarán
disponibles cuando su garantía caduque.
Por el Período de GE Appliances reemplazará
Un Año
Desde la fecha de la
compra original
Cualquier pieza del producto de cocción que falle debido a un defecto en los materiales o la
fabricación. Durante esta garantía limitada de un año, GE Appliances también proveerá, sin costo,
todo el trabajo y costos del servicio relacionados con el reemplazo de la pieza defectuosa.

49-2000742 Rev. 0 15
Notas
16 49-2000742 Rev. 0
Impreso en China
Soporte para el Consumidor
SOPORTE PARA EL CONSUMIDOR
Sitio Web de GE Appliances
¿Desea realizar una consulta o necesita ayuda con su electrodoméstico? ¡Intente a través del Sitio Web de GE Appliances las
24 horas del día, cualquier día del año! Usted también puede comprar más electrodomésticos maravillosos de GE Appliances y
aprovechar todos nuestros servicios de soporte a través de Internet, diseñados para su conveniencia.
En EE.UU.: GEAppliances.com
Registre su Electrodoméstico
¡Registre su electrodoméstico nuevo a través de Internet, según su conveniencia! Un registro puntual de su producto permitirá
una mejor comunicación y un servicio más puntual de acuerdo con los términos de su garantía, en caso de surgir la necesidad.
También puede enviar una carta en la tarjeta de inscripción preimpresa que se incluye con el material embalado.
En EE.UU.: GEAppliances.com/register
Servicio Programado
El servicio de reparación de expertos de GE Appliances está a sólo un paso de su puerta. Conéctese a través de Internet y programe
su servicio a su conveniencia cualquier día del año. En EE.UU.: GEAppliances.com/service
o comuníquese al 800.432.2737 durante el horario de atención comercial.
Garantías Extendidas
Adquiera una garantía extendida de GE Appliances y conozca los descuentos especiales que están disponibles mientras su
garantía aún está vigente. La puede adquirir en cualquier momento a través de Internet. Los servicios de GE Appliances aún
estarán allí cuando su garantía caduque.
En EE.UU.: GEAppliances.com/extended-warranty
o comuníquese al 800.626.2224 durante el horario de atención comercial.
Conectividad Remota
Para solicitar asistencia para la conectividad de red inalámbrica (para modelos con acceso remoto),
visite nuestro sitio web en GEAppliances.com/connected-home-smart-appliances/ o comuníquese al 800.220.6899 en EE.UU.
Piezas y Accesorios
Aquellos individuos calificados para realizar el servicio técnico de sus propios electrodomésticos podrán solicitar el envío de
piezas o accesorios directamente a sus hogares (se aceptan las tarjetas VISA, MasterCard y Discover). Ordene hoy a través de
Internet durante las 24 horas, todos los días. En EE.UU.: GEApplianceparts.com o de forma telefónica al 877.959.8688 durante
el horario de atención comercial.
Las instrucciones que figuran en este manual cubren los procedimientos que serán realizados por cualquier usuario.
Otros servicios técnicos generalmente deben ser derivados a personal calificado del servicio. Se deberá tener cuidado,
ya que una reparación indebida podrá hacer que el funcionamiento no sea seguro.
Contáctenos
Si no se encuentra satisfecho con el servicio que recibió de GE Appliances, comuníquese con nosotros a través de nuestro sitio
Web con todos los detalles, incluyendo su número telefónico, o escriba a:
En EE.UU.: General Manager, Customer Relations | GE Appliances, Appliance Park | Louisville, KY 40225
GEAppliances.com/contact