Loading ...
Loading ...
Loading ...
• 8 •
IMPORTANT: This charger does not have an ON/OFF switch. ON and OFF are
controlled by plugging in the charger to the AC wall outlet. The charger will not
supply current to the connector until a battery is properly connected.
USING THE CABLE CONNECTORS
1. Connect the cable connector to the charger. Make sure to place the charger
on a dry, non-ammable surface.
2. With the charger disconnected from the wall outlet, connect the cable connector
by connecting the blue connector to the blue connector on the end of the charger
cable. Connect the other end of the cable connector to the battery or ride-on toy
charging outlet.
NOTE: Never connect the cable connectors together for use in other applications,
such as external battery or other power source charging, or to extend the output
cable length, as reverse polarity and/or overcharge conditions will occur.
QUICK CHARGE
When the
CHARGING/CHARGED
LED
begins to ash, the battery is ready
to use. Unplug the charger from the wall outlet and then disconnect the charger
from the battery or ride-on toy charging outlet.
COMPLETE CHARGE
When the
CHARGING/CHARGED
LED
turns off, the charger has switched to the
maintain mode of operation. When ready to use, unplug the charger from the wall outlet
and then disconnect the charger from the battery.
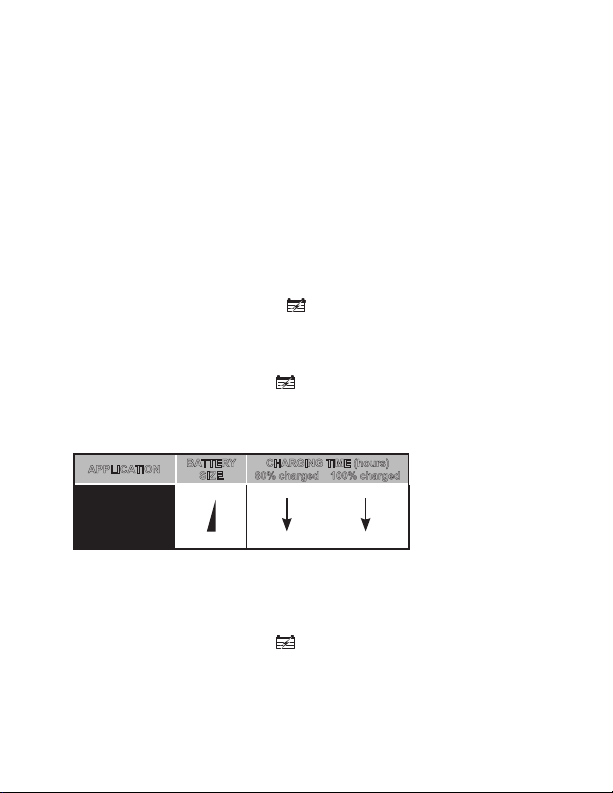
CHARGING TIMES
APPLICATION
BATTERY
SIZE
CHARGING TIME (hours)
80% charged 100% charged
RIDE-ON TOY 5 Ah
15Ah
2 4
5 9
Times will vary, depending on the battery’s level of discharge.
NOTE: For longer battery life, the battery must be completely charged after two
consecutive quick charges (example: quick-quick-complete).
MAINTAIN MODE (FLOAT MODE MONITORING)
When the
CHARGING/CHARGED
LED
turns off, the charger has started maintain
mode. In this mode, the charger keeps the battery fully charged by delivering a
small current when necessary.
Loading ...
Loading ...
Loading ...