ge.com
Safety Information .......... 2-6
Operating ImlrucCions
Adjust the Oven
Thermostat ................... 91
(;lock and Timer . .......... 15, 16
()yen ..................... 12-14
Oven Controls ............. 10, 11
Sabbath Feature ............ 19, 90
Selecting Types of Cookware ..... 9
Self-Cleaning .............. 94, 95
Special Feauues ............... 18
Surface Units ................ 7, 8
Timed Baking and Roas6ng ..... 17
_4'anning Drawer ........... 22, 23
Care and Cleaning ........ 94-33
(;lass Cooktop ............. 39, 33
Self-Cleaning O_en ......... 94, 95
In_lallation Instructions
Anti-Tip Device ............ 34, 40
Before You Begin ............. 34
Electrical Connections ....... 36-39
Lex>ling .................. 40, 41
Troubleshooting Tips ...... 49-46
Accessories .................. 47
Consumer Support
Consumer Support ..... Back Coxer
Product Regisuation ........ 49, 50
VVanantv .................... 51
(20il 7biJ a_d
Radia_'_t T@ Modds
Standard S>_Ck_ar_
Cbar_ ModeLs ModeLs
ygso
ygso7
yBs 5
.]BS27
.lsss(
RB525
RB526
RB536
RB540
yB, oo
ygP 5
]BP2 l
fl_P22
JBP60
RB7qO
R B 757
RB787
RB790
RBSO0
Write the model and serial
numbershere:
Model #
Serial #
You can find them on a label,
behind the storage drawer or
warming drawer on the oven
li'aIIle.
183D6379P039 49-88031 03-07 JR
READ Art INSrgugrloN$BEFORE USING
B
For your safety, the hTformafion in _hismanual must be followed to minimize the risk of fire or explosion,
electric shock, or to prevent property damage, personal injury, or loss of fife.
WARNINGANTI-TIPDEVICE
A# ranges can tip and injury could result.
Toprevent accidental tipping of the range, attach
itto the wall by instalfing the Anti-tip device
supplied.
If the Anti-tip device supplied with the range does
not fit this application, use the universal Anti-tip
device WB2X7909.
To check if the device is installed and engaged
properly, carefully tip the range forward. The
Anti-tip device should engage and pravent
the range from tipping over.
If you pull file rang_ out from file wall %r
any reason, make sure dm device is properly
eng_ged when you push the rang_ back against
the wall. If it is not, there is a possible risk of tim
range tipping oxer and causing i,_ju U if you or
a child stand, sit or lean on an open door
Please refer to the Anti-Tip dexice information
in this manual. Failure to take this precaution
could resuh in tipping of the range and i,lju U.
IMPORTANTSAFETYNOTICE
The California Safe Drinking Water and Toxic
Enforcement Act requires the Governor of
California to publish a list of substances known
to the state to cause cancer, birth defects or other
reproductive harm, and requires businesses to
warn customers of potential exposure to such
substances.
The fiberglass insulation in self-clean ovens gives
off a very small amount of carbon monoxide during
the cleaning cycle. Exposure can be minimized by
venting with an open window or using a ventilation
fan or hood.
SAFETYPRECAUTIONS
When using electrical appliances, basic safety precautions should be followed, including the following:
iiiiiiiiiiii_iii
iiiiiiiiiiii_iii
Use this appliance only %r its intended
(
puq)ose as described in this )_me_ s Manual.
Be sure your appliance is properly installed
and g_ounded by a qualified technician in
accordance with the provided installation
instructions.
Do not attempt to repair or replace any
part of your range unless it is specifically
recommended in this manual. All other
servicing should be refened to a qualified
technician.
Before performing any service, disconnect
the range power supply at the household
distdbnfion panel by _emoving the fllse or
switching off the circuit breaker
iiiiiiiiiiii_iii
iiiiiiiiiiii_iii
iiiiiiiiiiii_iii
Do not leme children alone----rifildren
should not be left alone or unattended in
an area where an appliance is in use. They
should nexer be allowed to sit or stand on
any part of the appliance.
Do not allow anyone to climb, stand or
hang on file doo,; storag_ drawel, wamfing
drawel; or cooktop. They could damage the
rang_ and even tip it ovel; causing sex.re
personal injm T.
Do not store flammable materials in an oxen
or near the cooktop.
CAUTlONJ hems of interest to
children should not be stored in cabinets
aboxe a range or on the backsplash of a
range--children climbing on the range to
reach items could be seriously injured.
2
ge.com
COOKMEATANDPOULTRYTHOROUGHLY...
Cookmeat andpoultry thoreughly--meat to at least an INTERNALtemperatureof 160°Fandpoultry to at least an
iNTERNALtemperatureof 180°ECookingto thesetemperaturesusua//yprotectsagainst foodbomeillness.
a, WARNING!
SAFETYPRECAUTIONS
Nexer wear loose-fitting or hanging garments
while using the appliance. Be carefld when
reaching for imms stored oxer the range.
Flammable mamrial could be ignimd if
brougtlt in contact wifl_ hot surface units
or heating elements and m W cause sexere
b/lrlls.
Use only d U pot holders--moist or damp
pot holders on hot surfaces may result in
bun_s from steam. Do not let pot holders
touch hot surfitce units or heating elements.
Do not use a towel or other bulky cloth.
For your safety, nexer use your appliance
for wmlning or heating the room.
Do not let cooking grease or odmr flammable
matelials accumulam in or near the range.
Do not use wamr on grease fires. Nexer pick
up a flaming pan. Turn the controls off.
Smother a flaming pan on a surface unit 1)7
covering the pan completely with a well-
fitting lid, cookie sheet or fiat tr W. Use a
nndfi-purpose d U chemical or foam-type
rite extinguisher
Flaming grease outside a pan can be put
out by coxering it with baking soda o_,
if available, 1)y using a multi-purpose dly
chemical or foam-type fire exfinguishen
Flame in the oxen or wakening drawer
can be smothered complemly by closing tile
door and mining tile oven offor by using a
nmhi-purpose d U chemical or foam-type fire
extinguisher
Do not touch file snrlaace units, the heating
elements or rite inmlior surt_ace of the oxen.
These surfaces m W be hot enougtl m bum
exen thouOi they are dark in color During
and after use, do *lot much, or let cloflling
or other flammable mam_ials contact, file
surfitce units, areas nearby the snrlaace units
or any inmrior area of the oxen; allow
sufficient time for cooling first.
Potentially hot snrt_aces include the cooktop,
areas fhcing the cooktop, oxen xent opening,
surPaces near the opening, crevices around
dm oxen door and metal uim parts above
the door
REMEMBER: The inside surPace of the oven
may be hot when die door is opened.
Do not store or use combustible mamrials,
gv_soline or other flammable vapors and
liquids in the vicinity of this or any other
appliance.
Kee I) die hood and grease filmrs clean
to maintain g_od xenfing and to ax_id
gxease fires.
Nexer block dm xents (air openings) of die
range. They provide the air inlet and oudet
dlat are necessa W for die range to operam
properly with cotxect combustion. Air
openings are located at file rear of the
cooktop, at file top and bottom of file oven
door, and at file bottom of the range under
the warming drawer or storage drawee
IMPORTANTSAFETYINFORMATION.
READALLINSTRUCTIONSBEFOREUSING.
OVEN
Stand away from the range when opening
tile oxen door Hot air or steam which
escapes can cause bnnls to hands, face
and/or eyes.
Do not heat unopened food containers.
Pressure could build up and file container
could burst, causing an i_ljury.
Kee I) file oxen xent unobstrncted.
Kee I) file oxen flee from gxease bnildup.
Pulling out tile shelf to tile stop-lock is a
comenience in lifting heax T foods. It is also
a precaution against burns flom touching
hot surfitces of tile door or oxen walls.
When using cooking or roasting bags in tile
Place the oxen shelf in the desired position
while tile oven is cool. If shelxes must be
handled when hot, do not let pot holder
contact tile heating elements.
oxen, follow the manufacturer's directions.
Do not use the oxen to d_T newspapers.
If overheamd, they can catch on fire.
Do *lot use the oxen for a storage area.
Imms staled in an oven can ignite.
Do not leme paper products, cooking
utensils or food in tile oxen when ,lot in use.
SELF-CLEANINGOVEN
Do not clean tile door gasket. Tile door
gasket is essential for a g_od seal. Care
should be taken not to rub, damage or
moxe tile gasket.
Clean only parts listed u_ tins _x_ner s
Manual.
Do not use oven cleaners on self-clean
models. No commercial oxen cleaner or
oxen liner protective coating of any kind
should be used in or around any part of
the oxen. Residue flom oxen cleaners will
damage the inside of tile oxen when tile
self-clean cycle is used.
Be%re self-cleaning the oven, remoxe any
broiler pan, grid and other cookware.
Be sure to wipe up excess spillage before
starting tile self-cleaning operation.
If the self-cleaning mode malflmctions,
turn the oxen off and disconnect tile power
supply. Haxe it serviced by a qualified
technician.
Take tile shelxes out of tile oxen before
you beg-in tile self-clean cycle or they
may discolor
i
4
g_com
WARMINGDRAWER(onsomemode/s)
The pml)ose of die wamling drawer is
to hold hot cooked foods at secving
mmperaun_e. Always start with hot fbod;
cold food cannot be heamd or cooked
in tile wanning drawer
Do not use file wamling drawer to d_T
newspapers. If oxerheated, they can catch
on fire.
Do not leme paper products, cooking
umnsils or food in the warming drawer
when not in use.
Never leax>jars or cans of fat dfipping:s in
or near your wanning drawer
Always kee I) wooden and plastic utensils
and canned food a safe distance away tiom
your wanning drawer
Do not touch the heating element or the interior
surface of the warming drawer. _lese sur_tces
may be hot enougtl to BuHI.
REMEMBER: The inside surPace of die
wanning drawer may be hot when tile
drawer is opened.
Use care when opening die drawel: Open
tile drawer a crack and let hot air or steam
escape before removing or replacing food,
Hot air or steam which escapes can cause
burns to hands, fl_ce and/or eyes.
Do not use aluminunl %il to line tile diawe_:
Foil is an excellent heat insulator and will
nap heat beneath it. This will upset tile
performance of tile drawer and it could
damag_ tile inmrior finish.
Do not warm food in tile wanning drawer
for more than two hours.
SURFACEUNITS--ALLMODELS
Use proper pan size-select cookware having fiat bottoms large enough to cover the surface unit
heating element. The use of undersized cookware will expose a portion of the surface unit to direct
contact and may result in ignition of c/otMng. Proper relationship of cookware to surface unit will also
improve efficiency
Never leax> tile surthce units unatmnded at
higil heat setting:s. Boilo_ers cause smoking
and greasy spillox>rs that may catch on rile.
Only certain types of glass, gtassAeramic,
earthenware or other glazed containers are
suitable for cookmp secvice; oflmrs m W
break because of tile sudden chang_ in
temperature.
To minimize dm possibility of bums,
ignidon of flammable mamlials and spillage,
tile handle of a container should be untied
toward dm center of the rang> without
exmnding ox_r nearby snriace traits.
Always tnill tile surthce units off before
remo\'ing cookware.
Do not flame foods on die cooktop. If you
do flame foods under rile hood, unn tile
_tn oil,
Kee I) an eye on foods being tided at high or
medium high heat setfing:s.
Foods for ti?ing should be as d U as possible.
Frost on tiozen foods or moisune on tiesh
foods can cause hot tZatto bubble up and
o_er tile sides of tile pan.
Use little fat %r effective shallow or deep fi_t
flying. Filling tile pan too tifll oftht can
cause spillovers when food is added.
ff a combination of oils or fiats will be used in
flying, sill together before heating, or as fiats
melt slowly.
_: Always heat fiat slowly, and watch as it heats.
Use a deep fiat fllennometer whenever
possible to prexent oxerheafing fi_t beyond
rile smoking point.
READ ALL INSTRUCTIONSBEFORE USING
WARNING!
RADIANTSURFACEUNITS(onso,,e,,o efs)
Use care when touching the cooktop. The glass surface of the cooktop will retain heat after the controls
have been turned off.
Avoid scratching tile gtass cooktop. The
cooktop carl be scratched with imms such as
sharp instruments, dngs or otherjeweh T and
rivets on clothing.
Large scratches or impacts to glass doors
or cooktops carl lead to broken or shattered
glass.
Do not operate file radiant sur/aace units if
the glass is broken. Spilloxets or cleaning
solution may penetram a broken cooktop
and cream a lisk of electrical shock. Contact
a qualified mchnician immediamly should
your gtass cooktop hecome broken.
Clean tile cooktop Mill caution. If a wet
spong_ or clofll is used to Mpe spills on a
hot surthce unit, be carefltl to axoid steam
1)urns. Some cleaners carl produce noxious
flmtes if applied to a hot suifi_ce.
NOTE."_Ajerecommend that you mold Mping
any surthce unit areas until they haw cooled
and tile indicator li01t has gone off: Sugar
spills ate file exception to tiffs. Please see
Cleaning the glass cooktop secdon.
When the cooktop is cool, use only the
recommended cleaning cream to clean
the cooktop.
Nmer use tile glass cooktop surPace as a
cutting hoard.
Do not place or store items that carl meh or
catch fire on tile glass cooktop, exen when it
is not being used.
To moid possible damage to file cooking
surPace, do not apply cleaning cream to the
glass surt_ace when it is hot.
Alter cleaning, use a d U cloth or paper towel
to remoxe all cleaning cream residue.
Be carefltl when placing spoons or other
stirring utensils on the glass cooktop smPace
when it is in use. They may hecome hot and
could cause hums.
Read and follow all instructions and
warnings on the cleaning cream labels.
Do not lift the cooktop. Lifting tile cooktop
carl lead to damage and improper operation
of the range.
A WARNING!
COILSURFACEUNITS(on
Clean tile cooktop with caution, ff a
wet sponge is used to wipe spills on a hot
cooktop, be carefltl to axoid steam bnrIls.
To avoid tile possibility of a bui_l or elecuic
shock, ahvws be certain that tile controls for
all surPace units are at the OFFposit.ion and
all coils are cool 1)efore attempting to lift or
remo\_ a nnit.
Do not immerse or soak tile remoxable
surface units. Do not put them in a
dishwasher:
iiiiiiiiiiii_iii
Be sure file drip pans and tile x_nt duct are
not cox_red and are in place. Their absence
dining cooking could damag_ range parts
and wiring,
Do not use ahmfinmn %il to line file drip
pans or anywhere in tile oven except as
described in this manual. Misuse could
result in a shock, fire hazard or damage
to the rang_.
READANDFOLLOWTHISSAFETYINFORMATIONCAREFULLY.
SAVETHESEINSTRUCTIONS
Usingthesurfaceunits, go,o=
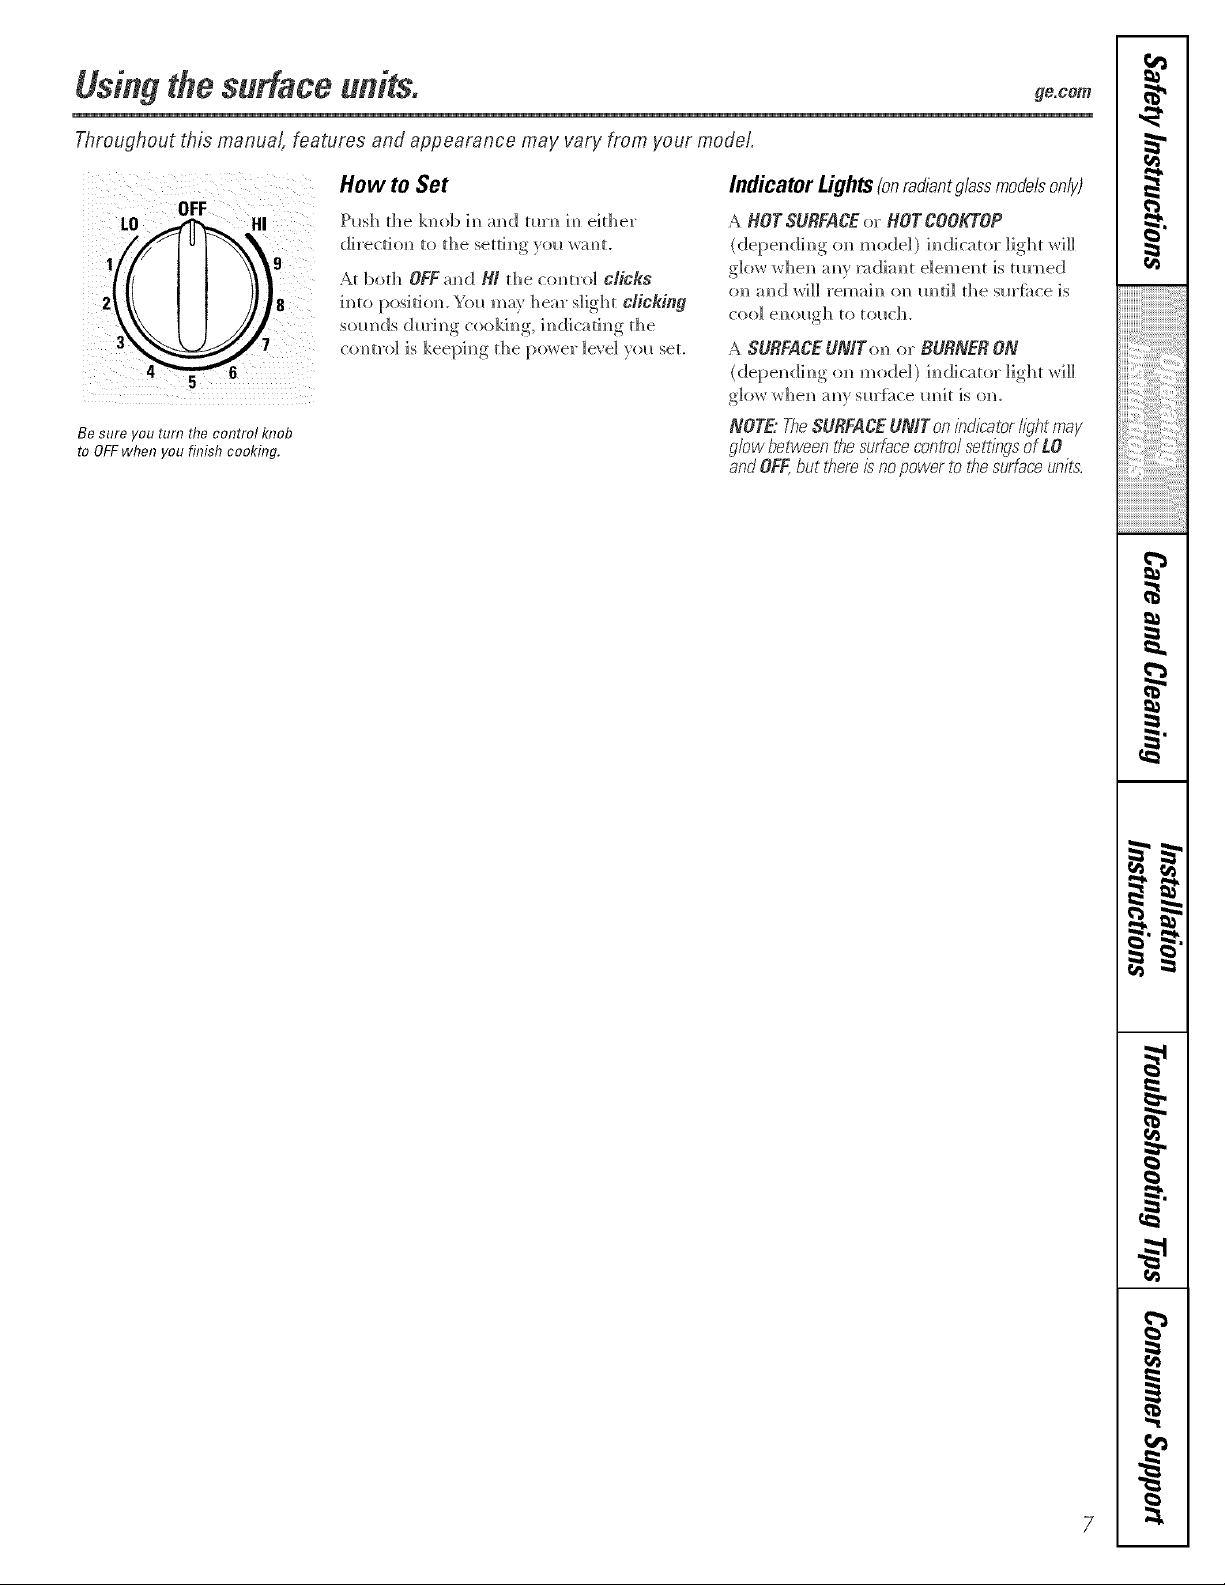
Throughout this manual, features and appearance may vary from your model.
OFF
4
Be sure you turn the control knob
to OFFwhen you finish cooking.
How to Set
Push d_e k_ob im_m_d mrN_im_eid_er
dh'ec@m to d_e setdm_g_ol__,;mL
At bod_ OFFm_d B/d_e comrol cricks
imo posidom You mar he_r slight cricking
som]ds dl_rim_g cookim_g, ]m_dicadm_g die
comltro] is keepimlg the I)()v,r(_l" le_ el yol_ set.
Indicator Lights(onrad/antg/ass modeb only)
A HOT SURFACE or HOT COOKTOP
(depe_ d]m_gom_m odd ) h_d]cat(>rlight _dll
cool e_?ollgb to tollch.
A SURFACEUNITo_ or BURNERON
(depe_ d]_g o_ m ode1 ) ]_d]catot l igbt _qll
glow whe_ mw s_rfi_ce m_it is om
NOTE"TheSURFACEUNITonindicatorlightmay
glowbetweent¢}esurfaceconiTo/settingsof LO
andOFF,but flTemisnopowertoflTesurfaceunit:s.
7
m
w
r_
g
m
8
m
__
i
L
m
m
1=
m
I
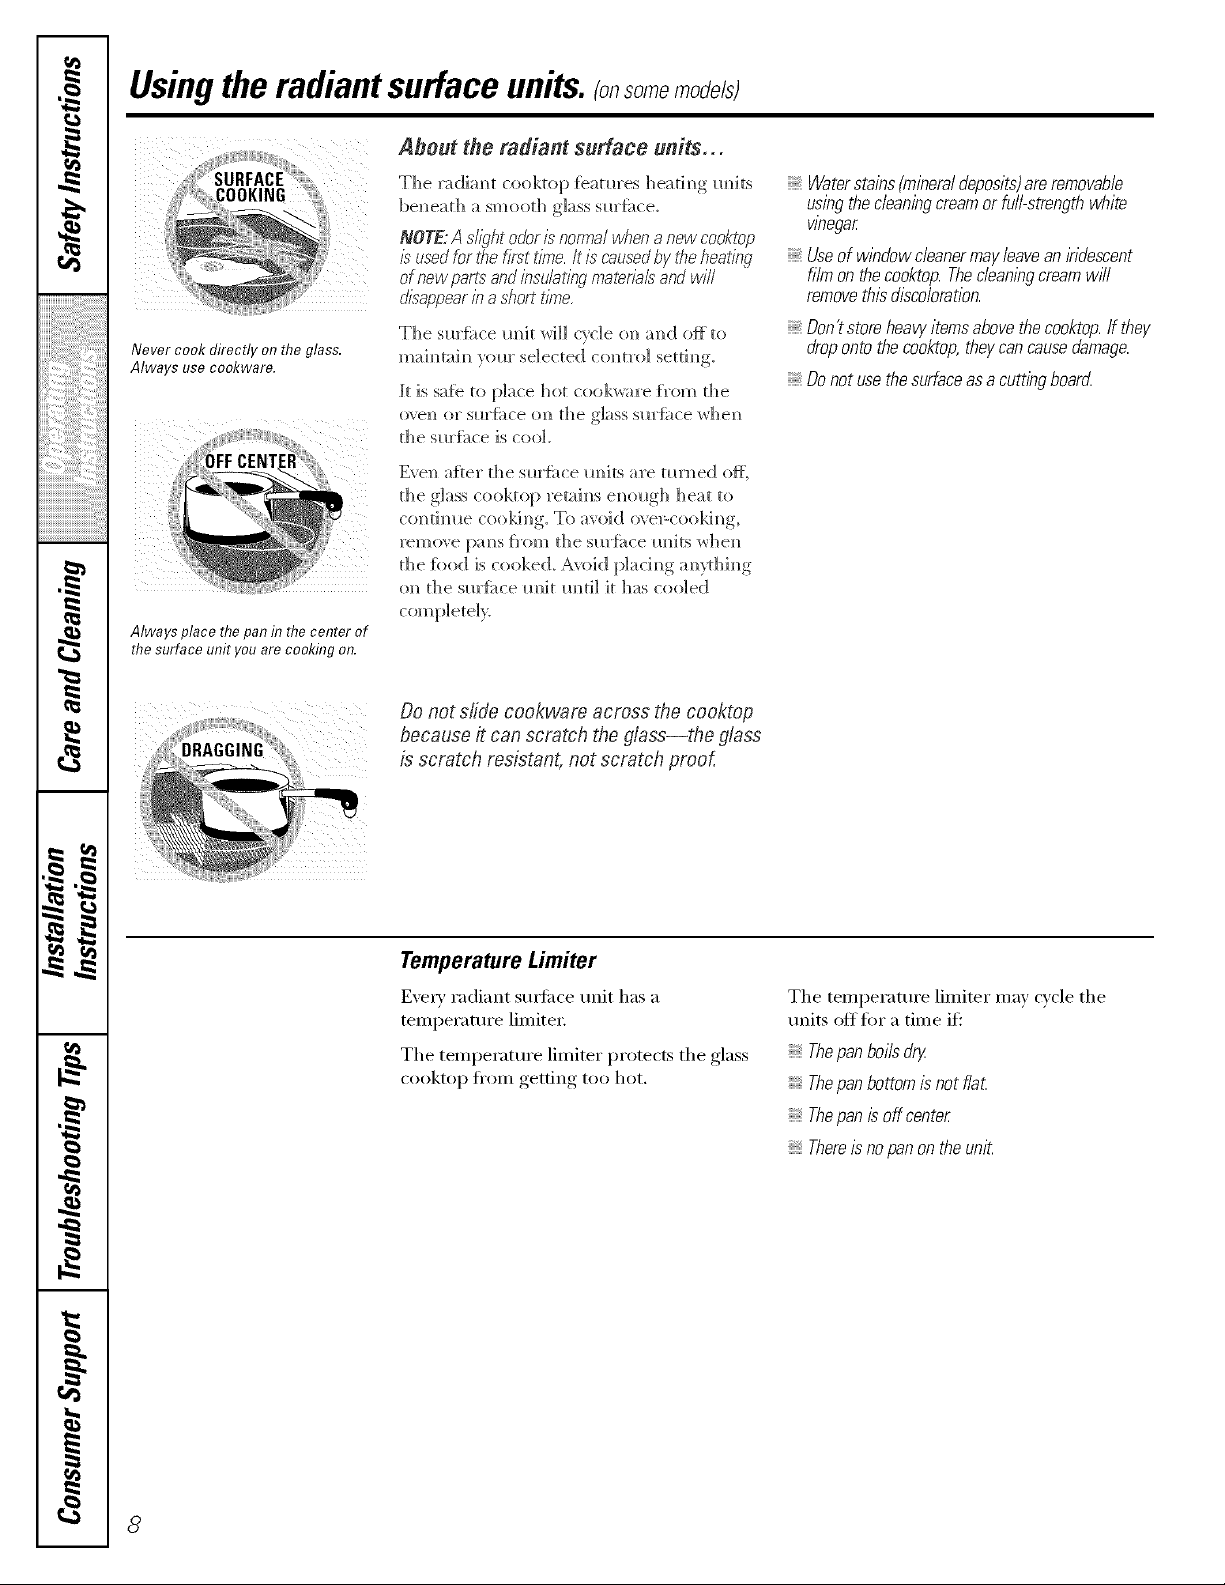
Usingthe radiant surface units, some o efsl
Never cook directly on the glass.
Always use cookware.
About tile radiant surface units.,,
The x_dkmt cooktop {bamx'es heath_g Imits
beneath a smooth glass sl_Hhce.
NOTE:A sll_,f_todoris"normalwhena new cooktop
g"usedforthe firsttlb_e./t /s causedby tileheating
of newparLs"andbsu/at/?_qmaterialsandwill
disappearb a shortt/_te.
The sm'fhce uMt will cycle on and off to
]]]aim_tai m)_olo]" se]ected col) t]'o] setti m),
l't is sa:[e to place hot cookwa_'e Item the
ove]_ o]" sl_]'[{_ce o]_ the glass sw'_{_ce whe]_
the s_]'_ce is cool.
the glass cooktop :'etah)s e_)o_gh ]]eat to
contim_e coo]Orig. To avoid o_ePcoo]d_g,
the {hod is cooked. Avoid p]aci_g a_L_d_i_g
on the s_Hi_ce m_it _mti] it has cooled
Waterstains(mineraldeposits)are removable
usingthecleaningcreamorfull-strengthwhite
wnegar
Useof w/bdowcleanermayleavean/bdescent
filmon thecooktop.Thec/ean/bgcreamwff/
removethisdiscoloration.
Don'tstoreheavyitemsabovethecooktop.If they
dropontothecooktop,theycancausedamage.
Donot use the surfaceas a cutting board
Always place the pan in the center of
the surface unit you are cooking on.
if!I
Do not slide cookware across the cooktop
because it can scratch the glass--the glass
is scratch resistant, not scratch proof,
Temperature Limiter
E\'eI_' radiai]t suHhce uI]it has a
ten]pei'atui'e lin]itei:
The ten]pei'atui'e limiter pi'otects the glass
cooktop from getting too hot.
The temperature limiter may cycle the
units off fi>r a time if'."
Thepan boils dry
Thepan bottom is not fla£
Thepan is off center
Thereis no pan on the unit.
8
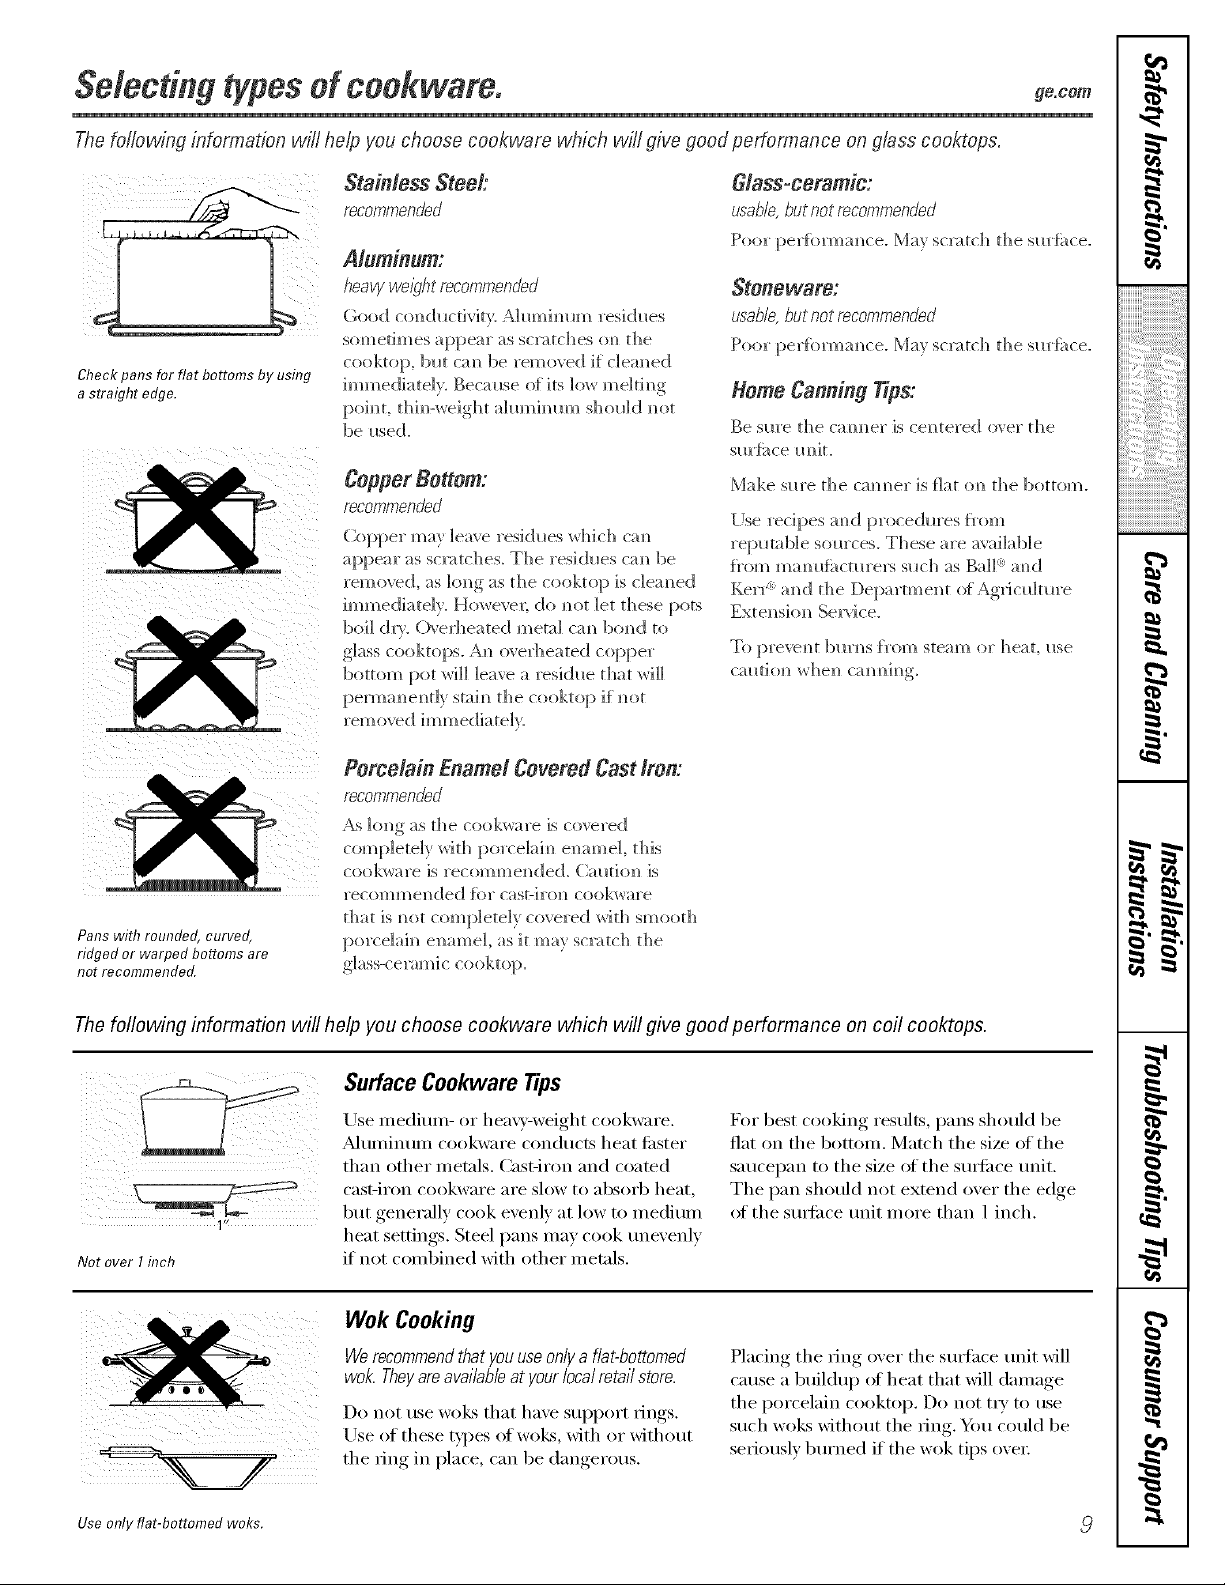
Selectingtypesef coekware, go.c,m
The following informat,ion will help you choose cookware which will give good performance on glass cooktops.
Check pans for flat bottoms by using
a straight edge.
Stainless Steel:
recommended
Aluminum:
heavy we/gh_ recommended
Good conductivkv: Ahmlhmm residues
sometimes appear as sol,itches <m the
cooktop, blot ca N_be rein eyed if d em_ ed
immediately, Becmlse o[ its ]o_ me]tim_g
poh_t, thh_-weight ahm_hmm shol_]d m_ot
be i_sed.
Copper Bottom:
recommended
Copper may leave reskh_es _d_]ch cam_
appear as sQ;_tches, The resi<h_es cm_ be
removed, as long as the cooktop is c]em_ed
immediately. However; do m_ot let these pots
boil (hw. ()_e_tleated metal cam_ homed to
glass cooktops. A_ o',erheated copper
bottom pot _rH]] leave a residlle that wi]]
pem_a m_em_t]y stai m_th e cooktop if m_ot
removed immediateE.
Glass-ceramic:
u,s'ab/e,butnot recommended
Poor perfbrmm_ce. May sc_tch the sm'f_ce.
Stoneware:
usable,hutnot recommended
Poor perfbrmm_ce. May sc_tch the sm'fi_ce.
Home Canning Tips:
Be sm'e the cam_er is centered over the
sm'fi_ce m_it.
Make sm'e the cromer is J_lat (m the bottom.
[Ise recipes m_d proce<h_res [_'om
reputable sources. These are available
f_'(;q'_)c_)a_lllfi_ct_ll'elN s_lch as BaH <: a_)<]
Eerr a_)d the Department of Agrio_]mre
Exte_sio_ Se_ice.
To preve_t 1)ln'_s []'om steam o]" heat, i_se
Pans with rounded, curved,
ridged or warped bottoms are
not recommended.
Porcelain Enamel Covered Cast #on'.
recommended
/ks long as the cook_are is covered
completely with porce]ah_ emmie], this
cook_are is recomme_de(L (;autio_ is
recom m el? <led {6r casFir(tl) cookware
that is _ot completely covered /_'rith S_))O()t])
porce]ai_i ellame], as it may scl;_tch the
The foflowing information will help you choose cookware which will give good performance on coil cooktops.
1"1
Not over I inch
Surface Cookware tips
Use medium- or hea\?'-weight cookware.
A]tlI//intlIll cook\wire cond/Icts heat fi_ster
than other metals. Cast-iron and coated
cast-ii'on cookware _lI'e slow [o _lbsoi'b heat,
but generally cook evenh' at low to medium
heat settings. Steel pans may cook tmevenlv
if not combined with other metals.
For best cooking results, pans should be
flat on tile bottom. Match tile size (ff tile
saucepan to tile size of tile SUltilce unit.
The pan should not extend over the edge
ot the smli_ce trait more than 1 inch.
Use only flat-bottomed woks.
Wok Cooking
Werecommendthatyouuseonlya flat-bottomed
wok.Theyareavailableat yourlocalretailstore.
Do not llSe welts that have Sllpport IJngs.
Use of these types of woEs with or without
the ring in place, can be dangerous.
Placing tile ring over tile sm_hce trait will
cause a buildup of heat that will damage
tile porcelain cooktop. Do not t_' m tlse
such woks without tile ring. 54:,u could be
seriously burned if the wok tips over
w
r_
g
m

,0
O,
-=_
m
m
#.
m
aa
Usingthe ovencontrols, so e odefsl
Throughout this manual, features and appearance may vary from your model.
OVEN CONTROLS
.-%
ONTROLS
OvenControl,Clockand TimerFeaturesand Settings
o BAKE/TEMPRECALLPad 0
Touch tiffs pad to select tile bake function.
BAKE Light
[qashes _hile in edit mo(le--} ou can change
tile oven temperature at this point. (;lo_:s _tlen
the oven is in bake mode.
START/ON Pad
Must be touched to start an) cooking or
cleaning function.
O Display
Shows the time otda}; oxen temperature,
whether the oven is in the bake, broil or
self:cleaning mode and the times set for
tile tiiller or atltoillatic ()veil operations.
Tile display will show PREwhile preheating.
_._q/en tile oxen reaches tile selected
temperature, the oxen control will beep and
_fJ
the display will show the oven temperature.
If "Y- and a number or letter" flash in the displayand the
oven control sl)na& this indicatesa function error code.
/f your oven was set for a timed oven operationand
a power outageoccurred the clockand aft programmed
functions must be reseL
The tline of day wi// flash in the display when therehas been
a power outage.Resetthe clock.
V
If the function error code appears dunbg the self-cleaning
cycle, check the ovendoor latch. Thelatch handle may have
been moved even if only slightly, from the/atchedposition.
Make sure the latch is moved to the nght as far as it wi// go.
Touch the CLEAR/OFFpad. Allow the oven to cool for
one hour Put the oven back into operation, ff the function
error code repeats, disconnectthe power to the range and
ca//for servtce.
KITCHEN TIMER ON/OFF
or TIMER ON/OFFPad
Touch this pad to select tile timer tbature.
Then touch tile + and -pads to a(!just tile
[ilI/el:
TIMER Light
b'lashes _]lile in edit mode--y_)u can change
the set time at this point. Glows _hen tile timer
has been activated. [qashes again _hen tile time
has run out tmtil tile control is reset.
CLOCK Pad
To set tile clock, press this pad twice and then
press tile +and -pads. Tile time of day will
flash in tile display when tile oven is fi_t
tllrned on,
START TIME Pad (on some models)
Use along with tile COOKINGTIME or
SELFCLEANpads to set tile oven to start
and stop automatically at a time you set.
START TIME Light
b'lashes _hile in edit mode--y_)u can change
the start trine at this Ixfint, (;leers _hen the
flmcfion has been activated.
COOKING TIME Pad (on some models)
Touch this pad and then touch tile + or -
pads to set tile alllO/lnt oJ[ tiI/le veil %;lilt VO/lr
toed to cook. Tile oven will shut off when tile
cooking time has run out.
COOKINGTIME Light
b'lashes _hile in edit mode--y_)u can change
the set time at this point. Glo_:s _hen the
flmcfion has been activated. Flashes again Mien
the trine has mn out until the control is reset.
/0
ge.com
OvenControl Clockand TimerFeaturesand Settings
O
AUTOMATIC OVEN Light (on some models)
This lights anytin_e the oven has been
progranm_ed using the COOKING TIMEor
START riME timctions.
O OVENLIGHTor "_'_ Pad
Touch this pad to turn the o',en light on or off.
-Pad
Short taps to this pad will decrease the time
or temi)erature by small amounts. Touch
and hold the pad to decrease the time or
temperature by larger amounts.
O +POd
Short taps to this pad will increase the time
or temi)erature by small amounts. Touch
and hold the pad to increase the time or
temperature by larger amounts.
SELF CLEAN Pad (on some models)
Touch this pad to select the self=cleaning
flmction. See the Using the self-cleaning oven
section.
Indicator Lights (on some pads)
EOlTmode lasts several seconds afier the last
pad press. START TIMEON/OFFand COOKING
TIMEON/OFFwill be the on b pads lit if either
of these options is selected. (Example: START
TIMEis selected with BAKE the SraRT TIME
pad will remain lit until the clock reaches the
programmed time, at _hich point it will turn
off and the BAKUrEMPRECALLpad lig]_t will
lig]_t up),
CLEANLight
Flashes while ill edit mode--you can change
the length of time ti)r the selt:_lean cycle at this
point. Glows when the ()veil is ill the self:_lean
c}cle. Mter the sellhlean cycle, the lig]_t will
turn of E Unlatch the door
CLEAR/OFFPad
Touch this pad to cancel ALL oven operations
except the clock and fimei;
BROIL HI/LO Pad
Touch this pad to select the broil flmction.
BROIL Light
Flashes _dfile ill edit mode--you can switch
fi'om HI to LOBROILat this point. Glows when
the oven is ill broil mode,
//
w
r_
g
e=
---
"1=
e=
L
m
t=
m
I
Usingthe oven.
i__ _ _ ii iii
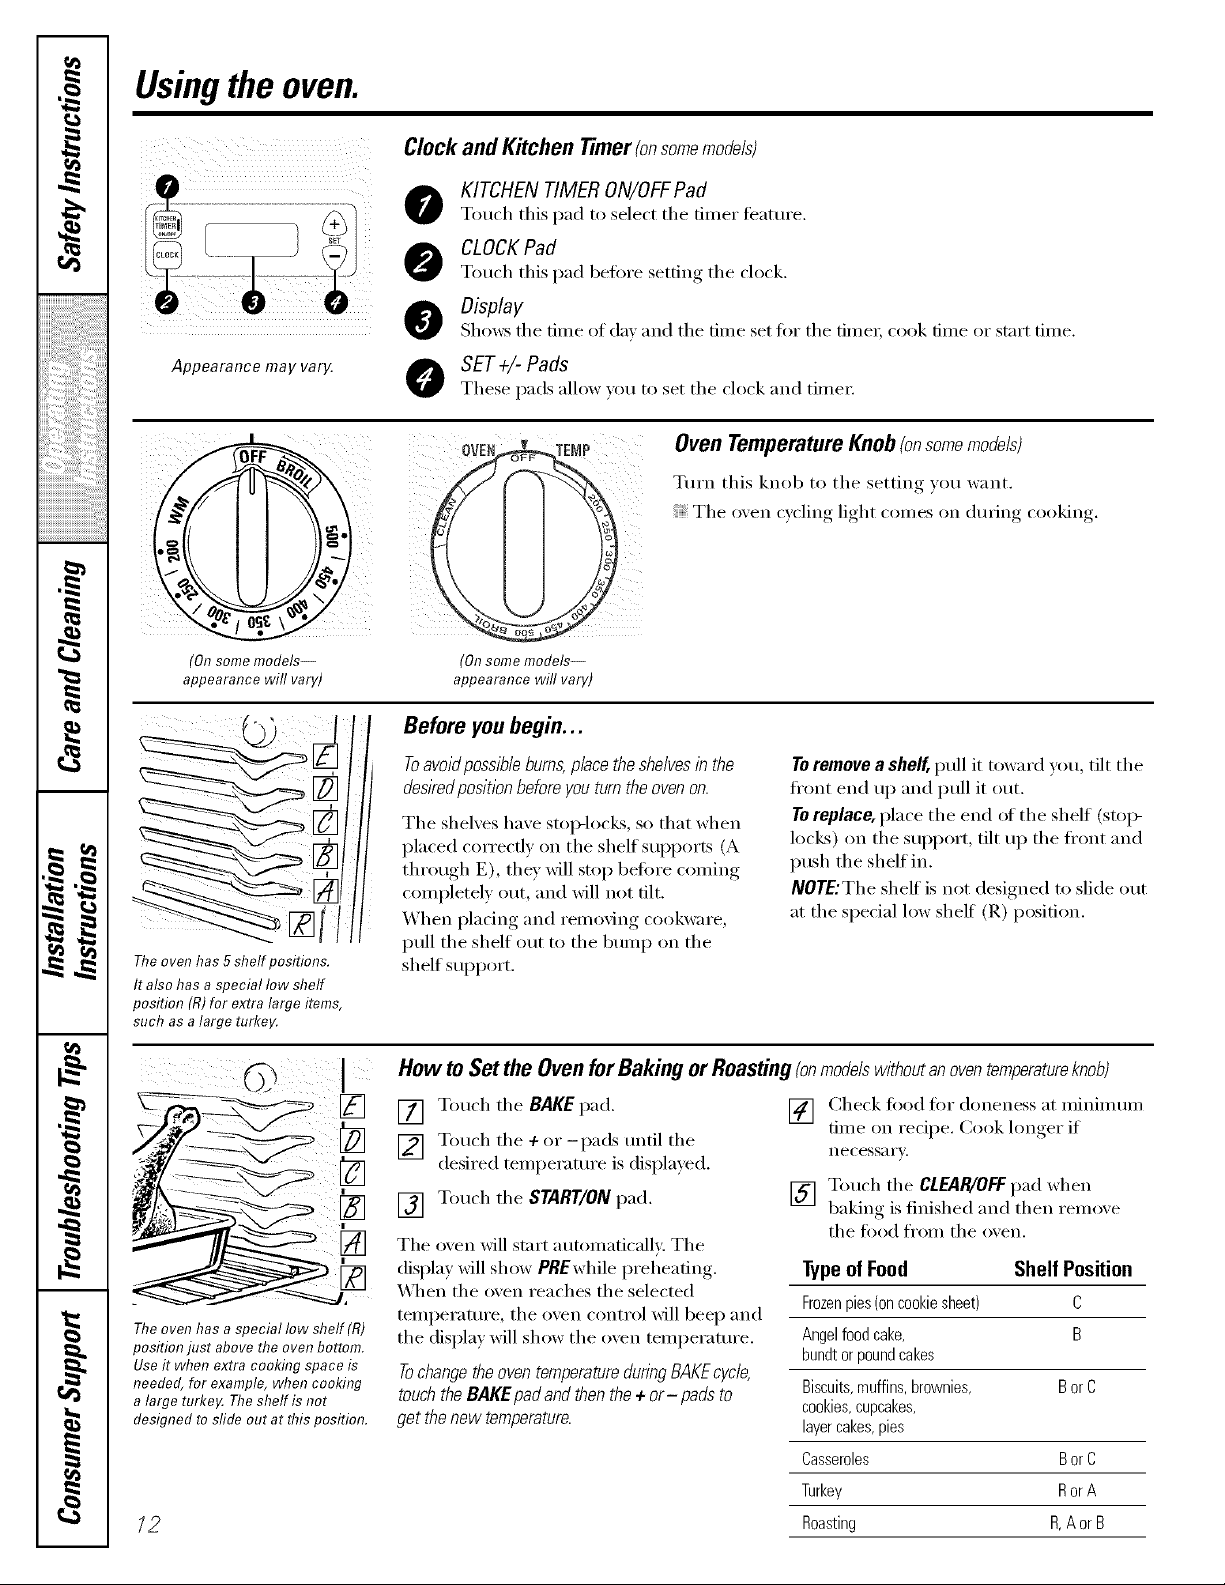
Clock and Kitchen Timer(onsomemodels)
KITCHEN TIMER ON/OFFPad
Touch this pad to select the timer featm'e.
CLOCKPad
Touch this pad before setting the clock.
Display
Sho_:s fl_e time oI day and the time set tor the fime_; cook time or start time.
Appearance may va04
O SET+i-Pads
These pads allow _ou to set the clock and time_:
(On some models--
appearance will vary)
(On some models--
appearance will vary)
Oven TemperatureKnob/on somemodels)
Turn this knob to the setting you want.
The o_en cycling light comes on dining cooking.
The oven has 5 shelf positions.
It also has a special low shelf
position (R)for extra large items,
such as a large turkey.
Before you begin...
Toavoid possible burns,place the shelves in the
desiredposition before you turn the oven on.
The shelves have stop-locks, so that when
placed correctly on the shelf supports (A
through E), they will stop before coming
completely out, and will not tilt.
When plating and removing cookware,
pull the shelf Otlt to the bump on the
shelf support.
To remove a shelf, pull it toward you, tilt the
ti'ont end up and pull it out.
To replace, place the end _ff the shelf (stoi>
locks) on the support, tilt up the ti'ont and
push the shelf in.
NOTE:The shelf is not designed to slide out
at the special low shelf (R) position.
@ I
_i_II_IIII
i ii
The oven has a special low sheff (R)
position just above the oven bottom.
Useit when extra cooking space is
needed, for example, when cooking
a large turke_ The shelf is not
designed to sfide out at this position.
/2
How to Set the OvenforBaking or Roasting(onmodelswithoutanoventemperatureknob)
[] Touch the BAKE pad.
[] Touch the ÷or-pads tmtil the
desired temperature is displa)ed.
[] Touch the START/ON pad.
The oven will start automatically. The
display will show PBEwhile preheating.
_4]_en the oven reaches the selected
temperature, the oven control will beep and
the display will show the oven temperature.
Tochange the oven temperatureduring BAKEcycle,
touch the BAKEpad and then the + or-pads to
get the new temperature.
[] (_heck fi)od fi)r aloneness at minim um
time on recipe. Cook hmger if
necessaYv.
[] Touch the CLEAR/OFFpad when
baking is finished and then reinoxe
the food from the oven.
Typeof Food Shelf Position
Frozenpies(oncookiesheet) C
Angelfoodcake, B
bundtorpoundcakes
Biscuits,muffins,brownies, Bor C
cookies,cupcakes,
layercakes,pies
Casseroles Bor C
Turkey Ror A
Roasting R,A orB
ge.com
Typeof Margarine Will Affect Baking Performance!
Most recipes for baking have been
developed using high fat products such
as butter or margarine (80% fat). If you
decrease the fat, the recipe may not
give the same results as with a higher
fat product.
Recipefailurecanresultffcakes,pies,pastries,
cookiesorcandiesare madewithlow fat spreads.
Thelowerthefatcontentofa spreadproduct,the
morenoticeablethesedifferencesbecome.
Federal standards require products labeled
"margarh]e" to contain at least 80% fi_t by
weight, ix>Bqi_t spreads, on the other hand,
contain less tilt and more water. The high
moisture content of these spreads afl'ects
the texture and flavor of baked goods. For
best results with w>ur old fiB.'orite redpes,
rise mmgmine, butter or stick spreads
containing at least 70% vegetable oil.
Preheating and Pan Placement
Preheat the eve]) if the recipe ca]Is }br it.
To preheat, set the ove_ at the correct
tern peru rare. Preh ea t]m_g is m_ecessa _w_kn"
good results whe]_ bakh_g cakes, cookies,
Forovenswithouta preheatindicatorlight ortone,
preheat10minutes.
Onsomemedals,thedisplaywHIshow "PRE"
w¢fi/epreheat#_g.Whentheovenreachesthe
selectedt_mpemture,t¢_eovencontTo/will beep
andbe displaywill showbe ovent_mpemmra.
Bakh_g results wi]] be better if bakim_g pm)s
are ce]_tered ]m_the ove]_ as ml*(h as
possible. Pm_s should m_ottouch each other
or the wails o{ the ove]]. If you m]eed to i_se
two s]]e]ves, stagger the pam?s so o]?e is m?ot
directly above the othe_; m_d leave
approximately 1½" f)'om the 5"oN_tel the
[:>m_to the t_'oN_toI the sheik
Aluminum Foil
Do not use aluminum foil on thebottom of the oven.
Never entirely cover a shelf with aluminum
fi>il. This will distud) the heat circulation
and result in poor baking.
A smaller sheet of fi>il may be used to
catch a spillover by placing it on a lower
shelf several inches below the toed.
l
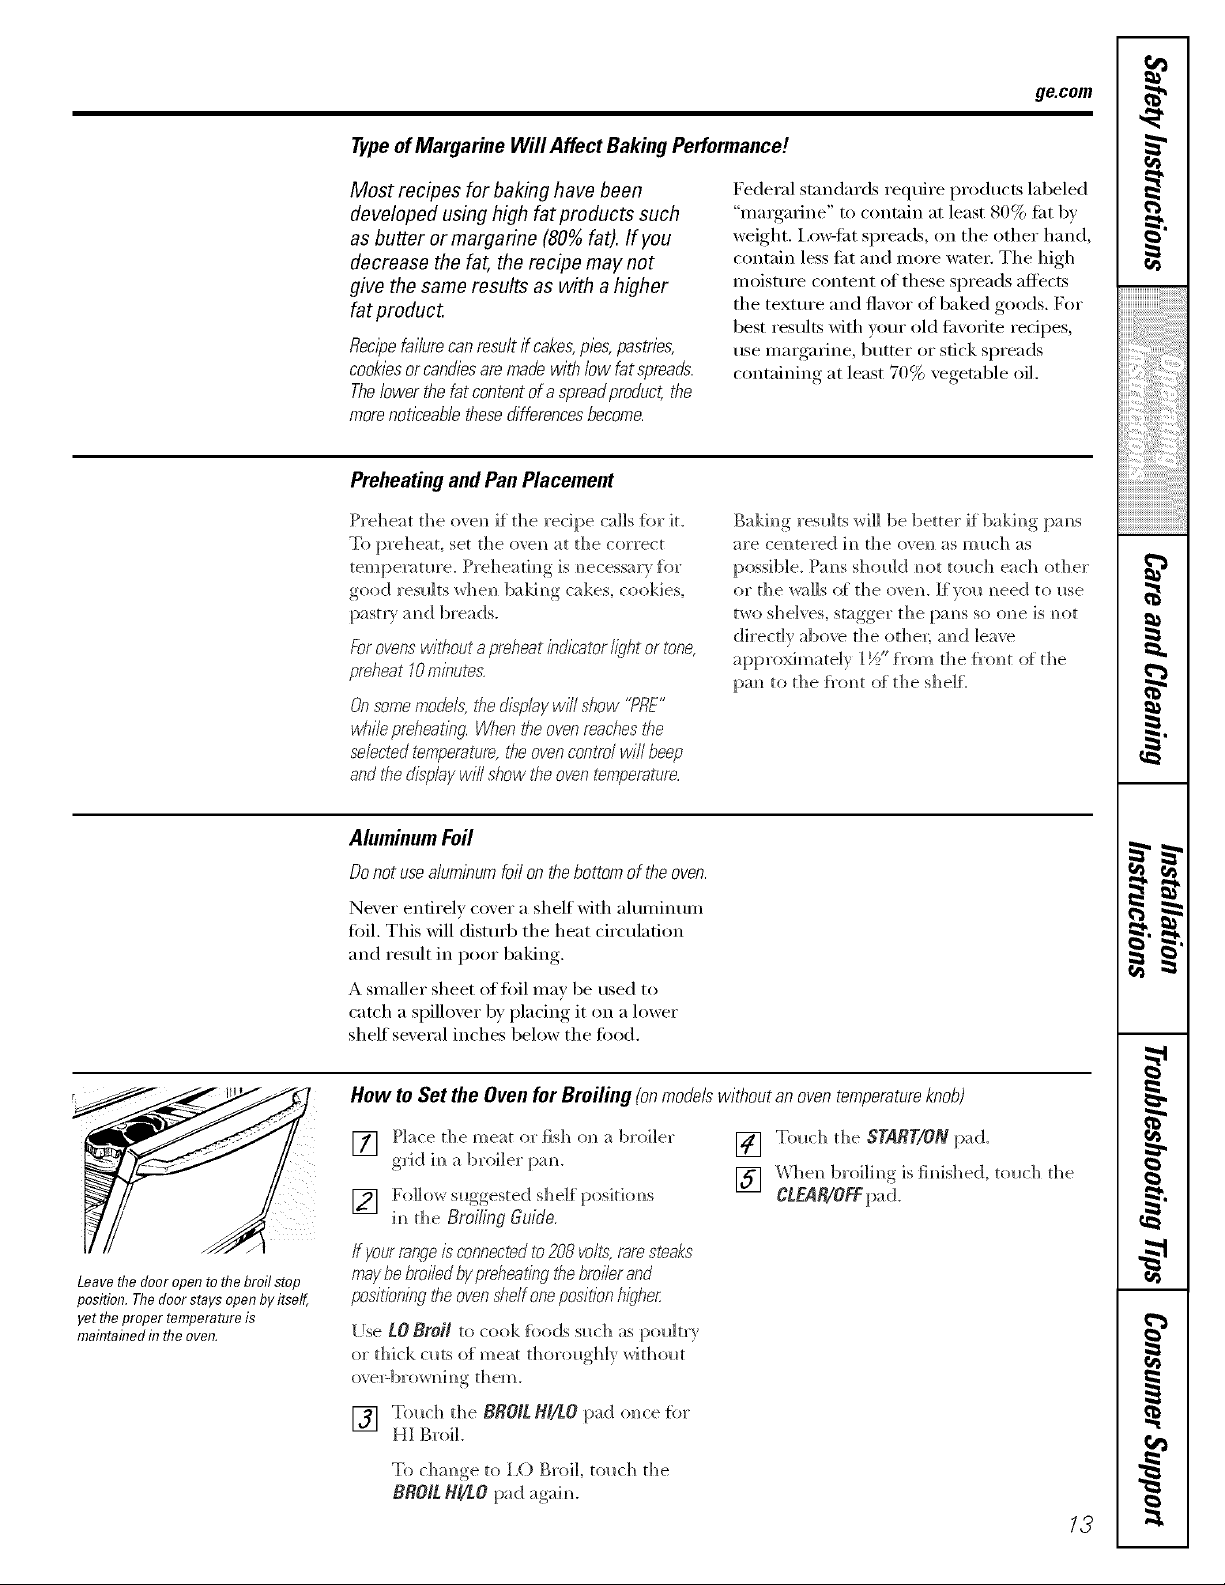
Leave the door open to the broil stop
position. The door stays open by itself,
yet the proper temperatere is
maflTtainedf17the oven.
How to Set the Oven for Broiling (onmodels without an oven temperatureknob)
[] Place the meat or fish o]_ a broiler
grid im_a broiler [>am
[] Fo]]owsuggested shelf >ositiom_s
im_the BroLqng Guide.
ff pvur rangeis connectedto 208 volts,rare st_,aks
maybe broNedby prehearingthe broNerand
podtionlbg be ovenshelf one position higher
[Ise LO Broil to c(>ok {beds such as pou]t_ T
c+r thick curs of meat thoroughly Wit])<)lK
o\ el=bl+ow]_] m_g [hem.
[] Touch the BROIL BI/LO pad o_ce {or
HI Broil
[] Touch the START/ON pad.
[] TXI]e]] br{>i]i_]g is tiMshed, to_(;h the
CLEAR/OFFpa d.
To chm_ge to I,O Broil touch the
BROIL HI/tO pa d agai m
w
w
w
,0
#,
-=
m
m
#.
1::
m
Usingtheoven.
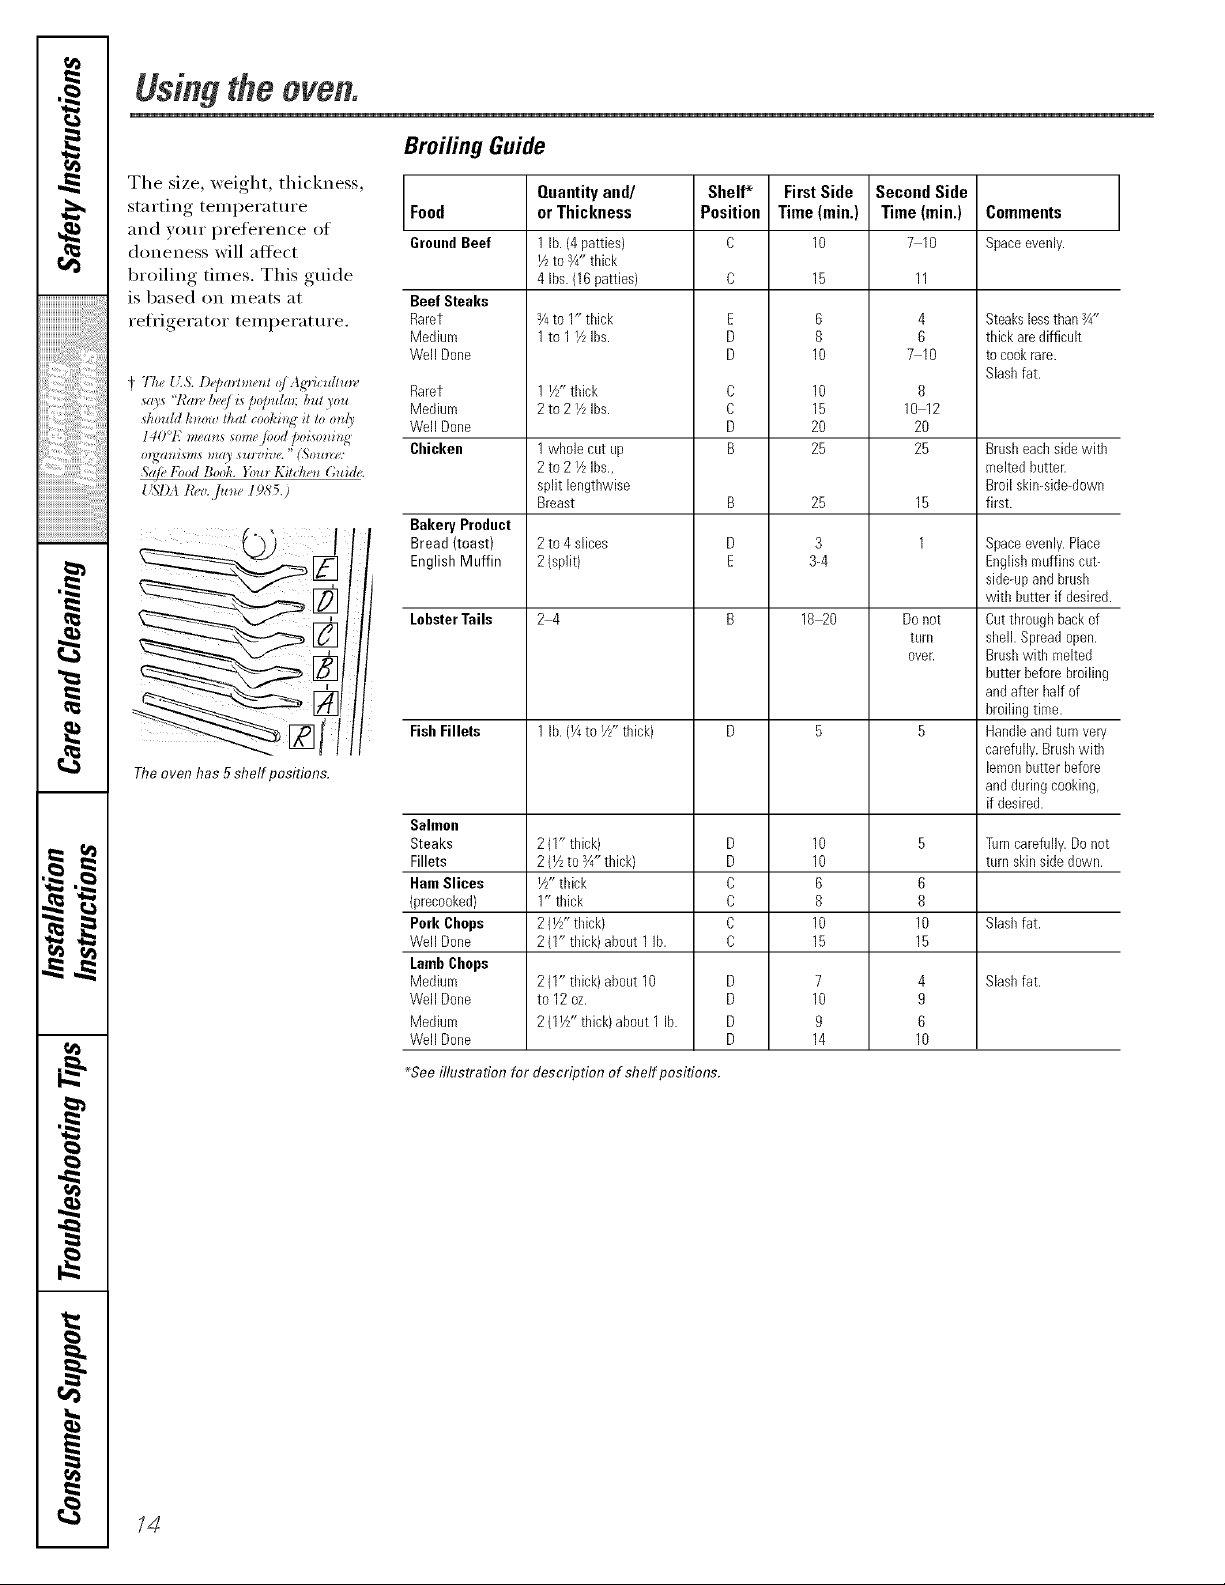
The size, weight, thickness,
starting temi)eratm'e
and yotu _preference of
doneness will atii_ct
broiling times. This guide
is based on meats at
refl'igera tot temperature.
The oven has 5 shelf positions.
Broiling Guide
Food
GroundBeef
Beef Steaks
Raret
Medium
Well Done
Rarer
Medium
Well Done
Chicken
Bakery Product
Bread (toast)
English Muffin
LobsterTails
FishFillets
Salmon
Steaks
Fillets
HamSlices
"_recooked)
Pork Chops
Well Done
LambChops
Medium
Well Done
Medium
Well Done
Quantityand/
or Thickness
1 lb. (4patties)
I/zto _4"thick
4 Ibs. (16 patties)
3/4to 1" thick
1 to 1 i/z Ihs.
1 I//' thick
2t02 Y_Ibs.
1 whole cut kip
2 to 2 YzIbs.,
split lengthwise
Breast
2 to 4 slices
2 {split)
24
1 lb. (¼to I//' thick)
2 (1" thick)
2 (Yzto Y4"thick)
Y_"thick
1" thick
2 (Tz"thick)
2 (I" thick) about 1 lb.
2 (1" thick) about 10
to 12 oz.
2 (IV/' thick)about 1 lb.
Shelf* First Side
Position Time (rain.)
c lO
E
D
D
C
C
D
B
B
D
E
D
D
C
C
C
D
D
D
D
D
6
8
10
10
15
20
25
25
3
3-4
18 20
10
10
6
8
10
15
7
10
g
14
Second Side
Time (rain.)
7 10
4
6
7 10
8
10 12
20
25
15
1
Do not
tunl
over.
6
8
10
15
4
g
6
10
Comments
Spaceevenly.
Steakslessthan_4"
thick are difficult
to cookrare.
Slashfat.
Brusheachside with
melted butter.
Broil skin-side-down
first.
Spaceevenly.Place
Englishmuffins cut-
side-upand brush
with butter if desired.
But throughback of
shell. Spreadopen.
Brushwith melted
butter beforebroiling
and after half of
broiling time.
Handleand turn very
carefully.Brushwith
lemonbutter before
and duringcooking,
if desired.
Turncarefully. Do not
turn skinside down.
Slashfat.
Slashfat.
_Seeillustration for description of shelf positions.
/4
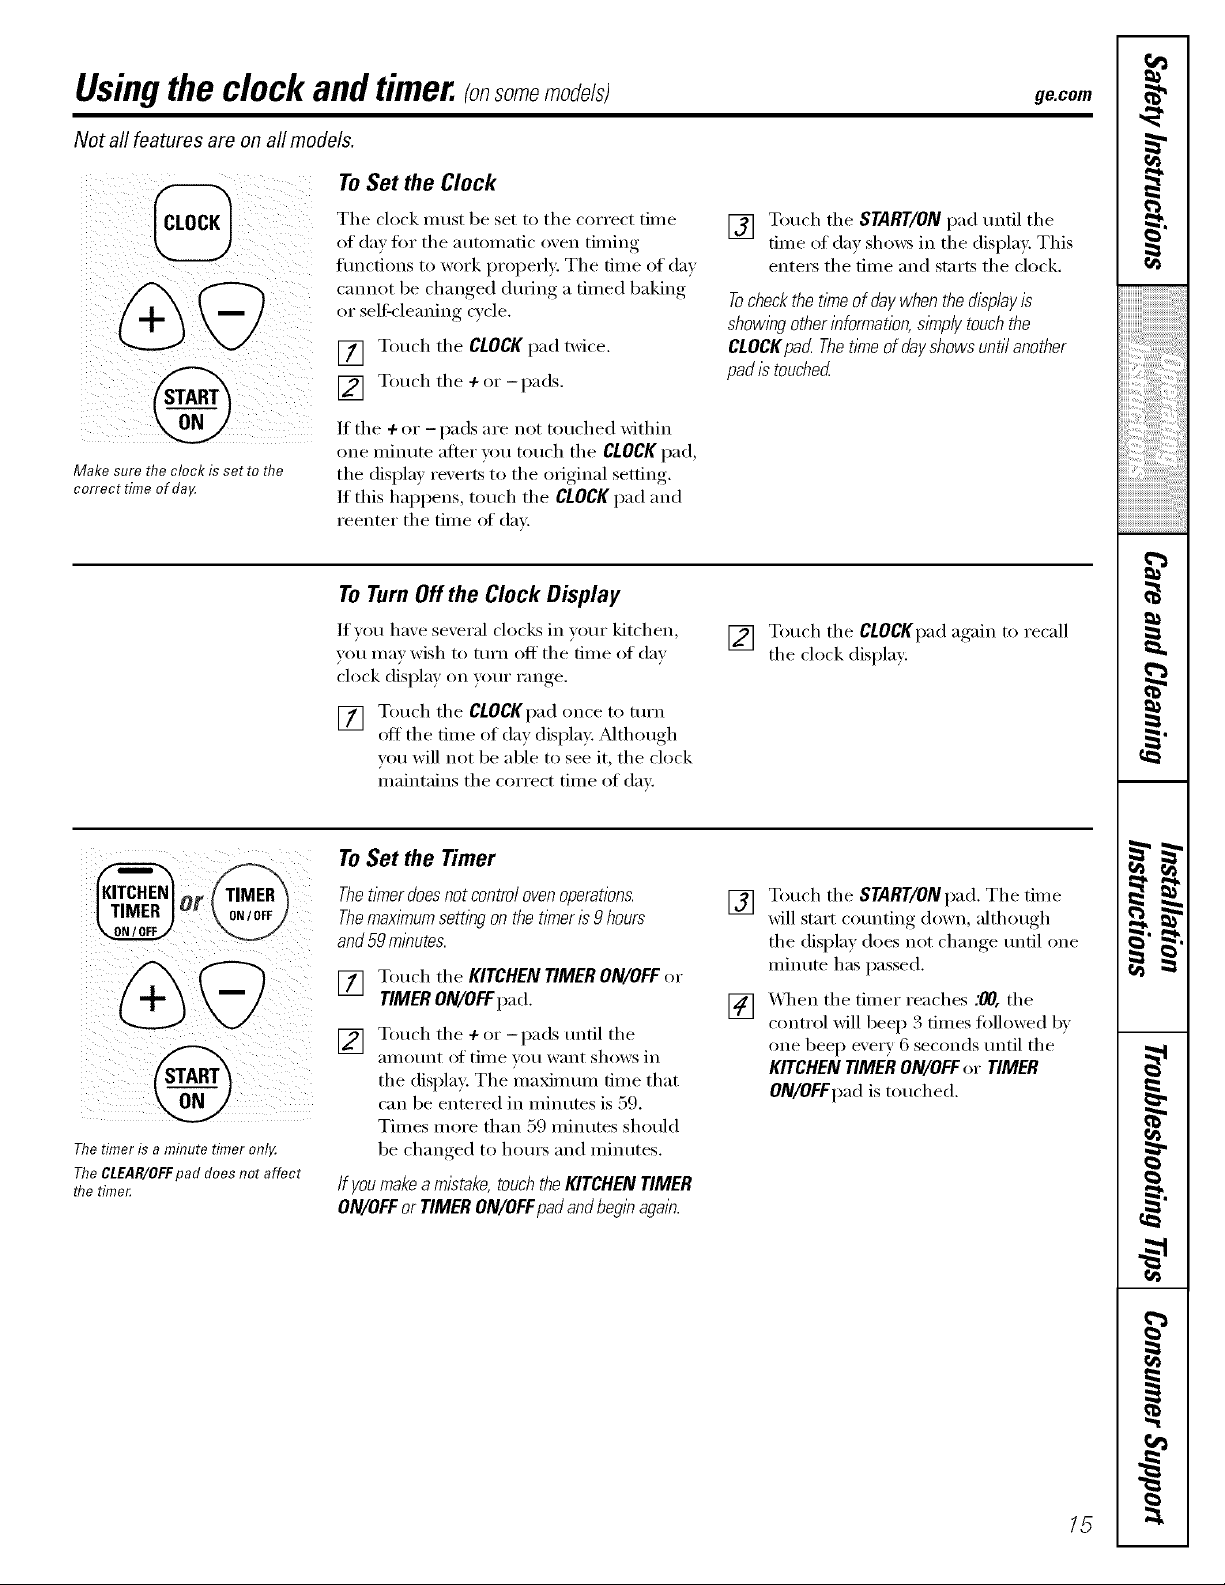
Usingthe clock and timer.(onso e ode/sl ge.com
Not all features are on all models.
@
@
Make sure the clock/s set re me
correct time of da_
ToSet the Clock
The clock Inust be set to the correct time
of day fin" tile automatic ox'ell timing
flmctions to work properly: The time of day
emmet be chan_ed dufin_ a timed baking
or seltk'leanin_ cycle.
[] Touch the CLOCK/)adtwice.
] Touch the + or-pads.
If the + or - pads are not touched withill
one minute alter you touch the CLOCKpad,
the display reverts to the ofiuinal setting.
/f rids happens, touch the CLOCK pad and
reenter the time of din:
[] Touch the START/ONpad tmfil the
time of day shows in the displa); This
entet_ the time and starts the clock,
Tocheckthetitheof daywhenthedisplayis
showingotherinformation,sl_nplytouchthe
CLOCKpad Thetimeof dayshowsuntilanother
padis touched
To Turn Off the Clock Display
If you have several clocks in yam" kitchen,
you may wish to mrn off the time of day
clock display on p)ur range.
[] Touch the CLOCKpadonce to ttlrn
off the time of day display: _Mthough
you will not be able to see it, the ('lock
maintains the correct time of elm:
[] Touch the CLOCKpad again to recall
the clock display:
The timer is a minute timer onl_
The CLEAR/OFFpad does not affect
flTetime_
To Set the Timer
Thetknerdoesnotcontro/ovenoperations.
The maxlYnum setting on the timer is 9 hours
and 59 minutes.
[] Touch the KITCHEN TIMER ON/OFF or
TIMERON/OFFpa d.
[] Touch the +or-pads tmtil the
}lillOtlnt ()t tillle veil iV}lilt sh()tvs in
the display: The maxim mn time that
can be entered in minutes is 59.
Times more than 59 minutes should
be changed to hom_ and minutes.
If youmakeamistake,touchtheKITCHENTIMER
ON/OFFor TIMERON/OFFpadandbeginagain.
[] Touch the START/ONpad. The time
will start counting down, although
the display does not change tmfil one
minute has passed.
[] X4q)en the timer reaches :00, the
control will beep 3 times followed b',
one beep eveI T 6 seconds until the
KITCHEN TIMER ON/OFF or TIMER
ON/OFFpad is touched.
15
==
w
r_
g
_n
,0
O,
Usingthe clock and timer._o,somemodefsl
Not all features are on all models.
#r
@
or
@
m
m
O_ 1c
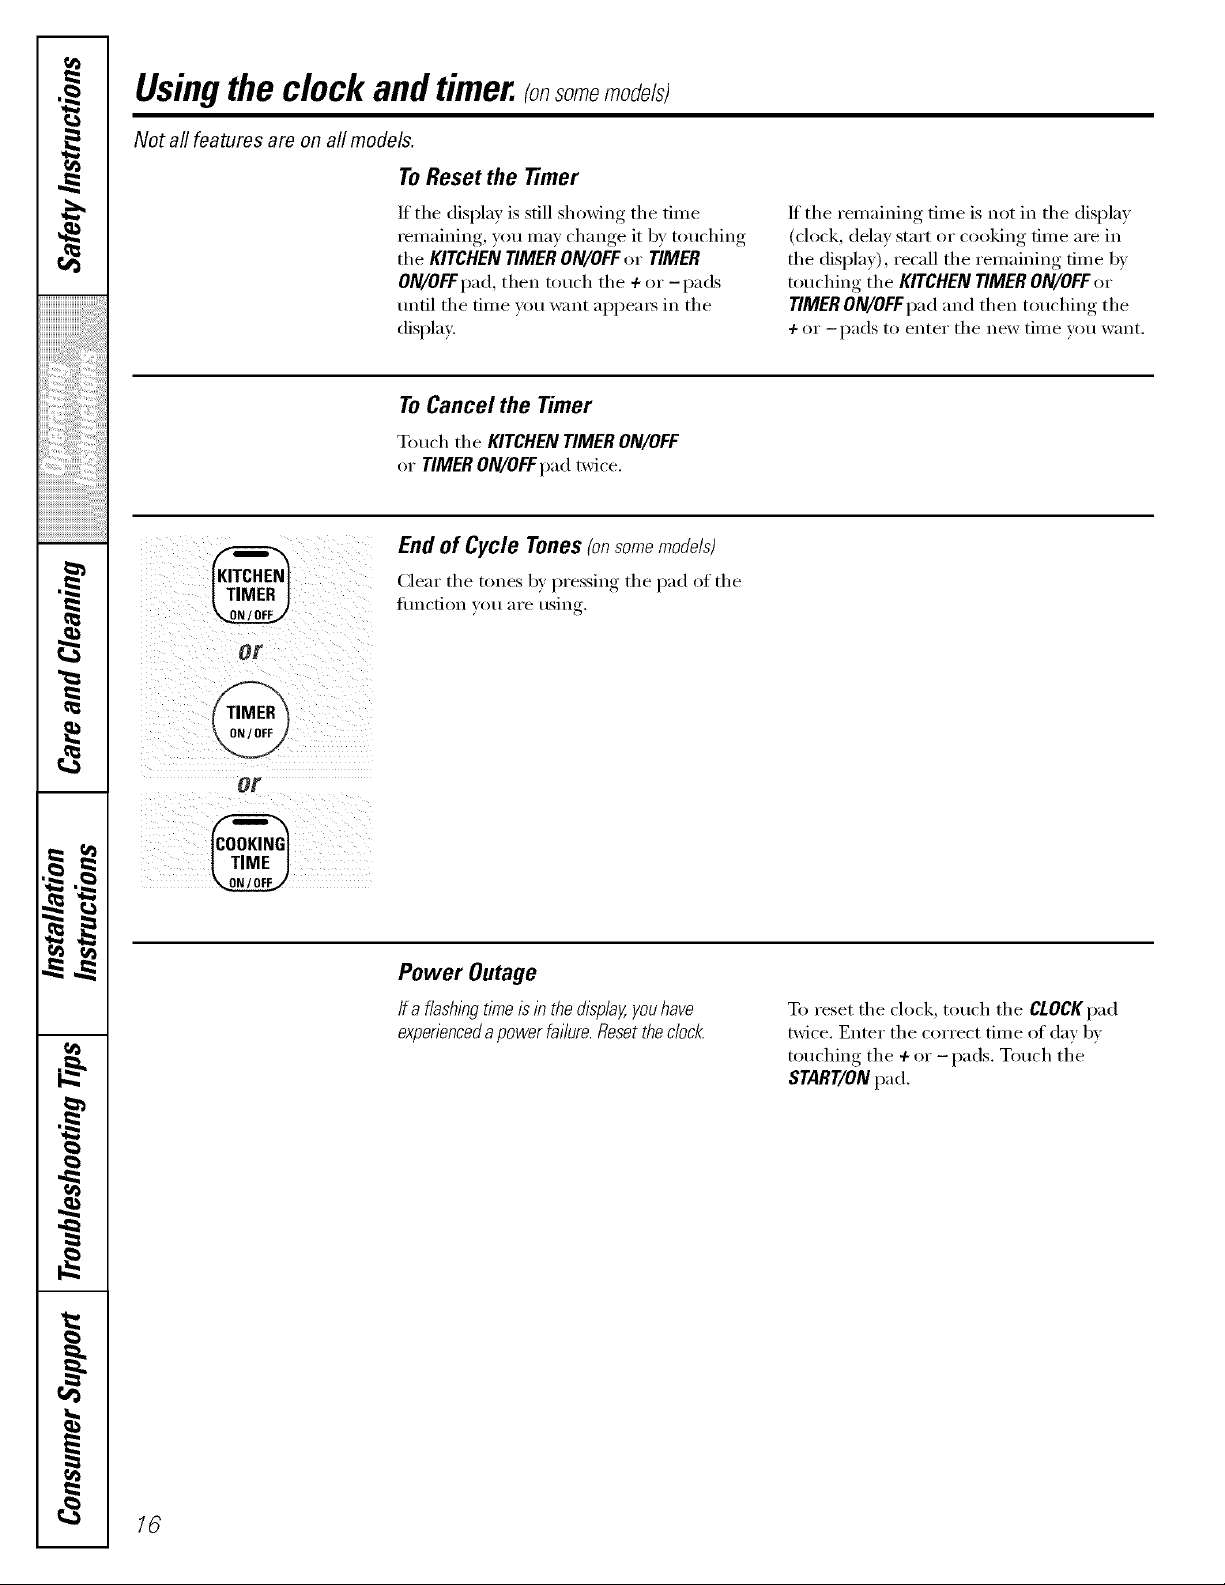
ToReset the Timer
If tile display is still showing tile time
remaining, you may change it 1)y touching
the KITCHEN TIMER ON/OFF or TIMER
ON/OFFpad, then touch the + or-pads
tmtil tile time you want al)l)ea_ in tile
display.
If tile remaining time is not in tile display
(clock, delay start or cooking time are in
the display), recall the remaining time by
touching the KITCHEN TIMER ON/OFF or
TIMER ON/OFFpad and then touching the
-/- or --pads to entei" tile new [lille veil w_lIlt.
To Cancel the Timer
Touch the KITCHEN TIMER ON/OFF
or TIMER ON/OFFpa d twice.
Endof Cycle Tones(onsomemodels)
(]ear tile tones b} pressing tile pad of tile
iilnction _Otl _lI'e tlsin r
Power Outage
Ifa flashlhgtitheis in thedL_play,youhave
expenencedapowerfai/ure.Resetthedock
To reset tile clock, touch tile CLOCKpad
twice. Enter tile correct time of day by
touching tile + or -pads. Touch tile
START/ON pad.

Usingthe timedbaking and roastingfeatures.(onsomemodeJs,J go.corn
Do not lock the oven door with the latch during tkned cooking. The latch is used for self=cleaning only,
NOTE: Foods that spoil easily--such as milk, eggs, fish, stuffings, poultry and pork--should not be aflowed to sit for
more than I hour before or after cooking. Room temperature promotes the growth of harmful bacteria. Be sure that
the oven light is off because heat from the bulb will speed harmful bacteria growth,
Hew to Set an Immediate Start and Automatic Step
Theoven wil/ turn on/_lrnedhtely and cook for a [] Touch d_e START/ON pad.
selected/ength of tl?ne.At the end of the cooklT_g
time, the oven will turn off autornatica//y
[] Tolmh d_e BAKE pad.
] Tol_ch d_e ÷ or =pads U_set d_e
overt {eH_pel_tHl"e.
[] Touch d_e COOKING TIME pad.
NOTE"If your rec/_perequires preheating, y_u may
need to add additional t/kle to the bngth of be
cookbgtlk_e.
] Touch the ÷ or =pads to set the
bakb_g time.
The coo]Orangtime that _l* em_tered will be
disp]a}e(L (l{ }ou select Cooking Time first
amid them_ a(!iust the Bake Tempeivmn'e, die
oven temperature will be disp]a}ed im_stead).
The display shows ekher d_e oven
temper:mire that roll set or the cookim_g
dine C()_l_]_(]o_ri/e (The disp]a starts _it]_
PREif sho_Gm_g the oven tempe_m_re.)
The oven will co_dm_e [() cook fbr d_e
[)i'og_}_HM]/ed, _H]/(}IOH[ of time, [hell [[H'H
()ff a_t(m_atica]]v.
[] To_tch t]_e CLEAPJOFEpad to dear
the di splay if _ ecessa _'}_
RemoveNe food from Ne oven. Remember,even
thoughthe oven shuts off automatically, foods
continuecookingafter controls am off
@
How to Set a Delayed Start and Automatic Stop
Theoven will turn on at the t_Yneof day you set,
cook for a specific/ength of timeand then turn off
autornatica//y
Make sure the clock shows the correct
time of day.
[] Touch the BAKE pad.
] Touch the ÷ or -pads to set the
oveIl teI//l)eI'att II'e.
[] Touch the COOKING TIME pad.
] Touch the + or -pads to set the
desired length of cooking tim e.
[] Touch the START TIMEpad.
] Touch the + or _i)ads to set the tim e
(If dav veil W_lIlt the o_,eIl to [tlI'II Oil
and start cooking.
[] Touch the START/ON pad.
NOTE"If you w_mld like to check the times
you have set, touch the START TIME pad to
check the start time you have set or touch
the COOKING TIME pad to check the length
(ff cooking time you have set.
When the oven turns on at the time of day
um have set, the display will show PRE tmtil
it reaches the selected temperature, then it
will display the ()veil temperatm'e.
At the end of cooking time, the oven
will turn off and the end ot cycle tone
will sound.
[] Touch the C{_AR/Off pad to clear
the displa) if necessar).
Removethe food from the oven. Remember,even
thoughthe oven shuts off automatically, foods
continue cookingafter contro/s are off
NOTE"An attentiontonewill soundif youareusing
timedbakinganddonot touchtheSTART/ONpad
17
w
r_
7,
m
,0
m
m
1=
m
Special features of your ovencontrol
Yournew touch pad control has additional features that you may choose to use. The following are the features and
how you may activate them.
The special feature modes can only be activated while the display is showing the time of day. They remain in the
control's memory until the steps are repeated.
When the display shows your choice, touch the START/ON pad. The special features will remain in memory after a
power failure.
NOTE" The Sabbath feature and the Thermostat Adjustment feature are also Special Features, but they are addressed
separately in the foflowing sections.
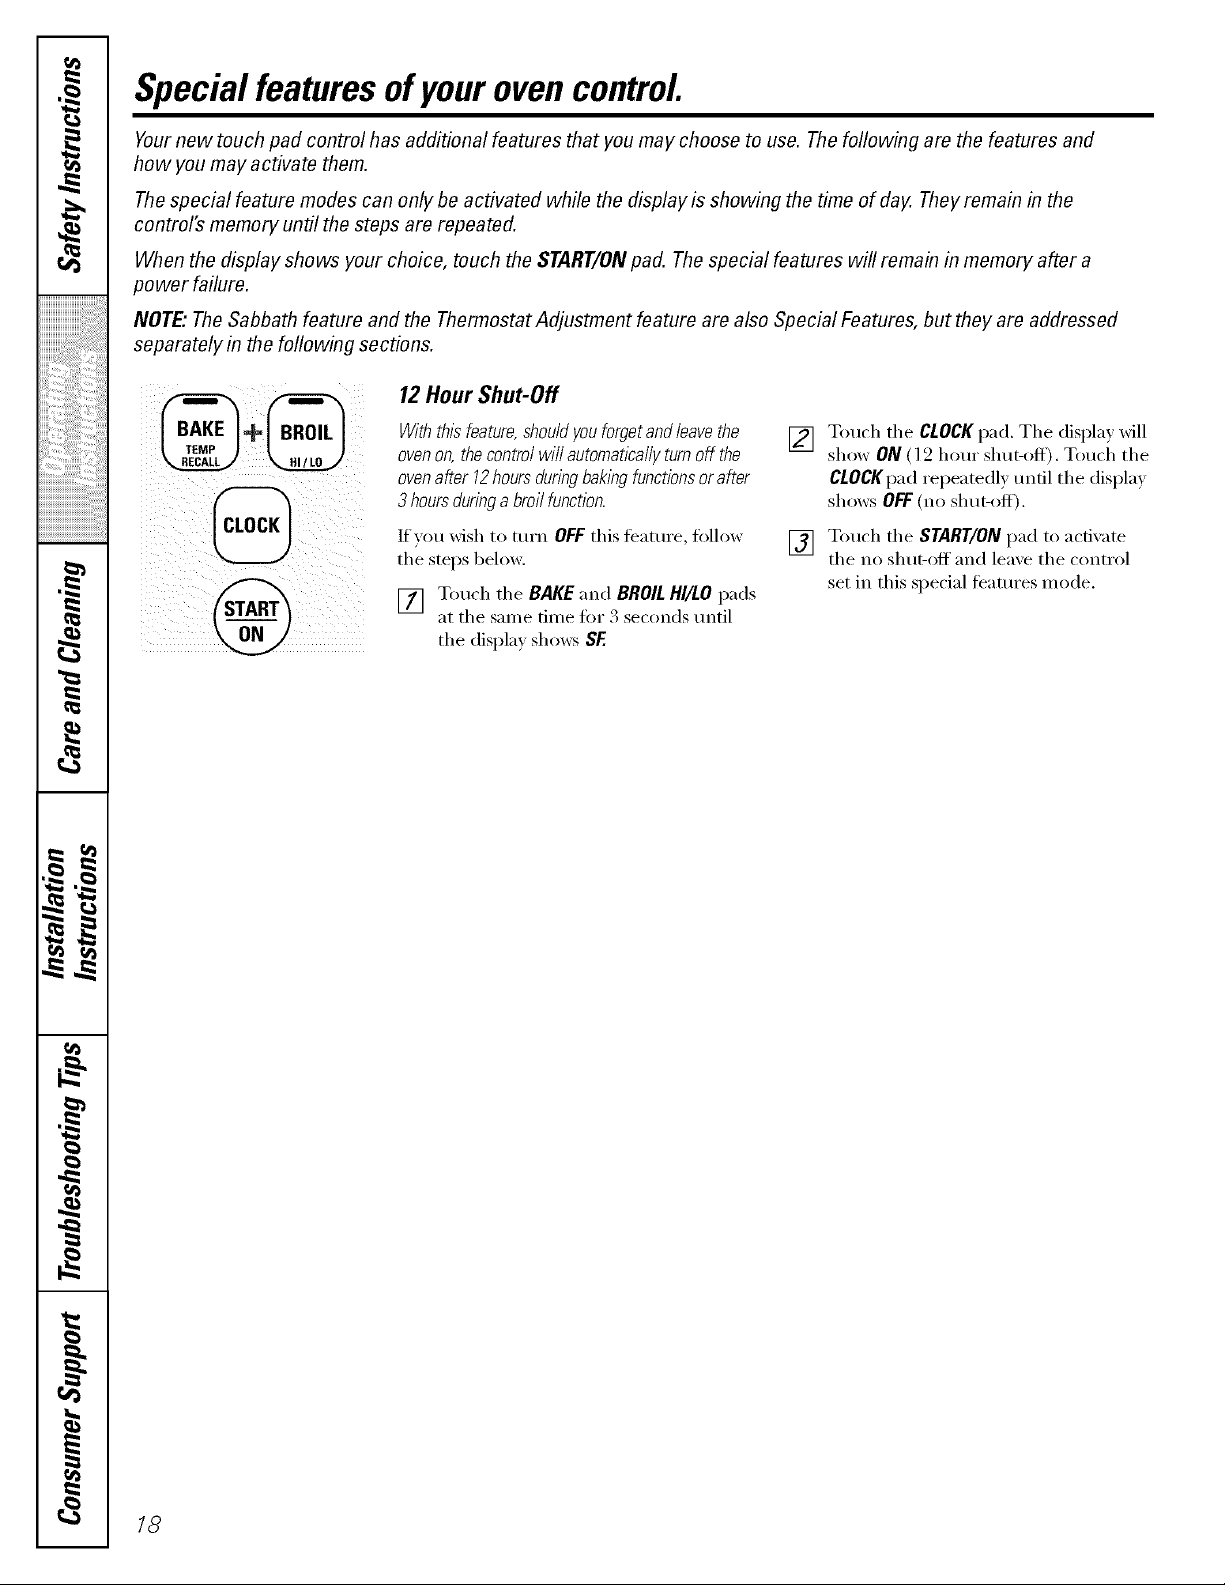
12 Hour Shut-Off
With thisfeature, should you forget and leave the
ovenon, the control will automatically turn off the
ovenafter 12hours duringbaking functions or after
3 hours during a broil function.
If you wish to mrn OFF this tbattli'e, ti)llow
the stops below.
Touch the BAKE "and BROILHI/tOpads
at the same time tot 3 seconds until
the display sho_:s SF.
[] Touch the CLOCKpad. The displa} will
show ON ( 12 hour shut-off). Touch the
CLOCKpad repeatedl)tmtil the display
shows OFF(no shut-off).
[] Touch the START/ON pad to activate
the no shut-off and lea;e the control
set in this special teatures mode.
18
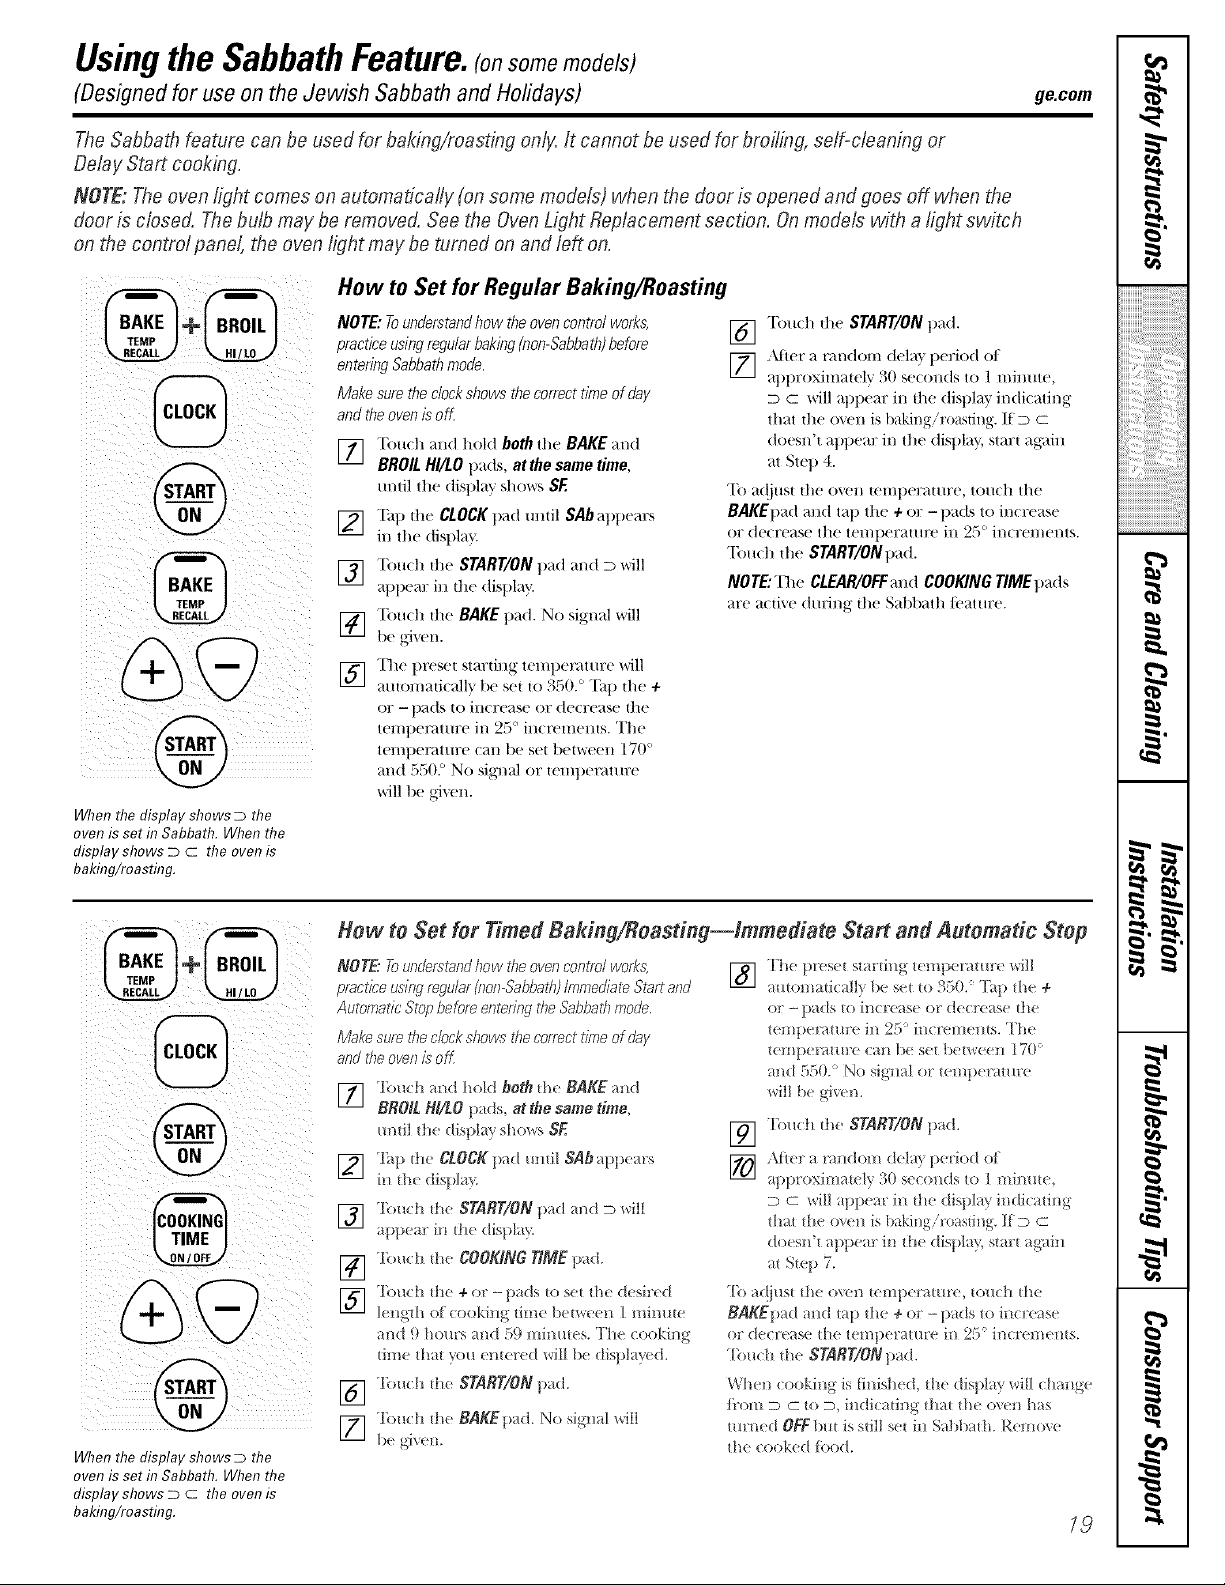
"-'--usingthe SabbathFeature.(onsomemodels)
(Designed for use on the Jewish Sabbath and Hofidays) ge.com
The Sabbath feature can be used for baiting/roasting only, It cannot be used for broiling, self=cleaning or
Delay Start cooking.
NOTE: The oven fight comes on automatically (on some models) when the door is"opened and goes off when the
door is cbsed. The bulb maybe removed. See the Oven Light Replacement sectinn. On models with a/ights_Jtch
on the control pane!, the oven ,light may be turned on and left on.
ii !
i iii@
ZI
When the display shows D the
oven is set in Sabbath. When the
display shows D C the oven is
baking/roasting.
How to Set for Regular Baking/Roasting
NOTE: Tounderstand how the oven control works,
practice using regular baking (non-Sabbath)before
entering Sabbath mode.
Make sure the clock shows the correct time of day
and the oven is oK
] Toudl and hokl both tim BAKE and
BROIL HI/LO pads, at the same time,
m_til the display shov,rs SF
] "Pap dm CLOCK pad mldl SAb appears
in the displaT_
] "['ot.h die START/ON pad m)d D will
appem: in tl'te disp1; w.
] "[buch die BAKEpad. No signal *,*,rill
] The preset starting tempemttu:e vdll
amomaticallv be set to 350. ° "Pap d_c 4-
or - pads m increase or decrease die
temperature in 25 ° incrcmems. The
tempe_mu:e can be set between 170 °
m_d 550. ° No signal or temperature
will be gJ*,vn.
[] Touch die START/ON pad.
[_ )Jier a rim(tom dcla} period st
_tt)t)l oxilIlately _{0 se(ollds to ] l//illtltl3,
D C will appear in die (tisplay indicating
that die o*,_m is baking/ro_ksting. If D C
doesn't appem: in tile display, start ag;_in
at Step 4.
"Ib a(!iust tl_e o\'cn temperature, touch the
BAKEpad and tap the 4- or - pads to increase
or decrease tile tel/lt)er_tllll'€' ill 2.'_ ° ill€Fell/SlitS.
"Ibuch tl_e START/ONpad.
NOTE: The CLEAR/OFF and COOKING TIME pads
are acdve dining the SaM)ath/i.,at ure.
@
@
@
When the display shows D the
oven is set h7Sabbath. When the
display shows D C the oven is
baking/roasting.
Hew te Set fer Timed Baking/Reasting--lmmediate Start and Autematic Step
NOTE: To undmsland how fits over?cofltro/ works,
practice using regular (non-Sahbattll/mmedial_ Start and
Autsmalfc Stop before entmi/ig die Sabbadl mode,
Make sure fits clock shows the correct time of day
and the oven is oK
] 'l;)_lch al_d hold beth th( BAKE al_d
BROIL Hi/tO pads, at the same time,
m_IiI /tic disI)l _} sh(ms SE
] 'l_p _he CLOCK pad umil SAb appears
i_/_hc displa?,
] T()uch the START/ON pad md m will
at)pear in _he displa}.
[_] 'lbuch _he COOKIN6 tiME tied.
] 'li)u(:h fl_( + or-p;gis to s(t/h( d(sircd
]( l/gill of (ookiHg/il//_ I)(mq(_(_]_ I l!/in/tK
al/d 9 he[It's _!ld 5() IlliI/_ll(S. Th( (:ookil/g
time _h_t _()u (m(i'ed will b( dispJ_ _d.
[_] 'lbu(:h fl/( START!ON p_d.
] rii)ll(:h [Hi(! BAKEt)_d. No sig_ml *,*,'ill
!)e ,4ix('n
] 'lhe preset smr_i_g/cmpcmmr( *,*,'ill
a(m)m_d(:alI_ be s(t to 350. 'l_{) _h( +
O[" -- l)ilds _o ilTt(! ('_s(' el d('(I'('/se th('
temt)enm+re in 25 )incrcme_ts. 'I'l_e
t('l/!})(Iitii/i'(' (;/_l 1)(' S(t t)¢/%('('I_ ] 70 )
md 550. ) No sig_al or temt)er re+re
wiI! be given.
[_ 'l'o_ch _he ST_RE/ON pad.
] \l_cr a m_dom dell} p(riod of
approximat(I_ 30 seconds/o / mimll(,
D _ _ill _i)pem" i_ tim dispk_ indi(_ting
that tl_e o_(qi is b_&ingiro_tsti_g, i[_
doesn't _ppe_r in the disp! ty, start ag:d_
at Step 7.
'1"oadjust the ox(,n tumperatm_,, Iot_ch the
BAKEp_d md tap tl_e + c,r - p_ds to i_crease
or d(clease the tel//iIe/'lIH['e iI_ 2_ ° il/cI'el//el/_s.
'['o_cb the SNR_]ON pad.
When (:ooki_g is linish(d, fl_e dispL+?, witI cha_ge
{i'om m c to D, i_(licati_g that the o*,e_ has
turned OFFl_+t is still sel i_/Sabb _th. Remo'_e
the cooked Ibod.
79
w
r_
g
,0
m
m
m
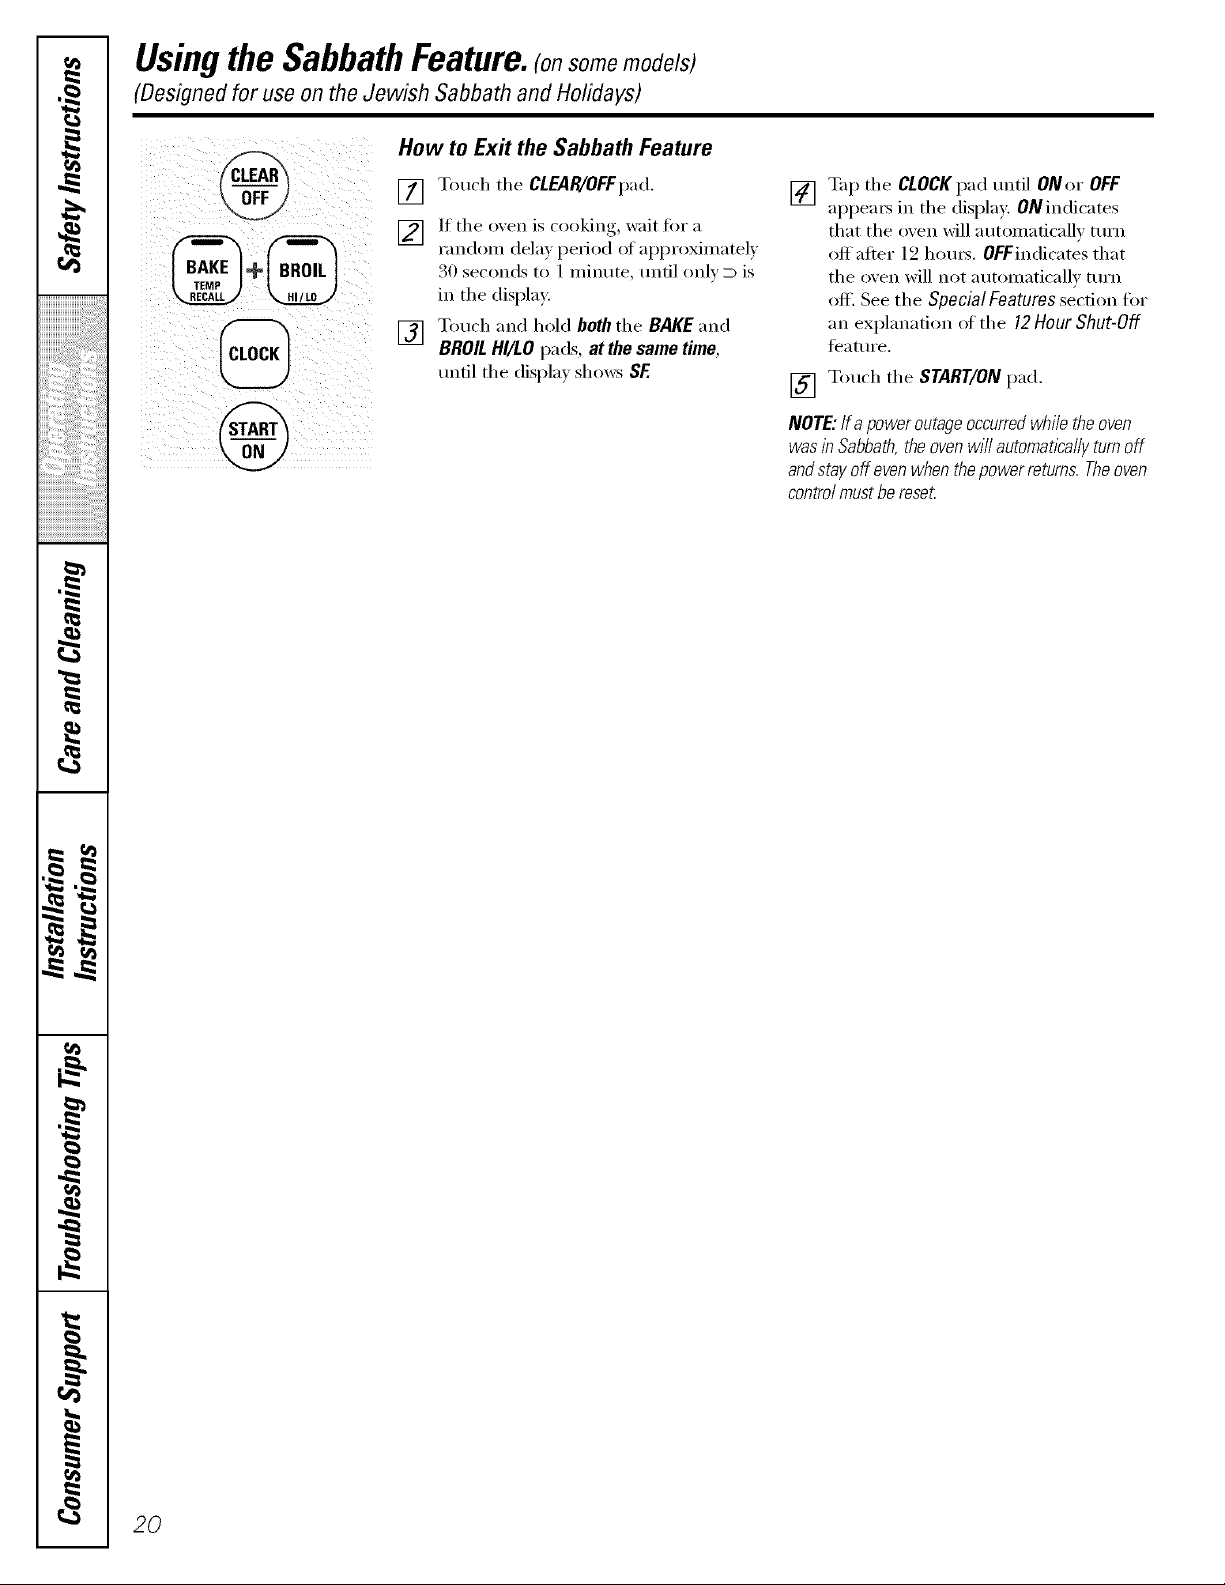
"-'--usingthe SabbathFeature.(onsomemodels)
(Designed for use on the Jewish Sabbath and Holidays)
How to Exit the Sabbath Feature
[]
[]
[]
Touch the CLEAR/OFFpad.
If the oxen is cooking, wait fi)r a
randon_ dela)period of approximatel)
30 see(rods to 1 minute, until only D is
in the display.
Touch and hold both the BAKE and
BROIL HI/LO pads, at the same time,
until the displa) shows SF.
2O
[] Tap the CLOCKpad until ONor OFF
appems in the display. 0N indicates
that the oven will automatically turn
off after 12 houx_. OFFindicates that
the oven will not automatically turn
off. See the Special Features section fiw
an explanation ot the 12 Hour Shut-Off
teature.
[] Touch the START/ON pad.
NOTE: If a power outageoccurredwhi/e the oven
was in Sabbath,the oven w/// automatlca//y turn off
and stay off even when the power returns. Theoven
control must be reset.
Adjust the oven thermestat--EasF to de yourself! gecem
You may find ftlat your new oven cooks differently than the one it replaced. Use your new oven for a few weeks to
become more familiar with it./f you stiff think your new oven is too hot or too cold', you can adjust the thermostat yourself,
Do not use thermometers, such as those found in grocery stores, to check the temperature setting of your oven. These
thermometers may vary 2g4O°E
NOTE: This adjustment will not affect the broiling or the self=cleaning temperatures (on some models). The adjustment
will be retained in memory after a power failure.
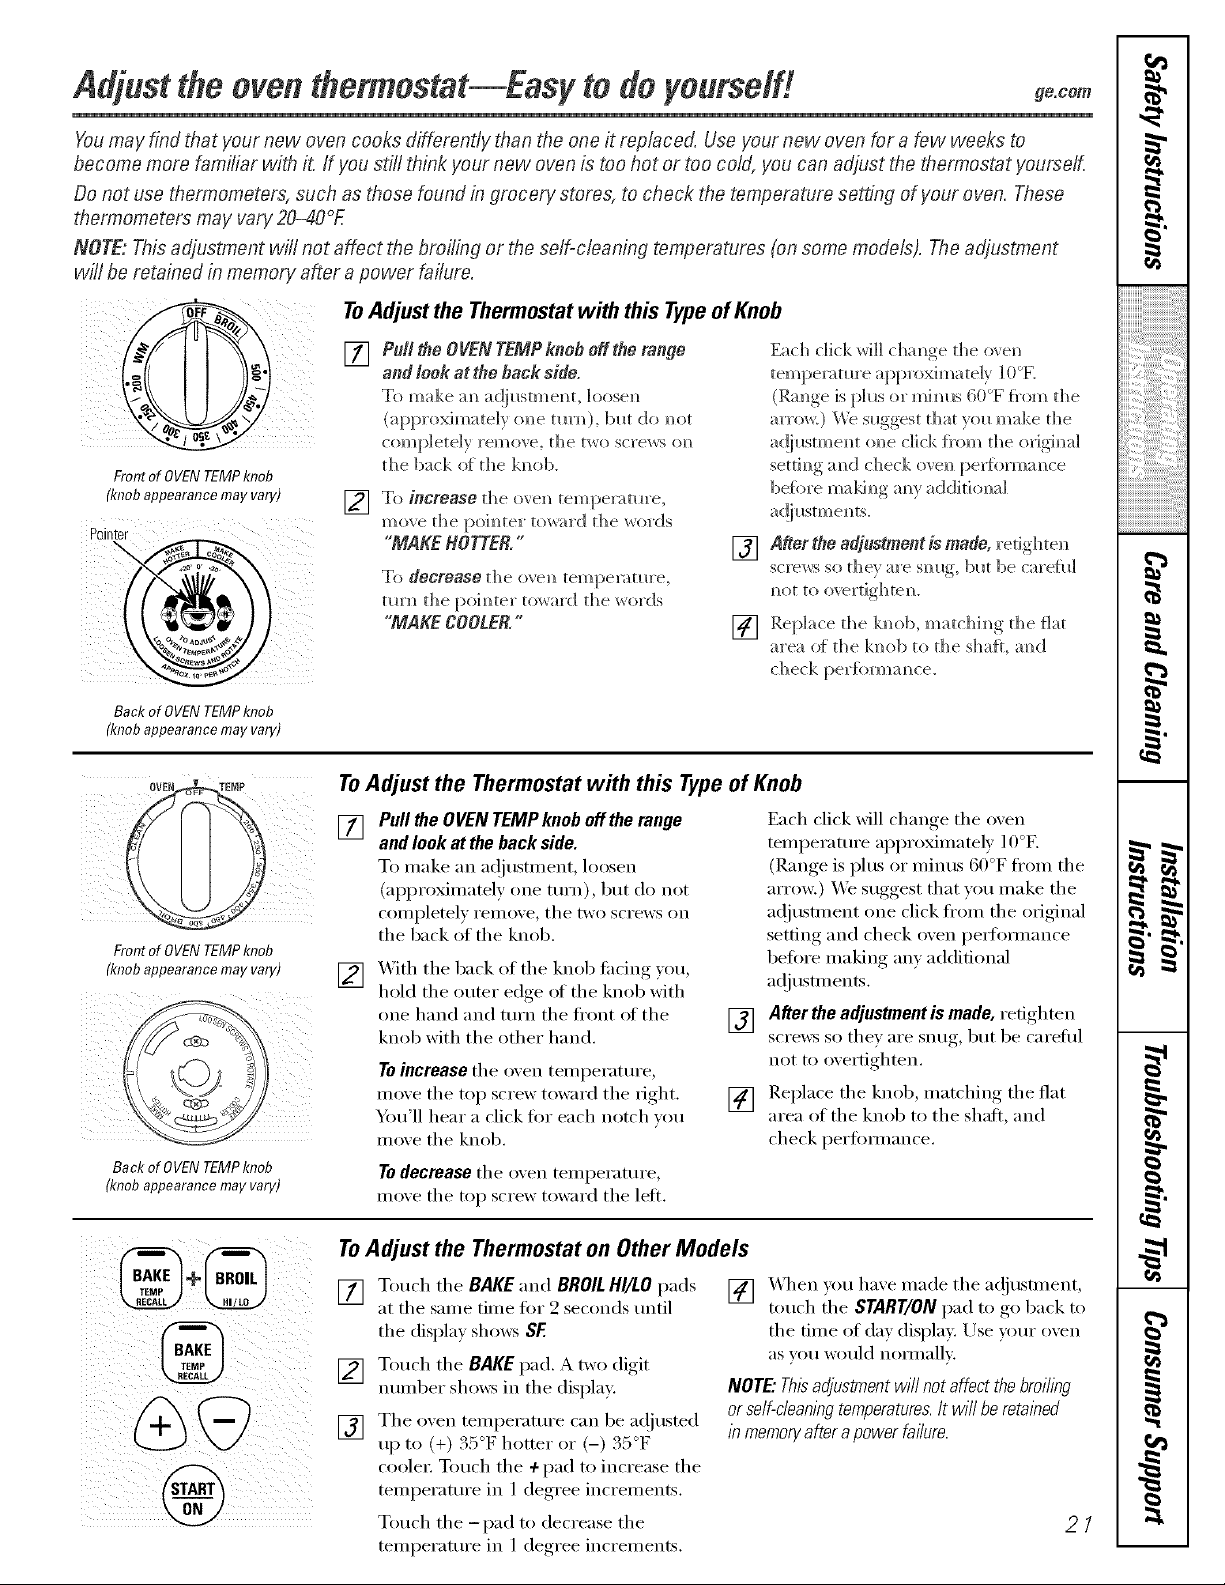
Front of OVENTEMPknob
(knobappearance may vary)
Pointer
ToAdjust the Thermostat with this Type of Knob
[]
[]
Pull the OVEN TEMP knob elf the range
and leek at the back side.
To make an_ a(!illstme_L ]oose_
(approximately (me mrm_), blot do m_(it
completely remove, the two screws {m
the back (ff the kmtb.
To ificre_3se the ove_ tempe_m_re,
"MAKE HOTTER,"
To decfeese the ove_ tempe_m_re,
t m'_ the poi m_ter t_ward the words
"MAKE COOLER."
Each click will cha_ge the o', e_
tempel_mre approxh/_ately 1 (l°E
(Range is pllls or m] m_I_s G(I°F fi'om the
arro_:) We suggest that you make the
a(!]l_sm_em (me click fl'(im the (tlJgim_]
setth_g am_(] check ove_ perfbrmam_ce
before ma]dm_g m_y a(Idki(ma]
[] A#erthe adjustment is made, refigbte_)
screws so the} are smtg, b_tt be careful
_ot to overtighte_.
[] Replace the k]]ob, matchi_g [lie {]at
area of tlle k]l(Ib to the sha:{t, an_d
Back of OVENTEMPknob
(knob appearance may vary)
[]
Frontof OVENTEMPknob
(knobappearancemayvary) [2]
Back of OVENTEMPknob
(knob appearance may vary)
To Adjust the Thermostat with this Type of Knob
Pull the OVEN TEMP knob off the range
and look at the back side.
To make an a(!justment, loosen
(approximately (:,he tin'n), but do not
completely remove, tile two screws on
the back of the knob.
X._ith tile back of tile knob fi_cing _ou
hold the outer edge of the knob with
one hand and turn the fl'ont of the
knob with the other hand.
To increase tile oven temperatm'e,
m(:,ve tile top screw towar(l tile right.
_)u'll hear a click fi)r each notch w)u
m(:,ve tile knob.
[]
[]
Each click will change tile oven
temi)erature approximately l 0°E
(Range is i)lus or minus 60°F fl'om the
arrow.) We suggest that vou make the
a(!justment one click fl'om the original
setting and check oven l)eiti)m]ance
before making any additional
a(!jusm/ents.
After the adjustment is made, refighten
screws so they are snug, but be carefifl
not to overtighten.
Replace the knob, matching the flat
area of tile knob to tile shall and
check i)erfi)m]ance.
Todecreasetile oxen teml)erature,
moxe tile top screw toward tile left.
To Adjust the Thermostat on Other Models
[] Touch tile BAKE and BROIL HI/LO pads
at tile same time fiir 2 seconds m]til
tile display sl/o_:s SE
[] Touch tile BAKE pad. A two digit
number shows in tile display:
[] Tile ()veil teml)erature cai] be a(!justed
up to (+) 35°F hotter or (-) 35°F
coolei: Touch the ÷ pad to increase the
temperature in 1 degree increments.
[] X_q/en you ha;e made tile a(!jusUnent,
touch tile START/ON pad to go back to
tile time of day display. Use }our oxen
[IS X()/I Wo/lld noiillallv.
NOTE"Thtsadjustmentwill notaffectthebroiling
orse/f-c/ean/bgtemperatures.It wi//be retatbed
/bmemoryafter apowerfailure.
Touch tile -pad to decrease tile
temperatm'e in 1 deoTee_ increments.
21
-g.
w
r_
g
m
H
m
__
L
m
m
m
I
Usingthe warming drawer, so e o efs)
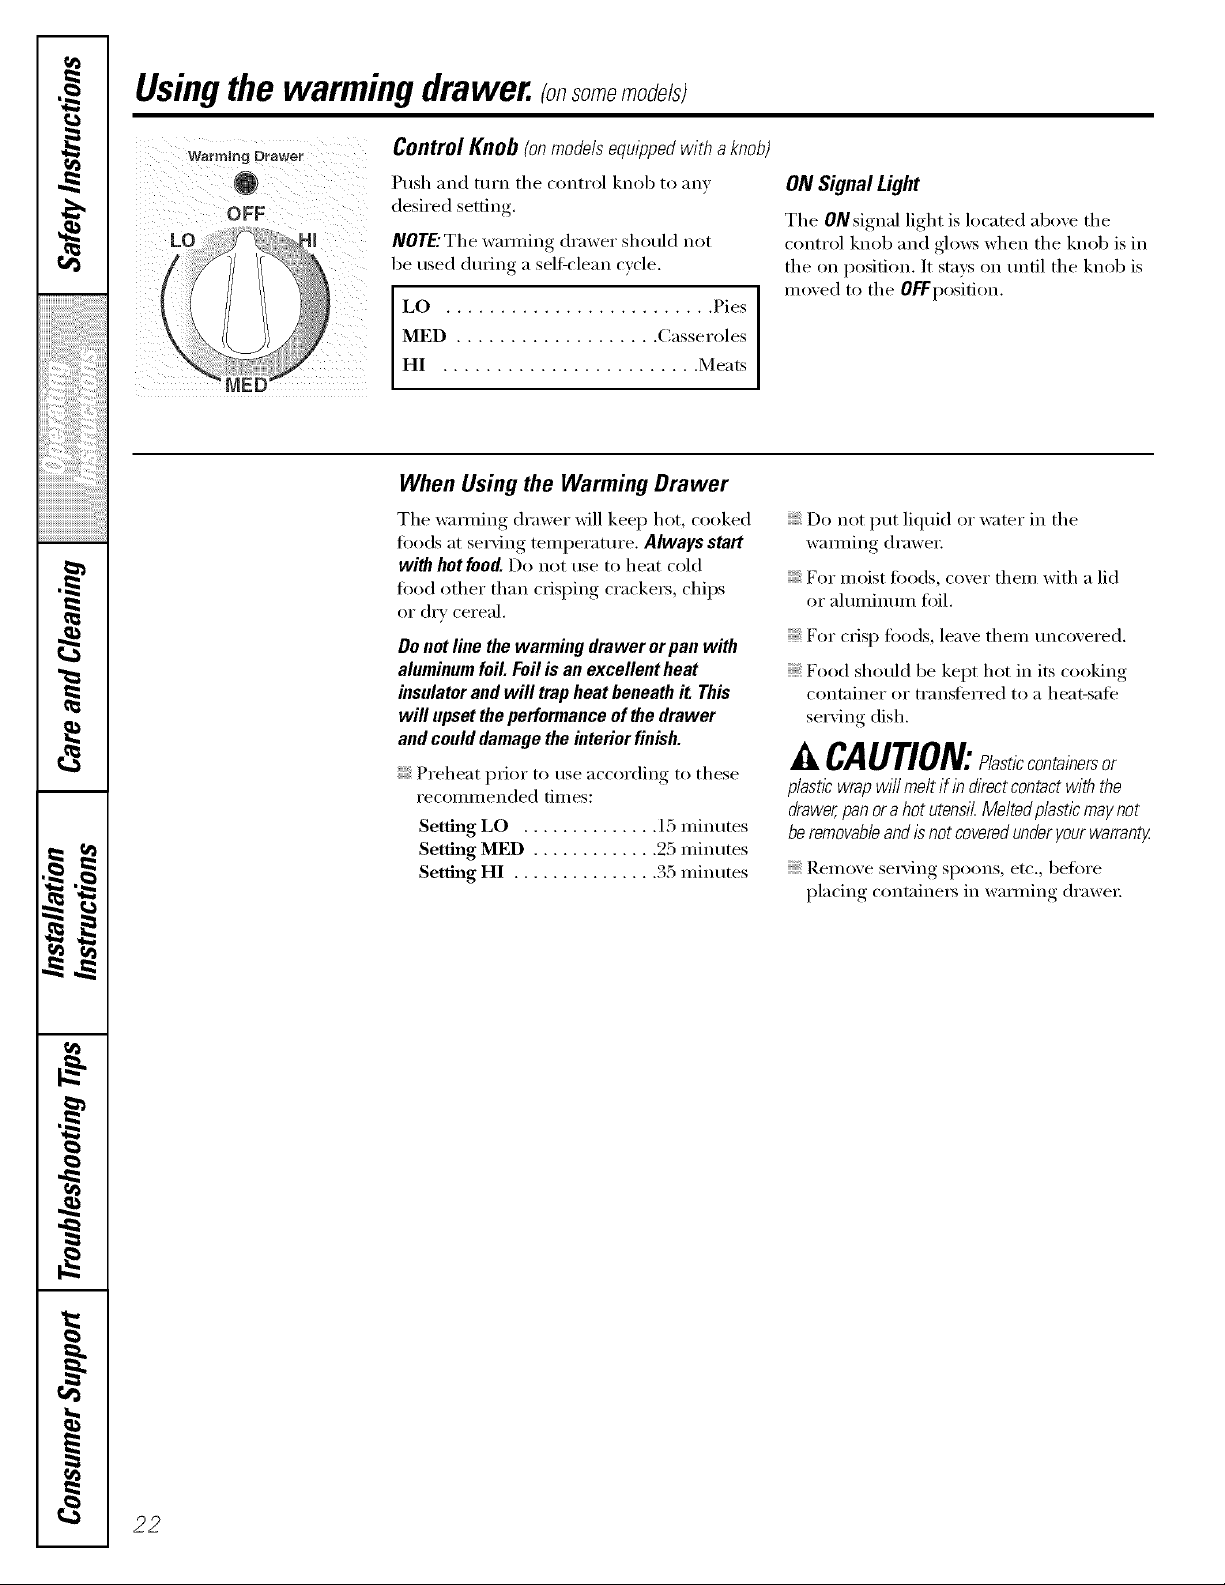
Warming Drawer
OFF
LO
Control Knob (onmodelsequipped with a knob)
Push and mrn the control knob to any
desired setting.
NOTE."The wamfing drawer should not
be used during a self-clean cycle.
LO ......................... Pies
MED ................... Casseroles
HI ........................ Meats
ON Signal Light
The ONsignal light is located above the
control knob and ghm:s when the knob is in
the on position. It stays on tmtil the knob is
moved to the OFFposition.
When Using the Warming Drawer
The wamfing drawer will kee I) hot, cooked
foods at serving temperatm'e. Always start
with hot food. Do not use to heat cold
toed other than crisping cracke_, chips
or dry cereal.
Do not line the warming drawer or pan with
aluminum foil. Foil is an excellent heat
insulator and will trap heat beneath it This
will upset the performance of the drawer
and could damage the interior finish.
Preheat prior to use according to these
recommended times:
Setting LO .............. 15 minutes
Setting MED ............. 25 minutes
Setting HI ............... 35 minutes
Do not put liquid or water in the
wamfing drawe_:
For moist toods, cover them with a lid
or aluminmn toil.
For crisp fi)ods, leave them tmcovered.
Food should be kept hot in its cooking
container or transferred to a heat-safe
serving dish.
CAUTION: lastlecontainersor
plastic wrap wi// melt if in direct contact with the
drawer,pan ora hot utensil.Melted plastic maynot
be removableand is not coveredunderyour warranty
Rem()ve se_'ing spoons, etc., before
placing containe_ in wamdng drawe_:
22
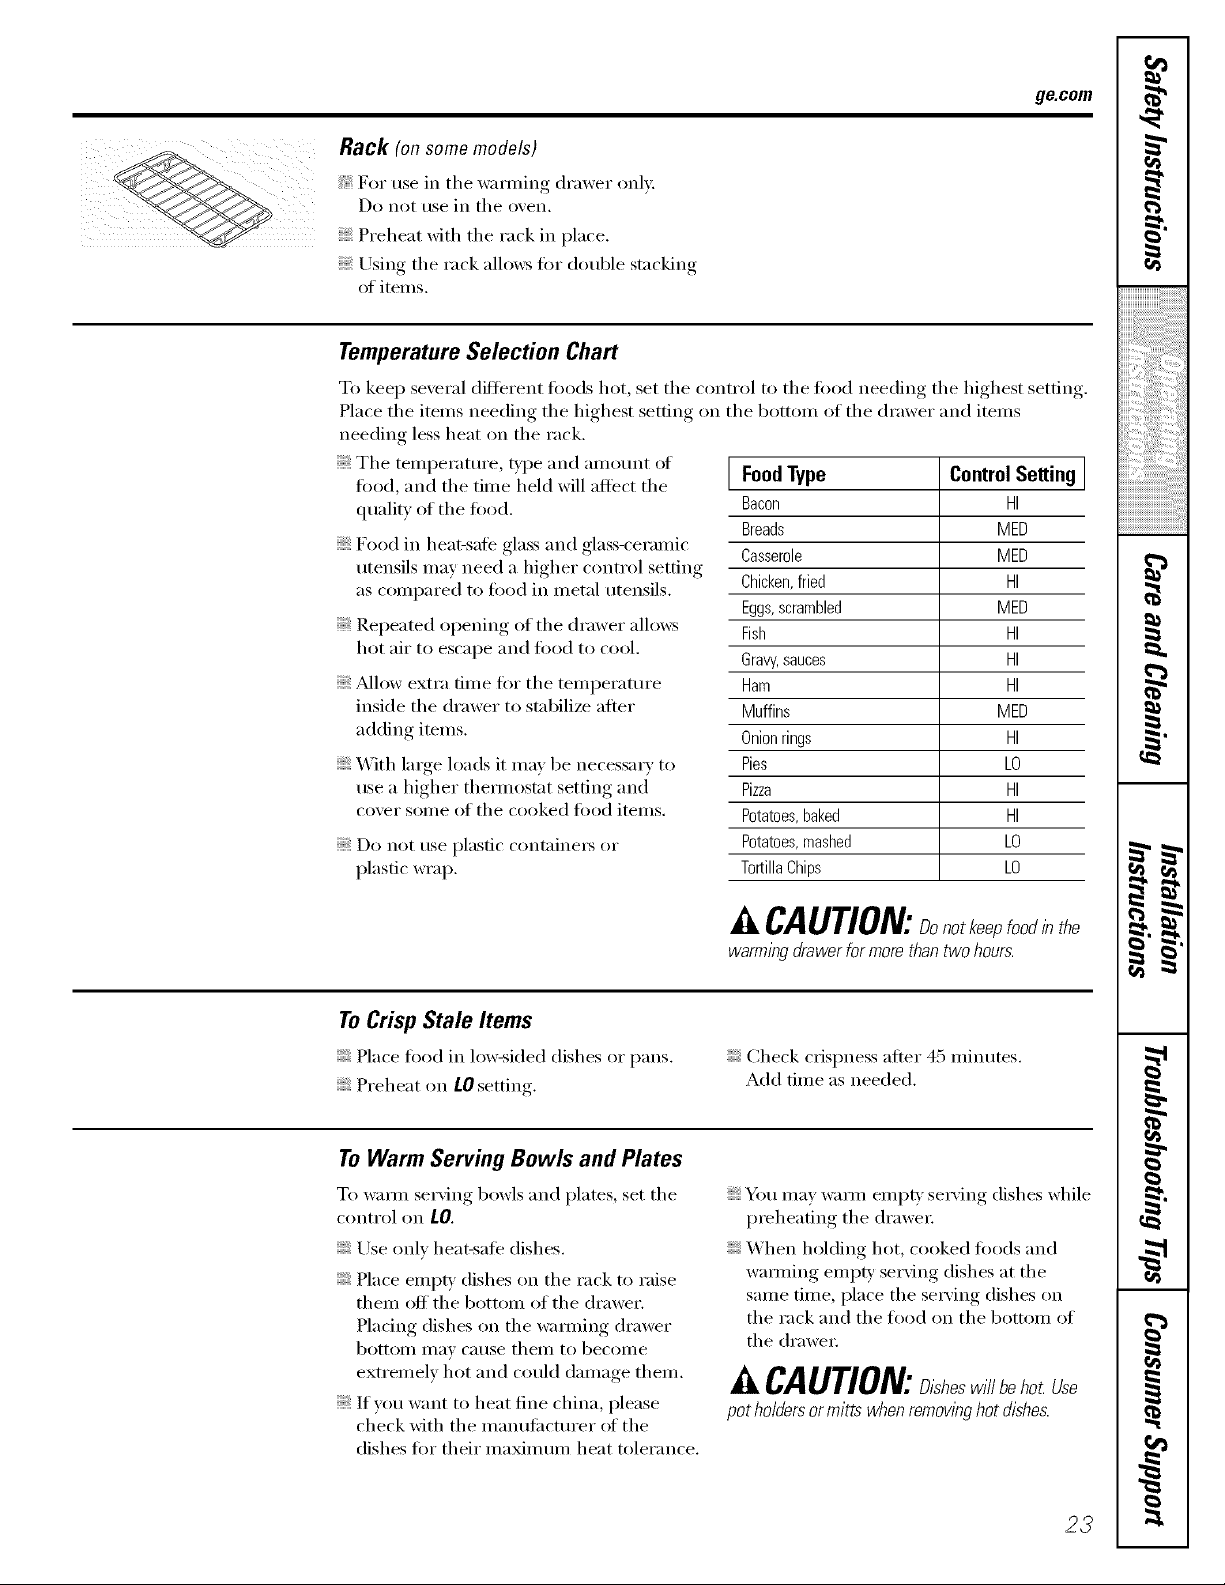
Rack (on some models)
For use in the wam/ing drawer only.
Do not t/se in the o_,eIl.
Preheat with the rack in place.
Using the rack allows tor double stacking
of items.
ge.com
Temperature Selection Chart
To keep sexeral different fi_ods hot, set the control to the toed needing the highest setfin ,
Place the items needing the highest setting on the bottom of the drmver and items
needing less heat on the rack.
The temperature, t,ipe and amount ot
food, and the time held will affect the
quality of the toed.
Food in heat-sate glass and glass-ceramic
utensils may need a higher control setting
as compared to toed in metal utensils.
Repeated opening of the drawer allo_vs
hot air to escape and toed to cool.
_Mlow extra time for the temperature
inside the drawer to stabilize alter
adding items.
_A]th large loads it may be necessary to
use a higher them_ostat setting and
cover some of the cooked toed items.
Do not use plastic containe_ or
plastic wrap.
[ FoodType ControlSetting [
Bacon HI
Breads MED
Casserole MED
Chicken,fried HI
Eggs,scrambled MED
Fish HI
Gravy,sauces HI
Ham HI
Muffins MED
Onionrings HI
Pies LO
Pizza HI
Potatoes,baked HI
Potatoes,mashed LO
TortillaChips LO
^,,,CAUTION:Do kee foodinthe
warming drawer for more than two hours.
To Crisp Stale Items
Place food in low-sided dishes or pans.
Preheat on LOsetting.
Check crispness after 45 minutes.
Add time as needed.
To Warm Serving Bowls and Plates
To wam_ serving bowls and plates, set the
control on tO,
Use only heat-safe dishes.
Place erupt' dishes on the rack to raise
them off the bottom of the drawer.
Pladng dishes on the wamfing drawer
bottoIll Ill}IV C}ltlSe theIll 1(:, becoi/le
extremely hot and could damage them.
If you want to heat fine china, please
check with the n/anufilcturer (ff the
dishes for their maximmn heat tolerance.
You may warn/ empU se_'ing dishes while
p_eheafing the drawe_:
When holding hot, cooked toods and
wamfing erupt' se_Mng dishes at the
same time, place the serving dishes on
the rack and the food on the bottom of
the drawe_:
A CAUTION:D,shesw,//beho Use
pot holders ormitts when remownghot dishes.
w
r_
w
m
w
,0
Usingthe self-cleaning oven. somemo els)
€0
Never force the latch handle. Forcing the handle will damage the door lock mechanism.
The oven door must be closed and all controls set correctly for the cycle to work properly.
_" Before a Clean Cycle
For tile fi_t self=clean cycle, we recomn/end Do not dean tile gasket. Tile fiberglass
_'_ venting your kitchen with an ellen window material of tile oven door _asket emmet
-- or using a ventilation tim or hood. withstand abrasion. It ix essential for the
_ _ the broiler broiler gasket to remain intact. If you notice it
-_2 _ _,,_ Reino',Vgridall cookwareShelves'andanYanvaluIninuInPan' t0il becoining worn or fi'aved I'eplace it.
_ _ _ _-_....--.-_ fl'oiu tile oven. Wipe up any hem)" sllilh)vers on tile oven
._l f,_ The oven shelves can be sel6cleaned,
CI_ _,__ but they will darken, lose their luster Make the bulb ix in
light
Sl/l'e OVell covei"
_ ;lad beconle hard to slide, l)lace and tile oven light ix off.
_ Wipe up heavy soil on flye oven
Do]lot,,se o,e]l,le ,,le, o," CAUTION:thegratesa.ddrippa.s
()&'ell l)l'ote('toIs ill or ne;ll" the selfL('le;ming (if so equipped)shouldnever be cleanedin the
oven, A ('Ol[/bination of any of these
Ilroducts plus the high clean cv(le self-cleaning oven.
temllerattn'es may dmnage the ll()rcelain Do not use commercial oven cleaners or oven
finish of the oven. protectors in or near the self-cleaning oven.
A combination of any of these products
Soil on tile fl'ont fl'mne of tile rmlge and l)lus tile high (lean cycle temperatm'es may
outside tile gasket on tile door will need
damaoe the porcelain finish of the oven.
to be cleaned by hand. Clean these ;l]'e;is
with hot water, soap-filled steel-wool l/ads IMPORTANT: The healfl/of some birds ix
or cleansels such as Soft Scrub') extreInelv sensitive to the fl]n_es given off
Rinse well with cleml water and dry. dtu_ing the sel6clemfing cvde of am" range
__ Ml)ve birds t() a n l)th er well ventilated rl)l)m.
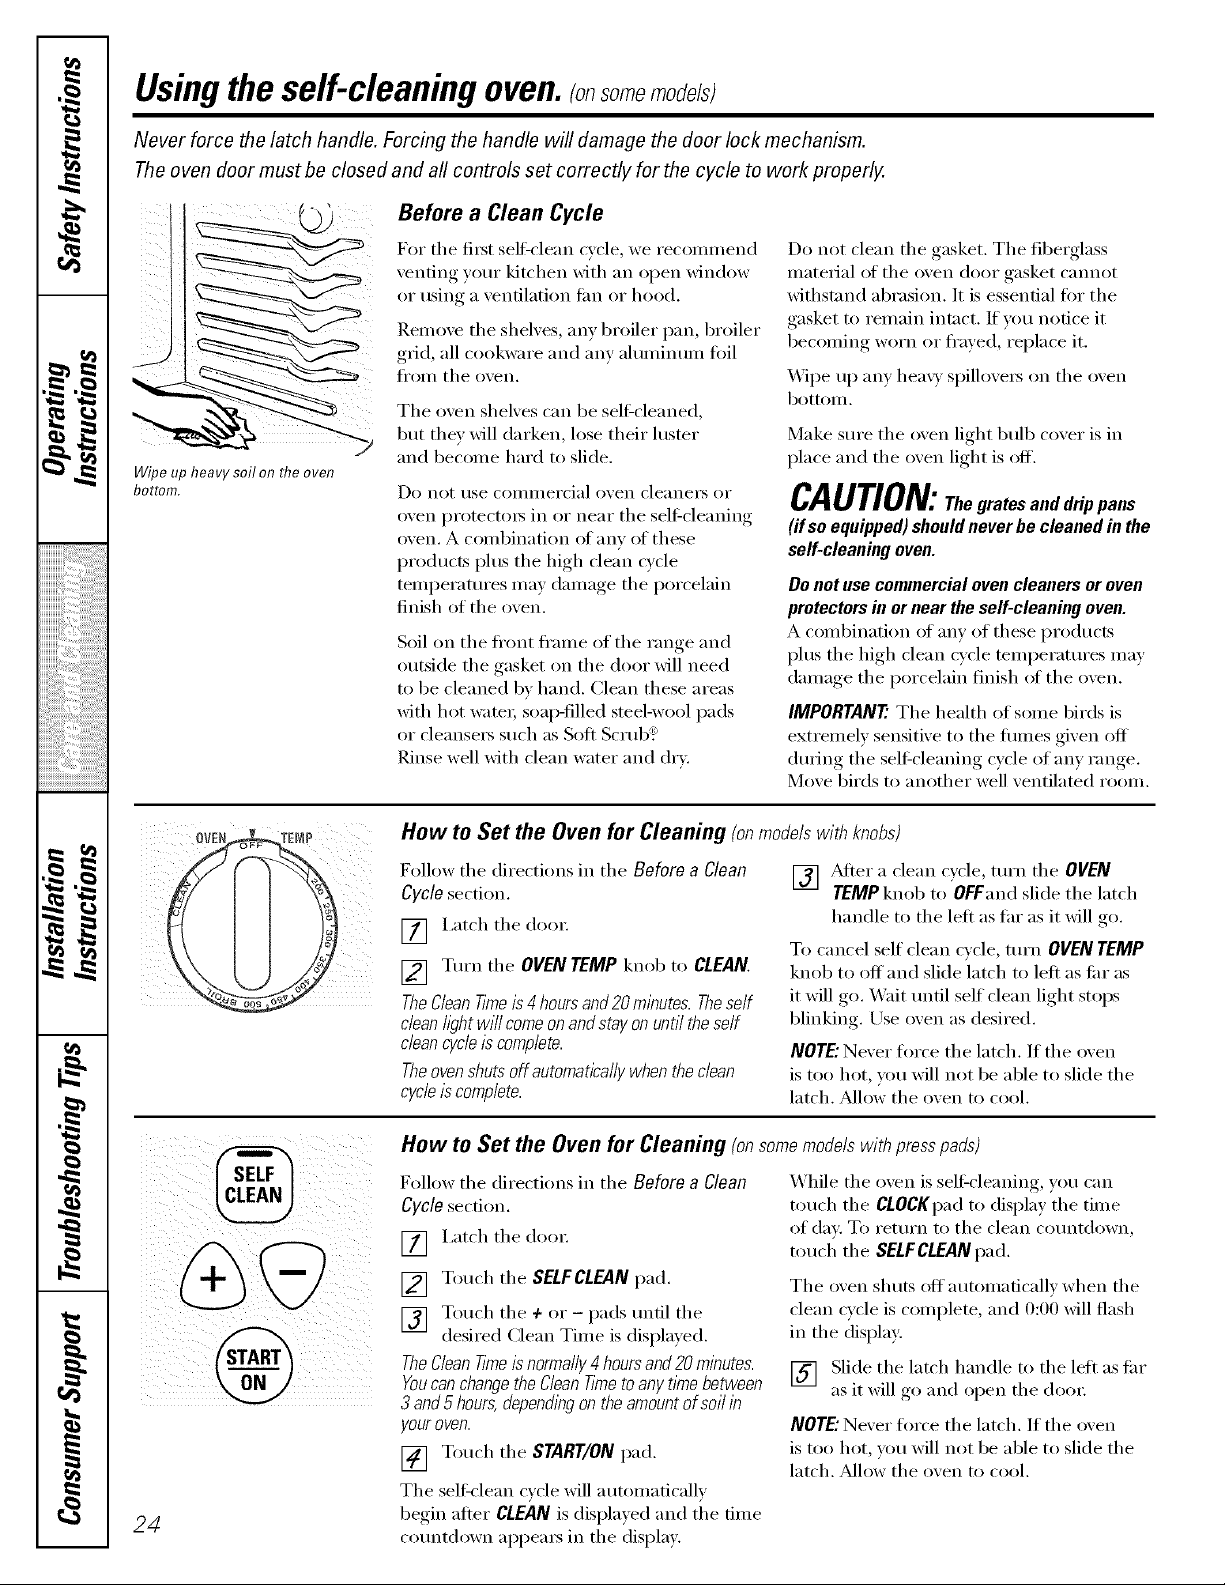
HOW tO Set the Oven for Cleaning (on models with knobs)
= Follow the directions ill the Before a Clean [] J_tel" }1 (leml ('v('le tul'n the OVEN
",_ Cycle section. TEMP knob to "OFFend slide the latch
_ [] Latch tile doo_: hmldle to tile left as flu" as it will _o
_ To cancel self' clean cycle, turn OVEN TEMP
,,_ _ [] Turn the OVEN TEMP knob tl) CLEAN. knobtl) offandslidelatchtl)lefiastiu'as
TheCleanT/Yneis4hoursand20mlbutes.Theserf it will go. Wait until self cle:m light stl)llS
cleanh_htwi//comeonandstayon untiltheserf blinking Use oven as desired.
"_ clean cycle is complete. NOTE" Never force tile latch. ]f tile oven
Theovenshutsoffautomatica//ywhen the clean ix too hot, yl)tl will not be ;ible to slide the
_'_ cycle/s complete, latch. Mh )w the ()yen t() (()1)1.
-._,
HOW tO Set the Oven for Cleaning (on some models with press pads)
° %
"_,_ Follow the directions in the Before a Clean While the oven ix sel6cle:ming, you can
,,_ Cycle section, touch the CLOCKpadto display the time
"_ [] Latch the dl)oi: of day. To return to the clean cotmtdown,
),_ @ _ touch tile SELFCLEANpad.__ [] Tl)uch the SELF CLEAN pad. Th e ()yen shuts off' a utl)maficallv when the
E [] Touch the + or- pads until the clean cycle ix coIulllete, and 0:00 will flash
desired Cle:m Time ix displayed, in file display.TheCleanT/Yneis normally4 hoursand20minutes.Youcanchangethe CleanT/YnetoanytlYnebetween [] Slkle file latch handle to file left as fro"
3 and 5 hours, dependlbg on the amount of soil/b as it will go and ellen the dl)or
youroven. NOTE" Never force the latch. ]f the oven
--- [] Touch tile START/ONpad. ix too hot, you will not be able to slide tile
latch. Mh)w the oxen to cool.
The selfklean cwle will automati(-all_
beoin after CLEAN is displa}ed and tile time
24
__ comltdown appea_ in the display.
g_com
The oven door must be closed and all controls set correctly for the cycle to work properly,
START
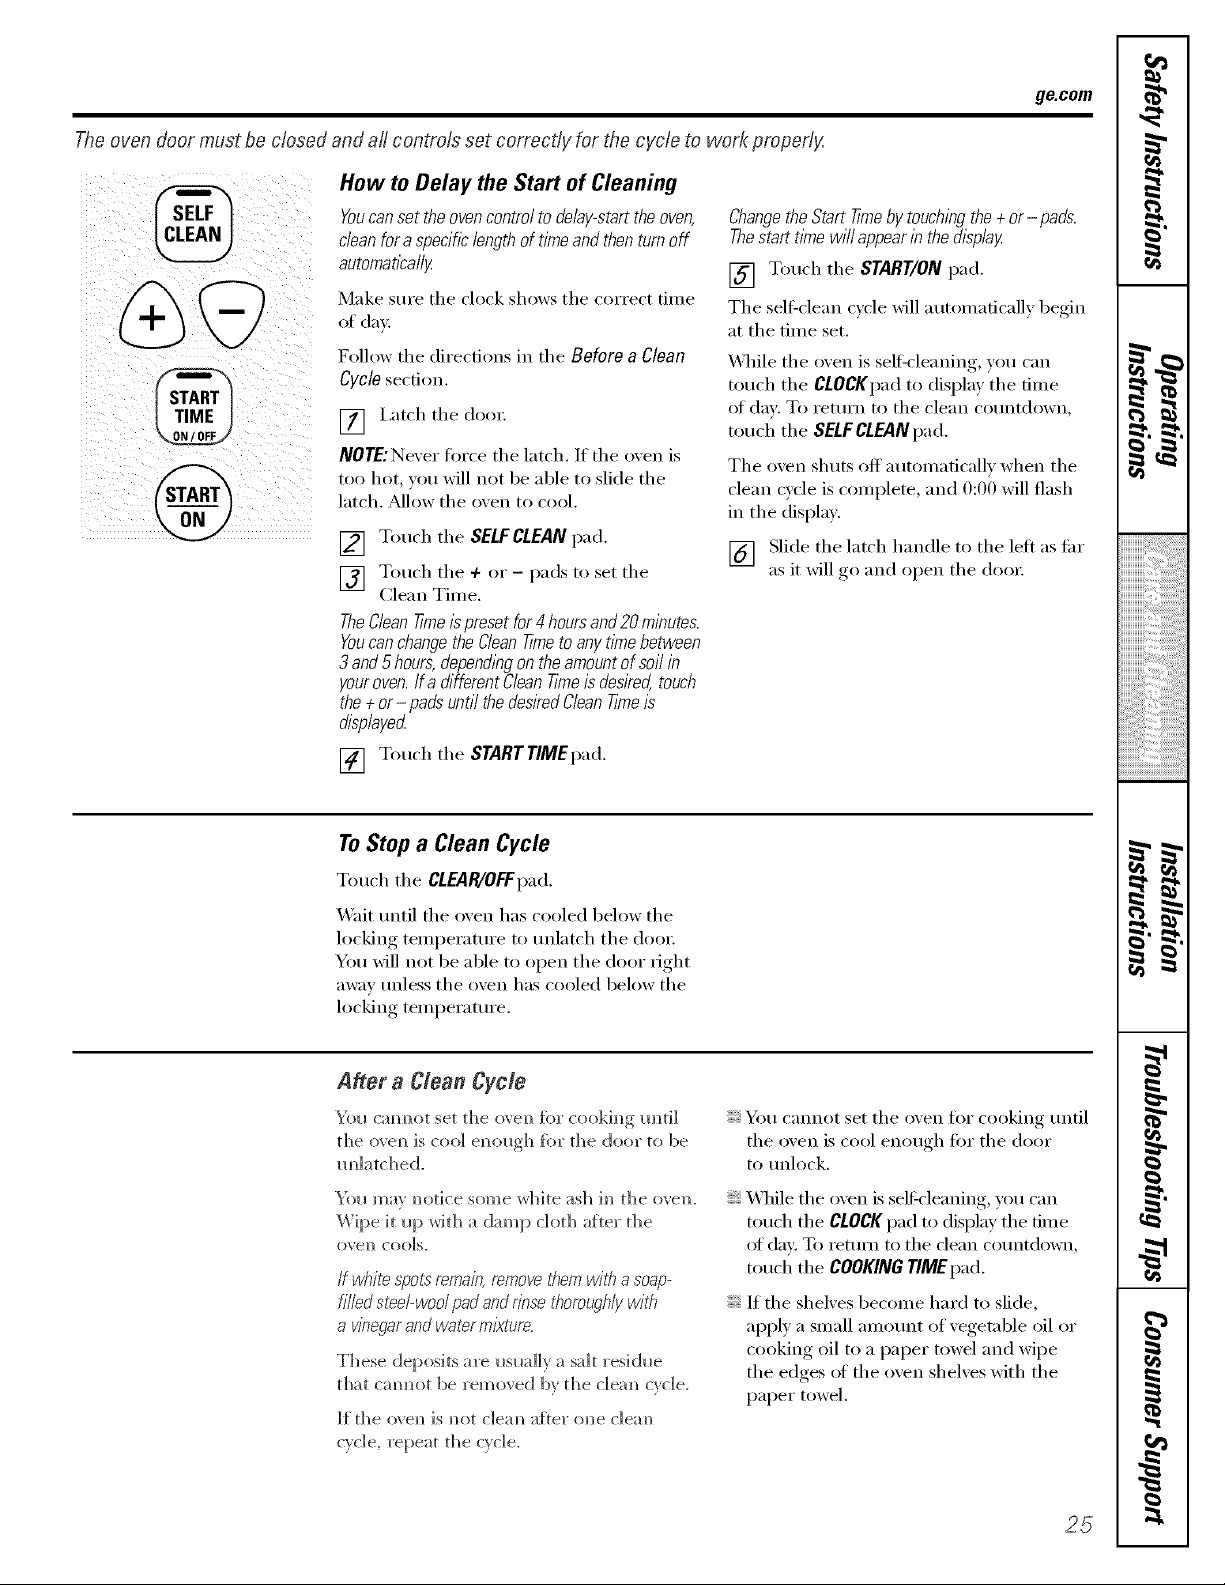
How to Delay the Start of Cleaning
Youcanset the ovencontrol to delay-start the oven,
clean for a specific length of time and then turn off
automatically
Make sure the chx'k shows the correct time
of day.
Follow the directions in the Before a Clean
Cycle section.
[] I,atch the dora:
/VOTE'.Never force the latch. If the oven is
too hot, you will not be able to slide the
latch. Mlow the oven to cool.
[] Touch the SELFCLEAN pad.
] Touch the + ()r - pads to set the
Clean Time.
TheClean time is preset for 4 hours and 20 minutes.
Youcanchange the Clean Timeto any tlYnebetween
3 and 5 hours, dependingon theamount of soft in
your oven. If a different Clean Timeis desked, touch
the + or-pads until the desiredClean Timeis
displayed
[] Touch the START TfMEpad.
Changethe Start time by touchingthe + or- pads.
Thestart time will appear in the display
[] Touch the START/ON pad.
The selFclean cycle will automatically begin
at the time set.
\_]file the oven is selFcleaning, you can
touch the CtOCKpad to display the time
of day. To return to the clean countdown,
touch the SELFCLEANpad.
The oven shuts off automatically when the
clean cycle is complete, and 0:00 will flash
in the display.
[] Slide the latch handle to the left as flu"
as it will go and open the dora:
ToStop a Clean Cycle
Touch the CLEAR/OFFpad.
Wait tmtil the oven has cooled below the
locking temperature to mflatch the doo_:
You will not be able to open the door right
away mfless the oven has cooled below the
locking temperature.
A#er a Clean Cycle
Yol_ cromer set the (wel_ fi)r cookim_g m_ti]
the o_em_is coo] el_ol_gh for the door to be
m_]atc]_ed.
Yell mav m?()[ice some white ash ill [lie ()veil.
_'][)e it lip wit]) _ d_u)) I) clot)) after the
()veil COOLS.
If _v¢}itespoL_remain, remove them with a soap-
filled st_e/-woolpad and rinse thoroughlywith
a wT}egarand water mixture.
These deposits are I_sl_a]]v a salt resi(h_e
that emmet be removed bv tile c]em? cycle.
If the (wem_ is m_ot cIem_ a{[er omle cIeam?
c}c]e, repeat the c}c]e.
You cannot set the oven fl)r cooking until
the oven is cool enough for the door
to mflock.
X41file the oven is selFcleaning, you can
touch the CLOCKpad to display the time
(ff day: To remm to the dean commh re'n,
touch the COOKING77MEpad.
If the shelves become hard to slide,
apply a small amount of vegetable oil or
cooking oil to a paper towel and wipe
the edges (ff the oven shelves with the
paper towel.
25
,0
wL
L
w
iiiiiiiiiiiiiiii!_iii_i_iiiiiii:ii:!i_i;il;il;il;il;il;ii:ii:ii:iiiii!i!i_i;i¸_
iiiiiiiii _;<' iiiiiiiiii%
HH_,_,__ ,,__;p;>x_<,
iiiiiiiiiiiiiiiiiiiiiiiiiiiiiiiiiiiiiiiiiiiiiiiiiiiiiiiiiiiiiiiiiii_i!;iiii_i
m
m
2.
m
Care and cleaning of the range.
Be sure electrical power is off and all surfaces are cool before cleaning any part of the range.
ff your range is removed for cleaning, when the range is replaced. Failure
servicing or any reason, be sure the to take this precaution could result in
anti-tip device is re-engaged properly tipping of the range and cause inju_
Oven Interior (non-selfcleanmodels)
_&]th l)rol)er care, the l)orcelain enaniel
finish on the inside of the oven--tOl),
bottonl, sides, back and inside ot the
door---will stay neBqooking tot yeaI_.
I,et the range cool betoi'e cleaning. _._b
reconiinend that you wear rubber gh)ves
when cleaning the range.
Soap and water will noimally do the job.
Heavy sl)atteIing or spilloveI_ nlay require
deaning with a inild abrasive cleanei 2
Soap-filled scouiJng i)ads nlav also be used.
Do not allow food spills with a high
sugar or acid content (suchas milk,
tomatoes,sauerkraut, fruit juices or
pie filllbg) to remain on the surface. Theymay
causea dull spot even after c/eanlbg.
Household aninlonia niay nlake the
{leaning job easiei: Pla{e 1/2 cup in a
shallow glass or I)otteIT {ontainer in a {oM
oven overnight. The anm]onia fiunes will
hel I) loosen the burned-on grease and fi)od.
If ne{'essar,v, you IIIQV tlSe }lll ()veil {-leanei:
Follow the i)ackage directions.
Do not spray ovenc/eana on the electrical controls
and switches becauseit could causea short circuit
and result in sparklbgor fire.
Do not allow a film from the cleaner to build up on
the temperaturesensor-it could cause the oven to
heat lYnproper/y(Thesensor is located at the top of
theoven.)Carefully wipe the sensorc/ean after each
oven c/eanlbg,babg carefulnot to move the sensor
as a changein its position couldaffect how the
oven bakes.
Do not spray any oven cleaneron the oven door,
handles or any exterior surface of the oven, cablbets
or palbted surfaces. Thec/eanercan damage these
surfaces.
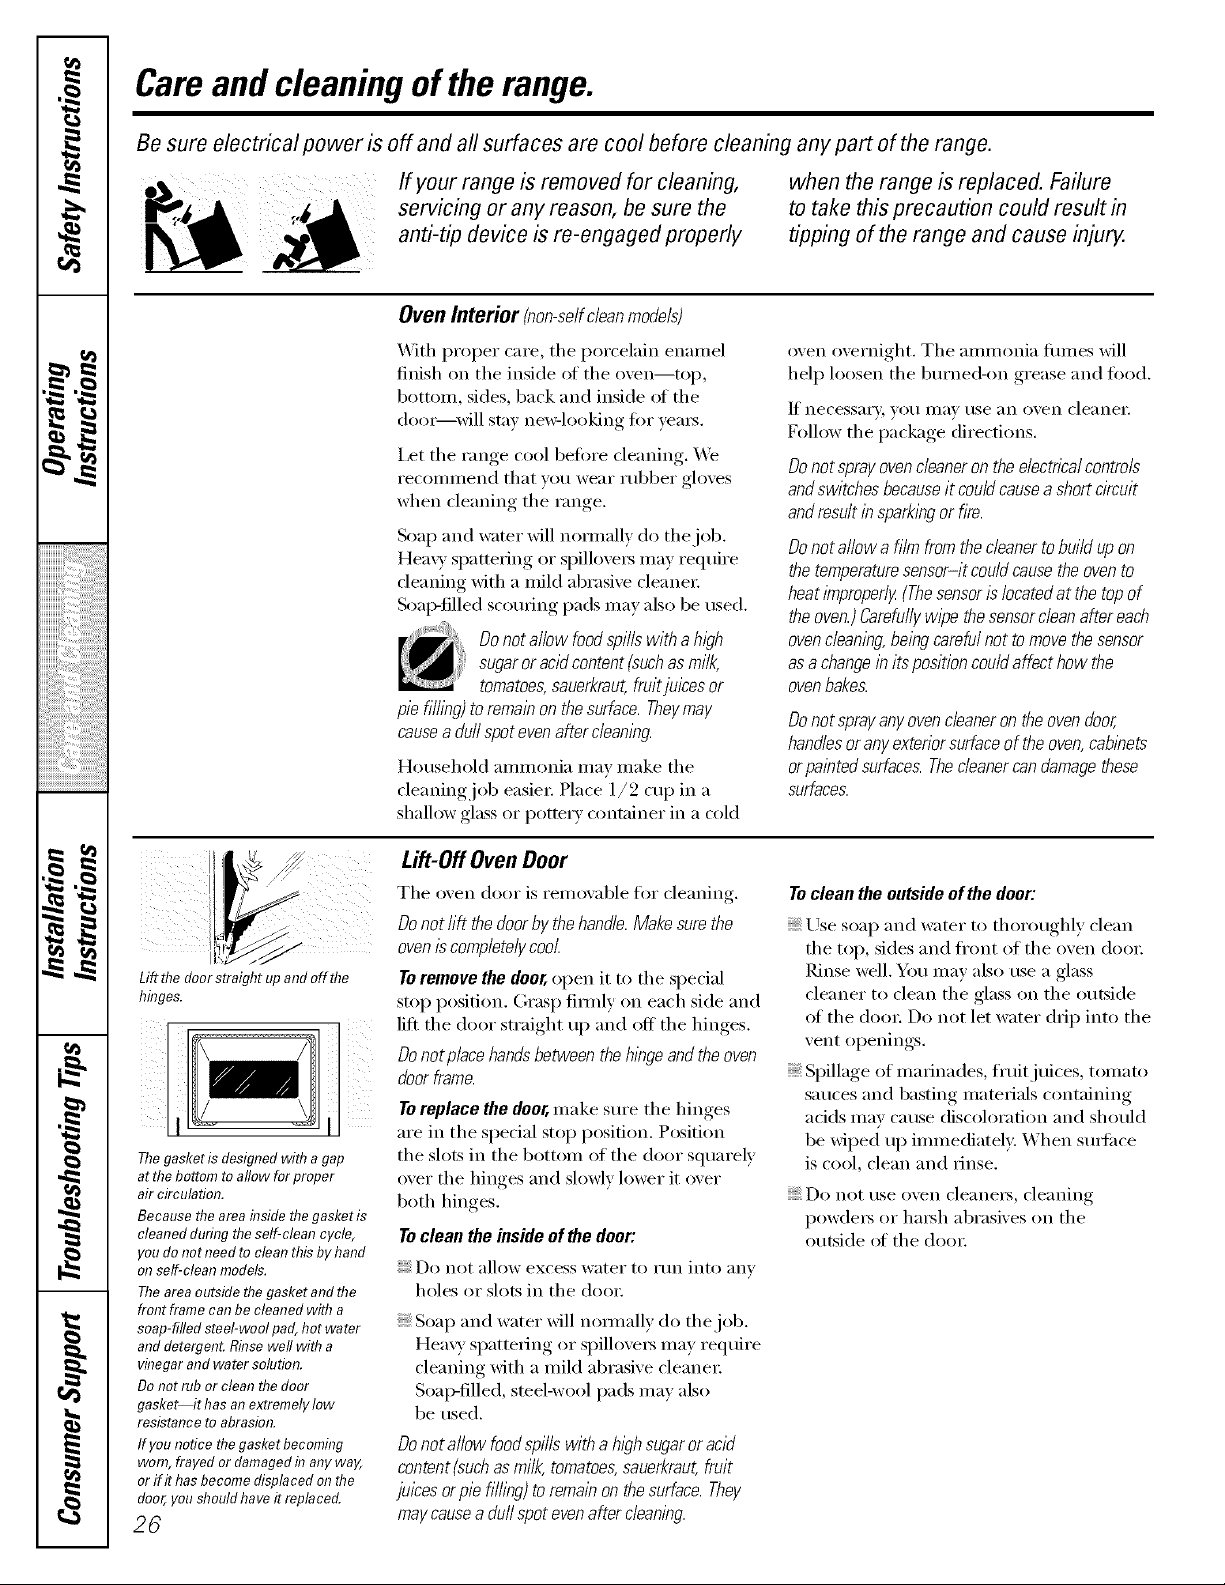
Lift flTe door stratgnr up and off flTe
lTl!Tgea.
The gasKeT IS OeSlglTO0 Win7 a gap
at rite Detrain to allow for erooer
atr cIrcuIaTIOR,
Because the area inside the gasket is
cleanedduringtheself-cleancycle,
youdonot needto cleat?thisbyhand
on self-cleanmodels.
Theareaoutsidethe gasket andthe
frontframecat?be cleanedwitha
soap-filledsteel-woolpad,hotwater
and detergent. Rinsewell witha
vinegarandwatersoh_tion.
Donotrubor cleat?thedoor
gasket it has anextremelylow
resistanceto abrasion.
If you noticethegasket becomll?g
worn,frayed or damaged in anyway,
orif ithasbecomedisplacedonthe
door, youshozfldhaveit replaced.
26
Lift-Off Oven Door
The oven door is renlovable for {leaning.
Donot rift the door by the handle. Make sure the
ovenis completely cool.
Toremove the door,open it to the sl)ecial
stop position. Gras l) fimIly on each side and
lift the door straight up and off the hinges.
Donot p/ace handsbetween the h_bgeand the oven
door frame.
Toreplace the deer,nlake sure the hinges
are in the sI)ecial sto I) I)osition. Position
the slots in the bottoin of the door squarely
over the hinges and slowly lower it over
both hinges.
Toclean the inside of the door:
Do not allow excess wateI" to I'tln into }lnv
holes or slots in the door.
Soap and water will noimally do the job.
Hea\y spatteiing or spilloveI_ nlay require
cleaning with a inild abrasive cleanei 2
Soai}-filled , smel-wool pads nlay also
be used.
Donot allow food spills with a high sugar or acid
content (suchas milk, tomatoes,sauerkraut,fruit
juices or pie filling) to remain on the surface. They
may causea duff spot evenafter cleaning.
Toclean the outside of the door:
Use soa l) and water to thoroughly clean
the toI), sides and ti'oIlt of the oven dooI 2
Rinse well. You nlav also use a glass
cleaner to clean the glass on the outside
of the door. Do not let water chip into the
vent oi)enings.
Si)illage of inai_inades, fl'uitj uices, tomato
sauces and basting inatei_ials containing
acids nlay cause discoh)ration and should
be wil)ed up inmlediately. When sui_fi_ce
is cool, clean and rhlse.
Do not use oven cleaneis, cleaning
pow(leI_ or haIM] abrasives on the
outside of the (loot.
OvenHeating Elements
Do not clean the bake element or the broil element
Anysoil will burn off when the elements are heatec_
To dean tile oven flora, gently lift tile bake
element. Clean with wam] soapy water;
ge.com
Oven Shelves
Clean the oven shelves with an abrasive
cleanser (>r scouring pad. _Mter cleaning,
rinse the shelves with clean water and dry
with a clean cloth.
NOTE:%_Le the shelves out (>I the (>vet]
befi_re you begin the selfk'lean cycle (>r
they may discolor;
To make tile shelves slide more easily, apply
a small amotmt of vegetnble oil or cooking
oil to a paper towel and wipe the edges of
the oven shelves with the paper towel.
\
Wire cover holder
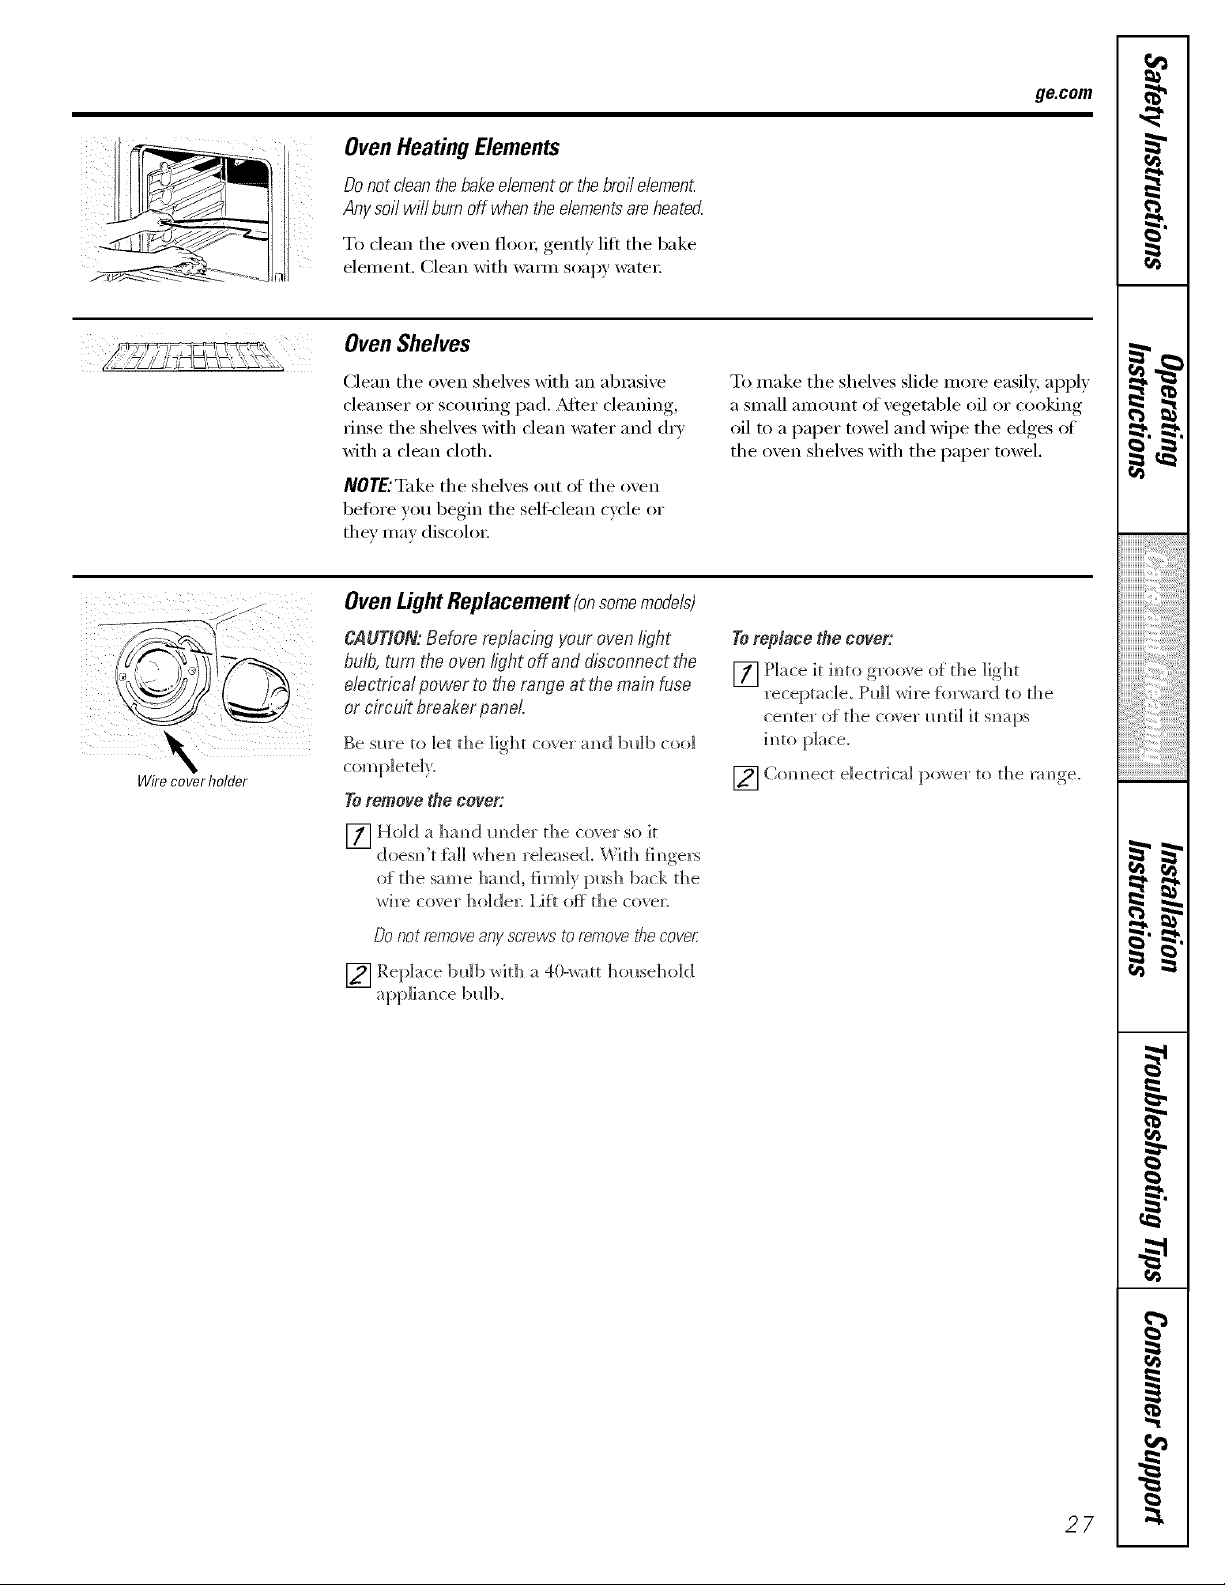
OvenLightReplacement(onsomemodels)
CAUTION: Before replacing your oven light
bulb, turn the oven light off and disconnectthe
electrical power to the range at flTe main fuse
or circuit breaker panel
Be sm'e to let the light cover amid bulb _oo1
7"0 remote rite cover:
Toreplace the cover:
[] Place it im_to g_'oo_ e o_ the light
_'ece}:)tat ]e_ IPl_]] wife J_)]",v_:_l'dto the
ce]]te_ _of the co_ el _m_ti] it smq)s
im_to place.
[2] Com_ect e]ectdca] i)o_el _to the x_mge.
of the sam e ha m_(1, {1m_l) jpl_sh back the
wi]'e cove]" hoIc[e]; i ,fit off tile co'_'e];
OO not fen?eve any screws to remol/e the COl!eL
[] ]_tep]ace 1]l_]b with a 40-watt hol_seho](]
appIiam_ce bldb.
27
,O
wL
L
w
iiiiiiiiiiiiiiii!_iii_i_iiiiiii:ii:!i_i;il;il;il;il;il;iiiiiiiiiiiiii!i!i_i;i¸_
iiiiiiiiiiiiiiiiiiiiiiiiiiiiiiiiiiiiiiiiiiiiiiiiiiiiiiiiiiiiiiiiiii_i!_iiii_i
m
q
#_.
m
Care and cleaning of the range.
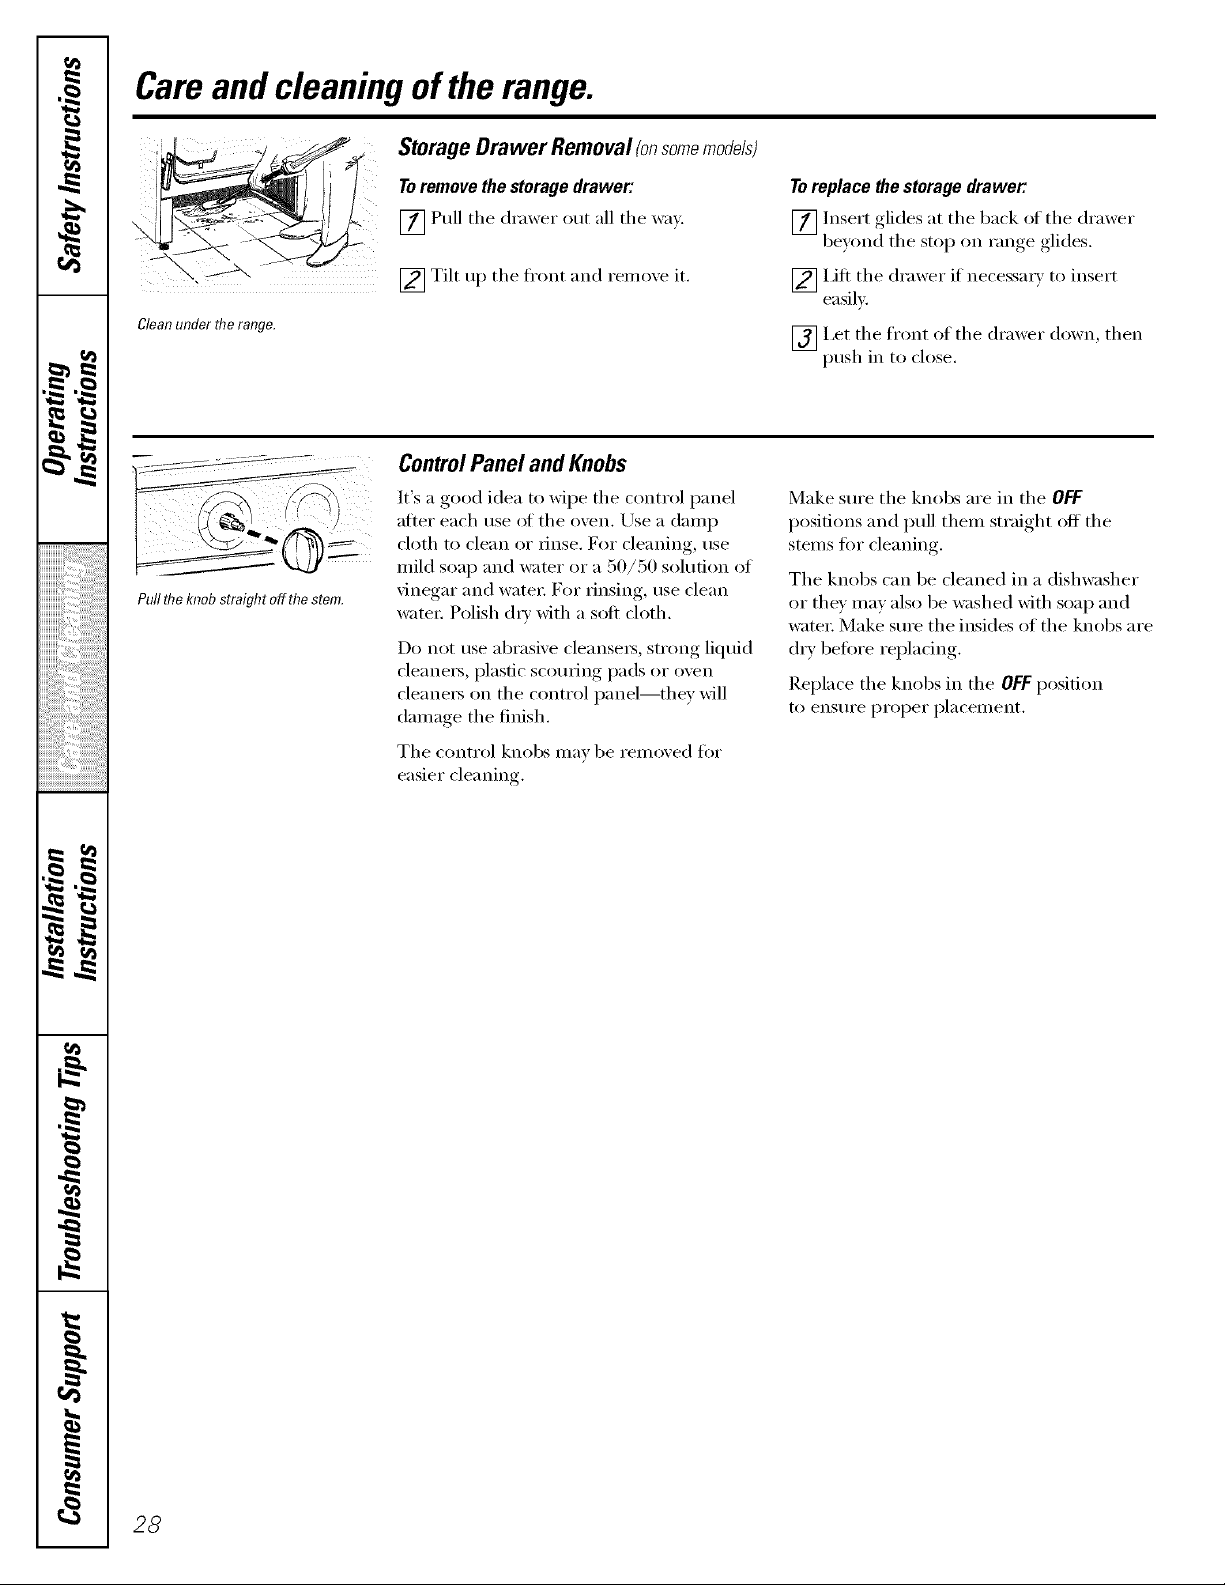
CleanunderflTerange.
Storage Drawer Removal (onsomemodels)
Toremove the storage drawer:
[] Pull the drawer out all the way.
[] Tilt up the fl'ont and remoxe it.
Toreplace ltle storage drawer:
[] Insert glides at the back iff_he drawer
beyond the stop on range glides.
[] Lilt the drawer if necessa_ T to insert
easily.
_] I,et the front of the drawer down, then
push in to close.
jl
PullflTeknobstraightoff thestem.
ControlPanel and Knobs
It's a good idea to wipe the control panel
atter each use (ff the oven. Use a damp
cloth t() clean ()r rinse. D)r cleaning, use
mild soap and water or a 50/50 solufi(m of
vinegar and water: For _insing, use clean
wateI: Polish (h_' with a soft cloth.
Do not use abrasive cleansex_, strong liquid
cleane_, plastic scouring pads or oven
cleane_ on the control panel--they will
damage the finish.
The control knobs may be removed tot
easier cleaning.
Make sure the knobs are in the OFF
positions and pull them straight off the
stems tot cleaning.
The knobs can be cleaned in a dishwasher
or they may also be washed with soap and
watex: Make suxe the insides of the knobs are
(h T betore replacing.
Replace the knobs in the OFF posidon
to ensure proper placement.
28
_e.com
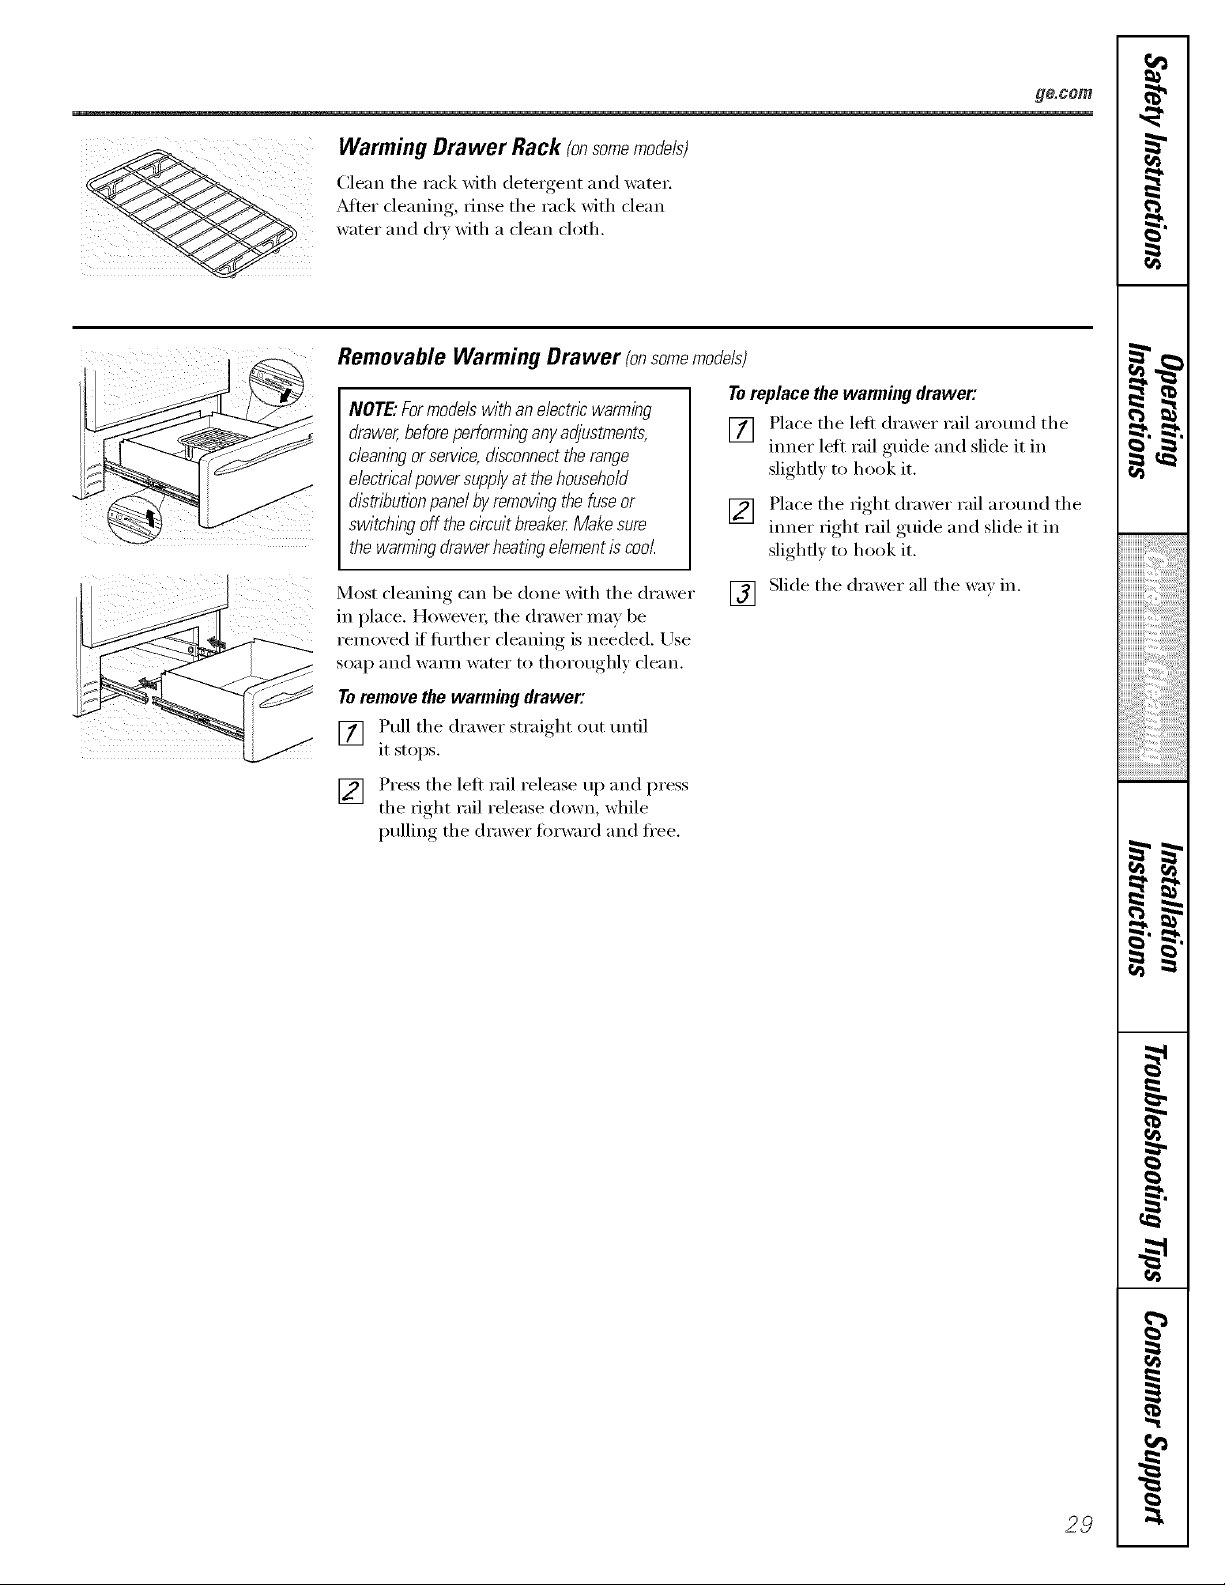
Warming Drawer Rack (onsomemodels)
Clean the rack with detergent and water.
_Mier cleaning, rinse the rack with clean
water and dry with a clean cloth.
Removable Warming Drawer (onsome models)
NOTE"Formodelswithan electricwarming
drawer,beforeperforminganyadjustments,
cleaningorservice,disconnecttherange
electricalpowersupplyat thehousehold
distributionpanelbyremowngthefuseor
switchingoff thecircuitbreakerMakesure
the warmingdrawerheatingelementis cool.
To replace the warming drawer:
[] Place the left drawer rail arotmd the
ironer lefi rail guide and slide it in
slightly to hook it.
[] .Place the tight drawer rail arotmd the
tuner fight rail guide and slide it in
slighfl) to hook it.
Most cleaning can be done with the drawer
in place. HoweveL the drawer may be
removed if flu'ther cleaning is needed. Use
soap and wam_ water to thoroughly clean.
[] Slide the drawer all the wm in.
Toremove the warming drawer:
[] Ptfll the drawer straight out tmtil
it stops.
[] Press the left rail release up and press
the right rail release down, while
_ullin,, the drawer fi)rward and fl'ee.
28
,0
O,
wL
L
w
iiiiiiiiiiiiiiiiiiiiiiiiiiiiiiiiiiiiiiiiiiiiiiiiiiiiiiiiiiiiiiiiiii_i!_iiii_i
m
q
#_.
1=
m
Careand cleaning of the range.
PorcelainEnamelCooktop(onsomemodels)
The i)orcelain enalllel filfish is sttlrdv
but breakable if misused. This finish is
acid-resistant. However; any acidic foods
spilled (such as fl'uitj uices, tomato or
vinegar) should not be pemfitted to remain
on the finish.
If acids spill on the cooktop while it is hot,
use a (li T paper towel or cloth to wipe it up
fight awa> _A]/ell the SUltilce has cooled,
wash with soap and water: Rinse well.
For other spills such as ti_t spattefings, wash
with soap and water or cleansing powde_
atter the SUltilce has cooled. Rinse well.
Polish with a dry cloth,
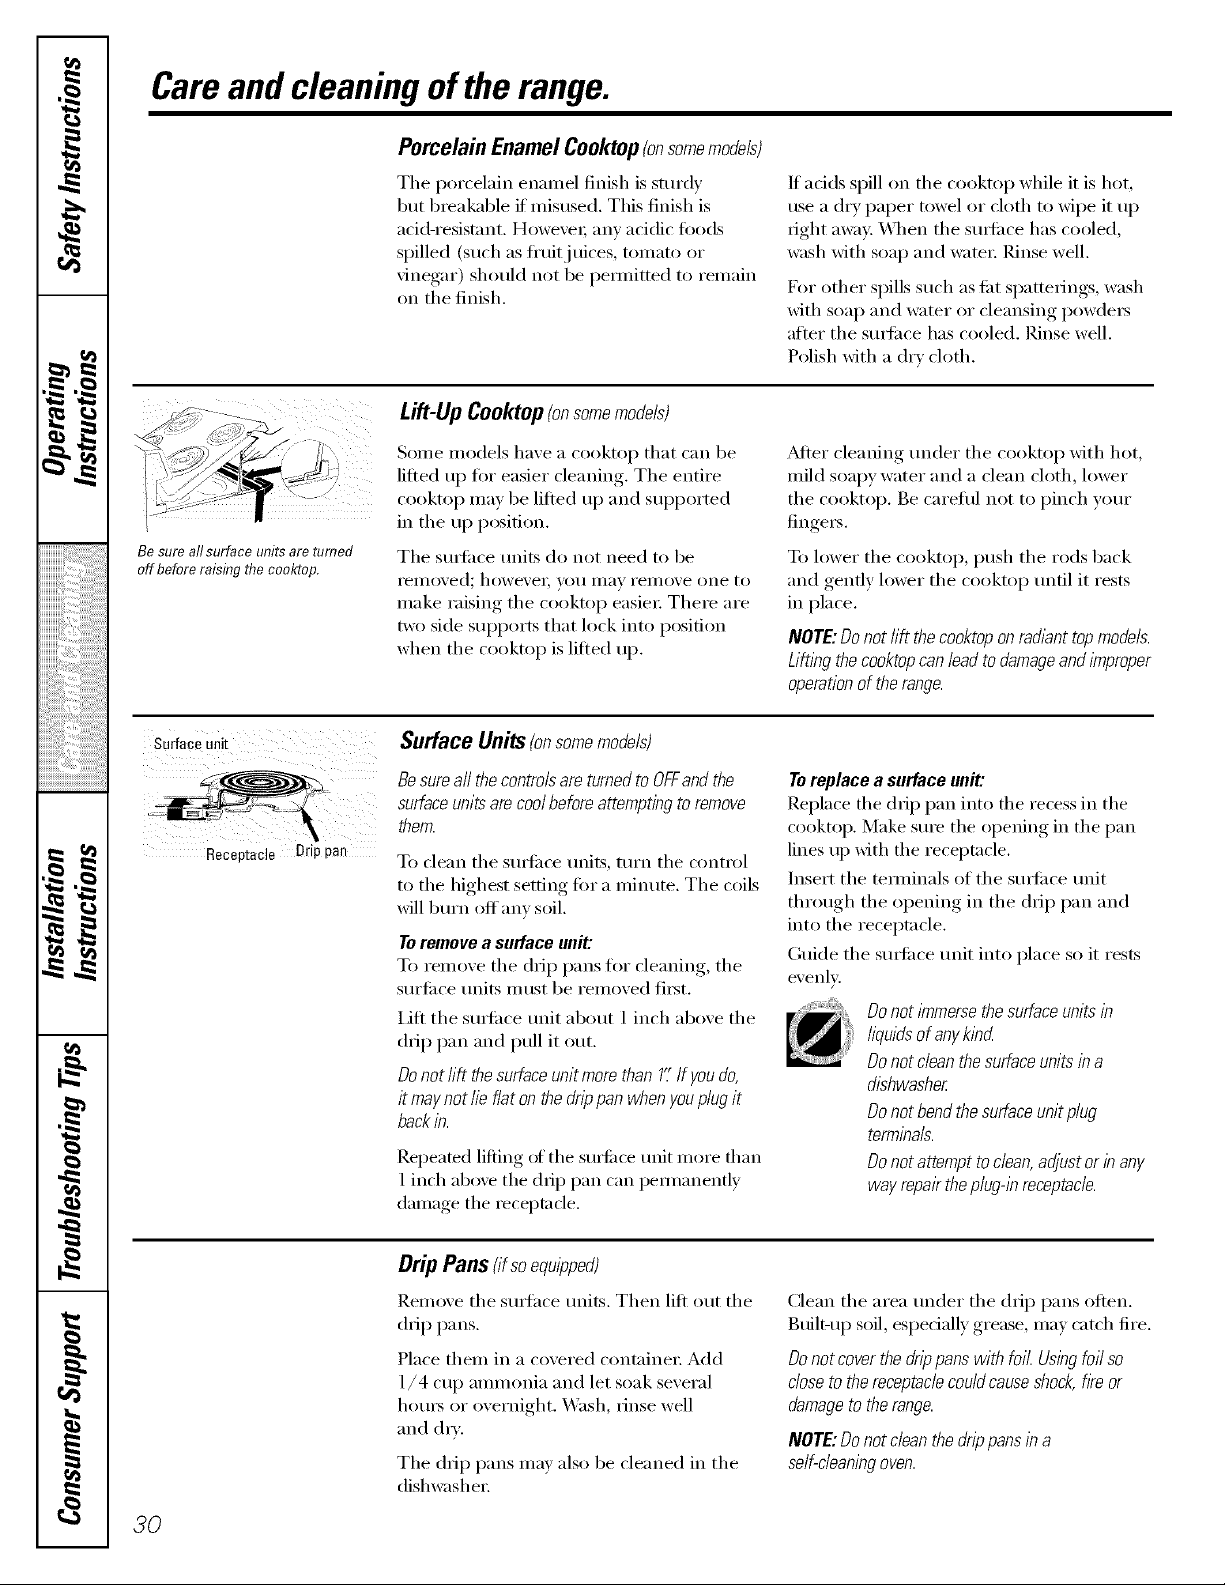
Be sure all surface units are turned
off before raising flTe cooktop.
Lift-Up Cooktop(onsomemodels)
Some models have a cooktop that can be
lifted up fin" easier cleaning. The entire
cooktop may be lifted up and sui)ported
in the up position.
The SUltilce units do not need to be
i'eliloved; howevei; you IIlaV I'elllOVe one to
make raising the cooktop easier: There are
two side sui)ports that lock into position
when the cooktop is lifted up.
_Mter cleaning trader the cooktop with hot,
mild soapy water and a clean cloth, lower
the cooktop. Be careflfl not to pinch your
finge_.
To lower the cooktop, push the rods back
and gently lower the cooktop un61 it rests
in place.
NOTE: Do not hft the cooktopon red!ant top models.
Lifting the cooktopcan lead to damage and improper
operation of the range.
Surface Unit
N
Receptacle Drip pan
Surface Units (onsomemodels)
Besure all the controls are turned to OFFand the
surface units are cool before attempting to remove
them.
To clean the sm_i_ce units, turn the control
to the highest setting fin" a minute. The coils
will burn offam soil.
Toremovea surfaceunit:
To remove the drip pans fin" cleaning, the
surli_ce units must be removed fi_t.
Lift the SUll'ilce unit about 1 inch above the
drip pan and pull it out.
Donothft thesurfaceunitmorethan 11'If youdo,
it maynot fie flaton thedrippan whenyouplugit
backin.
Repeated lifting of the surl_ce unit more than
1 inch aboxe the dil I) pan can pem_anentl}
damage the receptacle,
Toreplace a surface unit:
Replace the drip pan into fl_e recess in the
cooktop. Make sure the opening in the pan
lines up _ith the receptacle.
Insert the temfinals of the sudi_ce unit
through the opening in the drip pan and
into the receptacle.
Guide the sm#i_ce unit into place so it rests
evenl>
Donot #nmersethe surfaceunits in
liquids of any kind
Donot dean thesurface units in a
dishwasher
Donot bend the surface unit plug
terminals.
Donot attempt to dean, adjust or in any
way repair theplug-in receptacle.
Drip Pans (ifso equipped)
Remove the smthce units. Then lift out the
drip pans.
Place them in a covered containe_: Add
1/4 cup ammonia and let soak several
hom_ or overnight. Wash, rinse well
and (h_'.
The drip pans may also be cleaned in the
dishwasher:
Clean the area under the drip pans often.
Btfilt-up soil, espedally grease, may catch fire.
Do not cover the drip pans with foil. Using foil so
close to the receptacle could cause shock,fire or
damage to the range.
NOTE: Do not clean the drip pans in a
self-cleaning oven.
30
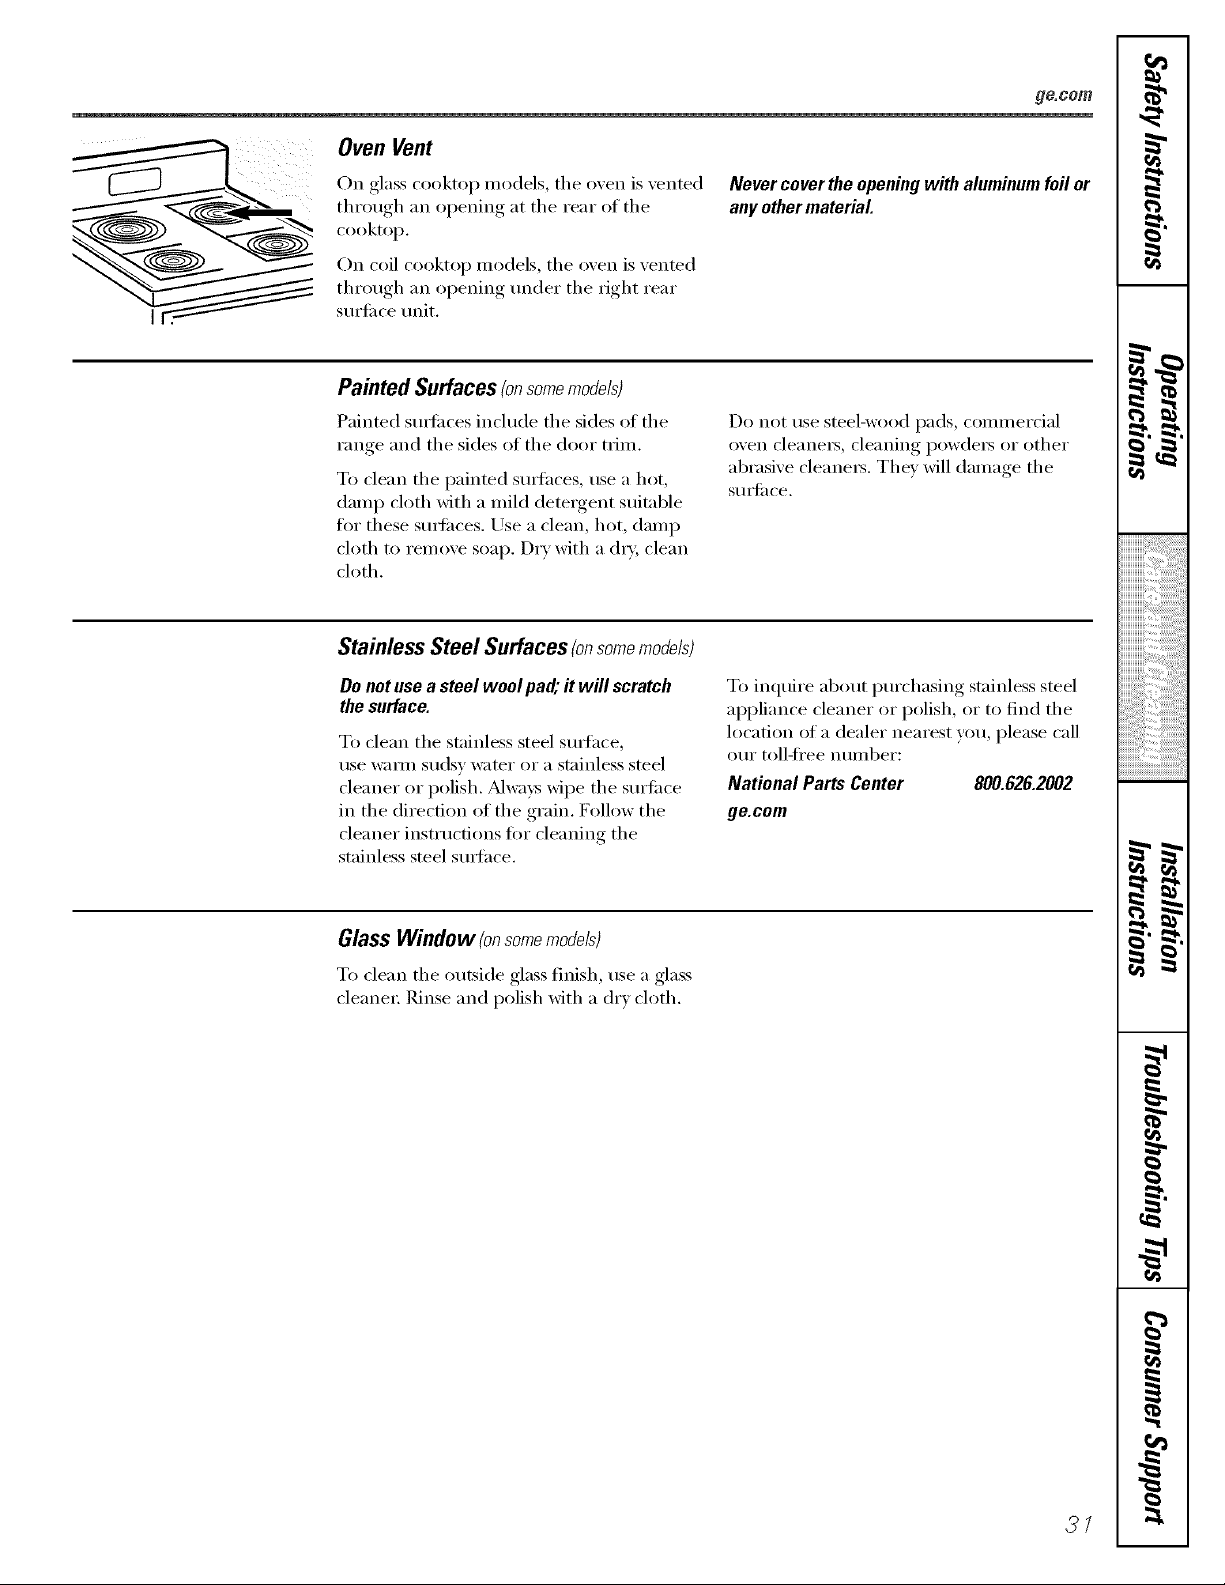
Oven Vent
On glass cooktop models, the oven is vented
through an opening at the rear of the
cooktop.
On coil cooktop models, the oven is venmd
through an opening trader the right rear
surti_ce unit.
Never cover the opening with aluminum foil or
any other material
Painted Surfaces(onsomemodels)
Painted sm_i_ces include the sides of the
range and the sides of the door trim.
To clean the painted SUll'hces, use a hot,
damp cloth with a mild detergent suitable
for these smti_ces. Use a clean, hot, damp
cloth to remove soap. D_T with a d_T, clean
cloth.
Do not rise steel-wood pads, COlllll/eI'cial
oven cleane_, cleaning l)owde_ or other
abrasive cleane_. They will damage the
S/llS{il ce.
Stainless Steel Surfaces (onsomemodels)
Donotusea steel woolpad;it will scratch
the surface.
To clean the stainless steel sm_hce,
use wam_ sudsy water or a stainless steel
cleaner or polish. Mways wipe the sm'ti_ce
in the direction of the grain. Follow the
cleaner instructions tot cleaning the
stainless steel sm_hce.
To inquire about pro'chasing stainless steel
appliance cleaner or polish, or to find the
location of a dealer nearest you, please call
ore" toll-ti'ee number:
National Parts Center 800.628.2002
ge.com
Glass Window (onsomemode/s)
To clean the outside glass finish, use a glass
cleane_: Rinse and polish with a dry cloth.
7I
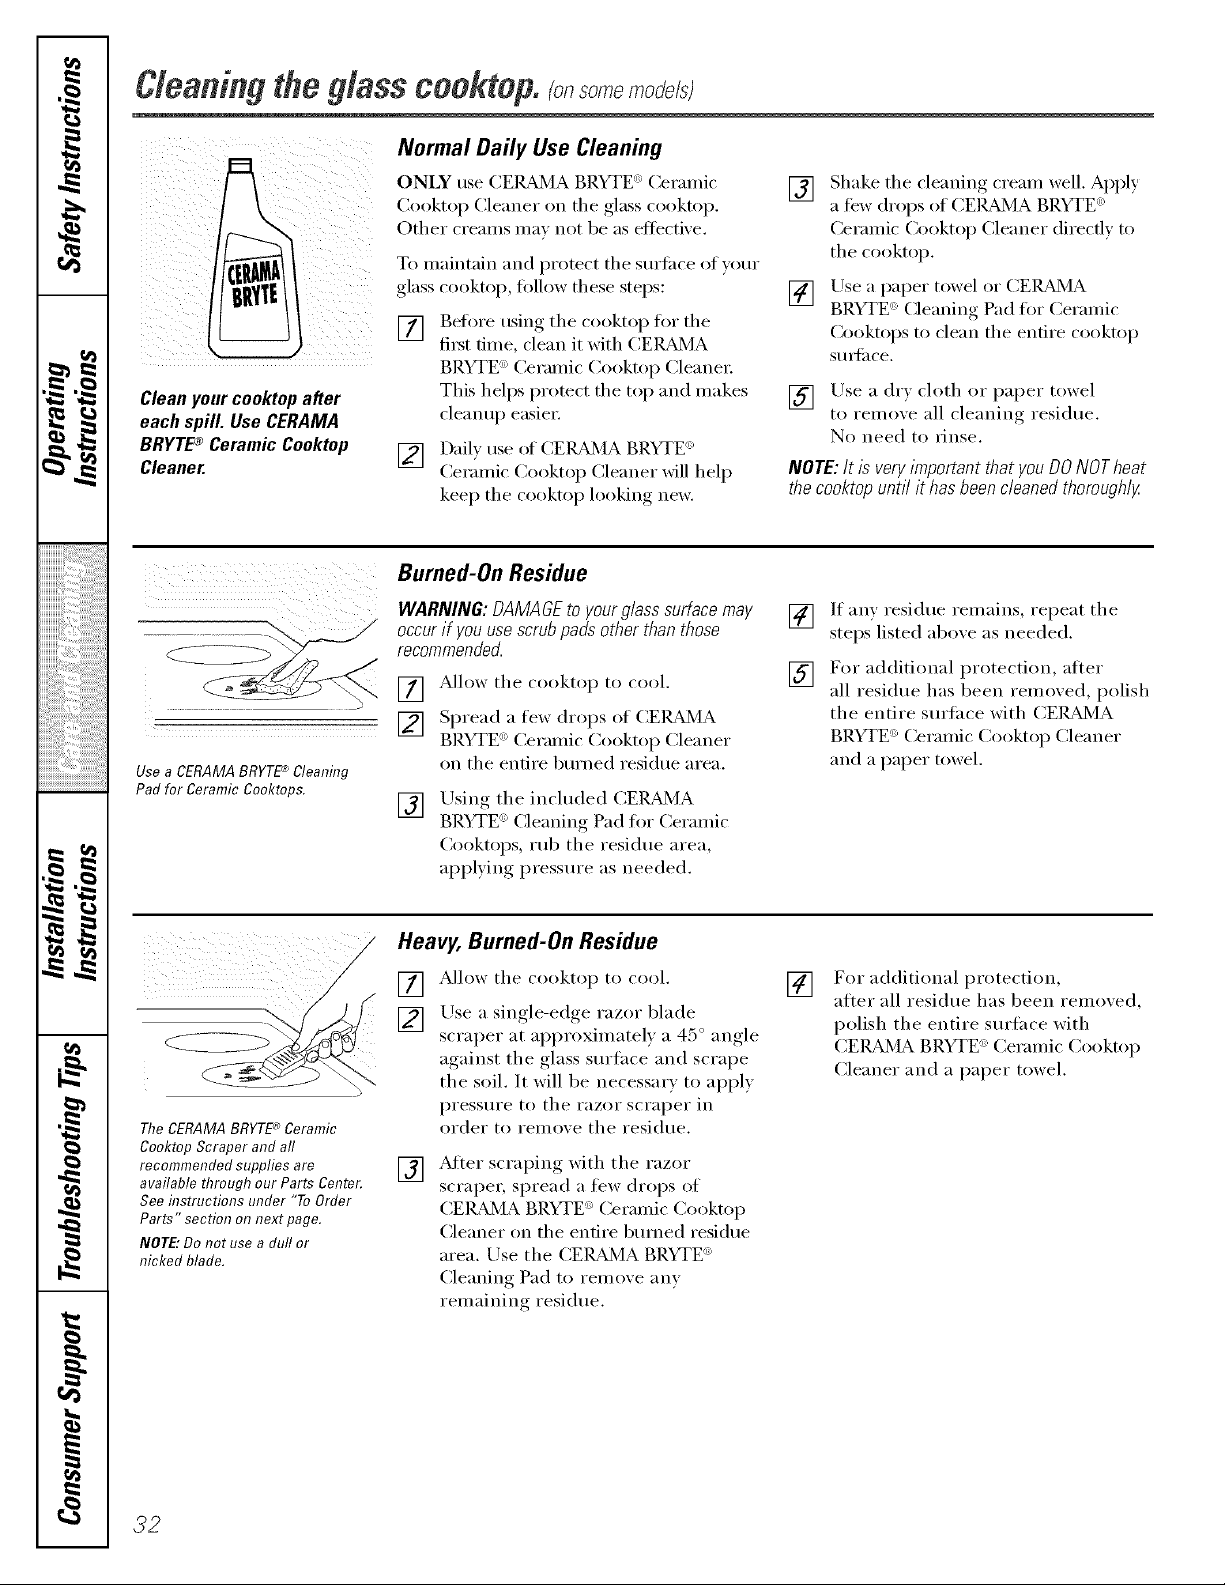
,O
wL
L
w
iiiiiiiiiiiiiiii!_iii_i_iiiiiii:ii:!i_i;il;il;il;il;il;ii;ii;ii;iiiii!i!i_ii_i¸_
HH_,_,__ ,,__;p;>X_<,
iiiiiiiiiiiiiiiiiiiiiiiiiiiiiiiiiiiiiiiiiiiiiiiiiiiiiiiiiiiiiiiiiii_i!;ii;i_i
m
m
#_.
m
a__,
Cleaningtheglasscooktop.
Cleanyour cooktepafter
each spill. Use CERAMA
BRYTEc_Ceramic Cooktep
Cleaner.
Normal Daily Use Cleaning
ONLY use CE]_dMA BP.YTE_ Ceramic
Cooktop Cleaner on tile glass cooktop.
Other creams max not be as eflectixe.
To maintain and protect tile sm'ti_ce of w}m"
glass cooktop, tollow these steps:
[] Before using the cooktop fin" the
fi_t time, clean it with CEI_d_IA
BRYTE <'_Ceramic Cooktop Cleane_:
This helps promct tile top and makes
cleanup easier:
[] Daily use of CEILAAMABRYTE <_>
Ceramic Cooktop Cleaner will hel I)
kee I) the cooktop looking new.
[] Shake tile cleaning cream well. Apply
a few drops of CEILBd_4A BP.YTE _
Ceramic (2ooktop Cleaner dire{'tlv to
the cooktop.
[] Use a paper towel or CEILBdMA
BRYTE _' Cleanino Pad for Ceramic
()}okk}ps to clean tile entire cooktop
Stlltil{'e.
[] Use a drx cloth or paper towel
to remove all cleaning residue.
No need to rinse.
NOTE:It is veryimportantthat you DONOTheat
thecooktopuntil it hasbeencleanedthoroughly
_ill_i_i_ii _ii _ii_ i_ _iii:_
Use a CERAMA BRYTE'_ Cleaning
Pad for Ceramic Cooktops.
Burned-On Residue
WARNING:DAMAGEto yourglasssurfacemay
occurif youusescrubpads otherthan those
recommended.
[] Allow tile cookto I) to cool.
[] Spread a few drops of CEIL_MA
BRYTE (_)Ceramic (_ooktop Cleaner
on the entire bm'ned residue area.
[]
Using tile included CEI{_dMA
BRYTE (_)Cleaning Pad for Ceramic
(_ookt{}ps, rub tile residue area,
alI,) )lving, i)resstlre as needed.
[]
[]
If any residue remains, repeat tile
steps listed above as needed.
For additional protection, after
all residue has been returned, polish
the entire sm'tace with CE/_dVIA
BRYTE ') Ceramic (_ooktop Cleaner
and a paper towel.
The CERAMA BRYTE'*_Ceramic
Cooktop Scraper and all
recommended supplies are
available through our Parts Center.
See instructions under "To Order
Parts" section on next page.
NOTE:Do not use a dull or
nicked blade.
Heavy, Burned-On Residue
[] Allow tile {'ooktop to cool.
[] Use a single-edge razor blade
scraper at approximately a 45 ° angle
against the glass surtace and scrape
the soil. It will be necessary to apply
l)resstlre to tile i'_lzoi" scraper in
order t{} remove tile residue.
[]
After scraping with tile razor
scrape_; spread a few drops of
CEI{_dMA BRYTE ') Ceramic Cooktop
Cleaner (m tile entire burned residue
area. Use tile (;EI_d_A BRYTE '_
Cleaning Pad to remove any
remaining residue.
[]
For additional i)rotection,
after all residue has been remo',ed,
polish the entire surfilce with
CEILBd_L_ BRYTE _2'Ceramic (_ooktop
Cleaner and a paper towel.
32

ge.com
Metal Marks and Scratches
[]
Be careflll not to slide pots and pans
across wmr cooktop. It will leave
metal markings on the cooktop
S/lI'J[_l ce,
These marks are remowd)le using
tile CEI_/IA BRYTE _ Ceramic
Cooktop Cleaner with the CEI_L_dMA
BRYTE ': Cleaning Pad tor Ceramic
Cooktops.
[] If pots with a thin oxerla) of
almninmn or COl)per are allowed to
boil dry, tile overlay may leave black
discoloration on tile cooktop.
This should be removed immediately
beiore heating again or the
discoloration may be permanent.
WARNING: Carefully check the bottom of pans
for roughness that would scratch the cooktop.
Cooktop Seal
To clean the cooktop seal around the
e&es_ of the glass, la)a wet cloth on it
for a few minutes, then wipe clean with
nonabrasi_, e cleaners.
Glass sufface potential for permanent damage.
Our testing shows that if
you are cooking high sugar
mixtures such as jelly or
fudge and have a spillover,
it can cause permanent
damage to the glass surface
unless the spillover is
immediately removed.
Damage from Sugary Spills and Melted Plastic
[] Turn off all surtace traits. Remo',e
hot pans.
[] Wearing an oven mitt:
a. Use a single-edge razor blade
scraper (CEIL_MA BRYTE <:
Ceramic Cooktop Scraper) to
ii/ove tile spill to a cool aI'ea on
the cooktop.
b. Remove the spill with
paper towels.
[] Any remaining spilloxer should be
lett until the surtace of the cooktop
has cooled.
] Don't use tile sm'tace traits again
tmtil all of the residue has been
completely removed.
NOTE:If pitting or indentationin theglass
surfacehasalreadyoccurred,the cooktopglass
wi// haveto be replaced/n thiscase,servicewifl
benecessary
To Order Parts
To order (:EI_JlA BRYTE '_Ceranfic
Cookto I) Cleaner and tile cooktop
scraper, please call ore" toll-fl'ee nmnber:
National Parts Center ...... 800.626.2002
CERAMA BRYTE®Ceramic
Cooktop Cleaner .......... # WXTOX300
CERAMA BRYTE® Ceramic
Cooktop Scraper ......... # WXIOX0302
Kit ...................... # WB64X50£7
(Kit includes cream and cooktop scraper)
CERAMA BRYTE® Cleaning Pads for
Ceramic Cooktops ........ # WX10X350
33

I Ilnstallation IFree-Standing
nstructlons Electric Ranges
I| Questions? Call 800.GE.CARES (800.432.2737) or Visit our Website at: ge.com I
BEFORE YOU BEGIN
Read these instructions completely
and carefully.
• IMPORTANT - Savethese
instructions for local inspector's use.
• IMPORTANT - Observeall
governing codes and ordinances.
• Note to Installer - Be sure to leave these
instructions with the Consumer.
• Note to Consumer - Keep these
instructions for future reference.
• Skill level - Installation of this appliance
requires basic mechanical skills.
• Completion time - 1 to 3 hours
• Proper installation is the responsibility of
the installer.
• Product failure due to improper installation
is not covered under the Warranty,
AWARNING - This appliance must
be properly grounded.
FOR YOUR SAFETY:
_,WARNING - Before beginning the
installation, switch power off at service panel
and lock the service disconnecting means to
prevent power from being switched on
accidentally. When the service disconnecting
means cannot be locked, securely fasten a
prominent warning device, such as a tag, to
the service panel.
FOR YOUR SAFETY:
All rough-in and spacing dimensions must be
met for safe use of your range, Electricity to
the range can be disconnected at the outlet
without moving the range if the outlet is in
the preferred location (remove lower drawer).
To reduce the risk of burns or fire when
reaching over hot surface elements, cabinet
storage space above the cooktop should be
avoided. If cabinet storage space is to be
provided above the cooktop, the risk can
be reduced by installing a range hood that
sticks out at least 5" beyond the front of the
cabinets. Cabinets installed above a cooktop
must be no deeper than 13_'
Be sure your appliance is properly installed
and grounded by a qualified technician.
Make sure the cabinets and wall coverings
around the range can withstand the temperatures
(up to 200°F) generated by the range.
ANTI-TIP DEVICE
AWARNING - Toreducetherisk
of tipping, the appliance must be secured by
properly installed Anti-Tip bracket packed
with this appliance.
If the Anti-Tip device supplied with the range
does not fit this application, use the universal
Anti-Tip device WB2X7909.
AWARNING-
• All ranges can tip
• Injury to persons could result
(_ • Install Anti-Tip bracket packed
with range
• See Installation Instructions
If you pull the range out and away from the
wall for any reason, make sure the Anti-Tip
bracket is engaged when the range is pushed
back against the wall.
34
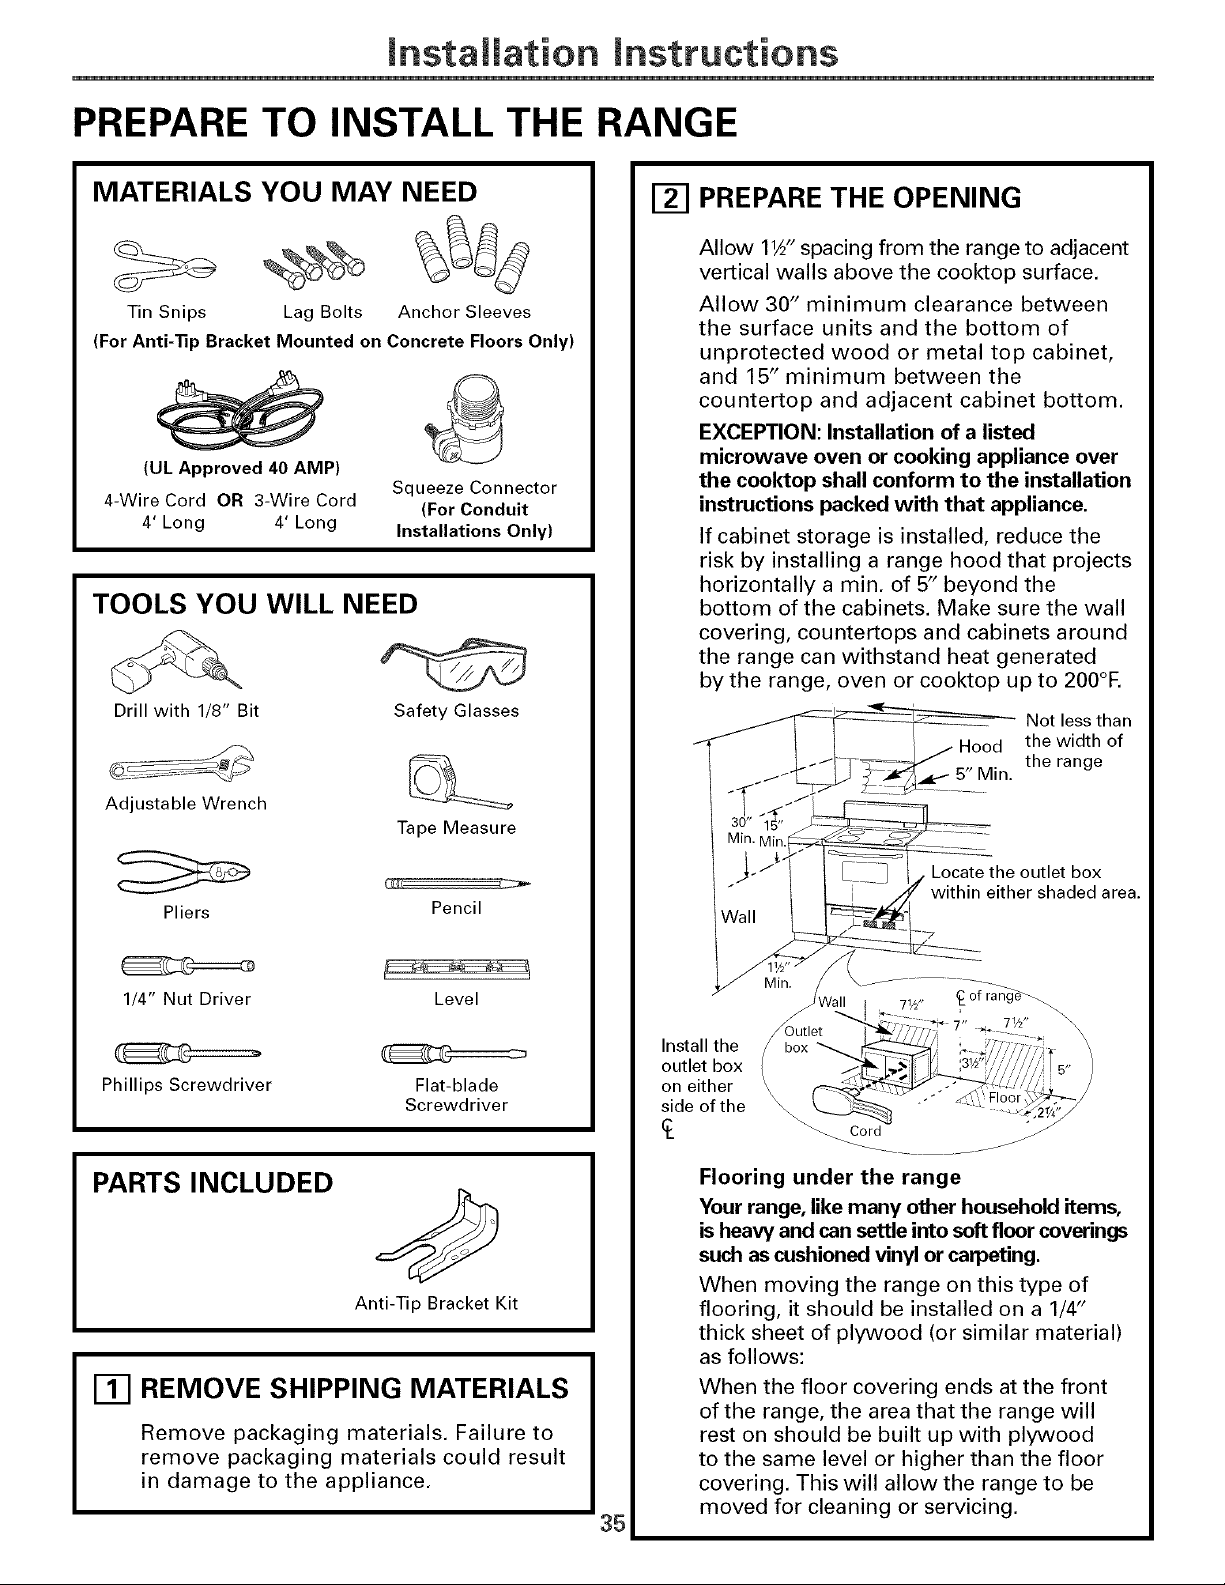
mnstaliation mnstructions
PREPARE TO INSTALL THE RANGE
MATERIALS YOU MAY NEED
Tin Snips Lag Bolts Anchor Sleeves
(For Anti-Tip Bracket Mounted on Concrete Floors Only)
(UL Approved 40 AMP)
4-Wire Cord OR 3-Wire Cord
4' Long 4' Long
Squeeze Connector
(For Conduit
Installations Only)
TOOLS YOU WILL NEED
Drill with 1/8" Bit Safety Glasses
Adjustable Wrench
Tape Measure
Pliers
Pencil
1/4" Nut Driver Level
Phillips Screwdriver
Flat-blade
Screwdriver
PARTS INCLUDED
Anti-Tip Bracket Kit
17-1REMOVE SHIPPING MATERIALS
Remove packaging materials. Failure to
remove packaging materials could result
in damage to the appliance,
35
PREPARE THE OPENING
Allow 11A" spacing from the range to adjacent
vertical walls above the cooktop surface.
Allow 30" minimum clearance between
the surface units and the bottom of
unprotected wood or metal top cabinet,
and 15" minimum between the
countertop and adjacent cabinet bottom.
EXCEPTION: Installation of a listed
microwave oven or cooking appliance over
the cooktop shall conform to the installation
instructions packed with that appliance.
If cabinet storage is installed, reduce the
risk by installing a range hood that projects
horizontally a min. of 5" beyond the
bottom of the cabinets. Make sure the wall
covering, countertops and cabinets around
the range can withstand heat generated
by the range, oven or cooktop up to 200°R
Not less than
Hood the width of
the range
5" Min.
Locate the outlet box
either shaded area.
Install the bOU_let
outlet box
on either
side of the \ .... _.
_ Cord _/
Flooring under the range
Your range, like many other household items,
is heaw and can settle into soft floor coverings
such as cushioned vinyl or carpeting.
When moving the range on this type of
flooring, it should be installed on a 1/4"
thick sheet of plywood (or similar material)
as follows:
When the floor covering ends at the front
of the range, the area that the range will
rest on should be built up with plywood
to the same level or higher than the floor
covering. This will allow the range to be
moved for cleaning or servicing.
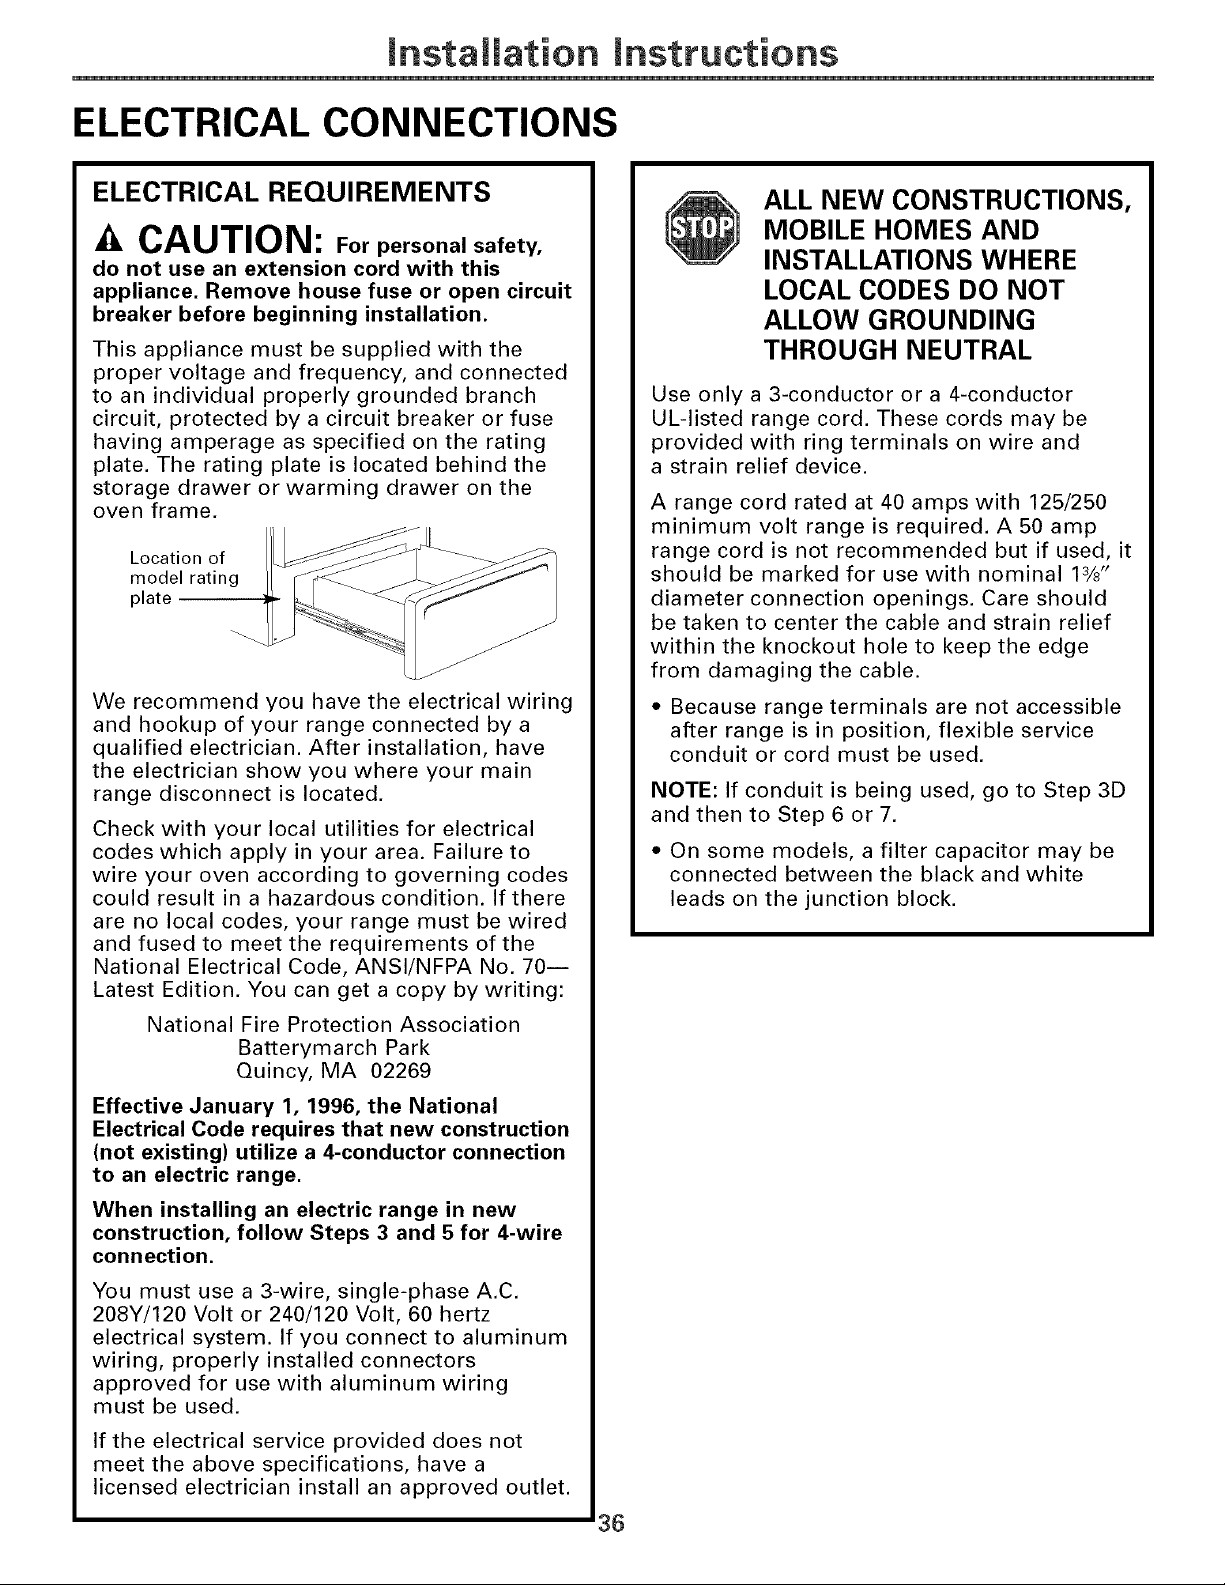
mnstaliation mnstructions
ELECTRICAL CONNECTIONS
ELECTRICAL REQUIREMENTS
-4,CAUTION: For personal safety,
do not use an extension cord with this
appliance. Remove house fuse or open circuit
breaker before beginning installation.
This appliance must be supplied with the
proper voltage and frequency, and connected
to an individual properly grounded branch
circuit, protected by a circuit breaker or fuse
having amperage as specified on the rating
plate. The rating plate is located behind the
storage drawer or warming drawer on the
oven frame.
Location of
model rating
plate
We recommend you have the electrical wiring
and hookup of your range connected by a
qualified electrician. After installation, have
the electrician show you where your main
range disconnect is located.
Check with your local utilities for electrical
codes which apply in your area. Failure to
wire your oven according to governing codes
could result in a hazardous condition. If there
are no local codes, your range must be wired
and fused to meet the requirements of the
National Electrical Code, ANSI/NFPA No. 70 i
Latest Edition. You can get a copy by writing:
National Fire Protection Association
Batterymarch Park
Quincy, MA 02269
Effective January 1, 1996, the National
Electrical Code requires that new construction
(not existing) utilize a 4-conductor connection
to an electric range.
When installing an electric range in new
construction, follow Steps 3 and 5 for 4-wire
connection.
You must use a 3-wire, single-phase A.C.
208Y/120 Volt or 240/120 Volt, 60 hertz
electrical system. If you connect to aluminum
wiring, properly installed connectors
approved for use with aluminum wiring
must be used.
If the electrical service provided does not
meet the above specifications, have a
licensed electrician install an approved outlet.
ALL NEW CONSTRUCTIONS,
MOBILE HOMES AND
INSTALLATIONS WHERE
LOCAL CODES DO NOT
ALLOW GROUNDING
THROUGH NEUTRAL
Use only a 3-conductor or a 4-conductor
UL-listed range cord. These cords may be
provided with ring terminals on wire and
a strain relief device.
A range cord rated at 40 amps with 125/250
minimum volt range is required. A 50 amp
range cord is not recommended but if used, it
should be marked for use with nominal 13/8"
diameter connection openings. Care should
be taken to center the cable and strain relief
within the knockout hole to keep the edge
from damaging the cable.
• Because range terminals are not accessible
after range is in position, flexible service
conduit or cord must be used.
NOTE: If conduit is being used, go to Step 3D
and then to Step 6 or 7.
• On some models, a filter capacitor may be
connected between the black and white
leads on the junction block.
36
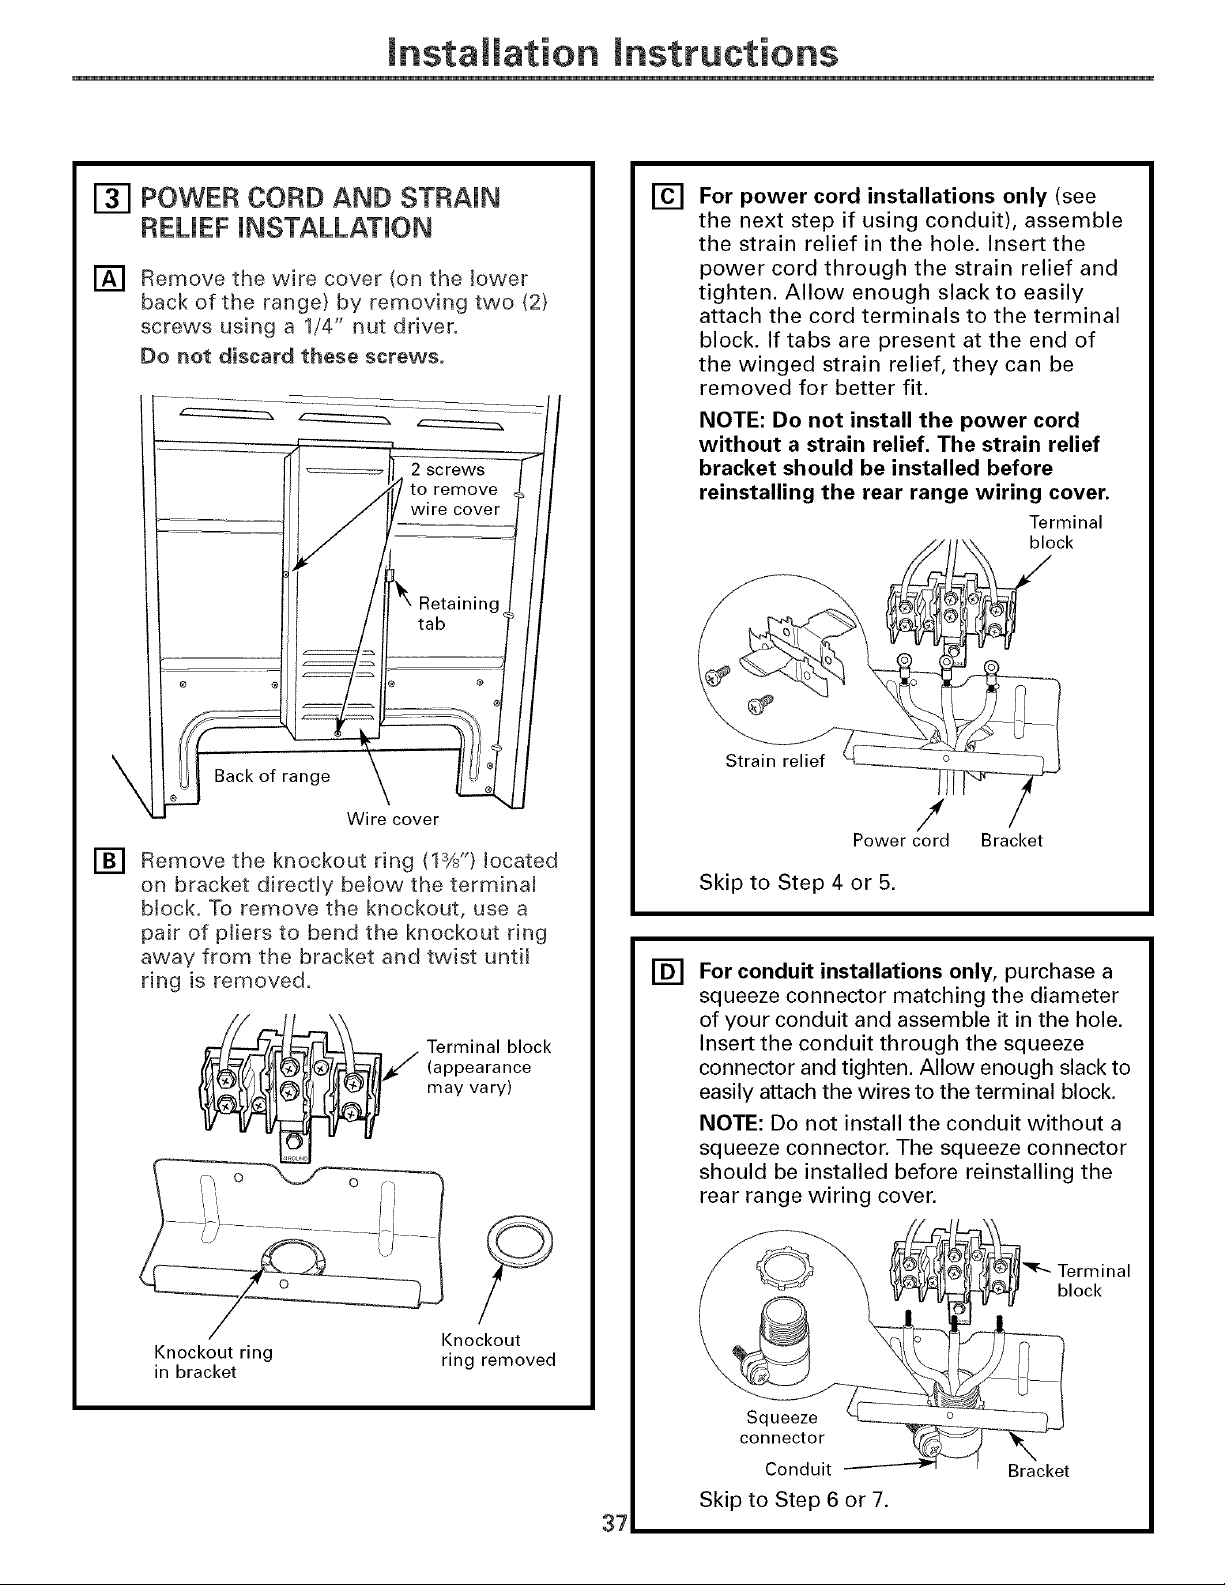
Installation Instructions
POWER CORD AND STRAIN
REUEF INSTALLATION
[]
Remove the wire cover (on the lower
back of the range) by removing two (2)
screws using a 1/4" nut driver.
Do not discard these screws.
2 screws
to remove
wire cover
Retaining
tab
@
[]
Back of range
Wire cover
Remove the knockout ring (13/8") located
on bracket directly betow the terminal
block. To remove the knockout, use a
pair of pliers to bend the knockout ring
away from the bracket and twist until
ring is removed.
_ erminal block
(appearance
may vary)
Knockout ring ring removed
in bracket
[]
[]
37
For power cord installations only (see
the next step if using conduit), assemble
the strain relief in the hole. Insert the
power cord through the strain relief and
tighten. Allow enough slack to easily
attach the cord terminals to the terminal
block. If tabs are present at the end of
the winged strain relief, they can be
removed for better fit.
NOTE: Do not install the power cord
without a strain relief. The strain relief
bracket should be installed before
reinstalling the rear range wiring cover.
Terminal
_/ _/_ \ block
Power cord Bracket
Skip to Step 4 or 5.
For conduit installations only, purchase a
squeeze connector matching the diameter
of your conduit and assemble it in the hole.
Insert the conduit through the squeeze
connector and tighten. Allow enough slack to
easily attach the wires to the terminal block.
NOTE: Do not install the conduit without a
squeeze connector. The squeeze connector
should be installed before reinstalling the
rear range wiring cover.
Terminal
block
Squeeze
connector
Conduit
Skip to Step 6 or 7.
Bracket
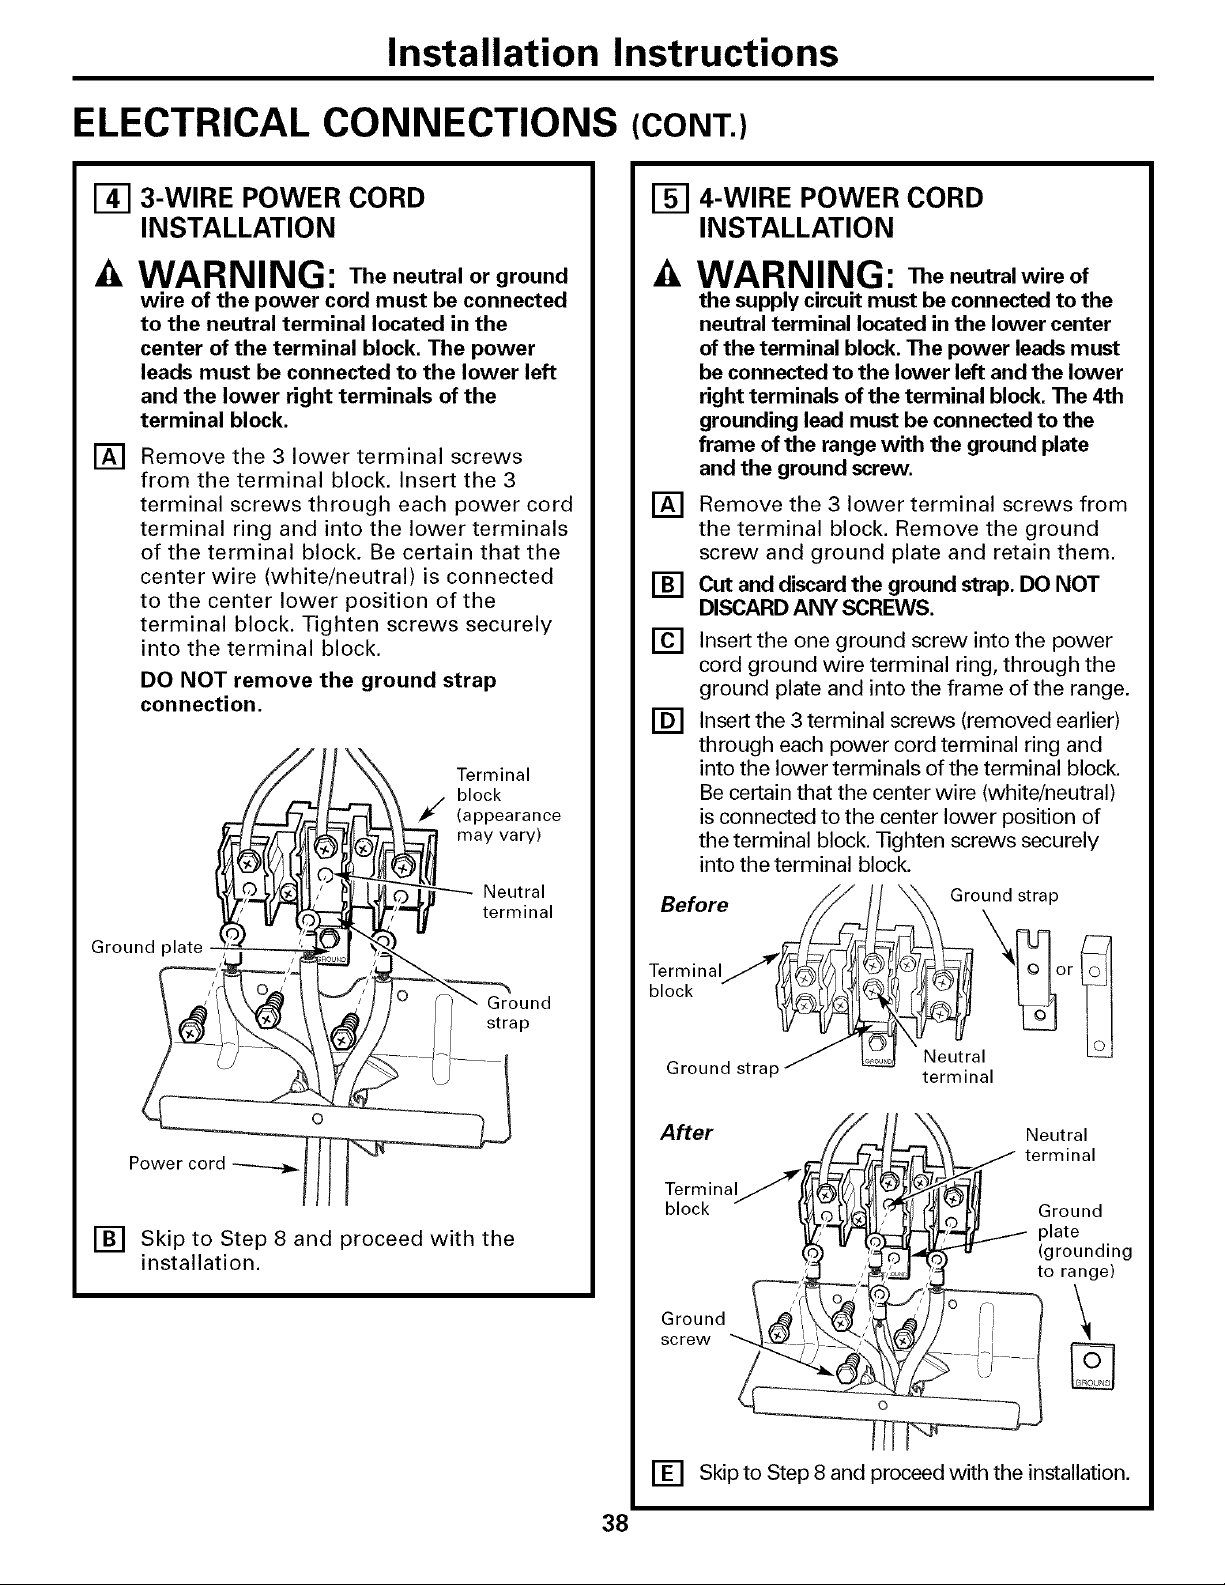
Installation Instructions
ELECTRICAL CONNECTIONS (CONT.)
[]
[]
3-WIRE POWER CORD
INSTALLATION
WARNING: The neutral or ground
wire of the power cord must be connected
to the neutral terminal located in the
center of the terminal block. The power
leads must be connected to the lower left
and the lower right terminals of the
terminal block.
Remove the 3 lower terminal screws
from the terminal block. Insert the 3
terminal screws through each power cord
terminal ring and into the lower terminals
of the terminal block. Be certain that the
center wire (white/neutral) is connected
to the center lower position of the
terminal block. Tighten screws securely
into the terminal block.
DO NOT remove the ground strap
connection.
Ground plate
Terminal
block
(appearance
may vary)
Neutral
terminal
Ground
strap
Power cord
[] Skip to Step 8 and proceed with the
installation.
[_ 4-WIRE POWER CORD
INSTALLATION
[]
[]
[]
[]
WARNING: The neutralwire of
the supply circuit must be connected to the
neutral terminal located in the lower center
of the terminal block. The power leads must
be connected to the lower left and the lower
right terminals of the terminal block. The 4th
grounding lead must be connected to the
frame of the range with the ground plate
and the ground screw.
Remove the 3 lower terminal screws from
the terminal block. Remove the ground
screw and ground plate and retain them,
Cut and discard the ground strap. DO NOT
DISCARD ANY SCREWS.
Insert the one ground screw into the power
cord ground wire terminal ring, through the
ground plate and into the frame of the range.
Insert the 3 terminal screws (removed earlier)
through each power cord terminal ring and
into the lower terminals of the terminal block.
Be certain that the center wire (white/neutral)
is connected to the center lower position of
the terminal block. Tighten screws securely
into the terminal block.
After Neutral
terminal
Terminal
block
Ground
screw
Ground
plate
(grounding
to range)
\
[] Skip to Step 8 and proceed with the installation,
38
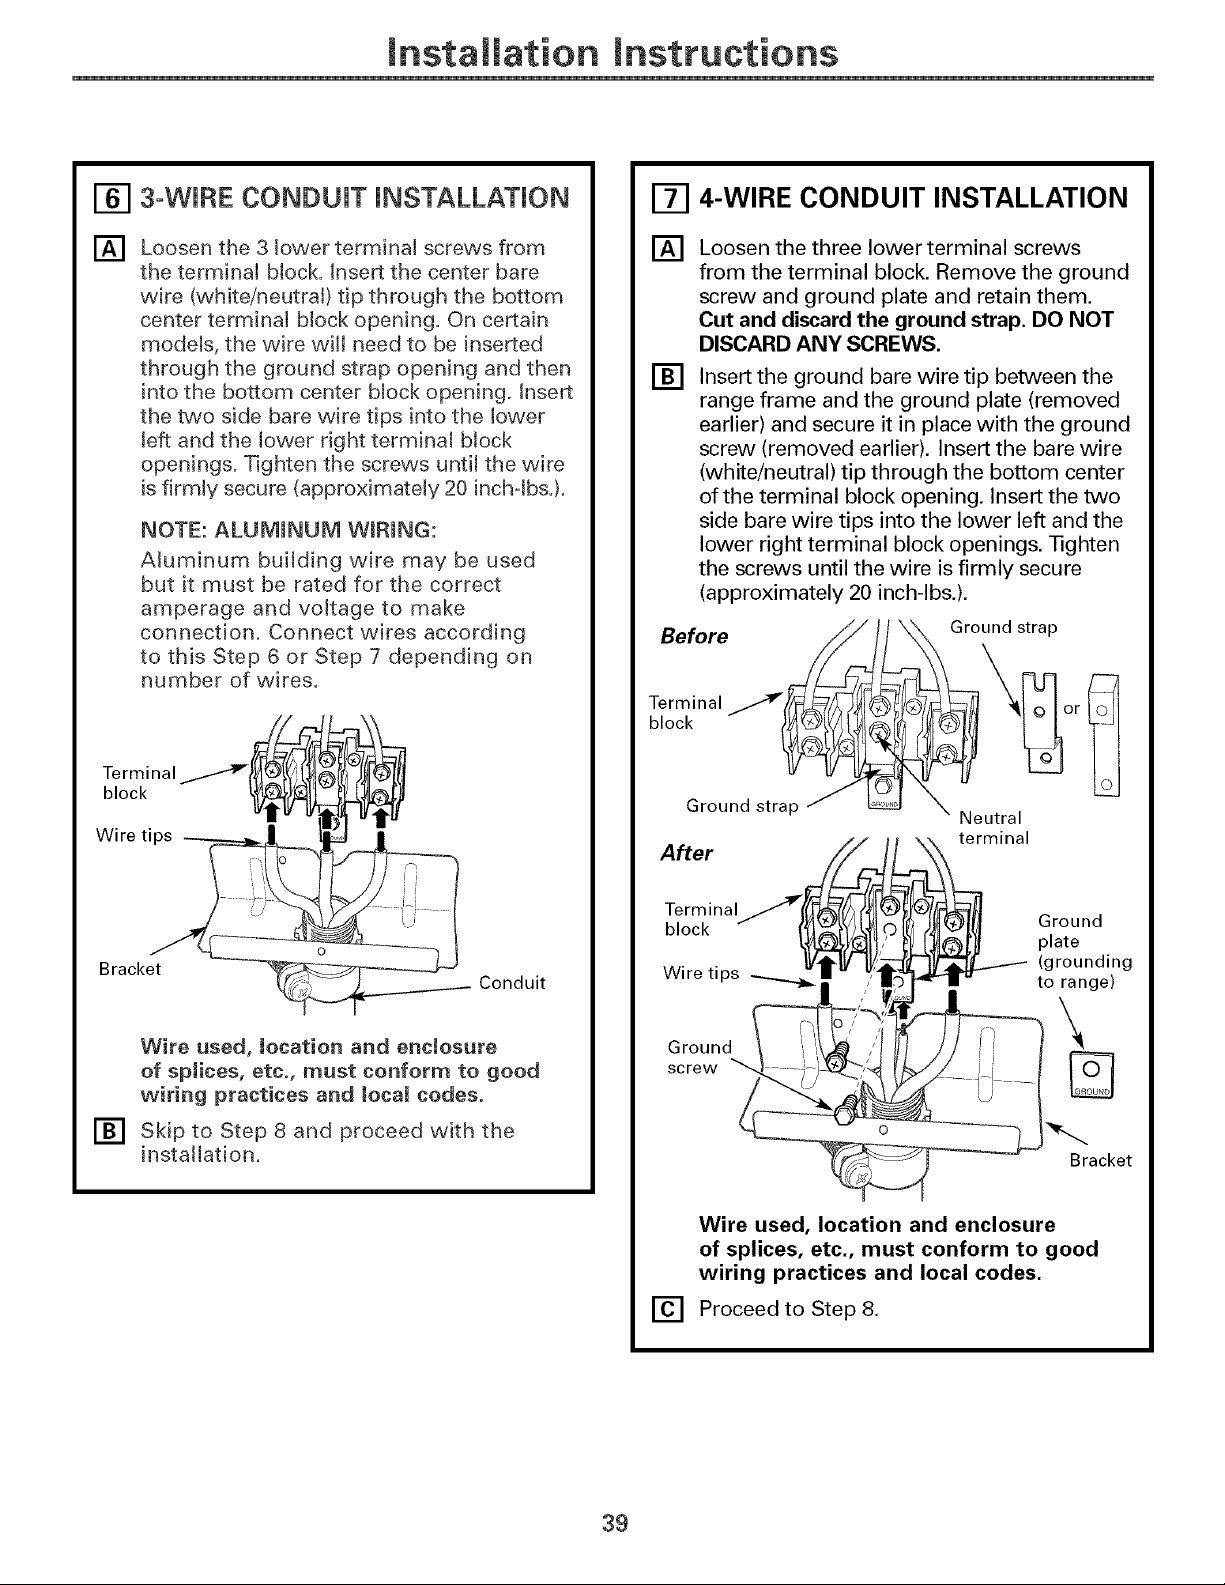
mnstaliation mnstructions
@
[]
3°WIRE CONDUIT iNSTALLATiON
Loosen the 3 lower terminal screws from
the terminal block. Insert the center bare
wire (wMte/neutrat) tip through the bottom
center terminat block opening. On certain
models, the wire will need to be inserted
through the ground strap opening and then
into the bottom center block opening. Insert
the two side bare wire tips into the lower
left and the lower right terminal block
openings. Tighten the screws until the wire
is firmly secure (approximately 20 inchqbs.).
NOTE: ALUMINUM WmRING:
Aluminum building wire may be used
but it must be rated for the correct
amperage and voltage to make
connection. Connect wires according
to this Step 6 or Step 7 depending on
number of wires.
Terminal t__ _ _
wiretips
i
Conduit
Wire used, location and enclosure
of sptices, etc., must conform to good
wiring practices and local codes.
[] Skip to Step 8 and proceed with the
installation.
4-WIRE CONDUIT INSTALLATION
[]
[]
Loosen the three lower terminal screws
from the terminal block. Remove the ground
screw and ground plate and retain them.
Cut and discard the ground strap. DO NOT
DISCARD ANY SCREWS.
Insert the ground bare wire tip between the
range frame and the ground plate (removed
earlier) and secure it in place with the ground
screw (removed earlier), Insert the bare wire
(white/neutral) tip through the bottom center
of the terminal block opening. Insert the two
side bare wire tips into the lower left and the
lower right terminal block openings. Tighten
the screws until the wire is firmly secure
(approximately 20 inch-lbs.).
Ground
screw
und strap
k__or _
eutral
minal
Ground
plate
(grounding
to range)
\
Bracket
Wire used, location and enclosure
of splices, etc., must conform to good
wiring practices and local codes.
[] Proceed to Step 8.
39
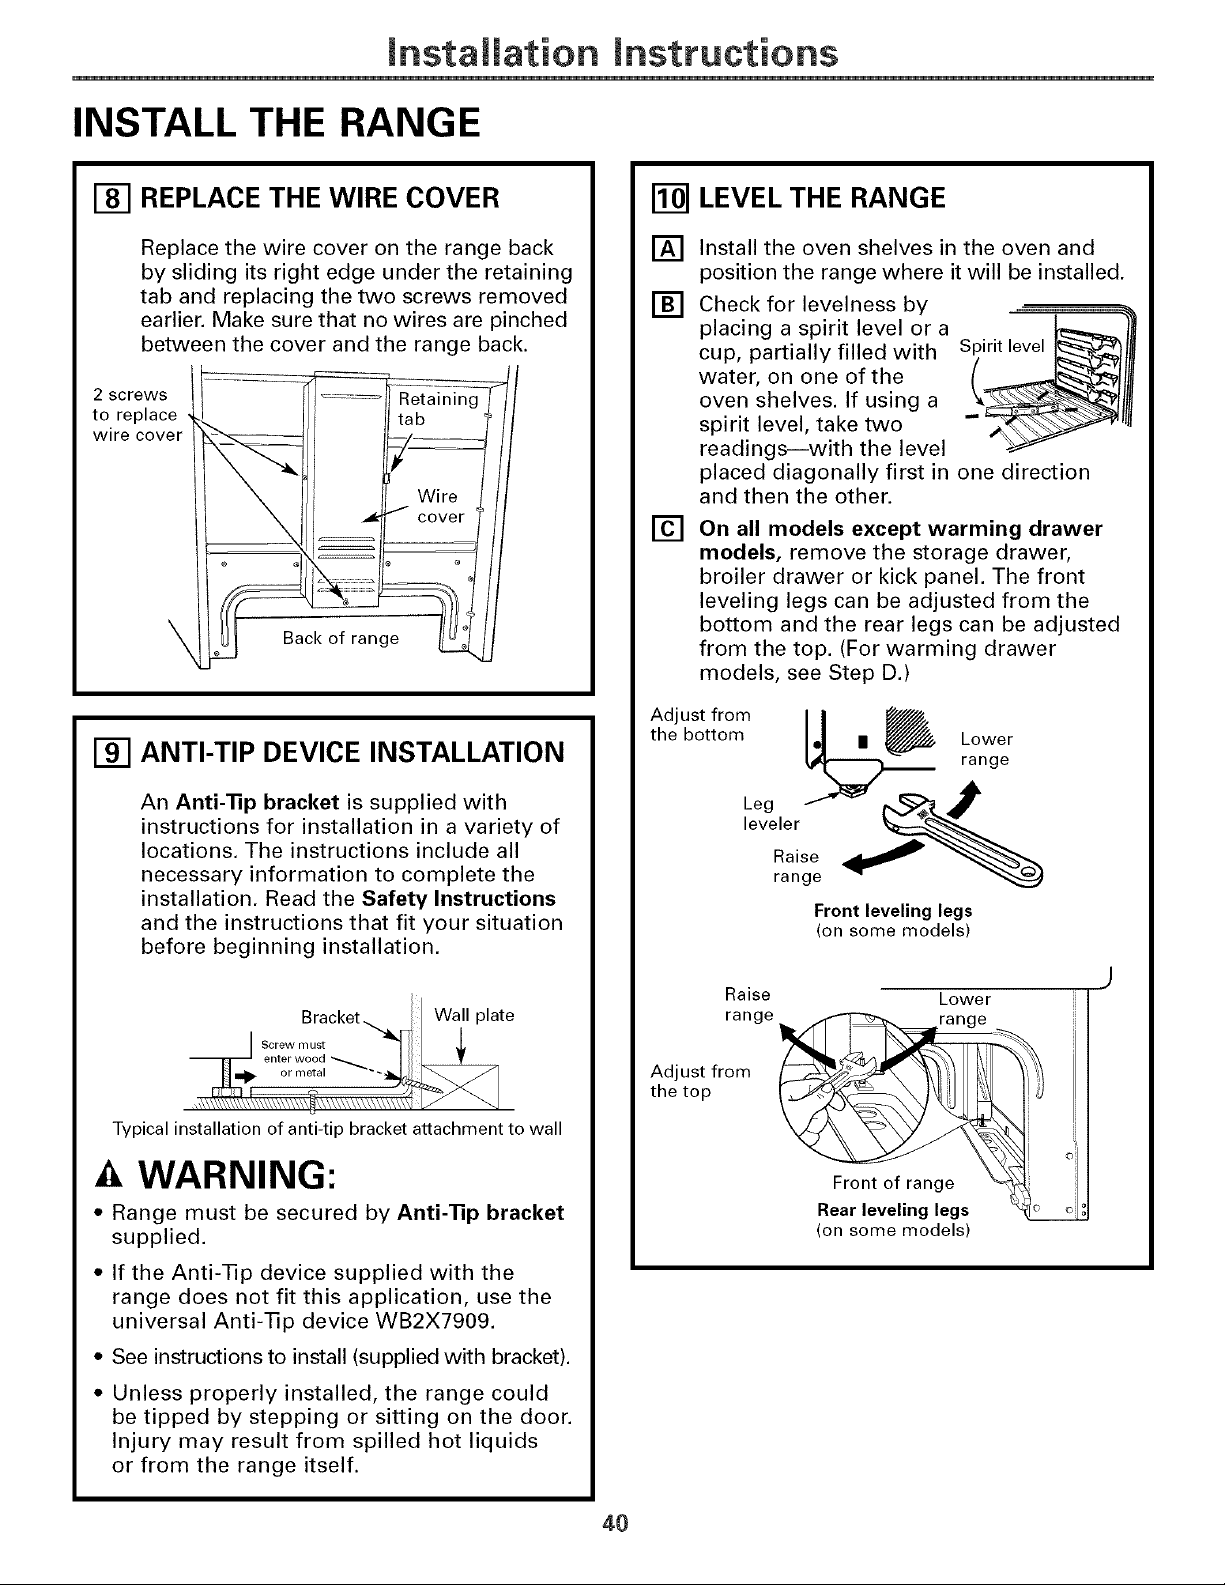
mnstaliation mnstructions
INSTALL THE RANGE
[-_ REPLACE THE WIRE COVER
Replace the wire cover on the range back
by sliding its right edge under the retaining
tab and replacing the two screws removed
earlier. Make sure that no wires are pinched
between the cover and the range back.
2 screws
to replace ,
wire cover
Back of range
Fgq
ANTI-TIP DEVICE INSTALLATION
An Anti-Tip bracket is supplied with
instructions for installation in a variety of
locations. The instructions include all
necessary information to complete the
installation, Read the Safety Instructions
and the instructions that fit your situation
before beginning installation.
Bracket_y_ Wall plate
Typical installation of anti-tip bracket attachment to wall
A WARNING:
• Range must be secured by Anti-Tip bracket
supplied.
• If the Anti-Tip device supplied with the
range does not fit this application, use the
universal Anti-Tip device WB2X7909.
• See instructions to install (supplied with bracket).
• Unless properly installed, the range could
be tipped by stepping or sitting on the door.
Injury may result from spilled hot liquids
or from the range itself.
LEVEL THE RANGE
[]
[]
[]
Install the oven shelves in the oven and
position the range where it will be installed.
Check for levelness by
placing a spirit level or a
cup, partially filled with
water, on one of the
oven shelves. If using a
spirit level, take two
readings--with the level
Spirit level _
placed diagonally first in one direction
and then the other.
On all models except warming drawer
models, remove the storage drawer,
broiler drawer or kick panel. The front
leveling legs can be adjusted from the
bottom and the rear legs can be adjusted
from the top. (For warming drawer
models, see Step D.)
tAdeJ_tt _r°°m _ rLa°nger
Front leveling legs
(on some models)
Raise Lower
range _ rangef_
Front o
Rear leveling legs
(on some models)
Adjust from
the top
40
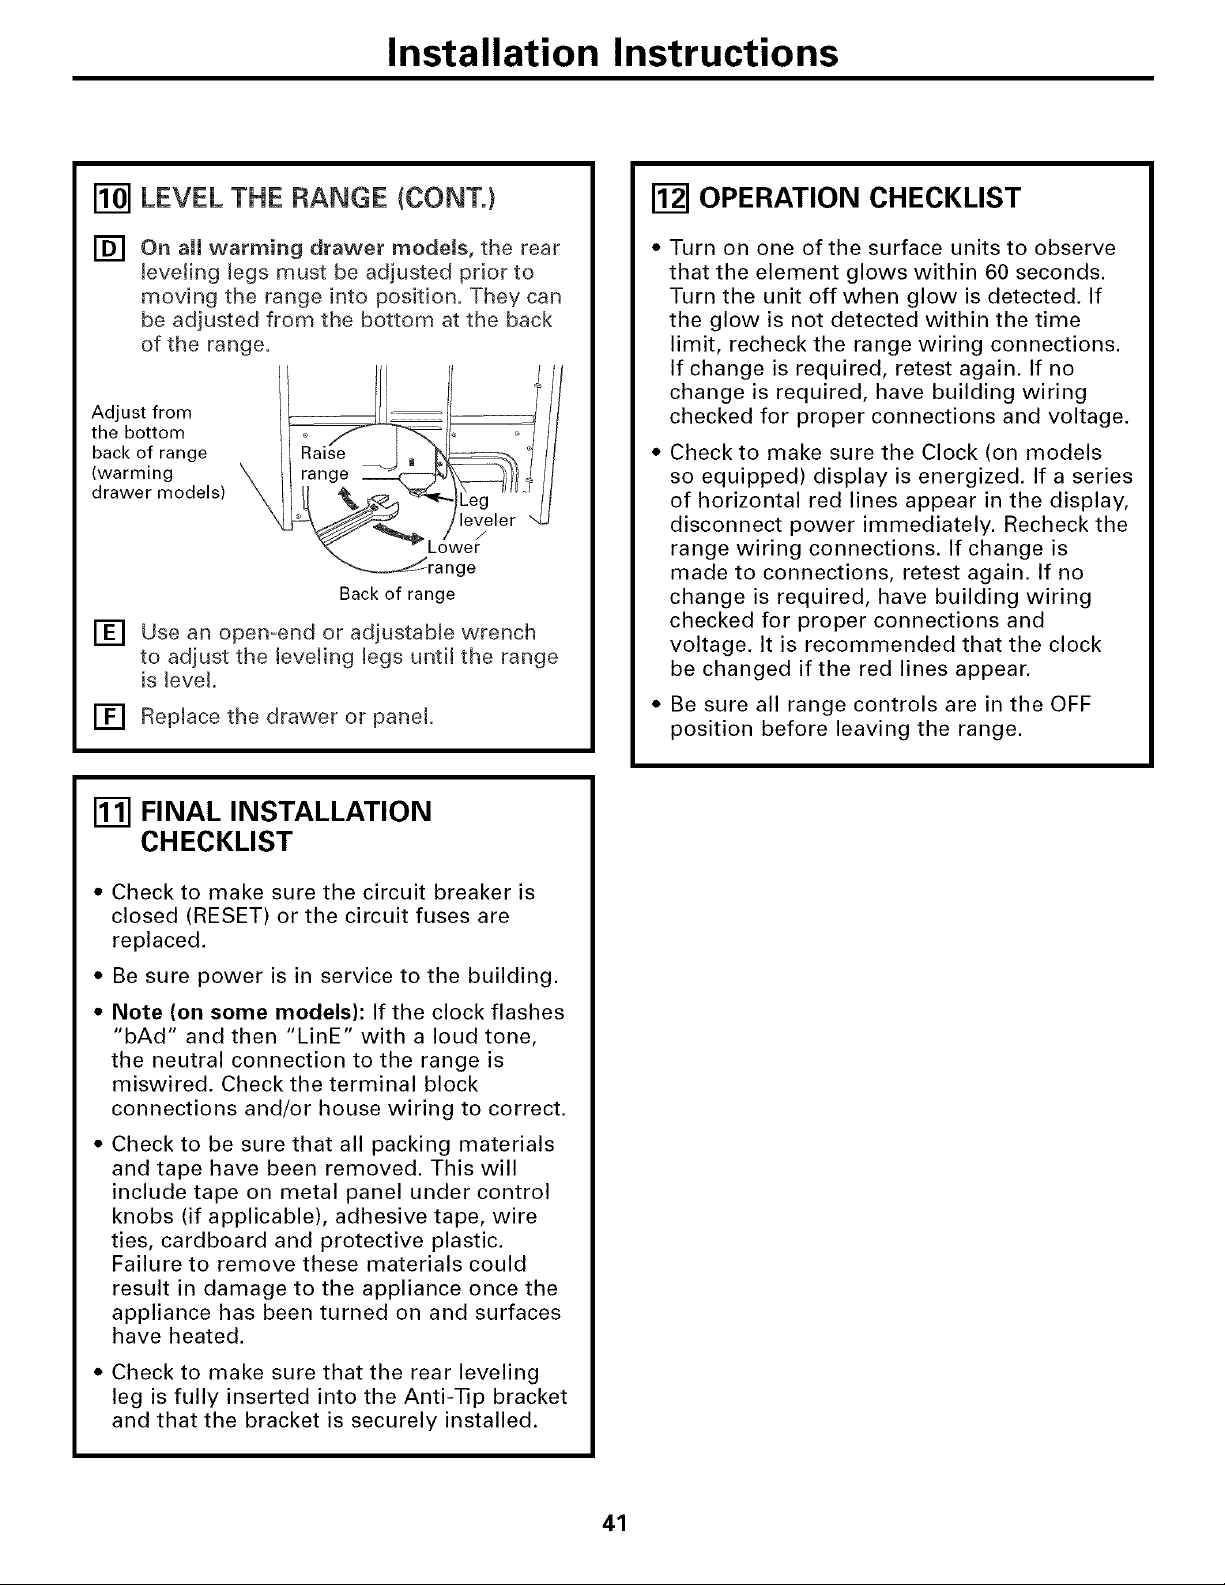
Installation Instructions
[] LEVEL THE RANGE (CONT.}
[] On aJJ warming drawer modets, the rear
JeveJing Jegs must be adjusted prior to
moving the range into position. They can
be adjusted from the bottom at the back
of the range.
Adjust from
the bottom
back of range
(warming
drawer models)
Lower
ge
Back of range
[] Use an open-end or adjustabJe wrench
to adjust the JeveJing Jegs untiJ the range
is JeveL
[] RepJace the drawer or panel
OPERATION CHECKLIST
Turn on one of the surface units to observe
that the element glows within 60 seconds.
Turn the unit off when glow is detected. If
the glow is not detected within the time
limit, recheck the range wiring connections.
If change is required, retest again. If no
change is required, have building wiring
checked for proper connections and voltage.
Check to make sure the Clock (on models
so equipped) display is energized. If a series
of horizontal red lines appear in the display,
disconnect power immediately. Recheck the
range wiring connections. If change is
made to connections, retest again. If no
change is required, have building wiring
checked for proper connections and
voltage. It is recommended that the clock
be changed if the red lines appear.
Be sure all range controls are in the OFF
position before leaving the range.
FINAL INSTALLATION
CHECKLIST
• Check to make sure the circuit breaker is
closed (RESET) or the circuit fuses are
replaced.
• Be sure power is in service to the building.
• Note (on some models): If the clock flashes
"bAd" and then "LinE" with a loud tone,
the neutral connection to the range is
miswired. Check the terminal block
connections and/or house wiring to correct.
• Check to be sure that all packing materials
and tape have been removed. This will
include tape on metal panel under control
knobs (if applicable), adhesive tape, wire
ties, cardboard and protective plastic.
Failure to remove these materials could
result in damage to the appliance once the
appliance has been turned on and surfaces
have heated.
• Check to make sure that the rear leveling
leg is fully inserted into the Anti-Tip bracket
and that the bracket is securely installed.
41
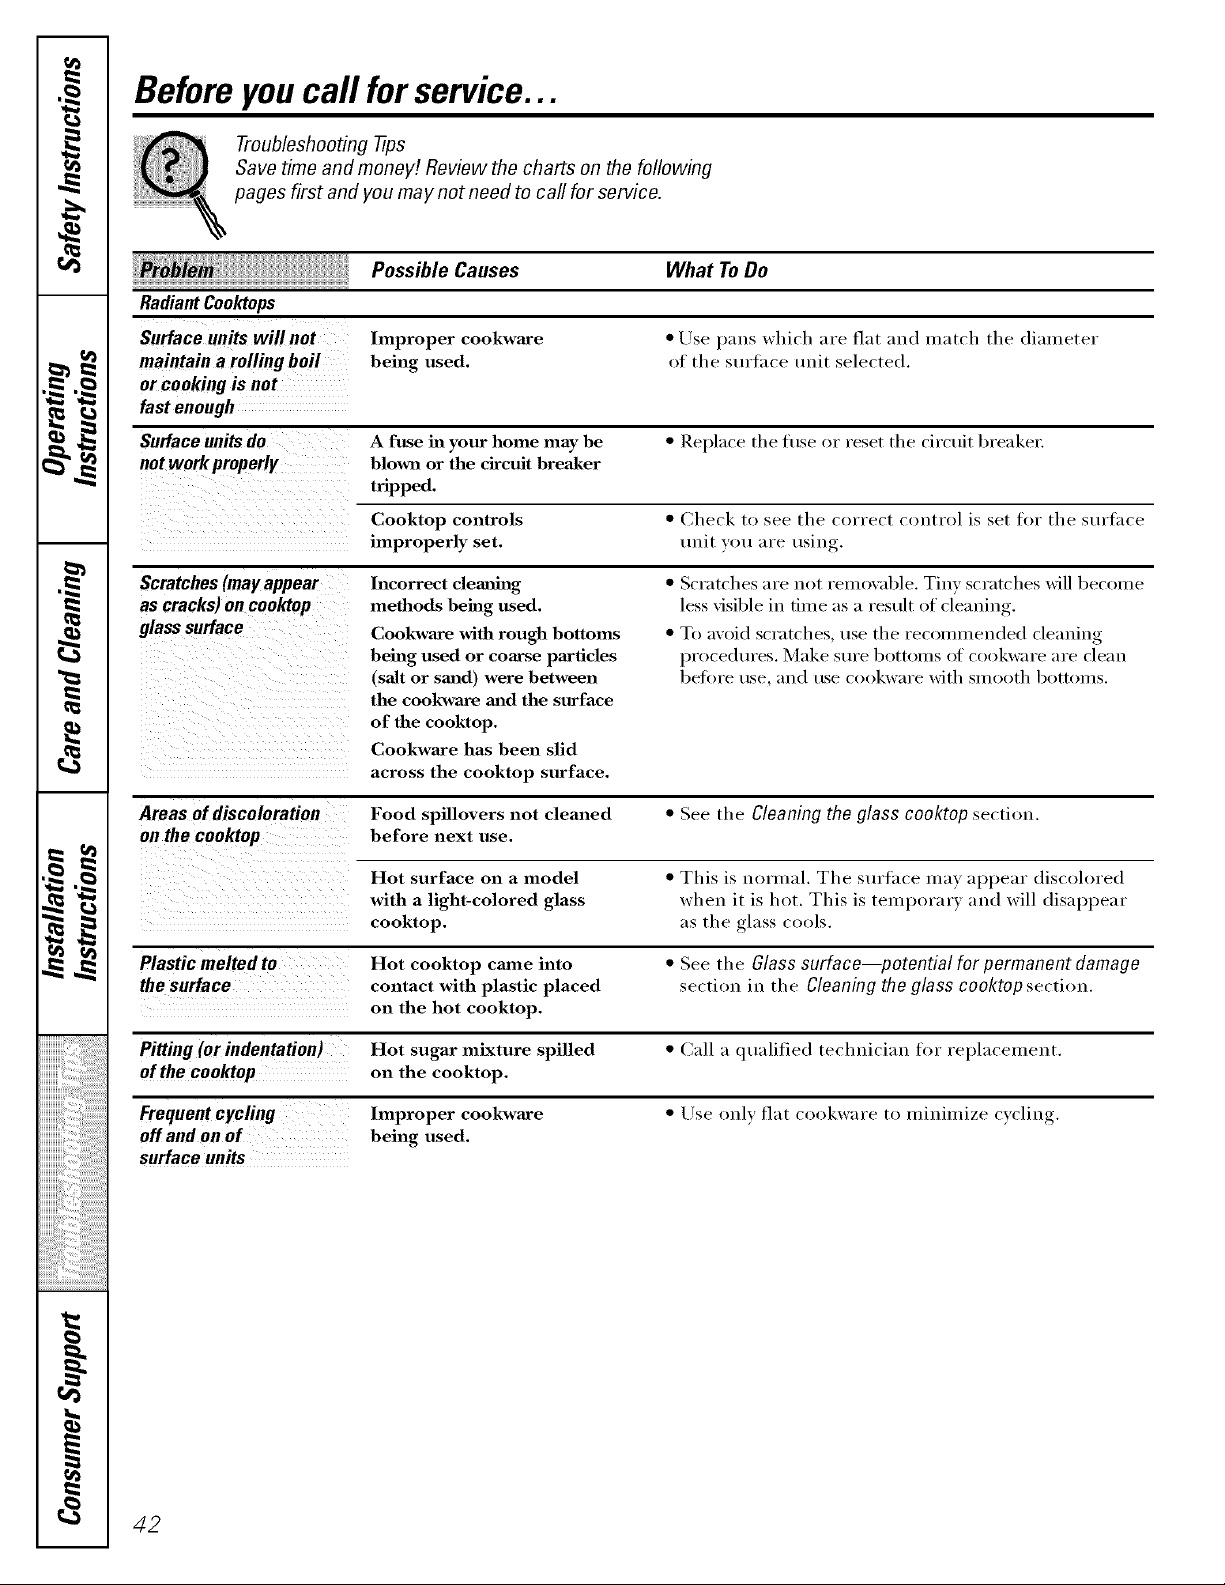
Before you call forservice...
Troubleshooting -tips
Save time and money/. Review the charts on the following
pages first and you may not need to call for service.
Possible Causes What To Do
Radiant Cooktops
Surface units willnot Improper cookwm'e * Use l)ans which are fiat and match tile diameter
maintain a rolling boil being used. of tile Sttl't;ice unit selected.
or cooking is not
fast enough
Surface units do A fuse in your home may be * Rel)lace tile fuse or reset tile circuit breaker:
not workproperly blown or the circuit breaker
tripped.
Cooktop controls * Check tl) see tile correct control is set fin" tile surthce
improperly set. unit you are using.
Scratches (may appear
as cracks) on cooktop
glass surface
Incorrect clemfing
methods being used.
Cookwa_e with rough bottoms
being used or coarse particles
(salt or sm_d) were between
the cookwaye and the surface
of the cooktop.
Cookwaxe has been slid
across the cooktop surface.
• Scratches are not removable. Tiny scratches will become
less visible in time as a result of cleaning.
• To avoid scratches, use the recommended cleaning
procedures. Make Stli'e bottolilS ot cookware are clean
betoi'e tlse_ and tlse cookwai'e with SIllooth bottoins.
Areas of discoloration Food spillovers not cleaned • See tile Cleaning the glass cooktop section.
on the cooktop before next use.
Hot surface on a model • This is normal. Tile stu't_lce lll_ly appear discolored
with a light-colored glass when it is hot. This is temporary and will disappear
cooktop, as tile glass cools.
Plastic melted to Hot cooktop crone into • See the Glass surface--potential for permanent damage
the surface contact with plastic placed section in the Cleaning the glass cooktop section.
on the hot cooktop.
Pitting (or indentation) Hot sugar mixture spilled • Call a qualified teclmician for rel)lacement.
of the cooktop on the cooktop.
Frequent cycling Improper cookwaxe • Use only fiat cookware to minimize cycling.
off and on of being used.
surface units
42
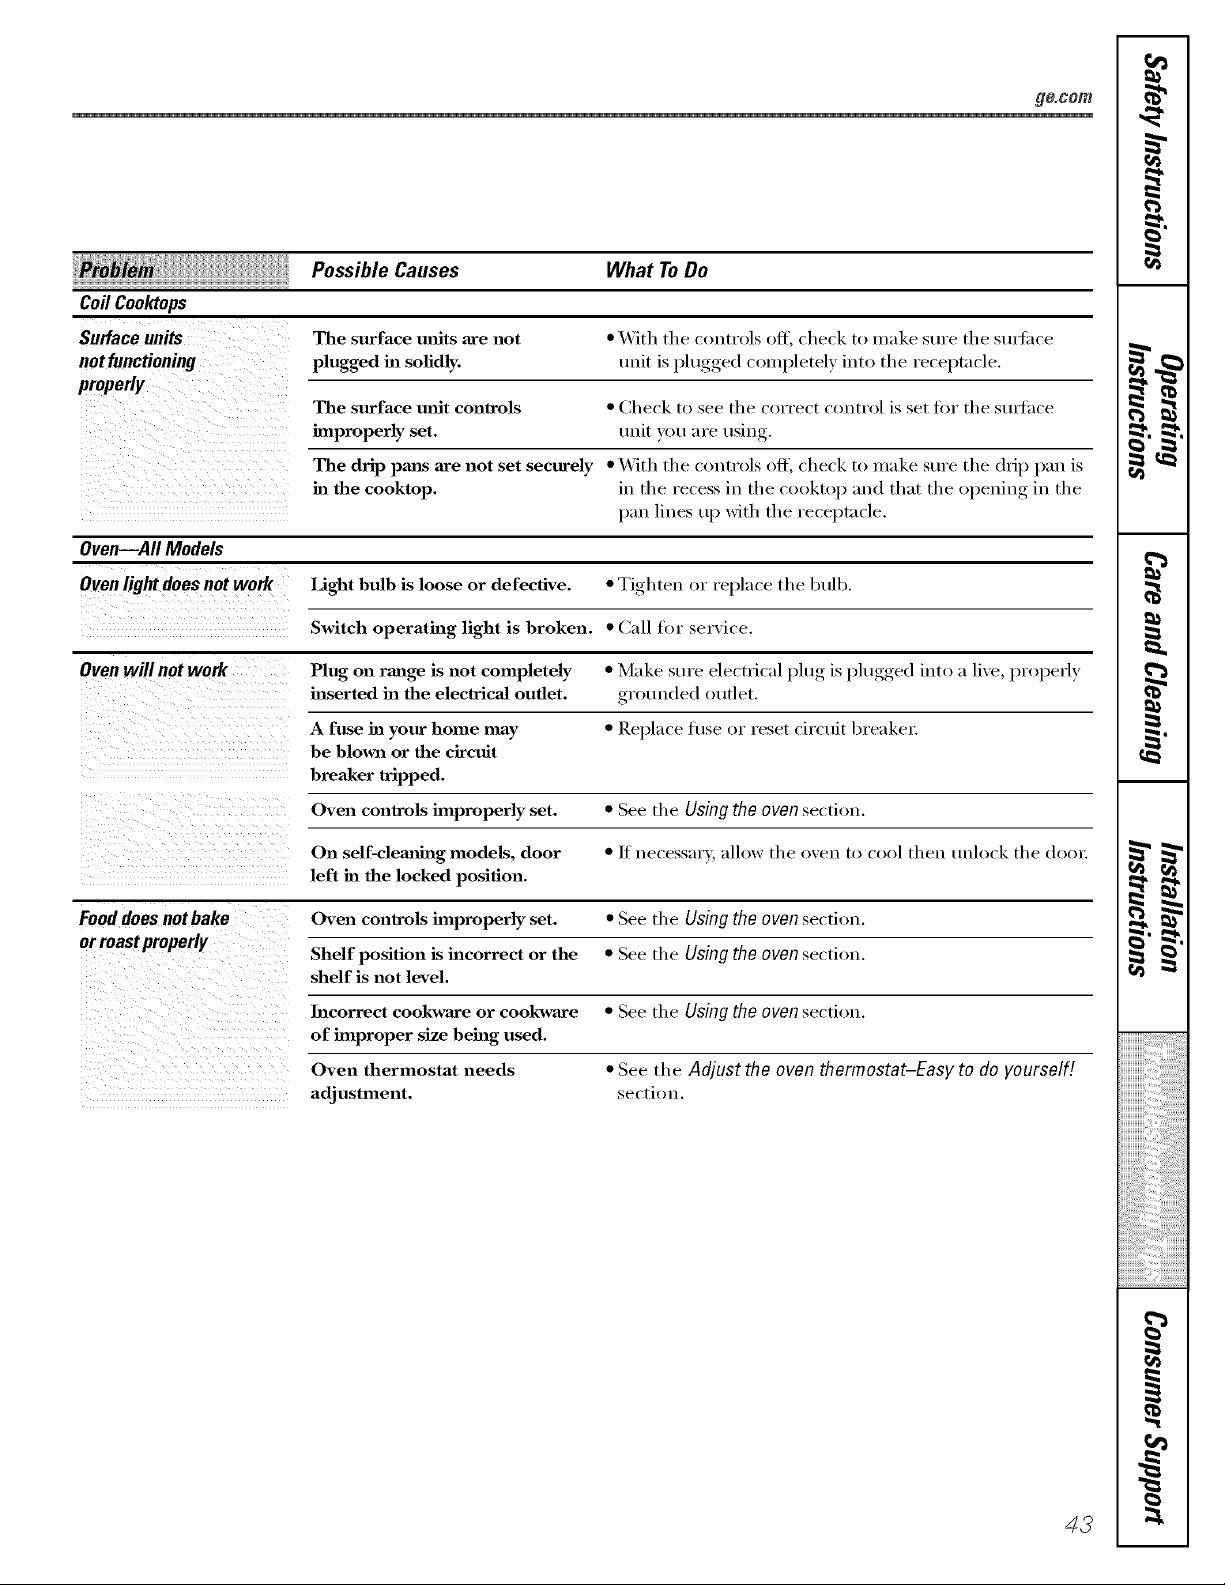
ge, com
Possible Causes What ToDo
Coil Coohtops
The surface milts are not * With tile controls off, check to make sure tile stutilce
not functioning plugged in sofidly, trait is plt/gged c_nu pletely iut_ the receptn cle.
properly
improperlyThesurfaCeset.milt controls * CheCkunitvottt°areSeeusing.thecorrect control is set tor the mwfhce
The drip pmas are not set securely * With the controls off, check to make sure the drip p:m is
in the cooktop, in the recess in the cooktop mid that the opening in the
pm] lines tq) with the receptncle.
Oven--All Models
Oven light does not work Light bulb is loose or defective. * Tighten or replace the l_ulb.
Switch operating light is broken. * Call for service.
Oven will not work Plug on range is not completely • Make stu'e electrical plt/g is plt/gged into a live, properly
inserted ha the electrical outlet, grotmded outlet.
A fuse in your home may * Replace fl/se or reset circuit breakel:
be blown or the circuit
breaker tripped.
Oven controls hnproperly set. * See the Using the oven section.
On self-clemlhag models, door */f uecessary, allow the oven to cool then tmlock the ,doo]:
left in the locked position.
Food does not bake Oven controls improperly set. * See the Using the oven se(fi_>u.
or roast properly
Shelf position is incorrect or the * See the Using the oven section.
shelf is not level.
Incorrect cookwaxe or cookwaxe
of improper size being used.
Oven thermostat needs
adjustment.
• See the Using the oven section.
• See the Adjust the oven thermostat-Easy to do yourself!
section.
43
=d.
w
td_
r_
iiiiiiiiiiiiiiiiiiiiiiiiiJii%iiiiiiiiiiiiiiiiiiiiiiiiiilJ
I
m
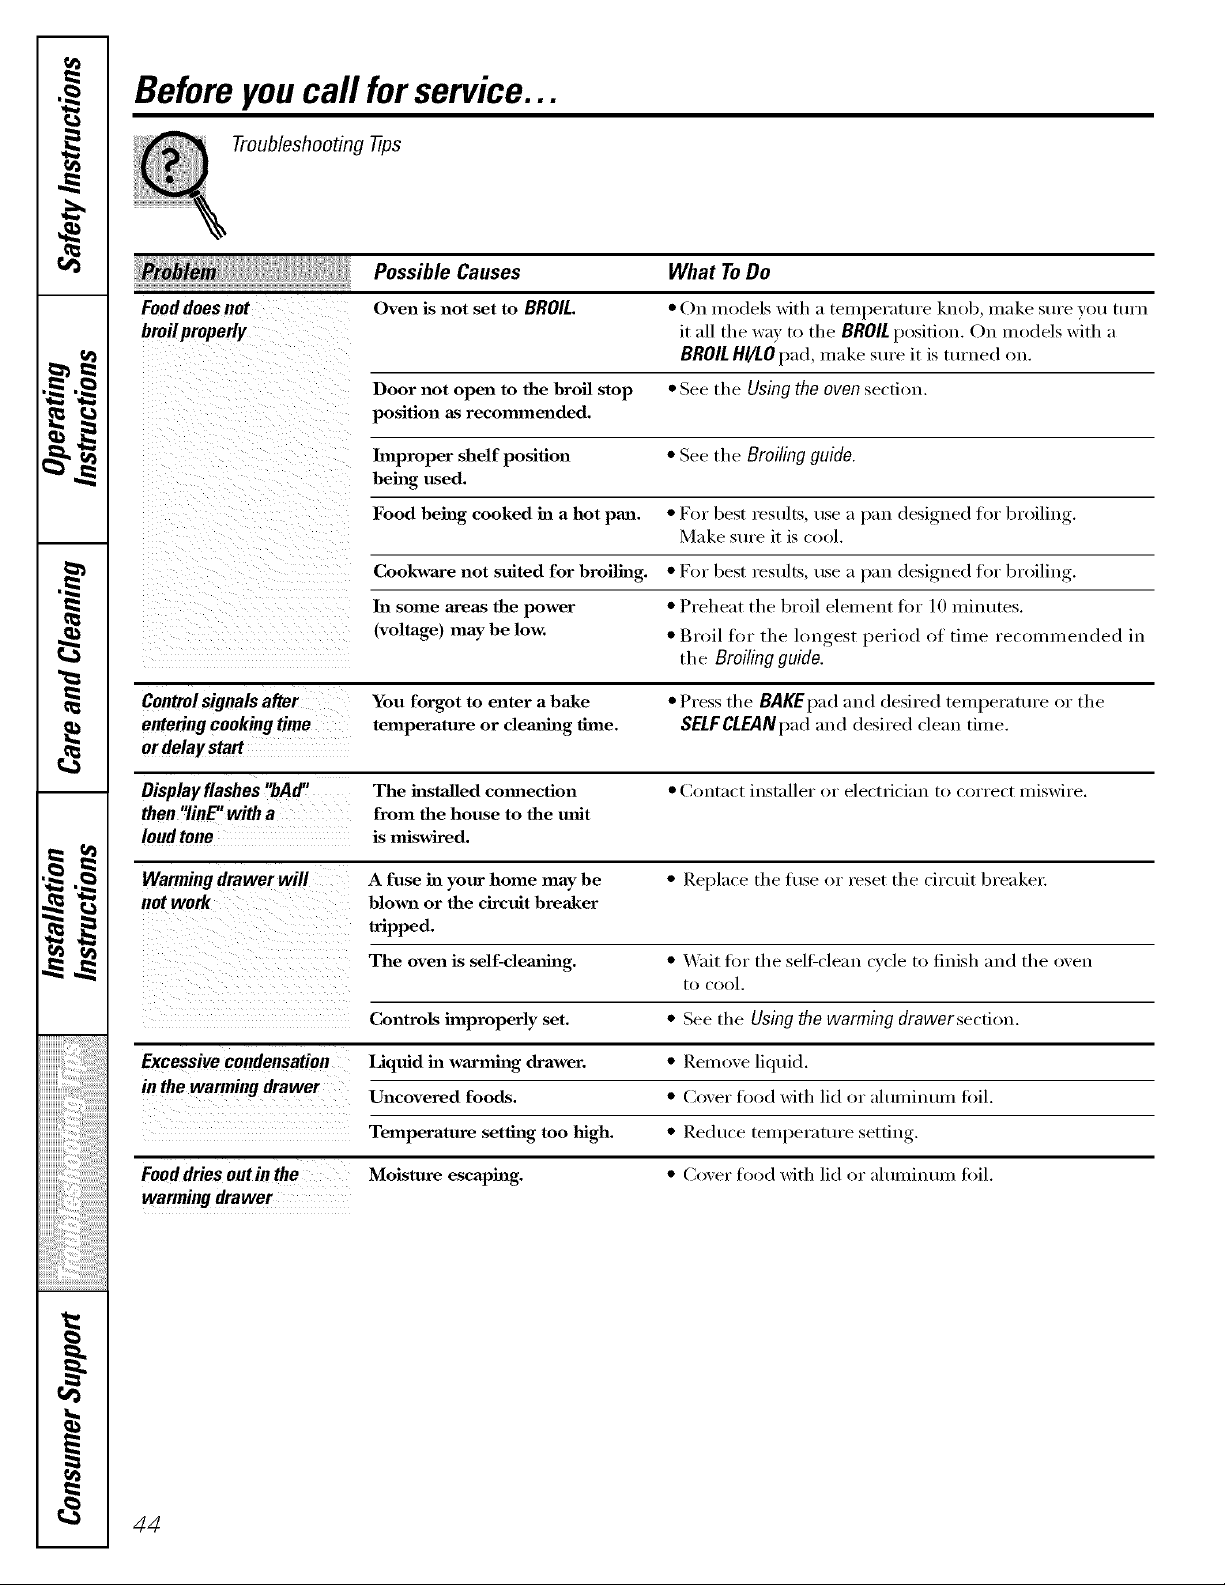
Before you call forservice...
Troubleshooting -tips
Possible Causes What To Do
Food does not Oven is not set to BROIL. * On models with a temperature kuob, make sure you turn
broilproperly it Jill the way to the BROIL position. On models with a
BROIL HI/LOpad, make st/Ye it is turued ou.
Door not open to the broil stop * See the Using the oven section.
position as recommended.
Improper shelf position * See the Broiling guide.
being used.
Food being cooked ha a hot pan. * For best results, use a }_:m designed, for broiliu_
Make sure it is cool.
Cookware not suited for broiling. • For best results, use a }_:m designed, for broiliu_
ha some areas the power * Preheat the broil element fin" 10 minutes.
(voltage) may be low. * Broil for the lougest period of time recouHueuded iu
tire Broiling guide.
Control signals after You forgot to enter a bake * Press tire BAKEpad and desired temperature or tire
entering cooking time temperature or clemmag time. SELF CLEANpad and desired clean time.
or delay start
Display flashes "bAd" The installed cmmection • (;*intact lust;diet rn" electrician tr) c_wrect miswire.
then "linE" with a from the house to the mtit
loud tone is miswired.
Warming drawer will A fuse in your home may be * Replace tire h/se or reset tire circuit breaker:
not work blown or the circuit breaker
tripped.
The oven is self-clemmlg. * Wait fin" tire sell_cleau cycle to finish and tire oven
to cool.
Controls improperly set. * Sue tire Using the warming drawersecfiou.
Excessive condensation Liquid in warming drawer. * Remr)x,'e liquid.
in the warming drawer
Uncovered foods. * Cover tbod with lid or alumiutuu f0il.
Temperature setting too high. * Redt/ce temperattwe settiu r
Food dries outin the Moisture escaping. * (',over food with lid or alumiutuu foil.
warming drawer
44
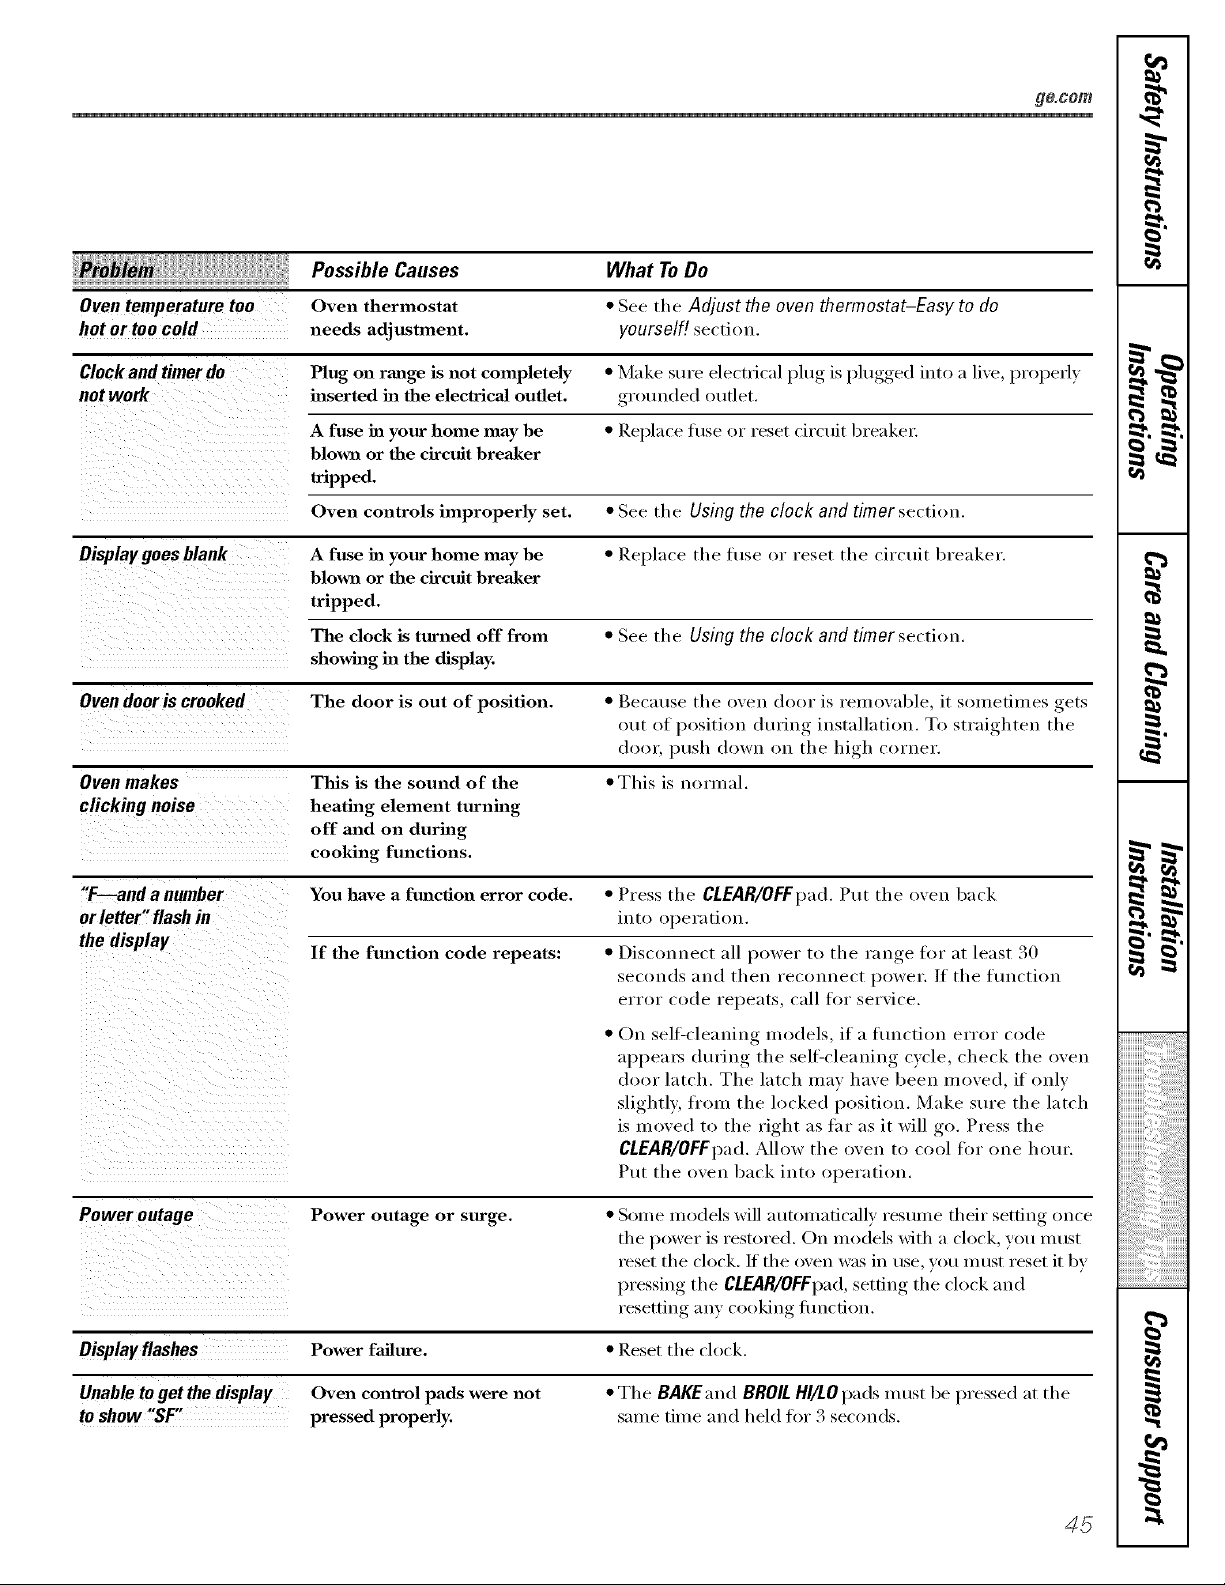
ge, com
Oventemperaturetoo
hot or toocolt/
Possible Causes
Oven thermostat
needs adjustment.
What ToDo
• Seethe Adjust the oven thermostat-Easy to do
yourself] section.
Clock and timer do Plug on range is not completely • Make sure electrical l)lug is l)lugged into a live, ln'Ol)erly
not work inserted in the electrical outlet, grounded outer.
A fuse in your home may be • Replace fl/se or reset drcuit bI'eake_:
blintz or the circuit breaker
tripped.
Oven controls improperly set. • See tile Using the clock and timer section.
Display goes blank A fuse in your home may be • Rel)lace tile fuse or reset the circtfit breaker.
blintz or the circuit breaker
tripped.
The dock is turned off from • See the Using the clock and timersectiou.
showhlg in the displa)_
Oven dooris crooked The door is out of position. • gec;itlse the oven door is removable, it sometimes gets
out of position din'lug installation. To straighten the
door, push down on the high corner.
Oven makes This is the sound of the • This is normal.
clicking noise heating element turnhag
off and on during
cooking functions.
"F--and a number You have a function error code. • Press the CLEAR/OFFp:_d. Put the oven back
orletter" flash in into ol)eratiou.
the display If the function code repeats: • L)iscounect all power to the range for at least 30
seconds and then reconnect power./f the ftmction
error code rel)eats, call for service.
• On sell=cleaning models, if a traction error code
al)l)ea_s din'lug the sell=cleaning cycle, check the oven
door latch. The latch may have been moved, if only
slightly, fl'om the locked position. Make sure the latch
ix moved to the right as fhr as it will go. Press the
CLEAR/OFFpad. Allow the oven to cool for one hour.
Put the oven back into operation.
Power outage Power outage or surge. • Some models will automatically resume their setting once
the power is restored. On models with a clock, you must
xeset the clock. If the oven was in use, you must reset it by
I)ressim"_ the CLEAR/OFFpad,,settim,_ the clock and
resetting any cooking traction.
Displayflashes Power failure.
Unable to get thedisplay Oven control pads were not
to show "SF" pressed properly.
• Reset the clock.
• The BAKEand BROILHI/LOpads m ust be pressed at the
same time and held for 3 seconds.
45
w
_r_ fj_
r_
I
m
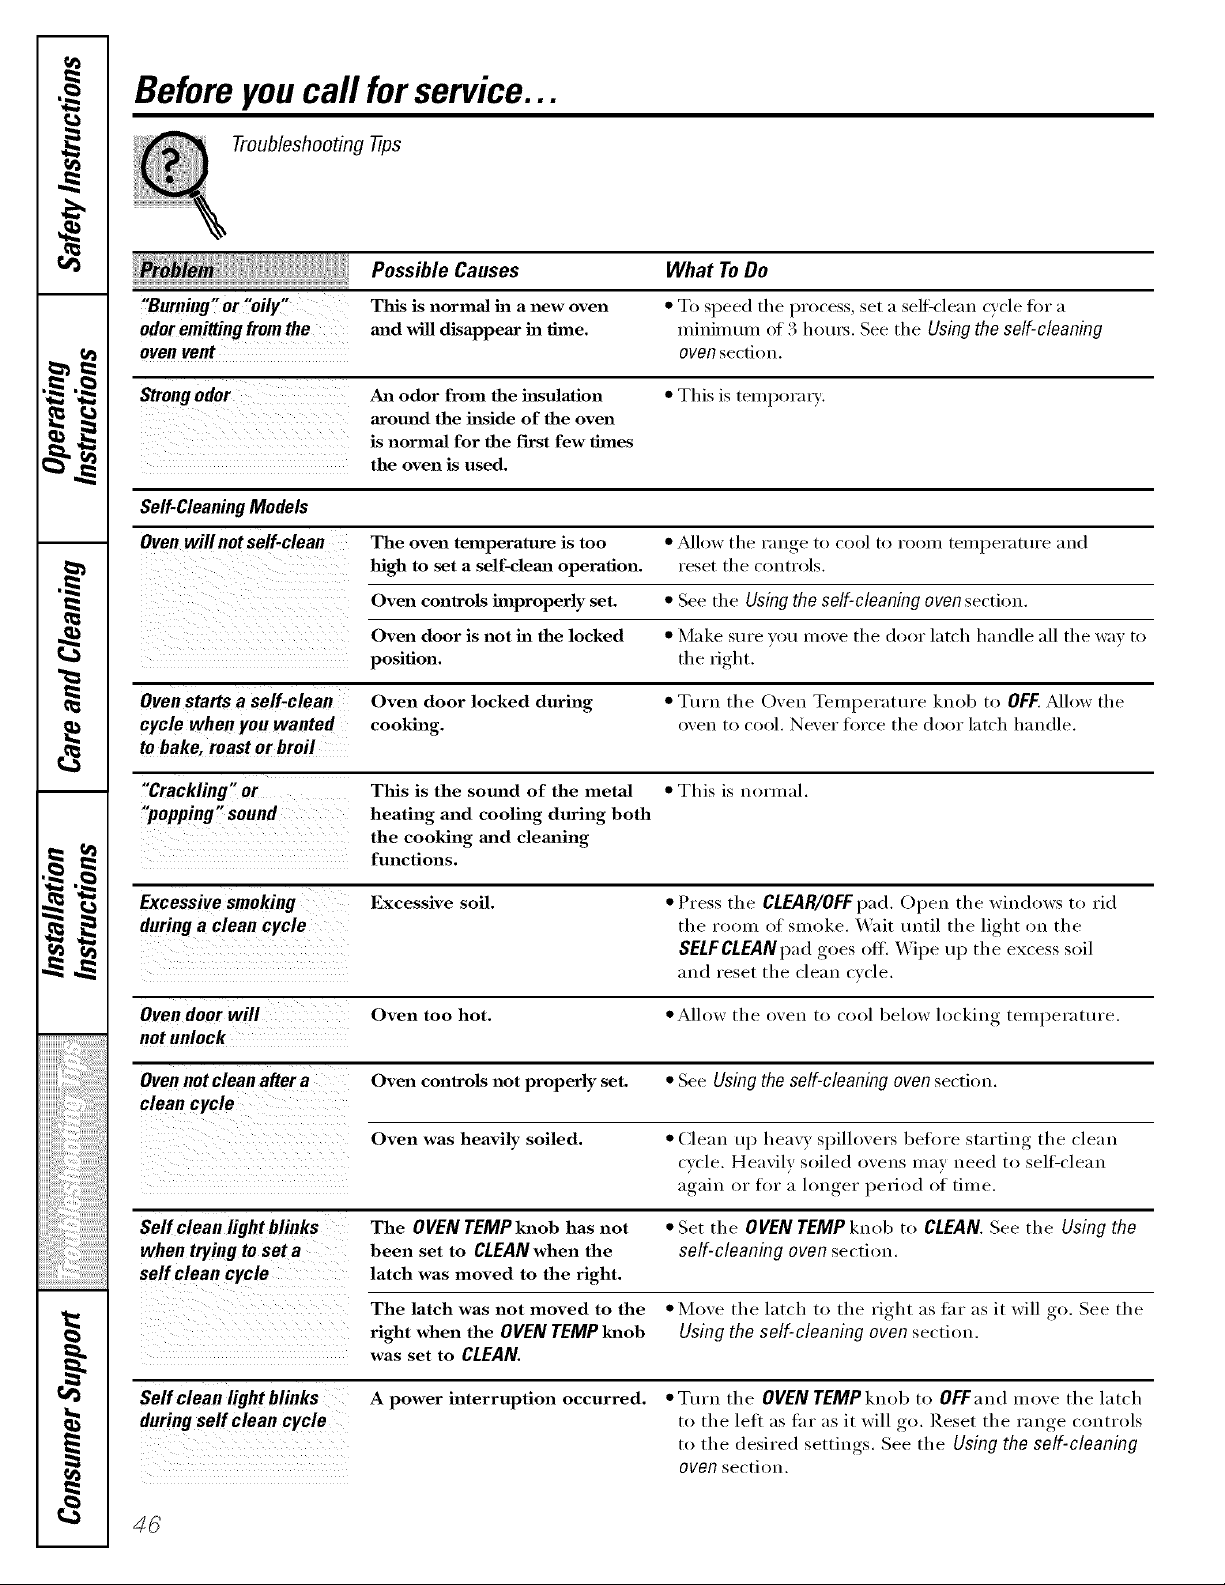
Before you call forservice...
Troubleshooting -tips
Possible Causes What ToDo
"Burning, or "oily" This is normal in a new oven
odoremittingfromthe mad will disappear ha time.
oven vent
• To speed tile process, set a sell:< lean cycle for a
mininmnl of 3 hems. See tile Using the self-cleaning
OVeR section.
Strongodor An odor from the hastflation • This is temporaxy.
around the h_side of the oven
is normal for the first few thnes
the oven is used.
Self-CleaningModels
Ovenwillnotself-clean The oven telnperature is too • _dlow tile range to cool to room temperature and
high to set a self-clema operation, reset tile controls.
Oven conlrols hnproperly set. • See tile Usingthe self-cleaning oven section.
Oven door is not ha the locked • Make stu'e Veil ino``e tile door latch handle all tile wa`` to
position, tile right.
oven starts a self-clean Oven door locked during • Tm'n tile O``en Temperatm'e knob to OFF.?dlow tile
cycle when you wanted cooking. (),.ell to cool. Ne``er force tile door latch handle.
to bake, roast or broil
"Crackling," Ot This is the sound of the metal • This is normal.
"popping" sound heating and cooling during both
the cooking aaad clemfing
functions.
Excessive smoking Excessive soil. • Press tile CLEAR/OFF pad. Open tile windows to rid
during a clean cycle tile room of smoke. _,_ait tmtil tile light on tile
SELFCLEANpadgoes off. _\ ipe up tile excess soil
and reset tile clean cxcle.
Oven door will Oven too hot. • Allow tile o``en to cool below locking temperature.
notunlock
Oven not clean after a Oven consols not properly set. • See Using the self-cleaning oven section.
Oven was heavily soiled. • Clean up hea``) spillo``ers beim'e starting tile clean
c_cle. Heavily soiled o``ens may need to sell=clean
again or for a hmger period of time.
Self clean light blinks The OVEN TEMP knob has not •Set tile OVEN TEMP knob to CLEAN. See tl/e Using the
when trying to set a been set to CLEAN when the self-cleaning oven section.
latch was moved to the right.
ro
The latch was not moved to the • Mo``e tile latch to tile right as fi_r as it will _ See tile
right when the OVENTEMPMaob Using the self-cleaning oven section.
was set to CLEAN.
Self clean light blinks A power interruption occurred. •Turn tile OVENTEMPknob to OFFand mo``e tile latch
duringself clean cycle to tile left as tar as it will go. Reset tile range controls
to tile desired settin ,s See tile Using the self-cleaning
oven section.
4_
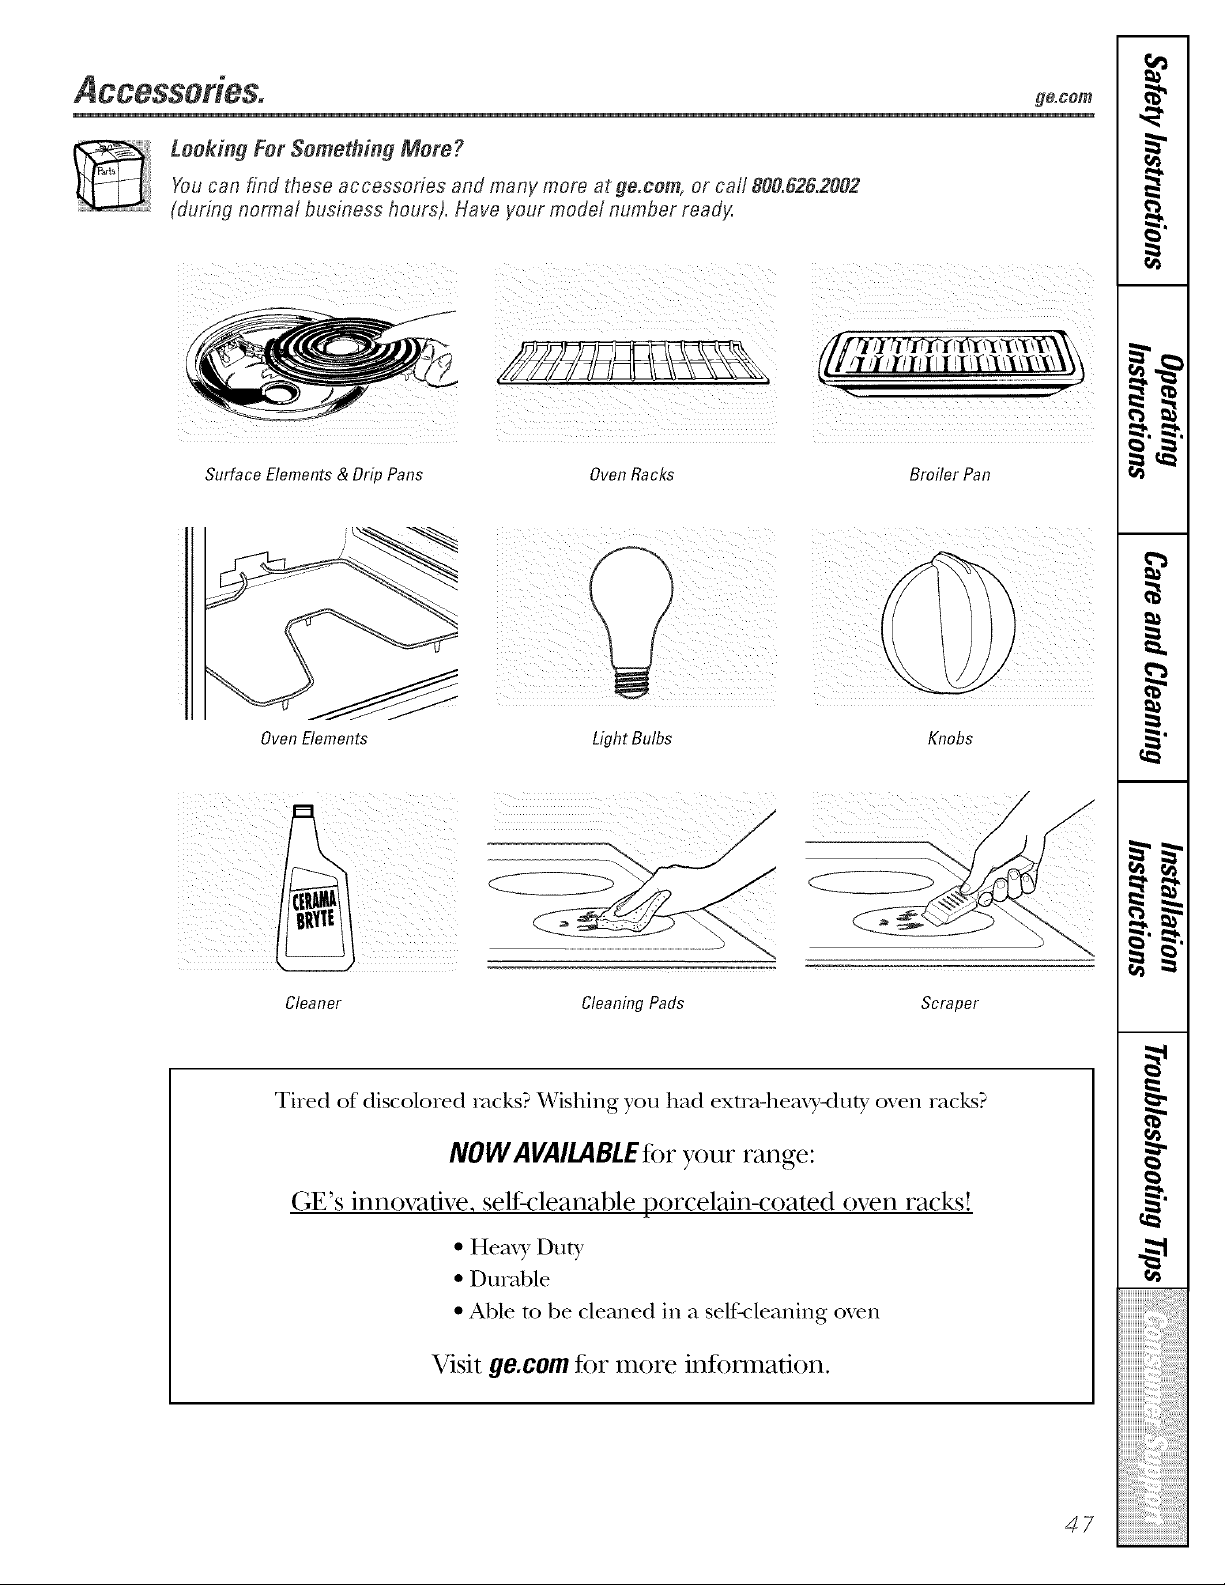
Accessorieso g_,oom
Looking For Something More?
Youcan find these accessories and many more at ge.cem, or carl 800.626.2002
(during normal business hours), Have your model number ready,
Surface Elements & Drip Pans Oven Racks Broiler Pan
.....
Oven Elements
i _ ¸ _
Light Bulbs Knobs
Cleaner Cleaning Pads Scraper
Tired of discolored rocks? Wishing you had exm_-heax3,-duty oven racks?
NOW AVAILABLE for your range:
(;E's innovative, self:cleanable porcelain-coated oven racks!
• Heax 3, Duty
• Durable
• Able m be cleaned in a self-cleaning oven
Visit go.corn fbr more infbnnadon.
47
._ Notes.
m
wL
L
w
m
__
m
m
m
m
---
1=.
m
48
GE Service Protection Plus '_'
GE, a imme recog_fized _orklwkle for q_alit),' aild depeildabN% offers }<m
Ser',ice Protectio_l } h_s --compleheils_e protectioil oil all yore" appHa_ces--
No Matter What Brand!
Benefits Include:
* Backed by GE
. All brands covered
. U_imited service calls
* All parts and labor costs included
* No out-of-pocket expenses
* No bidden deductibles
* One 800 number to call
We Ti Cover Any Appliance.
Anywhere. Anytime.
Yim wi]] be clm_p]ete])' satisfied with oLlr service [:)rotecti<m or }'ol_ may reql_est )'<mr m<mev back
<m the remaim_im_g x'ah_e of yol_r com_tract. No ql_estiom_s asked. It's that simple.
Protect vol_r refldgeratox; dishwasher, washer a_/d dxyex; raN_ge, TVI VCR al_d mlach more--any brand!
Phas there's m_o extra charge [k)r emergel_cy service m_d ]o_ mol_th]y fi_lam_ci_g is a_ai]ab]e. Eve_ icemaker
coverage a_d %od spoilage protectiol_ is oftered_ _)_ ca_ rest eas), km)wi_g that a]] vo_r w_h_ab]e
ho_seho]d prod_cts are protected agai_st expel_sive repairs.
for more
_ (]ill hele
Please place in envelope and mail to:
General Electric Companf
Warranty Registration Department
P.O. Box 32150
Louisville, KY 40232-215{)
49
Consumer Product Ownership Registration
Dear Customer:
Thank you for purchasing our product and thank you for placing your confidence in us.
_A/e are proud to ha_e you as a customer!
Follow these three steps to protect your new appliance investment:
Complete and mail
your Consumer
Product Ownership
Registration today.
ttaw' tim peace ot
mind of knowing wc
CHII COlltact VOI/ ill
the tmlikely ev(nt of a
satbly modificalion.
Aiter mailing the
registration below,
store this document
ill a sati' place. It
contains inlormation
you will need should
you require service.
Our selwice number is
800.GE.CARES
(8t)0.432.2737).
Read your Owner's
Malmal careihllv.
It will help you
operat( your lie%
appliance properlv.
Model Number Serial Number
I,,,,,, , , , , , II , , ,
Important: If you did not get a registration card with your
product, detach and return the form below to
ensure that your product is registered, or register
online at ge.com.
I I I
_.,,._ (MI ll(r(
Consumer Product Ownership Reg
Model Number
Serial Number
I I I I I
Ms. M*>,. Mix_,
Fir'q ] I Lasl]
Name I I I I I I I I I Nain(! I I I I I I I I I I I I
_1 r( (!1 I
Addr( ss I I I I I I I I I I I I I I I I I I I I I I I I
I
I
Apt. # I i
ciw I
l )ale PJ4ced
hi Use III
Monlh
I I I I I I I EqnailAddress*
I I I I I I I I I I
1,.>.l, I ,arl , I
, , I
t)holl(
Nt/iH1)(!r I
Zip I
State I , 1 (:o_le
I I I-I I I
50
GE Consumer & Industrial
Appliances
General Electric Cornpan9
Louisville, KY/40225
ge.corn
* Please provide your e-mail address to receive, via e-mail, discounts, special ottLp, and other
important communications from (',E Appliances (GEA).
[ Check here if wm do not want to receive communications trom GEA's careflfllv selected
partllers.
FAILI JRE T() COMPLETE AN[) RE'F[ 7RN TIIIS CARD DOES NOT DIMINISII YOI JR
WARRAN'IY RIGIITS.
For information about GEA's privacy and data usage polio B go to ge.com and click on "Prixacy
Policy" or call 800.626.2924.
Electric Range Warranty.
Aft warranty service provided by our Factory Service Centers,
or an authorized Customer Care® technician. Toschedule service,
on-line, 24 hours a day, vis# us at ge.com, or carl 800.GE.CARES
(800.432.2737).Please have serial number and model number
available when calling for service.
Staple your receipt here.
Proof of the original purchase
date is needed to obtain service
under the warrantg
Fromthe date Ofthe
originalpurchase
GE Will Provide:
Anypart ot the range which tidls due to a detect in materials or workmanship.
During this lim#ed one-year warranty, GE will also provide, free of charge, all labor
and in-home service to replace the defecti\'e part.
Service trips to your home to teach you how to use
the product.
hnproper hastallation, delivery or maintenance.
Failure of the product if it is abused, misused, or used for
other than the intended purpose or used commerciaJly.
Dmnage to the glass cooktop caused by use of clemaers
other than the recommended clemlhlg cretans.
Dmnage to the glass cooktop caused by hardened spills
of sugm'y materiaJs or melted plastic that are not clemaed
accordh_g to the directions in the Owner's MmmaJ.
Replacement of house fuses or resetting of circuit
breakers.
Damage to the product caused by accident, fire, floods
or acts of God.
Incidental or consequentiaJ dmnage caused by possible
defects with this applimlce.
Damage caused after delivery.
Product not accessible to provide required service.
I EXCLUSIONOFIMPLIED WARRANTIES--Your sole and exclusive remedy is product repair as provided in this Limited Warranty. J
z
Any implied warranties, includiug the implied warranties of merchantability or fitness for a particular purpose, are limited to
I
oneyear or the shortest period allowed by law.
This warranty is extended to the original purchaser and any succeeding owner for products purchased for home use
within the USA. If the product is located in an area where service by a GEAuthorized Servicer is not available, you
may be responsible for a trip charge or you may be required to bring the product to an Authorized GE Service location
for service. In Alaska, the warranty excludes the cost of shipping or service calls to your home.
Some states do not aflow the exclusion or limitation of incidental or consequential damages. This warranty gives
you specific legal rights, and you may also have other rights which vary from state to state. To know what your
legal rights are, consult your local or state consumer affairs office or your state's Attorney General
Warrantor: General Electric Company.Louisville, KY 40225
51

ConsumerSupport.
l GEAppliancesWebsite ge.com
Haxe a question or need assist;race with your appliance? Try the (;E Al)pliances _._ebsite 24 hom_ a day,
any da)of the year'. For greater comenience and faster service, you can now download Owner s Manuals,
order parts or e_.en schedule serxice on-line.
ScheduleService
Expert GE repair se_Mce is onl) one step away fl'om your doo_: Get on-line and schedule vc,t:u"service at
your conxenience 24 hom_ any day of the year! Or call 800.GE.(:AI/ES (800.432.2737) dufin{, n{mnal
business hom_.
ge.com
RealLife DesignStudio ge.com
GE supports the Universal Design concept--products, services and environments that can be used by
people of all ages, sizes and capabilities. _,Verecognize the need to design for a wide range _ff physical and
mental abilities and impaim_ents. For details of GE's Universal Design applications, including kitchen
design ideas for people with disabilities, check out our _,Vebsim today. For the hearing impaired, please call
800.TDD.GEAC (800.833.4322).
ExtendedWarranties ge.com
Purchase a (;E extended warrant_ and learn about special discounts that are axailable while xour, warrant_
is still in effect. You C_llli)urchase it on-line amfime or call 800.626.2224 during nomml business hom_.
(;E (_onsulner Home Serxices will still be there after }our warrant}, expires.
PartsandAccessories
ge.com
Individtmls qualified to setMce their own appliances can have parts or accessories sent directly to their
homes (VISA, MasterCard and Discover cards are accepted). Order on-line today, 24 hom_ evet-v day or
by phone at 800.626.2002 during nomml business hom_.
Instructions contained in this manual cover procedures to be performed by any user. Other servicing generally
should be referred to qualified service personnel Caution must be exercised, since improper servicing may cause
unsafe operation.
ContactUs
ge.com
If vou are not safistied with the service w)u receive fl'om GE, contact us on our X.Vebsite with all the details
including your phone ntllllbeI; oi" wlJte to: General Manage_; CtlStOlllei" ]),elations
GE Appliances, Appliance Park
i,ouisville, KY 40225
l RegisterYourAppl&nce
Register your new applim_ce on-lhle----at your convenience! Timely product registration will allow for
' enhanced conlinunicafion and prompt service under the terms of)our warranty, should the need arise.
You may also mail in the pre-printed registration card included in the packing material.
ge.com
Thisbook is printed on recycled paper.
Printed in Mexico