Loading ...
Loading ...
Loading ...
76
The following table provides basic cooking
guidelines for popular, convenience and
frozen foods. Please note that due to the
variations in thickness and size of the foods
being cooked some experimentation may be
required for the best cooking results. Always
ensure that the food is thoroughly cooked
to food-safe temperature throughout before
consuming.
When cooking fresh fries, we’ve kept the
oil quantities as low as possible for the
healthiest results. However, if you feel the
fries are a little pale and require further
browning, increase the quantity of oil
slightly.
Note: For crispier results it is recommended
to shake the fryer basket 2-4 times
throughout the cooking cycle.
For larger quantities, (1kg) increase cooking
times and toss food more frequently.
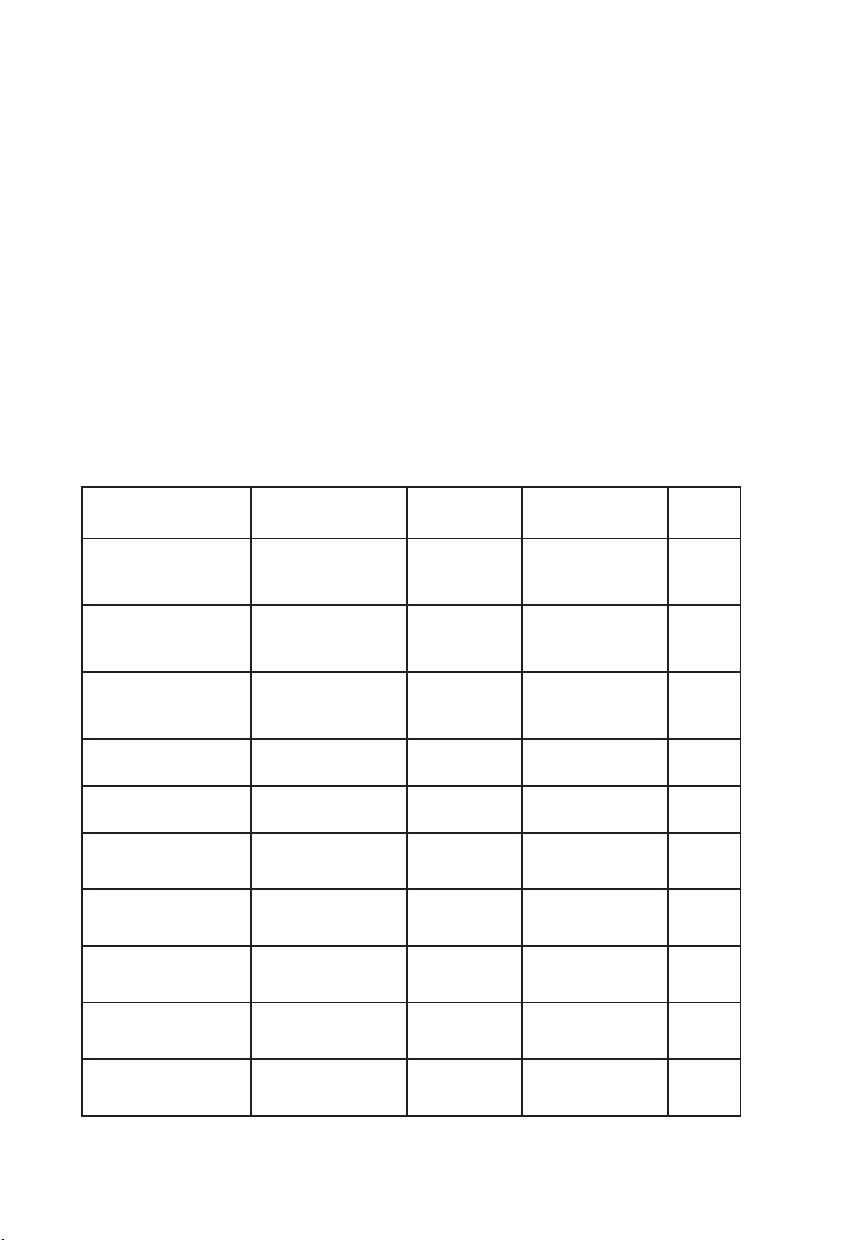
Cooking Popular, Convenience
And Frozen Foods
Food Cooking Time (mins)
Cooking Temp
(Degrees C)
Notes
Oil
(TBSP)
600g fresh fries 23-25 200
Remove and
shake basket
periodically
1
600g frozen fries 12-16 200
Remove and
shake basket
periodically
-
900g frozen fries 20-25 200
Remove and
shake basket
frequently
-
500g frozen cheese
sticks
8-10 200
Cover basket in
one layer
-
600g frozen hash
browns
8-10 200
Coat basket
lightly with oil
1
Frozen beef burger
8-10 medium
11-13 well done
200 Flip once -
300g frozen small
chicken nuggets
10-12 200
Cover basket in
one layer
-
2 fresh chicken
breast
20 180 Wash and pat dry 1
6 fresh chicken
drumsticks
25-30 180 Wash and pat dry 1
8 muffins 15-20 160
Follow packet mix
instructions
-
Your Digital Air Fryer can be used to cook
fresh or frozen foods. Always ensure that
the ingredients are evenly coated with oil.
1. Plug the Digital Air Fryer into an
electrical outlet.
2. When plugged in, the Power button
light will turn on. Press this button to
enter the function choice mode.
3. In function choice mode, the Power
button will flash and the display will
show a default temperature of 180°
C and a default cook time of 15 min.
You may start cooking using these
default settings by pressing the Power
button again, OR you may use the
Temperature, Timer, and Menu buttons
to adjust the cook settings.
4. To change the temperature settings,
press the Temperature button and use
the Up and Down arrow buttons to
adjust to the desired temperature.
5. To change the time settings, press the
Timer button and use the Up and Down
arrow buttons to adjust to the desired
cook time.
6. To choose from one of the 7 Preset
Cook Functions, press the Menu button.
Use the Menu button to toggle between
the following functions: Poultry, Steak,
Fish, Dessert, Vegetables, Fries, and
Prawns.
7. Use the handle to gently pull the
cooking tray from the Digital Air Fryer.
Place food in the removable cooking
basket and replace the tray back into
the Digital Air Fryer properly. If the tray
is not inserted properly, the appliance
will not operate.
8. Use the Power button to start cooking
once you've adjusted the cook settings
to your liking. If you hold the Power
button for more than 5 seconds, the
Digital Air Fryer will enter standby
mode.
9. To ensure crispiness, some foods
require shaking frequently through the
cooking process. To do this, pull the
cooking tray out of the appliance by the
handle and gently shake/stir the food.
Then slide the tray back into the Digital
Air Fryer and continue to cook.
Note: The removable cooking tray may
move out of place when shaking/stirring
food in the basket. Ensure the cooking
tray is in the proper position before
returning the tray to the Digital Air Fryer
to continue cooking.
10. When you hear the timer bell, the set
cooking time has finished. Pull the tray
out of the appliance and place it on
a heat resistant surface. Check if the
foods are ready. If not, simply put back
into the Digital Air Fryer and set the
time for a few extra minutes.
11. When the food is ready, carefully pull
the cooking tray from the Digital Air
Fryer and empty basket of food into
serving bowl or plate. For larger or more
fragile items, use tongs to lift the food
out of the basket.
12. Do not use metallic utensils to take
food out from the cooking tray or the
cooking basket. Use heat resistant, non-
metallic utensils to take out food from
the removable cooking tray.
Cooking Guide
Loading ...
Loading ...
Loading ...