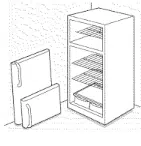
Kit Ice Maker Moel
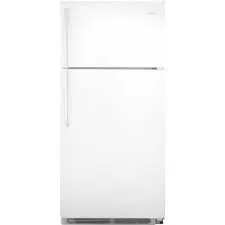
1. Contenedor de la puerta del congelador
2. Compartimiento para lacteos
3. Compartimiento de la puerta mediano ajustable
4. Compartimiento de la puerta de conservador completo
5. Parrilla de alambre ajustable
6. Parrilla de mediana ajustable
7. Parrilla de mediana ajustable con cajón
8. Cajón para carnes
9. Parrilla completa ajustable
10. Cajón para almacenamiento de frutas y
11. Bandeja de hielos
12. Maquina para fabricar hielos
Your actual product may differ depending on the specification of the models
1. Freezer door bin
2. Dairy compartment
3. Adjustable half width door bin
4. Full width door bin
5. Adjustable wire shelf
6. Adjustable half width shelf
7. Adjustable half width shelf
8. Deli drawer
10. Humidity controlled crisper drawer
11. Ice tray
12. Ice maker
9. Adjustable full width shelf
Lamp
Always use a LED lamp of similar specification
The lamp is located under the top wall of the refrigerator interior
Unscrew the LED lamp and remplace
Replace the cover in place by hooking the tabs into the corresponding holes
Before you begin
Read each step thoroughly before proceeding.
CAUTION – Unplug the Refrigerator.
To eliminate the danger of electric shock during installation. you must unplug the refrigerator from its electrical outlet.
Remove plug
Remove and discard the white plug from the lower left back corner of the freezer wall.
Remove the cover Use a Phillips head screwdriver to remove the compressor compartment access cover. This requires removing six screws which attach the cover to the back of the refrigerator case.
Be sure to save the screws as the access cover must be reinstalled later to ensure your refrigerator will function properly.
Go to the back of the refrigerator. Find the small label in the upper right corner and remove it off. Then discard the label.
Install Guide Cab W/Tube A1
Remove label
Remove one side of the seal paper for
Connect the water line Make sure there is enough plastic water line to extend from the water valve to well into the water tube inlet. Cut off any excess tubing.
Prepare for Installation
Set feeler arm to Stop position.
Move the feeler arm to the STOP (up) position until the refrigerator is connected to the water supply to prevent premature operation.
Hole for wire tie (Appearance may vary)
Mounting screws
Inside the freezer. loosen the two moungting screws.
Install the Icemaker Fill Cup
Install the icemaker fill cup (side-mounted) into the icemaker as shown.