& CARE MA
L
Contents
2
3
3
3
4
4
5-10
11
11
12
Warranty
Product Registration
Packaging
Normal Sounds
Important Safety Instructions
Operation of Current Device
Air Conditioner Features
Care and Cleaning
Energy Saving Ideas
Avoid Service Checklist
NOTE: This USE & CARE MANUAL
provides specific operating instructions
for your model. Use the room air
conditioneronlyas instructedinthisU SE
& CARE MANUAL instructionsare not
meant to cover every possiblecondition
and situationthat may occur.Common
senseandcautionmust be practicedwhen
installing,operating, and maintaining any
appliance.
READ AND SAVE THESE INSTRUCTIONS
nd EAVY
ELECTRONIC CONTROL
AIR CONDITIONERS
P/N 66129901612EN
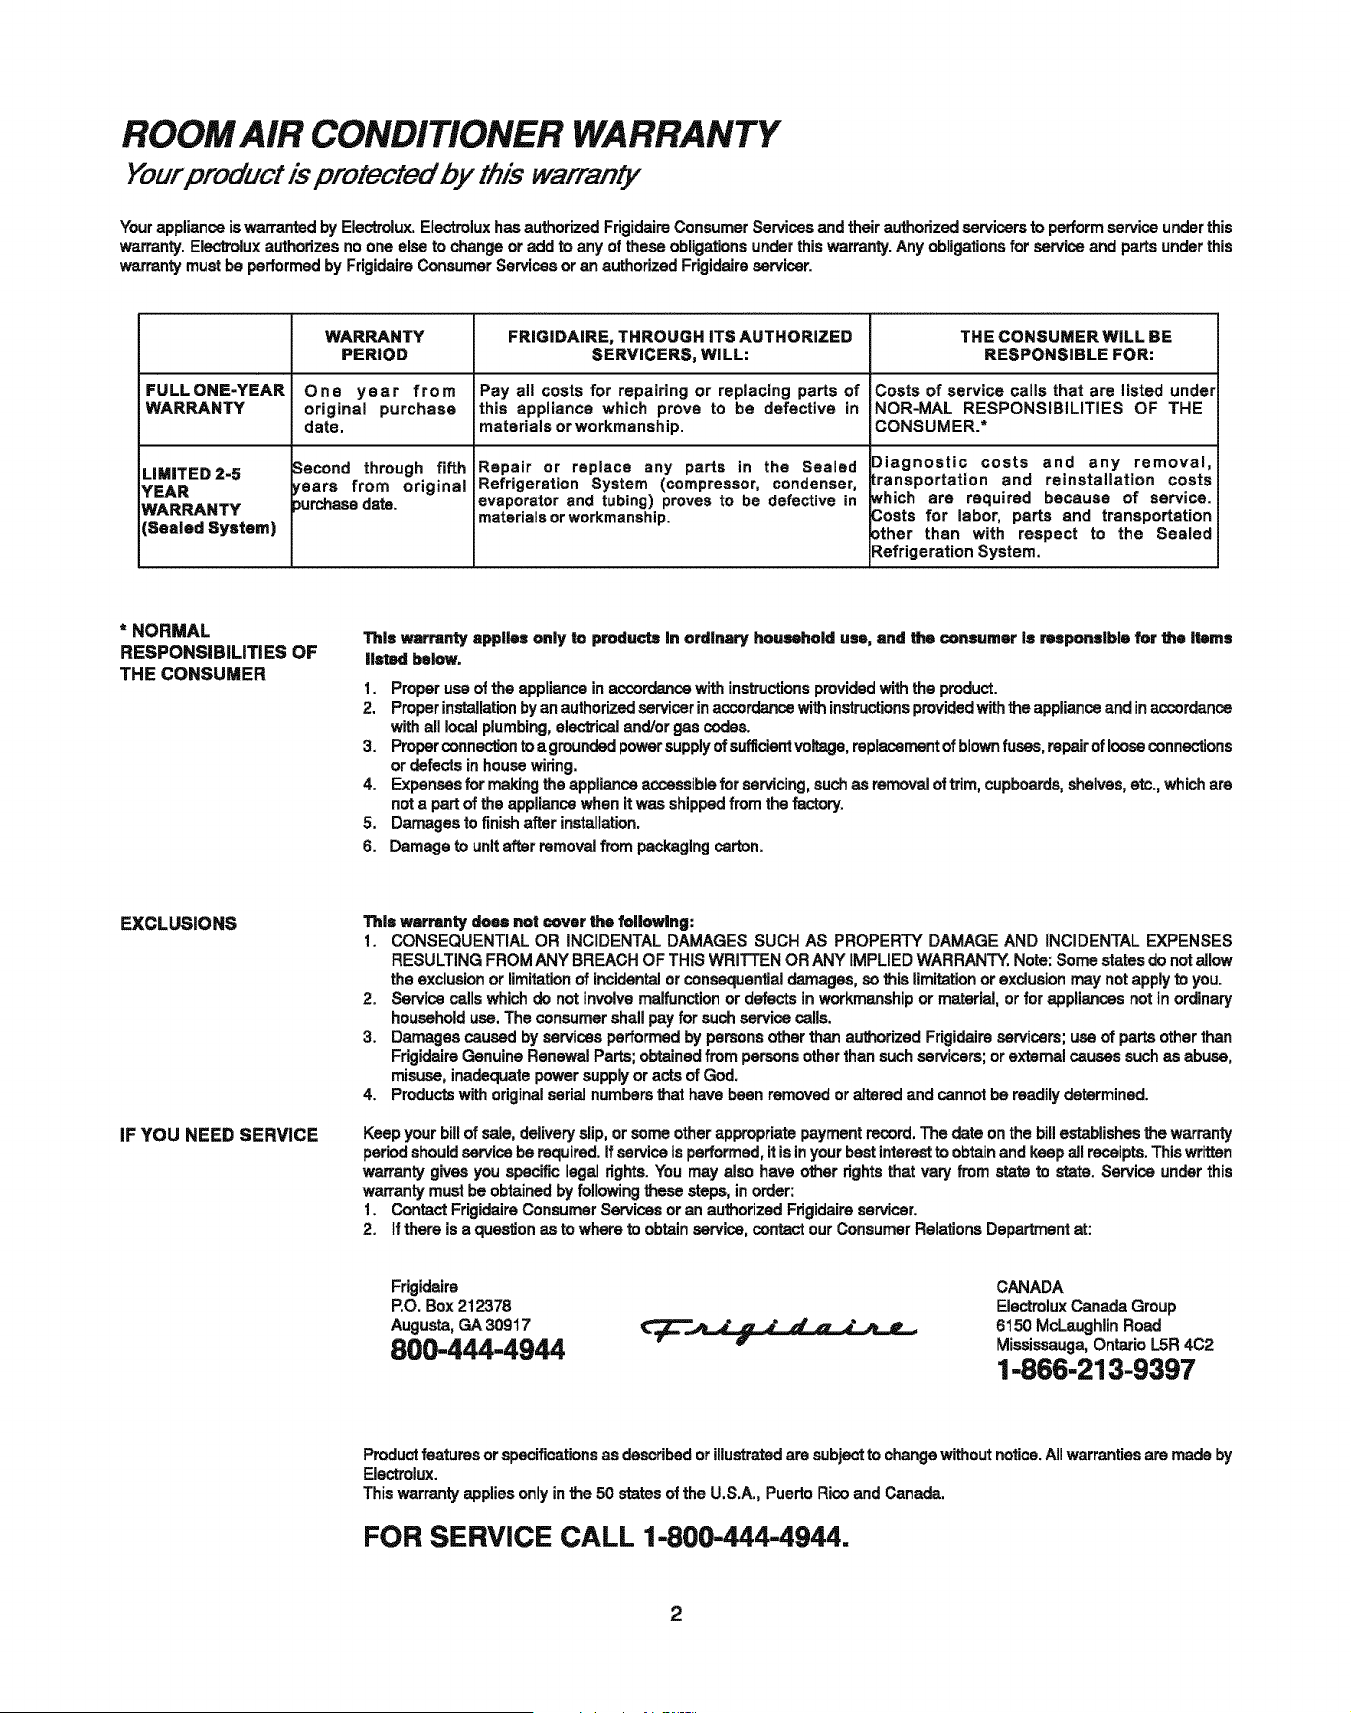
ROOM AIR CONDiTiONER WARRANTY
Yourproduct isprotected by this warranty
Yourapplianceiswarranted byElectrolux.Electroluxhas authorizedFrigidaireConsumerServicesandtheirauthorizedservicersto performserviceunderthis
warranty.Electroluxauthodzes no one else tochange or addto any of these obligationsunderthiswarranty.Anyobligationsfor service and partsunderthis
warrantymustbe performedby FrigidaireConsumerServicesor an authorizedFrigidaireservicer.
WARRANTY FRiGiDAIRE, THROUGH iTS AUTHORIZED THE CONSUMERWILL BE
PERIOD SERVICERS, WILL: RESPONSIBLE FOR:
FULLONE-YEAR One year from Pay all costs for repairing or replacing parts of Costs of service calls that are listed under
WARRANTY original purchase this appliance which prove to be defective in NOR-MAL RESPONSIBILITIES OF THE
date. materials or workmanship. CONSUMER.*
LiMiTED 2-5
YEAR
WARRANTY
(Sealed System)
_econd through fifth
ears from original
>urchase date.
Repair or replace any parts in the Sealed
Refrigeration System (compressor, condenser,
evaporator and tubing) proves to be defective in
materials or workmanship.
Diagnostic costs and any removal,
transportation and reinstallation costs
which are required because of service.
Costs for labor, parts and transportation
other than with respect to the Sealed
Refrigeration System.
* NORMAL
RESPONSIBILITIES OF
THE CONSUMER
This warranty applies only to products In ordinary household use, and He consumer is responsible for _heitems
listed below.
1. Proper useof the appliancein accordancewithinstructionsprovidedwith the product.
2. Properinstallationbyan authorizedservicer inaccordancewithinstructionsprovidedwiththe applianceand inaccordance
withall localplumbing,alect3"icaland/orgas codes.
3. Propercenne_on toa groundedpowersupplyofsuflicierdvoltage,replacementof blownfuses,repairoflooseconnections
or defects inhousewiring.
4. Expensesfor making the appliance accessible for servicing,suchasremovaloftrim,cupboards,shelves,etc., whichare
n= a part of the appliancewhenit was shippedfromthe factory.
5. Damagesto finishafter installation.
6. Damage to unitafterremovalfrom packagingcarton.
EXCLUSIONS
IF YOU NEED SERVICE
This warranty does not cover the following:
1. CONSEQUENTIAL OR INCIDENTAL DAMAGES SUCH AS PROPERTY DAMAGE AND INCIDENTAL EXPENSES
RESULTINGFROM ANY BREACHOF THIS WRITTEN OR ANY IMPLIEDWARRANTY:.Note: Somestatesdo notallow
the exclusionor limitationof incidentalor consequentialdamages,so this limitationor exclusionmay not applyto you.
2. Servicecallswhich do not involvemalfunction or defectsin workmanshipor material, orfor appliancesnot in ordinary
householduse. Theconsumershallpay for suchservice calls.
3. Damages caused by services performedby personsother than authorized Frigidaireservicers; use of partsother than
FrigidaireGenuineRenewalParts;obtainedfrom personsotherthansuchservicers;or externalcausessuchas abuse,
misuse, inadequatepowersupplyor acts of God.
4. Productswith originalserial numbersthat havebeen removed or altered and cannotbe readilydetermined.
Keepyour billof sale, deliveryslip, or someother appropriate paymentrecord. The date on the billestablishesthe warranty
periodshouldservice berequired.If serviceis performed,it isinyourbestinterestto obtainand keepall receipts.Thiswritten
warranty givesyou specificlegal rights.You may also have other rightsthat vary from state to state. Service underthis
warrantymust be obtainedbyfollowing these steps, inorder:
1. Contact FrigidaireConsumerServicesor an authorizedFrigidaireservicer.
2. ifthere is a quas_onas towhere to obtainservice, contactour ConsumerRelationsDepartmentat:
Frigidaire
P.O. Box212378
Augusta,GA30917
800-444-4944
CANADA
ElectroluxCanada Group
6150 McLaughiinRoad
Mississauga,OntarioL5R 4C2
1-866-213-9397
Productfeaturesorspecificationsas describedorillustratedare subjectto changewithoutnotice.Allwarrantiesare made by
Electmlux.
Thiswarrantyapplies onlyin the 50 statesof the U.S.A., PuedoRice and Canada.
FOR SERVICE CALL 1-800-444-4944.
2
Product Registration
Record Your Model and Serial Numbers
Record in the space provided below the model and serial numbers. On all models, the sedal
plate is located on the outside of the cabinet.
Register Your Product
The self-addressed PRODUCT REGISTRATION CARD should be filled incompletely, signed
and returned to the Frigidaire Company.
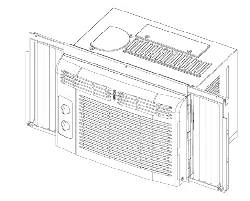
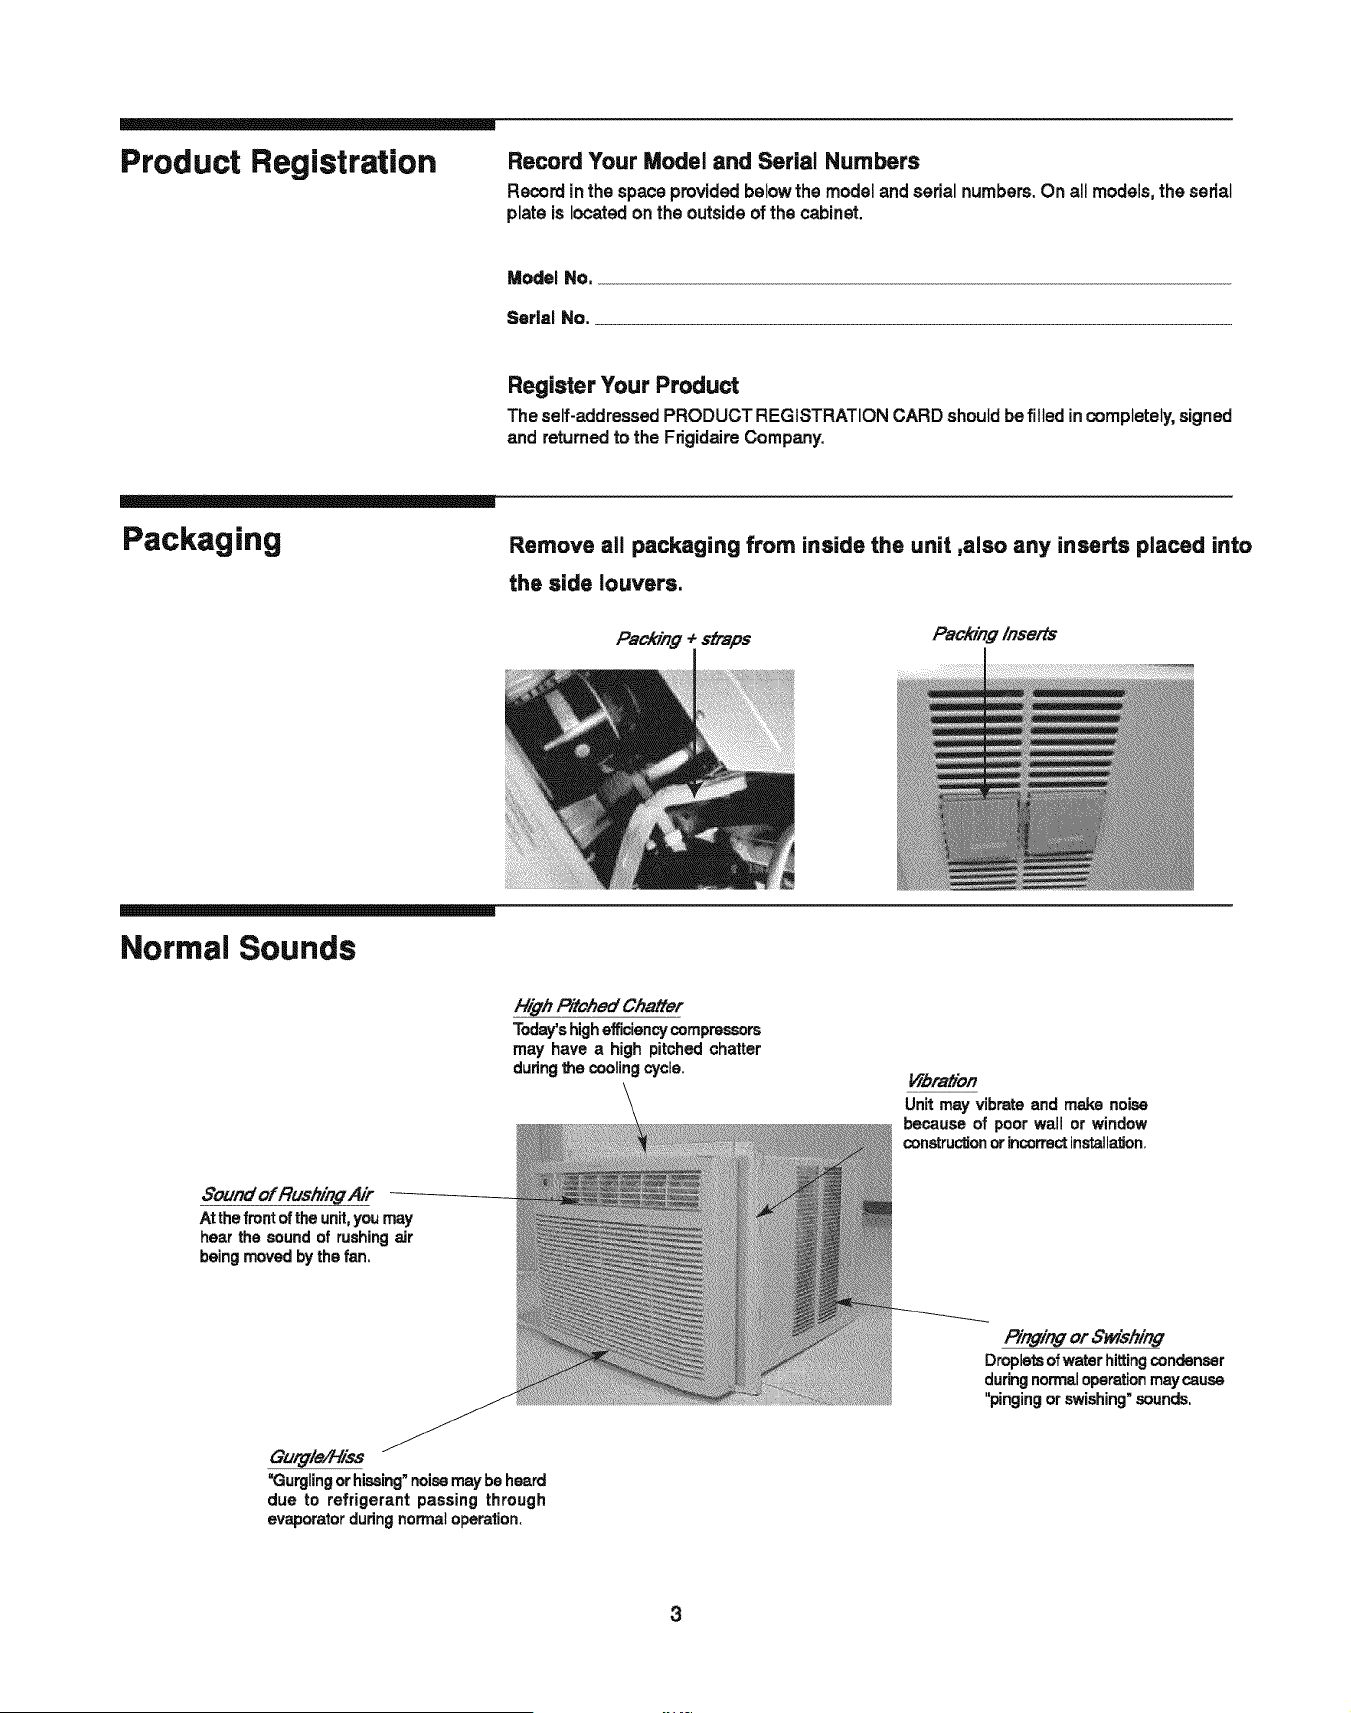
Packaging
Remove all packaging from inside the unit ,also any inserts placed into
the side louvers.
Packing _ straps
Pack/n#/needs
Normal Sounds
8ound of Rushing Air
Atthe front oftheunit,youmay
hear the sound of rushingair
beingmoved bythe fan.
F//:ghPitched Cha#er
Today'shighefficiencycompressors
may have a high pitched chatter
duringthe cooling cycle.
Vibrah'on
Unitmay vibrateand make noise
because of poor wall or window
constructionorincorrectinstalla_on.
P/ngin# or Swishin#
Dropletsofwater hittingcondenser
duringnormaloperationmaycause
"pinging or swishing"sounds,
Gurgled-lies
_Gurglingor hissing"noisemay be heard
due to refrigerant passing through
evaporatorduringnormaloperation.
3

Important Safety
Instructions
The power supply cord with
this air conditioner contains a current
detectiondevicedesignedto reducethe risk
of fire.
Please refer to the section 'Operationof
CurrentDevice'for details.
Inthe eventthat the powersupplycord is
damaged,it cannot be repairedit mustbe
replaced with a cord from the Product
Manufacturer.
Avoidfire hazardor electric
shock.Do not use an extensioncordor an
adaptorplug.Do notremoveanyprongfrom
the powercord.
Grounding type wall
receptacle
Power supply cord
with 3-prong grounding
plug and current
detection device
Read all instructions before using this air conditioner,
For Your Safety
Do notstoreor usegasolineor other flammable vaporsand liquidsinthe vicinity of thisorany
otherappliance.Read productlabelsforflammabilityand otherwarnings.
Prevent Accidents
Toreducethe riskoffire, electrical shock,orinjuryto personswhenusingyourairconditioner,
follow basic precautions,includingthe following:
• Besurethe electricalserviceis adequate for the modelyouhavechosen.Thisin_rmation
can be found on the serialplate,whichis locatedon the sideof the cabinetand behind the
grille.
• If the air conditioneris to be installedin a window,youwill probablywant to clean both
sidesof the glassfirst, if the window is a triple-tracktype with a screen panelincluded,
removethe screencompletelybeforeinstallation.
• Be sure the air conditionerhas been securelyand correctlyinstalledaccording to the
separate installationinstructionsprovidedwith this manual. Save this manual and the
installationinstructionsfor possiblefuture use in removingor reinstallingthisunit.
• When handlingthe air conditioner,be carefulto avoidcutsfromsharpmetalfinsonfront
and rearcoils.
Electrical information
The completeelectrical ratingof your new roomairconditioneris statedon the serial plate.
Referto the ratingwhen checkingthe electrical requirements.
• Be sure the air conditioner is properlygrounded.To minimizeshock and fire hazards,
propergroundingis important.The powercord is equippedwith a three-prong grounding
plugfor protectionagainstshockhazards.
, Your air conditionermust be used in a properlygroundedwall receptacle, if the wail
receptacleyouintendto use isnot adequately groundedor protectedbya time delayfuse
or circuitbreaker,have a qualifiedelectricianinstallthe properreceptacle.
• Do not run air conditionerwithouttheoutside protectivecover in place. This could
result in mechanical damagewithinthe airconditioner.
, Do not use an extension cord or an adapter plug.
READ THiS SECTION BEFORE ATTEMPTING TO OPERATE AIR CONDrrlONER.
Operation of Current
Device
Plug in &
press
NOTE: Some plugs have
buttons on the top.
The powersupplycordcontains a currentdevicethat sensesdamageto the powercord. To
test yourpowersupplycord dothe following:
1. Pluginthe AirConditioner.
2. The powersupplycord witlhaveTWO buttonsonthe plughead. Pressthe TEST button.
Youwill noticea clickas the RESET buttonpopsout.
3. Pressthe RESET button.Againyouwiltnoticea clickas the button engages.
4. The powersupplycord is now supplyingelectricityto the unit.(On some productsthisis
alsoindicatedby a lighton the plughead).
NOTES:
• Do notusethisdeviceto turnthe uniton or off.
, Alwaysmakesurethe RESET buttonis pushedinfor correct operation.
• The powersupplycord mustbe replacedifit fails to resetwheneitherthe TEST buttonis
pushed,orit cannotbe reset.A new onecan be obtainedfrom the productmanufacturer.
, If power supplycord is damaged, it CANNOT be repaired, it MUST be replacedby one
obtainedfrom the productmanufacturer.
4
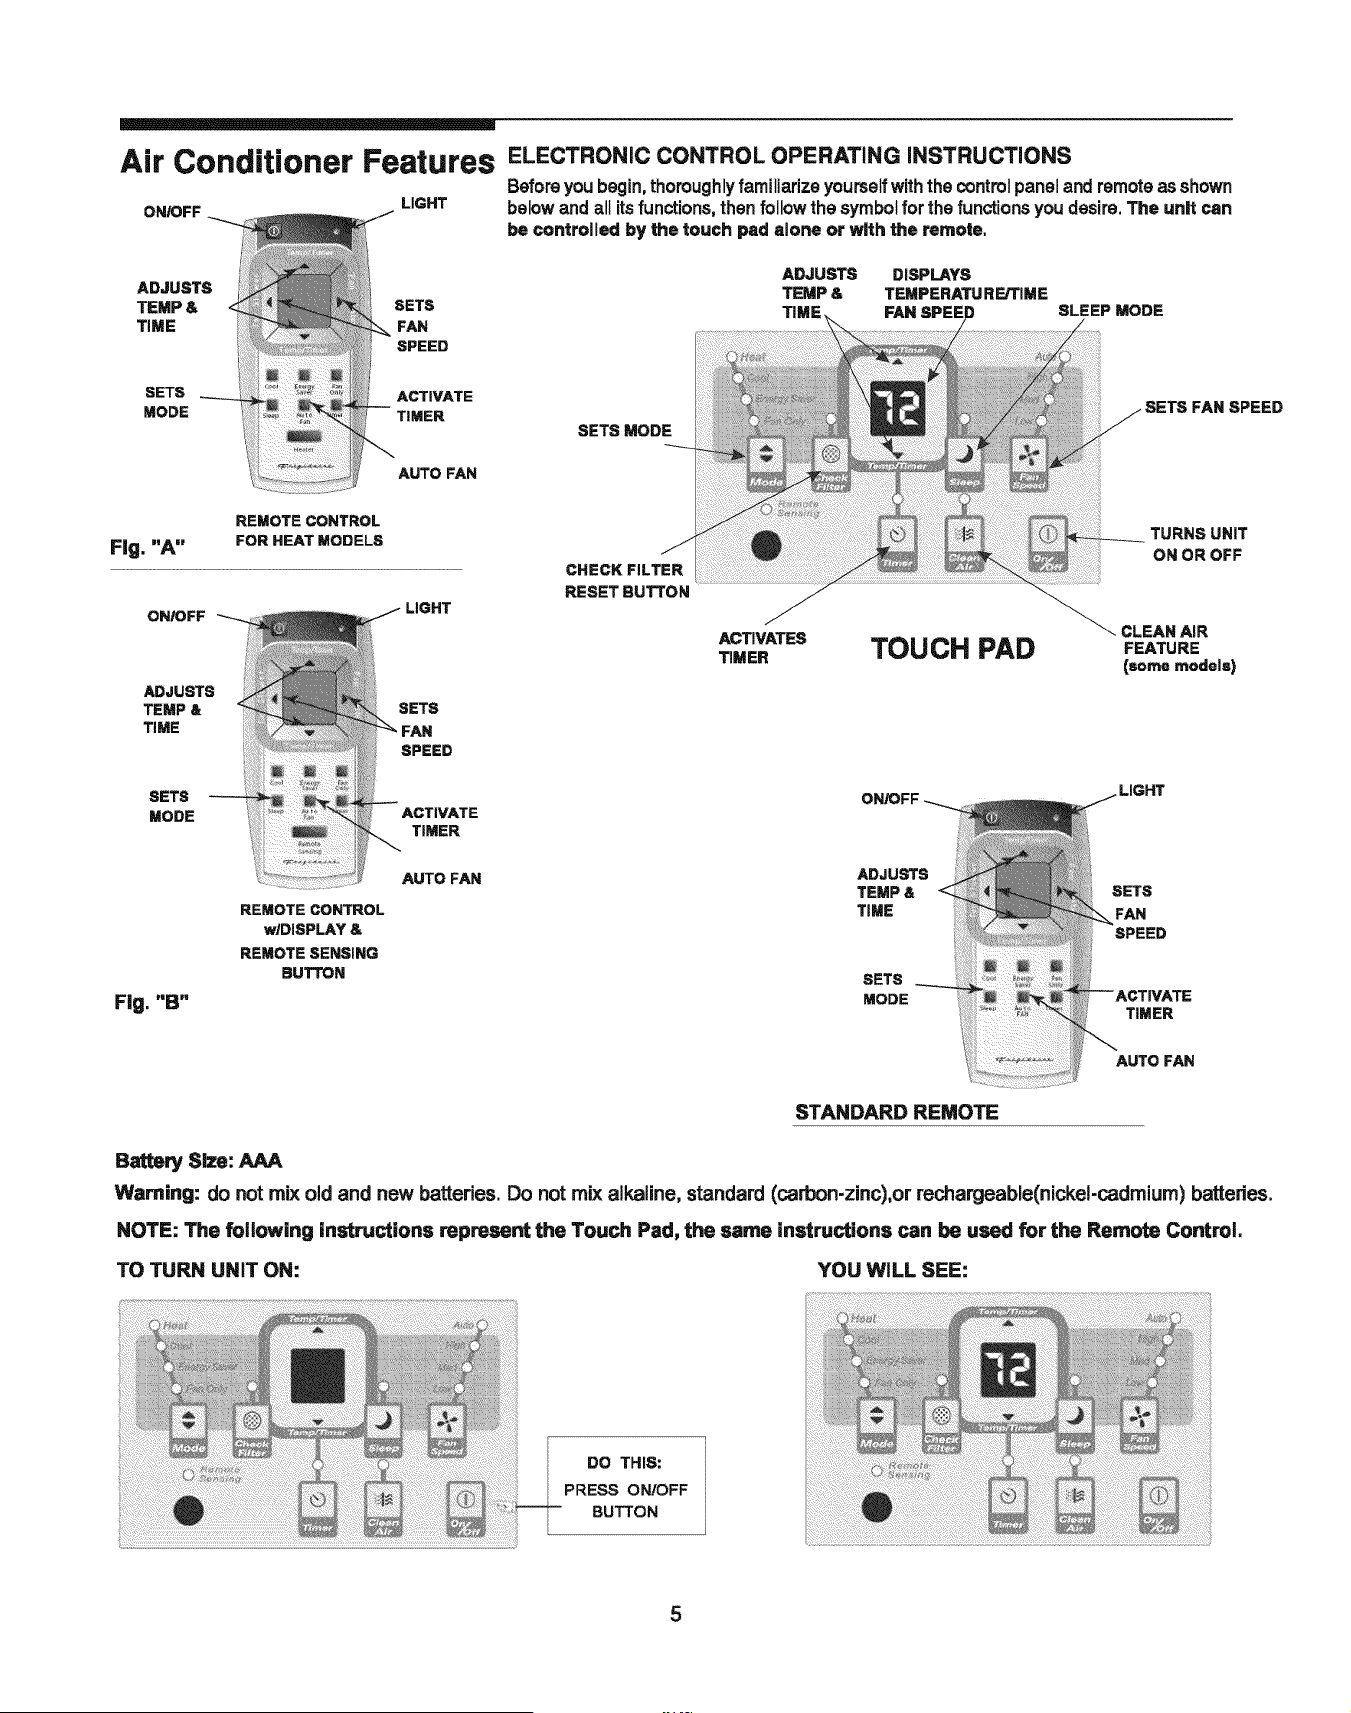
Air Conditioner Features
LIGHT
ON/OFF
ADJUSTS
TEMP &
TIME
SETS
FAN
SPEED
ELECTRONIC CONTROL OPERATING iNSTRUCTiONS
Beforeyou begin,thoroughly familiarize yourselfwiththe controlpaneland remoteasshown
belowand air itsfunctions,thenfollowthe symbolfor the functions youdesire.The unit can
be controlled by the touch pad alone or with the remote,
ADJUSTS DISPLAYS
TEMP & TEMPERATURE/TIME
TIME FAN SPEED SLEEP MODE
SETS ACTIVATE
MODE TIMER
AUTO FAN
SETS MODE
SETS FAN SPEED
Fig. "A"
REMOTE CONTROL
FOR HEAT MODELS
ON/OFF _
ADJUSTS
TEMP &
TIME
SETS
SPEED
CHECK FILTER
RESET BUTTON
ACTIVATES
TIMER
TOUCH PAD
TURNS UNiT
ON OR OFF
CLEAN AiR
FEATURE
(some models)
SETS
MODE
Fig. "B"
REMOTE CONTROL
wlDISPLAY &
REMOTE SENSING
BUTTON
ACTIVATE
TIMER
AUTO FAN
ADJUSTS
TEMP &
TIME
SETS
MODE
SETS
FAN
SPEED
AUTO FAN
STANDARD REMOTE
Battery Size: AAA
Warning: do not mix old and new batteries. Do not mix alkaline, standard (carbon-zinc),or rechargeable(nickel-cadmium) batteries.
NOTE: The following instructions represent the Touch Pad, the same instructions can be used for the Remote Control.
TO TURN UNIT ON: YOU WILL SEE:
DO THIS:
PRESS ON!OFF
BUTTON
5
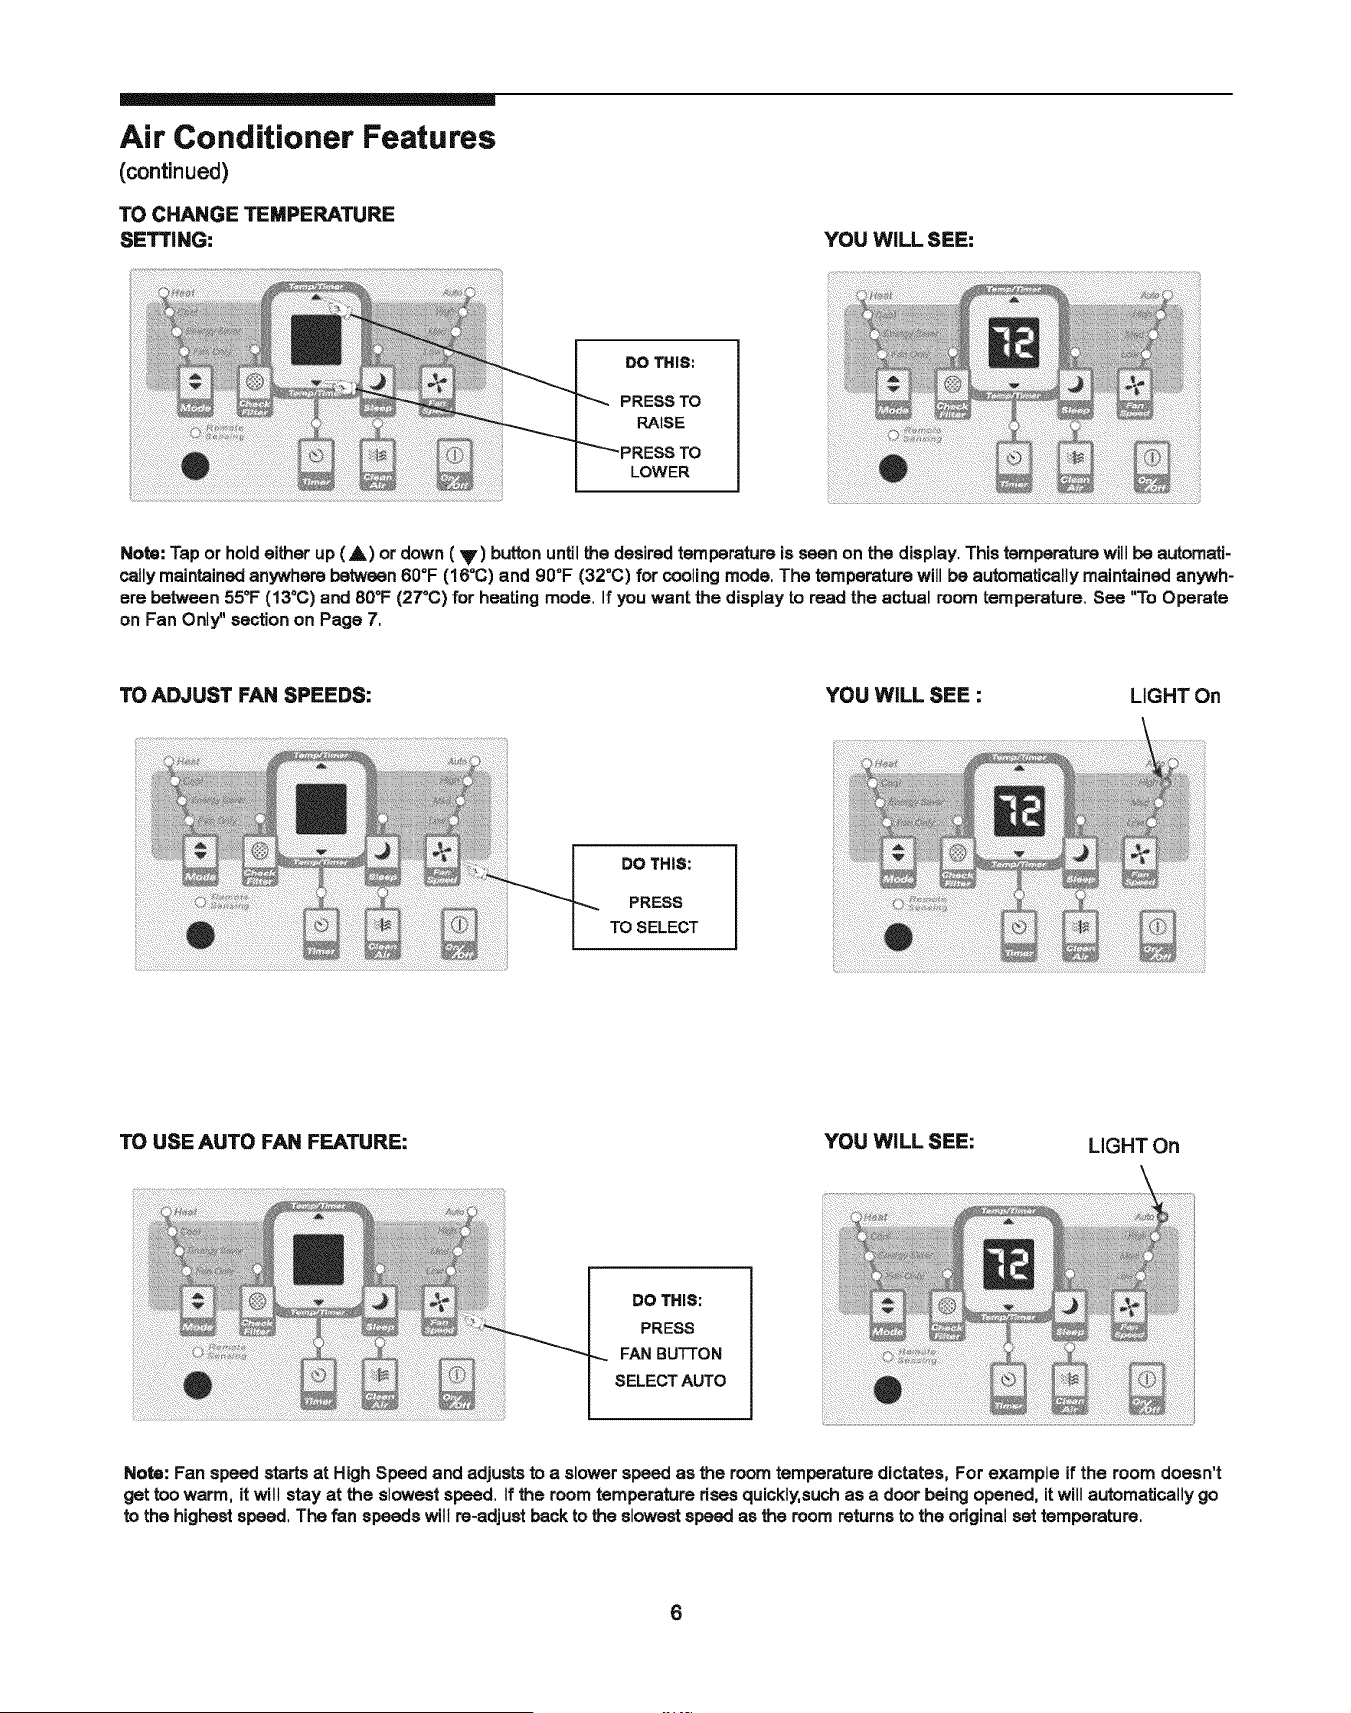
Air Conditioner Features
(continued)
TO CHANGE TEMPERATURE
SETTING:
YOU WILL SEE:
DO THIS:
PRESS TO
RAISE
LOWER
Note: Tap or hold either up (A) or down (V) button until the desired temperature is seen on the display. This temperature will be automati-
cally maintained anywhere between 600F (16°C) and 90°F (32°C) for cooling mode, The temperature will be automatically maintained anywh-
ere between 55_F (13°C) and 80°F (27°C) for heating mode. If you want the display to read the actual room temperature. See "To Operate
on Fan Only_'section on Page 7,
TO ADJUST FAN SPEEDS: YOU WiLL SEE : LIGHT On
DO THIS:
PRESS
TO SELECT
TO USE AUTO FAN FEATURE: YOU WiLL SEE:
LIGHT On
DO THIS:
PRESS
FAN BUTTON
SELECT AUTO
Note: Fan speed starts at High Speed and adjusts to a slower speed as the room temperature dictates, For example if the room doesn't
get too warm, it will stay at the slowest speed. If the room temperature dses quickly,such as a door being opened, it will automatically go
to the highest speed, The fan speeds will re-adjust back to the slowest speed as the room returns to the odginal set temperature.
6
Air Conditioner Features
(continued)
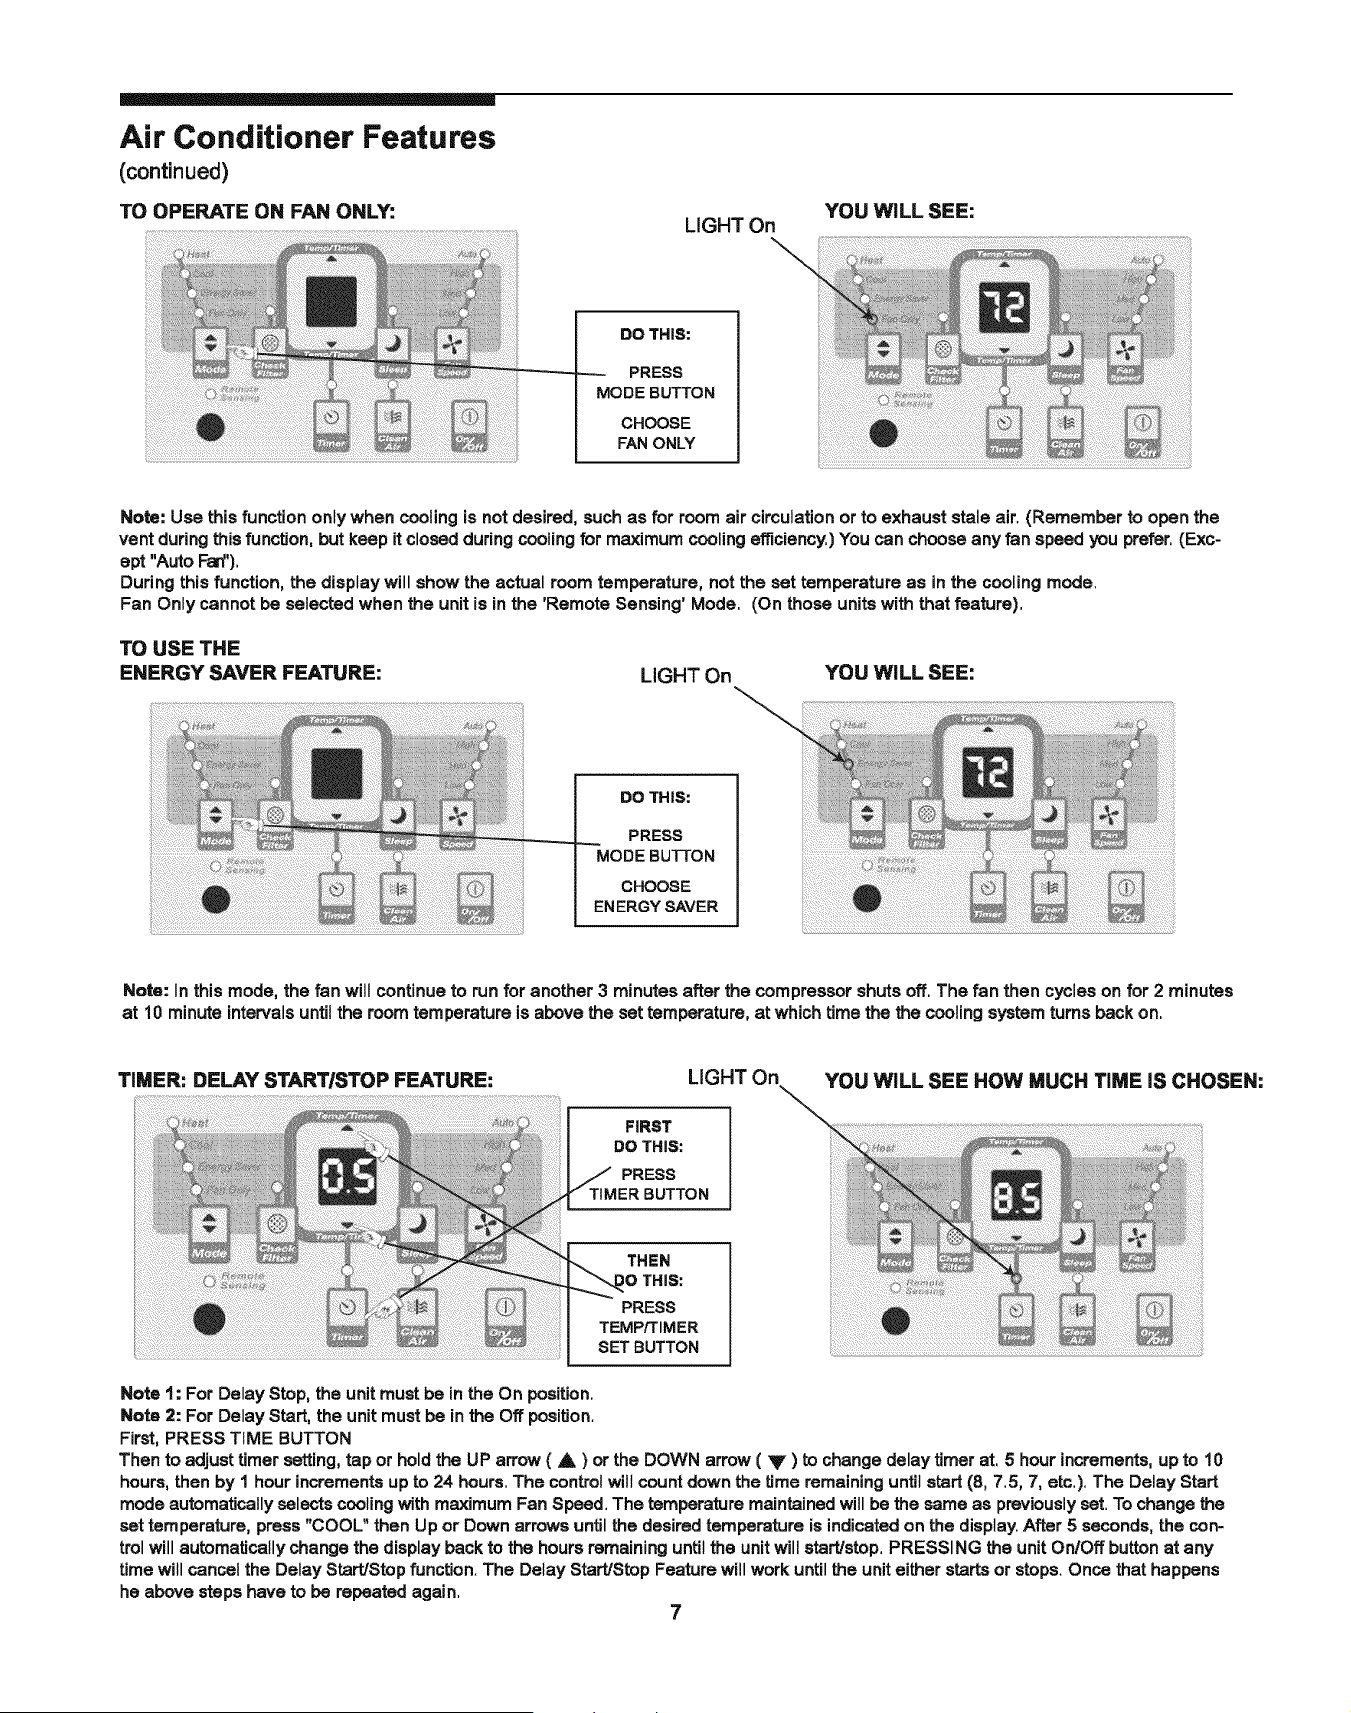
TO OPERATE ON FAN ONLY:
LIGHT On
YOU WILL SEE:
DO THIS:
PRESS
MODE BUTTON
CHOOSE
FAN ONLY
Note: Use this function only when cooling is not desired, such as for room air circulation or to exhaust stale air. (Remember to open the
vent during this function, but keep it closed during cooling for maximum cooling efficiency.) You can choose any fan speed you prefer. (Exc-
ept "Auto Fan").
During this function, the display will show the actual room temperature, not the set temperature as in the cooling mode.
Fan Only cannot be selected when the unit is in the 'Remote Sensing' Mode. (On those units with that feature).
TO USE THE
ENERGY SAVER FEATURE:
LIGHT On
-\
YOU WiLL SEE:
DO THIS:
PRESS
MODE BUTTON
CHOOSE
ENERGY SAVER
Note: In this mode, the fan will continueto runfor another 3 minutes after the compressorshutsoff, The fan then cycleson for2 minutes
at 10 minuteintervalsuntilthe roomternperatureis abovethe settemperature, at whichtime the the coolingsystemturnsbackon,
TIMER: DELAY START/STOP FEATURE:
FIRST
DO THIS:
PRESS
LIGHT On
YOU WiLL SEE HOW MUCH TiME iS CHOSEN:
THEN
tO THIS:
PRESS
TEMP/TIMER
SET BUTTON
Note 1: For Delay Stop, the unit must be in the On position.
Note 2: For Delay Start, the unit must be in the Off position.
First, PRESS TIME BUTTON
Then to adjust timer setting, tap or hold the UP arrow ( A ) or the DOWN arrow ( V ) to change delay timer at, 5 hour increments, up to 10
hours, then by I hour increments up to 24 hours. The control will count down the time remaining until start (8, 7.5, 7, etc.). The Delay Start
mode automatically selects cooling with maximum Fan Speed. The temperature maintained will be the same as previously set. To change the
set temperature, press "COOL" then Up or Down arrows until the desired temperature is indicated on the display. After 5 seconds, the con-
trol will automatically change the display back to the hours remaining until the unit will start/stop, PRESSING the unit On/Off button at any
time will cancel the Delay Start/Stop function. The Delay Start/Stop Feature will work until the unit either starts or stops. Once that happens
he above steps have to be repeated again.
7
Air Conditioner Features
(continued)
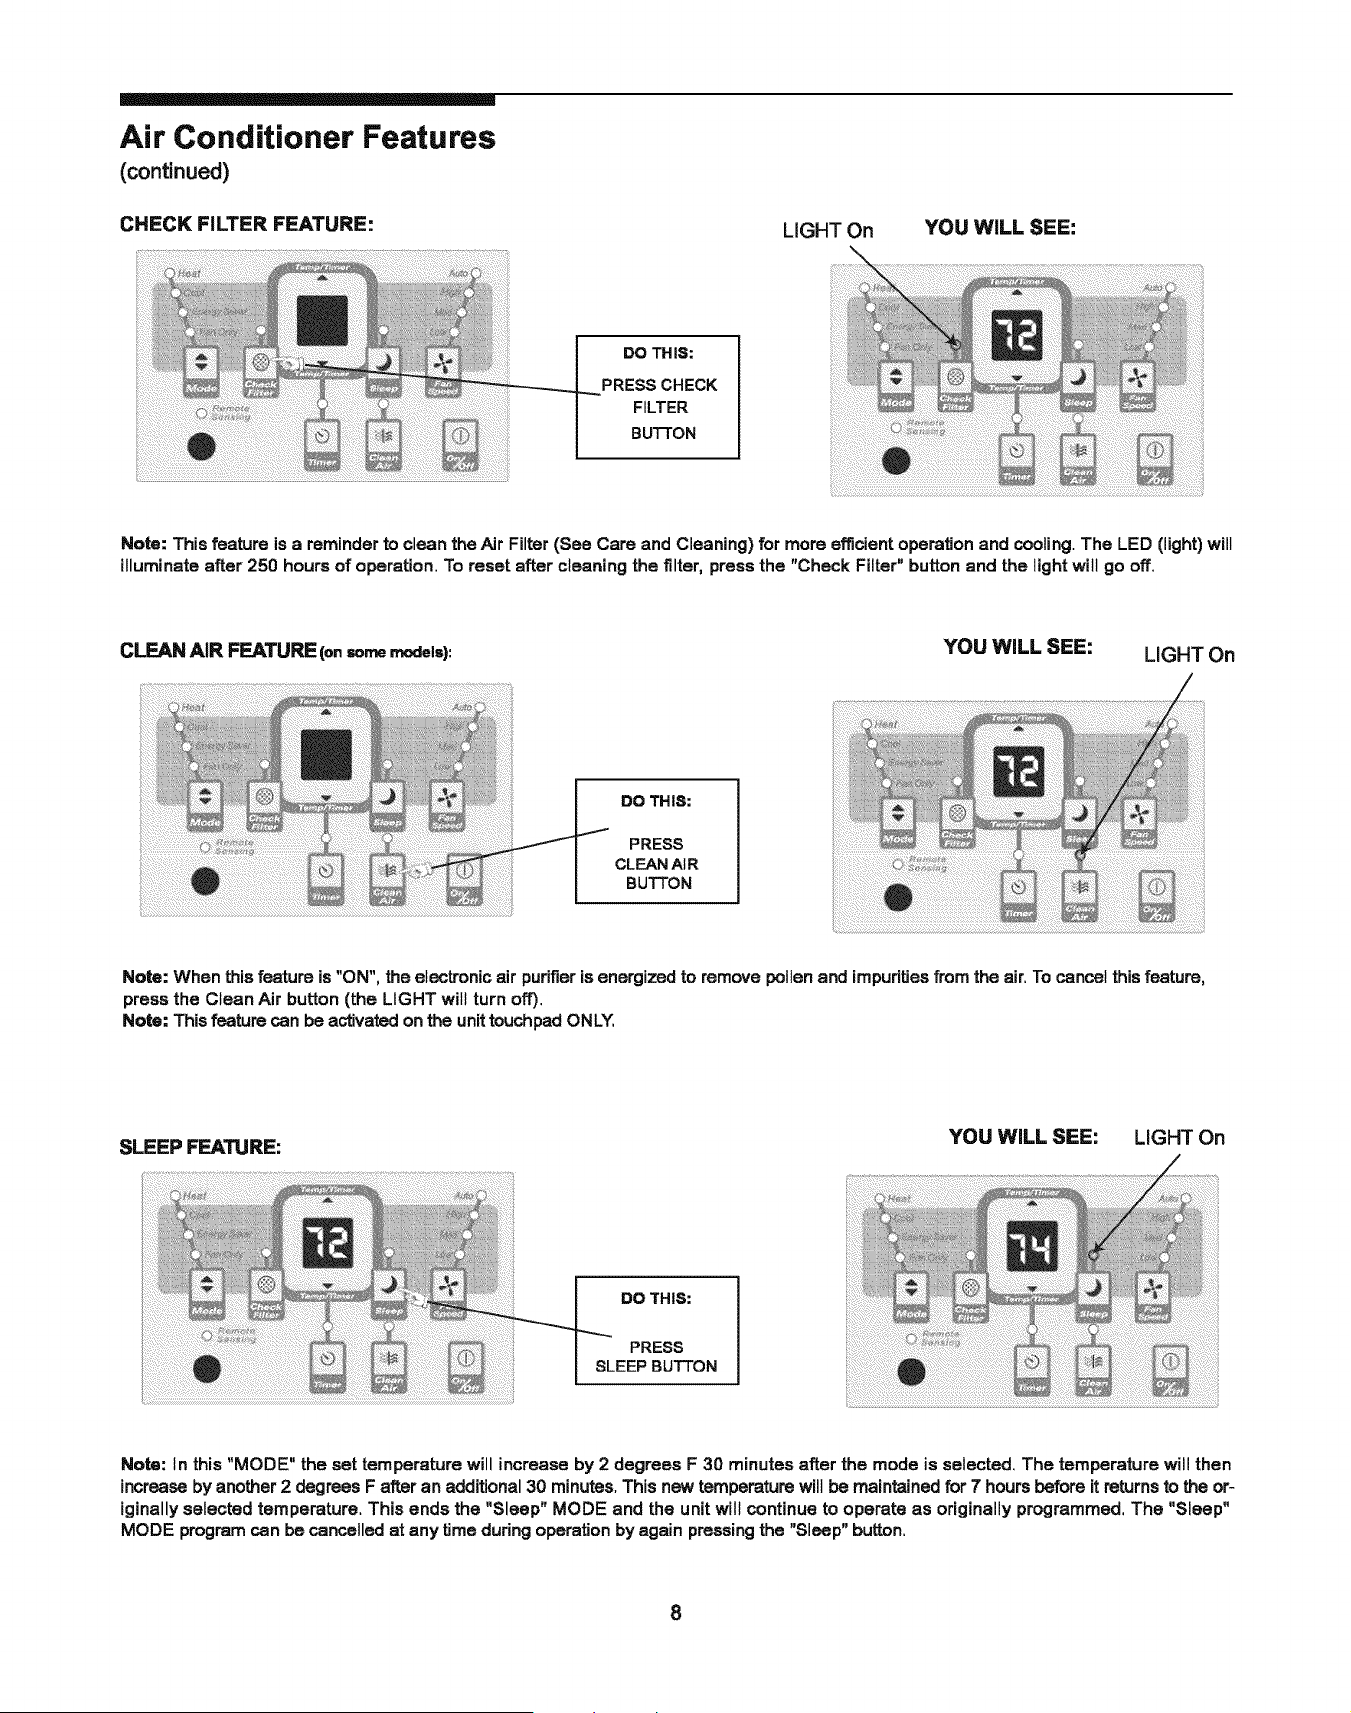
CHECK FILTER FEATURE:
LIGHT On
YOU WiLL SEE:
DO THIS:
PRESS CHECK
FILTER
BU'I-FON
Note: This feature is a reminder to clean the Air Filter (See Care and Cleaning) for more efficient operation and cooling. The LED (light) will
illuminate after 250 hours of operation. To reset after cleaning the filter, press the "Check Filter" button and the light wilt go off.
CLEAN AIR FEATURE (onsomemodels): YOU WiLL SEE: LIGHT On
DO THIS:
PRESS
CLEAN AIR
BUTTON
Note: When this feature is "ON", the electronic air purifier is energized to remove pollen and impurities from the air. To cancel this feature,
press the Clean Air button (the LIGHT will turn off).
Note: This feature can be activated on the unit touchpad ONLY,
SLEEP FEATURE:
YOU WILL SEE: LIGHT On
DO THIS:
PRESS
SLEEP BUTTON
Note: tn this "MODE" the set temperature will increase by 2 degrees F 30 minutesafter the mode is selected.The temperaturewill then
increaseby another2 degreesF after an additional30 minutes.Thisnew temperaturewillbe maintained for 7 hoursbeforeitreturnsto the or-
iginallyselectedtemperature.This ends the "Sleep" MODE and the unitwill continueto operate as originallyprogrammed,The "Sleep"
MODE programcan be cancelledat any time duringoperationby again pressingthe "Sleep" button.
8
Air Conditioner Features
(continued)
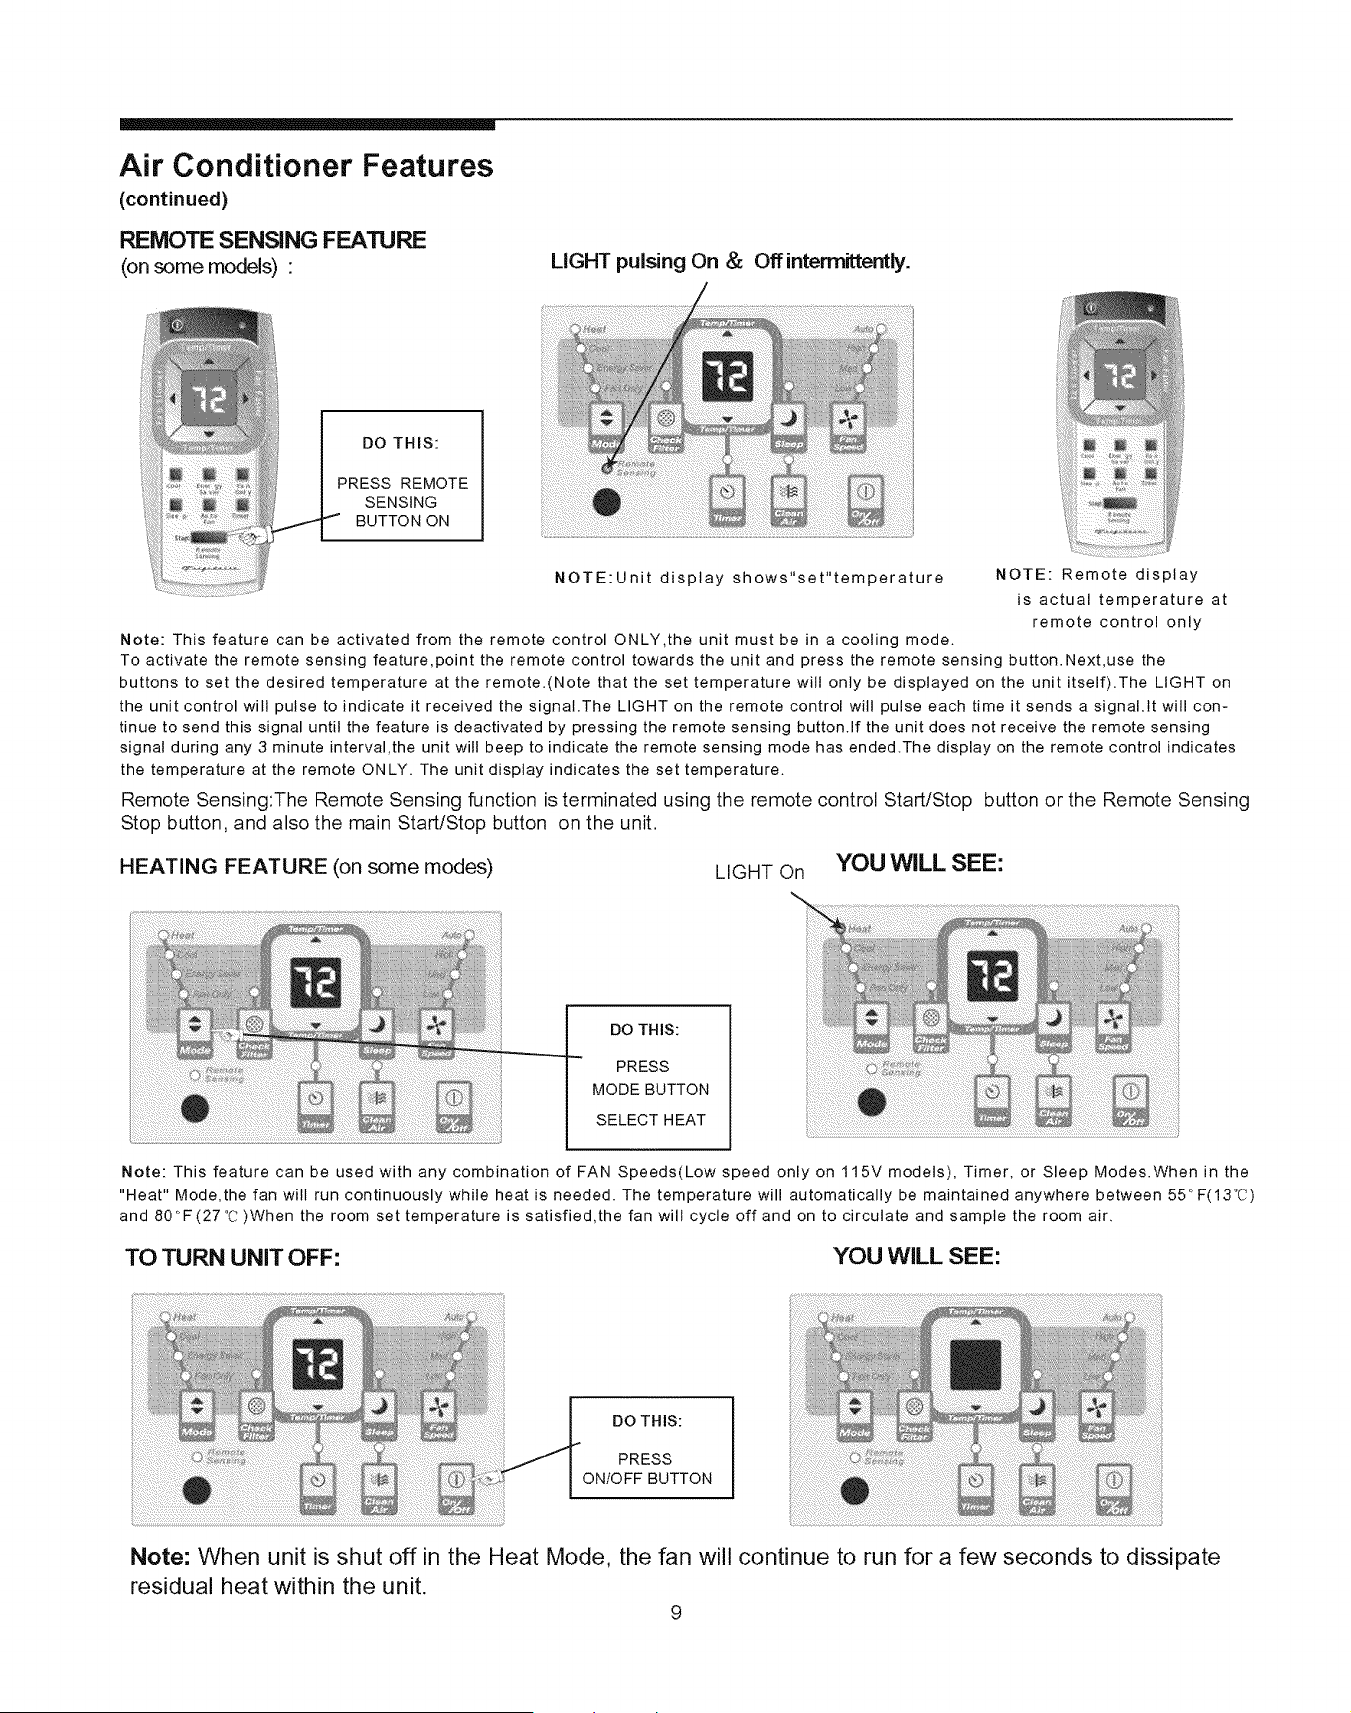
REMOTE SENSING FEA'RJRE
(on some models) •
LIGHT pulsing On & Offinterrnittently.
DO THIS:
PRESS REMOTE
SENSING
BUTTON ON
NOTE:Unit display shows"set"temperature NOTE: Remote display
is actual temperature at
remote control only
Note: This feature can be activated from the remote control ONLY,the unit must be in a cooling mode.
To activate the remote sensing feature,point the remote control towards the unit and press the remote sensing button.Next,use the
buttons to set the desired temperature at the remote.(Note that the set temperature will only be displayed on the unit itself).The LIGHT on
the unit control will pulse to indicate it received the signal.The LIGHT on the remote control will pulse each time it sends a signal.It will con-
tinue to send this signal until the feature is deactivated by pressing the remote sensing button.If the unit does not receive the remote sensing
signal during any 3 minute interval,the unit will beep to indicate the remote sensing mode has ended.The display on the remote control indicates
the temperature at the remote ON LY. The unit display indicates the set temperature.
Remote Sensing:The Remote Sensing function is terminated using the remote control Start/Stop button or the Remote Sensing
Stop button, and also the main Start/Stop button on the unit.
HEATING FEATURE (on some modes) LIGHT On YOU WiLL SEE:
DO THIS:
PRESS
MODE BUTTON
SELECT HEAT
Note: This feature can be used with any combination of FAN Speeds(Low speed only on 115V models), Timer, or Sleep Modes.When in the
"Heat" Mode,the fan will run continuously while heat is needed. The temperature will automatically be maintained anywhere between 55 ° F(13°C)
and 80°F(27°C )When the room set temperature is satisfied,the fan will cycle off and on to circulate and sample the room air.
TO TURN UNIT OFF: YOU WILL SEE:
DO THIS:
PRESS
ON/OFF BUTTON
Note: When unit is shut off in the Heat Mode, the fan will continue to run for a few seconds to dissipate
residual heat within the unit.
9
÷ _
Air Conditioner Features
(continued)
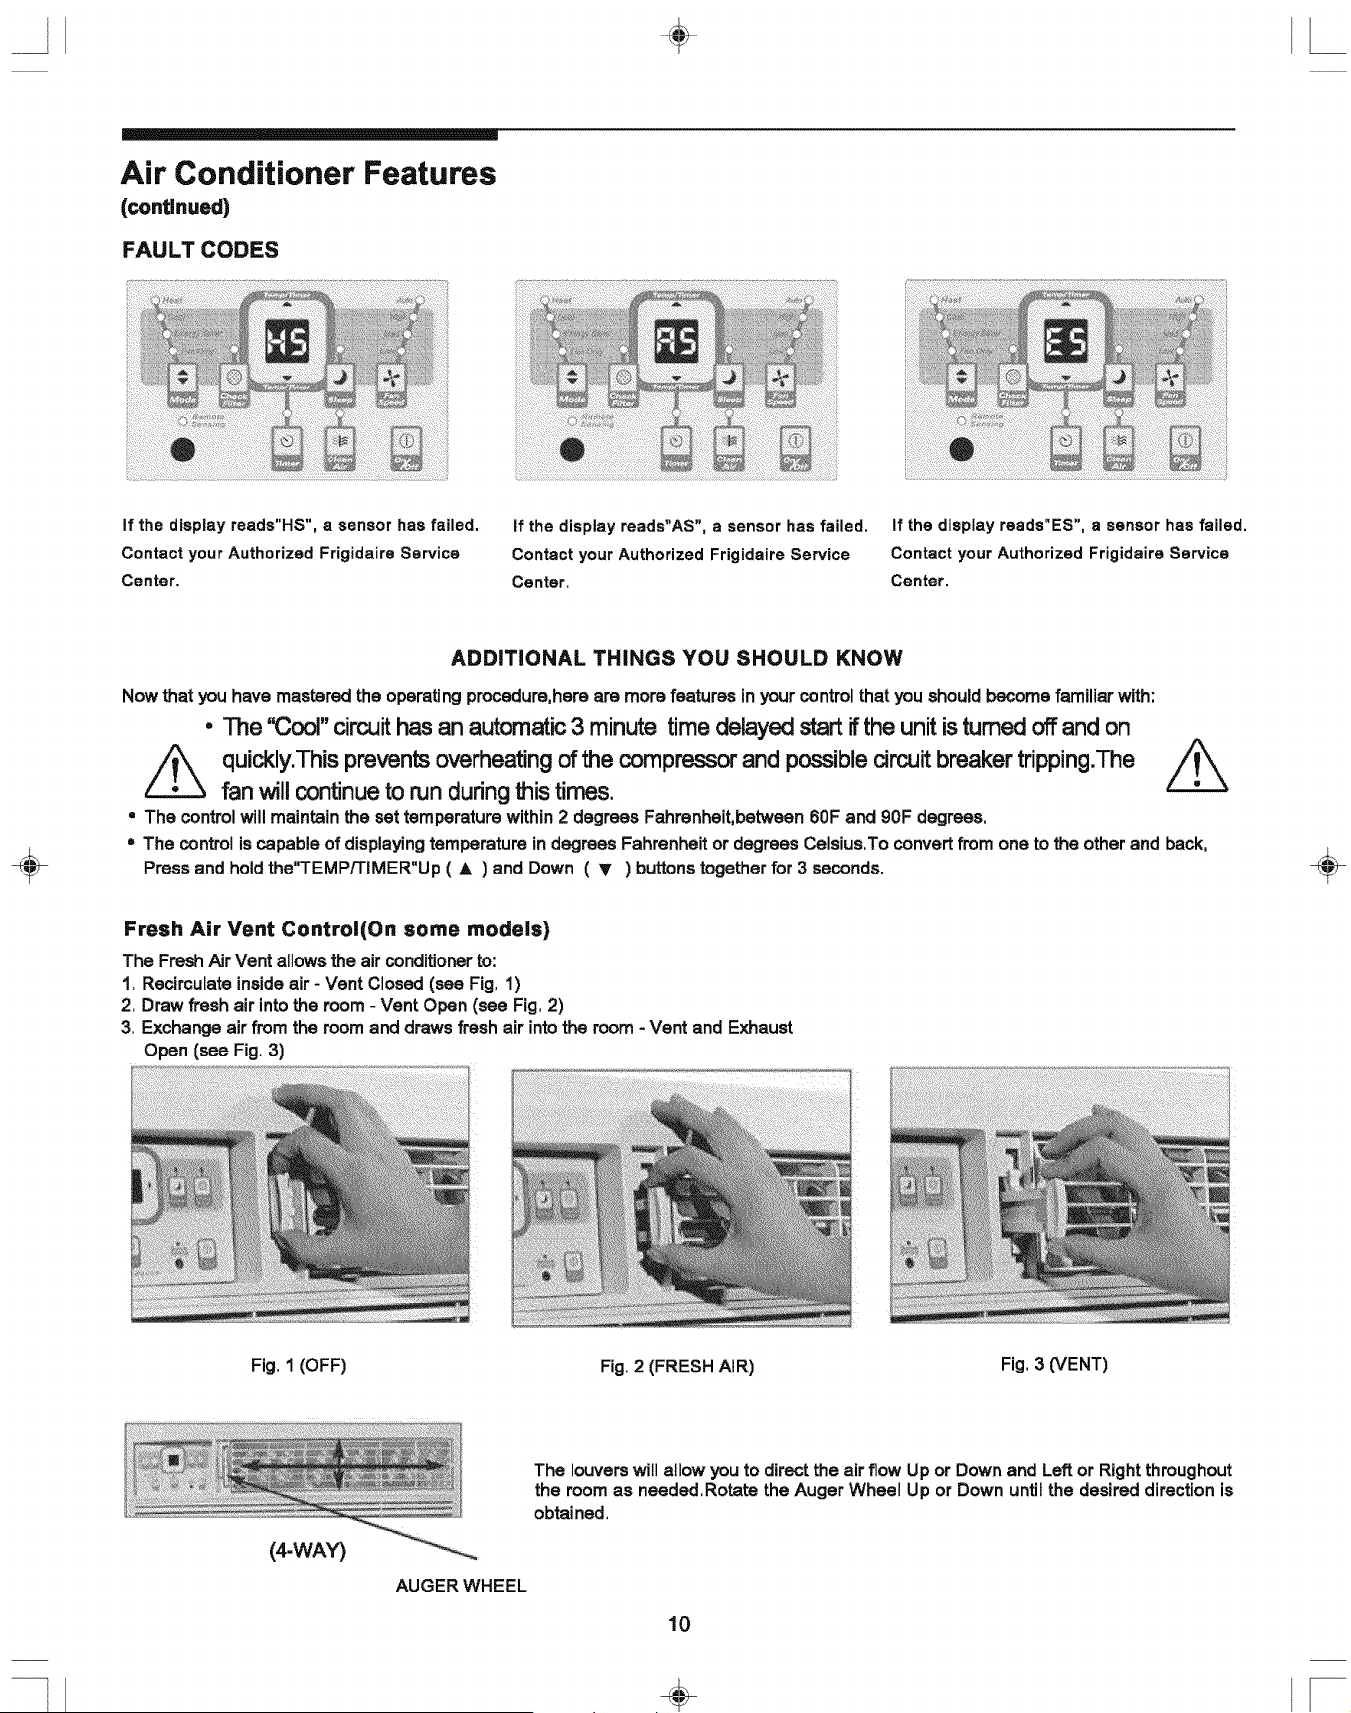
FAULT CODES
If the display reads"HS", a sensor has failed.
Contact your Authorized Frigidaire Service
Center.
If the display reads"AS", a sensor has failed. If the display reads"ES", a sensor has failed.
Contact your Authorized Frigidaire Service Contact your Authorized Frigidaire Service
Center. Center.
ADDiTiONAL THINGS YOU SHOULD KNOW
Now that you have mastered the operating procedure,here are more features in your control that you should become familiar with:
• The '_3oor'circuithasan automatic3 minute time delayedstartifthe unitisturnedoffand on
Z_ quickly.This prevents overheating of the compressor and possible circuit breaker tripping.The _
fan will continue to run during _is times.
= The control will maintain the set temperature within 2 degrees Fahrenheit, between 60F and 90F degrees.
• The control is capable of displaying temperature in degrees Fahrenheit or degrees Celsius,To convert from one to the other and back,
Press and hold the"TEMP/TIMER"Up ( A ) and Down ( _' ) buttons together for 3 seconds.
Fresh Air Vent Control(On some models)
The Fresh Air Vent allows the air conditioner to:
1. Recirculate inside air - Vent Closed (see Fig, 1)
2. Draw fresh air into the room - Vent Open (see Fig, 2)
3, Exchange air from the room and draws fresh air into the room - Vent and Exhaust
Open (see Fig, 3)
Fig. 1 (OFF)
Fig. 2 (FRESH AIR)
Fig, 3 (VENT)
(4-WAY)
AUGER WHEEL
The louvers will allowyou to direct the air flow Up or Down and Leftor Rightthroughout
the roomas needed,Rotatethe Auger Wheel Up or Down untilthe desireddirectionis
obtained,
10
÷ --

Care and Cleaning
ii iii!iiiiiiiiiiiili!iiiiii!i!iii!i!illI
Clean your air conditioneroccasionallyto keep it lookingnew. Be sure to unplug the
unit before cleaning to prevent shock or fire hazards.
Air Filter Cleaning
The air filter shouldbe checkedat least once a monthto see if cleaningis necessary.
Trappedparticlesin the filter can buildup and cause an accumulationof frost on the
coolingcoils.
• Push the vent handleto the Vent Closedposition(where applicable).
• Open the front panel.
• Grasp the filterbythe center and pullup and out.
• Wash the filter using liquiddishwashing detergent and warm water. Rinse filter
thoroughly. Gentlyshake excesswater from the filter. Be sure filter is thoroughlydry
beforereplacing.
• Or, insteadof washingyou may vacuumthe filterclean.
Cabinet Cleaning
• Be sureto unplugthe air conditioner to preventshockor fire hazard.The cabinetand
front may bedustedwithanoil-freeclothorwashedwitha clothdampenedinasolution
of warmwater and mildliquiddishwashingdetergent.Rinsethoroughlyand wipe dry.
• Never use harshcleaners,wax or polishon the cabinetfront.
• Be suretowringexcesswaterfrom the clothbeforewipingaround the controls. Excess
water in or around the controls may cause damage to the air conditioner.
• Plug inair conditioner.
Winter Storage
If you plan to storethe air conditionerduring the winter,remove it carefullyfrom the
window accordingto the installationinstructions.Cover it with plasticor returnit to the
originalcarton.
÷ ÷
Energy Saving ideas
• Donotblockalrflowlnsldewlthbllnde, curtalnsorfumlture;oroutsldewlthehrubs,
enclosures, or other buildings,
. Thecapacityof the room air conditioner mustfitthe roomsize for efficientandsatisfactory
operation.
, Installthe roomair conditioneronthe shadyside of yourhome.Awindowthatfaces north
is bestbecause it is shadedmostof the day.
, Close the fireplace damper, floor and wall registersso coot air does notescape up the
chimneyand intothe ductwork.
, Keepblindsand drapesinotherwindowsclosedduringthe sunniestpartof the day.
• Clean the airfilteras recommendedin the section"Care and Cleaning."
, Properinsulationand weatherstrippingin yourhomewillhelpkeepwarm air out and cool
airin.
, Externalhouseshadingwithtrees, plantsor awningswill helpreducethe air conditioner's
workload.
, Operate heat producingappliancessuchas ranges, washers, dryers and dishwashers
duringthe coolestpartof the day.
11
-1 ÷ I-
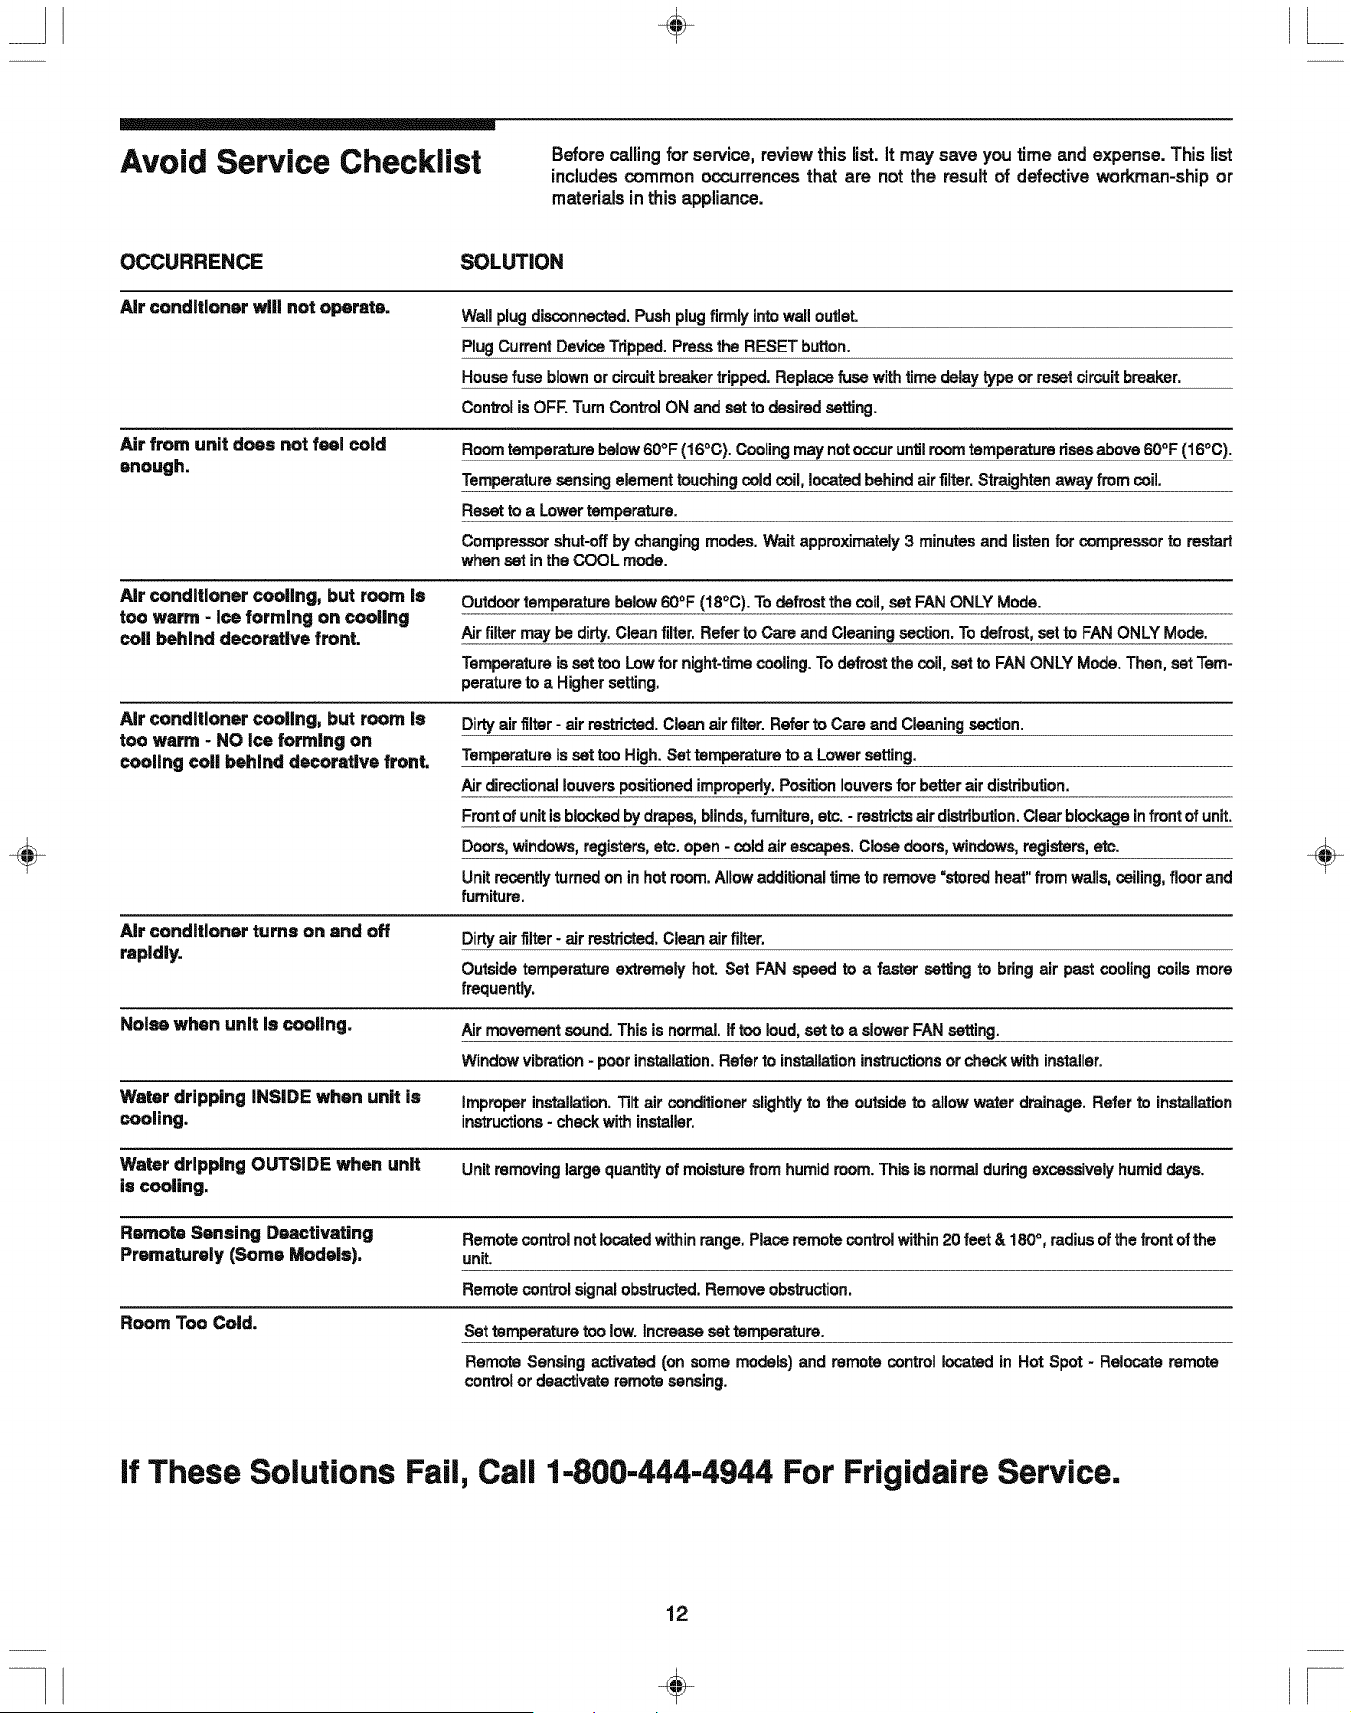
Avoid Service Checklist
Beforecallingfor service,reviewthis list.It may save you time and expense.This list
includescommonoccurrencesthat are not the result of defectiveworkman-shipor
materialsin thisappliance.
÷
OCCURRENCE SOLUTION
Air conditioner will not operate.
Wall plugdisconnected.Pushplugfirmly intowalloutlet.
PlugCurrentDeviceTripped.Pressthe RESET button.
Housefuse blownor circuitbreakertripped.Replacefusewith time delaytypeor resetcircuitbreaker.
Controlis OFF. TurnControlON and set to desiredsetting.
Air from unit does not feel cold
enough.
Roomtemperaturebelow60°F (16°C). Coolingmay not occuruntilroomtemperature risesabove60°F (16°C).
TemperaturesensingelementtouchingcoldcoU,locatedbehindair filter.Straightenaway from coil,
Resetto a Lowertemperature.
Compressorshut-offby changingmodes.Wait approximately 3 minutes and listenfor compressorto restart
when setin the COOL mode.
Air conditioner cooling, but room Is
too warm - ice forming on cooling
coil behind decorative front,
Outdoortemperature below60°F (18°C). To defrost the coil,set FANONLY Mode.
Airfilter may be dirty.Clean filter.Referto Care and Cleaningsection.Todefrost,set to FAN ONLYMode.
Temperatureisset too Low for night-timecooling.To defrostthe coil, set to FANONLY Mode.Then, setTem-
peratureto a Highersetting.
Air conditioner cooling, but room is
too warm - NO ice forming on
cooling coil behind decorative front.
Dirtyair filter- air restricted.Clean air filter.Referto Care and Cleaningsection.
Temperatureisset too High. Set temperatureto a Lowersetting.
Air directionallouverspositionedimproperly,Positionlouversfor betterair distribution,
Frontofunitis blockedbydrapes,blinds,furniture, etc. - restrictsair distribution.Clear blockagein frontofunit.
Doors,windows,registers,etc. open- cold air escapes. Closedoors,windows,registers,etc.
Unitrecentlyturnedon in hot room.Allowadditionaltime to remove=storedheat"fromwalls,ceiling, floorand
furniture.
Air conditioner turns on and off
rapidly.
Noise when unit is cooling.
Dirtyair filter- air restricted.Clean air filter.
Outside temperatureextremelyhot. Set FAN speed to a faster seffing to bring air past coolingcoilsmore
frequently.
Air movementsound.Thisis normal. If too loud,setto a slowerFANsetting.
Windowvibration- poor installation.Referto installationinstructionsor checkwith installer.
Water dripping iNSiDE when unit is improperinstallation.Tiltair conditioner slightlyto the outsideto allow water drainage. Refer to installation
cooling, instructions- checkwithinstaller.
Water dripping OUTSIDE when unit Unitremovinglargequantityof moisture fromhumidroom. Thisis normalduringexcessivelyhumiddays.
is cooling,
Remote Sensing Deactivating Remotecontrolnotlocatedwithinrange,Place remotecontrol within20feet & 180°, radiusof the front of the
Prematurely (Some Models), unit.
Remotecontrolsignalobstructed.Removeobstruction.
Set temperature toolow. Increaseset temperature.
Remote Sensingactivated(on some models) and remote controllocated in Hot Spot - Relocate remote
controlor deactivateremotesensing.
Room Too Cold.
÷
if These Solutions Fail, Call 1-800-444-4944 For Frigidaire Service.
12
÷