W11037201A
W11037202A - SP
If you have any problems or questions, visit us at www.whirlpool.com
Pour tout problème ou toute question, consulter www.whirlpool.ca
Use & Care Guide
Guide d’utilisation et d’entretien
Top-Loading High Efficiency Low-Water Washer
Laveuse haute efficacité à faible consommation
d’eau avec chargement par le dessus
Para obtener acceso
al Manual de uso y
cuidado en español, o para
obtener información adicional
acerca de su producto, visite:
www.whirlpool.com.
Designed to use only HE High Efficiency
detergents.
Conçue pour l’utilisation d’un détergent haute
efficacité seulement.
2
Table of Contents
WASHER SAFETY ............................................................2
WHAT’S NEW UNDER THE LID? ....................................4
CONTROL PANEL AND FEATURES ...............................5
Dispensers and faucet ....................................................... 6
CYCLE GUIDE ..................................................................7
USING YOUR WASHER ...................................................8
WASHER MAINTENANCE ..................................................13
TROUBLESHOOTING ..........................................................15
WARRANTY............................................................................20
ASSISTANCE OR SERVICE .............................. Back Cover
Table des matières
SÉCURITÉ DE LA LAVEUSE .........................................21
QUOI DE NEUF SOUS LE COUVERCLE? ...................22
TABLEAU DE COMMANDE
ET CARACTÉRISTIQUES .............................................23
Distributeurs et robinet ....................................................25
GUIDE DES PROGRAMMES .........................................26
UTILISATION DE LA LAVEUSE .....................................28
ENTRETIEN DE LA LAVEUSE ............................................ 34
DÉPANNAGE ..........................................................................36
GARANTIE ..............................................................................44
ASSISTANCE OU SERVICE ................. Couverture arrière
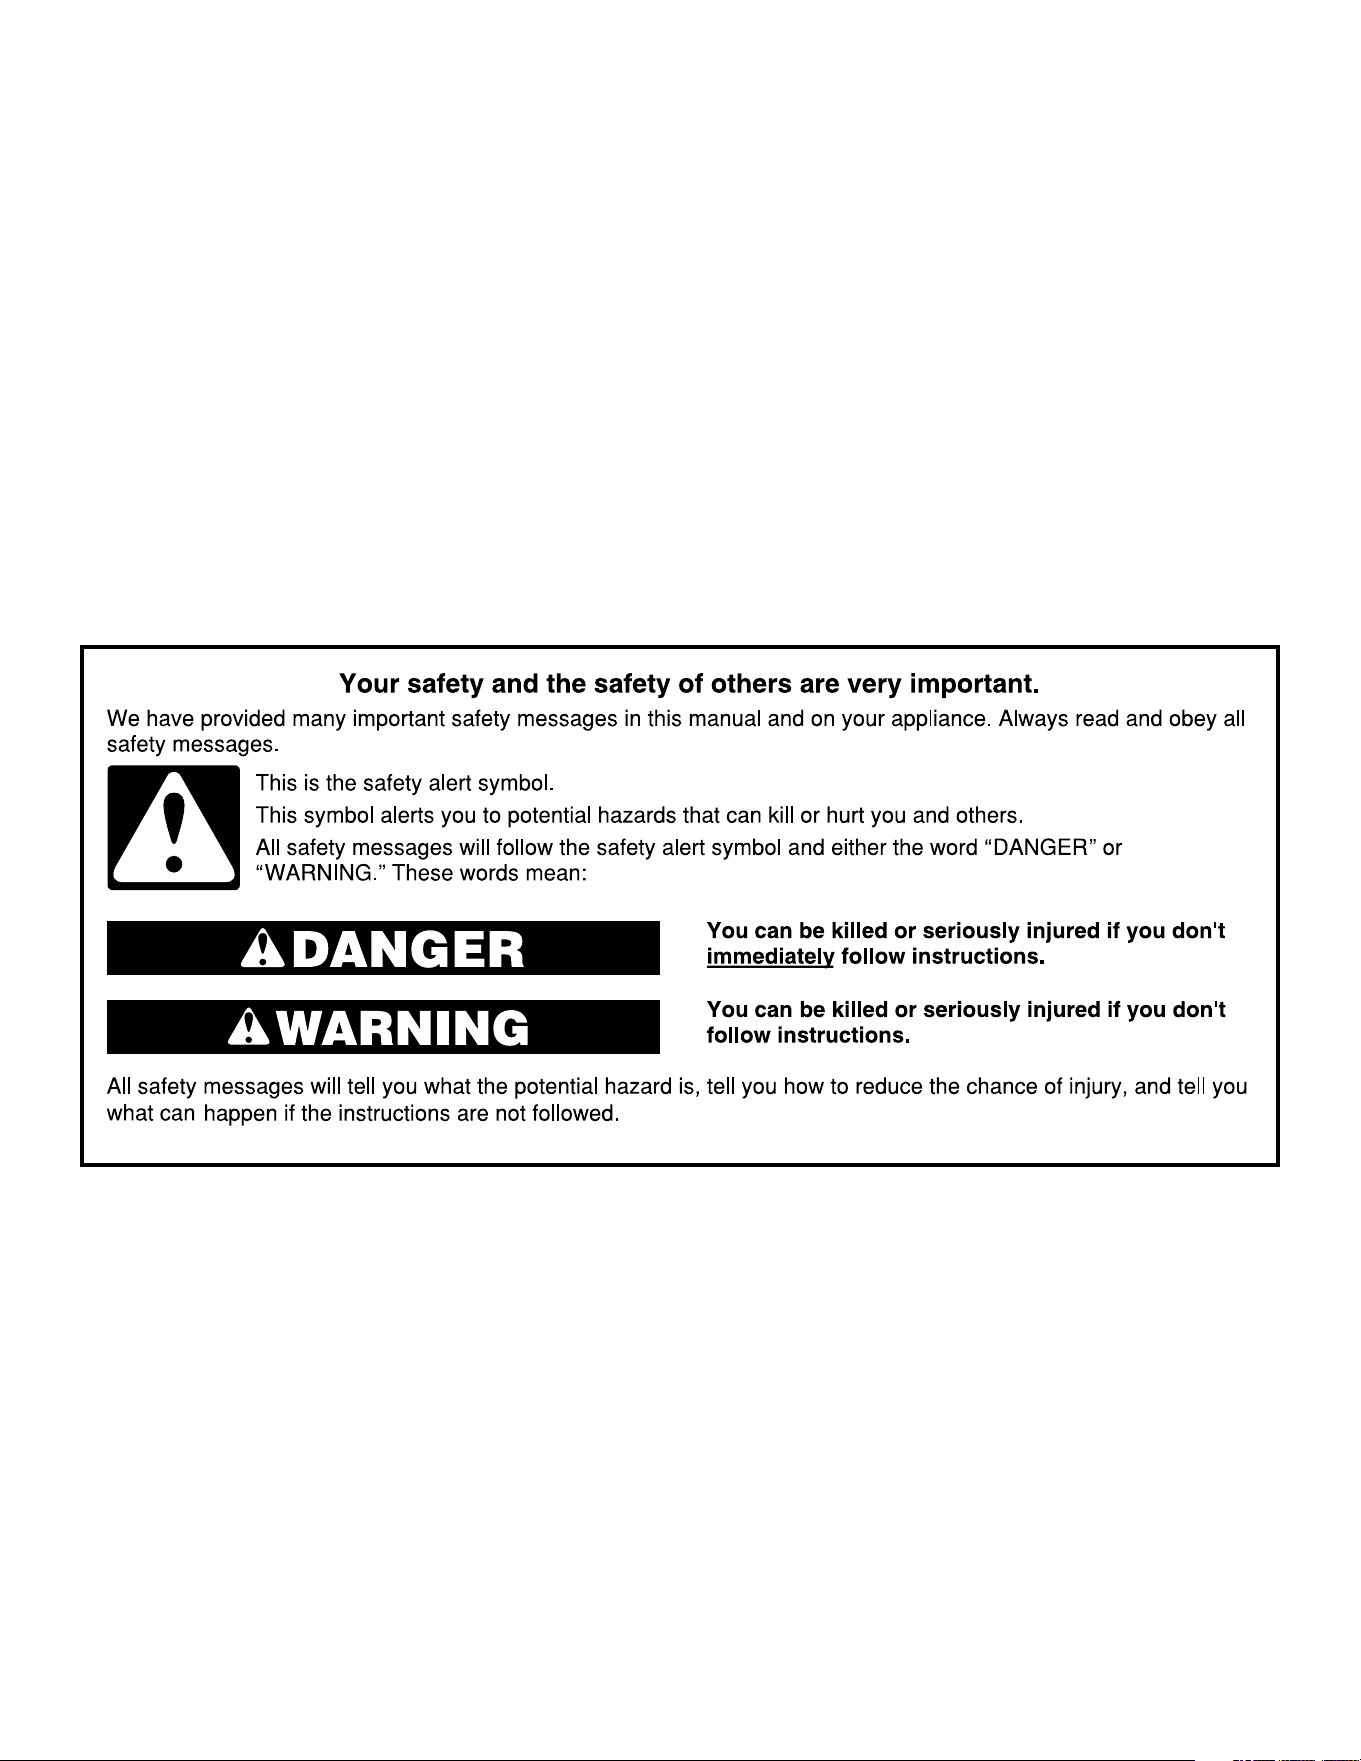
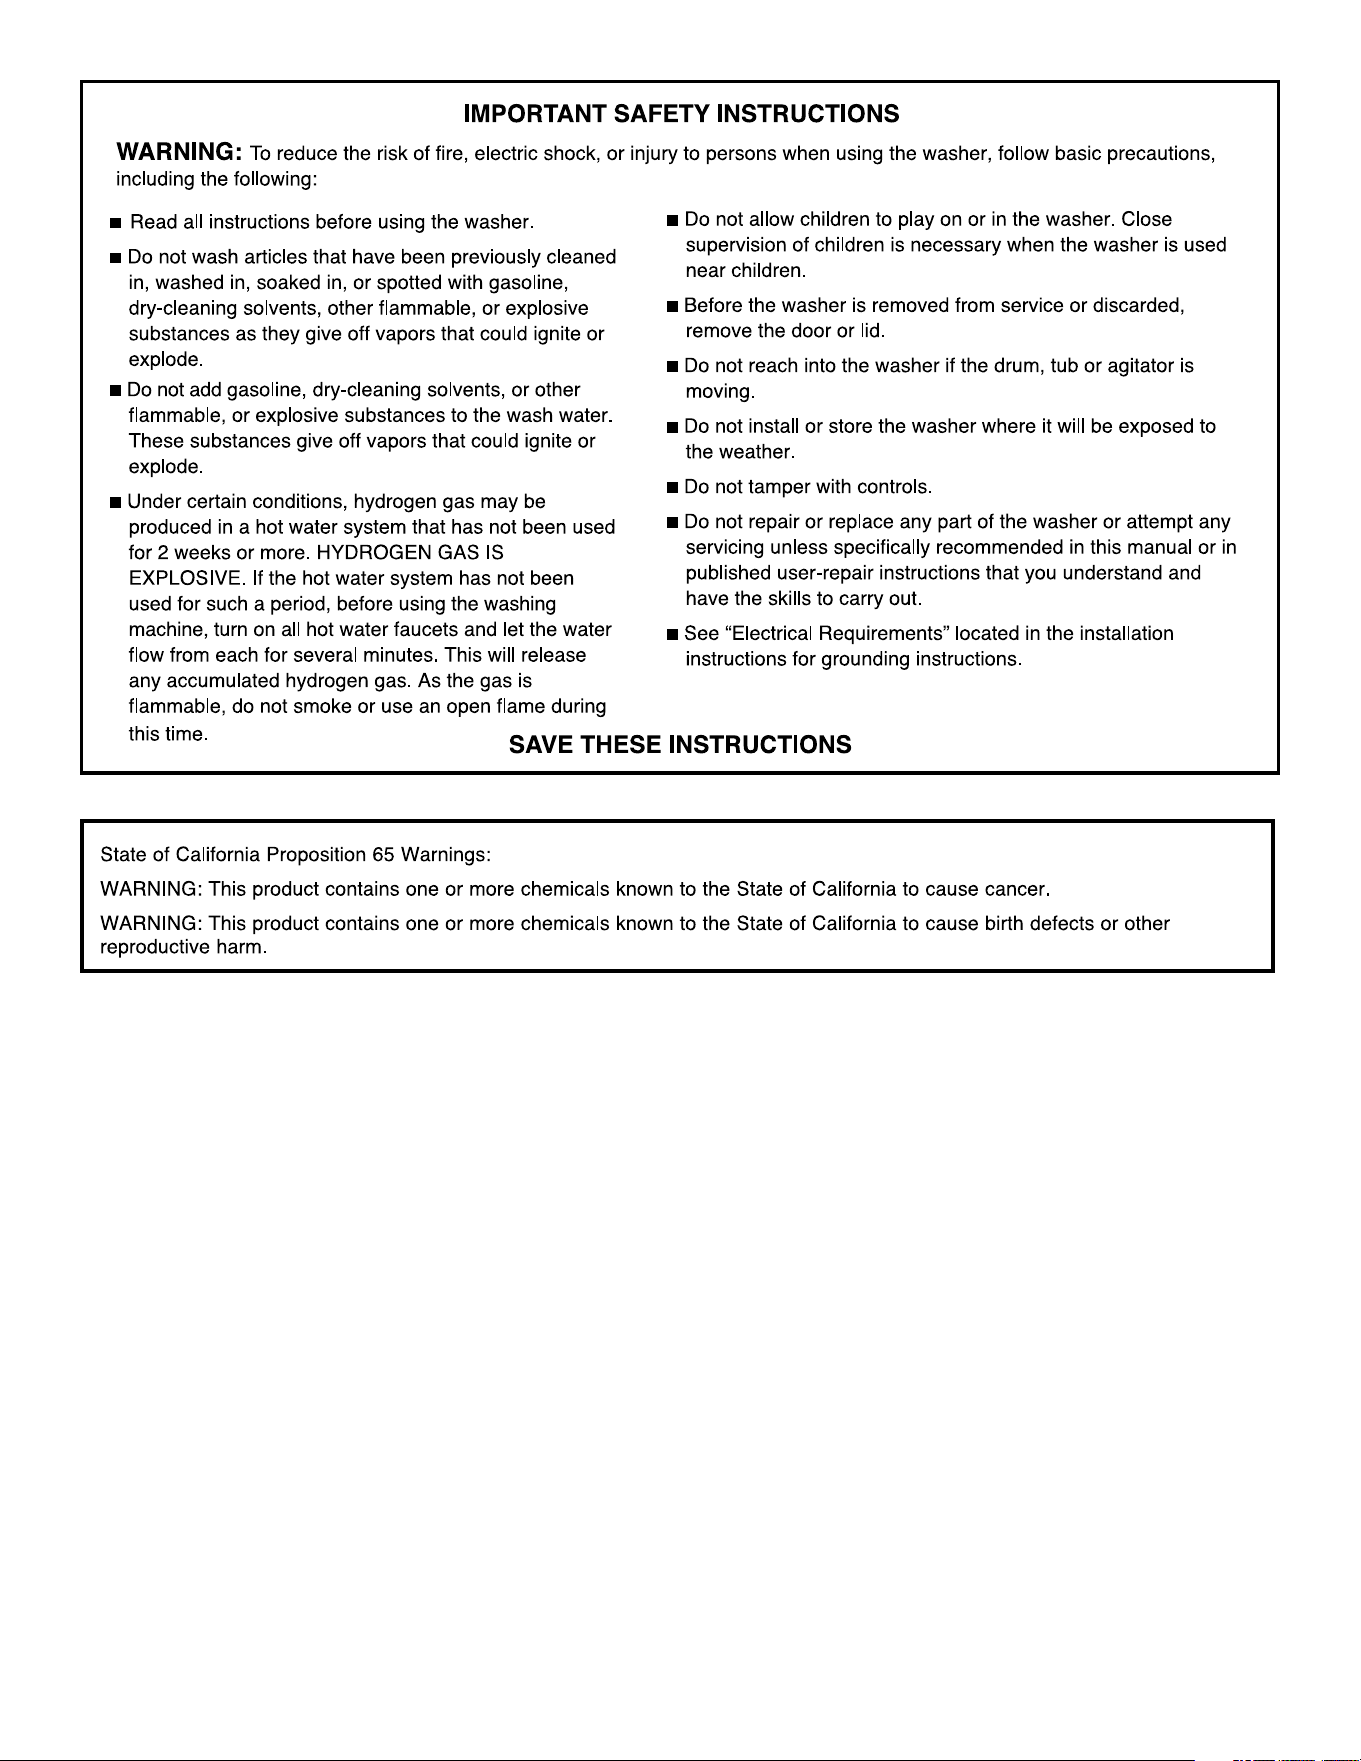
Washer Safety
3
4
What’s New Under the Lid?
Choosing the Right Detergent
Use only High Efficiency detergents. The package will
be marked “HE” or “High Efficiency.” Low-water washing
creates excessive sudsing with a non-HE detergent. Using
non-HE detergent will likely result in longer cycle times and
reduced rinsing performance. It may also result in component
malfunction and, over time, buildup of mold or mildew. HE
detergents should be low-sudsing and quick-dispersing to
produce the right amount of suds for the best performance.
They should hold soil in suspension so it is not redeposited
onto clean clothes. Not all detergents labeled as High Efficiency
are identical in formulation and their ability to reduce suds.
For example, natural, organic, or homemade HE detergents
may generate a high level of suds. If you use one of these
and see an “F0E2” error code appear in the display, consider
using a different HE detergent. Always follow the detergent
manufacturer’s instructions to determine the amount of
detergent to use. Do not go over the Max line on the dispenser.
See “Using Laundry Product Dispensers” for more information.
Normal Sounds You Can Expect
At different stages of the wash cycle, you may hear sounds
and noises that are different from those of your previous washer.
For example, you may hear a clicking and hum at the beginning
of the cycle as the lid lock goes through a self-test. There will
be different kinds of humming and whirring sounds as the
washplate moves the load and as the basket is slowing down to
stop. And sometimes, you may hear nothing at all as the washer
determines the correct water level for your load or allows time
for clothes to soak.
Use only High Efficiency (HE) detergent.
Improved Cleaning
Low-water cleaning means concentrated cleaning. Rather
than diluting detergent as done in an agitator-style washer,
this washer delivers the detergent directly to the soils. This low
water wash also allows the clothing to move in a more effective
way to remove soils.
Automatic Load Size Sensing
Once you start the cycle, the lid will lock and the washer will
begin the sensing process to determine the correct water level
for the load.
Initially the basket will start to spin prior to adding water; this is
part of the sensing process and is normal. This low-water wash
method uses less water and energy compared to a traditional
agitator-style washer.
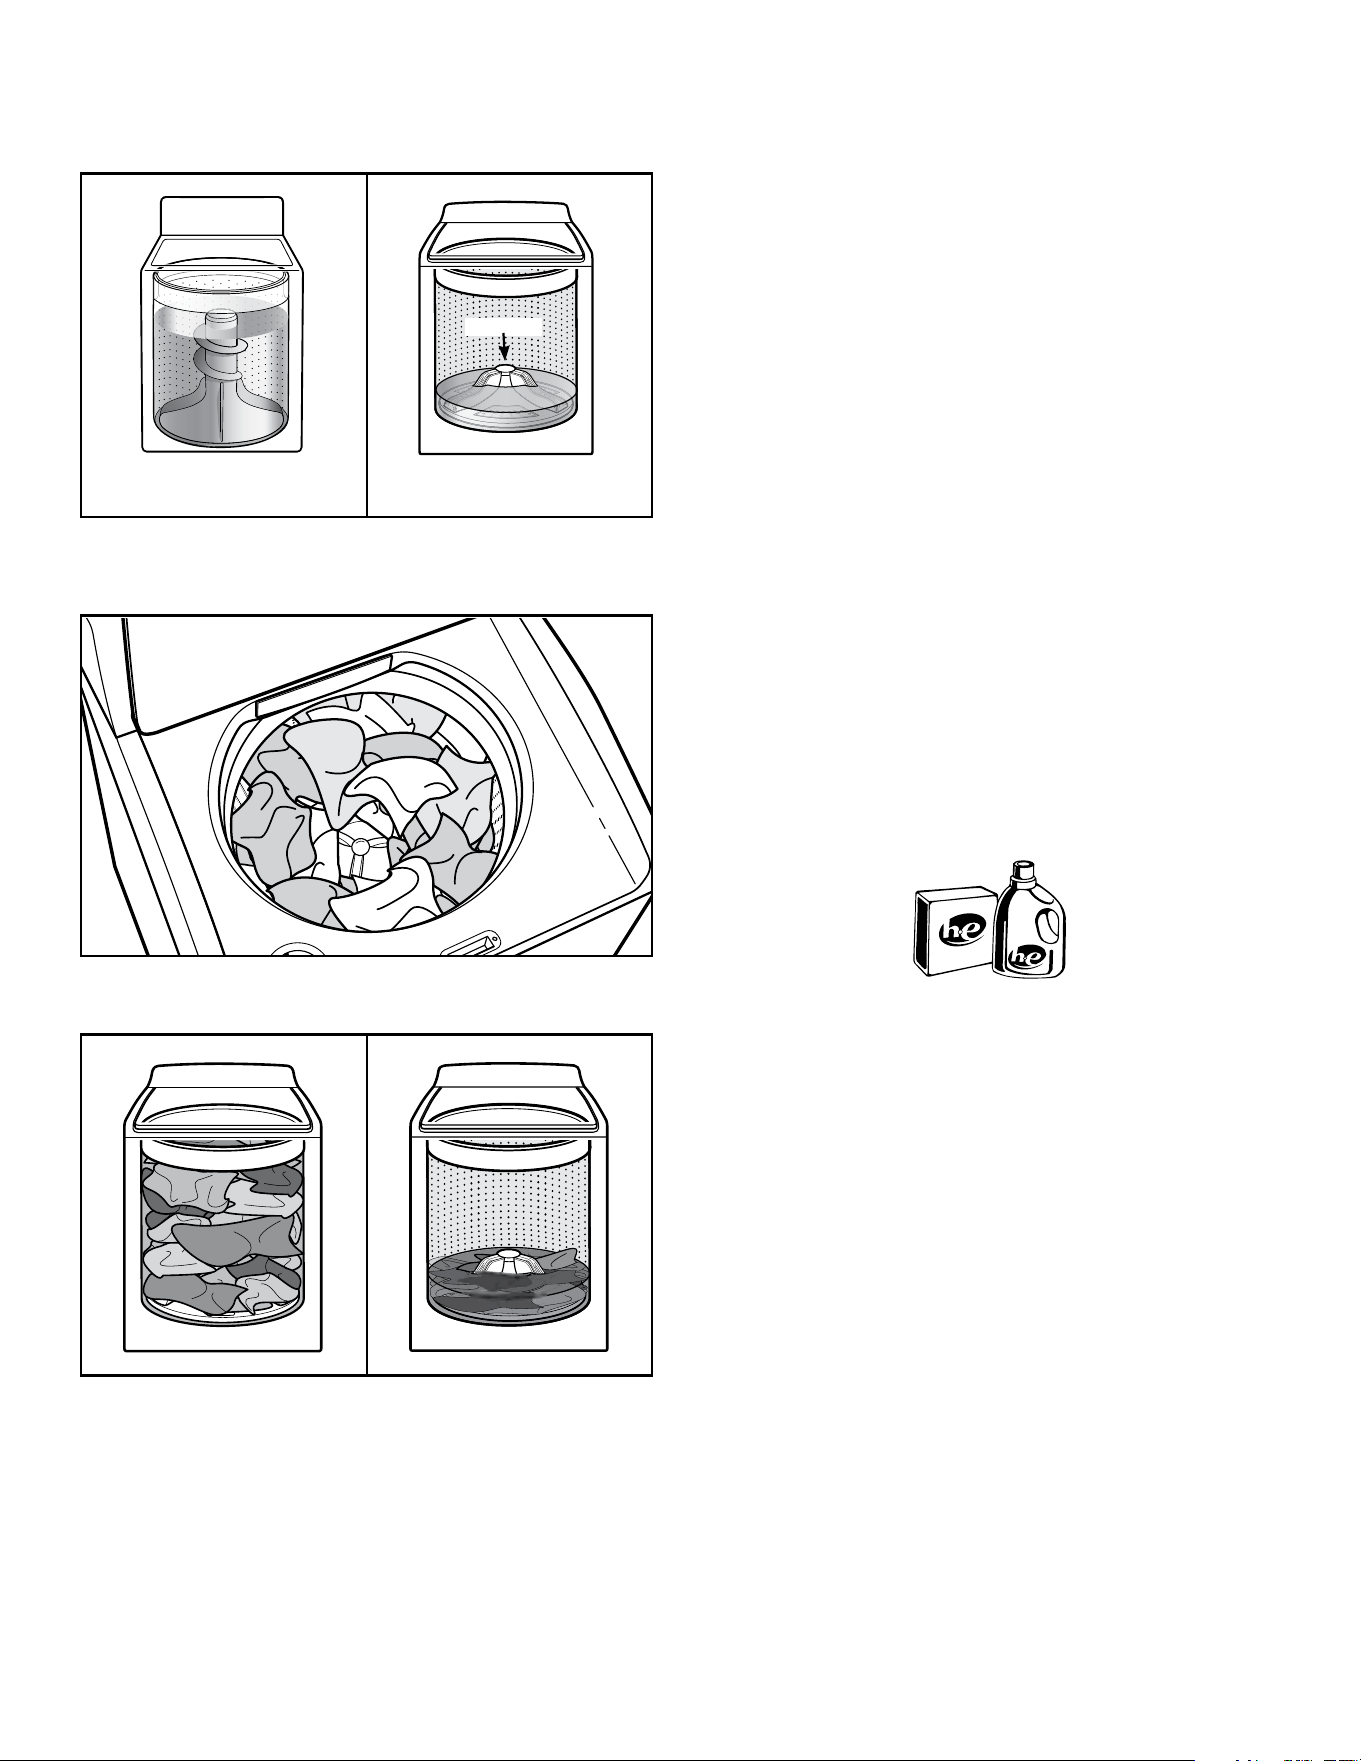
For best performance, it is recommended to load items in loose
heaps evenly around the washplate.
As the washer dampens and moves the load, the level
of the items will settle in the basket. This is normal and
does not indicate that more items should be added.
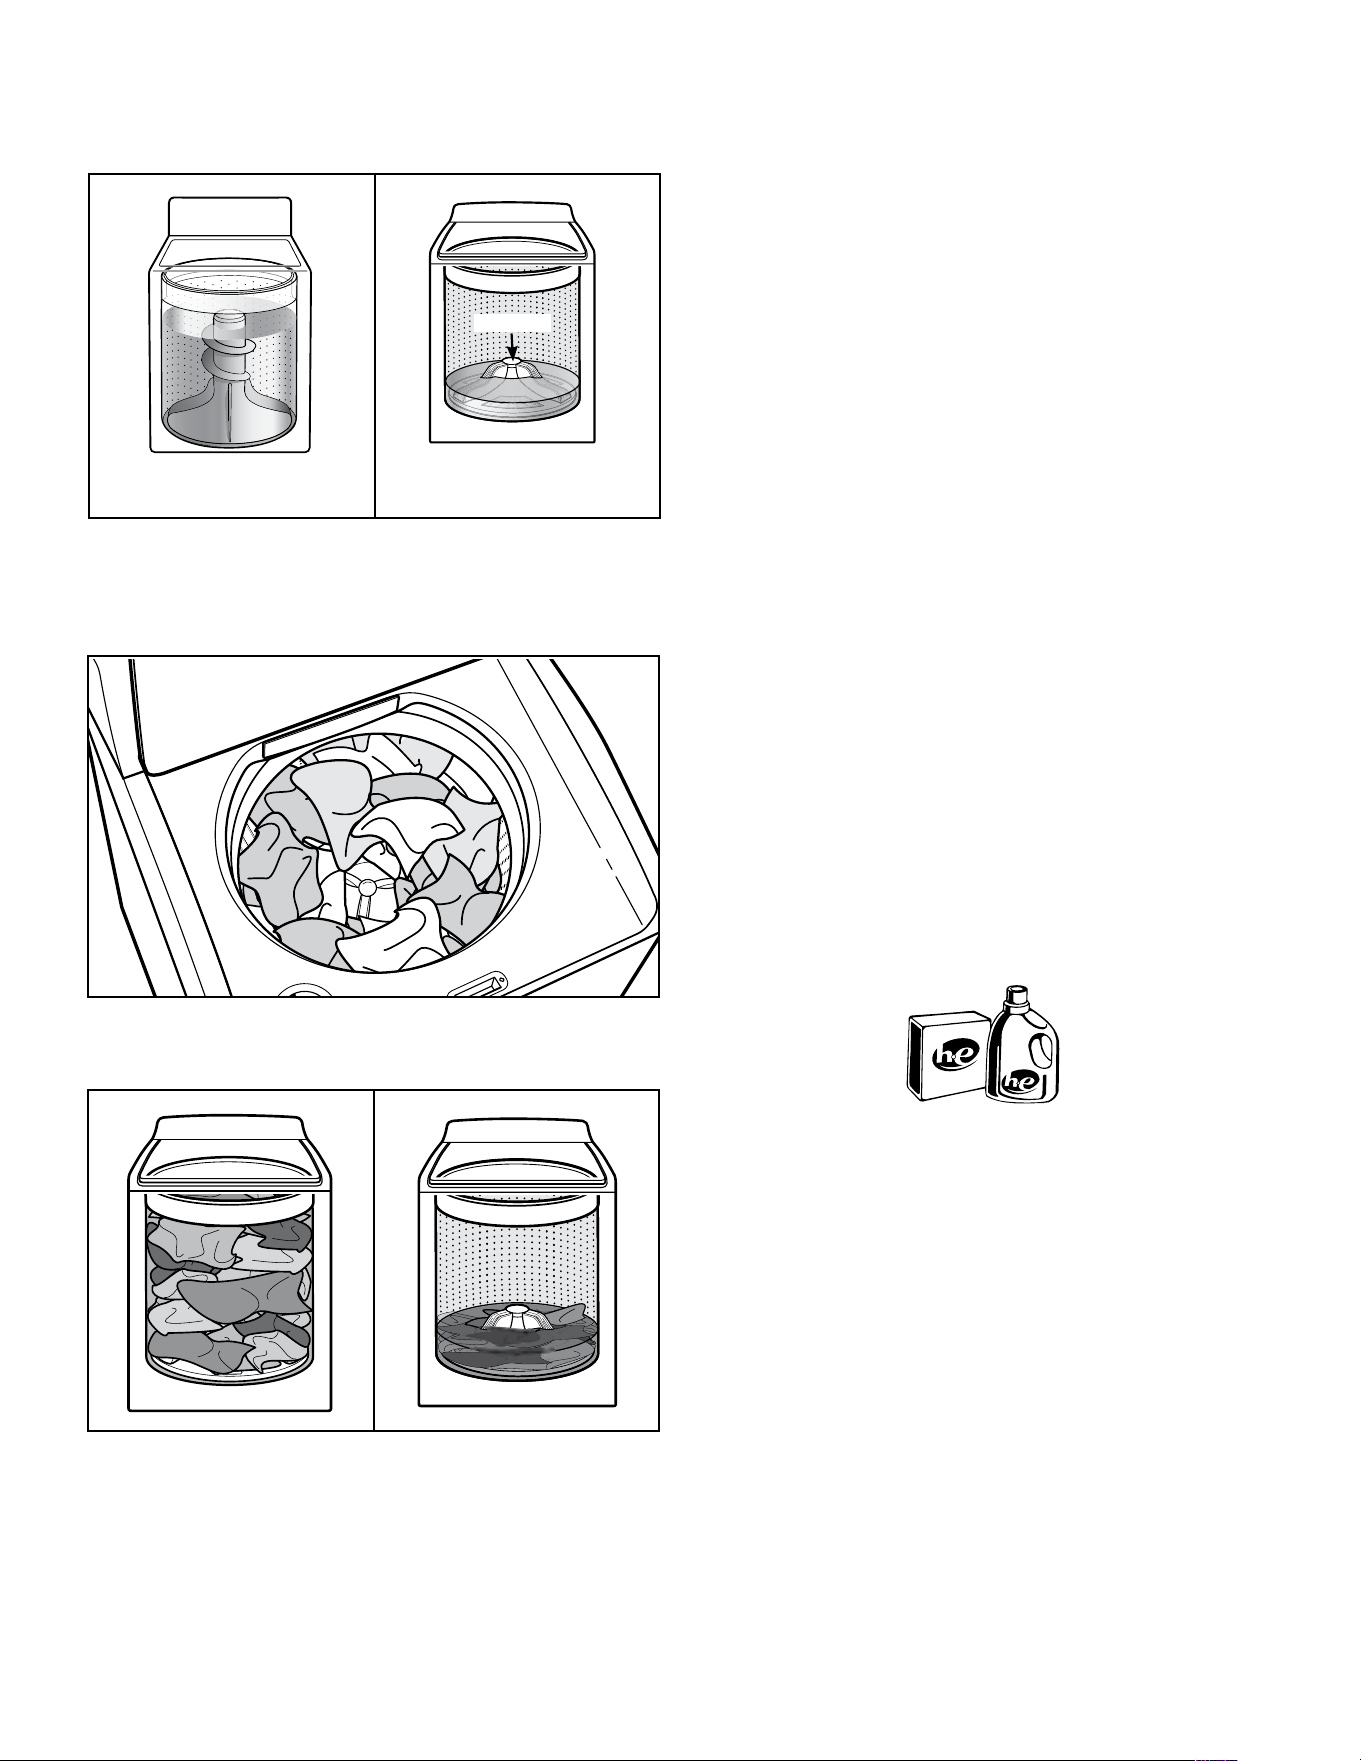
IMPORTANT: You will not see a washer basket full of water
as with your past agitator-style washer. It is normal for some
of the load to be above the water line.
Cleaning with Less Water
The most striking difference in your new washer is the low-water
washplate wash system. The washer automatically adjusts the
water level to the load size—no water level selector is needed.
Traditional agitator-style
washer
Low-water washer
Washplate
Washplate
5
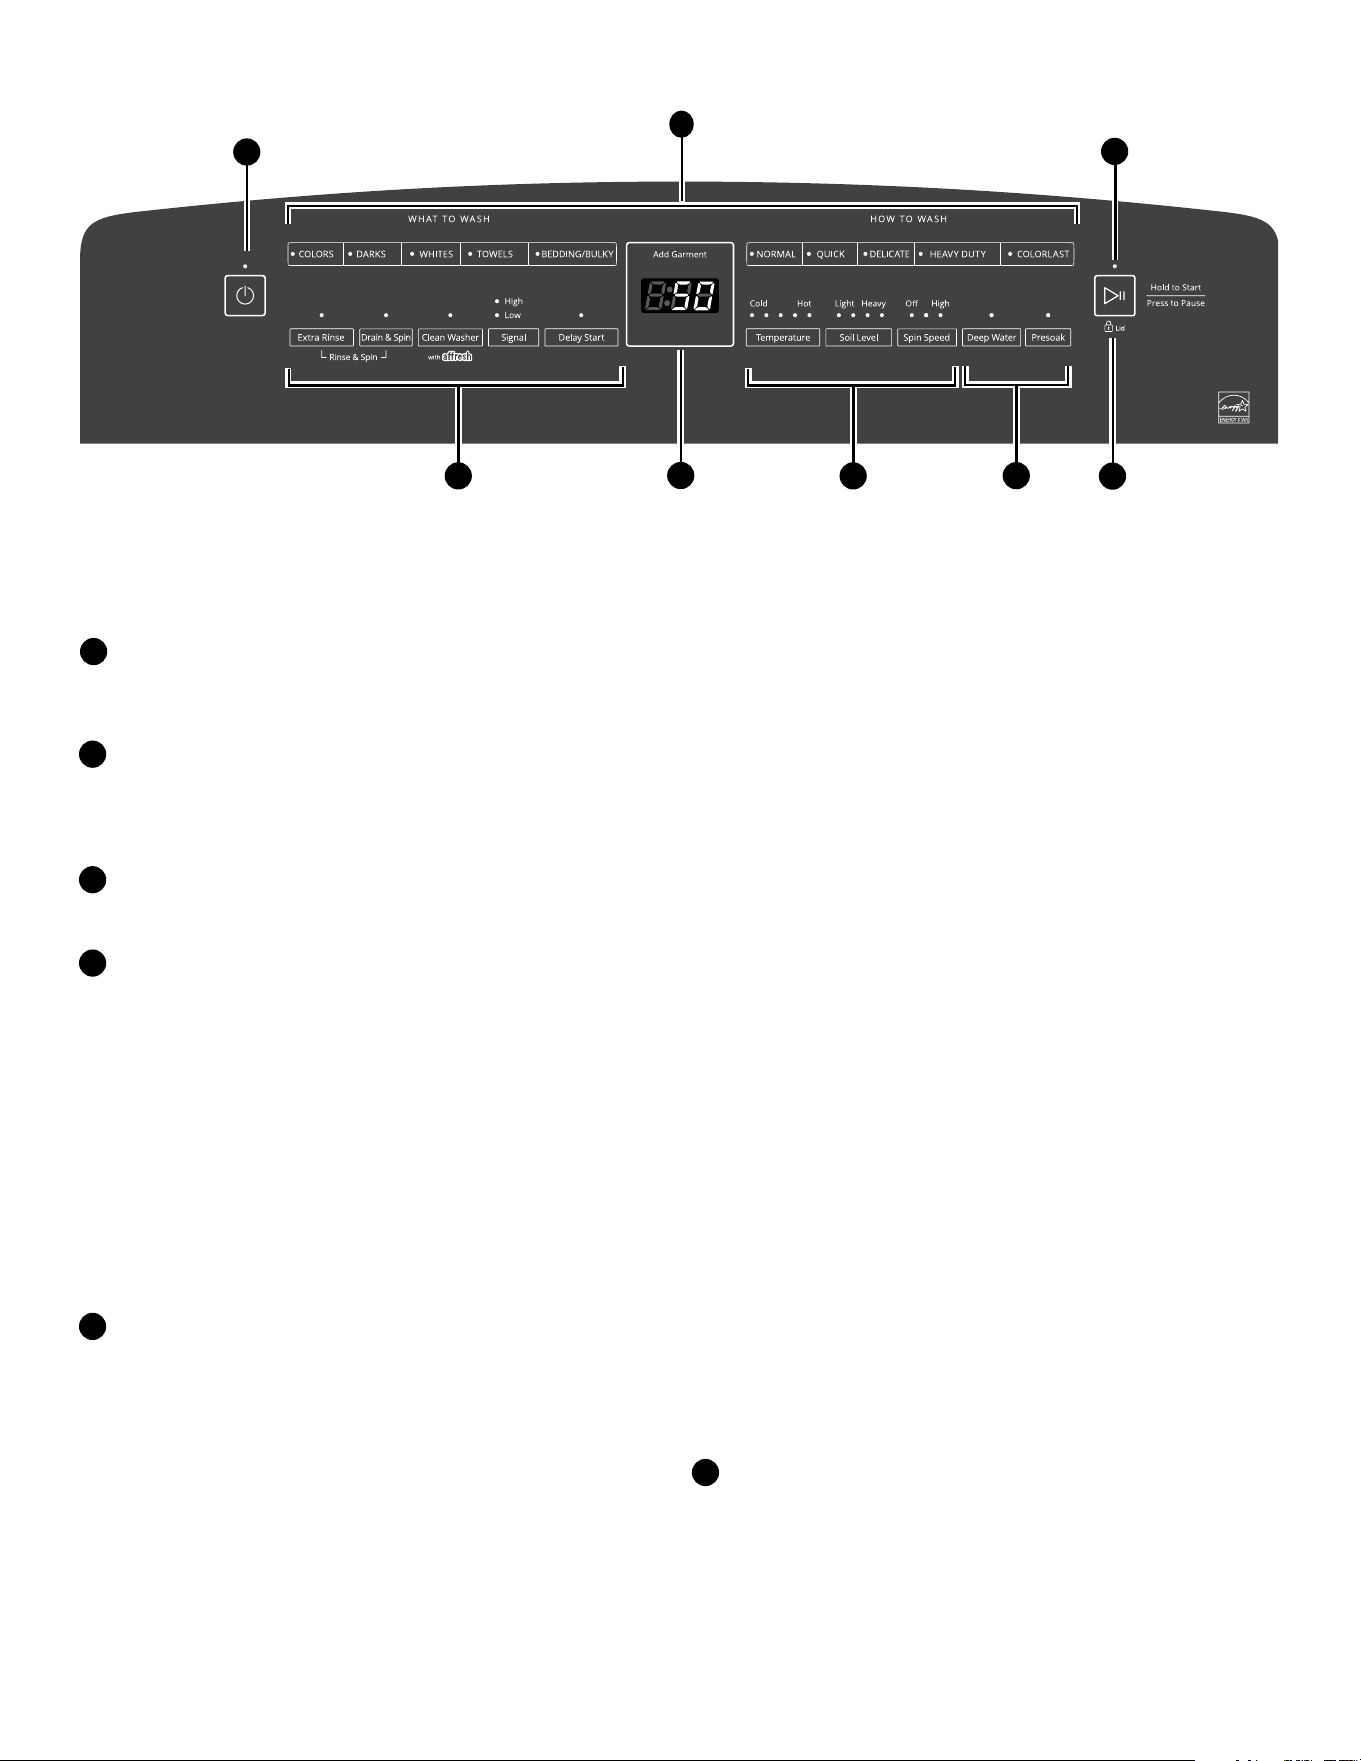
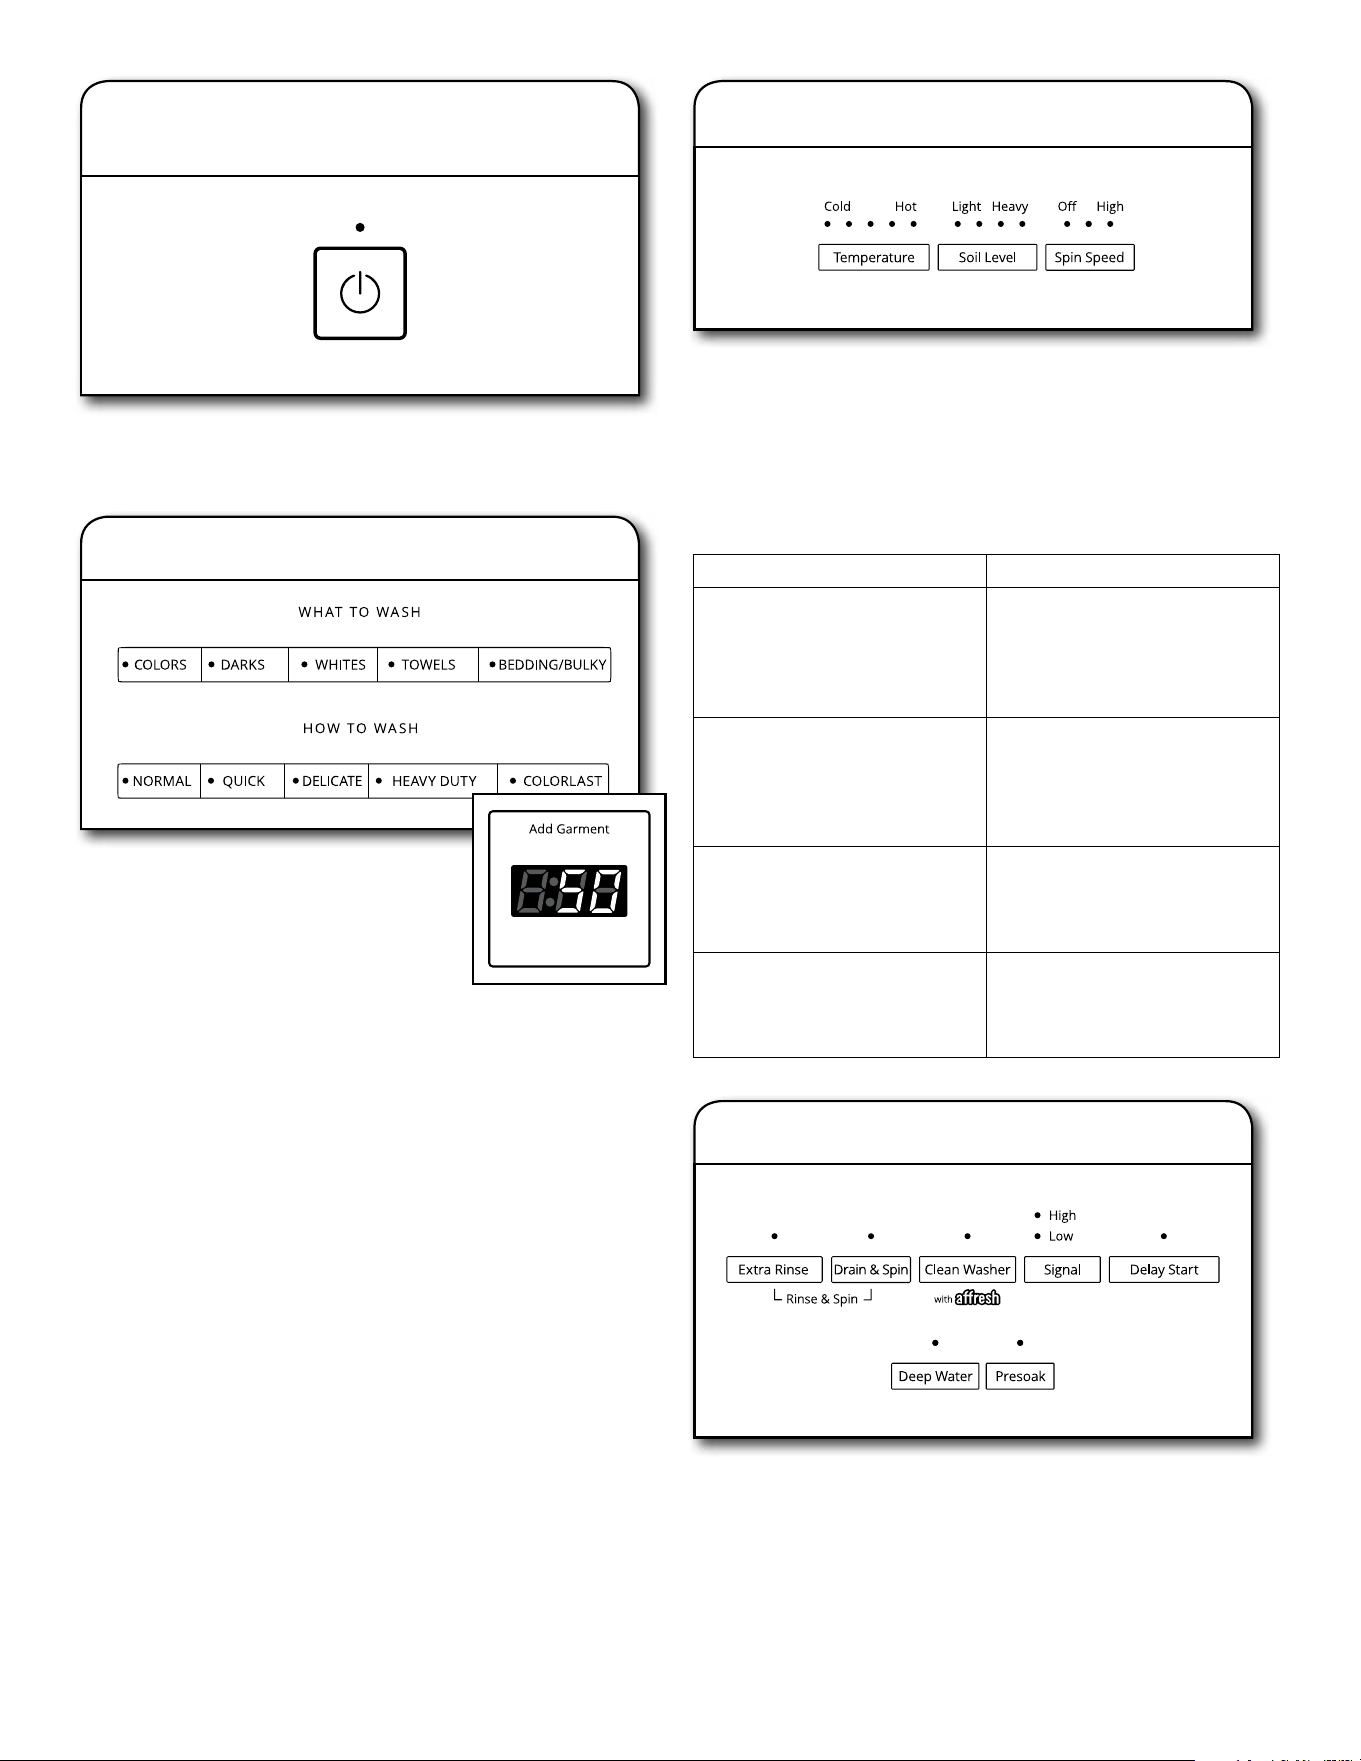
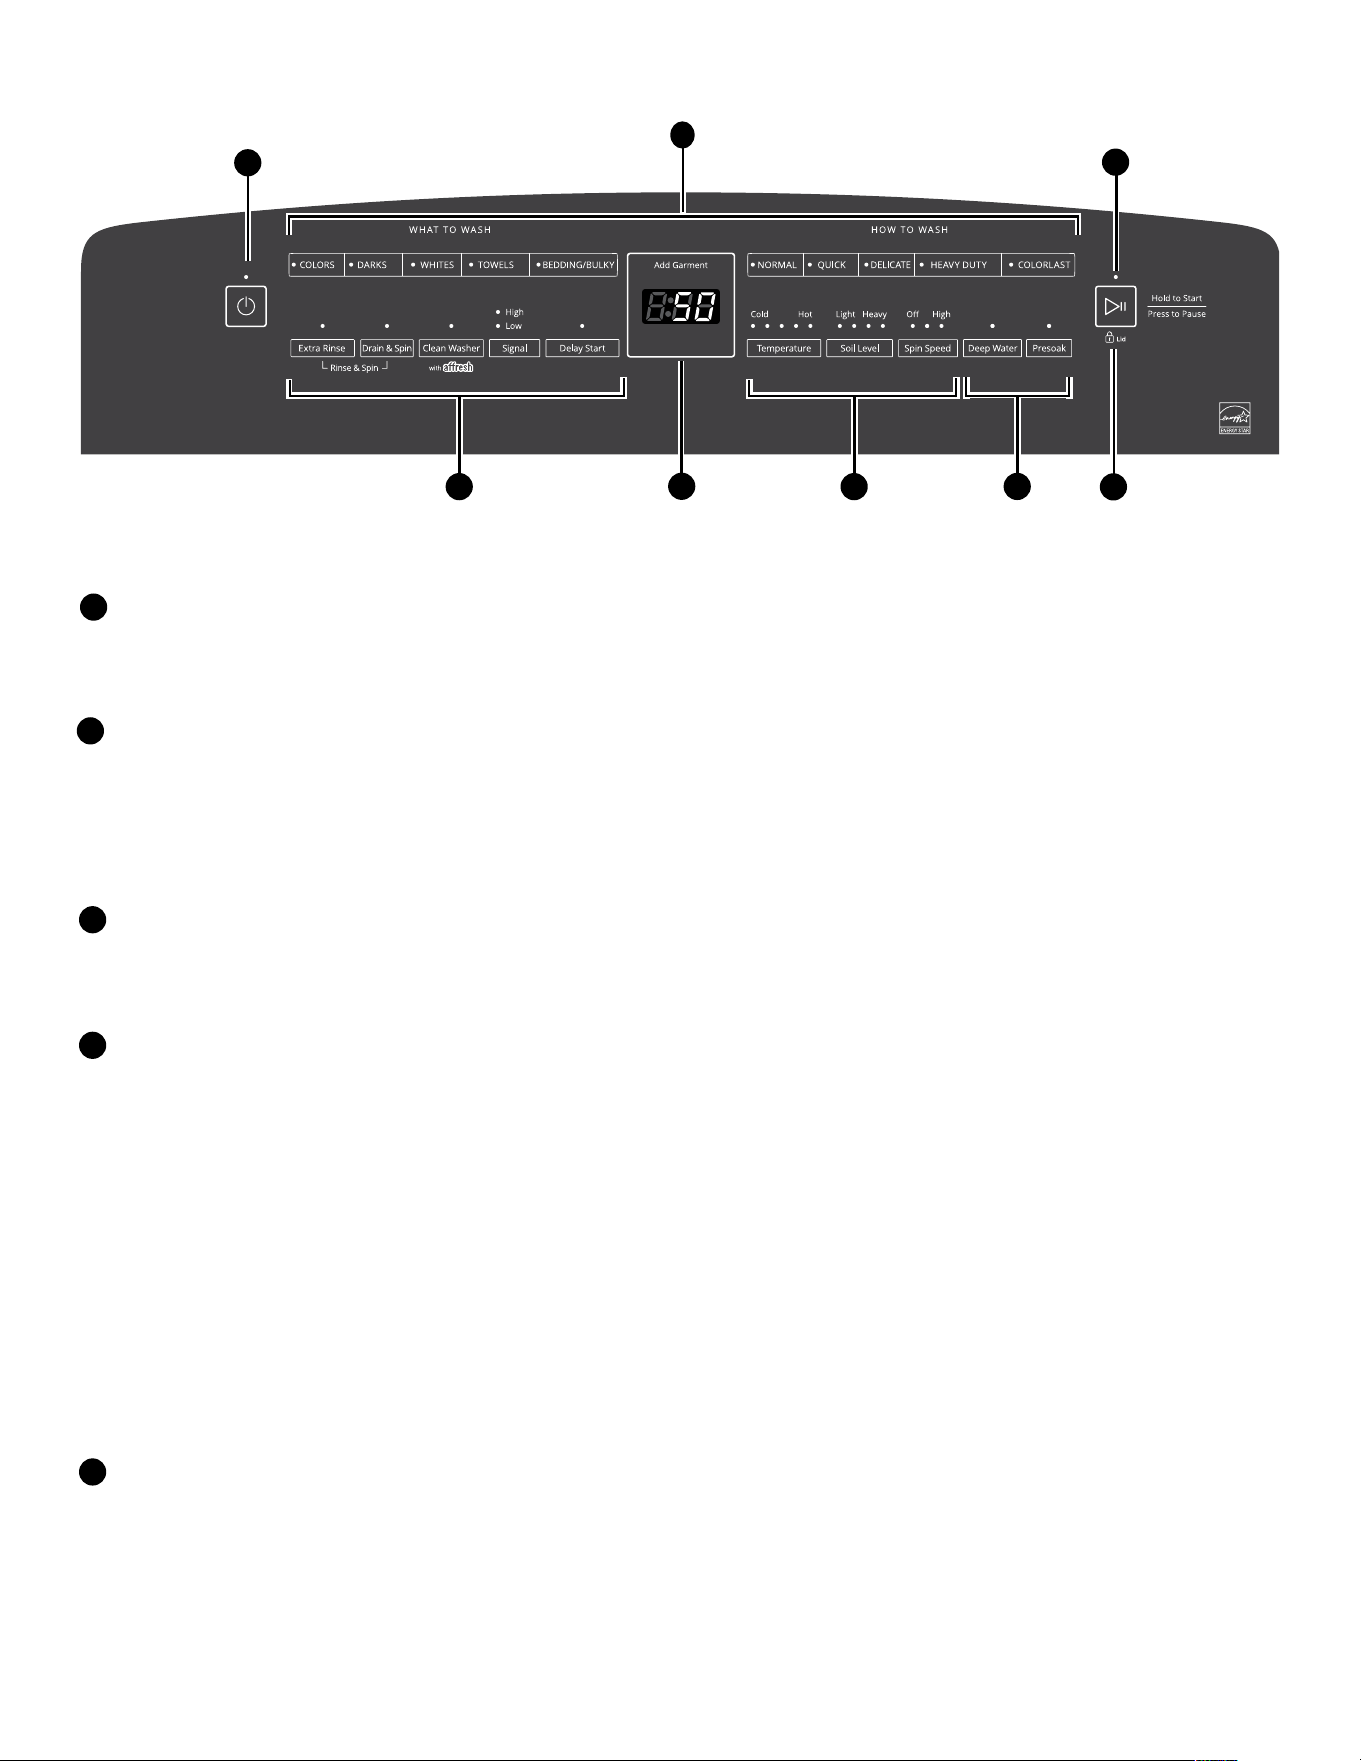
NOTE: The control panel features a sensitive surface that responds to a light touch of your finger. To ensure your selections are
registered, touch the control panel with your finger tip, not your fingernail. When selecting a setting or option, simply touch its name
until the desired section is illuminated.
POWER BUTTON
Touch to turn the washer on. Touching once while the washer
is on will cancel the current cycle, touching twice will turn
the washer off.
WHAT TO WASH/HOW TO WASH
First select a cycle from “What to Wash” and then select
“How to Wash” to get the best combination cycle available
for the type of items you are going to wash. See “Cycle
Guide” for cycle details.
START/PAUSE BUTTON
Touch and hold the START/PAUSE button to begin
the selected cycle; touch again to pause a cycle.
LED TIME/STATUS DISPLAY
The Estimated Time Remaining display shows the time
required for the cycle to complete. Factors such as load
size and water pressure may affect the time shown in
the display. Tightly packed loads, unbalanced loads, or
excessive suds may cause the washer to adjust the cycle
time, as well.
If you have set a delay start to the cycle, the Estimated
Time Remaining display will show the delay time adjusted.
When the cycle is complete, the Done indicator will light
until the lid is opened.
ADD GARMENT
When Add Garment is lit, you may pause the washer,
open the lid, and add items. Touch and hold the
START/PAUSE button to start the washer again.
OPTIONS
You may add or remove options for each cycle. Not all
options can be used with all cycles, and some are preset
to work with certain cycles.
EXTRA RINSE
This option can be used to automatically add a second
rinse to most cycles.
DRAIN & SPIN
This option spins the load and drains any water in the tub.
The load is not rinsed.
RINSE & SPIN
Touch the DRAIN & SPIN button, then touch the EXTRA
RINSE button. This option combines a rinse and high spin
1
2
3
4
5
speed for loads requiring an additional rinse cycle
or to complete a load after power interruption.
Also use for loads that require rinsing only.
CLEAN WASHER
Use this every 30 washes to keep the inside of your
washer fresh and clean. This cycle uses a higher water
level. Use with affresh
®
Washer Cleaner tablet or liquid
chlorine bleach to thoroughly clean the inside of your
washer. This cycle should not be interrupted. See
“Washer Care.”
IMPORTANT: Do not place garments or other items in
the washer during the Clean Washer cycle. Use this cycle
with an empty washer tub.
SIGNAL
Use this to turn the signal indicating the end of a wash
cycle to low, high, or off.
NOTE: You may also adjust the tones that sound when
a feature, setting, or option is touched. Touch and hold
SIGNAL for about 3 seconds to turn key activation
sounds to low, high, or off.
DELAY START
Touch DELAY START to delay the start of the wash cycle
up to 12 hours “12H.” Touch DELAY START until a “0H”
appears in the status display to turn off, or touch the
POWER button.
DEEP WATER
Use this option to add the maximum amount of water
to your wash cycle.
NOTE: Expect longer cycle times due to extended fill
times when using the Deep Water option.
PRESOAK
Use this option to add an extra soak period to any cycle
to help loosen tough stains. The washer will fill and pause
to soak, then begin the selected cycle.
CYCLE MODIFIERS
When you select a cycle, its default settings or the previous
cycle selection used will light up.
TEMPERATURE
Temperature Control senses and maintains uniform
water temperatures by regulating incoming hot and
cold water.
6
Control Panel and Features
4
5 6
5
7
1
3
2
6
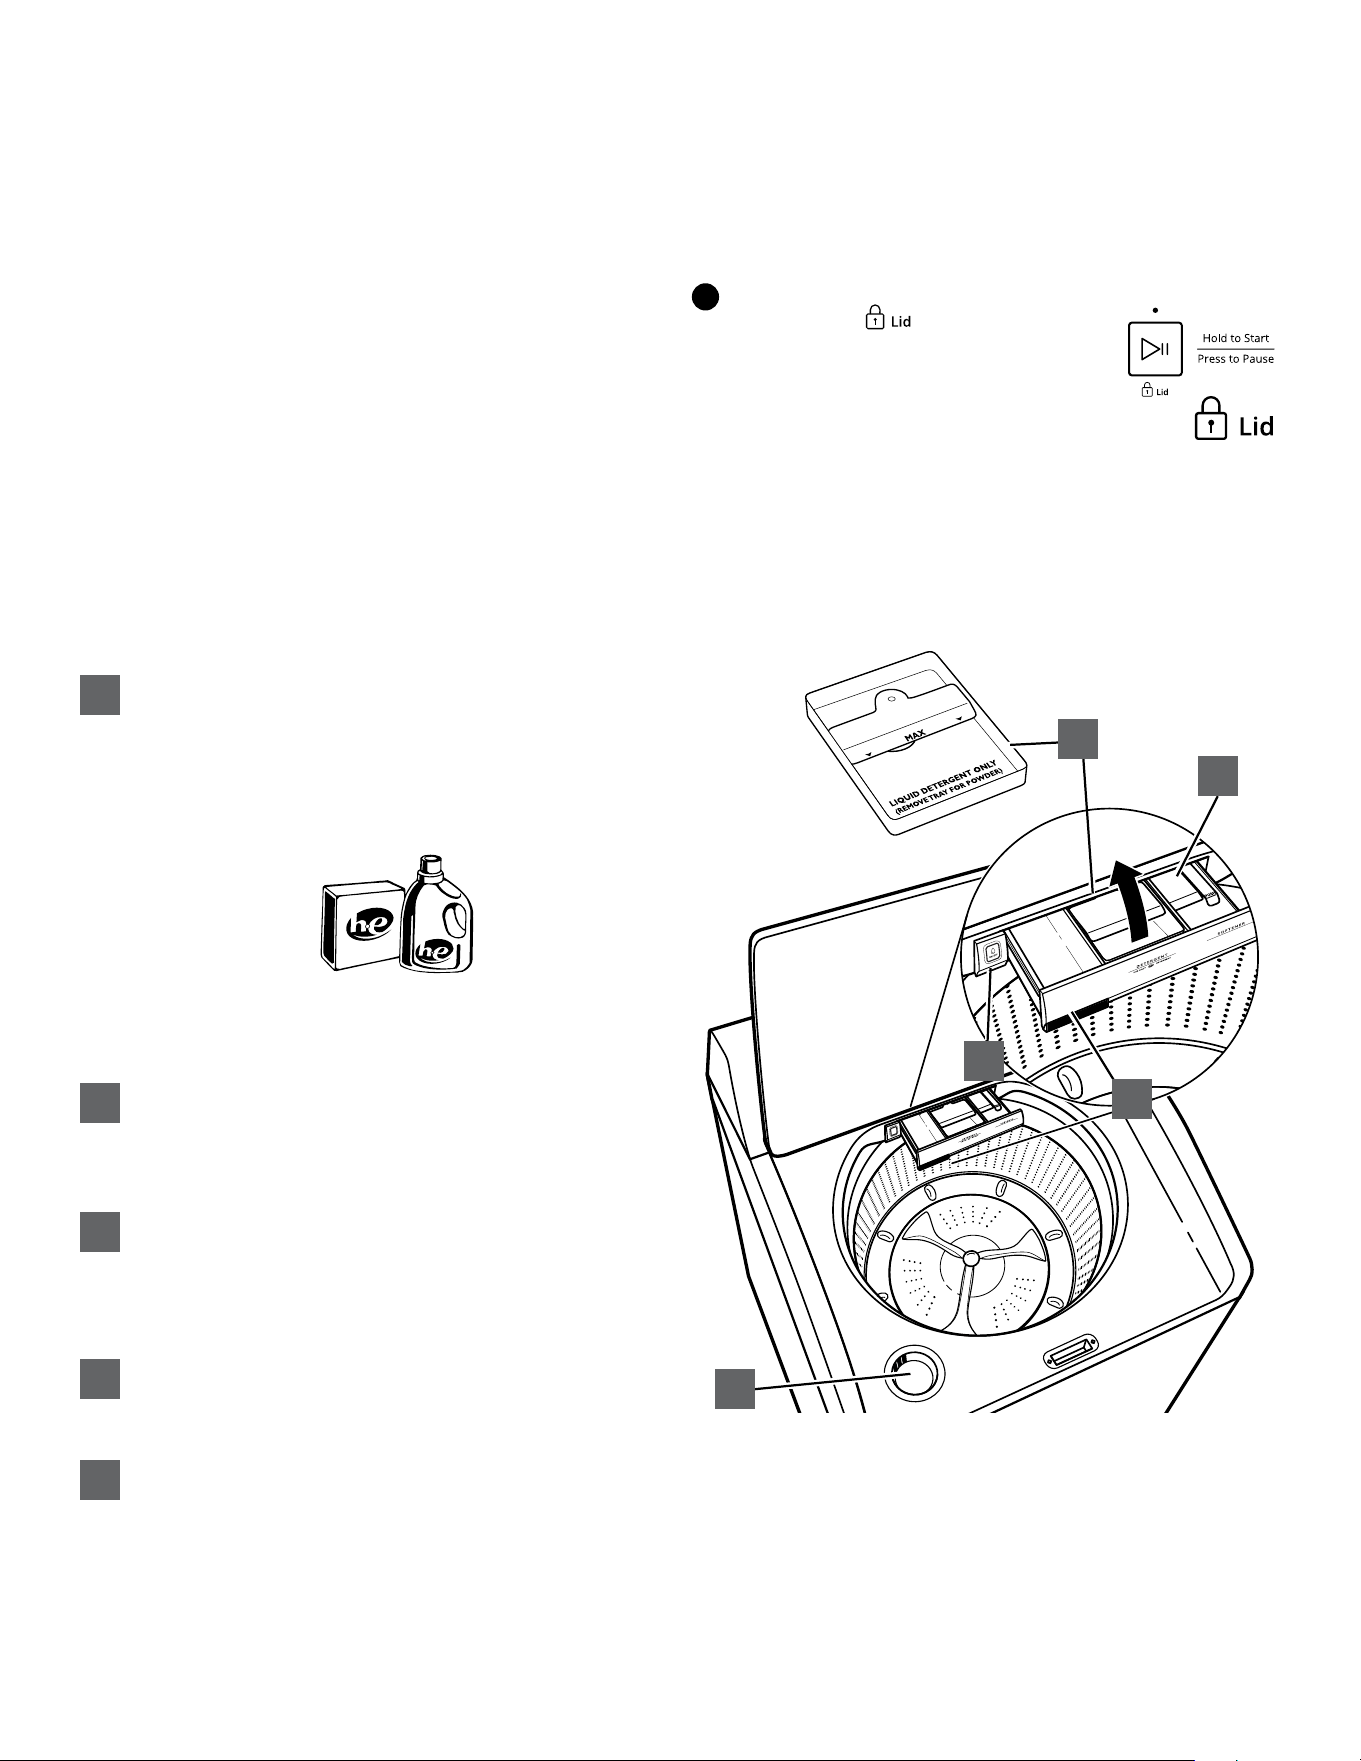
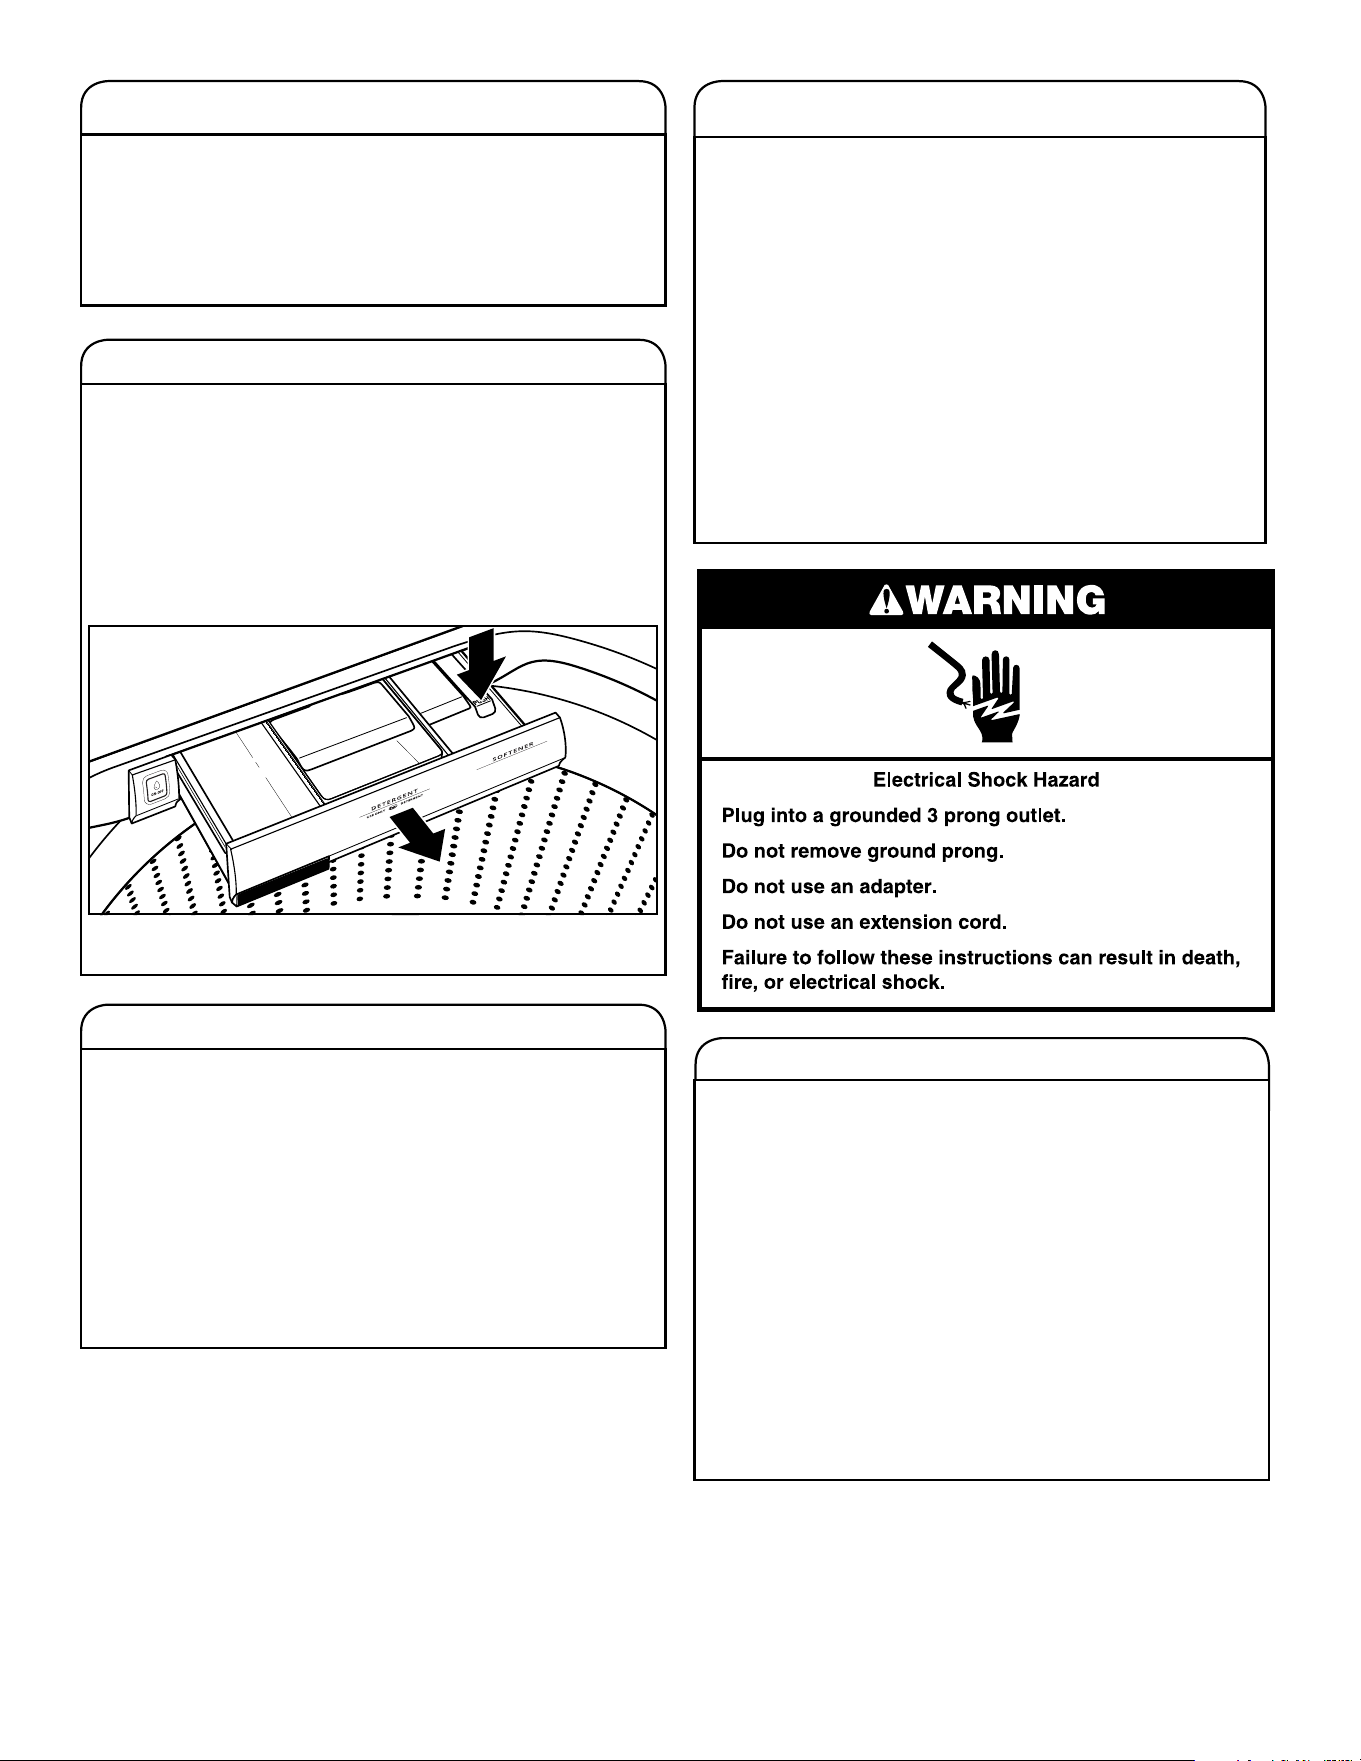
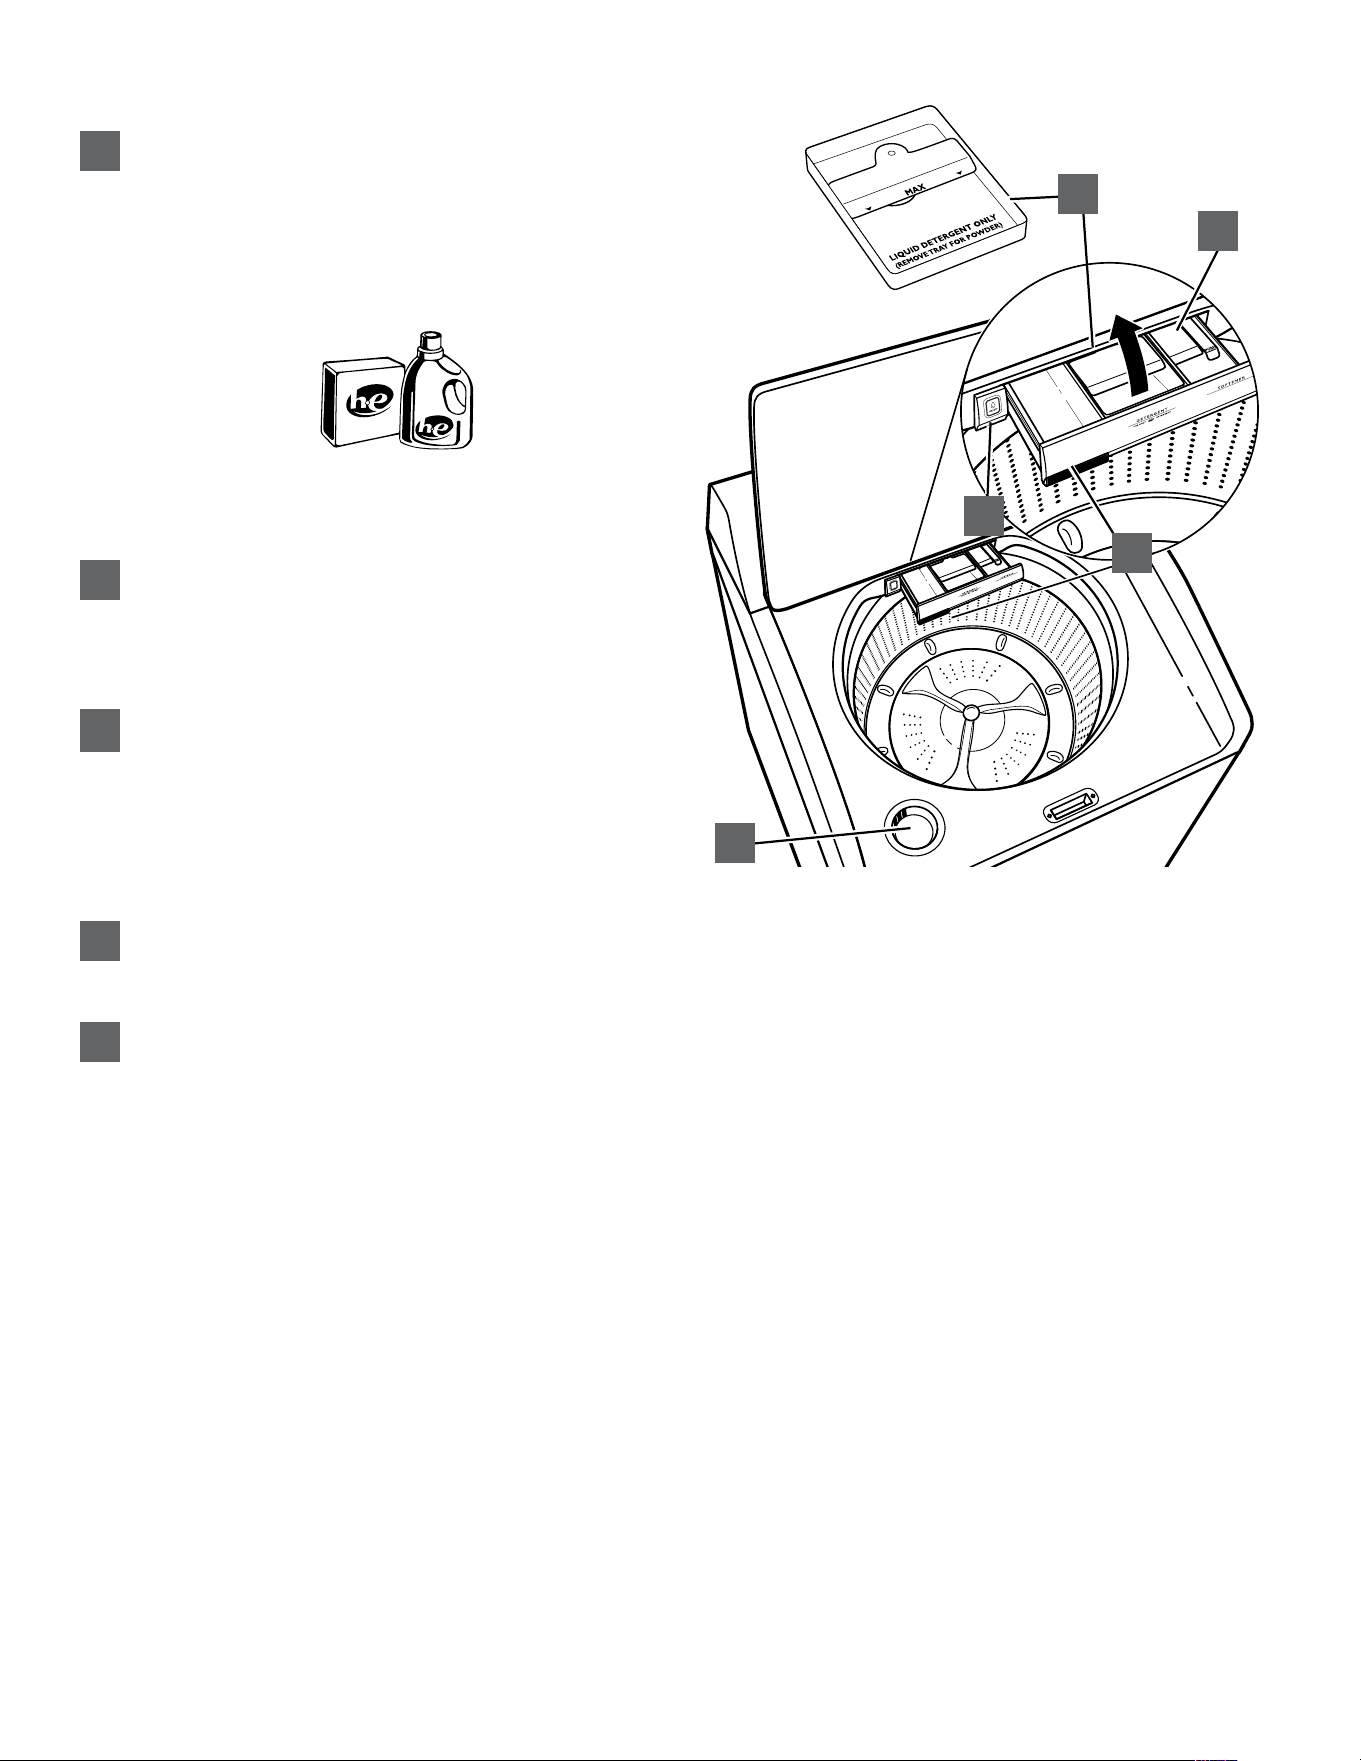
Dispensers and faucet
High Efficiency “HE” detergent dispenser
Add liquid or powdered HE detergent product to this
dispenser for your main wash cycle. Remove tray if using
powder detergent.
IMPORTANT: Make sure tray is in drawer when using liquid
detergent and removed when using powder detergent.
Do not go over the Max line.
NOTE: Follow the manufacturer’s instructions to determine
the amount of detergent to use.
Liquid fabric softener dispenser
Pour measured liquid fabric softener into the liquid fabric
softener dispenser, if desired. It will dispense automatically
at the optimum time.
•
Use only liquid fabric softener in this dispenser.
Liquid chlorine bleach dispenser
This dispenser holds up to 3/4 cup (180 mL) liquid chlorine
bleach. The bleach will be automatically diluted and
dispensed at the optimum time during the wash cycle.
This dispenser cannot dilute powdered bleach.
NOTE: Fill dispenser with only liquid bleach.
Water faucet
The water faucet dispenses fresh water that can be used
for pretreating clothes, rinsing your detergent cup, or filling
your washer tub.
Faucet button
Press once to toggle on and press again to toggle off.
You do not need to hold the button.
NOTE: If accidentally left on for more than 10 minutes,
the faucet will automatically shut off.
A
B
C
D
E
Use only High Efficiency (HE) detergent.
Select a wash temperature based on the type of fabric
and soils being washed. For best results and following
the garment label instructions, use the warmest wash
water safe for your fabric.
• On some models and cycles, warm and hot water will
be cooler than what your previous washer provided.
• Even for cold wash settings, some warm water
may be added to the washer to maintain a minimum
temperature.
SOIL LEVEL
Soil Level (wash time) is preset for each wash cycle.
As you touch Soil Level, the cycle time (minutes) will
increase or decrease in the Estimated Time Remaining
display and a different wash time will appear.
Select the most suitable setting for your load. For heavily
soiled items, select Heavy Soil Level for more wash
time. For lightly soiled items, select Light Soil Level for
less wash time. Lighter soil level setting will help reduce
tangling and wrinkling.
B
C
A
SPIN SPEED
This washer automatically selects the spin speed
based on the cycle selected. The preset speeds can be
changed. Not all spin speeds are available with all cycles.
• Faster spin speeds mean shorter dry times, but may
increase wrinkling in your load.
• Slower spin speeds mean less wrinkling, but will leave
your load more damp.
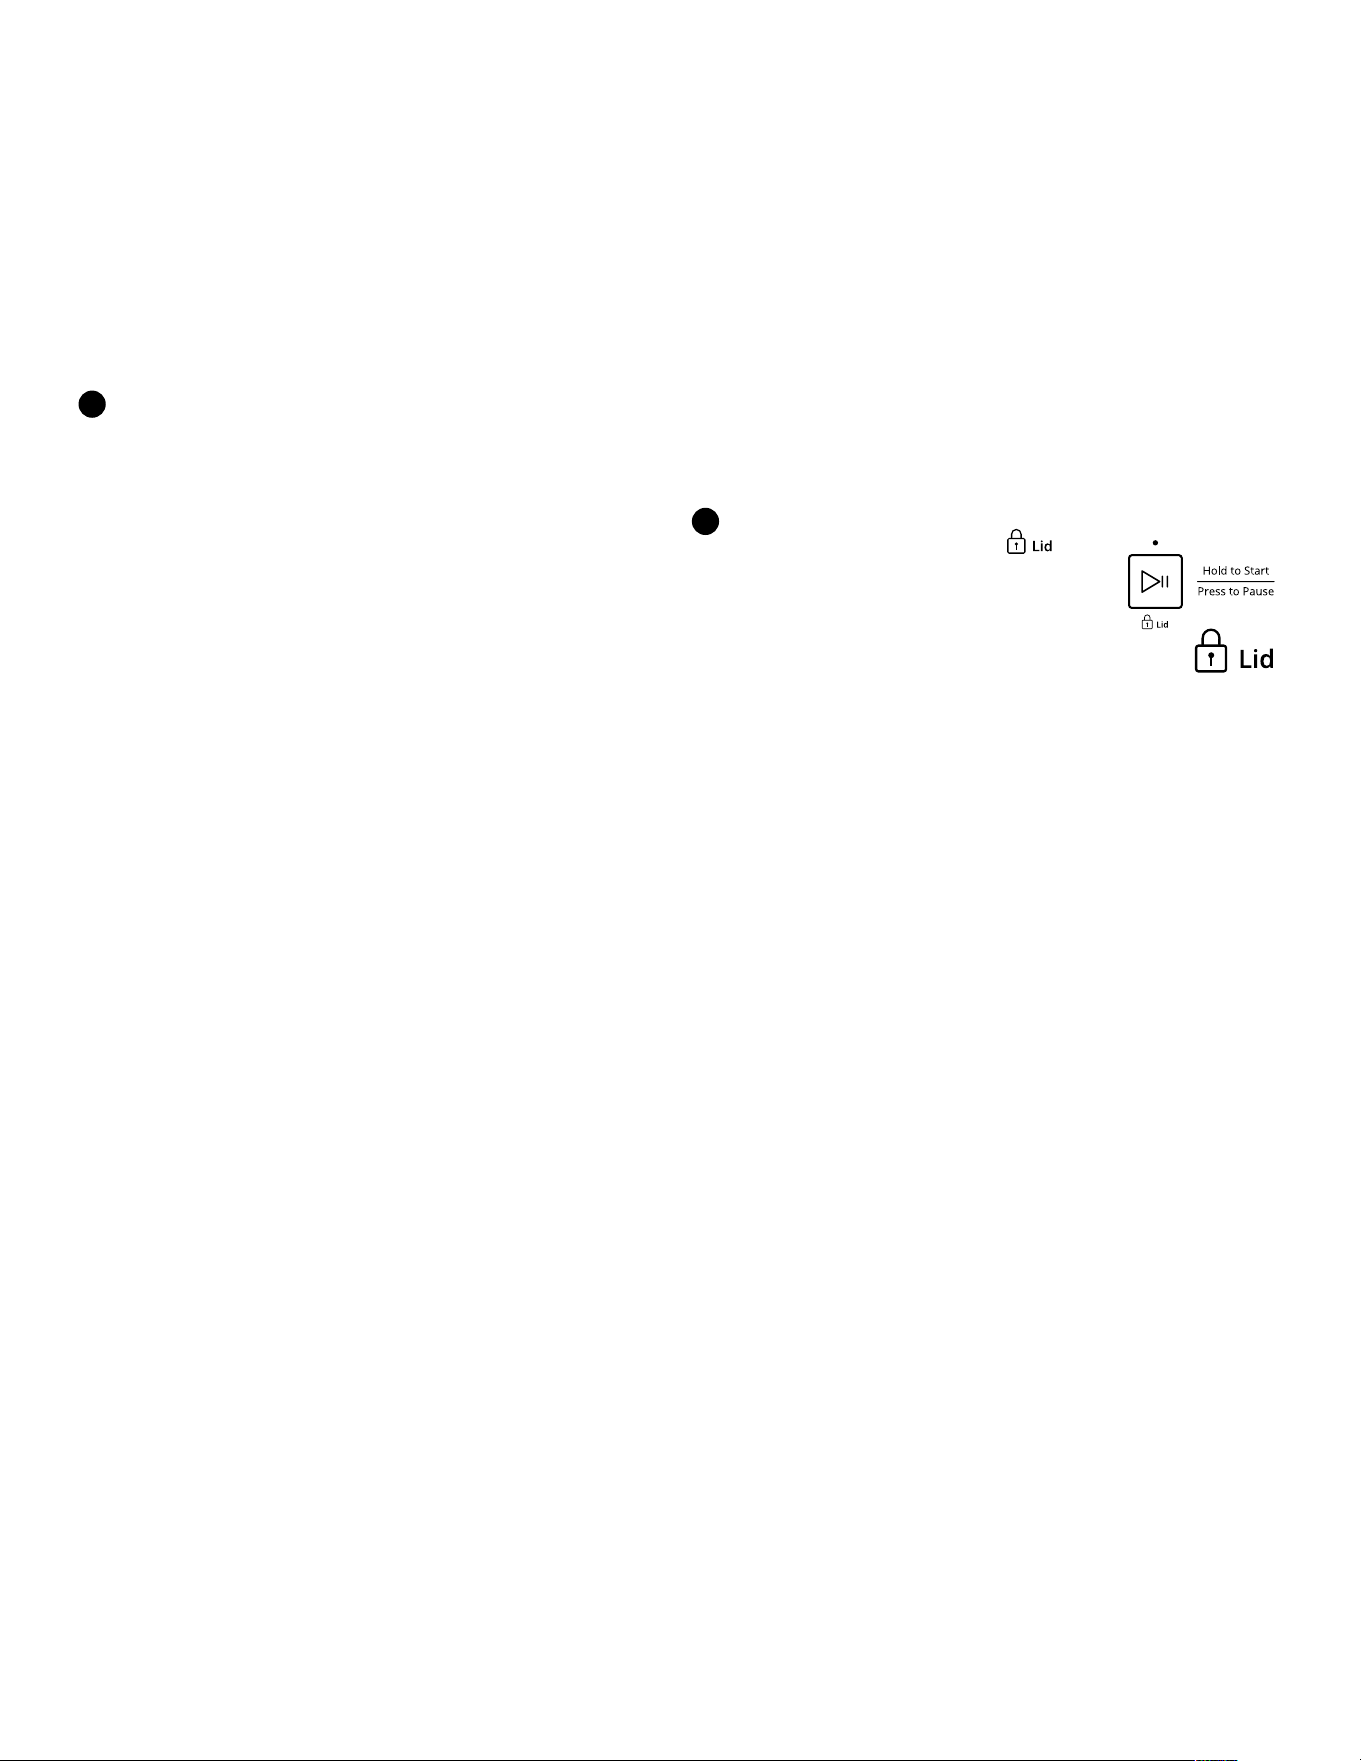
LID
The Lid Lock (
) indicator lights up
when the lid is locked and cannot be
opened. If you need to open the lid,
touch and hold the START/PAUSE button.
The lid will unlock once the washer
movement has stopped. This may take
several minutes if the load was spinning at
high speed. Touch and hold the START/PAUSE
button again to restart the cycle.
7
D
E
7
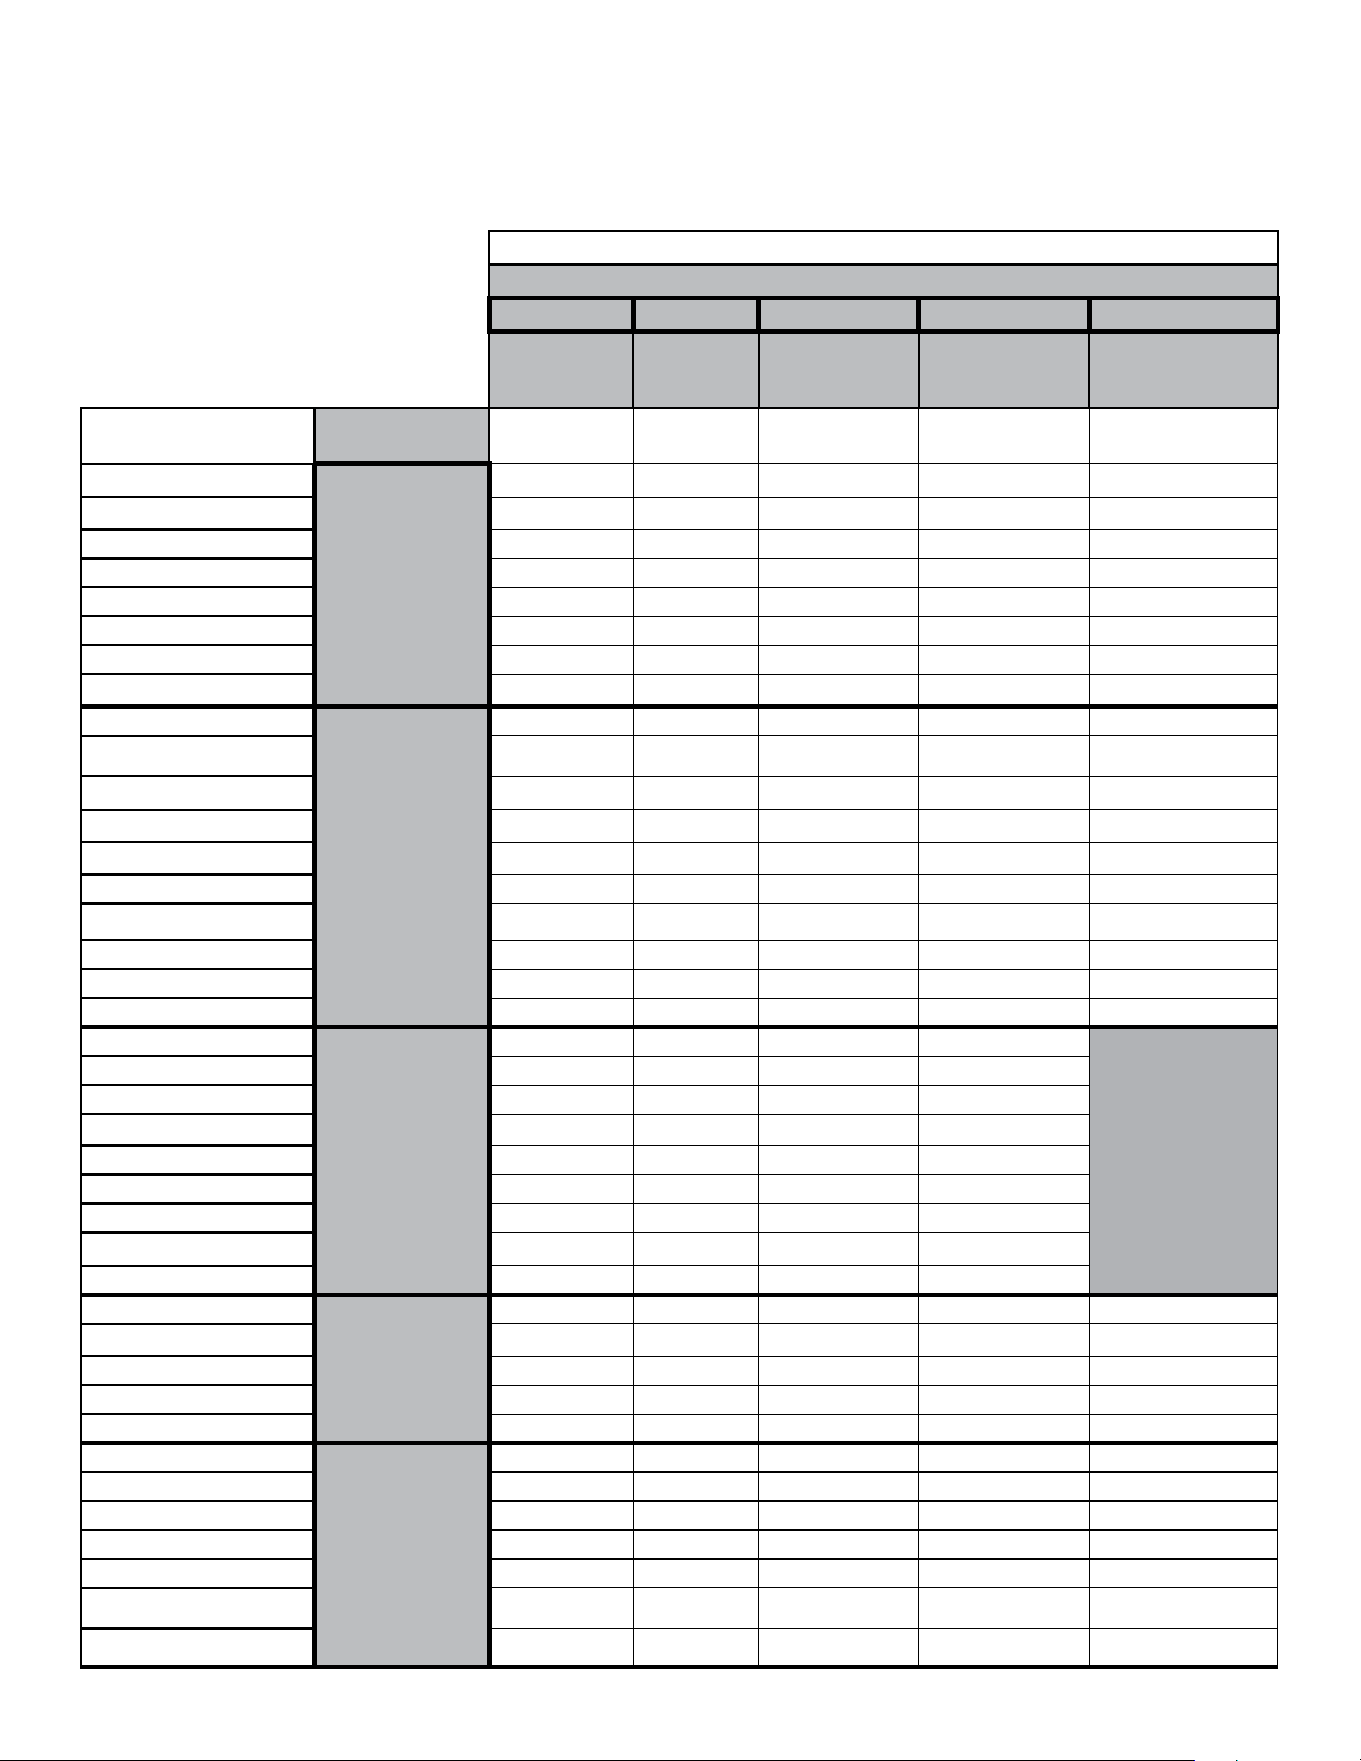
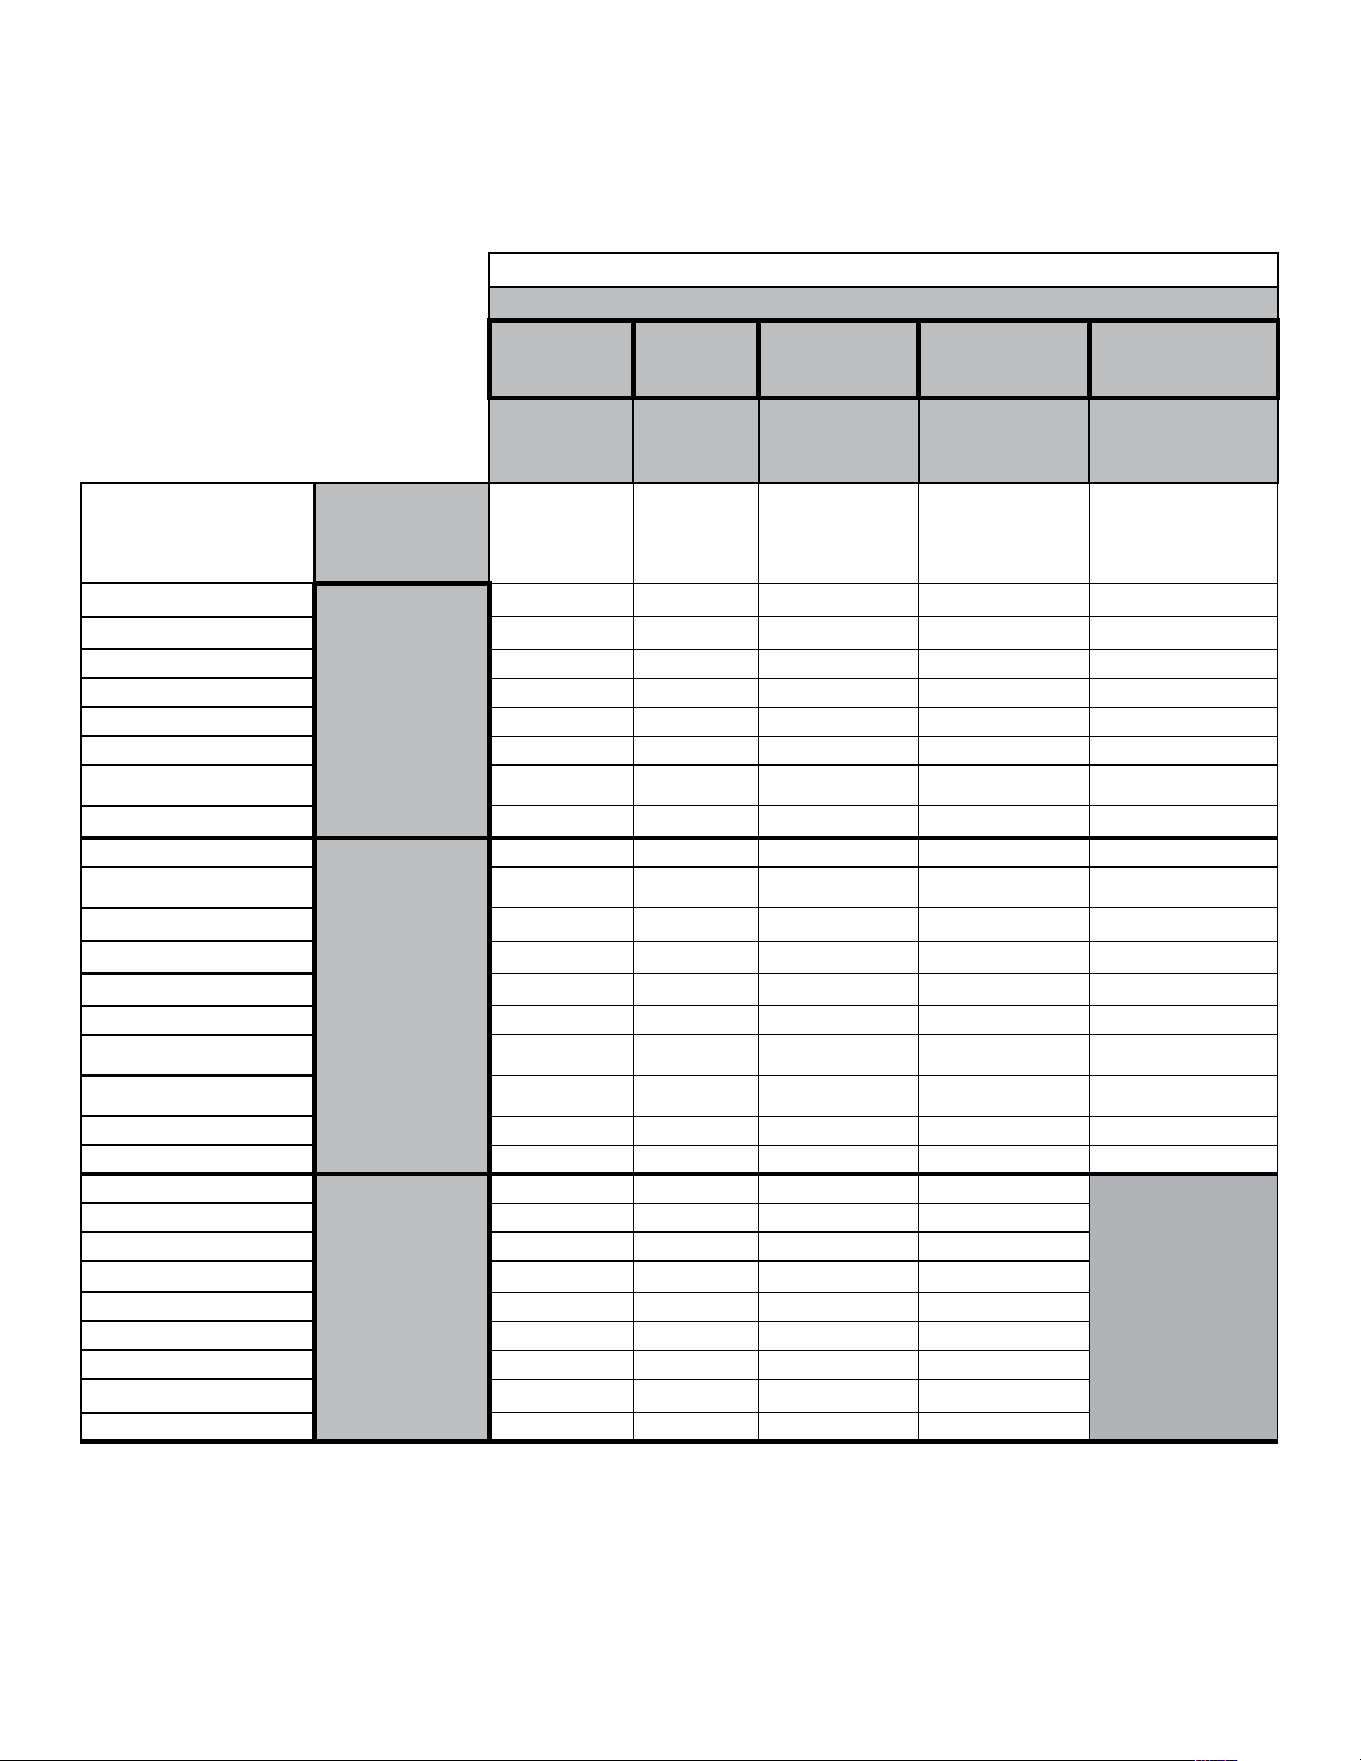
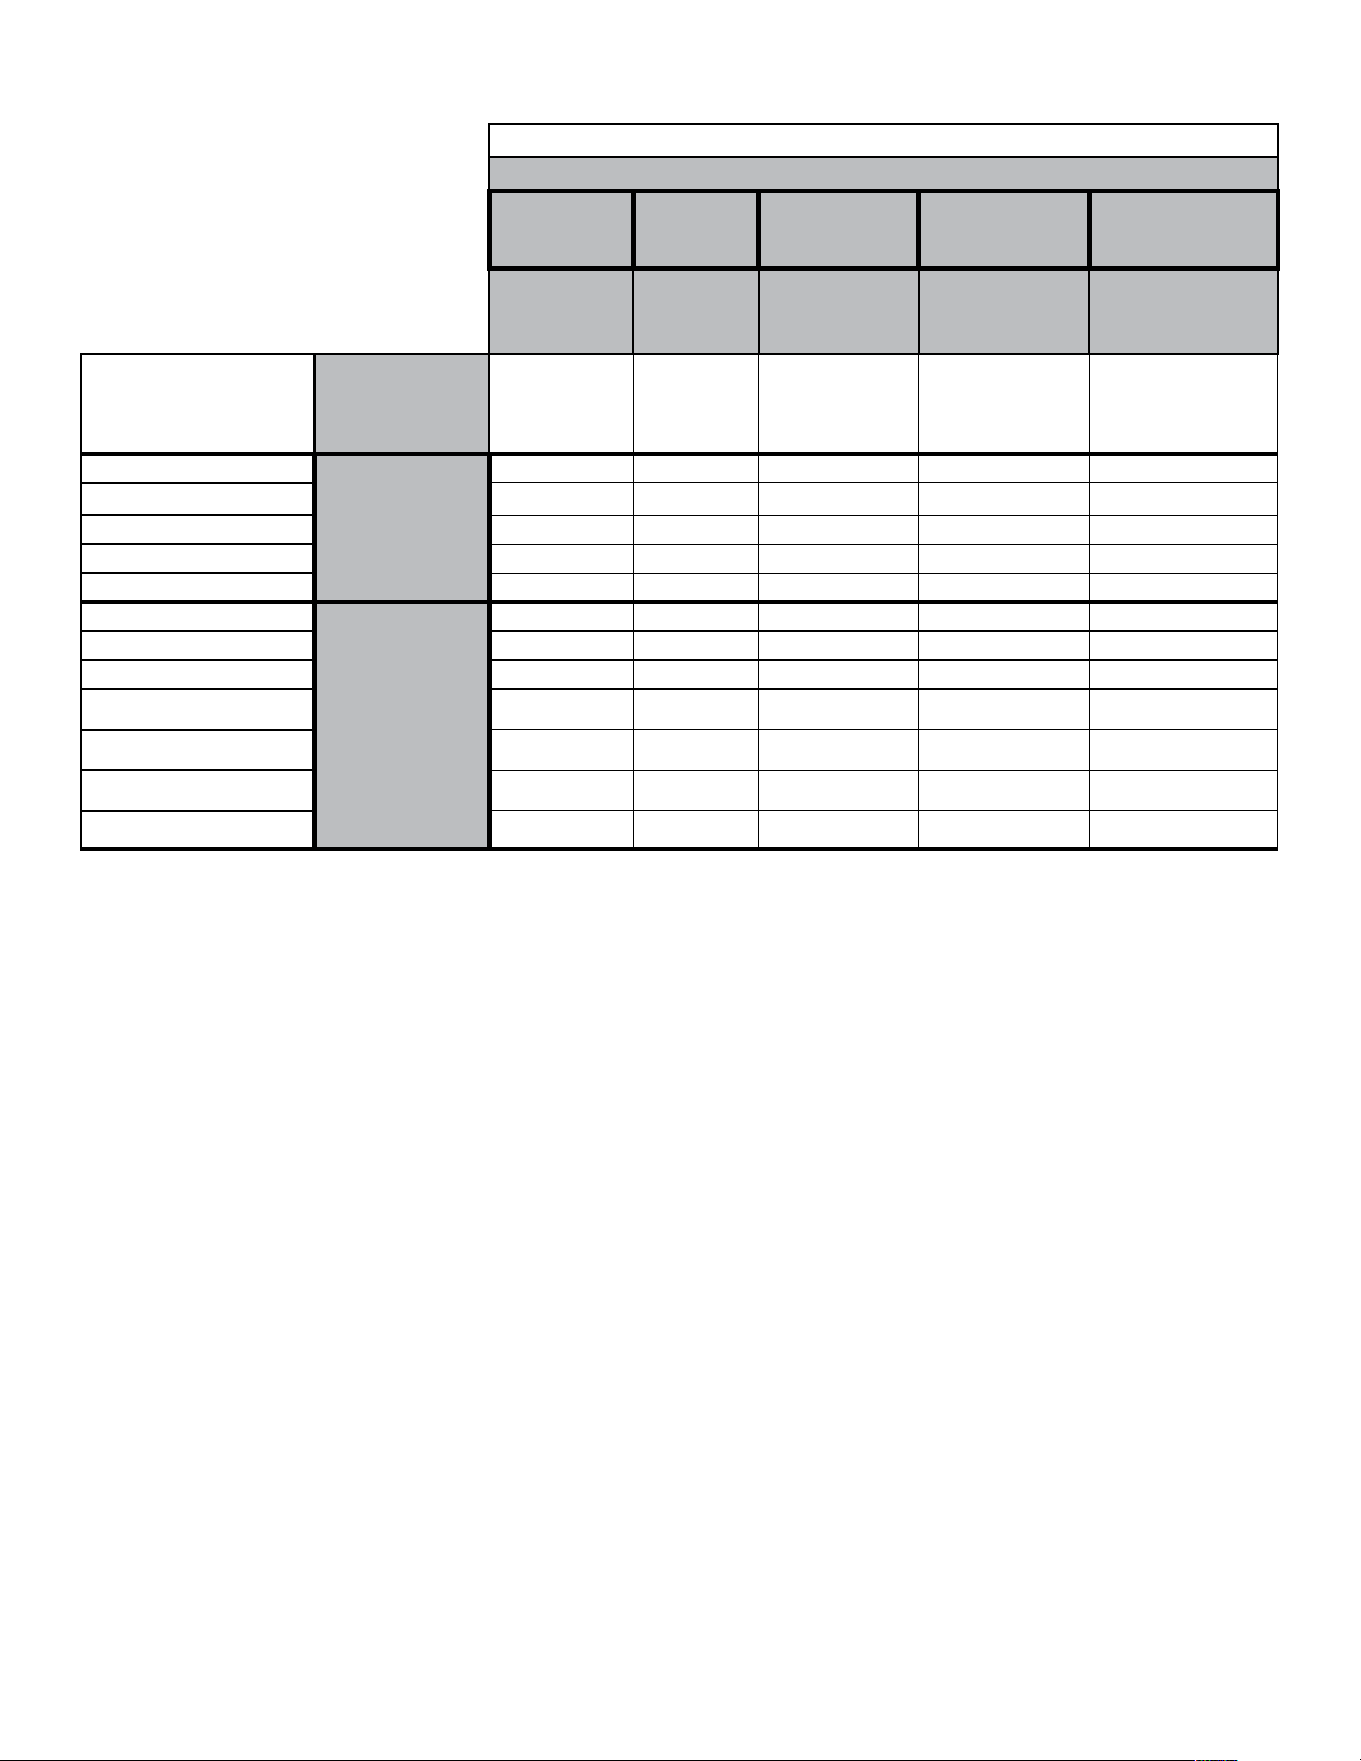
Cycle Guide
How do you want to wash?
“How to Wash” Cycle Selection
Normal Quick Delicate
Heavy Duty
ColorLast
• Regular Wash • Saves Time • Gentle Cleaning
• Protects My
Fabrics
• Powerful Soil
Removal
• Gentle Cleaning
• Protects My Colors
What do you
want to wash?
“What to Wash”
Cycle Selection
Cottons/Linens
Colors
P A A A A
Bright Colors
R R R R P
Handwash Fabrics
R R P A R
Bras
R R P A R
Lingerie
R R P A R
Baby Clothes
R R R P R
Machine Wash Silks
R R P A R
Wool
R R
P
R
R
Dark Colors
Darks
P R A R R
Athletic/High Performance
Wear
R R A P A
T-Shirts
P R R R R
Sweatshirts
P R R R R
Jeans
P R R R R
Pajamas
P R R R R
Business Casual
R
R R
R P
Dress Shirts/Pants
R R R A P
No-Iron Fabrics
R R R R P
Dark Sheets
P R A R R
White Clothing
Whites
P R R R
NA
White Shirts
P R R R
White T-Shirts
P R R R
Socks
R R
R
P
Undergarments
R R R P
Handkerchiefs
R R P R
Napkins
R R P R
White Sheets
P R A R
Tablecloths
P R R R
Towels
Towels
P R R R R
Terry Cloth
P R R R R
Hand Towels
P R R R R
Wash Cloths
P R R R R
Bath Towels
P R R R R
Blankets
Bedding/Bulky
P A R R R
Coats & Jackets
P A R R R
Comforters
P A R R R
Machine Wash Curtains
R R P A R
Machine Wash Slip Covers
P R R A R
Non-Rubber Lined Rugs
& Mats
P A R R R
Sleeping Bags
P A R A R
Your Whirlpool
®
washer has a unique user interface to help you select the best cycle you need for your load. The “What to Wash”
“How to Wash” layout guides you to the optimal cycle in two easy steps:
First determine what items are in the load that you are trying to wash. Use that to guide your “What to Wash” selection. Then determine
how you want the washer to wash them and select the appropriate “How to Wash” selection. See chart below for more details.
For best fabric care, choose the cycle
that best fits the load being washed.
P – Preferred Cycle Selection
R – Recommended Alternate
A – Available but not optimal

8
Using Your Washer
Using Your Washer’s Faucet Before Washing
Rinsing Before Running
a Wash Cycle
• Press the faucet button once. You do not need to hold the
button.
• Turn off the faucet by pressing the button again.
• If accidentally left on, the faucet will automatically shut off.
• Water from the tub will automatically drain if the level
becomes too high. The water will also drain after 10 minutes
if the lid is left open.
1. Turn on faucet
IMPORTANT: Before rinsing, make sure to sort, prepare,
and load laundry as discussed in “Running a Wash Cycle.”
• If you choose to drain water in the tub: with the washer turned
on, select DRAIN & SPIN and touch and hold the START/
PAUSE button.
• Water in the tub will always be drained before you start
a wash cycle.
2. Drain water manually, if desired
• If you choose to rinse the laundry and then drain: with the
washer turned on, select RINSE & SPIN and touch and hold
the START/PAUSE button.
• Water in the tub will always be drained before you start
a wash cycle.
3. Rinse and drain water, if desired
Press faucet
button
9
Presoaking Without Running
a Wash Cycle
• Press the faucet button once. You do not need to hold
the button.
TIP: You may want to add any detergent, color-safe bleach,
or oxi-type boosters while the faucet is running to mix it with
the water. (See Step 2 in the next column.)
• Turn off the faucet by pressing the button again.
If accidentally left on, the faucet will automatically shut off.
IMPORTANT: To stop the tub from draining automatically
in 10 minutes, you must close the lid. The water will remain
in the tub as long as the lid is closed and you take no action.
After 3 hours, the water will automatically be drained.
If you choose to drain water in the tub: with the washer
turned on, select DRAIN & SPIN and touch and hold the
START/PAUSE button.
NOTE: If you run a wash cycle, water in the tub will always be
drained before you start the cycle.
2. Drain water manually, if desired
If you choose to rinse the laundry: with the washer turned on,
select RINSE & SPIN and touch and hold the START/PAUSE
button. The washer will drain, spin, rinse the load, and spin
again.
NOTE: If you run a wash cycle, water in the tub will always be
drained before you start the cycle.
3. Rinse and drain water, if desired
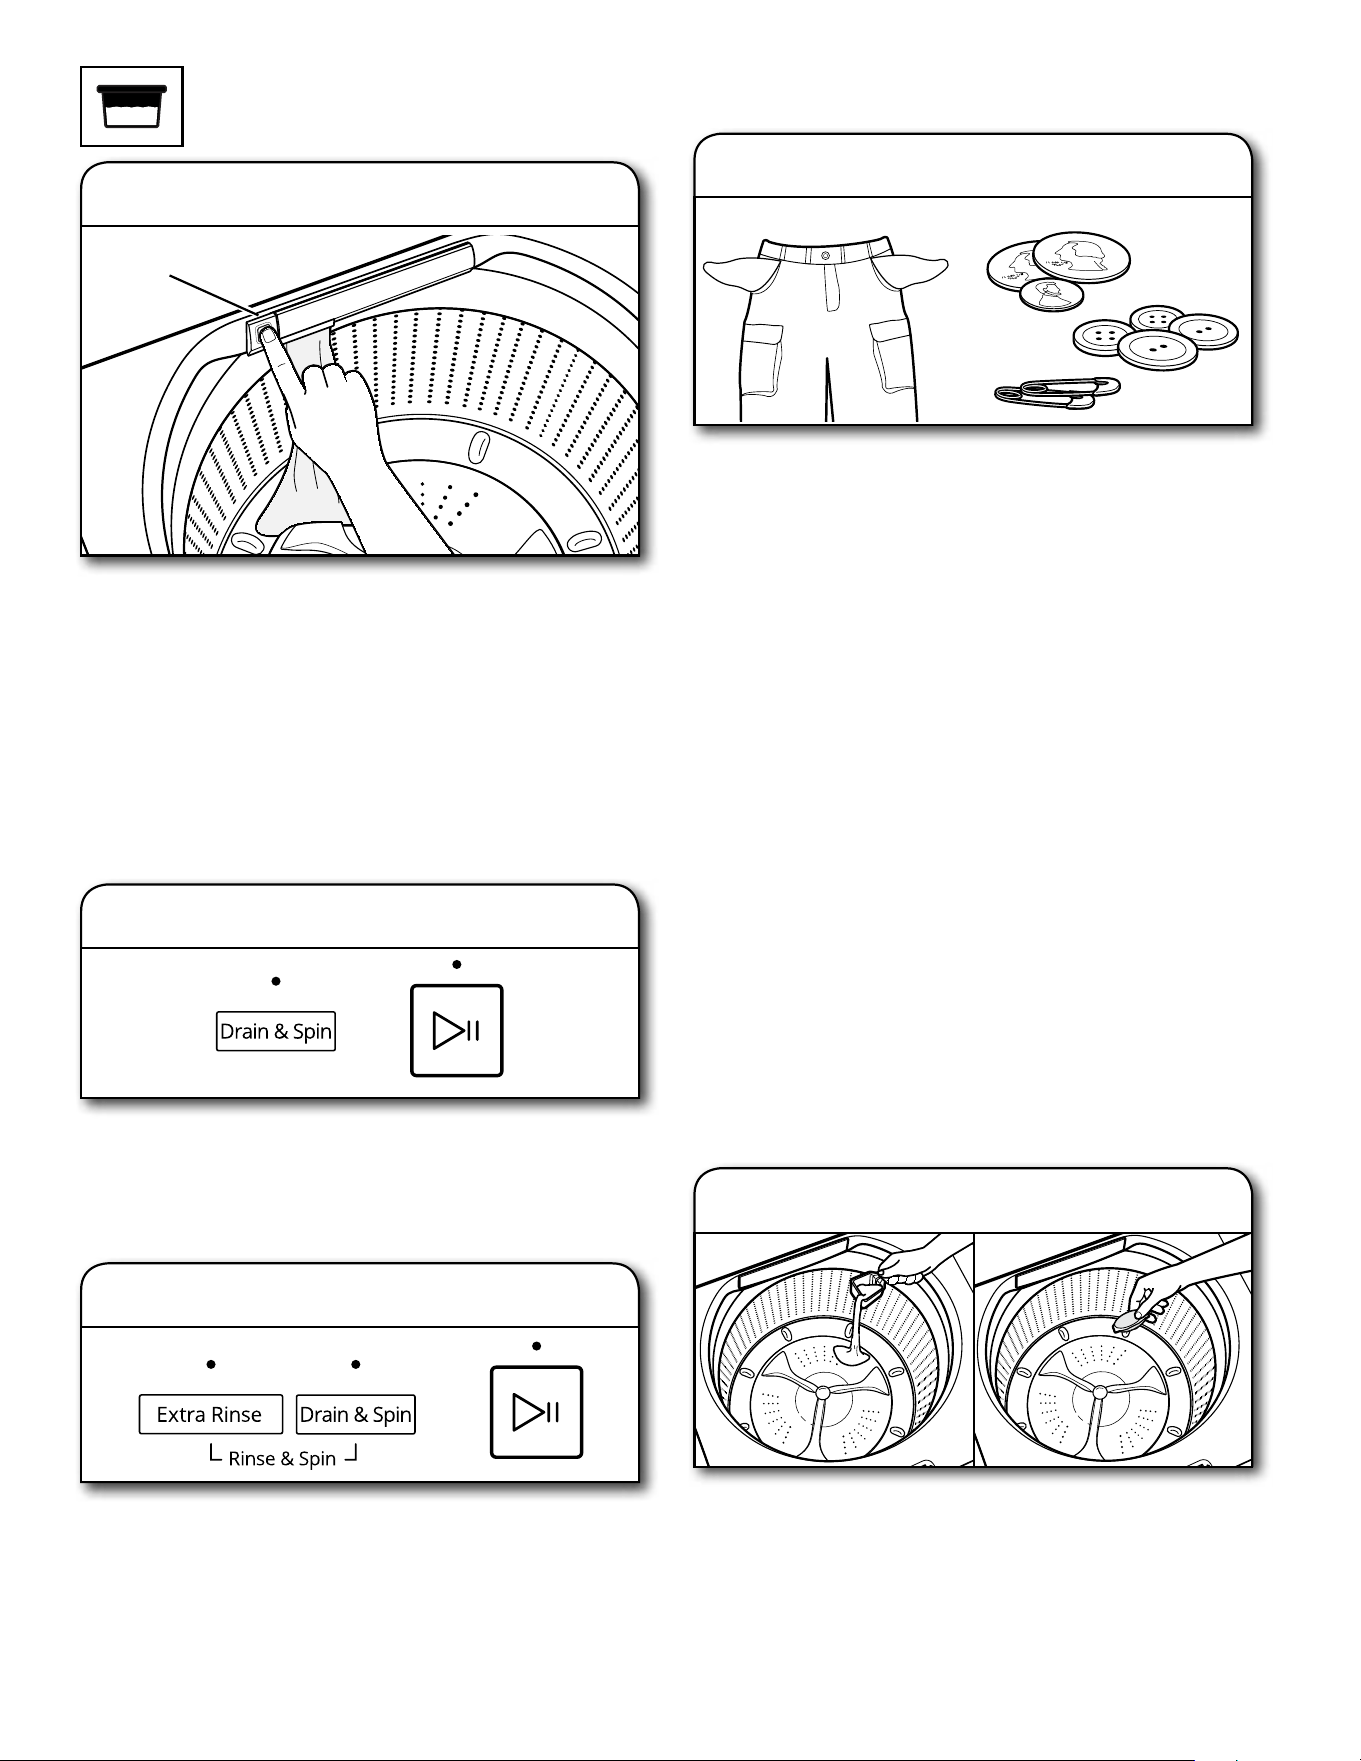
• Empty pockets. Loose change, buttons, or any small
object can pass under the washplate and become
trapped, causing unexpected sounds.
• Sort items by recommended cycle, water temperature,
and colorfastness.
• Separate heavily soiled items from lightly soiled.
• Separate delicate items from sturdy fabrics.
• Do not dry items if stains remain after washing, as heat
can set stains into fabric.
• Treat stains promptly.
• Close zippers, fasten hooks, tie strings and sashes.
Remove non-washable trim and ornaments.
• Mend rips and tears to avoid further damage to items
during washing.
Helpful Tips:
• For best performance, use HE liquid detergent when
washing bulky items.
• When washing waterproof or water-resistant items,
load evenly.
• Use mesh bags to help avoid tangling when washing
delicate or small items.
• Turn knits inside out to avoid pilling. Separate lint-takers
from lint-givers. Synthetics, knits, and corduroy fabrics
will pick up lint from towels, rugs, and chenille fabrics.
NOTE: Always read and follow fabric care labels instructions
to avoid damage to your items.
1. Sort and prepare your laundry
Running a Wash Cycle
Single-dose laundry packet, color-safe bleach, Oxi-type
boosters, or fabric softener crystals can be added to the
basket prior to adding laundry.
NOTE: Always follow manufacturer’s instructions.
2. Add laundry products
1. Turn on faucet
Press faucet
button
10
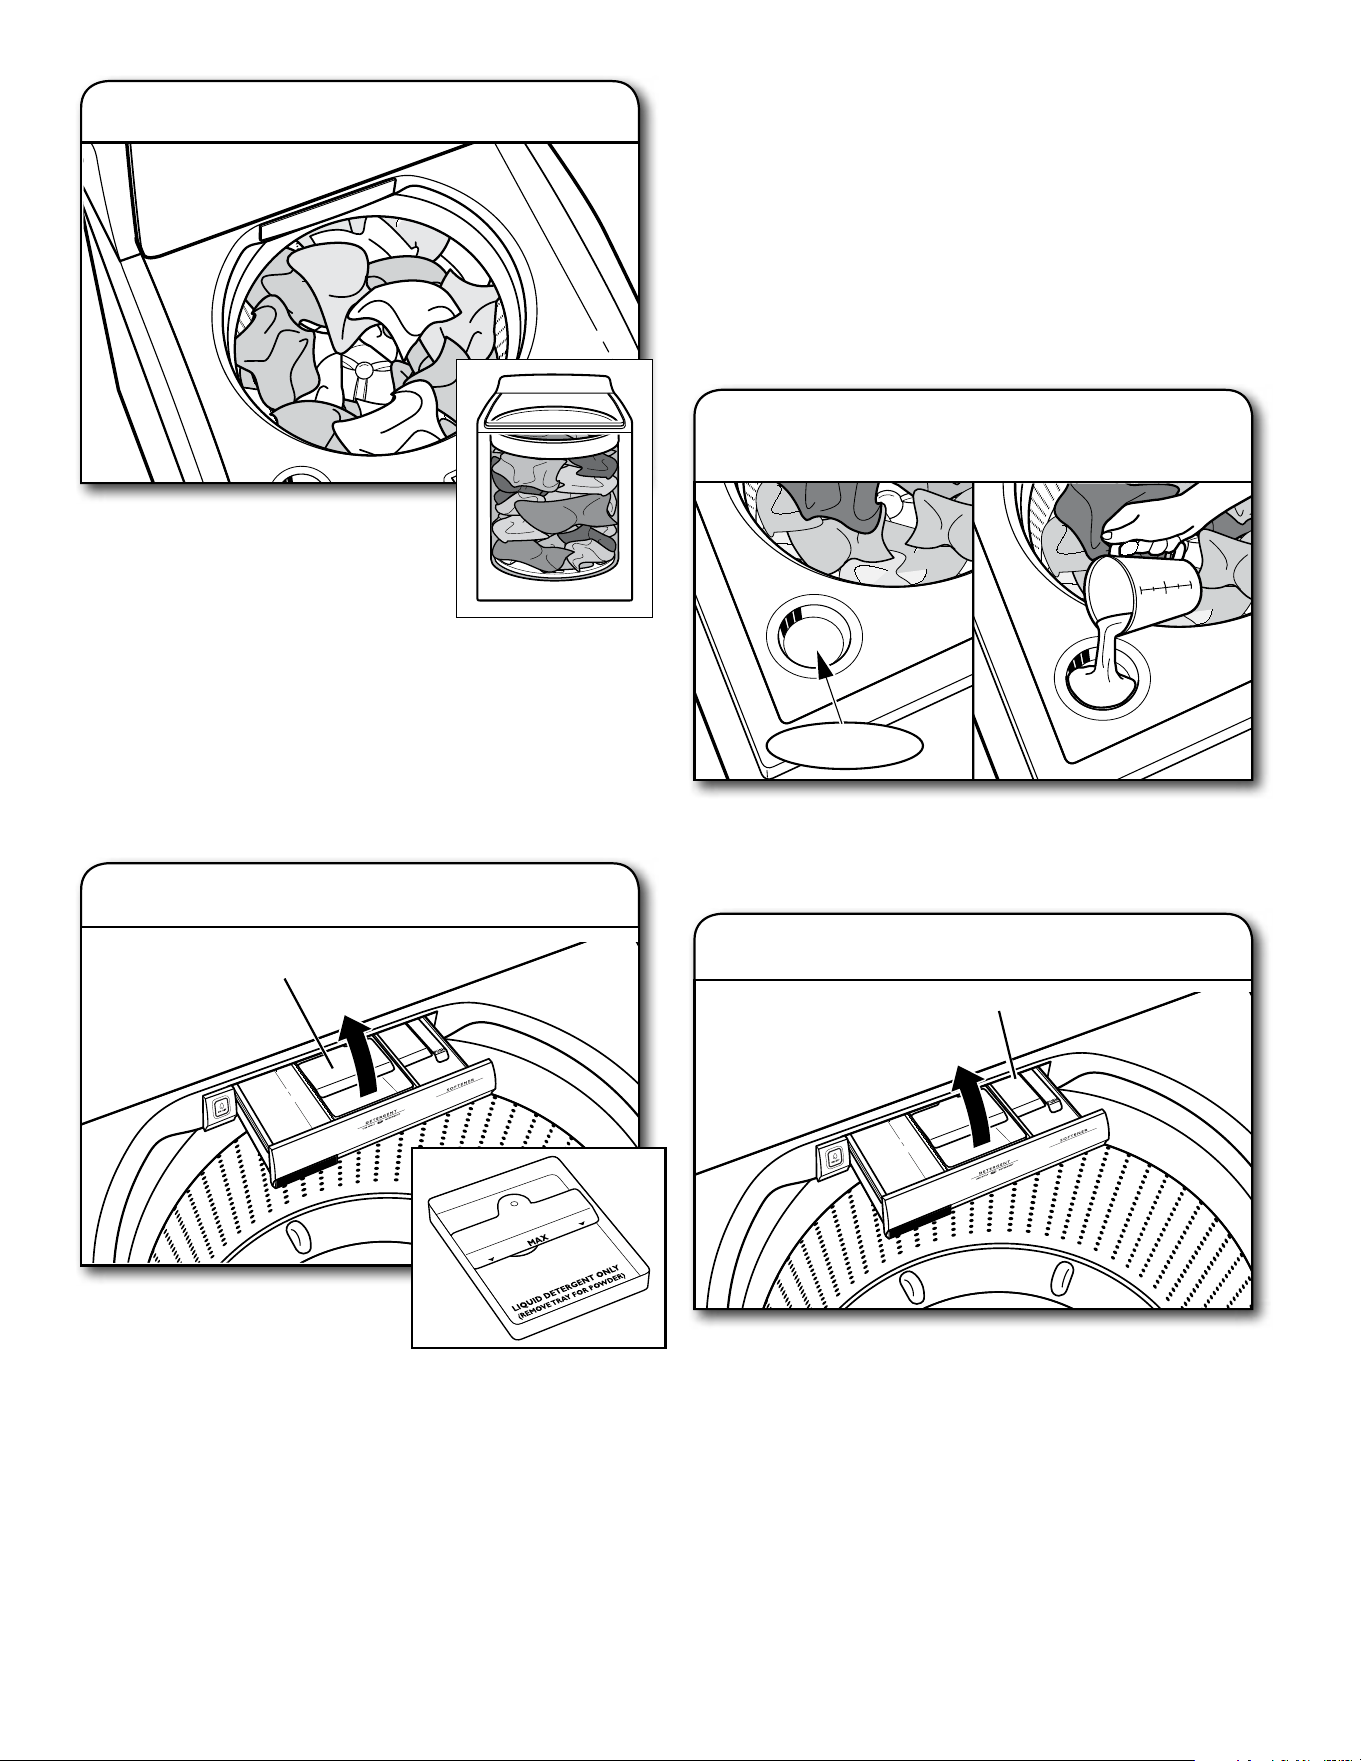
For best performance, load items
in loose heaps evenly around the
washplate. Try mixing different sized
items to reduce tangling.
IMPORTANT: Items need to move freely
for best cleaning and to reduce wrinkling and tangling.
3. Load laundry into washer
6. Add liquid fabric softener
Pour a measured amount of liquid fabric softener into tray;
always follow manufacturer’s directions for correct amount
of fabric softener based on your load size. Close dispenser
drawer. Fabric Softener is added during rinse.
IMPORTANT: Do not overfill or dilute. Overfilling the
dispenser will cause fabric softener to immediately dispense
into the washer.
If Extra Rinse option is selected, fabric softener will be
dispensed into the last rinse.
It is normal for a small amount of water to remain in the
dispenser at the end of a cycle.
Fabric softener tray
Liquid
Chlorine Bleach
5. Add liquid chlorine bleach
to dispenser
Do not overfill, dilute, or use more than 1 cup (236 mL).
Do not use color-safe bleach or Oxi products in the same
cycle with liquid chlorine bleach.
Add a measured amount of HE
detergent into detergent tray. This
tray holds 3 oz. (89 mL). If adding
powder HE detergent, remove the inside tray. Do not overfill
the tray; adding too much detergent may cause detergent to be
dispensed into the washer too early.
NOTE: Make sure the tray is in the drawer when using liquid
detergent and removed when using powder detergent. Do not go
over the Max line.
IMPORTANT: Use only High Efficiency detergents. The package
will be marked “HE” or “High Efficiency.” Low-water washing
creates excessive sudsing with a non-HE detergent. Using
non-HE detergent will likely result in longer cycle times and
reduced rinsing performance. It may also result in component
malfunction and, over time, buildup of mold or mildew. HE
detergents should be low-sudsing and quick-dispersing to
4. Add HE detergent
HE removable
detergent tray
NOTE: Do not add single-dose laundry packets, color-safe
bleach, Oxi-type boosters, or fabric softener crystals to
dispensers. They will not dispense correctly. Add to the
basket prior to adding laundry.
Using Laundry Product Dispensers
produce the right amount of suds for the best performance. They
should hold soil in suspension so it is not redeposited onto clean
clothes. Not all detergents labeled as High Efficiency are identical
in formulation and their ability to reduce suds. For example,
natural, organic, or homemade HE detergents may generate
a high level of suds. If you use one of these and see an “F0E2”
error code appear in the display, consider using a different
HE detergent. Always follow the detergent manufacturer’s
instructions to determine the amount of detergent to use.
Do not go over the Max line on the dispenser.
HELPFUL TIP: See “Washer Maintenance” for information
on recommended method of cleaning washer dispenser trays.
11
First touch a cycle from the “What to
Wash,” and then select the “How to Wash”
to get the best combination cycle available
for the type of items you are going to wash.
See “Cycle Guide” for cycle details. Not all
cycles are available on all models.
Estimated Time Remaining will light up with a cycle time.
You may notice time adjusting during the cycle. This is
normal.
If you do not want to begin a cycle immediately, you may
choose the Delay Start option.
To choose a delay time:
1. Touch the DELAY START button to select desired delay
time. Time will increase in hour increments up to 12 hours.
2. Touch and hold the START/PAUSE button to start delay
start time.
IMPORTANT: When delaying a cycle, use liquid HE
detergent only in the dispenser. Powdered detergents may
absorb moisture from a previous cycle and clump before
the wash cycle begins.
To cancel delay start:
1. Touch the POWER button to cancel Delay Start.
To pause delay start:
1. Touch the START/PAUSE button to pause delay start.
2. Touch and hold the START/PAUSE button again to start
the delay start time. If the delay start time is not started
after 10 minutes, the washer will power off.
8. Select type of load to wash
9. Select cycle modifiers
Once you select a cycle, the default modifiers or the previously
set modifiers for that cycle will be lit. Touch the cycle settings
buttons to change the Soil Level, Spin Speed, and Temperature,
if desired. Not all settings are available with all cycles.
NOTE: Always read and follow fabric care labels instructions
to avoid damage to your items.
7. Touch POWER button to turn
on washer
Make sure the dispenser drawer is closed completely, then
touch the POWER button to turn on the washer.
Temperature Suggested Fabrics
Hot
Some cold water is added
to save energy. This will be
cooler than your hot water
heater setting.
Whites and pastels
Durable items
Heavy soils
Warm
Some cold water will be
added, so this may be cooler
than what your previous
washer provided.
Bright colors
Moderate to light soils
Cool
Warm water is added to assist
in soil removal and to help
dissolve detergents.
Colors that bleed or fade
Light soils
Cold
Warm water may be added
to assist in soil removal and
to help dissolve detergents.
Dark colors that bleed or fade
Light soils
10. Select cycle options
Select any other cycle options you may wish to add, if not
previously set. Some cycles will automatically add certain
options such as Extra Rinse. These may be turned off if desired.
NOTE: Not all options are available with all cycles. Touch the
control panel to select any other options.

12
11. Touch and hold START/PAUSE
button to begin wash cycle
Touch and hold the START/PAUSE button to start the wash
cycle. When the cycle has finished, the end-of-cycle signal
will sound (if set). Promptly remove items when cycle is done
to avoid odor, reduce wrinkling, and reduce rusting of metal
hooks, zippers, and snaps.
Unlocking the lid to add items
If you need to open the lid to add one or two missed items:
Touch the START/PAUSE button to pause the washer;
the lid will unlock once the washer movement has stopped.
This may take several minutes if the load was spinning at
a high speed. Then close lid and touch and hold the START/
PAUSE button again to restart the cycle.
IMPORTANT: If the lid is left open for more than 10 minutes,
the water will pump out and the F8E6 error code will appear
on the display.
13
WASHER CARE (cont.)
2. Chlorine Bleach Procedure (Alternative):
a. Open the washer lid and remove any clothing
or items.
b. Add 1 cup (236 mL) of liquid chlorine bleach
to the bleach compartment.
NOTE: Use of more liquid chlorine bleach than is
recommended above could cause washer damage
over time.
c. Close the washer lid.
d. Do not add any detergent or other chemical
to the washer when following this procedure.
e. Select the Clean Washer cycle.
f. Touch and hold the START/PAUSE button to begin
the cycle. The Clean Washer Cycle Operation is
described below.
NOTE: For best results, do not interrupt cycle. If cycle
must be interrupted, touch the POWER button. After
the Clean Washer cycle has stopped, run a
Rinse & Spin
cycle to rinse cleaner from washer.
Description of Clean Washer Cycle Operation:
1. This cycle will fill to a water level higher than in normal
wash cycles to provide rinsing at a level above the water
line for normal wash cycle.
2. During this cycle, there will be some agitation and
spinning to increase the removal of soils.
After this cycle is complete, leave the lid open to allow
for better ventilation and drying of the washer interior.
Cleaning the Outside of the Washer
Use a soft, damp cloth or sponge to wipe away any spills.
Use only mild soaps or cleaners when cleaning external
washer surfaces.
IMPORTANT: To avoid damaging the washer’s finish, do not
use abrasive products.
Replace inlet hoses after 5 years of use to reduce the risk
of hose failure. Periodically inspect and replace inlet hoses
if bulges, kinks, cuts, wear, or leaks are found.
When replacing your inlet hoses, mark the date of
replacement on the label with a permanent marker.
NOTE: This washer does not include inlet hoses.
See the Installation Instructions for more information.
WATER INLET HOSES
WASHER CARE
Recommendations to Help Keep Your Washer
Clean and Performing at Its Best
1. Always use High Efficiency (HE) detergents and follow
the HE detergent manufacturer’s instructions regarding
the amount of HE detergent to use. Never use more than
the recommended amount because that may increase the
rate at which detergent and soil residue accumulate inside
your washer, which may result in undesirable odor.
2. Use warm and hot wash water settings sometimes
(not exclusively cold water washes), because they do
a better job of controlling the rate at which soils and
detergent accumulate.
3. Always leave the washer lid open between uses
to help dry out the washer and prevent the buildup
of odor-causing residue.
Cleaning Your Top-Loading Washer
Read these instructions completely before beginning
the routine cleaning processes recommended below.
This Washer Maintenance Procedure should be performed,
at a minimum, once per month or every 30 wash cycles,
whichever occurs sooner, to control the rate at which soils
and detergent may otherwise accumulate in your washer.
Cleaning the Inside of the Washer
To keep your washer odor-free, follow the usage instructions
provided above, and use this recommended monthly
cleaning procedure:
Clean Washer Cycle
This washer has a special cycle that uses higher water
volumes in combination with affresh
®
Washer Cleaner
or liquid chlorine bleach to clean the inside of the washer.
Begin procedure
1. affresh
®
Washer Cleaner Cycle Procedure
(Recommended for Best Performance):
a. Open the washer lid and remove any clothing or items.
b. Place an affresh
®
Washer Cleaner tablet in the bottom
of the washer basket.
c. Do not place an affresh
®
Washer Cleaner tablet
in the detergent dispenser.
d. Do not add any detergent or other chemical to the
washer when following this procedure.
e. Close the washer lid.
f. Select the Clean Washer cycle.
g. Touch and hold the START/PAUSE button to begin
the cycle. The Clean Washer Cycle Operation is
described in the next column.
NOTE: For best results, do not interrupt cycle. If cycle
must be interrupted, touch the POWER button. After the
Clean Washer cycle has stopped, run a
Rinse & Spin
cycle
to rinse cleaner from washer.
Washer Maintenance
14
Operate your washer only when you are home. If you are
moving or not using your washer for a period of time, follow
these steps:
1. Unplug or disconnect power to washer.
2. Turn off water supply to washer to avoid flooding
due to water pressure surge.
NON-USE AND VACATION CARE
WINTER STORAGE CARE
IMPORTANT: To avoid damage, install and store washer
where it will not freeze. Because some water may stay in
hoses, freezing can damage washer. If storing or moving
during freezing weather, winterize your washer.
To winterize washer:
1. Shut off both water faucets; disconnect and drain water
inlet hoses.
2. Put 1 qt. (1 L) of R.V.-type antifreeze in the basket
and run the washer on the Rinse & Spin cycle for about
30 seconds to mix antifreeze and remaining water.
3. Unplug washer or disconnect power.
REINSTALLING/USING WASHER AGAIN
To reinstall washer after non-use, vacation, winter storage,
or moving:
1. Refer to Installation Instructions to locate, level, and
connect washer.
2. Before using again, run washer through the following
recommended procedure:
To use washer again:
1. Flush water pipes and hoses. Reconnect water inlet
hoses. Turn on both water faucets.
2. Plug in washer or reconnect power.
3. Run washer through Bedding/Bulky and Heavy Duty
cycle to clean washer and remove antifreeze, if used.
Use only HE High Efficiency detergent. Use half the
manufacturer’s recommended amount for a medium-
size load.
TRANSPORTING YOUR WASHER
1. Shut off both water faucets. Disconnect and drain water
inlet hoses.
2. If washer will be moved during freezing weather, follow
“Winter Storage Care” directions before moving.
3. Disconnect drain from drain system.
4. Unplug power cord.
5. Place inlet hoses inside washer basket.
6. Drape power cord and drain hose over the console
and secure with masking tape.
7. Place foam packing ring from original shipping materials
back inside washer. If you do not have packing ring,
place heavy blankets or towels into basket opening.
Close lid and place tape over lid and down front of
washer. Keep lid taped until washer is placed in
new location. Transport washer in the upright position.
CLEANING YOUR DISPENSER
IMPORTANT: Dispenser drawer and tray are not
dishwasher-safe.
You may find laundry product residue leftover in your
dispenser drawer. To remove residue, follow this
recommended cleaning procedure:
1. Pull drawer out until you feel resistance.
2. Push one tab downward, then continue pulling out.
3. Wash in warm, soapy water, using a mild detergent.
4. Rinse with warm water.
5. Air dry or dry with a towel, then place back into slot.
15
Troubleshooting
If you experience Possible Causes Solution
Vibration or Off-Balance
Vibration, rocking, or
“walking”
Feet may not be in contact with the
floor and locked.
Front and rear feet must be in firm contact with floor, and washer
must be level to operate properly.
Washer may not be level. Check floor for flexing or sagging. If flooring is uneven, a 3/4"
(19 mm) piece of plywood under your washer will reduce sound.
See “Level the Washer” in the Installation Instructions.
Vibration during spinning
or washer stopped
Load could be unbalanced. Load items in loose heaps evenly around the washplate.
Adding wet items to washer or adding more water to basket
could unbalance washer.
Avoid washing single items. Balance a single item such as a
rug or jean jacket with a few extra items. If the dial is flashing,
redistribute the load, close the lid, and touch and hold the
START/PAUSE button.
Use Bedding/Bulky and Heavy Duty cycle for oversized,
non-absorbent items such as comforters or poly-filled jackets.
Other items are not appropriate for Bedding/Bulky Heavy Duty
cycle. See “Cycle Guide.”
Item or load not suitable for selected cycle. See “Cycle Guide”
and “Using Your Washer.”
Noises – For normal operating sounds, go to www.whirlpool.com/product_help.
Clicking or metallic
noises
Objects may be caught in washer
drain system.
Empty pockets before washing. Loose items such as coins
could fall between basket and tub or may block pump. It may be
necessary to call for service to remove items.
It is normal to hear metal items on clothing such as metal snaps,
buckles, or zippers touch against the stainless steel basket.
Gurgling or humming Washer may be draining water. It is normal to hear the pump making a continuous humming
sound with periodic gurgling or surging as final amounts of water
are removed during the spin/drain cycles.
Humming Load sensing may be occurring. You may hear the hum of the sensing spins after you have
started the washer. This is normal.
Whirring Basket may be slowing down. You may hear the whirring sound of the basket slowing down.
This is normal.
Water Leaks
Check the following for
proper installation:
Washer not level. Water may splash off basket if washer is not level.
Fill hoses not attached tightly. Tighten fill-hose connection.
Fill hose washers Make sure all four fill hose flat washers are properly seated.
Drain hose connection Pull drain hose from washer cabinet and properly secure it to
drainpipe or laundry tub.
Do not place tape over drain opening.
Check household plumbing for leaks
or clogged sink or drain.
Water can back up out of a clogged sink or drainpipe. Check all
household plumbing for leaks (laundry tubs, drain pipe, water
pipes, and faucets.)
Washer not loaded as
recommended.
An unbalanced load can cause basket to be out of alignment
and cause water to splash off tub. See “Using Your Washer”
for loading instructions.
Washer not performing as expected
Not enough water
in washer
Load not completely covered
in water.
This is normal operation for an HE low-water washer. The load
will not be completely underwater. The washer senses load
sizes and adds correct amount of water for optimal cleaning.
See “What’s New under the Lid.”
IMPORTANT: Do not add more water to washer. Adding water lifts
the items off the washplate, resulting in less effective cleaning.
Run clean washer cycle to optimize the water level and wash
performance.
First try the solutions suggested here or visit our website at www.whirlpool.com/product_help –
In Canada www.whirlpool.ca for assistance and to possibly avoid a service call.
16
Troubleshooting
Washer won’t run or fill;
washer stops working
(cont.)
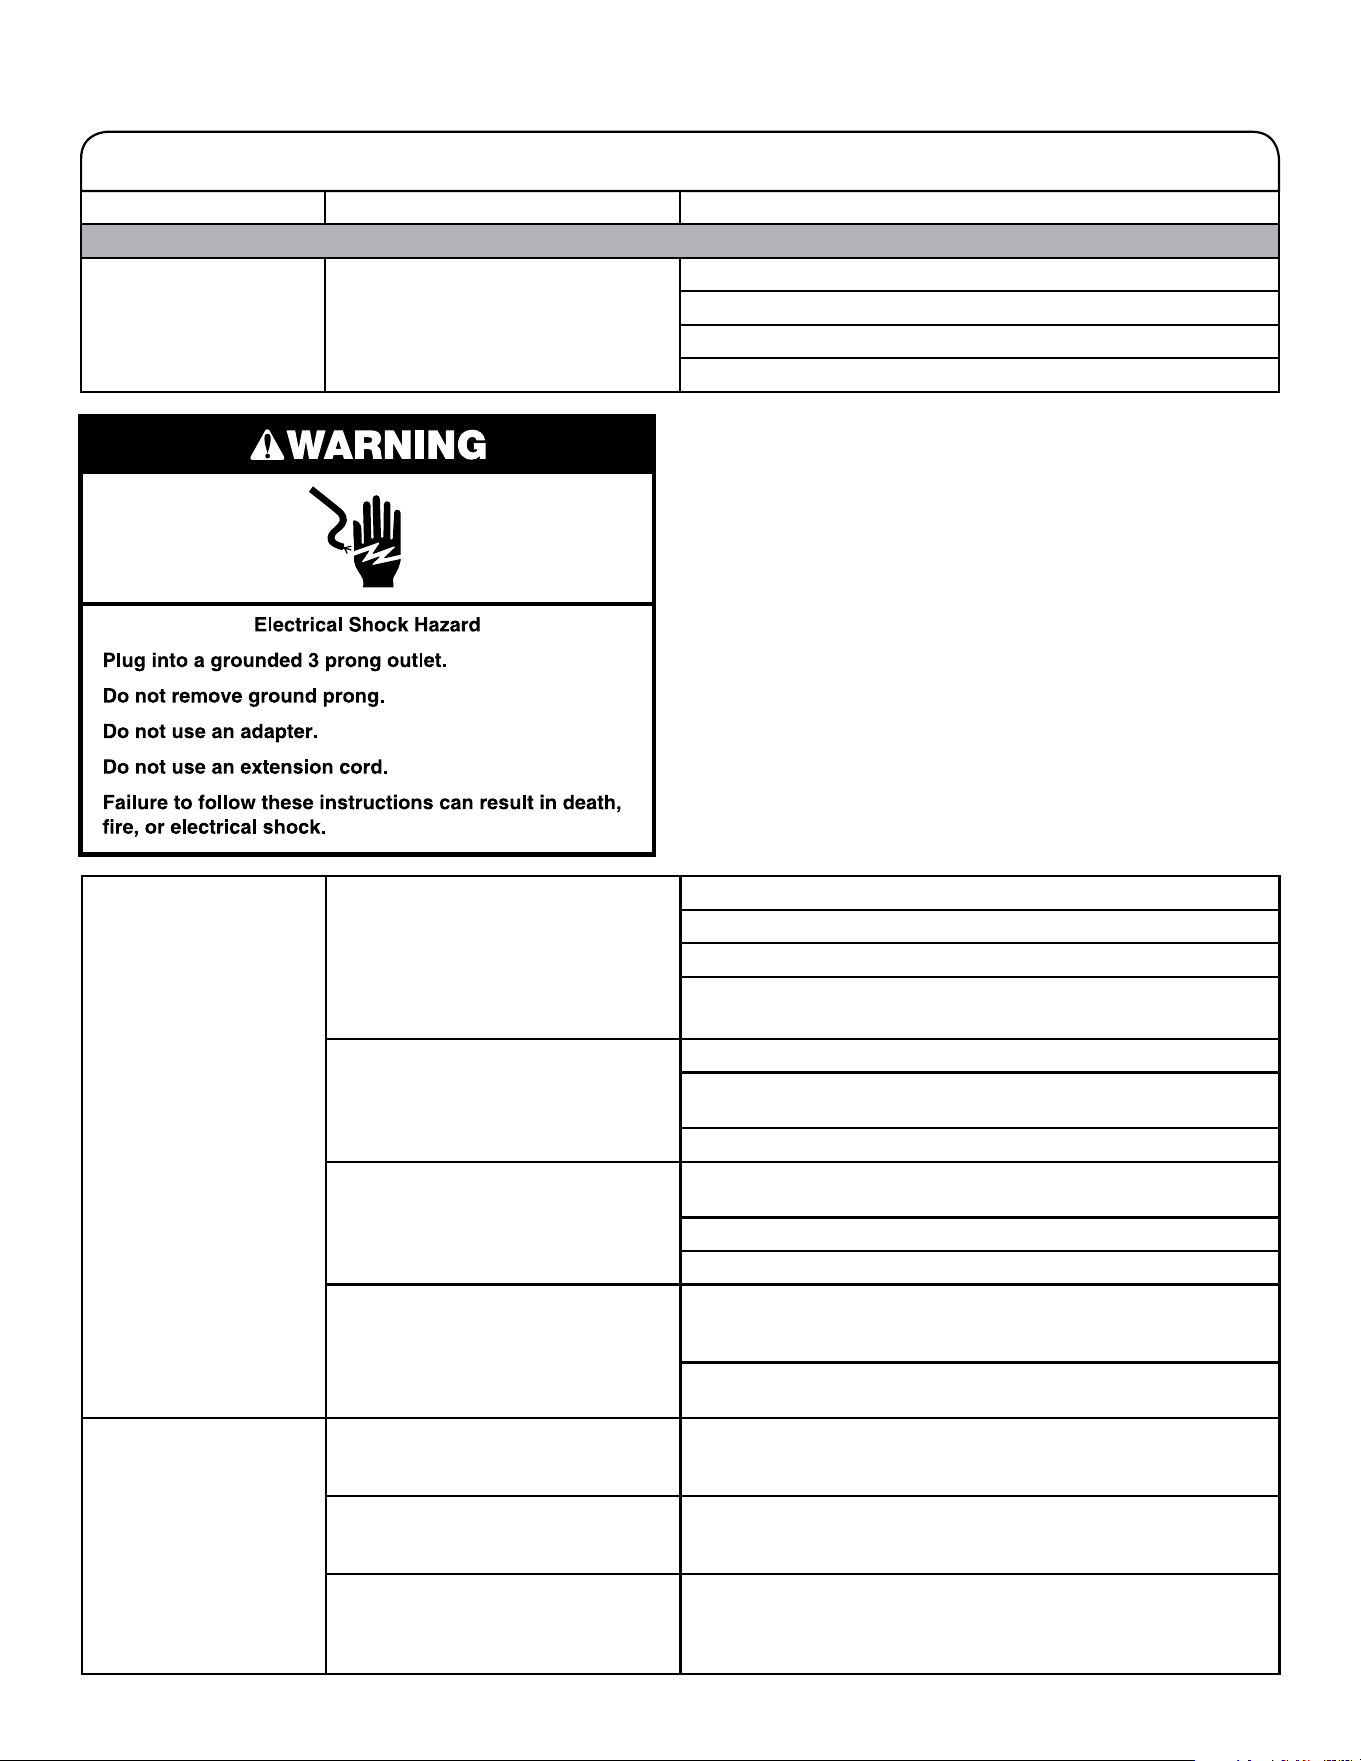
Check proper electrical supply. Plug power cord into a grounded 3 prong outlet.
Do not use an extension cord.
Ensure there is power to outlet.
Reset a tripped circuit breaker. Replace any blown fuses.
NOTE: If problems continue, contact an electrician.
Normal washer operation. Lid must be closed for washer to run.
Washer will pause during certain phases of cycle. Do not
interrupt cycle.
Washer may be stopped to reduce suds.
Washer may be tightly packed. Remove several items, rearrange load evenly around the
washplate. Close lid, touch and hold the START/PAUSE button.
Add only one or two additional items after washer has started.
Do not add more water to the washer.
Not using HE detergent or using too
much HE detergent.
Only use HE detergent. Suds from regular detergents can slow
or stop the washer. Always measure detergent and following
detergent directions based on your load requirements.
To remove suds, cancel cycle. Select RINSE & SPIN. Select your cycle.
Touch and hold the START/PAUSE button. Do not add more detergent.
Washer not draining/
spinning; loads are
still wet
Small items may have been caught
in pump or between basket and tub,
which can slow draining.
Empty pockets and use garment bags for small items.
Using cycles with a lower spin speed. Cycles with lower spin speeds remove less water than cycles
with high spin speeds. Use the recommended cycle/speed spin
for your item.
Washer may be tightly packed or
unbalanced.
Tightly packed loads may not allow the washer to spin correctly,
leaving the load wetter than normal. Evenly arrange the wet load
for balanced spinning. Select RINSE & SPIN to remove excess
water. See “Using Your Washer” for loading recommendations.
If you experience Possible Causes Solution
Washer not performing as expected (cont.)
Washer won’t run or fill;
washer stops working
Check for proper water supply.
Both hoses must be attached and have water flowing to inlet valve.
Both hot and cold water faucets must be turned on.
Check that inlet valve screens have not become clogged.
Check for any kinks in inlet hoses, which can restrict water flow.
First try the solutions suggested here or visit our website at www.whirlpool.com/product_help –
In Canada www.whirlpool.ca for assistance and to possibly avoid a service call.

17
Troubleshooting
If you experience Possible Causes Solution
Washer not performing as expected (cont.)
Washer not draining/
spinning; loads are
still wet (cont.)
Load off balanced. See “Vibration or Off-Balance” in the “Troubleshooting” section
for more information.
Check plumbing for correct drain
hose installation. Drain hose
extends into standpipe farther
than 4.5" (114 mm).
Check drain hose for proper installation. Use drain hose
form and securely attach to drainpipe or tub. Do not tape
over drain opening. Lower drain hose if the end is higher than
96" (2.4 m) above the floor. Remove any clogs from drain hose.
Not using HE detergent or using too
much HE detergent.
Suds from regular detergent or using too much detergent can
slow or stop draining or spinning. Use only HE detergent. Always
measure and follow detergent directions for your load. To remove
extra suds, select RINSE & SPIN. Do not add detergent.
Incorrect or wrong wash
or rinse temperatures
Check for proper water supply. Make sure hot and cold inlet hoses are not reversed.
Both hoses must be attached to both washer and faucet, and
have both hot and cold water flowing to inlet valve.
Check that inlet valve screens are not clogged.
Remove any kinks in hoses.
Energy-saving controlled wash
temperatures.
ENERGY STAR
®
qualified washers use cooler wash and rinse
water temperatures than traditional top-loading washers.
This includes cooler hot and warm washes.
Load not rinsed Check for proper water supply. Make sure hot and cold inlet hoses are not reversed.
Both hoses must be attached and have water flowing to the
inlet valve.
Both hot and cold water faucets must be on.
Inlet valve screens on the washer may be clogged.
Remove any kinks in the inlet hose.
Not using HE detergent or using too
much HE detergent.
The suds from regular detergent can cause the washer to
operate incorrectly.
Use only HE detergent. Be sure to measure correctly.
Always measure detergent and follow detergent directions based
on load size and soil level.
Washer may be tightly packed. The washer is less efficient at rinsing when load is tightly
packed.
Load items in loose heaps evenly around the washplate.
Use cycle designed for the fabrics being washed.
Add only one or two additional items after the washer has
started.
Sand, pet hair, lint, etc.
on load after washing
Heavy sand, pet hair, lint, and
detergent or bleach residues may
require additional rinsing.
Add an Extra Rinse to the selected cycle.
Load is tangling Washer not loaded as recommended. Load items in loose heaps evenly around the washplate.
Reduce tangling by mixing types of load items. Use the
recommended cycle for the type of items being washed.
Wash action and/or spin speed too
fast for load.
Select a cycle with a slower wash action and slower spin speed.
Note that items will be wetter than when using a higher speed spin.
Not cleaning or
removing stains
Wash load not completely
covered in water.
Washer senses load size and adds correct amount of water.
This is normal and necessary for clothes to move.
Added more water to washer. Do not add more water to washer. Adding water lifts the items
off the washplate, resulting in less effective cleaning.
Washer not loaded as recommended. Load items in loose heaps evenly around the washplate.
Add only one or two additional items after the washer has
started.
First try the solutions suggested here or visit our website at www.whirlpool.com/product_help –
In Canada www.whirlpool.ca for assistance and to possibly avoid a service call.
18
Troubleshooting
If you experience Possible Causes Solution
Washer not performing as expected (cont.)
Not cleaning or
removing stains (cont.)
Not using HE detergent or using too
much HE detergent.
The suds from regular detergent can keep washer from
operating correctly.
Use only HE detergent. Be sure to measure correctly.
Always measure detergent and follow detergent directions based
on load size and soil level.
Not using correct cycle for
fabric type.
Use a higher soil level cycle option and warmer wash
temperature to improve cleaning.
If using Quick cycle, wash only a few items.
Use Whites/Normal cycle for tough cleaning.
See the “Cycle Guide” to match your load with the best cycle.
Not using dispensers. Use dispensers to avoid chlorine bleach and fabric softener
staining.
Load dispensers before starting a cycle.
Avoid overfilling.
Do not add products directly onto the load.
Not washing like colors together. Wash like colors together and remove promptly after the cycle
is complete to avoid dye transfer.
Odors Monthly maintenance not done as
recommended.
Run the Clean Washer cycle after every 30 washes. See “Washer
Care” in “Washer Maintenance.”
Unload washer as soon as cycle is complete.
Not using HE detergent or using too
much HE detergent.
Use only HE detergent. Be sure to measure correctly.
Always follow the detergent directions.
See “Washer Care” section.
Fabric Damage Sharp items were in pockets during
wash cycle.
Empty pockets, zip zippers, and snap or hook fasteners before
washing to avoid snags and tears.
Strings and straps could have
tangled.
Tie all strings and straps before starting wash load.
Items may have been damaged
before washing.
Mend rips and broken threads in seams before washing.
Fabric damage can occur if the load
is tightly packed.
Load items in loose heaps evenly around washplate.
Load items should move freely during the wash to avoid damage.
Use the cycle designed for the fabrics being washed.
Add only one or two additional items after the washer has
started.
Garment care instructions may not
have been followed.
Always read and follow garment manufacturer’s care label
instructions. See the “Cycle Guide” to match your load with
the best cycle.
Liquid chlorine bleach may have
been added incorrectly.
Do not pour liquid chlorine bleach directly onto load. Wipe up
bleach spills.
Undiluted bleach will damage fabrics. Do not use more than
recommended by manufacturer.
Do not place load items on top of bleach dispenser when
loading and unloading washer.
First try the solutions suggested here or visit our website at www.whirlpool.com/product_help –
In Canada www.whirlpool.ca for assistance and to possibly avoid a service call.
19
Troubleshooting
If you experience Possible Causes Solution
Washer not performing as expected (cont.)
Incorrect dispenser
operation
Clogged dispensers or laundry
products dispensing too soon.
Do not overfill dispenser. Overfilling causes immediate dispensing.
Load dispensers before starting a cycle.
It is normal for small amounts of water to be remain in dispenser
at the end of the cycle.
Fabric softener thickens as it gets older. If there becomes an
increase of fabric softener in the dispenser after a cycle, then
check the age of the fabric softener and replace if needed.
Homes with low water pressure may result in residual powder
in the dispenser. To avoid, select a warmer wash temperature
if possible, depending on your load.
Liquid chlorine bleach not used in
dispenser.
Use only liquid chlorine bleach in the bleach dispenser.
Powdered detergent
not dissolving completely
in load
Using too much HE detergent. Follow the manufacturer’s instructions to determine the amount
of detergent to use.
Water temperature is very cold. Select a warmer wash temperature.
Try adding the detergent to the basket prior to adding laundry,
rather than using the detergent dispenser.
Single-dose laundry
packet not dissolving
Adding laundry packet incorrectly. Be sure laundry packet is added to washer basket before adding
clothes. Follow the manufacturer’s instructions to avoid damage
to your items.
Error Code Appears in Display
F#E# code (F-type error
code) appears in display
System error code. Touch the POWER button to clear the code and exit cycle.
Then touch the POWER button, select cycle, and touch and hold
the START/PAUSE button to start washer. If code appears again,
call for service.
F8E1 or LF (too long to
fill) appears in display
Washer taking too long to fill. Drain
extends more than 4.5" (114 mm) into
standpipe.
Check plumbing for correct drain hose installation. Use drain
hose form and attach securely to drainpipe or tub. Do not tape
over drain opening. See Installation Instructions.
Make sure water supply line is turned on.
F9E1, drn, dr (drain
pump system problem –
long drain) appears in
display
Washer taking too long to drain
water. Drain extends more than
4.5" (114 mm) into standpipe.
Check plumbing for correct drain hose installation. Use drain
hose form and attach securely to drainpipe or tub. Do not tape
over drain opening.
Lower drain hose if the end is higher than 96" (2.4 m) above
the floor. Remove any clogs from drain hose. See Installation
Instructions.
F8E6 (Lid opened)
appears in display
Washer lid left open. Close the lid and touch the POWER button to clear the display.
If the lid is left open for more than 10 minutes, the cycle will reset
and water in the washer will drain.
F1E1 ACU (Appliance
control fault)
Internal ACU failure. Call for service.
F2E3 UI/ACU mismatch Wrong ACU or UI has been installed. Call for service.
F3E1 Water level sensing
failure
Pressure sensor on ACU failure. Call for service.
F5E2 Lid lock will not
lock or lid lock failure
An item in the load may be keeping
the lid from locking.
Check for items directly under the lid.
F5E3 Lid cannot unlock Objects on washer lid keep it from
unlocking.
Remove objects, such as baskets of laundry, from top of washer.
F6E2 or F6E3
Communication Error:
UI cannot communicate
ACU or UI synchronization error. Remove power from the washer. Let washer sit for 5 minutes for
the washer to completely power down. Apply power to washer
and check for error codes. If the error code persists call for
service.
“Ofb” (Off Balance) Load not balanced or evenly
distributed around the basket.
Cycle is paused as indicated by the flashing Start/Pause
indicator. Open the lid, redistribute the load, and close the lid.
Touch and hold the START/PAUSE button to resume.
First try the solutions suggested here or visit our website at www.whirlpool.com/product_help –
In Canada www.whirlpool.ca for assistance and to possibly avoid a service call.
20
WHIRLPOOL
®
LAUNDRY
LIMITED WARRANTY
ATTACH YOUR RECEIPT HERE. PROOF OF PURCHASE IS
REQUIRED TO OBTAIN WARRANTY SERVICE.
Please have the following information available when you call the
Customer eXperience Center:
n
Name, address, and telephone number
n
Model number and serial number
n
A clear, detailed description of the problem
n
Proof of purchase including dealer or retailer name and address
DISCLAIMER OF IMPLIED WARRANTIES
IMPLIED WARRANTIES, INCLUDING ANY IMPLIED WARRANTY OF MERCHANTABILITY OR IMPLIED WARRANTY OF FITNESS FOR
A PARTICULAR PURPOSE, ARE LIMITED TO ONE YEAR OR THE SHORTEST PERIOD ALLOWED BY LAW. Some states and provinces
do not allow limitations on the duration of implied warranties of merchantability or tness, so this limitation may not apply to you. This
warranty gives you specic legal rights, and you also may have other rights that vary from state to state or province to province.
LIMITATION OF REMEDIES; EXCLUSION OF INCIDENTAL AND CONSEQUENTIAL DAMAGES
YOUR SOLE AND EXCLUSIVE REMEDY UNDER THIS LIMITED WARRANTY SHALL BE PRODUCT REPAIR AS PROVIDED HEREIN.
WHIRLPOOL SHALL NOT BE LIABLE FOR INCIDENTAL OR CONSEQUENTIAL DAMAGES. Some states and provinces do not allow
the exclusion or limitation of incidental or consequential damages, so these limitations and exclusions may not apply to you. This
warranty gives you specic legal rights, and you also may have other rights that vary from state to state or province to province.
DISCLAIMER OF REPRESENTATIONS OUTSIDE OF WARRANTY
Whirlpool makes no representations about the quality, durability, or need for service or repair of this major appliance other than the
representations contained in this Warranty. If you want a longer or more comprehensive warranty than the limited warranty that comes
with this major appliance, you should ask Whirlpool or your retailer about buying an extended warranty.
11/14
IF YOU NEED SERVICE:
1. Before contacting us to arrange service, please determine whether your product requires repair.
Some questions can be addressed without service. Please take a few minutes to review the
Troubleshooting or Problem Solver section of the Use and Care Guide, scan the QR code on
the right to access additional resources, or visit https://www.whirlpool.com/product_help.
2. All warranty service is provided exclusively by our authorized Whirlpool Service Providers.
In the U.S. and Canada, direct all requests for warranty service to:
Whirlpool Customer eXperience Center
In the U.S.A. call 1-800-253-1301. In Canada call 1-800-807-6777.
If outside the 50 United States and Canada, contact your authorized Whirlpool dealer to determine if another warranty applies.
https://www.whirlpool.com/product_help
ONE YEAR LIMITED WARRANTY
WHAT IS COVERED
WHAT IS NOT COVERED
1. Commercial, non-residential, multiple-family use, or use inconsistent with published user,
operator, or installation instructions.
2. In-home instruction on how to use your product.
3. Service to correct improper product maintenance or installation, installation not in
accordance with electrical or plumbing codes, or correction of household electrical or
plumbing (i.e. house wiring, fuses, or water inlet hoses).
4. Consumable parts (i.e. light bulbs, batteries, air or water filters, preservation solutions,
etc.).
5.
Defects or damage caused by the use of non-genuine Whirlpool parts or accessories.
6. Conversion of your product from natural gas or L.P. gas or reversal of appliance doors.
7. Damage from accident, misuse, abuse, fire, floods, acts of God, or use with products not
approved by Whirlpool.
8. Repairs to parts or systems to correct product damage or defects caused by
unauthorized service, alteration, or modification of the appliance.
9. Cosmetic damage including scratches, dents, chips, and other damage to appliance
finishes unless such damage results from defects in materials and workmanship and is
reported to Whirlpool within 30 days.
10. Discoloration, rust, or oxidation of surfaces resulting from caustic or corrosive
environments, including but not limited to, high salt concentrations, high moisture or
humidity, or exposure to chemicals.
11. Pick-up or delivery. This product is intended for in-home repair.
12. Travel or transportation expenses for service in remote locations where an authorized
Whirlpool servicer is not available.
13. Removal or reinstallation of inaccessible appliances or built-in fixtures (i.e. trim,
decorative panels, flooring, cabinetry, islands, countertops, drywall, etc.) that interfere
with servicing, removal, or replacement of the product.
14. Service or parts for appliances with original model/serial numbers removed, altered, or
not easily determined.
The cost of repair or replacement under these excluded circumstances shall be
borne by the customer.
For one year from the date of purchase,
when this major appliance is installed,
operated, and maintained according
to instructions attached to or furnished
with the product, Whirlpool Corporation
or Whirlpool Canada LP (hereafter
“Whirlpool”) will pay for Factory
Specified Replacement Parts and repair
labor to correct defects in materials or
workmanship that existed when this major
appliance was purchased, or at its sole
discretion replace the product. In the event
of product replacement, your appliance
will be warranted by the remaining term of
the original unit’s warranty period.
YOUR SOLE AND EXCLUSIVE REMEDY
UNDER THIS LIMITED WARRANTY
SHALL BE PRODUCT REPAIR AS
PROVIDED HEREIN. Service must be
provided by a Whirlpool designated
service company. This limited warranty
is valid only in the United States or
Canada and applies only when the major
appliance is used in the country in which
it was purchased. This limited warranty
is effective from the date of original
consumer purchase. Proof of original
purchase date is required to obtain service
under this limited warranty.
21
Sécurité de la laveuse
22
Quoi de neuf sous le couvercle?
Choix du détergent approprié
Utiliser uniquement des détergents haute efficacité. L’emballage
portera la mention “HE” ou “High Efficiency” (haute efficacité).
Un lavage avec faible consommation d’eau produit un excès de
mousse avec un détergent non HE. Il est probable que l’utilisation
d’un détergent non HE prolongera la durée des programmes et
réduira la performance de rinçage. Ceci peut aussi entraîner des
malfunctions de composants et, avec le temps, une accumulation
de moisissure. Les détergents HE devraient produire peu de
mousse et se dissoudre rapidement pour produire une quantité
de mousse idéale pour une performance optimale. Ils devraient
retenir les particules de saleté en suspension afin qu’elles ne
se redéposent pas sur les vêtements propres. Les détergents
identifiés HE ne comportent pas tous une formule identique
et ne produisent pas tous la même quantité de mousse. Par
exemple, les détergents HE naturels, organiques et faits maison
peuvent produire une plus grande quantité de mousse. Si l’un de
ces produits est utilisé et que le code d’erreur “F0E2” s’affiche
à l’écran, l’utilisation d’un autre détergent HE est conseillée.
Toujours suivre les instructions du fabricant pour déterminer
la quantité de détergent à utiliser, et ne pas remplir au-delà
de la ligne de remplissage maximum du distributeur. Voir
“Utilisation des distributeurs de produits de lessive” pour
plus d’informations.
Sons normaux prévisibles
Au cours des différents stades du programme de lavage, vous
entendrez peut-être des bruits que votre laveuse précédente
ne produisait pas. Par exemple, vous entendrez peut-être
un cliquetis au début du programme lorsque le système de
verrouillage du couvercle effectue un test automatique. Différents
bourdonnements et bruits de frottement rythmiques se produiront
à mesure que le plateau de lavage déplace la charge et que
le panier ralentit jusqu’à l’arrêt. Parfois, il est possible que la
laveuse soit complètement silencieuse, lorsqu’elle détermine
le niveau d’eau adéquat ou qu’elle laisse tremper les vêtements.
Utiliser uniquement un détergent haute efficacité (HE).
Nettoyage amélioré
Le système de lavage à faible consommation d’eau signifie un
lavage concentré. Plutôt que de diluer du détergent comme dans
une laveuse de type agitateur, cette laveuse libère le détergent
directement sur les endroits souillés. Ce système de lavage à
faible consommation d’eau déplace également les vêtements
d’une manière plus efficace pour éliminer la saleté.
Détection automatique
de la taille de la charge
Une fois que l’on démarre le programme, le couvercle se
verrouille et la laveuse entame un processus de détection
pour déterminer le niveau d’eau approprié à la charge.
Le panier se met tout d’abord à tourner avant que l’eau ne
s’écoule. Ceci est normal et fait partie du processus de détection.
Cette méthode de lavage avec faible consommation d’eau utilise
moins d’eau et d’énergie qu’une laveuse traditionnelle de type
agitateur.
La nouveauté la plus remarquable de cette nouvelle laveuse
est son système de lavage à faible consommation d’eau avec
plateau de lavage. La laveuse ajuste automatiquement le
niveau d’eau en fonction de la taille de la charge – nul besoin
de sélecteur de niveau d’eau.
Pour un meilleur rendement, il est recommandé de déposer
les articles en vrac et de façon uniforme le long du plateau
de lavage.
À mesure que la laveuse imbibe et déplace la charge,
les vêtements se tassent dans le panier. Ceci est normal
et ne signifie pas que l’on doive rajouter des vêtements.
IMPORTANT : Le panier de la laveuse ne sera pas rempli d’eau,
comme avec votre précédente laveuse de type agitateur. Il est
normal qu’une partie de la charge dépasse du niveau d’eau.
Laver avec moins d’eau
Laveuse traditionnelle
de type agitateur
Laveuse à faible
consommation d’eau
Washplate
Impulseur
23
Tableau de commande et caractéristiques
REMARQUE : La surface du tableau de commande est très sensible et il suffit d’un léger toucher pour l’activer. Pour s’assurer que
vos sélections ont été sauvegardées, toucher le tableau de commande du bout du doigt et non avec l’ongle. Pour sélectionner un
réglage ou une option, il suffit de toucher le nom qui lui correspond jusqu’à ce que la section souhaitée s’allume.
BOUTON DE POWER (mise sous tension)
Appuyer sur ce bouton pour mettre en marche la laveuse.
Si l’on appuie une fois sur ce bouton alors que la laveuse
fonctionne, le programme en cours est annulé et appuyer
une seconde fois la laveuse s’éteint.
WHAT TO WASH (articles à laver)/HOW TO WASH
(méthode de lavage)
Commencer par choisir un programme dans la section
“What to Wash” (articles à laver) puis choisir “How to Wash”
(méthode de lavage) pour obtenir la meilleure combinaison
de programmes disponibles pour le type d’articles à laver.
Voir le “Guide de programmes” pour plus de détails sur
le programme.
BOUTON DE START/PAUSE
(mise en marche/pause)
Appuyer sans relâcher sur ce bouton pour démarrer le
programme sélectionné, puis appuyer de nouveau pour
suspendre un programme
AFFICHAGE DEL DE DURÉE/STATUT
L’affichage de durée résiduelle estimée indique le temps
nécessaire à l’achèvement du programme. Des facteurs
tels que la taille de la charge et la pression de l’eau peuvent
affecter la durée affichée. La laveuse peut également ajuster
la durée du programme si le linge est tassé, la charge
déséquilibrée ou si la mousse produite est excessive.
Si une mise en marche différée a été programmée,
l’affichage de durée résiduelle estimée indiquera la durée
différée réglée.
Une fois le programme terminé, Done (terminé) apparaît
sur l’affichage jusqu’à ce que l’on ouvre le couvercle.
ADD GARMENT (ajouter un vêtement)
Lorsque Add Garment (ajouter un vêtement) est allumé,
on peut suspendre le programme de la laveuse, ouvrir
le couvercle et ajouter des articles. Appuyer et maintenir
enfoncé le bouton START/PAUSE (mise en marche/pause)
pour remettre la laveuse en marche.
OPTIONS
On peut aussi ajouter ou supprimer des options pour
chaque programme. Certaines options ne peuvent pas être
utilisées avec certains programmes, et certaines d’entre
elles sont préréglées pour ne fonctionner qu’avec certains
programmes.
1
2
3
4
5
EXTRA RINSE (rinçage supplémentaire)
On peut utiliser cette option pour ajouter
automatiquement un second rinçage à la plupart
des programmes.
DRAIN & SPIN (vidange et essorage)
En sélectionnant cette option, l’essorage de la charge et
la vidange de l’eau dans la cuve sont effectués. La charge
n’est pas rincée.
RINSE & SPIN (rinçage et essorage)
Appuyer sur le bouton DRAIN & SPIN (vidange et
essorage), puis appuyer sur le bouton EXTRA RINSE
(rinçage supplémentaire). Cette option combine un
rinçage et un essorage à haute vitesse pour les charges
nécessitant un programme de rinçage supplémentaire
ou pour terminer une charge après une coupure de
courant. Utiliser également pour les charges nécessitant
uniquement un rinçage.
CLEAN WASHER (nettoyage de la laveuse)
Utiliser ce programme à l’issue de chaque série de
30 lavages pour que l’intérieur de la laveuse reste
frais et propre. Ce programme utilise un niveau d’eau
plus élevé. Utiliser avec une pastille de nettoyant pour
laveuse affresh
®
ou de l’eau de Javel pour nettoyer
soigneusement l’intérieur de la laveuse. Ce programme
ne doit pas être interrompu. Voir “Entretien de la laveuse”.
IMPORTANT : Ne pas placer de vêtements ou
autres articles dans la laveuse pendant le programme
Clean Washer (nettoyage de la laveuse). Utiliser
ce programme avec une cuve de lavage vide.
SIGNAL (signal)
Appuyer sur ce bouton pour régler le signal de fin
d’un programme de lavage sur faible, élevé ou désactivé.
REMARQUE :
Il est également possible de régler les
signaux sonores qui retentissent lorsqu’on appuie sur
un bouton de caractéristique, de réglage ou d’option.
Appuyer et maintenir enfoncé SIGNAL (signal de fin de
programme) pendant 3 secondes pour régler les signaux
sonores sur faible, élevé ou désactivé.
DELAY START (mise en marche différée)
Appuyer sur DELAY START (mise en marche différée) pour
différer le démarrage d’un programme de lavage jusqu’à
12 heures “12H”. Pour désactiver, appuyer sur DELAY
START (mise en marche différée) jusqu’à ce que “0H”
apparaisse sur l’affichage de durée/statut, ou appuyer
sur le bouton POWER (mise sous tension).
4
5 6
5
7
1
3
2
24
DEEP WATER (niveau d’eau élevé)
Utiliser cette option pour ajouter la quantité maximale
d'eau au programme de lavage.
REMARQUE : Le programme prendra plus de temps
à s’exécuter en raison du temps de remplissage
supplémentaire occasionné par l’option Deep Water
(niveau d’eau élevé).
PRESOAK (prétrempage)
Utiliser cette option pour ajouter une période de trempage
supplémentaire à n’importe quel programme pour aider
à désincruster les taches tenaces. La laveuse se remplit,
puis s’interrompt pour le trempage, puis démarre
le programme sélectionné.
MODIFICATEURS DE PROGRAMMES
Lorsqu’on sélectionne un programme, ses réglages par
défaut ou la sélection du programme précédemment utilisé
s’allument.
TEMPERATURE (température)
La fonction de contrôle de température détecte et
maintient une température uniforme de l’eau en régulant
le débit d’arrivée d’eau chaude et d’eau froide.
Sélectionner une température de lavage en fonction
du type de tissu et de saleté à laver. Pour des résultats
optimaux, suivre les instructions sur l’étiquette du
vêtement et utiliser la température d’eau de lavage la
plus chaude possible qui reste sans danger pour le tissu.
• Les températures de l’eau tiède et de l’eau chaude
peuvent être inférieures à celles de votre précédente
laveuse, sur certains modèles et avec certains
programmes.
• Même avec un réglage de lavage à l’eau froide, il est
possible que de l’eau tiède soit ajoutée à la laveuse
pour maintenir une température minimale.
SOIL LEVEL (niveau de saleté)
Le niveau de saleté (durée de lavage) est préréglé
pour chaque programme de lavage. Lorsque l’on
appuie sur la touche Soil Level (niveau de saleté),
la durée du programme (en minutes) augmente ou
diminue sur l’afficheur de la durée résiduelle estimée
et une durée de lavage différente apparaît.
6
Sélectionner le réglage le plus adapté à votre charge.
Pour les articles très sales, sélectionner Heavy Soil Level
(niveau de saleté très élevé) pour prolonger la durée de
lavage. Pour les articles peu sales, sélectionner Light
Soil Level (niveau de saleté faible) pour abréger la durée
de lavage. Le réglage de niveau de saleté faible aidera
à réduire l’emmêlement et le froissement.
SPIN SPEED (vitesse d’essorage)
Cette laveuse sélectionne automatiquement la vitesse
d’essorage en fonction du programme sélectionné. Les
vitesses préréglées peuvent être modifiées. Sur certains
programmes, certaines vitesses d’essorage ne sont pas
disponibles.
• Des vitesses d’essorage plus élevées signifient des
durées de séchage plus courtes, mais elles peuvent
augmenter le froissement de la charge.
• Des vitesses d’essorage plus lentes signifient moins
de froissement, mais laissent la charge plus humide.
LID
Le témoin lumineux Lid Lock (
)
(couvercle verrouillé) s’allume lorsque
le couvercle est verrouillé et ne peut être
ouvert. Si l’on doit ouvrir le couvercle,
appuyer sur le bouton START/PAUSE
(mise en marche/pause). Le couvercle
se déverrouille une fois que le mouvement
de la laveuse a cessé. Il se peut que cela
prenne plusieurs minutes si la laveuse
essorait la charge à grande vitesse. Appuyer
sans relâcher encore une fois sur le bouton
START/PAUSE (mise en marche/pause) pour
redémarrer le programme.
7
25
Distributeurs et robinet
Distributeur de détergent haute efficacité “HE”
Verser le détergent HE liquide ou en poudre dans ce
distributeur pour le programme de lavage principal. Retirer
le compartiment si l’on utilise du détergent en poudre.
IMPORTANT : S’assurer que le compartiment se trouve
dans le tiroir lorsque l’on utilise du détergent liquide, et
qu’il a été retiré lorsque l’on utilise du détergent en poudre.
Ne pas dépasser la ligne de remplissage Max.
REMARQUE : Suivre les recommandations du fabricant
pour déterminer la quantité de détergent à utiliser.
Distributeur d’assouplissant liquide
Si désiré, verser la mesure d’assouplissant liquide dans
le distributeur d’assouplissant liquide. Celui-ci distribuera
automatiquement le produit au moment opportun.
•
Utiliser uniquement de l’assouplissant liquide dans
ce distributeur.
Distributeur d’eau de Javel
Ce distributeur peut contenir jusqu’à 3/4 de tasse
(180 ml) d’agent de blanchiment liquide. L’agent de
blanchiment sera automatiquement dilué et distribué au
moment opportun au cours du programme de lavage. Ce
distributeur ne peut pas diluer de l’agent de blanchiment
en poudre.
REMARQUE : Remplir le distributeur uniquement avec
de l’eau de Javel.
Robinet d’eau
Le robinet d’eau distribue de l’eau fraîche qui peut être
utilisée pour prétraiter les vêtements, rincer le distributeur
de détergent ou remplir la cuve de la laveuse.
Bouton Robinet
Appuyer une fois pour activer et appuyer de nouveau pour
désactiver. Il n’est pas nécessaire de maintenir enfoncé
le bouton
REMARQUE : Si le programme n'est pas désactivé après
plus de 10 minutes, le robinet s’arrête automatiquement.
A
B
C
C
D
E
Utiliser uniquement un détergent haute efficacité (HE).
B
C
A
D
E
26
Guide de programmes
Quelle méthode de lavage souhaitez-vous utiliser?
Sélection du programme “How to Wash” (méthode de lavage)
Normal
Quick
(rapide)
Delicate
(articles
délicats)
Heavy Duty
(service intense)
ColorLast
(préservation
des couleurs)
• Lavage
normal
• Fait
économiser
du temps
• Nettoyage
délicat
• Préservation
de mes tissus
• Détachage
puissant
• Nettoyage délicat
• Préservation
de mes couleurs
Quels articles
souhaitez-vous laver
Sélection du
programme
“What to wash”
(articles à laver)
Coton/lin
Colors
(couleurs)
P A A A A
Couleurs vives
R R R R P
Tissus lavables à la main
R R P A R
Soutiens-gorge
R R P A R
Lingerie
R R P A R
Vêtements pour bébé
R R R P R
Articles en soie lavables
en machine
R R P A R
Lainages
R R
P
R
R
Couleurs foncées
Darks
(couleurs
foncées)
P R A R R
Vêtements de sport intensif
R R A P A
T-shirts
P R R R R
Hauts de survêtements
P R R R R
Jeans
P R R R R
Pyjamas
P R R R R
Tenues de bureau
décontractées
R R R R P
Chemises et pantalons
habillés
R R R A P
Tissus non repassables
R R R R P
Draps
foncés
P R A R R
Vêtements blancs
Whites
(blancs)
P R R R
S.O.
Chemises blanches
P R R R
T-shirts blancs
P R R R
Chaussettes
R R
R
P
Sous-vêtements
R R R P
Mouchoirs
R R P R
Serviettes
R R P R
Draps
blancs
P R A R
Nappes
P R R R
Votre laveuse Whirlpool
®
possède une interface utilisateur unique pour vous aider à sélectionner le programme le mieux adapté à votre
charge. Les configurations “What to Wash” (articles à laver) et “How to Wash” (méthode de lavage) vous indiquent le programme idéal
en deux étapes faciles :
D’abord, déterminer les articles de la charge que l’on va nettoyer. Sélectionner ainsi les articles adéquats dans la partie “What to Wash”
(articles à laver). Ensuite, déterminer la manière dont on souhaite nettoyer ces articles et sélectionner la méthode appropriée dans
la partie “How to Wash” (méthode de lavage). Voir le tableau ci-dessous pour plus de détails.
Pour un meilleur soin des tissus, choisir
le programme qui convient le mieux
à la charge à laver.
P – Sélection du programme souhaitée
R – Programme alternative recommandé
A – Programme disponible mais pas optimal
27
Guide de programmes
Quelle méthode de lavage souhaitez-vous utiliser?
Sélection du programme “How to Wash” (méthode de lavage)
Normal
Quick
(rapide)
Delicate
(articles
délicats)
Heavy Duty
(service intense)
ColorLast
(préservation
des couleurs)
• Lavage
normal
• Fait
économiser
du temps
• Nettoyage
délicat
• Préservation
de mes tissus
• Détachage
puissant
• Nettoyage délicat
• Préservation
de mes couleurs
Quels articles
souhaitez-vous laver
Sélection du
programme
“What to wash”
(articles à laver)
Serviettes
Towels
(serviettes)
P R R R R
Tissu éponge
P R R R R
Serviettes à main
P R R R R
Tapis de bain
P R R R R
Serviettes de bain
P R R R R
Couvertures
Bedding/Bulky
(articles
de literie/
articles
volumineux)
P A R R R
Manteaux et vestes
P A R R R
Couettes
P A R R R
Rideaux lavables
en machine
R R P A R
Housses lavables en
machine
P R R A R
Tapis et paillassons sans
garniture de caoutchouc
P A R R R
Sacs de couchage
P A R A R
Pour un meilleur soin des tissus, choisir
le programme qui convient le mieux
à la charge à laver.
P – Sélection du programme souhaitée
R – Programme alternative recommandé
A – Programme disponible mais pas optimal
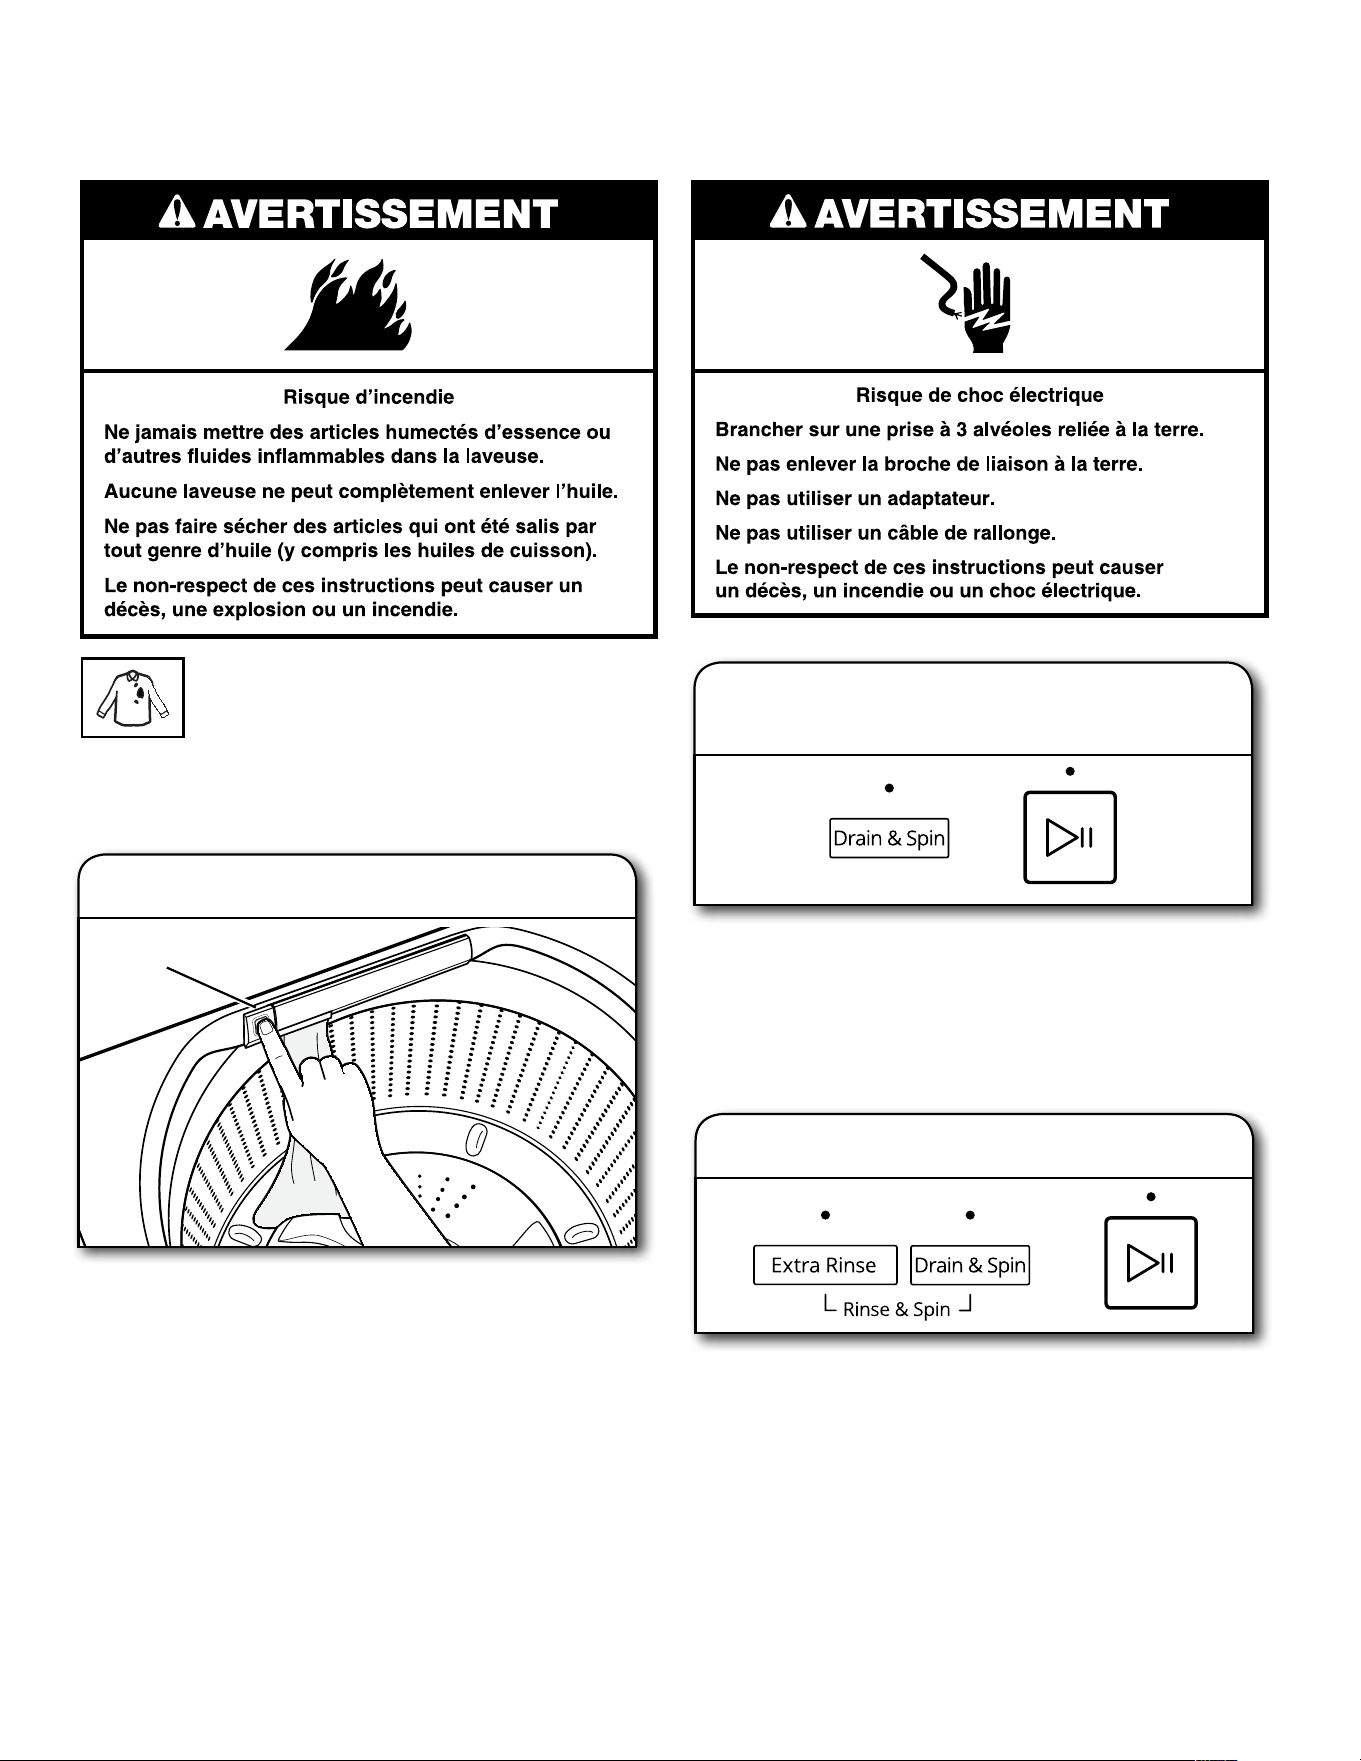
28
Utilisation de la laveuse
Utilisation du robinet de la laveuse avant le programme de lavage
Rinçage avant de faire
fonctionner le programme
de lavage
• Appuyer sur le bouton une fois. Il n’est pas nécessaire
de maintenir enfoncé le bouton.
• Fermer le robinet en appuyant de nouveau sur le bouton.
• Si l’on oublie de fermer le robinet, le robinet s’arrête
automatiquement.
• L’eau de la cuve se vidange automatiquement si le niveau
d’eau est trop élevé. L’eau se vidange également au bout
de 10 minutes si la porte est laissée ouverte.
1. Ouvrir le robinet
IMPORTANT : Avant le rinçage, s’assurer de trier, de préparer
et charger la lessive comme indiqué dans “Faire fonctionner
le programme de lavage”.
• Si l’on souhaite de vidanger l’eau dans la cuve – avec la
laveuse en marche, sélectionner DRAIN & SPIN (vidange
et essorage) et appuyer sans relâcher sur le bouton START/
PAUSE (mise en marche/pause).
• L’eau dans la cuve est toujours vidangée avant qu’un
programme de lavage ne puisse être démarré.
2. Vidanger l’eau manuellement,
si désiré
• Si l’on souhaite rincer la lessive, puis vidanger l’eau – avec
la laveuse en marche, sélectionner RINSE & SPIN (rinçage
et essorage) et appuyer sans relâcher sur le bouton START/
PAUSE (mise en marche/pause).
• L’eau dans la cuve est toujours vidangée avant qu’un
programme de lavage ne puisse être démarré.
3. Rincer et vidanger l’eau, si désiré
Appuyer sur le
bouton du robinet
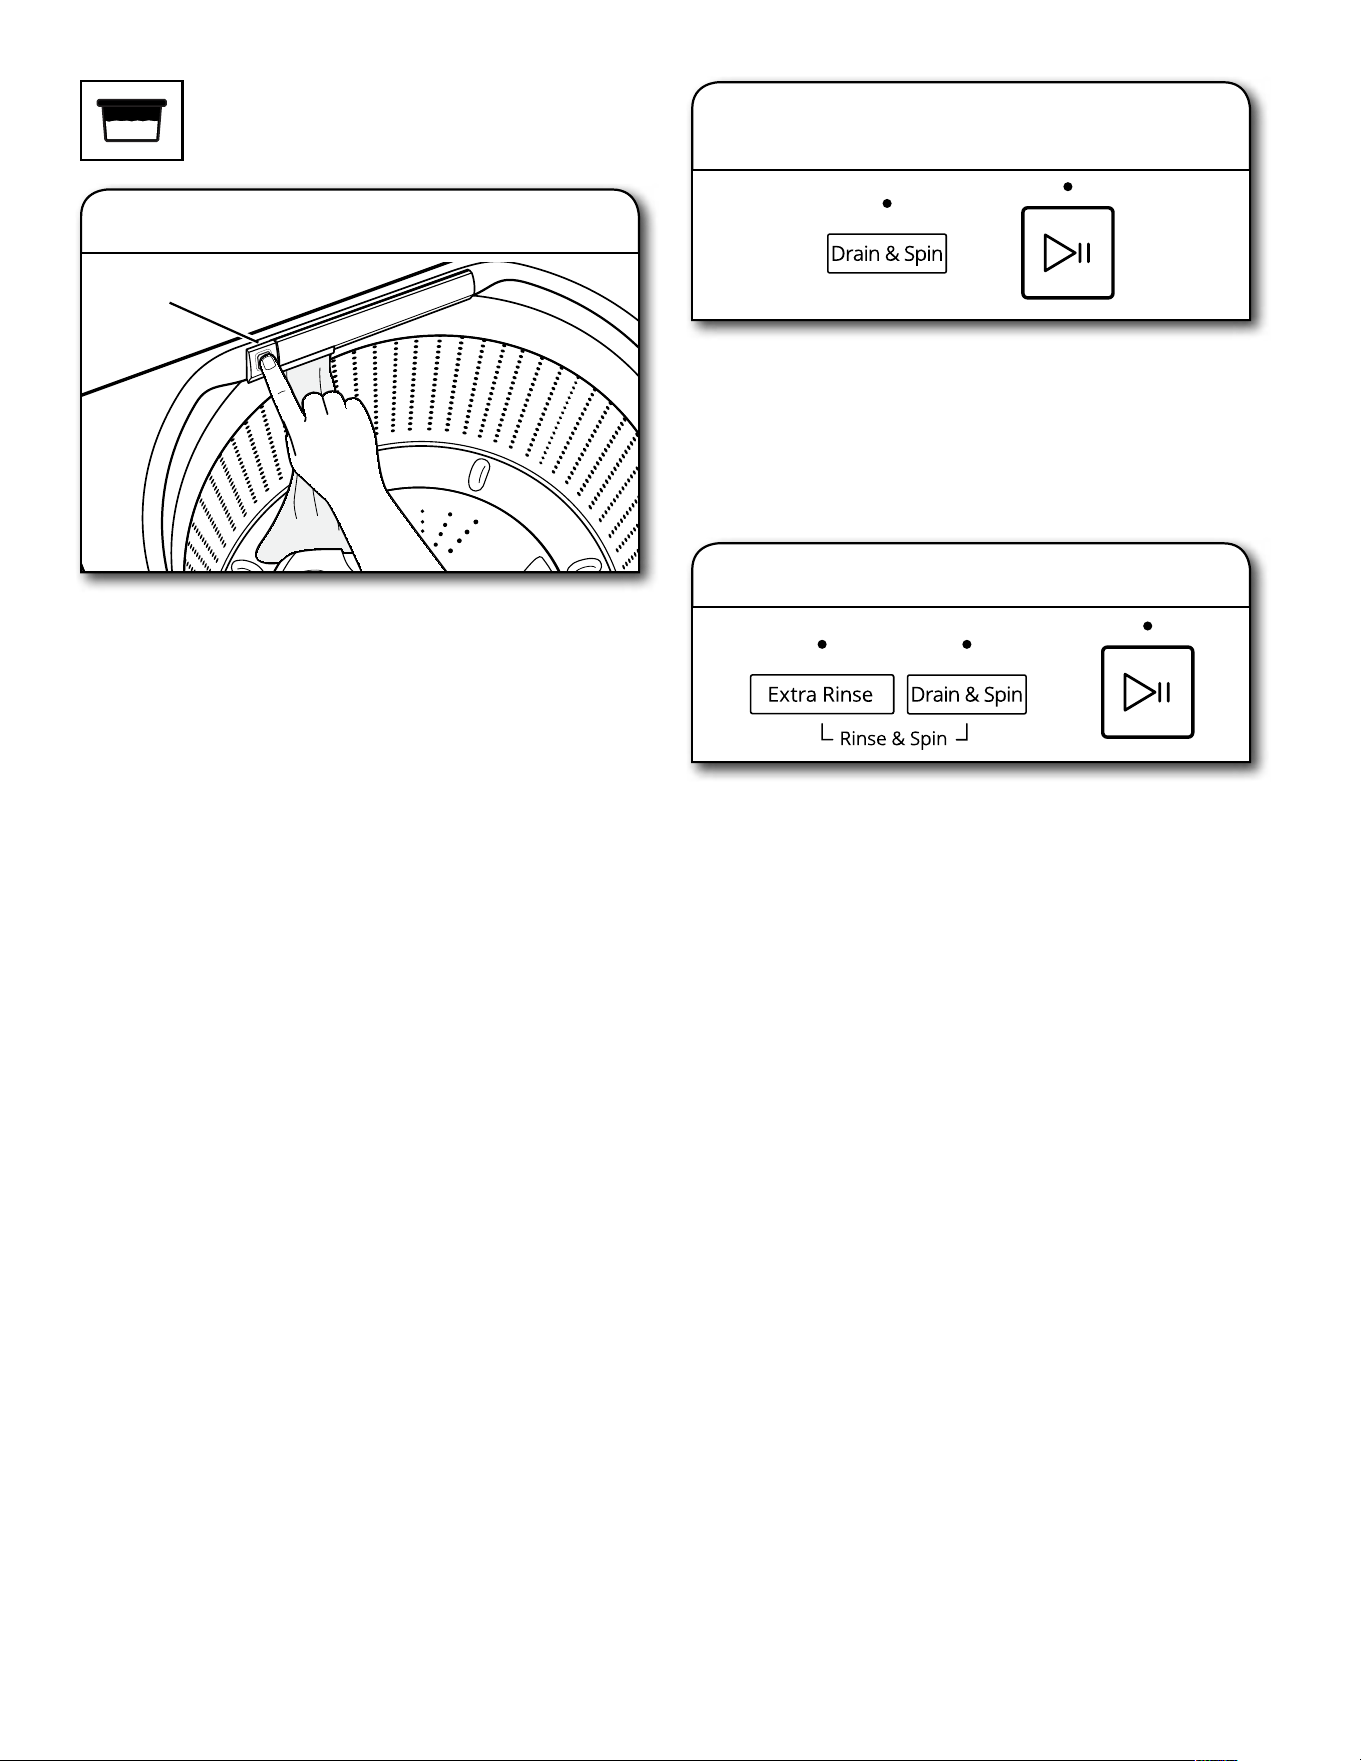
29
Prétrempage sans faire
fonctionner le programme
de lavage
• Appuyer une fois sur le bouton du robinet. Il n’est pas
nécessaire de maintenir enfoncé le bouton.
CONSEIL : L’on peut ajouter du détergent, de l’agent de
blanchiment sans danger pour les couleurs, des activateurs
de lessive de type Oxi tandis que l’eau coule du robinet pour
le mélanger avec l’eau. (Voir étape 2 dans la colonne suivante.)
• Fermer le robinet en appuyant de nouveau sur le bouton.
Si l’on oublie de fermer le robinet, le robinet s’arrête
automatiquement.
IMPORTANT : Pour arrêter la cuve de se vidanger
automatiquement en 10 minutes, fermer le couvercle. L’eau
reste dans la cuve aussi longtemps que le couvercle est fermé
et aucune autre action n’est prise. Au bout de 3 heures, l’eau
est automatiquement vidangée.
Si l’on souhaite de vidanger l’eau dans la cuve – avec la laveuse
en marche, sélectionner DRAIN & SPIN (vidange et essorage)
et appuyer sans relâcher sur le bouton START/PAUSE (mise
en marche/pause).
REMARQUE : Si l’on souhaite démarrer le programme
de lavage, l’eau dans la cuve est toujours vidangée avant
que le programme ne puisse être démarré.
2. Vidanger l’eau manuellement,
si désiré
Si l'on souhaite rincer la lessive – avec la laveuse en marche,
sélectionner RINSE & SPIN (rinçage et essorage) et appuyer
sans relâcher sur le bouton START/PAUSE (mise en marche/
pause). La laveuse effectue la vidange de l’eau, l’essorage
et le rinçage de la charge, puis l’essorage de nouveau.
REMARQUE : Si l’on souhaite démarrer le programme
de lavage, l’eau dans la cuve est toujours vidangée avant
que le programme ne puisse être démarré.
3. Rincer et vidanger l’eau, si désiré
1. Ouvrir le robinet
Appuyer sur le
bouton du robinet
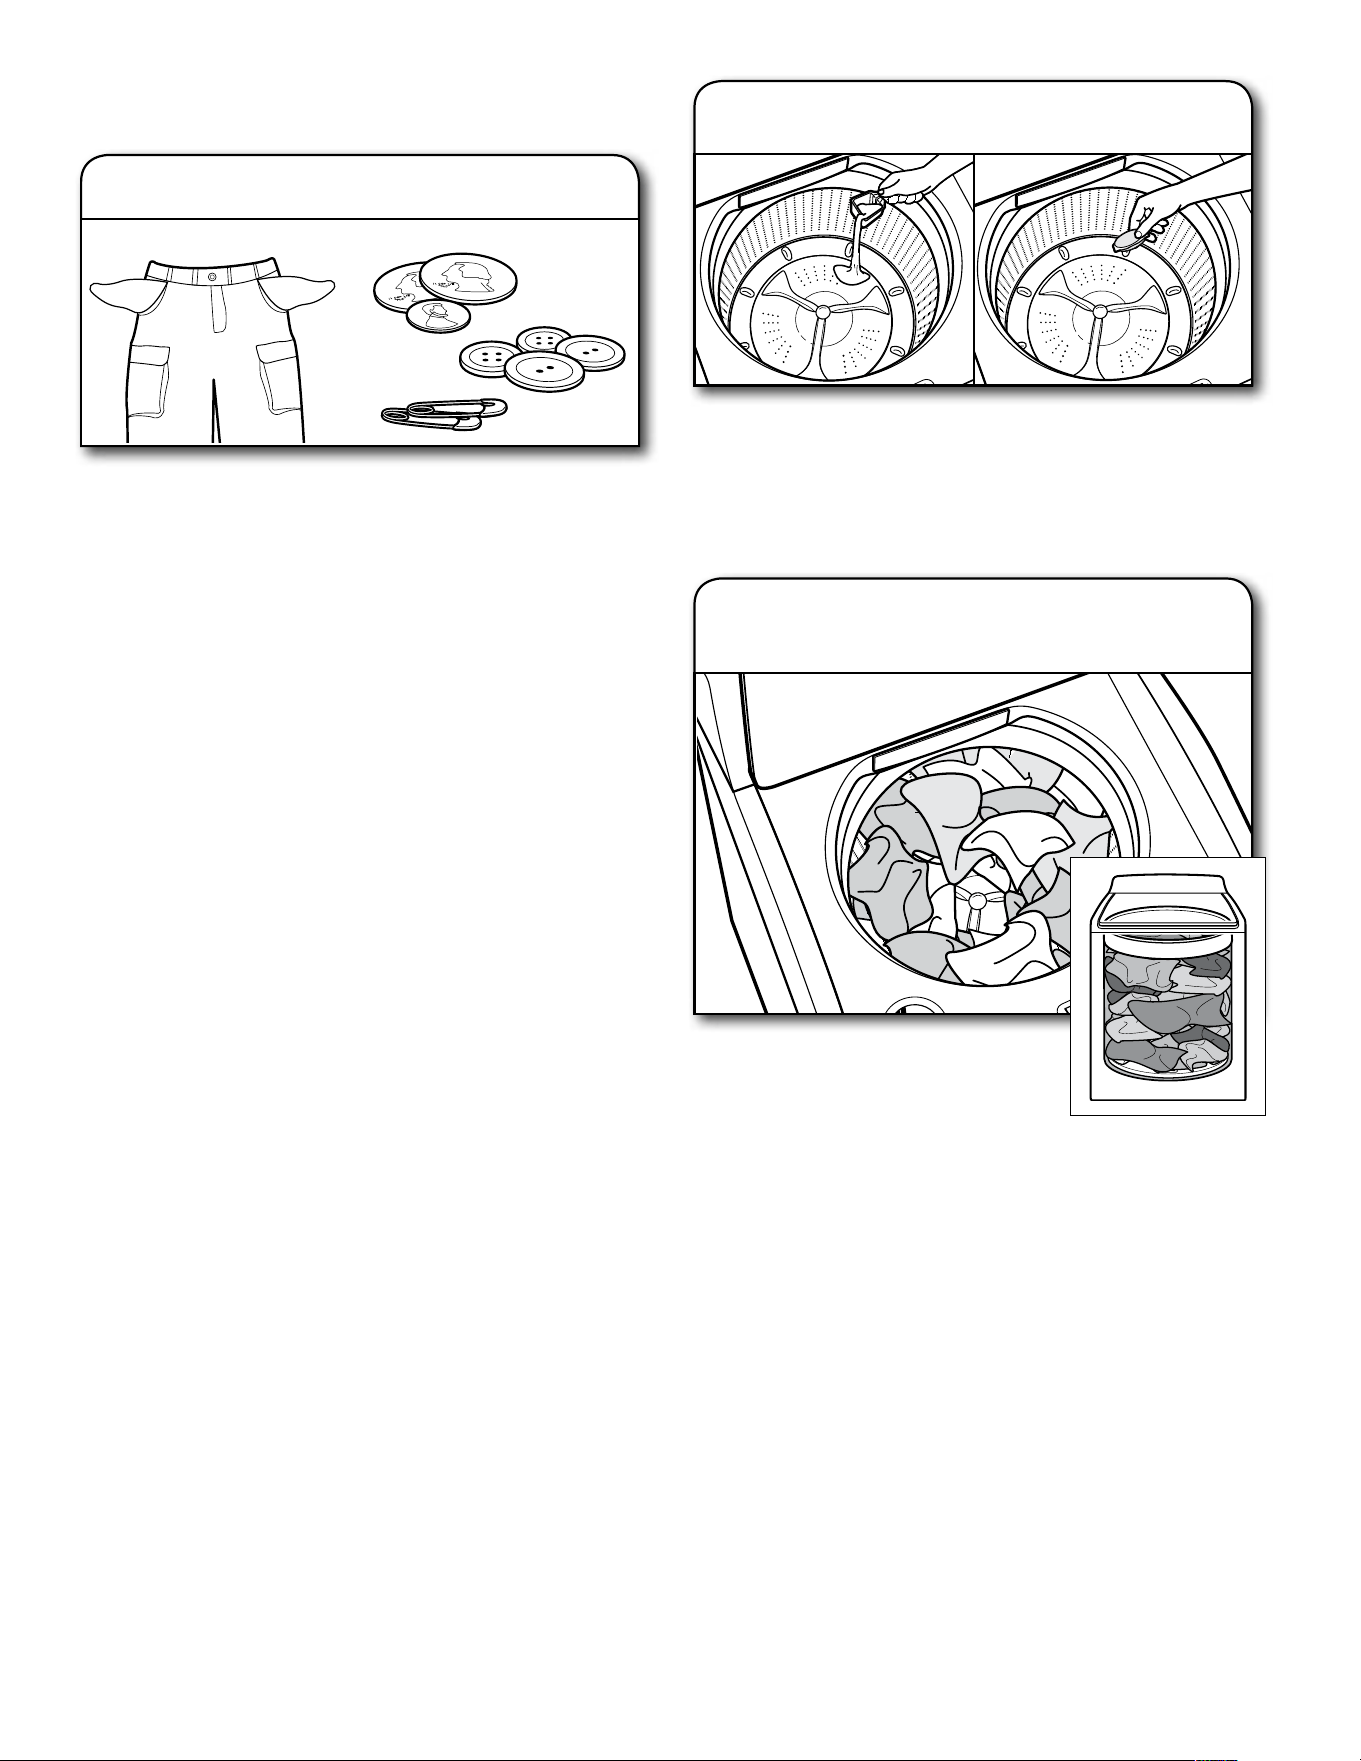
30
On peut ajouter un sachet de lessive à dose unique, l’agent
de blanchiment sans danger pour les couleurs, des produits
activateurs de type Oxi ou des cristaux d’assouplissant pour
tissu dans le panier avant d’ajouter le linge.
REMARQUE : Toujours suivre les instructions du fabricant.
2. Ajouter les produits de lessive
Pour un meilleur rendement, il est
recommandé de déposer les vêtements
en vrac et de façon uniforme le long du
plateau de lavage. Essayer de mélanger
des articles de différentes tailles pour réduire l’emmêlement.
IMPORTANT : Les articles doivent pouvoir se déplacer librement
pour un nettoyage optimal et pour réduire le froissement et
l’emmêlement.
3. Charger les vêtements dans
la laveuse
Vider les poches. Des pièces de monnaie, des boutons
ou objets de petite taille sont susceptibles de glisser sous
le plateau de lavage et de s’y coincer, ce qui peut entraîne
des bruits inattendus.
• Trier les articles en fonction du programme et de la
température d’eau recommandés, ainsi que de la solidité
des teintures.
• Séparer les articles très sales des articles peu sales.
• Séparer les articles délicats des tissus résistants.
• Ne pas sécher les vêtements si les taches sont toujours
présentes après le lavage, car la chaleur pourrait fixer
les taches sur le tissu.
• Traiter les taches sans délai.
• Fermer les fermetures à glissière, attacher les crochets,
cordons et ceintures en tissu. Ôter les garnitures et les
ornements non lavables.
• Réparer les déchirures pour éviter que les articles
ne s’endommagent encore davantage lors du lavage.
Conseils utiles :
• Pour une meilleure performance, utiliser un détergent haute
efficacité (HE) pour le lavage des articles volumineux.
• Lors du lavage d’articles imperméables ou résistants
à l’eau, charger la laveuse de façon uniforme.
• Utiliser des sacs en filet pour aider à empêcher l’emmêlement
lors du lavage d’articles délicats ou de petits articles.
• Retourner les tricots pour éviter le boulochage. Séparer
les articles qui forment la charpie de ceux qui la retiennent.
Les articles synthétiques, tricots et articles en velours
retiennent la charpie provenant des serviettes, des tapis
et des tissus chenille.
REMARQUE : Toujours lire et suivre les instructions
des étiquettes de soin des tissus pour éviter d’endommager
les vêtements.
1. Trier et préparer le linge
Faire fonctionner un programme
de lavage

31
Ajouter une mesure de détergent
liquide HE dans le compartiment
à détergent. La capacité de ce
compartiment est de 3 oz (89 ml).
Si l’on ajoute du détergent en poudre
HE, retirer le compartiment intérieur. Ne pas remplir
excessivement le compartiment – le fait d’ajouter trop
de détergent peut entraîner sa distribution prématurée
dans la laveuse.
REMARQUE : S’assurer que le compartiment se trouve dans le
tiroir lorsque l’on utilise du détergent liquide, et qu’il a été retiré
lorsque l’on utilise du détergent en poudre. Ne pas dépasser la
ligne de remplissage Max.
IMPORTANT : Utiliser uniquement des détergents haute
efficacité. L’emballage portera la mention “HE” ou “High
Efficiency” (haute efficacité). Un lavage avec faible
consommation d’eau produit un excès de mousse avec
un détergent non HE. Il est probable que l’utilisation d’un
détergent non HE prolongera la durée des programmes et
réduira la performance de rinçage. Ceci peut aussi entraîner
des malfunctions de composants et, avec le temps, une
accumulation de moisissure. Les détergents HE devraient
produire peu de mousse et se dissoudre rapidement pour
produire une quantité de mousse idéale pour une performance
optimale. Ils devraient retenir les particules de saleté en
suspension afin qu’elles ne se redéposent pas sur les vêtements
propres. Les détergents identifiés HE ne comportent pas tous
une formule identique et ne produisent pas tous la même
quantité de mousse. Par exemple, les détergents HE naturels,
organiques et faits maison peuvent produire une plus grande
quantité de mousse. Si l’un de ces produits est utilisé et que le
code d’erreur “F0E2” s’affiche à l’écran, l’utilisation d’un autre
détergent HE est conseillée. Toujours suivre les instructions
du fabricant pour déterminer la quantité de détergent à utiliser,
et ne pas remplir au-delà de la ligne de remplissage maximum
du distributeur.
CONSEIL UTILE : Voir “Entretien de la laveuse” pour plus
d’informations sur la méthode recommandée pour le nettoyage
des compartiments de distribution de la laveuse.
4. Ajouter le détergent HE
Compartiment à détergent
amovible HE
REMARQUE : Ne pas placer de sachets de lessive à dose
unique, d’agent de blanchiment sans danger pour les
couleurs, des produits activateurs de type Oxi ou des cristaux
d’assouplissant pour tissu dans les distributeurs. Ces produits
ne se dissoudront pas correctement. Ajouter dans le panier
avant d’ajouter la lessive.
Utilisation des distributeurs de produits
de lessive
6. Verser de l’assouplissant liquide
Verser une mesure d’assouplissant liquide dans le
distributeur – toujours suivre les instructions du fabricant
concernant la dose d’assouplissant à utiliser en fonction
de la taille de la charge. Fermer le tiroir distributeur.
L’assouplissant est ajouté lors du rinçage.
IMPORTANT : Ne pas remplir le distributeur excessivement
ni diluer le produit. Si l’on remplit excessivement le
distributeur, l’assouplissant pour tissu sera distribué
dans la laveuse immédiatement.
Si l’on sélectionne l’option Extra Rinse (rinçage
supplémentaire), l’assouplissant pour tissu sera distribué
au cours du dernier rinçage.
Il est normal qu’il reste une petite quantité d’eau dans
le distributeur une fois le programme terminé.
Compartiment
d’assouplissant
pour tissu
Liquid
Chlorine Bleach
5. Ajouter l’agent de blanchiment
liquide dans le distributeur
Ne pas remplir excessivement le distributeur, diluer le produit
ou utiliser plus d’une (1) tasse (236 ml). Ne pas utiliser d’agent
de blanchiment sans danger pour les couleurs ni de produit
Oxi avec un programme utilisant de l’eau de Javel.
Agent
de blanchiment
liquide
7. Appuyer sur le bouton POWER
(mise sous tension) pour mettre
en marche la laveuse
S’assurer que le tiroir distributeur est complètement fermé,
puis appuyer sur le bouton POWER (mise sous tension) pour
mettre la laveuse en marche.
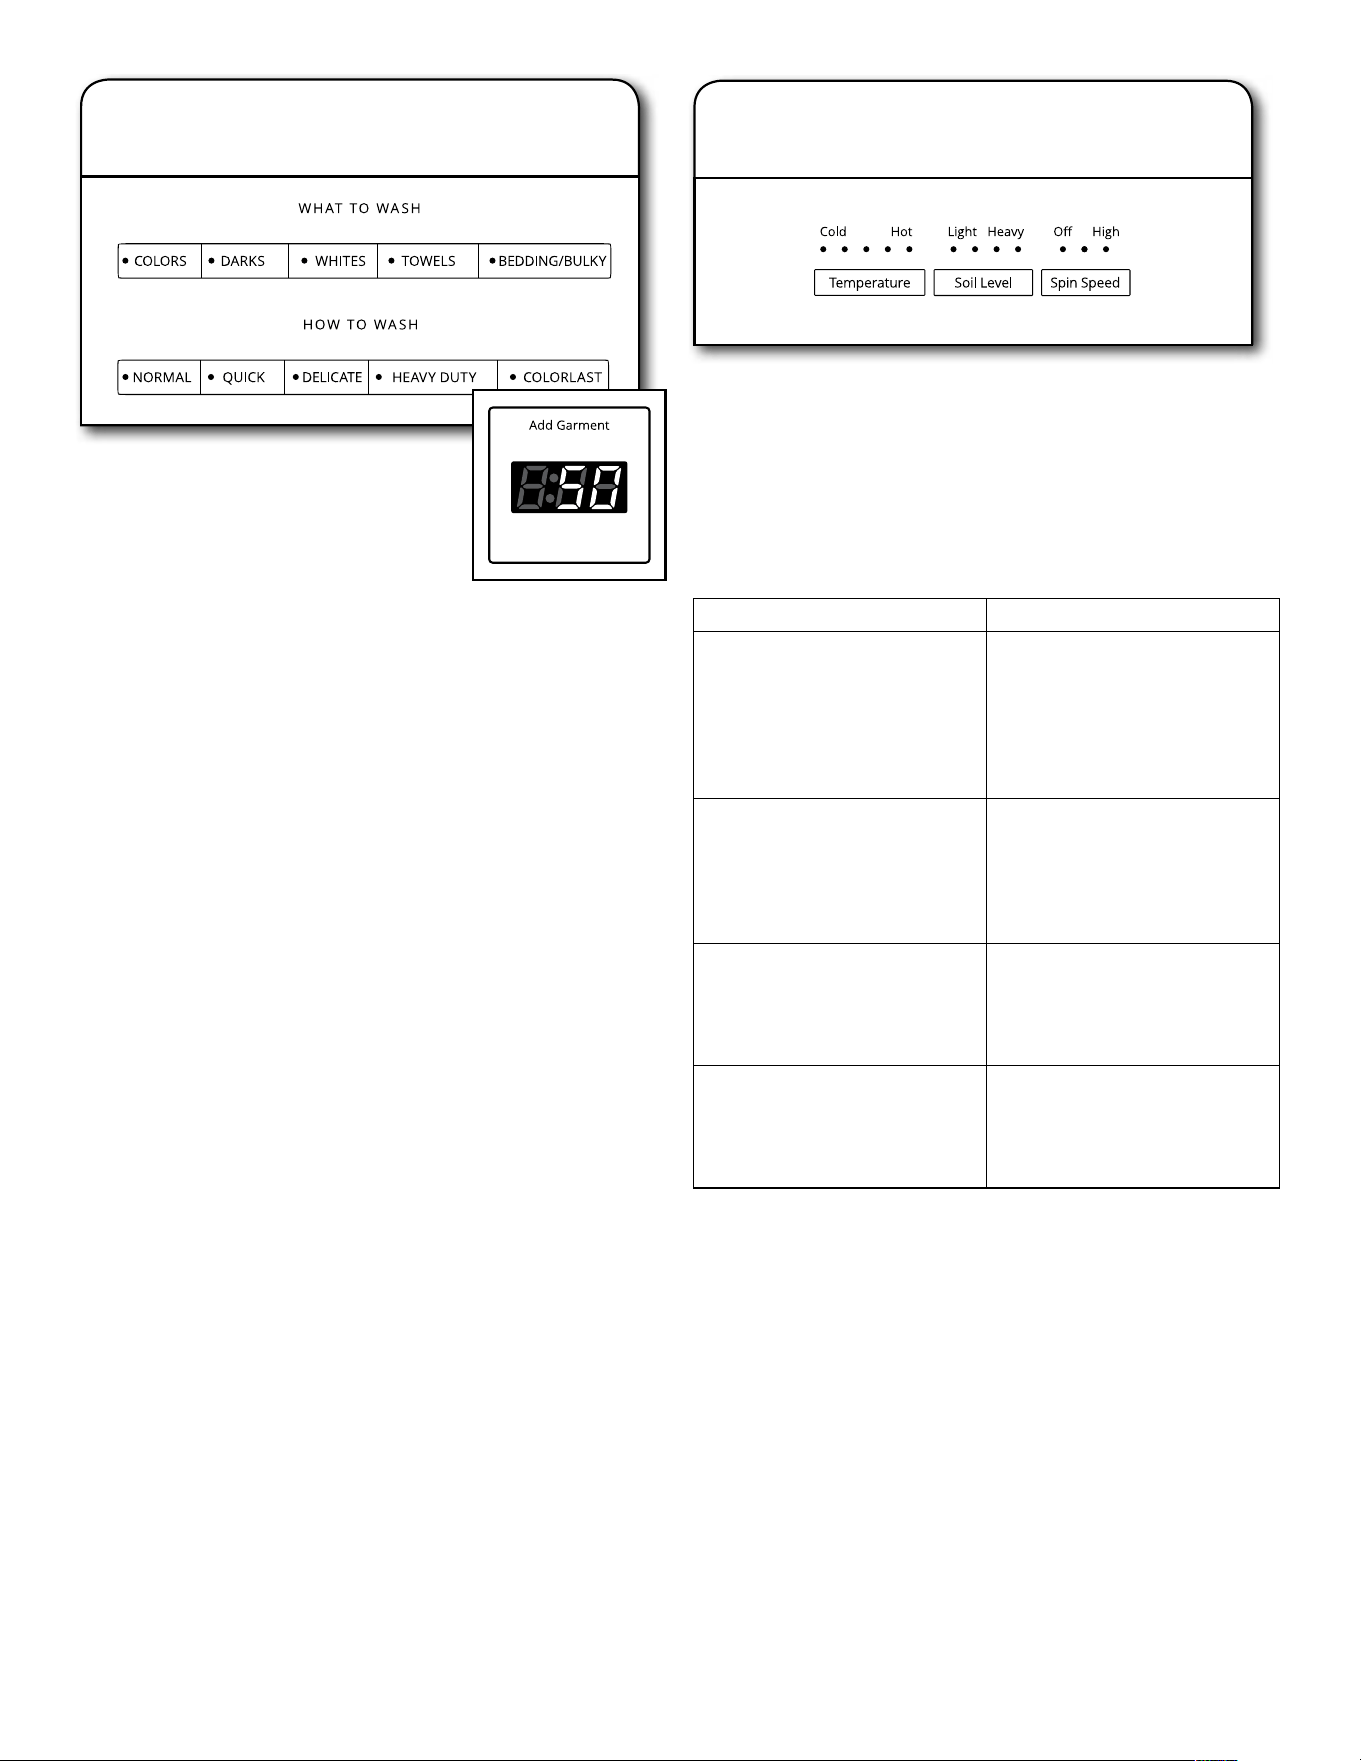
32
D’abord, appuyer sur un programme dans
la partie “What to Wash” (articles à laver),
puis sélectionner un programme dans la
partie “How to Wash” (méthode de lavage)
pour obtenir la meilleure combinaison
de programmes disponibles pour le type
d’articles à laver. Voir le “Guide de programmes” pour plus
de détails. Certains programmes ne sont pas disponibles sur
certains modèles.
La durée résiduelle estimée s’allume, accompagnée
de la durée du programme. On peut remarquer un ajustement
de la durée durant le programme. Ceci est normal.
Si l’on ne souhaite pas démarrer un programme
immédiatement, on peut choisir l’option Delay
Start (mise en marche différée).
Choix d’une heure de lavage différé :
1. Appuyer sur le bouton DELAY START (mise en marche
différée) pour sélectionner le délai souhaité. Cela
augmente la durée par tranche d’une heure à hauteur
de 12 heures.
2. Appuyer et maintenir enfoncé le bouton START/PAUSE
(mise en marche/pause) pour différer l’heure de lavage.
IMPORTANT : Lorsqu’on utilise un programme différé,
utiliser uniquement du détergent HE liquide dans le
distributeur. Les détergents en poudre peuvent absorber
l’humidité d’un programme précédent et former
des grumeaux avant que le programme de lavage
ne commence.
Annulation de la mise en marche différée :
1. Appuyer sur le bouton POWER (mise sous tension) pour
annuler la mise en marche différée.
Mise en pause de la mise en marche différée :
1. Appuyer sur le bouton START/PAUSE (mise en marche/
pause) pour mettre en pause la mise en marche différée.
2. Appuyer de nouveau et maintenir enfoncé le bouton
START/PAUSE (mise en marche/pause) pour relancer
la mise en marche différée. Si la mise en marche différée
n’a pas été lancée au bout de 10 minutes, la laveuse
s’éteint automatiquement.
8. Sélectionner le type de charge
à laver
9. Sélectionner les modificateurs
de programme
Après avoir sélectionné un programme, les modificateurs par
défaut correspondant à ce programme s’allument. Appuyer
sur les boutons des réglages du programme pour modifier
le niveau de saleté, la vitesse d’essorage et la température
si désiré. Tous les réglages ne sont pas disponibles avec
tous les programmes.
REMARQUE : Toujours lire et suivre les instructions des
étiquettes de soin des tissus pour éviter d’endommager
les articles.
Temperature (température) Tissus suggérés
Hot (chaude)
De l’eau froide est ajoutée
pour économiser de l’énergie.
Ceci sera plus froid que
le réglage du chauffe-eau
pour l’eau chaude de votre
domicile.
Blancs et couleurs claires
Vêtements robustes
Saleté intense
Warm (tiède)
De l’eau froide sera ajoutée;
il est donc possible que l’eau
soit plus froide que celle
que fournissait votre laveuse
précédente.
Couleurs vives
Saleté modérée à légère
Cool (fraîche)
De l’eau chaude est ajoutée
pour favoriser l’élimination
de la saleté et pour aider
à dissoudre les détergents.
Couleurs qui déteignent ou
s’atténuent
Saleté légère
Cold (froide)
De l’eau tiède est ajoutée
pour favoriser l’élimination
de la saleté et aider à
dissoudre les détergents.
Couleurs foncées qui
déteignent ou s’atténuent
Saleté légère
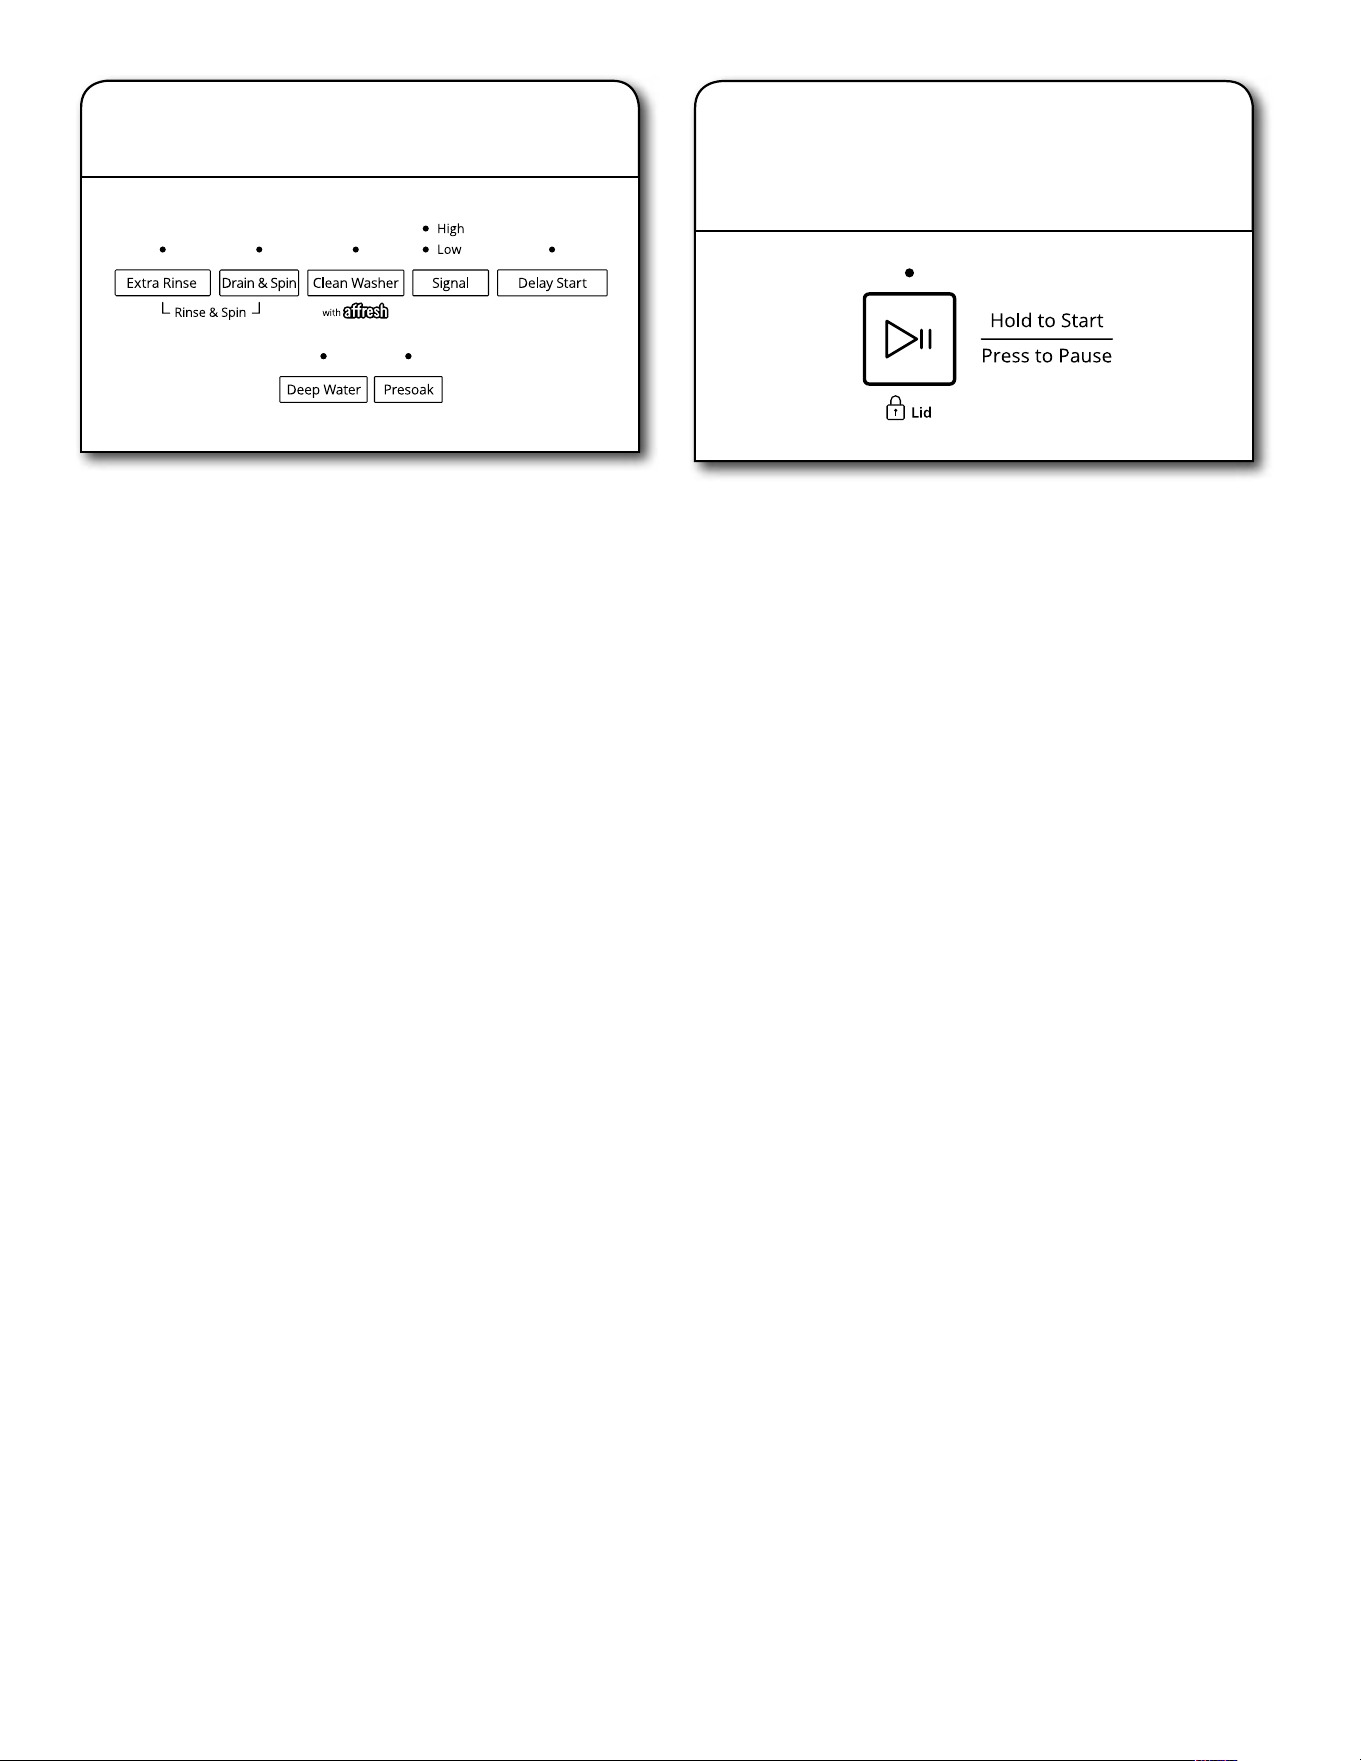
33
Sélectionner les autres options de programme que l’on
souhaite ajouter si elles ne sont pas déjà programmées.
Certains programmes ajoutent automatiquement certaines
options telles que Extra Rinse (rinçage supplémentaire).
Elles peuvent être désactivées si désiré.
REMARQUE : Toutes les options ne sont pas disponibles
avec tous les programmes. Appuyer sur le panneau de
commande pour sélectionner toute autre option.
10. Sélectionner les options
de programme
11. Appuyer et maintenir enfoncer
sur le bouton START/PAUSE
(mise en marche/pause) pour
démarrer le programme de lavage
Appuyer et maintenir enfoncer le bouton START/PAUSE
(mise en marche/pause) pour démarrer le programme de
lavage. Lorsque le programme est terminé, le signal de fin
de programme retentit (si activé). Retirer rapidement les
vêtements une fois le programme terminé pour empêcher
la formation d’odeurs, réduire le froissement et empêcher
les crochets métalliques, fermetures à glissière et boutons-
pression de rouiller.
Déverrouiller le couvercle pour ajouter les vêtements
Si l’on doit ouvrir le couvercle pour ajouter un ou deux
vêtements :
Appuyer sur le bouton START/PAUSE (mise en marche/pause)
pour interrompre la laveuse; le couvercle se déverrouille
une fois que le mouvement de la laveuse a cessé. Ceci peut
prendre plusieurs minutes si la laveuse essorait la charge
à grande vitesse. Fermer ensuite le couvercle et appuyer
de nouveau sur le bouton START/PAUSE (mise en marche/
pause) en maintenant le bouton enfoncé pour redémarrer
le programme.
IMPORTANT : Si on laisse le couvercle ouvert pendant plus
de 10 minutes, l’eau est vidangée et le code d’erreur F8E6
apparaît sur l’afficheur.
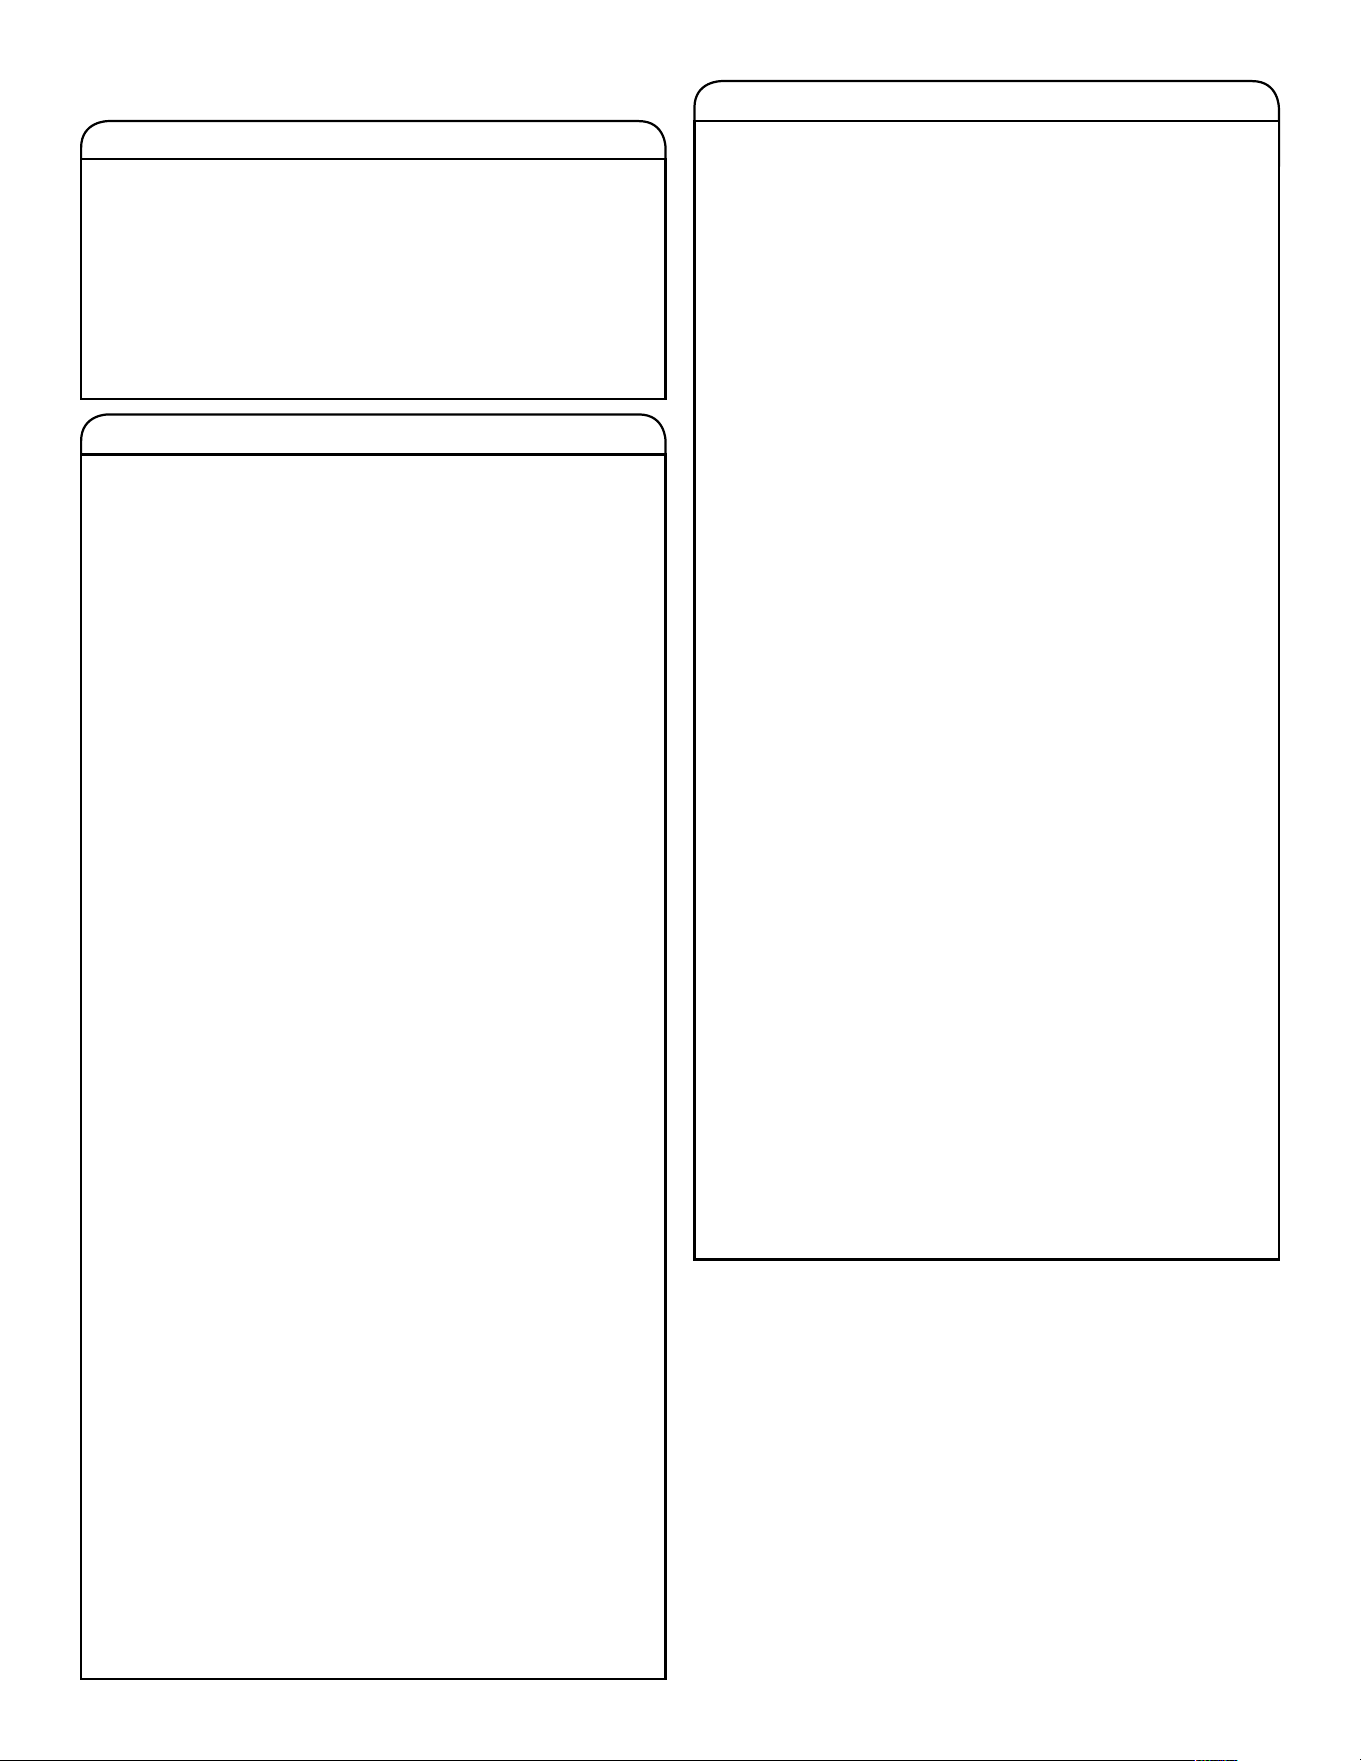
34
Entretien de la laveuse
Remplacer les tuyaux d’arrivée d’eau après 5 ans d’utilisation
pour réduire le risque de défaillance intempestive. Inspecter
périodiquement les tuyaux; les remplacer en cas de renflement,
de déformation, de coupure et d’usure ou si une fuite se
manifeste.
Lorsque vous remplacez les tuyaux d’arrivée d’eau, noter la
date de remplacement au marqueur indélébile sur l’étiquette.
REMARQUE : Cette laveuse ne comprend pas de tuyaux
d’arrivée d’eau. Voir les Instructions d’installation pour plus
de renseignements.
TUYAUX D’ARRIVÉE D’EAU
ENTRETIEN DE LA LAVEUSE
Recommandations pour une laveuse propre et pour
un niveau de performance optimal
1. Toujours utiliser des détergents haute efficacité (HE) et suivre
les recommandations du fabricant de détergent HE pour
déterminer la quantité de détergent HE à utiliser. Ne jamais
utiliser plus que la quantité recommandée de détergent, car
ceci peut augmenter le taux d’accumulation de résidus de
détergent et de souillures à l’intérieur de la laveuse, ce qui
pourrait entraîner la formation d’odeurs indésirables.
2. Exécuter périodiquement des lavages avec de l’eau tiède
ou chaude (et non pas exclusivement des lavages à l’eau
froide), car l’eau tiède ou chaude permet de contrôler plus
efficacement la vitesse à laquelle les saletés et les résidus
de détergent s’accumulent.
3. Veiller à toujours laisser le couvercle de la laveuse ouvert
entre deux utilisations pour qu’elle puisse sécher, et pour
éviter l’accumulation de résidus générateurs d’odeurs.
Nettoyage de la laveuse à chargement par le dessus
Lire complètement ces instructions avant d’entreprendre les
opérations de nettoyage de routine recommandées ci-dessous.
Le processus d’entretien de la laveuse doit être exécuté au
moins une fois par mois ou à intervalles de 30 lavages (selon
la période la plus courte des deux); ceci permettra de contrôler
la vitesse à laquelle les résidus de détergent et les souillures
s’accumulent dans la laveuse.
Nettoyage de l’intérieur de la laveuse
Pour que l’intérieur de la laveuse reste libre de toute odeur,
suivre les instructions d’utilisation indiquées ci-dessus et
effectuer la procédure de nettoyage mensuelle recommandée
suivante :
Programme Clean Washer (nettoyage de la laveuse)
Cette laveuse comporte un programme spécial qui utilise un
volume d’eau plus important en conjonction avec le nettoyant
pour laveuse affresh
®
ou un agent de blanchiment liquide
au chlore pour nettoyer l’intérieur de la laveuse.
Début de la procédure
1. Procédure de nettoyage avec le nettoyant pour laveuse
affresh
®
(recommandé pour une performance optimale) :
a. Ouvrir le couvercle de la laveuse et retirer tout vêtement
ou article.
b. Placer une pastille de nettoyant pour laveuse affresh
®
dans le fond du panier de la laveuse.
c. Ne pas placer de pastille de nettoyant pour laveuse
affresh
®
dans le distributeur à détergent.
d. Ne pas ajouter de détergent ou autre composé chimique
dans la laveuse lors de l’exécution de cette procédure.
e. Rabattre le couvercle de la laveuse.
f. Sélectionner le programme Clean Washer (nettoyage
de la laveuse).
g. Appuyer et maintenir enfoncer le bouton
START/PAUSE
(mise en marche/pause) pendant 3 secondes pour
démarrer le programme. Le processus du programme
de nettoyage de la laveuse est décrit ci-dessous.
ENTRETIEN DE LA LAVEUSE (suite)
REMARQUE : Pour de meilleurs résultats, ne pas interrompre
le programme. Si l’on doit interrompre le programme,
appuyer sur le bouton POWER (mise sous tension). Une fois
le programme de nettoyage de la laveuse arrêté, effectuer
un programme Rinse & Spin (rinçage et essorage) pour
rincer le nettoyant de la laveuse.
2. Méthode avec agent de blanchiment au chlore
(autre option) :
a. Ouvrir le couvercle de la laveuse et retirer tout vêtement
ou article.
b. Verser 1 tasse (236 ml) d’agent de blanchiment liquide
au chlore dans le distributeur d’agent de blanchiment.
REMARQUE : L’emploi d’une quantité d’agent de
blanchiment liquide au chlore supérieure à ce qui est
recommandé ci-dessus pourrait endommager la laveuse
avec le temps.
c. Rabattre le couvercle de la laveuse.
d. Ne pas ajouter de détergent ou autre composé chimique
dans la laveuse lors de l’exécution de cette procédure.
e. Sélectionner le programme Clean Washer (nettoyage
de la laveuse).
f. Appuyer et maintenir enfoncer le bouton START/PAUSE
(mise en marche/pause) pour démarrer le programme.
Le processus du programme de nettoyage de la laveuse
est décrit ci-dessous.
REMARQUE : Pour de meilleurs résultats, ne pas interrompre
le programme. Si l’on doit annuler le programme, appuyer
sur le bouton POWER (mise sous tension). Une fois le
programme de nettoyage de la laveuse arrêté, effectuer
un programme Rinse & Spin (rinçage et essorage) pour
rincer le nettoyant de la laveuse.
Description de l’utilisation du programme de nettoyage
de la laveuse :
1. Ce programme remplit la laveuse à un niveau supérieur à
celui des programmes de lavage ordinaires afin que le niveau
de l’eau de rinçage soit supérieur à celui d’un programme
de lavage ordinaire.
2. Ce programme comporte une agitation et un essorage pour
améliorer l’élimination des souillures.
Une fois ce programme terminé, laisser le couvercle ouvert
pour permettre une meilleure ventilation et pour que l’intérieur
de la laveuse puisse sécher.
Nettoyage de l’extérieur de la laveuse
Utiliser une éponge ou un chiffon doux et humide pour essuyer
les renversements éventuels. Utiliser uniquement des savons ou
nettoyants doux pour nettoyer la surface externe de la laveuse.
IMPORTANT : Afin d’éviter d’endommager le revêtement
de la laveuse, ne pas utiliser de produits abrasifs.
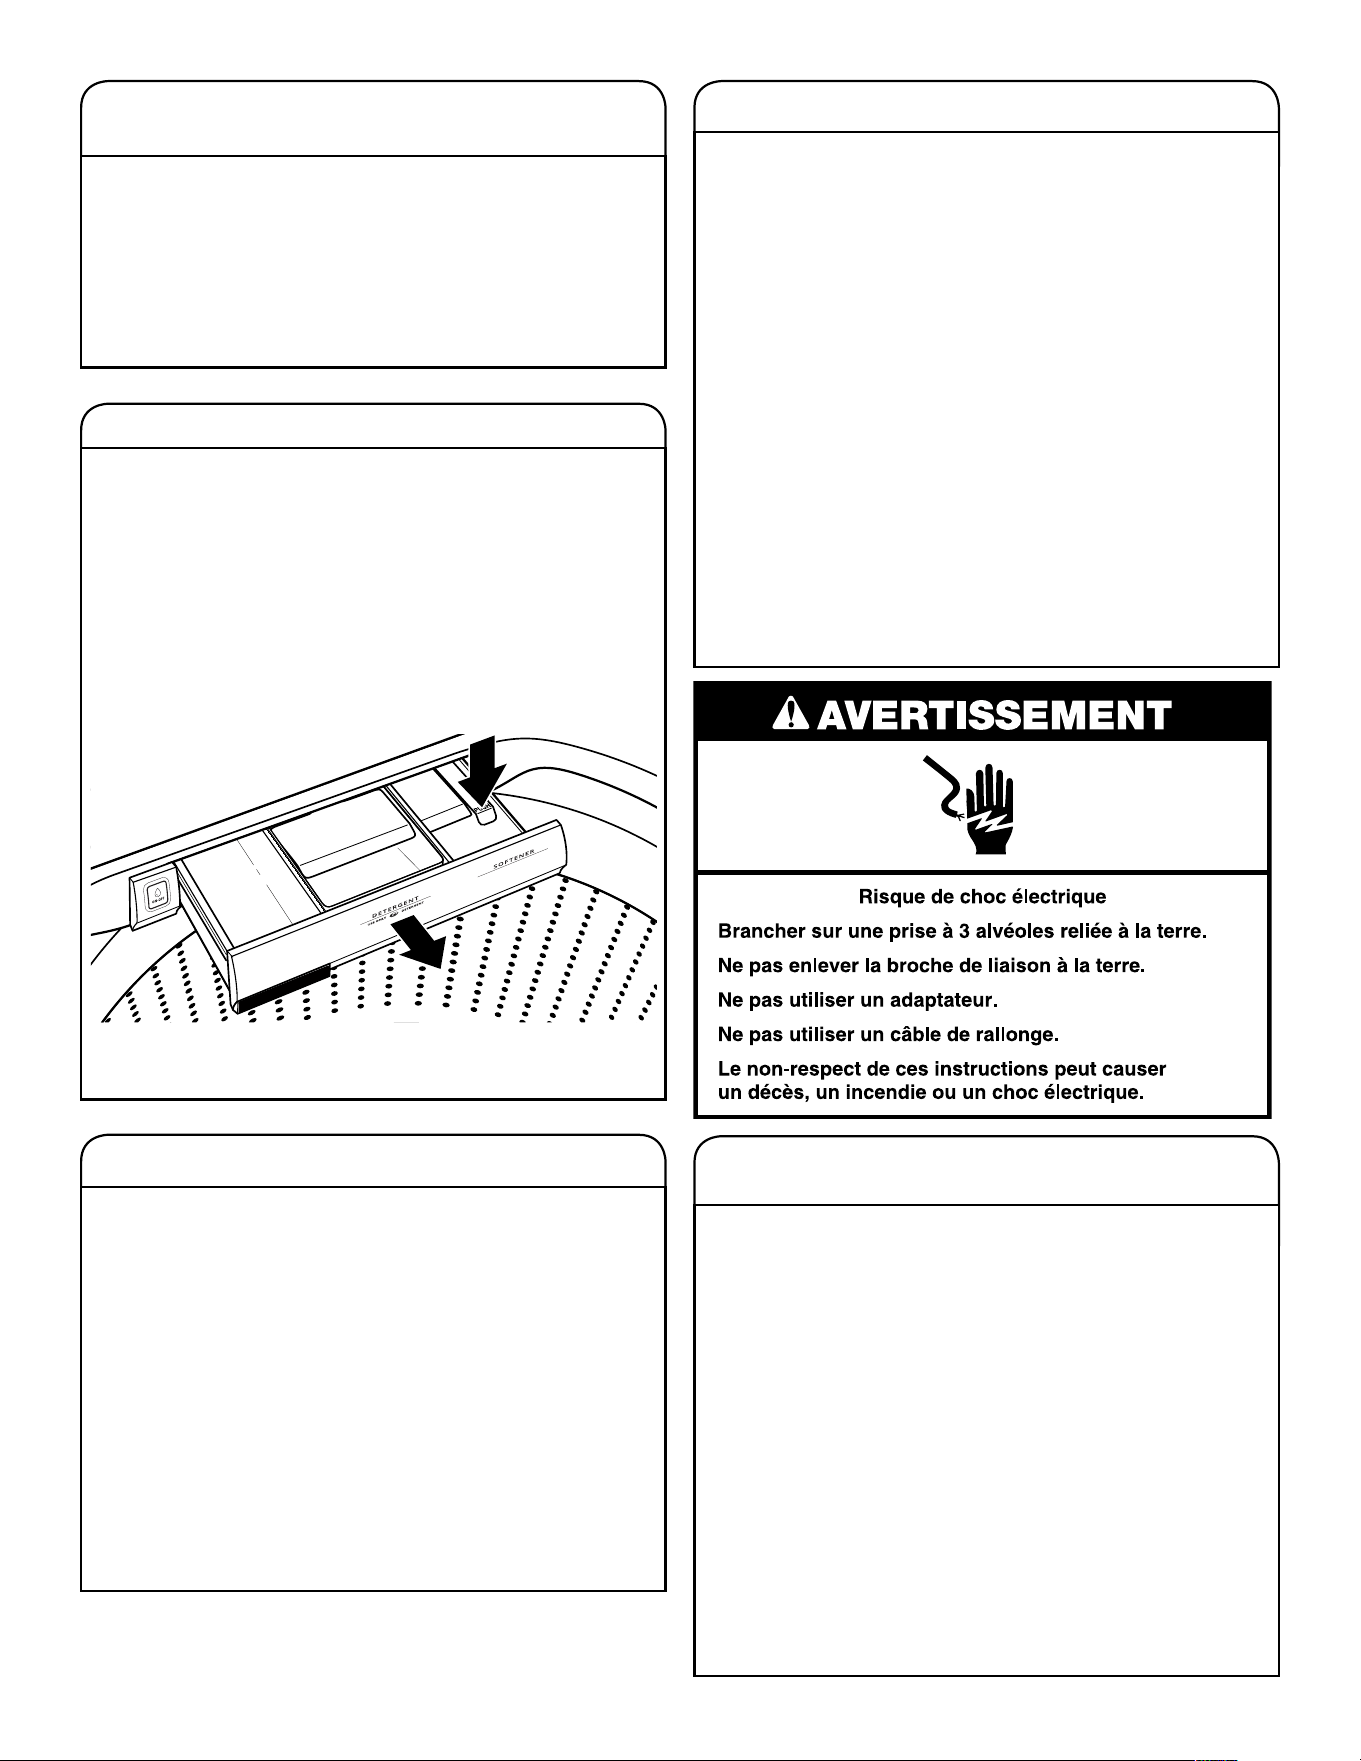
35
Faire fonctionner la laveuse seulement lorsqu’on est
présent. En cas de déménagement ou si l’on n’utilise
pas la laveuse pendant un certain temps, suivre
les étapes suivantes :
1. Débrancher la laveuse ou déconnecter la source
de courant électrique.
2. Fermer l’alimentation en eau à la laveuse pour éviter
toute inondation due à une surpression.
NON-UTILISATION ET ENTRETIEN
EN PÉRIODE DE VACANCES
NETTOYAGE DU TIROIR DISTRIBUTEUR
IMPORTANT : Le tiroir distributeur n’est pas lavable
au lave-vaisselle.
On trouvera peut-être des traces de produits de lessive
dans le tiroir distributeur. Pour éliminer ces traces, suivre
la procédure de nettoyage recommandée suivante :
1. Tirer le tiroir jusqu’à ce que l’on sente une résistance.
2. Appuyer sur un onglet, et continuer à tirer.
3. Laver dans une eau tiède et savonneuse avec un détergent
doux.
4. Rincer à l’eau tiède.
5. Sécher à l’air ou avec une serviette, puis le replacer dans
son logement.
ENTRETIEN POUR ENTREPOSAGE HIVERNAL
IMPORTANT : Pour éviter tout dommage, installer
et remiser la laveuse à l’abri du gel. L’eau qui peut rester
dans les tuyaux risque d’abîmer la laveuse en temps
de gel. Si la laveuse doit faire l’objet d’un déménagement
ou d’entreposage au cours d’une période de gel, hivériser
la laveuse.
Hivérisation de la laveuse :
1. Fermer les deux robinets d’eau; déconnecter et vidanger
les tuyaux d’arrivée d’eau.
2. Placer 1 pinte (1 l) d’antigel pour véhicule récréatif
dans le panier et faire fonctionner la laveuse sur un
programme Rinse & Spin (rinçage et essorage) pendant
environ 30 secondes pour mélanger l’antigel et l’eau
restante.
3. Débrancher la laveuse ou déconnecter la source
de courant électrique.
TRANSPORT DE LA LAVEUSE
1. Fermer les deux robinets d’eau. Débrancher et vidanger
les tuyaux d’arrivée d’eau.
2. Si l’on déplace la laveuse pendant une période de gel,
suivre les instructions de la section “Entretien pour
entreposage hivernal” avant de la déplacer.
3. Déconnecter le tuyau de vidange du système de vidange.
4. Débrancher le cordon d’alimentation.
5. Placer les tuyaux d’arrivée d’eau dans le panier
de la laveuse.
6. Faire passer le cordon d’alimentation et le tuyau
de vidange par-dessus la console et les fixer avec
du ruban de masquage.
7. Replacer l’emballage en polystyrène circulaire des
matériaux d’expédition d’origine à l’intérieur de la laveuse.
Si vous n’avez plus l’emballage circulaire, placer des
couvertures lourdes ou des serviettes dans l’ouverture
du panier. Fermer le couvercle et placer du ruban adhésif
sur le couvercle et jusqu’à la partie inférieure avant de la
laveuse. Laisser le couvercle fermé par l’adhésif jusqu’à
ce que la laveuse soit installée à son nouvel emplacement.
Déplacer la laveuse en position verticale.
RÉINSTALLATION/RÉUTILISATION
DE LA LAVEUSE
Pour réinstaller la laveuse après une non-utilisation,
d’entreposage pour l’hiver, un déménagement ou une période
de vacances :
1. Consulter les Instructions d’installation pour choisir
l’emplacement, régler l’aplomb de la laveuse et la raccorder.
2. Avant de réutiliser la laveuse, exécuter la procédure
recommandée suivante :
Remise en marche de la laveuse :
1. Vidanger les canalisations d’eau et les tuyaux. Reconnecter
les tuyaux d’arrivée d’eau. Ouvrir les deux robinets d’eau.
2. Brancher la laveuse ou reconnecter la source de courant
électrique.
3. Faire exécuter à la laveuse le programme Bedding/Bulky
(articles de literie/articles volumineux) et Heavy Duty (service
intense) pour nettoyer la laveuse et éliminer l’antigel, le cas
échéant. Utiliser uniquement un détergent haute efficacité
(HE). Utiliser la moitié de la quantité recommandée par
le fabricant pour une charge de taille moyenne.
36
Dépannage
Si les phénomènes
suivants se produisent
Causes possibles Solution
Vibrations ou déséquilibre
Vibrations, balancement
ou effet de “marche”
de la laveuse
Les pieds ne sont peut-être pas
en contact avec le plancher ou
peut-être qu’ils ne sont pas
verrouillés.
Les pieds avant et arrière doivent être en contact ferme avec
le plancher et la laveuse doit être d’aplomb pour fonctionner
correctement.
La laveuse n’est peut-être
pas d’aplomb.
Vérifier que le plancher n’est pas incurvé ou qu’il ne s’affaisse
pas. Si le plancher est irrégulier, un morceau de contreplaqué
de 3/4 po (19 mm) placé sous la laveuse permettra de réduire
le bruit.
Voir “Réglage de l’aplomb de la laveuse” dans les Instructions
d’installation.
Vibrations durant
l’essorage ou la laveuse
s’arrête
La charge est peut-être
déséquilibrée.
Charger les vêtements sans les tasser et de façon uniforme
le long du plateau de lavage. Le fait d’ajouter des articles
mouillés ou de rajouter de l’eau dans le panier pourrait
déséquilibrer la laveuse.
Éviter de laver un article seul. Compenser le poids d’un article
seul tel qu’un tapis ou une veste en jeans par quelques articles
supplémentaires pour équilibrer le tout. Si le cadran clignote,
réagencer la charge, fermer le couvercle et appuyer et maintenir
enfoncer le bouton START/PAUSE (mise en marche/pause).
Utiliser le programme Bedding/Bulky (articles de literie/articles
volumineux) et Heavy Duty
(service intense)
pour les articles
volumineux et non absorbants tels que les couettes ou les vestes
avec rembourrage en polyester. Certains articles ne conviennent
pas au programme Bedding/Bulky (articles de literie/articles
volumineux) et Heavy Duty
(service intense)
. Voir le “Guide
de programmes”.
L’article ou la charge ne convient pas au programme sélectionné.
Voir “Guide de programmes” et “Utilisation de la laveuse”.
Bruits – Pour une liste des bruits de fonctionnement normaux consulter le, www.whirlpool.com/product_help.
Cliquetis ou bruits
métalliques
Des objets sont peut-être coincés
dans le système de vidange de la
laveuse.
Vider les poches avant le nettoyage. Les articles mobiles tels
des pièces de monnaie sont susceptibles de tomber entre
le panier et la cuve; ils peuvent aussi obstruer la pompe.
Un appel pour intervention de dépannage s’avérera peut-être
nécessaire pour retirer ces objets.
Il est normal d’entendre des articles métalliques faisant partie
des vêtements comme les boutons-pression métalliques,
boucles ou fermetures à glissière toucher le panier en acier
inoxydable.
Gargouillement
ou bourdonnement
La laveuse est peut-être en train
d’évacuer de l’eau.
Il est normal d’entendre la pompe produire un bourdonnement
continu accompagné de gargouillements ou de bruits de
pompage périodiques lorsque les quantités d’eau restantes sont
éliminées au cours des programmes d’essorage/de vidange.
Bourdonnement Le processus de détection de
la charge est peut-être en cours.
Il est possible que les essorages émettent un bruit de
ronronnement après la mise en marche de la laveuse.
Ceci est normal.
Frottements rythmiques Il se peut que le panier ralentisse. Il se peut que le panier qui ralentit émette un bruit de frottements
rythmiques. Ceci est normal.
Fuites d’eau
Vérifier ce qui suit pour
que l’installation soit
correcte :
La laveuse n’est pas d’aplomb. Il est possible que de l’eau éclabousse en dehors du panier
si la laveuse n’est pas d’aplomb.
Les tuyaux de remplissage ne sont
pas solidement fixés.
Serrer le raccord du tuyau de remplissage.
Rondelles d’étanchéité des tuyaux
de remplissage.
S’assurer que les quatre rondelles d’étanchéité plates
des tuyaux de remplissage sont correctement installées.
Essayer d’abord les solutions suggérées ici ou consulter le site Web www.whirlpool.com/product_help –
Au Canada www.whirlpool.ca
pour obtenir de l’aide et pour éviter une intervention de réparation.
37
Dépannage
Si les phénomènes
suivants se produisent
Causes possibles Solution
Fuites d’eau (suite)
Vérifier ce qui suit pour
que l’installation soit
correcte : (suite)
Raccord du tuyau de vidange. Tirer le tuyau de vidange de la caisse de la laveuse
et le fixer correctement dans le tuyau de rejet à l’égout
ou l’évier de buanderie.
Ne pas placer de ruban adhésif sur l’ouverture du système
de vidange.
Inspecter le circuit de plomberie du
domicile pour vérifier qu’il n’y a pas
de fuites ou que l’évier ou le tuyau
de vidange n’est pas obstrué.
De l’eau pourrait refouler de l’évier ou du tuyau de rejet
à l’égout obstrué. Inspecter tout le circuit de plomberie
du domicile (éviers de buanderie, tuyau de vidange, conduites
d’eau et robinets) pour vérifier qu’il n’y a aucune fuite.
La laveuse n’a pas été chargée
comme recommandé.
Une charge déséquilibrée peut entraîner une déviation
du panier et de l’eau pourrait alors éclabousser en dehors
de la cuve. Voir “Utilisation de la laveuse” pour des instructions
sur le chargement.
La laveuse ne fonctionne pas comme prévu
Quantité d’eau
insuffisante dans
la laveuse
La charge n’est pas complètement
submergée dans l’eau.
Ceci correspond à un fonctionnement normal pour une laveuse
HE à faible consommation d’eau. La charge ne sera pas
complètement submergée. La laveuse détecte la taille de la
charge et ajoute la bonne quantité d’eau pour un nettoyage
optimal. Voir “Quoi de neuf sous le couvercle”.
IMPORTANT : Ne pas ajouter d’eau dans la laveuse. De l’eau
supplémentaire éloignerait la charge du plateau de lavage en
la soulevant, ce qui réduirait la performance de nettoyage.
Lancer le programme de nettoyage de la laveuse afin d’optimiser
le niveau d’eau et la performance de lavage.
La laveuse ne fonctionne
pas ou ne se remplit pas;
elle cesse de fonctionner
Vérifier que la laveuse est
correctement alimentée en eau.
Les deux tuyaux doivent être fixés et l’eau doit pénétrer dans
la valve d’arrivée.
Les robinets d’eau chaude et d’eau froide doivent être ouverts
tous les deux.
Vérifier que les tamis des valves d’arrivée ne sont pas obstrués.
Vérifier que les tuyaux d’arrivée d’eau ne sont pas déformés;
ceci peut réduire le débit.
Essayer d’abord les solutions suggérées ici ou consulter le site Web www.whirlpool.com/product_help –
Au Canada www.whirlpool.ca
pour obtenir de l’aide et pour éviter une intervention de réparation.
38
Dépannage
Si les phénomènes
suivants se produisent
Causes possibles Solution
La laveuse ne fonctionne pas comme prévu (suite)
La laveuse ne fonctionne
pas ou ne se remplit pas;
elle cesse de fonctionner
(suite)
Vérifier que l’alimentation électrique
à la laveuse est correcte.
Brancher le cordon d’alimentation dans une prise à 3 alvéoles
reliée à la terre.
Ne pas utiliser de câble de rallonge.
Vérifier que la prise est alimentée.
Remettre un disjoncteur qui serait ouvert en marche. Remplacer
tout fusible grillé.
REMARQUE : Si le problème persiste, appeler un électricien.
Fonctionnement normal
de la laveuse.
Le couvercle doit être fermé pour que la laveuse puisse
fonctionner.
La laveuse fait des pauses durant certaines phases
du programme. Ne pas interrompre le programme.
On peut arrêter la laveuse pour réduire la production de mousse.
La charge de la laveuse est
peut-être trop tassée.
Retirer plusieurs articles, et réagencer la charge de façon
uniforme le long du plateau de lavage. Fermer le couvercle
et appuyer et maintenir enfoncer le bouton START/PAUSE
(mise en marche/pause).
Si l’on souhaite ajouter des vêtements une fois que la laveuse
a démarré, n’en rajouter qu’un ou deux.
Ne pas ajouter d’eau dans la laveuse.
Détergent HE non utilisé ou utilisation
excessive de détergent HE.
Utiliser uniquement un détergent HE. La mousse produite par
des détergents ordinaires peut ralentir ou arrêter la laveuse.
Toujours mesurer la quantité de détergent et suivre les
instructions figurant sur le détergent en fonction des
modalités de nettoyage de la charge.
Pour éliminer la mousse, annuler le programme. Sélectionner
RINSE & SPIN (rinçage et essorage). Appuyer et maintenir
enfoncer le bouton START/PAUSE (mise en marche/pause).
Ne pas ajouter de détergent.
La laveuse ne se
vidange/n’essore pas;
les charges restent
mouillées
Des petits articles sont peut-être
coincés dans la pompe ou entre le
panier et la cuve, ce qui peut ralentir
la vidange.
Vider les poches et utiliser des sacs à linge pour les petits articles.
Utiliser des programmes comportant
une vitesse d’essorage inférieure.
Les programmes avec vitesses d’essorage réduites éliminent
moins d’eau que les programmes qui comportent des vitesses
d’essorage supérieures. Utiliser la vitesse d’essorage appropriée/
le programme recommandé pour le vêtement.
Essayer d’abord les solutions suggérées ici ou consulter le site Web www.whirlpool.com/product_help -
Au Canada www.whirlpool.ca
pour obtenir de l’aide et pour éviter une intervention de réparation.
39
Dépannage
Si les phénomènes
suivants se produisent
Causes possibles Solution
La laveuse ne fonctionne pas comme prévu (suite)
La laveuse ne se
vidange/n’essore pas;
les charges restent
mouillées (suite)
La charge de la laveuse est peut-être
tassée ou déséquilibrée.
Des charges trop tassées peuvent empêcher la laveuse d’essorer
correctement : les charges ressortent donc plus mouillées
qu’elles ne devraient l’être. Répartir uniformément la charge
mouillée pour que l’essorage soit équilibré. Sélectionner le
programme RINSE & SPIN (rinçage et essorage) pour éliminer
l’eau restée dans la laveuse. Voir “Utilisation de la laveuse”
pour des recommandations sur la façon de charger la laveuse.
Charge déséquilibrée. Voir “Vibration ou déséquilibre” dans la section “Dépannage”
pour plus d’informations.
Inspecter le circuit de plomberie pour
vérifier que le tuyau de vidange est
correctement installé. Le tuyau de
vidange se prolonge dans le tuyau
rigide de rejet à l’égout au-delà de
4,5 po (114 mm).
Vérifier que le tuyau de vidange est correctement installé. Utiliser
la bride de retenue pour tuyau de vidange et la fixer solidement
au tuyau de rejet à l’égout ou à la cuve. Ne pas placer de ruban
adhésif sur l’ouverture du système de vidange. Abaisser le tuyau
de vidange si l’extrémité se trouve à plus de 96 po (2,4 m)
au-dessus du plancher. Retirer toute obstruction du tuyau
de vidange.
Détergent HE non utilisé ou utilisation
excessive de détergent HE.
Un excès de mousse causé par l’utilisation d’un détergent
ordinaire ou d’un surplus de détergent peut ralentir ou arrêter
la vidange ou l’essorage. Utiliser uniquement un détergent HE.
Toujours mesurer les quantités et suivre les instructions figurant
sur le détergent en fonction de la charge. Pour éliminer tout excès
de mousse, sélectionner RINSE & SPIN (rinçage et essorage).
Ne pas ajouter de détergent.
Températures de lavage
ou de rinçage incorrectes
Vérifier que la laveuse est
correctement alimentée en eau.
Vérifier que les tuyaux d’arrivée d’eau chaude et d’eau froide
ne sont pas inversés.
Les deux tuyaux doivent être raccordés à la fois à la laveuse
et au robinet, et la valve d’arrivée doit recevoir à la fois de l’eau
chaude et de l’eau froide.
Vérifier que les tamis des valves d’arrivée ne sont pas obstrués.
Éliminer toute déformation des tuyaux.
Températures de lavage contrôlées
pour économies d’énergie.
Les laveuses certifiées ENERGY STAR
®
utilisent des
températures de lavage et de rinçage inférieures à celles d’une
laveuse traditionnelle à chargement par le dessus. Cela signifie
également les températures de lavage à l’eau chaude et à l’eau
tiède.
Charge non rincée Vérifier que la laveuse est
correctement alimentée en eau.
Vérifier que les tuyaux d’arrivée d’eau chaude et d’eau froide
ne sont pas inversés.
Les deux tuyaux doivent être fixés et l’eau doit pénétrer dans
la valve d’arrivée.
Les robinets d’eau chaude et d’eau froide doivent être ouverts
tous les deux.
Les tamis de la valve d’arrivée d’eau de la laveuse sont peut-être
obstrués.
Éliminer toute déformation du tuyau d’arrivée.
Détergent HE non utilisé ou utilisation
excessive de détergent HE.
La mousse produite par un détergent ordinaire peut empêcher
la laveuse de fonctionner correctement.
Utiliser uniquement un détergent HE. Veiller à mesurer
correctement.
Toujours mesurer la quantité de détergent et suivre les
instructions du détergent en fonction de la taille et du niveau
de saleté de la charge.
Essayer d’abord les solutions suggérées ici ou consulter le site Web www.whirlpool.com/product_help –
Au Canada www.whirlpool.ca
pour obtenir de l’aide et pour éviter une intervention de réparation.
40
Dépannage
Si les phénomènes
suivants se produisent
Causes possibles Solution
La laveuse ne fonctionne pas comme prévu (suite)
Charge non rincée (suite) La charge de la laveuse est
peut-être trop tassée.
La laveuse effectuera un rinçage moins performant si la charge
est bien tassée.
Charger les vêtements sans les tasser et de façon uniforme
le long du plateau de lavage.
Utiliser le programme conçu pour les tissus à laver.
Si l’on souhaite ajouter des vêtements une fois que la laveuse
a démarré, n’en rajouter qu’un ou deux.
Sable, poils d’animaux,
charpie, etc. sur la
charge après le lavage
Des résidus lourds de sable, de
poils d’animaux, de charpie et de
détergent ou d’agent de blanchiment
peuvent nécessiter un rinçage
supplémentaire.
Ajouter un Extra Rinse (rinçage supplémentaire) au programme
sélectionné.
La charge est emmêlée La laveuse n’a pas été chargée
comme recommandé.
Charger les vêtements sans les tasser et de façon uniforme
le long du plateau de lavage.
Réduire l’emmêlement en mêlant plusieurs types d’articles dans
la charge. Utiliser le programme recommandé correspondant aux
types de vêtements à laver.
Action de lavage ou vitesse
d’essorage trop rapide pour
la charge.
Sélectionner un programme comportant un lavage plus lent
et une vitesse d’essorage inférieure. Noter que les articles
seront plus mouillés que si l’on utilise une vitesse d’essorage
supérieure.
Ne nettoie ou
ne détache pas
La charge de lavage n’est pas
complètement submergée dans l’eau.
La laveuse détecte la taille de la charge et ajoute la quantité
d’eau adéquate. Ceci est normal et nécessaire au mouvement
des vêtements.
Davantage d’eau a été ajoutée
à la laveuse.
Ne pas ajouter d’eau dans la laveuse. De l’eau supplémentaire
éloignerait le linge du plateau de lavage en le soulevant, ce qui
réduirait la performance de nettoyage.
La laveuse n’a pas été chargée
comme recommandé.
Charger les vêtements sans les tasser et de façon uniforme
le long du plateau de lavage.
Si l’on souhaite ajouter des vêtements une fois que la laveuse
a démarré, n’en rajouter qu’un ou deux.
Détergent HE non utilisé ou utilisation
excessive de détergent HE.
La mousse produite par un détergent ordinaire peut garder
la laveuse de fonctionner correctement.
Utiliser uniquement un détergent HE. Veiller à mesurer
correctement.
Toujours mesurer la quantité de détergent et suivre les
instructions figurant sur le détergent en fonction de la taille
et du niveau de saleté de la charge.
Programme utilisé incorrect
par rapport au type de tissu.
Utiliser une option de programme de niveau de saleté plus
élevée et une température de lavage plus chaude pour améliorer
le nettoyage.
Si l’on utilise le programme Quick Wash (lavage rapide), ne laver
que quelques articles.
Utiliser le programme Whites (blancs) Normal pour un nettoyage
puissant.
Voir le “Guide de programmes” pour utiliser le programme qui
correspond le mieux à la charge utilisée.
Distributeurs non utilisés. Utiliser les distributeurs pour éviter que l’agent de blanchiment
ou l’assouplissant ne tachent les vêtements.
Remplir les distributeurs avant de démarrer un programme.
Essayer d’abord les solutions suggérées ici ou consulter le site Web www.whirlpool.com/product_help –
Au Canada www.whirlpool.ca
pour obtenir de l’aide et pour éviter une intervention de réparation.
41
Dépannage
Si les phénomènes
suivants se produisent
Causes possibles Solution
La laveuse ne fonctionne pas comme prévu (suite)
Ne nettoie ou ne détache
pas (suite)
Distributeurs non utilisés. (suite) Éviter de les remplir excessivement.
Ne pas verser de produits directement sur la charge.
Les couleurs similaires ne sont
pas lavées ensemble.
Laver ensemble les couleurs semblables et les retirer rapidement
une fois le programme terminé pour éviter tout transfert de
teinture.
Odeurs L’entretien mensuel n’est pas
effectué comme recommandé.
Faire fonctionner le programme Clean Washer (nettoyage de
la laveuse) après chaque série de 30 lavages. Voir “Entretien
de la laveuse” dans la section “Entretien de la laveuse”.
Décharger la laveuse dès que le programme est terminé.
Détergent HE non utilisé
ou utilisation excessive
de détergent HE.
Utiliser uniquement un détergent HE. Veiller à mesurer
correctement.
Toujours suivre les instructions du détergent.
Voir la section “Entretien de la laveuse”.
Dommages aux tissus Des objets pointus se trouvaient
dans les poches au moment
du programme de lavage.
Vider les poches, fermer les fermetures à glissière, les boutons
pression et les agrafes avant le lavage pour éviter d’accrocher
et de déchirer le linge.
Les cordons et les ceintures se sont
peut-être emmêlés.
Attacher tous les cordons et les ceintures avant de démarrer
le nettoyage de la charge.
Les articles étaient peut-être
endommagés avant le lavage.
Raccommoder les déchirures et repriser les fils cassés des
coutures avant le lavage.
Les tissus peuvent subir des
dommages si l’on tasse le linge
dans la laveuse.
Charger les vêtements sans les tasser et de façon uniforme
le long du plateau de lavage.
Les articles de la charge devraient bouger librement pendant
le cycle de lavage pour éviter des dommages.
Utiliser le programme conçu pour les tissus à laver.
Si l’on souhaite ajouter des vêtements une fois que la laveuse
a démarré, n’en rajouter qu’un ou deux.
Les instructions de soin des
vêtements n’ont peut-être pas
été suivies.
Toujours lire et suivre les instructions d’entretien du fabricant
indiquées sur l’étiquette du vêtement. Voir le “Guide de
programmes” pour utiliser le programme qui correspond
le mieux à la charge utilisée.
Vous n’avez peut-être pas ajouté
l’agent de blanchiment liquide
correctement.
Ne pas verser d’eau de Javel directement sur la charge.
Essuyer tous les renversements d’agent de blanchiment.
Un agent de blanchiment non dilué endommagera les tissus.
Ne pas utiliser plus que la quantité recommandée par le fabricant.
Ne pas placer d’articles sur le dessus du distributeur d’agent
de blanchiment lorsqu’on charge et décharge la laveuse.
Fonctionnement incorrect
du distributeur
Distributeurs obstrués ou produits
de lessive distribués trop tôt.
Ne pas remplir excessivement le distributeur. Un remplissage
excessif peut entraîner une distribution immédiate.
Remplir les distributeurs avant de démarrer un programme.
Il est normal qu’il reste de petites quantités d’eau dans
le distributeur une fois le programme terminé.
L’assouplissant épaissit lorsqu’il refroidit. Si de l’assouplissant
s’accumule dans le distributeur après un programme, vérifier
la date péremption et le remplacer si nécessaire.
Pour les domiciles présentant une basse pression d’eau, il est
possible qu’il reste de la poudre dans le distributeur. Pour éviter
cela, sélectionner une température de lavage plus chaude si
possible, en fonction de la charge.
L’agent de blanchiment liquide n’a
pas été versé dans le distributeur.
Utiliser seulement un agent de blanchiment liquide dans
le distributeur d’agent de blanchiment.
Essayer d’abord les solutions suggérées ici ou consulter le site Web www.whirlpool.com/product_help –
Au Canada www.whirlpool.ca
pour obtenir de l’aide et pour éviter une intervention de réparation.
42
Dépannage
Si les phénomènes
suivants se produisent
Causes possibles Solution
La laveuse ne fonctionne pas comme prévu (suite)
Le détergent en poudre
ne se dissout pas
complètement
dans la charge
Utilisation excessive de détergent
HE.
Suivre les recommandations du fabricant pour déterminer
la quantité de détergent à utiliser.
La température de l’eau est très
froide.
Sélectionner une température de lavage plus chaude.
Ajouter le détergent dans le panier avant d’ajouter le linge,
plutôt que d’utiliser le distributeur de détergent.
Le sachet de lessive
à dose unique ne se
dissout pas
Sachet de lessive mal utilisé. Veiller à ajouter le sachet de lessive dans le panier de la laveuse
avant d’ajouter les vêtements. Suivre les instructions du
fabricant pour éviter d’endommager les vêtements.
Un code d’erreur apparaît sur l’afficheur
Un code F#E# (code
d’erreur de type F)
apparaît sur l’affichage
Code d’erreur du système. Appuyer sur le bouton POWER (mise sous tension) pour effacer
le code et sortir du programme. Ensuite, appuyer sur le bouton
POWER (mise sous tension), choisir un programme et appuyer
et maintenir enfoncer le bouton START/PAUSE (mise en marche/
pause) pour démarrer la laveuse. Si le code réapparaît, faire
un appel de service.
F8E1 ou LF (remplissage
trop long) apparaît sur
l’affichage
La laveuse met trop de temps
à se remplir. Le tuyau de vidange se
prolonge dans le tuyau rigide de rejet
à l’égout au-delà de 4,5" (114 mm).
Inspecter le circuit de plomberie pour vérifier que le tuyau
de vidange est correctement installé. Utiliser la bride de
retenue pour tuyau de vidange et la fixer solidement au tuyau
de rejet à l’égout ou à la cuve. Ne pas placer de ruban adhésif
sur l’ouverture du système de vidange. Voir les Instructions
d’installation.
S’assurer que l’alimentation en eau est ouverte.
F9E1, drn, dr (erreur
du système de pompe
de vidange – vidange
longue) apparaît sur
l’affichage
La laveuse met trop de temps
à se vidanger. Le tuyau de vidange se
prolonge dans le tuyau rigide de rejet
à l’égout au-delà de 4,5 po (114 mm).
Inspecter le circuit de plomberie pour vérifier que le tuyau de
vidange est correctement installé. Utiliser la bride de retenue
pour tuyau de vidange et la fixer solidement au tuyau de rejet
à l’égout ou à la cuve. Ne pas placer de ruban adhésif sur
l’ouverture du système de vidange.
Abaisser le tuyau de vidange si l’extrémité se trouve à plus de
96 po (2,4 m) au-dessus du plancher. Retirer toute obstruction
du tuyau de vidange. Voir les Instructions d’installation.
F8E6 (couvercle ouvert)
apparaît sur l’affichage
Le couvercle de la laveuse est resté
ouvert.
Fermer le couvercle et appuyer sur le bouton POWER (mise
sous tension) pour effacer l’affichage. Si le couvercle reste
ouvert pendant plus de 10 minutes, le programme reprend
depuis le début et l’eau présente dans la laveuse est vidangée.
F1E1 ACU (erreur du
module de commande
de l’appareil)
Erreur du module de commande
interne.
Faire un appel de service.
F2E3 Non concordance
entre l’interface
utilisateur et le module
de commande
Le mauvais module de commande
ou la mauvaise interface utilisateur
a été installé.
Faire un appel de service.
F3E1 Erreur de détection
du niveau d’eau
Erreur du capteur de pression
du module de commande.
Faire un appel de service.
F5E2 Le couvercle
ne se verrouille pas
ou défaillance du
verrouillage du couvercle
Un des articles de la charge
empêche peut-être le couvercle
de se verrouiller.
Vérifier qu’aucun article ne se trouve sous le couvercle.
F5E3 Le couvercle
ne se déverrouille pas
Des objets sur le couvercle
de la laveuse l’empêchent
de se déverrouiller.
Retirer les objets, tels qu’un panier de linge, du dessus
de la laveuse.
Essayer d’abord les solutions suggérées ici ou consulter le site Web www.whirlpool.com/product_help –
Au Canada www.whirlpool.ca
pour obtenir de l’aide et pour éviter une intervention de réparation.

43
Dépannage
Si les phénomènes
suivants se produisent
Causes possibles Solution
Un code d’erreur apparaît sur l’afficheur (suite)
F6E2 ou F6E3 Erreur
de communication :
L’interface utilisateur
ne communique pas
Erreur de synchronisation
du module de commande
ou de l’interface utilisateur.
Déconnecter la laveuse de la source d’électricité. Laisser
la laveuse reposer pendant 5 minutes pour s’éteindre
complètement. Mettre la laveuse sous tension et contrôler
les codes d’erreur. Si le code d’erreur réapparaît, faire un
appel de service.
“Ofb” déséquilibré La charge n’est pas équilibrée
ou distribuée de façon uniforme
le long du panier.
Le programme est suspendu, signalée par le témoin de Start/
Pause (mise en marche/pause) clignotant. Ouvrer le couvercle,
redistribuer la charge et fermer le couvercle. Appuyer sans
relâcher sur le bouton START/PAUSE (mise en marche/pause)
pour reprendre.
Essayer d’abord les solutions suggérées ici ou consulter le site Web www.whirlpool.com/product_help –
Au Canada www.whirlpool.ca
pour obtenir de l’aide et pour éviter une intervention de réparation.
44
GARANTIE DES
APPAREILS DE BUANDERIE
WHIRLPOOL
®
SI VOUS AVEZ BESOIN DE SERVICE :
1. Avant de nous contacter pour obtenir un dépannage, veuillez déterminer si des réparations
sont nécessaires pour votre produit. Certains problèmes peuvent être résolus sans intervention
de dépannage. Prenez quelques minutes pour parcourir la section Dépannage ou Résolution
des problèmes du guide d’utilisation et d’entretien, scannez le code QR ci-contre pour accéder
à des ressources supplémentaires, ou rendez-vous sur le site
https://www.whirlpool.ca/product_help.
2. Tout service sous garantie doit être effectué exclusivement par nos fournisseurs de
dépannage autorisés Whirlpool. Aux É.-U. et au Canada, dirigez toutes vos demandes
de service sous garantie au :
Centre d’eXpérience de la clientèle Whirlpool
Aux É.-U., composer le 1-800-253-1301. Au Canada, composer le 1-800-807-6777.
Si vous résidez à l’extérieur du Canada et des 50 États des États-Unis, contactez votre marchand Whirlpool autorisé
pour déterminer si une autre garantie s’applique.
https://www.whirlpool.ca/product_help
GARANTIE LIMITÉE D’UN AN
CE QUI EST COUVERT
CE QUI N’EST PAS COUVERT
1. Usage commercial, non résidentiel ou par plusieurs familles, ou non-respect des
instructions de l’utilisateur, de l’opérateur ou des instructions d’installation.
2. Visite d’instruction à domicile pour montrer à l’utilisateur comment utiliser l’appareil.
3. Visites de service pour rectier une installation ou un entretien fautifs du produit, une
installation non conforme aux codes d’électricité ou de plomberie, ou la rectication
de l’installation électrique ou de la plomberie du domicile (ex : câblage électrique,
fusibles ou tuyaux d’arrivée d’eau du domicile).
4. Pièces consomptibles (ex : ampoules, batteries, ltres à air ou à eau, solutions de
conservation, etc.).
5. Défauts ou dommage résultant de l’utilisation de pièces ou accessoires Whirlpool
non authentiques.
6. Conversion de votre produit du gaz naturel ou du gaz de pétrole liquéé, ou inversion
des portes de l’appareil.
7. Dommages causés par : accident, mésusage, abus, incendie, inondations,
catastrophe naturelle ou l’utilisation de produits non approuvés par Whirlpool.
8. Réparations aux pièces ou systèmes dans le but de rectier un dommage ou des
défauts résultant d’une réparation, d’une altération ou d’une modication non
autorisée de l’appareil.
9. Défauts d’apparence, notamment les éraures, traces de choc, ssures ou tout
autre dommage subi par le ni de l’appareil ménager, à moins que ces dommages
ne résultent de vices de matériaux ou de fabrication et ne soient signalés à Whirlpool
dans les 30 jours.
10. Décoloration, rouille ou oxydation des surfaces résultant d’environnements
caustiques ou corrosifs incluant des concentrations élevées de sel, un haut degré
d’humidité ou une exposition à des produits chimiques (exemples non exhaustifs).
11. Enlèvement ou livraison. Ce produit est conçu pour être réparé à l’intérieur du
domicile.
12. Frais de déplacement et de transport pour le dépannage/la réparation dans
une région éloignée où une compagnie de service Whirlpool autorisée n’est pas
disponible.
13. Retrait ou réinstallation d’appareils inaccessibles ou de dispositifs préinstallés (ex :
garnitures, panneaux décoratifs, plancher, meubles, îlots de cuisine, plans de travail,
panneaux de gypse, etc.) qui entravent le dépannage, le retrait ou le remplacement
du produit.
14. Service et pièces pour des appareils dont les numéros de série et de modèle
originaux ont été enlevés, modiés ou ne peuvent pas être facilement identiés.
Le coût d’une réparation ou d’un remplacement dans le cadre de ces circonstances
exclues est à la charge du client.
Pendant un an à compter de la date
d’achat, lorsque ce gros appareil
ménager est installé, utilisé et entretenu
conformément aux instructions jointes
à ou fournies avec le produit, Whirlpool
Corporation ou Whirlpool Canada LP
(ci-après désignées “Whirlpool”) décidera
à sa seule discrétion de remplacer le
produit ou de couvrir le coût des pièces
de remplacement spécifiées par l’usine
et de la main-d’œuvre nécessaires pour
corriger les vices de matériaux ou de
fabrication qui existaient déjà lorsque ce
gros appareil ménager a été acheté. S’il
est remplacé, votre appareil restera sous
garantie pour la durée restant à courir
de la période de garantie sur le produit
d’origine.
LE SEUL ET EXCLUSIF RECOURS
DU CLIENT DANS LE CADRE DE
LA PRÉSENTE GARANTIE LIMITÉE
CONSISTE EN LA RÉPARATION
PRÉVUE CI-DESSUS. Le service doit
être fourni par une compagnie de service
désignée par Whirlpool. Cette garantie
limitée est valide uniquement aux
États-Unis ou au Canada et s’applique
exclusivement lorsque le gros appareil
ménager est utilisé dans le pays où il a
été acheté. La présente garantie limitée
entre en vigueur à compter de la date
d’achat initial par le consommateur. Une
preuve de la date d’achat d’origine est
exigée pour obtenir un service dans le
cadre de la présente garantie limitée.
ATTACHEZ ICI VOTRE REÇU DE VENTE. UNE PREUVE D’ACHAT
EST OBLIGATOIRE POUR OBTENIR L’APPLICATION DE LA
GARANTIE.
Lorsque vous appelez le centre d’eXpérience de la clientèle,
veuillez garder à disposition les renseignements suivants :
n
Nom, adresse et numéro de téléphone
n
Numéros de modèle et de série
n
Une description claire et détaillée du problème rencontré
n
Une preuve d’achat incluant le nom et l’adresse du marchand
ou du détaillant

45
CLAUSE D’EXONÉRATION DE RESPONSABILITÉ AU TITRE DES GARANTIES IMPLICITES
LES GARANTIES IMPLICITES, Y COMPRIS LES GARANTIES APPLICABLES DE QUALITÉ MARCHANDE OU D’APTITUDE À UN
USAGE PARTICULIER, SONT LIMITÉES À UN AN OU À LA PLUS COURTE PÉRIODE AUTORISÉE PAR LA LOI. Certains États et
certaines provinces ne permettent pas de limitation sur la durée de garanties implicites de qualité marchande ou d’aptitude à un
usage particulier, de sorte que la limitation ci-dessus peut ne pas être applicable dans votre cas. Cette garantie vous confère des
droits juridiques spéciques, et vous pouvez également jouir d’autres droits qui peuvent varier d’une juridiction à l’autre.
LIMITATION DES RECOURS; EXCLUSION DES DOMMAGES FORTUITS OU INDIRECTS
LE SEUL ET EXCLUSIF RECOURS DU CLIENT DANS LE CADRE DE LA PRÉSENTE GARANTIE LIMITÉE CONSISTE EN LA
RÉPARATION PRÉVUE CI-DESSUS. WHIRLPOOL N’ASSUME AUCUNE RESPONSABILITÉ POUR LES DOMMAGES FORTUITS OU
INDIRECTS. Certains États et certaines provinces ne permettent pas l’exclusion ou la limitation des dommages fortuits ou indirects
de sorte que ces limitations et exclusions peuvent ne pas être applicables dans votre cas. Cette garantie vous confère des droits
juridiques spéciques, et vous pouvez également jouir d’autres droits qui peuvent varier d’une juridiction à l’autre.
EXONÉRATION DE RESPONSABILITÉ EN DEHORS DE LA GARANTIE
Whirlpool ne prend aucun engagement quant à la qualité ou la durabilité de l’appareil, ou en cas de dépannage ou de réparation
nécessaire sur ce gros appareil ménager, autre que les engagements énoncés dans la présente garantie. Si vous souhaitez une
garantie prolongée ou plus complète que la garantie limitée fournie avec ce gros appareil ménager, renseignez-vous auprès de
Whirlpool ou de votre détaillant à propos de l’achat d’une extension de garantie.
11/14

46
Notes

47
Notes
W11037201A
W11037202A - SP
Assistance or Service
Before calling for assistance or service, please check “Troubleshooting” or visit www.whirlpool.com/help.
It may save you the cost of a service call. If you still need help, follow the instructions below.
When calling, please know the purchase date and the complete model and serial number of your appliance.
This information will help us to better respond to your request.
Whirlpool Brand Appliances
Customer eXperience Center
553 Benson Road
Benton Harbor, MI 49022-2692
1-866-698-2538
Whirlpool Brand Appliances
Customer eXperience Centre
Unit 200-6750 Century Ave
Mississauga, Ontario L5N 0B7
1-800-688-2002
You can write with any questions or concerns at:
Our consultants provide assistance with
Please include a daytime phone number in your correspondence.
If you need replacement parts or to order accessories
We recommend that you use only FSP
®
Factory Specified Parts.
These parts will fit right and work right because they are made with the same precision
used to build every new WHIRLPOOL
®
appliance.
To locate FSP
®
replacement parts or accessories go to www.whirlpoolpartsonline.com.
Questions? Call us toll free at 1-866-698-2538 or in Canada call 1-800-688-2002.
In the U.S.A.
■ Features and specifications on our full line of appliances.
■ Installation information.
■ Specialized customer assistance (Spanish speaking,
hearing impaired, limited vision, etc.).
In the U.S.A. and Canada
■ Use and maintenance procedures.
■ Accessory and repair parts sales.
■ Referrals to local dealers, repair parts distributors,
and service companies. Whirlpool designated service
technicians are trained to fulfill the product warranty and
provide after-warranty service, anywhere in the United
States and Canada.
Assistance ou Service
Avant de faire un appel pour obtenir de l’assistance ou un entretient, vérifier la section “Dépannage” ou consulter
www.whirlpool.com/help. Cette vérification peut vous faire économiser le coût d’une visite de réparation.
Si vous avez encore besoin d’aide, suivre les instructions ci-dessous.
Lors d’un appel, garder à portée de main la date d’achat et les numéros de modèle et de série de votre appareil.
Ces renseignements nous aideront à mieux répondre à votre demande.
Pour commander des pièces de rechange ou des accessoires
Pour commander des pièces de rechange, nous vous recommandons d’utiliser seulement
des pièces spécifiées par l’usine. Ces pièces conviendront et fonctionneront bien parce qu’elles sont fabriquées selon
les mêmes spécifications précises utilisées pour construire chaque nouvel appareil WHIRLPOOL
®
.
Pour trouver des pièces de rechange FSP
®
ou des accessoires, visiter le www.whirlpool.ca.
Des questions? Composer le numéro sans frais
1-800-688-2002.
Pour plus d’assistance
Vous pouvez nous soumettre toute question ou toute
problème en écrivant à l’adresse ci-dessous :
Whirlpool Brand Appliances
Centre pour l’eXpérience de la clientèle
Unit 200-6750 Century Ave
Mississauga, Ontario L5N 0B7
1-800-688-2002
Dans votre correspondance, veuillez indiquer un numéro
de téléphone où nous pouvons vous joindre dans la journée.
Nos consultants fournissent
l’assistance pour :
■ Procédés d’utilisation et d’entretien.
■ Vente d’accessoires et de pièces de rechange.
■ Références aux concessionnaires, compagnies de service
de réparation et distributeurs de pièces de rechange
locaux. Les techniciens de service désignés par Whirlpool
sont formés pour remplir la garantie des produits et fournir
un service après la garantie, partout au Canada.
®
/
TM
©2017 Whirlpool. All rights reserved. Used under license in Canada.
®
/
TM
©2017 Whirlpool. Tous droits réservés. Emploi sous licence au Canada.
04/17