
05/2021
- 1 -
Copyright © 2021, Fast ČR, a.s.
EN Automatic smoothie blender
Translation of the original manual
SBL 7570SS
05/2021
- 2 -
Copyright © 2021, Fast ČR, a.s.
EN
Automatic smoothie blender
Important safety instructions
READ CAREFULLY AND STORE FOR FUTURE USE.
General warnings
■ This appliance may not be used by children. Keep the appliance
and its power cord away from children.
■ The appliance may be used by persons with reduced physical,
sensory or mental capabilities or with a lack of experience and
knowledge, if they are supervised or have been instructed
to use the appliance in a safe manner and understand the
potential dangers.
■ Children must not play with the appliance.
■ Cleaning and maintenance performed by the user must not be
performed by unsupervised children.
■ In the event that the power cord is damaged, have it repaired
at a professional service centre to prevent causing a dangerous
situation. It is forbidden to use the appliance if it has a damaged
power cord.
Warning:
Incorrect use may lead to injuries.
■ Be especially careful not to injure yourself on the sharp cutting
edges when handling the chopping blades, especially when
removing the blades from the blending jar or bottle, when
emptying the blending jar or bottle and when cleaning it.
■ The surfaces of the appliance that come into contact with food
must always be cleaned according to the instructions in this
user's manual.
05/2021
- 3 -
Copyright © 2021, Fast ČR, a.s.
■ Always turn off the appliance and disconnect it from the power
socket if you will not be using it and if you will be leaving it
without supervision, before assembly, disassembly, cleaning or
moving it.
■ Before replacing the accessories or accessible parts that move
during use, turn the appliance off and disconnect it from the
power supply.
Electrical safety
■ Before connecting this appliance to a power socket, make sure that the voltage stated on its rating label corresponds to the voltage in your power socket.
■ Connect the appliance only to a properly grounded socket. Do not use an extension cord.
■ Do not connect and disconnect the power cord to and from the power socket with wet hands.
■ Ensure that the power plug contacts do not come into contact with water or moisture.
■ Do not disconnect the appliance from the power socket by pulling on the power cord. This could damage the power cord or the power socket. Disconnect the
cord from the power socket by gently pulling the plug of the power cord.
■ Do not place heavy items on the power cord. Make sure the power cord does not hang over the edge of a table and that it is not touching a hot surface or
sharp objects.
■ To avoid the danger of injury by electrical shock, do not repair the appliance yourself or make any adjustments to it. Have all repairs or adjustments of the
appliance performed at an authorised service centre. Tampering with the appliance during the warranty period may void the warranty.
■ Do not spray the appliance with water or any other liquid. Never wash it under running water or submerge it in water or another liquid.
■ Always turn off the appliance and disconnect it from the power socket when you have finished using it.
■ This appliance is not designed to be controlled using a programmed device, external timer switch or remote control.
Correct use of the appliance
■ This appliance is intended for home use. It is not intended for use in locations such as:
– staff kitchens in stores, offices and other workplaces;
– agricultural farms;
– hotel or motel rooms and other living areas;
– bed and breakfast establishments.
■ The appliance is designed and constructed for blending a standard amount of food in the household and for grinding coffee or herbs. Do not use it for any
other purposes than those intended.
■ This appliance is designed for use in indoor areas only. Never use it in an outdoor or industrial environment.
■ This appliance must be used only in accordance with the instructions contained in this user's manual.
■ Only use the appliance with the original accessories that came with it.
Attention:
Using non-original accessories may result in a dangerous situation arising.
■ Do not use sprays in the vicinity of the appliance.
■ Only place the appliance on an even, dry surface. Do not place the appliance on window sills or on unstable surfaces. Likewise, do not place the appliance on
an electric or gas stove or in its vicinity, do not place it in the vicinity of an open fire or an appliance that is a source of heat.
■ Do not use the appliance when it is not functioning correctly or after it has fallen on the floor, been submerged in water or is damaged in any other way. Hand
it over to an authorised service centre for inspection or repair.
■ It is forbidden to modify the surface of the appliance in any way, e.g. using self-adhesive wallpaper, foil, etc.
■ Before first use, it is necessary to thoroughly wash the accessories using warm water and kitchen detergent, then rinse them with drinking water and wipe
thoroughly until dry using a fine wiping cloth.
■ Make sure that the appliance is correctly assembled before putting it into operation. The appliance is equipped with a safety mechanism that will prevent it
from being started unless the removable accessories are seated on the motor base unit.
■ Do not use the appliance if you have wet hands.
■ Do not turn on the appliance when it is empty. Incorrect use of the appliance may negatively affect its lifetime.
■ Do not fill the blending jar or bottle past its maximum nominal capacity.
■ Pay increased attention when handling hot liquids, because they may release steam or they could spray and cause burns. Allow hot liquids to cool down to a
temperature of at least 40 °C before pouring them into the blending jar.
■ Do not leave the appliance in continuous operation for longer than 2 minutes. Before turning it on again, allow it to cool down for at least 2 minutes. When
processing harder foods or thick liquids, do not leave the appliance in continuous operation for longer than 1 minute.
■ The appliance is equipped with a thermal fuse protecting the motor from damage in case of overload. If the appliance shuts off as a consequence of the motor
being overloaded, disconnect it from the power socket and allow it cool for at least 30 minutes. Then you can put it into operation again.
■ If ingredients stick to the blade assembly or the inside walls of the blending jar or bottle, turn the appliance off and unplug it from the power supply. Make
sure that the blade assembly has stopped rotating. Remove the blending jar or bottle assembly from the motor base unit. In the case of the blending jar, clean
the blades using a plastic spatula. In the case of the bottle, remove the blade assembly and clean the removed parts using a plastic spatula. Assemble the
appliance, plug the power cord into a power socket and continue blending.
■ The included blending jar and bottle are not intended for heating food in a microwave oven.
■ Check that the motor base unit is turned off, disconnected from the power socket and that the rotating parts have come to a complete stop before removing
the blending jar or bottle assembly from the motor base unit.

05/2021
- 4 -
Copyright © 2021, Fast ČR, a.s.
■ Do not use the appliance when it is not functioning properly or showing any signs of damage. In order to prevent a hazardous situation arising, do not repair
the appliance yourself or modify it in any way. Have all repairs performed at an authorised service centre. By tampering with the appliance, you risk voiding
your legal rights arising from unsatisfactory performance or quality warranty.
Safety during maintenance
■ Allow the appliance to always fully cool down before cleaning it.
■ Regularly clean the appliance after each use according to the instructions in chapter Maintenance and cleaning. Do not perform any maintenance on the
appliance apart from the maintenance procedure described in chapter Maintenance and cleaning.
■ Do not submerge the motor base unit or its power cord in water or any other liquid, or wash these parts under running water. The motor base unit is not
designed to be washed in a dishwasher.
05/2021
- 5 -
Copyright © 2021, Fast ČR, a.s.
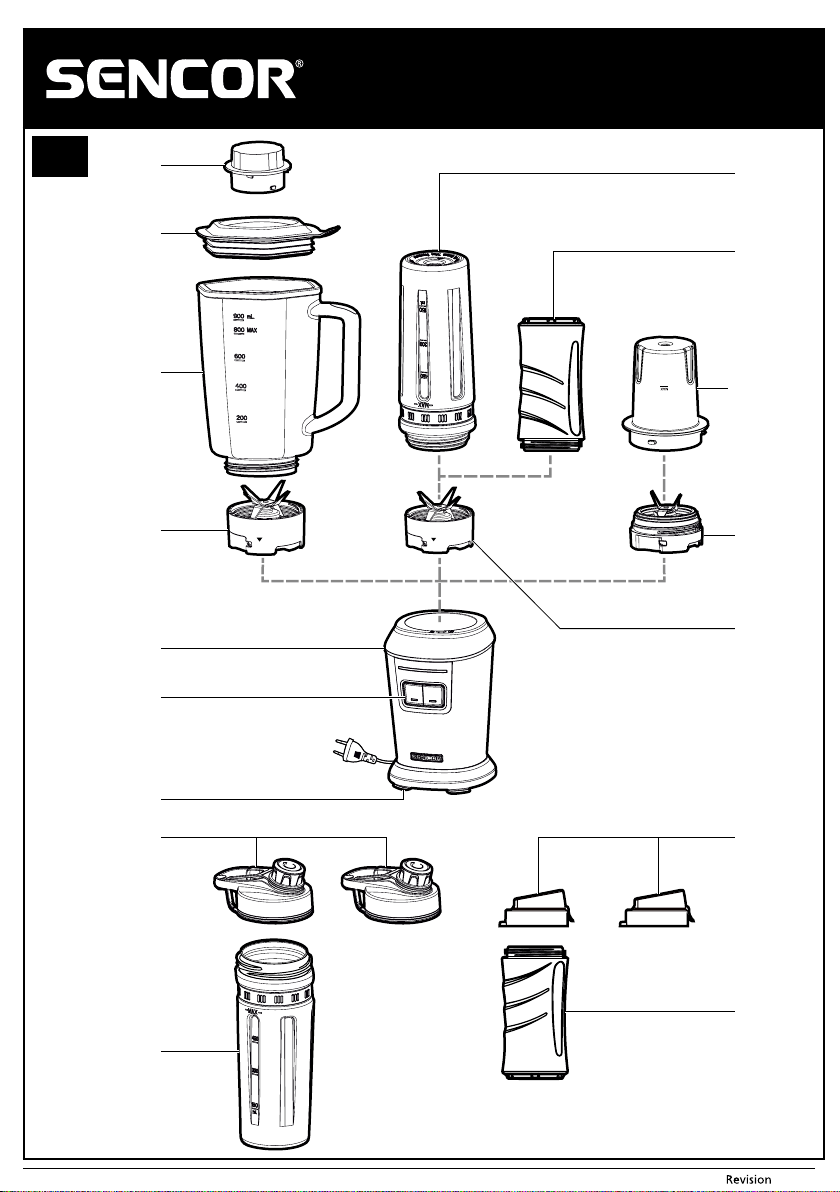
SBL 7570SS
13
14
15
16
2
4
1
3
5
7
6
9
8
10
11
12
A
05/2021
- 6 -
Copyright © 2021, Fast ČR, a.s.
STAGE
S OFT HARD
2
3
1
B
- 7 -
05/2021
Copyright © 2021, Fast ČR, a.s.
EN
Automatic smoothie
blender
User's manual
BEFORE FIRST USE
■ Prior to using this appliance, please read the user's manual thoroughly, even in
cases, when one has already familiarised themselves with previous use of similar
types of appliances. Only use the appliance in the manner described in this user’s
manual. Keep this user's manual in a safe place where it can be easily retrieved for
future use. In the event that you hand this appliance over to somebody else, make
sure to also include this user's manual.
■ We recommend saving the original cardboard box, packaging material, purchase
receipt and responsibility statement of the vendor or warranty card for at least the
duration of the legal liability for unsatisfactory performance or quality. In the event
of transportation, we recommend that you pack the appliance in the original box
from the manufacturer.
■ Carefully unpack the appliance and take care not to throw away any part of the
packaging before you find all the parts of the appliance.
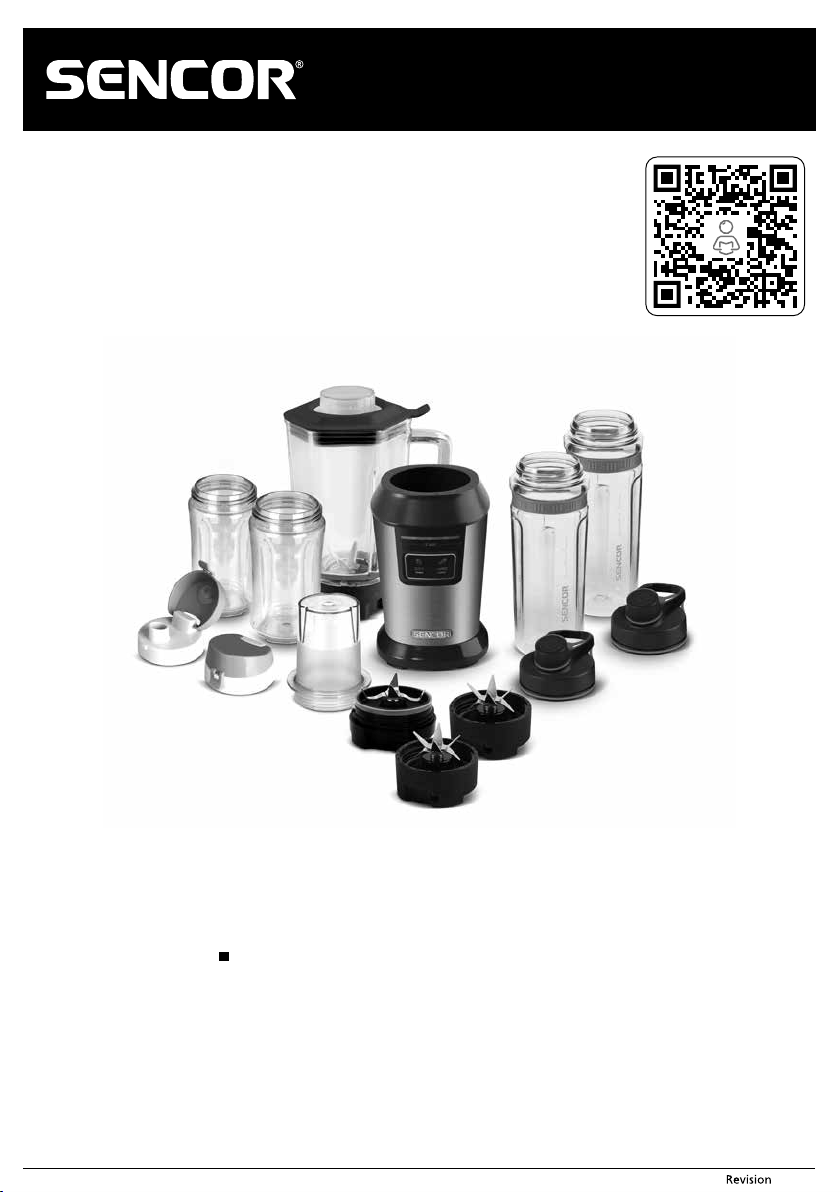
DESCRIPTION OF THE APPLIANCE AND ACCESSORIES
A1 Inner cap
Serves to close the filling cap
opening or as a liquid measuring
cup
A2 Outer lid
A3 Glass blending jar with 0.9 l capacity
A4 Blade assembly for the blending jar
Contains six high quality titanium
coated stainless steel blades
A5 Large sports bottle for processing
food with 0.6l capacity
The bottle is made from impact-
resistant bisphenol-A-(BPA)-free
PCTG
It is suitable for taking along to
training, on the bicycle and fits
perfectly into the cup holder in
motor vehicles
A6 Blade assembly for sports bottles
Contains six high quality titanium
coated stainless steel blades
A7 Small sports drinking bottle with
0.3l capacity
The bottle is made from impact-
resistant bisphenol-A-(BPA)-free
PCTG
It is suitable for taking along to
training, on the bicycle and fits
perfectly into the cup holder in
motor vehicles
A8 Blade assembly for the blending jar
Contains four high-quality
removable stainless steel blades
A9 Grinding jar for 100g of ingredients
It is suitable for grinding coffee
beans, nuts or herbs.
A10 Motor base unit
A11 Control and signalling elements
A12 Anti-slip feet for stability of the
appliance during operation
A13 Lids for both large sports bottles
A14 Second large sports bottle for
processing food with 0.6 l capacity
It has identical properties to the first
bottle
A15 Lids for the small sports bottle
A16 Second sports drinking bottle with
0.3 l capacity
It has identical properties to the first
small bottle
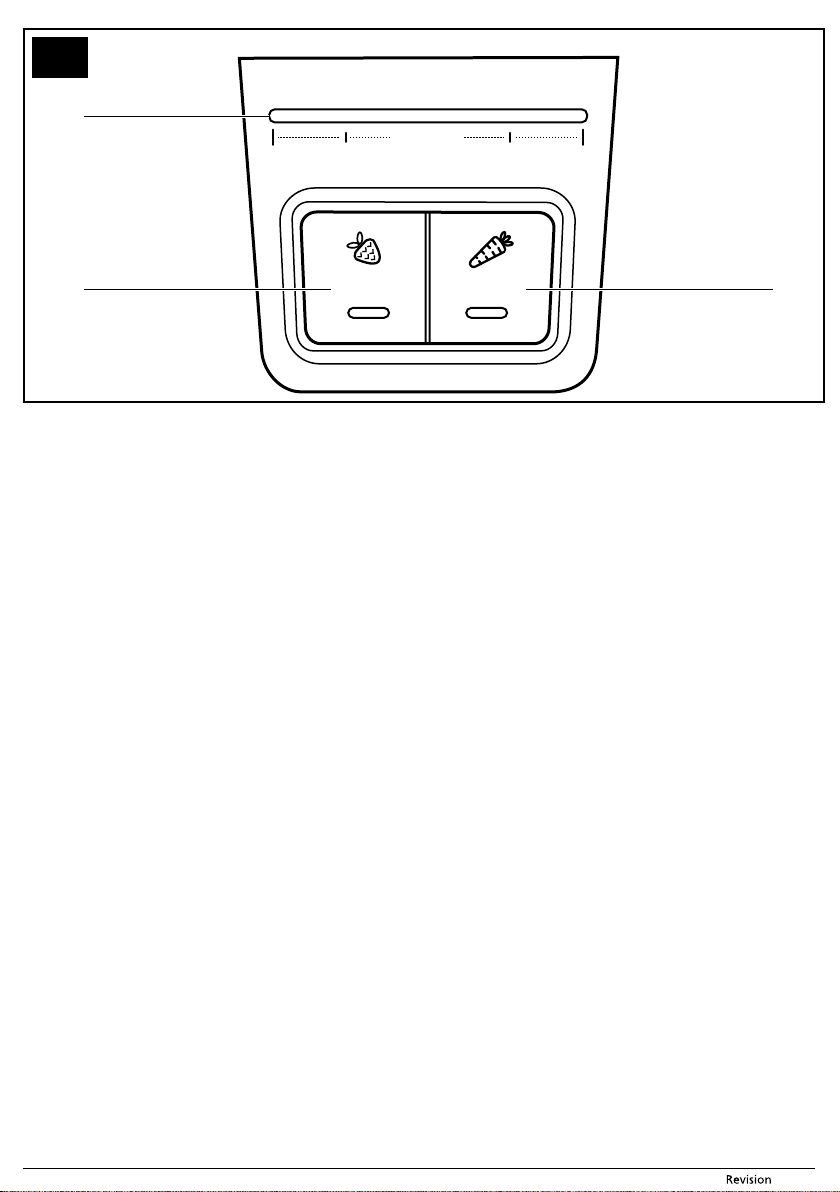
B1 LED blending progress indicator
B2 SOFT mode for soft fruit/vegetables
such as strawberries, tomatoes, etc.
B3 HARD mode for hard fruit /
vegetables such as pineapples and
carrots
PURPOSE OF USE AND APPLIANCE FEATURES
■ This smoothie blender is intended for processing a standard amount of food
in the household. It is ideal for preparing drinks from fresh fruit or fitness drinks,
milkshakes and other cocktails, mixed drinks, salsas, creamy soups, sauces, blended
baby food and for grinding coffee, spices, herbs or nuts without shells.
■ Ingredients can be blended either in the glass blending jar, in one of the two large
sports bottles or in one of the two small sports bottles. The blending jar and the
bottles have their own removable six-blade assembly made from high quality
stainless steel. The bottle lid has a closable spout that enables the bottle to be easily
carried without any spillage. The contents of one large bottle can be poured into the
smaller bottles. All the bottles perfectly fit into the cup holder in motor vehicles or
a bicycle bottle holder.
■ The grinder can grind coffee and handles various other types of nuts without shells,
spices, herbs, poppy seeds.
■ The progress of blending or grinding is shown on an LED indicator and the blender
automatically turns off when it is finished. So it is not necessary to keep the button
of one of the two blending modes pushed down during the blending/grinding
process.
■ The anti-slip feet with suction cups ensure outstanding stability of the base unit
during operation.
■ This smoothie blender is not intended for mashing potatoes, mixing dough,
whipping eggs or grinding raw meat.
BEFORE FIRST USE
■ Before first use, thoroughly wash all parts that come into contact with food (glass
blending jar and its parts, both bottles, bottle lid and both blade assemblies) in hot
water using neutral dishwashing detergent. Then rinse everything with clean water
and allow to dry naturally or wipe dry thoroughly using a wiping cloth. Parts A3, A5,
A7, A9, A14 a A16 may be washed in a dishwasher.
Attention:
When washing the blade assemblies, take special care to avoid
injury on the sharp cutting edges.
Do not rinse the motor base unit or its power cord under water or
submerge it in water. The motor base unit is not intended to be
washed in a dishwasher.
■ Use a lightly dampened wiping cloth to wipe the outside parts of the motor base
unit.
PREPARING FOR OPERATION
Attention:
Prior to mounting the glass blending jar, sports bottle or
grinder on the motor base unit, the base unit must always be
disconnected from the power socket.
ASSEMBLING AND FILLING THE GLASS BLENDING JAR
■ Into the bottom part of the glass blending jar A3, insert the blade assembly A4 so
that the blades point inwards into the blending jar and screw the blade assemblyin.
Check that it is firmly and correctly screwed in and that liquid is not leaking out of
the blending jar.
■ Place the ingredients that you wish to process into the jar. Always respect the
maximum mark on the jar. We recommend to add the ingredients into the jar in the
order described in section QUICK GUIDE TO PROCESSING INGREDIENTS.
Warning:
Before pouring hot liquids into the blending jar, allow these
liquids to cool down to at least 40 °C. When processing hot liquids
or liquids that expand in volume during the blending process, it
is recommended to fill the blending jar to no more than ⅔ of its
maximum capacity.
■ Place the lid A2 on to the blending jar so that its edges copy the neck of the jar, and
push it down thoroughly along its entire perimeter. Into the hole in the lid, insert the
inner cap A1 and lock it by turning it clockwise.
ASSEMBLING AND FILLING THE LARGE SPORTS BOTTLE OR
THE SMALL SPORTS BOTTLE
■ Into the large sports bottle (A5 or A14) or the small sports bottle (A7 or A16), insert
the ingredients that you wish to process. Always respect the maximum mark on the
bottle. We recommend to add the ingredients into the bottle in the order described
in section QUICK GUIDE TO PROCESSING INGREDIENTS.
Warning:
Before pouring hot liquids into the bottle, allow these liquids
to cool down to at least 40 °C. When processing hot liquids or
liquids that expand in volume during the blending process, it is
recommended to fill the bottle to no more than ⅔ of its maximum
capacity.
■ From above, mount the blade assembly A6 on to the bottle so that the blades point
inwards into the bottle and screw in the blade assembly. Check that it is firmly and
correctly screwed in and that liquid is not leaking out of the bottle.
■ Turn the assembled bottle around so that the blade assembly is at the bottom.
Again, check that no liquid is leaking out of the bottle.
ASSEMBLING AND FILLING THE GRINDING JAR
■ Into grinding jar or the small sports bottle A9, add the ingredients that you wish to
process. Always respect the maximum mark on the jar. From above, mount the blade
assembly A8 on to the jar so that the blades point inwards into the jar and screw in
the blade assembly. Check that it is screwed in firmly and correctly.
MOUNTING THE BLENDING JAR, BOTTLE OR GRINDER ON TO
THE MOTOR BASE UNIT
■ Place the motor base unit A10 on a dry, even surface such as a kitchen countertop,
however, do not connect it to the power grid.
■ Seat the assembled jar/bottle/grinder on the motor base unit so that the arrow on
the blade assembly is aligned with the arrow on the motor base unit. Rotate the jar/
bottle/grinder in the direction towards the closed padlock symbol on the base unit
until it is firmly mounted. When the jar/bottle/grinder are correctly mounted on the
base unit, it is not possible to lift them off the base unit.
OPERATION
QUICK GUIDE TO PROCESSING INGREDIENTS
Blending
■ Before blending, decide whether to put the ingredients into the glass jar or into
one of the sports bottles. The glass jar is suitable for cases where it is necessary to
add the ingredients during the blending process since it enables them to be added
through the hole in the lid without needing to remove the jar from the motor base
unit.
■ If you wish to achieve optimal blending results, add the ingredients into the
blending jar or bottle in the following order: liquids, fresh fruit, frozen fruit, yoghurt
and ice cream.
■ First cut ingredients with a firm consistency or with larger dimensions into smaller
pieces measuring 2 to 3 cm and only then blend them.
- 8 -
05/2021
Copyright © 2021, Fast ČR, a.s.
■ Remove hard peals, stones or hard seeds from any fruit and vegetables.
■ If you need to blend food of a solid consistency together with liquids, we
recommend that you first blend the food of solid consistency and a part of the
liquids. Then gradually add the remaining liquids through the hole in the lid while
blending.
■ First, blend a smaller amount of ingredients and then gradually add more
ingredients through the hole in the lid while blending. In this way, you will achieve
better results than by adding all ingredients into the blending jar at once.
■ Frozen ingredients (ice cubes, frozen banana, strawberries, etc.) should not be larger
than 2×2 cm. Ice cubes must be processed immediately upon being removed from
the freezer. When the ice starts to melt, the ice cubes will stick together and it will
not be possible to blend them.
Attention:
Do not use this smoothie blender for pressing potatoes, mixing
dough, whipping eggs or grinding raw meat.
Grinding
■ Add only dry ingredients into the grinding jar.
■ If you wish to grind nuts, always first remove any shells.
PRESET BLENDING MODES
■ This blender has two blending modes. Both modes have their preset speed and
blending duration and their settings cannot be changed. The use of modes is
described in the following table.
Blending
Mode Ingredients Preset blending time
SOFT
Fruit and vegetables of soft consistency
(strawberries, tomatoes, bananas, etc.)
40 seconds
Salsa
Sauces
HARD
Fruit and vegetables of firm consistency
(carrots, apples, pears, pineapple, etc.)
60 seconds
Smoothie beverages and cocktails
Frozen food
Baby food, side dishes
Grinding
Mode Ingredients Preset blending time
SOFT Oats, poppy seeds, herbs, dried chilli 40 seconds
HARD Coffee beans, wheat, grains, pepper, nuts 60 seconds
BLENDING AND GRINDING
■ Insert the the power plug to a power socket.
Note:
The motor unit base is equipped with a safety mechanism that will
prevent it from being turned on unless it is correctly assembled. In the
event that blending does not start, it is possible that the jar or bottle is
incorrectly mounted. Release the jar/bottle and mount it again according
to the procedure above.
■ Based on the type of ingredient, start blending/grinding by pressing button SOFT
or HARD. Blending/grinding runs automatically without the need to hold down the
mode button, and its progress is shown by the LED indicator B1. When the preset
time has elapsed, the blending/grinding will stop automatically.
■ Blending/grinding can be stopped at any time by again pressing the mode button
in which the blender is running. Blending/grinding can be restarted by pressing the
same button.
■ If after completing the blending/grinding cycle you are not satisfied with the
resulting mixture, you may repeat the whole cycle again by pressing button SOFT
or HARD.
Attention:
The maximum operating time is 2 minutes. Do not leave the
blender running non-stop for longer than the specified operating
time. Then, allow the appliance to cool down for 2 minutes. When
blending tougher ingredients or thicker liquids, do not leave the
blender running for longer than 1 minute.
■ When blending in the glass blending jar A3, you may also add solid and liquid
ingredients into the jar through the hole in the lid A2 after removing the inner cap
A1. However, never open the outer lid A2 during operation. When processing hot
liquids, the inner cap A1 must remain closed.
■ In the event that ingredients are getting stuck on the blade assembly or the walls
of the jar or bottle, turn off the blender by pressing the button of the mode that
is running and wait for the blade assembly to come to a complete stop. Then
disconnect the blender from the power socket. Then, proceed as follows:
- When blending in the glass blending jar, remove its outer lid and using a plastic
spatula, clean the blade assembly and the walls of the blending jar. Put the lid
back on.
- When blending in the sports bottle, rotate the bottle in the direction of the open
padlock and take it off the base unit by pulling it out upwards. Turn the bottle so
that the blade assembly is on top and screw off the blade assembly. Use a plastic
spatula to clean the blade assembly and the walls of the bottle. Then screw the
blade assembly back on and mount the bottle back on to the base unit.
■ Reconnect the blender to the power grid and continue blending by pressing the
button of the respective mode.
ENDING BLENDING
■ When you have finished blending, disconnect the power cable of the blender from
the power socket and remove the blending jar or bottle or grinding jar from the
base unit by turning it in the direction of the open padlock on the base unit and
pulling it upwards.
■ If you have been blending in the glass jar, remove its outer lid and pour its contents
into another suitable container or bottle or into the remaining sports bottles.
■ If you have been blending in the large sports bottle, turn the bottle upside down
and screw off the blade assembly. You may leave the contents inside the bottle and
simply close it with the lid A13 or you may pour them out into one or both of the
smaller bottles.
■ Pour the contents of the grinding jar into another suitable jar or coffee hopper, spice
jar, etc.
■ Clean the blender and the used accessories according to the instructions in chapter
CLEANING AND MAINTENANCE.
CLEANING AND MAINTENANCE
Attention:
Prior to any cleaning or maintenance, always disconnect the
blender from the power grid.
The motor base unit and its power cord are not intended for
washing in a dishwasher. Do not spray these parts with water or
any other liquid or submerge them in water or any another liquid.
Never use chemicals, dishwashing wool, steel wool or cleaning
agents with an abrasive component since these may seriously
damage the surface of the base unit.
■ We recommend cleaning the emptied blending jar or bottle or grinding jar as soon
as possible after use so that the blended/ground ingredients do not stick to the
walls. Ingredients that have dried on, are very difficult to remove.
■ To quickly clean the blending jar or the bottle, pour in some clean water up to the
maximum mark, and add a small amount of neutral dishwashing detergent. Then
mount the assembled jar or bottle on to the base unit and start the SOFT mode.
When you have finished the mode, disconnect the blender, remove the jar/bottle
and empty its contents out into a sink.
■ Disassemble the blending jar or bottle or the grinding jar into its individual parts
and then wash them all in hot water with a small amount of kitchen detergent, rinse
out with clean water and wipe dry. Parts A3, A5, A7, A9, A14 a A16 may be washed
in a dishwasher.
Warning:
When cleaning and handling the blade assembly A4, A6 or A8, be
very careful not to injure yourself. The blades are sharp.
Certain foods may cause discolouration of the jar or bottles. This,
however, has no effect on the operation of the blender.
■ Wipe the outer parts of the motor base unit using a lightly dampened wiping cloth
or sponge, and then wipe dry.
STORAGE
■ Before storing it, the blender and its accessories must be disconnected from the
power supply, clean and dry.
■ Store the blender and its accessories in a clean, dry place out of children's reach.
Attention:
Keep the stored blender away from extreme temperatures, direct
sunlight and excessive humidity and do not store it in an overly
dusty environment.
TECHNICAL SPECIFICATIONS
Rated voltage range .................................................................................................... 220−240 V AC
Rated frequency........................................................................................................................50/60 Hz
Power output .................................................................................................................................. 800 W
Volume of the glass jar .................................................................................................................... 0.9 l
Volume of the large sports bottle ............................................................................................... 0.6 l
Volume of the small sports bottle ............................................................................................... 0.3 l
Capacity of the grinding jar ........................................................................................................ 100 g
Electrical shock protection class ........................................................................................................ II
Noise level ...................................................................................................................................85 dB(A)
The declared noise emission level of the appliance is 85 dB(A), which represents a level
A of acoustic power with respect to a reference acoustic power of 1 pW.
Explanation of technical terminology
Safety class for electrical shock protection:
Class II – Electrical shock protection is provided by double or heavy-duty insulation.
Changes to text and technical parameters are reserved.

- 9 -
05/2021
Copyright © 2021, Fast ČR, a.s.
INSTRUCTIONS AND INFORMATION REGARDING THE
DISPOSAL OF USED PACKAGING MATERIALS
Dispose of used packaging material at a site designated for waste in your municipality.
DISPOSAL OF USED ELECTRICAL AND ELECTRONIC
EQUIPMENT
This symbol on products or original documents means that used
electric or electronic products must not be added to ordinary
municipal waste. For proper disposal, renewal and recycling, hand
over these appliances to determined collection points. Alternatively,
in some European Union states or other European countries you may
return your appliances to the local retailer when buying an equivalent
new appliance.
Correct disposal of this product helps save valuable natural resources
and prevents potential negative effects on the environment and human health, which
could result from improper waste disposal. Ask your local authorities or collection
facility for more details.
In accordance with national regulations penalties may be imposed for the incorrect
disposal of this type of waste.
For business entities in European Union states
If you want to dispose of electric or electronic equipment, ask your retailer or supplier
for the necessary information.
Disposal in other countries outside the European Union.
This symbol is valid in the European Union. If you wish to dispose of this product,
request the necessary information about the correct disposal method from the local
council or from your retailer.
This product meets all the basic requirements of EU directives related to
it.