EN
ES
FR
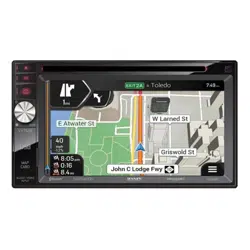
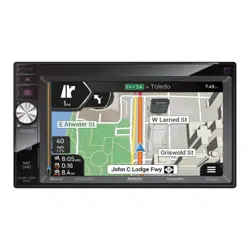
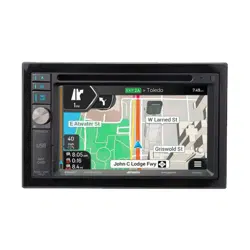
6.5-INCH NAVIGATION / DVD RECEIVER
INE-W970HD
• OWNER’S MANUAL
Please read before using this equipment.
• MODE D’EMPLOI
Veuillez lire avant d’utiliser cet appareil.
• MANUAL DE OPERACIÓN
Léalo antes de utilizar este equipo.
Thank you for purchasing this Alpine product. Please take a moment to protect your purchase by
registering your product now at the following address: www.alpine-usa.com.
You will be informed of product and software updates (if applicable), special promotions, news about
Alpine.
Merci d’avoir acheté ce produit Alpine. Nous vous invitons à consacrer un moment à la protection de
votre achat en enregistrant votre produit dès maintenant à l’adresse suivante :
www.alpine-usa.com.
Vous serez tenu informé des mises à jour des produits et des logiciels (le cas échéant), des promotions
spéciales et de l’actualité d’Alpine.
Gracias por adquirir este producto Alpine. Con solo unos pocos pasos podrá proteger su producto,
registrándolo a través de la siguiente dirección: www.alpine-usa.com.
Recibirá información sobre nuevos productos y software, promociones especiales y novedades
sobre Alpine.
04001-00161-2

ALPINE ELECTRONICS MARKETING, INC.
1-7, Yukigaya-Otsukamachi, Ota-ku,
Tokyo 145-0067, JAPAN
Phone: 03-5499-4531
ALPINE ELECTRONICS OF AMERICA, INC.
1500 Atlantic Boulevard, Auburn Hills,
Michigan 48326, USA
Phone 1-800-ALPINE-1 (1-800-257-4631)
ALPINE ELECTRONICS OF AUSTRALIA PTY. LTD.
161-165 Princes Highway, Hallam
Victoria 3803, Australia
Phone 03-8787-1200
ALPINE ELECTRONICS GmbH
Ohmstr. 4, 85716 Unterschleißheim München,
Germany
Phone 089-32 42 640
ALPINE ELECTRONICS OF U.K. LTD.
Alpine House
Fletchamstead Highway, Coventry CV4 9TW, U.K.
www.alpine.co.uk
ALPINE ELECTRONICS GmbH
SUCCURSALE FRANCE
184 allée des Erables
CS 52016 – Villepinte
95 945 Roissy CDG cedex
FRANCE
Phone : +33(0)1 48 63 89 89
ALPINE ITALIA S.p.A.
Viale Cristoforo Colombo 8,
20090 Trezzano sul Naviglio MI, Italy
Phone +39 02 484781
ALPINE ELECTRONICS GmbH
SUCURSAL EN ESPAÑA
C/Portal de Gamarra, 36 - Pabellón, 3201013
Vitoria - ALAVA
Phone 945-283588

3
-EN
PRECAUTIONS
IMPORTANT INFORMATION :
PLEASE READ CAREFULLY BEFORE USING
THIS PRODUCT. .............................................. 7
Copyrights and Trademarks
Copyrights and Trademarks ............................. 10
Key Features
Key System Features ....................................... 11
My Menu .......................................................... 11
Swiping the Touch Screen ............................... 11
About Dual Screen ........................................... 11
Getting Started
Components and Features .............................. 12
Turning Power On/Off ...................................... 12
Turning the System On .................................... 12
Resetting the System ....................................... 13
Adjusting the Volume........................................ 13
Muting the Volume ............................................ 13
Touch Screen Operation .................................. 13
Sound Settings ................................................. 14
Voice Recognition ............................................. 14
Switching Sources ............................................ 14
Inputting Text (Keypad) .................................... 15
Information Display on the Status Bar ............. 15
Home Screen .................................................... 16
Adding Your Favorite Menu Items to My Menu 16
All Menus Screen ............................................. 17
Radio/HD Radio
Radio/HD Radio Main Screen .......................... 18
Listening to FM/AM Radio ................................ 19
Selecting Radio Broadcast ............................... 19
Saving Radio Broadcast to Presets ................. 20
Using Preset Menu ........................................... 20
Using Ballgame Mode (HD Radio™ Mode only)
20
HD Radio On/Off .............................................. 21
Sound Settings ................................................. 21
About the Feature Logos.................................. 21
SiriusXM
SiriusXM Radio Main Screen ........................... 22
Listening to SiriusXM Radio ............................. 22
Selecting Channels .......................................... 23
Parent Lock ....................................................... 23
Saving Channel to Presets .............................. 24
Smart Favorites ............................................ 24
Using Preset Menu ........................................... 24
Channel List ...................................................... 24
Category ........................................................... 25
Featured Favorites ....................................... 25
TuneStart™ ...................................................... 26
Replay™ ........................................................... 26
Saving Song/Artist Alert.................................... 27
Editing Song/Artist Alert .................................... 27
Sound Settings ................................................. 27
SiriusXM User Data Reset ............................... 27
Disc
Supported Disc Formats .................................. 28
DVD Region Codes .......................................... 28
Disc Video
Disc Video Main Screen ................................... 29
Playing Disc Video Files ................................... 29
Viewing in Full Screen ...................................... 29
Searching Disc Video Files .............................. 30
Fast-Forwarding or Rewinding a File ............... 30
Repeat .............................................................. 30
Shuffle ............................................................... 30
Sound Settings ................................................. 30
Visual Settings .................................................. 30
Supported Disc Video Format .......................... 30
Disc Music
Disc Music Main Screen................................... 31
Playing Disc Music Files .................................. 31
Searching Disc Music Files .............................. 31
Fast-Forwarding or Rewinding a File ............... 32
Repeat .............................................................. 32
Shuffle ............................................................... 32
Sound Settings ................................................. 32
Supported Disc Music Format ......................... 32
Data CD – Image Disc
Disc Image Main Screen .................................. 33
Playing Disc Image Files .................................. 33
Viewing in Full Screen ...................................... 33
Searching Disc Image Files ............................. 33
Repeat .............................................................. 34
Shuffle ............................................................... 34
Visual Settings .................................................. 34
Contents

4
-EN
Supported Disc Image Format ......................... 34
Disc DVD
Disc DVD Main Screen .................................... 35
Playing a DVD .................................................. 35
Viewing in Full Screen ...................................... 35
Searching Chapters.......................................... 36
Fast-Forwarding or Rewinding a Chapter ....... 36
Repeat .............................................................. 36
Changing Screen Ratio .................................... 37
Using Top Menu ................................................ 37
Using Sub Menu ............................................... 37
Changing Subtitle Language ........................... 37
Changing Voice Language ............................... 37
Supported Disc DVD Format ........................... 37
Audio CD
Audio CD Main Screen..................................... 38
Playing An Audio CD ........................................ 38
Searching Tracks .............................................. 38
Fast-Forwarding or Rewinding a Track ........... 39
Repeat .............................................................. 39
Shuffle ............................................................... 39
Scan .................................................................. 39
Supported Audio CD Format ............................ 39
USB Music
USB Music Main Screen .................................. 40
Playing USB Music Files .................................. 40
Searching USB Music Files ............................. 40
Fast-Forwarding or Rewinding a File ............... 41
Repeat .............................................................. 41
Shuffle ............................................................... 41
Scan .................................................................. 41
Adding a Song to a Playlist .............................. 42
Sound Settings ................................................. 42
Supported USB Music Formats ....................... 42
USB Video
USB Video Main Screen .................................. 43
Playing USB Video Files .................................. 43
Viewing in Full Screen ...................................... 43
Searching USB Video Files .............................. 44
Fast-Forwarding or Rewinding a File ............... 44
Repeat .............................................................. 44
Viewing File Info ............................................... 44
Caption .............................................................. 44
Visual Settings .................................................. 45
Sound Settings ................................................. 45
Supported USB Video Formats ....................... 45
USB Image
USB Image Main Screen ................................. 46
Playing USB Image Files ................................. 46
Viewing in Full Screen ...................................... 46
Searching USB Image Files ............................. 46
Screen Settings ................................................ 46
Supported USB Image Format ........................ 46
iPod Music
iPod Music Main Screen .................................. 47
Playing iPod Music ........................................... 47
Fast-Forwarding or Rewinding a File ............... 48
Fast-Forwarding or Rewinding File .................. 48
Repeat .............................................................. 48
Shuffle ............................................................... 48
Sound Settings ................................................. 48
Android Auto
What Is Android Auto ........................................ 49
Activate Android Auto ....................................... 49
Apple CarPlay
Access to Apple CarPlay .................................. 49
HDMI
HDMI Main Screen ........................................... 50
Playing HDMI Mode ......................................... 50
Viewing in Full Screen ...................................... 50
Changing Screen Ratio .................................... 50
Visual Settings .................................................. 51
Sound Settings ................................................. 51
AUX (Auxiliary Device)
AUX Main Screen ............................................. 52
Playing AUX Mode ........................................... 52
Viewing in Full Screen ...................................... 52
Changing Screen Ratio .................................... 52
Visual Settings .................................................. 52
Sound Settings ................................................. 52
Bluetooth Audio
Bluetooth Audio Main Screen .......................... 53
Playing Bluetooth Audio ................................... 53
Fast-Forwarding or Rewinding a File ............... 54
Repeat .............................................................. 54
Shuffle ............................................................... 54
Sound Settings ................................................. 54
Bluetooth Operation
Setup Before Using .......................................... 55

5
-EN
Phone
Pairing and Connecting a Phone ..................... 56
When No Phones Have Been Paired .......... 56
When a Phone Is Already Paired ................. 56
When a Phone Is Connected ....................... 56
Disconnecting Bluetooth Devices ............... 57
Deleting Bluetooth Devices ......................... 57
Phone Screen ................................................... 57
Bluetooth Phone Main Screen ..................... 57
Making a Call .................................................... 58
Dialling by Dialling a Number ....................... 58
Making a Call from Contacts ........................ 58
Making a call from contacts ......................... 58
Making a Call from Favorites ....................... 59
Answering a Call ............................................... 59
Operating Menus During a Call ....................... 60
Ending a Call ................................................ 60
Switching a Call to Private/Handsfree ......... 60
Switching to Call Waiting .............................. 60
Turning Mic On/Off ....................................... 61
Adjusting Call Volume .................................. 61
DTMF (Touch-Tone) Function ...................... 61
Contacts ............................................................ 61
Downloading Contacts ................................. 61
Searching Contacts ...................................... 61
Information .................................................... 62
Call History........................................................ 62
Information .................................................... 62
Favorites ........................................................... 62
Saving to Favorites ....................................... 62
Deleting Favorites ........................................ 63
Bluetooth Settings ............................................ 63
Setup
Starting Mode ................................................... 64
Bluetooth Settings ............................................ 64
Bluetooth Connection ................................... 64
Setting Auto-Connection Priority .................. 66
Viewing Bluetooth System Info .................... 67
Setting the Passkey ..................................... 67
Resetting Bluetooth Settings........................ 67
Sound Settings ................................................. 68
Setting Tone/Fader/Balance......................... 68
Setting Subwoofer ........................................ 68
Setting MX HD .............................................. 69
Setting EQ Presets ....................................... 69
Setting the Crossover (X-Over) ................... 70
Setting the Time Correction ........................ 71
Setting Defeat ............................................... 72
Setting Key Sound ....................................... 72
Setting Mute while backing up .................... 73
Default Sound Settings ................................ 73
Visual Settings .................................................. 73
Setting Brightness/Contrast/Saturation/Hue 73
Screen Settings ................................................ 74
Setting Screen/Lighting ............................... 74
Setting Screen Color .................................... 74
Setting Illumination Color ............................. 75
Setting Text Scroll ......................................... 75
General Setup .................................................. 75
Setting Screen Saver ................................... 75
Setting Language ......................................... 76
Setting Security Code .................................. 76
Viewing System Info ..................................... 76
Setting Demo Mode ..................................... 77
Initializing the System ................................... 77
Car Settings ...................................................... 78
Setting Steering Wheel ................................ 78
Setting Installation Status ............................. 78
SiriusXM Settings ............................................. 78
Setting All Alerts On/Off ................................ 78
Deleting All Saved Alerts .............................. 79
Setting Saved Alerts ..................................... 79
Setting Favorite Sports Team Alerts ............ 79
Setting Featured Favorite Update Notification
On/Off ........................................................... 80
Setting Parent Lock ...................................... 80
Signal Strength Information ......................... 81
AUX Setup ........................................................ 81
Turning AUX On/Off ..................................... 81
Setting AUX Name ....................................... 82
Using Remote Control .................................. 82
Setting Signal ............................................... 82
HDMI Settings .................................................. 82
Camera Settings ............................................... 83
Setting Camera Status ................................. 83
Setting Camera Signal ................................. 83
Setting Camera Guideline ............................ 83
Connectivity Settings ........................................ 84
Setting Android Auto ..................................... 84
Setting Apple CarPlay .................................. 84
Date/Time Settings ........................................... 85
Receiving GPS Time .................................... 85
Converting Time Format .............................. 85
Turning Daylight Savings Time On/Off ........ 85
If This Message Appears .................................. 85
SiriusXM ....................................................... 85
Camera Operation
Rear Camera Operation ................................... 86
Displaying the Rear Camera Image from the
Menu Screen ................................................ 86
Displaying the Rear View Video While the car

6
-EN
Is in Reverse ................................................. 86
Guideline Display On/Off .............................. 86
Hitch Guideline Display On/Off .................... 86
Switching the Front Camera Image ............. 86
About the Rear Camera Guideline .................. 87
Information
Product Software Update ................................. 89
Cautions about Discs ....................................... 89
Discs Playable on This Unit ............................. 90
About the Supported Formats .......................... 91
About MP3/WMA/AAC/FLAC/OGG/APE/MP2
91
In Case of Difficulty ........................................... 93
Error Messages ............................................... 94
Specifications .................................................... 96
END USER LICENSE AGREEMENT (HERE) 97
Limited warranty ............................................... 98
7
-EN
Operating Instructions
PRECAUTIONS
IMPORTANT INFORMATION :
PLEASE READ CAREFULLY BEFORE USING
THIS PRODUCT.
• This product is not a substitute for your personal judgement. Any
route suggestions made by this navigation system should never
supersede any local traffic regulations or your personal judgement
and/or knowledge of safe driving practises. Do not follow route
suggestions if the navigation system instructs you to perform an
unsafe or illegal manoeuvre, places you in an unsafe situation, or
routes you into an area which you consider unsafe.
• Glance at the screen only when necessary and safe to do so. If
prolonged viewing of the screen is necessary, stop in a safe and
legal manner and location.
• Do not input destinations, change settings, or access any functions
requiring a prolonged view of the monitor while you are driving.
Stop in a safe and legal manner and location before attempting to
access the system.
• When using the navigation system to find/route to an emergency
service, please contact the facility to validate and verify availability,
prior to driving to it. Not all locations of emergency service
providers such as police and fire stations, hospitals, and clinics are
contained in the database. Please use your own judgement and
your ability to ask for directions in these situations.
• The map database used in the navigation system is the most
recent map data available at the time of production. Because of
changes in streets and neighbourhoods, there may be situations
where the navigation system may not be able to route you to
your desired destination. In these cases, use your own personal
judgement.
• The map database is designed to provide you with route
suggestions, it does not take account of the relative safety of a
suggested route, or of factors which may affect the time required
to reach your destination. The system does not reflect road
closures or construction, road characteristics (i.e. type of road
surface, slope or grade, weight or height restrictions, etc.), traffic
congestion, weather conditions, or any other factors which may
affect the safety or timing of your driving experience. Use your
personal judgement if the navigation system is unable to provide
you with an alternate route.
• There may be situations where the navigation system may display
the vehicle’s location erroneously. Use your own driving judgement
in this situation, taking into account current driving conditions.
Please be aware that in this situation, the navigation system
should correct the vehicle’s position automatically; however, there
may be times where you may have to correct the position yourself.
If this is the case, stop in a safe and legal manner and location
before attempting operation.
• Make certain that the volume level of the unit is set to a level which
still allows you to hear outside traffic and emergency vehicles.
Driving while unable to hear outside sounds could cause an
accident.
• Please make certain that any other person who intends on using
this navigation system reads these precautions and the following
instructions carefully.
If there is anything in the manual about the operation of the
navigation system which you are uncertain about, please
contact your local Alpine authorised navigation dealer before
using the navigation system.
• Read this manual carefully before using this disc and the system
components. They contain instructions on how to use this product
in a safe and effective manner. Alpine cannot be responsible for
problems resulting from failure to observe the instructions in this
manual.
• This manual uses various pictorial displays to show you how
to use this product safely and to alert you to potential dangers
resulting from improper connections and operation. Following
are the meanings of these pictorial displays. It is important to fully
understand the meanings of these pictorial displays in order to use
this manual and the system properly.
WARNING
• Operation of the system while driving is dangerous. Users
should stop vehicle before operating the software.
• Road conditions and regulations take precedence over
information contained on the map display: observe actual
traffic restrictions and circumstances while driving.
• This software is designed for use exclusively in the unit.
It cannot and may not be used in conjunction with other
hardware.
8
-EN
WARNING
This symbol means important instructions. Failure
to heed them can result in serious injury or death.
INSTALL THE PRODUCT CORRECTLY SO THAT THE DRIVER
CANNOT WATCH TV/VIDEO UNLESS THE VEHICLE IS STOPPED
AND THE PARKING BRAKE IS APPLIED.
It is dangerous for the driver to watch TV/Video while driving
a vehicle. Installing this product incorrectly enables the driver
to watch TV/Video while driving. This may cause a distraction,
preventing the driver from looking ahead, thus causing an accident.
The driver or other people could be severely injured.
DO NOT WATCH VIDEO WHILE DRIVING.
Watching the video may distract the driver from looking ahead of the
vehicle and cause an accident.
DO NOT OPERATE ANY FUNCTION THAT TAKES YOUR ATTENTION
AWAY FROM SAFELY DRIVING YOUR VEHICLE.
Any function that requires your prolonged attention should only be
performed after coming to a complete stop. Always stop the vehicle
in a safe location before performing these functions. Failure to do so
may result in an accident.
DO NOT FOLLOW ROUTE SUGGESTIONS IF THE NAVIGATION
SYSTEM INSTRUCTS YOU TO PERFORM AN UNSAFE OR ILLEGAL
MANEUVER, OR PLACES YOU IN AN UNSAFE SITUATION OR AREA.
This product is not a substitute for your personal judgement. Any
route suggestions by this system should never supersede any local
traffic regulations or your personal judgement or knowledge of safe
driving practice.
KEEP THE VOLUME AT A LEVEL WHERE YOU CAN STILL HEAR
OUTSIDE NOISES WHILE DRIVING.
Excessive volume levels that obscure sounds such as emergency
vehicle sirens or road warning signals (train crossings, etc.) can be
dangerous and may result in an accident. LISTENING AT LOUD
VOLUME LEVELS IN A CAR MAY ALSO CAUSE HEARING
DAMAGE.
MINIMIZE DISPLAY VIEWING WHILE DRIVING.
Viewing the display may distract the driver from looking ahead of the
vehicle and cause an accident.
DO NOT DISASSEMBLE OR ALTER.
Doing so may result in an accident, fire or electric shock.
USE ONLY IN CARS WITH A 12 VOLT NEGATIVE GROUND.
(Check with your dealer if you are not sure.) Failure to do so may
result in fire, etc.
KEEP SMALL OBJECTS SUCH AS SCREWS OUT OF THE REACH
OF CHILDREN.
Swallowing them may result in serious injury. If swallowed, consult a
physician immediately.
USE THE CORRECT AMPERE RATING WHEN REPLACING FUSES.
Failure to do so may result in fire or electric shock.
DO NOT BLOCK VENTS OR RADIATOR PANELS.
Doing so may cause heat to build up inside and may result in fire.
USE THIS PRODUCT FOR MOBILE 12V APPLICATIONS.
Use for other than its designed application may result in fire, electric
shock or other injury.
MAKE THE CORRECT CONNECTIONS.
Failure to make the proper connections may result in fire or product
damage.
BEFORE WIRING, DISCONNECT THE CABLE FROM THE NEGATIVE
BATTERY TERMINAL.
Failure to do so may result in electric shock or injury due to electrical
shorts.
DO NOT ALLOW CABLES TO BECOME ENTANGLED IN
SURROUNDING OBJECTS.
Arrange wiring and cables in compliance with the manual to prevent
obstructions when driving. Cables or wiring that obstruct or hang up
on places such as the steering wheel, gear lever, brake pedals, etc.
can be extremely hazardous.
DO NOT SPLICE INTO ELECTRICAL CABLES.
Never cut away cable insulation to supply power to other equipment.
Doing so will exceed the current carrying capacity of the wire and
result in fire or electric shock.
DO NOT DAMAGE PIPE OR WIRING WHEN DRILLING HOLES.
When drilling holes in the chassis for installation, take precautions
so as not to contact, damage or obstruct pipes, fuel lines, tanks or
electrical wiring. Failure to take such precautions may result in fire.
DO NOT USE BOLTS OR NUTS IN THE BRAKE OR STEERING
SYSTEMS TO MAKE GROUND CONNECTIONS.
Bolts or nuts used for the brake or steering systems (or any other
safety-related system), or tanks should NEVER be used for
installations or ground connections. Using such parts could disable
control of the vehicle and cause fire etc.
DO NOT INSTALL IN LOCATIONS WHICH MIGHT HINDER VEHICLE
OPERATION, SUCH AS THE STEERING WHEEL OR GEARSHIFT.
Doing so may obstruct forward vision or hamper movement etc. and
results in serious accident.
9
-EN
WARNING
This symbol means important instructions.
Failure to heed them can result in injury or material
property damage.
HALT USE IMMEDIATELY IF A PROBLEM APPEARS.
Failure to do so may cause personal injury or damage to the
product. Return it to your authorized Alpine dealer or the nearest
Alpine Service Center for repairing.
HAVE THE WIRING AND INSTALLATION DONE BY EXPERTS.
The wiring and installation of this unit requires special technical
skill and experience. To ensure safety, always contact the dealer
where you purchased this product to have the work done.
USE SPECIFIED ACCESSORY PARTS AND INSTALL THEM
SECURELY.
Be sure to use only the specified accessory parts. Use of other than
designated parts may damage this unit internally or may not
securely install the unit in place. This may cause parts to become
loose resulting in hazards or product failure.
ARRANGE THE WIRING SO IT IS NOT CRIMPED OR PINCHED BY A
SHARP METAL EDGE.
Route the cables and wiring away from moving parts (like the seat
rails) or sharp or pointed edges. This will prevent crimping and
damage to the wiring. If wiring passes through a hole in metal, use a
rubber grommet to prevent the wire’s insulation from being cut by the
metal edge of the hole.
DO NOT INSTALL IN LOCATIONS WITH HIGH MOISTURE OR DUST.
Avoid installing the unit in locations with high incidence of moisture
or dust. Moisture or dust that penetrates into this unit may result in
product failure.
NOTICE
Product Cleaning
Use a soft dry cloth for periodic cleaning of the product. For more
severe stains, please dampen the cloth with water only. Anything
else has the chance of dissolving the paint or damaging the plastic.
Temperature
Be sure the temperature inside the vehicle is between +45°C
(+113°F) and 0°C (+32°F) before turning your unit on.
Maintenance
If you have problems, do not attempt to repair the unit yourself.
Return it to your Alpine dealer or the nearest Alpine Service Station
for servicing.
Protecting the USB connector
• Only compatible smartphones, iPods or USB Flash drives can be
connected to the USB connector on this unit. Correct performance
using other USB products cannot be guaranteed.
• If the USB connector is used, be sure to use only the supplied
connector cable with the unit. A USB hub is not supported.
• Depending on the connected USB flash drive, the unit may not
function or some functions may not be performed.
• The audio file format that can be played back on the unit is MP3/
WMA/AAC/FLAC/OGG/APE/MP2.
• Artist/song name, etc., can be displayed. Certain, special
characters may not be correctly displayed.

10
-EN
CAUTION
Alpine shall not be responsible for lost data even if such data is
lost while using this product.
On Handling USB Flash drive
• This unit can control a memory storage device that supports the
USB Mass Storage Class (MSC) protocol. Playable audio file
formats are MP3, WMA, AAC, OGG, APE, MP2 and FLAC.
• USB Flash drive function is not guaranteed. Use USB flash drive
according to the terms of agreement. Read the USB flash drive
Owner’s Manual thoroughly.
• Avoid usage or storage in the following locations:
Anywhere in the car exposed to direct sunlight or high
temperatures.
Anywhere the possibility of high humidity or corrosive
substances are present.
• Fix the USB flash drive in a location where driver operation will not
be hindered.
• USB Flash drive may not function correctly at high or low
temperature.
• Use only certified USB flash drive. Note that even certified USB
flash drive, may not function correctly depending on its type or
state.
• Depending on the settings of the USB flash drive type, memory
state or encoding software, the unit may not play back or display
properly.
• USB Flash drive may take time to start playback. If there is a
particular file other than audio in the USB flash drive, it may take
considerable time before the file is played back or searched.
• The unit can play back MP3, WMA, AAC, OGG, APE, MP2 or
FLAC file extensions.
• Do not add the above extensions to a file other than audio data.
This non-audio data will not be recognized. The resulting playback
may contain noise that can damage speakers and/or amplifiers.
• It is recommended to back up important data on a personal
computer.
• Do not remove the USB device while playback is in progress.
Change SOURCE to something other than USB, then remove the
USB device to prevent possible damage to its memory.
Copyrights and
Trademarks
• “Made for iPod,” and “Made for iPhone,” mean that an electronic
accessory has been designed to connect specifically to iPod, or
iPhone, respectively, and has been certified by the developer
to meet Apple performance standards. Apple is not responsible
for the operation of this device or its compliance with safety and
regulatory standards. Please note that the use of this accessory
with iPod, or iPhone may affect wireless performance.
• Apple, iPhone, iPod, and iPod touch are trademarks of Apple
Inc., registered in the U.S. and other countries. Apple CarPlay is a
trademark of Apple Inc.
• Use of the Apple CarPlay logo means that a vehicle user interface
meets Apple performance standards. Apple is not responsible
for the operation of this vehicle or its compliance with safety and
regulatory standards. Please note that the use of this product with
iPhone, or iPod may affect wireless performance.
• Google, Android, Android Auto, Google Play and other marks are
trademarks of Google Inc.
• The Bluetooth
®
word mark and logos are registered trademarks
owned by the Bluetooth SIG, Inc. and any use of such marks by
Alpine Electronics, Inc. is under license.
• Manufactured under license from Dolby Laboratories. Dolby and
the double-D symbol are trademarks of Dolby Laboratories.
• The terms HDMI and HDMI High-Definition Multimedia Interface,
and the HDMI Logo are trademarks or registered trademarks of
HDMI Licensing, LLC in the United States and other countries.
• is a trademark of DVD Format/Logo Licensing Corporation.
• SiriusXM and all related marks and logos are trademarks of Sirius
XM Radio, Inc. All rights reserved.
• ⓒ
1987-2018 HERE All rights reserved.
11
-EN
Key Features
Key System Features
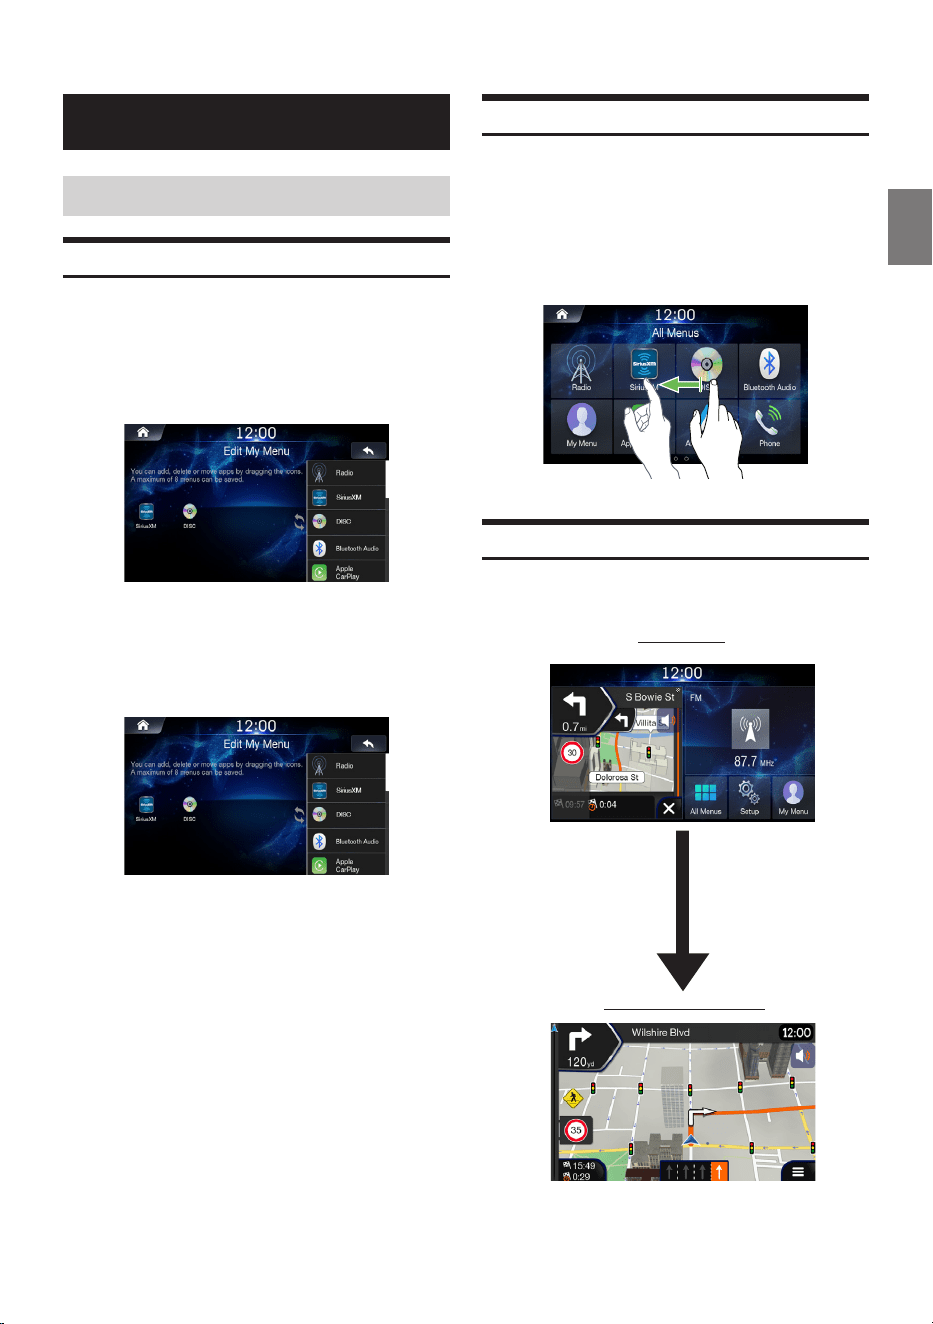
My Menu
Frequently used functions such as the Audio or Navigation mode
can be easily recalled by adding them to the My Menu screen. For
details, see “My Menu Function” (page 16).
■
My Menu Screen Example
• Frequently used functions and useful functions can be customized
for your convenience.
• Up to eight items can be added to My Menu.
• You cannot add the same feature more than once.
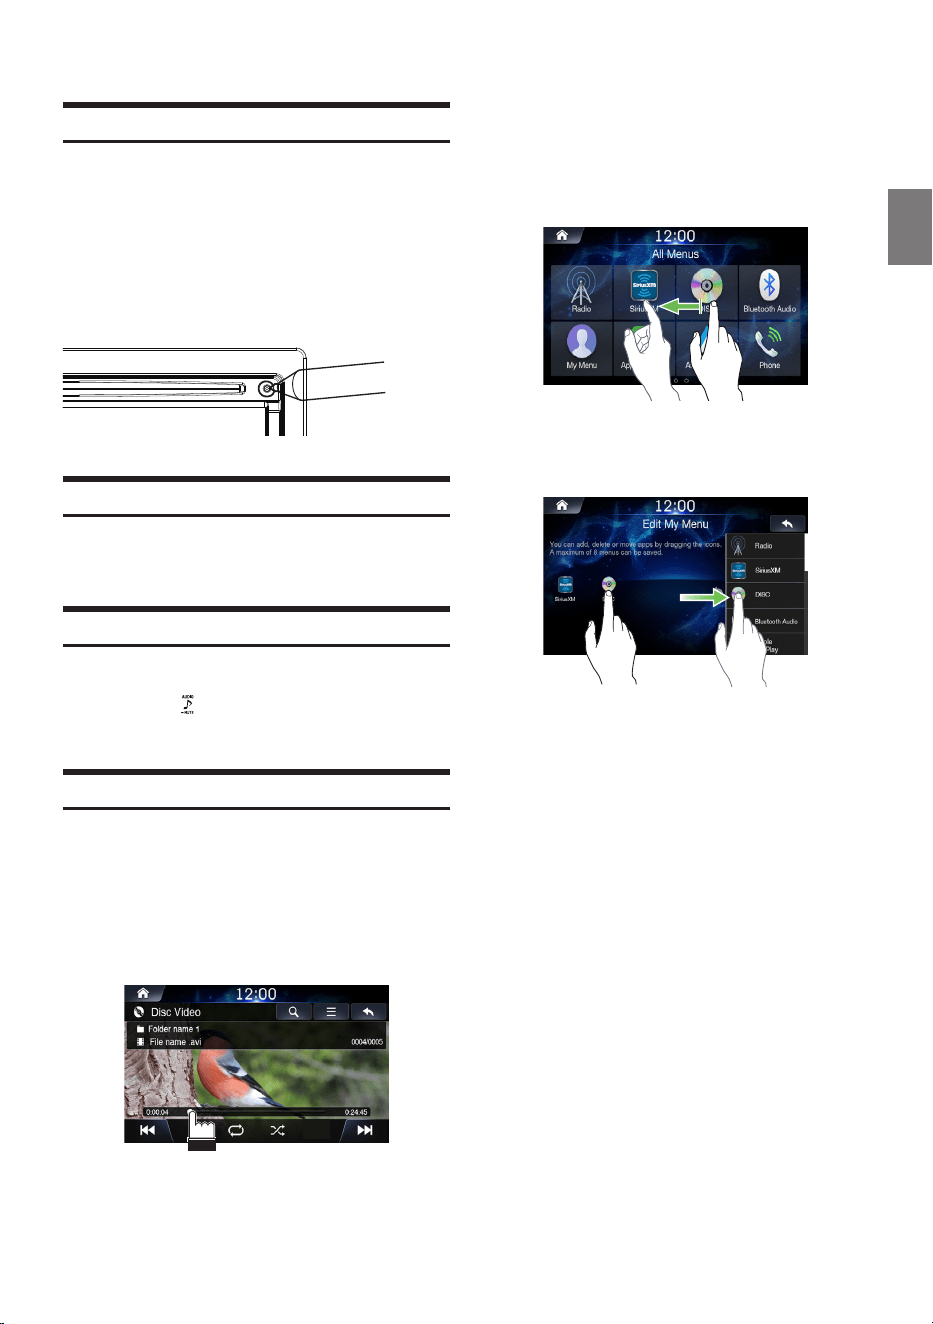
Swiping the Touch Screen
You can change a screen or a page by swiping the touch screen
vertically or horizontally with your finger. For details, see “Touch
Screen Operation" (page 13).
USB Music Screen Example
Swipe the display with your finger lightly.
About Dual Screen
Dual Screen allows you to display the Navigation and Audio/Visual
screens simultaneously.
Touch left side of dual screen
Navigation Full Screen
Dual Screen
12
-EN
Getting Started
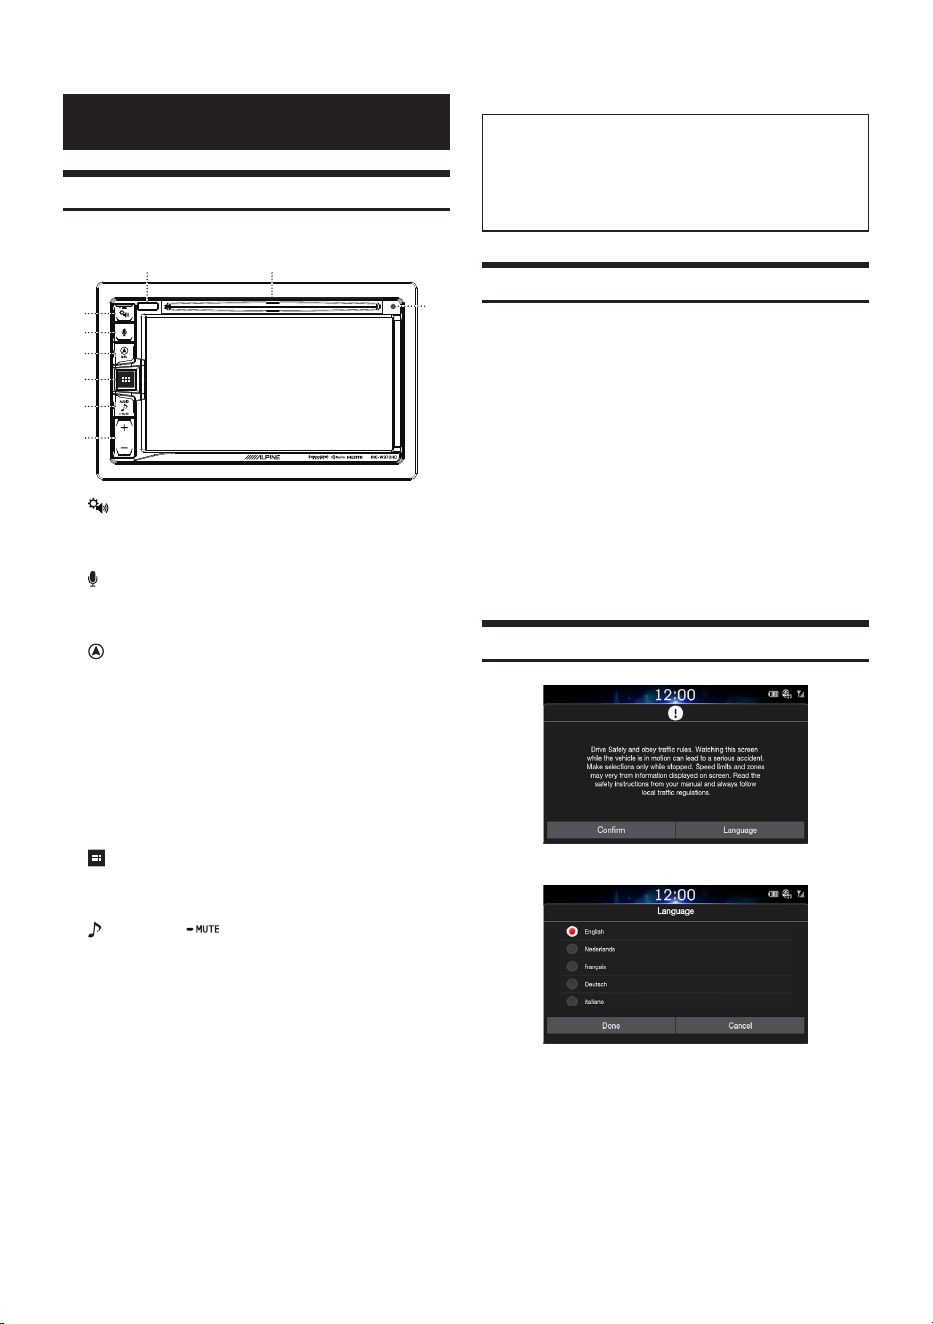
Components and Features
INE-W970HD
①
⑧⑦
⑨
②
③
④
⑤
⑥
〇①〇
Sound Settings or Eject button
Displays the Tone/Fader/Balance settings screen.
Press and hold this button to eject Disc.
〇②〇
VOICE button
Depending on the connected smartphone, press to call Siri
function or voice recognition mode.
〇③〇
NAV button
From an Audio system screen, press this button to recall the the
last screen of the Navigation System.
Press again to switch to Navigation menu screen.
Press and hold this button for at least 2 seconds to change to
Go Home route screen. (If Home is not set yet, it will change to
the Home setting screen.)
For details of navigation operations, refer to “Navigation System
OM (Owner's Manual)”.
Recalls the connected smartphone’s map screen.
Depending on the smartphone, this function may not be available.
〇④〇
ALL MENUS or (Power Off) button
Recalls the All Menus screen.
Press and hold this button for at least 2 seconds to turn the power off.
〇⑤〇
(AUDIO) or (MUTE) button
Displays the Audio/Visual screen.
When pressed and held, mutes the volume.
〇⑥〇 +
/ − button
Press to adjust the volume.
〇⑦〇
Remote Sensor
Point the remote control transmitter towards the remote sensor
within a range of 2 meters.
〇⑧〇
Disc insert slot
Inserts/ejects discs
〇⑨〇
RESET switch
The system of this unit is reset.
About the button descriptions used in this Owner’s
Manual
The buttons found on the face of the unit are expressed in bold
(e.g. MENU). The buttons found on the touch-screen display
are shown in bold within brackets, [ ] (e.g. [×]).
Turning Power On/Off
Some of this unit’s functions cannot be performed while the vehicle
is in motion. Be sure to stop your vehicle in a safe location and apply
the parking brake before attempting these operations.
1
Turn the ignition key to the ACC or ON position.
The system turns on.
• When turned on, the system displays the last screen that was
displayed before the ignition key was turned off. For example,
if the unit is in radio mode when ignition is turned off, it will
remain in radio mode when ignition is turned back on.
2
Press and hold the ALL MENUS/(Power Off)
button for more than 2 seconds to turn the power off.
• The unit can be turned on by pressing any button.
• The unit is a precision device. Careful handling of the unit
should provide you with years of trouble-free operation.
Turning the System On
With the Alpine system, the home screen is displayed automatically
when the ignition key is turned to ACC or ON.
When the system is used for the first time, the language
selection menu is displayed. Swipe the Language list screen
vertically, then touch your choice from the list of 3 languages.
• Some of this unit’s functions cannot be performed while the vehicle
is in motion. Be sure to stop your vehicle in a safe location and
apply the parking brake before attempting these operations.
13
-EN
Resetting the System
Be sure to press the RESET switch when using the unit for the first
time, after changing the car battery, etc.
1
Turn off the unit power.
2
Press the RESET switch with a ballpoint pen or
similar pointed object.
Adjusting the Volume
Adjust the volume by pressing the [+ -] button. Volume increases/
decreases continuously by pressing and holding the [+ -] button.
Volume: 0 - 35
Muting the Volume
Audio Mute function instantly lowers the volume level to 0.
Press and hold the
AUDIO button.
The Audio level will be 0.
Touch Screen Operation
You can operate the system by using the touch panel on the screen.
• Be sure to touch the onscreen button lightly with the pad of your
finger to avoid scratching the display.
Touch Operation
Touch a button or list item on the screen lightly.
• If you touch a button and there is no reaction, remove your finger.
•
Onscreen buttons that cannot be operated are dimmed.
Swipe Operation
To scroll through multiple screens, move your finger lightly with a
swipe left or right.
Drag & Drop operation
Touch and hold the desired item, then drag it to its new location by
moving your finger, then release your finger to place the item.
• It is not possible to narrow the screen with two fingers (pinch in) or
spread the screen (pinch out).
16 : 9

14
-EN
Sound Settings
Press the (Sound Settings) button to adjust sounds.
The Tone/Fader/Balance settings screen will be displayed.
①
②
③
〇①〇
Buttons for Tone Level
〇②〇
Balance/Fader Area
〇③〇
Button for Center Position
Use the +, -,
▲
,
▼
,
◀
,
▶
, and buttons to adjust settings.
Touch to restore sound to the Center position.
Voice Recognition
You can use the Siri or Google Assistant voice function of your
iPhone/Android phone.
1
Connect your phone and activate Apple CarPlay
or Android Auto.
2
Press the Voice button to start voice
recognition.
3
Say the command.
Switching Sources
Press the (AUDIO) button to change the source.
Switching Sources Using the AUDIO button
During audio/visual playback, press the (AUDIO) button
repeatedly to switch to the desired source.
Radio
→
USB Music
→
USB Video
→
AUX
→
HDMI
→
Disc
→
Bluetooth Audio
→
Radio
*1 When no USB flash drive/iPod/HDMI device/Smartphone/Bluetooth
compatible device is connected, USB Music will be skipped.
*2 The name of the HDMI or AUX device will be displayed.
*3 When AUX is set to “Off,” USB Music will be skipped.
*4 Available when Apple CarPlay is used/Android smartphone which
installed Android Auto App is connected.
To play Apple CarPlay music shall impact iPod source when an
iPhone 5 or later is connected and vice versa. Refer to “Setting
Apple CarPlay”.
Switching Sources from the All Menus Screen
1
Press the All Menus button.
The menu screen is displayed.
• You can also display the menu screen by touching [All
Menus] on home screen.
2
Touch your desired media source.
15
-EN
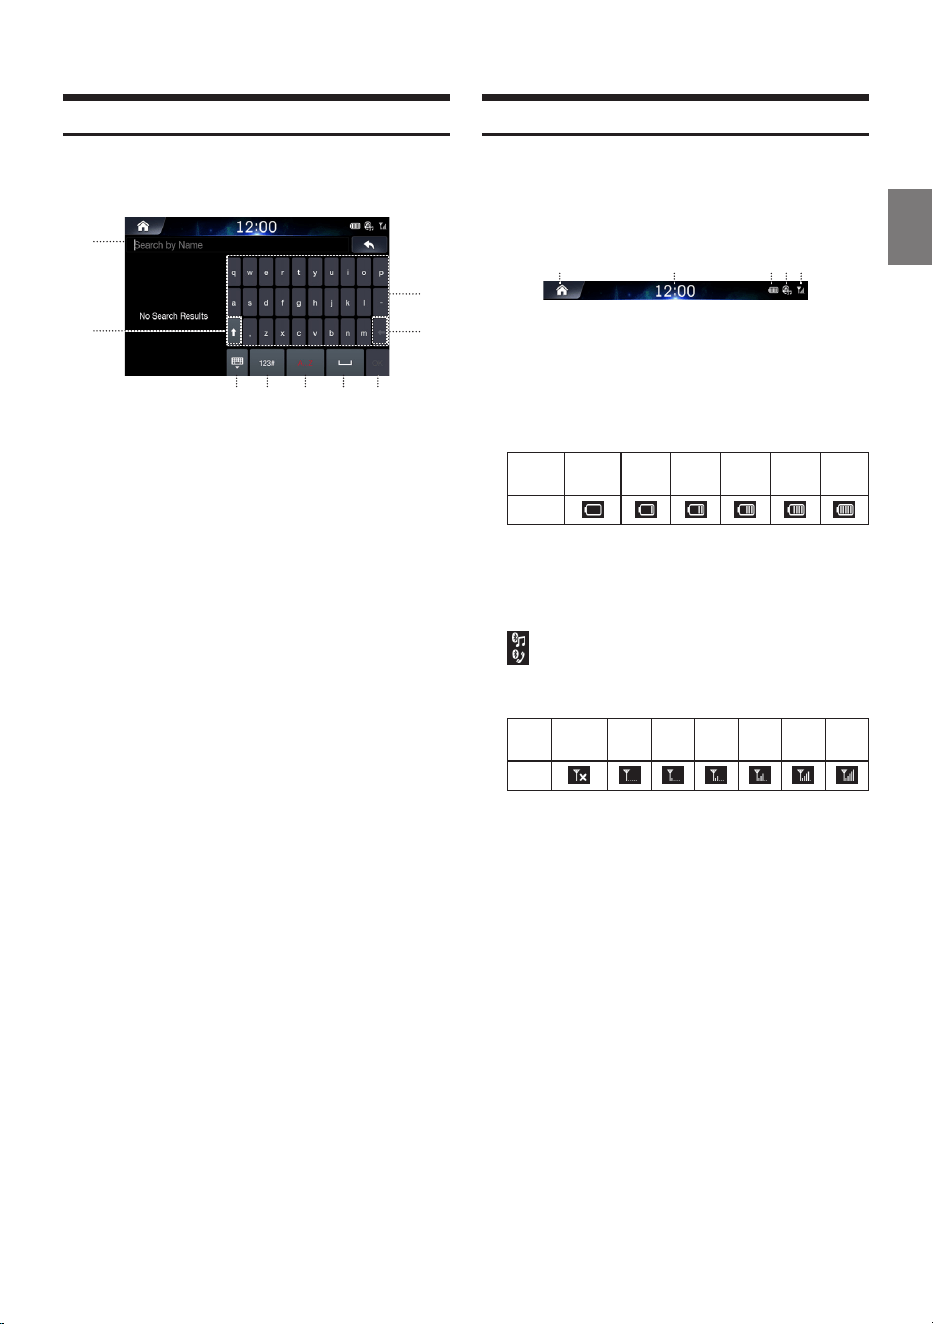
Inputting Text (Keypad)
The displayed screens and procedures may vary slightly depending
on the function used, but the basic input method is the same.
④
①
②
③
⑤ ⑥ ⑦ ⑧ ⑨
〇①〇
Text Entry Box
〇②〇
Current Keypad
〇③〇
Shift Key
〇④〇
Delete Key
Press once to delete the last character.
Press and hold to quickly delete several characters.
〇⑤〇
Hide the Keypad
〇⑥〇
Numeric Keypad
Press to display the numeric keypad.
〇⑦〇
Alpha Keypad
Press to display the alphabetic keypad
〇⑧〇
Space Key
〇⑨〇
Enter Key
Information Display on the Status Bar
Displays the date and time along with the system status shown by
the various icons to the right of the clock.
The icons in the following table indicate the various types of system
status details and events.
① ③ ④ ⑤②
〇①〇
Goes to the Home Screen.
〇②〇
Clock
You can switch between the 12 hour display and 24 hour display
options.
For details on clock display settings, refer to "Setting the Clock
Display" (page 75).
〇③〇
Battery level of connected Bluetooth device.
Battery
Level
No
Battery
Level
1
Level
2
Level
3
Level
4
Level
5
Icon
This feature may not be supported for some Bluetooth devices.
The system will sound an alarm when the battery level
decreases by one level.
〇④〇
Enabled when Bluetooth device is connected and connection is
set to ON. Disabled when disconnected or connection is set to
OFF.
: Bluetooth connection to audio device
: Bluetooth connection to Handsfree Phone Blinks while
reconnecting.
〇⑤〇
Signal strength of connected Bluetooth device.
This feature becomes enabled when Bluetooth setting is ON.
No
Service
1 2 3 4 5 6
Icon
16
-EN
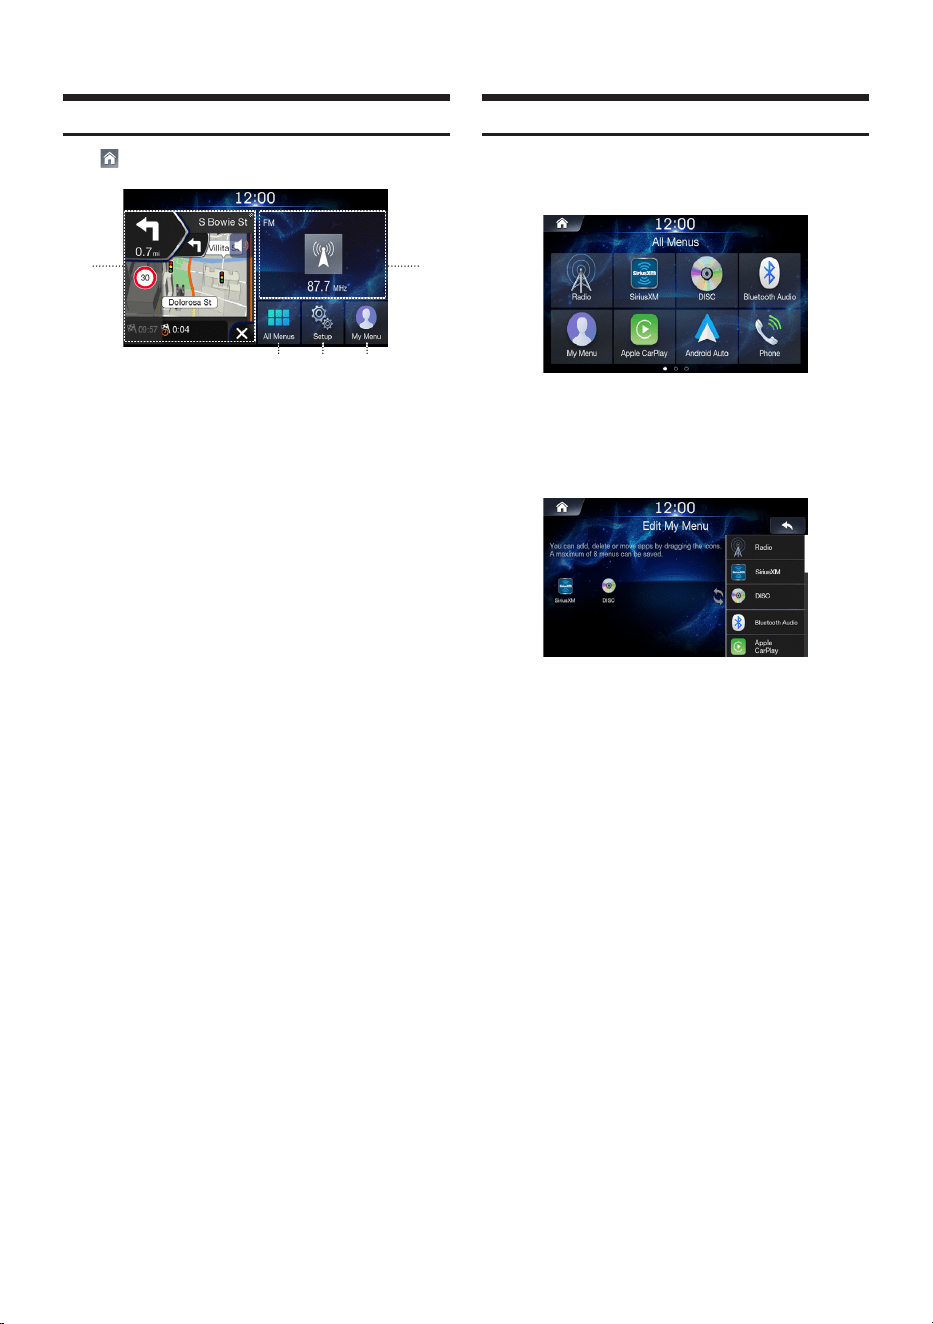
Home Screen
Touch .
① ②
③ ④ ⑤
〇①〇
Navigation Widget
When the Navi widget is booting, the clock is displayed on
the screen while the Navi widget is being prepared. Once
preparation is complete, the Navi widget is displayed.
〇②〇
AV Widget
Displays brief information of radio or media currently playing.
Touch the area to move to the media screen currently playing.
〇③〇
All Menus
Shows all of the items in the system menu.
〇④〇
Setup
〇⑤〇
My Menu
Moves to the My Menu screen.
Add your Favorite menus to have quick and easy access.
• The NAVI widget is displayed when a NAVI SD card is inserted.
Adding Your Favorite Menu Items to My Menu
1
In the Home screen, touch [My Menu]
→
[Edit].
2
From the Edit My Menu screen, select menu
items from the list on the right, then drag and
drop them to the desired place on the left.
• Up to eight items can be added to My Menu.
17
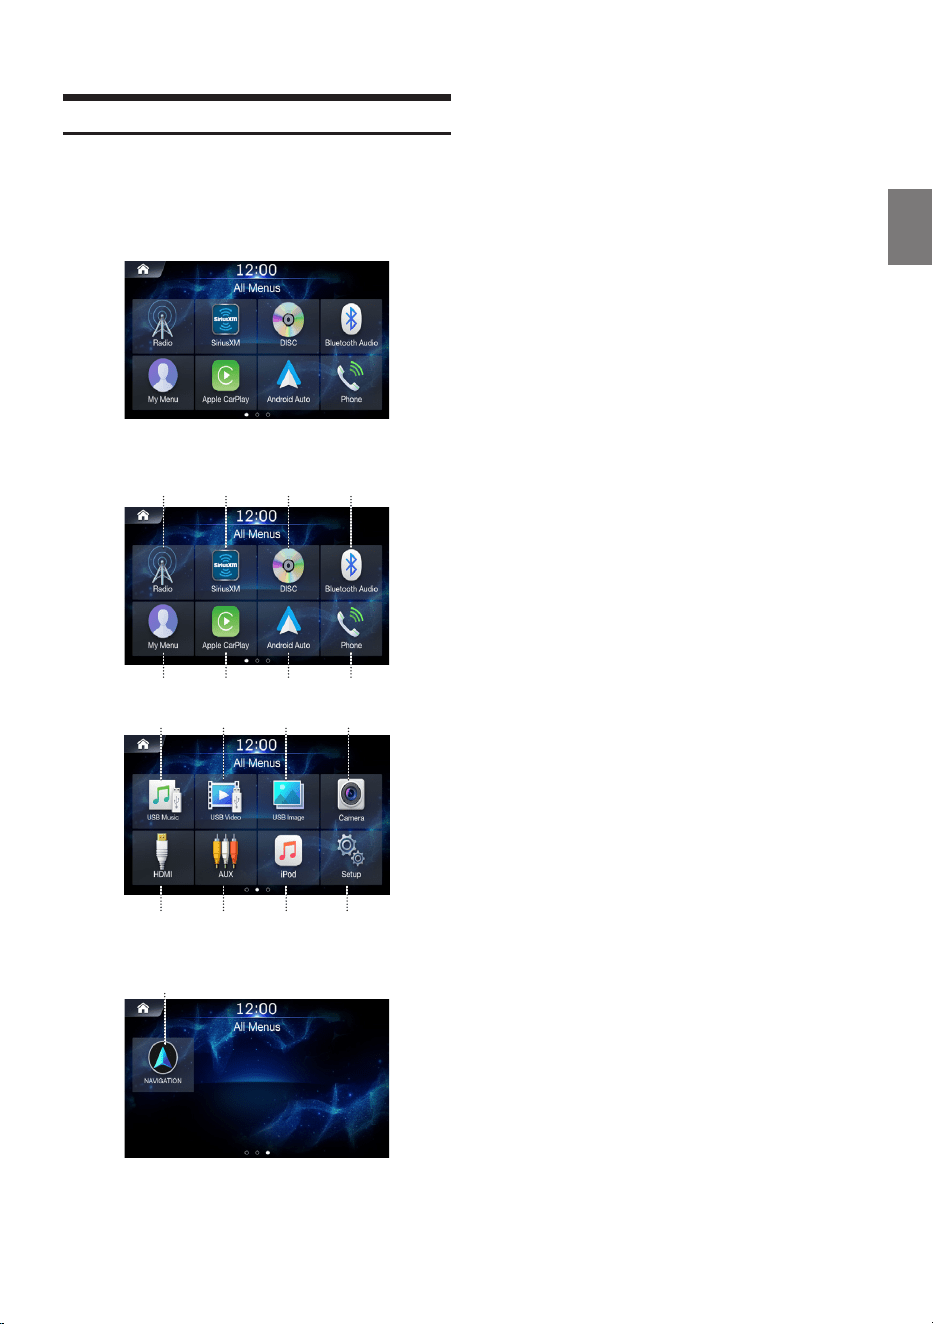
-EN
All Menus Screen
The Menu screen displays all of the available modes that can be
selected to operate the system.
Press the All Menus button.
The menu screen is displayed.
■
Menu Screen example
④① ③②
⑧⑤ ⑦⑥
⑫⑨ ⑪⑩
⑬ ⑭ ⑮ ⑯
⑰
〇①〇
Radio button
Displays the Radio screen. (page 18)
〇②〇
SiriusXM button
Displays the SiriusXM screen. (page 22)
〇③〇
DISC button
Displays the DISC screen. (page 28)
〇④〇
Bluetooth Audio button
Displays the Bluetooth Audio screen. (page 53)
〇⑤〇
My Menu button
Displays the My Menu screen. (page 11)
〇⑥〇
Apple CarPlay
Displays the Apple CarPlay screen. (page 49)
〇⑦〇
Android Auto
Displays the Android Auto screen. (page 49)
〇⑧〇
Phone button
Displays the Phone menu screen. (page 56)
〇⑨〇
USB Music button
Displays the USB Music screen. (page 40)
〇⑩〇
USB Video button
Displays the USB Video screen. (page 43)
〇⑪〇
USB Image button
Displays the USB Image screen. (page 46)
〇⑫〇
Camera button
Displays the Camera screen. (page 86)
〇⑬〇
HDMI
Displays the HDMI screen.(page 50)
〇⑭〇
AUX button
Displays the AUX screen. (page 51)
〇⑮〇
iPod button
Displays the iPod screen. (page 47)
〇⑯〇
Setup button
Displays the Setup screen. (page 64)
〇⑰〇
Navigation button
Displays the Navigation screen.
Refer to the Map Manual for more information.
18
-EN
Radio/HD Radio
The unit can receive HD Radio signals based on digital radio
broadcast standards, in addition to analog radio broadcasts using
RBDS.
HD Radio signals are broadcast in the service areas of the current
AM/FM broadcasters where they provide digital audio distribution
and data services. This unit receives the above digital broadcasts for
your highquality sound enjoyment.
Depending on the signal strength in TUNER mode, the unit will
automatically switch between digital signals if they can be received,
and analog radio using RBDS if digital signals cannot be received.
For details, please see “HD Radio On/Off”.
• RBDS mode is only available during FM broadcast reception.
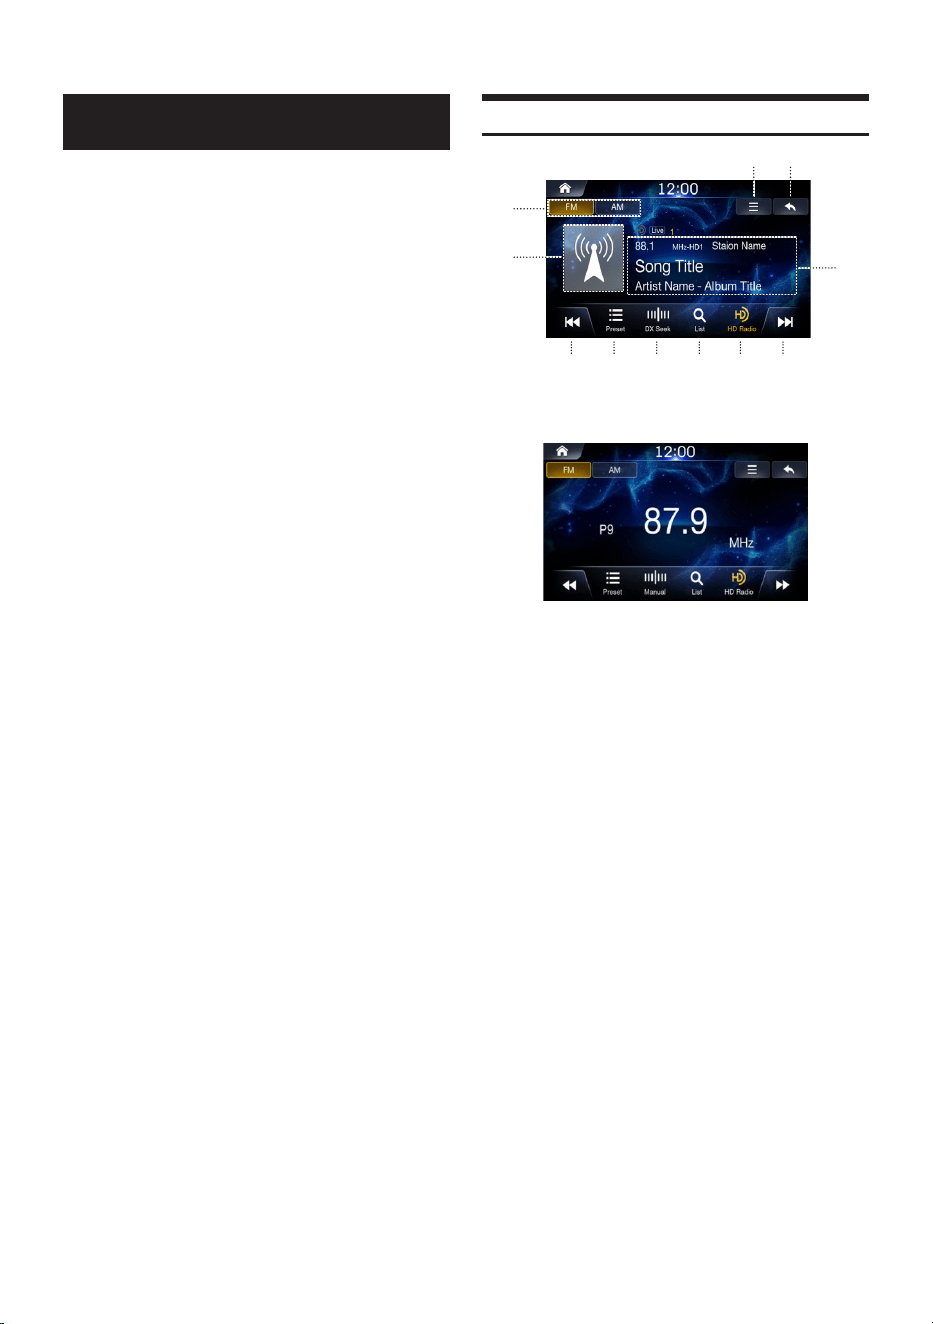
Radio/HD Radio Main Screen
①
④
⑤
⑨⑧⑦⑥ ⑩ ⑪
② ③
<When HD Radio is turned on>
<When HD Radio is turned off>
〇①〇
Radio Band Tab
If you select the desired tab, the selected Radio mode will
operate.
〇②〇
Menu (Sound Settings)
〇③〇
Displays the Previous Screen
〇④〇
Album Art
Image priority : 1st Album Art, 2nd Channel image, 3rd Default
image
〇⑤〇
Information Display
Displays information such as frequency, station name, preset
number, live mode, HD radio channel, song title, artist name and
album title
〇⑥〇
Decreases Frequency
〇⑦〇
Displays the preset screen
〇⑧〇
Changes Tuning Mode
Switches the tuning mode used to search radio Broadcasts
between Manual Tune, Preset, or DX Seek.
〇⑨〇
Displays the list screen
〇⑩〇
HD Radio
〇⑪〇
Increases Frequency
19
-EN
Listening to FM/AM Radio
1
Press the All Menus button
→
touch [Radio].
Or In the Home screen, touch [All Menus]
→
[Radio].
2
Press the desired band tab.
3
Press and select the desired tuning mode.
• DX Seek: both strong and weak broadcasts will be tuned in.
• Manual: the frequency is manually tuned in steps.
• Preset: directly switches preset broadcasts.
4
Press or and change the desired
Broadcast.
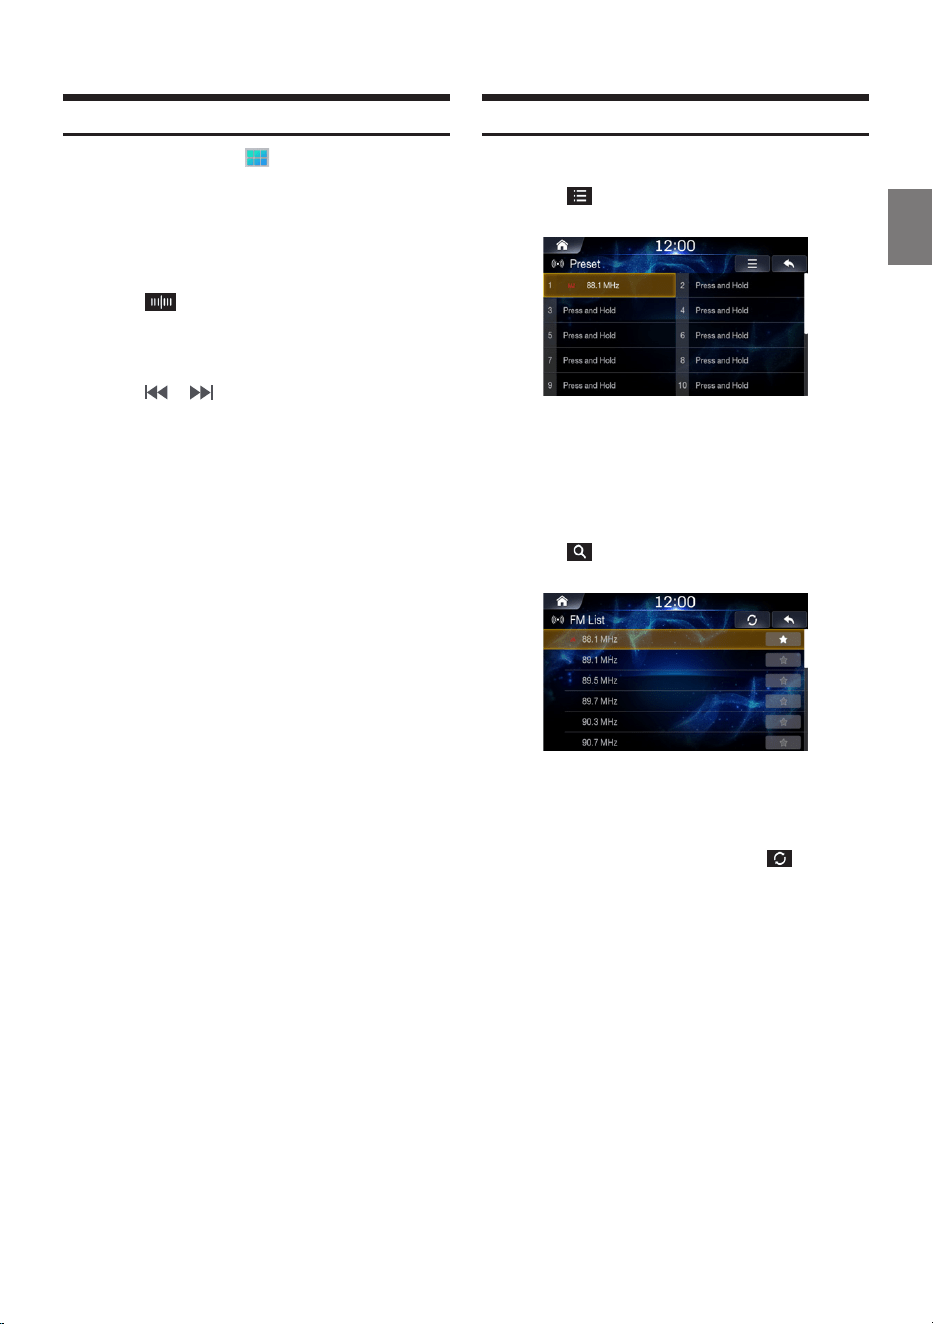
Selecting Radio Broadcast
■
Selecting Broadcasts from Presets
1
Touch .
2
From the presets, select the Broadcast you want
to listen to.
■
Selecting Broadcast from List
1
Touch .
2
From the lists, select the frequency you want to
listen to.
FM/AM lists are manually updated by pressing .
20
-EN
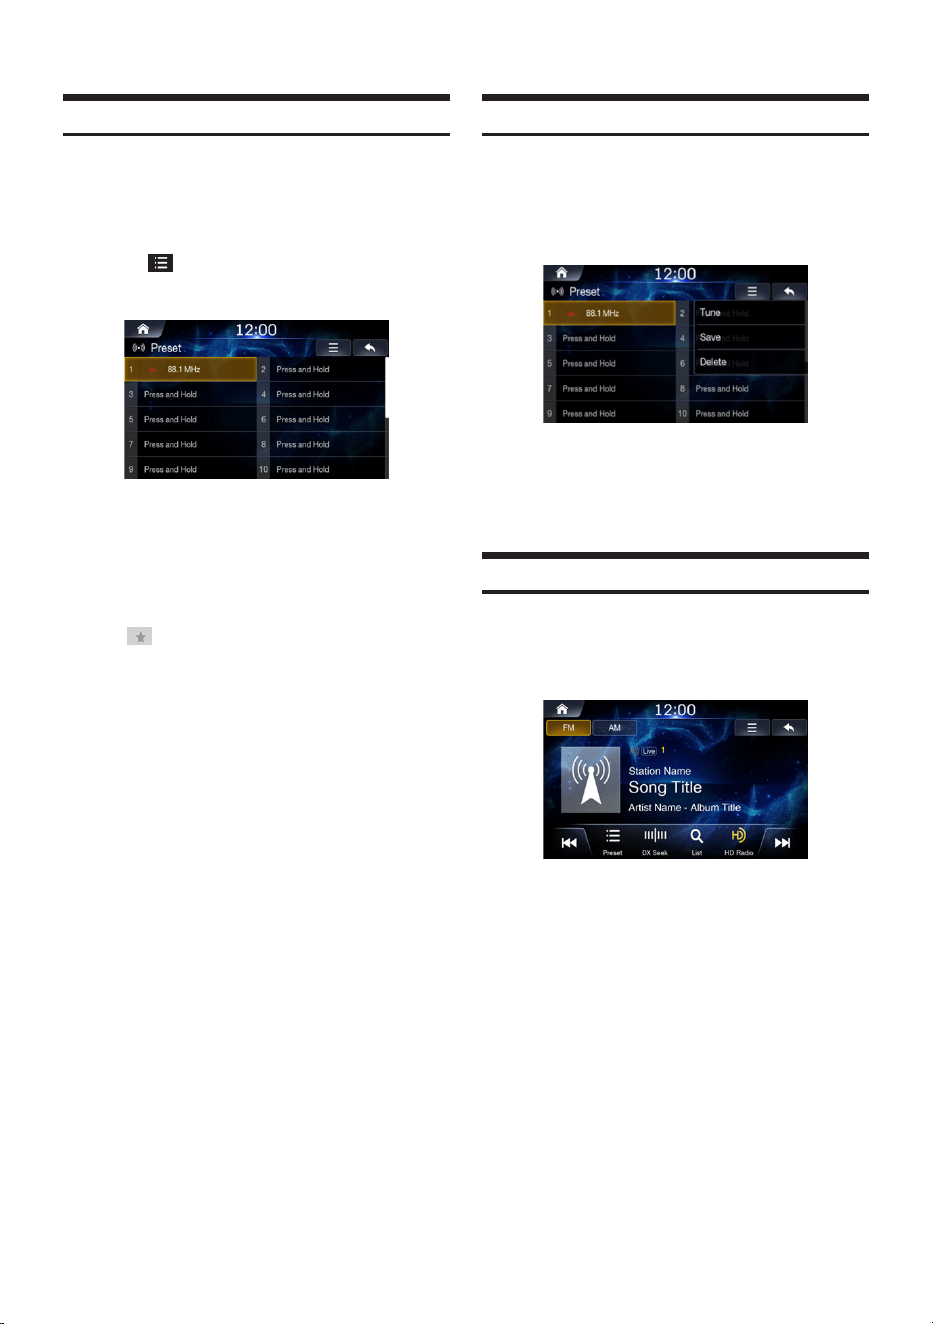
Saving Radio Broadcast to Presets
This feature is used to manually save the current broadcast to the
desired preset number.
1
Tune the Broadcast you wish to save.
2
Touch .
3
Press and hold the [Press and Hold] area or the
desired number area you want to save.
A total of 20 presets can be stored in the preset memory for each
band (FM, AM).
• In the List screen, you can also save the channel to preset by
pressing .
• If a preset memory has already been set in the same preset
number, it will be cleared and the new broadcast will be
memorized.
•
In the Presets screen, you can delete the saved presets. Press
[Menu]
→
[Delete all].
Using Preset Menu
This feature is used to manually save the current broadcast to the
desired preset number.
1
Press and hold the preset list you want to edit.
2
Select the desired option.
• [Tune]: Plays the selected preset frequency.
• [Save]: Overwrites the preset frequency with the current
broadcast frequency.
• [Delete]: Clears the selected preset.
Using Ballgame Mode (HD Radio™ Mode only)
In live broadcast, such as sportscasts, etc., a time lag occurs
between digital sound and analog sound. Therefore, when live
broadcasts are received, a time lag between the real broadcast may
occur and the unit can change to analog broadcasting automatically.
The LIVE Indicator is displayed when Ballgame Mode is set to “On.”
• When receiving a live broadcast while the Ballgame mode is on,
the LIVE indicator is highlighted.

21
-EN
HD Radio On/Off
1
Touch .
2
Select [On] to display HD Radio stations.
HD Radio Reception & Channel number will be displayed.
3
If you want to turn off HD Radio, Press [HD
Radio]
→
[Off].
You can save a total of 20 stations or broadcasts as presets
for each band (FM, AM).
• HD Radio is supported in USA only.
Sound Settings
Touch
→
[Sound Settings]
For details, refer to the “Sound” on the page 68.
About the Feature Logos
• HD Radio broadcasts deliver crystal clear digital audio quality to
consumers.
• Program Info provides song name, artist, station ID, and other
relevant data to the receiver.
• Adjacent to traditional main stations are HD2/HD3 Channels,
providing new original
formats on the FM dial.
• Visual images, such as album art and station logos, of over-the-air
broadcasts from HD Radio stations.

22
-EN
SiriusXM
■
About SiriusXM Satellite Radio
Only SiriusXM
®
brings you more of what you love to listen to, all
in one place. Get over 140 channels, including commercial- - free
music plus the best sports, news, talk, comedy and entertainment.
Welcome to the world of satellite radio. A SiriusXM Vehicle Tuner
and Subscription are required. For more information, visit www.
siriusxm.com.
• The SiriusXM Satellite Radio controls on this unit are available
only when a SiriusXM Tuner is connected.
•
Refer to the SiriusXM Tuner User Guide for details on how to
install the SiriusXM Tuner.
■
Activating your SiriusXM Subscription
After installing your SiriusXM Connect Vehicle Tuner and antenna,
power on your system and select SiriusXM mode. You should be
able to hear the SiriusXM preview channel on Channel 1. If you
cannot hear the preview channel, please check the installation
instructions to make sure your SiriusXM Connect tuner is properly
installed.
After you can hear the preview channel, tune to Channel 0 to find
the Radio ID of your tuner. In addition, the Radio ID is located on the
bottom of the SiriusXM Connect Vehicle Tuner and its packaging.
You will need this number to activate your subscription. Write the
number down for reference.
• The SiriusXM Radio ID does not include the letters I, O, S or F.
In the USA, you can activate online or by calling SiriusXM Listener
care:
• Visit www.siriusxm.com/activatenow
•
Call SiriusXM Listener Care at 1- 866- 635- 2349
For Canadian Subscriptions, please contact:
• Visit www.siriusxm.ca/activatexm
•
Call SiriusXM Customer Care at 1-888-539-7474
As part of the activation process, the SiriusXM satellites will send an
activation message to your tuner. When your radio detects that the
tuner has received the activation message, your radio will display:
"Subscription Updated”. Once subscribed, you can tune to channels
in your subscription plan. Note, the activation process usually takes
10 to 15 minutes, but may take up to an hour. Your radio will need
to be powered on and receiving the SiriusXM signal to receive the
activation message.
SiriusXM Radio Main Screen
⑬ ⑭⑫⑪
① ②
③
④
⑥
⑩
⑤
⑦
⑨
⑧
〇①〇
Menu
〇②〇
Displays the Previous Screen
〇③〇
Album Art
Displays the image that represents the currently received station
When album art is not available, the channel logo or the
SiriusXM logo will be displayed.
• Compatible with SXV200 or later tuner models. Not all music
channels contain album art images.
〇④〇
Indicators
Satellite Antenna Signal, Preset Number, Fav, Live
〇⑤〇
Information Display
Displays information such as channel name, channel number,
category/artist/title/content info.
〇⑥〇
Channel Tune - Down
〇⑦〇
Channel Tune - Up
〇⑧〇
Time Difference
Displays the time difference between the live broadcast time
and actual playing time.
〇⑨〇
Control Panel
Enables use of Skip Backward (by segment) / Skip Forward (by
segment) Play/Pause/Rewind/Fast-forward features.
〇⑩〇
Changes to the program currently being broadcast.
〇⑪〇
Displays the preset screen
〇⑫〇
Displays the list screen
〇⑬〇
Direct Tune
〇⑭〇
Alert
Listening to SiriusXM Radio
1
Press the All Menus button
→
Press
[SiriusXM].
Or In the Home screen, Press [All Menus]
→
[SiriusXM].
2
Press or and change the desired channel.
23
-EN
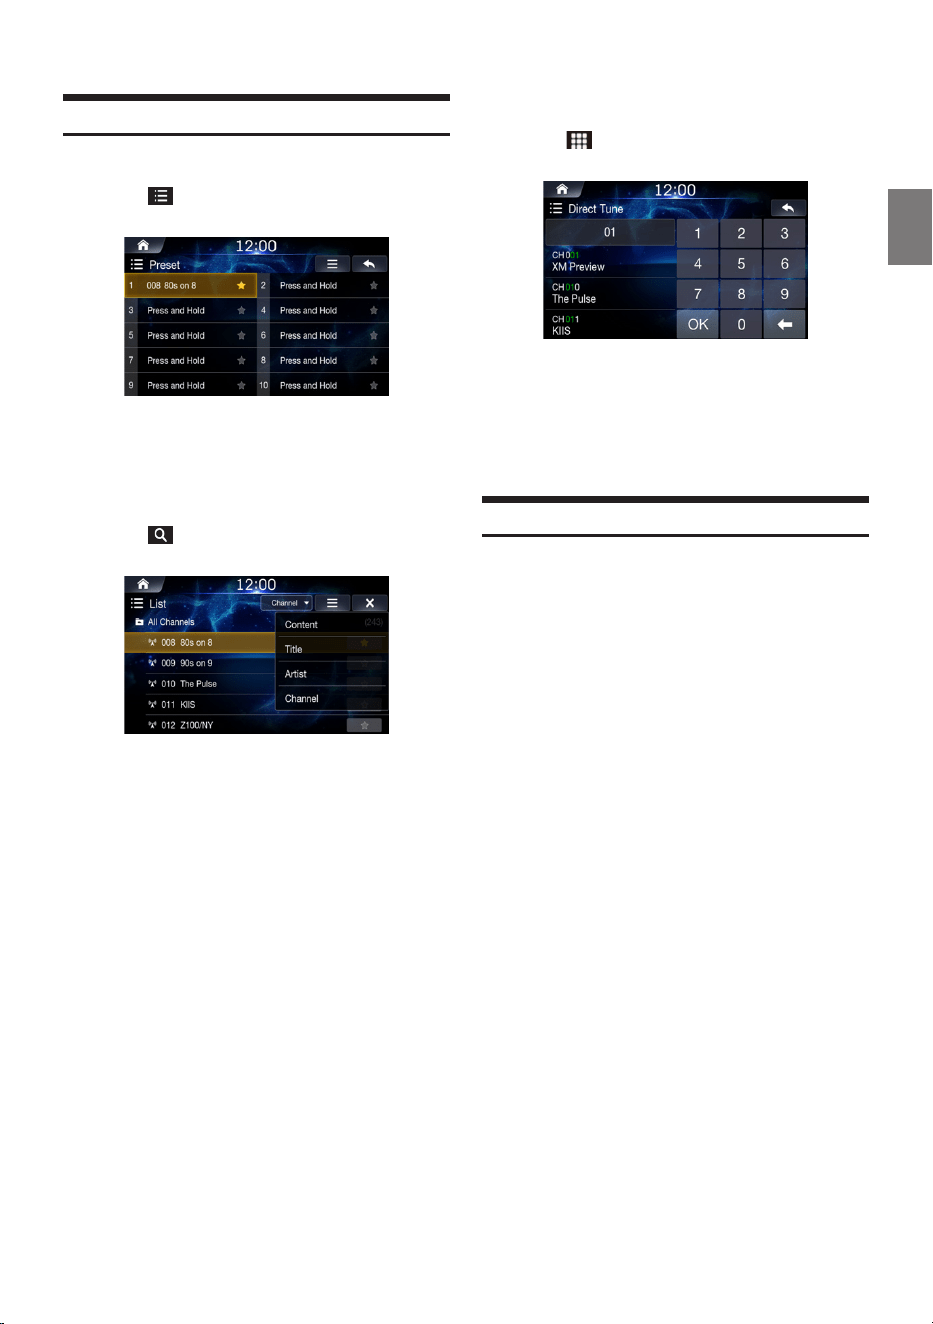
Selecting Channels
■
Selecting Channels from Presets
1
Touch .
2
From the presets, select the channel you want to
listen to.
■
Selecting Channel from List
1
Touch .
2
From the lists, select the desired channel you
want to listen to.
Use the pull down menu to view list by Content, Title, Artist, or
Channel.
■
Selecting Channels through Direct Tune
1
Touch .
2
Enter the desired channel number.
3
From the search result, select the channel you
want to listen to.
Parent Lock
The Parental Control feature allows you to limit access to any
SiriusXM channels, including those with mature content. When
enabled, the Parental Control feature requires you to enter a pass
code to tune to the locked channels. Information on setting up the
pass code and locking channels can be found below.
When a locked channel is selected, “Channel <xxx> Locked” is
displayed and then the numeric keypad appears for you to enter the
passcode.
Enter the 4-digit passcode you set in [Edit Code].
The initial number is 0000.
• For information on setting the Parent Lock Passcode, see “Setting
Parent Lock” (page 80).
•
If you enter the wrong passcode, “Incorrect Pass Code entered” is
displayed.
•
After entering the correct passcode, you can access all locked
channels without entering the passcode again until the unit is
powered off and then back on.
•
The passcode is reset to '0000' upon restoring factory default
settings.
•
If there are no inputs for 10 seconds, the "Incorrect Passcode is
entered" popup is displayed on the screen.

24
-EN
Saving Channel to Presets
This feature is used to manually save the current channel to the
desired preset number.
1
Tune the channel you wish to save.
2
Touch .
3
Press and hold the [designated] area or the
desired number area you want to save.
A total of 20 presets can be stored in the preset memory for
each band.
: none
: saved channels
: saved Smart Favorites channels (SVX200: number 1 to 6)
• In the List screen, you can also save the channel to preset by
pressing .
•
If a preset memory has already been set in the same preset
number, it will be cleared and the new broadcast will be
memorized.
•
In the Presets screen, you can delete the saved presets. Press
[Menu]
→
[Delete all].
Smart Favorites
SiriusXM Vehicle Tuner automatically buffers the broadcast audio
content of the Smart Favorites channels in the background for your
Preset channels.
SVX200: up to 6
SXV300: up to 20
Smart Favorites allow you to rewind and replay up to 60 minutes
of any missed programming from your current Band of Preset
channels.
Music channels that are Smart Favorites also support TuneStart™
Using Preset Menu
This feature is used to manually save the current station to the
desired preset number.
1
Press and hold the preset list you want to edit. A
menu allowing to you to tune, save or delete the
preset is displayed.
2
Select the desired option.
• [Tune]: Plays the selected preset frequency.
• [Save]: Overwrites the preset frequency with the current
broadcast frequency.
• [Delete]: Clears the selected preset.
Channel List
This feature is used to search all channels using the sorting feature.
1
Touch .
2
Select the desired sort.
3
From the lists, select the desired channel you
want to listen to.
Use the pull down menu to view list by Content, Title, Artist, or
Channel.
• In the List screen, you can save the channel to preset by pressing
.
•
If you want to display current channel, Press [Menu]
→
[Show
Current Channel].
25
-EN
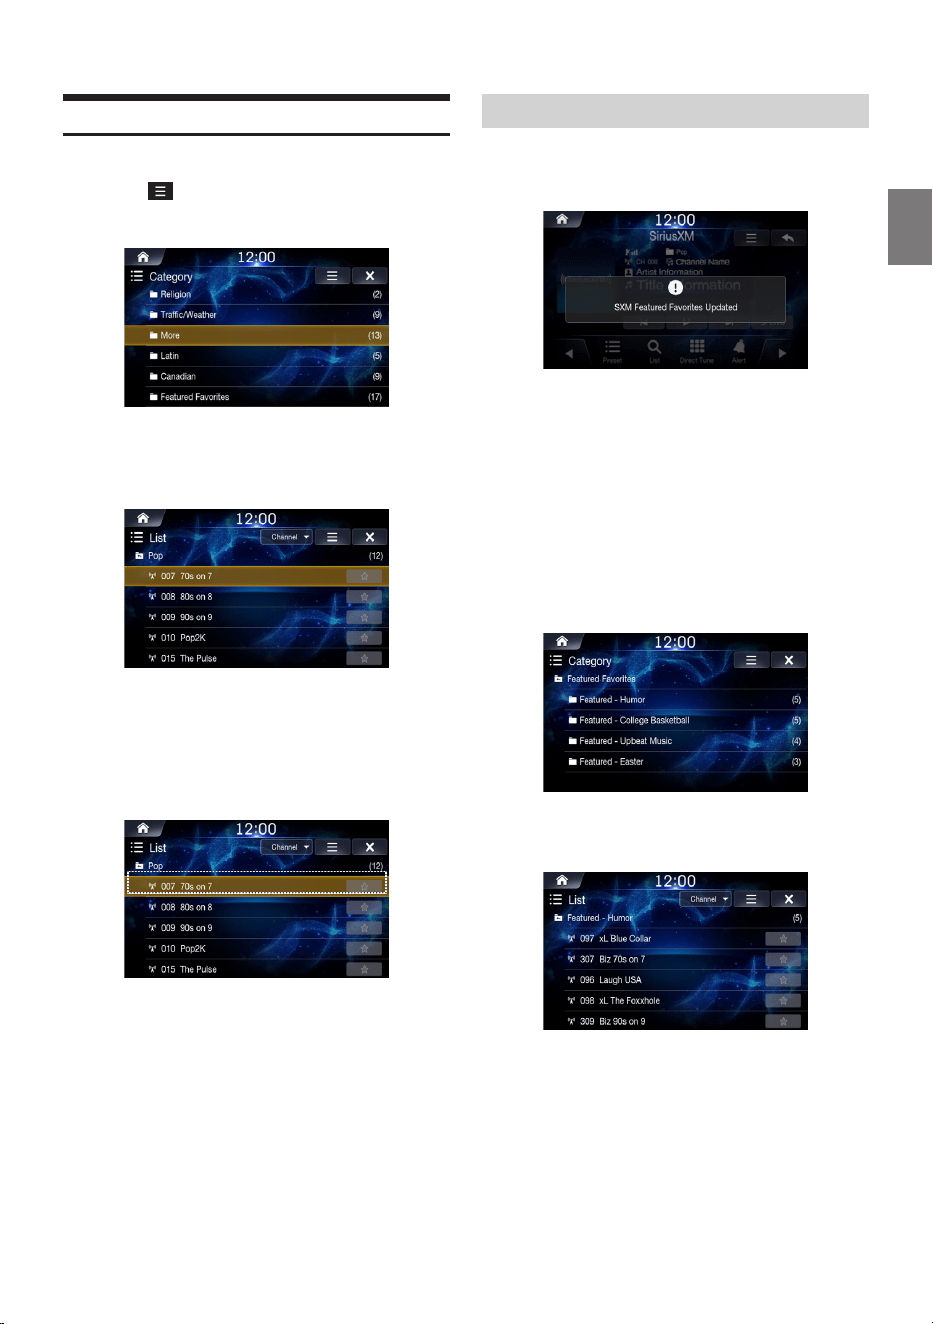
Category
This feature is used to search channels within the desired category.
1
Touch
→
[Category].
Displays the category screen.
2
Select the desired category. The following list
screen will be displayed.
• If you want to display current category, touch [Menu]
→
[Show
Current Channel].
3
Press the current category title in the list screen
to return to the Category screen.
Featured Favorites
When Featured Favorites have been updated, the following screen
will be displayed.
Featured Favorites are groups of channels that are created by the
SiriusXM Programming department allowing you to discover new
channels.
Featured Favorite channels are dynamic and can change often,
allowing you to discover new channels.
Featured Favorites function is always activated.
Information on accessing Featured Favorites can be found below.
1
Press [Category]
→
[Featured Favorites].
Featured Favorites categories are displayed after the
Featured Favorites list is downloaded from SiriusXM.
2
Select the desired list.
26
-EN
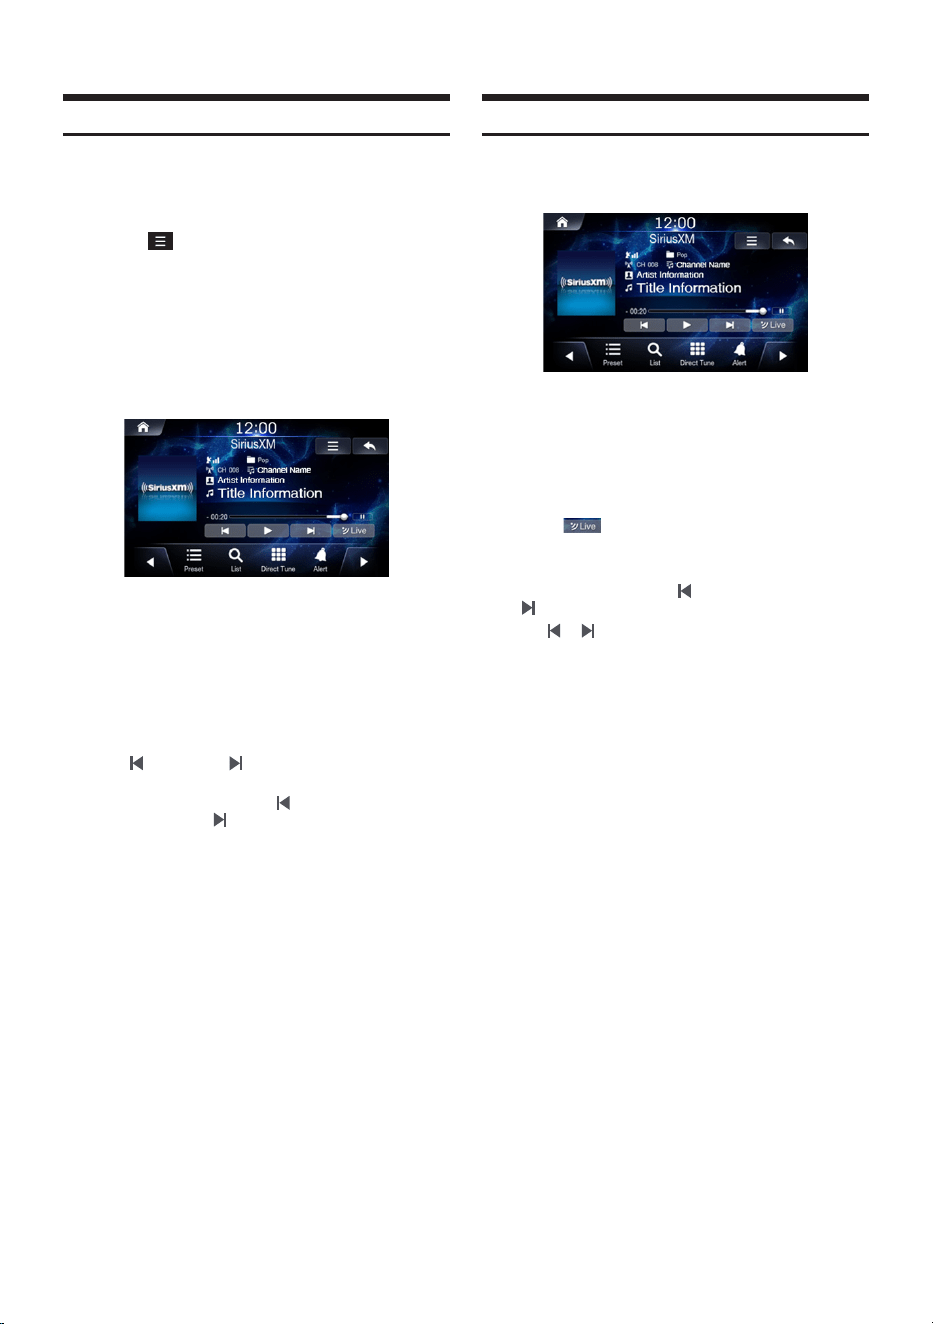
TuneStart™
Use TuneStart to play music content from its beginning on
programmed preset Channel. The user can, therefore, enjoy the full
track (i.e. song) rather than hearing what’s left from its current live
playback position.
1
Touch .
2
Check the [Tune Start] box to turn the feature on.
3
Press [Preset] to begin Tune Start mode.
The Replay mode will be started.
4
Touch [Preset] and select the desired preset
channel.
During Tune Start mode, displays the time difference between the
live broadcast time and actual playing time.
• Pressing (Track Up) or (Track Down) will move a track up/
down.
•
To fast reverse, Press and hold (Track Down) and to fast
forward, Press and hold (Track Up).
•
Tune Start only applies to the first entry of track. If the same track
is playing when it is changed to another channel and returned,
change it to the Live state without changing to the Tune Start state.
•
This function is available only when SiriusXM Tuner-SXV200
is connected or later is connected. When Tuner-SXV200 is
connected, this function is available only for Preset channels 1-6.
When Tuner-SXV300 is connected, this function is available for all
Preset channels.
•
Preset Channels that play other than music-type content will start
playing the channel from the current live play point when selected.
Replay™
In SiriusXM mode, you can pause, rewind and replay of live Satellite
Radio.
1
Press [ ll ] to pause the channel content.
2
Press [
▶
] to resume the channel content.
3
Press to exit Replay and listen to live
content.
• To fast reverse, Press and hold and to fast forward, Press and
hold .
•
Pressing or will move a track up/down.
•
If you change channels while in Replay mode, the contents of the
replay buffer are emptied.
•
The allowed recording time differs depending on the SiriusXM
Tuner box.
•
Replay mode will end automatically when the time difference
between the live broadcast time and actual playing time becomes
00:00.

27
-EN
Saving Song/Artist Alert
This feature is used to add song and artist alerts.
While listening to SiriusXM Satellite Radio, you can be alerted when
your favorite songs or artists are playing on other channels. A popup
is displayed when a channel starts playing a song or artist saved.
1
Touch .
2
Check the [Artist Name] or [Song Name] box to
add the current song or artist to the list.
3
A popup is displayed when a channel starts
playing a song or artist saved.
• Tune: plays the corresponding channel.
• Active Alerts: displays My Music of the corresponding
category.
• Dismiss: displays the previous screen.
• Up to 50 alerts can be saved to Favorites.
•
“Artist Alerts and Song Alerts Not Available” appears on the display
if both the artist and song is not available to be stored.
•
“Artist (Song) Alerts Not Available” is displayed if just the artist
(song) is not available to be stored.
•
“Artist (Song) Saved” is displayed if this Artist (Song) was
previously stored.
•
When you try to save new Alert, but there is not enough memory
space, “Alert Memory Full. Do You want to replace?” is displayed.
If you select “YES,” then the list of stored alert items is displayed.
Press the item that you want to replace.
•
For details, refer to “Setting Favorite Sports Team Alerts” on page
79.
Editing Song/Artist Alert
This feature is used to search channels within the desired category.
1
Touch
→
[Edit Alert].
2
Check/uncheck the [Artist Name] or [Song
Name] box to turn the alert on/off.
3
Press [Del] to delete the alert.
Sound Settings
Touch
→
[Sound Settings]
For details, refer to the “Sound” on the page 68.
SiriusXM User Data Reset
Press [Setup]
→
[General]
→
[Factory Reset].
This feature is used to reset SiriusXM Data.
28
-EN
Disc
WARNING
• It is dangerous for the driver to watch the DVD/Disc, Video/
Disc Image while driving the vehicle. The driver may be
distracted from looking ahead and an accident could occur.
•
Install the unit correctly so that the driver cannot watch DVD/
Disc Video/Disc Image unless the vehicle is stopped, and the
parking brake is applied.
•
If the unit is not installed correctly, the driver will be able to
watch DVD/Disc Video/Disc Image while driving the vehicle
and may be distracted and could cause an accident. The
driver or other people could be severely injured.
•
Video/Image are not available while driving. (Because of traffic
regulations, videos are only available when your vehicle is
parked.)
Caution
• Not all functions will operate for every Disc. See the individual
Disc’s instructions for details on the features supported.
•
Fingerprints on a disc may adversely affect playback. If a
problem occurs, remove the disc and check for fingerprints on
the playback side. Clean the disc if necessary.
•
Turn on the car ignition before using this device. Do not
operate this system for long periods of time with the ignition
turned off as such operations may lead to battery discharge.
•
Video CDs cannot be played.
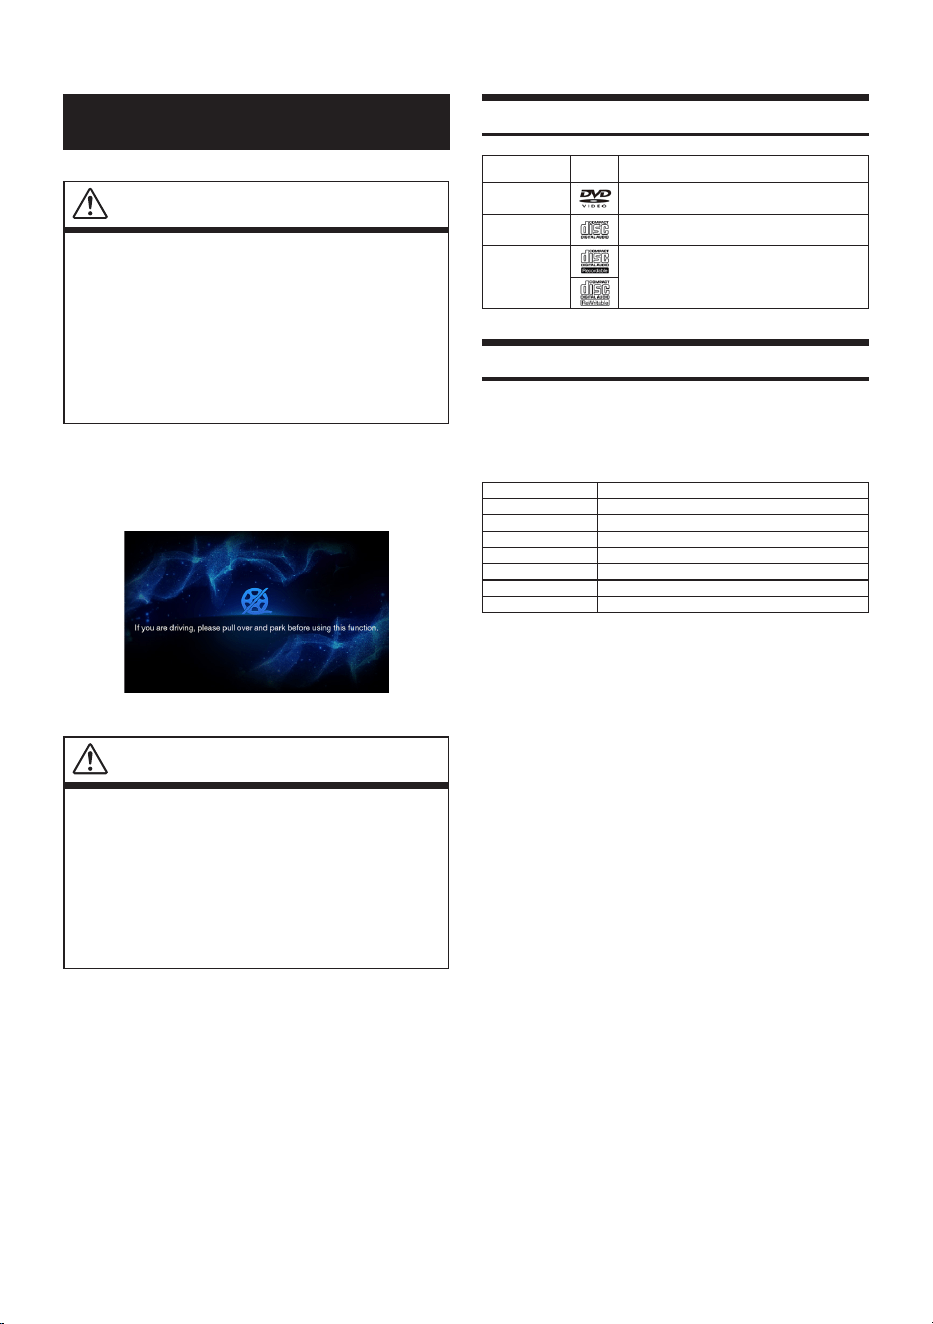
Supported Disc Formats
Supported
Disc Formats
Disc
Logo
Description
DVD Video
Displays discs with region codes of ALL
or the corresponding region code.
Audio CD
Plays normal music CDs.
CD-R/RW
Plays discs recorded with music
titles, WMA, and MP3 files.
DVD Region Codes
The DVD Player and DVD discs are assigned region codes. DVDs
without the proper region codes as supported by this device are
not supported. Check the table below for more information on DVD
region codes.
Region code Area
1 United States, Canada
2 Europe, Middle East, South Africa
3 South Korea
4 Latin America
5 Russia, Africa
6 Mainland China
All Can be played in all regions
29
-EN
Disc Video
You can play Music/Video/Image files stored in a disc on the internal
player of this system.
WARNING
• It is dangerous (and illegal in many countries) for the driver
to watch video while driving the vehicle. The driver may be
distracted from looking ahead and an accident could occur.
•
Install the unit correctly so that the driver cannot watch video
unless the vehicle is stopped, and the parking brake is applied.
•
If the unit is not installed correctly, the driver will be able to
watch video while driving the vehicle and may be distracted
from looking ahead and cause an accident. The driver or other
people could be severely injured.
• Disc Video mode is not available while driving. (Because of
traffic regulations, videos are only available when your vehicle is
parked.)
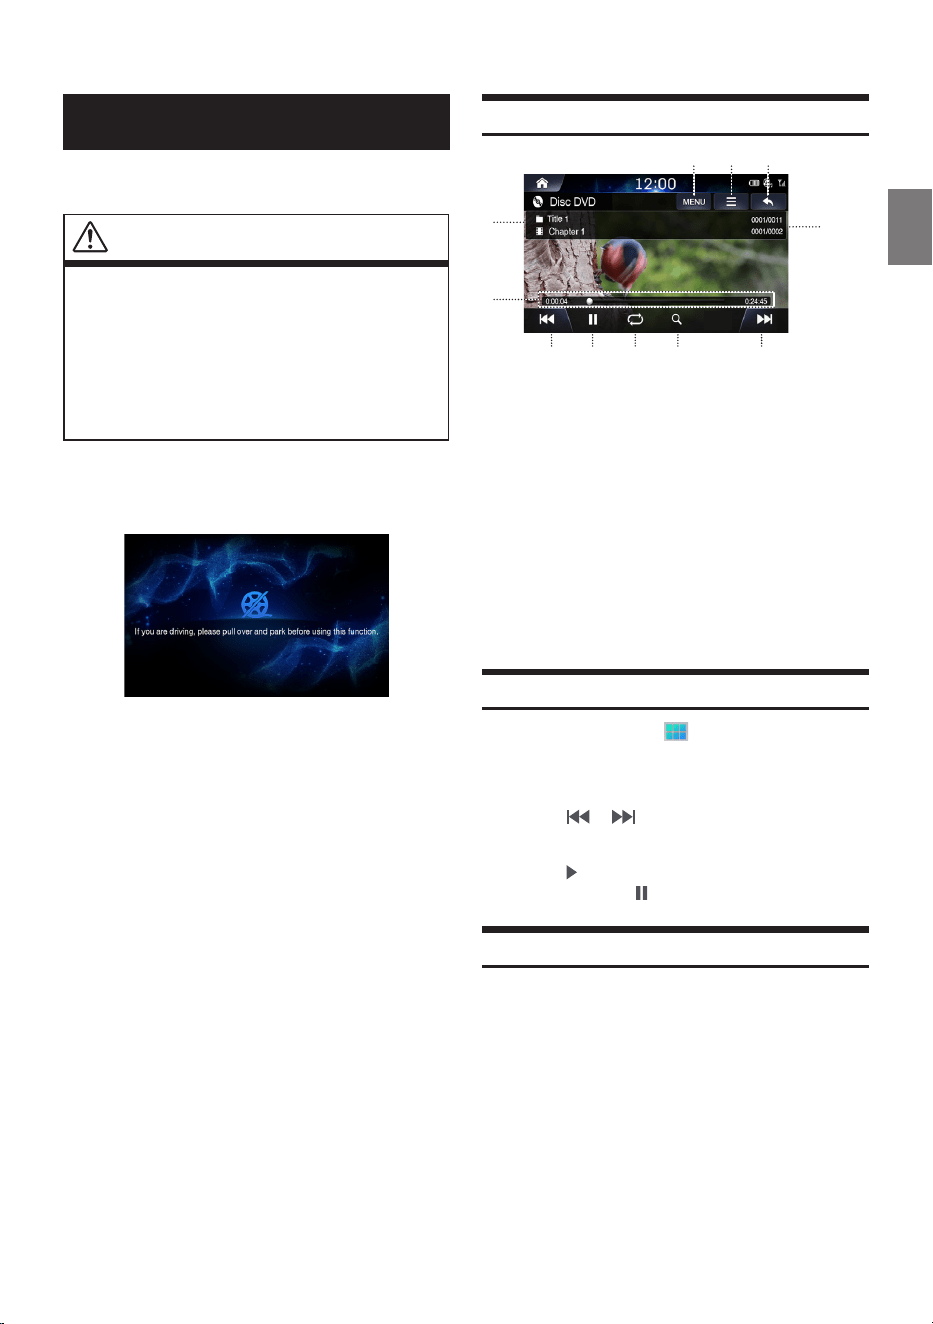
Disc Video Main Screen
Playing Disc Video Files
1
Press the All Menus button
→
touch [DISC].
Or in the Home screen, touch [All Menus]
→
[DISC].
2
Touch or and select the desired file.
3
Touch to play Disc video.
While playing, touch to pause Disc video.
Viewing in Full Screen
Touch the screen in a non-menu area to change to full screen.
If you want to display the menu, touch the screen.
• If there are no operations for 10 seconds, the menu will
automatically disappear.
④
⑥
⑤
⑨ ⑩⑦ ⑧
① ② ③
⑪
〇①〇
M openu (Top menu, Sub menu)
〇②〇
Main Menu
〇③〇
Displays the Previous Screen
〇④〇
Chapter and Title Information
〇⑤〇
Chapter and Title Index
〇⑥〇
Play Time and Play Bar
〇⑦〇
Previous Chapter
〇⑧〇
Play/Pause
〇⑨〇
Repeat
〇⑩〇
Search
〇⑪〇
〇
Next Chapter
30
-EN
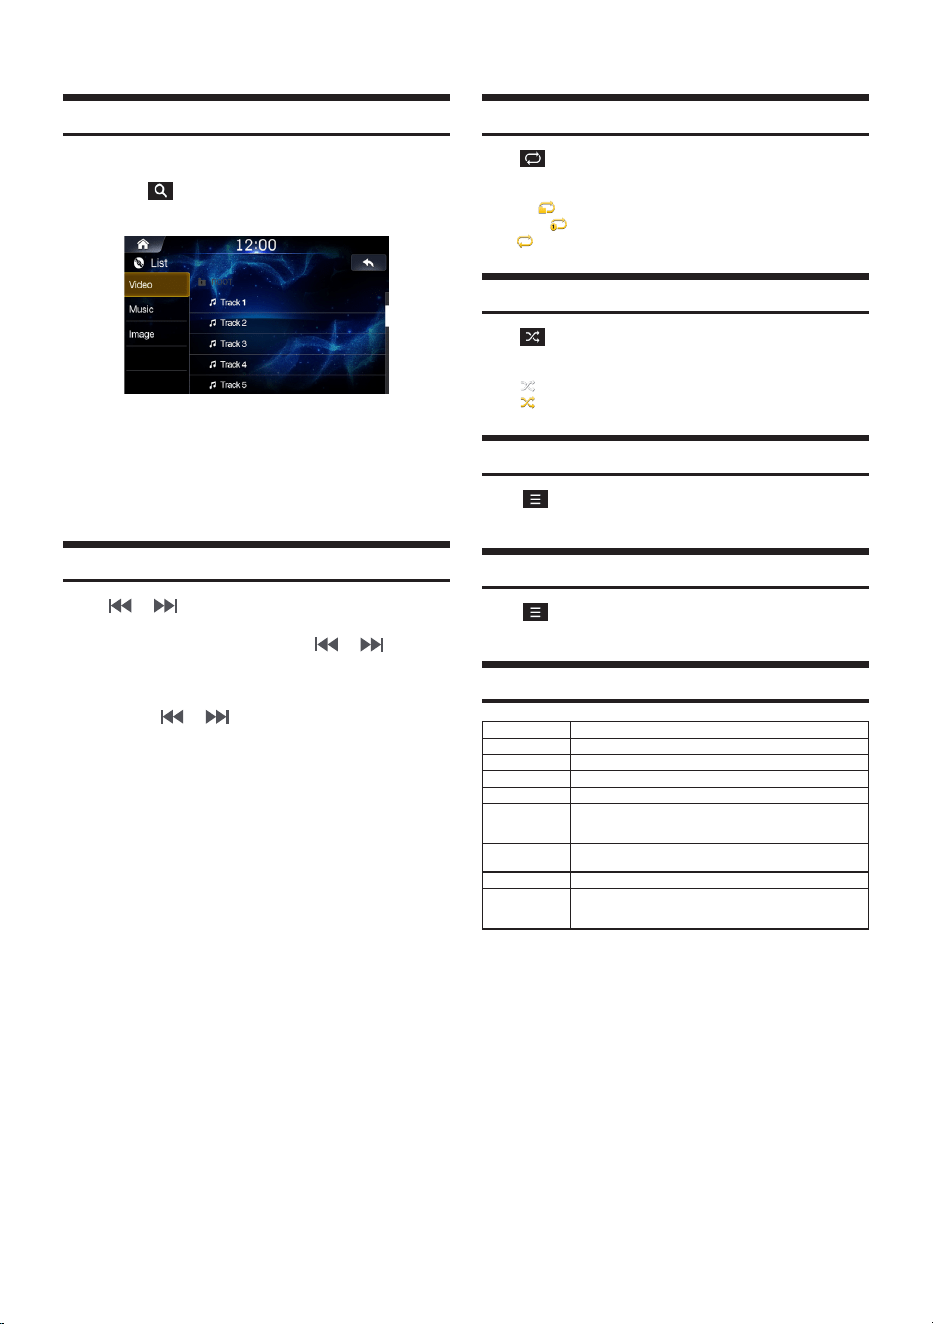
Searching Disc Video Files
You can search the files in the List screen.
1
Touch to display Disc File list screen.
2
Touch [Video] and search the desired file.
3
Touch the desired file to play.
Fast-Forwarding or Rewinding a File
Using or .
1
While playing, touch and hold or .
Touch and hold for more than 1 second to rewind or fast-
forward at high speed.
2
Release or to play the file at normal
speed.
Using Play Bar
Drag or touch the slider along the play bar to jump to the point that
you want to play from.
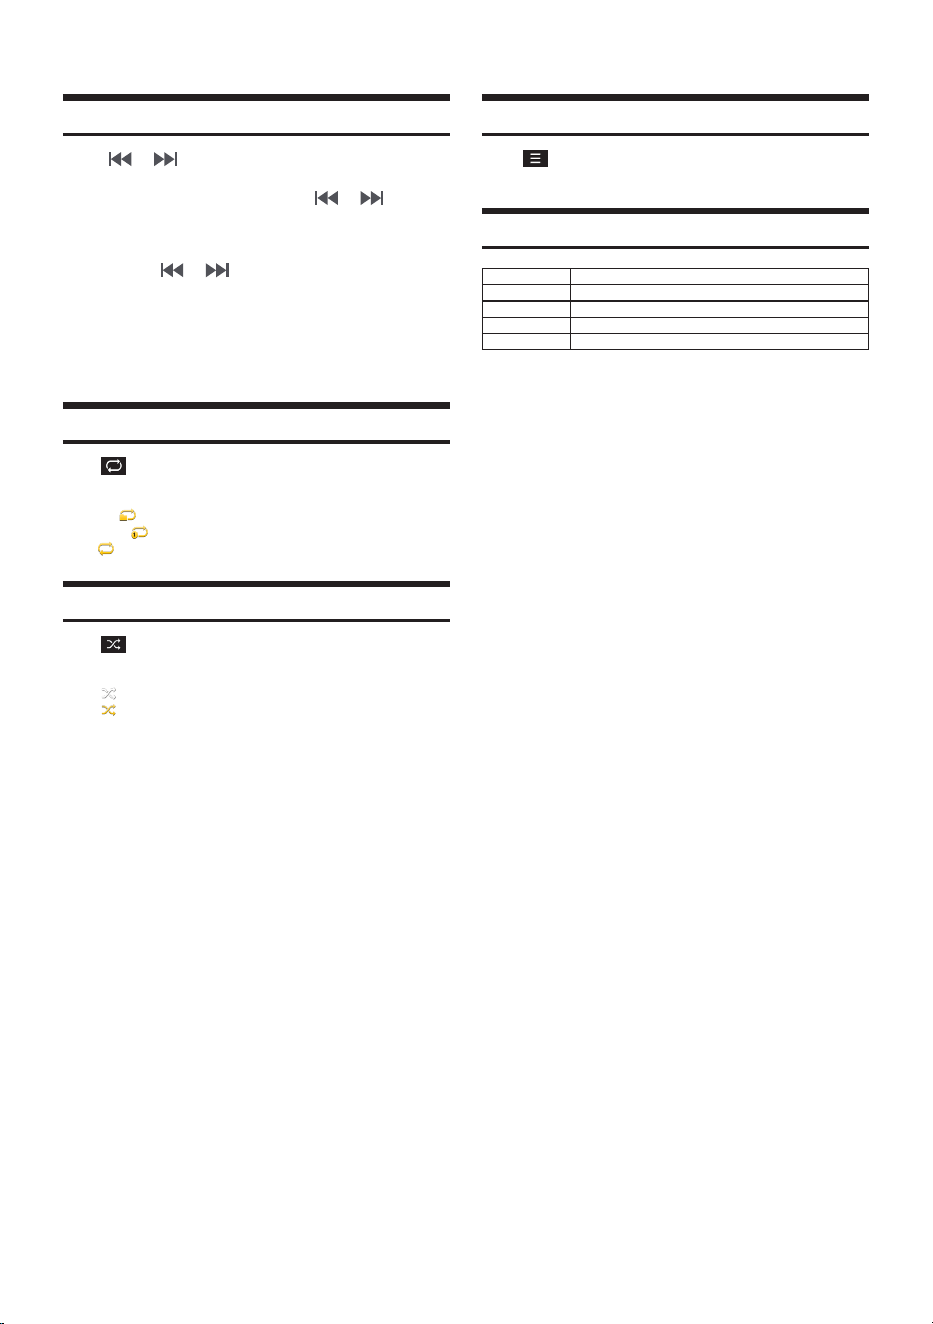
Repeat
Touch to toggle between the modes.
• Folder : repeats the files in the current folder.
• One File : repeats play of currently playing file.
• All : repeats the all files in the Disc.
Shuffle
Touch to toggle between the modes.
• Off : turns the shuffle feature off.
• On : plays all files in random order.
Sound Settings
Touch
→
[Sound Settings]
For details, refer to “Sound Settings” on page 68.
Visual Settings
Touch
→
[Visual Settings]
For details, refer to “Visual Settings” on page 73.
Supported Disc Video Format
Category Description
File Format AVI, MPG, FLV,DAT, VOB, MP4, MOV, OGG, ASF
Extensions avi, mpg, mpeg,dat, flv, vob, mp4, mov, ogg, asf
Video Codec MP4V, MPEG-1, MSVC, MPEG-1/MPEG-2, H.263,
Video 720*480/576 (30fps)
Resolution
Response Sampling Rate : 8,11.025, 16,22.05, 24, 32, 44.1, 48 KHz.
Response Bitrate : 45~500Kbps.
(WMA : 8K~48KHz, 16kbps~320kbps)
Audio Codec
Dolby Digital(AC3),WMA/PCM/LPCM,AAC LC (2ch),MPEG-
Audio,(MP1/MP2/MP3) LPCM, uLaw/aLaw, OGG, WMA
Subtitles SMI
Unsupported files
1. Video with OGG
2. Audio formats other than Vorbis with OGG
3. Vorbis format in AVI

31
-EN
Disc Music
You can play music files stored in a disc on the internal player of this
system.
Disc Music Main Screen
④
⑥
⑤
⑦
⑪⑩⑨⑧
① ② ③
⑬⑫
〇①〇
Displays the list screen
〇②〇
Menu
〇③〇
Displays the Previous Screen
〇④〇
Disc Music Icon
〇⑤〇
Current Song no. / Total Song no.
〇⑥〇
Information Display
〇⑦〇
Play Time and Play Bar
〇⑧〇
Previous File
〇⑨〇
Play/Pause
〇⑩〇
Repeat
〇⑪〇
Shuffle
〇⑫〇
Scan
〇⑬〇
Next File
Playing Disc Music Files
1
Press the All Menus button
→
touch [DISC].
Or in the Home screen, touch [All Menus]
→
[DISC].
2
Touch to play Disc music.
While playing, touch to pause Disc music.
Searching Disc Music Files
You can search the files in the List screen.
1
Touch to display Disc File list screen.
2
Touch [Music] and search the desired file.
3
Touch the desired file to play.
32
-EN
Fast-Forwarding or Rewinding a File
Using or
1
While playing, touch and hold or .
Touch and hold for more than 1 second to rewind or fast-
forward at high speed.
2
Release or to play the file at normal
speed.
Using Play Bar
Drag or touch the slider along the play bar to jump to the point that
you want to play from.
Repeat
Touch to toggle between the modes.
• Folder : repeats the files in the current folder.
• One File : repeats play of currently playing file.
• All : repeats the all files in the Disc.
Shuffle
Touch to toggle between the modes.
• Off : turns the shuffle feature off.
• On : plays all files in random order.
Sound Settings
Touch
→
[Sound Settings]
For details, refer to "Sound Settings" on page 68.
Supported Disc Music Format
Category Description
File Format MP3, WMA7, WMA8, WMA9
Extensions mp3, wma
Bit rate 16kbps ~ 320 kbps
Sampling Rate 8K~ 48 KHz
33
-EN
Data CD – Image Disc
You can play Image files stored in a disc on the internal player of this
system.
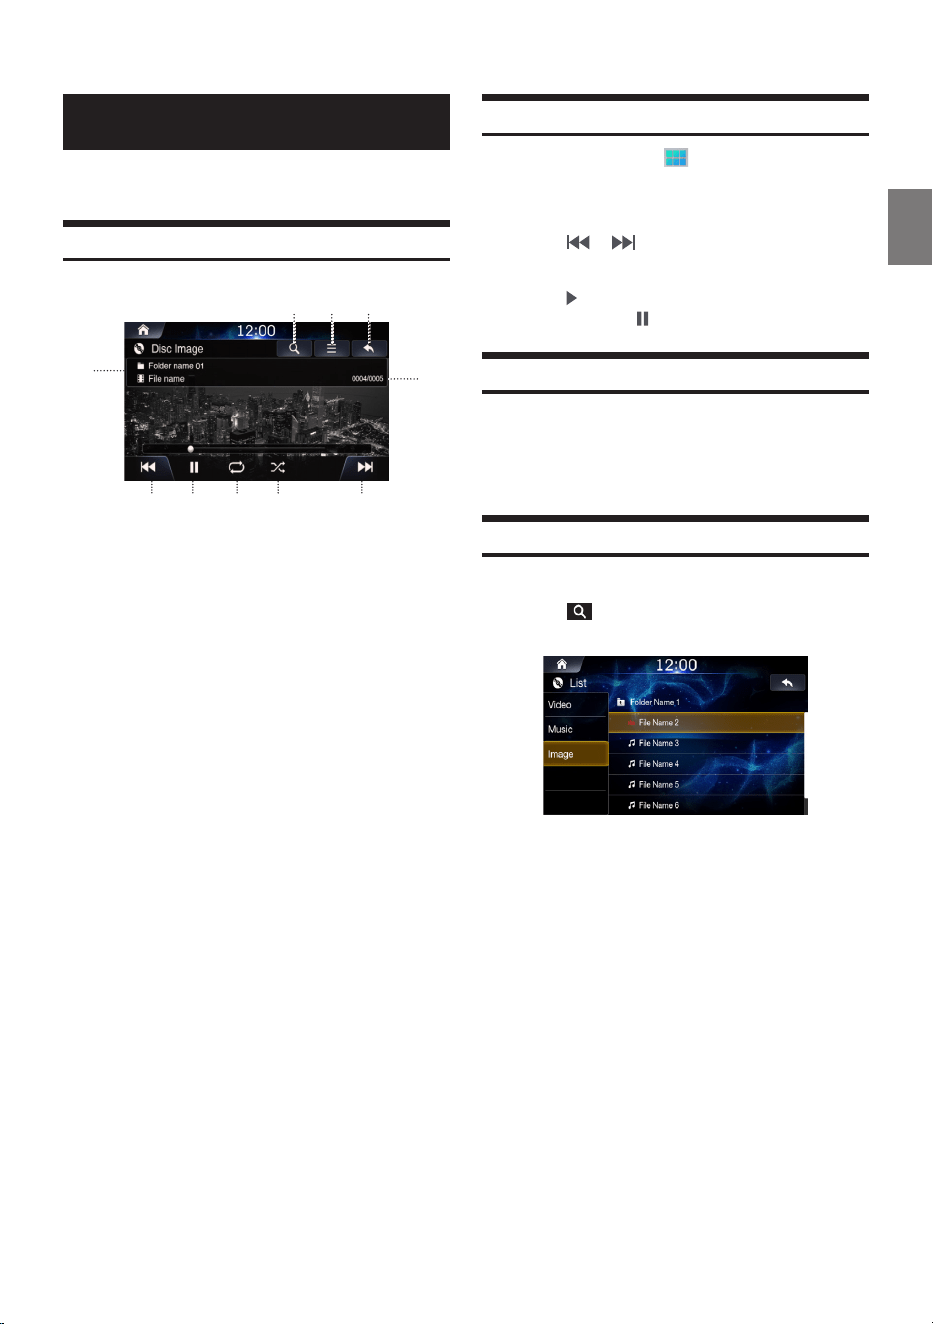
Disc Image Main Screen
〇①〇
Displays the list screen
〇②〇
Menu
〇③〇
Displays the Previous Screen
〇④〇
Information Display
〇⑤〇
Current Image no. / Total Image no.
〇⑥〇
Previous File
〇⑦〇
Play/Pause
〇⑧〇
Repeat
〇⑨〇
Shuffle
〇⑩〇
Next File
Playing Disc Image Files
1
Press the All Menus button
→
touch [DISC].
Or in the Home screen, touch [All Menus]
→
[DISC].
2
Touch or and select the desired file.
3
Touch to play Disc Image.
While playing, touch to pause Disc image.
Viewing in Full Screen
Touch the screen in a non-menu area to change to full screen.
If you want to display the menu, touch the screen.
• If there are no operations for 10 seconds, the menu will
automatically disappear.
Searching Disc Image Files
You can search the files in the List screen.
1
Touch to display Disc File list screen.
2
Touch [Image] and search the desired file.
3
Touch the desired file to play.
④
⑤
⑨⑧⑦⑥
②① ③
⑩

34
-EN
Repeat
Touch to toggle between the modes.
• Folder : repeats the files in the current folder.
• One File : repeats play of currently playing file.
• All : repeats the all files in the Disc.
Shuffle
Touch to toggle the shuffle mode on or off.
• Off : turns the shuffle feature off.
• On : plays all files in random order.
Visual Settings
Touch
→
[Visual Settings]
For details, refer to the “Visual Settings” on the page 73.
Supported Disc Image Format
Category Description
File Format JPEG, PNG, GIF, BMP
Extensions jpeg, png, gif, bmp

35
-EN
Disc DVD
Disc DVD Main Screen
④
⑥
⑤
⑩⑨⑧⑦
②① ③
⑫⑪
〇①〇
Menu (Top menu, Sub menu)
〇②〇
Main Menu
〇③〇
Displays the Previous Screen
〇④〇
Chapter and Title Information
〇⑤〇
Chapter and Title Index
〇⑥〇
Play Time and Play Bar
〇⑦〇
Previous Chapter
〇⑧〇
Play/Pause
〇⑨〇
Repeat
〇⑩〇
Search
〇⑪〇
Screen ration (16 : 9 / 4 : 3 LB / 4 : 4 PS)
〇⑫〇
Next Chapter
Playing a DVD
1
Press the All Menus button
→
touch [DISC].
Or in the Home screen, touch [All Menus]
→
[DISC].
2
Touch or or select the desired Chapter.
3
Touch to play a DVD.
While playing, touch to pause a DVD.
Viewing in Full Screen
Touch the screen in a non-menu area to view the DVD in full
screen.
If you want to display the menu, touch the screen.
• If there are no operations for 10 seconds, the menu will
automatically disappear.
16:9

36
-EN
Searching Chapters
1
Touch .
2
Search the desired chapter.
3
Touch the desired chapter to play.
Fast-Forwarding or Rewinding a Chapter
Using or .
1
While playing, touch and hold or .
Touch and hold for more than 1 second to rewind or fast-
forward at high speed.
2
Release or to play the chapter at normal
speed.
Using Play Bar
Drag or touch the slider along the play bar to jump to the point
that you want to play from.
Repeat
Touch to toggle between the modes.
• One Chapter : repeats play of currently playing chapter.
• All : repeats the all chapter in the current title.
• Disc : repeats the all title in the DVD.
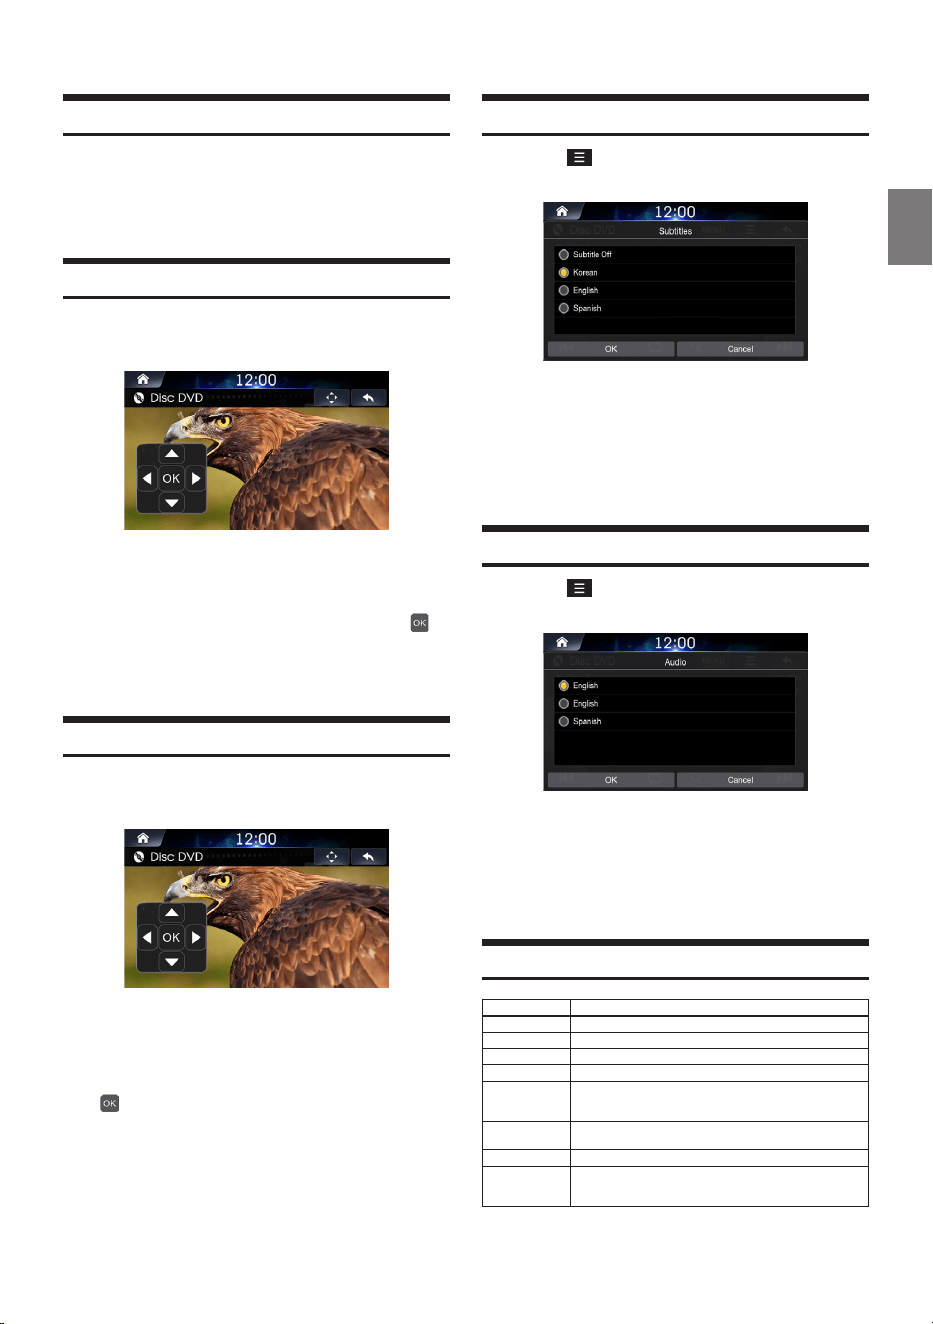
37
-EN
Changing Screen Ratio
Touch [16 : 9 / 4 : 3 LB / 4 : 4 PS] to toggle between the modes.
• 16 : 9: displays in 16:9 wide screen.
• 4 : 3 LB: displays in 4:3 screen ratio.
• 4 : 4 PS: displays in 4:4 screen ratio
Using Top Menu
1
Touch [Top Menu] to display Top Menu screen.
2
Touch the controller up/down/left/right directions
to select the desired menu and touch Enter
.
• The Top menu option can only be used within DVDs that support
these features.
Using Sub Menu
1
Touch [Sub Menu] to display Top Menu screen.
2
Touch the controller in up/down/left/right
directions to select the desired menu and touch
.
• The Sub menu and DVD menu options can only be used within
DVDs that support these features.
Changing Subtitle Language
1
Touch
→
[Subtitle].
2
Select the desired language.
• Supported caption languages may differ according to the DVD
title.
Changing Voice Language
1
Touch
→
[Audio].
2
Select the desired language.
• Supported voice languages may differ according to the DVD title.
Supported Disc DVD Format
Category Description
File Format AVI, MPG, FLV,DAT, VOB, MP4, MOV, OGG, ASF
Extensions avi, mpg, mpeg,dat, flv, vob, mp4, mov, ogg, asf
Video Codec MP4V, MPEG-1, MSVC, MPEG-1/MPEG-2, H.263,
Video 720*480/576 (30fps)
Resolution
Response Sampling Rate : 8,11.025, 16,22.05, 24, 32, 44.1, 48 KHz.
Response Bitrate : 45~500Kbps.
(WMA : 8K~48KHz, 16kbps~320kbps)
Audio Codec
Dolby Digital(AC3),WMA/PCM/LPCM,AAC LC (2ch),MPEG-
Audio,(MP1/MP2/MP3) LPCM, uLaw/aLaw, OGG, WMA
Subtitles SMI
Unsupported files
1. Video with OGG
2. Audio formats other than Vorbis with OGG
3. Vorbis format in AVI
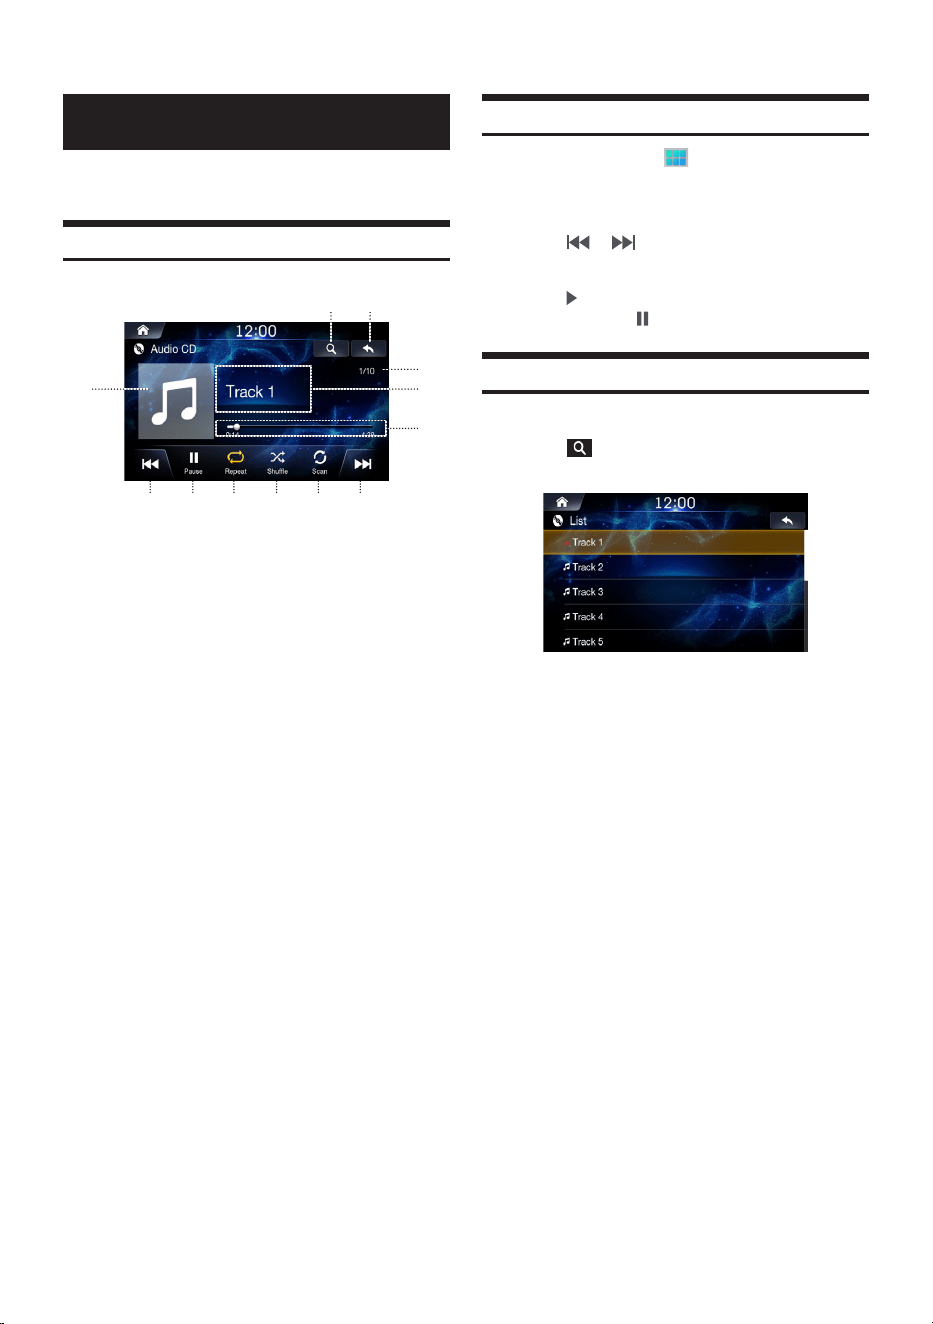
38
-EN
Audio CD
You can play music files stored in a disc on the internal player of this
system.
Audio CD Main Screen
〇①〇
Displays the list screen
〇②〇
Displays the Previous Screen
〇③〇
Artwork Display
〇④〇
Current Song no. / Total Song no.
〇⑤〇
Information Display
〇⑥〇
Play Time and Play Bar
〇⑦〇
Previous Track
〇⑧〇
Play / Pause
〇⑨〇
Repeat
〇⑩〇
Shuffle
〇⑪〇
Scan
〇⑫〇
Next Track
Playing An Audio CD
1
Press the All Menus button
→
touch [DISC].
Or in the Home screen, touch [All Menus]
→
[DISC].
2
Touch or or select the desired track.
3
Touch to play Audio CD.
While playing, touch to pause Audio CD.
Searching Tracks
You can search the tracks in the List screen.
1
Touch to display Audio CD list screen.
2
Search the desired track.
3
Touch the desired track to play.
③
⑤
④
⑥
⑩⑨⑧⑦
① ②
⑫⑪
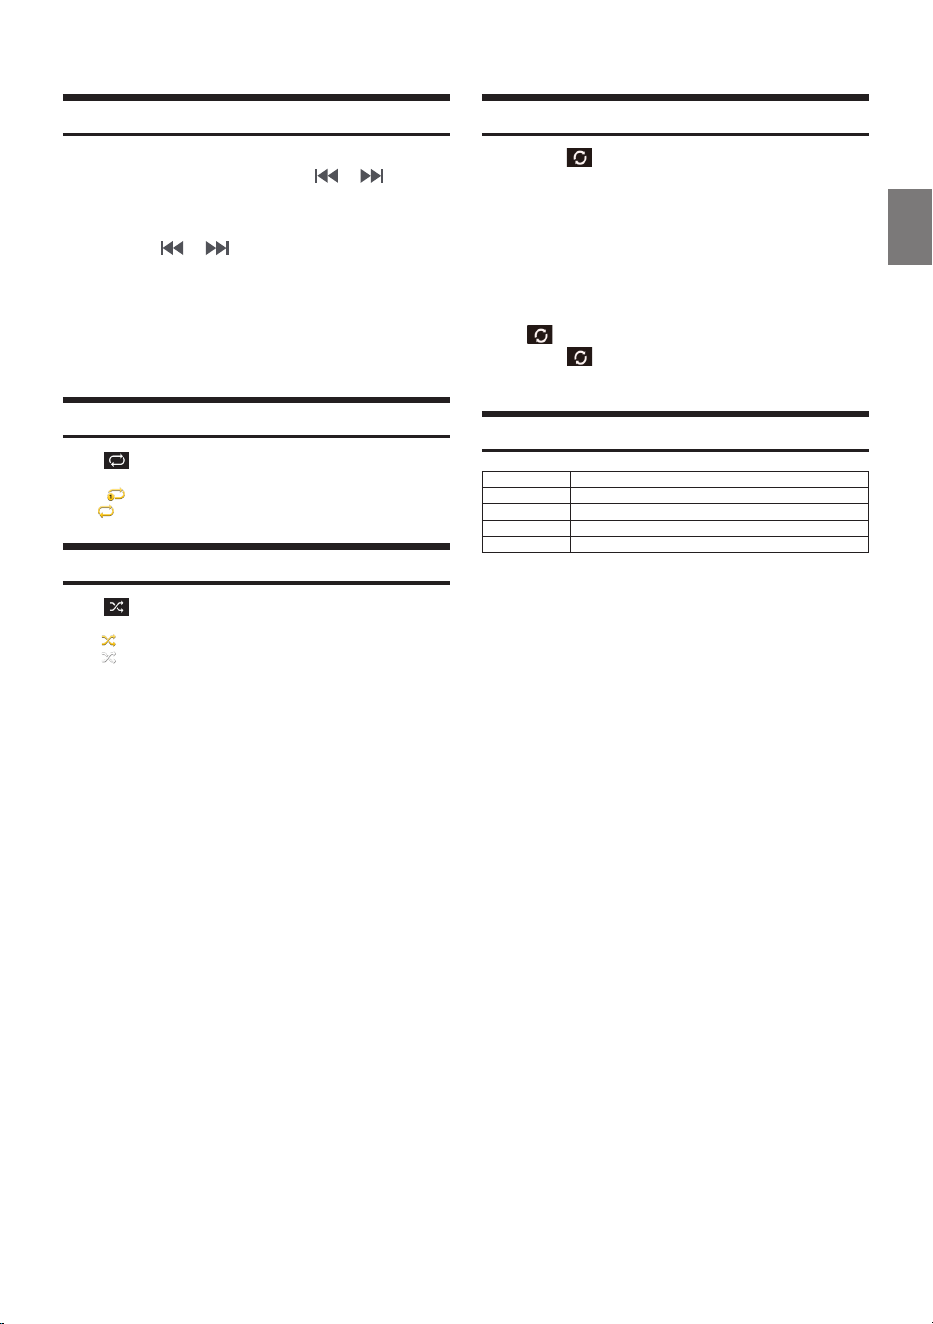
39
-EN
Fast-Forwarding or Rewinding a Track
1
While playing, touch and hold or .
Touch and hold for more than 1 second to rewind or fast-
forward at high speed.
2
Release or to play the track at normal
speed.
Using Play Bar
Drag or touch the slider along the play bar to jump to the point
that you want to play from.
Repeat
Touch
to toggle between the modes.
• One : repeats play of currently playing track.
• All : Repeats all of the tracks on the Audio CD.
Shuffle
Touch
to toggle the shuffle mode on or off.
• On : plays tracks in the Audio CD in random order.
• Off : turns the shuffle feature off.
Scan
1
Touch .
The beginning part (approximately first 10 seconds) of all files
within the current folder/category or the entire Audio CD are
scanned.
2
Touch [Scan] to stop scanning.
• Scan : Scans all files within the USB.
• Folder Scan Scans all files within the current folder
• Off : turns the scan feature off.
Supported Audio CD Format
Category Description
File Format MP3, WMA7, WMA8, WMA9
Extensions mp3, wma
Bit rate 16kbps ~ 320 kbps
Sampling Rate 8K~ 48 KHz
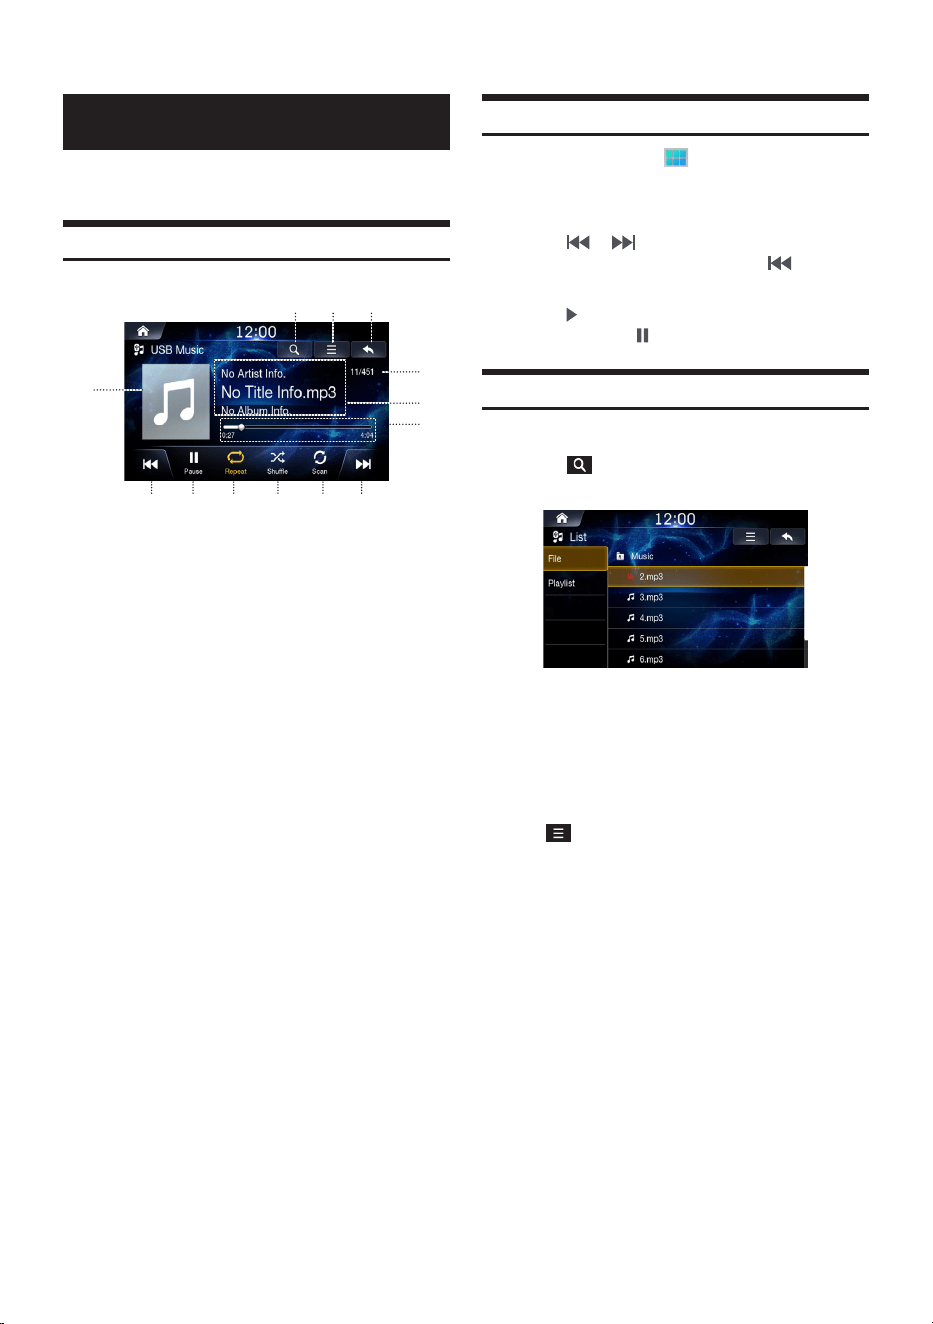
40
-EN
USB Music
You can play back music files (MP3/WMA/AAC/FLAC/OGG/APE/
MP2) stored on a USB flash drive.
USB Music Main Screen
〇①〇
Displays the list screen
〇②〇
Menu (Add to Playlist, Sound Settings)
〇③〇
Displays the Previous Screen
〇④〇
Artwork Display
〇⑤〇
Current Song no. / Total Song no.
〇⑥〇
Information Display
〇⑦〇
Play Time and Play Bar
〇⑧〇
Previous File
〇⑨〇
Play / Pause
〇⑩〇
Repeat
〇⑪〇
Shuffle
〇⑫〇
Scan
〇⑬〇
Next File
Playing USB Music Files
1
Press the All Menus button
→
touch [USB
Music]. Or in the Home screen, touch [All Menus]
→
[USB Music].
2
Touch or and select the desired file.
If play time is over 3 seconds, pressing will play the
current file from the beginning.
3
Touch to play USB music.
While playing, touch to pause USB music.
Searching USB Music Files
You can search the music file in the List screen.
1
Touch to display USB Music list screen.
2
Search the desired category and file.
It is possible to search by File and Artist.
3
Touch the desired file to play.
• In the List screen, it is possible to add current song to playlist by
touching
→
[Add to Playlist].
④
⑥
⑤
⑦
⑪ ⑫⑩⑨⑧
②① ③
⑬
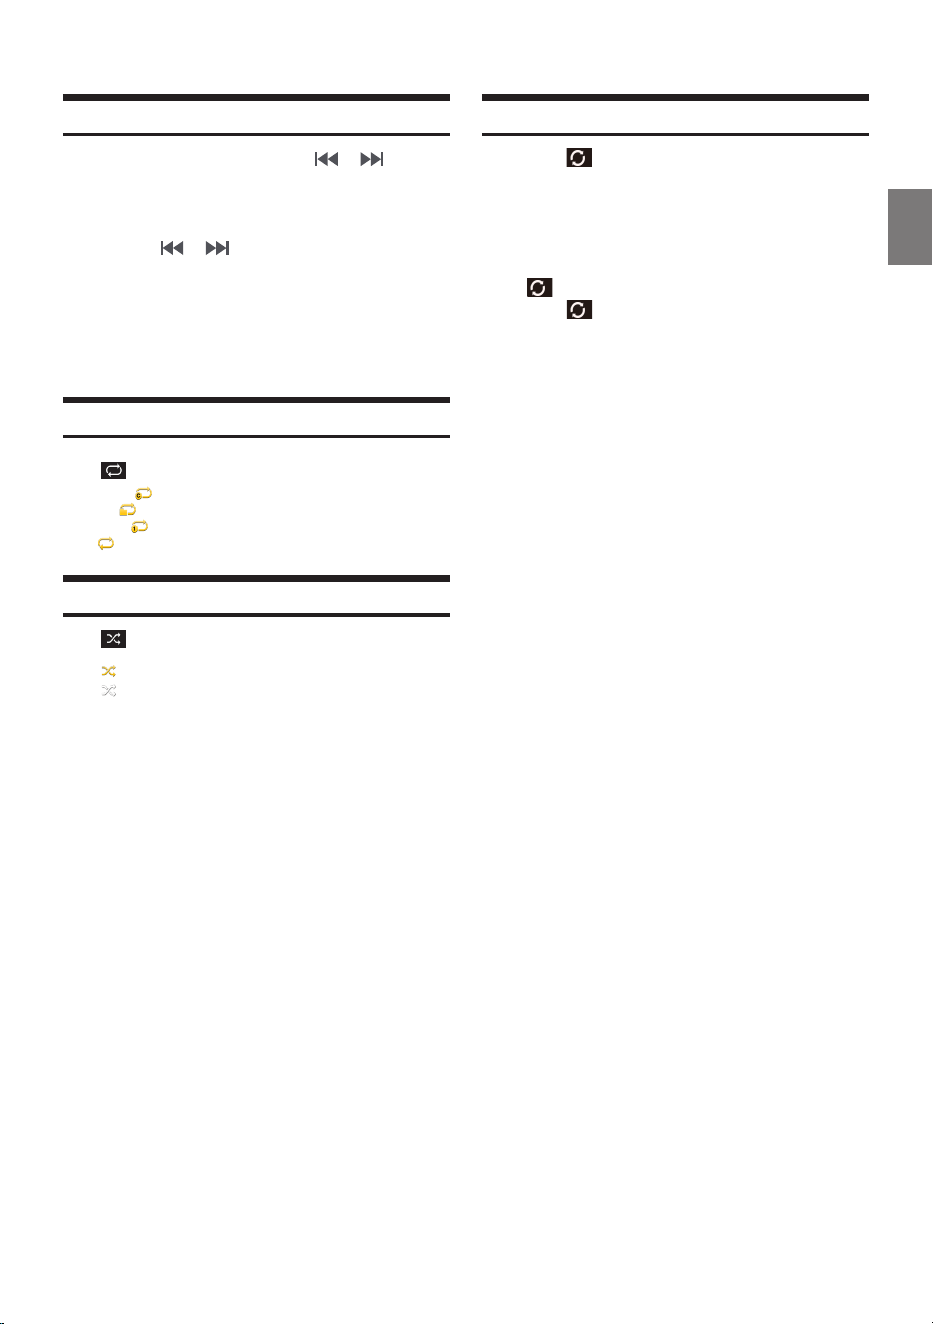
41
-EN
Fast-Forwarding or Rewinding a File
1
While playing, touch and hold or .
Touch and hold for more than 1 second to rewind or fast-
forward at 4x speed. Keep touching to switch the speed to
20x.
2
Release or to play the track at normal
speed.
Using Play Bar
Drag or touch the slider along the play bar to jump to the point
that you want to play from.
Repeat
Touch to toggle between the modes.
• Category : repeats the files in the current category.
• Folder : repeats the files in the current folder.
• One File : repeats play of currently playing file.
• All : repeats the all files in the USB.
Shuffle
Touch to toggle between the modes.
• On : plays files in the current category in random order.
• Off : turns the shuffle feature off.
Scan
1
Touch .
The beginning part (approximately first 10 seconds) of all
files within the current folder/category or the entire USB are
scanned.
2
Touch [Scan] to stop scanning.
• Scan : Scans all files within the USB
• Folder Scan
:
Scans all files within the current folder
•
Off : turns the scan feature off.
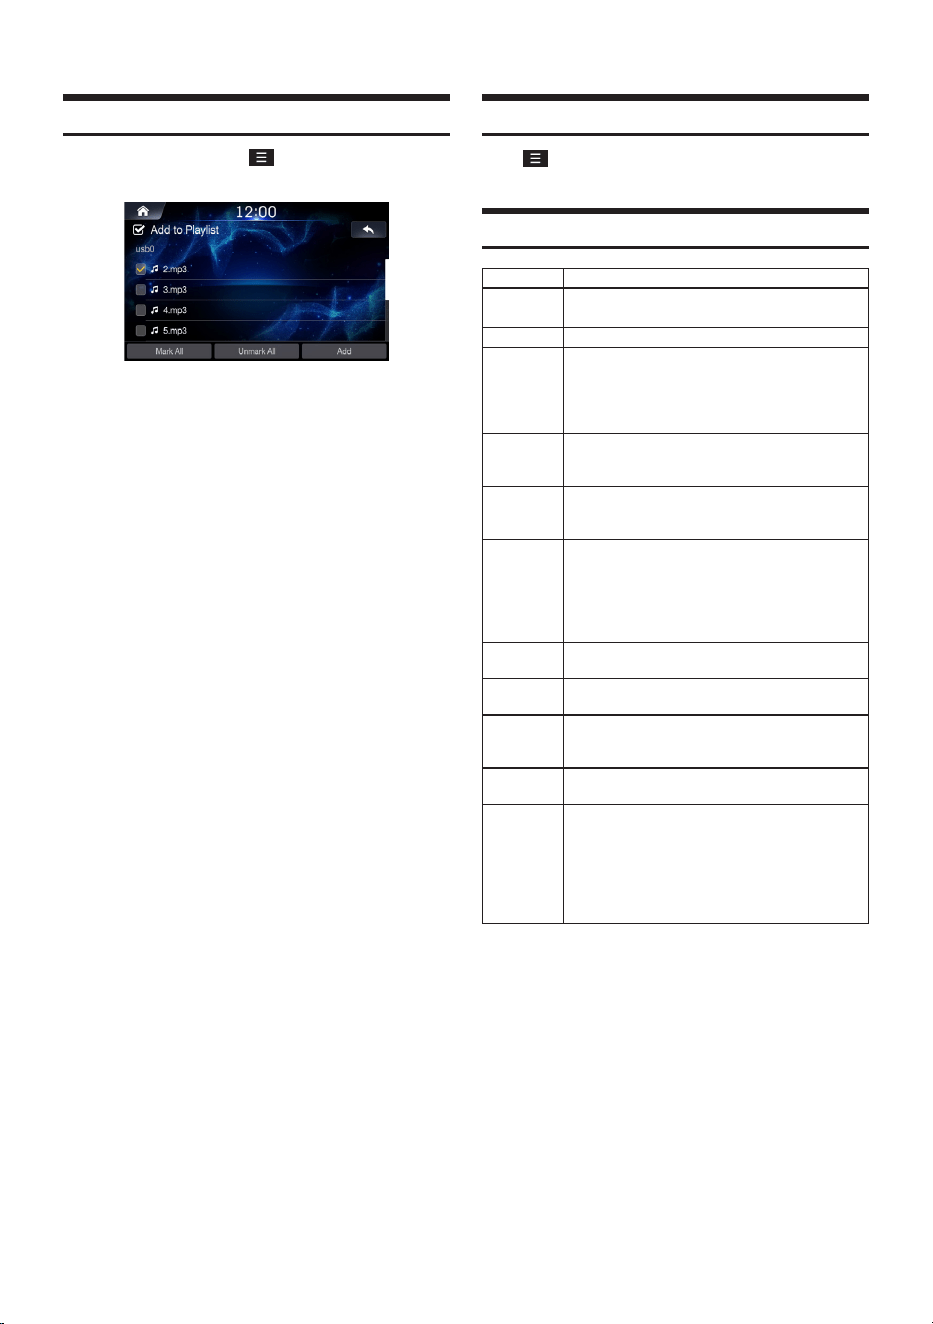
42
-EN
Adding a Song to a Playlist
1
While playing, touch
→
[Add to Playlist].
2
Select the desired songs and touch [Add].
Sound Settings
Touch
→
[Sound Settings]
For details, refer to "Sound Settings" on page 68.
Supported USB Music Format
Category Description
File Format MP3, WMA, AAC, FLAC, OGG, APE, MP2
Extensions mp3, wma, aac, flac, ogg, ape, mp2
MP3 File
Specification
• Response Specification: MPEG AUDIO LAYER3
• Response Sampling Frequency : 32, 44.1, 48 (KHz)
• Response Bitrate: 32, 40, 48, 56, 64, 80, 96, 112,
128, 160, 192 ,224 ,256 ,320 (Kbps)
• ID3 v1.1, ID3 v2.x TAG and ID3 v1.0
WMA File
Specification
• WMA9std, WMA10 Pro, and WMA9 Lossless
• Response Sampling rate : Up to 48 KHz
• Tag Information : WMA Tag Ver1.x
AAC File
Specification
• MPEG2 AAC-LC, MPEG4 AAC-LC, HE-AAC v1,
and AAC v2
• sampling rate : from 8kHz to 48kHz
FLAC File
Specification
• The version shall be 1.3.0.
• The corresponding sampling frequency is as
follows :
8, 16, 22.05, 24, 32, 44.1, 48, 88.2, 96 kHz
• Tag Information : According to the Vorbis
description, and the character code is UTF-8
OGG File
Specification
• bit-rate : From Q-1 to Q10
• sampling rate : Up to 48 KHz
APE File
Specification
• sampling rate - Up to 48 KHz
MP2 File
Specification
• MPEG-1/2 layer 2, Mono/Stereo 16-384Kbps
• bit-rate : CBR/VBR 16kbps ~ 384kbps
• sampling rate: up to 48KHz
ID3/WMA
TAG
• ID3 v1.0, v1.1, v2.2, v2.3, v2.4
• WMA v1.x
Detailed
Specification
• Max Directory Layers: 15 layers
• Max length of folder names and file names:
255Bytes
• Characters supported for folder/file names: English
and numbers
• Max number of files recognized from all USB
device(music + video + image): 5,000
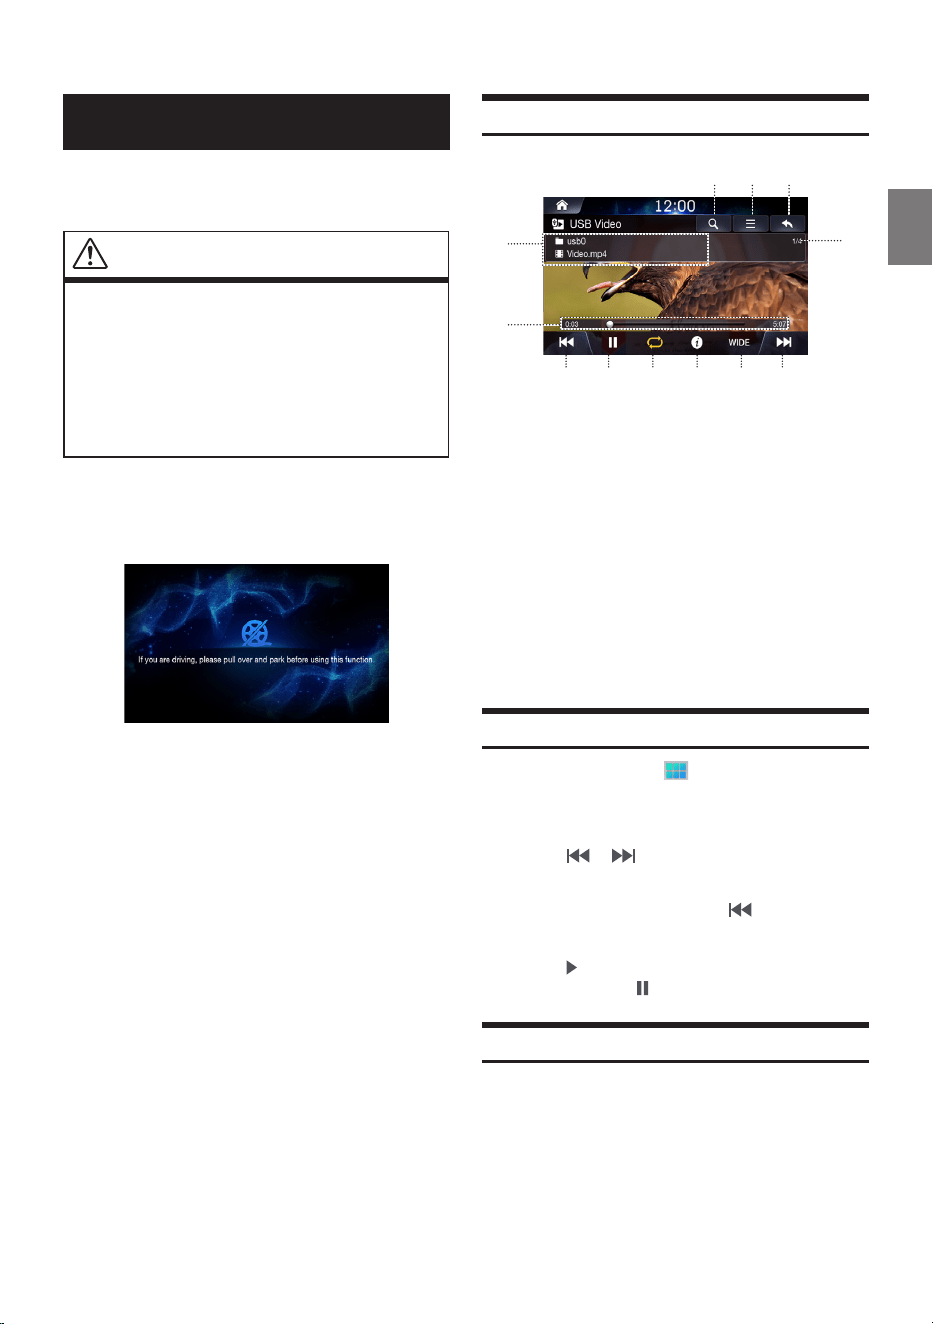
43
-EN
USB Video
You can play video files
(AVI/MKV/MP4/ASF/WMV/MPG/3GP/MOV/FLV) stored in a USB
flash drive on the internal player of this system.
WARNING
• It is dangerous (and illegal in many countries) for the driver
to watch video while driving the vehicle. The driver may be
distracted from looking ahead and an accident could occur.
•
Install the unit correctly so that the driver cannot watch video
unless the vehicle is stopped, and the parking brake is applied.
•
If the unit is not installed correctly, the driver will be able to
watch video while driving the vehicle and may be distracted
from looking ahead and cause an accident. The driver or other
people could be severely injured.
•
USB Video is not available while driving. (Because of traffic
regulations, videos are only available when your vehicle is
parked.)
USB Video Main Screen
〇①〇
Displays the list screen
〇②〇
Menu (Caption, Sound Settings, Visual Settings)
〇③〇
Displays the Previous Screen
〇④〇
Information Display
〇⑤〇
Current Video no. / Total Video no.
〇⑥〇
Play Time and Play Bar
〇⑦〇
Previous File
〇⑧〇
Play / Pause
〇⑨〇
Repeat
〇⑩〇
Info
〇⑪〇
Screen ratio (WIDE/NORMAL)
〇⑫〇
Next File
Playing USB Video Files
1
Press the All Menus button
→
touch [USB
Video]. Or in the Home screen, touch [All Menus]
→
[USB Video].
2
Touch or and select the desired file.
• If play time is over 3 seconds, pressing will play the current
file from the beginning.
3
Touch to play USB video.
While playing, touch to pause USB video.
Viewing in Full Screen
Touch the screen in a non-menu area to change to full screen.
If you want to display the menu, touch the screen.
• If there are no operations for 10 seconds, the menu will
automatically disappear.
④
⑥
⑤
⑩⑨⑧⑦
②① ③
⑫⑪
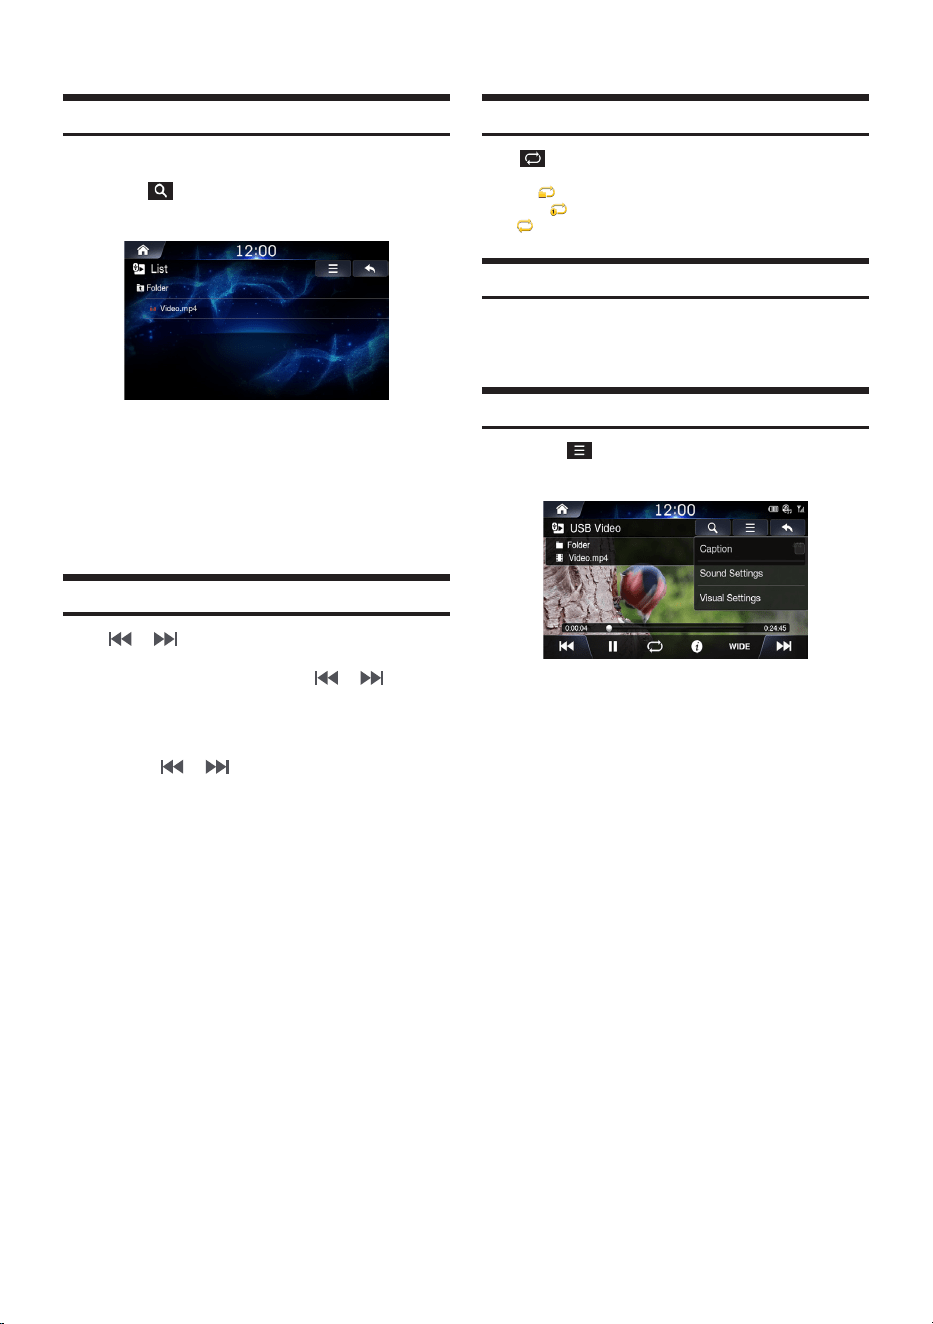
44
-EN
Searching USB Video Files
You can search the files in the List screen.
1
Touch to display USB Video list screen.
2
Search the desired folder and file.
3
Touch the desired file to play.
Fast-Forwarding or Rewinding a File
Using or .
1
While playing, touch and hold or .
Touch and hold for more than 1 second to rewind or fast-
forward at 4x speed. Keep touching to switch the speed to
20x.
2
Release or to play the file at normal
speed.
Using Play Bar
Drag or touch the slider along the play bar to jump to the point
that you want to play from.
Repeat
Touch to toggle between the modes.
• Folder : repeats the files in the current folder.
• One File : repeats play of currently playing file.
• All : repeats the all files in the USB.
Viewing File Info
Touch [Info].
The file information (File name, Resolution and Total Time) will be
displayed.
Caption
1
Touch
→
[Caption].
2
Check the caption box to display caption on USB
Video screen.
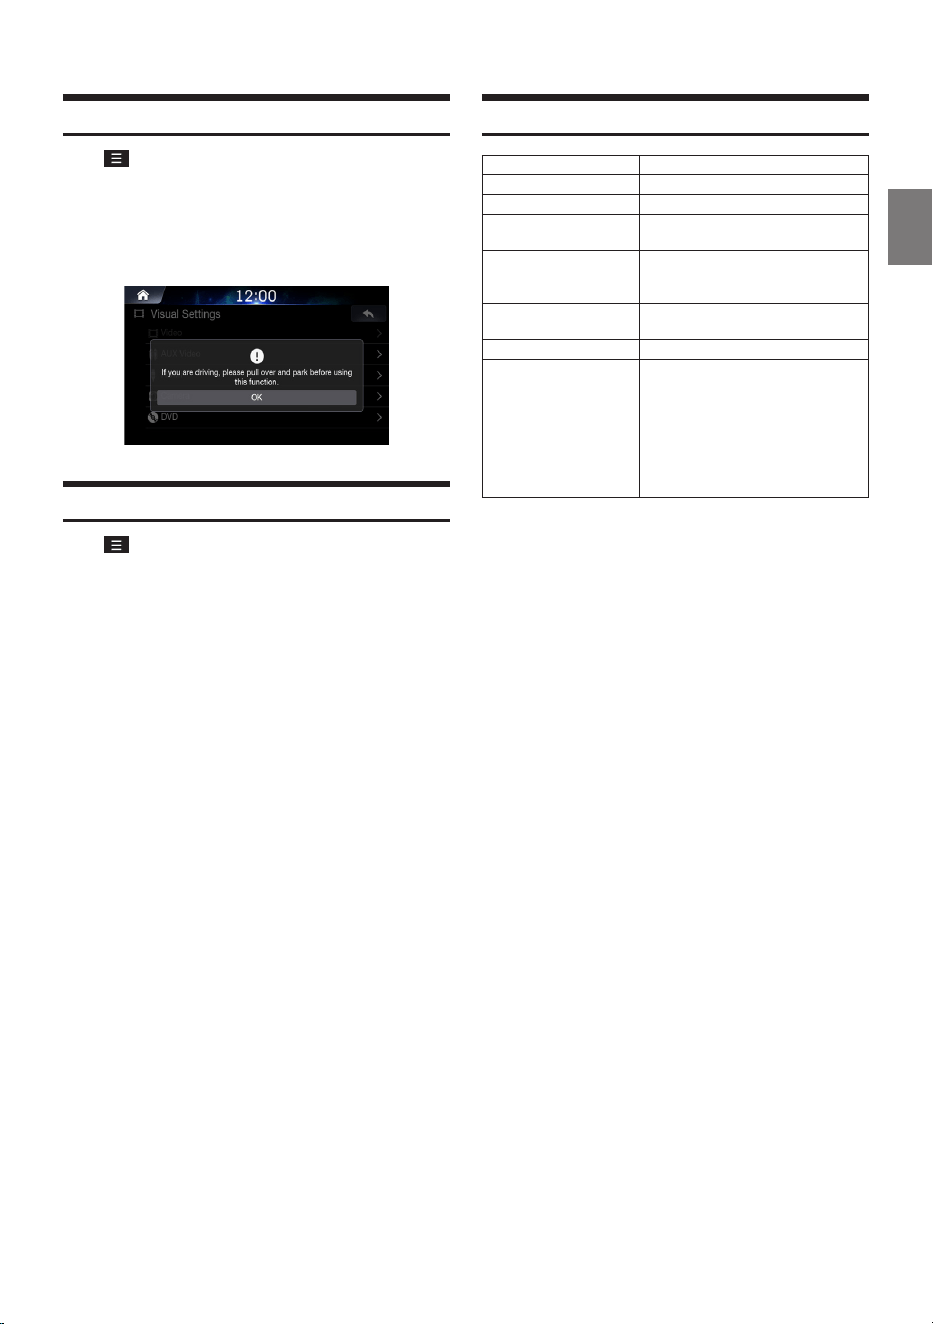
45
-EN
Visual Settings
Touch
→
[Visual Settings]
For details, refer to "Visual Settings" on page 73.
• Operating the Visual Settings is not available while driving.
(Because of traffic regulations, videos are only available when
your vehicle is parked.)
Sound Settings
Touch
→
[Sound Settings]
For details, refer to "Sound Settings" on page 68.
Supported USB Video Formats
Category Description
File Format AVI, MPEG
Extensions avi, mpg, mpeg, mp4, wmv
Video Codec
MPEG4-ASP, MPEG4-AVC(H.264),
AVS, VP8
Video Resolution
1920 x 1080
(WMV 9: Max 8Mbps, 1280x720,
WMV 8: 640x480)
Audio Codec
MP3, OGG, WMA …(AC3 not
supported)
Subtitles SMI
Unsupported files
• Files not compatible with supported
specifications
• Modified files (files with modified file
formats)
• Transformed files (example: AVI files
encoded with WMV video codec)
• Files without indexes
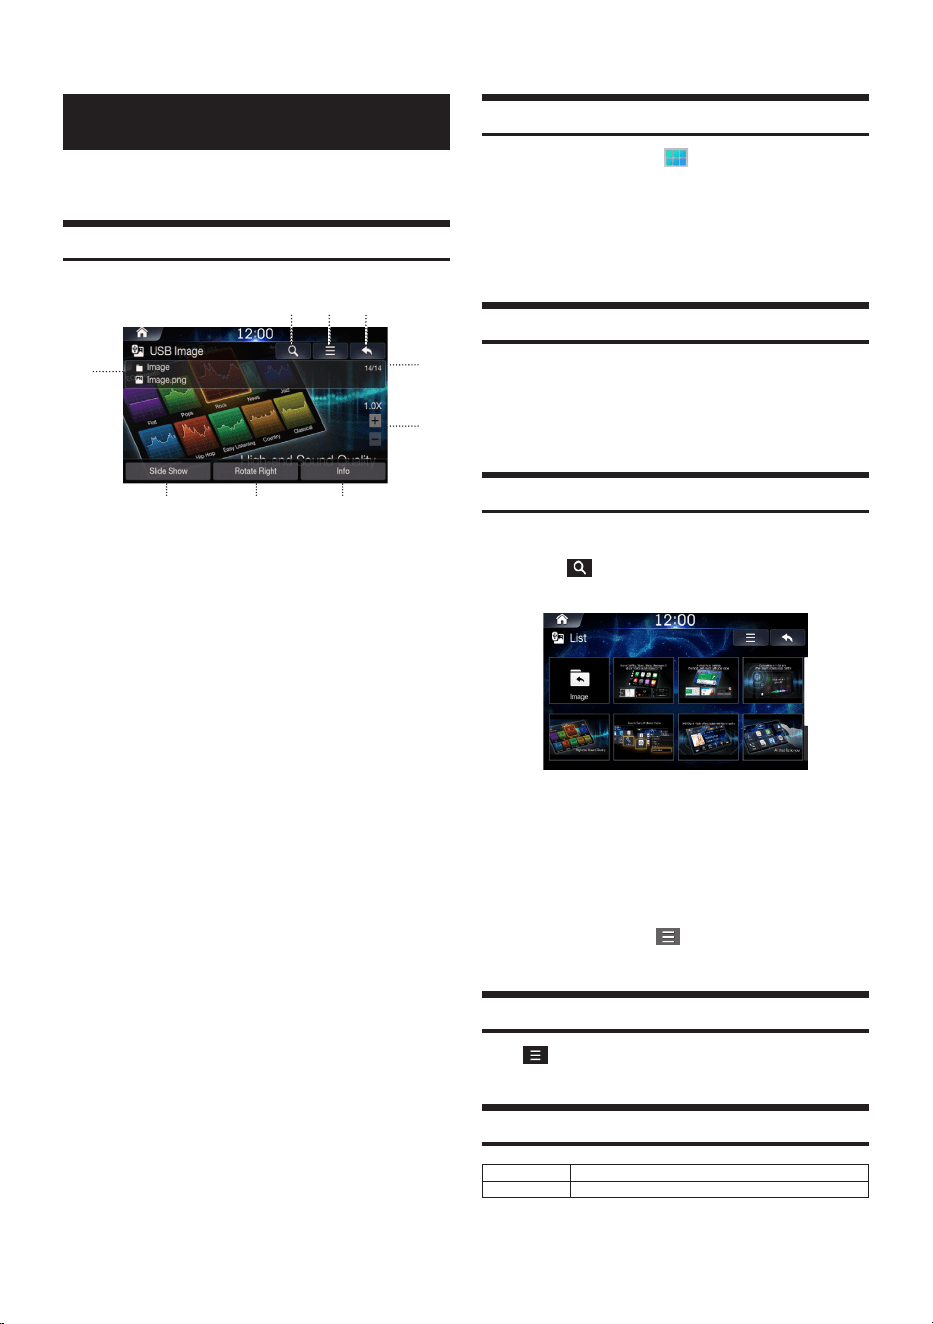
46
-EN
USB Image
You can play music/Video/Image files stored in a disc on the internal
player of this system.
USB Image Main Screen
④
⑤
⑥
⑨⑧⑦
②① ③
〇①〇
Displays the list screen
〇②〇
Screen Settings
〇③〇
Displays the Previous Screen
〇④〇
Information Display
〇⑤〇
Current Image no. / Total Image no.
〇⑥〇
Zoom in/out
〇⑦〇
Slide Show
〇⑧〇
Rotate Right
〇⑨〇
Info
Playing USB Image Files
1
Press the All Menus button
→
touch [USB
Image]. Or in the Home screen, touch [All Menus]
→
[USB Image].
2
Swipe left or right to display and select the
desired file.
Viewing in Full Screen
Touch the screen in a non-menu area to change to full screen.
If you want to display the menu, touch the screen.
• If there are no operations for 10 seconds, the menu will
automatically disappear.
Searching USB Image Files
You can search the files in the List screen.
1
Touch to display USB File list screen.
2
Search the desired file.
3
Touch the desired file to play.
• To change list type, touch and select [List View] or Show
Current Track.
Screen Settings
Touch
→
[Screen Setting]
For details, refer to "Screen Settings" on page 74.
Supported USB Image Format
Category Description
Supported Format bmp, jpg, png, gif file

47
-EN
iPod Music
• Before using this function, turn Apple CarPlay On and plug in your
iPhone using the Lightning to USB Cable (Supplied with iPhone)
to the unit (page 84).
•
The use of genuine iPhone
®
cables supplied by Apple is
recommended. (The use of other products may result in noise or
abnormal operation.)
•
Within iPhones, streaming audio and iPod
®
control may
occasionally conflict. If problems persist, remove the iPhone and
connect again.
•
If iPods
®
and Bluetooth
®
devices are connected simultaneously
with the same iPhone, Bluetooth
®
audio will be unavailable.
•
Some iPhones with unsupported communication protocols may
not properly operate with the system.
Supported iPhone Devices
• While iPhone device work normally on iOS 12.4, they may not
work normally on future iOS versions as their operation have not
yet been tested.
- Supported iPhone: starting from generation 5, 5s, 5c, 6, 6+, ....
iPod Music Main Screen
②① ③
⑥
⑤
⑧ ⑨ ⑩ ⑪ ⑫
⑦
④
〇①〇
Displays the list screen
〇②〇
Menu
〇③〇
Displays the Previous Screen
〇④〇
Artwork Display
〇⑤〇
Current Song no. / Total Song no.
〇⑥〇
Information Display
〇⑦〇
Play Time and Play Bar
〇⑧〇
Previous File
〇⑨〇
Play/Pause
〇⑩〇
Repeat
〇⑪〇
Shuffle
〇⑫〇
Next File
Playing iPod Music
1
Press the All Menus button
→
touch [iPod
Music]. Or in the Home screen, touch [All Menus]
→
[iPod Music].
2
Touch or and select the desired file.
If play time is over 3 seconds, pressing
will
play the current file from the beginning.
3
Touch
to play iPod music.
While playing, touch to pause iPod music.
The feature may operate differently depending on the iPod
specification.
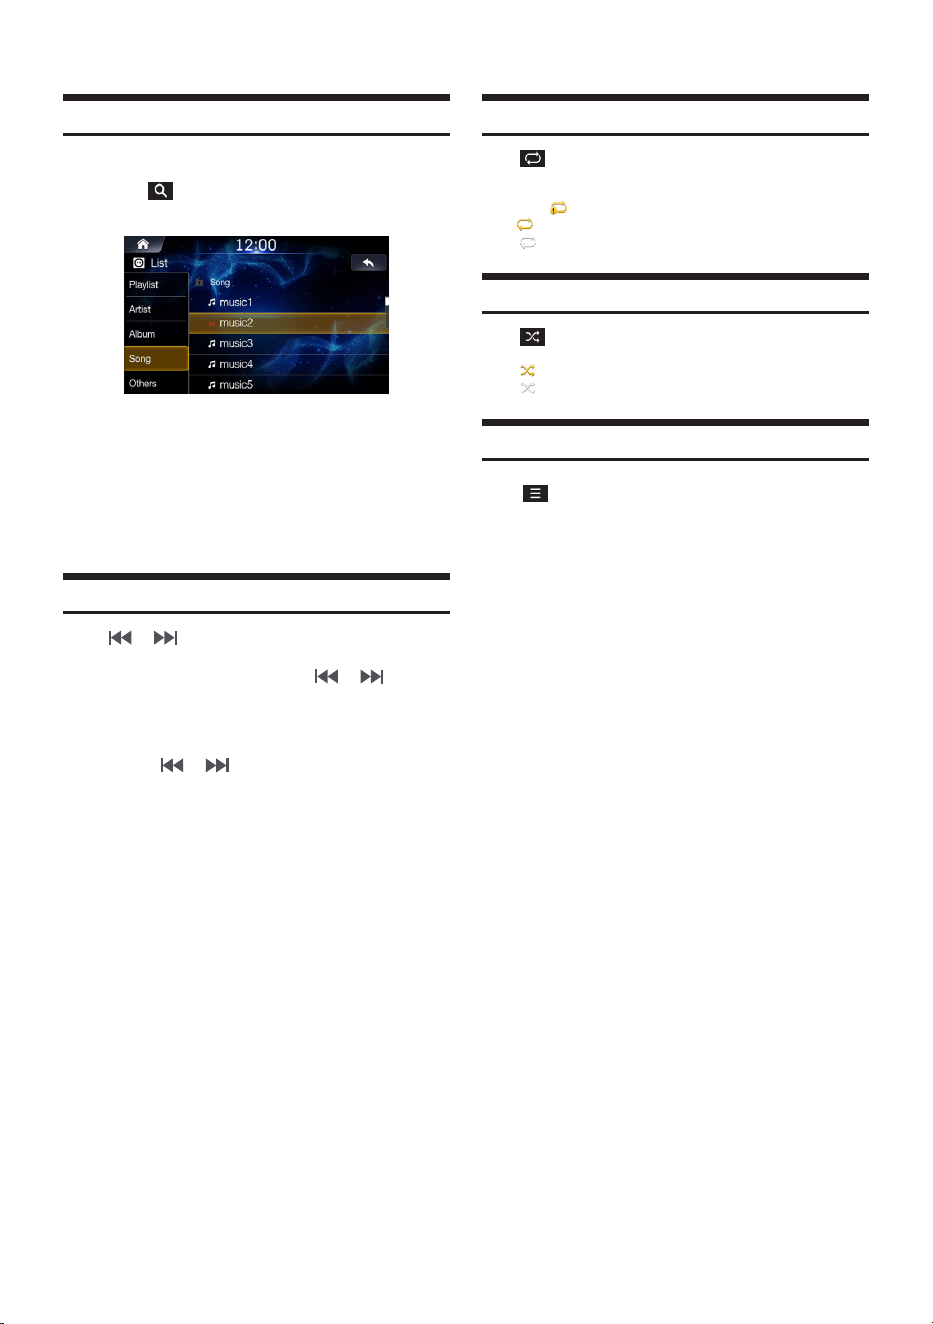
48
-EN
Fast-Forwarding or Rewinding a File
You can search the files in the List screen.
1
Touch to display iPod Music list screen.
2
Search the desired category and file.
It is possible to search by Playlist, Artist Album, song and
others.
3
Touch the desired file to play.
Fast-Forwarding or Rewinding File
Using or .
1
While playing, touch and hold or .
Touch and hold for more than 1 second to rewind or fast-
forward at 4x speed. Keep touching to switch the speed to
20x.
2
Release or to play the file at normal
speed.
Using Play Bar
Drag or touch the slider along the play bar to jump to the point that
you
want to play from.
Repeat
Touch to toggle between the modes.
• One File : repeats play of currently playing file.
• All : repeats the all files in the USB.
• Off : turns the repeat feature off.
Shuffle
Touch to toggle between the modes.
• On : plays files within playlist in random order.
• Off : turns the shuffle feature off.
Sound Settings
Touch
→
[Sound Settings]
For details, refer to "Sound Settings" on page 68.

49
-EN
Android Auto
What Is Android Auto
Android Auto is designed to make it easier to use apps from your
phone while you’re on the road. Navigate with Google Maps, listen
to playlists or podcasts from your favorite apps, and more.
Activate Android Auto
Download the Android Auto App from the Google Play store before
continuing.
Just plug in your smartphone to the unit's USB connector, then follow
the prompt to pair your smartphone with the unit.
• The connected smartphone with Android Auto will disconnect other
phone’s Bluetooth connection and pair to the unit.
1
Press the All Menus button
→
touch [Android
Auto]. Or in the Home screen, touch [All Menus]
→
[Android Auto].
2
The Android Auto screen is displayed.
• When a used smartphone is reconnected, touch the pop-up
message-“Android Auto connected” within 5 seconds to access to
Android Auto screen, or you can ignore prompt by touching [ ]
on the top right.
•
You can make a call, use voice recognition function and Android
Auto’s compatible navigation app, etc,.
•
Only Google approved apps with necessary driver-safety
measures in place can be used.
Apple CarPlay
Apple CarPlay is a smarter, safer way to use your iPhone in the car.
Apple CarPlay takes the things you want to do with your iPhone
while driving and puts them right on the unit. You can get directions,
make calls, send and receive messages, and listen to music, all in
a way that allows you to stay focused on the road. Just plug in your
iPhone to the unit and go.
• Before using this function, turn Apple CarPlay On and plug in your
iPhone using Lightning to USB Cable (Supplied with iPhone) to
the unit.
•
Some functions may not be available while driving.
•
About iPhone models usable with this unit, see “iPod/iPhone
” (page 84). Only an iPhone 5 or later compatible with Apple
CarPlay function.
Access to Apple CarPlay
1
Press the All Menus button
→
touch [Apple
CarPlay]. Or in the Home screen, touch [All
Menus]
→
[Apple CarPlay].
2
The Apple CarPlay mode is activated.
• Touch the desired App icon on the unit, or use Siri function by
pressing the VOICE button.
• When a used iPhone 5 or later is reconnected, touch the pop-up
message-“Apple CarPlay connected.” within 5 seconds to access
to Apple CarPlay screen, or you can ignore prompt by touching
[
] on the top right.
• The App must be Apple CarPlay compatible in order to appear in
the Home screen.
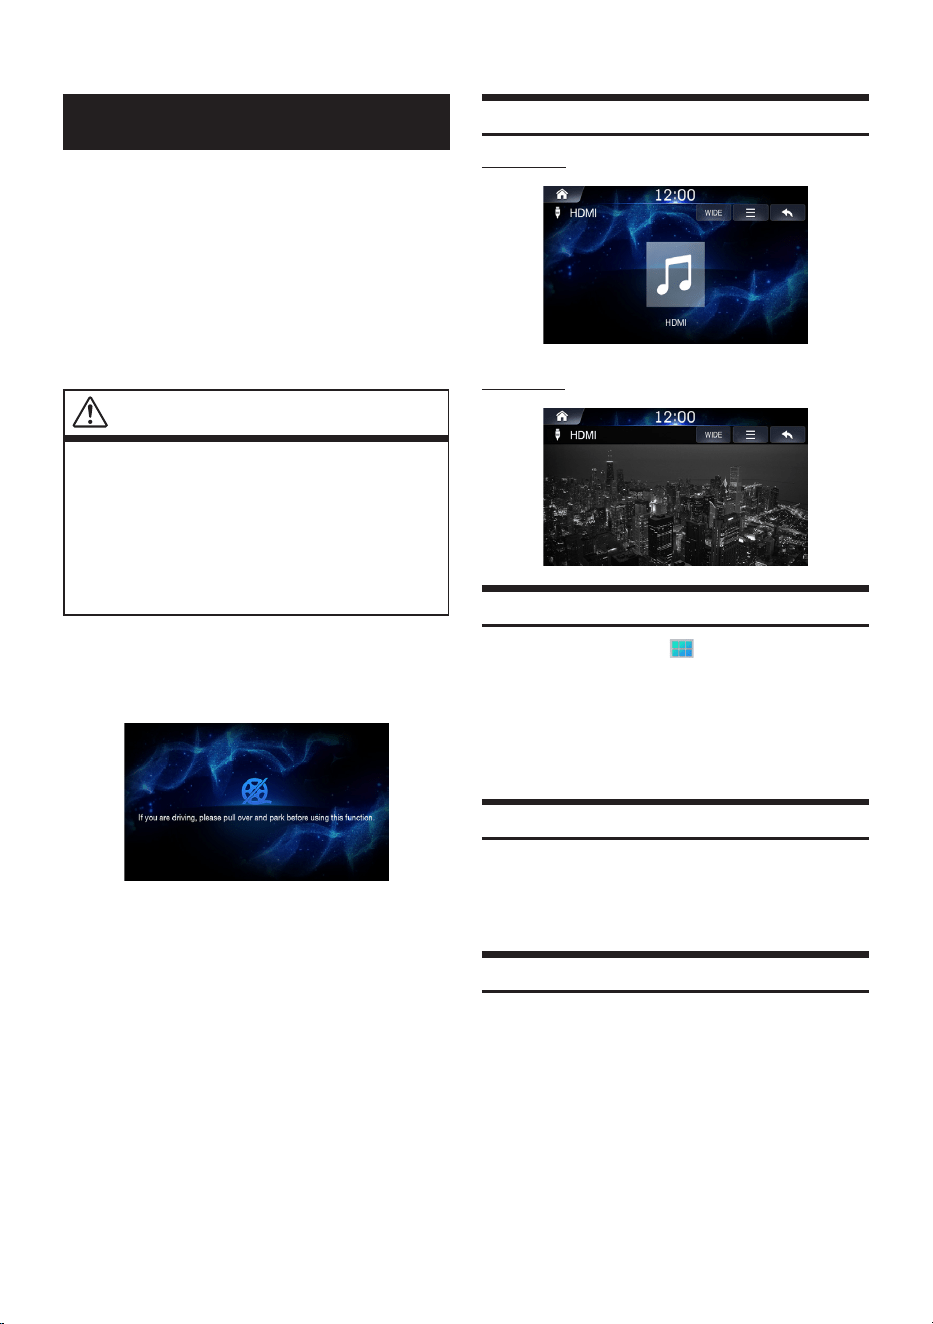
50
-EN
HDMI
Devices supporting HDMI can connect and play back through this
unit. When making HDMI connections, you need to set HDMI on the
unit suitable for the connected device.
• The HDMI/MHL connecting cable differs depending on the
connected device corresponding to HDMI. Prepare optional HDMI/
MHL connecting cable sets suitable for your device.
•
The electronic device must possess an HDMI output interface.
•
Not all devices with an HDMI output interface can be recognised
by this unit.
•
Use only the Alpine Special HDMI connection cable.
WARNING
• It is dangerous (and illegal in many countries) for the driver
to watch video while driving the vehicle. The driver may be
distracted from looking ahead and an accident could occur.
•
Install the unit correctly so that the driver cannot watch video
unless the vehicle is stopped, and the parking brake is applied.
•
If the unit is not installed correctly, the driver will be able to
watch video while driving the vehicle and may be distracted
from looking ahead and cause an accident. The driver or other
people could be severely injured.
•
HDMI Video is not available while driving. (Because of traffic
regulations, videos are only available when your vehicle is
parked.)
HDMI Main Screen
HDMI Audio
HDMI Video
Playing HDMI Mode
1
Press the All Menus button
→
touch [HDMI].
Or in the Home screen, touch [All Menus]
→
[HDMI].
2
Control directly within your HDMI device.
Viewing in Full Screen
Touch the screen in a non-menu area to change to full screen.
If you want to display the menu, touch the screen.
• If there are no operations for 10 seconds, the menu will
automatically disappear.
Changing Screen Ratio
1
Touch [Wide].
Each time the button is touched, the mode is changed.
2
Select the desired mode.
• Wide: displays in 16:9 wide screen.
• Normal: displays in 4:3 screen ratio.
• Cinema: displays in 21:9 screen ratio
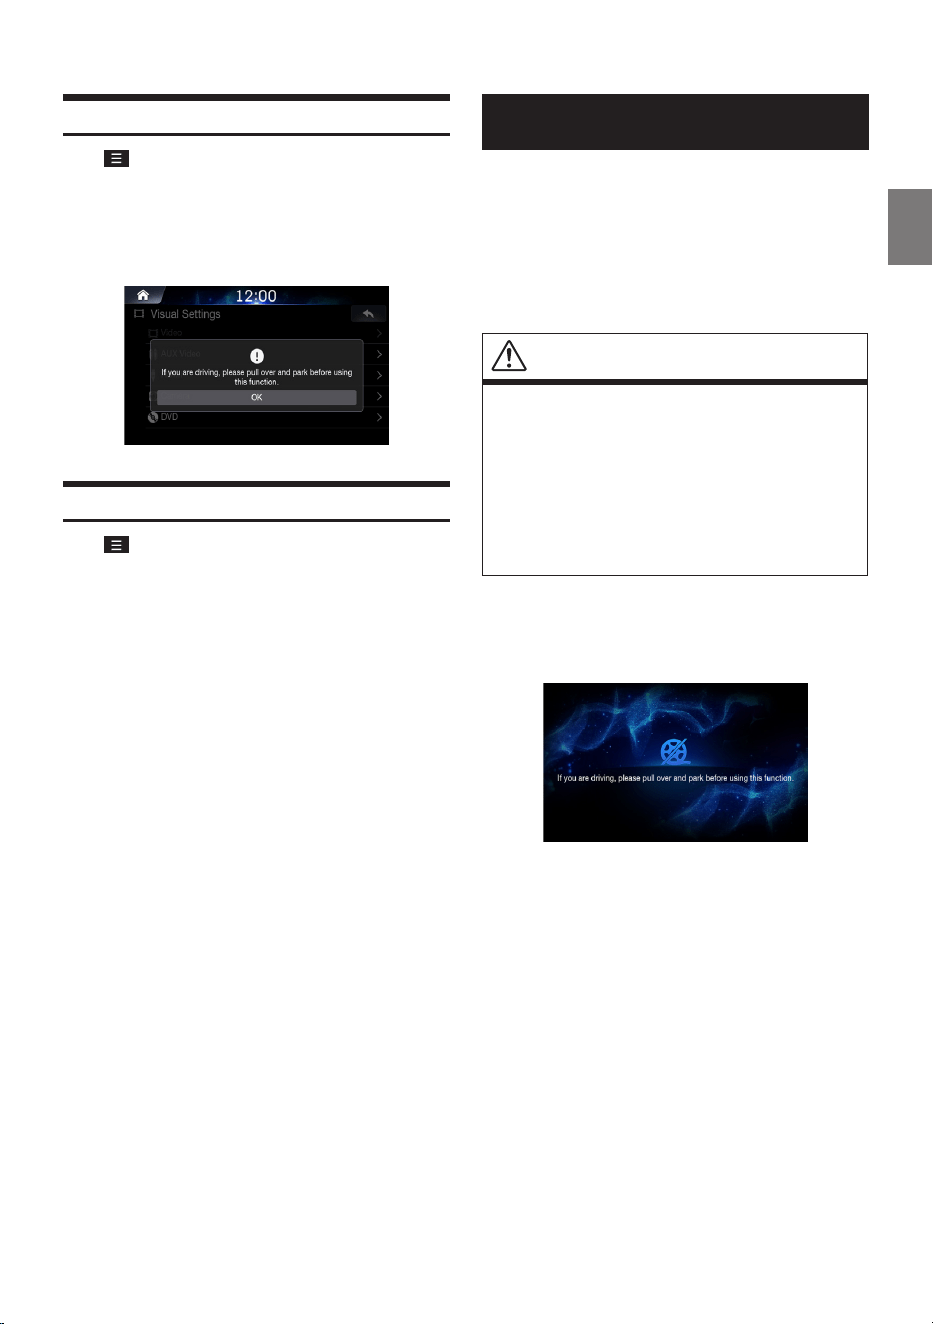
51
-EN
Visual Settings
Touch
→
[Visual Settings]
For details, refer to "Visual Settings" on page 73.
• Operating the Visual Settings is not available while driving.
(Because of traffic regulations, videos are only available when
your vehicle is parked.)
Sound Settings
Touch
→
[Sound Settings]
For details, refer to "Sound Settings" on page 68.
AUX (Auxiliary Device)
Devices supporting AUX can connect and play back through this
unit. When making AUX connections, you need to set AUX on the
unit suitable for the connected device.
• Set AUX to “On.”
• Depending on the connected unit, the operation may differ.
• You can operate AUX, AUX DVD, GAME, Ext. DVD, DVD
Changer, DVB-T, TV and -USB Player.
WARNING
• It is dangerous (and illegal in many states) for the driver to
watch TV/video while driving the vehicle. The driver may be
distracted from looking ahead and an accident could occur.
• Install the unit correctly so that the driver cannot watch TV/
video unless the vehicle is stopped and the emergency brake
is applied.
• If the unit is not installed correctly, the driver will be able to TV/
watch video while driving the vehicle and may be distracted
from looking ahead and cause an accident. The driver or other
people could be severely injured.
• AUX TV/Video is not available while driving. (Because of traffic
regulations, videos are only available when your vehicle is
parked.)
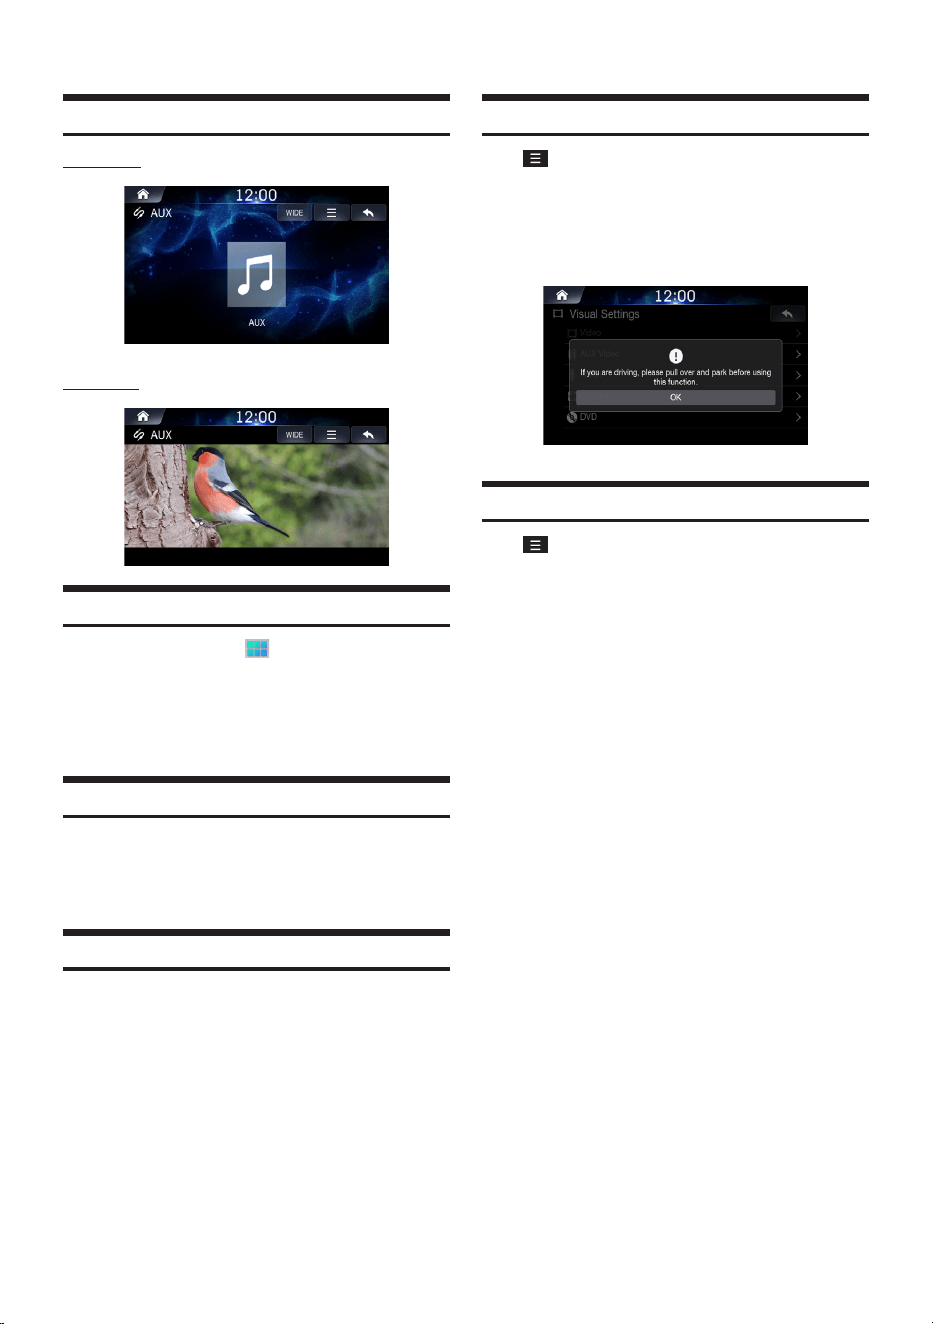
52
-EN
AUX Main Screen
AUX Audio
AUX Video
Playing AUX Mode
1
Press the All Menus button
→
touch [AUX].
Or in the Home screen, touch [All Menus]
→
[AUX].
2
Control directly within your external device.
Viewing in Full Screen
Touch the screen in a non-menu area to change to full screen.
If you want to display the menu, touch the screen.
• If there are no operations for 10 seconds, the menu will
automatically disappear.
Changing Screen Ratio
1
Touch [Wide].
Each time the button is touched, the mode is changed.
2
Select the desired mode.
• Wide: displays in 16:9 wide screen.
• Normal: displays in 4:3 screen ratio.
• Cinema: displays in 21:9 screen ratio
Visual Settings
Touch
→
[Visual Settings]
For details, refer to "Visual Settings" on page 73.
• Operating the Visual Settings is not available while driving.
(Because of traffic regulations, videos are only available when
your vehicle is parked.)
Sound Settings
Touch
→
[Sound Settings]
For details, refer to "Sound Settings" on page 68.
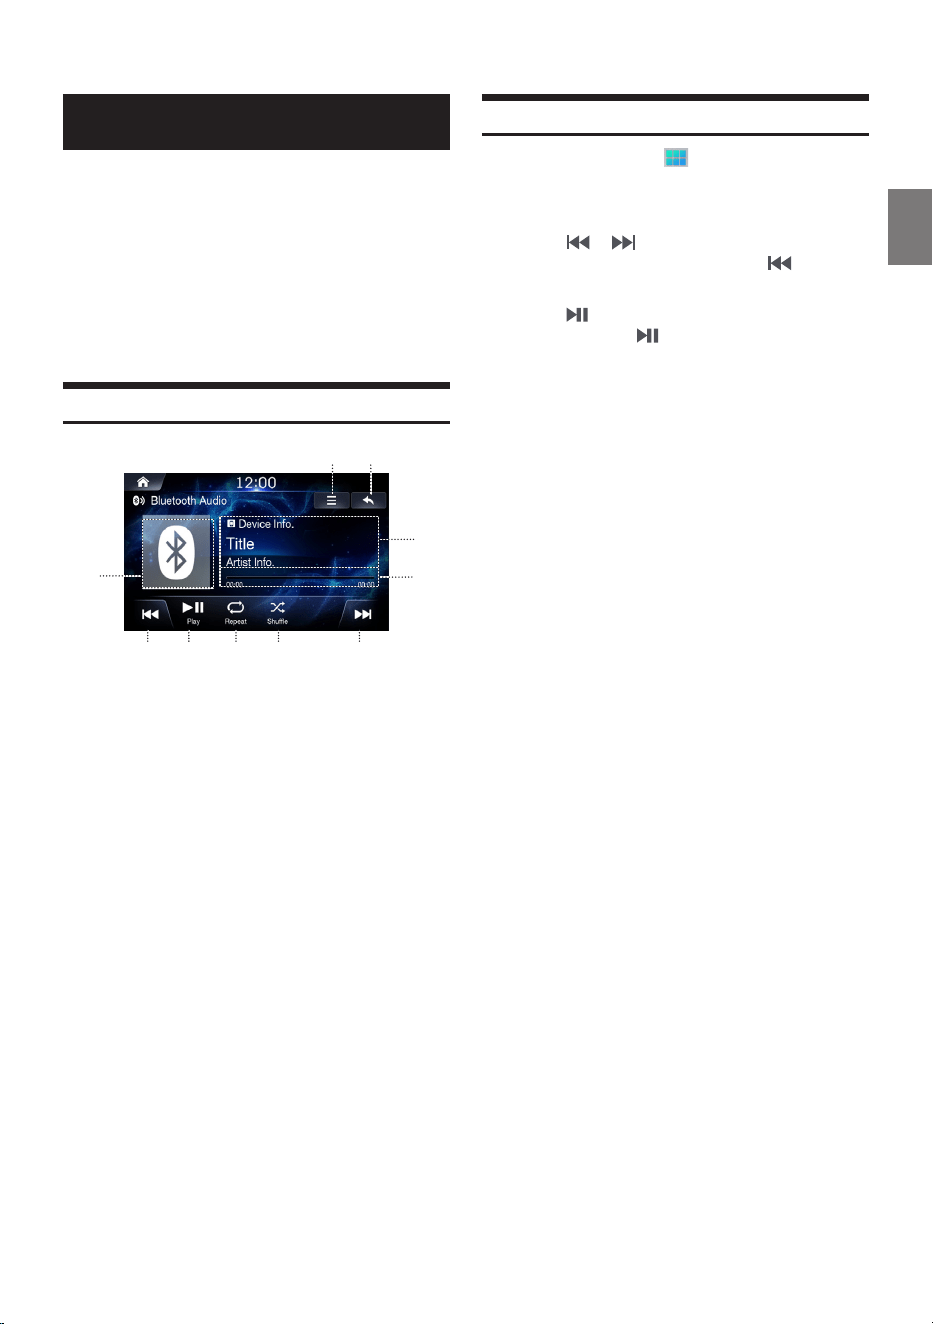
53
-EN
Bluetooth Audio
Music saved in the mobile phone, portable player, etc. can be played
in the car through Bluetooth audio streaming.
• Bluetooth audio can be played only when a Bluetooth phone or
Bluetooth audio device has been connected. To play Bluetooth
audio, connect the Bluetooth phone to the car system. For more
information on connecting Bluetooth, please refer to the user’s
manual [Pairing and connecting the unit and a Bluetooth phone]
on page 64.
• The feature may operate differently depending on the Bluetooth
device.
Bluetooth Audio Main Screen
②①
③
⑥ ⑦ ⑧ ⑨ ⑩
⑤
④
〇①〇
Menu
〇②〇
Displays the Previous Screen
〇③〇
Bluetooth Icon
〇④〇
Information Display
〇⑤〇
Play Time and Play Bar
〇⑥〇
Previous File
〇⑦〇
Play / Pause
〇⑧〇
Repeat
〇⑨〇
Shuffle
〇⑩〇
Next File
Playing Bluetooth Audio
1
Press the All Menus button
→
touch
[Bluetooth Audio]. Or in the Home screen, touch
[All Menus]
→
[Bluetooth Audio].
2
Touch or and select the desired file.
If play time is over 3 seconds, pressing will play the
current file from the beginning.
3
Touch to play Bluetooth Audio.
While playing, touch to pause Bluetooth Audio.
• The title/artist info may not be supported in some devices. When it
is not supported, only the symbol will be displayed.
• The play/pause feature may operate differently depending on the
device.
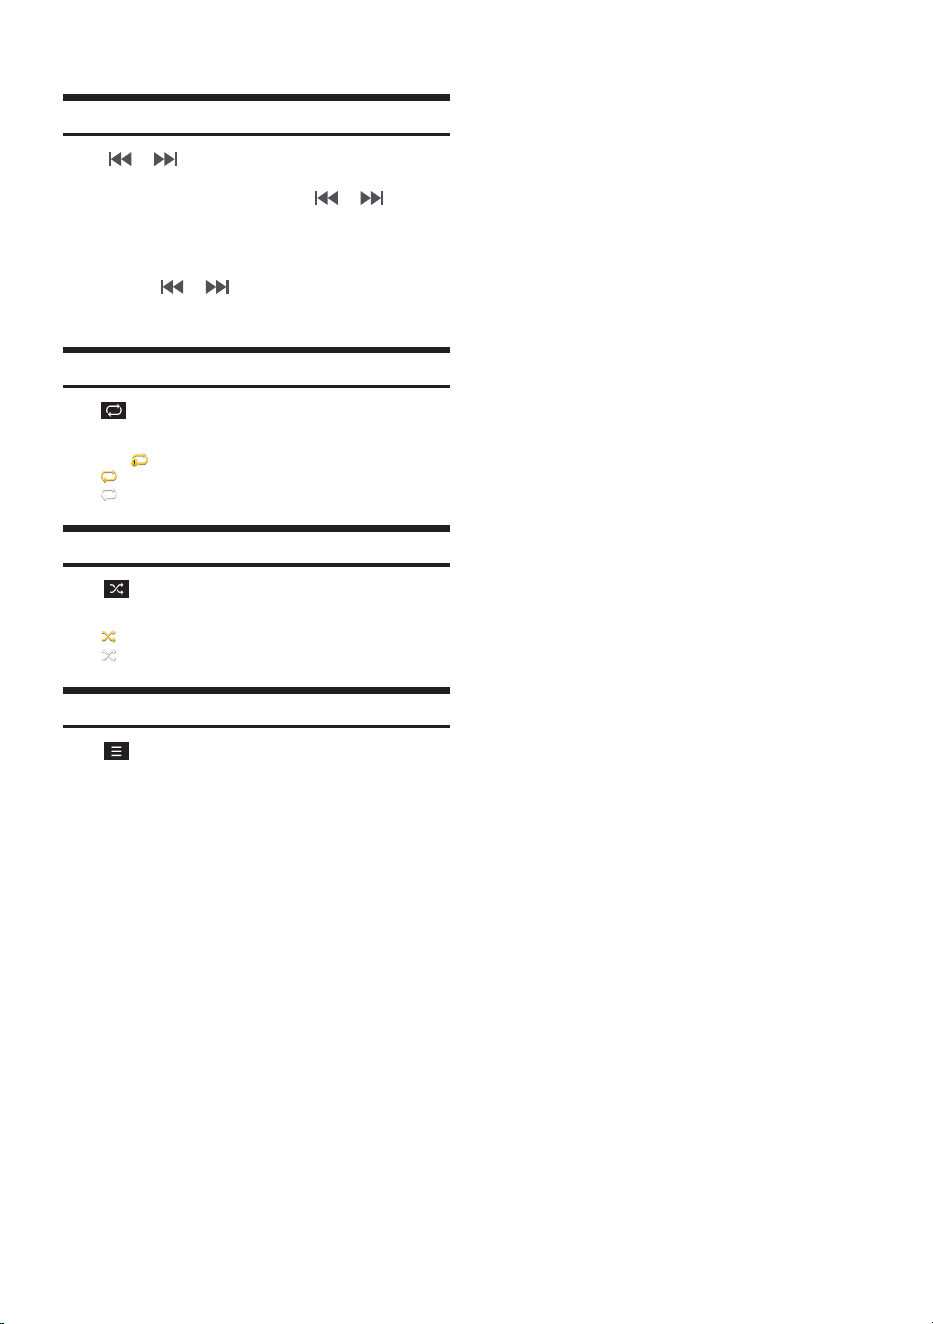
54
-EN
Fast-Forwarding or Rewinding a File
Using or .
1
While playing, touch and hold or .
Touch and hold for more than 1 second to rewind or fast-
forward at 4x speed. Keep touching to switch the speed to
20x.
2
Release or to play the track at normal
speed.
Repeat
Touch to toggle between the modes.
• One File : repeats play of currently playing file.
• On : repeats all of the files in the Bluetooth Audio.
• Off : turns the Repeat feature off.
Shuffle
Touch
to toggle between the modes.
• On : plays files in the current category in random order.
• Off : turns the shuffle feature off.
Sound Settings
Touch
→
[Sound Settings]
For details, refer to "Sound Settings" on page 68.

55
-EN
Bluetooth Operation
Setup Before Using
■
About Bluetooth
Bluetooth is a wireless technology allowing communication between
a mobile device or personal computer over short distances. This
enables a handsfree call or data transmission between Bluetooth
compatible devices. Bluetooth transmission is available in the
unlicensed 2.4 GHz spectrum if the distance between devices is
within 10 metres. For details, refer to the Bluetooth website (http://
www.bluetooth.com/).
• Depending on the Bluetooth version, a Bluetooth compatible
device may not be able to communicate with this unit.
• Proper function of this unit with all Bluetooth compatible devices is
not guaranteed. For handling of the Bluetooth compatible device,
consult your Alpine dealer or Alpine website.
• Depending on the surroundings, Bluetooth wireless connection
may be unstable.
• When you place a call, or perform setup operations, be sure to
stop your car in a safe place.
• Depending on the connected Bluetooth compatible device(s),
the function may differ. Also refer to the Owner’s Manual of the
connected device(s).
■
About Handsfree Phone
Handsfree calls are possible when using a HFP (Hands-Free Profile)
compatible mobile phone with this unit.
• Avoid performing a handsfree call in heavy traffic or on narrow or
winding streets.
• Close the windows while calling to reduce background noise.
• If both calling parties are using handsfree devices, or the call is
made in a noisy location, difficulty hearing the other person’s
voice is normal.
• Depending on telephone line conditions or certain mobile devices
used, voices may sound unnatural.
• When using a microphone, speak as directly as you can into the
microphone to obtain the best sound quality.
• Certain mobile phone features are dependent on the capabilities
and settings of your service provider’s network. Additionally,
certain features may not be activated by your service provider,
and/or the provider’s network settings may limit the feature’s
functionality.
• Always contact your service provider about feature availability and
functionality.
• All features, functionality, and other product specifications, as well
as the information contained in the Owner’s Manual are based
upon the latest available information and are believed to be
accurate at the time of printing.
• Alpine reserves the right to change or modify any information or
specifications without notice or obligation.
• Notice that when you connect an iPhone 5 or later/Android
smartphone which installed Android Auto App, the operation
screen may differ from this section.
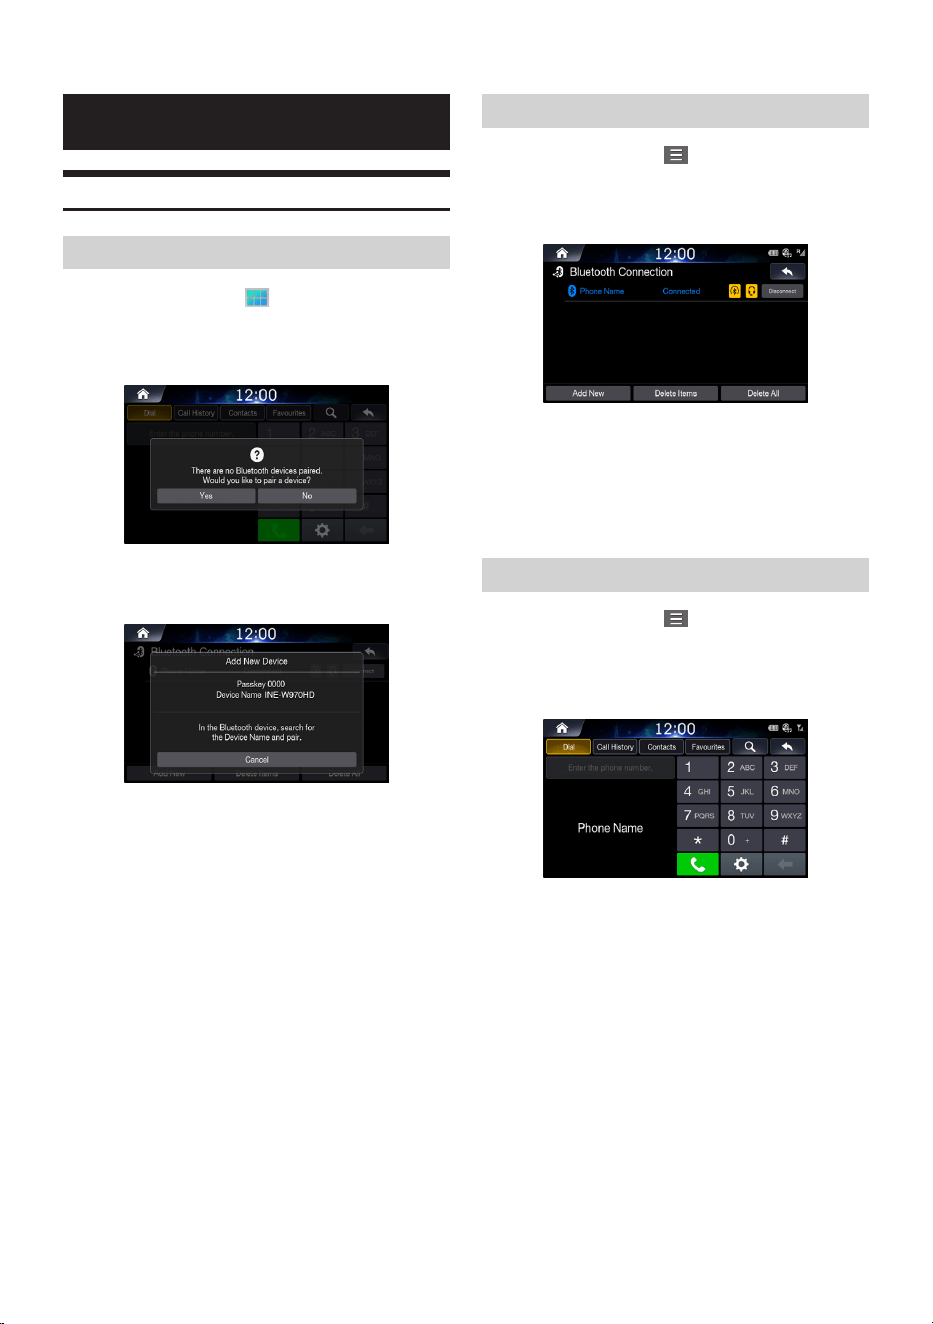
56
-EN
Phone
Pairing and Connecting a Phone
When No Phones Have Been Paired
1
Press the All Menus button
→
touch [Phone].
Or in the Home screen, touch [All Menus]
→
[Phone].
2
Touch [Yes].
3
Pair from the Bluetooth Device
From the Bluetooth device, search for the car name and pair
the device. When searching from the Bluetooth device, the
car name is ‘INE-W970HD’ and the default passkey is ‘0000’.
When a Phone Is Already Paired
1
Press the All Menus button
→
touch [Phone].
Or in the Home screen, touch [All Menus]
→
[Phone].
2
Select the device from the list and touch
[Connect].
• When a Bluetooth device is connected, a new device cannot
be paired. If you want to pair a new phone, first disconnect the
connected Bluetooth device.
When a Phone Is Connected
1
Press the All Menus button
→
touch [Phone].
Or in the Home screen, touch [All Menus]
→
[Phone].
The following screen will be displayed.
• Once Bluetooth connection is successful, the name of the
connected mobile phone will be displayed on the phone screen
and Bluetooth handsfree functions will be ready to be operated.
• Some functions may not be supported due to limited Bluetooth
compatibility between the car system and mobile phone.
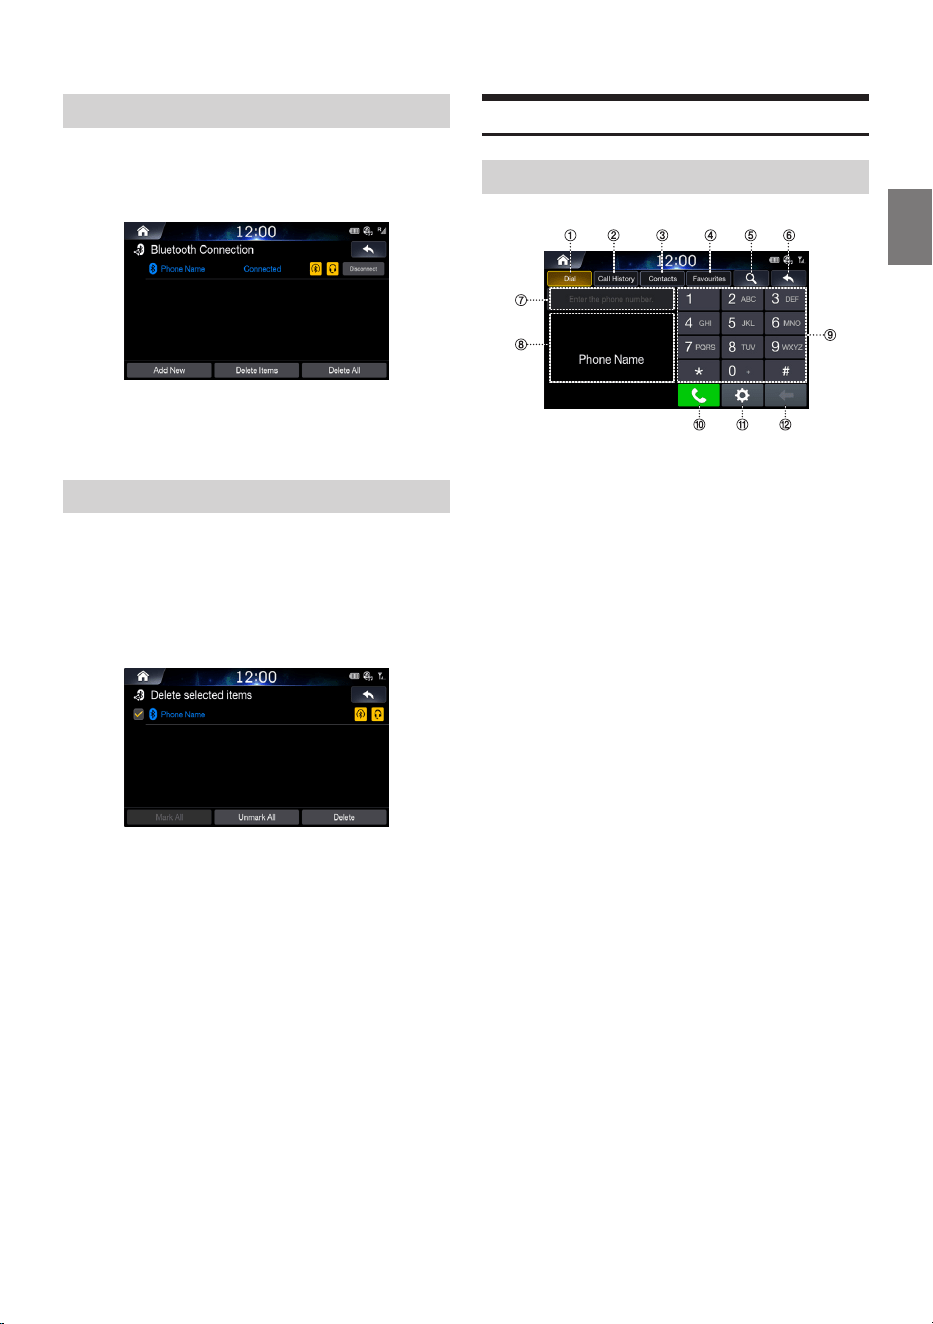
57
-EN
Disconnecting Bluetooth Devices
1
In the Phone screen, touch [Settings]
→
[Bluetooth Connection].
2
Select the currently connected device and touch
[Disconnect].
Deleting Bluetooth Devices
1
In the Phone screen, touch [Settings]
→
[Bluetooth Connection].
2
Touch [Delete Items] and select the device you
wish to delete.
3
Touch [Delete].
To select all devices, press [Mark All].
To deselect all selected devices, press [Unmark All].
• A connected Bluetooth device cannot be deleted. First disconnect
the connected Bluetooth device.
• If you want to delete all paired devices, touch [Delete all].
• Once a device is deleted, the call history and contacts that were
saved to the head unit are also deleted.
Phone Screen
Bluetooth Phone Main Screen
〇①〇
Dial
This is the main screen in which Bluetooth Phone operates.
〇②〇
Call History
Display the Call History screen.
〇③〇
Contacts
Display the Contacts screen.
〇④〇
Favorites
Display the Contacts screen.You can add frequently used
numbers to Favorites to quickly find and call numbers.
〇⑤〇
Search
Displays the Contacts Search screen. You can search the
contacts by name or phone number.
〇⑥〇
Displays the Previous Screen
〇⑦〇
Number Field
Shows entered numbers
〇⑧〇
Search Results
Displays the contact and number search results.
〇⑨〇
Dial Pad
Used to enter numbers.The entered numbers are shown in the
number field.
〇⑩〇
Call
If a number has been entered, calls the number.
〇⑪〇
Settings
Displays the Bluetooth Settings Screen.
〇⑫〇
Delete
Deletes entered numbers.
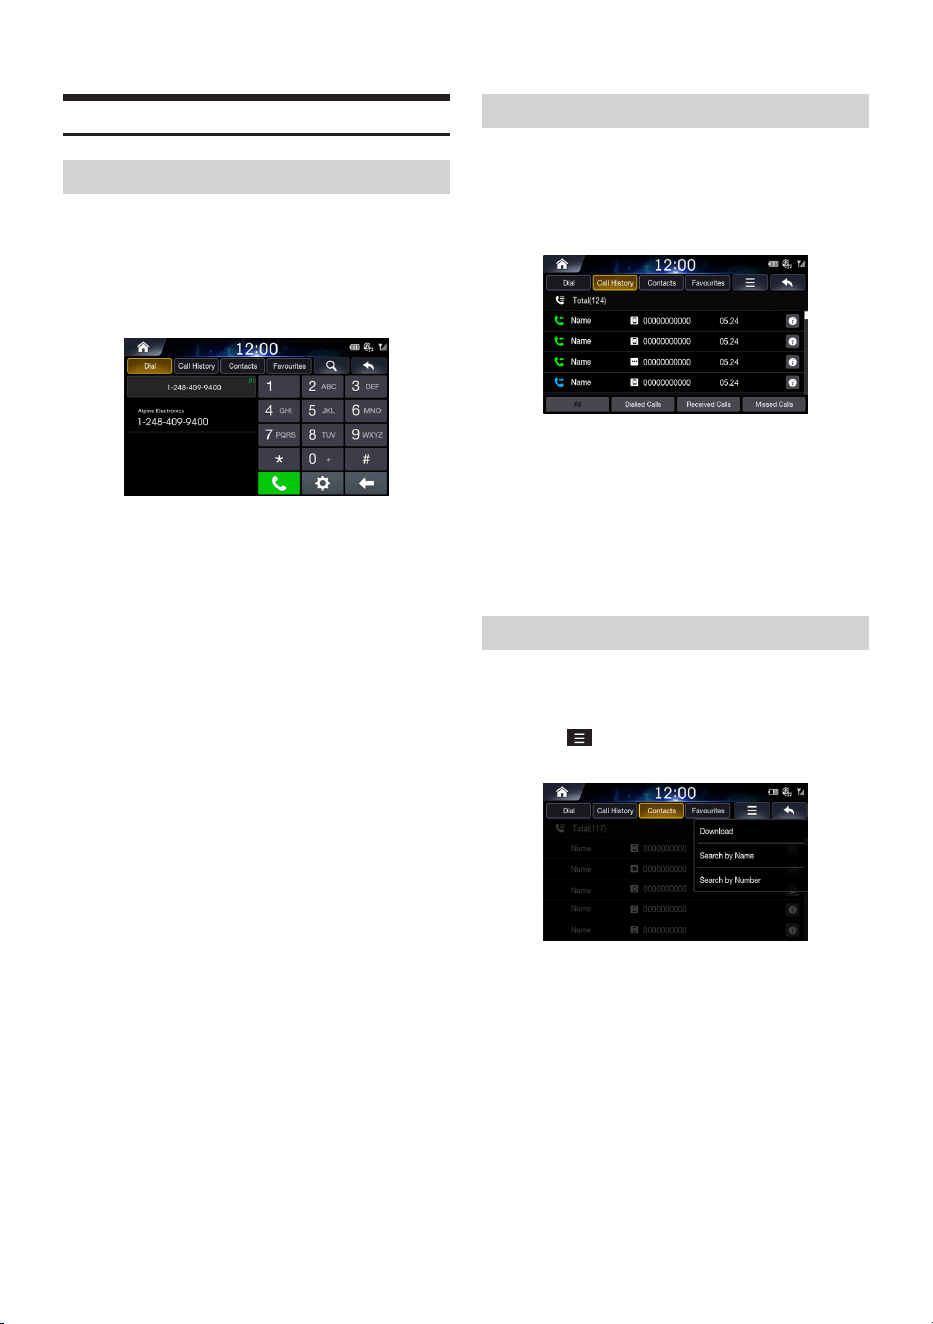
58
-EN
Making a Call
Dialling by Dialling a Number
1
Enter number on the Dial Pad
2
Touch [Call].
The phone call is started.
• If you press the wrong number, press [Delete] to delete one digit
of the entered number. Press and hold the dial pad [0+] to enter a
"+".
■
Making a Call from Speed Dial
1. Enter the 1 or 2 digit speed dial number with the Dial Pad
2. Touch and hold the last number.
The phone call is started.
■
Calling through Redial
1. Touch and hold [Call].
The phone call is started.
• Redialling is not possible when there is no dialled calls list.
Making a Call from Contacts
1
Touch [Call History]
2
Select the desired option.
• All: entire calls list
• Dialled Calls: dialled calls list
• Received Calls: received calls list
• Missed Calls: missed calls list
3
Select the contact you wish to call.
The phone call is started.
Making a call from contacts
1
Touch [Contacts]
2
Touch
→
Select the desired search option.
3
Enter the name or number.
4
Select the contact you wish to call.
The phone call is started.
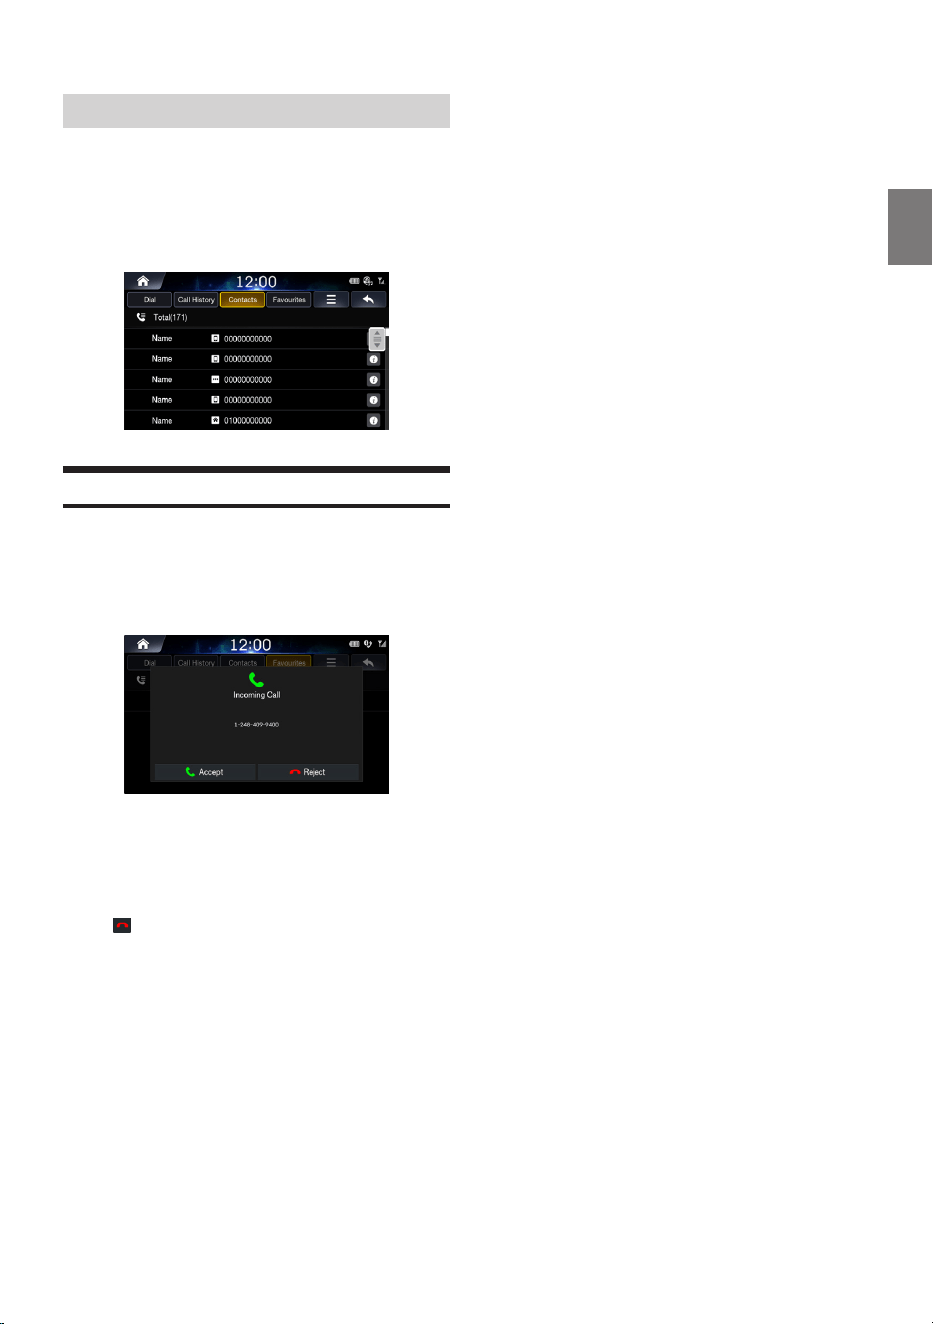
59
-EN
Making a Call from Favorites
1
Touch [Favorites]
2
Select the contact you wish to call.
The phone call is started.
Answering a Call
1
When there is an incoming call you wish to
accept, touch [Accept].
2
The incoming call is connected.
• During a call, the audio for the current mode on the unit is muted.
After calling, playback will resume.
• When the caller’s number is transmitted to the system, if the
caller’s name is stored in the phone book, the name is displayed.
If the name is not stored, the number is displayed.
• Touch (Reject) to reject an incoming call.
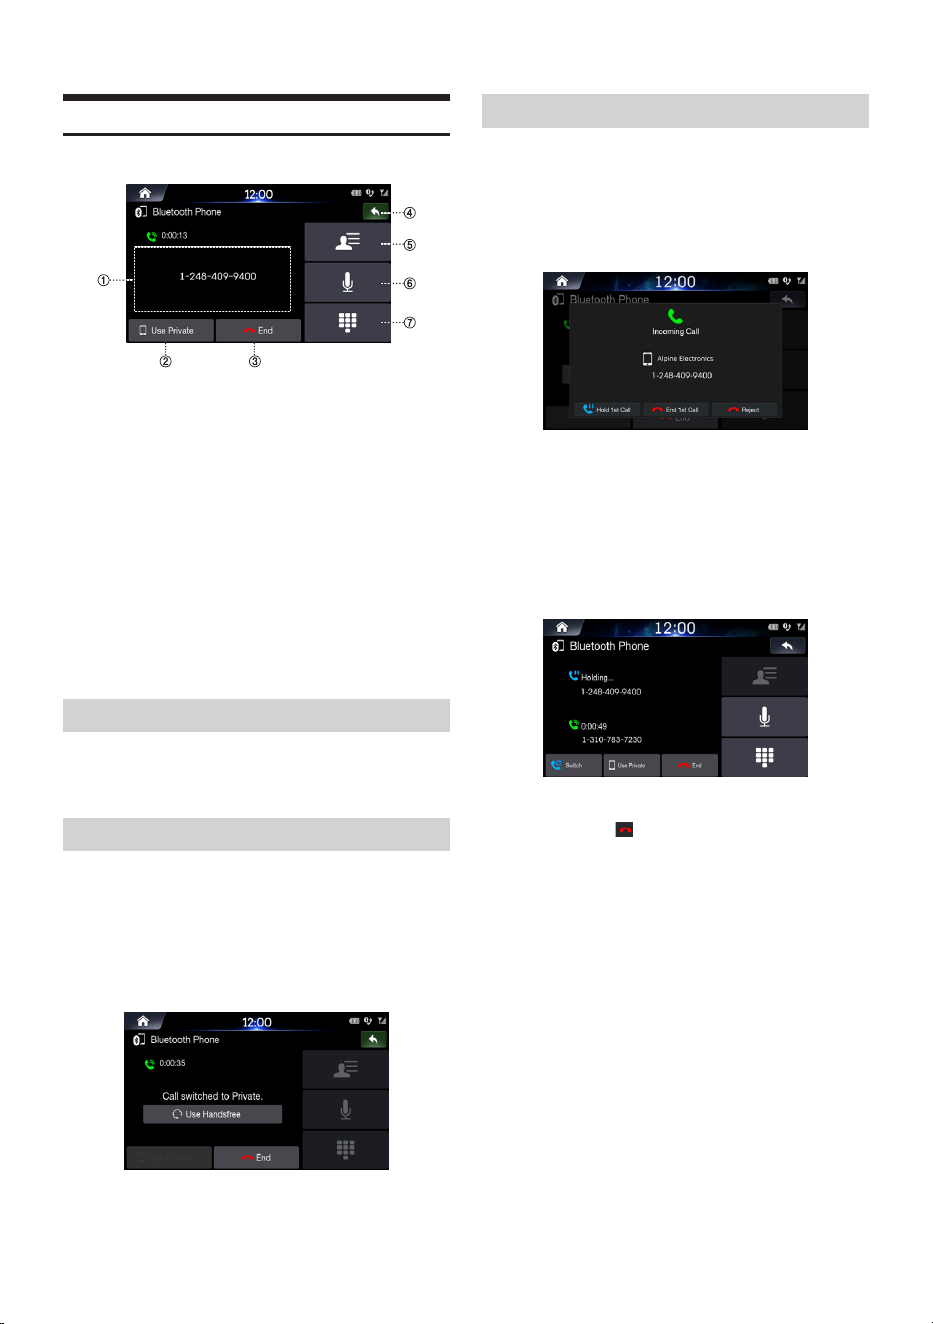
60
-EN
Operating Menus During a Call
〇①〇
Info Display Window
〇②〇
Use Private
During a handsfree call, this function is used to switch the call to
the mobile phone.
〇③〇
End
〇④〇
Displays the Previous Screen
〇⑤〇
Contacts
〇⑥〇
Mic Volume On/Off
〇⑦〇
Dial Pad
Ending a Call
1
Touch [End].
Switching a Call to Private/Handsfree
1
During a handsfree call, press [Use Private] to
switch the call to Bluetooth phone.
2
Once the call is switched to the cell phone, a
message is displayed on the screen.
3
To switch the call back to the handsfree, press
[Use Handsfree].
Switching to Call Waiting
If another person calls while you are already on a call, the current
call can be placed on hold or ended to answer the new call.
1
If there is a new call, the following screen will be
displayed.
• Hold 1st Call: holds current call and answers new call.
• End 1st Call: ends current call and answers new call.
• Reject: rejects new call and maintains current call.
2
If there is a call waiting, touch [Switch] to switch
to the waiting call.
• To finish a call, touch (End).
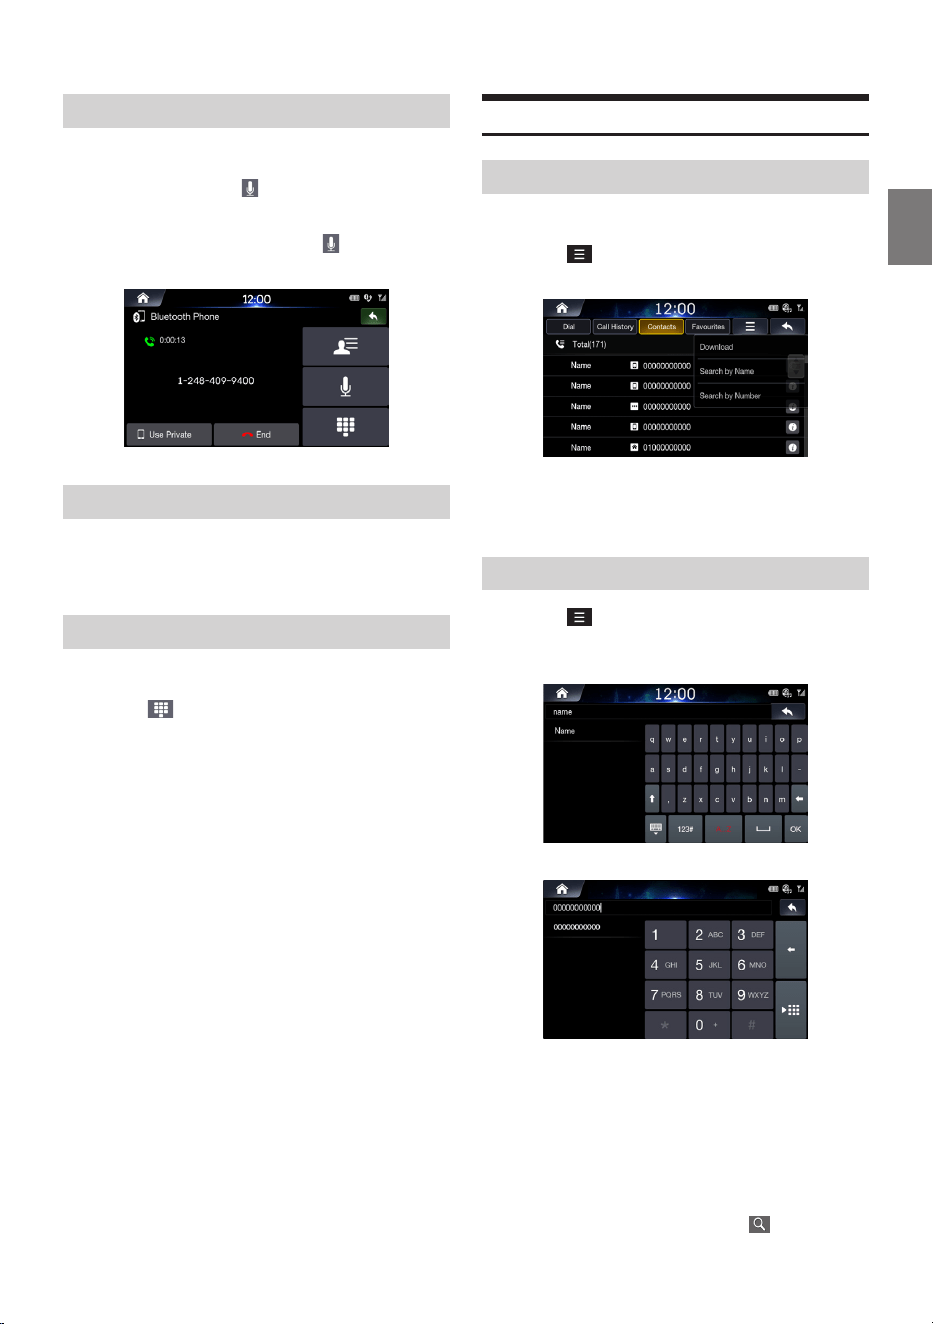
61
-EN
Turning Mic On/Off
This feature is used to mute the outgoing volume to the other party.
1
During a call, touch .
2
To Turn the mic back on, touch again.
Adjusting Call Volume
This menu is used to adjust the mic volume during calls.
Press the volume (+/-) button to adjust the mic volume.
DTMF (Touch-Tone) Function
This menu is used to display keypad during calls.
1
Touch .
The number input screen (Keypad) displays.
2
Enter number.
Contacts
Downloading Contacts
Up to 5,000 mobile phone contacts can be updated.
1
Touch
→
[Download].
2
The contacts are deleted and the contacts of the
connected phone is updated.
Searching Contacts
1
Touch
→
[Search by Name] or [Search by
Number].
12:00
2
Enter the name or number.
3
Select the contact you wish to call.
The phone call is started.
• For details of how to input characters using the keypad, see “How
to "Inputting Text (Keypad)" on page 15.
• You can also search contacts by touching in the Bluetooth
Phone main screen.
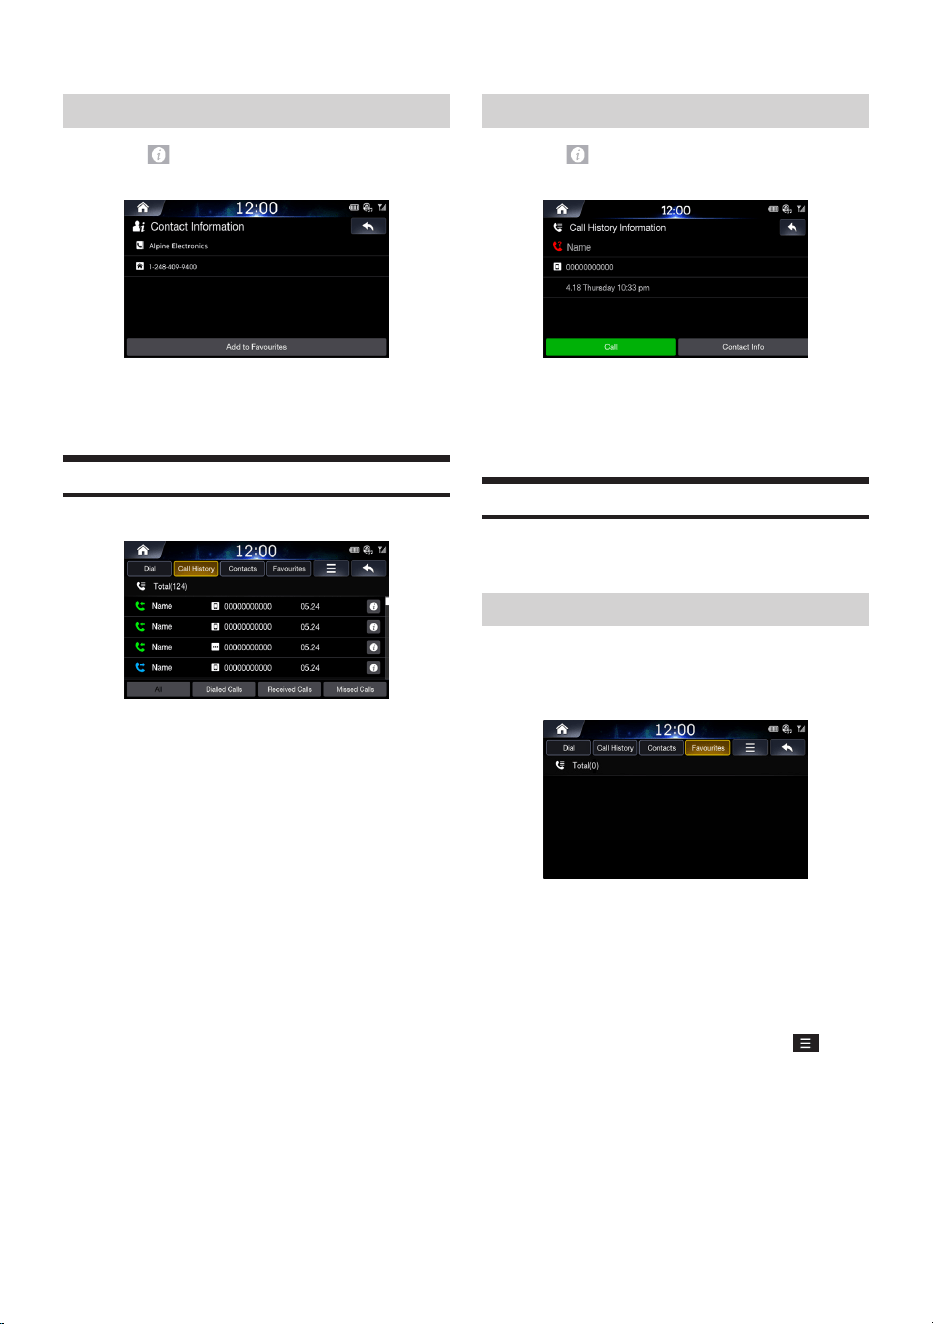
62
-EN
Information
1
Touch .
2
Touch [Add to Favorites] to add contact to
Favorites.
Call History
• All: entire calls list
• Dialled Calls: dialled calls list
• Received Calls: received calls list
• Missed Calls: missed calls list
Information
1
Touch .
2
Touch [Call] to make a call
Touch [Contact info]
→
[Add to Favorites] to add
contact to Favorites.
Favorites
You can add frequently used numbers to Favorites to quickly find
and call numbers.
Saving to Favorites
1
When no Favorites have been added, the
following screen will be displayed.
2
Touch [Add New].
3
Select the contact you wish to add from the
contacts.
• To add a contact to a saved Favorites list, touch
→
[Add
New].
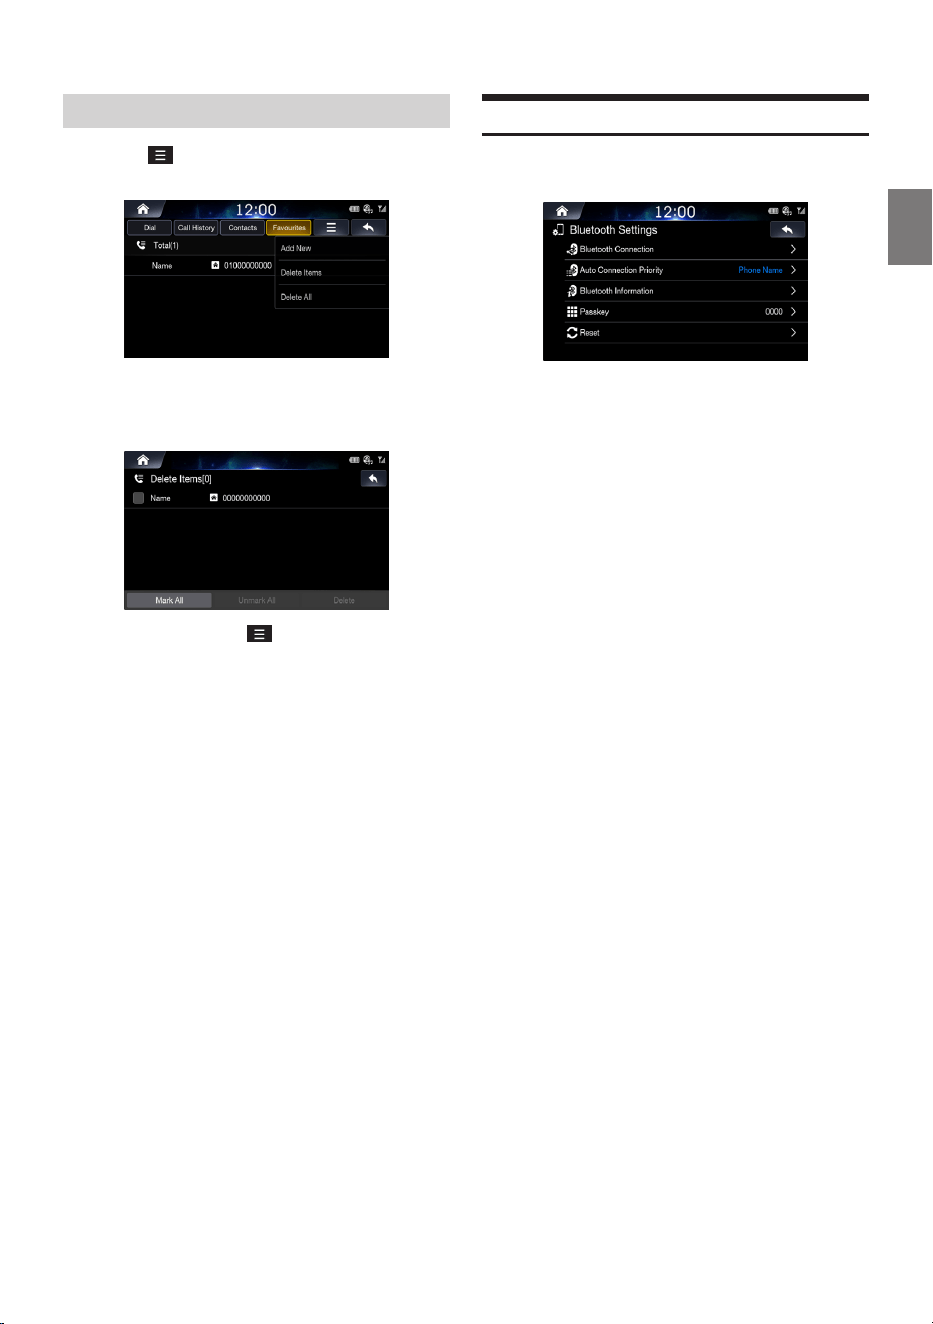
63
-EN
Deleting Favorites
1
Touch
→
[Delete Items]
2
Select the contacts and touch [Delete].
12:00
• If you want to delete all, touch
→
[Delete all].
Bluetooth Settings
1
Touch [Settings].
For details, refer to "Bluetooth Settings" on page 64.
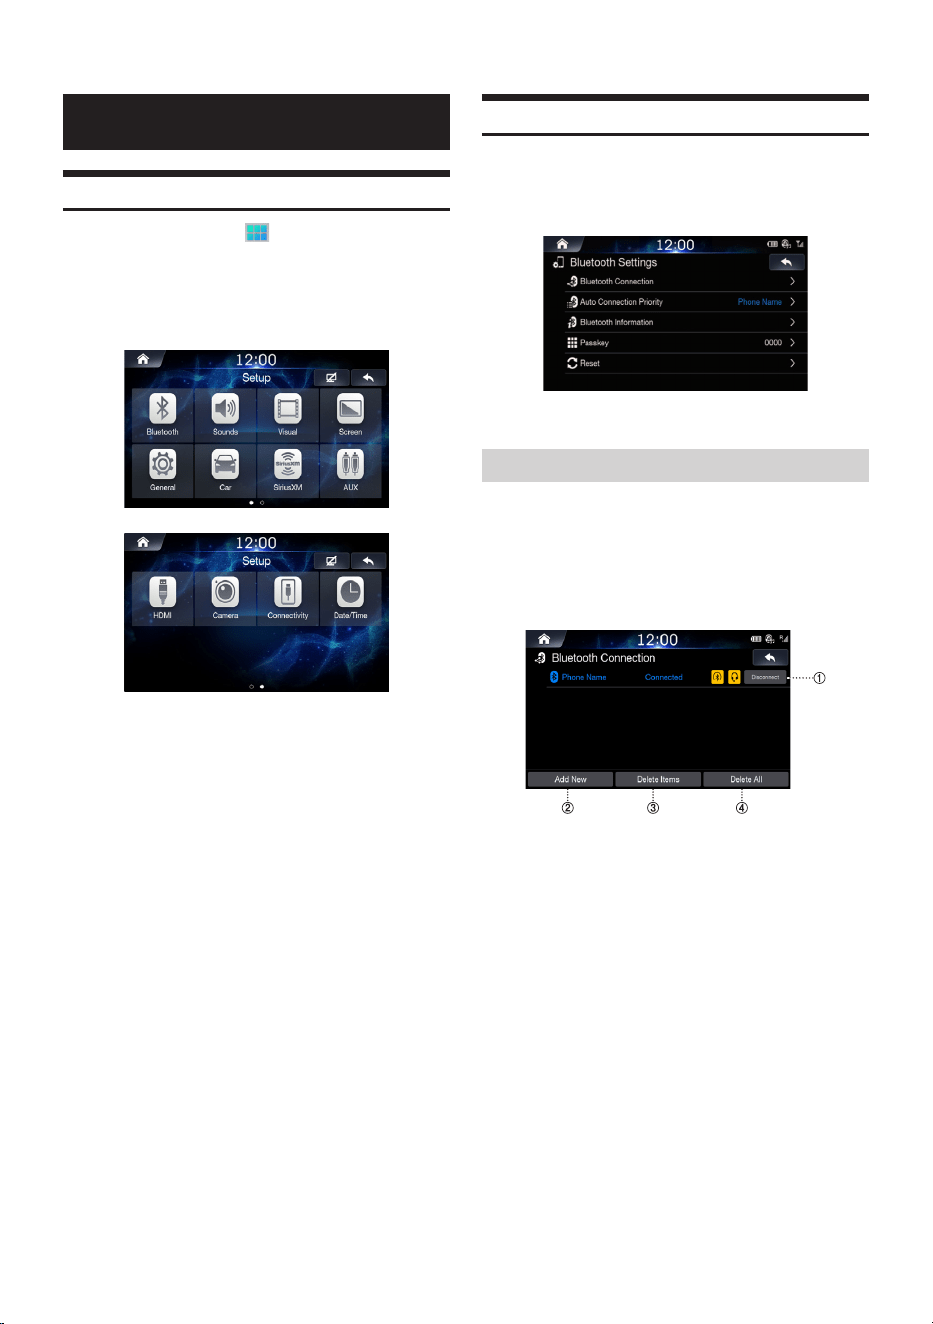
64
-EN
Setup
Starting Mode
1
Press the All Menus button
→
touch [Setup].
Or in the Home screen, touch
→
[Setup].
The Setup main screen will be displayed. Swipe to the left to see the
second page.
2
Touch the icon of the desired setting.
Bluetooth Settings
This menu allows you to set Bluetooth settings.
1
In the Setup screen, touch [Bluetooth].
Bluetooth Connection
This menu allows you to manage the Bluetooth device list, such as
pairing, connecting or deleting Bluetooth devices.
1
In the Bluetooth Settings screen, touch [Bluetooth
Connection].
〇①〇
Connect/Disconnect
connects/disconnects a Bluetooth device.
〇②〇
Add new
pairs a new Bluetooth device.
〇③〇
Delete items
deletes a paired Bluetooth device.
〇④〇
Delete all
deletes all paired Bluetooth devices.
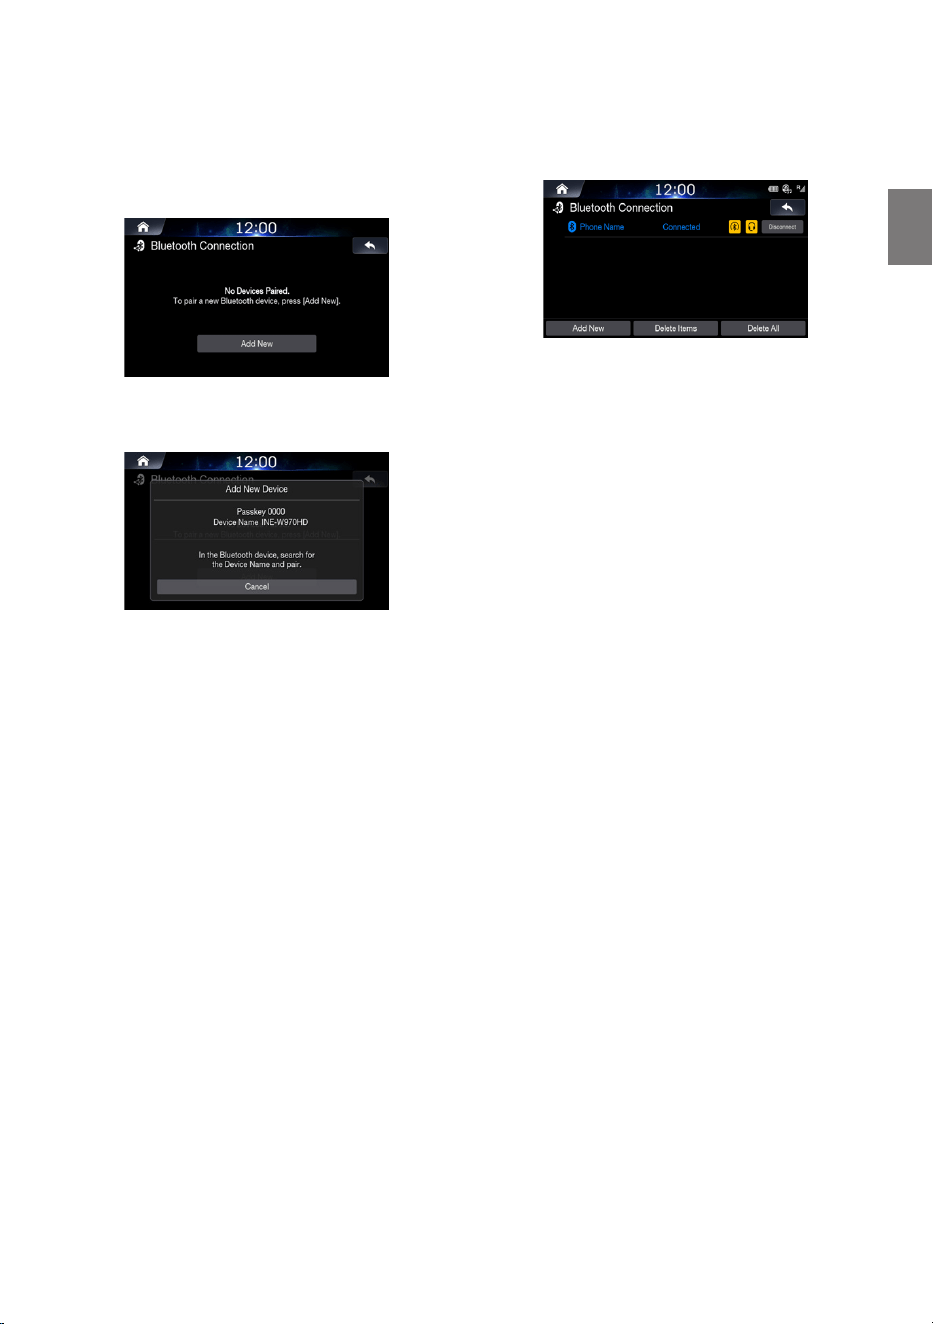
65
-EN
■
Pairing and Connecting a Phone - When no
Phones Have Been Paired
1. Touch [Add New].
Or in the Home screen, touch [All Menus]
→
[Phone].
2. Pair from the Bluetooth Device.
From the Bluetooth device, search for the AVN unit name and pair
the device. When searching from the Bluetooth device, the AVN unit
name is ‘INE-W970HD’ and the default passkey is ‘0000’.
• Some Bluetooth devices may require you to enter the passkey
while others may not.
3. Once Bluetooth connection is successful, the name of the
connected Bluetooth device will be displayed on the screen.
■
When a Phone is Already Paired
Select the device from the list and touch [Connect].
• While a phone is paired and connected, the user can press [Add
New] and follow the prompt to confirm system action to disconnect
the current phone and pair a new one.
• You can register up to 5 Bluetooth compatible mobile phones.
• If all 5 devices have been registered, you cannot register a 6th
device. To register another device, you need to delete one of the
other 5 devices first.
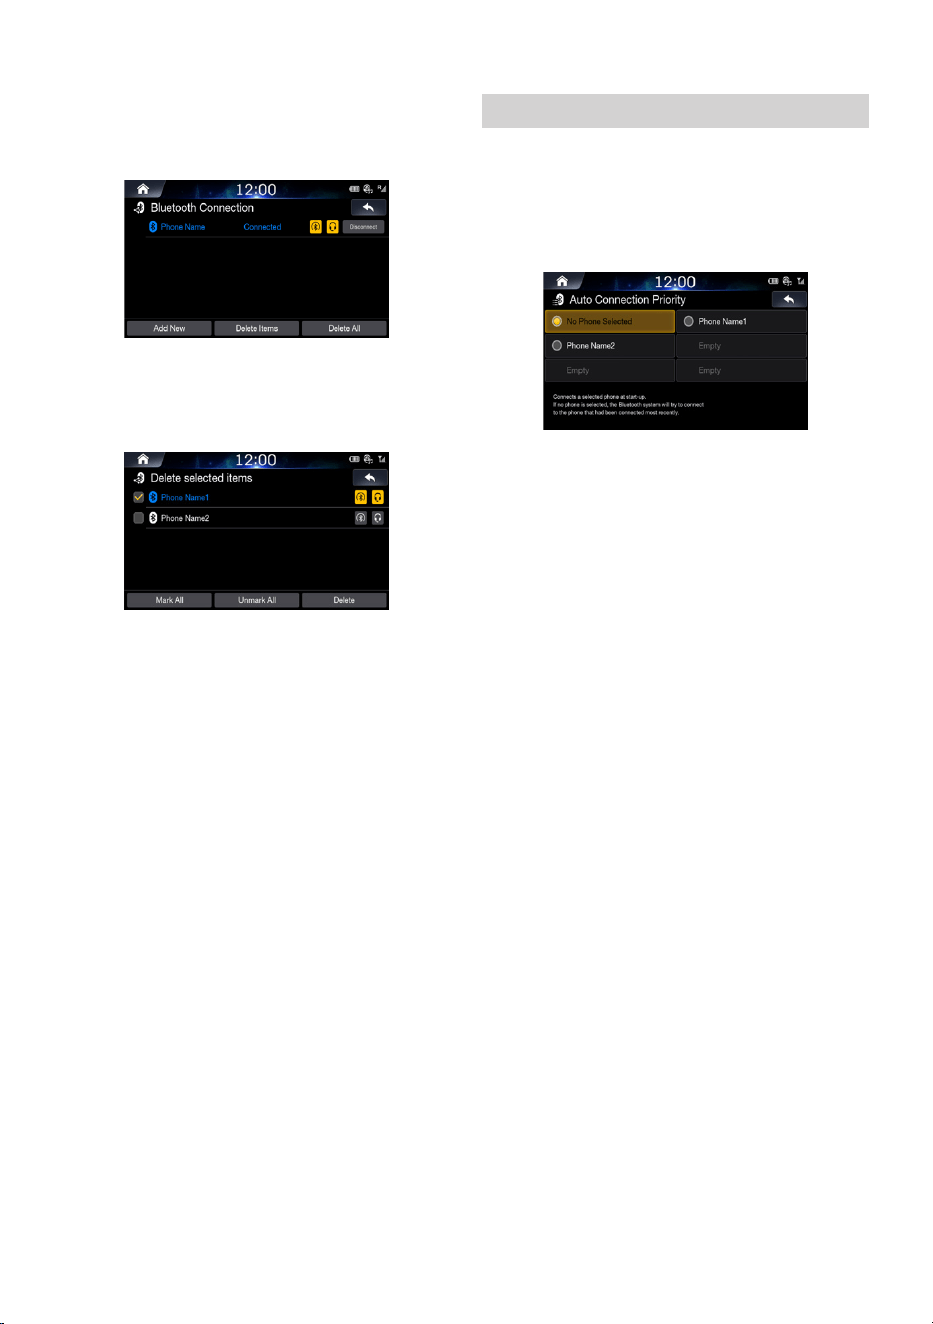
66
-EN
■
Disconnecting Bluetooth Devices
Select the currently connected device and touch [Disconnect].
■
Deleting Bluetooth Devices
1. Touch [Delete Item] and select the device you wish to delete.
2. Touch [Delete].
To select all devices, press [Mark All].
To deselect all selected devices, press [Unmark All].
• A connected Bluetooth device can be deleted by pressing Yes
in the popup window alerting you that the device will first be
disconnected.
• If you want to delete all paired devices, touch [Delete all].
• Once a device is deleted, the call history and contacts that were
saved to the head unit are also deleted.
Setting Auto-Connection Priority
The Bluetooth device that is selected to have priority will
automatically be connected when the car ignition is turned on.
1
In the Bluetooth Settings screen, touch [Auto
connection priority].
2
Select the Bluetooth device you want the system
to connect automatically.
If you touch [No Phone Selected] button, the most recently
connected Bluetooth
®
phone will connect automatically.
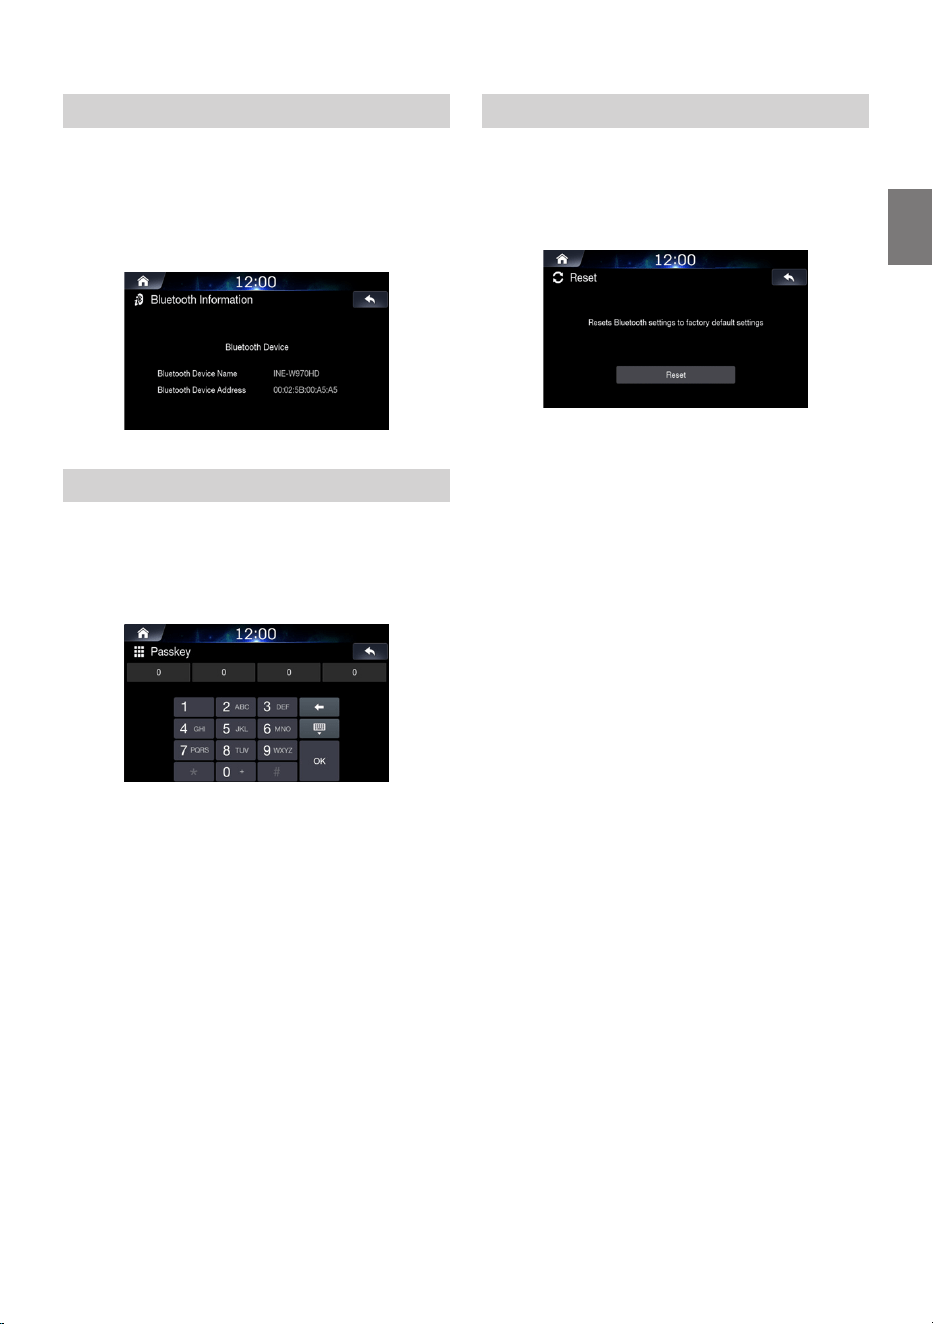
67
-EN
Viewing Bluetooth System Info
This feature is used to view the Bluetooth vehicle name and system
information.
1
In the Bluetooth Settings screen, touch [Bluetooth
Information].
Setting the Passkey
This feature allows you to change the passkey used for Bluetooth
device authentication.
1
In the Bluetooth Settings screen, touch [Passkey].
2
Enter the passkey and touch [OK]
• The default passkey is 0000.
Resetting Bluetooth Settings
This feature will restore the system's Bluetooth connection settings
to the factory default. Any paired/connected devices will be removed.
1
In the Bluetooth Settings screen, touch [Reset].
2
Touch [Reset]
→
[Yes].
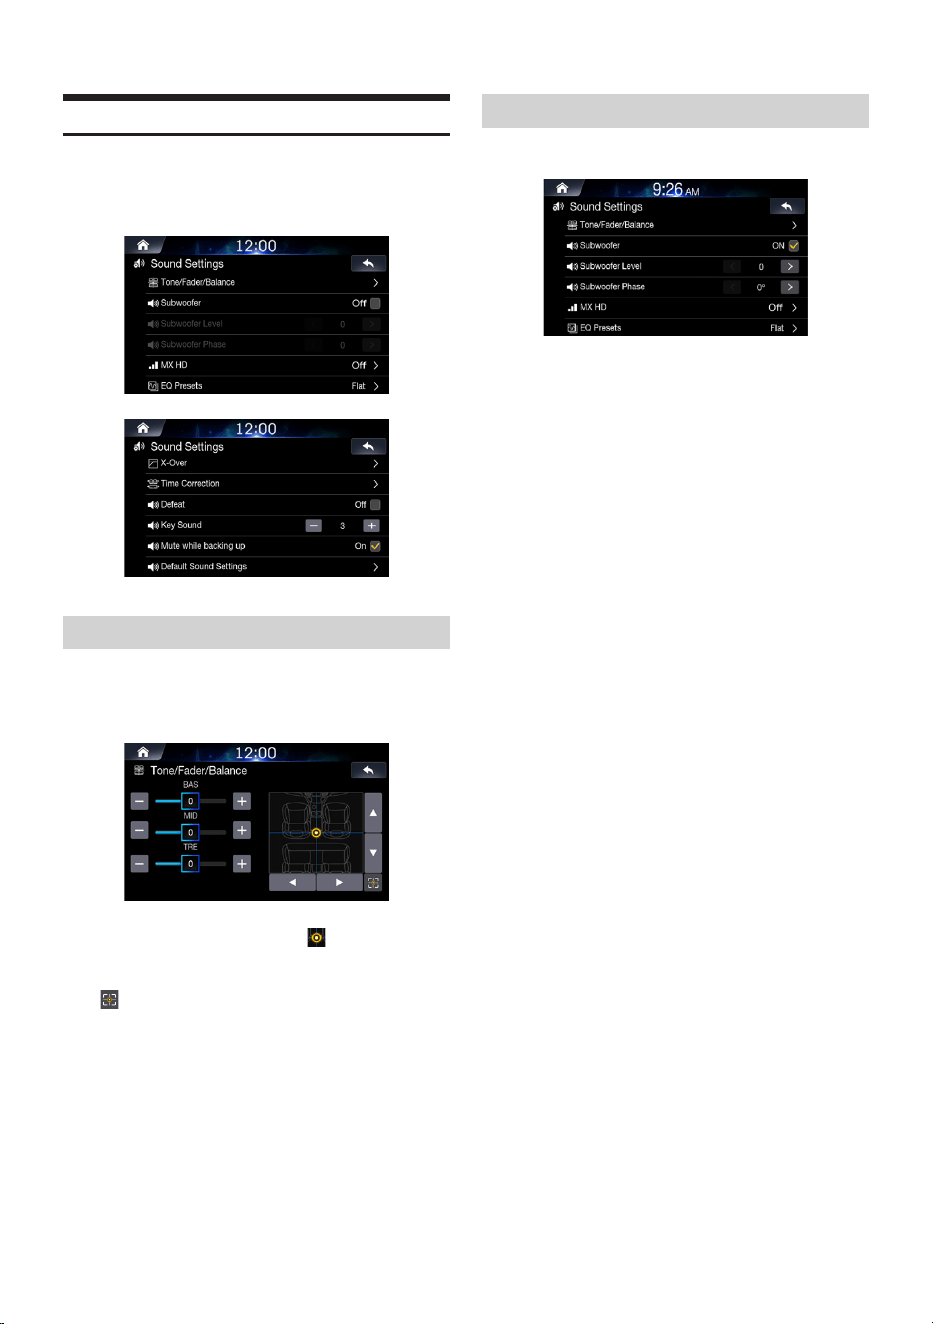
68
-EN
Sound Settings
This menu is used to adjust the sound effects for the whole system.
1
In the Setup screen, touch [Sounds].
Setting Tone/Fader/Balance
1
In the Sounds Settings screen, touch
[Tone/Fader/Balance].
2
Use the
▲
,
▼
,
◀
,
▶
, +, -, and buttons to adjust
settings.
Touch to restore sound to the Center position.
Setting Subwoofer
1
Check the [Off] box to turn subwoofer feature on.
2
Adjust the subwoofer level and phase using
[< , >].
• The Subwoofer Lever and Phase features are unavailable when
the Subwoofer feature is turned off.
• The subwoofer level can be set from 0 to 15.
• The subwoofer output phase is toggled Subwoofer Normal (0°) or
Subwoofer Reverse (180°).
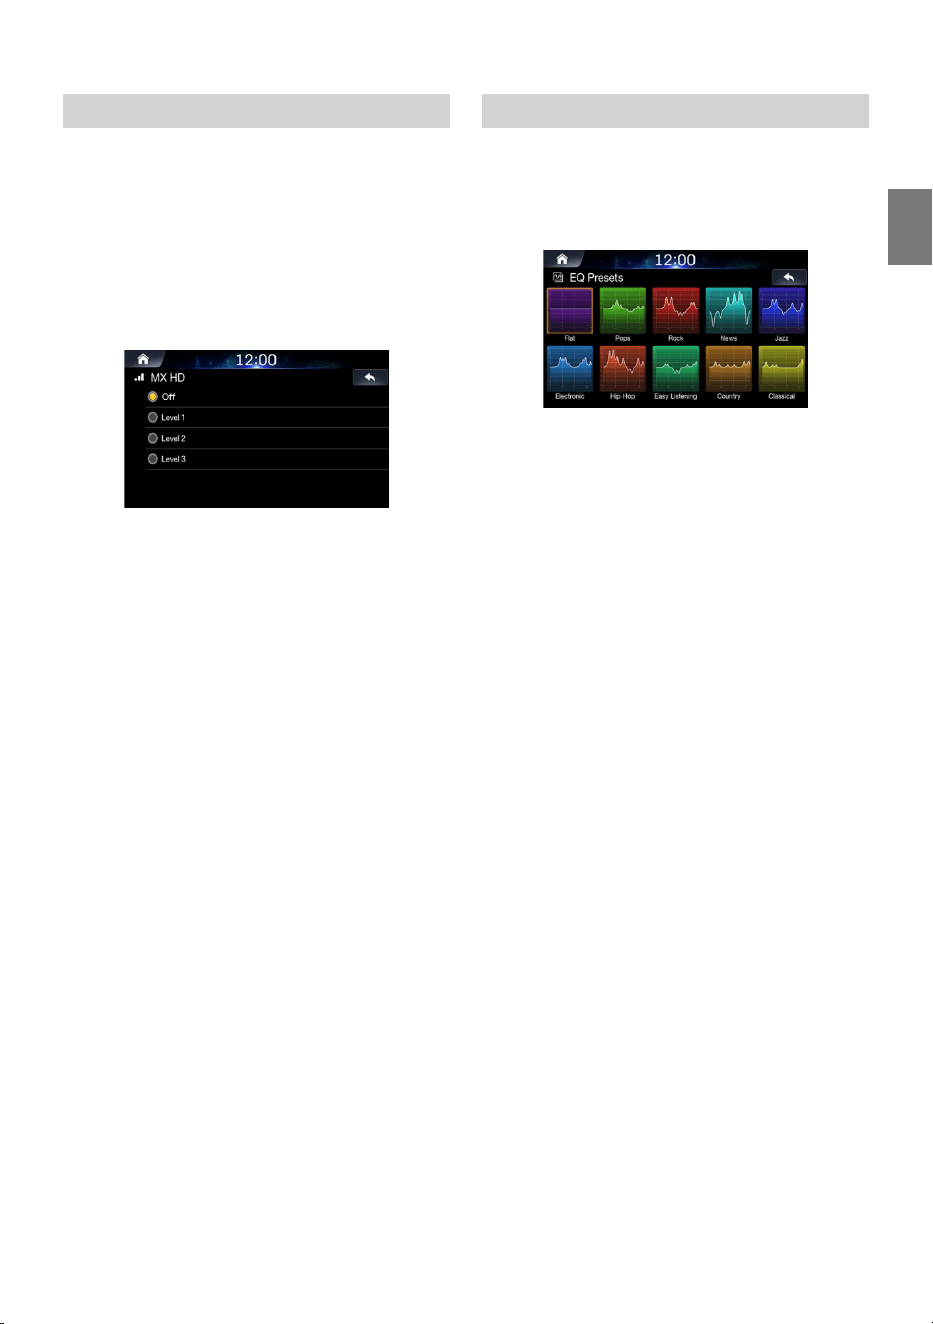
69
-EN
Setting MX HD
Media Xpander (MX HD) makes vocals or instruments sound distinct
regardless of the music source. The Radio FM/SiriusXM, USB Flash
drive and iPod/iPhone, will be able to reproduce the music clearly
even in cars with a lot of road noise.
1
In the Sounds Settings screen, touch [MX HD].
2
Set the desired option.
Media: Off/Level1/Level2/Level3: The medium to high frequencies
become more clear, and produces well balanced sound in all the
bands.
When AUX is connected, the options will be [Off, Compressed Media
/ Movie / Music].
AUX: Off / Compressed Media / Movie / Music : Choose the MX HD
mode (Compressed Media, Movie, or Music) that corresponds to the
media connected.
• When the Defeat setting is “On,” you cannot perform the set up.
• The MX HD setting can be performed only when a source is
currently selected.
• The effectiveness increases as the MX HD setting value increases
Level1 Level2 Level3.
• Movie: The dialogue portion of the video is reproduced more
clearly
• Music: This disc contains a large quantity of data such as music
clip. MX uses this data to reproduce the sound accurately.
Setting EQ Presets
10 typical equalizer settings are preset at the factory for a variety of
musical source material..
1
In the Setup screen, touch [EQ Presets].
• Only one type can be set to ON.
• The Equalizer Presets setting can be configured when Defeat is
“Off.”

70
-EN
Setting the Crossover (X-Over)
■
About the Crossover
This unit is equipped with an active crossover. The crossover limits
the frequencies delivered to the outputs. Each channel is controlled
independently. Thus, each speaker pair can be driven by the
frequencies for which they have been optimally designed.
The crossover adjusts the HPF (high pass filter) or LPF (low pass
filter) of each band, and also the slope (how fast the filter rolls off the
highs or lows).
Adjustments should be made according to the reproduction
characteristics of the speakers. Depending on the speakers, a
passive network may not be necessary. If you are unsure about this
point, please consult your authorized Alpine dealer.
Cut-off
frequency (1/3
octave steps)
Slope
Level
HPF LPF HPF LPF
Subwoofer
(LPF) ----
20 Hz -
200 Hz
----
0, 6, 12,
18,
24 dB/oct.
0 to
–12 dB
Rear speaker
(HPF)
20 Hz -
200 Hz
----
0, 6, 12, 18,
24 dB/oct.
----
0 to
–12 dB
Front speaker
(HPF)
20 Hz -
200 Hz
----
0, 6, 12, 18,
24 dB/oct.
----
0 to
–12 dB
Low range
Slope adjusting
High range
Output frequency
range
Output frequency
range
Subwoofer
Slope
FLAT
Level
adjusting
(0 to –12
dB)
Rear speaker
Front speaker
20 Hz
(Different from
actual display)
200 Hz
LPF cut-off
frequency
HPF cut-off
frequency
• HPF (high pass filter): Cuts the lower frequencies and allows the
higher frequencies to pass.
• LPF (low pass filter): Cuts the higher frequencies and allows the
lower frequencies to pass.
• Slope: The level change (in dB) for a frequency change of one
octave.
• The higher the slope value, the steeper the slope becomes.
• Adjust the slope to FLAT to bypass the HP or LP filters.
• Do not use a tweeter without the HPF set on, with a high cut-off
frequency, otherwise damage may occur to the speaker due to the
low frequency content.
• Adjustment should be made according to the recommended
crossover frequency of the connected speakers. Determine the
recommended crossover frequency of the speakers. Adjusting
to a frequency range outside that recommended may cause
damage to the speakers.
For the recommended crossover frequencies of Alpine speakers,
refer to the respective Owner’s Manual.
We are not responsible for damage or malfunction of speakers
caused by using the crossover outside the recommended value.
1. In the Setup screen, touch [X-Over].
2. Touch [Channel[ to select the channel.
Each time you touch, the channel switches.
• The channel being adjusted is displayed in red.
Front HPF
→
Rear HPF
→
Subw. LPF
→
Front HPF
3. Adjust the crossover to your preference.
Selecting the Cut-Off Frequency
Touch or of “Frequency,” and then select the cut-off frequency.
(20 / 25 / 31.5 / 40 / 50 / 63 / 80 (Initial setting) / 100 / 125 / 160 /
200)
Adjusting the Slope
Touch or of “Slope,” and then adjust the HPF or LPF slope.
(0 (Initial setting) / 6 / 12 / 18 / 24 dB/oct.)
Adjusting the Level
Touch [+] or [-] of “Level,” and then adjust the HPF or LPF level.
(-12 to 0 dB (Initial setting: 0))
4. Repeat steps 1 to 2 to make adjustment to the other
channels.
5. To store the adjusted setting value, touch and hold [Preset 1],
[Preset 2], or [Preset 3] for at least 2 seconds.
• Touch [Flat] to initialise all values.
• If the Subwoofer setting is “Off,” the Subwoofer setting cannot be
edited.
• While adjusting the X-OVER you should consider the frequency
response of the connected speakers.
Calling the X-OVER adjusted value
Calling the pre-set X-OVER adjusted value.
Touch [Preset 1], [Preset 2], or [Preset 3] on the X-OVER
screen.
The setting stored in the Preset will be recalled.
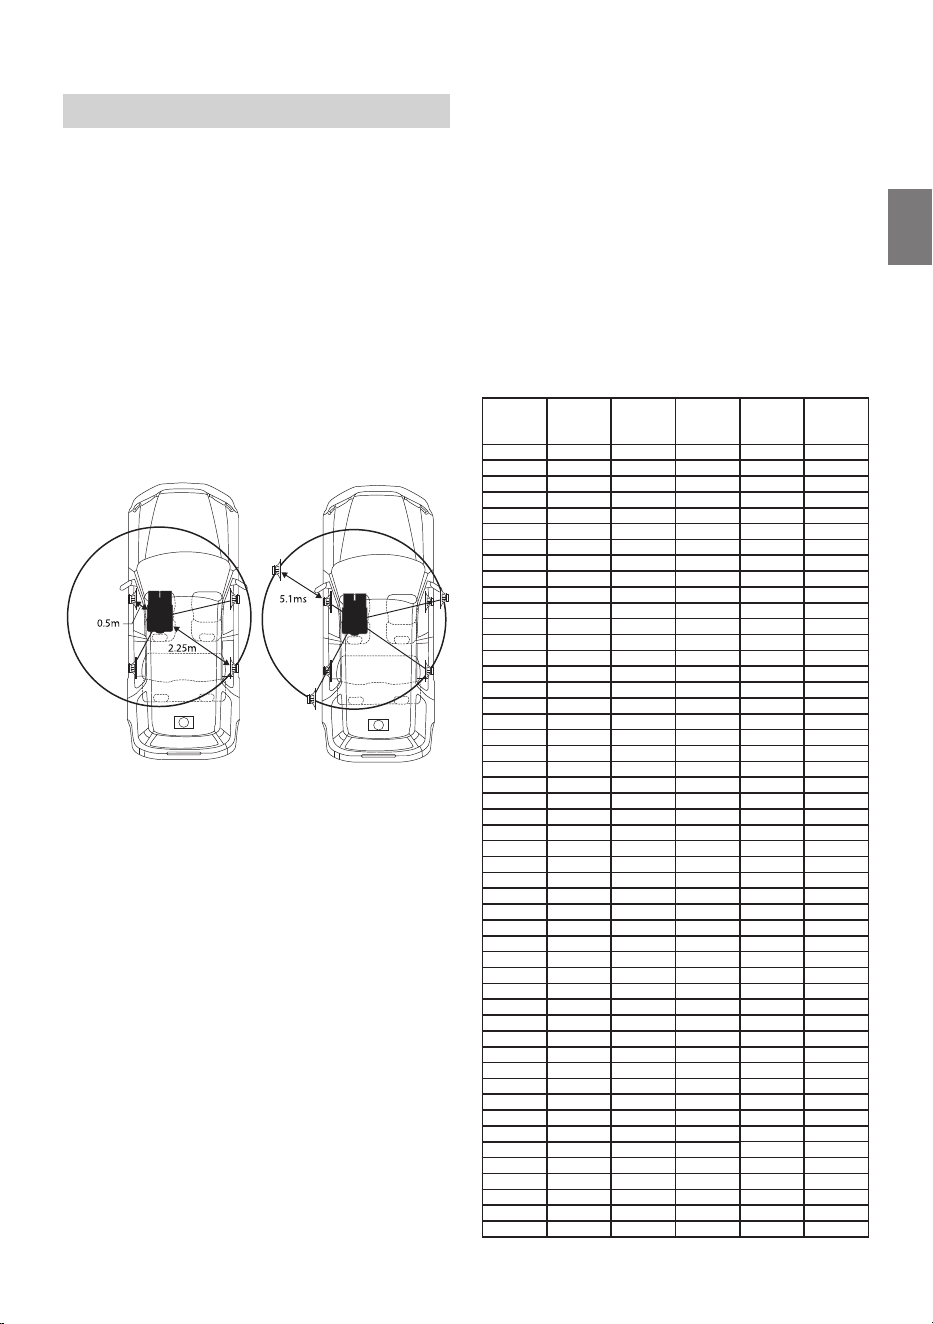
71
-EN
Setting the Time Correction
■
About Time Correction
The distance between the listener and the speakers in a car vary
widely due to the complex speaker placement. This difference in
the distances from the speakers to the listener creates a shift in the
sounds image and frequency characteristics. This is caused by the
time delay between the sound reaching the listener’s right versus the
left ear.
To correct this, this unit is able to delay the audio signal to the
speakers closest to the listener. This effectively creates a perception
of increased distance for those speakers. The listener can be placed
at an equal distance between the left and right speakers for optimum
staging. The adjustment will be made for each speaker in 3.4 cm
steps.
Example 1. Listening Position: Front Left Seat
Adjust the time correction level of the front left speaker to a high
value and the rear right to zero or a low value.
The sound is not balanced because the distance between the
listening position and the various speakers is different.
The difference in distance between the front left speaker and the
rear right speaker is 1.75 m (68-7/8").
Here we calculate the time correction value for the front left speaker
in the diagram on the above.
Conditions:
Farthest Speaker – listening position : 2.25 m (88-9/16") Front
left speaker – listening position : 0.5 m (19-11/16") Calculation: L
= 2.25 m – 0.5 m = 1.75 m (68-7/8")
Time correction = 1.75 ÷ 343* × 1,000 = 5.1 (ms)
* Speed of sound: 343 m/s (765 mph) at 20°C
In other words, giving the front left speaker a time correction value of
5.1 ms makes it seem as if its distance from the listener is the same
as the distance to the farthest speaker.
Time correction eliminates the differences in the time required for the
sound to reach the listening position.
The time of the front left speaker is corrected by 5.1 ms so that its
sound reaches the listening position at the same time as the sound
of other speakers.
Example 2. Listening Position: All Seats
Adjust the time correction level of each speaker to almost the same
level.
1. Sit in the listening position (driver’s seat, etc.) and measure
the distance (in meters) between your head and the various
speakers.
2. Calculate the difference between the distance correction
value to the farthest speaker and the other speakers.
L = (distance to farthest speaker) – (distance to other speakers)
These values are the time correction values for the different
speakers. Setting these values to make each sound reach the
listening position at the same time as the sound of other speakers.
Time Correction Value List
Time
Difference
(msec)
Distance
(cm)
Distance
(inch)
Time
Difference
(msec)
Distance
(cm)
Distance
(inch)
0.0 0.0 0.0 5.0 170.0 67.0
0.1 3.4 1.3 5.1 173.4 68.3
0.2 6.8 2.7 5.2 176.8 69.7
0.3 10.2 4.0 5.3 180.2 71.0
0.4 13.6 5.4 5.4 183.6 72.4
0.5 17.0 6.7 5.5 187.0 73.7
0.6 20.4 8.0 5.6 190.4 75.0
0.7 23.8 9.4 5.7 193.8 76.4
0.8 27.2 10.7 5.8 197.2 77.7
0.9 30.6 12.1 5.9 200.6 79.1
1.0 34.0 13.4 6.0 204.0 80.4
1.1 37.4 14.7 6.1 207.4 81.7
1.2 40.8 16.1 6.2 210.8 83.1
1.3 44.2 17.4 6.3 214.2 84.4
1.4 47.6 18.8 6.4 217.6 85.8
1.5 51.0 20.1 6.5 221.0 87.1
1.6 54.4 21.4 6.6 224.4 88.4
1.7 57.8 22.8 6.7 227.8 89.8
1.8 61.2 24.1 6.8 231.2 91.1
1.9 64.6 25.5 6.9 234.6 92.5
2.0 68.0 26.8 7.0 238.0 93.8
2.1 71.4 28.1 7.1 241.4 95.1
2.2 74.8 29.5 7.2 244.8 96.5
2.3 78.2 30.8 7.3 248.2 97.8
2.4 81.6 32.2 7.4 251.6 99.2
2.5 85.0 33.5 7.5 255.0 100.5
2.6 88.4 34.8 7.6 258.4 101.8
2.7 91.8 36.2 7.7 261.8 103.2
2.8 95.2 37.5 7.8 265.2 104.5
2.9 98.6 38.9 7.9 268.6 105.9
3.0 102.0 40.2 8.0 272.0 107.2
3.1 105.4 41.5 8.1 275.4 108.5
3.2 108.8 42.9 8.2 278.8 109.9
3.3 112.2 44.2 8.3 282.2 111.2
3.4 115.6 45.6 8.4 285.6 112.6
3.5 119.0 45.9 8.5 289.0 113.9
3.6 122.4 48.2 8.6 292.4 115.2
3.7 125.8 49.6 8.7 295.8 116.6
3.8 129.2 50.9 8.8 299.2 117.9
3.9 132.6 52.3 8.9 302.6 119.3
4.0 136.0 53.6 9.0 306.0 120.6
4.1 139.4 54.9 9.1 309.4 121.9
4.2 142.8 56.3 9.2 312.8 123.3
4.3 146.2 57.6 9.3 316.2 124.6
4.4 149.6 59.0 9.4 319.6 126.0
4.5 153.0 60.3 9.5 323.0 127.3
4.6 156.4 61.6 9.6 326.4 128.6
4.7 159.8 63.0 9.7 329.8 130.0
4.8 163.2 64.3 9.8 333.2 131.3
4.9 166.6 65.7 9.9 336.6 132.7
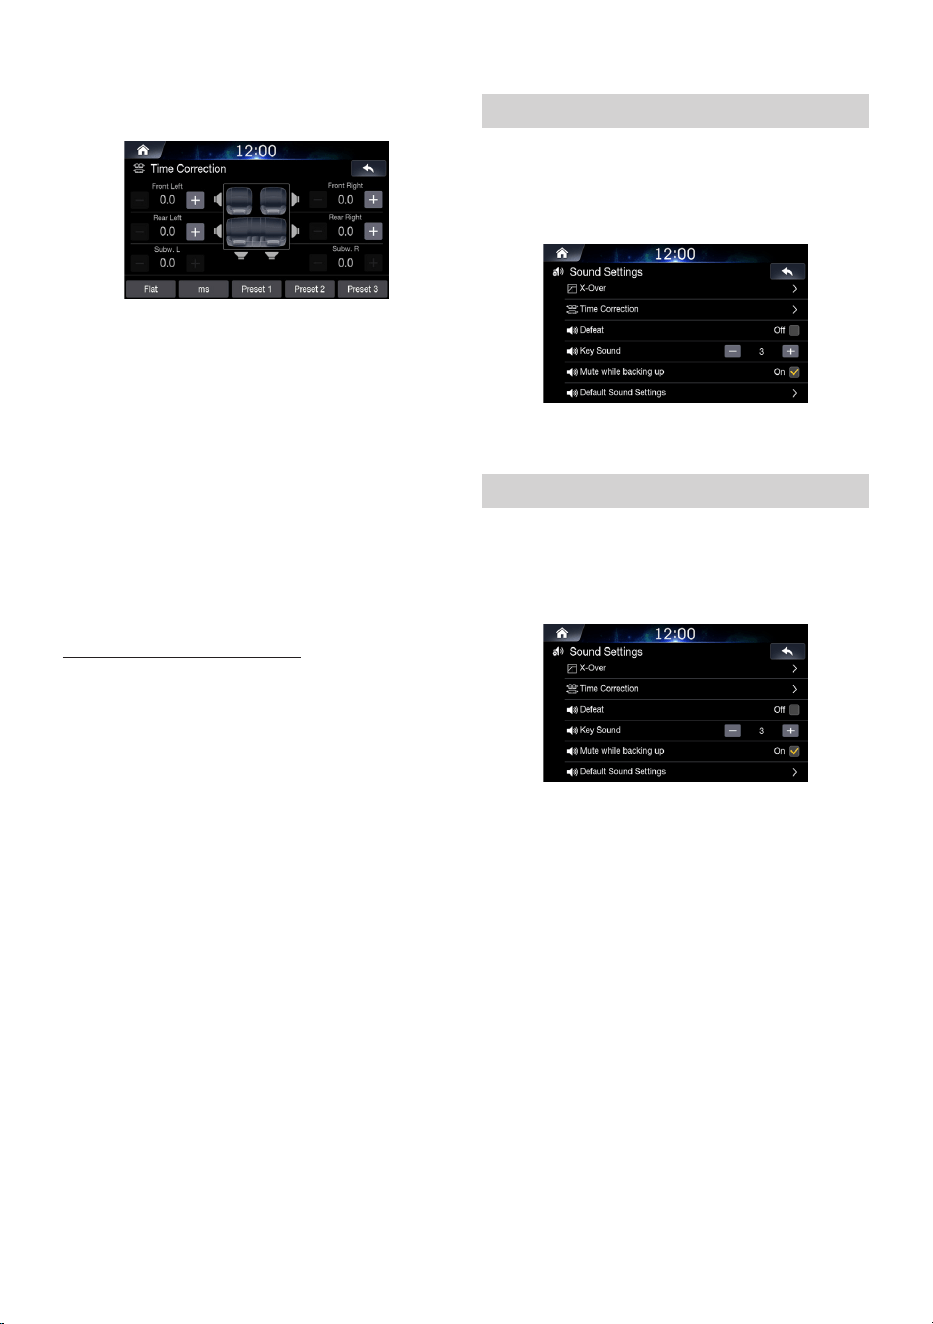
72
-EN
1. In the Setup screen, touch [Time Correction].
2. Touch the Correction Mode button and select the mode.
Each time the button is pressed, mode is changed from ms, inch and
cm.
3. Touch [
+
] or [
-
] for each speaker to adjust the time or
distance.
0.0 msec to 9.9 msec (0.1 msec/step)
0.0 cm (0.0 inch) to 336.6 cm (132.7 inch) (3.4 cm/step)
All speaker setting values are adjustable in the range of 15 ms or
510 cm.
4. To store the adjusted setting value, touch and hold [Preset 1],
[Preset 2], or [Preset 3] for at least 2 seconds.
• Touch [Flat] to set all values to 0.0.
• If the Subwoofer setting is “Off,” the Subwoofer setting cannot be
edited.
Calling the Time Correction Value
Calling the pre-set time correction value.
Touch [Preset 1], [Preset 2], or [Preset 3] on the time correction
screen.
The setting stored in the Preset will be recalled.
Setting Defeat
When Defeat is "ON," MX HD and EQ Presets are turned off. The
settings for these functions will be disabled.
Check the [Off] box to turn the feature on.
Uncheck the [On] box to turn the feature off.
Setting Key Sound
You can change the volume of the sound heard when a button is
touched.
Adjust the sound level from 0 to 6.
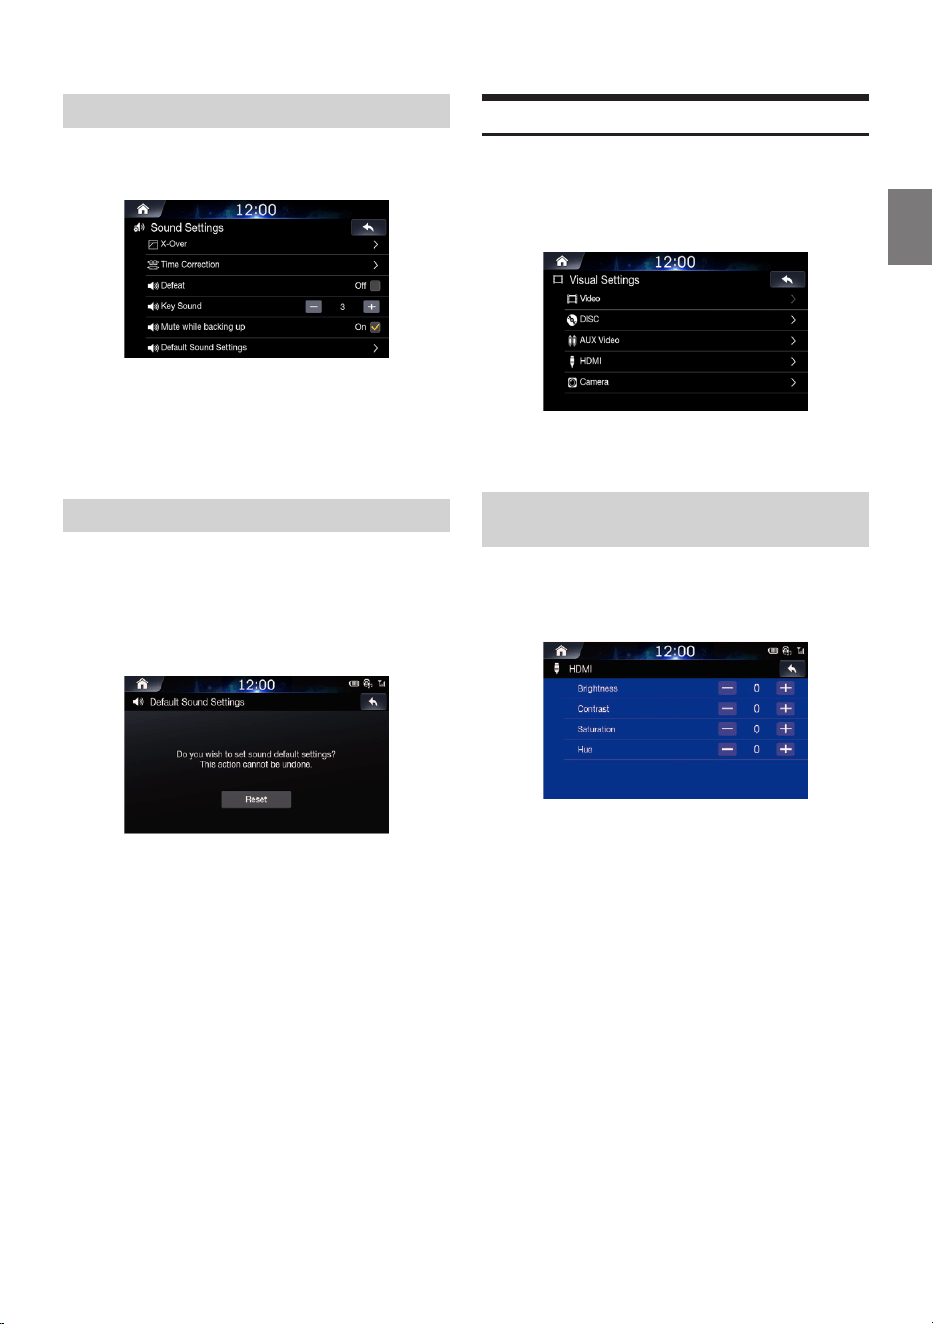
73
-EN
Setting Mute while backing up
1
Select the desired option from Off and On.
• Audio Mute while Reversing - feature used to control audio upon
shifting the vehicle into Reverse.
• On - Mutes sound while play continues.
• Off - Audio continues to play, unmuted.
Default Sound Settings
This feature is used to restore all sound settings back to default
state.
1
In the Sound Settings screen, touch [Default
Sound Settings].
2
Touch [Reset].
Visual Settings
This feature is used to adjust the Brightness, Saturation, Contrast
and Hue levels.
1
In the Setup screen, touch [Visual].
• “Video” can be selected while a video is playing.
Setting Brightness/Contrast/Saturation/
Hue
1
In the Visual Settings screen, touch the desired
menu.
2
Use [+] and [-] to adjust settings from -5 to +5.
• In the Video visual settings, [Hue] is not supported.
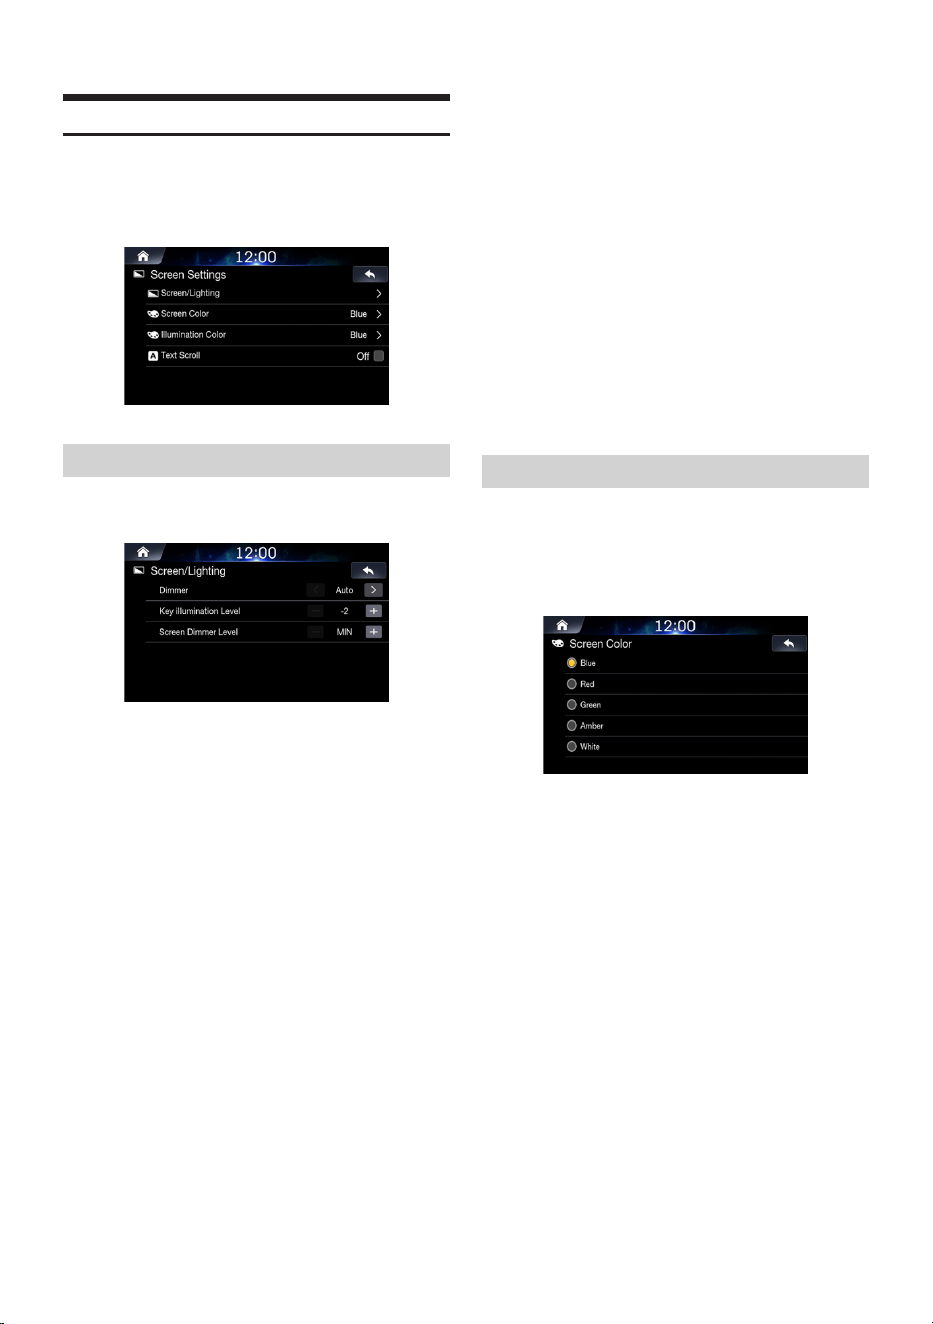
74
-EN
Screen Settings
This menu allows you to set the display settings
for the whole system
In the Setup screen, touch [Screen].
Setting Screen/Lighting
In the Screen Settings screen, touch [Screen/Lighting].
■
Setting Dimmer
Backlighting is provided by LED lights built into the liquid crystal
panel. The Dimmer setting adjusts the brightness of the backlighting
based on the car ambient lighting for easier viewing.
Set the desired value from Auto, On and Off.
Auto: Adjust the brightness of the background illumination of the
monitor automatically to the brightness of the car interior.
On: Keep the background illumination of the monitor dark.
Off: Deactivate Auto Dimmer mode to keep the background
illumination of the monitor bright.
• The Key Illumination Level and Screen Dimmer Level feature are
unavailable when the Dimmer value is set to “Off”.
■
Setting Key Illumination Level
You can adjust the brightness of the button lighting at night with the
Key Illumination Level.
Adjust the value from -2 to +2.
This setting is only available when “Dimmer” is set to “On.” or "Auto."
■
Setting Screen Dimmer Level
You can adjust the brightness of the backlight. This function could be
used, for instance, to change the screen brightness while travelling
at night.
Adjust the value from -15 to +15.
You can adjust the level between MIN (-15) and MAX (+15). When it
reaches the minimum or maximum point, the display shows “MIN” or
“MAX” respectively.
• This setting is only available when “Dimmer” is set to “On” or “Auto.”
Setting Screen Color
You can choose the screen Color from 5 different Colors.
1
In the Screen Settings screen,
touch [Screen Color].
2
Select the desired Color.
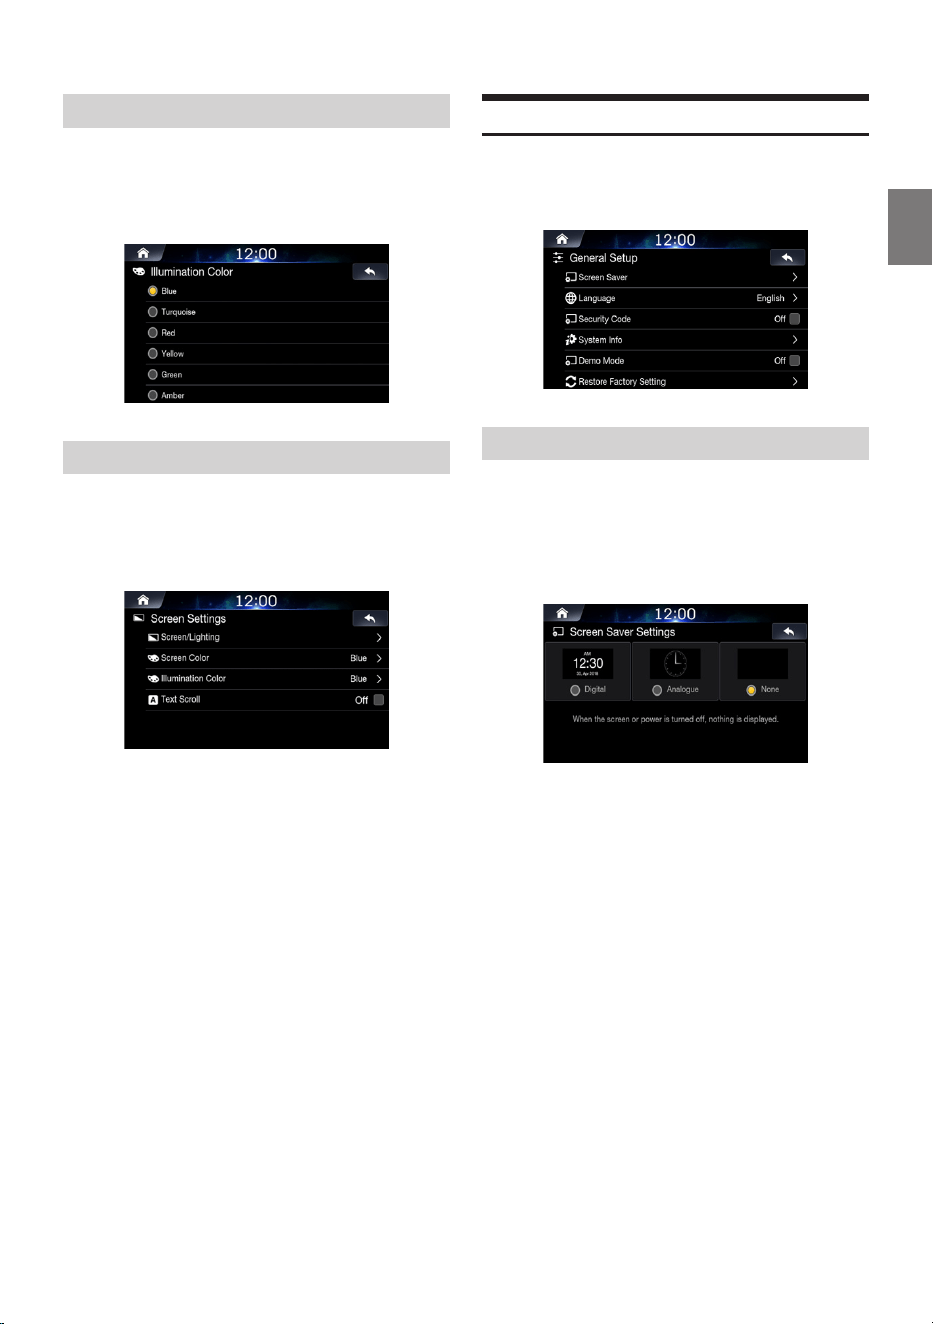
75
-EN
Setting Illumination Color
You can choose the Color of the Front Panel button from one of 7
Colors.
In the Screen Settings screen, touch [Illumination Color].
Setting Text Scroll
Scroll display is available if folder name, file name or tag information
is entered.
Check the [Off] box to turn the feature on.
• Uncheck the [On] box to turn the feature off.
General Setup
You can set up items related to the language, etc.
In the Setup screen, touch [General].
Setting Screen Saver
This feature is used to display a screen saver
when the monitor is off.
1
In the General Settings screen,
touch [Screen Saver].
2
Select the desired option.
• Digital: the screen will display the digital clock.
• Analogue: the screen will display the analogue clock.
• None: the screen will remain off.
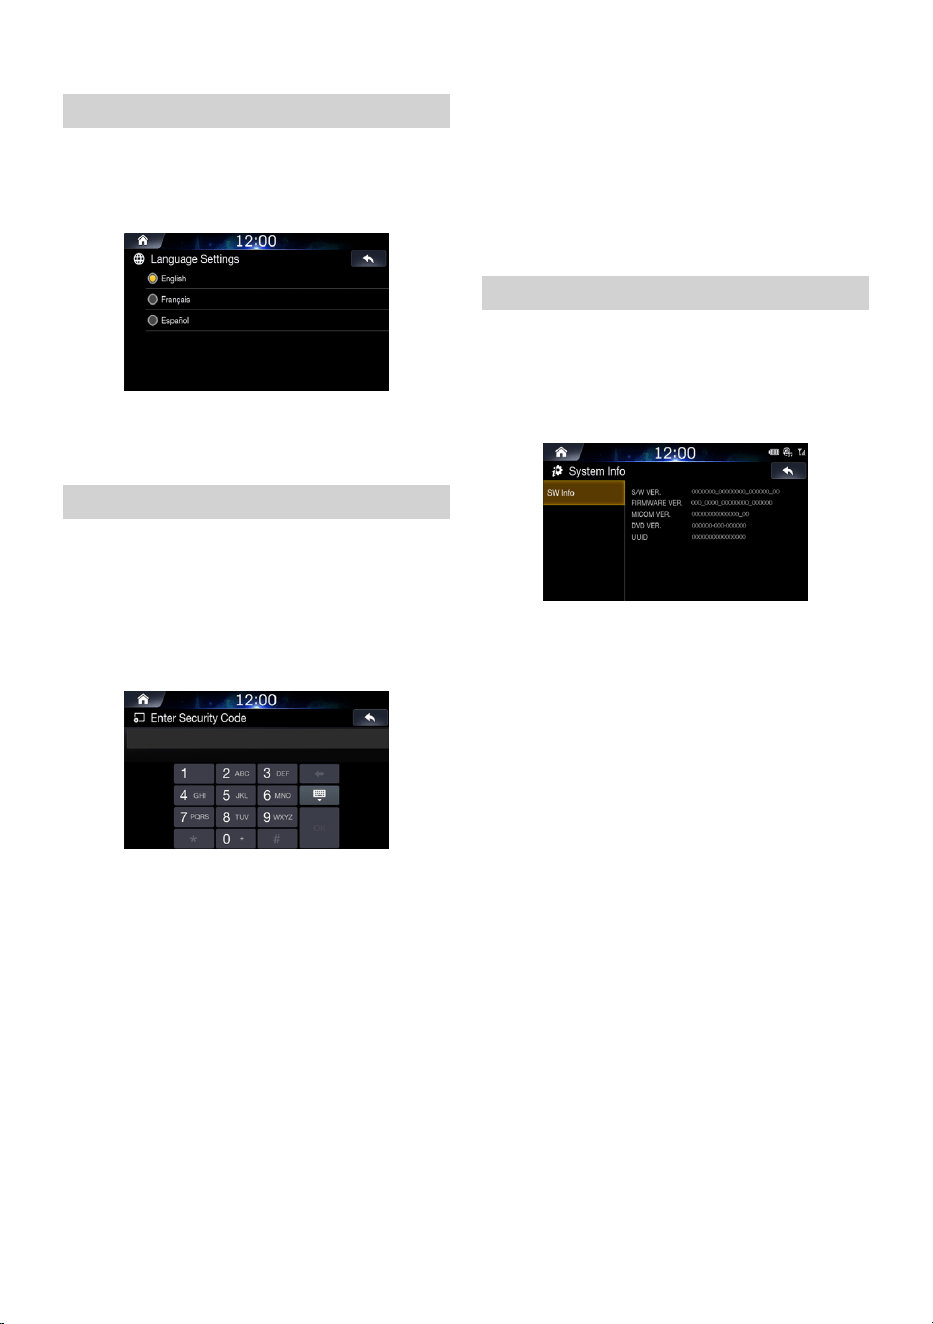
76
-EN
Setting Language
This menu allows you to set the language of the system.
1
In the General Settings screen, touch [Language].
2
Select the desired language.
English / Français / Español
Setting Security Code
You can set the system to be unusable without entering a password.
When you turn this setting to “On” and set a password, password
input is required when the system is connected to a battery and
turned on for the first time.
■
Setting the security Code
1. Check the [Off] box to turn the feature on and touch [OK].
2. Enter a password and touch [OK].
• Enter a 6~10 digit number.
• Touch [
] to delete an entered number.
3. Enter the same pasword again and touch [OK].
The security code is set and the system returns to the General
Settings screen, then the checkbox of the Security Code is set to
“On”.
• If you forget a registered password, you can not use this unit. In
this case, service will be required.
■
Clearing the security Code
1. Uncheck the [On] box.
The password setting screen is displayed.
2. Enter the password you have set and touch [OK].
The password is cleared and the system returns to the General
Settings screen then the checkbox of the Security Code is set to “Off”.
Viewing System Info
You can view the version information of this product. Make note of
this information and refer to it whenever you contact Alpine Tech
Support or an Alpine-authorized dealer.
In the General Settings screen, touch [System Info].

77
-EN
Setting Demo Mode
This unit has a Demonstration feature for the display.
To quit demo mode, set Demo mode to Off.
1
Uncheck the [On] box to turn the feature off.
2
Check the [Off] box to turn the feature on.
To start Demo mode, refrain from operating the system for 30
seconds. Please wait.
• If you perform an operation during the Demo mode, the
demonstration is temporarily stopped.
Initializing the System
You can initialise all data, to restore the factory settings. Remove the
USB flash drive, etc. from the system before operation.
1
In the General Settings screen,
touch [Factory Reset].
2
Touch [Reset]
→
[Yes].
• Do not turn on/off the power, change the ignition key position or
remove the screen panel until system restart is completed.
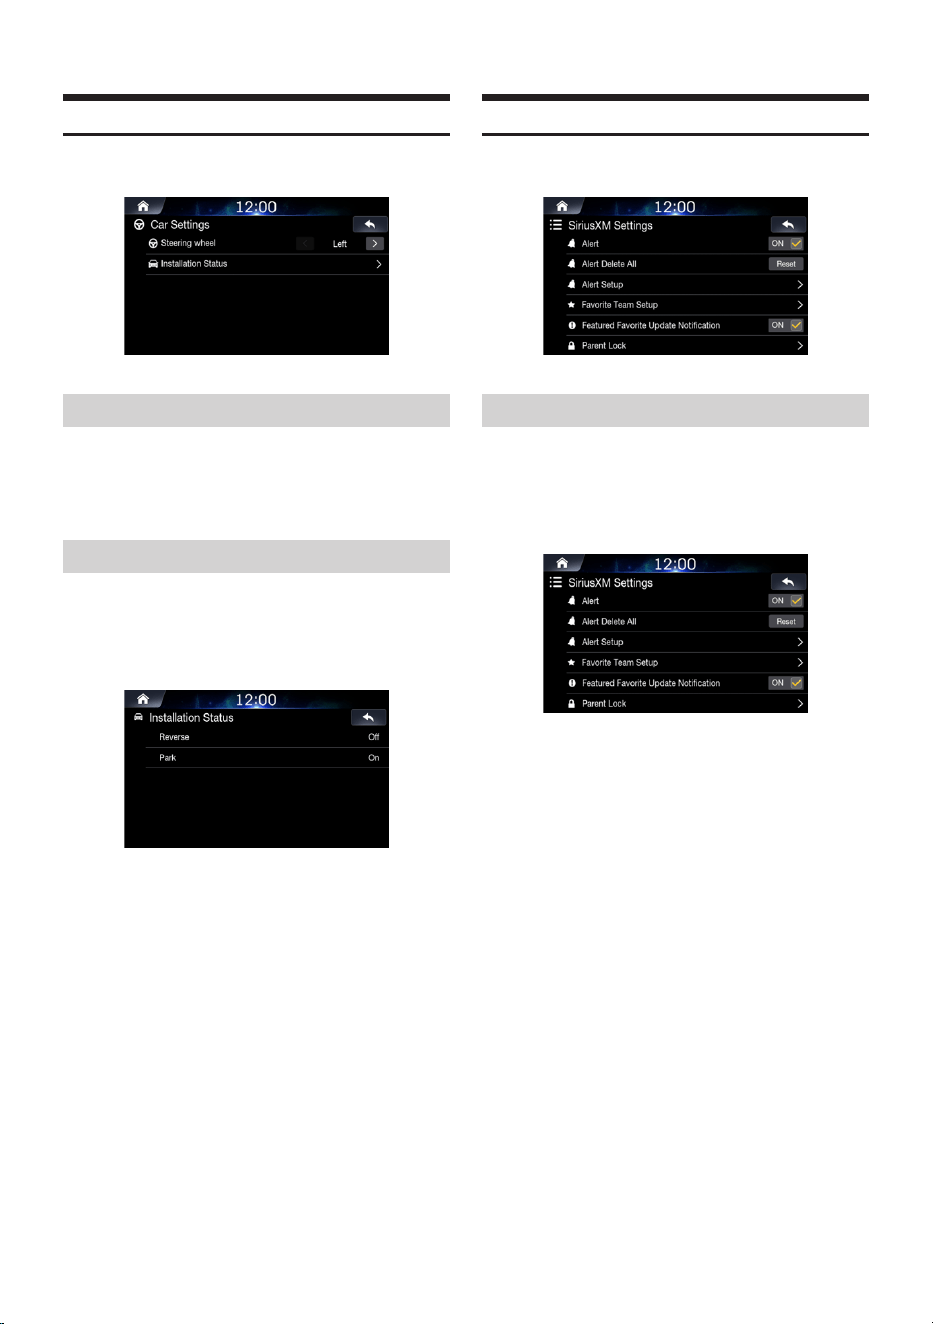
78
-EN
Car Settings
In the Setup screen, touch [Car].
Setting Steering Wheel
Set this item when Apple CarPlay is used.
This setting influences Apple CarPlay mode.
Select the desired option from Left and Right.
Setting Installation Status
Installation Status enables you to check the connection status of
Reverse Lead/Parking Brake Lead.
In the Car Settings screen, touch [Installation Status].
SiriusXM Settings
In the Setup screen, touch [SiriusXM].
Setting All Alerts On/Off
This menu option allows you to temporarily disable all alerts.
1
Uncheck the [On] box of Alert to disable the
alerts.
2
Check the [Off] box to enable the alerts.
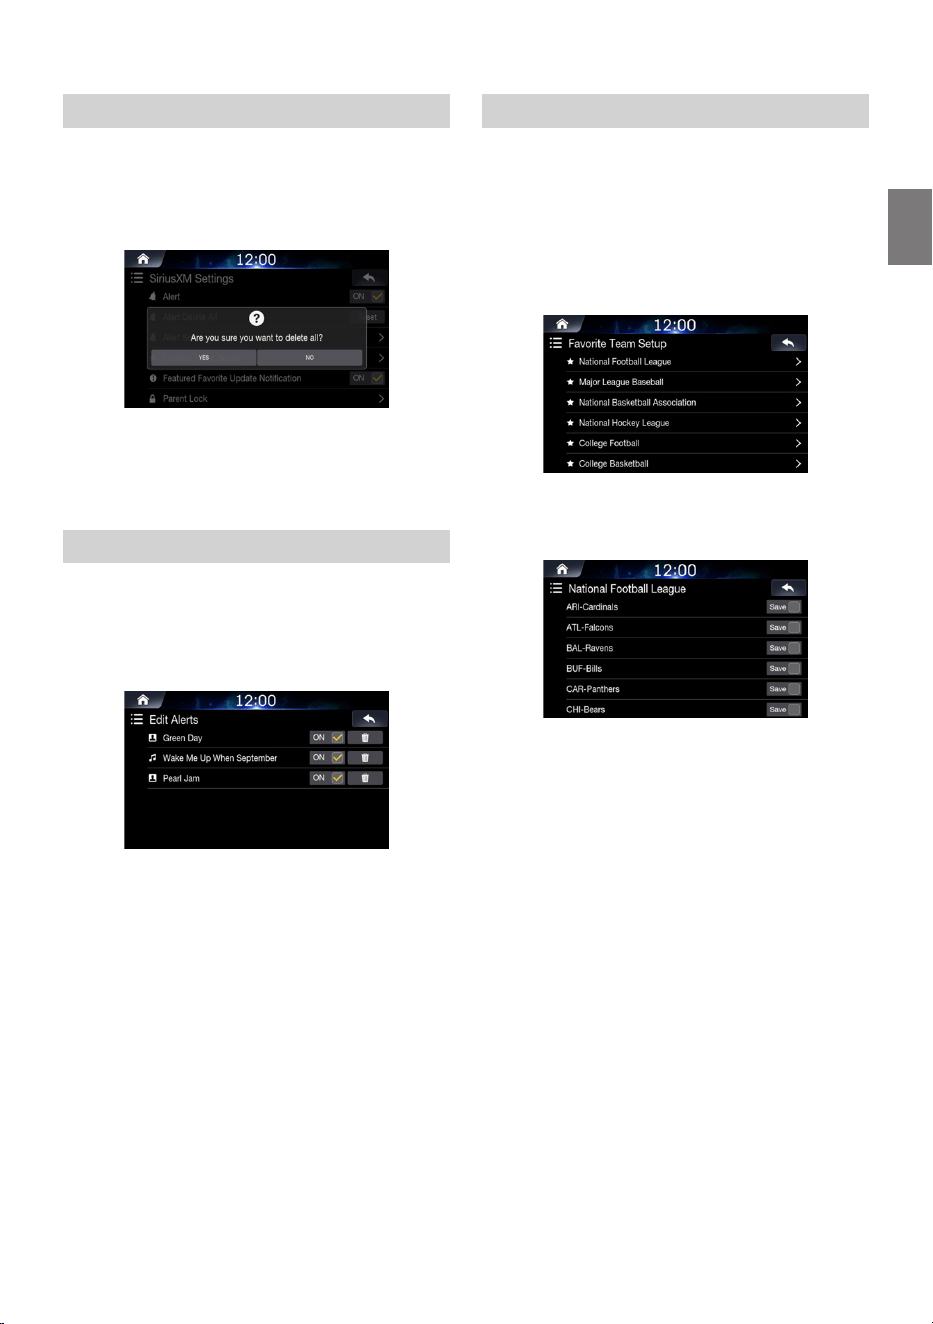
79
-EN
Deleting All Saved Alerts
This operation will delete all alerts (artists, songs and teams) saved
in memory.
1
Touch [Reset] of “Alert Delete All”.
2
Touch [YES] to clear the information of all stored
Artist, Song, and Game alert items.
Touch [NO] to cancel.
Setting Saved Alerts
This menu option allows you to disable/delete the saved alerts.
1
In the SiriusXM Settings screen, touch [Alert
Setup].
2
Uncheck the [On] box to disable the alerts.
Check the [Off] box to enable the alerts.
3
Touch [Del] to delete the saved alerts.
Setting Favorite Sports Team Alerts
This menu option allows you to select your favorite teams, organized
by leagues, so that you will be alerted later when your favorite teams
are playing on other channels. Once selected, you will be alerted
when games that those teams are playing in can be heard on a
SiriusXM channel.
1
In the SiriusXM Settings screen, touch [Favorite
Team Setup].
2
Select the desired league.
3
Check/uncheck the [Save] box to save/delete
team.
• When the team is saved, popup screen of the Total saved teams,
and Remaining number of saving slots is displayed for two
seconds, then the team is saved as a Favorite Team.
• When you uncheck the [Save] box to delete an Alert, a
confirmation popup is displayed.
• The maximum number of saved Teams, Artists, and Songs is 50.
For details on how to register an Artist alert or Song alert, see
“Saving Song/Artist Alert” on page 27.
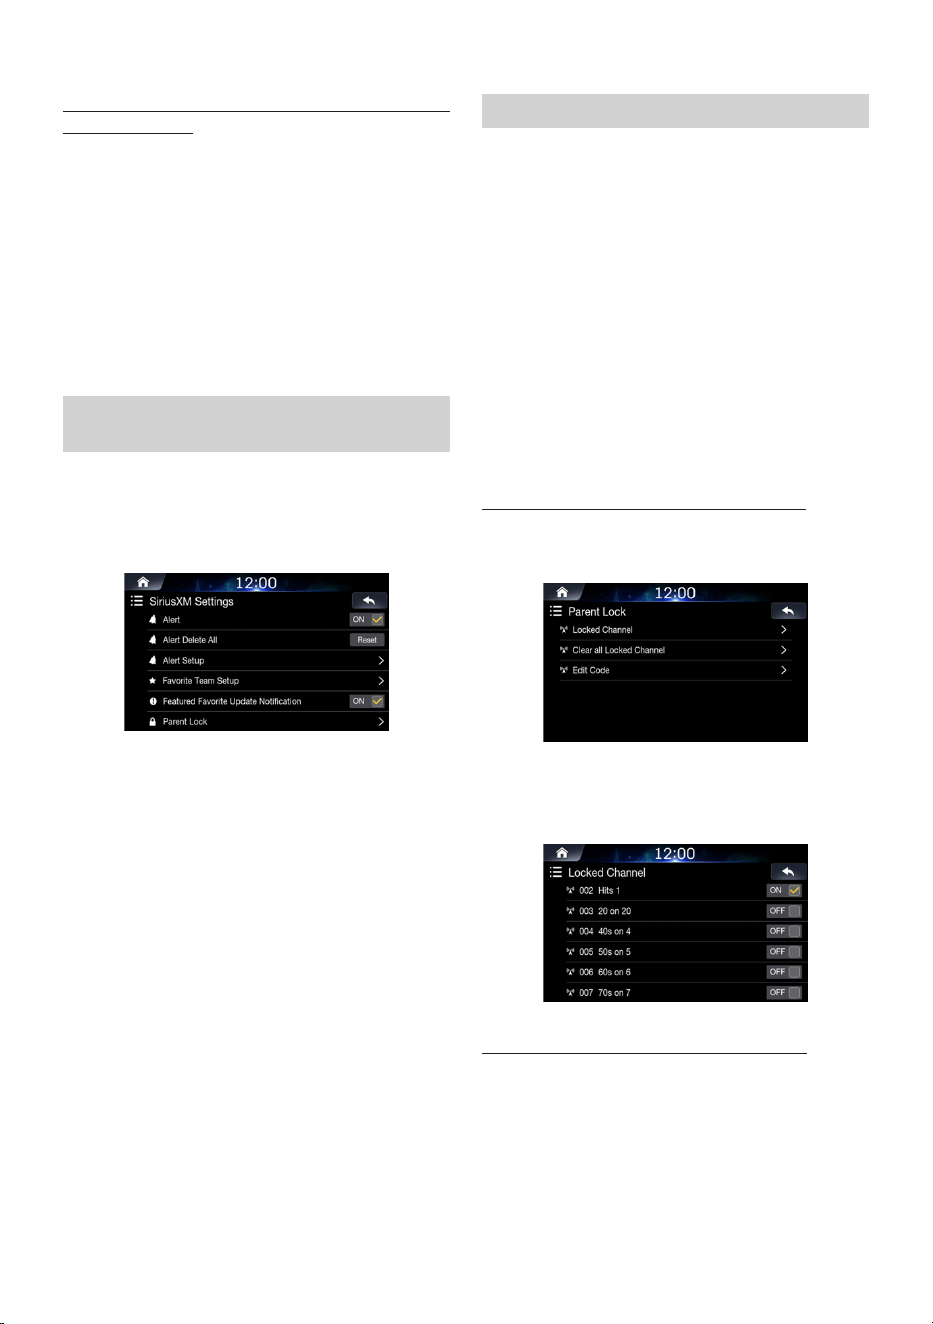
80
-EN
When the number of registered Teams, Artist, and
Songs exceeds 50
If you try to save an alert after 50 alerts have been saved, a popup is
displayed, asking whether you want to replace a saved Artist/Song/
Team with the new one.
1
Touch [YES].
The list of saved Artists/Songs/Teams is displayed.
• If you want to cancel the saving of your Favorite Team, then
touch [NO], and return to step 3.
2
Select the alert you want to replace.
Popup screen of confirmation is displayed for 2 seconds, then
the team is saved as a Favorite Team.
Setting Featured Favorite Update
Notification On/Off
This menu option allows you to temporarily disable Featured
Favorite Update Alert.
1
Uncheck the [On] box to disable the alert.
2
Check the [Off] box to enable the alert.
Setting Parent Lock
You can lock out channels with passcode protection. Channels
that are locked cannot be accessed without entering the passcode.
You can unlock a channel or change the passcode using this menu
option.
1
In the SiriusXM Settings screen, touch [Parent
Lock].
A passcode input screen is displayed.
2
Enter a 4-digit passcode.
The initial default 4-digit passcode is set to 0000.
After entering the digit, it is displayed as “*” (asterisk).
• Touch [<-] to delete an entered number.
• Touch [Delete All] to delete all entered numbers.
3
Touch [Done].
Setting the Lock status of individual channels
1
Touch [Locked Channel].
2
Check/uncheck [On] or [Off] of the channels list
to set the Parental Lock Off/On.
Clearing the Lock of ALL the locked Channels
1
Touch [Clear All Locked Channels].
2
Touch [YES] to clear the lock of all the locked
channels.
Touch [NO] to cancel.
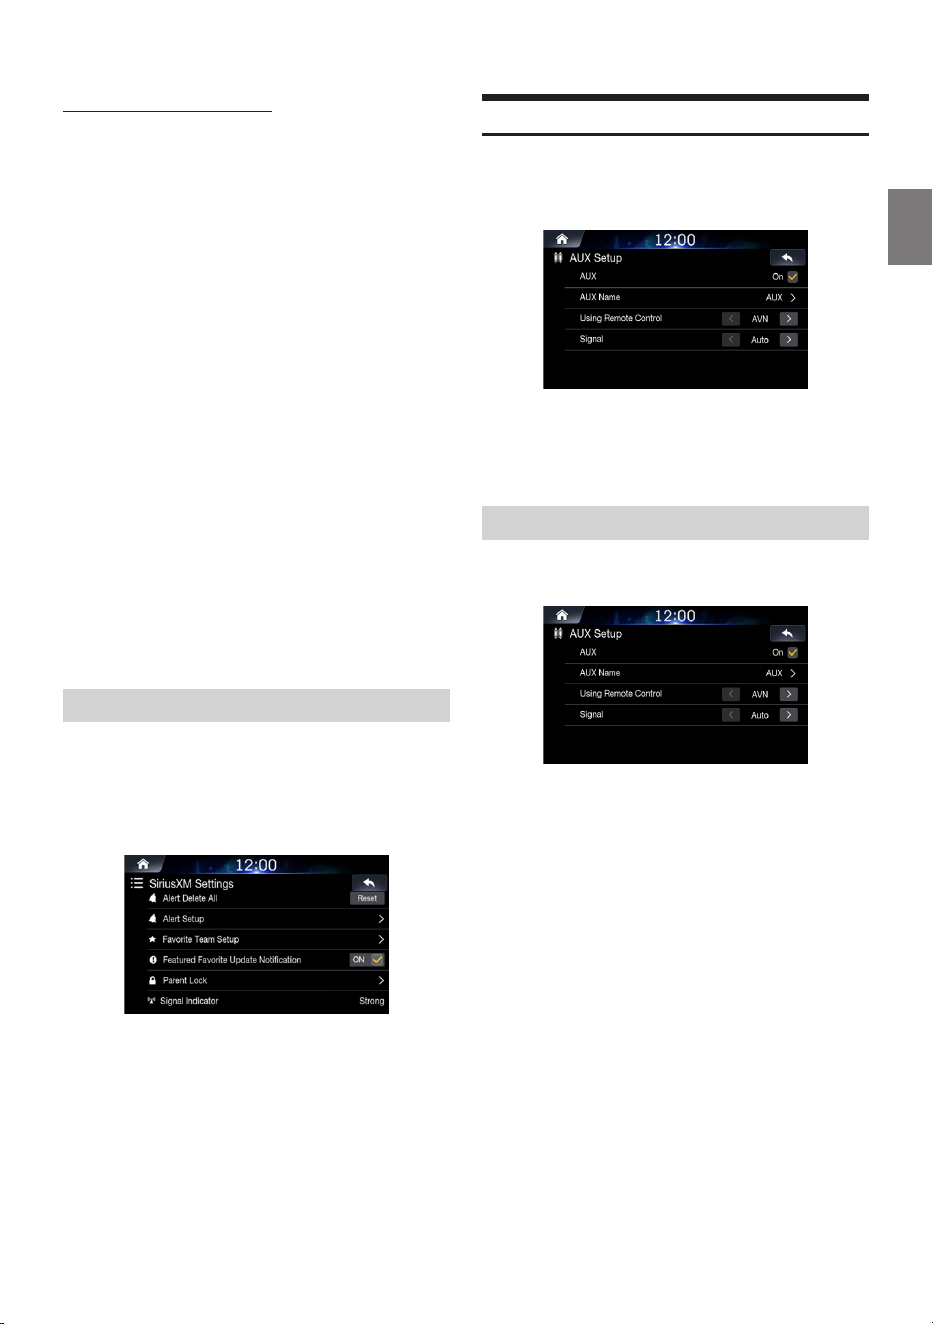
81
-EN
Changing the Lock Passcode
1
Touch [Edit Code].
The numeric keypad screen is displayed.
2
Enter a 4-digit passcode.
The initial passcode is set to 0000.
• Touch [<-] to delete an entered number.
• Touch [Delete All] to delete all entered numbers.
3
Touch [Done] to confirm the entry.
4
Now use the keypad to enter the new 4-digit
passcode.
5
Touch [Done].
6
Then use the keypad to enter the new 4-digit
passcode a second time to verify it.
7
Touch [Done].
• Remember to keep a note of the passcode in a safe place in case
you forget the code.
• The passcode is reset to '0000' upon restoring factory default
settings.
Signal Strength Information
While listening to a SiriusXM Channel, the Signal strength of the
current channel will be displayed.
This menu item displays the SiriusXM signal strength as
Strong, Good, Weak or No Signal.
• If the Signal Indicator reports Weak or No Signal and your vehicle
is parked outside with no obstructions to the southern sky, then
your SiriusXM antenna may not be properly installed or may have
become damaged.
AUX Setup
You can set up the items related to the Auxiliary device.
In the Setup screen, touch [AUX].
• These settings cannot be changed when AUX is the current audio
source.
• These settings are only available when “AUX” is set to “On”.
Turning AUX On/Off
Check the [Off] box to turn the feature on.
Uncheck the [On] box to turn the feature off.
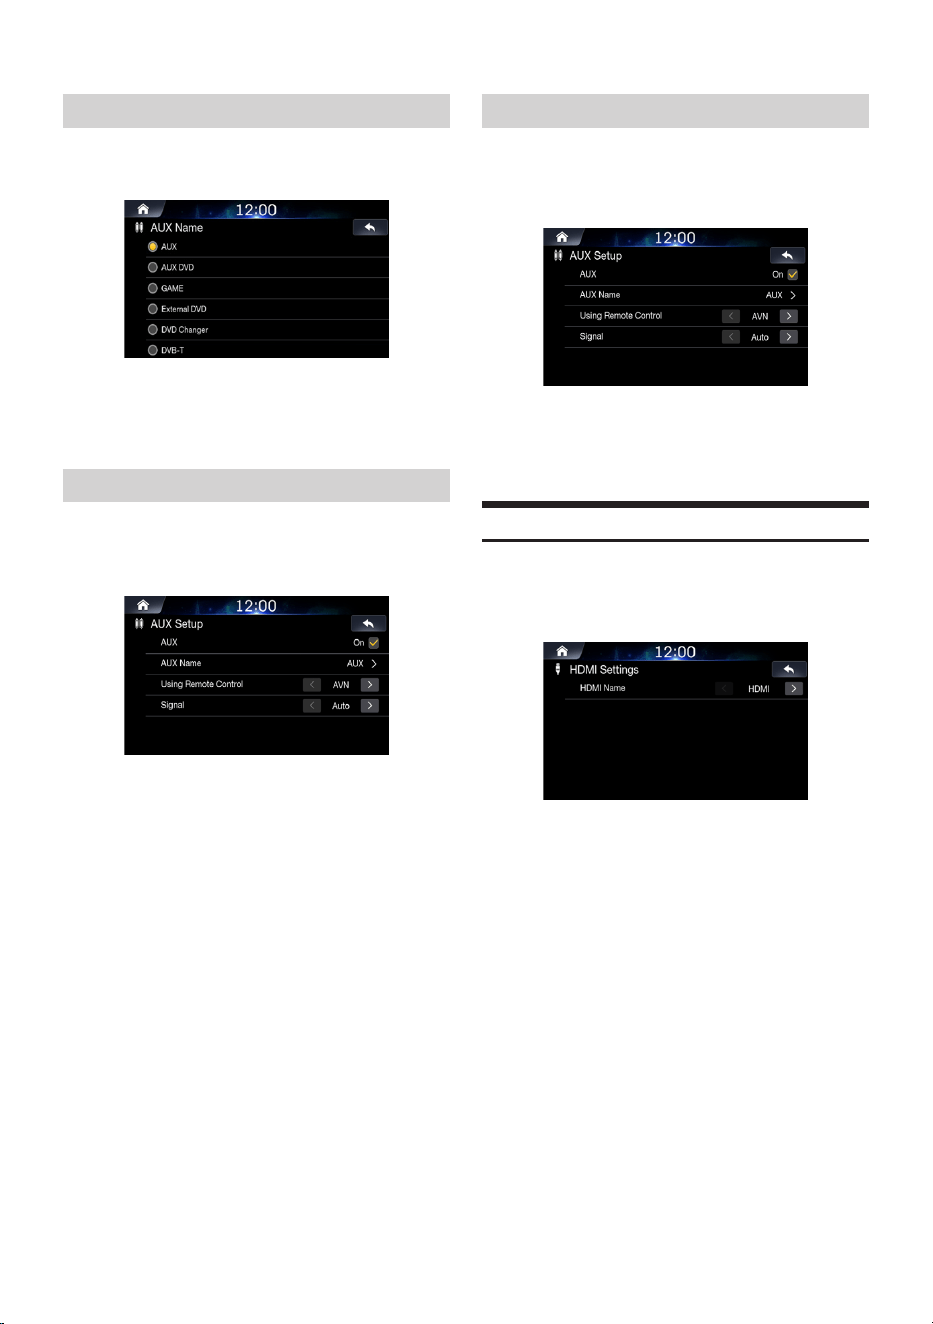
82
-EN
Setting AUX Name
1
In the AUX Settings screen, touch [AUX Name].
2
Select the desired name.
AUX / AUX DVD / GAME / External DVD / DVD Changer /
DVB-T / TV / USB Player
Using Remote Control
1
Set the [Using Remote Control] menu to AVN or
RSE to use the remote control.
2
Set this menu to [AVN] or [RSE].
• AVN : AUX is operated through the remote controller signal from
the Remote Sensor.
• RSE : AUX is operated using the remote controller signal delivered
from the device connected with the RSE.
Setting Signal
You can switch the visual input signal system.
Select the desired option.
• Auto: the video input signal type (NTSC or PAL) will be
automatically selected.
• NTSC/PAL: choose the video input signal type manually.
HDMI Settings
You can set the name of an external device connected via HDMI.
1
In the Setup screen, touch [HDMI].
2
Select the desired name.
• HDMI: set when a smartphone is connected via HDMI.
• DVD: set when an external DVD player is connected.
• This setting cannot be changed when HDMI is the current audio
source.
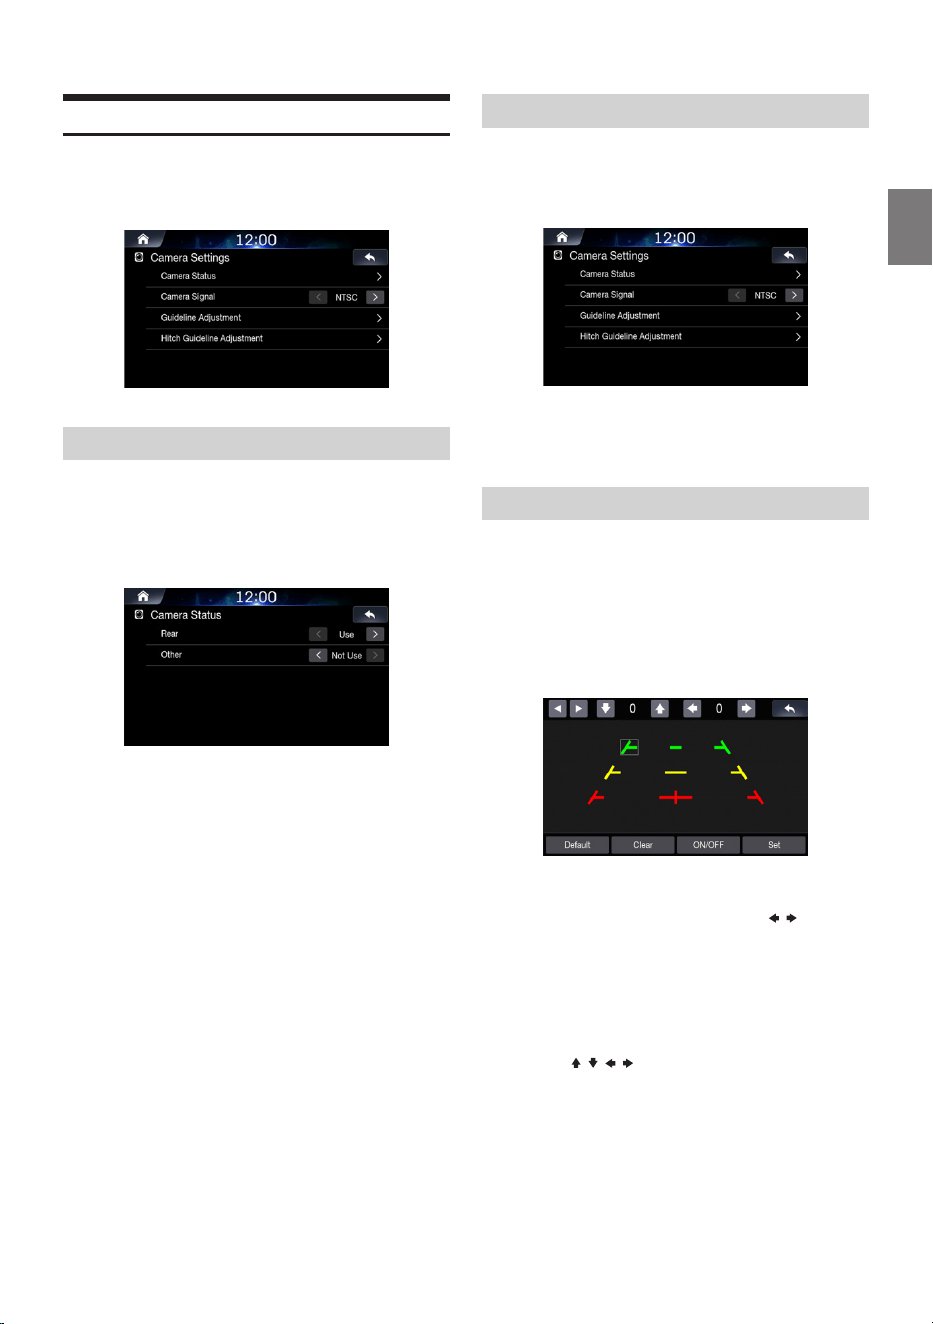
83
-EN
Camera Settings
You can set up items related to the Camera.
In the Setup screen, touch [Camera].
Setting Camera Status
You can set the camera input.
1
In the Camera Settings screen,
touch [Camera Status].
2
Set whether to use rear camera or other cameras.
• Rear: Rear camera
• Other: Side camera, Room camera, etc.
Setting Camera Signal
You can switch the video input signal system.
Select the desired option.
• Auto: the video input signal type (NTSC or PAL) will be
automatically selected.
• NTSC/PAL: choose the video input signal type manually.
Setting Camera Guideline
The camera guideline can be changed when connected to Rear
View Camera.
This item cannot be selected when the rear camera status is set to
“Use” or “Not Use”.
1
In the Camera Settings screen,
touch [Guideline Adjustment].
2
Touch the guideline you intend to adjust.
Guideline can also be selected by touching [
,
].
• You cannot adjust the position of the yellow guideline in the Center
independently.
It is controlled by a system to be the Center of the two yellow
guidelines on the left and right, or the central green line and red
guide line.
3
Touch [ , , , ] to adjust the position of the
guideline.
• Touching [Clear] clears adjustments and returns to the setting
before guideline alteration.
4
After the adjustment is completed, touch [Set].
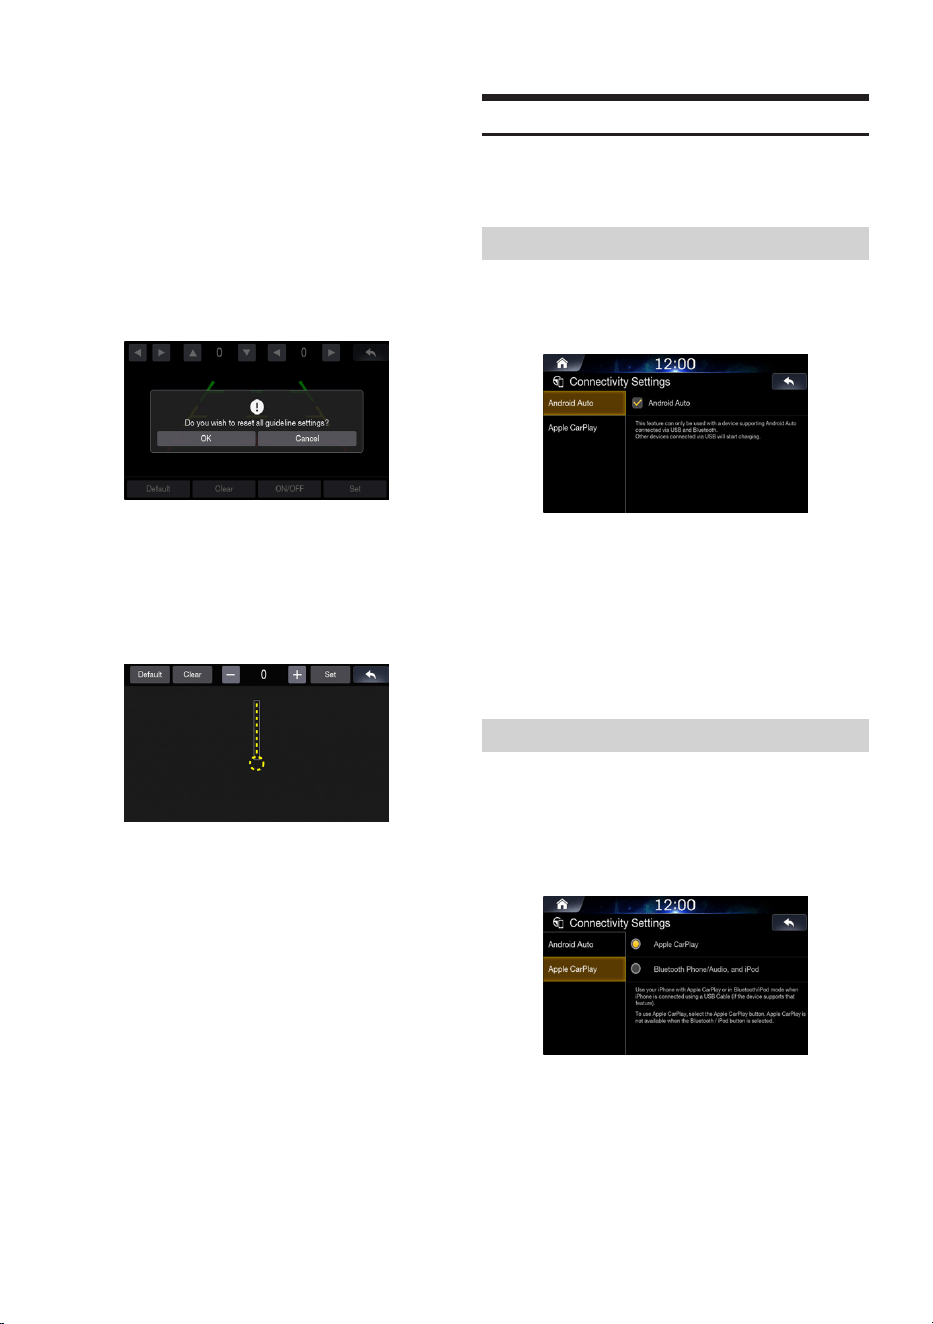
84
-EN
■
Turning Guideline Display On/Off
1. Select the guideline.
2. Touch [On/Off].
The currently selected guide will turn off.
3. To turn the guideline on, touch [On/Off] again.
• Guidelines that are turned off are still adjustable.
■
Returning Guideline to Default
1. Touch [Default]
2. Touch [OK].
Adjusted values will return to default settings
■
Setting Hitch Guideline
1. In the Camera Settings screen, touch [Hitch Guideline
Adjustment].
2. Touch the guideline you intend to adjust.
Guideline can also be selected by touching [
▲
,
▼
].
3. Touch [
+
,
-
] to adjust the position of the guideline.
4. After the adjustment is completed, touch [Set].
Connectivity Settings
This menu allows you to set the car connectivity of your system.
In the Setup screen, touch [Connectivity].
Setting Android Auto
1
In the Connectivity Settings screen, touch
[Android Auto].
2
Check to use your Android phone with Android
Auto.
If Android Auto is checked, you can use the functions of your Android
phone with a USB cable and Bluetooth connected. It enables the
Android Auto functions.
• While Android Auto is running, you cannot use Bluetooth Audio.
Setting Apple CarPlay
This menu allows you to set connectivity When iPhone is connected
using a USB cable.
1
In the Connectivity Settings screen,
touch [Apple CarPlay].
2
Select the desired option.
• Apple CarPlay: uses your iPhone with Apple CarPlay
• Bluetooth Phone/Audio and iPod: uses your iPhone in
Bluetooth/iPod mode.
• This setting is invalid for music playing of iPhone 4S and iPod.
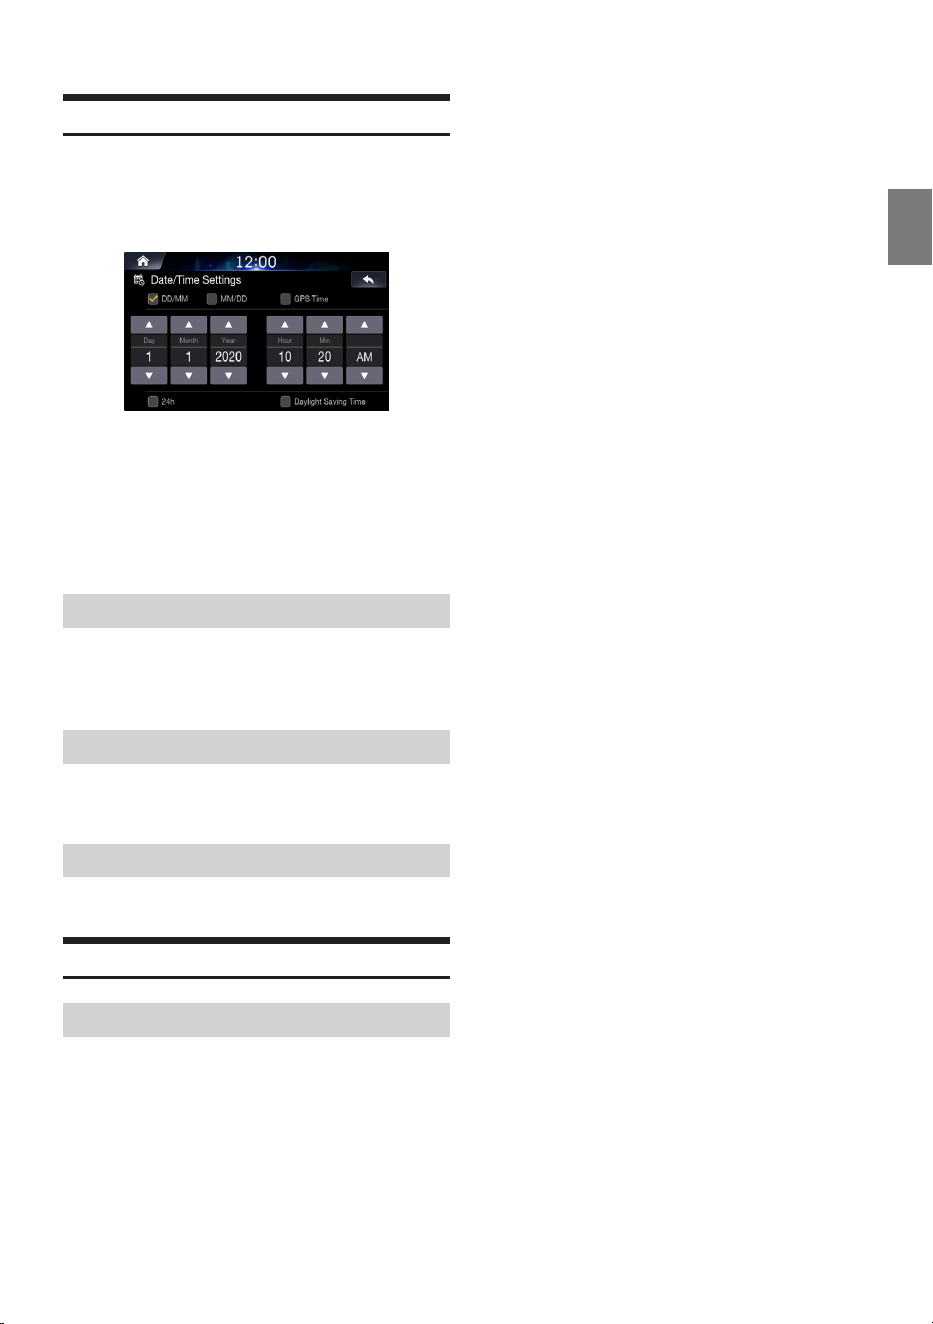
85
-EN
Date/Time Settings
This feature is used to set the time and date shown within the
system.
1
In the Setup screen, touch [Date/Time].
• The Date/Time feature is unavailable when GPS time is being
used. To change the date/time manually, turn off the [GPS Time]
feature.
2
Adjust the date and time.
• DD/MM: displays the date in order of day > month
• MM/DD: displays the in order of month > day.
Receiving GPS Time
Check the [GPS Time] box to display the received GPS Time.
• The Date/Time feature is unavailable when GPS time is being
used.
Converting Time Format
Check/uncheck the [24 Hours] box to convert the digital clock
display to 24 or 12 hours.
Turning Daylight Savings Time On/Off
Check the [Daylight Savings Time ] box to turn the feature on.
If This Message Appears
SiriusXM
■
Check SXM Antenna
• The radio has detected a fault with the SiriusXM antenna. The
antenna cable may be either disconnected or damaged.
• Verify that the antenna cable is connected to the SiriusXM
Connect Vehicle Tuner.
• Inspect the antenna cable for damage and kinks. Replace the
antenna if the cable is damaged.
• SiriusXM products are available at your local car audio retailer or
online at http://shop.siriusxm.com.
■
Check Tuner
• The radio is having difficulty communicating with the SiriusXM
Connect Vehicle Tuner. The tuner may be disconnected or
damaged.
• Verify that the SiriusXM Connect Vehicle Tuner cable is securely
connected to the radio
■
No SXM Signal
• The SiriusXM Connect Vehicle Tuner is having difficulty receiving
the SiriusXM satellite signal.
• Verify that your vehicle is outdoors with a clear view of the sky.
• Verify that the SiriusXM magnetic mount antenna is mounted on a
metal surface on the outside of the vehicle.
• Move the SiriusXM antenna away from any obstructions.
• Inspect the antenna cable for damage and kinks.
• Consult the SiriusXM Connect Vehicle tuner installation manual
for more information on antenna installation. Replace the antenna
if the cable is damaged. SiriusXM products are available at your
local car audio retailer or online at www.shop.siriusxm.com.
■
Subscription Updated
• The radio has detected a change in your SiriusXM subscription
status. Press “OK” to clear the message.
• In the U.S.A., visit www.siriusxm.com or call 1-866- 635- 2349 if
you have questions about your subscription. In Canada, visit www.
siriusxm.ca or call 1- 877- 438- 9677 if you have questions about
your subscription.
■
Channel <xxx> Not Available
• The channel that you have requested is not a valid SiriusXM
channel or the channel that you were listening to is no longer
available. You may also see this message briefly when first
connecting a new SiriusXM Connect Vehicle tuner.
• Visit www.siriusxm.com for more information about the SiriusXM
channel lineup.
■
Channel <xxx> Not Subscribed
• The channel that you have requested is not included in your
SiriusXM subscription package or the channel that you were
listening to is no longer included in your SiriusXM subscription
package.
• In the U.S.A., visit www.siriusxm.com or call 1-866- 635-2349 if
you have questions about your subscription package or would like
to subscribe to this channel. In Canada, visit www.siriusxm.ca/
activate or call Customer Care at 1-888-539-7474.
■
Channel <xxx> Locked
The channel that you have requested is Locked by the radio Parental
Control feature. See “Setting Parent Lock” for more information on
the Parental Control feature and how to access locked channels.
■
Replay Memory Full
• Buffer for Replay is full.
■
Replay Memory Near Full
• Buffer for Replay will full within 11 seconds.
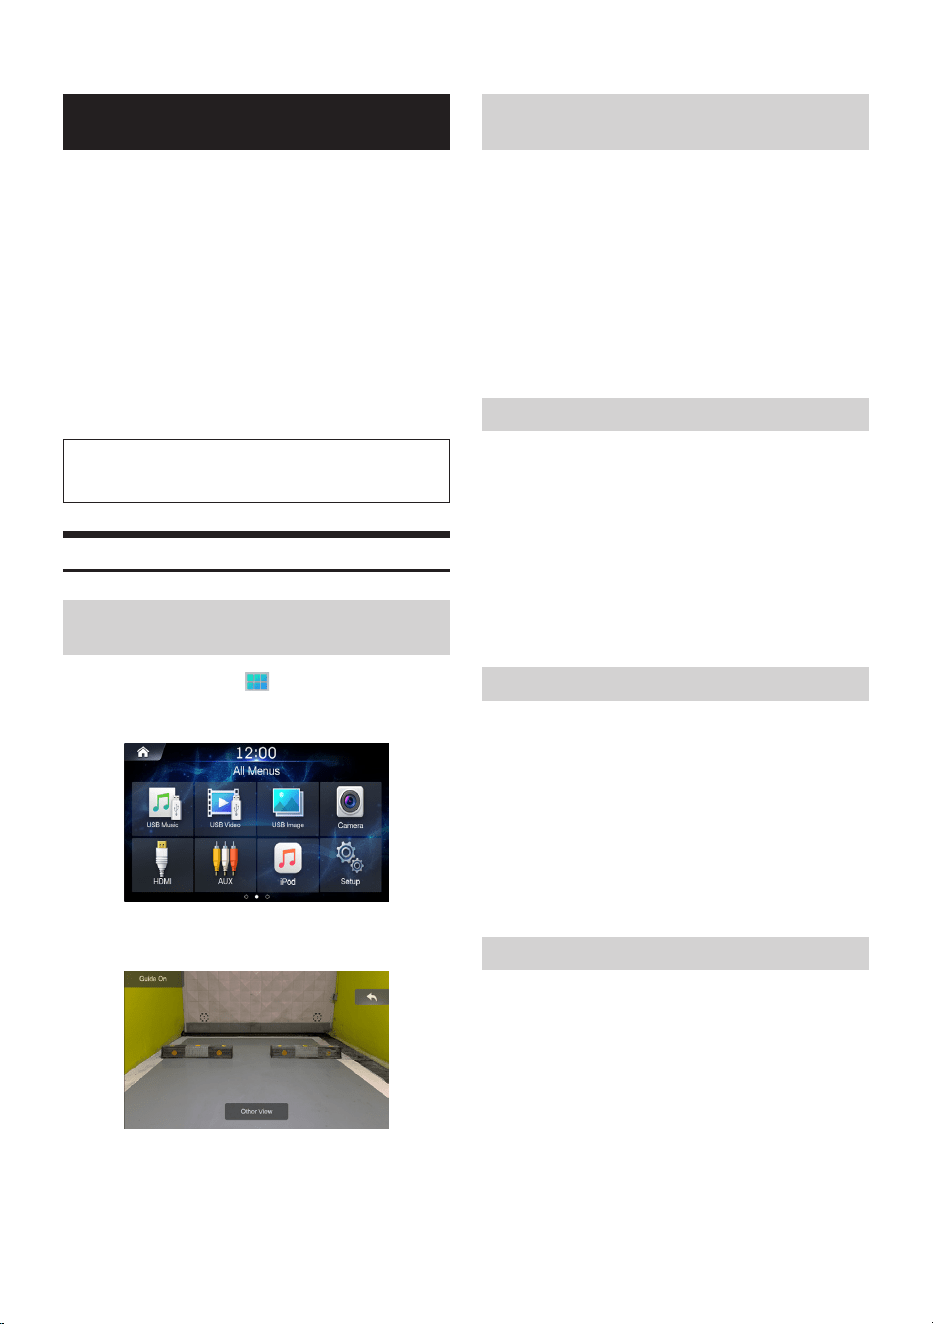
86
-EN
Camera Operation
When an optional camera is connected, video of the camera view
can be output to the screen of this unit.
Front camera or Rear camera can be connected to this unit.
Set the Camera Status Setting (Rear or Other) according to your
connected camera.
Rear camera:
If an HCE-C127D/HCE-C157D/HCE-C252RD, etc., camera is
connected, when the vehicle is reversed, the rear camera view
(guide marks for vehicle width and available distance) is displayed
automatically on the screen of this unit.
Other camera:
Set when connecting to a camera other than the Rear camera, such
as a front camera.
You can adjust the quality of the camera image. Setting
items: Brightness / Color / Contrast/Hue. Refer to “Visual
Settings”.
Rear Camera Operation
Displaying the Rear Camera Image from
the Menu Screen
1
Press the All Menus button.
Or in the Home screen, touch [All Menus].
2
Touch [Camera].
• Touch [
←
] to return the previous screen.
• You can perform a Guideline Adjustment. For details, see “Setting
Camera Guideline”.
• The guidelines will be displayed (or hidden) depending on whether
the Guide is turned On/Off.
Displaying the Rear View Video While the
car Is in Reverse
1. Shift the gear lever to the reverse (R) position.
The rear view image is displayed while the car remains in
reverse.
2. If you shift the gear lever to a position other than reverse (R),
the monitor returns to the previous screen.
• Never depend solely on the camera when backing up. Always turn
and look and only use the camera for additional assistance.
• This function is effective when the reverse wire is properly
connected.
• You can perform a Guideline Adjustment. For details, see “Setting
Camera Guideline”.
Guideline Display On/Off
1. Touch the screen when the image from the camera is
displayed.
The operation screen is displayed on the screen.
• After a 5-second time-out, the operation screen returns to the
camera display screen.
2. Touch [Guide Off] on the Rear camera display screen.
The guide disappears, and then the [Guide Off] switch changes
to [Guide On].
3. Touch [Guide On] to turn on the guide.
Hitch Guideline Display On/Off
1. Touch the screen when the image from the camera is
displayed.
The operation screen is displayed on the screen.
• After a 5-second time-out, the operation screen returns to the
camera display screen.
2. Touch [Hitch Guide On] on the Rear camera display screen.
The hitch guideline is displayed, and then the [Hitch Guide On]
switch changes to [Hitch Guide Off].
3. Touch [Hitch Guide Off] to turn off the guide.
Switching the Front Camera Image
1. Touch the screen when the image from the camera is
displayed.
The operation screen is displayed on the screen.
• After a 5-second time-out, the operation screen returns to the
camera display screen.
2. Touch [Other View] on the Rear camera display screen.
The Front Camera View is displayed, and then the [Other View]
switch changes to [Rear View].
3. Touch [Rear View] to display the Rear Camera View.
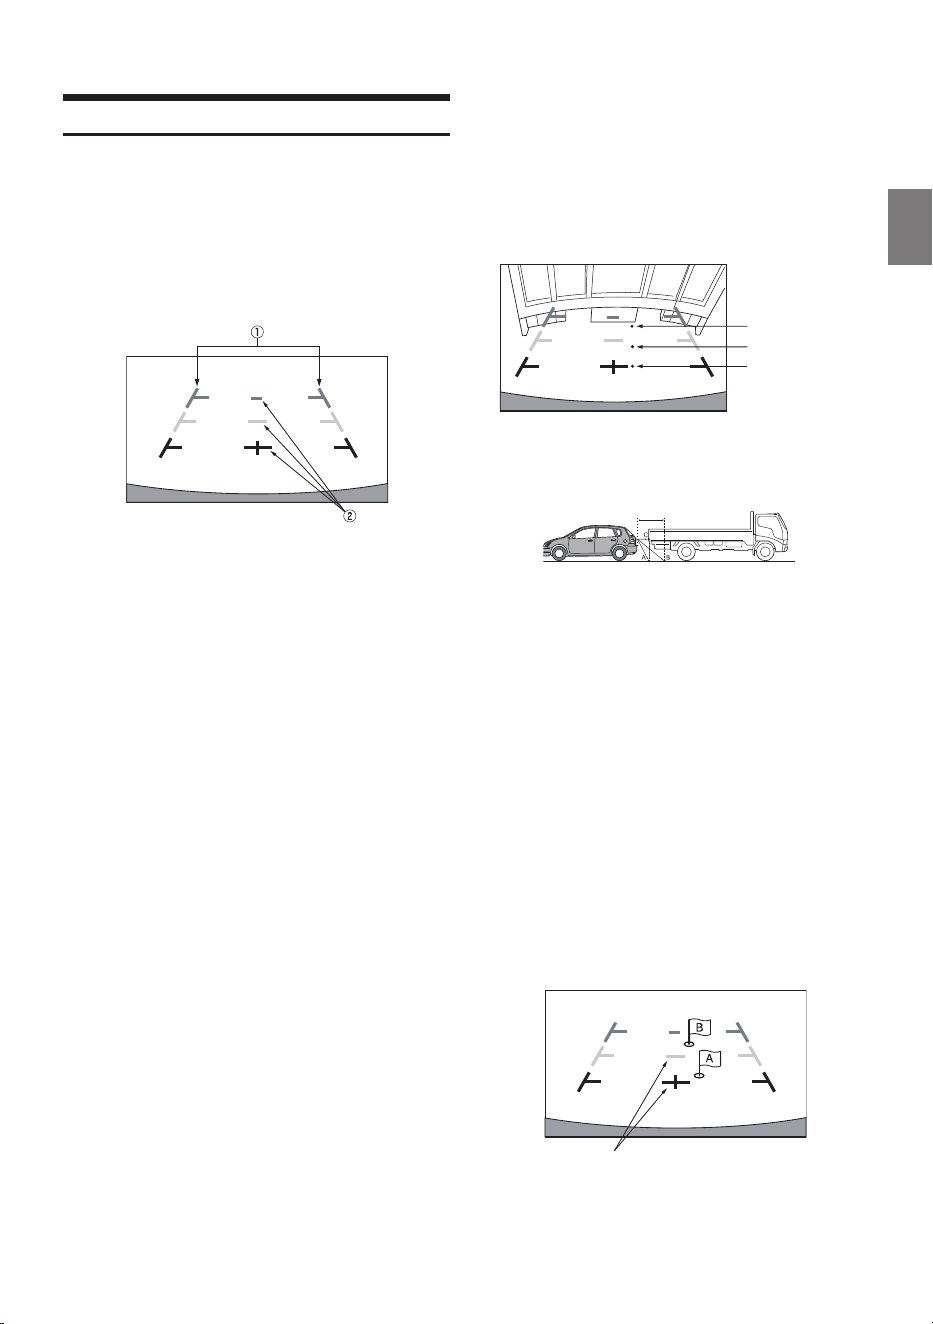
87
-EN
About the Rear Camera Guideline
To display the guideline, turn guideline on. Also, to adjust the guide,
see “Setting Camera Guideline”.
You can also turn off the guideline in the Rear camera display
screen.
■
Indication mark meaning
When the car is put into reverse gear, the monitor switches to the
rear view camera image. Guides appear to help visualise the car’s
width and distance from the rear bumper.
1. Car width extension marks (red, yellow and green in order of
distance)
If properly calibrated, the marks indicate the car’s width. This
helps guide the car’s path when backing up in a straight line.
The marks represent the distance from the rear of the car (from
the rear end of the bumper).
The marks do not move in synchronisation with the steering wheel.
Set the marks to suit the car’s width.
2. Distance guidance marks
The marks represent the distance from the rear of the car (from
the rear end of the bumper).
• The marks do not move in synchronisation with the steering
wheel.
• We recommend that you measure the actual distance to the
marks when parked on a level surface.
• Depending on the condition of the car or road surface, the range
of vision may vary.
• The camera has a limited range of vision. Objects at extreme
angles to the camera (e.g. under the bumper or at opposite ends
of the bumper) may not be in the its field-of-vision.
• The rear camera image may have a tint which is different from the
actual surroundings.
• Depending on the car, the guidance may deviate to the right or left.
This is not a malfunction.
■
Distance guidance mark
The distance guides represent the ground level distance from the
rear bumper. It is difficult to accurately estimate the distance to
objects above ground level.
In the following example, the distance to A is 0.5 m and the distance
to B is 1 m.
<Screen>
C
B
A (about 0.5 m)
<Positions of A, B and C>
about 1 m
In the screen, according to the distance guidance marks, the truck
seems to be parked about 1 m away (at the position B). In actual
fact, however, if you reversed to position A, you would collide with
the truck.
In the screen, positions A, B and C seem to be located in order of
proximity. However, in actual fact, the position A and C are the same
distance, and B is farther away than positions A and C.
• The car width extension mark represents the distance to the road
surface. The distance to an object on the road is not accurately
represented by the guides.
Error between the screen and the actual road surface
In the following conditions, errors are produced between the screen
guidance and the actual road surface. (The illustrations represent a
case when the camera is installed in the standard position.)
■
When there is a steep upward slope behind the car
(example)
<Screen>
Distance guidance marks
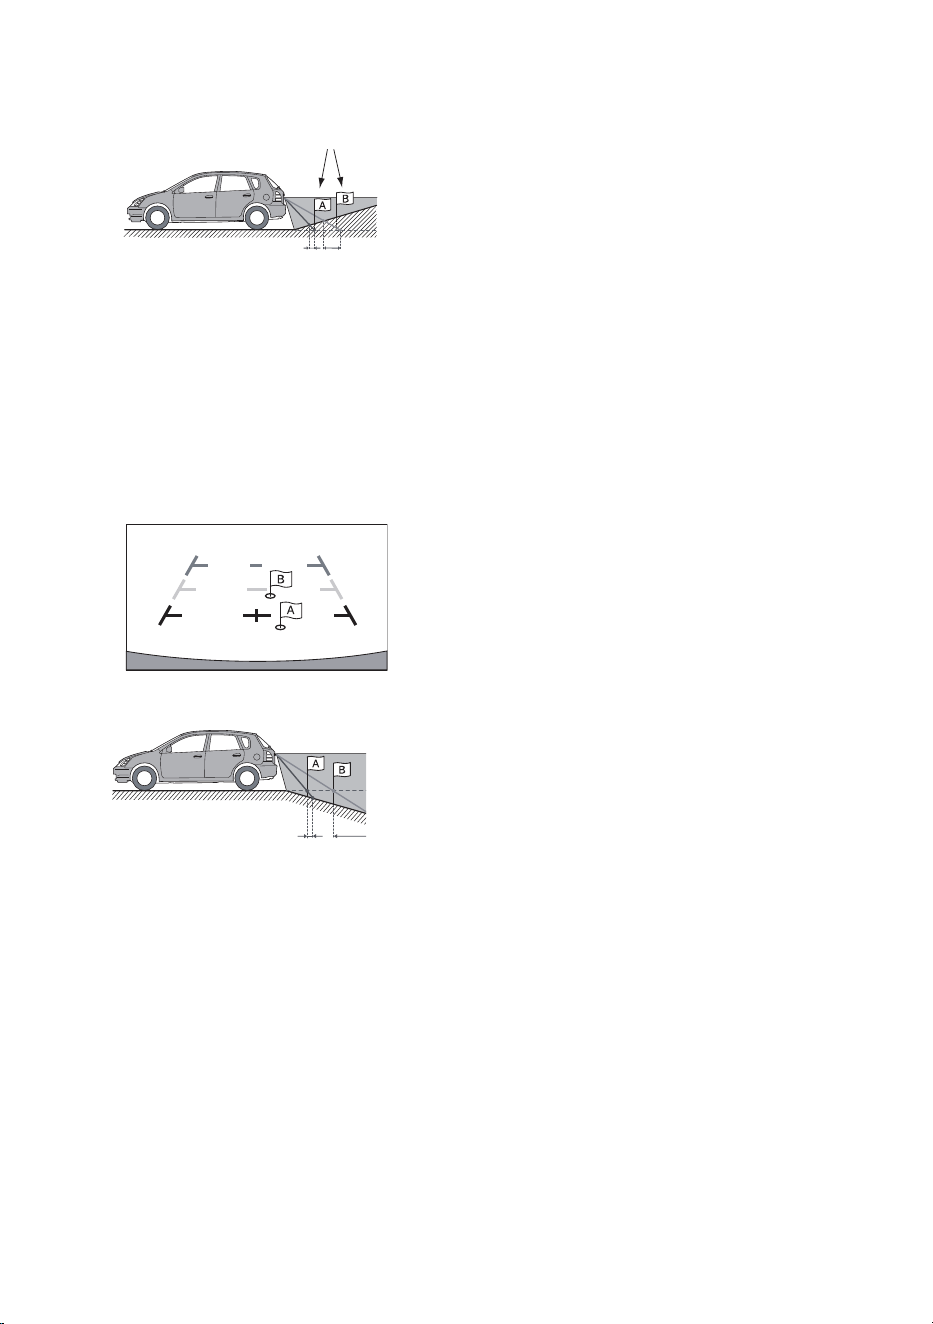
88
-EN
<Situation of the car>
Actual distances
Error Error
The distance guidance mark represents the distance to a flat road
surface. Therefore, in the case of an upward slope behind the car,
the distance guides are displayed closer to the rear bumper than the
actual distance. For example, if there is an obstacle on the upward
slope, it may appear farther away than its actual position.
Also, an error may occur between the guidance and the actual path
of the car on the road surface.
■
When there is a steep downward slope behind the
car (example)
<Screen>
<Situation of the car>
Error Error
In the case of a downward slope behind the car, the distance guides
are displayed farther from the rear bumper than the actual distance.
If there is an obstacle on the downward slope, it seems closer than
its actual position.
Also, an error may occur between the guidance and the actual path
of the car on the road surface.
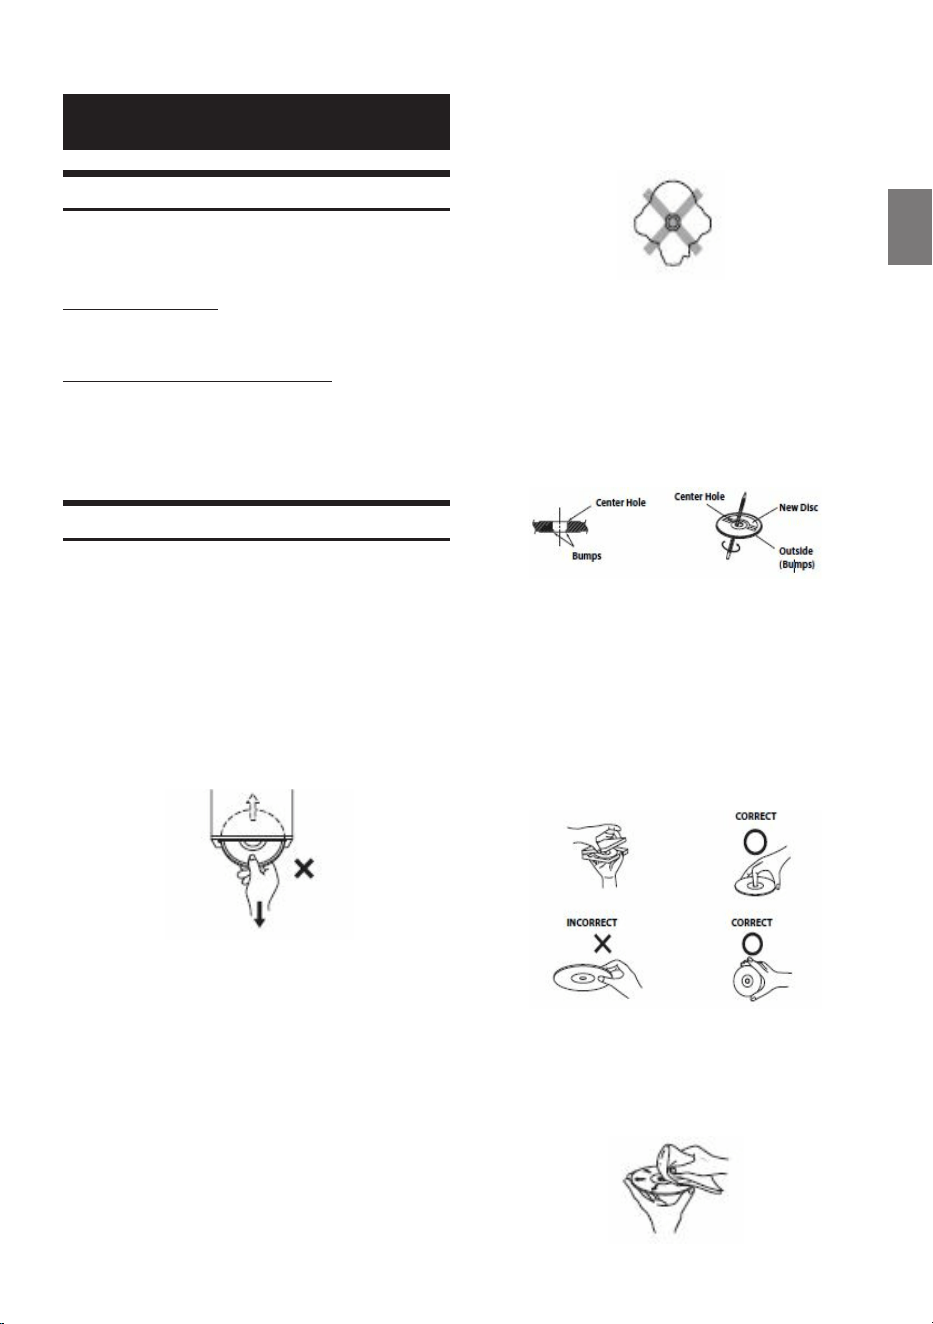
89
-EN
Information
Product Software Update
This product use software that can be updated through a USB flash
drive. Download the software from the Alpine website and update
the product using the USB flash drive.
Updating this product
Check the Alpine website for details on updating.
http://www.alpine-europe.com
Important information on the software
About the software license of the product
The software installed in the product contains open-source software.
See the following Alpine website for details on the open source
software.
http://www.alpine.com/e/research/oss/
Cautions about Discs
Moisture Condensation
You may notice the disc playback sound wavering due to
condensation. If this happens, remove the disc from the player and
wait about an hour for the moisture to evaporate.
Damaged Disc
Do not attempt to play cracked, warped, or damaged discs. Playing
a bad disc could severely damage the playback mechanism.
Never Attempt the Following
Do not grip or pull out the disc while it is being pulled back into the player
by the automatic reloading mechanism.
Do not attempt to insert a disc into the unit when the unit power is off.
Inserting Discs
Your player accepts only one disc at a time for playback. Do not
attempt to load more than one disc.
Make sure the label side is facing up when you insert the disc. “Disc
error” will be displayed on your player if you insert a disc
incorrectly. If “Disc error” continues to be displayed even though
the disc has been inserted correctly, push the RESET switch with a
pointed object such as a ballpoint pen.
Playing a disc while driving on a very bumpy road may result in
skips, but this will not scratch the disc or damage the player.
Irregular Shaped Discs
Do not grip or pull out the disc while it is being pulled back into the player
by the automatic reloading mechanism.
Do not attempt to insert a disc into the unit when the unit power is off.
New Discs
To prevent the disc from jamming, “Disc error” is displayed if discs with
irregular surfaces are inserted or if discs are inserted incorrectly. When
a new disc is ejected immediately after initial loading, use your finger to
feel around the inside of the center hole and outside edge of the disc.
If you feel any small bumps or irregularities, this could inhibit proper
loading of the disc. To remove the bumps, rub the inside edge of the
hole and outside edge of the disc with a ballpoint pen or other such
instrument, then insert the disc again.
Installation Location
Make sure the unit will not be installed in a location subjected to:
• Direct sun and heat
• High humidity and water
• Excessive dust
• Excessive vibrations
Correct Handling
Do not drop the disc while handling. Hold the disc so you will not leave
fingerprints on the surface. Do not affix tape, paper, or gummed labels to
the disc. Do not write on the disc.
Disc Cleaning
Fingerprints, dust, or soil on the surface of the disc could cause the
DVD player to skip. For routine cleaning, wipe the playing surface with
a clean, soft cloth from the center of the disc to the outer edge. If the
surface is heavily soiled, dampen a clean, soft cloth in a solution of mild
neutral detergent before cleaning the disc.
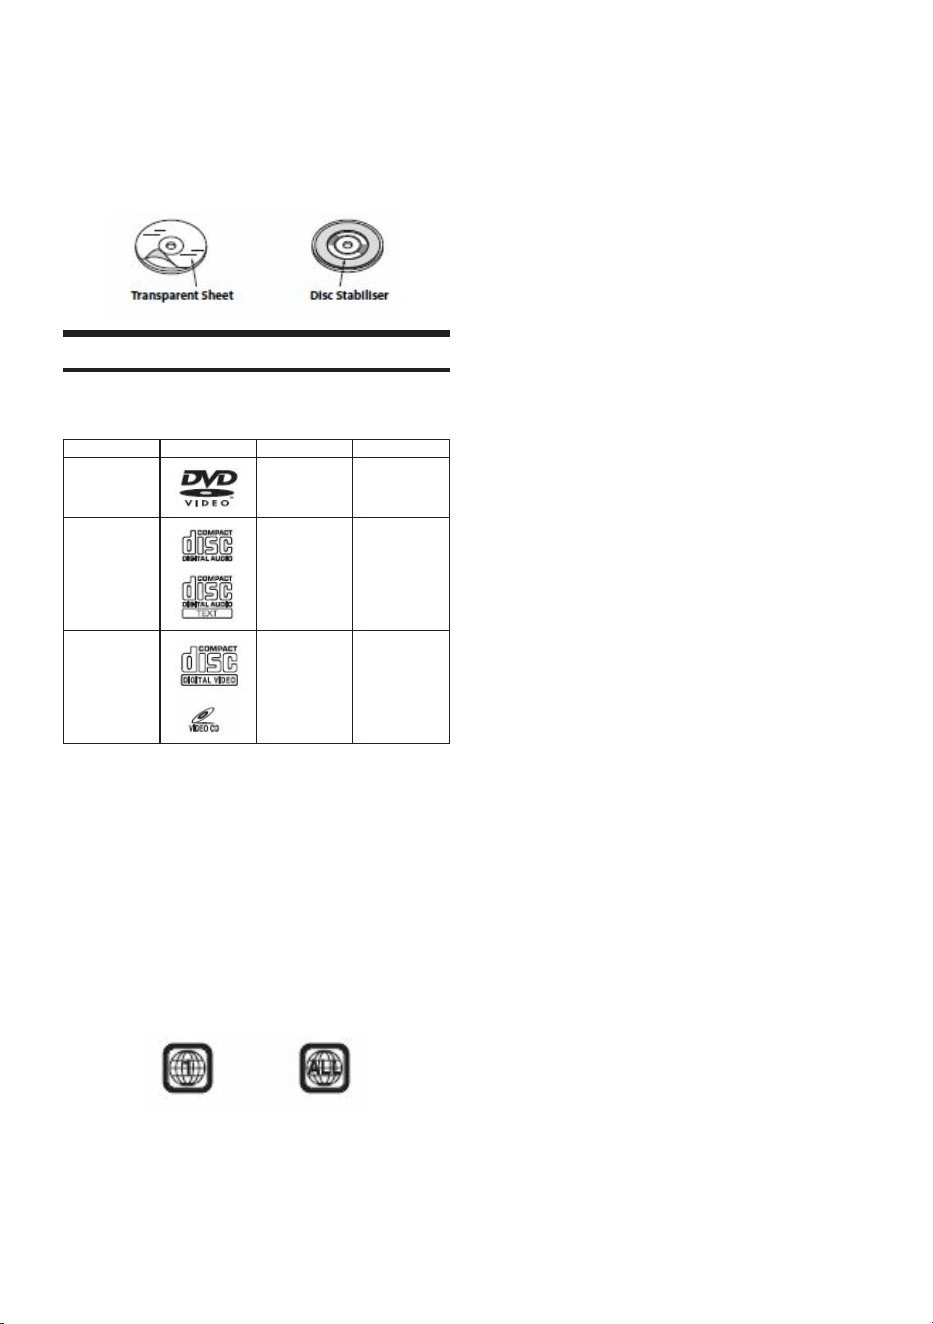
90
-EN
Disc Accessories
There are various accessories available on the market for protecting
the disc surface and improving sound quality. However, most of them
will influence the thickness and/or diameter of the disc. Using such
accessories can cause operational problems. We recommend not using
these accessories on discs played in Alpine DVD players.
Discs Playable on This Unit
Playable Discs
The discs listed below can be played on this unit.
Mark (logo) Recorded Content Disc size
DVD Video Audio + Video 12 cm*
Music CD Audio 12 cm
Video CD Audio + Video 12 cm
* Two-layer DVD disc compatible
Discs that cannot be played
DVD-ROMs, DVD-RAMs, CD-ROMs (excluding MP3/WMA/AAC/WAV
files), photo CDs, etc.
DualDisc
This unit is not compatible with DualDisc.
Using a DualDisc may cause unit malfunction, and may cause disc
damage when the disc is inserted/ejected.
DVD region number (playable region number)
This DVD player will play back any disc whose region number is 2 (or
All). DVDs with a region number other than those listed below, cannot
be played on this DVD player.
Video CDs
This DVD unit is compatible with playback control (PBC) compatible
video CDs (version 2.0).
“PBC” is a function by which you can use menu screens recorded on
the disc to find the scene you want to watch and view various types of
information in dialog style.
Using compact discs (CD/CD-R/CD-RW)
If you use unspecified compact discs, correct performance cannot be
guaranteed.
You can play CD-Rs (CD-Recordables)/CD-RWs (CDReWritables)
which have been recorded only on audio devices.
You can also play CD-Rs/CD-RWs containing MP3/WMA/AAC/
WAV formatted audio files.
• Some of the following discs may not play on this unit: Flawed
discs, discs with fingerprints, discs exposed to extreme
temperatures or sunlight (e.g., left in the car or this unit), discs
recorded under unstable conditions, discs on which a recording
failed or a re-recording was attempted, copy-protected CDs which
do not conform to the audio CD industry standard.
• Use discs with MP3/WMA/AAC/WAV files written in a format
compliant with this unit.
To customers using CD-R/CD-RW
• If a CD-R/CD-RW cannot be played back, make sure the last
recording session was closed (finalized).
• Finalize the CD-R/CD-RW if necessary, and attempt playback
again.
Tips for making your own discs
The unit plays DVD Video, Video CD, Audio CD and has a built in MP3/
WMA/AAC decoder.
The following information is designed to help you create your own music
CDs (either Audio CD or MP3/WMA/AAC encoded CD-R/ RW files).
What is the difference between an Audio and MP3/WMA/AAC
CD?
An Audio CD is the same format as the commercial CDs you buy in
the store (also known as CD-DA). MP3 (MPEG Audio Layer 3)/ WMA
(Windows Media Audio)/AAC (Advanced Audio Coding) is a data file that
uses a compression scheme to reduce the size of the music file*.
* If the first session on a disc containing both CD-DA data and MP3/
WMA/AAC data is a CD-DA file, only CD-DA files will be played.
Multisession CD-R/RW:
Once a recording has been stopped, this is considered one session.
If the disc is not closed (finalized), additional data may be added.
Once this additional data has been recorded, this becomes a
“multisession” CD.
Properly formatted MP3/WMA/AAC Discs:
Use ISO9660 formatting to insure proper playback. You may use
standard ISO naming Level 1 (8.3 DOS standard), Level 2 (32
characters) or Joliet (Windows or Macintosh long filenames) file
naming
conventions*.
* Please consult the Owner’s manual for additional information.

91
-EN
On handling compact discs (CD/CD-R/CD-RW)
• Do not touch the surface.
• Do not expose the disc to direct sunlight.
• Do not affix stickers or labels.
• Clean the disc when it is dusty.
• Make sure that the disc is smooth and flat.
• Do not use commercially available disc accessories.
Do not leave the disc in the car or the unit for a long time.
Never expose the disc to direct sunlight.
Heat and humidity may damage the disc and you may not be
able to play it again.
Using DVD-Rs/DVD-RWs/DVD+Rs/DVD+RWs
• This unit is compatible with discs recorded in the standard DVD-
Video format.
• Note that discs not finalized (processed to enable to play on
playback-only DVD players) cannot be played on this DVD player.
• Some discs may not play back, depending on the recording device
and disc format.
• Discs or files utilising copy protection, may not be playable. Some
recording systems may not properly format copied files to enable
proper playback.
• In the following cases, the disc may not play on this unit: discs
recorded by certain DVD recorders, certain irregular discs, flawed
discs, dirty discs, when the pickup lens of this DVD player is dirty,
or when moisture condensation has occurred inside the unit.
• Be sure to follow all cautions included with your DVD-Rs/ DVD-
RWs/DVD+Rs/DVD+RWs discs.
• Do not put stickers, seals, or tape on the label side of DVD-Rs/
DVD-RWs/DVD+Rs/DVD+RWs.
• Compared to the regular discs, DVD-Rs/DVD-RWs/DVD+Rs/
DVD+RWs are more affected by heat, moisture, and direct
sunlight. If left in a car, etc., damage may occur and it might not
play on this unit.
• The operable temperature range for disc playback is as follows:
DVD-R/DVD-RW: 25 to +70°C
DVD+R/DVD+RW: +5 to +55°C
About the Supported Formats
For the list of video formats supported from a USB flash drive, see
“About USB Video format” (page 45).
About MP3/WMA/AAC/FLAC/OGG/APE/MP2
Caution
Except for private use, duplicating audio data (including
MP3/WMA/AAC/FLAC data) or distributing, transferring, or
copying it, whether for free or for a fee, without permission
of the copyright holder is strictly prohibited by the Copyright
Act and by international treaty.
What is MP3?
MP3, whose official name is “MPEG Audio Layer 3,” is a
compression standard prescribed by the ISO, the International
Standardisation Organisation and MPEG which is a joint activity
institution of the IEC.
MP3 files contain compressed audio data. MP3 encoding is capable
of compressing audio data at extremely high ratios, reducing the size
of music files to as much as one-tenth their original size. This is
achieved while still maintaining near CD quality. The MP3 format
realises such high compression ratios by eliminating the sounds that
are either inaudible to the human ear or masked by other sounds.
What is WMA?
WMA, or “Windows Media™ Audio,” is compressed audio data.
WMA is similar to MP3 audio data.
What is AAC?
AAC is the abbreviation for “Advanced Audio Coding,” and is a basic
format of audio compression used by MPEG2 or MPEG4.
What is FLAC?
FLAC (Free Lossless Audio Codec) is an audio file codec for
lossless compression, developed and offered as open source
software. Codecs with lossy compression forms, such as MP3 and
AAC, reduce part of the data to improve compression efficiency.
However, FLAC can reconstruct compressed data to be an identical
copy of the original data by performing lossless compression. The
compression ratio of FLAC is about 50%.
Method for creating MP3/WMA/AAC/FLAC (USB Flash drive) files
Audio data is compressed using software with MP3/WMA/AAC/
FLAC (USB Flash drive) codecs. For details on creating MP3/WMA/
AAC/ FLAC (USB Flash drive) files, refer to the user’s manual for
that software.
MP3/WMA/AAC/FLAC (USB Flash drive) files that are playable on
this device have the file extensions.
MP3: “mp3”
WMA: “wma”
AAC: “aac”
FLAC: ”flac”/”fla”
OGG: "ogg"
APE: "ape"
MP2: "mp2"
WMA is not supported for the following files, Windows Media Audio
Professional, Windows Media Audio 10 std or Windows Media Audio
10 Pro Lossless.
There are many different versions of the AAC format. Confirm that
the software being used conforms to the acceptable formats listed
above. It’s possible that the format may be unplayable even though
the extension is valid.
Playback of AAC files encoded by iTunes is supported.
Supported playback sampling rates and bit rates
MP3 (USB Flash drive)
Sampling rates: 48 kHz, 44.1 kHz, 32 kHz, 24 kHz, 22.05 kHz,
16 kHz, 12 kHz, 11.025 kHz, 8 kHz
Bit rates: 8 - 320 kbps
WMA (USB Flash drive)
Sampling rates: 48 kHz, 44.1 kHz, 32 kHz, 22.05 kHz, 16 kHz,
11.025 kHz, 8 kHz
Bit rates: 48 - 320 kbps
AAC (USB Flash drive)
Sampling rates:
48 kHz, 44.1 kHz, 32 kHz, 24 kHz, 22.05 kHz, 16 kHz,
12 kHz, 11.025 kHz, 8 kHz
Bit rates: 16 - 320 kbps
FLAC (USB Flash drive)
Sampling rates: 96kHz, 88.2kHz, 48kHz, 44.1kHz, 32kHz, 24kHz,
22.05kHz, 16kHz, 8kHz
Channel number: 1ch, 2ch
This device may not play back correctly depending on sampling
rates.
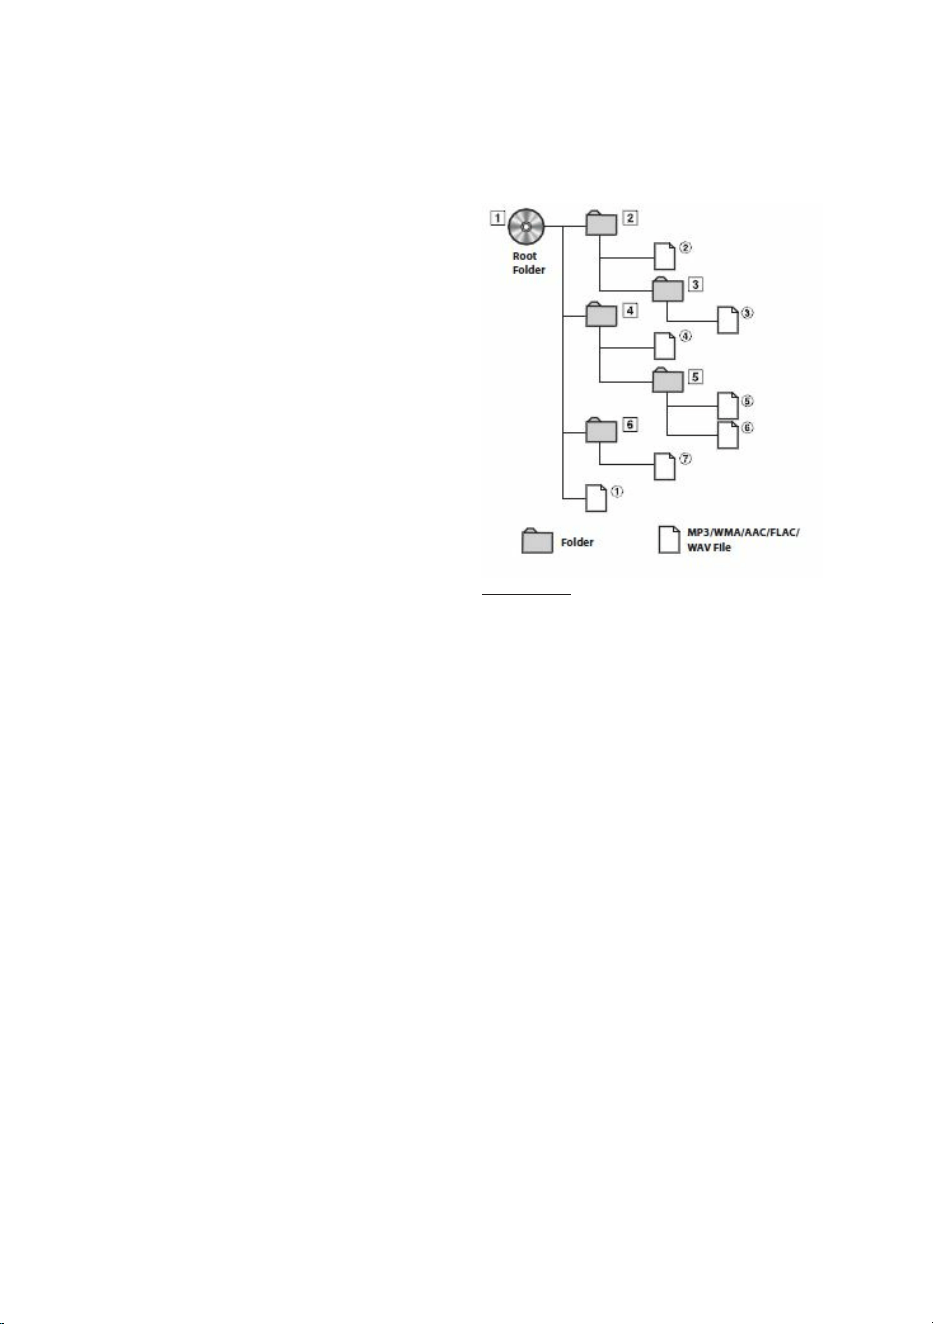
92
-EN
OGG (USB Flash drive)
Sampling rates: Up to 48kHz
Bit rates: 8 - 500 kbps
APE (USB Flash drive)
Sampling rates: Up to 48kHz
Channel number: 1ch, 2ch
MP2 (USB Flash drive)
Sampling rates: Up to 48kHz
Bit rates: 16 - 384 kbps
ID3 tags/WMA tags
This device supports ID3 tag v1.0, v1.1, v2.2, v2.3, v2.4, and WMA
tag Ver.1.x. If tag data is in an MP3/WMA/AAC file, this device can
display the title (track title), artist name, and album name ID3 tag/
WMA tag data.
For non-supported characters, “?” is displayed.
The number of characters may be limited, or not correctly displayed,
depending on the tag information.
Playing back MP3/WMA/AAC/FLAC
MP3/WMA/AAC/OGG/APE/MP2 files are prepared, then written to a
USB flash drive.
• Maximum numbers of playable files/folders USB Flash drive: 5,000
files/ 2,000 folders (including Root Folder)
• Largest playable file size: 512 MB
Playback may not be performed if a disc exceeds the limitations
described above.
If a file/folder name is long, the maximum possible number of files
may decrease.
• Both Audio and Video files are counted if their formats are playable
on this unit.
Media supported
Media devices supported
This unit can play back supported files from a USB flash drive, iPod,
iPhone or Android phone connected to the unit.
Corresponding File Systems
This device supports FAT 16/32.
The maximum nested folder depth is 15 (including the root directory).
File names are limited to 256 characters (including the extension).
Valid characters for folder/file names are letters A-Z (all caps),
numbers 0-9, and ‘_’ (underscore), Special Characters
~!@#$%^&()+`-=;',.{} (except : \/:*?"<>|).
Order of files
Files are played back in the order that the writing software writes
them to the disc. Therefore, the playback order may not be what’s
expected. Verity the writing order in the software’s documentation.
The playback order of the folders and files is as follows. (The
following numbers may differ from actually displayed numbers.)
Terminology
Bit rate
This is the “sound” compression rate specified for encoding. The
higher the bit rate, the higher the sound quality, but also the larger
the files.
Sampling rate
This value shows how many times per second the data is sampled
(recorded). For example, music CDs use a sampling rate of 44.1
kHz, so the sound is sampled (recorded) 44,100 times per second.
The higher the sampling rate, the higher the sound quality, but also
the larger the volume of data.
Encoding
Converting music CDs, WAVE (AIFF) files, and other sound files into
the specified audio compression format.
Tag
Song information such as track titles, artist names, album names, etc.,
written into MP3/WMA/AAC/FLAC/OGG/APE/MP2 (USB flash drive) files.
Root folder
The root folder (or root directory) is found at the top of the file system.
The root folder contains all folders and files. It is created automatically for all
burned discs.

93
-EN
In Case of Difficulty
If you encounter a problem, please turn the power
off, then on again. If the unit is still not functioning
normally, please review the items in the following
checklist. This guide will help you isolate the
problem if the unit is at fault. Otherwise, make sure
the rest of your system is properly connected, or
then consult your authorized Alpine dealer.
Basic
No function or display.
• Vehicle’s ignition is off.
- If connected according to the instructions, the unit will not
operate with the vehicle’s ignition off.
• Improper power lead connections.
- Check power lead connections.
• Blown fuse.
- Check the fuse on the battery lead of the unit; replace with the
proper value if necessary.
• Internal micro-computer malfunctioned due to interference noise,
etc.
- Press the RESET switch with a ballpoint pen or other pointed
article.
No sound or unnatural sound.
• Incorrect setting of volume/balance/fader controls.
- Readjust the controls.
• Connections are not properly or securely made.
- Check the connections and firmly connect.
Screen not displayed.
• Brightness/Contrast control is set at the minimum position.
- Adjust the Brightness/Contrast control.
• Temperature in the vehicle is too low.
- Increase the vehicle’s interior temperature to operation
temperature range.
• Connections to the Auxiliary Device are not securely made.
- Check the connections and firmly connect.
• The Parking Brake Lead is not connected.
• The Parking Brake is not engaged.
- Connect the Parking Brake Lead, then engage the Parking
Brake.
Movement of displayed picture is abnormal.
• Temperature in the vehicle is too high.
- Allow the vehicle’s interior temperature to cool.
The optional remote control is inoperative.
• The remote control sensor setting of "Using Remote Control" (page 82)
is not set to this unit ("AVN")
- Set for "AVN"
Radio
Unable to receive stations.
• No antenna, or open connection in the antenna cable.
- Make sure the antenna is properly connected; replace the
antenna or cable if necessary.
Unable to tune stations in the seek mode.
• You are in a weak signal area.
- Make sure the tuner is in DX mode.
• If the area you are in is a primary signal area, the antenna may not
be grounded and connected properly.
- Check your antenna connections; make sure the antenna is
properly grounded at its mounting location.
• The antenna may not be the proper length.
- Make sure the antenna is fully extended; if broken, replace the
antenna with a new one.
Broadcast is noisy.
• The antenna is not the proper length.
- Extend the antenna fully; replace it if it is broken.
• The antenna is poorly grounded.
- Make sure the antenna is grounded properly at its mounting
location.
• The station signal is weak and noisy.
- If above solution does not work, tune in another station.
USB Audio
Unit does not operate.
• Condensation.
- Wait a while (about 1 hour) for the condensation to dry.
Picture is unclear or noisy.
• Vehicle’s battery power is weak.
- Check the battery power and wiring. (The unit may malfunction if
the battery power is under 11 volts with a load applied.)
Rear Seat Entertainment System
DVD sound is not being output from the rear monitor
headphones.
• The external audio processor and DVD Player (DVE-5300) are
optically connected.
- Set the Audio Out of the DVD Player to “LPCM.”
Disc
Disc playback sound is wavering.
• Moisture condensation in the disc module.
- Allow enough time for the condensation to evaporate (about 1
hour).
Disc insertion not possible.
• A disc is already in this unit.
- Eject the disc and remove it.
• The disc is being improperly inserted.
- Insert the disc correctly. (See page 89)
Unable to fast-forward or fast-reverse the disc.
• The disc has been damaged.
- Eject the disc and discard it; using a damaged disc in your unit
can cause damage to the mechanism.

94
-EN
Disc playback sound skips due to vibration.
• Improper mounting of the unit.
- Securely re-mount the unit.
• Disc is very dirty.
- Clean the disc.
• Disc has scratches.
- Change the disc.
• The pick-up lens is dirty.
- Do not use a commercially available lens cleaner disc. Consult
your nearest Alpine dealer.
Disc playback sound skips without vibration.
• Dirty or scratched disc.
- Clean the disc; a damaged disc should be replaced.
CD-R/CD-RW/DVD-R/DVD-RW/DVD+R/DVD+RW playback
not possible.
• Close session (finalization) has not been performed.
- Perform finalization and attempt playback again.
Error displays.
• Mechanical error.
- Press
. After the error indication disappears, insert the disc
again. If the above-mentioned solution does not solve the
problem, consult your nearest Alpine dealer.
MP3/WMA/AAC is not played back.
• Writing error occurred. The CD format is not compatible.
- Make sure the CD has been written in a supported format.
Refer
to “About MP3/WMA/AAC”, then rewrite in the format supported
by this device.
Unit does not operate.
• Condensation.
- Wait a while (about 1 hour) for the condensation to dry.
Playback does not start.
• Disc is loaded upside-down.
- Check the disc and load it with the labeled side facing upward.
• Disc is dirty.
- Clean the disc.
• A disc not able to play back with this unit is loaded.
- Check if the disc is able to be played back.
• Parental lock is set.
- Cancel the parental lock or change the rating level.
Picture is unclear or noisy.
• Disc is being fast-forwarded or fast-reversed.
- The picture may be slightly disturbed, but this is normal.
• Vehicle’s battery power is weak.
- Check the battery power and wiring.
(The unit may malfunction if
the battery power is under 11 volts with a load applied.)
Image stops sometimes.
• Disc is scratched.
- Replaced with a non-scratched disc.
Navigation
The Navigation cannot work properly.
• Reset Navigation system.
- Turn the ignition key off, and then set to ON again.
Error Messages
Various messages are displayed on the screen during operation. In
addition to the messages telling you the current status or providing
guidance for the next operation, there are also the following error
messages. If one of these error messages is displayed, carefully
follow the instructions in the solution column.
System
If you are driving, please pull over and park before using this
function.
• A setup operation, etc., was attempted while the vehicle was
running.
- Move the vehicle to a safe location, stop, and engage the parking
brake, then carry out this operation.
Unknown Error
- If the USB video file is damaged or the codec is unknown, please
check if the video file can be played.
This format is not supported.
• A USB Video file that is not supported by this unit is selected.
- Check if the video file is playable by seeing "Supported USB
Video Format" (page 45).
Audio/Visual
The device does not support media function.
• An iPod/iPhone/Android Phone that is not supported by the unit is
connected.
- Connect an iPod/iPhone/Android Phone that is supported by the unit.
- Reset the iPod.
• A USB device that is not supported by the unit is connected.
- Attempt to connect another USB flash drive.
• Communication error.
- Turn the ignition key off, and then set to ON again.
- Check the display by reconnecting between the iPod/iPhone/Android
Phone and the unit, using the iPod/iPhone/Android Phone cable.
- Check the display by reconnecting between the USB flash drive and the
unit.
• Caused by the iPod/iPhone/Android Phone Software Version not being
compatible with this unit.
- Update the iPod/iPhone/Android Phone Software Version to be
compatible with this unit.
• The iPod/iPhone/Android Phone is not verified.
- Change to another iPod/iPhone/Android Phone.
There are no Media files available.
• There are no data in the iPod/iPhone/Android Phone.
- Download data to the iPod/iPhone/Android Phone and connect to the
unit.
• There are no data in the USB flash drive.
- Download data to the USB flash drive and connect to this unit.
• If Android Auto does not work properly after the Android Phone
Connect
- Please disconnect and reconnect your smartphone and try again.

95
-EN
Bluetooth
Connection Error.
• Please delete device from your Phone and Navigation system
then try again.
• The Bluetooth audio device was not connected correctly.
- Check the settings for the unit and the Bluetooth audio device
and reconnect.
Unable to download phonebook.
• Phonebook failed to read due to mobile phone disconnection, etc.
- Check the mobile phone connection, and then conduct
synchronising and adding again. (See page 61)
• The connected mobile phone does not support synchronising of its
phone book.
- Connect the mobile phone that supports synchronising the phone
book, then synchronise again. (See page 61)
DISC
Disc Load Error
• When the inserted disc CD is not read properly
- Re-insert disc again to check
- Check if the disc is a normal disc
Region error
• When inserting a DVD with unsupported Region Code
- Check the region code of the DVD CD
Unknown Error
• Displayed when an unknown error occurs on the inserted Disc
CD.
- Check if the Disc CD is damaged
- Check if the Disc CD is inserted correctly
This file is not supported.
• Displayed when attempting to play unsupported media file (codec,
etc.)
- Check the media files in Disc CD
- Check if Codec or file is supported
There is no media files.
• Displayed if there is no playable media file
- Check if there is media file exists in the Disc CD

96
-EN
Specifications
MONITOR SECTION
Screen Size 6.5" (INE-W970HD)
LCD Type Transparent type TN LCD
Operation System TFT active matrix
Number of Picture Elements 1,152,000 pcs. (800 × 480 × 3
(RGB))
Effective Number of Picture Elements
99% or more
Illumination System LED
FM TUNER SECTION
Tuning Range 87.7 – 107.9 MHz
Mono Usable Sensitivity 9.3 dBf (0.8 μV/75 ohms)
50 dB Quieting Sensitivity 13.5 dBf (1.3 μV/75 ohms)
Alternate Channel Selectivity 80 dB
Signal-to-Noise Ratio
65 dB
Stereo Separation 35 dB
AM TUNER SECTION
Tuning Range 530 – 1,710 kHz
Usable Sensitivity 25.1 μV/28 dBf
USB SECTION
USB requirements USB 2.0
Max. Power Consumption 1,500 mA (CDP Support)
USB Class USB (Mass Storage Class)
File System FAT16/32
Decoding Format MP3/WMA/AAC/FLAC/OGG/APE/MP2
Number of Channels 2-Channels (Stereo)
Frequency Response*1 5 – 20,000 Hz (±1 dB)
Total Harmonic Distortion 0.016% (at 1 kHz)
Dynamic Range 95 dB (at 1 kHz)
Signal-to-Noise Ratio 85 dB
Channel Separation 75 dB (at 1 kHz)
*
1 Frequency response may differ depending on the encoder software/bit rate.
HDMI SECTION
Input Format 480p/720p
GPS SECTION
GPS Reception frequency 1,575.42 ±1 MHz
GPS Reception sensitivity -130 dBm max.
Bluetooth SECTION
Bluetooth Specification Bluetooth V4.0
Frequency band 2,402 – 2,480 MHz
Output Power '-6~+4 dBm Ave. (Power class 2)
Profile HFP (Hands-Free Profile)
PBAP (Phone Book Access Profile)
A2DP (Advanced Audio
Distribution Profile)
AVRCP (Audio/Video Remote
Control Profile)
GENERAL
Power Requirement 14.4 V DC
(11–16 V allowable)
Operating temperature -4°F to +140°F
(-20°C to + 60°C)
Power Output 16 W RMS × 4*2
• Power output: measured at 4 Ohms and ≤ 1% THD+N
• S/N: 80 dBA (reference: 1 W into 4 Ohms)
Audio output level
Preout (Front, Rear): 4V/10k ohms (max.)
Preout (Subwoofer): 4V/10k ohms (max.)
Weight (unit only) 2.05kg
CHASSIS SIZE
Width 178 mm
Height 100 mm
Depth 142 mm
NOSE SIZE (FACE PLATE W/O)
Width 178 mm
Height 100 mm
Depth 21.3 mm

97
-EN
DISC AUDIO SECTION
File Format MP3, WMA7, WMA8, WMA9
Extensions mp3, wma
Bit rate 16kbps ~ 320 kbps
Sampling Rate 8K~ 48 KHz
Frequency response (20Hz ~ 20KHz) 0±1dB
Signal to Noise radio ≥ 85dB
THD (Total harmonic distortion) ≤ 0.06%
Dynamic Range (1kHz) ≥ 80dB
R/L Cross sound ≥ 75dB
DISC IMAGE SECTION
File Format JPEG, PNG, GIF, BMP
Extensions JPEG, PNG, GIF, BMP
DISC VIDEO SECTION
File Format AVI, MPG, FLV,DAT, VOB, MP4, MOV, OGG, ASF
Extensions avi, mpg, mpeg,dat, flv, vob, mp4, mov, ogg, asf
Video Codec MP4V, MPEG-1, MSVC, MPEG-1/MPEG-2, H.263,
Video 720*480/576 (30fps)
Resolution
Response Sampling Rate : 8,11.025, 16,22.05, 24, 32, 44.1, 48 KHz.
Response Bitrate : 45~500Kbps.
(WMA : 8K~48KHz, 16kbps~320kbps)
Audio Codec
Dolby Digital(AC3),WMA/PCM/LPCM,AAC LC (2ch),MPEG-
Audio,(MP1/MP2/MP3) LPCM, uLaw/aLaw, OGG, WMA
Subtitles SMI
Unsupported files
1. Video with OGG
2. Audio formats other than Vorbis with OGG
3. Vorbis format in AVI
CVBS
Video Signal Level 0.7±0.1 V p-p
Sync Level 0.3±0.1 V p-p
Video Out Level 1.0±0.1 V p-p
S-VIDEO Level
Y 1.0±0.1
C 0.3±0.1
• Due to continuous product improvement, specifications and design
are subject to change without notice.
• The LCD panel is manufactured using an extremely high precision
manufacturing technology. Its effective pixel ratio is over 99.99%.
This means that there is a possibility that 0.01% of the pixels could
be either always ON or OFF.
END USER LICENSE AGREEMENT (HERE)
In using this Navigation System (hereinafter referred to as “System”),
which includes Alpine Electronics, Inc. (“Alpine”) Specifications,
Space Machine, Inc. (“Space Machine”) Software and HERE North
America, LLC. (“HERE”) Database, you are bound by the terms
and conditions set forth below. By breaking the seal on the System
and using your copy of the System, you have demonstrated your
agreement to the terms and conditions of this Agreement. You
should, therefore, make sure that you read and understand the
following provisions.
The System may not be copied, duplicated or otherwise modified,
in whole or in part, without the express written permission of Alpine,
Space Machine and HERE. The System may not be transferred or
sublicensed to any third party for profit, rent or loan or licensed for
reuse in any manner. The System may not be decompiled, reverse
engineered or otherwise disassembled, in whole or in part. The
System may not be used in a network or by any other manner of
simultaneous use in multiple systems. The System is intended solely
for personal use (or internal use where the end-user is a business)
by the consumer. The System is not to be used for commercial
purposes. Neither Alpine, Space Machine nor HERE guarantees
to the customer that the System meet the specific objectives of the
user. Neither Alpine, Space Machine nor HERE shall be responsible
for any damages caused by the use of the System to the actual user
and to any third party. The warranty on the System shall not extend
to an exchange or refund due to misspelling, omission of letters, or
any other cosmetic discrepancy in layout found in the System. The
right to use the System shall expire either when the user destroys
this software, or when any of the terms for use is violated and
Alpine, Space Machine and/or HERE exercise the option to revoke
the license to use this software. The terms and conditions hereof
apply to all subsequent users and owner’s as well as to the original
purchaser.
The HERE Database may include or reflect data of licensors,
including Her Majesty The Queen in right of CANADA. Such data is
licensed on an “AS IS” basis. The licensors, including Her Majesty
The Queen, make no guarantees, representations or warranties
respecting such data, either express or implied, arising by law or
otherwise, accuracy or fitness for a particular purpose. The licensors,
including Her Majesty The Queen, shall not be liable in respect of
any claim, demand or action, irrespective of the nature of the cause
of the claim, demand or action alleging any loss, injury or damages,
direct or indirect, which may result from the use or possession of the
data or the HERE database. The licensors, including Her Majesty
The Queen, shall not be liable in any way for loss of revenues or
contracts, or any other consequential loss of any kind resulting
from any defect in the data or the HERE database. End User shall
indemnify and save harmless the licensors, including Her Majesty
The Queen and the minister, and their officers, employees and
agents from and against any claim, demand or action, irrespective of
the nature of the cause of the claim, demand or action, alleging loss,
costs, expenses, damages or injuries (including injuries resulting in
death) arising out of the use or possession of the data or the HERE
database.

98
-EN
LIMITED WARRANTY
ALPINE ELECTRONICS OF AMERICA, INC. (“Alpine”), is dedicated to quality craftsmanship and is pleased to oer this Warranty. We suggest that you
read it thoroughly. Should you have any questions, please contact your Dealer or contact Alpine at one of the telephone numbers listed below.
PRODUCTS COVERED:
This Warranty covers Car Audio Products and Related Accessories (“the
product”). Products purchased in the Canada are covered only
in the
Canada. Products purchased in the U.S.A. are covered only in the U.S.A.
LENGTH OF WARRANTY:
This Warranty is in eect for one year from the date of the rst
consumer purchase.
WHO IS COVERED:
This Warranty only covers the original purchaser of the product, who
must reside in the United States, Puerto Rico or Canada.
WHAT IS COVERED:
This Warranty covers defects in materials or workmanship (parts and
labor) in the product.
WHAT IS NOT COVERED:
This Warranty does not cover the following:
Damage occurring during shipment of the product to Alpine for
repair (claims must be presented to the carrier).
Damage caused by accident or abuse, including burned voice coils
caused by over-driving the speaker (amplier level is turned up
and driven into distortion or clipping). Speaker mechanical failure
(e.g. punctures, tears or rips). Cracked or damaged LCD panels.
Dropped or damaged hard drives.
Damage c
aused by negligence, misuse, improper operation or
failure to follow instructions contained in the Owner’s manual.
Damage caused by act of God, including without limitation,
earthquake, re, ood, storms or other acts of nature.
Any cost or expense related to the removal or reinstallation of the
product.
Service performed by an unauthorized person, company or
association.
Any product which has the serial number defaced, al
tered or
removed.
Any product which has been adjusted, altered or modied without
Alpine’s consent.
Any product not distributed by Alpine within the United States,
Puerto Rico or Canada.
Any product not purchased from an Authorized Alpine Dealer.
HOW TO OBTAIN WARRANTY SERVICE:
You are responsible for delivery of the product to an Authorized
Alpine Service Center or Alpine for repair and for payment of any
initial shipping charges. Alp
ine will, at its option, repair or replace
the product with a new or reconditioned product without charge.
If the repairs are covered by the warranty, and if the product was
shipped to an Authorized Alpine Service Center or Alpine, Alpine
will pay the return shipping charges.
You should provide a detailed description of the problem(s) for
which service is required.
You must supply proof of your purchase of the product.
You must packag
e the product securely to avoid damage during
shipment. To prevent lost packages it is recommended to use a
carrier that provides a tracking service.
HOW WE LIMIT IMPLIED WARRANTIES:
ANY IMPLIED WARRANTIES INCLUDING FITNESS FOR USE AND
MERCHANTABILITY ARE LIMITED IN DURATION TO THE PERIOD OF THE
EXPRESS WARRANTY SET FORTH ABOVE AND NO PERSON IS
AUTHORIZED TO ASSUME FOR ALPINE ANY OTHER LIABILITY IN
CONNECTION WITH THE SALE OF THE PRODUCT.
HOW WE EXCLUDE CERTAIN DAMAGES:
ALPINE EXPRESSLY DISCLAIMS LIABILITY FOR INCIDENTAL AND
CONSEQUENTIAL DAMAGES CAUSED BY THE PRODUCT. THE TERM
“INCIDENTAL DAMAGES” REFERS TO EXPENSES OF TRANSPORTING
THE PRODUCT TO THE ALPINE SERVICE CENTER, LOSS OF THE
ORIGINAL PURCHASER’S TIME, LOSS OF THE USE OF THE PRODUCT,
BUS FARES, CAR RENTALS OR OTHERS COSTS RELATING TO THE CARE
AND CUSTODY OF THE PRODUCT. THE TERM “CONSEQUENTIAL
DAMAGES” REFERS TO THE COST OF REPAIRING OR REPLACIN
G OTHER
PROPERTY WHICH IS DAMAGED WHEN THIS PRODUCT DOES NOT
WORK PROPERLY. THE REMEDIES PROVIDED UNDER THIS WARRANTY
ARE EXCLUSIVE AND IN LIEU OF ALL OTHERS.
HOW STATE/PROVINCIAL LAW RELATES TO THE
WARRANTY:
This Warranty gives you specic legal rights, and you may also have
other rights which vary from state to state and province to province. In
addition, some states/provinces do not allow limitations on how long
an implie
d warranty lasts, and some do not allow the exclusion or
limitation of incidental or consequential damages. Accordingly,
limitations as to these matters contained herein may not apply to you.
IN CANADA ONLY:
This Warranty is not valid unless your Alpine car audio product has
been installed in your vehicle by an Authorized Installation Center, and
this warranty stamped upon installation by the installation center.
HOW TO CONTACT CUSTOMER SERVICE:
Should the product require service, please call the following number
for your nearest Authorized Alpine Service Center.
Or visit our website at; http://www.alpine-usa.com
CAR AUDIO 1-800-ALPINE-1 (1-800-257-4631)
NAVIGATION 1-888-NAV-HELP (1-888-628-4357)
ALPINE ELECTRONICS OF AMERICA, INC., 1500 Atlantic Boulevard, Auburn Hills, Michigan 48326, USA
Do not send products to this address.
Call the toll free telephone number or visit the website to locate a service center.

99
-EN
About the Rules of Bluetooth Electromagnetic Radiation Regulation
USA/Canada
FCC/IC CAUTION
This device complies with Industry Canada’s licence-exempt RSSs. Operation is subject to the following two
conditions:
(1) This device may not cause interference; and
(2) This device must accept any interference, including interference that may cause undesired operation of the
device.
Changes or modications not expressly approved by the party responsible for complian
ce could void the user’s
authority to operate the equipment.
This equipment complies with FCC/IC radiation exposure limits set forth for an uncontrolled environment and
meets the FCC radio frequency (RF) Exposure Guidelines and RSS-102 of the IC radio frequency (RF) Exposure rules.
This equipment has very low levels of RF energy that it deemed to comply without maximum permissive exposure
evaluation (MPE). But it is desirable that it
should be installed and operated keeping the radiator at least 20 cm or
more away from person’s body.
Le présent appareil est conforme aux CNR d’Industrie Canada applicables aux appareils radio exempts de licence.
L’exploitation est autorisée aux deux conditions suivantes :
(1) l’appareil ne doit pas produire de brouillage;
(2) l’utilisateur de l’appareil doit accepter tout brouillage radioélectrique subi, même si le brouillage est susceptible
d’en
compromettre le fonctionnement.
Cet équipement est conforme aux limites d’exposition aux rayonnements énoncées pour un environnement non
contrôlé et respecte les règles les radioélectriques (RF) de la FCC lignes directrices d’exposition et d’exposition aux
fréquences radioélectriques (RF) CNR-102 de l’IC. Cet équipement émet une énergie RF très faible qui est considérée
conforme sans évaluation de l’exposition maximale autorisée (MPE). Cependant, il es
t souhaitable qu’il devrait être
installé et utilisé en gardant une distance de 20 cm ou plus entre le radiateur et le corps humain.
Don’t forget to take a moment to protect your purchase by registering your product now at the following
address: www.alpine-usa.com/registration.
N’oubliez pas de consacrer un moment à la protection de votre achat en enregistrant votre produit dès
maintenant à l’adresse suivante : www.alpine-usa.com/registration.
Recuerde que con solo unos pocos pasos podrá proteger su producto, registrándolo a través de la siguiente
dirección: www.alpine-usa.com/registration.

User Manual
Navigation software for Alpine Navigation System
English
July 2019, ver. 1.0

2
Table of contents
1 Getting started ....................................................................................................................................5
1.1 Initial set-up ............................................................................................................................................................................. 5
1.2 Screen controls........................................................................................................................................................................ 6
1.2.1 Using the buttons and other controls ............................................................................................................................. 6
1.2.2 Using the cursor ........................................................................................................................................................................ 8
1.2.3 Using the keyboard ................................................................................................................................................................. 8
1.2.4 Using touch gestures .............................................................................................................................................................. 9
1.2.5 Manipulating the map .......................................................................................................................................................... 10
1.3 Navigation view................................................................................................................................................................... 12
1.3.1 Streets and roads ................................................................................................................................................................... 14
1.3.2 GPS position markers .......................................................................................................................................................... 14
1.3.3 Turn preview and next street .......................................................................................................................................... 15
1.3.4 The planned route ................................................................................................................................................................. 15
1.3.5 Maneuver icons ...................................................................................................................................................................... 16
1.3.6 Lane information ................................................................................................................................................................... 17
1.3.7 Signposts .................................................................................................................................................................................... 17
1.3.8 Junction view ........................................................................................................................................................................... 18
1.3.9 Tunnel view .............................................................................................................................................................................. 18
1.3.10 Freeway services ................................................................................................................................................................. 19
1.3.11 3D object types ..................................................................................................................................................................... 19
1.4 Navigation menu ................................................................................................................................................................ 20
2 Warnings and safety information ............................................................................................. 23
3 Using the navigation ...................................................................................................................... 24
3.1 Selecting a destination ..................................................................................................................................................... 24
3.1.1 Using combined search........................................................................................................................................................ 24
3.1.2 Selecting an address ............................................................................................................................................................. 27
3.1.2.1 Entering an address with states ......................................................................................................................................................... 27
3.1.2.2 Entering an address starting with the street name ................................................................................................................... 30
3.1.2.3 Selecting a town center .......................................................................................................................................................................... 32
3.1.2.4 Selecting the midpoint of a street ...................................................................................................................................................... 33
3.1.2.5 Selecting an intersection in a town ................................................................................................................................................... 34
3.1.2.6 Using the ZIP code to select a destination ...................................................................................................................................... 35
3.1.3 Selecting a Place of Interest ............................................................................................................................................... 35
3.1.3.1 Using Quick search categories ............................................................................................................................................................ 36
3.1.3.2 Searching by category ............................................................................................................................................................................ 38
3.1.3.3 Searching by name ................................................................................................................................................................................... 40

3
3.1.3.4 Finding help nearby ................................................................................................................................................................................. 41
3.1.4 Selecting a Saved Location ................................................................................................................................................. 43
3.1.5 Selecting a History item ...................................................................................................................................................... 44
3.1.6 Selecting a saved route ........................................................................................................................................................ 45
3.1.7 Entering coordinates ............................................................................................................................................................ 46
3.1.8 Selecting a location on the map ....................................................................................................................................... 48
3.1.9 Planning a Multipoint Route ............................................................................................................................................. 48
3.2 Checking route information and alternatives ....................................................................................................... 50
3.3 Editing the route ................................................................................................................................................................. 51
3.3.1 Setting a new starting point .............................................................................................................................................. 51
3.3.2 Adding an additional destination .................................................................................................................................... 52
3.3.3 Modifying the list of destinations ................................................................................................................................... 52
3.3.4 Saving the planned route .................................................................................................................................................... 53
3.3.5 Deleting the planned route ................................................................................................................................................ 54
3.3.6 Selecting a route alternative when planning the route ......................................................................................... 54
3.3.7 Selecting a route alternative for an existing route .................................................................................................. 55
3.3.8 Setting a detour ....................................................................................................................................................................... 56
3.3.9 Pausing guidance.................................................................................................................................................................... 57
3.4 Saving a location ................................................................................................................................................................. 57
3.4.1 Editing a saved location ...................................................................................................................................................... 58
3.5 Running a Simulation ....................................................................................................................................................... 59
3.6 Off-road navigation ........................................................................................................................................................... 60
3.6.1 Switching to off-road navigation ..................................................................................................................................... 60
3.6.2 Selecting the destination in off-road mode ................................................................................................................ 61
3.6.3 Navigating in off-road mode ............................................................................................................................................. 61
4 Map Update ....................................................................................................................................... 62
5 Reference guide ............................................................................................................................... 64
5.1 Concepts .................................................................................................................................................................................. 64
5.1.1 2D/3D GPS reception ........................................................................................................................................................... 64
5.1.2 Road safety cameras and other proximity Alert Points ........................................................................................ 64
5.1.3 Route calculation and recalculation .............................................................................................................................. 65
5.1.4 Smart Zoom .............................................................................................................................................................................. 65
5.1.5 Speed limit warning .............................................................................................................................................................. 65
5.1.6 Intelligent navigation ........................................................................................................................................................... 66
5.1.6.1 Congestion detour on highways ......................................................................................................................................................... 66
5.1.6.2 Real-time alternative routes ................................................................................................................................................................ 66
5.1.6.3 Parking around destination ................................................................................................................................................................. 67
5.1.6.4 Hints upon detour ..................................................................................................................................................................................... 67

4
5.2 Useful Information menu ................................................................................................................................................ 67
5.2.1 Where Am I ............................................................................................................................................................................... 68
5.3 Settings menu ....................................................................................................................................................................... 69
5.3.1 Route preferences settings ................................................................................................................................................ 70
5.3.1.1 Route Planning Method types .............................................................................................................................................................. 71
5.3.1.2 Navigation Mode ....................................................................................................................................................................................... 72
5.3.1.3 Road types .................................................................................................................................................................................................... 72
5.3.2 Sound settings ......................................................................................................................................................................... 73
5.3.3 Warnings settings .................................................................................................................................................................. 73
5.3.4 Navigation View settings .................................................................................................................................................... 75
5.3.5 Regional settings .................................................................................................................................................................... 77
5.3.6 Display settings ....................................................................................................................................................................... 77
6 Troubleshooting .............................................................................................................................. 78
6.1 GPS signal cannot be received ...................................................................................................................................... 78
6.2 Address cannot be found ................................................................................................................................................. 78
6.3 The calculated route is not optimal ........................................................................................................................... 78
6.4 Disabling the speed limit warning .............................................................................................................................. 79
6.5 Keyboard buttons are greyed out ............................................................................................................................... 79
6.6 The map is hidden behind an image of a junction ............................................................................................... 80
7 Copyright note ................................................................................................................................. 81
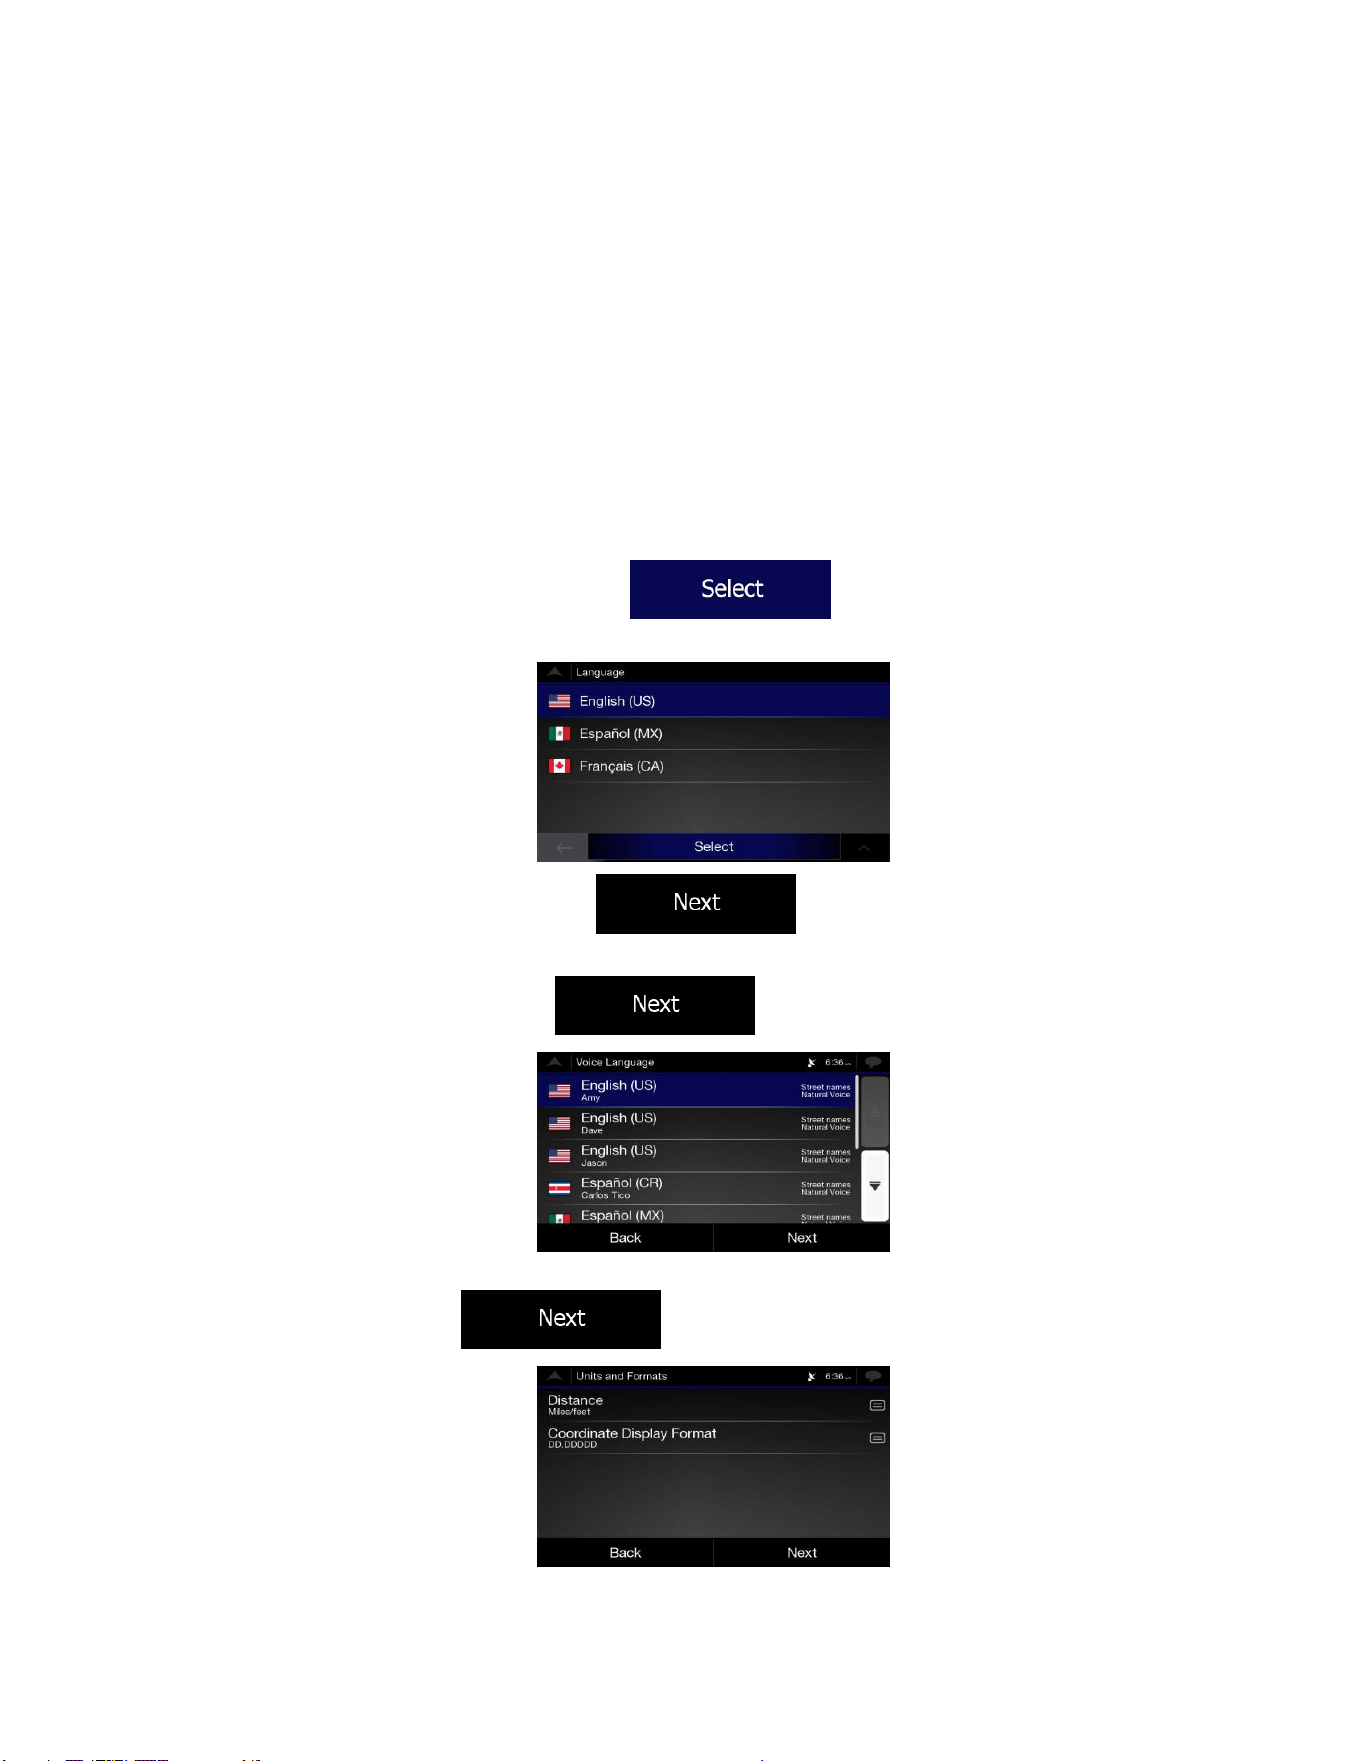
5
1 Getting started
Alpine navigation is optimised for in-car use. You can use it easily by tapping the screen buttons and the
map with your fingertips.
When you start using the product, you can download new maps in the next.
1.1 Initial set-up
When using the navigation software for the first time, an initial set-up process starts automatically.
1. Select your preferred language, then tap to confirm your selection. Later you
can change it in Regional settings (page 77).
2. The Configuration Wizard starts. Tap to continue.
3. Select the language and speaker used for voice guidance messages. Later you can change it in
Regional settings (page 73). Tap to continue.
4. If needed, modify the time format and unit settings. Later you can change them in Regional
settings (page 77). Tap to continue.
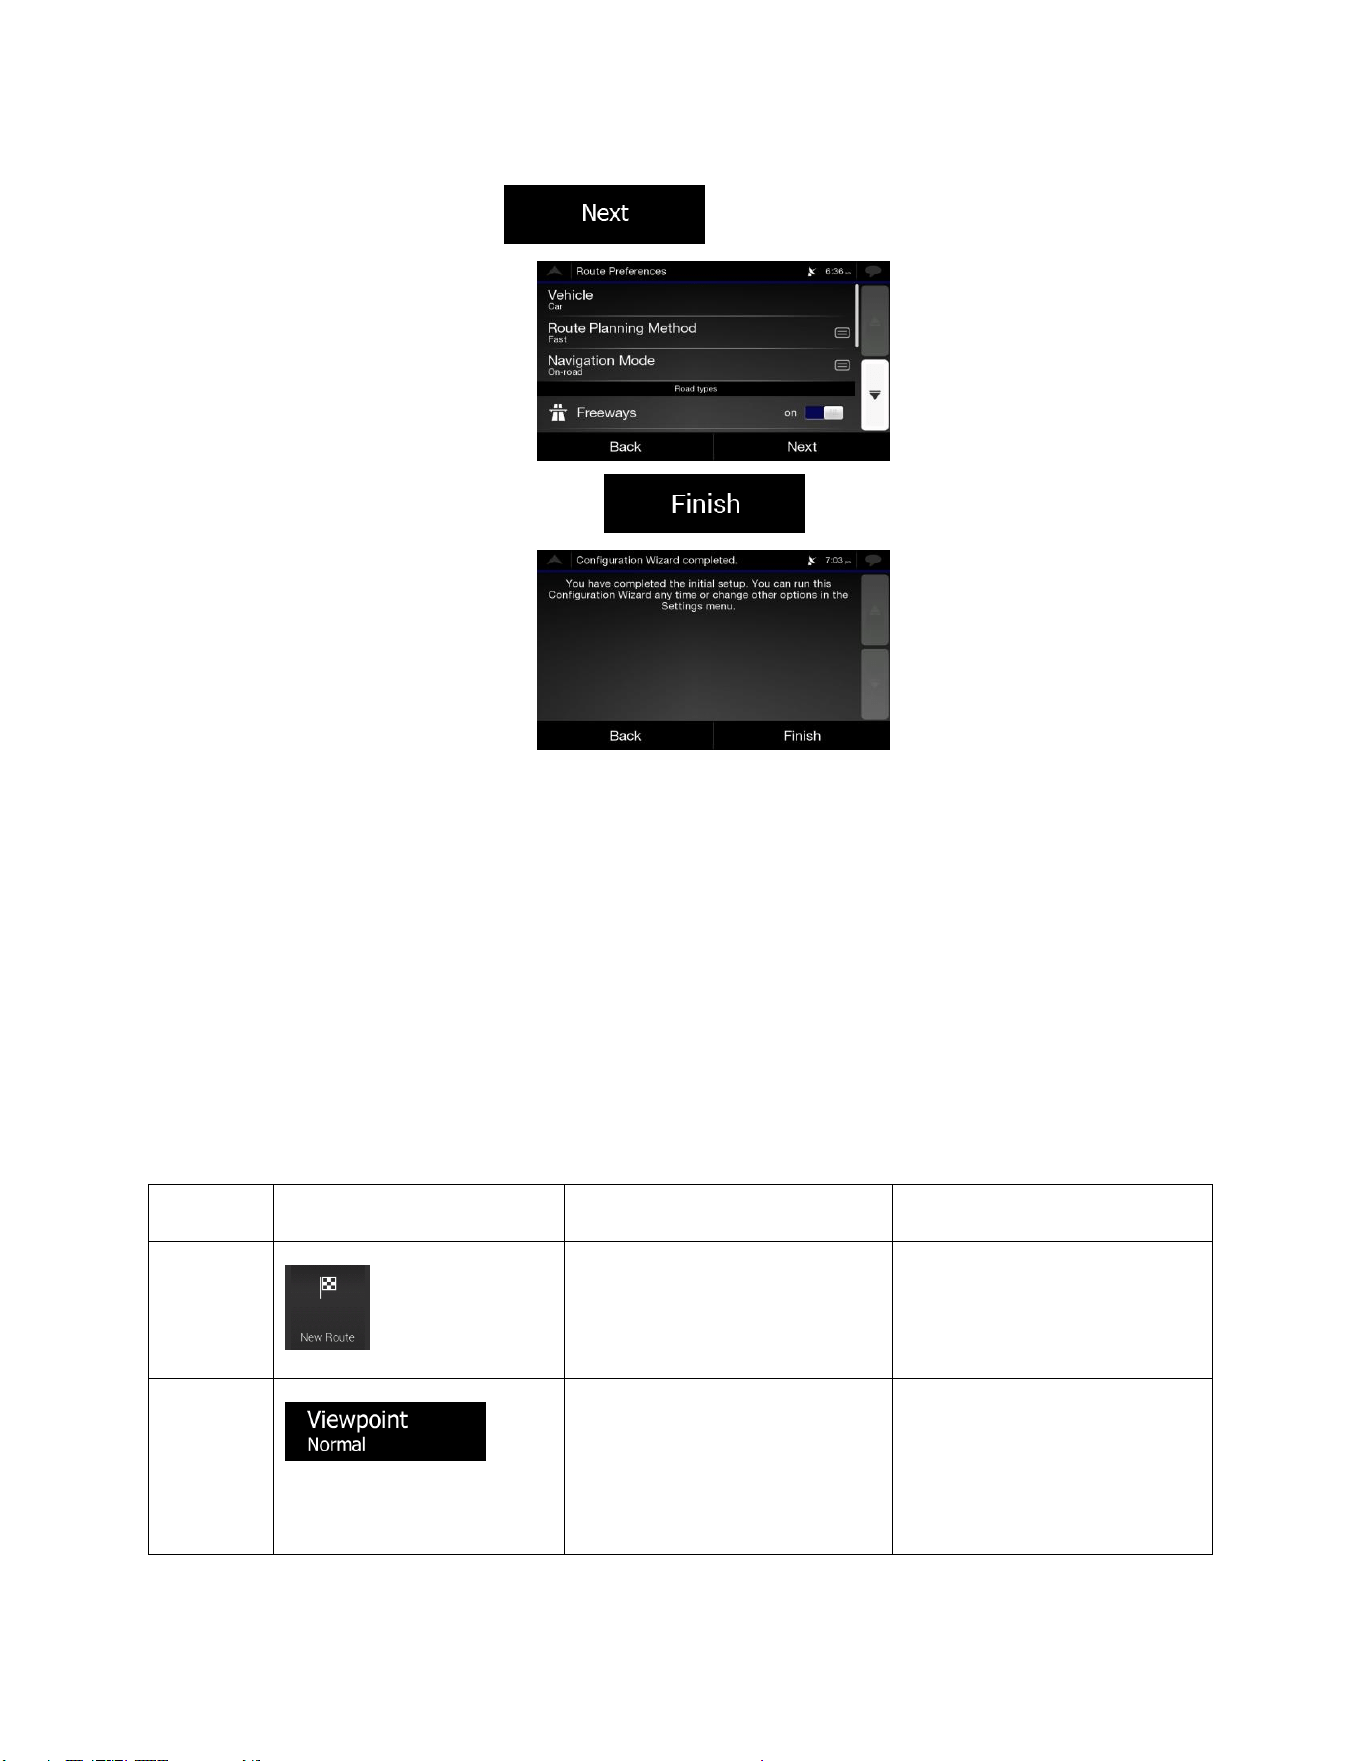
6
5. If needed, modify the default route planning options. Later you can change them in Route
Preferences (page 70). Tap to continue.
6. The initial set-up is now complete, tap to enter the Navigation view.
1.2 Screen controls
The following sections describe the functionality and use of buttons, sliders, and other screen controls in
Alpine navigation.
1.2.1 Using the buttons and other controls
To operate Alpine navigation, tap the buttons on the touch screen.
Type
Example
Description
Function
Button
Opens a new screen where
you can set a parameter.
Tap it once.
Button
with value
Displays the current value of a
field or setting where the value
can be changed. After the
change, the new value is
shown on the button.
Tap it once.
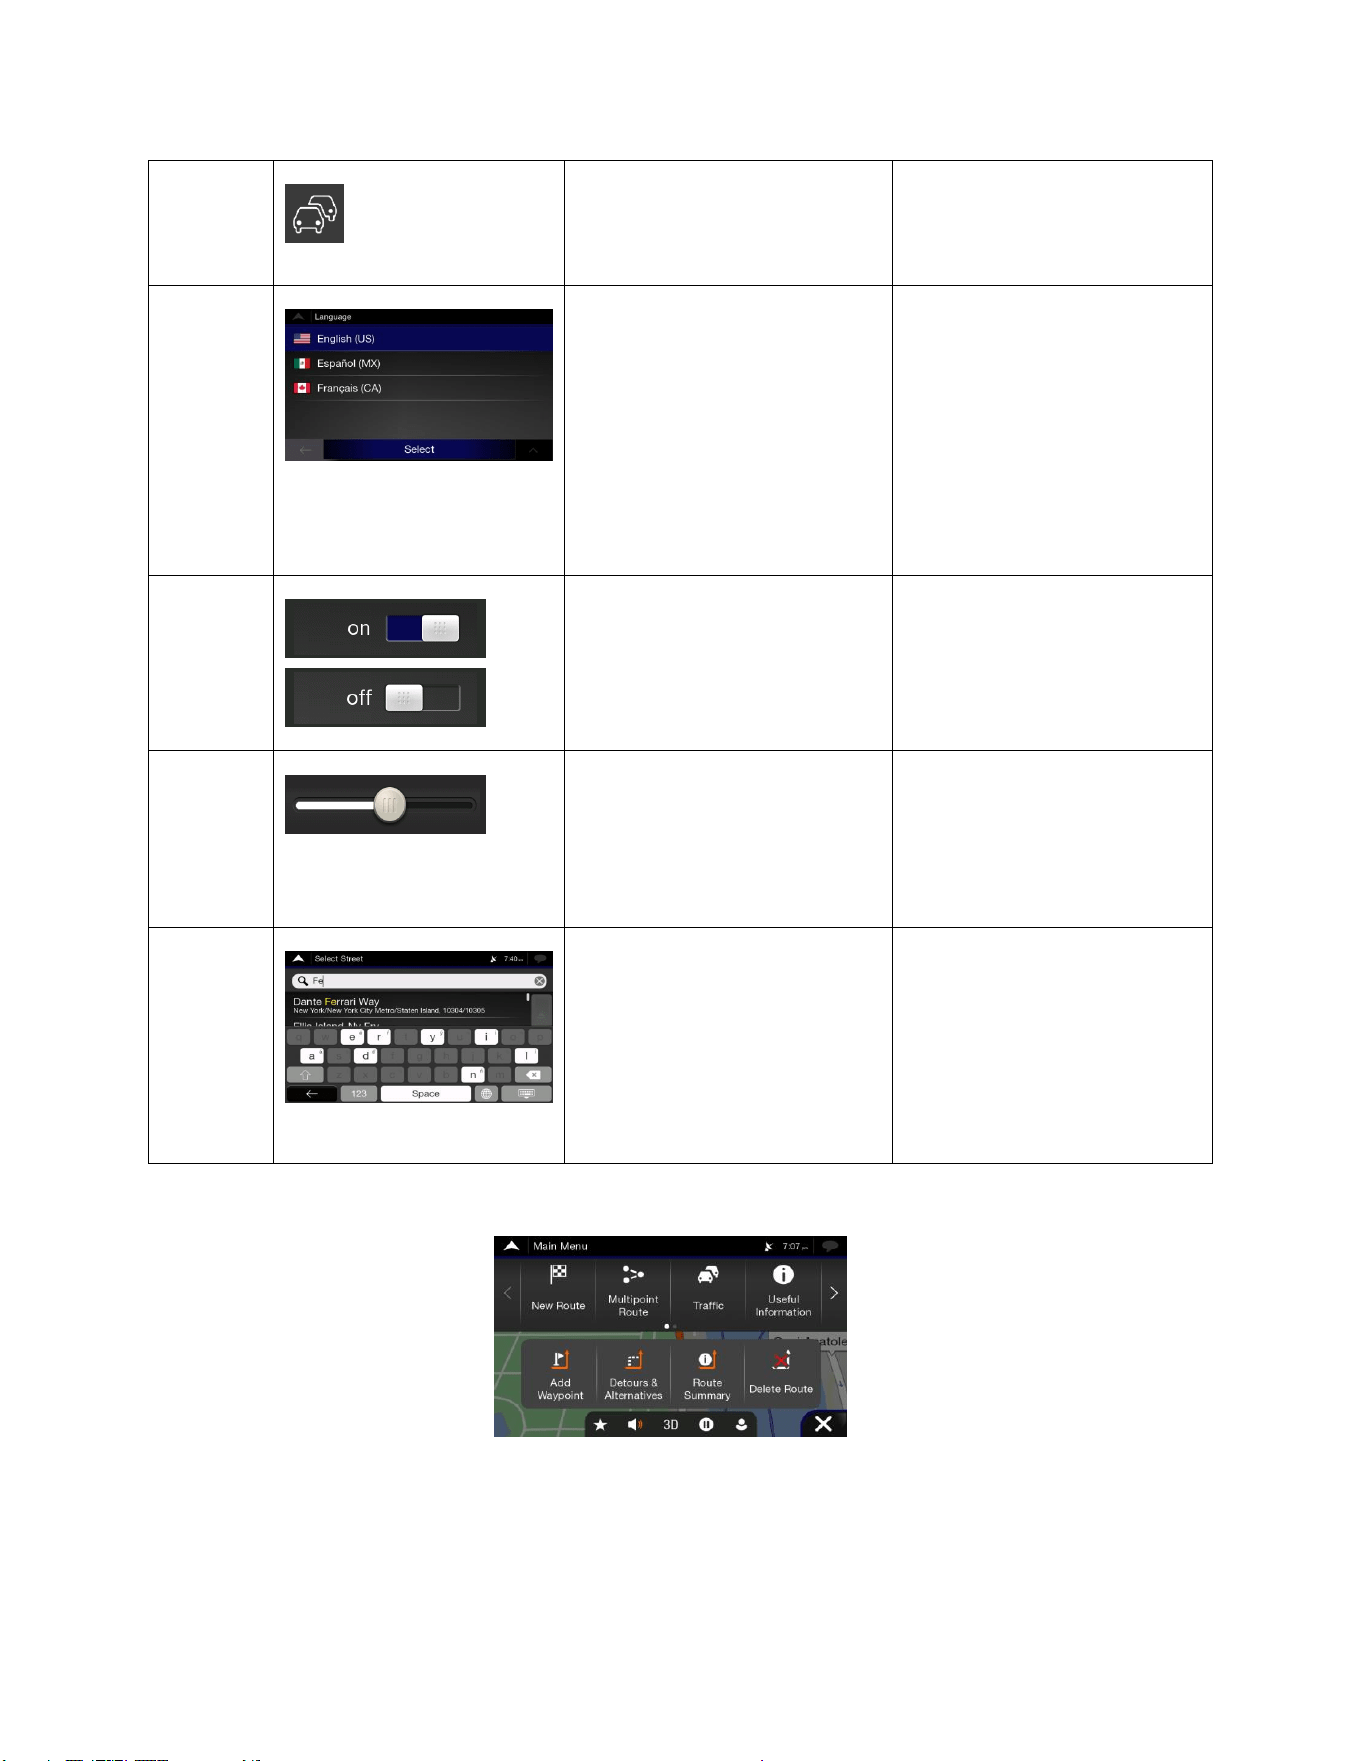
7
Icon
Provides additional
information, for example traffic
summary or itinerary.
Tap it once to open a screen
with additional information or
options.
List
Shows multiple options.
Grab the list anywhere and
slide your finger up or down.
Depending on the speed of
sliding, the list scrolls fast or
slow, only a bit or till the end.
Alternatively, move between
items in a list with the arrows
and tap the value that you
want to select.
Switch
Shows whether a feature is
enabled when there are only
two choices.
Tap it to turn the switch on or
off.
Slider
When a feature can be set to
different values in a range,
Alpine navigation shows an
indicator on a gauge that
displays and sets the value.
Drag the handle to move the
slider to its new position.
Tap the slider where you
want the handle to appear.
Virtual
keyboard
Used to enter text and
numbers.
Each key is a touch screen
button.
The Navigation menu may contain several menu items on one or more pages.
You need to confirm selections or changes only if the application needs to be restarted, if it needs to
perform a major reconfiguration, or if you are about to lose some of your data or settings. Otherwise,
Alpine navigation saves your selections and applies the new settings without confirmation as soon as you
use the controls.
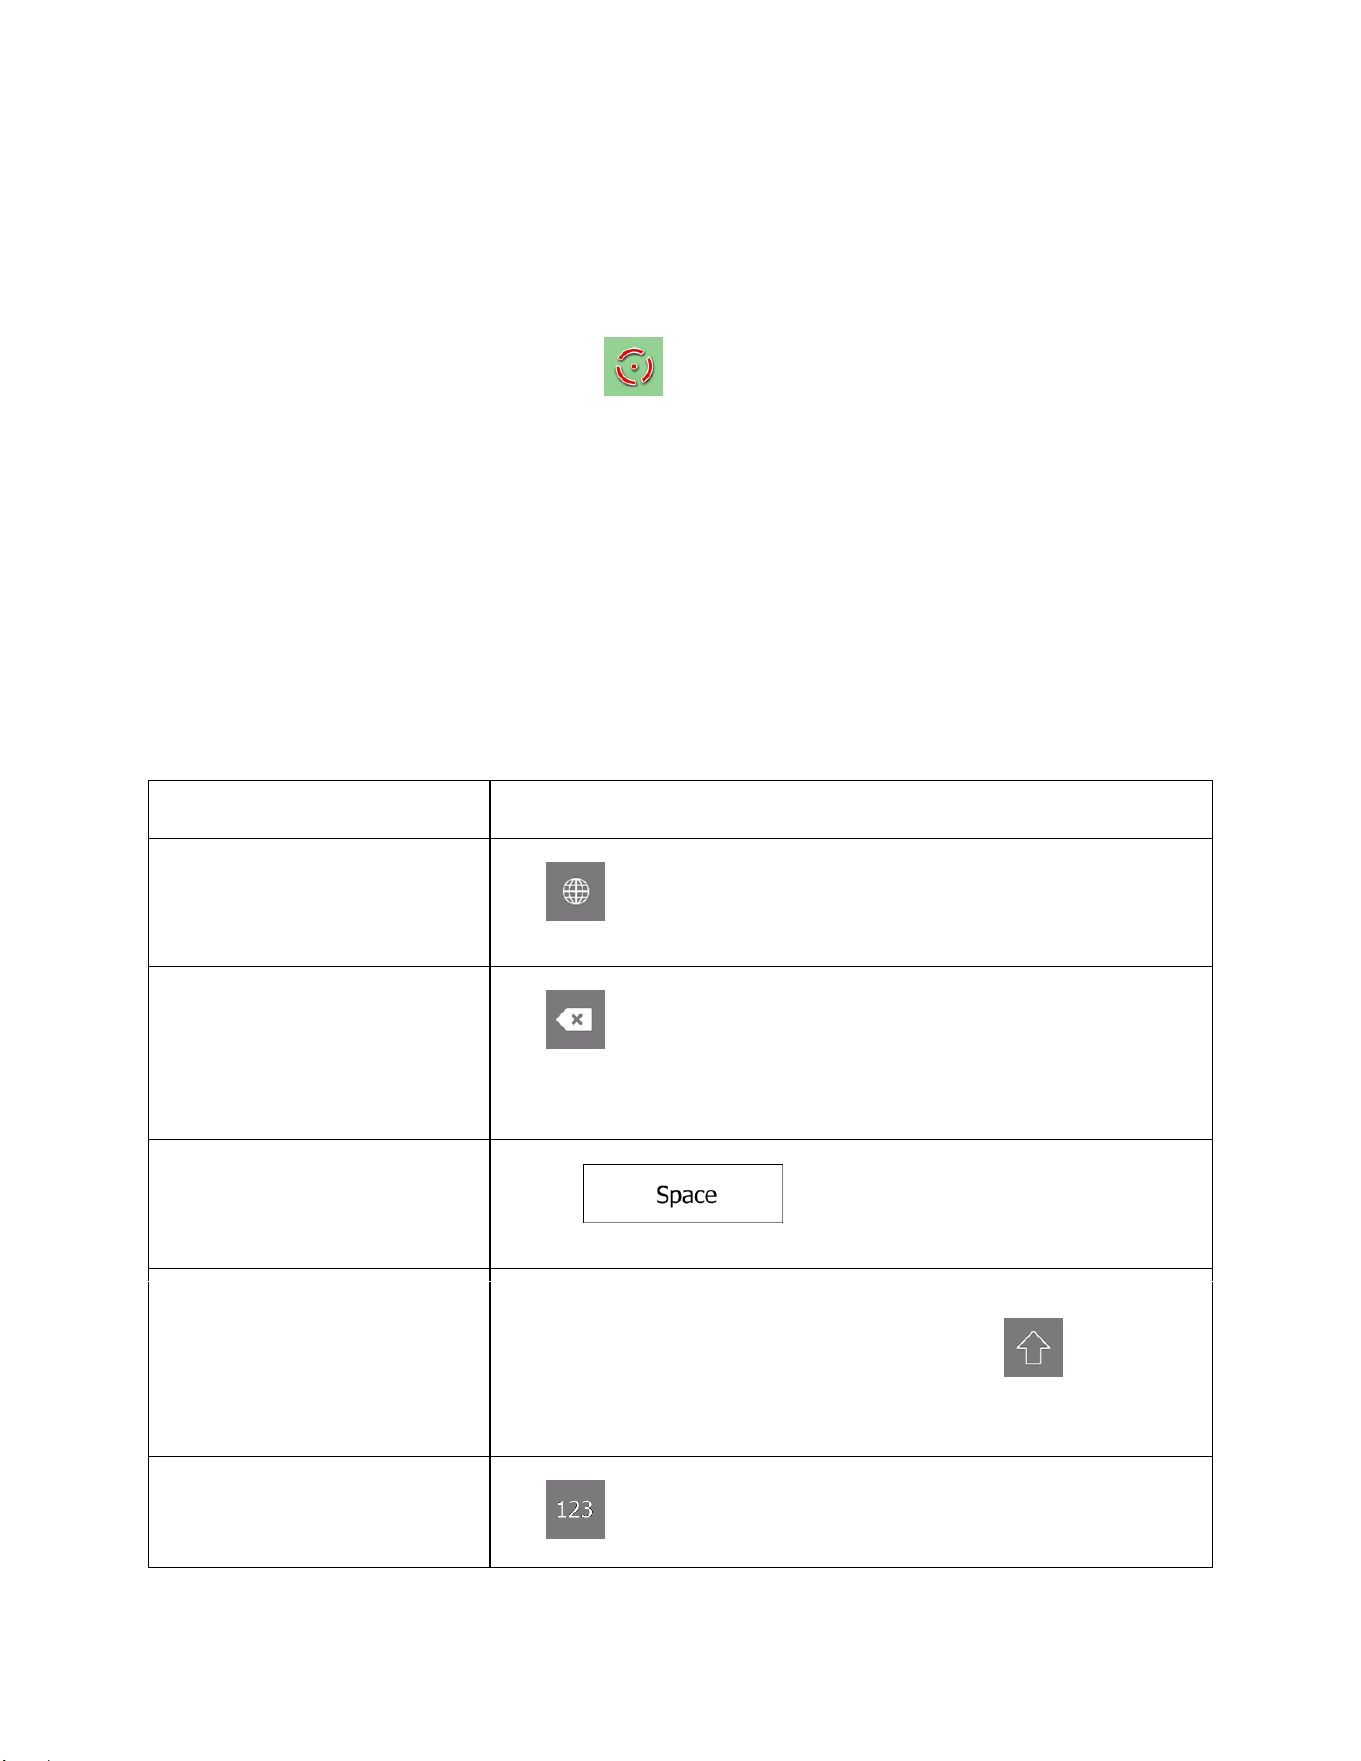
8
1.2.2 Using the cursor
You can select a map location in the following ways:
• By tapping the map when navigating
• By tapping the map when you are asked to confirm the destination at the end of a search.
When a map location is selected, the cursor ( ) appears at the selected point on the map.
The location of the cursor can be used as the destination of the route, you can search for Places around it,
or you can add this location to your saved locations.
You can also select some of the objects on the map. If you tap the map at the icon of a Place, the object
is selected, and you can get information about this object or you can use it as a route point.
1.2.3 Using the keyboard
You can type with your fingertips on the screen keyboards and you can switch between various keyboard
layouts, for example English, Greek or numerical. Only those keyboard buttons are active that can be
used to type a name that is available on the map. The other keys are greyed out.
Action
Function
Switching to another keyboard
layout, for example from an
English keyboard to a Greek
keyboard
Tap and select the new keyboard layout from the list.
Correcting your entry on the
keyboard
Tap to remove the unnecessary character(s).
Tap and hold the button to delete several characters or the entire input
string.
Entering a space, for example
between a first name and a
family name or in multi-word
street names
Tap the button at the bottom center of the screen.
Entering upper and lower case
letters
By default, when entering a text, the first character appears in upper
case while the rest of the text is in lower case. Tap to enter an
upper case letter or tap it twice to turn on Caps Lock. Tap again to use
lower case letters.
Entering numbers and symbols
Tap to switch to a keyboard offering numbers and symbols.
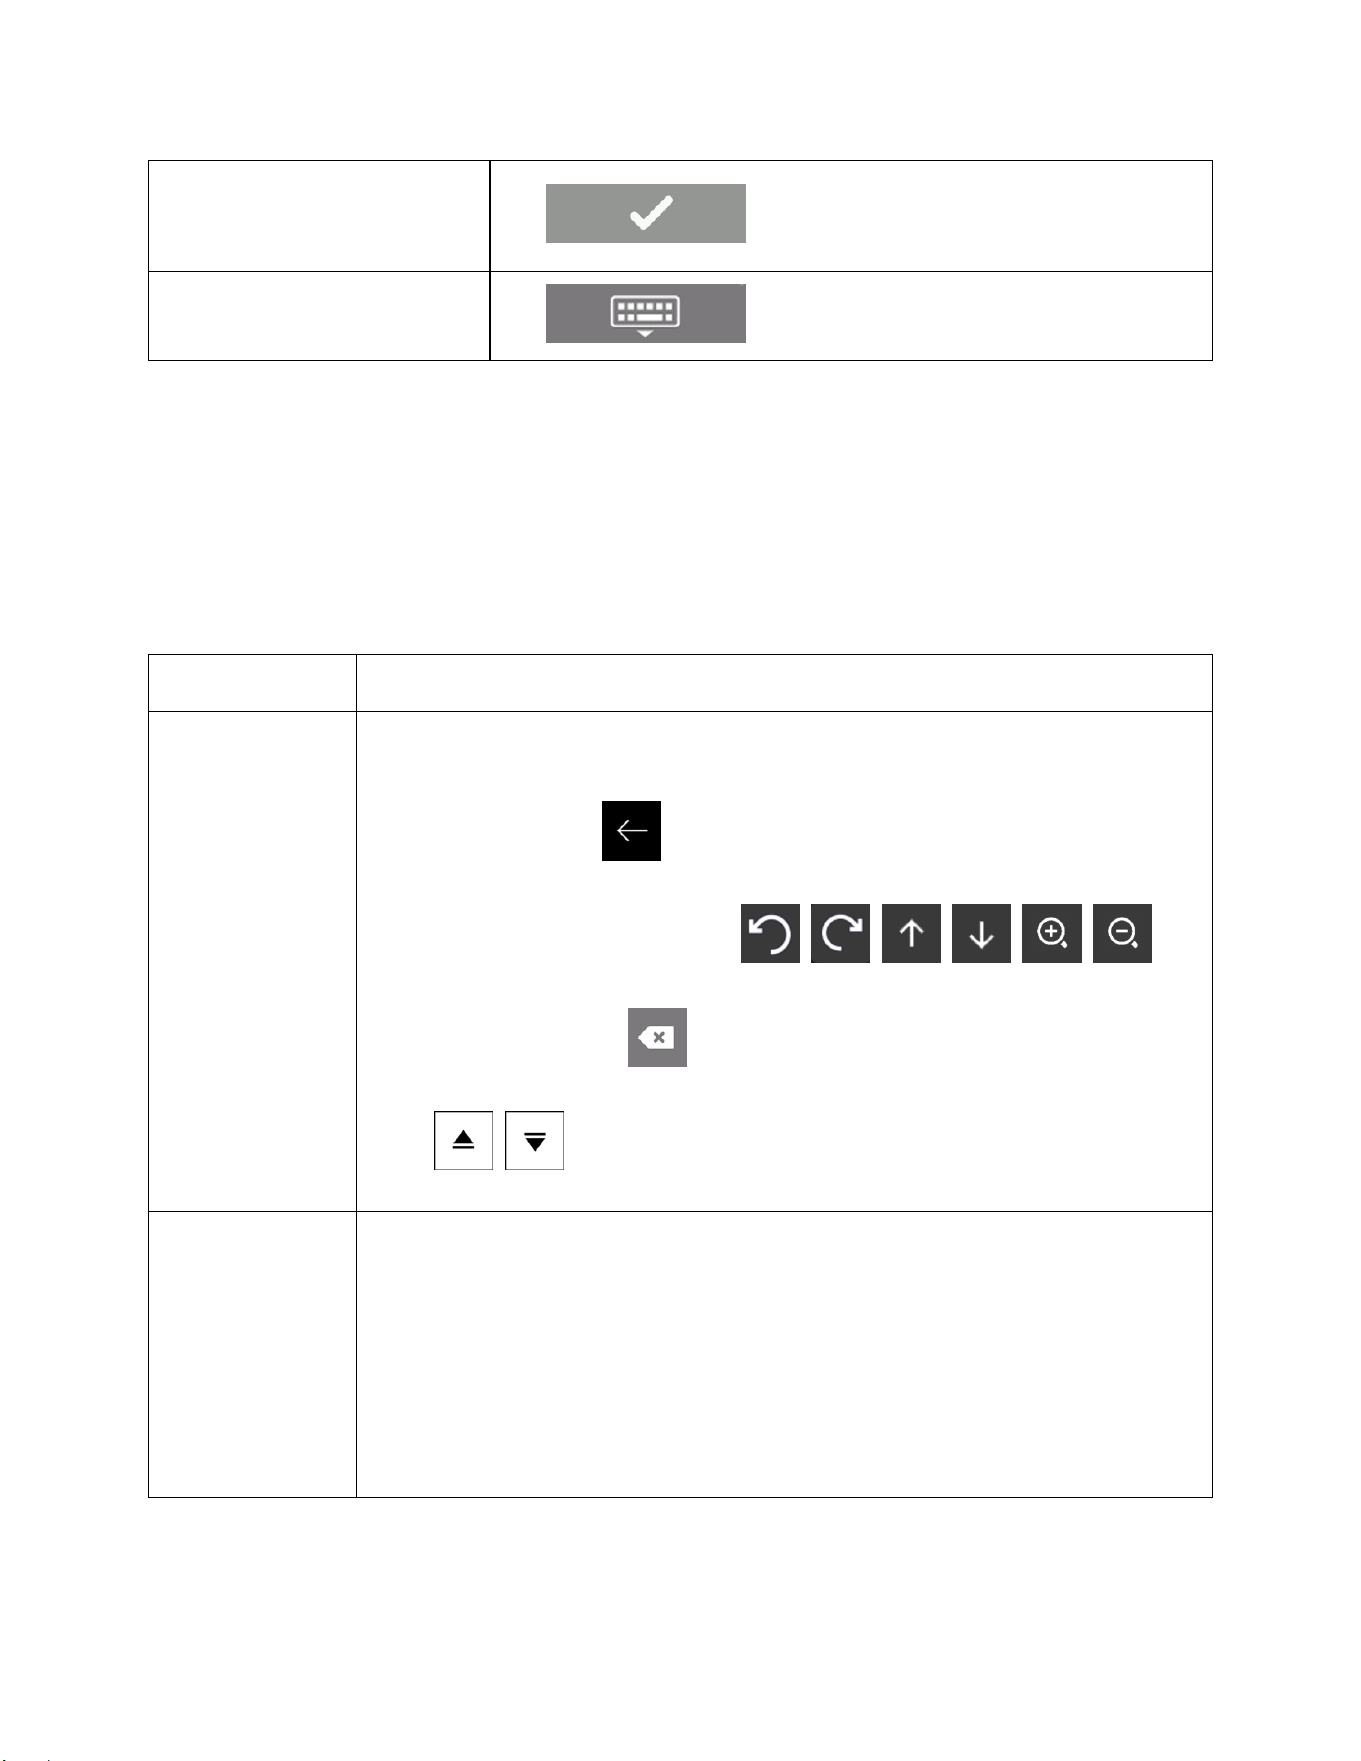
9
Finalizing the keyboard entry
Tap .
Hiding the keyboard
Tap .
1.2.4 Using touch gestures
You usually need to tap the screen only once. However, some useful features can be accessed with other
gestures. See the table below.
Action
Function
Tapping and
holding the screen
Tap and keep pressing the following buttons to reach extra functions:
• Tap and hold the following button on list and menu screens to show the
Navigation view: .
• Tap and hold any of the following buttons on the Navigation view to rotate, tilt,
or scale the map continuously: , , , , , .
• Tap and hold the following button on keyboard screens to quickly delete
several characters: .
• Tap and hold the following buttons in long lists to scroll pages continuously:
, .
Dragging
Drag the screen in the following cases:
• To move the handle on a slider.
• To scroll a list: grab the list anywhere and slide your finger up or down.
Depending on the speed of the sliding, the list scrolls faster or slower, only a
bit or till the end.
• To move the map in map browsing mode: grab the map, and move it in the
desired direction.
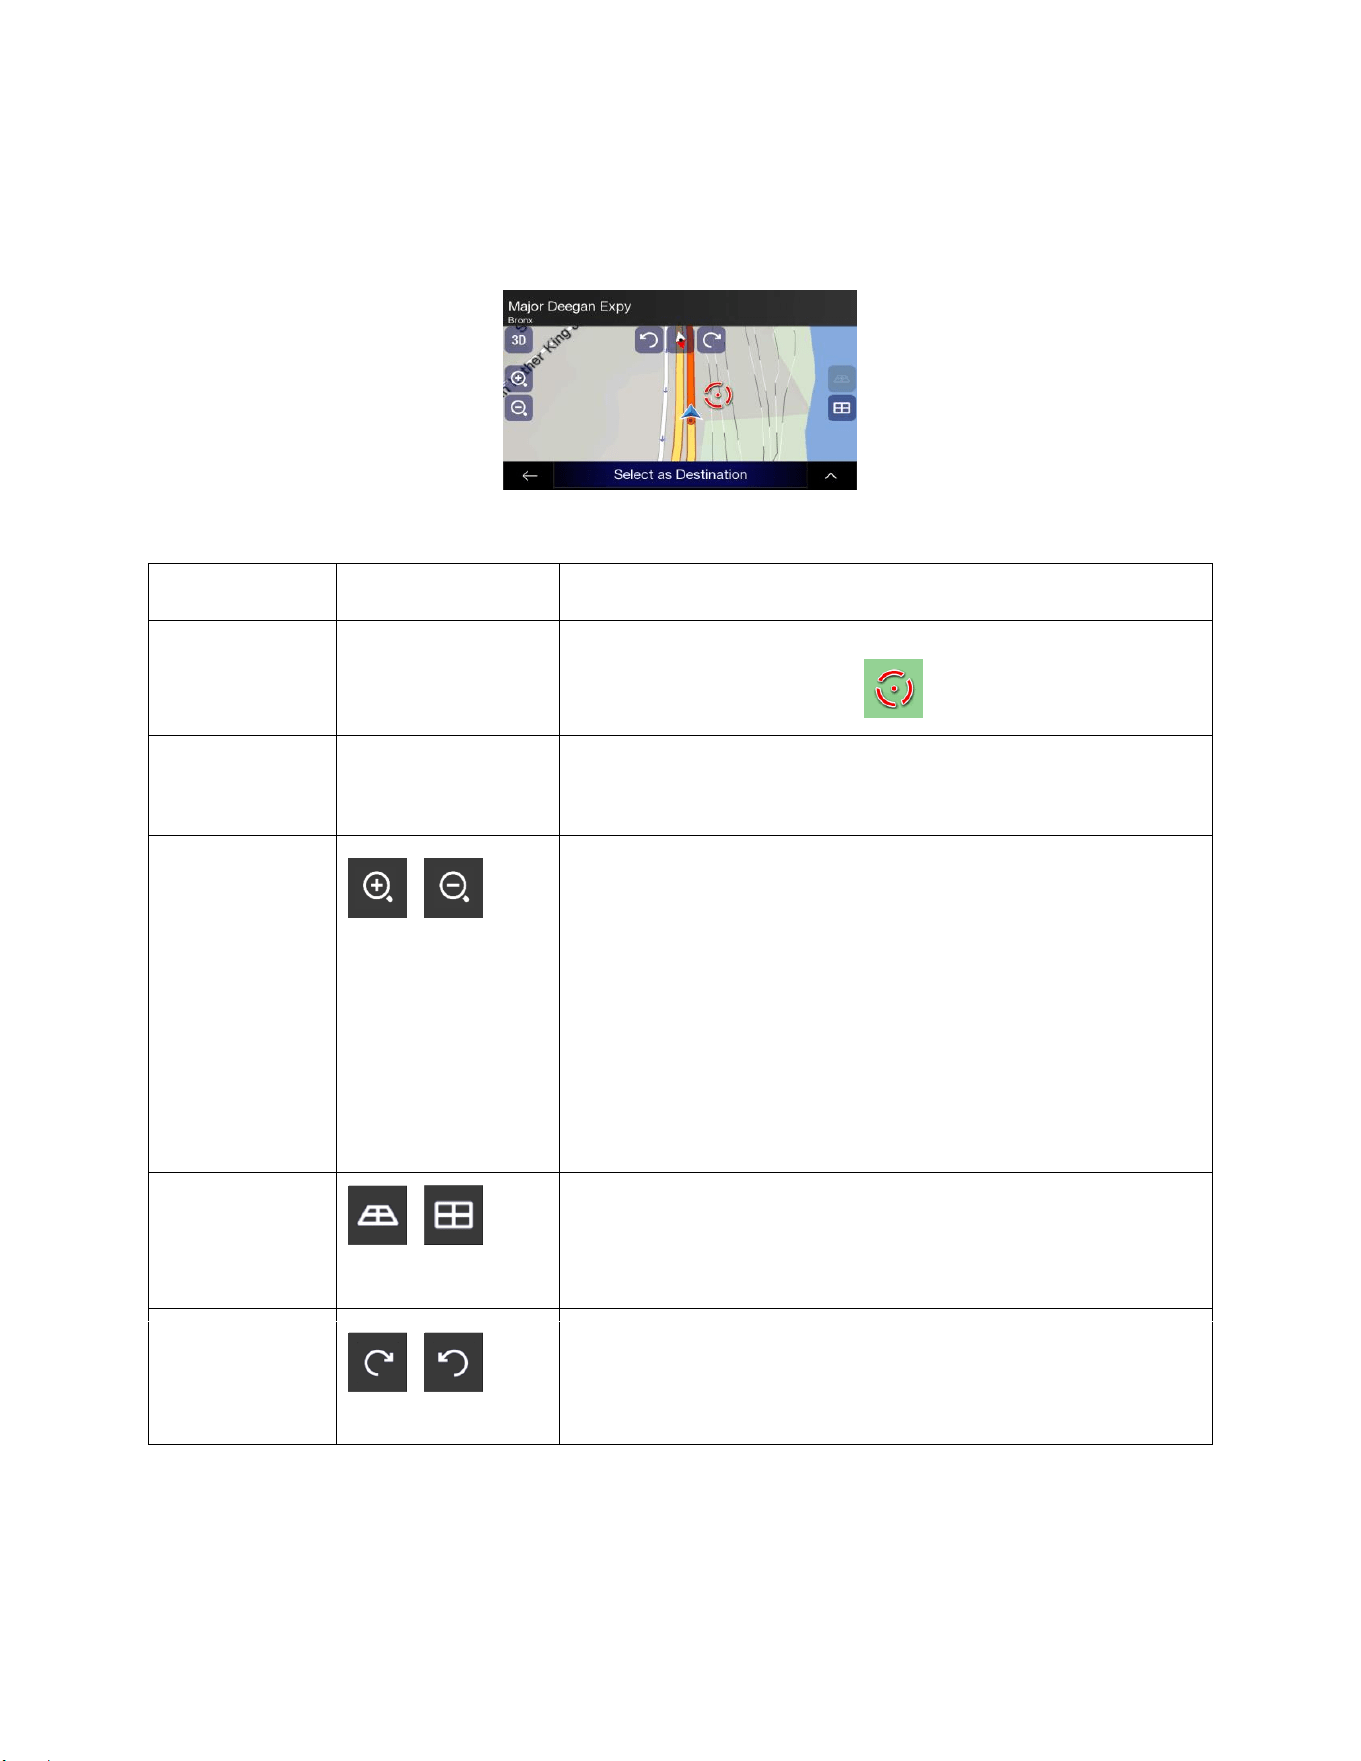
10
1.2.5 Manipulating the map
If you tap the map anywhere during navigation, the map stops following the current position (the blue
arrow is not locked in a fix position on the screen anymore) and control buttons appear to help you modify
the map view.
You can perform the following actions on the map:
Action
Button(s)
Function
Checking
location
information
No buttons
The top section of the Navigation view shows information about
the selected point (the cursor ).
Moving the map
by dragging
No buttons
Move the map in any direction: tap and hold the map and move
your finger towards the direction you want to move the map.
Zooming in and
out
,
Change how much of the map is displayed on the screen.
Alpine navigation uses maps that let you examine the locations
at various zoom levels, always with optimised content. It always
displays street names and other text with the same font size,
never upside-down, and you only see the streets and objects
that you need.
Map scaling has a limit in 3D map view mode. If you zoom out
further, the map switches to 2D view mode.
Tap once to modify the view in a large step, or tap and hold the
button to modify it continuously and smoothly.
Tilting up and
down
,
Change the vertical view angle of the map in 3D mode.
Tap once to modify the view in a large step, or tap and hold the
button to modify it continuously and smoothly.
Rotating left and
right
,
Changes the horizontal view angle of the map.
Tap once to modify the view in a large step, or tap and hold the
button to modify it continuously and smoothly.
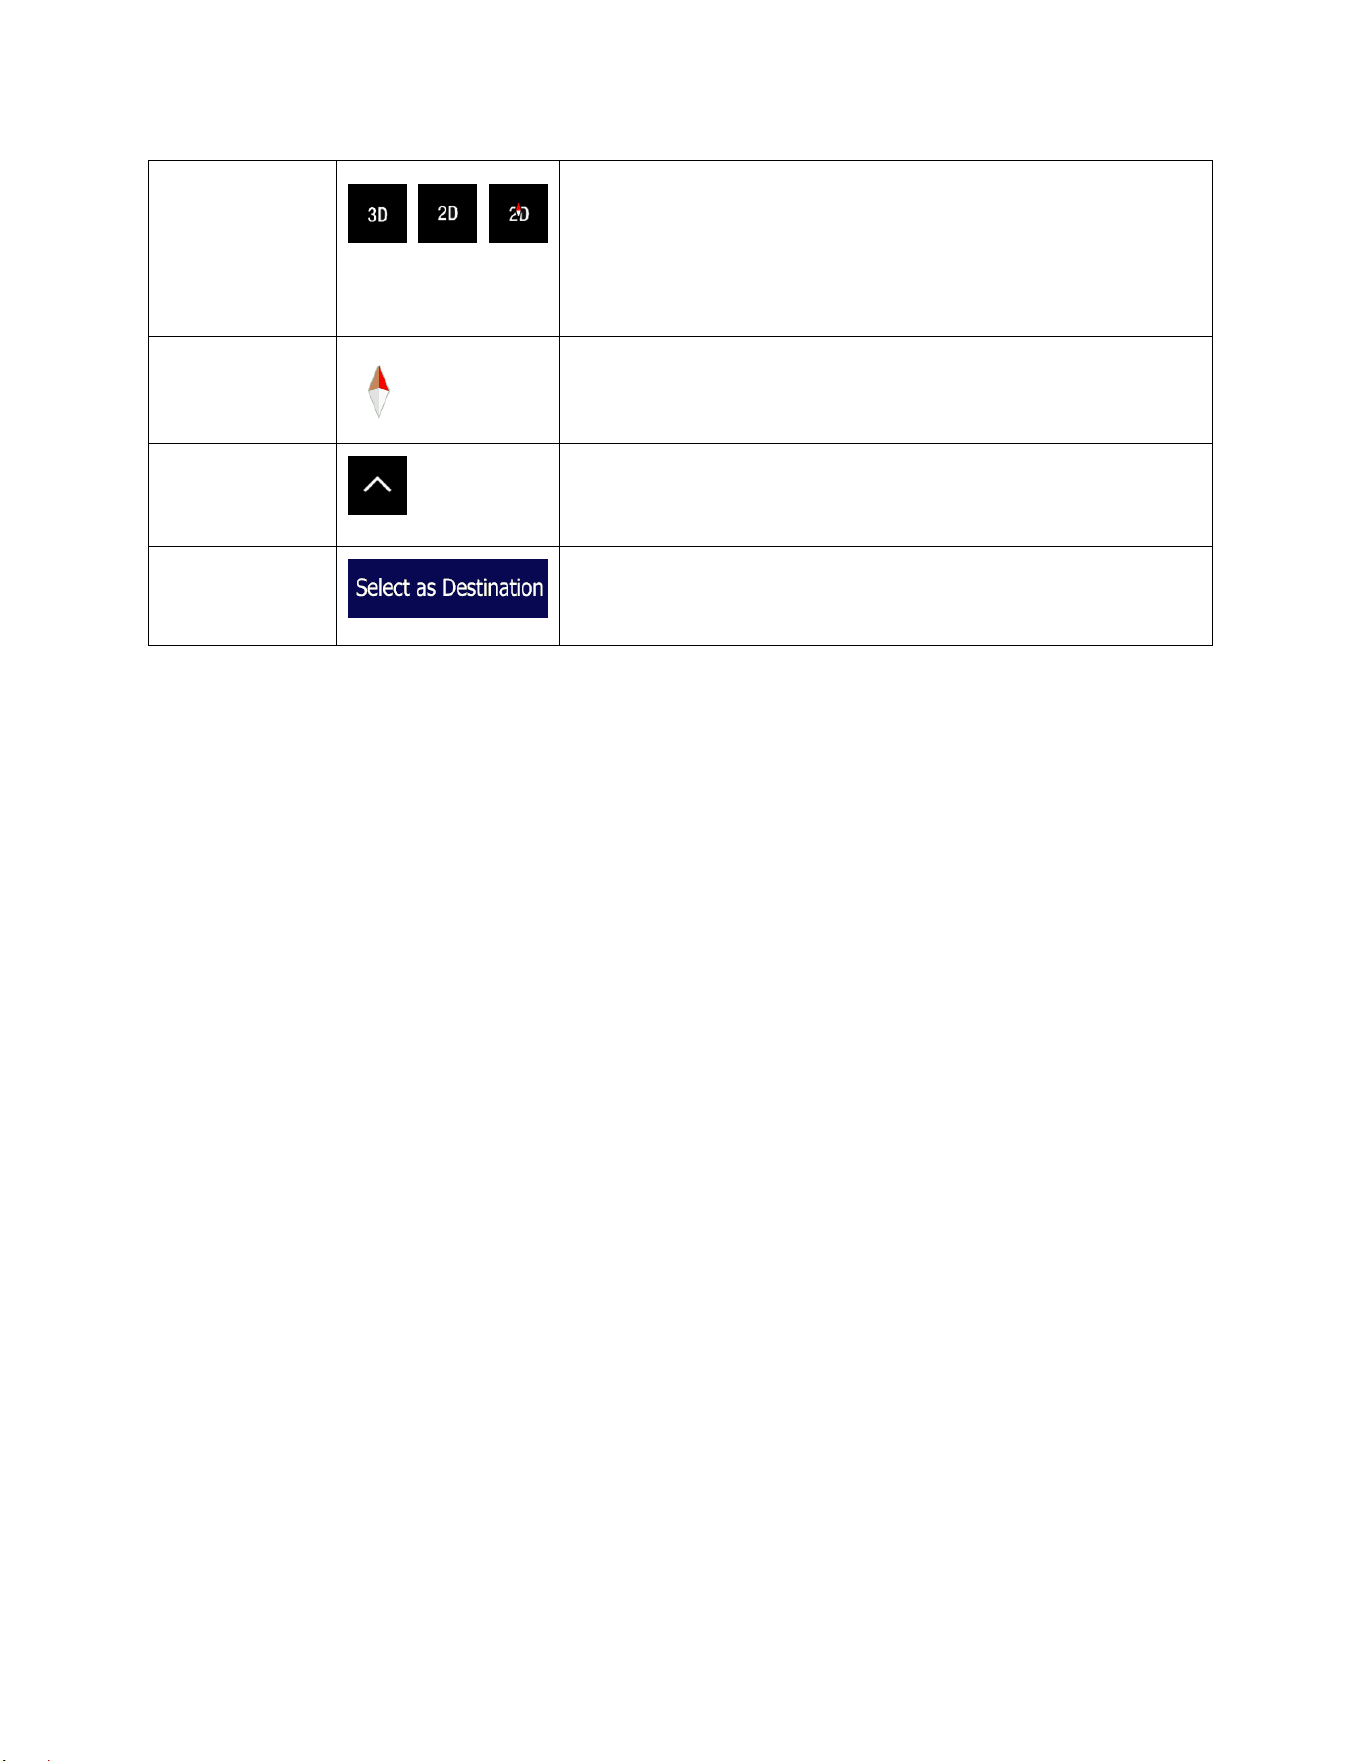
11
Changing 2D,
3D, or 2D North
up views
, ,
Switch between the 3D perspective, 2D Heading up, and 2D
North up map view modes. In Heading up mode the map is
rotated so its top always points in the current driving direction.
This is the default orientation in 3D map view mode. In North up
mode, the map faces North.
Checking the
compass
The direction of the compass shows North.
Selecting
additional
options
Open a list of additional features like saving a location, or
searching for Places around the cursor.
Selecting a
destination
Select the cursor location as a new destination. The route is
automatically calculated.
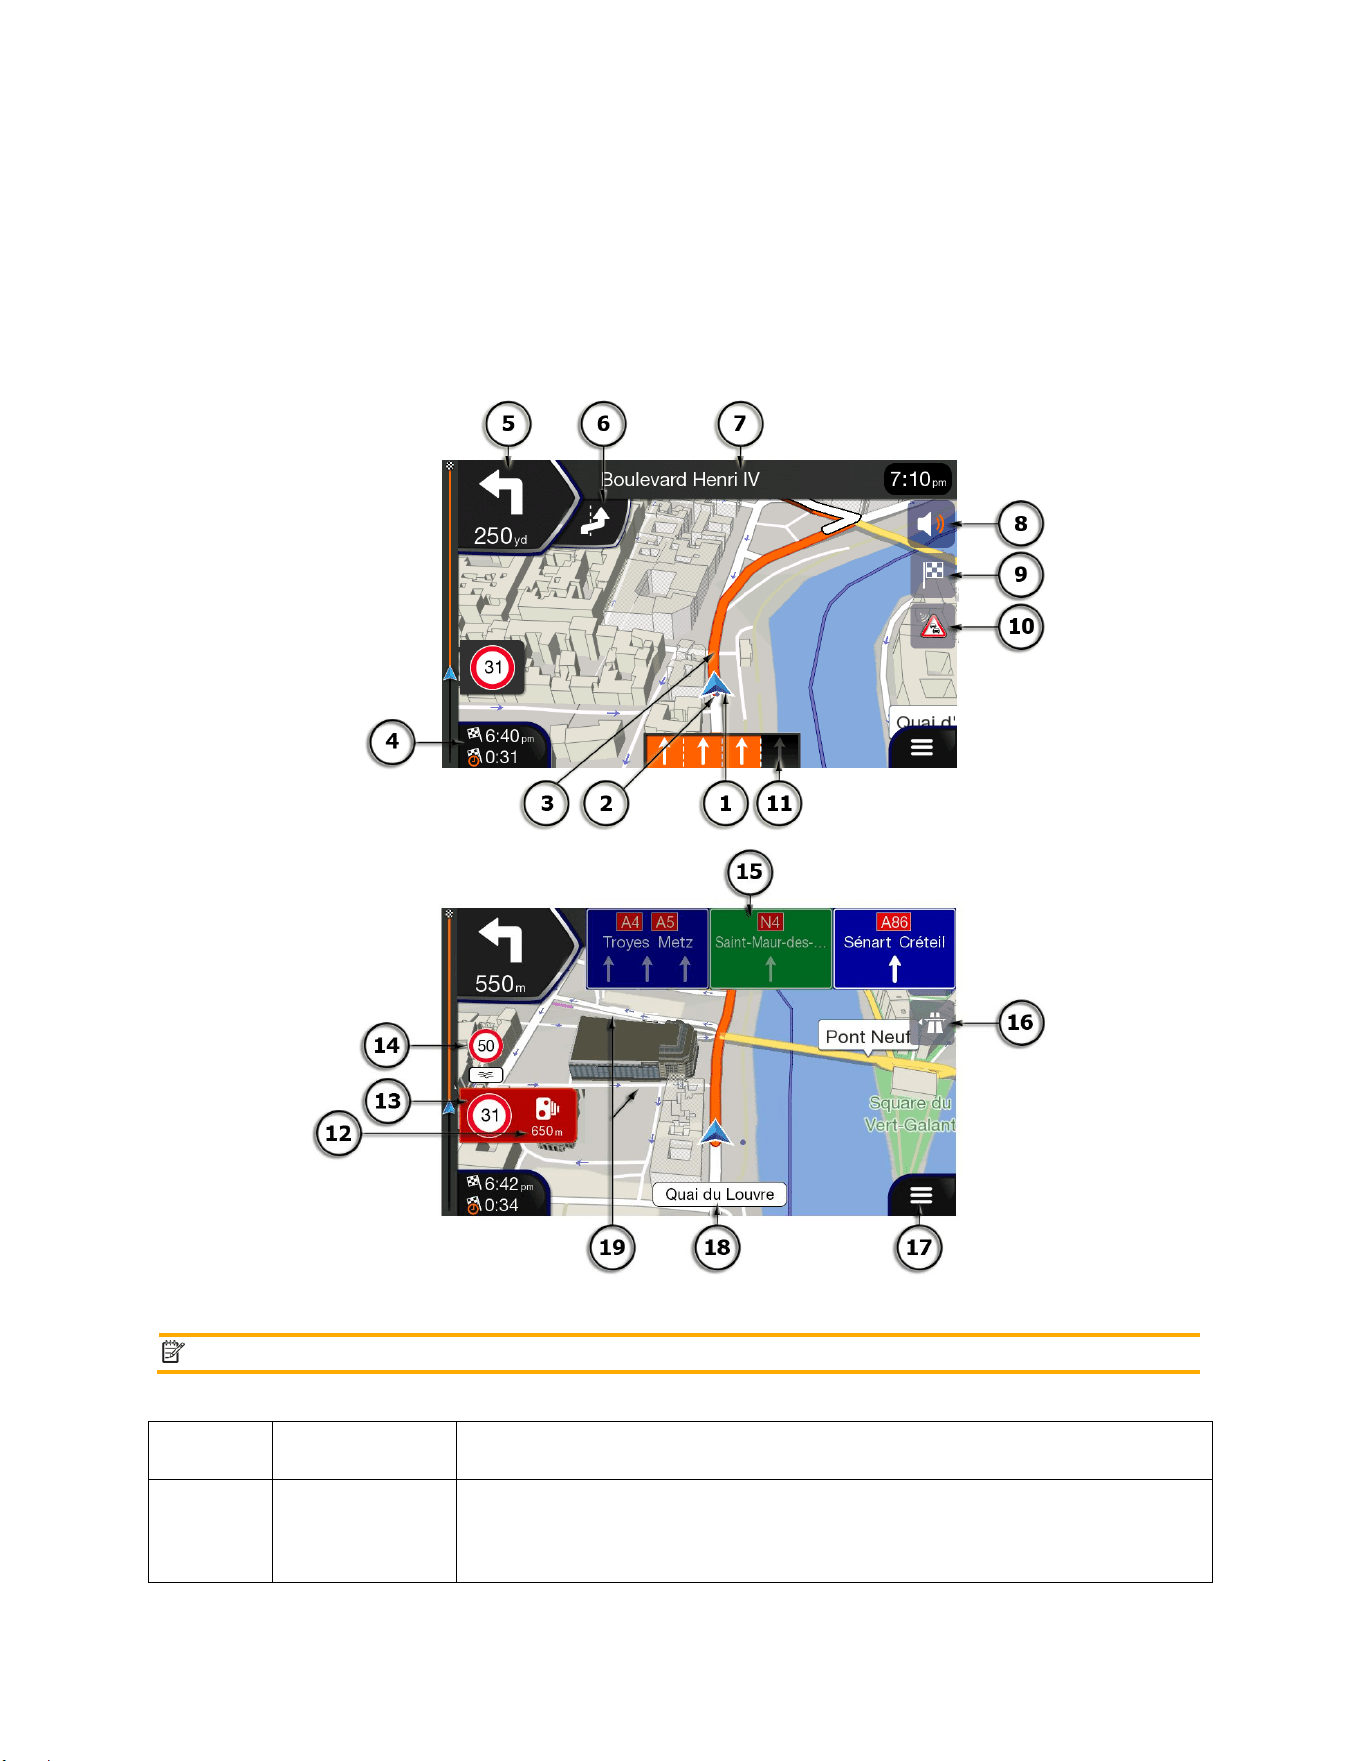
12
1.3 Navigation view
The navigation view is the main screen of Alpine navigation that shows the planned route on a map.
Alpine navigation works with digital maps which are not simply the computerised versions of traditional
paper maps. Similarly to paper road maps, the 2D mode of digital maps shows you streets and roads.
Elevation is also illustrated in color.
The navigation view displays the following screen buttons, data fields, and route information on the map
during navigation:
Note!
Some buttons, fields, or icons may not be available in your product version.
Number
Name
Description
1
Current
position
marker
The current position is displayed as a blue arrow by default. When there is
no GPS position, the current position marker is transparent and it shows
your last known position. See page 14.

13
2
GPS position
The dot near the arrow shows the GPS position as perceived by the GPS
receiver. See page 14.
3
Planned route
The planned route is displayed as an orange line.
4
Data fields
Three data fields show the following information:
• The estimated time of the arrival at the destination.
• The remaining time of the trip.
• The remaining distance to the destination.
You can change the default values in Settings (page 75) or by tapping and
holding the area where the data fields appear.
If you have not selected a destination, you can see your heading instead
of the three data fields.
5
Next turn
preview
It shows the type of the next maneuver and its distance. See page 15.
6
Second next
turn preview
It shows the type of the second next maneuver if it is near the first one.
See page 15.
7
Next street
It displays the name of the next street. See page 15.
If you have not selected a route destination, you can see nearby house
numbers, if they are available.
8
Sound
Set the volume or mute the navigation.
9
Destination
menu
It appears near the destination. By tapping it, you can check the trip
summary, find Places around your final destination, save the current
location, or suspend the navigation.
10
Traffic
It shows traffic-related information. (The live Traffic feature is not available
in North America.)
11
Lane
information
On multi-lane roads, it shows the lanes ahead and their directions. The
highlighted arrows represent the lanes and direction you need to take.
See page 17.
12
Alert point
warning
It shows the type of the alert points when approaching a road safety
camera or other Alert Points like school zones or railroad crossings. You
must make sure that using this feature is legal in the country where you
intend to use it. See page 73.
13
Speed limit
warning
It shows the current speed and the speed limit when speeding. See page
73.
14
Warning road
sign
It shows warning for the current road (for example, dangers, sharp
curves). See page 73.

14
15
Signpost
It shows the available destinations and the road numbers. See page 17.
16
Freeway
services
By tapping it, you can check the details of the next few service stations
(gas stations, restaurants) when traveling on a freeway. See page 19.
17
Navigation
menu
By tapping it, you can open the Navigation menu, where you can reach
other parts of Alpine navigation.
18
Street name
It shows the current street name. By tapping it, you can open the Where
Am I screen. See page 68.
19
3D objects
They display hills, mountains, roads, landmarks, and buildings in 3D.
If you are approaching a freeway exit or a complex intersection and the needed information exists, the
map is replaced with a 3D view of the junction. See page 18.
When entering a tunnel, the map is replaced with a generic tunnel image. See page 18.
1.3.1 Streets and roads
Alpine navigation shows the streets similarly to paper road maps. Their width and colours correspond to
their importance; you can easily tell a freeway from a small street.
1.3.2 GPS position markers
When your GPS position is available, Alpine navigation marks your current position. By default, this
marker is a blue arrow. The dot near the arrow shows the GPS position as perceived by the GPS receiver.
When on-road navigation is selected, the current position marker may not show your exact GPS position
and heading. If roads are near, it is aligned to the nearest road to eliminate GPS position errors, and the
direction of the icon is aligned to the direction of the road.

15
If you select off-road navigation, the current position marker is at your exact GPS position. The direction
of the icon shows your current heading.
1.3.3 Turn preview and next street
When navigating a route, the top section of the Navigation view shows information about the next route
event (maneuver) and the next street or the next town.
There is a field in the top left corner displaying the next maneuver. Both the type of the maneuver (turn,
traffic circle, exiting freeway, and so on) and its distance from the current position are displayed.
A smaller icon shows the type of the second next maneuver if it is near the first one. Otherwise, only the
next maneuver is displayed. Tap the icon of the actual maneuver to open the Itinerary screen.
1.3.4 The planned route
The planned route is the currently navigated route. Whenever the destination is set, the route is active
until you delete it, reach your destination or suspend navigation. Alpine navigation displays the route in
the following ways:
Symbol
Name
Description
Current GPS position
and starting point
It is your current position displayed on the map.
• If a vehicle is selected for route calculation and roads are
near, the arrow jumps to the nearest road.
• Normally, if GPS position is available, the route starts from
the current position. If there is no valid GPS position, Alpine
navigation uses the last known position as the starting point.
Waypoint
(intermediate
destination)
It is an intermediate destination of the route before reaching the final
destination.
Destination (end point)
It is the final destination of the route.
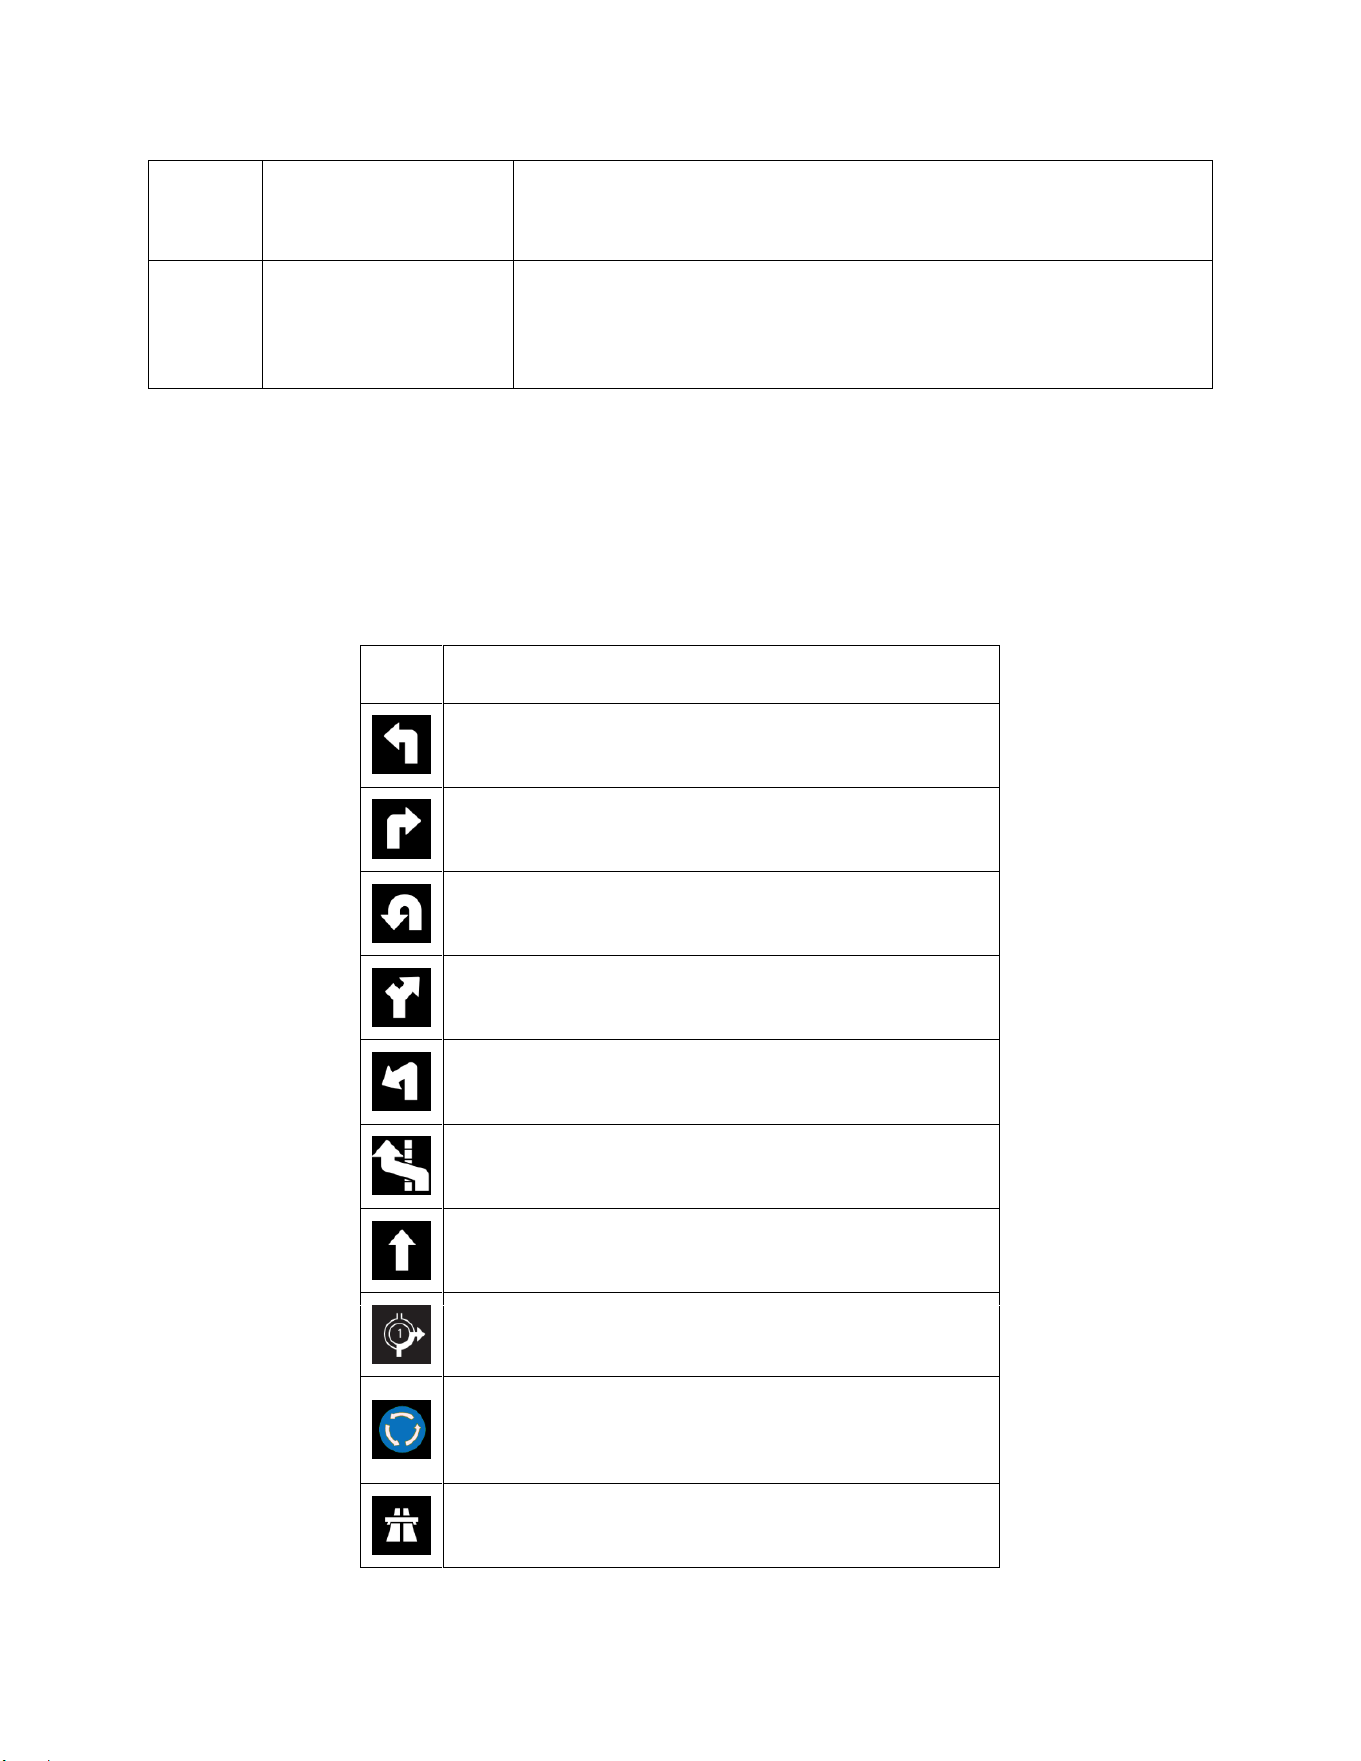
16
Route color
The route always stands out with its color on the map, both in
daytime and night color modes.
Streets and roads that
are excluded from the
navigation
You can choose whether you want to use or avoid certain road
types (page 70). However, when Alpine navigation cannot avoid
such roads, the route includes them and shows them in a color that
is different from the route color.
1.3.5 Maneuver icons
During navigation the next maneuver is displayed in the top left corner. Most of the maneuver icons are
intuitive. The following table lists some of the frequently shown route events:
Icon
Function
Turn left.
Turn right.
Turn back.
Bear right.
Turn sharp left.
Keep left.
Continue straight in the intersection.
Enter the traffic circle and take the first exit (next
maneuver).
Enter the traffic circle (second next maneuver).
Enter the freeway.
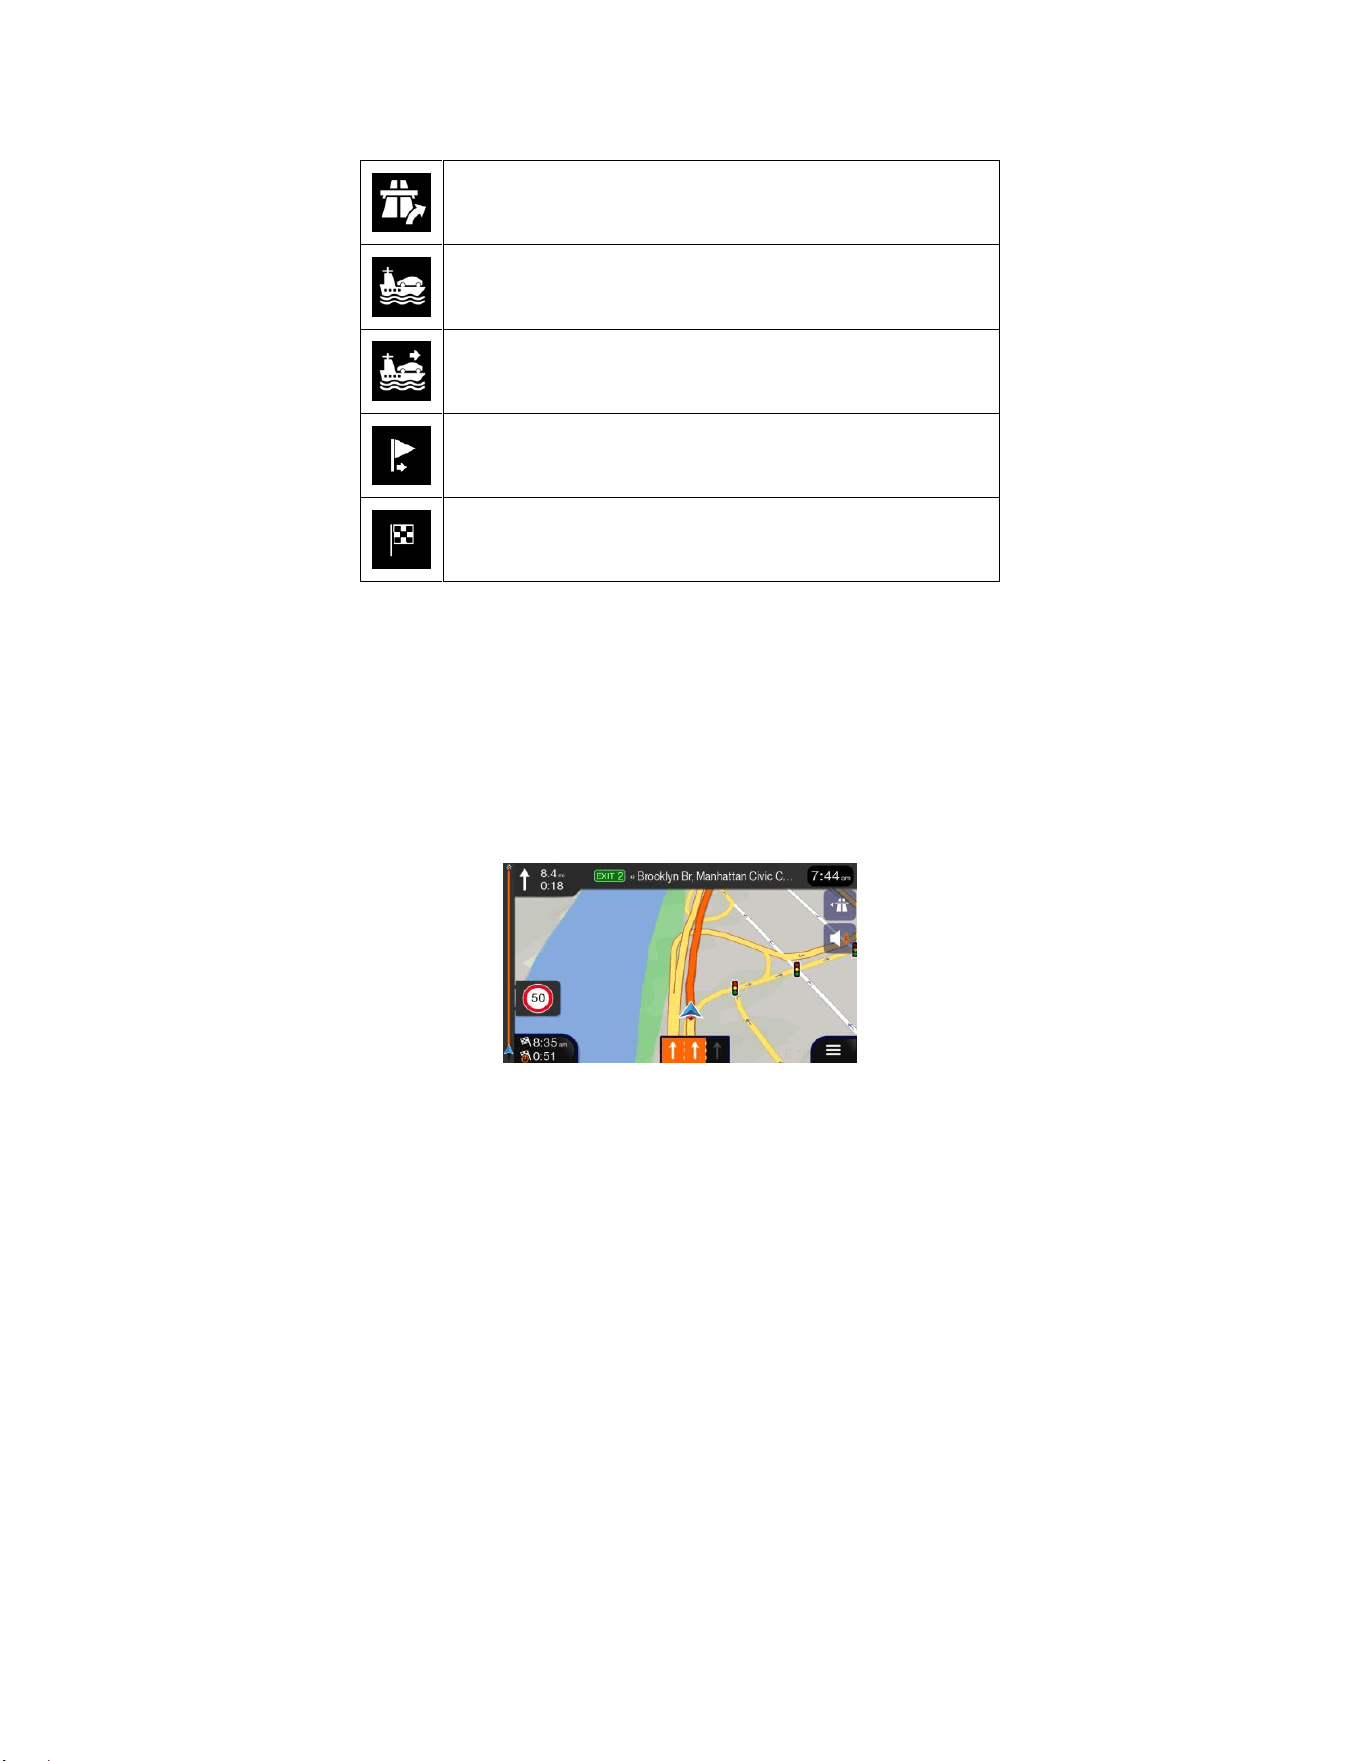
17
Exit the freeway.
Board the ferry.
Leave the ferry.
Approaching a waypoint on the right.
Approaching the destination.
1.3.6 Lane information
When navigating on multi-lane roads, it is important to take the appropriate lane in order to follow the
planned route. If lane information is available in the map data, Alpine navigation displays the lanes and
their directions using small arrows at the bottom of the map. Highlighted arrows represent the lanes and
the direction you need to take.
1.3.7 Signposts
If necessary information is available, Alpine navigation displays signposts at the top of the map. The color
and style of the signposts are similar to the real ones you can see above roads or by roadsides. They
show the available destinations and the road numbers.
All signposts look similar when cruising (when there is no planned route). During navigation only the
signpost that points to the lane(s) to be taken is highlighted; all the others are darker.
If you want to hide the currently displayed signposts, tap any of them and the normal Navigation view
returns until new signpost information is received.
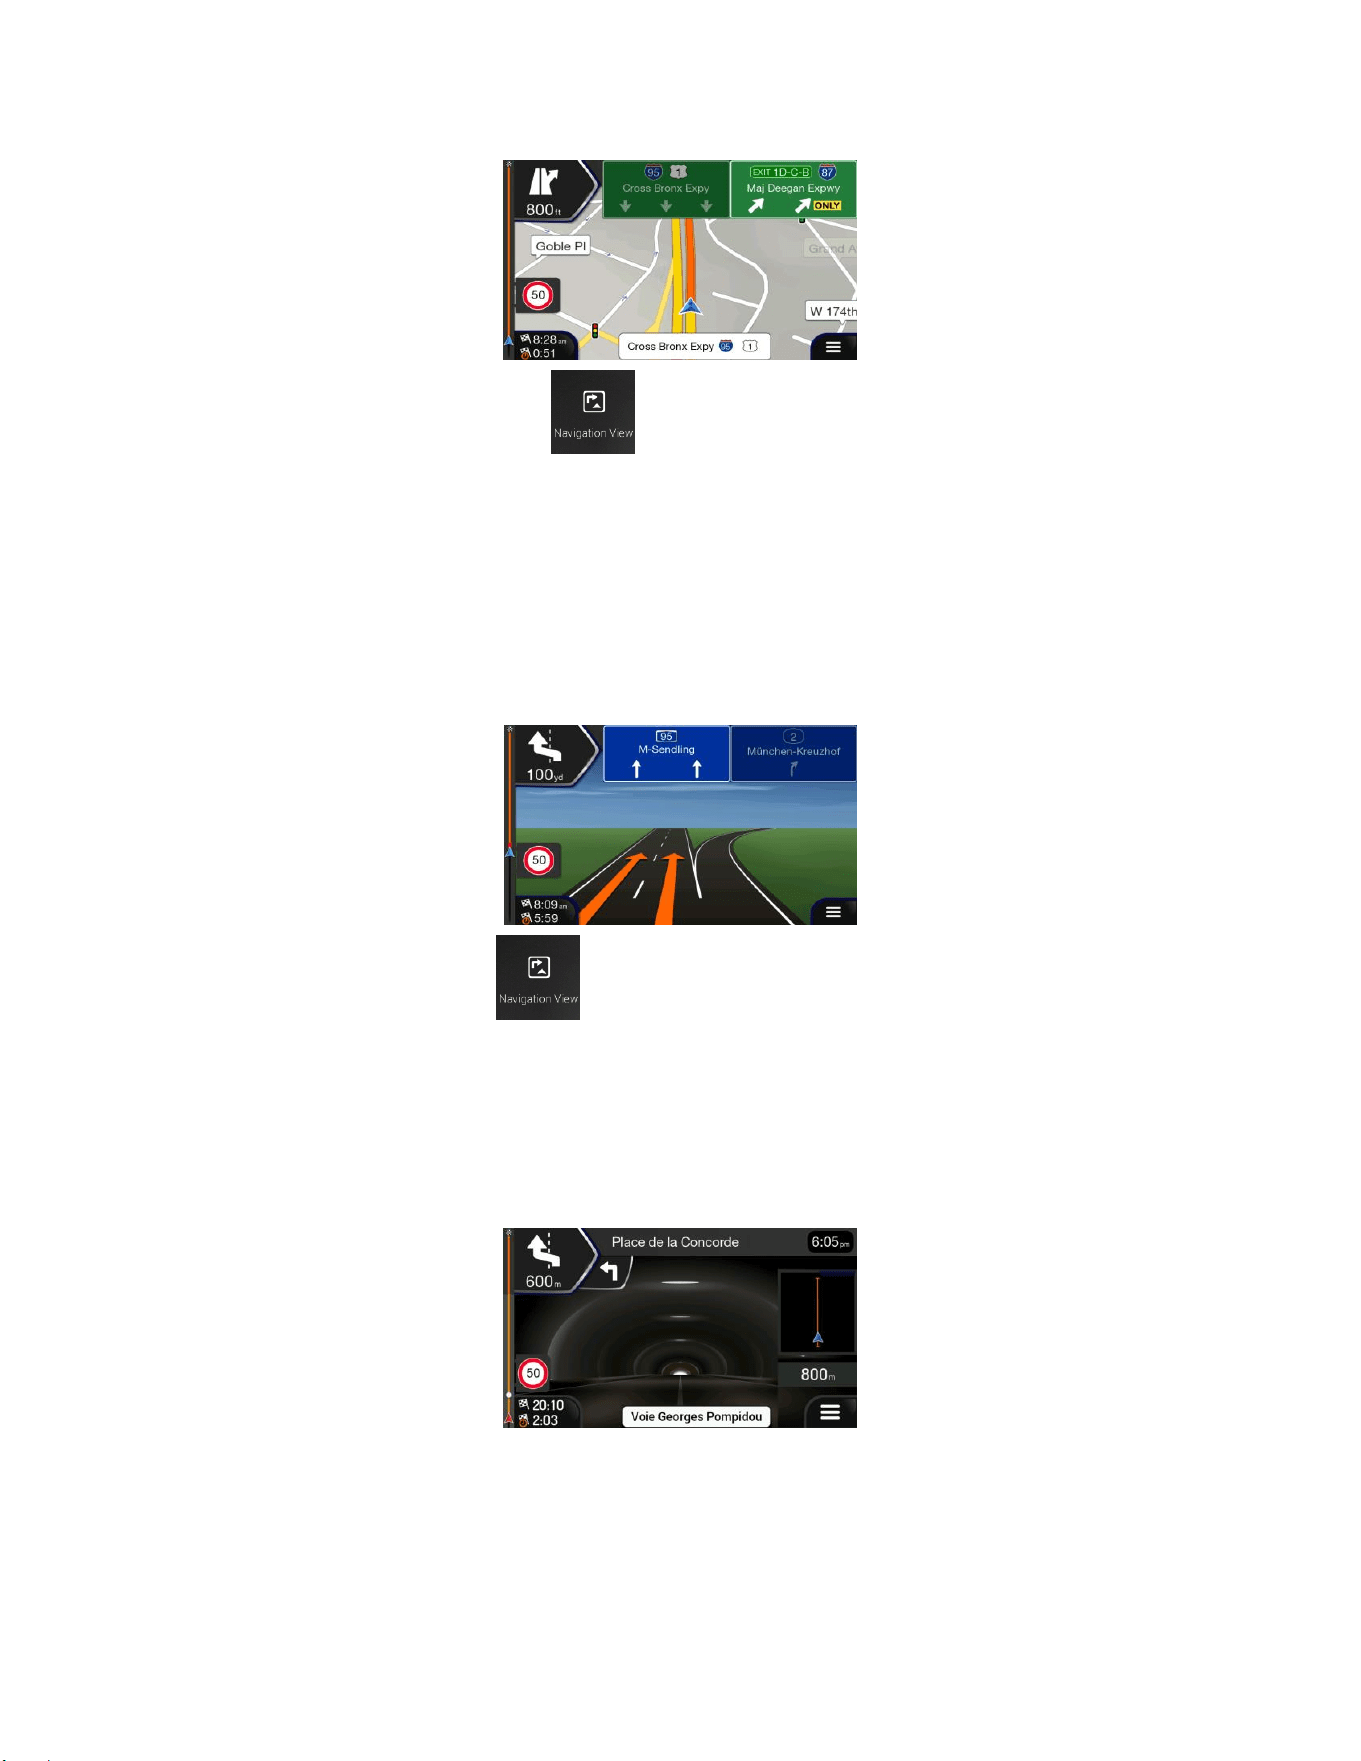
18
You can modify the signpost settings in (page 75).
1.3.8 Junction view
If you are approaching a freeway exit or a complex intersection and the needed information exists, the
map is replaced with a 3D view of the junction. The lanes you need to take are displayed with arrows. At
the top of the screen, road signs show you additional information.
If you want to hide the currently displayed junction and return to the Navigation view, tap the picture.
Junction view can be turned off in . See page 75.
1.3.9 Tunnel view
When entering a tunnel, the map is replaced with a generic tunnel image so that surface roads and
buildings cannot distract you.
The top-down overview of the tunnel displayed in a separate window helps you orient yourself. The
remaining distance in the tunnel is also displayed.
After leaving the tunnel, the original map view returns.
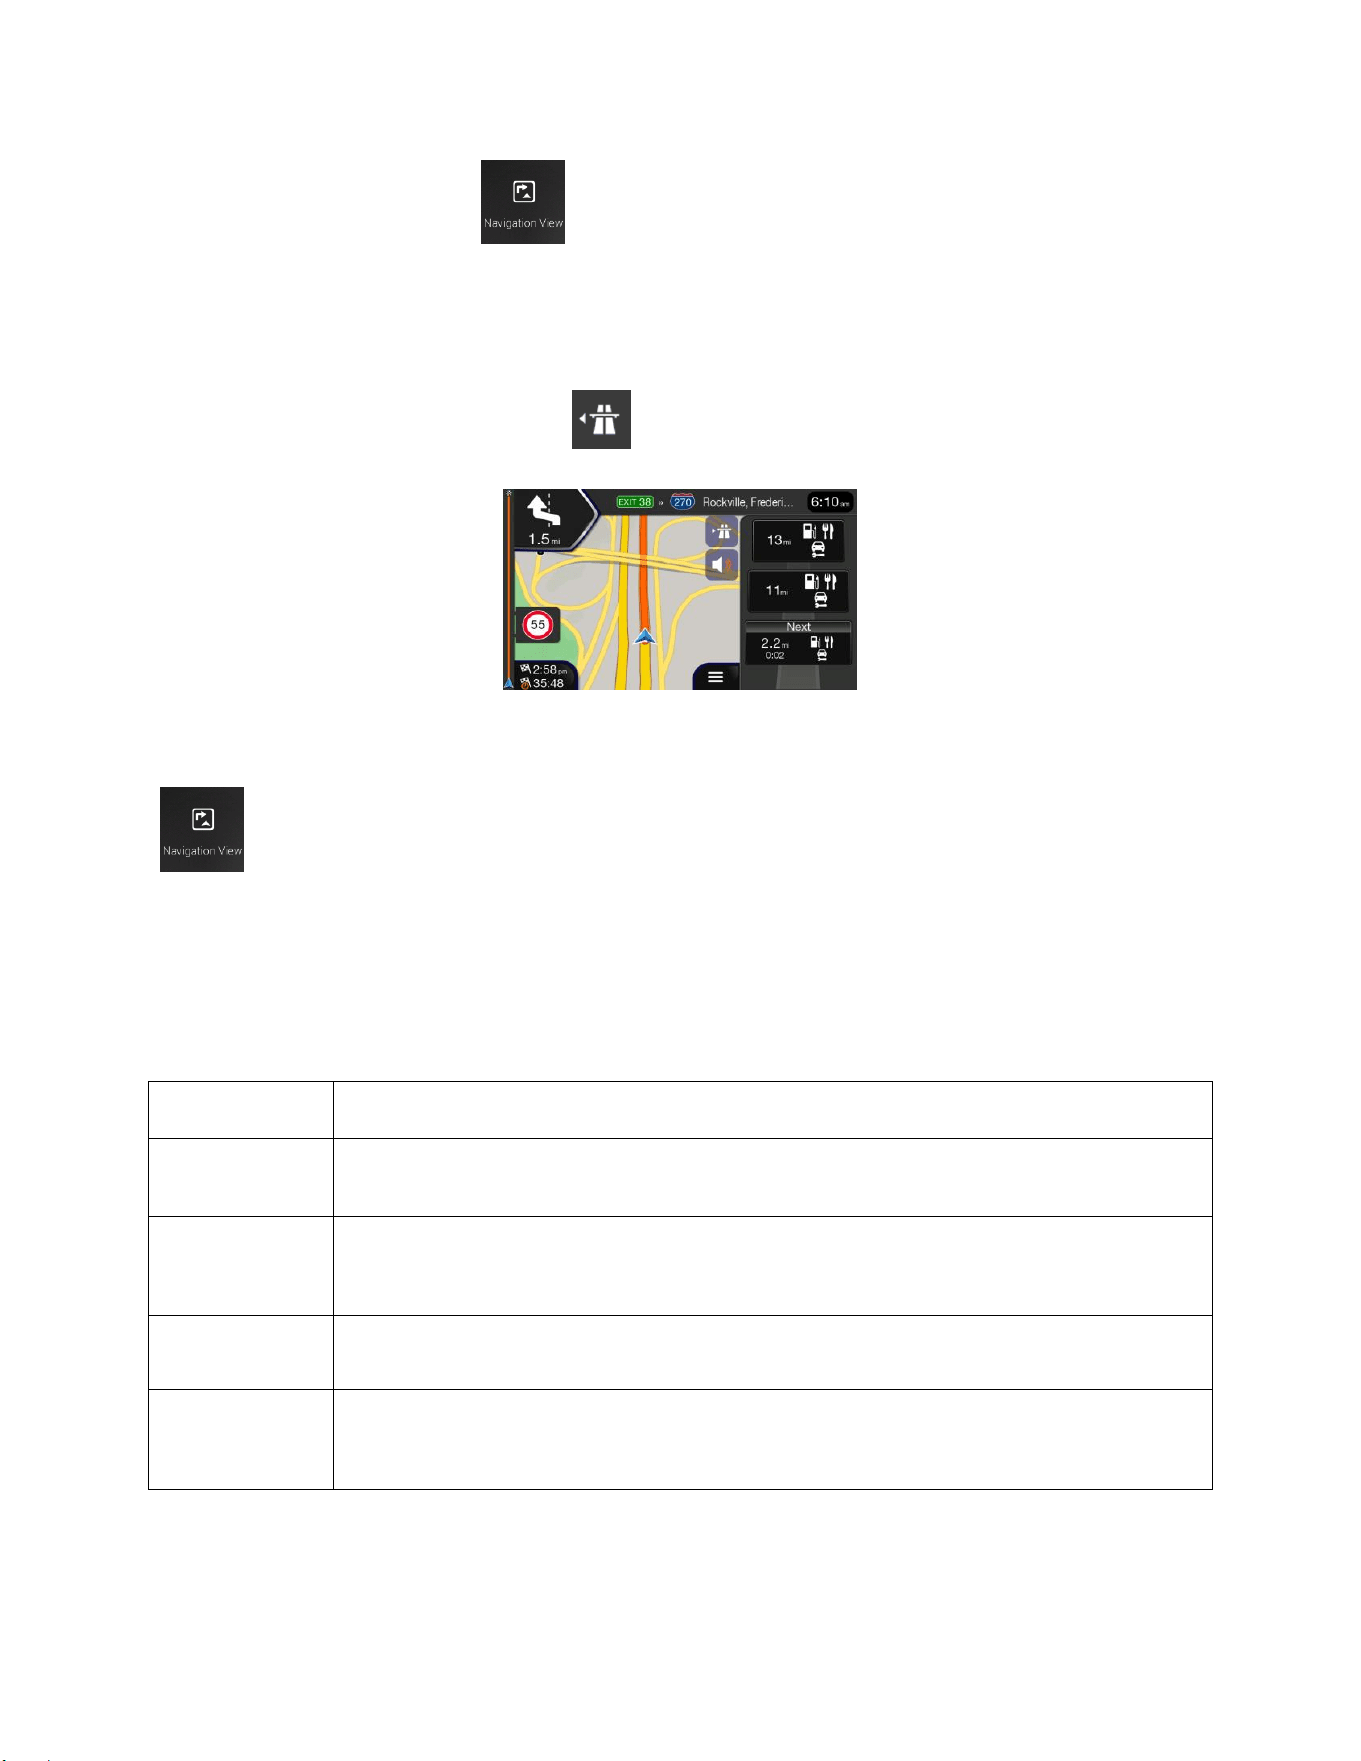
19
Tunnel view can be turned off in . See page 75.
1.3.10 Freeway services
When you are driving on a freeway, the button appears at the top right corner of the Navigation
view. Tap it to open a panel with the details of the next few service stations (gas stations, restaurants).
Tap any of them to display the exit area on the map. You can now easily add this service station as a
waypoint to your route if necessary.
If you want to display other types of Places at the next few service stations, you can change the icons in
. See page 75.
1.3.11 3D object types
Alpine navigation supports the following 3D object types:
Type
Description
3D terrain
Alpine navigation displays 3D hills and mountains in the Navigation view, and
illustrates them by colouring and shading on the 2D map.
Elevated roads
Elevated roads are complex intersections and vertically isolated roads (such as
overpasses or bridges) displayed in 3D.
3D landmarks
Landmarks are 3D representations of prominent or well-known objects.
3D buildings
3D buildings are block representations of full town building data containing actual
building sizes and positions on the map.
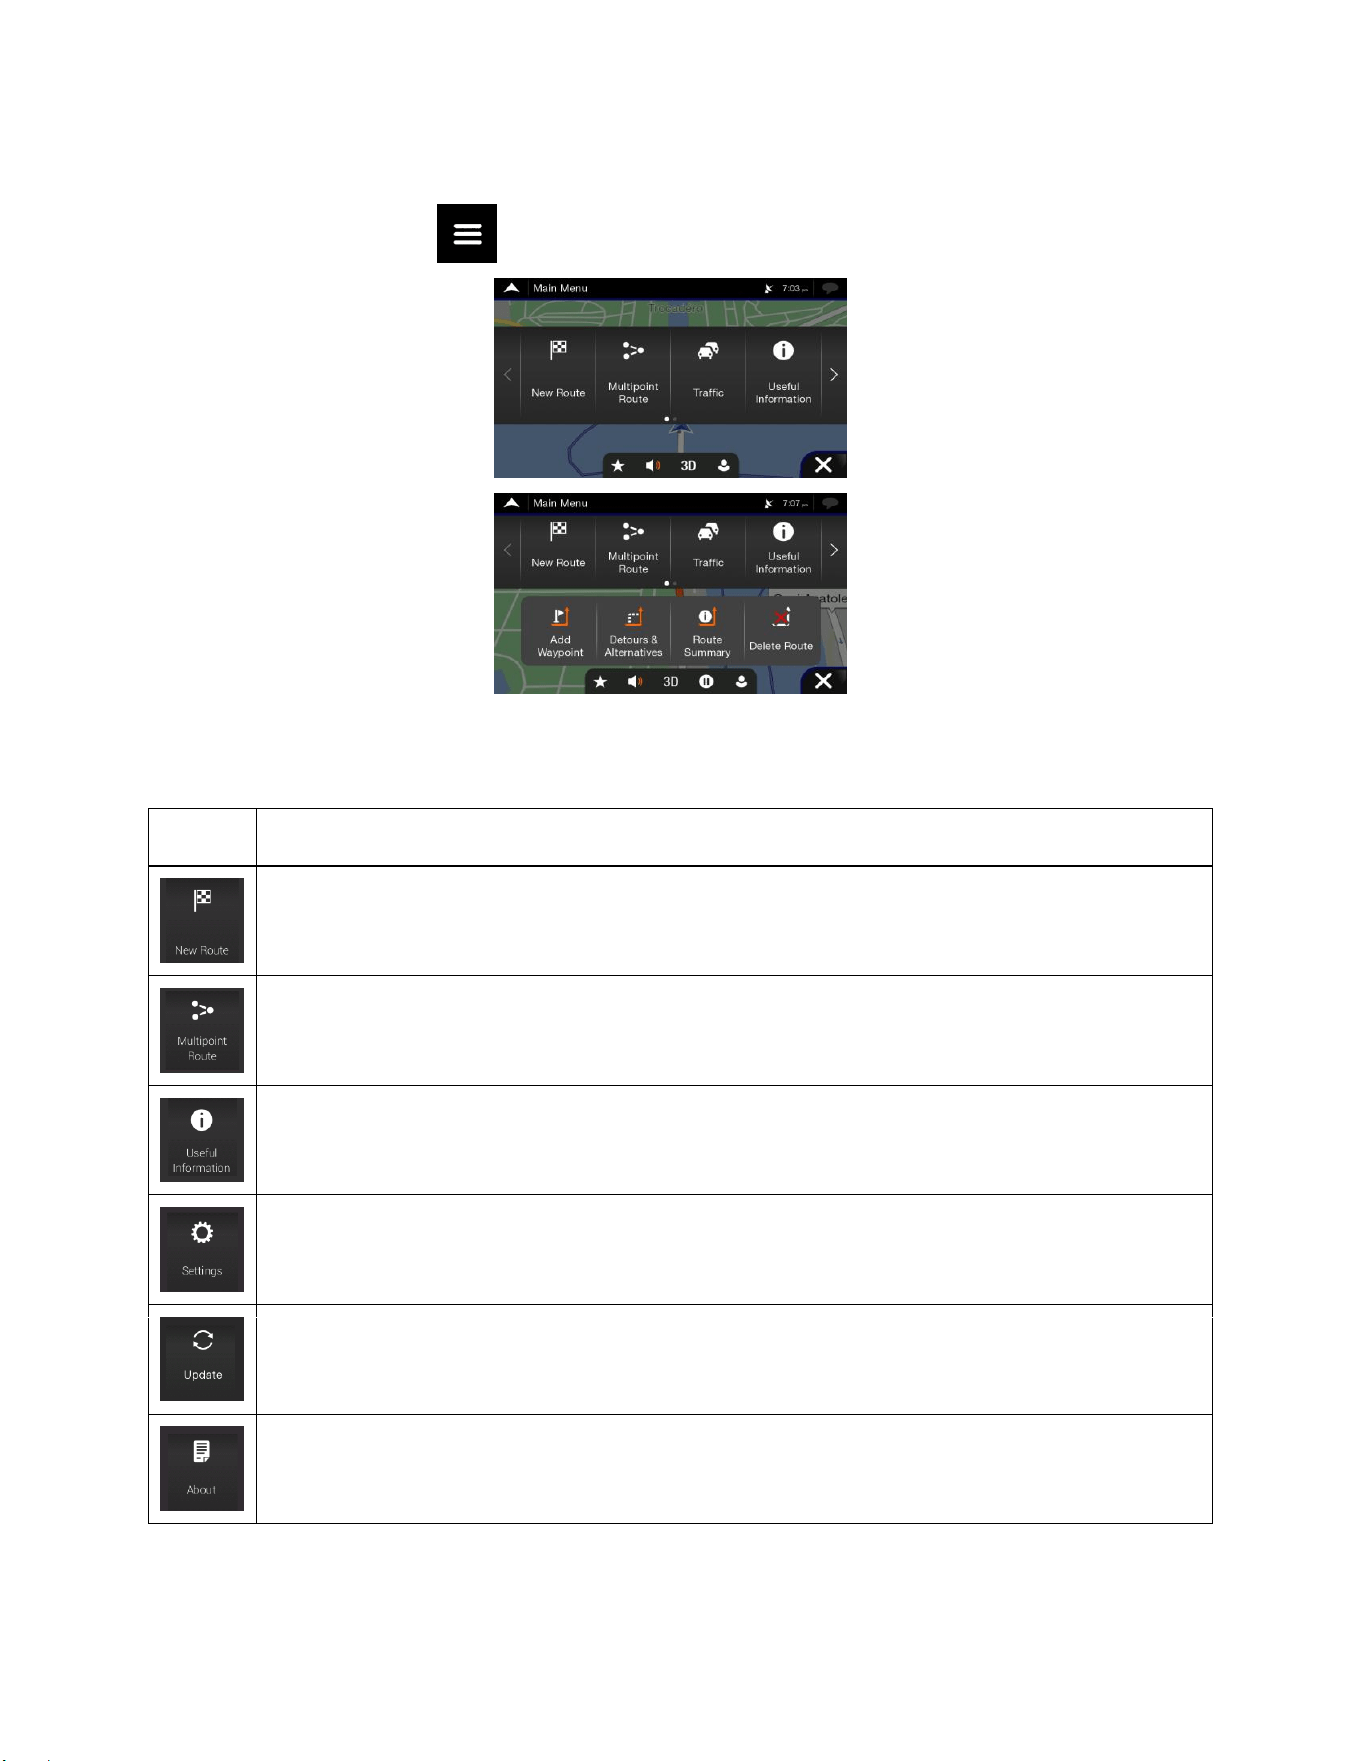
20
1.4 Navigation menu
On the Navigation view, tap to open the Navigation menu.
You can see the following menu options when you are navigating without a planned route:
Button
Function
Select your destination by entering an address or its coordinates, or by selecting a Place, a
Saved Location, or a Saved Route. You can also look up your recent destinations from the
History.
Build your route from one or more route points. You can also plan a route independently of
your current GPS position by setting a new starting point.
Access additional options and check navigation-related information.
Customise the way the navigation software works.
You can access the latest free map or software updates here.
The About section provides you with product information. Read the Software and Database
End User License Agreement, or check the map and other contents of the application. You can
also access program usage statistics.
With a planned route, the following menu options are also available:
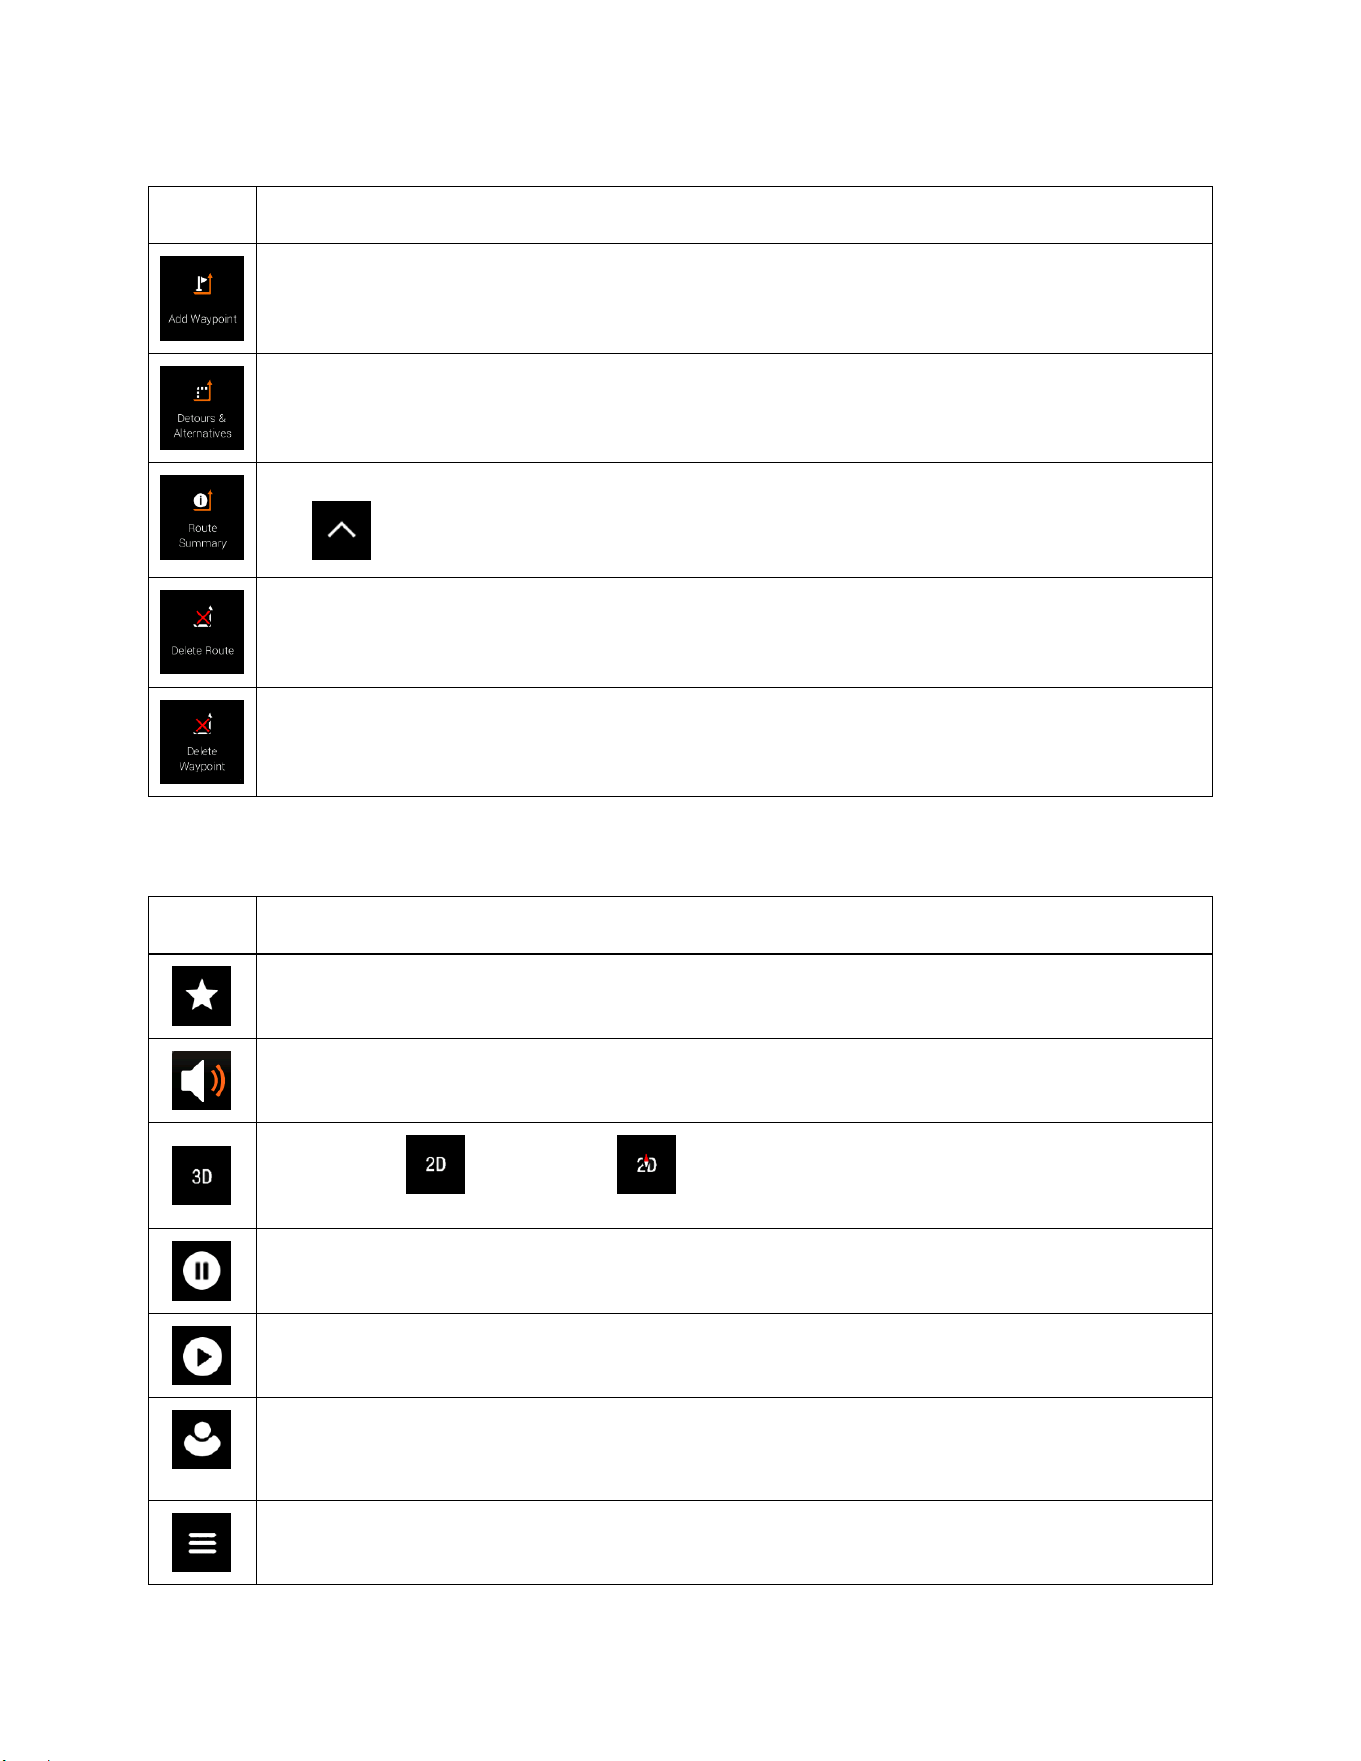
21
Button
Function
Add an intermediate destination to your route.
See route alternatives to avoid parts of the route, or to avoid a specific road from your planned
route.
View the route in its full length on the map and check route parameters and route alternatives.
Tap to access additional options, like Simulation or Route Preferences.
Delete your route.
Delete the next waypoint or the whole route. It is displayed if there is a multipoint route.
In the navigation menu, you have the following additional options:
Button
Function
Open the Saved Locations screen where you can save a location as a favorite destination or
edit a saved location.
Set the volume or mute the navigation.
Switch to 2D ( ), 2D North up ( ) view or back to 3D mode.
Suspend navigation.
Resume navigation.
Access the User profiles menu where you can create new profiles or edit the existing ones. If
several drivers are using the navigation system, they can create their own profiles with their
own settings.
The Menu button appears when the Navigation view is displayed. Tap it to open the Navigation
menu.

22
The More button appears on the screen to display additional features. Tap it to open the list of
additional features on certain screens.
Tap the Back button to return to the previous screen. You can also press and hold this button
to quickly return to the Navigation view from any other screen.

23
2 Warnings and safety information
The navigation system helps you find your way to your destination with the built-in GPS receiver. Alpine
navigation does not transmit your GPS position; others cannot track you.
It is important to look at the display only when it is safe to do so. If you are the driver of the vehicle, we
recommend that you plan and review your route before you start your journey. Plan the route before your
departure and stop if you need to change the route.
You must follow the traffic rules. If you deviate from the planned route, Alpine navigation changes the
instructions accordingly.

24
3 Using the navigation
By default, Alpine navigation calculates routes using the road network of the maps provided with the
product.
You can select the destination and start navigating to it right away (normal navigation) if you need a route
for immediate navigation.
You can also plan a route independently of your current GPS position even without GPS reception. To
achieve this, you need to set a new starting point in the Multipoint Route menu. It also suspends guidance
so that the route is not recalculated when a new position is received. See page 51.
You can plan routes with multiple destinations by selecting a first and a second destination and adding it
to your route. You can add as many destinations to your route as you like. See page 48.
You can also use Alpine navigation for off-road navigation. See page 60.
3.1 Selecting a destination
You can choose your destination by selecting one of the following options:
• Using combined search to search among different destination types at once, see page 24
• Entering a full address or a part of an address, for example a street name without a house number,
see page 27
• Selecting a Place as your destination, see page 35
• Selecting a previously saved location as your destination, see page 43
• Selecting a location from the History of previously used destinations, see page 44
• Selecting a previously saved route, see page 45
• Entering the coordinate of the destination, see page 46
• Selecting a location on the map, see page 48
• Planning a multipoint route, see page 48.
3.1.1 Using combined search
There are several ways to select your destination. You can initiate a separate search for addresses,
Places, saved locations, or recent destinations, but the fastest way to search for any of these is to use
combined search.
Perform the following steps to use combined search:
1. Tap on the Navigation view to access the Navigation menu.
2. Tap .

25
3. Tap . You can see the input field at the top of the screen. Right next to it you
can see the search area, the town around which the search is carried out. The default search area
is the area where you are located. For a local search, skip the next step.
4. (optional) To search in a different area, tap the input field with the search area, and start entering
the name of the new search area on the keyboard.
You only need to enter a few letters to get a result. The most likely result appears below the input
field as you enter new letters.
a. If the new search area is in a different country or state, start entering the country/state and
the town.
b. Tap to see the whole list of the matching results.
5. With the proper search area displayed, start entering the name, address, or category of the
destination you are looking for.
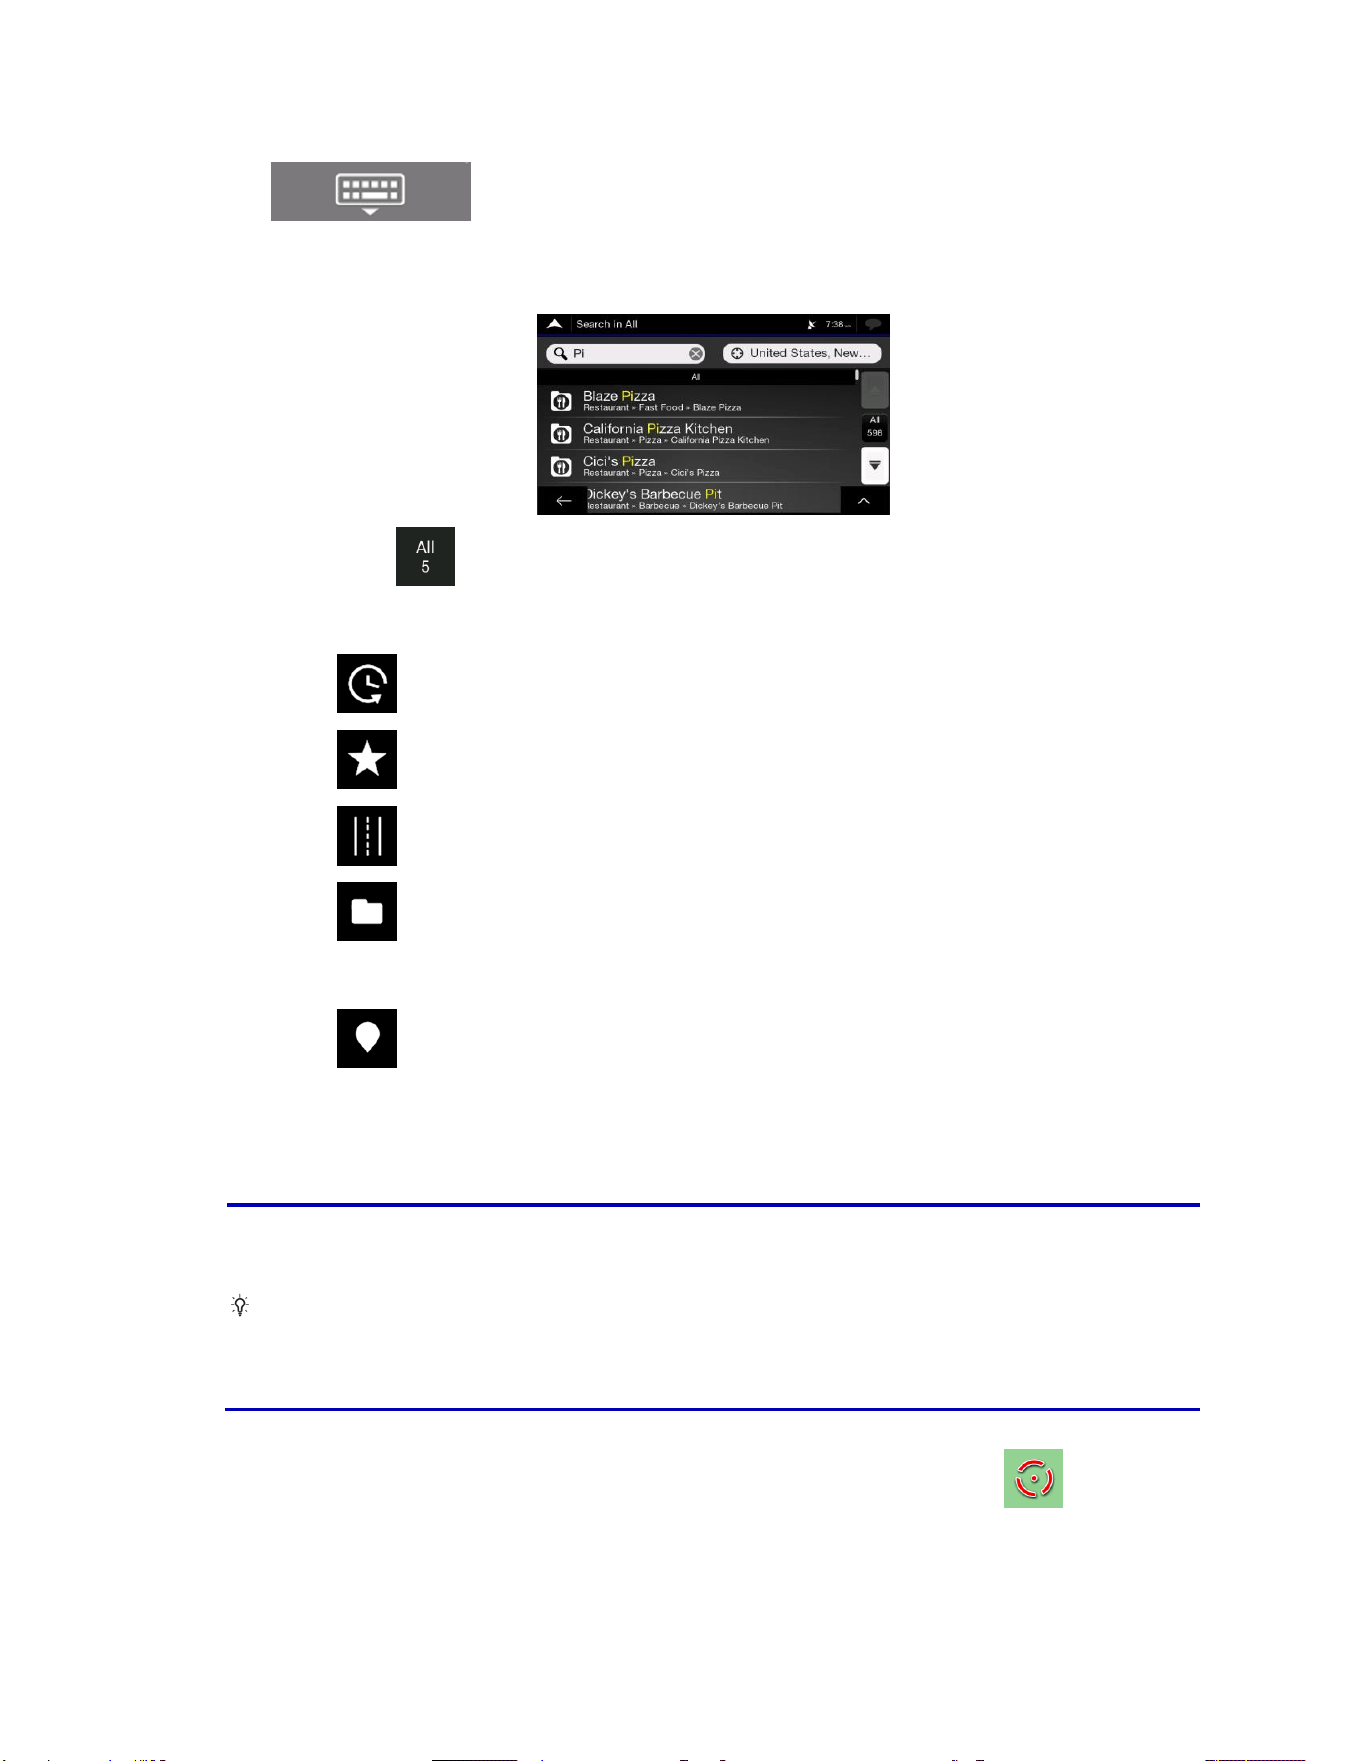
26
6. Tap to switch to the result screen. You can see all the results in the list,
regardless of their type. Addresses, Places, Place categories, Saved locations, and recent
destinations are mixed in one list. You can immediately select the result you want to use as your
destination or narrow the list of results for only one type (for example, Places).
7. If necessary, tap on the right side of the list and then tap the corresponding button to narrow
the list of search results by type (the number on the related icon shows the number of the matching
results):
• Tap to see the list of recent destinations with a matching name or address.
• Tap to see the list of your saved locations with a matching name.
• Tap to see the list of matching addresses.
• Tap to see the list of matching Place category names. Scroll the list and select one of
the categories. You get the list of Places in that category ordered by their distance from your
current position.
• Tap to see the list of matching Places ordered by their distance from your current
location.
• (optional) If your product contains Places from different data providers, you can further
narrow the list by showing the results from one provider only. Look for the provider logos.
Tap one of them to see Places from that provider.
Tip!
To search for an intersection in the combined search, enter the names of the streets
connected by the '&' sign. You do not need to use spaces before and after the separator
character. For example you can find the intersection of Collins Street and Douglas Avenue
by entering strings, like "Collins St & Douglas Ave", "Collins & Douglas", "Col&Doug", etc.
The more precise the input string is, the fewer false results are expected. If you enter
"Collins St&", you get all the intersections of Collins Street and you can select the
appropriate one from the result list.
8. Once the destination is selected, a full screen map appears with the selected point in the middle. If
necessary, tap the map somewhere else to modify the destination. The cursor ( ) appears in
the new location.
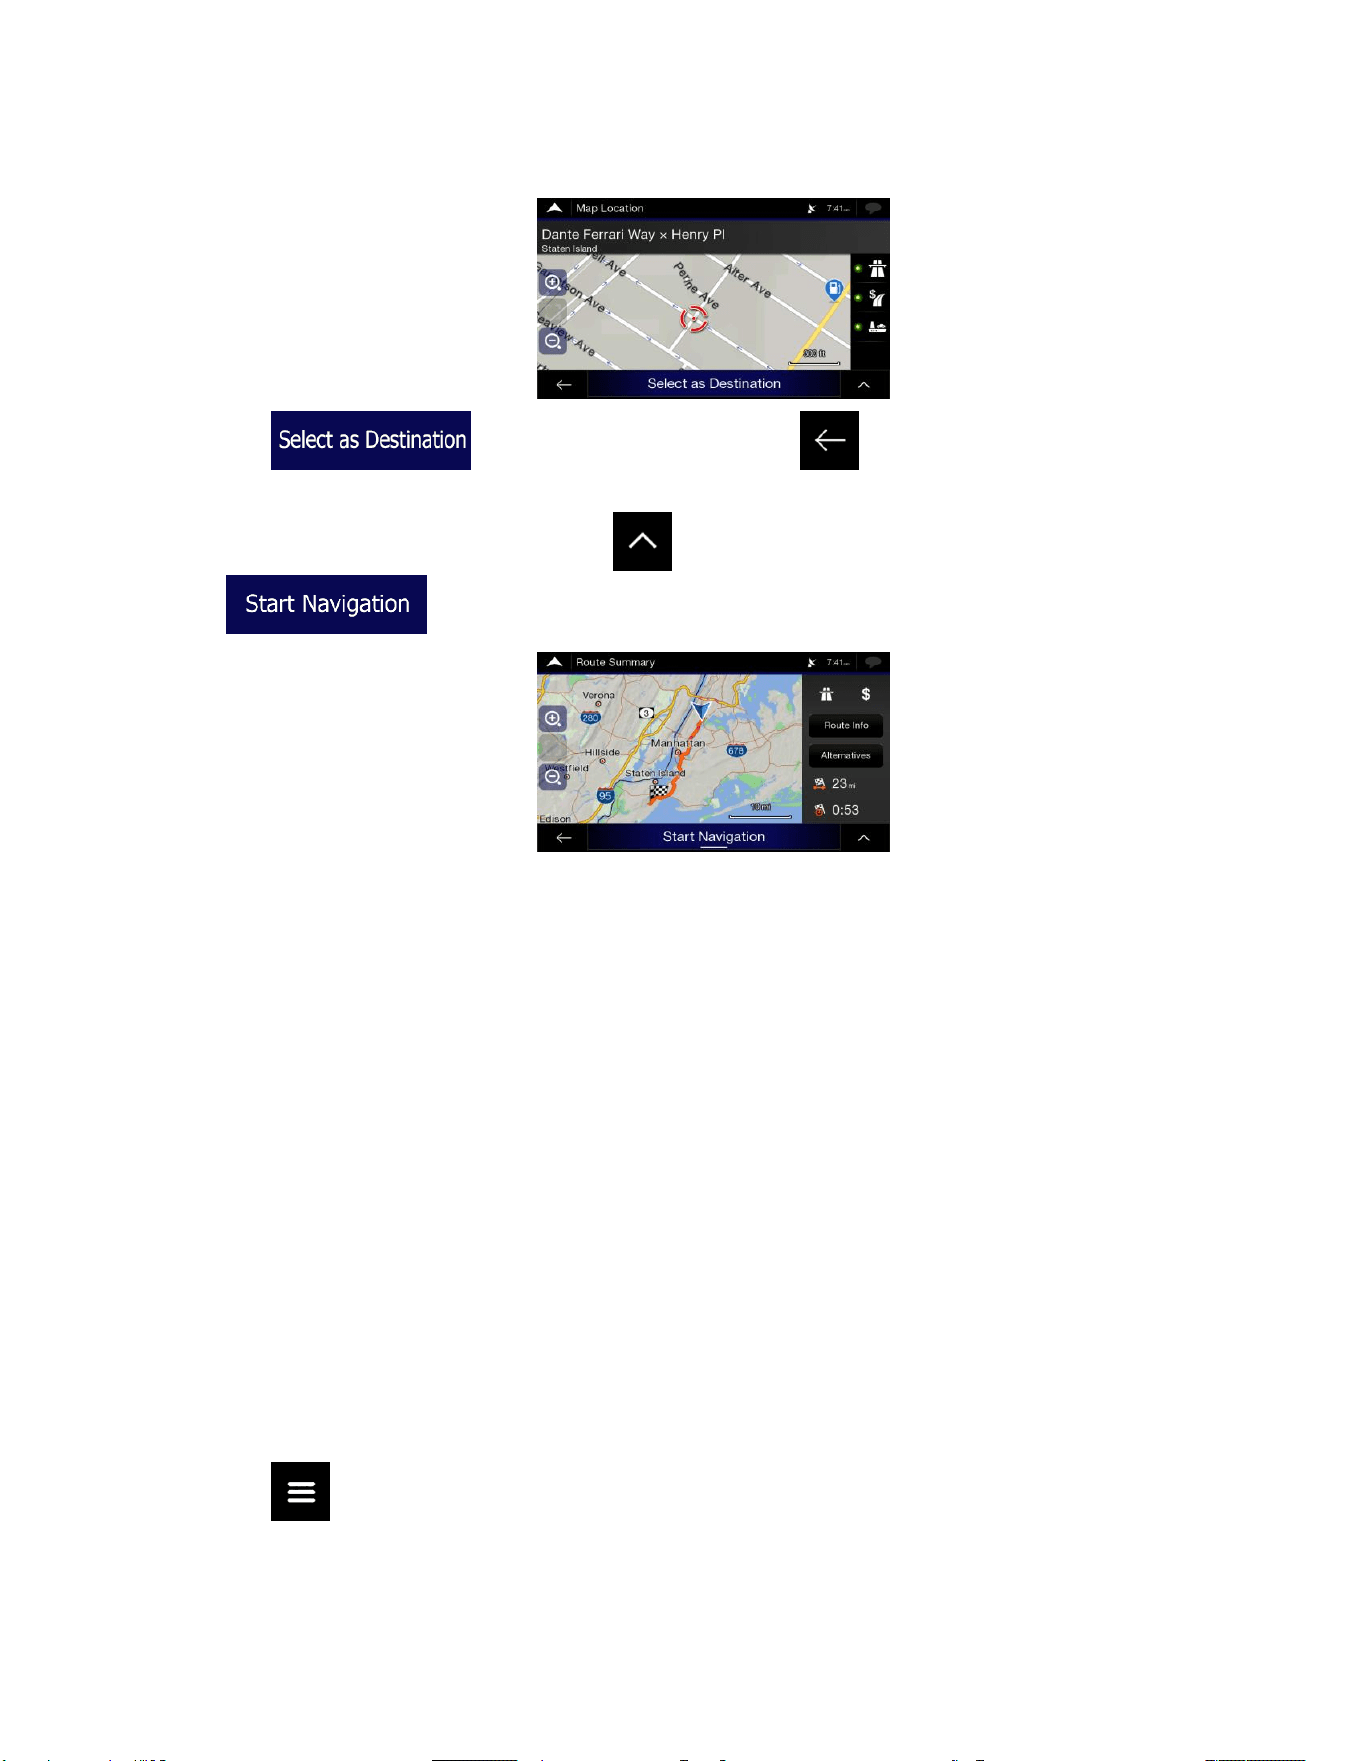
27
9. Check the settings for road types and change them if necessary.
10. Tap to confirm the destination, or tap to select a different destination.
11. The route is calculated and the map appears showing the entire route, where you can check route
information and route alternatives. Tap to modify the route parameters, or tap
to start your journey.
3.1.2 Selecting an address
If you know at least a part of the address, this is the quickest way to select your destination.
Using the same screen, you can find an address by entering the following information:
• The exact address, including the house number, see page 27
• The address starting with the street name, see page 30
• The center of a town, see page 32
• The midpoint of a street, see page 33
• An intersection, see page 34
• Any of the above, starting the search with the ZIP code, see page 35.
3.1.2.1 Entering an address with states
To enter an address as the destination, follow these steps:
1. Tap on the Navigation view to access the Navigation menu.
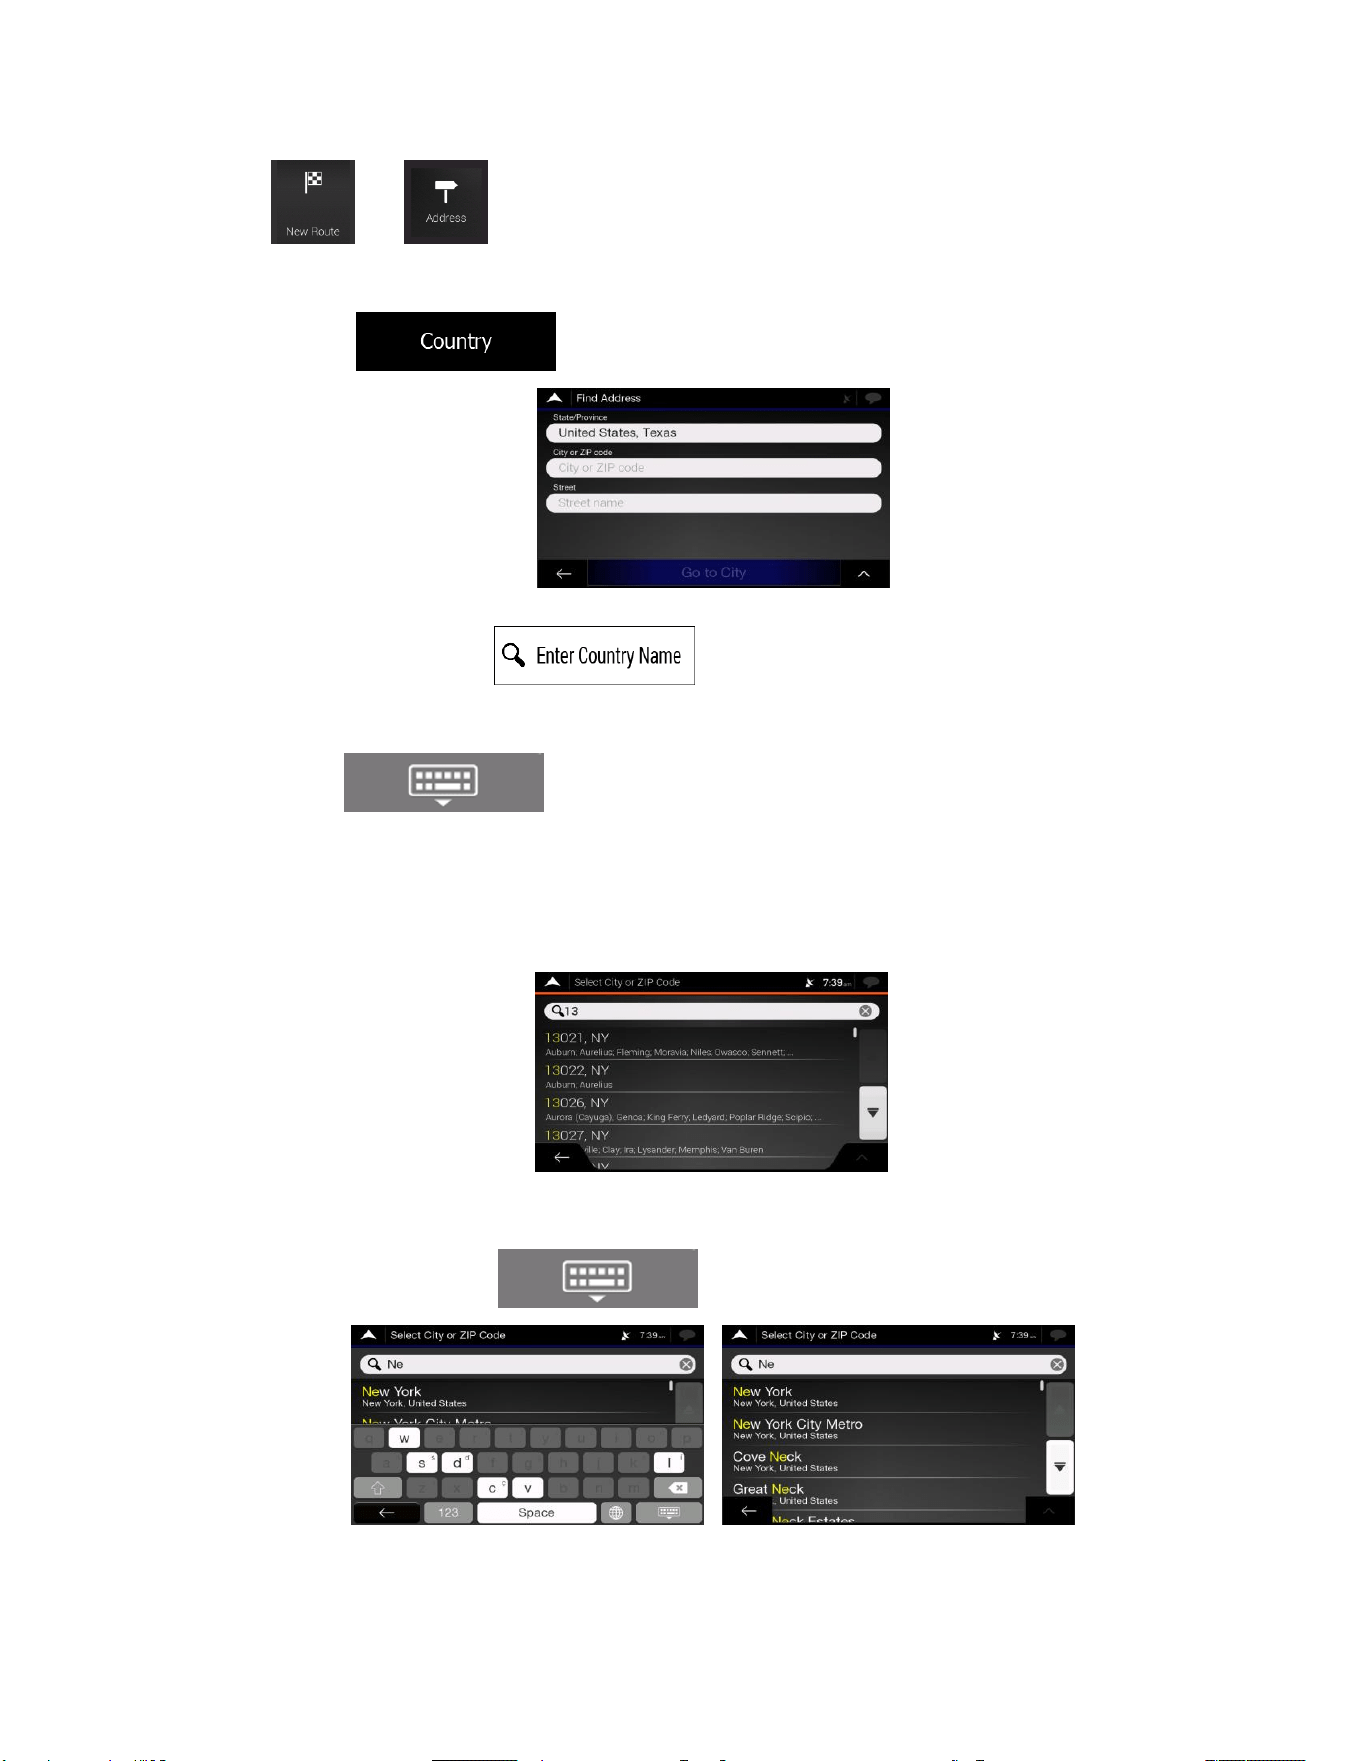
28
2. Tap and .
3. By default, the Alpine navigation proposes the country and state where you are or in case there is
no valid GPS position, the country and state of the last known position. If needed, change the
country. Tap .
a. In the Select Country screen, you can immediately select a country from the list below the
input field or tap the button and start entering the first few letters of the
country on the keyboard. If you select a country without a state, you can search for a town
in all its states.
b. Tap to open the list of results and select one country from the list.
4. If needed, select a new city.
a. Tap the City or ZIP code field.
b. (optional) In the Select City or ZIP code screen, you can immediately select a city from the
list of suggestions.
c. Otherwise, start entering the first few letters of the city on the keyboard. The names that
match the string appear in a list.
d. To open this list, tap and select the city.
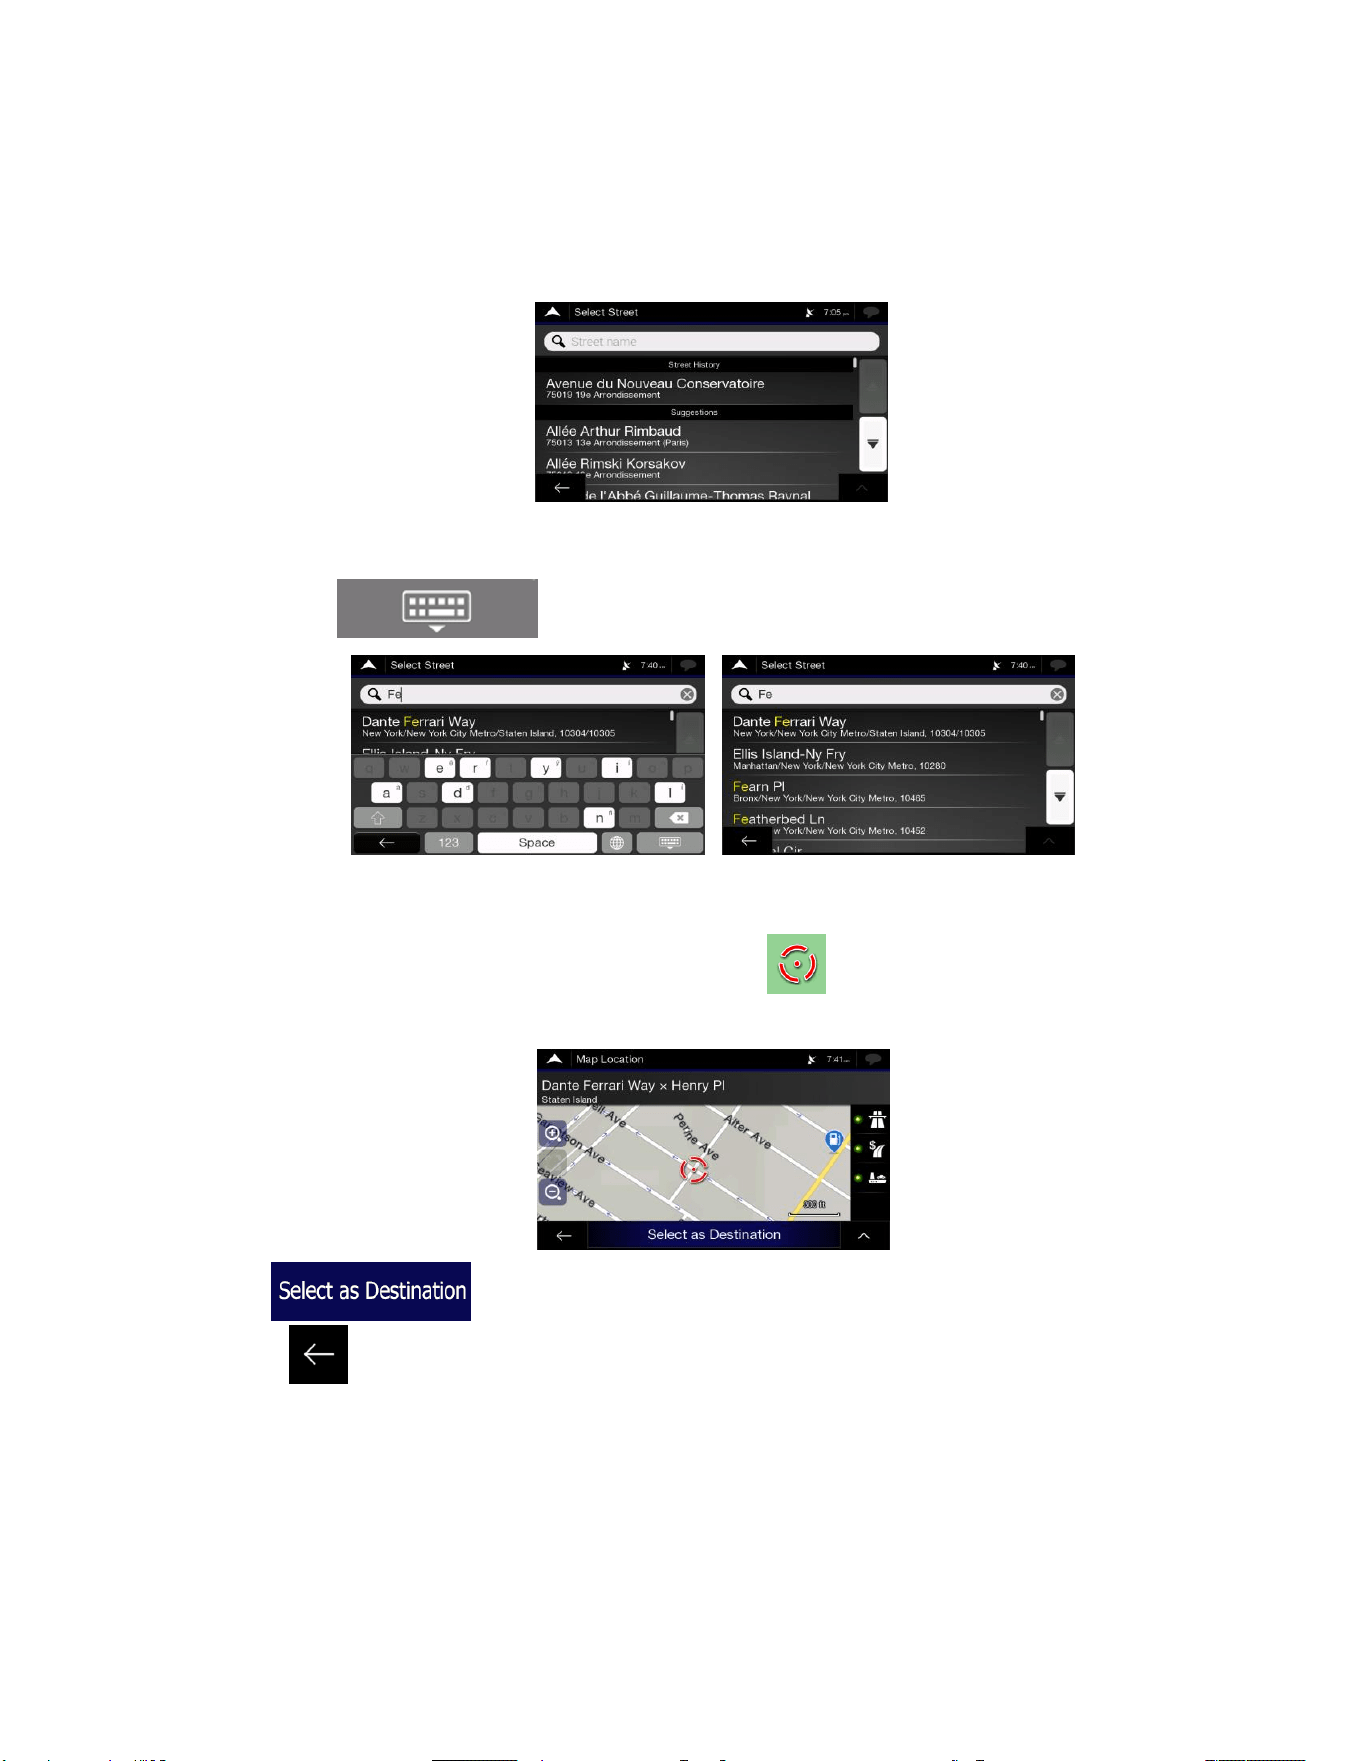
29
5. Enter the street name.
a. Tap the Street field.
b. (optional) On the Select Street screen, you can immediately select a street from the list of
suggestions.
c. Otherwise, start entering the street name on the keyboard, the names that match the string
appear in a list.
d. Tap to open the list of results. Select the street from the list.
6. A full screen map appears with the selected point in the middle. If necessary, tap the map
somewhere else to modify the destination. The cursor ( ) appears at the new location.
7. Check the settings for road types and change them if necessary.
8. Tap to confirm the destination. You can also select a nearby point on the map
or tap to select a different destination.
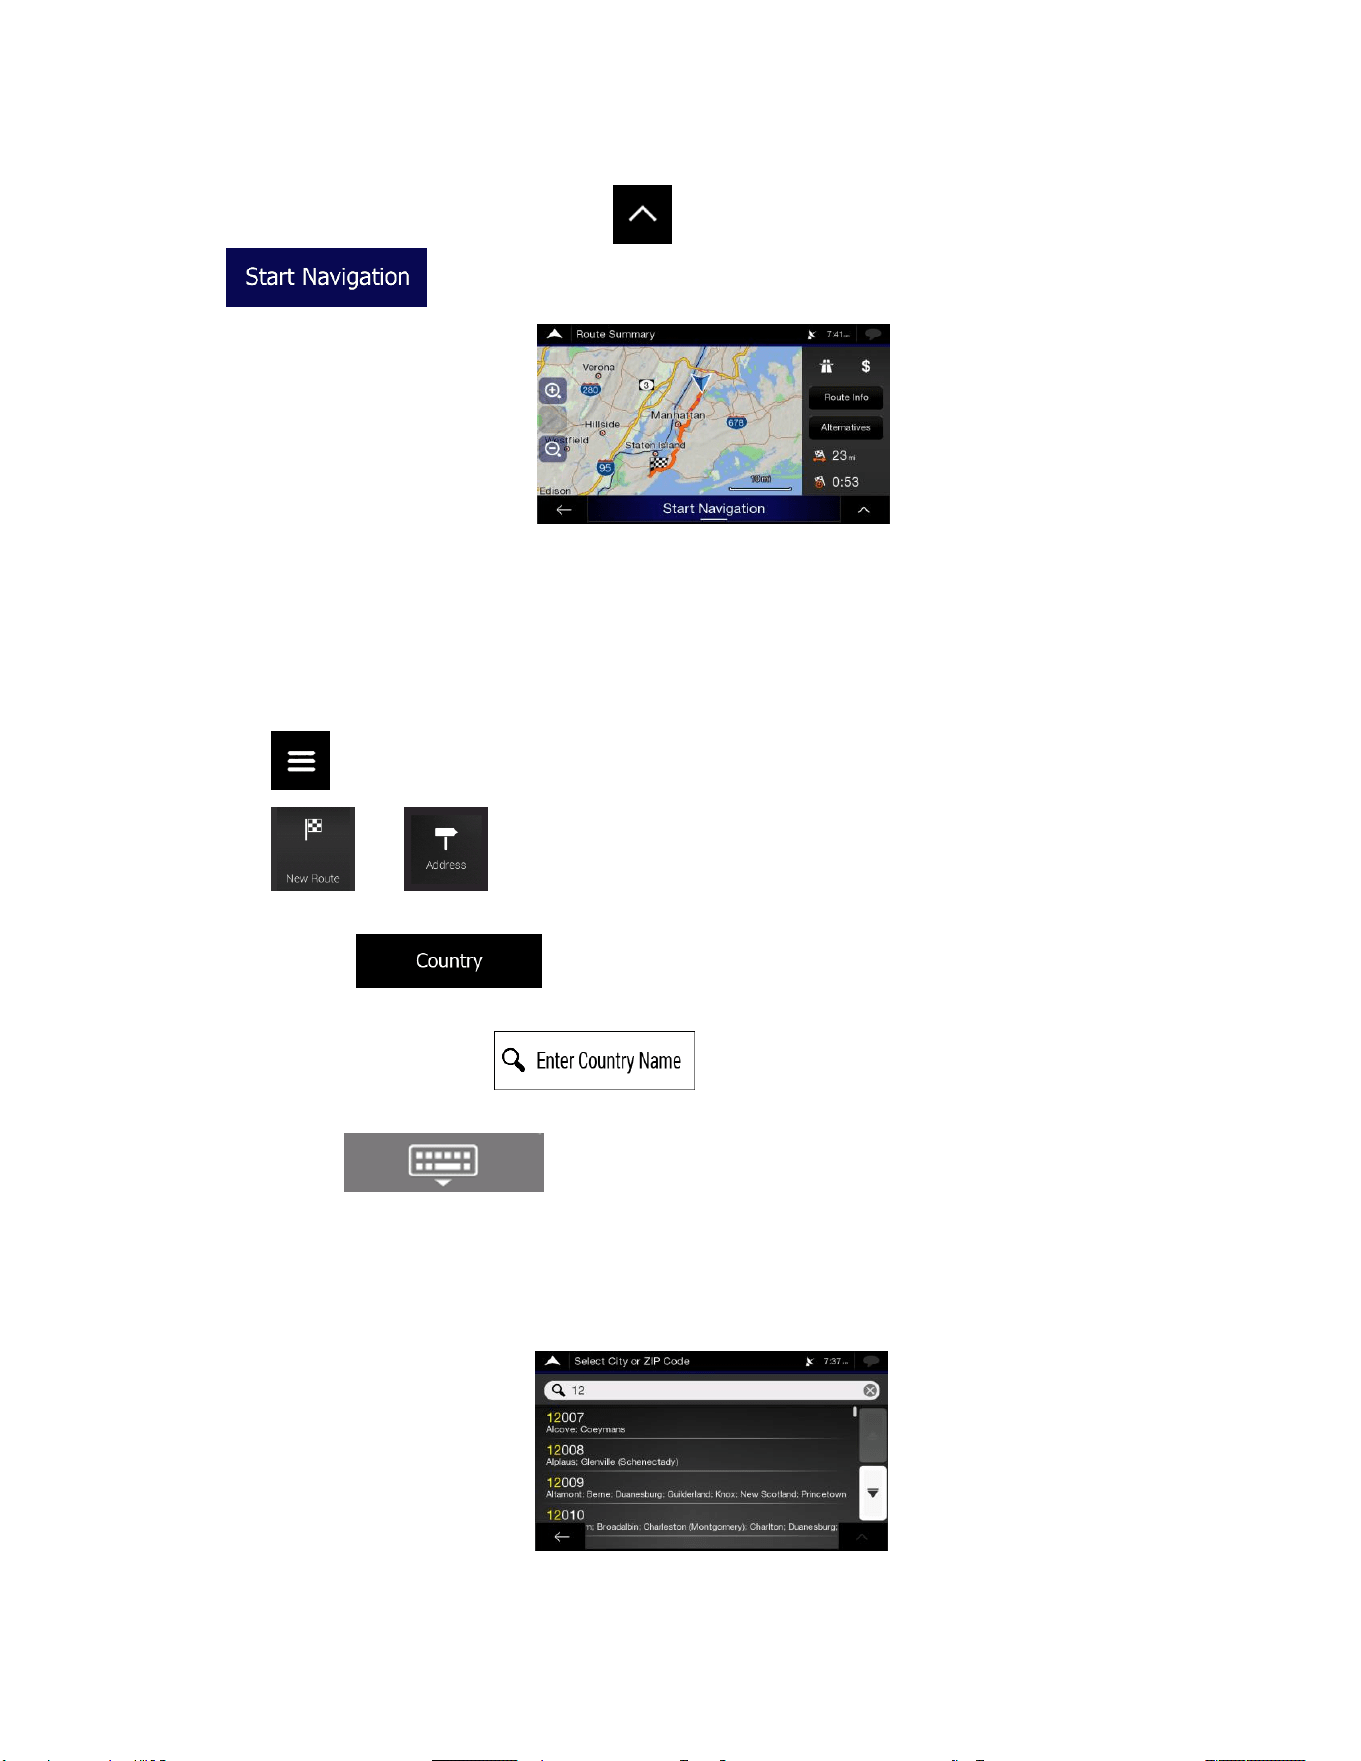
30
9. The route is calculated and the map appears showing the entire route, where you can check route
information and route alternatives. Tap to modify the route parameters, or tap
to start your journey.
3.1.2.2 Entering an address starting with the street name
After you have selected the country and state, you can leave the city or ZIP code field empty and start the
search with the street name. This way you can search in all streets of a state. If you select the country
without a state, this function cannot work.
1. Tap on the Navigation view to access the Navigation menu.
2. Tap and .
3. By default, Alpine navigation proposes the country and state where you are. If needed, change the
country. Tap .
a. In the Select Country screen, you can immediately select a country from the list below the
input field or tap the button and start entering the first few letters of the
country on the keyboard.
b. Tap to open the list of results and select one country from the list.
4. If needed, select a new city.
a. Tap the City or ZIP code field.
b. (optional) In the Select City or ZIP code screen, you can immediately select a city from the
list of suggestions.

31
c. Otherwise, start entering the first few letters of the city on the keyboard. The names that
match the string appear in a list.
d. To open this list, tap and select the city.
5. Enter the street name.
a. Tap the Street field.
b. (optional) On the Select Street screen, you can immediately select a street from the list of
suggestions.
c. Otherwise, start entering the street name on the keyboard, the names that match the string
appear in a list.
d. Tap to open the list of results. Select the street from the list.
6. A full screen map appears with the selected point in the middle. If necessary, tap the map
somewhere else to modify the destination. The cursor ( ) appears at the new location.
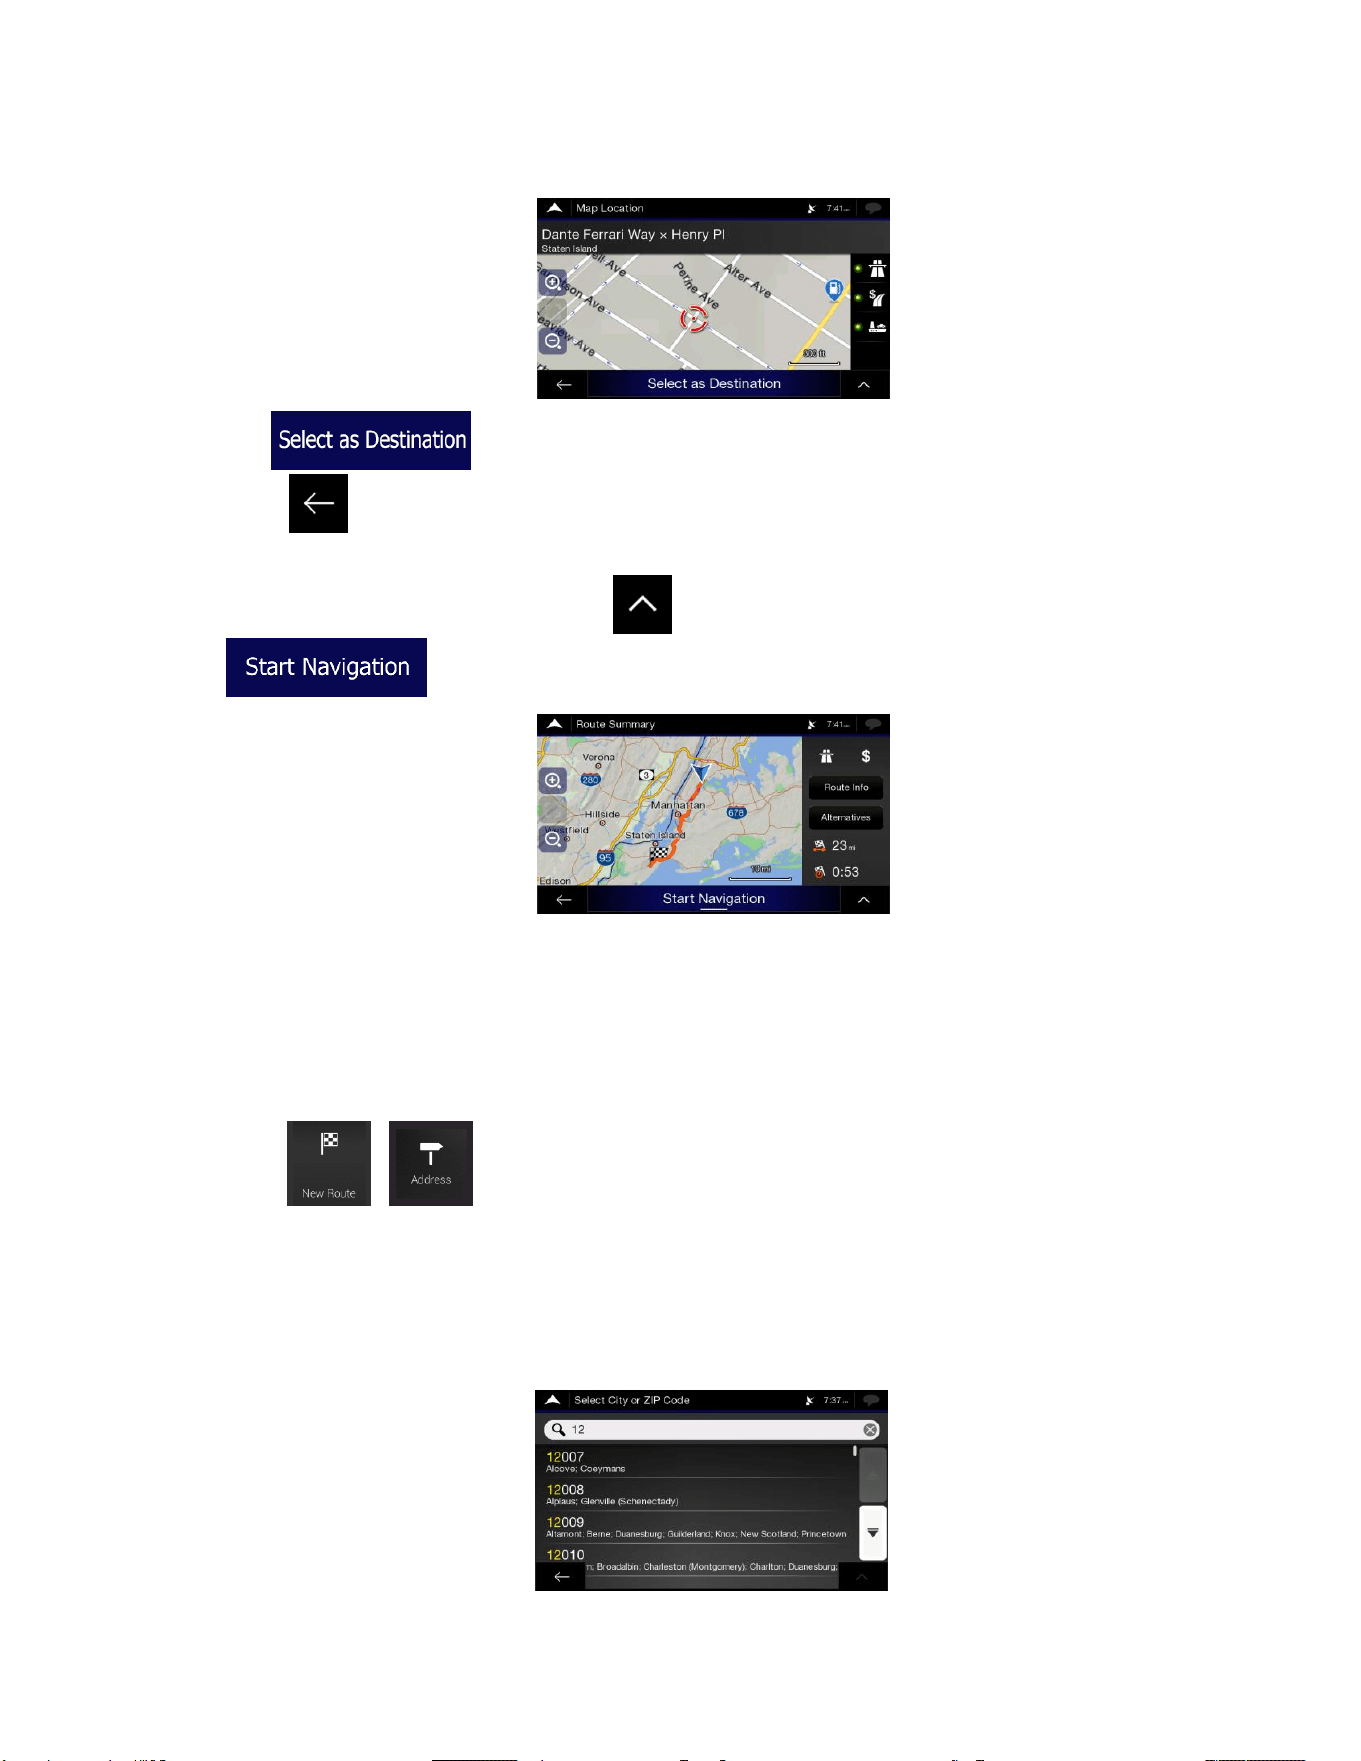
32
7. Check the settings for road types and change them if necessary.
8. Tap to confirm the destination. You can also select a nearby point on the map
or tap to select a different destination.
9. The route is calculated and the map appears showing the entire route, where you can check route
information and route alternatives. Tap to modify the route parameters, or tap
to start your journey.
3.1.2.3 Selecting a town center
The town center is not the geometric center of the town but an arbitrary point the map creators have
chosen. In towns and villages, it is usually the most important intersection and in larger towns, it is one of
the important intersections.
1. Go to , , and modify the country and state as described earlier (page 27), if
necessary.
2. If necessary, select a new town by performing the following steps:
a. Tap the Town or ZIP code field.
b. (optional) On the Town or ZIP code screen, you can select a town from the list of
suggestions.
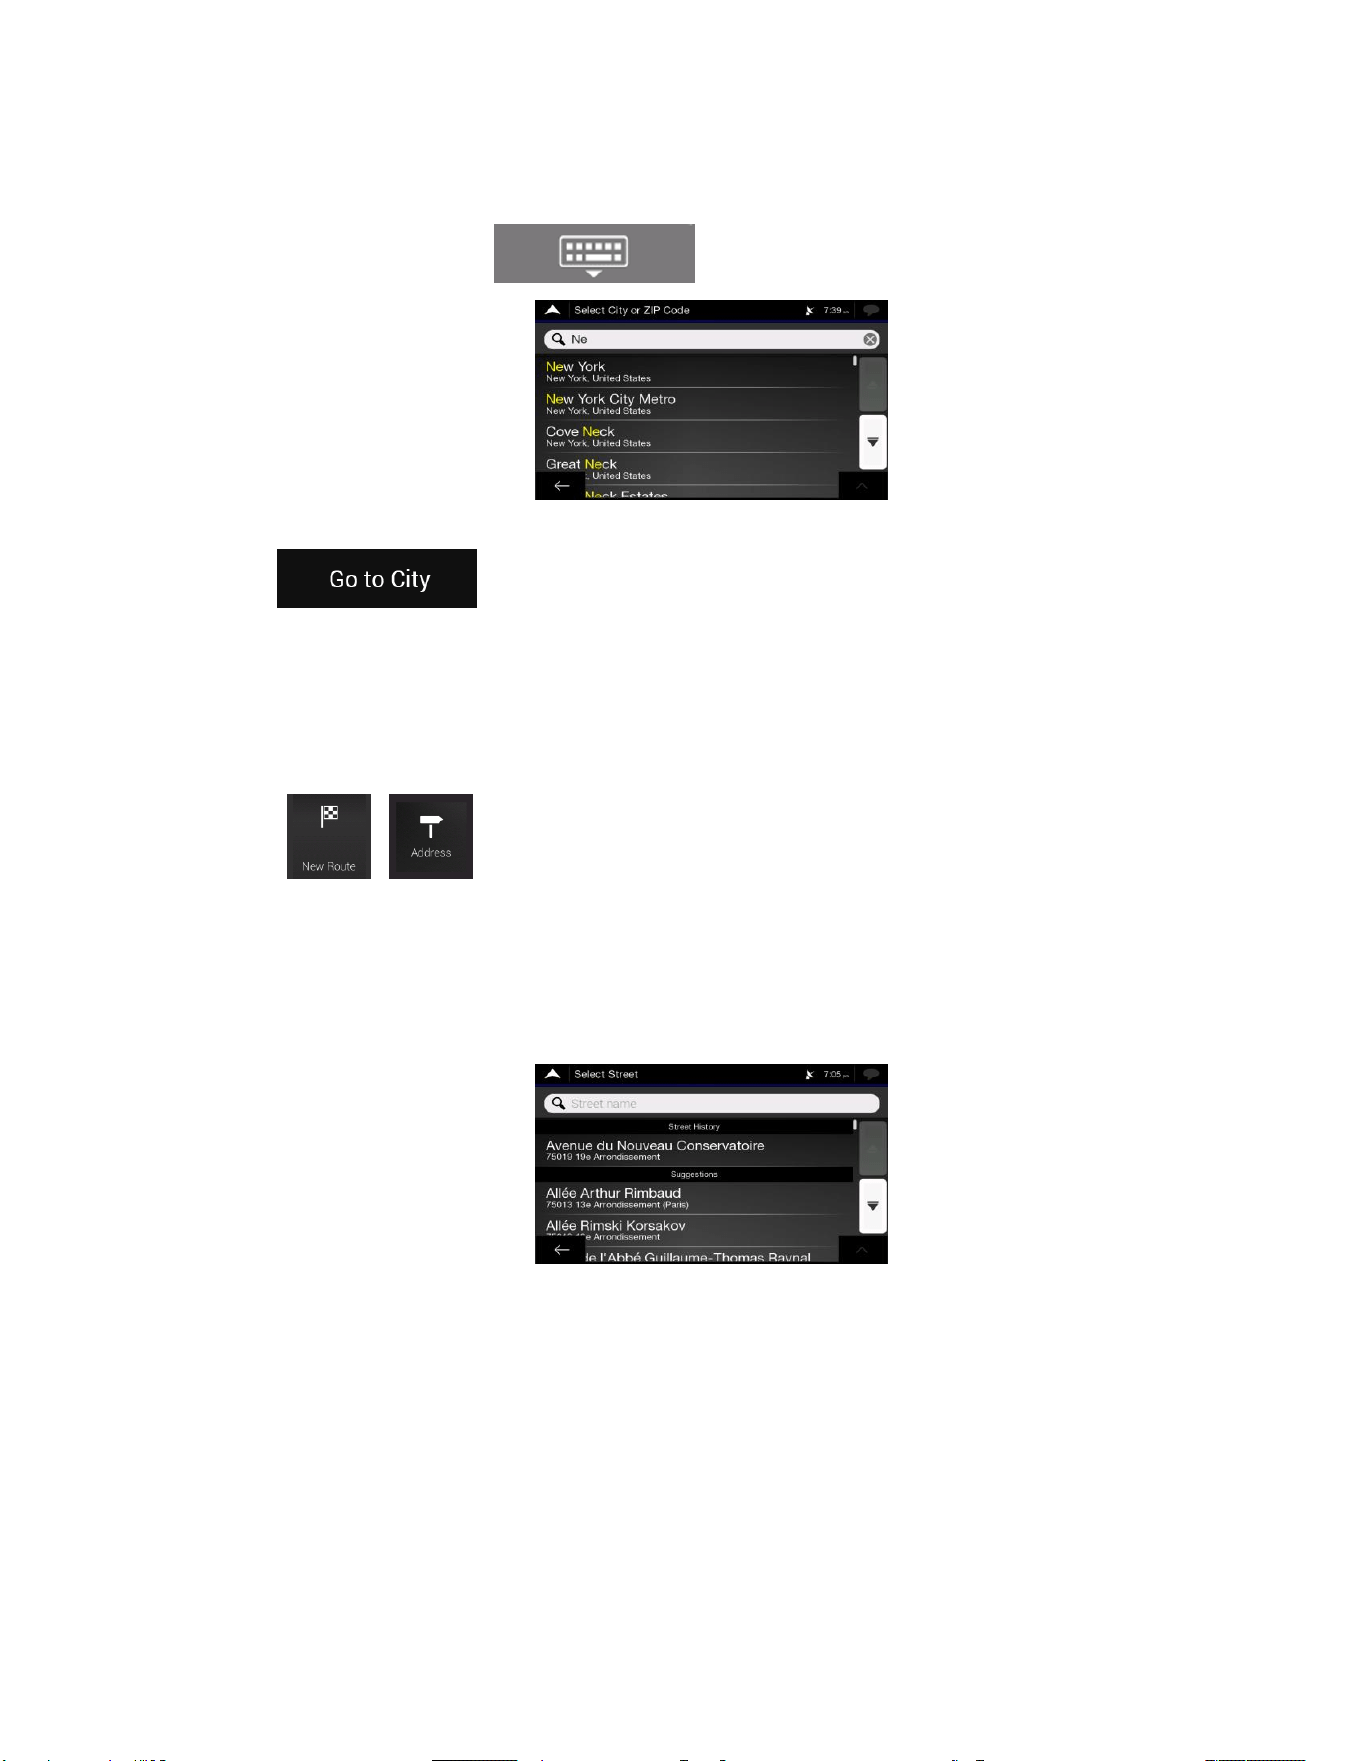
33
c. Otherwise, start entering the first few letters of the town. The names that match the string
appear in a list.
d. To open the list, tap and select the town.
3. Tap . This way the center of the displayed town becomes the destination of
the route.
3.1.2.4 Selecting the midpoint of a street
To navigate to the midpoint of a street without entering the house number, perform the following steps:
1. Go to , , and select the country and town as described earlier. The Select Street
screen appears.
2. Enter the street name by performing the following steps:
a. Tap the Street name field.
b. (optional) On the Select Street screen, you can immediately select a street from the list of
suggestions.
c. Otherwise, start entering the street name on the keyboard. The names that match the string
appear in a list.

34
d. Tap to open the list of results. Select the street from the list.
3. Instead of entering the house number, tap . The midpoint of the street is
selected as the destination.
3.1.2.5 Selecting an intersection in a town
To navigate to an intersection, perform the following steps:
1. Go to , , and select the country and city as described earlier.
2. Enter the street name by performing the following steps:
a. Tap the Street name field.
b. (optional) On the Select Street screen, you can immediately select a street from the list of
suggestions.
c. Otherwise, start entering the street name on the keyboard. The names that match the string
appear in a list.
d. Tap to open the list of results. Select the street from the list.
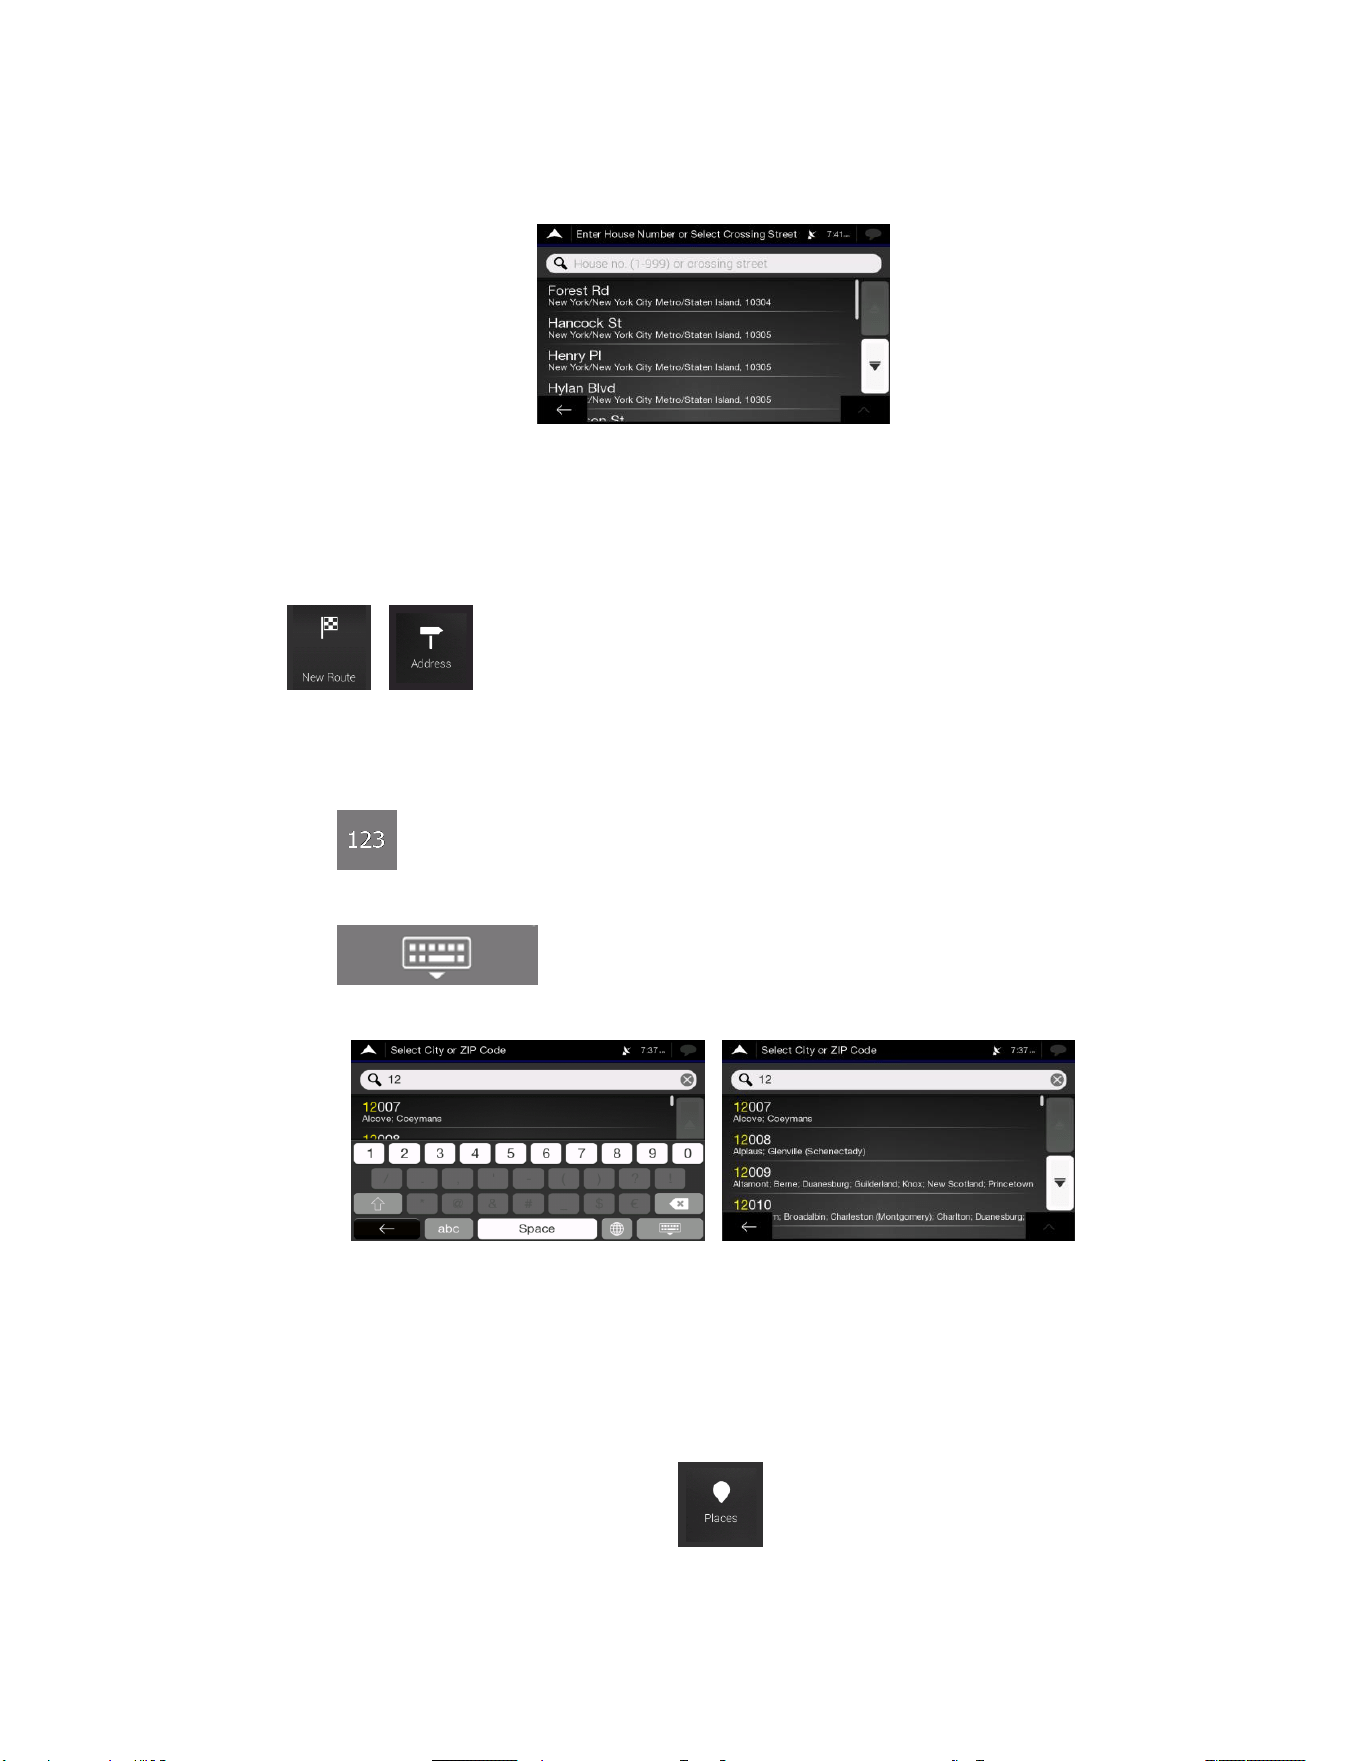
35
3. Tap the House number or crossing street field and browse the list of crossing streets or start
entering the street name in the field. Select one from the list.
3.1.2.6 Using the ZIP code to select a destination
You can also select any kind of destination by entering the ZIP code instead of the city name. To select
the ZIP code, perform the following steps:
1. Go to , , and modify the country and state as described earlier (page 27), if
necessary.
2. Tap the Town or ZIP code field.
3. Enter the ZIP code by performing the following steps:
a. Tap to open the numeric keypad.
b. Start entering the ZIP code.
c. Tap to open the list of results.
d. Find the place you need.
4. Continue the search as described previously (page 27).
3.1.3 Selecting a Place of Interest
You can search for Places of Interest (Places) in the menu.
Using the same screen, you can find a Place by selecting one of the following options:
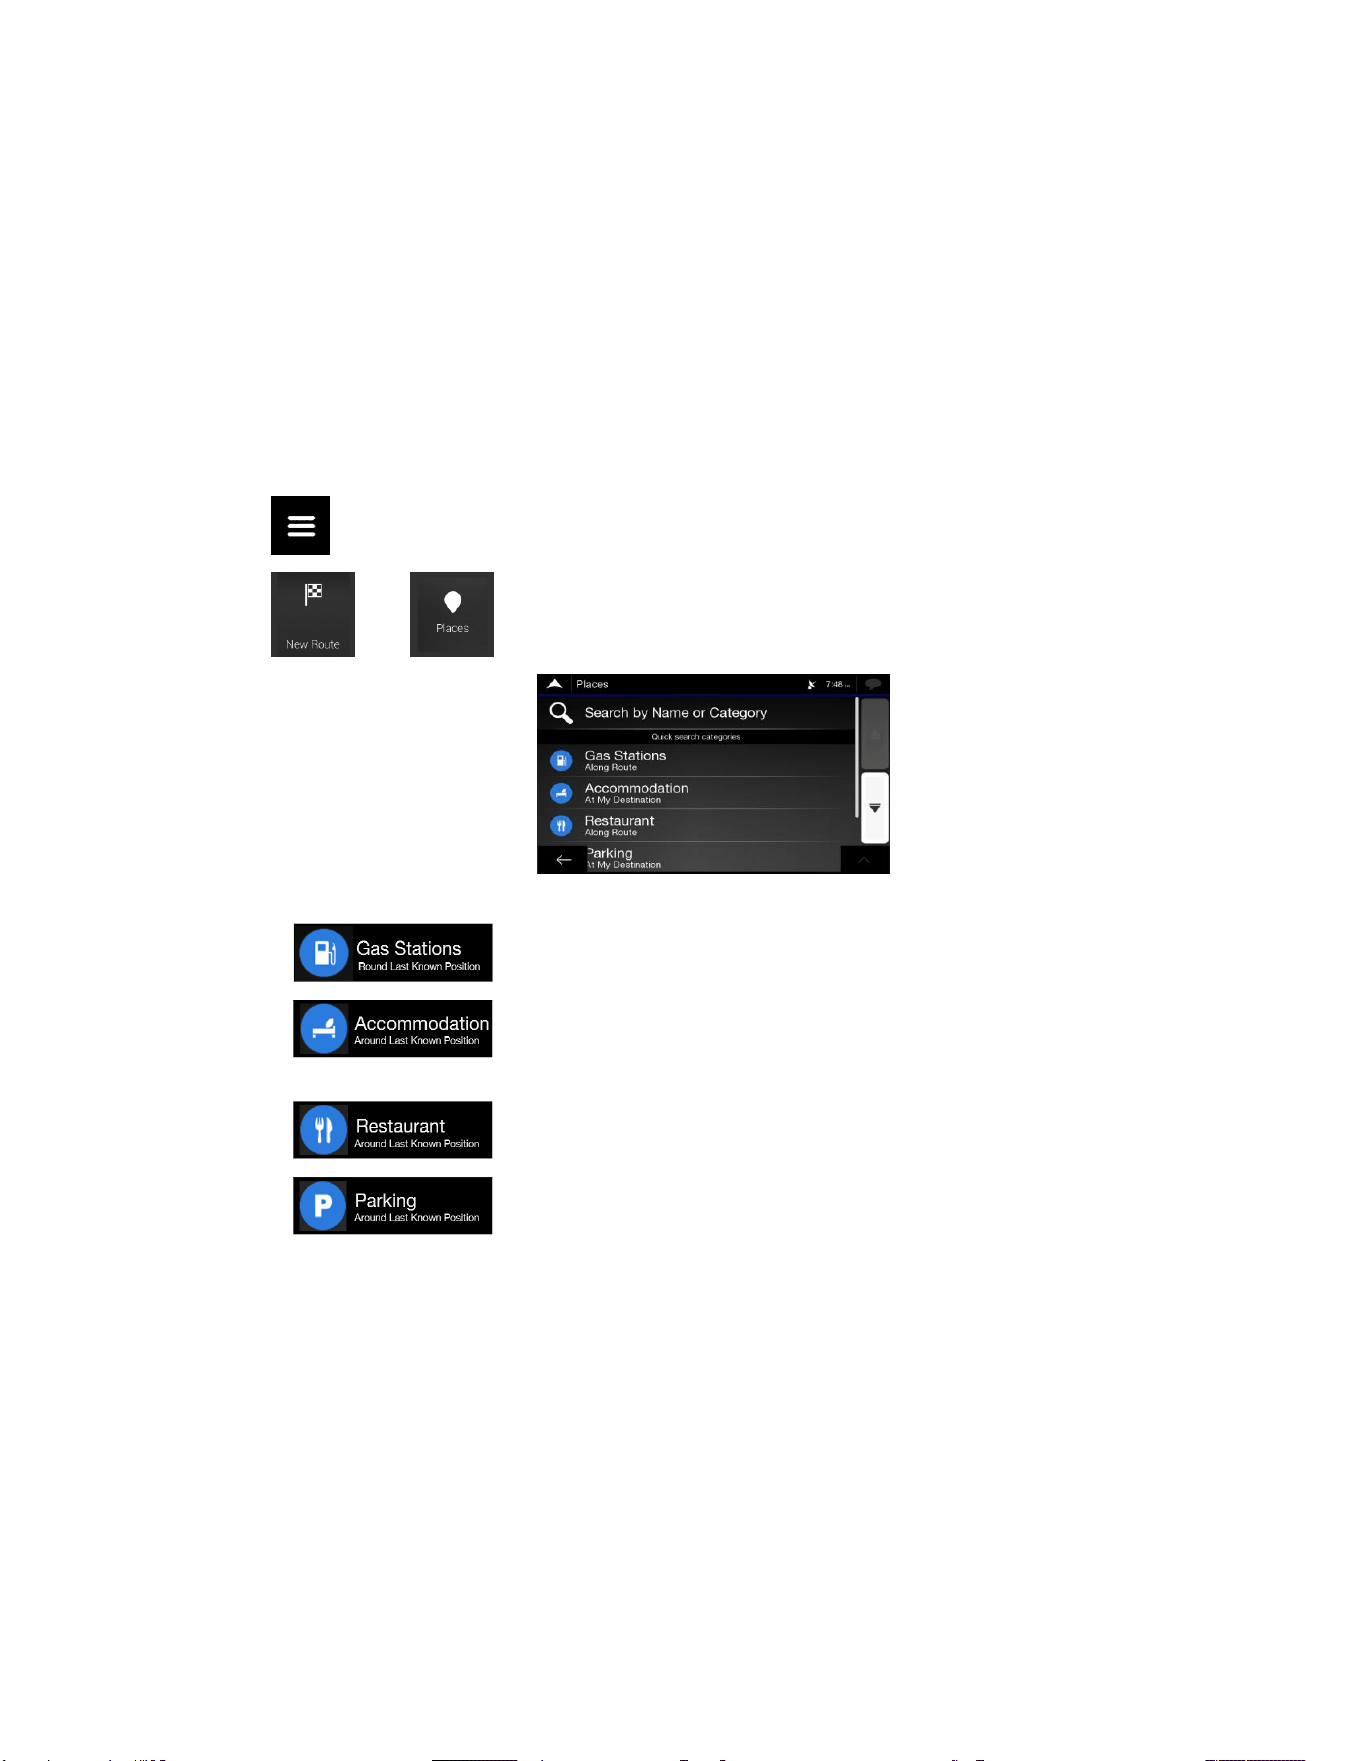
36
• Finding frequently searched types of Places with the Quick search categories, see page 36
• Searching for a Place by its name, see page 40
• Searching for a Place by its category, see page 38
In case of emergency, you can also find help nearby, see page 41
3.1.3.1 Using Quick search categories
The Quick search feature helps you quickly find the most frequently selected types of Places. Perform the
following steps:
1. Tap on the Navigation view to access the Navigation menu.
2. Tap and .
The following Quick search categories appear:
• : If a planned route exists, gas stations are searched along the route.
• : If a planned route exists, accommodation is searched around the
destination.
• : If a planned route exists, restaurants are searched along the route.
• : If a planned route exists, parking lots are searched around the
destination.
If there is no planned route (destination is not selected), the search is carried out around the
current position. If the current position is not available either (no GPS signal), places are searched
around the last known position.
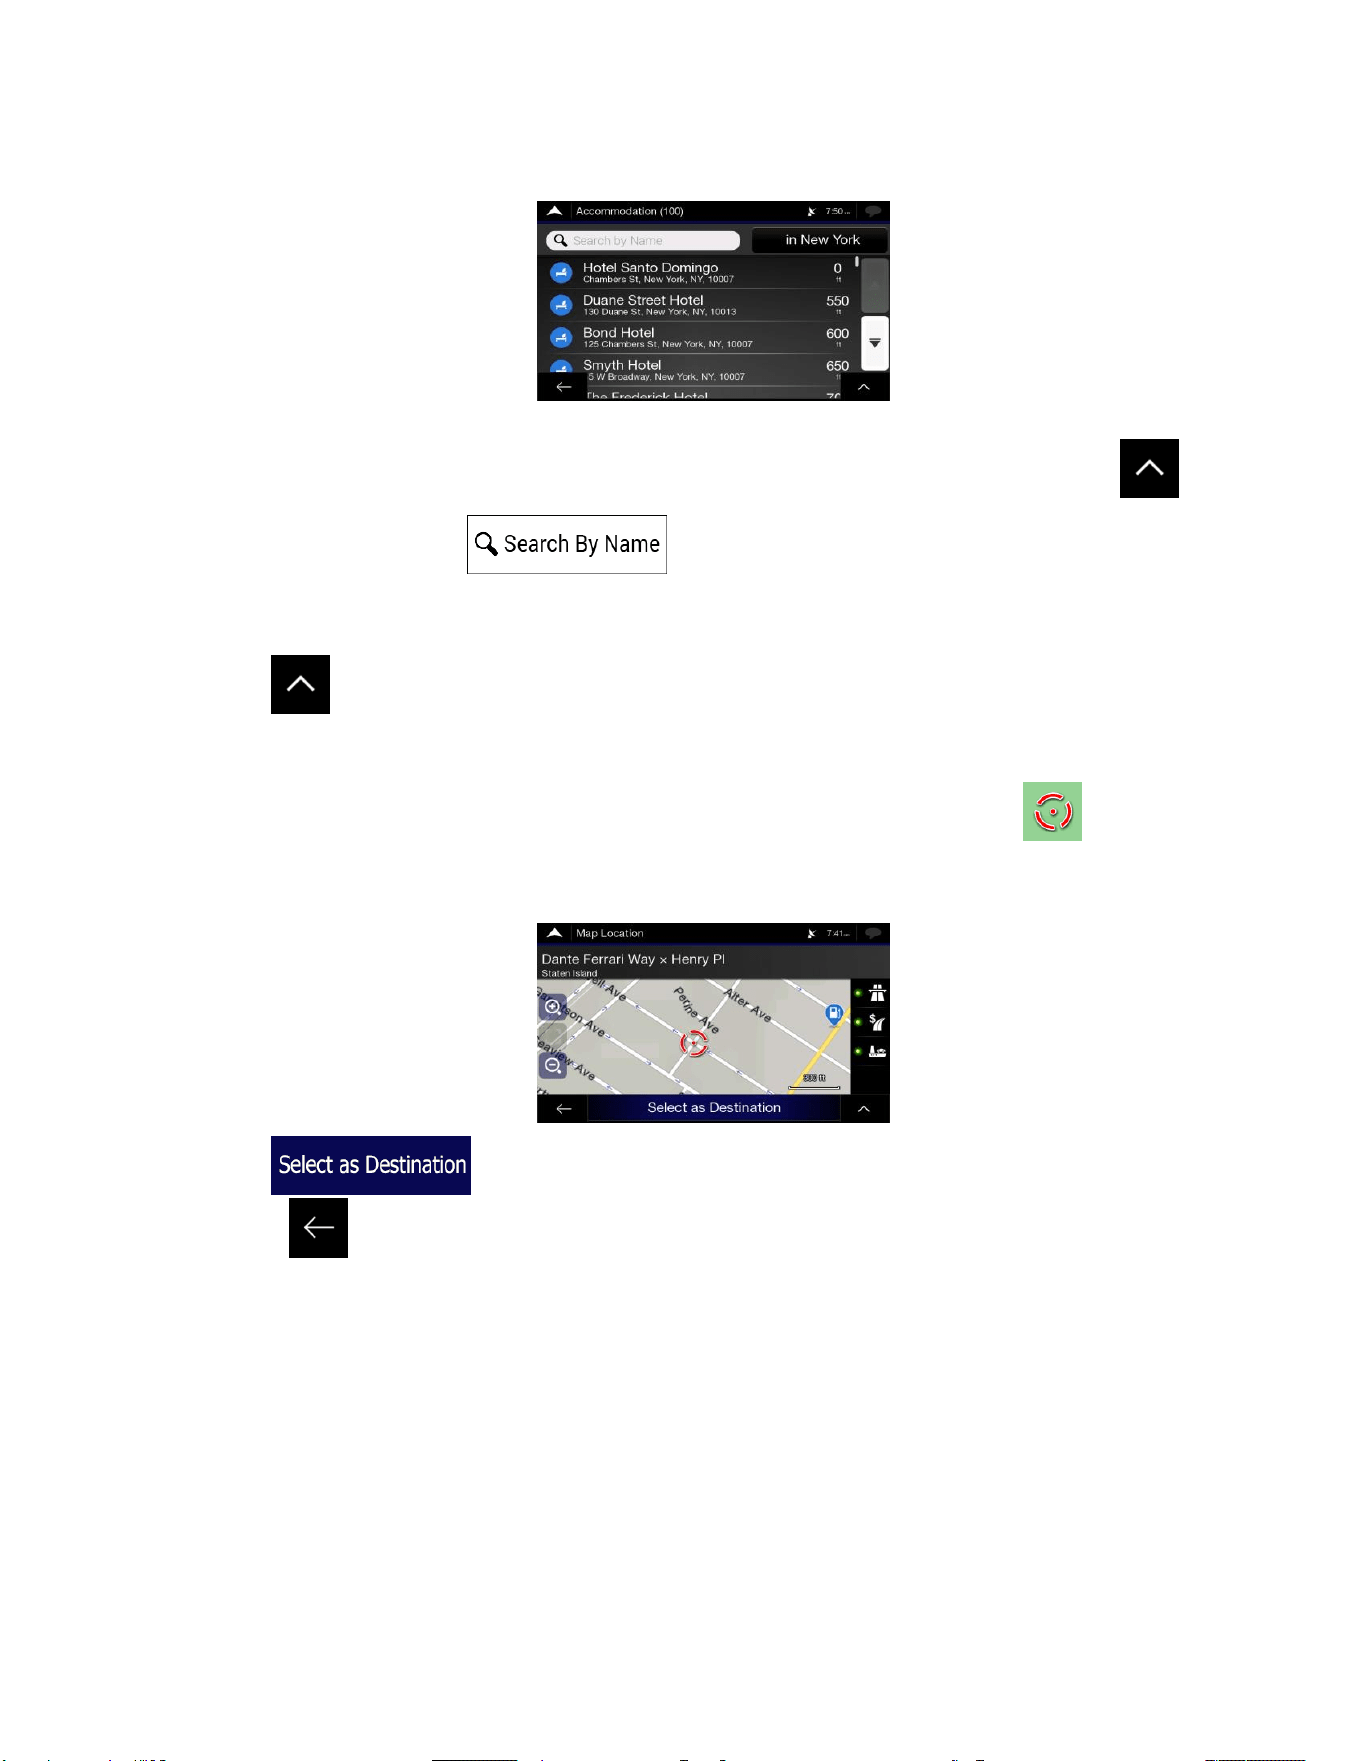
37
3. Tap any of the quick search buttons to get an instant list of Places.
4. The Places in the list can be ordered by their distance from the current or last known position, from
the destination, or by the length of the necessary detour. If you need to reorder the list, tap .
5. (optional) If needed, tap to further filter the list of results.
6. Browse the list and tap one of the list items. A full screen map appears with the selected point in
the middle. The name and address of the Place is displayed at the top of the screen.
7. Tap to see the details of the selected Place, or to save the location. If there is a telephone
number saved for this Place, you can make a call to that number by tapping the green button at the
bottom.
8. If necessary, tap the map somewhere else to modify the destination. The cursor ( ) appears at
the new location.
9. Check the settings for road types and change them if necessary.
10. Tap to confirm the destination. You can also select a nearby point on the map
or tap to select a different destination.
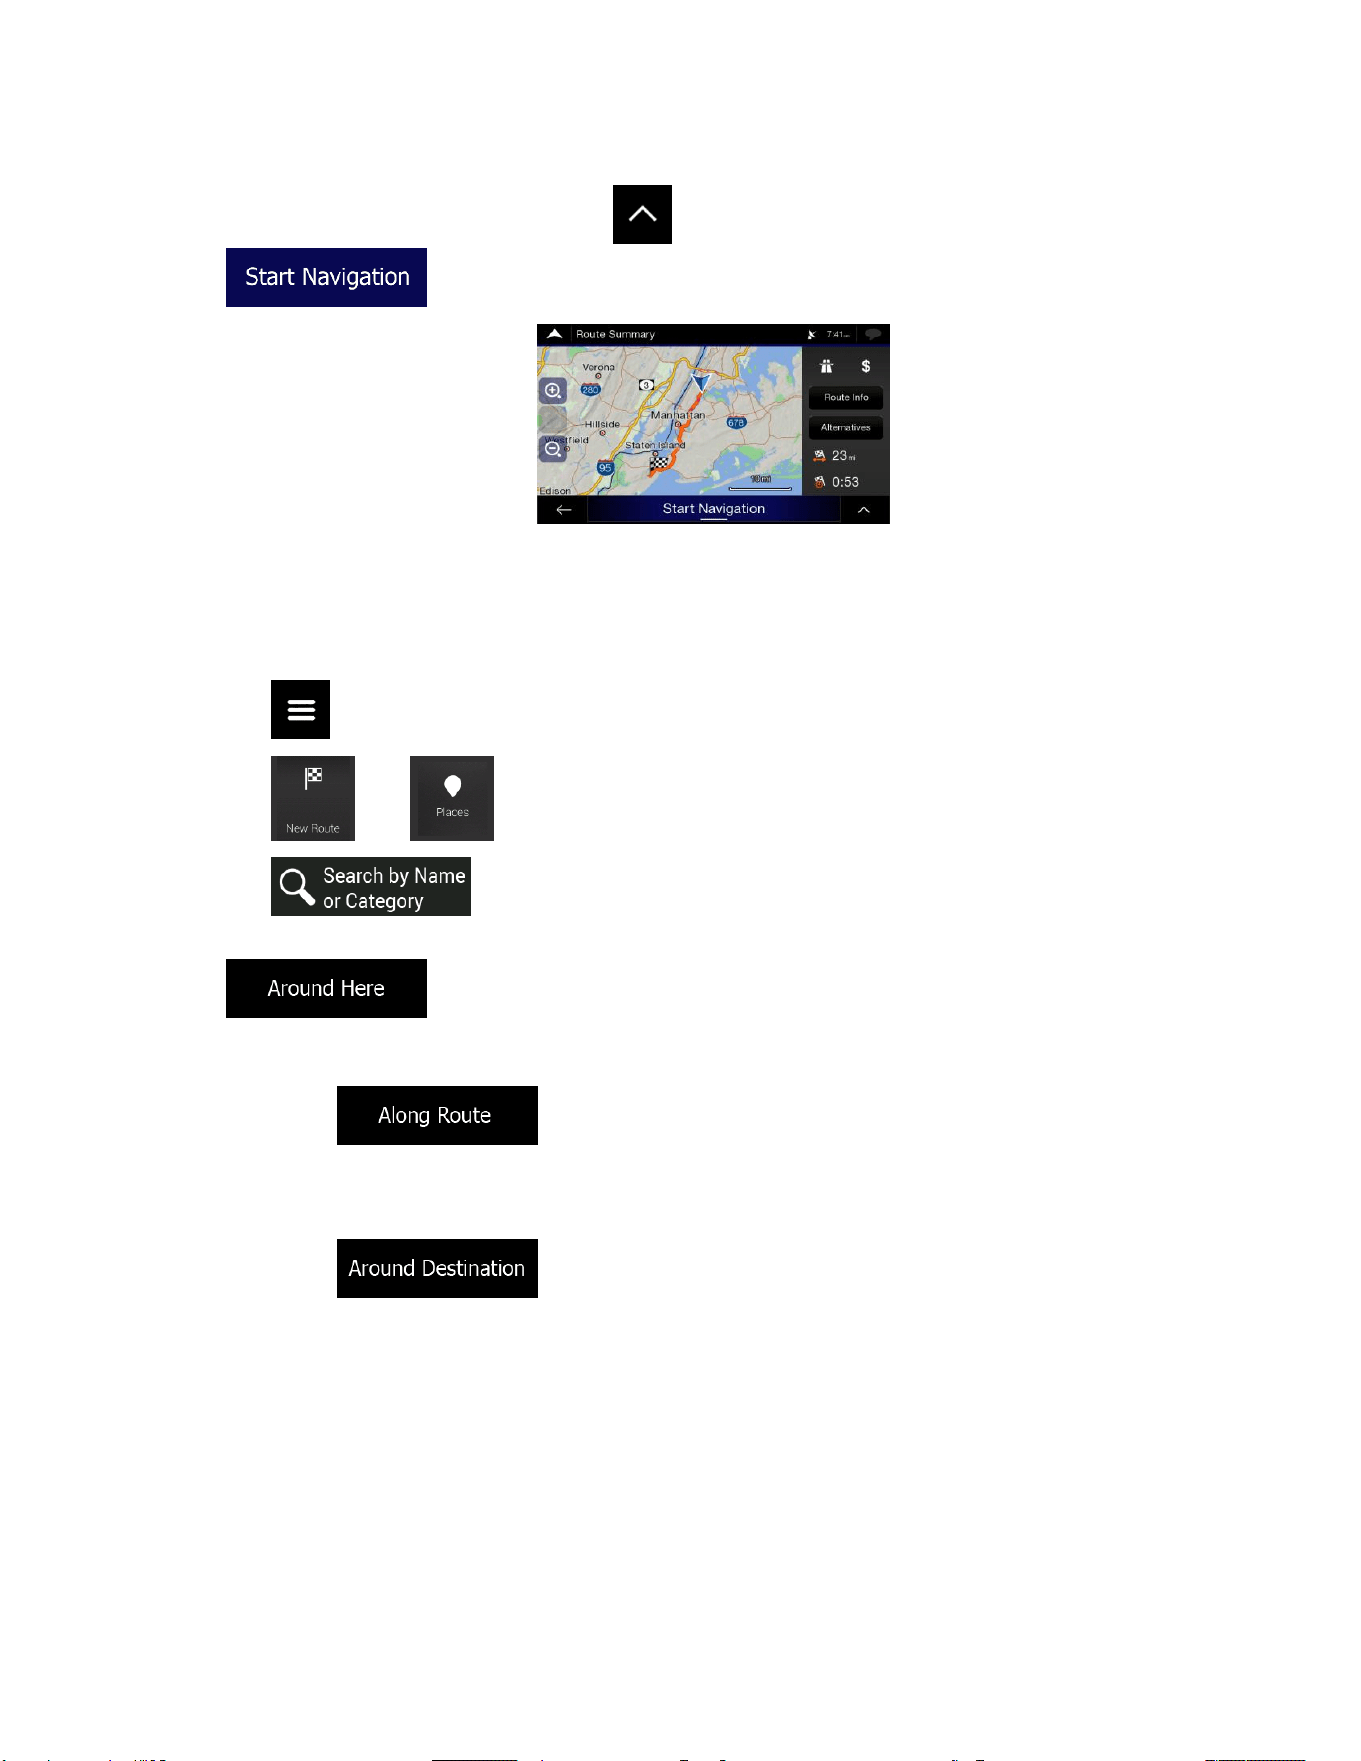
38
11. The route is calculated and the map appears showing the entire route, where you can check route
information and route alternatives. Tap to modify the route parameters, or tap
to start your journey.
3.1.3.2 Searching by category
To search for Places by their categories and subcategories, perform the following steps:
1. Tap on the Navigation view to access the Navigation menu.
2. Tap and .
3. Tap .
4. Select the area around which you would like to search for the Place by tapping
. By default, the search area is around the current position (or if it is not
available, around the last known position). In this case, the following result list is ordered by the
distance from this position.
• Tap to search along the planned route, and not around a given point.
This is useful when you search for a later stopover that results in a minimal detour only,
such as searching for upcoming gas stations or restaurants. (The result list is ordered by the
length of the necessary detour.)
• Tap to search for a place around the destination of the planned route.
(The result list is ordered by the distance from the destination.)
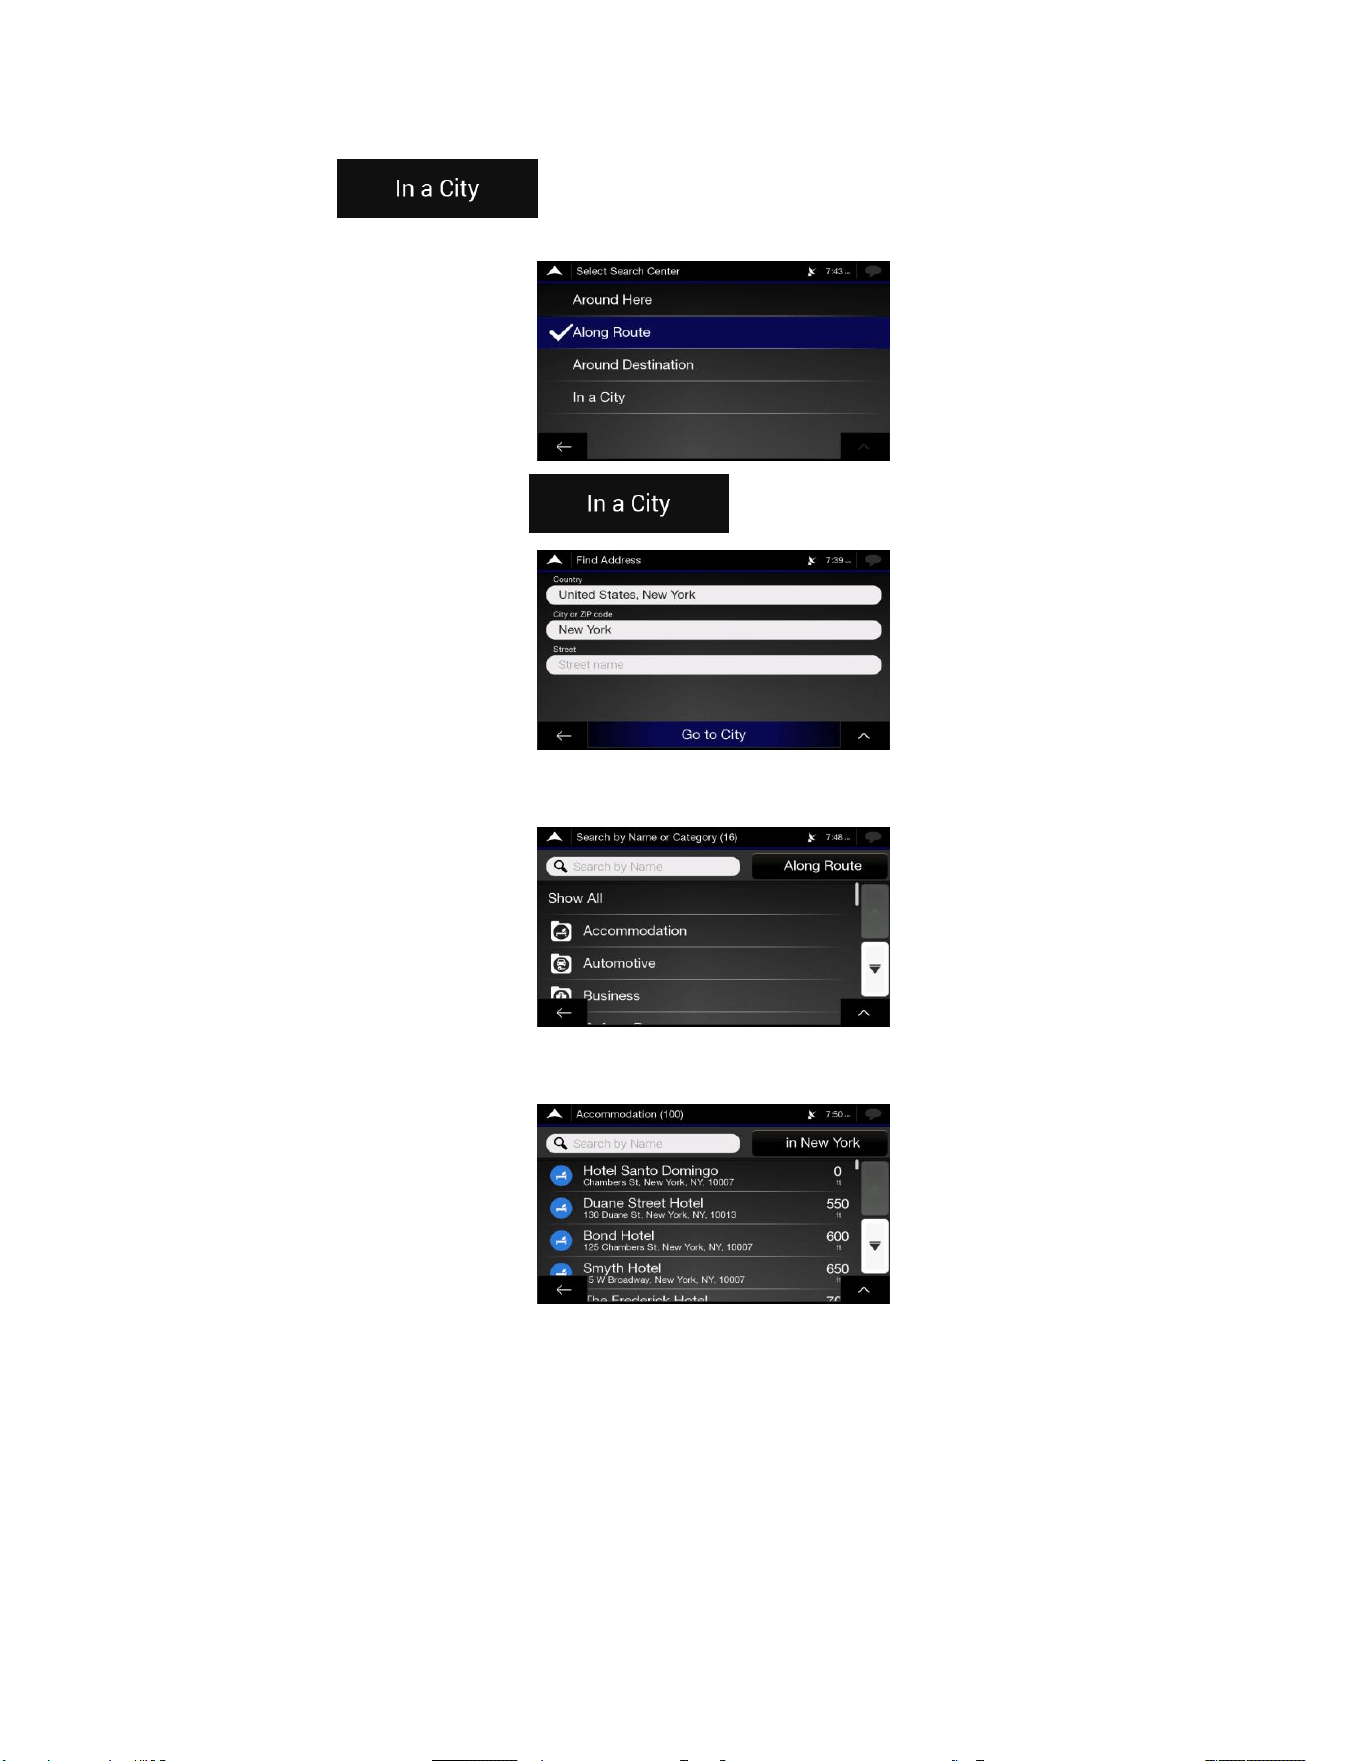
39
• Tap to search for a place within a selected town. (The result list is
ordered by the distance from the center of the selected town.)
5. (optional) If you have selected , select the town to search in.
6. Select one of the main Place categories (for example, Accommodation), then browse the
subcategories (for example, Hotel or Motel) to find your destination.
7. You can turn the Category View off at any level to list all Places around the selected location or
along the route.
8. (optional) The Places in the list can be ordered by the following criteria:
• Name
• Their distance from the current or last known position
• Their distance from the selected town
• Their distance from the destination
• The length of the necessary detour.
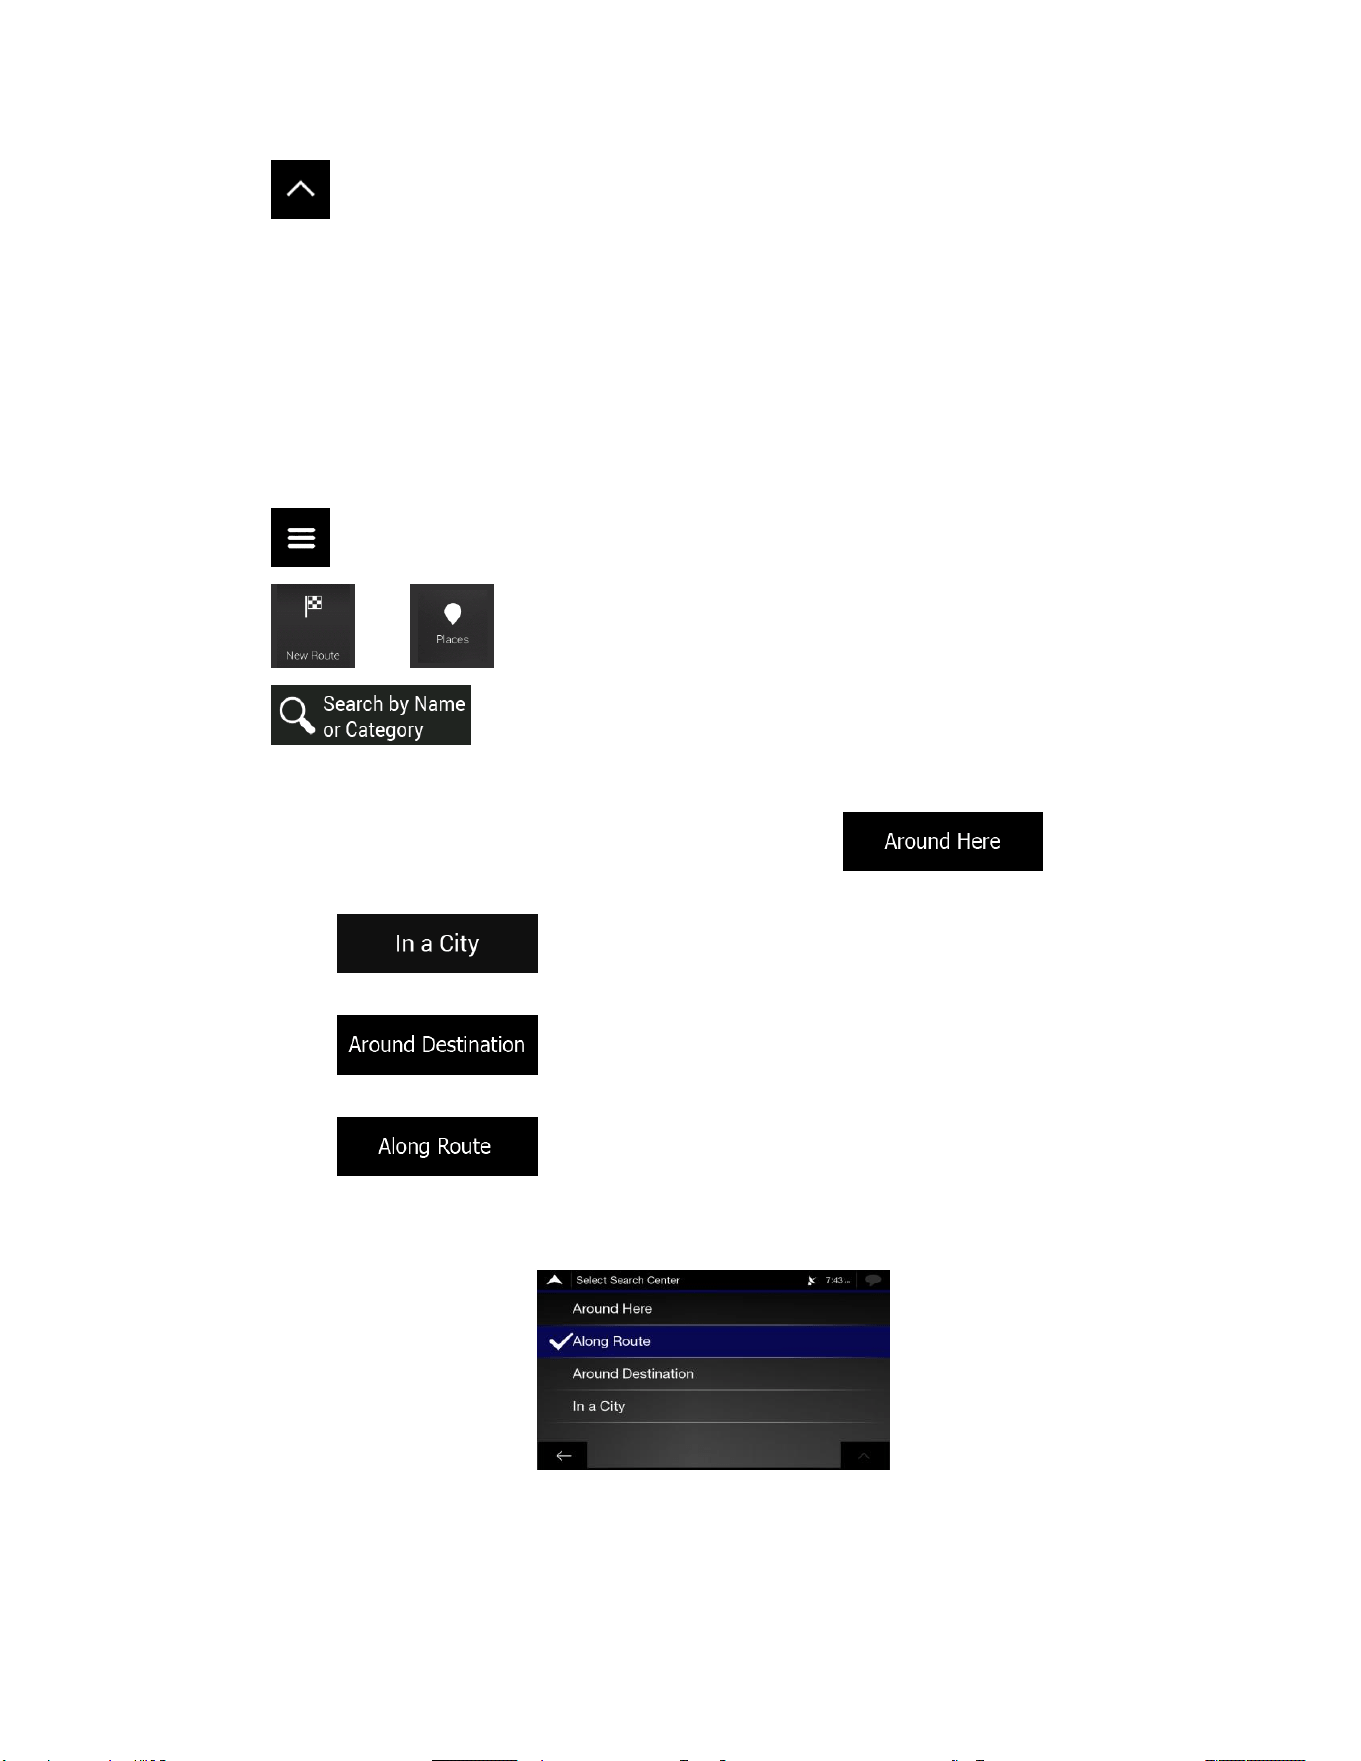
40
Tap to reorder the list.
9. Browse the list and tap one of the list items. A full screen map appears with the selected point in
the middle. The name and address of the Place is displayed at the top of the screen.
10. The process continues the same way as in case of any other search for Places. See page 36.
3.1.3.3 Searching by name
To search for a Place by name, browse the various Place categories, or use the mixture of the two search
types, perform the following steps:
1. Tap on the Navigation view to access the Navigation menu.
2. Tap and .
3. Tap to open the Search By Name or Category window.
4. Select the area around which you would like to search for the Place. By default, the search area is
around the current position (or if it is not available, around the last known position). In this case,
the result list is ordered by the distance from this position. Tap to select one of
the following search areas:
• Tap to search for a place within a selected town. (The result list is
ordered by the distance from the center of the selected town.)
• Tap to search for a place around the destination of the planned route.
(The result list is ordered by the distance from the destination.)
• Tap to search along the planned route, and not around a given position.
This is useful when you search for a later stopover that results in a minimal detour only,
such as searching for upcoming gas stations or restaurants. (The result list is ordered by the
length of the necessary detour.)
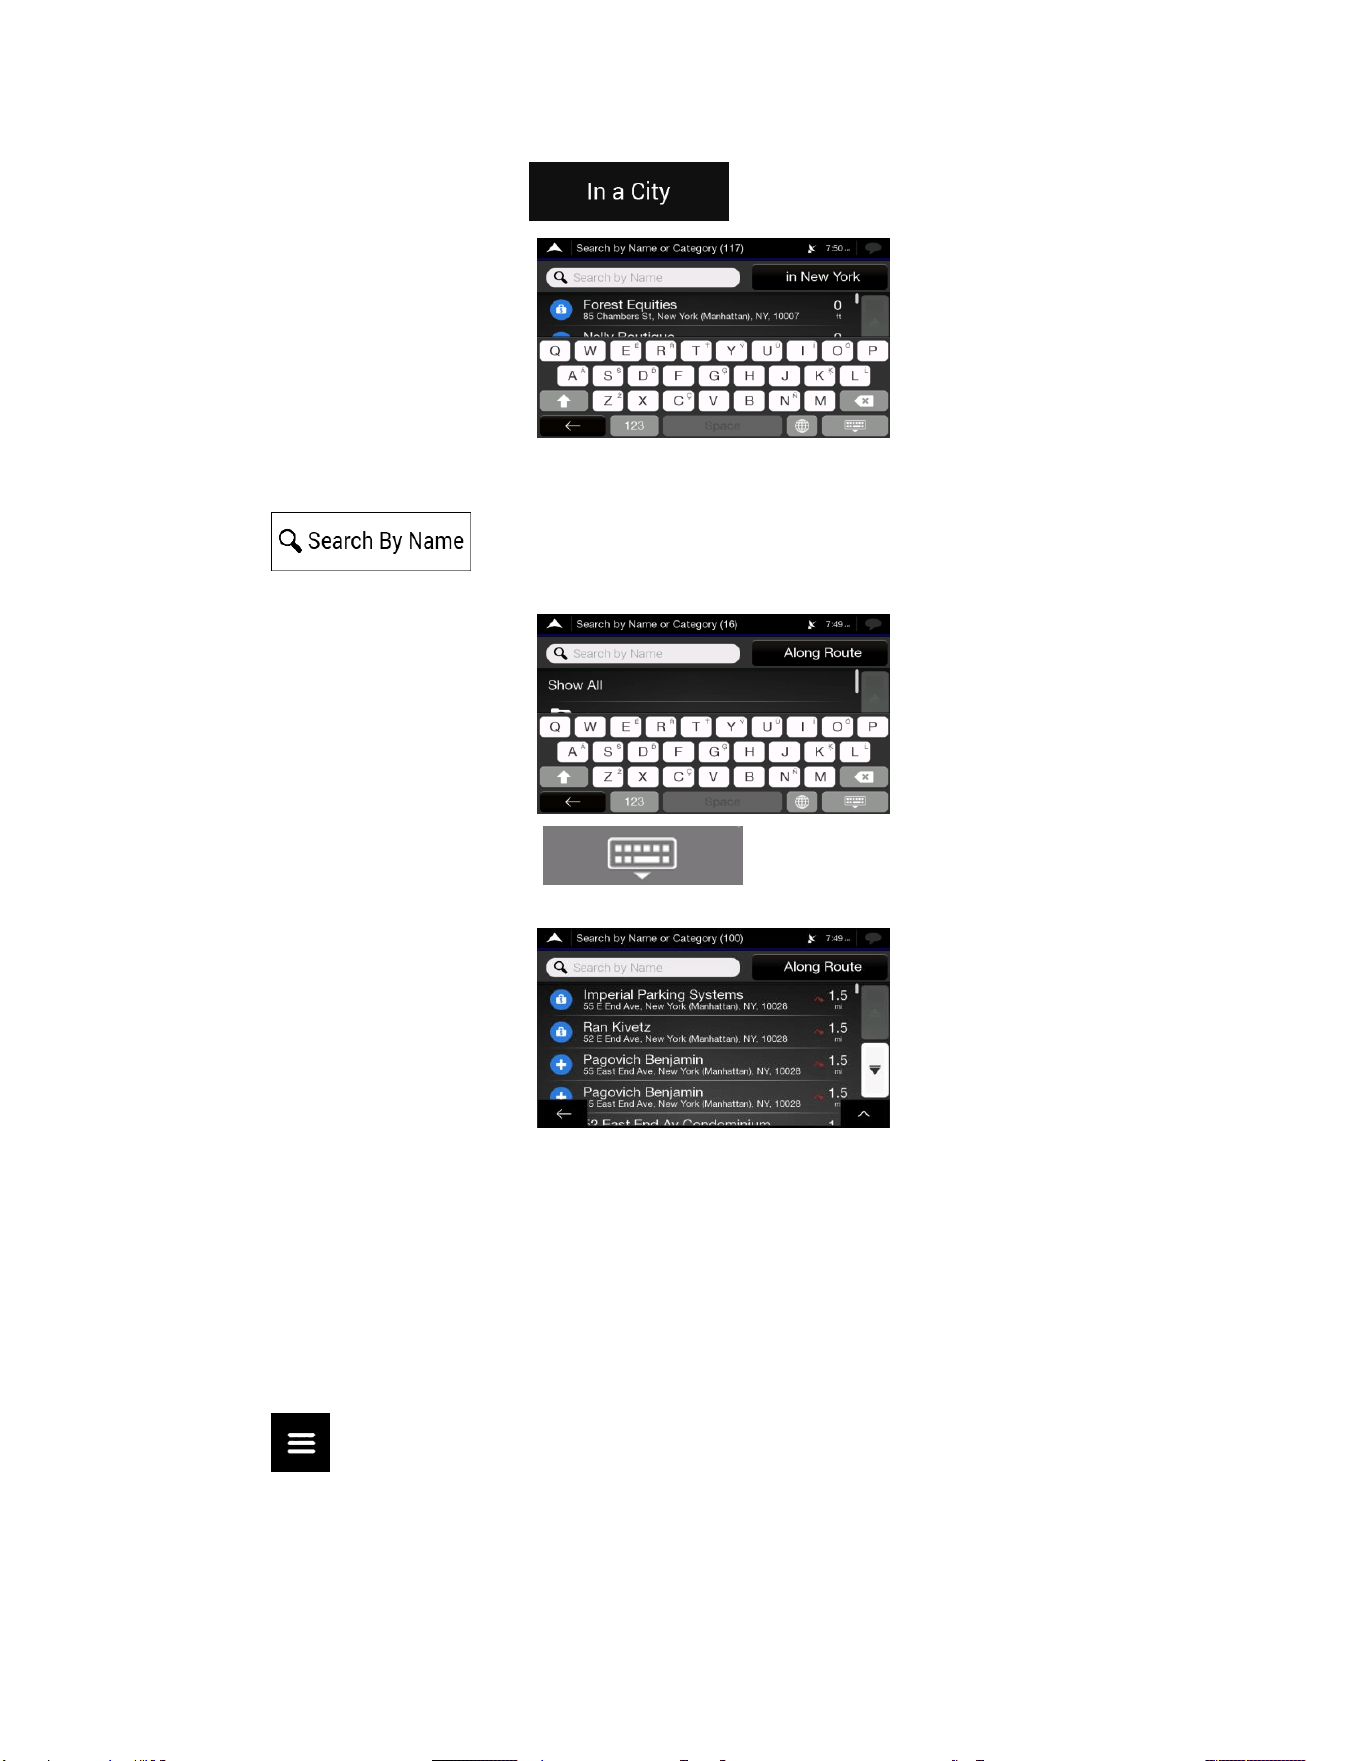
41
5. (optional) If you have selected , select the town to search in.
You can search for the name of a Place in all categories by performing the following steps:
1. Tap . Using the keyboard, start entering the name of the Place or browse in
the categories.
2. After entering a few letters, tap to open the list of Places or Place categories
with names containing the entered character sequence.
3. Browse the list, if necessary, and tap the desired list item. A full screen map appears with the
selected point in the middle. The name and address of the Place is displayed at the top of the
screen.
4. The process continues the same way as in case of any other Places search. See page 36.
3.1.3.4 Finding help nearby
To quickly search for nearby assistance, perform the following steps:
1. Tap on the Navigation view to access the Navigation menu.

42
2. Tap and .
Places in the following pre-set search categories can be searched for around the current position
(or around the last known position if the current position is not available):
• : Car repair and roadside assistance services
• : Medical and emergency services
• : Police stations
• : Gas stations
3. Tap any of the quick search buttons to get an instant list of those types of Places.
4. (optional) The Places in the list can be ordered by the following criteria:
• By their distance from the current or last known position
• By name.
Tap to reorder the list.
5. Browse the list and tap one of the list items. A full screen map appears with the selected point in
the middle. The name and address of the Place is displayed at the top of the screen.
6. The process continues the same way as in case of any other Places search. See page 36.
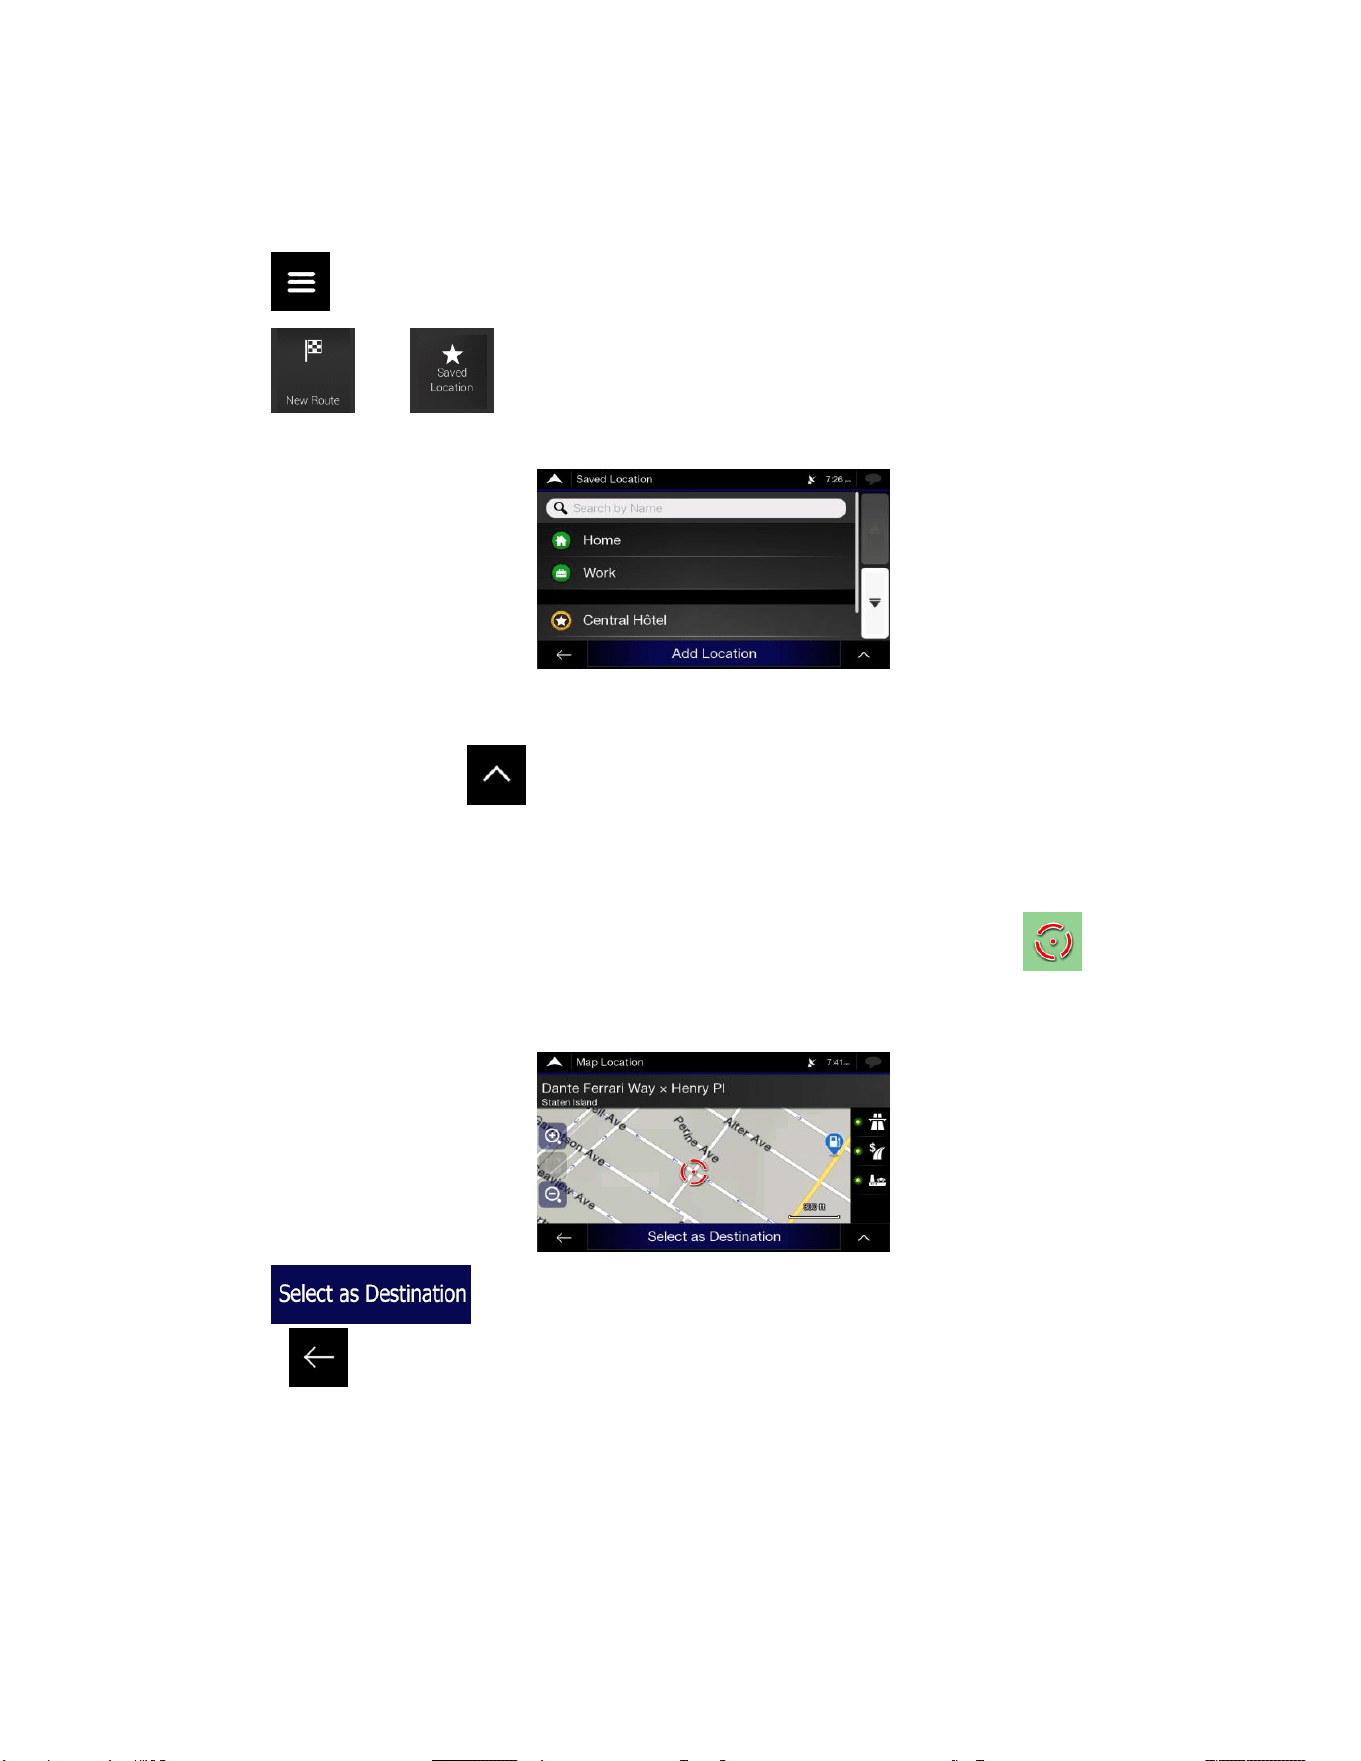
43
3.1.4 Selecting a Saved Location
To select a location that you have already saved (page 57), perform the following steps:
1. Tap on the Navigation view to access the Navigation menu.
2. Tap and .
3. The list of saved locations is displayed. It contains two pre-set categories: Home and Work.
4. Tap the location that you want to set as your destination. If necessary, browse the list to see more
results.
5. (optional) If needed, tap to enable the editing option so that you can rename the saved
locations or delete any of them.
6. After you have selected a saved location as the destination, a full screen map appears with the
selected point in the middle.
7. If necessary, tap the map somewhere else to modify the destination. The cursor ( ) appears in
the new location.
8. Check the settings for road types and change them if necessary.
9. Tap to confirm the destination. You can also select a nearby point on the map
or tap to select a different destination.
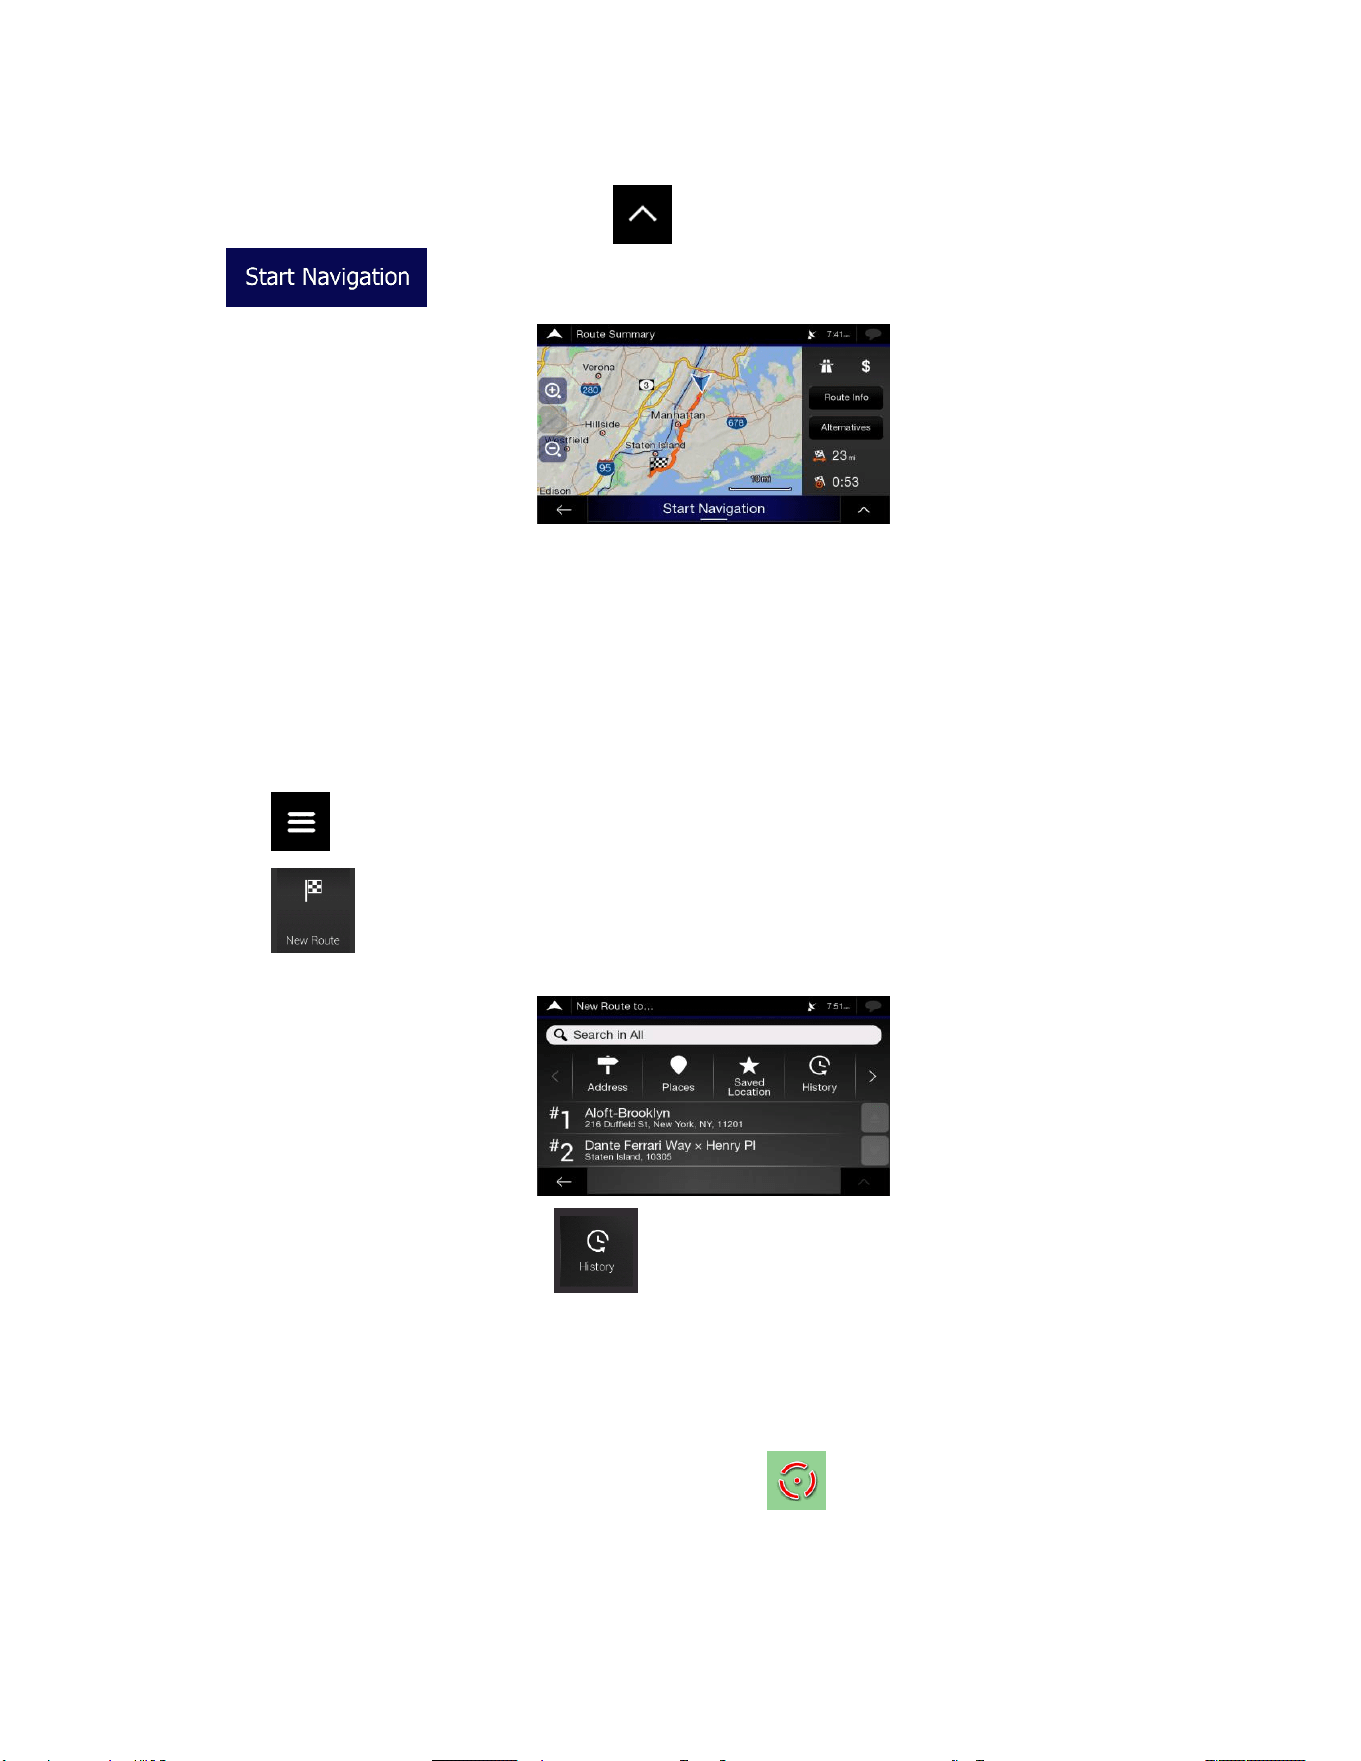
44
10. The route is calculated and the map appears showing the entire route, where you can check route
information and route alternatives. Tap to modify the route parameters, or tap
to start your journey.
3.1.5 Selecting a History item
The destinations that you have used earlier appear in the History list. Smart History offers these locations
from your previous destinations, using parameters like the current time of day, the day of week, and the
current location. The more you use the navigation software, the better it can guess your desired
destination. To select a History item, perform the following steps:
1. Tap on the Navigation view to access the Navigation menu.
2. Tap . Two of the Smart History Items are displayed in the New Route to... screen for easy
access. You can select one of them as your destination.
3. To open all the history items, tap . The list of recent destinations appears. The list begins
with the three most likely destinations that are selected based on your previous routes (Smart
History). The rest of the destinations are ordered by the time they were last selected. If necessary,
scroll the list to see earlier destinations.
4. Select a destination from the list.
5. A full screen map appears with the selected point in the middle. If necessary, tap the map
somewhere else to modify the destination. The cursor ( ) appears at the new location.
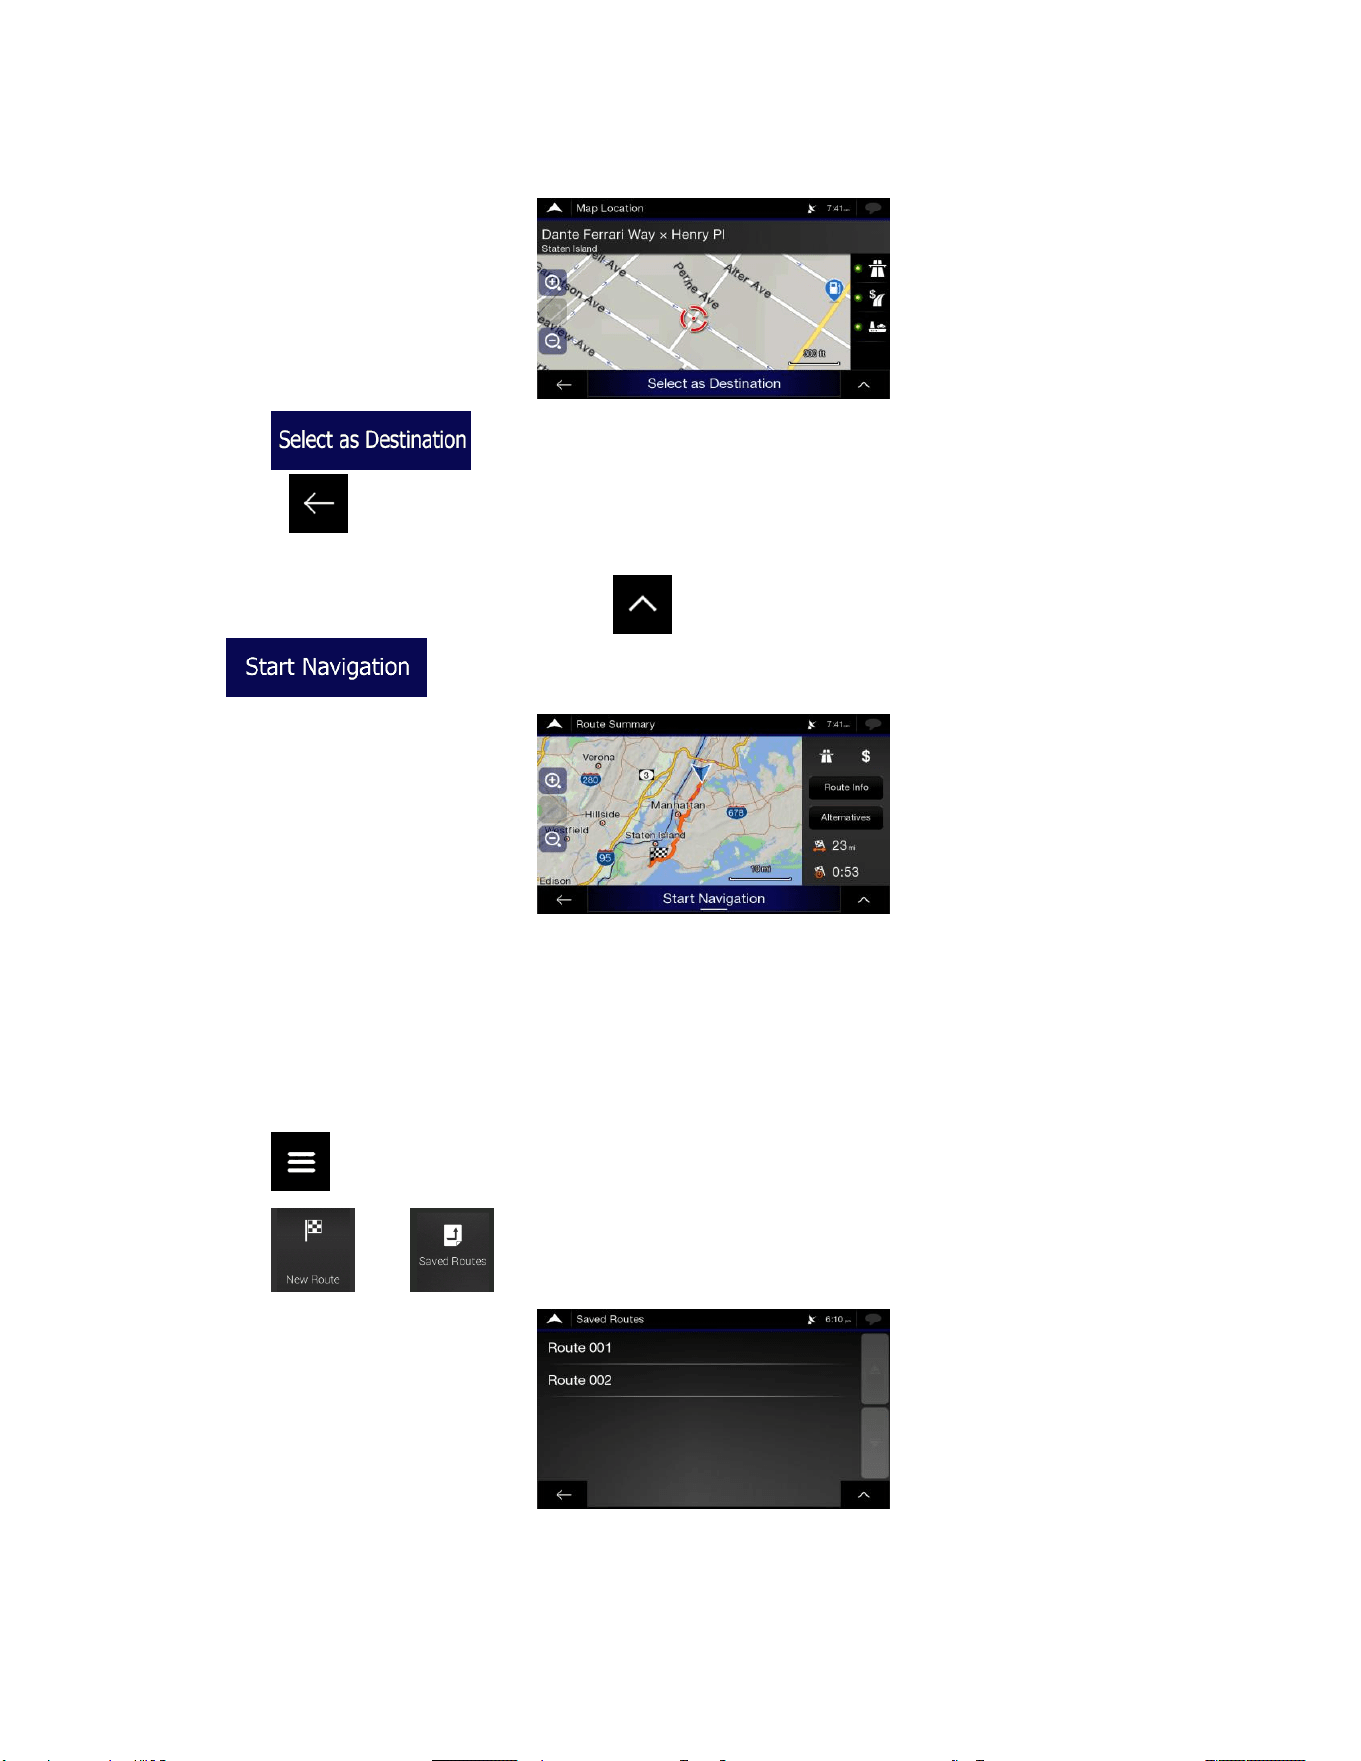
45
6. Check the settings for road types and change them if necessary.
7. Tap to confirm the destination. You can also select a nearby point on the map
or tap to select a different destination.
8. The route is calculated and the map appears showing the entire route, where you can check route
information and route alternatives. Tap to modify the route parameters, or tap
to start your journey.
3.1.6 Selecting a saved route
The routes that you have saved earlier appear in a list. To select a previous route, perform the following
steps:
1. Tap on the Navigation view to access the Navigation menu.
2. Tap and .
3. The list of saved routes appears. If necessary, scroll the list to see earlier routes.
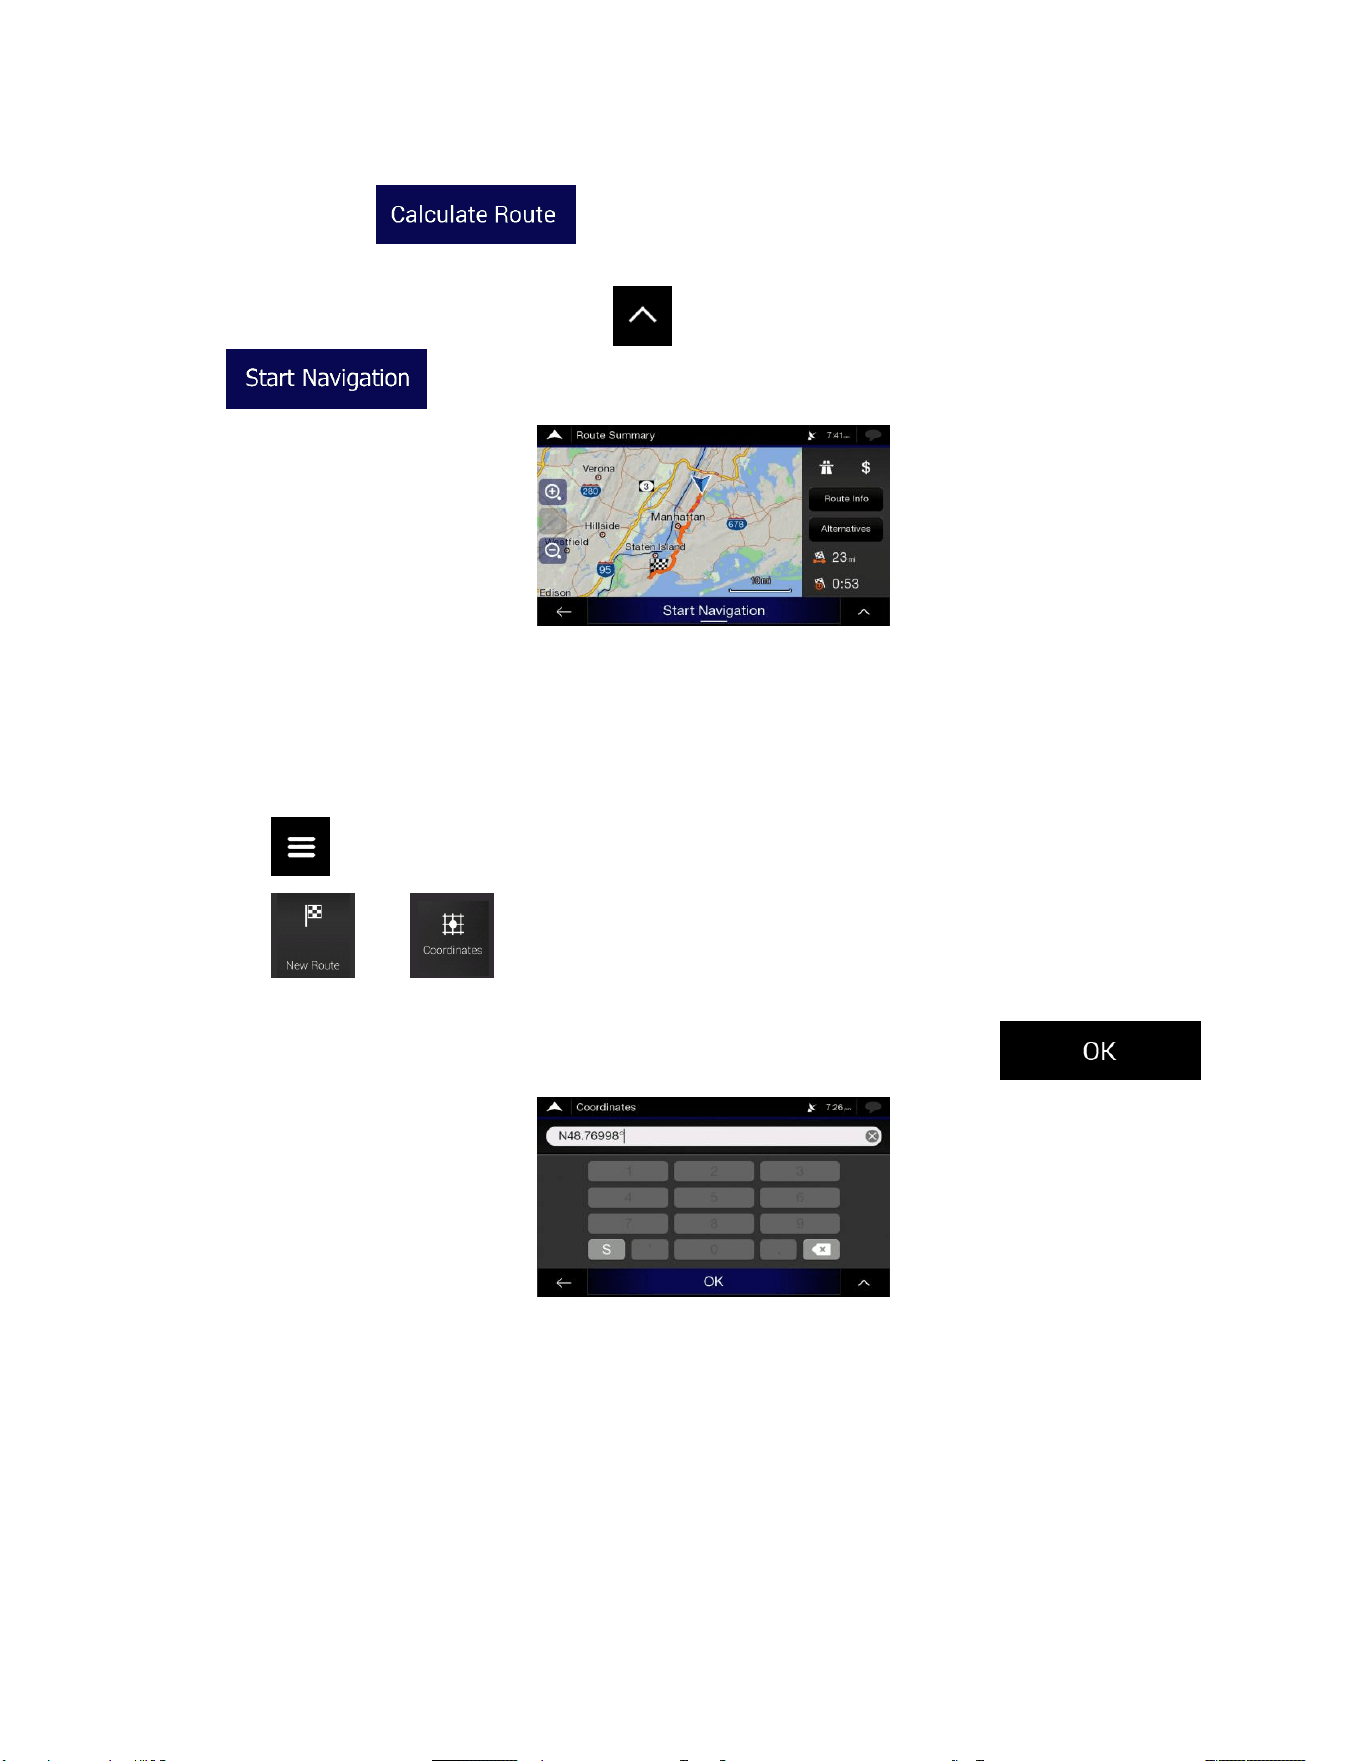
46
4. Select a route and the Multipoint Route screen appears. If necessary, modify the saved route.
Otherwise, tap .
5. The route is calculated and the map appears showing the entire route, where you can check route
information and route alternatives. Tap to modify the route parameters, or tap
to start your journey.
3.1.7 Entering coordinates
To select a destination by entering its coordinates, perform the following steps:
1. Tap on the Navigation view to access the Navigation menu.
2. Tap and .
3. You can enter the latitude and longitude values in any of the following formats: decimal degrees,
degrees and decimal minutes, or degrees, minutes and decimal seconds. Tap .
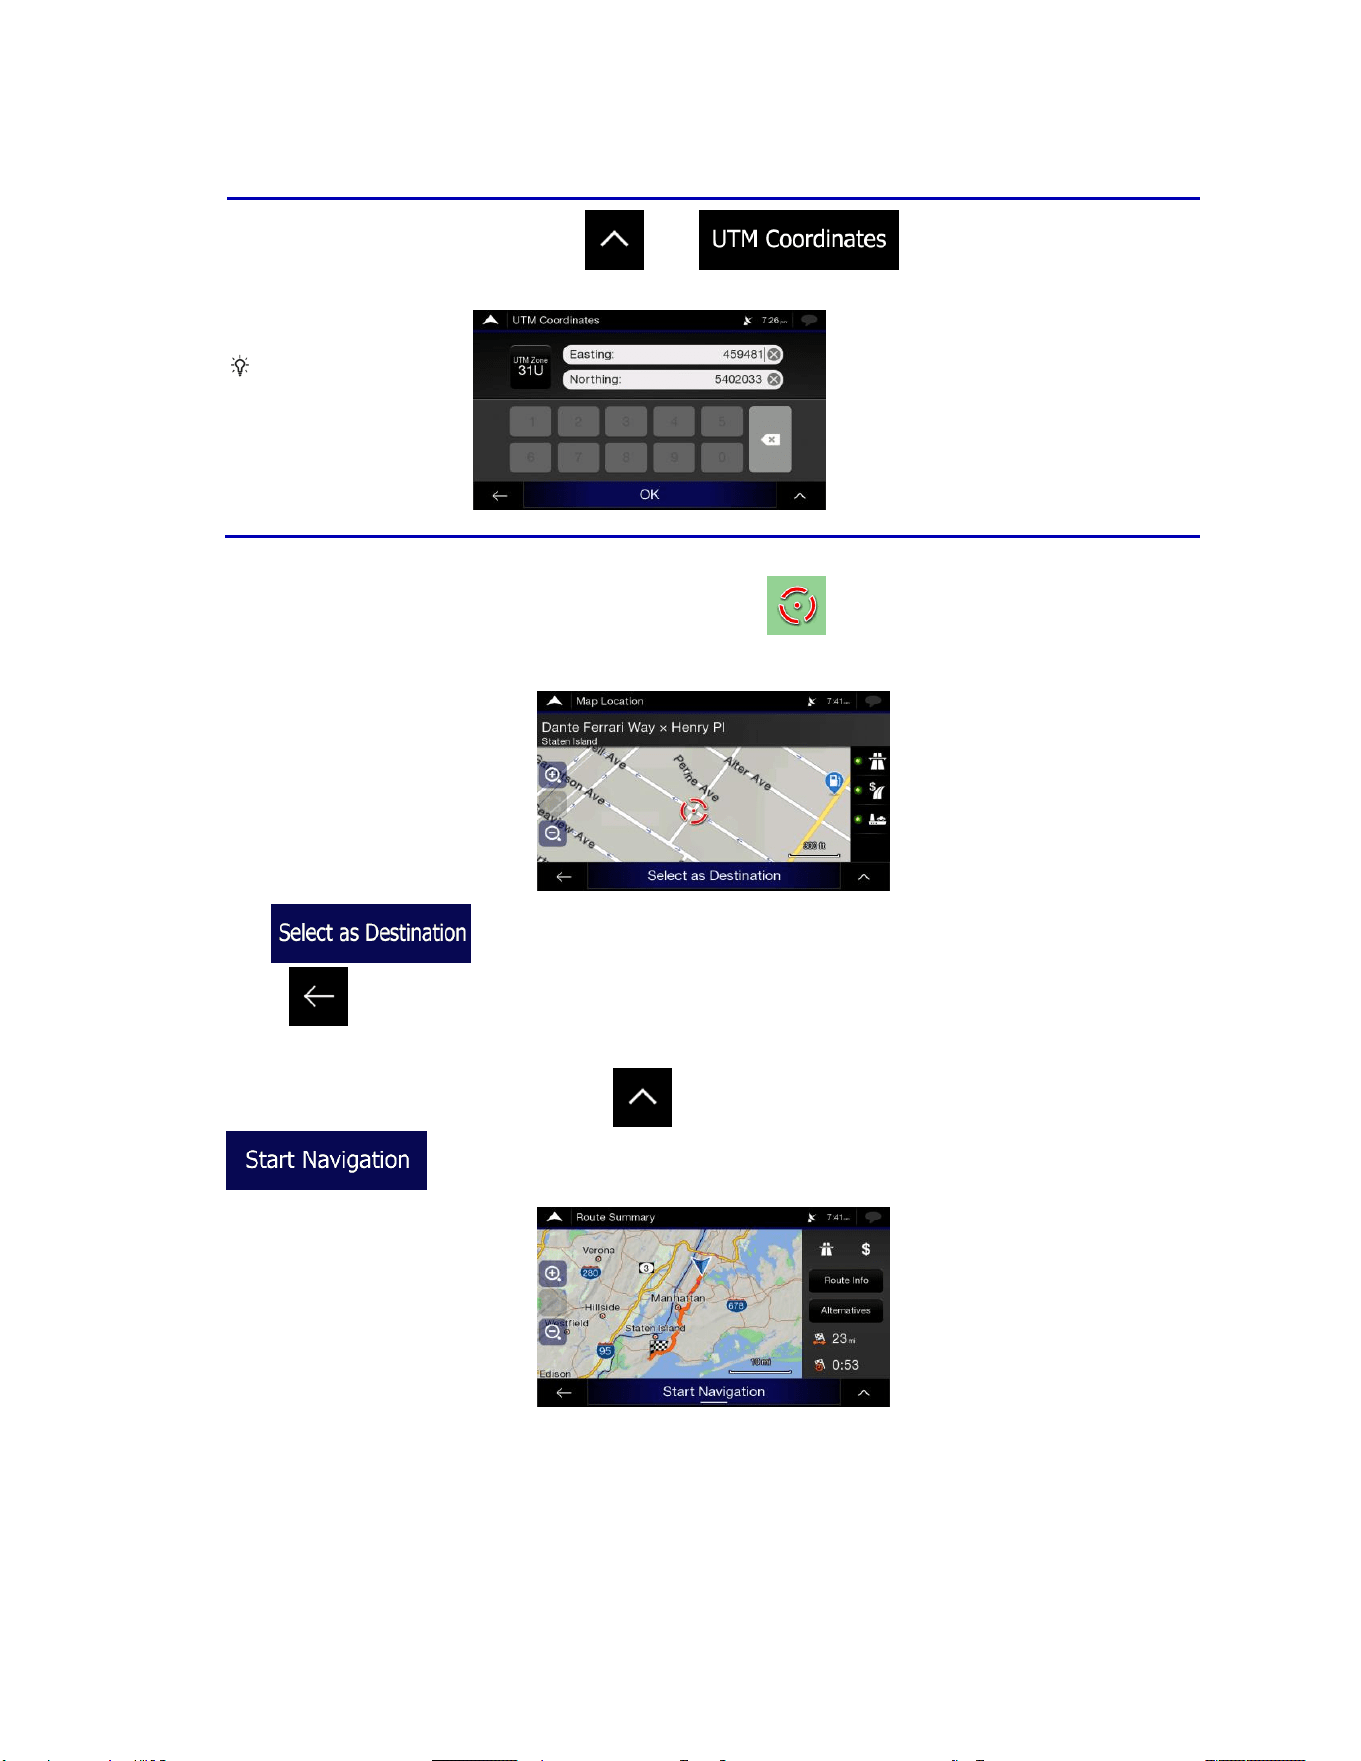
47
Tip!
(optional) If necessary, tap then and enter the coordinate in
UTM format.
4. A full screen map appears with the selected point in the middle. If necessary, tap the map
somewhere else to modify the destination. The cursor ( ) appears at the new location.
5. Check the settings for road types and change them if necessary.
6. Tap to confirm the destination. You can also select a nearby point on the map
or tap to select a different destination.
7. The route is calculated and the map appears showing the entire route, where you can check route
information and route alternatives. Tap to modify the route parameters, or tap
to start your journey.
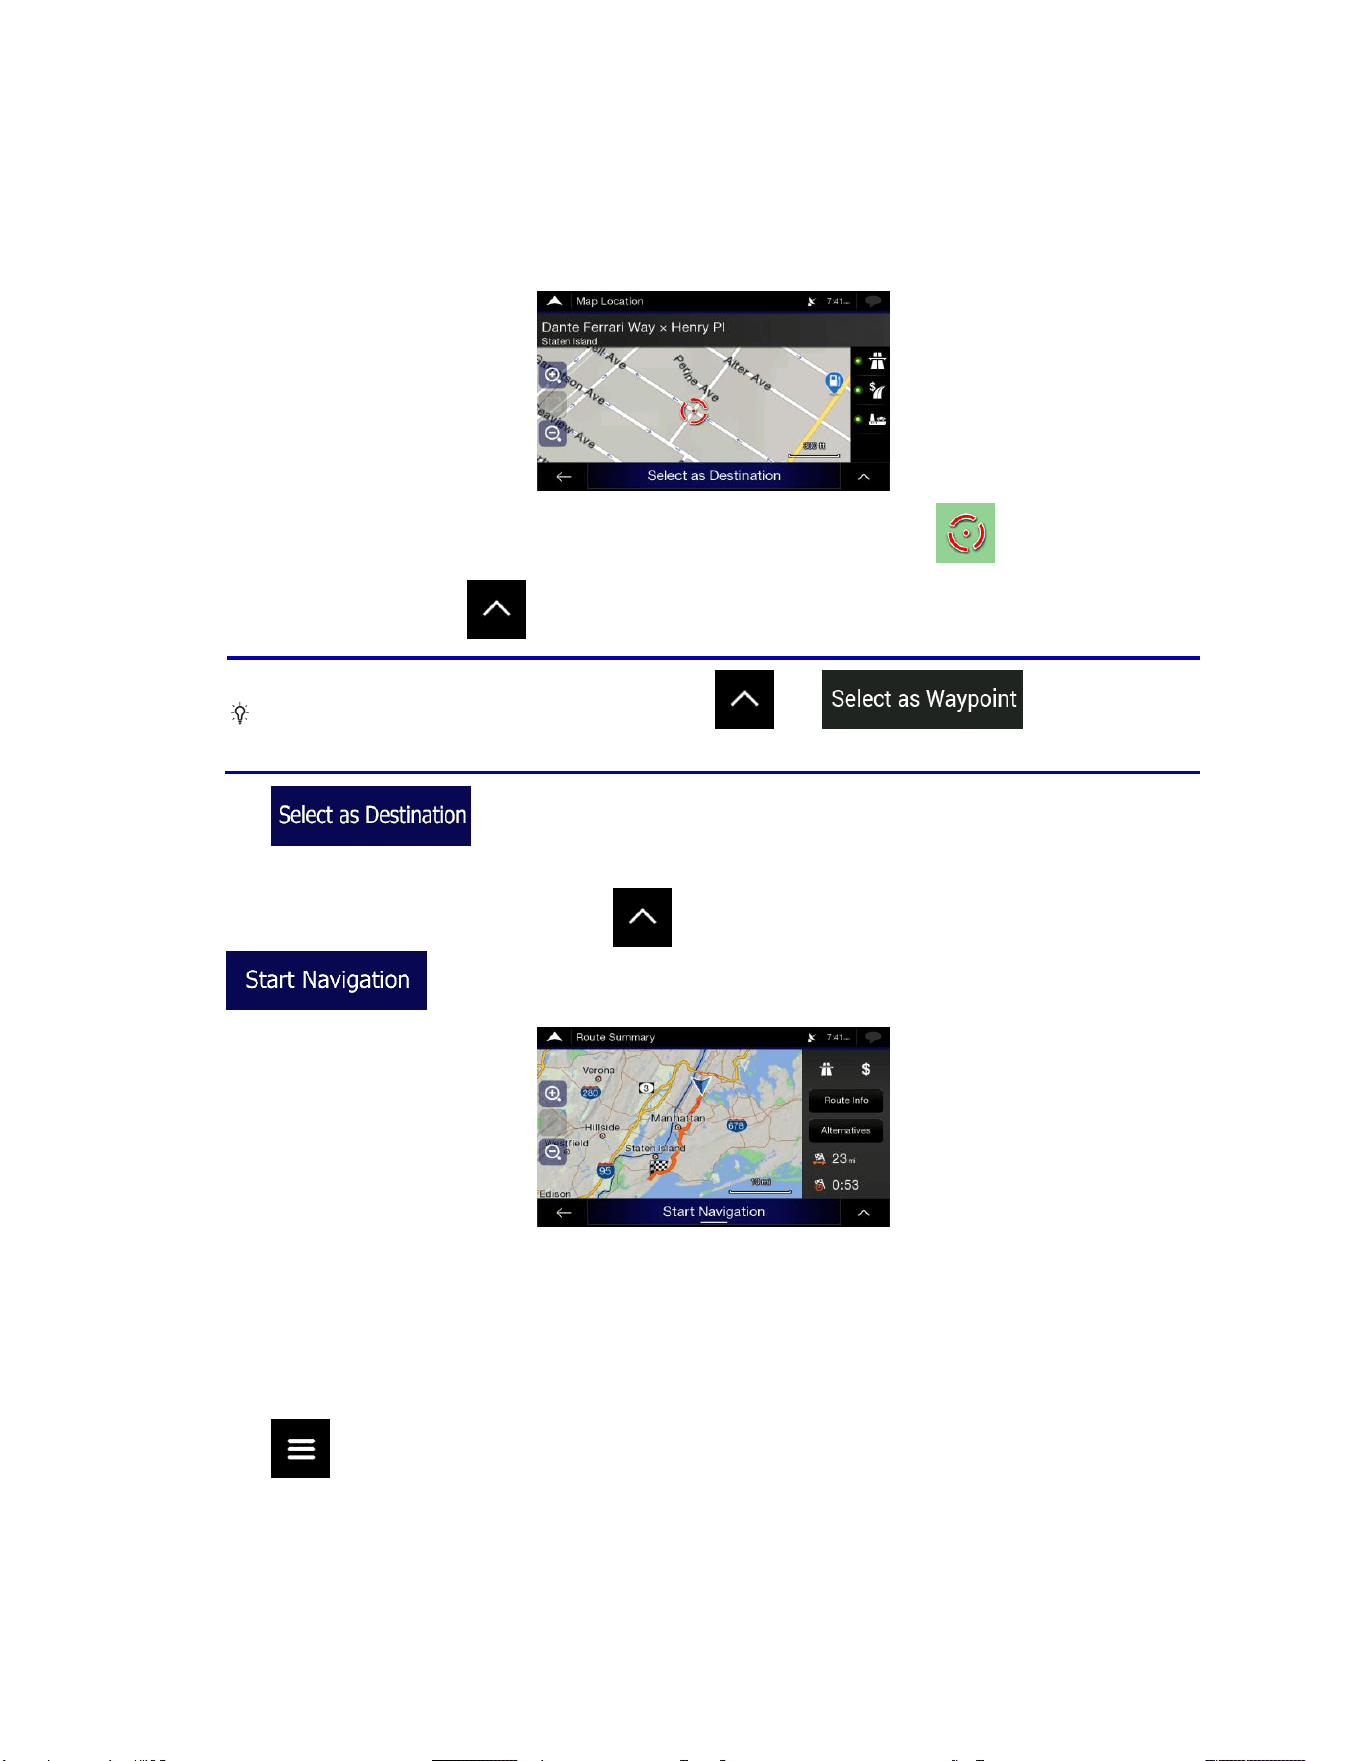
48
3.1.8 Selecting a location on the map
To select a map location, perform the following steps:
1. Locate your destination on the map. Move and scale the map as necessary.
2. Tap the location that you want to select as your destination. The cursor ( ) appears there.
3. (optional) If needed, tap to list the Places near the selected point or to save this location.
Tip!
If you already have a planned route, tap and to add the
selected location to your route.
4. Tap to select the cursor as the destination.
5. The route is calculated and the map appears showing the entire route, where you can check route
information and route alternatives. Tap to modify the route parameters, or tap
to start your journey.
3.1.9 Planning a Multipoint Route
To build your route destination-by-destination, perform the following steps:
1. Tap on the Navigation view to access the Navigation menu.
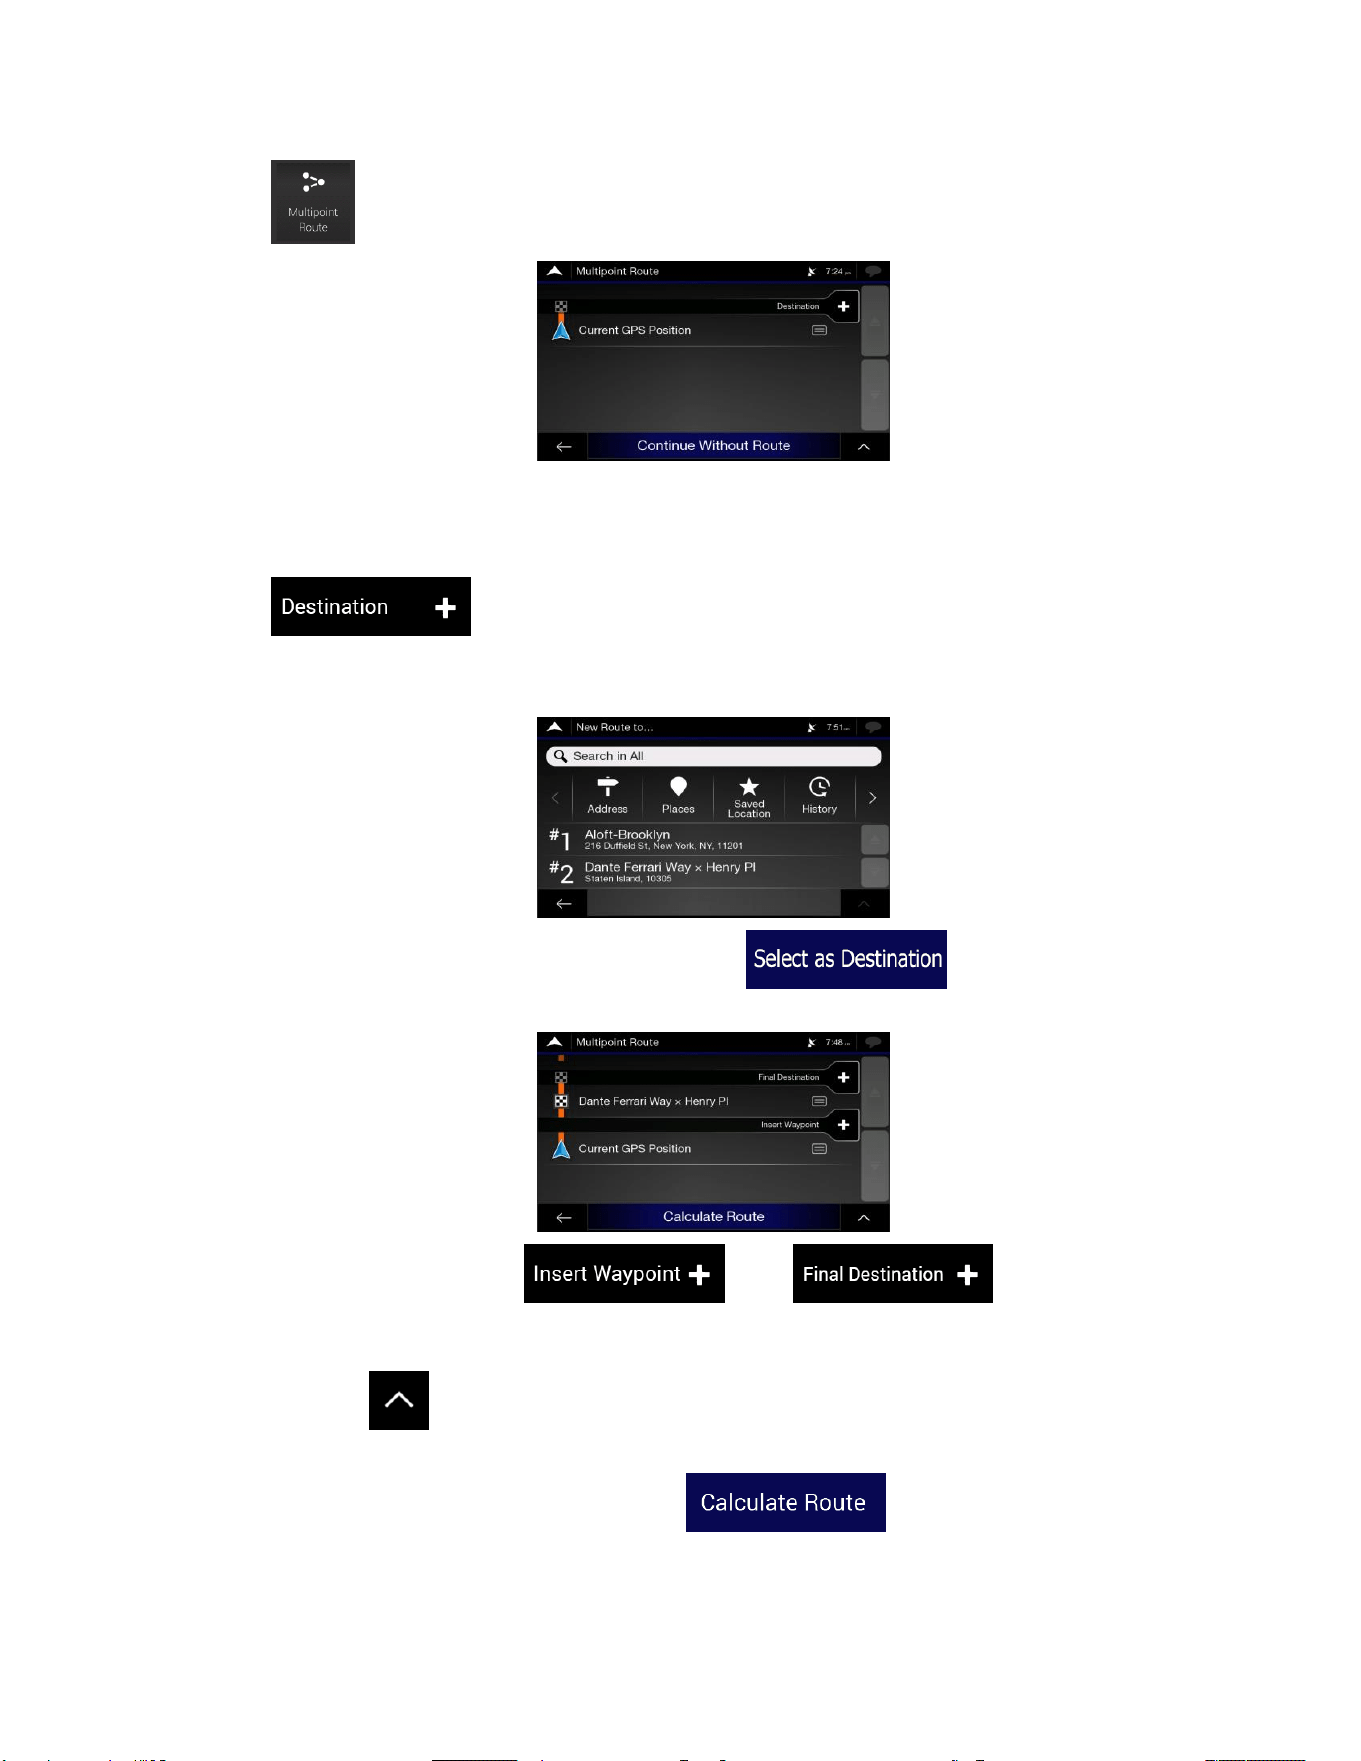
49
2. Tap .
3. There is only one line in the list of route points, the starting point of the route, which is normally the
current GPS position.
4. Tap to select the destination.
5. The New Route to... screen appears, where you can select the destination of the route the same
way as described in the previous sections.
6. When the selected location appears on the map, tap and the list returns. If
needed, you can add further intermediate destinations.
7. To add more route points, tap or tap to change the final
destination. The Add to Route... menu appears again, where you can select the new route point
the same way as you have set the destination before.
8. (optional) Tap to optimise the whole route or the order of waypoints. You can also delete all
the destinations.
9. When you have added all the route points, tap and the planned route is
automatically calculated.
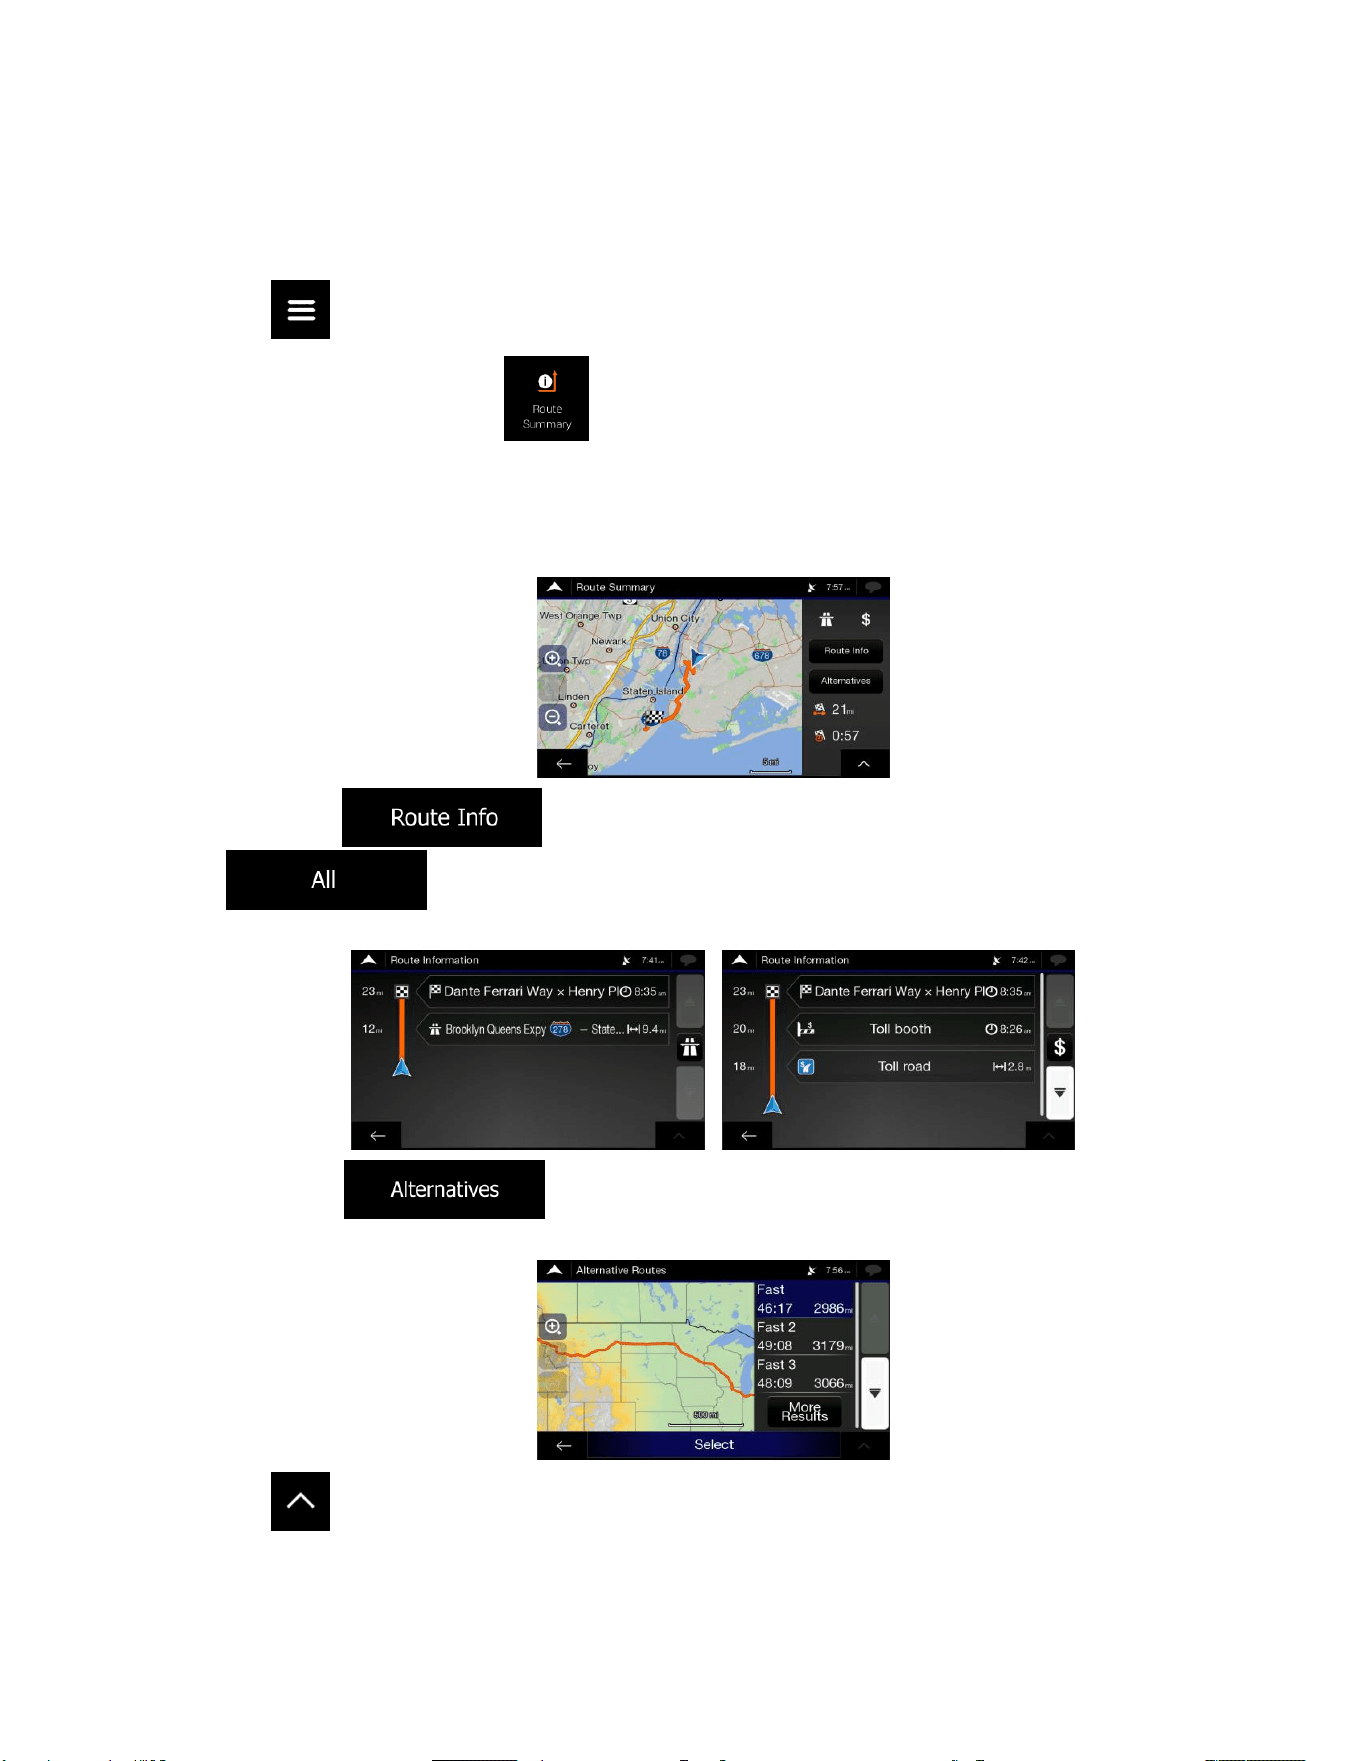
50
3.2 Checking route information and alternatives
To get a map overview of the planned route and check different parameters of the planned route, perform
the following steps:
1. Tap on the Navigation view to access the Navigation menu.
2. In the Navigation menu, tap .
The planned route is displayed in its full length on the map with the following additional information:
• The total length of route
• The total time of route.
By tapping , you can check detailed information about the route. If you tap
on the right side of the screen, you can narrow the route information, for
example to show only freeway sections or toll roads.
By tapping , your can see a list of route alternatives and select the most
suitable route.
3. Tap on the Route Summary screen to carry out additional actions, for example edit your
route preferences or display the itinerary.
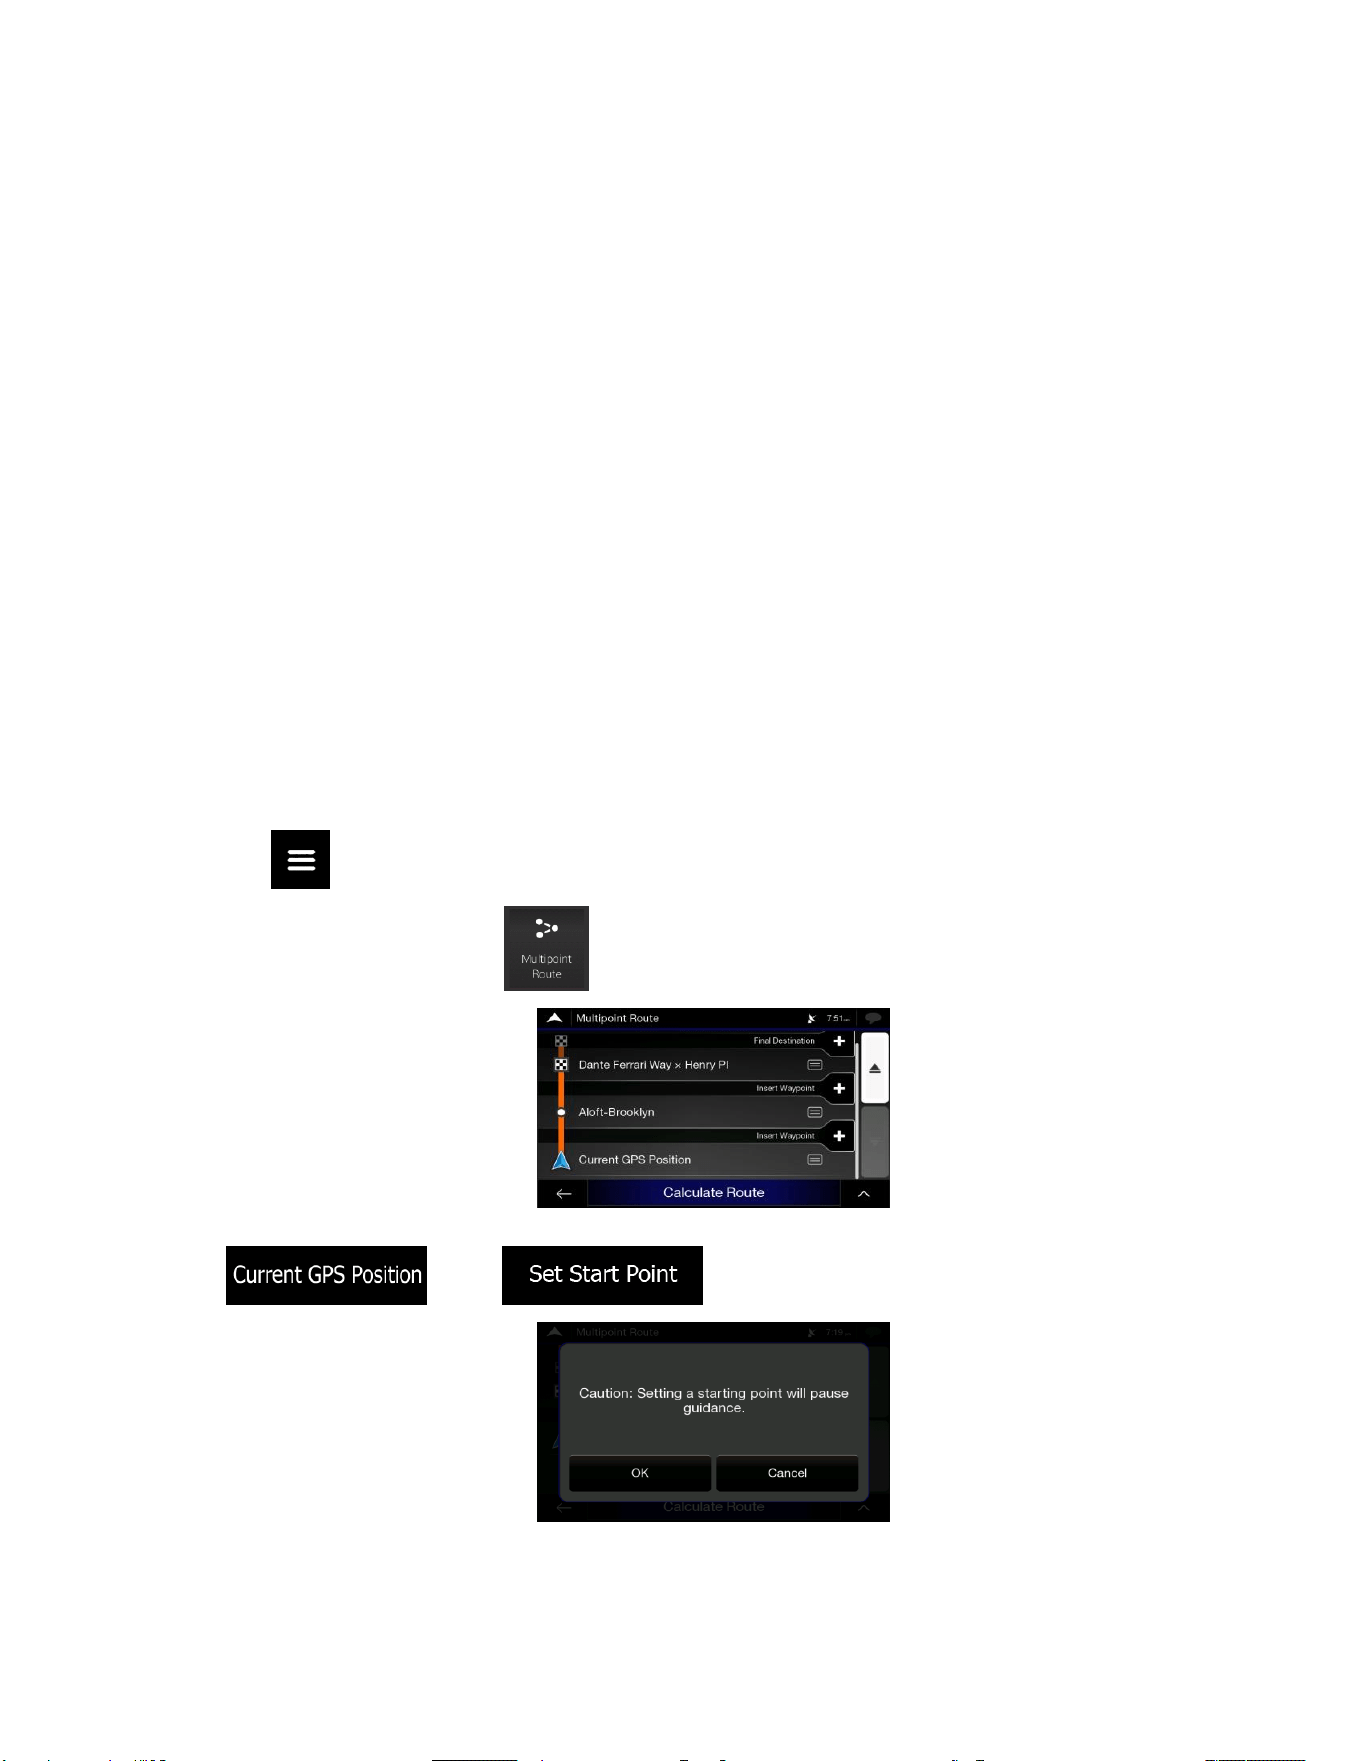
51
3.3 Editing the route
When navigation has already started, there are several ways to modify the planned route. You have the
following options:
• Setting a new starting point, see page 51
• Adding an additional destination, see page 52
• Modifying the list of destinations, see page 52
• Saving the planned route, see page 53
• Deleting the planned route, see page 54
• Selecting a route alternative when planning the route, see page 54
• Selecting a route alternative for an existing route, see page 55
• Pausing guidance, see page 57.
3.3.1 Setting a new starting point
For normal navigation, all routes are calculated from the current position. You can pause navigation to
check future routes, simulate them or see their length in time and distance. Then you can set the starting
point of the route to a location other than the current GPS position.
1. Tap on the Navigation view to access the Navigation menu.
2. In the Navigation menu, tap .
3. The first line from the bottom is the start of the route, normally the current GPS position. Tap
, select , and confirm your action at the warning message.

52
4. The Change Start to... screen appears. Select the starting point of the route the same way you
select a destination.
5. You can see the new starting point on the map. Tap and the Multipoint Route
screen appears where you can continue adding a destination to your route.
6. Tap to continue. The route will be saved with the starting point that you have just set. You can use
the saved route later to plan a route. (See page 44.)
3.3.2 Adding an additional destination
If you already have a planned route and you select a new destination as described in the above sections,
the route to the previous destination is deleted and a new route is calculated.
To add a new intermediate destination to the planned route, perform one of the following actions:
• Tap the map anywhere to browse it. After selecting the location on the map, tap and
to add the selected location to your route as an intermediate destination. The
other destinations of the route remain intact.
• Tap on the Navigation view and tap . Add a destination to your route as described
on page 48.
3.3.3 Modifying the list of destinations
To edit your route, perform the following steps:
1. Tap on the Navigation view to access the Navigation menu.
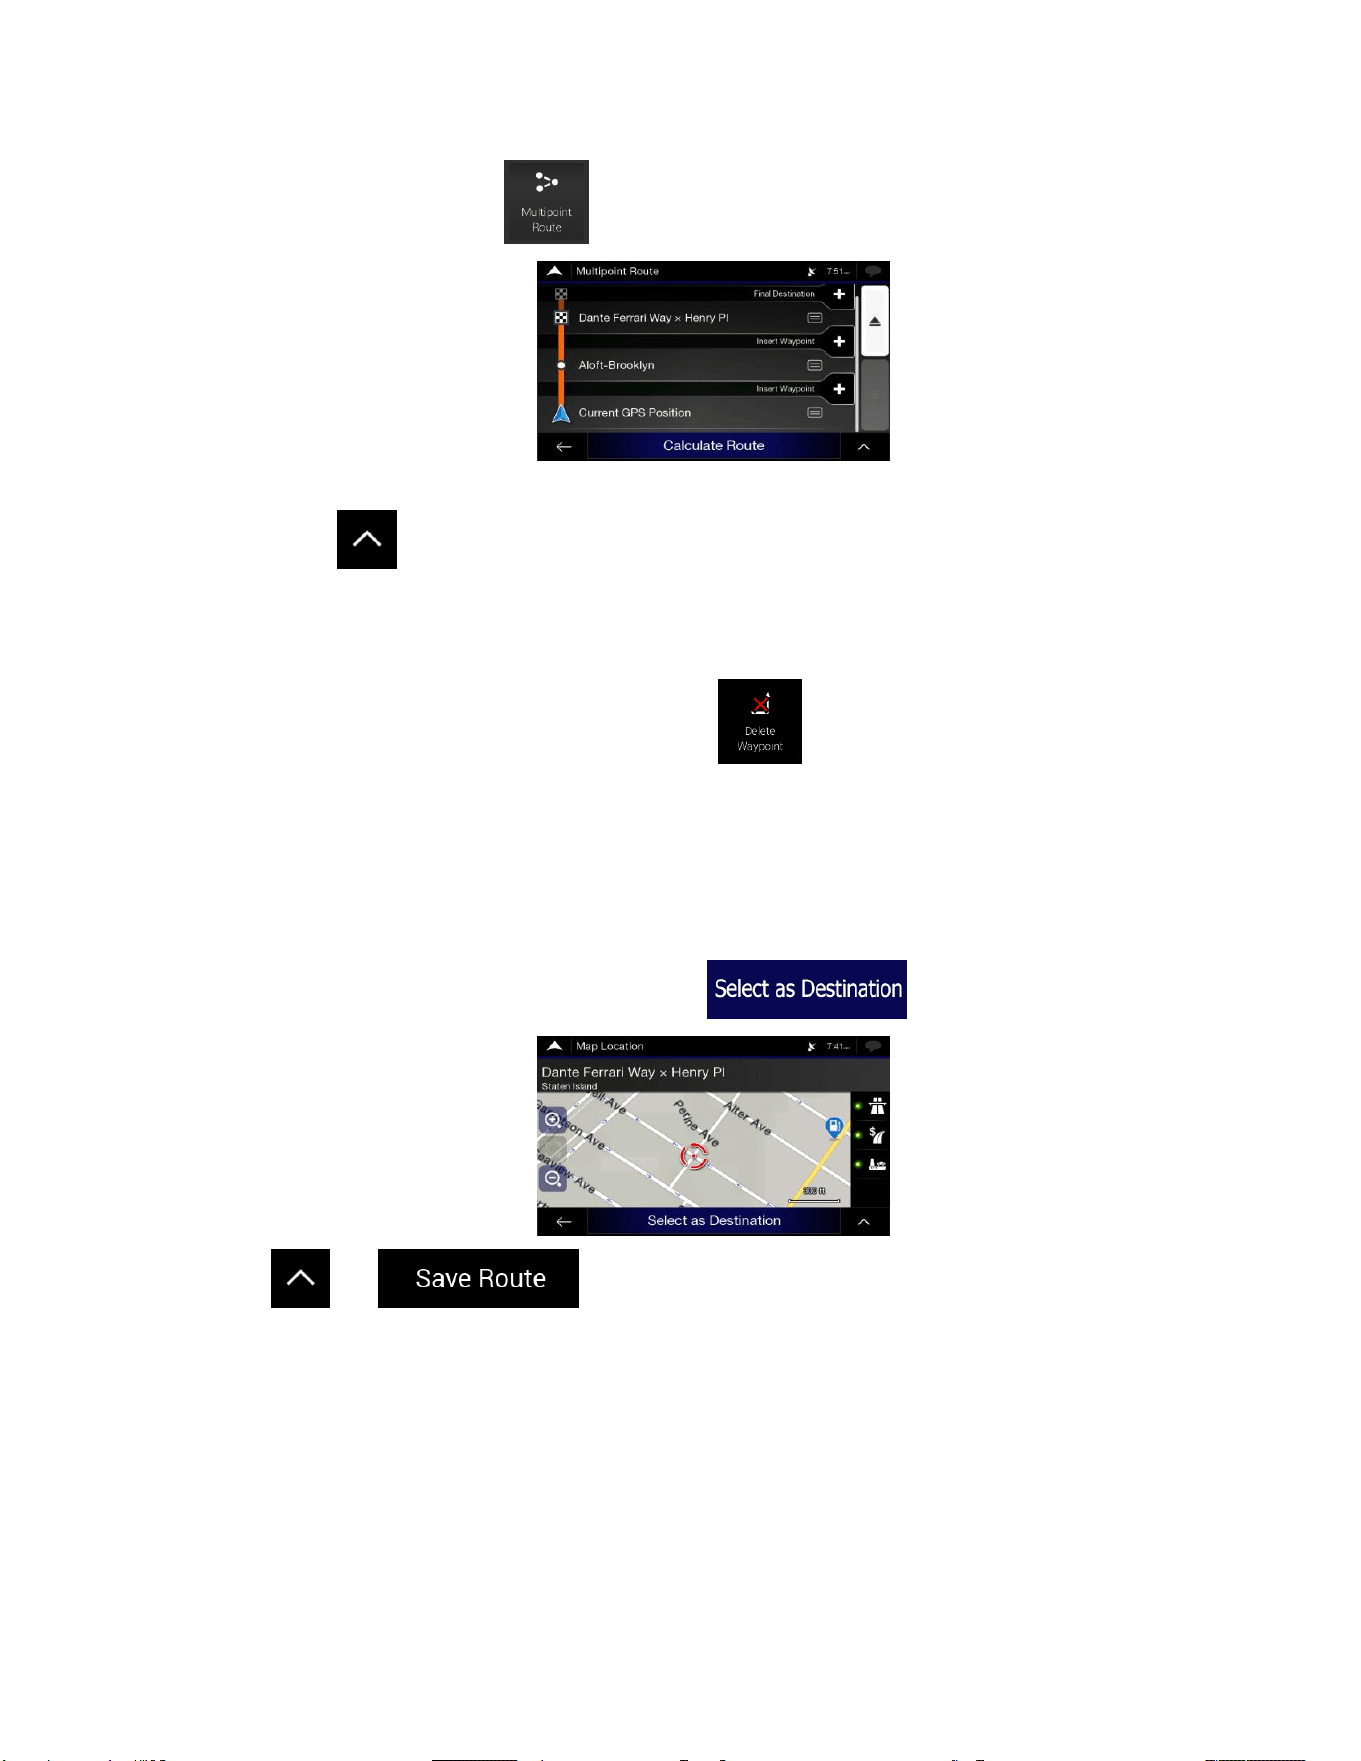
53
2. In the Navigation menu, tap .
You have the following options on this screen:
• Tap to delete all the destinations, or optimise the waypoints or the route.
• Tap the name of the intermediate destination to move it up or down in the list, to save the
location, or to delete it from the list.
• If you have a route with at least one intermediate destination, you can delete the waypoint
from the list right from the Main menu. Tap , then confirm the deletion.
3.3.4 Saving the planned route
To save the planned route, perform the following steps:
1. Select a destination as described earlier and tap .
2. Tap and .
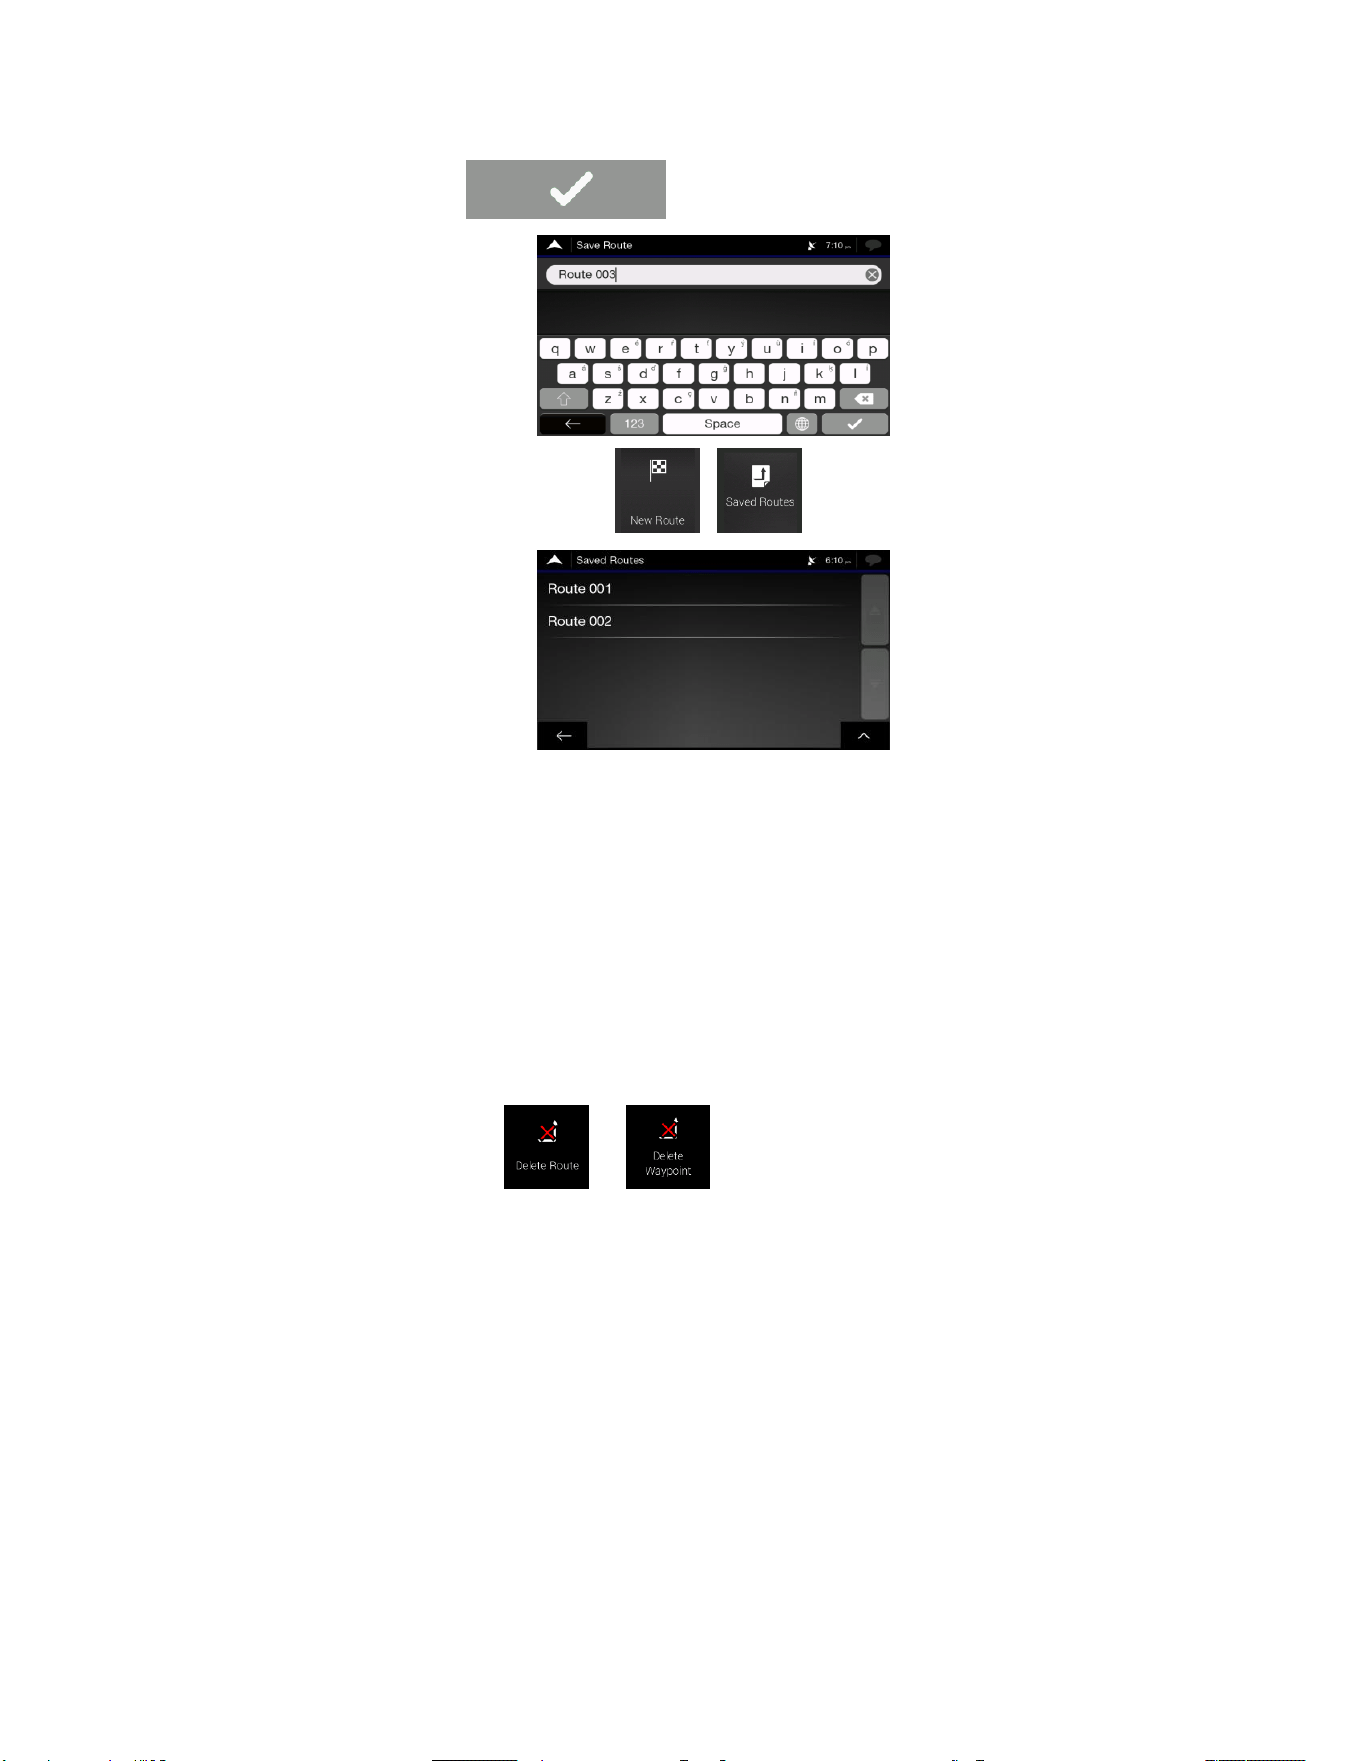
54
3. Type in a name and tap .
4. The route is saved and it is available in , .
By selecting a previously saved route, Alpine navigation recalculates the route using the saved
destination and/or the waypoints.
3.3.5 Deleting the planned route
You have the following two options to delete the navigated route:
• If you already have a planned route and you select a new destination as described in the above
sections, the route to the previous destination is automatically deleted and a new route is
calculated.
• In the Navigation menu, tap or . If there are no waypoints, the planned route is
deleted after a confirmation. If you have waypoints, you can choose to delete the whole route, or
only the next waypoint.
3.3.6 Selecting a route alternative when planning the route
To select from different route alternatives or change the route planning method after you have selected a
new destination, perform the following steps:
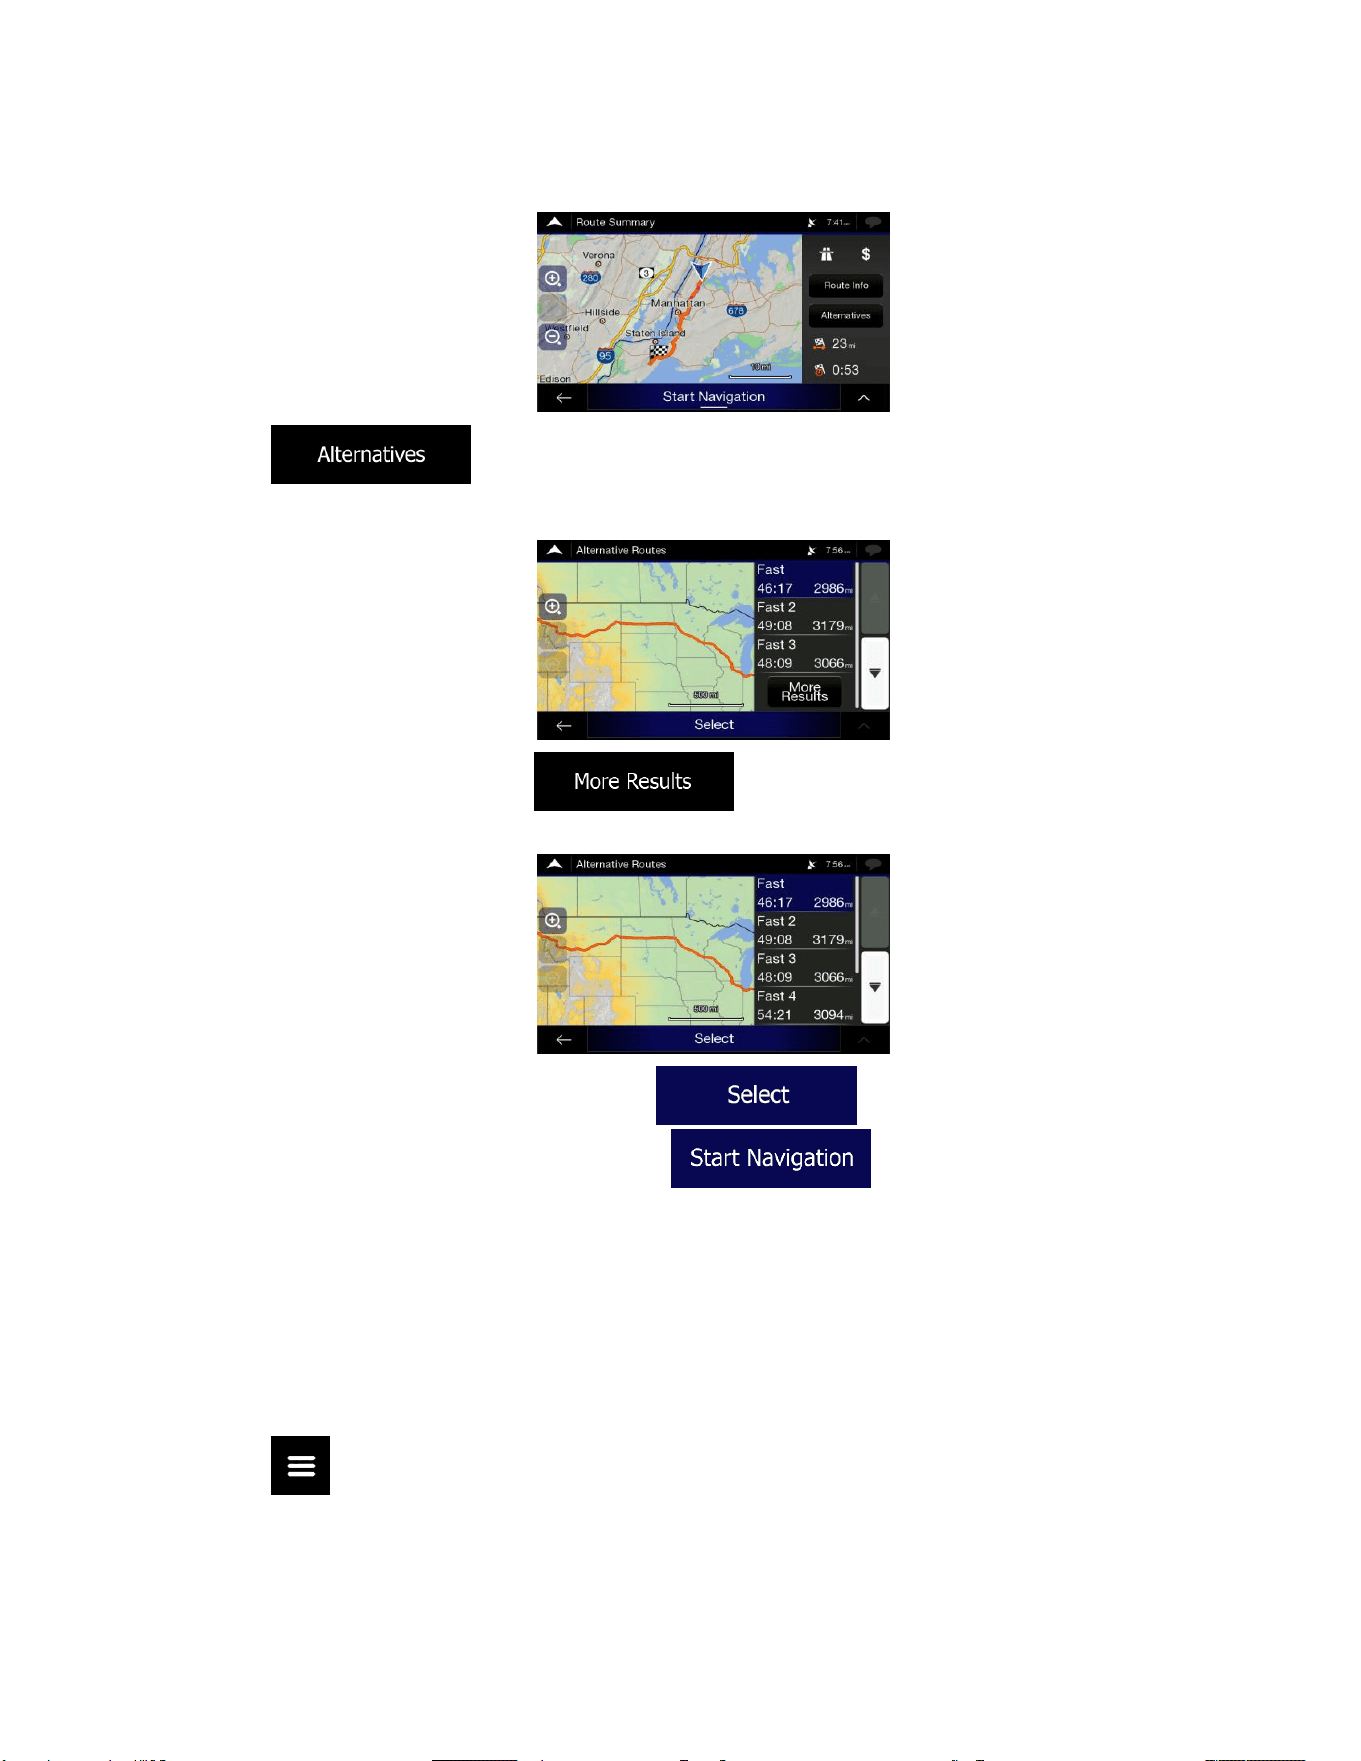
55
1. Select a destination as explained earlier, and go to the route confirmation screen.
2. Tap .
3. You can see the basic details of route alternatives. Tap any of them to see it on the map.
4. To view more suggestions, tap and scroll down for other alternative routes
with different route planning methods.
5. Select one of the route alternatives and tap to return to the previous screen.
Alpine navigation recalculates the route. Tap to start your journey. The orange
line now shows the new planned route.
3.3.7 Selecting a route alternative for an existing route
To recalculate the planned route with a different route planning method and to compare different route
alternatives, perform the following steps:
1. Tap on the Navigation view to access the Navigation menu.
2. You can access the list of route alternatives from the Navigation menu in one of the following ways:
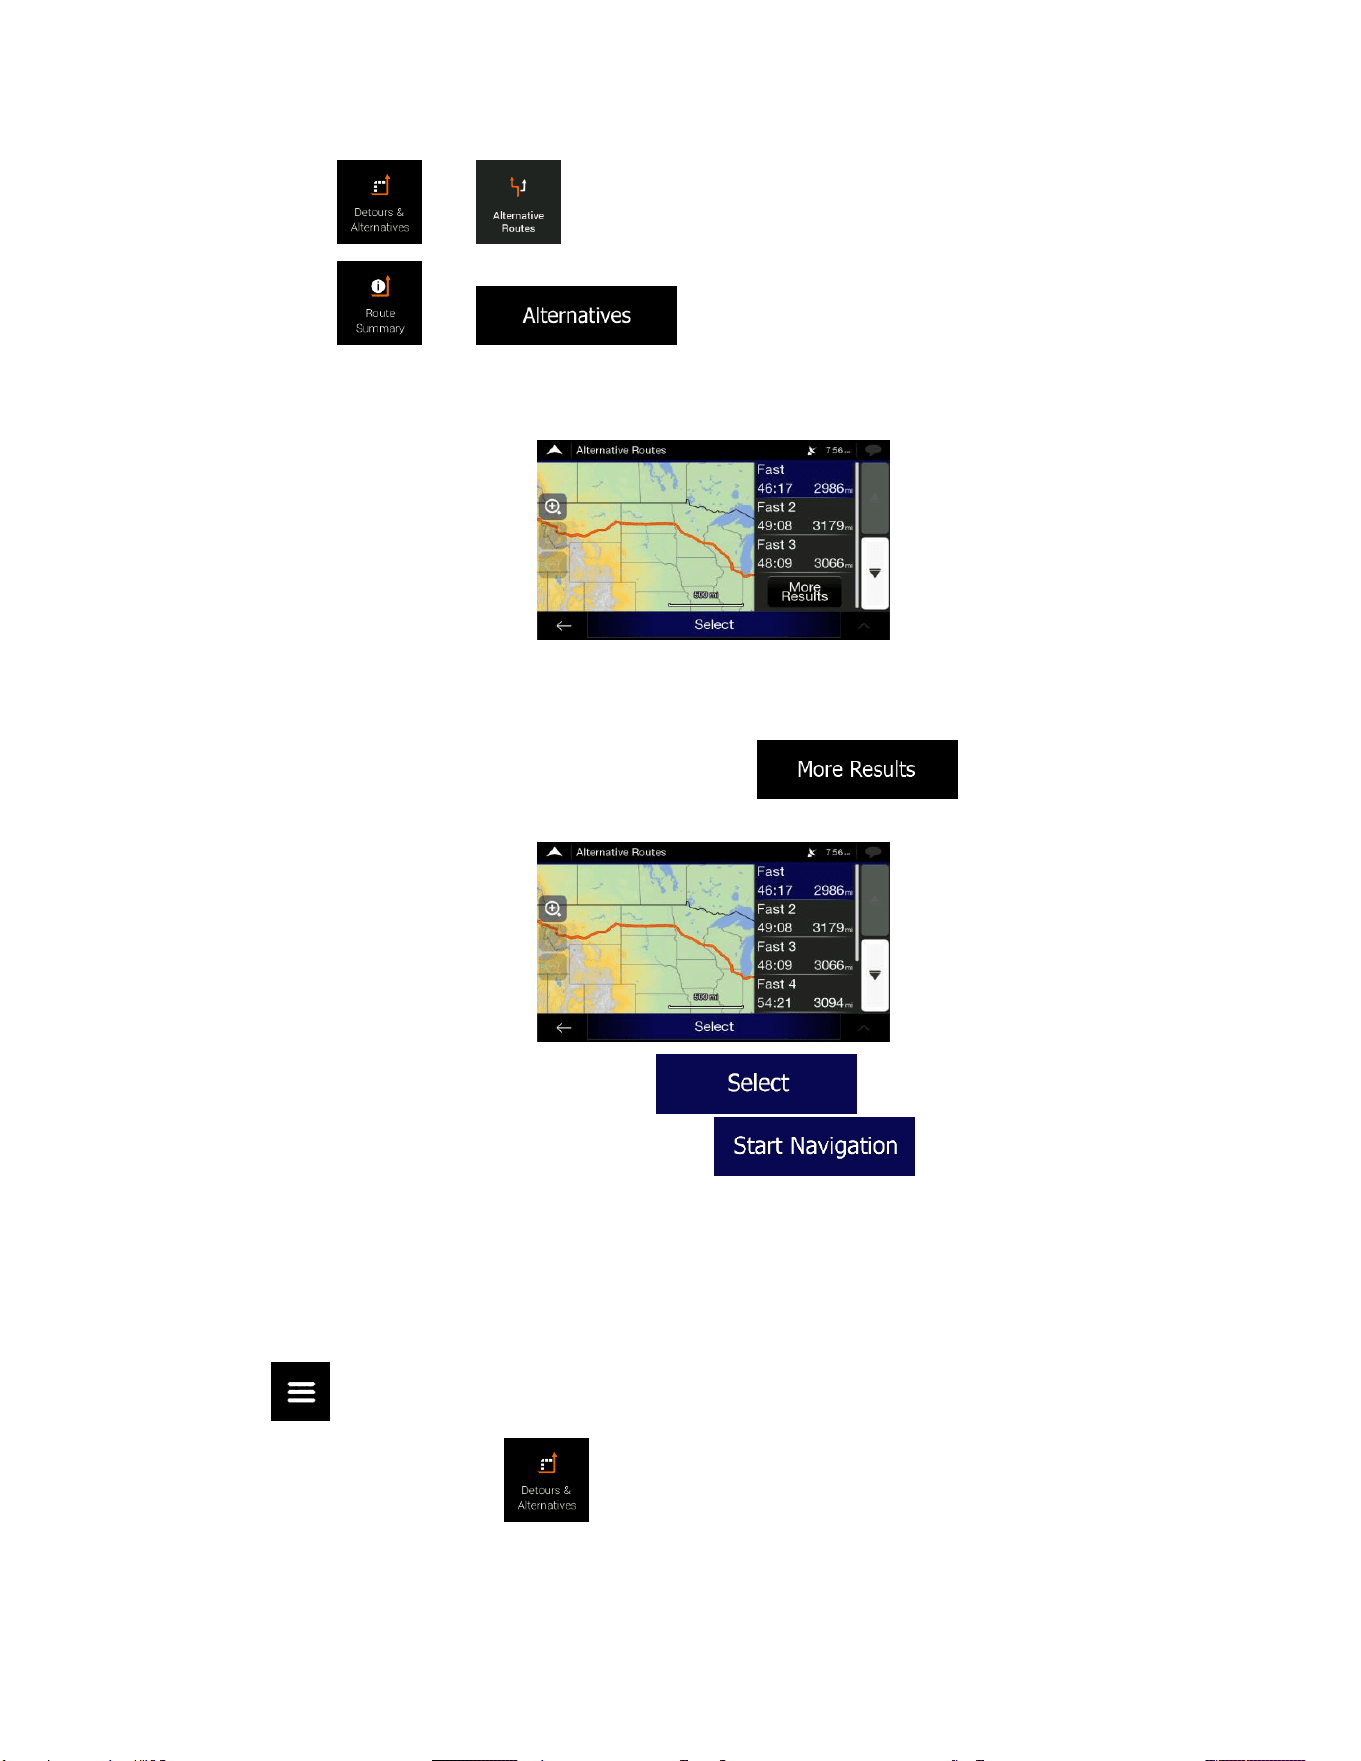
56
• Tap and .
• Tap and .
3. You can see the basic details of a few route alternatives. Tap any of them to see it on the map.
If there are suitable alternatives calculated with the route planning method that is selected in Route
preferences (page 70), they are shown on top of the list. Routes with other route planning methods
are shown at the bottom of the list.
4. If there are more than a few suggestions, you can tap and scroll down for
routes.
5. Select one of the route alternatives and tap to return to the previous screen.
Alpine navigation replaces the original route. Tap to start your journey. The
orange line now shows the new planned route.
3.3.8 Setting a detour
1. Tap on the Navigation view to access the Navigation menu.
2. In the Navigation menu, tap .
You can set up a detour for your route in the following ways:
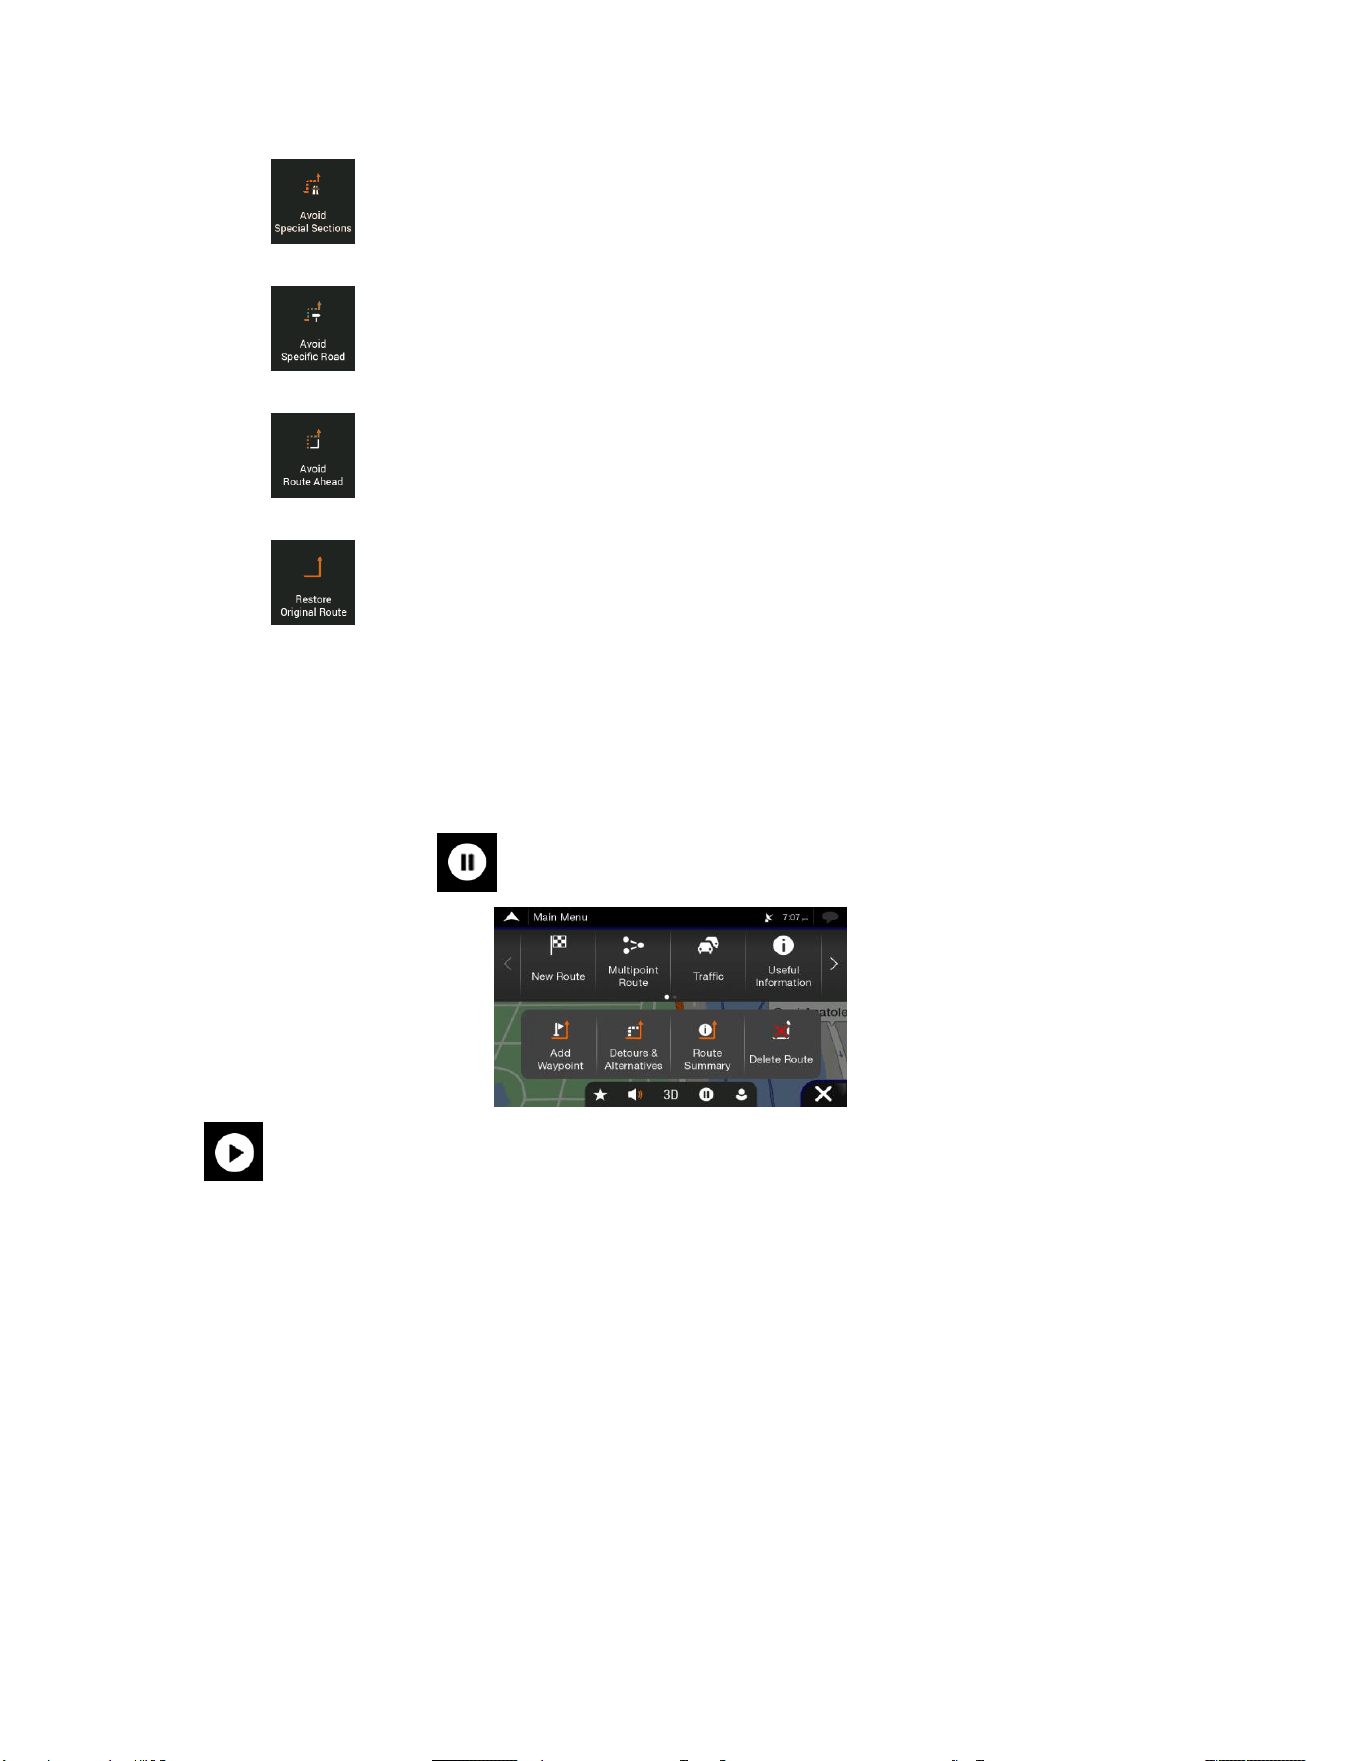
57
• Tap to open a list of special sections of the planned route such as stretches of freeway,
toll road or ferry trips. Tap any of these items on the itinerary to avoid a special section.
• Tap to open the full list of roads on the planned route. Tap any of these items on the
itinerary to avoid that specific road.
• Tap to avoid a part of the planned route that is right ahead of you on the itinerary. You
can set the distance for which you want to avoid the road ahead.
• Tap to delete all detours that you have set up for the planned route,
3.3.9 Pausing guidance
When you are driving a planned route but you do not need guidance for a certain part of the route, you
can suspend it and continue when it is needed again.
In the Navigation menu, tap to suspend guidance.
Tap to resume guidance.
3.4 Saving a location
To add any location to the saved locations (the list of frequently used destinations), perform the following
steps:
1. Select a destination as described before. It can be an address, a Place, any location on the map, a
previously used destination from History, and so on.
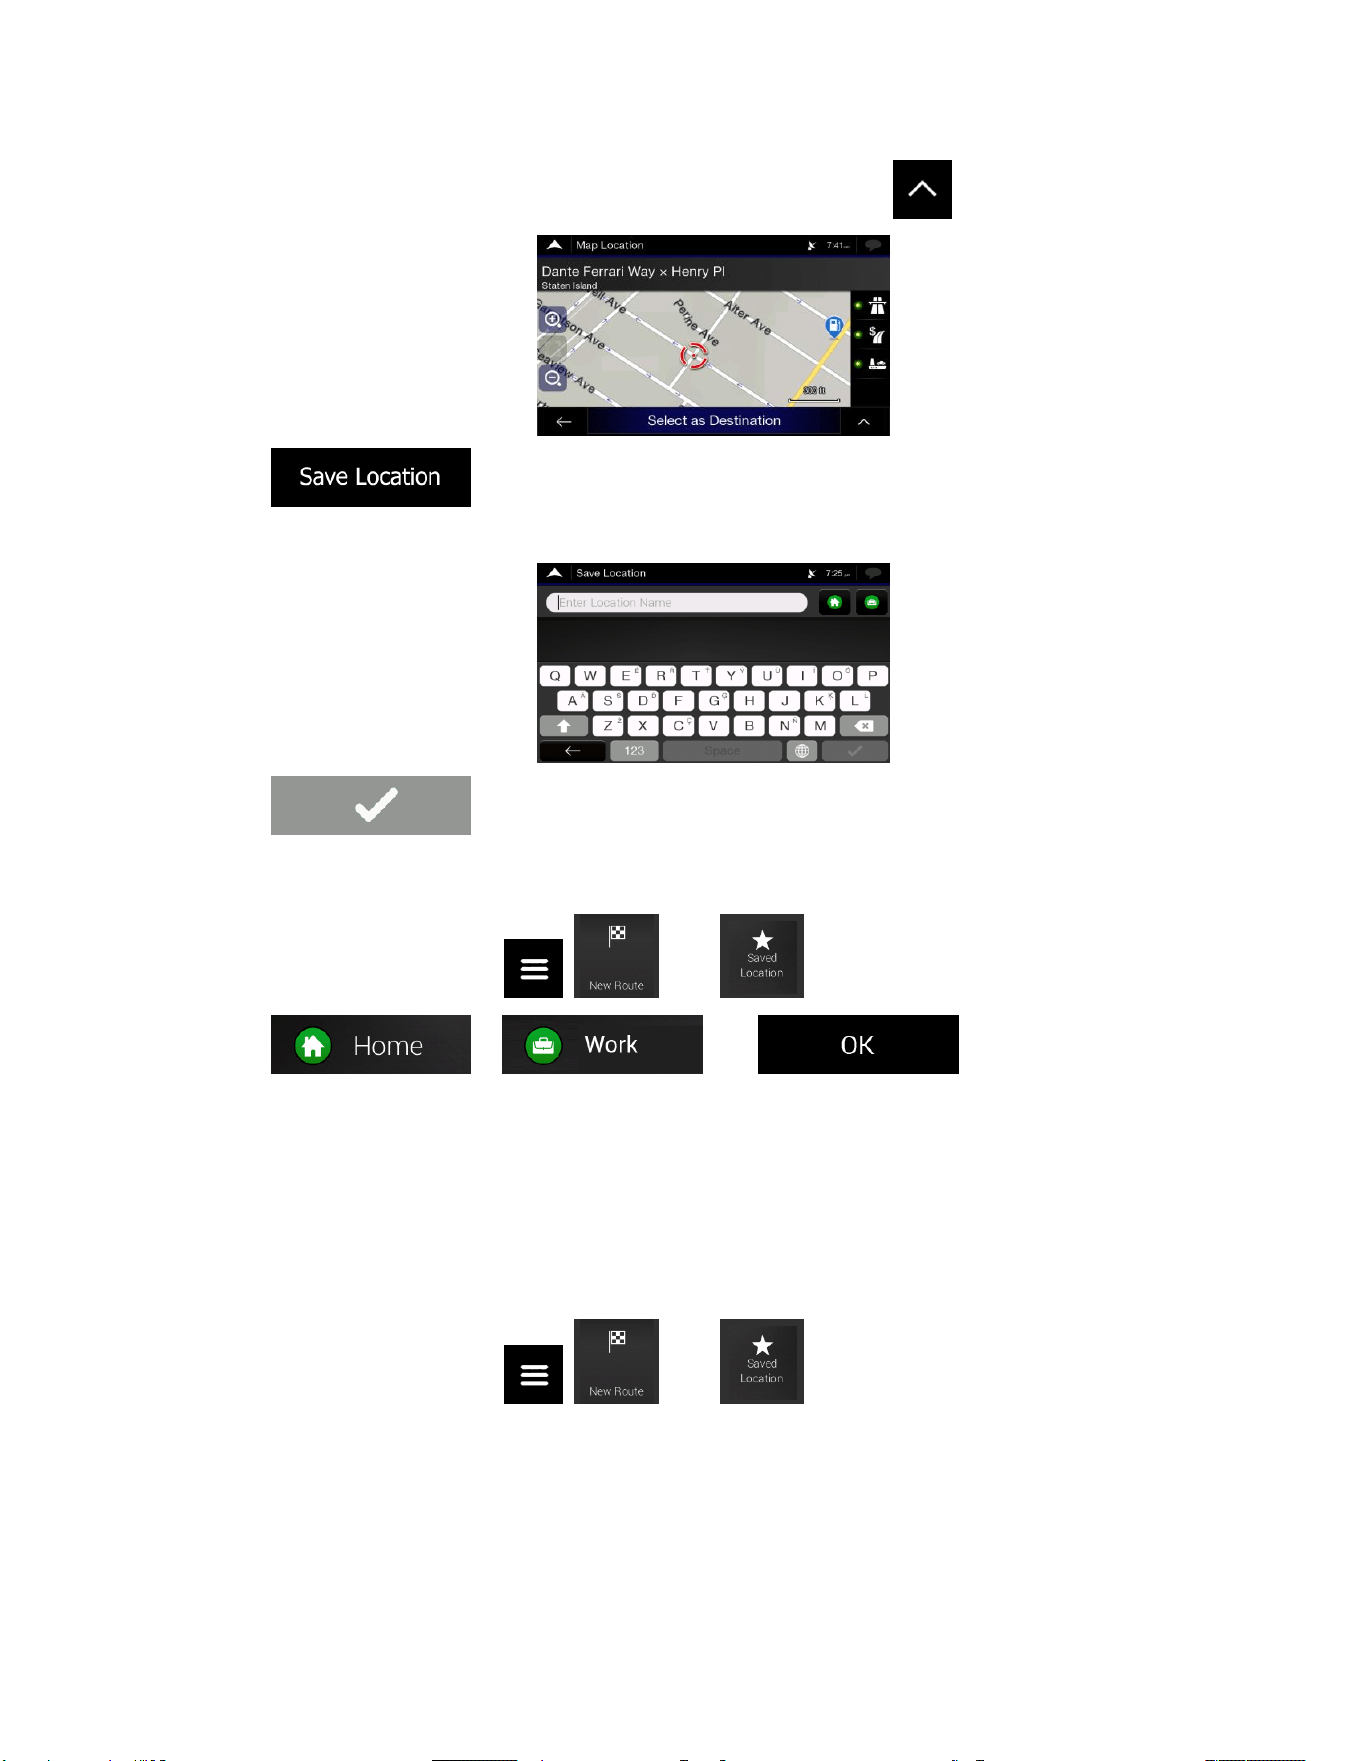
58
2. When the map appears with the selected location in the middle, tap .
3. Tap .
4. (optional) Using the keyboard, you can change the name offered for the Saved Location.
5. Tap to save the location.
To add your home and work address to the saved locations, perform the following steps:
1. On the Navigation view, tap , , and .
2. Tap or . Tap to confirm your
selection.
3. You can search for the address as described on page 24.
Planning a route to one of the saved locations is described on page 43.
3.4.1 Editing a saved location
To edit a location that you have already added as a Saved Location, perform the following steps:
1. On the Navigation view, tap , , and .
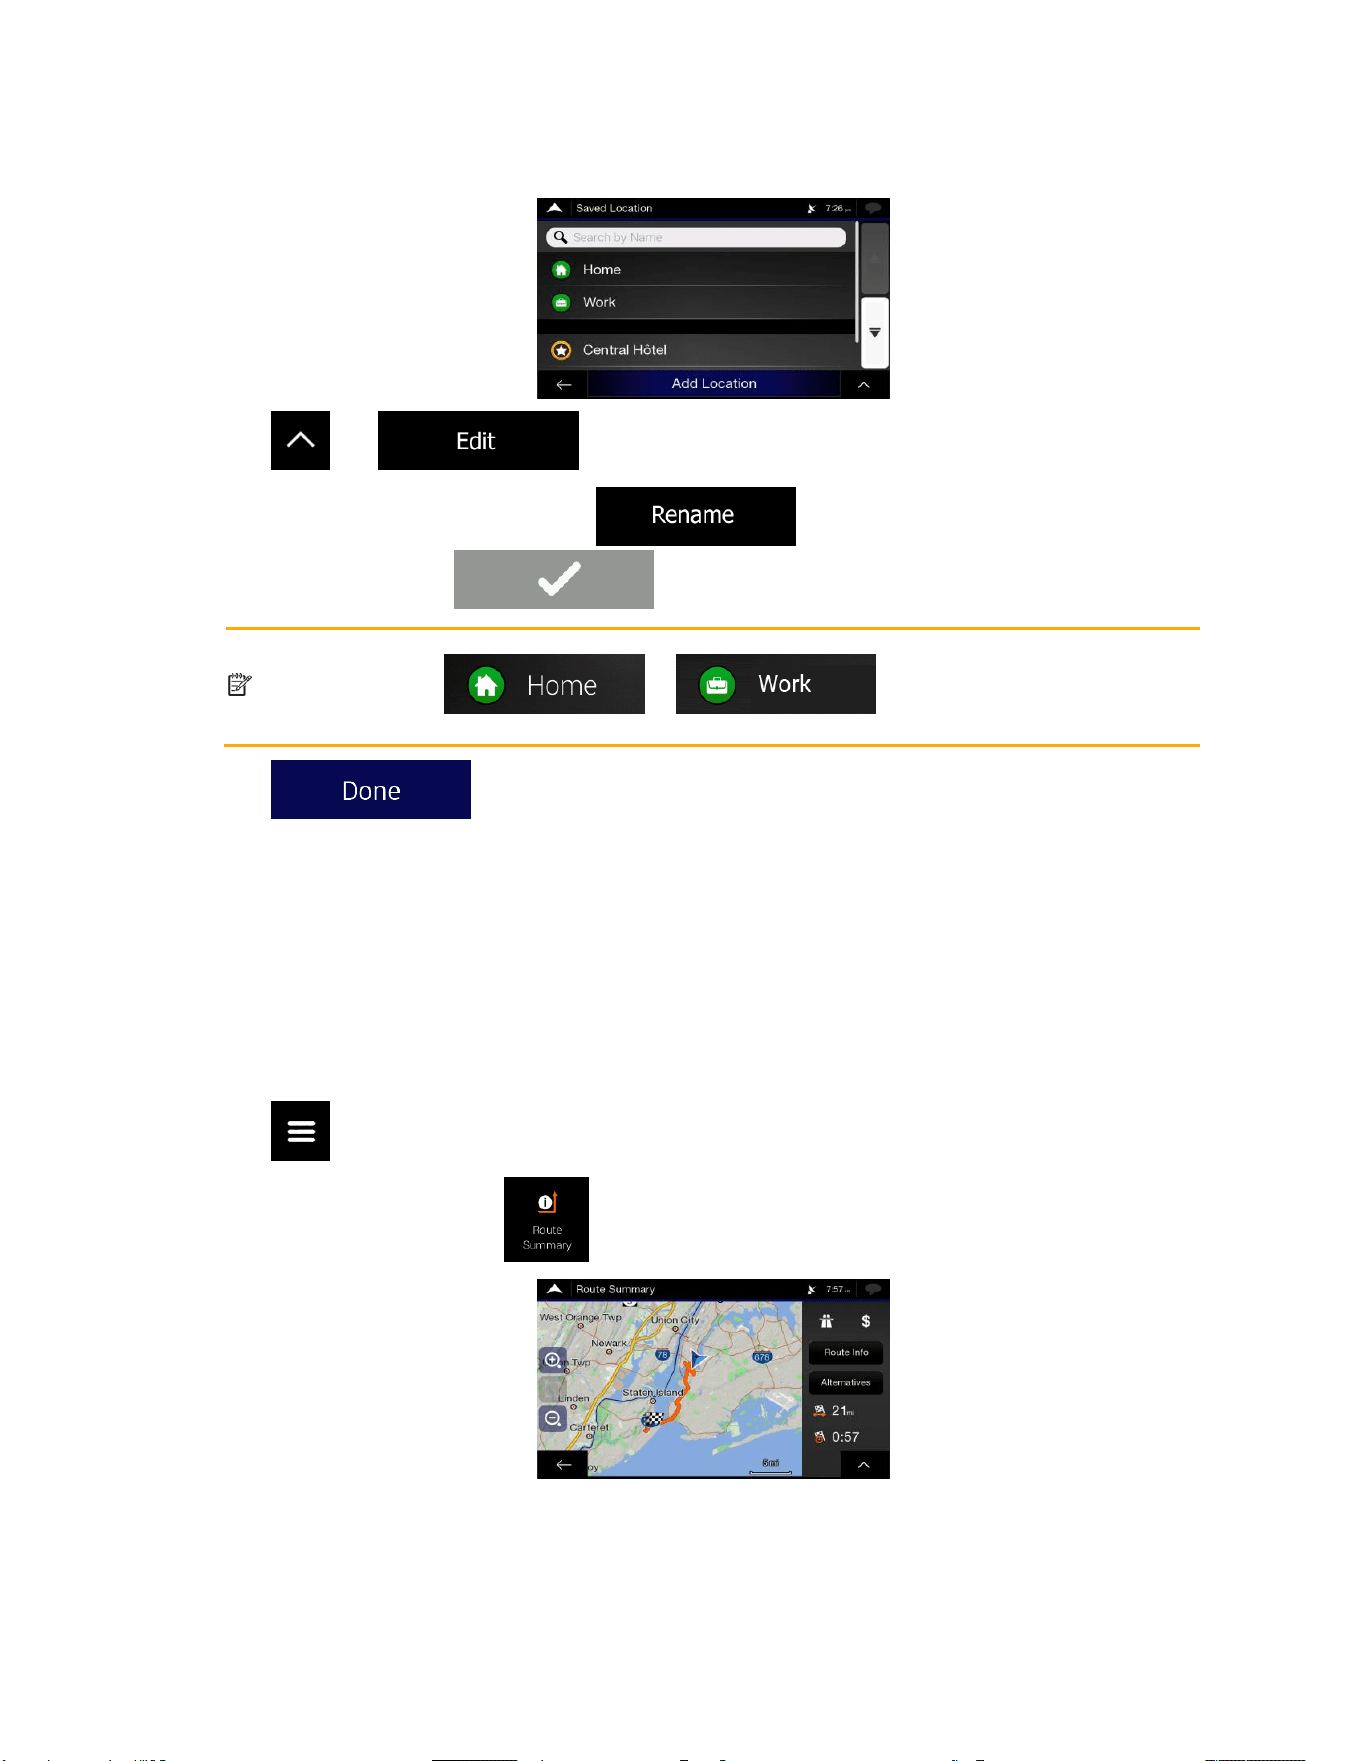
59
2. The list of Saved locations is displayed.
3. Tap and .
4. Tap the location you want to edit, tap and enter the name of the location on
the keyboard, then tap .
Note!
In Saved Locations, Home and Work cannot be renamed. To change your home or work
location, tap or , and confirm the address
change.
5. Tap .
Adding a location to the list of saved locations is described on page 57.
3.5 Running a Simulation
To run a simulated navigation that demonstrates the planned route, perform the following steps:
1. Tap on the Navigation view to access the Navigation menu.
2. In the Navigation menu, tap .

60
3. Tap .
4. Tap . The simulation starts from the starting point of the route and leads you
through the whole planned route using a realistic speed.
(optional) You have the following controls during the simulation (the control buttons disappear after
a few seconds but you can open them again if you tap the map):
• : Jump to the next route event (maneuver).
• : Pause the simulation.
• : Jump to the previous route event (maneuver).
• : Tap to increase the speed of the simulation to 4, 8 or 16 times faster. Tap again to
return to normal speed.
5. Tap to stop the simulation.
3.6 Off-road navigation
When first started, Alpine navigation calculates routes using the road network of the maps provided with
the product. If you want to disregard roads during navigation, you can switch to off-road mode, for
example when driving in a desert.
3.6.1 Switching to off-road navigation
To switch to off-road navigation, perform the following steps:
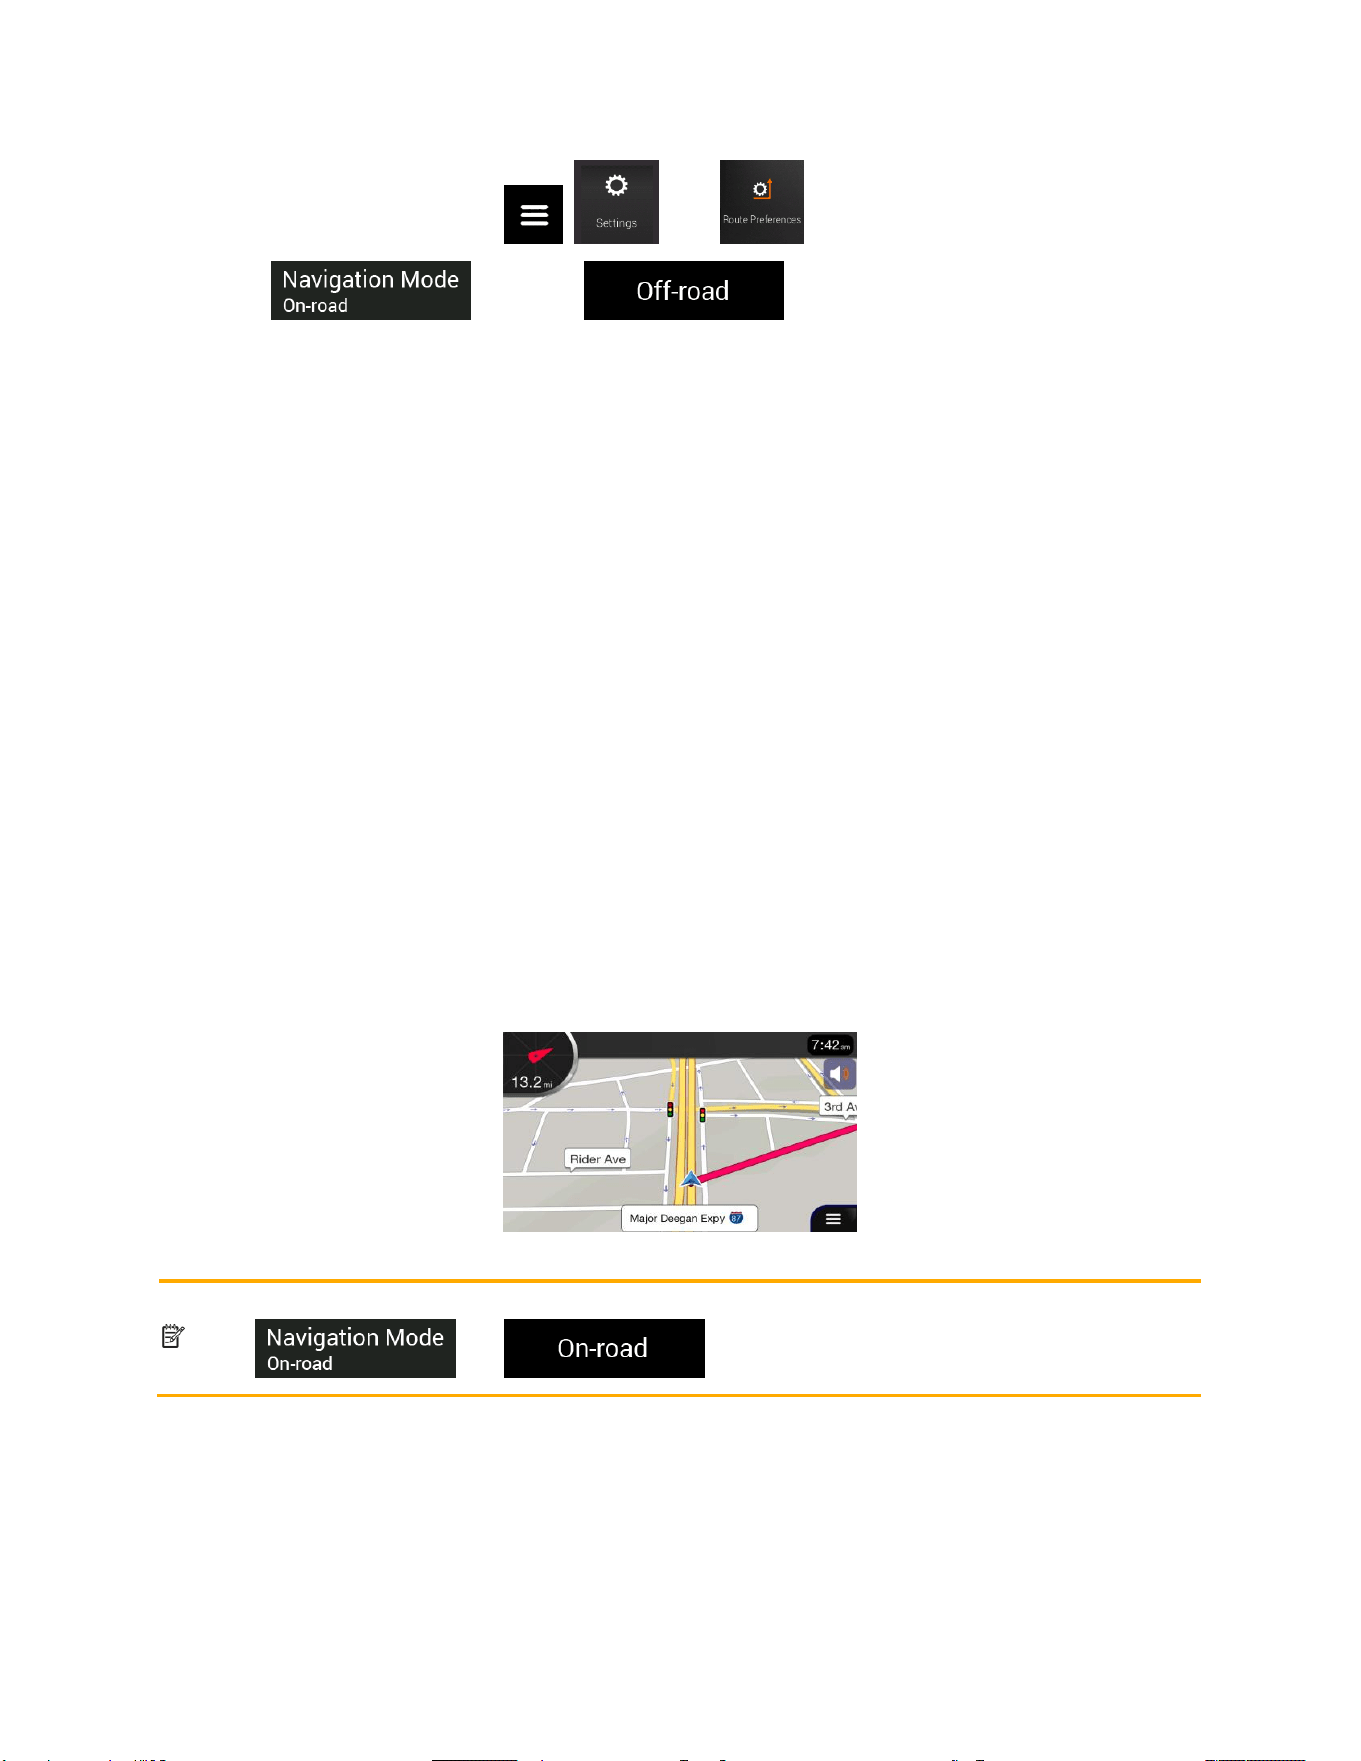
61
1. On the Navigation view, tap , , and .
2. Tap and select .
Most of the procedures described for on-road navigation also apply to off-road navigation. However, there
are some that are not available in this navigation mode. For example:
• You cannot open the itinerary as you have no manoeuvres just route points and straight lines
between them.
• There are no route alternatives and route planning method.
• Vehicle settings are disabled.
3.6.2 Selecting the destination in off-road mode
Selecting a destination (waypoint or final destination) is the same as described in the previous sections.
The only difference is that route points are linked to form a route with straight lines regardless of the road
network and traffic regulations.
3.6.3 Navigating in off-road mode
The real difference between on-road and off-road modes is the navigation itself. When you are on the
Navigation view with an off-road route:
• Your position and heading is not aligned to the nearest road.
• There is no turn-by-turn navigation, just a recommended direction.
You can see an orange line drawn between your current position and the next destination to reach. The
Turn Preview field in the top left corner shows a compass with your bearing and the distance of the next
destination.
When you reach the final destination, the navigation ends.
Note!
If you do not want to use off-road navigation, switch back to on-road navigation by tapping
and .

62
4 Map Update
To update your navigation software and its maps, you need the following:
• Internet connection
• An empty USB storage device
To update your navigation software and its maps, perform the following steps:
1. Download and install the Toolbox PC tool on your PC.
a. Go to the alpine.naviextras.com website. If you do not have a user account yet, create one.
b. Click Download PC tool on the right side of the page to access the download page.
c. Follow the instructions on the site to download and install the Toolbox PC tool on your PC.
2. Collect navigation device information on a USB storage device.
Caution!
Do not switch off your navigation system during the following process
Do not remove the USB storage device until the preparation process is completed.
a. Start the navigation system while your vehicle is parked.
b. Insert the empty USB storage device into the USB port of your navigation system.
c. Press the navigation hardkey button, and in the Navigation Menu, tap
d. Tap Yes on the confirmation screen. The collection of device information starts, and a
progress bar shows the status of the process.
e. Wait until you receive the following message: Operation successful. You can now connect
your USB stick to your computer and purchase/download the necessary contents from
www.naviextras.com using the Toolbox application. Remove the USB storage device from
your navigation system.
3. Download updates with the Toolbox PC tool.
a. Connect the same USB storage device to your PC.
b. Start the Toolbox PC tool on your PC and sign in with your Naviextras user name and
password.
c. Use the Toolbox PC tool to download updates and to purchase additional extras at your
convenience. For instructions on using the Toolbox, see the Toolbox How-to Guides at
alpine.naviextras.com/shop/portal/support.
d. Once the download is complete, remove the USB storage device from the PC.
4. Perform the update on your navigation system.
Caution!
Do not switch off your navigation system during the following process
Do not remove the USB storage device until the preparation process is completed.
a. Start the navigation system while your vehicle is parked and go to any navigation-related
screen.
b. Insert the USB storage device that now contains the updates into the USB port of your
navigation system.
c. Tap Yes on the confirmation screen. The software update starts, and a progress bar shows
the status of the process.

63
d. Wait until you receive the following message: The software update has been successfully
completed. Remove the USB storage device from your navigation system.
The navigation system will start using the updated maps next time you start the car.
Note!
If you switch off the navigation system or remove the USB storage device during the update
process, it will continue on next launch.

64
5 Reference guide
The following sections describe the different concepts and menu screens of Alpine navigation.
5.1 Concepts
The following sections describe and explain navigation-related concepts.
5.1.1 2D/3D GPS reception
The GPS receiver uses satellite signals to calculate its (your) position and needs at least four signals to
give a three-dimensional position, including elevation. Because the satellites are moving and because
objects can block the signals, your GPS device might not receive four signals. If three satellites are
available, the receiver can calculate the horizontal GPS position but the accuracy is lower and the GPS
device does not give you elevation data; only 2D reception is possible.
Several factors have an impact on the deviation between your real position and the one given by the GPS
device. For example, signal delay in the ionosphere or reflecting objects near the GPS device have a
different and varying impact on how accurately the GPS device can calculate your position.
5.1.2 Road safety cameras and other proximity Alert Points
There is a special proximity warning for road safety cameras (like speed or red light cameras) and other
proximity Alert Points (like schools or railroad crossings). These Alert Points are preloaded in Alpine
navigation.
The application can warn you when you approach road safety cameras like speed cameras or dangerous
areas like school zones or railroad crossings. You can set up the different alert types individually in the
Warnings settings, see page 73.
The following warning types are available:
• Audio warning: beeps are played while you are approaching one of these points, or extra alert
sounds if you exceed the given speed limit while approaching.
• Visual warning: the type of the Alert Point, its distance and the related speed limit appear on the
Navigation view while you are approaching one of these locations.
For some of the Alert Points, either the enforced or expected speed limit is available. For these points, the
audio alert can be different if you are below or above the given speed limit.
• Only when speeding: The audio alert is only played when you exceed the given speed limit.
• When approaching: The audio alert is always played when approaching one of these Alert Points.
In order to draw your attention, the alert is different when you exceed the speed limit.
Note!
The warning for road safety cameras is usually disabled when you are in a country where road
safety camera warnings are prohibited. Make sure that using this feature is legal in the country
where you intend to operate. Use it on your own responsibility.

65
5.1.3 Route calculation and recalculation
A route is a sequence of route events, that is, manoeuvres (for example, turns and roundabouts) to reach
the destination. The route contains one starting point and one or more destinations. The starting point is
the current (or last known) position by default. If you need to see a future route, the starting point can be
replaced with any other given point. See page 51.
Once the destination has been selected, Alpine navigation calculates the route based on your
preferences. These preferences are the route planning method, the vehicle type, and the road types used
or avoided when calculating the route. For detailed information on all the preferences, see Route
preferences settings, page 70.
Alpine navigation automatically recalculates the route if you deviate from the proposed itinerary.
Intelligent data (captured historical speed information based on probe data) is used for optimal routing
depending on the day of the week and time of day. Route segments where traffic flow is typically slow at
the given time of day and day of the week are avoided if a suitable alternative can be found. When
calculating the optimal route, the data relevant for the time of the estimated arrival of the vehicle at the
given route point is taken into account. As a result, Alpine navigation may suggest a different route during
the weekday rush hours, especially in major cities with frequent traffic jams. See page 1.
5.1.4 Smart Zoom
Smart Zoom provides the following features:
• While following a route: When approaching a turn, it zooms in and raises the view angle to let
you easily recognise your next maneuver. If the next turn is at a distance, it zooms out and lowers
the view angle to be flat so you can see the road in front of you.
• While driving without a planned route: Smart Zoom zooms in if you drive slowly and zooms out
when you drive at a high speed.
5.1.5 Speed limit warning
Maps may contain information about the speed limits of the road segments. Alpine navigation is able to
warn you if you exceed the current limit. This information may not be available for your region, or may not
be fully correct for all roads on the map.
Speed warning can be fine-tuned in Warnings. See page 73.
You can also set the relative speed tolerance above which the application initiates the warning.
The following warning types are available:
• Audio warning: You receive a verbal warning when you exceed the speed limit with the given
percentage.
• Visual warning: The current speed limit is shown on the map when you exceed it (for example
).
You can also choose to see the speed limit sign on the map all the time.
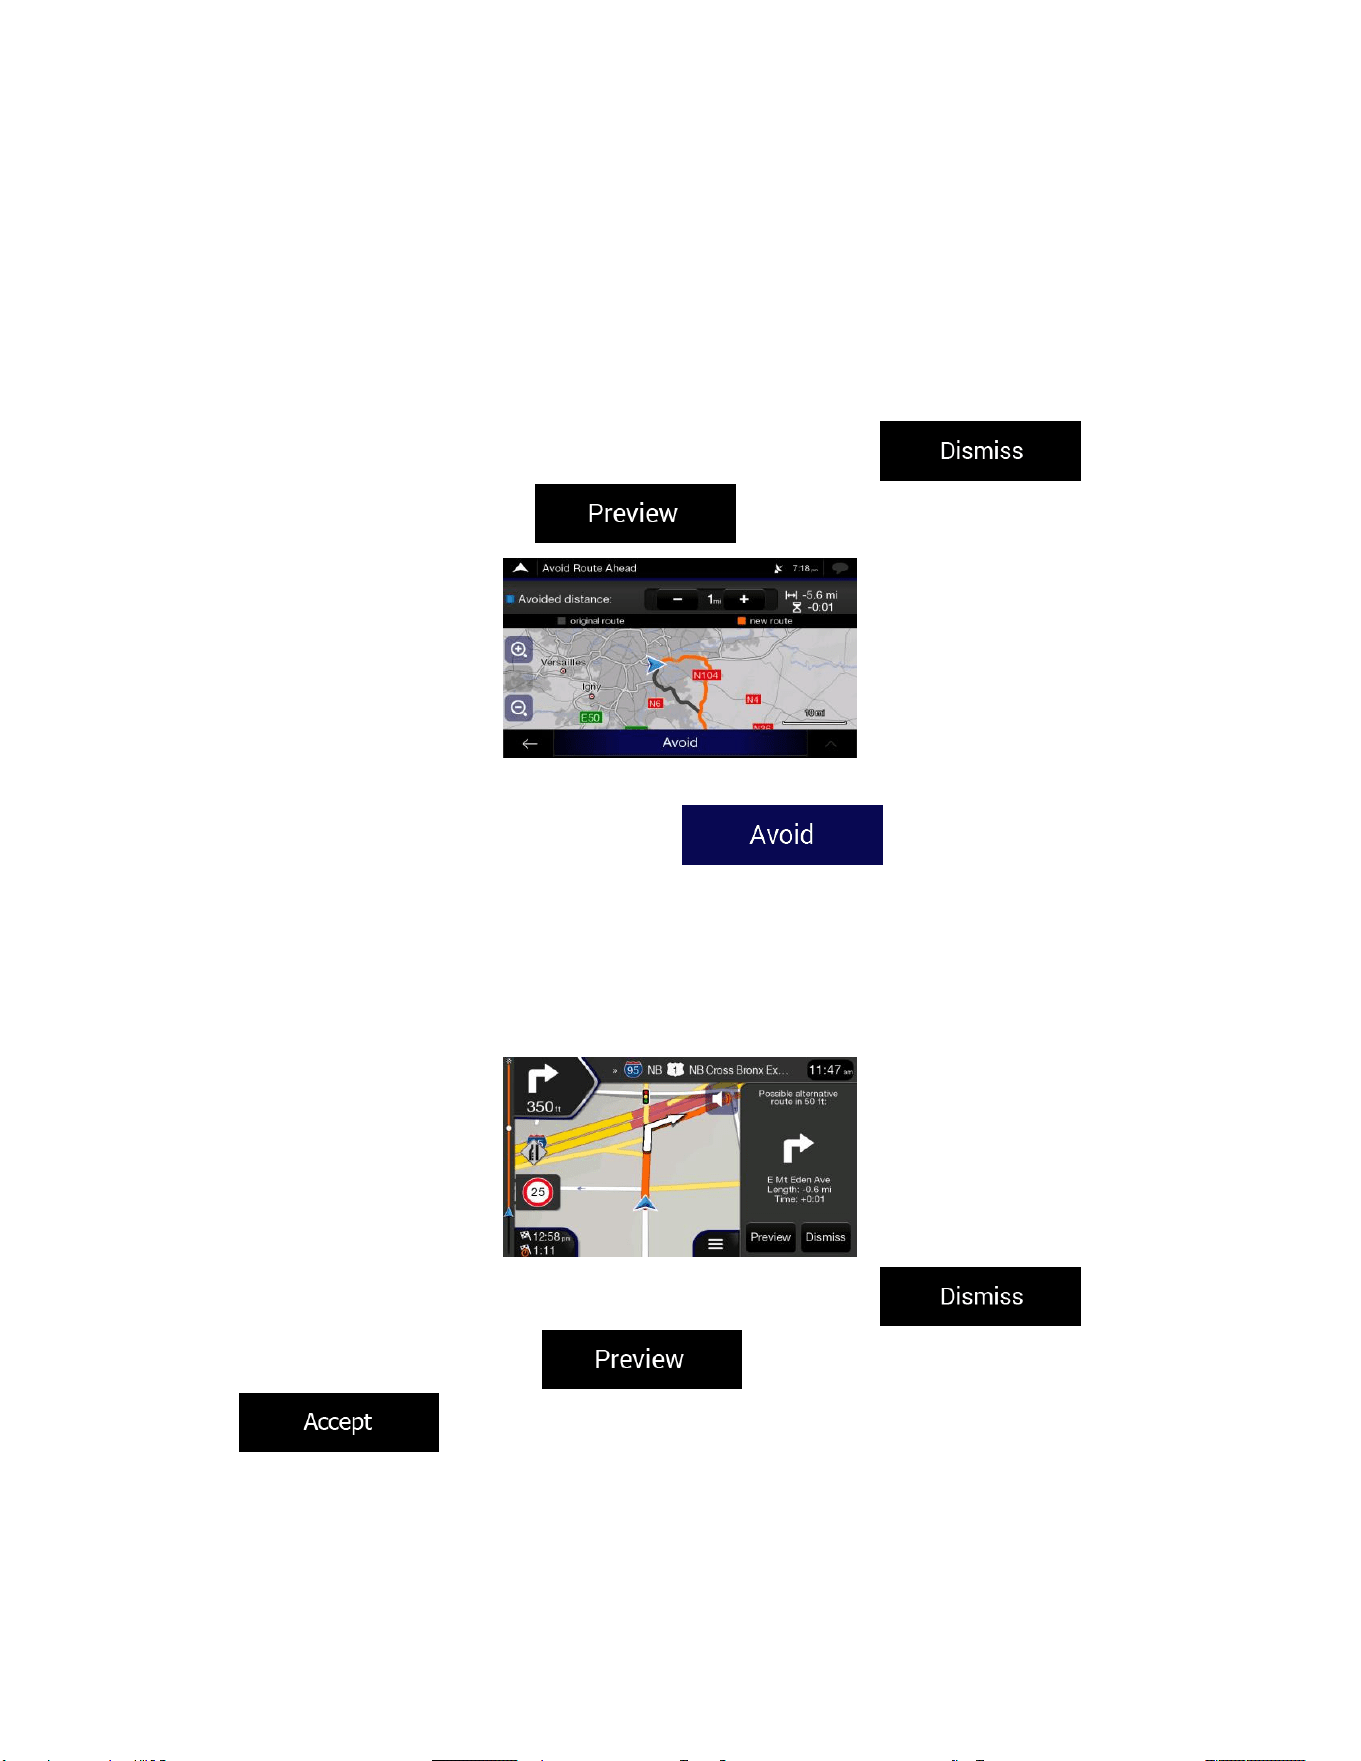
66
5.1.6 Intelligent navigation
With the help of intelligent navigation, the planned route can adapt to traffic and other changes during
navigation. The following sections describe these features.
5.1.6.1 Congestion detour on highways
Alpine navigation may offer a detour when you slow down on a highway due to a traffic jam. The Potential
congestion detour window appears and shows the length and duration of the detour.
You can ignore this message and keep the original route by tapping or you can
check the suggested route by tapping .
By tapping the plus/minus signs, you can increase or decrease the distance to avoid on the highway.
You can accept the recommended detour by tapping .
5.1.6.2 Real-time alternative routes
Alpine navigation may offer an alternative route on normal roads in case of a traffic jam. The possible
alternative route window appears and shows the length and duration of the detour.
You can ignore this message and keep the original route by tapping or you can
check the suggested route by tapping . You can accept the recommended detour by
tapping .
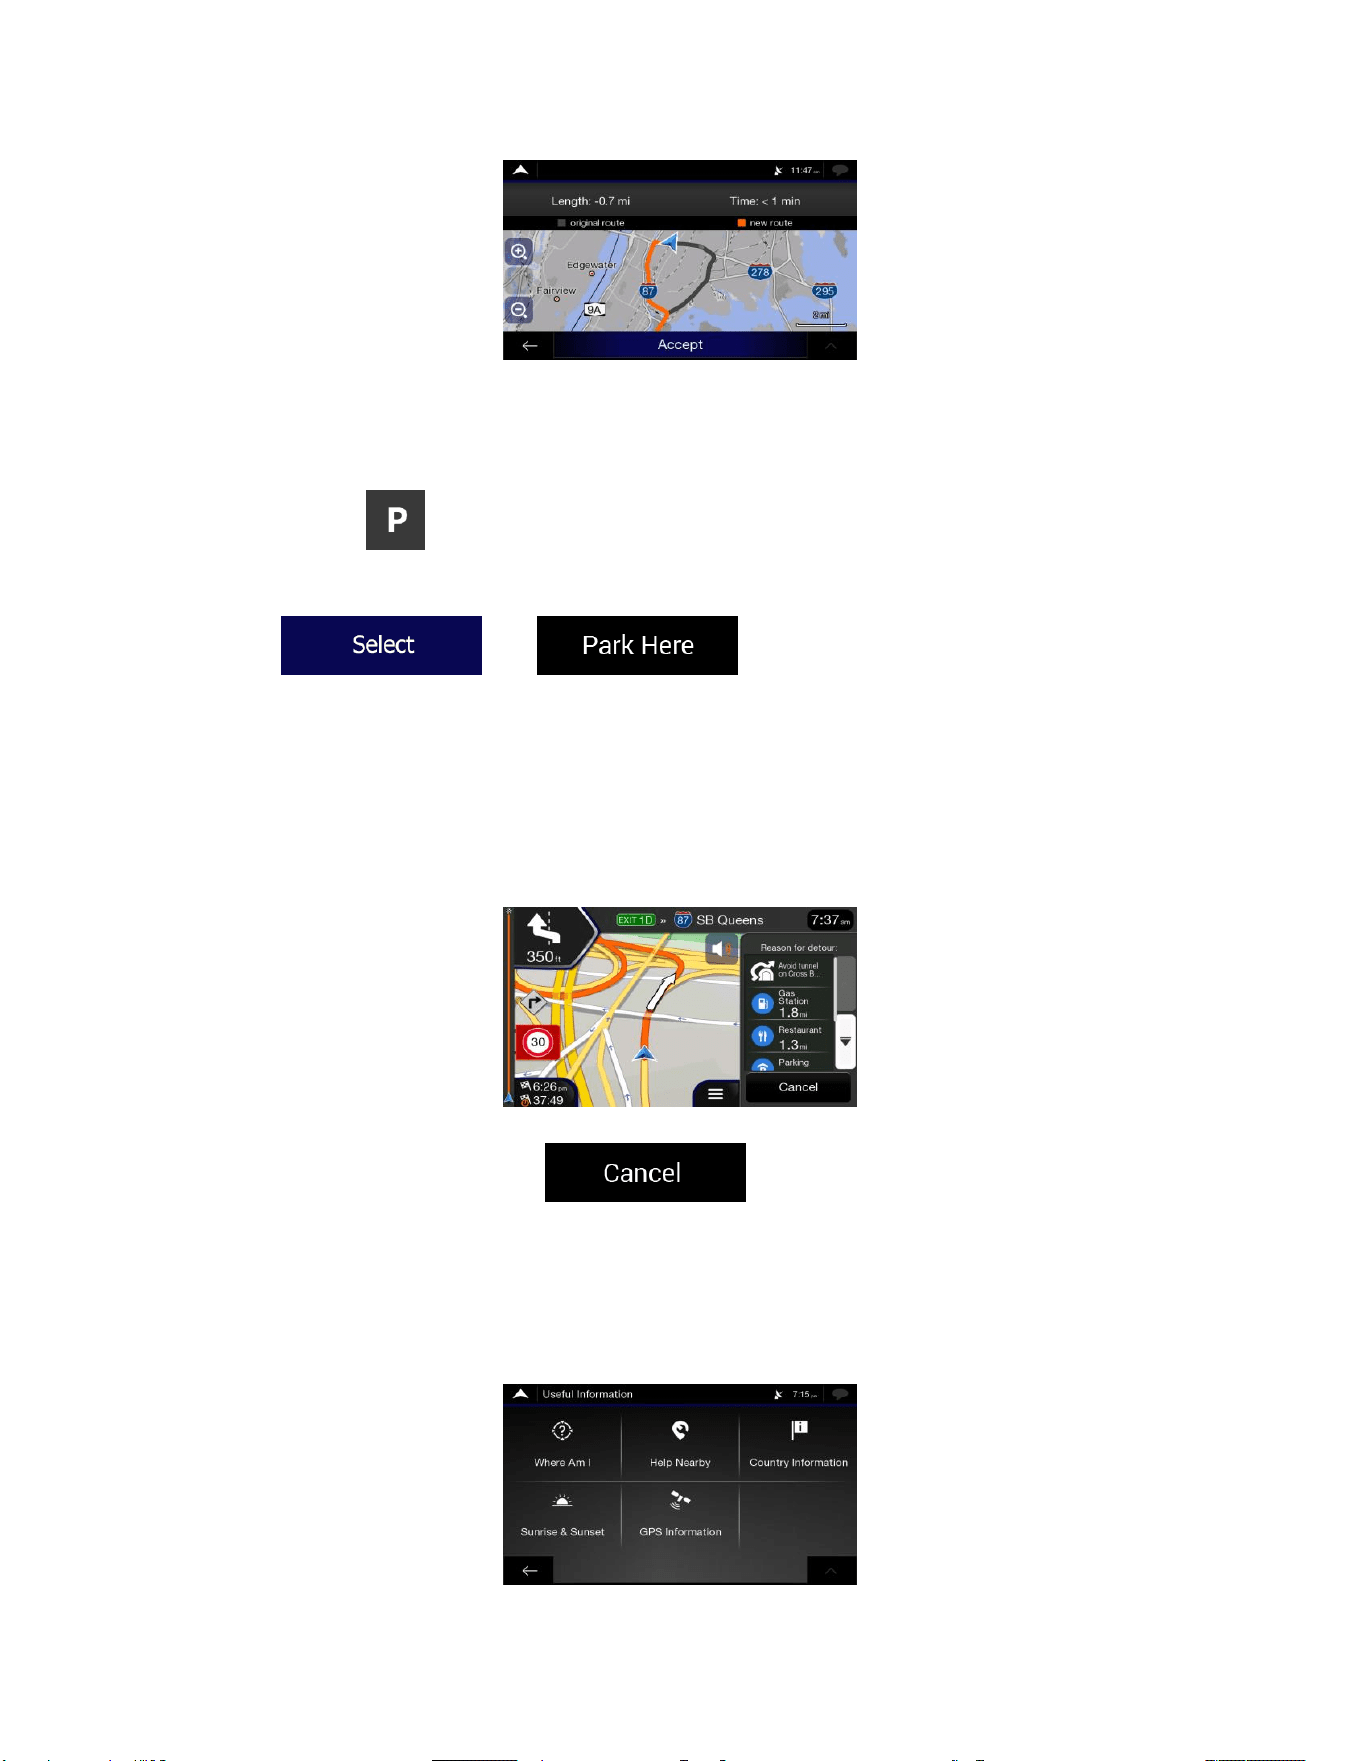
67
5.1.6.3 Parking around destination
If you leave the planned route by exiting a freeway, Alpine navigation tries to guess the reason for making
a detour. By tapping , you can open a top-down map with the recommended parking Places around
the destination. By tapping the arrows on the sides, you can switch between the recommended parking
facilities.
By tapping and , the selected parking place becomes your
destination.
5.1.6.4 Hints upon detour
If you leave the planned route by exiting a freeway, Alpine navigation tries to guess the reason for making
a detour. The Reason for detour window appears and shows available gas stations, restaurants or other
Places around the current position. Also, if there are avoidable parts of the original route ahead (like a
tunnel, a toll road or a ferry), you can find them in the list, in case you want to bypass them.
By tapping one of the Places, Alpine navigation creates a waypoint and navigates you to the selected
place. You can ignore them by tapping .
5.2 Useful Information menu
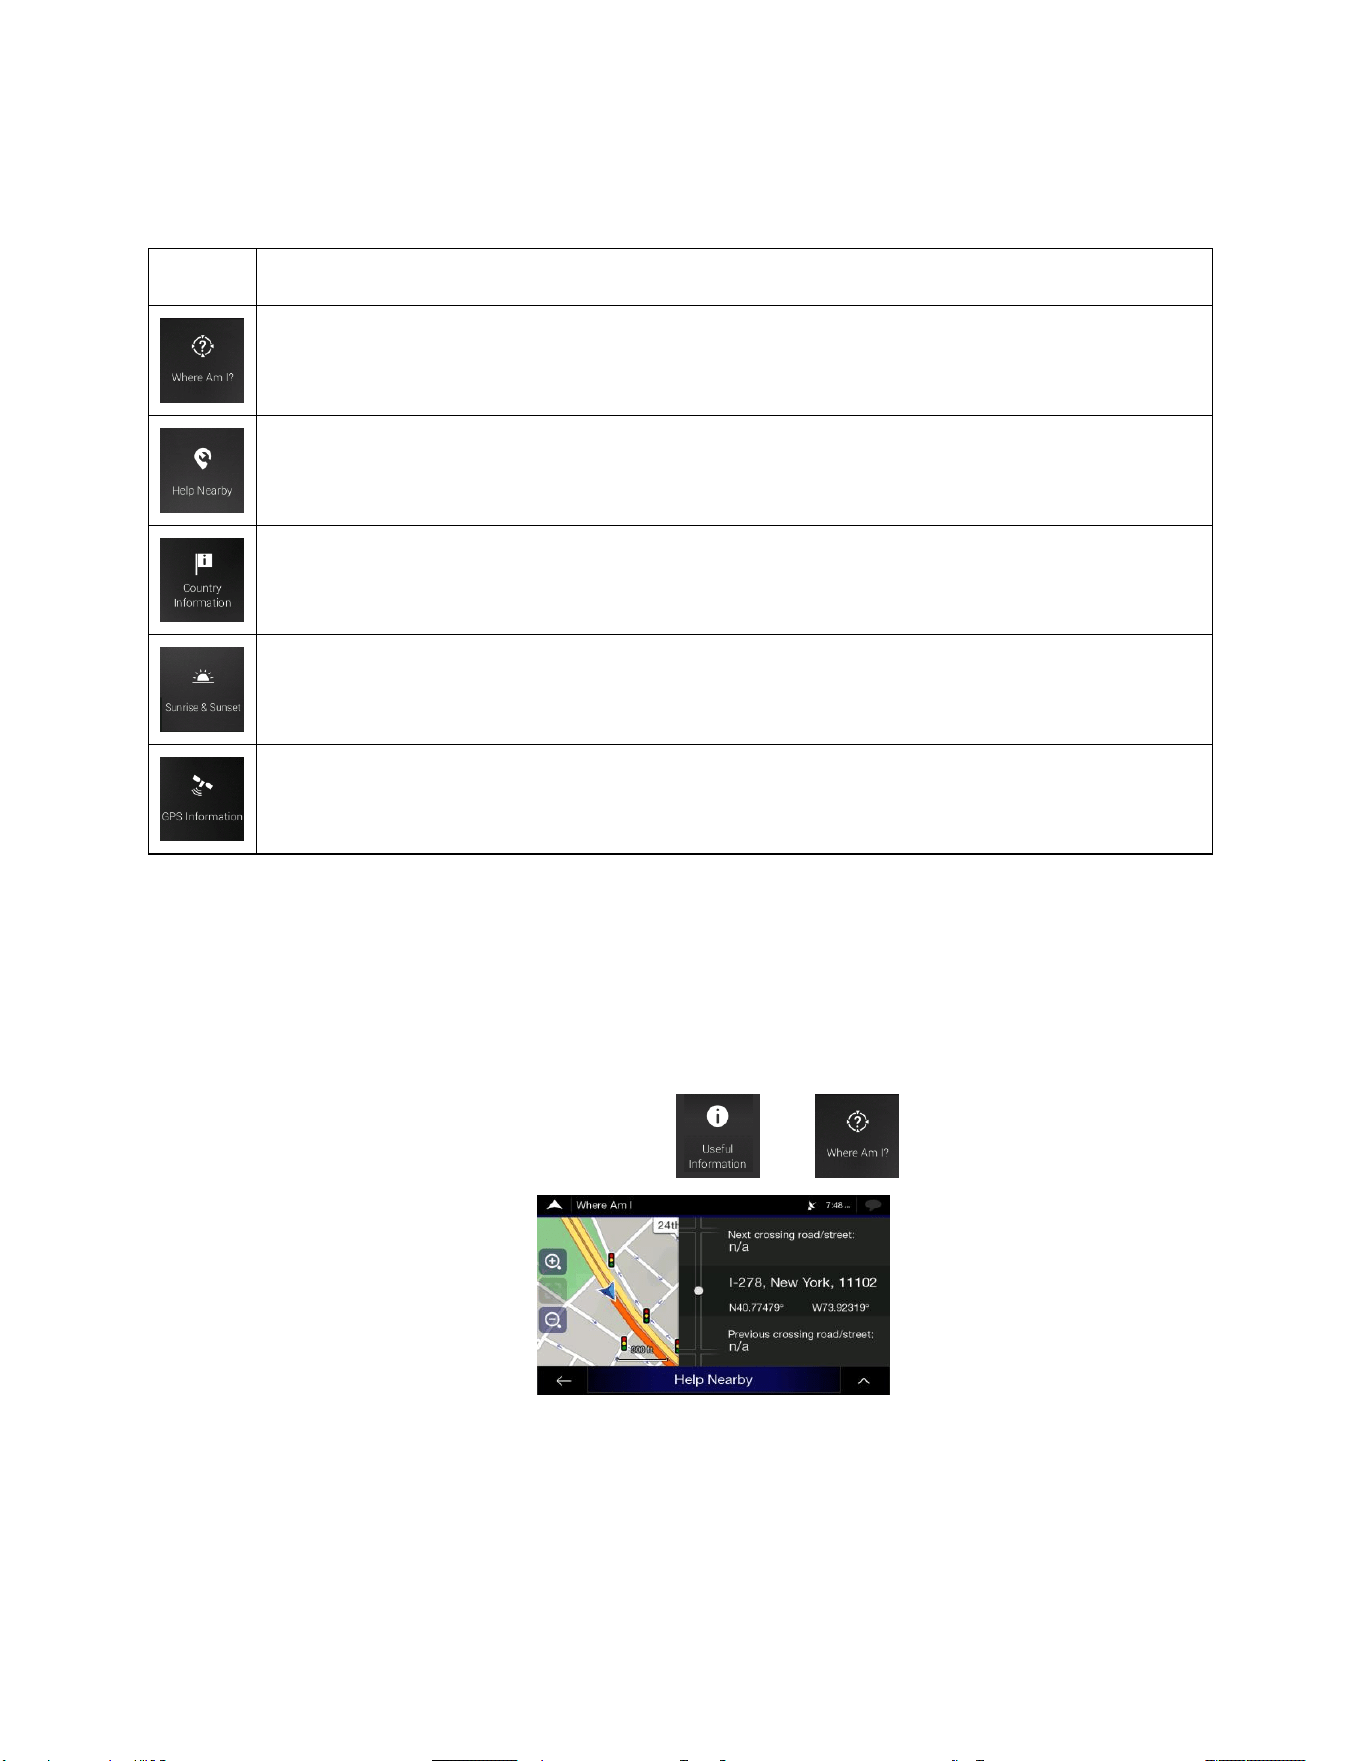
68
The Useful Information menu provides various additional functions. It can be found in the Navigation
menu.
Button
Description
Shows information on the current position (latitude, longitude, nearest town, next crossing
street, and so on) or the last known position if GPS reception is not available. See page 68.
Offers assistance near your current position. See page 41.
Offers a list of countries with useful driving information about the selected country (for example
speed limits, maximum blood alcohol level).
Shows the exact sunrise and sunset times for all your route points.
Shows the GPS Information screen with satellite position and signal strength information.
5.2.1 Where Am I
This screen contains information about the current position (or about the last known position if GPS
reception is not available). You can access it the following two ways:
• By going to the Navigation menu and tapping and .
• By tapping the current street name if it is displayed below the current position marker on the map.
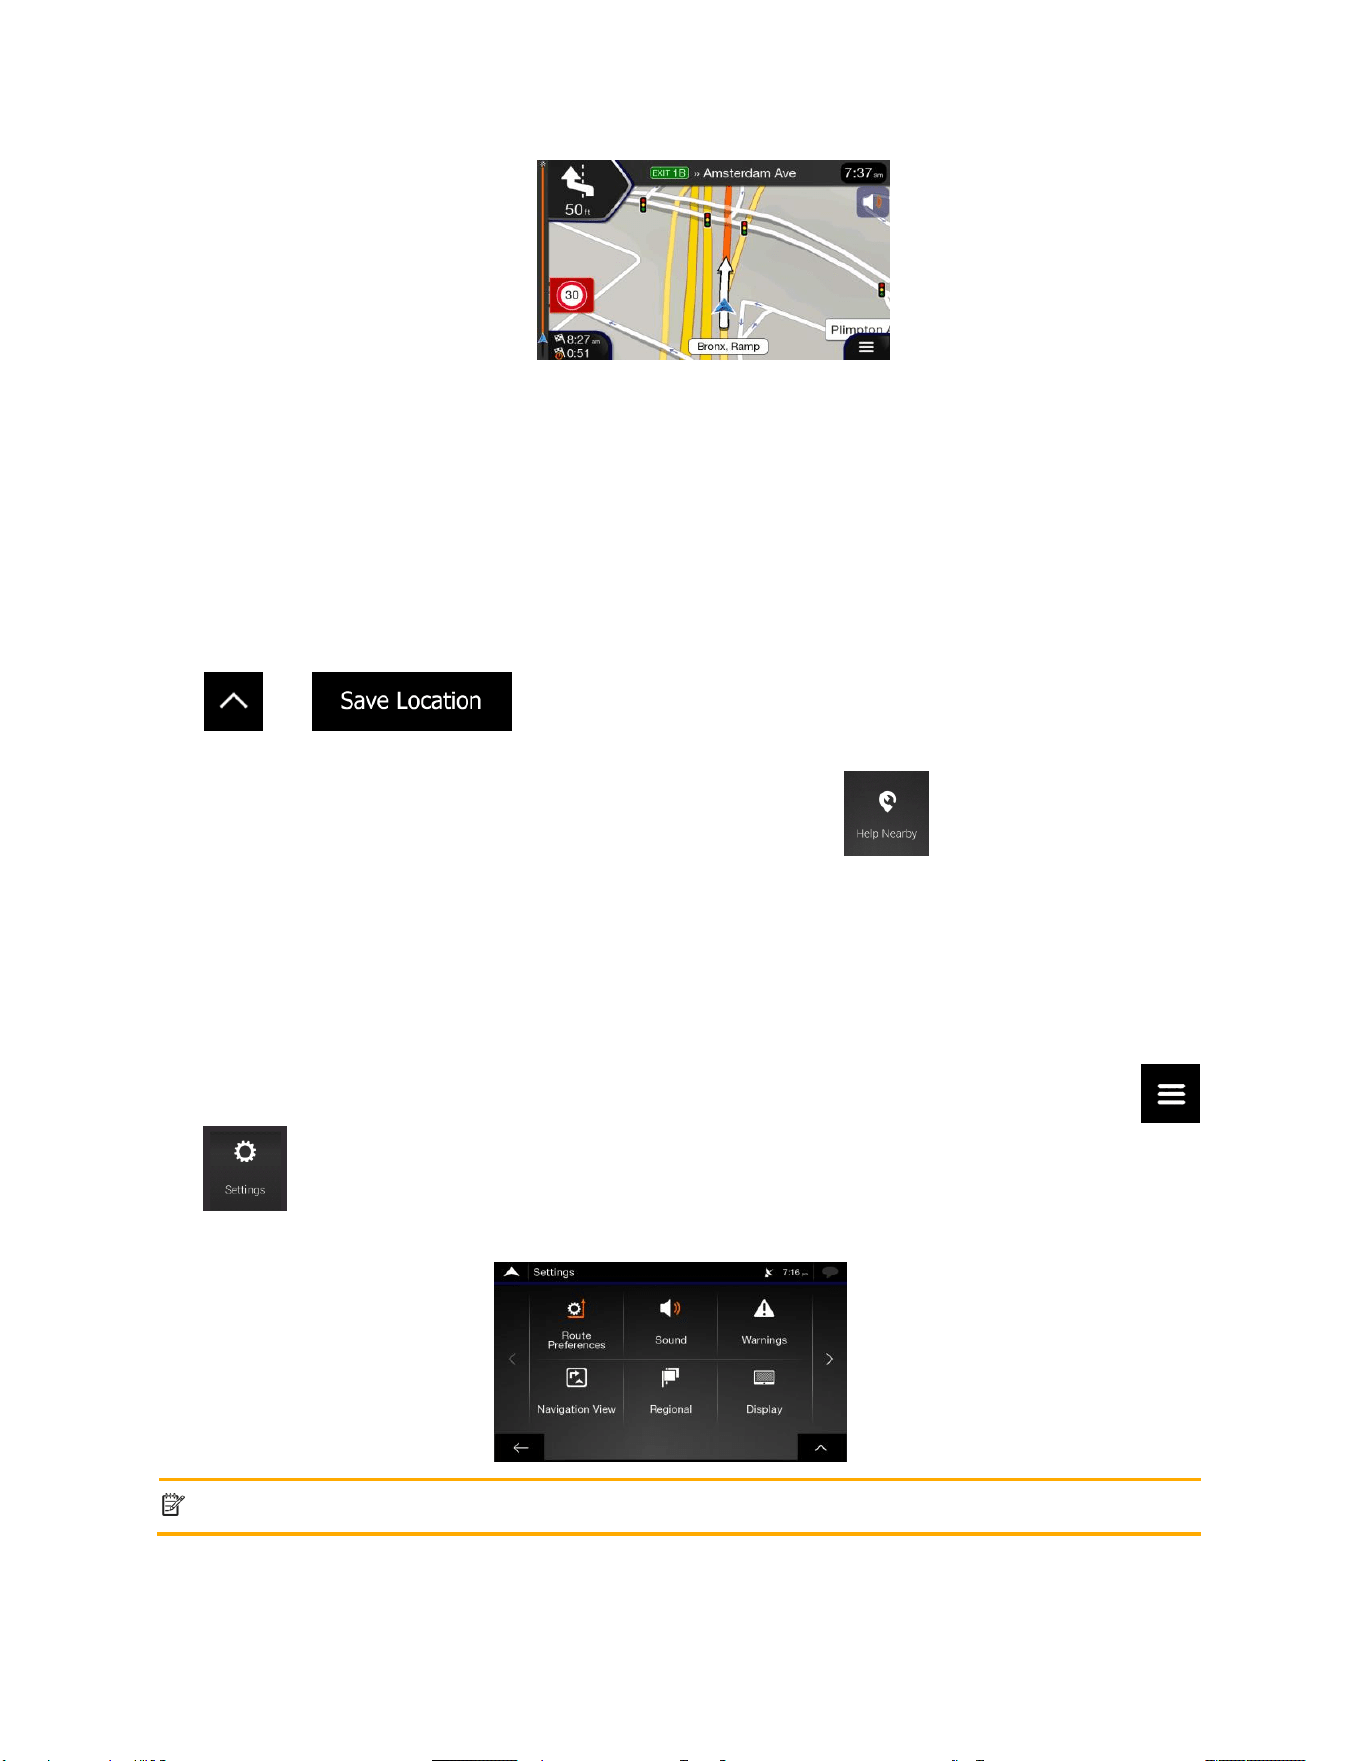
69
The following information is shown on the Where Am I screen:
• Address details (when available) of the current position
• Latitude and Longitude (coordinate of the current position in WGS84 format)
• The nearest town
• Next crossing road/street
• Previous crossing road/street.
You can also perform some actions on this screen.
Tap and to add the current position to the saved locations and to check the
country information.
You can also search for assistance near your current position. Tap to open a new screen for
quick search and select a category. For detailed information, see page 41.
5.3 Settings menu
You can configure the navigation settings, and modify the behavior of Alpine navigation, by tapping
and .
Tap the arrows to view the content of other pages.
Note!
Changing some of these settings may not have an effect in your current region if the map data
do not contain the required information.
The Settings menu provides the following options:

70
Button
Function
Select the type of vehicle you are driving, the road types used in route planning, and the route
planning method.
Adjust the different sound volumes.
Enable and set up warnings for speed limit, Alert Points (such as speed cameras), and road
signs.
Fine-tune the appearance of the Navigation view or adjust how the software helps you
navigate with different kinds of route-related information on the Navigation view.
Change the voice guidance language, set the time zone, the measurement units, the time and
date formats, and customise the application for your local language.
Enable or disable menu animations.
5.3.1 Route preferences settings
The following settings determine how routes are calculated:
Button
Function
Set the type of vehicle you want to use to navigate the route. Based on this setting,
some of the road types can be excluded from the route, or some of the restrictions
may not be taken into account in route calculation.
Optimise the route calculation for different situations and vehicle types by changing
the planning method. See page 71.
Select on-road or off-road navigation. See page 60.
Select your preferred road types for the route. See page 72.
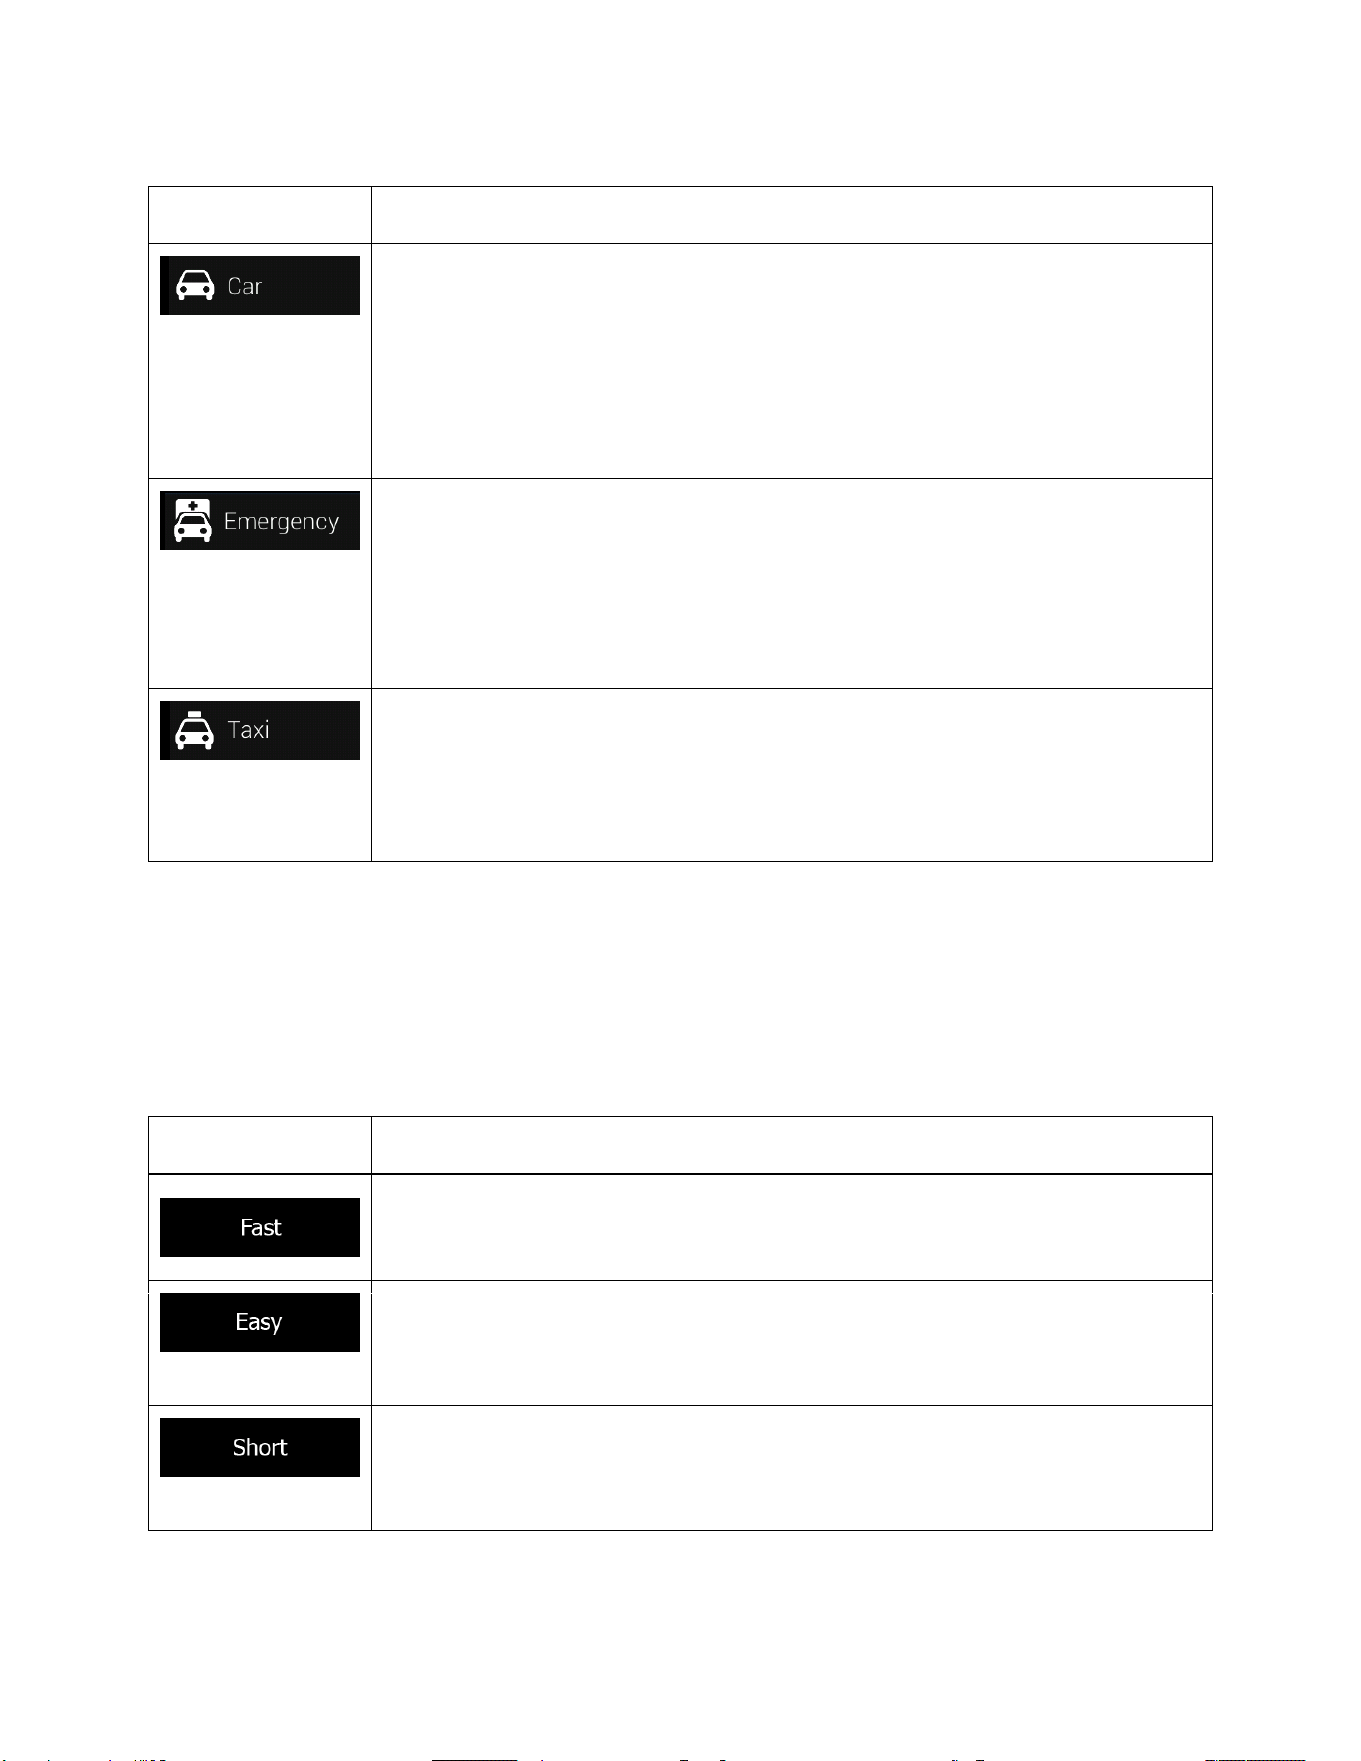
71
Button
Description
Maneuver restrictions and directional constraints are taken into account when
planning a route.
Roads are used only if access for cars is allowed.
Private roads and resident-only roads are used only if they are inevitable to reach
the destination.
Walkways are excluded from routes.
All manoeuvres are available in intersections.
One-way streets are taken into account so that driving in the opposite direction is
allowed at low speed.
A private road is used only if the destination is there.
Walkways are excluded from routes.
Maneuver restrictions and one-way streets are taken into account when planning a
route.
Roads are used only if access for taxis is allowed.
Private roads, resident-only roads and walkways are excluded from routes.
5.3.1.1 Route Planning Method types
You can select from the following route planning method types:
Button
Description
Gives a quick route if you can travel at or near the speed limit on all roads. Usually,
the best selection for fast and normal cars.
Results in a route with fewer turns and no difficult manoeuvres. With this option,
you can make Alpine navigation take, for example, the freeway instead of a series
of smaller roads or streets.
Gives a short route to minimize the travel distance. It can be optimal for slow
vehicles. Searching for a short route regardless of the speed, this route type is
rarely optimal for normal vehicles.
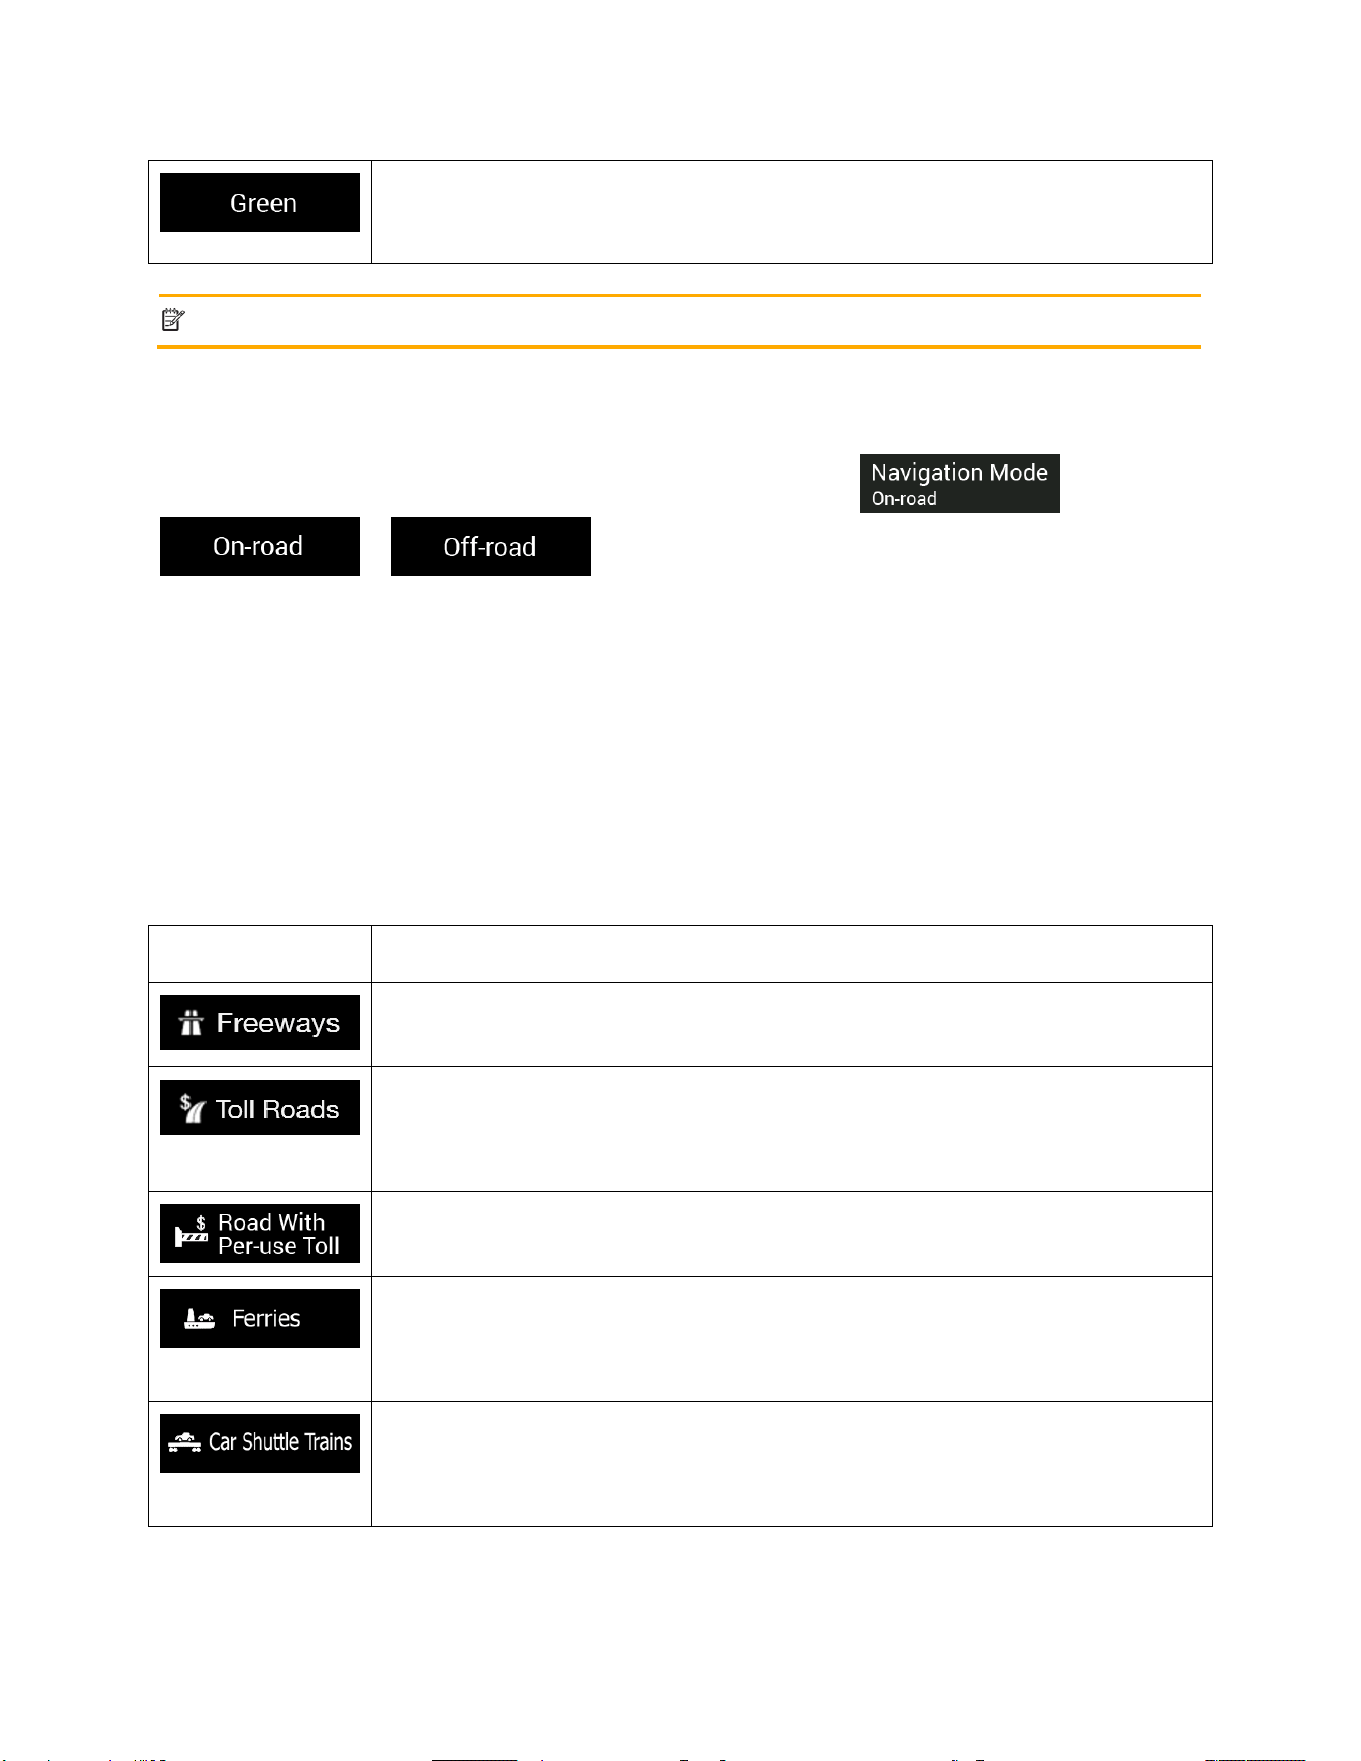
72
Gives a quick but fuel-efficient route based on the fuel consumption data. Travel
cost and CO
2
emission calculations are estimations only. They cannot take
elevations, curves and traffic conditions into consideration.
Note!
Depending on the vehicle type, some methods may not be available.
5.3.1.2 Navigation Mode
You can switch between on-road and off-road navigation by tapping and selecting
or (page 60).
5.3.1.3 Road types
To let the route fit your needs, you can also set which road types are to be considered for or to be
excluded from the route.
Excluding a road type is a preference. It does not necessarily mean total prohibition. If your destination
can only be accessed using some of the excluded road types, they are used only as much as necessary.
In this case, a warning icon is shown on the Route information screen, and the part of the route not
matching your preference is displayed in a different color on the map.
The following road types are available:
Button
Description
You might need to avoid motorways when you are driving a slow car or you are
towing another vehicle.
Charge roads are pay roads where you can purchase a pass or vignette to use the
road for a longer period of time. They can be enabled or disabled separately from
toll roads.
Per-use toll roads are pay roads where there is a per-use charge in the routes by
default. If you disable toll roads, Alpine navigation plans the best toll-free route.
Alpine navigation includes ferries in a planned route by default. However, a map
does not necessarily contain information about the accessibility of temporary
ferries. You might also need to pay a fare on ferries.
Car shuttle trains are used to transport vehicles for a relatively short distance and
they usually connect places that are not easily accessible on a road, for example,
in Switzerland.
73
Alpine navigation excludes unpaved roads by default. Unpaved roads can be in a
bad condition and you usually cannot reach the speed limit on them.
4WD tracks are dirt roads of very poor condition. They can only be driven by 4WD
vehicles. Alpine navigation Excludes 4WD tracks by default.
5.3.2 Sound settings
You can modify the following settings:
Button
Function
Disable verbal instructions. This function is enabled by default.
Set whether you want an immediate announcement for the next maneuver after
each turn, or it is enough to receive the information when the turn is near.
Set the verbosity of the voice instructions, that is how much they tell and how often
they speak.
• Low: the voice instruction is given once right before the next maneuver.
• Medium: the voice instruction is given when approaching the next maneuver
and it is repeated right before the maneuver.
• High: the voice instruction is given first relatively far from the next
maneuver, it is repeated when approaching the next turn, and it is repeated
again right before the actual maneuver.
5.3.3 Warnings settings
You can enable and modify the following settings:
74
Button
Description
Alpine navigation is able to warn you if you exceed the current speed limit. This
information may not be available in your region, or may not be fully correct for all
roads on the map.
This setting lets you decide whether you wish to receive visible and/or audible
warnings.
The following warning types are available:
• Visual warning: the current speed limit is shown on the map when you
exceed it.
• Audio and Visual warning: besides the current speed limit being shown on
the map, you also receive a verbal warning when you exceed the speed
limit with the set percentage.
If you prefer to see the speed limit sign on the map all the time (normally, it is
shown only if you exceed the limit), you can set it here.
You can also set the relative speed above which the application initiates the
warning by adjusting a slider. The value can be different within and outside towns.
Tap it to receive a warning when approaching a road safety camera or other Alert
Points like school zones or railroad crossings. You must make sure that using this
feature is legal in the country where you intend to use it.
You can set the warning type for the different Alert Point categories (alert types)
individually. The following warning types are available:
• Visual warning: the type of the Alert Point, its distance, and the related
speed limit appear on the Navigation view while you are approaching one of
these locations.
• Audio and Visual warning: besides the visual alert, beeps are played while
you are approaching one of these points, or extra alert sounds if you exceed
the given speed limit while approaching.
For some of the Alert Points, the enforced or expected speed limit is available. For
these points, the audio alert can be different if you are below or above the given
speed limit.
• Only when speeding: The audio warning is only played when you exceed
the given speed limit.
• When approaching: The audio warning is always played when approaching
one of these Alert Points. In order to draw your attention, the audio alert is
different when you exceed the speed limit.
Maps may contain driver alert information that can be shown on the Navigation
view in a similar way as real-life road signs. Tap it to enable or disable the warning
for these road segments (for example, dangers and sharp curves). For each
category of warning signs, set the warning type (visual or audio and visual) and the
distance from the hazard to receive the warning at.
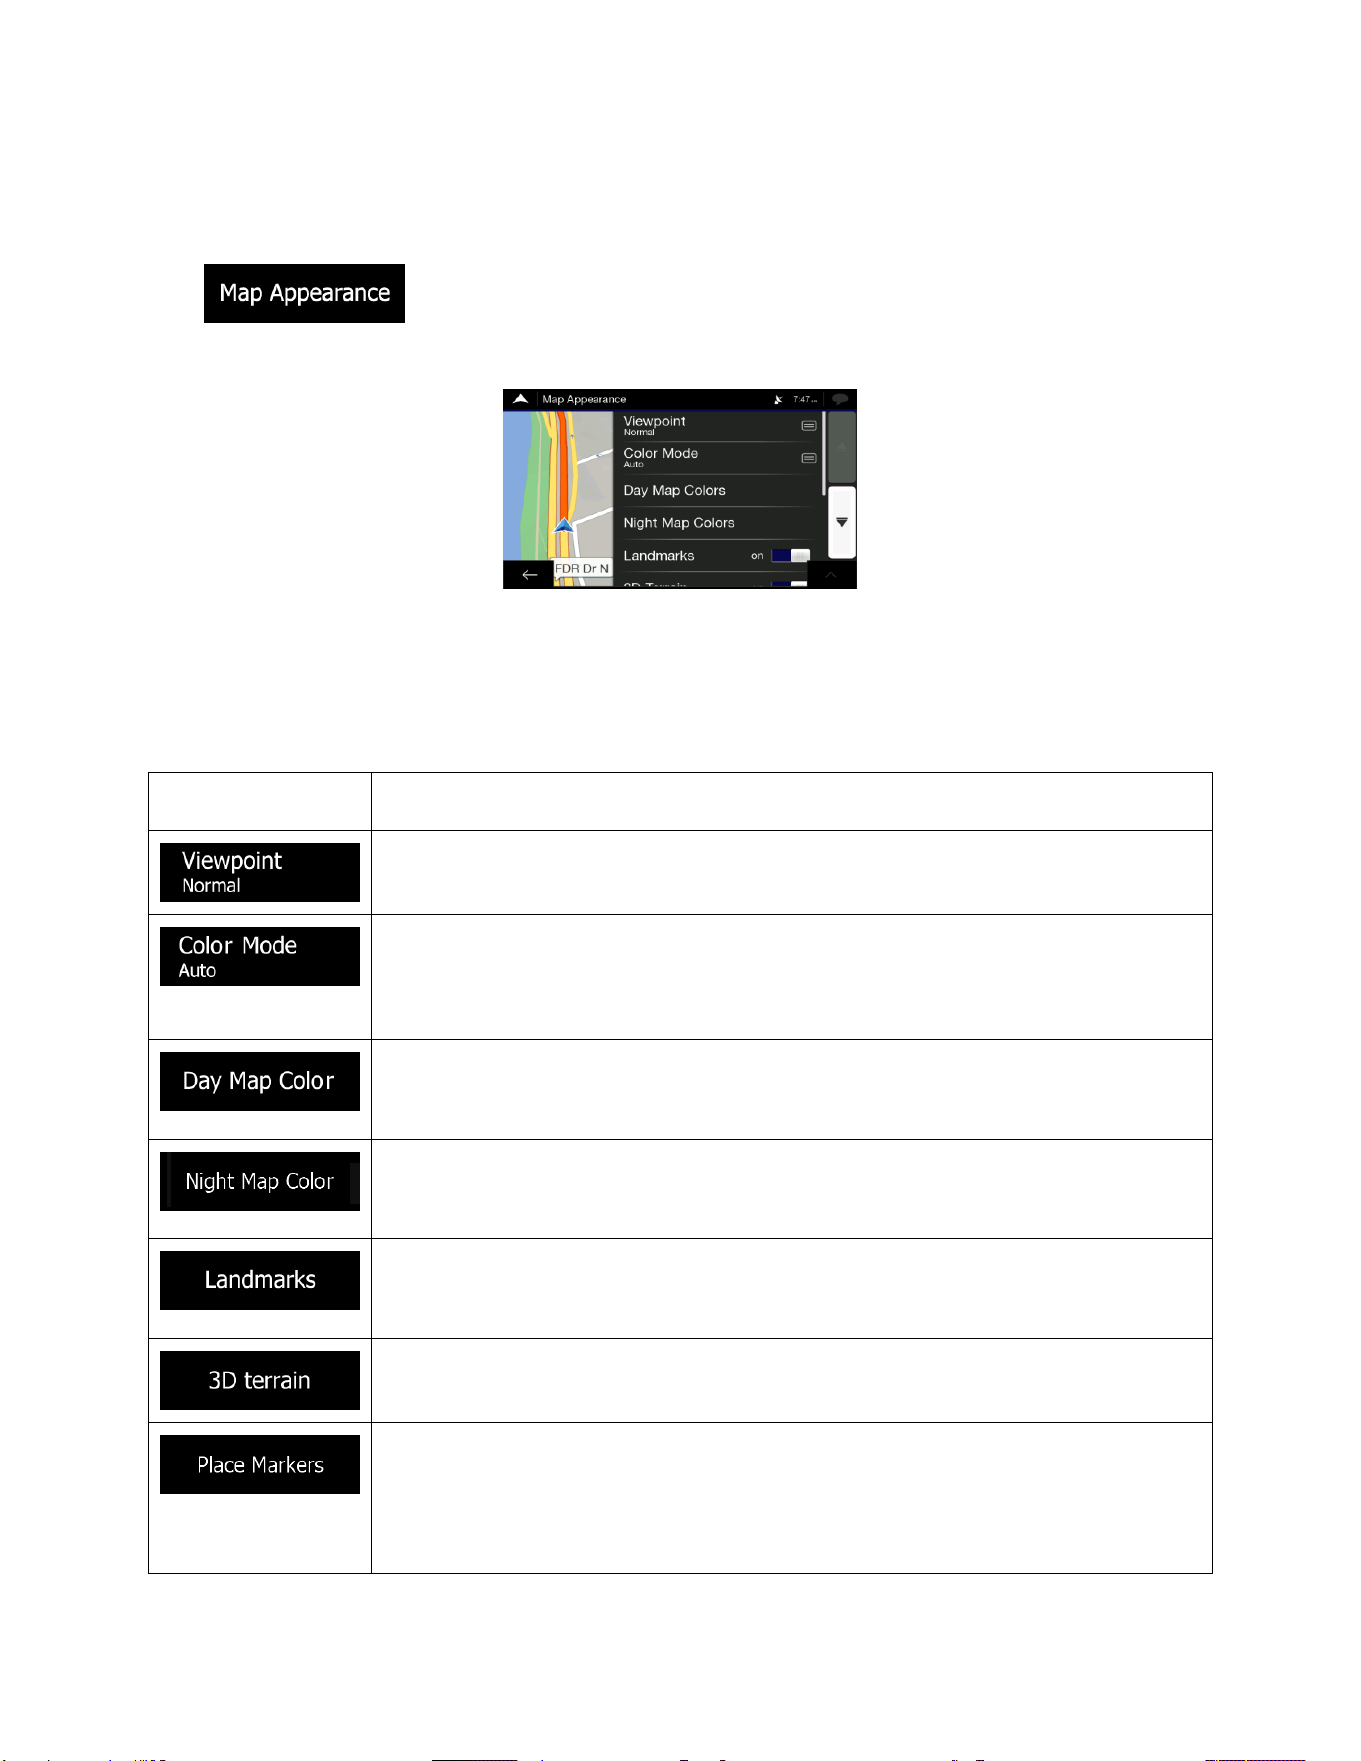
75
5.3.4 Navigation View settings
These settings allow you to fine-tune the appearance of the Navigation view. You can also adjust how the
software helps you navigate with different kinds of route-related information on the Navigation view.
Tap to adjust the navigation view to your needs, choose suitable color themes from
the list for both daytime and nighttime use, show or hide 3D buildings, landmarks, and manage your
Place visibility sets (which Places to show on the map).
You can modify the following settings:
Button
Function
Adjust the basic zoom and tilt levels to your needs. Three levels are available.
Switch between daytime and night color modes or let the software switch between
the two modes automatically a few minutes before sunrise and a few minutes after
sunset.
Select the color scheme used in daytime mode. Daytime colours are bright and
similar to paper road maps.
Select the color scheme used in night mode. Night colours are darker to keep the
average brightness of the screen low.
Show or hide 3D landmarks (3D representations of prominent or well-known
objects).
Show or hide the 3D elevation of the terrain.
Select which Places to show on the map while navigating. Too many Places make
the map crowded so it is a good idea to keep as few of them on the map as
possible. Tap the name of the Place category to show/hide it or to open the list of
its subcategories.
76
You can modify the following additional settings on the Navigation View screen:
If you are navigating with a planned route, you can set three data fields to be
displayed on the Navigation view. You can choose from the time of arrival at
destination, distance to destination, time to destination, time of arrival at waypoint,
distance to waypoint, time to waypoint, heading, or altitude. Without a planned
route, there is only one data field that can be set to show the heading or the
altitude.
Turn the Route Progress Bar on or off. If turned on, an orange line is displayed on
the side of the screen, and a blue arrow on it shows your progress.
Turn it on to get freeway service information (for example gas stations,
restaurants) or turn it off if you do not need it.
Select the service types displayed for the freeway exits. Choose from the Places
categories.
Zoom out and show an overview of the surrounding area if the next maneuver is
far and you are driving on a freeway. When you get close to the event, the normal
map view returns.
Whenever adequate information is available, lane information similar to the real
ones on road signs above the road is displayed at the top of the map. Tap it to turn
this feature on or off.
If you are approaching a freeway exit or a complex intersection and the needed
information exists, the map is replaced with a 3D view of the junction. Tap it to turn
this feature on or let the map be displayed for the whole route.
When entering tunnels, the surface roads and buildings can be disturbing. Tap it to
show a generic picture of a tunnel instead of the map. A top-down overview of the
tunnel and the remaining distance are also displayed.
In certain situations, Alpine navigation offers an alternative route when there is a
traffic jam on the road. See page 66.
In certain situations, Alpine navigation offers different route alternatives when you
leave the planned route and suddenly exit the freeway. See page 67.
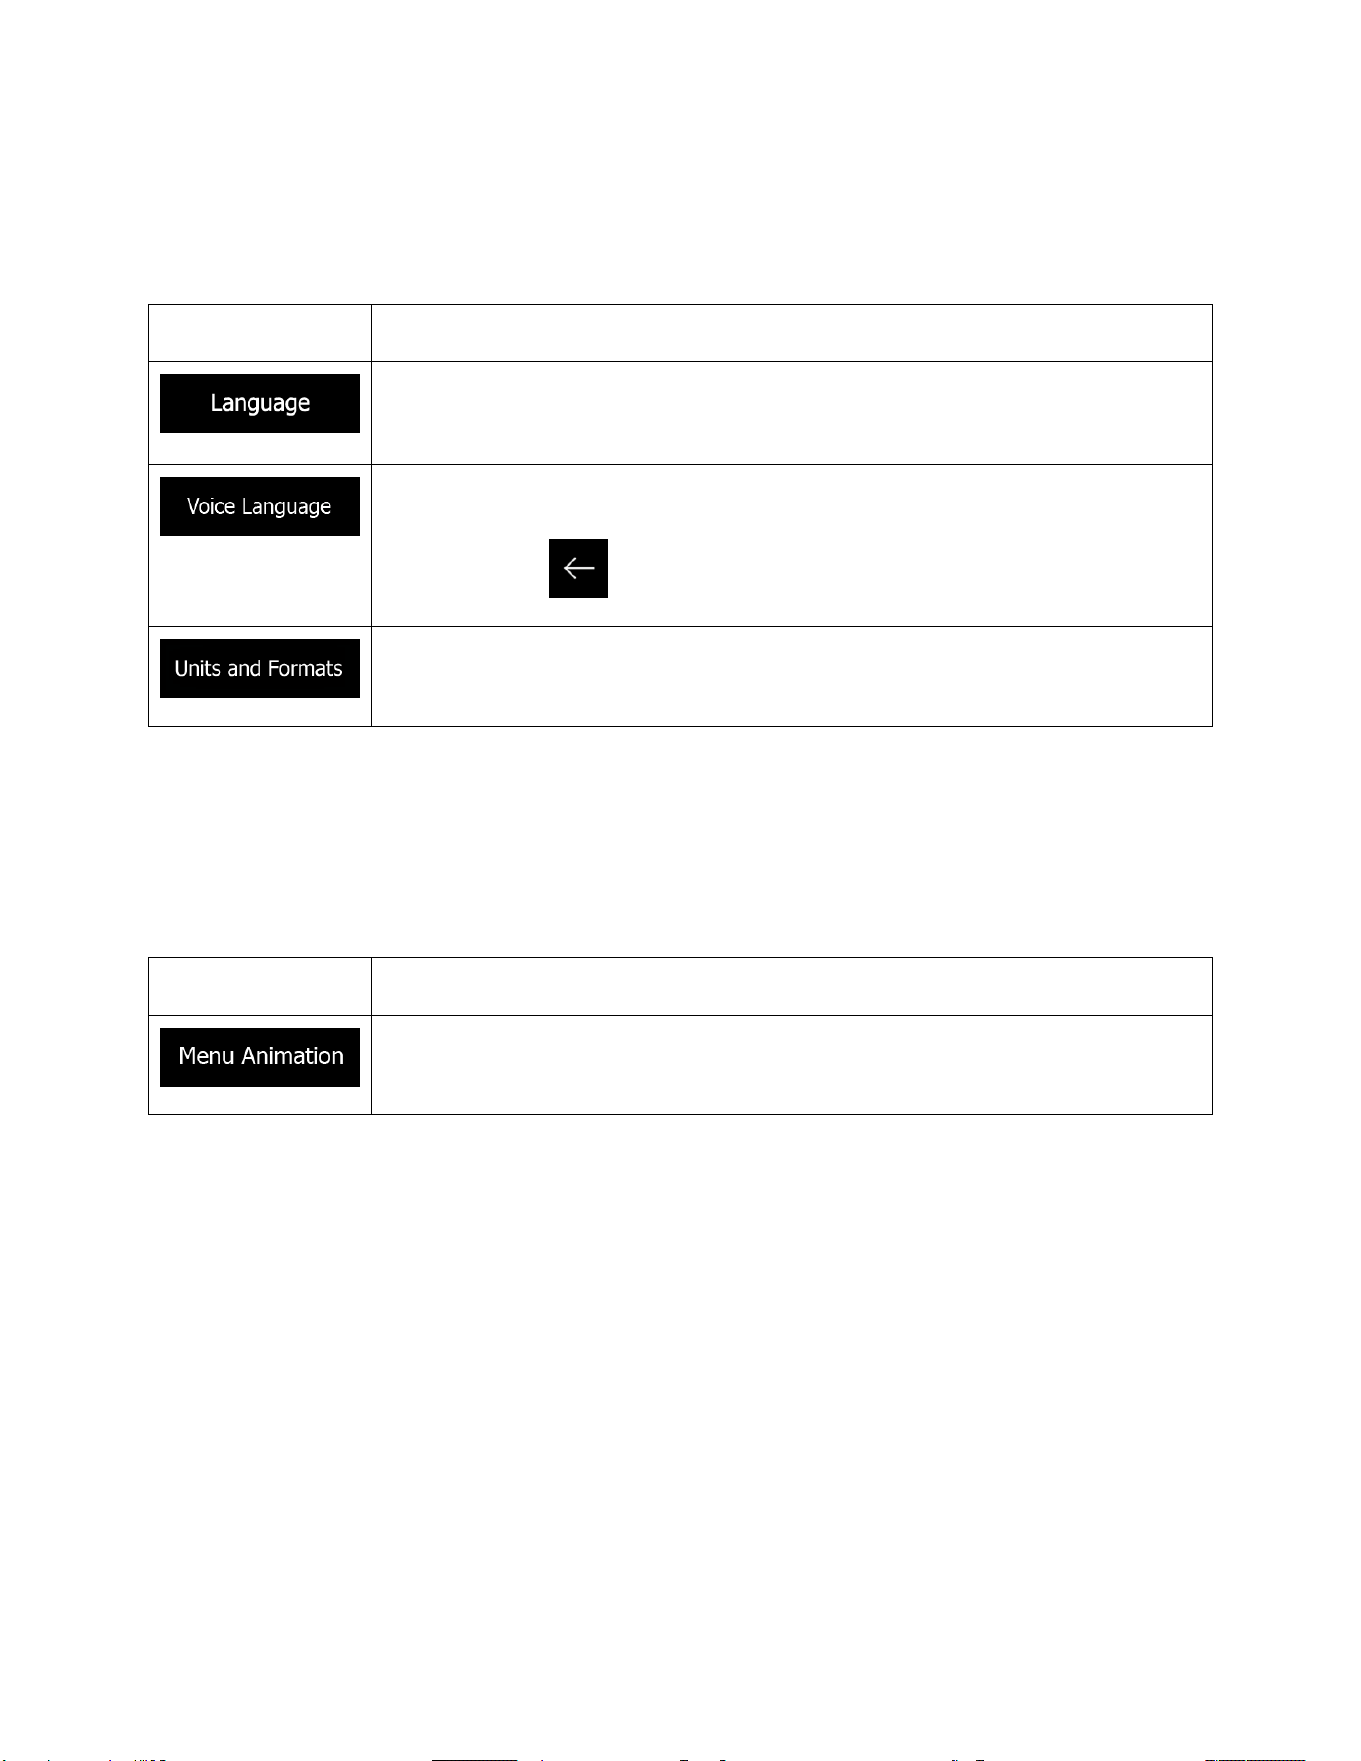
77
5.3.5 Regional settings
You can modify the following settings:
Button
Description
It displays the current written language of the user interface. Tap it to select a new
language from the list of available languages. The application restarts after you
change this setting and confirm it.
It shows the current voice guidance profile. Tap it to select a new profile from the
list of available languages and speakers. Tap any of these to hear a sample voice
prompt. Just tap when you have selected the new spoken language.
You can set the measurement units and time/date format to be used. Alpine
navigation may not support all the listed units in some voice guidance languages.
5.3.6 Display settings
You can modify the following settings:
Button
Function
When animation is turned on, buttons on menus and keyboard screens, and
screen transitions are animated.

78
6 Troubleshooting
This section offers possible solutions to issues that may occur during the operation of Alpine navigation.
6.1 GPS signal cannot be received
Issue: The current location is not available, because GPS signal cannot be received.
Cause 1: GPS signal is weak or may not be available if you are between tall buildings, in garages or
tunnels as the signal weakens or distorts as it travels through solid material.
Solution 1: Go to a place where there is a clear sight of the sky or at least a bigger part of the sky is
visible.
Cause 2: It may take several minutes to receive GPS signals when first using Alpine navigation, or when
your last known position is farther away from your current position.
Solution 2: Wait a few minutes for the GPS signal.
6.2 Address cannot be found
Issue: Alpine navigation cannot find the address you entered.
Cause: The digital map data may not include every single address.
Solution 1: If the house number is not known or Alpine navigation cannot find it, select only the street
name. This way, Alpine navigation will navigate you to the midpoint of the street, where you can find the
exact address more easily.
Solution 2: Search for another address that is close to the destination.
Solution 3: Search for the coordinates or a nearby Place of Interest.
6.3 The calculated route is not optimal
Issue: The planned route is too long or includes several minor roads.
Cause: In , the route planning method is not set to the optimal parameter.
Solution: Select your preferred route planning method by performing the following steps:
1. Tap , , and .
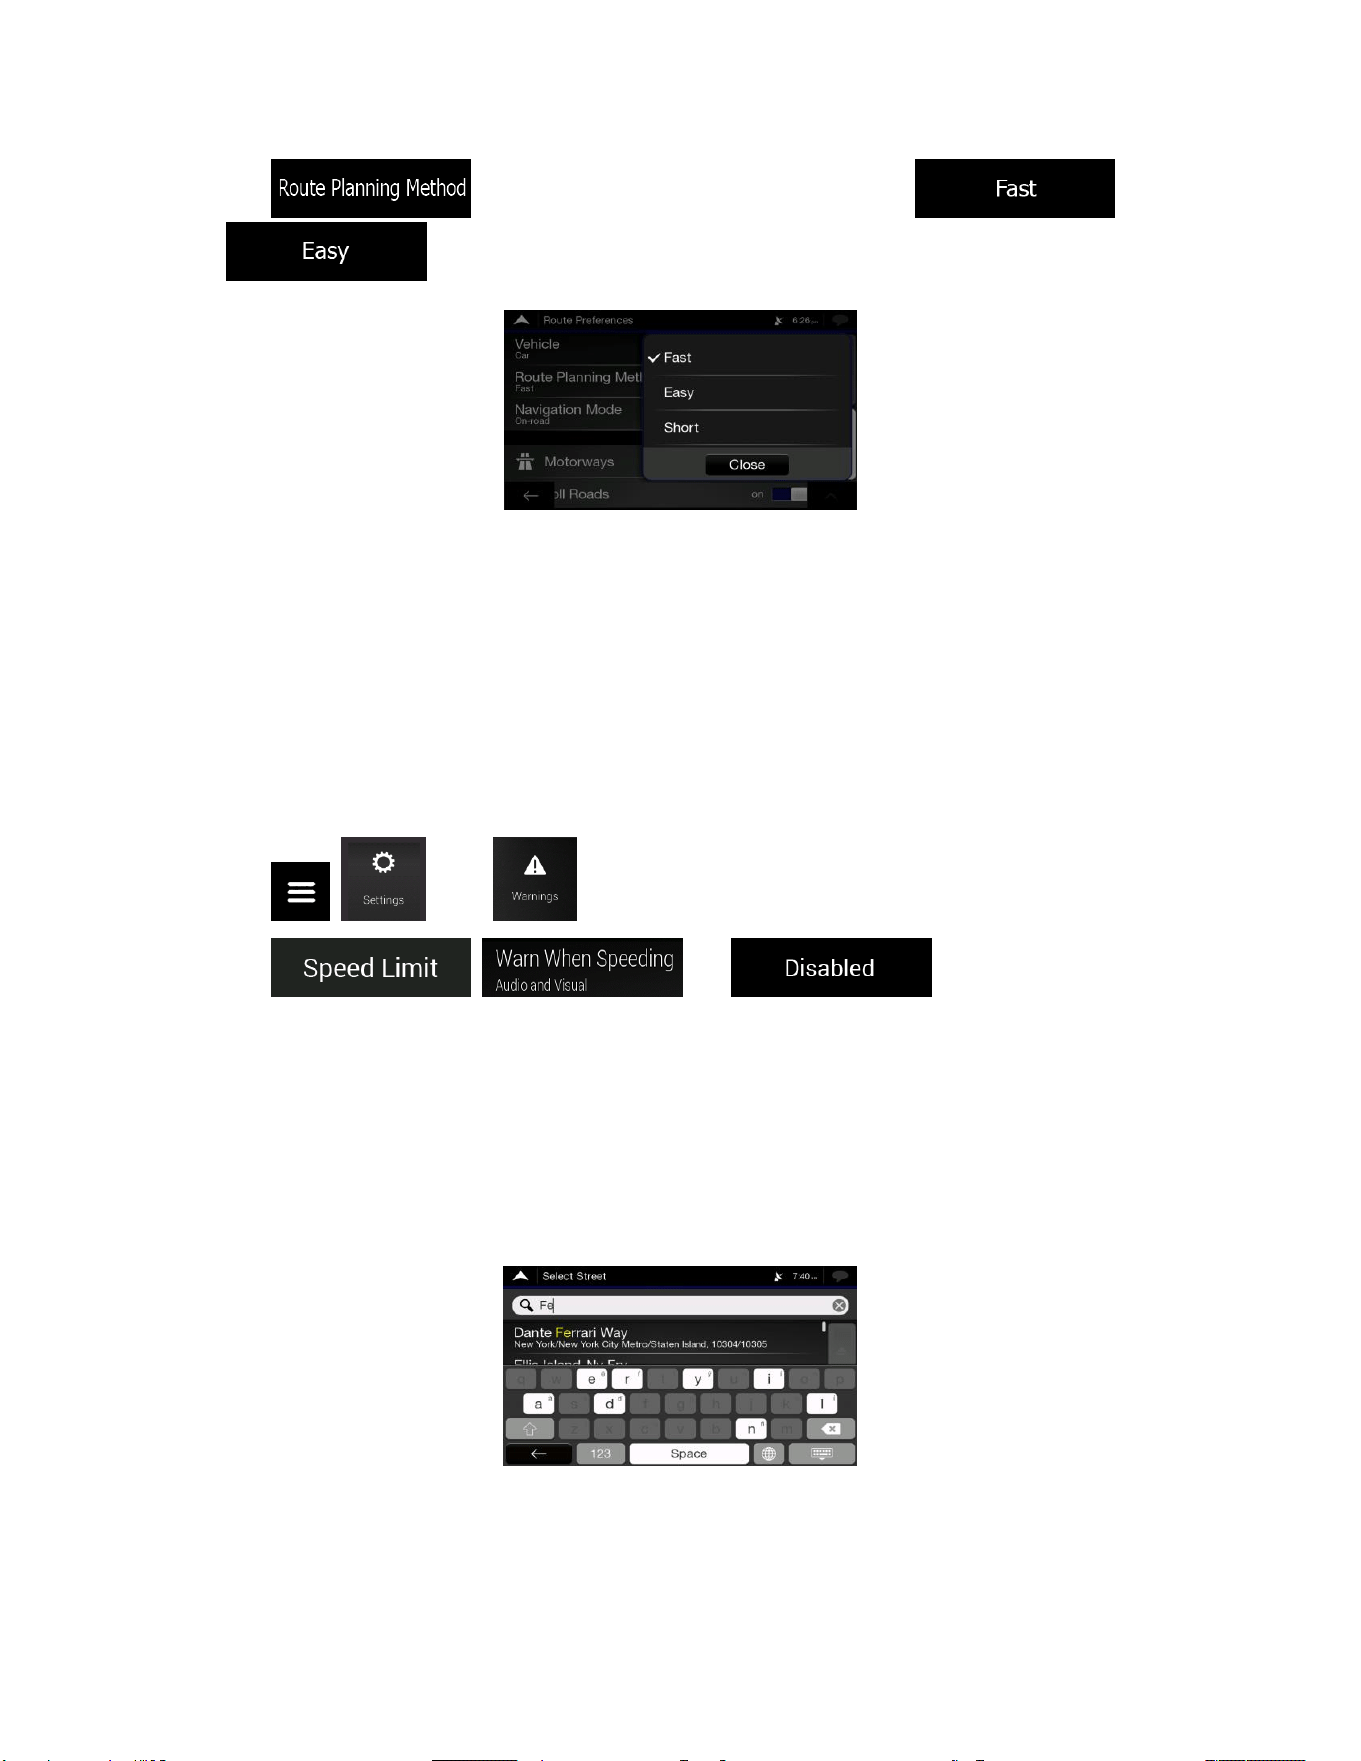
79
2. Tap and select your preferred route, for example or
.
6.4 Disabling the speed limit warning
Issue: The speed limit warning is signalling even when the actual speed limit is kept.
Cause: The speed limit in the digital map data might differ from the actual speed limit of your current
location.
Solution: Disable the speed warning by performing the following steps:
1. Tap , , and . .
2. Tap , and .
6.5 Keyboard buttons are greyed out
Issue: Some keyboard buttons are greyed out and cannot be used.
Cause: Alpine navigation has a smart keyboard for address search, which means that only those buttons
are active that can be used to type a name that is available on the map.
Solution: Check if you entered the name correctly. If the name is correct, then the address you are
looking for is not available in the digital map data.
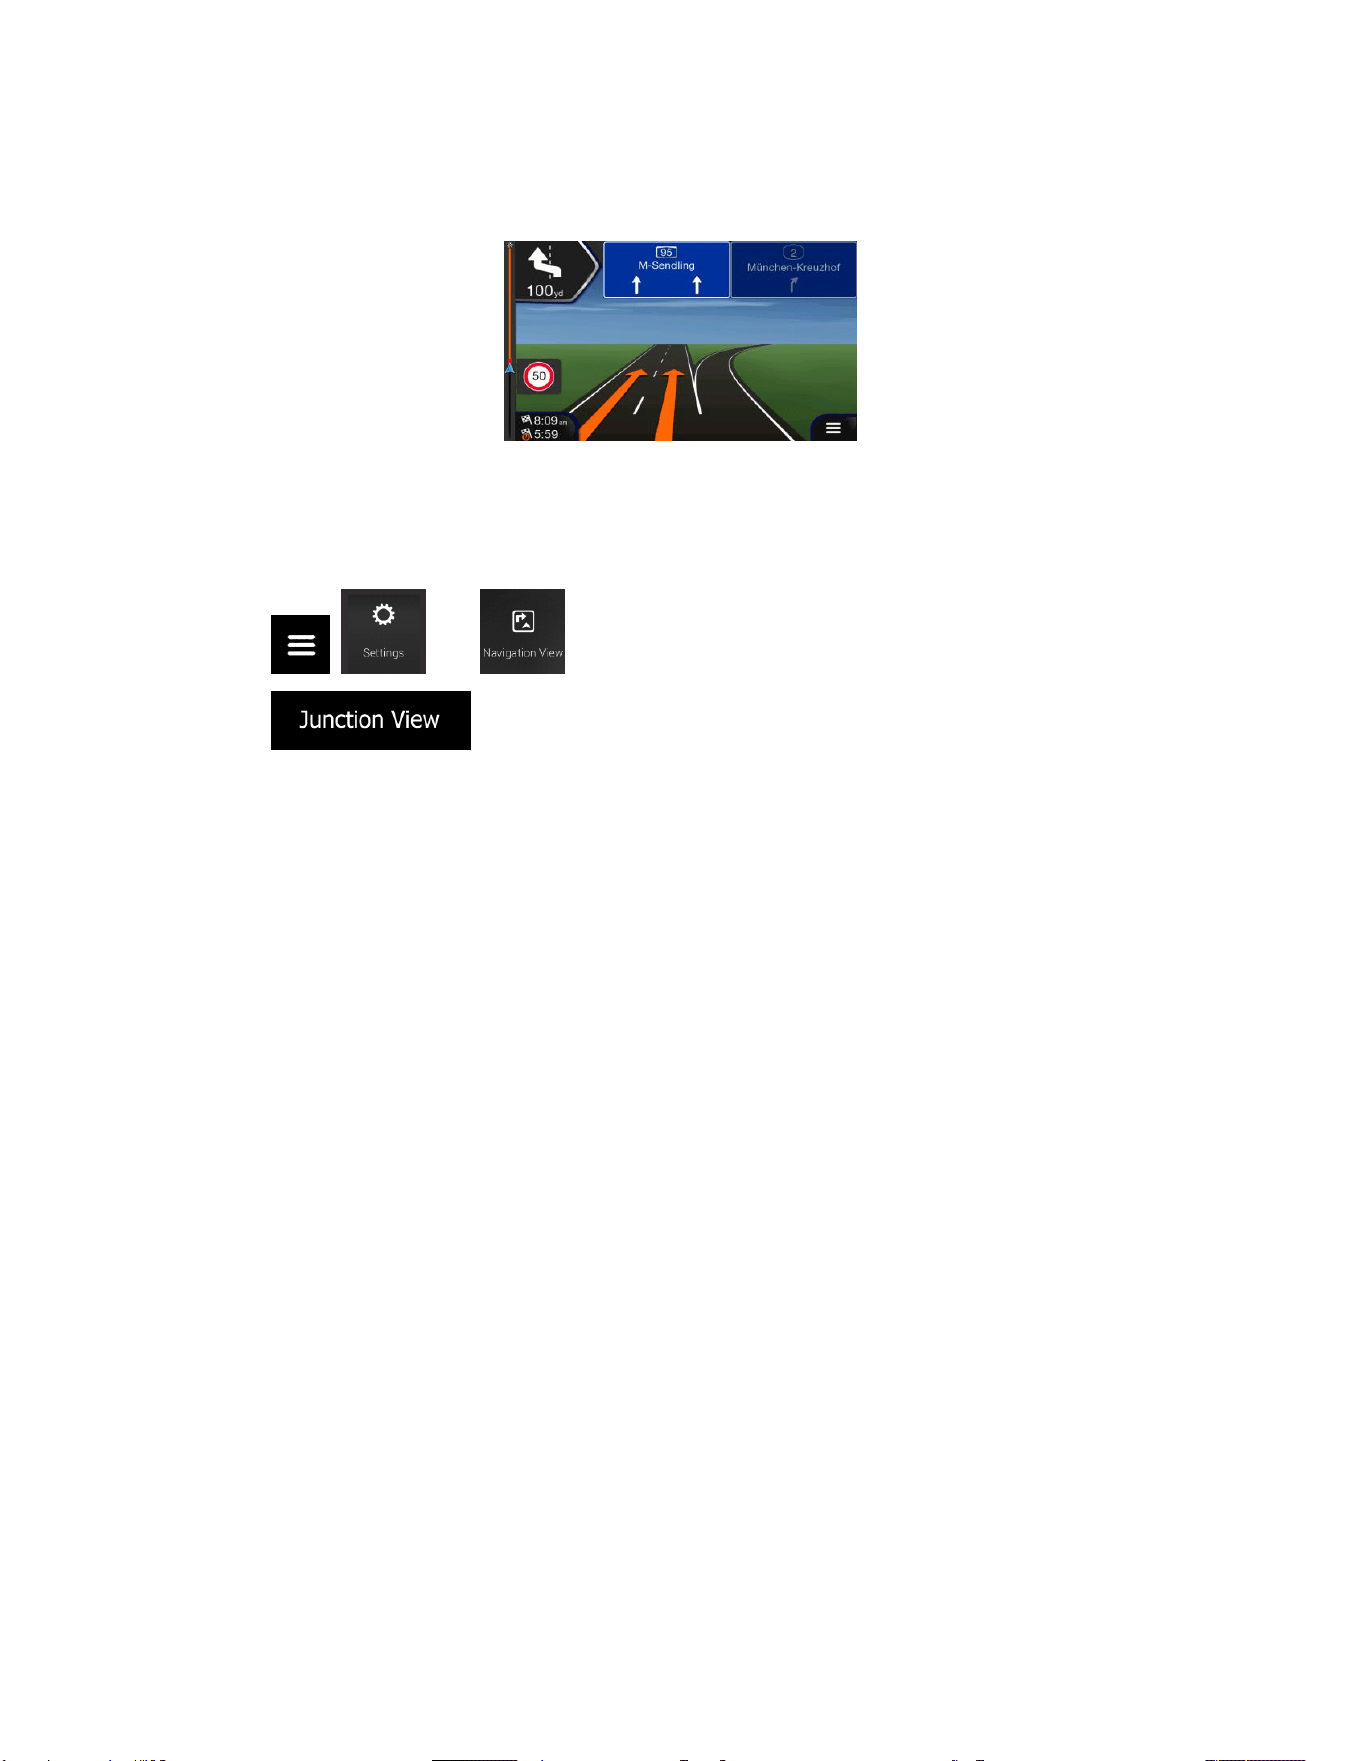
80
6.6 The map is hidden behind an image of a junction
Issue: The map is not visible because it is hidden behind an image of a junction.
Cause: If you are approaching a freeway exit or a complex intersection and the needed information exists,
the map is replaced with a 3D view of the junction. The lanes you need to take are displayed with arrows.
Solution: If you want to hide the currently displayed junction and return to the Navigation view, tap the
picture. To turn off this feature, perform the following steps:
1. Tap , , and .
2. Tap . Now the junction view will not appear again.

81
7 Copyright note
The product and the information contained herein are subject to change without prior notification.
This manual may not, in whole or in part, be reproduced or transmitted in any form either electronically or
mechanically, including photocopying and recording, without the express written consent of NNG.
© 2019 - NNG
Map data: © 1987 - 2019 HERE. All rights reserved. See http://corporate.navteq.com/supplier_terms.html.
All rights reserved.

ALPINE_QRG_AM_ENG_191027.indd 2 2019-10-27 오후 9:33:36

Contents
WARNING .................................................................................................................................... 4
Getting Started
.............................................................................................................................. 6
Key Features
................................................................................................................................. 8
Android Auto
................................................................................................................................. 9
Apple CarPlay
............................................................................................................................... 9
Radio/HD RadioTM/SiriusXM
................................................................................................... 10
USB Flash Drive Operation
....................................................................................................... 11
DISC-DVD
................................................................................................................................... 12
iPod Music
................................................................................................................................... 13
Bluetooth Audio
........................................................................................................................... 14
Map Functions
............................................................................................................................ 16
Navigation Menu......................................................................................................................... 17
Setting a Destination
.................................................................................................................. 18
Specifications
.............................................................................................................................. 19
IMPORTANT
Please record the serial number of your unit in the space provided below and keep it as a
permanent record.
SERIAL NUMBER :______________________________________________________________
ISO SERIAL NUMBER : __________________________________________________________
INSTALLATION DATE : __________________________________________________________
INSTALLATION TECHNICIAN : ____________________________________________________
PLACE OF PURCHASE : _________________________________________________________
ALPINE_QRG_AM_ENG_191027.indd 3 2019-10-27 오후 9:33:36
4
-EN
WARNING
WARNING
This symbol means important instructions. Failure
to heed them can result in serious injury or death.
INSTALL THE PRODUCT CORRECTLY SO THAT THE DRIVER
CANNOT WATCH TV/VIDEO UNLESS THE VEHICLE IS STOPPED
AND THE PARKING BRAKE IS APPLIED.
It is dangerous for the driver to watch TV/Video while driving a vehicle.
Installing this product incorrectly enables the driver to watch TV/Video
while driving. This may cause a distraction, preventing the driver from
looking ahead, thus causing an accident. The driver or other people
could be severely injured.
DO NOT WATCH VIDEO WHILE DRIVING.
Watching the video may distract the driver from looking ahead of the
vehicle and cause an accident.
DO NOT OPERATE ANY FUNCTION THAT TAKES YOUR
ATTENTION AWAY FROM SAFELY DRIVING YOUR VEHICLE.
Any function that requires your prolonged attention should only be
performed after coming to a complete stop. Always stop the vehicle
in a safe location before performing these functions. Failure to do so
may result in an accident.
DO NOT FOLLOW ROUTE SUGGESTIONS IF THE NAVIGATION
SYSTEM INSTRUCTS YOU TO PERFORM AN UNSAFE OR
ILLEGAL MANEUVER, OR PLACES YOU IN AN UNSAFE
SITUATION OR AREA.
This product is not a substitute for your personal judgement. Any
route suggestions by this system should never supersede any local
traffic regulations or your personal judgement or knowledge of safe
driving practice.
KEEP THE VOLUME AT A LEVEL WHERE YOU CAN STILL
HEAR OUTSIDE NOISES WHILE DRIVING.
Excessive volume levels that obscure sounds such as emergency vehicle
sirens or road warning signals (train crossings, etc.) can be dangerous
and may result in an accident. LISTENING AT LOUD VOLUME
LEVELS IN A CAR MAY ALSO CAUSE HEARING DAMAGE.
MINIMIZE DISPLAY VIEWING WHILE DRIVING.
Viewing the display may distract the driver from looking ahead of the
vehicle and cause an accident.
DO NOT DISASSEMBLE OR ALTER.
Doing so may result in an accident, fire or electric shock.
USE ONLY IN CARS WITH A 12 VOLT NEGATIVE GROUND.
(Check with your dealer if you are not sure.) Failure to do so may result
in fire, etc.
KEEP SMALL OBJECTS SUCH AS SCREWS OUT OF THE
REACH OF CHILDREN.
Swallowing them may result in serious injury. If swallowed, consult a
physician immediately.
USE THE CORRECT AMPERE RATING WHEN REPLACING
FUSES.
Failure to do so may result in fire or electric shock.
DO NOT BLOCK VENTS OR RADIATOR PANELS.
Doing so may cause heat to build up inside and may result in fire.
USE THIS PRODUCT FOR MOBILE 12V APPLICATIONS.
Use for other than its designed application may result in fire, electric
shock or other injury.
MAKE THE CORRECT CONNECTIONS.
Failure to make the proper connections may result in fire or product
damage.
BEFORE WIRING, DISCONNECT THE CABLE FROM THE
NEGATIVE BATTERY TERMINAL.
Failure to do so may result in electric shock or injury due to electrical
shorts.
DO NOT ALLOW CABLES TO BECOME ENTANGLED IN
SURROUNDING OBJECTS.
Arrange wiring and cables in compliance with the manual to prevent
obstructions when driving. Cables or wiring that obstruct or hang up
on places such as the steering wheel, shift lever, brake pedals, etc.
can be extremely hazardous.
DO NOT SPLICE INTO ELECTRICAL CABLES.
Never cut away cable insulation to supply power to other equipment.
Doing so will exceed the current carrying capacity of the wire and
result in fire or electric shock.
DO NOT DAMAGE PIPE OR WIRING WHEN DRILLING HOLES.
When drilling holes in the chassis for installation, take precautions
so as not to contact, damage or obstruct pipes, fuel lines, tanks or
electrical wiring. Failure to take such precautions may result in fire.
DO NOT USE BOLTS OR NUTS IN THE BRAKE OR STEERING
SYSTEMS TO MAKE GROUND CONNECTIONS.
Bolts or nuts used for the brake or steering systems (or any other
safety-related system), or tanks should NEVER be used for
installations or ground connections. Using such parts could disable
control of the vehicle and cause fire etc.
DO NOT INSTALL IN LOCATIONS WHICH MIGHT HINDER
VEHICLE OPERATION, SUCH AS THE STEERING WHEEL OR
SHIFT LEVER.
Doing so may obstruct forward vision or hamper movement etc. and
results in serious accident.
ALPINE_QRG_AM_ENG_191027.indd 4 2019-10-27 오후 9:33:36

5
-EN
CAUTION
This symbol means important instructions. Failure
to heed them can result in injury or material
property damage.
HALT USE IMMEDIATELY IF A PROBLEM APPEARS.
Failure to do so may cause personal injury or damage to the product.
Return it to your authorized Alpine dealer or the nearest Alpine
Service Centre for repairing.
HAVE THE WIRING AND INSTALLATION DONE BY EXPERTS.
The wiring and installation of this unit requires special technical skill
and experience. To ensure safety, always contact the dealer where
you purchased this product to have the work done.
USE SPECIFIED ACCESSORY PARTS AND INSTALL THEM
SECURELY.
Be sure to use only the specified accessory parts. Use of other than
designated parts may damage this unit internally or may not securely
install the unit in place. This may cause parts to become loose
resulting in hazards or product failure.
ARRANGE THE WIRING SO IT IS NOT CRIMPED OR PINCHED BY A
SHARP METAL EDGE.
Route the cables and wiring away from moving parts (like the seat
rails) or sharp or pointed edges. This will prevent crimping and
damage to the wiring. If wiring passes through a hole in metal, use a
rubber grommet to prevent the wire’s insulation from being cut by the
metal edge of the hole.
DO NOT INSTALL IN LOCATIONS WITH HIGH MOISTURE OR DUST.
Avoid installing the unit in locations with high incidence of moisture
or dust. Moisture or dust that penetrates into this unit may result in
product failure.
• The following screen examples of INE-W970HD used in this manual are for reference only.
They may differ from the actual screen displays.
ALPINE_QRG_AM_ENG_191027.indd 5 2019-10-27 오후 9:33:36
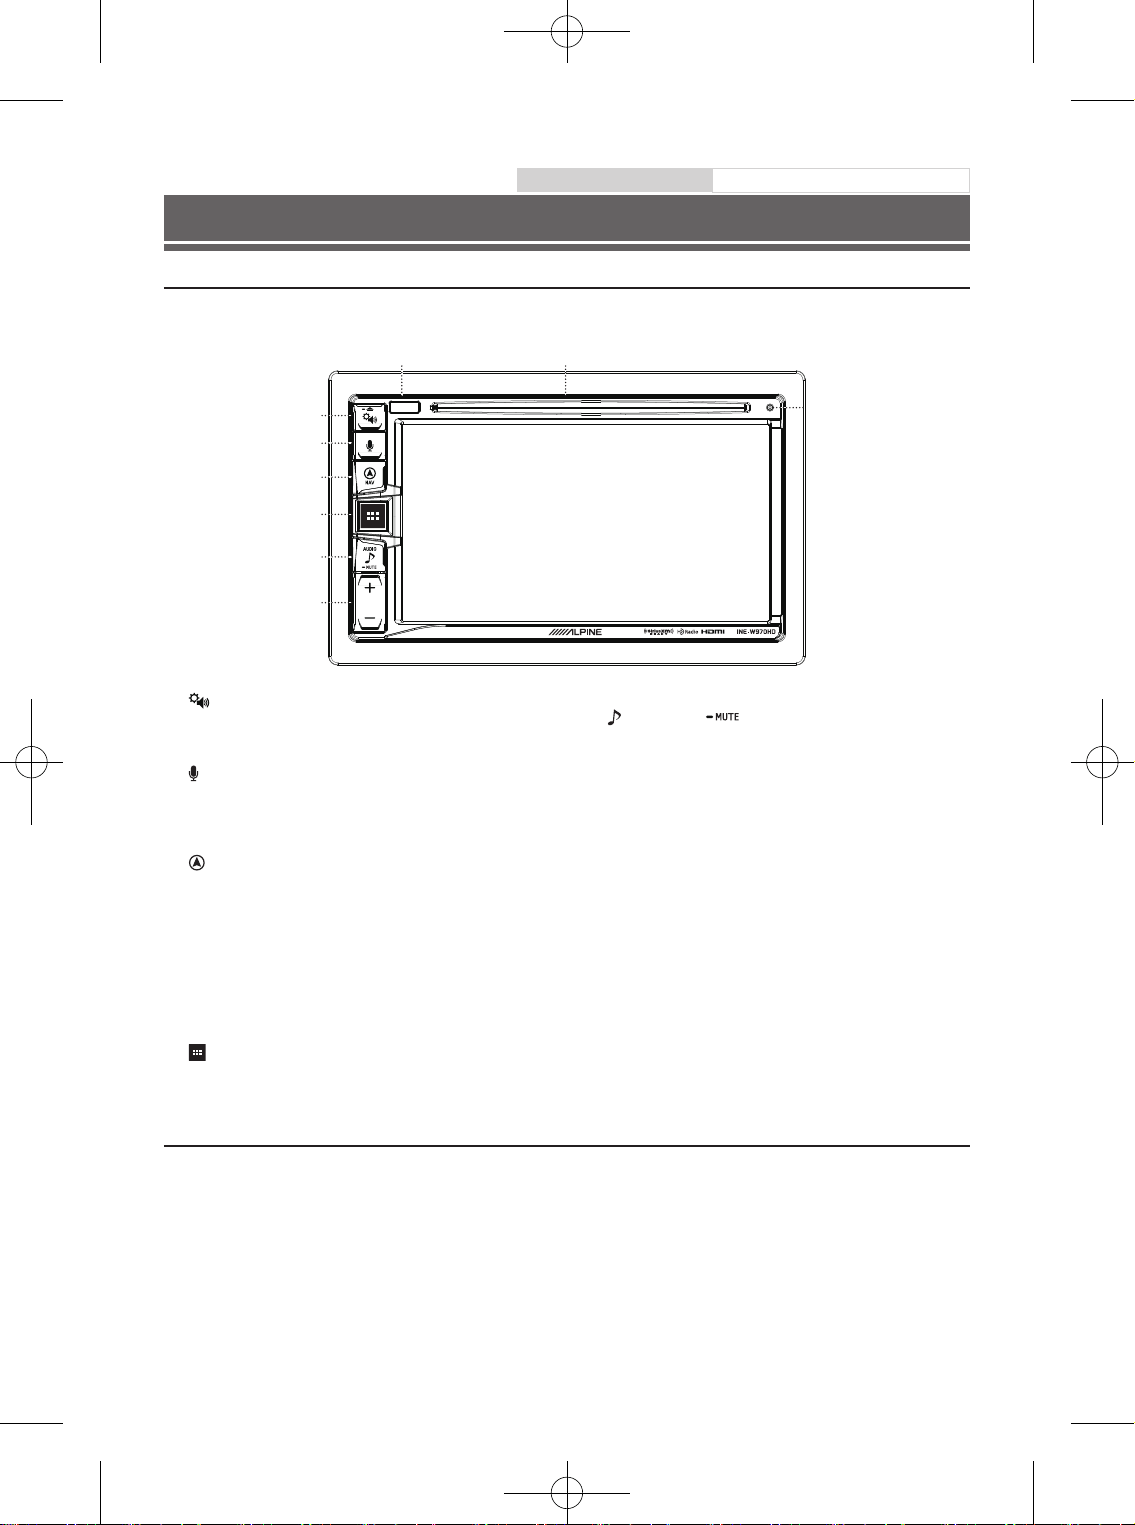
6
-EN
Getting Started
Location of Controls
The screen design used in the Owner’s Manual may differ from the actual screen.
■
For INE-W970HD
①
⑨
⑦ ⑧
②
③
④
⑤
⑥
Turning Power On/Off
Some of this unit’s functions cannot be performed while the is vehicle is in motion. Be sure to stop your vehicle in a safe location and apply the
parking brake then release and apply and keep applied before attempting these operations.
〇①〇
Sound Settings or Eject button
Displays the [Tone/Fader/Balance] settings screen.
Press and hold this button to eject Disc.
〇②〇
or VOICE button
Depending on the connected smartphone, press to activate
Siri function or voice recognition mode. (Only works for Apple
CarPlay and Android Auto.)
〇③〇
(NAV) button
Recalls the navigation map screen.
Press again to switch to Navigation menu screen.
Press and hold this button for at least 2 seconds to change to
Go Home route screen. (If Home is not set yet, it will change to
the Home setting screen.)
For details of navigation operations, refer to “Navigation System
OM (Owner's Manual)”.
Recalls the connected smartphone’s map screen.
Depending on the smartphone, this function may not be available.
〇④〇
ALL MENUS or (Power Off) button
Recalls the All Menus screen.
Press and hold this button for at least 2 seconds to turn the power off.
〇⑤〇
(AUDIO) or (MUTE) button
Displays the Audio/Visual screen.
When pressed and held, mutes the volume.
〇⑥〇 +
/ − button
Press to adjust the volume.
〇⑦〇
Remote Sensor
Point the remote control transmitter towards the remote sensor
within a range of 2 metres.
〇⑧〇
Disc insert slot
Inserts/ejects discs
〇⑨〇
RESET switch
The system of this unit is reset.
1
Turn the ignition key to the ACC or ON position.
The system turns on.
2
Press and hold the All Menus/ (Power Off) button
for more than 2 seconds to turn the power off.
Owner’s manual Getting Started
ALPINE_QRG_AM_ENG_191027.indd 6 2019-10-27 오후 9:33:37
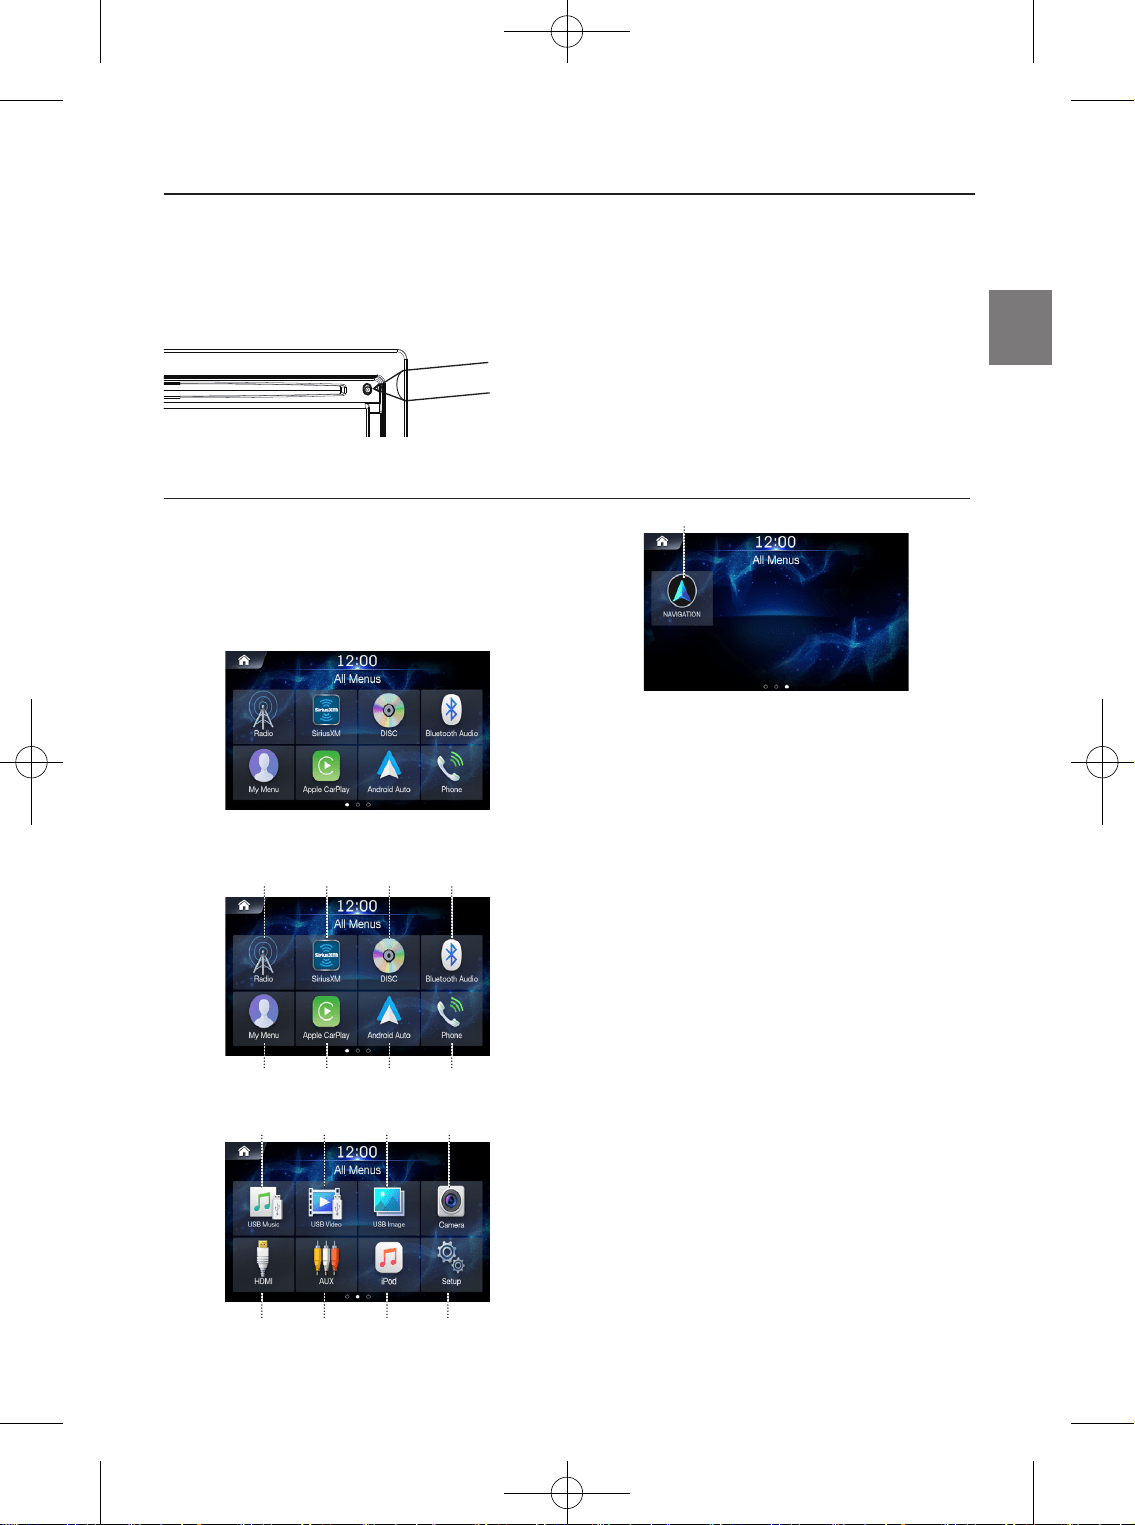
7
-EN
The All Menus Screen displays all of the available modes that can
be selected to operate the system.
Press the All Menus button.
The All Menus Screen is displayed.
■
All Menus Screen example
④① ③②
⑧⑤ ⑦⑥
⑫⑨ ⑪⑩
⑬ ⑭ ⑮ ⑯
⑰
〇①〇
Radio button
〇②〇
SiriusXM button
〇③〇
DISC button
〇④〇
Bluetooth Audio button
〇⑤〇
My Menu button
〇⑥〇
Apple CarPlay
〇⑦〇
Android Auto
〇⑧〇
Phone button
〇⑨〇
USB Music button
〇⑩〇
USB Video button
〇⑪〇
USB Image button
〇⑫〇
Camera button
〇⑬〇
HDMI
〇⑭〇
AUX button
〇⑮〇
iPod button
〇⑯〇
Setup button
〇⑰〇
Navigation button
All Menus Screen
Resetting the System
Be sure to press the RESET switch when using the unit for the first time, after changing the car battery, etc.
1
Turn off the unit power.
2
Press the RESET switch with a ballpoint pen or similar pointed object.
ALPINE_QRG_AM_ENG_191027.indd 7 2019-10-27 오후 9:33:37
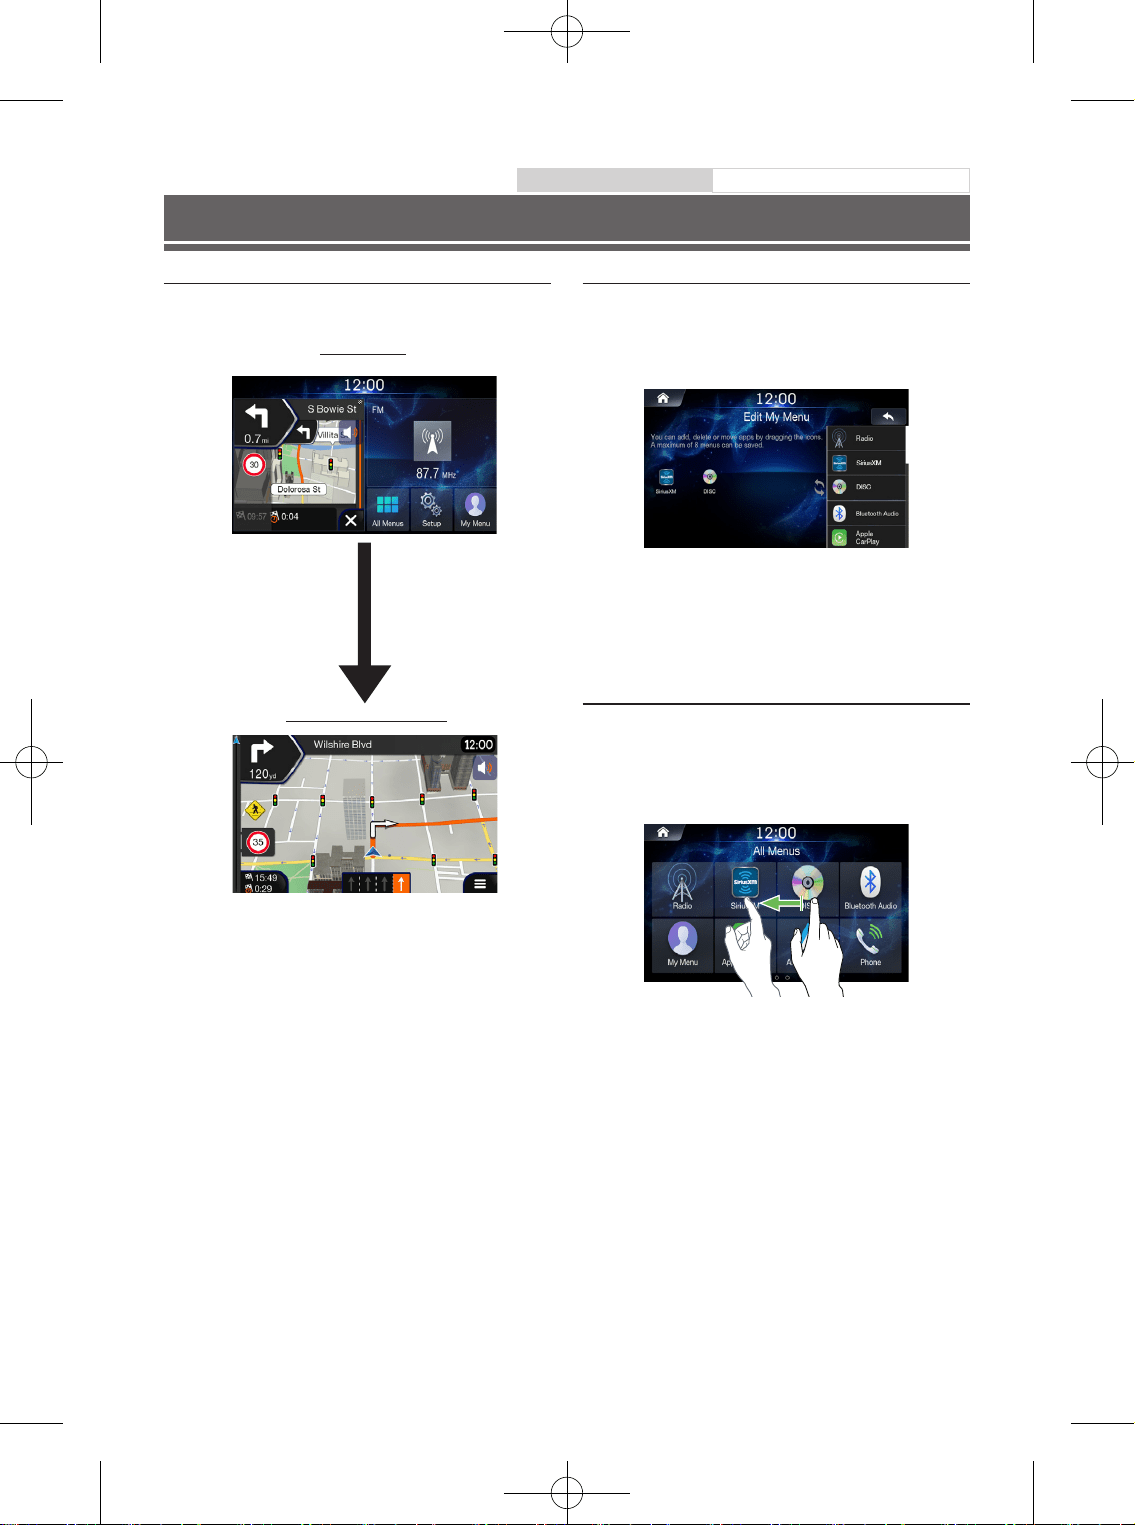
8
-EN
Key Features
About Dual Screen
Dual Screen allows you to display the Navigation and Audio/Visual
screens simultaneously.
Touch left side of dual screen
Navigation Full Screen
Dual Screen
My Menu
Frequently used functions such as the Audio or Navigation mode
can be easily recalled by adding them to the My Menu screen. For
details, see “My Menu Function”
■
My Menu Screen Example
• Frequently used functions and useful functions can be customized
for your convenience.
• You can register up to 8 menus.
• You cannot add the same feature more than once.
Swiping the Touch Screen
You can change a screen or a page by swiping the touchscreen
vertically or horizontally with your finger. For details, see "Touch
Screen Operation".
Swipe the display with your finger lightly.
Owner’s manual Favourite Function
ALPINE_QRG_AM_ENG_191027.indd 8 2019-10-27 오후 9:33:38

9
-EN
Android Auto
Android Auto is designed to make it easier to use apps from your phone while you’re on the road.
Navigate with Google Maps, listen to playlists or podcasts from your favorite apps, and more.
Download the Android Auto App from the Google Play store before continuing.
Connect your Android compatible Phone to begin using Android Auto.
1
Press the All Menus button.
The All Menus screen is displayed.
2
Touch [Android Auto].
The Android Auto screen is displayed.
• For details operation of Android Auto, refer to “Android Auto” in the Owner’s Manual.
Apple CarPlay
Apple CarPlay is a smarter, safer way to use your iPhone in the car. Apple CarPlay takes things you want to do with your iPhone while driving
and puts them right on this unit. You can get directions, make calls, send and receive messages, and listen to music, all in a way that allows
you to stay focused on the road. Just plug in your iPhone to this unit and go.
For details, refer to Owner’s Manual.
Press
or VOICE to activate Siri function of the iPhone.
You can make a call, play music, etc., by using Siri function of the iPhone.
You can also control Apple CarPlay on touchscreen.
Owner’s manual Android Auto
Owner’s manual Apple CarPlay
ALPINE_QRG_AM_ENG_191027.indd 9 2019-10-27 오후 9:33:38
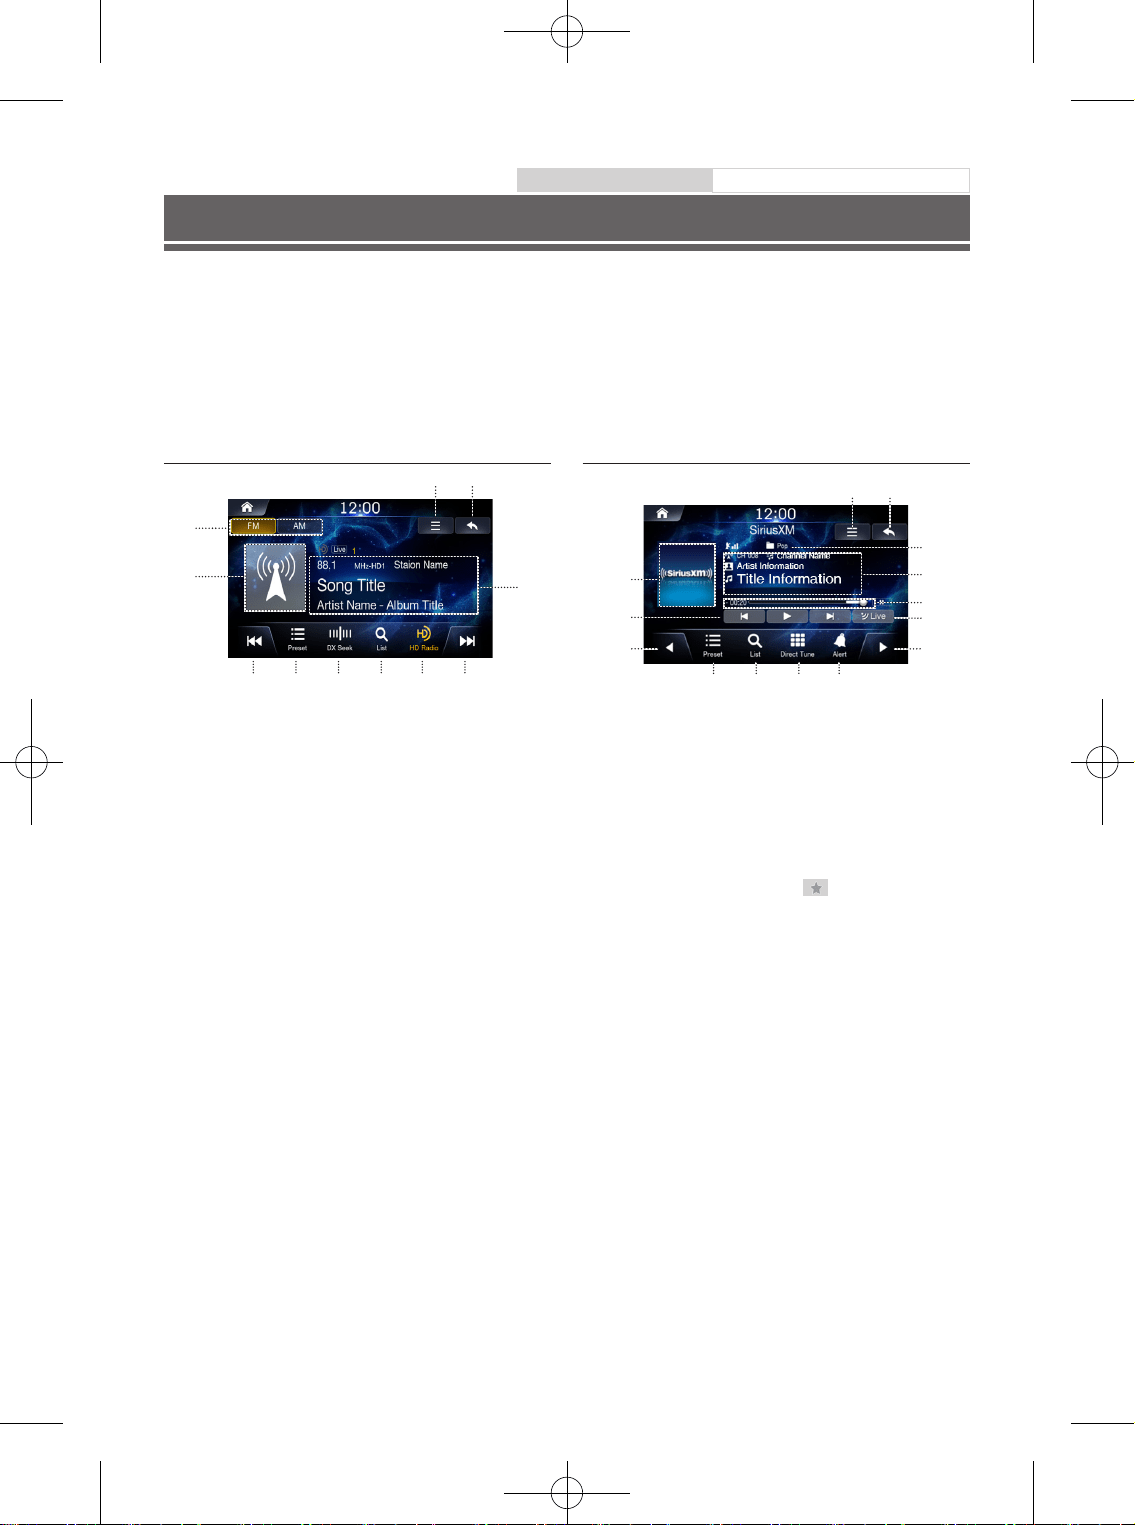
10
-EN
Radio/HD Radio
TM
/SiriusXM
The unit can receive HD Radio signals based on digital radio broadcast standards, in addition to analog radio broadcasts using RBDS.
HD Radio signals are broadcasted in the service areas of the current AM/FM broadcasters where they provide digital audio distribution and
data services. This unit receives the above digital broadcasts for your high-quality sound enjoyment.
Depending on the signal strength in TUNER mode, the unit will automatically switch between digital signals if they can be received, and analog
radio using RBDS if digital signals cannot be received. For details, please see “HD Radio On/Off”.
• RBDS mode is only available during FM broadcast reception.
Owner’s manual Radio/HD Radio
Radio Main Screen
①
④
⑤
⑨⑧⑦⑥ ⑩ ⑪
② ③
〇①〇
Radio Band Tab
If you select the desired tab, the selected Radio mode will
operate.
〇②〇
Menu (Sound Settings)
〇③〇
Displays the Previous Screen
〇④〇
Album Art
Image priority : 1st Album Art, 2nd Channel image, 3rd Default
image
〇⑤〇
Information Display
Displays information such as frequency, station name, preset
number, live mode, HD radio channel, song title, artist name
and album title
〇⑥〇
Decreases Frequency
〇⑦〇
Displays the preset screen
〇⑧〇
Changes Tuning Mode
Switches the tuning mode used to search radio Broadcasts
between Manual Tune, Preset, or DX Seek.
〇⑨〇
Displays the list screen
〇⑩〇
HD Radio
〇⑪〇
Increases Frequency
SiriusXM Radio Main Screen
⑬ ⑭⑫⑪
① ②
③
④
⑥
⑩
⑤
⑦
⑨
⑧
〇①〇
Menu
〇②〇
Displays the Previous Screen
〇③〇
Album Art
Displays the image that represents the currently received station
When album art is not available, the channel logo or the
SiriusXM logo will be displayed.
〇④〇
Indicators
Satellite Antenna, Preset Number, Fav, Live
〇⑤〇
Information Display
Displays information such as channel name, channel number,
category/artist/title/content info.
〇⑥〇
Channel Tune - Down
〇⑦〇
Channel Tune - Up
〇⑧〇
Time Difference
Displays the time difference between the live broadcast time
and actual playing time.
〇⑨〇
Control Panel
Enables use of Skip Backward (by segment) / Skip Forward (by
segment) Play/Pause/Rewind/Fast-forward features.
〇⑩〇
Changes to the program currently being broadcast.
〇⑪〇
Displays the preset screen
〇⑫〇
Displays the list screen
〇⑬〇
Direct Tune
〇⑭〇
Alert
ALPINE_QRG_AM_ENG_191027.indd 10 2019-10-27 오후 9:33:38
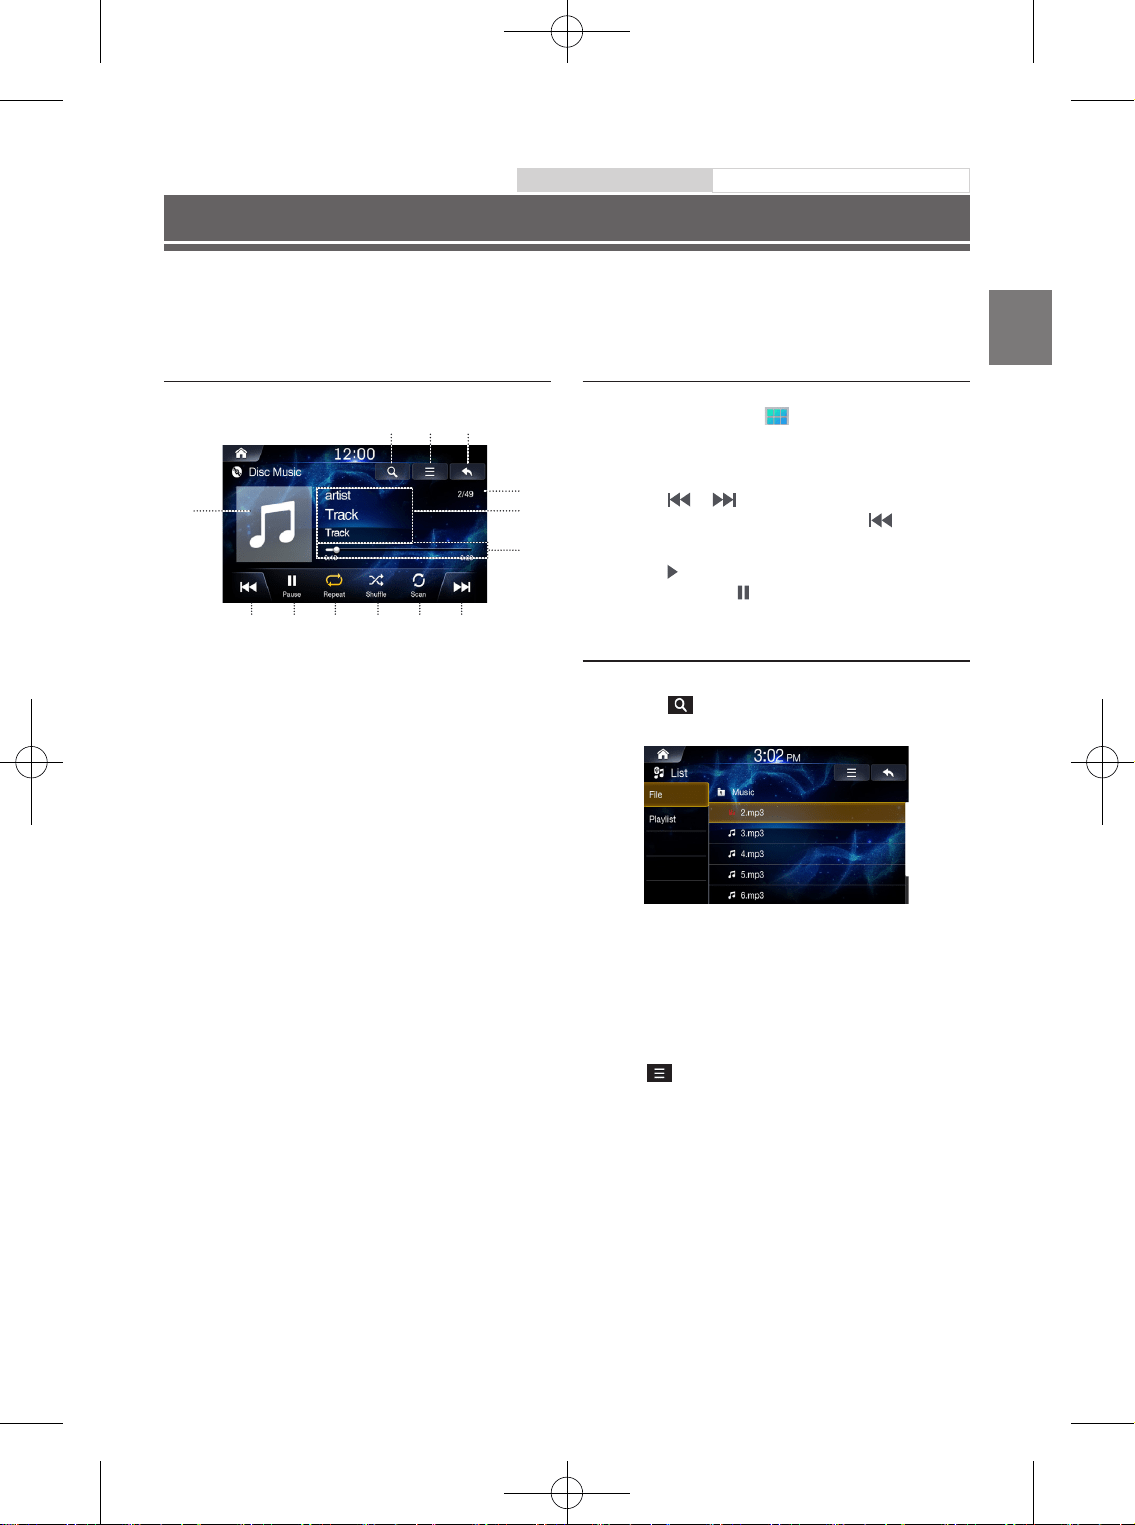
11
-EN
USB Flash drive Operation
You can play back music files (MP3/WMA/AAC/FLAC/OGG/APE/MP2) and video files (AVI/MKV/MP4/ASF/WMV/MPG/3GP/MOV/FLV) stored
in a USB flash drive on the internal player of this system.
Owner’s manual USB Flash drive Operation
USB Music main screen example
④
⑥
⑤
⑦
⑪⑩⑨⑧
① ② ③
⑬⑫
〇①〇
Displays the list screen
〇②〇
Menu (Add to Playlist, Sound Settings)
〇③〇
Displays the Previous Screen
〇④〇
Artwork Display
〇⑤〇
Current Song no./Total Song no.
〇⑥〇
Information Display
〇⑦〇
Play Time and Play Bar
〇⑧〇
Previous File
〇⑨〇
Play/Pause
〇⑩〇
Repeat
〇⑪〇
Shuffle
〇⑫〇
Scan
〇⑬〇
Next File
Playing USB Music Files
1
Press the All Menus button
→
touch [USB
Music]. Or in the Home screen, touch [All Menus]
→
[USB Music].
2
Touch or and select the desired file.
If play time is over 3 seconds, pressing will play the
current file from the beginning.
3
Touch to play USB music.
While playing, touch to pause USB music.
Searching USB Music Files
You can search the music file in the List screen.
1
Touch to display USB Music list screen.
2
Search the desired category and file.
It is possible to search by File, Playlist.
3
Touch the desired file to play.
• In the List screen, it is possible to add current song to playlist by
touching
→
[Add to Playlist].
ALPINE_QRG_AM_ENG_191027.indd 11 2019-10-27 오후 9:33:39
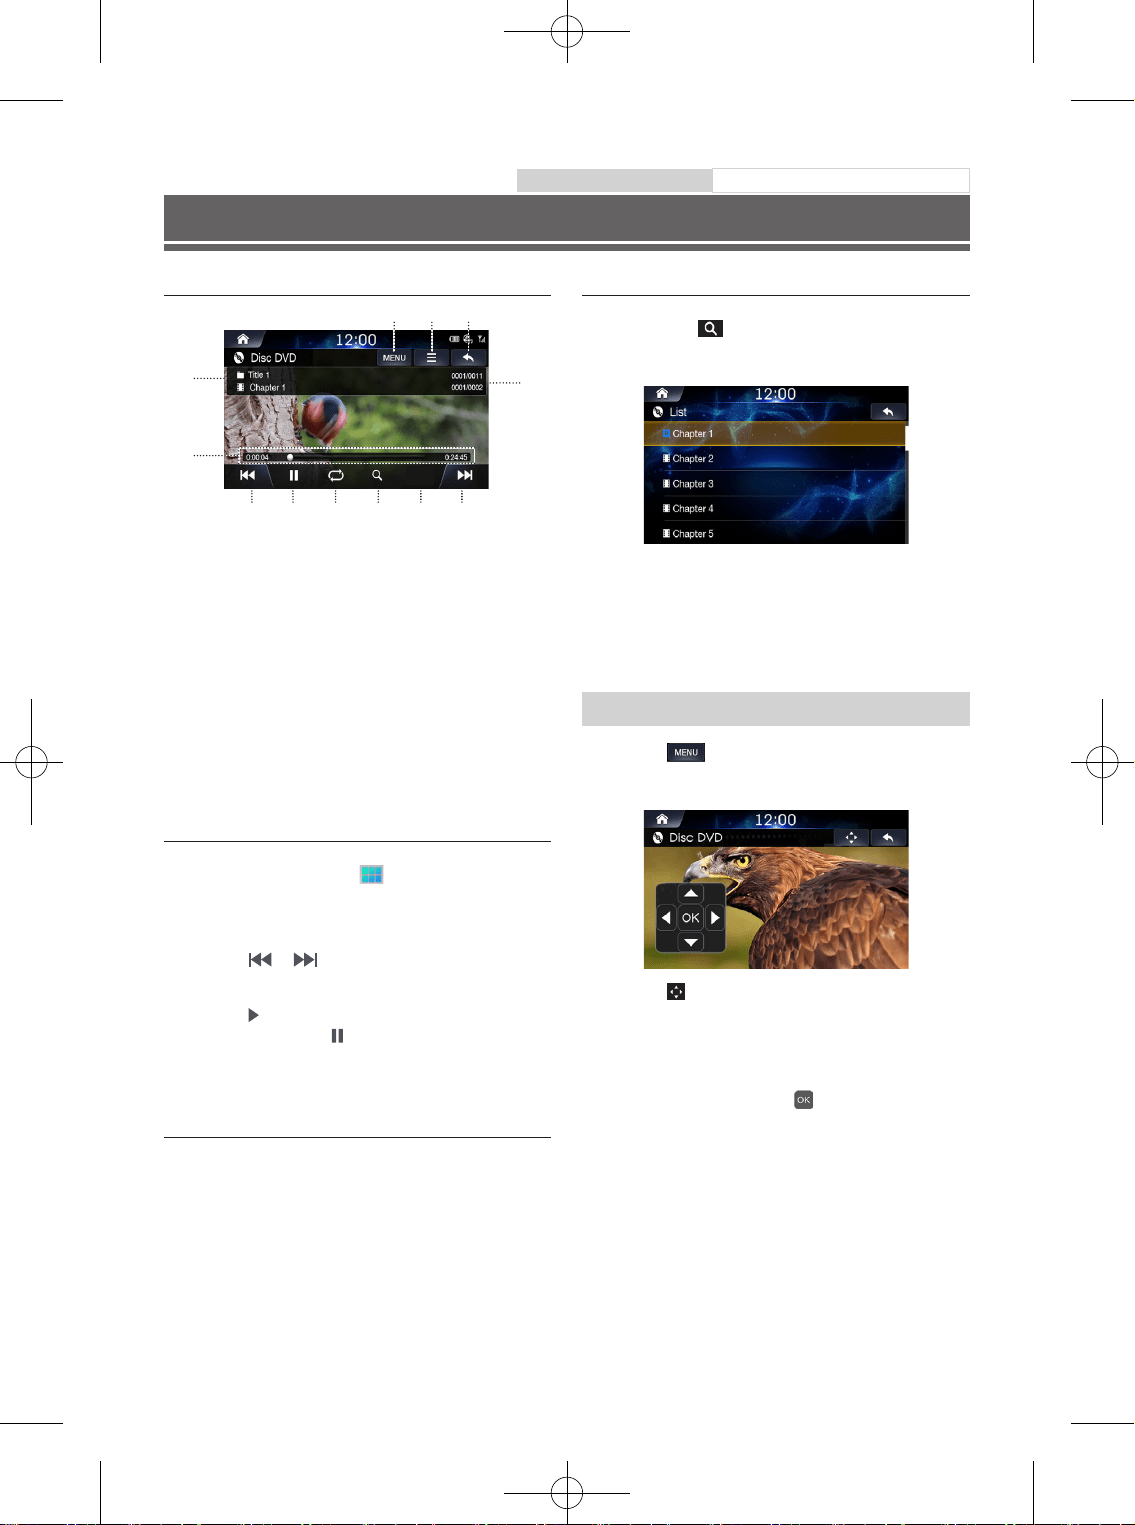
12
-EN
DISC-DVD
Disc DVD Main Screen
④
⑥
⑤
⑩⑨⑧⑦
②① ③
⑫⑪
〇①〇
Menu (Top menu, Sub menu)
〇②〇
Main Menu
〇③〇
Displays the Previous Screen
〇④〇
Chapter and Title Information
〇⑤〇
Chapter and Title Index
〇⑥〇
Play Time and Play Bar
〇⑦〇
Previous Chapter
〇⑧〇
Play/Pause
〇⑨〇
Repeat
〇⑩〇
Search
〇⑪〇
Screen ration (16 : 9 / 4 : 3 LB / 4 : 4 PS)
〇⑫〇
Next Chapter
Playing a DVD
1
Press the All Menus button
→
touch [Disc
Video]. Or in the Home screen, touch [All Menus]
→
[DISC].
2
Touch or or select the desired Chapter.
3
Touch to play a DVD.
While playing, touch to pause a DVD. To enable DVD
playback apply the parking brake then release and apply and
keep applied.
Viewing in Full Screen
Touch the screen in a non-menu area to view the DVD in full
screen.
If you want to display the menu, touch the screen.
• If there are no operations for 10 seconds, the menu will
automatically disappear.
Searching Chapters
1
Touch List .
2
Search the desired chapter.
3
Touch the desired chapter to play.
Searching from Top Menu
1
Touch to display Top Menu screen.
2
Touch .
3
Search the desired chapter and title.
Touch the controller up/down/left/right directions to select the
desired menu and touch Enter
.
• The Top menu and DVD menu options can only be used
within DVDs that support these features.
Owner’s manual D
isc
ALPINE_QRG_AM_ENG_191027.indd 12 2019-10-27 오후 9:33:40
16 : 9
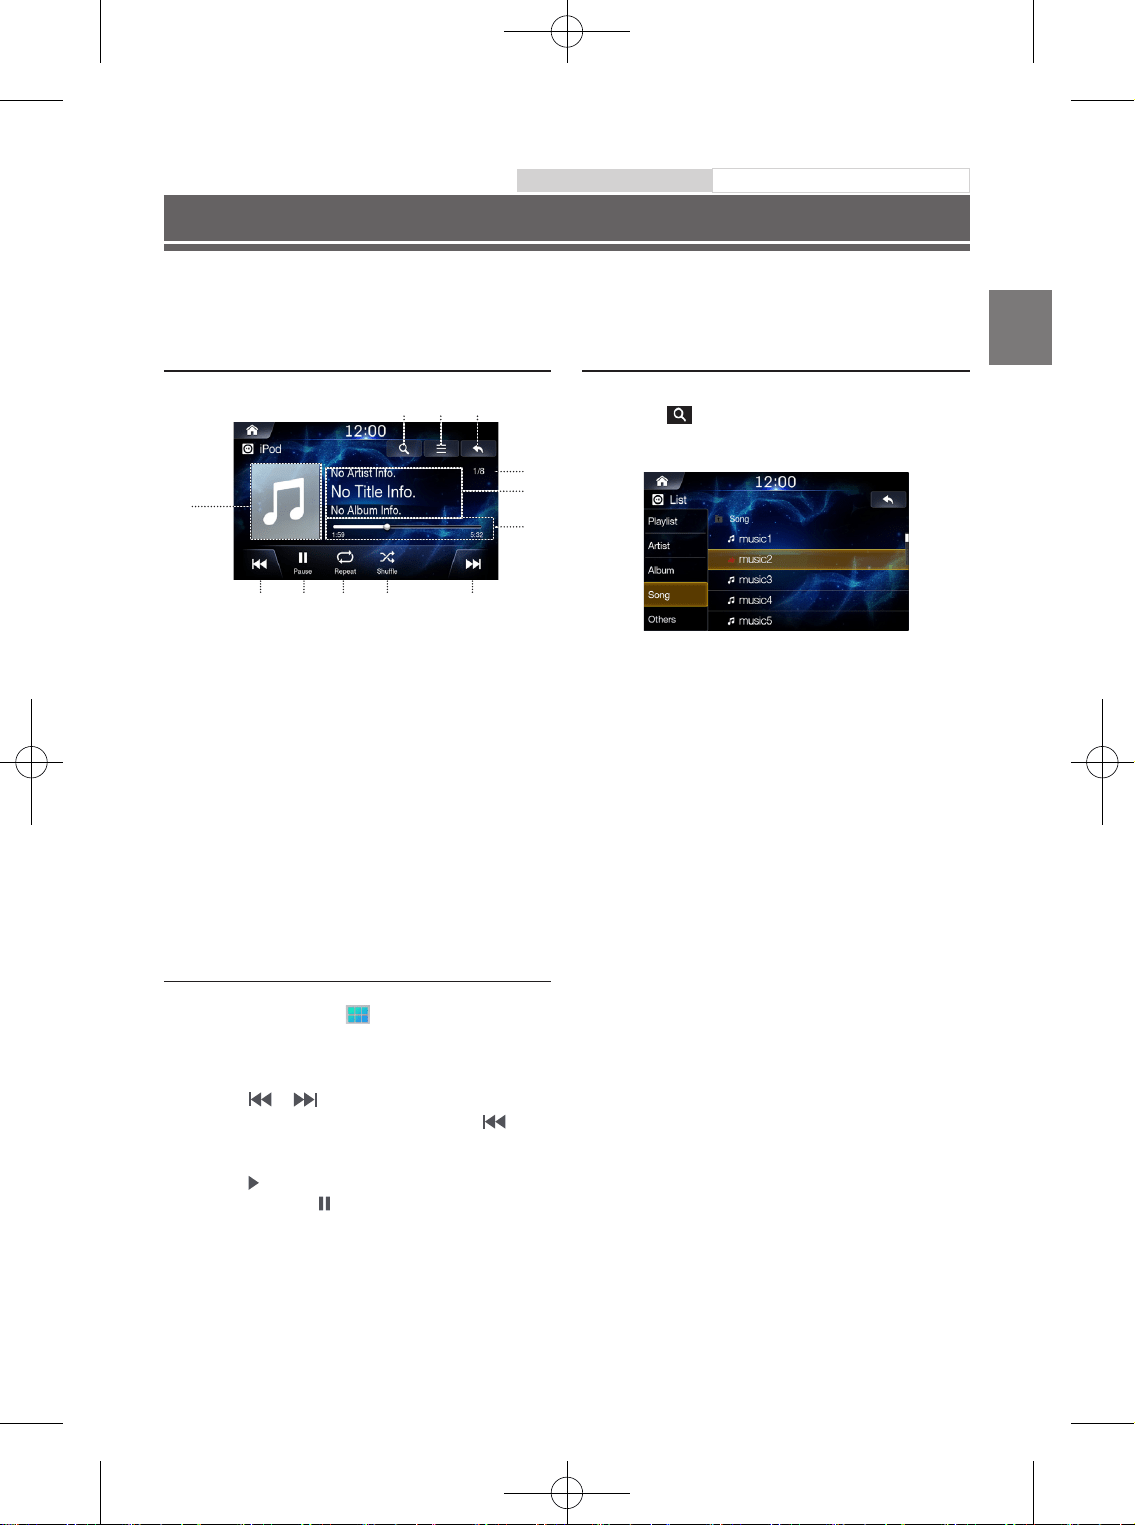
13
-EN
iPod Music
A separately sold Lightning to USB cable (KCU-471i), etc., is required depending on the type of iPod/iPhone.
Owner’s manual iPod/iPhone
iPod Music Main Screen
②① ③
⑥
⑤
⑧ ⑨ ⑩ ⑪ ⑫
⑦
④
〇①〇
Displays the list screen
〇②〇
Menu
〇③〇
Displays the Previous Screen
〇④〇
Artwork Display
〇⑤〇
Current Song no./Total Song no.
〇⑥〇
Information Display
〇⑦〇
Play Time and Play Bar
〇⑧〇
Previous File
〇⑨〇
Play/Pause
〇⑩〇
Repeat
〇⑪〇
Shuffle
〇⑫〇
Next File
Playing iPod Music
1
Press the All Menus button
→
touch [iPod
Music]. Or in the Home screen, touch [All Menus]
→
[iPod Music].
2
Touch or and select the desired file.
If play time is over 3 seconds, pressing
will
play the current file from the beginning.
3
Touch
to play iPod music.
While playing, touch to pause iPod music.
The feature may operate differently depending on the iPod
specification.
Searching iPod Music Files
You can search the files in the List screen.
1
Touch to display iPod Music list screen.
2
Search the desired category and file.
It is possible to search by Playlist, Artist Album, song and
others.
3
Touch the desired file to play.
ALPINE_QRG_AM_ENG_191027.indd 13 2019-10-27 오후 9:33:40
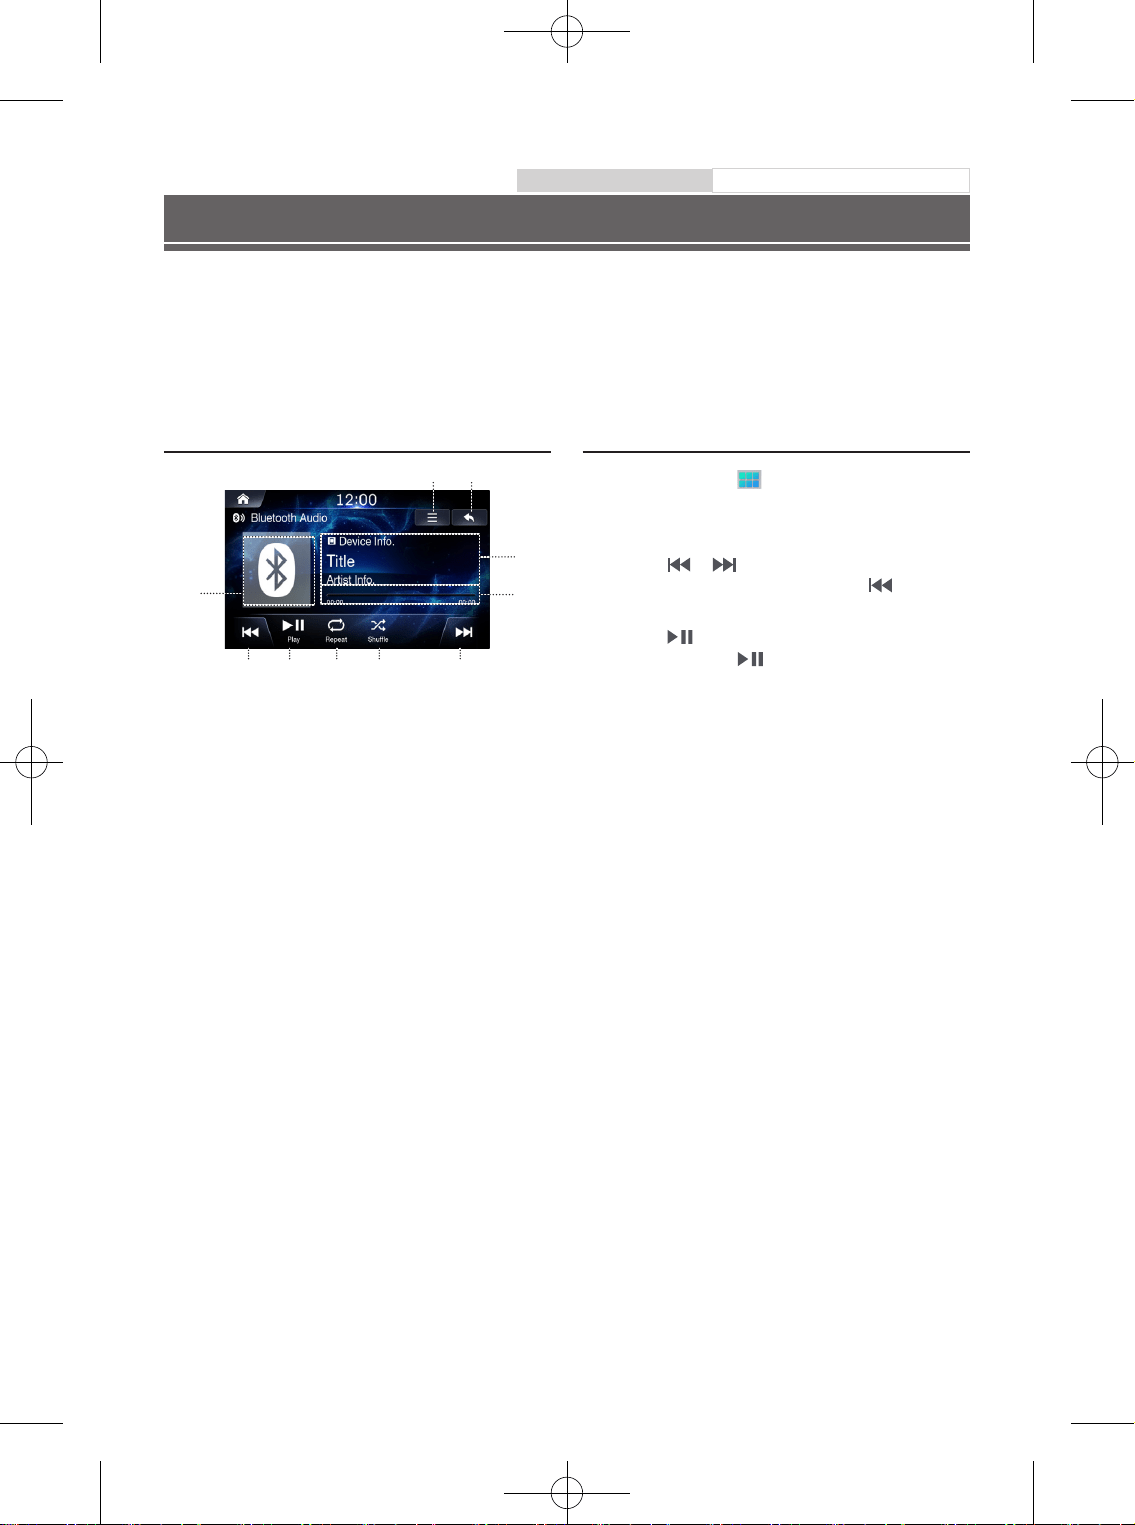
14
-EN
Bluetooth Audio
Owner’s manual
Bluetooth Audio
Bluetooth Audio Main Screen
②①
③
⑥ ⑦ ⑧ ⑨ ⑩
⑤
④
〇①〇
Menu
〇②〇
Displays the Previous Screen
〇③〇
Bluetooth Icon
〇④〇
Information Display
〇⑤〇
Play Time and Play Bar
〇⑥〇
Previous File
〇⑦〇
Play/Pause
〇⑧〇
Repeat
〇⑨〇
Shuffle
〇⑩〇
Next File
Playing Bluetooth Audio
1
Press all menus button
→
touch [Bluetooth
Audio] Or in the Home screen, touch [All Menus]
→
[Bluetooth Audio].
2
Touch or and select the desired file.
If play time is over 3 seconds, pressing will play the
current file from the beginning.
3
Touch to play Bluetooth Audio.
While playing, touch
to pause Bluetooth Audio.
• The title/artist info may not be supported in some devices. When it
is not supported, only the symbol will be displayed.
•
The play/pause feature may operate differently depending on the
device.
Music saved in the mobile phone, portable player, etc. can be played in the car through Bluetooth audio streaming.
• Bluetooth audio can be played only when a Bluetooth phone or Bluetooth audio device has been connected. To play Bluetooth audio,
connect the Bluetooth phone to the car system. For more information on connecting Bluetooth, please refer to the user’s manual [Pairing and
connecting the unit and a Bluetooth phone].
•
The feature may operate differently depending on the Bluetooth device.
ALPINE_QRG_AM_ENG_191027.indd 14 2019-10-27 오후 9:33:40
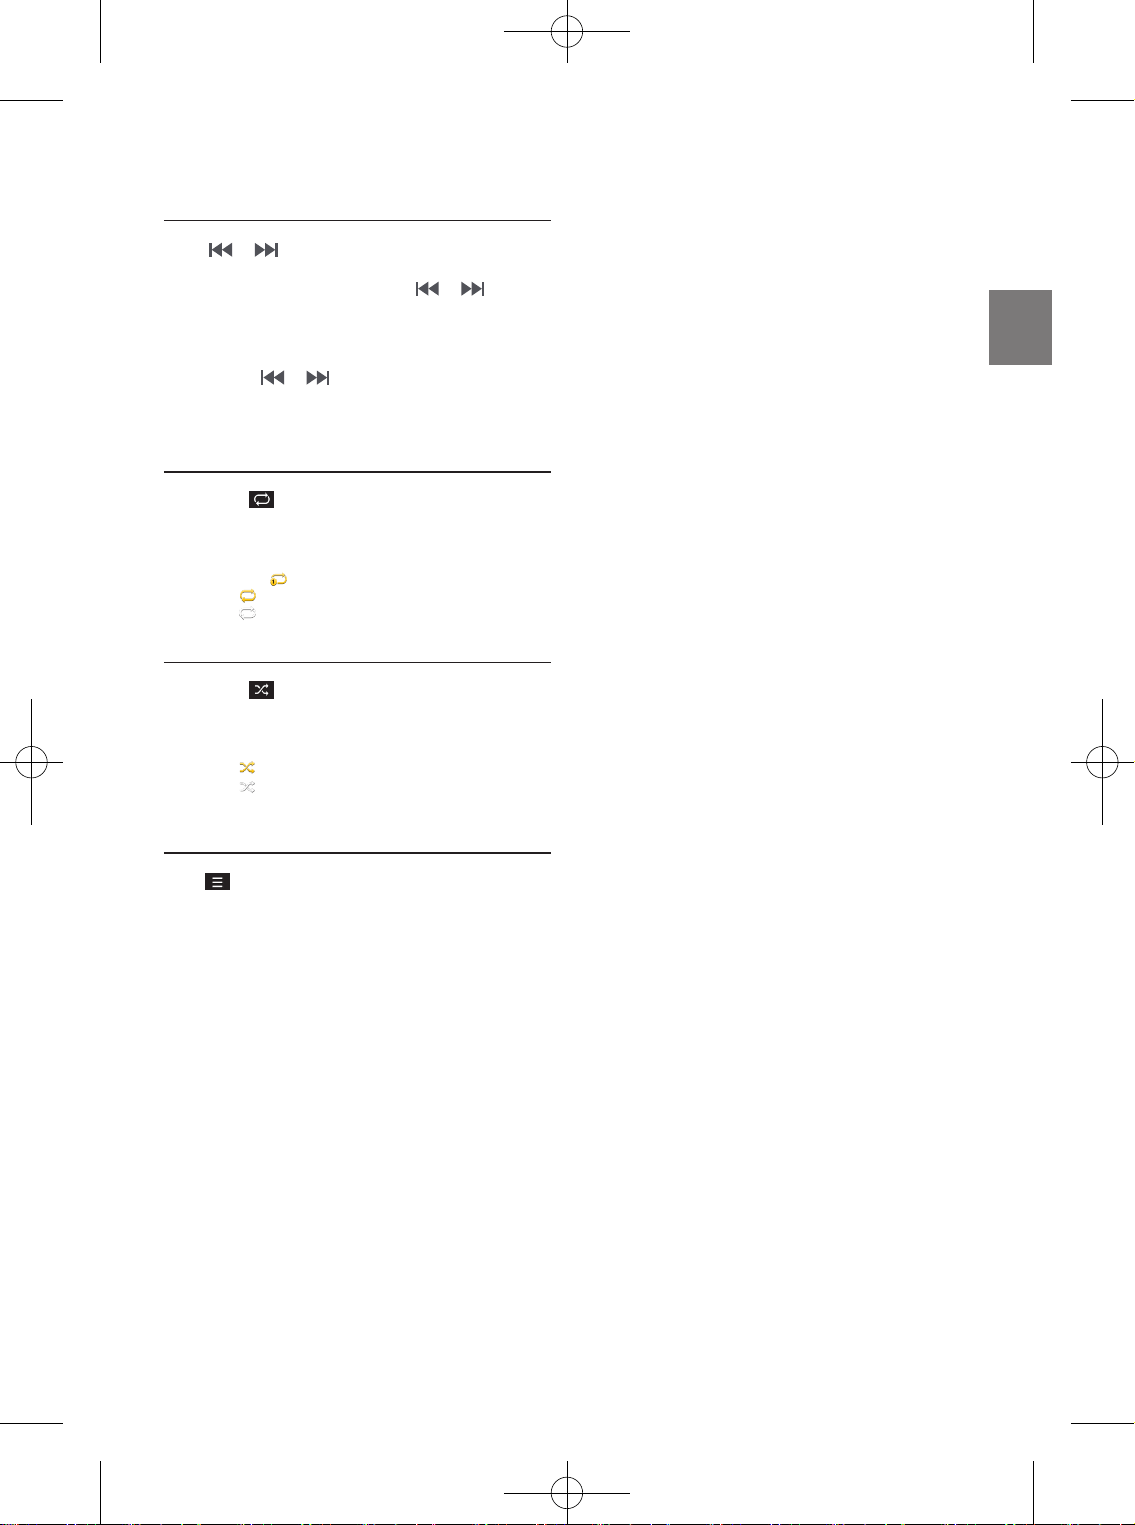
15
-EN
Fast-forwarding or Rewinding File
Using or .
1
While playing, touch and hold or .
Touch and hold for more than 1 second to rewind or fast-
forward at 4x speed. Keep touching to switch the speed to
20x.
2
Release or to play the track at normal
speed.
Repeat
1
Touch .
Each time the button is touched, the mode is changed.
2
Select the desired mode.
• One File : repeats play of currently playing file.
• On : repeats all the files in the Bluetooth Audio.
• Off : turns the Repeat feature off.
Shuffle
1
Touch .
Each time the button is touched, the mode is changed.
2
Select the desired mode.
• On : plays files in the current category in random order.
• Off : turns the shuffle feature off.
Sound Settings
Touch
→
[Sound Settings].
ALPINE_QRG_AM_ENG_191027.indd 15 2019-10-27 오후 9:33:41
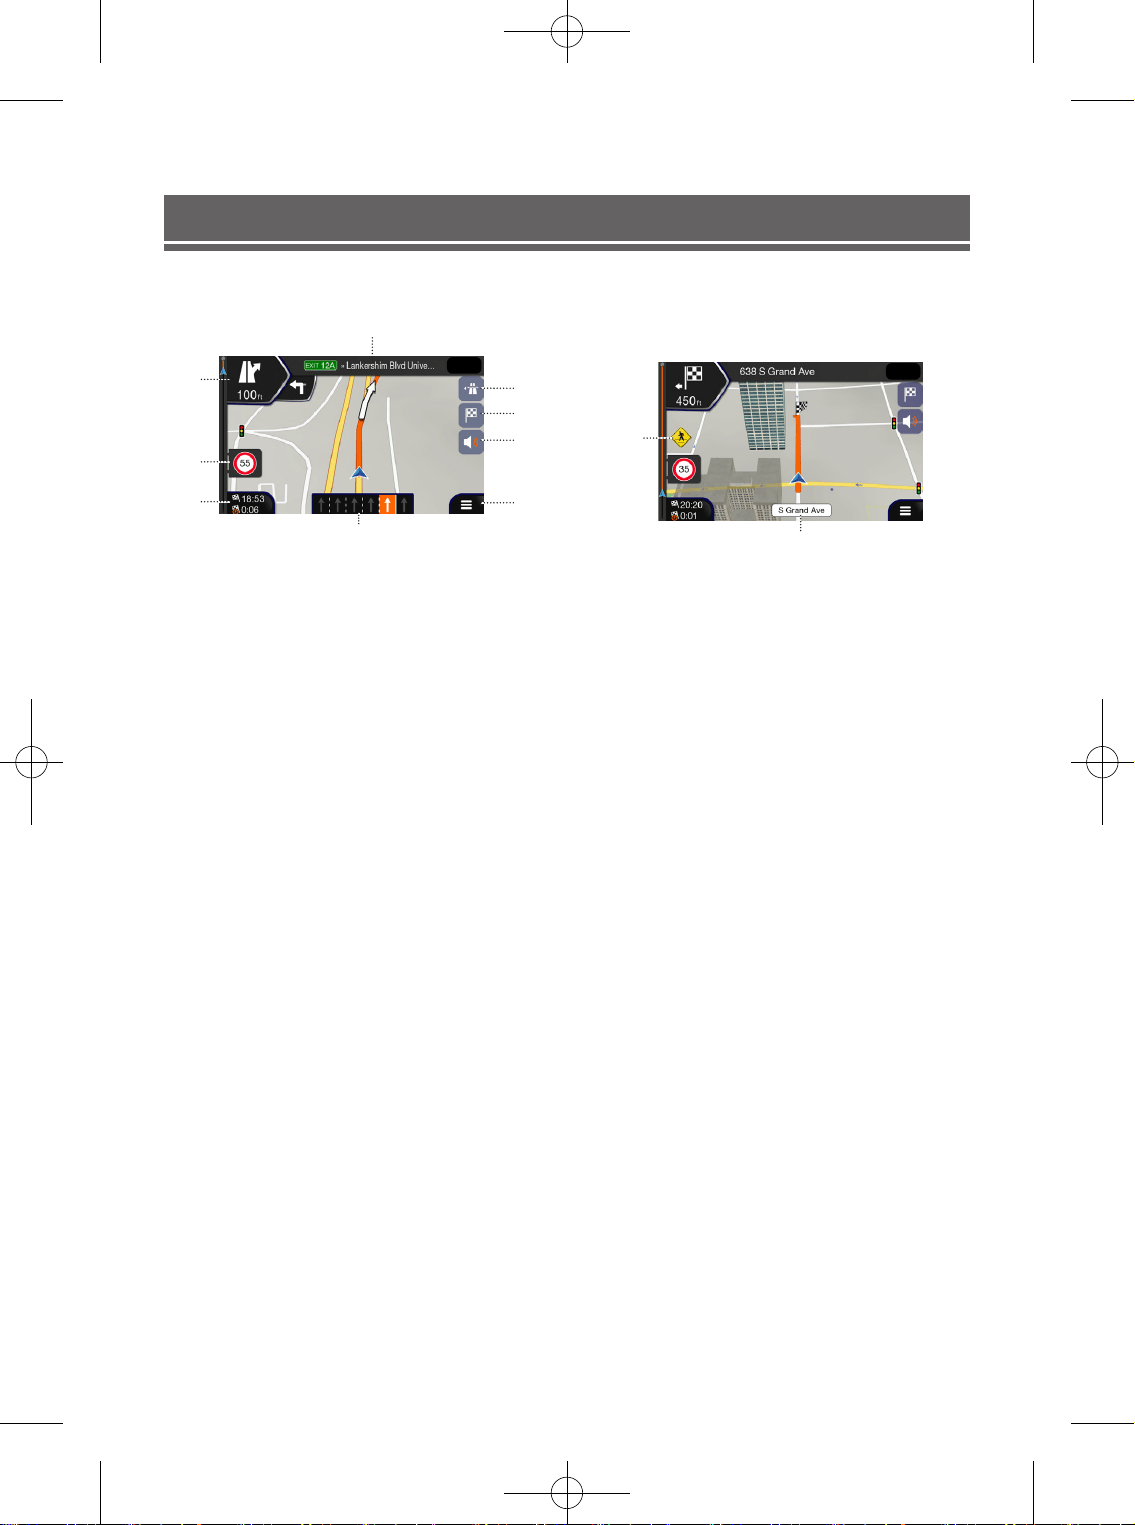
16
-EN
Map Functions
Below is an overview of different buttons and icons on the map display. For more detailed information about this screen, please see the
Owner’s Manual.
①
⑥
⑤
②
⑦
⑧
⑨
③
④
12:00
〇①〇
Next street
〇②〇
Next turn preview
〇③〇
Speed limit warning
〇④〇
Data fields
〇⑤〇
Lane information
〇⑥〇
Motorway services
〇⑦〇
Destination Menu
〇⑧〇
Sound settings
〇⑨〇
Access to Main Menu
①
②
12:00
〇①〇
Warning road sign
〇②〇
Street name
ALPINE_QRG_AM_ENG_191027.indd 16 2019-10-27 오후 9:33:41
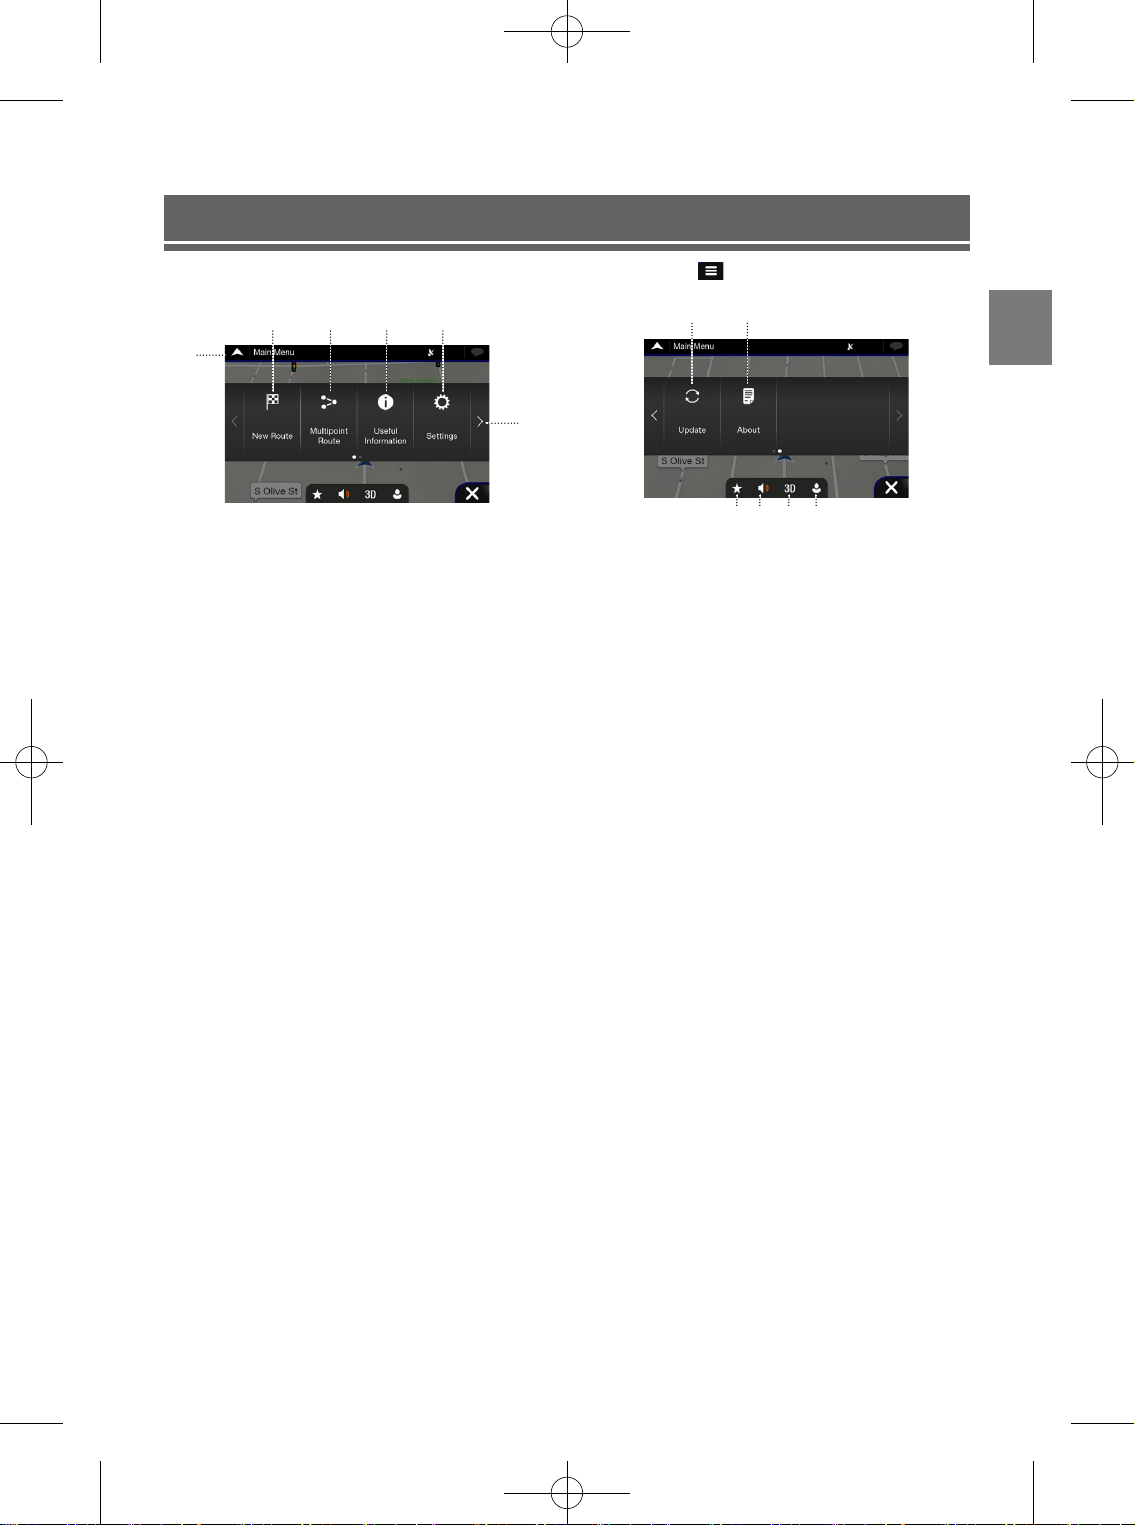
17
-EN
Navigation Menu
To access the Navigation Menu, touch on the icon on the right lower corner of the map screen.
12:00
①
② ③ ④ ⑤
⑥
〇①〇
Access the Map
Click on the arrow
〇②〇
New Route
Select your destination by entering an address or its coordinate,
or by selecting a Place, a Saved Location, or a Saved Route.
You can also look up your recent destinations from the History.
〇③〇
Multipoint Route
Build your route from one or more route points.
You can also plan a route independently of your current GPS
position by setting a new starting point.
〇④〇
Useful Information
Access additional options and check navigation-related
information.
〇⑤〇
Settings
Customize the way the navigation works
〇⑥〇
Next Menu
① ②
③ ④ ⑤ ⑥
12:00
〇①〇
Update
Enable Map updates for users
〇②〇
About
Version Information, Contents, Legal, credits and etc.
〇③〇
Favorites
Saved favorite locations
〇④〇
Volume
Change the volume settings to Alerts Only/Muted/Volume On
〇⑤〇
View
Change the views to 2D/2DNorth-Up/3D
〇⑥〇
User Profiles
New user profiles can be added and customized
ALPINE_QRG_AM_ENG_191027.indd 17 2019-10-27 오후 9:33:41
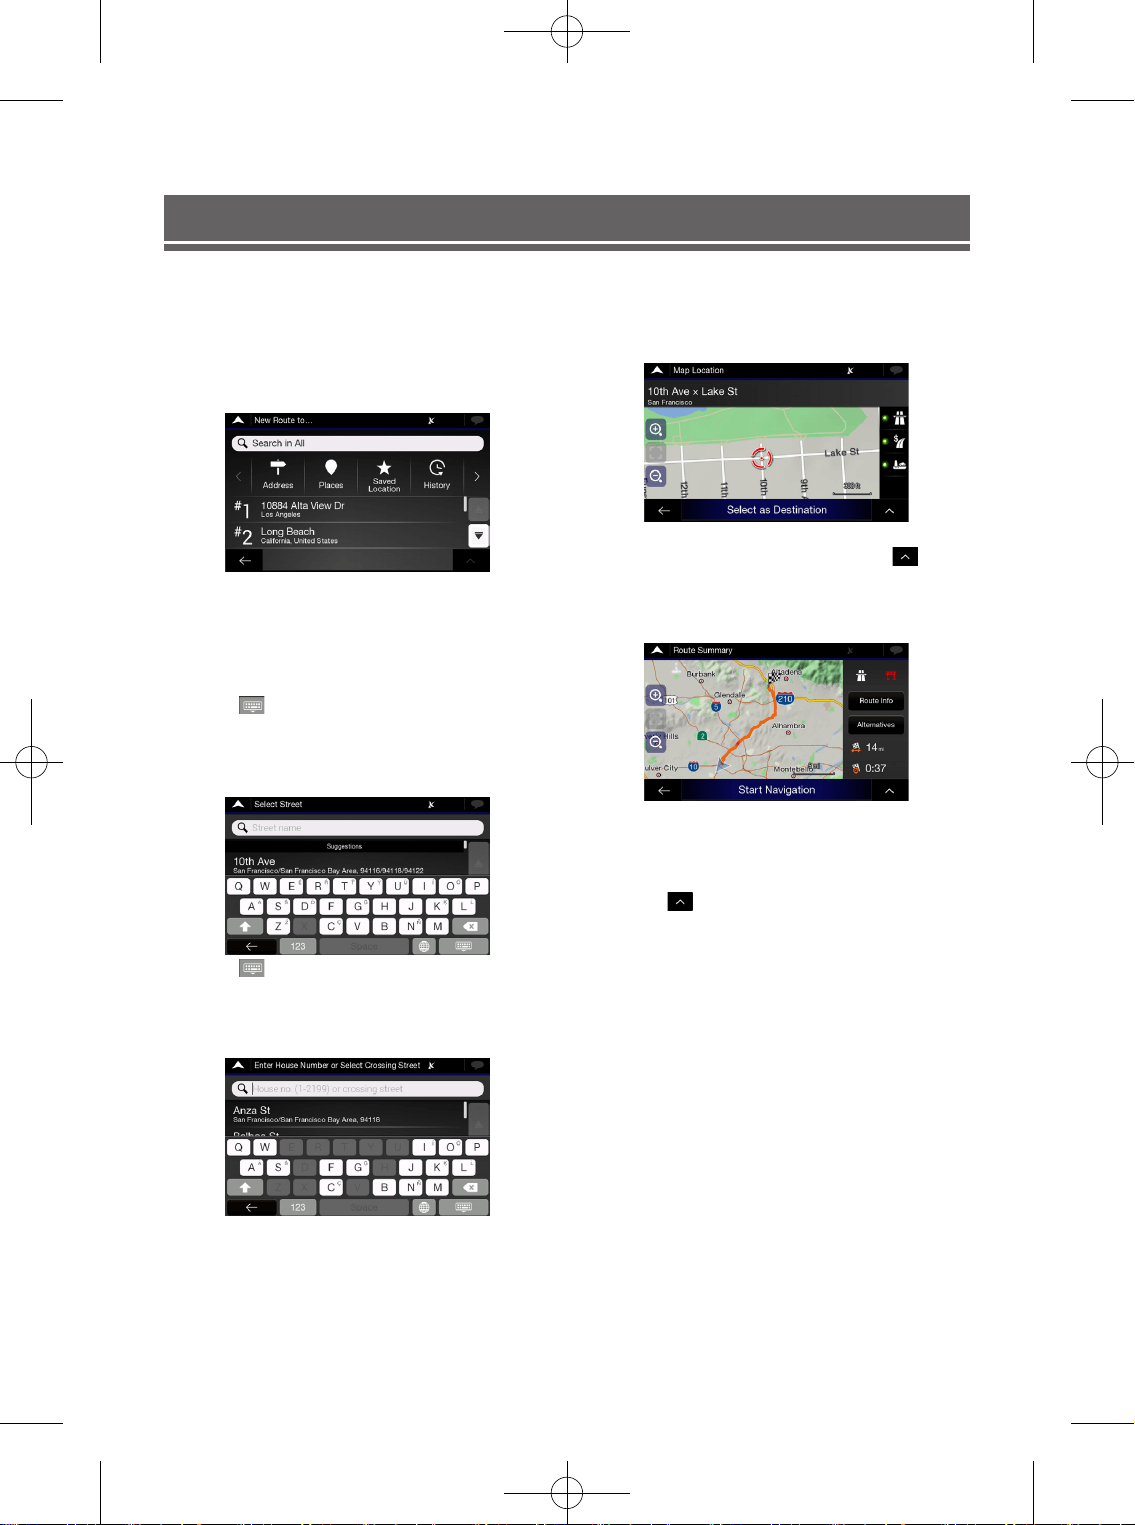
18
-EN
Setting a Destination
The following example describes how to search for a destination when choosing [City or ZIP code] from [Address].
• You can search and narrow down the Country/State by starting from [Country/State].
1
Touch [New Route] from the Navigation Menu.
2
Touch [Address].
12:00
3
Touch [City or ZIP code].
4
Enter the City or ZIP code.
Touch
to display the candidate list.
5
Enter the desired street name.
12:00
Touch
to display the candidate list.
6
Enter the house number or crossing street.
12:00
7
Select your destination
12:00
Confirm the location of your destination or click
for more
detailed information
8
Route Summary
12:00
The route is calculated, and a map appears, showing the
entire route. Here you can check route information and route
alternatives
9
Touch to modify the route parametres, or
touch [Start Navigation] to start your journey.
ALPINE_QRG_AM_ENG_191027.indd 18 2019-10-27 오후 9:33:42

19
-EN
MONITOR SECTION
Screen Size 6.5" (INE-W970HD)
LCD Type Transparent type TN LCD
Operation System TFT active matrix
Number of Picture Elements 1,152,000 pcs. (800 × 480 × 3
(RGB))
Effective Number of Picture Elements
99% or more
Illumination System LED
FM TUNER SECTION
Tuning Range 87.7 – 107.9 MHz
Mono Usable Sensitivity 9.3 dBf (0.8 μV/75 ohms)
50 dB Quieting Sensitivity 13.5 dBf (1.3 μV/75 ohms)
Alternate Channel Selectivity 80 dB
Signal-to-Noise Ratio
65 dB
Stereo Separation 35 dB
AM TUNER SECTION
Tuning Range 530 – 1,710 kHz
Usable Sensitivity 25.1 μV/28 dBf
USB SECTION
USB requirements USB 2.0
Max. Power Consumption 1,500 mA (CDP Support)
USB Class USB (Mass Storage Class)
File System FAT16/32
Decoding Format MP3/WMA/AAC/FLAC/OGG/APE/MP2
Number of Channels 2-Channels (Stereo)
Frequency Response*1 5 – 20,000 Hz (±1 dB)
Total Harmonic Distortion 0.016% (at 1 kHz)
Dynamic Range 95 dB (at 1 kHz)
Signal-to-Noise Ratio 85 Db
Channel Separation 75 dB (at 1 kHz)
*
1 Frequency response may differ depending on the encoder software/bit rate.
HDMI SECTION
Input Format 480p/720p
GPS SECTION
GPS Reception frequency 1,575.42 ±1 MHz
GPS Reception sensitivity -130 dBm max.
Bluetooth SECTION
Bluetooth Specification Bluetooth V4.0
Frequency band 2,402 – 2,480 MHz
Output Power '-6~+4 dBm Ave. (Power class 2)
Profile HFP (Hands-Free Profile)
PBAP (Phone Book Access Profile)
A2DP (Advanced Audio
Distribution Profile)
AVRCP (Audio/Video Remote
Control Profile)
GENERAL
Power Requirement 14.4 V DC
(11–16 V allowable)
Operating temperature -4°F to +140°F
(-20°C to + 60°C)
Power Output 16 W RMS × 4*2
• Power output: measured at 4 Ohms and ≤ 1% THD+N
• S/N: 80 dBA (reference: 1 W into 4 Ohms)
Audio output level
Preout (Front, Rear): 4V/10k ohms (max.)
Preout (Subwoofer): 4V/10k ohms (max.)
Weight (unit only) 2.05kg
CHASSIS SIZE
Width 178 mm
Height 100 mm
Depth 142 mm
NOSE SIZE (FACE PLATE W/O)
Width 178 mm
Height 100 mm
Depth 21.3 mm
Specifications
Owner’s manual
Specifications
ALPINE_QRG_AM_ENG_191027.indd 19 2019-10-27 오후 9:33:42

20
-EN
DISC AUDIO SECTION
File Format MP3, WMA7, WMA8, WMA9
Extensions mp3, wma
Bit rate 16kbps ~ 320 kbps
Sampling Rate 8K~ 48 KHz
Frequency response (20Hz ~ 20KHz) 0±1dB
Signal to Noise radio ≥ 85dB
THD (Total harmonic distortion) ≤ 0.06%
Dynamic Range (1kHz) ≥ 80dB
R/L Cross sound ≥ 75dB
DISC IMAGE SECTION
File Format JPEG, PNG, GIF, BMP
Extensions JPEG, PNG, GIF, BMP
DISC VIDEO SECTION
File Format AVI, MPG, FLV,DAT, VOB, MP4, MOV, OGG, ASF
Extensions avi, mpg, mpeg,dat, flv, vob, mp4, mov, ogg, asf
Video Codec MP4V, MPEG-1, MSVC, MPEG-1/MPEG-2, H.263,
Video 720*480/576 (30fps)
Resolution
Response Sampling Rate : 8,11.025, 16,22.05, 24, 32, 44.1, 48 KHz.
Response Bitrate : 45~500Kbps.
(WMA : 8K~48KHz, 16kbps~320kbps)
Audio Codec
Dolby Digital(AC3),WMA/PCM/LPCM,AAC LC (2ch),MPEG-
Audio,(MP1/MP2/MP3) LPCM, uLaw/aLaw, OGG, WMA
Subtitles SMI
Unsupported files
1. Video with OGG
2. Audio formats other than Vorbis with OGG
3. Vorbis format in AVI
CVBS
Video Signal Level 0.7±0.1 V p-p
Sync Level 0.3±0.1 V p-p
Video Out Level 1.0±0.1 V p-p
S-VIDEO Level
Y 1.0±0.1
C 0.3±0.1
• Due to continuous product improvement, specifications and design
are subject to change without notice.
• The LCD panel is manufactured using an extremely high precision
manufacturing technology. Its effective pixel ratio is over 99.99%.
This means that there is a possibility that 0.01% of the pixels could
be either always ON or OFF.
Copyrights and Trademarks
• “Made for iPod,” and “Made for iPhone,” mean that an electronic
accessory has been designed to connect specifically to iPod, or
iPhone, respectively, and has been certified by the developer
to meet Apple performance standards. Apple is not responsible
for the operation of this device or its compliance with safety and
regulatory standards. Please note that the use of this accessory
with iPod, or iPhone may affect wireless performance.
• Apple, iPhone, iPod, and iPod touch are trademarks of Apple
Inc., registered in the U.S. and other countries. Apple CarPlay is a
trademark of Apple Inc.
• Use of the Apple CarPlay logo means that a vehicle user interface
meets Apple performance standards. Apple is not responsible
for the operation of this vehicle or its compliance with safety and
regulatory standards. Please note that the use of this product with
iPhone, or iPod may affect wireless performance.
• Google, Android, Android Auto, Google Play and other marks are
trademarks of Google Inc.
• The Bluetooth
®
word mark and logos are registered trademarks
owned by the Bluetooth SIG, Inc. and any use of such marks by
Alpine Electronics, Inc. is under license.
• Manufactured under license from Dolby Laboratories. Dolby and
the double-D symbol are trademarks of Dolby Laboratories.
• The terms HDMI and HDMI High-Definition Multimedia Interface,
and the HDMI Logo are trademarks or registered trademarks of
HDMI Licensing, LLC in the United States and other countries.
• is a trademark of DVD Format/Logo Licensing Corporation.
• SiriusXM and all related marks and logos are trademarks of Sirius
XM Radio, Inc. All rights reserved.
ALPINE_QRG_AM_ENG_191027.indd 20 2019-10-27 오후 9:33:43