Ffl CH DOOfl
,,q %, }iNS_I}S! INStil{It/leSS
Plee_ read tffis guide
fl_orougHy before
®crating _ keep ff h_dy
for referen_ at all times.
To contact LG Electronics, 24 hours a day,
7 days a week:
USA i CANADA I_LGCANADA
Or visit us on the Web at:
USA us,lge,com CANADA www, tge,ca
Pour contacter LG Electronics, 24 heures par
jour, 7 jours par semaine:
USA 1_243-1Y3_ CANADA I_LGCANADA
Ou visitez notre site Web & I'adresse:
USA us,lge,com CANADA www.tge.ca
Para comunicarse @n LG Electronics,
24 horas a[ dia, 7 dias a la semana:
USA 1_24._ CANADA I_LGCANADA
O visitenos en la Web en:
USA us.ige.com CANADA _w.lge.ca
A
_ i _¸ ...., ,.,_
/}_!D[F£•H[BA/lOS
Veuill_ [ire _ gui_ attenti_ment
avant la mi_ @ set,¢i_ _ I'@parel
et g_ez le & port_ de m±n
_ur le _nsuRer en _s _ besoin,
EP,TAFRANCES
gJ/4PA}{_{ElUS(}
iSSItlUCC/ONESDEiSS/i_UClOS
Lee _teni_te estas
inslru_or_s antes utilizar
el Ngorif_ y gu_el_ como
refere_ia _ra e_future,
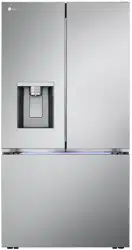
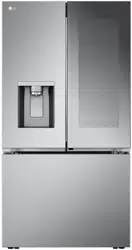
LMX25g8H**. LMX21g8Lt**
P/No. MFL37933582
IMPORTANT SAFETY INFORMATION
Basic Safety Precautions ........................................ 3
CFC Disposal ..................................................................................4
How to Connect Electricity ...................................... 5
PARTS AND FEATURES
Special Features ................................................................................6
Key Parts and Com_nents .................................... 7
INSTALLATION
Choose the Pro_r Location ................................... 8
Clearances ..............................................................................................8
Flooring ................................................................... 9
Handle Removal ................................................................................9
Door and Drawer Removal .................................... 10
Connecting the Water Supply ...............................................18
Connecting the Water Lines .................................. 18
Leveling the Refrigerator Doors .........................................20
Starting .................................................................. 21
HOW TO USE
Control Panel Features ......................................... 22
The LED Display ............................................................................23
Adjusting the Temperatures and Display .....................24
Operating the Dispenser ...................................... 25
Setting the Functions ..............................................................26
In-Door Ice Bin ..................................................... 27
Automatic lcemaker ...................................................................28
Storing Foods ....................................................... 29
Location of Fo_s .......................................................................30
Shelf Height Adjustment ....................................... 31
f
K YOU!
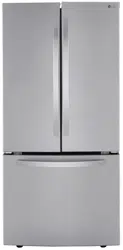
Congratulations on your purchase
and welcome to the LG family.
Your new LG French Door
Refrigerator combines
advanced cooling technology
with simple operation and high
efficiency, Follow the operating
and care instructions in this
manual and your refrigerator
will provide you with many years
of reliable service,
CARE AND CLEANING
Removing and Replacing Componen_ ................ 32
Cleaning the Refrigerator .........................................................35
General Information ............................................. 35
Light Bulb Replacement ............................................................36
Replacing the Water Filter ..................................... 37
TROUBLESHOOTING
Before Calling for Service .................................... 38
SPECIFICATIONS
Key Dimensions and Specifications ..................... 42
WARRANTY
Prc_uct Registration Information .......................... 43
2

BASIC SAFETY PRECAUTIONS
This guide contains many important safety messages. Always read and obey all
safety messages.
_This is the safety alert symbol, It alerts you to safety messages that inform you of hazards that can kill
or hurt you or others or cause damage to the product, All safe_ messages will be preceded by the safety
alert symbol and the hazard signal word DANGER, WARNING, or CAUTION These words mean:
&DANGER
WARNING
&CAUTION
You might be killed or seriously injured if you don't follow instructions.
You can be killed or seriously injured if you don't follow instructions.
Indicates an imminently hazardous situation which, if not avoided, may
result in minor or moderate injury, or product damage.
All safety me_ages will identify the hazard, tell you how to reduce the chance of injury, and tell you
what can happen if the instructions are not followed.
&WARNING
To reduce the risk of fire, el_tric shock, or
injury to _rsons when using your pr_uct,
basic _fety pr_autions should _ followed,
including the following.
Read all instructions before using this appliance.
• NEVER unplug your refrigerator by pulling on the
_wer cord. Always grip the plug firmly and pull it
straight out from the outlet.
• Repair or replace immediately all electric service
cords that have become frayed or otherwise
damaged. Do not use a cord that shows cracks or
abrasion damage along its length or at either the
plug or connector end.
• When moving your refrigerator away from the wall,
be careful not to roll over or damage the _wer cord.
• DO NOT store or use gasoline or other flammable
va_rs and liquids in the vicinity of this or any other
appliance.
• Do NOT allow children to climb, stand, sit or hang
on doors, drawers or shelves of the refrigerator.
They could damage the refrigerator and seriously
injure themselves.
• Keep fingers out of pinch point areas; clearances
between the doors and cabinet are necessarily
small, Be careful closing doors when children are
in the area.
• Unplug your refrigerator before cleaning or making
any repairs.
NOTE: Service should be performed by a qualified
technician.
. Before replacing a burned-out light bulb, unplug the
refrigerator or turn off power at the circuit breaker
or fuse box in order to avoid contact with a live wire
filament. (A burned-out light bulb may break when
being replaced.)
NOTE: Some models have LED interior lighting and
service should be performed by a qualified
technician.
NOTE: Setting either or both controls to the OFF
_sition does not remove power to the light circuit.
° When you are finished, reconnect the refrigerator to
the electrical source and reset the control
(Thermostat Refrigerator Control, or Freezer
Control, or Freezer Control, depending on the
model) to the desired setting.
° This refrigerator must be properly installed in
accordance with the Installer Instructions that
were taped to the front of the refrigerator.
° After your refrigerator is in operation, do not touch
the cold surfaces in the freezer compartment when
hands are damp or wet. Skin may adhere to the
extremely cold surfaces.
° in refrigerators with automatic icemakers, avoid
contact with the moving parts of the ejector
mechanism or with the heating element that
releases the cubes. DO NOT place fingers or hands
on the automatic icemaking mechanism while the
refrigerator is plugged in.
° Do not modify or extend the power cord length.
it will cause electric shock or fire.
BASIC SAFETY PRECAUTIONS (CONT.)
• Do not use drier to dry the inside, nor light a candle to
remove odor.
• Install in places away from the fire such as the place
where flammable gas is leaked.
• This appliance is not intended for use by persons
(including children) with reduced physical, sensory or
mental capabilities, or lack of experience and
knowledge, unless they have been given supervision
or instruction concerning use of the appliance by a
person responsible for their safety.
Children should be supervised to ensure that they do
not play with the appliance.
DO NOT refreeze frozen foods which have
thawed completely. The United States
Department of Agriculture in Home and Garden
Bulletin No. 69 says:
...You may safely refreeze frozen foods that have
thawed if they still contain ico crystals or if they are
still col_elow 40°F (4°C).
...Thawed ground meats, poultry, or fish that have
any off-odor or off-color should not be refrozen
and should not be eaten. Thawed ice cream
should be discarded. If the odor or color of any
food is poor or questionable, dispose of it. The
food may be dangerous to eat.
Even partial thawing and refreezing reduces the
quality of foods, particularly fruits, vegetables,
and prepared foods. The eating quality of red
meats is affected less than that of many other
foods. Use refrozen foods as soon as _ssible to
save as much of their quality, as you can.
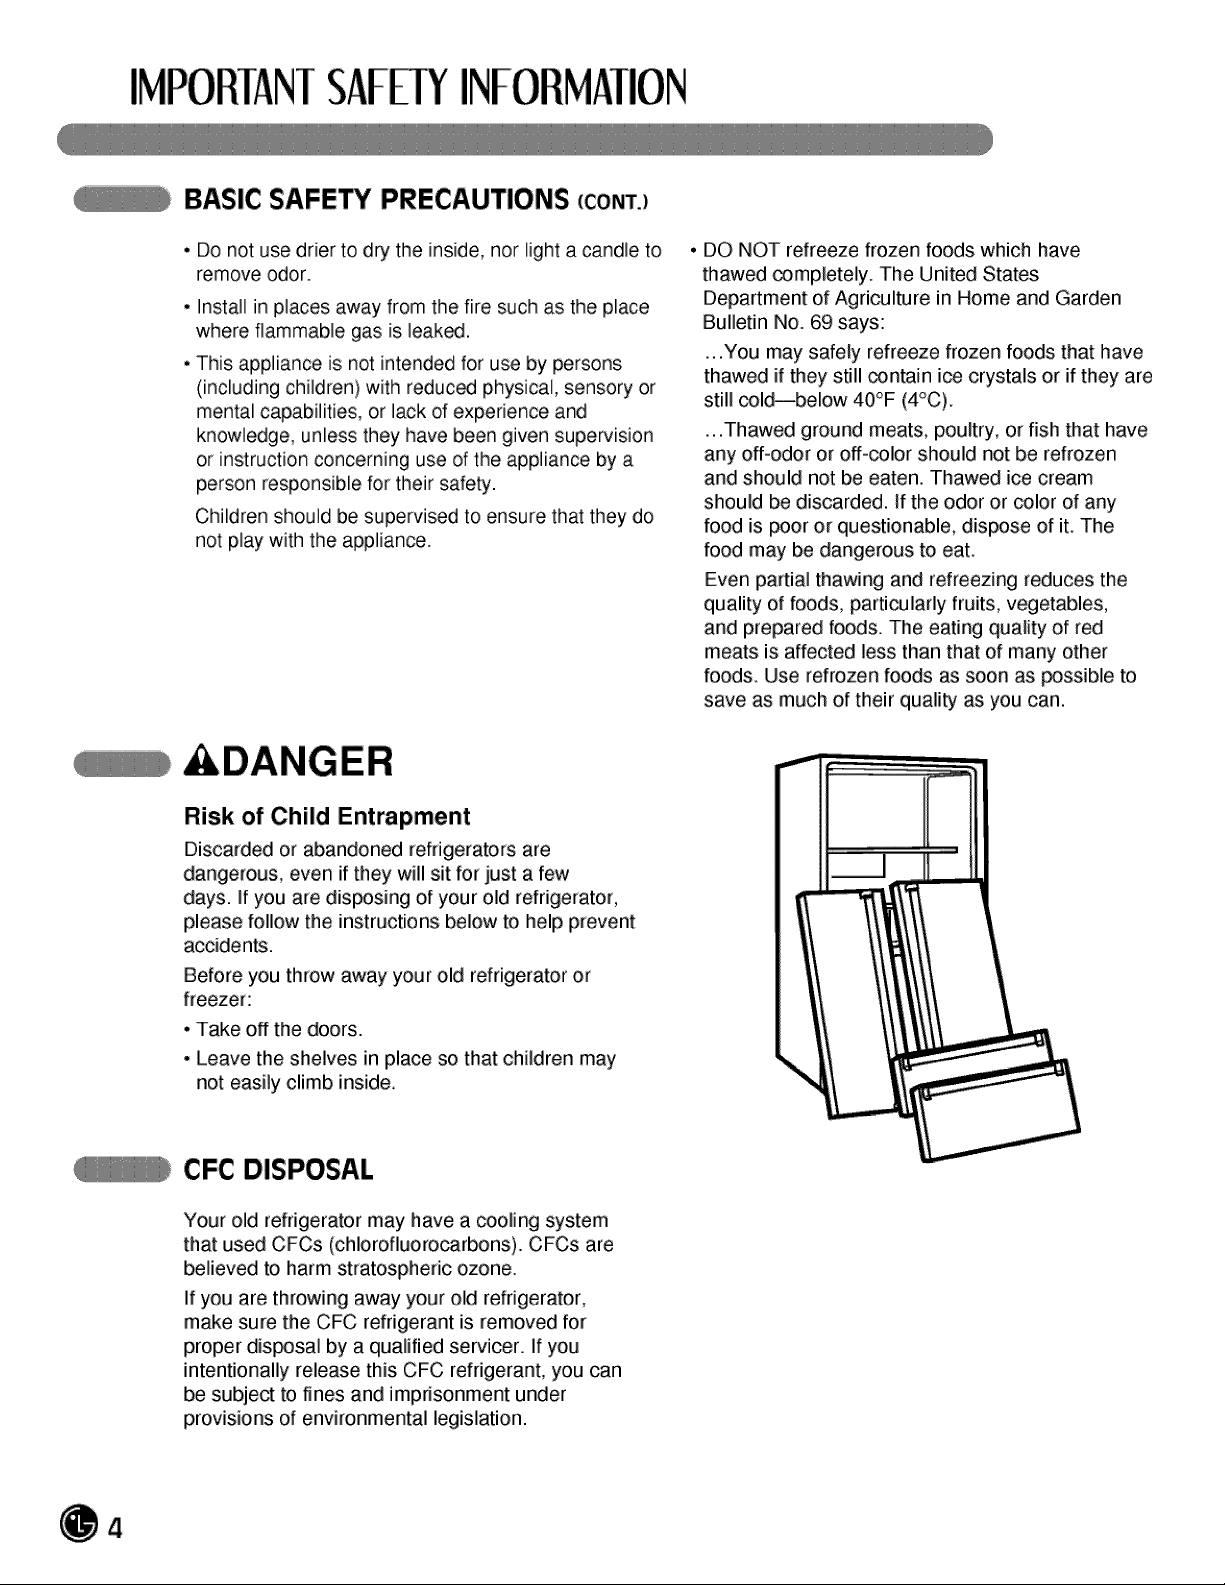
&DANGER
Risk of Child Entrapment
Discarded or abandoned refrigerators are
dangerous, even if they will sit for just a few
days. ff you are disposing of your old refrigerator,
please follow the instructions below to help prevent
a_idents.
Before you throw away your old refrigerator or
freezer:
• Take off the doors.
• Leave the shelves in place so that children may
not easily climb inside,
CFC DISPOSAL
Your old refrigerator may have a cooling system
that used CFCs (chlorofluoro_rbons). CFCs are
believed to harm stratospheric ozone.
If you are throwing away your old refrigerator,
make sure the CFC refrigerant is removed for
proper dis_sal by a qualified servicer. If you
intentionally release this CFC refrigerant, you can
be subject to fines and imprisonment under
provisions of environmental legislation.
4
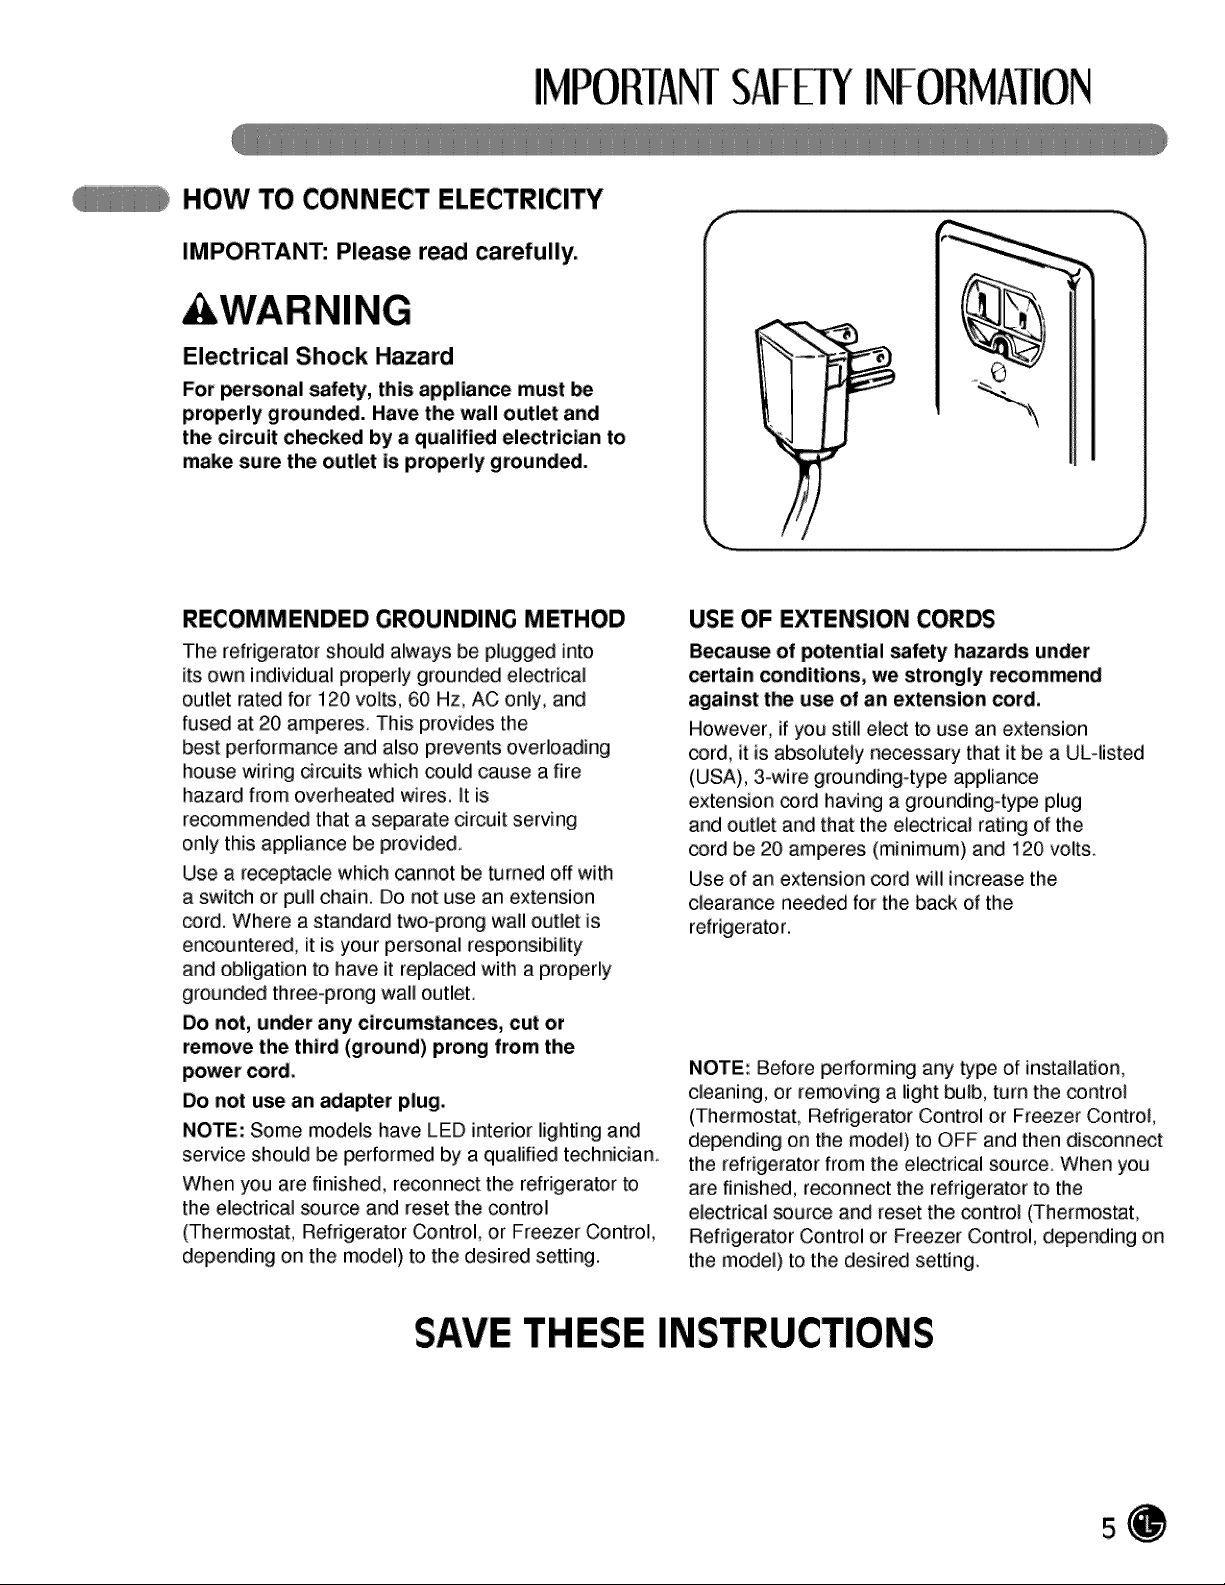
HOW TO CONNECT ELECTRICITY
IMPORTANT: Please read carefully.
WARNING
Electrical Shock Hazard
For personal _fety, this appliance must
properly ground_. Have the wall outlet and
the circuit checked by a qualified el_triclan to
make sure the outlet is properly grounded.
RECOMMENDED GROUNDING METHOD
The refrigerator should always be plugged into
its own individual properly grounded electrical
outlet rated for 120 volts, 60 Hz, AC only, and
fused at 20 amperes.. This provides the
best performance and also prevents overloading
house wiring drcuits which could cause a fire
hazard from overheated wires. It is
recommended that a separate circuit serving
only this appliance be provided..
Use a re_ptacle which cannot be turned off with
a switch or pull chain. Do not use an extension
cord. Where a standard twooprong wall outlet is
encountered, it is your personal responsibility
and obligation to have it replaced with a properly
grounded three-prong wall outlet..
Do not, under any circumstances, cut or
remove the third (ground) prong from the
power cord,
Do not use an adapter plug,
NOTE: Some models have LED interior lighting and
service should be performed by a qualified technician..
When you are finished, reconnect the refrigerator to
the electrical source and reset the control
(Thermostat, Refrigerator Control, or Freezer Control,
depending on the model) to the desired setting.
USE OF EXTENSION COR_
B_ause of _tential safety hazards under
certain conditions, we strongly recommend
against the use of an extension cord,
However, if you still elect to use an extension
cord, it is absolutely necessary that it be a UL-listed
(USA), 3owire grounding-type appliance
extension _rd having a grounding-type plug
and outlet and that the electrical rating of the
cord be 20 amperes (minimum) and 120 volts_
Use of an extension cord will increase the
clearance needed for the back of the
refrigerato r.
NOTE: Before performing any type of installation,
cleaning, or removing a light bulb, turn the control
(Thermostat, Refrigerator Control or Freezer Control,
depending on the model) to OFF and then disconnect
the refrigerator from the electrical source_ When you
are finished, reconnect the refrigerator to the
electrical source and reset the control (Thermostat,
Refrigerator Control or Freezer Control, depending on
the model) to the desired setting.
SAVE THESE INSTRUCTIONS
5

PARTSAND
0
0
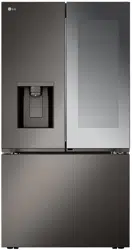
SPECIAL FEATURES
CONTROL PANEL LED DISPLAY SCREEN
Simple electronic controls are user-friendly_
The LED screen shows refrigerator and freezer
temperatures, displays water filter status,
dispenser information, and more.
ICE PLUS
When this feature is activated, the freezer section
will run at the coldest temperature for a 24- hour
period to increase ice production by about 20
percent.
FILTERED WATER AND ICE DISPENSER
The water dispenser offers fresh, chilled, filtered
water through the door. The ice dispenser offers
cubed or crushed ice.
O
O
O
O
O
DOOR ALARM
A warning alarm sounds at 30-second intervals
when the refrigerator or freezer door is left open
for more than 60 seconds.
IN-DOOR ICE BIN
The icemaker automatically produces 80-130
ice cubes in a 24-hour period to keep the ice
dispenser fully supplied. The in-door design
creates more shelf space.
CRISPERS
LG's crispers preserve humidity and
help vegetables stay crisp
AUTO CLOSING HINGE
When you slightly push the door of
the refrigerator, it is automatically closed.
(The door is automatically closed within
30 ° of the opening angle.)
GLIDE'N'SERVE
Provides storage space with a variable tempera#Jre
control that keeps the compartment _lder than
refrigerator.
__1'#
6
@
Q
0
PARTSAND
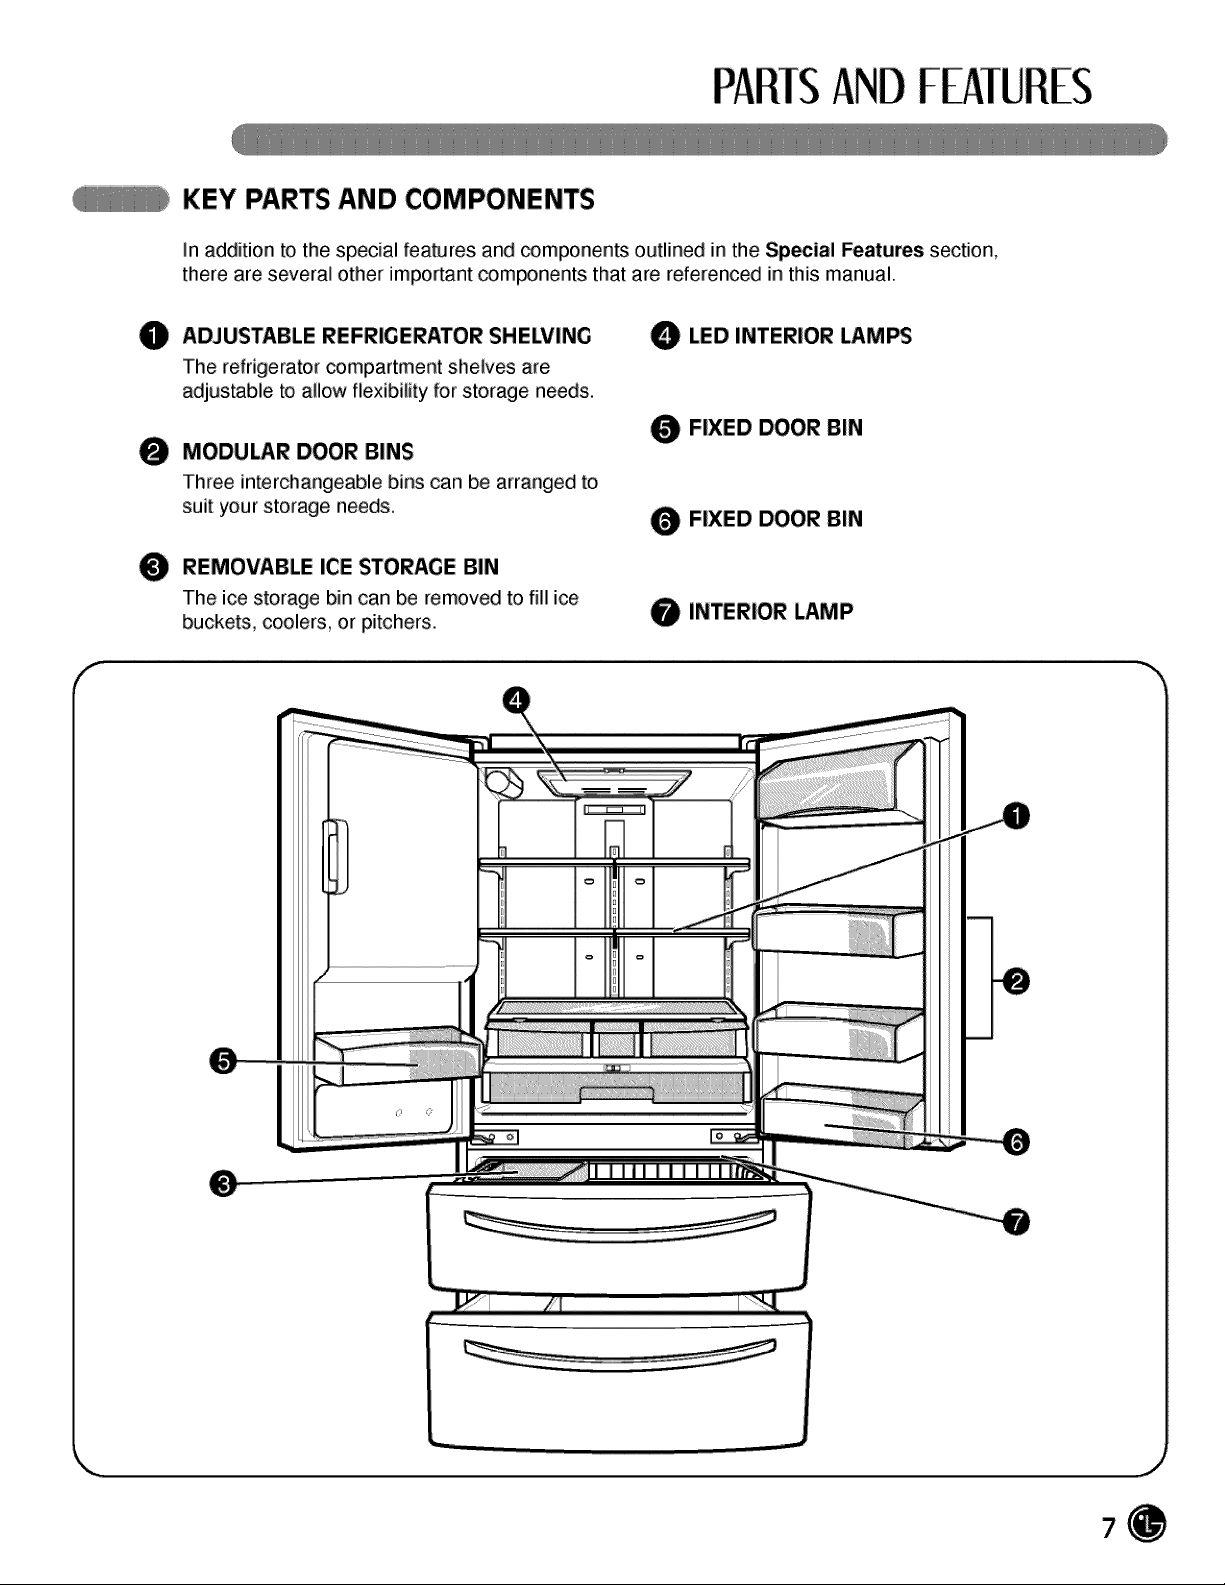
KEY PARTS AND COMPONENTS
In addition to the special features and components outlined in the Special Features section,
there are several other important components that are referenced in this manual.
ADJUSTABLE REFRIGERATOR SHELVING
The refrigerator compartment shelves are
adjustable to allow flexibility for storage needs.
MODU_R DOOR BINS
Three interchangeable bins can be arranged to
suit your storage needs.
REMOVABLE ICE STORAGE BIN
The ice storage bin can be removed to fil ice
buckets, coolers or pitchers.
O LED INTERIOR LAMPS
FIXED DOOR BIN
FIXED DOOR BIN
INTERIOR LAMP
7
CHOOSE THE PROPER LOCATION
WARNING
Excessive Weight Hazard
Two or more p_ple are required when
moving and unpacking the appliance.
• Store and install the refrigerator where it will not
be exposed to temperatures below freezing or
exposed to outdoor weather conditions.
• Install this appliance in an area where the
temperature is between 55°F (13°C) and 110°F
(43°C). If the temperature around the appliance
is too low or too high, cooling ability may be
adversely affected.
• If this refrigerator is installed where the
temperature is a_ve 110°F (43°C), the
freezing capacity is compromised and the cost
of electricity used increases.
• To reduce the risk of electric shock, do not
install the refrigerator in a wet or damp area.
• Select a place where a water supply can be
easily connected for the automatic icemaker
and dispenser.
• Unstable installation may cause vibration and
noise, if the floor is not even, make the
refrigerator level by rotating the height adjusting
screws.
• Properly ground the refrigerator to conform with
all governing codes and ordinances.
CAUTION
Avoid placing the unit near heat sources,
dir_t sunlight, or moisture.
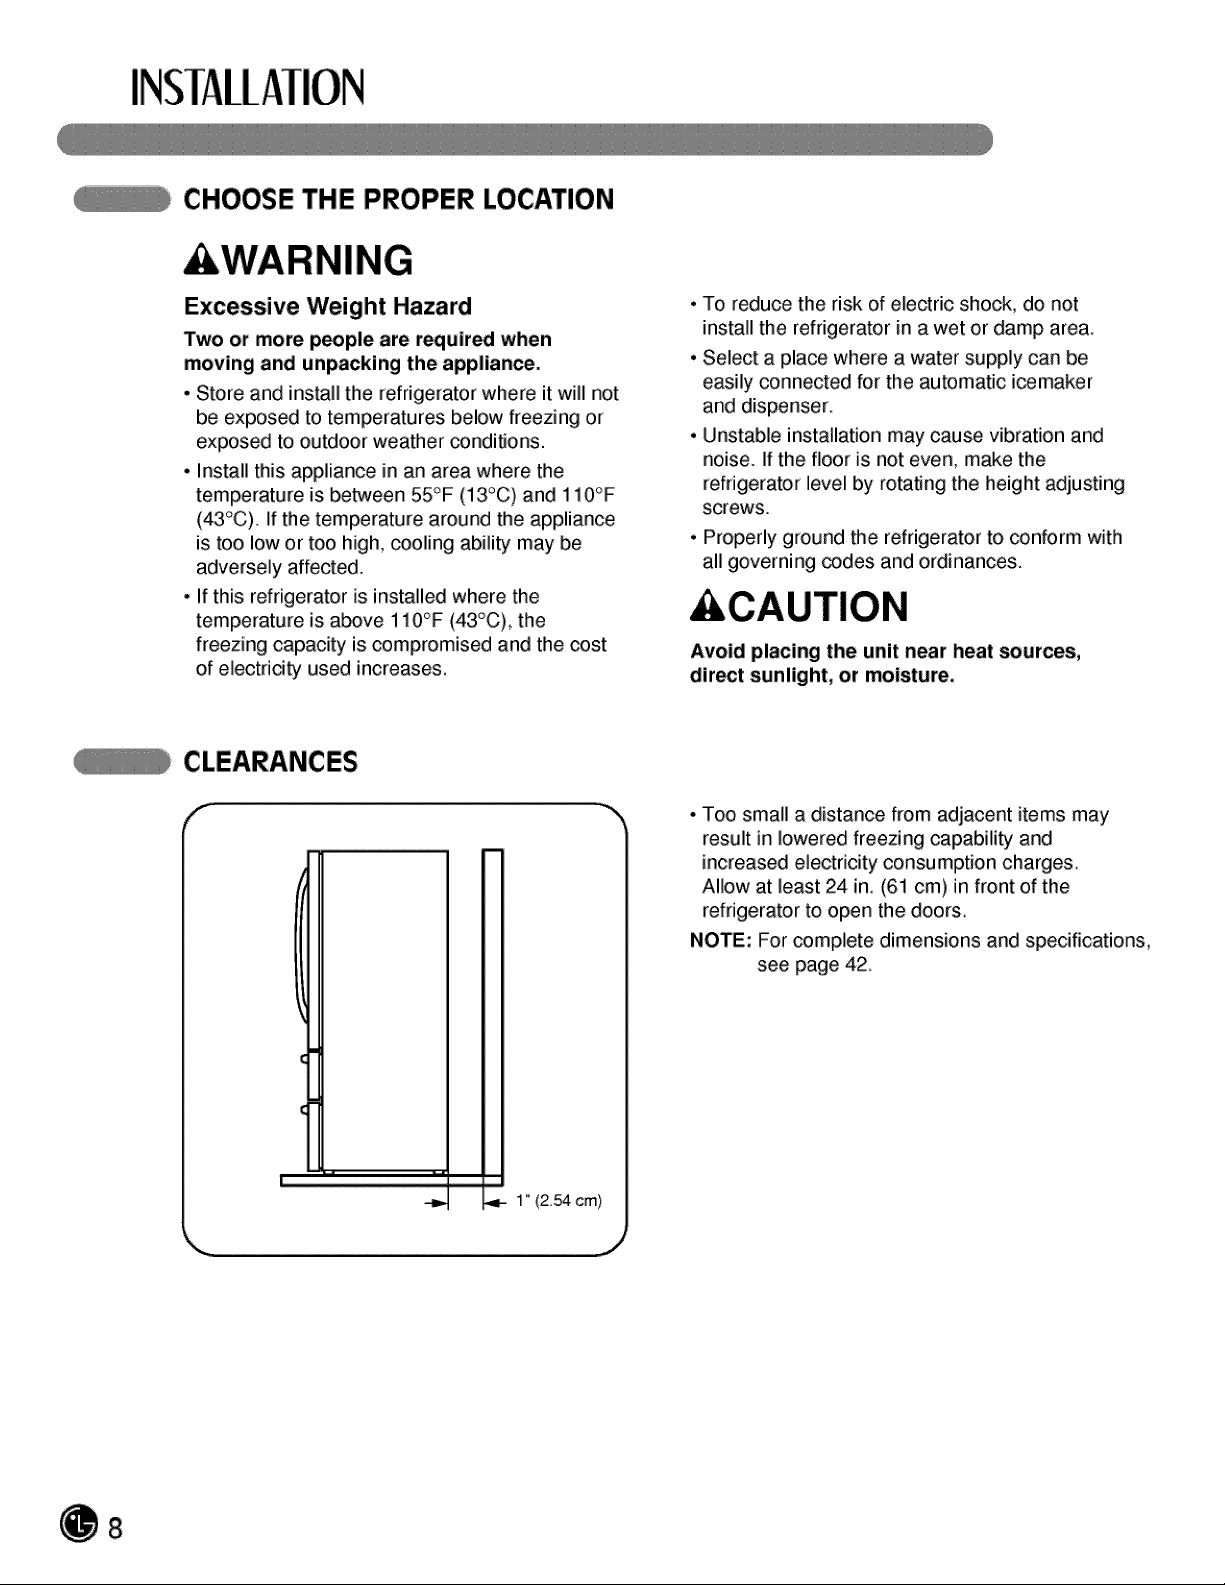
CLEARANCES
f
1" (2._ cm)
J
• Too small a distance from adjacent items may
result in lowered freezing capability and
increased electricity consumption charges.
Allow at least 24 in. (61 cm) in front of the
refrigerator to open the doors.
NOTE: For complete dimensions and specifications,
see page 42.
8

FLOORING
To minimize noise and vibration, the refrigerator
MUST be installed on a solidly constructed
floor.
To avoid vibration, the unit must be level. If
required, adjust the leveling legs to compensate
for unevenness of the floor. The front should be
slightly higher than the rear to aid in door
closing. The leveling legs can be turned easily
by pushing against the top of the refrigerator to
take the weight off the feet. Turn the leveling
legs clockwise to raise the unit or
counterclockwise to lower it.
• Carpeting and soft tile surfaces are not
recommended.
• Never install the refrigerator on a platform or
weakly supported structure.
NOTE: When moving the refrigerator for cleaning
or service, be sure to protect the floor. Always
pull the refrigerator straight out when moving it.
Do not wiggle or walk the refrigerator when trying
to move it; floor damage could occur.
NOTE: It is recommend that the doors be removed when it is necessary, to move the refrigerator through a
narrow opening.
HANDLE REMOVAL
To move the refrigerator through a house door, it
may be necessary to remove the refrigerator
door handles,
NOTE: Handle appearance may vary from
illustrations on this page,
• Use special care when removing handles to
prevent scratching the doors,
• The handle could be damaged if you hit it with
a hammer while removing or attaching.
• When you assemble or disassemble a handle,
you must push or pull with reasonable force.
Fasteners
Set Screw
Allen Wrench
Loosen the set screws with a 2,5 mm (3/32")
Allen wrench and remove the handle.
NOTE: if the handle mounting fasteners need
to be tightened or removed, use a 1/4" Alien
wrench.
Loosen the set screws located on the iower
side of the handle with a 3.1 mm (1/8") Aiten
wrench and remove the handle.
NOTE: If the handle mounting fasteners ne_
to be tightened or remove, use a 1/4" Ailen
wrench.
9
HANDLE REMOVAL (CONT.)
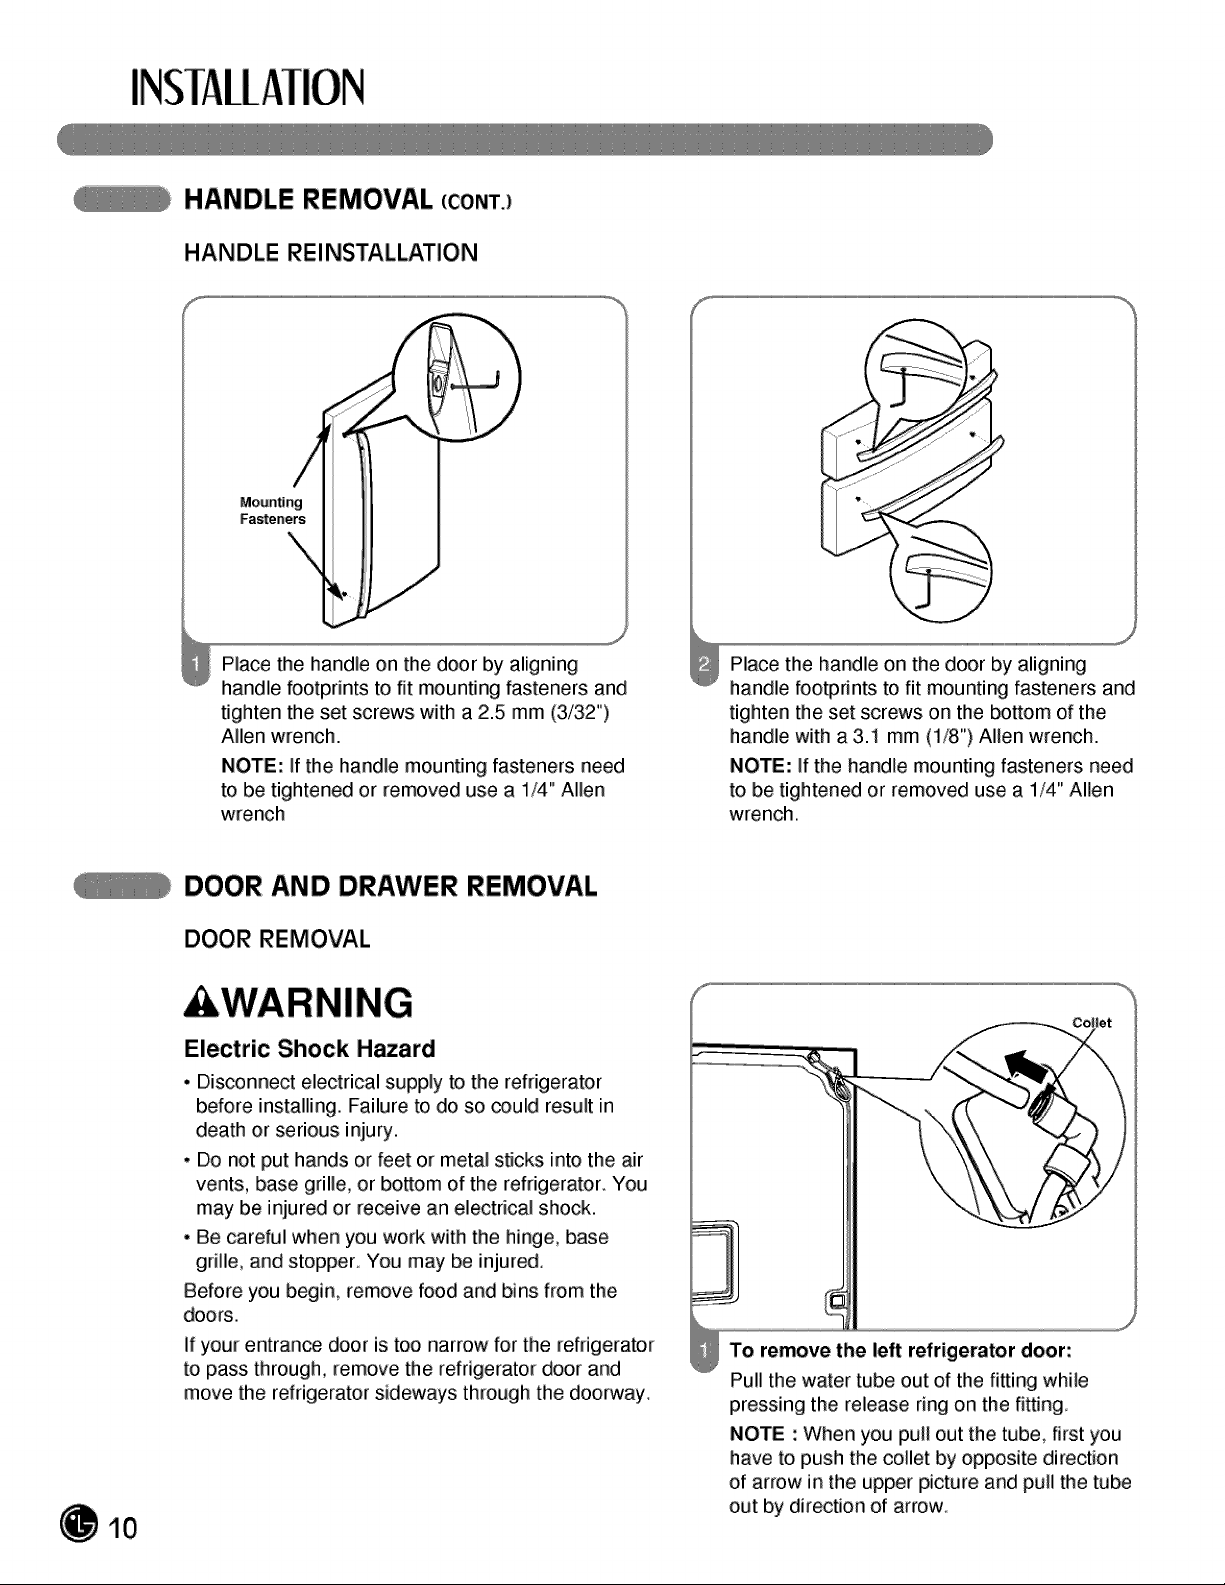
HANDLE REINSTALLATION
f,,, %_
Place the handle on the door by aligning
handle footprints to fit mounting fasteners and
tighten the set screws with a 2.5 mm (3/32")
Allen wrench.
NOTE: if the handle mounting fasteners need
to be tightened or removed use a 1/4" Allen
wrench
Place the handle on the door by aligning
handle footprints to fit mounting fasteners and
tighten the set screws on the bottom of the
handle with a 3.1 mm (1/8") Allen wrench.
NOTE: if the handle mounting fasteners need
to be tightened or removed use a 1/4" Allen
wrench.
10
DOOR AND DRAWER REMOVAL
DOOR REMOVAL
WARNING
Electric Shock H_ard
• Disconnect electrical supply to the refrigerator
before installing. Failure to do so _uld result in
death or serious injury.
, Do not put hands or feet or metal sticks into the air
vents, base grille, or bottom of the refrigerator, You
may be injured or re_ive an electrical shock.
• Be careful when you work with the hinge, base
grille, and stoppeL You may be injured,
Before you begin, remove food and bins from the
doors,
If your entrance door is too narrow for the refrigerator
to pass through, remove the refrigerator door and
move the refrigerator sideways through the doorway,
To remove the left refrigerator door:
Pull the water tube out of the fitting while
pressing the release ring on the fitting
NOTE : When you pull out the tube, fi_t you
have to push the collet by opposite direction
of arrow in the upper picture and pull the tube
out by direction of arrow,
DOOR AND DRAWER REMOVAL (CONT.)
DOOR REMOVAL (CONTJ
\
®)
• Open the door. Remove the top hinge cover
screw (1).
• Use a flat-head screwdriver to pry back the
hooks (not shown) on the front underside of
the cover (2). Lift up the cover.
• Remove the cover. Pull out the tube (3).
• Disconnect all the wire harnesses (4).
• Remove the grounding screw(5),
• Rotate hinge lever (6) counterclockwise,
Lift the top hinge (7) free of the hinge lever
latch (8).
IMPORTANT: When lifting the hinge free of
the latch, be careful that the door does not fall
fop€card.
• Lift the door from the middle hinge pin and
remove the door.
• Place the door, inside facing up, on a non-
scratching surface.
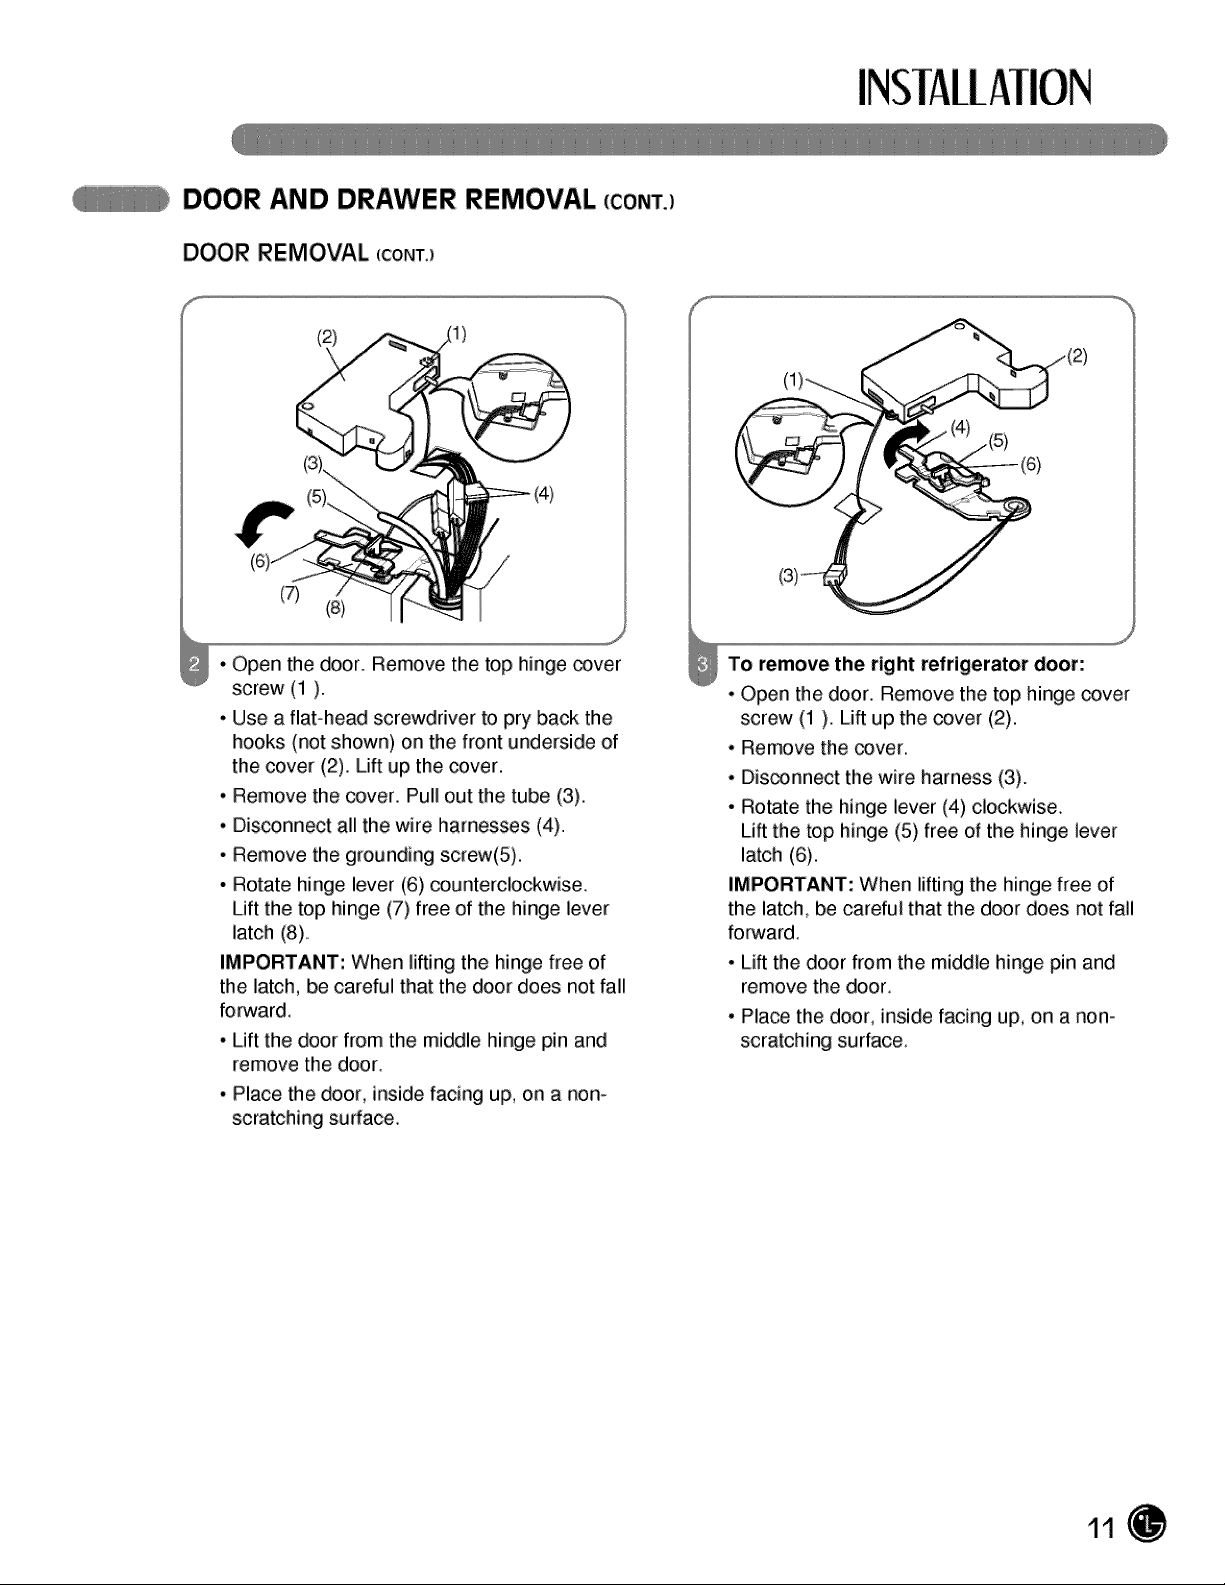
To remove the right refrigerator door:
• Open the door. Remove the top hinge cover
screw (1). Lift up the cover (2).
• Remove the cover.
• Disconnect the wire harness (3),
• Rotate the hinge lever (4) clockwise,
Lift the top hinge (5) free of the hinge lever
latch (6),
IMPORTANT: When lifting the hinge free of
the latch,, be careful that the door does not fall
forward.
• Lift the door from the middle hinge pin and
remove the door.
• Place the door, inside facing up, on a non-
scratching surface.
11
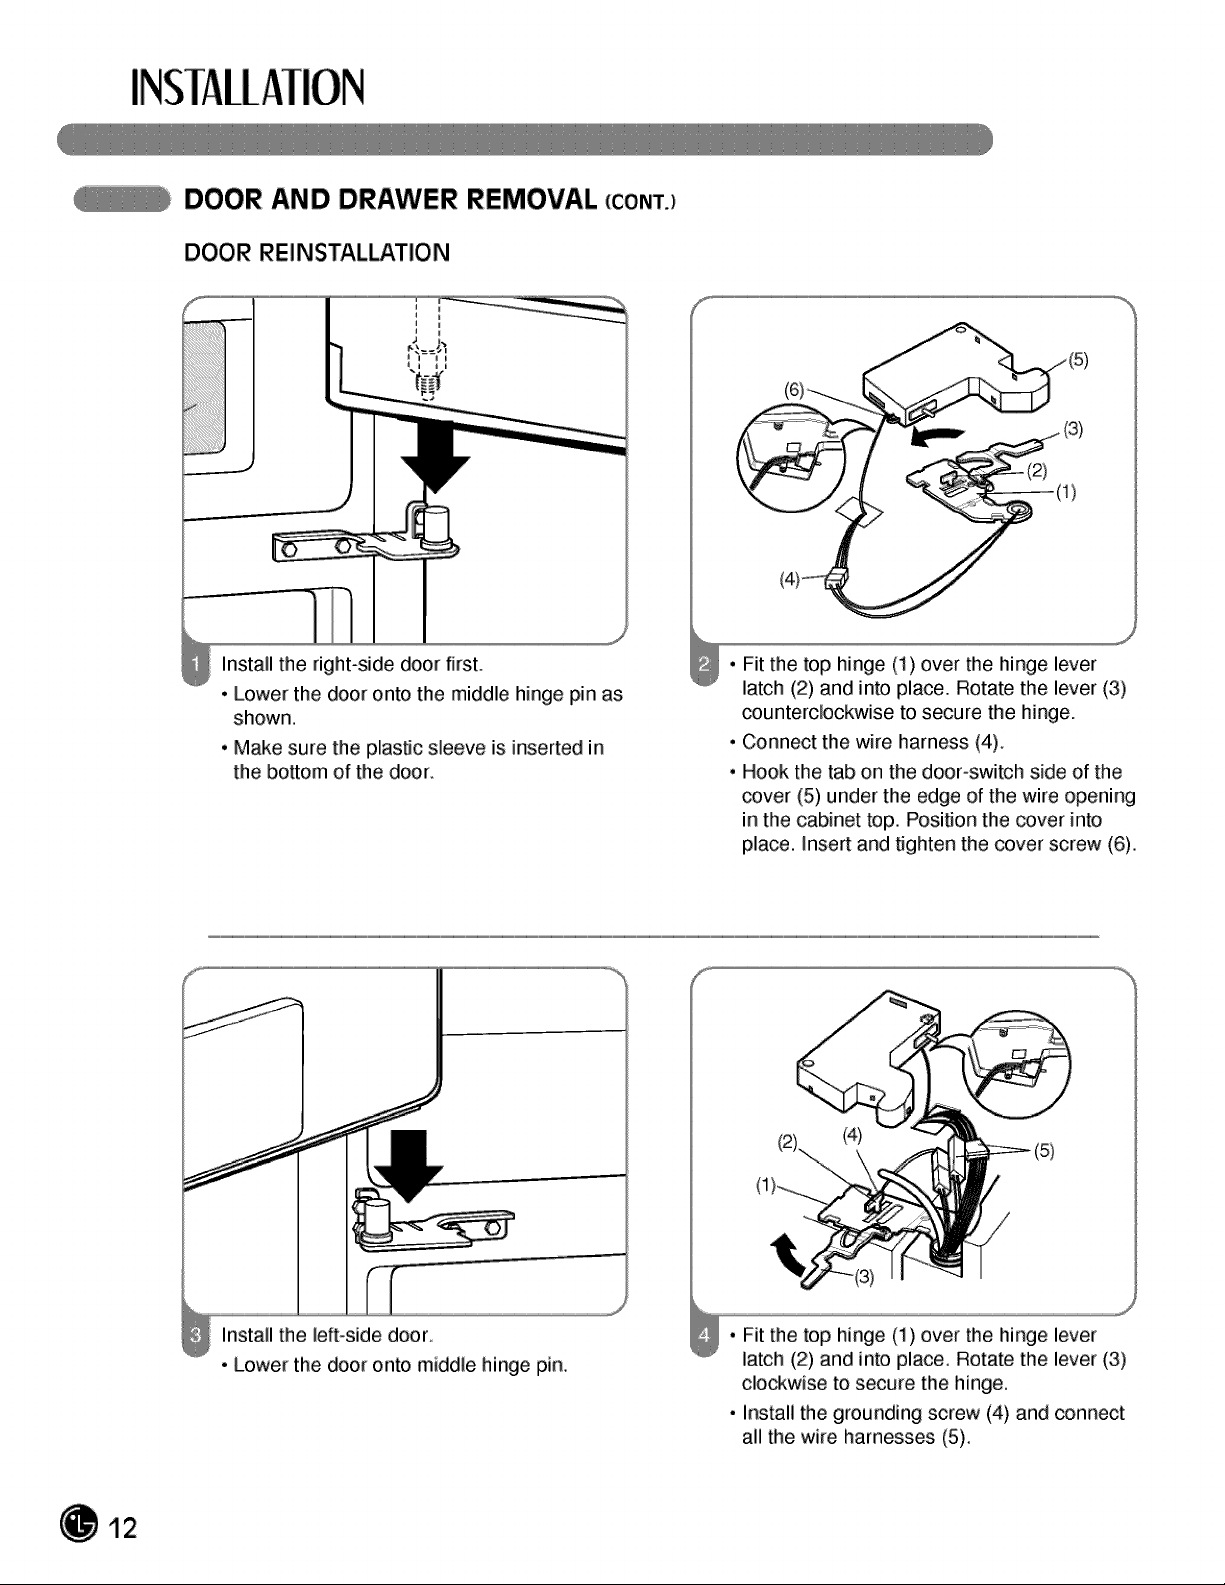
DOOR AND DRAWER REMOVAL (CONT.)
DOOR REINSTALLATION
f,,, %_
Install the right-side door first.
• Lower the door onto the middle hinge pin as
shown.
• Make sure the plastic sleeve is inserted in
the bottom of the door.
• Fit the top hinge (1) over the hinge lever
latch (2) and into place. Rotate the lever (3)
counterclockwise to secure the hinge.
• Connect the wire harness (4).
• Hook the tab on the door-switch side of the
cover (5) under the edge of the wire opening
in the cabinet top. Position the cover into
place, insert and tighten the cover screw (6).
Install the left-side door.
• Lower the door onto middle hinge pin,
• Fit the top hinge (1) over the hinge lever
latch (2) and into place, Rotate the lever (3)
clockwise to secure the hinge,
• Install the grounding screw (4) and connect
all the wire harnesses (5)_
12
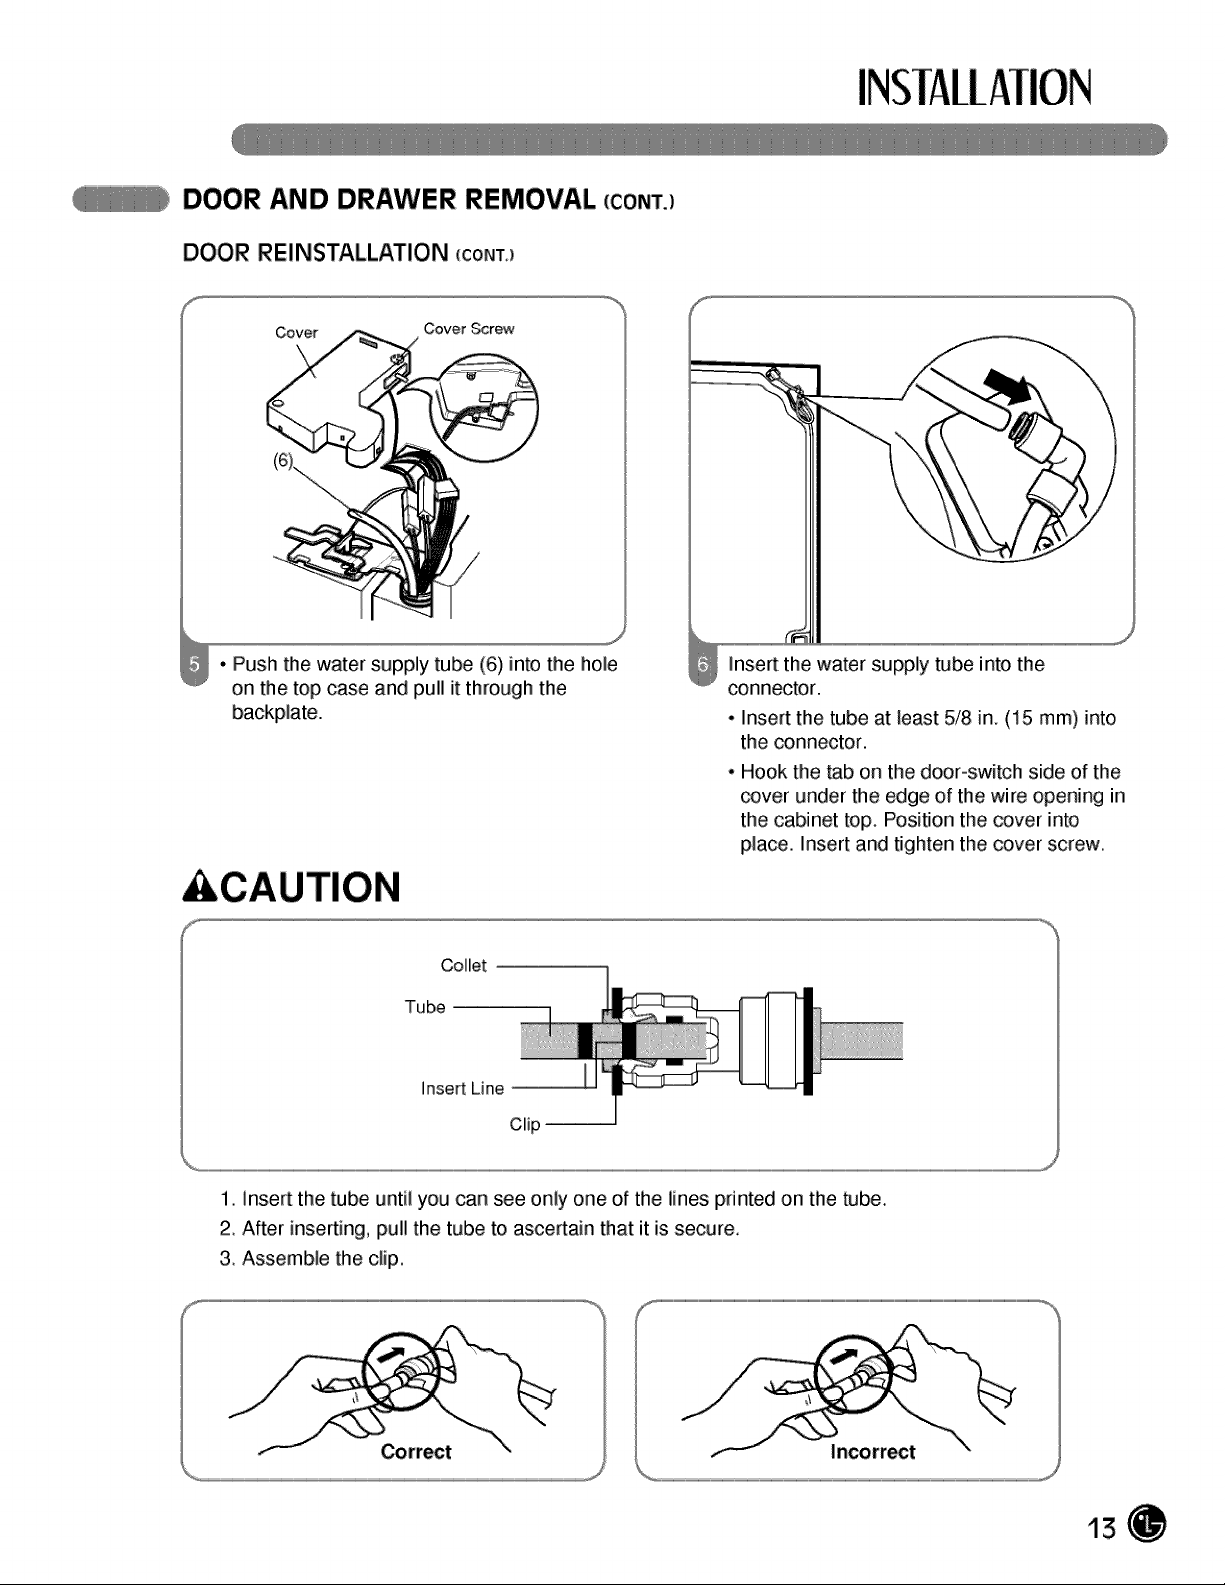
DOOR AND DRAWER REMOVAL (CONT.)
DOOR REINSTALLATION (CONT.)
Cover Cover Screw
• Push the water supply tube (6) into the hole
on the top case and pull it through the
backplate.
&CAUTION
insert the water supply tube into the
connector.
• insert the tube at least 5/8 in. (15 ram) into
the connector.
• Hook the tab on the door-switch side of the
cover under the edge of the wire opening in
the cabinet top. Position the cover into
place. Insert and tighten the cover screw.
Collet
Tube
InsertLine --
Clip --
1. insert the tube until you carl see only one of the lines printed on the tube.
2. After inserting, pull the tube to ascertain that it is secure.
3. Assemble the clip.
13
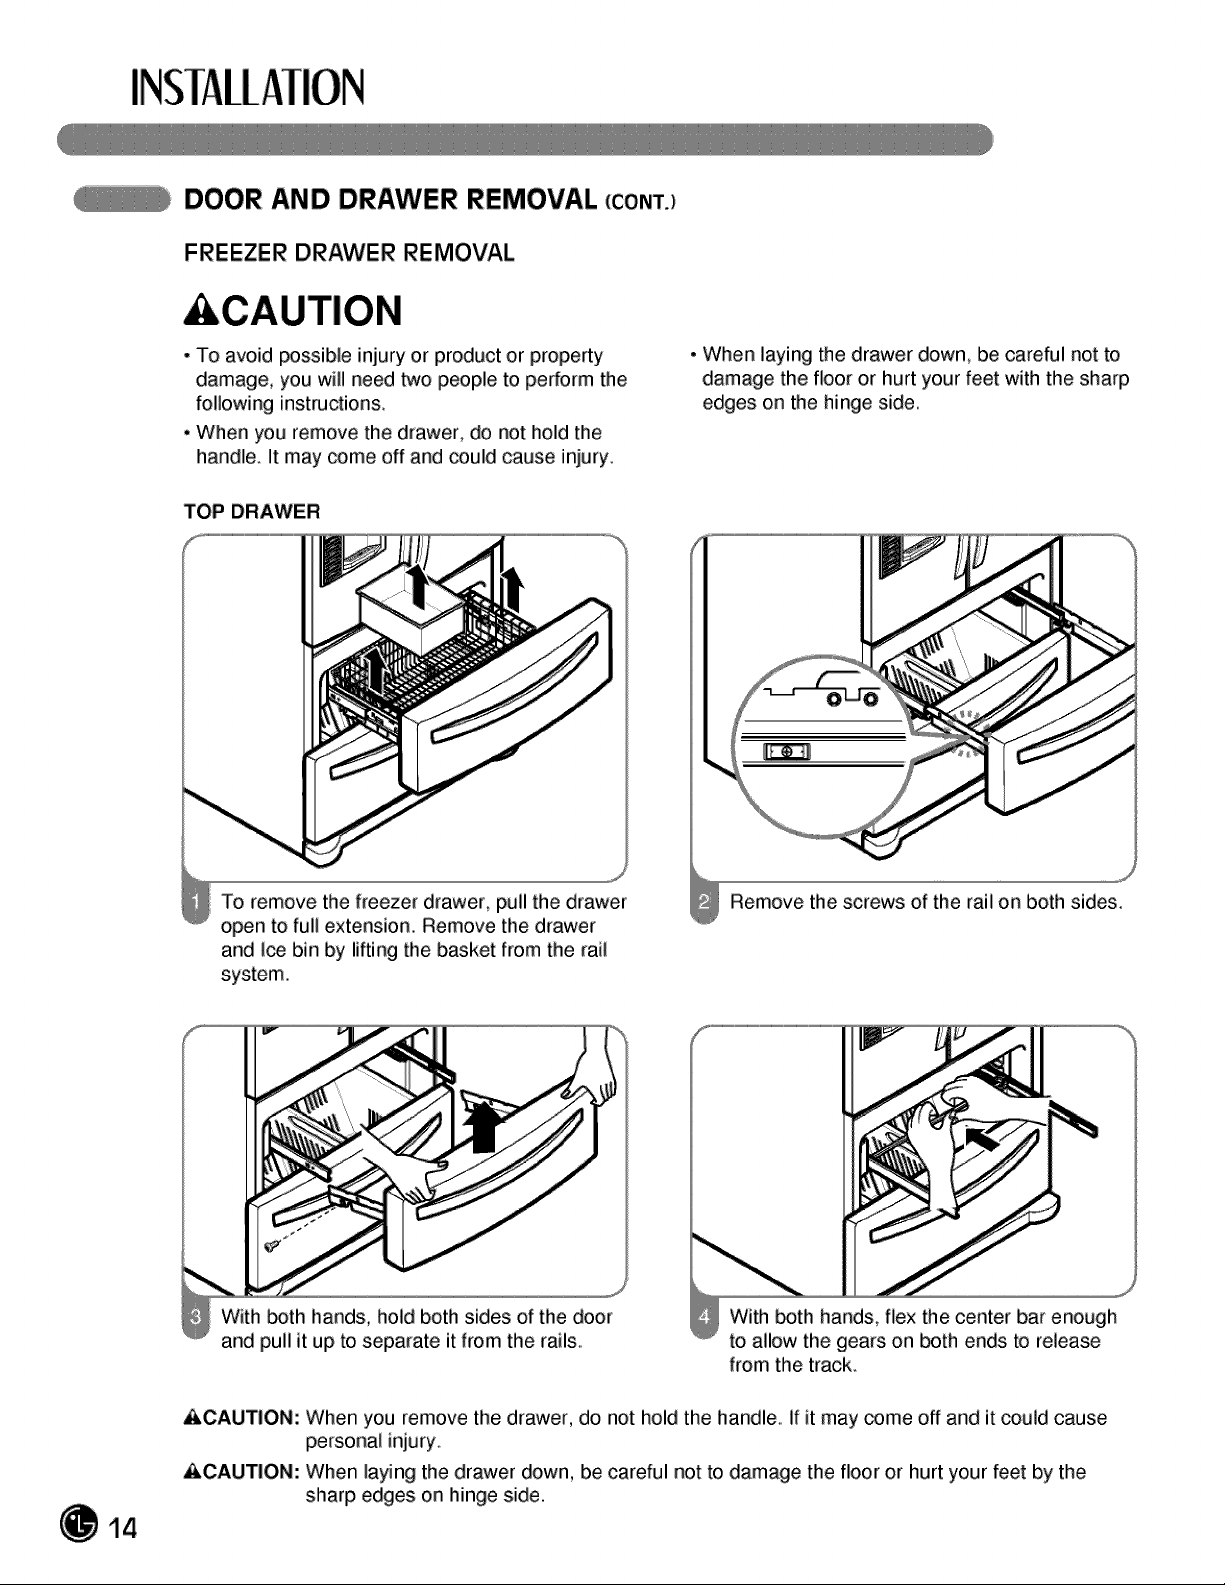
DOOR AND DRAWER REMOVAL (CONT.)
FREEZER DRAWER REMOVAL
CAUTION
• To avoid possible injury or product or property
damage, you will need t,,,¢opeople to perform the
following instructions.
• When you remove the drawer, do not hold the
handle. It may come off and could cause injury.
TOP DRAWER
• When laying the drawer down, be careful not to
damage the floor or hurt your feet with the sharp
edges on the hinge side.
To remove the freezer drawer, pull the drawer
open to full extension. Remove the drawer
and ice bin by lifting the basket from the rail
system.
Remove the screws of the rail on both sides.
14
With _th hands, hold both sides of the door
and pull it up to separate it from the rails.
With _th hands, flex the center bar enough
to allow the gears on both ends to release
from the track
ACAUTION: When you remove the drawer, do not hold the handle, if it may come off and it could cause
personal injury.
ACAUTION: When laying the drawer down, be careful not to damage the floor or hurt your feet by the
sharp edges on hinge side.
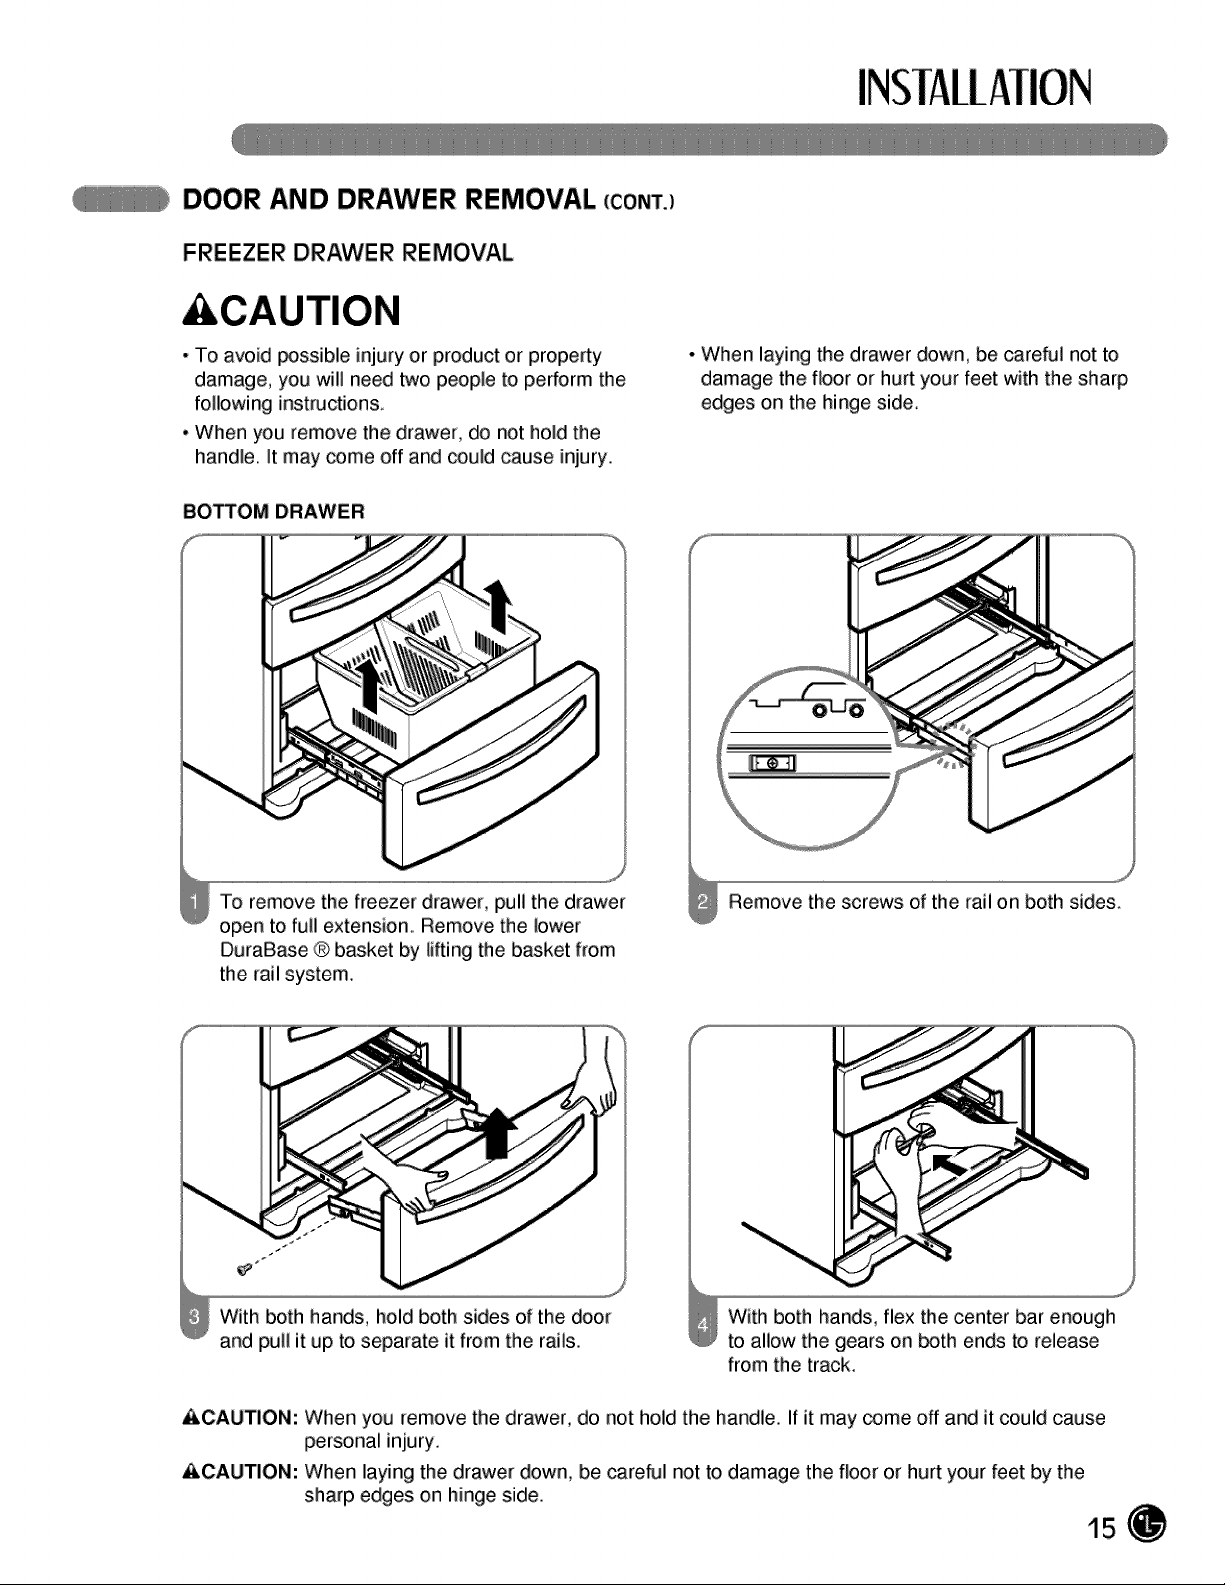
DOOR AND DRAWER REMOVAL (¢ONTJ
FREEZER DRAWER REMOVAL
&CAUTION
• To avoid _ssible injury or product or property
damage, you will need two people to perform the
following instruction&
• When you remove the drawer, do not hold the
handle. It may come off and could cause injury.
• When laying the drawer down, be careful not to
damage the floor or hurt your feet with the sharp
edges on the hinge side.
BOSOM DRAWER
To remove the freezer drawer, pull the drawer
open to full extension. Remove the lower
DuraBase ® basket by lifting the basket from
the rail system
Remove the screws of the rail on both sides.
With both hands, hold both sides of the door
and pull it up to separate it from the rails.
With both hands, flex the center bar enough
to allow the gears on _th ends to release
from the track.
ACAUTION: When you remove the drawer, do not hold the handle. If it may come off and it could cause
personal injury.
ACAUTION: When laying the drawer down, be _refuI not to damage the floor or hurt your feet by the
sharp edges on hinge side.
15
DOOR AND DRAWER REMOVAL (CONT.)
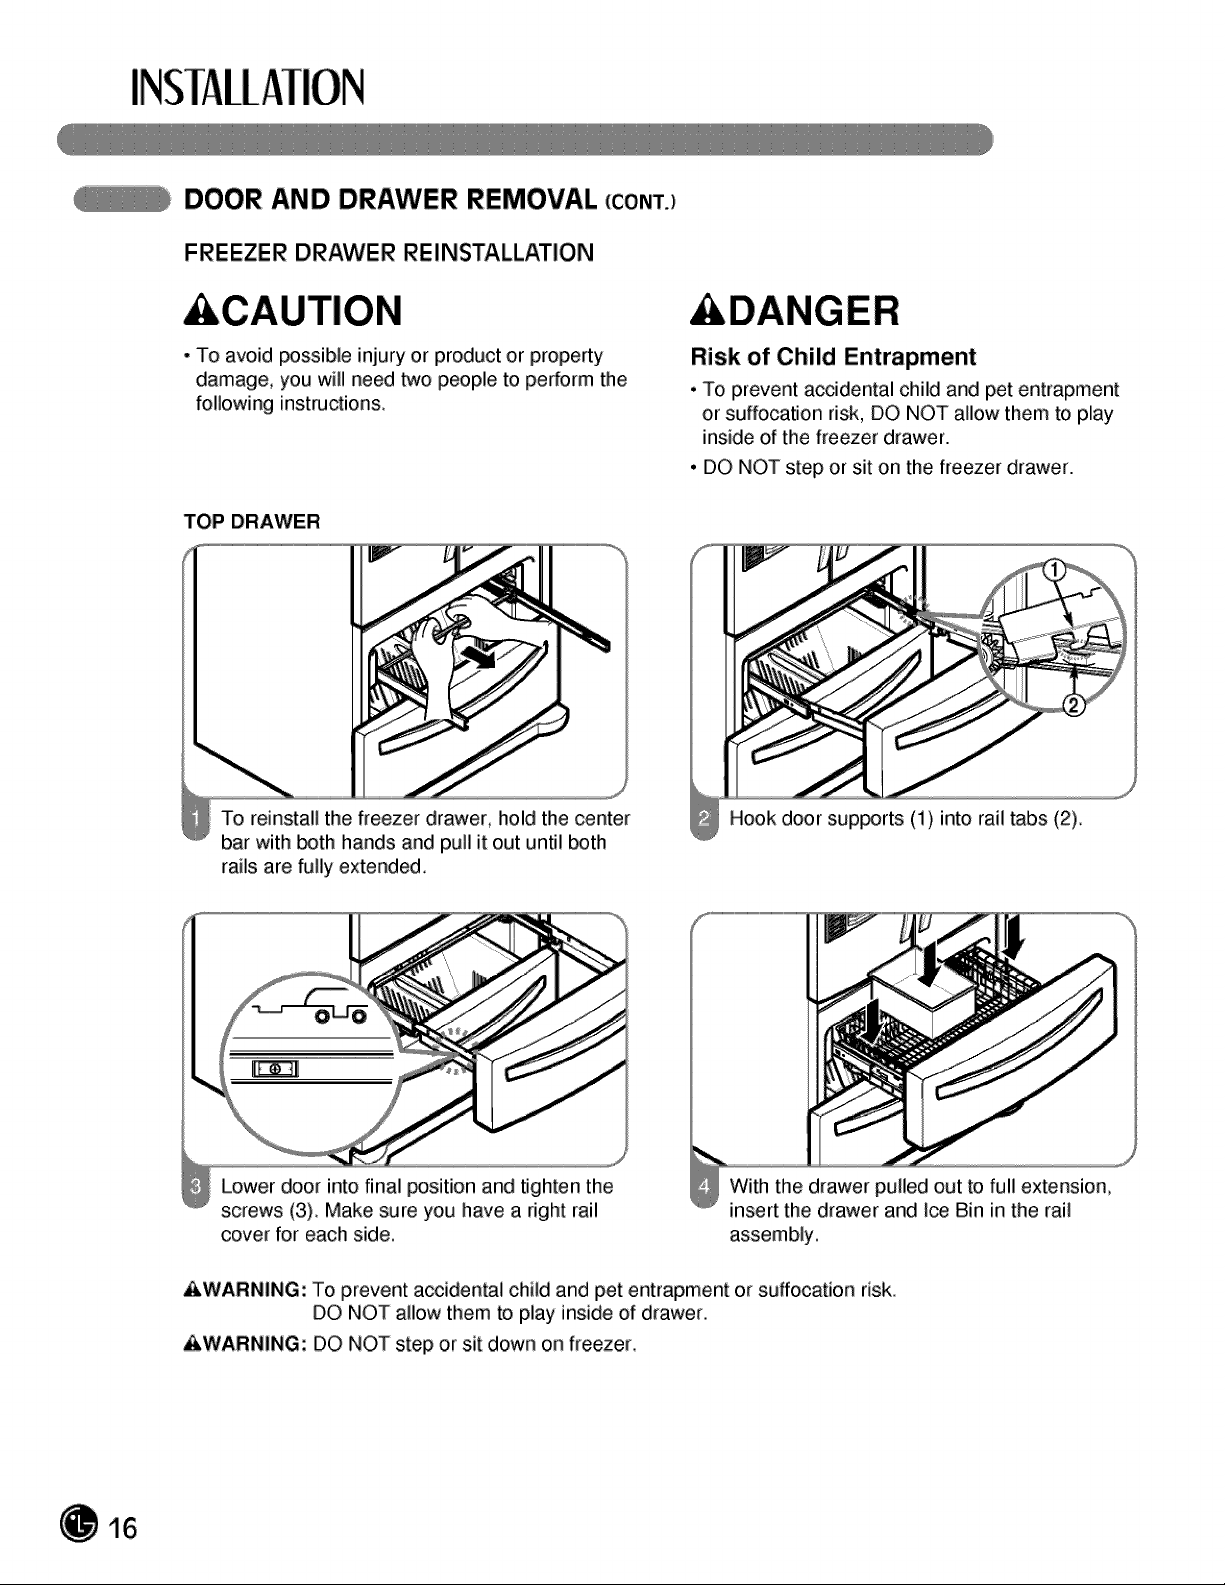
FREEZER DRAWER RE INSTALLATION
CAUTION
• To avoid possible injury or product or property
damage, you will need two people to perform the
following instructions.
TOP DRAWER
&DANGER
Risk of Child Entrapment
• To prevent acddental child and pet entrapment
or suffocation risk, DO NOT allow them to play
inside of the freezer drawer.
• DO NOT step or sit on the freezer drawer.
To reinstall the freezer drawer, hold the center
bar with _th hands and pull it out until both
rails are fully extended,.
Hook door supports (1) into rail tabs (2)
Lower door into final position and tighten the
screws (3). Make sure you have a right rail
cover for each side.
With the drawer pulled out to full extension,
insert the drawer and i_ Bin in the rail
assembly.
AWARNING: To prevent accidental child and pet entrapment or suffocation risk
DO NOT allow them to play inside of drawer.
&WARNING: DO NOT step or sit down on freezer,
16
DOOR AND DRAWER REMOVAL (CONT.)
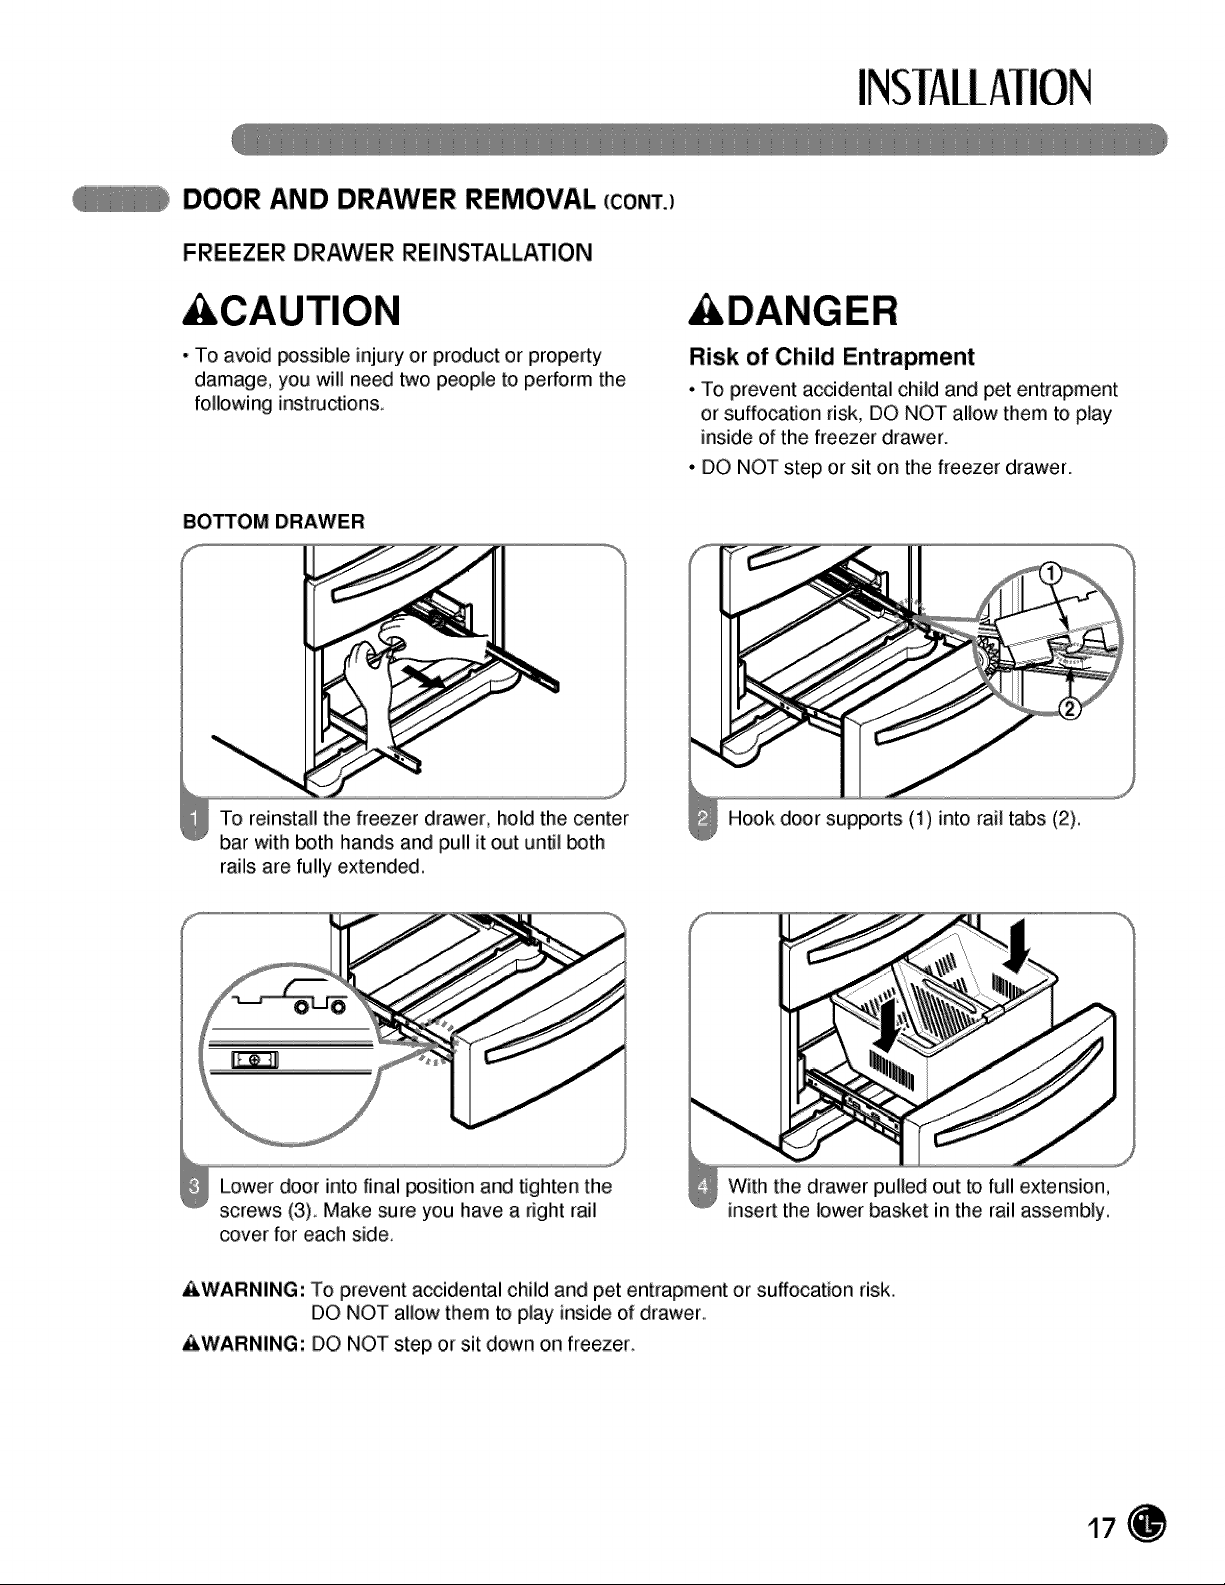
FREEZER DRAWER REINSTALLATION
CAUTION
• To avoid _ssible injury or product or property
damage, you will need two people to perform the
following instructions.
BOTTOM DRAWER
&DANGER
Risk of Child Entrapment
• To prevent accidental child and pet entrapment
or suffocafion risk, DO NOT allow them to play
inside of the freezer drawer.
• DO NOT step or sit on the freezer drawer.
To reinstall the freezer drawer, hold the center
bar with both hands and pull it out until _th
rails are fully extended.
Hook door supports (1)into rail tabs (2)_
Lower door into final position and tighten the
screws (3)., Make sure you have a right rail
cover for each side.,
With the drawer pulled out to full extension,
insert the lower basket in the rail assembly.
AWARNING: To prevent accidental child and pet entrapment or suffocation risk
DO NOT allow them to play inside of drawer.,
&WARNING: DO NOT step or sit down on freezer,
17
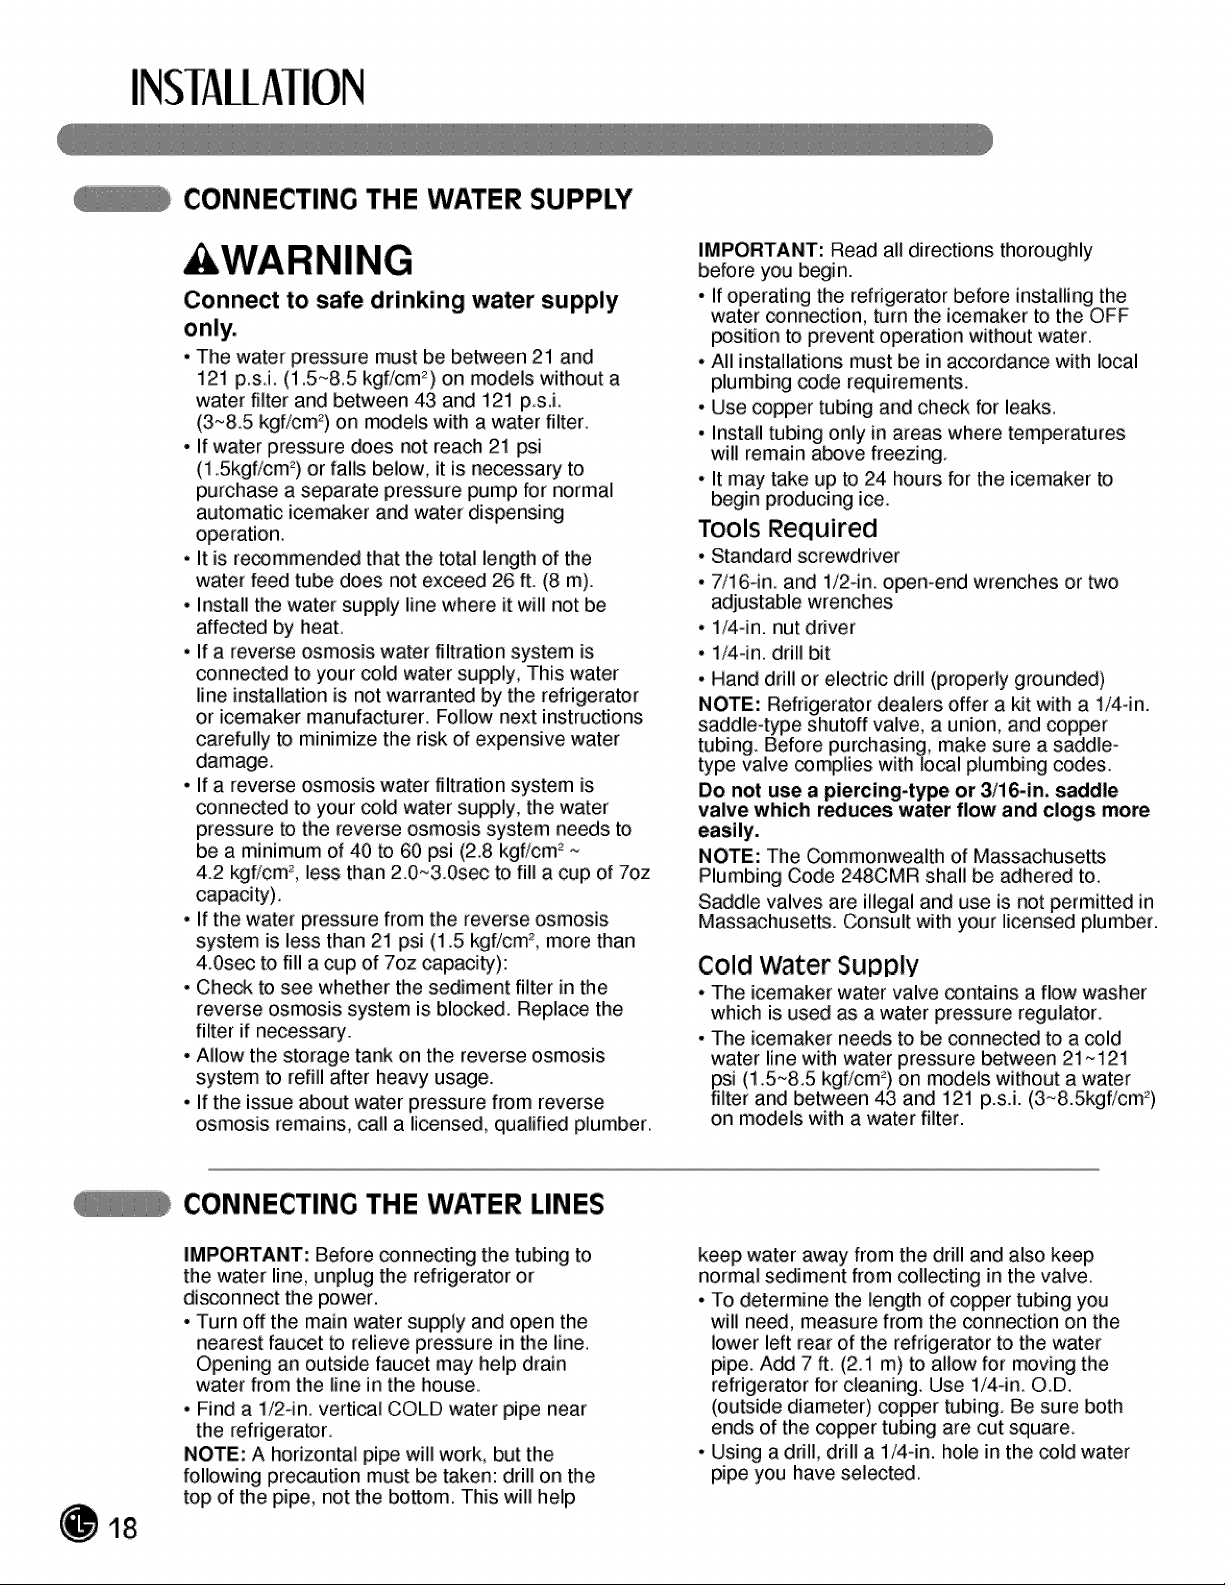
CONNECTING THE WATER SUPPLY
WARNING
Connect to safe drinking water supply
• The water pressure must be between 21 and
121 p,sJ, (1,5~8,5 kgficm =) on models without a
water filter and between 43 and 121 ps,i,
(3~8.5 kgf/cm _) on models with a water filter.
• If water pressure does not reach 21 psi
(1,5kgficm 2)or falls below, it is necessary to
purchase a separate pre_ure pump for normal
automatic icemaker and water dispensing
operation,
• It is recommended that the total length of the
water feed tube does not exceed 26 ft. (8 m).
• Install the water supply line where it will not be
affected by heat,
• If a reverse osmosis water filtration system is
connected to your cold water supply, This water
line installation is not warranted by the refrigerator
or icemaker manufacturer. Follow next instructions
carefully to minimize the risk of expensive water
damage.
• If a reverse osmosis water filtration system is
connected to your cold water supply, the water
pressure to the reverse osmosis system needs to
be a minimum of 40 to 60 psi (2,8 kgficm 2 --
4.2 kgf/cm% less than 2.0~3.0sec to fill a cup of 7oz
capacity),
• If the water pressure from the reverse osmosis
system is less than 21 psi (1.5 kgf/cm =, more than
4.0sec to fill a cup of 7oz capacity):
• Che_ to see whether the sediment filter in the
reverse osmosis system is blocked. Replace the
filter if necessary.
• Allow the storage tank on the reverse osmosis
system to refill after heavy usage.
• If the issue about water pressure from reverse
osmosis remains, call a licensed, qualified plumber,
IMPORTANT: Read all directions thoroughly
before you begin.
• If operating the refrigerator before installing the
water connection, turn the icemaker to the OFF
position to prevent operation without water,
• All installations must be in accordance with local
plumbing code requirements.
• Use copper tubing and check for leaks,
• Install tubing only in areas where temperatures
will remain a_ve freezing.
• It may take up to 24 hours for the icemaker to
begin producing ice.
Tools Required
• Standard screwdriver
• 7/1Gin and 1/2-in open-end wrenches or two
adjustable wrenches
• 1/4-in. nut driver
• 1/44n, drill bit
• Hand drill or electric drill (properly grounded)
NOTE: Refrigerator dealers offer a kit with a 1!4-in.
saddle-type shutoff valve, a union, and copper
tubing. Before purchasing, make sure a saddle-
type valve complies with local plumbing codes
Do not use a piercing-type or 3/1_in, saddle
valve which r_uces water flow and clogs more
NOTE: The Commonwealth of Massachusetts
Plumbing Code 248CMR shall be adhered to.
Saddle valves are illegal and use is not permitted in
Massachusetts. Consult with your licensed plumber.
Cold water Supply
• The icemaker water valve contains a flow washer
which is used as a water pressure regulator.
• The icemaker needs to be connected to a cold
water line with water pressure between 21 ~121
psi (1.5--8,5 kgflcm 2)on models without a water
filter and between 43 and 121 p.s.i. (3--8.5kgf/cm 2)
on models with a water filter.
18
CONNECTING THE WATER LINES
IMPORTANT: Before connecting the tubing to
the water line, unplug the refrigerator or
disconnect the power,
• Turn off the main water supply and open the
nearest faucet to relieve pressure in the line,
Opening an outside faucet may help drain
water from the line in the house,
• Find a 1/2oin, vertical COLD water pipe near
the refrigerator,
NOTE: A horizontal pipe wili work, but the
following precaution must be taken: drill on the
top of the pipe, not the bottom. This wil help
keep water away from the drill and also keep
normal sediment from collecting in the valve.
• To determine the length of copper tubing you
will need, measure from the connection on the
lower left rear of the refrigerator to the water
pipe, Add 7 ft (2.1 m) to allow for moving the
refrigerator for cleaning, Use 1/4-in. O.D.
(outside diameter) copper tubing. Be sure both
ends of the copper tubing are cut square
• Using a drill, drill a 1!4-in. hole in the cold water
pipe you have selected.
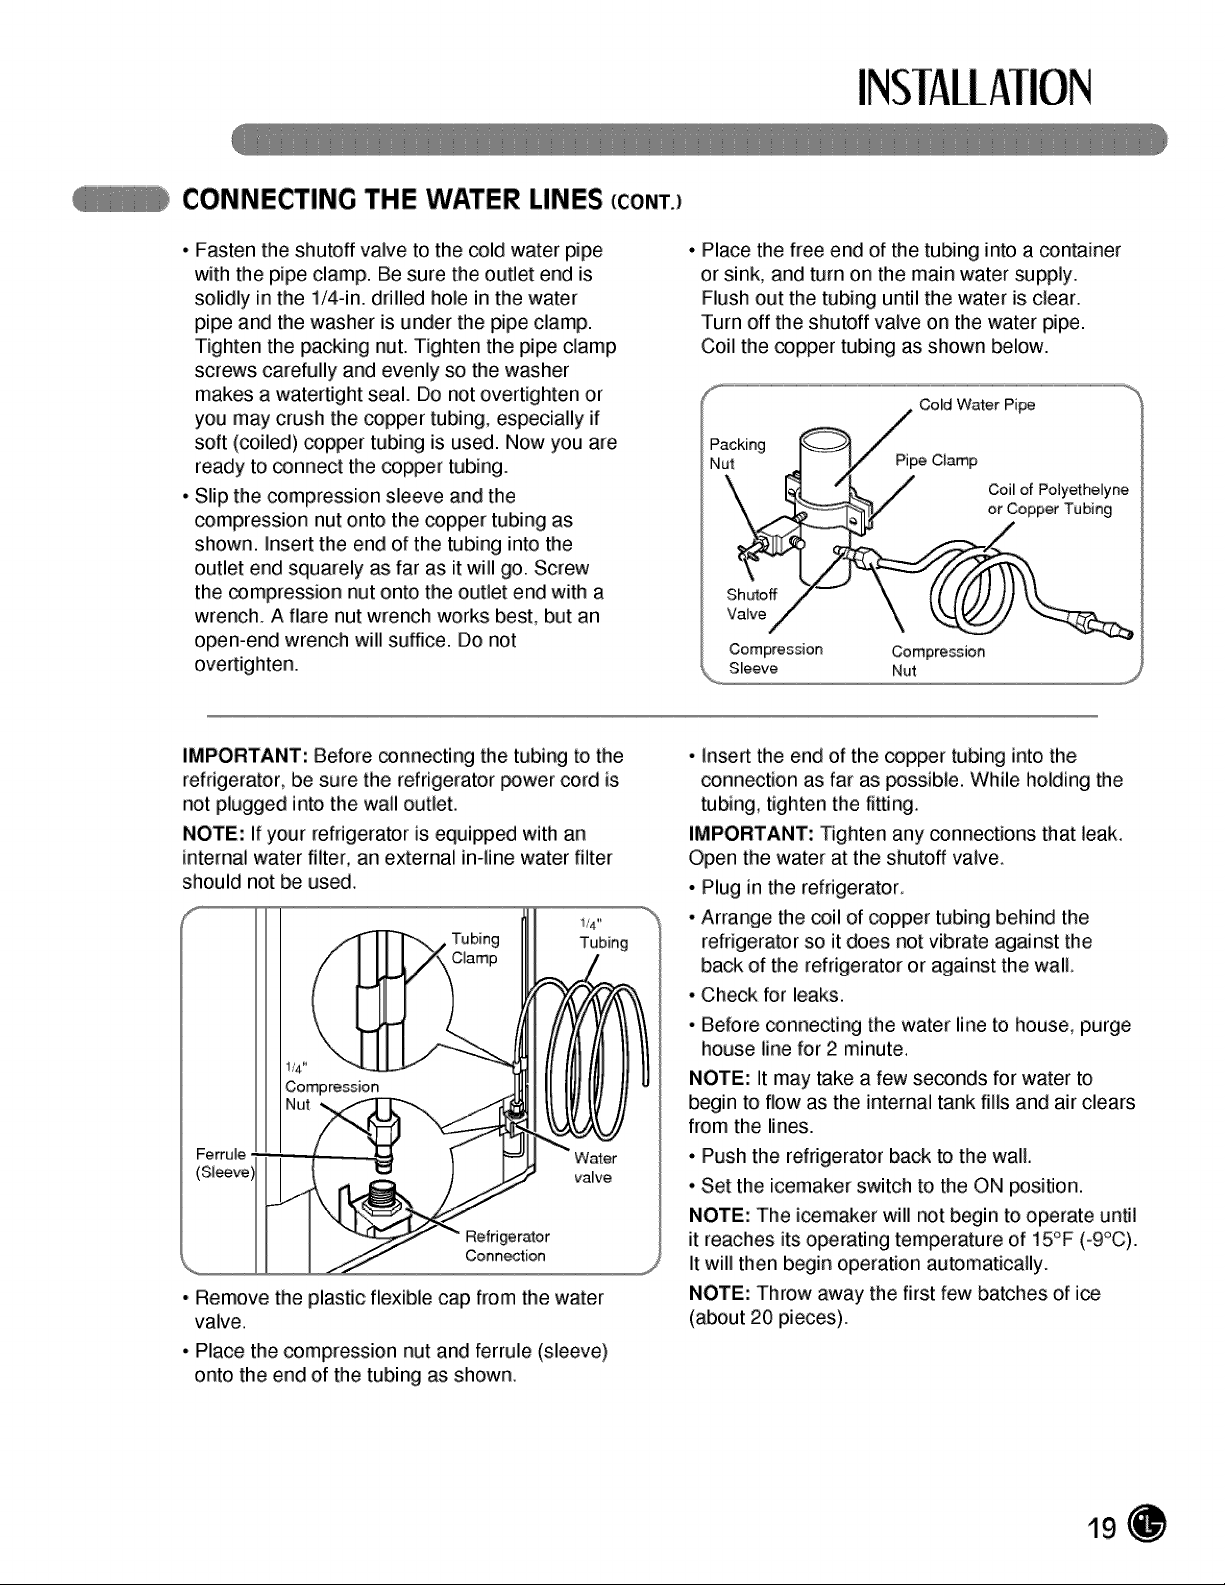
CONNECTING THE WATER LINES (CONT.)
• Fasten the shutoff valve to the cold water pipe
with the pipe clamp. Be sure the outlet end is
solidly in the 1/4-in. drilled hole in the water
pipe and the washer is under the pipe clamp.
Tighten the packing nut. Tighten the pipe clamp
screws carefully and evenly so the washer
makes a watertight seal. Do not overtighten or
you may crush the copper tubing, especially if
soft (coiled) copper tubing is used. Now you are
ready to connect the copper tubing.
• Slip the compression sleeve and the
compression nut onto the copper tubing as
shown. Insert the end of the tubing into the
outlet end squarely as far as it will go. Screw
the compre_ion nut onto the outlet end with a
wrench. A flare nut wrench works best, but an
open-end wrench will suffice. Do not
overtighten.
• Place the free end of the tubing into a container
or sink, and turn on the main water supply.
Flush out the tubing until the water is clear.
Turn off the shutoff valve on the water pipe.
Coil the copper tubing as shown below.
Packing
ShLY_off
Valve/
Compression
Compression
IMPORTANT: Before connecting the tubing to the
refrigerator, be sure the refrigerator _wer cord is
not plugged into the wall outlet.
NOTE: If your refrigerator is equipped with an
internal water filter, an external in-line water filter
should not be used.
1/4"
Compression
• Remove the plastic flexible cap from the water
valve.
• Place the compression nut and ferrule (sleeve)
onto the end of the tubing as shown.
!/4"
Tubing
• Insert the end of the copper tubing into the
connection as far as possible. While holding the
tubing, tighten the fitting.
IMPORTANT: Tighten any _nnections that leak.
Open the water at the shutoff valve.
• Plug in the refrigerator.
• Arrange the coil of copper tubing behind the
refrigerator so it does not vibrate against the
back of the refrigerator or against the wall.
• Check for leaks.
• Before connecting the water line to house, purge
house line for 2 minute.
NOTE: It may take a few seconds for water to
begin to flow as the internal tank fills and air clears
from the lines.
• Push the refrigerator back to the wall.
• Set the icemaker switch to the ON position.
NOTE: The icomaker will not begin to operate until
it reaches its operating temperature of 15°F (-9°C).
It will then begin operation automatically.
NOTE: Throw away the first few batches of ice
(about 20 pieces).
19
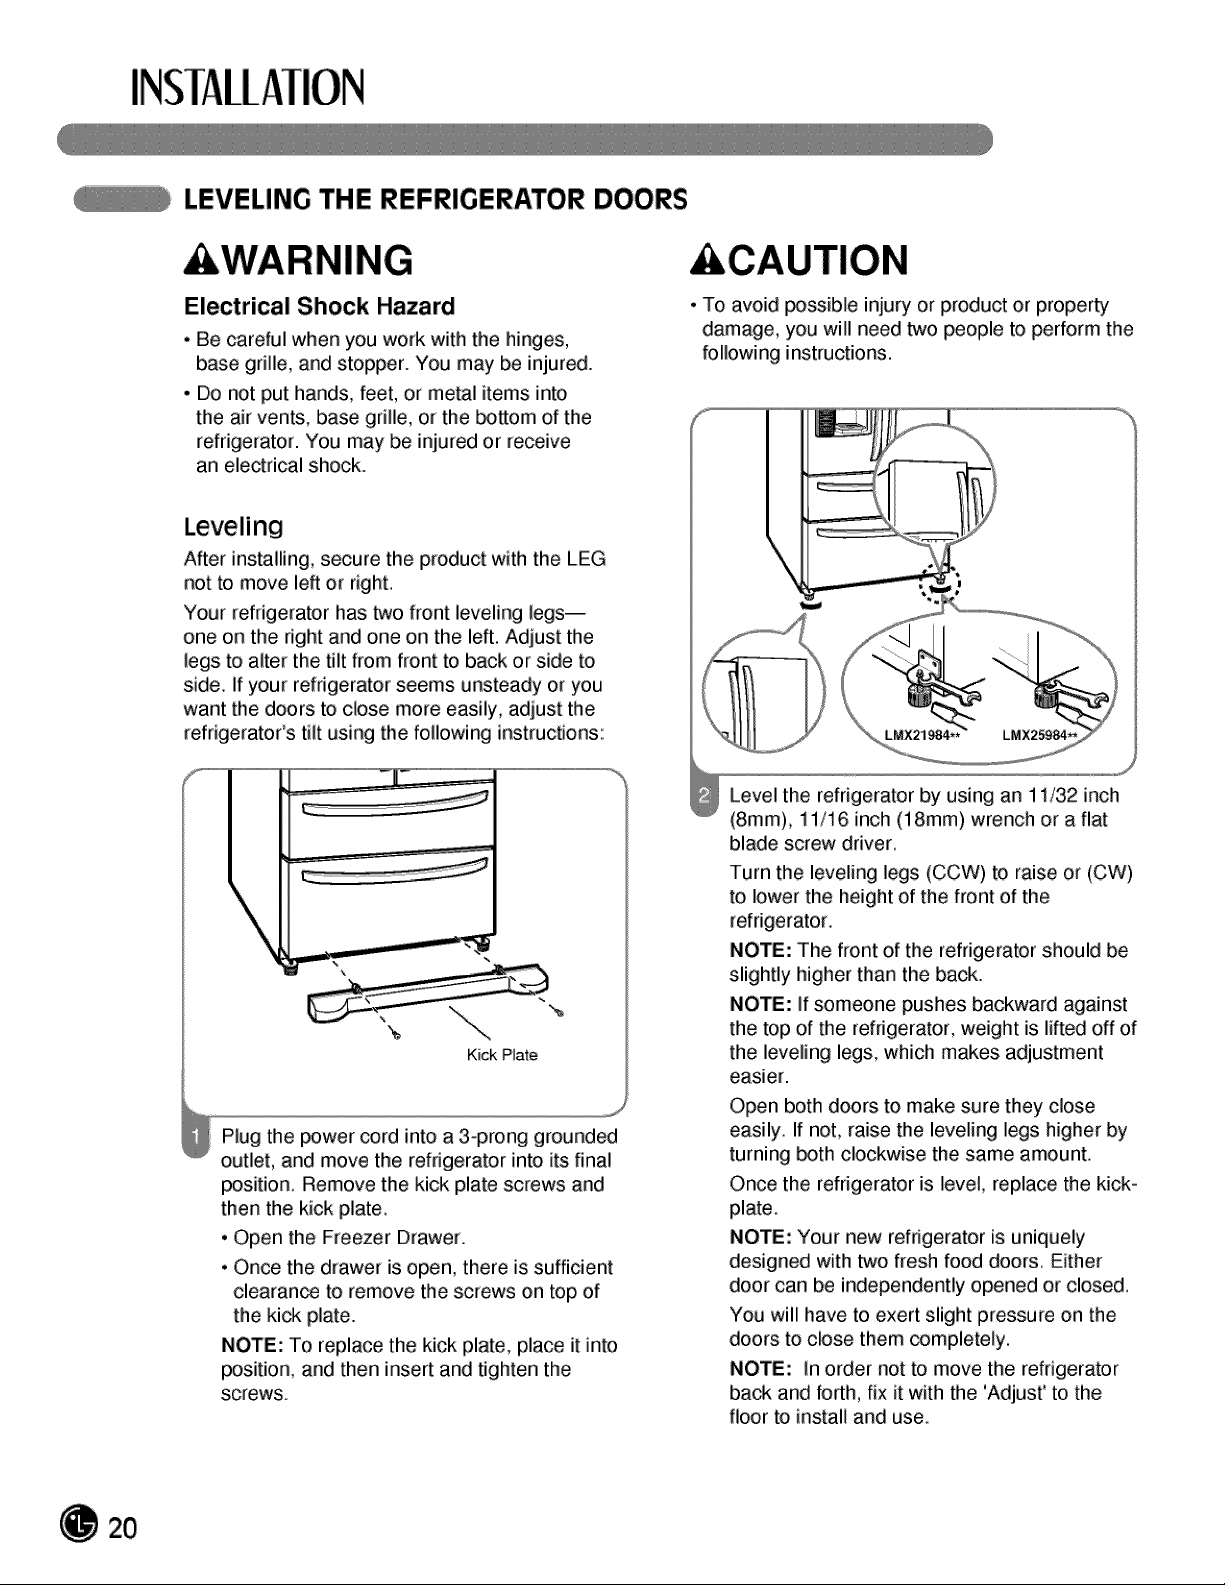
LEVELING THE REFRIGERATOR DOORS
WARNING
Electrical Shock Hazard
• Be careful when you work with the hinges,
base grille, and stopper. You may be injured.
• Do not put hands, feet, or metal items into
the air vents, base grille, or the _ttom of the
refrigerator. You may be injured or receive
an electrical shock.
Leveling
After installing, secure the product with the LEG
not to move left or right.
Your refrigerator has two front leveling legs--
one on the right and one on the left. Adjust the
legs to alter the tilt from front to back or side to
side. If your refrigerator seems unsteady or you
want the doors to close more easily, adjust the
refrigerator's tilt using the following instructions:
Kick PWate
J
Plug the power cord into a 3oprong grounded
outlet, and move the refrigerator into its final
position, Remove the kick plate screws and
then the kick plate,
• Open the Freezer Drawer.
• Once the drawer is open, there is sufficient
clearan_ to remove the screws on top of
the kick plate.
NOTE: To replace the kick plate, place it into
position, and then insert and tighten the
screws.
CAUTION
• To avoid _ssible injury, or product or property
damage, you will need two people to perform the
following instructions.
Level the refrigerator by using an 11/32 inch
(8ram), 11/i6 inch (18ram) wrench or a flat
blade screw driver.
Turn the leveling legs (CCW) to raise or (CW)
to lower the height of the front of the
refrigerator.
NOTE: The front of the refrigerator should be
slightly higher than the back.
NOTE: If someone pushes backward against
the top of the refrigerator, weight is lifted off of
the leveling legs, which makes adjustment
easier.
Open both doors to make sure they close
easily. If not, raise the leveling legs higher by
turning _th clockwise the same amount.
Once the refrigerator is level, replace the kick-
plate.
NOTE: Your new refrigerator is uniquely
designed with b¢¢ofresh food doors. Either
door can be independently opened or closed.
You will have to exert slight pressure on the
doors to close them completely.
NOTE: In order not to move the refrigerator
bah and forth, fix it with the 'Adjust' to the
floor to install and use,
20

LEVELING THE REFRIGERATOR DOORS (CONT.)
DOOR ALIGNMENT
• Remove the Base Grillie,
• Turn the leveling legs (CCW) to raise or
(CW) to lower the height of the front of the
refrigerator by using flat blade screw driver
or 11/32" wrench.
• Use the wrench (Included with the User
Manual) to adjust the bolt in the door hinge
to adjust the height. (CCW to raise or CW to
lower the height.)
STARTING
Before loading your refrigerator with fresh foods:
• Remove tape and any temporary labels from
your refrigerator before using. To remove any
remaining adhesive residue, rub the area briskly
with your thumb, or rub a small amount of liquid
dish soap over the adhesive with your fingers,
Wipe with warm water and dry Do not use sharp
instruments, rubbing alcohol, flammable fluids,
or abrasive cleaners to remove tape or glue,
NOTE: Do not remove any warning-type labels,
the model and serial number label, or the tech
sheet that is taped to the back of the refrigerator.
• Thoroughly clean your refrigerator and wipe off all
dust that may have ac_mulated during shipping.
• Install accessories such as the i_ cube bin,
drawers, and shelves, in their proper places.
They are packed together to prevent possible
damage during shipment
• Adjust the desired temperature for the
refrigerator and freezer (see Adjusting the
Temperature and Functions),
• Let your refrigerator run for at least 2 or 3 hours
before putting food in it. Check the flow of _ld
air in the freezer compartment to ensure proper
cooling. Your refrigerator is now ready for use.
21
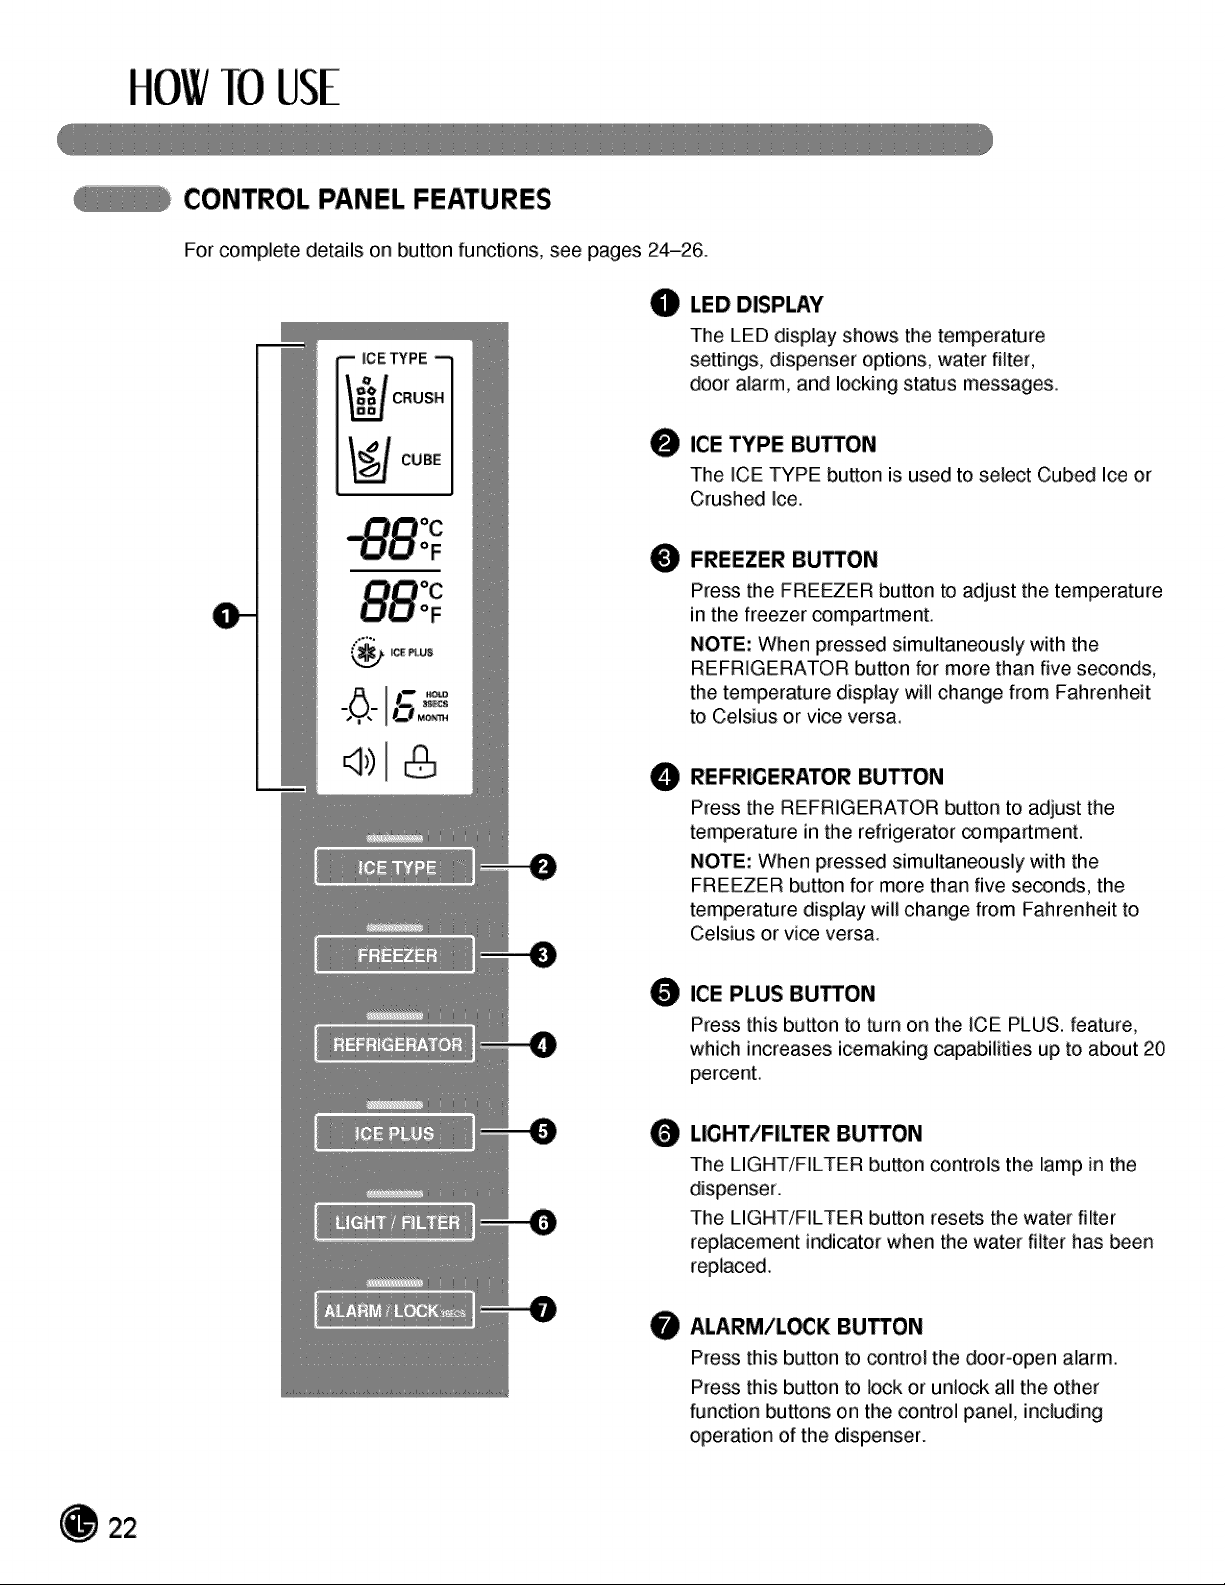
HOWTOUSE
CONTROL PANEL FEATURES
For complete details on button functions, see pages 2_26.
gp,.,,
O LED DISPLAY
The LED display shows the temperature
settings, dispenser options, water filter,
door alarm, and locking status messages.
0
ICE TYPE BUTTON
The ICE TYPE button is used to select Cubed Ice or
Crushed ice.
O
FREEZER BUTTON
Press the FRE_ER button to adjust the temperature
in the freezer compartment
NOTE: When pressed simultaneously with the
REFRIGERATOR button for more than five seconds,
the temperature display will change from Fahrenheit
to Celsius or vice vers&
O
O
O
O
REFRIGERATOR BUTTON
Press the REFRIGERATOR button to adjust the
temperature in the refrigerator _mpartmenL
NOTE: When pressed simultaneously with the
FREEZER button for more than five seconds, the
temperature display will change from Fahrenheit to
Celsius or vim versa.
ICE PLUS BUTTON
Press this button to turn on the ICE PLUS, feature,
which increases icemaking capabiliUes up to about 20
percent,
LIGHT/FILTER BUTTON
The LIGHT/FILTER button controls the lamp in the
dispenser.
The LIGHT/FILTER button resets the water filter
replacement indicator when the water filter has been
replaced.
ALARM/L_K BUTTON
Press this button to control the door-open alarm.
Press this button to lock or unlock all the other
function buttons on the control panel, including
operation of the dispenser.
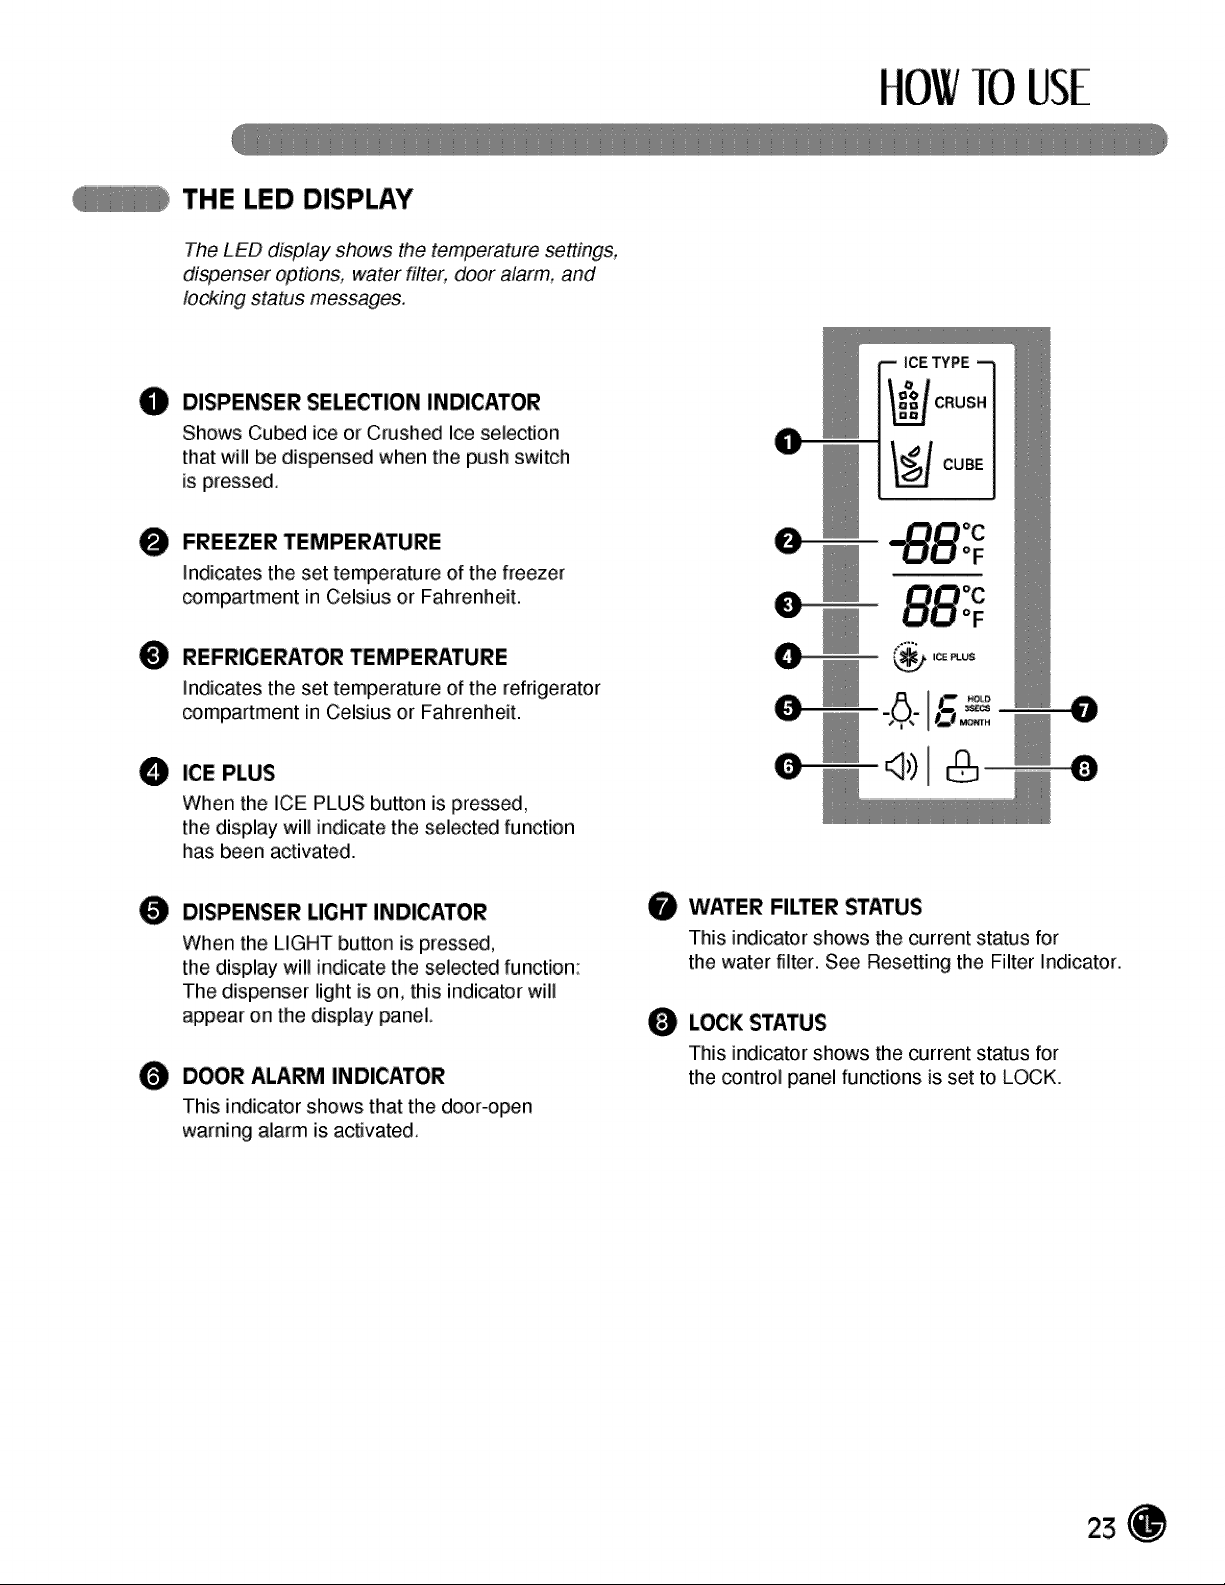
TOUSE
THE LED DISPLAY
The LED display shows the temperature settings,
dispenser options, water filter, door alarm, and
locking status messages.
0
O
O
O
O
O
DISPENSER SELECTION INDICATOR
Shows Cubed ice or Crushed Ice selection
that will be dispensed when the push switch
is pressed.
FREEZER TEMPERATURE
indicates the set temperature of the freezer
compartment in Celsius or Fahrenheit.
REFRIGERATOR TEMPERATURE
indicates the set temperature of the refrigerator
compartment in Celsius or Fahrenheit.
ICE PLUS
When the ICE PLUS button is premed,
the display will indicate the selected function
has been activated.
DISPENSER LIGHT INDICATOR
When the LIGHT button is pressed,
the display wi!! indicate the selected function:
The dispenser light is on, this indicator will
appear on the display panel.
DOOR ALARM INDICATOR
This indicator shows that the door-open
warning alarm is activated.
O
0
0
0
0
0
O WATER FILTER STATUS
This indicator shows the current status for
the water filter. See Resetting the Filter Indicator.
LOCK STATUS
This indicator shows the current status for
the control panel functions is set to LOCK.
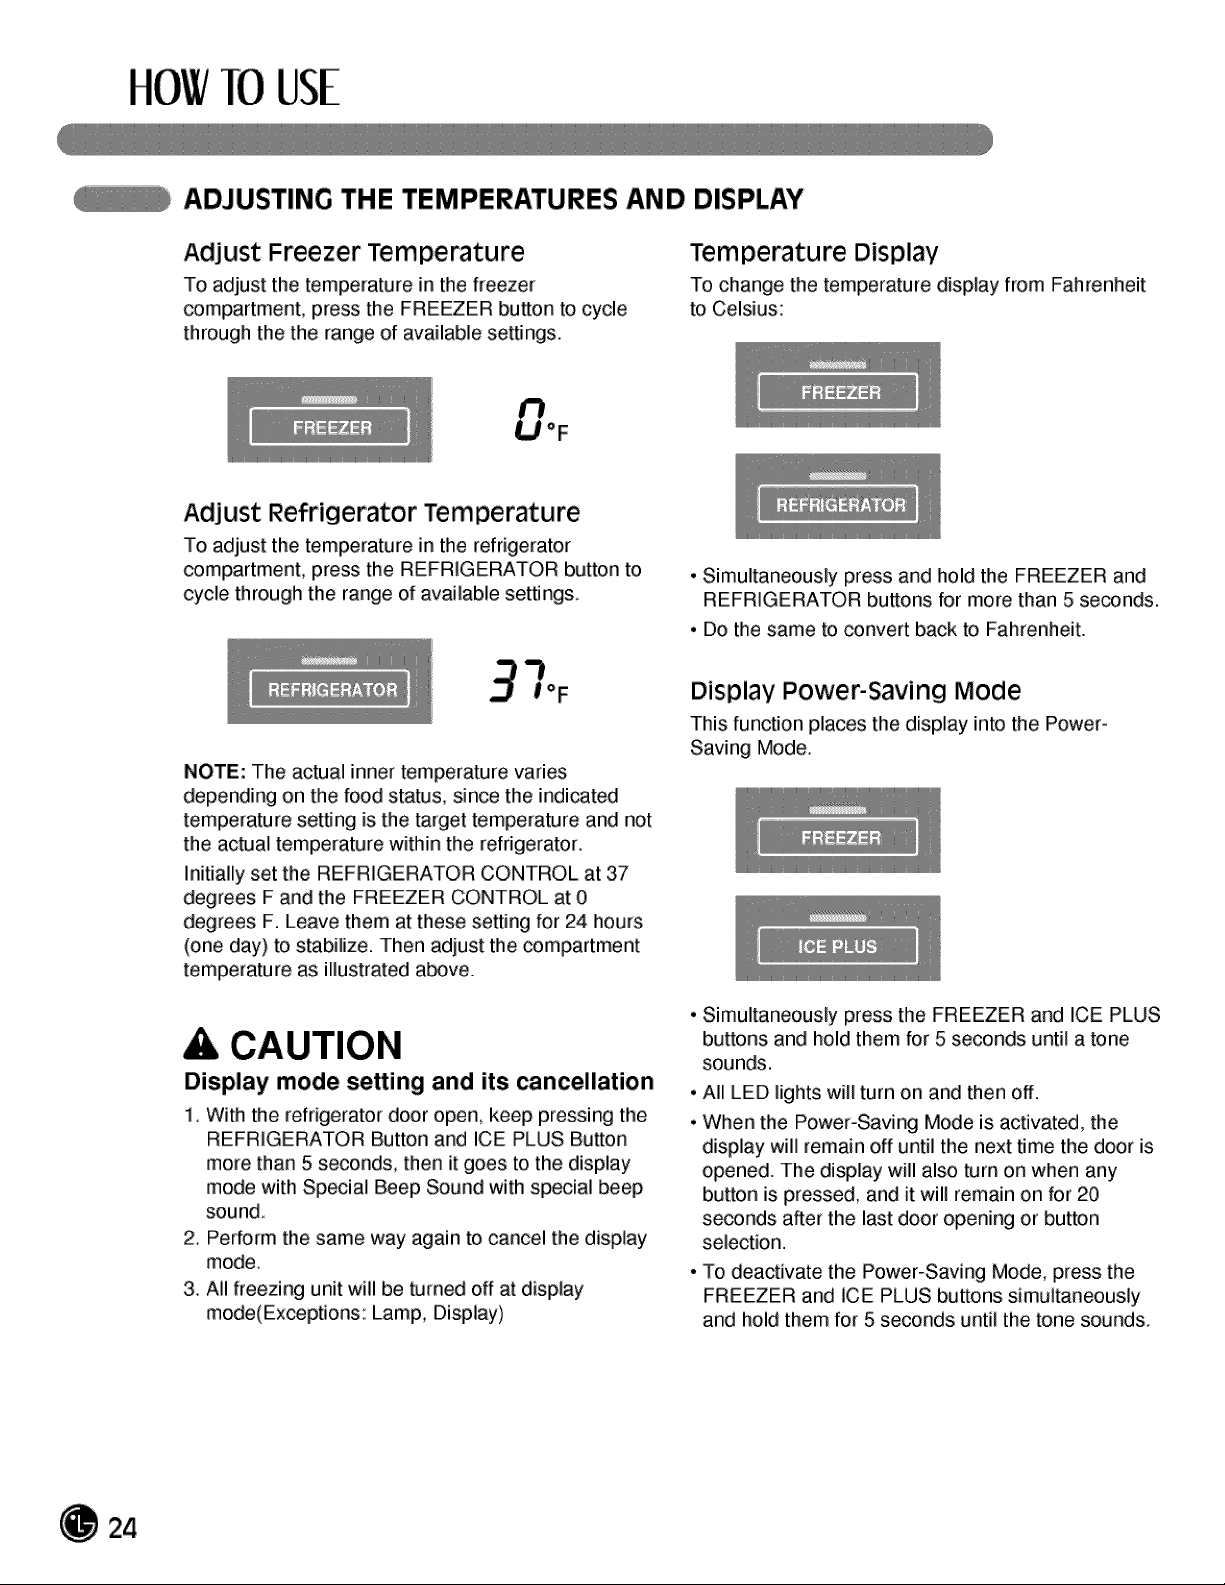
HOWTOUSE
ADJUSTING THE TEMPERATURES AND DISPLAY
Adjust Freezer Temperature
To adjust the temperature in the freezer
compartment, press the FREEER button to cycle
through the the range of available se#jngs.
Temperature Display
To change the temperature display from Fahrenheit
to Celsius:
AdjuSt Refrigerator Temperature
To adjust the temperature in the refrigerator
compartment, press the REFRIGERATOR button to
cycle through the range of available settings,
NOTE: The actual inner temperature varies
depending on the food status, since the indicated
temperature se#jng is the target temperature and not
the ac;#Jaltemperature within the refrigerator.
Initially set the REFRIGERATOR CONTROL at 37
degrees F and the FREEZER CONTROL at 0
degrees F. Leave them at these setting for 24 hours
(one day) to stabilize. Then adjust the compartment
temperature as illustrated a_ve.
CAUTION
Display mode setting and its cancellation
1. With the refrigerator door open, keep pressing the
REFRIGERATOR Button and ICE PLUS Button
more than 5 seconds, then it goes to the display
mode with Special Beep Sound with special beep
sound.
2, Perform the same way again to cancel the display
mode.
3. All freezing unit will be bJmed off at display
mode(Exceptions Lamp, Display)
• Simultaneously press and hold the FREEZER and
REFRIGERATOR buttons for more than 5 seconds.
• Do the same to convert back to Fahrenheit.
Display Power-Saving Mode
This function places the display into the Power-
Saving Mode.
• Simultaneously press the FREEZER and ICE PLUS
buttons and hold them for 5 seconds until a tone
sounds.
• All LED lights will turn on and then off,
• When the Power-Saving Mode is activated, the
display will remain off until the next time the door is
opened. The display will also turn on when any
button is pressed, and it will remain on for 20
seconds after the last door opening or button
selection.
• To deactivate the Power-Saving Mode, press the
FREEZER and iCE PLUS buttons simultaneously
and hold them for 5 seconds until the tone sounds.
TOUSE
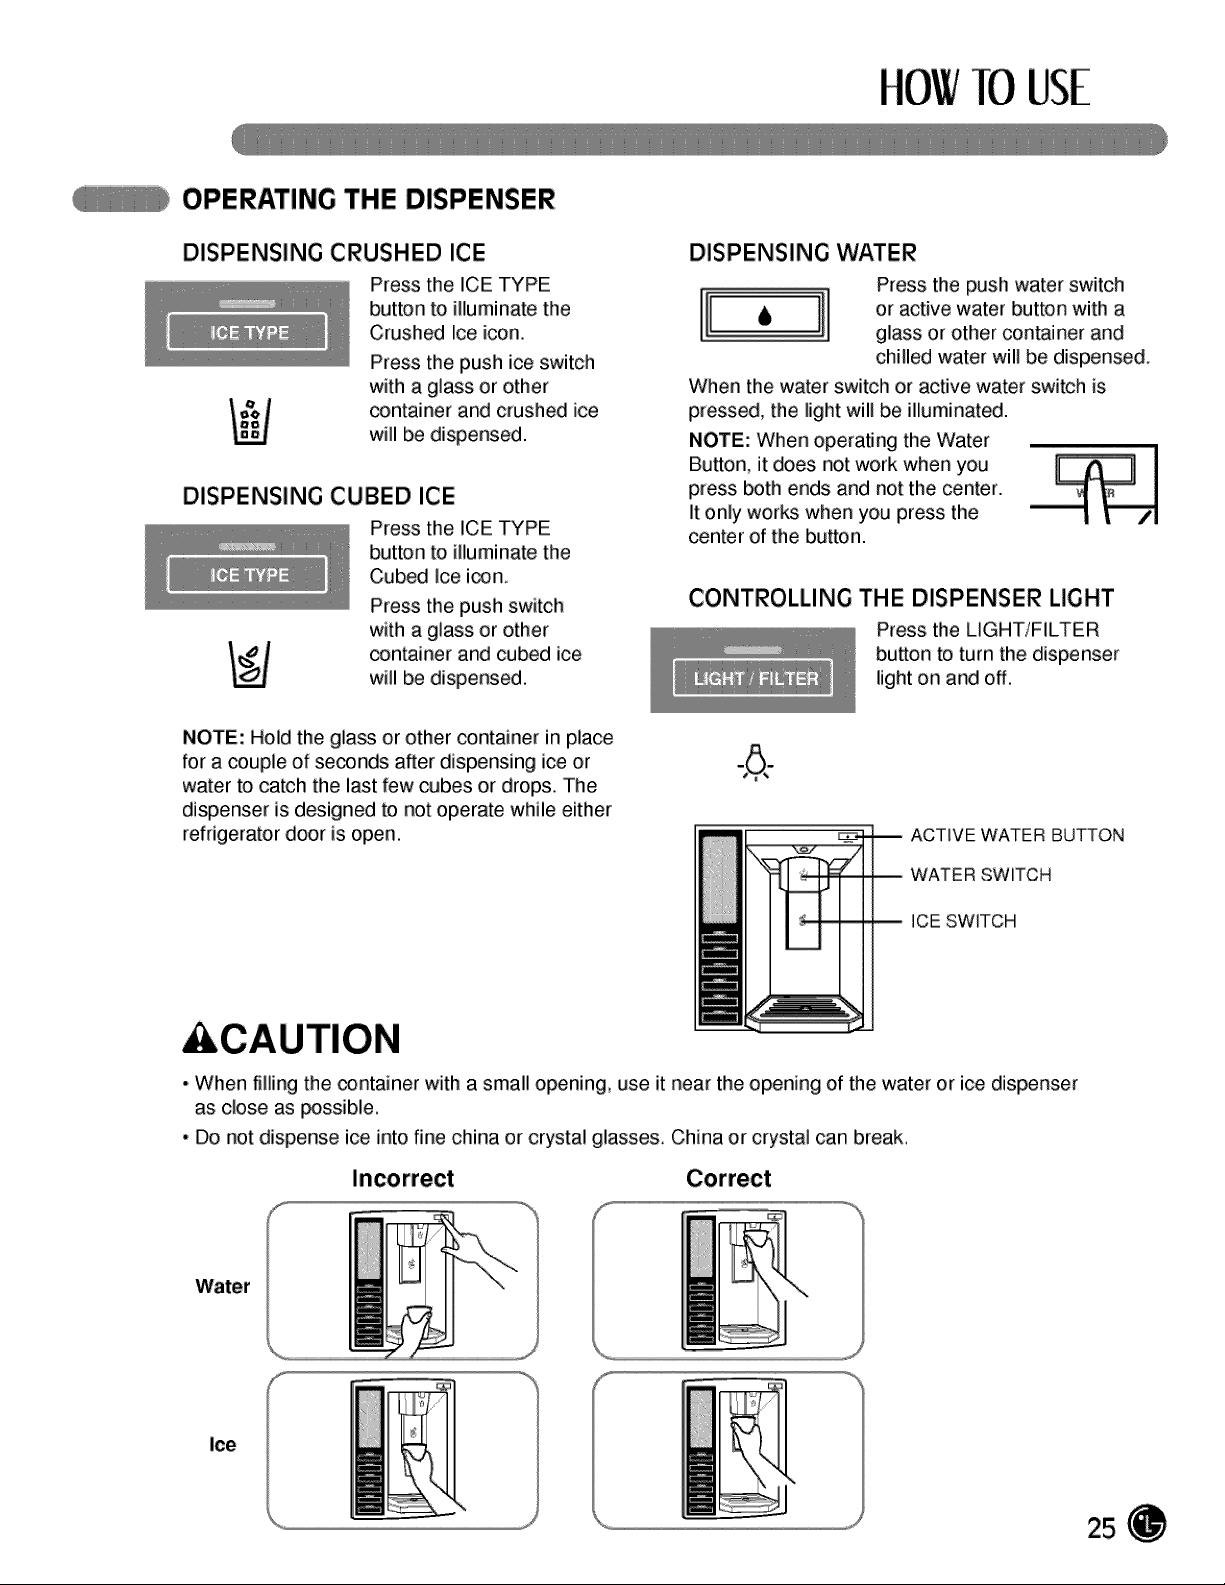
OPERATING THE DISPENSER
DISPENSING cRUSHED ICE
Press the ICE TYPE
button to illuminate the
Crushed Ice icon.
Press the push ice switch
with a glass or other
container and crushed ice
will be dispensed.
DISPENSING CUBED ICE
Press the ICE TYPE
button to illuminate the
Cubed Ice icon,
Press the push switch
with a glass or other
container and cubed ice
will be dispensed,
DISPENSING WATER
Press the push water switch
In.
glass or other container and
chilled water will be dispensed.
When the water switch or active water switch is
pressed, the light will be illuminated.
NOTE: When operating the Water
Button, it does not work when you
press both ends and not the center.
It only works when you press the
center of the button.
CONTROLLING THE DISPENSER LIGHT
Press the LIGHT/FILTER
button to turn the dispenser
light on and off,
NOTE: Hold the glass or other container in place
for a couple of seconds after dispensing ice or
water to catch the last few cubes or drops, The
dispenser is designed to not operate while either
refrigerator door is open,
ACTWE WATER BUTTON
WATER SWITCH
ICE SWITCH
&CAUTION
• When filling the container with a small opening, use it near the opening of the water or ice dispenser
as close as _ssible.
• Do not dispense ice into fine china or crystal glasses. China or crystal can break.
Water
Ice
HOWTOUSE
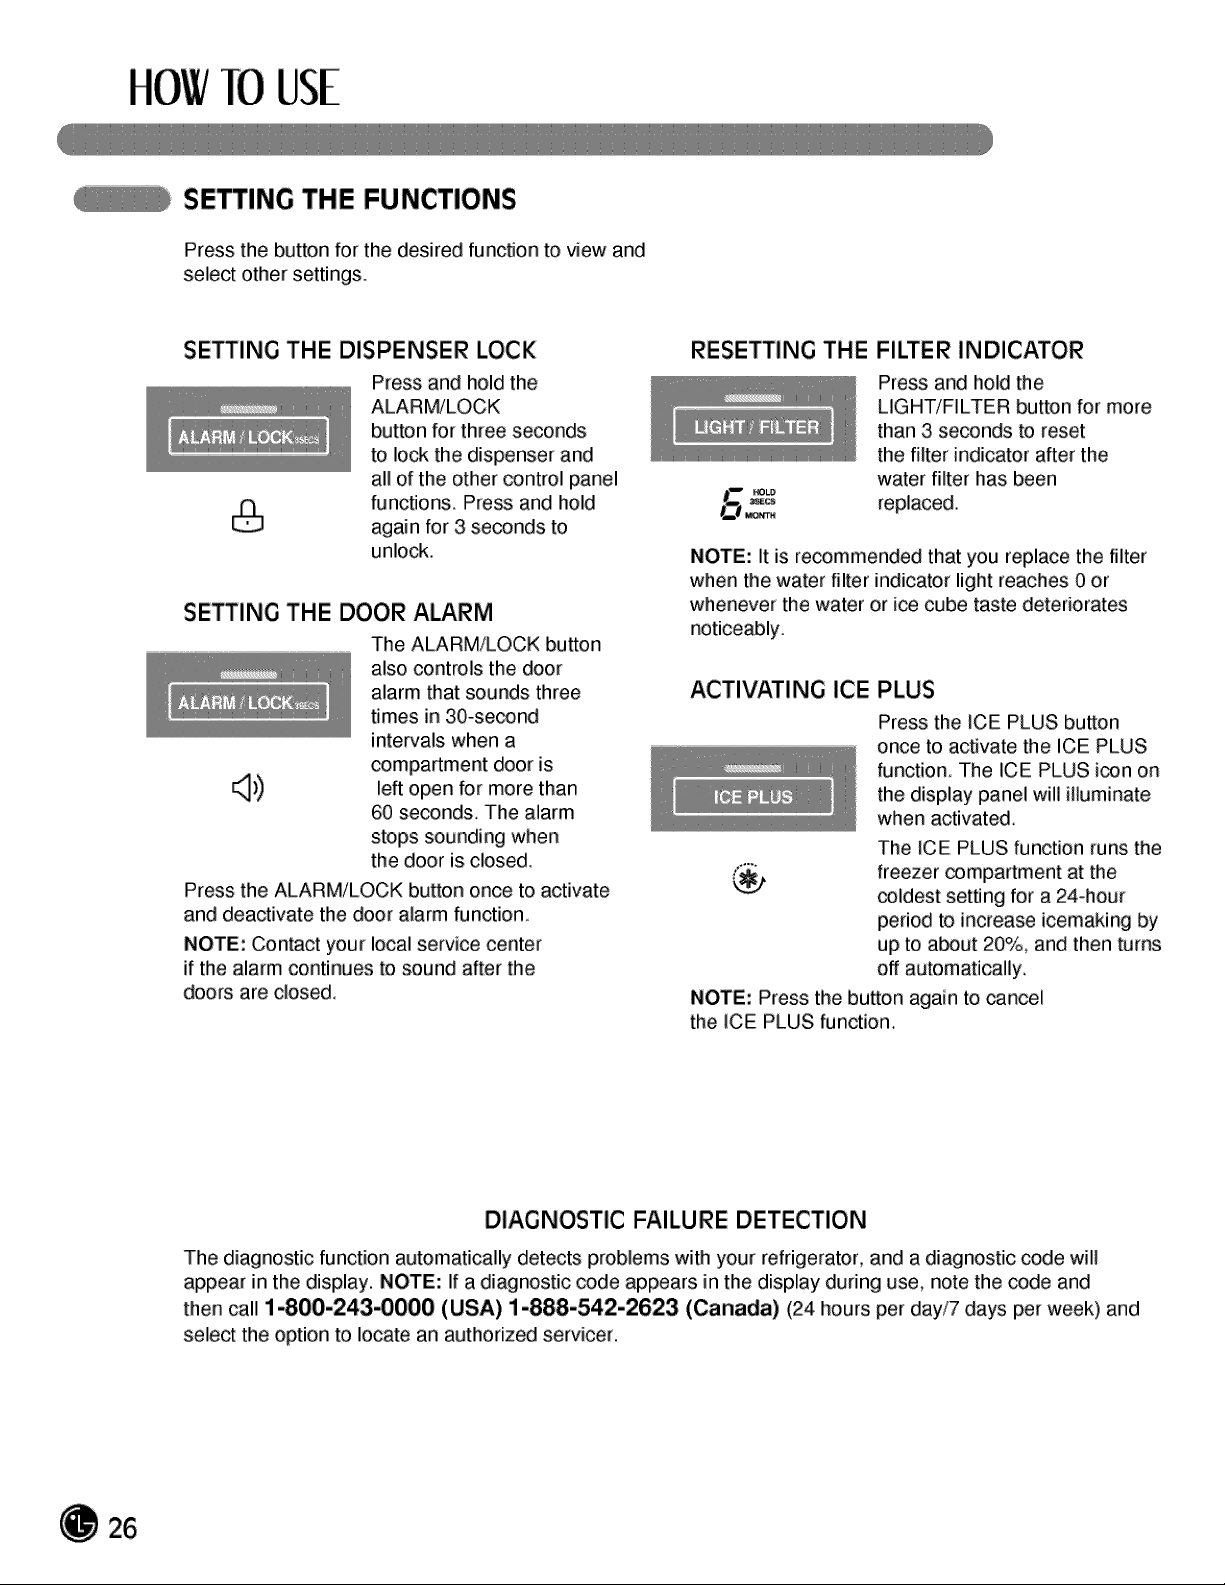
SETTING THE FUNCTIONS
Press the button for the desired function to view and
select other settings.
SE_ING THE DISPENSER LOCK
Press and hold the
ALARMJLOCK
button for three seconds
to 1o_ the dispenser and
all of the other control panel
functions. Press and hold
again for 3 seconds to
union.
SE_ING THE DOOR ALARM
The ALARM/LOCK button
also controls the door
alarm that sounds three
times in 30-second
intervals when a
compartment door is
K_])) left open for more than
60 seconds. The alarm
stops sounding when
the door is closed.
Press the ALARM/LOCK button once to activate
and deactivate the door alarm function.
NOTE: Contact your local service center
if the alarm continues to sound after the
doors are closed.
RESE_ING THE FILTER INDICATOR
Press and hold the
LIGHT/FILTER button for more
than 3 seconds to reset
the filter indicator after the
water filter has been
replaced.
NOTE: It is recommended that you replace the filter
when the water filter indicator light reaches 0 or
whenever the water or ice cube taste deteriorates
noticeably.
ACTIVATING ICE PLUS
Press the ICE PLUS button
once to activate the ICE PLUS
function The ICE PLUS icon on
the display panel will illuminate
when activated.
The ICE PLUS function runs the
_ freezer compartment at the
coldest setting for a 24ohour
period to increase icemaking by
up to a_ut 20%, and then turns
off automatically.
NOTE: Press the button again to cancel
the ICE PLUS function.
DIAGNOSTIC FAILURE DETECTION
The diagnostic function automatically detects problems with your refrigerator, and a diagnostic code will
appear in the display. NOTE: If a diagnostic code appears in the display during use, note the code and
then call 1-800-243-0000 (USA) 1-888-542-2623 (Canada) (24 hours per day/7 days per week) and
select the option to locate an authorized servicer.
TOUSE
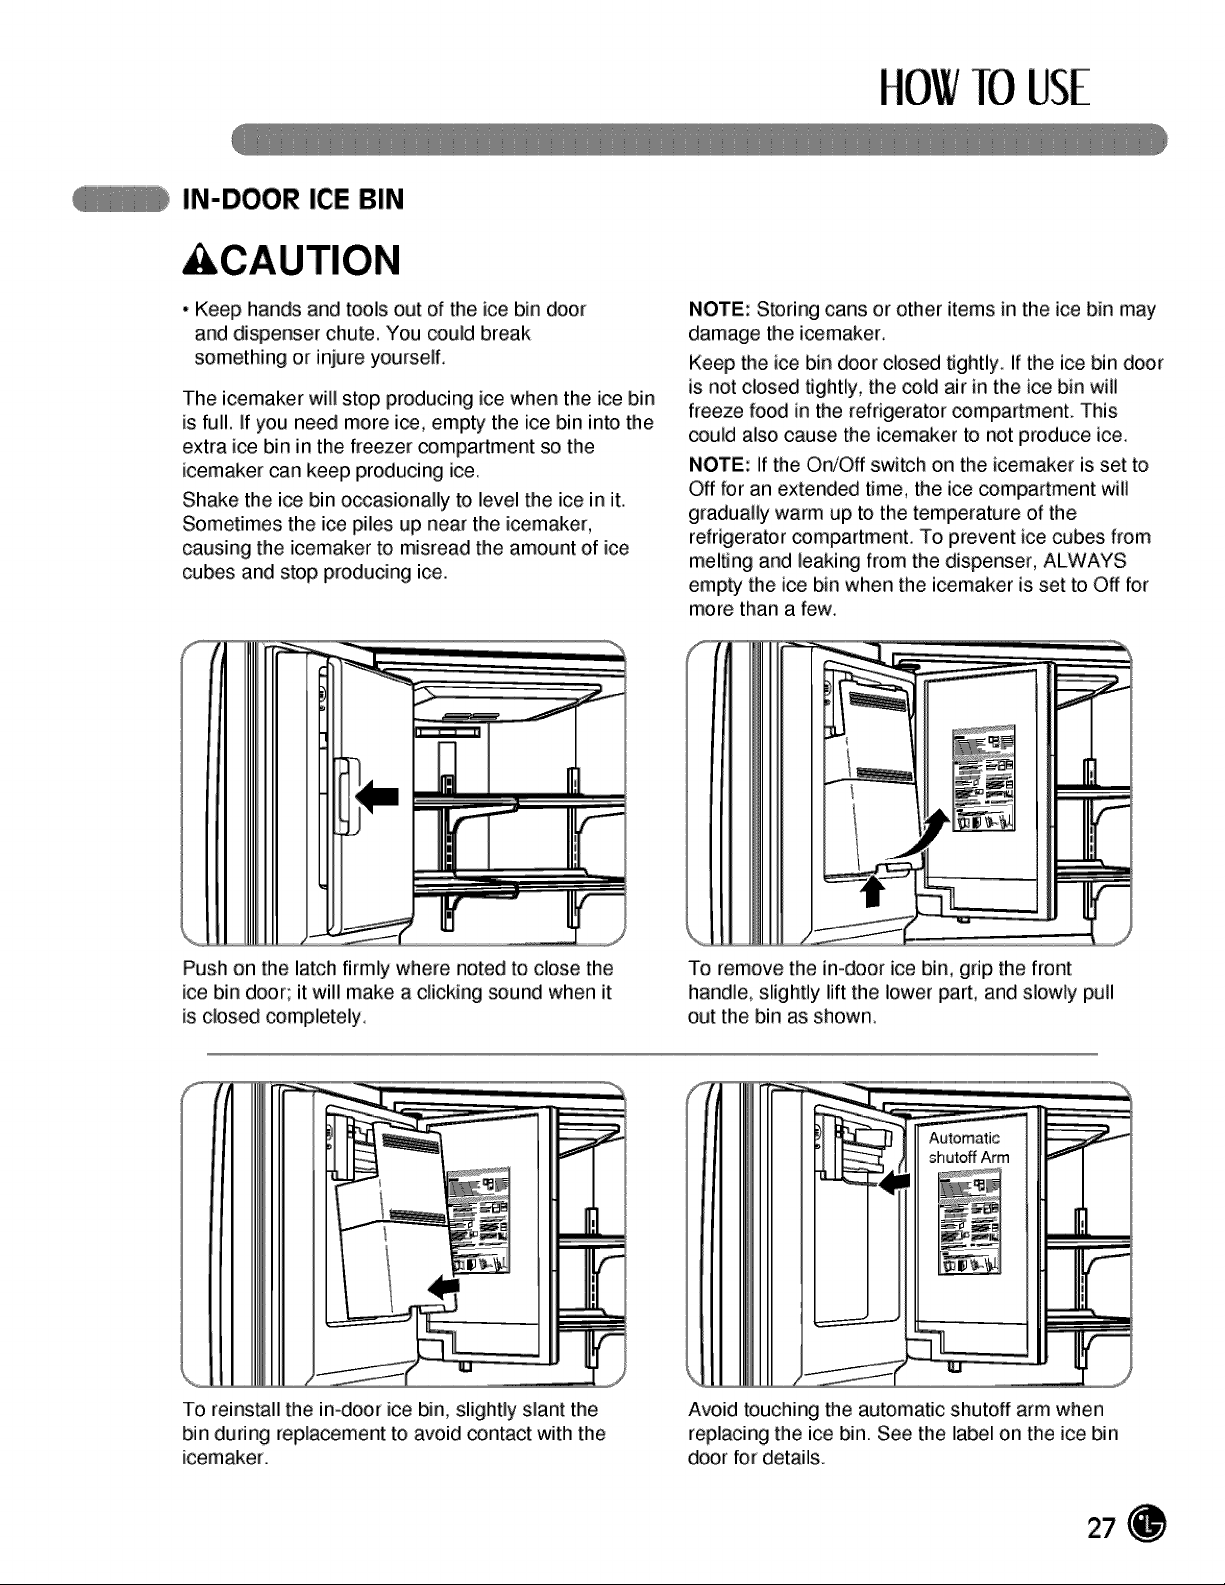
IN-DOOR ICE BIN
CAUTION
• Keep hands and tools out of the ice bin door
and dispenser chute. You could break
something or injure yourself.
The icemaker will stop producing ice when the ice bin
is full. If you need more ice, empty the ice bin into the
extra ice bin in the freezer compartment so the
icemaker carl keep producing ice.
Shake the ice bin occasionally to level the ice in it.
Sometimes the ice piles up near the icemaker,
causing the icemaker to misread the amount of ice
cubes and stop producing ice.
NOTE: Storing cans or other items in the ice bin may
damage the icemaken
Keep the ice bin door closed tightly if the ice bin door
is not closed Ughtly, the cold air in the ice bin will
freeze food in the refrigerator _mpartmenL This
could also cause the icemaker to not produce ice.
NOTE: If the On/Off switch on the icemaker is set to
Off for an extended time, the ice compartment will
gradually warm up to the temperature of the
refrigerator compartment To prevent ice cubes from
melSng and leaking from the dispenser, ALWAYS
empty the ice bin when the icemaker is set to Off for
more than a few.
_J
Push on the latch firmly where noted to close the
ice bin door; it will make a clicking sound when it
is closed completely.
To remove the in-door ice bin, grip the front
handle, slightly lift the lower part, and slowly puff
out the bin as shown.
fir
To reinstall the in-door ice bin, slightly slant the
bin during replacement to avoid contact with the
icemaker.
Avoid touching the automatic shutoff arm when
replacing the ice bin. See the label on the ice bin
door for details.
HOWTOUSE
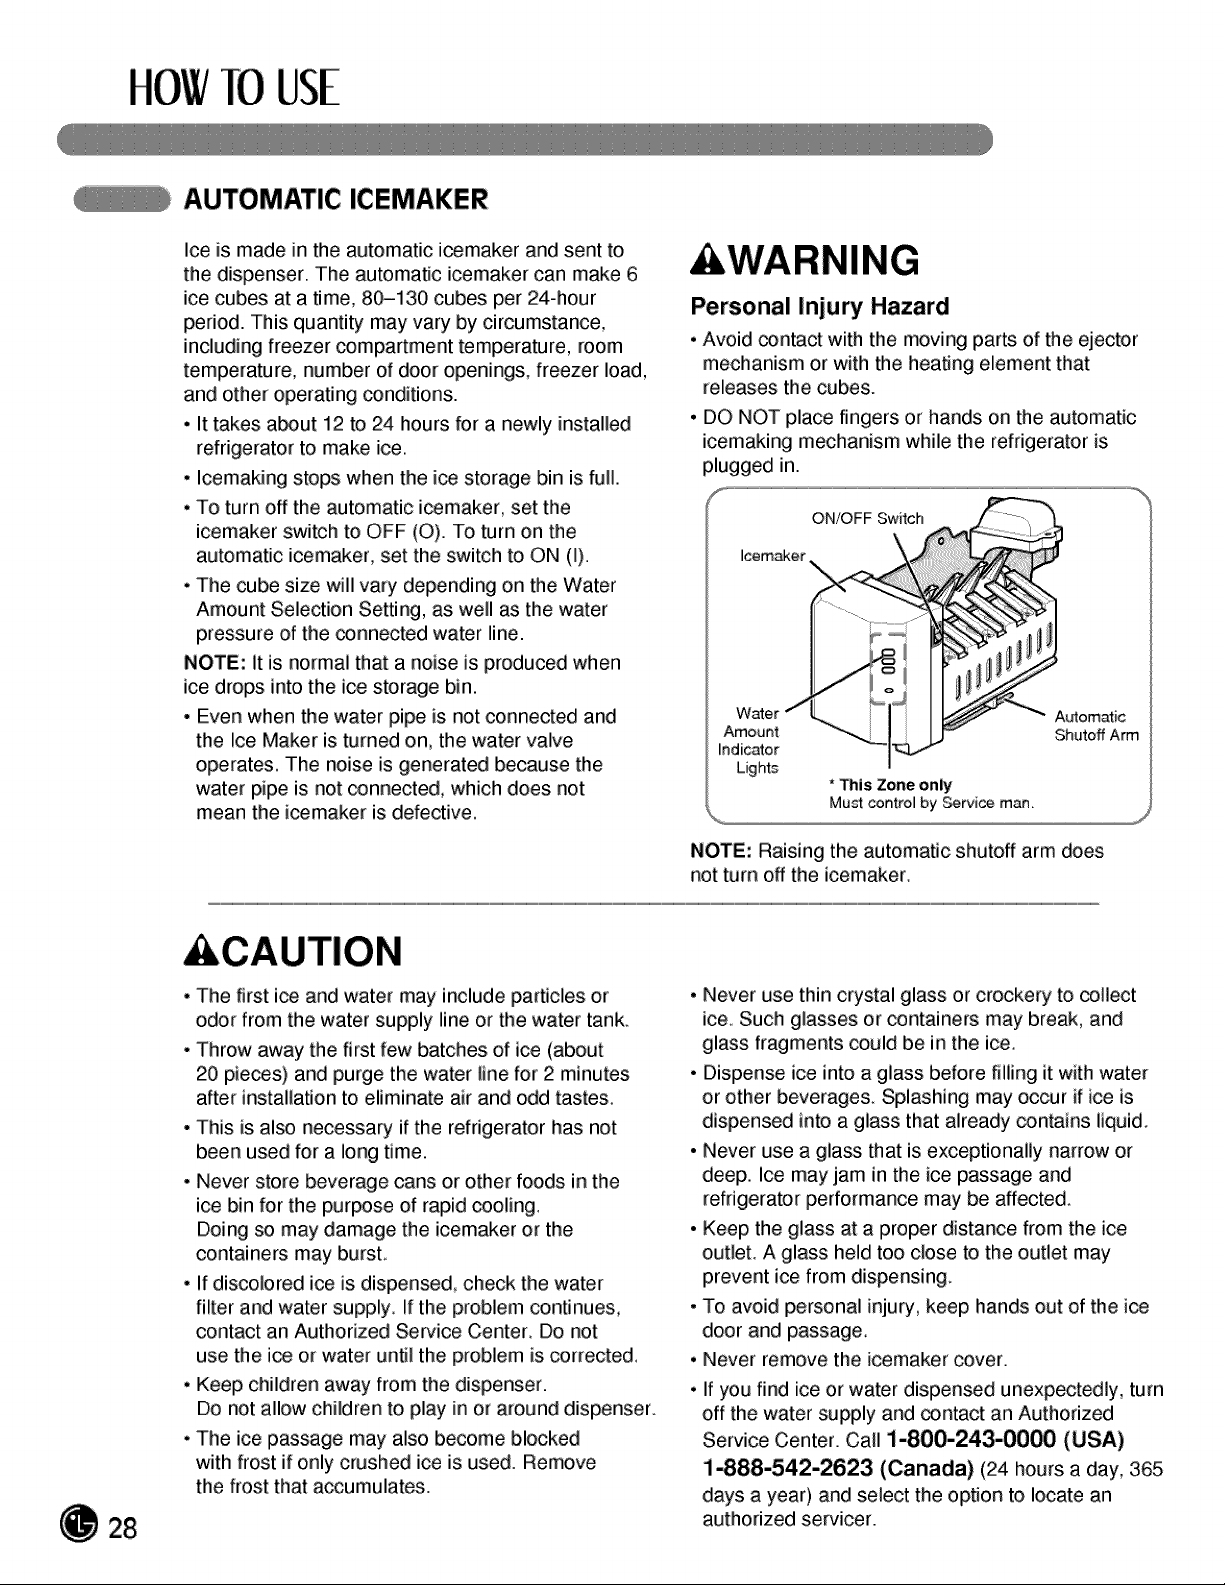
AUTOMATIC ICEMAKER
Ice is made in the automatic icemaker and sent to
the dispenser. The automatic icemaker can make 6
ice cubes at a time, 80-130 cubes per 24-hour
period. This quantity may vary by circumstance,
including freezer compartment temperature, room
temperature, number of door openings, freezer load,
and other operating conditions.
• It takes a_ut 12 to 24 hours for a newly installed
refrigerator to make ice.
• Icemaking stops when the i_ storage bin is full.
• To turn off the automatic i_maker, set the
icemaker switch to OFF (O). To turn on the
automatic icemaker, set the switch to ON (I).
• The cube size will vary depending on the Water
Amount Selection Setting, as well as the water
pressure of the connected water line.
NOTE: it is normal that a noise is produced when
ice drops into the ice storage bin.
• Even when the water pipe is not connected and
the Ice Maker is bJmed on, the water valve
operates. The noise is generated because the
water pipe is not connected, which does not
mean the icemaker is defective.
WARNING
Personal Injury Hazard
• Avoid contact with the moving parts of the ejector
mechanism or with the heating element that
releases the cubes.
• DO NOT place fingers or hands on the automatic
icemaking mechanism while the refrigerator is
plugged in.
ON/OFF Switch
Icem_er
indicator
Lights
* This Zone only
Automatic
Shutoff Am
NOTE: Raising the automatic shutoff arm does
not turn off the icemaker
&CAUTION
• The first ice and water may include particles or
odor from the water supply line or the water tank.
• Throw away the first few batches of ice (about
20 pieces) and purge the water line for 2 minutes
after installation to eliminate air and odd tastes.
• This is also necessary if the refrigerator has not
been used for a long time.
• Never store beverage cans or other foods in the
ice bin for the purpose of rapid cooling.
Doing so may damage the icemaker or the
containers may burst.
• If discolored ice is dispensed, check the water
filter and water supply If the problem continues,
contact an Authorized Sewice Center. Do not
use the ice or water until the problem is corrected.
• Keep children away from the dispenser.
Do not allow children to play in or around dispenser.
• The ice passage may also become blocked
with frost if only crushed ice is used. Remove
the frost that accumulates.
• Never use thin crystal glass or crockery to _llect
ice. Such glasses or containers may break, and
glass fragments could be in the ice
• Dispense ice into a glass before filling it with water
or other beverages. Splashing may occur if ice is
dispensed into a glass that already contains liquid_
• Never use a glass that is exceptionally narrow or
deep. Ice may jam in the ice passage and
refrigerator performance may be affected.
• Keep the glass at a proper distance from the ice
outlet. A glass held too close to the outlet may
prevent ice from dispensing
• To avoid personal injury, keep hands out of the i_
door and passage_
• Never remove the icemaker cover.
• If you find ice or water dispensed unexpectedly, turn
off the water supply and contact an Authorized
Service Center. Call 1-800-243-0000 (USA)
1_88-542-2623 (Canada) (24 hours a day, 365
days a year) and select the option to locate an
authorized servicer.

TOUSE
STORING FOODS
• Store fresh food in the refrigerator compartment.
• How food is frozen and thawed is an important
factor in maintaining freshness and flavor.
• Do not store food that spoils easily, such as
bananas and melons, at low temperatures.
• Mow hot food to cool prior to storing; placing hot
food in the refrigerator could spoil other food and
lead to higher energy consumption.
• When storing food, cover it with vinyl wrap or store
in a container with a lid. This prevents moisture from
evaporating and helps food to keep its flavor and
nutrition.
• Do not block air vents with food or containers.
Smooth circulation of chilled air keeps the
refrigerator temperatures even.
• Do not open the doors frequently. Opening the
doors allows warm air to enter the refrigerator and
freezer compartments, which causes temperatures
to rise.
• Never overload the door rac'_s; overloading may
push against the inner racks and prevent the doors
from closing correctly.
Freezer compartment
• DO not store g_ass bottles in the freezer
compartment; glass may, break when the contents
are frozen.
• Do not refreeze food that has been thawed.
This causes loss of flavor and nutrition.
• Do not touch cold foods or containers, especially
those made of metal, with wet hands or place glass
products in the freezer compartment.
Refrigerator compa rtment
• Avoid placing moist food on the top refrigerator
shelves; it could freeze from direct contact with
chilled air.
• Always clean food prior to refrigeration.
Vegetables and fruits should be washed and wiped
and packed food should be wiped to prevent
adjacent food from spoiling.
NOTE: If you keep the refrigerator in a hot and humid
place, frequent opening of the door or storing a lot of
vegetables in the refrigerator may cause
condensation to form. Wipe the condensation with a
clean cloth or a paper towel.
HOWTOUSE
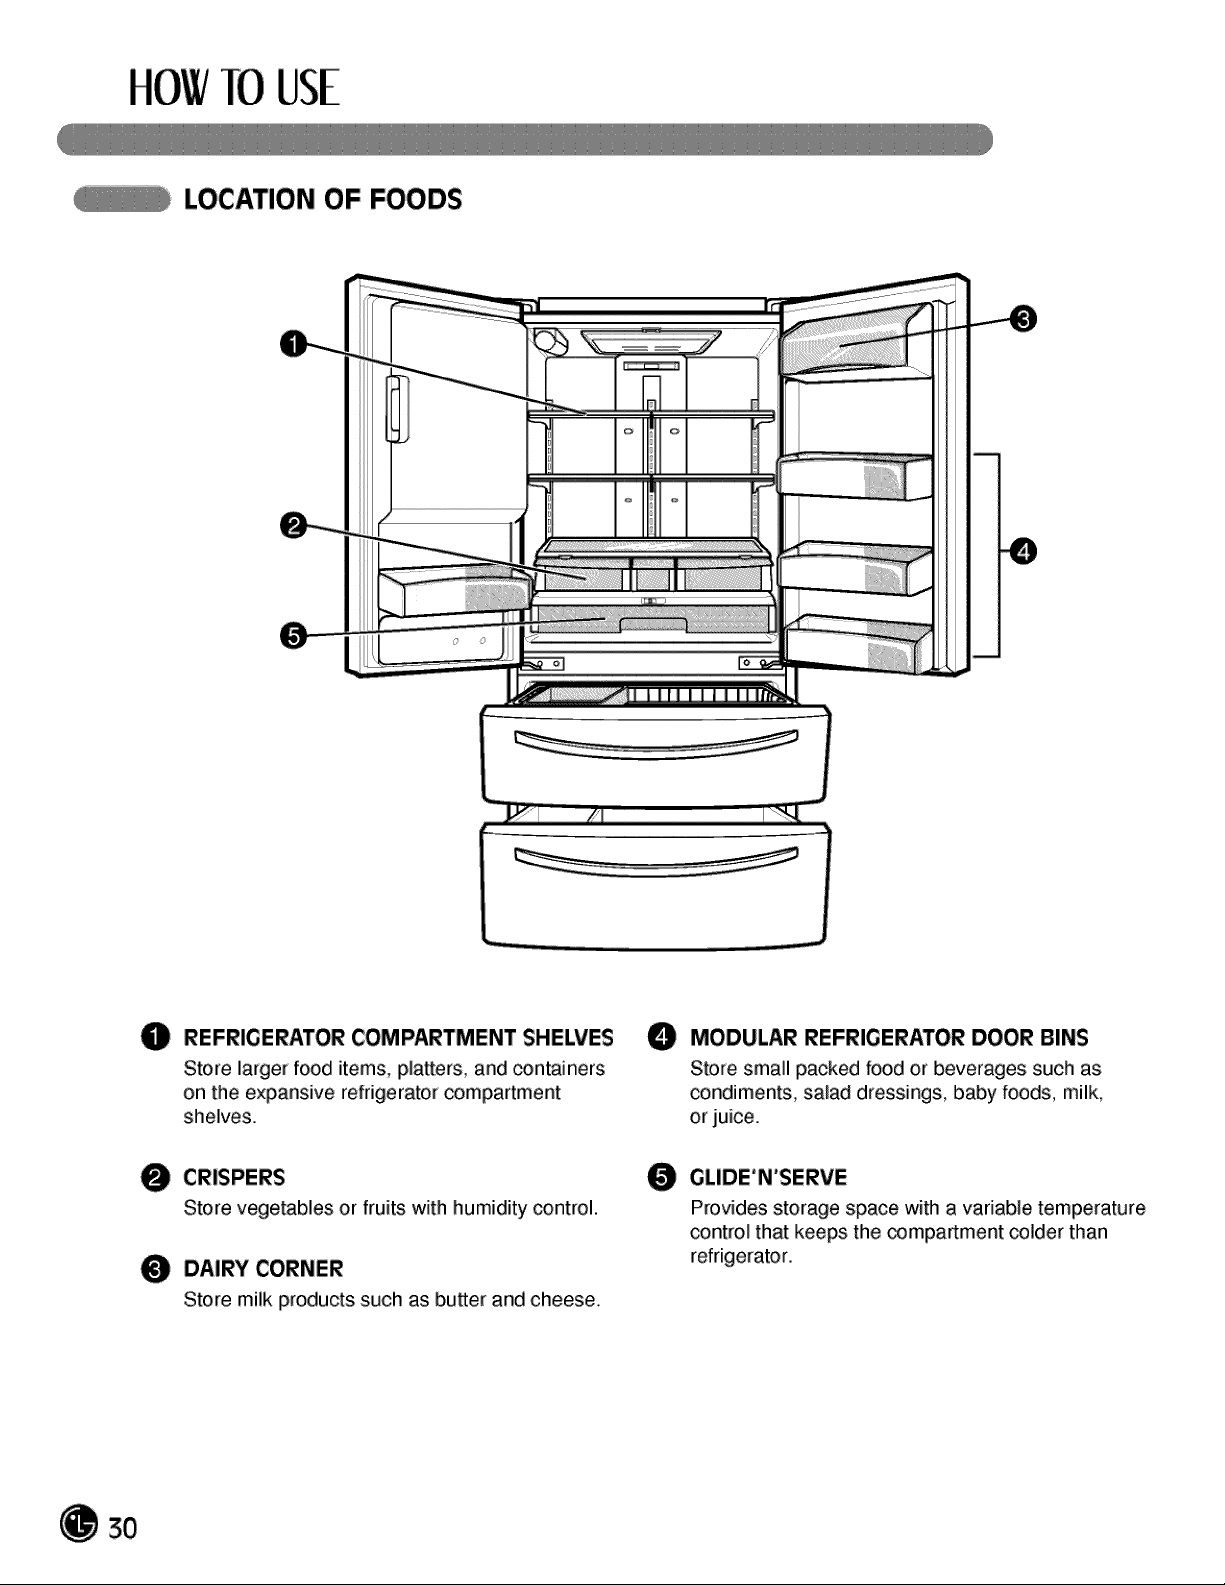
LOCATION OF FOODS
O
REFRIGERATOR COMPARTMENT SHELVES
Store larger food items, platters, and containers
on the expansive refrigerator compartment
shelves.
CRISPERS
Store vegetables or fruits with humidity control.
DAIRY CORNER
Store milk products such as butter and cheese_
MODULAR REFRIGERATOR DOOR BINS
Store small packed food or beverages such as
condiments, salad dressings, baby, foods, milk,
or juice.
0
GLIDE'N'SERVE
Provides storage space with a variable temperature
control that keeps the compartment colder than
refrigerator.
TOUSE
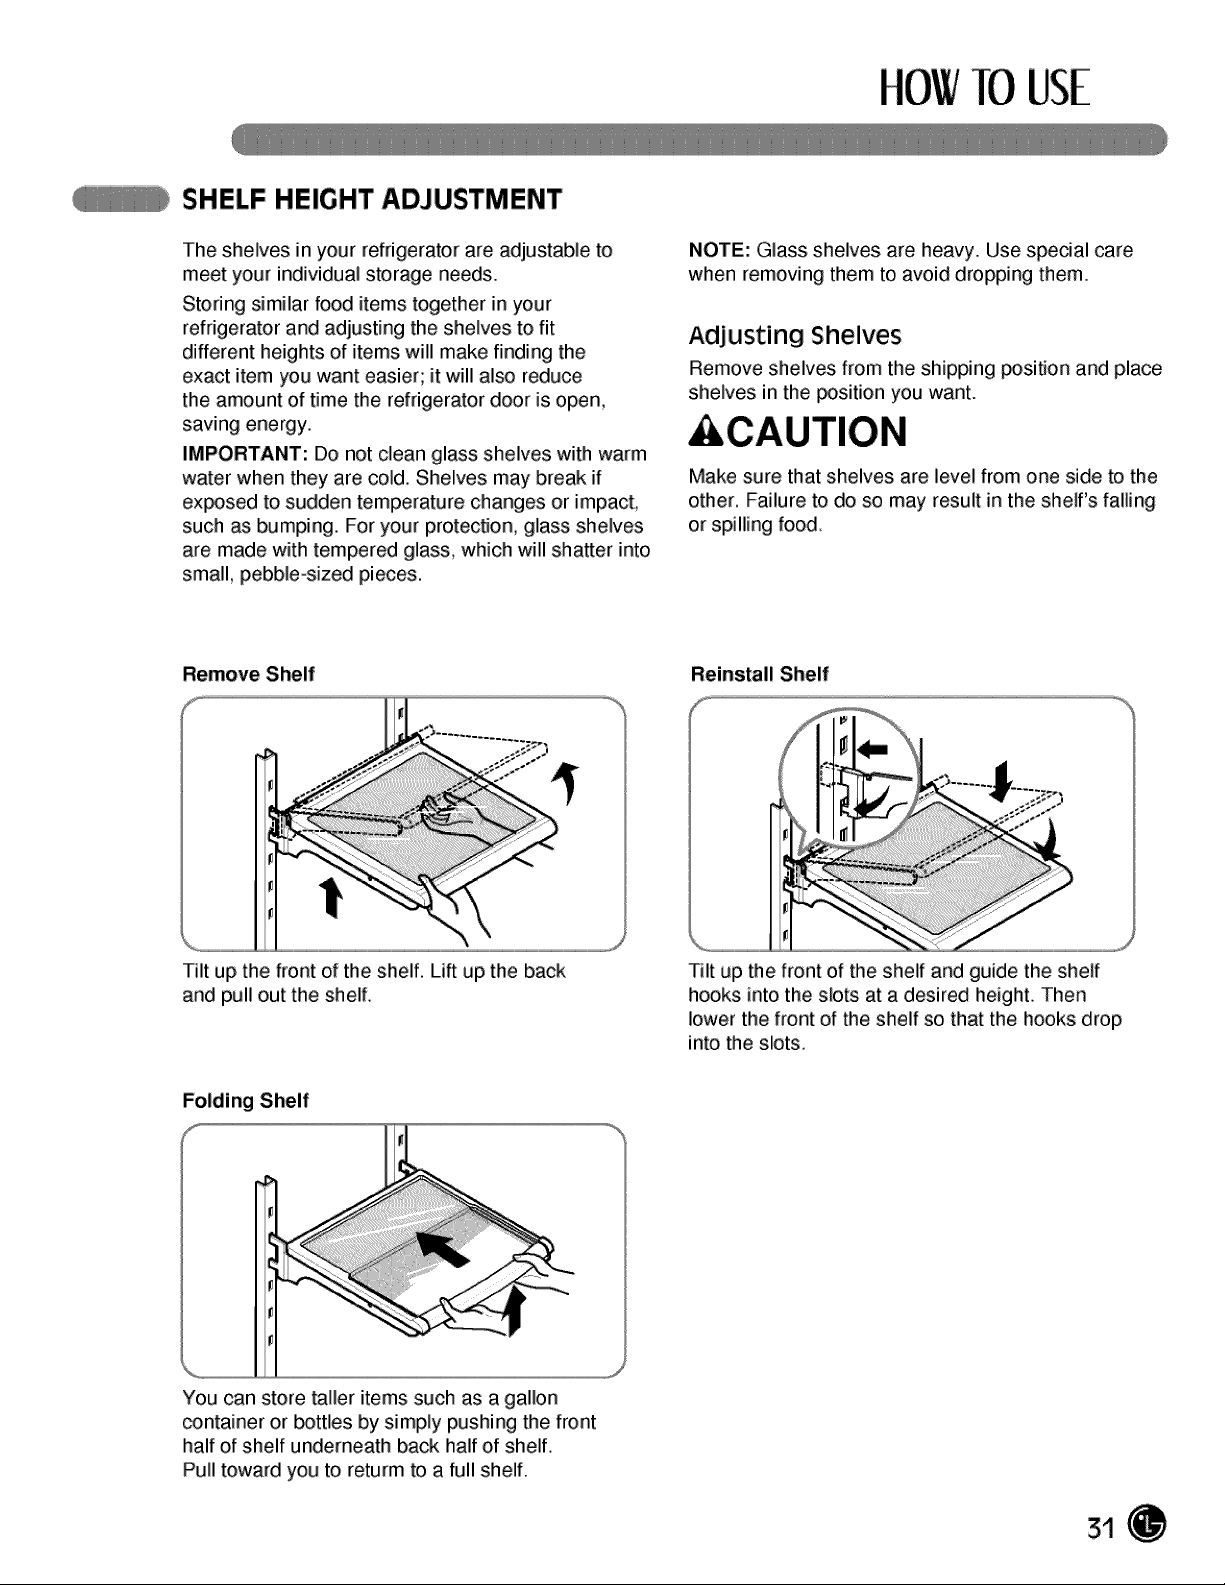
SHELF HEIGHT ADJUSTMENT
The shelves in your refrigerator are adjustable to
meet your individual storage needs.
Storing similar food items together in your
refrigera$or and adjusting the shelves to fit
different heights of items will make finding the
exact item you want easier; it will also reduce
the amount of time the refrigerator door is open,
saving energy.
IMPORTANT: Do not clean glass shelves with warm
water when they are cold. Shelves may break if
ex_sed to sudden temperature changes or impact,
such as bumping. For your protection, glass shelves
are made with tempered glass, which will shatter into
small, pebble-sized pieces.
NOTE: Glass shelves are heavy. Use special care
when removing them to avoid dropping them.
AdjLIsting Shelves
Remove shelves from the shipping _sition and place
shelves in the _sition you want.
Make sure that shelves are level from one side to the
other, Failure to do so may result in the shelf's falling
or spilling food.
Remove Shelf Reinstall Shelf
Tilt up the front of the shelf, Lift up the back
and pull out the shelf,
Tilt up the front of the shelf and guide the shelf
hooks into the slots at a desired height. Then
lower the front of the shelf so that the hooks drop
into the slots,
Folding Shelf
You can store taller items such as a gallon
container or _ttles by simply pushing the front
half of shelf underneath back half of shelf.
Pull toward you to returm to a full shelf.
CAREANDCLONING
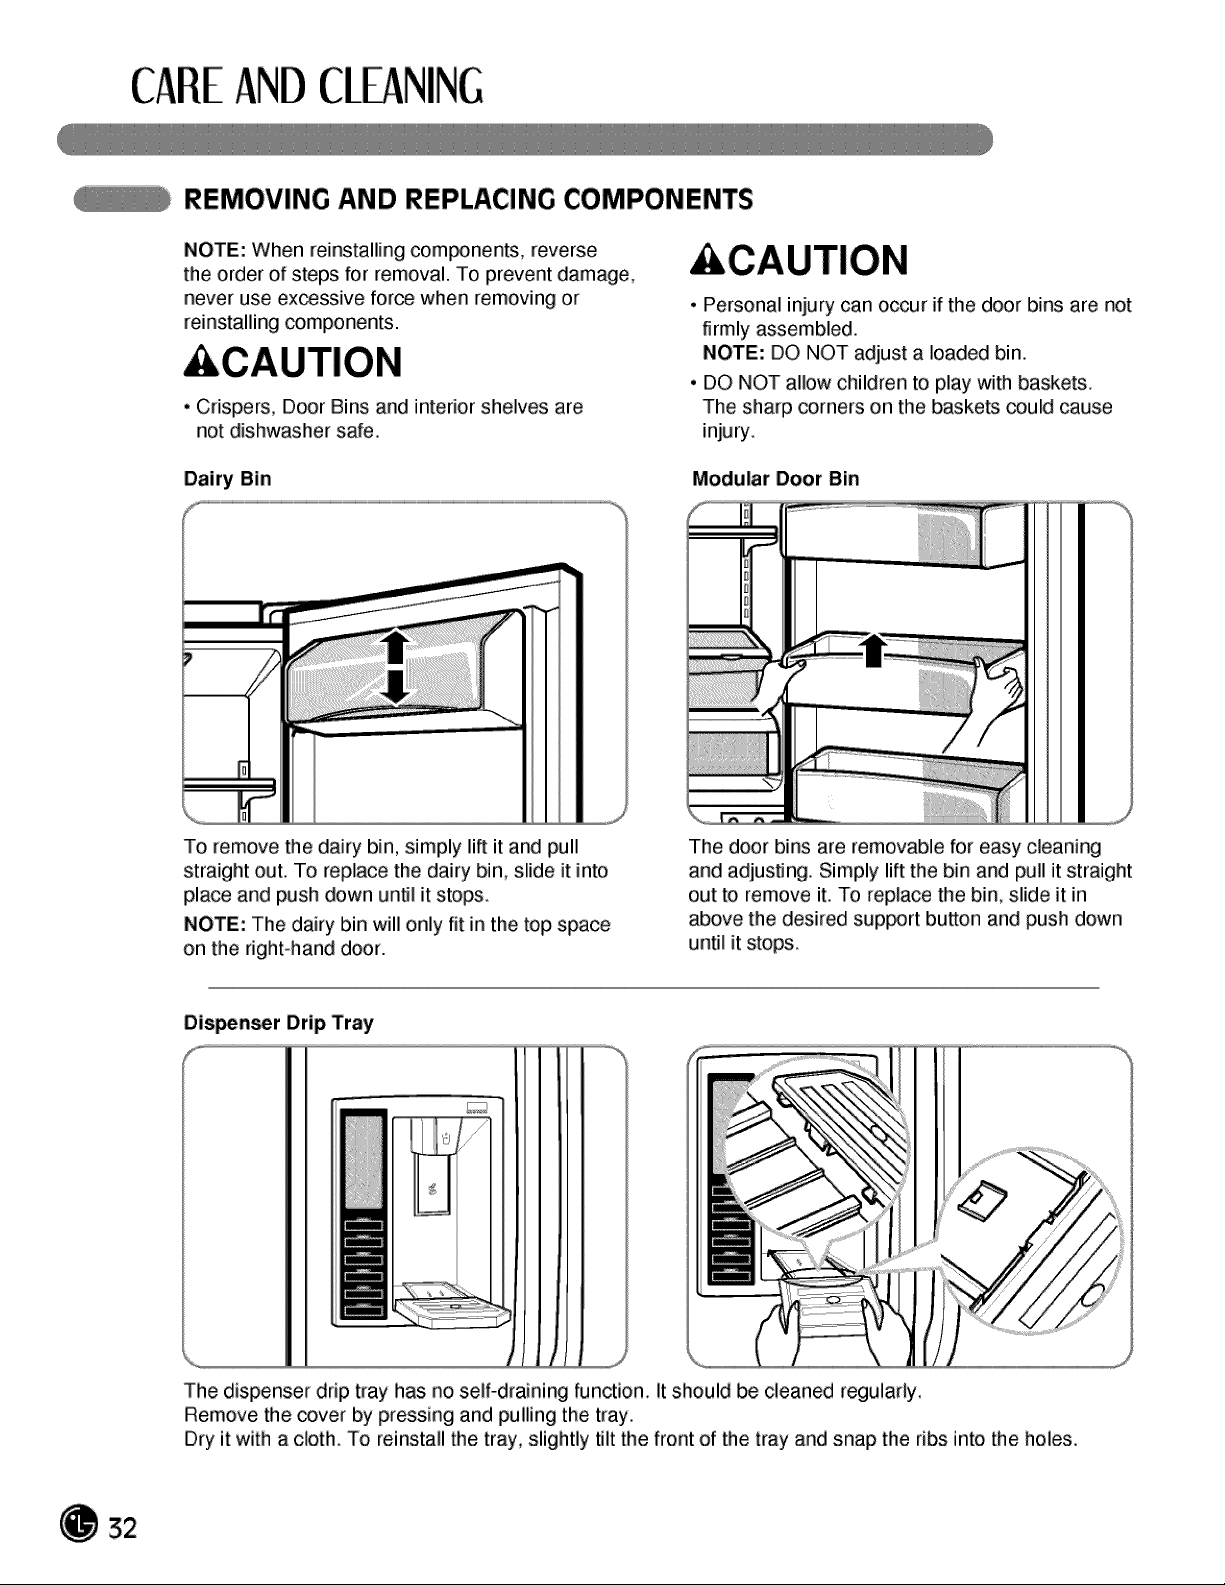
REMOVING AND REPLACING COMPONENTS
NOTE: when reinstalling com_nents, reverse
the order of steps for removal. To prevent damage,
never use excessive force when removing or
reinstalling components.
CAUTION
• Crispers, Door Bins and interior shelves are
not dishwasher safe.
,IkCAUTION
• Personal injury can occur if the door bins are not
firmly assembled.
NOTE: DO NOT adjust a loaded bin.
• DO NOT allow children to play with baskets.
The sharp corners on the baskets could cause
injury.
Dairy Bin
To remove the dairy bin, simply lift it and pull
straight out. To replace the dairy bin, slide it into
place and push down until it stops.
NOTE: The dairy bin will only fit in the top space
on the right-hand door.
Modular Door Bin
The door bins are removable for easy cleaning
and adjusting. Simply lift the bin and pull it straight
out to remove it. To replace the bin, slide it in
above the desired sup_rt button and push down
until it stops.
Dis_n_r Drip Tray
C_C
JJ
The dispenser drip tray has no self-draining function, It should be cleaned regularly,
Remove the cover by pressing and pulling the tray,
Dry it with a cloth, To reinstall the tray, slightly tilt the front of the tray and snap the ribs into the holes.
CAREANDcLEANING
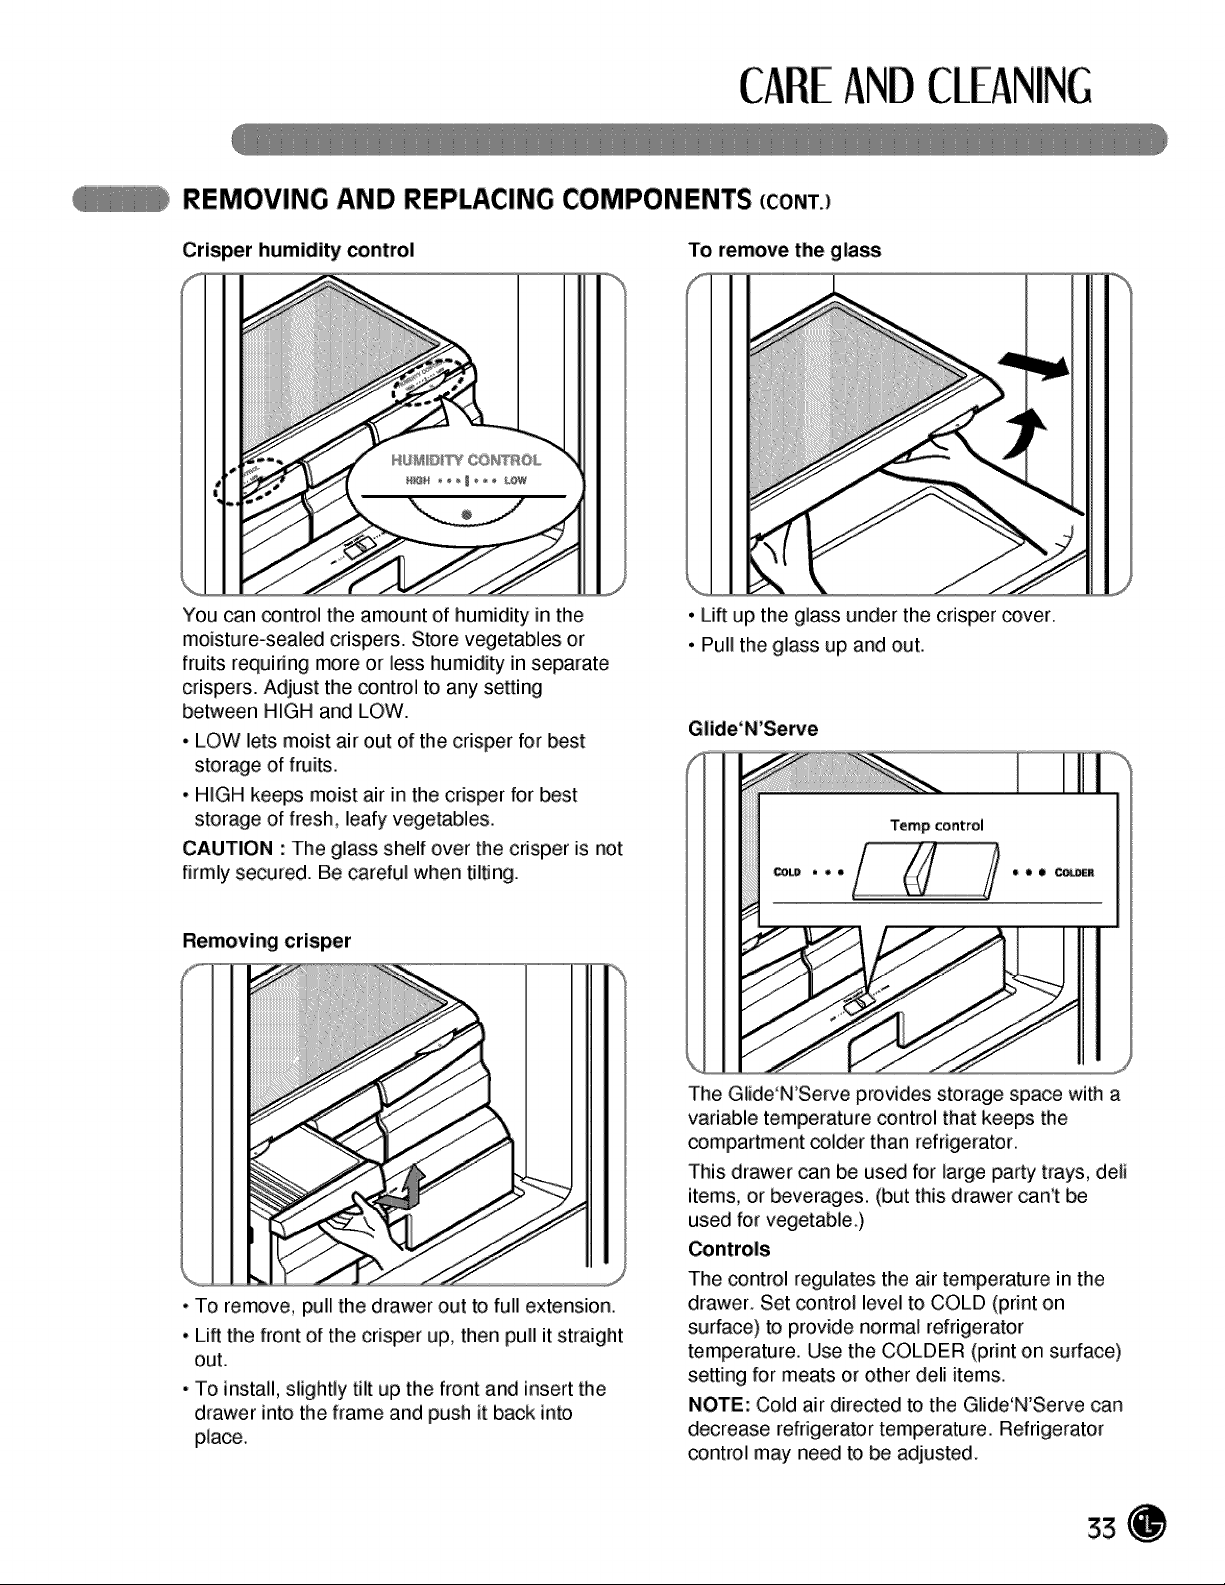
REMOVING AND REPLACING COMPONENTS (CONT.)
Crisper humidity control
°"_,_
J
You can _ntrol the amount of humidity in the
moisture-sealed crispers. Store vegetables or
fruits requiring more or less humidity in separate
crispers. Adjust the control to any setting
between HIGH and LOW.
• LOW lets moist air out of the crisper for best
storage of fruits.
• HIGH keeps moist air in the crisper for best
storage of fresh, leafy vegetables.
CAUTION : The glass shelf over the crisper is not
firmly secured. Be careful when tilting.
Removing crisper
, To remove, pull the drawer out to full extension.
• Lift the front of the crisper up, then pull it straight
out.
• To install, slightly tilt up the front and insert the
drawer into the frame and push it back into
place.
TO remove the glass
• Lift up the glass under the crisper cover.
• Pull the glass up and out.
J
Glide'N'Serve
I
The Glide'N'Serve provides storage space with a
variable temperature control that keeps the
compartment colder than refrigerator.
This drawer can be used for large party trays, dell
items, or beverages. (but this drawer can't be
used for vegetable.)
Controls
The control regulates the air temperature in the
drawer. Set control level to COLD (print on
surface) to provide normal refrigerator
temperature. Use the COLDER (print on surface)
setting for meats or other dell items.
NOTE: Cold air directed to the Glide'N'Serve can
decrease refrigerator temperature. Refrigerator
control may need to be adjusted.
CAREANDCLONING
REMOVING AND REPLACING COMPONENTS (cont.)
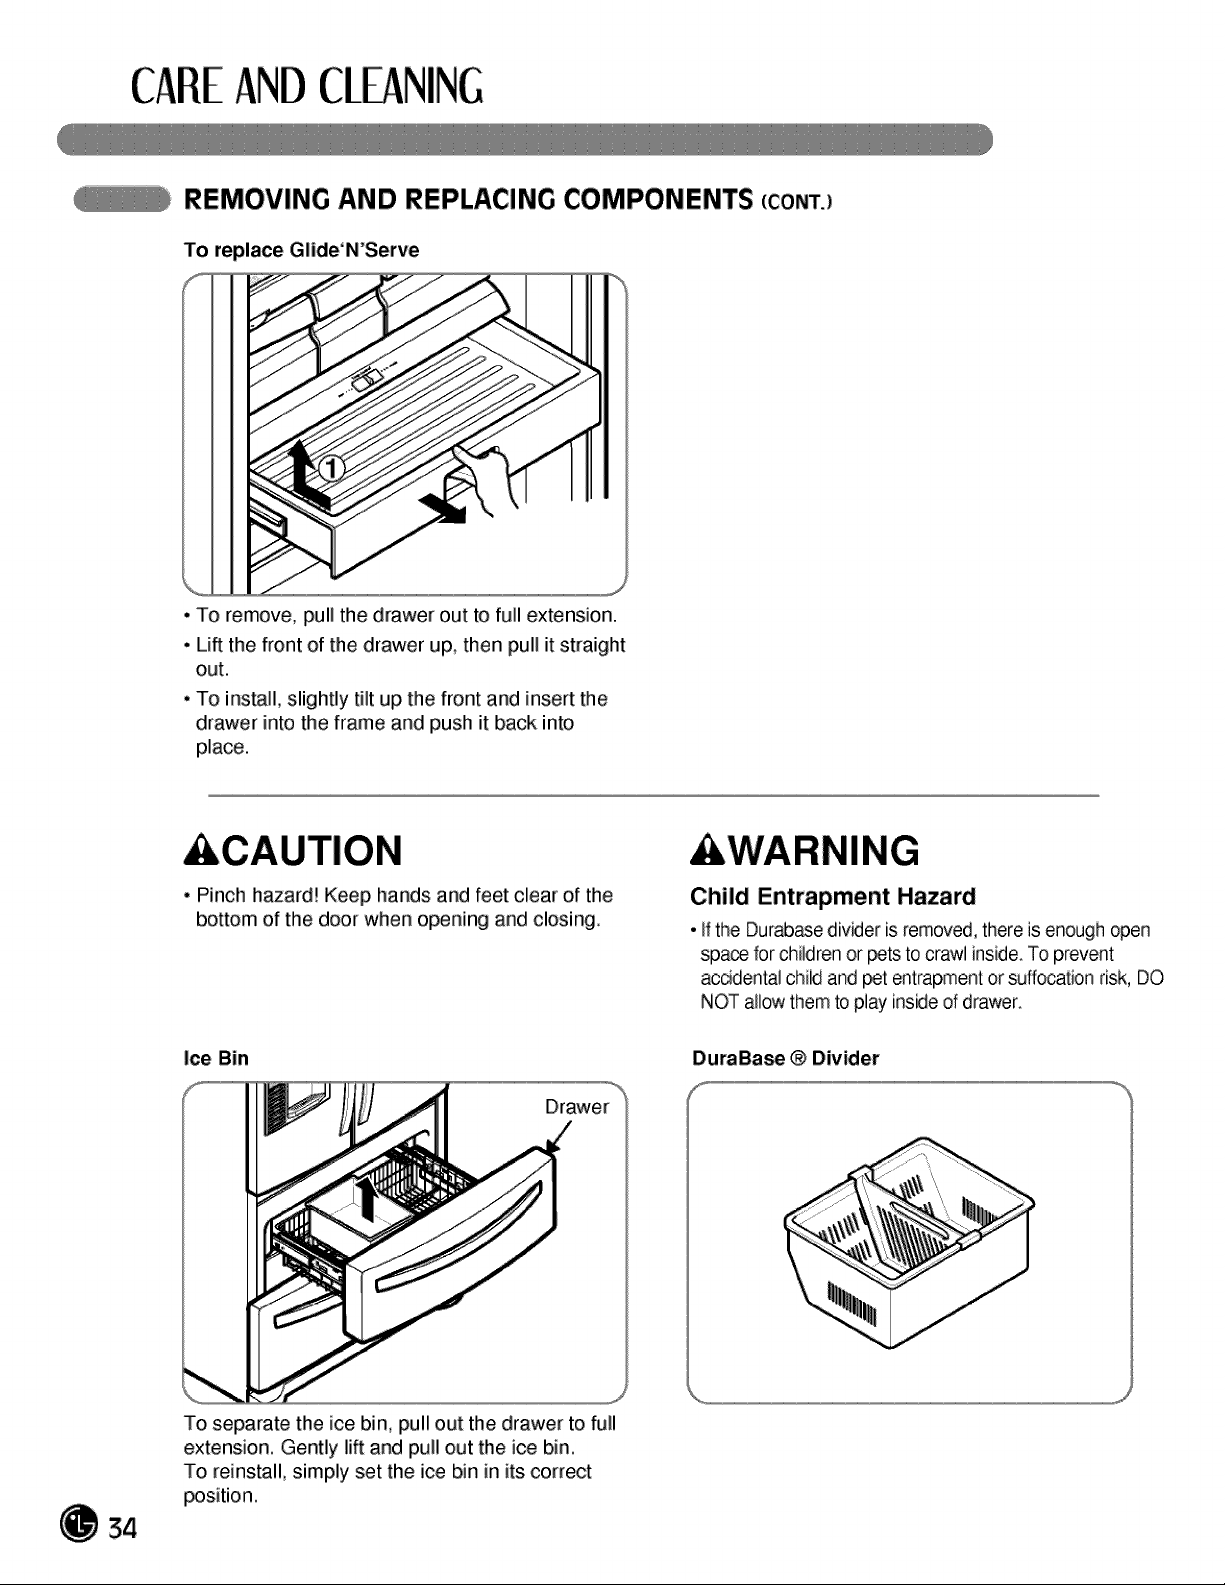
TO replace Glide'N'Serve
f
• To remove, pull the drawer out to full extension.
• Lift the front of the drawer up, then pull it straight
out.
• To instal, slightly tilt up the front and insert the
drawer into the frame and push it back into
place.
&CAUTION
• Pinch hazard! Keep hands and feet clear of the
bottom of the door when opening and closing
Ice Bin
To separate the ice bin, pull out the drawer to full
extension. Gently lift and pull out the ice bin.
To reinstall, simply set the ice bin in its correct
position.
&WARNING
Child Entrapment Hazard
• if the Durabase divider is removed, there is enough open
space for children or pets to crawl inside. To prevent
acddenta] chi_ and pet entrapment or suffocation risk, DO
NOT allow them to play ins_e of drawer.
DuraBase ® DivIder
CAREANDcLEANING
CLEANING THE REFRIGERATOR
WARNING
Explosion Hazard
• Use nonflammable cleaner,
• Failure to do so can result in death,
explosion, or fire,
Both the refrigerator and freezer sections defrost
automatically. However, clean both sections about
once a month to prevent odors. Wipe up spills
immediately.
• Unplug the refrigerator.
• Remove all removable parts, such as shelves and
crispers.
• Use a clean sponge or soft cloth and a mild
detergent in warm water. Do not use abrasive or
harsh cleaners.
• Hand wash, rinse, and thoroughly dry all surfaces.
• Plug in the refrigerator.
NOTE: Window sprays, abrasive cleaners, or
flammable fluids can scratch or damage plastic
covers or panels.
Cleaning the Exterior
For models with a stainless steel exterior, use a
commercially available stainless steel cleaner in
accordance with the manufacturer's instructions.
You may also use a clean sponge or soft cloth and
a mild detergent in warm water. Do not use abrasive
or harsh cleaners. Dr}, thoroughly with a soft cloth.
IMPORTANT: Do not use cleaning waxes,
concentrated detergents, or cleaners containing
petroleum on plastic refrigerator parts such as door
liners or gaskets.
Care and Cleaning of the Interior
NOTE: Allow the freezer to warm so the cleaning
cloth will not stick.
To help remove odors, you can wash the inside of
the refrigerator with a mixture of baking soda and
warm water. Mix 2 tbsp baking soda to 1 qt. of water
(26 g soda to 1 L of water) Be sure the baking soda
dissolves completely so it does not scratch the
surfaces of the refrigerator.
IMPORTANT: Do not use a spray nozzle to clean
the interior.
GENERAL INFORMATION
During average-length vacations, you will
probably find it best to leave the refrigerator in
operation. Place freezable items in the freezer for
longer life.
When you plan to store the refrigerator, remove
all food, disconnect the _wer cord, clean the
interior thoroughly, and block the doors open to
prevent mold and mildew. Be certain the stored
refrigerator does not present a child entrapment
danger.
Power Failure
Most _wer failures that are corrected within an
hour or two will not affect your refrigerator
temperatures. However, you should minimize the
number of door openings while the power is off.
Water may drip from the ice bin during a _wer
outage. To prevent this, remove the ice bin, discard
all of the ice, towel dry, and replace.
Unload the refrigerator to move it, (This is probably
not necessary when pulling it out to clean behind it,)
Be sure to let the refrigerator warm up to room
temper_-ure, and dry the inside before closing the
doors to pack it for moving, To avoid damaging the
height-adjusting screws, turn them all the way into the
base.
CAREANDCLONING
LIGHT BULB REPLACEMENT
WARNING
Electrical Shock Hazard
• Before replacing a burned-out light _lb, either unplug
the refrigeratoror turn off _wer at the circuit brewer
or fuse box.
NOTE: Moving the @ntrol to the OFF position
does not remove power to the light cir_it.
NOTE:
• Not all appliance bulbs will fit your refrigerator.
Be sure to replace the bulb with one of the
same size, shape and wattage.
• The light bulbs will turn off if door is left open for
seven continuous minutes. Shutting door for
one second will light bulbs to come back on.
• There is a safety thermal protector in the "fresh
food" compartments interior lights to prevent
over heating if the door is left open too long,, If
the lights go off bemuse the thermal protector
is activated, close the doors and allow 10
minutes for the thermal protector to reset,,
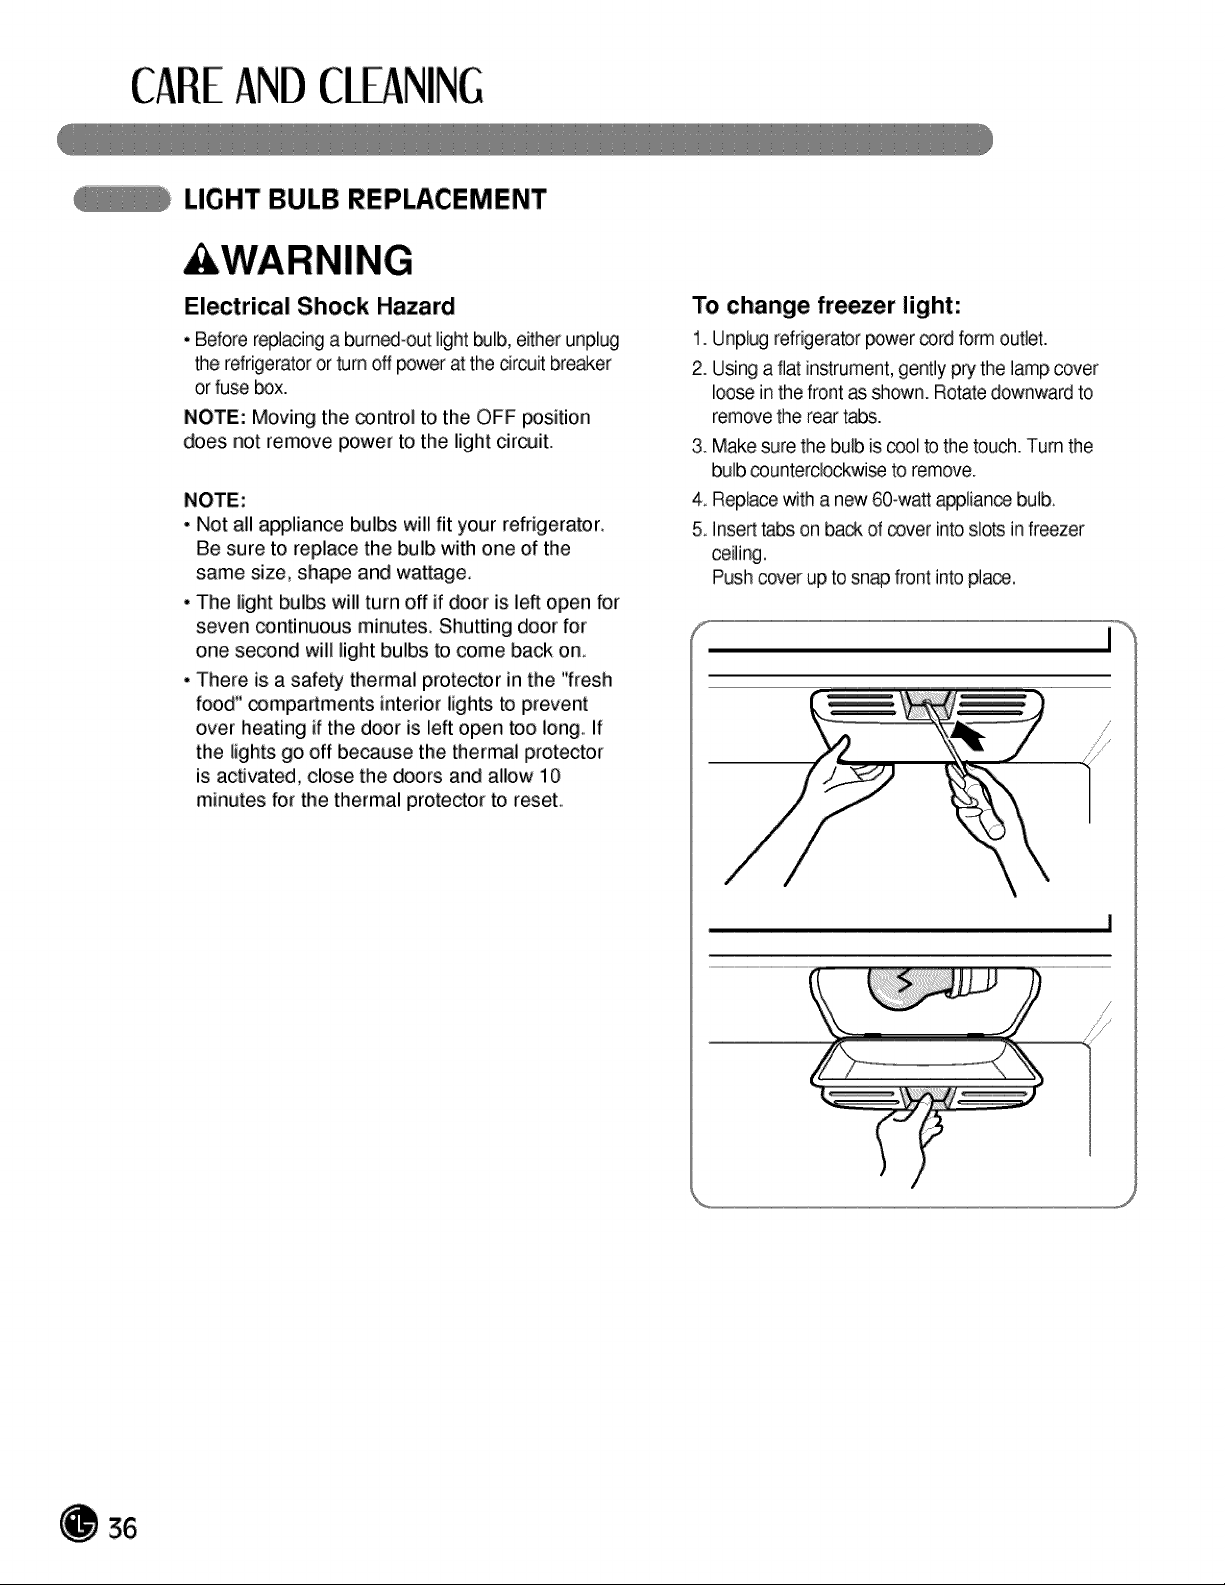
To change freezer light:
1. Unplug refrigerator power cord form outlet.
2. Using a fiat instrument,gently p_ the lamp cover
Ioo_ inthe front as shown. Rotatedownward to
removethe rear tabs.
3. Make sure the bulb is cool to the touch. Turn the
bulb counterclockwise to remove.
4. Replace witha new 60-watt applianco bulb_
5. inserttabs on ba_ of cover into slots in freezer
ceiling.
Push cover up to snap front into placo.
I
..........................................................................................................................................................................................................................................................................................................................................................................................................................................J
CAREANDcLEANING
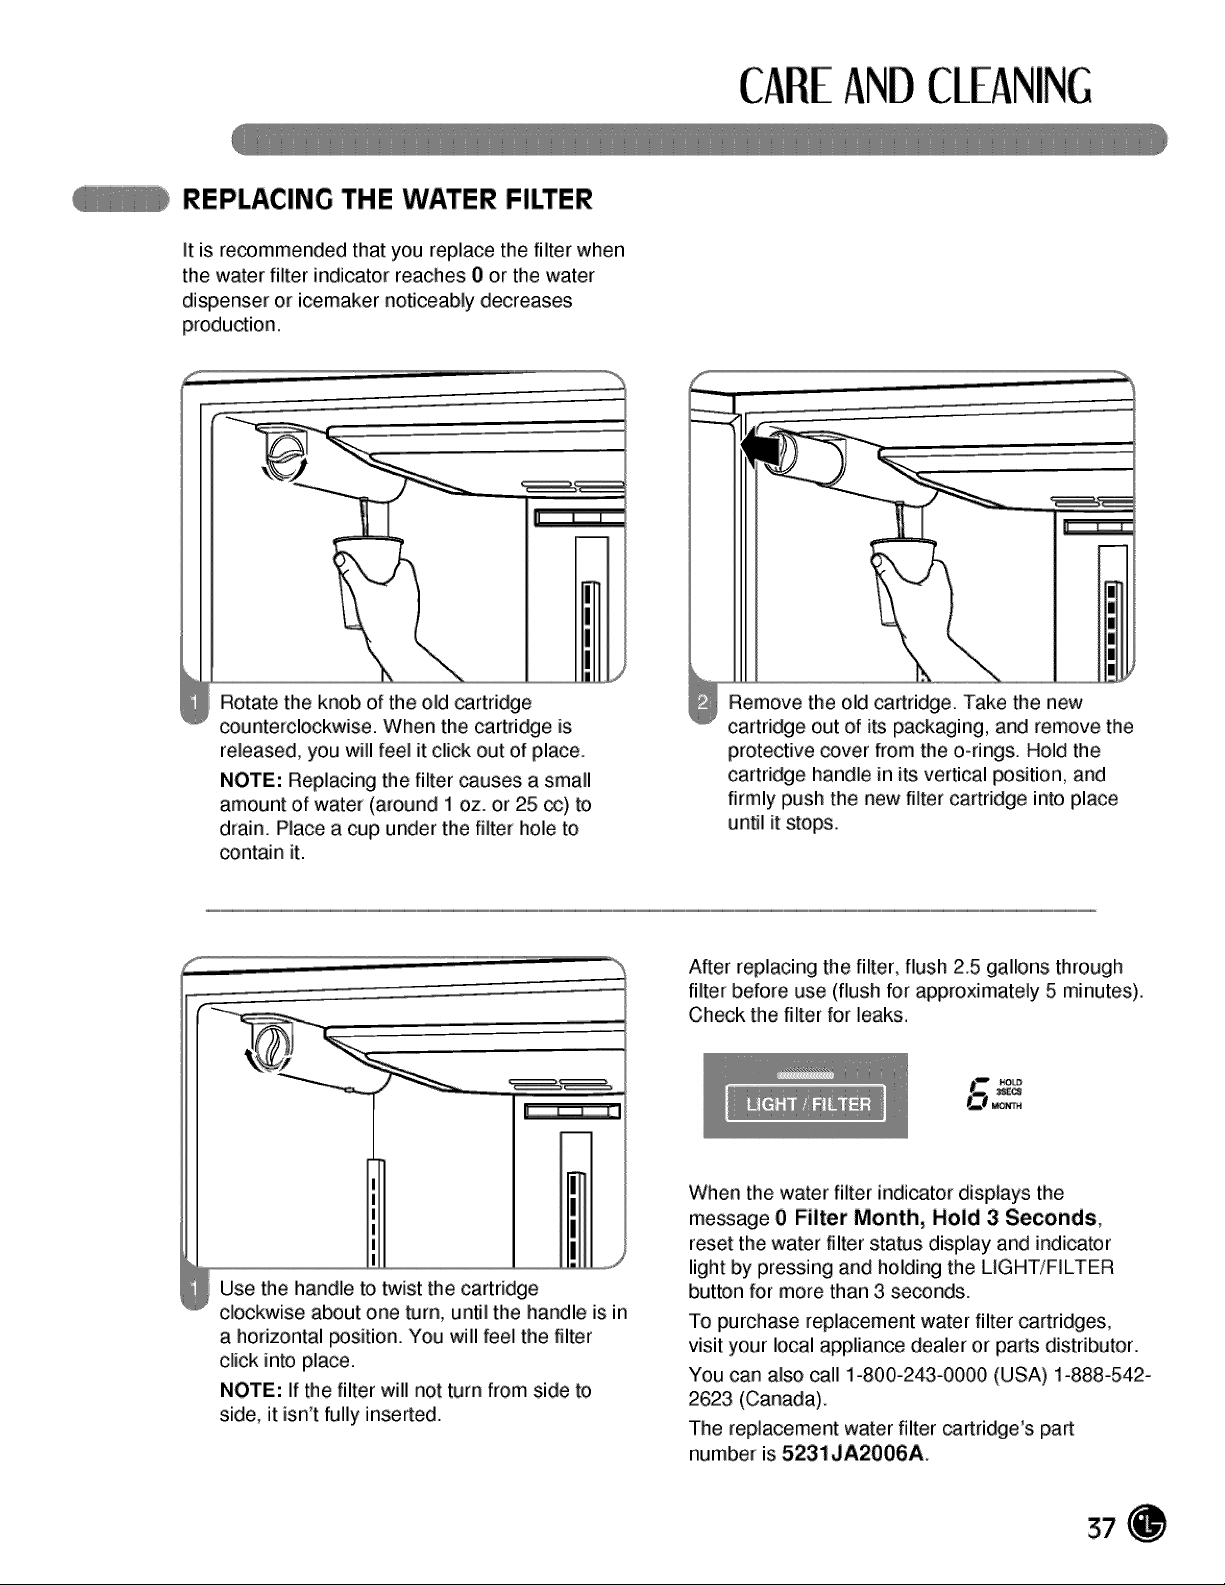
REPLACING THE WATER FILTER
It is re_mmended that you replace the filter when
the water filter indicator reaches 0 or the water
dispenser or icemaker noticeably decreases
production.
_' ,,m
Rotate the knob of the old cartridge
counterclockwise. When the cartridge is
released, you will feel it click out of place.
NOTE: Replacing the filter Ruses a small
amount of water (around 1 oz. or 25 _) to
drain. Place a cup under the filter hole to
contain it.
Remove the old cartridge. Take the new
cartridge out of its packaging, and remove the
protective cover from the o-rings. Hold the
cartridge handle in its vertical position, and
firmly push the new filter cartridge into place
until it stops.
z .........
Use the handle to twist the cartridge
clockwise about one turn, until the handle is in
a horizontal position. You will feel the filter
click into place.
NOTE: If the filter will not turn from side to
side, it isn't fully inserted.
After replacing the filter, flush 2.5 gallons through
filter before use (flush for approximately 5 minutes).
Check the filter for leaks.
When the water filter indicator displays the
message 0 Filter Month, Hold 3 Seconds,
reset the water filter status display and indicator
light by pressing and holding the LIGHT/FILTER
button for more than 3 seconds.
To purchase replacement water filter cartridges,
visit your local appliance dealer or parts distributor.
You can also call 1-800-243-0000 (USA) 1-888o542-
2623 (Canada).
The replacement water filter cartridge's part
number is 5231JA2006A.
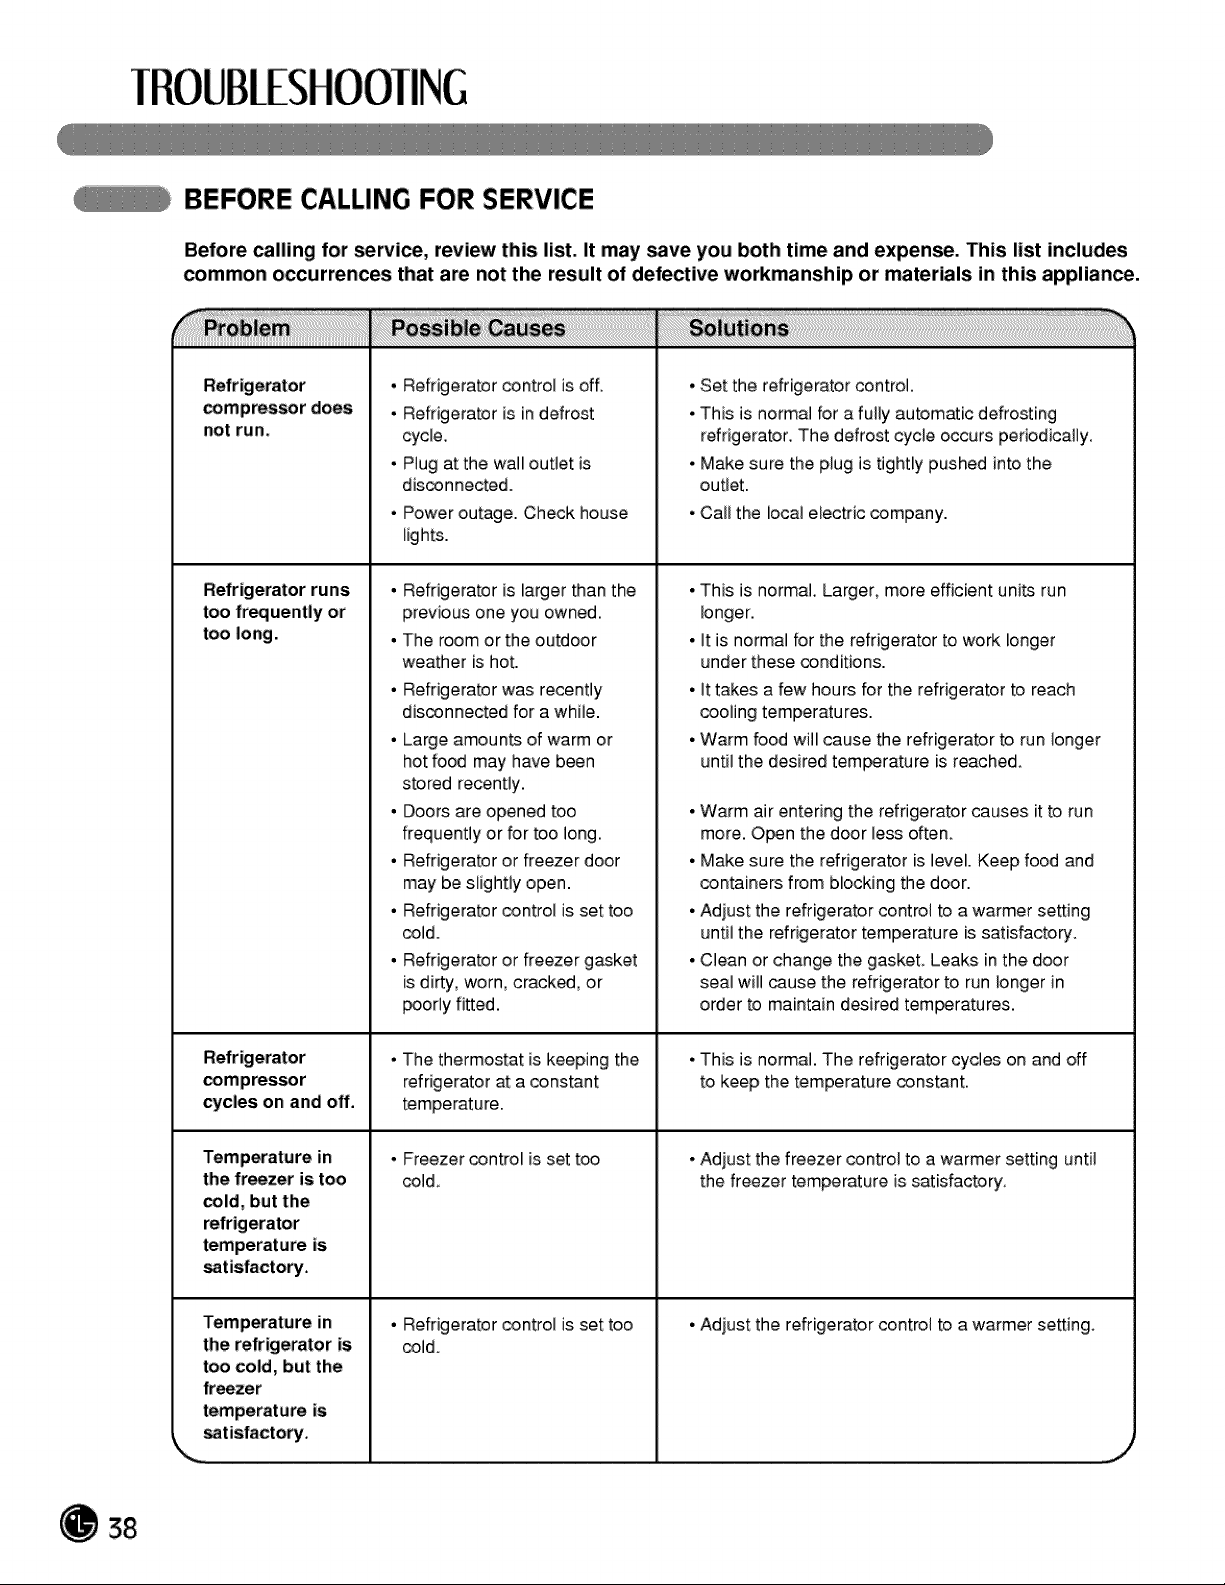
BEFORE CALLING FOR SERVICE
Before calling for service, review this list. It may _ve you both time and expense. This list includes
common occurrences that are not the result of defective workmanship or materials in this appliance.
compressor does
not run,
, Refrigerator control is off,
, Refrigerator is in defrost
cycle.
, Plug at the wall outlet is
disconnected.
o Power outage. Check house
lights.
• Set the refrigerator control.
• This is normal for a fully automatic defrosting
refrigerator. The defrost cycle occurs periodically.
• Make sure the plug is tightly pushed into the
outlet.
• Call the local electric company.
Refrigerator runs
too frequently or
too long,
, Refrigerator is larger than the
previous one you owned.
, The room or the outdoor
weather is hot.
o Refrigerator was recently
disconnected for a while.
o Large amounts of warm or
hot food may have been
stored recently.
, Doors are opened too
frequently or for too long.
o Refrigerator or freezer door
may be slightly open.
o Refrigerator control is set too
cold.
, Refrigerator or freezer gasket
is dirty, worn, erack_, or
_ody fitted.
• This is normal. Larger, more efficient units run
longer.
• It is normal for the refrigerator to work longer
under these conditions.
• It takes a few hours for the refrigerator to reach
cooling temperatures.
• Warm food will cause the refrigerator to run longer
until the desired tem_rature is reached,
• Warm air entering the refrigerator causes it to run
more. O_n the door less often.
• Make sure the refrigerator is level. Keep food and
containers from blocking the door.
• Adjust the refrigerator control to a warmer seeing
until the refrigerator temperature is satisfactory.
• Clean or change the gasket Leaks in the door
seal will _use the refrigerator to run longer in
order to maintain desired tem_ratures.
o The thermostat is keeping the • This is normal. The refrigerator cycles on and off
compressor refrigerator at a consent to keep the temperature consent.
cycles on and off. temperature.
Temperature in . Freezer control is set too • Adjust the freezer control to a warmer setting until
the freezer is too cold,, the freezer temperature is satisfactory,
cold, but the
temperature is
Temperature in o Refrigerator control is set too • Adjust the refrigerator control to a warmer setting.
the refrigerator is cold.
too cold, but the
freezer
temperature is
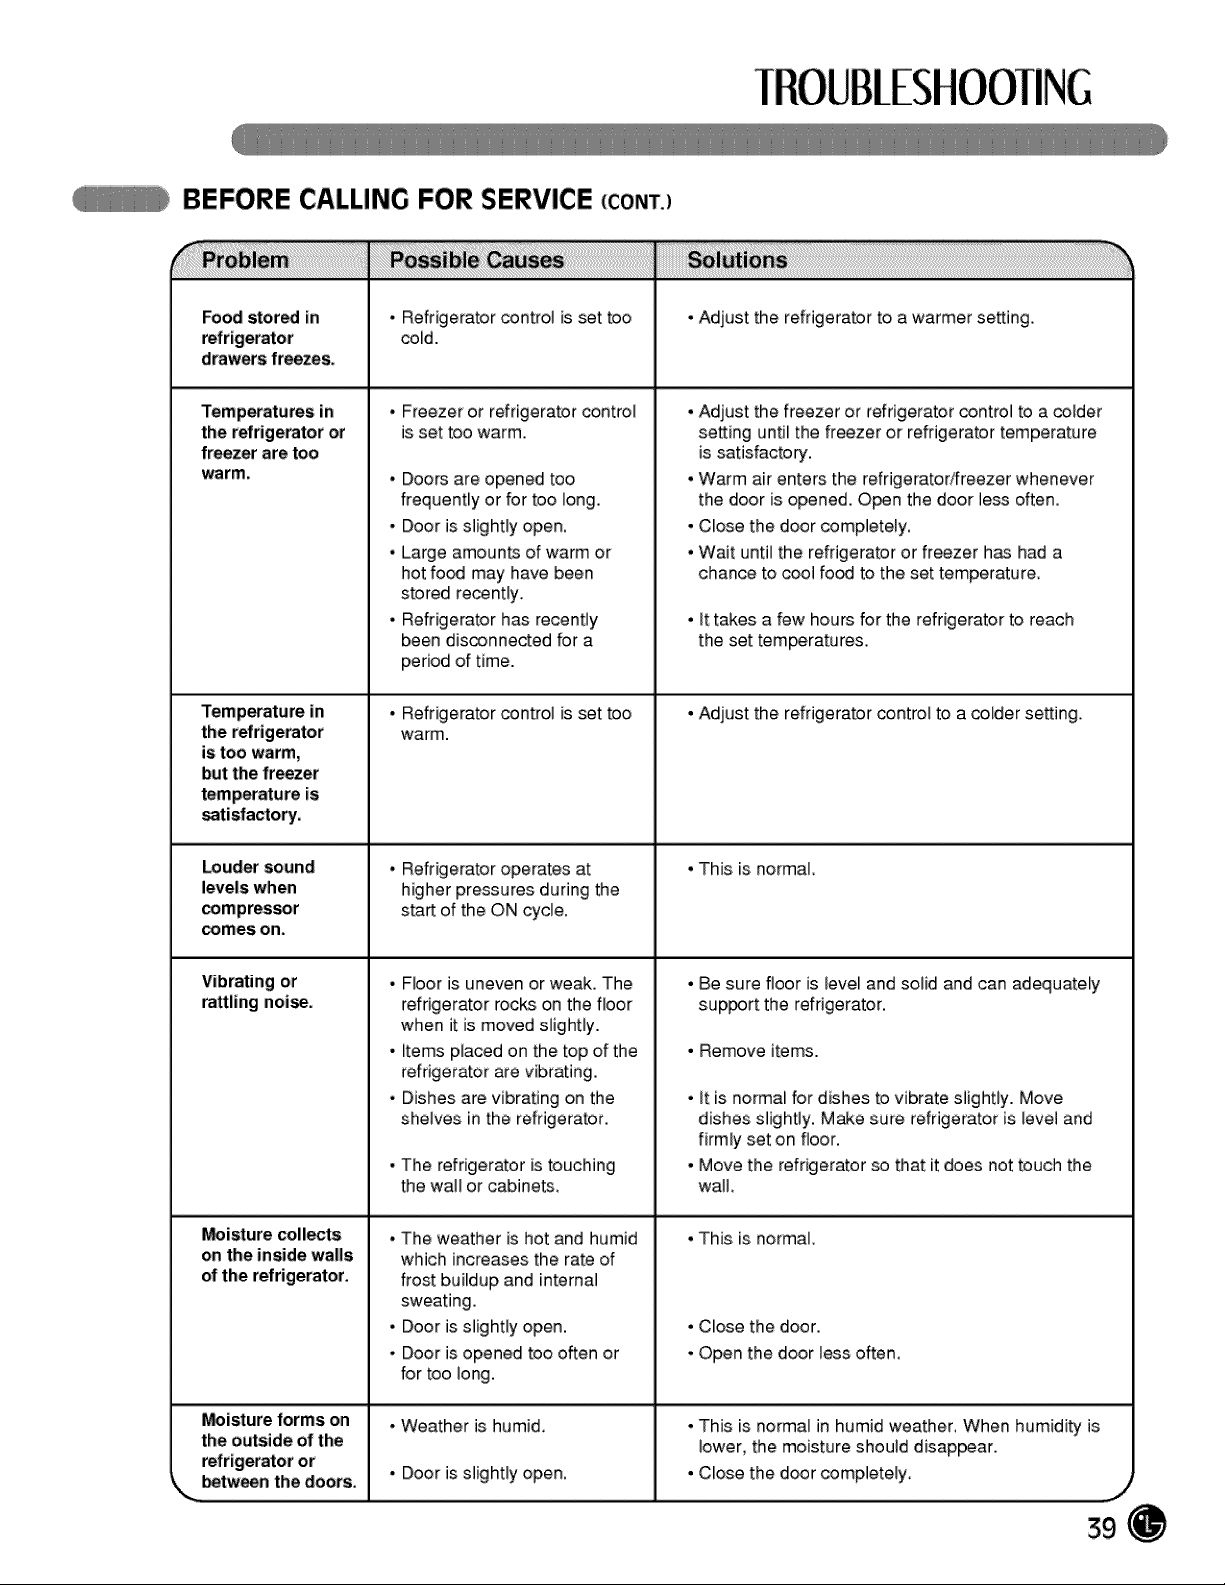
BEFORE CALLING FOR SERVICE (CONT.)
Food stored in • Refrigerator control is set too , Adjust the refrigerator to a warmer setting_
cold.
drawers freezes,
Temperaturesin
the refrigeratoror
freezer are too
warm.
• Freezer or refrigerator control
is set too warm.
• Doors are opened too
frequently or for too long.
• Door is slightly open.
• Large amoun_ of warm or
hot fo_ may have been
stored recently.
• Refrigerator has recently
been disconnected for a
period of time.
, Adjust the freezer or refrigerator control to a colder
setting until the freezer or refrigerator temperature
is satisfactory.
, Warm air enters the refrigerator/freezer whenever
the door is opened. O_n the door less often.
, Close the door completely.
, Wait until the refrigerator or freezer h_ had a
chance to cool fo_ to the set temperature
* It takes a few hours for the refrigerator to reach
the set temperatures,
• Refrigerator control is set too , Adjust the refrigerator control to a colder setting_
the refrigerator warm.
is too warm,
but the freezer
temperature is
Louder sound • Refrigerator operates at , This is normal.
levels when higher pressures during the
compressor s_rt of the ON cycle.
comes on,
Vibrating or
rattling nolo.
_isture coll_ts
on the inside walls
• Floor is uneven or weak. The
refrigerator rocks on the floor
when it is moved slightly.
• Items placed on the top of the
refrigerator are vibrating
• Dishes are vibrating on the
shelves in the refrigerator.
- The refrigerator is touching
the wall or cabinets.
* Be sure floor is level and solid and can adequateiy
sup_rt the refrigerator.
, Remove items.
, It is normal for dishes to vibrate slightly. Move
dishes slightly. Make sure refrigerator is level and
firmly set on floor.
- Move the refrigerator so that it does not touch the
wall.
the o_side of the
• The weather is hot and humid
which increases the rate of
frost buildup and internal
sweating.
• Door is slightly open.
- Door is opened too often or
for too long.
• Door is slightly open.
, This is normal,
, Close the door.
- Open the door less often,
, This is normal in humid weather, When humidity is
lower, the moisture should disappear.
, Close the door completely,
J
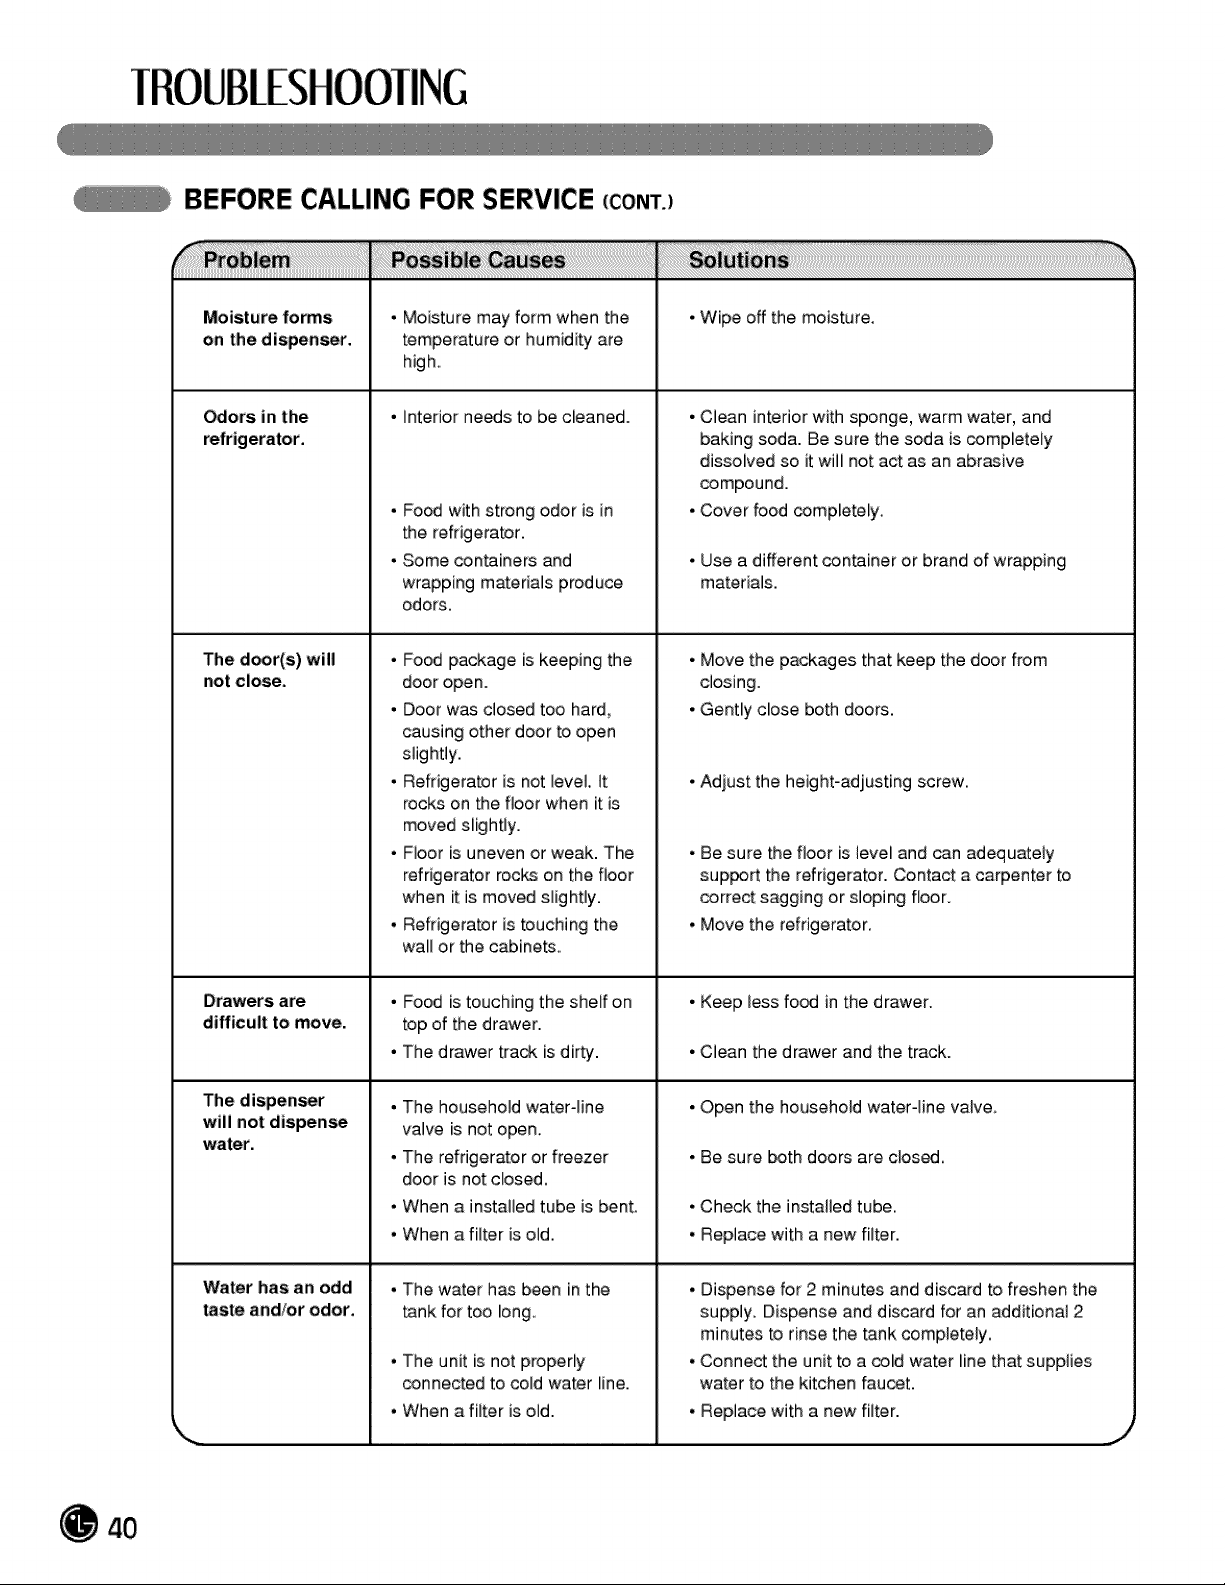
BEFORE CALLING FOR SERVICE (CONT.)
Moisture forms , Moisture may form when the • Wipe off the moisture.
on the dispen_r, temperature or humidity are
high,,
Odors in the , Interior needs to be cleaned.
, Food with strong odor is in
the refrigerator.
, Some containers and
wrapping materials produce
odors,
• Clean interior with sponge, warm water, and
baking soda. Be sure the soda is completeiy
dissolved so it will not act as an abr_ive
compound.
• Cover food completely,
• Use a different container or brand of wrapping
materials.
The d_r(s) will , Food package is keeping the • Move the packages that keep the door from
not close, door open. dosing.
, Door was closed too hard, • Gently close both doors.
causing other door to open
slightly.
, Refrigerator is not level, It • Adjust the height=adjusting screw.
rocks on the floor when it is
moved slightly.
• Floor is uneven or weak. The • Be sure the floor is level and can adequately
refrigerator roc_ on the floor support the refrigerator. Contact a carpenter to
when it is moved slightly, correct sagging or sloping floor.
, Refrigerator is touching the • Move the refrigerator.
wall or the cabine_.
Drawers are * Food is touching the shelf on • Keep less fo_ in the drawer.
difficult to move, top of the drawer.
• The drawer track is dirty. • Clean the drawer and the track.
The dispen_r
will not dispense
water.
, The household water-line
valve is not open.
, The refrigerator or freezer
door is not closed.
, When a installed tube is bent.
, When a filter is old.
• Open the household water-line valve,
• Be sure _th doors are dosed.
• Check the installed tube.
• Replace with a new filter.
Water has an odd
_ste and/or odor,
, The water has been in the
_nk for too Iong.
, The unit is not properly
connected to cold water line.
* When a filter is old.
• Dispense for 2 minutes and discard to freshen the
supply. Dispense and discard for an additional 2
minutes to rinse the tank completely.
• Connect the unit to a cold water line that supplies
water to the kitchen faucet.
• Replace with a new filter.
4O
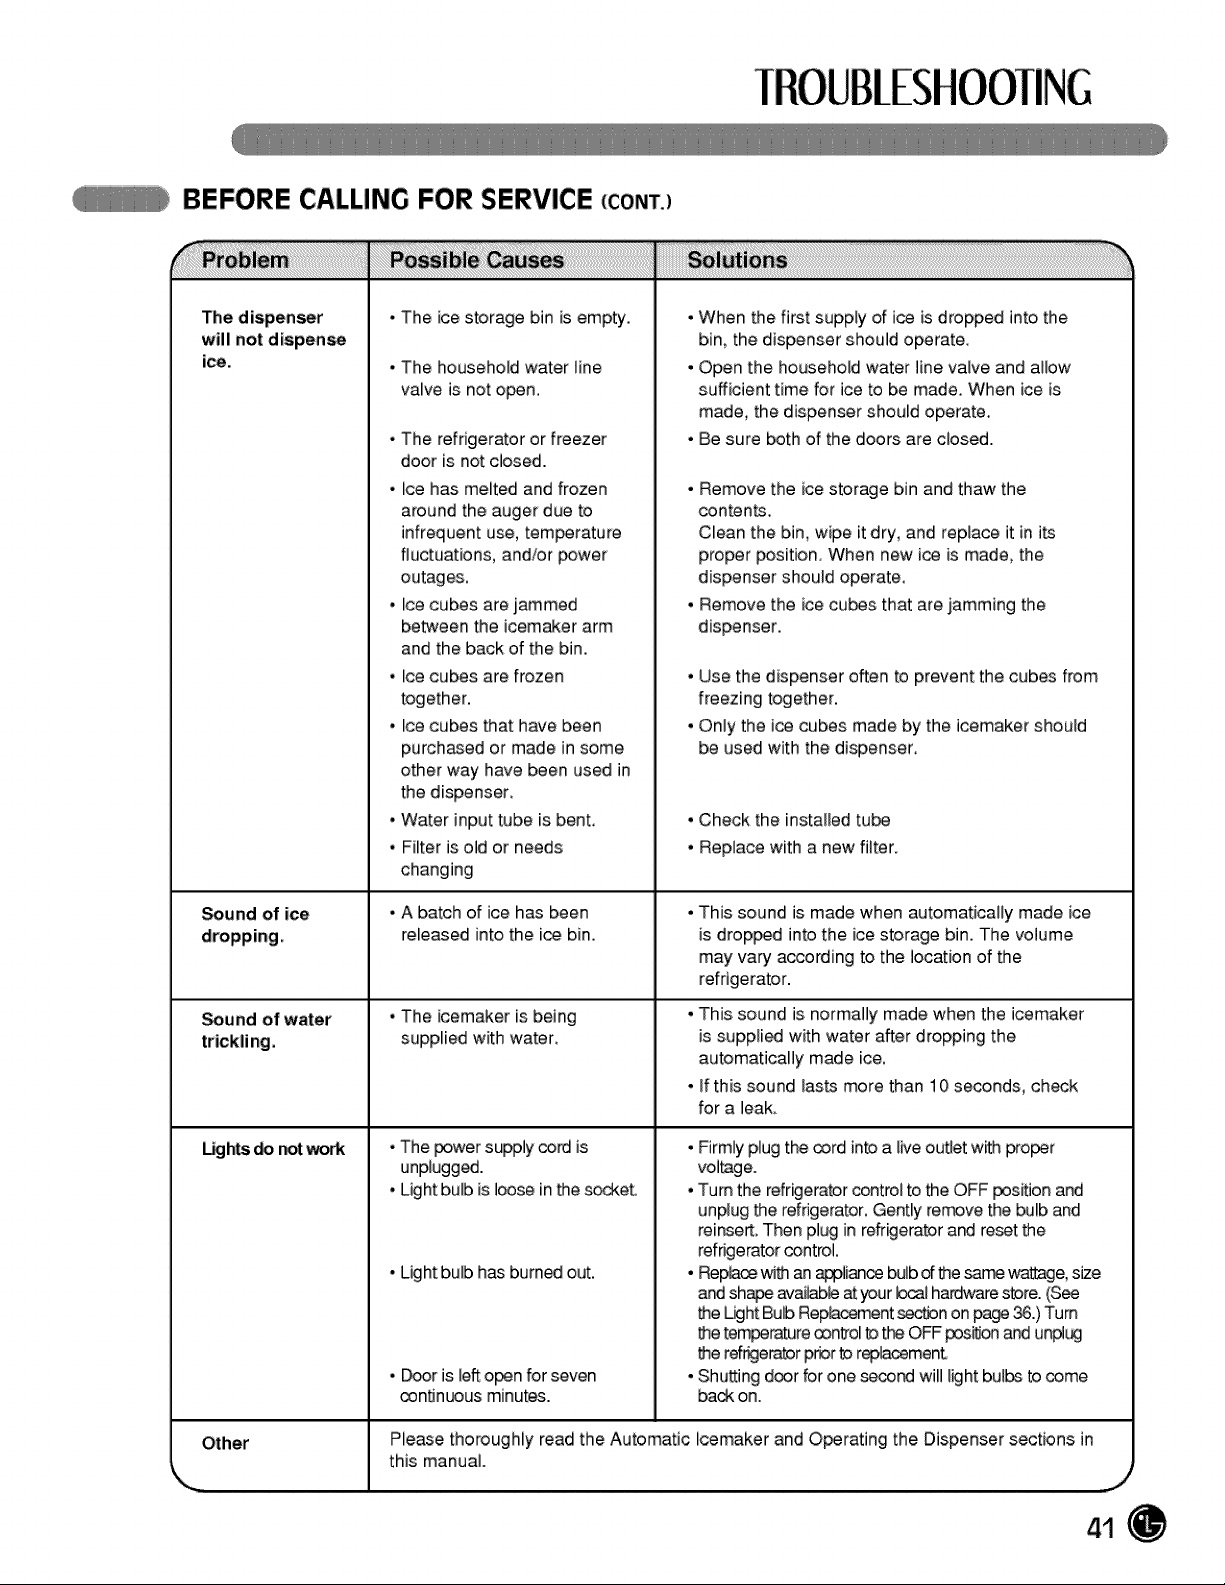
BEFORE CALLING FOR SERVICE (CONT.)
The dispenser
will not dispen_
ice,
• The ice storage bin is empty.
• The household water line
valve is not o_n.
* The refrigerator or freezer
door is not closed.
* Ice has melted and frozen
around the auger due to
infrequent use, tem_rature
fluctuations, and/or _wer
outages.
, Ice cubes are jammed
between the icemaker arm
and the back of the bin.
* Ice cubes are frozen
together.
, Ice cubes that have been
purch_ed or made in some
other way have been used in
the dispenser.
, Water input tube is bent,
, Filter is old or needs
changing
, When the first supply of ice is dropped into the
bin, the dispenser should operate
, Open the household water line valve and aIIow
sufficient time for ice to be made When ice is
made, the dispenser should operate.
, Be sure both of the doors are closed.
, Remove the ice storage bin and thaw the
contents,
Clean the bin, wipe it dry, and replace it in its
proper _sition When new ice is made, the
dispenser should operate.
, Remove the ice cu_s that are jamming the
dispenser.
, Use the dispenser often to prevent the cubes from
freezing together.
, Only the ice cubes made by the icemaker should
be used with the dispenser.
, Check the installed tu_
, Replace with a new filter.
Sound of ice • A batch of ice has been * This sound is made when automatically made ice
released into the ice bin. is drop_d into the ice storage bin. The volume
may vary according to the location of the
refrigerator.
Sound of water • The [cemaker is being . This sound is normally made when the icemaker
trickling, supplied with water, is suppl[_ with water after dropping the
automatically made ice.
, If this sound lasts more than 10 seconds, check
for a leak.
_hts_ _
* The power supply co_d is
unplugged.
, Light bulb is loose in the s_et
• Light bulb has burned out.
• Dm_ris left open for seven
continuous minutes.
Ple_e thoroughly read the Automatic
this manual.
Other
, Firmly plug the cord into a live outlet with pro_r
voltage.
* Turn the refrk]erator control to the OFF position and
unplug the refrigerator. Gently rerr_ve the bub and
reir_serL Then plug in refr_erator ar_ reset the
refrigerator control,
, Rep_e _th an _is_e bulb of the sar¢_ wattage, size
a_ sh_ avai#3b_at your _1 hardware store. (S_
the Lk3htBub Rep_.,'ement section on pa_ _.) Turn
the tem_rature control to the OFF posi'_ and unpt[O
the refrigerator_r to rep_..ement.
, Shutting door for one _cer_ will light bulbs to come
back on.
Icemaker and Q_rating the Dispenser sections in
J
41
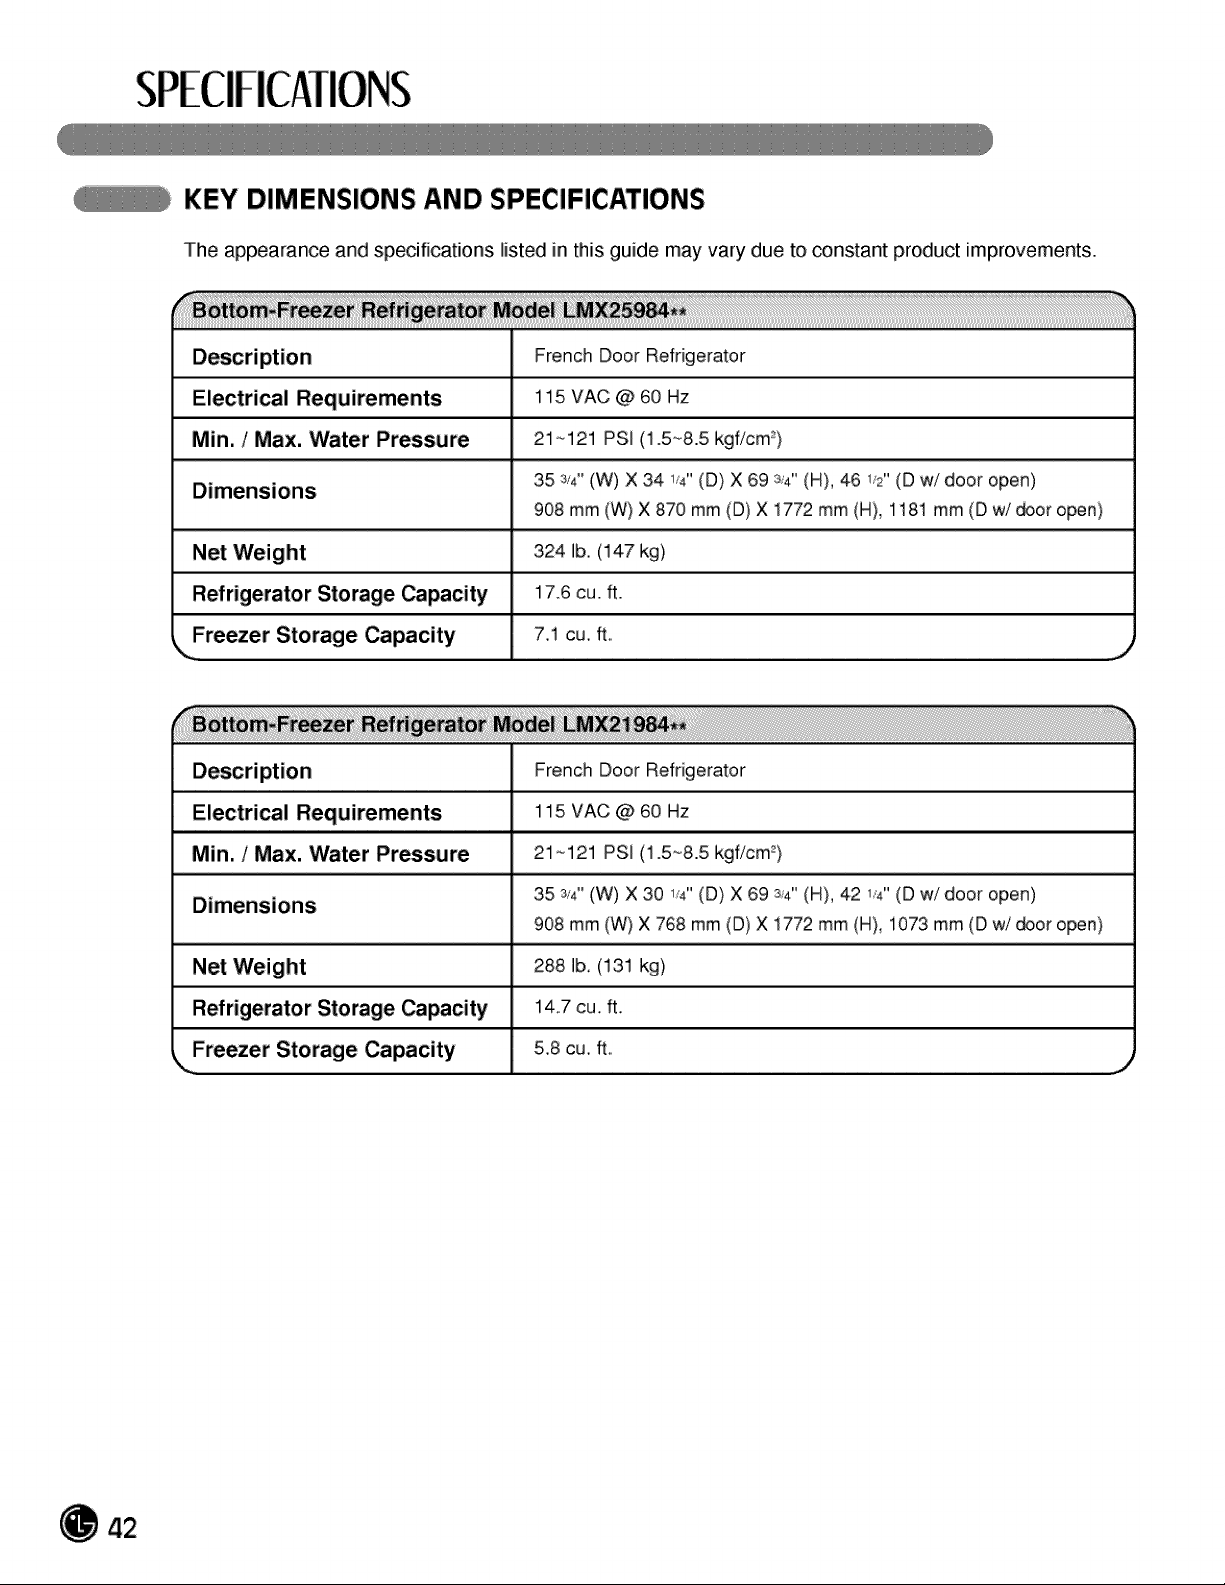
KEY DIMENSIONS AND SPECIFICATIONS
The appearance and specifications listed in this guide may vary due to constant product improvements.
French Door Refrigerator
Electrical Requirements 115 VAC @ 6OHz
Min. / Max. Water Pressure 21~121 PSi (1.5_8.5 kgf/cm=)
35 3_4"(W) X 34 W' (D) X 89 3J4"(H), 46 1,_2"(D w/door open)
Dimensions
908 mm (W) X 870 mm (D) X 1772 mm (H), 1181 mm (D w/_or open)
Net Weight 324 lb. (147 kg)
Refrigerator Storage Capacity 17.6 cu. ft.
Freezer Storage Capacity 7,1 cu, fL
J
French Door Refrigerator
Electri_l Requirements 115 VAC @ 6OHz
, = ,
Min. / Max. Water Pressure 21 ~121 PSi (1.5"48.5 kgf/cm _)
r3 " 1 " 3 " 1' (D w/ door open)o 4 (W) X30 _4 (U) X 69 _4 (H), 42 ,4
908 mm (W) X 768 mm (D) X i772 mm (H), i073 mm (D w/_or open)
Net Weight 288 ibm,(131 kg)
Refrigerator Storage Capacity 14,7 cu, fl,
Freezer Storage Capacity 5,8 cu, ft,
,. j
Should your LG Refrigerator ("Product") fail due to a defect in materials orworkmanship under normal home use, during the warranty period
set forth below, LGwill at its option repair or replace the product. This limitedwarranty is valid only to the original retail purchaser of the
product and applies only when purchased and used within the United States including U.S. Territories. Proof of original retail purchase is
required to obtain warranty service under this limited warranty.
WARRANTY PERIOD
Refrigerator Sealed System (Compressor, Condenser, Dryer, Connecting Tube and Evaporator)
One (1) year from the date of original One (1) year from the date of original Seven (7) years from the date of original
retail purchase retail purchase retail purchase
Parts and Labor Parts and Labor Parts only
(internal/functional parts only) (Consumer will be charged for labor)
• Replacement products and parts are warranted for the remaining portion of the original warranty period or ninety (90) days, whichever is
greater.
• Replacement products and parts may be new or remanufactured.
THIS WARRANTY IS IN LIEU OF ANY OTHER WARRANTY, EXPRESS OR IMPLIED, INCLUDING WITHOUT LIMITATION, ANY
WARRANTY OF MERCHANTABILITY OR FITNESS FOR A PARTICULAR PURPOSE. TO THE EXTENT ANY IMPLIED
WARRANTY IS REQUIRED BY LAW, IT IS LIMITED IN DURATION TO THE EXPRESS WARRANTY PERIOD ABOVE. NEITHER
THE MANUFACTURER NOR ITS U.S. DISTRIBUTOR SHALL BE LIABLE FOR ANY INCIDENTAL, CONSEQUENTIAL, INDIRECT,
SPECIAL, OR PUNITIVE DAMAGES OF ANY NATURE, INCLUDING WITHOUT LIMITATION, LOST REVENUES OR PROFITS, OR
ANY OTHER DAMAGE WHETHER BASED IN CONTRACT, TORT, OR OTHERWISE. Some states do not allow the exclusion or
limitation of incidental or consequential damages or limitations on how long an implied warranty lasts, so the above exclusion or limitation
may not apply to you. This warranty gives you specific legal rights and you may also have other rights that vary from state to state.
THIS LIMITED WARRANTY DOES NOT COVER:
1. Service trips to deliver, pick up, install,or repair the product; instructthe
customer on operation of the product; repair or replace fuses or correct
wiring or plumbing, or correction of unauthorized repairs/installation.
2. Failure of product to perform during power failures and interruptions or
inadequate electrical service.
3. Damage caused by leaky or broken water pipes, frozen water pipes,
restricted drain lines, inadequate or interrupted water supply or
inadequate supply of air.
4. Damage resulting from operating the product in a corrosive atmosphere
or contrary to the instructions outlined in the product owner's manual.
5. Damage to the product caused by accidents, pests and vermin,
lightning,wind, fire, floods, or acts of God.
6. Damage resulting from misuse, abuse, improper installation, repair, or
maintenance. Improper repair includes use of parts not approved or
specified by LG.
7. Damage or failure caused by unauthorized modification or alteration, or
if it is used for other than the intended purpose, or any water leakage
where the unit was not properly installed.
8. Damage or failure caused by incorrect electrical current, voltage, or
plumbing codes, commercial or industrial use, or use of accessories,
components, or consumable cleaning products that are not approved
by LG.
9. Damage caused by transportation and handling, including scratches,
dents, chips, and/or other damage to the finish of your product, unless
such damage results from defects in materials or workmanship and is
reported within one (1) week of delivery (Call: 1-800-243-0000).
10. Damage or missing items to any display, open box, discounted, or
refurbished product.
11. Products with original serial numbers that have been removed, altered,
or can not be readily determined. Model and Serial numbers, along with
original retail sales receipt, are required for warranty validation.
12. Increases in utility costs and additional utility expenses.
13. Replacement of light bulbs, filters, or any consumable parts.
14. Repairs when your product is used in other than normal and usual
household use (e.g. commercial use, offices, and recreational facilities)
or contrary to the instructions outlined inthe product owner's manual.
15. Costs associated with removal of your product from your home for
repairs.
16. The removal and reinstallation of the product if it is installed in an
inaccessible location or is not installed in accordance with published
installation instructions, including LG's owner's and installation manuals.
17. Shelves, door bins, drawers, handles, accessories, and other parts
besides,_thosethat were originally included with this particular model.
The cost of repair or replacement under these excluded circumstances shall be borne by the consumer.
For complete warranty details and customer assistance,
please call or visit our website:
Call 1-800-243-0000 (24 hours a day, 365 days a year) and select the appropriate
option from the menu, or visit our website at http://us.lgservice.com
Or by mail: LG Customer InformationCenter:
P. O. Box 240007, 201 James Record Road Huntsville, Alabama 35813
ATTN: CIC
Write your warranty information below:
Product Registration Information:
Model:
Serial Number:
Date of Purchase:
43
WARRANTY: Should your LG Refrigerator ("Product") fail due to a defect in materialor workmanship under normal home use during the
warranty period set forth below, LG Canada will at its option repair or replace the Product upon receipt of proof of original retail purchase.
This warranty is valid only to the original retail purchaser of the product and applies only to a Product distributed in Canada by LG Canada or
an authorized Canadian distributor thereof. The warranty only applies to Products located and used within Canada.
WARRANTY PERIOD: (Note: If the original date of purchase can not be verified,
the warranty will begin sixty (60) days from the date of manufacture)
Refrigerator/Freezer Sealed System (Compressor, Condenser, Dryer, Connecting Tube and Evaporator)
One (1) year from the date of original One (1) year from the date of original Seven (7) years from the date of original
retail purchase retail purchase retail purchase
Parts and Labor Parts and Labor Parts only
(internal/functional parts only) (Consumer will be charged for labor)
• Replacementproductsandpartsarewarrantedforthe remainingportionof theoriginalwarrantyperiodorninety(90)days,whicheveris greater.
• Replacementproductsandpartsmaybe neworremanufactured.
• LGAuthorizedServiceCenterwarrantiestheirrepairworkbr thirty(30)days.
LGCANADA'SSOLE LIABILITYIS LIMITEDTO THEWARRANTYSETOUTABOVE.EXCEPTAS EXPRESSLYPROVIDEDABOVE,LG
CANADAMAKESNOANDHEREBYDISCLAIMSALL OTHERWARRANTIESAND CONDITIONSRESPECTINGTHEPRODUCT,WHETHER
EXPRESSORIMPLIED,INCLUDING,BUTNOTLIMITEDTO,ANYIMPLIEDWARRANTYOR CONDITIONOFMERCHANTABILITYOR FITNESS
FORA PARTICULARPURPOSE,AND NOREPRESENTATIONSSHALL BEBINDINGON LG CANADA.LGCANADADOESNOTAUTHORIZE
ANY PERSONTO CREATEORASSUMEFORIT ANYOTHERWARRANTYOBLIGATIONOR LIABILITYINCONNECTIONWITHTHE
PRODUCT.TO THE EXTENTTHATANYWARRANTYORCONDITIONIS IMPLIEDBYLAW, ITIS LIMITEDTO THEEXPRESSWARRANTY
PERIODABOVE.LGCANADA,THEMANUFACTUREROR DISTRIBUTORSHALL NOT BELIABLEFORANY INCIDENTAL,CONSEQUENTIAL,
SPECIAL,DIRECTORINDIRECTDAMAGES,LOSSOFGOODWILL,LOSTPROFITS,PUNITIVEOR EXEMPLARYDAMAGESORANY OTHER
DAMAGE,WHETHERARISINGDIRECTLYORINDIRECTLYFROMANYCONTRACTUALBREACH,FUNDAMENTALOR OTHERWISE,OR
FROMANYACTSOROMISSIONS,TORT,OROTHERWISE.Thiswarrantygivesyouspecificlegalrights.Youmayhaveotherrightswhichmayvary
fromprovinceto provincedependingonapplicableprovinciallaws.Anytermof thiswarrantythat negatesorvariesanyimpliedconditionor warranty
underprovinciallaw isseverablewhereit conflictswith provinciallawwithoutaffectingthe remainderofthiswarranty'sterms.
THIS LIMITED WARRANTY DOES NOT COVER:
1. Servicetripstodeliver,pickup,or installtheproduct;instructinga customeron
operationof theproduct;repairor replacementof fusesorcorrectionofwiringor
plumbing,or correctionof unauthorizedrepairs/installation.
2. Failureof theproductto performduringpowerfailuresandinterruptionsor
inadequateelectricalservice.
3. Damagecausedby leakyor brokenwater pipes,frozenwaterpipes,restricted
drainlines,inadequateor interruptedwatersupplyor inadequatesupplyof air.
4. DamageresultingfromoperatingtheProductina corrosiveatmosphereor
contraryto the instructionsoutlinedinthe Productowner'smanual.
5. Damageto the Productcausedbyaccidents,pestsandvermin,lightning,wind,
fire,floods,oractsof God.
6. Damageresultingfromthemisuse,abuse,improperinstallation,repair,or
maintenanceofthe Product. Improperrepairincludesuse of partsnot approved
or specifiedby LGCanada.
7. Damageor productfailurecausedbyunauthorizedmodificationoralteration,or
use forotherthan itsintendedpurpose,or resultingfromany waterleakagedue
to improperinstallation.
8. Damageor Productfailurecausedbyincorrectelectricalcurrent,voltage,or
plumbingcodes,commercialor industrialuse, or use of accessories,
components,or cleaningproductsthatare notapprovedby LGCanada.
9. Damagecausedbytransportationandhandling,includingscratches,dents,
chips,and/orotherdamageto thefinishof yourproduct,unlesssuchdamage
resultsfromdefectsinmaterialsor workmanshipandis reportedwithinone(1)
weekof delivery.
10. Damageormissingitemsto any display,openbox, discounted,or refurbished
Product.
11. Productswithoriginalserialnumbersthathavebeenremoved,altered,or
cannotbe readilydetermined.ModelandSerialnumbers,alongwith original
retailsalesreceipt,are requiredforwarrantyvalidation.
12. Increasesin utilitycostsandadditionalutilityexpenses.
13. Replacementof lightbulbs,filters,orany consumableparts.
14. Repairswhenyour Productis usedinotherthan normaland usualhousehold
use (including,withoutlimitation,commercialuse,in officesor recreational
facilities)or contraryto the instructionsoutlinedintheProductowner'smanual.
15. Costsassociatedwithremovalof theProductfromyourhomefor repairs.
16. The removaland reinstallationof the Productifit is installedin an inaccessible
locationoris not installedinaccordancewithpublishedinstallationinstructions,
includingthe Productowner'sandinstallationmanuals.
17. Shelves,doorbins,drawers,handles,andaccessoriestothe Product.Also
excludedare partsbesidesthosethatwereoriginallyincludedwiththe Product.
All costs associated with the above excluded circumstances shall be borne by the consumer.
For complete warranty details and
customer assistance, please call or visit
our website: Call 1-888-542-2623 (24 hours
a day, 365 days a year) and select the
appropriate option from the menu, or visitour
website at http://www.lg.ca
O 44
Write your warranty information below:
Product Registration Information:
Model:
Date of Purchase:
Serial Number:


P/No. MFL37933582