Loading ...
Loading ...
Loading ...
- 8 -
05/2020
Copyright © 2020, Fast ČR, a.s.
EN
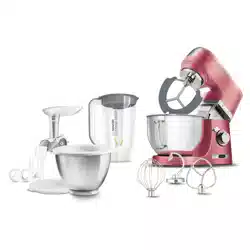
Food Processor
User'smanual
■ Prior to using this appliance, please read the user’smanual thoroughly, even if you
already have experience in using similar appliances. Only use the appliance in the
manner described in this user’smanual. Keep this user’smanual in asafe place
where it can be easily retrieved for future use.
■ We recommend saving the original cardboard box, packaging material, purchase
receipt and responsibility statement of the vendor or warranty card for at least the
duration of the legal liability for unsatisfactory performance or quality. In the event
of transportation, we recommend that you pack the appliance in the original box
from the manufacturer.
DESCRIPTION OF THE APPLIANCE AND ACCESSORIES
A1 Button for releasing the meat
grinder from the front attachment
hub
A2 Removable cover of the front meat
grinder attachment hub
A3 A-shaped beater
A4 Balloon whisk
A5 Kneading hook
A6 Elastic A-shaped beater
A7 Removable cover of the top blender
attachment hub
A8 Tilt-out multi-function head
A9 Attachment hub for attaching
attachments A3-A6
A10 Transparent bowl cover with ahole
for adding ingredients
A11 4.5-litre stainless steel bowl with
handle
A12 Base unit
A13 Speed control knob serves to
variably set the speed level
MIN-1-2-3-4-5-6-MAX, sets the pulse
level
(PULSE) and turns the appliance off
(OFF).
A14 Multi-function head release lock
A15 Minus „-” button for decreasing time
A16 Plus „+” button for increasing time
A17 Display
A18 Start/Pause button
A19 Anti-slip feet for stability of the
appliance during operation
A20 3-litre stainless steel bowl without
handles
A21 Lid serves to close the stainless steel
bowl A11 for short term storage of
processed ingredients.
DESCRIPTION OF MEAT GRINDER ACCESSORIES
B1 Pusher
B2 Stainless steel hopper
B3 Feed tube
B4 Grinding chamber
B5 Screw shaft
B6 Grinding blade
B7 Screw ring
B8 Fine grinding plate
B9 Medium fine grinding plate
B10 Coarse grinding plate
B11 Separator
B12 Sausage stuffer attachment
B13 Moulder
B14 Conical attachment
B15 Cookie maker
B16 Cookie maker holder
Note:
Parts B11–B14 are contained inside the pusher B1.
Certain models are only equipped with afine and coarse grinding disc B8
and B10.
DESCRIPTION OF THE BLENDER ACCESSORIES
C1 Inner cap of the blending jar
C2 Outer lid of the blending jar with
ahole for adding ingredients
C3 Handle
C4 1.5-litre Tritan blending jar with
titanium blades
C5 Cuff
C6 Blade assembly
BEFORE FIRST USE
1. Take the appliance and its accessories out of the packaging materials.
2. Thoroughly wash all accessory parts that are intended to come into contact with
food using warm water and aneutral kitchen detergent. Then rinse under clean
running water and thoroughly wipe dry with ane wiping cloth or allow them to
dry naturally. After washing and drying, we recommend to coat the grinding blade
B6 and the grinding plates B8–B10 with cooking oil.
3. Do not submerge the food processor or its power cord in water or any other liquids.
Attention:
The metal parts of the meat grinder and attachments A3–A6 are
not intended for washing in adishwasher. Other removable parts
may be washed in adishwasher.
BEATING, WHIPPING AND KNEADING
SELECTING ATTACHMENT TYPES
Attachment type Purpose of use
Beater A3 and A6
It is used for beating light and medium heavy yeast-free
doughs, for preparing sauces, creams, fillings, etc. Do not use it
for kneading heavy doughs.
Balloon whisk A4 It is used for whisking whole eggs or egg whites, whipped
cream, foamy creams, etc. Do not use it for beating or
kneading doughs.
Kneading hook A5 It is used for kneading various types of doughs including heavy
and thick doughs such as for example bread dough, pizza
dough, fresh pastry doughs, etc.
ASSEMBLING AND DISASSEMBLING THE FOOD PROCESSOR
■ Before you start assembling or disassembling the food processor, check that it is
turned o and disconnected from the el. power socket.
1. Inserting the bowl and attaching the cover
1.1 Place the food processor on an even, dry and stable surface, for example on
akitchen countertop.
1.2 Use the lock A14 to release the multi-function head A8 and tilt it out all the way.
After tilting out the multi-function head release the lock A14. Locking of the multi-
function head inthe top open position is indicated by the lock returning to the
default position, which is accompanied by an audible click.
1.3 Insert the stainless steel bowl A11 into the base unit A12 and secure it in place by
turning it clockwise. When the bowl is properly attached, it cannot be separately
lifted out of the base unit.
1.4 On to the bottom part of the multi-function head A8 with attachment hub A9,
slide the cover A10 so that the latches along the perimeter of the round opening
in the cover A10 slide into the grooves along the perimeter of the attachment hub
A9.
1.5 The lid A21 is used for covering the bowl A11 for short term storage of processed
ingredients.
2. Mounting attachments
2.1 When attaching an attachment, the multi-function head A7 must be locked in
the open position, see point 1.2 in the previous chapter. To attachment hub A8,
attach one of the attachments A3–A5 in such a way that the attachment hub
shaft A8 slides into the attachment. Push the attachment towards the attachment
hub A8 and turn it anticlockwise to secure it in place. Lightly pull the attachment
downwards with one hand to check that it is properly attached.
2.2 Place the ingredients that you wish to process into the bowl A11. Release the lock
A14 and tilt the multi-function head A8 to ahorizontal position. After tilting down
the multi-function head A7, release the lock A13. The locked status of the multi-
function head in the tilted down work position is indicated by the lock returning to
the default position. This is accompanied by an audible click.
3. Disassembly
3.1 Use the lock A14 to release the multi-function head A8 and tilt it out all the way.
After tilting out the multi-function head, release the lock. Locking of the multi-
function head inthe top open position is indicated by the lock returning to the
default position, which is accompanied by an audible click.
3.2 Push the attachment towards the attachment hub A9 and turn it clockwise to
release it, and then remove it. Turn the bowl A11 anticlockwise and remove it from
the base unit A12. Remove the cover A10 by pulling it downwards. Move the multi-
function head A8 back to the horizontal position.
USING THE FOOD PROCESSOR
1. Select the right type of attachment based on its intended use and assemble
the appliance according to the instructions in the chapter Assembling and
disassembling the appliance. Place the ingredients into the bowl A11.
Attention:
In asingle batch, it is possible to precess no more than 2.2 litres
of light dough or 0.8 litres of thick, heavy dough. The maximum
number of egg whites that can be whisked at once is 12. We
recommend that you do not ll the bowl A11 past the level of
the 3l mark. If an insucient amount of ingredients are put in the
bowl A11 (less than 0.3 litres of dough), then they may not be
optimally processed.
2. Make sure that the multi-function head A8 is tilted down in the horizontal working
position and that the speed control knob A13 is set to the OFF position. Connect
the power cord to apower socket.
3. Set the required speed using the speed control knob A13. Gradually turn the
speed control knob A13 clockwise to increase the speed, turning it in the opposite
direction will reduce the speed. To initially stir in the ingredients, rst set alower
speed and then adjust it as required. Electronic speed regulation ensures that the
set speed will be maintained under various loads. While it is running, ingredients
may be added into the bowl A11 through the hole in the cover A10.
4. The pulse mode is used for increasing the speed to maximum for ashort time. To
activate the pulse mode, turn the speed control knob A13 to the PULSE position
and to ensure continuous operation hold it down in this position. As soon as you
release the speed control knob A13, it will automatically return to the OFF position.
5. If it is necessary to wipe ingredients o the inside of the mixing bowl A11 and
the attachment, rst turn o the food processor by setting the speed control knob
A13 to the OFF position and then disconnect it from the power socket. Wait until
the rotating parts come to astop and only then scrape away the ingredients with
aspatula.
6. After you have nished using the appliance, set the speed control knob A13 to the
OFF position and disconnect the power cord from the power socket.
7. Wait until the rotating parts come to a stop and disassemble the food mixer
according to the instructions included in chapter Assembling and disassembling
the appliance. Use asoft plastic spatula to empty out the contents of the bowl A11.
8. Clean out the food processor after each use according to the instructions in
chapter Cleaning and maintenance.
LED LIGHT
■ The multi-function head A8 has aLED light that turns on automatically when the
food processor is connected to apower socket. The LED light turns o automatically
after 2.5 minutes of inactivity, i.e. when the appliance is not running or when the
speed is not set during this time. The LED light turns on again automatically when
the food processor is put into operation by the control knob A13 being set to
a desired speed level. DISPLAY
Loading ...
Loading ...
Loading ...