t_ .... _t_ ¸• . * .....
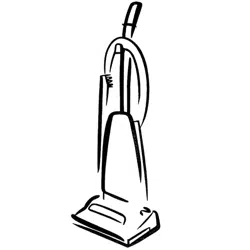
Vacuum Cleaner
0 WNER'SMAN UAL
READ THIS MANUAL for important safety,
assembly and operating instructions.
C_I ZAEXI _U_-437_O6]
WARRANTY ........................... 2
SERVICE ........................ 2
IMPORTANT SAFETYINSTRUCTIONS....... 3
PARTSAND FEATURES.................... 4-5
ASSEMBLY................... 6-7
USE ................................... 8
How to Start ............................. 8
Vacuuming Tips ......................... 9
Suggested Pile Height Settings ............ 9
Attachments ........................ 10
Attachment Use Chaff ............... t0
Performance Features ................... 11
HOW YOUR VACUUM WORKS ..........12
CANISTER CARE .........................12
Bag Changing .......................... 12
Motor Safety FilterCleaning ............... 13
Cleaning Exterior and Attachments ...... 13
POWER-MATE TM CARE ................. 14
Ught Bulb Changing ..................... 14
Belt Changlng and BrushCleaning ...... 14-15
BrushServicing..........................16
Brush Assembly ................ 16
TROUBLESHOOTING.................... 17
Proper assembly and safe use of your vacuum cleaner are your responsibilities.. Your cleaner is intend-
ed only for household user The cleaner should be stored in a dry, indoor area, Read fhls Owner's Manu-
al carefully for important use and safety inforrnation_
KENMORE VACUUM CLEANER
FULLONE-YEAR WARRANTY
When used for private household purposes, if wilhln
one year from the date of purchase, thls vacuum
cleaner fails due to a defect In mateaol or workmanship0
RETURN tT TO THE NEAREST SEARSSERVICE CENTER/
DEPARTMENT tN THE UNITED STATES.and Sears wli!
repair it free of charge
If this vacuum cleaner Isused for commercla! or rentai
purposes, the above warranty coverage applies for
only 90 days from the date of purchase.
Thls warranty gives you specific legal rights, and you
may also have other rights which vary from state to state
SEARS,ROEBUCKAND CO. D/B17WA,
Hoffman Estales,IL 60179
If you need service or paris, visit your nearest Sears
Service Center or the Service Depadment located at
most Sears Retalt Stores. They wit! be able to solve
your problem and supp#y any needed replacement
parts. Any service needed other than described In
this Owner's Manual should be done by a Sears
authorized service representative
How to Order Repair Parts
When requesting service or ordering pads, have the
following information available:
I. Canister model number and serial number,
2, POWER-MATE TM model number and serial number
3. Description of problem
4. Part number
5,,Name of part
6, Location of part - Canister or POWER-MATE_M
English Speaking:
To Cal! Toll Free For Service:
To Catl Toll Free For PaRs:
Spanish Speaking:
To CallToiiFree ForService:
To CallTollFree ForParis:
(1-B00-4-REPAIR)
(1-800-473-7247)
(1-80a-FaN-PART]
(1-800-366-7278)
(1-800-626-581I)
(1-800-659-7084)
TANTSAFETy'INSTRUCTIONS
WAR J NG............
To reduce the risk of fire, electrical shock, injury to persons or damage when using your
vacuum cleaner, follow basic safety precautions including the following:
Read this manual before assembfing or USing
your vacuum cleaner_
Use your cleaner only as described in this
manual. Use only with Sears recommended
attachments_
To reduce the risk of eIectrical shock - Do not
use outdoors or on wet surfaces_
Disconnect electrical supply before servicing
or cleaning out brush area Failure to do so
could result in electrical shock or brush
suddenly starting
Always turn cleaner off before connecting or
disconnecting the hose or POWER_MATETM
Always turn cleaner off before unplugging
Do hal unplug by pulling on cord, To unplug,
grasp the plug, not the cord,
Hold plug when rewinding onto cord reel Do
not allow plug to whip when rewinding
Do not use with damaged cord or plug If
cleaner is not working as It shoutd, has been
dropped, damaged, left outdoors, or dropped
into water, return It to a Sears Service
Center/Department
Do not pult or carry by cord, use cord as a
handfe, close door on cord, or pull cord
around sharp edges or corners. Do not run
cleaner over cord° Keep cord away from
heated surfaces
Do not leave cleaner when piugged in, Unplug
from outlet when not in use and before servicing
Do no! allow to be used as a toy. Close attention
Is necessary when used by or near children
Do not handle plug or cleaner with wet hands,
Do not operate cleaner with a punctured hose.
The hose on some models contains electrical
wires° Replace Ifcut or worn_ Avoid picking up
sharp objects
Do not put any objects Into openings,
Do not use with any opening blocked; keep
free of dust, lint, hair and anything that may
reduce air flow,
Keep hair, loose clothing, fingers, and all parts
of body away from openings and moving parts.
Do not use cleaner without dust bag!and or
filters In place° Afways change the dust bag
after vacuuming carpet cleaners or freshener,
powders and fine dust. These products clog
the bag, reduce airflow and can cause the
bag to burst_ Failure to change bag coutd
cause permanent damage to the cleaner.
Do not use the cleaner to pick up sharp hard
objects, sma!l toys, plns_ paper, et¢_They may
damage the cleaner or dust bag
Do not pick up anything that Is burning or
smoking, such as cigarettes, matches, or hot
ashes.
Do not use cleaner to pick up flammable or
combustible Ilqutds (gasoline. cleaning fluids,
perfumes, etc.], or use In areas where they
may be present, The fumes from these
substances can create a fire hazard or explosion
Useextra care when cleanfng on sfalrs,Do not
put on chairs, tables, etc Keep on floor_
You are responsible for making sure that your
vacuum cleaner Isnot used by anyone unable
to operate It properly
SAVE THESEINSTRUCtiONS
Proper assembly and safe use of your vacuum cleaner are your responsibilities.
Your cleaner is Intended only for household use.
Read this Owner's Manual carefully for important use and safety information.
TSAND FEATURES
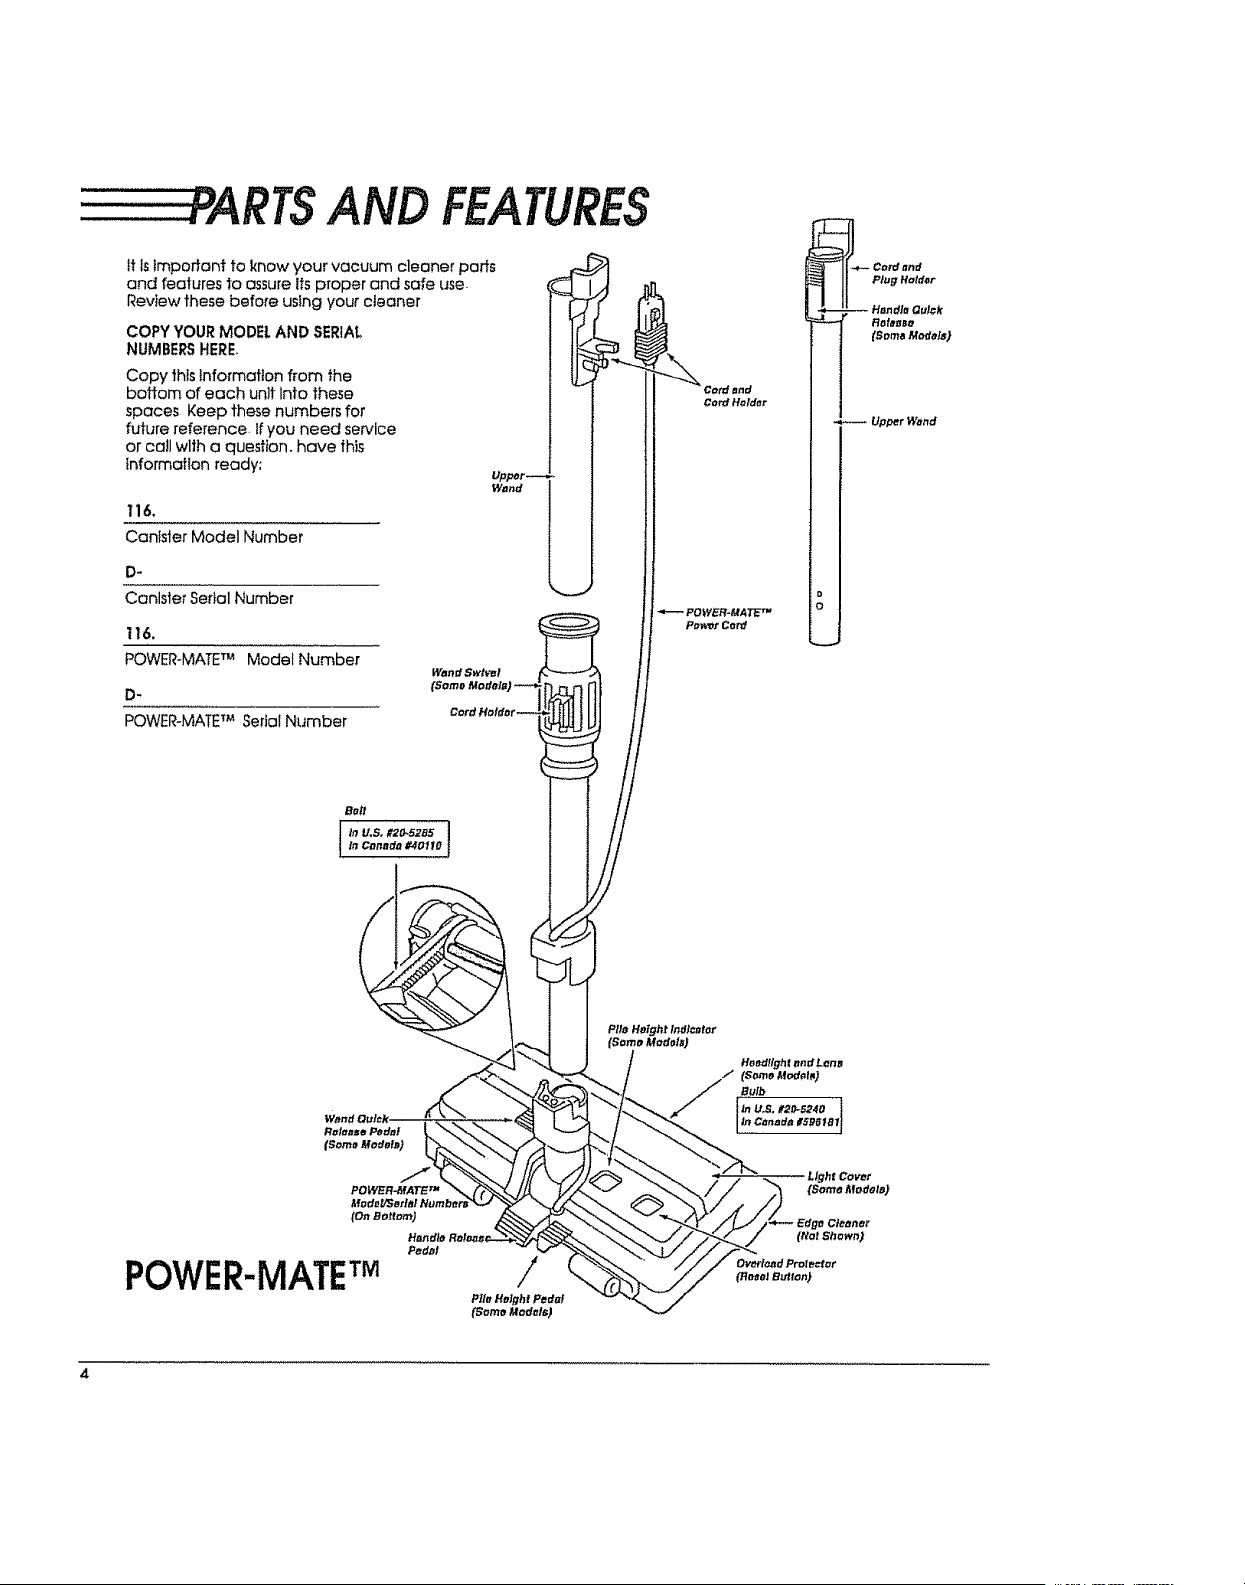
it isimporiant to know your vacuum cleaner pans
and features to assure its proper and safe use-
Review these before using your cleaner
COPYYOURMODEl,ANDSERIAL
NUMBERSHERE.
Copy this information from the
boffom of each unit Into these
spaces Keep these numbers for
future reference, if you need service
or call wlth a question, have this
Information ready:
116.
Canister Model Number
D-
Canister Seital Number
1t6,
POWER-MATETM Model Number
D-
POWER-MATETM Serial Number
Wand
_.- Cord and
Plug Harder
-- Handle Oulck
Releeeo
(Soma Models)
Upper Wand
4
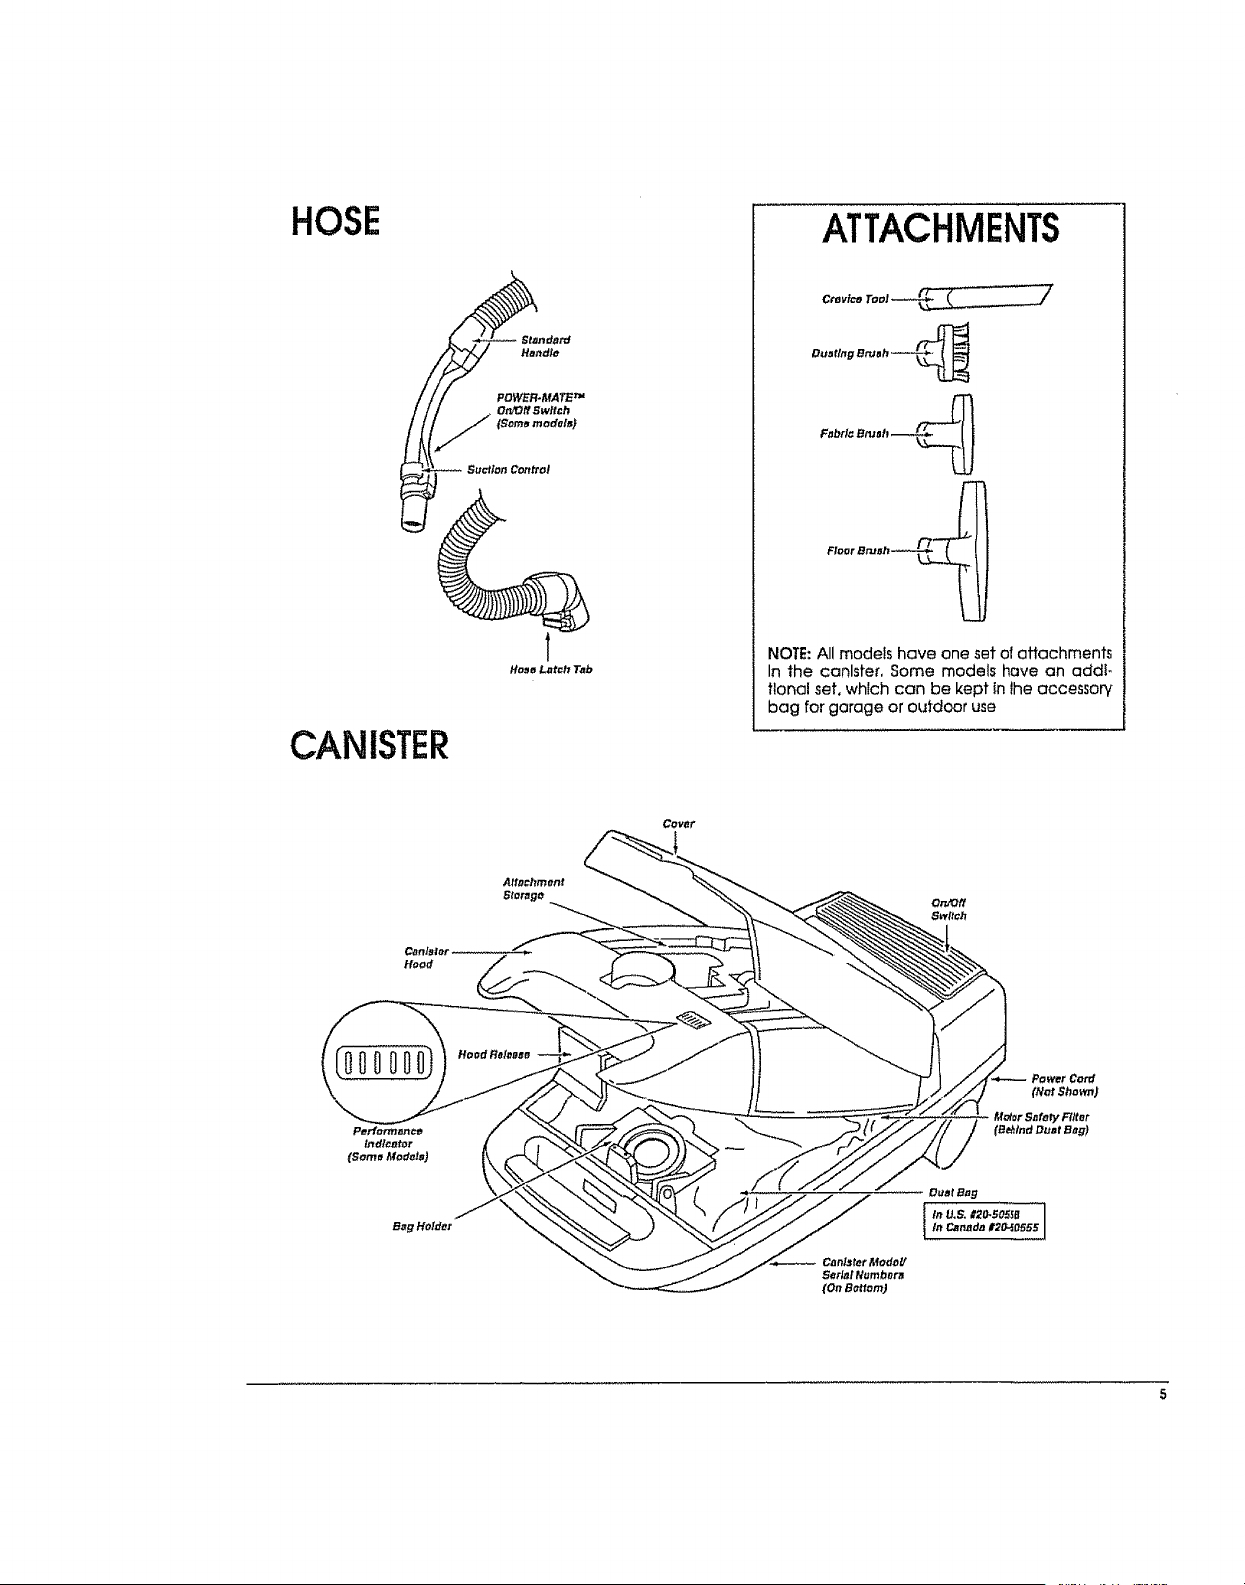
HOSE
CANISTER
ATTACHMENTS
Ouatlng Bru_h_..._._
Fobrl_Btuah __
Floor Bru_h.-_'__
NOTE: All models have one set of attachments
In the canister, Some models have an addi-
tional set, which can be kept in the accessory
bag for garage or oLddoor use
Covar
BagHolder
ASSEMBLY
Before assembling your vacuum cleaner, be sure you
have all pads shown In PARTS AND FEATURES,
WARNING
Electrical Shock Hazard
Do not plug Into elech_}cal supply unlll assembly Is
complete.. Fallu_e to do so could result In electrical
shock or In}ury.
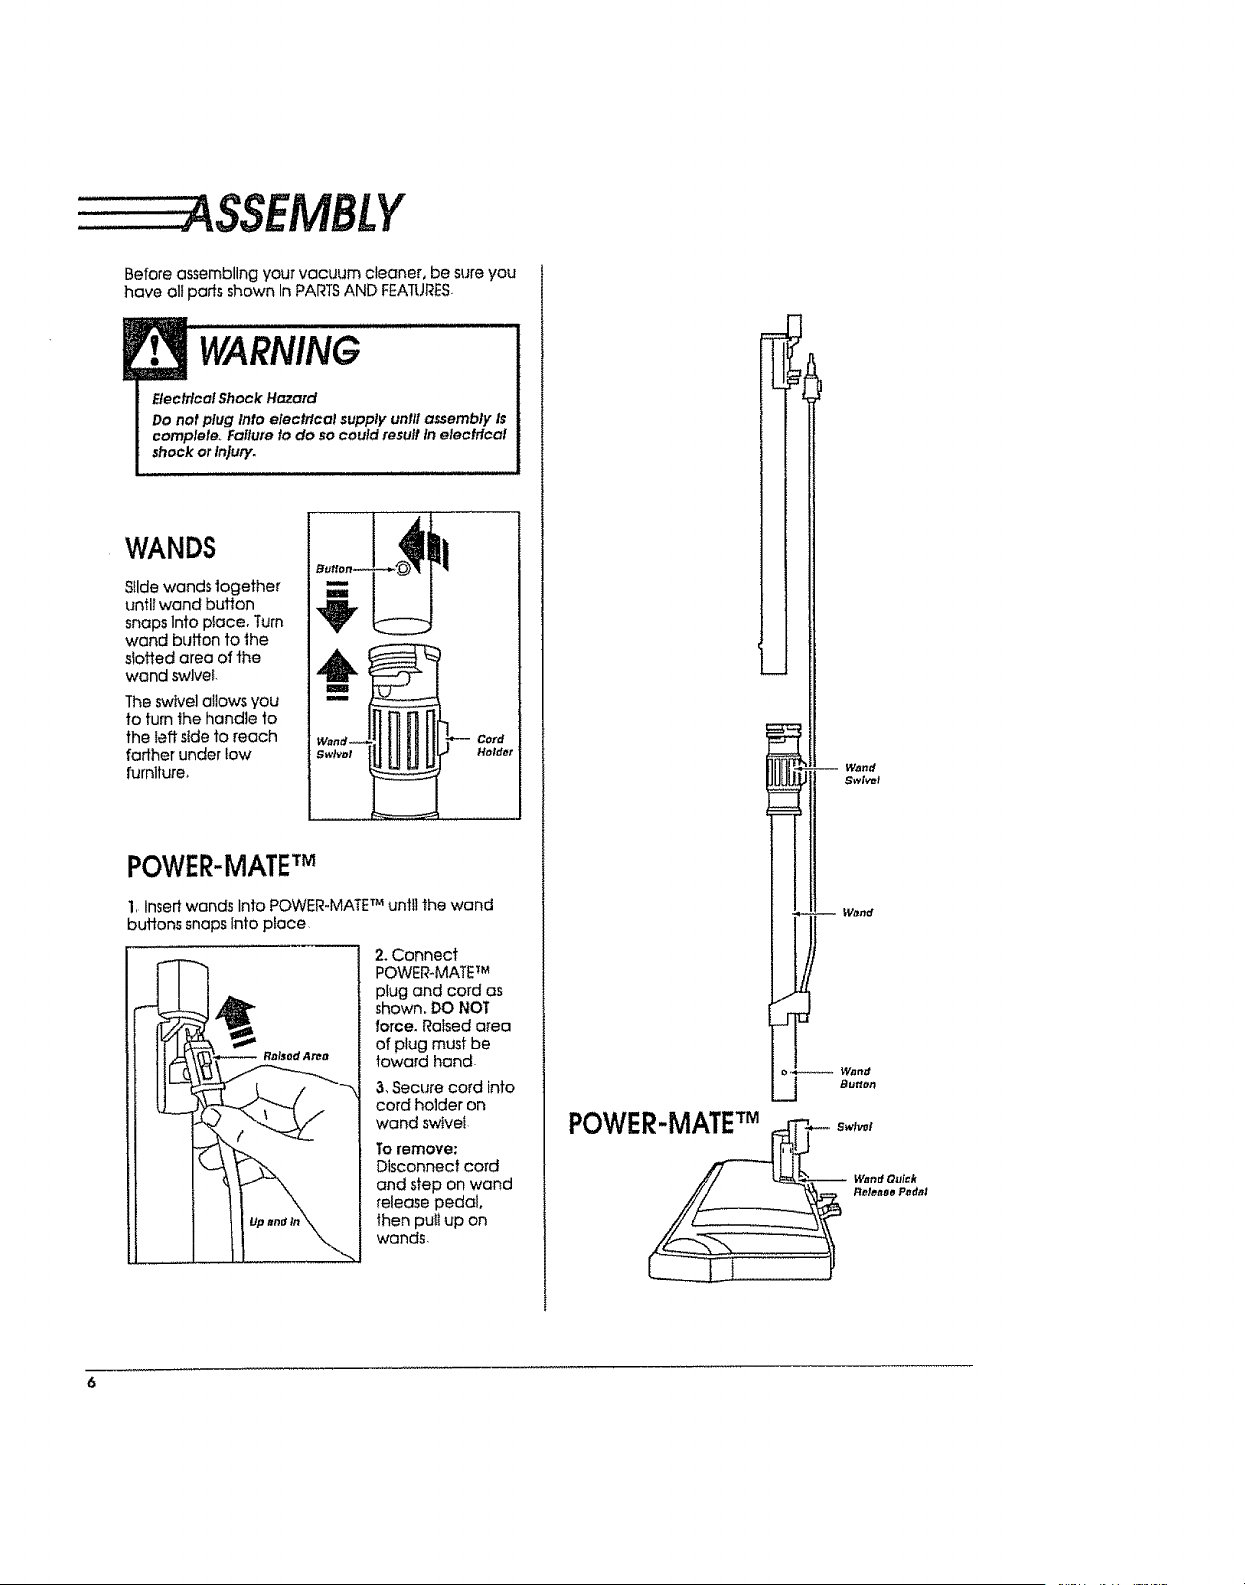
WANDS
Silde wands together
untl/wand button
snaps Into pface, Turn
wand button to the
slotted area of the
wand swivel
The swivel allows you
to turn the handle 1o
the left side to reach
farther under low
furniture_
Cord
Holder
POWER-MATE
1, Insert wands Into POWER-MATE TMuntil the wand
buttons snaps into place
2.Connect
POWER-MATE 7M
plug and cord as
shown, DO NOT
force. Ra_sed area
of plug must be
toward hand.
3, Secure cord into
cord holder on
wand swivel
To remove:
Disconnect cord
and step on wand
release pedal,
then puit up on
wands
i -- Wand
Swivel
W_nd
j Bu_
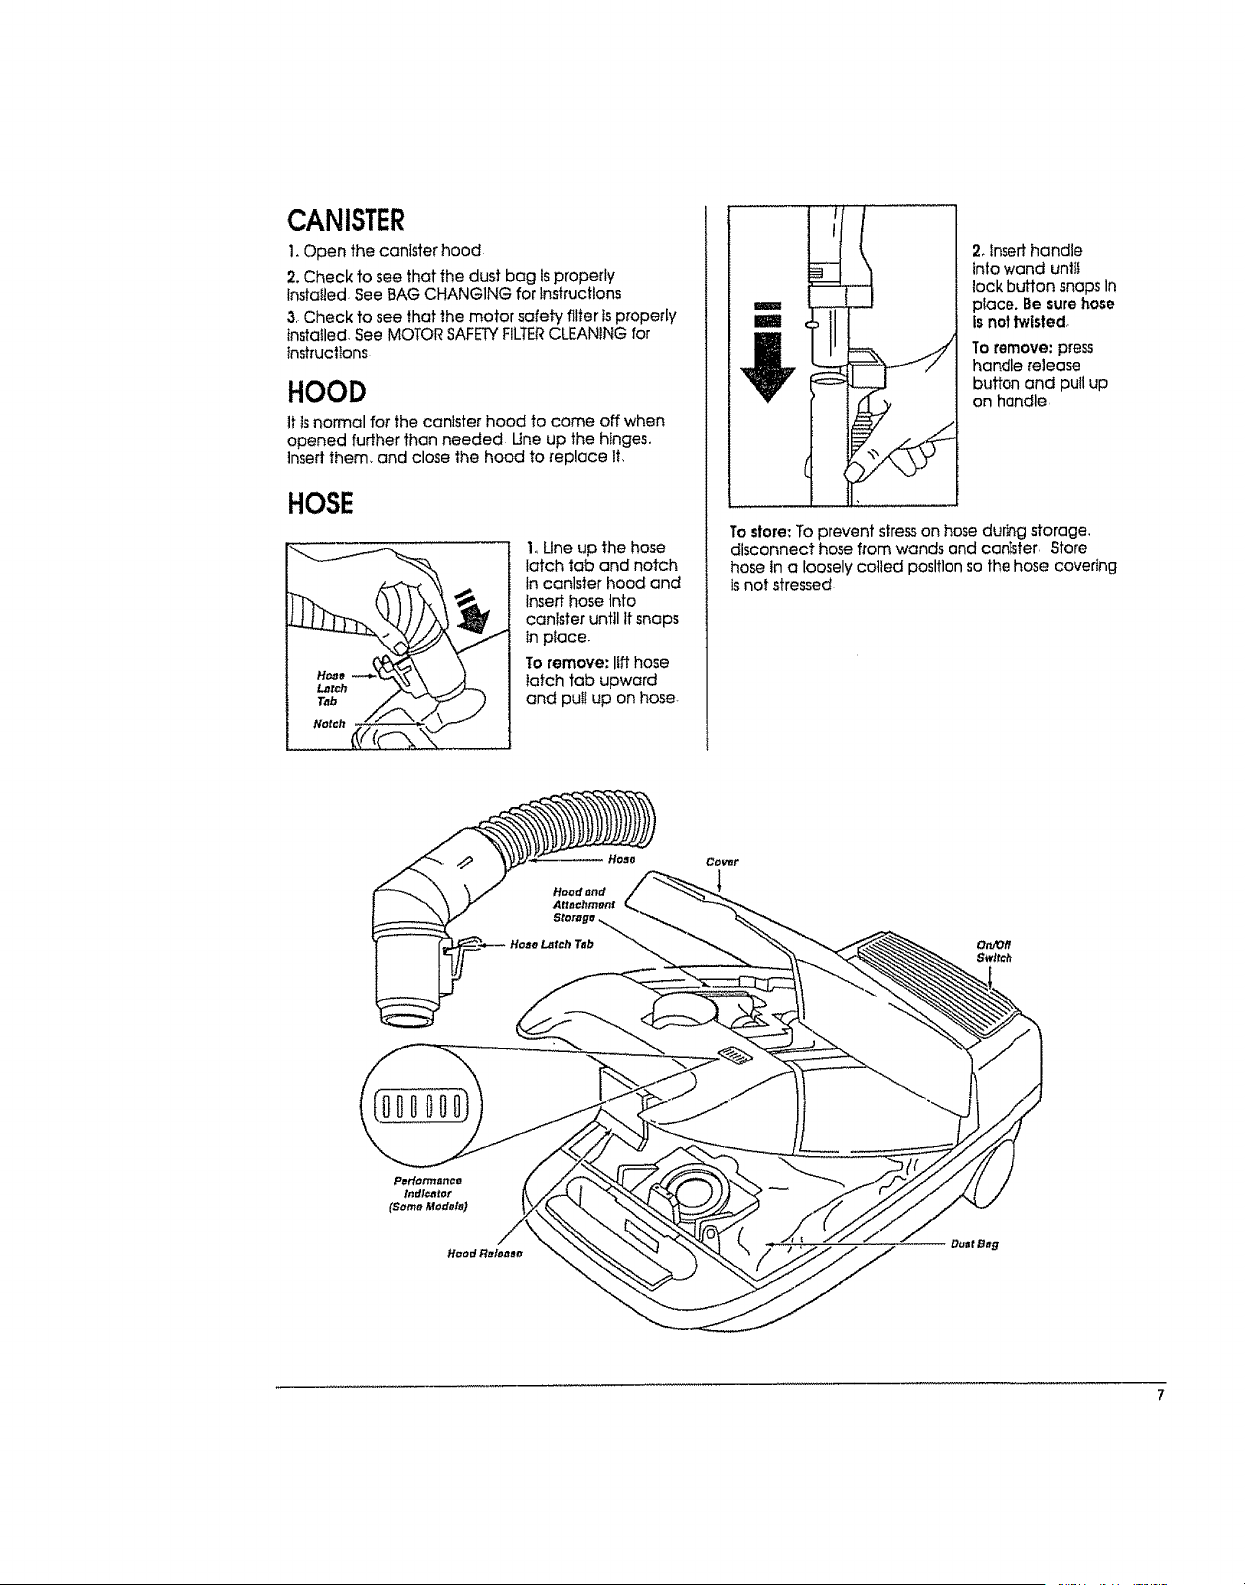
CANISTER
I.Open the canister hood
2. Check to see that the dust bag Isproperly
Installed. See BAG CHANGING for instructions
3, Check to see that the motor safety filter is properly
installed See MOTOR SAFETYFILTERCLEANING for
tnstrucllons
HOOD
It isnormal for the canister hood to come off when
opened further than needed Une up the hinges.
]nsed them, and close the hood to replace It,
HOSE
1.,Une up the hose
latch tab and notch
in canlster hood and
insert hose Into
canister until tt snaps
in piace.
To remove: lift hose
latch tab upward
and puIt up on hose-
2.Inserthandle
into wand unlt_
tack button snapsIn
place.Besurehose
isnottwisted,
To remove: press
handle release
button and pull up
on handle,
To store: To prevent stress on hose durhg storage,
disconnect hose from wands and canister, ,Store
hose in a loosely coiled position so the hose covering
isnot stressed
CO_t
HOW TOSTART
i
WARNING
Personal Injury and Product Damage Hazard
* DO NOT plug In ffswitch is In ON posltlon_
Personal injury or damage could result°
, The cord moves rapidly when rewlndlng_ Keep
children away and provide a clear path when
rewinding the cord to prevent personal injury,
, DO NOT use outlets above counferSo Damage io
Items In surrounding area could occur°
1. Pullcord out
of canister to
desired length.
2_Snap cord
Into grip to
prevent
accidental
rewinding°
NOTE: To reduce the risk of electric shock, this
vacuum cleaner has a polarized plug, one blade Is
wider than the other This plug will fit in a polarized
outlet only one way If the piug does not fit fuliy In
the outlet, reverse the plug If it slilf does not fit,
contact a qualified elecfficlan to lnstatt the proper
outlet, Do not change the plug In any way
3. Plug the polarfzed power cord Into 120 Vail outlet
focated near the floor,
To rewind: Unplug the cleaner. Hold the plug wh_ie
rewindlng 1o prevent damage or Injury from the
movlng cord. A sflght tug will release the locking
pawis In the cord reel allowing It to retract,
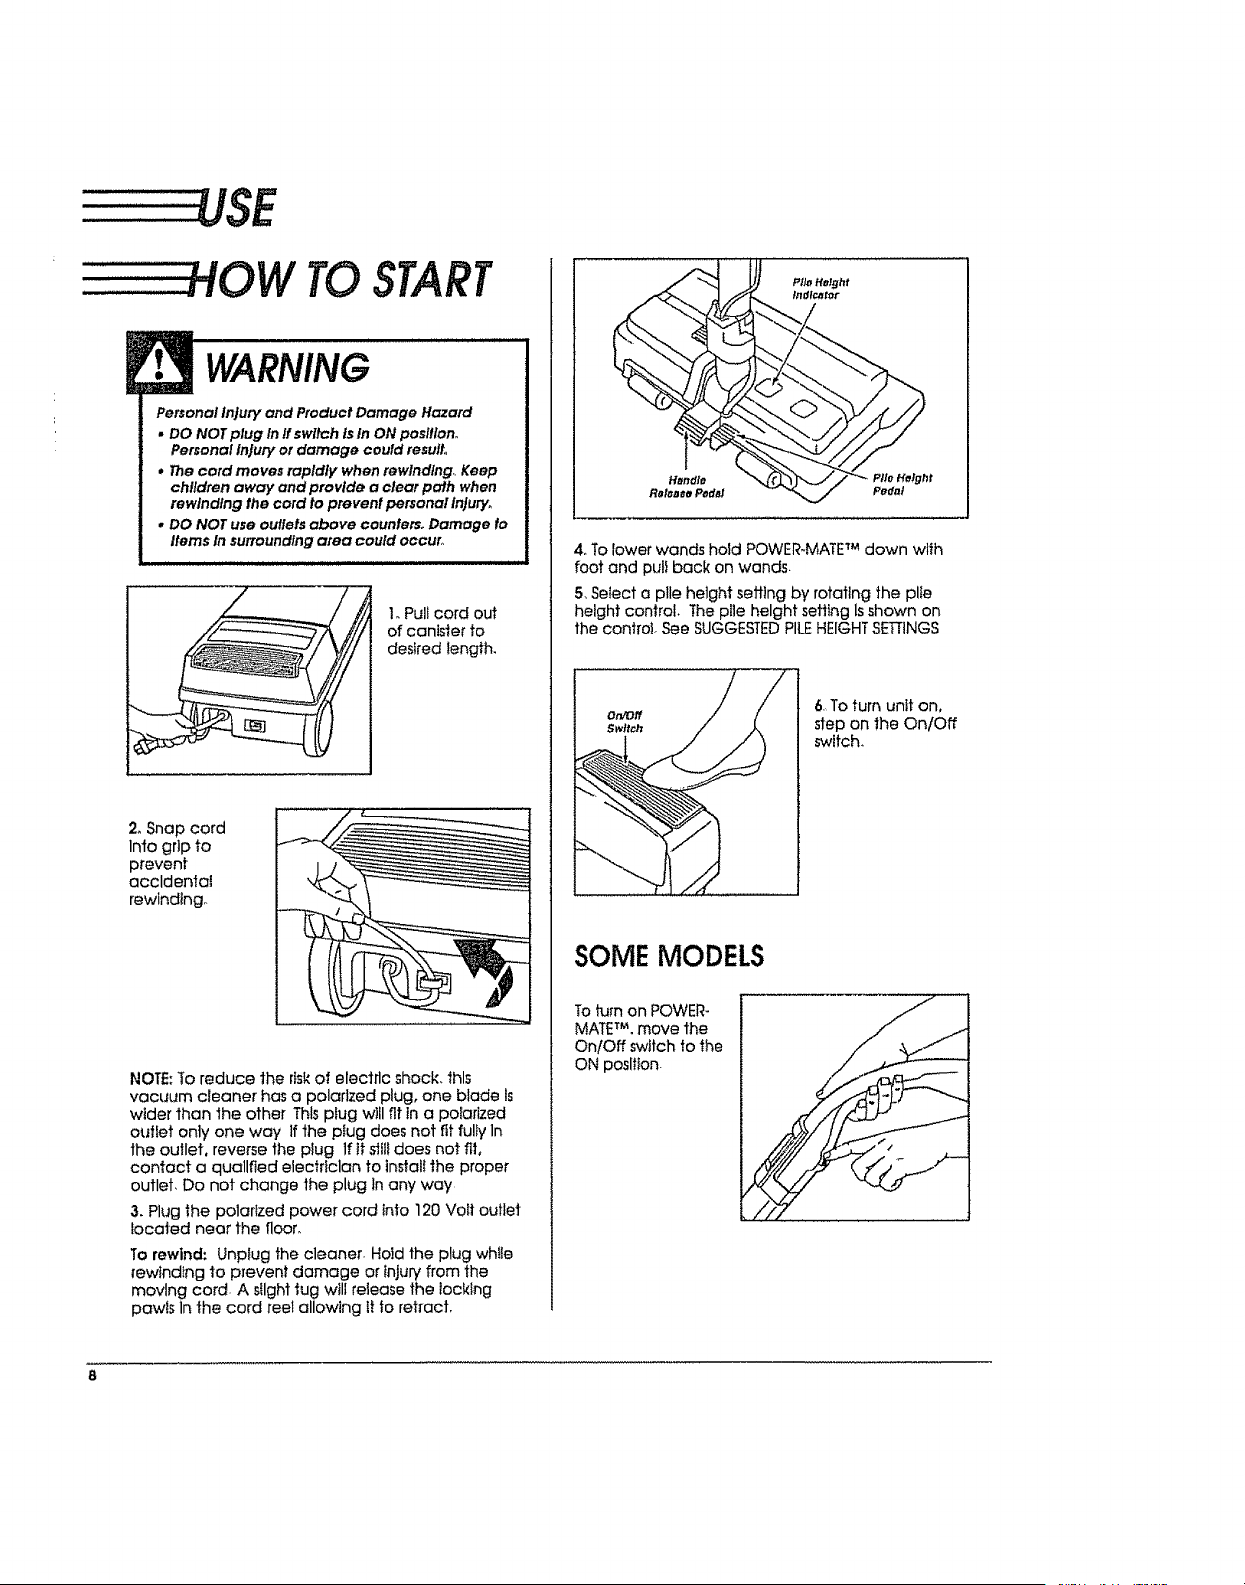
4, To lower wands hold POWER-MATE_Mdown with
foot and pult back on wands.
5, SeIect a plle hetght sefltng by rotating the plte
height control. The pile height setting Isshown on
the oontro!. See SUGGESTEDPILEHEIGHTSETTINGS
6.Toturn unit on,
step on the On/Off
switch,
SOME MODELS
Toturn on POWER-
MATETM,move the
On/Off switch to the
ON position

TIPS
Suggested sweeping pallem.
For best cleaning action, the POWER-MATE TM should
be pushed straight away from you and pulled
straight back At the end of each puti stroke, the
direction of the POWER-MATE TM should be changed
to point Into the next section to be cleaned. Thls
pattern should be continued across the rug wlth
stow, gliding motions
NOTE:Fast, jerky strokes do not provide
complete cteanlng
Small areas can be
cleaned without
moving the
canister The hose
swivel aliows the
hose to turn from
side to side wh_le
the canister stays in
place, Check hose
for fwtstlng bet'ore
puillng canister
,, "!
Carpeted stairs need to be vacuumed reguiady For
best cleaning results, fully close the suction controi.
See PERFORMANCE FEATURES
WARNING I
Personal In}ury Hazard I
Usecare if canisterisplaced on tt_,, II# falls,personal
Injury or properly damage could resu#, I
For best cleaning results, keep the airflow passage
open, Check each assembly area, shown In
HOW YOUR VACUUM WORKS, oecasl0noliy for clogs
Unplug from outiet before checking
PILEHEIGHT
SETTINGS
For best deep down cleaning, use the XLO sailing,
However, you may need to raise the height to make
some jobs easler, such as scarier rugsand some
deep p!le carpets, and to prevent the vacuum
cleaner from shufling off Suggested settings are:
HI -Shag, deep pile, or scoffer rugs,
MED - Medium to deep pile,
LO - Low to medium pile,
XLO - Most carpets and bare floors
CAUtiON
DO NOT attach or remove handle or wands while
cleaner Is ON. This could cause sparking and
damage the elechlcol contacts.
ATTACHMENTSON HANDLE
NOTE: If the
POVVER-MATETM Is
affached, turn
cleaner off befo_'e
removtng handle
from wands
I. Presslock buflon.
then puUto remove
handle from wand-
If your model has the optional feature of a handle
release, press it in similarly-
2oSlide
attachments
firmly on handie
as needed See
chaff below
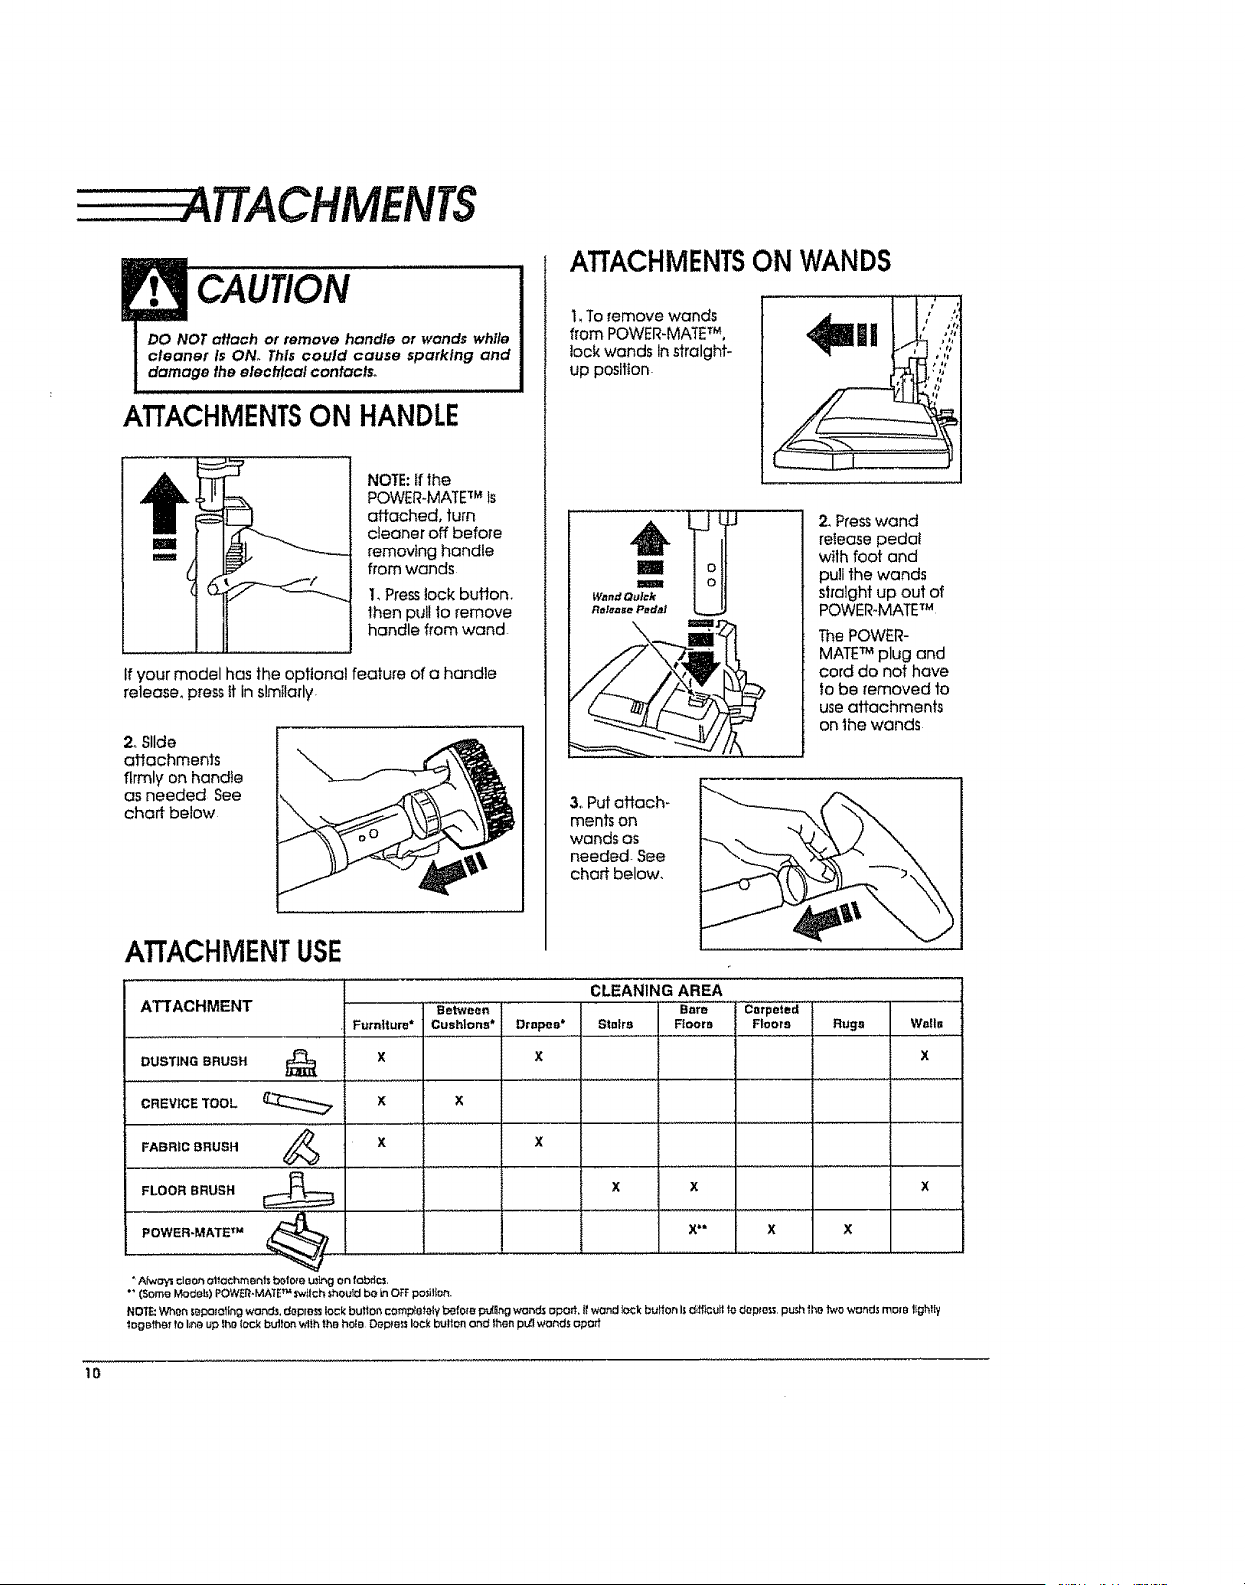
ATTACHMENTSON WANDS
I_ To remove wands
from POWER-MATE TM,
lockwands Instralght-
up position.
I
Wand Quick
ReleaSe Pedtll
_.__ _ _/l'_ .......
2.Presswand
reiease pedai
wtlh foot and
pull the wands
shalght up out of
POWER,MATE TM
The POWER-
MATETM plug and
cord do not have
to be removed to
use attachments
on the wands
3oPut attach-
ments on
wands as
needed- See
chaff below,
ATTACHMENT USE
AII A{.;HIVIEN I .....Between
Furniture* Cush|ons*
DUSTING BRUSH _ X
CLEANING AREA
Bare Carpeted
Drapes* Stairs Floors Floors Rugs
x
CREVICETOOL X X
FABRIC BRUSH _ X X
_YJ
FLOORBRUSH X X X
POWER_MATETM _ X** X X
A,fwoysct_on attachments b_fe_e u:_g en fob_c_.
*"(Sam9 Modeh) POWEQ,MA'_ETM Sw_tcht;hou_dbe inOFFpo$ilfot_.
NO';_ When _._poloIingwonds, dopm_ lockbutter,comp_oleIy1:._efo_ puQng wond_ aport,Itwond lockbullonI._d_ff_cullfodopto._,pu._hlhotwo wonds mope IIghlIy
IOgBfhgrfoI_n_,up thelock i:::_J'IIon'wlthth@ hoE@ OopFelllockbulionand lh@npL-(Iwands opoff
1o
Wails
x
PERFORMANCE
FEATURES
EDGECLEANER
Active brush
edge cleaners
are on both
stdes of the
POWER-MATE TM
Guide either side
of the POWER-
MATETM along
base-boards or
next to fumlture
to help remove
dirttrapped at
carpet edges
!• WARNING
Personal Injury Hazard
Always unplug the vacuum cleaner before clean-
Ing the brush area as btu_h may suddenly reslatt.,
Failure to do so can result In personal injury,.
OVERLOADPROTECTOR
The overload protector stops the motor when the
brush jams and prevents belt breakage
To correct problem:
I.Unplug electrical cord.
2oCheck brush and brush suppoJl areas for excessive
lint build-up or Jamming
3. Clean Jammed area See POWER-MATE TM CARE
To reset: Pressreset button on top of the POWER-
MATETM. Plug In and turn on cleaner
SUCTIONCONTROL
Thesuction control
increases or decreases
the suction for different
fabric and carpet
wetghts. Opening the
control decreases suc-
tion for draperies and
lightweight rugs.Closing
the controi increases
suction for furniture and
carpets.
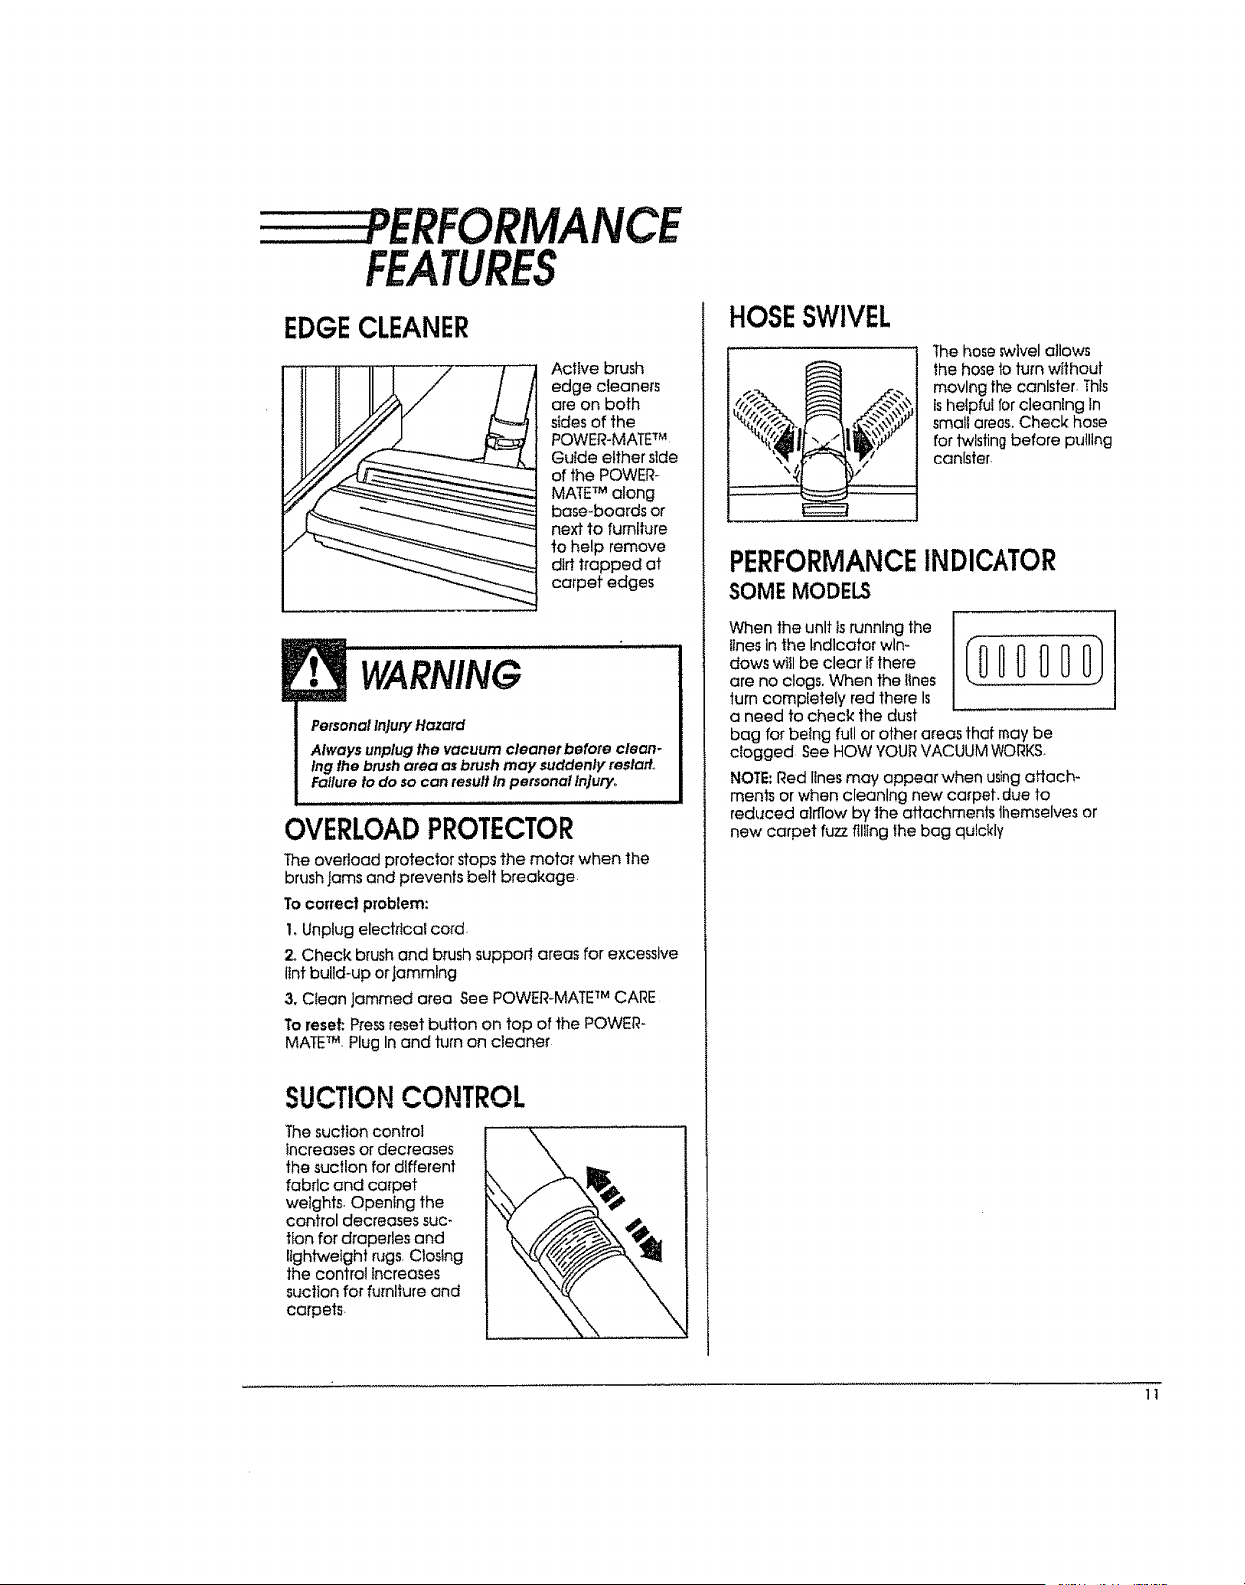
HOSESWIVEL
Thehoseswivelallows
the hoseb turn wtthout
moving the canister. This
ishelpful for cleaning tn
smallareas.Check hose
for twistingbefore pulling
canister.
PERFORMANCEINDICATOR
SOMEMODELS
When the unit Is running the
,tnesinthelndlcatorwln-_0 0 0 _ 0 O)
daws wttl be clear if there
are no clogs. When the Iines .........
turn completely red there Is
a need to check the dust
bag for being full or other areas that may be
dogged See HOW YOUR VACUUM WORKS.
NOTE; Red lines may appear when using attach-
ments or when cleaning new carpet, due to
reduced airflow by 1he attachments themselves or
new carpet fuzz filling the bag quickly
1t
YOURVACUUM
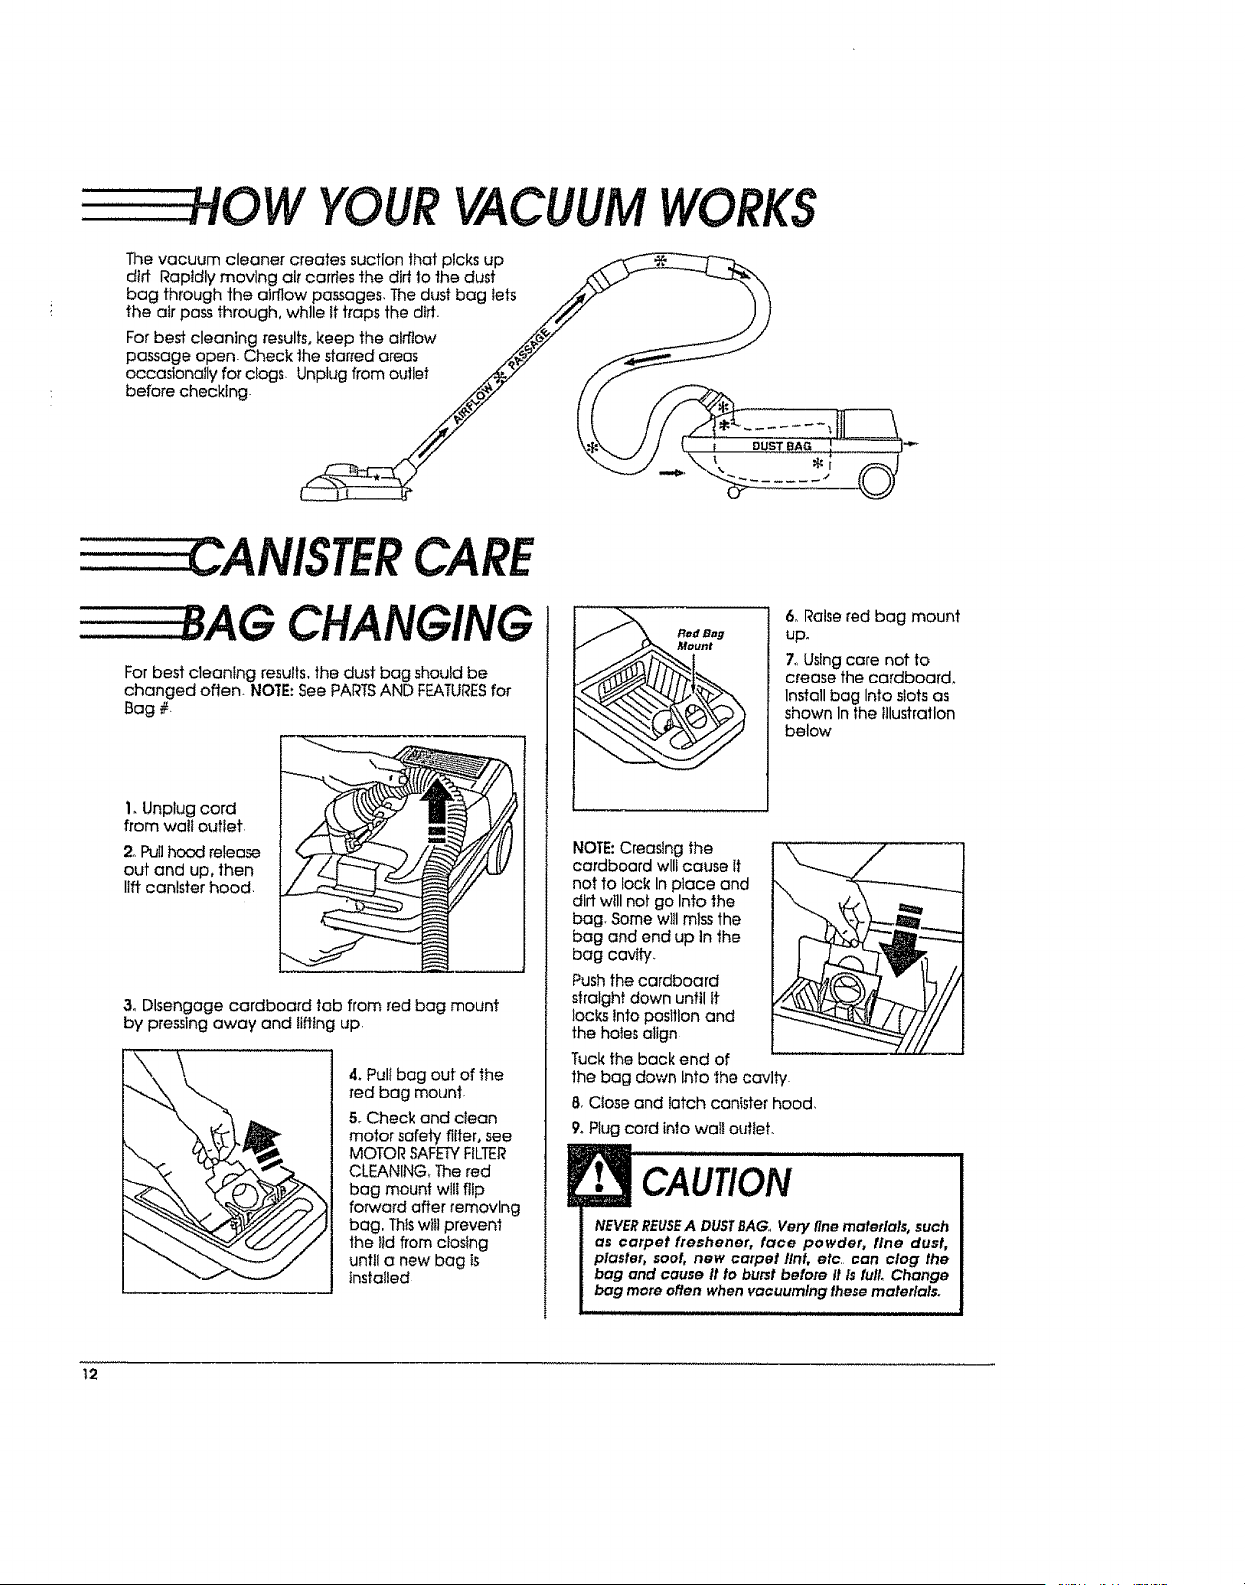
The vacuum cleaner creates suction that plcks up
dirt Rapidly moving air carries the dirt 1othe dust
bag through the airflow passages, The dust bag tats
the air pass through, wh!le it traps the did.
For best cleaning results, keep the airflow
passage open- Check the starred areas
occasionally for ciogs. Unplug from oullet
before checking.
WORKS
DUST BAG
CANISTERCARE
BAG CHANGING
For best cleanlng results, the dust bag should be
changed often. NOTE: See PARTS AND FEATURESfor
Bag #.
i. Unplug cord
from walt outlet,
2oPullhood release
out and up,then
llftcanisterhood.
3. Disengage cardboard tab from red bag mount
by pressing away and lifting up.
4. Pull bag out of the
red bag mount-
5. Check and clean
motor safety fitter, see
MOTOR SAFETYFILTER
CLEANING, The red
bag mount will flip
forward after removing
bag, Thiswill prevent
the lid from closing
until a new bag is
installed
Red eBB
Mount
6. Raise red bag mount
up.
7. Using care not to
crease the cardboard,
Install bag Into slots as
shown In the illustration
below
NOTE: Creasing the
cardboard will cause it
not to lock In place and
dirt will not go Into the
bag Some will miss the
bag and end up In the
bag cavity.
Push the cardboard
straight down until it
locks Into position and
the holes align
Tuck the back end of
the bag down Into the cavity.
8. Close and latch cantster hood,
9. Plug cord into wall outlet.
CAUtiON
NEVERREUSEA DUSTBAG,,Very fine materials, such
as carpet freshener, face powder, tlne dust,
plaster, soot, new carpet tint, etc. can clog the
bag and cause It to burst before It Is fuil Change
bag more often when vacuumlng these materials.
.. II H i ,,,
12
MOTORSAFETYFILTERCLEANING
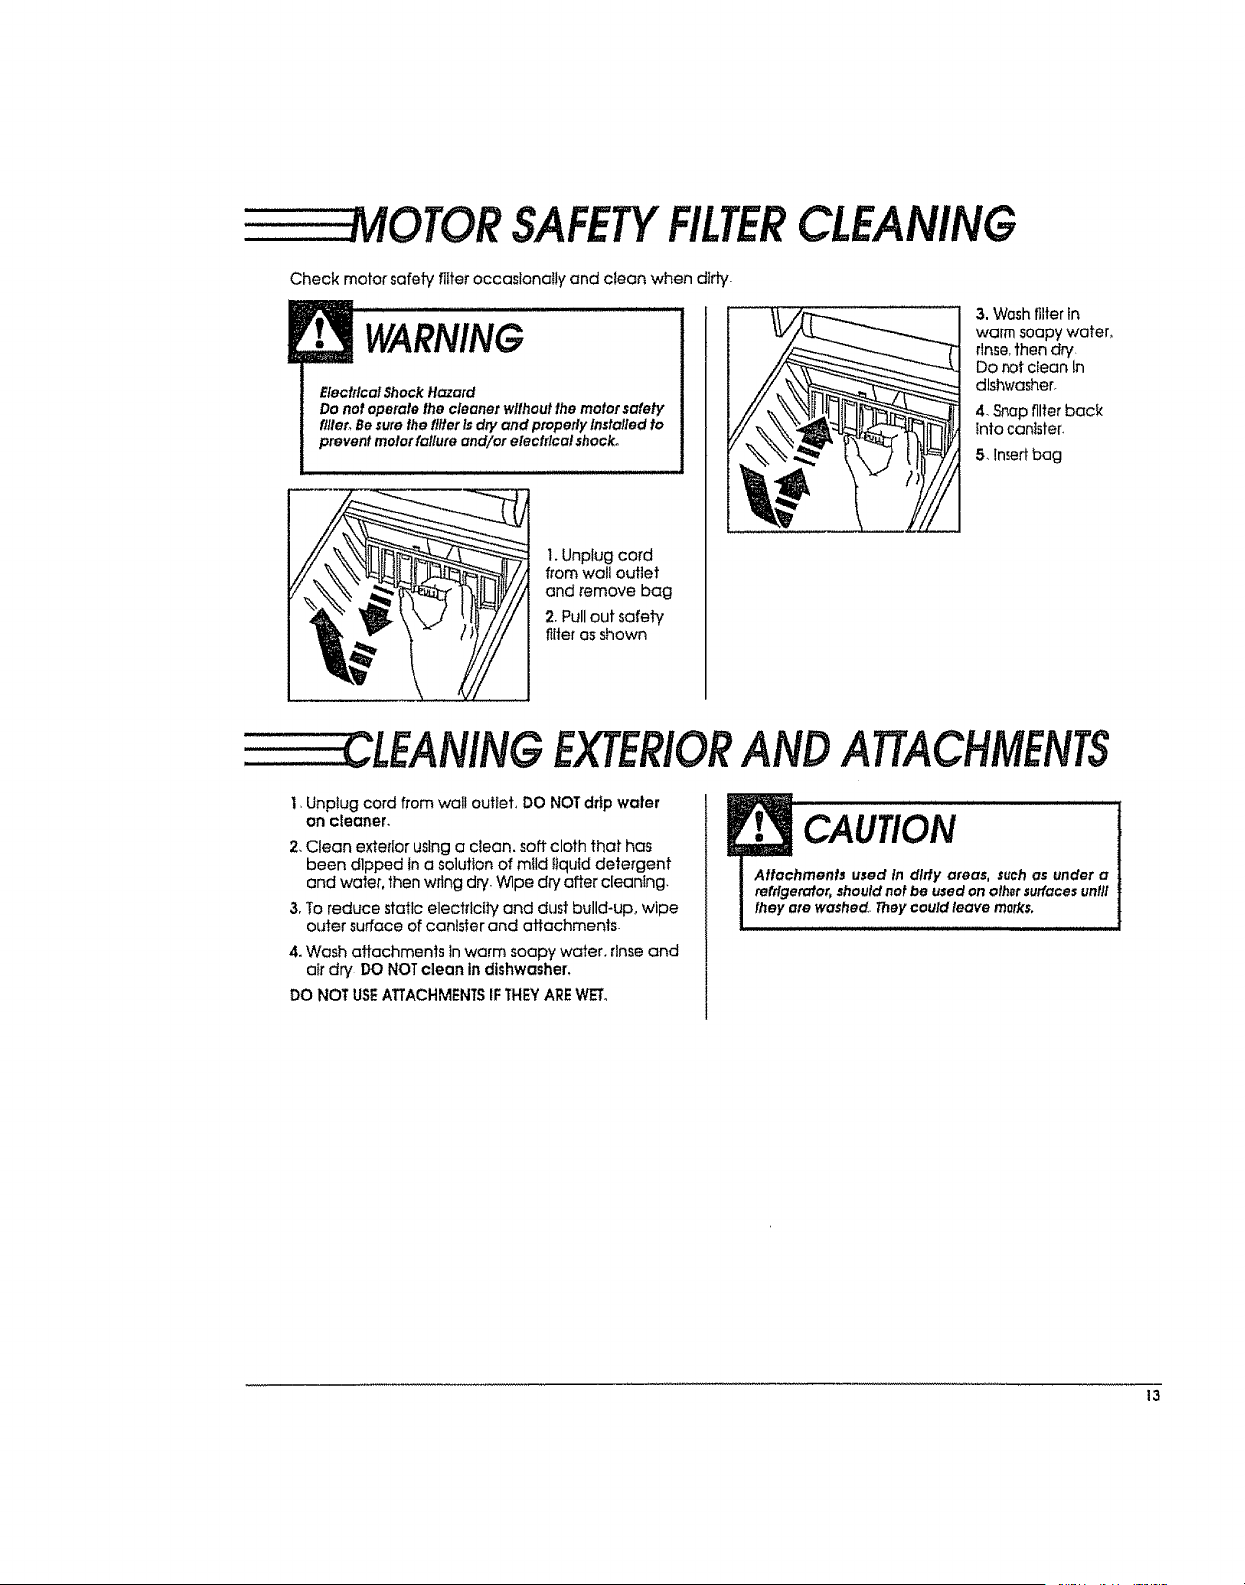
Check motor safety filter occaslonaIly and clean when dirty.
WARNING
Elec!ricalShockHazard
Do no!operate the cleaner wilhout lhe motor safety
fl/ler,Besure!he filler isdPyand properlyInstalled to
prevent meier failure and/or electrica! shock.
1. Unplug cord
from wall outlet
and remove bag
2, Pullout safety
filter as shown
3. Wash filter in
warm soapy water,
rinse,then dry
Do rot ctean In
dlsh_lasher.
4. Snap filter back
into canister.
5, liner bag
CLEANINGEXTERIORANDATTACHMENTS
1, Unplug cord from wall outiet, DO NOTdrip waler
On cleaner,
2. Clean exterior using a clean, soft cloth that has
been dlpped in a solution of mild tlqutd detergent
and water, then wring dry. Wipe dry after cleaning.
3, To reduce static electrlcily and dust build-up, wipe
outer surface of canister and attachments.
4. Wash attachmenls in warm soapy water, rtnse and
air dry DO NOT clean in dishwasher,
DO NOT USEATTACHMENTSIF THEYAREWET.
CAUtiON
Attachmen!s used In dlrty areas, such as under a
refrlgerc#or, should net be used on olhsr surfaces until
lhey ate washed.. They could leave marks,
13
= TM
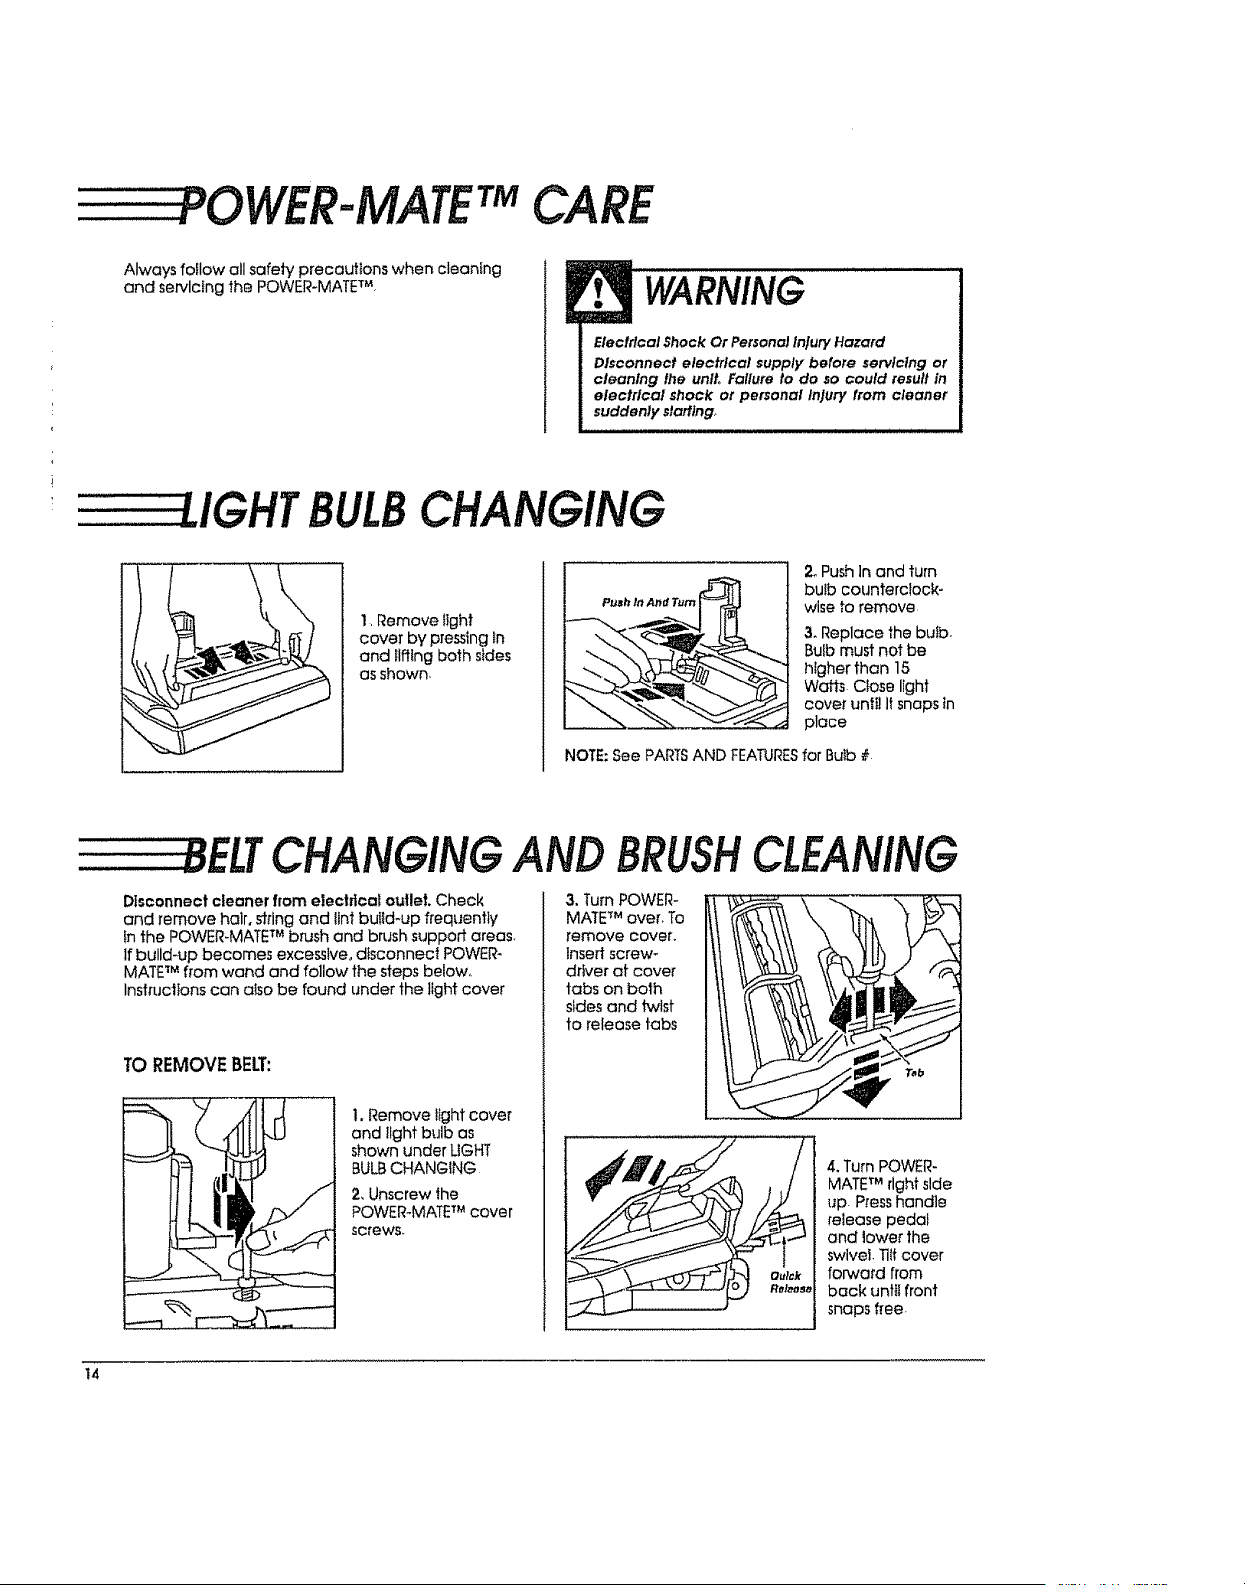
. OWERMATE CARE
Always foIIow all safety precautions when cleaning
and servlclng the POWER-MATE TM,
WARNING
Elecl#cal Shock Or Persona}injuryHazard
Disconnect electrical supply before servicing or
cleanlng lhe unlL Failure to do so could result in
electrical shock or personal injury from cleaner
suddenly starting,
........................ i i i i i i
UGHTBULBCHANGING
1, Remove iight
cover by pressing in
and ilffing both sides
as shown.
2_PushInand turn
bulb counterclock-
wise to remove
3. Replace the butb.
Bulb must not be
htgher than 15
Wafts Close light
cover until It snaps in
place
NOTE: See PARTSAND FEATURESfor Bulb #
_ELTCHANGINGAND BRUSHCLEANING
Disconnect cleaner from electrical oullet. Check
and remove hair,stringand tintbulld-upfrequently
inthe POWER-MATE TM b_ush and brush support areas_
If build-up becomes excessive, dtsconneci POWER-
MATE TM fFom wand and follow the steps below,,
Instructions can also be found under the light cover
TO REMOVEBEE:
__ , ,, ,
!I ,
1. Remove ilght cover
and light bulb as
shown under UGHT
BULB CHANGING
2, Unscrew the
POWER_MATETM cover
screws.
3, Turn POWER-
MATETM over. To
remove cover.
Insert screw-
driver of cover
tabs on both
sides and twist
to release tabs
4. Turn POWER-
MATETM right side
up Press handle
release pedal
and lower the
swivel. TiIfcover
forward from
back until front
snaps free.
14
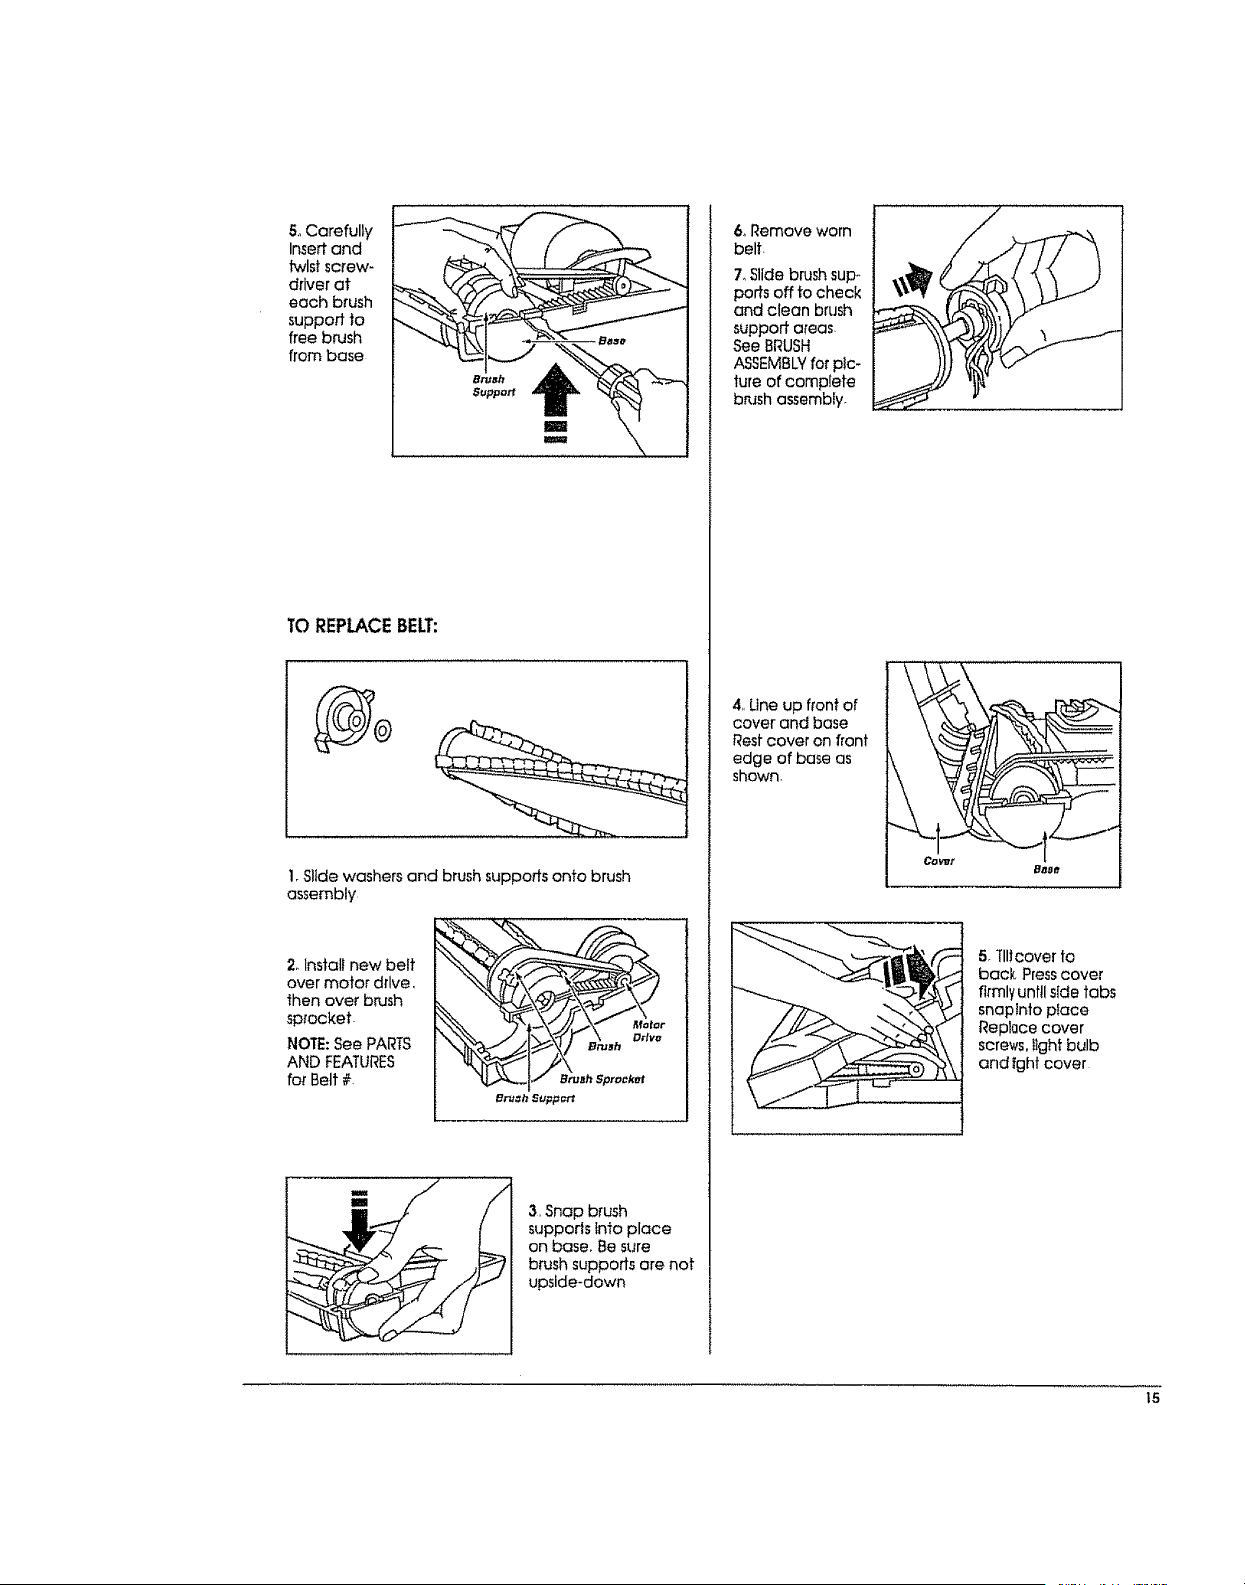
5oCarefully
Insertand
twlstscrew-
driverat
each brush
supportto
freebrush
frombase
TO REPLACEBELT:
1.Slide washers and brush supports onto brush
assembly
2. Install new belt
over motor drive,
then over brush
sprocket.
NOTE: See PARTS
AND FEATURES
for Belt #.
mm
Im
3, Snap brush
supports into place
on base. Be sure
brush suppods are not
upside-down
6oRemove worn
belt.
7oSlide brush sup°
ports off to check
and clean brush
support areas.
See BRUSH
ASSEMBLYfor pic-
ture of complete
b_t_shassembly.
4. Une up front of
cover and base
Rest cover on front
edge of bose as
shown.
i....... ,......, ,,,,,,,,,,,,
Baee
5. Til!cover to
back, Press cover
firmly until side tabs
snap into place
ReplQce cover
screws,Ilght bulb
and tght cover
15
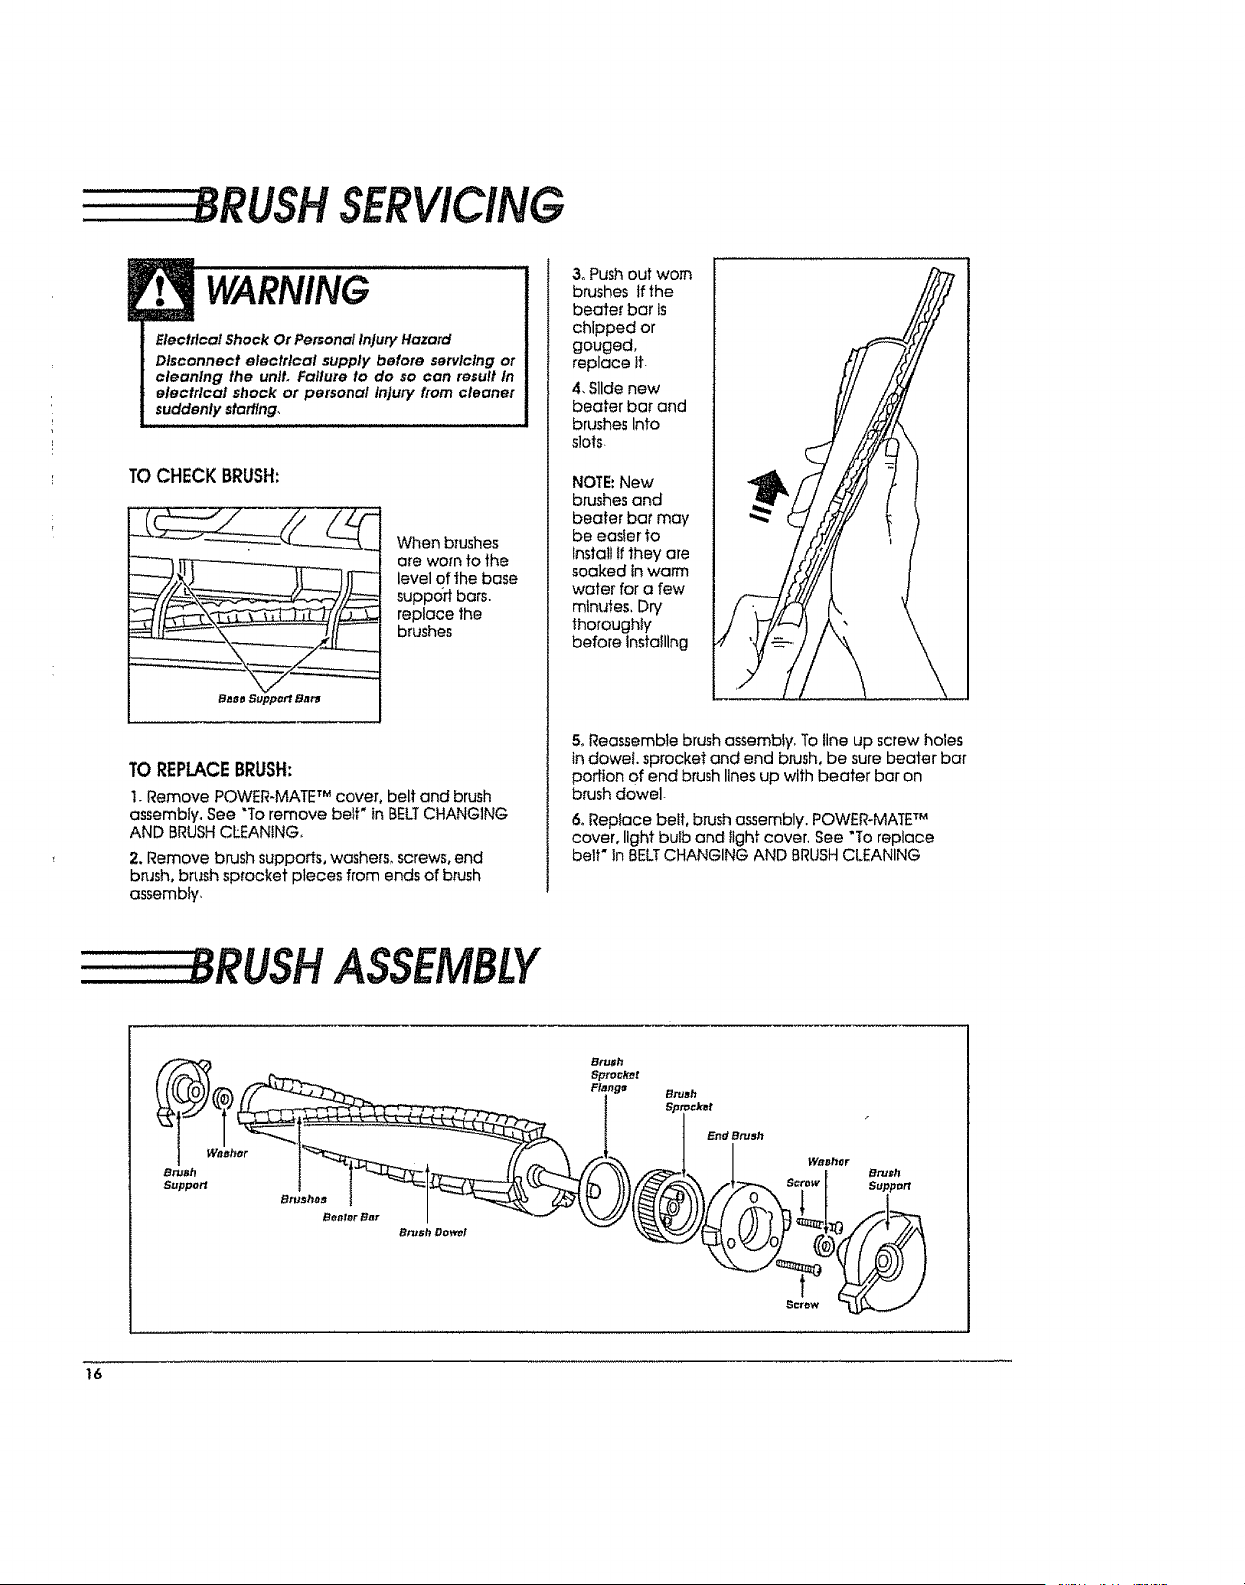
-----BRUSH SERVICING
WARNING
Electrical Shock Or Personal Injury Hazard
Disconnect electrical supply before servicing or
cleaning the uniL Fallure to do so can result In
electrical shock or personal Injury from cleaner
suddenly starling,
TOCHECKBRUSH:
When brushes
ore worn to the
level of the base
support bars.
replace the
brushes
Ba_o Support Bats
TOREPLACEBRUSH:
1. Remove POWER-MATE TM cover, belt and brush
assembly, See "To remove belF in BELTCHANGING
AND BRUSH CLEANING,
2. Remove brush supports, washers° screws, end
brush, brush sprocket pieces from ends of brush
assembly,
3oPush out worn
brushes If the
beater bar Is
chipped or
gouged,
replace ft.
4, Slide new
beater bar end
brushes Into
slots
NOTE:New
brushes and
beater bar may
be easier to
Install Ifthey are
soaked in warm
wafer for a few
minutes, Dry
thoroughly'
before Installing
5. Reassemble brush assembly, To line up screw holes
in dowel, sprocket and end brush, be sure beater bar
portion of end brush lines up with beater bar on
brush dowel-
6oReplace belt, brush assembly. POWER-MATE TM
cover, light bulb and light cover. See "To replace
belt" In BELTCHANGING AND BRUSH CLEANING
8RUSH ASSEMBLY
_E_h W_ Brush
Sptocf_t
F/_J3_, ,_ Flan98 Brush
°°"°" °2",. I so:°.t
16
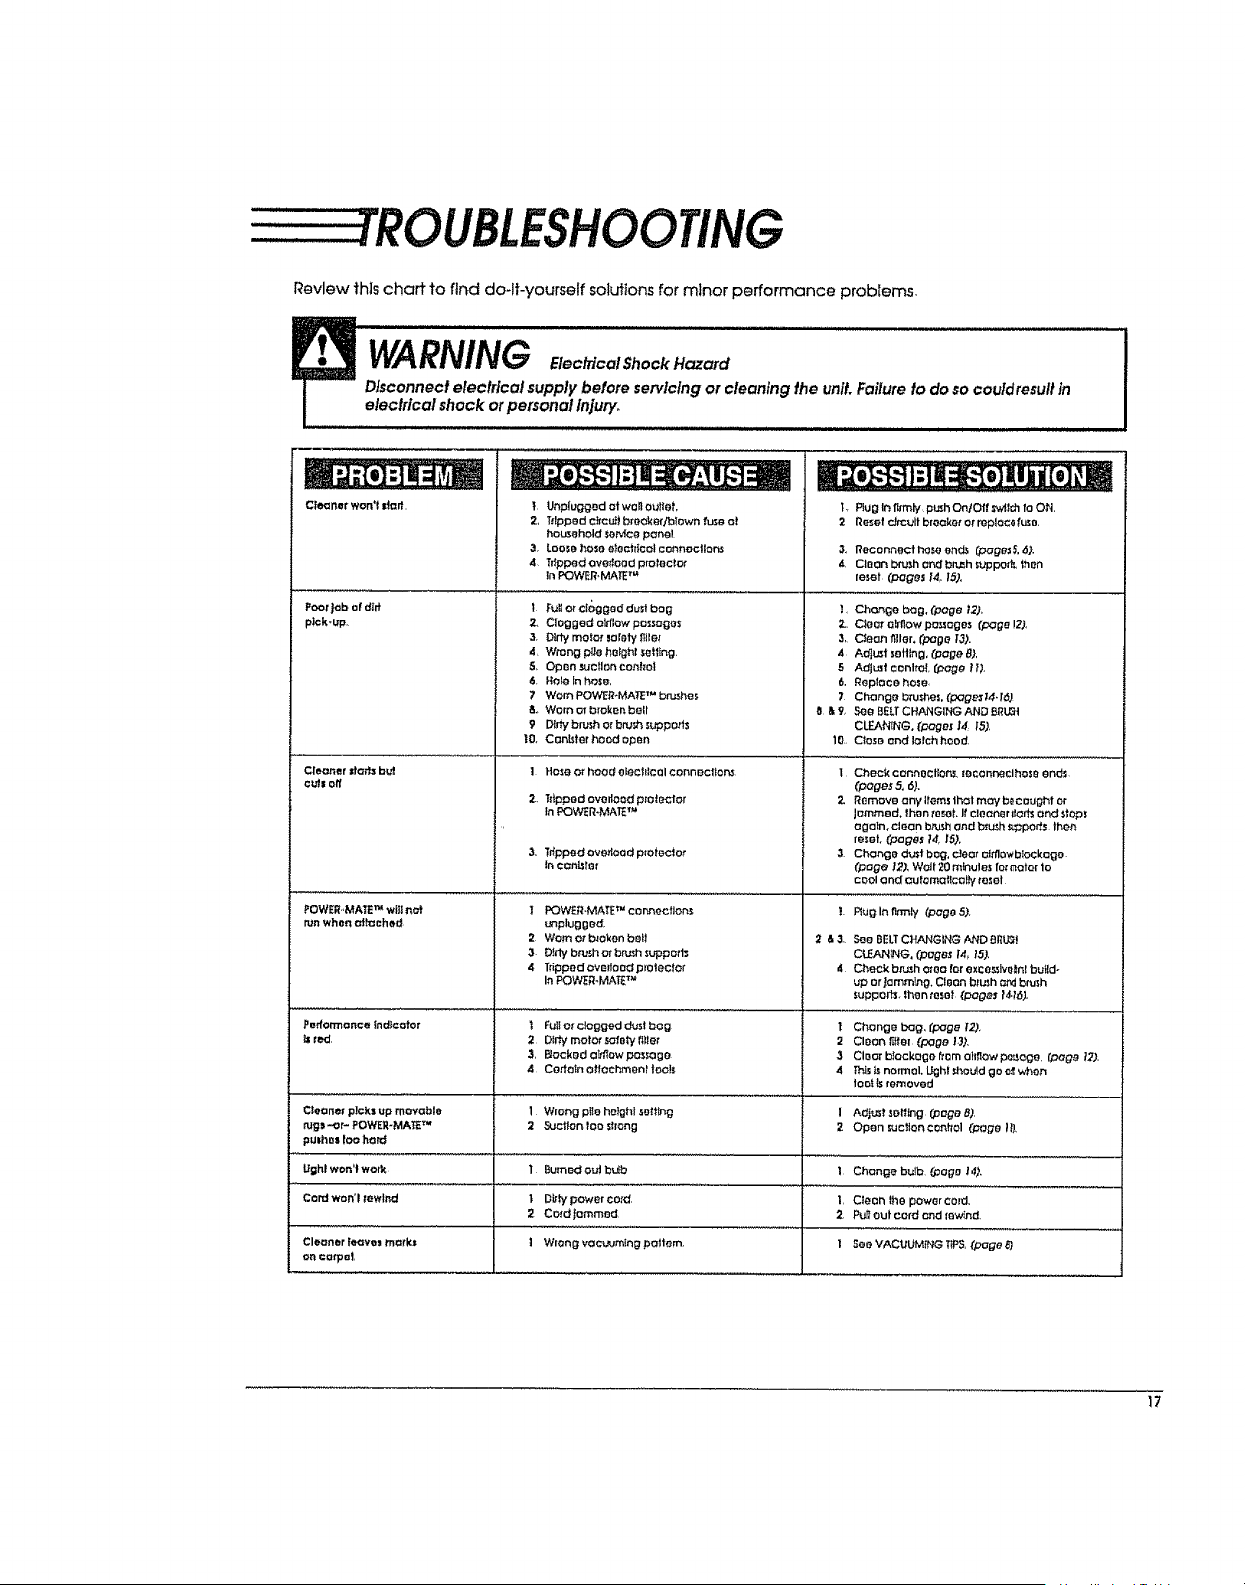
Reviewthischarttofind do-lt-yourself solutions for minor performance problems.
WARNING loo oolS.ock
Disconnect eleclrlcal supply before servicing or cleaning the unit. Failure to do so couldresull in
electrical shock orpersonal Injury_
/,rot.., i ,, i, i
Cleaner won't _orf.
Poor|oh of d[ff
pick-up.
-e : ,j -e. : o e
T. Unplugged at won aUdIO", L Rug In firmly, push OnlOff _v'Jtchre ON,
2, Trrpped rltou_i breaker/blown fuse ot 2 Reset rJtoult breaker or replace(use,
household._eMce panel
3. Loosohoseeleoh_colconnocllor_ 3, Roconnecthoseends (pogesS,6).
,4 TdpPedOverfaod protector 4 CleOn b_sh ondbr_h s_,'ppod_ then
in POWER, MA_ETM leset (pages 14, 15).
I Fu_ercioggeddustbog L Change bag, rpege 12)_
2, Clogged o_low pc_sogos
3, D_dy motor _otety _IIe_
4, Wrong pl|e helghf setting.
S, Open suclIon conhol
6. Hole Inhose,
7 Warn POWER÷MA_ TM bn_hes
_. Worn orbroken boll
9 DIr_ brush or bru_ support3
I0. Con_tet hood open
_, Ciearo_owpa_ages (page 12),
3, C_ean filler, (pa0o [3).
4 A_L_t sailing, (page 8),
5 Adjmt conlro[ (Page H),
6. Replace hose,
7 Changeb_u_es.(page_J4,/6)
O &9, SQeBELTCHAHGIHGANDBRLGI
CLEANING. (peges ,14 15),
10. Close and loloh hood,
Cleo_er darb b_ 1 Hose or head olechloalconnecllar_ I
eu_s off
2, Tr_pped ovo dead protector 2,
In _:_OWER*MAETM
3. Ttlppedoveflood proloclot
incon_ler
POWER-'MATE_ wffl nat ] POWER-MAi'E_ c o nnectlons
mn when a_h_ched _nplugged_
2 Worn or b_ok_n boil
3 Dirty btu_horbru_h suppart_
4 Tripped overte o_ protector
InPOWER_I'vI,,'_,T_TM
I................... ................................
Performance Indicator i FUlle_ clogged dustbog T
br_d, 2 DIrhi motor safely llller 2
3, Becked o_ow passage 3
4 Certain o_lec_ent Iod_ 4
Cleaner picks up movable I Wrong pile he_hl _ettfng I
tugl"_P POWE_,-MA_ TM 2 Suction tOO shang 2
pulhes IOOherd
Ughl won'lwork 1 ButoedouJ bdb I Change bulb (Peg0 1@.
Cord won'l rewind I Dt_typower col'd, I, Cleon lhe power cord.
2 Cord._ommod 2, P_ out card _nd {ew_nd,
Clet_ner te,r_ves merkl I Wrong voc_ming poltem. 1 See VACUUMING TIPS,(page 8}
on carpel,
Check conneollor',s, roconneclhos_ ond_
(pages 5, 6).
Remove any items Jholmc_ b_cought or
Jemmed, thentotal It cleaner rlar_ and stop_
again, clean brushend b_ _._pod_.lhen
reset, (pages 14,,iS).
3 Change dustbag, deer affflo_hlockoge
(Page/2), Wait 20 tubules for motor 10
cool and crufomallcelIy reset
I, Pluglnflrmly (page5).
2 & 3, See BELTCHANGING AND BitLi_l
CU_AN_NG. (poges /4_15),
4 Cheek bn._h area tar e xco._lv0tel build-
up orJamming, Cl_on b_ush Ord brush
supports than reset (pager tO.t6].
Change bag, (p_ge 120.
Cleon l_er (Doge 137,
Clear b_ockogo from airflow po_ago, (pag_ 12).
This_ noffllol,L_hl _ou_d go '_ when
to0_Is removed
AdjuS_sefftng _ege 8),
Open suctloncenh'al (page I!l
17
SEARS, ROEBUCK AND CO., HOFFMAN ESTATES, IL 60179 U.S.A.
PARTNO. C_IZAEX1_U_(_-437_61
Printed in U+SoA_
t_
rl

++ .....
+++ + -+_ _.....
Aspiradora
MANUAl DEL
PROPIETARiO
LEA ESTEMANUAL para enterarse de instrucciones importantes
acerca de la seguridad, armado y funcionamiento.
Cg1ZAEXI_Ugg-437gg61
DECONTENIDO
GARANT|A ...................... 2
SERVICIO ........................... 2
INSTRUCCIONESIMPORTANTESDE
SEGURIDAD........................ 3
PIEZASY CAI_CTERiSTICAS............ 4-5
ARMADa .......................... 6-7
usa ............................. 8
Para comemar .................... 8
Sugerenctas papa aspirar ................ 9
Sugerencias sabre el aJuste de nlvel de pelo
de la aifombra ........................ 9
Accesoflos ................. I0
Uso de losaccesorlos.............. 10
Caracterfstlcas de rendlmlento ........ 1t
FUNCIONAMIENTO DESUASPIRADORA . 12
CUIDADO DELRECEPT/_CULO............. 12
Comblo de labalsa .................. 12
Llmpieza del filtro de segurldad de! motor ..... t3
Ltmpleza def exterior y de los accesorlos ..... 13
CUIDADO DELA POWER-MATETM ..........14
Comblo de labomblile ............ 14
Camblo de tocorrea y llmplezadel ceplIIo. IN15
Culdado del cepttfo .............. 15
Ensemble del cepIllo.................. 16
RECONOCIMIENTO DE PROBLEMAS....... 17
I El armada y usaseguro de su asp#adore son suresponsabflidado Estaasplradora ha sldo dlse_ada excluslvamenfe
para usa dorn_sflce. La asplradora deber_ almacenarse en un lugar seco y en el Inferior. Lea esfe Manual de}
proplelario delenldamenfe, pues contlene informaci6n Imporlante sabre seguridad y usa,.
: ::::SERVICIO
ASPIRADORAKENMORE
GAI NTIA COMPLETA
PaR UNANO
Mien#as su usa selimtte o fines dom6sficos podlculares, sl
esta aspiradoro fo!ia dentro de un periodo de un a_',oa
porllr de ia fecha de compra, par rozones de defectos
en matertates o mane de obra, DEVUELVALA AL CEN-
TRe O DEPARTAMENTODESERVICtODE SEARSM/_SCER-
CANe y Sears 10reparar6 sinnlngOn cargo.
En el case de que esta aspiradoro sea ull!izada con
fines comerc!oles opara orrendamlento, ta anterlor-
mente cltada garantia de cobedura ser6 v6IIda Qnlca-
mente par un periodo de 90 dies o parllr de la fecha de
compra
Esta garantia le conflere derechos legales espedficos ,/
adem6s puede que tenga oti'os derechos que difleren
entre estados.
SEARS,ROEBUCKAND CO., D/817 WA,
HoffmanEstates,II.60179
St neceslta servlcfo o ptezas, vlsite el Centre de ser-
vlcfo de Sears m6s cercano o el Depadamento de
servlclo ublcado en la mayoria de las tlendas Sears.
Dfcho depaffamento solucionar6 su problema y le
factlltar6 cualquler repuesto necesado. Cualquler
serviclo requerldo adem6s de los que se descrlben
en este Manual det propietario deber6 ser realizado
par un representante de servlclo autorlzado par
Sears.
C6mo pedlr repuestos:
Cuando soltctte servlcioo plda [epueslos.tenga dlsponlble
ta slgulente Informac!6n:
1. N_mero de modelo y nOmero de serte de Ia asplrodora
de recepf6cuio
2. N_'nea3de modelo y nOmerode sedede la RDWER-M_k]I_M.
3. Descripcl6n del problema
4. NOmero de ta pleza
5. Nombre de la pleza
6,, Ubicacl6n de la pleza (asptradora de recept6culo
o POWER-MATE TM )
Pare hablat en IngI6s:
Uame grafts pare solicitor servlclo el: (1-80G4-REPAtR)
(1-800-473-7247)
Uame gratis pare so!ictlor plezas el: (1-800-FON-PART]
(1-B00-366-7278]
Pare hablar en espa6ol:
Uome grafts para soiIclfar servlclo el; (1-800-626-5811)
Uame gra!ls pare solicitorplezas al: (1-800-659-7084)
- ',.NSTRUCCIONESIMPORTANTESDESEGURIDAD
ADVERTENCIA
Para reduclr el flesgo de incend{o, choque el_ctflco, lesi6n corporal o dodos al utillzarsu asplradora,
act_e de acuerdo con precauciones b6slcas de segufldad, enfre ella_
Lea este manual antes de armar o utllizar
suasplradora.
Use su asplradara Qnicamente en fa forma
descflta en este manual Use Qnlcamente con
accesortos recomendadas per Sears
Para reducir el rtesgo de cheque el_ctricoo
no use su asplradora al aire Iibre nl sobre
superficies moiadas,
Desconecte el cord6n e!6ctrico antes de compo-
net o ltmpiar el 6tea del cepilio De Iocontrario, el
cepillo podfia arrancar de forma Imprevista o
podria producirse un cheque el6ctrtco
Siernpre debe apagar su asplradora antes de
desconectarla
Siempre debe apagar la spIradora antes de
connector o desconectar la manguera de ia
POWER-MATETM.
No desconecte la asplradora tirando del cord6n
ei6ctrico, Para desconectarla, hale el enchufe,
no el cord6n
Sulete el enchufe con la mane al enroilar e!
cord6n,. No permita que el enchufe se sacuda al
setenrollado
No usela asplrado_'asiel cord6n o et enchufe est6
daP_ado_St la aspifadora no est6 funcionando
adecuadamente o si se ha deJado coer, est6
dariada, se ha de]ado expuesta a ia Intemperie o
se ha dejado caer en agua, devu_tvala a un
Centro/Departamento de servtcio de Sears
No hale nt transporte la aspI/adora per el cord6n;
no use el cord6n come mango; no clerre puerfas
sobre el cord6n; no hale e! cord6n sobre rebordes
agudos ni esquinas No pose ia aspiradora sobre
el cord6n Mantenga el cord6n aleJado de super-
ficies calientes
No abandone la asplradora cuando est6 conec-
tada, Descan6ctela cuando no la est6 usando y
antes de darle servlcto,
No pe_mlta que sea ulittzada come Juguete Se
requlere tenet mayor cuidado cuando sea
utiitzada en la proxlmidad de ni_os o par nt_os
No toque la asplradora nl el enchufe con las
manes moladas
No usela aspttadora s]la manguera, est6 rota. La
manguera contlene aiambres el_ctricos
C6mbteia soest6 rata o desgastada Eviteasptrar
obJetosagudos,
Ne coloque obIetos en losabeduras
No ufllice la asplradofa st atguna abertura e#6
bloqueada; mant6ngala lfbre de polvo, pelusa,
cabeifos y cuaiqulera cosa que podria dtsminulr el
flutede alre
Mantenga ef cabello, ropa sueita, dedos y todas
las pades del cuerpo aleJados de los aberturas y
ptezasmecenlcas.
No use [a asplradora sin tenet instalada la bolsa
para polvo y/o los fiitros,Camble slempre la bolsa
para polve despu6s de asptrar Iimpladores de
alfombras o desodorantes, talcos y pelves fines
Estosproductos otascan ta bolsa, reducen el flute
de alre y pueden causar que _sta sei'ompa. Sino
cambta la bolsa podria ocaslonar daSo perma-
nente a la asplradora
No use la asplradora para levantar obJetos agu*
dos, Juguetes pequeSos, alfileres, papel, etc
PodriandaSar la asplradara o la bolsa para polvo
No Ievante nlnguna casa que se e_ quemando
o emiflendo humo, come cigarrillos, ceflltos o
cenlzas calIentes
No use la asplradora para asplrar lfquldos
lnflamables o combustibles (gasoltna, ffquldos
para ltmpteza,perfumes, etc )ni la use en lugares
donde estospodr[an estar presentes, Losvapores
de estassustanclas pueden crear un petlgro de
incendlo o expbsl6n
Tenga culdadoespeciala] uttlizarla aspiradora en
escalones No la coloque sobre sl!las,mesas, etc
Mantengala en el plso,
Usted es responsable de asegurar que su
asplradora no sea uttitzada per nlnguna persona
que no pueda manelarla coffecramente
GUARDE ESTASINSTRUCCION
Elarmadoy usosegurodesuasplradorasonsuresponsabllldad.Estaasplradoraha sldo dise_ada exclusivamente
parausodomes#co.La aspiradoradeber_almacenarseen unlugorseco y en ellnterior.LeaesteManualdel
propletafiodelenldamente,puescon#eneInformaclSnIrnportanlesabresegurldad yusa..
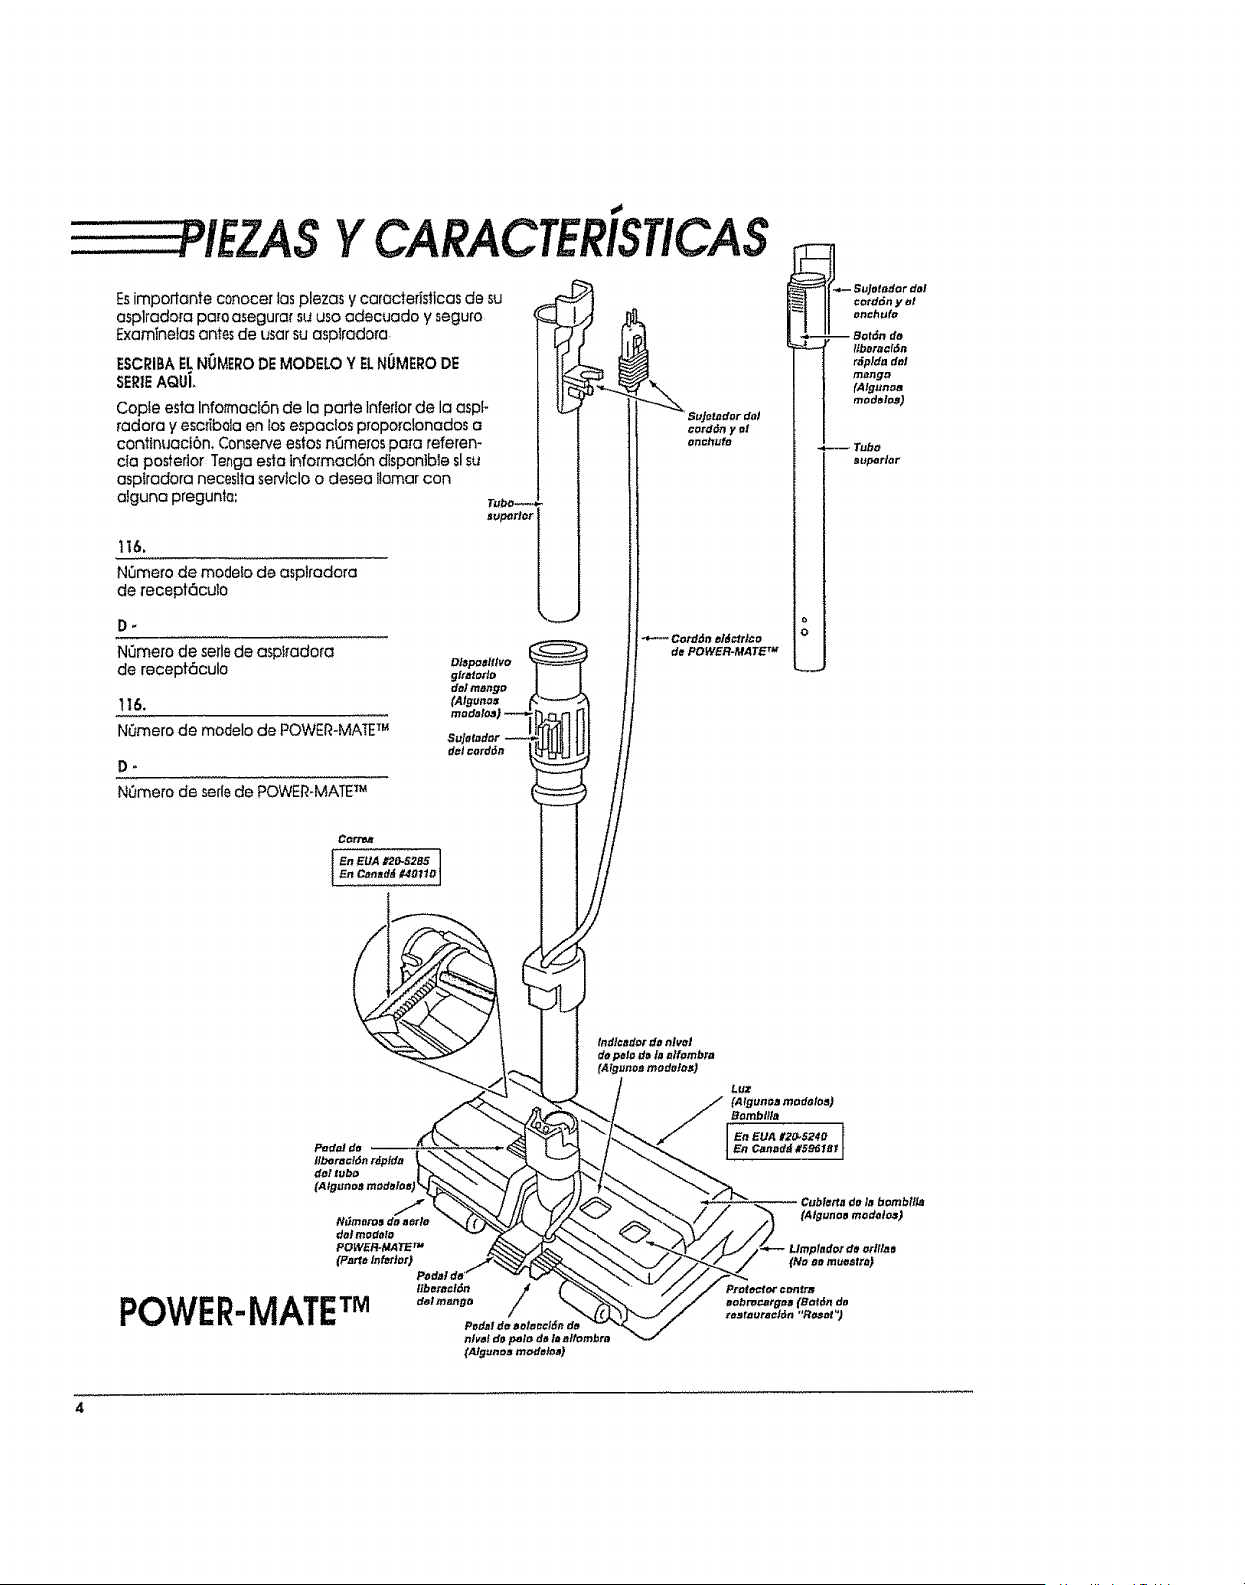
PIEZASYCARACTERISTICAS
Esimpodante conocer ;as plazas y caracteristicas de su
asplradora paro o_egura_"su usa adecuado y seguro
Examinelas antes de usar su asptradora.
ESCRIBAELNO_ERO DEMODELO Y ELNUMERODE
SEREAQU[
Cople esta Infotmad6n de la parte Inferior de la aspF
radora y eser_bolaen los espaclos proporclonados a
contInuaci6n, Conserve estos n_me_os pora referen-
cia posterior Teaga esta lnfofmac!6n dispontble slsu
aspfradora neceslta serviclo o desea flomar con
afguna preguntQ:
116.
NOme_o de modeio de asplradora
de recept6cuto
CordOn ahJctrL¢o
de POWER-MATE TM
POWER-MATE TM
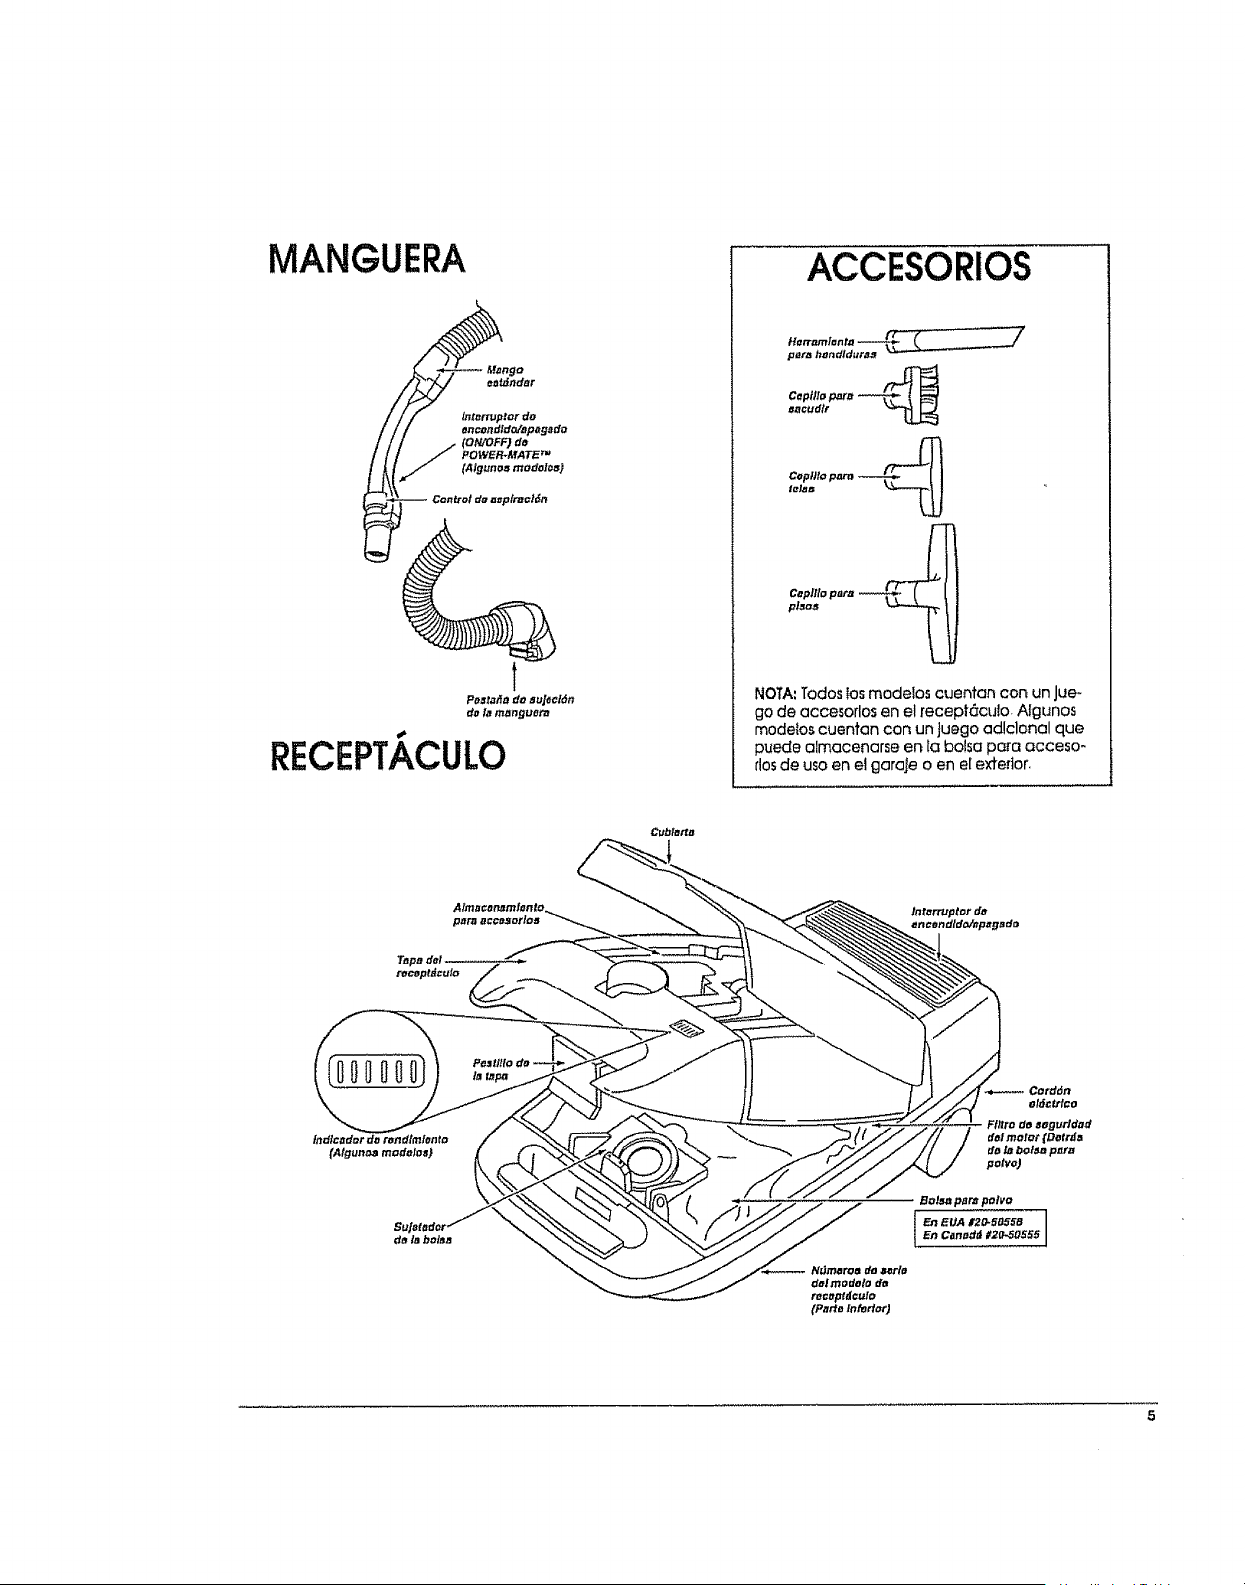
ACCESORIOS
Herramlenr.a --_._,_,_
pera hendld_tra# _
Cepttlo t:_re "'_--_
eacudlr
CoFtlto parn ._--.,,__
lelaB
C_plRo para _'_1
NOTA:Todos Ios modelos cuentan con un Jue-
go de accesorlos en el recept6cuto. Algunos
modeios cuentan con un Juego ad!clonal que
puede almacenarse en [a bolsa para acceso-
flosde uso en el garale o en e[ exterior.
Cubleda
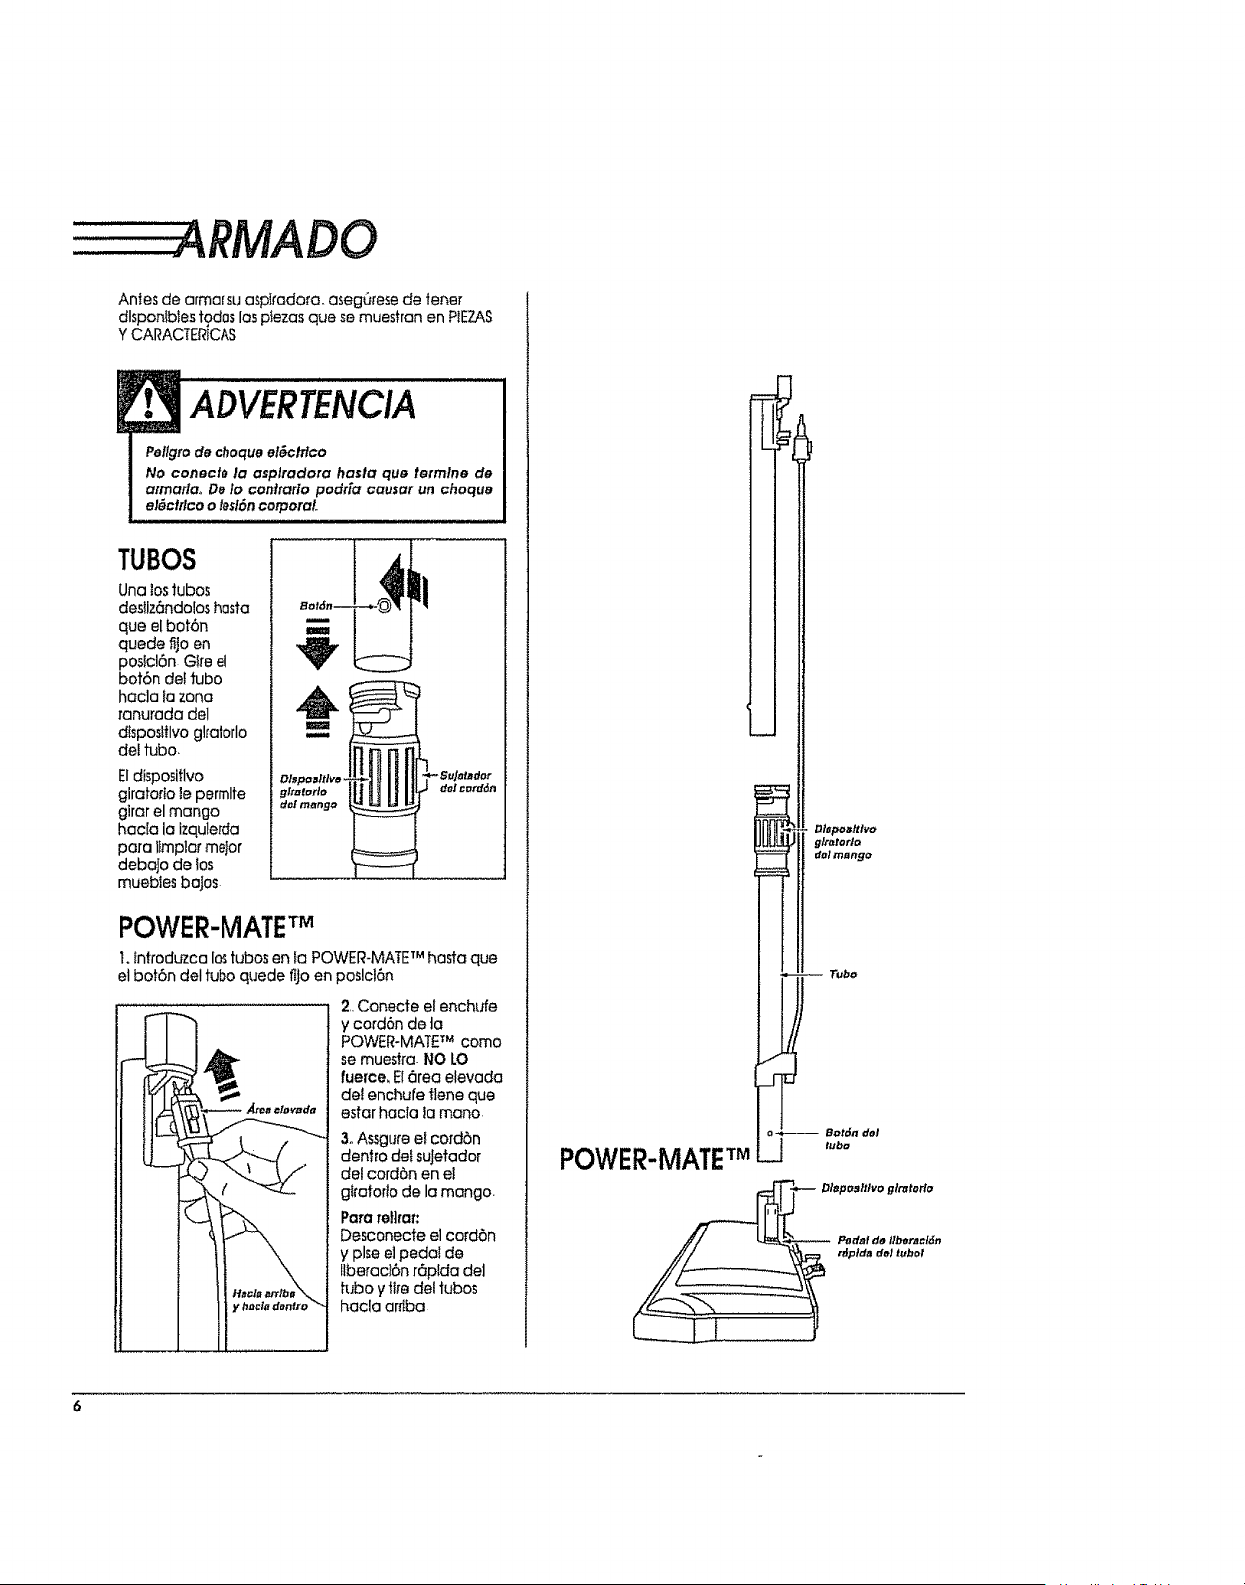
ARMADO
Antes de afmarsu asplradora, asegQrese de tenet
dlsponfbIes tgdos los ptezas que se muestran en PIEZAS
YCARACTERtCAS
ADVERTENCIA
Pellgro de choque el_clflco
No conecl_ la asplradora hasla que tetmlne de
atmarla,, De Io confrarlo podr[a causar un choquB
el_ctrlco o leslSn corporal..
TUBOS
Una lostubas
desllz6ndo[os hosta
que el bof6n
quede fijo en
posici6n Gire el
bot6n de{ tuba
hacla fa zona
ranurada del
dIsposlflvo glralorlo
det tuba.
Eldisposifivo
giratofIo le permlte
glrar el mango
hacla la izqule[da
para itmplar me]or
debajo de tos
muebJes baJos
POWER-MATETM
I. introduzca Io_tubas en la POWER-MATE TM hasta que
etbot6n del tuba quede fljo en poslcl6n
2, Conecfe el enchufe
y cord6n de ta
POWER-MAT£ TMcoma
se muestra. I,410LO
fuerce. B 6rea elevada
del enchufe flene que
estar hacia la mona
3oAssgure el cord6n
dentro dei suJefador
del cord6n en el
gi_aforio de la mango.
Para rellrar:
Desconecte el cord6n
y plse el pedal de
llberac_6n r6p[da deJ
h.fboyfl_edel tubas
hac!a arrtba
POWER-MATETM
_I
Tuba
tuba
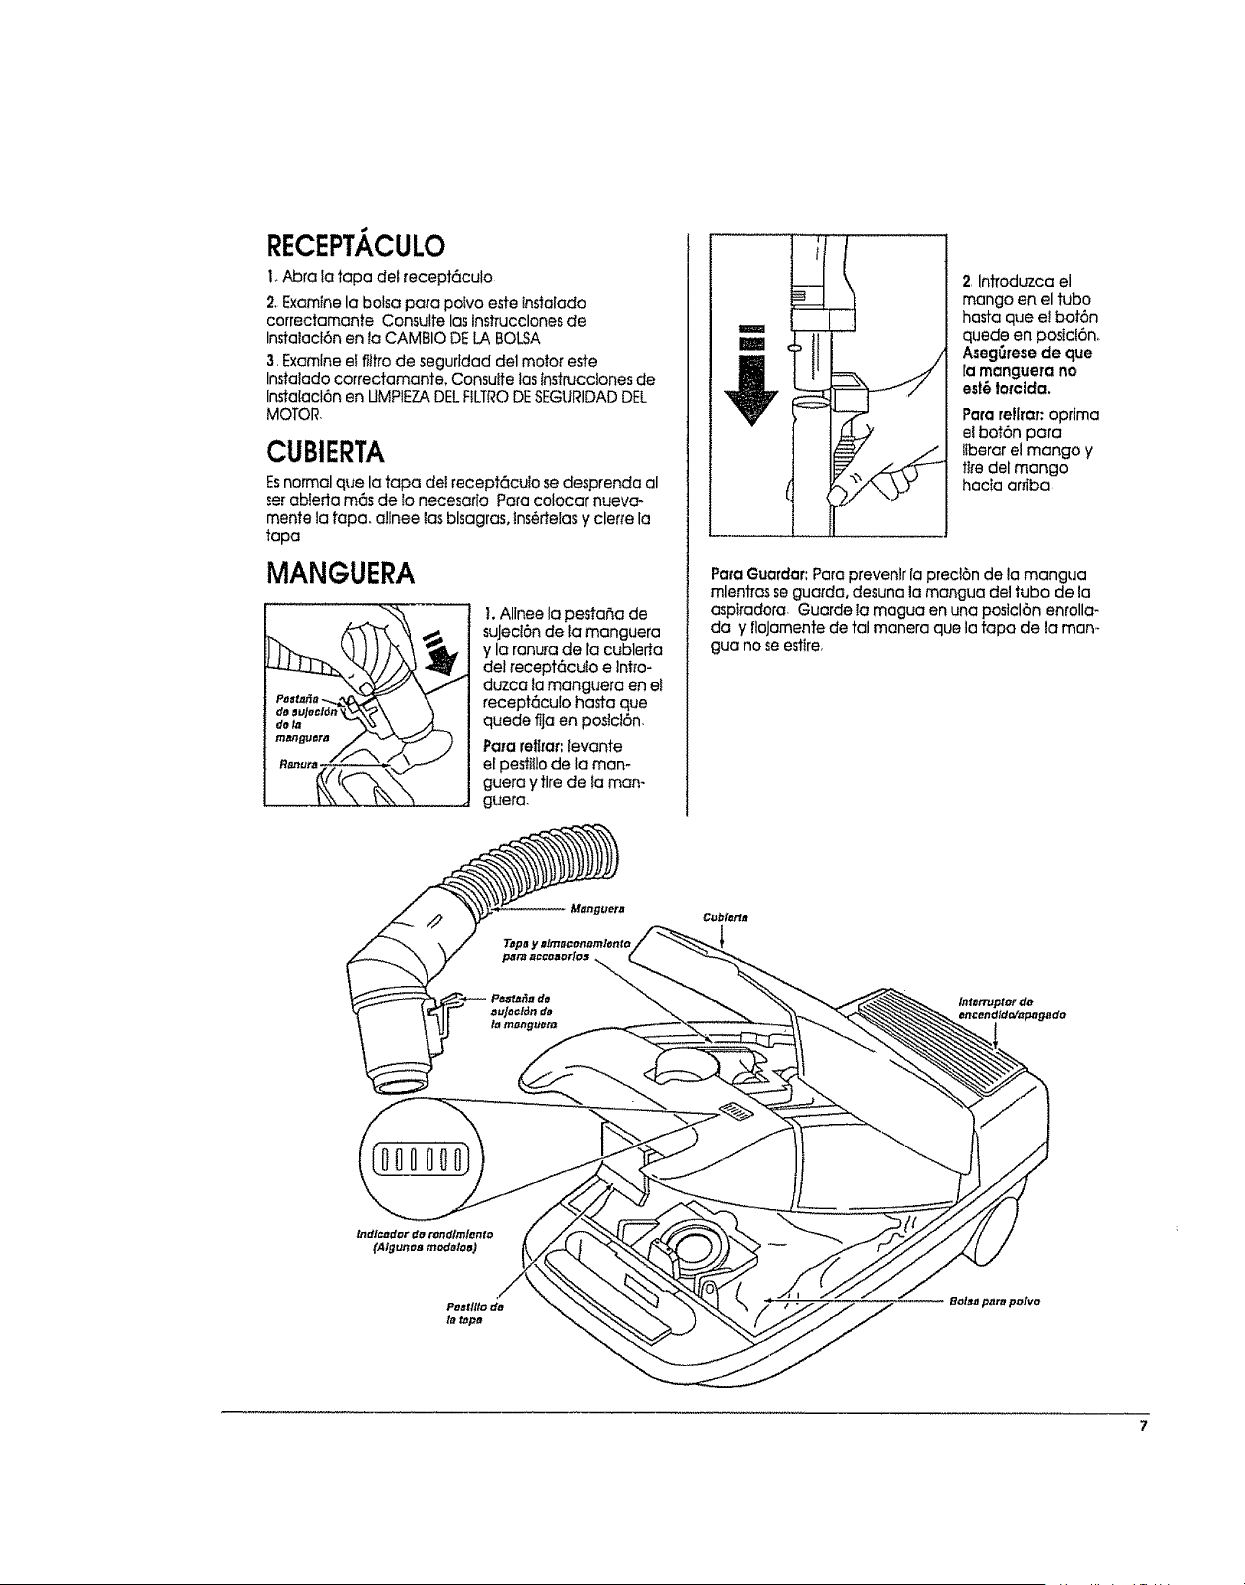
RECEPTACULO
I.A_ra _atapa del recept6culo
2. Examine la botsa para poIvo este Insta[ado
correctamante Consulte las tnstrucclones de
Instalacl6n en la CAMBIO DE LA BOLSA
3 Examine el flltro de segufldad del motor este
Instalado correctamant& Consuite las instrucciones de
lnstatacl6n en UMPIEZADEL FILTRODESEGURIDADDEL
MOTOR
CUBIERTA
Esnormal que la tapa det recept6culo se desprenda al
serabIerta m6s de lo necesar[a Para colocar nueva-
mente la tapa. allnee las blsagras, lns6rtelas y cleffe la
tapa
MANGUERA
I. AIInee la pesta_a de
suJed6n de la manguera
y la ronura de la cublerta
del receptc_cuio e ]nho-
duzca la manguera en et
recept6culo hasta que
quede flja en po._ict6n
Pararef_raf:levante
elpestlflode laman-
guera y tire de ta man-
guera.
2, Inffoduzca el
mango en el tuba
hasfa que el bof6n
quede en posicl6n_
Aseg_rese de que
ra mangue_a no
est6 lotclda.
Para reflraT:optima
el bot6n para
liberar el mango y
fife del mango
hacta arfiba
Para Guardar: Para prevenlr [a precl6n de la mangua
mlentras se guarda, desuna la mangua del tuba de la
asplradora Guarde ta magua en una poslcl6n emolla-
da y floJamente de tal manera que la tapa de la man-
gua no seestire
COMENZAR
ADVERTENCIA
Pellgrode ImlSnpersonal y dar]o ol producto
* NO enchule la asplradota slel Interruptorest_ en
la poslcl6ilON, Podtia causat /esl6npersonal o
dailo alproductoo
* Elcord6n el_cttlco se mueve r_pidamente
durante elenrollamlento°Mantenga alejados a
losnil'losyasegure espaclo llbresuflclenlepara
evltar leslonespersonales ol enrollare! cord6n,,
. NO use clovlJasublcadas arflba de rues#adores°
PodEa carat dailo a losobJetoscetcanos,
i ,i,
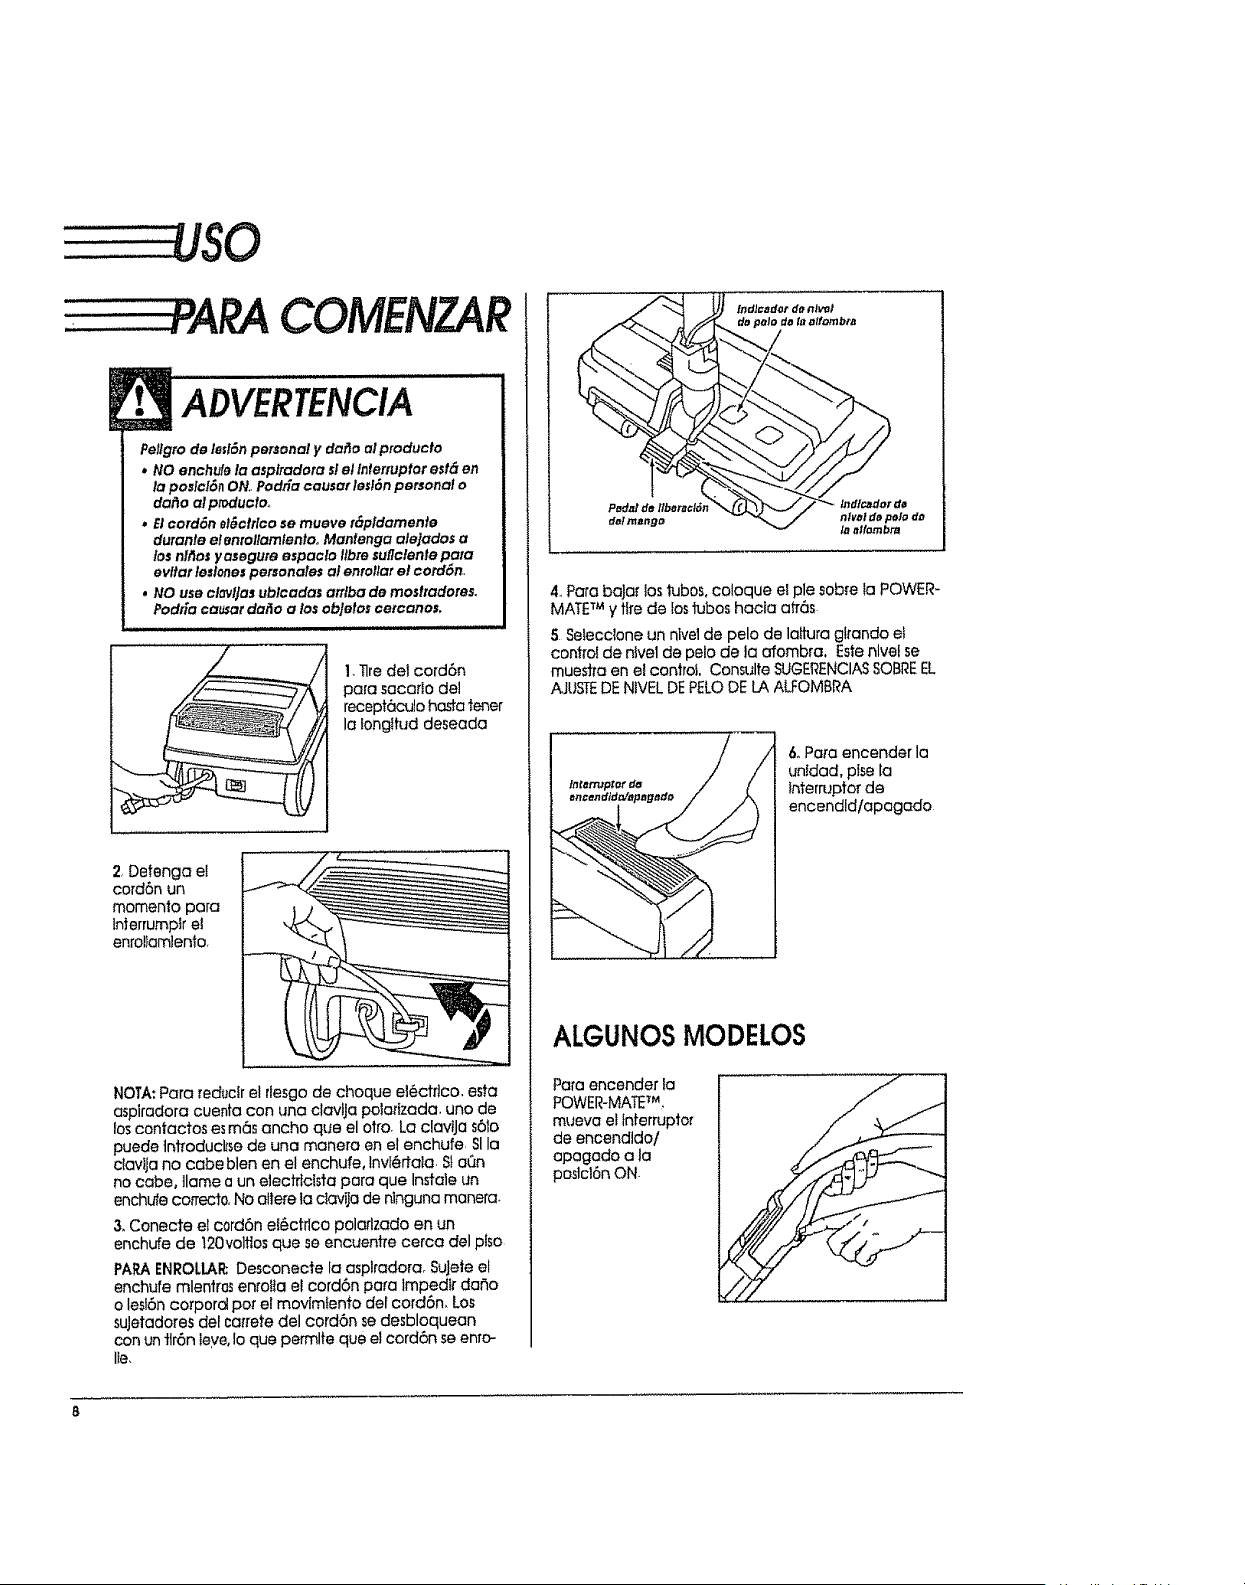
I,Tlredelcord6n
para sacarlodel
recept6culohastatener
la _ongttud deseada
2.Detenga ei
cord6n un
momento para
in_errumpIr e]
enrollamlento.
NOTA: Para reductr el rlesgo de cheque ei_ctflco, esta
asplradora cuenta con una clavlJa polatizada, uno de
los contactos es m6s ancho que el otto. La clavtJa s61o
puede ]nfroducl_sede una manera en el enchufe SI la
ciavtja no cabe blen en el enchufe, Invl@rtala. $!aen
no cabe, ]lame a un e]ectrfcIsta para que Instale un
enchufe correct0, No allere la clavila de nlnguna manera.
& Conecte el c0rd6n e!_ctrlco polaflzado en un
enchufe de t20voltios que se encuentre cerca del plso
PAPAENROLLAt_Desconecte la asplradora. SuJete el
enchufe mlentros enroila el cord6n para Impedir daSo
o lesiSn corporal per el movimtento del cord6n, Los
suJetadores del cai'rete del cord6n se desbloquean
con un ttr6n leye, Io que permlte que el cord6n se enro-
lie,
4. Para baJar los tubos, coloque e! pie sob[e la POWER-
MATETM y tire de losf1jbos hacla ah'6s
5 Seiecclone un hive1de pelo de lattura glrando ef
control de nivel de pelo de la afombra, Este nlvel se
mues#a en el control Consulte SUGERENCIASSOBREEL
AJUSTEDENtVEL DEPELODE LA AU:OMBRA
6,.Pa_'aencender la
untdad, plse[a
lnterruptorde
encendld/apagado
ALGUNOSMODELOS
Para encender ]a
POWER-MATE_M_
mueva elInterrupter
de encendldo/
apegado a la
poslcl6n ON.
.-....
,?y
PARAASPIRAR
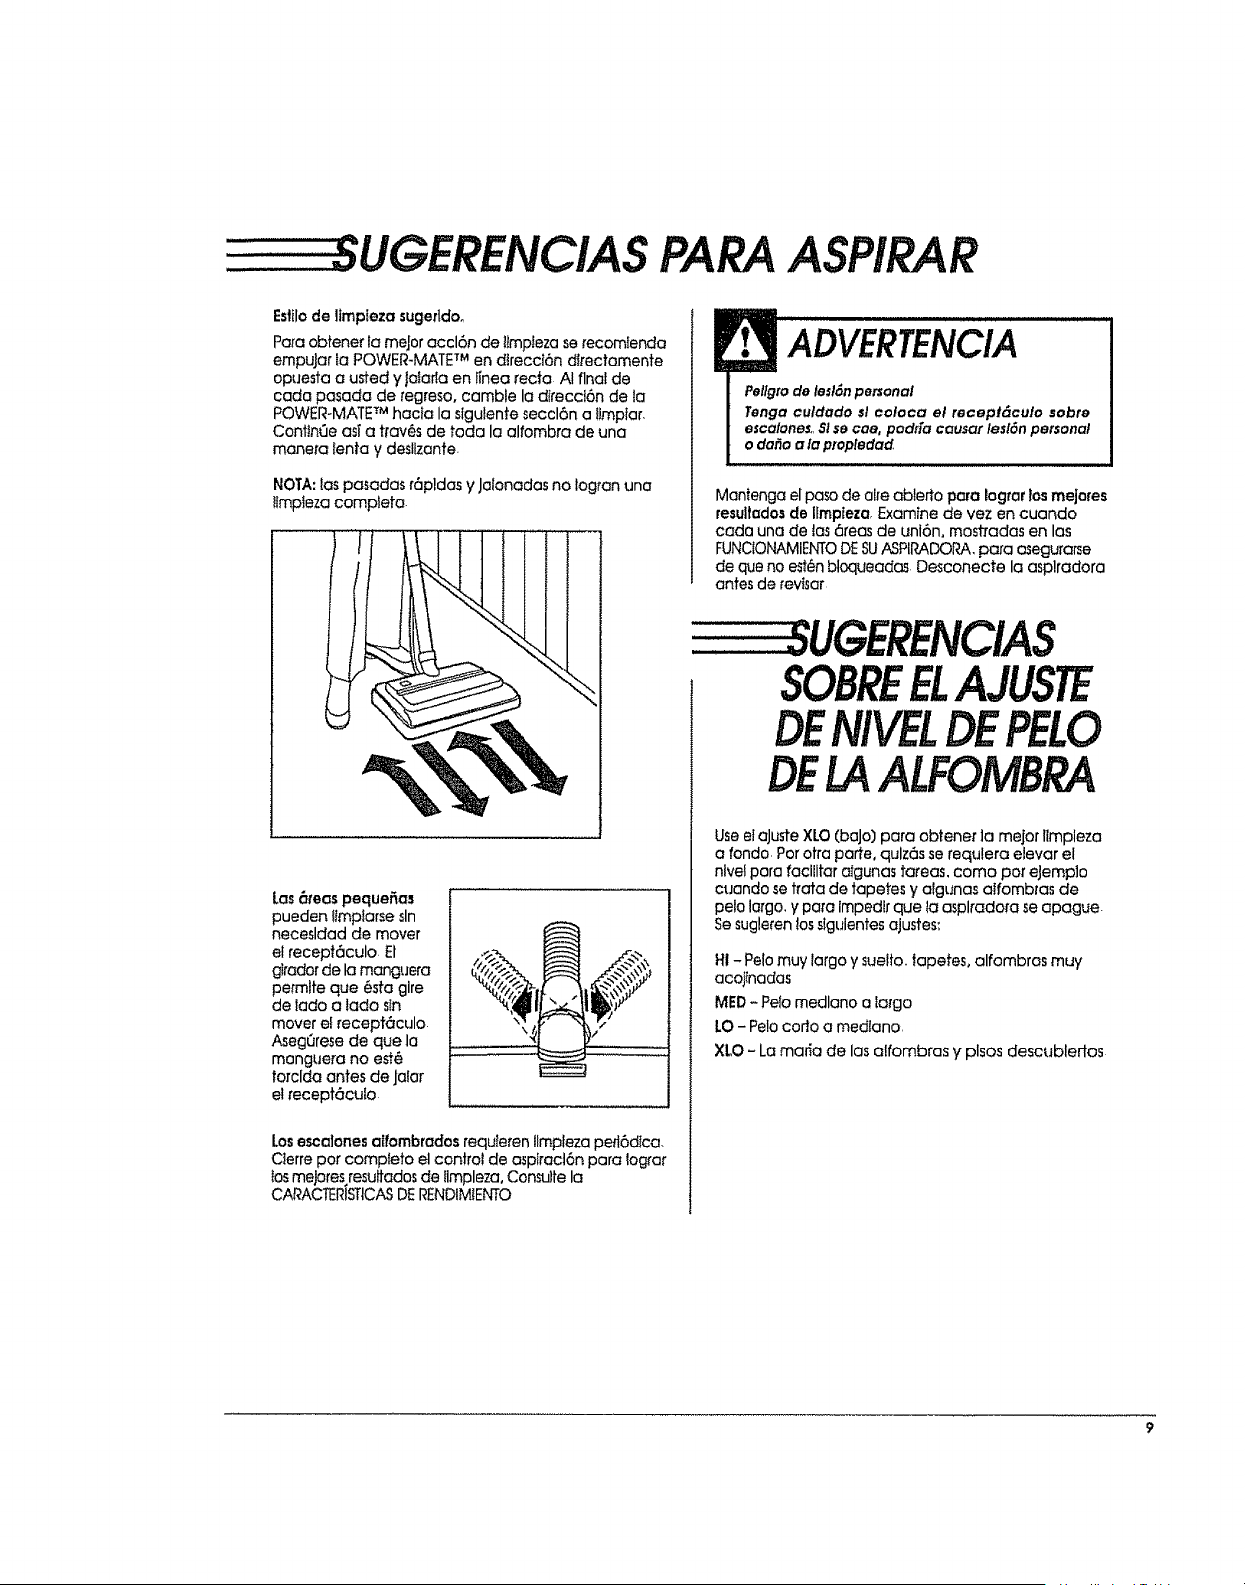
Esfilode ltmpteza sugerldo_
Pare obtene_ la meJor accl6n de l_mpteza serecomfenda
empuJar ta POWER_MATETM en direccl6n dlrectamente
opuesta a usted y jatarla en linea recto AI final de
cada pasada de regreso, camble la dlreccl6n de ta
POWER-MATE TM hacia la slgulente seccl6n a tlmplar,
Conttn_Je asf a tl'av6s de toda la alfombra de una
manera lenta y desllzante.
NOTA: tas pasadas r6pldas y Jalonadas no logran una
!tmpteza complete
i
ADVERTENCIA
Pellglode lesl_npersonal
Tenga culdado _I colaca el recept_culo sobre
escalones,,$I secae, podda causer lesl6npersonal
o da_o a la propledad,
Mantenga el paso de alre ablerto para Iograr los mejores
resultedos de IImpieza, Examine de vez en cuando
cada una de tas 6teas de unt6n, mostradas en los
FUNCIOt_,MIENTODESUASPIRADORA,para asegurarse
de que no es!_n bloqueadas Desconecte la asplradora
antes de revisar
Las_mas peque_as
pueden lImptarse sin
necesldad de mover
el recept6culo El
glrador de la manguera
pet'mlfe que 6sta glre
de lado a tado sin
mover el recepteculo.
AsegQrese de que la
manguera no estH
torclda antes de Ja!ar
el recept6cufo.
Losescalonesalfombradosrequteren llmpleza peft6dica.
Cterre par compteto etconJro! de asplract6n pare lograr
los mejores resultados de ilmpleza, Consulte la
CA_ACTERISTICASDERENDIMIENTO
SOBREELAJUSTE
DE PELO
DELAALFOMBRA
Use elaJuste XLO (baJo] pare obtener la mejor llmpleza
a rondo. Par otra parte, qulz6s se requlera elevar el
nlve! pare facilltar atgunas tareas, coma par eJemp]o
cuando se trata de tapetes y algunas aIfombras de
pelo largo, y pare impedlr que la asplradofa se apague
Sesugleren los slgulentes ajustes:
HI - Pelo muy largo y suelto, tapetes, alfombras muy
acojtnadas
MED- Pelo medlano a iargo
LO - Pelo coda a medlano.
XLO - La maria de las alfombras y plsos descublertos
CUIDADO
NO indale _ retire el mango nl lostuboscuando la
asplradota e;t_ encendida. Estopodda causar chls-
pasy da_a{;os contacfos el_c#Icos,
ACCESORIOSDELMANGO
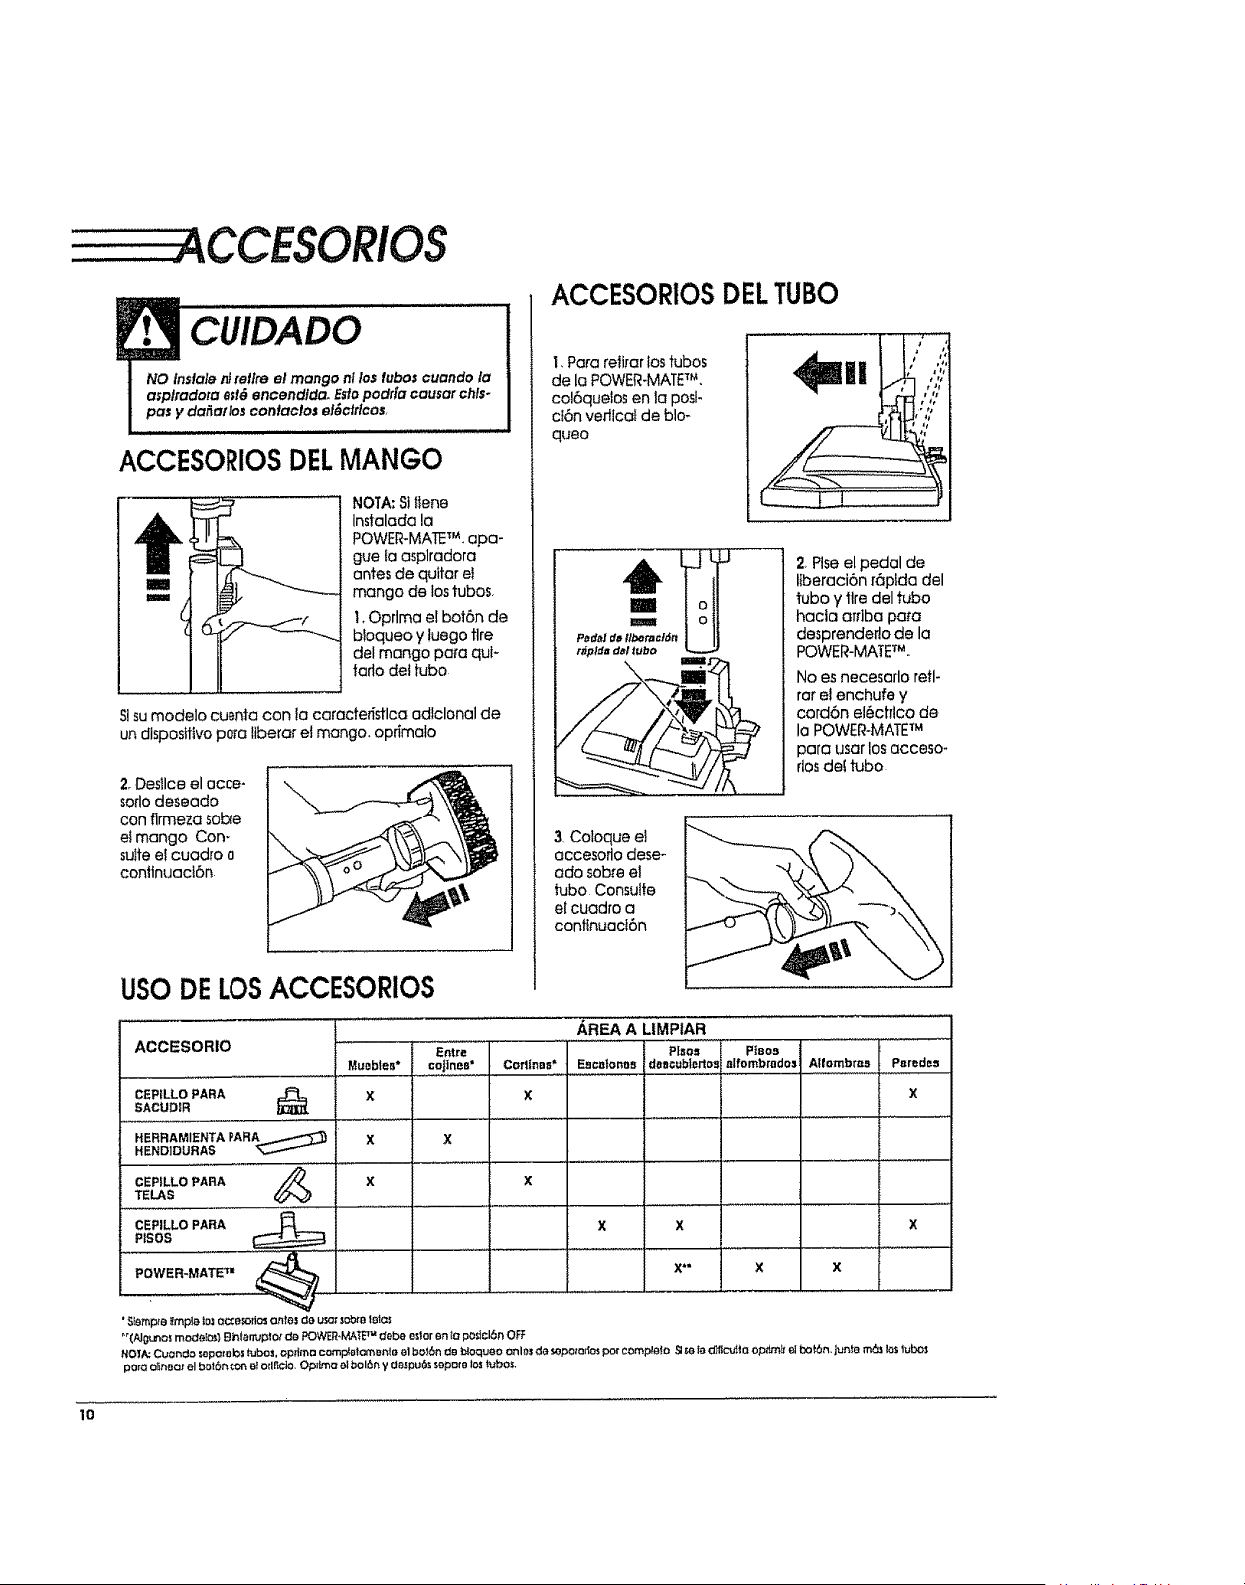
NOTA:Sttieno
Instalada la
POWER-MATETM. apa-
gue fa asplradora
antes de quttar el
mango de los tubos,
t, Optima el bot6n de
bloqueo y luego tire
del mango para quF
tarlo dot tubo
9 sumodelo cu_nta con !a caracte_stlca odlclonal de
undispositivop0raltbera_el mango, oprimalo
2,Desllce el occe-
sorlodeseado
con firmeza sob_e
el mango Con-
suite ei cuadro o
conflnuact6n
ACCESORIOSDELTUBO
I, Para reiirar los tubos
de la POWER-MATETM,
col6quelos en la posl-
cI6n vertlcai de blo-
queo
2 Plse el pedal de
Ilberaci6n r6ptda del
tubo y tire del tubo
hacla arrlba pora
desprenderto de la
POWER-MATE_U.
No es necesarlo retl-
rar e! enchufe y
cord6n el6ctflco de
la POWER-MATETM
para usar los acceso-
rlosdef tubo
3 Coloque el
accesoflo dese-
ado sobre el
tubo Consulfe
et cuadro a
conflnuaci6n
USODELOSACCESORIOS
...................... AREA A UMPIAR
ACCESORIO '"E_t'r_ 'PLs'o, Ptsos
Muobtes* cofines* Corlinas* Eacalonos das¢ubtorlos a|fombrados AtfombrL,1 Psredes
CEPtLLOPARA X X X
SACUDIR
HERRAMIENTAPARA_......._'_ X X
HEND]DURAS '_
CEPILLO PARA //-_ X X
TELAS
CEPILLO PARA X X X
PtSOS
POWER-MATE 'T=
X" X
• S_emp_eI{mpta to_ocze_ort_ ante5 ea usc¢:obj. lairds
"'(A!gLnOS mc.cfeI_} Bhtarruplor da POWER.MATETM #ebe odor en ta po_cl6n OFF
NO1/,._Cuor_eo sapo_'abstubos, oprtmo comp_ot_a'_enle el bo_6n da t:_oqueo onlos da sopo_o_ por compPa_a ._m la O_flcu_toopt_rn_rel bo_6n, jun_e m6_ los tub_
pore o'_noc=rel bot6_:cn et odrtclo, Op#na al bol_ y Oe,_pu6s sepote los tubos,
lO

........CARACTERISTICAS
DERENDIMIENTO
LIMPIADORDEORILLAS
Active los ceplilos
llmpiadores de off
lias a cada lade de
la POWER-MATETM.
Pose la POWER°
MATETM Junto aias
poredes o Juntoa
los muebles pa[a
ayudar a e]lmlnar la
tle_a acumulada
en las orlltas de la
alfombra.
ADVERTENCIA
Pellgro de leslones personales
Desconecte slempre la asplradera antes de tim-
plat los _reas de Io$ ceplllos pues _stos podgan
arrancar de manera lmptevlsta. El no hacetlo,
podr[a resulfar en leslones personales.
PROTECTORCONTRASOBRECAR-
GAS
Elprotector centre sob[ecargas lnterrumpe el motor
cuando el ceplllo se atasca_ lmptdiendo que se tempe
la coffee.
Para corregtr el problema:
I Desconecte el cord6n eI_ctrlco
2.Examine los cepllios y tas 6reas que los sopottan ase-
gur6ndose de que no est_n bloqueados y de que no
tengan demaslada acumulacl6n de peiusa
3,Destape el 6tea atascada. Consuite ta CUIDADO DELA
POWER-MAlETM.
Pare restoblecer: oprlma el bot6n de restableclmlento
ublcado en ta porte superior de ta POWER-MATETM-
Conecte y enclenda la asplradora
CONTROLDEASPIRACI6N
Etcontrol de asplraci6n
aumenta o dlsmtnuye la
asplrac!6n pare los dife-
rentes flpos de alfom-
bras y telas La asplra-
ci6n se dtsmlnuye
abriendo el control,
pare cortlnas y fapetes
iigeros, y se aumenta
cerr_ndolo, pare mue-
bles y alfombras.
GIRADORDELA MANGUERA
El glrador de la manguera
permite que la manguera
glre _lnmavei" el recept6-
culo Esto resulta Otilpara
la Ilmpleza de 6teas
pequer_as. Aseg(trese de
que fa manguera no est_
torclda antes de jalar el
recept6culo
INDICADORDERENDIMIENTO
ALGUNOSMODELOS
Cuando la unldad estO en
funcionarnlento lax iineas de
la ventanllla det Indicador no [000 000_
est6n encendIdas Cuando
se muestran completamente
rolesset6 necesarlo exami-
ner la bolsa pare polvo y
determine stest6 Ilena y examine cualquler otra 6tea
que podrfa ester atascada, Consulte la
FUNCIONAMIENTO DESUASPiRADORA
NOTA: Puede que los Ifneas se muestren en roJo el utilk
zar accesortos o sfest6 asplrando una aifombra nueva
Eslo se debe a que los accesor!os mismos reducen el
fluJode alre, o a que la pelusa de la olfombra nueva
Ilena la boise mw r6pldo,
11
" FUNCIONAMIENTODESUASPIRADORA
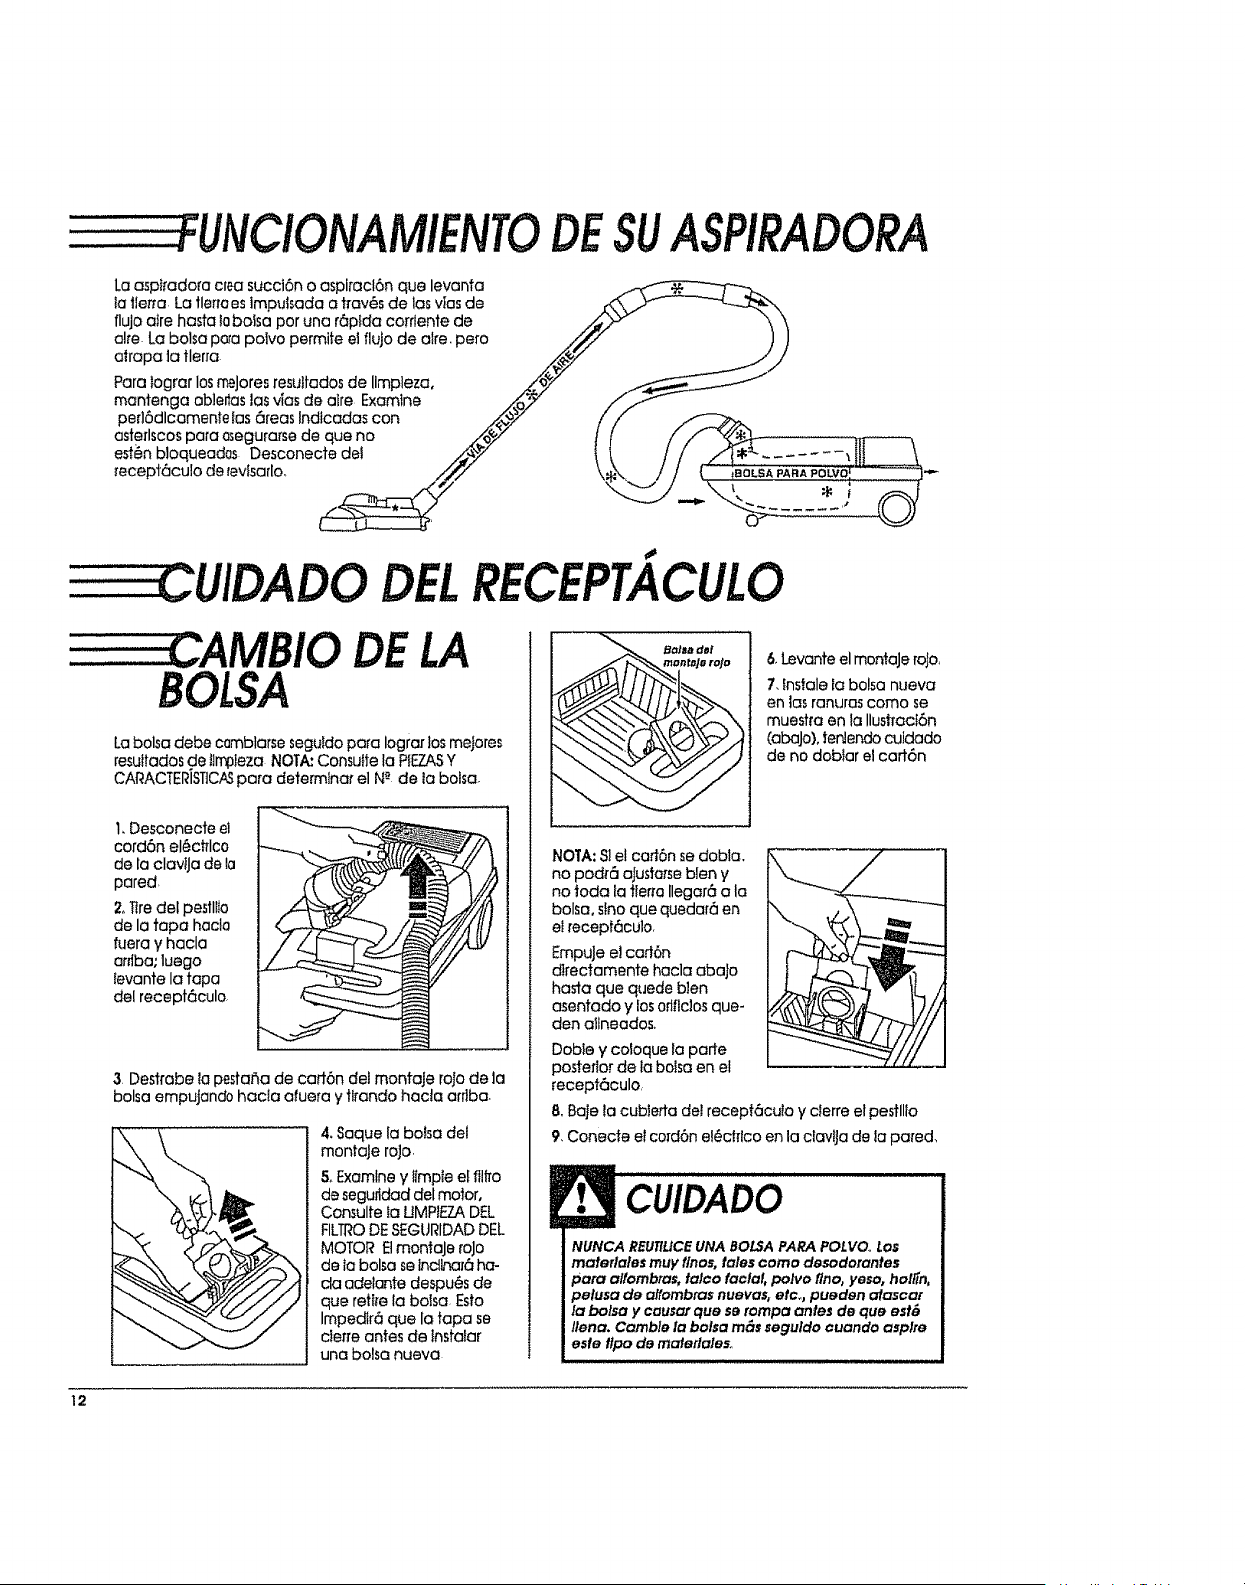
Laasp#adore cfea succt6n o aspiracl6n que levanta
ta llerra La tlerrees lmpuisada a trav6s de los vies de
flujo atre haste tobalsa par una r6pida corrtente de
alre. La balsa papa polvo permite et flujo de alre. pare
alrapa ia tlerra
Pare Iograr los trY,tares resultados de Ilmpleza,
mantenga ab!er_aslas vies de alre Examine
perl6dlcamenie ias 6teas Indlcadas con
asterlscos para asegurarse de que no
est_n bloqueadas Desconecte del
recept6culo de tevisarlo,
DELRECEPTACULO
BOLSA
DE LA
Labalsa debe cQmblarse seguldo pa[a Iograr los mejores
resuitados de tirr_ieza NOTA: Consulle la PIEZASY
CARACTERISTICASpara deterrnIna_ el N-"de la balsa,
1,Desconecte el
cord6n el6ct_Ico
de la clavtja de ta
pared,
2.Tire del pestll_o
de la tapa hacia
fuera y hacla
arriba; luego
ievante la tape
del recept6culo,
3. Des#abe la pestaSa de cad6n del montaJe rata de la
balsa empujando hacla afuera y tirando hacta arriba.
4. Saquela boise del
montaJe rata.
& Examine y iimpIe eI flllTo
de seguridad del motor,
Consulte ta UMPtEZA DEL
FILTRODESEGURIDAD DEL
MOTOR EtmantaJe rata
de ia balsa se lnclhar_ ha-
cla ade/anfe despu_s de
que retire la balsa Esto
Impedfr6 que la tapa se
cler_e antes de lnstalar
una balsa nueva
.......
6,LevanteelmontaJerata,
7, fnstale la balsa nueva
en los ranuras coma se
muesh'a en la Ilustract6n
(abaJo), tenlendo cuidado
de no dobiar el cart6n
NOTA: SIel caff6n se dobla.
no pod_6 ajusta_seblen y
no toda ia tier_a Ilegar6 ala
balsa, sino que quedar6 en
etrecept6culo.
EmpuJe e! cart6n
dlrectamente hacla abaJo
haste que quede bien
asentado y losoflflclos que-
den a11neados,
DobIe y coloque la porte
pastetlor de to balsa en el
recept6culo,
8, Bale la cubietta del recepf6cu!a y clerre el pestllio
9, Conecte e!cord6n el_cf_lco en la clcMJa de la pared,
CUIDADO
I UNCA REUTtLICEUNA BOLSA PARA POLVO, LOS
maferlales muy flnos, tales coma desodorantes
pare alfombras, talco facial, polvo flno, yeso, holgn,
pelusa de alfombras nuevas, etco, pueden atascat
la balsa y causer qua se tampa antes de qua esf&
/lena. Camb/e la balsa ross seguldo cuando aspire
esfe flpo de materlales,,
12
DELFILTRODESEGURIDAD
DELMOTOR
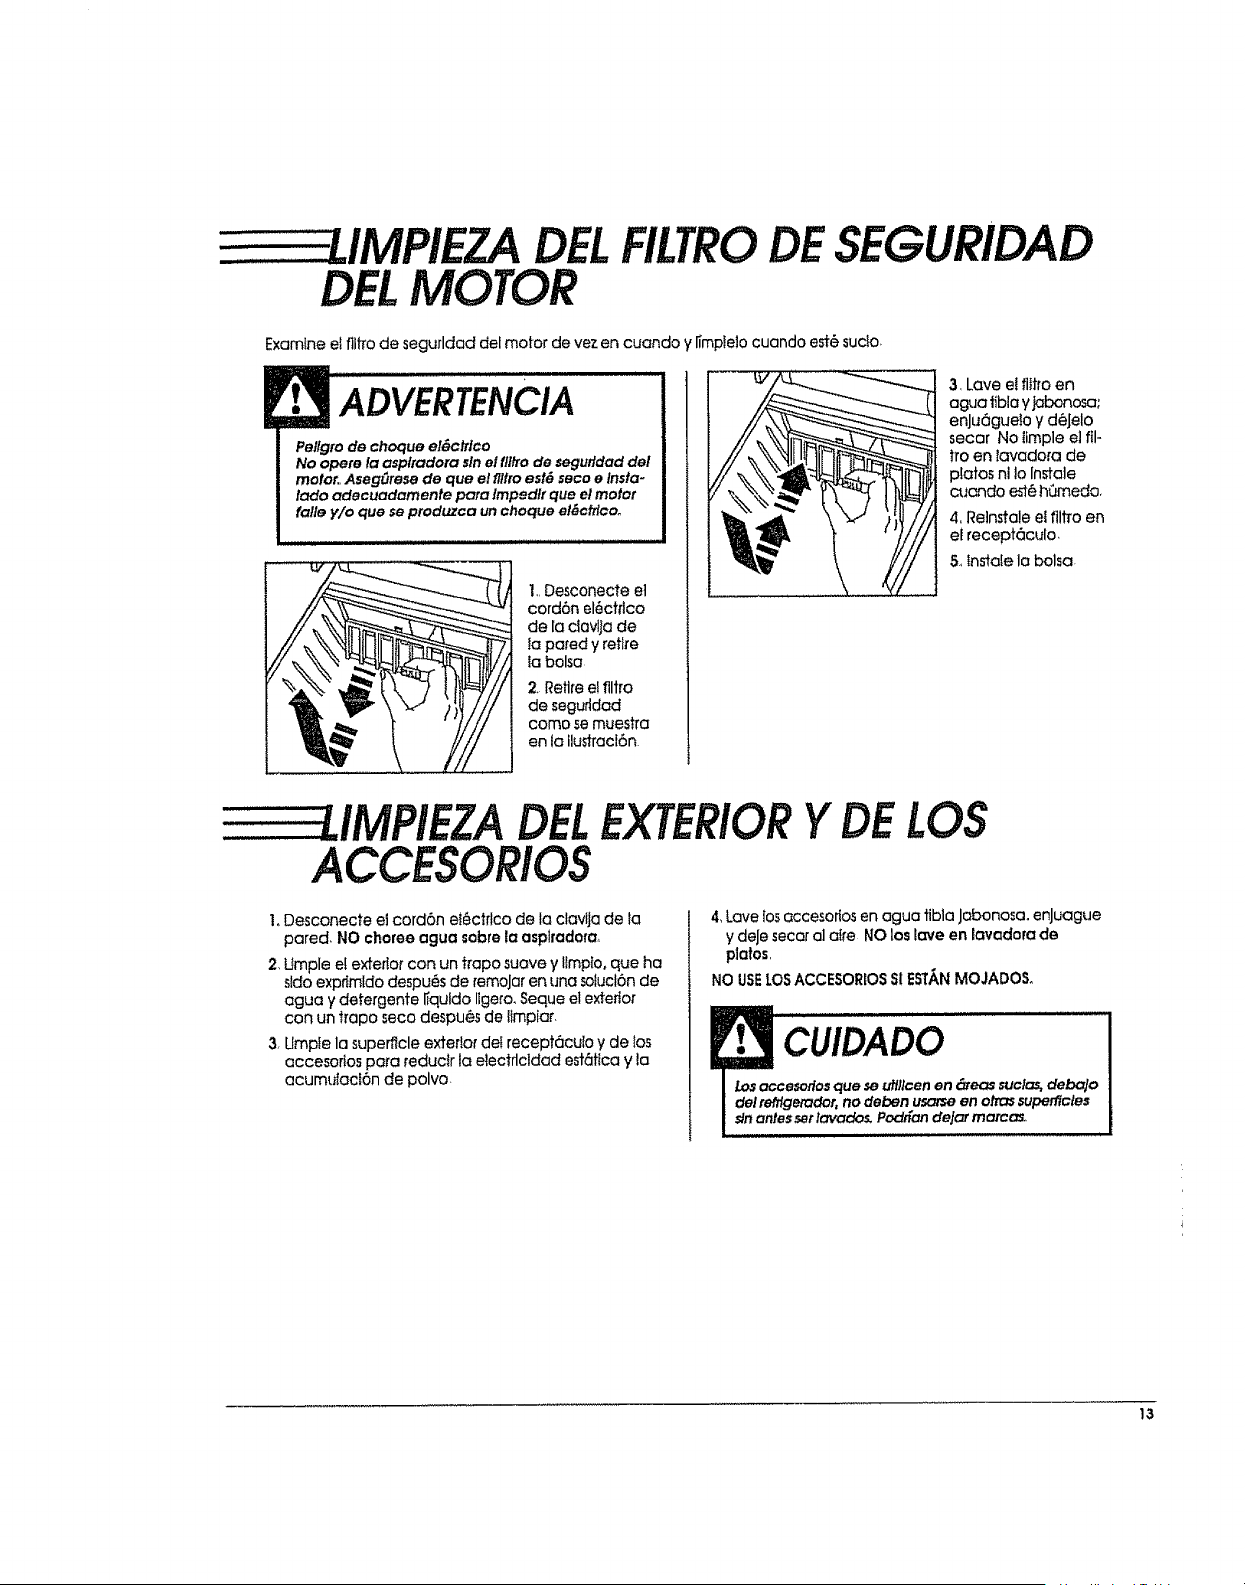
Examine el flitro de segurldad del motor de vez en cuando y ii"mptelo cuando est@sucio,
ADVERTENCIA
Pellgro de choque el&ctrlco
No opere la asplradora sinel flltrode segufldad del
motor..Aseg[Jresede que el flflro est6 seco e Insta-
iado adecuadamente para /mpedlr que el motar
falle y/o que se produzca un choque el_ctrtcoo
1. Desconecte el
cord6n el_ctilco
de la ciavlla de
la pared y retire
la balsa
2 Retire el flltro
de segurldad
coma se muestra
en la ilustracl6n
3, Lave e! flitro en
agua tibia y jabonosa;
enJtJ6gue!o y d_Jelo
secar No llmple el ill-
tro en tavadora de
piatos ni Io lnstale
cuando est_ h(Jmeda.
4. Relnstale el filiTo en
ef recept6culo
5,,instaie la balsa
DEL
ACCESORIOS
EXTERIORY LOS
1, Desconecte el cord6n ei6ctrlco de la clavlja de la
pared, NO charge agua sabre la asplradera_
2, Umple et exterior con un ffapo suave y ltmpto, que ha
sldo exprimldo despu6s de remoJaren una sotucl6n de
agua y detergente ffquldo ligero, Seque el exterior
con un tropo seco despu6s de lImpiar.
3, Umpfe la superflcle exterior dei recept6culo y de los
accesortos para reduclr la electdcldad est6tica y la
acumutacf6n de polvo
4,Lavelosaccesoriosen agua tibia jabonosa, enJuague
ydeJesecara]ai_'eNO loslaveen lavadorade
platos,
NO USE_-OSACCESORIO$SlESTANMOJADOSo
'C[,ilDADO
esoflos que se utlllcen en _eas suclas,debaJo
etador, no deben usarseen arrassuperflcles
essetlavados. Pad_an de!_, marcas,.
13
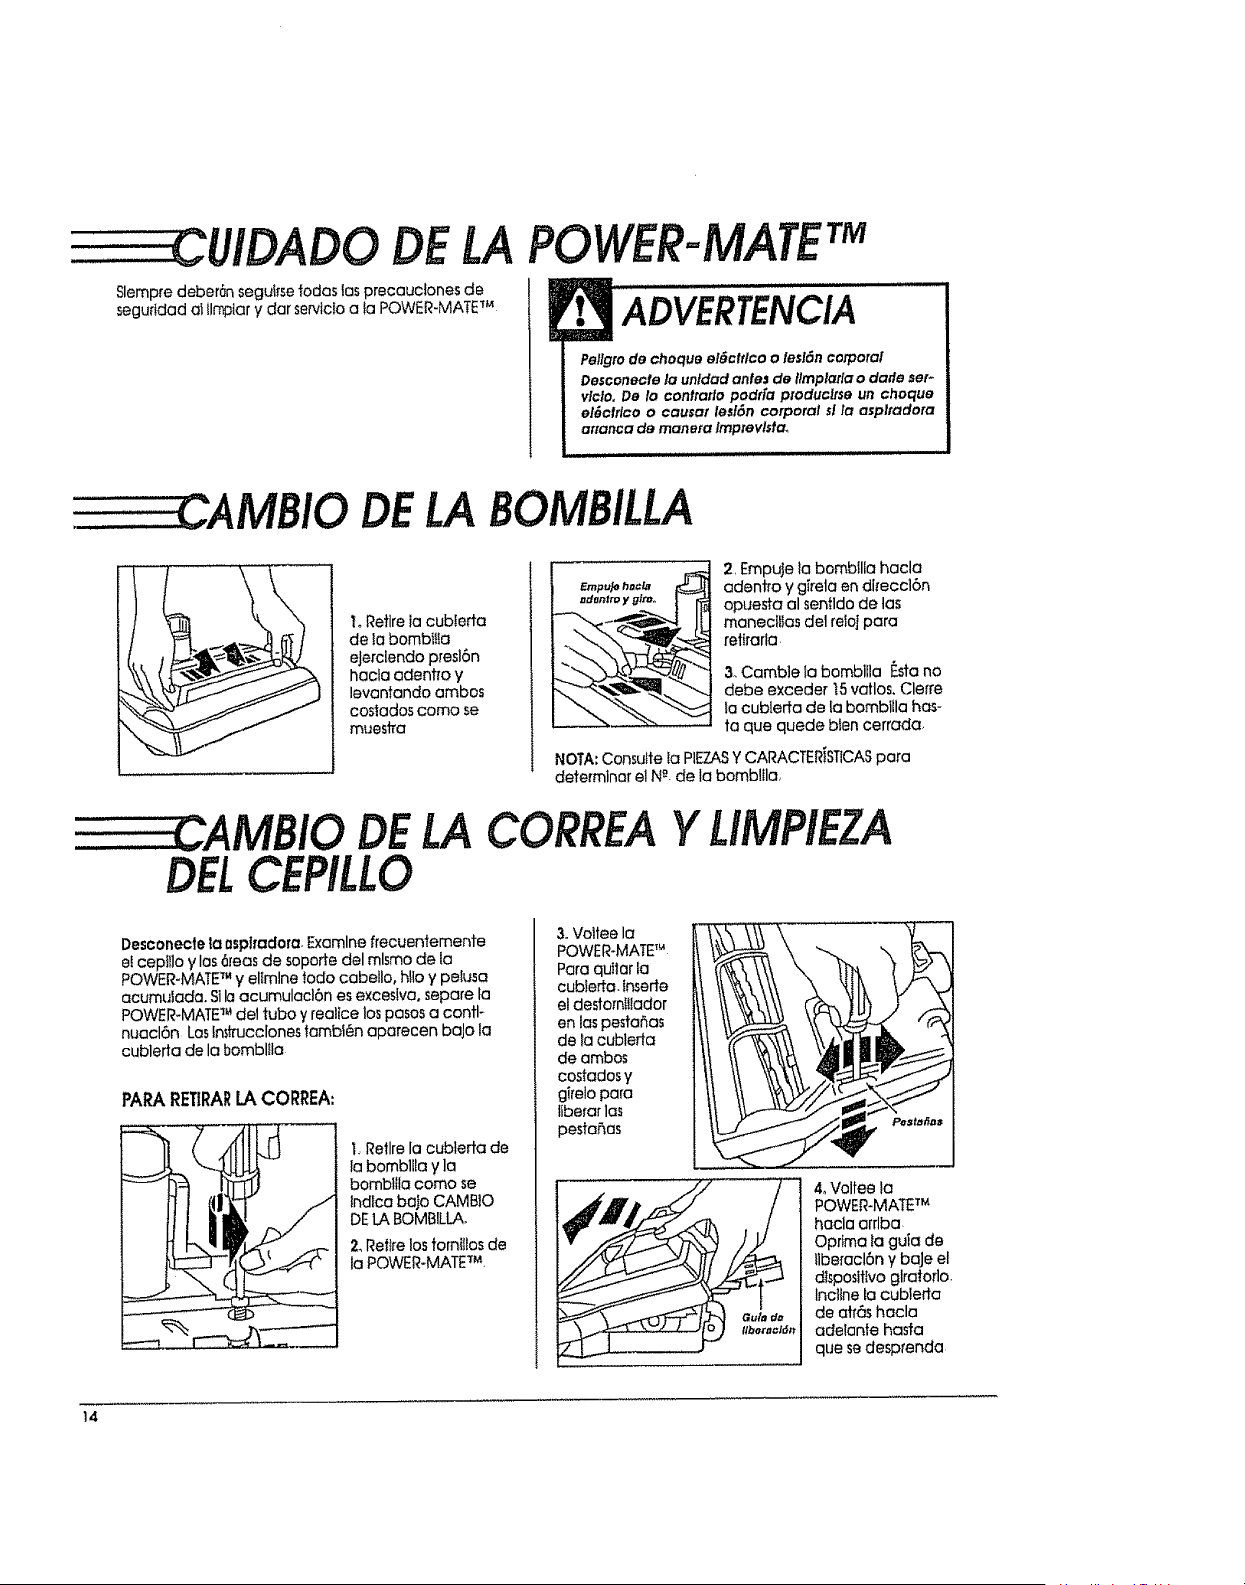
DELA
Slempre deber_n segu#_e fodas {asprecaudones de
seguridad al lln13tary dar servicIo a fa POWER-MATETM
POWER=MATETM
ADVERTENCIA
Pel[gro de choque el_ctrlco o lesi6n corporal
Desconecfe la unldad anles de llmp_tla o da#e ser-
vlclo, De to contrado podda produc#se un choque
el{_clflco o causar lesl6n corporal sl la aspltadora
arranca de manera Imprevlsta,
CAMBIO DELABOMBILLA
L Retire ia cubterta
de la bombtIta
eJerclendo presl6n
hacla aden#o y
levantando ambos
costados coma se
muestra
DELA
CEPILLO
£mpuJo h#€l_
.d..,m y.t_o I - r_
2, Empuje la bombflia hacla
adentro y girela en dl_eccl6n
opuesta al sentldo de las
maneci_Ias del relolpara
retirarla
3. Camble {a bombllla F.sta no
debe exceder t5 vatlos. Clerre
la cubierta de la bombilla has-
ta que quede bien cerrada,
NOTA: Consutte ia PIEZASYCARACTERiST1CASpara
determinar el NR.de la bombltla,
CORREAYLIMPIEZA
Desconecte la asptradora. Examine frecuentemente
et cepIIlo y las 6reas de soporte del mlsmo de la
POWER-MATE TM y ellmlne todo cabello, Nio y peiusa
acumulada. Slh acumulacl6n es excesiva, separe ta
POWER-MATE TM de1tuba y realice los pasos a contl-
nuacl6n Los lr_trucclones tambfen aparecen baJo la
cublerta de la bomblila
PAPARETIRARLACORREA:
1_Retire la cublerta de
{a bomblila y ]a
bombllla coma se
tndfca bafo CAMBIO
DELABOMBILLAo
2, Retire los families de
la POWER-MATE TM
3. Voltee la
POWER-MATETM
Para quttar ;a
cubieffa. Inserte
el destornIiiador
en las pestahas
de lacublerfa
de ambos
costados y
girelo para
liberar la_
pestahas
40Voltee la
POWER-MATE TM
haclaarrlba
Opdma lagulade
flberacl6ny baJeel
dlspesttivoglralorlo
Inclinetocublerta
de atr6shacla
adelante hasfa
que sedesprenda
14
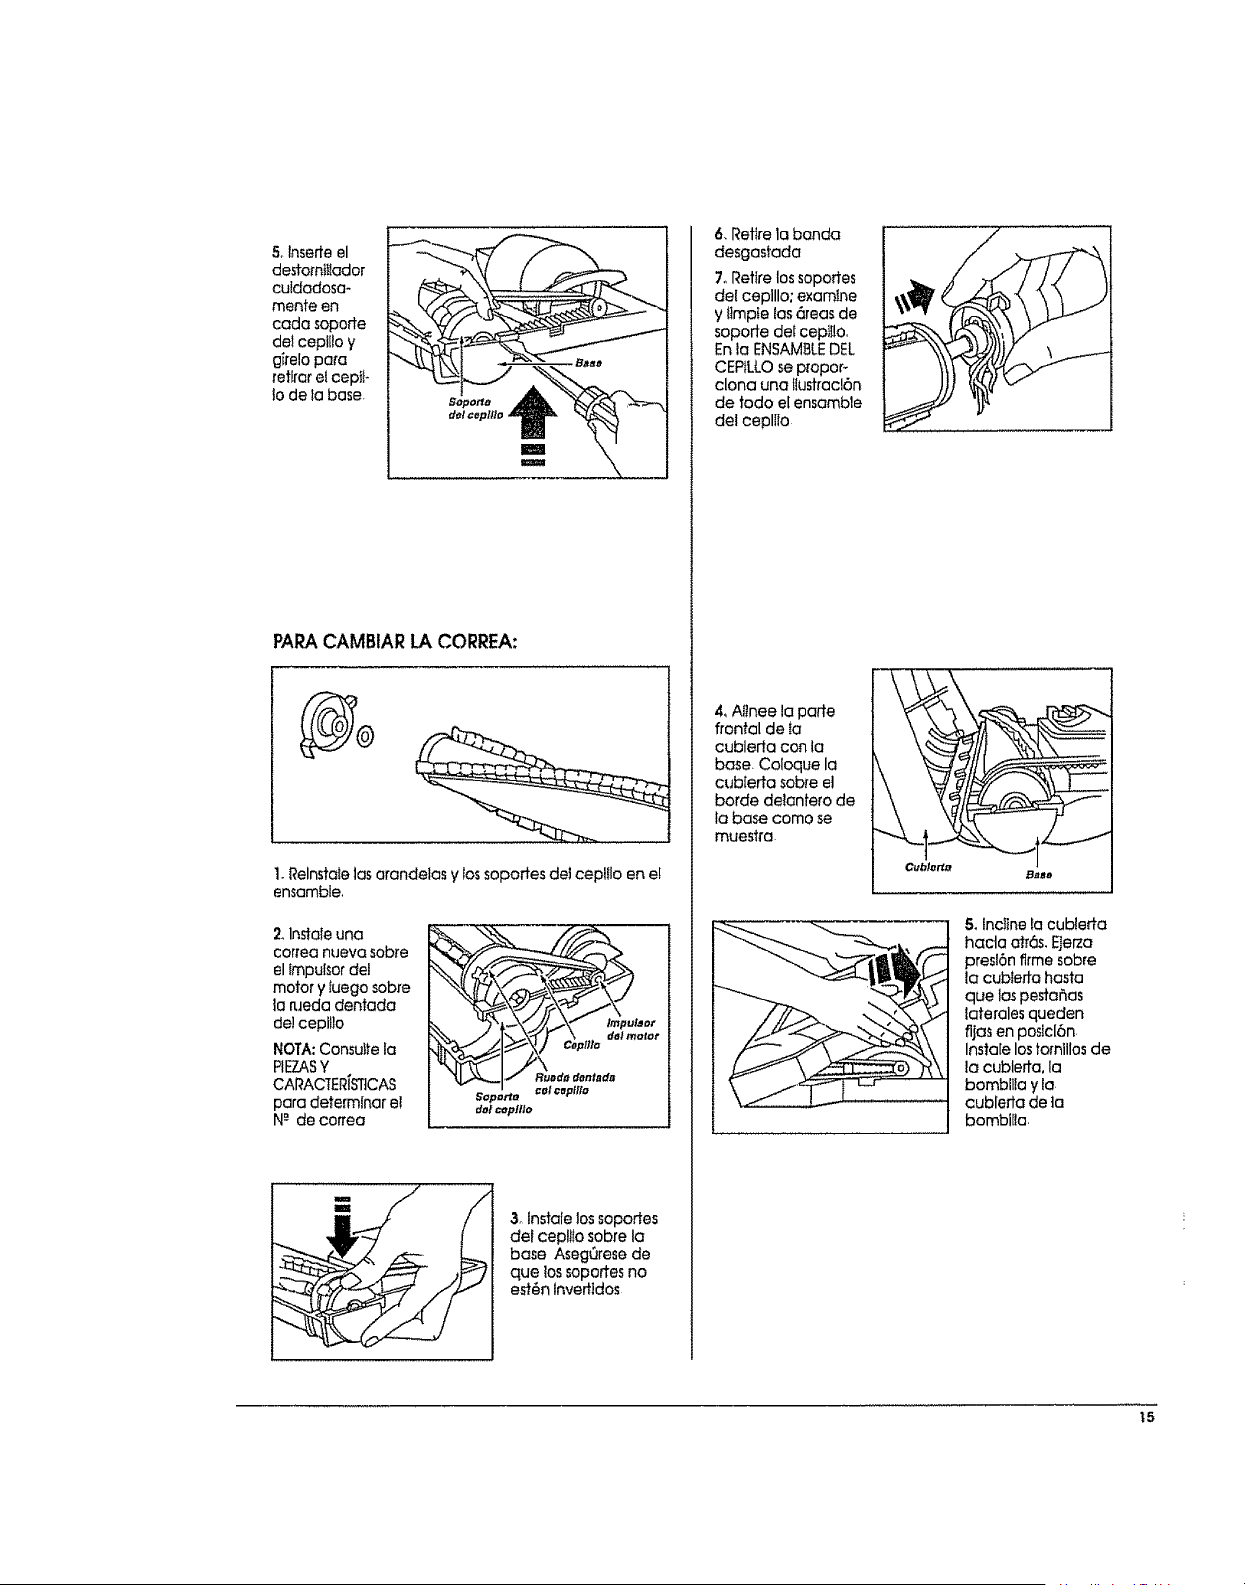
5olnserte el
de#omiIiador
culdadosa-
mente en
cada soporte
del cepl!to y
girela para
retlrar el cept_-
Io de ta base.
PARACAMBIARLACORREA:
t, Relnstaie las arandelas y lossoportes de! ceplflo en e!
ensamble.
2, In_aleuna
corfea rlueva sobre
el lmpulsor del
motor y fuego sobre
la p.Jeda dentada
de] cepib]o
NOTA: Consuite la
PIEZASY
CARACtER[b'qtCAS
para determinar el
N-" de coffee
Soportr_
dQl =epttlo
& lnstale los soportes
del cep!ilo sobre la
base AsegQrese de
que los sopoffes no
est6n lnvertldos
6, Retire la banda
desgastada
7oRetire los soportes
del ceplllo: examine
y Iimpte tas 6reas de
sopode dei cep$i!o.
Enla ENSAMSLEDEL
CEPtLLOse p[opor-
clona una !lustracl6n
de tado el ensamble
del cepllio
4, Afinee la porte
frontal de to
cublerta con la
base. Coloque la
cub[erta sob_e el
borde de!antero de
la base como se
muestra
Cubler1_
Base
5, Incllnelacubleda
haclaatr6s,EJerza
presl6n flrme sobre
ta cubted-a hasta
que las pesta_as
laterales queden
fljas en postcl6n
Insta[e lostomlllos de
la cubleffa, la
bambilta y ia
cublerta de la
bombilla,
_5
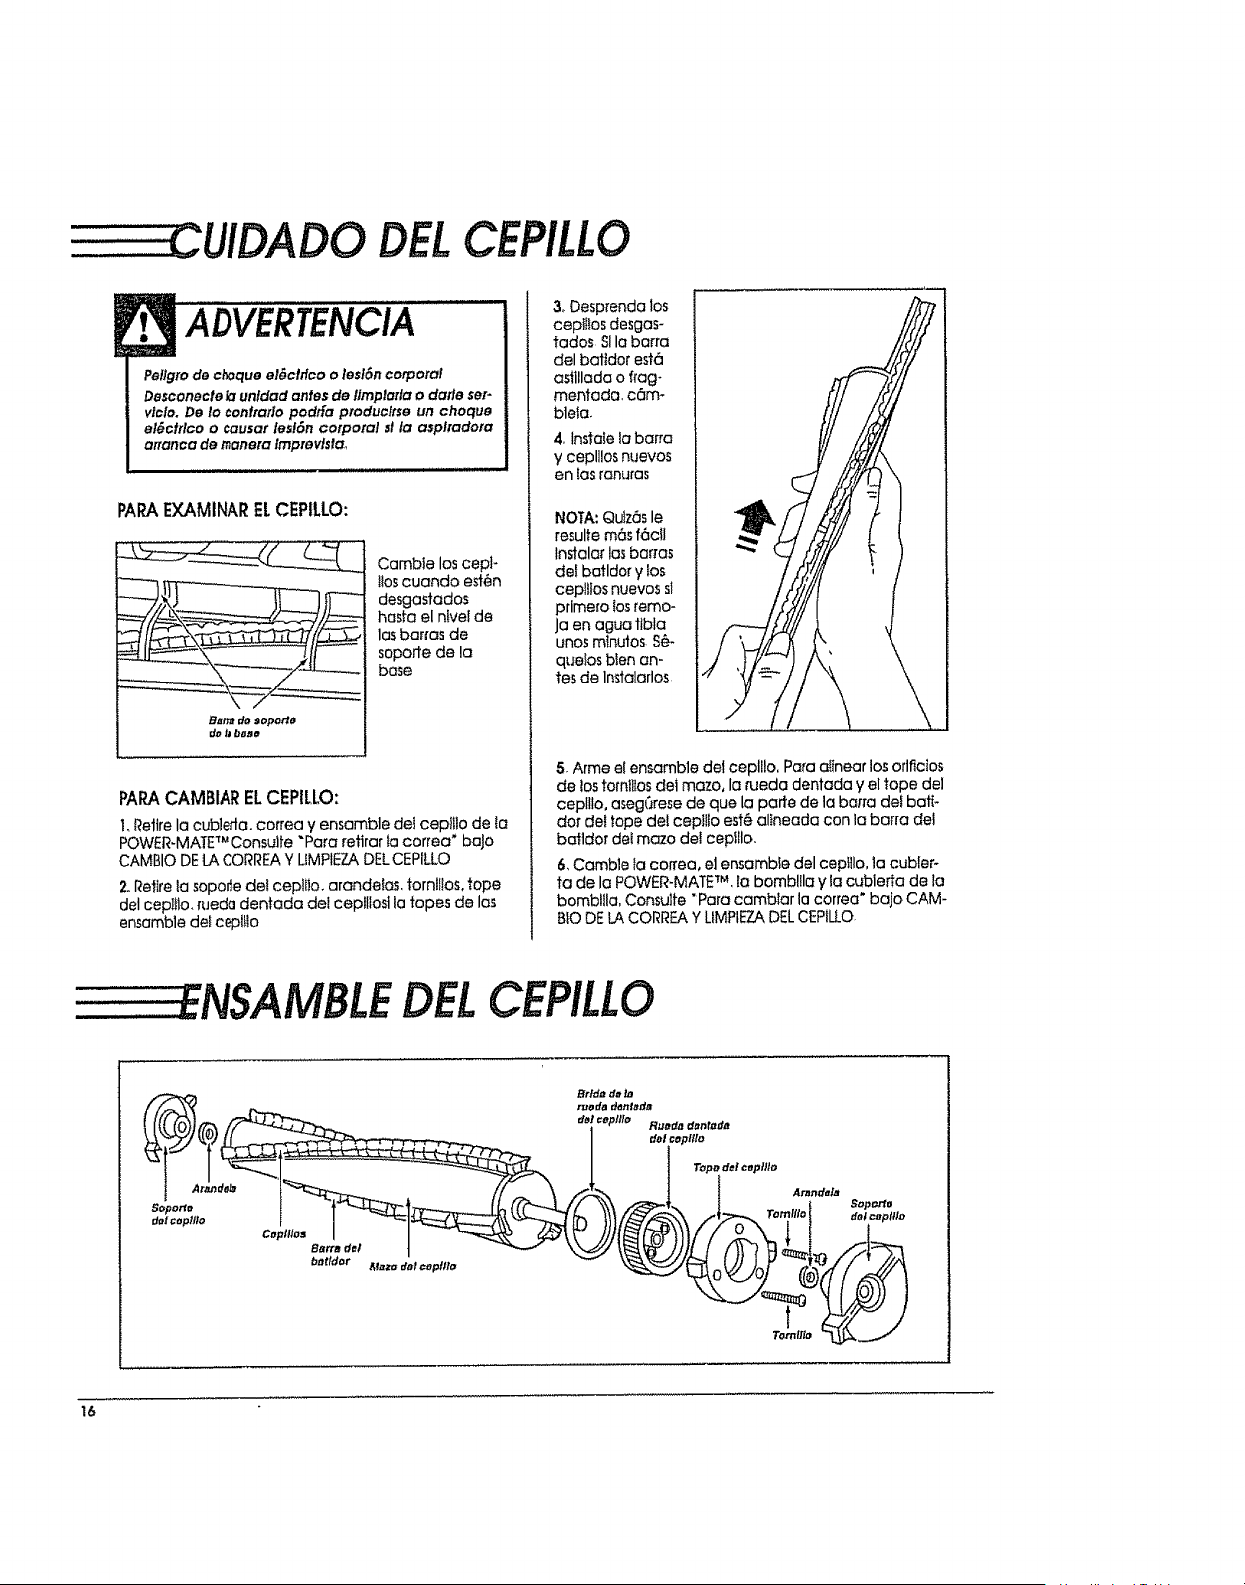
DELCEPILLO
ADVERTENCIA
Pellgro de choque el_clflco o lesl6n corporal
Desconecle lclunldad antes de fimplafla o dafle ser-
vlcla. De to confrclflo podr[a produclrse un choque
el_ctrlco o causar lesl6n corporal sl la asplradom
artanca de r_anera Imprevlstao
PARAEXAMINARELCEPILLO:
Bn_ do sopo_'o
do _ ba_o
Cambie los cepl-
t!oscuando est6n
desgastados
hasfa el ntvei de
los barras de
soporte de la
bose
PAPACAMBIARELCEPILLO:
1,Retire la cub]efla, correa y ensemble dei cepltlo de la
POWER-MATETM Consulfe "Paro retlrar la correa" baJo
CAMBIO DELACORREAY UMPIEZADEL CEPILLO
2oRetire ia soporie deI ceplflo, arandefas, tornltios, tope
dot oepiIlo, rueda dentada dot ceplliost la topes de los
ensomble dei cept_io
3, Desprenda los
cept;tos desgos-
tados SIla barra
del battdor est6
astllloda o frog-
mentada, c6m-
blela.
4, lnstoie lo barra
y ceplilos nuevos
en ias ranuras
NOTA: Qulz6s le
resulte m6s f6ctl
lnstalar losbar,as
del botldor y los
cep!llos nuevos sl
prime_o losremo-
ja en ague ttbla
unos mtnuJos S_-
queios bien an-
tes de lnstolarlos
5, Arme el ensemble del cepll!o. Para oilnear los orlficios
de los tota!!los del mazo, la rueda dentado y el tope del
ceplllo, asegC_resede que la porte de la befra del batt*
dot del tope def ceplilo est_ oltneodo con 1oborro det
batldor dei mazo de! cepfllo.
6, Camble ia coffee, e] ensemble del cepttlo, la cubler-
ta de la POWIER-MATETM, lo bombl!lo y Io cublerta de la
bomblUa, Consu]fe "Pare camblar la correa" bajo CAM-
BIO DELACORREA Y LIMPIEZADELCEPILLO.
NSAMBLEDELCEPILLO
Coplflos
Barre del
bnttdor
t
Tomflto
16
RECONOCIMIENTO DEPROBLEMAS
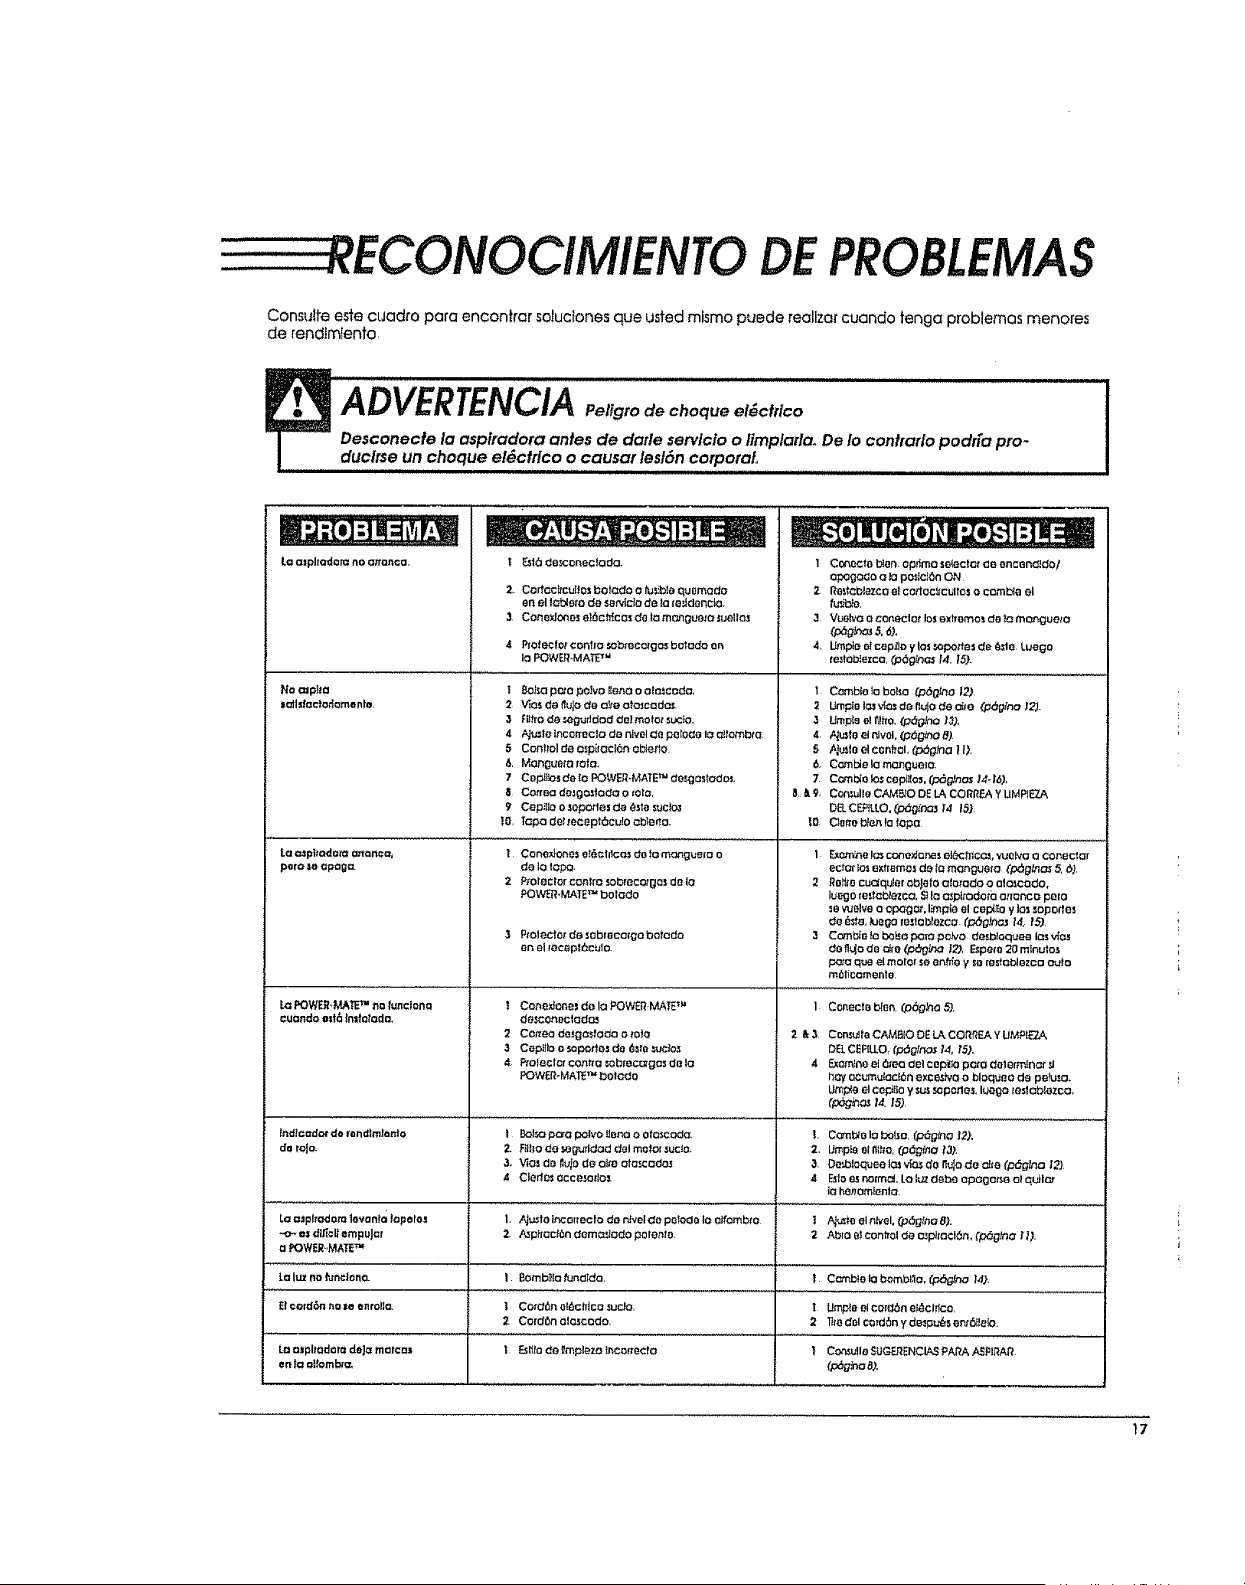
Consutfe este cuadro para encon)rar soluc(ones que usted mismo puede reallzar cuando fenga problemas menores
de rendtmlento
La mphadora no atranca
Ha _rpl_€l
laJlda_o_amento.
paro _o apaga.
La POWER.MKR TM no/undona
cuondo ezt6 (nltotodo,
i _16 do_onecto(:la.
2. Corfoc_cu(_osbo_ado o tu_ib(oqu0mado
en el _oblorode set,do de Io(_'Jd_nc_.
3. Co_o_lo_os e)_c_c as d_ lo m_0uo_o luollo._
40(o(ec(_ cor_ho _bmco._Oc)sbolado ,0n
IOPOW_.MA_ _
i 0o_ p_o po_vol(enoo olmccdo.
2 V_osd_ t_u)ode o_e oto_cado_
3 FU_rode_g_ddodde)molotsuc)o,
5 Control de o_pi(oc)6nob_erto
6. Mon_ueto rata.
7 C_pU_o_de (o FOWER.MATE_ desga_(odo_.
9 Cepi(Io o (oporto | da (_st_tsuc(o_
t0, Topadetmceptbcu(oc:b_eno.
! Conex_one_e_&cldcO_do fomOngue(o o
de io 1c:_.
2 P_ol_ctorcon_rosobrecotgosde io
POWI_bMATETM bolodo
3 Projectorde _0broco(gobotodo
,anel(OC_p_c_]O.
! Cone,_one_ do Io FOWER MA_P"
d6(;coti_ciodo._
2 Cornea desg_sfodo o m),_
3 Cepi)lo o ._opodosd_ __o _cto._
4. Ptoleclor cot_c: =obmcc_g_s de la
POW_ff-MAT_TM bOtOdo
. | =
1 Co_octo b_onop_mo setec)G_"do on c_ndldo!
oP_go_o olo po:ic|SnON
2- Re_f_13tazcoetcodoc_cultos o comma el
f_b_o,
3 Vu_VO O coneclotlo_exfromo__)o monguelo
_'p_gP,c_ 5,6,t
4, Umplo otcap_o y los _porte= de _te Luego
fe_tob!ezca, 03dg_C_ 14 15).
I Combiola bolso (,o_0(no 127
:_ IJmplel.a._'_o,sdefl_oded(e _[_fno 12}.
3 Ump{e e!?,lhO,(_g_hO ,13).
4 F{uSte_1nlvOI,_6glno 8).
5 h_u_toO]c_nffoL(P_g_O 11).
6, C_rnble lamanguelo,
lIE9, Ccr_,_lle CAMB_ODE LA CORRF.AYUMP_E7..A
DB. CE_LLO. O:_(i_:nas)'4 15}
_00or_o brenda(apa
1 F_mhe !_ cono)dory_seiL'_c_cc_, ._olvo o coneciar
ecr_ _o=exfrBmcs d_ (Omangueto (p_gtna_ 5._),
2 Ro,_ocuo_qu_or _bJeto o(otado o aloscodo,
lu_'_go(e_)c_co, _ l_a._pitodorbo,,(oncopmo
_evu_31veo op_gc_, I_ple el Ce13_,oylos sopodes
de _s_o,_uego_esloblo;_co. (p_g}no] 14. _5)
3 C_T_O(obo_op_[op_odesb(oqueelas_
dO fl_ode tire (pdg_K:_ |2), F_peto 20 mlnuios
pa,_oqua alma|or so en_e y soresio_ezco auto
m_l_camenle
I Conec_ob(en.(p(::_O_o5),
2 & 3, Con_uffaCAMB(O DE L_ CORNEA Y UMP(ET_
DB,CERLLO. _p_g_no_ 14, iS).
4 Exam!noo(6"_0 del c opi_opo_o dot_rm(n_ _1
hay oc_utad6n exce_'o o bloqueo de pefu_o+
Urnpleel cepilto y s_ _p#_rlos, I_ogo _eslabl_zco,
(_h_ t4, 15)
L C_Jrnblr3Io balsa, (p_g}no)2),
2. Umpi_ elfiI_o,(p6gi_a t3).
3. Do_laquee (.:)..ivIO._do ,%10de €:_e (p_gtna I_
4 Esloesno(m_, Lo I_ deb_ opago=e o_qu_l_
iohenomlenlo.
t A_e el n_'el,(o6g_no 8).
2 Ab_oe$con_oldeosp_tocl6rh(pSg,_aU),
|ndfc =do_ de mndlmlanto | BoP,_paro polvo _aria o otc_coda_
da m{o. 2. F_iho_o _ O_ddod del mo(o( _uc_o,
3. V(O_do i_vIodB oItooloscodo.i
4 Cied_ occesodo)
La mp(_adom |crania _opofos 1, _,..LsI((,ir_oneclo de HvoIdO poIodO lO oifomb_O
_o,- e( di/_¢ltampu)_f 2. A.._pf(ac(6ndom _Jodo polento.
a POWeRs,MARTM
_.aluz no fundor_O. 1, 8oml_la _naldo t Cc_mb!ola bombl_o, (p_na I4),
£|cotd_,_nno=eenrolt= I Co(d6noI6ch(co_c|o, I Un'_leeicold6neldclrtco,
2 Cordbno|o._codo 2 lltodrAcord_nydB_pui_s_nt6ff_Jio,
Laalphadarada)=moma= ) Esi_)ode_mpl_zo_cor_ecto I Co_UIIoSUG_Er-ICL,_3_A._AP3PIRAR
en 1= oitomba, (p6gha 8),
I7

SEARS,ROEBUCK AND CO,, HOFFMAN ESTATES,IL60179 EUA
PIEZA N-_oC_1ZAEXI_U_-437_61
Impreso en EUA
_. _ JI._.__ _ _ _-_. _.4.-_r_ _
l_,_I,_ _ _*,,_I_,_