
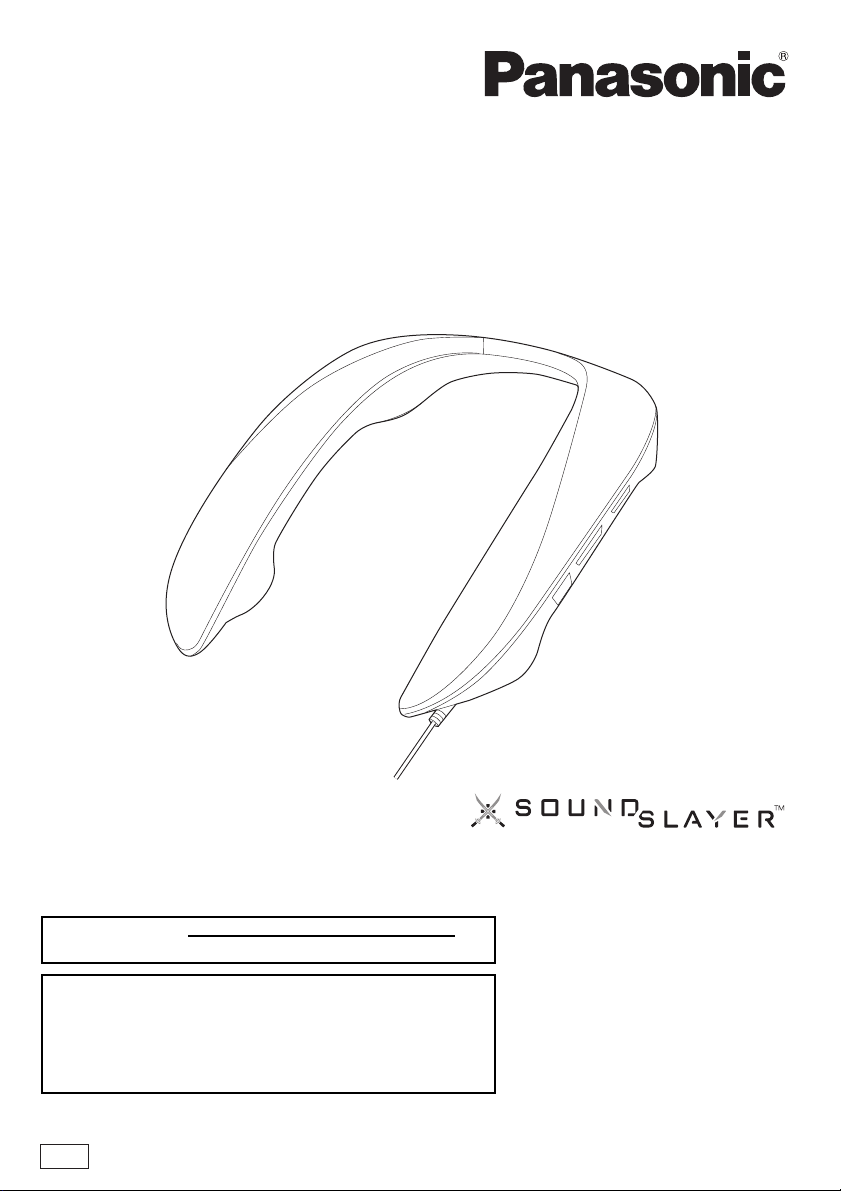
PP
Owner’s Manual
Wearable Speaker System
Model No. SC-GN01
TQBS0441
until
2021/10/15
Thank you for purchasing this product.
Please read these instructions carefully before using this product, and save this manual for future use.
Register online at http://shop.panasonic.com/support
(U.S. customers only)
If you have any questions, visit:
In the U.S.A.:
http://shop.panasonic.com/support
In Canada:
www.panasonic.ca/english/support
2
Safety precautions
∫ Unit
∫ Places where you use or store the product
• This unit is for indoor use.
• Do not use or leave where the temperature is extremely high such as in locations exposed to direct sunlight or
near heating devices.
• Do not use or leave in locations with a lot of dust.
• Do not use or leave in locations with a lot of vibration.
• Do not use or leave in locations with a lot of moisture, such as bathrooms.
∫ Handling
• Do not drop, hit, or apply strong shocks. This may cause malfunction.
• Sound may be interrupted or you may hear noise if the plug tip is dirty. If this occurs, wipe the tips of the plug
and plug adaptor clean with a soft dry cloth.
• When connected with the audio cable (supplied)
– This unit is for use with stereo AV devices.
– Sound is not output from the right side (R) if used with monaural devices.
• If the USB cable has excess length, coil it up to an appropriate length on the USB plug side before use.
WARNING:
To reduce the risk of fire, electric shock or product damage,
• Do not expose this unit to rain, moisture, dripping or splashing.
• Do not place objects filled with liquids, such as vases, on this unit.
• Use the recommended accessories.
• Do not remove covers.
• Do not repair this unit by yourself. Refer servicing to qualified service personnel.
This unit may receive radio interference caused by mobile telephones during use. If such interference occurs,
please increase separation between this unit and the mobile telephone.
The symbols on this product (including the accessories) represent the following: DC

3
THE FOLLOWING APPLIES ONLY IN THE U.S.A.
FCC Note:
This equipment has been tested and found to comply with the limits for a Class B digital device, pursuant to
Part 15 of the FCC Rules.
These limits are designed to provide reasonable protection against harmful interference in a residential
installation. This equipment generates, uses, and can radiate radio frequency energy and, if not installed and
used in accordance with the instructions, may cause harmful interference to radio communications. However,
there is no guarantee that interference will not occur in a particular installation. If this equipment does cause
harmful interference to radio or television reception, which can be determined by turning the equipment off
and on, the user is encouraged to try to correct the interference by one or more of the following measures:
• Reorient or relocate the receiving antenna.
• Increase the separation between the equipment and receiver.
• Connect the equipment into an outlet on a circuit different from that to which the receiver is connected.
• Consult the dealer or an experienced radio/TV technician for help.
FCC Caution:
Any unauthorized changes or modifications to this equipment would void the user’s authority to operate this
device.
This device complies with Part 15 of the FCC Rules. Operation is subject to the following two conditions:
(1) This device may not cause harmful interference, and (2) this device must accept any interference
received, including interference that may cause undesired operation.
Supplier’s Declaration of Conformity
Trade Name: Panasonic
Model No.: SC-GN01
Responsible Party: Panasonic Corporation of North America
Two Riverfront Plaza, Newark, NJ 07102-5490
Support Contact: http://shop.panasonic.com/support
THE FOLLOWING APPLIES ONLY IN CANADA.
CAN ICES-003(B)/NMB-003(B)
Conforms to
UL STD 62368-1.
Certified to CAN/CSA STD
C22.2 No.62368-1.
Conforme à la norme CAN/CSA
C22.2 No.62368-1.

4
Table of contents
Safety precautions ...................................................................................................................................... 2
Before use
Accessories................................................................................................................................................. 5
Maintenance................................................................................................................................................ 5
Part names (Main unit)................................................................................................................................ 6
Part names (Operation buttons/audio input/output terminal) ...................................................................... 7
Preparation
Connecting with the USB cable (USB input) ............................................................................................... 8
Connecting with the supplied audio cable (analogue input)......................................................................10
Fit the unit ..................................................................................................................................................11
Turning the unit on and off .........................................................................................................................11
Operation
Basic operations........................................................................................................................................ 12
• Adjusting the volume .......................................................................................................................... 12
• Muting (speaker mute)........................................................................................................................ 12
Changing the unit’s settings ...................................................................................................................... 13
• Enjoying sound field effects that suit the source (sound mode) ......................................................... 13
• Microphone muting ............................................................................................................................. 13
• Changing the volume balance between the front and back speakers (balance mode) ...................... 14
• Changing the volume of the other party in a chat (chat volume mode).............................................. 14
• Sound positioning mode ..................................................................................................................... 15
• Opening sound settings...................................................................................................................... 15
Other
Restore factory settings ............................................................................................................................ 16
Licenses .................................................................................................................................................... 16
Troubleshooting......................................................................................................................................... 17
Specifications ............................................................................................................................................ 19

Before use
5
Accessories
Please check and identify the supplied accessories.
1 x Audio cable
Maintenance
• To clean the main unit, wipe with a soft, dry cloth.
• Never use alcohol, paint thinner or benzine to clean this system.
• Before using chemically treated cloth, read the instructions that came with the cloth carefully.
Expressions used in this document
• Pages to be referred to are indicated as “l ±±”.
• The product illustrations may differ from the actual product.
Before use
6
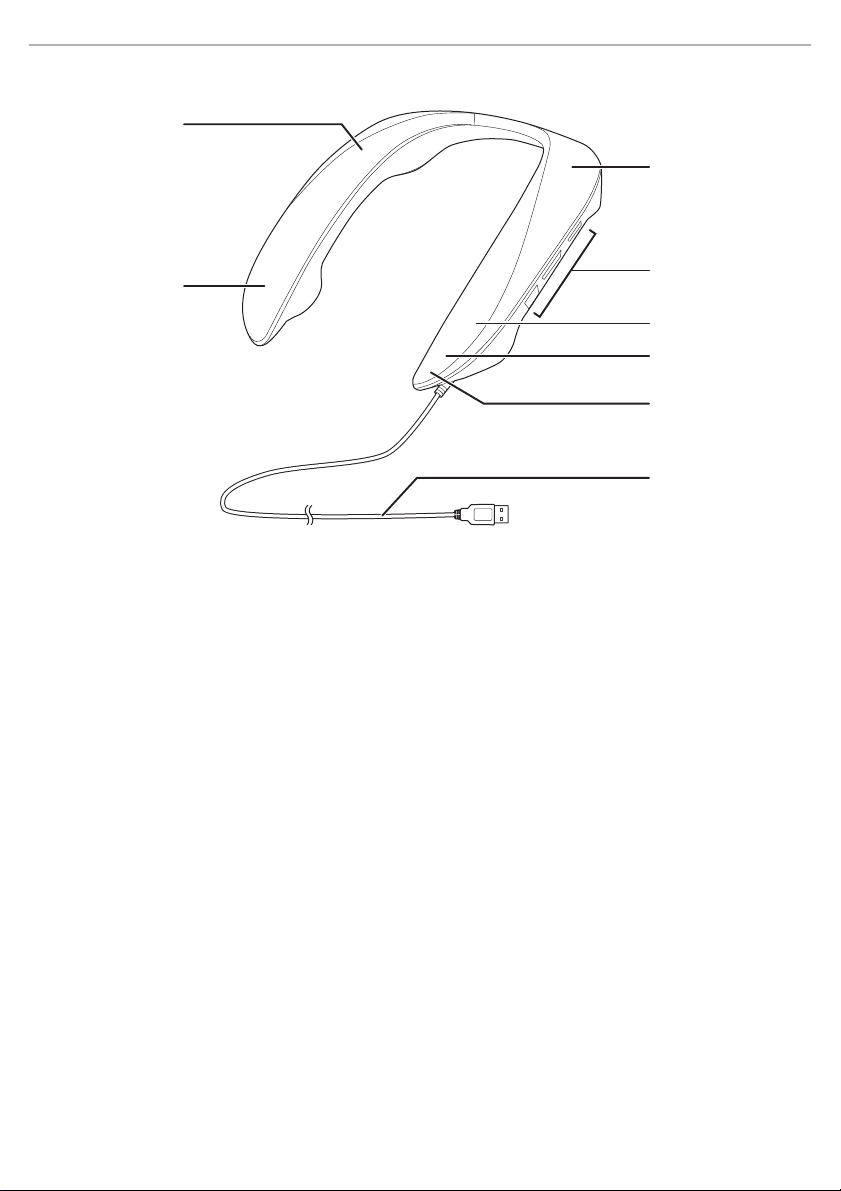
Part names (Main unit)
1 Surround (R) speaker
2 Front (R) speaker
3 Surround (L) speaker
4 Operation buttons/audio input/output terminal (l 7, “Part names (Operation buttons/audio input/output
terminal)”)
5 Front (L) speaker
6 Microphone
7 Operation indicator (red) (l 13, “Microphone muting”)
8 USB cable
1
2
3
5
4
6
7
8
Before use
7
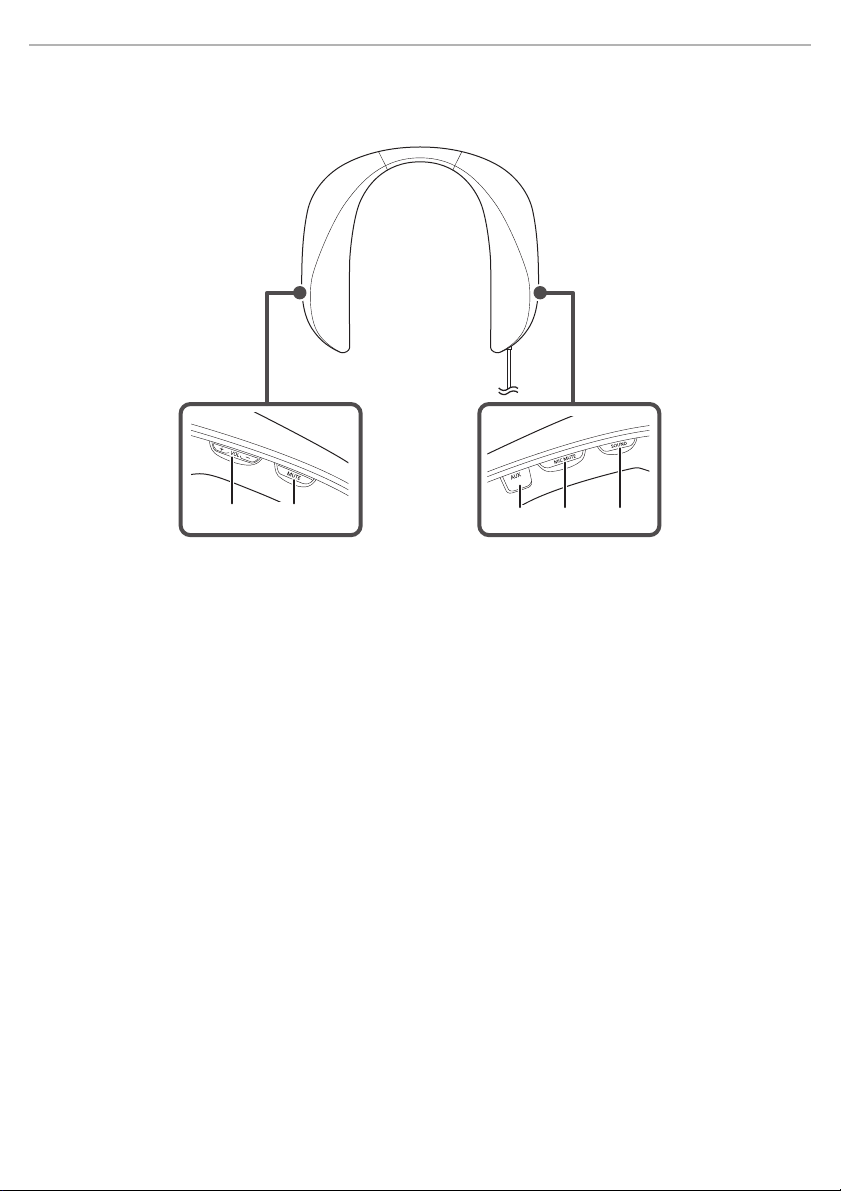
Part names (Operation buttons/audio input/output
terminal)
1[i VOL j] buttons (volume buttons)
2 [MUTE] button (sound mute button)
3 Audio input/output terminal [AUX] (connect the supplied sound audio cable)
4 [MIC MUTE] button (microphone mute button)
5 [SOUND] button (sound mode button)
1 2
3 4 5
Preparation
8
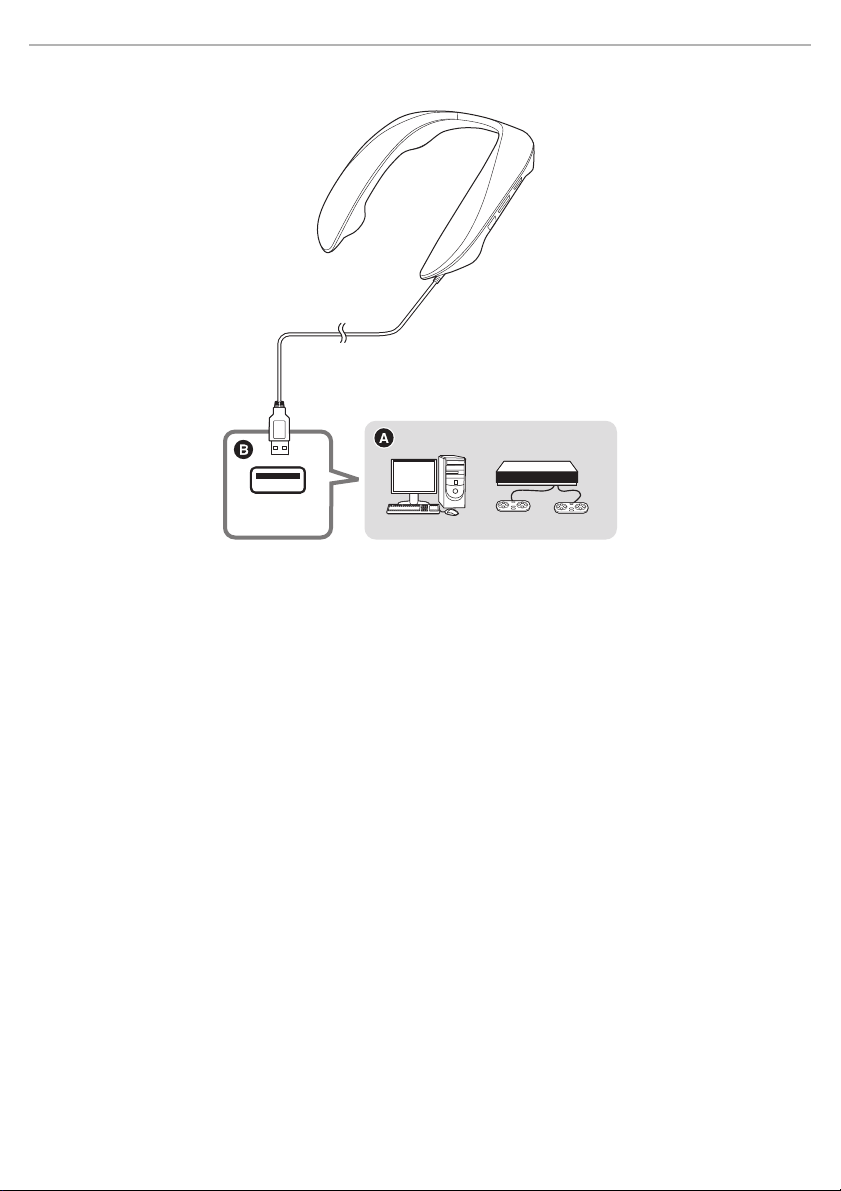
Connecting with the USB cable (USB input)
A Connected device
B Connect to a USB port with a power supply capacity of 5 V 900 mA. (A USB3.0 port is recommended.)
Volume reduces if the power supply of the port is 5 V 500 mA.
Connect to a device with a USB port (PC, PS4/PS5, etc.).
• Power is supplied from the USB port that the unit is connected to.
• First turn on the device to be connected, then connect this unit.
• In order to properly use this unit, depending on the operating environment and OS, you need to change some sound
settings on the computer. (
l 9, “When connecting to a PC”)
USB
Preparation
9
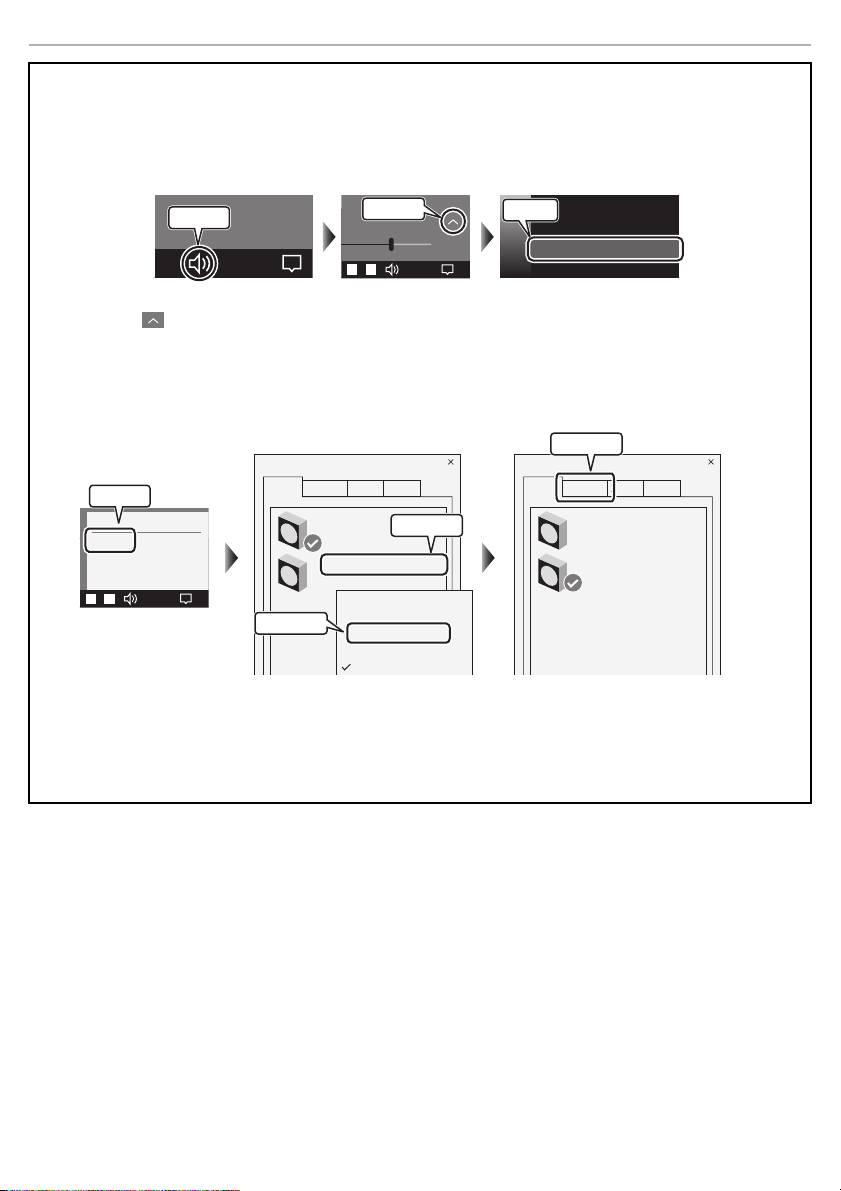
∫ When connecting to a PC
In order to properly use this unit, depending on the operating environment and OS, you need to change some
sound settings on the computer. Two devices are shown when you connect this unit, so make the settings as
follows:
Make “Panasonic SC-GN01 (Game)” the default device for “Playback”.
1 Click the speaker icon in the task tray.
2 Click the “ ” at the top right of the volume bar.
3 Select “Panasonic SC-GN01 (Game)”.
Make “Panasonic SC-GN01 (Game)” the default device for “Playback”,
make “Panasonic SC-GN01 (Chat)” the default device for “Recording”.
1 Right-click the speaker icon in the task tray and select “Sounds”.
2 Click the “Playback” tab.
3 Right-click “Panasonic SC-GN01 (Game)” and select “Set as Default Device”.
4 Click the “Recording” tab.
5 Right-click “Panasonic SC-GN01 (Chat)” and select “Set as Default Device”.
10:00
01/12/2021
10:00
01/12/2021
65
X
XXXXXXXXXXXXX.
Panasonic SC-GN01 (Game)
Select playback device
Panasonic SC-GN01 (Chat)
Click on
Select
Click on
10:00
01/12/2021
Sounds
XXXXXXXXXXX
XXXXXXXXXXX
XXXXXXXXXXX
XXXXXXXXXXX
Sound
Playback
Recording
XXXXX
XXXXX
XXXXXXXXXXXXXXX
Panasonic SC-GN01 (Game)
XXXXX
XXXXXXXXXXXXXXX
XXXXX XXXXX
XXXXX
XXXXX
XXXXX
Set as Default Device
XXXXX
XXXXX
XXXXX
Sound
Playback
Recording
XXXXX
XXXXX
XXXXXXXXXXXXXXX
Panasonic SC-GN01 (Game)
XXXXX
XXXXXXXXXXXXXXX
XXXXX XXXXX
Click on
Click on
Click on
Click on

Preparation
10
Connecting with the supplied audio cable (analogue input)
A Audio cable (supplied)
B Connected device
C a USB AC adaptor, etc.
Connect using the supplied audio cable.
Use this method when connecting to a device equipped with an analogue audio input/output terminal (headset
terminal) (Nintendo Switch, Xbox, etc.).
• Power is not supplied to this unit when only the audio cable is used for the connection. Also connect the USB cable to
a port that supplies power (a USB AC adaptor, etc.).
Note:
• Do not use any other audio cables except the supplied one.
• Connect this unit and the connected device with the audio cable first, then connect the USB cable to the power source
(USB AC adaptor, etc.). Noise may occur if you plug in or unplug the audio cable while the USB cable is connected
(power is being supplied).
• Noise may occur if you connect a device which is the same as the input and output of analogue audio signals or
another device that is connected by some kind of wiring with a USB cable.
USB

Preparation
11
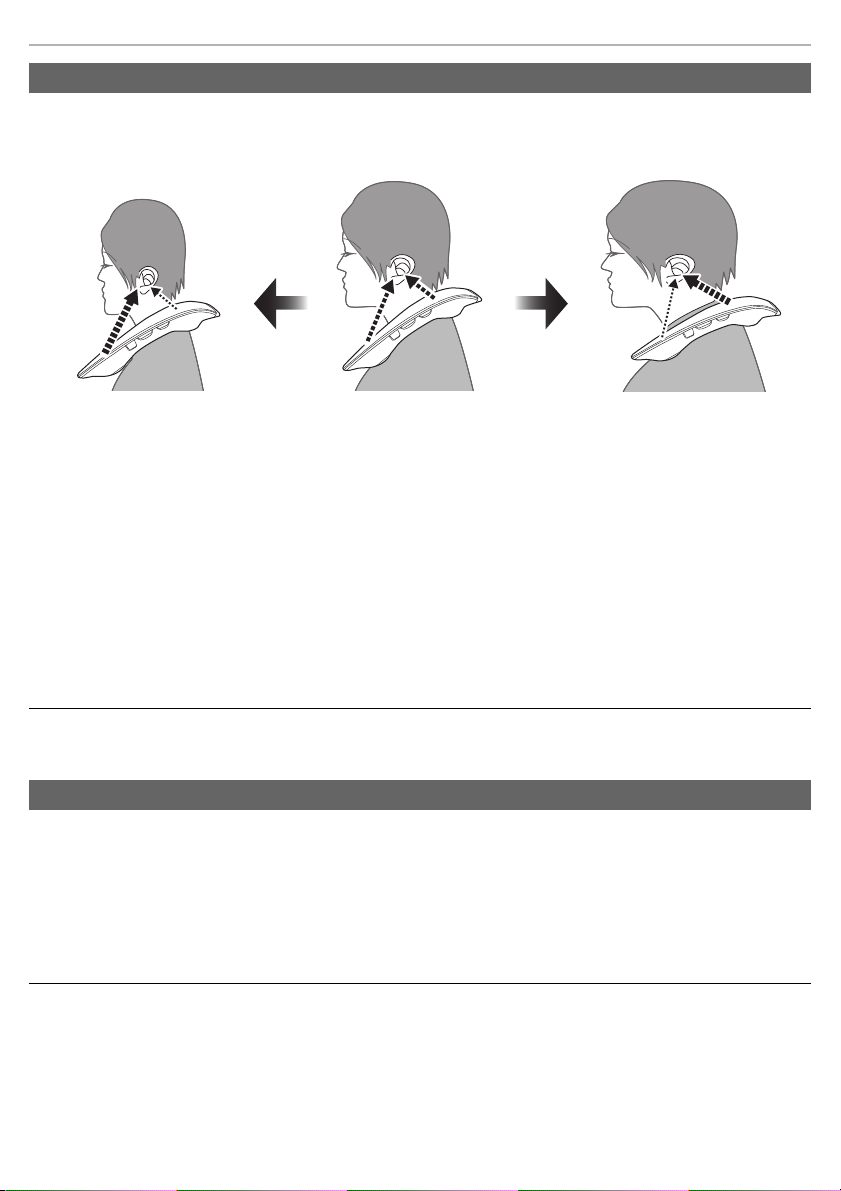
Fit the unit
Fit the unit by putting it around your shoulders, taking care of how it is
positioned.
Turning the unit on and off
The power for this unit is turned on and off by plugging the USB cable into or unplugging it from the power
supply.
To turn the unit on
Plug the USB cable into the power supply.
To turn the unit off
Unplug the USB cable from the power supply.
Note:
• When using a USB AC adaptor, etc., connect the USB cable to it first, then plug it to the mains socket.
• If the sound is distorted, turn down the volume.
• If there is an excessive input signal, the function of this unit may stop automatically and the power may be turned off
for safety.

Operation
12
Basic operations
Adjust the volume. (17 levels)
Press the [i VOL j] buttons.
Note:
• The volume setting is maintained even when the power is turned off.
• Separate volume settings are maintained for connection using the USB cable (USB input) and connection using the
supplied audio cable (analogue input).
Temporarily makes the sound inaudible.
• A voice prompt will notify you that speaker muting is ON/OFF.
Press the [MUTE] button.
An operation tone is made and the sound is muted.
• Press again to cancel.
Note:
• Mute is cancelled in the following cases:
– When the power is turned off/on
– When volume is adjusted
– When the unit enters the mode for balancing the speakers
– When the unit enters the sound positioning mode
Adjusting the volume
Muting (speaker mute)
Operation
13
Changing the unit’s settings
You can enjoy sound field effects that suit the images on connected equipment by switching the sound mode.
(Factory default: RPG)
Press the [SOUND] button.
The voice prompt announces the current mode when you press the [SOUND] button.
The mode changes if you press the [SOUND] button again within 3 seconds of the announcement.
• A guidance message will notify you of the mode you switched to.
Note:
• The setting is maintained until it is changed again.
Switches ON/OFF the microphone.
• A voice prompt will notify you that microphone muting is ON/OFF.
Press the [MIC MUTE] button.
The operation indicator (red) lights and the microphone is muted.
• Press again to cancel.
Note:
• Mute is cancelled when you turn off the unit.
Enjoying sound field effects that suit the source (sound mode)
RPG Mode suited to RPG (role-playing games).
FPS Mode suited to FPS (first-person shooter games).
Voice Enhances voices. Mode that makes people’s voices easier to hear.
Music Enjoy sound with instruments and vocals enveloping you.
Cinema Enjoy sound with the spatial effects and power you would expect from a film.
STEREO Output is stereo.
Microphone muting

Operation
14
You can adjust sound balance by changing the output of the surround speakers against the front speakers.
(Factory default: Unadjusted (0 dB))
1
While pressing the [MIC MUTE] button, press the [VOL j] button.
• An operation tone is made and the unit is in the mode for balancing the speakers.
• When the unit enters the mode for balancing the speakers, the operation indicator blinks twice each time.
2
While the unit is in the mode for balancing the speakers, press the [i VOL j] buttons
to adjust (7 levels).
• Output increases when you press the [i VOL] button.
• Output decreases when you press the [VOL j] button.
• Operation tones are made at the maximum value (i3 dB), unadjusted value (0 dB), and minimum value
(j3dB).
3
Press any button other than the [i VOL j] buttons to complete the settings.
• The settings are also completed if the unit is left in the mode for balancing the speakers for 10 seconds or
more.
Note:
• These can only be adjusted when this unit is connected by the USB cable.
• The setting is maintained until it is changed again.
Adjust the audio output of the other party in a chat that is output from the speakers.
(Factory default: Unadjusted value (0 dB))
1
While pressing the [MIC MUTE] button, press the [i VOL] button.
• An operation tone is made and the unit is in the chat volume mode.
• When the unit enters the chat volume mode, the operation indicator blinks three times each time.
2
While the unit is in the chat volume mode, press the [i VOL j] buttons to adjust
(7 levels).
• Output increases when you press the [i VOL] button.
• Output decreases when you press the [VOL j] button.
• Operation tones are made at the maximum value (i3 dB), unadjusted value (0 dB), and minimum value
(j3dB).
3
Press any button other than the [i VOL j] buttons to complete the settings.
• The settings are also completed if the unit is left in the chat volume mode for 10 seconds or more.
Note:
• These can only be adjusted when this unit is connected to a computer by the USB cable.
• The setting is maintained until it is changed again.
Changing the volume balance between the front and back speakers (balance mode)
Changing the volume of the other party in a chat (chat volume mode)
Operation
15
It may not be possible to achieve a suitable surround effect due to the difference in positioning between the
front and back speakers compared to the ear when the unit is placed on your shoulders. You can make
allowances so that it sounds suitable by adjusting the audio output of the speakers.
1
While pressing the [MIC MUTE] button, press the [MUTE] button.
• An operation tone is made and the unit is in the sound positioning mode.
• When the unit enters the sound positioning mode, the operation indicator blinks four times each time.
2
While the unit is in the sound positioning mode, press the [i VOL j] buttons to
adjust.
• Pressing the [i VOL] button sets the speaker sound position forwards.
• Pressing the [VOL j] button sets the speaker sound position backwards.
• An operation tone is made when set to forward, standard (centre), or backward.
3
Press any button other than the [i VOL j] buttons to complete the settings.
• The settings are also completed if the unit is left in the sound positioning mode for 10 seconds or more.
Note:
• The setting is maintained until it is changed again.
An opening sound is made when you turn on this unit. Use the following procedure to turn off the opening sound
(so the sound is not made).
To turn the opening sound off
Press and hold the [MUTE] button for 10 or more seconds.
• An operation tone is made and the opening sound is turned off.
• To turn the sound on again, press and hold the [MUTE] button for 10 seconds again.
Note:
• The setting is maintained until it is changed again.
Sound positioning mode
Forward setting
Standard (centre)
(Factory default)
Backward setting
Opening sound settings

Other
16
Restore factory settings
This is done when returning the unit to the state of purchase, such as by discarding or transferring the unit.
1
Press [VOL j] until the volume reaches the minimum level [0].
• An operation tone is made when the volume reaches the minimum level [0].
2
Press and hold the [SOUND] and [MUTE] buttons for about 5 seconds or more.
• An operation tone is made and the unit is in the factory settings mode.
• When the unit enters the factory settings mode, the operation indicator blinks once every second.
3
Press the [MIC MUTE] button while the unit is in the factory settings mode.
• The settings are each initialised, returning to the factory settings.
Licenses
SOUNDSLAYER is a trademark of Panasonic Corporation.
PS4 and PS5 are registered trademarks or trademarks of Sony Interactive Entertainment Inc.
Windows, Xbox, Xbox One, Xbox Series S, Xbox Series X are registered trademarks or trademarks of
Microsoft Corporation.
Nintendo Switch is a registered trademark or a trademark of Nintendo.
Other names of systems and products mentioned in these instructions are usually the registered trademarks
or trademarks of the manufacturers who developed the system or product concerned.
Some
TM
and
®
marks are not specified in the text.

Other
17
Troubleshooting
Before requesting service, make the following checks. If you are in doubt about some of the check points, or if
the remedies indicated in the chart do not solve the problem, refer to “Customer Services Directory” on “Basic
Owner’s Manual” if you reside in the U.S.A., or refer to “CONTACT INFORMATION” on “Basic Owner’s Manual”
if you reside in Canada, or consult your dealer for instructions.
The unit does not work.
• Make sure the USB cable is firmly connected to the USB port of each device or the AC adaptor (optional).
• Make sure the USB port is normal. If there are other USB ports on your computer, try using one of the other USB
ports.
• If the power still does not come on even after performing the above, unplug the USB cable and then plug it in again.
There is no sound.
• The USB port or plug may be dirty. Wipe the USB port and plug clean with a soft dry cloth.
• The sound may have been muted or turned down low on the connected device. Adjust the volume on the connected
device.
• Make sure that “Panasonic SC-GN01 (Game)” is selected as the audio output device on the connected device.
The sound is low.
• Also increase the volume on the other devices as well as this unit.
• You may have connected to a USB2.0 port. Connect to a USB3.0 port.
There are interruptions to the sound. / Too much noise. / Poor sound quality.
• Make sure the USB port is normal. If there are other USB ports on your computer, try using one of the other USB
ports.
• There may be a USB hub between the unit and the computer. If there are other USB ports on your computer, try using
one of the other USB ports.
• You may be trying to supply power from the USB port of a device which is the same as the input and output of
analogue audio signals or another device that is connected by some kind of wiring. Supply power with a USB AC
adaptor, etc..
Cannot operate the unit.
• Try unplugging the USB cable and then plugging it in again.
There is no surround effect.
• Make sure that “Panasonic SC-GN01 (Game)” is selected as the sound device on your PC.
No output of chat audio.
• Make sure that “Panasonic SC-GN01 (Chat)” is selected as audio output device on your game, chat app, or meeting
app, etc.

Other
18
Poor sound quality for chat audio.
• Turn off the noise cancelling functions in the apps you are using for chat or meetings, then try again.
Low volume for chat audio.
• Also increase the volume on the other devices as well as this unit.
No output of analogue audio.
• Check whether there is a problem with the headphone jack or analogue output terminal on the device you are using.
Use a pair of earphones or headphones to check whether audio is being output correctly, then try again.
This unit is not detected when connected with the USB cable.
• Try restarting the connected device.
An opening sound is made while the USB cable is connected.
• Due to its specifications, the connected device may temporarily stop supplying power via USB. When this occurs, this
unit may turn off and then on, but it is not a malfunction.
I have changed the settings in the balance mode and chat volume mode, but the speaker volume does
not increase after the change.
• This unit has a function that activates a control mechanism that suppresses the output when the volume is high. This
is not a malfunction. Before making adjustments, lower the volume.
Other
19
Specifications
∫ General
∫ Amplifier section
∫ Speaker section
∫ Microphone section
∫ Terminal section
Power supply DC 5 V, 900 mA
• Power is supplied from the USB cable on the connected equipment
Power consumption Approx. 4.5 W
Dimensions (W k H k D) Approx. 240 mm (9
1
/
2
q) k 46 mm (1
13
/
16
q) k 209 mm (8
1
/
4
q)
Length of USB cable Approx. 3 m (9.8 ft)
Mass (Weight) Approx. 244 g (8.6 oz)
Operating condition Operating temperature range:
5 oC to 35 oC (41 oF to 95 oF)
Operating humidity range:
20 %RH to 80 %RH (no condensation)
Total RMS output power
(non-simultaneous drive)
4W
*1
(1 kHz, T.H.D., 10.0 %, 6 h, 20 kHz LPF)
FTC output power 0.2 W i 0.2 W i 0.1 W i 0.1 W
*1
(1 kHz, T.H.D., 1.0 %, 6 h, 20 kHz LPF)
Front speaker (L/R) built in,
Surround speaker (L/R) built in
Speaker units:
3cm (1
3
/
16
q) Cone type 4 pcs
Impedance:
6 h
Microphone units MEMS type 2 pcs
USB plug USB Type A
Audio input/output (AUX) (for
headset terminal)
*2
3.5 mm mini jack CTIA compliant
*3

Other
20
∫ Compatible equipment
*4
∫ Accessories
*1 When the power supply capacity of the USB port on the connected device is 5 V 900 mA. Volume reduces if the
power supply is 5 V 500 mA.
*2 When the audio cable (supplied) is used for the connection to the headset terminal on the connected device, also
connect the USB cable to either the USB port on the connected device or to a USB AC adaptor (optional). Use a
USB AC adaptor (optional) with a power supply capacity equivalent to 5 V 900 mA.
*3 Audio output and microphone input operation is not guaranteed with all devices equipped with headset terminals
compatible with a 3.5 mm mini jack.
*4 Before connecting with other devices, be sure to read the operating instructions for each of the devices.
*5 For use, connect the USB plug to either the USB port on the connected device or to a USB AC adaptor (optional).
*6 Operation is not guaranteed on all computers that are running the supported OSs.
• Specifications are subject to change without notice.
Connection with USB cable PC, PS4/PS5,
Nintendo Switch (TV mode)
Connection with Audio cable
*5
PC, PS4/PS5,
Xbox One/Xbox Series S/X,
Nintendo Switch (Tabletop/Handheld mode)
PC compatible OS
*6
Windows 10
Audio cable Approx. 1.5 m (4.9 ft)

Two Riverfront Plaza, Newark, NJ 07102-5490
Panasonic Corporation of North America
Panasonic Canada Inc.
5770 Ambler Drive, Mississauga, Ontario L4W 2T3
www.panasonic.com
http://shop.panasonic.com
Panasonic Corporation 2021
TQBS0441
F0921MH0