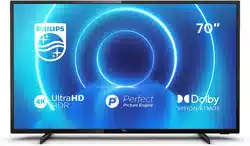
User Gudie Philips 55PUS7607/12 TV
Table of contents
- Get Support
- Identify and Register your TV
- TV Help and User Manual
- Consumer Care / Repair
- Software
- Update Software
- Software Version
- Automatic Software Update
- View Software Update History
- Quick Guide
- Remote Control
- IR sensor
- Setting Up
- Read Safety
- TV Placement
- Turn on TV
- Connections
- Connectivity guide
- Antenna
- Satellite
- Video Device
- Audio Device
- Mobile Device
- Other Device
- Computer
- Switch Source
- Source List
- Rename Device
- Channels
- About Channels and Switch Channels
- Install Channel
- Channel List
- Favourite Channels
- Text / Teletext
- TV Guide
- What You Need
- Using the TV Guide
- Freeview Play (for UK models)
- About Freeview Play
- Using Freeview Play
- Videos, Photos and Music
- From a USB Connection
- From a Computer or NAS
- Photos
- Photo
- Videos
- Music
- Open TV Setting Menus
- Home Menu Overview
- Frequent Settings and All settings
- All Settings
- Wireless and Networks
- Home Network
- Connect to Network
- Wireless and Network Settings
- Smart TV
- Setup Smart TV
- Smart TV Collection
- Netflix
- Rakuten TV
- Amazon Prime Video
- YouTube
- Alexa
- About Alexa
- Using Alexa
- Google Assistant
- Environmental
- European Energy Label
- EPREL Registration Number
- End of Use
- UK Declaration of Conformity
- Specifications
- Power
- Reception
- Display Resolution
- Supported Input Resolution
- Sound
- Multimedia
- Connectivity
- Troubleshooting
- Tips
- Switch On
- Remote Control
- Channels
- Satellite
- Picture
- Sound
- HDMI - UHD
- USB
- Wi-Fi and Internet
- Wrong Menu Language
- Safety and Care
- Safety
- Screen Care
- Terms of Use
- Copyrights
- HDMI
- HEVC Advance
- Dolby Vision and Dolby Atmos
- DTS-HD
- Wi-Fi Alliance
- Other Trademarks
- Open Source
- Open Source Software
- Open Source License
- Disclaimer regarding services
- Index
Update from Internet
- (Home) > Settings > Update software > Search for updates > Internet (Recommended)
- Look for a software update yourself.
- If the TV is connected to the Internet. you may receive a message to update the TV software. You need a high-speed (broadband) Internet connection. If you receive this message. we recommend you to carry out the update.
- During the software update. there is no picture and the TV will switch off and on again. This might happen several times. The update can take a few minutes.
- Wait until the TV picture comes back up. Do not press the power switch on the TV or on the remote control during the software update.
Update from USB
- (Home) > Settings > Update software > Search for updates > USB
- You need a computer with a high-speed Internet connection and a USB memory device to upload the software on the TV.
- Use a USB memory device with 512MB free space.
- Make sure that write protection is switched off.
1 - Start the update on TV Select Update software > Search for updates > USB. then press OK.
2 - Identify the TV Insert the USB memory into one of the USB connections of the TV.
- Select Start and press OK. An identification file is written on the USB memory device.
3 - Download the TV software Insert the USB memory into your computer.
- On the USB memory device. locate the file update.html and double click it.
Automatic Software Update
(Home) > Settings > Update software > Automatic software update
- To switch on Automatic software update to update your TV software automatically. Leave the TV in standby.
- When the setting is enabled. the upgrade gets downloaded when the TV is powered ON and installed 15min after the TV has gone to standby (as long as there is no alarm scheduled).
- When the setting is disabled. the "Upgrade Now" / "Later" OSD will be shown.
- View Software Update History
(Home) > Settings > Update software > View software update history
- Display the list of software versions that are successfully update on the TV.
- Quick Guide
- Remote Control
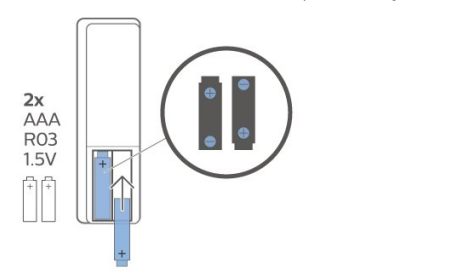
Replace batteries
- If the TV does not react on a key press on the remote control. the batteries might be empty.
- To replace the batteries. open the battery compartment on the back of the remote control.
1 - Slide the battery door in the direction shown by the arrow.
2 - Replace the old batteries with 2 type AAA-R03-1.5V batteries. Make sure the + and the - ends of the batteries line up correctly.
3 - Reposition the battery door and slide it back until it clicks.
• Remove the batteries if you are not using the remote control for a long time.
• Safely dispose of your old batteries according to the end of use directions.
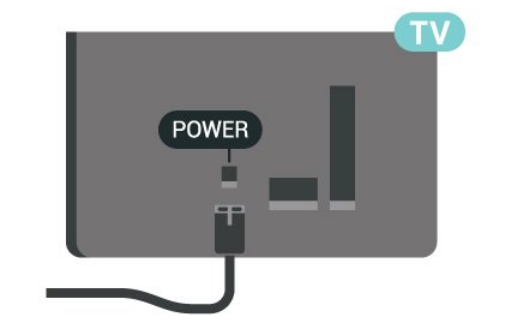
Connect Power Cable
- Insert the power cable into the POWER connector on the back of the TV.
- Make sure the power cable is securely inserted in the connector. • Make sure that the power plug, in the wall socket, is accessible at all times. • When you unplug the power cable, always pull the plug, never pull the cable.
- Although this TV has a very low standby power consumption, unplug the power cable to save energy if you do not use the TV for a long period of time.
Switch to standby
- To switch the TV to standby, press on the remote control. You can also press the small joystick key on the bottom of the TV. In standby mode, the TV is still connected to the mains power but consumes very little energy.
- To switch off the TV completely, disconnect the power plug. When disconnecting the power plug, always pull the power plug, never the cord. Ensure that you have full access to the power plug, power cord and outlet socket at all times.
Connectivity guide
- Always connect a device to the TV with the highest quality connection available. Also, use good quality cables to ensure a good transfer of picture and sound. When you connect a device, the TV recognizes its type and gives each device a correct type name.
- You can change the type name if you wish. If a correct type name for a device is set, the TV automatically switches to the ideal TV settings when you switch to this device in the Sources menu.
- Antenna Insert the antenna plug firmly into the Antenna socket at the back of the TV. You can connect your own antenna or an antenna signal from an antenna distribution system. Use an IEC Coax 75 Ohm RF antenna connector. Use this antenna connection for DVB-T and DVB-C input signals.
HDMI
- An HDMI connection has the best picture and sound quality. For best signal quality transfer, use a High speed HDMI cable and do not use an HDMI cable longer than 5 m, and also connect devices supporting HDR on any one of HDMI connections.
HDMI ARC/eARC
- Only HDMI 1 on the TV have HDMI ARC (Audio Return Channel). If the device, typically a Home Theatre System (HTS), also has the HDMI ARC connection, connect it to any of the HDMI connections on this TV.
- With the HDMI ARC connection, you do not need to connect the extra audio cable that sends the sound of the TV picture to the HTS
- . The HDMI ARC connection combines both signals. HDMI eARC (Enhanced Audio Return Channel) is an advancement over the previous ARC. It supports the latest high-bitrate audio formats up to192kHz, 24-bit, and uncompressed 5.1 and 7.1, and 32-channel uncompressed audio
Digital Audio Out
- Optical Audio Out - Optical is a high quality sound connection. This optical connection can carry 5.1 audio channels.
- If your device, typically a Home Theatre System (HTS), has no HDMI ARC connection, you can use this connection with the Audio In - Optical connection on the HTS. The Audio Out - Optical connection sends the sound from the TV to the HTS.
About CI+
- This TV is ready for the CI+ Conditional Access. With CI+ you can watch premium HD programmes, like movies and sports, offered by digital TV operators in your region. These programmes are scrambled by the TV operator and descrambled with a prepaid CI+ module.
- Digital TV operators provide a CI+ module (Conditional Access Module - CAM) and an accompanying smart card, when you subscribe to their premium programmes. These programmes have a high level of copy protection. Contact a digital TV operator for more information on terms & conditions.
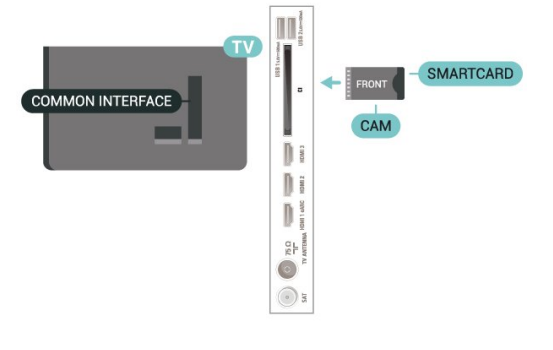
Smart Card
Digital TV operators provide a CI+ module (Conditional Access Module - CAM) and an accompanying smart card, when you subscribe to their premium programmes. Insert the smart card into the CAM module. See the instruction you received from the operator. To insert the CAM in the TV…
1. Look on the CAM for the correct method of insertion. Incorrect insertion can damage the CAM and TV.
2. While looking at the back of the TV, with the front of the CAM facing towards you, gently insert the CAM 14 into the slot COMMON INTERFACE.
3. Push the CAM in as far as it will go. Leave it in the slot permanently. When you switch on the TV, it may take a few minutes before the CAM is activated.
- If a CAM is inserted and subscription fees are paid (subscription methods can differ), you can watch the scrambled channels supported by the CAM smart card.
- The CAM and smart card are exclusively for your TV. If you remove the CAM, you will no longer be able to watch the scrambled channels supported by the CAM.
Computer
- You can connect your computer to the TV using a high quality HDMI cable and use the TV as a PC monitor. * Note for Nvidia Graphics card users: If you connect your computer to TV via HDMI, Nvidia card may automatically output Variable Refresh Rate (VRR) video to TV when TV’s HDMI Ultra HD setting is Optimal (Auto Game).
- Please always ensure turn off VRR function in graphics card before you change TV’s HDMI Ultra HD to Optimal or Standard, the TV UI selection Optimal or Standard will turn off VRR support in TV. * Note for AMD Graphics card users:
- If you connect your computer to TV via HDMI, please ensure following settings in graphics card used to have proper performance. - If graphics card output video is 4096 x 2160p or 3840 x 2160p and RGB pixel format is used, RGB 4:4:4 pixel format studio (limited RGB) shall be set in computer graphic card.
- Your TV is also prepared for a VESA-compliant wall mount bracket (sold separately).
Use the following VESA code when purchasing the wall mount .
• 43PUS7607 VESA MIS-F 200x100. M6 (Minimum 8 mm. Maximum 11 mm)
• 50PUS7607 VESA MIS-F 200x100. M6 (Minimum 8 mm. Maximum 11 mm)
• 55PUS7607 VESA MIS-F 200x100. M6 (Minimum 8 mm. Maximum 11 mm)
• 65PUS7607 VESA MIS-F 200x200. M6 (Minimum 12 mm. Maximum 18 mm)
• 70PUS7607 VESA MIS-F 300x300. M8 (Minimum 12 mm. Maximum 25 mm)
Caution
- Wall mounting the TV requires special skills and should only be performed by qualified personnel.
- The TV wall mounting should meet safety standards according to the TVs weight. Also read the safety precautions before positioning the TV.
- TP Vision Europe B.V. bears no responsibility for improper mounting or any mounting that results in accident or injury.
Turn on TV
Connect Power Cable
• Insert the power cable into the POWER connector on the back of the TV.
• Make sure the power cable is securely inserted in the connector.
• Make sure that the power plug. in the wall socket. is accessible at all times.
• When you unplug the power cable. always pull the plug. never pull the cable.
- Although this TV has a very low standby power consumption. unplug the power cable to save energy if you do not use the TV for a long period of time.
On or Standby
- Before you switch on the TV. make sure you plugged in the mains power in the POWER connector on the back of the TV.
Switch On
- Press the small joystick key on the bottom of the TV.
Switch to standby
- To switch the TV to standby. press on the remote control. You can also press the small joystick key on the bottom of the TV.
- In standby mode. the TV is still connected to the mains power but consumes very little energy.
- To switch off the TV completely. disconnect the power plug.
- When disconnecting the power plug. always pull the power plug. never the cord. Ensure that you have full access to the power plug. power cord and outlet socket at all times.
Connections
- Connectivity guide
- Always connect a device to the TV with the highest quality connection available. Also. use good quality cables to ensure a good transfer of picture and sound.
- When you connect a device. the TV recognizes its type and gives each device a correct type name. You can change the type name if you wish. If a correct type name for a device is set. the TV automatically switches to the ideal TV settings when you switch to this device in the Sources menu.
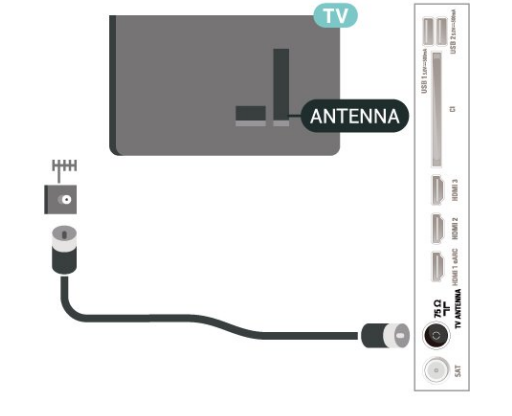
Antenna
- Insert the antenna plug firmly into the Antenna socket at the back of the TV.
- You can connect your own antenna or an antenna signal from an antenna distribution system. Use an IEC Coax 75 Ohm RF antenna connector.
- Use this antenna connection for DVB-T and DVB-C input signals.
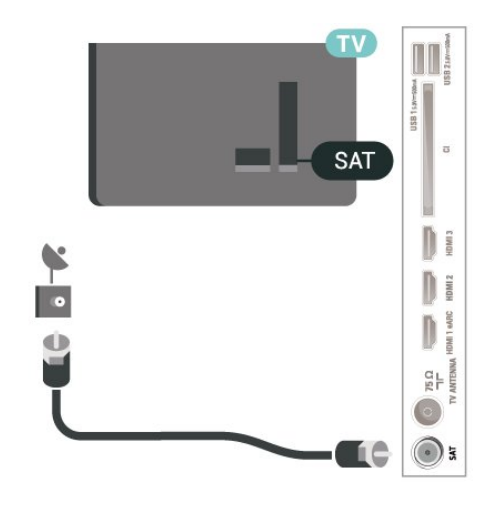
Satellite
- Attach the satellite F-type connector to the satellite connection SAT at the back of the TV.
- Video Device
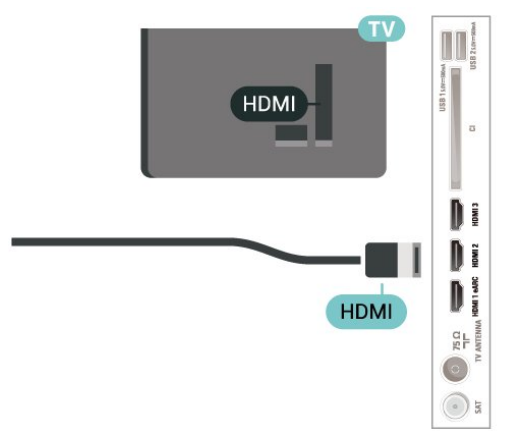
HDMI
- An HDMI connection has the best picture and sound quality.
- For best signal quality transfer. use a High speed HDMI cable and do not use an HDMI cable longer than 5 m. and also connect devices supporting HDR on any one of HDMI connections.
Copy protection
- HDMI ports support HDCP (High-bandwidth Digital Content Protection). HDCP is a copy protection signal that prevents copying content from a DVD disc or Blu ray Disc. Also referred to as DRM (Digital Rights Management).
- Audio Device
HDMI ARC/eARC
- Only HDMI 1 on the TV have HDMI ARC (Audio Return Channel).
- If the device. typically a Home Theatre System (HTS). also has the HDMI ARC connection. connect it to any of the HDMI connections on this TV.
- With the HDMI ARC connection. you do not need to connect the extra audio cable that sends the sound of the TV picture to the HTS. The HDMI ARC connection combines both signals.
- HDMI eARC (Enhanced Audio Return Channel) is an advancement over the previous ARC. It supports the latest high-bitrate audio formats up to192kHz. 24-bit. and uncompressed 5.1 and 7.1. and 32-channel uncompressed audio.
Computer
- You can connect your computer to the TV using a high quality HDMI cable and use the TV as a PC monitor. * Note for Nvidia Graphics card users: If you connect your computer to TV via HDMI, Nvidia card may automatically output Variable Refresh Rate (VRR) video to TV when TV’s HDMI Ultra HD setting is Optimal (Auto Game).
- Please always ensure turn off VRR function in graphics card before you change TV’s HDMI Ultra HD to Optimal or Standard, the TV UI selection Optimal or Standard will turn off VRR support in TV.
- * Note for AMD Graphics card users: If you connect your computer to TV via HDMI, please ensure following settings in graphics card used to have proper performance. - If graphics card output video is 4096 x 2160p or 3840 x 2160p and RGB pixel format is used, RGB 4:4:4 pixel format studio (limited RGB) shall be set in computer graphic card.
Frequency step size
- The TV searches for channels in steps of 8MHz.
- If this results in having no channels installed or if some channels are missing, you can search in smaller steps of 1MHz. Using the 1MHz steps will take more time to search for and install channels.
- Network frequency mode
- If you intend to use the fast Quick method in Frequency scan to search for channels, select Automatic. The TV will use 1 of the predefined network frequencies (or HC - homing channel) as used by most cable providers in your country.
- If you received a specific network frequency value to search for channels, select Manual.
Network frequency
- With the Network frequency mode set to Manual, you can enter the network frequency value received from your cable provider here. To enter the value, use the number keys.
Network ID
- Enter the network ID supplied by your cable provider.
- Symbol rate mode
- If your cable provider did not give you a specific symbol rate value to install the TV channels, leave the Symbol rate mode setting on Automatic.
- If you received a specific symbol rate value, select Manual.
Symbol rate
- With the Symbol rate mode set to Manual, you can enter the symbol rate value by using the number keys.
Free / Scrambled
- If you have a subscription and a CAM - Conditional
- Access Module for pay TV services, select Free + scrambled. If you did not subscribe to pay TV channels or services, you can select Free channels only .
- Automatic channel update Once a day, at 6 AM, the TV updates the channels and stores new channels. New channels are stored in the All channels list but also in the New channels list. Empty channels are removed.
- If new channels are found or if channels are updated or removed, a message is shown at TV start up. The TV must be in standby to automatically update channels. * Only available when Satellite channel list is set to From a sorted package
Connection type
- Select the number of satellites you want to install.
- The TV sets the appropriate connection type automatically.
- Up to 4 Satellites - You can install up to 4 satellites
- LNBs) on this TV. Select the exact number of satellites you wish to install at the start of the installation. This will speed up the installation.
- Unicable - You can use an Unicable system to connect the antenna dish to the TV. You can select
- Unicable for 1 or for 2 satellites at the start of the installation.
LNB settings
- In some countries, you can adjust the expert settings for homing transponder and each LNB. Only use or change these settings when a normal installation fails.
- If you have non-standard satellite equipment, you can use these settings to overrule the standard settings. Some providers might give you some transponder or LNB values which you can enter here.
- Universal or Circular - The general type of LNB, usually you can select this type for your LNB
To not Installed TVs
- Depending on whether your TV is already installed or not, you must use a different method to upload a channel list.
- To a TV that is not yet installed
- Plug in the power plug to start the installation and select language and country. You can skip the channel search. Finish the installation.
- Plug in the USB flash drive that holds the channel list of the other TV.
To start the channel list upload, select
- Home) > Settings > All settings > Channels > Channel List Copy > Copy to TV and press OK. Enter your PIN code if necessary.
- The TV notifies you if the channel list is copied to the TV successfully. Unplug the USB flash drive.
Programme Info
- Select Programme info to view the information of the programme you are watching.
- To call up the details of the selected programme…
- Tune to the channel.
- Press INFO to open or close programme info.
- Alternatively, you can press OPTIONS, select Programme Info and press OK to open the programme info.
- Press OPTIONS again or press Back to close the programme info.
Switch to a programme
- From the TV guide, you can switch to a current programme.
- To select a programme, use the arrow keys to highlight the programme name.
- Navigate to the right to view programmes scheduled later that day.
- To switch to the programme (channel), select the programme and press OK.
- View programme details
- To call up the details of the selected programme, press INFO .
Using Freeview Play
- To open Freeview Play*…
- Press (Home) to open the home menu.
- Press (right) to overview available Freeview players (apps) or select Explore Freeview Play to enter Freeview Play page.
- You can press Search or enter a keyword in search bar at the right-top to search channels.
- You can press Recommendation on TV Guide to sort different types of programmes on selecting a specific genre.
- Select a programme and press Episodes Info to view the details of the selected programme.
- Select a programme and press OK to start watching.
Press Back to close.
- Freeview Play is only for UK models.
- From a USB Connection
- You can view your photos or play your music and videos from a connected USB flash drive or USB Hard
- Drive.
- With the TV switched on, plug in a USB flash drive or a
- USB Hard Drive to one of the USB connections.
- Press SOURCES, then select USB, you can browse your files in folder structure you have organised on the USB Hard Drive.
From a Computer or NAS
- You can view your photos or play your music and videos from a computer or a NAS (Network Attached
- Storage) in your home network.
- The TV and computer or NAS must be in the same home network. On your computer or NAS, you need to install Media Server Software. Your Media Server must be set to share your files with the TV. The TV shows your files and folders as they are organised by the Media Server or as they are structured on your computer or NAS.
- The TV does not support subtitles on video streams from a computer or NAS.
- If the Media Server supports searching for files, a search field is available.
View 360° Photos
- Press SOURCES, select USB and press OK.
- Select USB Flash Drive and press (right) to select the USB device you need.
- Select 360° Photos, you can press Sort to browse your 360° photos by date, month, year or alphabetically by name.
- Select one of 360° photos, and press OK to view the selected 360° photo.
- To view photos, select 360° Photos in the menu bar, select a photo thumbnail and press OK.
- If there are several 360° photos in the same folder, select a 360° photo and press Slide show to start a slide show of all 360° photos in this folder.
Watch a photo and press INFO to show below:
- Progress bar, Playback control bar, (Jump to the previous photo in a folder), (Jump to the next photo in a folder), (Start slideshow playback), (Pause the playback), (Play all/Play one), (Little
- Planet), (Auto Mode/Manual mode).
- Little Planet: Little Planet is an alternate and fun view of 360° photo. When Little Planet view is started, the 360° photo will be rendered in a wrapped around view like a planet.
- Auto Mode/Manual mode: when the 360° player is started, it will auto pan the selected 360° photo from left to right (0 to 360 degrees) in 360° view. When manual mode is entered, the 360° player will stop auto panning/rotating to allow manually panning/rotating with the remote control keys.
Play Videos
- To play a video on TV…
- Select Videos , and select the file name and press OK.
- To pause the video, press OK. Press OK again to continue.
- To rewind or go fast forward, press or . Press the keys several times to speed up - 2x, 4x, 8x, 16x,
- To jump to the next video in a folder, press OK to pause and select on screen and press OK.
- To stop the video playback, press (Stop).
- To go back to the folder, press .
- Open video folder
- Press SOURCES, select USB and press OK.
- Select USB Flash Drive and press (right) to select the USB device you need.
- Select Videos and select one of video, you can press OK to play the selected video.
- Select a video and press INFO to show file information.
- Playback a video and press INFO to show below:
- Progress bar, Playback control bar, (Jump to the previous video in a folder), (Jump to the next video in a
About Alexa
- Alexa is a cloud-based voice service available on
- Alexa Echo devices from Amazon and device manufacturers. With Alexa working on your TV, you can switch on/off TV, change channels, change volume and more.
- To control your TV with Alexa, you will need...
- Philips Smart TV that supports Alexa
- Amazon account
- Alexa app* (mobile/tablet version)
- Wireless or wired network connection
- Philips TV Remote App
About Alexa Skill
- Alexa uses the Alexa Skills to extend the voice control operations. Skills add new capabilities that create a more personalised experience with your Alexa enabled TV. "Philips SAPHI Smart TV Voice Control" skill can be found on Alexa Skills store, it offers various voice control commands to work with your Philips Smart TV.
- Note: The supported Ambilight styles may depend on specific TV models. Please refer the user manual of your TV to know the supported Ambilight styles.
- Amazon, Alexa and all related logos are trademarks of
- Amazon.com, Inc. or its affiliates. Amazon Alexa is available in selected languages and countries.
- Services availability depends on region. A part or whole of software/services installed into or accessible through the product may be changed, discontinued, removed, suspended, or terminated without notice
Using Alexa
- To use Alexa, you need to first setup the Alexa client service on your Philips Smart TV. Start the setup by launching the "Amazon Alexa" app from the Home screen of your TV. Follow the instructions and complete the following steps:
- Select a name for your Smart TV for Alexa to recognize.
- Select an Amazon account and sign-in.
- Return to this skill in the Alexa App on your phone to enable it, link accounts, and discover your devices.
- Return to your TV to complete setup.
Setup on TV for Alexa
- Press Home and open "Amazon Alexa" app.
- You need Alexa app (on mobile device or web version) be ready to start the setup.
- Follow the instructions on screen to accept
- Privacy Policy terms, name your TV and sign in your
- Amazon account. The Amazon account is needed to pair with Alexa on TV.
- On your mobile device, sign in with the same
- Amazon account in the Amazon Alexa app.
- Complete following steps in the Amazon Alexa app. The first is to enable "Philips SAPHI Smart TV
- Voice Control" skill. The second is to link your Amazon account and then the final is to discover devices
- At the end of setup screen, you can select Done to start to use Alexa.
- To start Alexa voice control operations, if your TV remote control does not have Alexa button, you can use Philips TV Remote App (iOS and Android) on mobile devices.
Setup TV Control with Google Assistant
- Follow the instructions on screen to accept the
- Privacy Policy for the usage of Google Assistant voice control feature on this TV.
- Choose a name for the TV so that Google
- Assistant can recognise it.
- Sign in Google account. If you already have a
- Google account, please sign in. If not, please create an account and sign in. After you have signed in successfully, select "Get Code" to get the device code of this TV for your device registration.
- On your mobile/tablet, search for "Google Home" app in app store (iOS and Android). Download and open the Google Home app. Sign in with the same
- Google account, which is used to register this TV. You need to continue the setup on Google Home app in mobile/tablet to control your TV with voice commands.
- On Google Home app, select “Set up device”, then click “Search for TV” to find your TV. Sign in to link to your Google account and enable TV control on
Google Home app.
- You can use Google Assistant to turn on your TV using voice command. For this, the TV needs to remain in a special power mode, which may result in slightly higher power consumption during standby.
- TV Help on your tablet, smartphone or computer
- To carry out extended sequences of instructions more easily, you can download the TV Help in PDF format to read on your smartphone, tablet or computer. Alternatively, you can print the relevant
- Help page from your computer.
- To download the Help (user manual) go to www.philips.com/TVsupport
Switch On
- The TV does not switch on
- Disconnect the power cable from the power outlet.
- Wait for one minute then reconnect it. Make sure that the power cable is securely connected. Try switching on again.
- Connect the TV to another wall mains socket and try switching on.
- Disconnect all connected devices from the TV and try switching on.
- If the standby light on TV is on, the TV might not respond to the remote control.
- Creaking sound at startup or switch off
- When you are turning the TV on or standby, you hear a creaking sound from the TV chassis. The creaking sound is due to the normal expansion and contraction of the TV as it cools and warms up. This does not affect performance.
- The TV goes back to standby after showing the
Philips startup screen
- When the TV is in standby, a Philips startup screen is displayed, then the TV returns to standby mode. This is normal behaviour.
- When the TV is disconnected and reconnected to the power supply, the startup screen is displayed at the next startup. To switch on the TV from standby, press (Standby / On) the remote control or the TV.
- The standby light keeps on blinking
- Disconnect the power cable from the power outlet.
- Wait 5 minutes before you reconnect the power cable. If the blinking reoccurs, contact Philips TV
Consumer Care.
- In Help > User manual, press the colour key Keywords and look up Contact Info.
TV switches off by itself
- If the TV switches off suddenly, the setting Switch off timer might be switched on. With Switch off timer the TV switches off after 4 hours if no remote control signals were received.
- To avoid this automatic switch off, you can deactivate this switch off.
- In Help > User manual, press the colour key Keywords and look up Switch Off Timer.
- Also, if the TV does not receive a TV signal nor a remote control command for 10 minutes, the TV switches off automatically.