158.17530
i i i
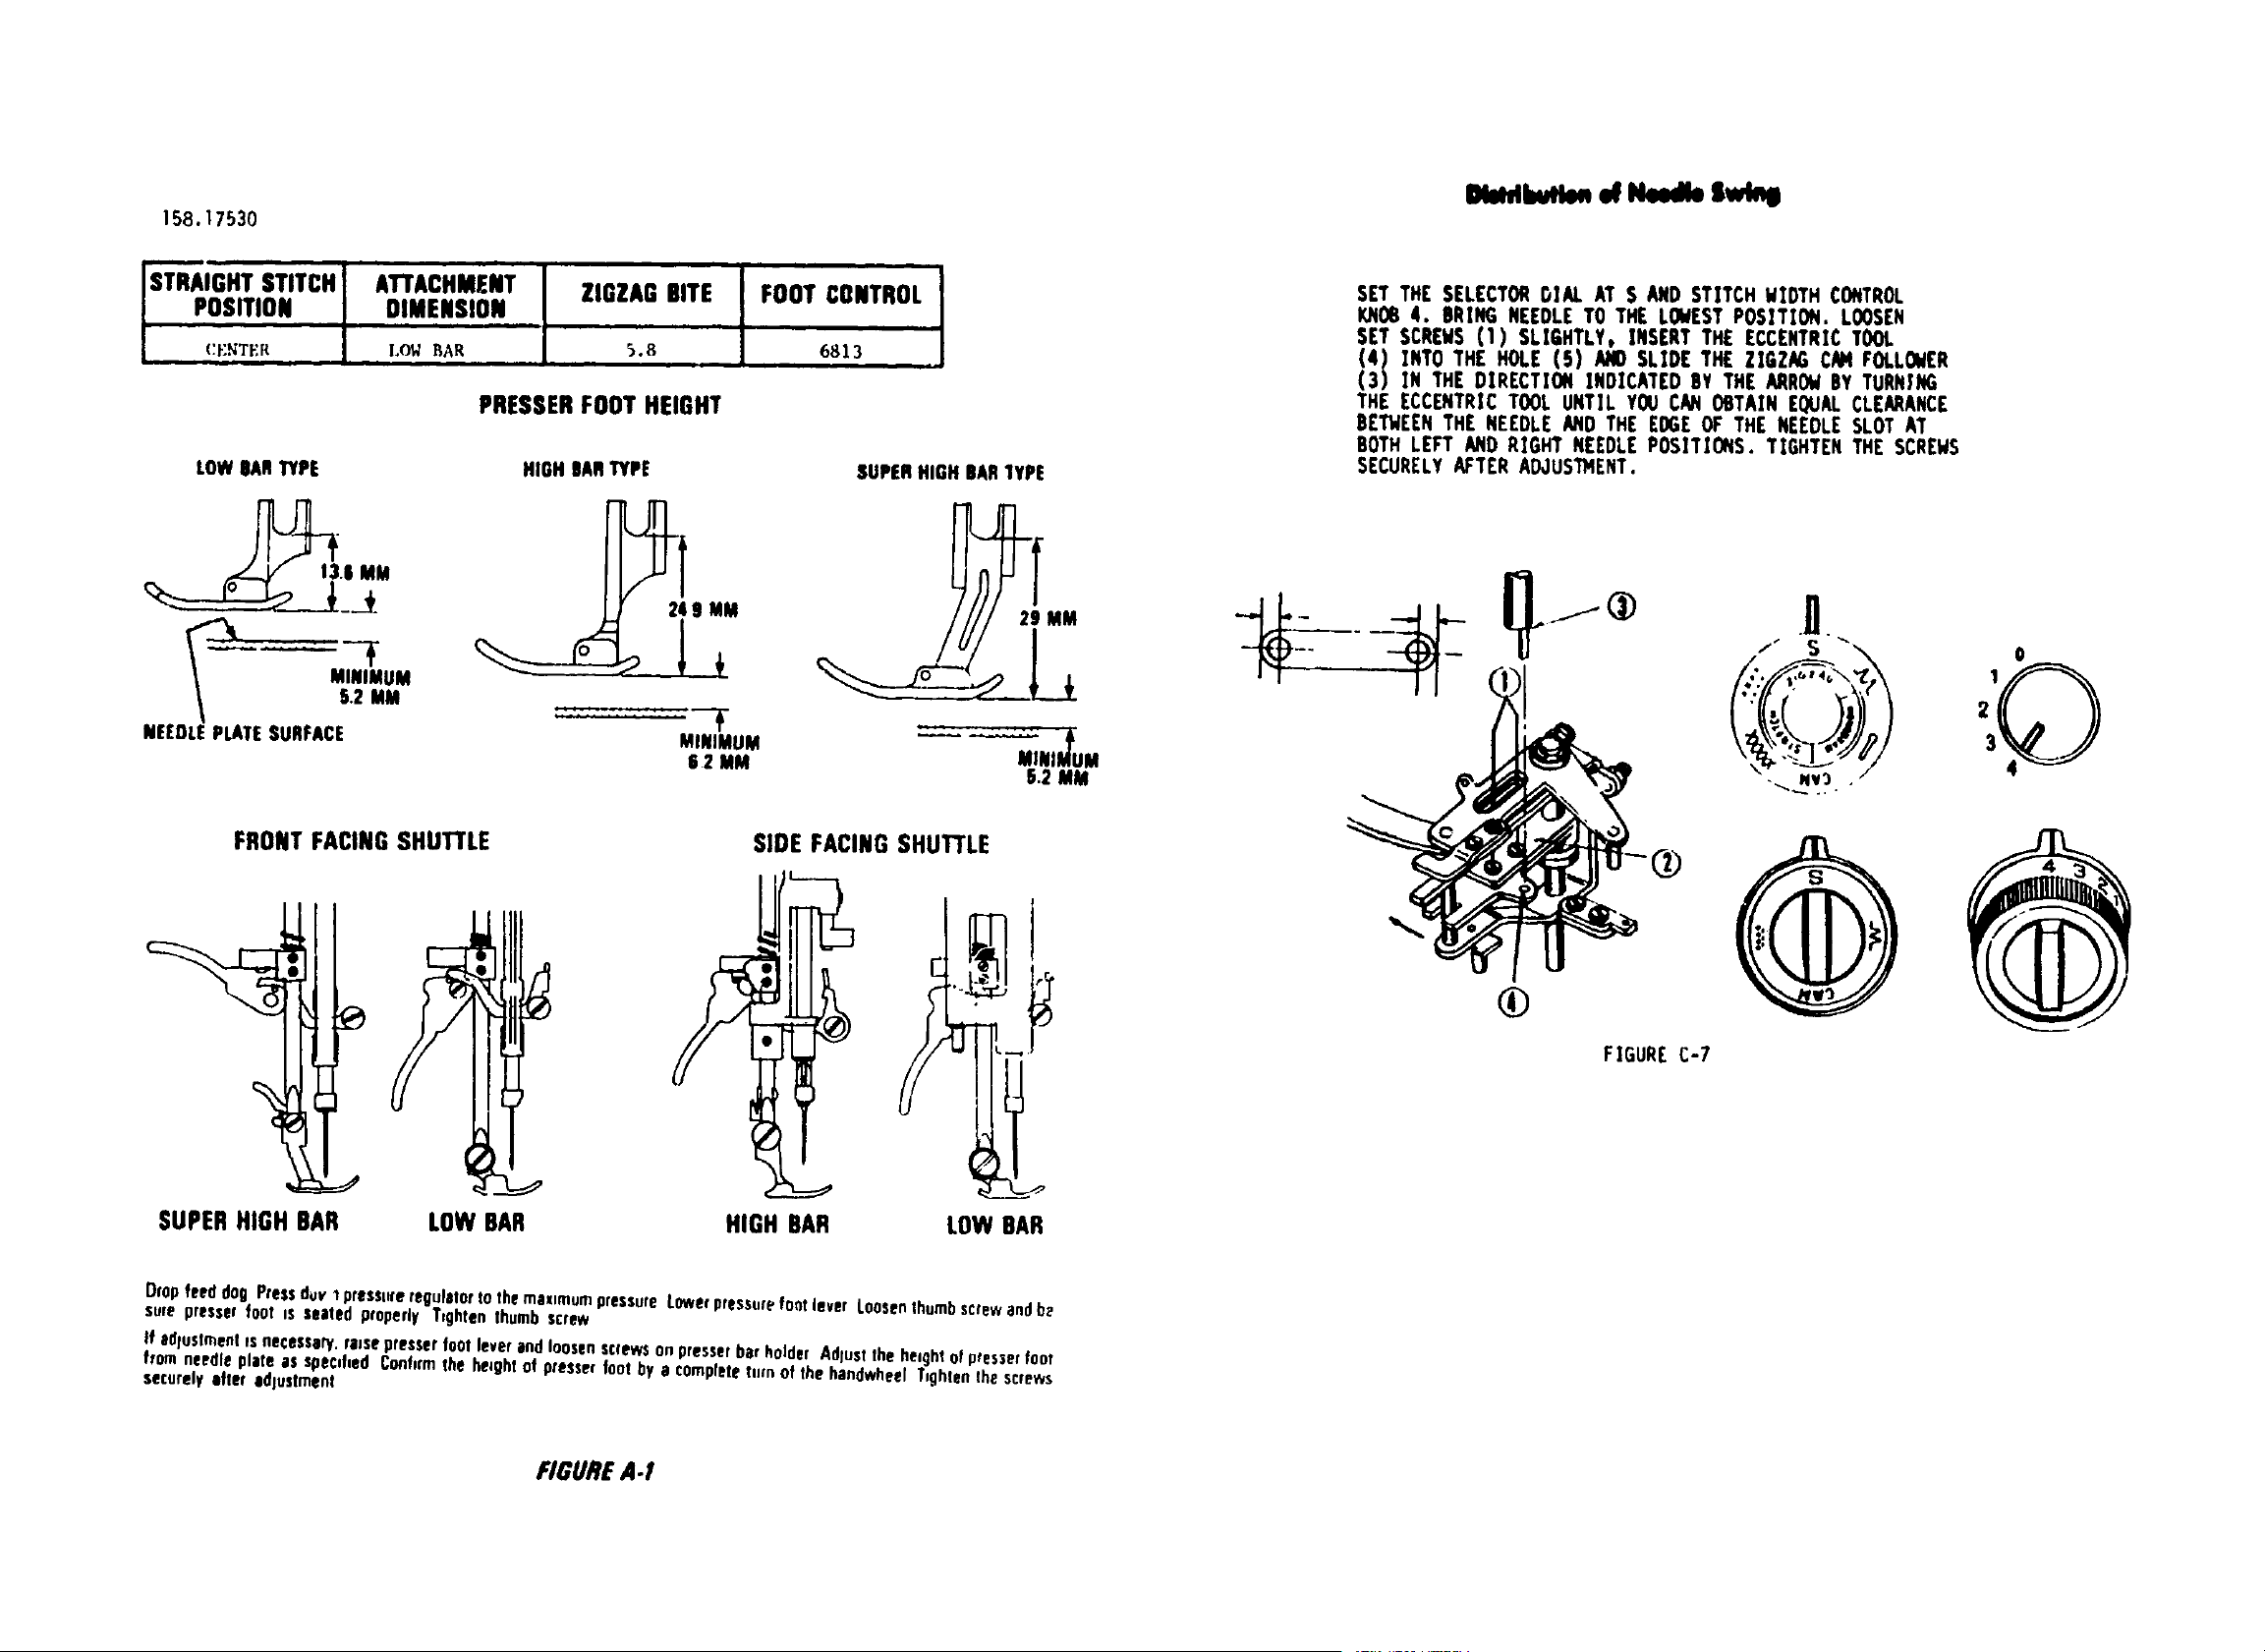
STRAIGHTSTITCH ATTACHMENT ZIGZAG BITE FOOT CONTROL
POSITION DIMENSION
, i
CF'STF:R LOt/ P,AR 5.8 6813
i ,m
PRESSERFOOT HEIGHT
LOWSARTYPE
.....- "-T
MINIMUM
5.2 MM
NEEDLE PLATE SURFACE
HIGHDARTYPE
249 MM
MINIMUM
6 2 MM
SUPERHIGH BAR1YPE
5.2 MM
SET THE SELECTORDIAL AT S AND STITCH WIDTH CONTROL
KNOR4. BRING NEEDLETO THE LOWESTPOSITION. LOOSEN
SET SCRENS(1) SLIGHTLY, INSERT THE ECCENTRICTOOL
(4) INTO THE HOLE (S) AM) SLIDE THE ZIGZAG C/V4 FOLLONER
(3) IN THE DIRECTION INDICATED BY THE ARROMBY TURN|NG
THE ECCENTRIC TOOL UNTIL YOU CANOBTAIN EQUALCLEARANCE
BE'I'_EENTHE NEEDLEAND THE EOGEOF THE NEEDLE SLOT AT
BOTHLEFT AND RIGHT NEEDLEPOSITIONS. TIGHTEN THE SCREHS
SECURELYAFTER ADJUSTNENT.
0
FRONTFACINGSHUTTLE SIDE FACINGSHUTTLE
SUPER HIGH BAR LOW BAR HIGH BAR LOW BAR
Dropfeed dog Pressduv 1pressureregulator tothe maximumpressure Lowerpressurefool lever Loosenthumbscrewand b_
sure presser foot is seated properly T,ghten thumb screw
If adjustment esnecessary,roJsepresserfoot lever and loosenscrewson presserbar holder Adlustthe heightofpresserfoot
from needle plate as specified Confirmthe heightof presserfoot by a completefilm of the handwheel T_ghtenthe screws
securelyafter adjustment
FIGURE A.I
158.17630
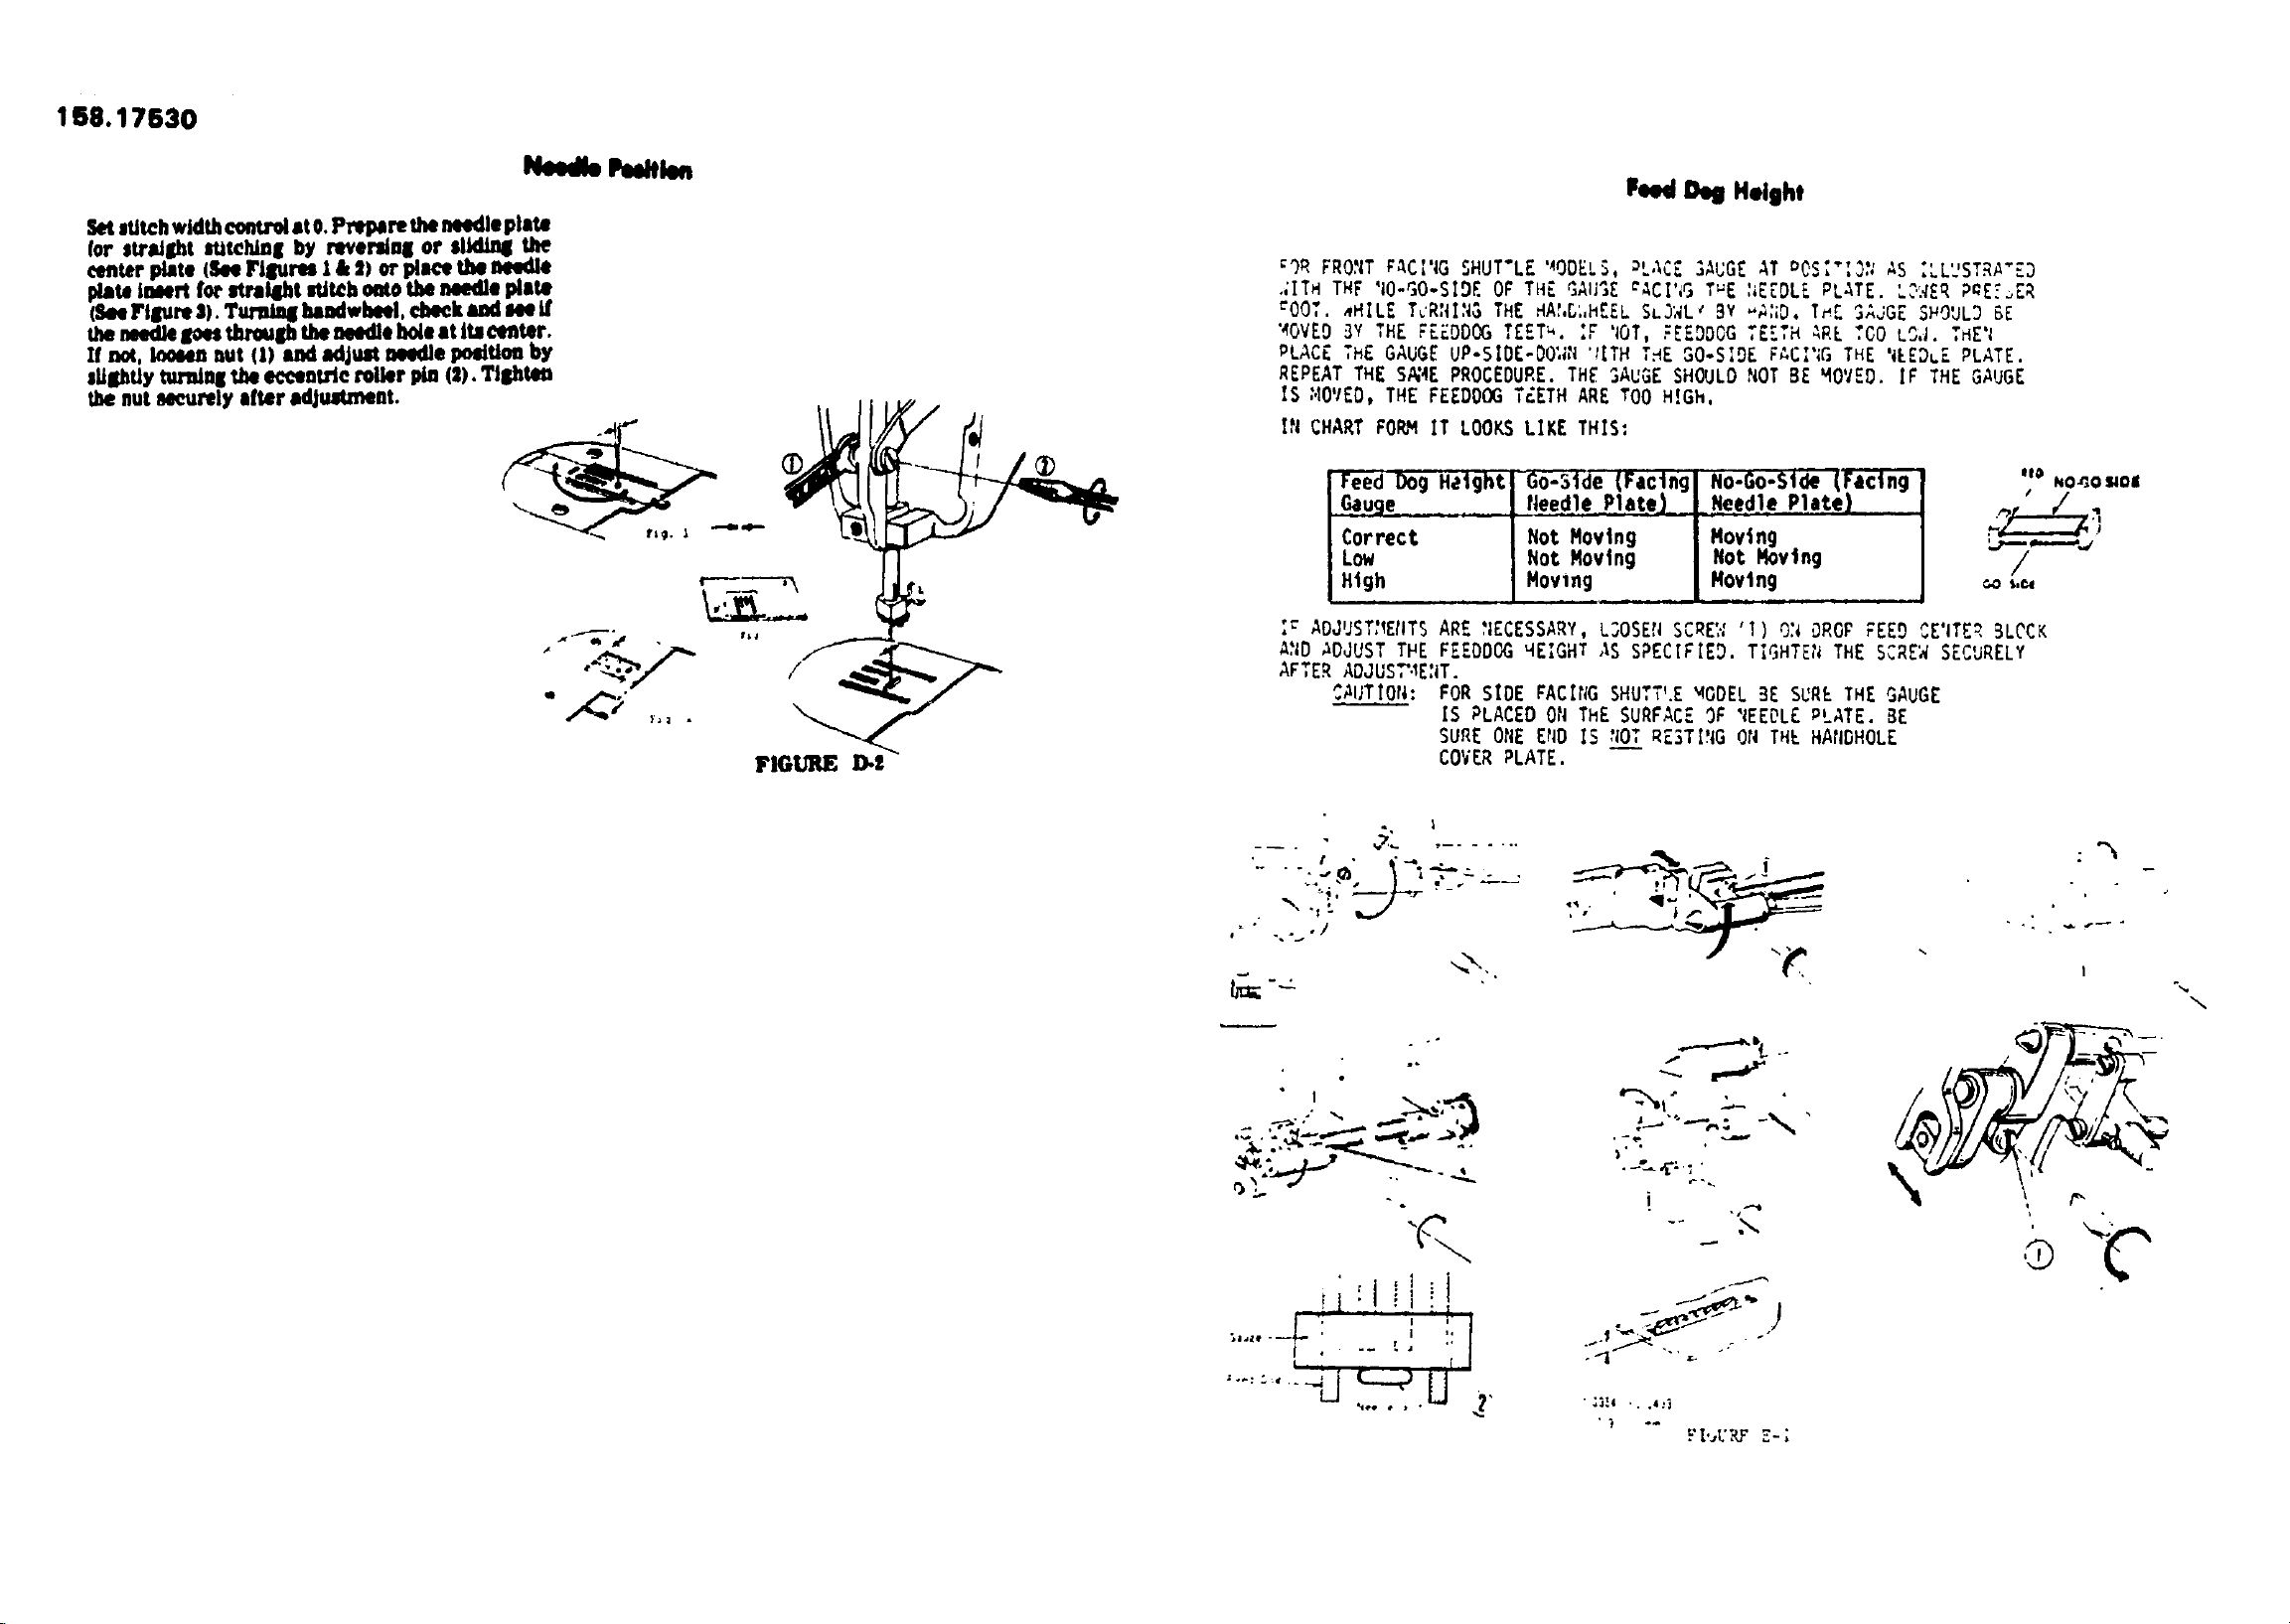
Need, _wW_I_
FIGURE D-t
Peed Dog Height
:gR FRO_T rACI'_G5HUT'LE'*OD_LS, _L_CE ;AUGE AT DOS;':_ _S :LL?STRA÷Z3
,;ITHTHF 'aO-_O-SIDEOF THE GAUGE _ACI';GTuE :_ZEDL_PLATE. L_ER P_E_ER
_OOT. _HIL[ T,RIIIN&THE HAI,_;,HEELSL3_L_ BY _A;ID.T_£ GAJGE SHOULD BE
_OVE9 3Y THE FE_DDCG TEET". :F 'lOT,F_DDOG TILTH _R_ TOO L&_. THE'_
PLACE THE GAUGE UP-SIDE-DO:_N'$1THT_E GO-SID_ FACI';GTHE '_EE%_ PLATE.
REPEAT THE S_4E PROCEDURE. TH_ GAUGE SHOULD NOT BE MOVED. IF THE GAUGE
IS NOVED, THE FEEODOG T_ETH ARE TOO H!GH.
IN CHART FORM IT LOOKS LI_E THIS:
Feed Dog Height Go-3]de (Facing No-Go-Side (Facing
6auge |teed lePlate) Needle Plate)
Correct Not Moving Moving
Low No_ Moving Not Moving
High Moving Moving
*ID kO-_O S_OI
I
:_"AOJUST'IEtlTSARE :;[CESSARY,L,'3OSE,qSCRE;.:'I) 0_ DROP ?EED CE'ITERBLOCK
A,_ID,_DJUSTTHE FEEDDOG HEIGHT ,ISSPECIFIED, TIGHTE_ITHE SCRE_ SECURELY
AFTER ADJUS,.EJT.
CAUTIOrI: FOR SIDE FACI_G SHUTTLE '40DELBE SUR[-THE GAUGE
IS PLACED ON THE SURFAC_ OF 'IEEOL_"PLATE. BE
SURE ONE E_IDIS 'IO._T.TRESTI!iGON THE HA{IDHOLE
COVER PLATE.
....:._,_, 1-'_.._-_ __,
.,./,..
2....'.
t ,,L [
f
-..
_t"
.T_.
i
.%
I
\
158.17530
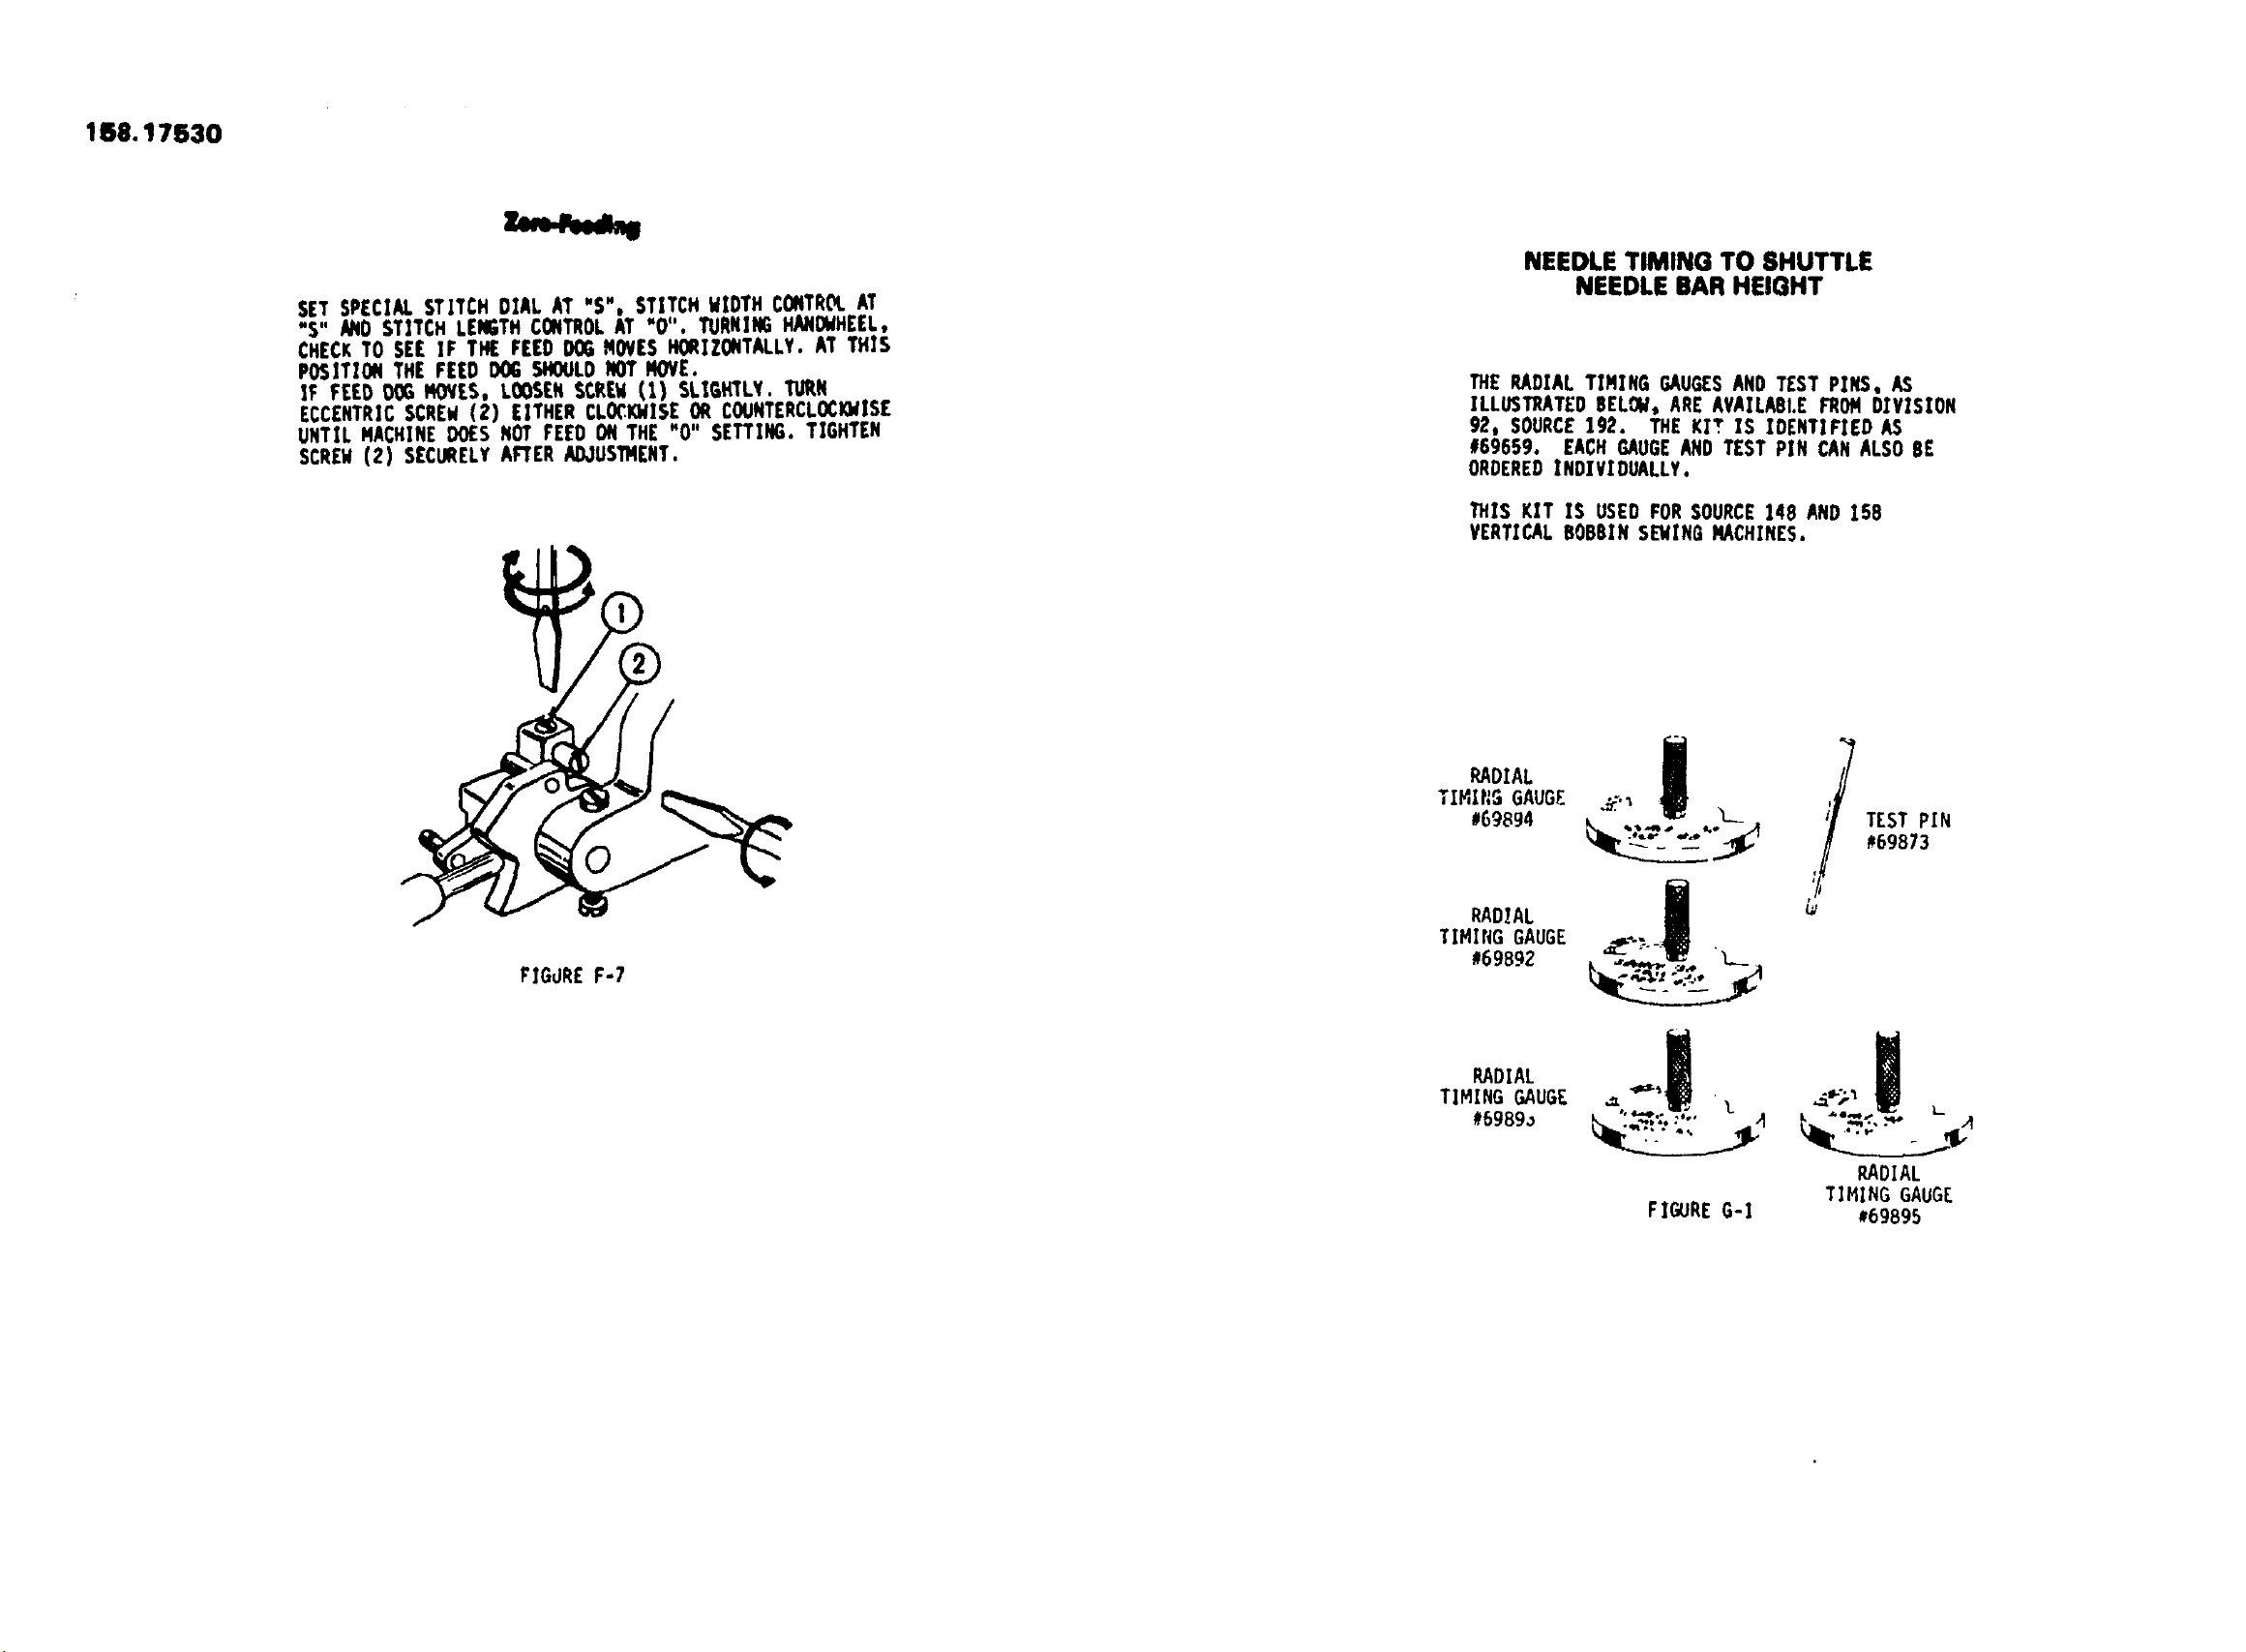
SET SPECIAL STITCH DIAL AT "S", STITCH WIDTH CONTROLAT
%" N_D STITCH LENGTHCONTROLAT "0% TURNING HANONHEEL,
CHECKTO SEE IF THE FEED DOGMOVESHORIZONTALLY. AT THIS
POSITION THE FEED DOG SHOOLDNOT ROVE.
IF FEED OO_ MOVES, LOOSENSCREW(1) SLIGHILY. TURN
ECCENTRICSCREW(2) EITHER CLOCKWISEOR COUNTERCLOCI_ISE
UNTIL MACHINE DOESNOT FEED ONTHE "0" SETTING. TIGHTEN
SCREW(2) SECURELYAFTER ADJUSTMENT.
FJGdRE F-7
NEEDLE TIMING TO SHUTTLE
NEEDLE BAR HEIGHT
THE RADIAL TIMING GAUGESAND TEST PINS, AS
ILLUSTRATED BELOW, ARE AVAILABI.E FROMDIVISION
92, SOURCE192. THE KIT IS IDENTIFIED AS
#69659. EACHGAUGEAND TEST PIN CAN ALSO BE
ORDEREDINDIVIDUALLY.
THIS KIT IS USED FOR SOURCE148 AND 158
VERTICAL BOBBIN SEWINGNACHINES.
RADIAL
TIMI_ GAUG_
#69894
RADIAL
TIMING GAUGE
#69892
RADIAL
TIMING GAUGE
#698%
TEST PIN
#69873
RADIAL
TIMING GAUGE
FIGURE G-I 169895
1.s.l?sso NEEDLETIMINGTOSHUTTLE
15e.16soo
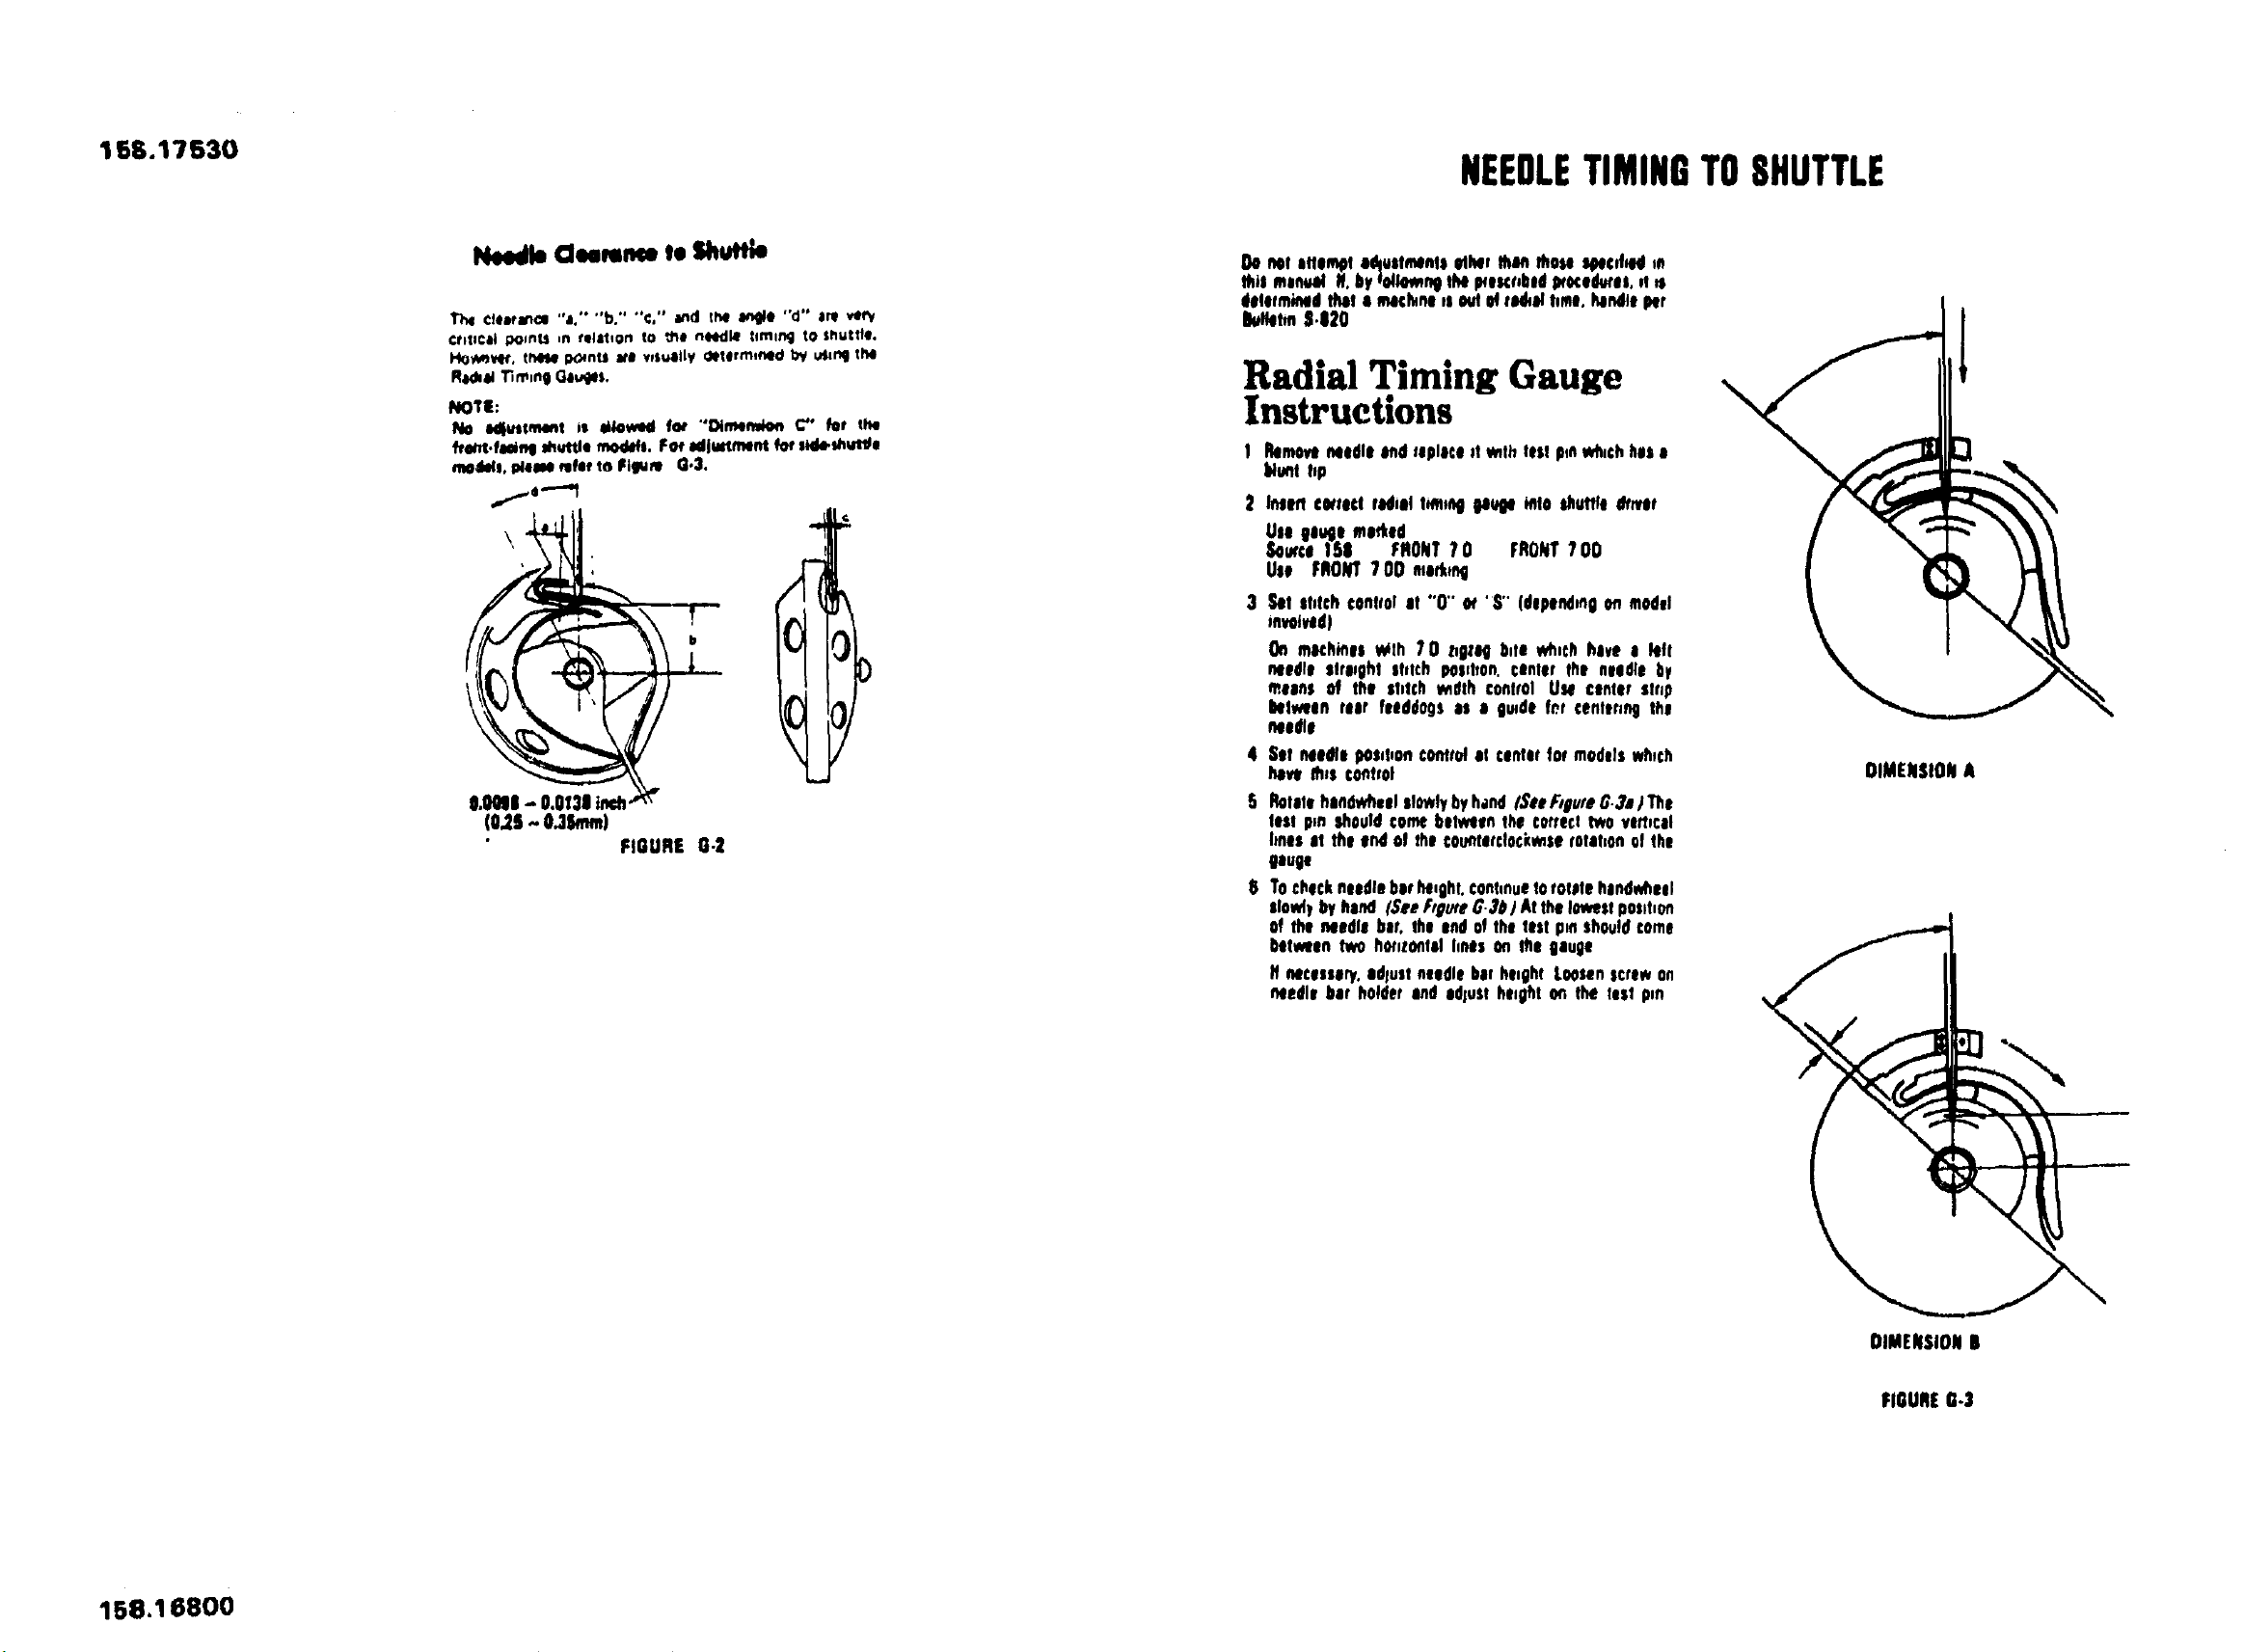
N_dle Cleemn_ to Shuflte
TI_ ¢fearafl_ "a." "b." "€," and th# _ "d" ate vcl_
crlt_cit points ,n relation to _o nNdl_ timing to Shuttle.
Ho_v4_r. these po, nts aridv,s_Xly dee#trained 1_ until the
A_x_ll 'l_m,ng Giu_pi$.
NOlle:
No lldlusZmentis ai_owedfo* "O4ma_a C'° for the
hl_e-fma0 m_ml, n_x_fs.Fo_Idiwtment _ sld4.mut_e
mo_z, Memomfneto FitNm (3.3.
O.001l- O.0f3i t_
(O,28-- 0,3Smm)
FIGURE G.2
Do notattomptadlusfmnts otMr thM those speedHidm
thismsnl_l If. byro/IomngtiN}_eKrdlsd _KO_'0i, of
determlnedthi! a macbne0s0MMrlHkiltom, _l_le per
DueetmS420
Radial Timing Gauge
Instructions
I
2
4
S
O
ROmOVehe0dl0lindsiploco 0truthlist p_nwhichhis e
blunttop
lasefl on.act .Hlill tun,n0giuge _tO Shuttle_r.lr
Useg0ug0 madtnd
hurt| 151 FRONT10 FRONT100
Use FRONT700 nlod.M
_'ditSfdchcontrolat "0" ot '$" (depend,n0 on model
tavotv/dI
On machinesNth 10 tlgZOgbite whichhave O kilt
nendl0 elrlpghtShlth POSdvon.conler tho neidlo by
n,.osn$Of the sheenwdlh €ontrol U_ €InIO; strip
hilweea root feeddogsis a grade fr.f confirm9the
needle
Sotneodfl pOSdlon€ontrd It centerfor modelswh,ch
haveth,s control
Rotatehandwheelslowlybyh.lndISeeF_oufe6.30) The
lost pmshouldcomebetweonthe €ot,eel twovemcol
hnesat theand of the€o_titclockmse rOtohonofthe
gouge
To€l_acknoodlebarhi,ont, conhnuetofotPlehinde_esl
slowlybyhand(SeeftOufeG.3}) Atthelowestposlbon
of the needlebar,the endof lhi lostpmshouldcome
betweentwo hmlzoefelhnesOnthe gauge
If necessary,adjustnoodlehotheightLoosenscrewon
noodlebe, holde,and OdlUStheighton the test pin
DIMENSIONA
DIMENSIONR
FIGUREn-3
\
\
168.17630
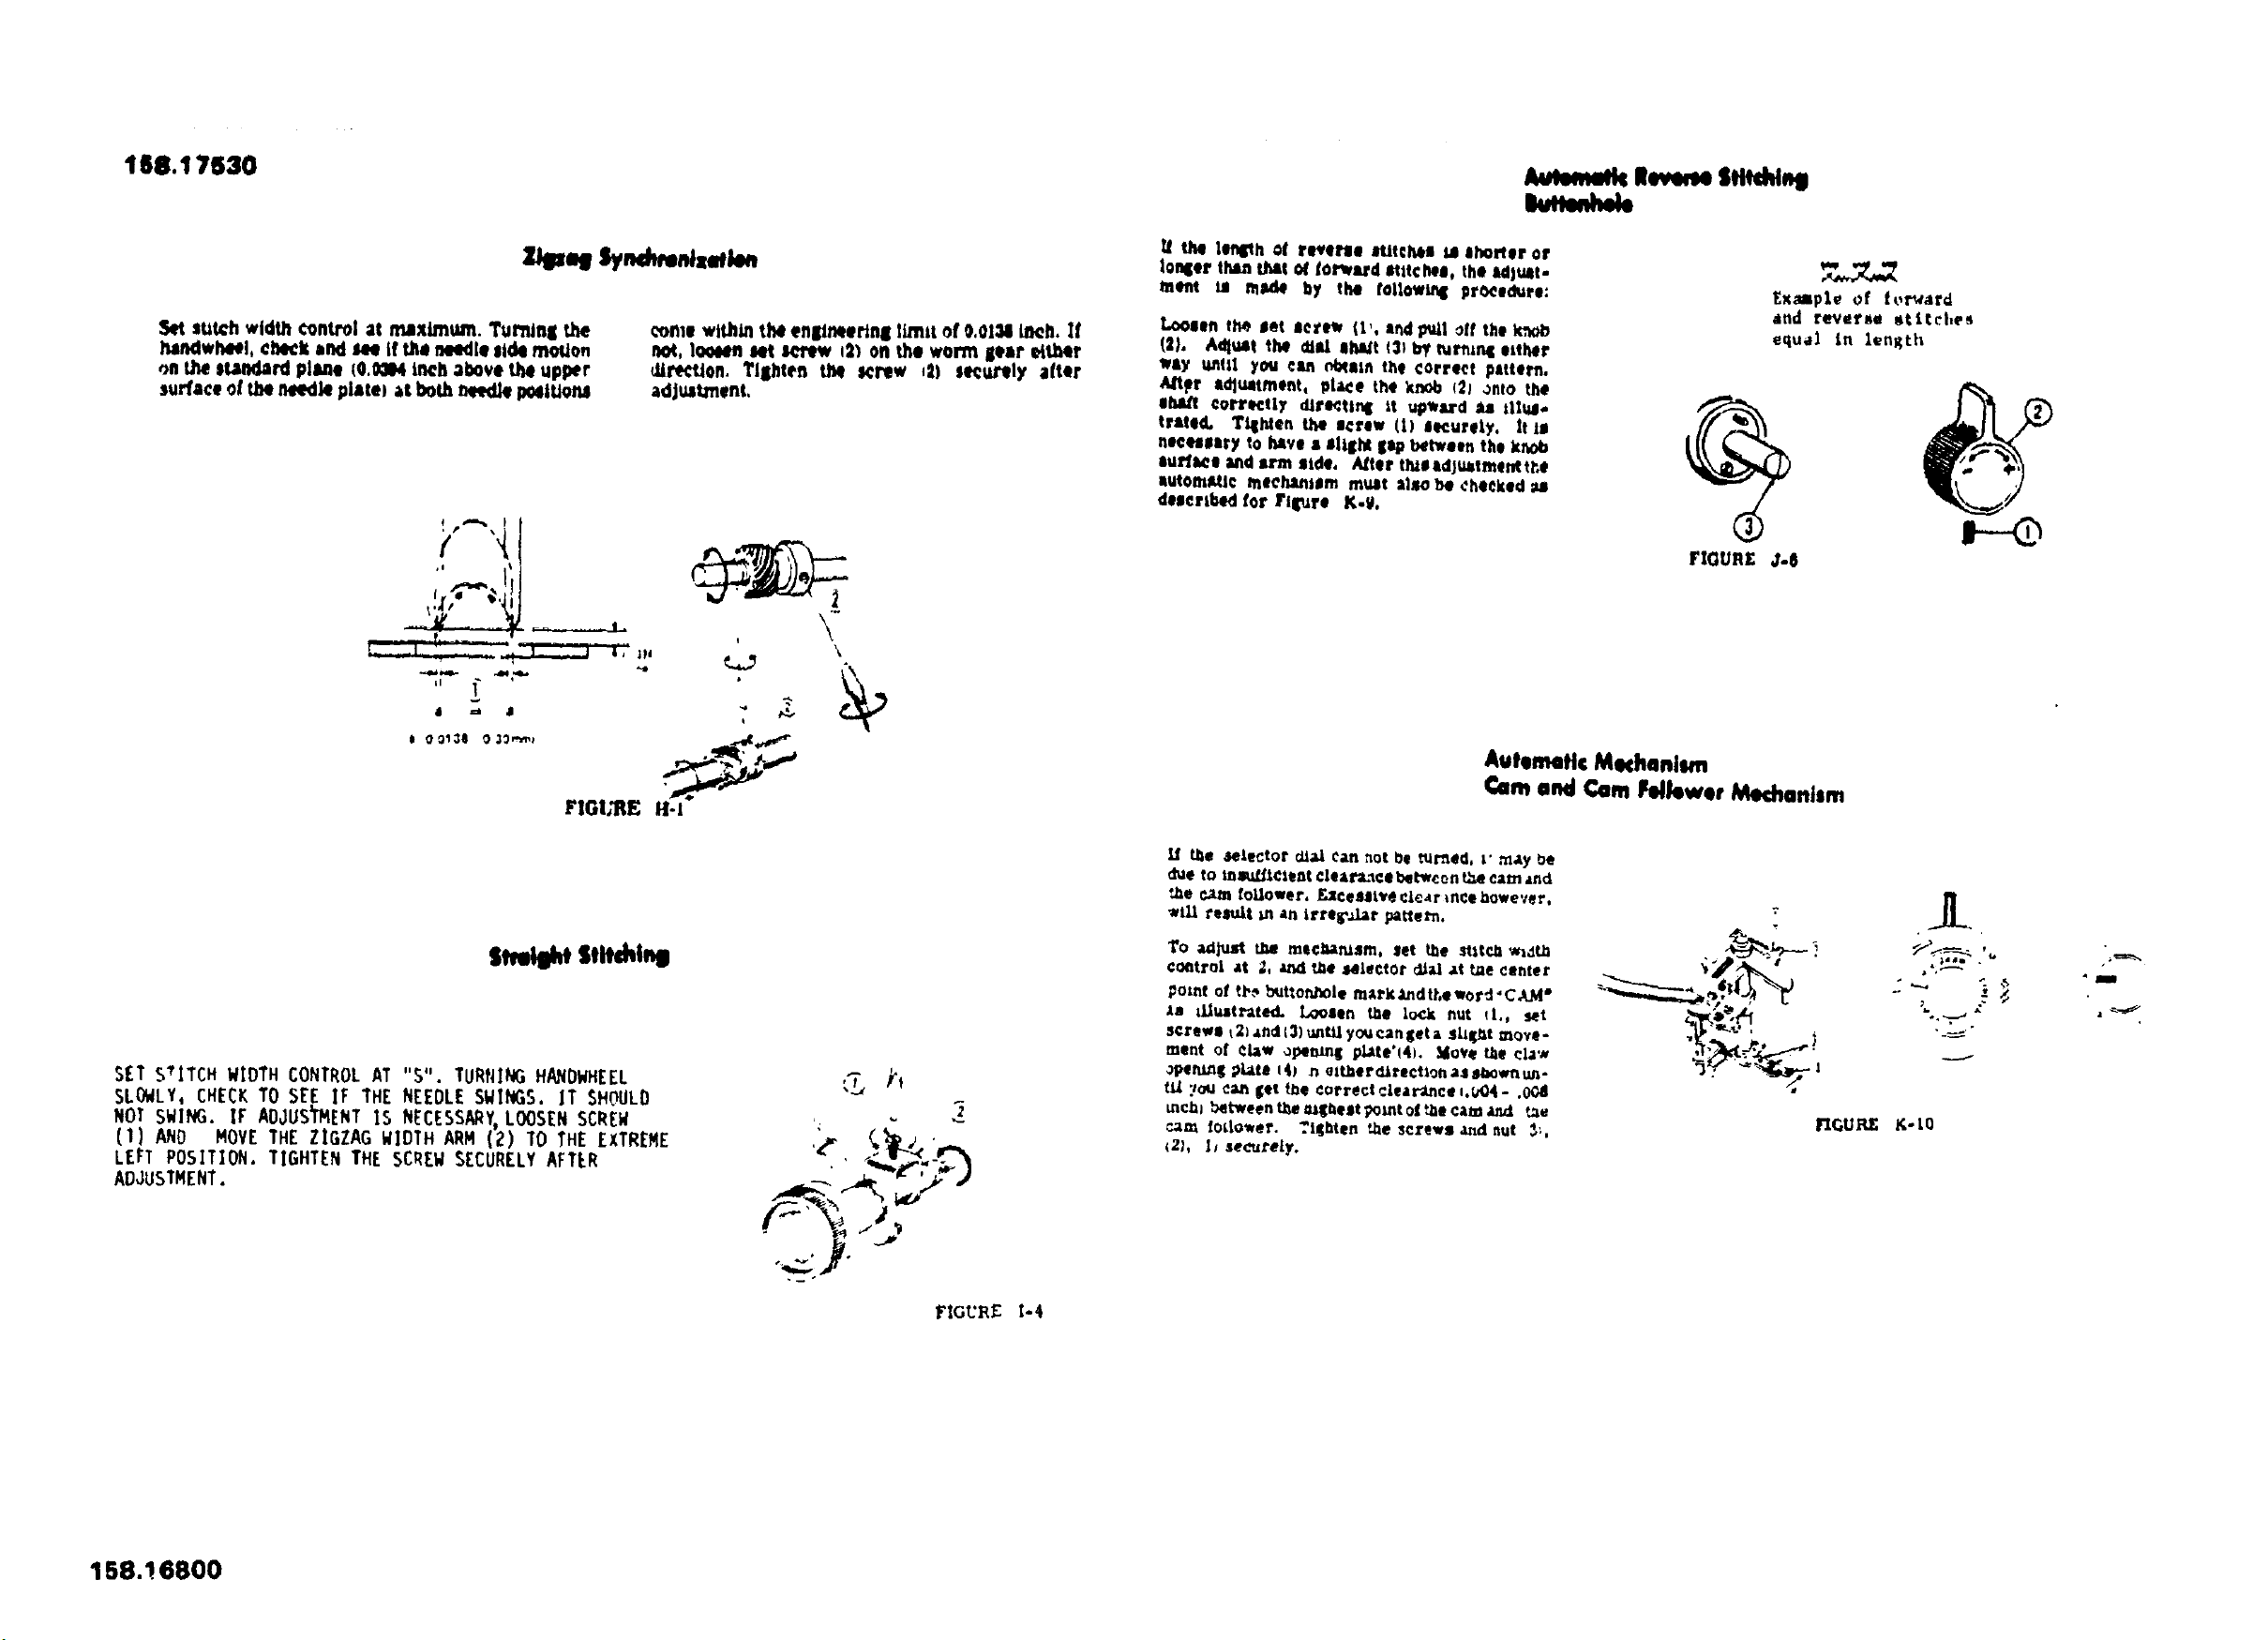
Set stitch wldffi €ontrol at maxlmuLm. Tul_inlll the
handwhe_l, €_k s_l m if _l _edte stdQmotion
on the itaneard plane (0._14 inch above _e upper
surface o! the mledkl ?late) it both _ p_|UohS
come within f,lii enl/Iwlerinll timit o! O.0111 Inch. It
llot, Ioolml lit _ db on the worm par otther
tbrectlon. ?liOiten tit! leriw ,el secirely after
adJuatmenL
I 00134 03_1
FIGi,II£ lid
\
\
stmk stitchintl
SIT S'rlTCH WIDTH CONTROLAT "S". TURI|ING HANDgHE[L
SLOWLY, CHE(_K3"0 SEE IF "THENEEDLE SWINGS. IT SHOULD
NO! sWING. IF ADJUS_ENT IS NECEssARY,LOOSENSCREW
(I) AND MOVETHE ZIGZAG WID'[HARM (2) T0 THE EXTREME
LEI:IPOSITION. TIGHTEN THE SCREW SECURELY AFTER
ADJUSIMIENT.
FIGURE I-4
Avlemik liar,heSl#chinl!
I1 tll lllih M rtVelle liltcllii II Ilmllar of
lower thlm list M lollilid lllt(Wi, the idiuit.
meet ie lade by the lollowmll pr_i@,irl:
l.(wliefl the let aliew 11', and I_I oli the I1_
(I). A@uit tM dill Ittlt Ill _ lll'_lnl eitlitr
wly lmtlf, Ill lill (_blile tht correct pattern.
ill I(_illleflt, pli_l the kilob ill onto the
llllUt eorii_ctll dili_tlnl tt lind es tllii.
timid. "rill_en tl_ iclew (11 licurell, It II
,llilllr# to hive I ilIIM lip betsi, the k_ib
$111ttils_d _ lidO, Mtet thisid)uitmilAt_,e
iutomelic lllechinllm mule Ill_ be chalked is
deicrl/for Fil_ile 1.9.
ExalpLe Of forward
Ind r_efx _t.ttc|tes
equal in length
FIGURE J.6
kulentitlt Michlmllm
CInl and Col. l kw,r M*dlcmtim
il tile setector_aA can _ot be _ed, t'm_y b_
_le to mililllcie_t claire'ice betw¢oll _t_ cam _nd
_be c,im follower, £xcesiive Clearracehowever.
wiltreside in an lrrer_Jir patte_no
ro adiust ells mecilinism, set Lhe Ititcli wl,.ttb
control it :_, and _ e41ector dial st Ule (Isllter
_oin{ of tb,* b.tto_l_ole m;_rk.imdtt, e_ord'CA.M"
;ze dJistilted. Loosen Use lock nut d,, set
screws _21and 13)unf_ you can !_eta tbg_t move-
mcnt of _lsw _pet_ plate't4i. Move t_e eli'#
opeill_!i ?_te i4! n eitllcr(Urectton'iisli, olml_li-
t_ 7o_1cartlet the correct clear'_ce ,._04- .004
mcbi between the molest pointof the cam ar,d t=e
cam fotlower. Tighten _€ screws a.d not _:,
(2h i_ se_ltely.
_GUR£ K-L0
158.!6800