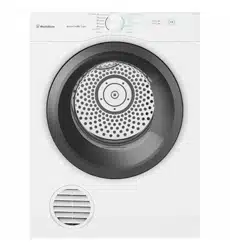
User Manual for Dryer
USE
The Control Panel
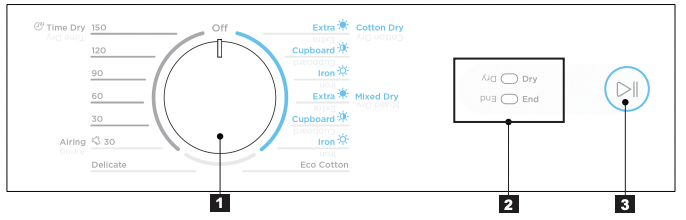
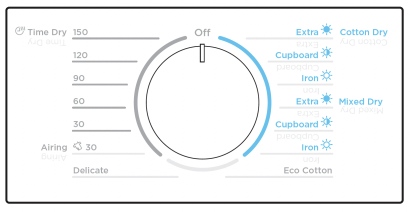
1 PROGRAM SELECTOR KNOB
Turn the Program Selector knob to choose a drying program. The table “Program Guide” shown on page 7 will help you in selecting the right program.
NOTES : The Program Selector knob is not a timer. Once you select a drying program, the Program Selector knob will stay at that position for the whole drying cycle.
2 INDICATORS
| STATES |
STATUS INDICATOR |
|
Initial Power on.
• After appliance is powered on.
• Allows user to select a drying program
|
• Dry LED blinks
• End LED Off

|
| Machine Switched Off |
•All LED Off

|
|
Drying Phase
• Drying cycle starts.
• Buzzer will sound after main drying and cooling phases ends, at the start of anticrease.
• Anticrease in progress
|
Drying & Cooling
• Dry LED On
• End LED Off

Anticrease
• Dry LED Off
• End LED blink

|
|
Paused
• Drying cycle paused
• Cannot change drying program
|
• Dry LED blinks End LED Off

|
|
End State
• Drying cycle and Anticrease completed
|
• Dry LED Off
• End LED Off

|
|
Alarm/ Error
• See description on page 10
|
• Dry LED blinks
• End LED blinks

|
ANTI CREASE CYCLE IN PROGRESS
• Dry LED Off
• End LED blinks

The anti crease cycle is designed to help prevent creases forming in the clothes after normal drying cycle has ended. The anti crease progress indicator will start blinking during the time anti crease phase is running. The drum will rotate for 5 seconds every minute and will go for 1 hour Anti crease phase cannot be disabled.
NOTE: Anti crease can be stopped at any time by opening the door and removing the clothes.
3 START/PAUSE BUTTON
- This button allows you to start or pause the dryer to check the contents or perhaps add more clothes.
NOTES : The dryer will not start unless the door is closed. (If door is not closed you will hear 6 beeps followed by DRY LED blinking 4 times.)
- If selector knob is turned while dryer is running or paused mid cycle 3 beeps is heard to indicate operation is not allowed. Cycle will not continue if selector knob is not returned to original selected program.
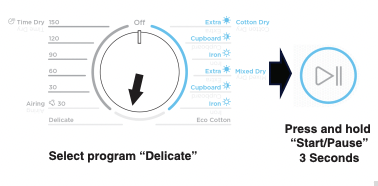
Enable/Disable Buzzer
- To Enable/Disable the Buzzer select “Delicate” then press and hold Start/ Pause button for 3 seconds (buzzer is enabled by default).
Operating Sequence
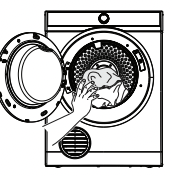
Step 1
Load your dryer loosely until it is no more than TWO THIRD FULL. Clothes must tumble freely in a dryer. Don’t cram them in. Wet clothesfluff up when dry.
Overloading will :
- Reduce efficiency
- Increase drying time
- Increases the risk of creasing
Do not load clothes or other articles which are dripping wet or have sand and grit on them into your dryer.
Step 2
SWITCH ON The dryer will not operate unless the door is completely close.
Step 3
Turn the Program Selector knob to choose the drying program you want.
Program Guide
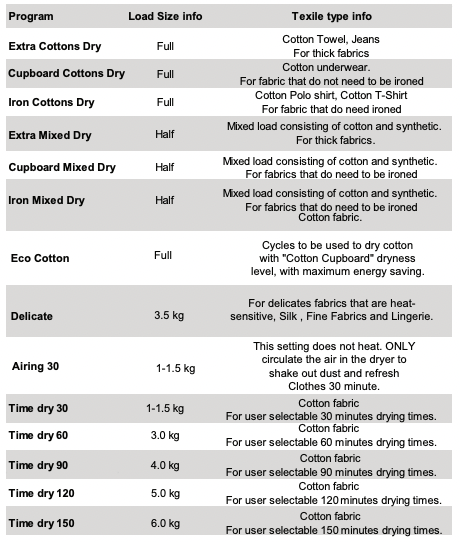
For best results we recommend to sort out your laundry
- Do not select the “Extra Dry” option for delicate fabrics such as polyester as shrinking may occur.
- To obtain the best drying results with small loads it is recommended to use “Time drying” program.
WARNING: Never stop a tumble dryer before the end of the drying cycle unless all items are quickly removed and spread out so that the heat is dissipated.
Reversing Action
The drum is designed to rotate in both direction, clockwise and anti-clockwise. This reduces tangling and gives more even drying is a shorter time.
Step 4
Turn the Program Selector knob to "OFF” When you have finished using the dryer to turn off the power, then switch off at the power point. It is recommended to power off the appliance when not in use.
Step 5
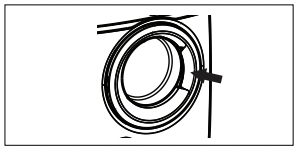
Clean Lint Filter
After every load clean the lint filter to reduce drying time and avoid overheating.
Checking the Load
To check the dryness or add clothes during the cycle, simply open the door. The dryer will beep several times indicating the door is open. If further drying is required, close the door and then press the Start/Pause button to continue.
For the best drying performance, only add or remove clothes at the begining of the drying cycle.
Hints
- Never tumble dry the following : Delicate items such as net curtains, woollen, silk, fabric with metal trim, nylon tights, bulky metarials such as anoraks, blankets, eiderdown, sleeping bags, feather quilts and any item containing rubber foam or materials similar to foam rubber.
- Do not place in your dryer undergarments such as bras and corsets that contain metal reinforcements.Your dryer may be damaged if metal part were to come loose fro the garment. Place such items in a bag designed for this purpose.
- Check and empty pockets. Clip, pens, nails and pins can damage bth the dryer and your clothes. Other item such as matches or cigarette lighters will cause a fire.
- Close all press studs, hooks, eyes and zips that may catch on something else. Tie all belts and aporn string to prevent tangling.
- Drying time will depend on fabric type and construction, load size and wetness. Save time and money and always spin the load as dry as possible your washing machine.
- Always clean the lint filter-this will reduce drying time and save you money.
- The laundry must be thoroughly spun before tumble drying.
- Easy-care items eg shirt, should be briefly pre-spun before drying (depending on tnis crease resistance approximately 30 seconds).
- If individual items are still damp after drying, please add appropriate Time Drying program. This may be necessary particularly for multilayered items (e.g. jeans, items with collars or pocket) or very small loads.
- To avoid static charge when drying is completed, use either a fabric softener when you are washing the laundry or a fabric conditioner specifically for tumble dryers.
- Remove the laundry when the dryer has finished drying.
- Do not over-dry laundry, this avoids creasing and saves energy.
- Clothes or towels containing sand or grit should be washed first
- Due to variations in dryer load fabric texture and thickness it is possible that not all items will be dried evenly. It you experience uneven dryness on Cupboard program please use either Extra Dry or Timer Program but be mindful of the type of fabric being dried to avoid overdrying certain types of fabric. Always follow drying instructions attached to the items intended to be dried in a clothes dryer.
- Drying time will also be effected by voltage fluctuations,room temperature and humidity. Clothes will dry more slowly on a cool or humid day.
- For best results, sort the load according to fabric. Such as heavy items which may take longer to dry, eg. towels, flannelette sheets, etc. than ones which dry quickly, eg. poly/cotton shirts and and sheets.
- Avoid drying dark clothes with light coloured items such as towels as lint will show on the dark clothes.
- Note : Some fabrics will collect lint from other clothes and items. Separate the lint “gives” and the lint “collectors” to minimise this problem.
- Clothes that give lint include towels, nappies, chenille. Clothes that collect lint include corduroy, synthetics and permanent press garments.
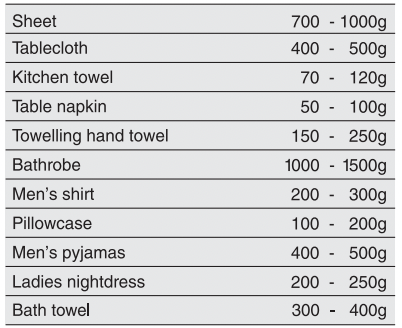
- If individule items are still damp after drying, set a 30 minutes post drying time. This wil be necessary particularly for multilayered items (eg. collars, pockets, etc).
- To help you, here is a list of the average weights of some common laundry items.
TROUBLESHOOTING & ACCESSORIES
Troubleshooting
Check the points listed here before you call for help, and make sure that you have followed the Important safety Instructions on pages 3 and 4.
| Problem |
Possible causes |
| The dryer will not start: |
- Plug is not firmly in socket, or power not turned on.
- You have blown a fuse. Check the power point with another appliance.
- You have not closed the dryer door or pushed in the door safety switch button.
|
| Your clothes are still wet/not fully dried |
- Load is too small for autosensing program or load consists of some multilayered items. Use Time Dry program to complete drying, refer Hints in section 4.
- The selected drying time was insufficient. Select a longer time setting.
- Longer time may be needed when the room temperature is 10 ºC or less.
- Check that the lint filter is not blocked.
- Check to see that you have read all the instructions carefully.
- Contact the Service Center if you are still having problems. Write down the model and serial numbers and the date of purchase before you ring. The Service Center will need this information.
|
Possible Failures
Certain problems are due to lack of simple maintenance or oversights, which can be solved easily without calling out an engineer. Before contacting your local Service Centre, please check possible cause of malfunction and solution listed below.
Once the problem has been eliminated, press the Start/Pause button to restart the program. If after all checks, the problem persists, contact your local Service Centre.
Alarm Code Indicator:
|
Dry LED blinks 4 times
End LED off
|
The appliance door is open or not closed correctly. Please check the door! |
|
Dry LED blinks 11 times
End LED off
|
The main supply is unstable. Wait until the main supply is stable. |
|
Dry LED blinks 9 times and then off
End LED blinks 1 time
|
Communication error between electronic boards of the appliance. Switch off and switch on again. |
WARNING! Deactivate the appliance before you do the checks.
Important
To operate efficiently the clothes dryer must have an unrestricted air supply and exhoust ventilation.
Service calls resulting from installation where ventilation is restricted are not covered by warranty.
THE COST OF THIS TYPE OF CALL WILL BE CHARGED TO THE CUSTOMER
Should you require further instructions in the use and care of your clothes dryer please contact the CUSTOMER CENTER on the phone number listed below:
If you have a warranty or spare parts enquiry you should call the number listed on page 11.
Accessories
You can buy venting kits (as mentioned on page 5) from your local appliance shop or Electrolux Home Products Pty.Ltd. Parts Distributor.