Use & Care Guide
Manual de Uso y Cuidado
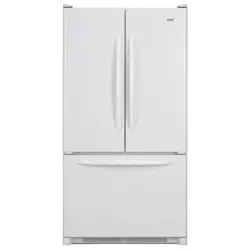
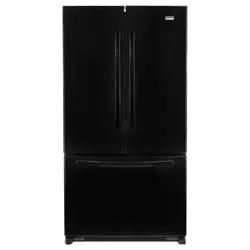
Bottom Freezer Refrigerator
Congelador Inferior Refrigerador
Model/Modelo: 795.7431* - PreView Grab-N-Go
TM
Model/Modelo: 795.7430* - Standard Door
* = color number, número de color
Sears Brands Management Corporation
+RçPDQ(VWDWHV,/86$
www.kenmore.com
0)/B5HY

2
7$%/(2)&217(176
Warranty............................................................................. 3
Important Safety Instructions
........................... 5-7
(OHFWULFDO*URXQGLQJ5HTXLUHPHQWV
..............7
Parts and Features
...................................................8-9
Refrigerator Installation .............................10-16
Unpacking Your Refrigerator ........................10
Installation
..................................................................... 11
Removing/Replacing Your Refrigerator and
Freezer Handles, Doors and Drawers
......12-16
Leveling and Door Alignment ......................17
Using Your Refrigerator ............................ 18-33
Setting the Controls .................................18-20
Smart Features ............................................... 21
Instructions for Smart Grid .......................... 22
FCC Notice .................................................... 23
In-Door Ice Bin
.......................................................... 24
Automatic Icemaker ............................... 25-26
Food Storage Guide .................................... 27
Refrigerator Section
Water Dispenser ........................................... 28
Refrigerator Shelves
................................................29
Humidity Controlled Crisper ........................ 30
Temperature Controlled Pantry Drawer .......30
Door Bin ............................................................30
PreView Grab-N-Go ..................................... 31
Grab-N-Go Case ........................................... 31
Replacing the Air Filter ................................ 32
Freezer Section
Extra Ice Bin ................................................. 32
Pullout Drawer .............................................. 33
Durabase ........................................................ 33
Durabase Divider .......................................... 33
Water Filter ............................................... 34-36
&DUH$QG&OHDQLQJ ................................... 37-38
General Cleaning Tips ................................ 37
Exterior .......................................................... 37
Inside Walls ................................................... 37
Door Liner And Gaskets ............................... 37
Plastic Parts .................................................... 37
Condenser Coils ............................................. 37
Light Bulb Replacement ............................... 38
Power Interruptions ....................................... 38
When You Go On Vacation ........................ 38
When You Move ............................................ 38
&RQQHFWLQJWKH:DWHU/LQH .......................39-41
Troubleshooting Guide ............................. 42-49
Diagnostics ............................................... 50
6HUYLFH ...............................................Back Cover
:$55$17<
5()5,*(5$725:$55$17<
KENMORE ELITE LIMITED WARRANTY
WITH PROOF OF SALE, the following warranty coverage applies when this appliance is correctly installed, operated and maintained
according to all supplied instructions.
One Year on Appliance
FOR ONE YEAR from the date of sale this appliance is warranted against defects in material or workmanship. A defective appliance
will receive free repair. If the appliance cannot be repaired it will be replaced free of charge. This warranty coverage applies for only
90 days from the sale date if the appliance is ever used for other than private household purposes.
Five Years on Sealed Refrigerant System
FOR FIVE YEARS from the date of sale, the sealed refrigerant system of this appliance is warranted against defects in material or
ZRUNPDQVKLS,IDV\VWHPSDUWLVGHIHFWLYHZLWKLQWKHoUVW\HDUDQHZSDUWZLOOEHVXSSOLHGDQGLQVWDOOHGDWQRFKDUJH,ID
the appliance is ever used for other than privDWHKRXVHKROGSXUSRVHV'HIHFWVPXVWEHYHULoHGE\D6HDUVDXWKRUL]HGVHUYLFH
representative.
Ten Years on Linear Compressor
FOR TEN YEARS from the date of sale, the linear compressor of this appliance is warranted against defects in material or
ZRUNPDQVKLS,IWKHFRPSUHVVRULVGHIHFWLYHZLWKLQWKHoUVW\HDUDQHZRQHZLOOEHVXSSOLHGDQGLQVWDOOHGDWQRFKDUJH,IWKH
sale date if the appliance is ever used for other than privDWHKRXVHKROGSXUSRVHV'HIHFWVPXVWEHYHULoHGE\D6HDUVDXWKRUL]HG
service representative.
Lifetime on Storage Bins
FOR AS LONG AS IT IS USED from the date of sale, a free replacement will be supplied for a defective refrigerator or freezer
FRPSDUWPHQWVWRUDJHELQ,IWKHGHIHFWDSSHDUVZLWKLQWKHoUVW\HDUDQHZELQZLOOEHLQVWDOOHGDWQRFKDUJH,IWKHGHIHFWDSSHDUV
year from the date of sale. This warranty coverage applies for only 90 days from the date of sale if the appliance is ever used for
other than privDWHKRXVHKROGSXUSRVHV'HIHFWVPXVWEHYHULoHGE\D6HDUVDXWKRUL]HGVHUYLFHUHSUHVHQWDWLYH
For warranty coverage details to obtain free repair or replacement, visit the web page: www.kenmore.com/warranty
This warranty covers ONLy defects in material and workmanship, and will NOT pay for:
9. Service to an appliance if the model and serial plate is missing, altered, or cannot easily be determined to have the appropriate
Disclaimer of implied warranties; limitation of remedies
Customer’s sole and exclusive remedy under this limited warranty shall be product repair or replacement as provided herein. Implied
years on the sealed refrigerant system, ten years on the linear compressor, and for as long as used on the storage bins, or the shortest
period allowed by law. Seller shall not be liable for incidental or consequential damages. Some states do not allow the exclusion or
these exclusions or limitations may not apply to you.
This warranty applies only while this appliance is used in the United States.
3
2. A service technician to clean or maintain this appliance, or to instruct the user in correct appliance installation, operation and
maintenance.
3. Service calls to correct appliance installation not performed by Sears authorized service agents, or to repair problems with house
fuses, circuit breakers, house wiring, and plumbing or gas supply systems resulting from such installation.
4. Damage to or failure of this appliance resulting from installation not performed by Sears authorized service agents, including
installation that was not in accord with electrical, gas or plumbing codes.
5. Damage to or failure of this appliance, including discoloration or surface rust, if it is not correctly operated and maintained
according to all supplied instructions.
6. Damage to or failure of this appliance, including discoloration or surface rust, resulting from accident, alteration, abuse, misuse or
use for other than its intended purpose.
7. Damage to or failure of this appliance, including discoloration or surface rust, caused by the use of detergents, cleaners, chemicals
or utensils other than those recommended in all instructions supplied with the product.

4
352'8&75(&25'
,QWKHVSDFHEHORZUHFRUGWKHGDWHRISXUFKDVHPRGHODQGVHULDOQXPEHURI\RXUSURGXFW<RXZLOOoQGWKHPRGHODQG
VHULDOQXPEHUSULQWHGRQDQLGHQWLoFDWLRQODEHOORFDWHGRQWKHLQWHULRUOLQHURIWKHUHIULJHUDWRUFRPSDUWPHQW+DYHWKHVH
items of information available whenever you contact Sears concerning your product.
Model No.___________________ Date of Purchase ___________________
Serial No.___________________
Save these instructions and attach your sales receipt for future reference.
5
,03257$176$)(7<,16758&7,216
:$51,1*
6$9(7+(6(,16758&7,216
7RUHGXFHWKHULVNRIoUHHOHFWULFVKRFNRUSHUVRQDO
injury when using your product, basic safety precautions
should be followed, including the following.
Read all instructions before using this appliance.
v NEVER unplug your refrigerator by pulling on the
SRZHUFRUG$OZD\VJULSWKHSOXJoUPO\DQGSXOOLW
straight out from the outlet.
v If the supply cord is damaged, it must be replaced
by the manufacturer or its service agent or a similarly
TXDOLoHGSHUVRQLQRUGHUWRDYRLGDKD]DUG'RQRWXVH
a cord that shows cracks or abrasion damage along its
length or at either the plug or connector end.
v Do not modify or extend the power cord length. It
FRXOGFDXVHHOHFWULFVKRFNRUoUH
v When moving your refrigerator away from the wall,
be careful not to roll over or damage the power cord.
%$6,&6$)(7<35(&$87,216
This guide contains many important safety messages. Always read and obey all safety messages.
This is the safety alert symbol. It alerts you to safety messages that inform you of hazards that can kill
or hurt you or others, or cause damage to the product.
All safety messages will be preceded by the safety alert symbol and the hazard
signal word DANGER, WARNING or CAUTION. These words mean:
You will be killed or seriously injured if you do not follow instructions.
You can be killed or seriously injured if you do not follow instructions.
Indicates an imminently hazardous situation which, if not avoided,
may result in minor or moderate injury, or product damage.
All safety messages will identify the hazard, tell you how to reduce the chance of injury, and tell you what can happen
if the instructions are not followed.
v '2127VWRUHRUXVHJDVROLQHRURWKHUpDPPDEOH
vapors and liquids in the vicinity of this or any other
appliance.
v DO NOT allow children to climb, stand, or hang on the
refrigerator doors or shelves in the refrigerator. They
could damage the refrigerator and seriously injure
themselves.
v .HHSoQJHUVRXWRISLQFKSRLQWDUHDVFOHDUDQFHV
between the doors and cabinets are necessarily small.
Be careful closing doors when children are in the area.
v Unplug your refrigerator before cleaning or making
any repairs.
127(It is strongly recommended that any service be
SHUIRUPHGE\DTXDOLoHGWHFKQLFLDQ
'$1*(5
:$51,1*
&$87,21
6
WARNING
DANGER:
RISK OF CHILD ENTRAPMENT
SAVE THESE INSTRUCTIONS
v %HIRUHUHSODFLQJDEXUQHGRXWRUEURNHQOLJKWEXOE
XQSOXJWKHUHIULJHUDWRURUWXUQRçSRZHUDWWKHFLUFXLW
EUHDNHURUIXVHER[LQRUGHUWRDYRLGFRQWDFWZLWKDOLYH
ZLUHoODPHQW$EXUQHGRXWOLJKWEXOEPD\EUHDNZKHQ
EHLQJUHSODFHGH[SRVLQJWKHZLUHoODPHQW
NOTE:6RPHPRGHOVKDYH/('LQWHULRUOLJKWLQJDQG
VHUYLFHVKRXOGEHSHUIRUPHGE\DTXDOLoHGWHFKQLFLDQ
WARNING:6HWWLQJHLWKHURUERWKFRQWUROVWRWKH2))
SRVLWLRQGRHVQRWUHPRYHSRZHUWRWKHOLJKWFLUFXLW
v :KHQ\RXDUHoQLVKHGUHFRQQHFWWKHUHIULJHUDWRUWR
WKHHOHFWULFDOVRXUFHDQGUHVHWWKHFRQWUROV7KHUPRVWDW
5HIULJHUDWRU&RQWURODQGRU)UHH]HU&RQWUROGHSHQGLQJ
RQWKHPRGHOWRWKHGHVLUHGVHWWLQJ
v 7KLVUHIULJHUDWRUPXVWEHSURSHUO\LQVWDOOHGLQ
DFFRUGDQFHZLWKWKHAttention Installer InstructionsWKDW
ZHUHWDSHGWRWKHIURQWRIWKHUHIULJHUDWRU
v $IWHU\RXUUHIULJHUDWRULVLQRSHUDWLRQGRQRWWRXFKWKH
FROGVXUIDFHVLQWKHIUHH]HUFRPSDUWPHQWZKHQKDQGV
DUHGDPSRUZHW6NLQPD\DGKHUHWRWKHH[WUHPHO\FROG
VXUIDFHV
v ,IFRQQHFWHGWRDFLUFXLWSURWHFWHGE\IXVHVXVHWLPH
GHOD\IXVH
-XQNHGRUDEDQGRQHGUHIULJHUDWRUVDUHGDQJHURXVHYHQ
LIWKH\DUHVLWWLQJIRURQO\DIHZGD\V,I\RXDUHJHWWLQJ
ULGRI\RXUROGUHIULJHUDWRUSOHDVHIROORZWKHLQVWUXFWLRQV
DWULJKWWRKHOSSUHYHQWDFFLGHQWVFKLOGHQWUDSPHQWDQG
VXçRFDWLRQ
v '2127WRXFKWKHDXWRPDWLFLFHPDNLQJPHFKDQLVP
ZKLOHWKHUHIULJHUDWRULVSOXJJHGLQ
v '2127UHIUHH]HIUR]HQIRRGVZKLFKKDYHWKDZHG
FRPSOHWHO\7KH8QLWHG6WDWHV'HSDUWPHQWRI
$JULFXOWXUHLQ+RPHDQG*DUGHQ%XOOHWLQ1RVD\V
{<RXPD\VDIHO\UHIUHH]HIUR]HQIRRGVWKDWKDYH
WKDZHGLIWKH\VWLOOFRQWDLQLFHFU\VWDOVRULIWKH\DUH
VWLOOFROGEHORZ£)£&
{7KDZHGJURXQGPHDWVSRXOWU\RUoVKWKDWKDYHDQ\
RçRGRURURçFRORUVKRXOGQRWEHUHIUR]HQDQGVKRXOG
QRWEHHDWHQ7KDZHGLFHFUHDPVKRXOGEHGLVFDUGHG
,IWKHRGRURUFRORURIDQ\IRRGLVSRRURUTXHVWLRQDEOH
GLVSRVHRILW7KHIRRGPD\EHGDQJHURXVWRHDW
(YHQSDUWLDOWKDZLQJDQGUHIUHH]LQJUHGXFHVWKH
HDWLQJTXDOLW\RIIRRGVSDUWLFXODUO\IUXLWVYHJHWDEOHV
DQGSUHSDUHGIRRGV7KHHDWLQJTXDOLW\RIUHGPHDWV
LVDçHFWHGOHVVWKDQWKDWRIPDQ\RWKHUIRRGV8VH
UHIUR]HQIRRGVDVVRRQDVSRVVLEOHWRVDYHDVPXFKRI
WKHLUTXDOLW\DV\RXFDQ
v 7KLVSURGXFWLVQRWWREHXVHGIRUVSHFLDOSXUSRVHVVXFK
DVWKHVWRUDJHRIPHGLFLQHRUWHVWPDWHULDOVRUIRUXVH
RQVKLSVHWF
v 'RQRWVWULNHRUDSSO\H[FHVVLYHIRUFHWRDQ\JODVV
VXUIDFH'RQRWWRXFKJODVVVXUIDFHVLIWKH\DUHFUDFNHG
RUEURNHQ
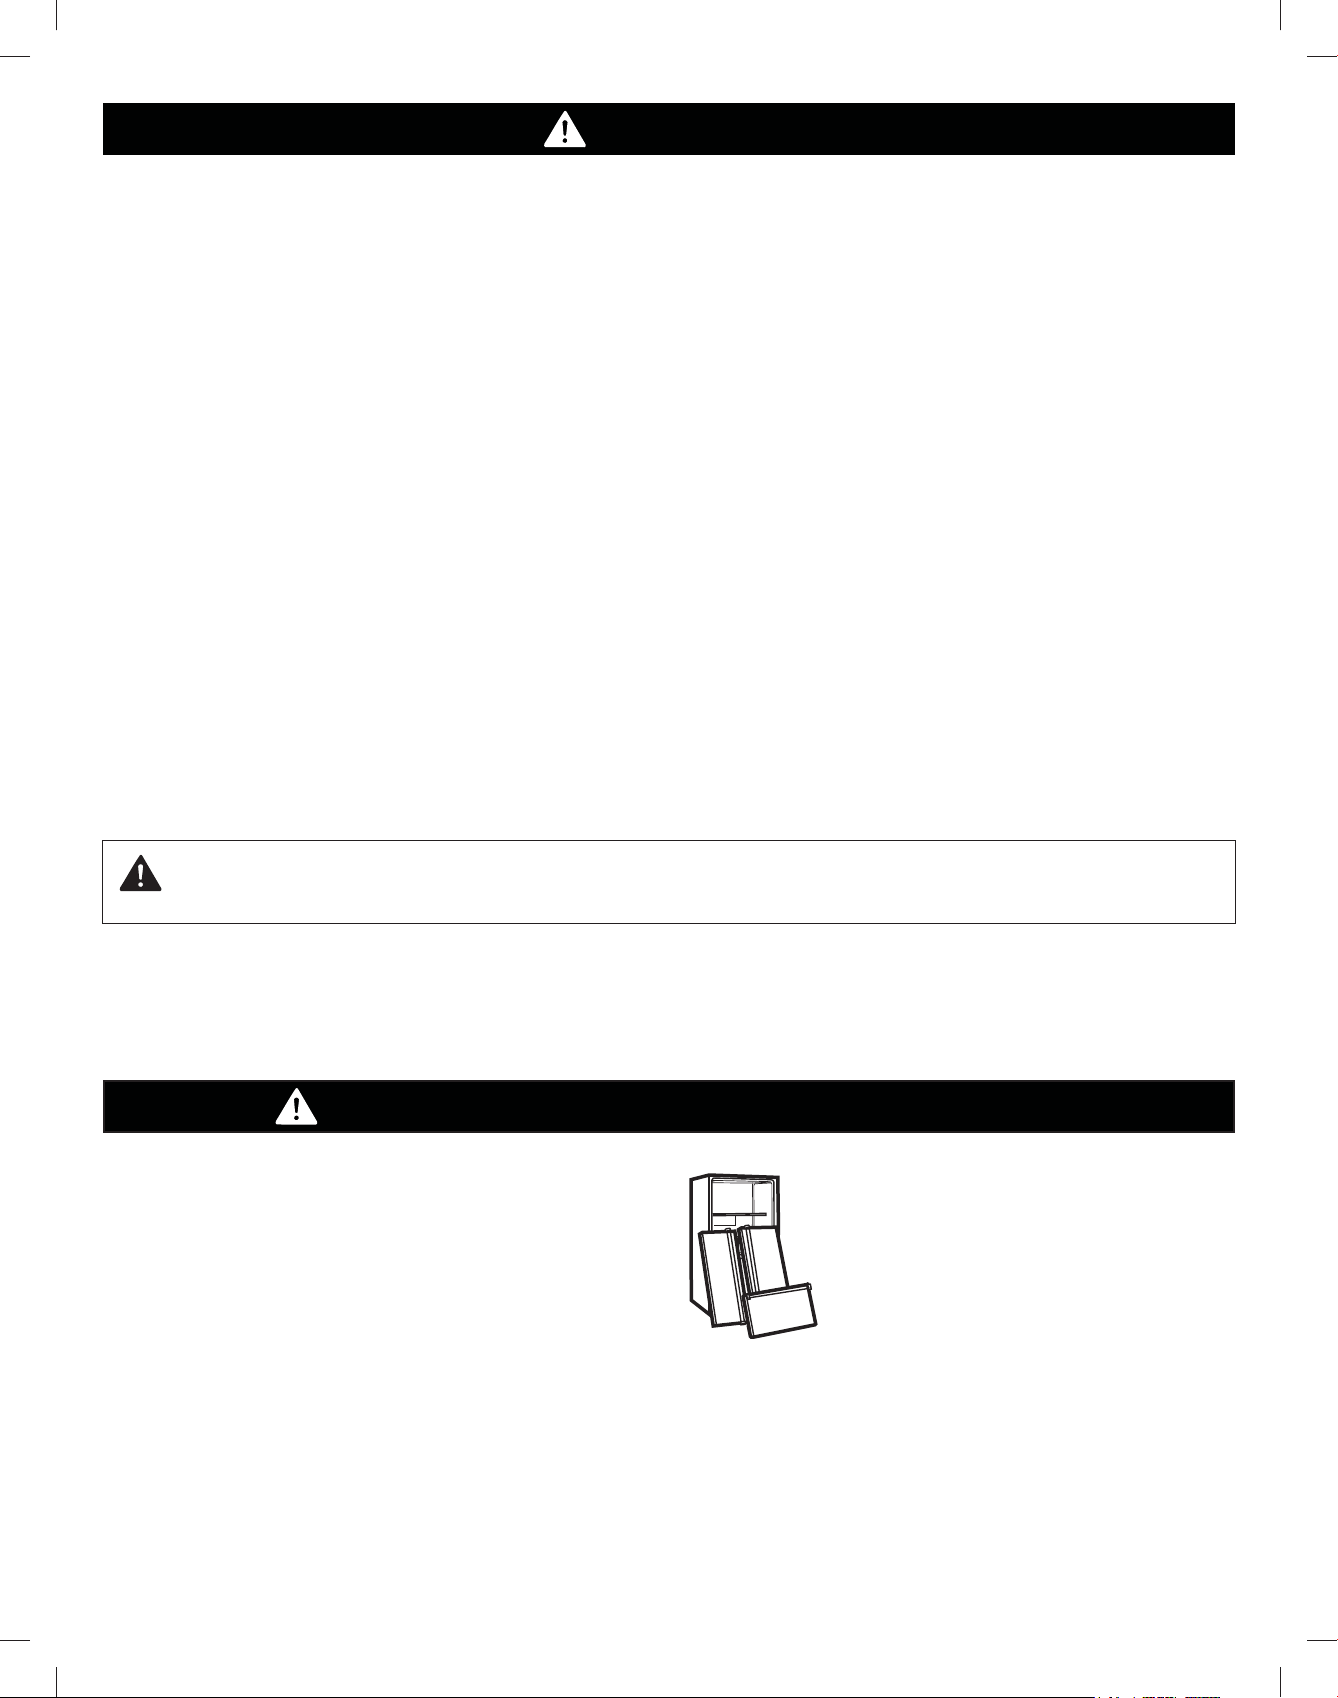
BEFORE YOU THROW AWAY
YOUR OLD REFRIGERATOR
OR FREEZER:
v 7DNHRçWKHGRRUV
v /HDYHWKHVKHOYHVLQSODFHVRWKDW
FKLOGUHQPD\QRWHDVLO\FOLPELQVLGH
WARNING : 7KLVSURGXFWFRQWDLQVFKHPLFDOVNQRZQWRWKH6WDWHRI&DOLIRUQLDWRFDXVHFDQFHUDQG
ELUWKGHIHFWVRURWKHUUHSURGXFWLYHKDUP
Wash hands after handling.
7
&)&+&)&',6326$/
(/(&75,&$/*5281',1*5(48,5(0(176
:$51,1*
Your old refrigerator may have a cooling system
WKDWXVHG&)&VRU+&)&VFKORURpXRURFDUERQVRU
K\GURFKORURpXRURFDUERQV&)&VDQG+&)&VDUH
believed to harm stratospheric ozone if released to the
atmosphere. Other refrigerants may also cause harm to
the environment if released to the atmosphere.
,03257$17Please read carefully.
72&211(&7(/(&75,&,7<
5(&200(1'('*5281',1*0(7+2'
The refrigerator should always be plugged into its own
individual properly grounded electrical outlet rated for
115 Volts, 60 Hz, AC only, and fused at 15 or 20 amperes.
This provides the best performance and also prevents
RYHUORDGLQJKRXVHZLULQJFLUFXLWVZKLFKFRXOGFDXVHDoUH
hazard from overheated wires. It is recommended that a
separate circuit serving only this appliance be provided.
8VHDUHFHSWDFOHWKDWFDQQRWEHWXUQHGRçZLWKDVZLWFK
or pull chain. Do not use an extension cord.
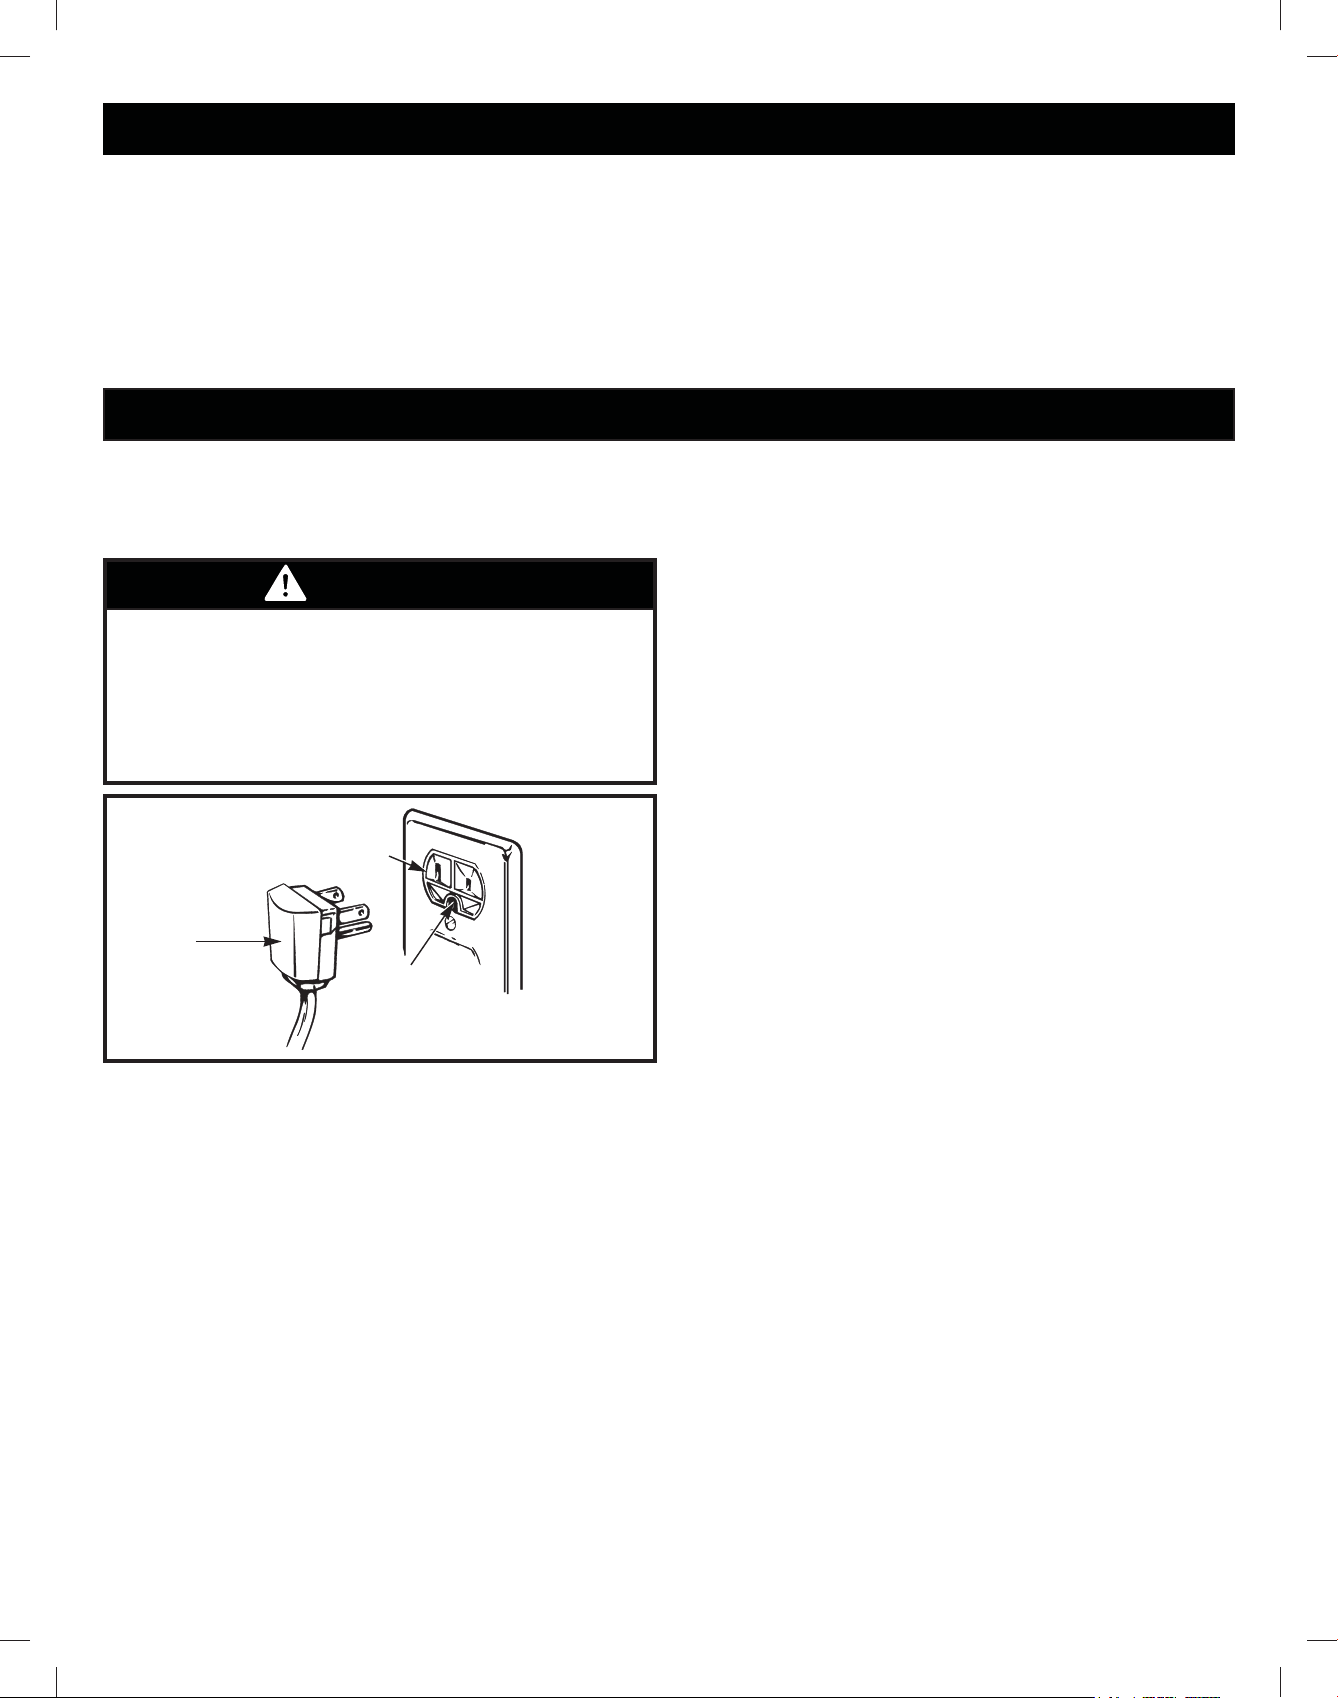
Where a standard two-prong wall outlet is encountered,
it is your personal responsibility and obligation to have
it replaced with a properly grounded three-prong wall
outlet.
(OHFWULFDO6KRFN+D]DUG
)253(5621$/6$)(7<this appliance must be
properly grounded. Have the wall outlet and the circuit
FKHFNHGE\DTXDOLoHGHOHFWULFLDQWRPDNHVXUHWKH
outlet is properly grounded.
If you are throwing away your old refrigerator, make
sure the refrigerant is removed for proper disposal
E\DTXDOLoHGWHFKQLFLDQ,I\RXLQWHQWLRQDOO\UHOHDVH
UHIULJHUDQW\RXPD\EHVXEMHFWWRoQHVDQGLPSULVRQPHQW
under provisions of environmental legislation.
86(2)(;7(16,21&25'6
Because of potential safety hazards under certain
conditions, the use of an extension cord is not
recommended. However, if you still elect to use an
extension cord, it is absolutely necessary that it be a UL-
OLVWHG86$ZLUHJURXQGLQJW\SHDSSOLDQFHH[WHQVLRQ
cord having a grounding type plug and outlet, and that
WKHHOHFWULFDOUDWLQJRIWKHFRUGEHDPSHUHVPLQLPXP
and 120 volts.
Use of an extension cord will increase the clearance
needed for the back of the refrigerator.
3-prong
grounding
plug
3-prong
grounding type
wall receptacle
Ensure proper
ground exists
before use.
8
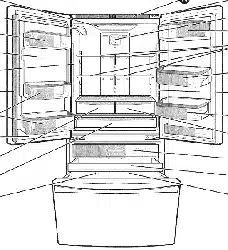
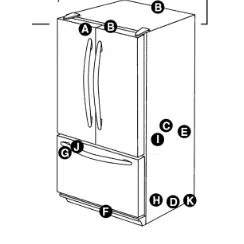
3$576$1')($785(6
J
A
B
E
C
D
C
G
I
N
K
M
E
O
R
P
P
T
S
F
L
H
Q
U
v Standard Door
v PreView Grab-N-Go
A
B
E
C
D
C
G
H
I
J
V
L
M
O
W
T
S
Q
U
F
K
9
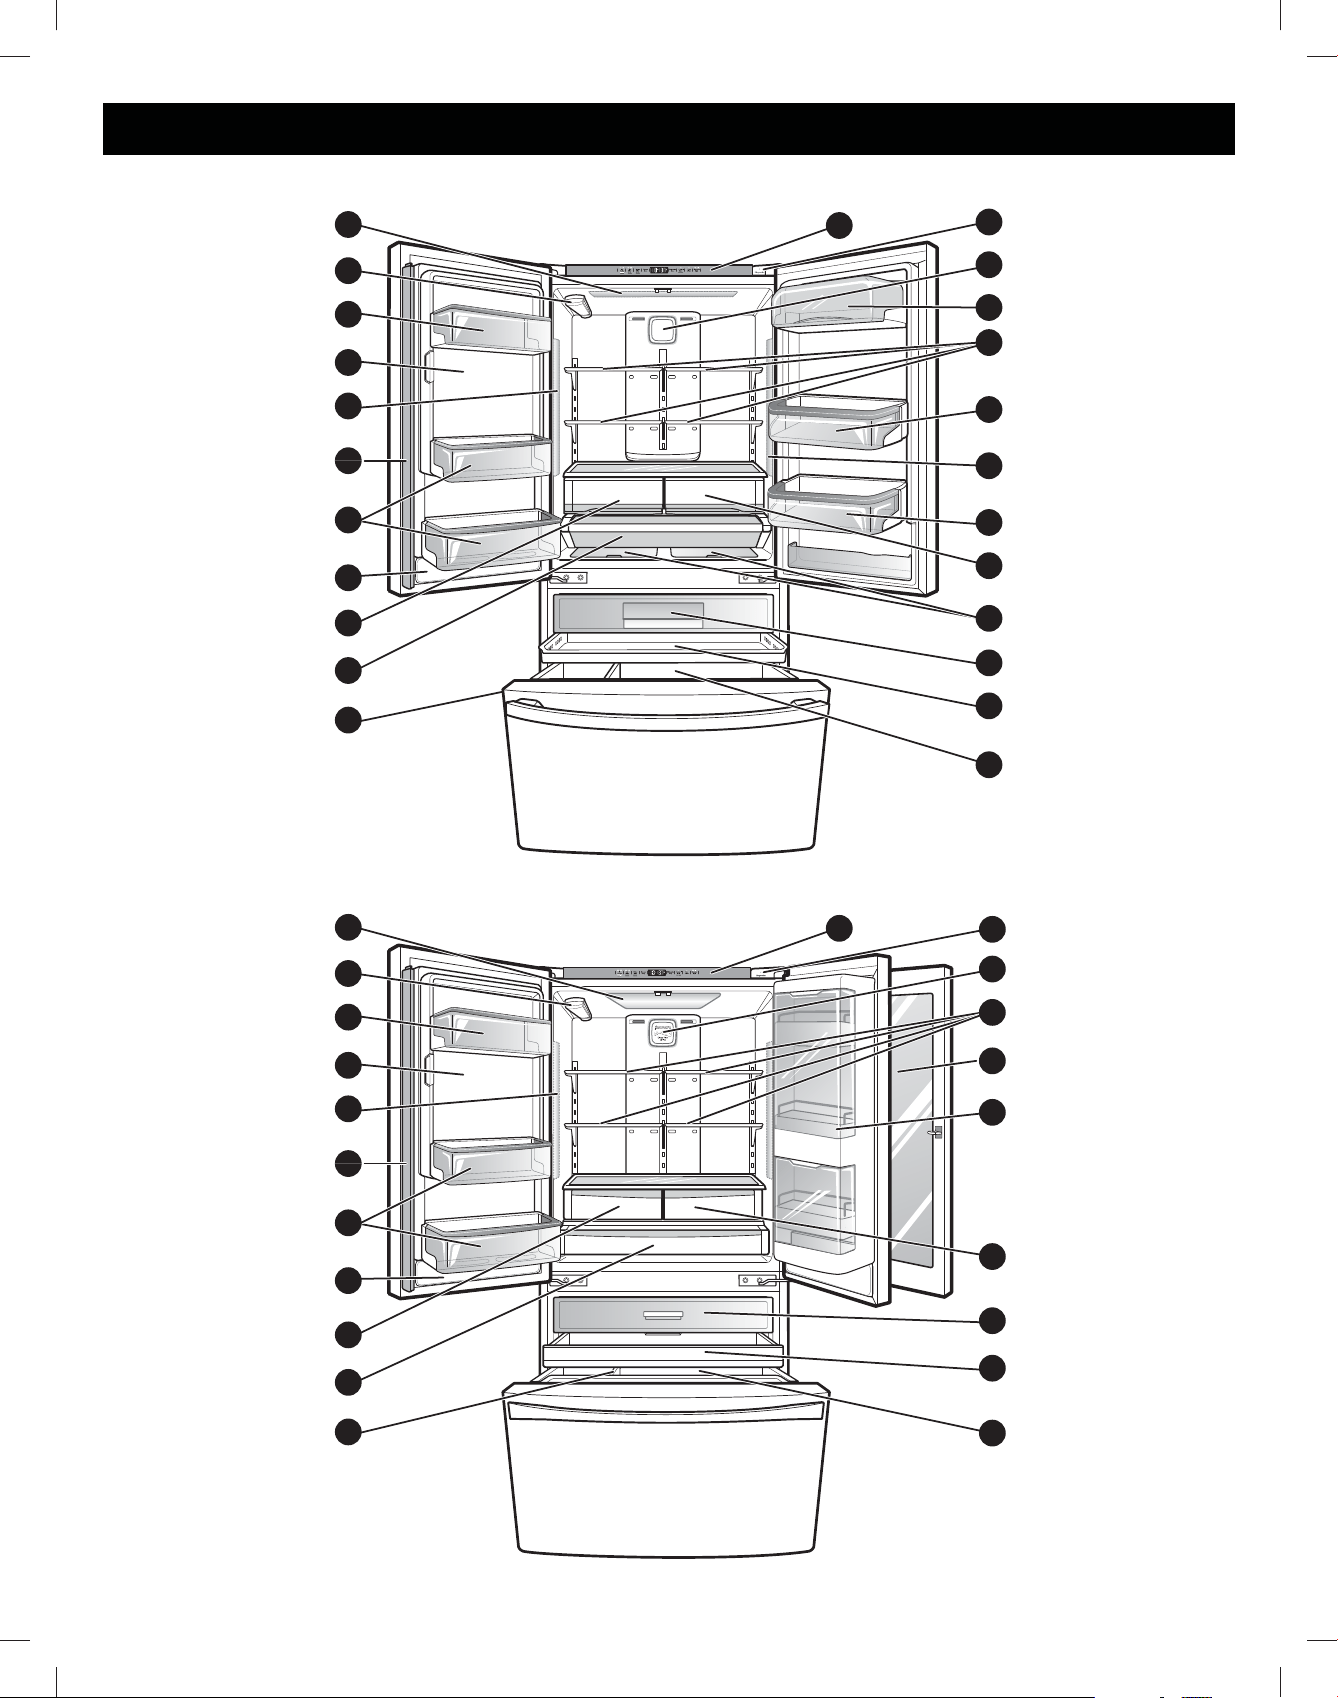
3$576$1')($785(6
Use this page to become more familiar with the parts and features of your refrigerator.
127(7KLVJXLGHFRYHUVVHYHUDOGLçHUHQWPRGHOV7KHUHIULJHUDWRU\RXKDYHSXUFKDVHGPD\KDYHVRPHRUDOORIWKH
items listed below. The locations of the features shown below may not match your model.
M
Air Filter
N
Adjustable Dairy Bin
2
Refrigerator Shelves
P
Adjustable Door Bins
4
Air Tight Crisper
R
Convenience Bin
S
Top Pullout Drawer
T
Middle Pullout Drawer
U
Durabase
V
PreView Grab-N-Go
W
Grab-N-Go Case
$
Refrigerator Light
B
Water Filter
C
Fixed Door Bins
D
Ice Compartment (Icemaker and Ice Bin)
(
Refrigerator Light (side)
F
Articulating Mullion
G
Water Tank Cover
H
Humidity Controlled Crisper
I
Temperature Controlled Pantry Drawer
J
Durabase Divider
K
Control Panel
/
Diagnostics Speaker
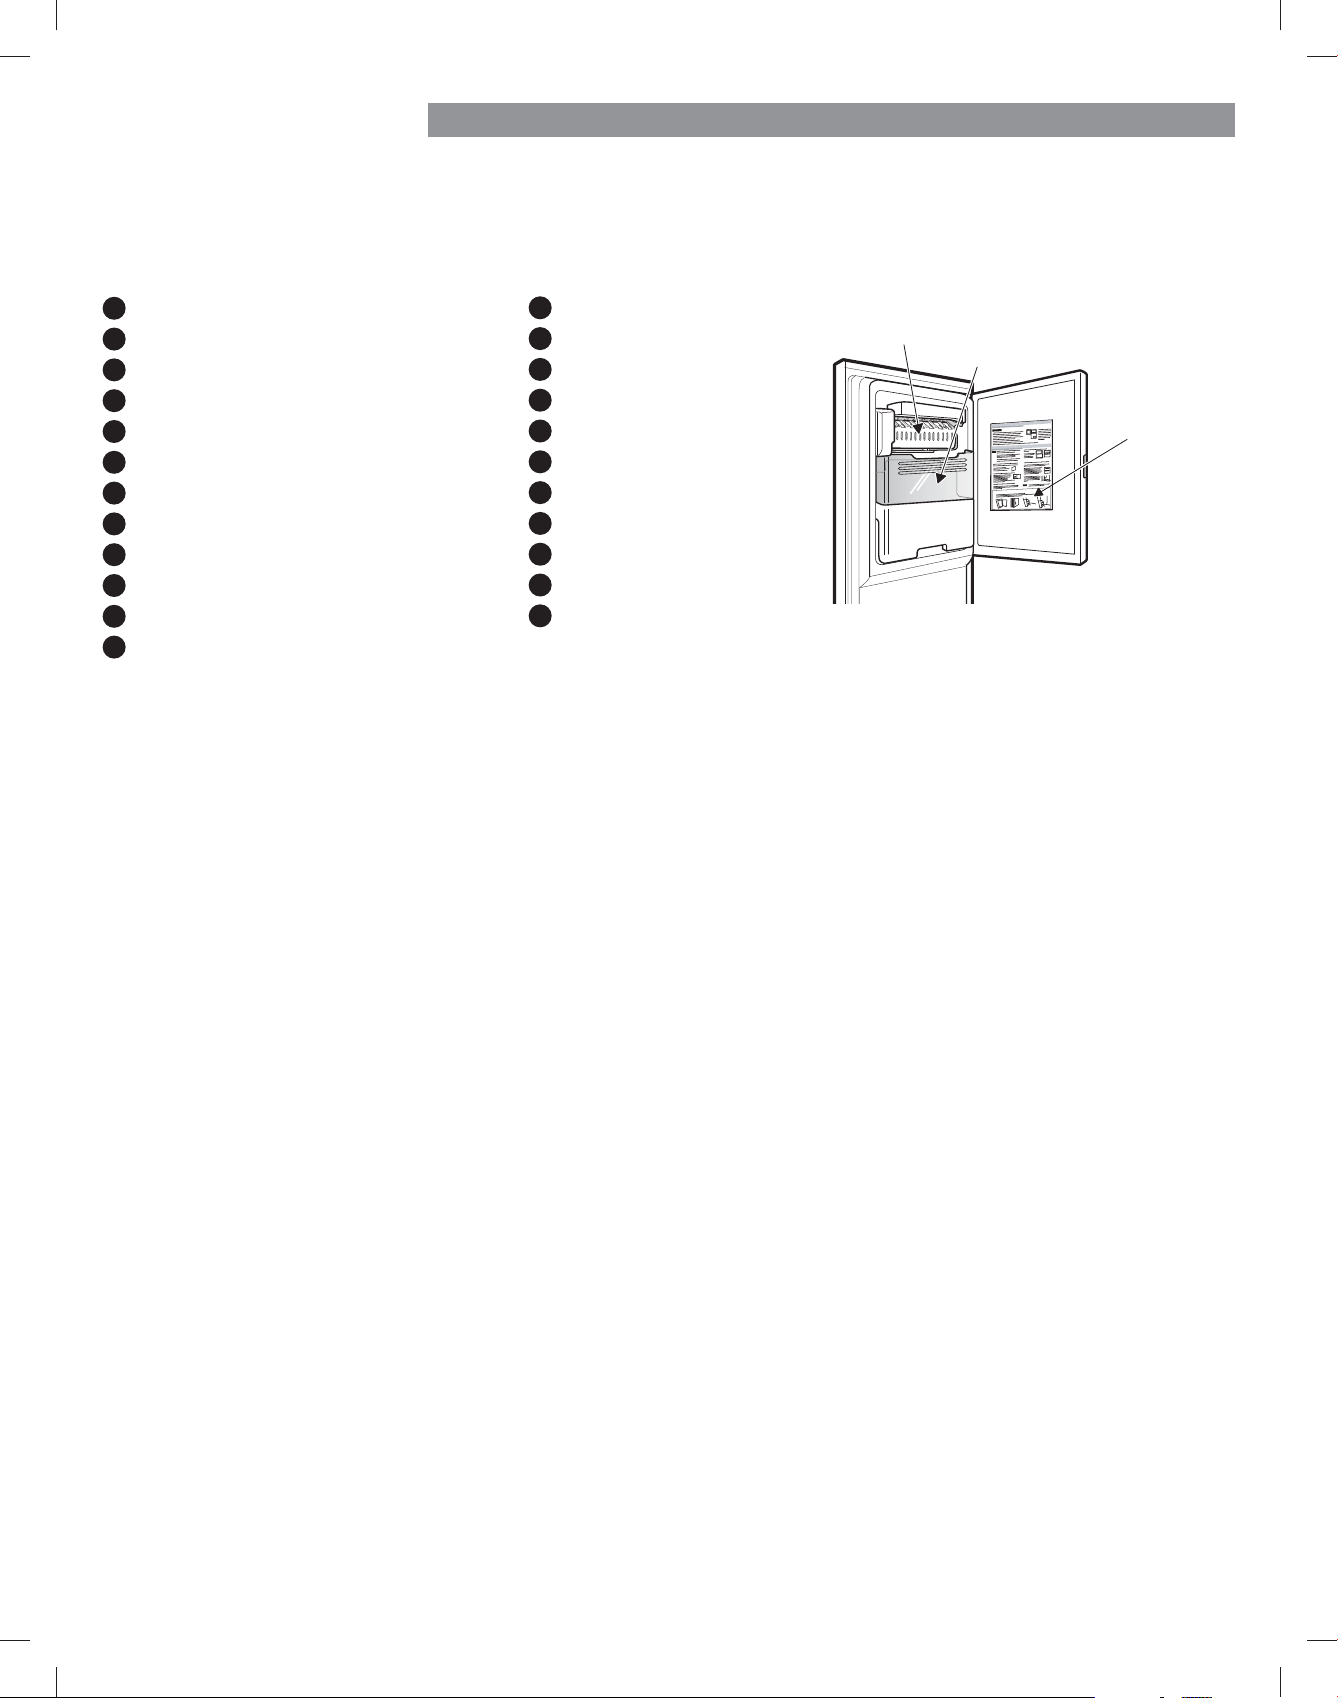
Ice Bin
Icemaker
Ice Compartment
Door
10
5()5,*(5$725,167$//$7,21
:$51,1* :$51,1*
:$51,1*
:$51,1*
813$&.,1*<2855()5,*(5$725
Remove tape and any temporary labels from your
refrigerator before using. Do not remove any warning-
type labels, the model and serial number label, or
the Tech Sheet that is located under the front of the
refrigerator.
To remove any remaining tape or glue, rub the area
briskly with your thumb. Tape or glue residue can also be
easily removed by rubbing a small amount of liquid dish
VRDSRYHUWKHDGKHVLYHZLWK\RXUoQJHUV:LSHZLWKZDUP
water and dry.
'RQRWXVHVKDUSLQVWUXPHQWVUXEELQJDOFRKROpDPPDEOH
pXLGVRUDEUDVLYHFOHDQHUVWRUHPRYHWDSHRUJOXH7KHVH
products can damage the surface of your refrigerator.
Refrigerator shelves are installed in the shipping position.
Please reinstall shelves according to your individual
storage needs.
([FHVVLYH:HLJKW+D]DUG
Use two or more people to move and install the
refrigerator. Failure to do so can result in back or
other injury.
([FHVVLYH:HLJKW+D]DUG
Your refrigerator is heavy. When moving the
refrigerator for cleaning or service, be sure to protect
WKHpRRU$OZD\VSXOOWKHUHIULJHUDWRUVWUDLJKWRXWZKHQ
moving it. Do not wiggle or walk the refrigerator when
WU\LQJWRPRYHLWDVpRRUGDPDJHFRXOGRFFXU
([SORVLRQ+D]DUG
.HHSpDPPDEOHPDWHULDOVDQGYDSRUVVXFKDV
gasoline, away from the refrigerator. Failure to do so
FDQUHVXOWLQoUHH[SORVLRQRUGHDWK
Connect to potable water supply only.
11
5()5,*(5$725,167$//$7,21
,167$//$7,21FRQWLQXHG
1. To avoid noise and vibration, the unit must be leveled
DQGLQVWDOOHGRQDVROLGO\FRQVWUXFWHGpRRU,IUHTXLUHG
adjust the leveling legs to compensate for unevenness
RIWKHpRRU7KHIURQWVKRXOGEHVOLJKWO\KLJKHUWKDQ
the rear to aid in door closing. Leveling legs can be
turned easily by tipping the cabinet slightly. Turn the
leveling legs to the left to raise the unit or to the right to
ORZHULW6HHLEVELING AND DOOR ALIGNMENT
127( Installing on carpeting, soft tile surfaces,
a platform or weakly supported structure is not
recommended.
Install this appliance in an area where the temperature
LVEHWZHHQ£)£&DQG£)£&,IWKH
temperature around the appliance is too low or high,
FRROLQJDELOLW\PD\EHDGYHUVHO\DçHFWHG
3. Select a place where a water supply can be easily
connected for the automatic icemaker.
127(The water pressure must be from 20-120 psi or
138-827 kPa or 1.4-8.4 kgf/cm². If the refrigerator is
LQVWDOOHGLQDQDUHDZLWKORZZDWHUSUHVVXUHEHORZ
SVL\RXFDQLQVWDOODERRVWHUSXPSWRFRPSHQVDWHIRU
the low pressure.
4. Too small of a distance from adjacent items may
result in lowered freezing capability and increased
electricity consumption charges. Allow at least 24
LQFKHVFPLQIURQWRIWKHUHIULJHUDWRUWRRSHQWKH
GRRUVDQGDWOHDVWLQFKHVFPEHWZHHQWKH
back of the refrigerator and the wall.
35,257286(
1.&OHDQ\RXUUHIULJHUDWRUWKRURXJKO\DQGZLSHRçDOO
dust that accumulated during shipping.
Install accessories such as ice cube bin, drawers,
shelves, etc., in their proper places. They are packed
together to prevent possible damage during shipment.
3. Allow your refrigerator to run for at least two to three
KRXUVEHIRUHSXWWLQJIRRGLQLW&KHFNWKHpRZRI
cold air in the freezer compartment to ensure proper
cooling. Your refrigerator is now ready for use.
,167$//$7,21
The refrigerator should always be plugged into its own
individual properly grounded electrical outlet rated for
115 Volts, 60 Hz, AC only, and fused at 15 or 20 amperes.
This provides the best performance and also prevents
RYHUORDGLQJKRXVHZLULQJFLUFXLWVZKLFKFRXOGFDXVHDoUH
hazard from overheated wires. It is recommended that a
separate circuit serving only this appliance be provided.
2" (5.08 cm)
Shock Hazard:
To reduce the risk of electric shock, do not install the
refrigerator in a wet or damp area.
:$51,1*
12
5()5,*(5$725,167$//$7,21
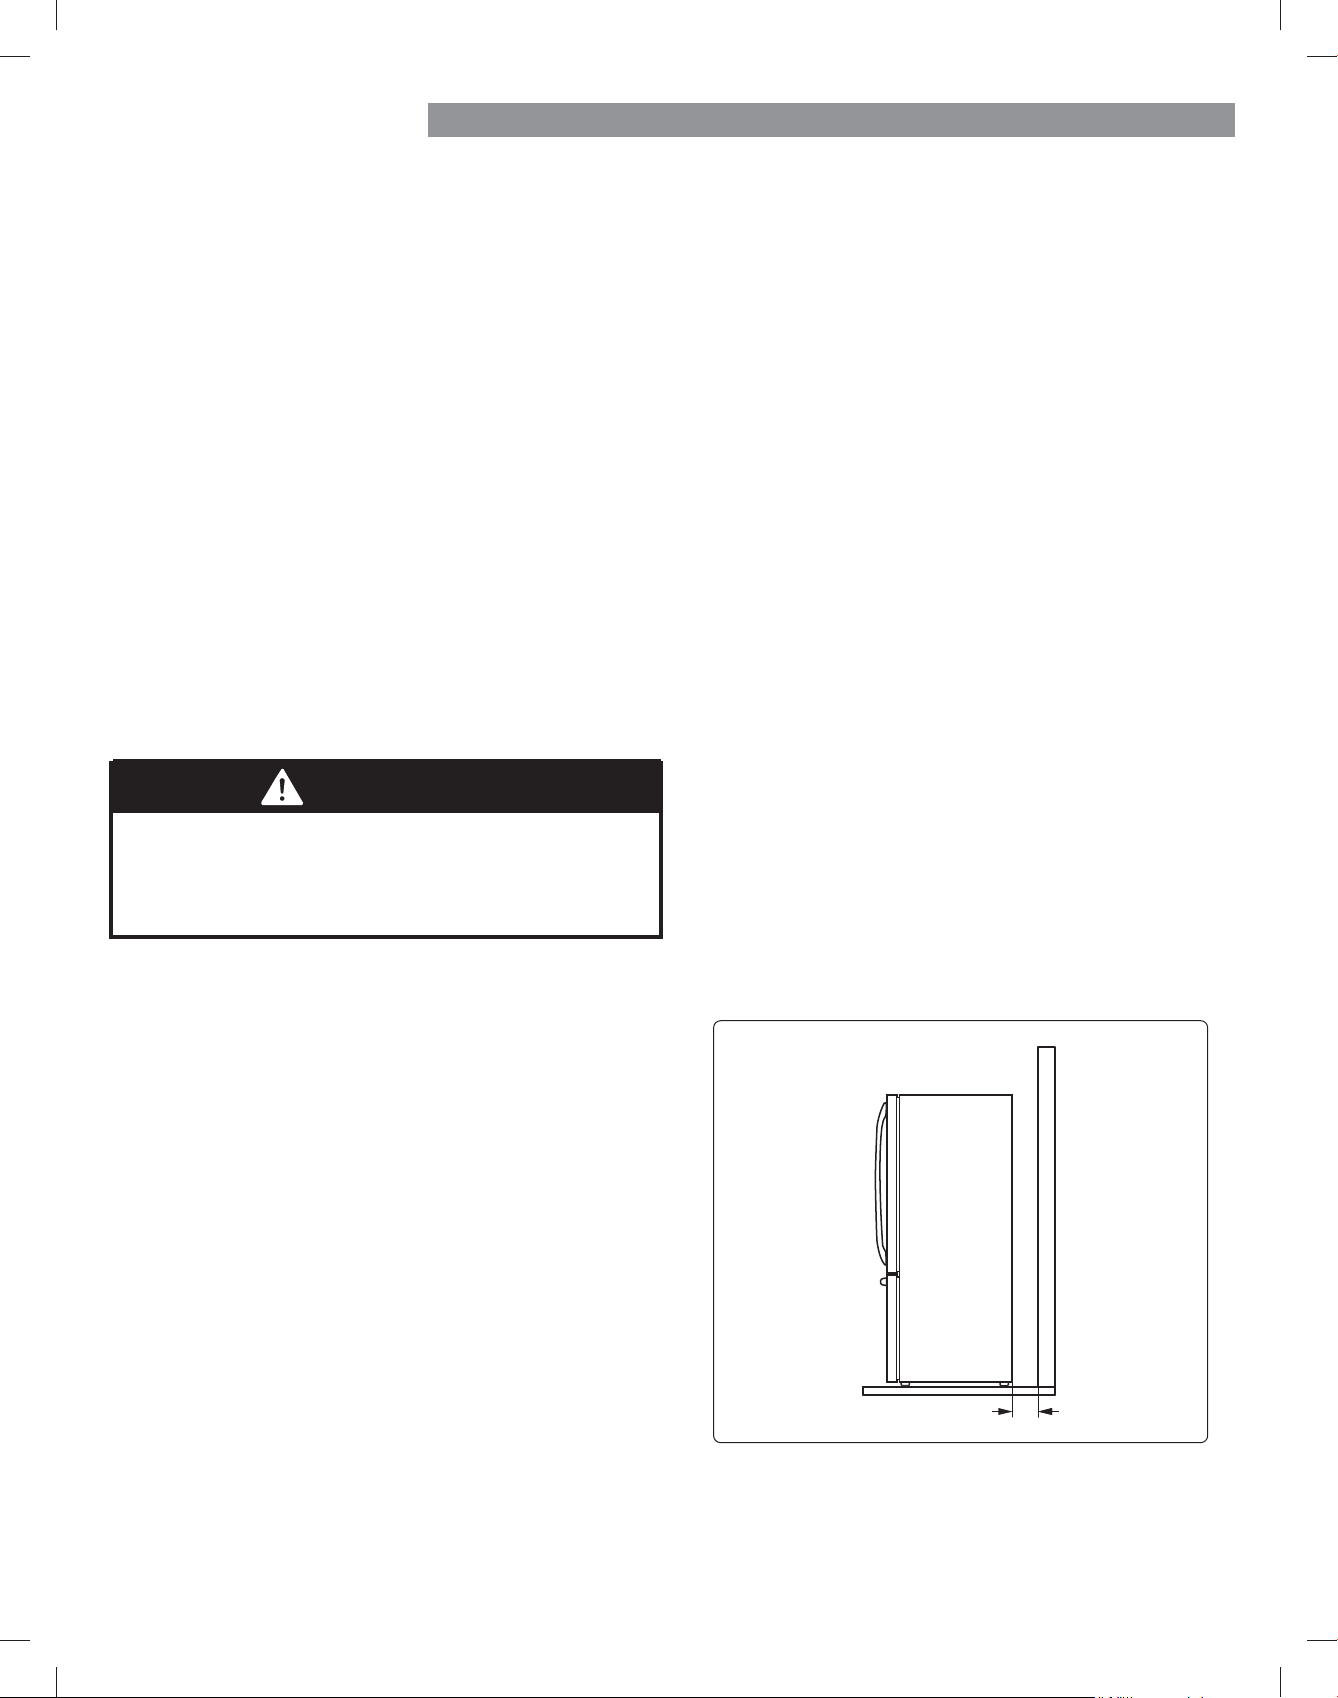
+2:725(029(5()5,*(5$725
'225+$1'/(
127( Handle appearance may vary from the
illustrations on this page.
5HPRYLQJ5HIULJHUDWRU+DQGOH
Loosen the set screws with a Ĕ/Ċĉ in. Allen
wrench and remove the handle.
127( If the handle mounting fasteners need
to be tightened or removed, use a ¼ in. Allen
wrench.
127( Removing the doors is always recommended when it is necessary to move the refrigerator through a narrow
opening. If it is necessary to remove the handles, follow the directions below.
Mounting
Fasteners
Set Screw
Allen
Wrench
+2:725(3/$&(5()5,*(5$725
'225+$1'/(
127(Handle appearance may vary from the
illustrations on this page.
Replacing Refrigerator Door Handle
3ODFHWKHKDQGOHRQWKHGRRUE\oWWLQJ
the handle footprints over the mounting
fasteners and tightening the set screws
with a Ĕ/Ċĉ in Allen wrench.
127( If the handle mounting fasteners
need to be tightened or removed, use a
¼ in. Allen wrench.
Mounting
Fasteners
13
5()5,*(5$725,167$//$7,21
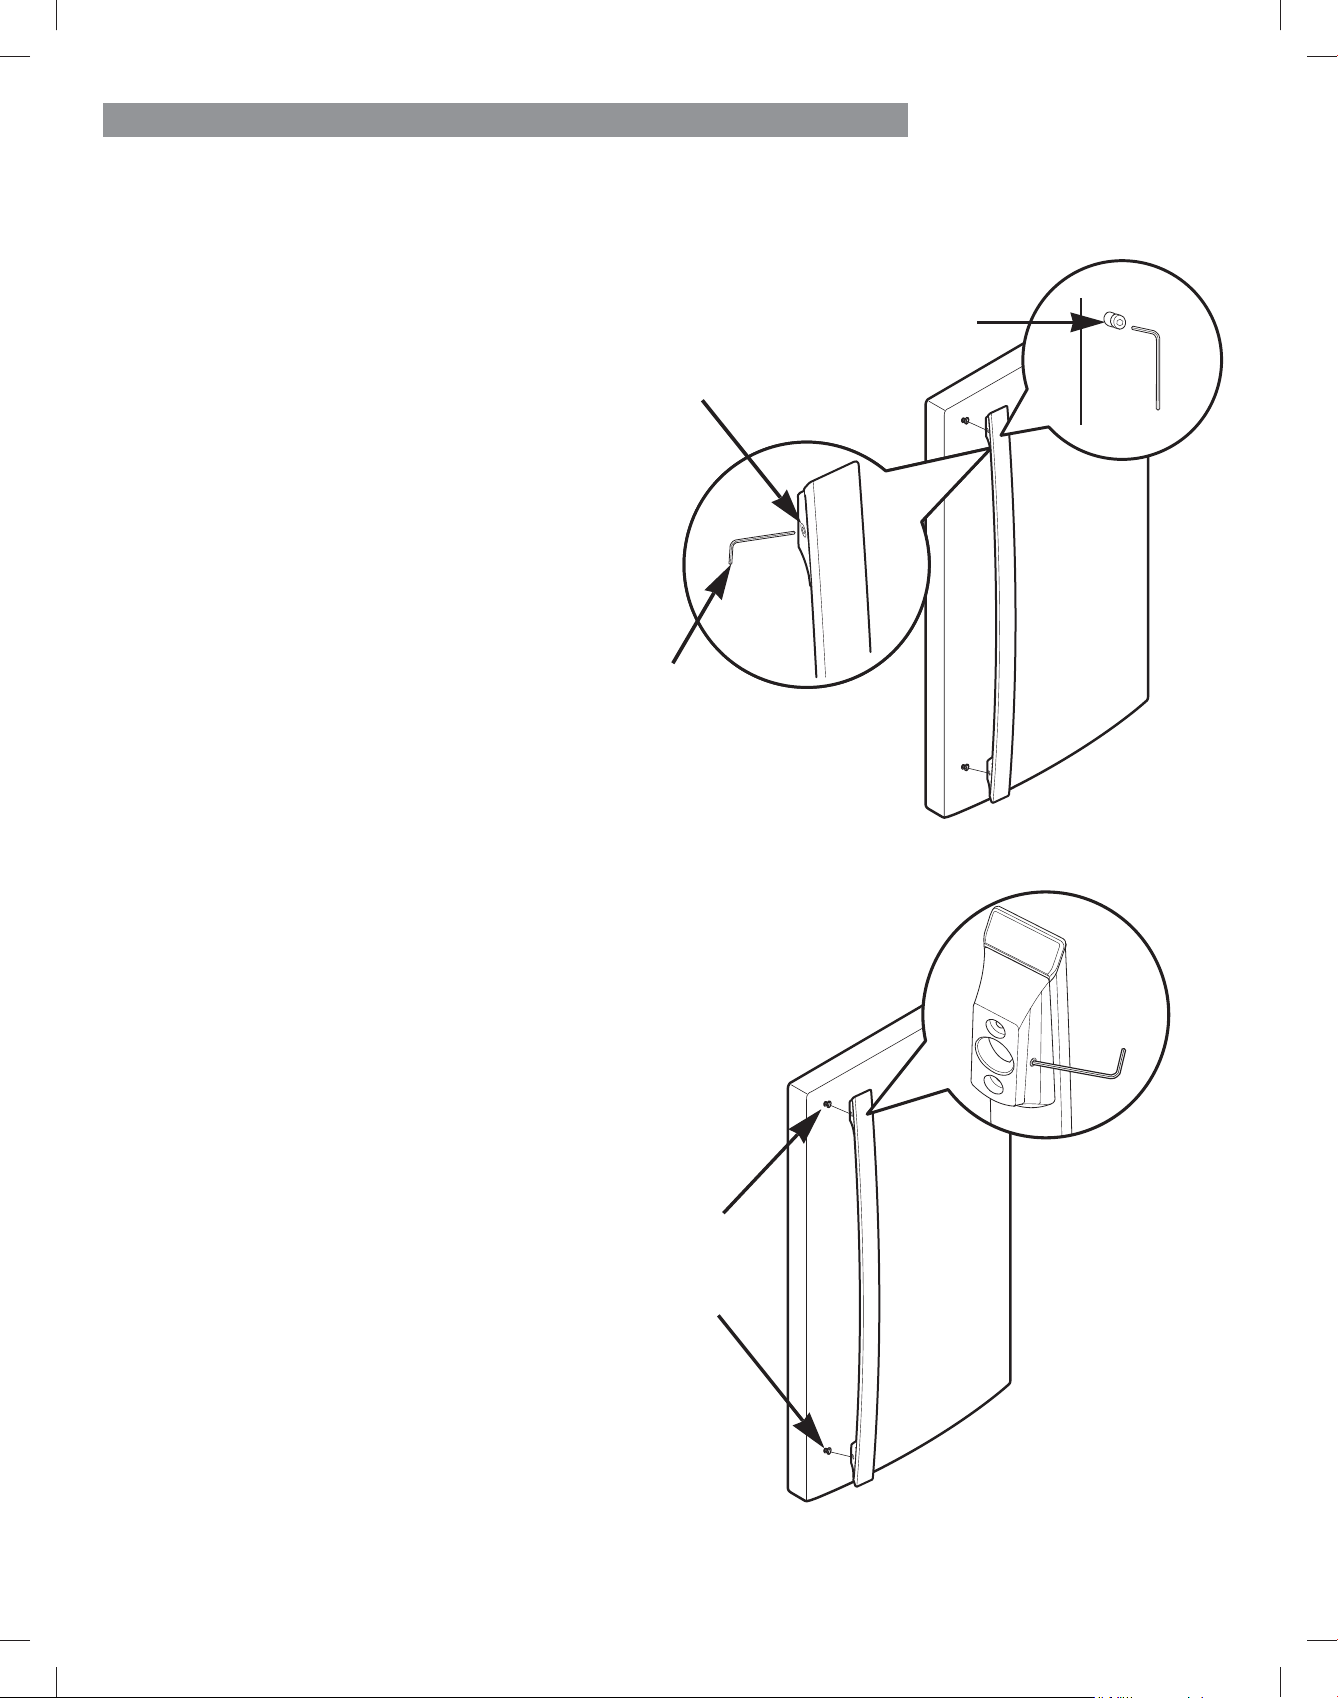
+2:725(3/$&()5((=(5'225+$1'/(
127(Handle appearance may vary from the illustrations
on this page.
Replacing Freezer Drawer Handle
3ODFHWKHKDQGOHRQWKHGRRUE\oWWLQJWKHKDQGOH
footprints over the mounting fasteners and tightening
WKHVHWVFUHZVZLWKDêLQ$OOHQZUHQFK
127( If the handle mounting fasteners need to be
tightened or removed, use a ¼ in. Allen wrench.
+2:725(029()5((=(5'225+$1'/(
127( Handle appearance may vary from the illustrations
on this page.
5HPRYLQJ)UHH]HU'UDZHU+DQGOH
Loosen the set screws located on the lower side of
WKHKDQGOHZLWKDêLQ$OOHQZUHQFKDQGUHPRYHWKH
handle.
127(If the handle mounting fasteners need to be
tightened or removed, use a ¼ in. Allen wrench.
127( Removing the doors is always recommended when it is necessary to move the refrigerator through a narrow
opening. If it is necessary to remove the handles, follow the directions below.
When assembling or disassembling the handles:
v *UDVSWKHKDQGOHoUPO\WRHQVXUHLWZLOOQRWGURSRU
cause injury.
v Prevent the handle from swinging toward nearby
people or animals.
v Insert the bracket hole of the handle into the stopper
bolt of the door exactly, then assemble the set screws
WRo[WKHKDQGOHLQSODFH
v Check for any gap between the door and handle after
WKHKDQGOHLVo[HGLQSODFH
:$51,1*
14
5()5,*(5$725,167$//$7,21
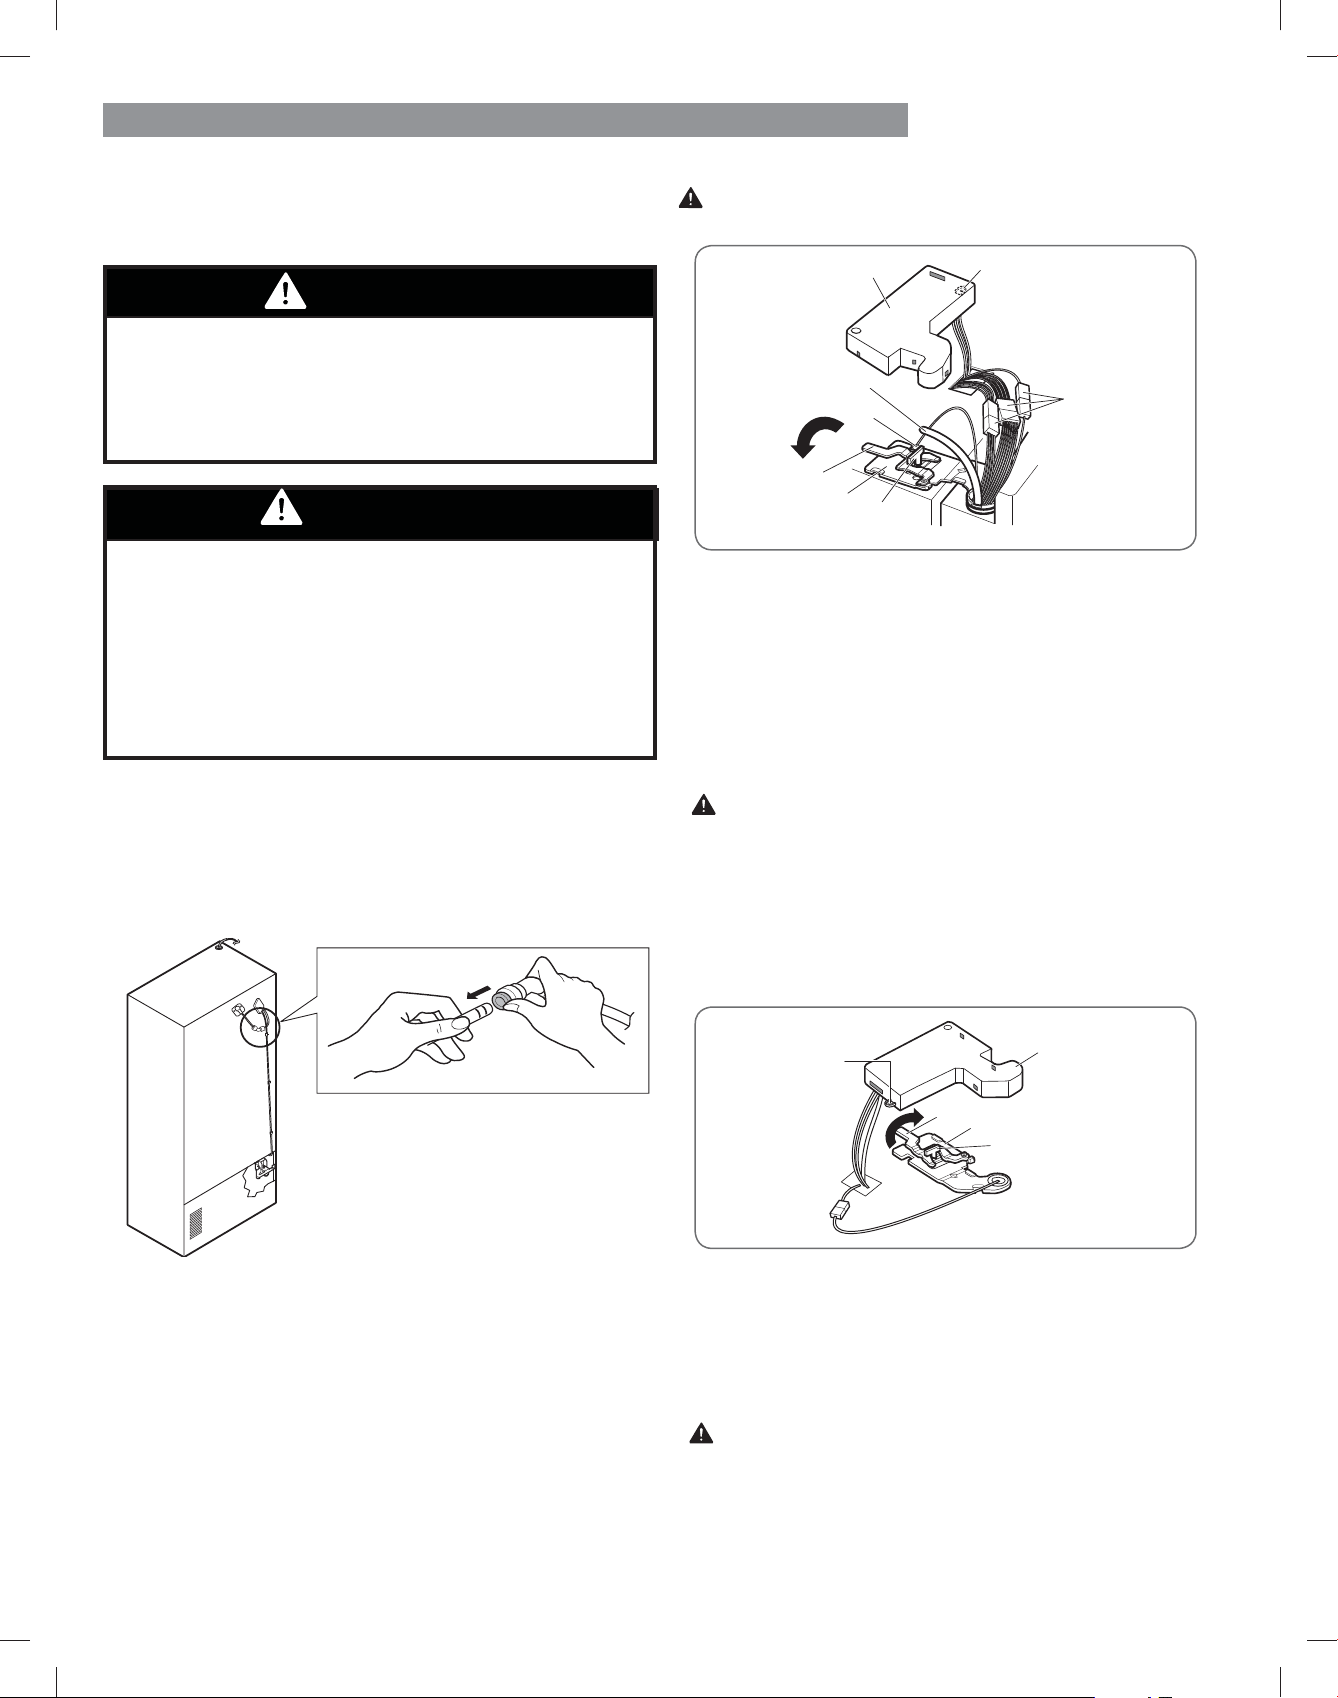
7RUHPRYHWKHOHIWUHIULJHUDWRUGRRU
On the back of the refrigerator, pull the water tube out of
WKHFROOHWoWWLQJRQWKHFRQQHFWRUE\SUHVVLQJWKHoWWLQJ
UHOHDVHULQJVHHSLFWXUHEHORZ
2SHQWKHGRRU5HPRYHWKHWRSKLQJHFRYHUVFUHZ
/LIWXSWKHFRYHU
2. Remove the cover.
3XOORXWWKHWXEH
'LVFRQQHFWDOOZLUHKDUQHVVHV
5. RePRYHWKHJURXQGLQJVFUHZ
5RWDWHKLQJHOHYHUFRXQWHUFORFNZLVH/LIWWKHWRS
KLQJHIUHHRIWKHKLQJHOHYHUODWFK
&$87,21 When lifting the hinge free of the latch,
be careful that the door does not fall forward.
7. Lift the door from the middle hinge pin and remove the
door.
8. Place the door, inside facing up, on a non-scratching
surface.
2SHQWKHGRRU5HPRYHWKHWRSKLQJHFRYHUVFUHZ
/LIWXSWKHFRYHU
2. Remove the cover. On the PreView model, disconnect
all wire harnesses.
5RWDWHWKHKLQJHOHYHUFORFNZLVH/LIWWKHWRSKLQJH
IUHHRIWKHKLQJHOHYHUODWFK
&$87,21 When lifting the hinge free of the latch, be
careful that the door does not fall forward.
4. Lift the door from the middle hinge pin and remove
the door.
5. Place the door, inside facing up, on a non-scratching
surface.
:$51,1*
(OHFWULFDO6KRFN+D]DUG
v Disconnect the electrical supply to the refrigerator
before installing. Failure to do so could result in
serious injury or death.
v Do not put hands, feet or other objects into the air
vents or bottom of the refrigerator. You may be
injured or receive an electrical shock.
7RUHPRYHWKHULJKWUHIULJHUDWRUGRRU
5(029,1*$1'5(3/$&,1*
5()5,*(5$725'2256
&$87,21Before you begin, remove food and bins
from the doors.
:$51,1*
([FHVVLYH:HLJKW+D]DUG
Use two or more people to remove and install the
refrigerator doors. Failure to do so can result in back or
other injury.
(2)
(3)
(4)
(5)
(1)
(1)
(2)
(3)
(6)
(7)
(8)
(4)
(5)
15
5()5,*(5$725,167$//$7,21
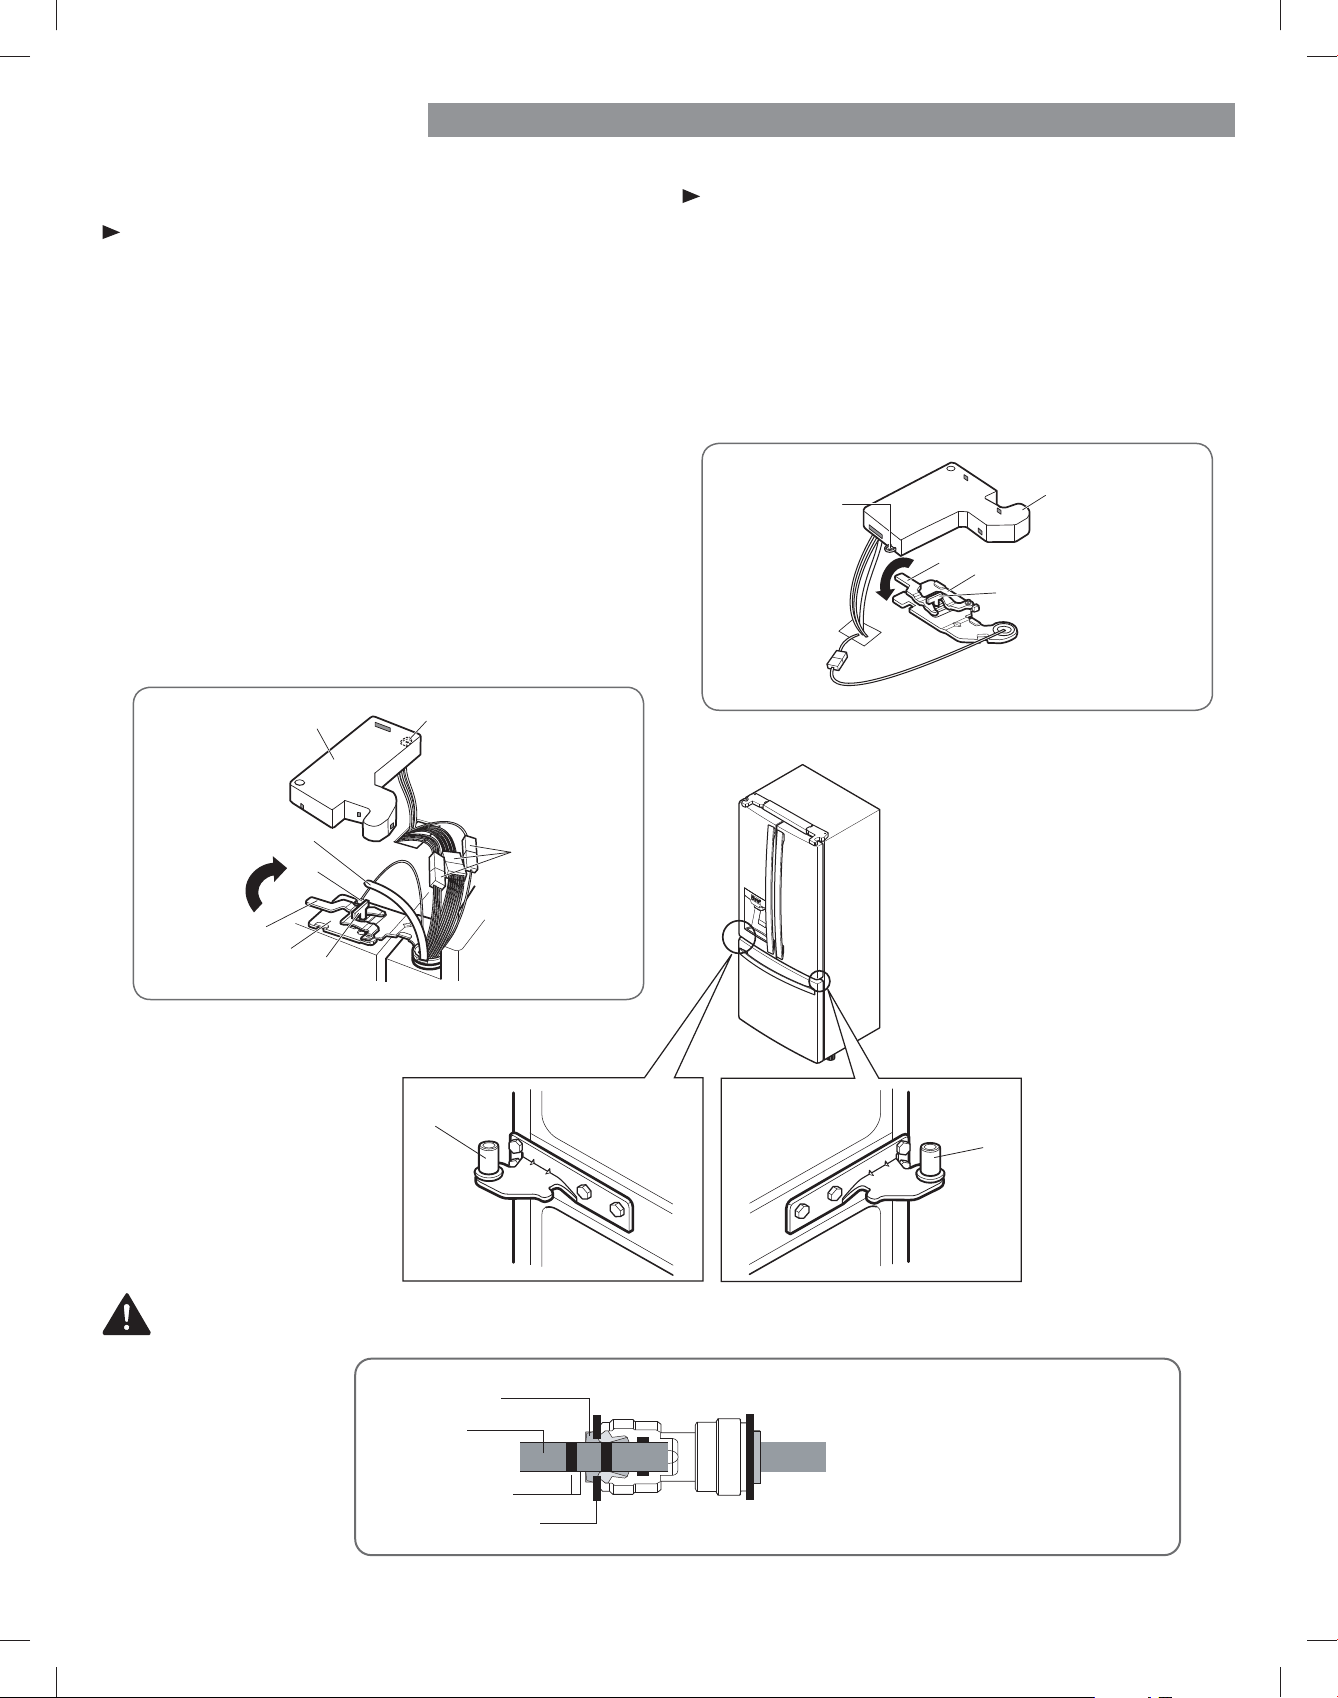
Reinstalling the Refrigerator Door
/HIW'RRU
/RZHUWKHGRRURQWRWKHPLGGOHKLQJHSLQ
)LWWKHWRSKLQJHRYHUWKHKLQJHOHYHUODWFKDQG
LQWRSODFH5RWDWHWKHOHYHUFORFNZLVHWRVHFXUHWKH
hinge.
,QVWDOOWKHJURXQGLQJVFUHZDQGFRQQHFWWKHWZR
ZLUHKDUQHVVHV
3XVKWKHZDWHUWXEHORFDWHGDWWKHWRSRIWKHOHIW
door into the hole beside the left hinge on the top of
the cabinet until it exits through the back.
,QVHUWWKHZDWHUVXSSO\WXEHLQWRWKHFRQQHFWRUXQWLO
you see only one scale mark. Fully insert the tube over
ìLQPP
+RRNWKHWDEVRQWKHOHIWVLGHRIWKHKLQJHFRYHU
XQGHUWKHHGJHRIWKHWRSKLQJHDQGSRVLWLRQWKH
FRYHULQSODFH,QVHUWDQGWLJKWHQWKHFRYHUVFUHZ
Right Door
/RZHUWKHGRRURQWRWKHPLGGOHKLQJHSLQ
)LWWKHWRSKLQJHRYHUWKHKLQJHOHYHUODWFKDQG
LQWRSODFH5RWDWHWKHOHYHUFRXQWHUFORFNZLVHWR
secure the hinge.
+RRNWKHWDEVRQWKHULJKWVLGHRIKLQJHFRYHU
XQGHUWKHHGJHRIWKHWRSKLQJHDQGSRVLWLRQWKH
FRYHULQSODFH,QVHUWDQGWLJKWHQWKHFRYHUVFUHZ
&$87,21
After inserting, pull the tube to
make sure that it is secure and
reinsert the clip.
Tube
Scale Mark
Collet
Clip
(10)
(9)
(2)
(5)
(1)
(3)
(4)
(1)
(3)
(6)
(7)
(8)
(4)
(5)
(2)
16
5()5,*(5$725,167$//$7,21
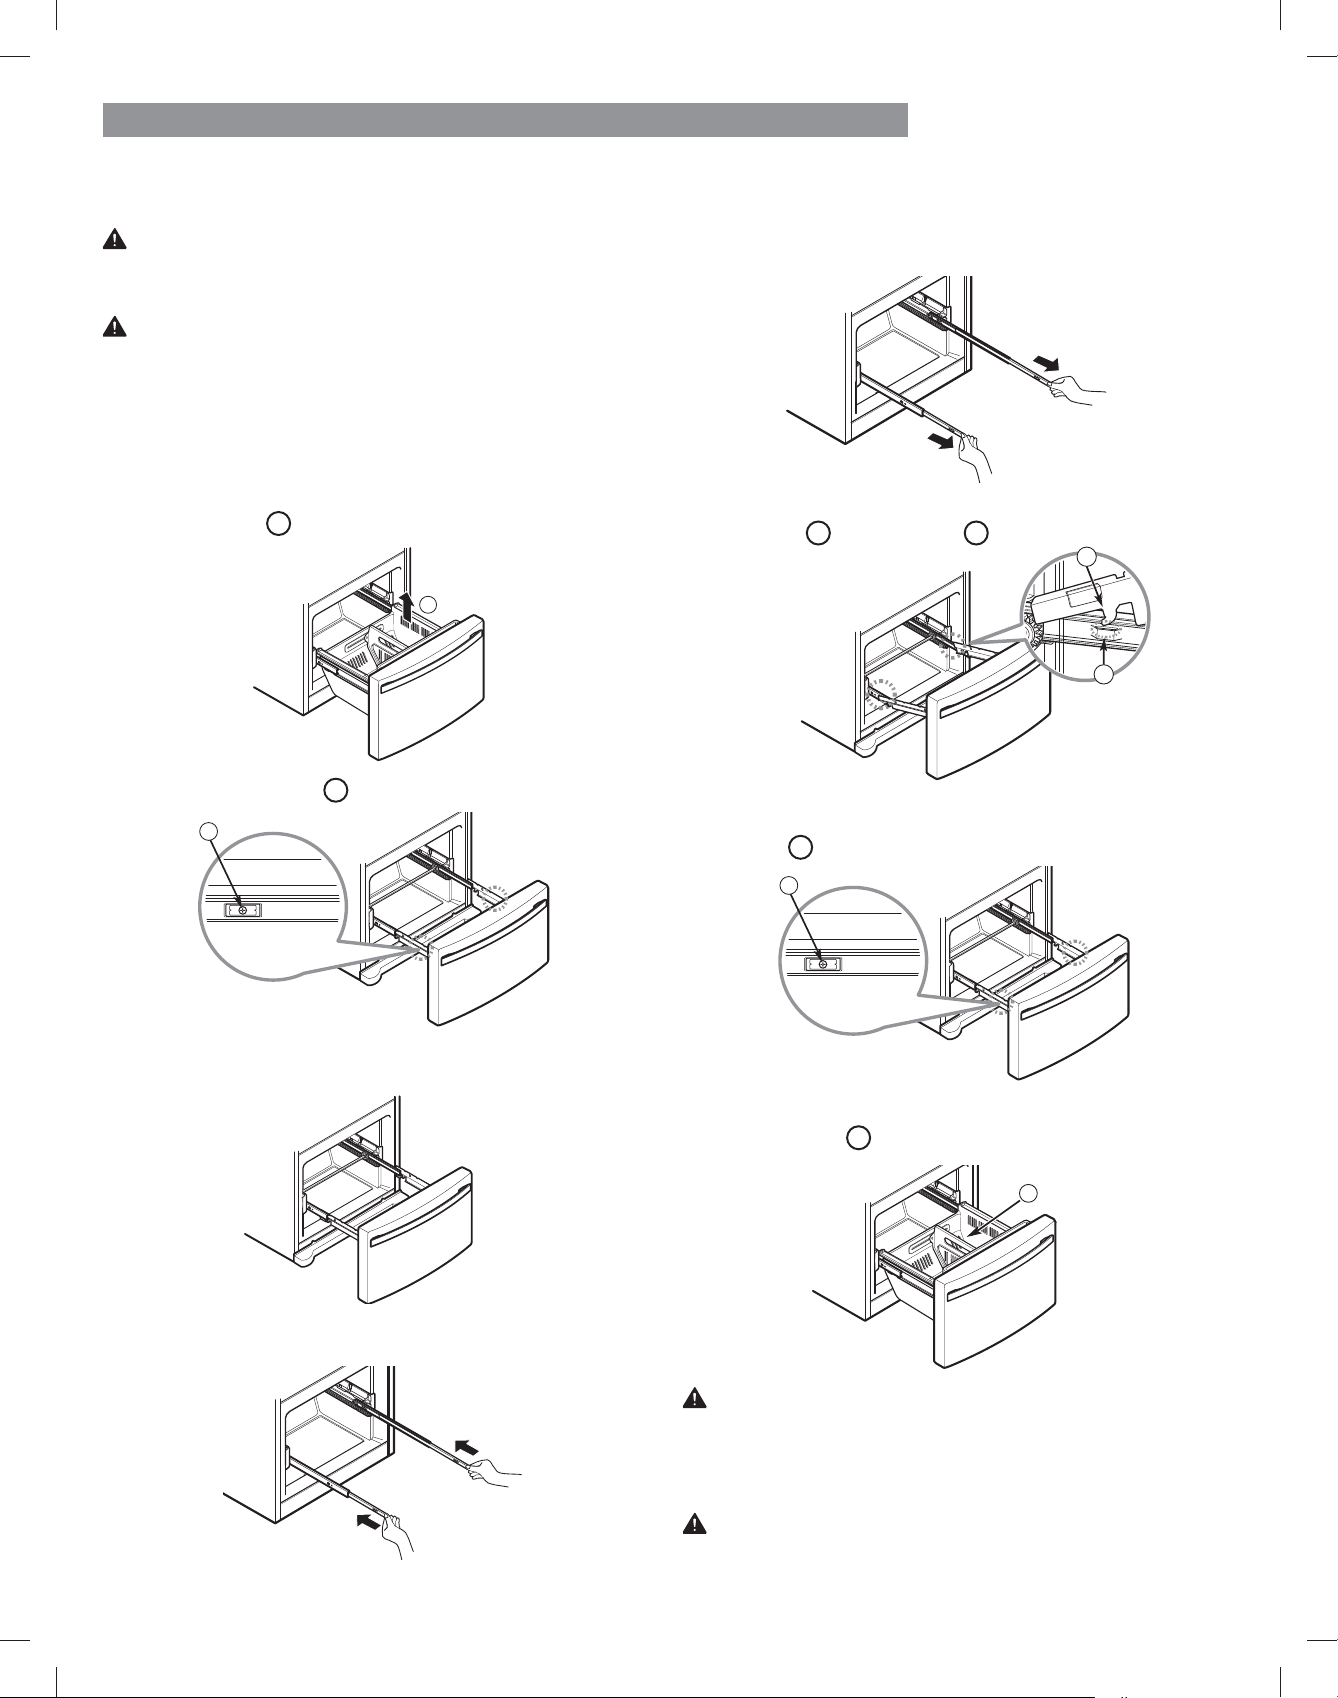
Pull the drawer open to full extension. Remove the
lower basket
1
by lifting the basket from the rail
system.
Remove the screws
from the rail on both sides.
Grasp the drawer on each side and pull it up to
separate it from the rails.
With both hands, slide each bar in simultaneously.
&$87,21 Do not hold the handle when removing or
UHSODFLQJWKHGUDZHU7KHKDQGOHPD\FRPHRçDQGLW
could cause personal injury.
2
Pull out each rail to full extension.
/RZHUWKHGRRULQWRLWVoQDOSRVLWLRQDQGWLJKWHQWKH
screws
3
located on both sides.
With the drawer pulled out to full extension, insert the
lower basket
4
in the rail assembly.
Grasp the drawer on each side and hook drawer
supports
1
into rail tabs
located on both sides.
:$51,1* If the Durabase divider is removed, there is
enough open space for children or pets to crawl inside.
To prevent accidental child and pet entrapment or
VXçRFDWLRQULVN'2127DOORZWKHPWRWRXFKRUJR
near the freezer drawer.
:$51,1*DO NOT step or sit down on the freezer
drawer.
3
+2:725(029(7+()5((=(5'5$:(5
+2:72,167$//7+()5((=(5'5$:(5
2
1
:$51,1* Use two or more people to remove and
install the freezer drawer. Failure to do so can result in
back or other injury.
127(,QWKHIROORZLQJoJXUHVWKH3XOORXW'UDZHU
located above the freezer drawer is not shown for
clarity.
4
1

17
5()5,*(5$725,167$//$7,21
/(9(/,1*$1''225$/,*10(17
/HYHOLQJ
After installing, plug the refrigerator’s power cord into a
3-prong grounded outlet and push the refrigerator into the
oQDOSRVLWLRQ
Your refrigerator has two front leveling legs—one on the
right and one on the left. Adjust the legs to alter the tilt
from front-to-back or side-to-side. If your refrigerator
seems unsteady, or you want the doors to close more
easily, adjust the refrigerator’s tilt using the instructions
below:
127( Tools Required: ĒĒ/ĈčyZUHQFKRUpDWEODGH
screwdriver.
1. Turn the leveling leg to the left to raise that side of
the refrigerator or to the right to lower it. It may take
several turns of the leveling leg to adjust the tilt of the
refrigerator.
127( Having someone push backward against the top of
WKHUHIULJHUDWRUWDNHVVRPHZHLJKWRçRIWKHOHYHOLQJOHJV
This makes it easier to adjust the legs.
Open both doors again and check to make sure that
they close easily. If the doors do not close easily, tilt
the refrigerator slightly more to the rear by turning
both leveling legs to the left. It may take several more
turns, and you should turn both leveling legs the same
amount.
127( Your refrigerator is uniquely designed with
two fresh food doors. Either door can be opened or
closed independently of the other. You may have to
exert slight pressure on the doors to get them to close
completely.
'RRU$OLJQPHQW
Both the left and right refrigerator doors have an
adjustable nut, located on the bottom hinge, to raise and
lower them to align properly.
If the space between your doors is uneven, follow the
instructions below to align the doors evenly:
8VHWKHZUHQFKLQFOXGHGZLWKWKH8VH&DUH*XLGHWR
turn the nut in the door hinge to adjust the height. To the
right to raise or to the left to lower the height.

18
86,1*<2855()5,*(5$725
6(77,1*7+(&21752/6
127( The dispenser will not work if any door is left open
or if the control lock is engaged.
127(If the Control Lock icon is illuminated, the
Dispenser will not work. Disable the Control Lock to use
the Dispenser again.
&$87,21 The control display is operated by touch.
Excessive moisture on the display may cause a
malfunction. Please keep the display clean and dry.
v The Refrigerator Temp Control ranges from 33°F to
£)£&WR£& Press the Refrigerator Temp button
to cycle through the available temperature settings one
increment at a time.
v 7KH)UHH]HU7HPS&RQWUROUDQJHLVIURP£)WR£)
£&WR£&Press the Freezer Temp button to cycle
through the available temperature settings one increment
at a time.
127( When changing control settings, wait 24 hours
before making additional adjustments. The controls are set
correctly when milk or juice is as cold as you would like
DQGZKHQLFHFUHDPLVoUP,IWKHWHPSHUDWXUHLQHLWKHU
compartment is too cold or too warm, change the setting
one increment at a time. Wait 24 hours for the change to
stabilize before adjusting again.
Dispenser
The dispenser will dispense water, cubed ice or crushed
LFH3UHVVWKHDSSURSULDWHLFRQRI\RXUFKRLFH
1
ZDWHU
2
FXEHGLFH
3
FUXVKHGLFH:KHQSUHVVHGWKHLFRQ
will illuminate.
$LUpRZ
Be sure not to block vents while packing your refrigerator.
'RLQJVRZLOOUHVWULFWDLUpRZDQGPD\FDXVHWKH
refrigerator temperature to become too warm or cause
LQWHULRUPRLVWXUHEXLOGXS6HHDLUpRZGLDJUDPEHORZ
Temperature
1
2
3

19
86,1*<2855()5,*(5$725
&$87,21
To reduce the risk of scratching the door or breaking the
door mullion, make sure that the refrigerator door mullion
is always folded in.
'LVSHQVHU/LJKW
7KLVOLJKWKDVWKUHHVHWWLQJV2Q2çDQG'LP6HOHFW
the Dim option at night. The light will automatically
turn on at full brightness when the dispenser pad is
pushed.
$UWLFXODWLQJ0XOOLRQ
This feature is a metal strip attached to the left door
WKDWDUWLFXODWHVURWDWHVGHJUHHVDVWKHGRRULV
FORVHGIRUPLQJDPXOOLRQEDVHIRUWKHOHIWDQGULJKW
door gaskets to seal against.
$LU)LOWHU
The Air Filter helps remove odors from the
refrigerator. The Air Filter has two settings, Auto and
MAX. In Auto mode, the Air FilterZLOOF\FOHRQDQGRç
in increments of ten minutes on and one hundred and
WHQPLQXWHVRç,IVHWWRWKH0AX mode, the Air Filter
will stay on continuously for four hours, cycling on and
RçLQLQFUHPHQWVRIWHQPLQXWHVRQDQGoYHPLQXWHV
Rç$IWHUIRXUKRXUVWKHAir Filter will switch to Auto
mode.
v Auto mode is the default mode.
v Press the Air Filter button once for MAX mode.
$LU)LOWHU5HVHW
When the CHANGELFRQWXUQVRQWKHDLUoOWHUQHHGV
WREHUHSODFHG$IWHUUHSODFLQJWKHDLUoOWHUSUHVVDQG
hold the Air Filter button for three seconds to turn the
LFRQOLJKWRç,WLVUHFRPPHQGHGWRFKDQJHWKHDLU
oOWHUDSSUR[LPDWHO\HYHU\PRQWKV
,FH0DNHU212))
v To switch the icemaker ON or OFF, press the Ice Maker
button.
$FFHOD,FH
v When you press and hold the Ice Maker button for
three seconds, the graphic will illuminate in the display
and will continue for 24 hours.
7KHIXQFWLRQZLOODXWRPDWLFDOO\VKXWRçDIWHUKRXUV
127( While you are selecting the Accela Ice function,
WKH,FH0DNHULFRQZLOOEULHp\VZLWFKWR2))WKHQ
return to ON. This is normal.
v You can stop this function manually by pressing and
holding the button one more time.
v This function increases both ice making and freezing
capabilities.
Water Filter Reset
When the CHANGE icon turns on, you need to
FKDQJHWKHZDWHUoOWHU$IWHUFKDQJLQJWKHZDWHU
oOWHUSUHVVDQGKROGWKHWater Filter button for
WKUHHVHFRQGVWRWXUQWKHLQGLFDWRUOLJKWRç<RXQHHG
WRFKDQJHWKHZDWHUoOWHUDSSUR[LPDWHO\HYHU\VL[
months.
20
86,1*<2855()5,*(5$725
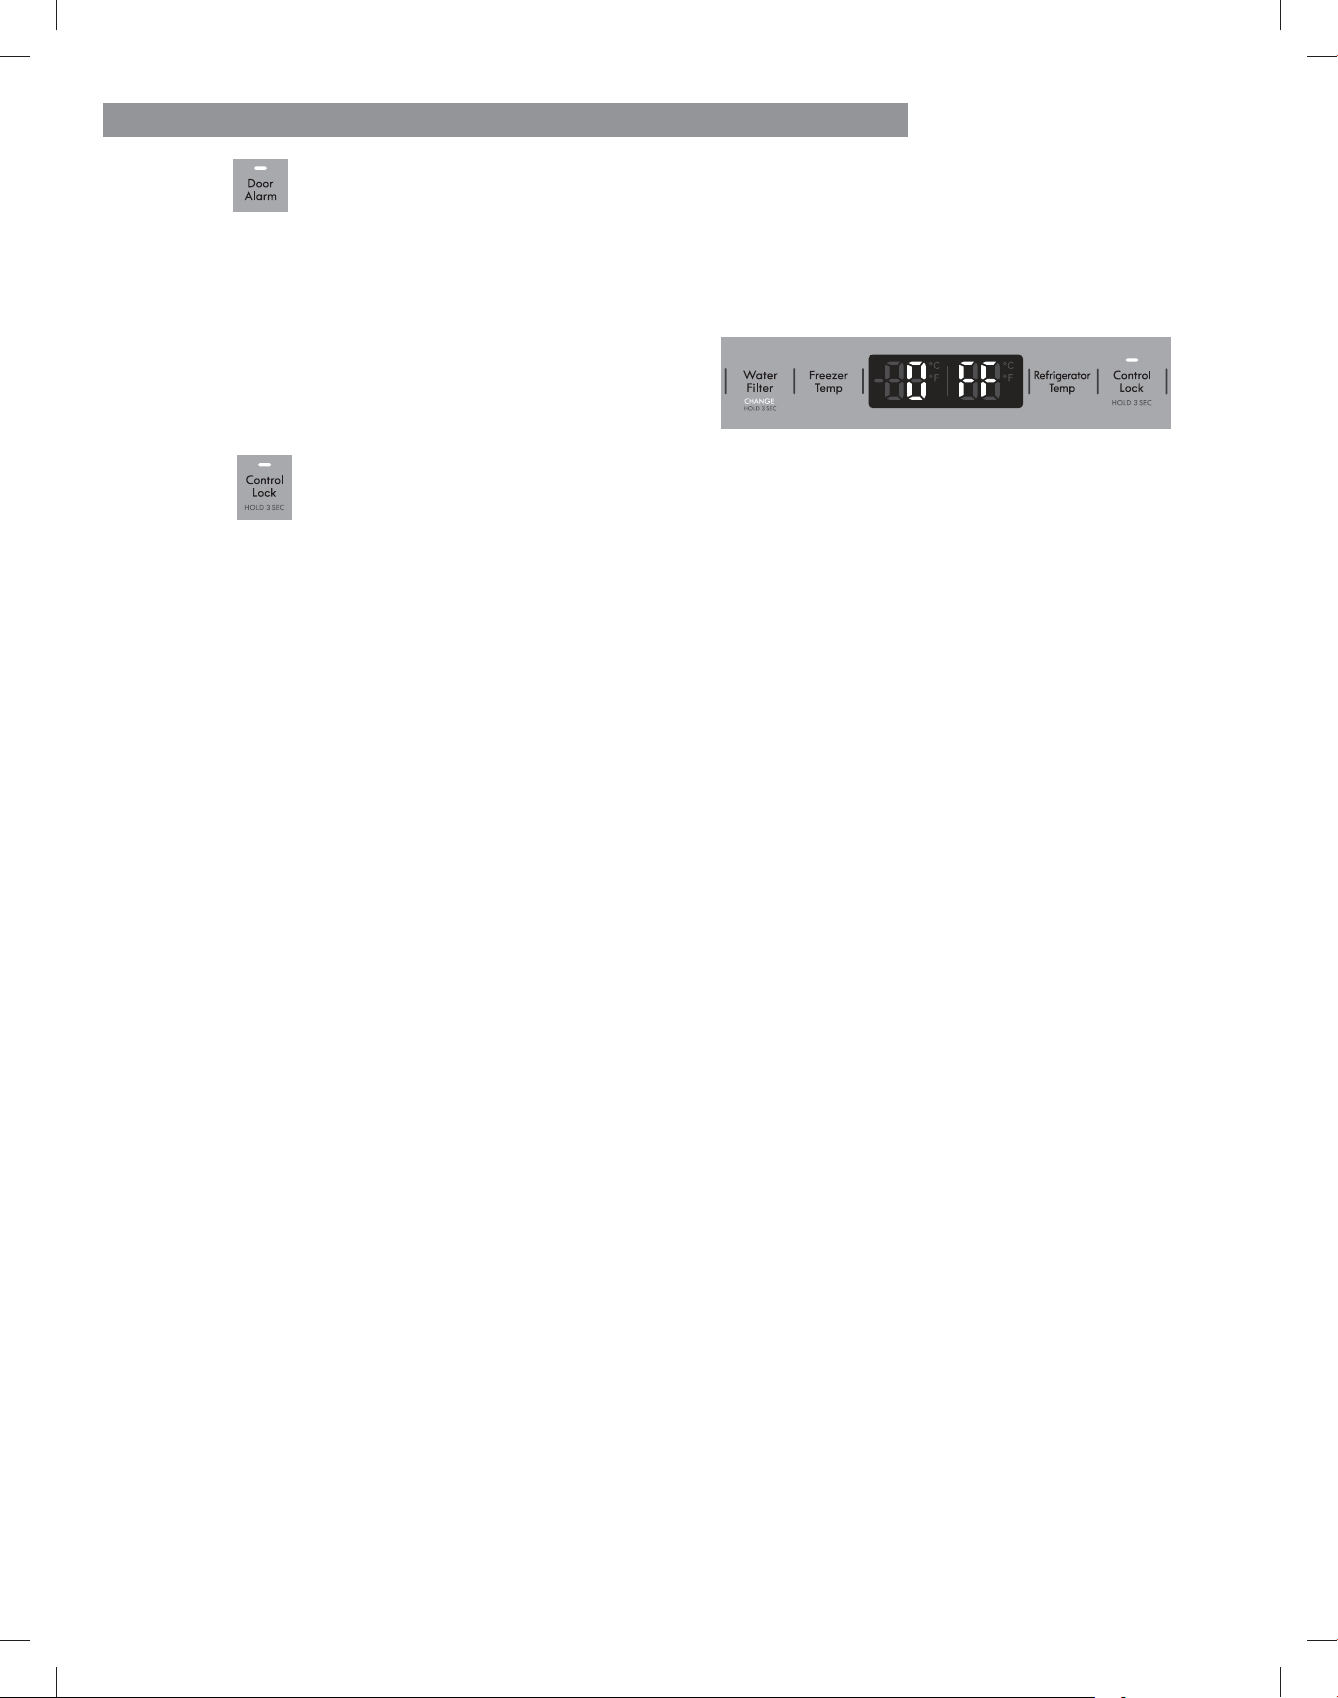
'RRU$ODUP
v When power is connected to the refrigerator, the door
alarm is initially set to ON. When you press the Door
Alarm button, the display will change to OFF and the
Door Alarm function will deactivate.
v When either the refrigerator or the freezer door is left
open for more than 60 seconds, the alarm tone will
sound to let you know that the door is open.
v When you close the door, the door alarm will stop.
&RQWURO/RFN
v When power is initially connected to the refrigerator,
the LockIXQFWLRQLVRç
v If you want to activate the Lock function to lock other
buttons, press and hold the Control Lock button for
three seconds or more. The Control Lock button will
illuminate and the Lock function is now enabled.
v When the Lock function is activated, no other buttons
will work. The dispenser pad is also deactivated.
v To disable the Lock function, press and hold the Control
Lock button for approximately three seconds.
7HPSHUDWXUH0RGH6ZLWFK)XQFWLRQ£)!£&
If you want to convert °F to °C or vice versa, press and
hold the Freezer Temp and Refrigerator Temp buttons at
WKHVDPHWLPHIRUDSSUR[LPDWHO\oYHVHFRQGV
'HPR0RGH)RU6WRUH8VH2QO\
The Demo Mode disables all cooling in the refrigerator
and freezer sections to conserve energy while on display
in a retail store. When activated, OFF will display on the
control panel.
7RGHDFWLYDWH
With either refrigerator door opened, press and hold the
Refrigerator Temp and Ice Maker buttons at the same
WLPHIRUoYHVHFRQGV7KHFRQWUROSDQHOZLOOEHHSDQGWKH
WHPSHUDWXUHVHWWLQJVZLOOGLVSOD\WRFRQoUPWKDWDemo
Mode is deactivated. Use the same procedure to activate
the Demo Mode.

21
86,1*<2855()5,*(5$725
'(),1,7,216
60$57/('ZKLWH
1RWLoHVWKHXVHUWKDWWKHDSSOLDQFHLVFRQQHFWHGWRWKH
internet.
6PDUW*ULG/('ZKLWH
1RWLoHVWKHXVHUWKDWWKHDSSOLDQFHLVFDSDEOHRI
receiving a signal, known as a Demand Response event,
from a utility company’s energy management system.
*5,'02'(/('UHG
1RWLoHVWKHXVHUWKDWWKHDSSOLDQFHLVUHGXFLQJRU
delaying energy use based on the signal received from
a utility company energy management system. The LED
ZLOOUHPDLQLOOXPLQDWHGGXULQJFULWLFDOSHDNSULFLQJ&33
DQGUHDOWLPHSULFLQJ573RUGXULQJDKLJKGHPDQGIRU
electricity.
*(77,1*&211(&7('
You need the following devices and application to use the
Smart Grid and other smart features on your refrigerator.
Required Devices: A wireless router, Kenmore Elite Smart
Refrigerator, and a mobile device.
Required Application: Kenmore Smart App.
&211(&7,1*7+(5()5,*(5$725
Refer to the Quick Start Guide that came with your smart
appliance for detailed instructions on creating a Kenmore
account and setting up the appliance for connected
operation from your mobile device. For additional
assistance, visit http://www.kenmore.com/smart
127( When successfully connected to the internet, the
SMART icon LED on the unit control panel will turn ON.
60$57)($785(6
29(59,(:
Kenmore Smart connectivity transforms your relationship
with your home. You can personalize the way Kenmore
Smart products operate based on your schedule and daily
routines, making life easier and providing greater peace
of mind. It does this by letting you link with and manage
your Kenmore Smart products on one app, all from trusted
brands, from a smart phone, tablet or computer.
This appliance is a connected-ready appliance, allowing
you to remotely monitor and control it from your smart
phone via the Kenmore® Smart app.
To get started, you will need the following:
v.HQPRUH(OLWH§6PDUW$SSOLDQFH
v:,),KRPHURXWHUFRQQHFWHGWRWKHLQWHUQHW
v6PDUWSKRQH
v.HQPRUH6PDUWDSS
For more information about your Kenmore Elite® Smart
appliance, please visit www.Kenmore.com/smart.
The Smart Grid function controls energy usage which
helps you save energy during peak usage periods. You can
RYHUULGHWKH60$57*5,'IXQFWLRQDWDQ\WLPHXVLQJWKH
6PDUW*ULGEXWWRQRUDSSOLFDWLRQ
6PDUW*ULGUHVSRQGVWRQRWLoFDWLRQHYHQWVIURP\RXU
utility company to run high energy-consuming tasks only
GXULQJRçSHDNWLPHVZKHQHOHFWULFDOGHPDQGLVORZHU
7KHVHQRWLoFDWLRQHYHQWVDUHNQRZQDV'HPDQG5HVSRQVH
'5VLJQDOV,IWKHUHIULJHUDWRUUHFHLYHVD'5VLJQDOIURP
the utility company, the refrigerator will turn on the GRID
MODE LED on the refrigerator control panel and regulate
power consumption according to the signal received. The
refrigerator will respond to the signals received from the
utility company as long as the appliance is connected to
the internet and Smart Grid is enabled.

22
86,1*<2855()5,*(5$725
,16758&7,216)2560$57*5,'
,03257$17
You must connect your Kenmore Smart appliance to the
internet and then register the appliance to your account in
order to use the Smart Grid function.
Consult the Quick Start Guide supplied with the appliance
for instructions on how to register your appliance using the
.HQPRUH6PDUWDSSOLFDWLRQDSS
The Smart Grid button serves two purposes:
LQWHUQHWFRQQHFWLRQRUGLVFRQQHFWLRQHQDEOHRU
disable/override the appliance Demand Response
capability.
NOTE: This appliance is a connected-ready appliance,
allowing you to remotely monitor and control it from your
smart phone via the Kenmore® Smart app.
To connect the refrigerator to the Internet:
Refer to the Quick Start Guide that came with your smart
appliance for detailed instructions on creating a Kenmore
account and setting up your appliance for connected
RSHUDWLRQIURP\RXUVPDUWSKRQH7KLV8VH&DUH*XLGH
contains information and instructions for operating
your appliance from the appliance control panel. For
additional assistance, visit http://www.kenmore.com/
smart
127(,IQRFRQQHFWLRQLVPDGHDIWHUoYHPLQXWHVWKH
EOLQNLQJ60$57*5,'EXWWRQ/('ZLOOWXUQRç
Smart Grid Operation:
Once connected and registered, the appliance is
capable of accepting a signal from your electric
company. The signal, known as a Demand Response
'5ZLOODGMXVWUHIULJHUDWRURSHUDWLRQWRUHGXFHSRZHU
consumption for a period of time ranging from a few
minutes up to a maximum of 4 hours. Ice making will be
delayed during this time. Opening the refrigerator door
may cancel certain DR signals.
7KH*ULG0RGH/('UHGZLOOEHVWHDGLO\OLWZKHQWKH
VLJQDOLVLQHçHFW7RGLVDEOHWKHVLJQDODQGSUHYHQW
further signal acceptance, press and release the Smart
Grid button. Both the Grid Mode and Smart Grid LED
ZLOOWXUQRç3UHVVDQGUHOHDVHWKH6PDUW*ULGEXWWRQ
again to enable DR signal acceptance capability. The
Smart Grid button LED will relight. The Grid Mode LED
will light when another DR signal is sent.

23
86,1*<2855()5,*(5$725
)&&5)5DGLDWLRQ([SRVXUH6WDWHPHQW
This equipment complies with FCC radiation exposure
limits set forth for an uncontrolled environment. This
transmitter must not be co-located or operating in
conjunction with any other antenna or transmitter.
This equipment should be installed and operated with
DPLQLPXPGLVWDQFHRIFPLQFKHVEHWZHHQ
the antenna and your body. Users must follow the
VSHFLoFRSHUDWLQJLQVWUXFWLRQVIRUVDWLVI\LQJ5)H[SRVXUH
compliance.
:LUHOHVV/$10RGXOH6SHFLoFDWLRQV
Model 2AHU4-KMTD17
Frequency Range 2412 to 2462 MHz
2XWSXW3RZHU0D[ IEEE 802.11b: 18.26 dBm
IEEE 802.11g: 20.10 dBm
IEEE 802.11n: 20.07 dBm
FCC Notice
)RUWUDQVPLWWHUPRGXOHFRQWDLQHGLQWKLVSURGXFW
This equipment has been tested and found to comply with
the limits for a Class B digital device, pursuant to Part 15
of the FCC Rules. These limits are designed to provide
reasonable protection against harmful interference in a
residential installation. This equipment generates, uses,
and can radiate radio frequency energy and, if not
installed and used in accordance with the instructions,
may cause harmful interference to radio communications.
However, there is no guarantee that interference will not
occur in a particular installation. If this equipment does
cause harmful interference to radio or television reception,
which can be determined by turning the equipment
RçDQGRQWKHXVHULVHQFRXUDJHGWRWU\WRFRUUHFWWKH
interference by one or more of the following measures:
- Reorient or relocate the receiving antenna.
- Increase the separation between the equipment and the
receiver.
&RQQHFWWKHHTXLSPHQWWRDQRXWOHWRQDFLUFXLWGLçHUHQW
from that to which the receiver is connected.
- Consult the dealer or an experienced radio/TV
technician for help.
This device complies with part 15 of the FCC Rules.
Operation is subject to the following two conditions:
WKLVGHYLFHPD\QRWFDXVHKDUPIXOLQWHUIHUHQFHDQG
WKLVGHYLFHPXVWDFFHSWDQ\LQWHUIHUHQFHUHFHLYHG
including interference that may cause undesired
operation of the device.
$Q\FKDQJHVRUPRGLoFDWLRQVLQFRQVWUXFWLRQRIWKLV
device which are not expressly approved by the party
responsible for compliance could void the user’s authority
to operate the equipment.
2SHQ6RXUFH6RIWZDUH1RWLFH
To obtain the source code that is contained in this product
under LGPL and other open source licenses, visit http://
kenmore.com/opensource. In addition to the source code,
all referred license terms, warranty disclaimers, and
copyright notices are available for download.
24
86,1*<2855()5,*(5$725
,1'225,&(%,1
&$87,21
Keep hands and tools out of the ice compartment door
and dispenser chute. Failure to do so may result in
damage or personal injury.
The icemaker will stop producing ice when the in-door ice
bin is full. If you need more ice, empty the ice bin into the
extra ice bin in the freezer compartment. During use, the
ice can become uneven causing the icemaker to misread
the amount of ice cubes and stop producing ice. Shaking
the ice bin to level the ice within it can reduce this problem.
127(Storing cans or other items in the ice bin will
damage the icemaker.
Keep the ice compartment door closed tightly. If the ice
compartment door is not closed tightly, the cold air in the
ice bin will freeze food in the refrigerator compartment.
This could also cause the icemaker to stop producing ice.
127( Emptying the ice bin is recommended if the
icemaker ON/OFF button on the control panel is set to
OFF for an extended period of time.
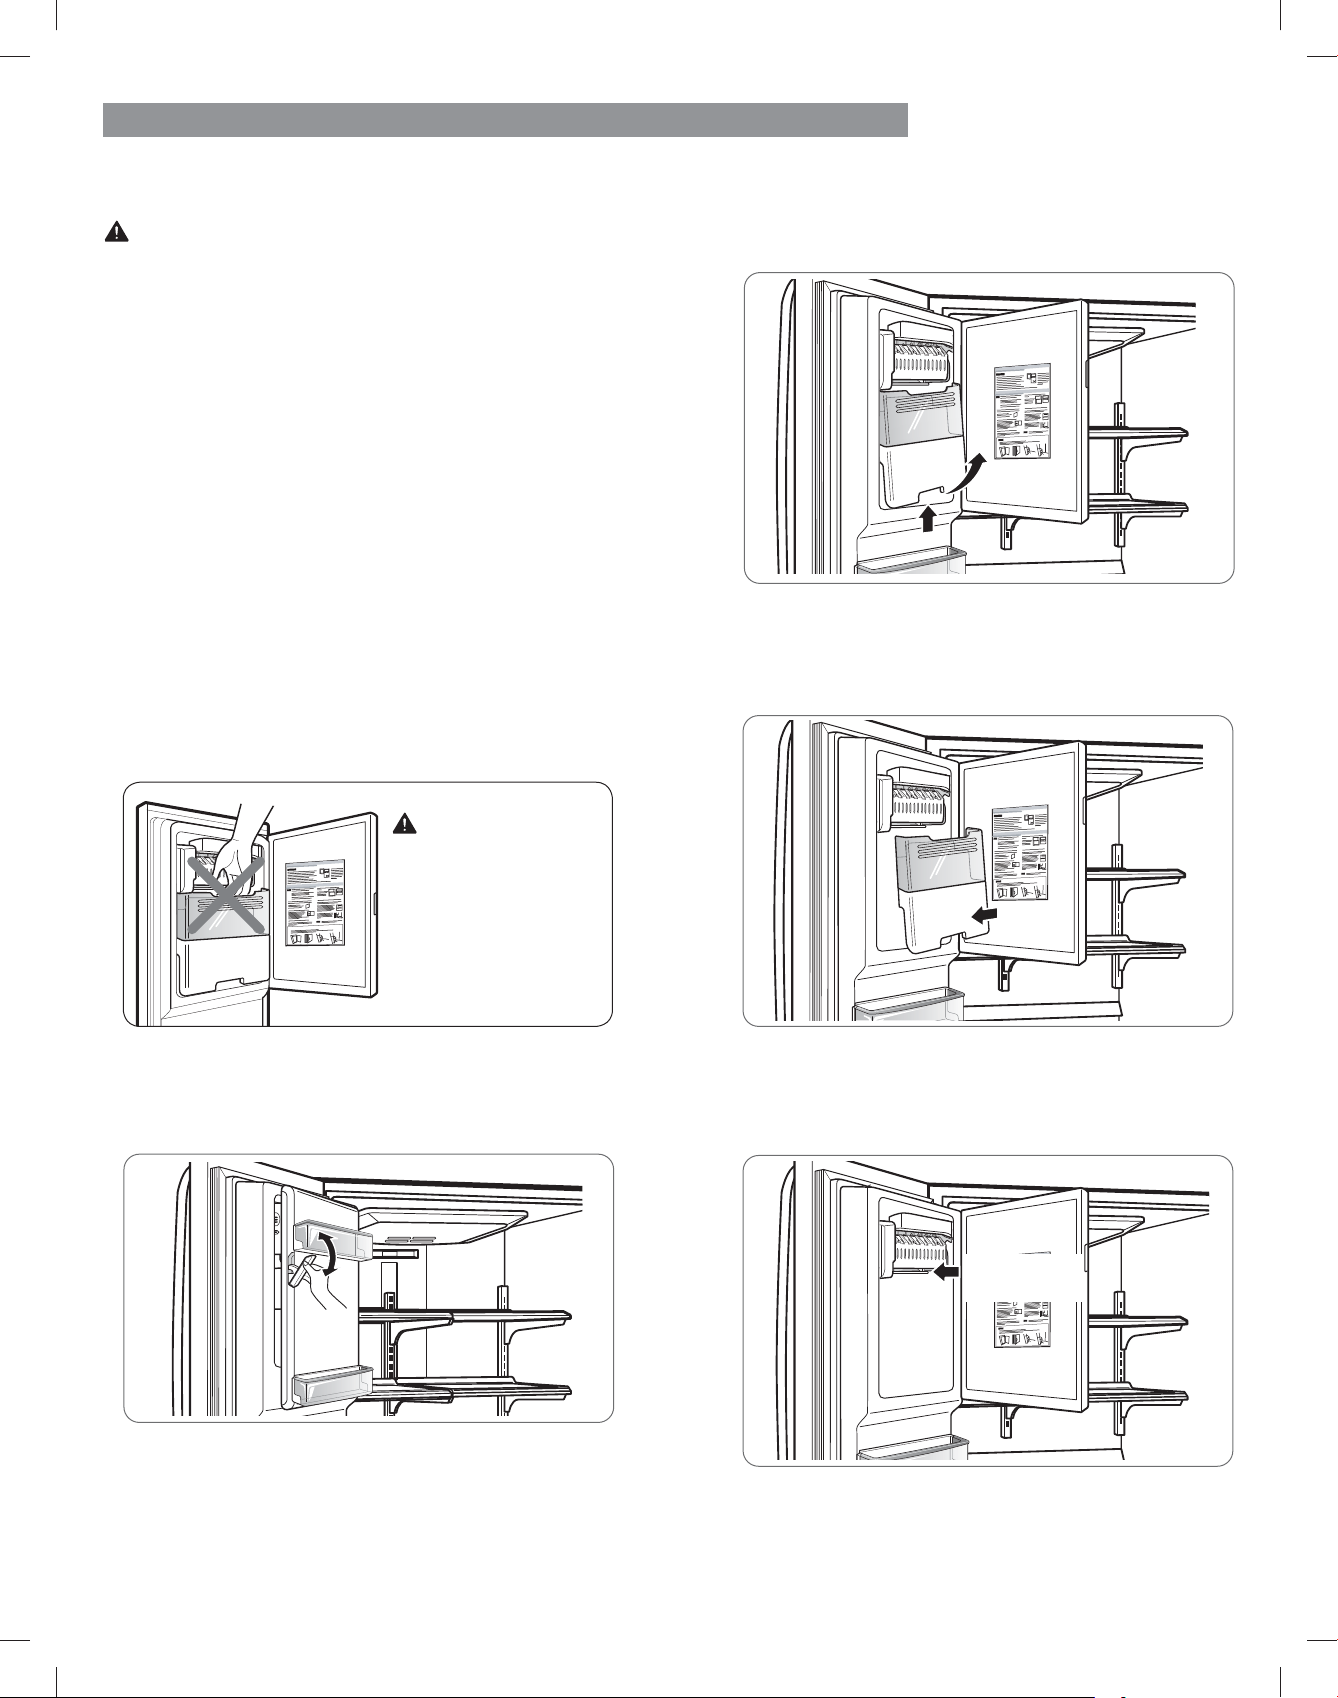
1. Pull or push the door handle to open or close the ice
compartment.
To remove the in-door ice bin, grip the front handle,
slightly lift the lower part, and slowly pull out the bin
as shown.
3. To reinstall the in-door ice bin, slightly slant the
bin during replacement to avoid contact with the
icemaker.
4.$YRLGWRXFKLQJWKHDXWRVKXWRçIHHOHUDUPZKHQ
replacing the ice bin. See the label on the ice
compartment door for details.
&$87,21
When handling the
ice bin, keep hands
away from the
icemaker tray area to
avoid personal injury.
$XWRVKXWRç
IHHOHUDUP
25
86,1*<2855()5,*(5$725
$8720$7,&,&(0$.(5
Ice is made in the automatic icemaker and sent to the
dispenser. The icemaker will produce 70-182 cubes in
a 24-hour period, depending on freezer compartment
temperature, room temperature, number of door openings
and other operating conditions.
v It takes about 12 to 24 hours for a newly installed
refrigerator to begin making ice. Wait 72 hours for full
ice production to occur.
v Ice making stops when the in-door ice bin is full.
When full, the in-door ice bin holds approximately 6 to
R]RUFFJODVVHVRILFH
v )RUHLJQVXEVWDQFHVRUIURVWRQWKHDXWRVKXWRçIHHOHU
DUPFDQLQWHUUXSWLFHSURGXFWLRQ0DNHVXUHWKHIHHOHU
arm is clean at all times for proper operation.
v To increase ice production, use the Accela Ice function.
This function increases both ice making and freezing
capabilities.
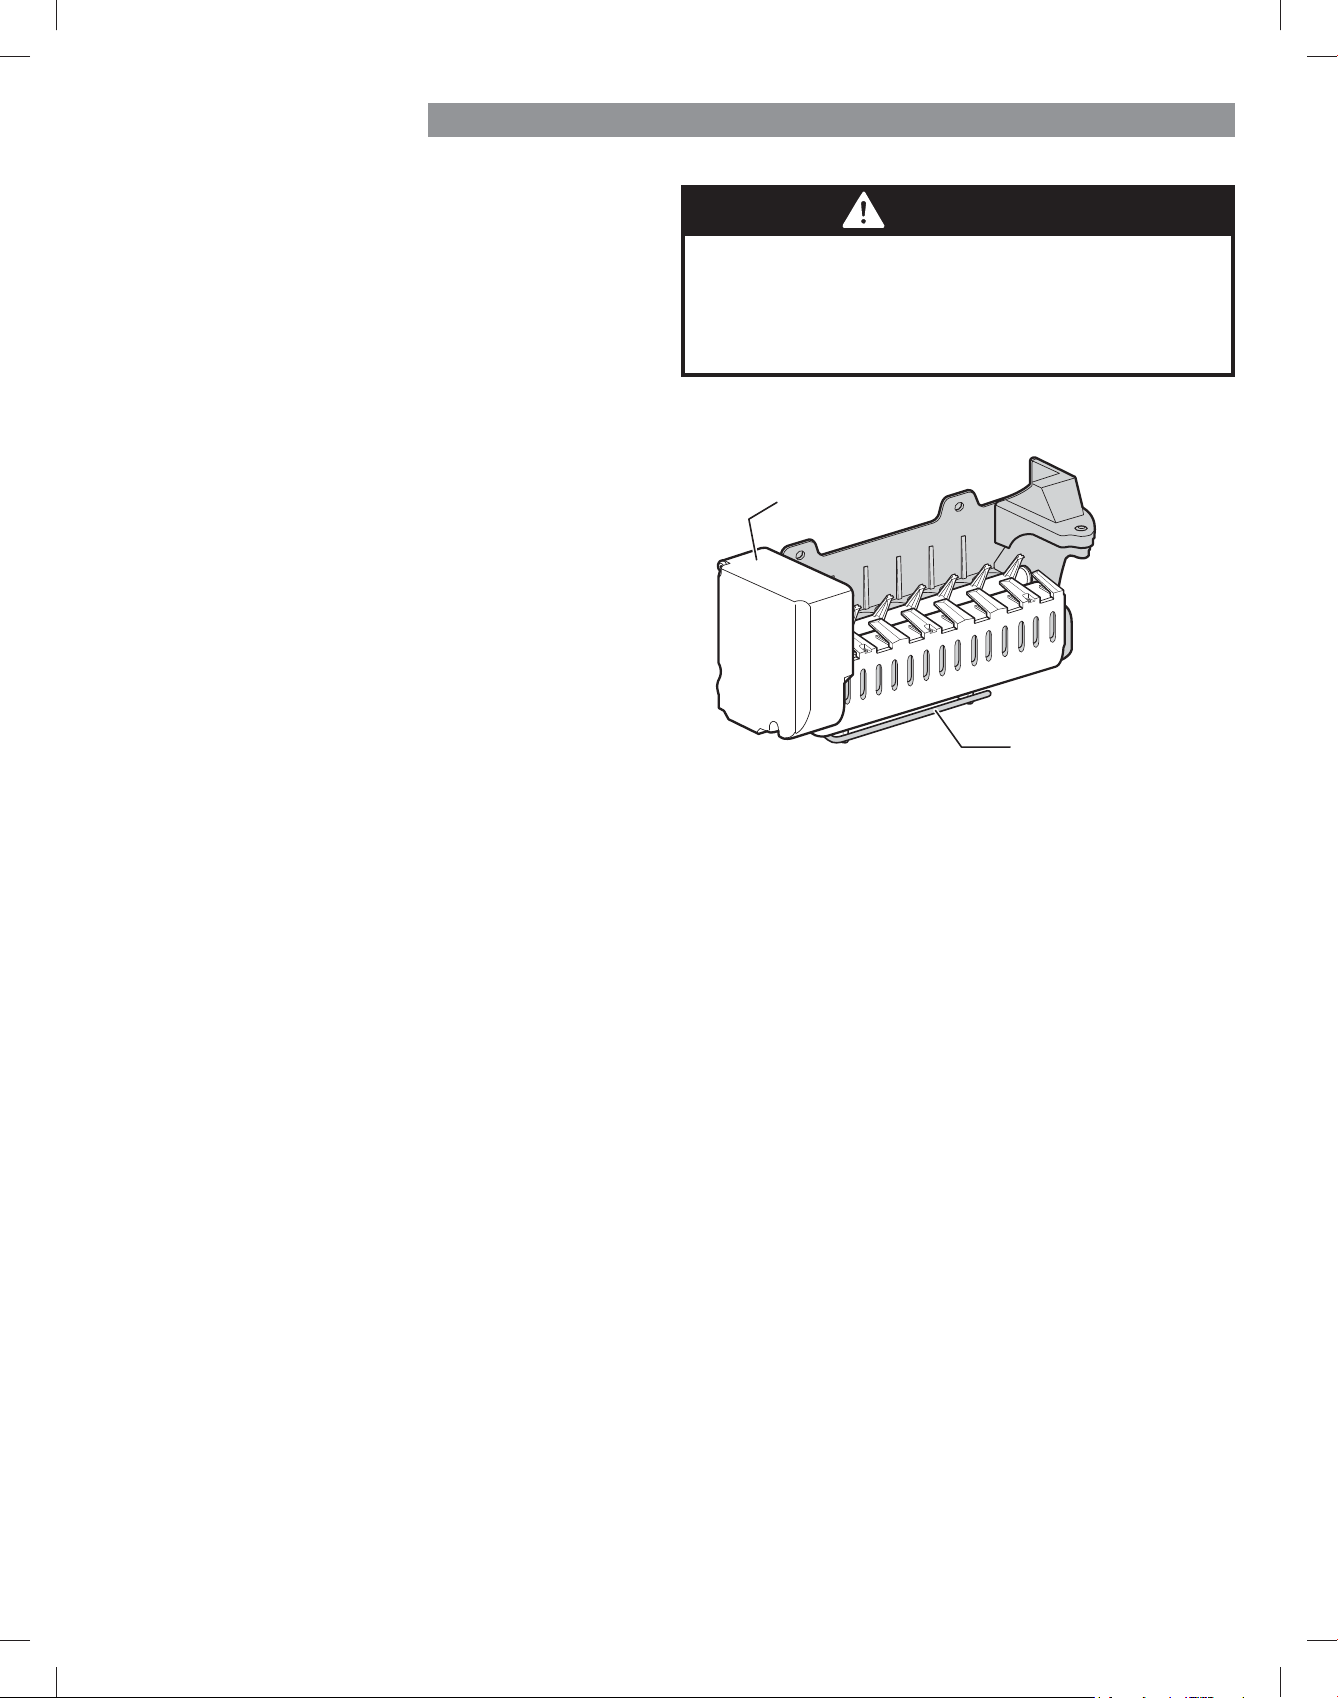
:$51,1*
Personal Injury Hazard
'2127SODFHoQJHUVRUKDQGVRQWKHDXWRPDWLFLFH
making mechanism while the refrigerator is plugged in.
lcemaker
$XWRVKXWRçIHHOHUDUP

26
86,1*<2855()5,*(5$725
v 7KHoUVWLFHDQGZDWHUGLVSHQVHGPD\LQFOXGHSDUWLFOHV
or odor from the water supply line or the water tank.
v 7KURZDZD\WKHoUVWIHZEDWFKHVRILFH7KLVLVDOVR
necessary if the refrigerator has not been used for a
long time.
v Never store beverage cans or other items in the ice
bin for the purpose of rapid cooling. Doing so may
damage the icemaker or the containers may burst.
v ,IGLVFRORUHGLFHLVGLVSHQVHGFKHFNWKHZDWHUoOWHU
and water supply. If the problem continues, contact a
6HDUVRURWKHUTXDOLoHGVHUYLFHFHQWHU'RQRWXVHWKH
ice or water until the problem is corrected.
v Keep children away from the dispenser. Children may
play with or damage the controls.
v The ice passage may become blocked with frost if only
crushed ice is used. Remove the frost that accumulates
by removing the ice bin and clearing the passage with
a rubber spatula. Dispensing cubed ice can also help
prevent frost buildup.
v Never use thin crystal glass or crockery to collect ice.
Such containers may chip or break resulting in glass
fragments in the ice.
v 'LVSHQVHLFHLQWRDJODVVEHIRUHoOOLQJLWZLWKZDWHU
or other beverages. Splashing may occur if ice is
dispensed into a glass that already contains liquid.
v Never use a glass that is exceptionally narrow or
deep. Ice may jam in the ice passage and refrigerator
SHUIRUPDQFHPD\EHDçHFWHG
v Keep the glass at a proper distance from the ice outlet.
A glass held too close to the outlet may prevent ice
from dispensing.
v To avoid personal injury, keep hands out of the ice
door and passage.
v Never remove the dispenser cover.
v ,ILFHRUZDWHUGLVSHQVHVXQH[SHFWHGO\WXUQRçWKH
water supply and contact Sears Home Service at
1-844-553-6667.
:+(1726(7,&(0$.(5722))
v :KHQWKHZDWHUVXSSO\ZLOOEHVKXWRçIRUVHYHUDO
hours.
v When the ice bin is removed for more than one or two
minutes.
v When the refrigerator will not be used for several days.
127( The ice bin should be emptied when the
icemaker ON/OFF button is turned to the 2)) mode.
1250$/6281'6<280$<+($5
v If the icemaker ON/OFF button is set to ON, the valve
will buzz even if the icemaker has not het been hooked
up to water. To stop the buzzing, switch the button to
OFF.
127( Keeping the icemaker ON/OFF button set to
ON before the water is connected can damage the
icemaker.
v You will hear the sound of cubes dropping into the bin
DQGZDWHUUXQQLQJLQWKHSLSHVDVWKHLFHPDNHUUHoOOV
35(3$5,1*)259$&$7,21
Set the icemaker ON/OFF button to2))DQGVKXWRçWKH
water supply to the refrigerator.
127( The ice bin should be emptied any time the
icemaker ON/OFF button is turned OFF.
If the ambient temperature will drop below freezing, have
DTXDOLoHGWHFKQLFLDQGUDLQWKHZDWHUVXSSO\V\VWHPWR
SUHYHQWVHULRXVSURSHUW\GDPDJHGXHWRpRRGLQJFDXVHG
by ruptured water lines or connections.
&$87,21
$8720$7,&,&(0$.(5FRQWLQXHG

27
86,1*<2855()5,*(5$725
)22'6725$*(*8,'(
Wrap or store food in the refrigerator in airtight and
moisture-proof material unless otherwise noted. This
prevents food odor and taste transfer throughout the
refrigerator. For dated products, check date code to
ensure freshness.
6725,1*)52=(1)22'
127( Check a freezer guide or a reliable cookbook
for further information about preparing food for
freezing or food storage times.
Freezing
Your freezer will not quick-freeze a large quantity of
food. Do not put more unfrozen food into the freezer
WKDQZLOOIUHH]HZLWKLQKRXUVQRPRUHWKDQWR
OEVRIIRRGSHUFXELFIRRWRIIUHH]HUVSDFH/HDYH
enough space in the freezer for air to circulate around
packages. Be careful to leave enough room at the
front so the door can close tightly.
Storage times will vary according to the quality and
type of food, the type of packaging or wrap used
KRZDLUWLJKWDQGPRLVWXUHSURRIDQGWKHVWRUDJH
temperature. Ice crystals inside a sealed package are
normal. This simply means that moisture in the food
and air inside the package have condensed, creating
ice crystals.
127( Allow hot foods to cool at room temperature
for 30 minutes, then package and freeze. Cooling hot
foods before freezing saves energy.
Packaging
Successful freezing depends on correct packaging.
When you close and seal the package, it must not
allow air or moisture in or out. If it does, you could
have food odor and taste transfer throughout the
refrigerator and could also dry out frozen food.
Packaging recommendations:
v 5LJLGSODVWLFFRQWDLQHUVZLWKWLJKWoWWLQJOLGV
v Straight-sided canning/freezing jars
v Heavy-duty aluminum foil
v Plastic-coated paper
v Non-permeable plastic wraps
v 6SHFLoHGIUHH]HUJUDGHVHOIVHDOLQJSODVWLFEDJV
Follow package or container instructions for proper
freezing methods.
Do not use
v Bread wrappers
v Non-polyethylene plastic containers
v Containers without tight lids
v Wax paper or wax-coated freezer wrap
v Thin, semi-permeable wrap
&$87,21 Do not keep beverage cans or plastic
food containers in the freezer compartment. They
may break or burst if they freeze.
Items How to
Butter or
margarine
Cheese
Milk
(JJV
Fruit
/HDI\
YHJHWDEOHV
Vegetables
with skins
FDUURWV
SHSSHUV
Fish
/HIWRYHUV
Keep opened butter in a covered
dish or closed compartment.
When storing an extra supply,
wrap in freezer packaging and
freeze.
Store in the original wrapping
until you are ready to use it. Once
opened, rewrap tightly in plastic
wrap or aluminum foil.
Wipe milk cartons. For best
storage, place milk on interior
shelf, not on door shelf.
Store in original carton on interior
shelf, not on door shelf.
Do not wash or hull the fruit
until it is ready to be used. Sort
and keep fruit in its original
container, in a crisper, or store in a
completely closed paper bag on a
refrigerator shelf.
Remove store wrapping and trim
RUWHDURçEUXLVHGDQGGLVFRORUHG
areas. Wash in cold water and
drain. Place in plastic bag or
plastic container and store in
crisper.
Place in plastic bags or plastic
container and store in crisper.
6WRUHIUHVKoVKDQGVKHOOoVKLQ
the freezer section if they are not
being consumed the same day of
purchase. It is recommended to
FRQVXPHIUHVKoVKDQGVKHOOoVKWKH
same day purchased.
Cover leftovers with plastic wrap
or aluminum foil, or store in plastic
containers with tight lids.
28
86,1*<2855()5,*(5$725
5()5,*(5$7256(&7,21
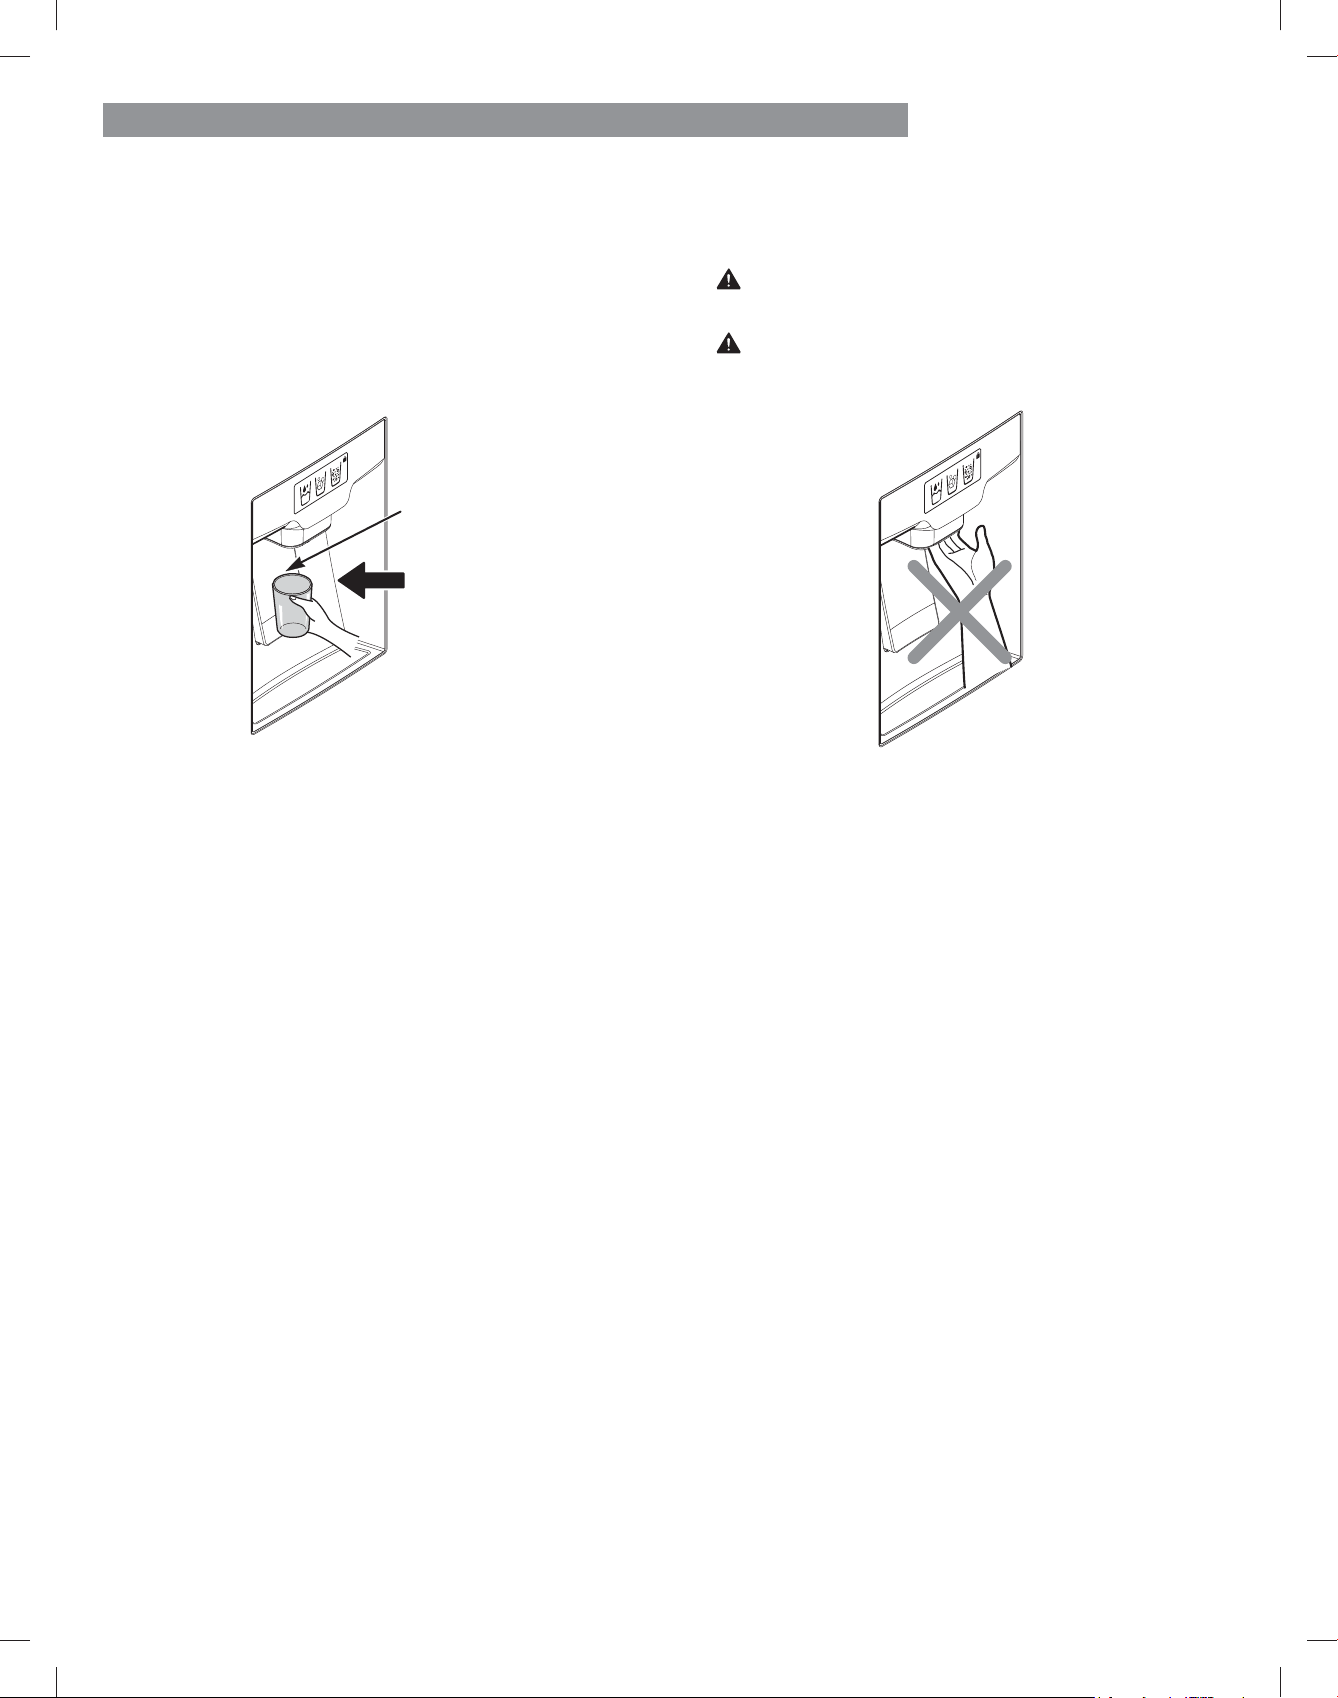
:$7(5',63(16(5
To dispense cold water, push on the dispenser switch
with a glass.
127( The dispenser is equipped with a light that
turns on when the dispenser pad is engaged.
:$51,1*'RQRWSXW\RXUoQJHUVXSWKHLFHFKXWH
opening. Doing so can result in severe injury.
&$87,21'RQRWGLVSHQVHLFHLQWRoQHFKLQDRU
crystal glasses. China or crystal can break.
Some dripping may occur after dispensing. Hold your
cup beneath the dispenser for a few seconds after
dispensing to catch all of the drops.
Push
Dispenser Switch
29
86,1*<2855()5,*(5$725
5()5,*(5$7256+(/9(6
The shelves in your refrigerator are adjustable to meet
your individual storage needs. Your model may have glass
or wire shelves.
$GMXVWLQJWKHVKHOYHVWRoWGLçHUHQWKHLJKWVRILWHPVZLOO
PDNHoQGLQJWKHH[DFWLWHP\RXZDQWHDVLHU'RLQJVRZLOO
also reduce the amount of time the refrigerator door is
open which will save energy.
,03257$17 Do not clean glass shelves with warm water
while they are cold. Shelves may break if exposed to
sudden temperature changes or impact.
&$87,21 Glass shelves are heavy. Use special care
when removing them.
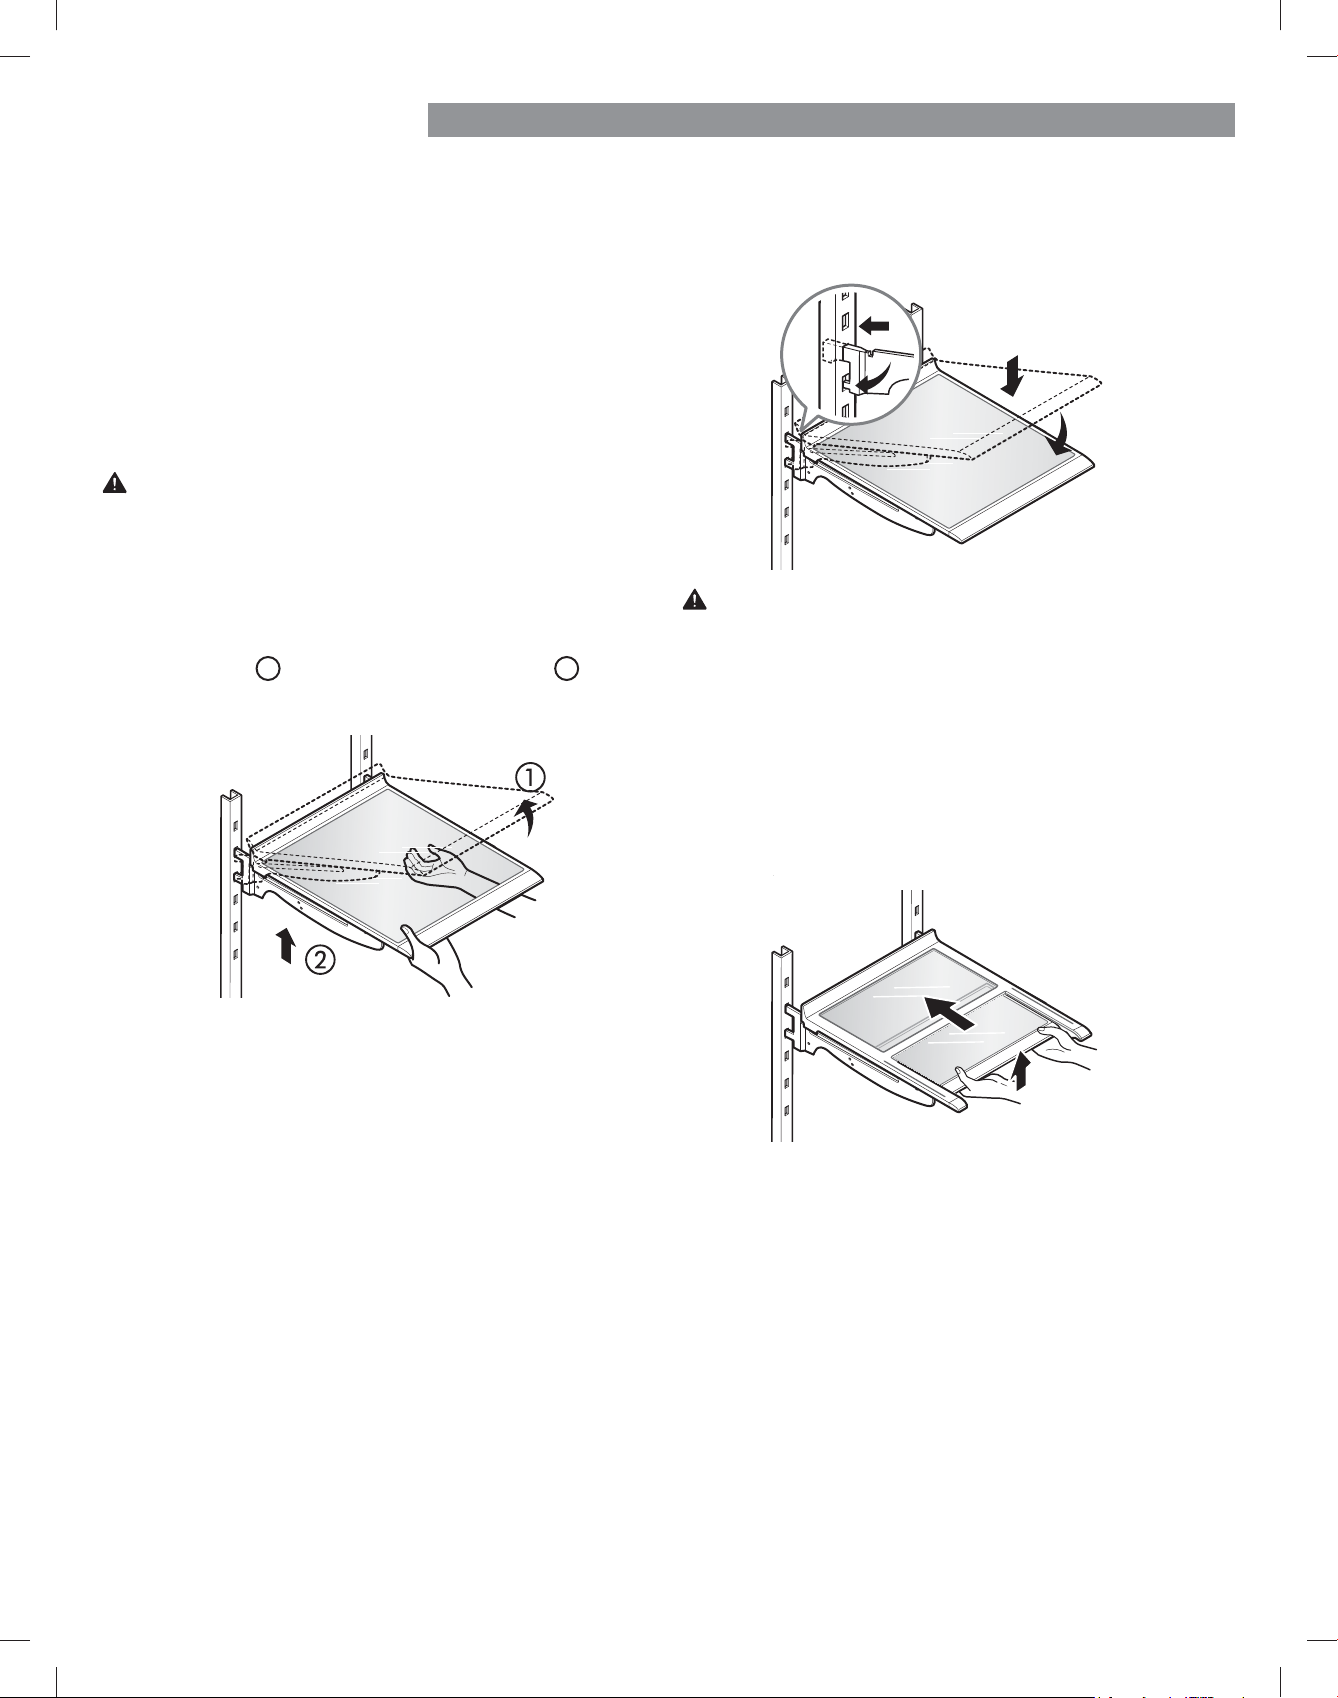
$GMXVWLQJ6KHOYHV&DQWLOHYHU
Remove shelves from the shipping position and replace
shelves in the position you want.
7RUHPRYHDVKHOI—Tilt up the front of the shelf in the
direction of
1
and lift it in the direction of
. Pull
the shelf out.
To reinstall a shelf—Tilt the front of the shelf up and
guide the shelf hooks into the slots at a desired height.
Then, lower the front of the shelf so that the hooks
drop into the slots.
)ROGLQJ6KHOIRQVRPHPRGHOV
You can store taller items, such as a gallon container
or bottles, by simply pushing the front half of the shelf
underneath the back half of the shelf. Pull the front of the
shelf toward you to return to a full shelf.
&$87,21 Make sure that shelves are level from one
side to the other. Failure to do so may result in the shelf
falling or spilling food.
y
30
86,1*<2855()5,*(5$725
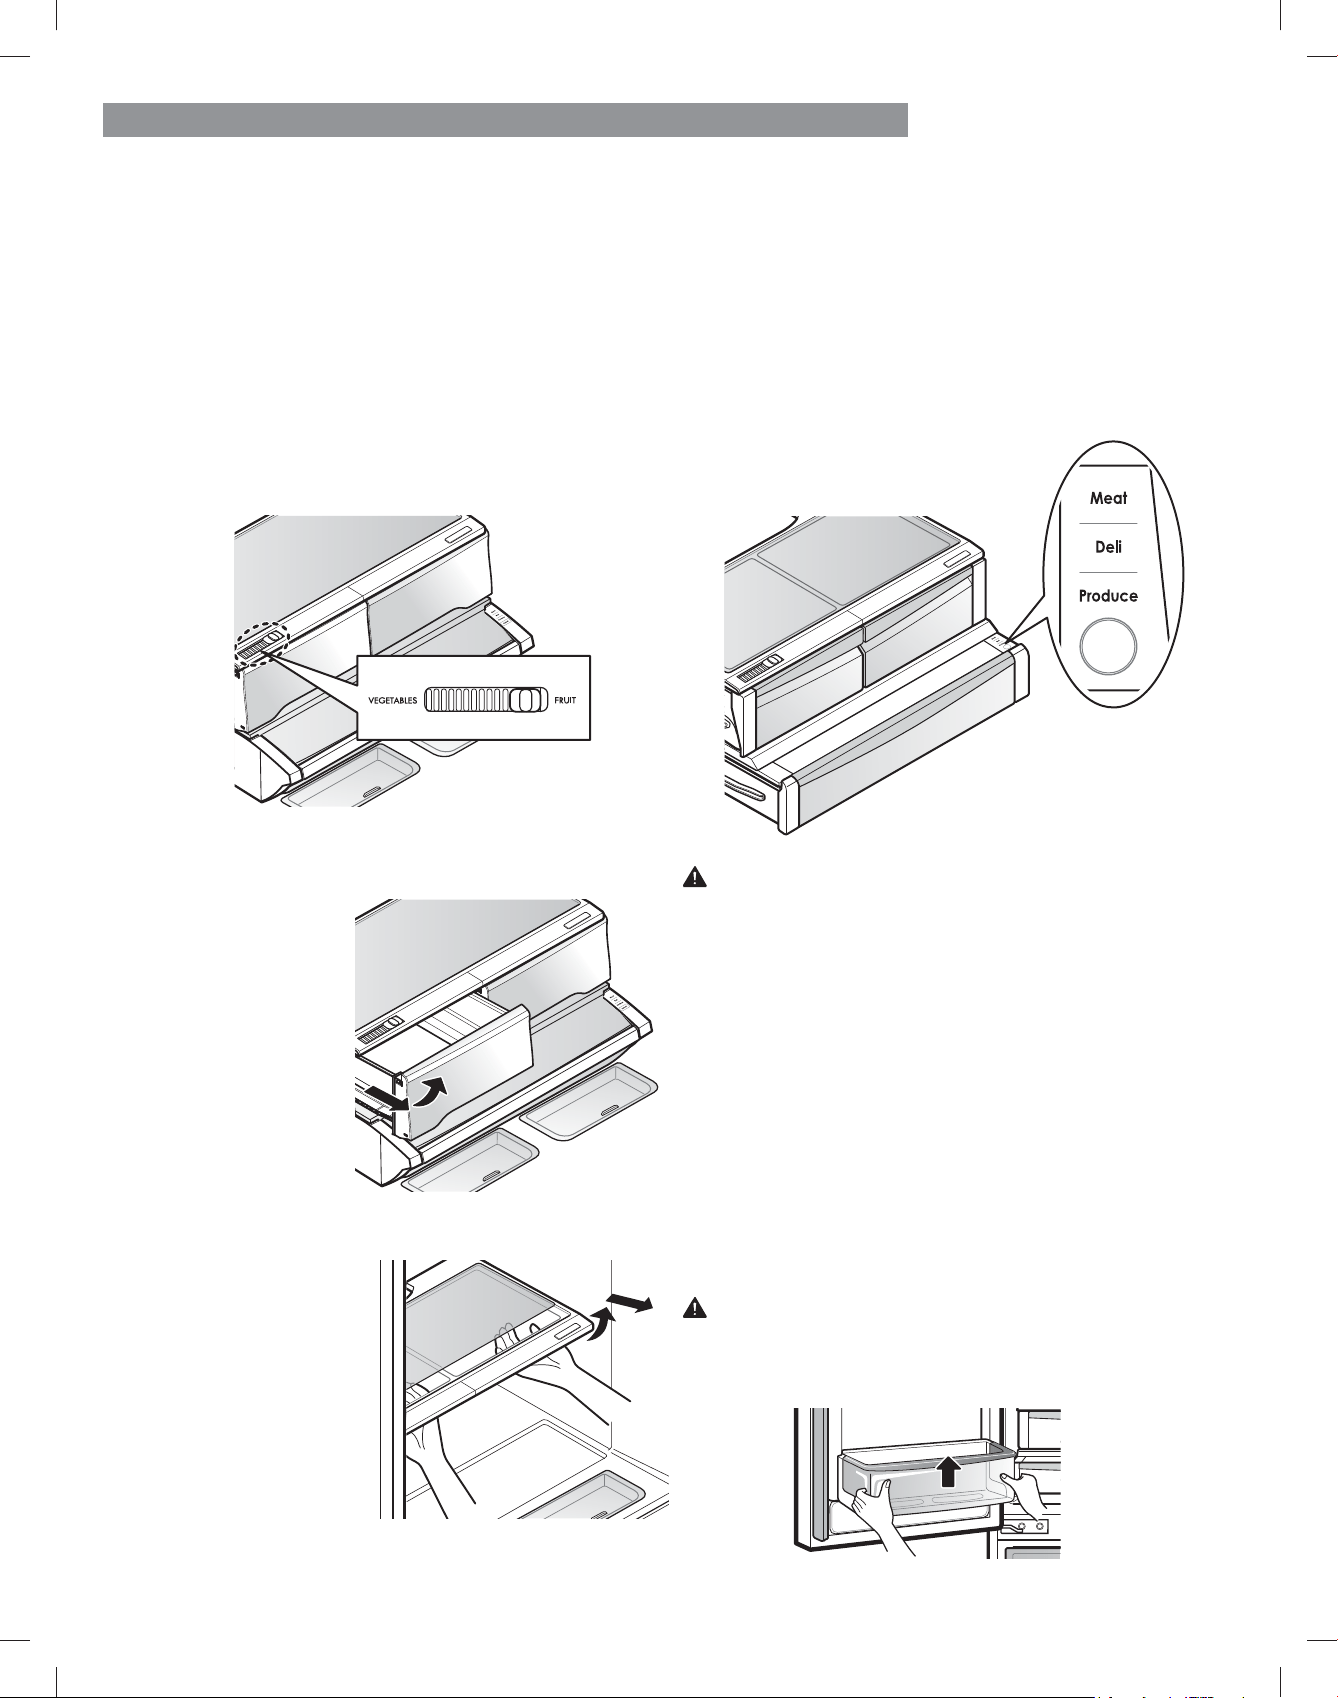
+80,',7<&21752//('&5,63(5
The crispers provide fresher tasting fruit and vegetables by
letting you easily control humidity inside the drawer.
You can control the amount of humidity in the moisture-
sealed crispers by adjusting the control to any setting
between 9(*(7$%/(6 and FRUIT.
v 9(*(7$%/(6 keeps moist air in the crisper for best
storage of fresh, leafy vegetables.
v FRUIT lets moist air out of the crisper for best storage
of fruit.
7RUHPRYHWKHJODVV
1. Lift up the glass under
the crisper cover.
Pull the glass up and
out.
127(: Pantry drawer not
shown for clarity.
5(029,1*7+(+80,',7<&21752//('&5,63(5
1. To remove, pull the
drawer out to full
extension.
Lift the front of the
crisper up, then pull
it straight out.
3. To install, slightly tilt
up the front, insert
the drawer into the
frame and push it
back into place.
7(03(5$785(&21752//('3$175<'5$:(5
The Temperature Controlled Pantry Drawer provides
storage space with a variable temperature control
WKDWFDQNHHSWKHFRPSDUWPHQWDWDVOLJKWO\GLçHUHQW
temperature than the refrigerator section. This
drawer can be used for large party trays, deli items
DQGEHYHUDJHV7KLVGUDZHUVKRXOGQRWEHXVHGIRU
YHJHWDEOHVWKDWUHTXLUHKLJKKXPLGLW\
3UHVVWKHEXWWRQWRFKRRVHEHWZHHQ0HDW&ROGHVW'HOL
&ROGHUDQG3URGXFH&ROG
&$87,21 Do not store glass bottles in the pantry. If
they freeze, they can break and cause personal injury.
&$87,21'RQRWRYHUoOORUSDFNLWHPVWRRWLJKWO\
into door bins. Doing so may cause damage to the bin
or personal injury if items are removed with excessive
force.
'225%,1
The door bins are removable for easy cleaning and
adjustment.
1. To remove the bin, simply lift the bin up and pull
straight out.
2. To replace the bin, slide it in above the desired support
and push down until it snaps into place.
127( Some bins may vary in appearance and will
RQO\oWLQRQHORFDWLRQ
31
86,1*<2855()5,*(5$725
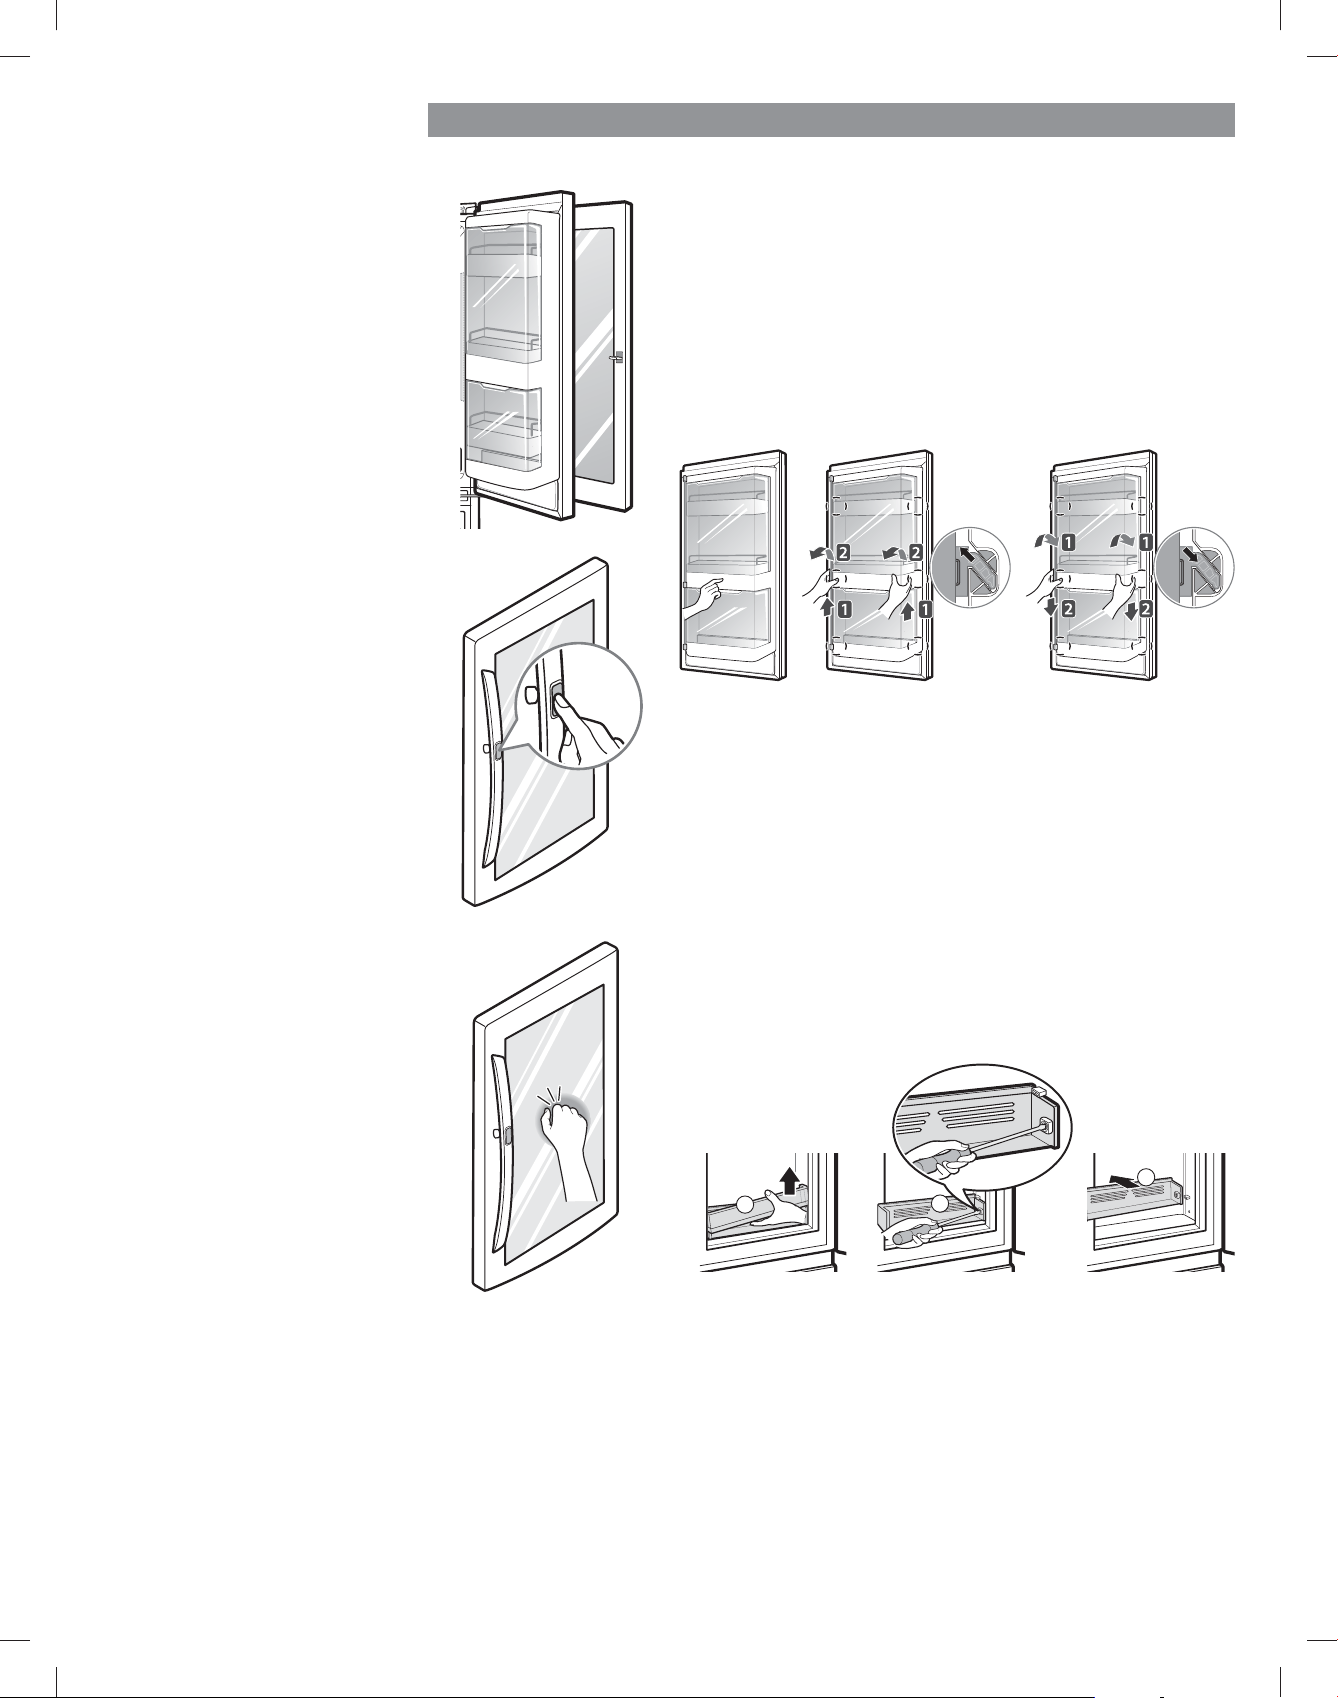
35(9,(:*5$%1*2
2QVRPHPRGHOV
The PreView Grab-N-Go
compartment allows for easy access
to commonly used food items.
35(9,(:*5$%1*2
&203$570(17
2QVRPHPRGHOV
To access the PreView Grab-N-
Go compartment, lightly press the
button on the right refrigerator door
handle to open the door.
*5$%1*2&$6(2QVRPHPRGHOV
To open the Grab-N-Go case, slightly push the marked
area to pop it open. The Grab-N-Go Case is removable
for easy cleaning and adjustment.
1. To remove the Grab-N-Go case, lift up and pull out.
2. To replace the Grab-N-Go case, line the tabs on
the Grab-N-Go case with the slots on the door and
push down until the case snaps into place.
35(9,(:)81&7,21
2QVRPHPRGHOV
The PreView function on the Grab-
N-Go lets you see if you’re running
low on frequently used items like
beverages and snacks, without
opening the refrigerator door.
1. Knock twice on the glass to turn
the LED light inside the Grab-N-
*RRQRURç
7KH/('OLJKWWXUQVRç
automatically after ten seconds.
v The PreView Grab-N-Go function
is disabled when the right
refrigerator door is open, for
two seconds after closing the door, and when the ice
dispenser is in use.
v Knock near the center of the glass. Knocking near the
edges of the glass may not activate the PreView Grab-
N-Go function properly.
v Knock hard enough that the knocking sound is audible.
v The PreView Grab-N-Go function may activate if a
loud noise occurs near the refrigerator.
1
2
3
*5$%1*2/2:(56+(/)2QVRPHPRGHOV
The Grab-N-Go lower shelf is removable for easy
cleaning.
1. To remove the lower shelf, lift the shelf retainer up
and out.
2. Remove the two screws from the shelf and pull it
straight out.
3. Reverse procedure to replace.
2SHQ 5HPRYLQJ $VVHPEOLQJ
32
86,1*<2855()5,*(5$725
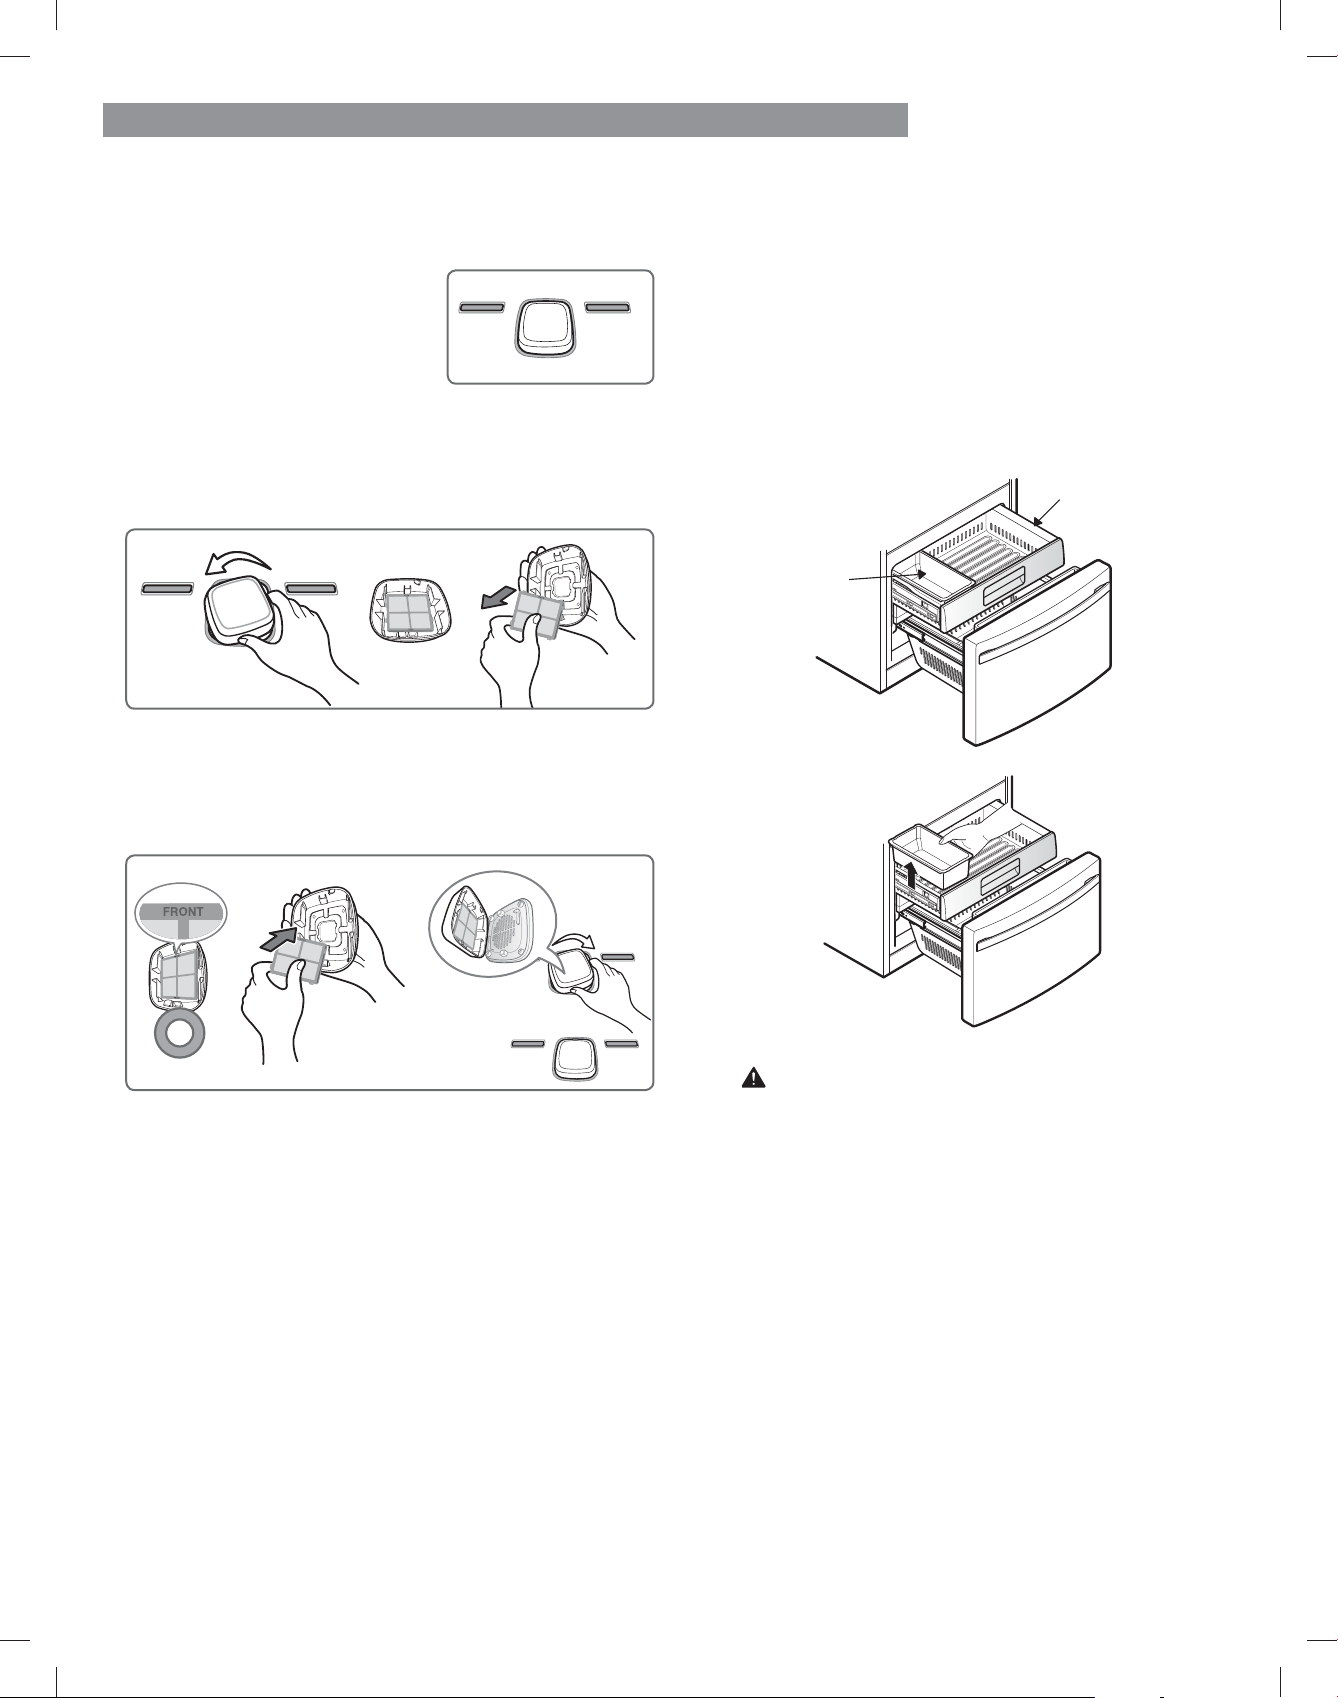
5(3/$&,1*7+($,5),/7(5
,WLVUHFRPPHQGHGWKDW\RXUHSODFHWKHDLUoOWHU
v Approximately every six months.
v When the CHANGE AIR FILTER
light turns on.
5HPRYHWKH2OG)LOWHU
3ODFHWKHQHZoOWHULQVLGHRIWKHFRYHUZLWKWKHVLGH
WKDWVD\Vk)URQWyIDFLQJRXWZDUG7XUQWKHoOWHUFRYHU
to the right to attach it to the refrigerator wall.
,QVWDOOD1HZ$LU)LOWHU
7XUQWKHoOWHUFRYHUWRWKHOHIWWRGHWDFKLWIURPWKH
UHIULJHUDWRUZDOO7KHoOWHULVORFDWHGRQWKHLQVLGHRI
WKHoOWHUFRYHU5HPRYHWKHoOWHUIURPWKHFRYHUDQG
UHSODFHLWZLWKDQHZoOWHU
)5((=(56(&7,21
(;75$,&(%,1
1. Pull the Freezer Drawer and the top Pullout Drawer out
as far as possible to remove the Extra Ice Bin.
2. Gently lift and pull out the ice bin.
3. To replace, pull both drawers out as far as possible,
and set the bin in its correct position in the Pullout
Drawer. Close the Pullout Drawer and then the Freezer
Drawer.
&$87,21 Pinch hazard! Keep hands and feet
clear of the bottom of the freezer drawer when
opening and closing.
$IWHUFKDQJLQJWKHoOWHUSXVKDQGKROGWKH$LU)LOWHU
EXWWRQIRUWKUHHVHFRQGVWRUHVHWWKHoOWHUVHQVRU
127(7RSXUFKDVHDUHSODFHPHQWDLUoOWHUYLVLW\RXUORFDO
Sears store, or call 1-844-553-6667.
You may also purchase online at www.kenmore.com
Extra Ice Bin
Pullout Drawer
33
86,1*<2855()5,*(5$725
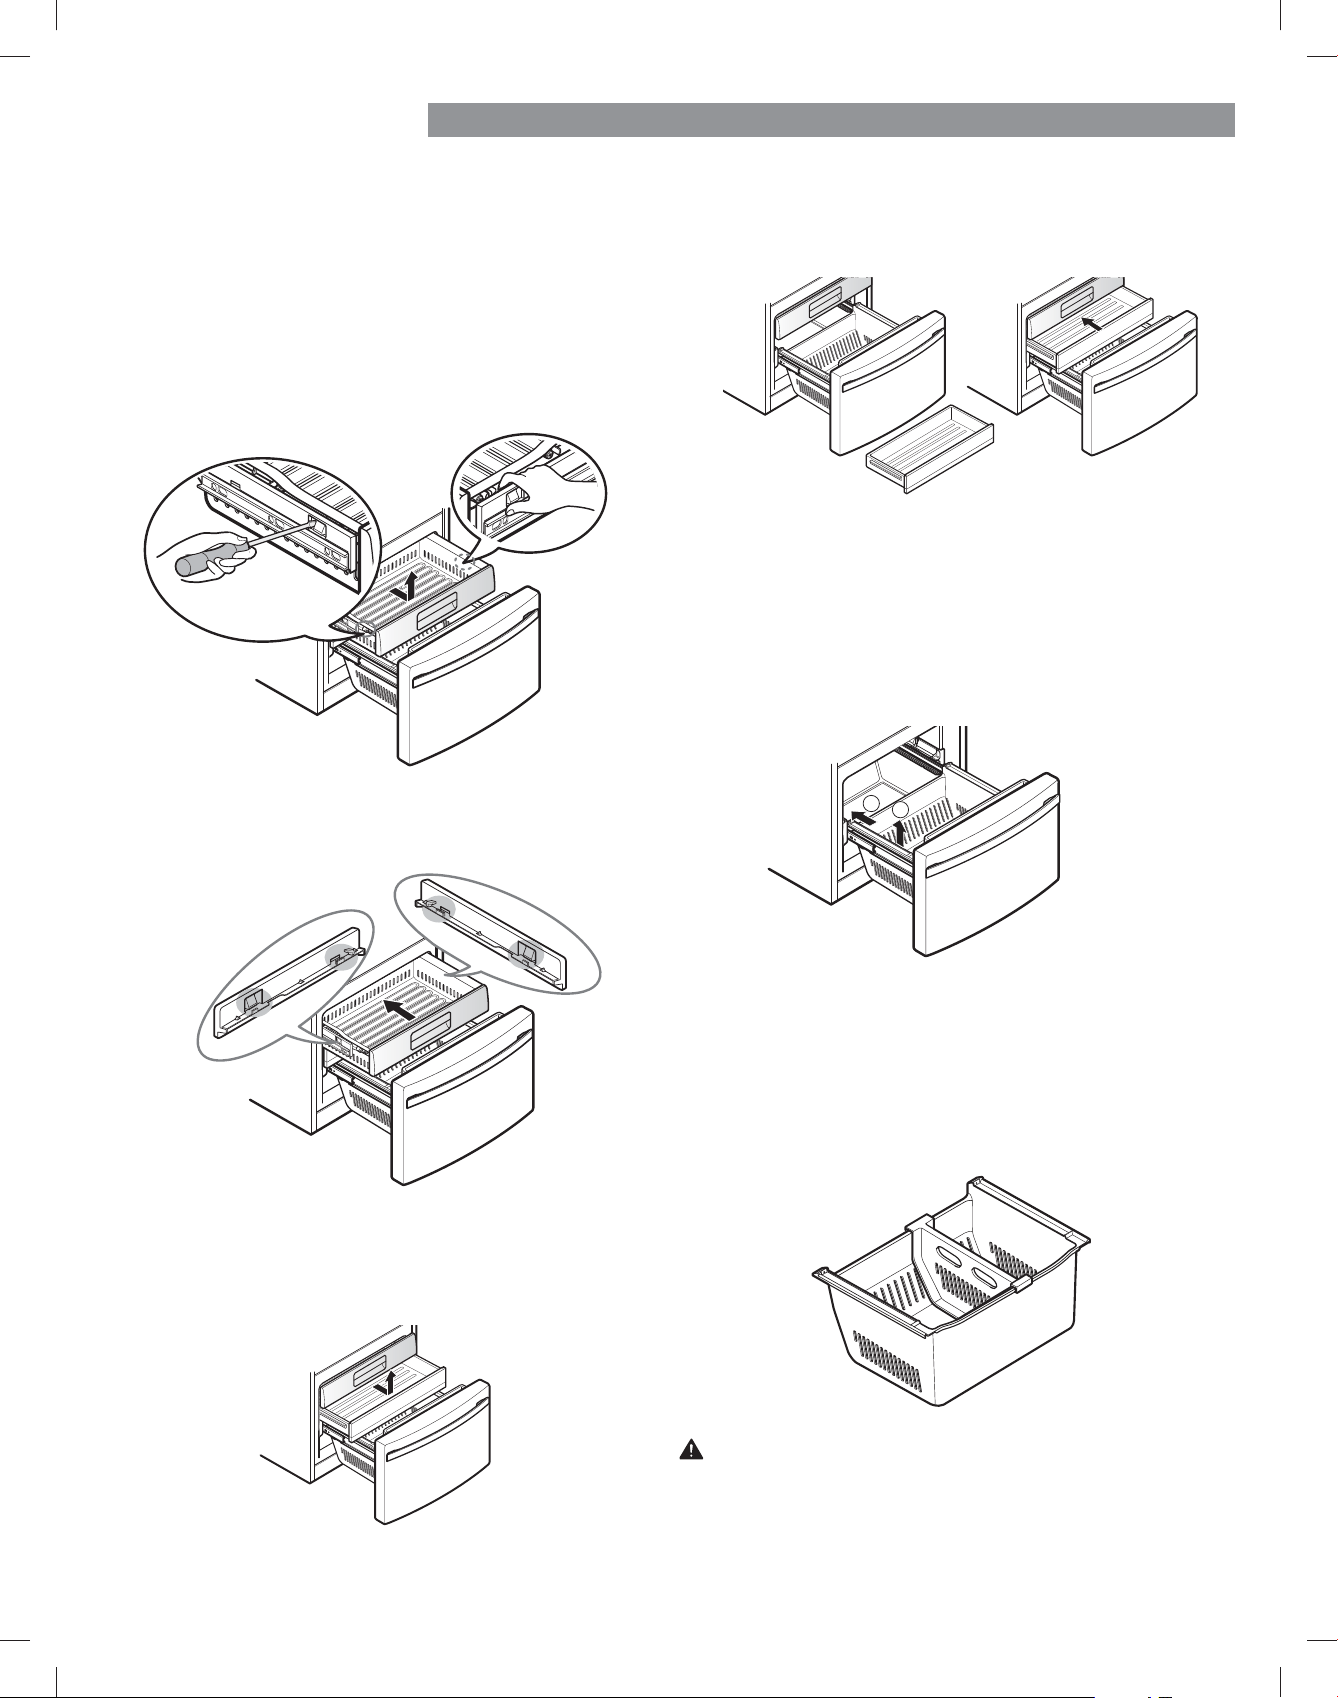
'85$%$6(
1. To remove the Durabase, push it to the back as much
as possible. Tilt up the front of the Durabase and pull
straight out.
To replace, insert the Durabase in the rail assembly.
38//287'5$:(56
Top Drawer
1. To remove, pull the drawer out to full extension. On
WKHOHIWUDLOXVHDpDWEODGHVFUHZGULYHUWRSXVKLQRQ
the tab to release the drawer from the rail, as shown
below. Once the left side is loose, push the tab on the
ULJKWVLGHZLWK\RXUoQJHUWRUHOHDVHWKHGUDZHU/LIW
the front of the drawer up, then pull it straight out.
To replace, slightly tilt up the front of the drawer, insert
the drawer into the frame, and push the drawer back
into place until you hear a click.
'85$%$6(',9,'(5
The Durabase divider allows you to organize the
Durabase area into sections. It can be adjusted from side
WRVLGHWRDFFRPPRGDWHLWHPVRIGLçHUHQWVL]HV
Middle Drawer
1. To remove, pull the drawer out to full extension. Lift the
front of the drawer up, then pull it straight out.
To replace, slightly tilt up the front of the drawer,
insert the drawer into the frame, and push it back into
place.
1
2
:$51,1* If the Durabase divider is removed, there is
enough open space for children or pets to crawl inside.
To prevent accidental child and pet entrapment or
VXçRFDWLRQULVN'2127DOORZFKLOGUHQRUSHWVWR
touch or go near the drawer.

34
:$7(5),/7(5
:$7(5),/7(5
,WLVUHFRPPHQGHGWKDW\RXUHSODFHWKHZDWHUoOWHU
v Approximately every six months.
v :KHQWKHZDWHUoOWHULQGLFDWRU
turns on.
v When the water dispenser output
decreases.
v When the ice cubes are smaller
than normal.
v 5RWDWHWKHZDWHUoOWHUXSLQWRSRVLWLRQDQGFORVHWKH
cover. The cover will click when closed correctly.
3.$IWHUWKHZDWHUoOWHULVUHSODFHGGLVSHQVH
JDOORQVRIZDWHUpXVKIRUDSSUR[LPDWHO\PLQXWHV
to remove trapped air and contaminants from
the system. Do not dispense the entire 2.5 gallon
amount continuously. Depress and release the
dispenser pad for cycles of 30 seconds ON and 60
seconds OFF.
127(7RSXUFKDVHDUHSODFHPHQWoOWHUYLVLW\RXUORFDO
Sears store, or call 1-844-553-6667. You may also
purchase online at www.kenmore.com
5HPRYHWKHROGZDWHUILOWHU
v Lower or remove the top left shelf
WRDOORZWKHZDWHUoOWHUWRURWDWH
all the way down.
v Pinch the sides to open the
ZDWHUoOWHUFRYHU
127(5HSODFLQJWKHZDWHUoOWHU
causes a small amount of water
DURXQGR]RUFFWRGUDLQ3ODFH
DFXSXQGHUWKHIURQWHQGRIWKHZDWHUoOWHUFRYHUWRFROOHFW
DQ\OHDNLQJZDWHU+ROGWKHZDWHUoOWHUXSULJKWRQFHLWLV
removed, to prevent any remaining water from spilling out of
WKHZDWHUoOWHU
v 0DNHVXUHWRURWDWHWKHoOWHUGRZQFRPSOHWHO\EHIRUH
pulling it out of the manifold hole.
v 3XOOWKHZDWHUoOWHUGRZQZDUGDQGWXUQLW
counterclockwise.
Before Replacing the Water Filter:
,IWKHWRSVKHOIORFDWHGEHORZWKHZDWHUoOWHULVLQWKH
highest position, it will need to be removed prior to
UHSODFLQJWKHZDWHUoOWHU
To remove any shelf–Tilt up the
front of the shelf
1
and lift it
.
Pull the shelf out.
5HSODFHZLWKDQHZZDWHUoOWHU
v Take the new
ZDWHUoOWHURXW
of its packing
and remove the
protective cover
from the o-rings.
v :LWKWKHZDWHUoOWHUWDEVLQ
the horizontal position, push
WKHQHZZDWHUoOWHULQWRWKH
manifold hole and turn it
clockwise.
35
:$7(5),/7(5
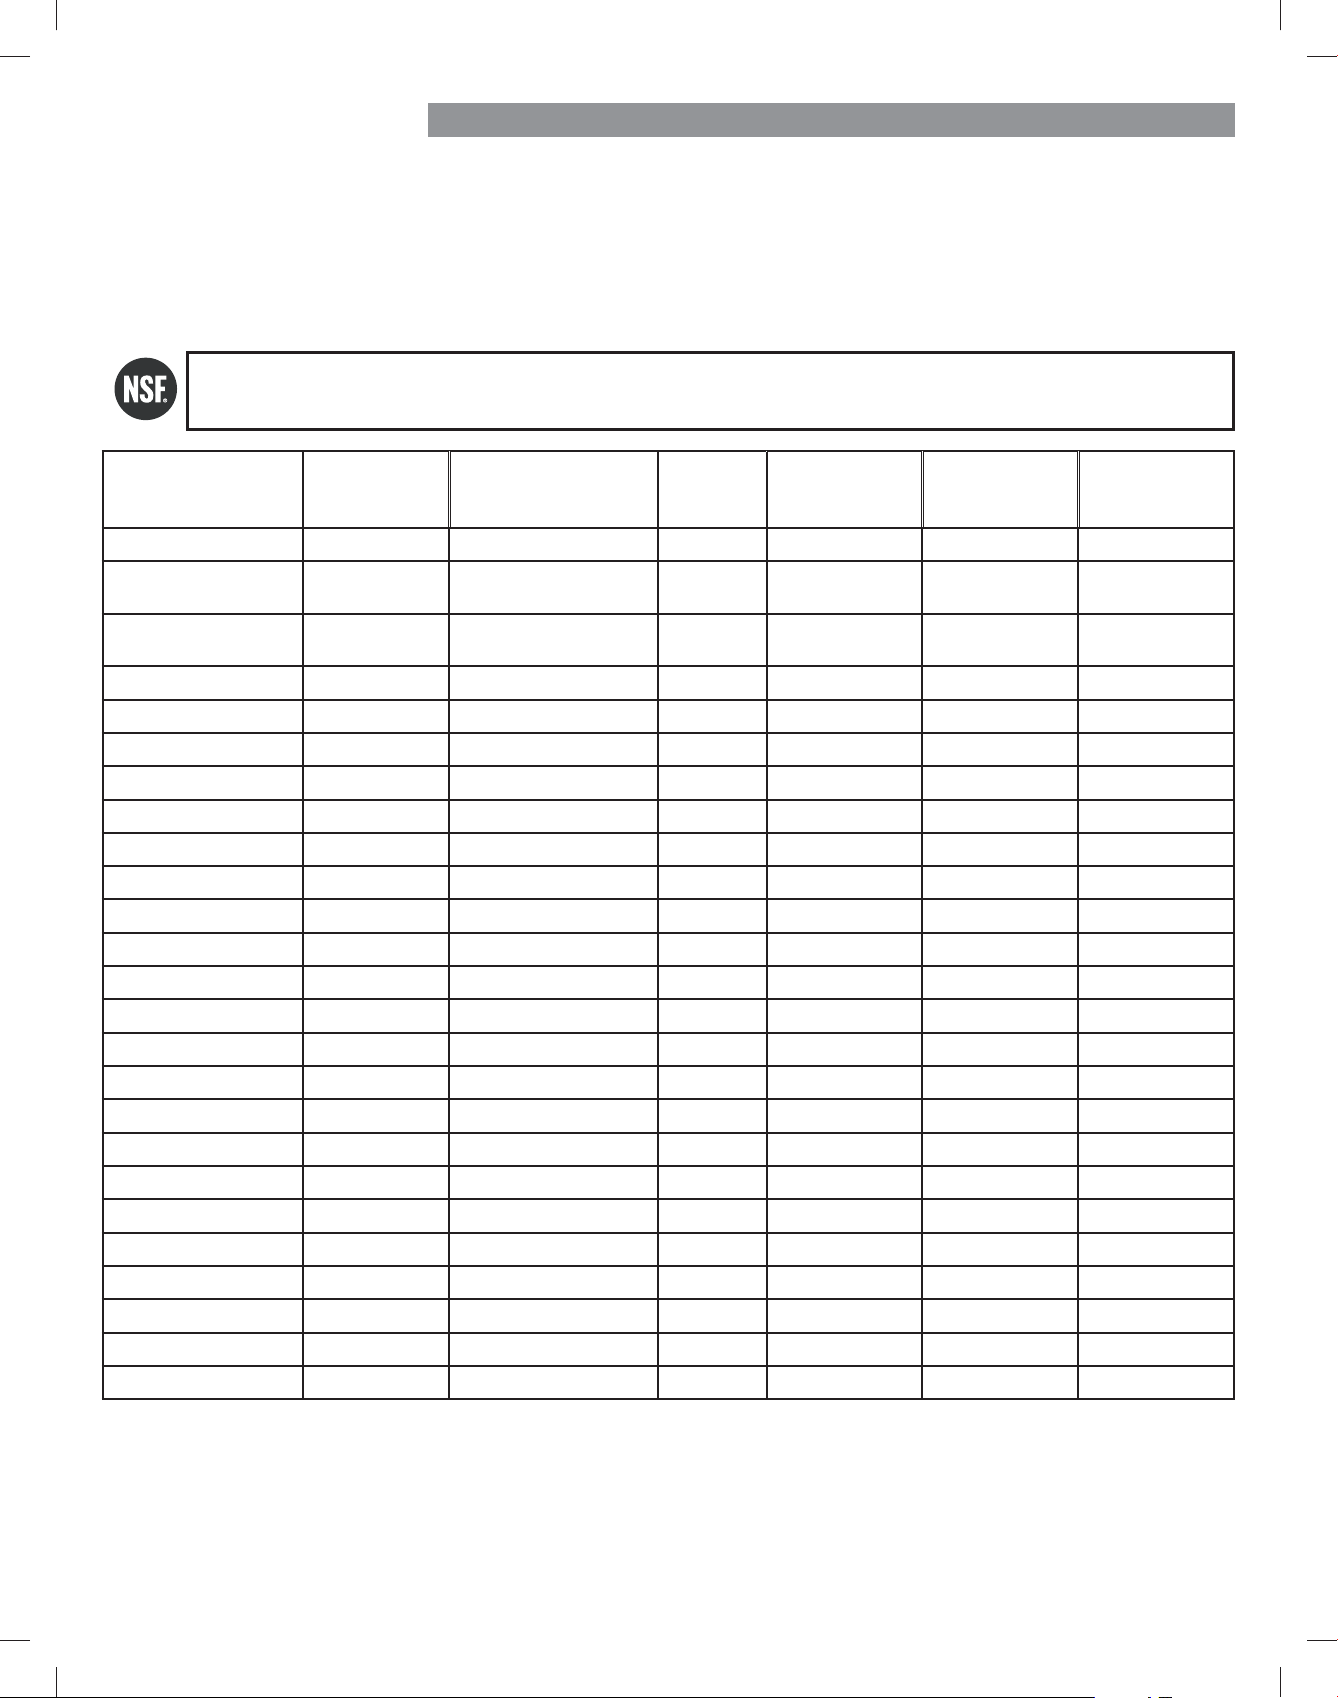
Performance Data Sheet
8VH5HSODFHPHQW&DUWULGJH0'-
The concentration of the indicated substances in water entering the system was reduced to a concentration less than or
HTXDOWRWKHSHUPLVVLEOHOLPLWIRUZDWHUOHDYLQJWKHV\VWHPDVVSHFLoHGLQ16)$16,6WDQGDUGDQG6WDQGDUGDQG
Standard 401.
66\VWHPWHVWHGDQGFHUWLoHGE\16),QWHUQDWLRQDODJDLQVW16)$16,6WDQGDUG6WDQGDUGDQG
Standard 401. For the reduction of substances listed below.
Contaminant Reduction
$YHUDJH
,QpXHQW
Challenge
16)VSHFLoHG&KDOOHQJH
Concentration
$YJ
Reduction
$YHUDJH
Product Water
Concentration
Max Permissible
Product Water
Concentration
NSF Reduction
5HTXLUHPHQW
Chlorine Taste and Odor òJ/ 2.0 mg/L ± 10% >97.5% òJ/ N/A Ă
Nominal Particulate Class I, ,
ĂWRòP
12,000,000 pts/mL At least 10,000 particles/mL 99.80% 24,000 pts/ml N/A Ă
Asbestos 180 MFL
10Ę to 10ę0)/oEHUVJUHDWHU
WKDQòPLQOHQJWK
>99.00% 0)/ N/A Ă
Atrazine òJ/ òJ/ >94.10% òJ/ òJ/ N/A
Benzene òJ/ òJ/ >96.60% òJ/ òJ/ N/A
Carbofuran òJ/ òJ/ 98.30% òJ/ òJ/ N/A
Lindane òJ/ òJ/ >99.00% òJ/ òJ/ N/A
P-Dichlorobenzene òJ/ òJ/ >99.80% òJ/ òJ/ N/A
2,4-D òJ/ òJ/ >99.90% òJ/ òJ/ N/A
Lead @ pH 6.5 òJ/ òJ/ 99.60% òJ/ òJ/ N/A
Lead @ pH 8.5 òJ/ òJ/ >90% òJ/ òJ/ N/A
Mercury @ pH 6.5 òJ/ òJ/ 91.00% òJ/ òJ/ N/A
Mercury @ pH 8.5 òJ/ òJ/ 92.50% òJ/ òJ/ N/A
Cyst* 100,000 cysts/L Minimum 50,000 cysts/L >99.99% 10 N/A Ă
Atenolol 240 ng/L 200 ± 40% ng/L > 95.50% 10.80 ng/L 30 ng/L NA
Carbamazepine 1600 ng/L 1400 ± 40% ng/L 98.40% 25.60 ng/L 200 ng/L NA
DEET 1600 ng/L 1400 ± 40% ng/L 97.10% 46.40 ng/L 200 ng/L NA
Trimethoprim 170 ng/L 140 ± 40% ng/L >96.80% 5.44 ng/L 20 ng/L NA
Linuron 160 ng/L 140 ± 40% ng/L >96.60% 5.44 ng/L 20 ng/L NA
Phenytoin 200 ng/L 200 ± 40% ng/L >94.80% 10.40 ng/L 30 ng/L NA
Ibuprofen 400 ng/L 400 ± 40% ng/L >94.50% 22.00 ng/L 60 ng/L NA
Naproxen 140 ng/L 140 ± 40% ng/L >96.10% 5.46 ng/L 20 ng/L NA
Estrone 120 ng/L 140 ± 40% ng/L >96.10% 4.68 ng/L 20 ng/L NA
Bisphenol A 2000 ng/L 2000 ± 40% ng/L >98.90% 22.00 ng/L 300 ng/L NA
Nonyl Phenol 1600 ng/L 1400 ± 40% ng/L >97.10% 46.40 ng/L 200 ng/L NA
* Based on the use of Cryptosporidium parvum oocysts

36
:$7(5),/7(5
It is essential that the manufacturer’s recommended
LQVWDOODWLRQPDLQWHQDQFHDQGZDWHUoOWHUUHSODFHPHQW
requirements be carried out for the product to perform as
advertised.
127(: While the testing was performed under standard
laboratory conditions, actual performance may vary.
127(7RSXUFKDVHDUHSODFHPHQWoOWHUYLVLW\RXUORFDO
Sears store, or call 1-844-553-6667. You may also
purchase online at www.kenmore.com
Product distributed in the United States by Sears Brands
0DQDJHPHQW&RUSRUDWLRQ+RçPDQ(VWDWHV,/
NSF is a trademark of NSF International.
:$51,1*
&$87,21
To reduce the risk associated with ingestion of
contaminants: Do not use with water that is
PLFURELRORJLFDOO\XQVDIHRURIXQNQRZQTXDOLW\
ZLWKRXWDGHTXDWHGLVLQIHFWLRQEHIRUHDQGDIWHUWKH
system.6\VWHPVFHUWLoHGIRUF\VWUHGXFWLRQPD\EH
XVHGRQGLVLQIHFWHGZDWHUWKDWPD\FRQWDLQoOWHUDEOH
cysts. EPA Establishment Number 10350-MN-005
To reduce the risk associated with property damage
due to water leakage:
v Read and follow the Water Filter instructions before
installation and use of this system.
v Installation and use MUST comply with all state and
local plumbing codes.
v Do notLQVWDOOLIZDWHUSUHVVXUHH[FHHGVSVL
N3D&RQWDFWDSOXPELQJSURIHVVLRQDOLI\RXDUH
uncertain of how to check your water pressure.
v Do not install where water hammer conditions may
occur. If water hammer conditions exist, you must
install a water hammer arrester. Contact a plumbing
professional if you are uncertain of how to check for
this condition.
v Do not install on hot water supply lines.
The maximum operating water temperature of this
ZDWHUoOWHUV\VWHPLV£)£&
v 3URWHFWZDWHUoOWHUIURPIUHH]LQJDo not operate
refrigerator in ambient conditions below 55°F
£& 'UDLQZDWHUoOWHUZKHQVWRULQJXQLWLQ
WHPSHUDWXUHVEHORZ£)£&
v 7KHGLVSRVDEOHZDWHUoOWHUPXVWEHUHSODFHGHYHU\
six months, at the rated capacity, or if a noticeable
UHGXFWLRQLQpRZUDWHRFFXUV
Application Guidelines/Water Supply Parameters
Service Flow JSPOSP
Water Supply Potable Water
Water Pressure SVLN3D
Water Temperature £)£)£&£&

37
&$5($1'&/($1,1*
:$51,1*
([SORVLRQ+D]DUG
8VHQRQpDPPDEOHFOHDQHU)DLOXUHWRGRVRFDQUHVXOW
LQoUHH[SORVLRQRUGHDWK
Both the refrigerator and freezer sections defrost
DXWRPDWLFDOO\KRZHYHUFOHDQERWKVHFWLRQVDERXWRQFHD
month to prevent odors. Wipe up spills immediately.
*(1(5$/&/($1,1*7,36
v Unplug refrigerator or disconnect power.
v Remove all removable parts, such as shelves, crispers,
etc. Refer to sections in Using Your Refrigerator for
removal instructions.
v Use a clean sponge or soft cloth and a mild detergent
in warm water. Do not use abrasive or harsh cleaners.
v Hand wash, rinse and dry all surfaces thoroughly.
v Plug in refrigerator or reconnect power.
(;7(5,25
Waxing external painted metal surfaces helps provide
rust protection. Do not wax plastic parts. Wax painted
metal surfaces at least twice a year using appliance wax
RUDXWRSDVWHZD[$SSO\ZD[ZLWKDFOHDQVRIWFORWK
For products with a stainless steel exterior, use a clean
sponge or soft cloth and a mild detergent in warm water.
Do not use abrasive or harsh cleaners. Dry thoroughly
with a soft cloth.
,16,'(:$//6DOORZIUHH]HUWRZDUPXSVR
WKHFORWKZLOOQRWVWLFN
To help remove odors, you can wash the inside of the
refrigerator with a mixture of baking soda and warm
water. Mix 2 tablespoons of baking soda to 1 quart of
ZDWHUJVRGDWROLWHUZDWHU%HVXUHWKHEDNLQJVRGD
is completely dissolved so it does not scratch the surfaces
of the refrigerator.
'225/,1(56$1'*$6.(76
Use a clean sponge or soft cloth and a mild detergent
in warm water. Do not use cleaning waxes, concentrated
detergents, bleaches, or cleaners containing petroleum on
plastic refrigerator parts.
3/$67,&3$576&RYHUVDQG3DQHOV
Use a clean sponge or soft cloth and a mild detergent
in warm water. Do not use window sprays, abrasive
FOHDQVHUVRUpDPPDEOHpXLGV7KHVHFDQVFUDWFKRU
damage the material.
&21'(16(5&2,/6
Use a vacuum cleaner with
an attachment to clean the
condenser cover and vents.
Do not remove the panel
covering the condenser
coil area.
&$87,21 While cleaning the inside, do not spray
water.

38
&$5($1'&/($1,1*
/,*+7%8/%5(3/$&(0(17
127( The refrigerator and freezer compartment
lights have LED interior lighting, and service should be
SHUIRUPHGE\DTXDOLoHGWHFKQLFLDQ
32:(5,17(55837,216
1. If the power will be out for 24 hours or less, keep all
refrigerator doors closed to help foods stay cold and
frozen.
If the power will be out for more than 24 hours, remove
all frozen food and store it in a frozen food locker.
:+(1<28*2219$&$7,21
,I\RXFKRRVHWROHDYHWKHUHIULJHUDWRURQZKLOH\RXDUH
away, follow these steps to prepare your refrigerator
before you leave.
1. Use up any perishables and freeze other items.
7XUQRçWKHLFHPDNHUDQGHPSW\WKHLFHELQ
,I\RXFKRRVHWRWXUQWKHUHIULJHUDWRURçEHIRUH\RXOHDYH
follow these steps.
1. Remove all food from the refrigerator.
Depending on your model, set the thermostat control
UHIULJHUDWRUFRQWUROWR2))6HHWKHSetting the
Controls section.
3. Clean the refrigerator, wipe it and dry well.
4. Tape rubber or wood blocks to the tops of both doors
to prop them open far enough for air to get in. This
stops odor and mold from building up.
(OHFWULFDO6KRFN+D]DUG
Before replacing a Compartment Lamp, either unplug
WKHUHIULJHUDWRURUWXUQRçSRZHUDWWKHFLUFXLWEUHDNHU
or fuse box.
:+(1<28029(
When you are moving your refrigerator to a new home,
follow these steps to prepare it for the move.
1. Remove all food from the refrigerator and pack all
frozen food in dry ice.
Unplug the refrigerator.
3. Clean, wipe and dry thoroughly.
4. Take out all removable parts, wrap them well and
tape them together so they do not shift and rattle
during the move. Refer to the Using your Refrigerator
section for removable instructions.
5. Depending on the model, raise the front of the
refrigerator so it rolls easier OR screw in the leveling
OHJVDOOWKHZD\VRWKH\GRQRWVFUDSHWKHpRRU6HH
the Door Closing section.
Tape the doors shut and tape the power cord to the
refrigerator cabinet.
When you get to your new home, put everything back and
refer to the Refrigerator Installation section for preparation
instructions.
:$51,1*
39
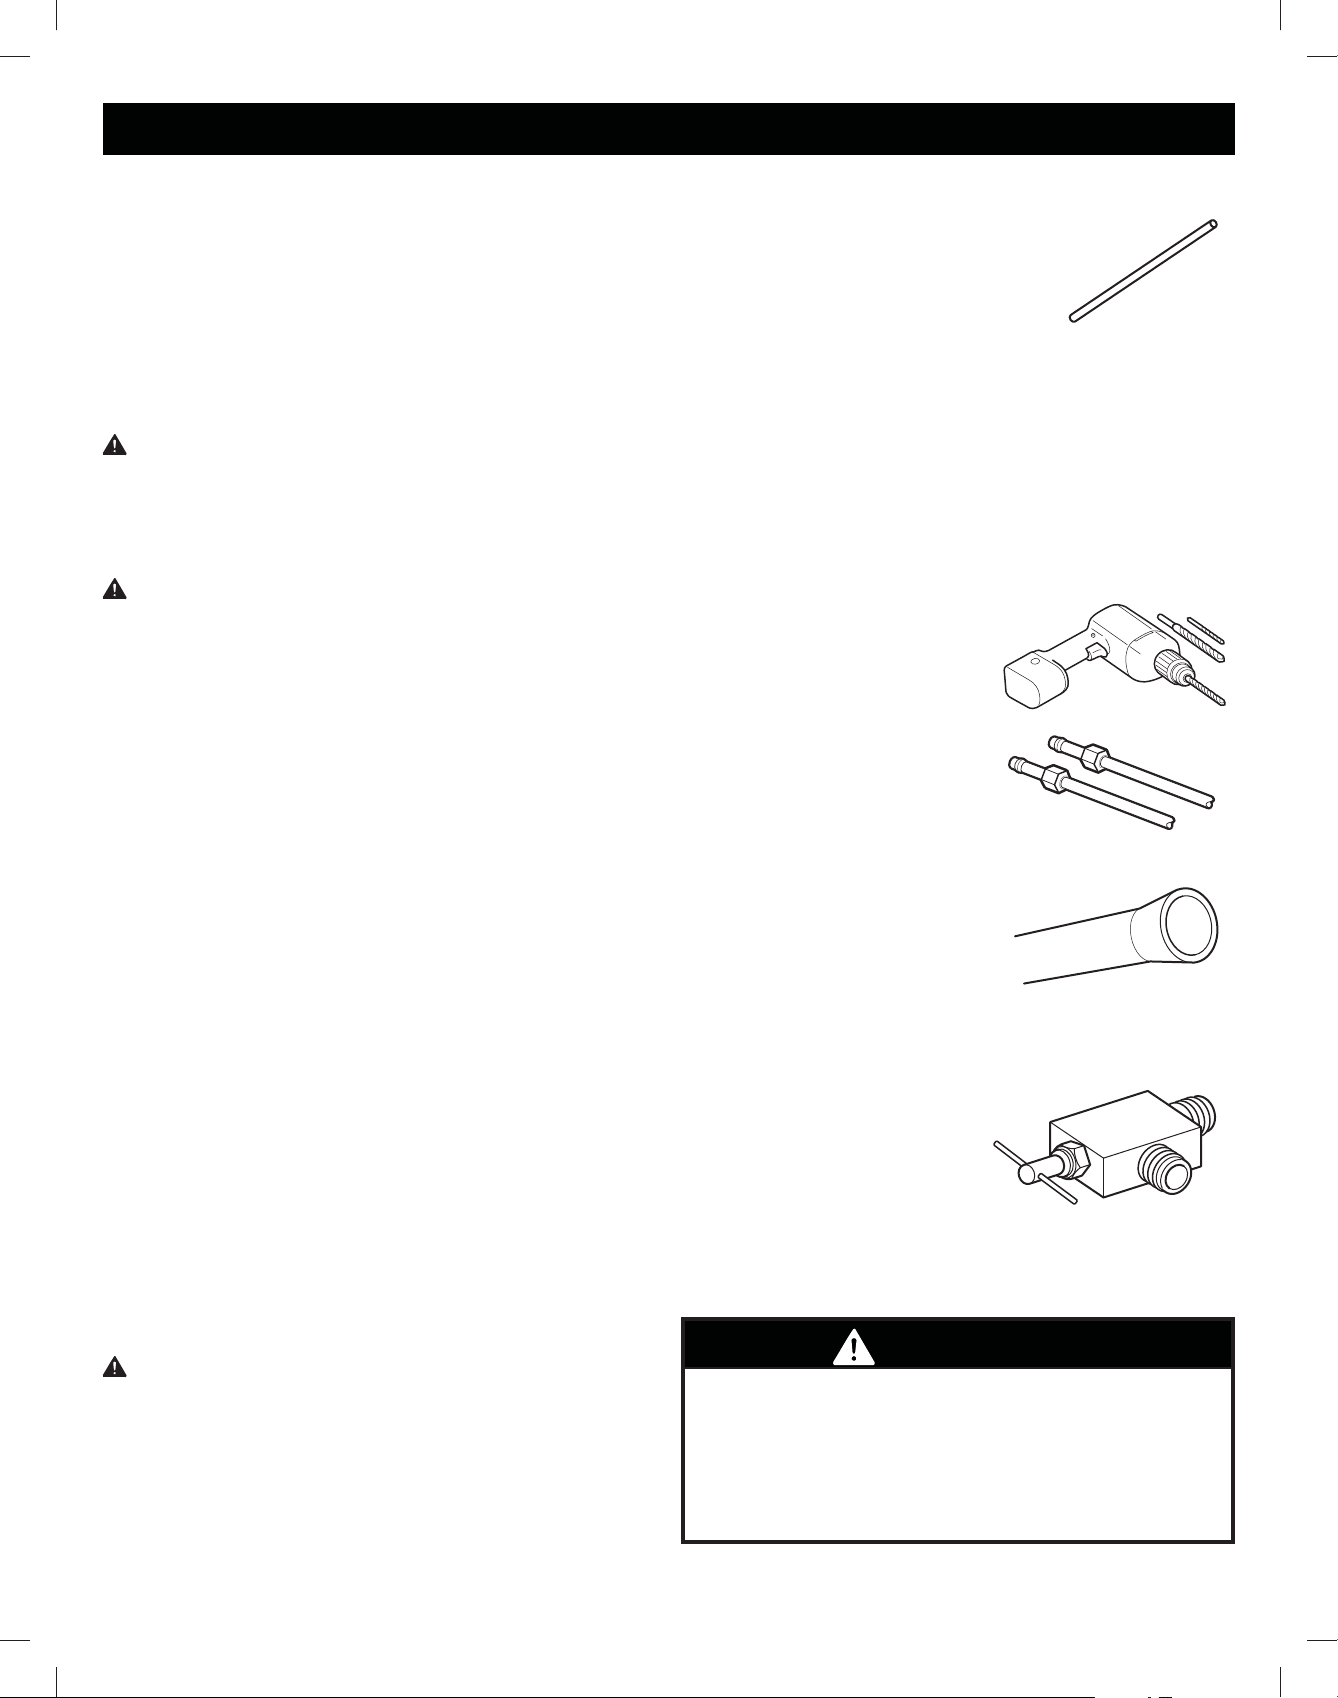
&211(&7,1*7+(:$7(5/,1(
%()25(<28%(*,1
This water line installation is not covered by the refrigerator
warranty. Follow these instructions carefully to minimize the
risk of expensive water damage.
:DWHUKDPPHUZDWHUEDQJLQJLQWKHSLSHVLQKRXVH
plumbing can cause damage to refrigerator parts and can
OHDGWRZDWHUOHDNDJHRUpRRGLQJ&DOODTXDOLoHGSOXPEHU
to correct water hammer before installing the water supply
line to the refrigerator.
&$87,21 To prevent burns and product damage, only
connect the refrigerator water line to a cold water supply.
If you use your refrigerator before connecting the water
line, make sure the icemaker is turned OFF at the control
panel.
&$87,21 Do not install the icemaker tubing in areas
where temperatures fall below freezing.
:$7(535(6685(
$FROGZDWHUVXSSO\ The water pressure must be between
20 and 120 psi. If the refrigerator is installed in an area
ZLWKORZZDWHUSUHVVXUHEHORZSVL\RXFDQLQVWDOOD
booster pump to compensate for the low pressure.
If a UHYHUVHRVPRVLVZDWHUoOWUDWLRQV\VWHP is connected
to your cold water supply, this water line installation is not
covered by the refrigerator warranty. Follow the following
instructions carefully to minimize the risk of expensive water
damage.
If a UHYHUVHRVPRVLVZDWHUoOWUDWLRQV\VWHP is connected
to your cold water supply, the water pressure to the
reverse osmosis system needs to be a minimum of 40 to
SVLN3DRUNJIFP¦OHVVWKDQ
VHFWRoOODFXSRIR]RUFFFDSDFLW\
If the water pressure from the reverse osmosis system is less
WKDQSVLRUN3DRUNJIFP¦WDNHVPRUHWKDQ
VHFWRoOODFXSRIR]RUFFFDSDFLW\
v &KHFNWRVHHLIWKHVHGLPHQWoOWHULQWKHUHYHUVHRVPRVLV
V\VWHPLVEORFNHG5HSODFHWKHoOWHULIQHFHVVDU\
v Allow the storage tank on the reverse osmosis system to
UHoOODIWHUKHDY\XVDJH
v If the issue concerning water pressure from reverse
RVPRVLVUHPDLQVFDOODOLFHQVHGTXDOLoHGSOXPEHU
v All installations must be in accordance with local
plumbing code requirements.
&$87,21 Wear eye protection during installation to
prevent injury.
:+$7<28:,//1(('
v Copper Tubing, ¼ in. outer
diameter, to connect the refrigerator
to the water supply. Be sure both
ends of the tubing are cut square.
v To determine how much tubing you
need: measure the distance from the water valve on the
back of the refrigerator to the water supply pipe. Then,
DGGIHHWP%HVXUHWKHUHLVVXèFLHQWH[WUDWXELQJ
DERXWIHHW>P@FRLOHGLQWRWXUQVRIDERXWLQ
>FP@GLDPHWHUWRDOORZWKHUHIULJHUDWRUWRPRYHRXW
from the wall after installation.
v Power drill.
v ½ in. or adjustable wrench.
v )ODWEODGHDQG3KLOOLSVKHDGVFUHZGULYHUV
v Two ¼ in. outer diameter
compression nuts and
IHUUXOHVVOHHYHV to
connect the copper tubing
WRWKHVKXWRçYDOYHDQGWKH
refrigerator water valve.
v If your existing copper water
OLQHKDVDpDUHGoWWLQJDWWKH
end, you will need an adapter
DYDLODEOHDWSOXPELQJVXSSO\
VWRUHVWRFRQQHFWWKHZDWHUOLQH
to the refrigerator OR you can
FXWRçWKHpDUHGoWWLQJZLWK
a tube cutter and then use a
FRPSUHVVLRQoWWLQJ
v 6KXWRçYDOYHWRFRQQHFW
to the cold water line. The
VKXWRçYDOYHVKRXOGKDYHDZDWHULQOHWZLWKDPLQLPXP
inside diameter of Ė/Ċĉ in. at the point of connection
to the COLD WATER LINE.
6DGGOHW\SHVKXWRçYDOYHV
are included in many water
supply kits. Before purchasing,
make sure a saddle-type
valve complies with your local
plumbing codes.
127( A Self Piercing Saddle Type Water Valve should
not be used.
:$51,1*
(OHFWULFDO6KRFN+D]DUG
:KHQXVLQJDQ\HOHFWULFDOGHYLFHVXFKDVDSRZHU
GULOOGXULQJLQVWDOODWLRQEHVXUHWKHGHYLFHLVEDWWHU\
powered, double insulated or grounded in a manner that
will prevent the hazard of electric shock.
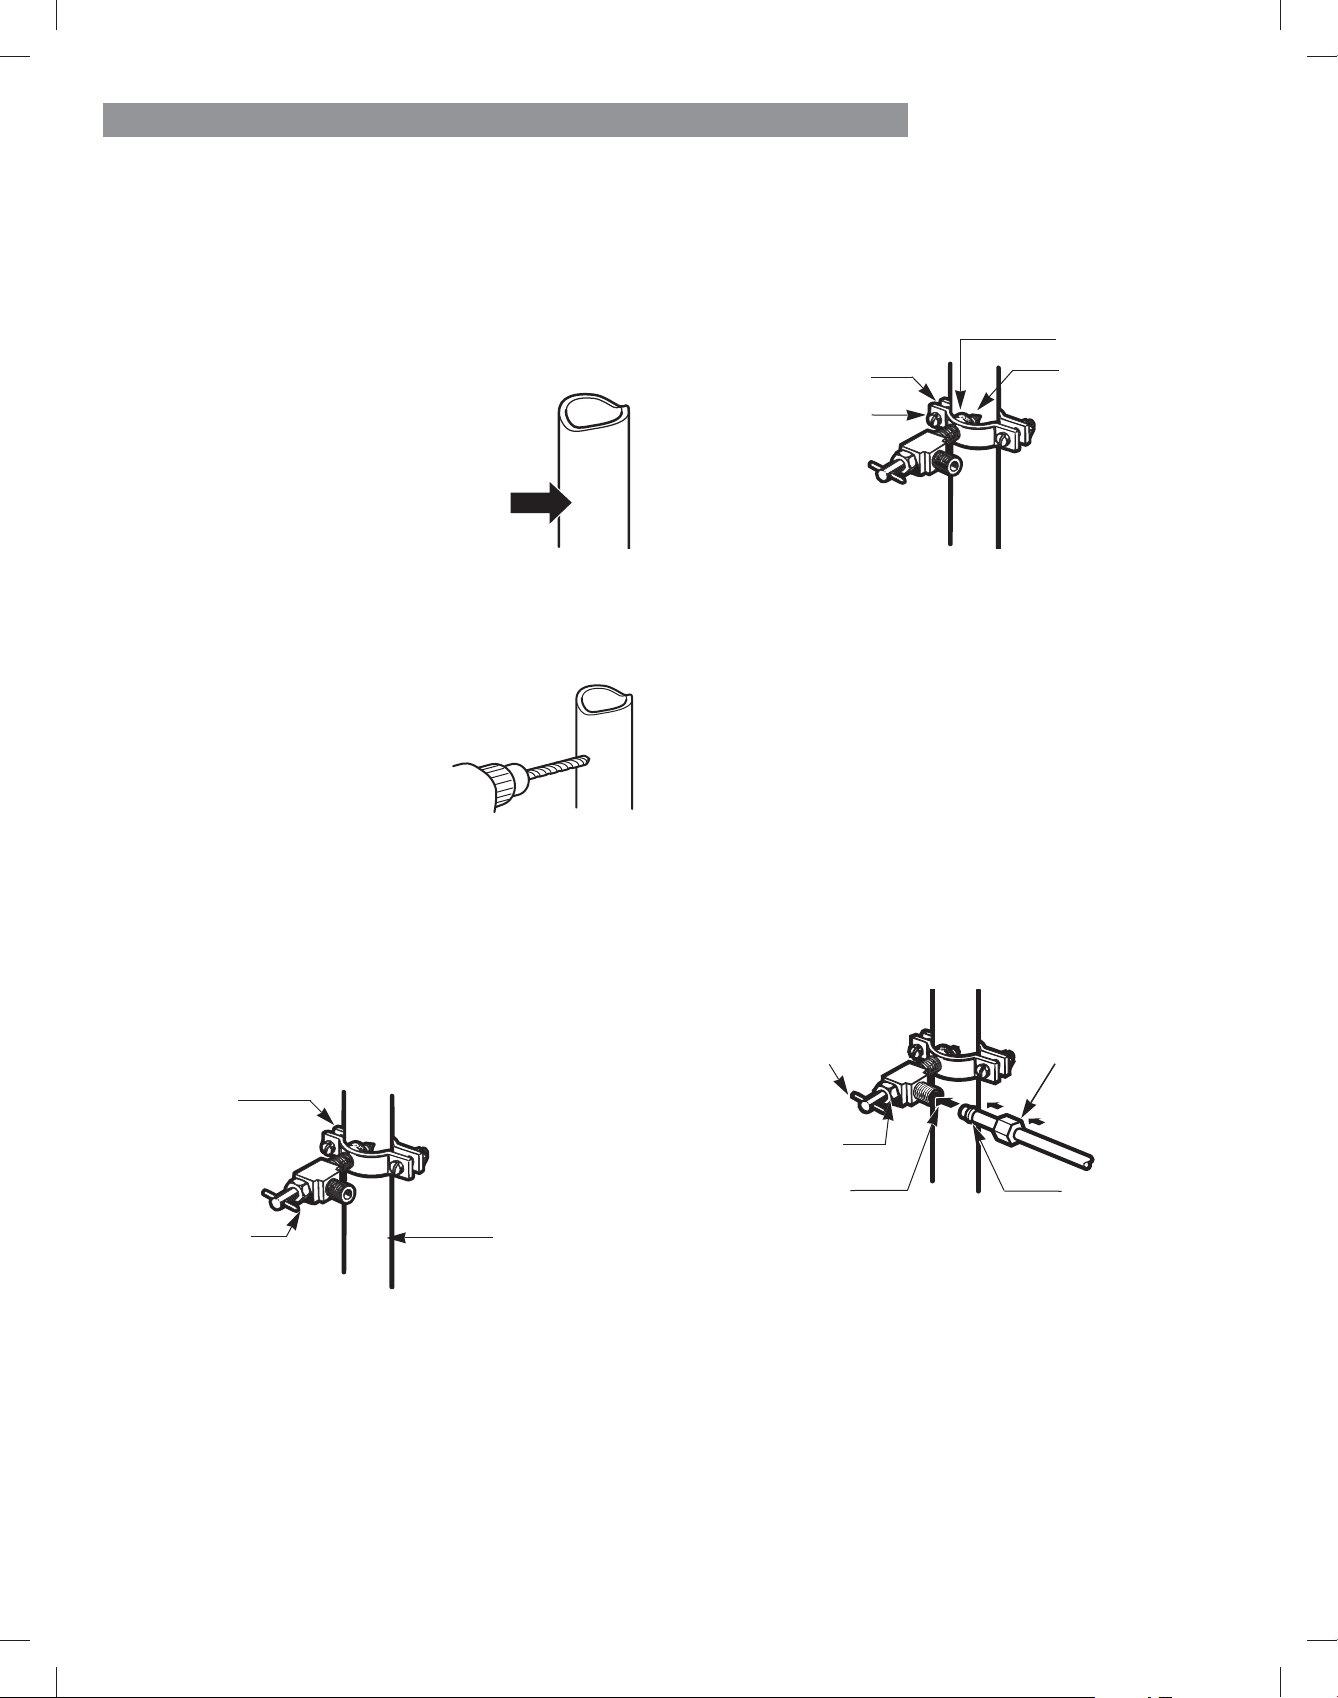
40
&211(&7,1*7+(:$7(5/,1(
,167$//$7,21,16758&7,216
,QVWDOOWKHVKXWRçYDOYHRQWKHQHDUHVWIUHTXHQWO\XVHG
drinking water line.
6+872))7+(0$,1:$7(56833/<
Turn on the nearest faucet to relieve the pressure on the
line.
&+226(7+(9$/9(/2&$7,21
Choose a location for the valve that is
easily accessible. It is best to connect
into the side of a vertical water pipe.
When it is necessary to connect into
a horizontal water pipe, make the
connection to the top or side, rather
than at the bottom, to avoid drawing
RçDQ\VHGLPHQWIURPWKHZDWHUSLSH
'5,//7+(+2/()257+(9$/9(
Drill a ¼ in. hole in the water pipe using a sharp bit.
Remove any burrs resulting from
drilling the hole in the pipe. Be
careful not to allow water to
drain into the drill. Failure to
drill a ¼ in. hole may result
in reduced ice production or
smaller cubes.
127( The hookup line cannot be white, plastic
tubing. Licensed plumbers must use only copper
WXELQJ1'$WXELQJRURU&URVV/LQN
3RO\HWK\OHQH3(;WXELQJ
)$67(17+(6+872))9$/9(
)DVWHQWKHVKXWRçYDOYHWRWKHFROGZDWHUSLSHZLWK
the pipe clamp.
127( Commonwealth of Massachusetts Plumbing
Codes 248CMR shall be adhered to. Saddle valves are
illegal and use is not permitted in Massachusetts.
Consult with your licensed plumber.
7,*+7(17+(3,3(&/$03
Tighten the clamp screws until the sealing washer
begins to swell.
127(Do not overtighten clamp or you may crush the
tubing.
5287(7+(78%,1*
Route the tubing between the cold water line and the
refrigerator.
Route the tubing through a hole drilled in the wall or
pRRUEHKLQGWKHUHIULJHUDWRURUDGMDFHQWEDVHFDELQHW
as close to the wall as possible.
127(%HVXUHWKHUHLVVXèFLHQWH[WUDWXELQJDERXW
IHHWFRLOHGLQWRWXUQVRIDERXWLQGLDPHWHUWR
allow the refrigerator to move out from the wall after
installation.
&211(&77+(78%,1*727+(9$/9(
3ODFHWKHFRPSUHVVLRQQXWDQGIHUUXOHVOHHYHIRU
copper tubing onto the end of the tubing and connect
LWWRWKHVKXWRçYDOYH0DNHVXUHWKHWXELQJLVIXOO\
inserted into the valve. Tighten the compression nut
securely.
127( Commonwealth of Massachusetts Plumbing
Codes 248CMR shall be adhered to. Saddle valves are
illegal and their use is not permitted in
Massachusetts. Consult with your licensed plumber.
Pipe Clamp
Saddle-Type
6KXWRç9DOYH
Vertical Cold
Water Pipe
Pipe Clamp
Clamp Screw
Washer
Inlet End
Saddle-Type
6KXWRç9DOYH
Packing Nut
Outlet Valve
Compression Nut
)HUUXOHVOHHYH

41
&211(&7,1*7+(:$7(5/,1(
78517+(:$7(521$77+(6+872))9$/9(
Tighten any connections that leak.
3/8*,17+(5()5,*(5$725
Arrange the coil of tubing so that it does not vibrate
against the back of the refrigerator or against the wall.
Push the refrigerator back to the wall.
67$577+(,&(0$.(5
Turn the icemaker ON at the control panel.
The icemaker will not begin to operate until it reaches
LWVRSHUDWLQJWHPSHUDWXUHRI£)q£&RUEHORZ,W
will then begin operation automatically if the icemaker
button has been turned ON.
&$87,21 Check to see if leaks occur at the water line
connections.
)/86+2877+(78%,1*
Turn the main water supply on and
pXVKRXWWKHWXELQJXQWLOWKHZDWHU
is clear.
6KXWWKHZDWHURçDWWKHZDWHU
valve after about one quart of
ZDWHUKDVEHHQpXVKHGWKURXJKWKH
tubing.
9&211(&77+(78%,1*727+( 5()5,*(5$725
1.5HPRYHWKHSODVWLFpH[LEOHFDSIURPWKHZDWHUYDOYH
3ODFHWKHFRPSUHVVLRQQXWDQGIHUUXOHVOHHYHRQWRWKH
end of the tubing as shown.
3. Insert the end of the copper tubing into the connection
as far as possible. While holding the tubing, tighten the
oWWLQJ
Tubing Clamp
¼ in. Tubing
¼ in.
Compression
Nut
Refrigerator
Connection
Ferrule
VOHHYH
:$51,1*
Before making the connection to the refrigerator, be sure
that the refrigerator power cord is not plugged into the
wall outlet.
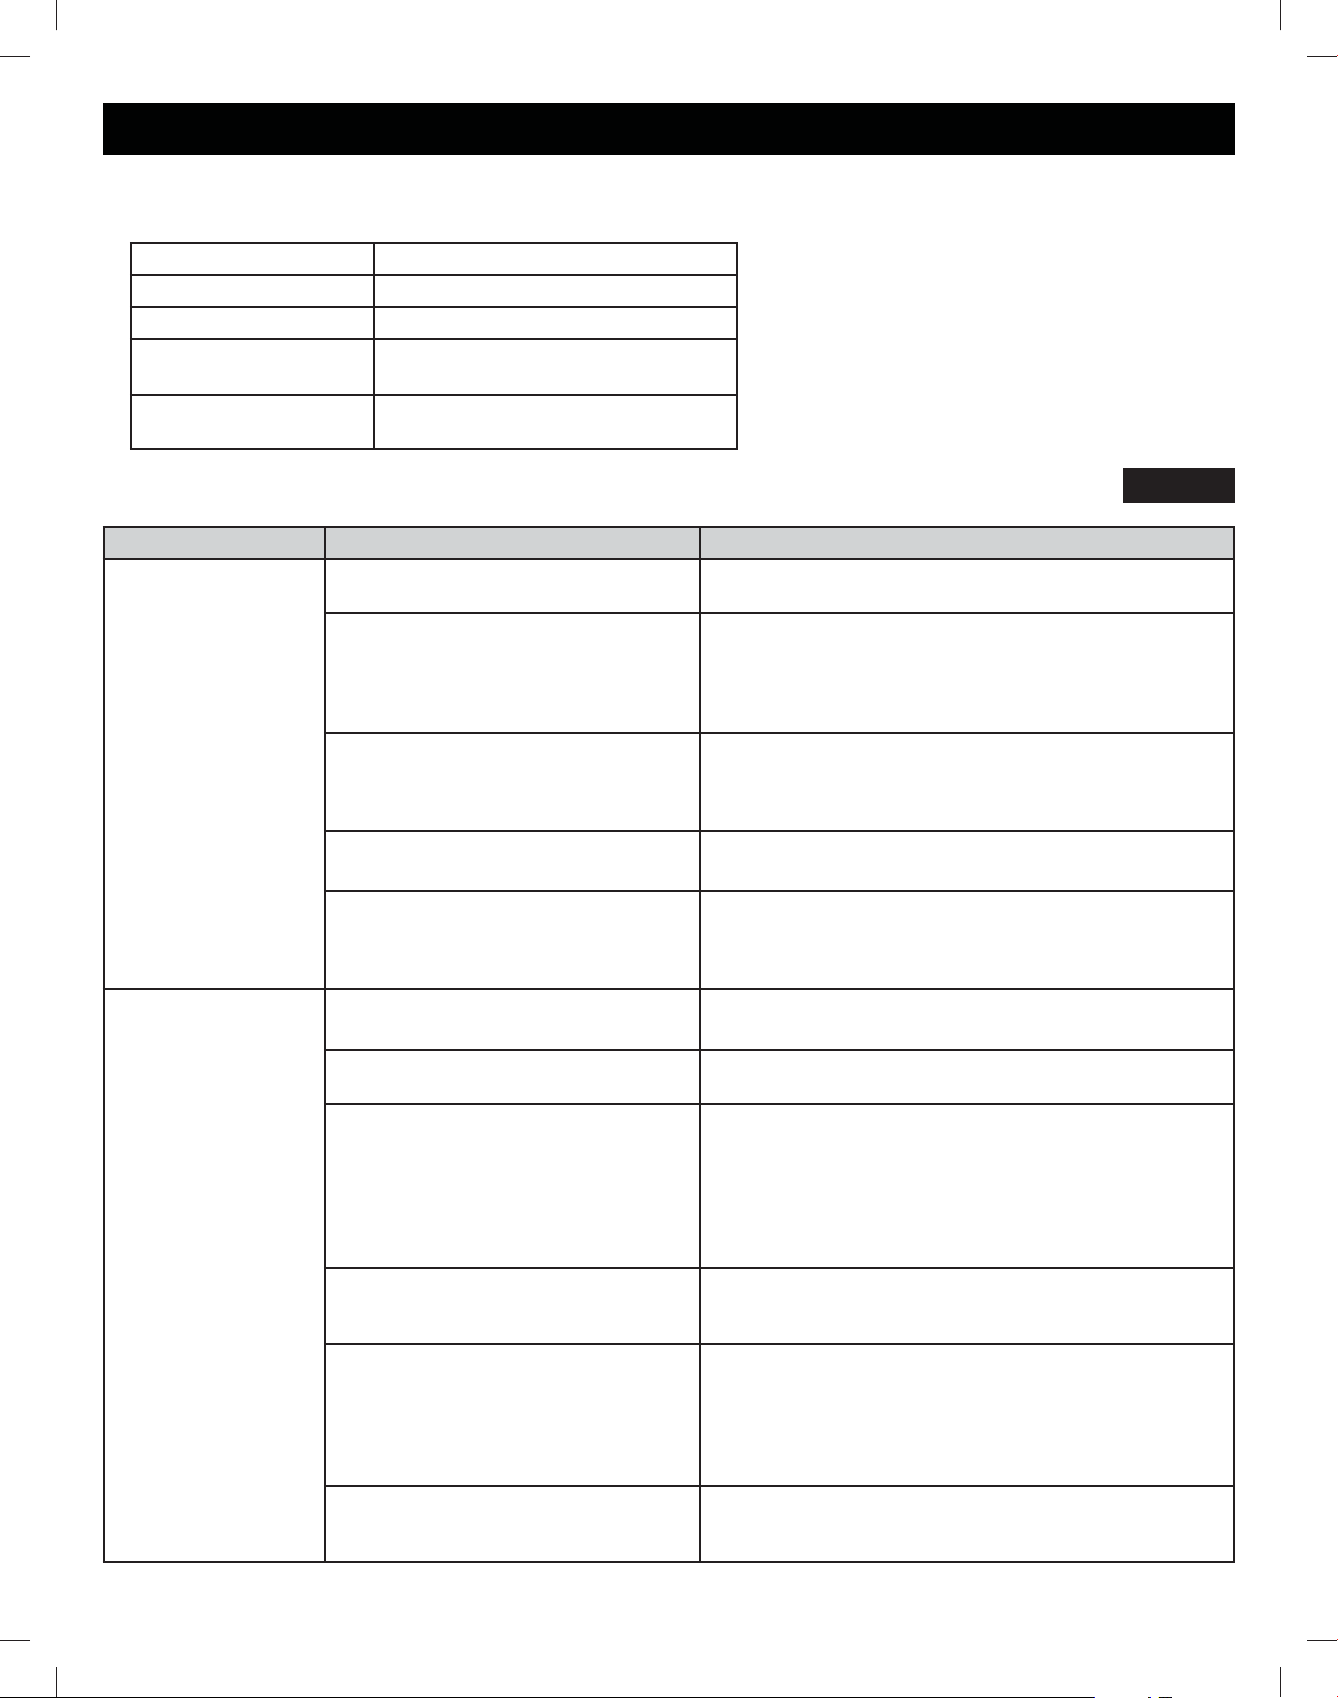
42
7528%/(6+227,1**8,'(
Problem Possible Causes Solutions
Refrigerator and
Freezer section are
not cooling.
The refrigerator control is set to OFF
VRPHPRGHOV
Turn the control ON. Refer to the Setting the Controls
section for proper temperature settings.
Refrigerator is set to demo mode. Demo Mode allows the lights and control display to
work normally while disabling cooling to save energy
ZKLOHRQWKHVKRZURRPpRRU5HIHUWRWKHSetting the
Controls section for instructions on how to disable
Demo Mode.
Refrigerator is in the defrost cycle. During the defrost cycle, the temperature of each
compartment may raise slightly. Wait 30 minutes and
FRQoUPWKHSURSHUWHPSHUDWXUHKDVEHHQUHVWRUHG
once the defrost cycle has completed.
Refrigerator was recently installed. It may take up to 24 hours for each compartment to
reach the desired temperature.
Refrigerator was recently relocated. If the refrigerator was stored for a long period of time
or moved on its side, it is necessary for the refrigerator
to stand upright for 24 hours before connecting it to
power.
Cooling System runs
too much.
Refrigerator is replacing an older
model.
Modern refrigerators require more operating time but
XVHOHVVHQHUJ\GXHWRPRUHHèFLHQWWHFKQRORJ\
Refrigerator was recently plugged in
or power restored.
The refrigerator will take up to 24 hours to cool
completely.
Door opened often or a large amount
of food / hot food was added.
Adding food and opening the door warms the
refrigerator, requiring the compressor to run longer in
order to cool the refrigerator back down. In order to
conserve energy, try to get everything you need out of
the refrigerator at once, keep food organized so it is
HDV\WRoQGDQGFORVHWKHGRRUDVVRRQDVWKHIRRGLV
UHPRYHG5HIHUWRWKHFood Storage Guide
Doors are not closed completely. Firmly push the doors shut. If they will not shut all the
way, see the Doors will not close completely or pop
open VHFWLRQLQ3DUWV)HDWXUHV7URXEOHVKRRWLQJ
Refrigerator is installed in a hot
location.
The compressor will run longer under warm conditions.
$WQRUPDOURRPWHPSHUDWXUHV£)H[SHFW\RXU
compressor to run about 40% to 80% of the time.
Under warmer conditions, expect it to run even more
often. The refrigerator should not be operated above
110°F.
Condenser / back cover is clogged. Use a vacuum cleaner with an attachment to clean the
condenser cover and vents. Do not remove the panel
covering the condenser coil area.
Before conducting troubleshooting, make sure that the following basic requirements are met:
Service Flow JSPOSP
Water Supply Potable Water
Water Pressure SVLN3D
Operating Ambient
Temperature Limits
55°F - 110°F
Electrical Ratings
115 Volts, 60 Hz, AC only, and fused
at 15 or 20 amperes.
&22/,1*

43
7528%/(6+227,1**8,'(
Problem Possible Causes Solutions
Refrigerator or
Freezer section is too
warm.
Refrigerator was recently installed. It may take up to 24 hours for each compartment to
reach the desired temperature.
Air vents are blocked. 5HDUUDQJHLWHPVWRDOORZDLUWRpRZWKURXJKRXWWKH
FRPSDUWPHQW5HIHUWRWKH$LUpRZGLDJUDPLQWKH
Using Your Refrigerator section.
Doors are opened often or for long
periods of time.
When the doors are opened often or for long periods
of time, warm, humid air enters the compartment.
This raises the temperature and moisture level within
WKHFRPSDUWPHQW7ROHVVHQWKHHçHFWUHGXFHWKH
frequency and duration of door openings.
Unit is installed in a hot location. The refrigerator should not be operated in
temperatures above 110F.
A large amount of food or hot food
was added to either compartment.
Adding food warms the compartment requiring the
cooling system to run. Allowing hot food to cool to
room temperature before putting it in the refrigerator
ZLOOUHGXFHWKLVHçHFW
Doors not closed correctly. See the Doors will not close correctly or pop open
VHFWLRQLQ3DUWV)HDWXUHV7URXEOHVKRRWLQJ
Temperature control is not set
correctly.
If the temperature is too warm, adjust the control one
increment at a time and wait for the temperature to
stabilize. Refer to the Setting the Controls section for
more information.
Defrost cycle has recently completed. During the defrost cycle, the temperature of each
compartment may raise slightly and condensation may
IRUPRQWKHEDFNZDOO:DLWPLQXWHVDQGFRQoUP
the proper temperature has been restored once the
defrost cycle has completed.
Interior moisture
buildup.
Doors are opened often or for long
periods of time.
When the doors are opened often or for long periods
of time, warm, humid air enters the compartment.
This raises the temperature and moisture level within
WKHFRPSDUWPHQW7ROHVVHQWKHHçHFWUHGXFHWKH
frequency and duration of door openings.
Doors not closed correctly. See the Doors will not close correctly section in the
Troubleshooting section.
Weather is humid. Humid weather allows additional moisture to enter the
compartments when the doors are opened leading to
condensation or frost. Maintaining a reasonable level
of humidity in the home will help to control the amount
of moisture that can enter the compartments.
Defrost cycle recently completed. During the defrost cycle, the temperature of each
compartment may raise slightly and condensation may
IRUPRQWKHEDFNZDOO:DLWPLQXWHVDQGFRQoUP
that the proper temperature has been restored once
the defrost cycle has completed.
Food is not packaged correctly. Food stored uncovered or unwrapped, and damp
containers can lead to moisture accumulation within
each compartment. Wipe all containers dry and store
food in sealed packaging to prevent condensation and
frost.
&22/,1*

44
7528%/(6+227,1**8,'(
&22/,1*,&(:$7(5
Problem Possible Causes Solutions
Food is freezing
in the refrigerator
compartment.
Food with high water content was
placed near an air vent.
Rearrange items with high water content away from air
vents.
Refrigerator temperature control is set
incorrectly.
If the temperature is too cold, adjust the control one
increment at a time and wait for the temperature to
stabilize. Refer to the Setting the Controls section for
more information.
Refrigerator is installed in a cold
location.
When the refrigerator is operated in temperature
EHORZ£)£&IRRGFDQIUHH]HLQWKHUHIULJHUDWRU
compartment. The refrigerator should not be operated in
WHPSHUDWXUHEHORZ£)£&
Frost or ice crystals
form on frozen food
RXWVLGHRISDFNDJH
Door is opened frequently or for long
periods of time.
When the doors are opened often or for long periods
of time, warm, humid air enters the compartment. This
raises the temperature and moisture level within the
compartment. Increased moisture will lead to frost and
FRQGHQVDWLRQ7ROHVVHQWKHHçHFWUHGXFHWKHIUHTXHQF\
and duration of door openings.
Door is not closing properly. Refer to the Doors will not close correctly or pop open
section in the Troubleshooting section.
Refrigerator or
Freezer section is too
cold.
Incorrect temperature control settings. If the temperature is too cold, adjust the control one
increment at a time and wait for the temperature to
stabilize. Refer to the Setting the Controls section for
more information.
Frost or ice crystals
on frozen food
LQVLGHRIVHDOHG
SDFNDJH
Condensation from food with a high
water content has frozen inside of the
food package.
This is normal for food items with a high water content.
Food has been left in the freezer for a
long period of time.
Do not store food items with high water content in the
freezer for a long period of time.
Icemaker is not
making enough ice.
Demand exceeds ice storage capacity. The icemaker will produce approximately 70-182 cubes in
a 24 hour period.
House water supply is not connected,
valve is not turned on fully, or valve is
clogged.
Connect the refrigerator to a cold water supply with
DGHTXDWHSUHVVXUHDQGWXUQWKHZDWHUVKXWRçYDOYHIXOO\
open.
If the problem persists, it may be necessary to contact a
plumber.
:DWHUoOWHUKDVEHHQH[KDXVWHG ,WLVUHFRPPHQGHGWKDW\RXUHSODFHWKHZDWHUoOWHU
v Approximately every six months.
v :KHQWKHZDWHUoOWHULQGLFDWRUWXUQVRQ
v When the water dispenser output decreases.
v When the ice cubes are smaller than normal.
Low house water supply pressure. The water pressure must be between 20 and 120 psi on
PRGHOVZLWKRXWDZDWHUoOWHUDQGEHWZHHQDQGSVL
RQPRGHOVZLWKDZDWHUoOWHU
If the problem persists, it may be necessary to contact a
plumber or install a booster pump to compensate for the
low pressure.
5HYHUVH2VPRVLVoOWUDWLRQV\VWHPLV
used.
5HYHUVHRVPRVLVoOWUDWLRQV\VWHPVFDQUHGXFHWKHZDWHU
pressure below the minimum amount and result in
LFHPDNHULVVXHV5HIHUWRWater Pressure VHFWLRQ
Tubing connecting refrigerator to house
supply valve is kinked.
The tubing can kink when the refrigerator is moved during
LQVWDOODWLRQRUFOHDQLQJUHVXOWLQJLQUHGXFHGZDWHUpRZ
Straighten or repair the water supply line and arrange it
to prevent future kinks.
45
7528%/(6+227,1**8,'(
Problem Possible Causes Solutions
Icemaker is not
making enough ice
FRQWLQXHG
Doors are opened often or for long
periods of time.
If the doors of the unit are opened often, ambient
air will warm the refrigerator which will prevent the
unit from maintaining the set temperature. Lowering
the refrigerator temperature can help, as well as not
opening the doors as frequently.
Doors are not closed completely. If the doors are not properly closed, ice production
ZLOOEHDçHFWHG6HHWKHDoors will not close
completely or pop openVHFWLRQLQ3DUWV)HDWXUHV
Troubleshooting for more information.
The temperature setting for the
freezer is too warm.
The recommended temperature for the freezer
compartment for normal ice production is 0°F. If the
freezer temperature is warmer, ice production will be
DçHFWHG
Dispensing water
slowly.
:DWHUoOWHUKDVEHHQH[KDXVWHG ,WLVUHFRPPHQGHGWKDW\RXUHSODFHWKHZDWHUoOWHU
v Approximately every six months.
v :KHQWKHZDWHUoOWHULQGLFDWRUWXUQVRQ
v When the water dispenser output decreases.
v When the ice cubes are smaller than normal.
5HYHUVHRVPRVLVoOWUDWLRQV\VWHPLV
used.
5HYHUVHRVPRVLVoOWUDWLRQV\VWHPVFDQUHGXFHWKHZDWHU
pressure below the minimum amount and result in
icemaker issues.
If the problem persists, it may be necessary to contact
a plumber or install a booster pump to compensate
for the low pressure.
Low house water supply pressure. The water pressure must be between 20 and 120 psi on
PRGHOVZLWKRXWDZDWHUoOWHUDQGEHWZHHQDQG
SVLRQPRGHOVZLWKDZDWHUoOWHU
If the problem persists, it may be necessary to contact
a plumber or install a booster pump to compensate
for the low pressure.
Not dispensing ice. Doors are not closed completely. Ice will not dispense if any of the refrigerator doors
are left open.
Infrequent use of the dispenser. Infrequent use of the ice dispenser will cause the cubes
to stick together over time, which will prevent them
from properly dispensing. Check the ice bin for ice
cubes clumping/sticking together. If they are, break up
the ice cubes to allow for proper operation.
The delivery chute is clogged with
frost or ice fragments.
Eliminate the frost or ice fragments by removing the
ice bin and clearing the chute with a plastic utensil.
Dispensing cubed ice can also help prevent frost or ice
fragment buildup.
The dispenser display is locked. Press and hold the Lock button for three seconds to
unlock the control panel and dispenser.
Ice bin is empty. It may take up to 24 hours for each compartment to
reach the desired temperature and for the icemaker
WREHJLQPDNLQJLFH0DNHVXUHWKDWWKHVKXWRçDUP
VHQVRULVQRWREVWUXFWHG
Once the ice supply in the bin has been completely
exhausted, it my take up to 90 minutes before
additional ice is available, and approximately 24
KRXUVWRFRPSOHWHO\UHoOOWKHELQ
,&(:$7(5

46
7528%/(6+227,1**8,'(
,&(:$7(5
Problem Possible Causes Solutions
Icemaker is not
making ice.
Refrigerator was recently installed or
icemaker recently connected.
It may take up to 24 hours for each compartment to
reach the desired temperature and for the icemaker to
begin making ice.
Icemaker not turned on. Locate the icemaker ON/OFFEXWWRQDQGFRQoUPWKDW
it is turned ON.
The refrigerator is not connected to
DZDWHUVXSSO\RUWKHVXSSO\VKXWRç
valve is not turned on.
Connect refrigerator to the water supply and turn the
ZDWHUVKXWRçYDOYHIXOO\RSHQ
,FHPDNHUVKXWRçIHHOHUDUP
obstructed.
,I\RXULFHPDNHULVHTXLSSHGZLWKDQLFHVKXWRçDUP
make sure that the arm moves freely.
5HYHUVHRVPRVLVZDWHUoOWUDWLRQ
system is connected to your cold
water supply.
5HYHUVHRVPRVLVoOWUDWLRQV\VWHPVFDQUHGXFHWKH
water pressure below the minimum amount and result
LQLFHPDNHULVVXHV5HIHUWRWKHWater Pressure
VHFWLRQ
Not dispensing water. New installation or water line recently
connected.
'LVSHQVHJDOORQVRIZDWHUpXVKIRUDSSUR[LPDWHO\
PLQXWHVWRUHPRYHWUDSSHGDLUDQGFRQWDPLQDWHV
from the system. Do not dispense the entire 2.5
gallon amount continuously. Depress and release the
dispenser pad for cycles of 30 seconds ON and 60
seconds OFF.
The dispenser panel is locked. Press and hold the Lock button for three seconds to
unlock the control panel and dispenser.
The dispenser is not set for water
dispensing.
The dispenser can be set for ice or water. Make
certain that the control panel is set for the proper
operation. Press the Water button on the control panel
to dispense water.
Refrigerator or freezer doors are not
closed properly.
Water will not dispense if any of the refrigerator
doors are left open.
:DWHUoOWHUKDVEHHQUHFHQWO\
removed or replaced.
$IWHUWKHZDWHUoOWHULVUHSODFHGGLVSHQVHJDOORQV
RIZDWHUpXVKIRUDSSUR[LPDWHO\PLQXWHVWRUHPRYH
trapped air and contaminates from the system. Do not
dispense the entire 2.5 gallon amount continuously.
Depress and release the dispenser pad for cycles of
30 seconds ON and 60 seconds OFF.
Tubing connecting refrigerator to
house supply valve is kinked.
The tubing can kink when the refrigerator is moved
during installation or cleaning resulting in reduced
ZDWHUpRZ6WUDLJKWHQRUUHSDLUWKHZDWHUVXSSO\OLQH
and arrange it to prevent future kinks.
The house water supply is not
connected, the valve is not turned on
fully, or the valve is clogged.
Connect refrigerator to the water supply and turn the
ZDWHUVKXWRçYDOYHIXOO\RSHQ
If the problem persists, it may be necessary to contact
a plumber.
47
7528%/(6+227,1**8,'(
Problem Possible Causes Solutions
Ice has bad taste or
odor.
Water supply contains minerals such
as sulfur.
$ZDWHUoOWHUPD\QHHGWREHLQVWDOOHGWRHOLPLQDWH
taste and odor problems.
127(,QVRPHFDVHVDoOWHUPD\QRWKHOS,WPD\QRW
be possible to remove all minerals / odor / taste in all
water supplies.
Icemaker was recently installed. 'LVFDUGWKHoUVWIHZEDWFKHVRILFHWRDYRLGGLVFRORUHG
or bad tasting ice.
Ice has been stored for too long. Ice that has been stored for too long will shrink,
become cloudy, and may develop a stale taste. Throw
away old ice and make a new supply.
The food has not been stored
properly in either compartment.
Rewrap the food. Odors may migrate to the ice if
food is not wrapped properly.
The interior of the refrigerator needs
to be cleaned.
See the Care and Cleaning section for more
information.
The ice storage bin needs to be
cleaned.
(PSW\DQGZDVKWKHELQGLVFDUGROGFXEHV0DNH
sure that the bin is completely dry before reinstalling
it.
Dispensing warm
water.
Refrigerator was recently installed. Allow 24 hours after installation for the water storage
tank to cool completely.
The water dispenser has been used
recently and the storage tank was
exhausted.
'HSHQGLQJRQ\RXUVSHFLoFPRGHOWKHZDWHUVWRUDJH
capacity will range from approximately 20 to 30 oz.
Dispenser has not been used for
several hours.
If the dispenser has not been used for several hours,
WKHoUVWJODVVGLVSHQVHGPD\EHZDUP'LVFDUGWKH
oUVWR]
Refrigerator is connected to the hot
water supply.
Make sure that the refrigerator is connected to a cold
water pipe.
WARNING: Connecting the refrigerator to a hot
water line may damage the icemaker.
Water has bad taste
or odor.
Water supply contains minerals such
as sulfur.
$ZDWHUoOWHUPD\QHHGWREHLQVWDOOHGWRHOLPLQDWH
taste and odor problems.
:DWHUoOWHUKDVEHHQH[KDXVWHG ,WLVUHFRPPHQGHGWKDW\RXUHSODFHWKHZDWHUoOWHU
v Approximately every 6 months.
v :KHQWKHZDWHUoOWHULQGLFDWRUWXUQVRQ
v When the water dispenser output decreases.
v When the ice cubes are smaller than normal.
Refrigerator was recently installed. 'LVSHQVHJDOORQVRIZDWHUpXVKIRUDSSUR[LPDWHO\
PLQXWHVWRUHPRYHWUDSSHGDLUDQGFRQWDPLQDWHV
from the system. Do not dispense the entire 2.5
gallon amount continuously. Depress and release the
dispenser pad for cycles of 30 seconds ON and 60
seconds OFF.
Icemaker is making
too much ice.
,FHPDNHUVKXWRçIHHOHUDUPLV
obstructed.
Empty the ice bin. If your icemaker is equipped with
DQLFHVKXWRçDUPPDNHVXUHWKDWWKHDUPPRYHV
freely. Reinstall the ice bin and wait 24 hours to
FRQoUPSURSHURSHUDWLRQ
,&(:$7(5

48
7528%/(6+227,1**8,'(
12,6(
Problem Possible Causes Solutions
Clicking The defrost control will click when
the automatic defrost cycle begins
DQGHQGV7KHWKHUPRVWDWFRQWURORU
UHIULJHUDWRUFRQWURORQVRPHPRGHOV
will also click when cycling on and
Rç
Normal Operation
Rattling Rattling noises may come from the
pRZRIUHIULJHUDQWWKHZDWHUOLQHRQ
the back of the unit, or items stored
on top of or around the refrigerator.
Normal Operation
Refrigerator is not resting solidly on
WKHpRRU
Floor is weak or uneven or leveling legs need to be
adjusted. See the Door Alignment section.
Refrigerator with linear compressor
was jarred while running.
Normal Operation
Whooshing Evaporator fan motor is circulating
air through the refrigerator and
freezer compartments.
Normal Operation
Air is being forced over the condenser
by the condenser fan.
Normal Operation
Gurgling 5HIULJHUDQWpRZLQJWKURXJKWKH
cooling system.
Normal Operation
Popping Contraction and expansion of the
inside walls due to changes in
temperature.
Normal Operation
Sizzling Water dripping on the defrost heater
during a defrost cycle.
Normal Operation
Vibrating If the side or back of the refrigerator
is touching a cabinet or wall, some of
the normal vibrations may make an
audible sound.
To eliminate the noise, make sure that the sides and
back cannot vibrate against any wall or cabinet.
Dripping Water running into the drain pan
during the defrost cycle.
Normal Operation
Pulsating or High-
Pitched Sound
Your refrigerator is designed to run
PRUHHèFLHQWO\WRNHHS\RXUIRRG
items at the desired temperature. The
KLJKHèFLHQF\FRPSUHVVRUPD\FDXVH
your new refrigerator to run longer
than your old one, but it is still more
HQHUJ\HèFLHQWWKDQSUHYLRXVPRGHOV
While the refrigerator is running, it is
normal to hear a pulsating or high-
pitched sound.
Normal Operation

49
7528%/(6+227,1**8,'(
Problem Possible Causes Solutions
Doors will not close
correctly or pop
open.
Food packages are blocking the door
open.
Rearrange food containers to clear the door and door
shelves.
Ice bin, crisper cover, pans, shelves,
door bins, or baskets are out of
position.
Push bins all the way in and put crisper cover, pans,
shelves and baskets into their correct positions. See the
Using Your Refrigerator section for more information.
The doors were removed during
product installation and not properly
replaced.
Remove and replace the doors according to the
Removing and Replacing Refrigerator Handles and
Doors section.
Refrigerator is not leveled properly. See Door Alignment in the Refrigeration Installation
section to level refrigerator.
'RRUVDUHGLèFXOWWR
open.
The gaskets are dirty or sticky. Clean the gaskets and the surfaces that they touch.
Rub a thin coat of appliance polish or kitchen wax on
the gaskets after cleaning.
Door was recently closed. When you open the door, warmer air enters the
refrigerator. As the warm air cools, it can create a
vacuum. If the door is hard to open, wait one minute
to allow the air pressure to equalize, then see if it
opens more easily.
Refrigerator wobbles
or seems unstable.
Leveling legs are not adjusted
properly.
Refer to the Leveling and Door Alignment section.
Floor is not level. It may be necessary to add shims under the leveling
legs or rollers to complete installation.
Lights do not work. LED interior lighting failure. The refrigerator compartment lamp is LED interior
lighting, and service should be performed by
DTXDOLoHGWHFKQLFLDQ5HIHUWRWKHLight Bulb
Replacement section.
Refrigerator has an
unusual odor.
The Air Filter may need to be set to
the MAX setting or replaced.
Set the Air Filter to the MAX setting. If the odor does
QRWJRDZD\ZLWKLQKRXUVWKHoOWHUPD\QHHGWREH
replaced. See the Replacing the Air Filter section for
replacement instructions.
The interior of
the refrigerator is
covered with dust or
soot.
7KHUHIULJHUDWRULVORFDWHGQHDUDoUH
VRXUFHVXFKDVDoUHSODFHFKLPQH\
or candle.
Make sure that the refrigerator is not located near a
oUHVRXUFHVXFKDVDoUHSODFHFKLPQH\RUFDQGOH
3$576)($785(6

50
',$*1267,&6
'LDJQRVWLFV2QVRPHPRGHOV
Should you experience any problems with your
refrigerator, it has the capability of transmitting data via
your telephone to the Diagnostics Team. This gives you the
capability of speaking directly to our trained specialists.
The specialist records the data transmitted from your
machine and uses it to analyze the issue, providing a fast
ective diagnosis.
If you experience problems with your refrigerator, call
1-844-553-6667. Only use the Diagnostics feature when
instructed to do so by the Diagnostics Team agent. The
transmission sounds that you will hear are normal and
sound similar to a fax machine.
Diagnostics cannot be activated unless your refrigerator
is connected to power. If your refrigerator is unable to
turn on, then troubleshooting must be done without using
Diagnostics.
Using Diagnostics
First, call 1-844-553-6667. If the number of the phone you
DUHXVLQJLVRQoOHDQGLVDVVRFLDWHGZLWK\RXUUHIULJHUDWRU
you will be quickly relayed to a Diagnostics team agent.
Only use the Diagnostics feature when instructed to do so
by the Diagnostics Team agent.
1. Lock the display. To lock the display, press and hold
WKH&RQWURO/RFNEXWWRQIRUWKUHHVHFRQGV,IWKH
GLVSOD\KDVEHHQORFNHGIRURYHUoYHPLQXWHV\RXPXVW
GHDFWLYDWHWKHORFNDQGWKHQUHDFWLYDWHLW
3. Hold the mouthpiece of your phone in front of the
speaker that is located on the right hinge of the
refrigerator door, when instructed to do so by the call
center.
4. Press and hold the Freezer Temp button for three
seconds while continuing to hold your phone to the
speaker.
5. After you hear three beeps, release the Freezer Temp
button.
Keep the phone in place until the tone transmission has
oQLVKHG7KHGLVSOD\ZLOOFRXQWGRZQWKHWLPH2QFH
the countdown is over and the tones have stopped,
resume your conversation with the specialist, who will
then be able to assist you in using the information
transmitted for analysis.
127(
- For best results, do not move the phone while the tones
are being transmitted.
- If the call center agent is not able to get an accurate
recording of the data, you may be asked to try again.
Open the right refrigerator door.

51
ÍNDICE
Garantía ...............................................................................52
Instrucciones de seguridad importantes
......54-56
Requisitos eléctricos y de conexión a tierra
....56
Componentes y características
....................57-58
Instalación del refrigerador .................... 59-66
Desembalaje del refrigerador .................... 59
Instalación
...................................................................... 60
Desmontaje y colocación de las
manijas y puertas del congelador
............61-65
Nivelación y alineación de las puertas ..... 66
Uso del refrigerador ................................. 67-82
Ajuste de los controles ...........................67-69
Funciones Inteligentes ...................................70
Instrucciones de Smart Grid .........................71
Aviso de la FCC .......................................... 72
Depósito de hielo del interior
de la puerta
................................................................... 73
Máquina de hielo automática ...............74-75
Guía para el almacenamiento
de alimentos ................................................. 76
Sección refrigerador
Dispensador de agua ...................................77
Estantes del refrigerador
...................................... 78
Cajón con control de humedad ..................79
Cajón despensero con control
de temperatura .............................................79
Bandejas de puerta .....................................79
PreView Grab-N-Go .................................... 80
Montaje De Caja Grab-N-Go ...................80
5HHPSOD]RGHOoOWURGHDLUH ........................81
Sección congelador
Depósito de hielo adicional ........................81
Cajón extraíble .............................................. 82
Durabase ....................................................... 82
Divisor Durabase ........................................... 82
Filtro de agua ........................................... 83-85
Cuidado y limpieza ...................................86-87
Sugerencias generales de limpieza .......... 86
Exterior ........................................................... 86
Paredes interiores .......................................... 86
Revestimiento de las puertas y juntas ........ 86
Piezas de plástico ......................................... 86
Bobinas del condensador ............................ 86
Sustitución de la bombilla ...........................87
Interrupciones de alimentación ...................87
Cuando se va de vacaciones ......................87
Cuando se muda ...........................................87
Conexión de la tubería de agua ............88-90
Guía para la solución de problemas ......91-98
Diagnostics (Diagnósticos) ............................ 99
Servicio técnico ..........................Contraportada
52
GARANTÍA
GARANTÍA DEL REFRIGERADOR
GARANTÍA LIMITADA KENMORE ELITE
Con el COMPROBANTE DE COMPRA, la siguiente cobertura de garantía aplica cuando este electrodoméstico se instala, opera y mantiene
correctamente, de acuerdo con todas las instrucciones proporcionadas.
Un Año de Garantía en el Electrodoméstico
Este aparato tiene garantía por defectos en el material o mano de obra DURANTE UN AÑO a partir de la fecha de venta. Si el aparato está
defectuoso, recibirá la reparación sin costo. Si el aparato no puede repararse, será reemplazado sin costo. La cobertura de garantía completa aplica
VRODPHQWHSRUGÕDVDSDUWLUGHODIHFKDGHYHQWDVLHOHOHFWURGRPÑVWLFRVHXVDFRQoQHVGLVWLQWRVGHOXVRGRPÑVWLFR
Cinco Años de Garantía en el Sistema Refrigerante Sellado
El sistema refrigerante sellado tiene garantía por defectos en el material o mano de obra DURANTE CINCO AÑOS a partir de la fecha de venta.* Si
aparecen defectos en alguna pieza del sistema dentro del primer año, se le proporcionará e instalará una nueva sin costo. Si aparece un defecto en
una pieza del sistema después del primer año, se le proporcionará una pieza nueva, pero no se le instalará sin costo. Usted será responsable del costo
del trabajo que implica la instalación de la pieza después del primer año a partir de la fecha de venta. La cobertura de garantía completa aplica
VRODPHQWHSRUXQDÙRDSDUWLUGHODIHFKDGHYHQWDVLHOHOHFWURGRPÑVWLFRVHXVDFRQoQHVGLVWLQWRVGHOXVRGRPÑVWLFR/RVGHIHFWRVGHEHQVHU
YHULoFDGRVSRUXQUHSUHVHQWDQWHGHVHUYLFLRDXWRUL]DGRGH6HDUV
Diez Años en el Compresor Lineal
El compresor lineal de este electrodoméstico tiene garantía por defectos en el material o mano de obra DURANTE DIEZ AÑOS a partir de la fecha
de venta.* Si aparecen defectos en el compresor dentro del primer año, se le proporcionará e instalará uno nuevo sin costo. Si aparece un defecto en
el compresor después del primer año, se le proporcionará uno nuevo, pero no se le instalará sin costo. Usted será responsable del costo del trabajo
que implica la instalación de la pieza después del primer año a partir de la fecha de venta. La cobertura de garantía completa aplica solamente por
GRVDÙRVDSDUWLUGHODIHFKDGHYHQWDVLHOHOHFWURGRPÑVWLFRVHXVDFRQoQHVGLVWLQWRVGHOXVRGRPÑVWLFR/RVGHIHFWRVGHEHQVHUYHULoFDGRVSRUXQ
representante de servicio autorizado de Sears.
Garantía de por Vida en Cajones de Almacenamiento
DURANTE EL TIEMPO QUE SE USE desde la fecha de venta, se proporcionará el cambio sin costo por un cajón de almacenamiento o
compartimiento defectuoso del refrigerador o congelador.* Si aparece un defecto dentro del primer año, se le instalará sin costo un nuevo contenedor
para la puerta. Si aparece un defecto después del primer año, se le proporcionará un nuevo contenedor, pero no se le instalará sin costo. Esta
garantía de por vida solo cubre los contenedores y no aplica a ningún otro componente o mecanismo relacionado. Usted será responsable del
costo del trabajo que implica la instalación del contenedor después del primer año a partir de la fecha de venta. La cobertura de garantía aplica
VRODPHQWHSRUGÕDVDSDUWLUGHODIHFKDGHYHQWDVLHVWHHOHFWURGRPÑVWLFRVHXVDFRQoQHVGLVWLQWRVGHOXVRGRPÑVWLFR/RVGHIHFWRVGHEHQVHU
YHULoFDGRVSRUXQUHSUHVHQWDQWHGHVHUYLFLRDXWRUL]DGRGH6HDUV
Para conocer los detalles de cobertura de la garantía y obtener reparación o cambio sin costo, visite el sitio web: www.kenmore.com/warranty
Esta garantía SOLO cubre defectos en el material y la mano de obra y NO cubrirá lo siguiente:
9. Servicio brindado a un electrodoméstico si faltan el modelo y la placa del número de serie, están alterados o no se puede determinar fácilmente
Aviso de garantías implícitas, limitación de recursos
El único y exclusivo recurso del cliente según esta garantía limitada será la reparación o el cambio del producto según se establece en el
el electrodoméstico, cinco años en el sistema refrigerante sellado, diez años en el compresor lineal, y el tiempo que se use en los contenedores de
almacenamiento, o el periodo más corto permitido por ley. Los vendedores no pueden ser responsables de daños incidentales o consecuenciales.
Algunos estados no permiten la exclusión o limitación de daños incidentales o consecuenciales, o las limitaciones sobre la duración de una garantía
implícita, de modo que estas exclusiones o limitaciones pueden no aplicarle a usted.
Esta garantía aplica solamente cuando el electrodoméstico se utilice en los Estados Unidos.
2. Un técnico de servicio limpiará o le dará mantenimiento al electrodoméstico, o le indicará al usuario la forma correcta de instalarlo, operarlo o
darle mantenimiento.
3. Llamadas de servicio para corregir la instalación del electrodoméstico no realizada por agentes de servicio autorizados de Sears o para reparar
problemas con fusibles del hogar, interruptores, cableado doméstico y sistemas de suministro de agua o gas provocados por dicha instalación.
4. Daño o falla de este electrodoméstico causado por la instalación no realizada por agentes de servicio autorizado de Sears, que incluye el hecho
de que la instalación no se haya realizado según los códigos eléctricos, de gas o de plomería.
acuerdo con todas las instrucciones proporcionadas.
mal uso o el uso contrario al previsto.
productos químicos o utensilios distintos de los recomendados en todas las instrucciones proporcionadas con el producto.

53
REGISTRO DEL PRODUCTO
En el espacio siguiente, anote la fecha de la compra, el modelo y el número de serie del producto. Encontrará el modelo
\HOQàPHURGHVHULHLPSUHVRHQODSODFDGHLGHQWLoFDFLÚQVLWXDGDHQHOUHYHVWLPLHQWRLQWHULRUGHOFRPSDUWLPLHQWRGHO
refrigerador. Tenga esta información a mano siempre que se ponga en contacto con Sears en relación con su producto.
N.º de modelo___________________ Fecha de compra ___________________
N.º de serie.___________________
Guarde estas instrucciones y su ticket de compra para futuras consultas.

54
INSTRUCCIONES IMPORTANTES SOBRE SEGURIDAD
ADVERTENCIA
GUARDE ESTAS INSTRUCCIONES
Para reducir el riesgo de incendio, descarga eléctrica
o lesiones personales al utilizar el producto, se deben
respetar una serie de precauciones de seguridad básicas,
entre las que se incluyen las siguientes:
Lea todas las instrucciones antes de utilizar este
electrodoméstico.
v NUNCA desenchufe el refrigerator tirando del cable
GHĄFRUULHQWH$JDUUHVLHPSUHHOHQFKXIHoUPHPHQWH\
WLUHĄGHOPLVPRSDUDUHWLUDUORGHODWRPDGHFRUULHQWH
v Si el cable de alimentación se encuentra dañado deberá
ser sustituido por el fabricante, por un servicio técnico
DXWRUL]DGRRSHUVRQDOFXDOLoFDGRSDUDHYLWDUULHVJRV
innecesarios. No use un cable con grietas o abrasiones
VREUHVXH[WHQVLÚQRHQĄORVH[WUHPRVGHOHQFKXIHR
conector.
v 1RPRGLoTXHQLDODUJXHODORQJLWXGGHOFDEOHGH
corriente, ya que podría causar una descarga eléctrica
RĄSURYRFDUXQLQFHQGLR
v Cuando separe el refrigerador de la pared, tenga
cuidado de no torcer o dañar el cable de alimentación.
PRECAUCIONES BÁSICAS DE SEGURIDAD
Este manual contiene muchos mensajes de seguridad importantes. Lea y cumpla siempre todos los mensajes de seguridad.
Éste es el símbolo de alerta de seguridad. Le avisa de mensajes de seguridad que le informan de peligros
de muerte o lesiones para usted o los demás, o que puedan dañar el producto.
Todos los mensajes de seguridad estarán precedidos del símbolo de alerta de seguridad y de las
SDODEUDVGHVHÙDOGHSHOLJUR3(/,*52$'9(57(1&,$R35(&$8&,½1(VWDVSDODEUDVVLJQLoFDQ
Si no respeta las instrucciones, morirá o sufrirá lesiones graves.
Si no respeta las instrucciones, podría morir o sufrir lesiones graves.
Indica una situación de peligro inminente que, si no se evita,
podría provocar lesiones leves o moderadas, o daños en el producto.
Todos los mensajes de seguridad le indicarán el peligro, lo que debe hacer para reducir la probabilidad de lesiones y lo que
puede ocurrirle si no se siguen las instrucciones.
v NO guarde ni utilice gasolina ni ningún otro gas o líquido
LQpDPDEOHFHUFDGHHVWHHOHFWURGRPÑVWLFRRGHFXDOTXLHU
otro.
v NO permita que los niños escalen, se monten o se
cuelguen de las puertas o estantes del refrigerador.
Podrían dañar el refrigerador o sufrir lesiones graves.
v Mantenga los dedos lejos de los puntos de riesgo de
pinzamiento; las distancias de separación entre las
puertas y los gabinetes son necesariamente pequeños.
Tenga especial cuidado al cerrar las puertas cuando
haya niños cerca.
v Desenchufe el refrigerador antes de limpiar o realizar
cualquier reparación.
NOTA: Se recomienda encarecidamente que cualquier
UHSDUDFLÚQVHDUHDOL]DGDSRUXQWÑFQLFRFXDOLoFDGR
PELIGRO
ADVERTENCIA
PRECAUCIÓN

55
ADVERTENCIA
PELIGRO: RIESGO DE ATRAPAMIENTO DE NIÑOS
GUARDE ESTAS INSTRUCCIONES
v $QWHVGHVXVWLWXLUXQDERPELOODIXQGLGDRURWD
GHVHQFKXIHHOUHIULJHUDGRURFRUWHODFRUULHQWHHQ
HOGLV\XQWRURFDMDGHIXVLEOHVFRQHOoQGHHYLWDUHO
FRQWDFWRFRQXQFDEOHFRQFRUULHQWH8QDERPELOOD
IXQGLGDSXHGHURPSHUVHHQHOPRPHQWRGHFDPELDUOD
SRUORTXHTXHGDH[SXHVWRXQFDEOHFRQFRUULHQWH
NOTA: $OJXQRVPRGHORVGLVSRQHQGHLOXPLQDFLÚQLQWHULRU
PHGLDQWH/('SRUORTXHHOPDQWHQLPLHQWRGHEHUÊVHU
UHDOL]DGRSRUXQWÑFQLFRFXDOLoFDGR
ADVERTENCIA: 3RQHUXQRRDPERVFRQWUROHVHQSRVLFLÚQ
GHDSDJDGR2))QRFRUWDODDOLPHQWDFLÚQGHĄFLUFXLWR
GHLOXPLQDFLÚQ
v &XDQGRKD\DWHUPLQDGRYXHOYDDFRQHFWDUHO
UHIULJHUDGRUDODUHGHOÑFWULFD\UHVWDEOH]FDORVFRQWUROHV
7HUPRVWDWR&RQWUROGHOUHIULJHUDGRU\R&RQWUROGHO
FRQJHODGRUHQIXQFLÚQGHOPRGHORDODMXVWHGHVHDGR
v (VWHUHIULJHUDGRUVHGHEHLQVWDODUFRUUHFWDPHQWHGH
DFXHUGRFRQODVinstrucciones importantes para el
instaladorLQFOXLGDVHQODKRMDDGKHVLYDSHJDGDDO
IURQWDOGHOUHIULJHUDGRU
v &XDQGRHOUHIULJHUDGRUHVWÑHQIXQFLRQDPLHQWRQRWRTXH
ODVVXSHUoFLHVIUÕDVGHOFRPSDUWLPLHQWRGHOFRQJHODGRU
FRQODVPDQRVKàPHGDVRPRMDGDV/DSLHOVHSRGUÕD
DGKHULUDODVVXSHUoFLHVH[WUHPDGDPHQWHIUÕDV
v 6LVHFRQHFWDDXQFLUFXLWRSURWHJLGRFRQIXVLEOHVXWLOLFH
XQIXVLEOHGHUHWDUGR
/RVUHIULJHUDGRUHVGHVHFKDGRVRDEDQGRQDGRVVRQ
SHOLJURVRVLQFOXVRVLVÚORHVSRUXQRVSRFRVGÕDV6LYDD
GHVKDFHUVHGHVXDQWLJXRUHIULJHUDGRUOHUHFRPHQGDPRV
TXHVLJDODVLQVWUXFFLRQHVTXHHQFRQWUDUÊDODGHUHFKDSDUD
HYLWDUSRVLEOHVDFFLGHQWHVDWUDSDPLHQWRGHQLÙRV\DVo[LD
v 12WRTXHHOPHFDQLVPRGHIDEULFDFLÚQDXWRPÊWLFD
GHĄKLHORPLHQWUDVHVWÑHOUHIULJHUDGRUHQFKXIDGR
v 12YXHOYDDFRQJHODUDOLPHQWRVFRQJHODGRVTXHVH
KD\DQGHVFRQJHODGRFRPSOHWDPHQWH(O'HSDUWDPHQWR
GH$JULFXOWXUDGH(VWDGRV8QLGRVHQHOEROHWÕQQ
GH&DVD\MDUGÕQGLFH
{6HSXHGHQYROYHUDFRQJHODUFRQVHJXULGDGDOLPHQWRV
FRQJHODGRVTXHVHKD\DQGHVFRQJHODGRVLDàQFRQWLHQHQ
FULVWDOHVGHKLHORRVLDàQVLJXHQIUÕRVSRUGHEDMRGHORV
£&
{/DFDUQHSLFDGDODFDUQHGHDYHRHOSHVFDGR
GHVFRQJHODGRVFX\RRORURFRORULQGLTXHQPDOHVWDGR
QRGHEHUÕDQYROYHUDFRQJHODUVHQLGHEHUÕDQFRPHUVH
(OKHODGRGHVFRQJHODGRVHGHEHGHVHFKDU6LHORORUR
HOFRORUGHFXDOTXLHUDOLPHQWRKDSHUGLGRIUHVFXUDRHV
FXHVWLRQDEOHGHVÑFKHOR&RPHUHVWHWLSRGHDOLPHQWRV
SXHGHVHUSHOLJURVR
,QFOXVRVLVHGHVFRQJHODSDUFLDOPHQWHXQDOLPHQWR\VH
YXHOYHDFRQJHODUVXFDOLGDGDOLPHQWLFLDVHYHUHGXFLGD
SDUWLFXODUPHQWHVLVHWUDWDGHIUXWDVYHUGXUDV\FRPLGD
SUHSDUDGD/DFDOLGDGDOLPHQWLFLDGHODVFDUQHVURMDVVH
YHPHQRVDIHFWDGDTXHODGHODPD\RUÕDGHDOLPHQWRV
8WLOLFHORVDOLPHQWRVUHFRQJHODGRVORDQWHVSRVLEOHSDUD
VDOYDJXDUGDUHOPÊ[LPRGHFDOLGDG
v 1RXVHHVWHHOHFWURGRPÑVWLFRSDUDoQHVHVSHFLDOHVFRPR
SDUDFRQVHUYDUPHGLFDPHQWRVRPDWHULDOHVGHHQVD\R
XVDUHQEDUFRVHWF
v 1RJROSHHQLDSOLTXHGHPDVLDGDIXHU]DHQODVVXSHUoFLHV
GHYLGULR1RWRTXHODVVXSHUoFLHVGHYLGULRVLHVWÊQ
DJULHWDGDVRURWDV
ANTES DE DESECHAR SU ANTIGUO
REFRIGERADOR O CONGELADOR:
v 'HVPRQWHODVSXHUWDV
v 'HMHORVHVWDQWHVHQVXVLWLRSDUDTXHORV
QLÙRVQRSXHGDQWUHSDUFRQIDFLOLGDGDO
LQWHULRU
ADVERTENCIA :
(VWHSURGXFWRFRQWLHQHTXÕPLFRVFRQRFLGRVSRUHO(VWDGRGH&DOLIRUQLDFRPRFDXVDQWHVGHFÊQFHU
\GHIHFWRVGHQDFLPLHQWRXRWURVGDÙRVUHSURGXFWLYRV
Lávese las manos después de usarlo.
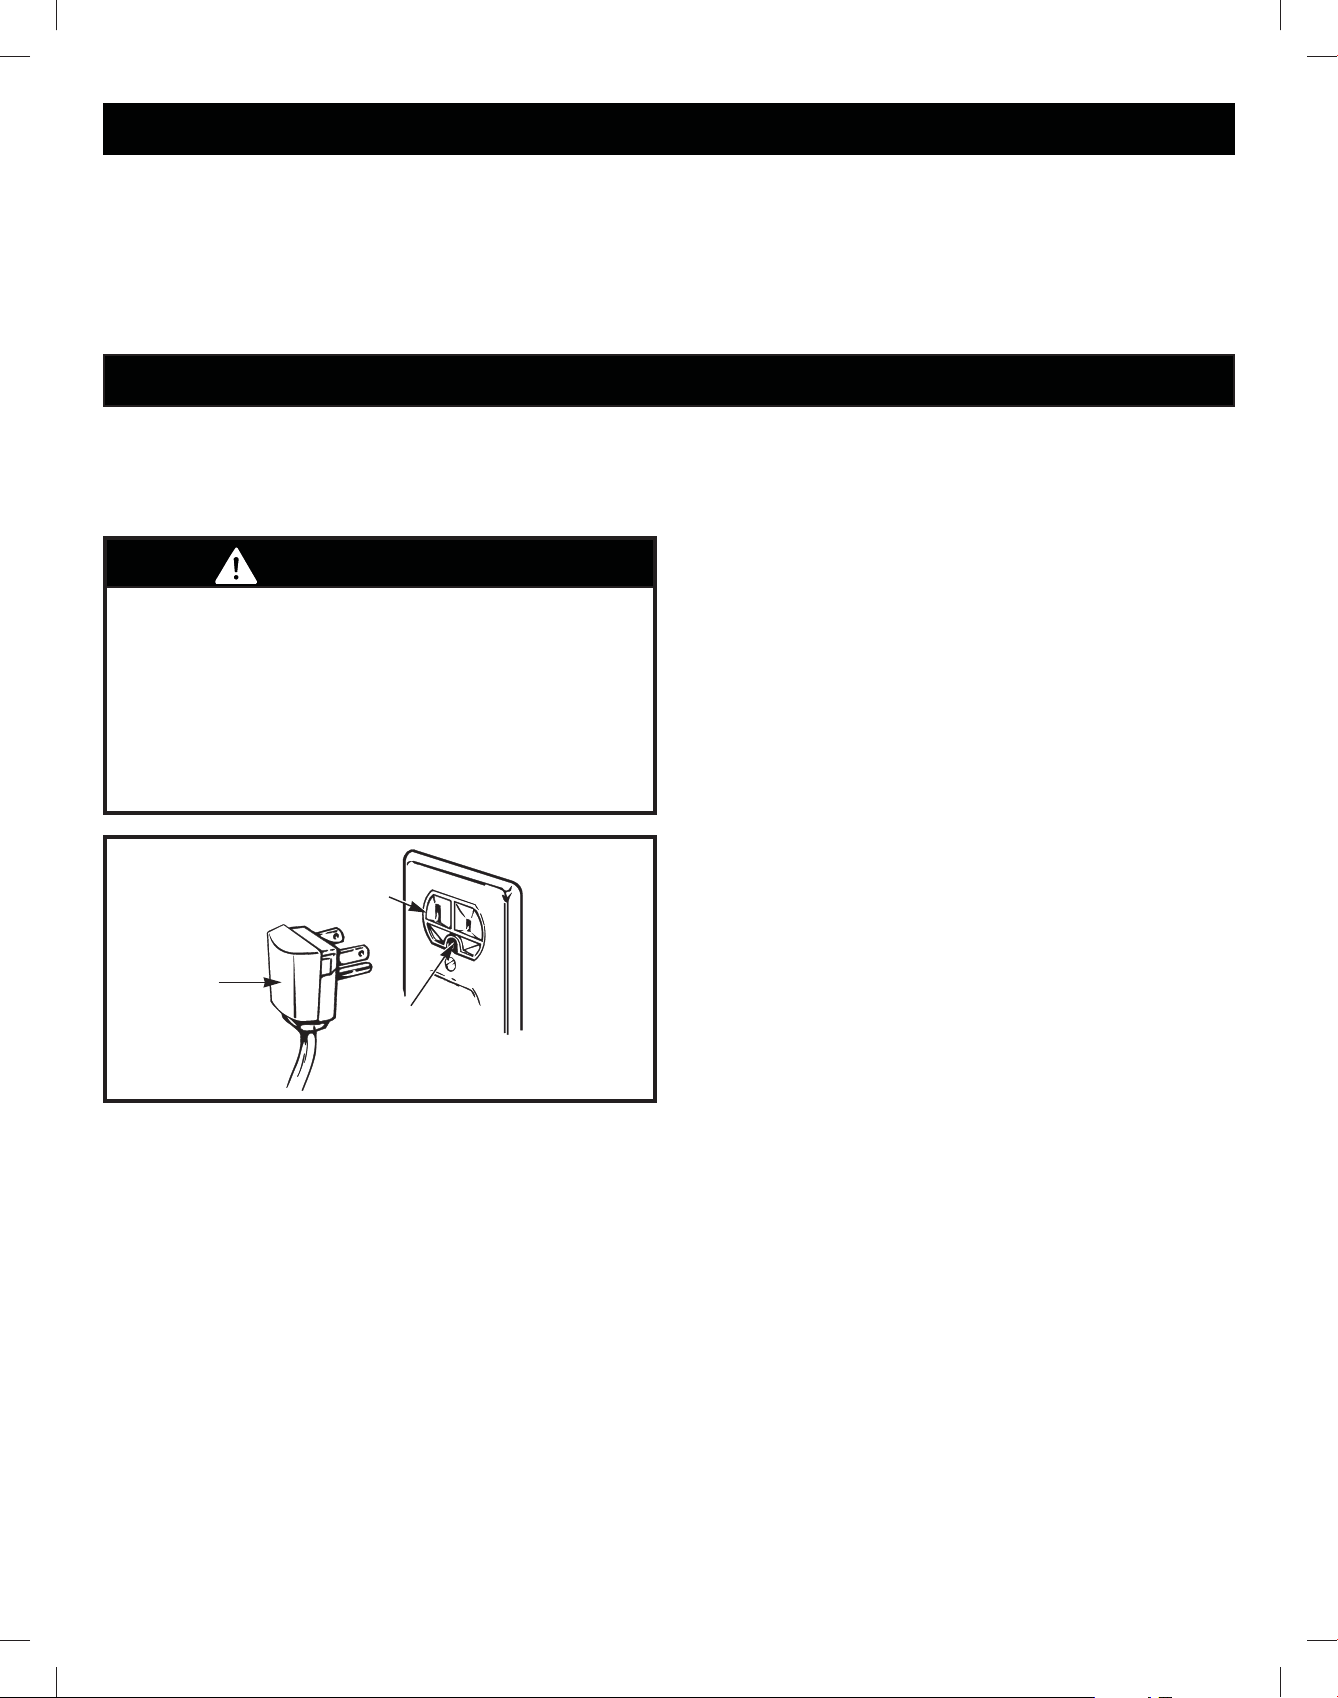
56
ELIMINACIÓN DE CFC
REQUISITOS ELÉCTRICOS Y DE CONEXIÓN A TIERRA
ADVERTENCIA
Es posible que su antiguo refrigerador tenga un sistema de
UHIULJHUDFLÚQTXHXVH&)&FORURpXRURFDUERQRV6HFUHHTXH
los CFC son perjudiciales para el ozono estratosférico.
IMPORTANTE: Lea atentamente la siguiente
información.
PARA CONECTAR LA ELECTRICIDAD
MÉTODO DE CONEXIÓN A TIERRA
RECOMENDADO
El refrigerador debe estar siempre enchufado a su toma
de corriente individual conectada a tierra adecuadamente
con una tensión nominal de 115 voltios, 60 Hz, sólo CA,
y protegida mediante fusible a 15 ó 20 amperios. Esta
FRQoJXUDFLÚQSURSRUFLRQDHOPHMRUUHQGLPLHQWR\DOPLVPR
tiempo, evita la sobrecarga de la instalación eléctrica de
la casa que podría provocar un peligro de incendio debido
a un sobrecalentamiento de los cables. Se recomienda
disponer de un circuito independiente para la exclusiva
alimentación de este electrodoméstico.
Use un receptáculo que no se pueda apagar con un interruptor
o una cadena de tracción. No utilice un alargador de corriente.
Si únicamente se dispone de una toma de corriente de 2
clavijas, será responsabilidad y obligación suya sustituirla
por otra de 3 clavijas con una conexión a tierra adecuada.
Riesgo de descargas eléctricas
POR MOTIVOS DE SEGURIDAD PERSONAL, este
electrodoméstico debe estar conectado a tierra
DGHFXDGDPHQWH6ROLFLWHDXQHOHFWULFLVWDFXDOLoFDGRTXH
compruebe la toma de corriente y el circuito eléctrico
para asegurarse de que la toma de corriente está
correctamente conectada a tierra.
Si va a desechar su antiguo refrigerador, asegúrese de que
XQWÑFQLFRFXDOLoFDGRVHHQFDUJXHGHUHWLUDUHOUHIULJHUDQWH
de CFC para su adecuada eliminación. Si de forma
intencionada libera este refrigerante de CFC, podría estar
sujeto a multas y penas de prisión según lo previsto en la
legislación medioambiental.
USO DE CABLES ALARGADORES
Debido a los posibles peligros de seguridad que se pueden
producir bajo ciertas condiciones, no se recomienda el
uso de un cable alargador.Sin embargo, si a pesar de ello
elige usar un cable alargador, es absolutamente necesario
que sea un cable alargador para electrodomésticos de 3
FODYLMDVFRQFRQH[LÚQDWLHUUD\FODVLoFDFLÚQ8/((88
que disponga de un enchufe y una toma de corriente con
FRQH[LÚQDWLHUUD\TXHODFODVLoFDFLÚQHOÑFWULFDGHOFDEOH
VHDGHDPSHULRVPÕQLPR\YROWLRV
El uso de un cable alargador aumentará la separación
necesaria para la parte posterior del refrigerador.
Enchufe
de conexión
a tierra de
3 clavijas
Toma de pared
con conexión a
tierra de 3 clavijas
Antes de usar el
electrodoméstico, asegúrese
de disponer de una conexión a
tierra adecuada.
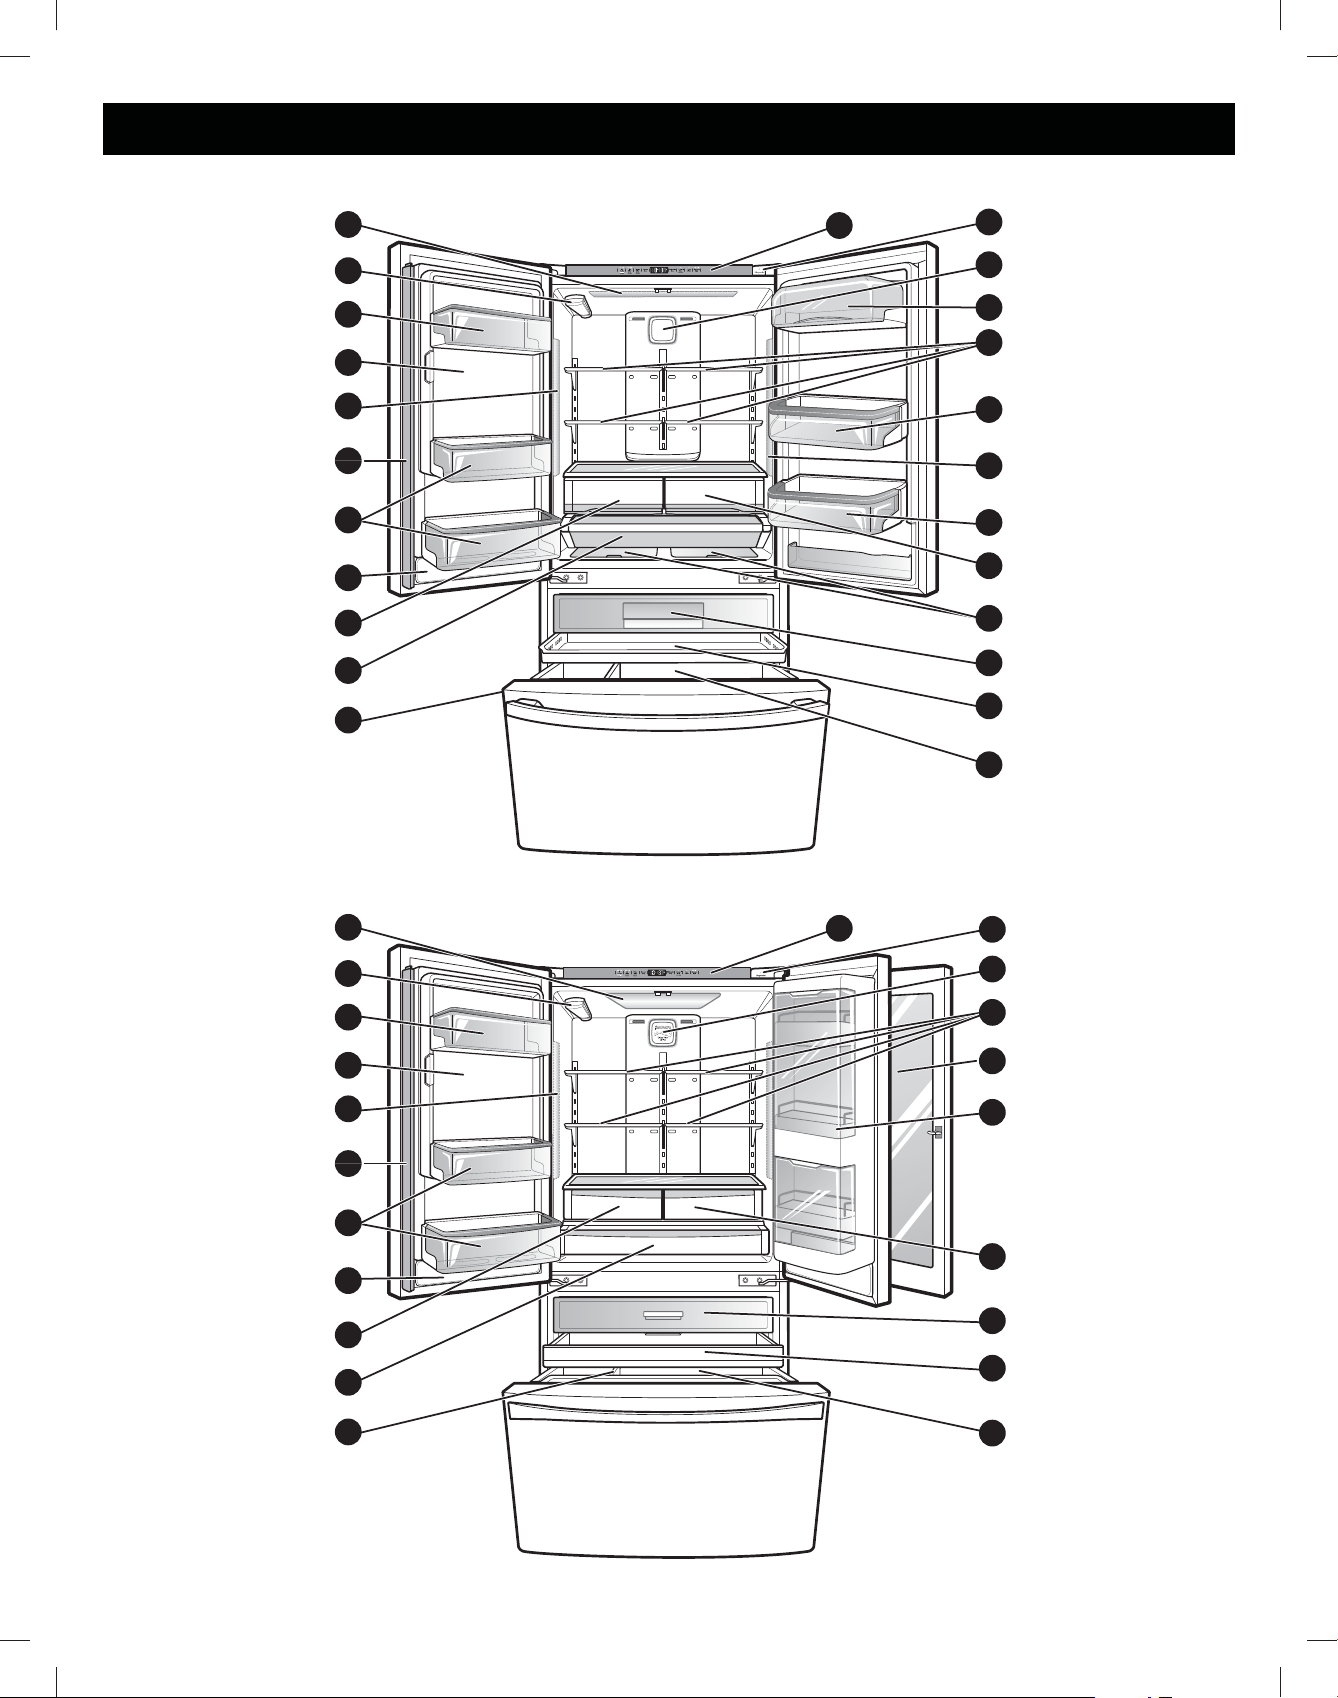
57
COMPONENTES Y CARACTERÍSTICAS
J
A
B
E
C
D
C
G
I
N
K
M
E
O
R
P
P
T
S
F
L
H
Q
U
v Puerta estándar
v PreView Grab-N-Go
A
B
E
C
D
C
G
H
I
J
V
L
M
O
W
T
S
Q
U
F
K

58
COMPONENTES Y CARACTERÍSTICAS
Use esta página para familiarizarse con los componentes y características del refrigerador. Para su comodidad, se incluyen
referencias a las páginas.
NOTA: Esta guía cubre varios modelos distintos. El refrigerador que ha adquirido puede tener algunos o todos los componentes
que se enumeran a continuación. Es posible que las ubicaciones de las características que se indican no coincidan con su modelo.
Puerta del
compartimento
de hielo
Depósito de hielo
Fábrica de
Hielo
A
Luz del refrigerador
B
Filtro de agua (interior)
C
%DQGHMDVGHSXHUWDoMDV
D
Compartimento de hielo
(Máquina de hielo y depósito de hielo)
E
Refrigerador de luz
F
Parteluz articulado
G
Tapa del depósito de agua
H
Cajón con control de humedad
I
Cajón despensero
con control de temperatura
J
Divisor Durabase
K
Panel de control
L
Altavoz de diagnósticos
M
Filtro de aire
N
Bandeja para lácteos
O
Estantes del refrigerador
P
Bandejas de puerta ajustables
Q
Cajón hermético
R
Cajón extraíble Top
S
Medio cajón extraíble
T
Durabase
V
PreView Grab-N-Go
W
Compartimiento Grab-N-Go
59
INSTALACIÓN DEL REFRIGERADOR
ADVERTENCIA ADVERTENCIA
ADVERTENCIA
ADVERTENCIA
DESEMBALAJE DEL REFRIGERADOR
Antes de su uso, retire la cinta adhesiva y todas las etiquetas
temporales del refrigerador. No retire las etiquetas que
indican advertencias, la etiqueta de modelo y número de
serie ni la Hoja técnica que está ubicada debajo del frontal
del refrigerador, detrás de la rejilla de la base.
Para retirar los restos de pegamento o cinta adhesiva,
frote enérgicamente el área con el pulgar. Los residuos de
pegamento o cinta adhesiva también se pueden retirar
fácilmente frotando con los dedos una pequeña cantidad
de lavavajillas líquido sobre el adhesivo. Aclare con agua
templada y seque el área.
1RXWLOLFHLQVWUXPHQWRVDoODGRVDOFRKROGHVLQIHFWDQWH
OÕTXLGRVLQpDPDEOHVQLOLPSLDGRUHVDEUDVLYRVSDUDUHWLUDU
la cinta adhesiva o el pegamento. Estos productos pueden
GDÙDUODVXSHUoFLHGHOUHIULJHUDGRU
Los estantes del refrigerador están instalados en la posición
de transporte. Vuelva a colocar los estantes de acuerdo con
sus necesidades personales de almacenamiento.
Riesgo de peso excesivo:
El desplazamiento e instalación del refrigerador deben
realizarse entre dos o más personas. Si no se respeta esta
advertencia, se podrán producir lesiones en la espalda o
de otro tipo.
Riesgo de peso excesivo:
Su refrigerador es muy pesado. Al desplazarlo para su
limpieza o mantenimiento, asegúrese de proteger el suelo.
Siempre debe tirar del refrigerador en línea recta cuando
los desplace. No menee ni zigzaguee el refrigerador al
tratar de desplazarlo, ya que esto puede dañar el suelo.
Riesgo de explosión:
0DQWHQJDORVPDWHULDOHVRYDSRUHVLQpDPDEOHVFRPR
la gasolina, lejos del refrigerador. Si no se respeta esta
advertencia, existe peligro de explosión, incendio o muerte.
Conecte únicamente a un suministro de agua potable.

60
INSTALACIÓN DEL REFRIGERADOR
INSTALACIÓN (continuación)
Para evitar el ruido y la vibración, es necesario
nivelar la unidad e instalarla en un suelo sólidamente
construido. Si es necesario, ajuste los pies de nivelación
para compensar los desniveles del suelo. La parte
delantera debe estar ligeramente más elevada que la
posterior para ayudar al cierre de la puerta. Los pies
de nivelación se pueden girar con facilidad inclinando
ligeramente el aparato. Gire los pies de nivelación
en sentido horario para elevar la unidad y en sentido
antihorario para bajarla. (Consulte NIVELACIÓN Y
ALINEACIÓN DE LAS PUERTAS).
NOTA: No se recomienda realizar la instalación
VREUHPRTXHWDVXSHUoFLHVGHEDOGRVDVpH[LEOHVXQD
plataforma o en una estructura con soporte inestable.
Instale este electrodoméstico en una zona donde la
temperatura esté entre 13 °C (55 °F) y 43 °C (110 °F).
Si la temperatura alrededor del electrodoméstico es
demasiado baja o demasiado alta, la capacidad de
refrigeración se verá gravemente afectada.
3. Seleccione un lugar en el que se pueda conectar
fácilmente el suministro de agua para la máquina
GHĄKLHORDXWRPÊWLFD
NOTA: La presión del agua debe ser 20-120 psi o 138-
827 kPa o 1,4-8,4 kgf/cm². Si el refrigerador se instala
en un area con baja presión de agua (menos de 20 psi)
se puede instalar una bomba de carga para compensar
la baja presión.
4./DGLVWDQFLDGHPDVLDGRSHTXHÙDGHVXSHUoFLHV
adyacentes puede minimizar la capacidad de
congelación y aumentar los cargos de consumo
eléctrico. Deje una distancia de 24 pulgadas (61 cm.)
como mínimo al frente del refrigerador para poder abrir
las puertas, y de al menos 2 pulgadas (5,08 cm.) entre
la parte trasera del refrigerador y la pared.
ANTES DE USAR
Limpie el refrigerador a fondo y quite todo el polvo
acumulado durante el transporte.
Instale los accesorios como el depósito de cubito de
hielo, los cajones, los estantes, etc., en su sitio. Están
empaquetados juntos para evitar posibles daños durante
el transporte.
3. Deje que el refrigerador esté en funcionamiento durante
al menos dos o tres horas antes de almacenar comida
GHQWURGHÑO&RPSUXHEHHOpXMRGHDLUHIUÕRHQHO
compartimiento del congelador para asegurarse de que
la refrigeración sea la adecuada. Su refrigerador ya
está listo para su uso.
INSTALACIÓN
El refrigerador debe estar siempre enchufado a su toma
de corriente individual conectada a tierra adecuadamente
con una tensión nominal de 115 voltios, 60 Hz, sólo CA,
y protegida mediante fusible a 15 ó 20 amperios. Esta
FRQoJXUDFLÚQSURSRUFLRQDHOPHMRUUHQGLPLHQWR\DOPLVPR
tiempo, evita la sobrecarga de la instalación eléctrica de
la casa que podría provocar un peligro de incendio debido
a un sobrecalentamiento de los cables. Se recomienda
disponer de un circuito independiente para la exclusiva
alimentación de este electrodoméstico.
2" (5.08 cm)
Riesgo de descarga:
Para reducir el riesgo de descarga eléctrica, no instale
el refrigerador en un área húmeda ni mojada.
ADVERTENCIA
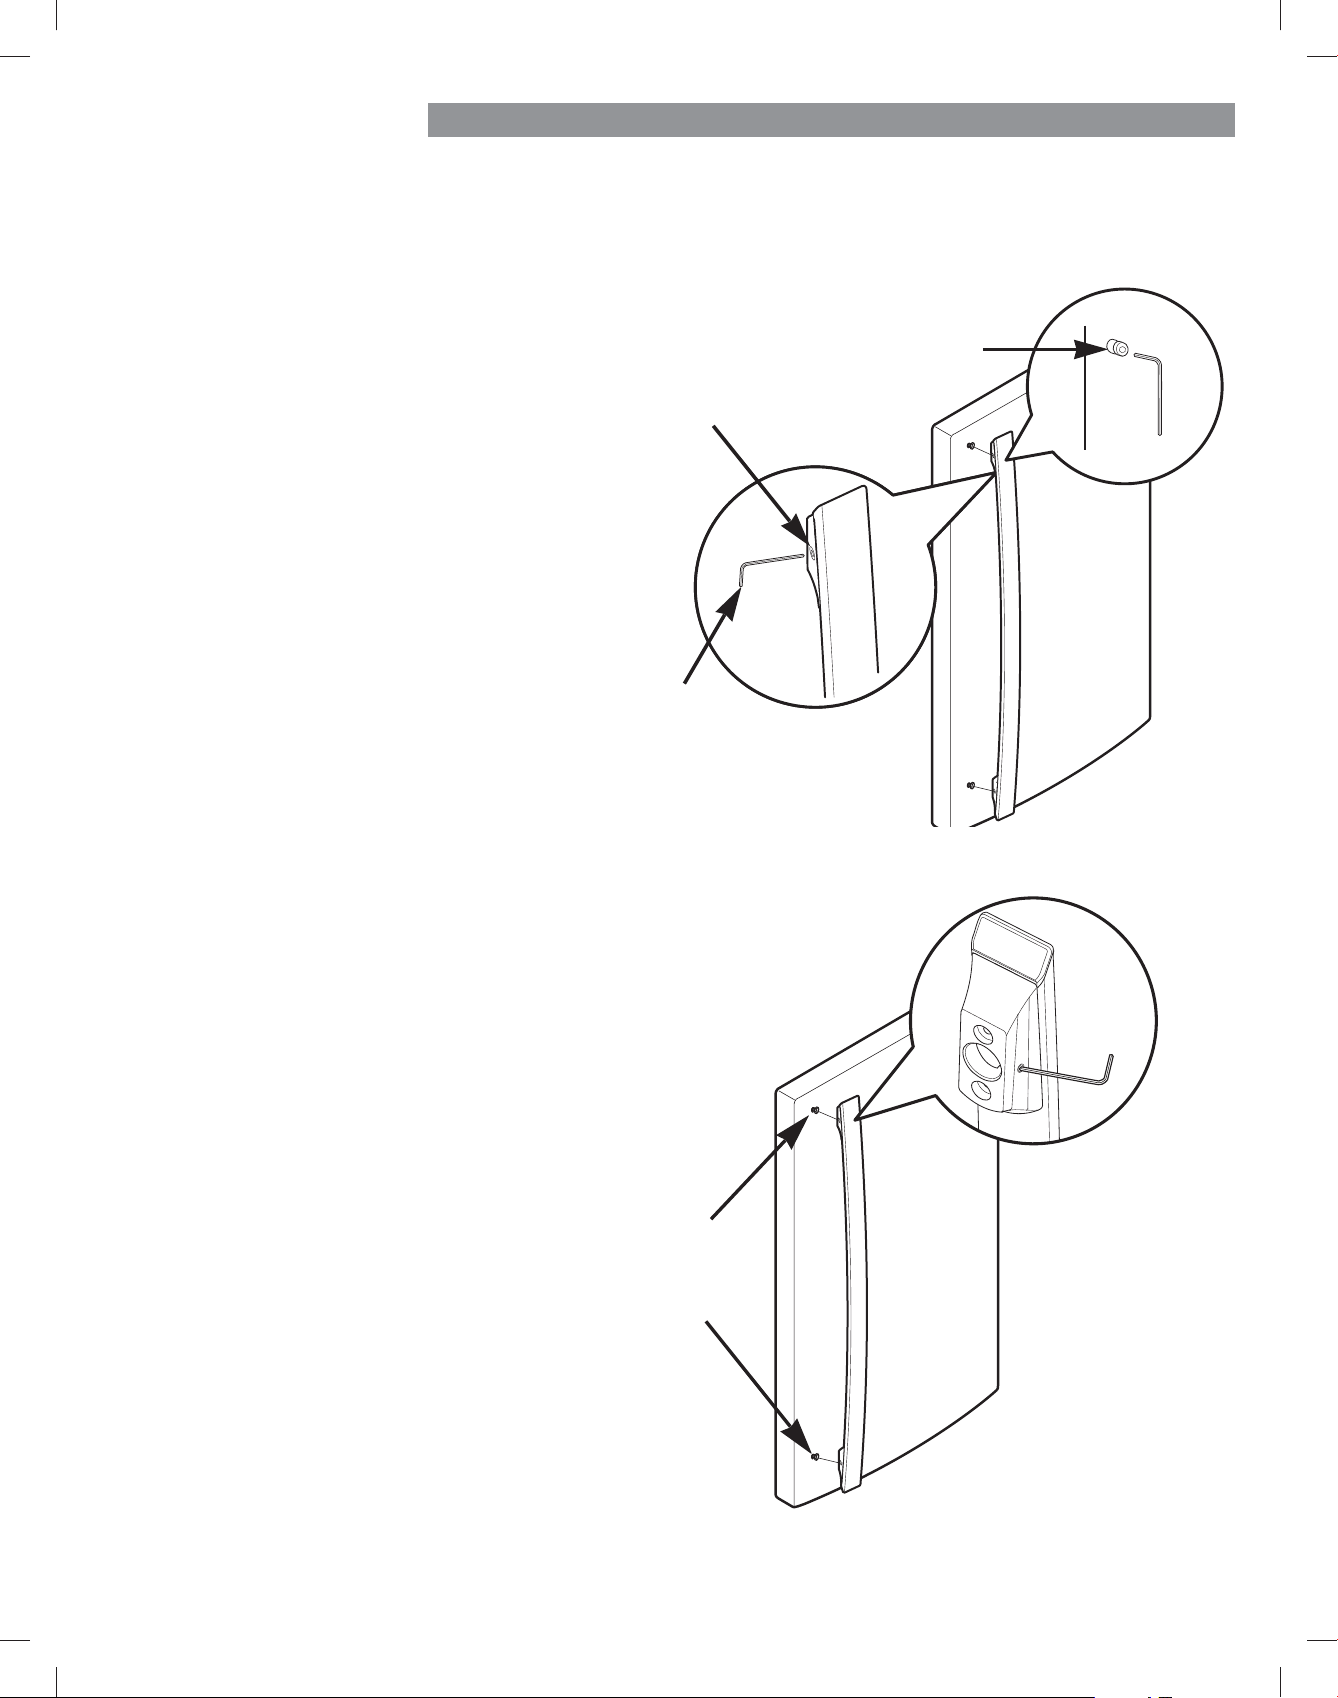
61
INSTALACIÓN DEL REFRIGERADOR
CÓMO DESMONTAR LA MANIJA DE
LA PUERTA DEL REFRIGERADOR
NOTA: El aspecto de la manija puede ser distinto
del que aparece en las
ilustraciones de esta página.
Desmontaje de la manija del refrigerador
$pRMHORVWRUQLOORVGHSUHVLÚQFRQXQDOODYH
Allen de 2,5 mm (Ĕ/Ċĉ pulg.) y retire la manija.
NOTA: Si es necesario apretar o retirar los
sujetadores de montaje de la manija, use una
llave Allen de 6,4 mm (¼ pulg.).
NOTA: Siempre se recomienda desmontar las puertas cuando sea necesario desplazar el refrigerador a través de un espacio
estrecho. Si es necesario desmontar las manijas, siga las instrucciones que se indican a continuación.
Sujetadores
de montaje
Tornillo de
presión
Llave Allen
CÓMO SUSTITUIR LA MANIJA DE
LA PUERTA DEL REFRIGERADOR
NOTA: El aspecto de la manija puede ser
distinto del que aparece en las ilustraciones
GHĄHVWDSÊJLQD
Sustitución de la manija de la puerta
GHOĄUHIULJHUDGRU
Coloque la manija en la puerta ajustando
las zonas de contacto de la manija
coincidan sobre los sujetadores de montaje
y apretando los tornillos de presión con una
llave Allen de 2,5 cm (Ĕ/Ċĉ pulg.).
NOTA: Si es necesario apretar o retirar
ORVĄVXMHWDGRUHVGHPRQWDMHGHODPDQLMD
XVHĄXQDOODYH$OOHQGHPPSXOJ
Sujetadores
de
montaje
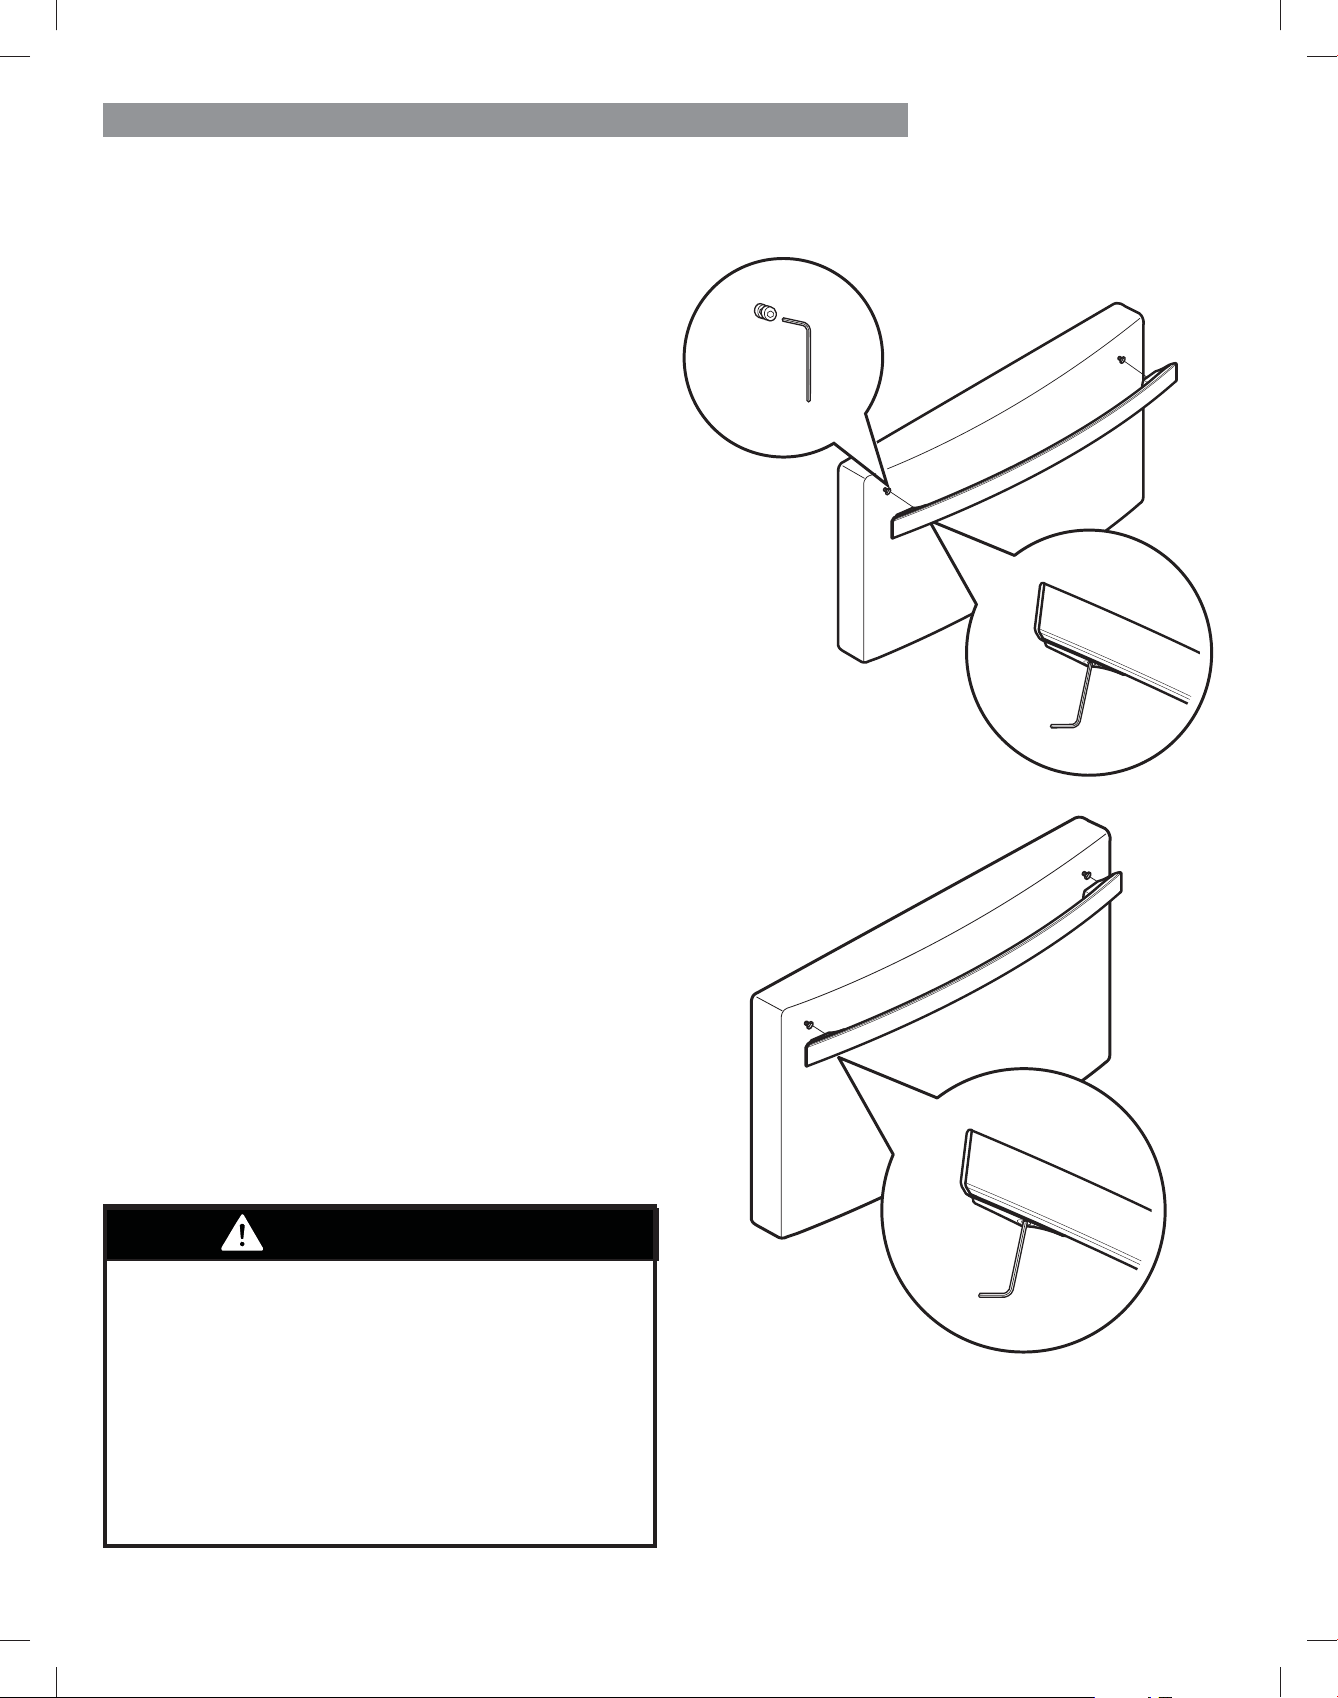
62
INSTALACIÓN DEL REFRIGERADOR
CÓMO SUSTITUIR LA MANIJA DE LA
PUERTA DEL CONGELADOR
NOTA: El aspecto de la manija puede ser distinto del que
aparece en las ilustraciones de esta página.
Sustitución de la manija del cajón del congelador
Coloque la manija en la puerta ajustando las zonas de
contacto de la manija coincidan sobre los sujetadores
de montaje y apretando los tornillos de presión con una
OODYH$OOHQGHPPêSXOJ
NOTA: Si es necesario apretar o retirar los sujetadores
de montaje de la manija, use una llave Allen de 6,4 mm
(¼ pulg.).
CÓMO DESMONTAR LA MANIJA DE LA
PUERTA DEL CONGELADOR
NOTA: El aspecto de la manija puede ser distinto del que
aparece en las ilustraciones de esta página.
Desmontaje de la manija del cajón del congelador
$pRMHORVWRUQLOORVGHSUHVLÚQXELFDGRVHQODSDUWHLQIHULRU
GHODPDQLMDFRQXQDOODYH$OOHQGHPPêSXOJ\
retire la manija.
NOTA: Si es necesario apretar o retirar los sujetadores
GHĄPRQWDMHGHODPDQLMDXVHXQDOODYH$OOHQGHPP
(¼ pulg.).
NOTA: Siempre se recomienda desmontar las puertas cuando sea necesario desplazar el refrigerador a través de un espacio
estrecho. Si es necesario desmontar las manijas, siga las instrucciones que se indican a continuación.
ADVERTENCIA
Para el montaje o desmontaje de los tiradores:
v Sujete el tirador con fuerza para evitar que se caiga o
le cause lesiones.
v Evite que el tirador oscile cerca de personas o animales.
v ,QVHUWHHORULoFLRGHVRSRUWHGHOWLUDGRUHQODWRUQLOORGH
topoe de la puerta exactamente, y coloque los tornillos
GHVXMHFLÚQSDUDoMDUHOWLUDGRUHQVXSRVLFLÚQ
v Compruebe que no haya ningún espacio entre la puerta
y el tirador tras colocar éste en su posición.

63
INSTALACIÓN DEL REFRIGERADOR
Para desmontar la puerta izquierda del refrigerador:
En la parte posterior del refrigerador, saque el tubo de
agua del adaptador de la virola situada en el conector
presionando el anillo de liberación del adaptador (vea la
imagen inferior).
1. Abra la puerta. Retire el tornillo de la tapa de la bisagra
superior (1).
2. Use un destornillador plano para hacer palanca y
levantar los ganchos (no se ven en la imagen) situados en
la parte inferior delantera de la tapa (2). Levante la tapa.
3. Retire la tapa. Saque el tubo (3).
4. Desconecte todos los mazos de cables (4).
5. Retire el tornillo de conexión a tierra (5).
6. Gire la palanca de la bisagra (6) en sentido antihorario.
Levante la bisagra superior (7) libre del pestillo de
palanca de la bisagra (8).
PRECAUCIÓN: Cuando levante la bisagra libre del
pestillo, tenga cuidado de que la puerta no se caiga
hacia delante.
7. Levante la puerta del pasador de la bisagra central y
retire la puerta.
8. Coloque la puerta, con el interior hacia arriba, sobre
XQDVXSHUoFLHTXHQRUD\H
1. Abra la puerta. Retire el tornillo de la tapa de la bisagra
superior (1). Levante la tapa (2).
2. En el modelo PreView, desconecte todos los arneses de
cables.
3. Gire la palanca de la bisagra (3) en sentido horario.
Levante la bisagra superior (4) libre del pestillo de
palanca de la bisagra (5).
PRECAUCIÓN: Cuando levante la bisagra libre del
pestillo, tenga cuidado de que la puerta no se caiga
hacia delante.
4. Levante la puerta del pasador de la bisagra central y
retire la puerta.
5. Coloque la puerta, con el interior hacia arriba, sobre
XQDVXSHUoFLHTXHQRUD\H
ADVERTENCIA
Riesgo de descargas eléctricas
v Desenchufe el suministro eléctrico al refrigerador
antes de realizar la instalación. Si no se respeta esta
advertencia, pueden producirse lesiones graves e
incluso la muerte.
v No ponga las manos, pies ni ningún otro objeto en las
rejillas de ventilación de aire, la rejilla de la base o
debajo del refrigerador. Podría sufrir lesiones o recibir
una descarga eléctrica.
Para desmontar la puerta derecha del refrigerador:
DESMONTAJE Y SUSTITUCIÓN
DE LAS PUERTAS DEL REFRIGERADOR
PRECAUCIÓN: Antes de comenzar, saque los alimentos y
quite las bandejas de las puertas.
ADVERTENCIA
Riesgo de peso excesivo:
El desplazamiento e instalación de las puertas del
refrigerador deben realizarse entre dos o más personas.
Si no se respeta esta advertencia, se podrán producir
lesiones en la espalda o de otro tipo.
NOTA: Tenga cuidado cuando trabaje con la bisagra y la
rejilla de la base. Podría sufrir alguna lesión.
(2)
(3)
(4)
(5)
(1)
(1)
(2)
(3)
(6)
(7)
(8)
(4)
(5)

64
INSTALACIÓN DEL REFRIGERADOR
Reinstalación de la puerta del refrigerador
Puerta izquierda
1. Baje la puerta hasta insertarla en el pasador de la
bisagra central (10).
2. Encaje la bisagra superior (7) sobre el pestillo de palanca
de la bisagra (8) y ajústela en su sitio. Gire la palanca (6)
en sentido horario para bloquear la bisagra.
3. Instale el tornillo de conexión a tierra (5) y conecte los
dos mazos de cables (4).
4. Empuje el tubo de agua (3) situado en la parte superior
de la puerta izquierda dentro del agujero situado junto
a la bisagra izquierda de la parte superior del aparato
hasta que salga por la parte trasera.
5. Inserte el tubo de suministro de agua (3) dentro del
conector hasta que sólo se vea un trazo de escala.
,QVHUWHFRPSOHWDPHQWHHOWXERVREUHPPìSXOJ
6. Enganche las pestañas situadas en el lado izquierdo de
la tapa de la bisagra (1) situada debajo del borde de la
bisagra superior (7) y coloque la tapa en su sitio. Inserte
y apriete el tornillo de la tapa (1).
Puerta derecha
1. Baje la puerta hasta insertarla en el pasador de la
bisagra central (9).
2. Encaje la bisagra superior (4) sobre el pestillo de palanca
de la bisagra (5) y ajústela en su sitio. Gire la palanca (3)
en sentido antihorario para bloquear la bisagra.
3. Enganche las pestañas situadas en el lado derecho de
la tapa de la bisagra (2) situada debajo del borde de la
bisagra superior (4) y coloque la tapa en su sitio. Inserte
y apriete el tornillo de la tapa (1).
PRECAUCIÓN
Después de insertarlo, tire del
tubo para asegurarse de que está
bien seguro y vuelva a insertar la
abrazadera.
Tubo
Trazo de escala
Virola
Abrazadera
(10)
(9)
(2)
(5)
(1)
(3)
(4)
(1)
(3)
(6)
(7)
(8)
(4)
(5)
(2)
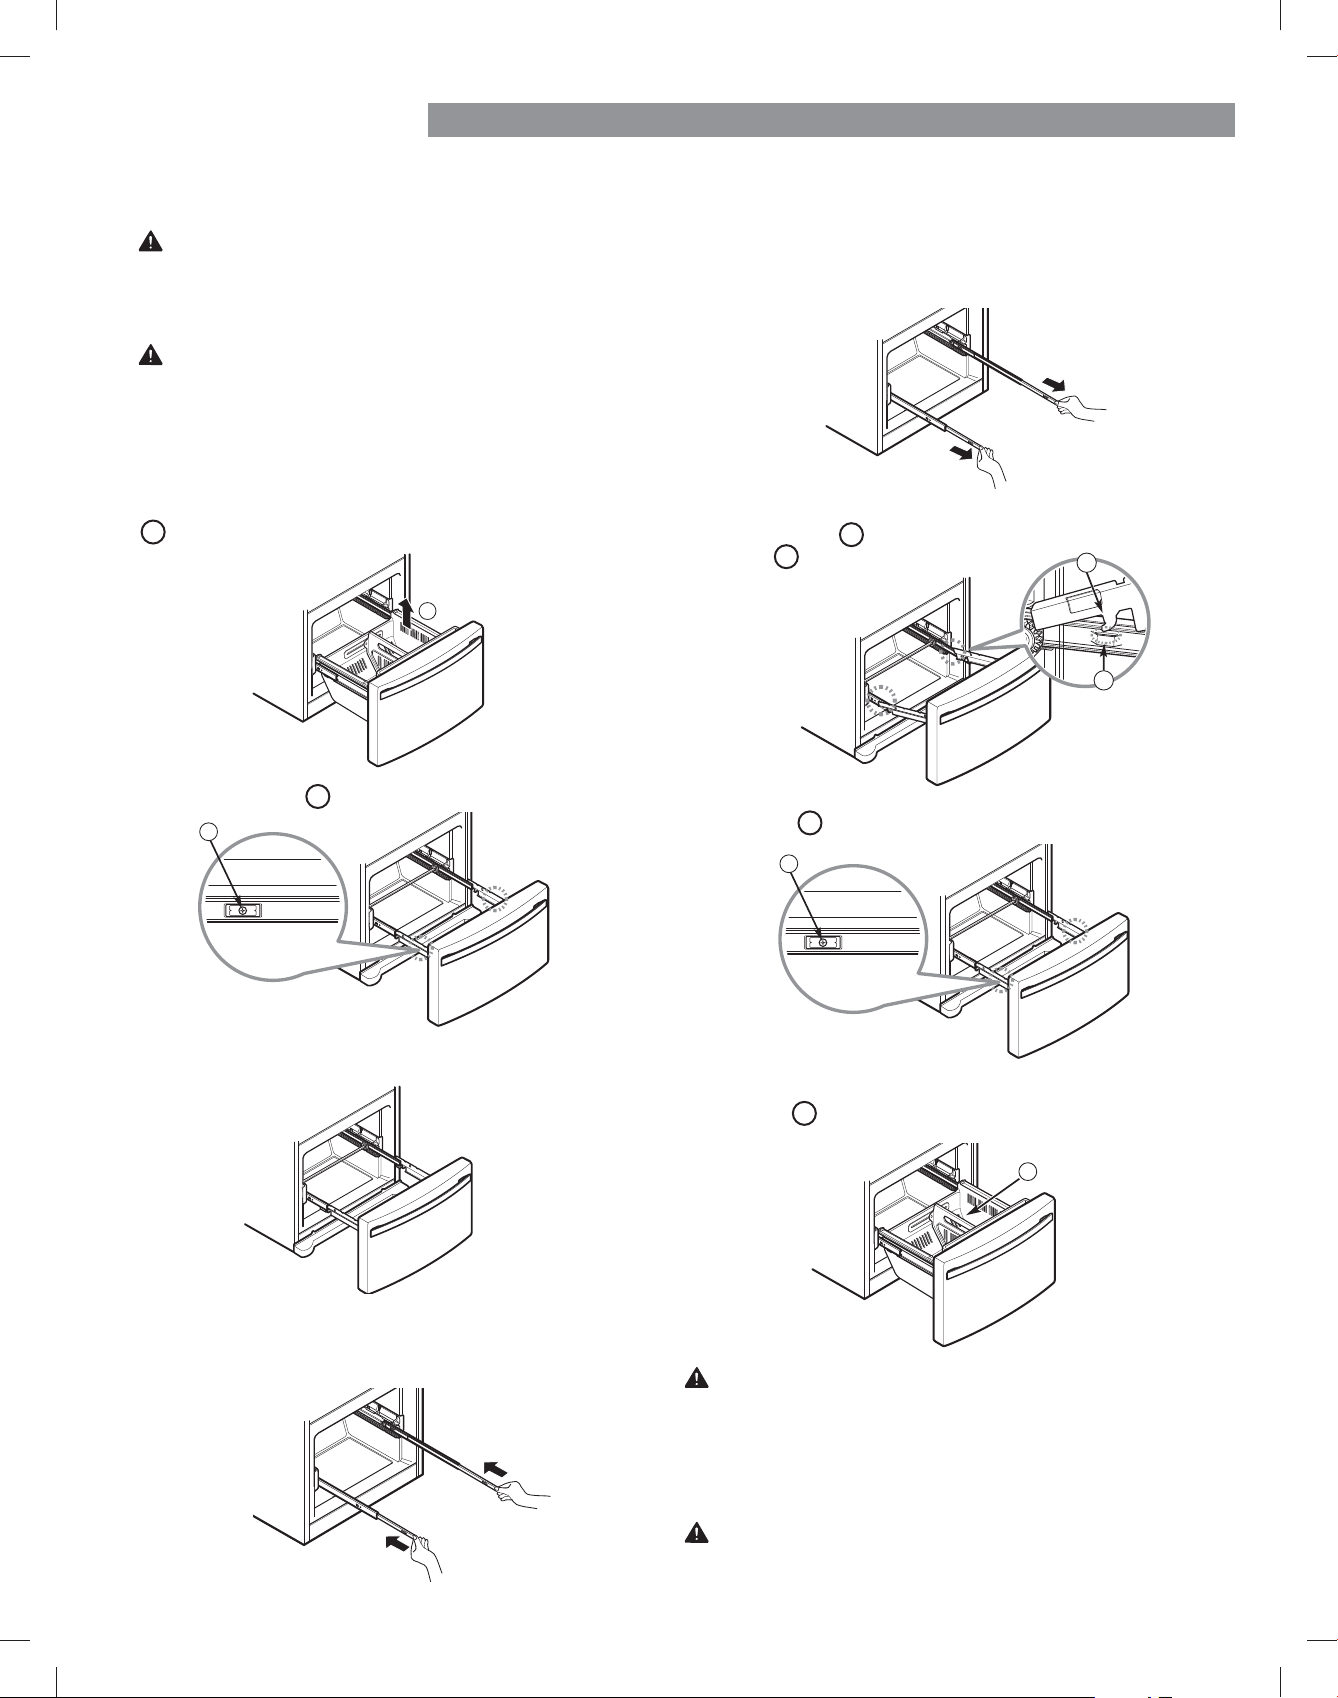
65
INSTALACIÓN DEL REFRIGERADOR
Retire los tornillosĄ
Ądel riel en ambos lados.
Sujete el cajón por cada lado y tire de él hacia arriba
para separarlo de los rieles.
Con las dos manos, sujete la barra central y empújela
hacia dentro de forma que ambos rieles se deslicen de
forma simultánea.
PRECAUCIÓN: No agarre la manija mientras
desmonta o vuelve a colocar el cajón. La manija podría
salirse y provocar lesiones personales.
2
Con las dos manos, sujete la barra central y tire
de ella hacia fuera hasta que ambos rieles queden
completamente extendidos.
%DMHODSXHUWDKDVWDVXSRVLFLÚQoQDO\DSULHWHORV
tornillos
Ą
3
Ąubicados a ambos lados.
Sujete el cajón por cada lado y enganche los soportes
de la puerta
Ą
Ąpara introducirlos en las pestañas de los
rieles
Ą
Ąque hay a ambos lados.
ADVERTENCIA: Si se retira el divisor Durabase, habrá
VXoFLHQWHHVSDFLRDELHUWRSDUDTXHXQQLÙRRXQD
mascota puedan gatear hasta el interior. Para evitar
el atrapamiento accidental de un niño o na mascota,
\HOSRVLEOHULHVJRGHDVo[LD12SHUPLWDTXHQLÙRV\
mascotas toquen ni se acerquen al cajón del congelador.
ADVERTENCIA: NO pise ni se siente en el cajón del
congelador.
3
CÓMO DESMONTAR EL CAJÓN
DEL CONGELADOR
CÓMO INSTALAR EL CAJÓN
DEL CONGELADOR
2
1
ADVERTENCIA: El desplazamiento e instalación del
cajón del congelador deben realizarse entre dos o más
personas. Si no se respeta esta advertencia, se podrán
producir lesiones en la espalda o de otro tipo.
NOTA: (QODVoJXUDVVLJXLHQWHVQRVHPXHVWUDHOFDMÚQ
extraíble situado por encima del cajón del congelador
para que la imagen sea más clara.
4
1
Con el cajón completamente sacado, inserte la cesta
inferior
Ą
4
Ąen la estructura de rieles.
Saque el cajón todo lo posible. Retire la cesta inferior
Ą
Ąlevantándola del sistema de rieles.
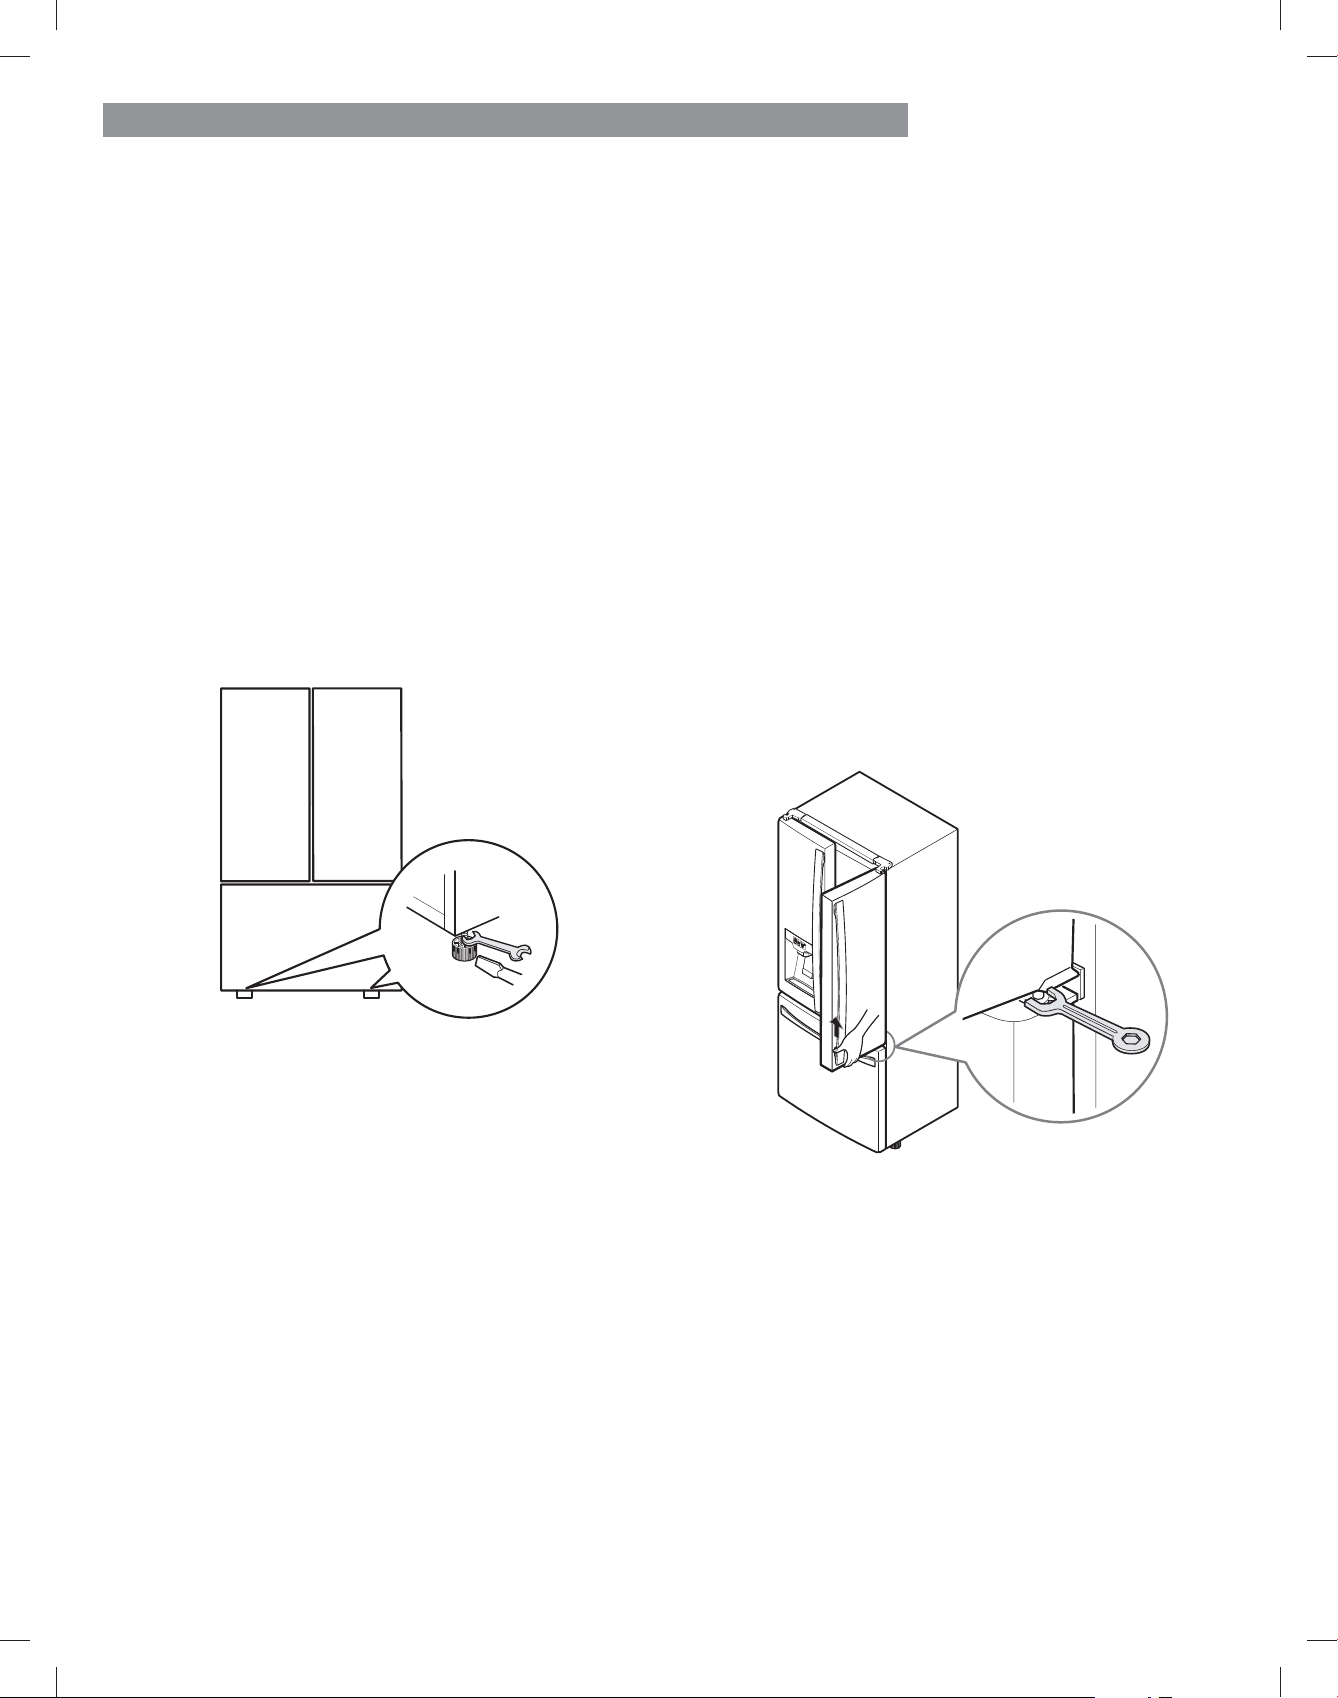
66
INSTALACIÓN DEL REFRIGERADOR
NIVELACIÓN Y ALINEACIÓN DE LAS PUERTAS
Nivelación
Tras la instalación, enchufe el cable de alimentación del
refrigerador en una toma de corriente de 3 clavijas con conexión
DWLHUUD\HPSXMHHOUHIULJHUDGRUKDVWDVXSRVLFLÚQGHoQLWLYD
Su refrigerador tiene dos pies de nivelación delanteros:
uno a la derecha y otro a la izquierda. Ajuste los pies para
PRGLoFDUODLQFOLQDFLÚQGHGHODQWHKDFLDDWUÊVRGHODGRD
lado. Si el refrigerador parece inestable o si desea que las
puertas se cierren más fácilmente, ajuste la inclinación del
refrigerador mediante las siguientes instrucciones:
NOTA: Herramientas necesarias: Llave de 18 mm (ĒĒ/Ĉč”)
RĄXQGHVWRUQLOODGRUSODQR
Gire los pies de nivelación en sentido antihorario para
levantar esa parte del refrigerador o en sentido horario
para bajarla. Puede que sean necesarios varios giros
del pie de nivelación para ajustar la inclinación del
refrigerador.
NOTA: Si una persona empuja hacia atrás la parte superior
del refrigerador, descargará parte del peso de los pies de
nivelación. Esta operación facilitará el ajuste de los pies.
3. Vuelva a abrir ambas puertas y compruebe que se
cierran con facilidad. Si no es así, incline el refrigerador
ligeramente hacia atrás girando ambos pies de
nivelación en sentido antihorario. Puede que sean
necesarios varios giros y debería girar ambos pies
GHĄQLYHODFLÚQHOPLVPRQàPHURGHJLURV
NOTA: Su refrigerador tiene un diseño exclusivo con dos
puertas para alimentos frescos. Cada una de las puertas
se puede abrir o cerrar de forma independiente de la
otra. Puede que deba ejercer una ligera presión en las
puertas para cerrarlas completamente.
Alineación de las puertas
Ambas puertas del refrigerador tienen una tuerca ajustable,
ubicada en la bisagra inferior, para levantarlas y bajarlas
FRQHOoQGHDOLQHDUODVFRUUHFWDPHQWH
Si el espacio entre las puertas es desigual, siga estas
instrucciones para alinear las puertas de forma uniforme:
Use la llave (incluida con el Manual de Uso y Cuidado)
para girar la tuerca que hay en la bisagra de la puerta
para ajustar la altura. En sentido horario para levantar
RĄHQĄVHQWLGRDQWLKRUDULRSDUDUHEDMDUODDOWXUD

67
USO DEL REFRIGERADOR
Dispensador
El dispensador servirá agua, cubitos de hielo o hielo picado.
Presione el ícono de su elección: (
1
) agua (
2
) cubitos de
hielo (
3
) hielo picado. Cuando lo pulse, se iluminará el
ícono.
AJUSTE DE LOS CONTROLES
v El rango del control de temperatura del refrigerador de
£&D£&£)D£)Pulse el botón de temperatura
del refrigerador para alternar entre los ajustes de
temperatura disponibles con incrementos de un grado
HQĄFDGDSXOVDFLÚQ.
v El rango del control de temperatura del congelador
HVGH£&D£&£)D£)Pulse el botón
de Freezer Temp para alternar entre los ajustes de
temperatura disponibles con incrementos de un grado
HQĄFDGDSXOVDFLÚQ
NOTA: Cada vez que cambie los ajustes de los controles,
debe esperar 24 horas antes de realizar ajustes adicionales.
Los controles están correctamente ajustados cuando la leche
o el zumo están a la temperatura fría de su gusto y el helado
HVWÊoUPH6LODWHPSHUDWXUDHVGHPDVLDGRIUÕDRGHPDVLDGR
caliente en alguno de los compartimientos, cambie el ajuste
en incrementos de un grado cada vez. Espere 24 horas a que
se estabilice la temperatura antes de volver a ajustarla.
Flujo de aire
Asegúrese de no bloquear los conductos de ventilación al cargar
VXUHIULJHUDGRU'HORFRQWUDULRUHVWULQJLUÊHOpXMRGHDLUH\SXHGH
que la temperatura del refrigerador suba demasiado o que se
acumule humedad en su interior. (Consulte el siguiente diagrama
GHpXMRGHDLUH
Temperatura
1
2
3
NOTA: El dispensador no funcionará si hay alguna puerta
abierta o si esta activado el bloqueo de control.
NOTA: Si se ilumina el icono de bloqueo, no se puede
controlar el tipo de dispensador.
Compruebo el modo ON/OFF de bloqueo de control en el
panel de control.
ADVERTENCIA: La pantalla de control es táctil. Un
exceso de humedad en la pantalla puede provocar una
avería. Recuerde mantener la pantalla limpia y seca.
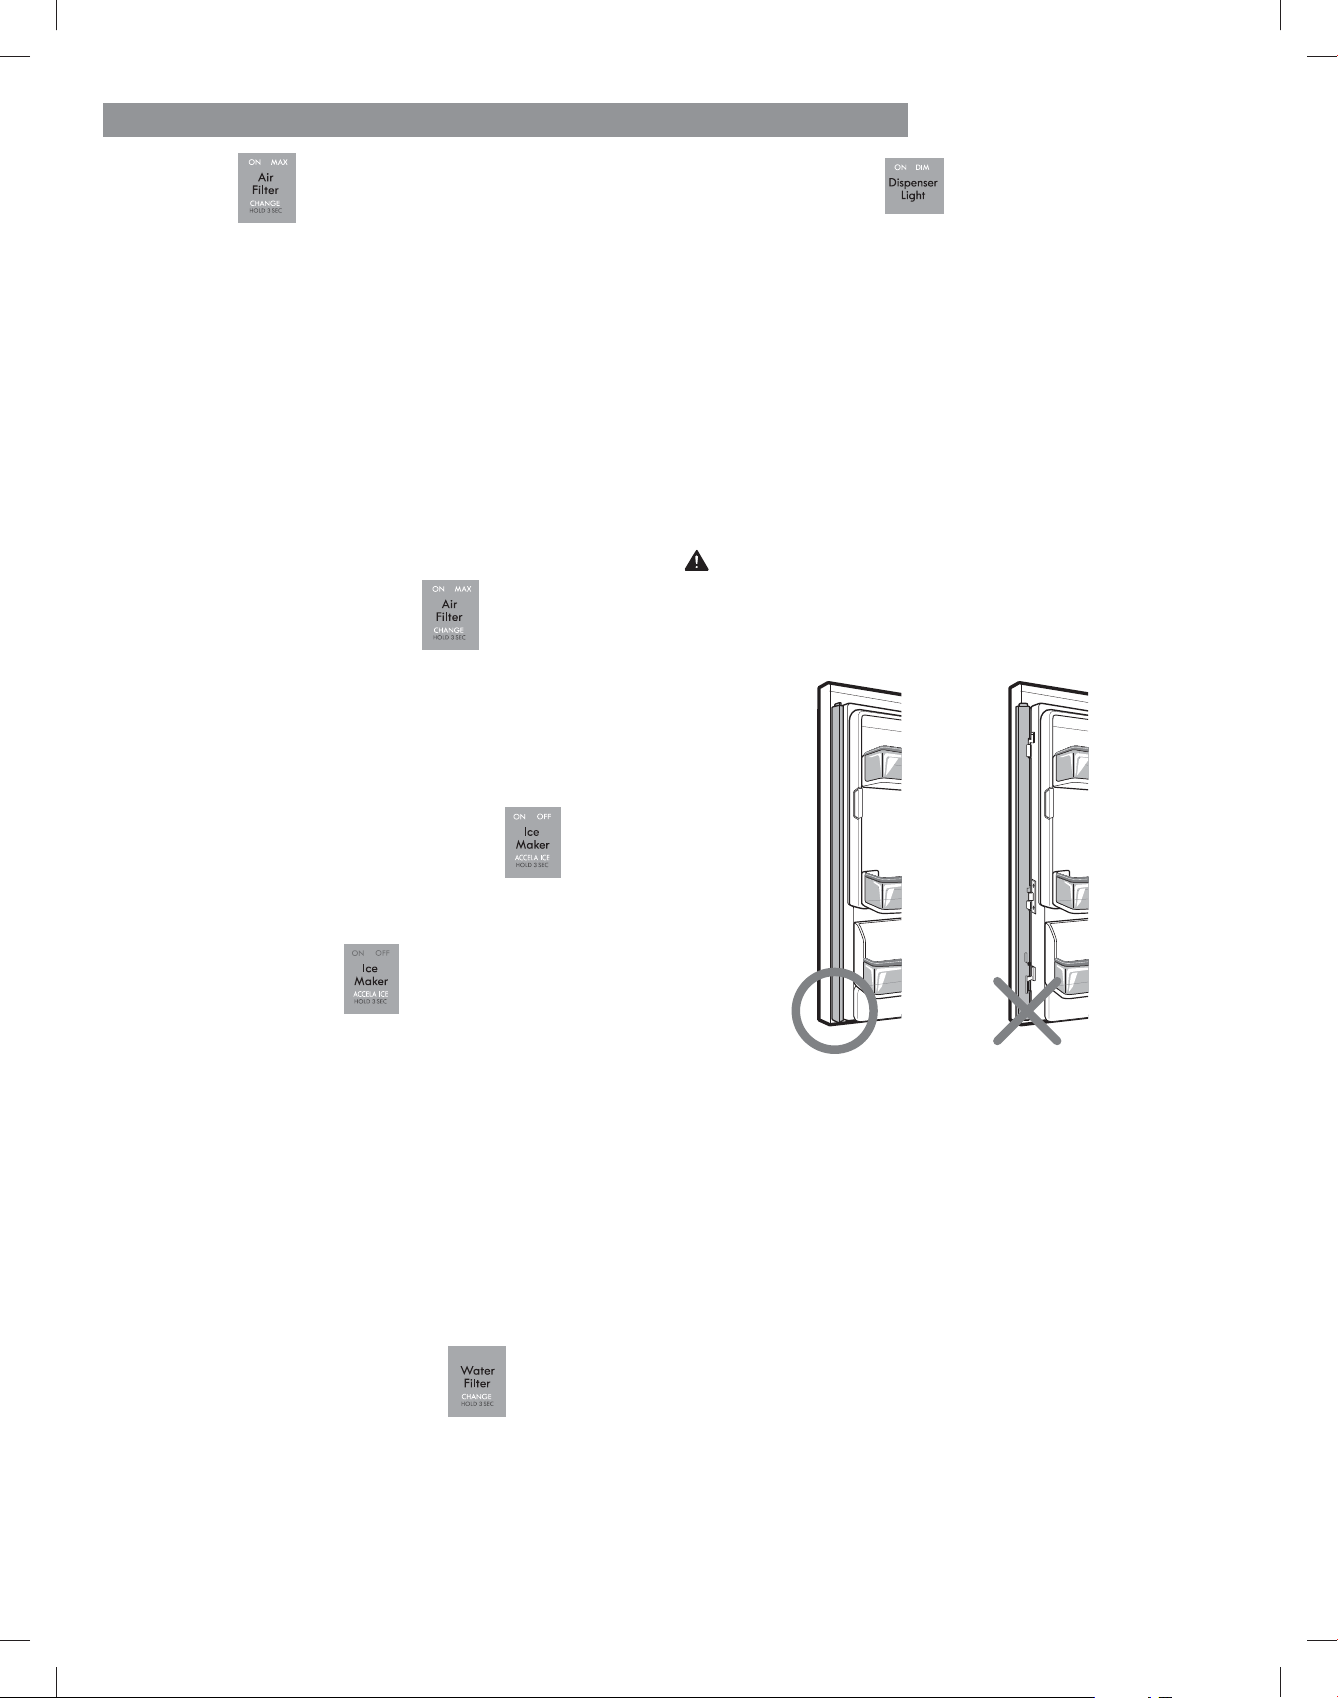
68
USO DEL REFRIGERADOR
PRECAUCIÓN
Para reducir el riesgo de rayar la puerta o romper el
parteluz, asegúrese de que el parteluz de la puerta del
refrigerador esté siempre plegado.
Luz del dispensador
Esta luz tiene tres posiciones: Encendido, Apagado y
Tenue. Seleccione la opción Tenue durante la noche.
La luz se encenderá automáticamente con toda
su luminosidad cunando se presione el panel del
dispensador.
Parteluz articulado
Esta característica es una tira de metal situada en la
puerta izquierda que se articula (gira) 90 grados al
cerrarse la puerta y forma un parteluz (base) para que
se sellen las juntas de las puertas izquierda y derecha.
Filtro de aire
(OoOWURGHDLUHD\XGDDHOLPLQDURORUHVGHOUHIULJHUDGRU
(OoOWURGHDLUHWLHQHGRVFRQoJXUDFLRQHV$XWR\
0$;(QHOPRGR$XWRHOoOWURGHDLUHVHHQFHQGHUÊ\
apagará en un ciclo de diez minutos para el encendido
\FLHQWRGLH]PLQXWRVSDUDHODSDJDGR6LVHFRQoJXUD
HQHOPRGR0$;HOoOWURGHDLUHSHUPDQHFHUÊ
encendido de forma continua durante cuatro horas,
apagándose y encendiéndose en un ciclo de diez
minutos para el encendido y cinco minutos para el
DSDJDGR'HVSXÑVGHFXDWURKRUDVHOoOWURGHDLUH
pasará al modo Auto.
v El modo Auto es el modo predeterminado.
v 3UHVLRQHHOERWÚQGHOoOWURGHDLUHXQDYH]SDUDHQWUDUHQ
modo MAX
5HVWDEOHFLPLHQWRGHOoOWURGHDLUH
&XDQGRVHHQFLHQGHHOÕFRQR&+$1*(HVWRVLJQLoFD
TXHHOoOWURGHDLUHGHEHVHUUHHPSOD]DGR/XHJR
GHUHHPSOD]DUHOoOWURGHDLUHPDQWHQJDSXOVDGRHO
botón Air Filter durante tres segundos para apagar la
OX]GHOÕFRQR6HUHFRPLHQGDFDPELDUHOoOWURGHDLUH
aproximadamente cada 6 meses.
Máquina de hielo ENCENDIDA/APAGADA
v Para encender o apagar el sistema de fabricación de
hielo, pulse el botón Ice Maker.
Accela Ice (Accela hielo)
v Cuando se mantiene pulsado el botón Ice Maker (del
sistema de producción de hielo) durante tres segundos,
VHLOXPLQDUÊHOJUÊoFRHQODSDQWDOOD\FRQWLQXDUÊ
encendido durante 24 horas. Esta función se apagará
automáticamente pasadas las 24 horas.
NOTA: Cuando seleccione la función Accela Ice, el icono de
la Máquina de hielo se cambiará brevemente a APAGADO
y luego volverá a ENCENDIDO. Esto es normal.
v Puede detener esta función manteniendo pulsado el
botón una vez más.
v Esta función aumenta tanto las capacidades de
congelación como las de fabricación de hielo.
5HVWDEOHFLPLHQWRGHOoOWURGHDJXD
Cuando se enciende el ícono CHANGE, indica que es
QHFHVDULRFDPELDUHOoOWURGHDJXD8QDĄYH]FDPELDGR
HOoOWURGHDJXDPDQWHQJDSXOVDGRHOERWÚQWater Filter
durante tres segundos para apagar la luz del indicador.
(OoOWURGHDJXDVHGHEHFDPELDUDSUR[LPDGDPHQWH
cada seis meses.

69
USO DEL REFRIGERADOR
Alarma de la puerta
v Cuando se conecta el refrigerador a la corriente, la
alarma de la puerta está inicialmente activada. Si pulsa
el botón Door Alarm, la pantalla cambiará a OFF y la
función de alarma de la puerta se desactivará.
v Si la puerta del refrigerador o del congelador se deja
abierta durante más de 60 segundos, sonará el tono de
la alarma para avisarle de que la puerta está abierta.
v Cuando se cierre la puerta, la alarma de la puerta dejará
de sonar.
Bloqueo de los controles
v Cuando se conecta inicialmente el refrigerador a la
corriente, la función de bloqueo Lock está desactivada.
v Si desea activar la función Lock para bloquear los
demás botones, mantenga pulsado el botón Control Lock
durante tres segundos como mínimo. Aparecerá el icono
Control Lock y se activará la función Lock.
v Cuando se activa la función Lock, no funciona ningún
otro botón. Los botones del dispensador también se
desactivan.
v Para desactivar la función Lock, mantenga presionado
el botón Control Lock durante aproximadamente
WUHVĄVHJXQGRV
)XQFLÚQSDUDFDPELDUHOPRGRGHWHPSHUDWXUD£)!£&
Si desea convertir °F a °C o viceversa, mantenga
presionados los botones Freezer Temp y Refrigerator Temp
al mismo tiempo durante aproximadamente cinco segundos.
Modo demostración (sólo para uso en tienda)
El modo demostración desactiva toda la refrigeración en las
secciones refrigerador y congelador para ahorrar energía
mientras está en exposición en una tienda. Cuando se activa,
en el panel de control aparece la palabra OFF.
Para desactivar:
Con la puerta del refrigerador abierta, mantenga presionados
los botones Refrigerator Temp y Ice Maker al mismo
tiempo durante cinco segundos. El panel de control pitará y
DSDUHFHUÊQORVDMXVWHVGHWHPSHUDWXUDSDUDFRQoUPDUTXHVH
ha desactivado el modo de demostración. Use el mismo same
procedimiento para activar el modo de demostración.

70
USO DEL REFRIGERADOR
DEFINICIONES
LED inteligente (blanco):
1RWLoFDDOXVXDULRTXHHOHOHFWURGRPÑVWLFRHVWÊFRQHFWDGR
al internet.
LED Smart Grid (blanco):
1RWLoFDDOXVXDULRTXHHODSDUDWRHVFDSD]GHUHFLELUXQD
señal, conocida como evento de respuesta a la demanda, de
un sistema de administración de energía de la compañía de
electricidad.
LED Modo Grid (rojo):
1RWLoFDDOXVXDULRTXHHODSDUDWRHVWÊUHGXFLHQGRR
demorando el consumo de energía debido a la señal que
recibió del sistema de administración de energía de la
compañía de electricidad. El LED permanece iluminado
durante períodos críticos de precios y precios en tiempo real
o durante un período de alta demanda de electricidad.
LLEVANDO A CABO LA CONEXIÓN
Necesita los siguientes dispositivos y la siguiente aplicación
para utilizar el Smart Grid (Red Inteligente) y otras funciones
inteligentes en su refrigerador.
Dispositivos Requeridos: Router Inalámbrico, Refrigerador
Kenmore Elite Smart, y un dispositivo móvil.
Aplicación Requerida: Kenmore Smart App.
CONEXIÓN DEL REFRIGERADOR
Consulte la Guía de Inicio Rápido incluida con su aparato
inteligente para obtener instrucciones detalladas acerca de
ODFUHDFLÚQGHXQDFXHQWD.HQPRUH\GHODFRQoJXUDFLÚQ
del aparato para la operación desde su dispositivo móvil.
Para asistencia adicional, visite
KWWSeeZZZNHQPRUHFRPeVPDUW
NOTA : Cuando se haya conectado con éxito a Internet, se
encenderá el LED del ícono SMART del panel de control.
FUNCIONES INTELIGENTES
DESCRIPCIÓN GENERAL
La conectividad Kenmore Smart transforma su relación con
su hogar. Puede personalizar la manera en que los productos
Kenmore Smart operan basandose en su horario y rutina
diaria, haciendo la vida más fácil y proporcionando una
mayor tranquilidad. Esto lo hace permitiéndole vincular y
manejar sus productos Kenmore Smart en una aplicación,
WRGRÑVWRGHVGHPDUFDVGHFRQoDQ]DGHVGHXQWHOÑIRQR
inteligente, tableta o computador.
Este es un electrodoméstico de conexión-lista, permitiéndole
monitorearlo y controlarlo remotamente desde su teléfono
inteligente mediante la aplicación Kenmore® Smart.
Para iniciar necesitará lo siguiente:
v Electrodoméstico Kenmore Elite Smart
v Enrutador (Router) Wi-Fi de casa conectado a internet.
v Teléfono inteligente
v Aplicación Kenmore Smart
Para más información acerca de su electrodoméstico
Kenmore Elite® Smart, por favor visite www.Kenmore.com/
smart.
La función Smart Grid controla el uso de energía, lo que le
ayudará a ahorrar energía durante períodos de uso pico.
Puede suspender la función SMART GRID en cualquier
momento (usando la aplicación o el botón Smart Grid).
6PDUW*ULGUHVSRQGHDODVQRWLoFDFLRQHVGHVXFRPSDÙÕD
de electricidad para ejecutar tareas de alto consumo
de energía solamente fuera de los horarios picos de
uso, cuando la demanda de electricidad es menor. Estas
QRWLoFDFLRQHVVHFRQRFHQFRPRVHÙDOHVGHUHVSXHVWDDOD
demanda. Si el refrigerador recibe una señal de respuesta a
la demanda de la compañía de electricidad, este encenderá
el LED del MODO GRID en el panel de control y regulará
el consumo de energía conforme a la señal recibida. El
refrigerador responderá a las señales recibidas de la
compañía de electricidad siempre que el aparato esté
conectado a Internet y la función Smart Grid esté activada.

71
USO DEL REFRIGERADOR
INSTRUCCIONES DE SMART GRID
IMPORTANTE:
Debe conectar su electrodoméstico Kenmore Smart al
internet y luego registrarlo en su cuenta a manera de usar la
función Smart Grid.
Consulte la Guía de inicio rápido suministrada con el
dispositivo para obtener instrucciones sobre cómo registrar
su aparato utilizando la aplicación de Kenmore Smart (app).
(OERWÚQ6PDUW*ULGVLUYHSDUDGRVoQHV
1) conectar o desconectar de Internet, 2) activar o
desactivar/ suspender la capacidad de respuesta a la
demanda del aparato.
NOTA: Este es un electrodoméstico de conexión-lista,
permitiéndole monitorearlo y controlarlo remotamente desde
su teléfono inteligente mediante la aplicación Kenmore®
Smart.
Para conectar el refrigerador a Internet:
Haga referencia a la Guía de Inicio Rápido que vino con su
electrodoméstico inteligente para instrucciones detalladas
sobre la creación de una cuenta Kenmore y el ajuste de su
electrodoméstico para operaciones conectadas desde su
teléfono inteligente.
Esta Guía de Uso y Cuidado contiene información e
instrucciones para operar su electrodoméstico desde el
panel de control del mismo. Para asistencia adicional, visite
http://www. kenmore.com/smart
NOTA: Si ninguna conexión es llevada a cabo después de
cinco
EFuncionamiento de Smart Grid:
Una vez conectado y registrado, el aparato es capaz de
aceptar una señal de su compañía de electricidad. La
señal, conocida como “respuesta a la demanda”, ajustará el
funcionamiento del refrigerador para reducir el consumo de
energía durante un período que puede ir desde unos pocos
minutos hasta un máximo de 4 horas. La fábrica de hielo
también se suspenderá durante este tiempo. Al abrirse la
puerta del refrigerador se pueden cancelar ciertas señales
de respuesta a la demanda.
El LED del modo Grid (rojo) quedará iluminado de forma
oMDFXDQGRVHHVWÑUHFLELHQGRHVWDVHÙDO3DUDGHVDFWLYDU
la señal y evitar que esta se siga aceptando en el futuro,
presione y suelte el botón Smart Grid. Tanto el modo Grid
como el LED de Smart Grid se apagarán. Presione y suelte
el botón Smart Grid de nuevo para activar la aceptación
de la señal de respuesta a la demanda. El LED del botón
Smart Grid se volverá a iluminar. El LED del modo Grid
se iluminará cuando se envíe otra señal de respuesta a la
demanda.

72
USO DEL REFRIGERADOR
Declaración sobre exposición a la radiación de RF de la
FCC
Este equipo cumple con los límites de exposición a la
radiación de la FCC establecidos para entornos no
controlados. Este transmisor no se debe ubicar ni opera junto
con ninguna otra antena ni transmisor.
El equipo se debe instalar y operar con una distancia
mínima de
20 cm (7. 8 pulg.) entre la antena y su cuerpo
Los usuarios deben seguir las instrucciones de operació
HVSHFÕoFDVGHPDQHUDWDOGHFXPSOLUFRQODVQRUPDVGH
exposición a la RF.
(VSHFLoFDFLRQHVPÚGXOR/$1LQDOÊPEULFR
Model 2AHU4-KMTD17
Rango de Frecuencia 2412 à 2462 MHz
Potencia de Salida (Máx) IEEE 802.11b: 18.26 dBm
IEEE 802.11g: 20.10 dBm
IEEE 802.11n: 20.07 dBm
Aviso de la FCC
(para el módulo transmisor contenido en este producto)
Este equipo fue probado y se determinó que cumple con
los límites para los dispositivos digitales de Clase B, en
conformidad con la parte 15 de las normas de la FCC.
Estos límites están diseñados para ofrecer una protección
razonable contra interferencias dañinas en una instalación
residencial. Este equipo genera, usa y puede emitir energía
de radiofrecuencia y, si no se instala y utiliza de acuerdo
con las instrucciones, podría causar interferencias dañinas a
las comunicaciones por radio. Sin embargo, no se garantiza
que dicha interferencia no pueda ocurrir en instalaciones
particulares. Si este equipo causa interferencia dañina a la
recepción de radio o televisión, que se puede determinar
encendiendo y apagando el equipo, se aconseja al usuario
intentar corregir la interferencia realizando alguna de las
siguientes acciones:
- Reoriente o reubique la antena receptora.
- Aumente la separación entre el equipo y el receptor.
- Conecte el equipo a una toma de corriente en un circuito
diferente del utilizado por el receptor.
- Solicite ayuda a su vendedor o a un técnico especialista en
radio o TV.
Este dispositivo cumple con la parte 15 de las normas
de la FCC. La operación está sujeta a las dos siguientes
condiciones:
1) este dispositivo no debe causar interferencia dañina, y
2) este dispositivo debe aceptar cualquier interferencia
recibida, incluso aquellas que pudieran causar un
funcionamiento no deseado del dispositivo.
&XDOTXLHUFDPELRRPRGLoFDFLÚQHQODFRQVWUXFFLÚQGH
este dispositivo que no cuente con la aprobación expresa
de la parte responsable del cumplimiento puede anular la
autorización del usuario para operar este equipo.
Aviso de Software de Fuente Abierta
Para obtener el código fuente contenido en este producto
bajo LGPL y otras licencias de fuente abierta, visite http://
kenmore.com/opensource. Adicional al código fuente, todos
los términos referidos de licencia, exenciones de garantía,
y avisos de derechos de autor están disponibles para
descarga.

73
USO DEL REFRIGERADOR
DEPÓSITO DE HIELO DEL INTERIOR DE LA PUERTA
PRECAUCIÓN
Mantenga manos y herramientas fuera del compartimiento
de hielo de la puerta y del conducto del dispensador. Si no
se respeta esta advertencia, podrían producirse daños o
lesiones personales.
La máquina de hielo dejará de fabricar hielo cuando
el depósito de hielo del interior de la puerta esté lleno.
Si necesita más hielo, vacíe el depósito de hielo en el
depósito de hielo adicional ubicado en el compartimiento
del congelador. Durante el uso, el hielo puede caer de
forma irregular lo que puede provocar una lectura errónea
del nivel de cubitos de hielo y detener la elaboración de
cubitos. Agitar el depósito de hielo para nivelar los cubitos
que contiene puede reducir este problema.
NOTA: Almacenar latas u otros elementos en el depósito
GHĄKLHORSRGUÕDGDÙDUODPÊTXLQDGHKLHOR
Mantenga la puerta del compartimiento de hielo
herméticamente cerrada. Si no se cierra herméticamente,
el aire frío del depósito de hielo congelará los alimentos
del compartimiento del refrigerador. Esto también podría
provocar que la máquina deje de fabricar hielo.
NOTA: Se recomienda vaciar el recipiente para el hielo si el
botón ON/OFF de la máquina de hielo del panel de control
ha permanecido en la posición OFF durante un periodo
prolongado de tiempo.
Tire o empuje de la manija de la puerta para abrir o
cerrar el compartimiento de hielo.
Para sacar el depósito de hielo del interior de la puerta,
agarre la manija delantera, levante ligeramente la parte
inferior y despacio saque el depósito tal como se muestra.
3. Para volver a instalar el depósito de hielo del interior
de la puerta, incline ligeramente el depósito al volver
a colocarlo en su sitio para evitar el contacto con la
máquina de hielo.
4. Evite tocar el apagado automático (brazo palpador)
al colocar el recipiente del hielo. Consulte la etiqueta
que hay en la puerta del compartimiento de hielo para
obtener información más detallada.
Apagado automático
(brazo palpador).
PRECAUCIÓN
Mientras manipule
el depósito de hielo,
mantenga las manos
lejos del área de la
bandeja de la máquina
de hielo para evitar
lesiones personales.
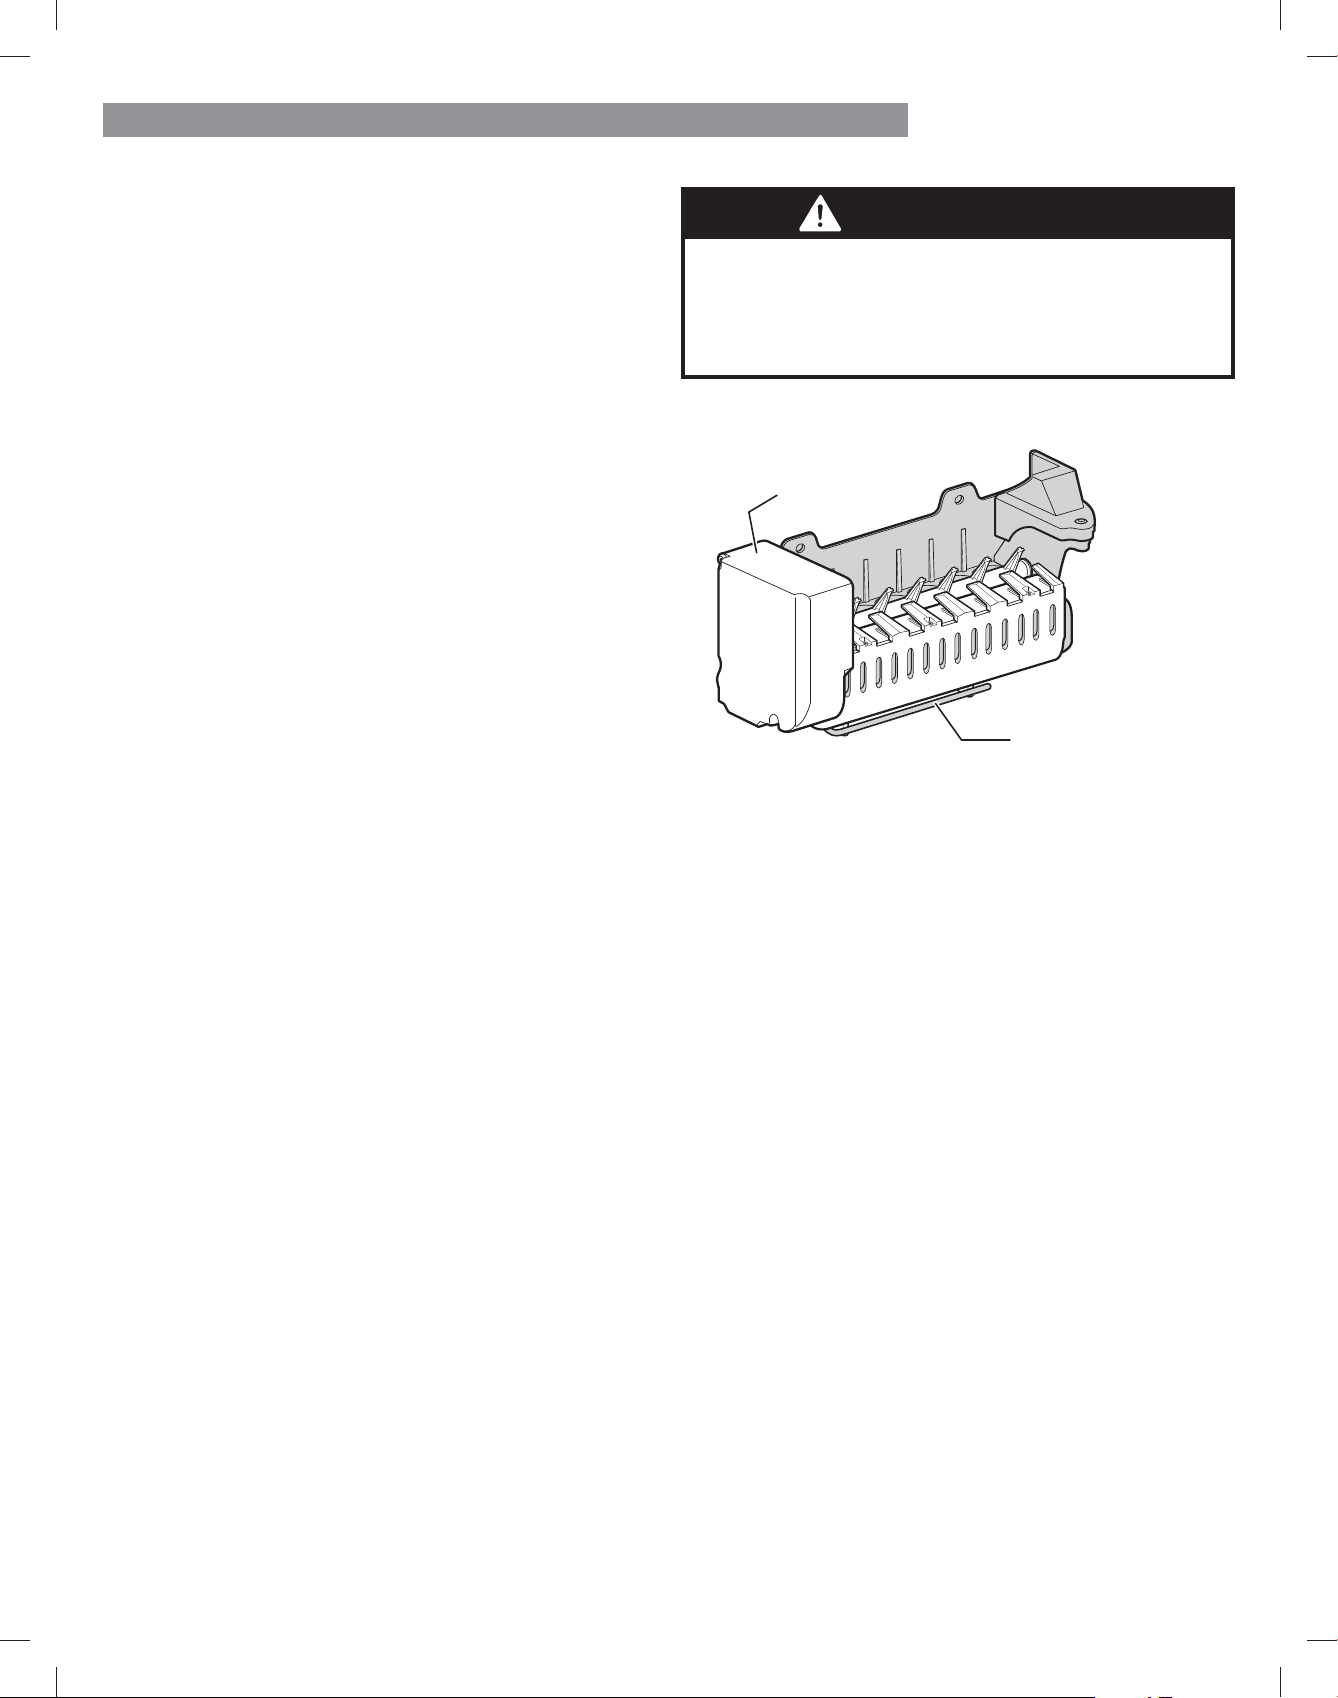
74
USO DEL REFRIGERADOR
MÁQUINA DE HIELO AUTOMÁTICA
El hielo se fabrica en la máquina de hielo automática y se
envía al dispensador. El dispensador de hielo producirá 70-
182 cubitos en un periodo de tiempo de 24 horas, en función
de la temperatura del congelador, de la temperatura
ambiente, del número de puerta abiertas y otras condiciones
de funcionamiento.
v Un refrigerador recién instalado tardará entre 12 y
ĄKRUDVHQHPSH]DUDIDEULFDUKLHOR(VSHUHKRUDV
para que comience la fabricación de hielo.
v La fabricación de hielo se detiene cuando se llena el
depósito de hielo. En ese caso, el depósito de hielo contiene
aproximadamente de 6 a 8 (12-16 oz o 340-455 cc) vasos
de hielo.
v Las sustancias extrañas o la escarcha el sensado automático
(brazo palpador) pueden interrumpir la producción. Para
un correcto funcionamiento, asegúrese de que el brazo
palpador esté limpio en todo momento.
v Para aumentar la producción de hielo, utilice la función
Accela Ice. Esta función aumenta la capacidad para
fabricar hielo y para congelar.
ADVERTENCIA
Riesgo de lesiones personales
NO introduzca los dedos o las manos en el mecanismo
de fabricación automática de hielo con el refrigerador
enchufado.
Fábrica de Hielo
Apagado automático
(brazo palpador).

75
USO DEL REFRIGERADOR
v La primera tanda de hielo y agua dispensada podría
incluir partículas y olor procedente de la tubería de
suministro de agua o del depósito de agua.
v Deseche las primeras tandas de hielo. Esto también es
necesario si el refrigerador no se usa durante un largo
período de tiempo.
v Nunca almacene latas de bebidas u otros artículos en
el depósito de hielo con el propósito de que se enfríen
rápidamente. Si lo hace, podría dañar la máquina de
hielo o los contenedores podrían estallar.
v 6LVHGLVSHQVDKLHORPDQFKDGRFRPSUXHEHHOoOWUR\HO
suministro de agua. Si el problema persiste, póngase en
FRQWDFWRFRQ6HDUVXRWURVHUYLFLRWÑFQLFRFXDOLoFDGR
No consuma el hielo ni el agua hasta que se resuelva el
problema.
v No permita que los niños utilicen el dispensador. Los niños
podrían jugar con los controles y romperlos.
v Si sólo se usa hielo picado, el conducto del hielo podría
quedar bloqueado con escarcha. Para retirar la escarcha
acumulada, desmonte el depósito de hielo y libere el
conducto con una espátula de goma. La dispensación de hielo
en cubitos también ayuda a evitar la formación de escarcha.
v 1XQFDXVHYDVRVGHFULVWDOoQRRUHFLSLHQWHVGHOR]D
para recoger hielo. Ese tipo de contenedores podrían
descascarillarse o romperse, y podrían caer fragmentos
de cristal al hielo.
v Dispense hielo en el vaso antes de rellenarlo con agua
u otras bebidas. Si se dispensa hielo en un vaso que ya
contiene líquido, pueden producirse salpicaduras.
v Nunca use un vaso que sea excesivamente estrecho o
profundo. El hielo podría atascarse en el conducto de hielo
y el rendimiento del refrigerador podría verse afectado.
v Mantenga el vaso a una distancia adecuada de la salida
del hielo. Si sostiene el vaso demasiado cerca de la
salida, puede impedir que se dispense el hielo.
v Para evitar lesiones personales, mantenga las manos lejos
de la puerta y del conducto del hielo.
v Nunca retire la tapa del dispensador.
v Si de forma inesperada se dispensa hielo o agua, corte el
suministro de agua y póngase en contacto con el servicio
técnico domestico de Sears llame 1-844-553-6667.
CUÁNDO APAGAR LA MÁQUINA DE HIELO
v Cuando el suministro de agua vaya a estar interrumpido
durante varias horas.
v Cuando se retire el depósito de hielo durante más de uno
o dos minutos.
v Cuando no se vaya a usar el refrigerador durante varios
días.
NOTA: El recipiente para el hielo deberá vaciarse
siempre que se ponga en OFF el botón ON/OFF
(encendido/apagado) de la máquina de hielo.
SONIDOS NORMALES QUE SE PUEDEN ESCUCHAR
v Si el botón ENCENDIDO/APAGADO de la máquina
de hielo se pone en ENCENDIDO, la válvula emitirá un
zumbido incluso si la máquina de hielo no está conectada
al agua. Para detener el zumbido, ponga el interruptor en
APAGADO.
NOTA: Si mantiene el botón ENCENDIDO/APAGADO de
la máquina de hielo en ENCENDIDO antes de conectar
el agua, la máquina podría dañarse.
v Oirá el sonido de los cubitos de hielo al caer en el
depósito y el agua corriendo por las tuberías cuando
VHĄUHOOHQDODPÊTXLQDGHKLHOR
PREPARACIÓN PARA LAS VACACIONES
Ponga el botón ON/OFF de la máquina de hielo en OFF y
cierre el suministro de agua al refrigerador.
NOTA: El recipiente para el hielo deberá vaciarse siempre
que se ponga en OFF el botón ON/OFF
Si la temperatura ambiente cae por debajo del punto
de congelación, póngase en contacto con un técnico
FXDOLoFDGRSDUDTXHSXUJXHHOVLVWHPDGHVXPLQLVWURGH
agua para evitar graves daños materiales debidos a las
inundaciones provocadas por la rotura de las tuberías o
conexiones de agua.
PRECAUCIÓN
MÁQUINA DE HIELO AUTOMÁTICA (continuación)
76
USO DEL REFRIGERADOR
GUÍA PARA EL ALMACENAMIENTO DE ALIMENTOS
Envuelva o almacene los alimentos en el refrigerador dentro
de materiales herméticos y antihumedad, a menos que se
indique lo contrario. Esto evitará que el olor y sabor de
ORVDOLPHQWRVVHWUDQVoHUDSRUWRGRHOUHIULJHUDGRU3DUD
productos con fecha de caducidad, compruebe el código
de fecha para garantizar la frescura.
ALMACENAMIENTO DE ALIMENTOS CONGELADOS
NOTA: Consulte una guía de congelación o un libro de
FRFLQDoDEOHSDUDREWHQHUPÊVLQIRUPDFLÚQVREUHOD
forma de preparar los alimentos para su congelación o
sobre los tiempos de almacenamiento de los alimentos
congelados.
Congelación
El congelador no congelará rápidamente una gran
cantidad de alimentos. No coloque más alimentos sin
congelar en el congelador que los que se congelarán
en 24 horas (no más de 1 o 1,5 kg de alimento por cada
OLWURVGHHVSDFLRHQHOFRQJHODGRU'HMHVXoFLHQWH
espacio en el congelador para que el aire pueda circular
HQWUHORVSDTXHWHV7HQJDFXLGDGRGHGHMDUVXoFLHQWH
espacio en la parte delantera para que se pueda cerrar
la puerta herméticamente.
Los tiempos de almacenamiento variarán en función
de la calidad y el tipo de alimento, el tipo de envase o
envoltorio utilizado (si son herméticos y antihumedad)
y la temperatura de almacenamiento. La aparición
de cristales de hielo dentro de un paquete sellado es
QRUPDO(VWRVÚORVLJQLoFDTXHODKXPHGDGGHODOLPHQWR
y del aire del interior del paquete se ha condensado,
creando cristales de hielo.
NOTA: Deje que los alimentos calientes se enfríen
a temperatura ambiente durante 30 minutos y, a
continuación, empaquételos y congélelos. Enfriar
alimentos calientes antes de congelarlos ahorra energía.
Empaquetamiento
Una congelación correcta depende de un
empaquetamiento adecuado. Cuando se cierra y sella
el paquete, no debe dejar que entre ni salga aire ni
humedad. Si eso sucede, es posible que el olor y el sabor
GHORVDOLPHQWRVVHWUDQVoHUDQSRUWRGRHOUHIULJHUDGRU\
también se podrían resecar los alimentos congelados.
Recomendaciones de empaquetamiento:
v Contenedores de plástico rígido con tapas herméticas
v Tarros de congelación / enlatado con lados rectos
v Papel de aluminio grueso
v Papel con revestimiento plástico
v Envoltorios plásticos no permeables
v Bolsas de plástico con autosellado y calidad
HVSHFÕoFDDSWDSDUDFRQJHODGRU
Siga las instrucciones del contenedor o paquete para
unos métodos de congelación adecuados.
No usar
v Envoltorios de pan
v Contenedores de plástico que no sean de polietileno
v Contenedores sin tapas herméticas
v Papel de cera o envoltorio para congelador revestidos
de cera
v (QYROWRULRoQR\VHPLSHUPHDEOH
PRECAUCIÓN: No almacene latas de bebidas
o contenedores de comida de plástico en el
compartimiento del congelador. Podrían romperse
RĄHVWDOODUDOFRQJHODUVH
Elementos Cómo
Mantequilla o
margarina
Queso
Leche
Huevos
Fruta
Verdura
con hoja
Vegetales con
piel (zanahorias,
pimientos)
Pescado
Sobras
Conserve la mantequilla abierta
en un plato cubierto o en un
compartimiento cerrado. Cuando
se almacena una cantidad extra,
envuélvala en una bolsa para
congelar y congélela.
Almacene en el envoltorio original
hasta que esté listo para consumirlo.
Una vez abierto, vuelva a envolverlo
herméticamente en un envoltorio
plástico o en papel de aluminio.
Limpie los cartones de leche. Para
un mejor almacenamiento, coloque
la leche en los estantes interiores y
no en los estantes de la puerta.
Almacénelos en el cartón original
en un estante interior, no en un
estante de la puerta.
No lave ni pele la fruta hasta
que ésta vaya a ser utilizada.
Organice la fruta y consérvela en
su contenedor original, en un cajón,
o bien almacénela en una bolsa de
papel completamente cerrada sobre
un estante del refrigerador.
Retire el envoltorio comercial
y corte o arranque las zonas
magulladas o decoloradas. Lave en
agua fría y deje escurrir. Colóquela
en una bolsa o un contenedor de
plástico, y almacénela en el cajón
para verduras.
Colóquelos en una bolsa o
un contenedor de plástico, y
almacénelos en el cajón para
verduras.
Almacene el pescado y los mariscos
frescos en el congelador si no van
a ser consumidos el mismo día en
que se los adquirió. Se recomienda
consumir pescados y mariscos frescos
el mismo día de haberlos adquirido.
Cubra las sobras con un envoltorio
plástico, papel de aluminio o dentro
de contenedores de plástico con
tapas herméticas.
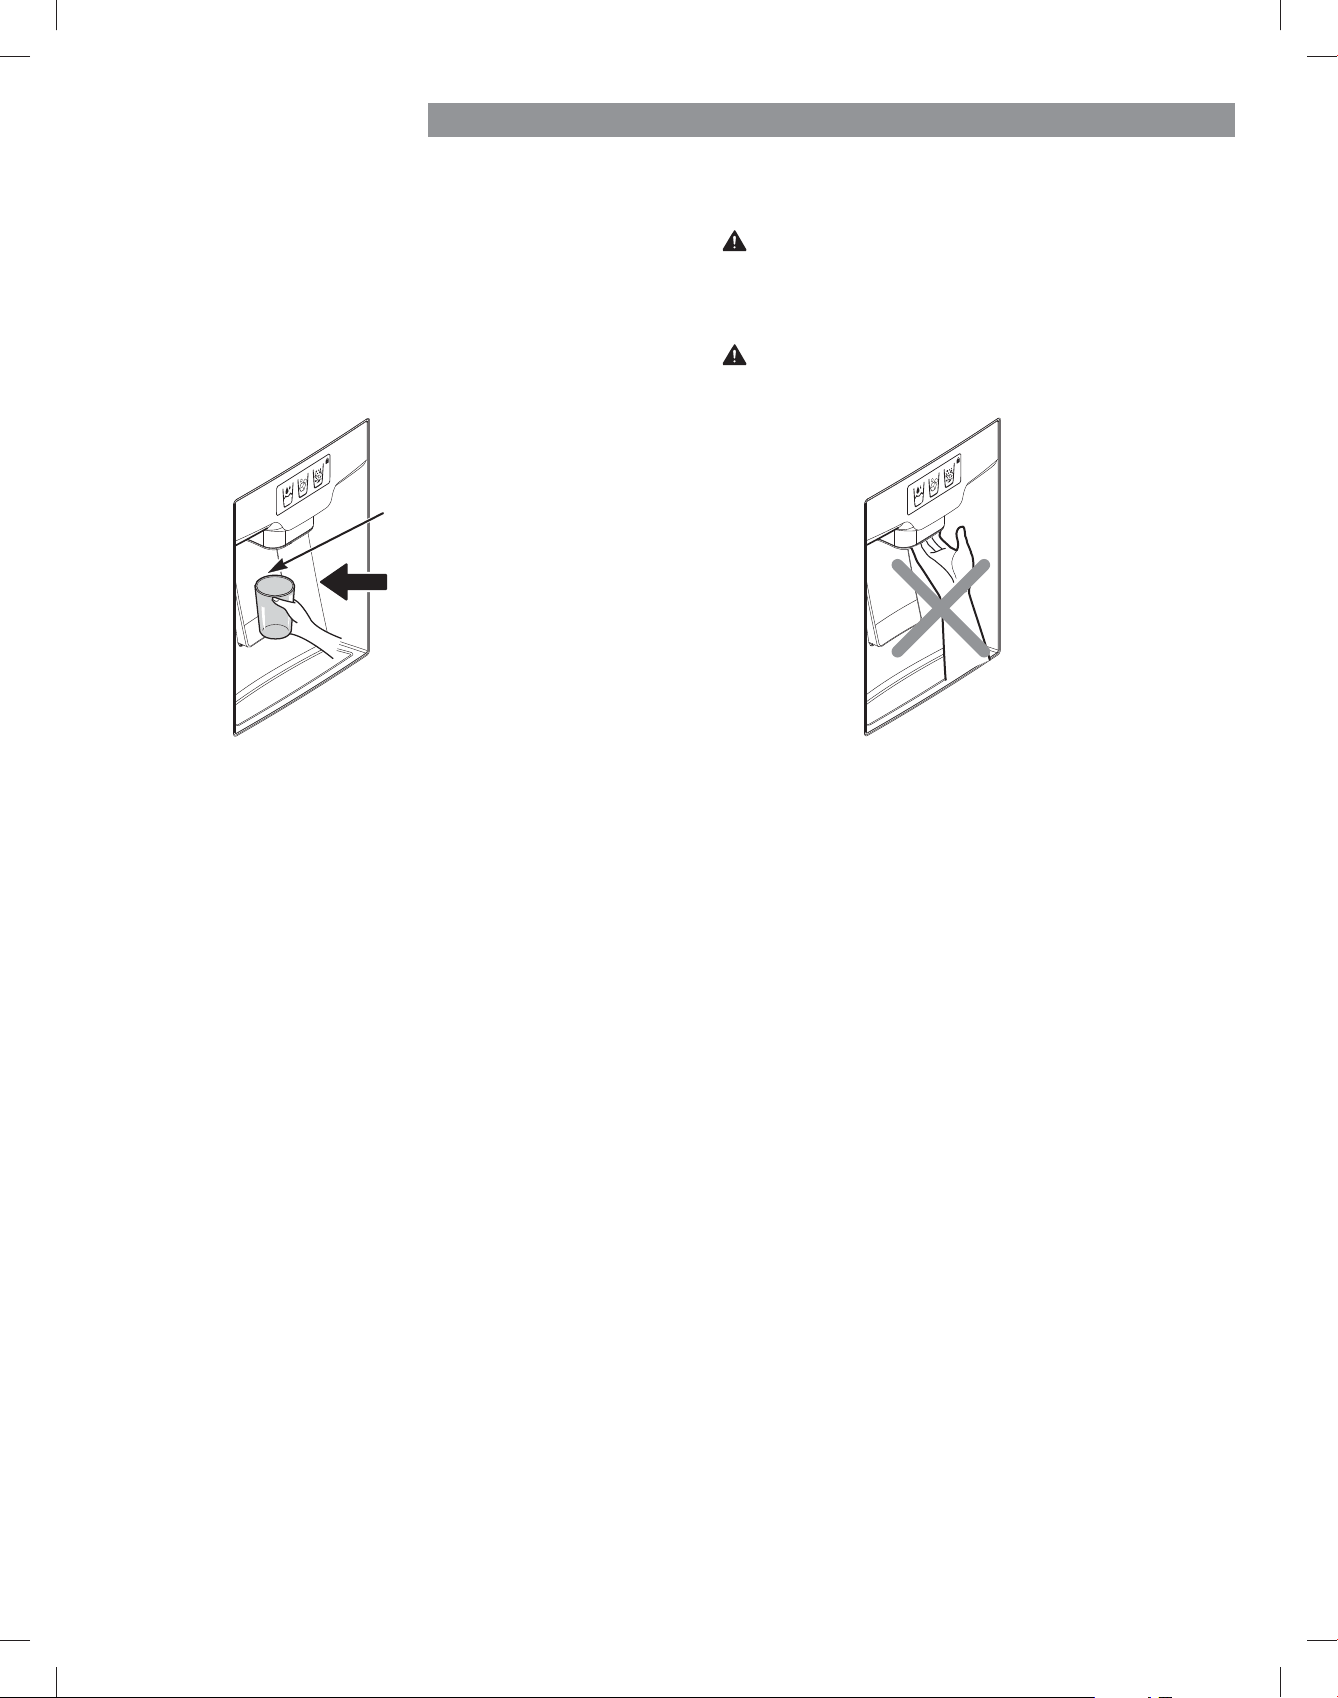
77
USO DEL REFRIGERADOR
SECCIÓN REFRIGERADOR
DISPENSADOR DE AGUA
Para dispensar agua fría, empuje el interruptor del
dispensador con un vaso.
ADVERTENCIA: No coloque los dedos encima de la
abertura del conducto de hielo, podría sufrir lesiones
de gravedad.
PRECAUCIÓN: No dispense hielo en vasos de cristal
RSRUFHODQDoQD\DTXHSRGUÕDQURPSHUVH
Es posible que tras la dispensación se produzca un goteo.
Mantenga el vaso bajo el dispensador durante unos
segundos tras la dispensación para recoger todas las gotas.
NOTA: El dispensador está equipado con una luz que se
enciende cuando se activan los botones del dispensador.
Dispensador de interruptor
Empuje
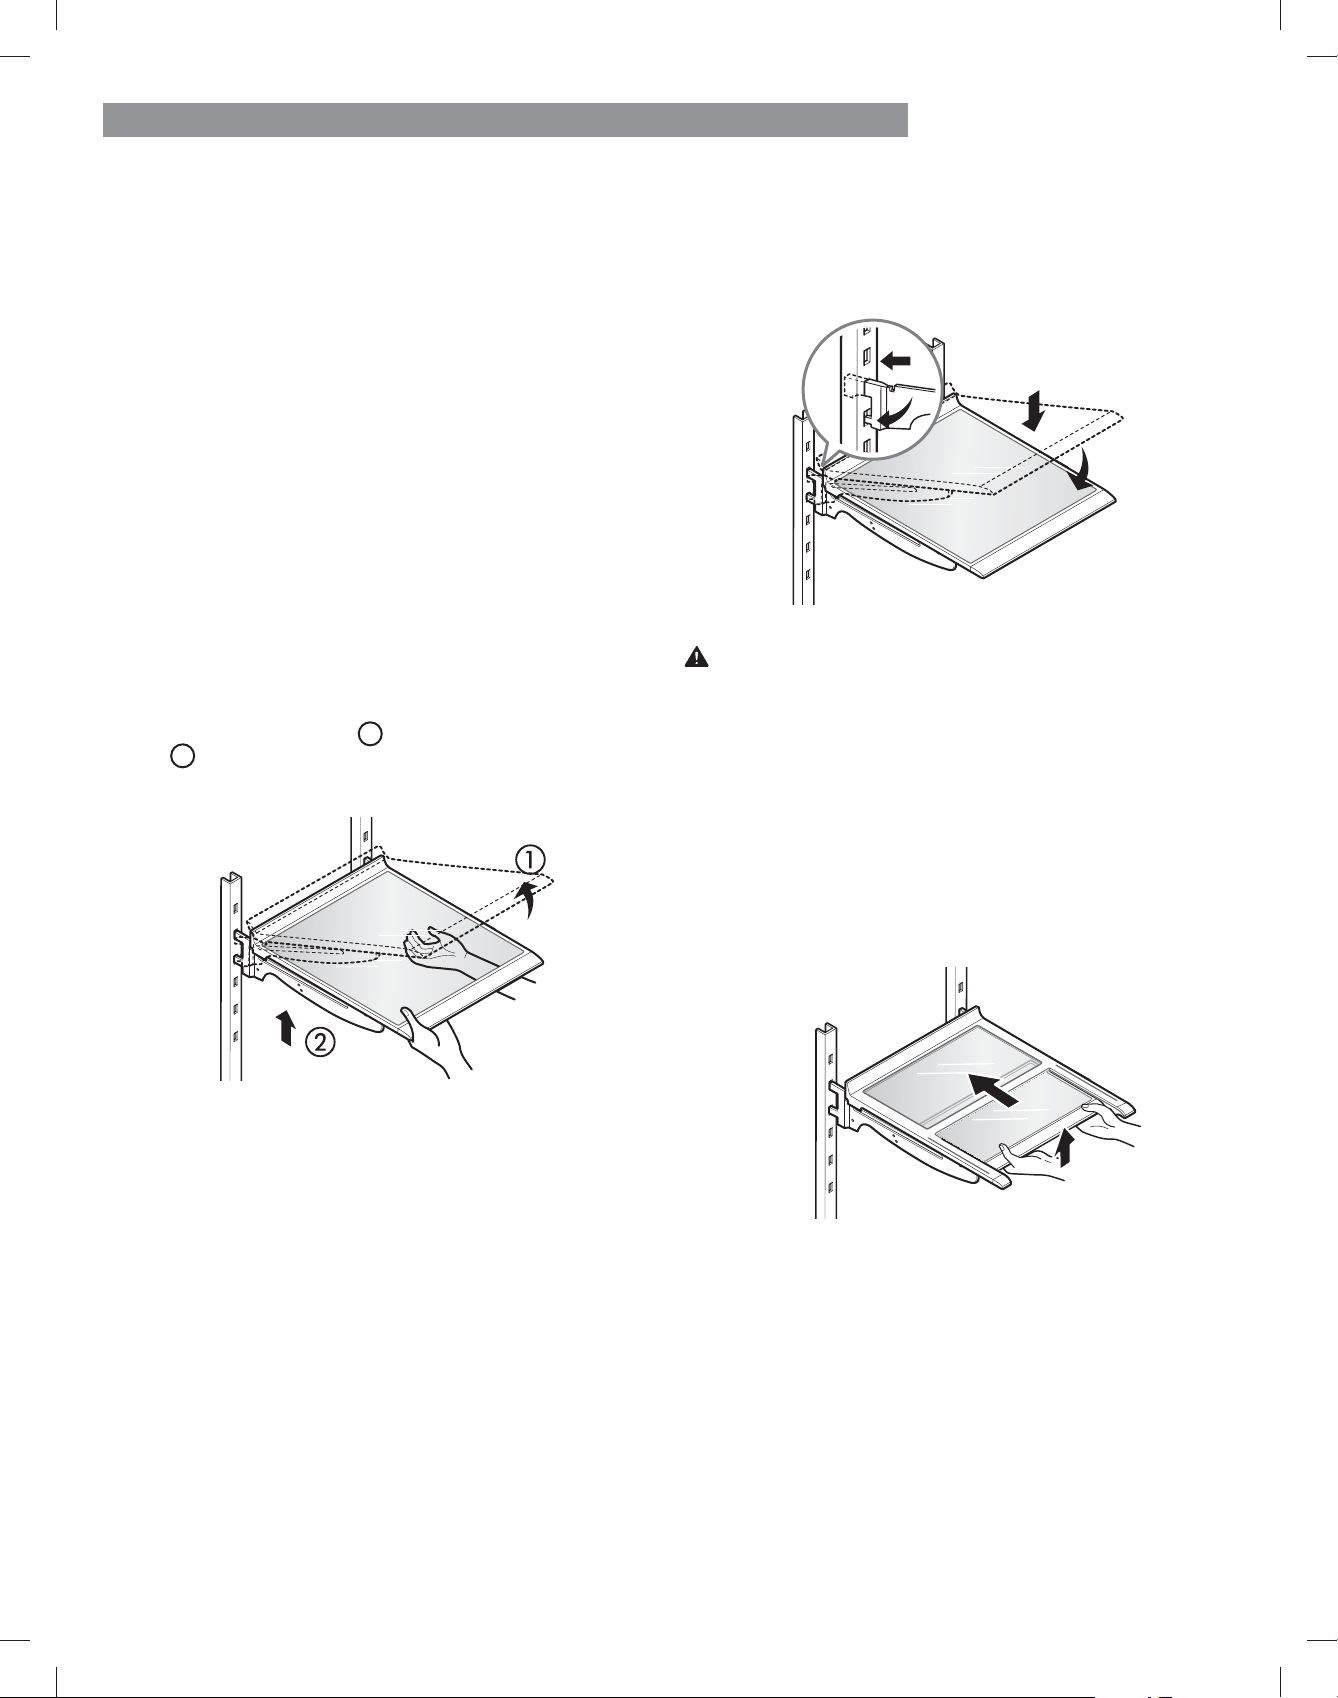
78
USO DEL REFRIGERADOR
ESTANTES DEL REFRIGERADOR
Los estantes del refrigerador son ajustables para satisfacer
sus necesidades personales de almacenamiento. En función
del modelo, los estantes pueden ser de vidrio o de rejilla
metálica.
Organizar los estantes para que se ajusten a las diferentes
alturas de los artículos hará que le resulte más fácil encontrar
lo que busca. Con ello también reducirá el tiempo que
permanece la puerta del refrigerador abierta y ahorrará
energía.
IMPORTANTE: No limpie los estantes de vidrio con agua
templada mientras aún están fríos. Los estantes podrían
romperse si se ven expuestos a cambios repentinos de
temperatura o a impactos.
NOTA: Los estantes de vidrio son pesados. Tenga especial
cuidado en el momento de retirarlos.
Organización de los estantes (Cantilever)
Retire los estantes de la posición de transporte y vuelva a
colocar los estantes en la posición que desee.
Para retirar un estante: incline la parte delantera del
estante en dirección de
Ą
Ąy levántelo en la dirección
de
Ą
. Saque el estante.
Para volver a instalar un estante: incline la parte
delantera del estante hacia arriba y guíe los ganchos
del estante al interior de las ranuras a la altura deseada.
A continuación, baje la parte delantera del estante de
manera que los ganchos caigan en las ranuras.
Estante plegable
Para almacenar artículos más altos, como botellas o
garrafas, empuje la mitad delantera del estante para que se
deslice debajo de la mitad posterior del estante. Tire de la
parte delantera del estante hacia usted para volver a tener
un estante completo.
PRECAUCIÓN: Asegúrese de que los estantes tienen
ambos lados nivelados. De lo contrario, podría caerse
HOĄHVWDQWHRGHUUDPDUVHORVDOLPHQWRV
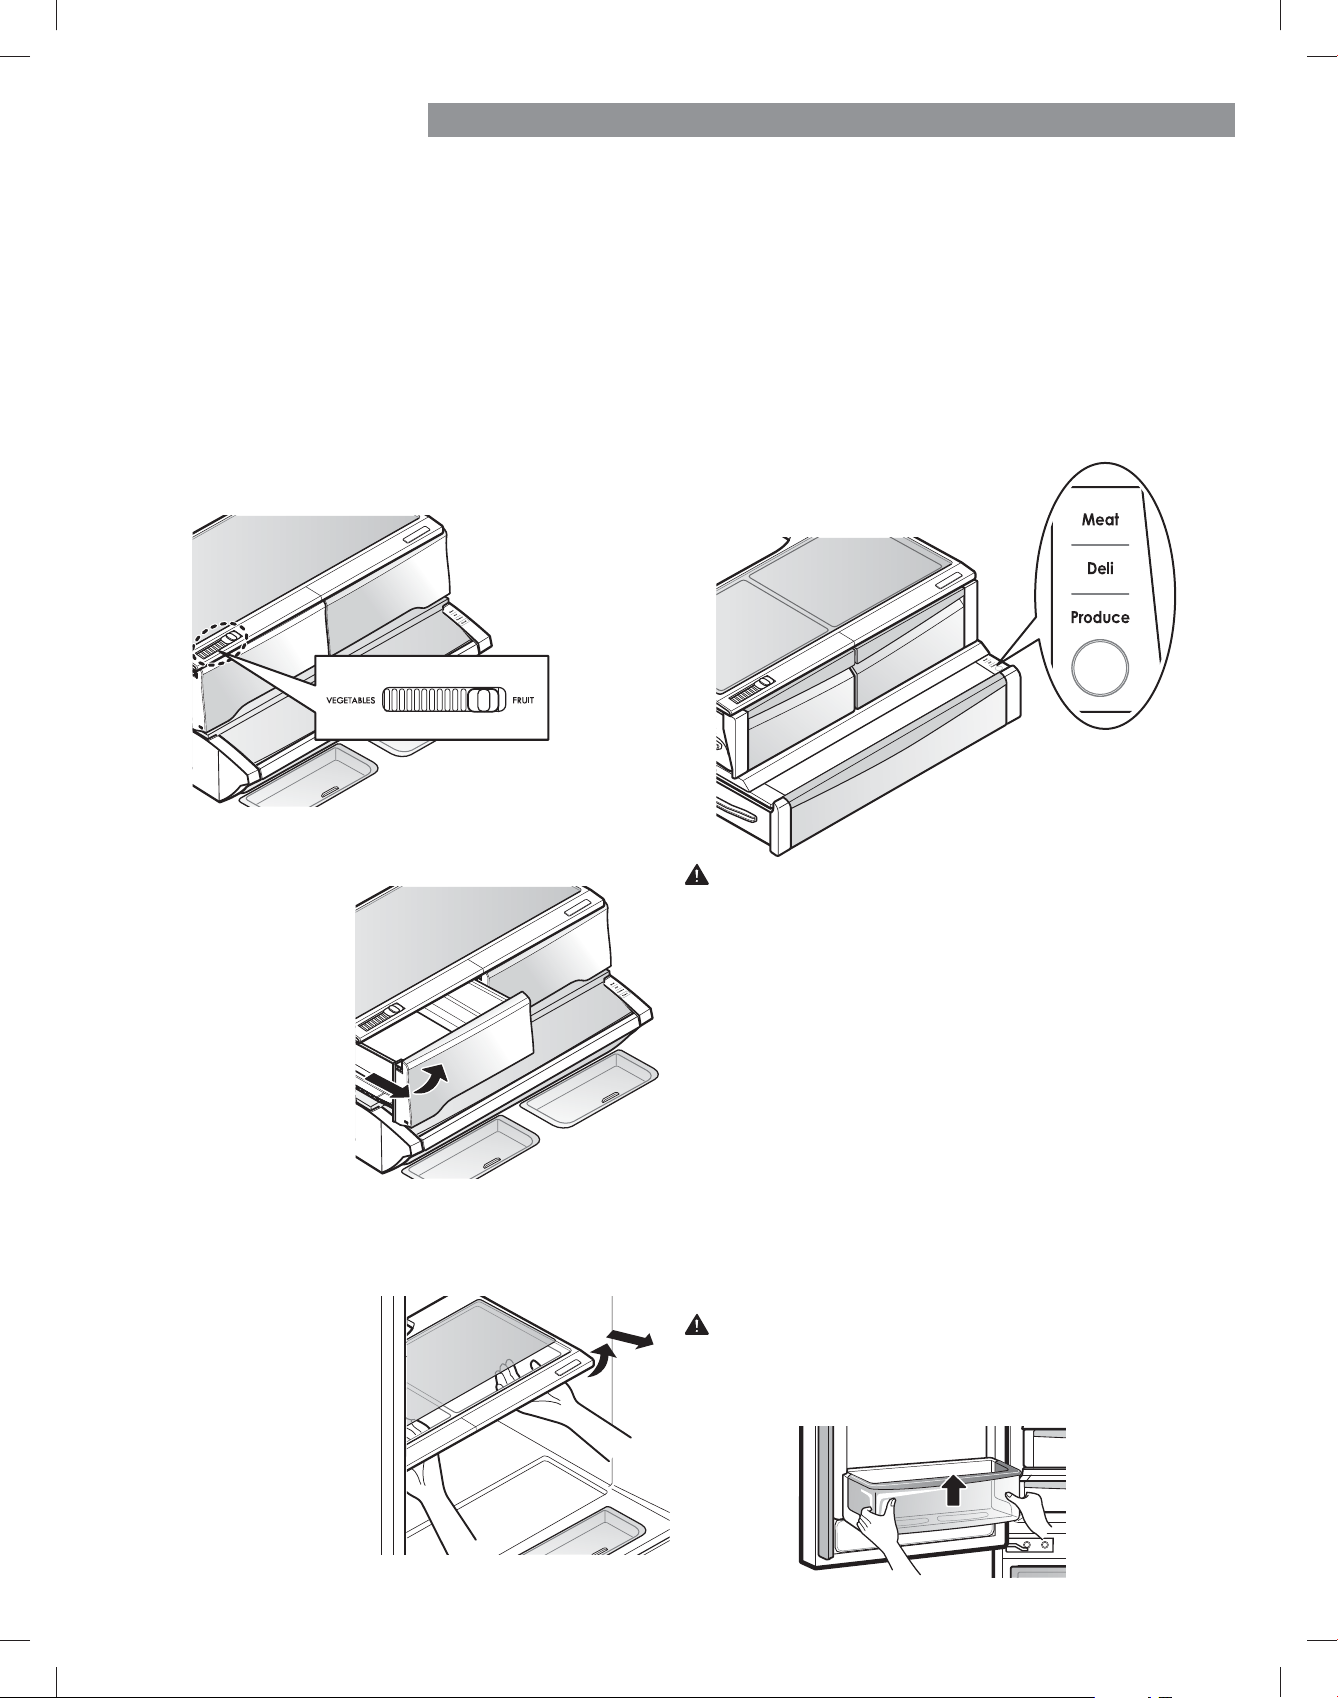
79
USO DEL REFRIGERADOR
CAJÓN CON CONTROL DE HUMEDAD
Los cajones para verduras mantienen el sabor y la frescura
de la fruta y la verdura al permitir controlar fácilmente la
humedad dentro del cajón.
Para controlar la cantidad de humedad en los cajones para
verduras con sellado antihumedad, ajuste el control en
cualquier posición entre VEGETABLES y FRUIT.
v VEGETABLES mantiene un aire húmedo en el cajón para
un mejor almacenamiento de las verduras frescas y de
hoja.
v FRUIT mantiene el aire húmedo fuera del cajón para un
mejor almacenamiento de la fruta.
Para quitar el vidrio
Levante el vidrio
situado bajo la tapa del
cajón para verduras.
Tire del vidrio hacia
arriba y hacia fuera.
NOTA: Para mayor
claridad, no se muestra el
cajón.
DESMONTAJE DEL CAJÓN CON CONTROL DE HUMEDAD
Para desmontarlo,
saque el cajón todo
lo posible.
Levante la parte
delantera del cajón
para verduras y tire
de él hacia fuera.
3. Para instalarlo,
incline la parte
delantera
ligeramente hacia
arriba, inserte el
cajón en el marco y empuje
hasta que encaje en su sitio.
CAJÓN DESPENSERO CON CONTROL DE TEMPERATURA
El Cajón despensero con control de temperatura
proporciona espacio de almacenamiento con un control
de temperatura variable que permite mantener el
compartimiento más frío que la sección del refrigerador.
(VWHFDMÚQVHSXHGHXVDUSDUDJUDQGHVEDQGHMDVGHoHVWD
DUWÕFXORVGHFKDUFXWHUÕD\EHELGDV(VWHFDMÚQQRĄVH
debe usar para verduras que requieran un alto nivel de
humedad).
3XOVHHOERWÚQSDUDHOHJLUHQWUH0HDWFDUQH'HOLĄFKDU-
cutería) y Produce (Productos cocinados).
PRECAUCIÓN: No guarde botellas de vidrio en la
despensa. Si se congelan, pueden romperse y causarle
lesiones.
PRECAUCIÓN: No llene o envase en exceso los
alimentos en los compartimentos de la puerta. Podría
dañar el compartimento o sufrir lesiones personales al
retirar los alimentos aplicando una fuerza excesiva.
BANDEJAS DE LA PUERTA
Las bandejas de la puerta son extraíbles para facilitar su
limpieza y ajuste.
Para desmontar la bandeja, simplemente levántela hacia
arriba y tire de ella hacia fuera.
. Para volver a colocar la bandeja, deslícela por encima
del soporte deseado y empuje hacia abajo hasta que
encaje en su sitio.
NOTA: Algunas bandejas tienen una apariencia
diferente y sólo encajarán en una ubicación.
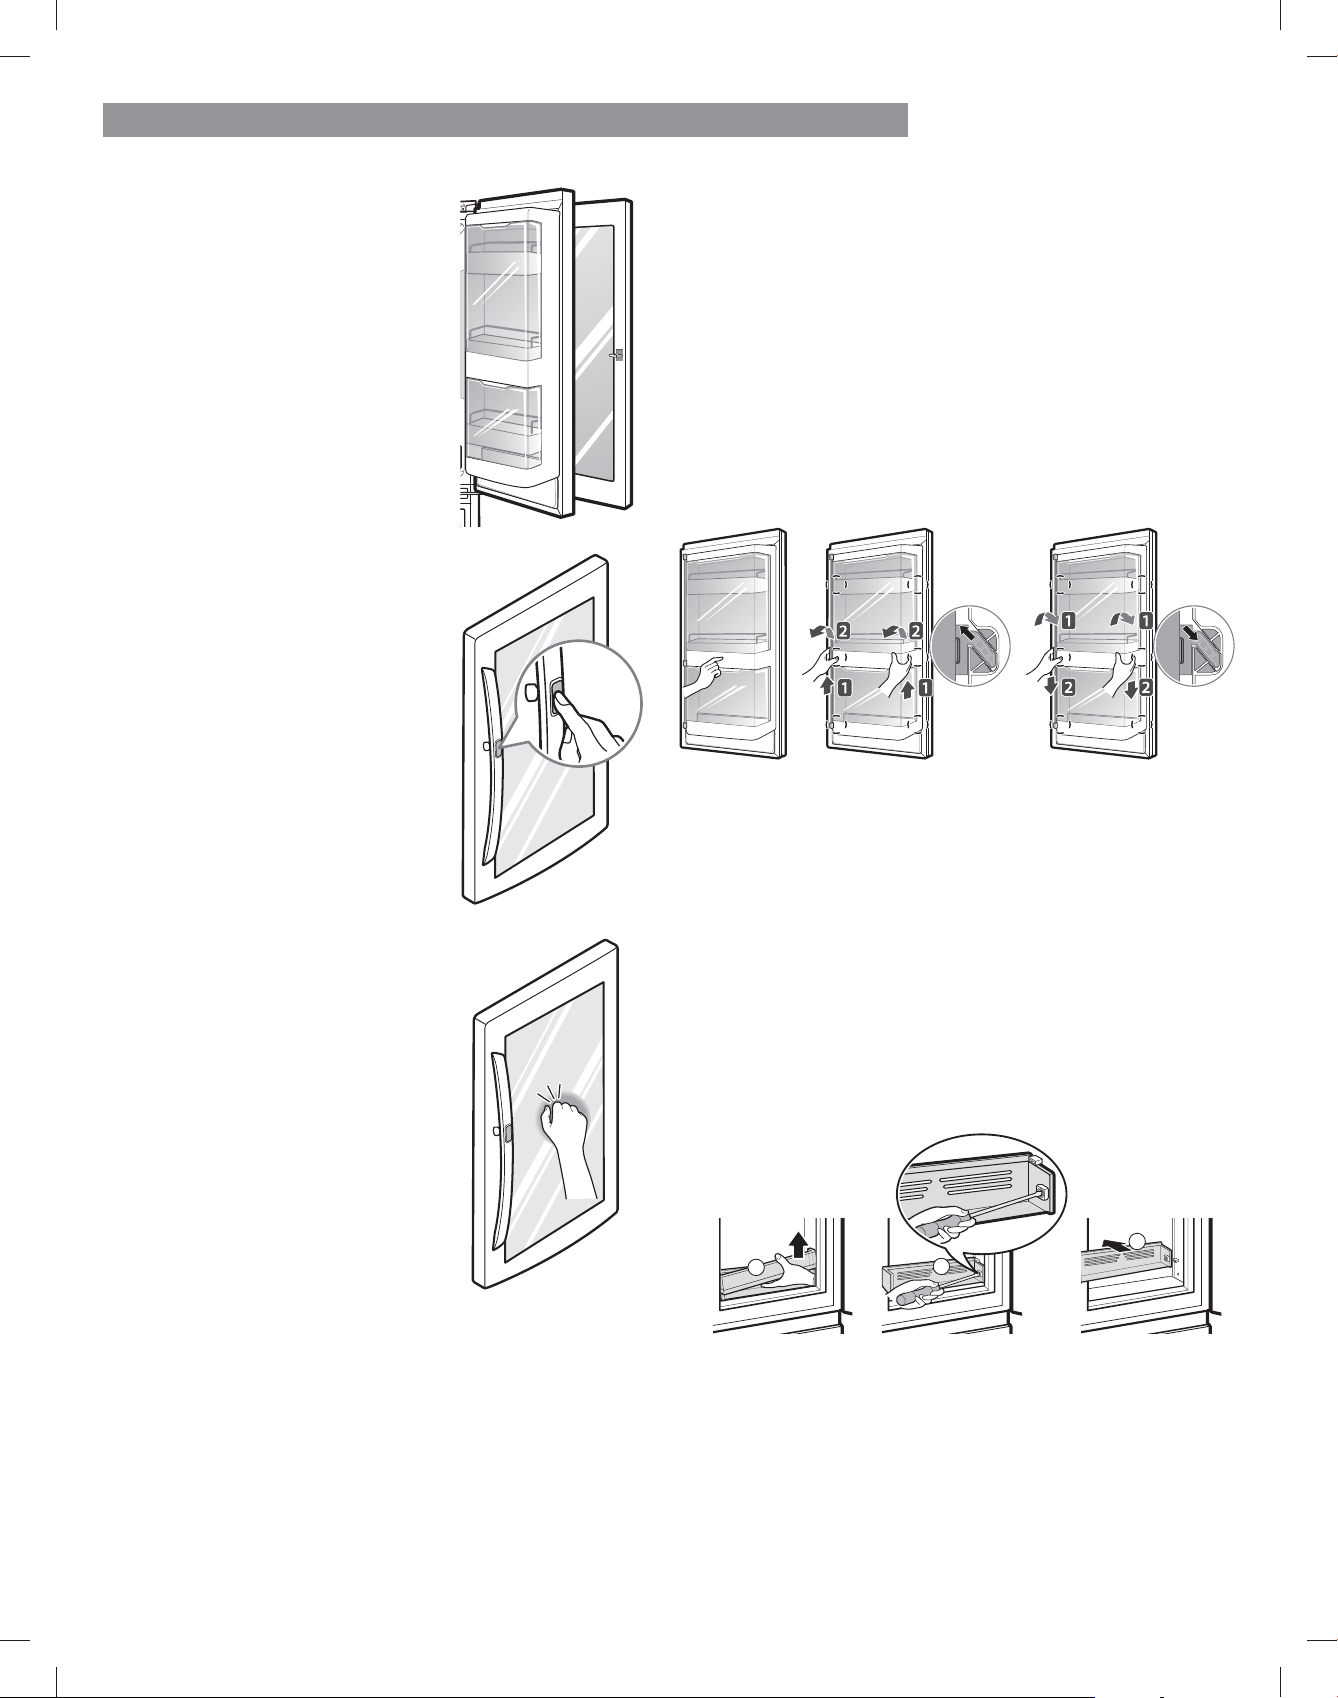
80
USO DEL REFRIGERADOR
PREVIEW GRAB-N-GO
(en algunos modelos)
El compartimento “PreView Grab-
N-Go” permite el fácil acceso a los
alimentos comúnmente utilizados.
PREVIEW GRAB-N-GO
COMPARTIMIENTO
(en algunos modelos)
Para acceder al compartimento
PreView Grab-N-Go, pulse
levemente el botón en el tirador
GHUHFKRGHODSXHUWDGHOIULJRUÕoFR
para abrir la puerta.
LA FUNCIÓN PREVIEW
(en algunos modelos)
La función PreView en la puerta
Grab-N-Go le permite ver si se
está quedando sin artículos de
uso frecuente como bebidas y
bocadillos, sin abrir la puerta del
refrigerador.
1. Toque dos veces el vidrio para
encender y apagar la luz de LED
dentro de la puerta LID.
2. La luz de LED se apaga
automáticamente después de
diez segundos.
v La función Knock-On está
deshabilitada cuando la puerta de la derecha del
refrigerador está abierta, durante dos segundos
después de cerrar la puerta y cuando el dispensador
de hielo está en uso.
v Toque cerca del centro del vidrio. Tocar cerca de los
bordes del vidrio puede no activar la función Knock-
On correctamente.
v Toque con fuerza de manera de escuchar el sonido del
golpe.
v La función Knock-On puede activarse si hay un ruido
fuerte cerca del refrigerador.
MONTAJE DE CAJA GRAB-N-GO (en algunos modelos)
El montaje de la caja Grab-N-Go se puede quitar para
limpiar y ajustar fácilmente. Para abrir el compartimento
“Grab-N-Go”, presione suavemente el área marcada para
abrirla
1. Para extraer el montaje de la caja Grab-N-Go,
levante y tire.
2. Para reemplazar el montaje de la caja Grab-N-
Go, alinee las lengüetas del montaje de la caja
Grab-N-Go a las ranuras de la puerta y empuje
hacia abajo hasta que se coloque en el lugar.he
door and push down until it snaps into place.
1
2
3
CAJONES DE PUERTA GRAB-N-GO (en algunos modelos)
El estante inferior Grab-N-Go se puede quitar para limpiar
fácilmente.
1. Para extraer el estante inferior, levante el sujetador
del estante hacia arriba y para afuera.
2. Retire los dos tornillos del estate y tire en forma
recta hacia afuera.
3. Para reemplazar, realice el procedimiento inverso.
Abrir Desmontaje Montaje

81
USO DEL REFRIGERADOR
SECCIÓN CONGELADOR
DEPÓSITO DE HIELO ADICIONAL
Tire del cajón congelador y el cajón extraíble lo máximo
posible para retirar el depósito de hielo adicional.
Con cuidado levante y saque el depósito de hielo.
3. Para volver a colocarlo, tire de los dos cajones lo
máximo posible y ponga el depósito en su posición
correcta en el cajón extraíble. Cierre el cajón extraíble
y, después, el cajón del congelador.
PRECAUCIÓN: Peligro de pinzamiento. Mantenga las
manos y pies lejos de la parte inferior del cajón del
congelador al abrir y al cerrar.
Depósito de
hielo adicional
/XHJRGHFDPELDUHOoOWURPDQWHQJDSXOVDGRHOERWÚQ$LU
Filter durante tres segundos para restablecer el sensor del
oOWUR
NOTA:3DUDDGTXLULUXQoOWURGHDLUHGHUHHPSOD]R
visitar su tienda local de Sears, o llame 1-844-553-6667.
También puede comprar en línea en: www.kenmore.com
REEMPLAZO DEL FILTRO DE AIRE
6HUHFRPLHQGDUHHPSOD]DUHOoOWURGHDLUH
v Aproximadamente cada seis
meses.
v Cuando se encienda la luz
CHANGE AIR FILTER (Cambiar
oOWURGHDLUH
([WUDLJDHOoOWURYLHMR
&RORTXHXQoOWURQXHYRGHQWURGHODWDSDFRQHOODWHUDO
TXHGLFHk)UHQWHyPLUDQGRKDFLDDIXHUD*LUHHOoOWUR
hacia la derecha para sujetarlo a la pared del
refrigerador.
,QVWDOHXQQXHYRoOWURGHDLUH
*LUHODWDSDGHOoOWURKDFLDODL]TXLHUGDSDUDVHSDUDUOR
GHODSDUHGGHOUHIULJHUDGRU(OoOWURVHXELFDHQODSDUWH
LQWHULRUGHODWDSDGHOoOWUR4XLWHHOoOWURGHODWDSD\
reemplácelo con uno nuevo.
Cajón extraíble

82
USO DEL REFRIGERADOR
DURABASE
Para desmontar el Durabase, empújelo hacia atrás todo
lo posible. Incline hacia arriba la parte delantera del
Durabase y tire de él hacia fuera.
Para volver a colocarlo, inserte el Durabase en la
estructura de rieles.
DIVISOR DURABASE
El divisor Durabase le permite organizar el área Durabase
en secciones. Se puede ajustar de lado a lado para alojar
artículos de diferentes tamaños.
ADVERTENCIA: Si se retira el divisor Durabase, habrá
VXoFLHQWHHVSDFLRDELHUWRSDUDTXHXQQLÙRRXQD
mascota puedan gatear hasta el interior.
Para evitar el atrapamiento accidental de un niño o una
PDVFRWD\HOSRVLEOHULHVJRGHDVo[LD12SHUPLWDTXH
niños y mascotas toquen ni se acerquen al cajón.
CAJÓN EXTRAÍBLE
Cajón superior
3DUDTXLWDUHOoOWURMDOHODJDYHWDHQWRGDVXH[WHQVLÚQ
En el riel izquierdo, empuje con un desarmador de punta
plana la lengüeta para liberar la gaveta del riel, como
se ilustra a continuación. Una vez que esté liberado el
lado izquierdo, empuje la lengüeta del lado derecho
con el dedo para liberar la gaveta. Levante la parte
delantera de la gaveta y luego jálela hacia afuera.
Para volver a colocarla, incline levemente hacia arriba
la parte delantera de la gaveta, inserte la gaveta en el
marco y empújela en su lugar hasta que escuche un clic.
Cajón medio
Para extraer el cajón, tírelo completamente hacia
afuera. Levante el frente del cajón, y tire del mismo
directamente hacia afuera.
Para volver a colocarlo, incline la parte delantera del
cajón ligeramente hacia arriba, inserte el cajón en el
marco y empuje hasta que encaje en su sitio.
1
2

83
FILTRO DE AGUA
FILTRO DE AGUA
6HUHFRPLHQGDUHHPSOD]DUHOoOWURGHDJXD
v Aproximadamente cada 6 meses.
v &XDQGRHOLQGLFDGRUGHOoOWURGHO
agua se encienda.
v Cuando disminuya el caudal del
dispensador de agua.
v Cuando los cubitos de hielo sean
más pequeños de lo normal.
v *LUHHOoOWURGHDJXDKDFLDDUULEDKDVWDFRORFDUORHQ
su sitio y cierre la tapa. La tapa hará "clic" cuando se
cierre correctamente.
3. 'HVSXÑVGHUHHPSOD]DUHOoOWURGHDJXDGLVSHQVH
9 litros de agua (deje correr el agua durante unos
5 minutos) para purgar el aire atrapado y los
contaminantes del sistema; no dispense los 9 litros
de agua de manera continua. Pulse y suelte el botón
del dispensador en ciclos de 30 segundos ON y
ĄVHJXQGRV2))
PRECAUCIÓN:12SRQJDHQPDUFKDHOIULJRUÕoFRVLQ
WHQHUXQoOWURGHDJXDRXQWDSÚQGHGHULYDFLÚQGHO
oOWURGHDJXDLQVWDODGR
NOTA: 3DUDFRPSUDUXQoOWURGHDJXDGHUHSXHVWR
visitar su tienda local de Sears, o llame 1-844-553-6667.
También puede comprar en línea en: www.kenmore.com
5HHPSOÊFHORFRQXQoOWURGHDJXDQXHYR
v Saque el nuevo
oOWURGHDJXDGHVX
envoltorio y retire la
tapa protectora de
las juntas tóricas.
v &RQODVSHVWDÙDVGHOoOWURGH
agua en posición horizontal
HPSXMHHOQXHYRoOWURGHDJXD
en el soporte del colector y gire
en sentido horario.
4XLWHHODQWLJXRoOWURGHDJXD
v Baje o desmonte el estante
superior izquierdo para permitir
TXHHOoOWURGHDJXDSXHGDJLUDU
hacia abajo totalmente.
v Pulse el botón de presión para
DEULUODWDSDGHOoOWURGHDJXD
NOTA: $OUHHPSOD]DUHOoOWURGH
agua se drena una pequeña cantidad
de agua (unos 25 cc). Coloque un vaso debajo de la parte
GHODQWHUDGHODWDSDGHOoOWURGHDJXDSDUDUHFRJHUHO
DJXDTXHVHHVFDSH6RVWHQJDHOoOWURGHDJXDHQSRVLFLÚQ
vertical, una vez retirado, para evitar que el agua residual
VHVDOJDGHOoOWURGHDJXD
v $VHJàUHVHGHURWDUFRPSOHWDPHQWHHOoOWURKDFLDDEDMR
DQWHVGHH[WUDHUORGHORULoFLRGHOFROHFWRU
v 7LUHGHoOWURGHODJXDKDFLDDEDMR\JÕUHORHQ
sentido antihorario.
$QWHVGHVXVWLWXLUHOoOWURGHDJXD
6LHOHVWDQWHVXSHULRUVLWXDGRGHEDMRGHOoOWURGHDJXD
está en la posición más alta, se necesitará retirar el mismo
DQWHVGHVXVWLWXLUHOoOWURGHDJXD
Para retirar cualquier estante -
Levante el frente del estante
y tire hacia arriba
. Saque el
estante.
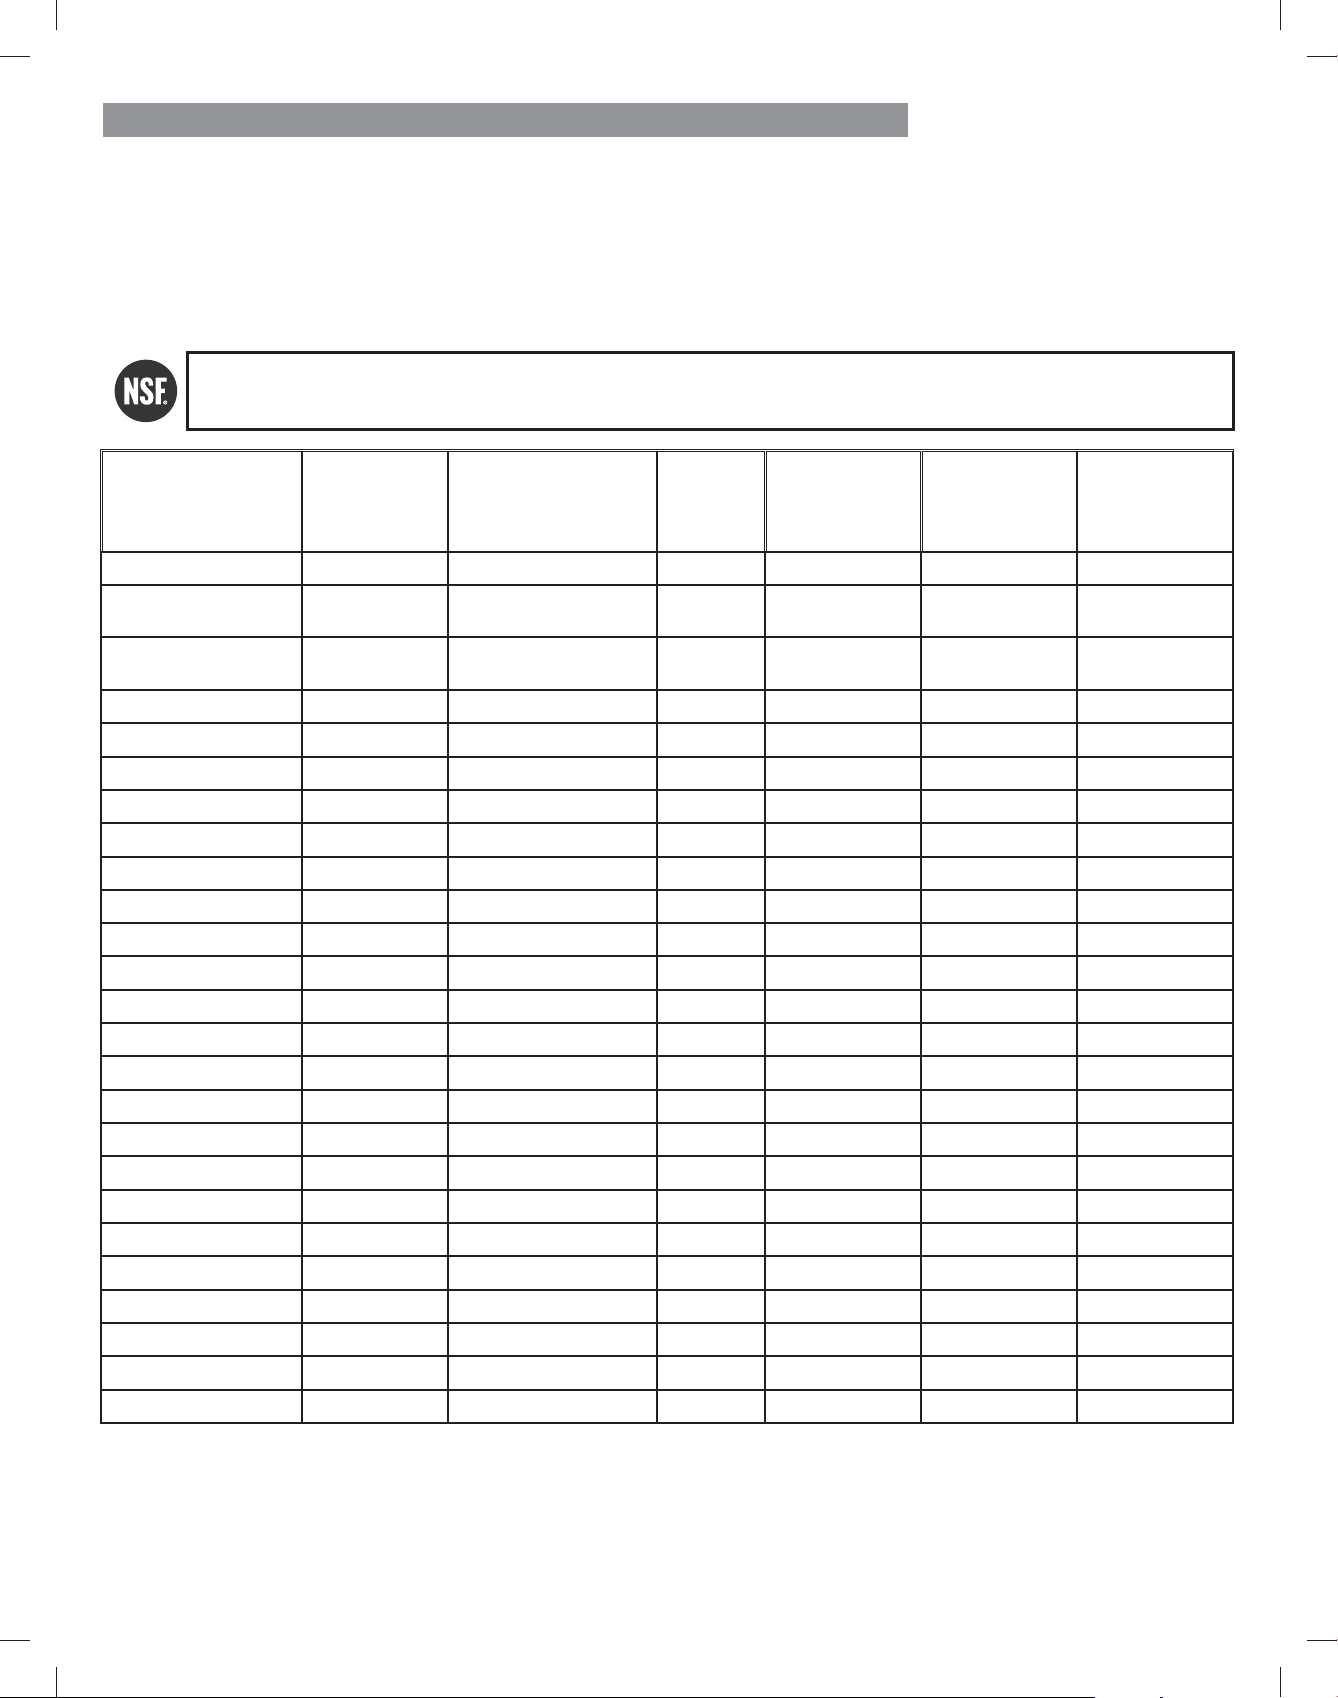
84
FILTRO DE AGUA
Hoja de datos de rendimiento
Utilice un recambio de cartucho: MDJ64844602(9980)
La concentración de las sustancias indicadas en el agua que entra en el sistema se redujo a una concentración menor o
LJXDODOOÕPLWHSHUPLVLEOHSDUDHODJXDGHVDOLGDVHJàQODVHVSHFLoFDFLRQHVGHORVHVWÊQGDUHV16)$16,\<
* Basado en el uso de Cryptosporidium parvum oocysts.
6LVWHPDSUREDGR\FHUWLoFDGRSRU16),QWHUQDWLRQDOVHJàQORVHVWÊQGDUHV16)$16,\\SDUDOD
reducción de las sustancias siguientes.
Reducción de
contaminantes
,QpXHQWHPHGLR
16)HVSHFLoFDGR
Concentración objetivo
%
promedio
Reducción
Producto
promedio
Concentración de
agua
Máximo
permitido
Concentración de
producto en agua
Reducción
NSF Requisito
Olor y sabor a cloro òJ/ 2.0 mg/L ± 10% >97.5% òJ/ N/A Ă
Partículas nominales I,
ĂDòP
12,000,000 pts/mL
Al menos 10,000 partículas/
mL
99.80% 24,000 pts/ml N/A Ă
Asbesto 180 MFL
10Ę a 10ę0)/oEUDVPD\RUHV
TXHòJ/LQGHORQJLWXG
>99.00% 0)/ N/A Ă
Atracina òJ/ òJ/ >94.10% òJ/ òJ/ N/A
Benceno òJ/ òJ/ >96.60% òJ/ òJ/ N/A
Carbofurano òJ/ òJ/ 98.30% òJ/ òJ/ N/A
Lindano òJ/ òJ/ >99.00% òJ/ òJ/ N/A
P-Diclorobenceno òJ/ òJ/ >99.80% òJ/ òJ/ N/A
2,4-D òJ/ òJ/ >99.90% òJ/ òJ/ N/A
Plomo a pH 6,5 òJ/ òJ/ 99.60% òJ/ òJ/ N/A
Plomo a pH 8,5 òJ/ òJ/ >90% òJ/ òJ/ N/A
Mercurio a pH 6,5 òJ/ òJ/ 91.00% òJ/ òJ/ N/A
Mercurio a pH 8,5 òJ/ òJ/ 92.50% òJ/ òJ/ N/A
Bacterias* 100,000 bacterias/L Mínimo de 50,000 bacterias/L >99.99% 10 N/A Ă
Atenolol 240 ng/L 200 ± 40% ng/L > 95.50% 10.80 ng/L 30 ng/L N/A
Carbamazepina 1600 ng/L 1400 ± 40% ng/L 98.40% 25.60 ng/L 200 ng/L NA
DEET 1600 ng/L 1400 ± 40% ng/L 97.10% 46.40 ng/L 200 ng/L NA
Trimetoprima 170 ng/L 140 ± 40% ng/L >96.80% 5.44 ng/L 20 ng/L NA
Linurón 160 ng/L 140 ± 40% ng/L >96.60% 5.44 ng/L 20 ng/L NA
Fenitoína 200 ng/L 200 ± 40% ng/L >94.80% 10.40 ng/L 30 ng/L NA
Ibuprofeno 400 ng/L 400 ± 40% ng/L >94.50% 22.00 ng/L 60 ng/L NA
Naproxeno 140 ng/L 140 ± 40% ng/L >96.10% 5.46 ng/L 20 ng/L NA
Estrona 120 ng/L 140 ± 40% ng/L >96.10% 4.68 ng/L 20 ng/L NA
Bisfenol A 2000 ng/L 2000 ± 40% ng/L >98.90% 22.00 ng/L 300 ng/L NA
Nonilfenol 1600 ng/L 1400 ± 40% ng/L >97.10% 46.40 ng/L 200 ng/L NA
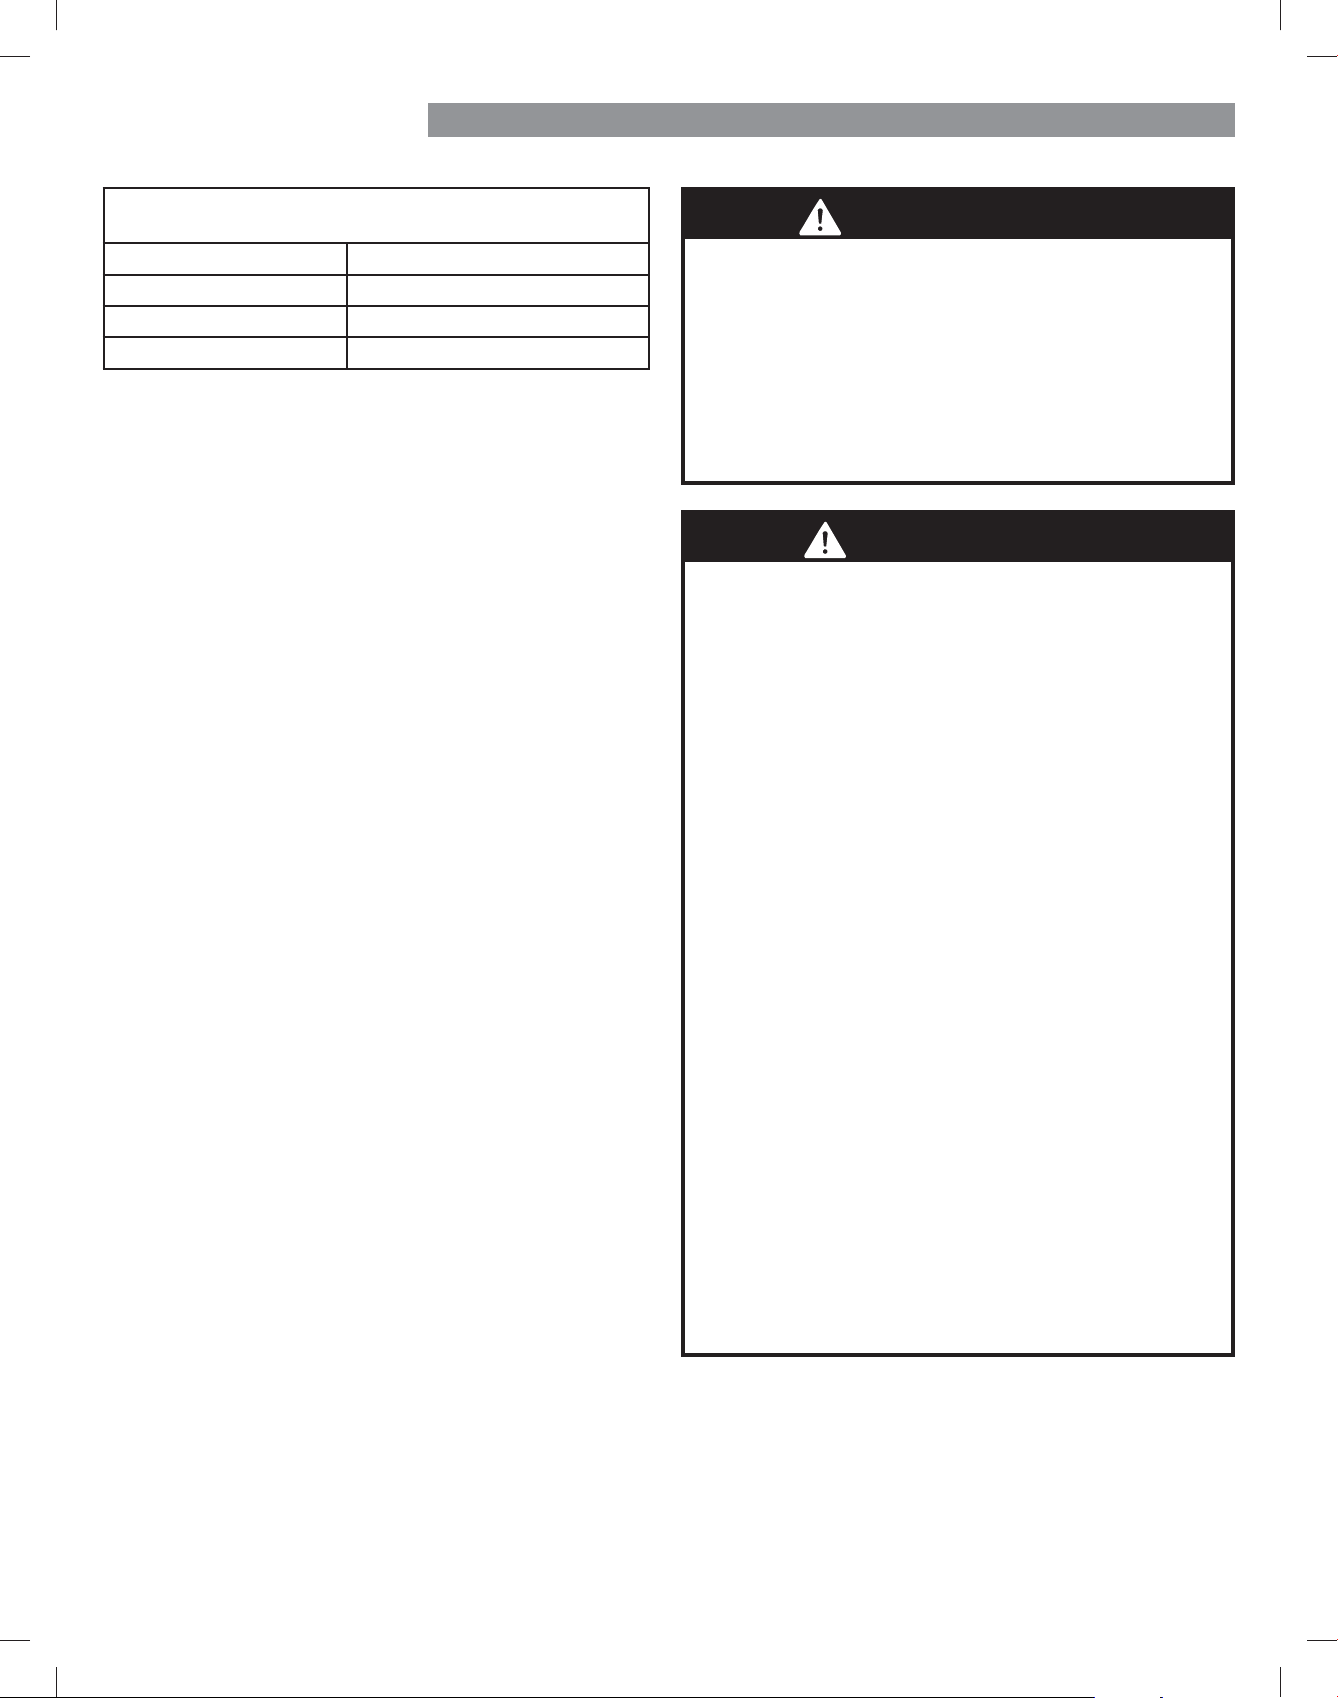
85
FILTRO DE AGUA
Es esencial respetar los requisitos recomendados por el
fabricante para la instalación, mantenimiento y reemplazo
GHOoOWURGHDJXDSDUDTXHHOSURGXFWRVHFRPSRUWHGHOD
forma indicada.
NOTA: Las pruebas se realizan en condiciones estándar de
laboratorio, por lo que el rendimiento real puede variar.
NOTA: 3DUDFRPSUDUXQoOWURGHDJXDGHUHSXHVWRYLVLWDU
su tienda local de Sears, 1-844-553- 6667. También puede
comprar en línea en: www.kenmore.com
Producto distribuido en los Estados Unidos de América por
6HDUV%UDQGV0DQDJHPHQW&RUSRUDWLRQ+RçPDQ(VWDWHV,/
60179.
NSF es una marca comercial de NSF International.
ADVERTENCIA
PRECAUCIÓN
Para reducir el riesgo asociado a la ingestión de
contaminantes: No utilice agua que no sea segura
microbiológicamente o cuya calidad se desconozca sin
una desinfección adecuada antes o después del sistema.
/RVVLVWHPDVFHUWLoFDGRVSDUDODUHGXFFLÚQGHTXLVWHV
puede utilizarse en aguas desinfectadas que puedan
FRQWHQHUTXLVWHVoOWUDEOHV1àPHURGHHVWDEOHFLPLHQWRGH
10350-MN-005
Para reducir el riesgo asociado con daños materiales
debidos a fugas de agua:
v Lea y cumpla ODVLQVWUXFFLRQHVGHXVRGHOoOWURGH
agua antes de la instalación y uso de este sistema.
v La instalación y uso DEBE cumplir con todas las
normativas de fontanería estatales y locales.
v No instalar si la presión del agua excede los 120 psi
(827 kPa). Póngase en contacto con un fontanero
profesional si no está seguro de cómo comprobar la
presión del agua.
v No instalar en sistemas donde se pueda producir el
efecto de golpe de ariete. Si existe una situación de
golpe de ariete en la instalación, debe instalar un
amortiguador de golpe de ariete. Póngase en contacto
con un fontanero profesional si no está seguro de
cómo comprobar esta situación.
v No instalar en tuberías de suministro de agua caliente.
La temperatura máxima de funcionamiento del agua de
HVWHVLVWHPDGHoOWUDGRGHDJXDHVGH£&£)
v 3URWHMDHOoOWURGHDJXDGHODFRQJHODFLÚQNo use
HOIULJRUÕoFRHQFRQGLFLRQHVDPELHQWDOHVSRUGHEDMR
GHORV&£)'UHQHHOoOWURGHDJXDFXDQGR
almacene la unidad en temperaturas inferiores a los
4,4 °C (40 °F).
v (OoOWURGHDJXDGHVHFKDEOHVHGHEHUHHPSOD]DUFDGD
seis meses, a la capacidad nominal, o si se produce
XQDVLJQLoFDWLYDUHGXFFLÚQGHOpXMR
Directrices de aplicación/Parámetros del suministro de
agua
Flujo de servicio 1,9 lpm (0,5 gpm)
Suministro de agua Agua potable
Presión del agua 138 - 827 kPa (20-120 psi)
Temperatura del agua 0,6 °C - 38 °C (33 ºF - 100 °F)

86
CUIDADO Y LIMPIEZA
ADVERTENCIA
Riesgo de explosión
8VHXQOLPSLDGRUQRLQpDPDEOH6LQRVHUHVSHWDHVWD
advertencia, existe peligro de explosión, incendio o
muerte.
Tanto las secciones refrigerador como congelador se
descongelan de forma automática; sin embargo, se
recomienda limpiar ambas secciones una vez al mes
para evitar la aparición de olores. Seque los derrames
inmediatamente.
SUGERENCIAS GENERALES DE LIMPIEZA
v Desenchufe el refrigerador o desconecte la alimentación.
v Retire todos los componentes extraíbles, como estantes,
cajones, etc. Consulte las secciones en 8VRĄGHOUHIULJHUDGRU
para obtener instrucciones acerca del desmontaje.
v Use una esponja limpia o un trapo suave, junto con
un detergente suave en agua templada. No utilice
limpiadores abrasivos o agresivos.
v /DYHDPDQRDFODUH\VHTXHWRGDVODVVXSHUoFLHVDIRQGR
v Enchufe el refrigerador o vuelva a conectar la corriente.
EXTERIOR
(OHQFHUDGRGHODVVXSHUoFLHVPHWÊOLFDVSLQWDGDVH[WHUQDV
proporciona una protección contra el óxido. No encere las
SLH]DVGHSOÊVWLFR(QFHUHODVVXSHUoFLHVPHWÊOLFDVSLQWDGDV
al menos dos veces al año con cera para electrodomésticos
(o cera en pasta para coches). Aplique la cera con un trapo
suave y limpio.
Para productos con un exterior en acero inoxidable, use una
esponja limpia o un trapo suave, junto con un detergente
suave en agua templada. No utilice limpiadores abrasivos o
agresivos. Seque a fondo con un trapo suave.
PAREDES INTERIORES (deje que el congelador se caliente
para que el trapo no se quede pegado)
Para ayudarle a eliminar los olores, puede lavar el interior
del refrigerador con una mezcla de bicarbonato sódico
y agua templada. Mezcle 2 cucharadas soperas de
bicarbonato sódico (unos 26 g) en 1 litro de agua. Asegúrese
de que el bicarbonato sódico esté completamente disuelto
SDUDTXHQRUD\HODVVXSHUoFLHVGHOUHIULJHUDGRU
REVESTIMIENTO DE LAS PUERTAS Y JUNTAS
Use una esponja limpia o un trapo suave, junto con un
detergente suave en agua templada. No utilice ceras de
limpieza, detergentes concentrados, lejías ni limpiadores que
contengan petróleo en las piezas del refrigerador que son
de plástico.
PIEZAS DE PLÁSTICO (tapas y paneles)
Use una esponja limpia o un trapo suave, junto con un
detergente suave en agua templada. No utilice sprays para
YHQWDQDVOLPSLDGRUHVDEUDVLYRVQLOÕTXLGRVLQpDPDEOHV\D
que pueden arañar o dañar el material.
BOBINAS DEL CONDENSADOR
Use un aspirador con un
accesorio para limpiar las
bobinas del condensador
y las rejillas de ventilación.
No retire el panel que cubre
el área de las bobinas
del condensador.
PRECAUCIÓN: Cuando esté limpiando el interior, no
pulverice agua.
87
CUIDADO Y LIMPIEZA
SUSTITUCIÓN DE LA BOMBILLA
ADVERTENCIA
Riesgo de descargas eléctricas
Antes de reemplazar la bombilla de un compartimento,
desenchufe el refrigerado o corte la corriente en el
disyuntor o en la caja de fusibles.
CUANDO SE MUDA
Cuando vaya a trasladar su refrigerador a una nueva casa,
siga estos pasos para prepararlo para la mudanza.
Saque todos los alimentos del refrigerador y empaquete
todos los alimentos congelados en hielo seco.
Desenchufe el refrigerador.
3. Lávelo y séquelo a fondo.
4. Retire todos los componentes extraíbles, envuélvalos bien
y, con cinta adhesiva, embálelos juntos para que no se
muevan ni traqueteen durante la mudanza. Consulte la
sección Uso del refrigerador para obtener instrucciones
sobre componentes extraíbles.
En función del modelo, levante la parte delantera del
refrigerador para que ruede con más facilidad O BIEN
atornille los pies de nivelación para que no rayen el
suelo. Consulte la sección Cierre de las puertas.
Use cinta adhesiva para mantener las puertas cerradas
y para pegar el cable de alimentación al cuerpo del
refrigerador.
Cuando llegue a su nueva casa, vuelva a colocar todo en su
sitio y consulte la sección Instalación del refrigerador para
obtener las instrucciones de preparación.
NOTA: La lámpara del compartimiento del refrigerador
es una iluminación interior mediante LEDs por lo que
el mantenimiento deberá ser realizado por un técnico
FXDOLoFDGR
INTERRUPCIONES DE ALIMENTACIÓN
Si la interrupción de la corriente durará 24 horas o
menos, mantenga todas las puertas del refrigerador
cerradas para que los alimentos permanezcan fríos y
congelados.
Si la interrupción de la corriente durará más de 24 horas,
saque todos los alimentos congelados y almacénelos en
un arcón congelador.
CUANDO SE VA DE VACACIONES
Si decide dejar encendido el refrigerador mientras está
fuera, siga estos pasos para preparar el refrigerador antes de
irse.
Consuma los alimentos perecederos y congele los demás.
Apague la máquina de hielo y vacíe el depósito de hielo.
Si decide apagar el refrigerador antes de partir, siga estos
pasos.
Saque todos los alimentos del refrigerador.
En función del modelo, ajuste el control del termostato
(control del refrigerador) en OFF. Consulte la sección
Ajuste de los controles.
3. Limpie el refrigerador y séquelo a fondo.
4. Con cinta adhesiva, coloque bloques de madera o goma
en la parte superior de ambas puertas para mantenerlas
ORVXoFLHQWHPHQWHDELHUWDVSDUDTXHSXHGDSDVDUHODLUH
Esto evitará la aparición de moho y malos olores.

88
CONEXIÓN DE LA TUBERÍA DE AGUA
ANTES DE EMPEZAR
Esta instalación de la tubería de agua no está cubierta por
la garantía del refrigerador. Siga estas instrucciones con
cuidado para minimizar el riesgo de costosos daños debidos
al agua.
El golpe de ariete (golpeteo del agua en las tuberías) en
la fontanería de la casa podría dañar componentes del
refrigerador y provocar una fuga o una inundación de agua.
/ODPHDXQIRQWDQHURFXDOLoFDGRSDUDUHVROYHUHOJROSHGH
ariete antes de instalar la tubería de suministro de agua en
el refrigerador.
PRECAUCIÓN: Para evitar quemaduras y daños en
el producto, conecte sólamente el tubo de agua del
refrigerador a un suministro de agua fría.
Si utiliza el refrigerador antes de la conexión al suministro
de agua, asegúrese de apagar la máquina de hielo en el
panel de control.
PRECAUCIÓN: No instale la tubería de la máquina
de hielo en zonas donde las temperaturas descienden por
GHEDMRGHOSXQWRGHĄFRQJHODFLÚQ
PRESIÓN DEL AGUA
Un suministro de agua fría. La presión del agua debe estar
entre los 20 y los 120 psi. Si el refrigerador se instala en un
área con baja presión de agua (menos de 20 psi), se puede
instalar una bomba de carga para compensar la baja
presión.
Si se conecta un VLVWHPDGHoOWUDFLÚQGHDJXDGHÚVPRVLV
inversa al suministro de agua fría, esta instalación de
la tubería de agua no está cubierta por la garantía del
refrigerador. Siga estas instrucciones con cuidado para
minimizar el riesgo de costosos daños debidos al agua.
Si se conecta un VLVWHPDGHoOWUDFLÚQGHDJXDGHÚVPRVLV
inversa al suministro de agua fría, la presión de agua al
sistema de ósmosis inversa debe ser como mínimo de entre
40 y 60 psi (276-414 kPa o 2,8-4,2 kgf/cm², menos de
2-3 s para llenar un vaso de 7 oz o 198 cc de capacidad).
Si la presión del agua del sistema de ósmosis inversa es
inferior a 20 psi o 138 kPa o 1,4 kgf/cm² (se necesitan más
de 4 se para llenar un vaso de 7 oz o 198 cc de capacidad):
v &RPSUXHEHVLHOoOWURGHVHGLPHQWRVGHOVLVWHPDGHÚVPRVLV
LQYHUVDHVWÊEORTXHDGR5HHPSODFHHOoOWURVLHVQHFHVDULR
v Después de un uso intensivo, déle tiempo al depósito de
almacenamiento del sistema de ósmosis inversa para que
se llene.
v Si el problema relacionado con la presión de agua
procedente de la ósmosis inversa persiste, llame a un
IRQWDQHURFXDOLoFDGR
v Todas las instalaciones deben realizarse conforme a los
requisitos de los códigos locales de fontanería.
PRECAUCIÓN: Use gafas protectoras durante la
instalación para evitar lesiones.
QUÉ NECESITARÁ
v Tubería de cobre, de ¼ de pulgada
de diámetro, para conectar el
refrigerador al suministro de agua.
Asegúrese de que ambos extremos de
la tubería están cortados a escuadra.
v Para determinar la cantidad de tubería que necesita: mida
la distancia desde la válvula de agua situada en la parte
posterior del refrigerador a la tubería del suministro de
agua. A continuación, súmele 2,4 metros (8 pies). Asegúrese
GHTXHKD\DVXoFLHQWHWXEHUÕDDGLFLRQDODSUR[LPDGDPHQWH
2,4 metros [8 pies] enrollada en 3 vueltas de unos 25 cm
>ĄSXOJ@GHGLÊPHWURSDUDSHUPLWLUTXHVHSXHGDGHVSHJDU
el refrigerador de la pared después de la instalación.
v Taladro eléctrico.
v Llave de ½ pulg. o una llave inglesa.
v Destornilladores de punta plana y de estrella.
v Dos tuercas de compresión
con un diámetro exterior de
GHSXOJ\DEUD]DGHUDV
para unir el tubo de cobre a la
válvula de corte y a la válvula
de agua del refrigerador.
v Si la tubería de agua de cobre
existente tiene una conexión
abocinada en el extremo,
necesitará un adaptador
(disponible en cualquier ferretería)
para conectar la tubería de agua
al refrigerador O puede cortar
la conexión abocinada con un
cortatubos y, a continuación, usar
una tuerca de unión.
v Una válvula de corte para conectar a la tubería de agua
fría. La válvula de corte debería tener una entrada de
agua con un diámetro interior mínimo de Ė/Ċĉ pulg. en el
punto de conexión con la TUBERÍA DE AGUA FRÍA. Las
válvulas de corte de montura se incluyen en muchos kits
de suministros de agua. Antes de
comprarla, asegúrese de que la
válvula de montura cumple con
los códigos locales de fontanería.
NOTA: No se debe usar una
válvula de agua de tipo de montura autoperforante.
ADVERTENCIA
Riesgo de descargas eléctricas
Si usa un dispositivo eléctrico (como un taladro) durante
la instalación, asegúrese de que esté alimentado por
batería y que tenga doble aislamiento o que esté
correctamente conectado a tierra de manera que evite
HOĄULHVJRGHXQDGHVFDUJDHOÑFWULFD
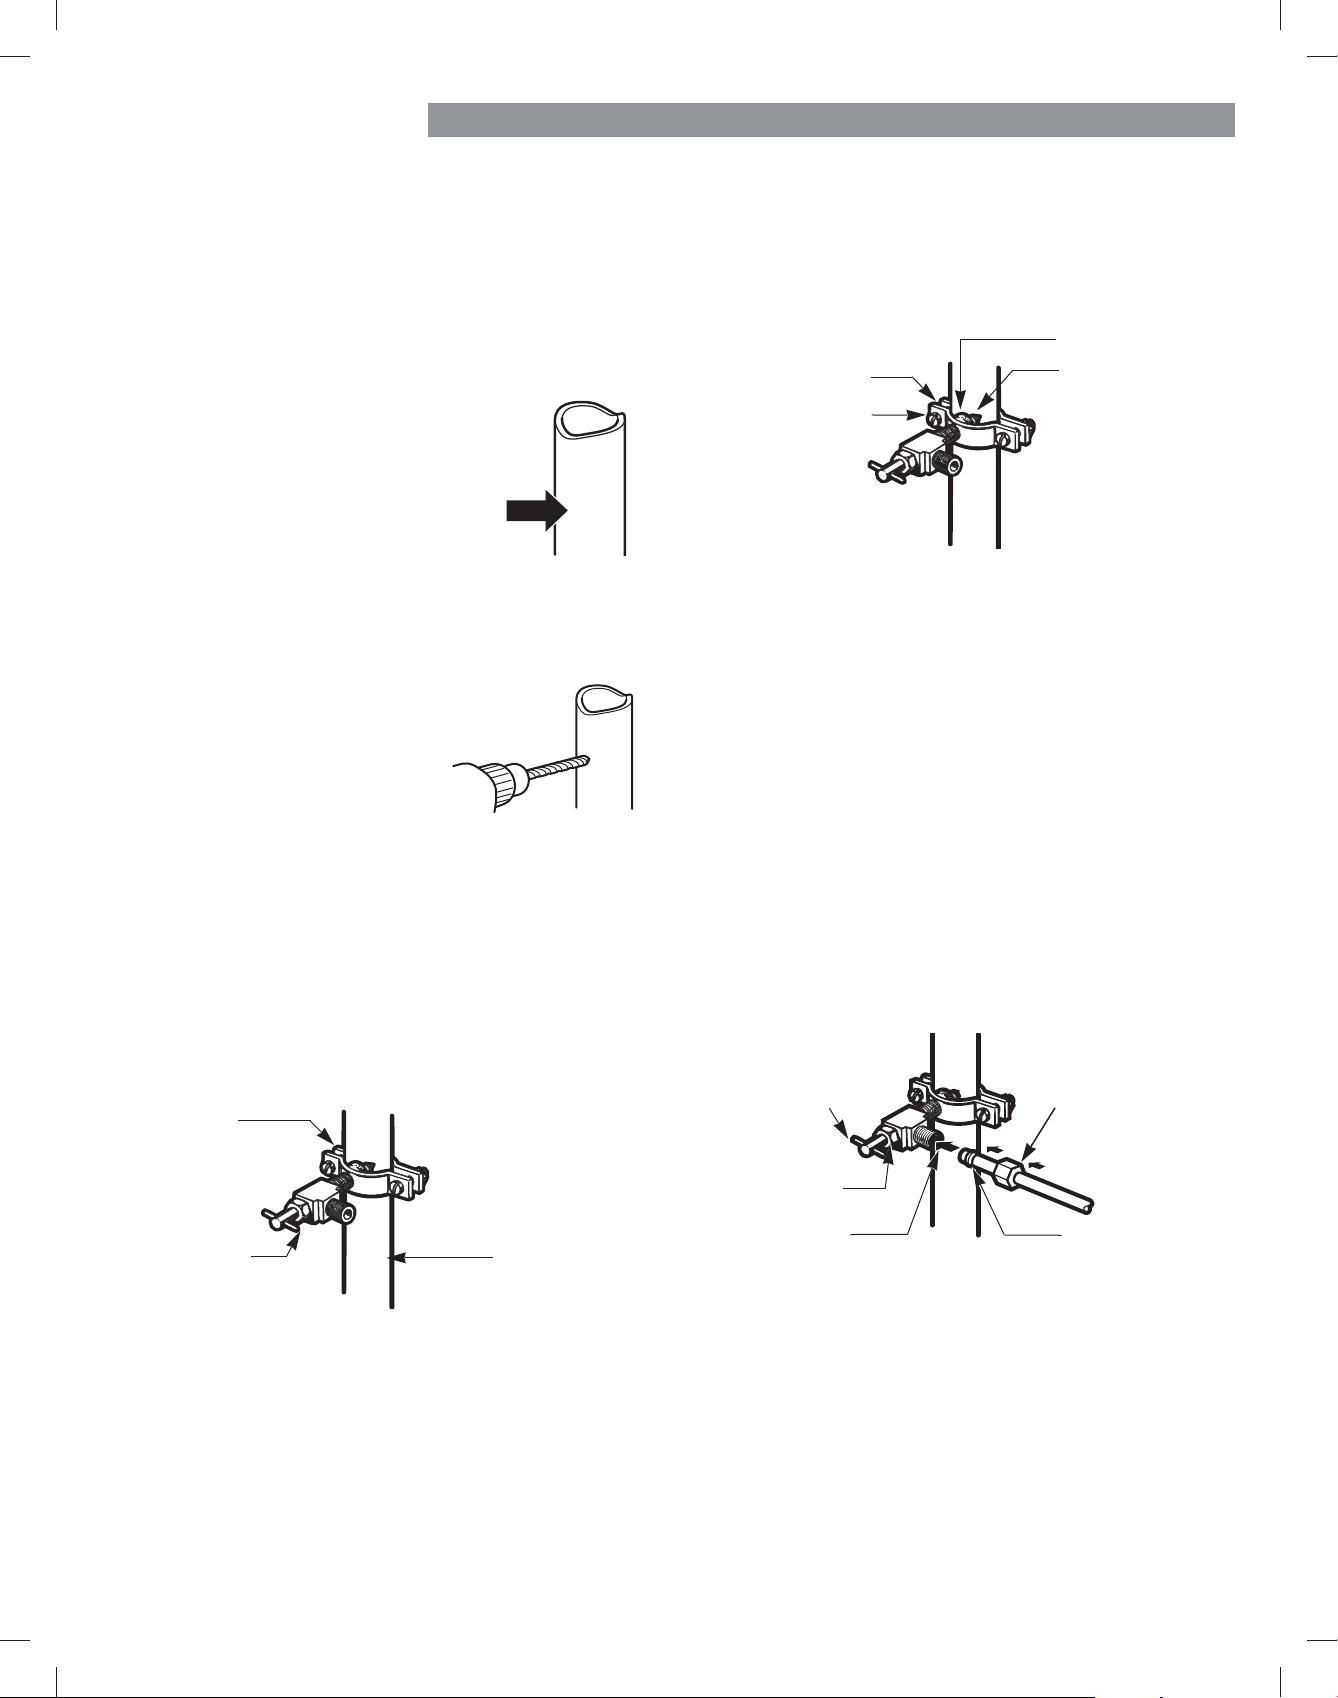
89
CONEXIÓN DE LA TUBERÍA DE AGUA
INSTRUCCIONES DE INSTALACIÓN
Instale la válvula de corte cerca de la tubería de agua
potable que más se usa.
&257((/680,1,6752'($*8$35,1&,3$/
Abra el grifo más cercano para liberar la presión
de la línea.
(/,-$/$8%,&$&,½1'(/$9/98/$
Elija una ubicación para la válvula a
la que se pueda acceder fácilmente.
Es mejor conectarla en el lateral de
una tubería de agua vertical. Cuando
sea necesario conectarla en una
tubería de agua horizontal, realice la
conexión en la parte superior o lateral,
en lugar de conectarla a la parte inferior, para evitar
la acumulación de sedimentos de la tubería de agua.
3. TALADRE EL ORIFICIO PARA LA VÁLVULA
7DODGUHXQRULoFLRGHSXOJHQ
la tubería de agua mediante una
SXQWDDoODGD4XLWHWRGDVODV
rebabas resultantes de taladrar
HORULoFLRHQODWXEHUÕD7HQJD
cuidado de que no caiga agua
en el taladro. Si no se taladra un
RULoFLRGHGHSXOJSRGUÕD
verse reducida la producción de hielo y el tamaño
de los cubitos.
NOTA: La tubería de conexión no puede ser una tubería
blanca de plástico. Los fontaneros profesionales solo
pueden utilizar tuberías de cobre (tuberías NDA #49595
o #49599) o tuberías de Polietileno Reticular (PEX).
4. FIJE LA VÁLVULA DE CORTE
Fije la válvula de corte a la tubería de agua fría con la
abrazadera para tubos.
NOTA: Se deben cumplir los códigos de fontanería
248CMR del Estado de Massachusetts. Las válvulas
de montura son ilegales y no se permite su uso en
Massachusetts. Consulte a su fontanero autorizado.
$35,(7(/$$%5$=$'(5$3$5$78%26
Apriete los tornillos de la abrazadera hasta que
la arandela de sellado comience a hincharse.
NOTA: Tenga cuidado de no sobreapretar la
abrazadera, ya que podría romper la tubería.
(1&$0,1(/$78%(5¸$
Encamine la tubería entre la tubería de agua fría y el
refrigerador.
(QFDPLQHODWXEHUÕDDWUDYÑVGHXQRULoFLRWDODGUDGR
en la pared o suelo (detrás del refrigerador o junto a
la base del aparato) lo más cerca de la pared que sea
posible.
NOTA: $VHJàUHVHGHTXHKD\DVXoFLHQWHWXEHUÕD
adicional (aproximadamente 2,4 metros enrollada en
ĄYXHOWDVGHXQRVFPGLÊPHWURSDUDSHUPLWLUTXHVH
pueda despegar el refrigerador de la pared después de
la instalación.
&21(&7(/$78%(5¸$$/$9/98/$
Coloque la tuerca de compresión y la abrazadera
para la tubería de cobre en el extremo de la tubería y
conéctela a la válvula de corte. Asegúrese de que la
tubería está completamente insertada en la válvula.
Apriete la tuerca de compresión con fuerza.
NOTA: Se deben cumplir los códigos de fontanería
248CMR del Estado de Massachusetts. Las válvulas de
montura son ilegales y no se permite su uso en
Massachusetts. Consulte a su fontanero autorizado.
Abrazadera
para tubos
Válvula de
corte de
montura
Tubería de
agua fría
vertical
Abrazadera
para tubos
Tornillo de la
abrazadera
Arandela
Extremo de
entrada
Válvula de
corte de
montura
Tuerca
prensaestopas
Válvula de
salida
Tuerca de
compresión
Guarnición
(manguito)
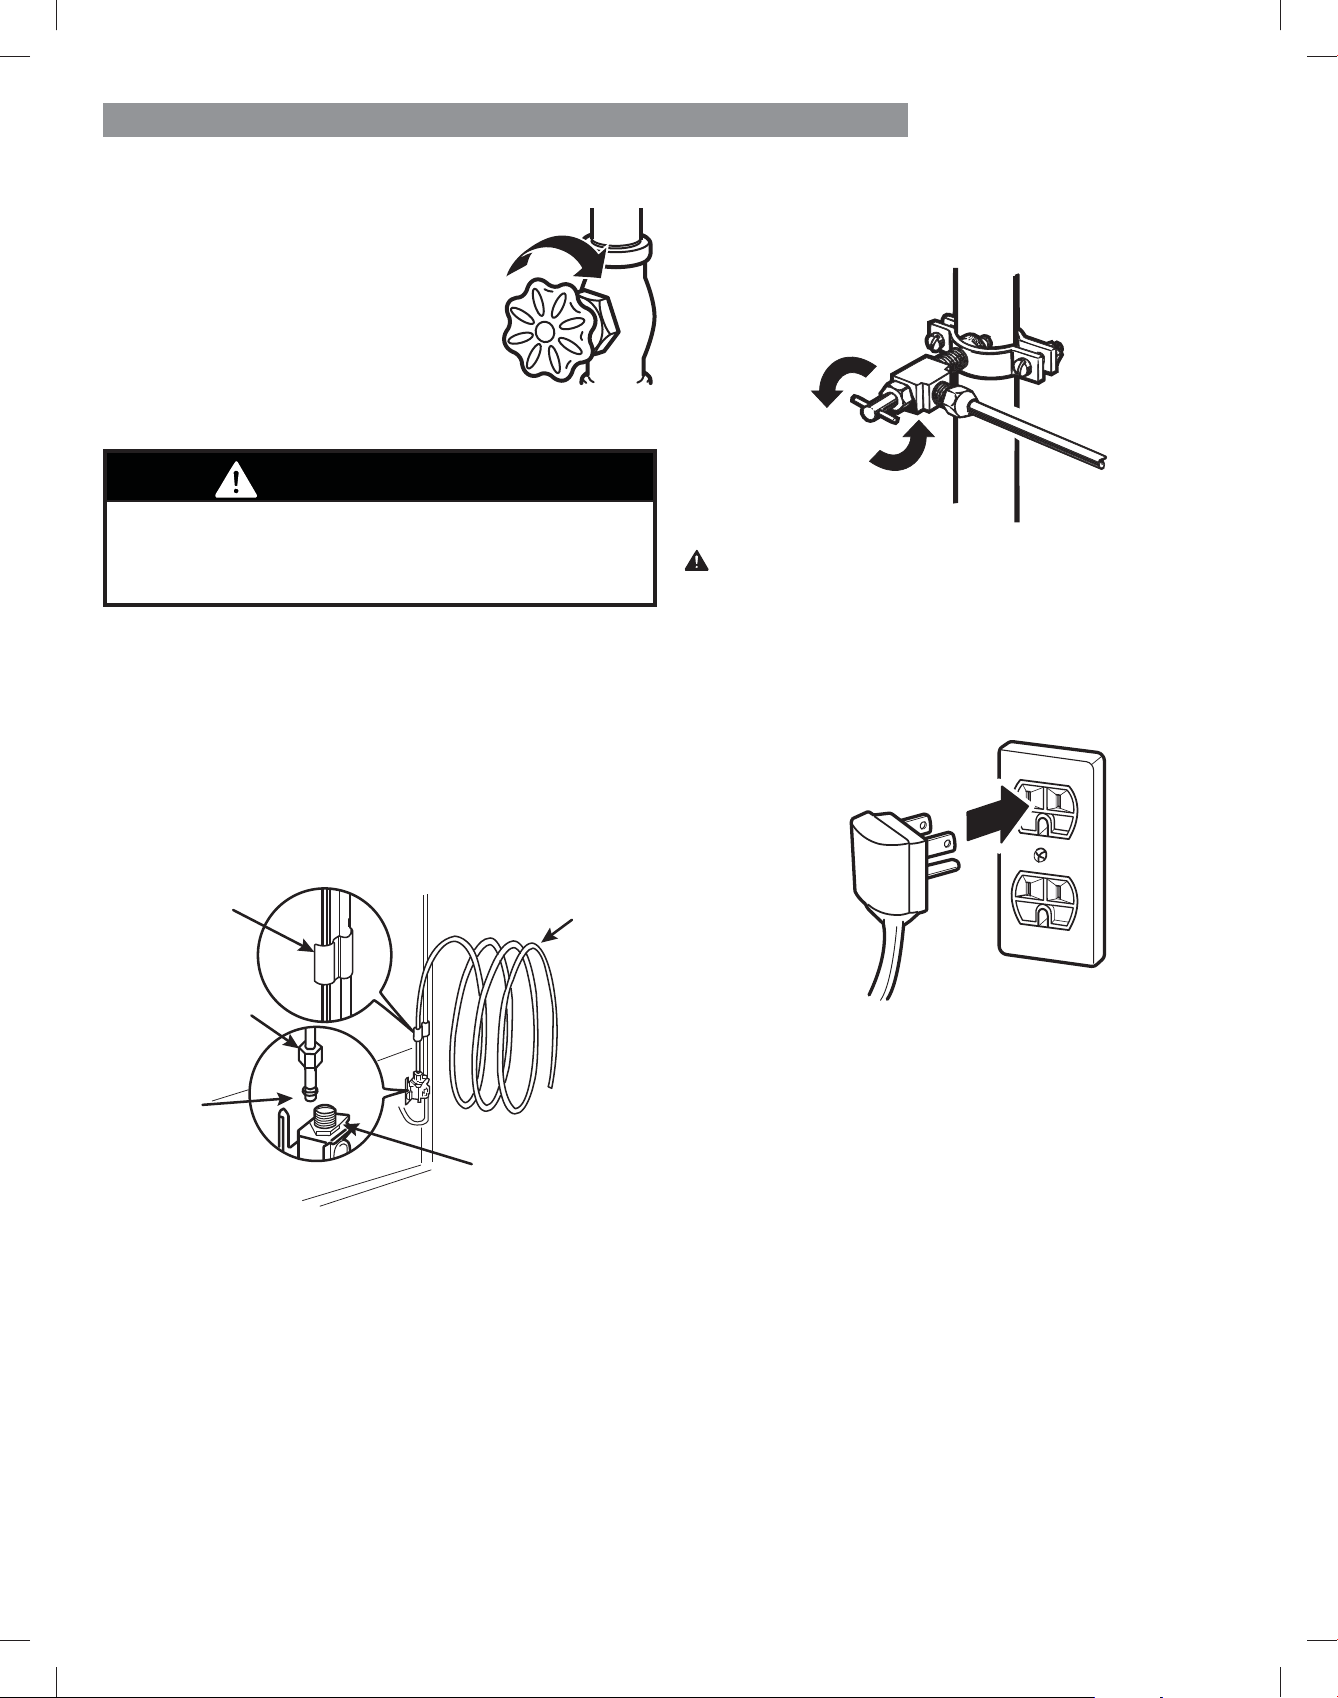
90
CONEXIÓN DE LA TUBERÍA DE AGUA
$%5$(/3$62'($*8$(1/$9/98/$'(&257(
Apriete las conexiones que goteen.
(1&+8)((/5()5,*(5$'25
Disponga la bobina de tubería de tal manera que no
vibr
e contra la parte posterior del refrigerador ni contra
la pared. Empuje el refrigerador hacia la pared.
(1&,(1'$/$048,1$'(+,(/2
Encienda la máquina de hielo en el panel de control.
La máquina de hielo no comenzará a funcionar hasta
que no alcance su temperatura de funcionamiento de
–9 °C (15 °F) o menos. Se pondrá en funcionamiento
automáticamente si se ha puesto en ON el botón de la
máquina de hielo.
PRECAUCIÓN: Compruebe si hay fugas en las
conexiones de las tuberías de agua.
$&/$5((/,17(5,25'(/$78%(5¸$
Active el suministro de agua principal
y deje correr el agua por la tubería
hasta que salga agua limpia.
Corte la válvula de agua después de
que haya pasado aproximadamente
un litro de agua a través de la
tubería.
. CONECTE LA TUBERÍA AL REFRIGERADOR
5HWLUHODWDSDGHSOÊVWLFRpH[LEOHGHODYÊOYXODGHDJXD
Coloque la tuerca de compresión y la guarnición
(manguito) en el extremo del tubo tal como se muestra
en la imagen.
3. Inserte el extremo de la tubería de cobre en la conexión
todo lo que pueda. Mientras sujeta la tubería, apriete el
adaptador.
Abrazadera de
tubería
Tubería de
¼ de pulg.
Tuerca de
compresión de
¼ de pulg.
Conexión del
refrigerador
Guarnición
(manguito)
ADVERTENCIA
Antes de realizar la conexión al refrigerador, asegúrese
de que el cable de alimentación del refrigerador no está
enchufado a la toma de corriente.

91
GUÍA DE SOLUCIÓN DE PROBLEMAS
Problema Causas posibles
Solutions
Las secciones del
refrigerador y del
congelador no enfrían.
El control del refrigerador está en la posición
OFF (en algunos modelos).
Encienda el control. Consulte la sección Ajuste de los controles
para obtener información acerca de los ajustes correctos de
temperatura.
El refrigerador está en Demo Mode (Modo
Demostración).
El Modo demostración permite que las luces y la pantalla
de control funcionen con normalidad, si bien el sistema de
refrigeración está deshabilitado para ahorrar energía, mientras
el electrodoméstico está en la planta de exposición del
establecimiento comercial. Consulte la sección Ajuste de los
controles para obtener instrucciones sobre cómo desactivar el
Modo Demostración.
El refrigerador está en el ciclo de
descongelación.
Durante el ciclo de descongelación, la temperatura de cada
compartimiento puede aumentar ligeramente. Espere 30 minutos
y una vez que se haya completado el ciclo de descongelación,
YHULoTXHTXHODWHPSHUDWXUDFRUUHFWDVHKD\DUHVWDEOHFLGR
El refrigerador se instaló recientemente. Puede tomar hasta 24 horas para que cada compartimiento
alcance la temperatura deseada.
El refrigerador se trasladó recientemente. Si el refrigerador estuvo fuera de uso por mucho tiempo, o si
estuvo guardado de costado, es necesario que se lo posiciones
de manera vertical por 24 horas antes de conectarlo a la energía
eléctrica.
El sistema de enfriado
funciona por demasiado
tiempo.
El refrigerador ha reemplazado a un modelo
más antiguo.
Los refrigeradores modernos requieren más tiempo de
funcionamiento pero consumen menos energía gracias a una
WHFQRORJÕDPÊVHoFLHQWH
El refrigerador se acaba de enchufar o la
electricidad se acaba de restablecer.
El refrigerador puede tardar hasta 24 horas en enfriarse
completamente.
La puerta se abre a menudo o se acaba de
introducir una gran cantidad de alimentos/
alimentos calientes.
Cuando se introducen alimentos o se abren las puertas, aumenta
la temperatura del refrigerador, lo que obliga al compresor a
funcionar por más tiempo para volver a enfriar el refrigerador.
Para ahorrar energía, intente sacar todo lo que necesite
del refrigerador de una sola vez, mantenga los alimentos
organizados para que resulte fácil encontrarlos, y cierre la
puerta en cuanto saque el alimento. (Consulte la Guía para el
almacenamiento de alimentos).
Las puertas no están completamente
cerradas.
(PSXMHoUPHPHQWHSDUDFHUUDUODVSXHUWDV6LÑVWDVQRVHFLHUUDQ
por completo, consulte el apartado “Las puertas no se cierran
completamente o quedan abiertas en la sección Componentes y
Características de la Guía de resolución de problemas.
El refrigerador está instalado en un lugar
caluroso.
El compresor funcionará por más tiempo en condiciones
calurosas. A temperaturas ambiente normales (21 °C), el
compresor debería funcionar entre el 40% y el 80% del tiempo.
En condiciones más calurosas, sería esperable que funcionara
incluso más a menudo. No se debería usar el refrigerador si la
temperatura supera los 43°C.
La tapa posterior/ el condensador está
obstruida/o.
Use un aspirador con un accesorio para limpiar las bobinas del
condensador y las rejillas de ventilación. No retire el panel que
cubre el área de las bobinas del condensador.
ENFRIADO
Before conducting troubleshooting, make sure that the following basic requirements are met:
Flujo de servicio 1,9 lpm (0,5 gpm)
Suministro de agua Agua potable
Presión del agua 138 - 827 kPa (20-120 psi)
Límites de temperatura
ambiente para el fun-
cionamiento
55°F - 110°F
(VSHFLoFDFLRQHV
eléctricas
115 voltios, 60 Hz, AC únicamente, y
fusionado a 15 o 20 amperios.

92
GUÍA DE SOLUCIÓN DE PROBLEMAS
Problema Causas posibles
Solutions
La sección del
REFRIGERADOR o del
CONGELADOR está
demasiado caliente.
El refrigerador se instaló recientemente. Puede tomar hasta 24 horas para que cada compartimiento
alcance la temperatura deseada.
Los conductos de ventilación del aire están
bloqueados.
Reorganice los artículos dentro del electrodoméstico para
SHUPLWLUTXHHODLUHpX\DDWUDYÑVGHOFRPSDUWLPLHQWR&RQVXOWHHO
diagrama de Flujo de aire en la sección Uso del refrigerador.
Las puertas se abren a menudo o por largos
períodos de tiempo.
Cada vez que las puertas se abren a menudo o por largos
períodos de tiempo, ingresa aire caliente y húmedo al
compartimiento. Esto aumenta la temperatura y el nivel de
humedad dentro de compartimiento. Para disminuir el efecto,
reduzca la frecuencia y duración de apertura de la puerta.
La unidad está instalada en un lugar
caluroso.
No se debería usar el refrigerador si la temperatura supera los
43°C (110°F).
Se agregó una gran cantidad de alimentos
o alimentos calientes al alguno de los
compartimientos.
Agregar alimentos calienta el compartimiento, con lo cual se
necesita que el sistema de enfriado comience a funcionar. Dejar
que la comida caliente se enfríe a temperatura ambiente antes
de ponerla en el refrigerador reducirá dicho efecto.
Las puertas no cierran correctamente. Consulte el apartado “Las puertas no se cierran completamente o
quedan abiertas” en la sección Componentes y Características de
la Guía de resolución de problemas.
El control de temperatura no es el adecuado. 6LODWHPSHUDWXUDQRHVWÊORVXoFLHQWHPHQWHIUÕDDMXVWHHO
control de a un punto a la vez y espere a que la temperatura
se estabilice. Consulte la sección Ajuste de los controles para
obtener mayor información.
El ciclo de descongelación se ha completado
recientemente.
Durante el ciclo de descongelación, la temperatura de cada
compartimiento puede aumentar ligeramente y se puede formar
condensación en la pared trasera. Espere 30 minutos y una vez
TXHVHKD\DFRPSOHWDGRHOFLFORGHGHVFRQJHODFLÚQYHULoTXH
que la temperatura correcta se haya restablecido.
Acumulación de
humedad en el interior
Las puertas se abren seguido o por largos
períodos de tiempo.
Cada vez que las puertas se abren seguido o por largos períodos
de tiempo, ingresa aire caliente y húmedo al compartimiento.
Esto aumenta la temperatura y el nivel de humedad dentro de
compartimiento. Para disminuir el efecto, reduzca la frecuencia y
duración de apertura de la puerta.
Las puertas no cierran correctamente. Consulte el apartado “Las puertas no se cierran correctamente”
en la sección Guía para la solución de problemas.
El clima es húmedo. El clima húmedo hace que más humedad ingrese a los
compartimientos cuando se abren las puertas, provocando
condensación o congelación. Mantener un nivel razonable
de humedad en el hogar ayudará a controlar la cantidad de
humedad que ingresa en los compartimientos.
El ciclo de descongelación se acaba de
completar.
Durante el ciclo de descongelación, la temperatura de cada
compartimiento puede aumentar ligeramente y se puede formar
condensación en la pared trasera. Espere 30 minutos y una vez
TXHVHKD\DFRPSOHWDGRHOFLFORGHGHVFRQJHODFLÚQYHULoTXH
que la temperatura correcta se haya restablecido.
Los alimentos no están empaquetados
correctamente.
Los alimentos destapados o desenvueltos y los envases húmedos
pueden provocar la acumulación de humedad dentro de cada
compartimiento. Limpie y seque todos los envases, y almacene los
alimentos en empaques sellados para prevenir la condensación y
la congelación.
ENFRIADO
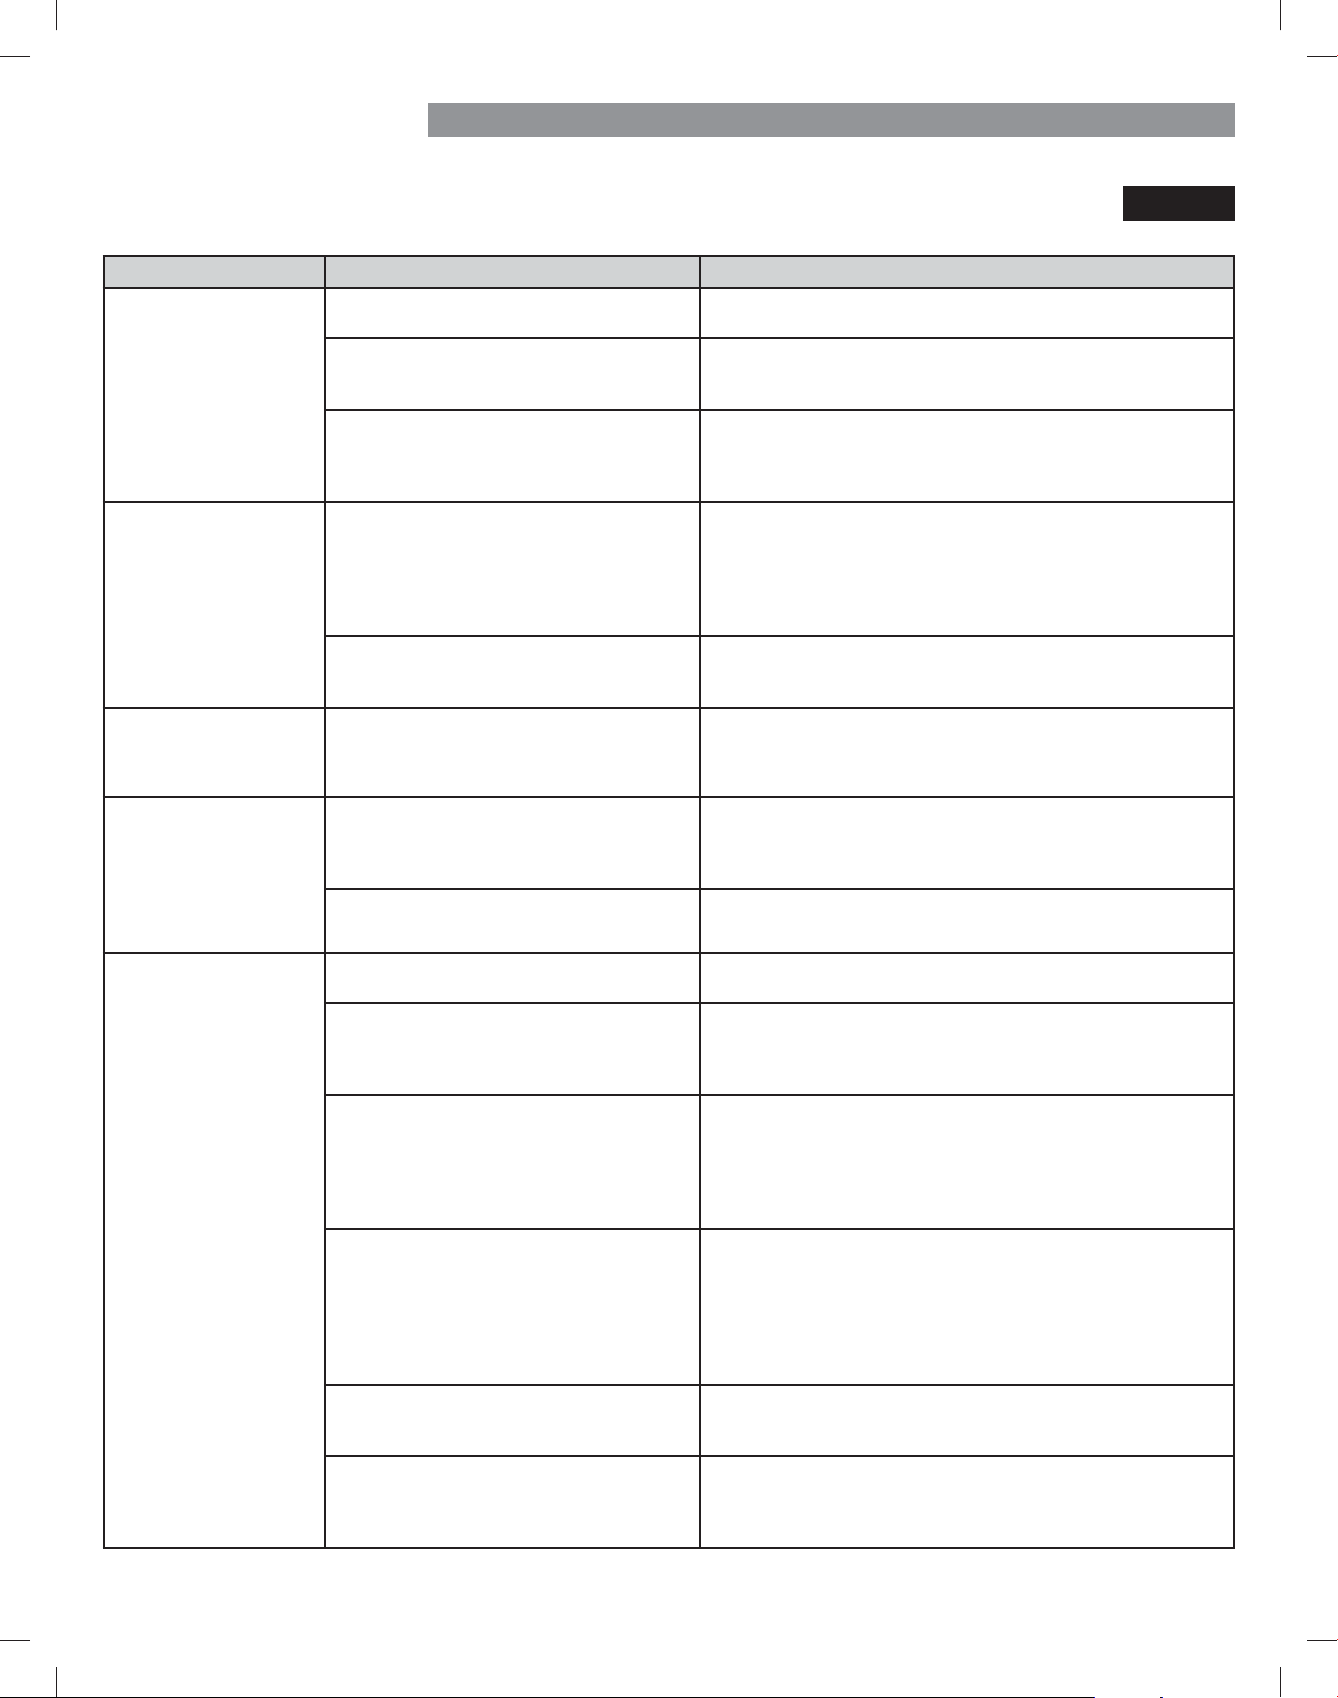
93
GUÍA DE SOLUCIÓN DE PROBLEMAS
Problema Causas posibles
Solutions
Los alimentos se congelan
en el compartimiento del
refrigerador.
Alimentos con alto contenido de agua fueron
colocados cerca de la ventilación de aire.
Reubique los alimentos con alto contenido de agua lejos de las
ventilaciones de aire.
El control de temperatura del refrigerador está
incorrectamente ajustado.
Si la temperatura está demasiado fría, ajuste el control de a un punto
a la vez y espere a que la temperatura se estabilice. Consulte la
sección Ajuste de los controles para obtener mayor información.
El refrigerador está instalado en un lugar frío. Cuando el refrigerador funciona a una temperatura menor a los 5°C
(41°F), los alimentos pueden congelarse en el compartimiento del
refrigerador. No se debería usar el refrigerador si la temperatura es
inferior a los 13°C (55°F).
Se forman cristales de
hielo o escarcha en los
alimentos congelados
(fuera de los paquetes).
La puerta se abre seguido o por largos períodos
de tiempo.
Cada vez que las puertas se abren a menudo o por largos períodos
de tiempo, ingresa aire caliente y húmedo al compartimiento.
Esto aumenta la temperatura y el nivel de humedad dentro de
compartimiento. La humedad produce congelación y condensación.
Para disminuir el efecto, reduzca la frecuencia y duración de
apertura de la puerta.
La puerta no se cierra correctamente. Consulte el apartado “Las puertas no se cierran completamente
o quedan abiertas” en la sección de la Guía de resolución de
problemas.
La sección del
REFRIGERADOR o del
CONGELADOR está
demasiado fría.
Los ajustes de control de temperatura son
incorrectos.
Si la temperatura está demasiado fría, ajuste el control de a un punto
a la vez y espere a que la temperatura se estabilice. Consulte la
sección Ajuste de los controles para obtener mayor información.
Se forman cristales de
hielo o escarcha en los
alimentos congelados
(dentro de paquetes
sellados).
La condensación proveniente de los alimentos
con alto contenido de agua provoca la
congelación en el interior del paquete del
alimento.
Esto es normal en alimentos con alto contenido de agua.
Los alimentos se han dejado en el congelador
por un largo tiempo.
No almacene alimentos con alto contenido de agua en el congelador
durante mucho tiempo.
La máquina de hielo no
KDFHVXoFLHQWHKLHOR
La necesidad de hielo excede la capacidad de
almacenamiento de hielo.
La máquina de hielo fabricará aproximadamente 70-182 cubitos en
un período de 24 horas.
El suministro de agua del hogar no está
conectado, la válvula no está completamente
encendida, o la válvula está obstruida.
Conecte el refrigerador al suministro de agua fría con adecuada
presión y abra completamente la válvula de corte de agua.
Si el problema persiste, puede ser necesario contactar a un plomero.
(OoOWURGHDJXDHVWÊDJRWDGR 6HUHFRPLHQGDUHHPSOD]DUHOoOWURGHDJXD
v Aproximadamente cada seis meses.
v &XDQGRVHHQFLHQGDHOLQGLFDGRUGHOoOWURGHODJXD
v Cuando disminuya el caudal del dispensador de agua.
v Cuando los cubitos de hielo sean más pequeños de lo normal.
Baja presión de suministro de agua en el hogar. La presión del agua debe estar entre los 20 y los 120 psi en modelos
VLQoOWURGHDJXD\HQWUHORV\SVLHQPRGHORVFRQoOWURGH
agua.
Si el problema continúa, puede ser necesaria la ayuda de un
fontanero o la instalación de una bomba de carga para compensar
la baja presión del agua.
6HXWLOL]DUXQVLVWHPDGHoOWUDFLÚQGHDJXDGH
ósmosis inversa.
/RVVLVWHPDVGHoOWUDFLÚQGHDJXDGHÚVPRVLVLQYHUVDSXHGHQUHGXFLU
la presión de agua por debajo del mínimo y provocar problemas en
la máquina de hielo. (Consulte la sección Presión del agua).
La tubería que conecta el refrigerador al
suministro del hogar está retorcida.
La tubería se puede retorcer cuando el refrigerador se mueve durante
ODLQVWDODFLÚQROLPSLH]DORTXHSURYRFDXQpXMRGHDJXDUHGXFLGR
Enderece o repare el conducto de suministro del agua y arréglelo a
oQGHSUHYHQLUIXWXUDVWRUFHGXUDV
ENFRIADO/ HIELO Y AGUA
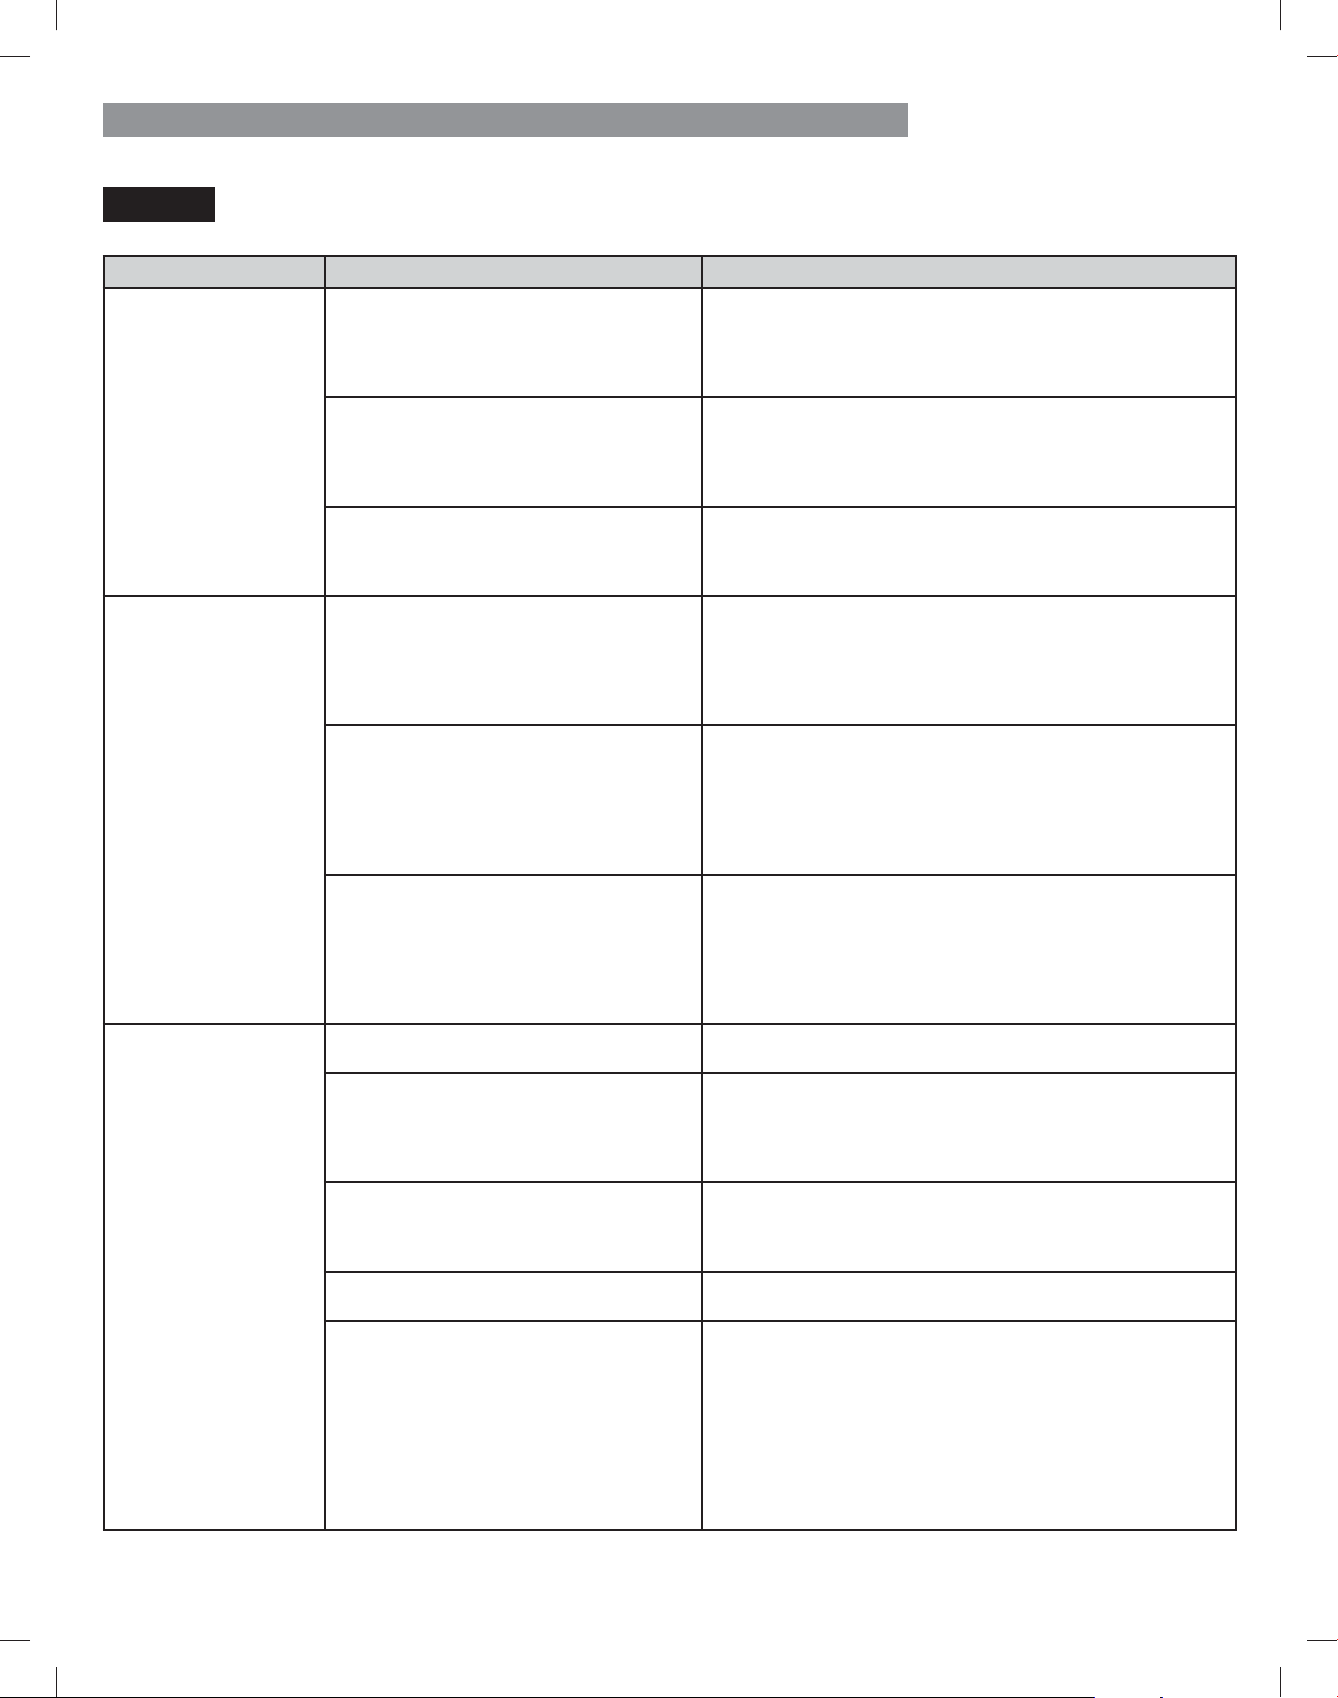
94
GUÍA DE SOLUCIÓN DE PROBLEMAS
Problema Causas posibles
Solutions
La máquina de hielo
QRKDFHVXoFLHQWHKLHOR
(continuación).
Las puertas se abren seguido o por largos
períodos de tiempo.
Si las puertas de la unidad se abren a menudo, el aire ambiental
calentará el refrigerador e impedirá que la unidad pueda
mantener la temperatura establecida. Para ayudar a resolver este
problema puede bajar la temperatura del refrigerador, además
de no abrir la puerta con tanta frecuencia.
Las puertas no están completamente
cerradas.
Si las puertas no se cierran correctamente, la fabricación de hielo
se verá afectada. Para obtener mayor información, consulte el
apartado “Las puertas no se cierran completamente o quedan
abiertas” en la sección Componentes y Características de la Guía
de resolución de problemas.
El ajuste de temperatura del congelador es
demasiado cálido.
La temperatura recomendada para el compartimento del
congelador para una fabricación normal de hielo es de –18 °C (0
°F). Si la temperatura del congelador es superior, la fabricación
de hielo se verá afectada.
Se dispensa agua
lentamente.
(OoOWURGHDJXDHVWÊDJRWDGR 6HUHFRPLHQGDUHHPSOD]DUHOoOWURGHDJXD
v Aproximadamente cada seis meses.
v &XDQGRVHHQFLHQGDHOLQGLFDGRUGHOoOWURGHODJXD
v Cuando disminuya el caudal del dispensador de agua.
v Cuando los cubitos de hielo sean más pequeños de lo normal.
6HXWLOL]DXQVLVWHPDGHoOWUDFLÚQGHDJXDGH
ósmosis inversa.
/RVVLVWHPDVGHoOWUDFLÚQGHDJXDGHÚVPRVLVLQYHUVDSXHGHQ
reducir la presión de agua por debajo del mínimo y provocar
problemas en la máquina de hielo.
Si el problema continúa, puede ser necesaria la ayuda de
un fontanero o la instalación de una bomba de carga para
compensar la baja presión del agua.
Baja presión de suministro de agua en el
hogar.
La presión del agua debe estar entre los 20 y los 120 psi en
PRGHORVVLQoOWURGHDJXD\HQWUHORV\SVLHQPRGHORV
FRQoOWURGHDJXD
Si el problema continúa, puede ser necesaria la ayuda de
un fontanero o la instalación de una bomba de carga para
compensar la baja presión del agua.
No se dispensa hielo. Las puertas no están completamente
cerradas.
El hielo no se dispensará si hay alguna puerta del refrigerador
abierta.
Uso poco frecuente del dispensador. Si el dispensador de hielo se usa con poca frecuencia, con el
tiempo los cubitos de hielo se pegan unos a otros, lo que impide
que se dispensen correctamente. Compruebe el depósito de hielo
en busca de cubitos agrupados o pegados entre sí. Si los hubiera,
sepárelos para que el dispensador funcione correctamente.
El conducto de dispensación está obstruido
con escarcha o fragmentos de hielo.
Para eliminar la escarcha o los fragmentos de hielo, desmonte el
depósito de hielo y libere el conducto con un utensilio de plástico.
La dispensación de hielo en cubitos también ayuda a evitar la
formación de escarcha y fragmentos de hielo.
La pantalla del dispensador está bloqueada. Mantenga presionado el botón Lock durante tres segundos para
desbloquear el panel de control y el dispensador.
El depósito de hielo está vacío. Puede tomar hasta 24 horas para que cada compartimiento
alcance la temperatura deseada y para que la máquina de hielo
comience a fabricar hielo. Asegúrese de que el corte (brazo/
sensor) no esté obstruido.
Una vez que se haya ventilado el suministro de hielo en el
depósito de hielo, puede tomar hasta 90 minutos para que esté
disponible más hielo, y aproximadamente 24 horas para poder
rellenar el depósito por completo.
HIELO Y AGUA
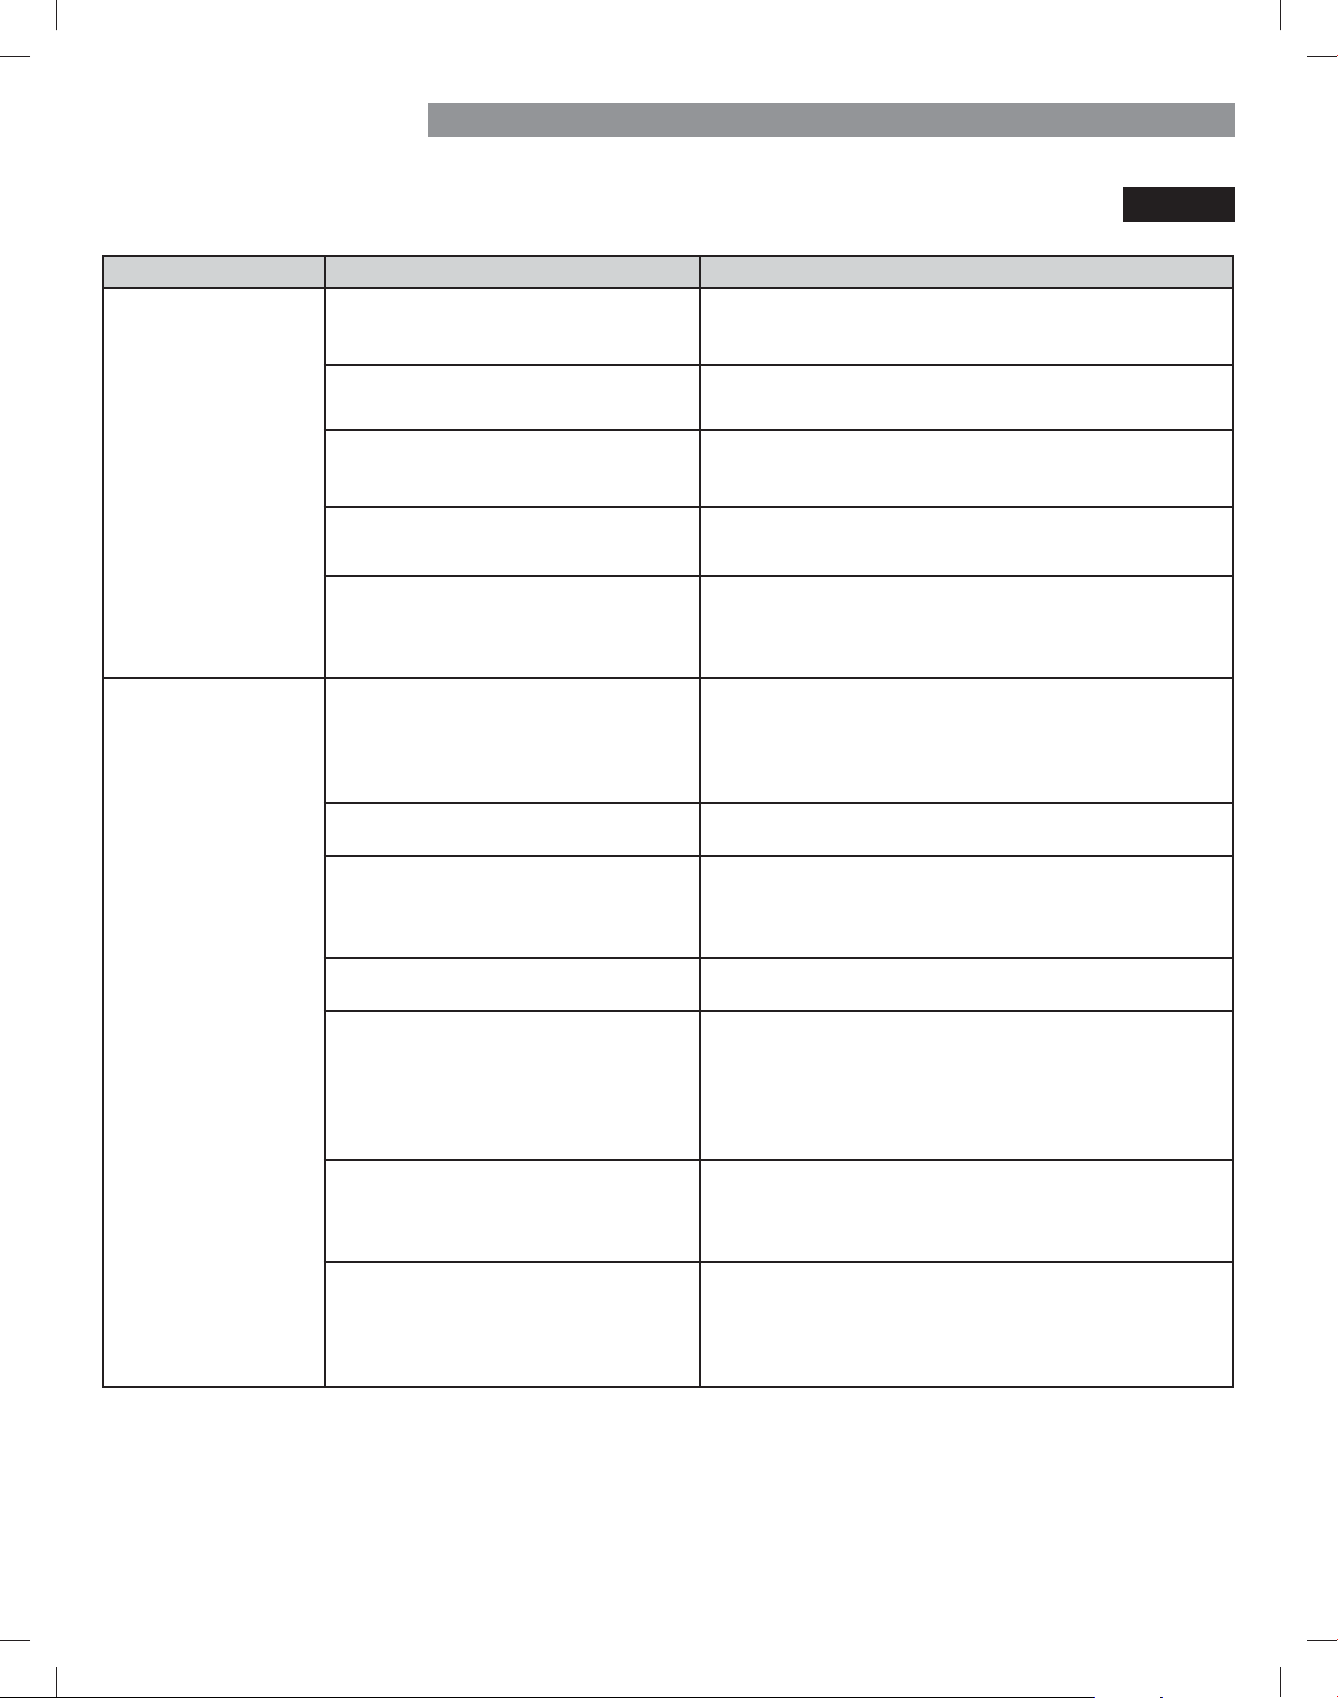
95
GUÍA DE SOLUCIÓN DE PROBLEMAS
Problema Causas posibles
Solutions
La máquina de hielo no
hace hielo.
El refrigerador se instaló recientemente o la
máquina de hielo se conectó recientemente.
Puede tomar hasta 24 horas para que cada compartimiento
alcance la temperatura deseada y para que la máquina de hielo
comience a fabricar hielo.
La máquina de hielo no está encendida. Localice el interruptor ON/OFF (encendido/apagado) de la
PÊTXLQDGHKLHOR\FRQoUPHTXHHVWÊHQODSRVLFLÚQ21
El refrigerador no está conectado a un
suministro de agua o la válvula de corte del
suministro no está abierta.
Conecte el refrigerador al suministro de agua y abra
completamente la válvula de corte de agua.
Apagado de la máquina de hielo (brazo
palpador) obstruido.
Si su máquina de hielo viene equipada con un brazo de corte de
hielo, asegúrese de que el brazo se mueva libremente.
7LHQHFRQHFWDGRXQVLVWHPDGHoOWUDFLÚQGH
agua de ósmosis inversa al suministro de
agua fría.
/RVVLVWHPDVGHoOWUDFLÚQGHDJXDGHÚVPRVLVLQYHUVDSXHGHQ
reducir la presión de agua por debajo del mínimo y provocar
problemas en la máquina de hielo. (Consulte la sección Presión
del agua).
No se dispensa agua. Nueva instalación o conducto de agua
recientemente conectado.
Dispense 9 litros de agua (deje correr el agua durante unos 5
minutos) para purgar el aire atrapado y los contaminantes del
sistema. No dispense los 9 litros de agua de manera continua.
Pulse y suelte el botón del dispensador en ciclos de 30 segundos
ON (encendido) y 60 segundos OFF (apagado).
El panel del dispensador está bloqueado. Mantenga presionado el botón Lock durante tres segundos para
desbloquear el panel de control y el dispensador.
El dispensador no está ajustado para
dispensar agua.
El dispensador se puede ajustar para que dispense hielo o
agua. Compruebe que el panel de control está ajustado para el
funcionamiento deseado. Presione el botón Water (agua) en el
panel de control para dispensar agua.
Las puertas del refrigerador o del congelador
no están cerradas correctamente.
El agua no se dispensará si hay alguna puerta del refrigerador
abierta.
(OoOWURGHDJXDVHVDFÚRVHFDPELÚ
recientemente.
'HVSXÑVGHUHHPSOD]DUHOoOWURGHDJXDGLVSHQVHOLWURVGH
agua (deje correr el agua durante unos 5 minutos) para purgar
el aire atrapado y los contaminantes del sistema; No dispense
los 9 litros de agua de manera continua. Pulse y suelte el botón
del dispensador por ciclos de 30 segundos ON (encendido) y 60
segundos OFF (apagado).
La tubería que conecta el refrigerador al
suministro del hogar está retorcida.
La tubería se puede retorcer cuando el refrigerador se mueve
GXUDQWHODLQVWDODFLÚQROLPSLH]DORTXHSURYRFDXQpXMRGH
agua reducido. Enderece o repare el conducto de suministro del
DJXD\DUUÑJOHORDoQGHSUHYHQLUIXWXUDVWRUFHGXUDV
El suministro de agua del hogar no está
conectado, la válvula no está completamente
encendida, o la válvula está obstruida.
Conecte el refrigerador al suministro de agua y abra
completamente la válvula de corte de agua.
Si el problema persiste, puede ser necesario contactar a un
plomero.
HIELO Y AGUA
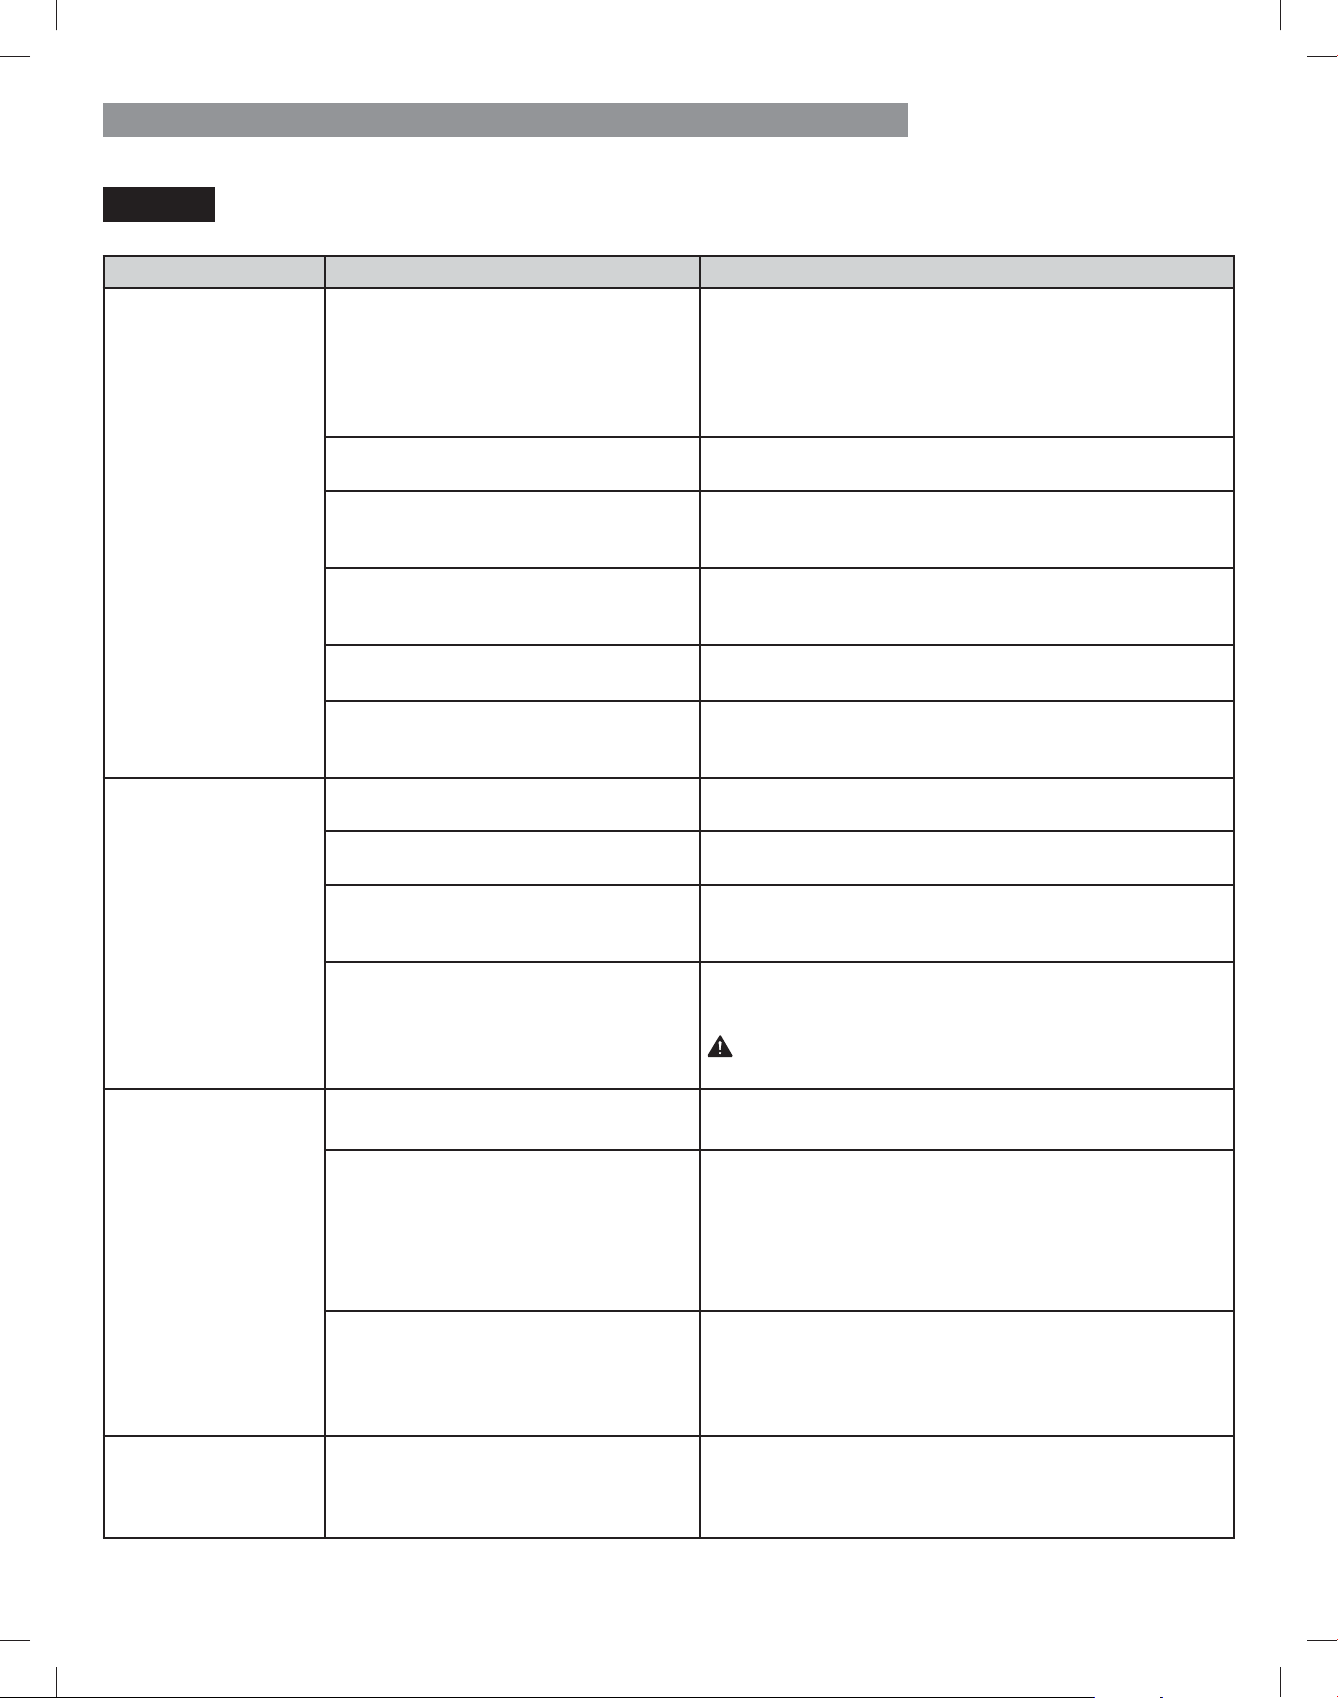
96
GUÍA DE SOLUCIÓN DE PROBLEMAS
Problema Causas posibles
Solutions
El hielo huele o sabe mal. El suministro de agua contiene minerales
tales como el azufre.
(VSRVLEOHTXHGHEDUHHPSOD]DUHOoOWURGHDJXDSDUDHOLPLQDU
los problemas de olor y sabor.
NOTA:(QDOJXQRVFDVRVXQoOWURSRGUÕDQRVHUGHD\XGD3XHGH
no resultar posible quitar todo mineral/ olor/sabor en todos los
suministros de agua.
La máquina de hielo se instaló hace poco
tiempo.
Deseche las primeras tandas de hielo para evitar hielo manchado
o con mal sabor.
El hielo ha estado almacenado por
demasiado tiempo.
El hielo almacenado por demasiado tiempo se achicará, se
volverá turbio, y puede desarrollar un sabor rancio. Deseche el
hielo antiguo y fabrique un nuevo suministro.
Los alimentos no se han almacenado
correctamente en los compartimentos.
Vuelva a envolver los alimentos. Vuelva a envolver los alimentos
ya que, si no están correctamente envueltos, los olores podrían
migrar hasta el hielo.
El interior del refrigerador necesita una
limpieza.
Consulte la sección Cuidado y limpieza para obtener más
información.
El depósito de hielo necesita una limpieza. Vacíe y limpie el depósito (deseche los cubitos de hielo viejos).
Asegúrese de que el depósito está completamente seco antes de
reinstalarlo.
El agua del dispensador
está caliente.
El refrigerador se ha instalado recientemente. Espere 24 horas tras la instalación a que el depósito de
almacenamiento del agua se enfríe completamente.
El dispensador de agua se ha utilizado
recientemente y el depósito estaba vacío.
'HSHQGLHQGR
GHVXPRGHORHVSHFÕoFRODFDSDFLGDGGH
almacenamiento de agua será de aproximadamente 20 a 30 oz.
No se ha utilizado el dispensador durante
varias horas.
Si el dispensador no se utilizó por varias horas, el primer vaso
GLVSHQVDGRSXHGHQRHVWDUORVXoFLHQWHPHQWHIUÕR'HVHFKHODV
primeras 10 onzas.
El refrigerador está conectado al suministro
de agua caliente.
Asegúrese de que el refrigerador está conectado a una tubería
de agua fría.
ADVERTENCIA: Conectar el refrigerador a un conducto de
agua caliente puede dañar la máquina de hielo.
El agua huele o sabe mal. El suministro de agua contiene minerales, por
ejemplo, azufre.
(VSRVLEOHTXHGHEDUHHPSOD]DUHOoOWURGHDJXDSDUDHOLPLQDU
los problemas de olor y sabor.
(OoOWURGHDJXDHVWÊDJRWDGR 6HUHFRPLHQGDUHHPSOD]DUHOoOWURGHDJXD
v Aproximadamente cada 6 meses.
v &XDQGRVHHQFLHQGDHOLQGLFDGRUGHOoOWURGHODJXD
v Cuando disminuya el caudal del dispensador de agua.
v Cuando los cubitos de hielo sean más pequeños de lo normal.
El refrigerador se ha instalado recientemente. Dispense 9 litros de agua (deje correr el agua durante unos 5
minutos) para purgar el aire atrapado y los contaminantes del
sistema. No dispense los 9 litros de agua de manera continua.
Pulse y suelte el botón del dispensador en ciclos de 30 segundos
ON (encendido) y 60 segundos OFF (apagado).
La máquina de hielo hace
demasiado hielo.
Apagado de la máquina de hielo (brazo
palpador) obstruido.
Vacíe el recipiente de hielo. Si la máquina de hielo incorpora un
brazo de apagado, asegúrese de que se mueva libremente.
Vuelva a instalar el recipiente de hielo y espere 24 horas para
comprobar su correcto funcionamiento.
HIELO Y AGUA
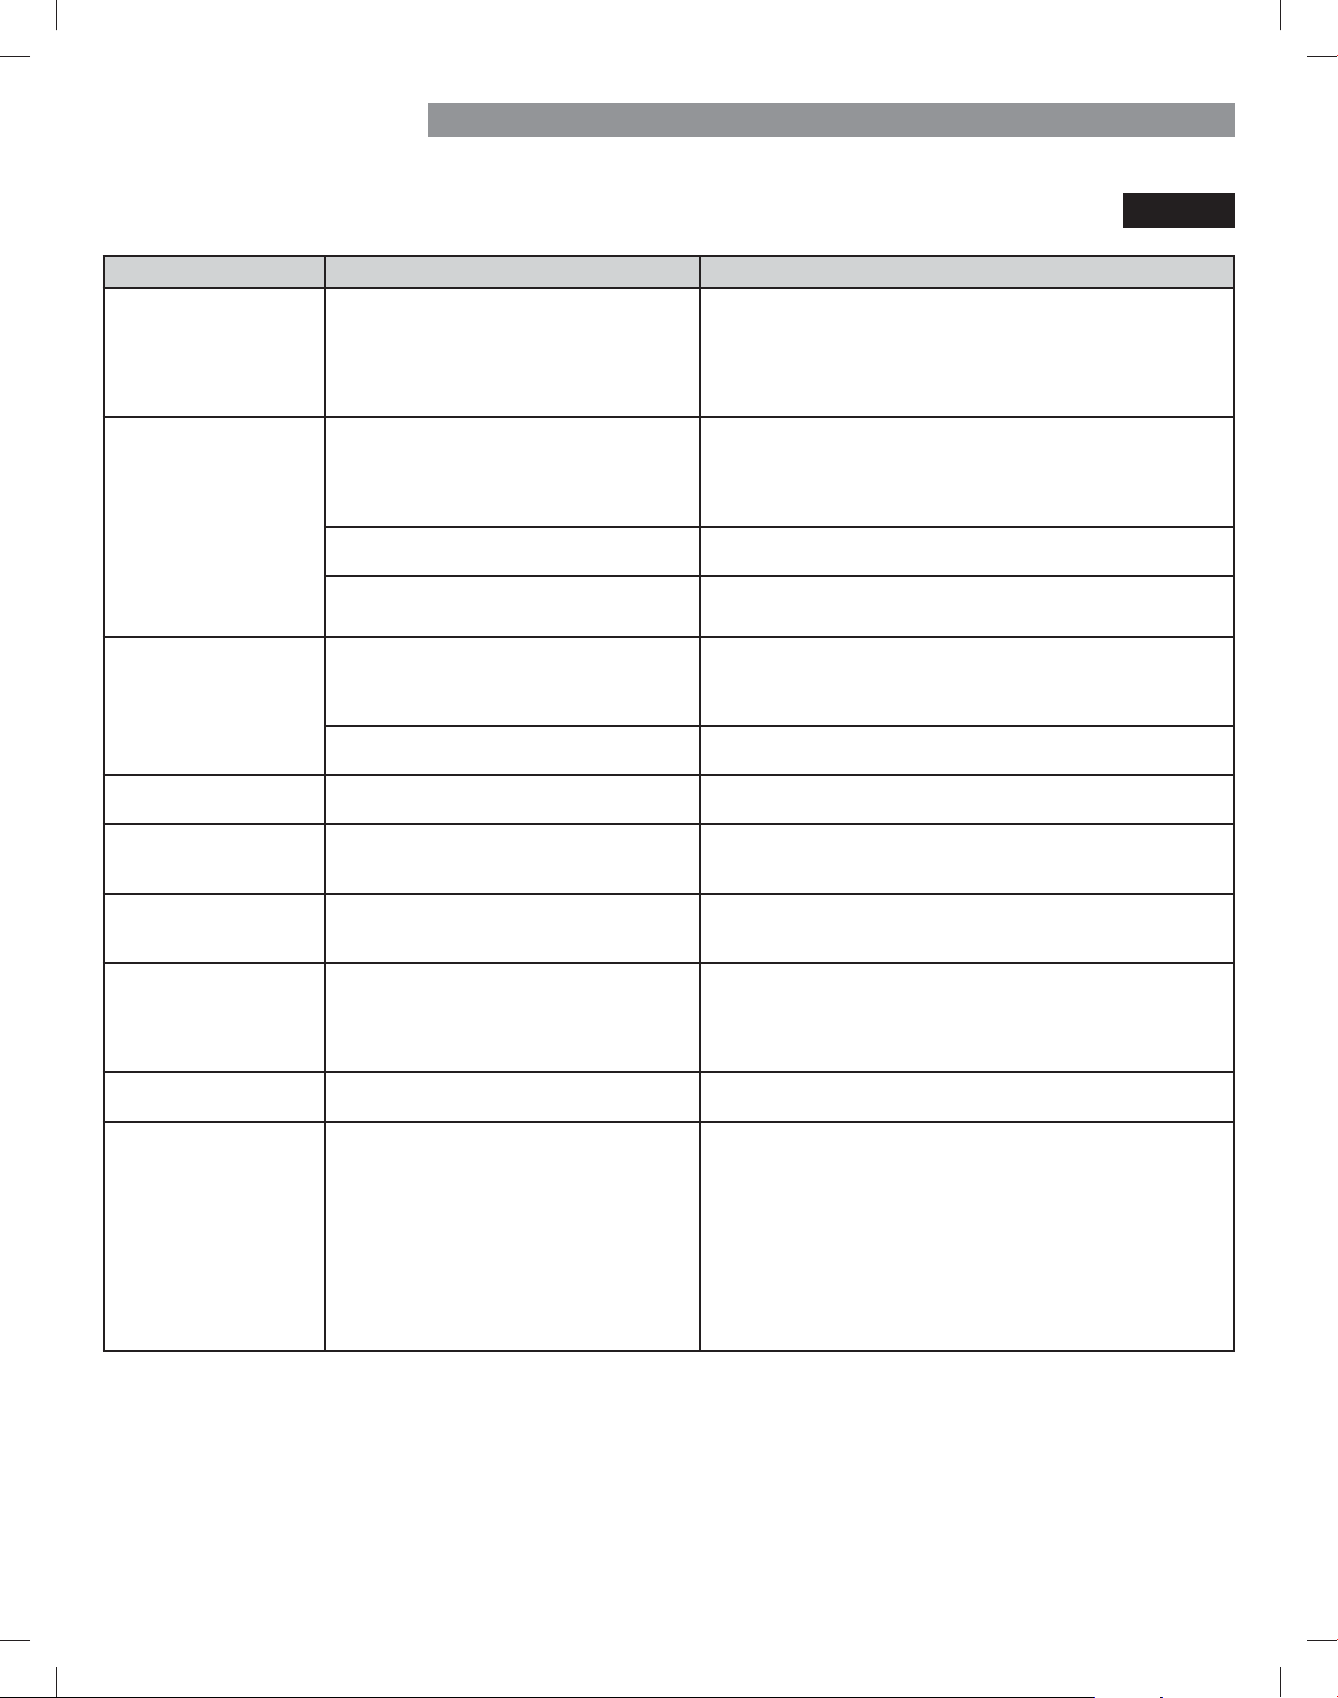
97
GUÍA DE SOLUCIÓN DE PROBLEMAS
Problema Causas posibles
Solutions
Clics El control de descongelación emitirá un
kFOLFyDOFRPHQ]DU\DOoQDOL]DUHOFLFORGH
descongelación. El control del termostato (o
control del refrigerador en algunos modelos)
WDPELÑQHPLWLUÊXQkFOLFyDOLQLFLDURoQDOL]DU
un ciclo.
Funcionamiento normal.
Traqueteo Los ruidos de traqueteos pueden proceder
GHOpXMRGHOUHIULJHUDQWHGHODWXEHUÕDGH
agua en la parte posterior de la unidad, o de
artículos almacenados encima o alrededor
del refrigerador.
Funcionamiento normal.
El refrigerador no está sólidamente apoyado
en el suelo.
El suelo es poco sólido o irregular, o es necesario ajustar los pies
de nivelación. Consulte la sección Alineación de las puertas.
El refrigerador con compresor lineal se
sacudió mientras estaba funcionando.
Funcionamiento normal.
Ruido de aspas El motor del ventilador del evaporador
está moviendo el aire a través de los
compartimentos del refrigerador y del
congelador.
Funcionamiento normal.
El ventilador del condensador está forzando
el paso de aire a través del condensador.
Funcionamiento normal.
Borboteo 5HIULJHUDQWHHVWÊpX\HQGRDWUDYÑVGHO
sistema de enfriamiento.
Funcionamiento normal.
Crujido Se produjo la contracción y expansión de
las paredes internas debido a cambios en la
temperatura.
Funcionamiento normal.
Crepitación El agua cayendo en el calentador de
descongelación durante un ciclo de
descongelación.
Funcionamiento normal.
Vibración Si el lateral o la parte posterior del
refrigerador están en contacto con un
mueble o una pared, algunas de las
vibraciones normales pueden producir un
sonido audible.
Para eliminar el ruido, asegúrese de que los laterales y la parte
posterior no puedan vibrar contra las paredes o los muebles.
Goteo El agua cayendo en la batea de drenaje
durante el ciclo de descongelación.
Funcionamiento normal.
Sonido de pulsación o
agudo
Su refrigerador está diseñado para funcionar
GHIRUPDPÊVHoFLHQWHSDUDFRQVHUYDUORV
alimentos a la temperatura deseada. El
FRPSUHVRUGHDOWDHoFLHQFLDSXHGHKDFHU
que su nuevo refrigerador funcione durante
más tiempo que su antiguo refrigerador, y
DXQDVÕVHUÊPÊVHoFLHQWHHQHUJÑWLFDPHQWH
que los modelos anteriores. Mientras el
refrigerador está en funcionamiento, es
normal escuchar un sonido de pulsación o
agudo.
Funcionamiento normal.
RUIDO
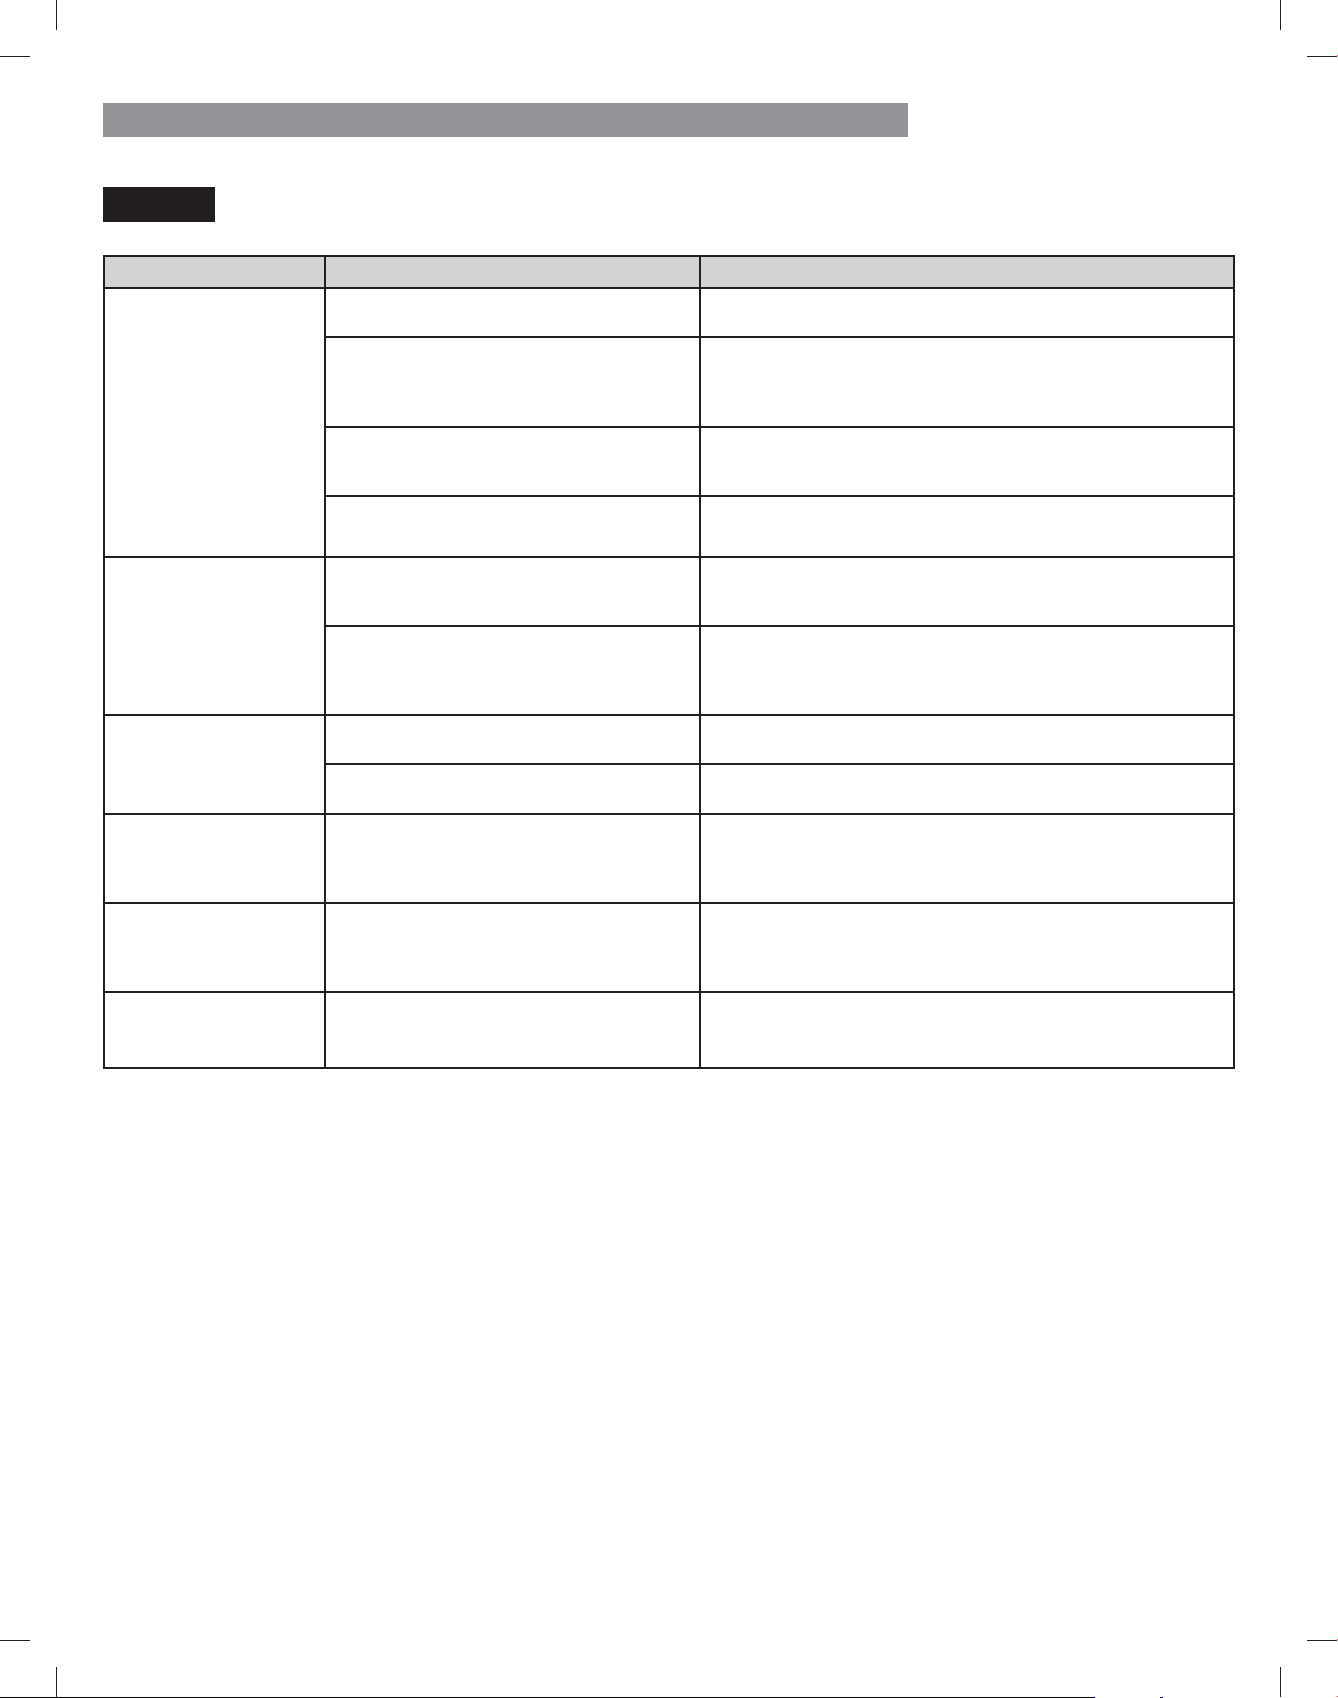
98
GUÍA DE SOLUCIÓN DE PROBLEMAS
Problema Causas posibles
Solutions
Las puertas no se cierran
completamente o quedan
abiertas.
Hay paquetes de alimentos bloqueando la
puerta que impiden que se cierre.
Reorganice los envases de alimentos para liberar la puerta y los
estantes de la puerta.
El depósito de hielo, la tapa del cajón
para verduras, las bateas, los estantes, las
bandejas de las puertas o las cestas no están
en su sitio.
Coloque correctamente las bandejas, la tapa del cajón para
verduras, las bateas, los estantes y las cestas. Consulte la sección
Uso del refrigerador Uso del refrigerador.
Las puertas se desmontaron durante la
instalación del producto y no se volvieron a
colocar correctamente.
Desmonte y vuelva a colocar las puertas siguiendo las
instrucciones de la sección Desmontaje y sustitución de las
manijas y puertas del refrigerador.
La puerta no está correctamente nivelada. Consulte el apartado Alineación de las puertas en la sección
Instalación del refrigerador para nivelar el refrigerador.
Las puertas se abren con
JUDQGLoFXOWDG
Las juntas están sucias o pegajosas. /LPSLHODVMXQWDV\ODVVXSHUoFLHVGHFRQWDFWR$SOLTXHXQDoQD
capa de cera para electrodomésticos o cera de cocina en las
juntas después de limpiarlas.
La puerta se acaba de cerrar. Cuando abre la puerta, aire más caliente entra al refrigerador.
Al enfriarse, crea el vacío. Si le cuesta abrir la puerta, espere
un minuto para permitir que la presión del aire se ecualice y, a
continuación, compruebe si se abre con más facilidad.
El refrigerador se
bambolea o parece
inestable.
Las patas niveladoras no están
correctamente ajustadas.
Consulte la sección Nivelación y alineación de las puertas.
El piso no está nivelado. Puede ser necesario agregar calibradores debajo de las patas o
rodillos de nivelación o para completar el proceso de instalación.
Las luces no funcionan. Falla de iluminación interior LED. La lámpara del compartimiento del refrigerador es una
iluminación interior mediante LED, por lo que el mantenimiento
GHEHUÊVHUUHDOL]DGRSRUXQWÑFQLFRFXDOLoFDGR&RQVXOWHOD
sección Sustitución de la bombilla.
Le refrigerador tiene un
olor inusual.
(OoOWURGHDLUHSXHGHQHFHVLWDUVHUDMXVWDGR
a MAX (máximo) o ser reemplazado.
$MXVWHHOoOWURGHDLUHD0$;6LQRGHVDSDUHFHHORORUGHQWURGH
ODVKRUDVHOoOWURSXHGHQHFHVLWDUVHUFDPELDGR&RQVXOWHOD
VHFFLÚQ6XVWLWXFLÚQGHOoOWURGHDLUHSDUDREWHQHULQVWUXFFLRQHV
acerca del reemplazo.
(OLQWHULRUGHOIULJRUÕoFR
está cubierto de polvo u
hollín.
(OIULJRUÕoFRVHHQFXHQWUDFHUFDGHXQIXHJR
por ejemplo, una chimenea o similar.
$VHJàUHVHGHTXHHOIULJRUÕoFRQRVHHQFXHQWUHFHUFDGHXQ
fuego, por ejemplo, una chimenea o similar.
COMPONENTES Y CARACTERÍSTICAS

99
DIAGNOSTICS (DIAGNÓSTICOS)
Diagnósticos (En algunos modelos)
Si experimenta algún problema en el refrigerador,
puede transmitir datos a través de su teléfono al equipo
Diagnósticos. Esto le da la posibilidad de hablar
GLUHFWDPHQWHFRQQXHVWURVHVSHFLDOLVWDVFXDOLoFDGRV(O
especialista graba los datos transmitidos por su máquina
y los utiliza para analizar el problema, suministrando un
diagnóstico rápido y efectivo.
Si experimenta problemas con su refrigerador, llame en
1-844-553-6667. Utilice la función Diagnósticos solo cuando
así se lo indique el agente del equipo Diagnósticos. Los
sonidos de transmisión que oirá son normales y suenan como
un fax.
Diagnósticos no se puede activar si su refrigerador no está
conectado a la alimentación eléctrica.
Si su refrigerador no se enciende, la localización y resolución
de problemas debe hacerse sin utilizar Diagnósticos.
Uso de Diagnósticos
En primer lugar, llame en 1-844-553-6667. Si el número de
teléfono que está usando ya está registrado y asociado con
su refrigerador, podrá contactar rápidamente con un agente
del equipo Diagnósticos.
Utilice la función Diagnósticos solo cuando así se lo indique el
agente del equipo Diagnósticos.
Bloquee la pantalla. Para bloquear la pantalla, mantenga
pulsado el botón de bloqueo Control Lock durante tres
segundos (Si la pantalla está bloqueada, reactívela)
3. Sujete el auricular del teléfono delante del altavoz
situado sobre la bisagra derecha de la puerta del
refrigerador, cuando así se lo indique el centro de
atención.
4. Mantenga pulsado el botón de temperatura del
congelador Freezer Temp durante tres segundos con el
teléfono junto al altavoz.
Tras oír tres pitidos, suelte el botón de temperatura del
congelador Freezer Temp.
0DQWHQJDHOWHOÑIRQRHQSRVLFLÚQKDVWDTXHoQDOLFH
el tono de transmisión. La pantalla mostrará el tiempo
WUDQVFXUULGR$OoQDOL]DUODFXHQWDDWUÊV\GHWHQHUVH
los tonos, reanude su conversación con el especialista,
quien estará entonces en medida de asistirle utilizando
la información transmitida para su análisis.
NOTA:
- Para lograr los mejores resultados, no mueva el teléfono
mientras se transmiten los tonos.
- Si el agente del servicio telefónico de atención al cliente
no puede grabar los datos con precisión, se le pedirá
volver a intentarlo.
Abra la puerta derecha del refrigerador.
Kenmore
®
Customer Care Hotline
To schedule in-home repair service
or order replacement parts
Para pedir servicio de reparación
a domicilio, y ordenar piezas
1-844-553-6667
www.
kenmore.
com
®