KitchenAJd"
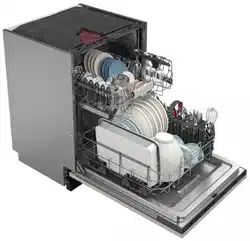
UNDERCOUNTER DISHWASHER
Use & Care Guide
LAVE-VAISSELLE ENCASTRI_
Guide d'utilisation et d'entretien
Table of Contents/Table des matibres .................... 2
Save Water
no pre-rinsing
Economie d'eau
sans pr_rin_age
Models/ModUles KUDV25SH
9744040 www.kitchenaid.com
TABLEOF
CONTENTS
DISHWASHER SAFETY ................................................... 3
BeforeUsingYour Dishwasher......................................... 4
PARTS AND FEATURES .................................................. 5
START-UP GUIDE............................................................... 6
UsingYour New Dishwasher............................................ 6
LOADING YOUR DISHWASHER ....................................... 6
Loading Suggestions........................................................ 6
Loadingthe Top Rack....................................................... 7
Loadingthe Bottom Rack................................................. 8
Loadingthe Silverware Basket......................................... 9
• USING YOUR DISHWASHER ........................................... 10
Detergent Dispenser....................................................... 10
How Much Detergentto Use.......................................... 10
RinseAid Dispenser........................................................ 11
DishwasherEfficiency"lips............................................. 11
Cycle Selection Chart ..................................................... 12
Cancelinga Cycle ........................................................... 13
Changinga Cycle or Setting........................................... 13
Adding Items Duringa Cycle .......................................... 13
Option Selections............................................................ 14
ControlPanel Ught ......................................................... 14
ElectronicDisplay............................................................ 15
Wash System.................................................................. 16
DryingSystem................................................................. 16
OverfillProtectionFloat................................................... 16
WASHING SPECIAL ITEMS ............................................. 17
CARING FOR YOUR DISHWASHER ............................... 18
Cleaning Your Dishwasher.............................................. 18
DrainAirGap................................................................... 18
StoringYour Dishwasher................................................ 19
TROUBLESHOOTING ....................................................... 20
ASSISTANCE OR SERVICE ............................................. 22
Inthe U.S.A..................................................................... 22
In Canada........................................................................ 22
WARRANTY ....................................................................... 23
TABLEDES
MATIERES
LA SI_CURITI_ DU LAVE-VAISSELLE ............................ 24
Avant d'utUiserlelave-vaisselle...................................... 25
PIf=CES ET CARACTIERISTIQUES ................................. 26
GUIDE DE MISE EN MARCHE ........................................ 27
Utilisationde votre nouveau lave-vaisselle.................... 27
CHARGEMENT DU LAVE-VAISSELLE ........................... 28
Suggestionsde chargement........................................... 28
Chargement du paniar sup6rieur.................................... 28
Chargement du panier inf6rieur...................................... 30
Chargement du panier _,couverts.................................. 31
UTIUSATION DU LAVE-VAISSELLE .............................. 32
Distributeurde d6tergent................................................ 32
Quantit6de d_tergent ;i utiliser...................................... 32
Distributeurd'agent de dn_age...................................... 34
Conseilsd'efficacit6 pour lelave-vaisselle..................... 34
Tableau de s61ectionde programme.............................. 35
Annulationd'un programme........................................... 36
Changement d'un programmeou r6glage..................... 36
Additionde vaisselledurant un programme.................. 37
S_lection d'options ......................................................... 37
Lampe du tableau de commande .................................. 38
Afficheur61ectronique..................................................... 38
Syst6me de lavage.......................................................... 39
Syst6me de s6chage ...................................................... 40
Dispositifde protection contred6bordement ................ 40
LAVAGE D'ARTICLES SPI-=-CIAUX................................... 40
ENTRETIEN DU LAVE-VAISSELLE ................................ 41
Nettoyage du lave-vaiaselle............................................ 41
Dispositif anti-refoulement.............................................. 42
Remisage du lave-vaisselle............................................ 42
D#PANNAGE ..................................................................... 44
ASSISTANCE OU SERVICE ............................................. 47
Aux I_tats-Unis................................................................ 47
Au Canada ...................................................................... 47
GARANTIE ......................................................................... 48
2
DISHWASHER SAFETY
Your safety and the safety of others is very important.
We have provided many importantsafety messages in this manual and on yourappliance. Always read and obey all
safety messages.
This is the safety alert symbol.
This symbol alerts you to hazards that can killor hurtyou and others.
Atl safety messages willbe preceded by the safety alert symbol and the word"DANGER" or
"WARNING." These words mean:
You will be killed or seriously injured if you don't
follow Instructions.
You can be killed or seriously Injured if you don_
follow Instructions.
Allsafety messages will identifythe hazard, tell you how to reducethe chance ofinjury,and tell you what can
happen ifthe instructionsare not followed.
IMPORTANT SAFETY INSTRUCTIONS
WARNING - When usingthe dishwasher, follow basic precautions,includingthe following:
• Read all instructionsbefore using the dishwasher.
• Use the dishwasher only for its intended function.
• Use onlydetergents or rinseagents recommended
for use in a dishwasher, and keep them out of the
reach of children.
• When loading itemsto be washed:
1) Locate sharp items sothat they are not likelyto
damage the door seal;and
2) Load sharp knives with the handles up to reduce
the risk of cut-type injuries.
• Do not wash plastic items unless they are marked
"dishwasher safe"or the equivalent. For plastic
items not so marked, checkthe manufacturer's
recommendations.
• Do not touch the heating element during or
immediately after use.
• Do not operete the dishwasherunlessall enclosure
panelsare properly inplace.
• Do not tamper with controls.
• Do not abuse, sit on, or stand on the door or dish
racks ofthe dishwasher.
To reducethe risk of injury,do not allowchildrento
play inor on the dishwasher.
Under certainconditions, hydrogengas may be
produced in a hot water system that has not been
usedfor two weeks or more. HYDROGEN GAS IS
EXPLOSIVE. Ifthe hot water system hasnot been
used for such a period, before usingthe dishwasher
turn on allhot water faucets and let the waterflow
from each for several minutes.This willrelease any
accumulated hydrogen gas. As the gas isflammable,
do not smoke or usean open flameduring this time.
• Remove thedoor to thewashing compartment when
removingan old dishwasherfrom service or
discardingit.
SAVE THESE INSTRUCTIONS
3

Before Using Your
Dishwasher
Tip Over Hazard
Do not use dishwasher until completely installed.
Do not push down on open door,
Doing so can result In serious injury or cuts.
Electrical Shock Hazard
Electrically ground dishwasher.
Connect ground wire to green ground connector
in terminal box.
Do not use an extension cord.
Failure to follow these instructions can result in
death, fire, or electrical shock.
GROUNDING INSTRUCTIONS
For a grounded, cord-connected dishwasher:
The dishwasher must be grounded. In the event
of a malfunction or breakdown, grounding will
reduce the risk of electric shock by providing a
path of least resistance for electric current. The
dishwasher isequipped with a cord having an
equipment-grounding conductor and a grounding
plug. The plug must be plugged intoan appro-
priate outlet that is installedand grounded in
accordance with all local codes and ordinances.
WARNING - Improper connection of the
equipment-grounding conductor can result in a
risk of electric shock. Check with a qualified
electrician or service representative if you are in
doubt whether the dishwasher is propedy
grounded. Do not modify the plug provided with
the dishwasher; if it will not fit the outlet, have a
proper outlet installedby a qualified electrician.
• For a permanently connected dishwasher:.
The dishwasher must be connected to a
grounded metal, permanent wiringsystem, or an
equipment-grounding conductor must be run
with the circuit conductors and connected to the
equipment-grounding terminal or lead on the
dishwasher.
SAVE THESE INSTRUCTIONS
• Install where dishwasher is protected from the
elements. Protect against freezing to avoid possible
rupture offill valve. Such rupturesare not covered by
the warranty. See "Storing YourDishwasher" in the
"Caring for YourDishwasher" section for winter storage
information.
• Install and level dishwasher on a floor that will hold the
weight, and in an area suitable for its size and use.
• Remove all shipping plugs from hoses and connectors
(such as the cap on the drain outlet)before installing.
See InstallationInstructionsfor complete information.
4
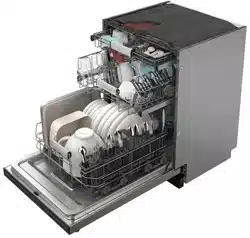
PARTSAND FEATURES
lO
3
4
5
6
11
12
13
14
15
16
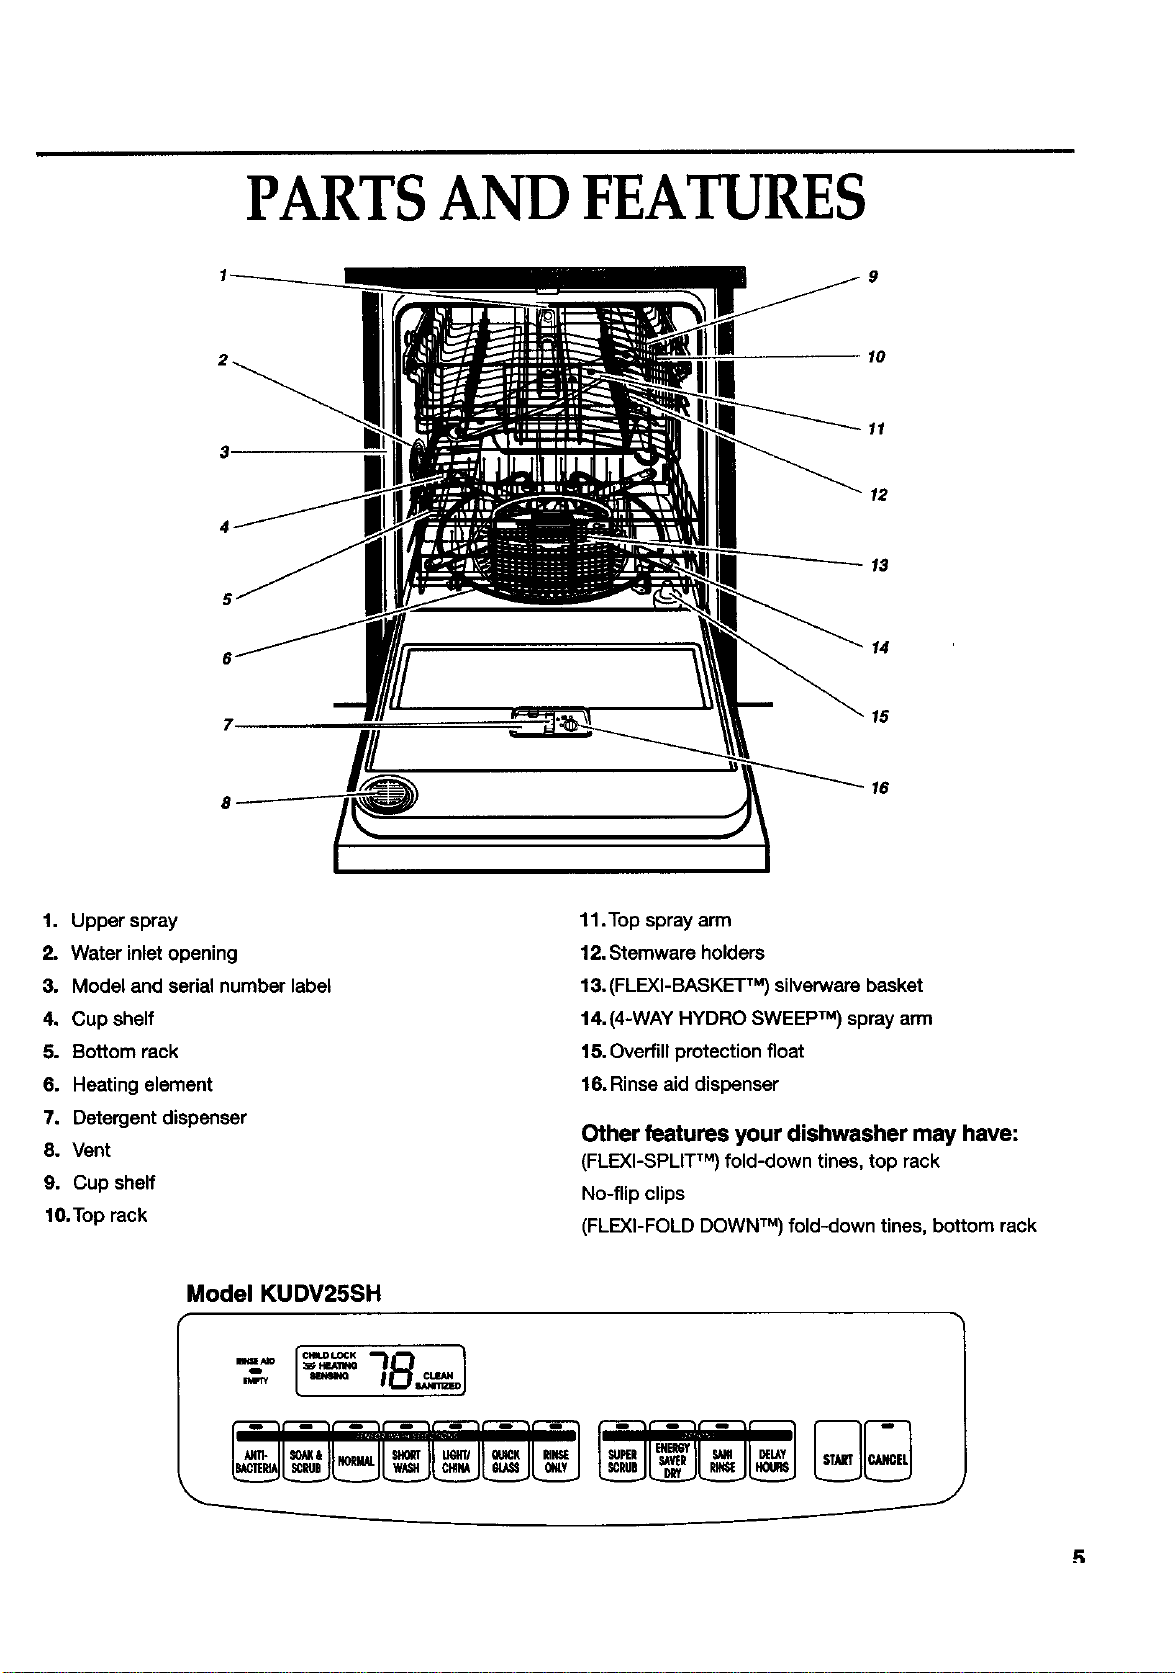
1. Upper spray
2. Water inletopening
3. Model and serial number label
4. Cup shelf
5. Bottom rack
6. Heating element
7. Detergent dispenser
8. Vent
9. Cup shelf
10.Top rack
11.Top spray arm
12.Stemware holders
13.(FLEXI-BASKETTM) silverware basket
14.(4-WAY HYDRO SWEEPTM) spray arm
15, Overfillprotection float
16. Rinseaid dispenser
Other features your dishwasher may have:
(FLEXI-SPLITTM) fold-down tines, top rack
No-flip clips
(FLEXI-FOLD DOWNTM) fold-down tines, bottom rack
Model KUDV25SH
R
START-UPGUIDE
Before using your dishwasher, remove all hang tags,
temporary labels, and packaging materials. Read this
entire Use and Care Guide. You will 1indimportant safety
information and useful operating tips.
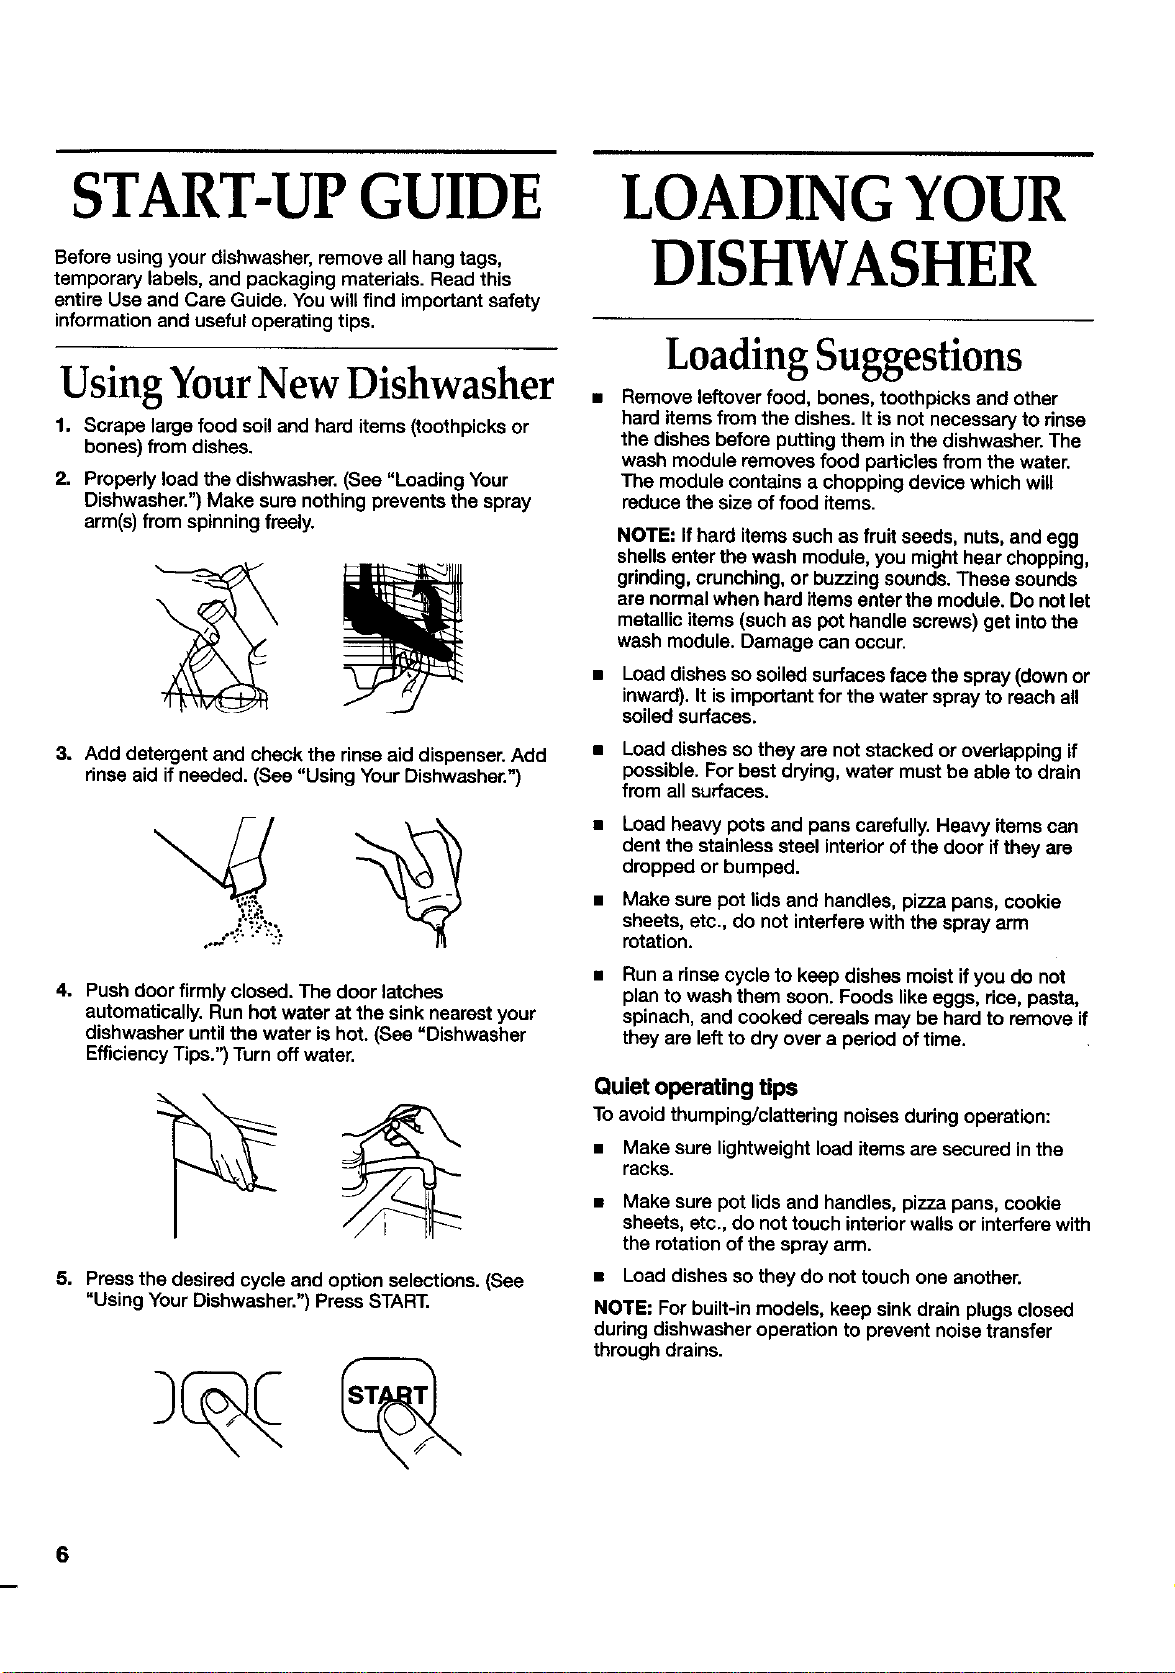
Using YourNew Dishwasher ,
1. Scrape large food soiland hard items (toothpicksor
bones)from dishes.
2. Properly load the dishwasher. (See "Loading Your
Dishwasher.") Make sure nothing prevents the spray
arm(s)from spinningfreely.
\
3. Add detergent and check the rinse aid dispenser. Add
rinse aid if needed. (See "Using Your Dishwasher.")
4. Push door firmly closed. The door latches
automatically. Run hot water at the sink nearest your
dishwasher untilthe water is hot. (See "Dishwasher
Efficiency Tips.'3 Turn off water.
5, Press the desired cycle and option selections. (See
"UsingYour Dishwasher.")PressSTART.
LOADING YOUR
DISHWASHER
Loading Suggestions
Remove leftoverfood, bones, toothpicks and other
harditems from the dishes. It isnot necessary to rinse
the dishes before puttingthem In the dishwasher.The
wash module removes food particlesfrom the water.
The module contains a chopping device which will
reduce the size of food items.
NOTE=If hard items such as fruit seeds, nuts,and egg
shellsenter the wash module,you mighthear chopping,
grinding,crunching, or buzzing sounds.These sounds
are normal when harditems enterthe module. Do not tet
metallicitems (such as pot handle screws) get intothe
wash module. Damage can occur.
• Load dishes sosoiled surfaces face the spray (down or
inward).It is importantfor the water spray to reach all
soiled surfaces.
• Load dishes so they are not stacked or overiapping if
possible. For best drying, water must be able to drain
from all surfaces.
Load heavy pots and pans carefully.Heavy itemscan
dent the stainlesssteel interiorofthe door ifthey are
dropped or bumped.
Make sure pot lidsand handles, pizza pans, cookie
sheets, etc., do not interfere with the spray arm
rotation.
Run a rinse cycle to keep dishes moist if you do not
plan to wash them soon. Foods like eggs, rice,pasta,
spinach, and cooked cereals may be hard to remove if
they are leftto dry over a period oftime.
Quiet operating tips
To avoidthumping/clattering noises during operation:
• Make sure lightweight load itemsare secured inthe
racks.
• Make sure pot lids and handles, pizza pans, cookie
sheets, etc., do nottouch interiorwalls or interfere with
the rotation ofthe spray arm.
• Load dishes so they do not touch one another.
NOTE: Forbuilt-in models, keep sinkdrain plugs closed
during dishwasheroperation to prevent noisetransfer
through drains.
6
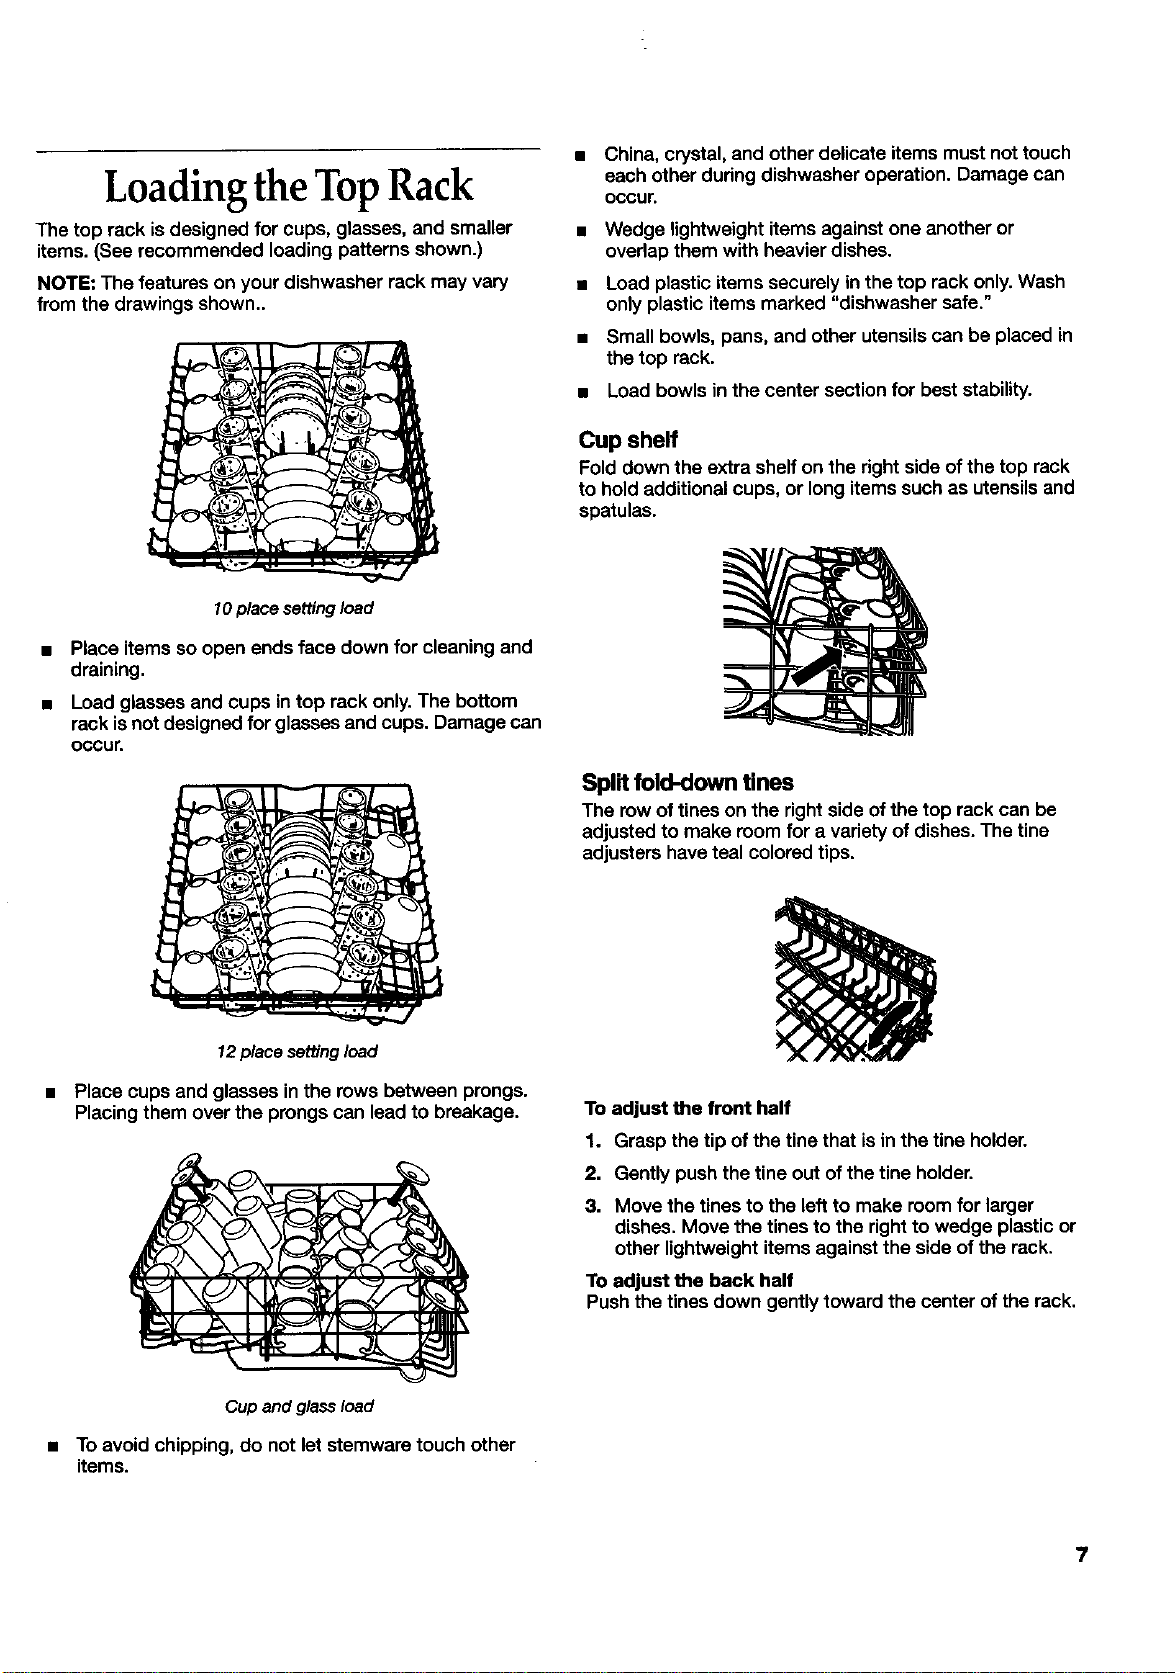
Loading theTopRack
The top rack is designed for cups, glasses, and smaller
items. (See recommended loading patterns shown.)
NOTE: The features on your dishwasher rack may vary
from the drawings shown..
China, crystal, and other delicate itemsmust not touch
each other duringdishwasher operation. Damage can
occur.
Wedge lightweight items againstone another or
overlapthem with heavier dishes.
Load plastic items securely inthe top rack only.Wash
only plasticitems marked "dishwasher safe."
Small bowls, pans, and other utensils can be placed in
the top rack.
Load bowls in the center section for best stability.
Cup sheff
Fold down the extra shelf on the right side ofthe top rack
to hold additionalcups, or long items such as utensilsand
spatulas.
10 place setting load
Place items so open ends face down for cleaning and
draining.
Load glasses and cups in top rack only.The bottom
rack isnot designedfor glasses and cups. Damage can
OCCUr.
12placesettingload
Place cups and glasses inthe rows between prongs.
Placing them over the prongscan lead to breakage.
Split fold-down tines
The row of tines on the right side of the top rack can be
adjusted to make room for a variety of dishes. The tine
adjusters have teal colored tips,
To adjust the front half
1. Grasp the tip of the tine that isin the tine holder.
2. Gently pushthe tine out of the tine holder,
3. Move the tines to the leftto make room for larger
dishes, Move the tines to the right to wedge plasticor
other lightweightitems againstthe side of the rack.
To adjust the back half
Push the tines down gentlytoward the center of the rack.
Cup and glass load
• To avoid chipping, do not let stemware touch other
items.
7

Fold-down tines
The row of tines on the left side of the top rack can be
adjusted to make room for a variety of dishes. The tine
adjuster has a teal colored tip. Gently push thetine down,
toward the center of the rack, to make room for larger
dishes.
Loading theBottomRack
The bottom rack is designed for plates, pans, casseroles,
and utensils. Items with cooked-on or dried-on food
should be loaded with soiled surfaces facing inwardto the
spray. (See recommended loading patterns shown.)
NOTE: The features on your dishwasher rack may vary
from the drawings shown.
Stemware holders
Use the stemware holders (attached to the cup shelf)to
keep water goblets, wine glasses,etc., in place and
prevent damage during washing.
No-flip clips
The no-flipclips hold lightweight plastic items likecups,
lids,or bowlsin place during washing.You can move a clip
anywhere in the rack.
1. Pull the clip up and off the tine.
2. Reposition the clip on another tine.
Mixed load
• Do not loadglasses, cups, or plastic items inthe
bottom reck. Load small items inthe bottom rack only
ifthey are secured in place.
• Load plates, soup bowls, etc., between prongs and
facing inward to the spray.
• Ovedap the edges of plates for large loads.
• Load soup, cereal, and serving bowls in the rack in a
variety of ways depending upon their size and shape.
Load bowls securely between the rows of prongs. Do
not nest bowls because the spray will not reach all
surfaces.
Utensilload
• Secure heavilysoiled cookware face down inthe rack.
• Make sure pot handles and other itemsdo not stop
rotationofthe spray arm(s).The spray arm(s)must
movefreely.
• Do not load items between the bottom rack and the
side of the dishwasher tub. You can block the water
inlet opening.
8
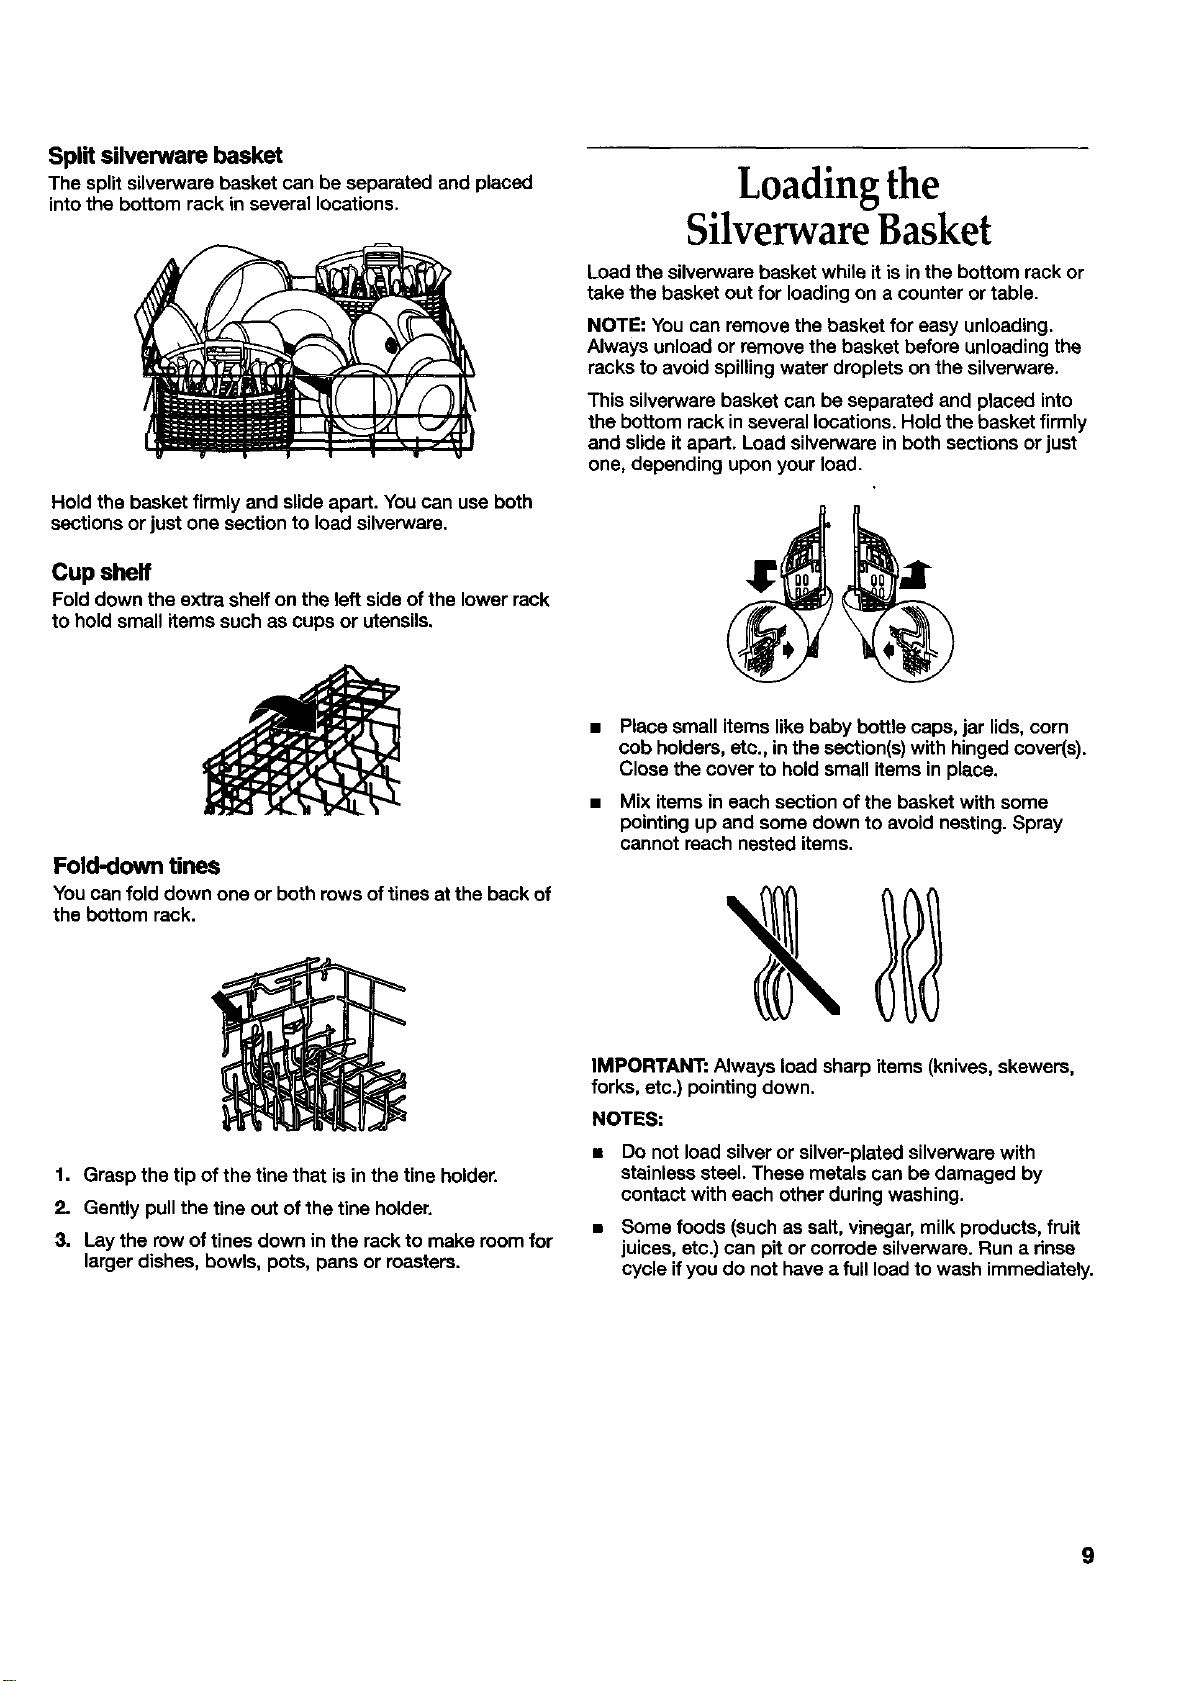
Split silverwarebasket
The splitsilverware basket can be separated and pieced
intothe bottom rack in several locations.
Hold the basket firmly and slide apart. You can use both
sections orjust one sectionto load silverware.
Cup shelf
Fold down the extra shelf on the left side of the lower rack
to hold small items such as cups or utensils.
Fold-down tines
You can fold down one or both rows of tines at the back of
the bottom rack.
Loadingthe
SilverwareBasket
Loadthe silverwarebasket whileit is inthe bottom rack or
take the basket out for loading on a counter or table.
NOTE: You can remove the basket for easy unloading.
Always unloador remove the basket before unloading the
racks to avoid spillingwater droplets on the silverware.
This silverwarebasket can be separated and placed into
the bottom rack in several locations. Hold the basket firmly
and slideit apart. Load silverware in both sections or just
one, depending upon your load.
• Place small items like baby bottle caps, jar lids, corn
cob holders, etc., in the section(s)with hinged cover(s).
Close the cover to hold small items in place.
• Mix items in each section of the basket with some
pointingup and some down to avoid nesting.Spray
cannot reach nested items.
1. Grasp the tip of the tine that isin the tine holder.
2. Gently pull the tine out of the tine holder.
3. Laythe row of tines down in the rackto make roomfor
larger dishes, bowls, pots, pans or roasters.
IMPORTANT: Always load sharp items (knives,skewers,
forks, etc.) pointingdown.
NOTES:
Do not load silveror silver-plated silverware with
stainlesssteel. These metals can be damaged by
contact with each other during washing.
Some foods (such as salt, vinegar,milk products, fruit
juices, etc.) can pit or corrode silverware.Run a rinse
cycle ifyou do not have afull loadto wash immediately.
9
USING YOUR
DISHWASHER
Detergent Dispenser
The detergent dispenser has 2 sections. The smaller Pre-
Wash section empties detergent into the dishwasher when
you close the door. The larger Main Wash section
automatically empties detergent into the dishwasher
during the wash cycle.
Use automatic dishwashing detergent only. Other
detergents can produce excessive suds that can
overflow out of the dishwasher and reduce washing
performance.
• Add detergent just before starting cycle.
= Store tightly closed detergent in a cool, dry place.
Fresh automatic dishwasher detergent resultsin better
cleaning.
NOTE: Do not use detergent with a rinse cycle.
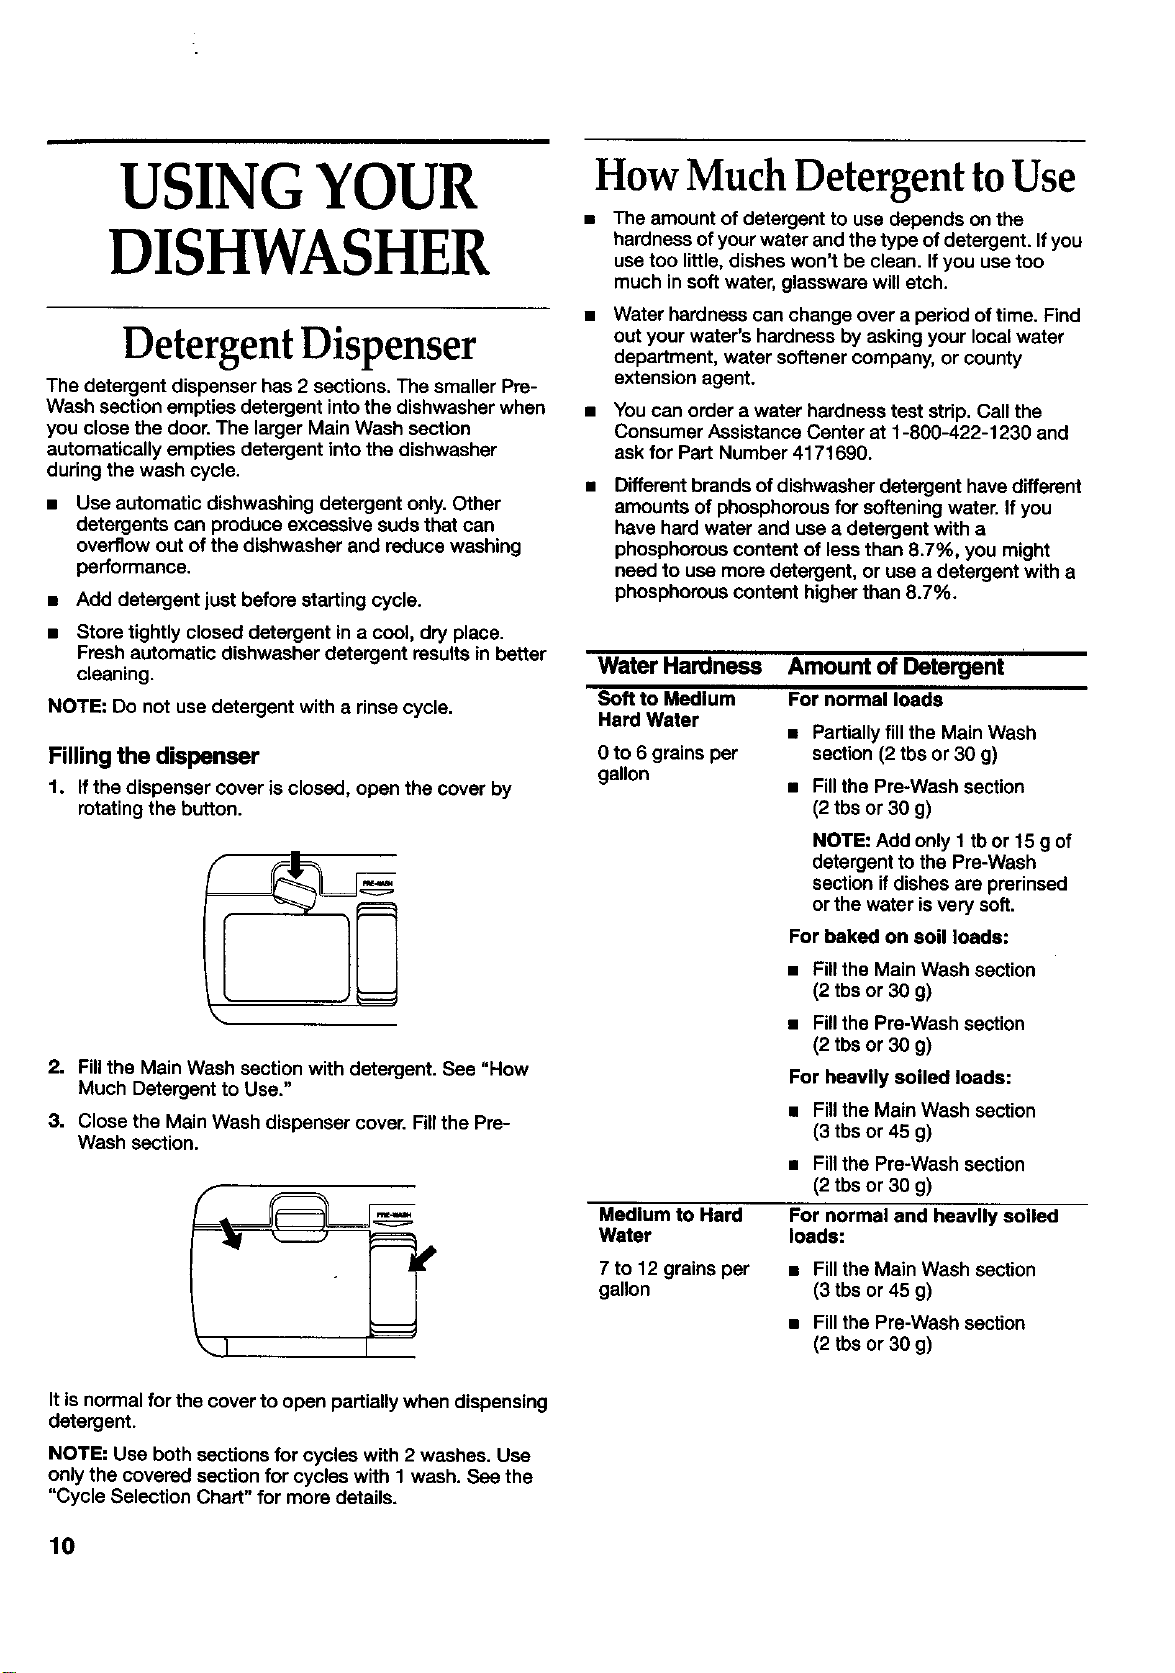
Filling the dispenser
1. Ifthe dispenser cover is closed, open the cover by
rotatingthe button.
2. Fill the Main Wash section with detergent. See "How
Much Detergent to Use."
3. Close the Main Wash dispenser cover. Fillthe Pre-
Wash section.
How Much Detergent toUse
• The amount of detergent to use depends on the
hardnessofyour water and the type of detergent. If you
usetoo little,dishes won't be clean. Ifyou usetoo
much insoft water, glassware will etch.
e
Water hardness can change over a period of time. Find
out your water's hardness by asking your localwater
department, water softener company, or county
extension agent.
Youcan order a water hardness test strip. Call the
Consumer Assistance Center at 1-800-422-1230 and
ask for Part Number 4171690.
Differentbrands ofdishwasher detergent have different
amounts of phosphorous for softeningwater. If you
have hard water and usea detergent with a
phosphorouscontent of lessthan 8.7%, you might
need to use more detergent, or use a detergent with a
phosphorouscontent higherthan 8.7%.
Water Hardness
Soft to Medium
Hard Water
0 to 6 grains per
gallon
Amount of Detergent
For normal loads
• Partiallyfill the Main Wash
section(2 tbs or 30 g)
• Fill the Pre-Wash section
(2 tbs or 30 g)
NOTE: Add only I tb or 15 g of
detergent to the Pra-Wash
sectionif dishesare prerinsed
or the water is very soft,
For baked on soil loads:
Medium to Hard
Water
• Fill the Main Wash section
(2 tbs or 30 g)
• Fillthe Pre-Wash section
(2 tbs or 30 g)
For beavlly soiled loads:
• Fillthe Main Wash section
(3 tbs or 45 g)
• Fillthe Pre-Wash section
(2 tbs or 30 g)
For normal and heavily soiled
loads:
7 to 12 grains per
gallon
• Fill the Main Wash section
(3 tbs or 45 g)
• Fillthe Pre-Wash section
(2 tbs or 30 g)
It is normal for the coverto open partially when dispensing
detergent.
NOTE: Use both sections for cycles with 2 washes. Use
onlythe covered section for cycles with 1 wash. See the
"Cycle Selection Chart" for more details.
10
Water Hardness Amount of Detergent
very Hard Water For normal loads:
13 grains per
gallon and above
NOTE: It might be
necessary to use
the Soak & Scrub
cycle, or the
Normal cycle, with
a High Temp wash
option or Super
Scrub (ifavailable)
for best wash
performance with
very hard water.
• Fillthe Main Wash section
(3 tbsor 45 g)
• Fillthe Pre-Wash section
(2 tbsor 30 g)
• Turnthe rinseaid dispenser to
a higher setting. See "Rinse
Aid Dispenser"later in this
section.
For heavily •oiled load•:
• Fill the Main Wash section
(3 tbs or 45 g)
• Fillthe Pre-Wash section
(2 tbs or 30 g)
• Turn the rinse aid dispenser to
a highersetting. See "Rinse
Aid Dispenser"later in this
section.
NOTE: Fillamount• shown are for standard powdered
detergent. Amounts may vary ifyou use liquid or
concentrated powdered detergent. Follow instructionson
the package when using liquid dishwasherdetergent or
concentrated powdered detergent.
Rinse Aid Dispenser
A rinseaid prevents water from forming droplets that can
dry as spots or streaks. It also improvesdrying by allowing
water to drain off of the dishes duringthe final rinseby
releasinga small amount of the rinse aid intothe rinse
water. Yourdishwasher isdesigned to use a liquid rinse
aid. Do not usea solid or bar-type rinseaid.
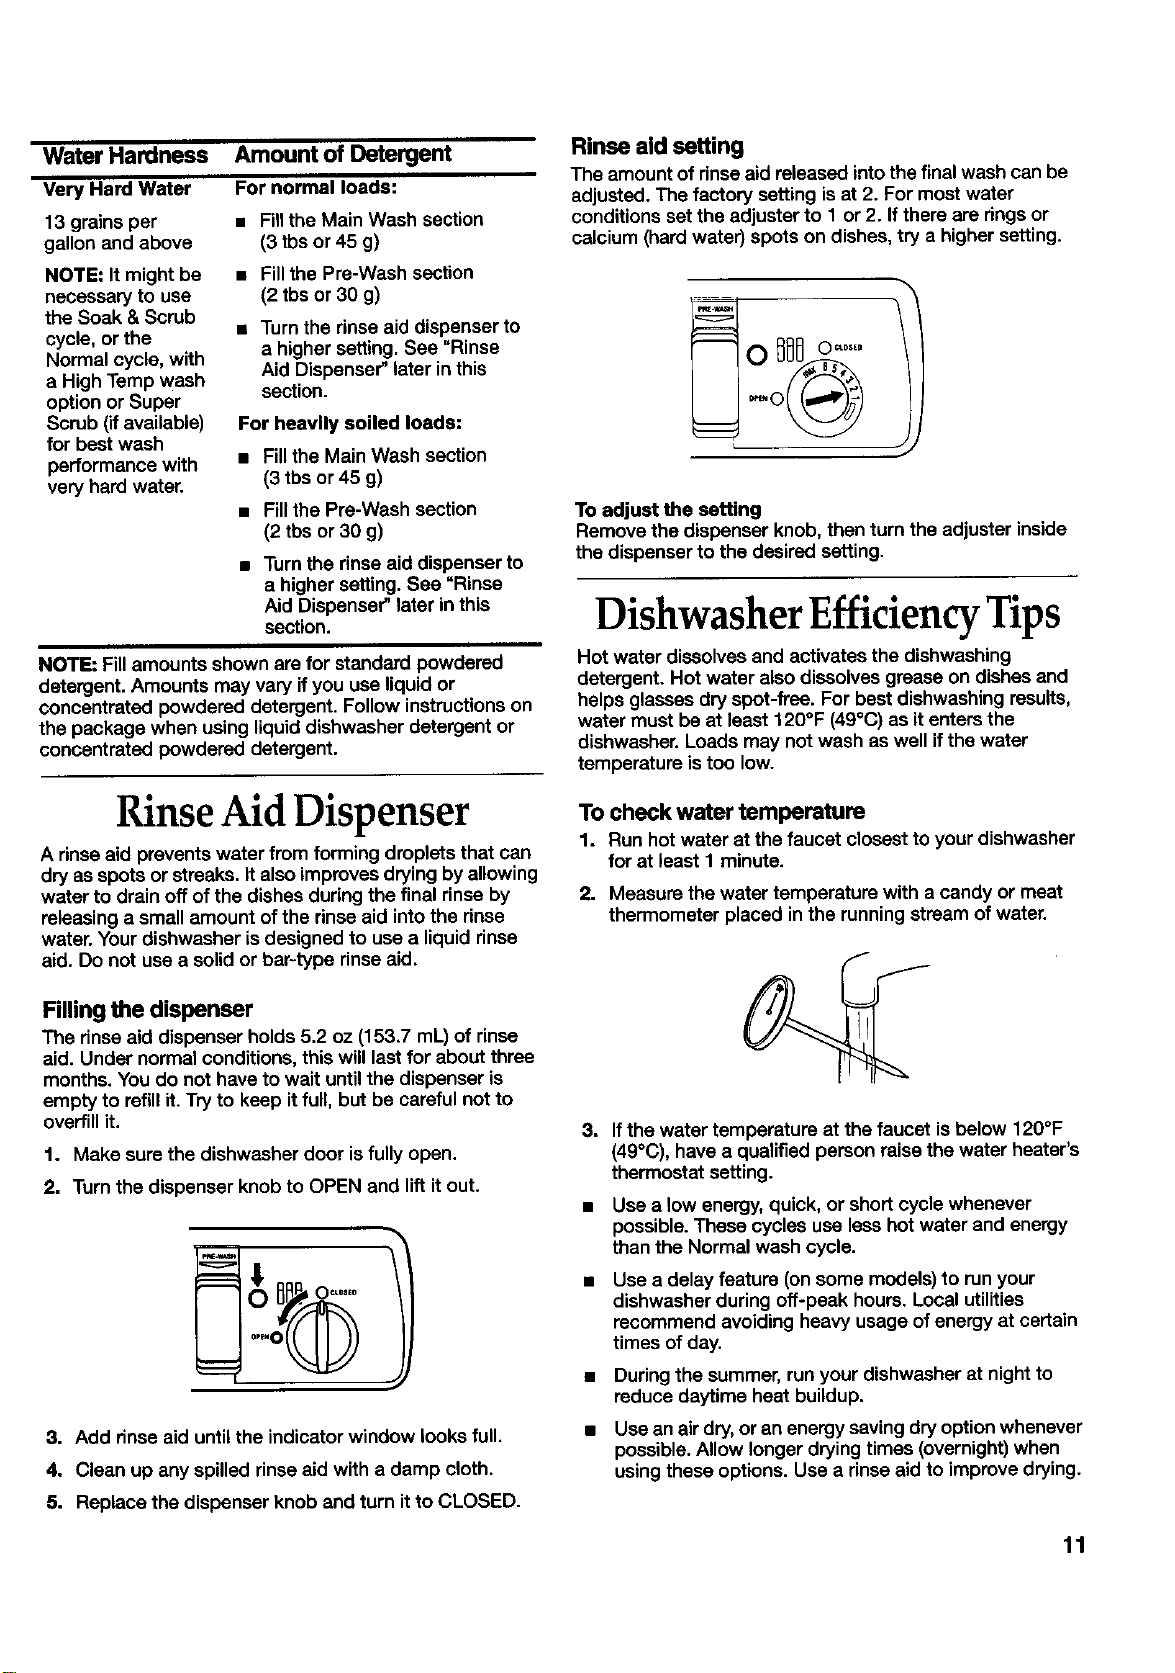
Rinse aid setting
The amountof rinseaid releasedintothe finalwash can be
adjusted. The factory setting isat 2. For most water
conditions set the adjuster to 1 or 2. Ifthere are ringsor
calcium (hardwater) spots on dishes, try a higher setting.
To adjust the setting
Remove the dispenser knob, then turn the adjuster inside
the dispenserto the desired setting.
Dishwasher EfficiencyTips
Hot water dissolves and activate• the dishwashing
detergent. Hot water also dissolves grease on dishesand
helps glassesdry spot-free. For bastdishwashing results,
water must be at least 120°F (49°(3)as itenters the
dishwasher. Load• may not wash as well if the water
temperature istoo low.
To check water temperature
1. Run hot water at the faucet closest to your dishwasher
for at least I minute.
2. Measure the water temperature with a candy or meat
thermometer placed in the runningstream of water.
Filling the dispenser
The rinseaid dispenser holds 5.2 oz (153.7 mL) of rinse
aid. Under normal conditions, this will lastfor about three
months. You do not have to wait untilthe dispenser is
empty to refillit. Try to keep itfull, but be careful not to
overfillit.
1. Make surethe dishwasher door isfully open.
2. Turn the dispenser knob to OPEN and lift itout.
....0_._
3. Add rinseaid untilthe indicator window looks full.
4. Clean up any spilled rinseaid with a damp cloth.
5. Replace the dispenser knob and turn itto CLOSED.
3. Ifthe water temperature at the faucet is below 120°F
(49°C), have a qualified person raise the water heater's
thermostatsetting.
• Use a low energy,quick, or shortcycle whenever
possible. These cycles use lesshot water and energy
than the Normal wash cycle.
Use a delay feature (on some models)to run your
dishwasher during off-peak hours. Local utilities
recommend avoiding heavy usage of energy at certain
times ofday.
• Duringthe summer,run your dishwasher at night to
reduce daytime heat buildup.
• Use an air dry, or an energysaving dry option whenever
possible. Allow longer drying times (overnight) when
using these options. Use a rinse aid to improve drying.
11
• Use cycles or options that add extra heat to the wash
or rinse portion of the cycle onlywhen needed.
• Run yourdishwasher with full loads. Run a rinse cycle
after meals untilthe dishwasher isfull.
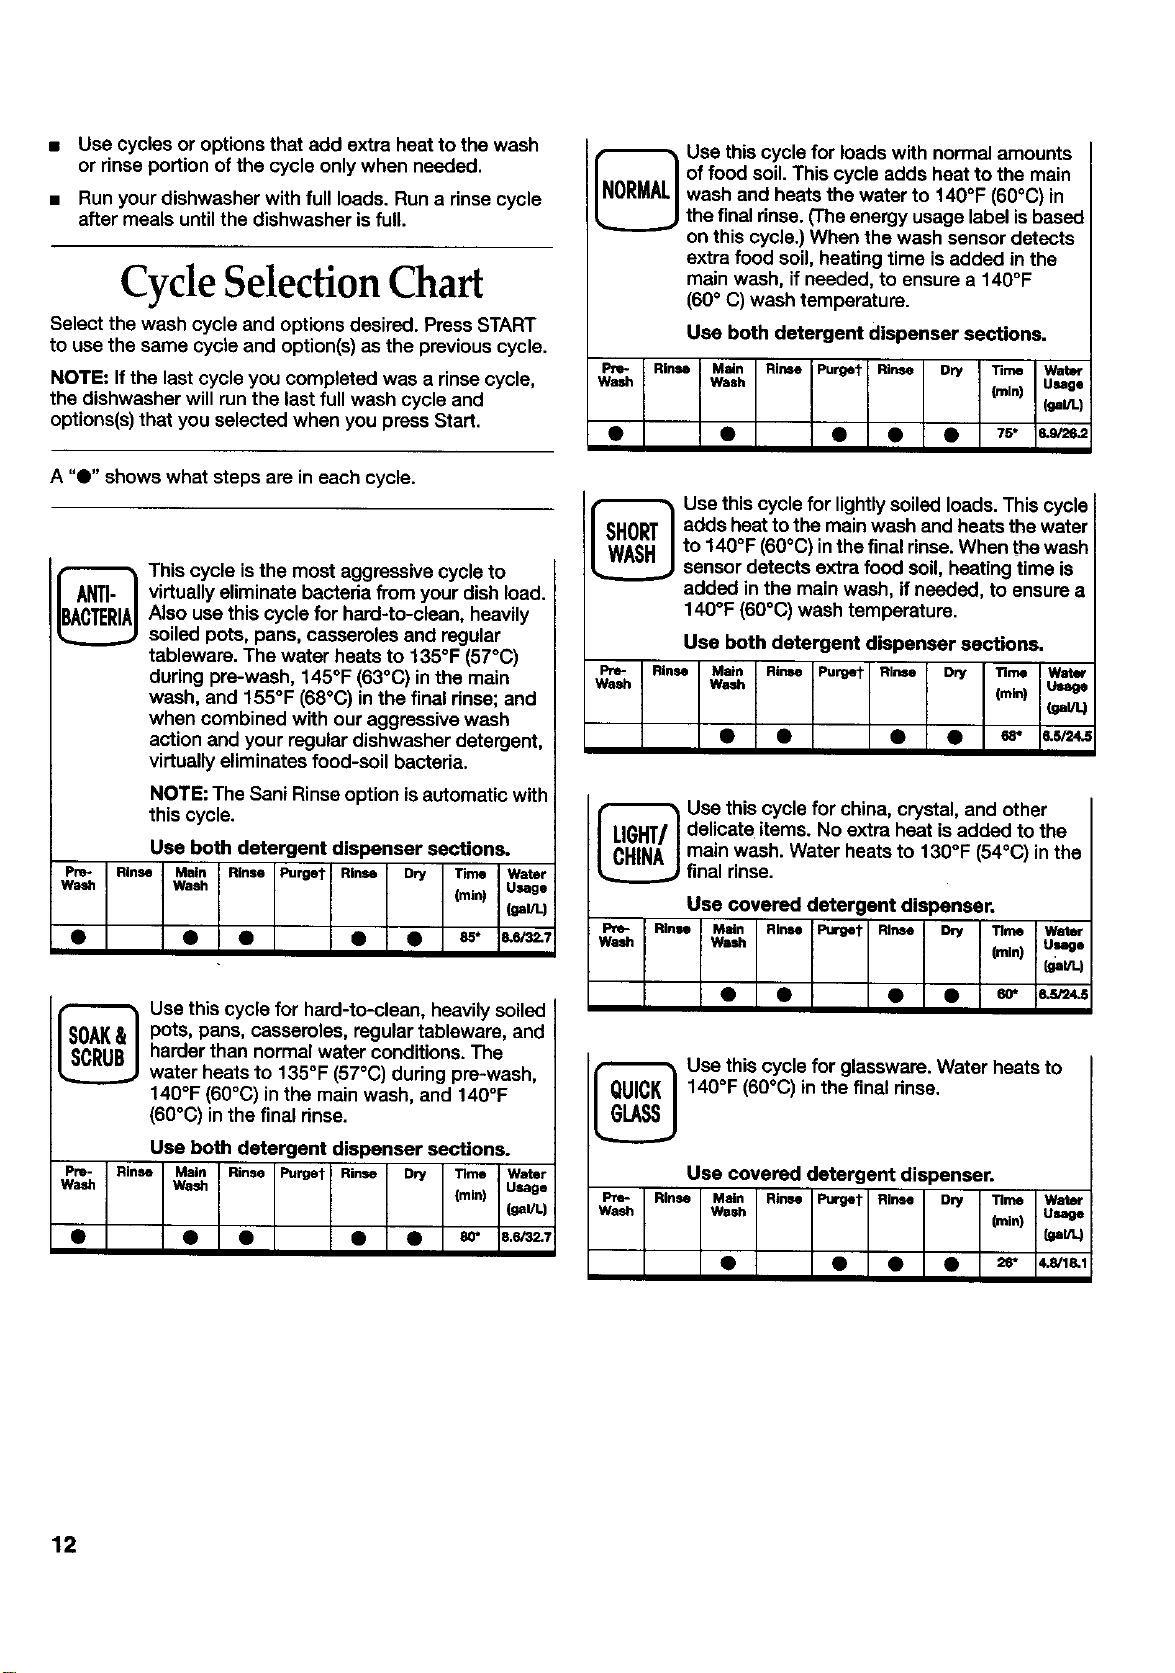
Cycle Selection Chart
Select the wash cycle and optionsdesired. Press START
to use the same cycle and option(s) as the previous cycle.
NOTE: If the last cycle you completed was a rinse cycle,
the dishwasherwill run the last full wash cycle and
options(s)that you selected when you press Start.
A "e" shows what steps are in each cycle.
%
This cycle isthe most aggressive cycle to
virtuallyeliminate bacteria from yourdish load.
Also usethis cyclefor hard-to-clean, heavily
soiled pots, pans, casserolesand regular
tableware. The water heats to 135°F (57°(3)
during pre-wash, 145°F (63°(3) inthe main
wash, and 155°F (68°(3)in the final rinse;and
when combined with ouraggressive wash
action and your regulardishwasherdetergent,
virtuallyeliminates food-soil bacteria.
NOTE: The Sani Rinseoption isautomatic with
this cycle.
Wash
Use both detergent dispenser sections.
Rinse Main : Rinse Purger Rinse Dry Time Water
Wash (min) Usage
(gaUL)
• • • • as* _u_.7
Use this cycle for hard-to-clean, heavilysoiled
pots, pans, casserolas, regular tableware, and
harder than normal water conditions. The
water heats to 135°F (57°C)during pre-wash,
140°F (60°C) in the main wash, and 140°F
(60°C) inthe final rinse.
Pl_-
Wash
Use both detergent dispenser sections.
Rinse Main I Rinse Purge_ Rinse Dry Time Water
Wash {rain) Usage
(gaUL)
• • • • ao" 8.e_2.7
Use this cycle for loads with normal amounts
of food soil. This cycle adds heat to the main
wash and heats the water to 140°F (60°C) in
thefinal rinse.(The energyusage label isbased
on this cycle.) When the wash sensordetects
extra food soil, heatingtime is added in the
main wash, ifneeded, to ensure a 140°F
(60° C) wash temperature.
Use both detergent dispenser sections.
Pre- Rinse Main Rirme Purge_ Rinse Dry Time Water
Wash Wash (mln) Usage
(gaUL)
• • • • • 7s, e._'ze_
%
Use this cyclefor lightly soiled loads. This cycle
adds heat tothe main wash and heatsthe water
to 140°F (60°C) inthe finalrinse.When the wash
sensordetects extra food soil, heating time is
added inthe main wash, ifneeded, to ensurea
140°F (60°(3)wash temperature.
Use both detergent dispenser sections.
Pro- Rinse Main Rinse Purge 1- Rirme Dry Time Water
Wash wa_t (rain) u=mga
(gat/14
Use this cycle for china, crystal, and other
delicate items. No extra heat isadded to the
main wash. Water heatsto 130°F (54°C) in the
final rinse.
Use covered detergent dispenser.
Pre- Rinse Main Rinse Purge t Rifle Dry Time Water
Wash Wash (min) i Usage
_=vq
Use this cycle for glassware. Water heats to
140°F (60°C) inthe final rinse.
Use covered detergent dispenser.
Pre- Rinse Main Rinse Purgat Rinse Dry Time Water
Wash Wash 0rain) Usage
12
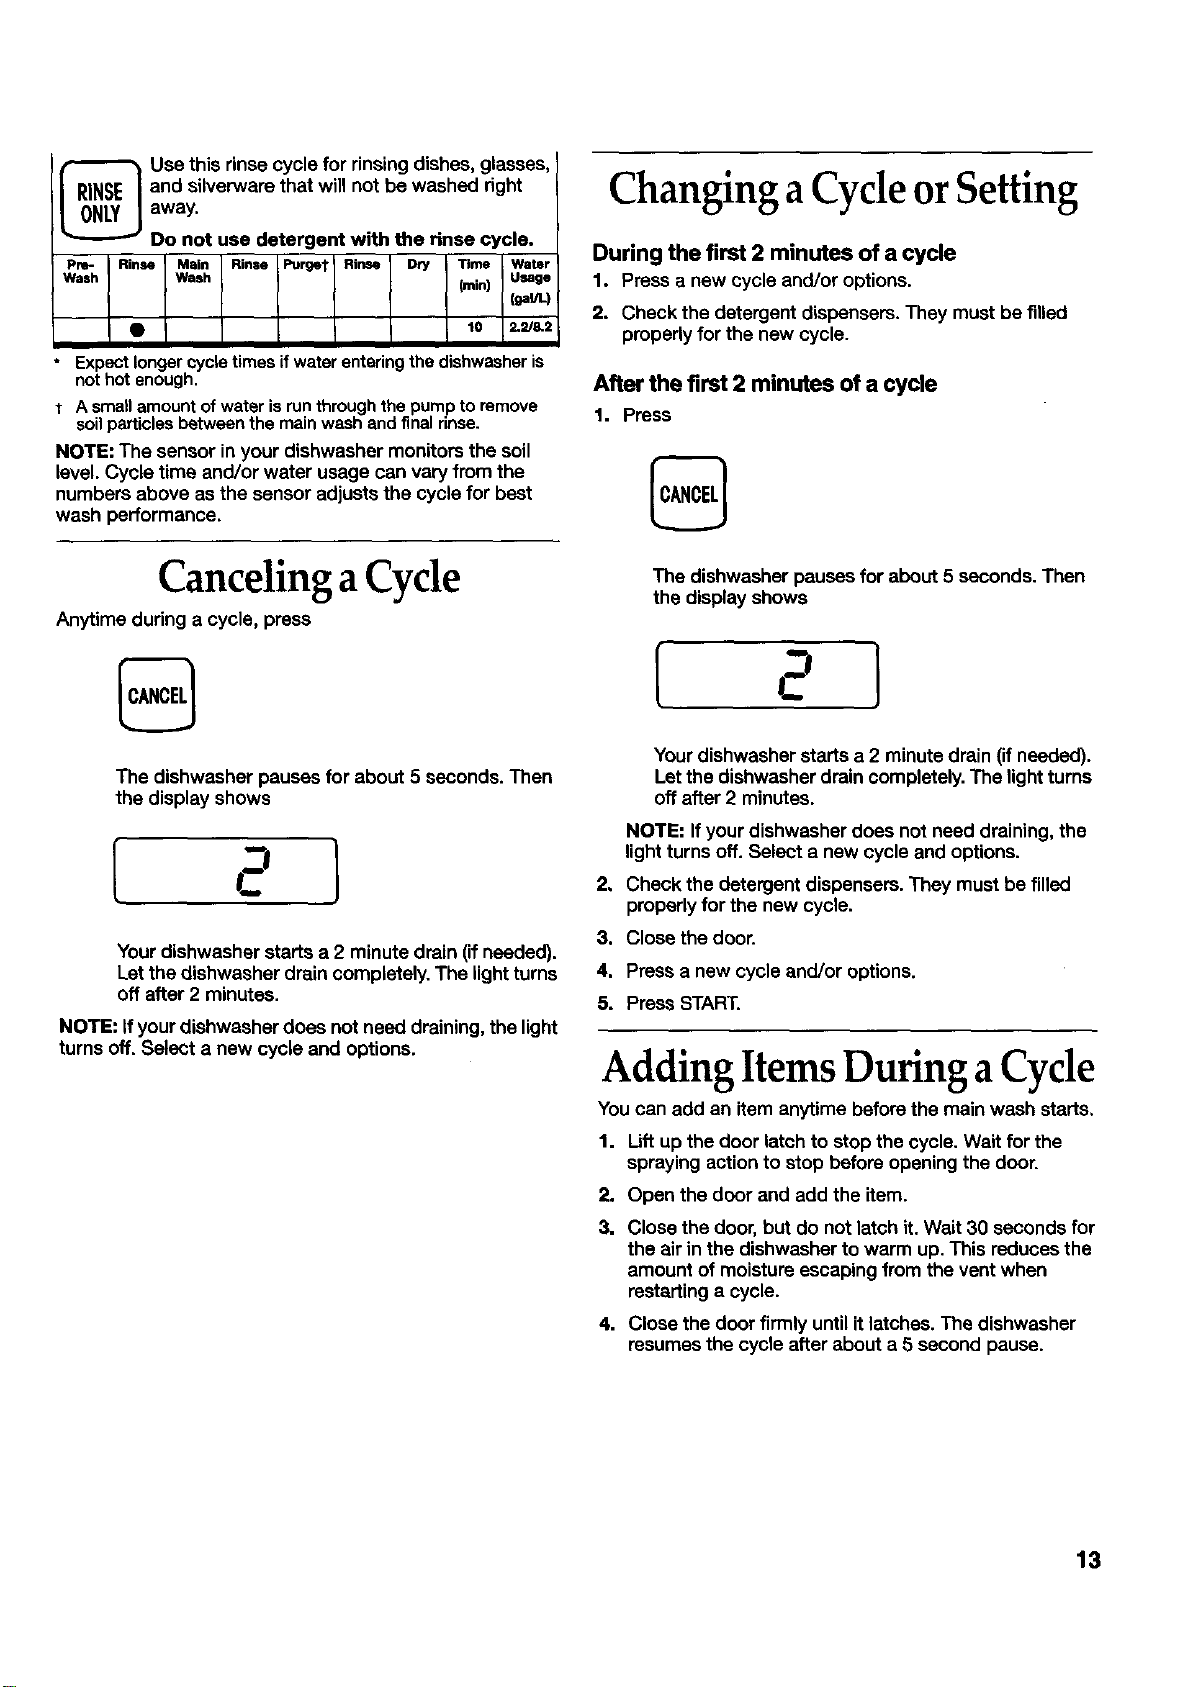
Use this rinse cycle for rinsing dishes, glasses,
and silverware that will not be washed right
away.
Do not use detergent with the rinse cycle.
Pre- Rinse Main Rinse Purger Rinse Dry Time Water
Wash Wash (mill) Usage
i lga_-)
• lo 2._&2
Expectlongercycletimesifwaterenteringthedishwasheris
not hotenough.
t A smatlamountofwaterisrunthroughthepumpto remove
soilparticlesbetweenthe mainwashand finalrinse.
NOTE: The sensor in your dishwasher monitorsthe soil
level.Cycle time and/or water usage can vary from the
numbers above as the sensor adjuststhe cyclefor beet
wash performance.
Canceling aCycle
Anytimeduring a cycle, press
The dishwasher pauses for about 5 seconds. Then
the display shows
[ 21
Yourdishwasher starts a 2 minute drain (if needed).
Let the dishwasher drain completely.The light turns
off after 2 minutes.
NOTE: If your dishwasher does not need draining, the light
turns off. Select a new cycle and options.
Changing a CycleorSetting
During the first 2 minutes of a cycle
1. Pressa new cycle and/or options.
2. Check the detergent dispensers.They must be filled
properlyfor the new cycle.
After the first 2 minutes of a cycle
1. Press
The dishwasher pauses for about 5 seconds. Then
the displayshows
[ 2]
Yourdishwasher startsa 2 minute drain (if needed).
Let the dishwasherdrain completely.The lightturns
offafter 2 minutes.
NOTE: Ifyour dishwasher does not need draining, the
light turnsoff. Select a new cycleand options.
2, Check the detergent dispensers. They must be filled
properlyfor the new cycle.
3. Close the door.
4. Press a new cycle and/or options.
5. Press START.
Adding ItemsDuring aCycle
You can add an item anytime before the main wash starts,
1. Lift up the door latch to stop the cycle. Wait for the
spraying actionto stop before opening the door.
2. Open the door and add the item.
.
Close the door, but do not latch it. Wait 30 seconds for
the air in the dishwasher to warm up. This reduces the
amount of moisture escaping from the vent when
restarting a cycle.
4. Close the door firmly untilit latches. The dishwasher
resumesthe cycle after about a 5 second pause.
13
Option Selections
Youcan customize yourcycles by pressing an option. If
you change your mind, press the option again to turn the
option off. Select a different option if desired.
You can change an option anytime before the selected
option begins. Forexample, you can press an unheated
dryingoption any time before drying begins.
Press START to use the same cycle and option(s)as the
previous wash cycle.
NOTE: If the lest cycle you completed was a rinse cycle,
when you press Start, the dishwasher runsthe lastfull
wash cycle and option(s).
Super Scrub
Select this high-temperature option for improvedcleaning
of heavily soiled dishes. Selecting this option adds heat
and wash time to the wash cycle. Heating the water helps
improve washing results.
@
NOTE: Super Scrub is an option with the Anti-Bacteria,
Soak & Scrub and Normal cycles.
Energy Saver Dry
Select this optionto dry disheswithout heat and save
energy. The dishestake longer to dry and some spotting
can OCCUr,
Forbest drying, use a liquid rinse aid. Some items (suchas
plastics)may need towel drying.
NOTE: Energy Saver Dry isan option with all cyclesexcept
RinseOnly and Quick Glass.
Sani Rinse option
Select this optionto raise thewater temperature inthe final
rinseto approximately 155° F (68° C) for 10 minutes. This
high-temperature rinsesanitizes yourdishes and
glassware in accordance with the NSF International
requirements (#95/480/05/2480).
NOTE: The Anti-Bacteria cycle automatically usesthis
option. Sani Rinseis an option with all cycles, except
RinseOnly,Quick Glass, and Ught/China.
Delay Hours
Select this option to run yourdishwasher at a later time or
during off-peak hours.
• You can delay the start of a cycle up to 9 hours.
• The firsttime you use Delay Hours, you willsea
showing a 1 hour delay.
To delay the start
1, Close the door.
2, Select a wash cycle and option(s).
3. Repeatedly press DELAY HOURS untilyou see the
desired hours delay in the display.When the delay
reaches 9 hours, the delay turns off. PressDELAY
HOURS again to select a new number of delay hours.
%
4. Press START.
NOTE: Tocancel the delay, press CANCEL untilno delay
hours show inthe display.
IMPORTANT:.
Operate yourdishwasher onlywhen you are at home.
Ifyour home isequipped with a water softener,do not
startthe dishwasherduring the regenerationofthe
softener.
Control Panel Light
Rinse Aid Empty light
Fillthe RinseAid dispenserwhen RINSE AID EMPTY islit.
A rinseaid prevents water from forming dropletsthat can
dry as spots or streaks.
RINSE AID
EMPTY
If the RinseAiddispenser isempty, the light glows when
you select a cycle or while a cycle isrunning.
14
ElectronicDisplay
Follow the progress ofyour dishwasher cycles on the
electronic display.The cycle time isdisplayed when you
select a wash cycle. The minutes on the display count
down to indicate the time left in a cycle.
NOTE: The sensor may automatically adjust the cycle.
When this happens, you may see the electronic display
pause or skip numbers as it counts down.
I°°L°LOC"-78=
HEAliNG
SENSING
s D
Child lock
Use Child Lock to preventyour dishwasher from
accidentally being turned on. Use Child Lock, also,to
preventaccidental cycle or option changes during a cycle.
When CHILD LOCK is lit, all pads are disabled. You can
turn on Child Lock whilethe dishwasher isrunning.
I CNILD LOCK 1
To turn Child Lock on
Pressand hold
Sensing
Yourdishwasher sensesthe soillevel on the dishes. Soil
level determines the length of some cycles, the amount of
heat added to a wash or rinse, and the cycle needed for
the load. SENSING glowsduring the soilsensing parts of
the cycle. Wash action continues while sensing occurs.
I SENSING I
Clean
CLEAN glowswhen a cycle isfinished.The lightturns off
when you open the door.
CLEAN ]
Sanitized
Ifyou select the Sani Rinseoption, SANITIZED glows
when the Sani Rinse cycle isfinished. The lightturns off
when you open the door.
P.M_ITIZED ]
If yourdishwasher did not propedy sanitize your dishes,
the light flashesat the end of the cycle. This can happen if
the cycle isinterrupted.
for 4 seconds. CHILD LOCK glows. If you press any pad
whileyour dishwasher is locked, CHILD LOCK flashes 3
times.
To turn Child Lock off
Pressand hold ENERGY SAVER DRY for 4 seconds. The
lightturns off.
NOTE; The dishwasher door can be opened while Child
Lock ison.
Water heating
HEATING glows, and the cycle count down pauses,
whenever water isheated during a cycle. Wash or rinse
action continues as the water heats.
_ HEATING
15
Wash System
The five-level wash system provides excellent cleaning
results.A triple filtration and soilcollector systemfiltersthe
wash water and prevents food particles from redepositing
on the clean dishes.
The wash water continuously flows through the Ultra-
Finefilter, trapping food particles.A small amount of
water remainsunder the filterto keep the pump seal
moist.
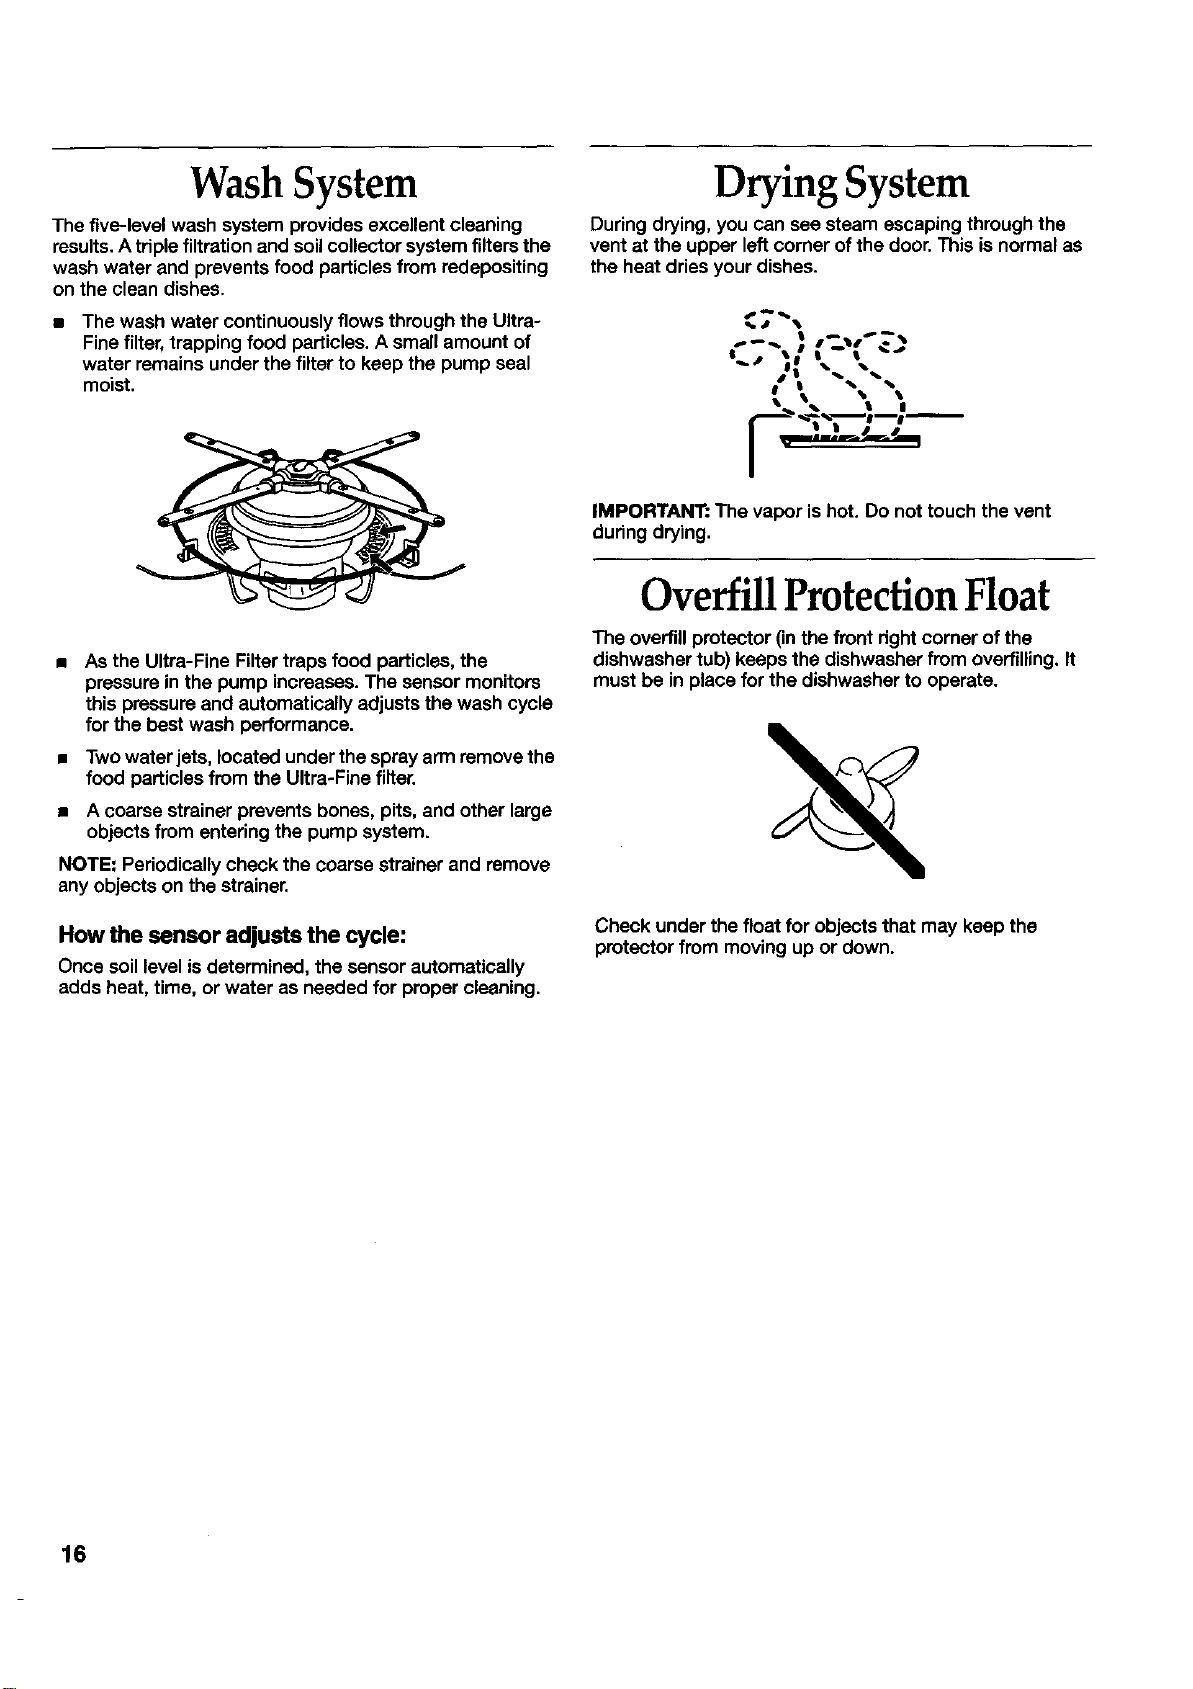
Drying System
During drying, you can see steam escaping through the
vent at the upper left corner of the door.This is normal as
the heat driesyour dishes.
__. % I I
• As the Ultra-Fine Filter traps food particles, the
pressure in the pump increases. The sensormonitors
this pressureand automaticallyadjusts the wash cycle
for the best wash performance.
• Two waterjets, located under the spray arm removethe
food particles from the Ultra-Fine filter.
• A coarse strainer prevents bones, pits, and other large
objects from entering the pump system.
NOTE: Periodicallycheck the coarse strainer and remove
anyobjects on the strainer.
How the sensor adjusts the cycle:
Once soil levelis determined, the sensor automatically
adds heat, time, or water as needed for propercleaning.
IMPORTANT: The vapor is hot. Do not touch the vent
during drying.
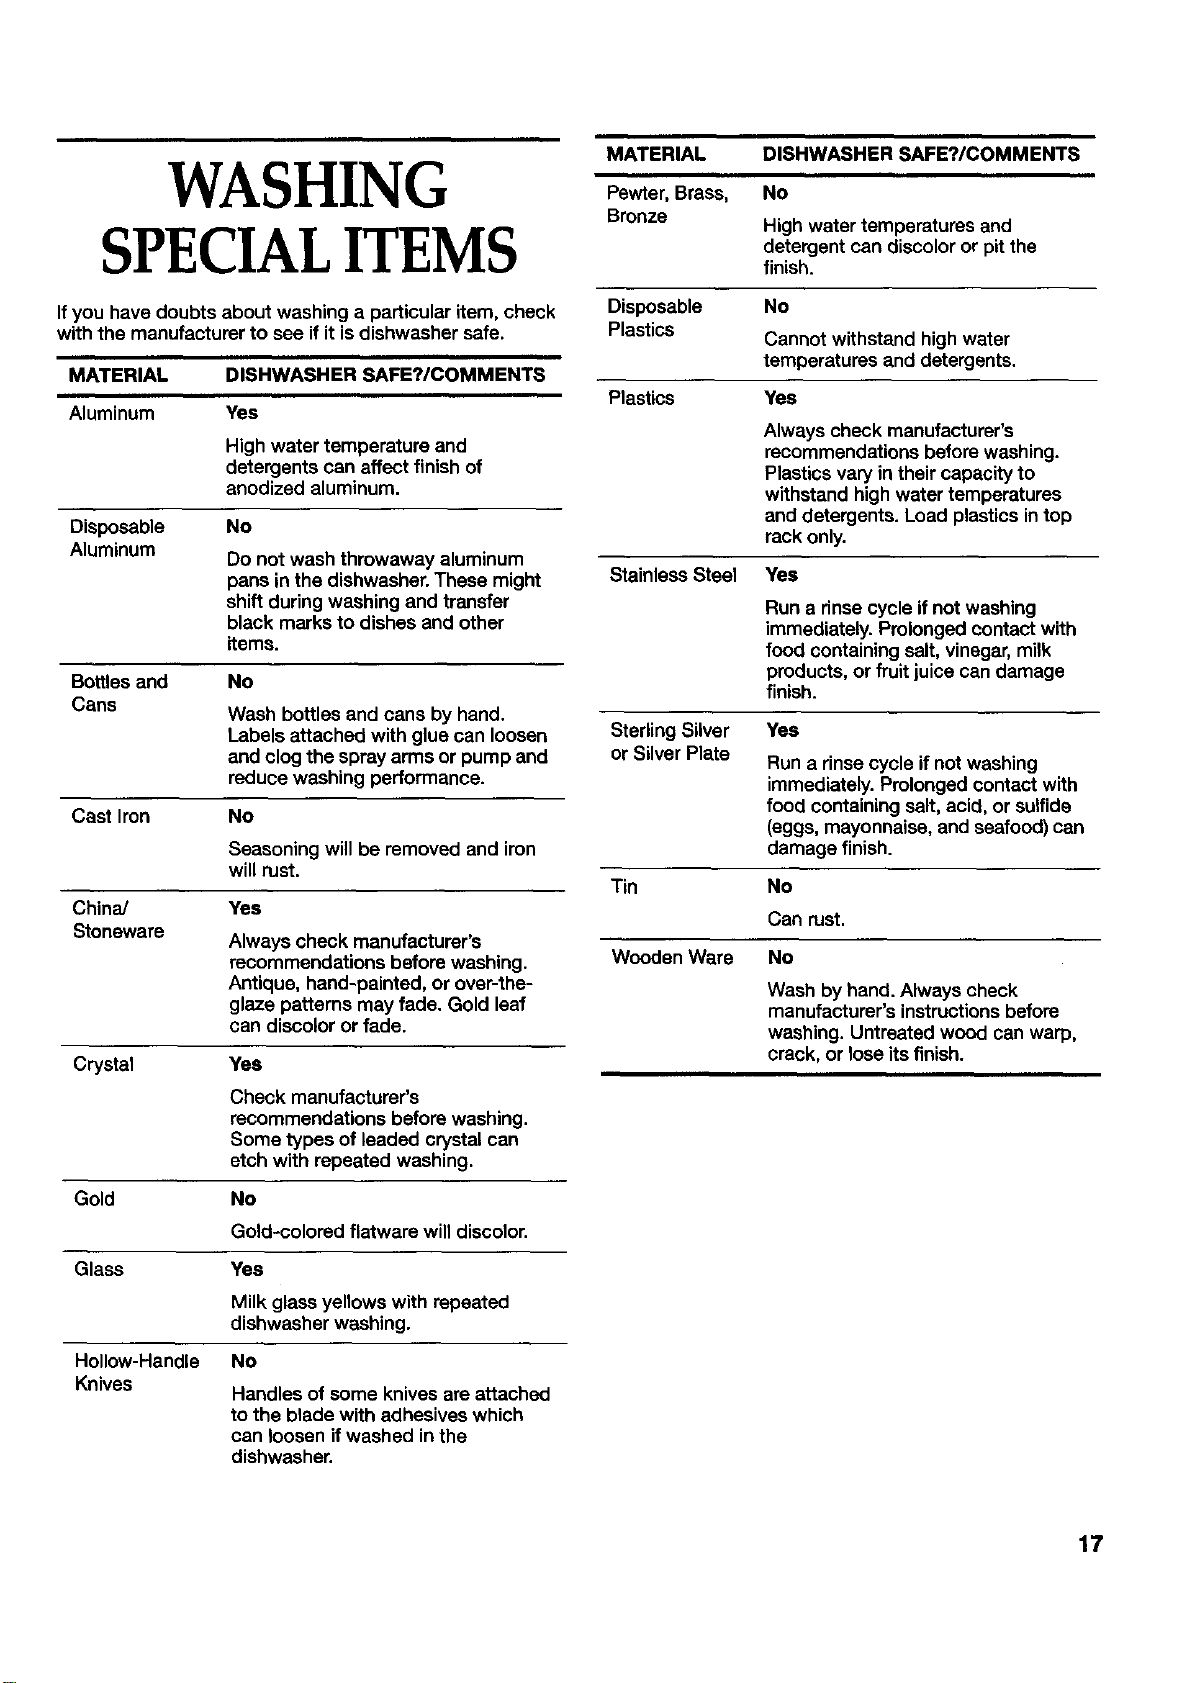
Overfill ProtectionFloat
The overfillprotector Onthe front rightcorner of the
dishwasher tub) keeps the dishwasherfrom overfilling.It
mustbe in place for the dishwasherto operate.
Check under the float for objects that may keep the
protector from moving up or down.
16
WASHING
SPECIALITEMS
If you have doubts about washing a particular item, check
with the manufacturer to see if it is dishwasher safe.
MATERIAL DISHWASHER SAFE?ICOMMENTS
Aluminum Yes
High water temperature and
detergents can affect finish of
anodized aluminum.
Disposable No
Aluminum
Do not wash throwaway aluminum
pans in the dishwasher. These might
shift during washing and transfer
black marks to dishesand other
items.
Bottlesand No
Cans
Wash bottles and cans by hand.
Labels attached with glue can loosen
and clog the spray arms or pump end
reduce washing performance.
Cast Iron No
Seasoning will be removed and iron
will rust.
China/
Stoneware
Yes
Always check manufacturer's
recommendations before washing.
Antique, hand-painted, or over-the-
glaze patterns may fade. Gold leaf
can discolor or fade.
Crystal Yes
Check manufacturer's
recommendations before washing.
Some types of leaded crystal can
etch with repeated washing.
Gold No
Gold-colored flatware will discolor.
Glass Yes
Milk glassyellows with repeated
dishwasher washing.
Hollow-Handle No
Knives Handles of some knives are attached
to the blade with adhesives which
can loosen if washed in the
dishwasher.
MATERIAL DISHWASHER SAFE?/COMMENTS
ii
Pewter, Brass, No
Bronze High water temperatures and
detergent can discolor or pit the
finish.
Disposable No
Plastics Cannot withstand high water
temperatures and detergents.
Plastics Yes
Always check manufacturer's
recommendations before washing.
Plastics vary intheir capacity to
withstand highwater temperatures
and detergents. Load plasticsintop
rack only.
Stainless Steel Yes
Run a rinsecycle ifnot washing
immediately.Prolonged contact with
food containingsalt, vinegar,milk
products, or fruitjuice can damage
finish.
SterlingSilver
or Silver Plate
Yes
Run a rinse cycle if not washing
immediately. Prolongedcontact with
food containingsalt, acid, or sulfide
(eggs, mayonnaise, and seafood)can
damage finish.
Tin No
Can rust.
Wooden Ware No
Wash by hand. Always check
manufacturer's instructions before
washing. Untreated wood can warp,
crack, or lose itsfinish.
17
CARING FOR
YOUR
DISHWASHER
Cleaning YourDishwasher
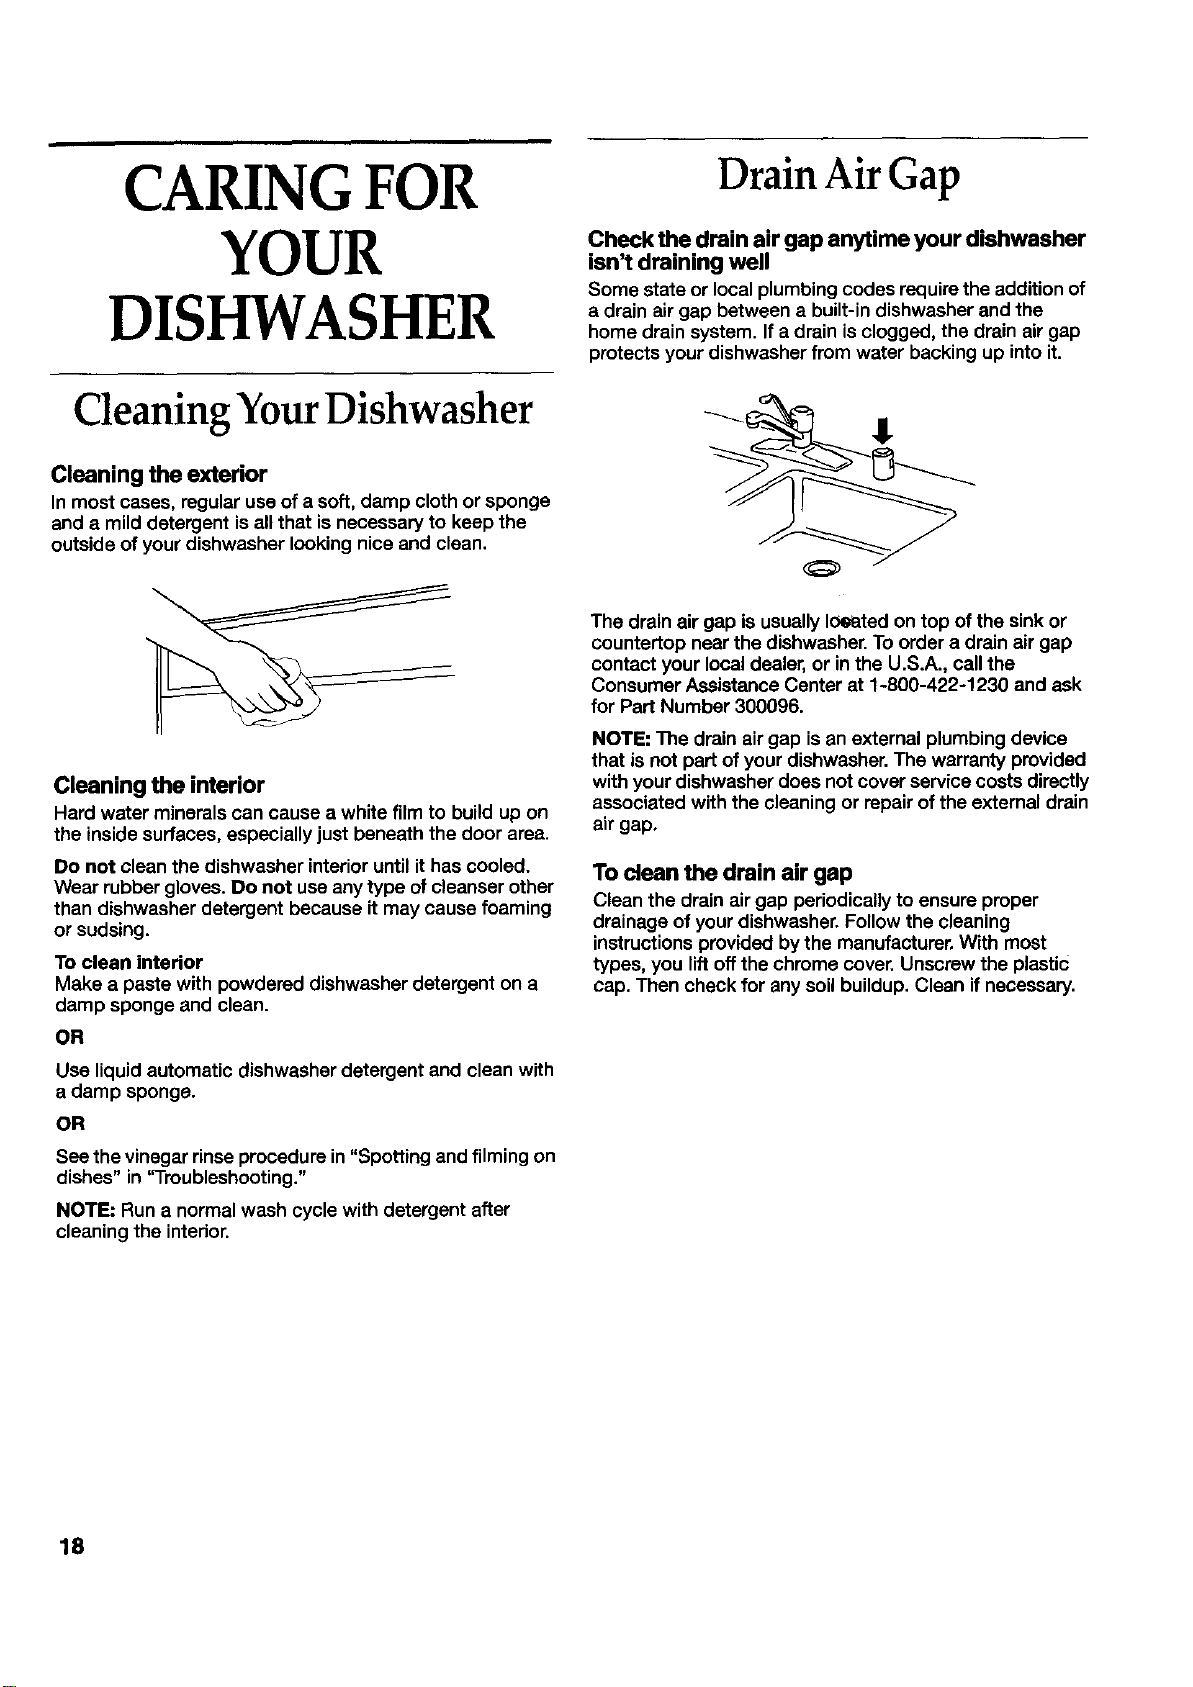
Cleaning the exterior
In most cases, regularuse of a soft, damp cloth or sponge
and a mild detergent is allthat is necessary to keep the
outside of yourdishwasher lookingnice and clean.
Cleaning the interior
Hard water mineralscan cause a white film to buildup on
the inside surfaces, especially just beneath the door area.
Do not clean the dishwasher interior until it has cooled.
Wear rubber gloves. Do not use anytype of cleanserother
than dishwasher detergent because it may cause foaming
or sudsing.
To clean interior
Make a paste with powdered dishwasher detergent on a
damp sponge and clean.
OR
Use liquid automatic dishwasher detergent and clean with
a damp sponge.
OR
See the vinegar rinseprocedure in "Spotting and filmingon
dishes" in 'q'roubleshooting."
NOTE: Run a normal wash cycle with detergent after
cleaningthe interior.
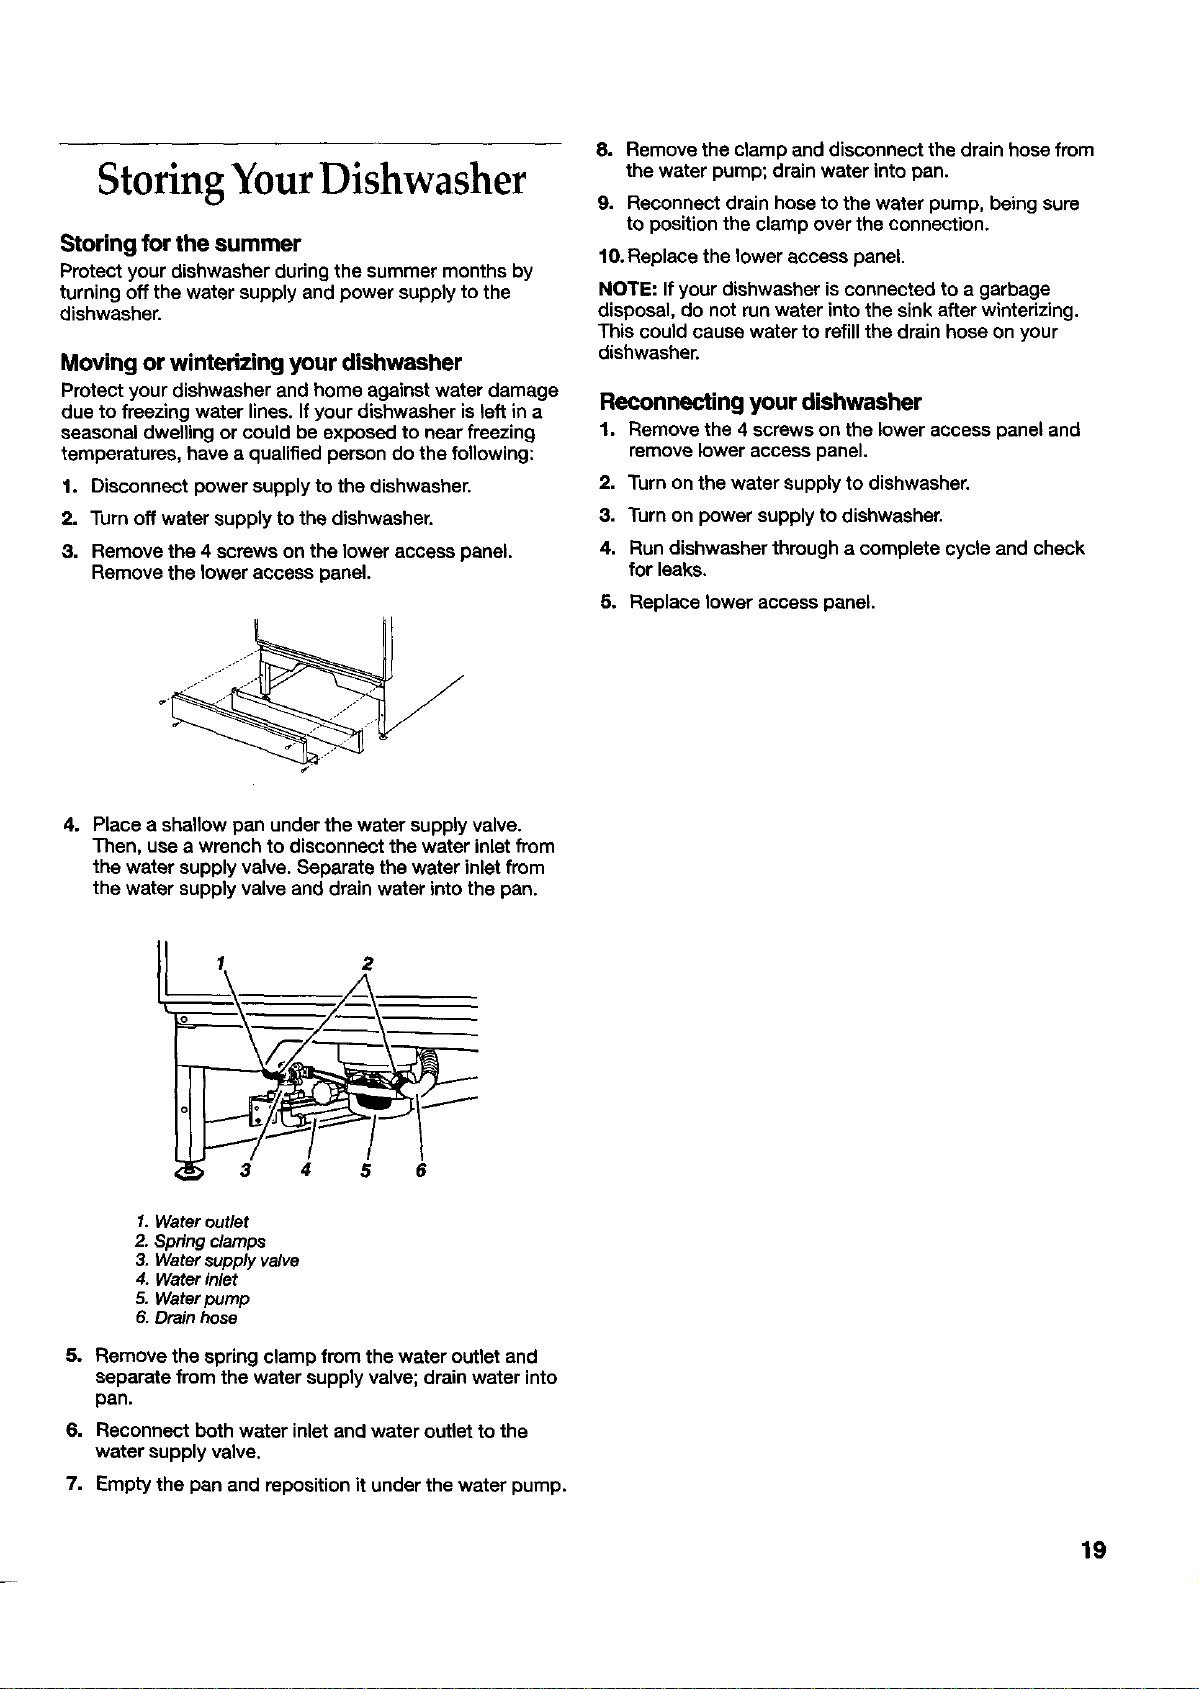
Drain Air Gap
Check the drain air gap anytime your dishwasher
isn't draining well
Some state or local plumbingcodes requirethe addition of
a drain air gap between a built-indishwasher and the
home drain system. If a drain isclogged, the drain air gap
protects your dishwasherfrom water backing up intoit.
The drain air gap is usuallyIOelatedon top of the sink or
countertop near the dishwasher.To order a drain air gap
contact your local dealer, or in the U.S.A., call the
Consumer Assistance Center at 1-800-422-1230 and ask
for Part Number 300096.
NOTE: The drain air gap is an external plumbing device
that is not part ofyour dishwasher.The warranty provided
with yourdishwasher does not cover servicecosts directly
associated with the cleaning or repair ofthe external drain
air gap.
To clean the drain air gap
Clean the drain air gap periodicallyto ensure proper
drainage of your dishwasher.Followthe cleaning
instructionsprovided by the manufacturer,With most
types, you lift offthe chrome cover, Unscrewthe plastic
cap. Then check for anysoil buildup. Clean ifnecessary.
18
Storing YourDishwasher
Storing for the summer
Protect your dishwasher during the summer months by
turning offthe water supply and power supply to the
dishwasher.
Moving or wintedzing your dishwasher
Protect your dishwasher and home against water damage
due to freezing water lines. Ifyour dishwasher is left in a
seasonal dwelling or could be exposed to near freezing
temperatures, have a qualified person do the following:
1. Disconnect power supply to the dishwasher.
2. Turnoff water supply to the dishwasher.
3. Remove the 4 screws on the lower access panel.
Remove the lower access panel.
8. Remove the clamp and disconnect the drain hose from
the water pump; drain water into pan.
9. Reconnect drain hose to the water pump, being sure
to position the clamp over the connection.
10.Replace the lower access panel.
NOTE: If your dishwasher is connected to a garbage
disposal, do not runwater intothe sink after winterizing.
This could cause water to refillthe drain hose on your
dishwasher.
Reconnecting your dishwasher
1. Remove the 4 screws on the lower access panel and
remove lower access panel.
2. Turn on the water supplyto dishwasher.
3. Turn on power supply to dishwasher.
4. Rundishwasherthrough a complete cycle and check
for leaks.
5. Replace lower access panel.
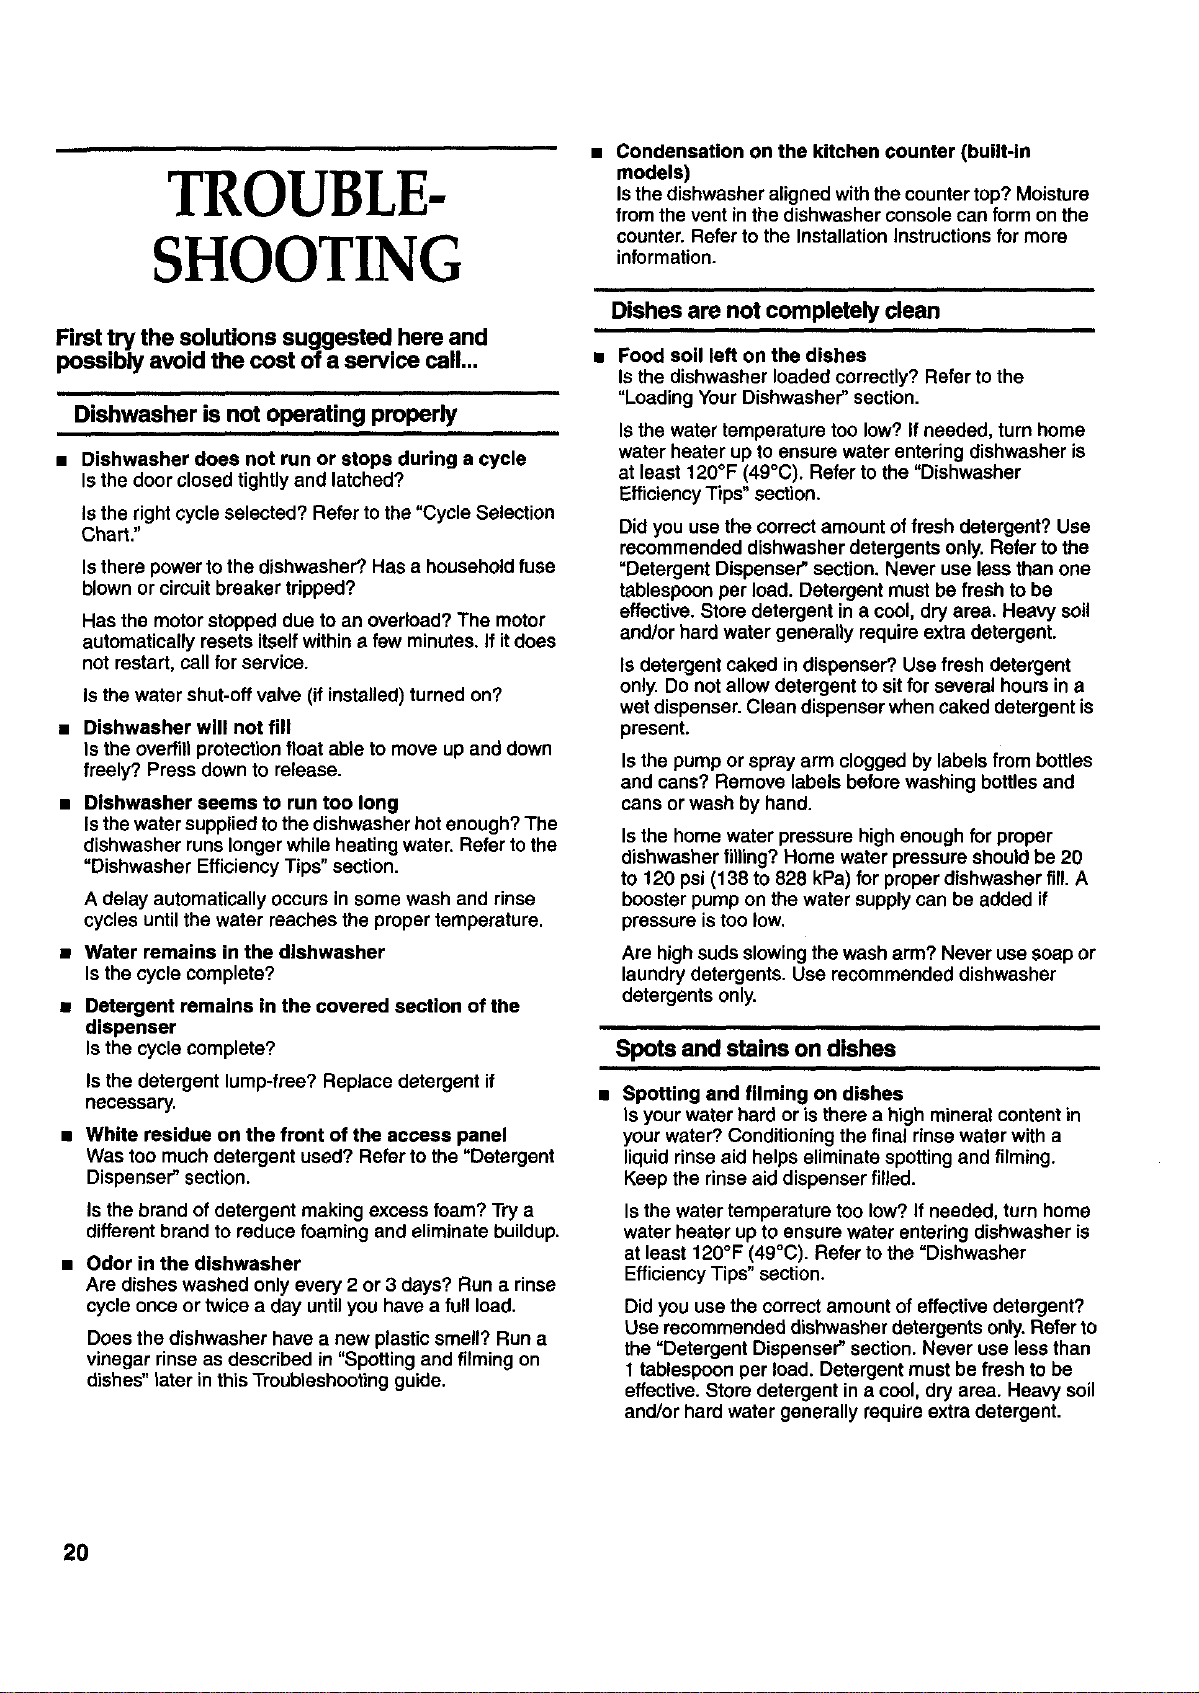
4. Place a shallow pan under the water supply valve.
Then, use a wrench to disconnect the water inlet from
the water supply valve. Separate the water inlet from
the water supply valve and drain water into the pan.
2
3 4 5 6
1. Water outlet
2. Spring clamps
3. Water supply valve
4. Water inlet
5. Water pump
6. Drain hose
5. Remove the springclamp from the water outlet and
separate from the water supply valve;drain water into
pan.
6. Reconnect both water inlet and water outletto the
water supply valve.
7. Empty the pan and repositionit under the water pump.
19
TROUBLE-
SHOOTING
First try the solutions suggested hers and
possibly avoid the cost of a service call...
Dishwasher is not operating properly
m Dishwasher does not run or stops during a cycle
Isthe door closedtightlyand latched?
Isthe rightcycle selected? Refer to the "Cycle Selection
Chart."
Isthere powerto the dishwasher? Has a householdfuse
blownor circuit breakertripped?
Has the motorstopped due to an overload? The motor
automaticallyresets itselfwithina few minutes. If itdoes
not restart, call for service.
Is the water shut-offvalve (if installed)turned on?
a Dishwasher will not fill
Isthe overfillprotectionfloat able to move up and down
freely? Press down to release.
• Dishwasher seems to run too long
Isthewater suppliedtothe dishwasherhotenough? The
dishwasher runslongerwhileheating water. Referto the
"Dishwasher EfficiencyTips"section.
A delay automaticallyoccurs in some wash and rinse
cycles until the water reaches the proper temperature.
• Water remains in the dishwasher
Is the cycle complete?
= Detergent remains in the covered section of the
dispenser
Isthe cycle complete?
Is the detergent lump-free? Replace detergent if
necessary.
a White residue on the front of the access panel
Was too muchdetergent used? Refer to the "Detergent
Dispenser"section.
Is the brand of detergent making excess foam? Try a
different brand to reduce foaming and eliminate buildup.
• Odor in the dishwasher
Are dishes washed onlyevery 2 or 3 days? Run a rinse
cycle once or twice a day untilyou have a full load.
Does the dishwasher have a new plastic smell? Run a
vinegar rinse as described in "Spotting and filming on
dishes" later in this Troubleshootingguide.
Condensation on the kitchen counter (built-in
models)
Isthe dishwasheralignedwith thecountertop? Moisture
from the vent inthe dishwasherconsole can form onthe
counter.Refer to the InstallationInstructionsformore
information.
Dishes are not completely clean
Food soil left on the dishes
Isthe dishwasher loaded correctly?Refer to the
"LoadingYourDishwasher"section.
Isthe water temperature too low?Ifneeded, turn home
water heater up to ensure water enteringdishwasher is
at least 120°F (49°C). Refer to the "Dishwasher
EfficiencyTips" section.
Did you use the correct amountof fresh detergent? Use
recommended dishwasherdetergents only. Refer to the
"Detergent Dispenser"section. Never use lessthan one
tablespoon per load. Detergent mustbe fresh to be
effective. Store detergent in a cool, dry area. Heavy soil
and/or hard water generally requireextra detergent.
Is detergent caked in dispenser? Use fresh detergent
only. Do notallow detergent to sitfor several hours ina
wet dispenser. Clean dispenserwhen caked detergent is
present.
Isthe pump or spray arm clogged bylabels from bottles
and cans? Remove labels beforewashing bottlesand
cans or wash by hand.
Is the home water pressure high enough for proper
dishwasher filling? Home water pressure shouldbe 20
to 120 psi (138 to 828 kPa) for properdishwasher fill.A
boosterpump on the water supplycan be added if
pressure is too low.
Are highsuds slowingthe wash arm? Never usesoap or
laundrydetergents. Use recommended dishwasher
detergents only.
Spots and stains on dishes
= Spotting and filming on dishes
Is yourwater hard or is there a high mineralcontentin
yourwater? Conditioningthe final rinsewater with a
liquidrinseaid helpseliminate spottingand filming.
Keep the rinseaid dispenserfilled.
Isthe watertemperature too low?If needed, turn home
water heater up to ensure water entering dishwasheris
at least 120°F (49°C). Refer to the =Dishwasher
EfficiencyTips"section.
Did you use the correctamountof effective detergent?
Use recommended dishwasher detergents only.Refer to
the "Detergent Dispenser"section. Never use lessthan
1 tablespoonper load. Detergent mustbe fresh to be
effective.Store detergent in a cool, dry area. Heavy soil
and/or hard water generally requireextradetergent.
2O
Is the home water pressure high enough for proper
dishwasher filling? Home water pressure should be 20
to 120 psi (138 to 828 kPa) for proper dishwasherfill. A
booster pump on the water supply can be added if
pressure istoo low.
NOTE: To remove spots and film from dishes,try a white
vinegar rinse. This procedure is intended for occasional
use only. Vinegar is an acid and using it too often could
damage your dishwasher.
1. Wash and rinsedishes. Use an air-dry or an energy
saving dry option. Remove all silverware or metal
items,
2. Put 2 cups (473 eL) white vinegar in a glass or
dishwasher-safe measuring cup on the bottom rack.
3. Run the dishwasher through a complete washing
cycle using an air-dry or an energy saving dry option.
Do not use detergent. Vinegar will mix with the wash
water.
m Silica film or etching (silica film Is a milky, rainbow-
colored deposit; etching Is a cloudy film)
Sometimes there is a water/chemical reactionwith
certain types of glassware. This is usually caused by
some combinationof softor softenedwater, alkaline
washing solutions,insufficientrinsing,overloading the
dishwasher,and the heat of drying. Itmight not be
possibleto preventthe problem, exceptby hand
washing.
To slow this processuse a minimum amountof
detergent but notless than 1 tablespoon per load. Use a
liquidrinse aid and underload the dishwasherto allow
thoroughrinsing.Silica film and etching are permanent
and cannotbe removed. Do notuse heated drying.
• White spots on cookware with non-stick finish
Has the dishwasherdetergent removed cookware
seasoning? Reseason cookware after washing inthe
dishwasher,
m Brown stains on dishes and dishwasher Interior
Does yourwater have highiron content? Rewash dishes
using 1-3 teaspoons of citricacid crystals added to the
covered sectionofthe detergent dispenser. Do not use
detergent. Followwith a Normal wash cycle with
detergent, if treatment isneeded more oftenthan every
other month, the installationof an iron removalunitis
recommended.
• Black or gray marks on dishes
Are aluminum items rubbingdishes during washing?
Disposable aluminum items can break down in the
dishwasherand cause marking.Hand washthese items.
Remove aluminummarkings by using a mildabrasive
cleaner.
m Orange stains on plastic dishes or dishwasher
interior
Are large amounts of tomato-based foods on dishes
placed in the dishwasher?,Stains gradually fade over
time. Regular use of heated dryingwillslow fading.
Stains will not affect dishwasherperformance. Regular
use of a rinse cycleand an air-dry or energy-saving dry
optionwillreduce the likelihoodof staining.
Dishes do not dry completely
e
Dishes are not dry
Did you load yourdishwasherto allow properwater
drainage? Do not overload. Refer to the =Loading Your
Dishwasher"section. Use a liquidrinseaid to speed
drying.
Are the plasticswet? Plastics often need towel drying.
Is the rinseaid dispenser empty? Refer to the"Rinse Aid
Dispenser" section.
Did you use an air-dry or energy-saving dry option?Use
a heated dryingoptionfor dryer dishes.
Dishes are damaged during a cycle
Chipping of dishes
Did you loadthe dishwasher properly? Loadthe dishes
and glasses so theyare stable and do not striketogether
from washing action. Minimize chippingby movingthe
rackin and out slowly.
NOTE: Antiques,feather-edged crystal,and similar
types of china and glassware mightbe too delicatefor
automaticdishwashing.Wash by hand.
Noises
• Grinding, grating, crunching or buzzing sounds
A hardobject has entered the wash module (on some
models). The sound shouldstop when the objectis
ground up,
_)1
ASSISTANCE
ORSERVICE
Beforecalling for assistance or service, please check
"Troubleshooting." It may save you the cost of a service
call. If you stillneed help, follow the instructions below.
When calling, please know the purchase date and the
complete model and serial number of your appliance. This
informationwill help us to better respond to your request.
Inthe U.S.A.
Call the KitchenAid Consumer Assistance Center
toll free: t-800-422-1230.
Our consultants provide assistance with:
• Featuresand specifications on ourfull lineof
appliances.
• Installationinformation.
Use and maintenance procedures.
Accessory and repair parts sales.
Specialized customer assistance (Spanish speaking,
hearing impaired, limited vision,etc.).
Referrals to localdealers, repair parts distributors, and
service companies. KitchenAid service techniciansare
trained to fulfillthe product warranty and provideafter-
warranty service, anywhere inthe United States.
To locate the authorizedKitchenAidservicecompany in
your area, you can also lookinyourtelephone directory
Yellow Pages.
If you need replacement parts
Ifyou need to order replacement parts, we recommend
that you onlyuse factory authorized parts. These parts will
fit right and work right,because they are made with the
same precision used to buildevery new KITCHENAID®
appliance. To locate factory authorized replacement parts
in yourarea, call ourConsumer Assistance Center
telephone number or your nearest authorized service
center.
For further assistance
Ifyou need further assistance, you can write to KitchenAid
with any questions or concerns at:
KitchenAid Brand Home Appliances
Consumer Assistance Center
c/o Correspondence Dept.
2000 North M-63
Benton Harbor, MI 49022-2692
Please include a daytime phone number in your
correspondence.
InCanada
Call the KitchenAid Canada Consumer Assistance Center
toll free: 1-800-461-5681 8:30 a.m. - 6:00 p.m. (EST)
Our consultants provide assistance with:
• Features and specifications on our full line of
appliances.
• Referrals to local dealers.
For service in Canada
Call 1-800-807-6777. KitchenAidservice techniciansare
trained to fulfillthe product warranty and provide after-
warranty service,anywhere in Canada.
If you need replacement parts
Ifyou need to order replacement parts, we recommend
that you onlyusefactory authorized parts.These parts will
fit right and work dght, because they are made with the
same precisionused to buildevery new KITCHENAID"
appliance. To locate factory authorized replacement parts
inyour area, call your nearest authodzed service center.
For further assistance
If you need further assistance, you can write to KitchenAid
Canada with any questions or concerns at:
Consumer RelationsCenter
KitchenAidCanada
1901 Minnesota Court
Mississeuga, Ontario LSN 3A7
Please includea daytime phone number inyour
correspondence.
22
KITCHENAII)*DISHWASHERWARRANTY
FULL ONE-YEAR WARRANTY
For one year from the date of installation,when this dishwasher is operated and maintained according to instructionsattached to or
furnished with the product, KitchenAid will pay for replacement parts and repair labor to correct defects in materials or workmanship.
Service must be provided by an authorized KitchenAid service company.
SECOND THROUGH FIFTH YEAR LIMITED WARRANTY
For the second through fifth year from the date of installation, when this dishwasher isoperated and maintained according to
instructionsattached to or furnished with the product, KitchenAidwilt pay for replacement parts forthe fogowingcomponents if
defective in materials or workmanship: the upper and lower nylon racks, the one-third horsepower motor assembly,the alectrenici
controls, the heating element.
LIFETIME FULL WARRANTY
Forthe lifetime ofthe product from the date of instellatian, KltchenAid will pay for reptecement parts and repair labor for the stainless
steel tub or inner door if the tub or inner door develops a water leak caused by rust-through resulting from defective materials or
workmanship, Service must be provided by an authorized KltohanAid service company.
KitchenAid will not pay for:.
1. Service calls to correct the installation of your dishwasher, to instruct you how to use your dishwasher, to replace house fuses or
correct house wiring or plumbing.
2. Repairs when your dishwasher is used in other than normal, single-tamityhousehold use. Normal home use includes semi*
commercial establishments, such as in-home day care centers, bed and breakfast inns,and home-bseed extended cars facilities.
Check local ordinances to ensure use of this unitis appropriate.
3. Damage resultingfrom accident, alteration, misuse, abuse, fire,floods, acts of God, improper installation,or installation not in
accordance with local electrical and plumbing codes.
4. Any labor costs during the limited warranty.
5. Replacement parts or repair labor costs for units operated outside the United States or Canada.
6. Pickup and delivery. This product isdesigned to be repaired inthe home.
7. Repairs to parts or systems resulting from unauthorized modifications made to the appliance.
8. In Canada, travel or transportation expenses for customers who reside in remote areas.
KITCHENAID AND KITCHENAID CANADA DO NOT
ASSUME ANY RESPONSIBILITY FOR INCIDENTAL OR
CONSEQUENTIAL DAMAGES.
Some states or provinces do not allow the exclusionor limitation
of incidental or consequential damages, sothis exclusion or
limitation may not apply to you. This warranty givesyou specific
legal rights and you may also have other rights which may vary
from state to state or province to province.
Outside the United States and Canada, a different
warranty may apply, For details, please contact your
authorized KitchenAid dealer,
Ifyou need service,first see "Troubleshooting." Additional help
can be found by checking "Assistance or Service." In the U.S.A.,
call our Consumer Assistance Center at 1-800-422-1230 (toll-
free), from anywhere in the U.S.A. In Canada, call KitchenAid
Canada at 1-800-807-6777.
Keep this book and your sales slip together for future
reference. You must provide proof of purchase or installation
date for in-warrenty service.
Write down the following information about your dishwasher to
better help you obtain assistance or service if you ever need it.
You will need to know your complete model number and serial
number. You can find this information onthe model and serial
number tabeVplats, located on your appliance as shown in"Parts
and Features."
Dealer name.
Address
Phone number
Model number
Serial number
Purchase date
23