
FormNo.3371-671-ASMRevA
22inRecycler
®
LawnMower
ModelNo.20332—SerialNo.312000001andUp
ModelNo.20334—SerialNo.312000001andUp
ModelNo.20352—SerialNo.312000001andUp
Operator'sManual
ReplacementpartsareavailablefromanAuthorizedServiceDealeroratwww.shoptoro.com.
Introduction
Thisrotary-blade,walk-behindlawnmowerisintended
tobeusedbyresidentialhomeowners.Itisdesigned
primarilyforcuttinggrassonwell-maintainedlawns
onresidentialproperties.Itisnotdesignedforcutting
brushorforagriculturaluses.
Readthisinformationcarefullytolearnhowtooperate
andmaintainyourproductproperlyandtoavoidinjury
andproductdamage.Youareresponsibleforoperating
theproductproperlyandsafely.
YoumaycontactTorodirectlyatwww .Toro.comfor
productandaccessoryinformation,helpndingadealer,
ortoregisteryourproduct.
Wheneveryouneedservice,genuineToroparts,
oradditionalinformation,contactanAuthorized
ServiceDealerorToroCustomerServiceandhave
themodelandserialnumbersofyourproductready.
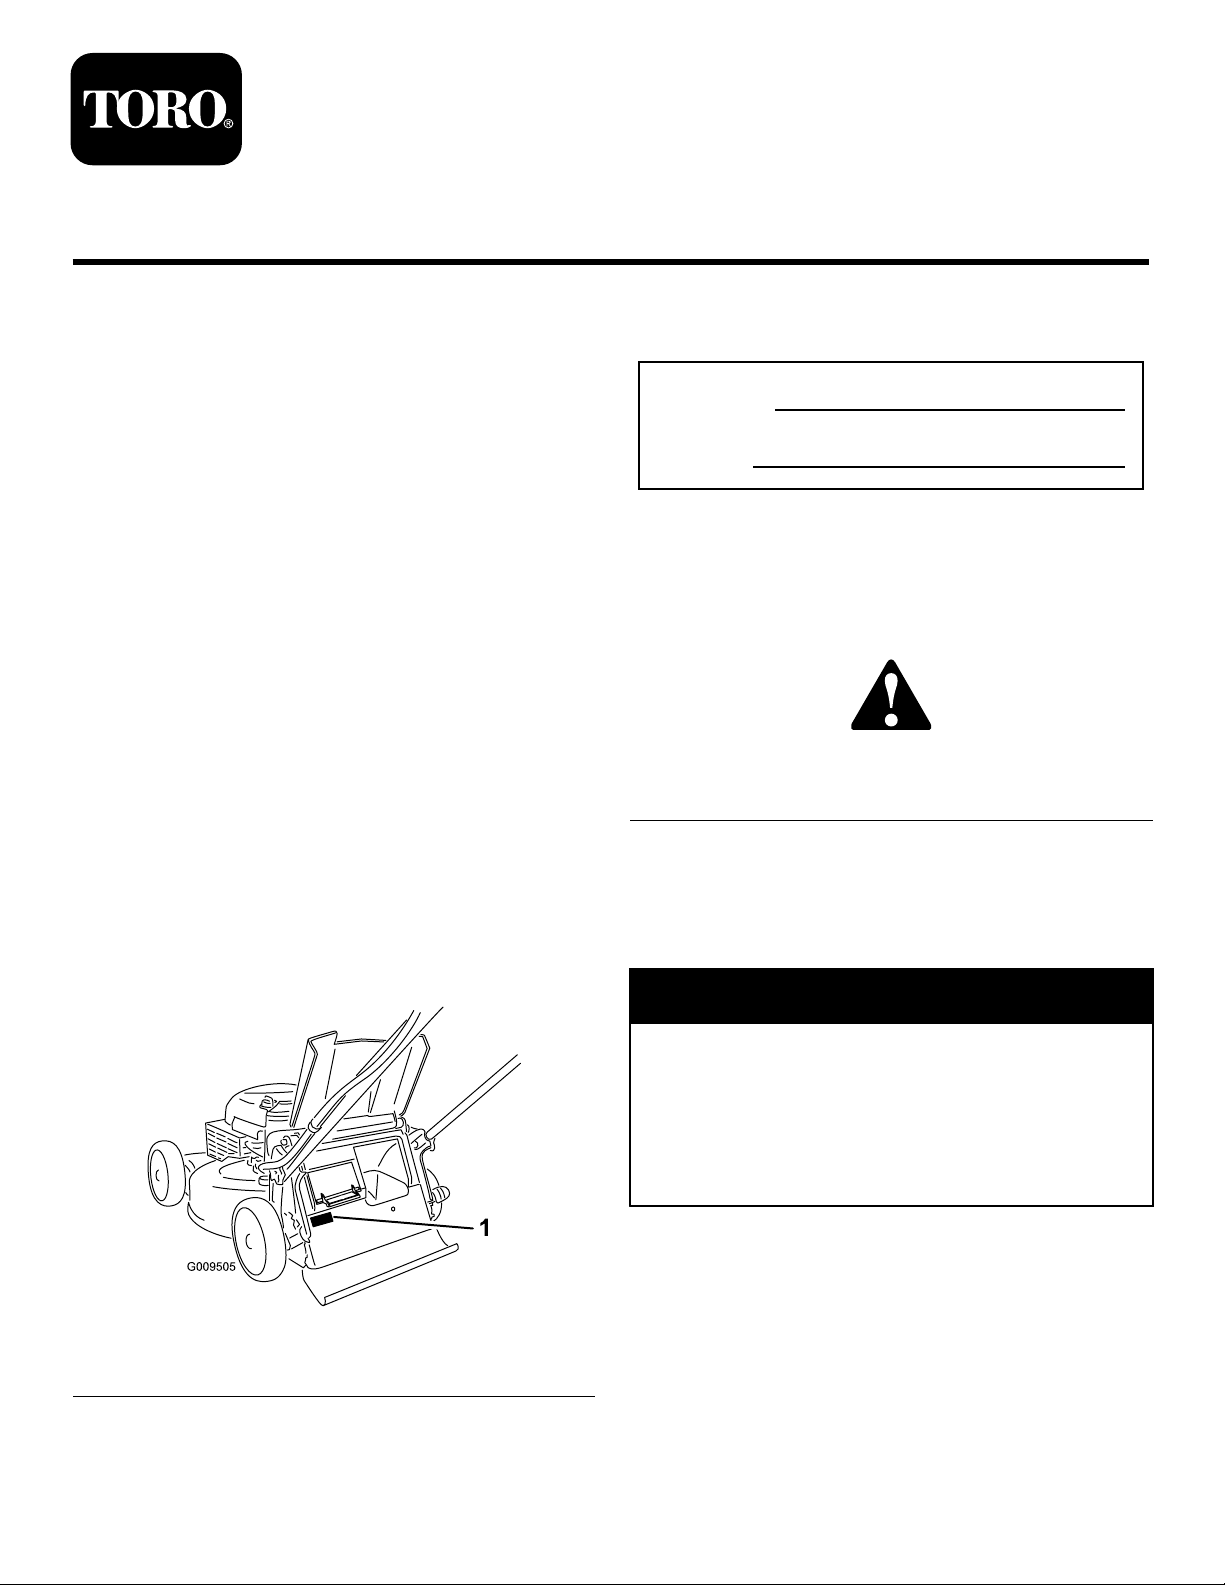
Figure1identiesthelocationofthemodelandserial
numbersontheproduct.
Figure1
1.Modelandserialnumberplate
Writetheproductmodelandserialnumbersinthespace
below:
ModelNo.
SerialNo.
Thismanualidentiespotentialhazardsandhassafety
messagesidentiedbythesafetyalertsymbol(Figure2),
whichsignalsahazardthatmaycauseseriousinjury
ordeathifyoudonotfollowtherecommended
precautions.
Figure2
1.Safetyalertsymbol
Thismanualuses2wordstohighlightinformation.
Importantcallsattentiontospecialmechanical
informationandNoteemphasizesgeneralinformation
worthyofspecialattention.
WARNING
CALIFORNIA
Proposition65Warning
Theengineexhaustfromthisproduct
containschemicalsknowntotheStateof
Californiatocausecancer,birthdefects,
orotherreproductiveharm.
Important:Thisengineisnotequippedwitha
sparkarrestermufer.ItisaviolationofCalifornia
PublicResourceCodeSection4442touseoroperate
theengineonanyforest-covered,brush-covered,or
grass-coveredland.Otherstatesorfederalareas
mayhavesimilarlaws.
ThissparkignitionsystemcomplieswithCanadian
ICES-002.
©2011—TheToro®Company
8111LyndaleAvenueSouth
Bloomington,MN55420
Registeratwww.Toro.com.
OriginalInstructions(EN)
PrintedintheUSA
AllRightsReserved

Theenclosed
EngineOwner'sManual
issupplied
forinformationregardingtheUSEnvironmental
ProtectionAgency(EPA)andtheCalifornia
EmissionControlRegulationofemissionsystems,
maintenance,andwarranty.Replacementsmaybe
orderedthroughtheenginemanufacturer.
Formodelswithstatedenginehorsepower,thegross
horsepoweroftheenginewaslaboratoryratedbythe
enginemanufacturerinaccordancewithSAEJ1940.
Asconguredtomeetsafety,emission,andoperating
requirements,theactualenginehorsepoweronthisclass
oflawnmowerwillbesignicantlylower.
Safety
ThislawnmowermeetsorexceedstheCPSCblade
safetyrequirementsforwalk-behindrotarylawnmowers
andtheB71.1specicationsoftheAmericanNational
StandardsInstituteineffectatthetimeofproduction.
Readandunderstandthecontentsofthismanual
beforeyoustarttheengine.
Thesafetyalertsymbol(Figure2)isusedtoalertyou
topotentialpersonalinjuryhazards.Obeyallsafety
messagesthatfollowthissymboltoavoidpossibleinjury
ordeath.Improperlyusingormaintainingthismower
couldresultininjuryordeath.Toreducethispotential,
complywiththefollowingsafetyinstructions.
Thefollowinginstructionshavebeenadaptedfromthe
ANSI/OPEIstandardB71.1-2003.
Thiscuttingmachinecanamputatehandsandfeet
andthrowobjects.Failuretoobservethefollowing
safetyinstructionscouldresultinseriousinjuryor
death.
GeneralOperation
•Read,understand,andfollowallinstructionsonthe
machineandinthemanual(s)beforestarting.
•Donotputhandsorfeetnearorunderthemachine.
Keepclearofthedischargeopeningatalltimes.
•Onlyallowresponsibleadults,whoarefamiliarwith
theinstructions,tooperatethismachine.
•Cleartheareaofobjectssuchasrocks,wire,toys,
etc.,whichcouldbethrownbytheblade.Staybehind
thehandlewhentheengineisrunning.
•Besuretheareaisclearofbystandersbefore
operating.Stopmachineifanyoneentersthearea.
•Donotoperatemachinebarefootedorwhilewearing
sandals.Alwayswearsubstantialfootwear.
•Donotpullmachinebackwardunlessabsolutely
necessary.Alwayslookdownandbehindbeforeand
whilemovingbackward.
•Neverdirectdischargedmaterialtowardanyone.
Avoiddischargingmaterialagainstawallor
obstruction.Materialmayricochetbacktoward
theoperator.Stopthebladewhencrossinggravel
surfaces.
•Donotoperatemachinewithouttheentiregrass
catcher,dischargeguard,rearguard,orothersafety
protectivedevicesinplaceandworking.
•Neverleavearunningmachineunattended.
•Stoptheengineandwaituntilthebladecomes
toacompletestopbeforecleaningthemachine,
removinggrasscatcher,oruncloggingthedischarge
guard.
•Operatemachineonlyindaylightorgoodarticial
light.
•Donotoperatemachinewhileundertheinuence
ofalcoholordrugs.
•Neveroperatemowerinwetgrass.Alwaysbesure
ofyourfooting;walk;neverrun.
•Disengagethedrivesystem,ifsoequipped,before
startingtheengine.
•Ifthemachineshouldstarttovibrateabnormally,
stoptheengineandcheckforthecauseimmediately.
Vibrationisgenerallyawarningoftrouble.
•Alwaysweareyeprotectionwhenoperatingmachine.
•Seemanufacturer'sinstructionsforproperoperation
andinstallationofaccessories.Onlyuseaccessories
approvedbythemanufacturer.
SlopeOperation
Slopesareamajorfactorrelatedtoslipandfallaccidents,
whichcanresultinsevereinjury.Operationonallslopes
requireextracaution.Ifyoufeeluneasyonaslope,do
notmowit.
•Mowacrossthefaceofslopes;neverupanddown.
Exerciseextremecautionwhenchangingdirection
onslopes.
•Watchforholes,ruts,bumps,rocks,orotherhidden
objects.Uneventerraincouldcauseaslipandfall
accident.Tallgrasscanhideobstacles.
•Donotmowonwetgrassorexcessivelysteepslopes.
Poorfootingcouldcauseaslipandfallaccident.
•Donotmowneardrop-offs,ditches,or
embankments.Youcouldloseyourfootingor
balance.
2

Children
Tragicaccidentscanoccuriftheoperatorisnotalertto
thepresenceofchildren.Childrenareoftenattractedto
themachineandthemowingactivity.Neverassume
thatchildrenwillremainwhereyoulastsawthem.
•Keepchildrenoutofthemowingareaandunderthe
watchfulcareofaresponsibleadultotherthanthe
operator.
•Bealertandturnmoweroffifachildentersthearea.
•Neverallowchildrentooperatethemachine.
•Useextracarewhenapproachingblindcorners,
shrubs,trees,orotherobjectsthatmayblockyour
viewofachild.
Service
SafeHandlingofGasoline
Toavoidpersonalinjuryorpropertydamage,use
extremecareinhandlinggasoline.Gasolineis
extremelyammableandthevaporsareexplosive.
•Extinguishallcigarettes,cigars,pipes,andother
sourcesofignition.
•Useonlyanapprovedgasolinecontainer.
•Neverremovegascaporaddfuelwiththeengine
running.Allowenginetocoolbeforerefueling.
•Neverrefuelthemachineindoors.
•Neverstorethemachineorfuelcontainerwhere
thereisanopename,spark,orpilotlightsuchas
onawaterheateroronotherappliances.
•Neverllcontainersinsideavehicleoronatruck
ortrailerbedwithaplasticliner.Alwaysplace
containersonthegroundawayfromyourvehicle
beforelling.
•Removegas-poweredequipmentfromthetruck
ortrailerandrefuelitontheground.Ifthisisnot
possible,thenrefuelsuchequipmentwithaportable
container,ratherthanfromagasolinedispenser
nozzle.
•Keepthenozzleincontactwiththerimofthefuel
tankorcontaineropeningatalltimesuntilfuelingis
complete.Donotuseanozzlelock-opendevice.
•Iffuelisspilledonclothing,changeclothing
immediately.
•Neveroverllfueltank.Replacegascapandtighten
securely.
WARNING
Exhaustcontainscarbonmonoxide,anodorless,
deadlypoisonthatcankillyou.
Donotruntheengineindoorsorinanenclosed
area.
GeneralService
•Neveroperatemachineinaclosedarea.
•Keepallnutsandboltstighttobesuretheequipment
isinsafeworkingcondition.
•Nevertamperwithsafetydevices.Checktheir
properoperationregularly.
•Keepmachinefreeofgrass,leaves,orotherdebris
build-up.Cleanupoilorfuelspillageandremove
anyfuel-soakeddebris.Allowmachinetocool
beforestoring.
•Ifyoustrikeaforeignobject,stopandinspectthe
machine.Repair,ifnecessary,beforestarting.
•Nevermakeanyadjustmentsorrepairswiththe
enginerunning.Disconnectthesparkplugwireand
groundagainstenginetopreventunintendedstarting.
•Checkgrasscatchercomponentsandthedischarge
guardfrequentlyandreplacewithmanufacturer's
recommendedparts,whennecessary.
•Mowerbladesaresharp.Wrapthebladeorwear
gloves,anduseextracautionwhenservicingthem.
•Donotchangetheenginegovernorsettingor
overspeedtheengine.
•Maintainorreplacesafetyandinstructionlabels,as
necessary.
3

SafetyandInstructionalDecals
Important:Safetyandinstructiondecalsarelocatednearareasofpotentialdanger.Replacedamaged
decals.
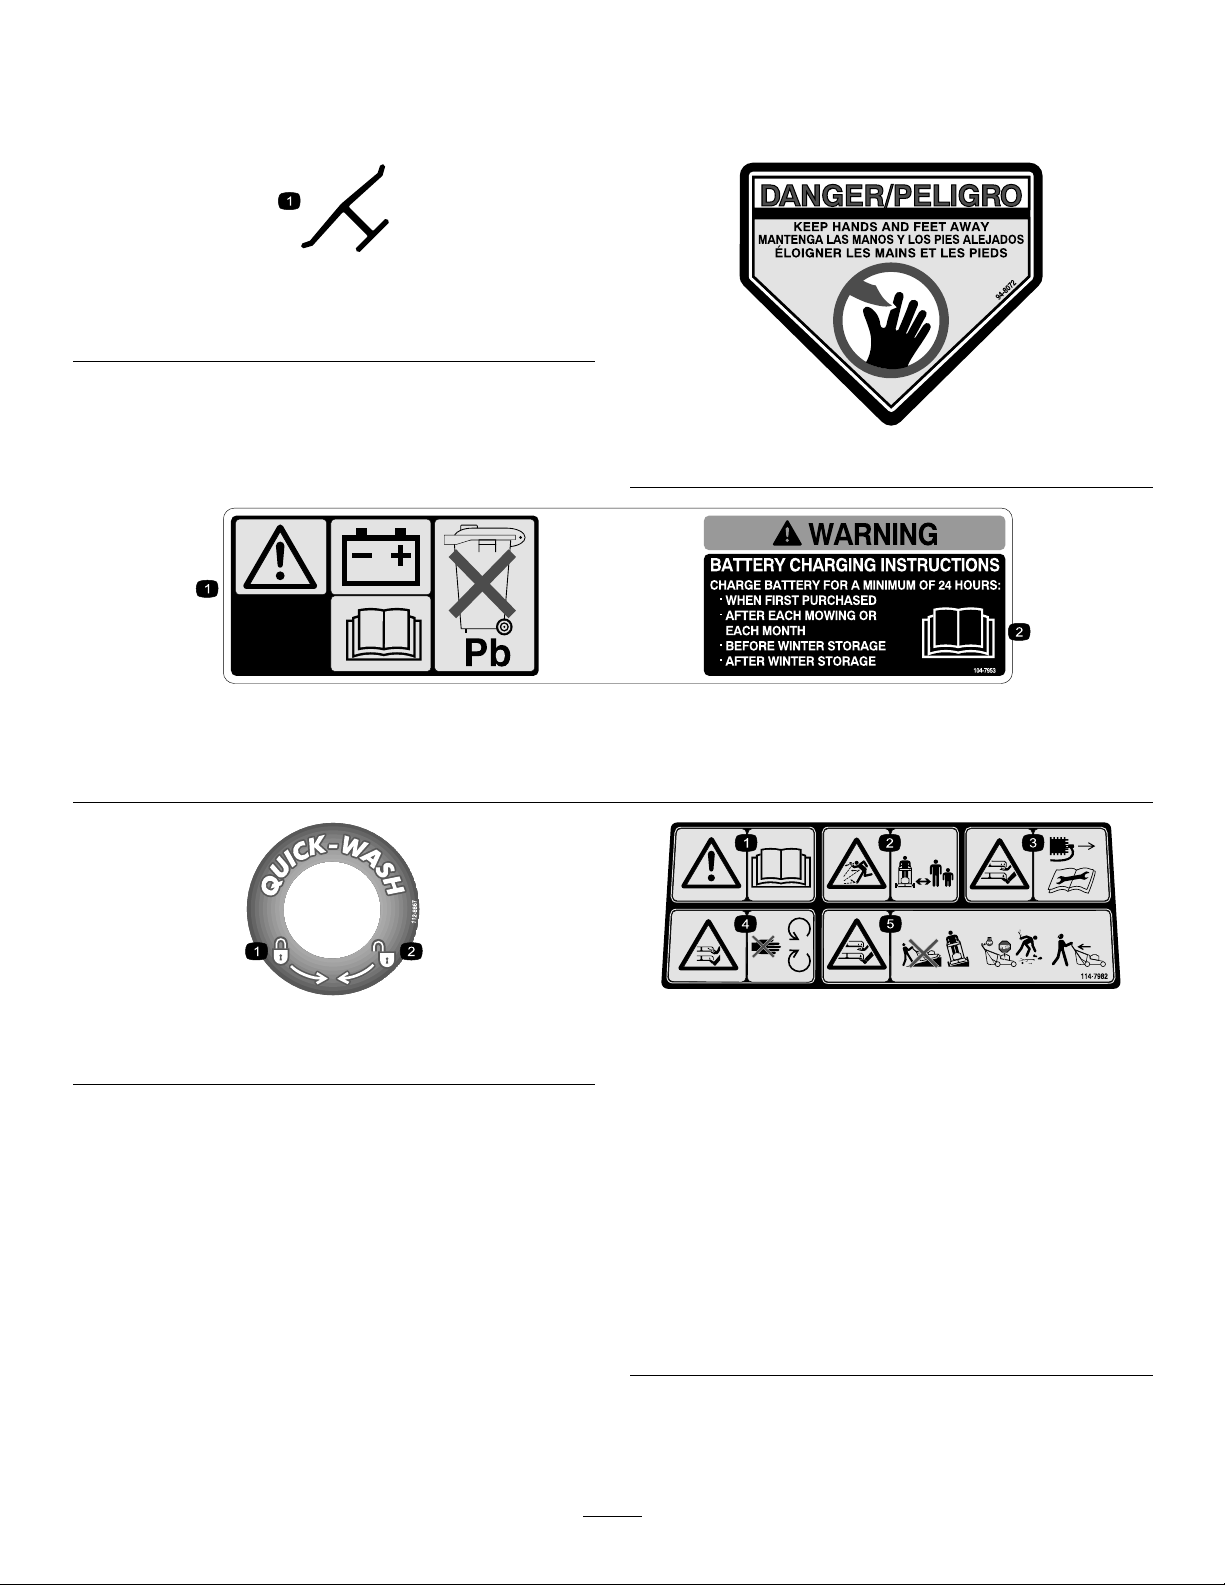
Manufacturer'sMark
1.Indicatesthebladeisidentiedasapartfromtheoriginal
machinemanufacturer.
94-8072
104-7953
1.Warning—readtheOperator'sManualforinformationonchargingthebattery;containslead;donotdiscard.
2.ReadtheOperator'sManual.
112-8867
1.Lock2.Unlock
114-7982
1.Warning—readtheOperator'sManual.
2.Thrownobjecthazard—keepbystandersasafedistance
fromthemachine.
3.Cutting/dismembermenthazardofhandorfoot,mower
blade—removetheignitionkeyandreadtheinstructions
beforeservicingorperformingmaintenance.
4.Cutting/dismembermenthazardofhandorfoot,mower
blade—stayawayfrommovingparts.
5.Cutting/dismembermenthazardofhandorfoot,mower
blade—donotoperateupanddownslopes;operatesideto
sideonslopes;stoptheenginebeforeleavingtheoperating
position;andlookbehindyouwhenbackingup.
4
Setup
Important:Removeanddiscardtheprotective
plasticsheetthatcoverstheengine.
1
InstallingtheHandle
NoPartsRequired
Procedure
WARNING
Foldingorunfoldingthehandleimproperlycan
damagethecables,causinganunsafeoperating
condition.
•Donotdamagethecableswhenfoldingor
unfoldingthehandle.
•Ifacableisdamaged,contactanAuthorized
ServiceDealer.
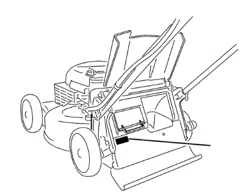
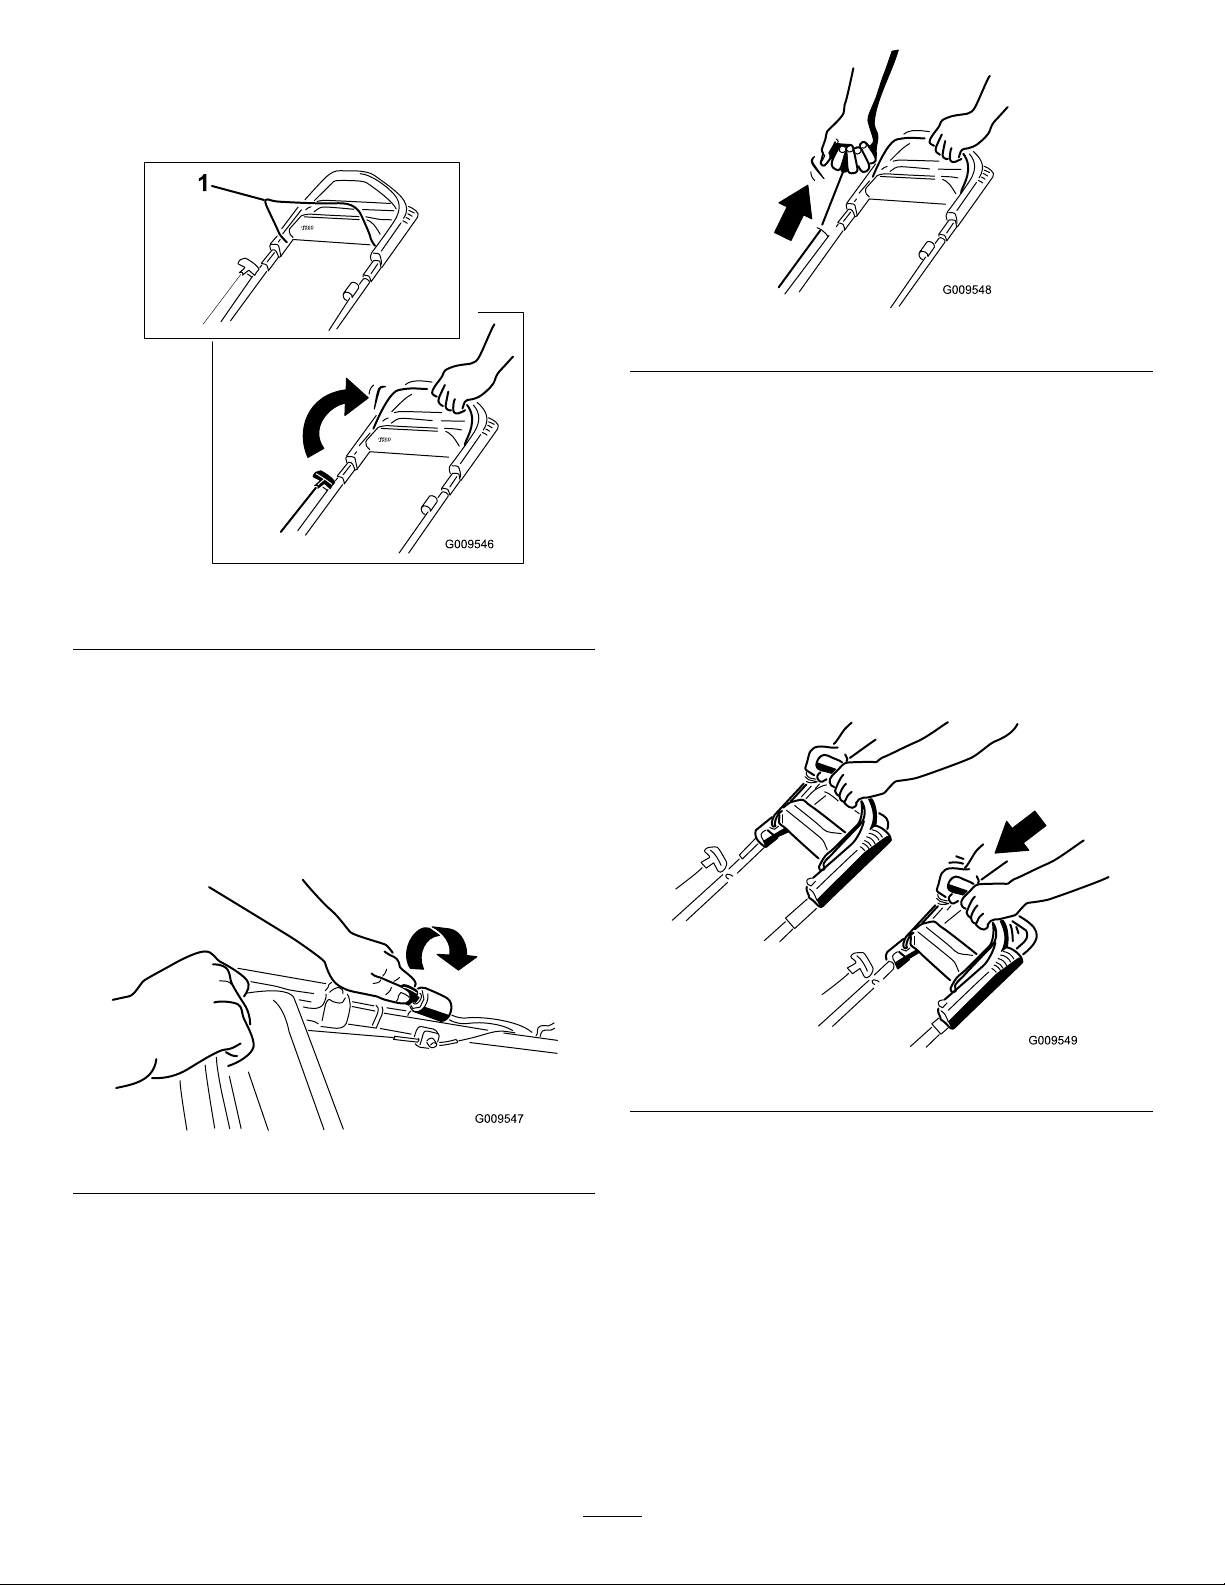
1.Removethehandleknobsfromthemowerhousing
(Figure3).
Important:Routethecablestotheoutsideof
thehandleknobsasyouinstallthehandle.
Figure3
2.Movethehandletotheoperatingposition.
3.Installandtightenthehandleknobsthatyou
removedinstep1.
2
FillingtheEnginewithOil
NoPartsRequired
Procedure
Important:Yourmowerdoesnotcomewithoilin
theengine,butitdoescomewithabottleofoil.
Beforestartingtheengine,lltheenginewithoil.
Max.ll:20oz.(0.59l),type:SAE30detergentoil
withanAPIserviceclassicationofSF,SG,SH,SJ,SL,
orhigher.
Note:Whenthecrankcaseisempty,pourabout3/4of
thecrankcasecapacityofoilinthecrankcase,thendo
thefollowing:
1.Movethemowertoalevelsurface.
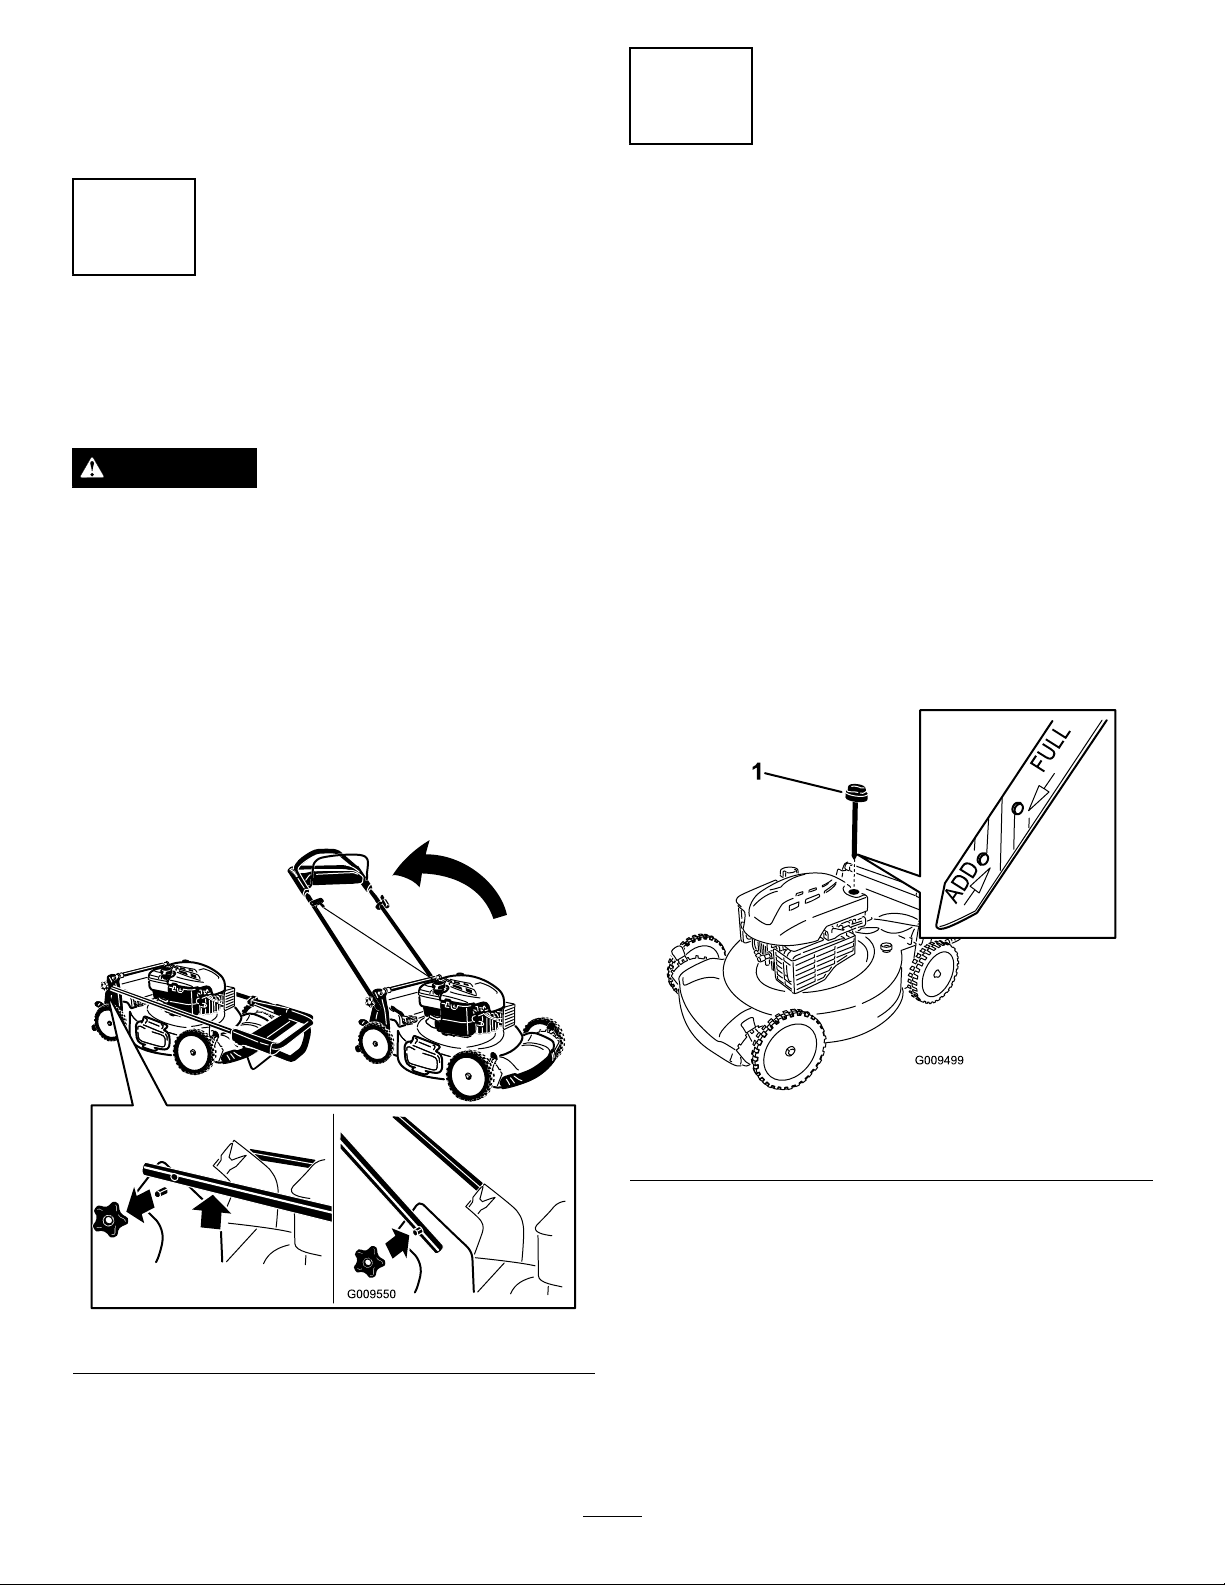
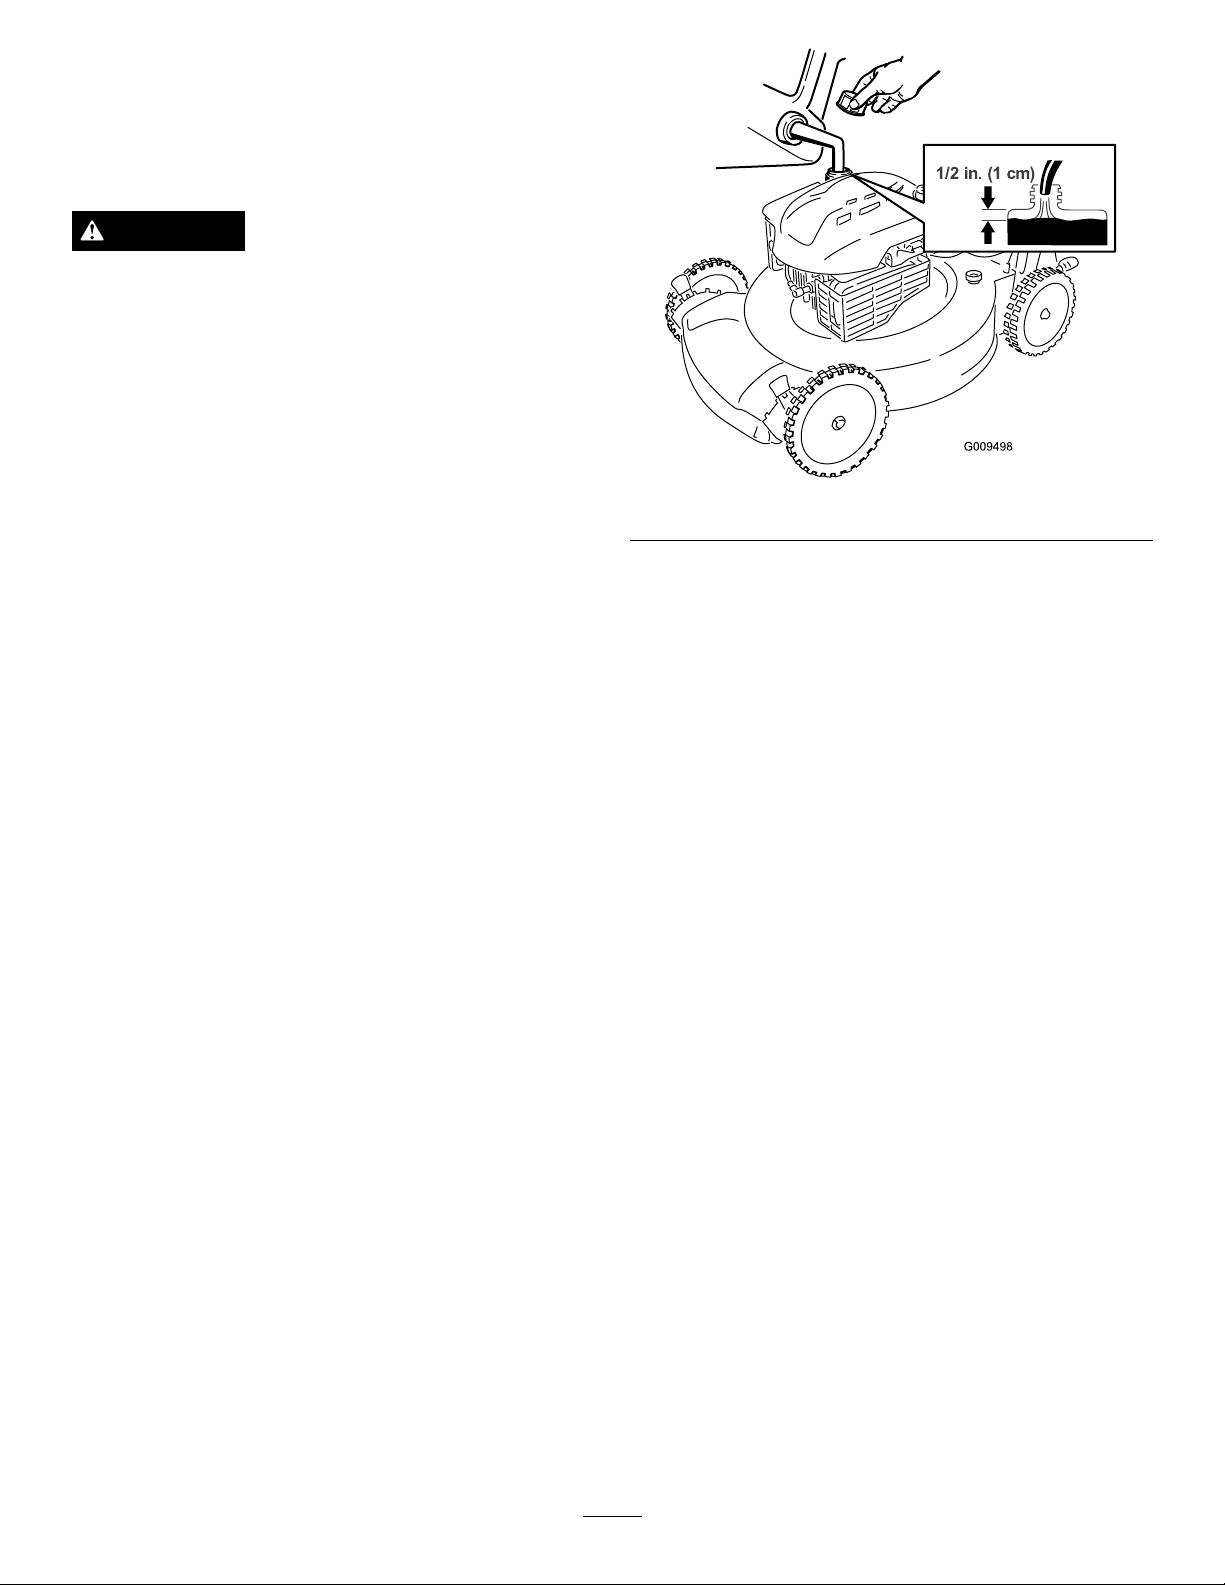
2.Removethedipstickbyrotatingthecap
counterclockwiseandpullingitout(Figure4).
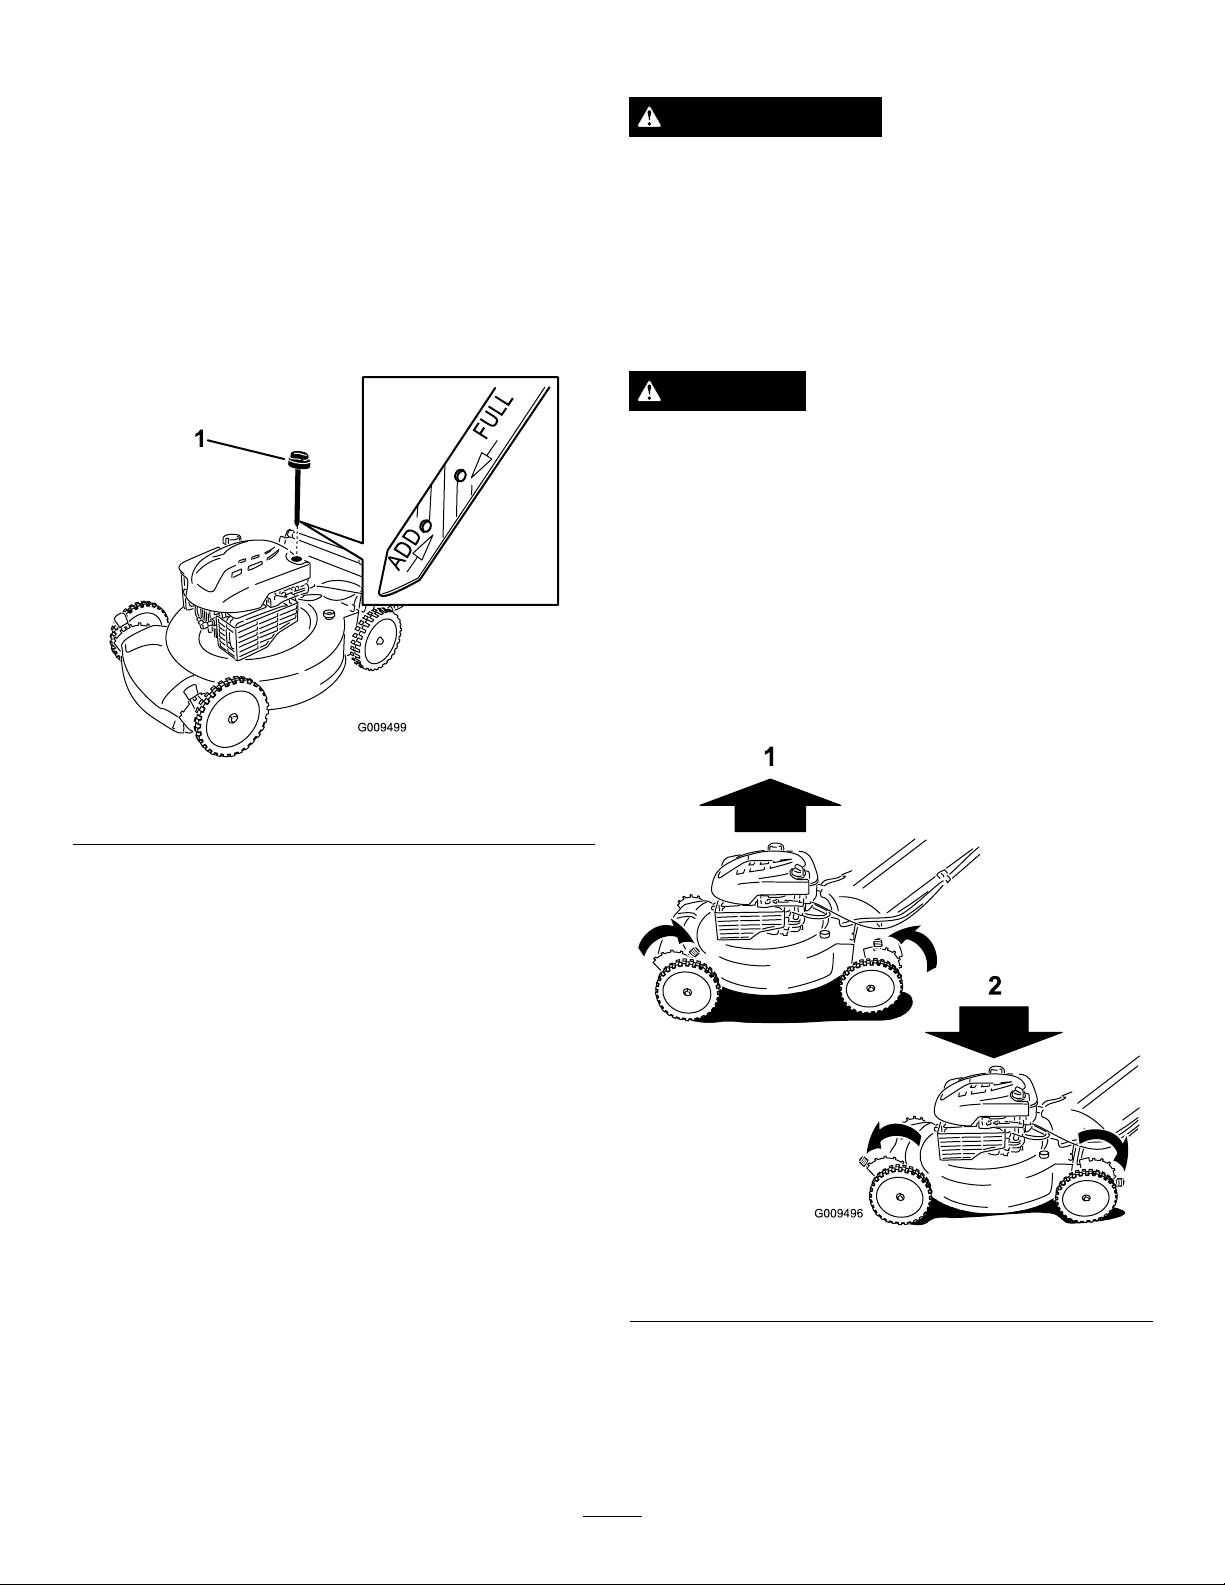
Figure4
1.Dipstick
3.Wipethedipstickcleanwithacleancloth.
4.Insertthedipstickfullyintotheoillltube,then
removethedipstick.
5.Readtheoillevelonthedipstick.
Note:IftheoillevelisbelowtheAddmarkon
thedipstick,slowlypourasmallamountofoilinto
theoillltube,wait3minutes,andrepeatsteps3
through5untiltheoillevelisattheFullmarkonthe
dipstick(Figure4).
5
Important:Donotoverllthecrankcasewith
oilandruntheengine.Draintheexcessoiluntil
theoillevelonthedipstickreadsFull.
6.Installthedipstickintotheoillltubesecurely.
Important:
Changetheengineoilaftertherst
5operatinghours
;changeityearlythereafter.
RefertoChangingtheEngineOil.
3
ChargingtheBattery
NoPartsRequired
Procedure
Electric-startmodelsonly
RefertoChargingtheBatteryintheMaintenance
section.
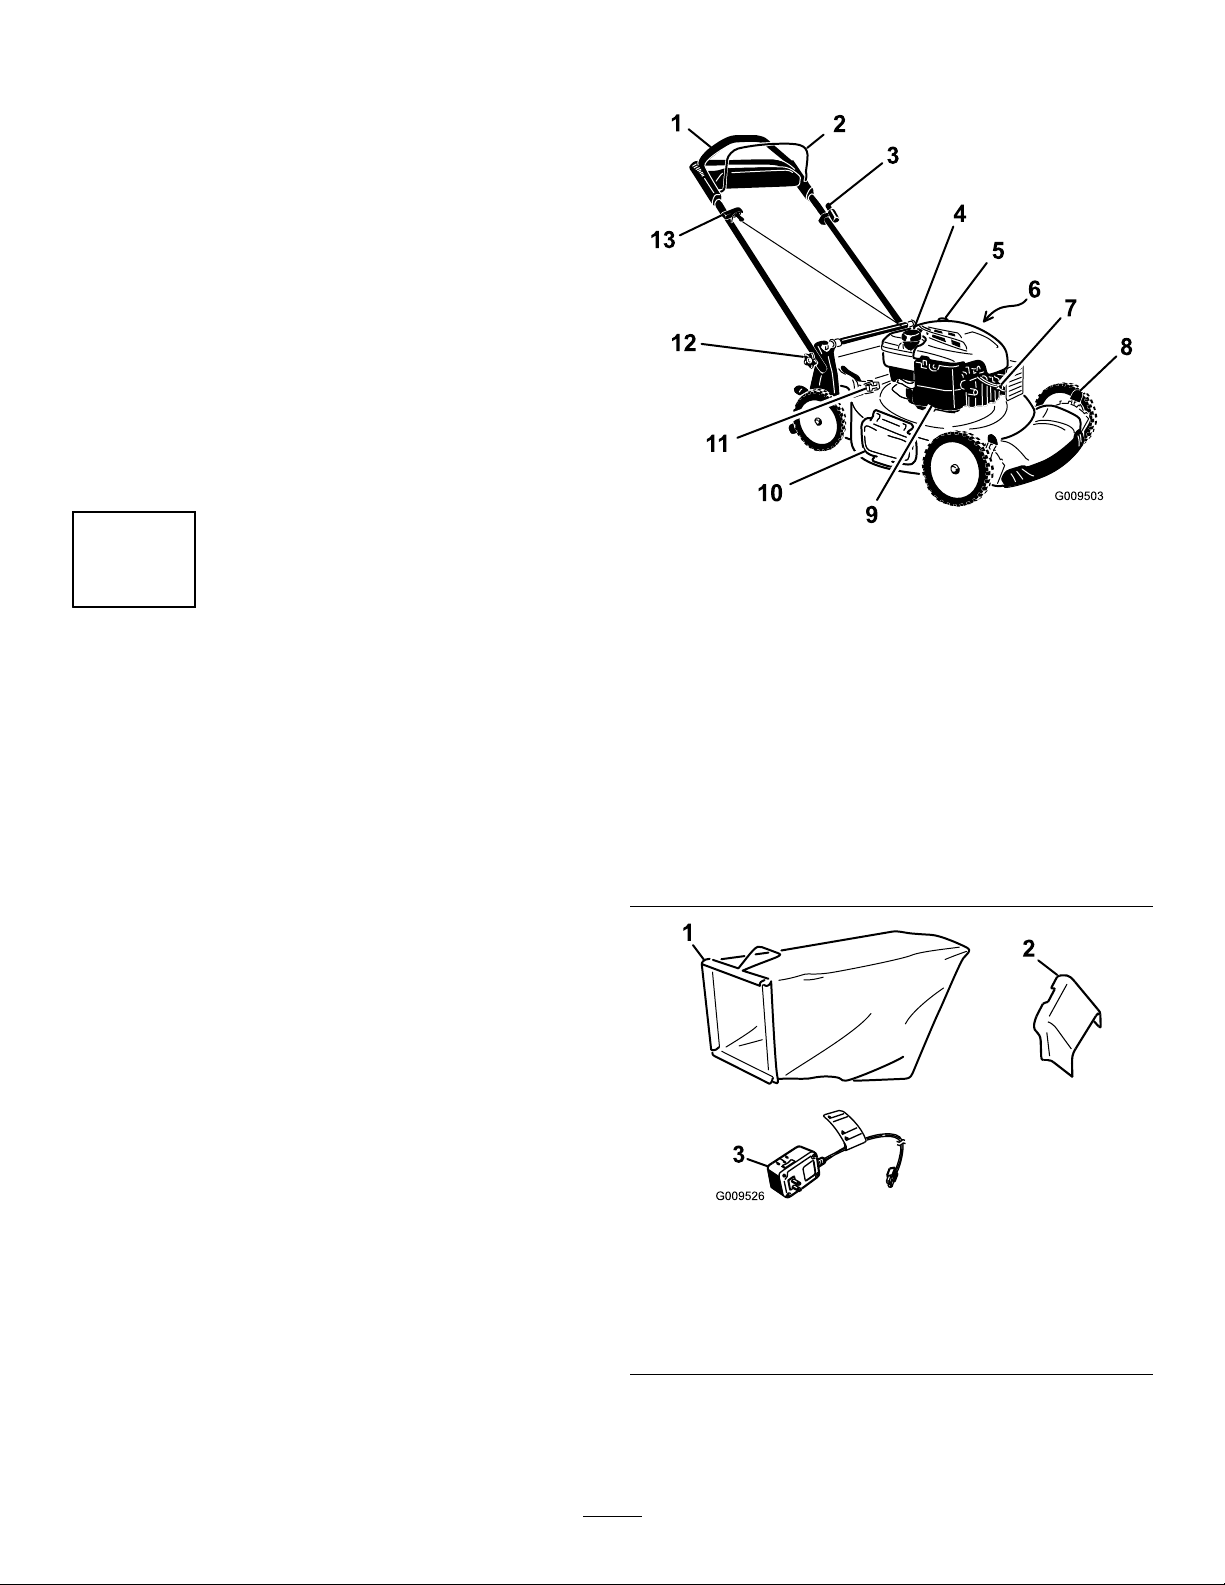
ProductOverview
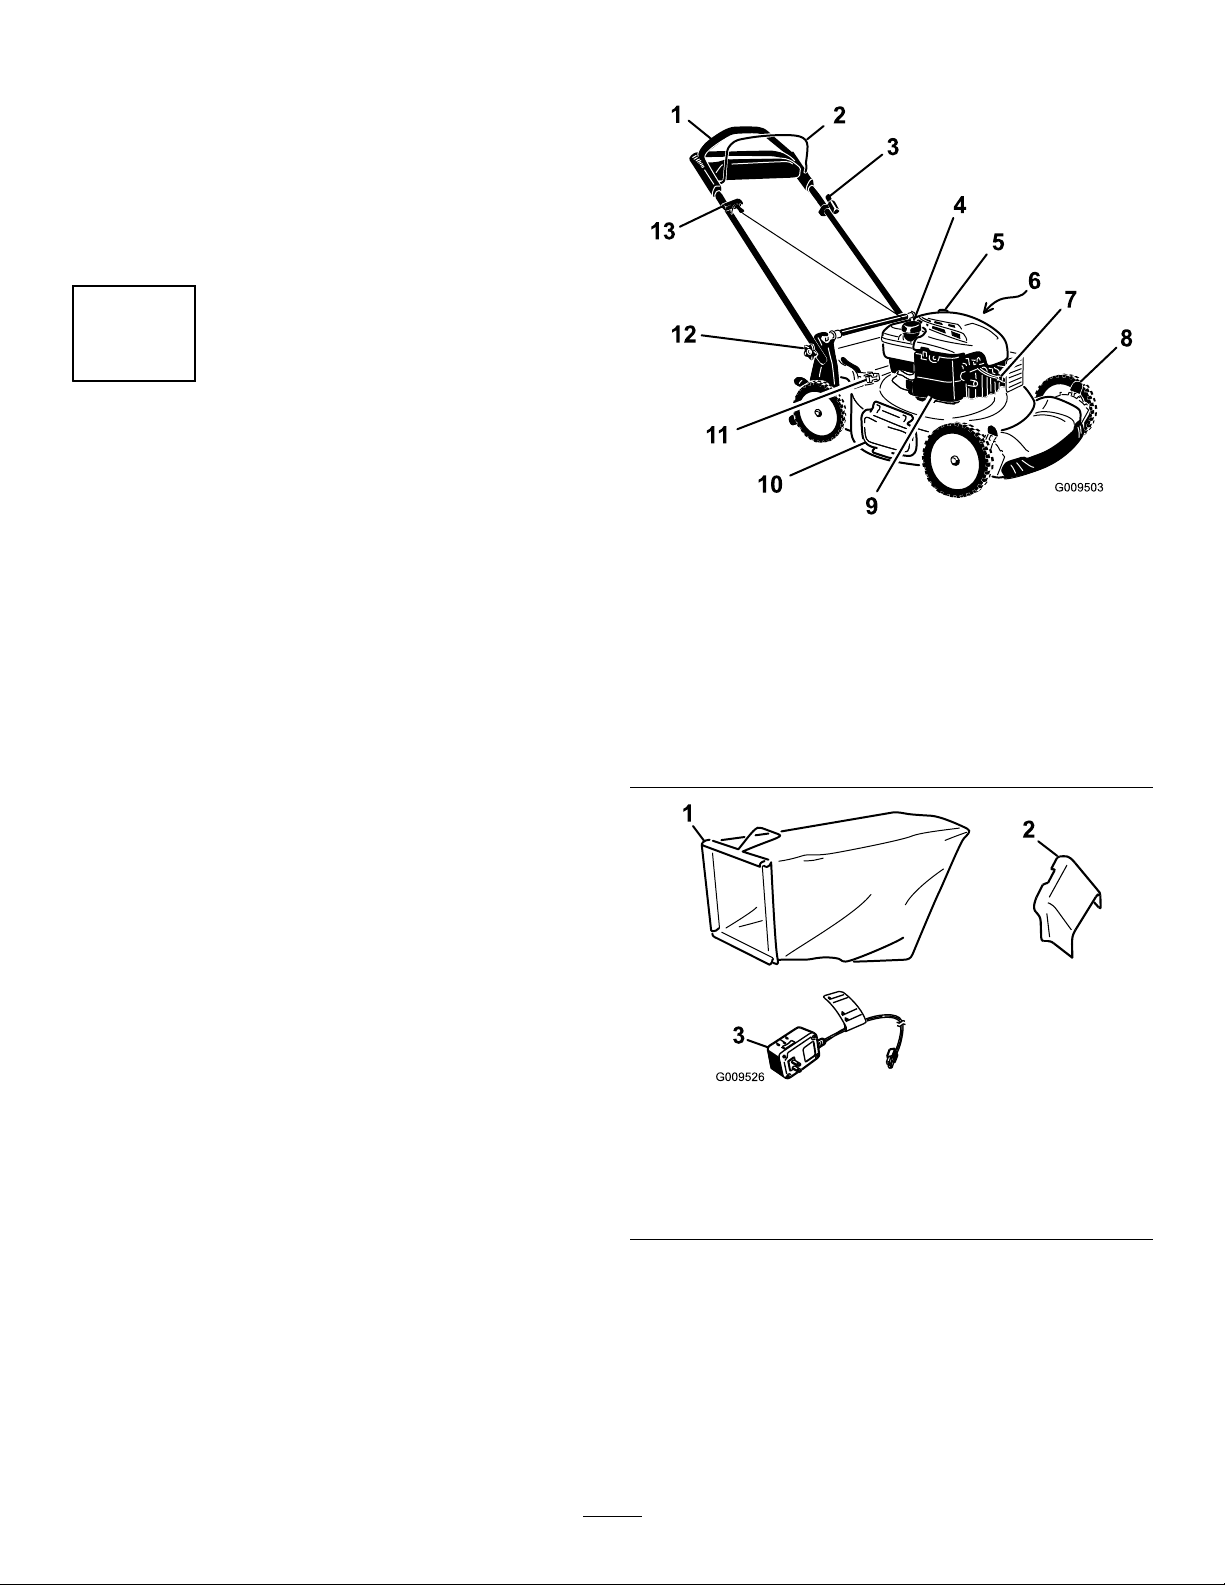
Figure5
1.Handle
8.Cuttingheightlever(4)
2.Bladecontrolbar
9.Airlter
3.Ignitionkey(electric-start
modelsonly)
10.Side-dischargedeector
4.Fueltankcap11.Bag-on-demandlever
5.Oilll/dipstick12.Handleknob(2)
6.Washoutport(notshown)
13.Recoilstarthandle
7.Sparkplug
Figure6
1.Grassbag
3.Batterycharger
(electric-startmodels
only)
2.Sidedischargechute
6
Operation
FillingtheFuelTank
DANGER
Gasolineisextremelyammableandexplosive.A
reorexplosionfromgasolinecanburnyouand
others.
•Topreventastaticchargefromignitingthe
gasoline,placethecontainerand/ormower
directlyonthegroundbeforelling,notina
vehicleoronanobject.
•Fillthetankoutdoorswhentheengineiscold.
Wipeupspills.
•Donothandlegasolinewhensmokingoraround
anopenameorsparks.
•Storegasolineinanapprovedfuelcontainer,out
ofthereachofchildren.
Fillthefueltankwithfreshunleadedregulargasoline
(havinganoctaneratingof87orhigher)fromamajor
name-brandservicestation(Figure7).
Note:Neverusemethanol,gasolinecontaining
methanol,orgasolinecontainingmorethan10%ethanol
becausethefuelsystemcouldbedamaged.Donotmix
oilwithgasoline.
Important:Toreducestartingproblems,add
fuelstabilizertothefuelallseason,mixingitwith
gasolinelessthan30daysold.
Figure7
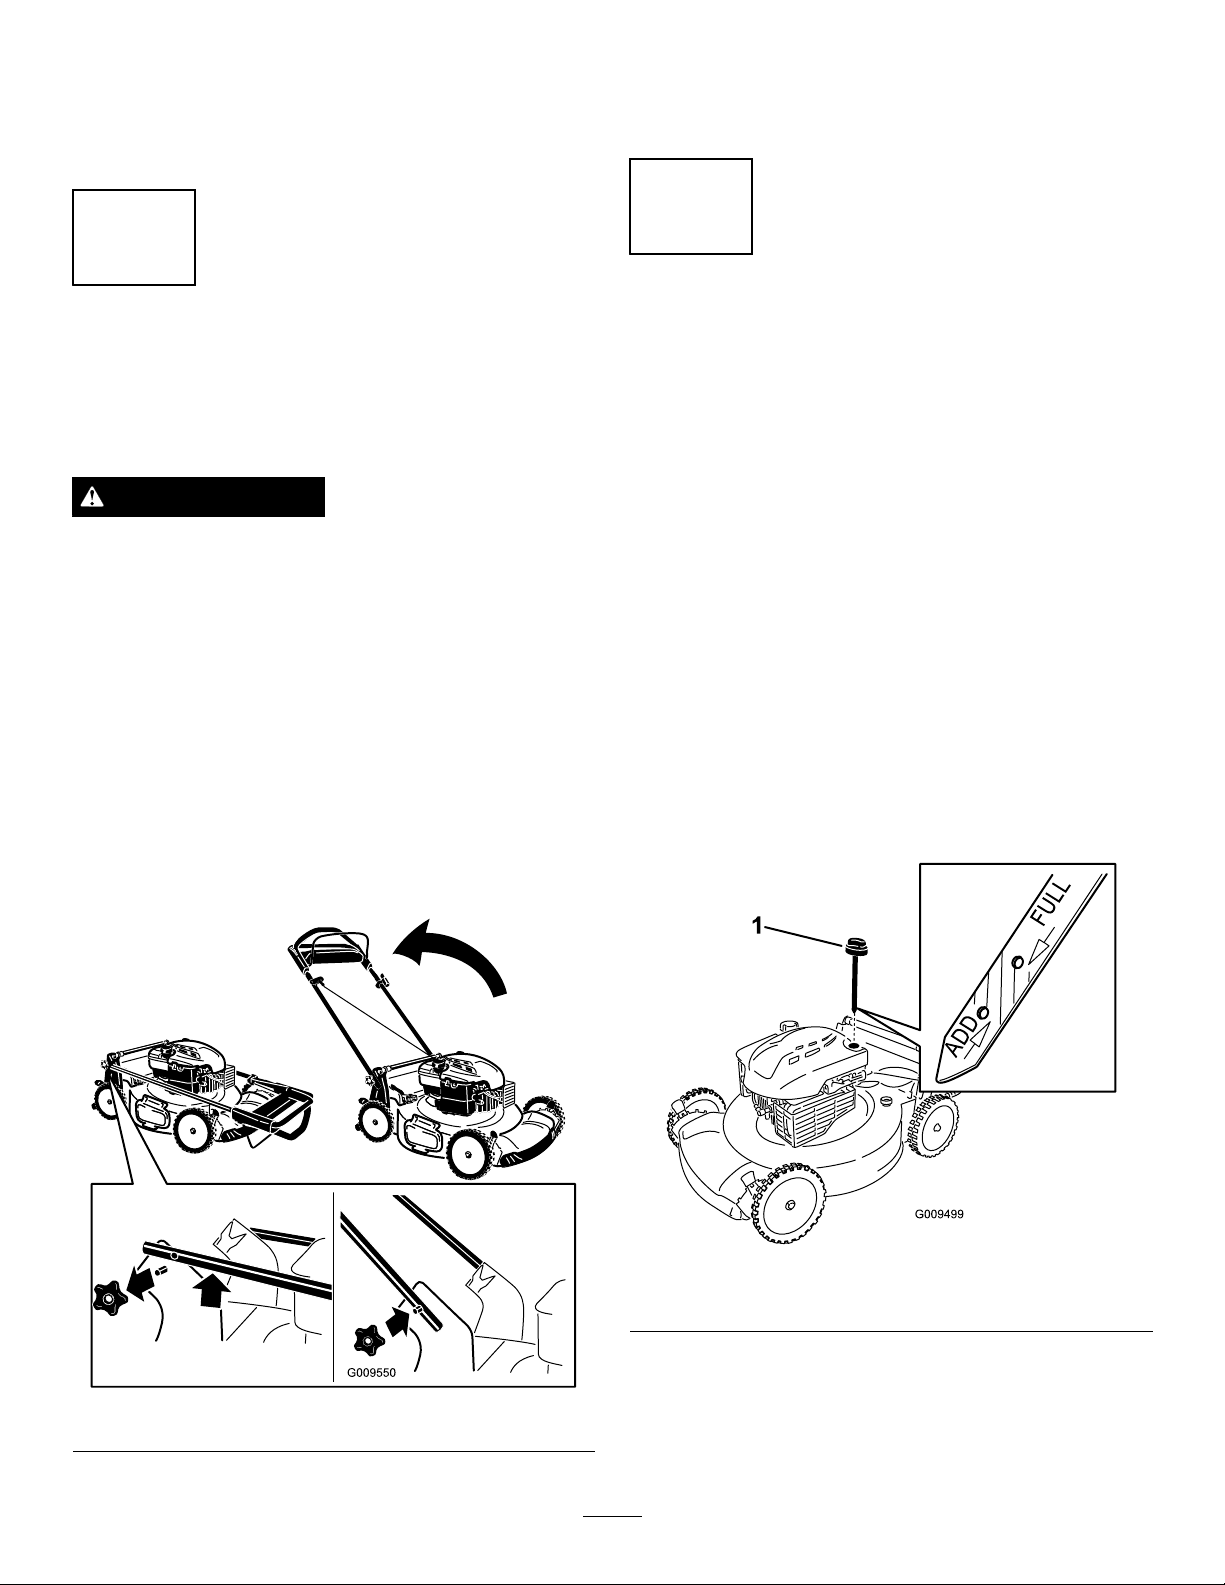
CheckingtheEngineOilLevel
ServiceInterval:Beforeeachuseordaily
Note:Max.ll:20oz.(0.59l),type:SAE30detergent
oilwithanAPIserviceclassicationofSF,SG,SH,SJ,
SL,orhigher.
1.Movethemowertoalevelsurface.
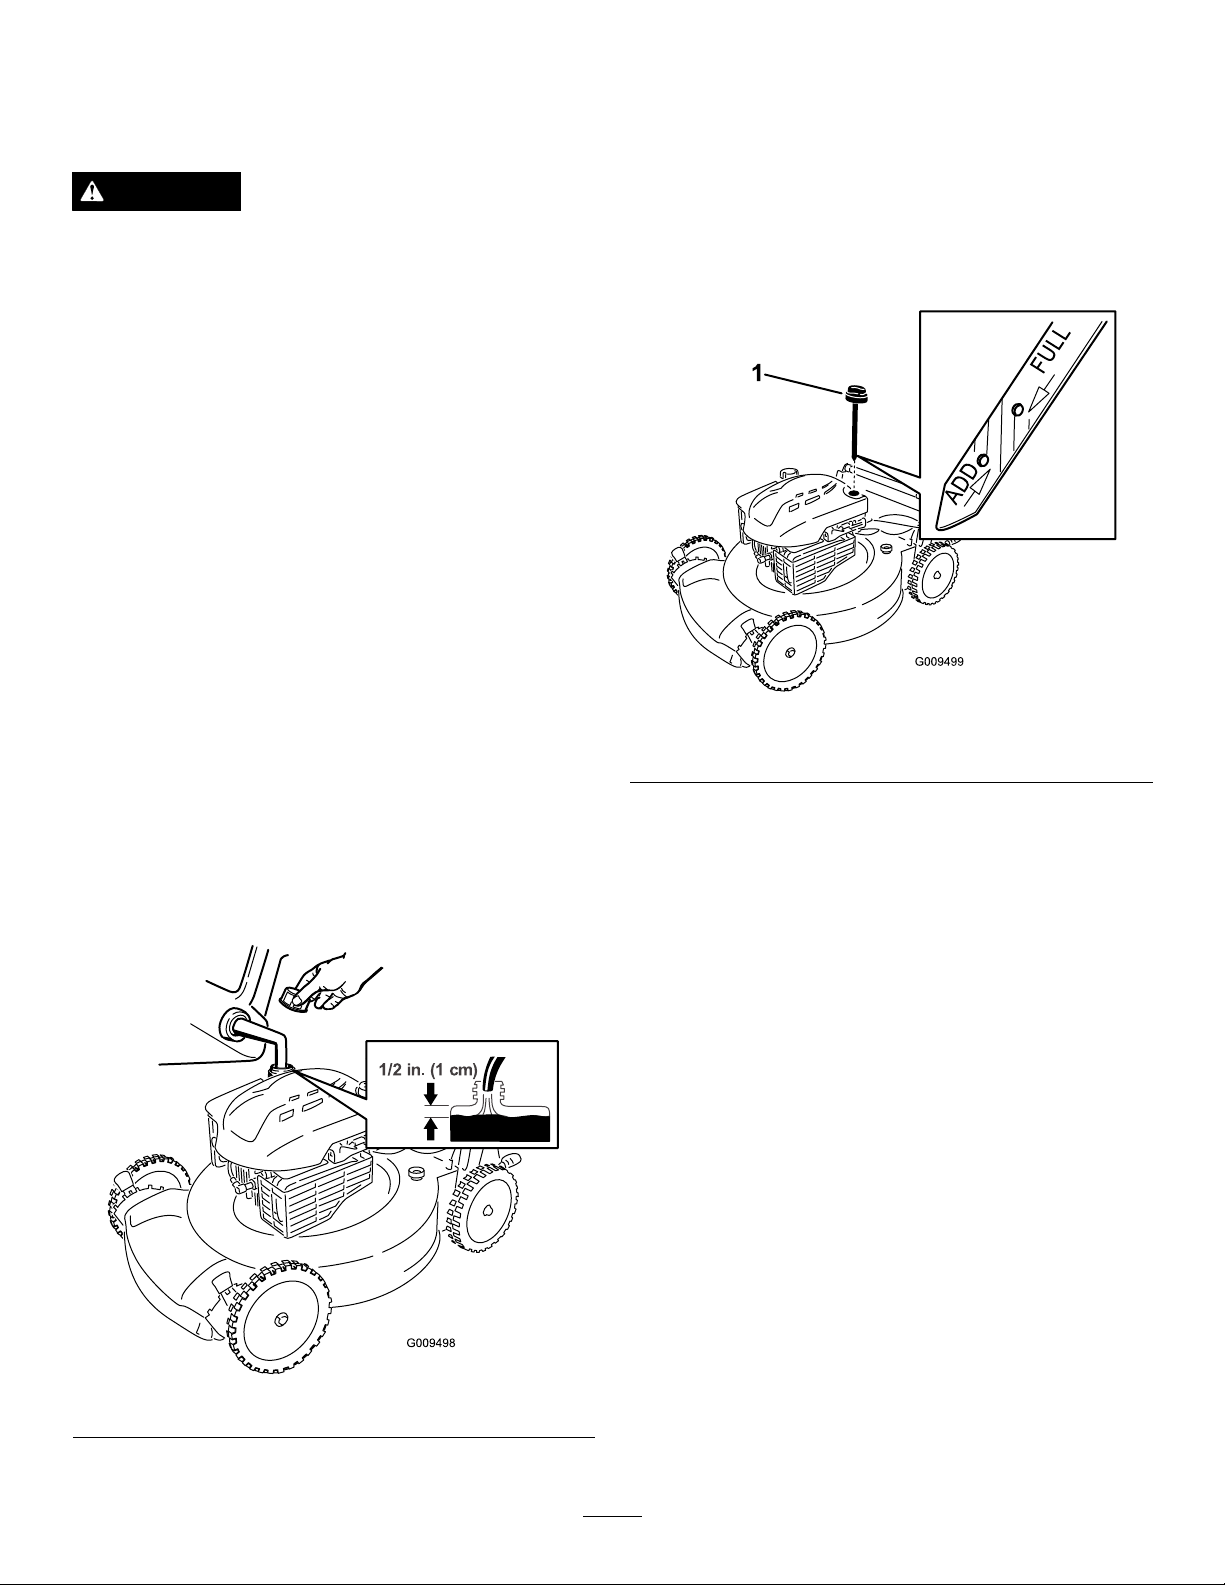
2.Removethedipstick(Figure8).
Figure8
1.Dipstick
3.Wipethedipstickcleanwithacleancloth.
4.Insertthedipstickfullyintotheoillltube,then
removethedipstick.
5.Readtheoillevelonthedipstick.
Note:IftheoillevelisbelowtheAddmarkon
thedipstick,slowlypourasmallamountofoilinto
theoillltube,wait3minutes,andrepeatsteps3
through5untiltheoillevelisattheFullmarkonthe
dipstick(Figure8).
Important:Donotoverllthecrankcasewith
oilandruntheengine.Draintheexcessoiluntil
theoillevelonthedipstickreadsFull.
6.Installthedipstickintotheoillltubesecurely.
7
AdjustingtheCuttingHeight
WARNING
Adjustingthecuttingheightmaybringyouinto
contactwiththemovingblade,causingserious
injury.
•Stoptheengineandwaitforallmovingparts
tostop.
•Donotputyourngersunderthehousingwhen
adjustingthecuttingheight.
CAUTION
Iftheenginehasbeenrunning,themuferwillbe
hotandcanseverelyburnyou.Keepawayfromthe
hotmufer.
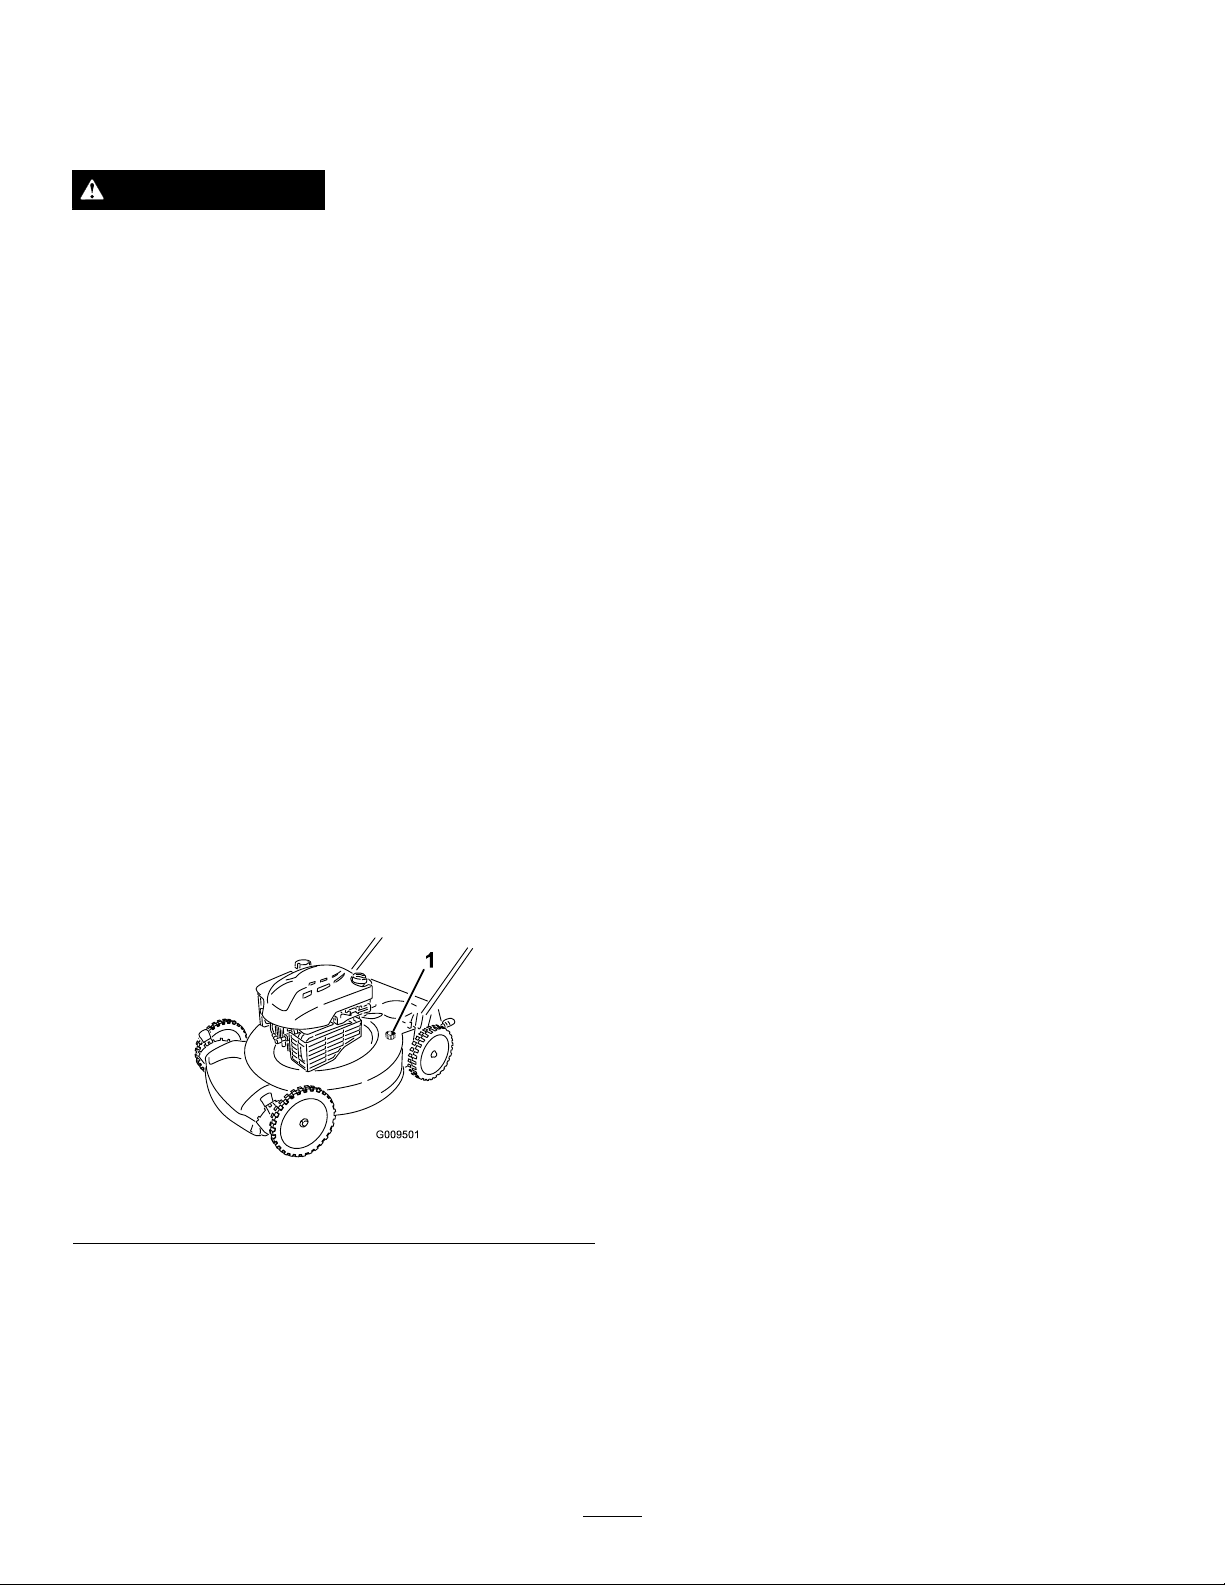
Adjustthecuttingheightasdesired.Setthefrontwheels
tothesameheightastherearwheels(Figure9).
Note:Toraisethemower,movethefrontcutting
heightleversrearwardandtherearcuttingheightlevers
forward.Tolowerthemower,movethefrontcutting
heightleversforwardandtherearcuttingheightlevers
rearward.
Figure9
1.Raisethemower2.Lowerthemower
Note:Thecuttingheightsettingsare1inch(25mm);
1-3/8inches(35mm);1-3/4inches(44mm);2-1/8
inches(54mm);2-1/2inches(64mm);2-7/8inches(73
mm);3-1/4inches(83mm);3-5/8inches(92mm);and
4inches(102mm).
StartingtheEngine
1.Holdthebladecontrolbaragainstthehandle
(Figure10).
Figure10
1.Bladecontrolbar
2.Turntheignitionkey(Figure11)(electric-start
modelsonly)orpulltherecoilstarthandle
(Figure12).
Note:Whenyoupulltherecoilstarthandle,pullit
lightlyuntilyoufeelresistance,thenpullitsharply
(Figure12).Allowtheropetoreturntothehandle
slowly.
Figure11
8
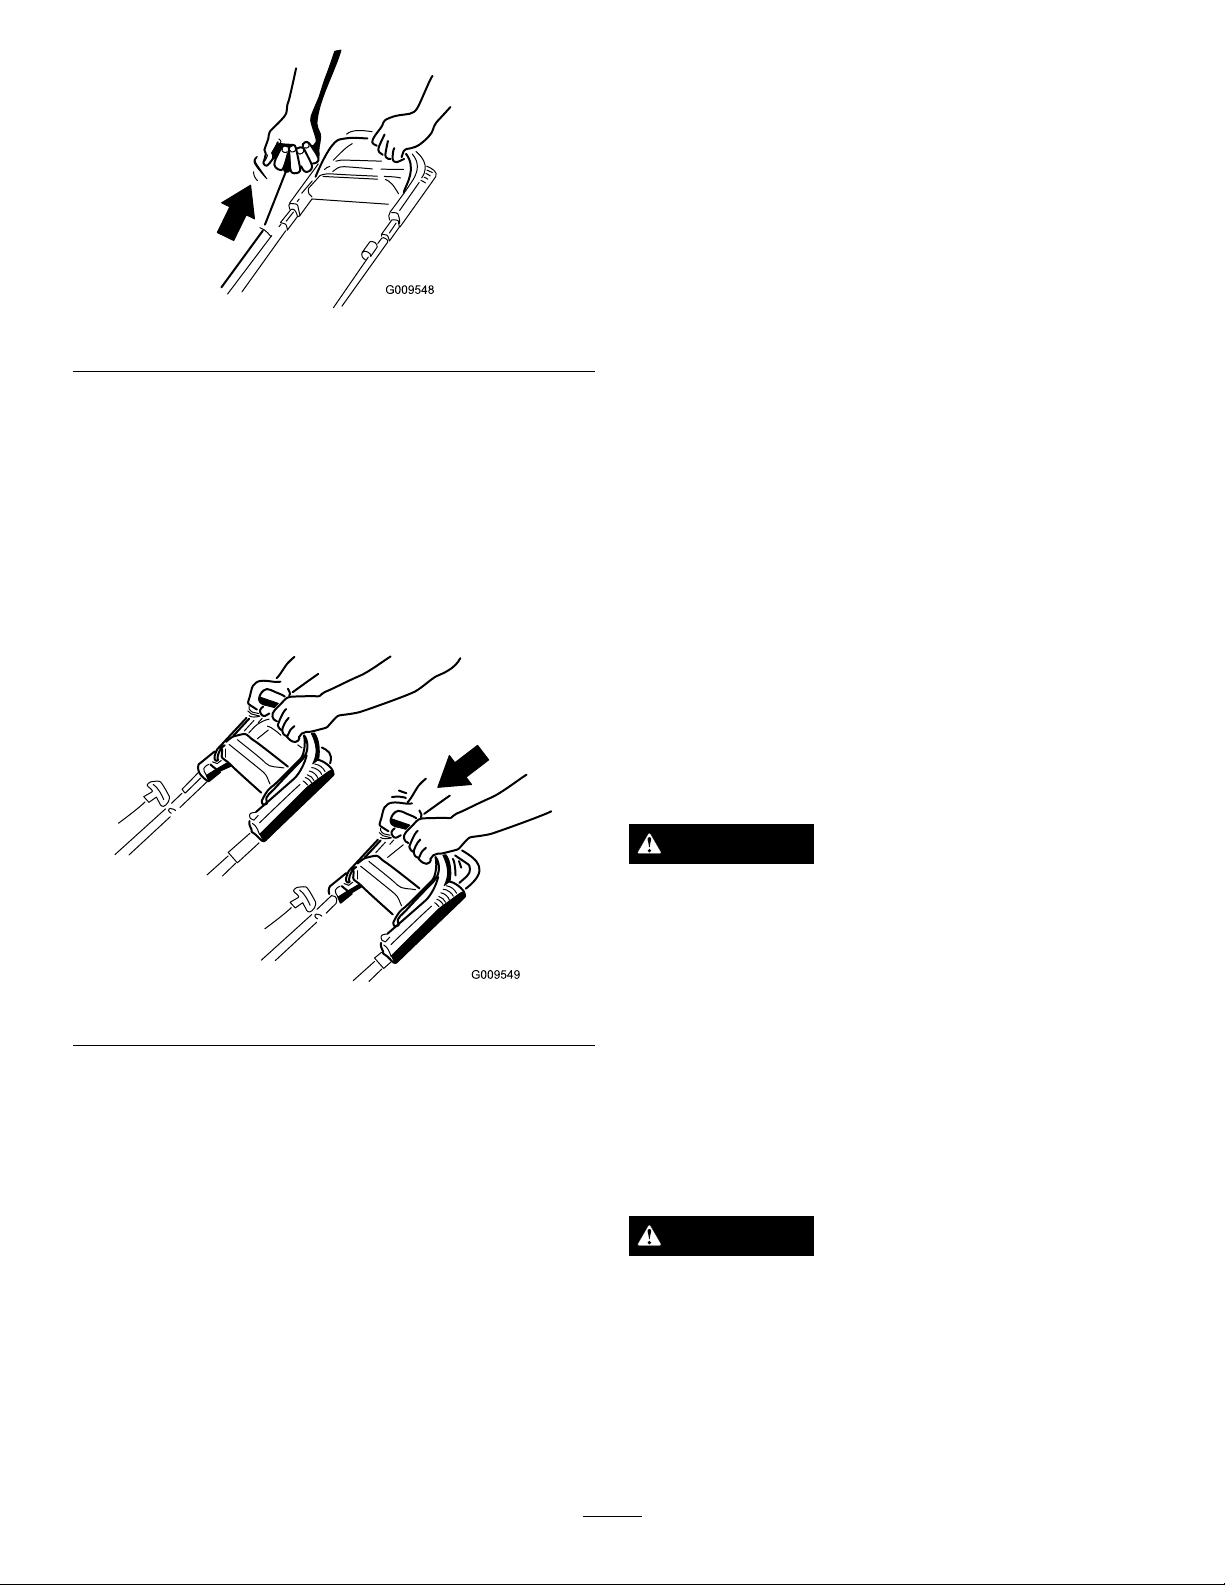
Figure12
Note:Ifthemowerdoesnotstartafterseveral
attempts,contactanAuthorizedServiceDealer.
UsingtheSelf-propelDrive
Tooperatetheself-propeldrive,simplywalkwithyour
handsontheupperhandleandyourelbowsatyour
sides,andthemowerwillautomaticallykeeppacewith
you(Figure13).
Figure13
Note:Ifthemowerdoesnotfreelyrollbackward
afterself-propelling,stopwalking,holdyourhandsin
place,andallowthemowertorollacoupleofinches
(centimeters)forwardtodisengagethewheeldrive.You
canalsotryreachingjustunderthepersonalpacehandle
tothemetalhandleandpushthemowerforwarda
coupleofinches(centimeters).Ifthemowerstilldoes
notrollbackwardeasily,contactanAuthorizedService
Dealer.
StoppingtheEngine
Tostoptheengine,releasethebladecontrolbar.
Note:Removetheignitionkeywhenyouleavethe
mower(electric-startmodelsonly).
Important:Whenyoureleasethebladecontrol
bar,boththeengineandbladeshouldstopwithin
3seconds.Iftheydonotstopproperly,stopusing
yourmowerimmediatelyandcontactanAuthorized
ServiceDealer.
RecyclingtheClippings
Yourmowercomesfromthefactoryreadytorecyclethe
grassandleafclippingsbackintothelawn.
Ifthegrassbagisonthemowerandthebag-on-demand
leverisinthebaggingposition,movethelever
totherecyclingposition(refertoOperatingthe
Bag-on-DemandLever)beforerecyclingtheclippings.
Iftheside-dischargechuteisonthemower,removeit
(refertoRemovingtheSideDischargeChute)before
recyclingtheclippings.
BaggingtheClippings
Usethegrassbagwhenyouwanttocollectgrassand
leafclippingsfromthelawn.
WARNING
Aworngrassbagcouldallowsmallstonesand
othersimilardebristobethrownintheoperator'sor
bystander'sdirectionandresultinseriouspersonal
injuryordeathtotheoperatororbystanders.
Checkthegrassbagfrequently.Ifitisdamaged,
installanewTororeplacementbag.
Ifthesidedischargechuteisonthemower,removeit
(refertoRemovingtheSideDischargeChute)before
baggingtheclippings.Ifthebag-on-demandleverisin
therecyclingposition,moveittothebaggingposition
(refertoOperatingtheBag-on-DemandLever).
WARNING
Thebladeissharp;contactingthebladecanresult
inseriouspersonalinjury.
Stoptheengineandwaitforallmovingpartstostop
beforeleavingtheoperatingposition.
InstallingtheGrassBag
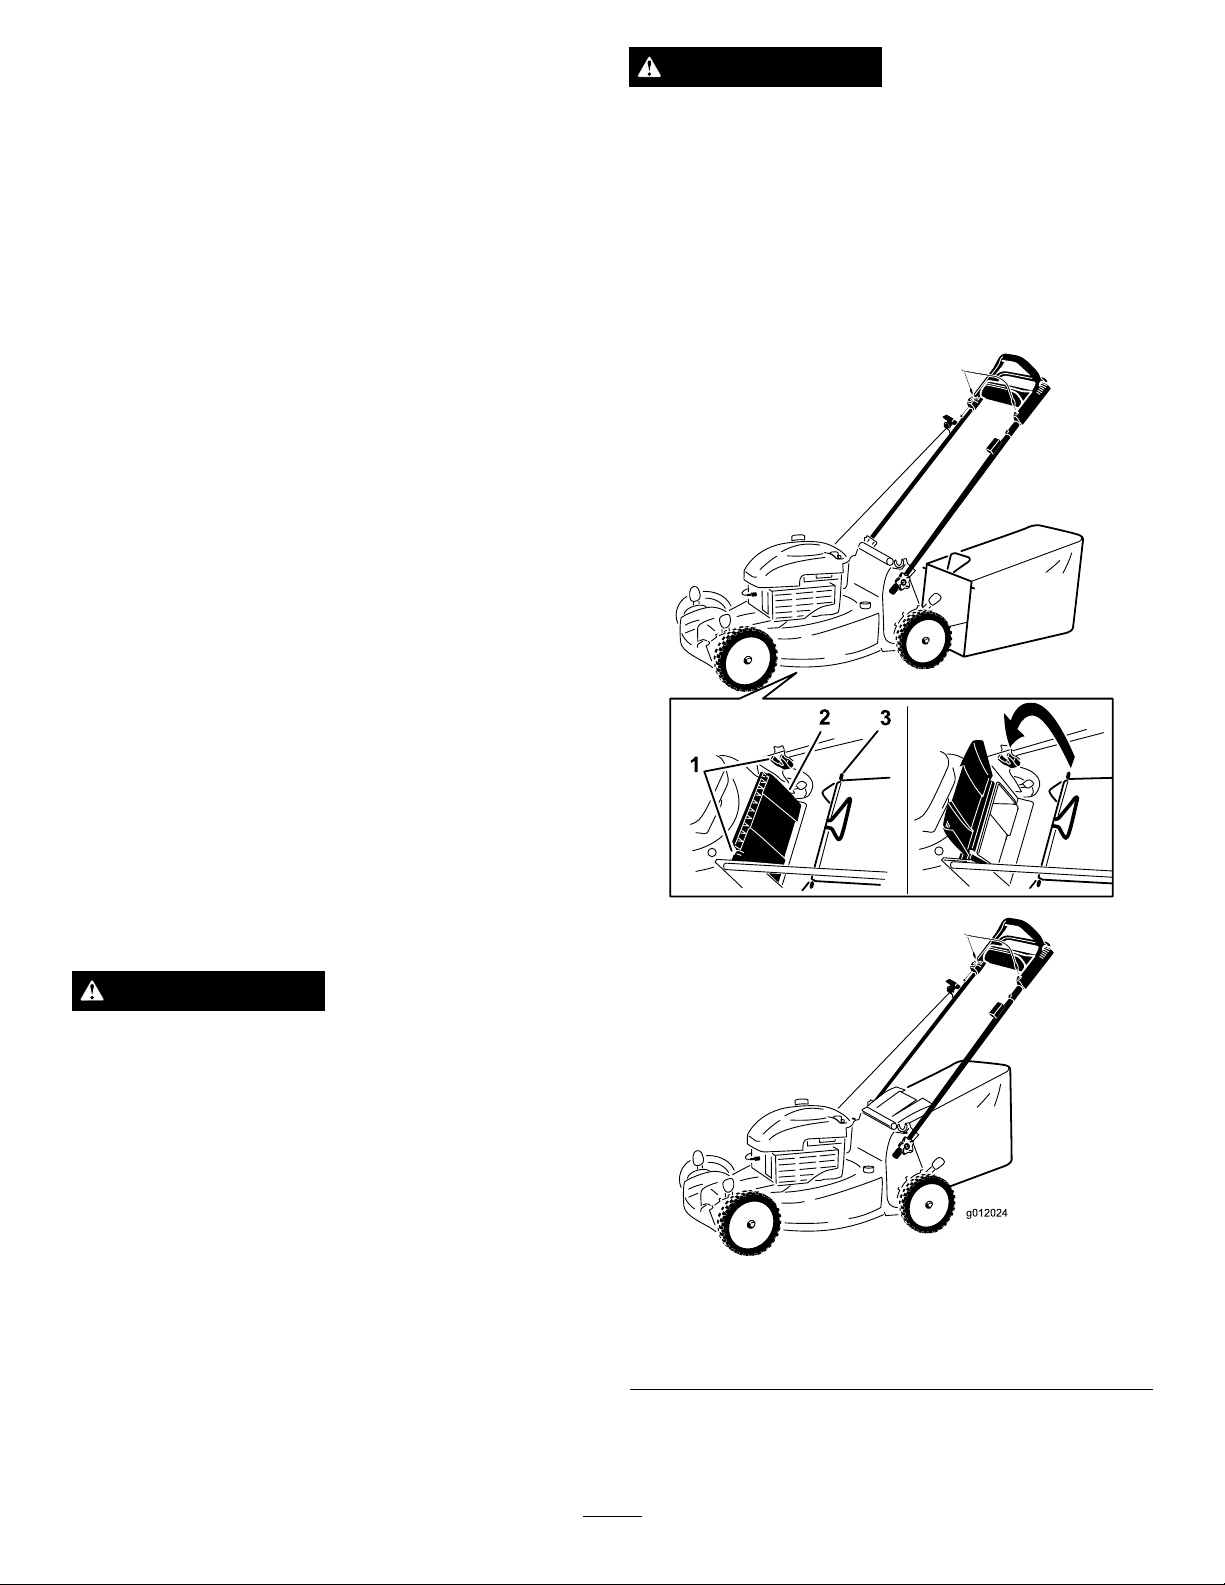
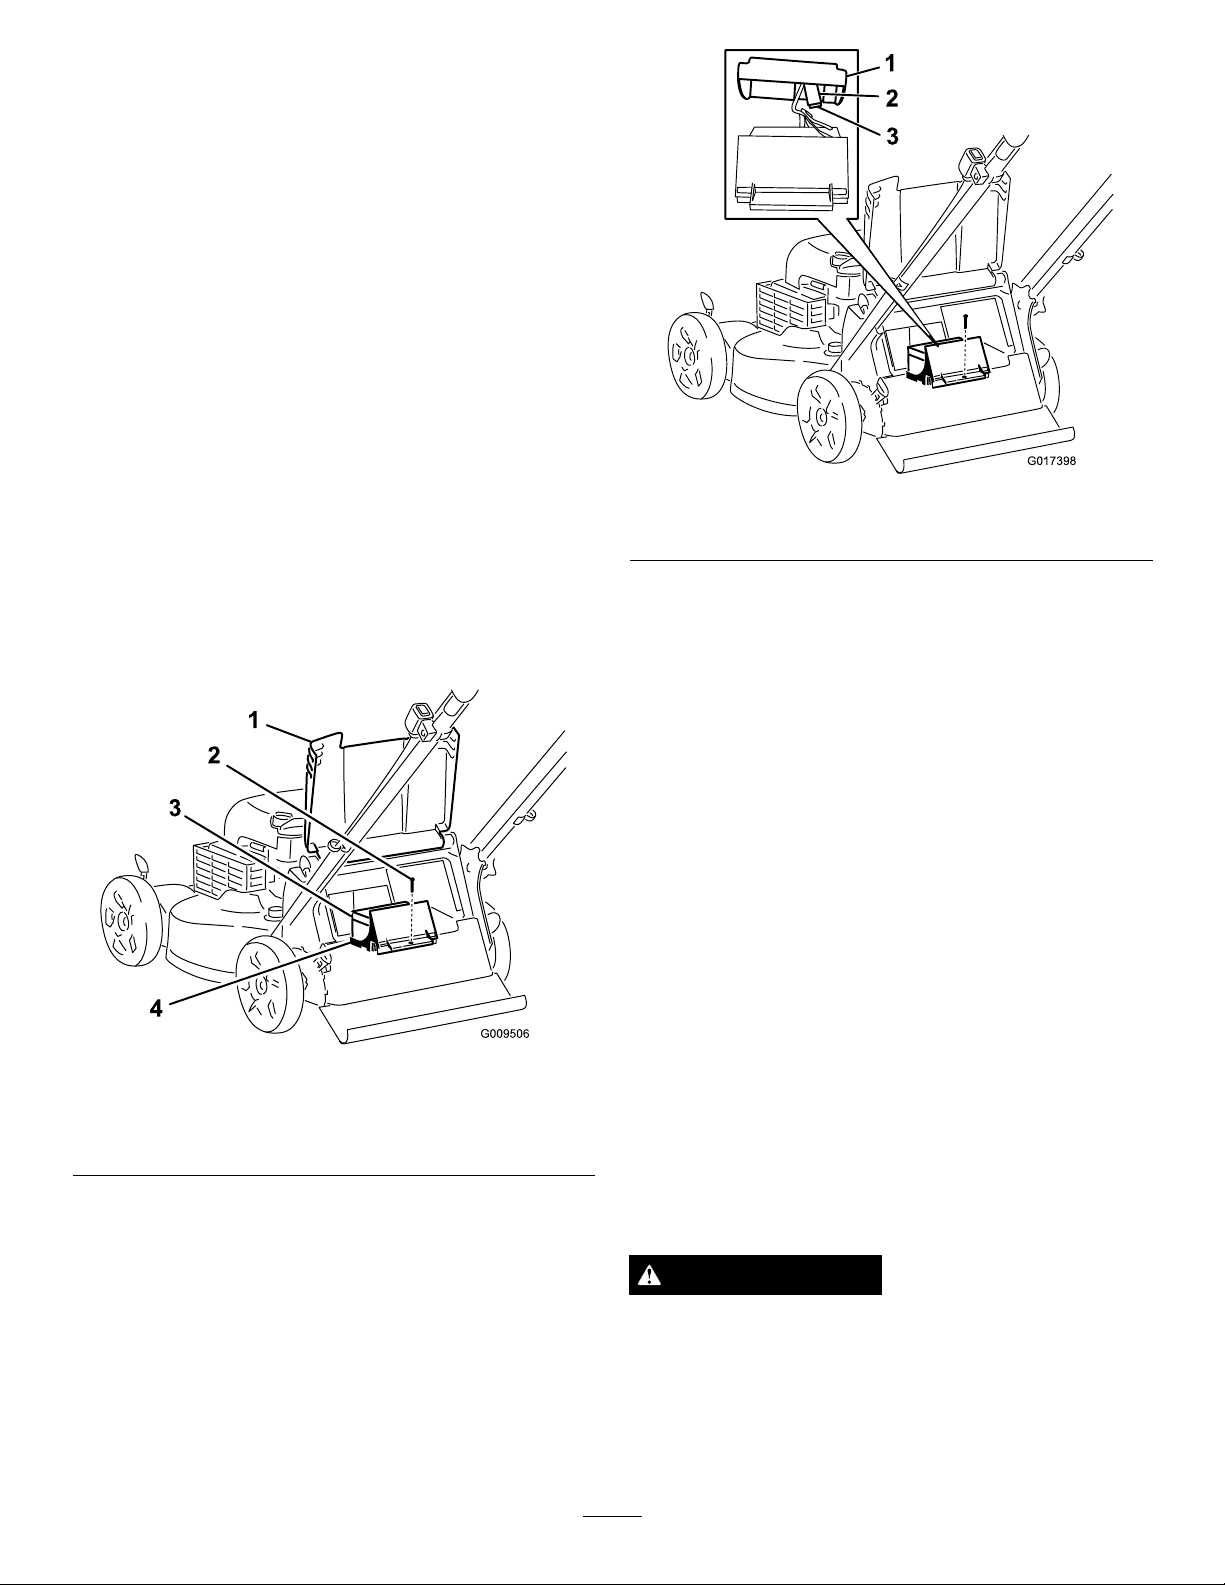
1.Raiseandholdupthereardeector(Figure14).
9
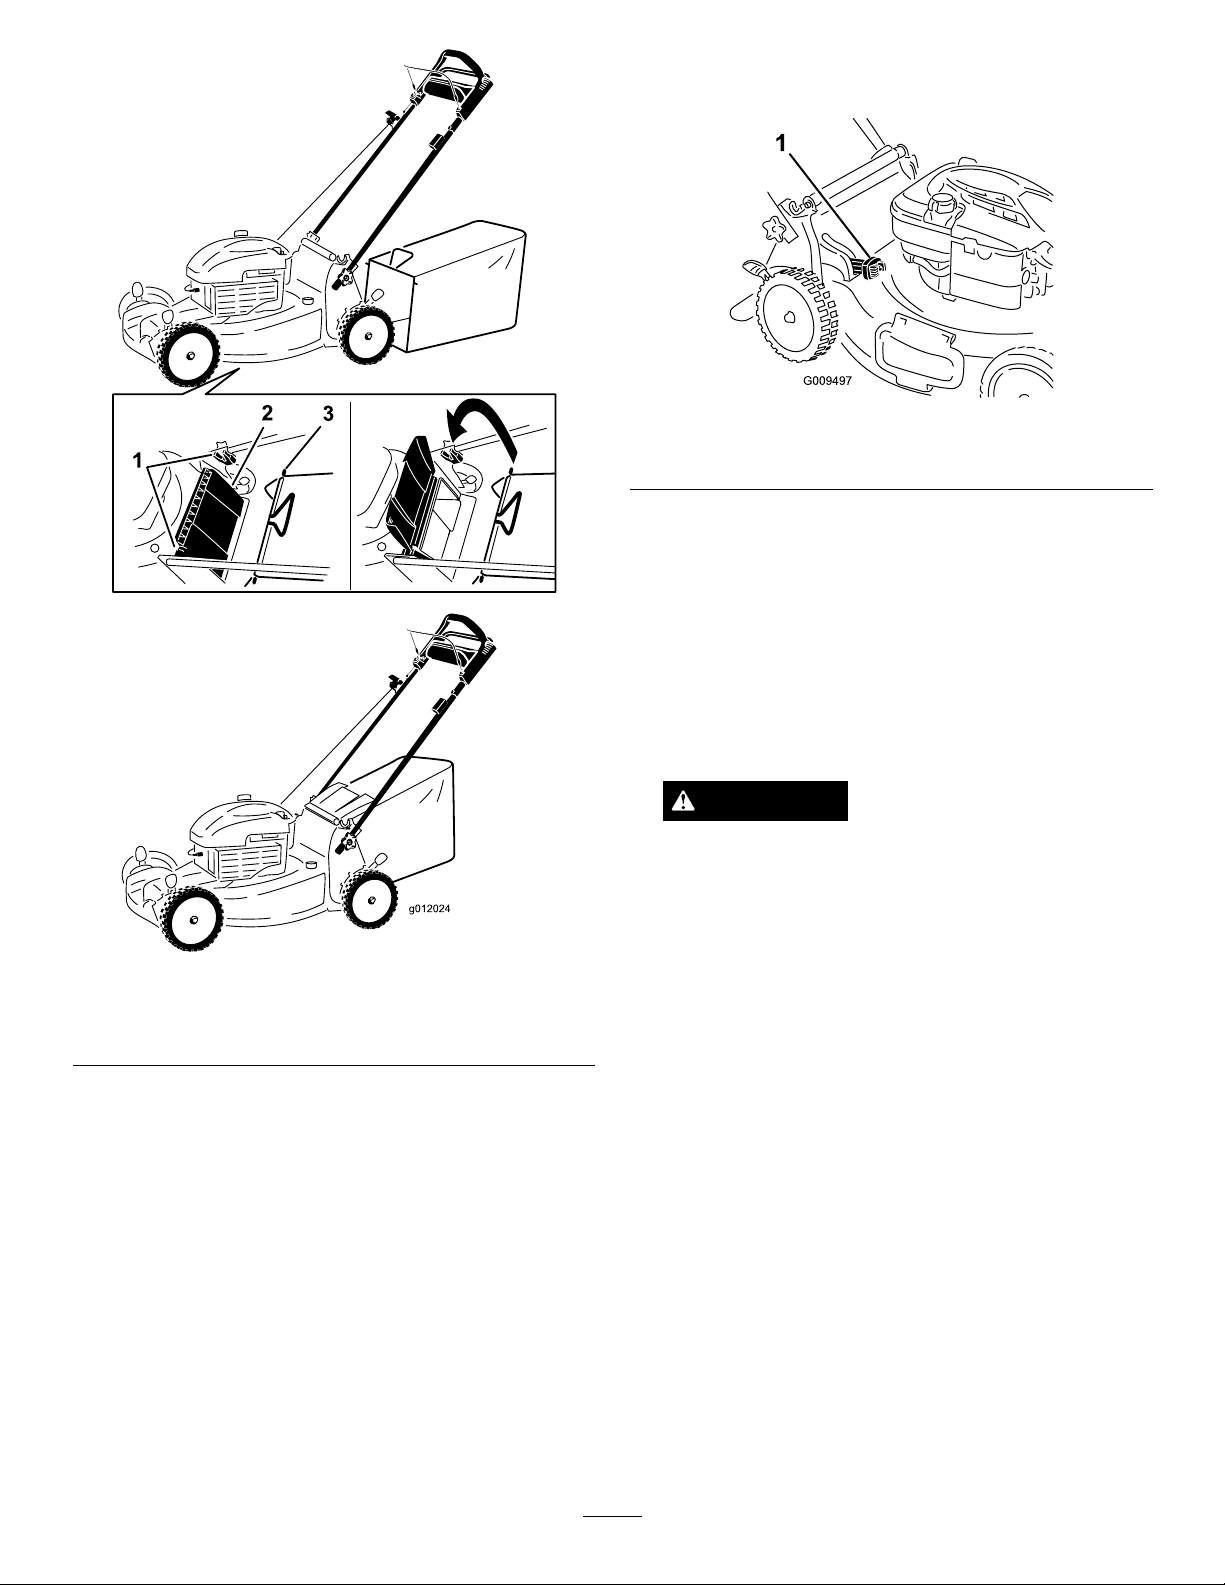
Figure14
1.Notches
3.Grassbagpin(2)
2.Reardeector
2.Installthegrassbag,ensuringthatthepinsonthe
bagrestinthenotchesonthehandle(Figure14).
3.Lowerthereardeector.
RemovingtheGrassBag
Toremovethebag,reversethestepsabove.
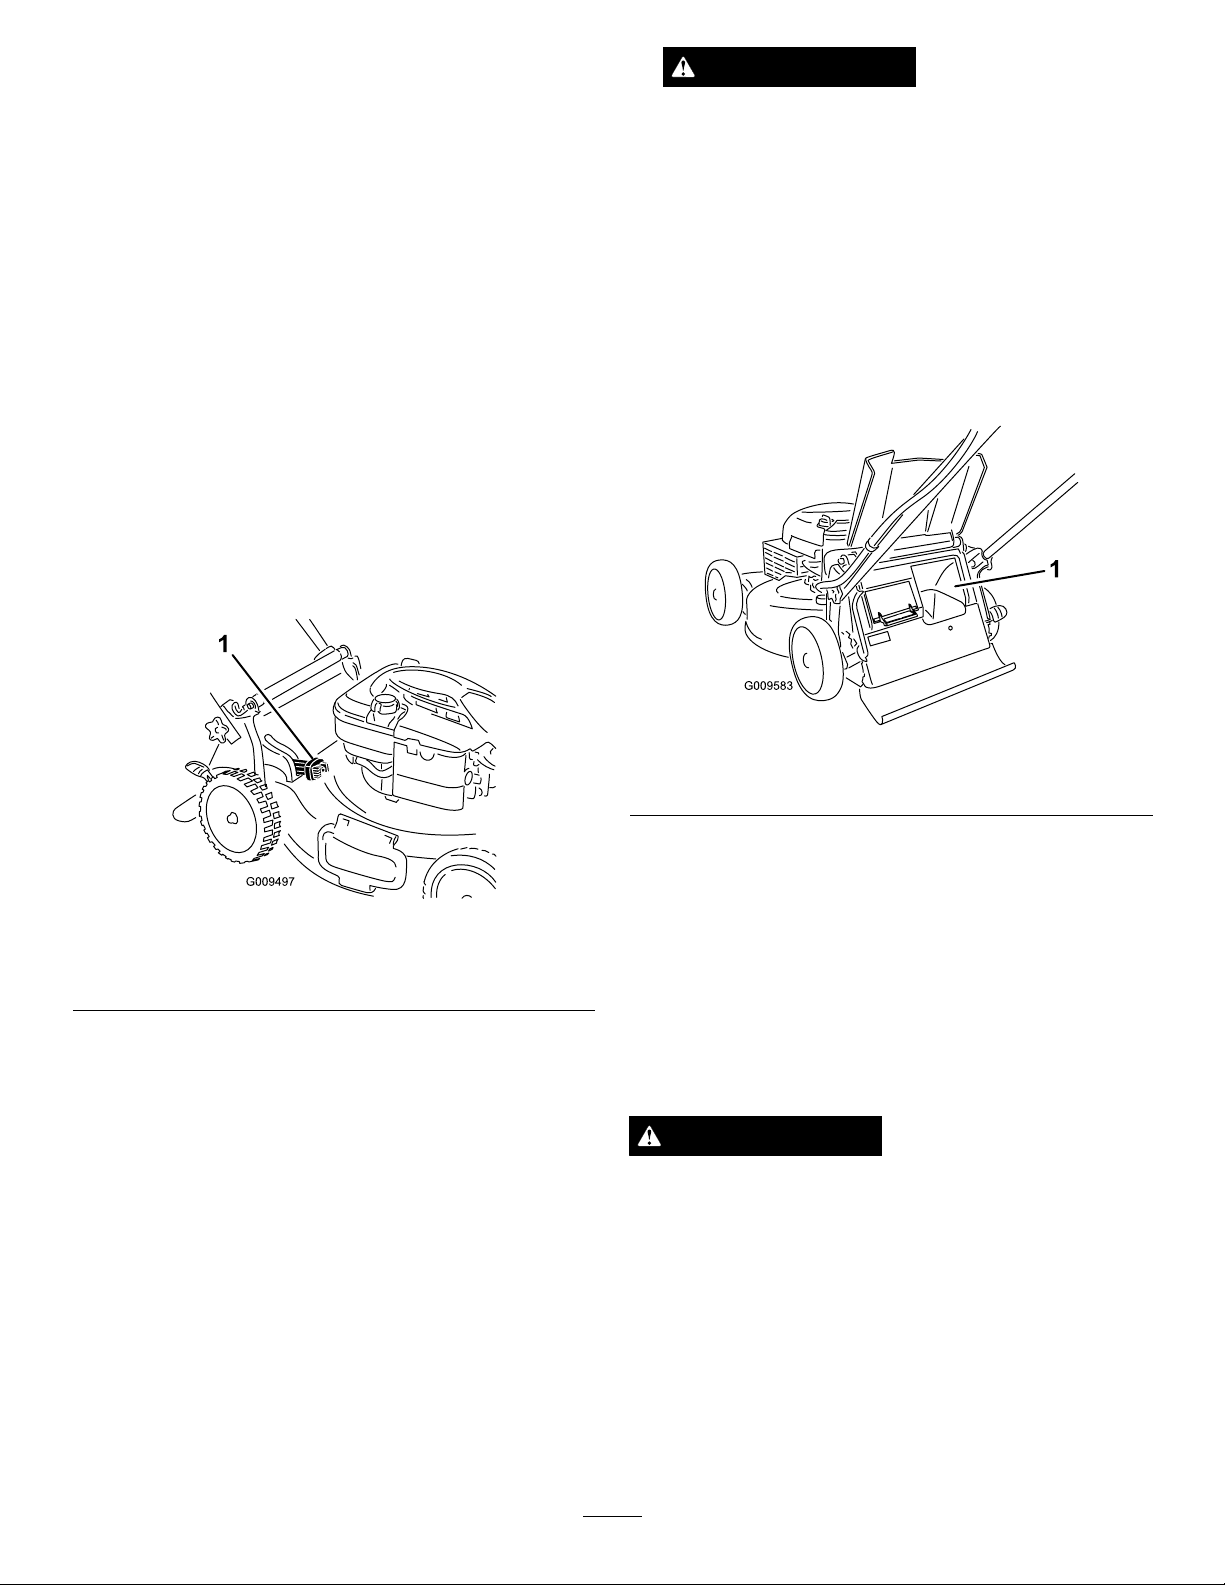
OperatingtheBag-on-DemandLever
Thebag-on-demandfeatureallowsyoutoeithercollect
orrecyclegrassandleafclippingswhilethegrassbag
isattachedtothemower.
•Forbaggingthegrassandleafclippings,pressthe
buttononthebag-on-demandleverandmovethe
leverforwarduntilthebuttonontheleverpopsup
(Figure15)
Figure15
1.Bag-on-demandlever(inbaggingposition)
•Forrecyclingthegrassandleafclippings,pressthe
buttonontheleverandmovetheleverrearward
untilthebuttonontheleverpopsup.
Important:Forproperoperation,remove
anygrassclippingsanddebrisfromthe
bag-on-demanddoorandthesurrounding
opening(Figure16)beforeyoumovethe
bag-on-demandleverfromonepositionto
another.
WARNING
Thebladeissharp;contactingthebladecan
resultinseriouspersonalinjury.Also,anopen
reardischargeareacouldallowsmallstones
andothersimilardebristobethrowninthe
operator'sorbystander'sdirectionandresultin
seriouspersonalinjuryordeathtotheoperator
orbystanders.
Stoptheengineandwaitforallmovingpartsto
stopbeforecleaningthebag-on-demanddoor
andthesurroundingopening.
10
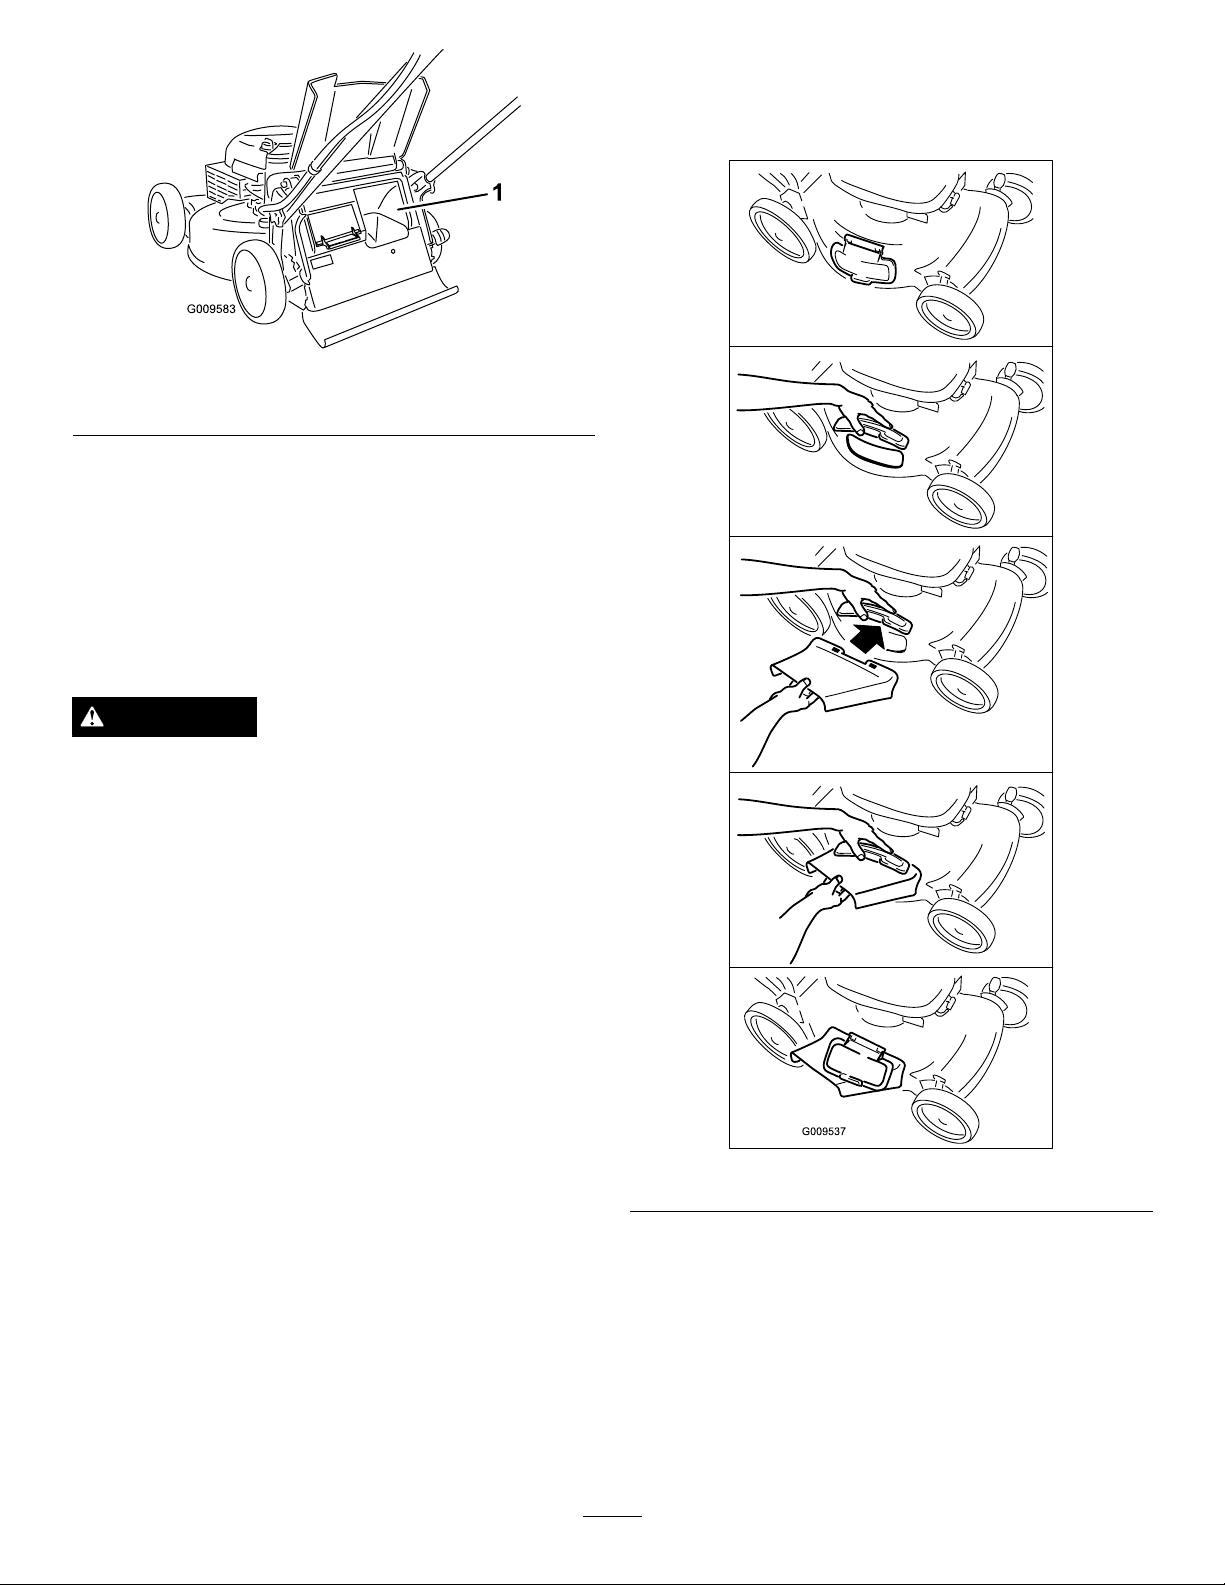
Figure16
1.Cleanhere
Side-dischargingtheClippings
Usethesidedischargeforcuttingverytallgrass.
Ifthegrassbagisonthemowerandthebag-on-demand
leverisinthebaggingposition,movethelever
totherecyclingposition(refertoOperatingthe
Bag-on-DemandLever).
WARNING
Thebladeissharp;contactingthebladecanresult
inseriouspersonalinjury.
Stoptheengineandwaitforallmovingpartstostop
beforeleavingtheoperatingposition.
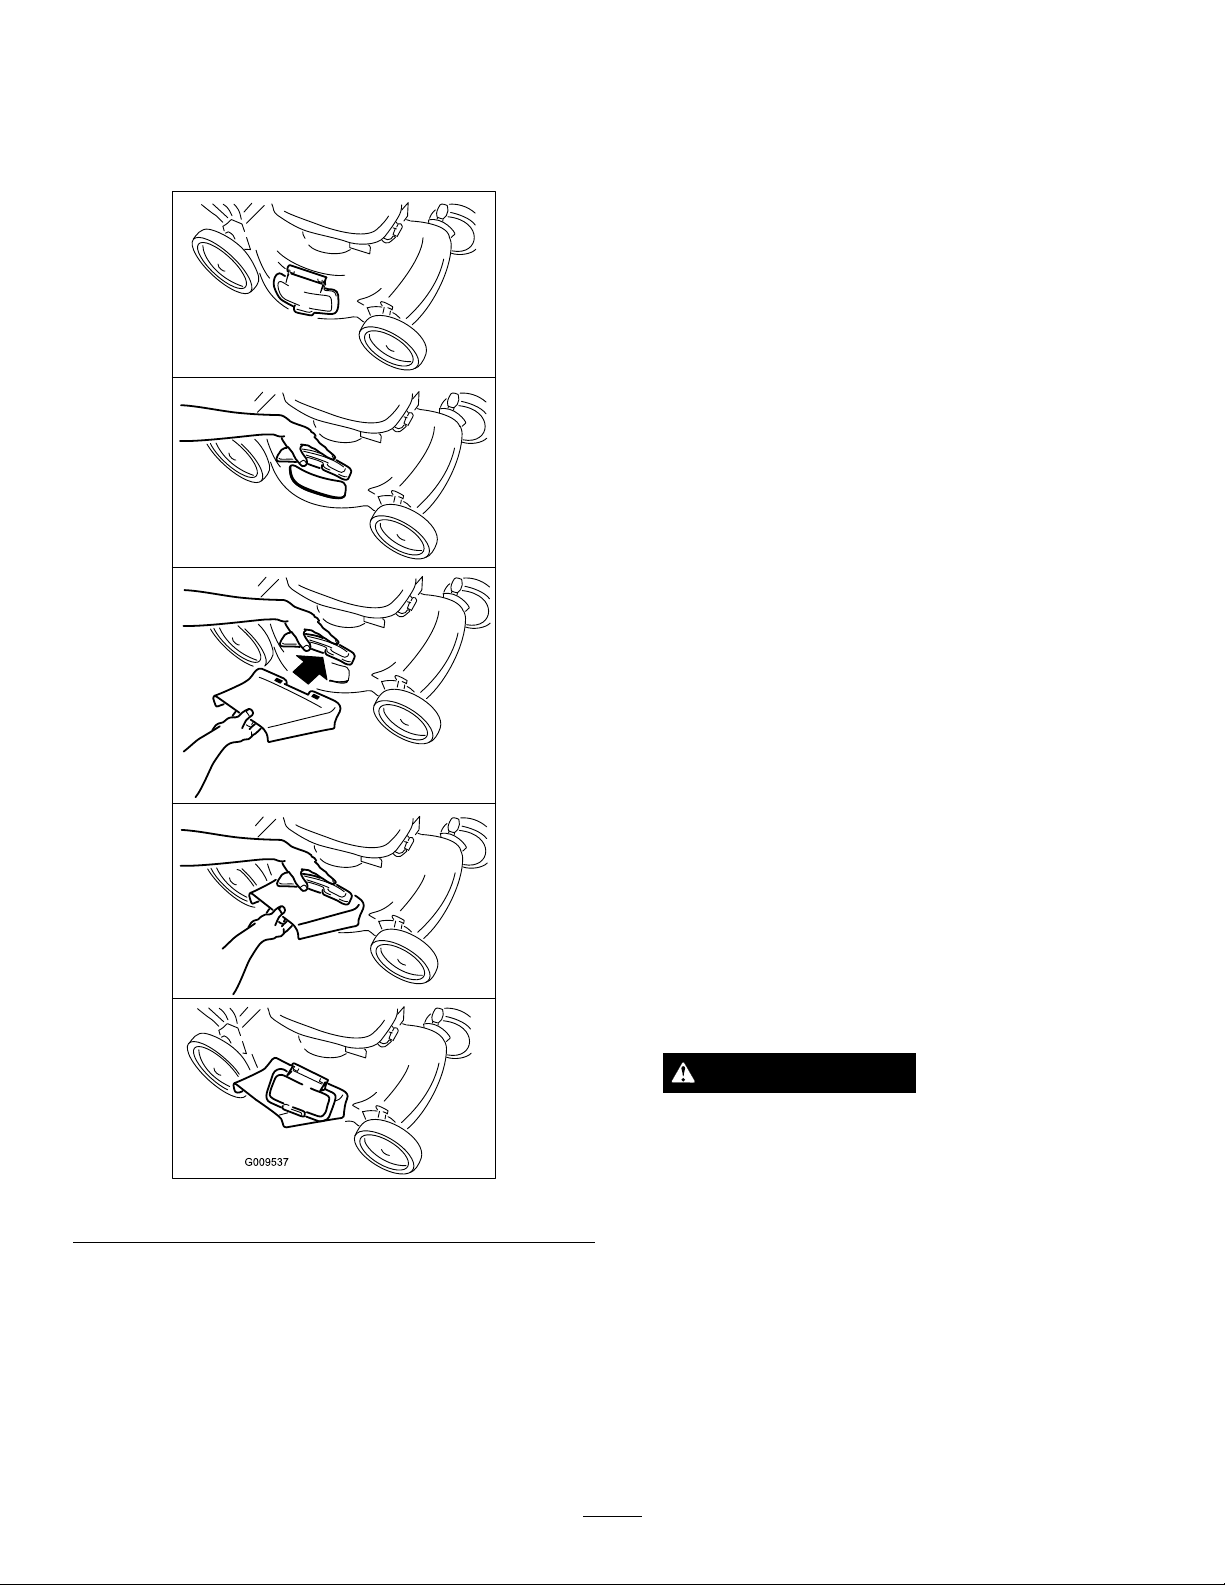
InstallingtheSideDischargeChute
Liftupthesidedeectorandinstallthesidedischarge
chute(Figure17).
Figure17
RemovingtheSideDischargeChute
Toremovethesidedischargechute,liftuptheside
deector,removethesidedischargechute,andlower
thesidedischargedeector.
11

OperatingTips
GeneralMowingTips
•Cleartheareaofsticks,stones,wire,branches,and
otherdebristhatthebladecouldhit.
•Avoidstrikingsolidobjectswiththeblade.Never
deliberatelymowoveranyobject.
•Ifthemowerstrikesanobjectorstartstovibrate,
immediatelystoptheengine,disconnectthewire
fromthesparkplug,andexaminethemowerfor
damage.
•Forbestperformance,installanewbladebeforethe
cuttingseasonbegins.
•ReplacethebladewhennecessarywithaToro
replacementblade.
CuttingGrass
•Cutonlyaboutathirdofthegrassbladeatatime.
Donotcutbelowthe2-1/8-inch(54mm)setting
unlessthegrassissparseoritislatefallwhengrass
growthbeginstoslowdown.RefertoAdjustingthe
CuttingHeight.
•Whencuttinggrassover6inches(15cm)tall,mow
atthehighestcuttingheightsettingandwalkslower;
thenmowagainatalowersettingforthebestlawn
appearance.Ifthegrassistoolong,themowermay
plugandcausetheenginetostall.
•Mowonlydrygrassorleaves.Wetgrassandleaves
tendtoclumpontheyardandcancausethemower
toplugortheenginetostall.
WARNING
Wetgrassorleavescancauseseriousinjuryif
youslipandcontacttheblade.Mowonlyindry
conditions.
•Beawareofapotentialrehazardinverydry
conditions,followalllocalrewarnings,andkeep
themowerfreeofdrygrassandleafdebris.
•Alternatethemowingdirection.Thishelpsdisperse
theclippingsoverthelawnforevenfertilization.
•Ifthenishedlawnappearanceisunsatisfactory,try
oneormoreofthefollowing:
–Replacethebladeorhaveitsharpened.
–Walkataslowerpacewhilemowing.
–Raisethecuttingheightonyourmower.
–Cutthegrassmorefrequently.
–Overlapcuttingswathsinsteadofcuttingafull
swathwitheachpass.
–Setthecuttingheightonthefrontwheelsone
notchlowerthantherearwheels.Forexample,
setthefrontwheelsat2-1/8-inch(54mm)and
therearwheelsat2-1/2inches(64mm).
CuttingLeaves
•Aftercuttingthelawn,ensurethathalfofthelawn
showsthroughthecutleafcover.Youmayneedto
makemorethanonepassovertheleaves.
•Iftherearemorethan5inches(13cm)ofleaves
onthelawn,setthefrontcuttingheightoneortwo
notcheshigherthantherearcuttingheight.
•Slowdownyourmowingspeedifthemowerdoes
notcuttheleavesnelyenough.
12
Maintenance
Note:Determinetheleftandrightsidesofthemachinefromthenormaloperatingposition.
RecommendedMaintenanceSchedule(s)
MaintenanceService
Interval
MaintenanceProcedure
Aftertherst5hours
•Changetheengineoil.
Beforeeachuseordaily
•Checktheengineoillevel.
•Ensurethattheenginestopswithin3secondsafterreleasingthebladecontrolbar.
•Cleangrassclippingsanddirtfromunderthemower.
Every25hours
•Replacetheairlter;replaceitmorefrequentlyindustyoperatingconditions.
•Chargethebatteryfor24hours(electric-startmodelsonly).
Beforestorage
•Emptythefueltankbeforerepairsasdirectedandbeforeannualstorage.
Yearly
•Changetheengineoil.
•Replacethebladeorhaveitsharpened(morefrequentlyiftheedgedullsquickly).
•Cleantheaircoolingsystem;cleanitmorefrequentlyindustyoperatingconditions.
Refertoyourengineoperator'smanual.
•Refertoyourengineoperator'smanualforanyadditionalyearlymaintenance
procedures.
Important:Refertoyourengineoperator'smanualforadditionalmaintenanceprocedures.
Note:ReplacementpartsareavailablefromanAuthorizedServiceDealer(gotowww.toro.comtondthenearest
dealer)oratwww .shoptoro.com.
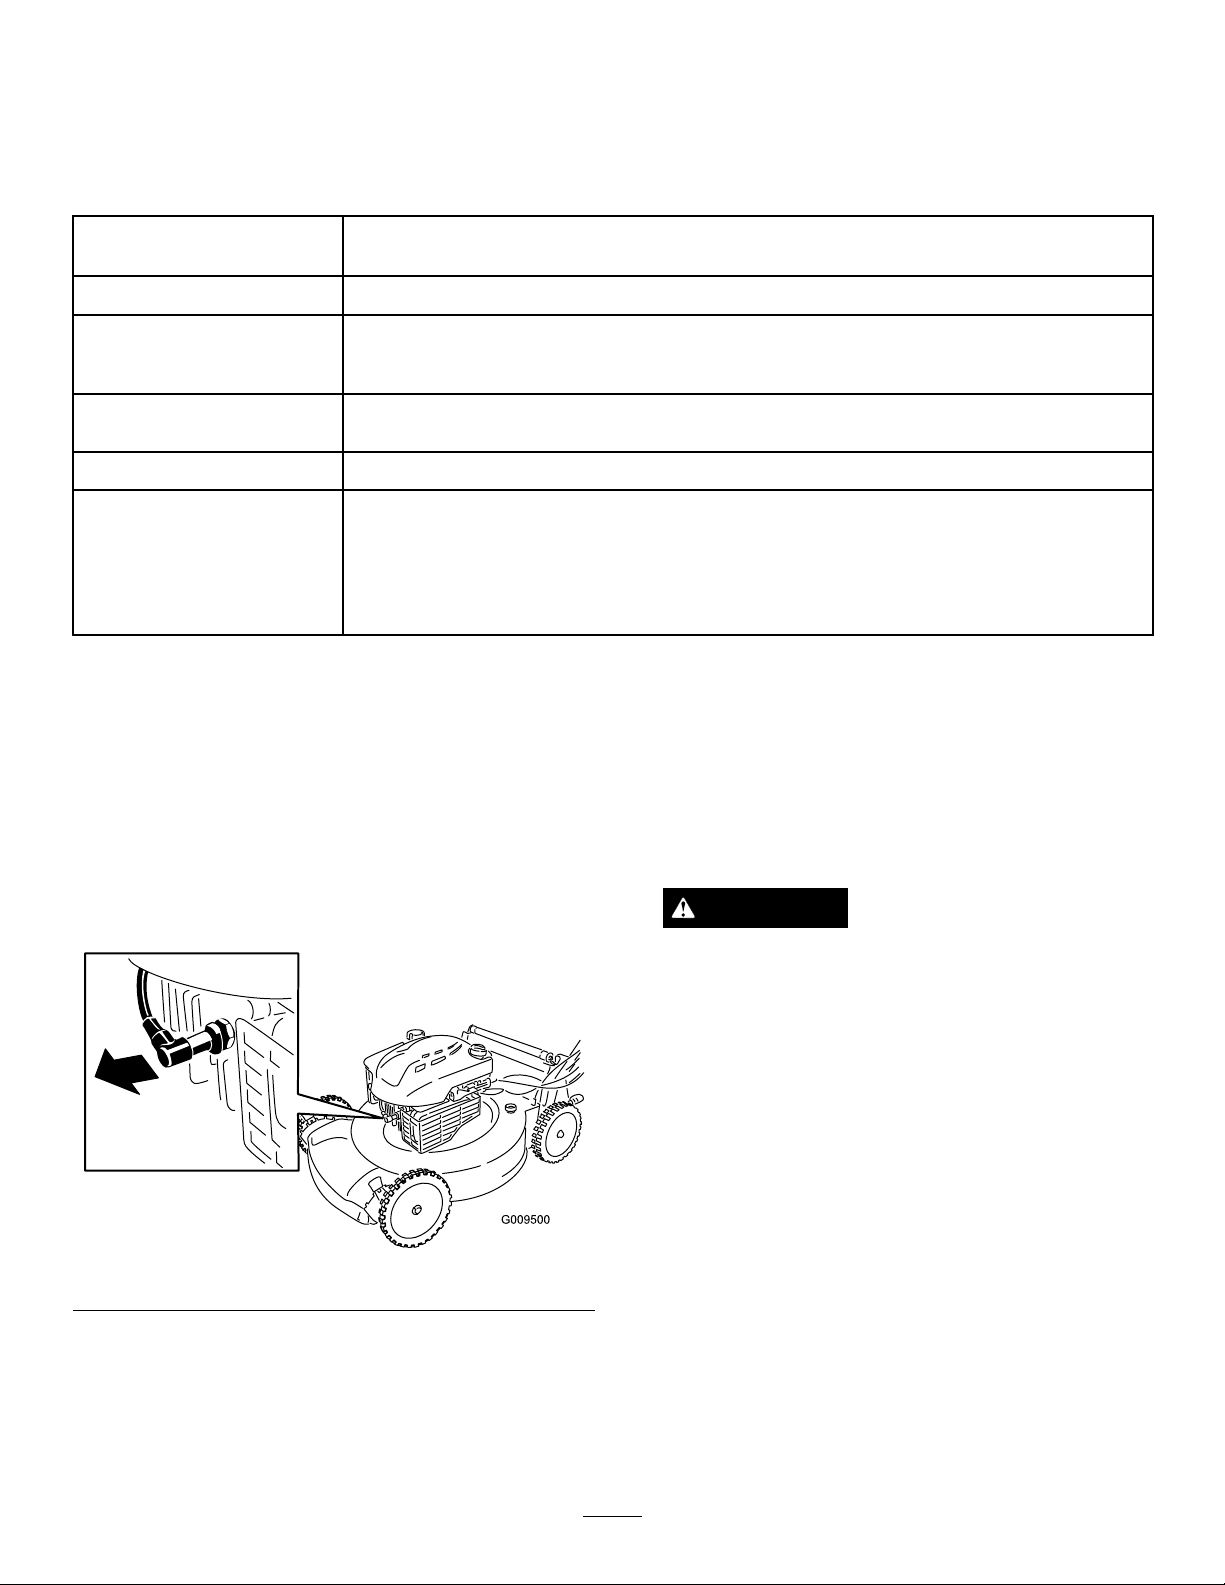
PreparingforMaintenance
1.Stoptheengineandwaitforallmovingpartstostop.
2.Disconnectthesparkplugwirefromthesparkplug
(Figure18)beforeperforminganymaintenance
procedure.
Figure18
3.Afterperformingthemaintenanceprocedure(s),
connectthesparkplugwiretothesparkplug.
Important:Beforetippingthemowertochange
theoilorreplacetheblade,allowthefueltank
torundrythroughnormalusage.Ifyoumust
tipthemowerpriortorunningoutoffuel,usea
handfuelpumptoremovethefuel.Alwaystip
themowerontoitsside,withtheairlterup.
WARNING
Tippingthemowermaycausethefueltoleak.
Gasolineisammable,explosiveandcancause
personalinjury.
Runtheenginedryorremovethegasolinewith
ahandpump;neversiphon.
13

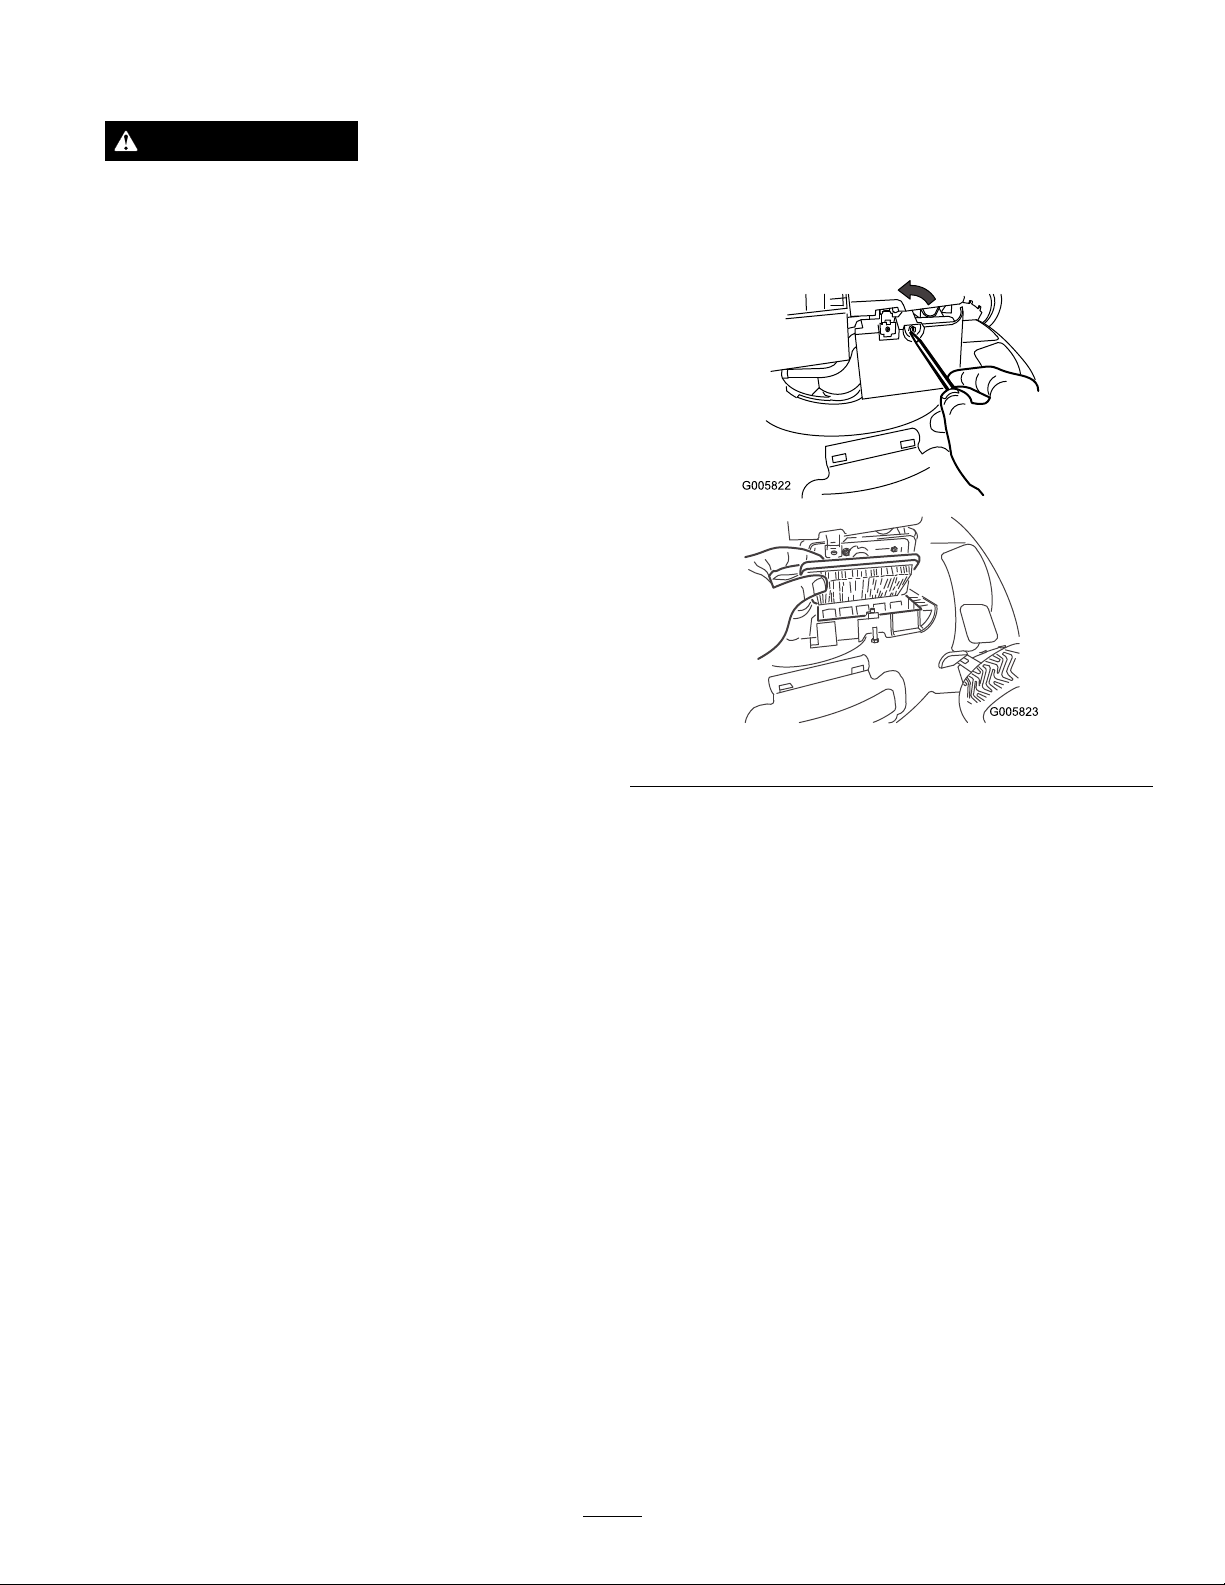
ReplacingtheAirFilter
ServiceInterval:Every25hours
1.Useascrewdrivertoopentheairltercover
(Figure19).
2.Replacetheairlter(Figure19).
3.Installthecover.
Figure19
ChangingtheEngineOil
ServiceInterval:Aftertherst5hours
Yearly
Runtheengineafewminutesbeforechangingtheoil
towarmit.Warmoilowsbetterandcarriesmore
contaminants.
1.Movethemowertoalevelsurface.
2.RefertoPreparingforMaintenance.
3.Removethedipstick(Figure20).
Figure20
1.Dipstick
4.Tipthemowerontoitssidewiththeairlterup
todraintheusedoiloutthroughtheoillltube
(Figure21).
Figure21
5.Returnthemowertotheoperatingposition.
6.Pourabout3/4ofthecrankcasecapacityofoilin
thecrankcase.
7.Wait3minutesfortheoiltosettle.
8.Wipethedipstickcleanwithacleancloth.
9.Insertthedipstickfullyintotheoillltube,then
removethedipstick.
10.Readtheoillevelonthedipstick.
Note:IftheoillevelisbelowtheAddmarkonthe
dipstick,slowlypourasmallamountofoilintothe
oillltubeandrepeatsteps8through10untiltheoil
levelisattheFullmarkonthedipstick(Figure20).
Important:Donotoverllthecrankcasewith
oilandruntheengine.Draintheexcessoiluntil
theoillevelonthedipstickreadsFull.
11.Installthedipstickintotheoillltubesecurely.
12.Disposeoftheusedoilproperlyatalocalrecycling
center.
14
ChargingtheBattery
ServiceInterval:Every25hours
Electric-startmodelsonly
WARNING
CALIFORNIA
Proposition65Warning
Batteryposts,terminals,andrelated
accessoriescontainleadandleadcompounds,
chemicalsknowntotheStateofCalifornia
tocausecancerandreproductiveharm.
Washhandsafterhandling.
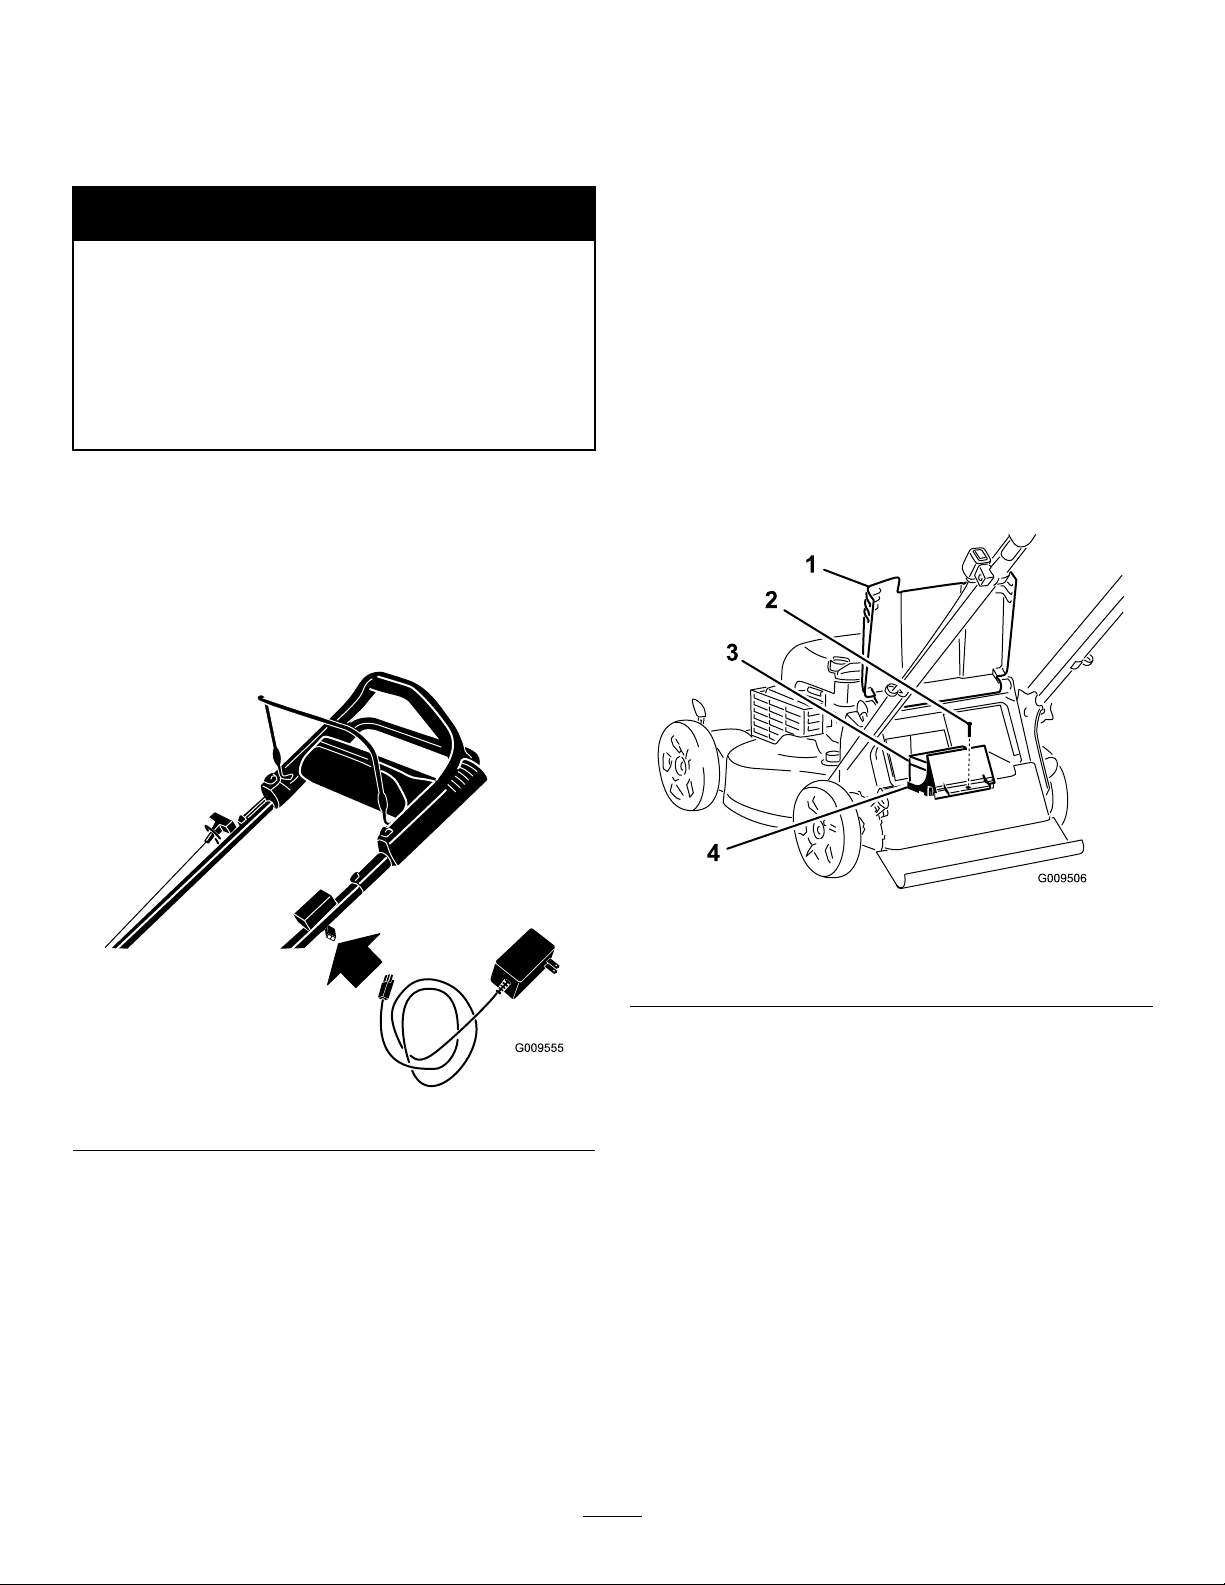
Chargethebatteryfor24hoursinitially,thenmonthly
(every25starts)orasneeded.Alwaysusethecharger
inashelteredareaandchargethebatteryatroom
temperature(70°or22°C)wheneverpossible.
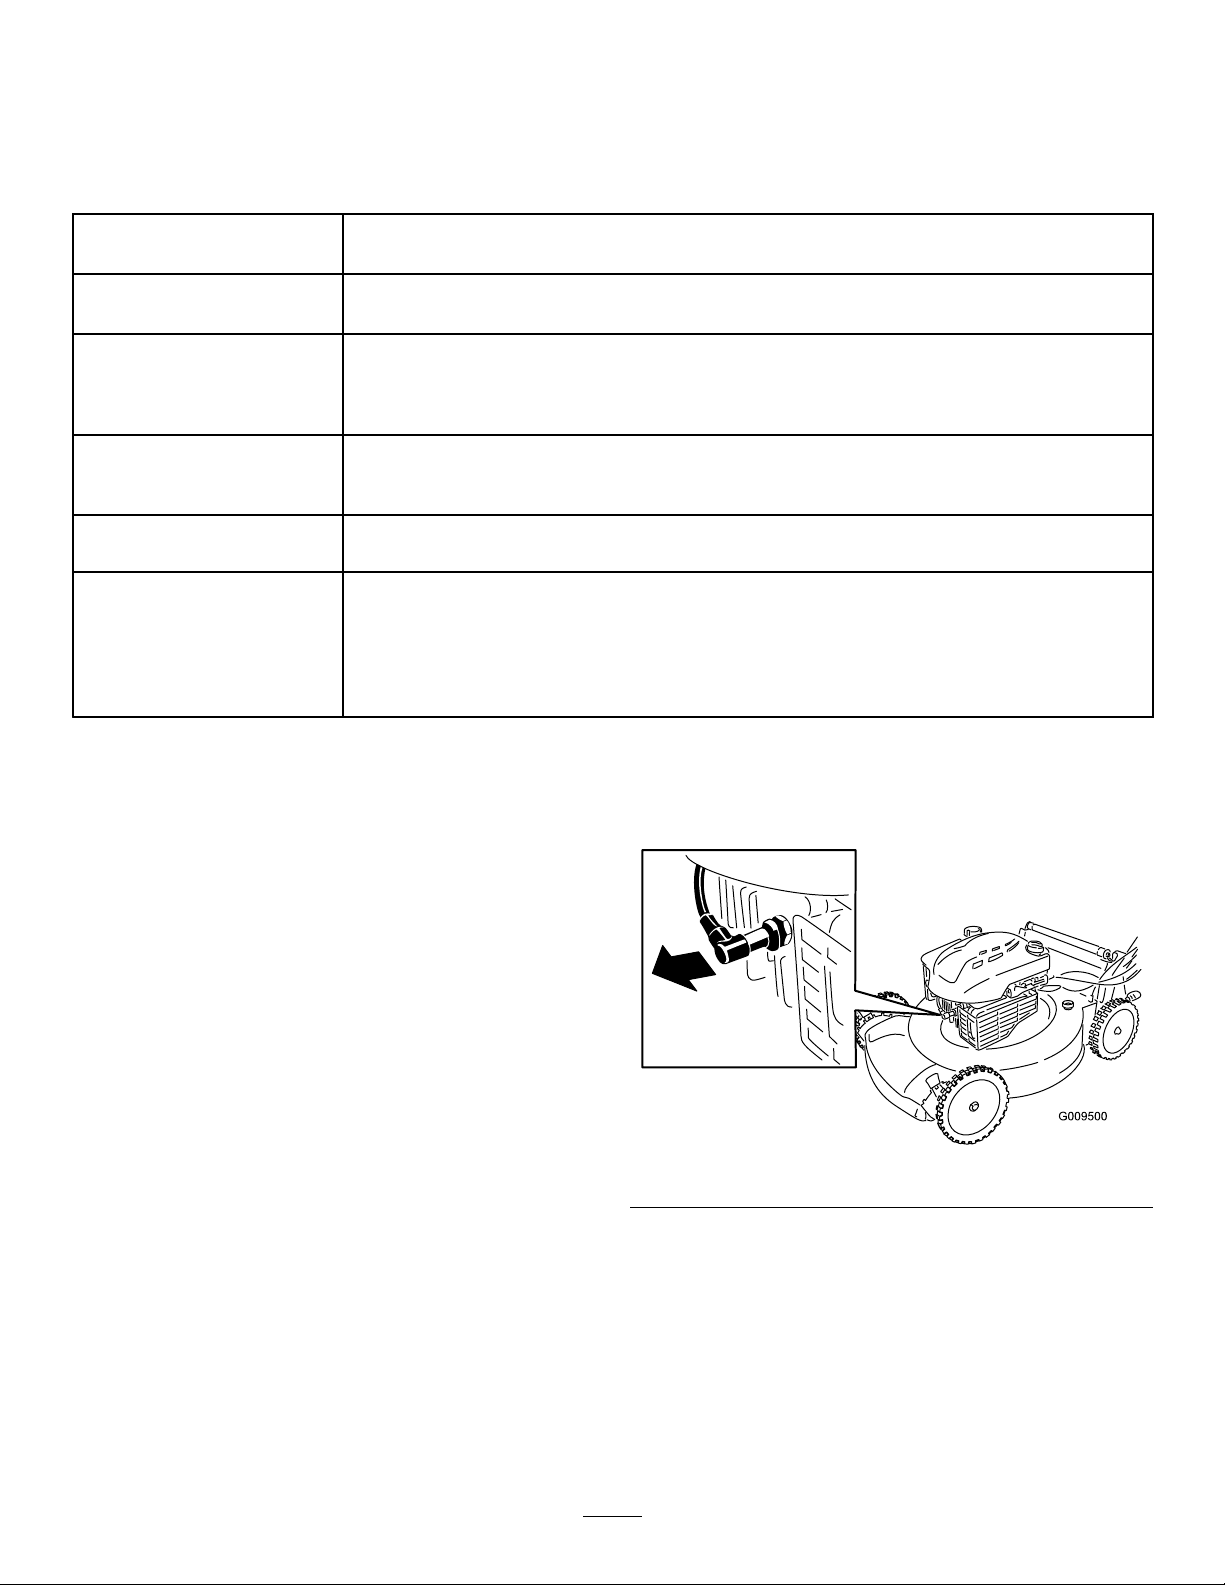
1.Connectthechargertothemowerwireharness
locatedbelowtheignitionkey(Figure22).
Figure22
2.Plugthechargerintoawalloutlet.
Note:Whenthebatterynolongerholdsacharge,
recycleordisposeofthelead-acidbatteryaccording
tolocalcodes.
Note:Yourbatterychargermayhaveatwo-colorLED
displaythatindicatesthefollowingstatesofcharging:
•Aredlightindicatesthatthechargerischargingthe
battery.
•Agreenlightindicatesthatthechargerisfully
chargedorthechargerisdisconnectedfromthe
battery.
•Aashinglightthatalternatesbetweenredandgreen
indicatesthatthebatteryisnearlyfullycharged.This
statelastsonlyafewminutesuntilthebatteryisfully
charged.
ReplacingtheFuse
Electric-startmodelsonly
Ifthebatterydoesnotchargeortheenginedoesnotrun
withtheelectricstarter,thefusemaybeblown.Replace
itwitha40-ampplug-intypefuse.
1.Raisethereardeectorandlocatethebattery
compartment(Figure23).
Figure23
1.Reardeector
3.Battery
2.Screw
4.Batterycompartment
2.Wipeawayanydebrisinthebatterycompartment
area.
3.Removethescrewthatsecuresthebattery
compartment,pulloutthebattery,andlocatethe
fuse(Figure24.
15

1
2
3
G017398
Figure24
1.Fuse2.Fuseholder
4.Replacethefuseinthefuseholder(Figure24).
Note:Yourmowercomeswithasparefuseinthe
batterycompartment.
5.Installthebatterycompartmentwiththescrewthat
youremovedinstep3.
6.Installthecoveringoverthebatterycompartment.
7.Lowerthereardeector.
ReplacingtheBlade
ServiceInterval:Yearly
Important:
Youwillneedatorquewrenchtoinstall
thebladeproperly
.Ifyoudonothaveatorque
wrenchorareuncomfortableperformingthis
procedure,contactanAuthorizedServiceDealer.
Examinethebladewheneveryourunoutofgasoline.If
thebladeisdamagedorcracked,replaceitimmediately.
Ifthebladeedgeisdullornicked,haveitsharpenedand
balanced,orreplaceit.
WARNING
Thebladeissharp;contactingthebladecanresult
inseriouspersonalinjury.
Weargloveswhenservicingtheblade.
1.RefertoPreparingforMaintenance.
2.Tipthemowerontoitssidewiththeairlterup.
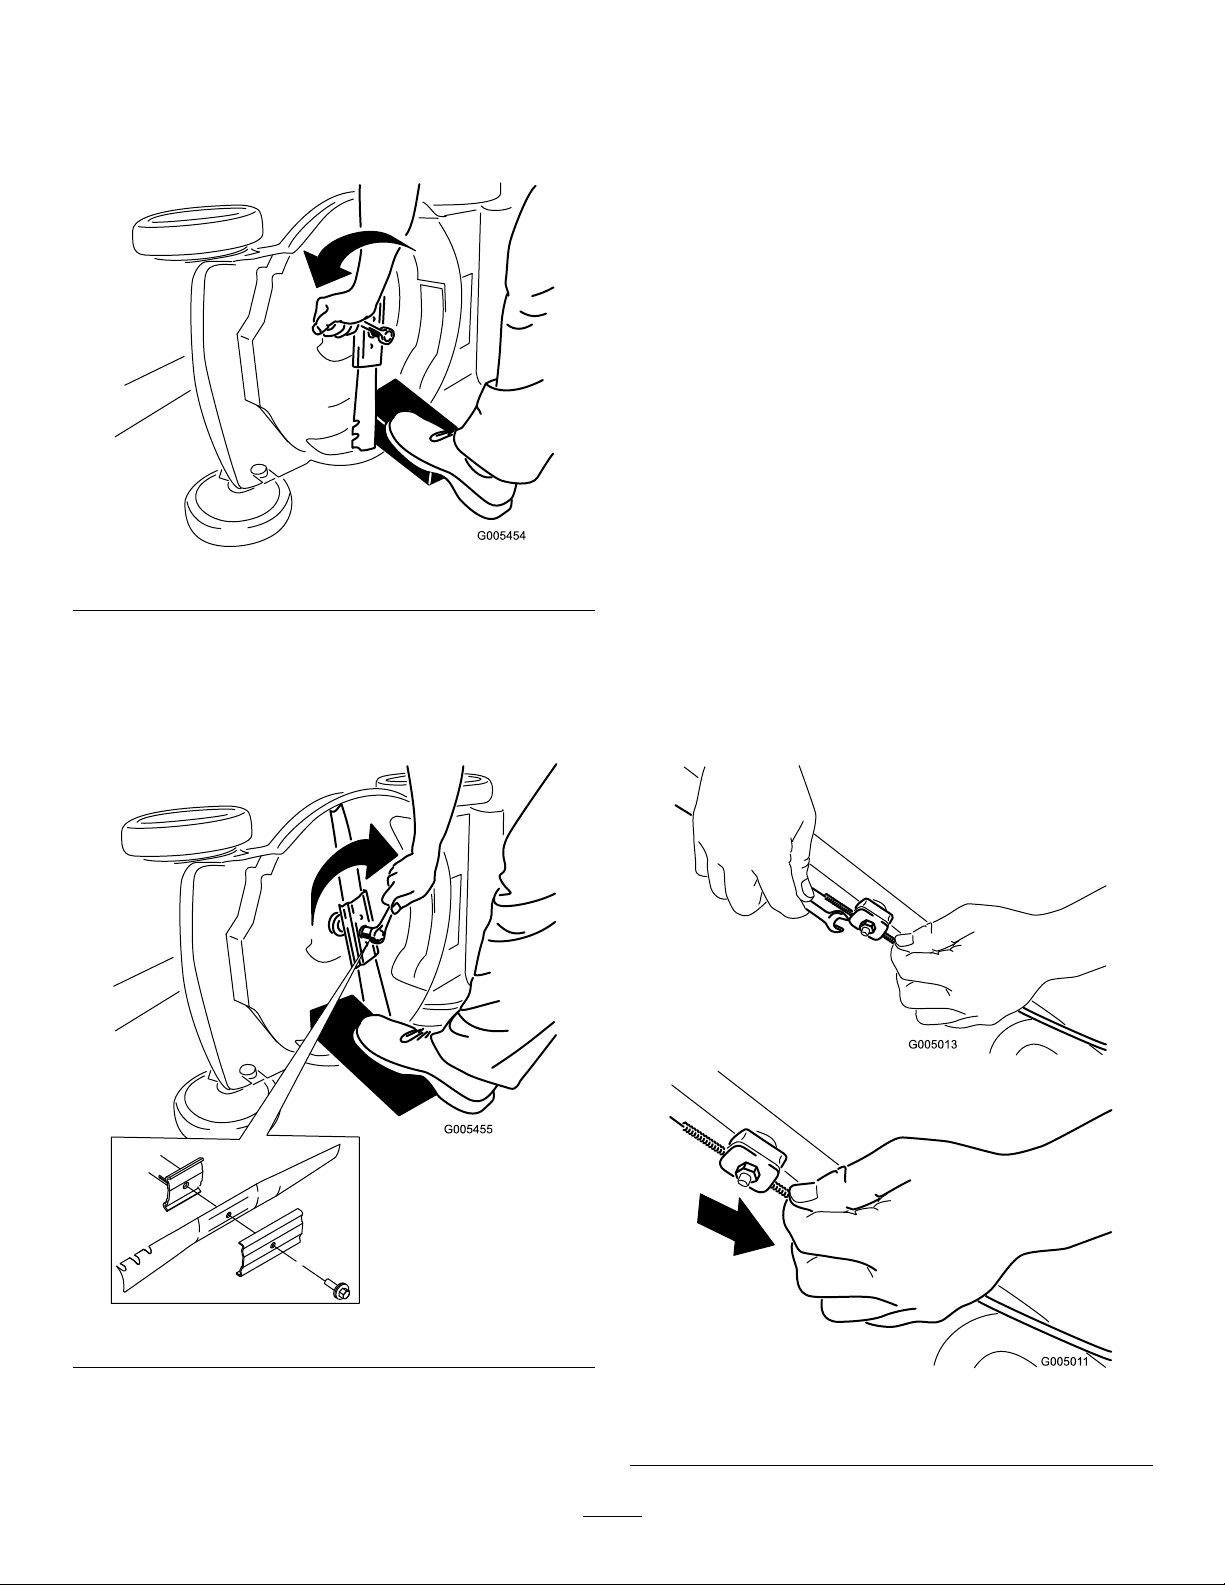
3.Useablockofwoodtoholdthebladesteady
(Figure25).
Figure25
4.Removetheblade,savingallmountinghardware
(Figure25).
5.Installthenewbladeandallmountinghardware
(Figure26).
Figure26
Important:Positionthecurvedendsofthe
bladetopointtowardthemowerhousing.
6.Useatorquewrenchtotightenthebladeboltto
60ft-lb(82N-m).
Important:Abolttorquedto60ft-lb(82N-m)
isverytight.Whileholdingthebladewitha
blockofwood,putyourweightbehindthe
16
ratchetorwrenchandtightentheboltsecurely.
Thisboltisverydifculttoovertighten.
AdjustingtheSelf-propelDrive
Cable
Wheneveryouinstallanewself-propelcableorif
theself-propeldriveisoutofadjustment,adjustthe
self-propeldrivecable.
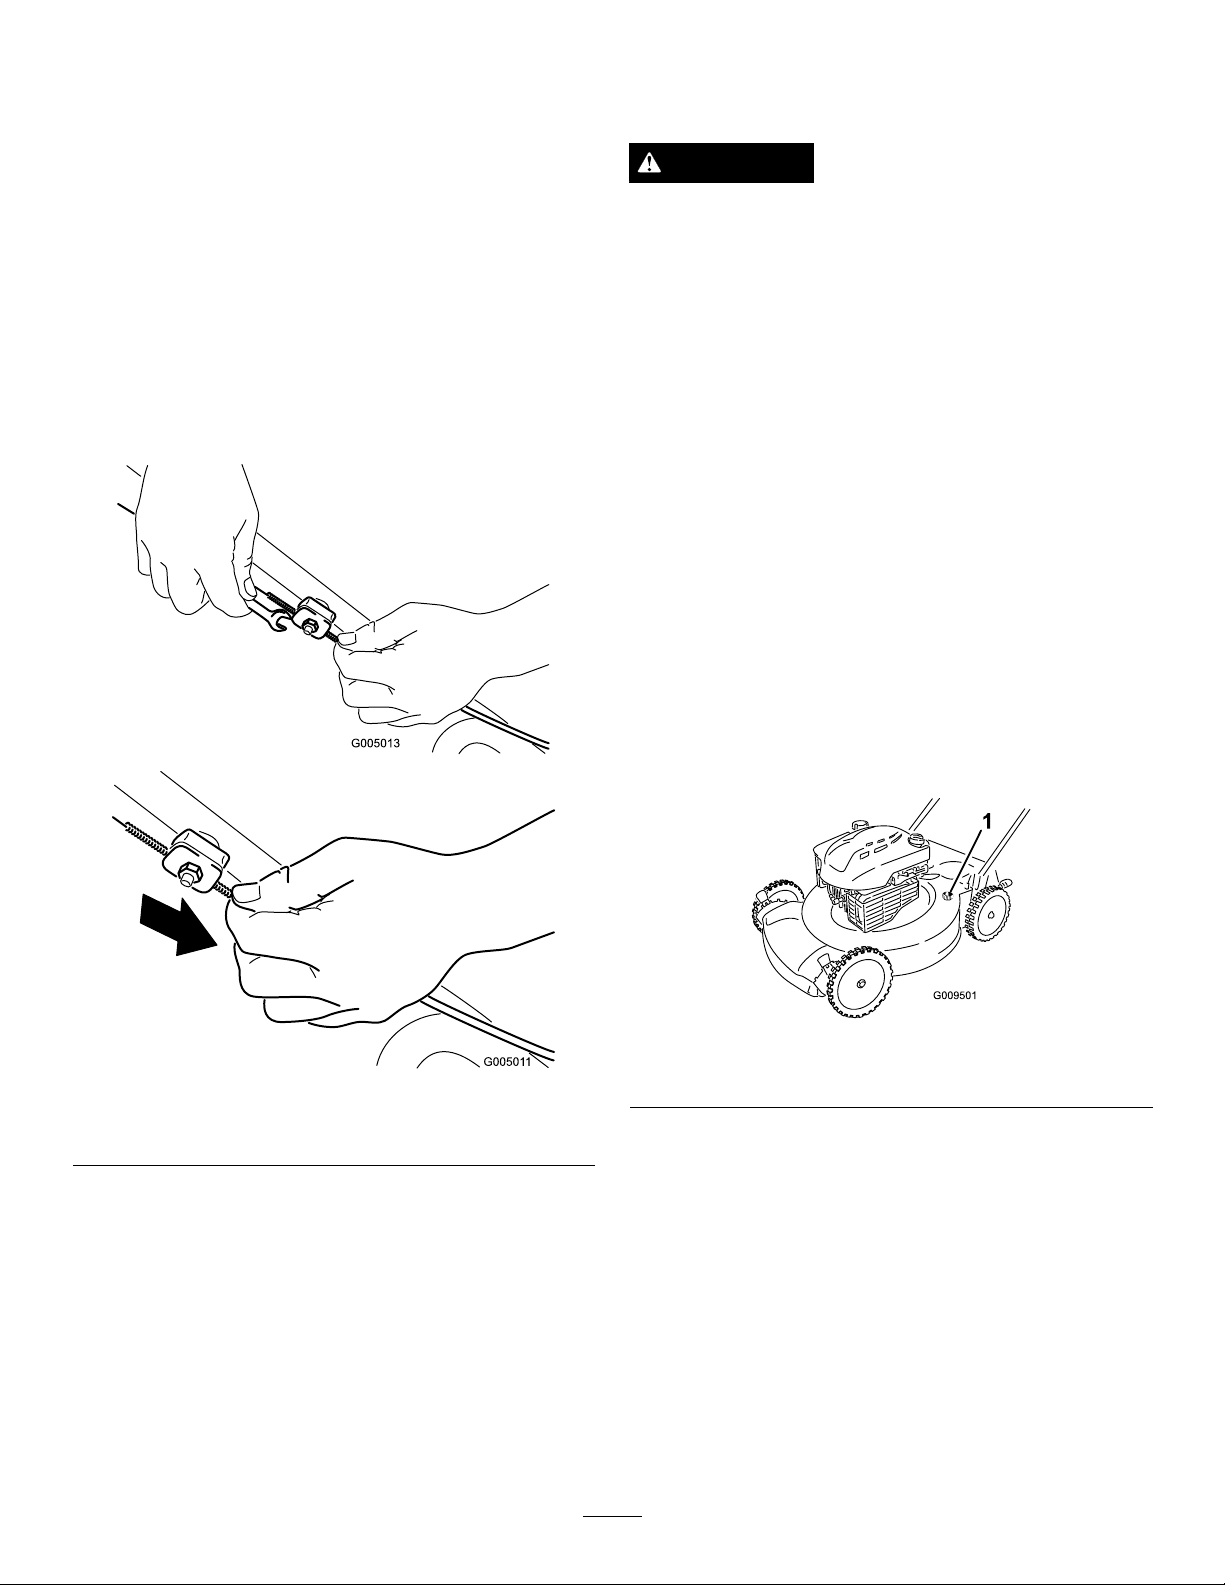
1.Loosenthecablesupportnut(Figure27).
2.Pulldownthecablejacket(towardthemower)until
thereisnoslackinthecable(Figure27).
3.Tightenthenutonthecablesupport.
Figure27
Thisgureissimpliedforthepurposeofclarity.
CleaningtheMower
ServiceInterval:Beforeeachuseordaily
WARNING
Themowermaydislodgematerialfromunderthe
mowerhousing.
•Weareyeprotection.
•Stayintheoperatingposition(behindthe
handle)whentheengineisrunning.
•Donotallowbystandersinthearea.
Forbestresults,cleanthemowersoonafteryouhave
completedmowing.
1.Lowerthemowertoitslowestcuttingheightsetting.
RefertoAdjustingtheCuttingHeight.
2.Movethemowerontoaatpavedsurface.
3.Washouttheareaunderthereardeectorwherethe
clippingsgofromthehousingtothegrassbag.
Note:Washouttheareawiththebag-on-demandin
boththefullyforwardandfullyrearwardpositions.
4.Attachagardenhosethatisconnectedtoawater
supplytothewashoutportonthemowerhousing
(Figure28).
Figure28
1.Washoutport
5.Turnthewateron.
6.Starttheengineandrunituntiltherearenomore
clippingsthatcomeoutfromunderthemower
housing.
7.Stoptheengine.
8.Shutoffthewateranddisconnectthegardenhose
fromthemower.
9.Starttheengineandrunitforafewminutestodry
thehousingtopreventitfromrusting.
10.Allowtheenginetocoolbeforestoringthemower
inanenclosedarea.
17
Storage
Storethemowerinacool,clean,dryplace.
PreparingtheMowerfor
Storage
WARNING
Gasolinevaporscanexplode.
•Donotstoregasolinemorethan30days.
•Donotstorethemowerinanenclosurenearan
opename.
•Allowtheenginetocoolbeforestoringit.
1.Onthelastrefuelingoftheyear,addfuelstabilizer
tothefuelasdirectedbytheenginemanufacturer.
2.Disposeofanyunusedfuelproperly.Recycleit
accordingtolocalcodes,oruseitinyourautomobile.
Note:Oldfuelinthefueltankistheleadingcause
ofhardstarting.Donotstorefuelwithoutstabilizer
morethan30days,anddonotstorestabilizedfuel
morethan90days.
3.Runthemoweruntiltheenginestopsfromrunning
outoffuel.
4.Starttheengineagain.
5.Allowtheenginetorununtilitstops.Whenyoucan
nolongerstarttheengine,itissufcientlydry.
6.Disconnectthewirefromthesparkplug.
7.Removethesparkplug,add1oz.(30ml)ofoil
throughthesparkplughole,andpullthestarterrope
slowlyseveraltimestodistributeoilthroughoutthe
cylindertopreventcylindercorrosionduringthe
off-season.
8.Looselyinstallthesparkplug.
9.Tightenallnuts,bolts,andscrews.
10.Chargethebatteryfor24hours,thenunplugthe
batterychargeranstorethemowerinanunheated
area.Ifyoumuststorethemowerinaheated
area,youmustchargethebatteryevery90days
(electric-startmodelsonly).
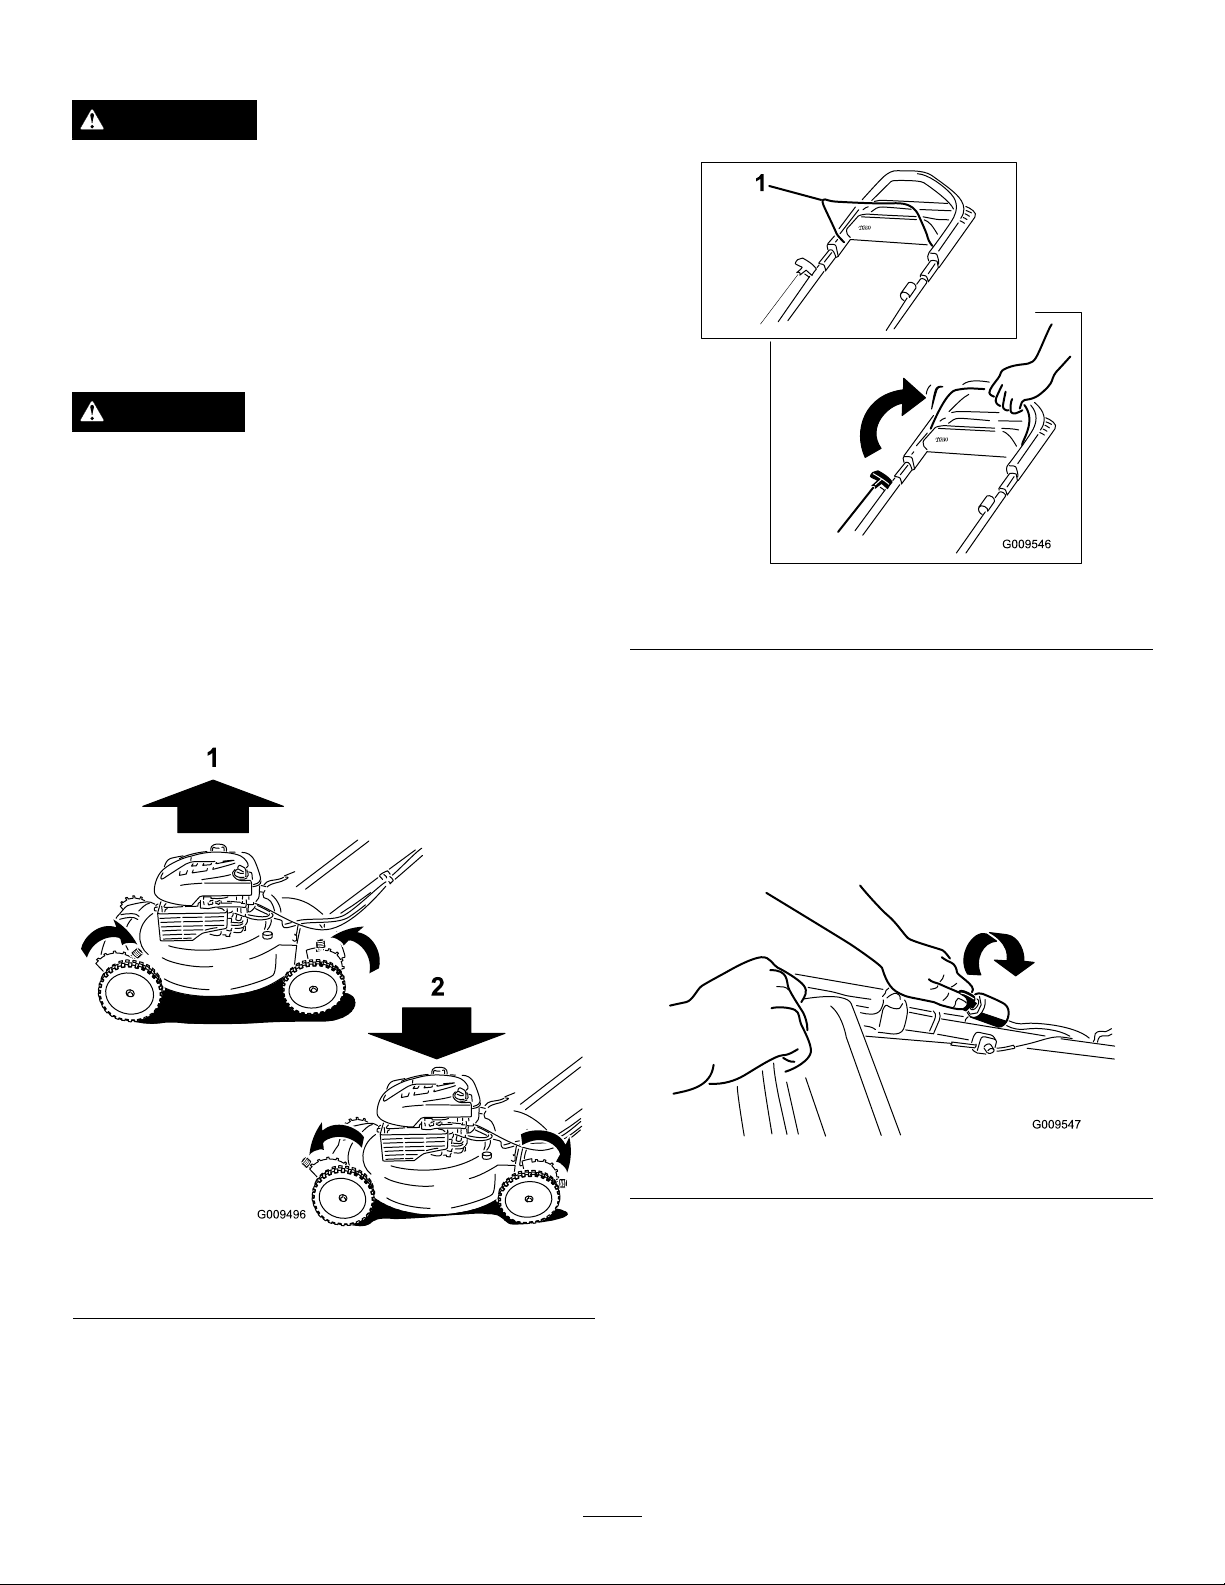
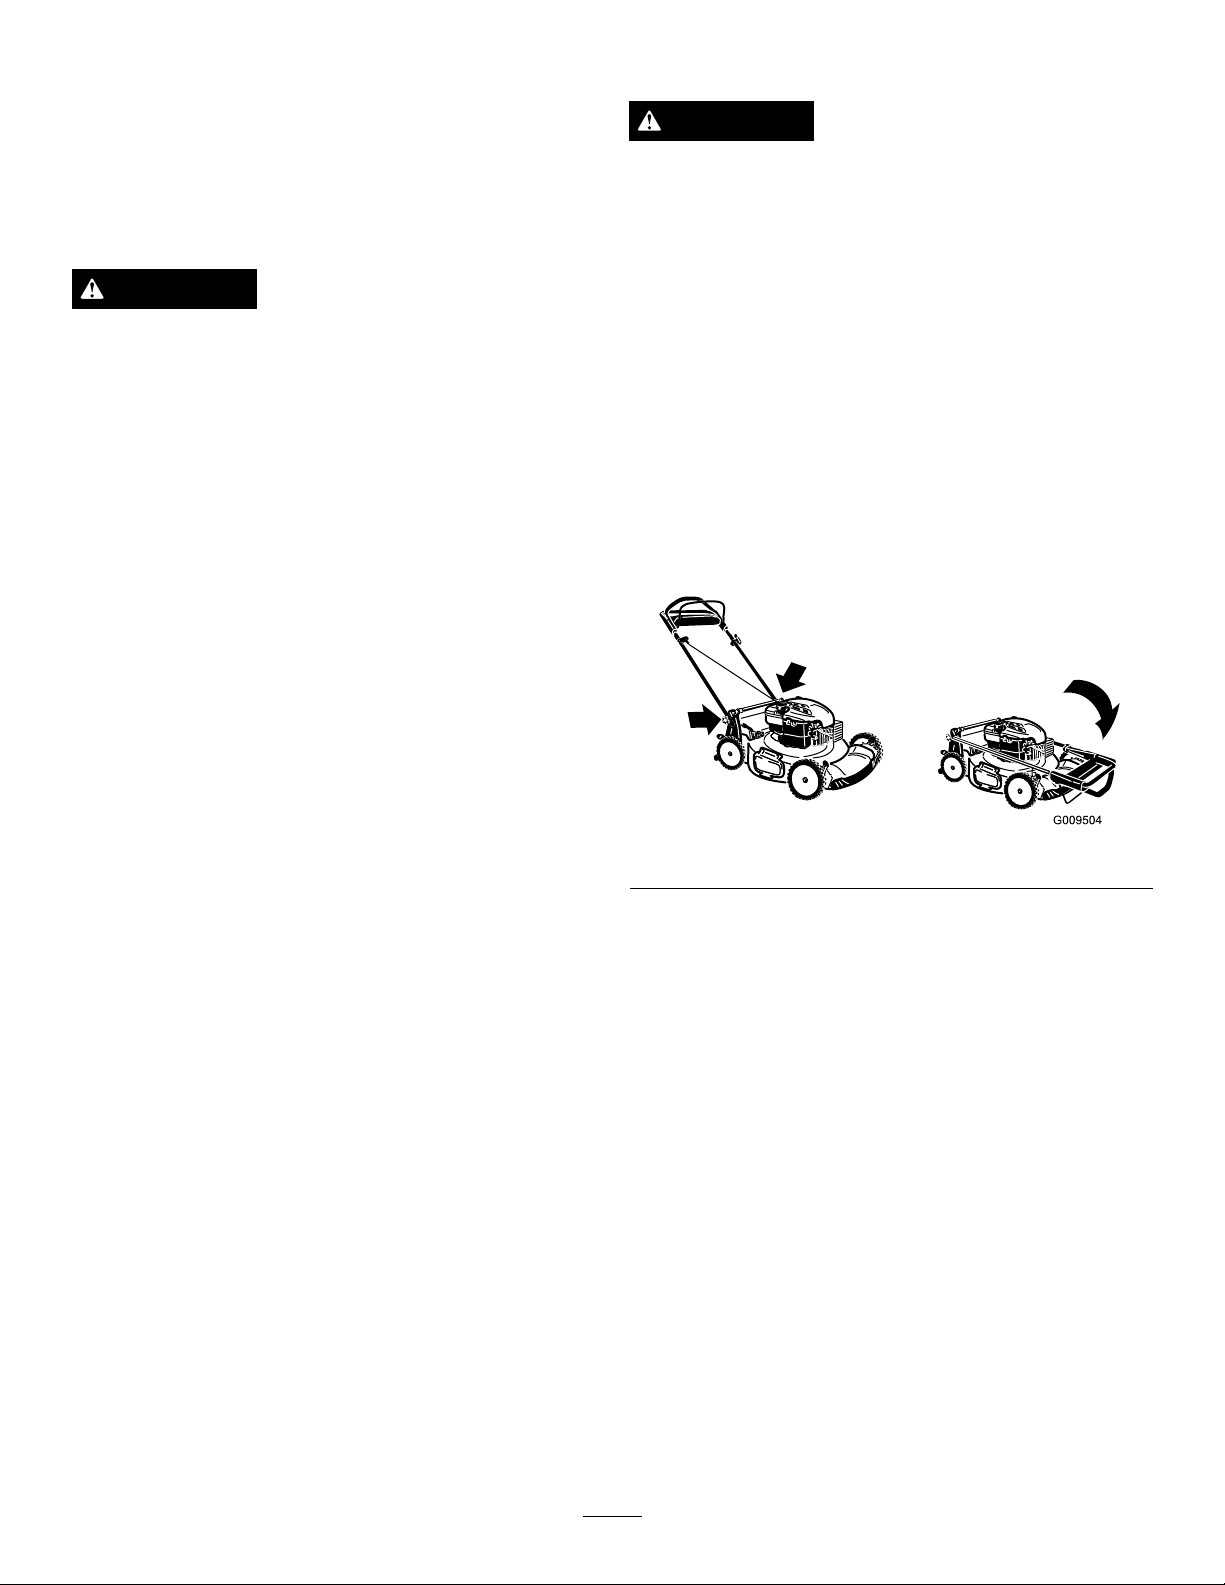
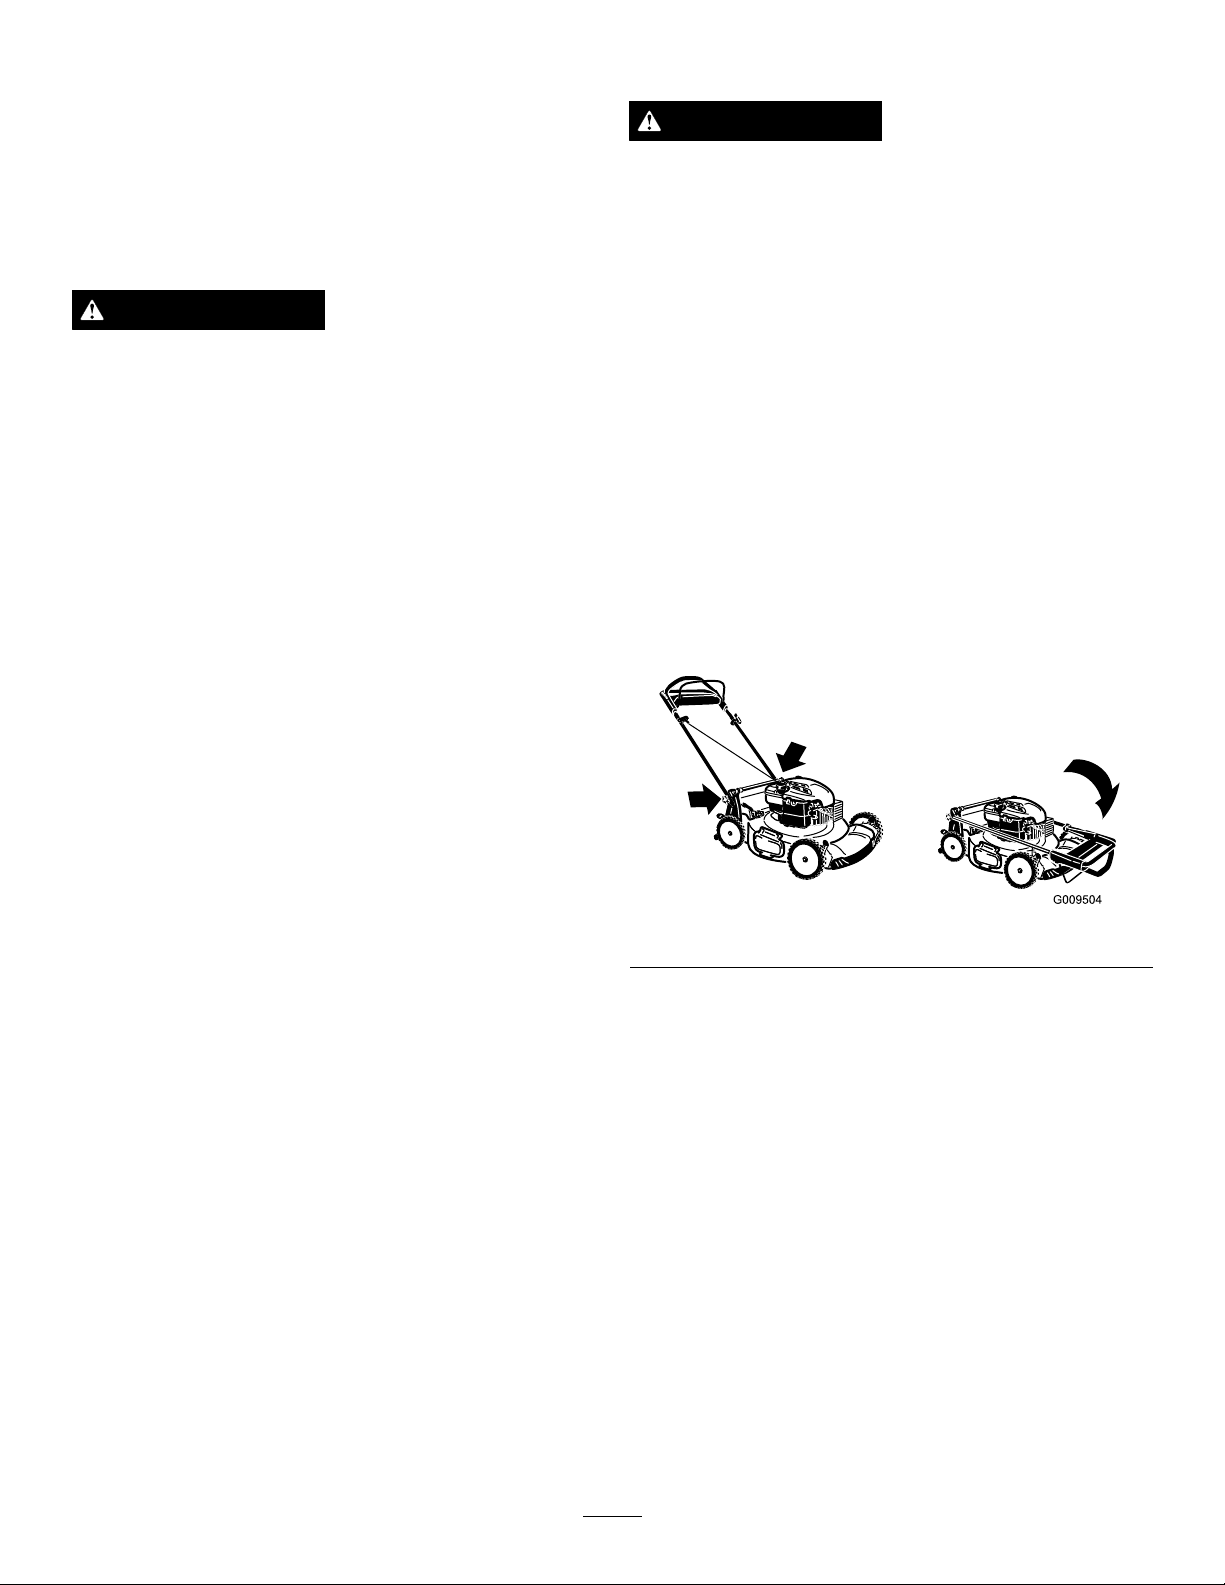
FoldingtheHandle
WARNING
Foldingorunfoldingthehandleimproperlycan
damagethecables,causinganunsafeoperating
condition.
•Donotdamagethecableswhenfoldingor
unfoldingthehandle.
•Ifacableisdamaged,contactanAuthorized
ServiceDealer.
1.Removetheignitionkey(electric-startmodelonly).
2.Loosenthehandleknobsuntilyoucanmovethe
upperhandlefreely.
3.FoldtheupperhandleforwardasshowninFigure29.
Important:Routethecablestotheoutsideof
thehandleknobsasyoufoldthehandle.
Figure29
4.Tounfoldthehandle,reversethestepsabove.
RemovingtheMowerfrom
Storage
1.Chargethebatteryfor24hours(electric-startmodels
only).
2.Connectthewiretothesparkplug.
18

Notes:
19

TheToroTotalCoverageGuarantee
22inRecycler
®
A2-Y earFullWarranty(45DayLimitedWarrantyforCommercialUse)20inMulcher/Bagger
TheToroGTSStartingGuarantee
WalkPowerMowers
A3-YearFullWarranty(NotApplicableforCommercialUse)
ConditionsandProductsCovered
TheToroCompanyanditsafliate,T oroWarrantyCompany,pursuantto
anagreementbetweenthem,jointlypromisetorepairtheToroProduct
listedbelowifusedforresidentialpurposes*;ifitisdefectiveinmaterials
orworkmanshiporifitstopsfunctioningduetothefailureofacomponent;
oriftheT oroGTS(GuaranteedtoStart)enginewillnotstartontherstor
secondpull,providedtheroutinemaintenancerequiredintheOperator's
Manualhavebeenperformed.
Thiswarrantycoversthecostofpartsandlabor,butyoumustpay
transportationcosts.
Thefollowingtimeperiodsapplyfromthedateofpurchase:
ProductsWarrantyPeriod
22inRecyclerand20in
Mulcher/BaggerandAttachments
2-yearfullwarranty
GTS(GuaranteedtoStart)3-yearfullwarranty
Engine
3-yearfullwarranty
Battery
1-yearfullwarranty
LimitedWarrantyforCommercialUse*
Gas-poweredToroProductsusedforcommercial,institutional,or
rentaluse,arewarrantedfor45daysagainstdefectsinmaterialsor
workmanship.Componentsfailingduetonormalweararenotcovered
bythiswarranty.
TheT oroGTS(GuaranteedtoStart)StartingGuaranteedoesnotapply
whentheproductisusedcommercially*.
InstructionsforObtainingWarrantyService
IfyouthinkthatyourToroProductcontainsadefectinmaterialsor
workmanship,orifanormal,able-bodiedadultcannolongerstartyour
product'sengineinoneortwopulls,followthisprocedure:
1.ContactanyAuthorizedT oroServiceDealertoarrangeserviceattheir
dealership.T olocateadealerconvenienttoyou,refertotheYellow
Pagesofyourtelephonedirectory(lookunder“LawnMowers”)or
accessourwebsiteatwww.T oro.com.Y oumayalsocallthenumbers
listedinitem#3tousethe24-hourT oroDealerlocatorsystem.
2.Bringtheproductandyourproofofpurchase(salesreceipt)tothe
ServiceDealer.Thedealerwilldiagnosetheproblemanddetermine
ifitiscoveredunderwarranty.
3.IfforanyreasonyouaredissatisedwiththeServiceDealer’s
analysisorwiththeassistanceprovided,contactusat:
CustomerCareDepartment,RLCDivision
TheToroCompany
8111LyndaleAvenueSouth
Bloomington,MN55420-1196
Tollfreeat866-214-9807(U.S.customers)
Tollfreeat866-214-9808(Canadiancustomers)
OwnerResponsibilities
YoumustmaintainyourT oroProductbyfollowingthemaintenance
proceduresdescribedintheOperator'sManual.Suchroutine
maintenance,whetherperformedbyadealerorbyyou,isatyourexpense.
ItemsandConditionsNotCovered
Thereisnootherexpresswarrantyexceptforspecialemissionsystem
coverageandenginewarrantycoverageonsomeproducts.Thisexpress
warrantydoesnotcoverthefollowing:
•Costofregularmaintenanceserviceorparts,suchaslters,fuel,
lubricants,oilchanges,sparkplugs,airltersbladesharpening
orwornblades,cable/linkageadjustments,orbrakeandclutch
adjustments
•Anyproductorpartwhichhasbeenalteredormisusedandrequires
replacementorrepairduetoaccidentsorlackofpropermaintenance
•Repairsnecessaryduetofailuretousefreshfuel(lessthanone
monthold),orfailuretoproperlypreparetheunitpriortoanyperiod
ofnon-useoveronemonth
•Pickupanddeliverycharges
•Operationalmisuse,neglect,oraccidents
•RepairsorattemptedrepairsbyanyoneotherthananAuthorized
ToroServiceDealer
•Repairsoradjustmentstocorrectstartingdifcultiesduetothe
following:
–failuretofollowpropermaintenanceprocedures
–rotarymowerbladestrikinganobject
–contaminantsinthefuelsystem
–improperfuel(consultyourOperator'sManualifindoubt)
–failuretodrainthefuelsystempriortoanyperiodofnon-use
overonemonth
•Specialoperationalconditionswherestartingmayrequiremorethan
twopulls:
–rsttimestartsafterextendedperiodofnon-useoverthree
monthsorseasonalstorage
–cooltemperaturestartssuchasthosefoundinearlyspringand
lateautumn
–improperstartingprocedures-ifyouarehavingdifcultystarting
yourunit,pleasechecktheOperator'sManualtoensurethat
youareusingthecorrectstartingprocedures.Thiscansavean
unnecessaryvisittoanAuthorizedT oroServiceDealer.
GeneralConditions
Allrepairscoveredbythesewarrantiesmustbeperformedbyan
AuthorizedT oroServiceDealerusingT oro-approvedreplacementparts.
RepairbyanAuthorizedT oroServiceDealerisyoursoleremedyunder
thiswarranty.
NeitherTheToroCompanynorToroWarrantyCompanyisliablefor
indirect,incidental,orconsequentialdamagesinconnectionwiththe
useoftheToroProductscoveredbythesewarranties,includingany
costorexpenseofprovidingsubstituteequipmentorserviceduring
reasonableperiodsofmalfunctionornon-usependingcompletionof
repairsunderthesewarranties.
Somestatesdonotallowexclusionsofincidentalorconsequential
damages,sotheaboveexclusionsmaynotapplytoyou.
Thiswarrantygivesyouspeciclegalrights,andyoumayalsohaveother
rightswhichvaryfromstatetostate.
CountriesOtherthantheUnitedStatesorCanada
CustomerswhohavepurchasedT oroproductsexportedfromtheUnitedStatesorCanadashouldcontacttheirToroDistributor(Dealer)toobtain
guaranteepoliciesforyourcountry,province,orstate.IfforanyreasonyouaredissatisedwithyourDistributor'sserviceorhavedifcultyobtaining
guaranteeinformation,contacttheT oroimporter.Ifallotherremediesfail,youmaycontactusatT oroWarrantyCompany.
*Residentialpurposesmeansuseoftheproductonthesamelotasyourhome.Useatmorethanonelocation,orinstitutionalorrentaluse,isconsidered
commercialuse,andthecommercialusewarrantywouldapply.
374-0254RevC
FormNo.3371-671-ASMRevA
CortacéspedRecycler
®
56cm(22pulgadas)
Nºdemodelo20332—Nºdeserie312000001ysuperiores
Nºdemodelo20334—Nºdeserie312000001ysuperiores
Nºdemodelo20352—Nºdeserie312000001ysuperiores
Manualdeloperador
PuedeadquirirpiezasderepuestoenunServicioTécnicoAutorizadooenwww.shoptoro.com.
Introducción
Estecortacéspeddirigidodecuchillasrotativasestá
diseñadoparaserusadoporusuariosdomésticos.
Estádiseñadoprincipalmenteparasegarcéspedbien
mantenidoenzonasverdesresidenciales.Noestá
diseñadoparacortarmalezaoparaaplicacionesagrícolas.
Leaestemanualdetenidamenteparaaprenderautilizar
ymantenercorrectamentesuproducto,yparaevitar
lesionesydañosalproducto.Ustedeselresponsablede
operarelproductodeformacorrectaysegura.
UstedpuedeponerseencontactodirectamenteconToro
enwww.Toro.comsideseainformaciónsobreproductos
yaccesorios,osinecesitalocalizarundistribuidoro
registrarsuproducto.
Cuandonecesiteasistenciatécnica,piezasgenuinasToro
oinformaciónadicional,póngaseencontactoconun
ServicioTécnicoAutorizadooconAsistenciaalCliente
Toro,ytengaamanolosnúmerosdemodeloyserie
desuproducto.Figura1identicalaubicacióndelos
númerosdemodeloyserieenelproducto.
Figura1
1.Placaconlosnúmerosdemodeloydeserie
Anoteacontinuaciónlosnúmerosdemodeloydeserie
desuproducto:
Nºdemodelo
Nºdeserie
Estemanualidenticapeligrospotencialesycontiene
mensajesdeseguridadidenticadosporelsímbolode
alertadeseguridad(Figura2),queseñalaunpeligroque
puedecausarlesionesgravesolamuertesiustedno
siguelasprecaucionesrecomendadas.
Figura2
1.Símbolodealertadeseguridad
Estemanualutiliza2palabraspararesaltarinformación.
Importantellamalaatenciónsobreinformación
mecánicaespecial,yNotaresaltainformacióngeneral
quemereceunaatenciónespecial.
ADVERTENCIA
CALIFORNIA
AdvertenciadelaPropuesta65
Losgasesdeescapedeesteproductocontienen
productosquímicosqueelEstadodeCalifornia
sabequecausancáncer,defectoscongénitos
uotrospeligrosparalareproducción.
Importante:Estemotornoestáequipadocon
unsilenciadorconparachispas.Esunainfracción
delalegislacióndeCalifornia(CaliforniaPublic
ResourceCodeSection4442)lautilizaciónola
operacióndelmotorencualquierterrenodebosque,
monteoterrenocubiertodehierba.Otrosestados
ozonasfederalespuedentenerunalegislación
similar.
©2011—TheToro®Company
8111LyndaleAvenueSouth
Bloomington,MN55420
Registresuproductoenwww.Toro.com.
Traduccióndeloriginal(ES)
ImpresoenEE.UU.
Reservadostodoslosderechos

Estesistemadeencendidoporchispacumplelanorma
canadienseICES-002.
El
Manualdelpropietariodelmotor
adjunto
ofreceinformaciónsobrelasnormasdelaU.S.
EnvironmentalProtectionAgency(EPA)ydela
CaliforniaEmissionControlRegulationsobre
sistemasdeemisiones,mantenimientoygarantía.
Puedesolicitarseunmanualnuevoalfabricante
delmotor.
Enloscasosenqueseindicalapotenciaencvdel
motor,lapotenciabrutadelmotorfuecalculadaenel
laboratorioporelfabricantedelmotor,conarregloalo
estipuladoenSAEJ1940.Debidoaqueelmotorestá
conguradoparacumplirlosrequisitosdeseguridad,
emisionesyoperación,supotenciarealenestetipode
cortacéspedserásignicativamentemenor.
Seguridad
Estecortacéspedcumpleosuperalosrequisitos
deseguridaddecuchillasCPSCparacortacéspedes
giratoriosdirigidosylasespecicacionesB71.1del
InstitutoNorteamericanodeEstándaresNacionalesen
vigorenelmomentodefabricación.
Leaycomprendaelcontenidodeestemanualantes
dearrancarelmotor.
Elsímbolodealertadeseguridad(Figura2)seutiliza
paraadvertirlesobrepotencialesriesgosdelesiones
personales.Observesiempretodoslosmensajesde
seguridadquesiguenaestesímboloconelndeevitar
posibleslesionesolamuerte.Elusoomantenimiento
incorrectosdeestecortacéspedpuedencausarlesiones
olamuerte.Parareducirestaposibilidad,cumplalas
siguientesinstruccionesdeseguridad.
Lassiguientesinstruccioneshansidoadaptadasdela
normaANSI/OPEIB71.1-2003.
Estamáquinadecortepuedeamputarmanosypies
ylanzarobjetosalaire.Elnoobservarlassiguientes
instruccionesdeseguridadpuededarlugara
lesionescorporalesgraveseinclusolamuerte.
Operacióngeneral
•Lea,comprendaysigatodaslasinstruccionesdel/de
losmanual(es)ylascolocadasenlamáquinaantes
dearrancarésta.
•Nocoloquelasmanosolospiescercadelamáquina
odebajodeésta.Manténgasealejadodelconducto
dedescargaentodomomento.
•Sólopermitaqueutilicenestamáquinaadultos
responsablesyfamiliarizadosconlasinstrucciones.
•Despejelazonadeobjetostalescomopiedras,
alambres,juguetes,etc.,quepodríanserarrojados
porlacuchilla.Permanezcadetrásdelmanillar
cuandoelmotorestáenmarcha.
•Asegúresedequenohayaotraspersonasenlazona
antesdeusarlamáquina.Parelamáquinasialguien
entraenlazona.
•Noutilicelamáquinasiustedestádescalzoolleva
sandalias.Llevesiemprecalzadofuerte.
•Notirehaciaatrásdelamáquinaamenosquesea
absolutamentenecesario.Antesdedesplazarsehacia
atrásymientraslohace,miresiemprehaciaabajoy
detrásdeusted.
•Nodirijanuncaelmaterialdescargadohacianadie.
Evitedescargarmaterialcontraunapareduotra
obstrucción.Elmaterialpodríarebotarhaciael
operador.Parelacuchillaalcruzarsuperciesde
grava.
•Nohagafuncionarlamáquinasinoestáncolocados
yfuncionandoelrecogedorcompleto,elprotector
dedescarga,elprotectortraserouotrosdispositivos
deprotección.
•Nodejenuncadesatendidalamáquinasiestá
funcionando.
•Pareelmotoryesperehastaquelacuchillasedetenga
completamenteantesdelimpiarlamáquina,retirarel
recogedorodesatascarelprotectordedescarga.
•Utilicelamáquinasolamenteconluznaturalocon
unabuenailuminaciónarticial.
•Noutilicelamáquinabajolainuenciadedrogaso
alcohol.
•Noutilicenuncaelcortacéspedenhierbamojada.
Asegúresedepisarrmemente;camine;nocorra
nunca.
•Desengraneelsistemadetransmisión,silamáquina
estáequipadaconuno,antesdearrancarelmotor.
•Silamáquinacomienzaavibrardemaneraanormal,
pareelmotorycompruebelacausainmediatamente.
Lavibraciónsueleserunavisodeproblemas.
•Siempreutiliceprotecciónocularalusarlamáquina.
•Consultelasinstruccionesdelfabricanterespectoa
lainstalaciónyoperacióncorrectasdelosaccesorios.
Utilicesolamenteaccesorioshomologadosporel
fabricante.
2

Operaciónenpendientes
Laspendientessonunfactordeprimeraimportancia
relacionadoconaccidentes,especialmenteresbalones
ycaídas,quepuedencausarlesionesgraves.Entodas
laspendientesycuestassenecesitateneruncuidado
especial.Siustednosesienteconconanzaenuna
pendiente,nolasiegue.
•Sieguedetravéslascuestasypendientes,nuncahacia
arribaohaciaabajo.Extremelasprecaucionesal
cambiardedirecciónencuestasopendientes.
•Estéalertaaagujeros,surcos,montículos,rocas
uotrosobjetosocultos.Losterrenosdesiguales
puedencausarcaídasyresbalones.Lahierbaalta
puedeocultarobstáculos.
•Nosieguelahierbamojadaoenpendientes
excesivamenteempinadas.Sinopisarme,puede
resbalarycaer.
•Nosieguecercadeterraplenes,fosasotaludes.
Ustedpodríaperderelequilibrooresbalar.
Niños
Puedenocurriraccidentestrágicossieloperadornoestá
alertaalapresenciadeniños.Amenudolosniñosse
sientenatraídosporlamáquinaylaactividaddesegar.
Nosuponganuncaquelosniñosvanapermaneceren
elúltimolugarenquelosvio.
•Mantengaalosniñosalejadosdelazonadesiegay
bajolaatentamiradadeunadultoresponsableque
noseaeloperador.
•Estéalertaypareelcortacéspedsientranniñosen
lazona.
•Nuncapermitaalosniñosutilizarlamáquina.
•Extremelaprecauciónalacercarseaesquinasciegas,
arbustos,árbolesuotrosobjetosquepuedanimpedir
queustedveaunniño.
Mantenimiento
Manejosegurodelagasolina
Paraevitarlesionespersonalesodañosmateriales,
extremelasprecaucionesalmanejarlagasolina.
Lagasolinaesextremadamenteinamableylos
vaporessonexplosivos.
•Apaguecualquiercigarrillo,cigarro,pipauotra
fuentedeignición.
•Utilicesolamenteunrecipientedegasolina
homologado.
•Noretirenuncaeltapóndecombustibleniañada
combustibleconelmotorenmarcha.Dejequese
enfríeelmotorantesderepostarcombustible.
•Norepostenuncalamáquinaenunrecintocerrado.
•Noguardenuncalamáquinaounrecipientede
combustiblecercadeunallamadesnuda,chispao
llamapiloto,porejemploenuncalentadordeagua
uotroelectrodoméstico.
•Nollenenuncalosrecipientesdentrodeunvehículo
osobrelaplataformadeuncamiónoremolquecon
forrodeplástico.Coloquesiemprelosrecipientes
degasolinaenelsuelo,lejosdelvehículo,antesde
llenarlos.
•Retireunequipoconmotordegasolinadelcamión
odelremolqueyrepósteloenelsuelo.Siestono
esposible,reposteelequipodesdeunrecipiente
portátil,envezdeusarunsurtidoroboquilla
dosicadoradegasolina.
•Mantengalaboquillaencontactoconelbordedel
depósitodecombustibleoeloriciodelrecipiente
entodomomentohastaqueterminederepostar.No
utilicedispositivosquemantenganabiertalaboquilla.
•Sisederramacombustiblesobresuropa,cámbiese
deropainmediatamente.
•Nuncallenedemasiadoeldepósitodecombustible.
Vuelvaacolocareltapóndegasolinayapriételo
rmemente.
ADVERTENCIA
Losgasesdeescapedelmotorcontienenmonóxido
decarbono,queesunvenenoinodoroquepuede
matarle.
Nohagafuncionarelmotordentrodeunedicioo
enunlugarcerrado.
Mantenimientogeneral
•Nohagafuncionarnuncalamáquinaenunlugar
cerrado.
•Mantengaapretadostodoslostornillosytuercaspara
asegurarsedequeelequipoestáencondicionesde
funcionamientoseguras.
•Nomanipulenuncalosdispositivosdeseguridad.
Comprueberegularmentequefuncionan
correctamente.
•Mantengalamáquinalibredeacumulacionesde
hierba,hojasyotrosresiduos.Limpiecualquier
derramedeaceiteocombustibleyretirecualquier
residuoempapadoencombustible.Dejequese
enfríelamáquinaantesdealmacenarla.
3

•Sigolpeaunobjetoextraño,pareeinspeccionela
máquina.Siesnecesario,repárelaantesdearrancar
denuevo.
•Nuncahagaajustesoreparacionesconelmotor
enmarcha.Desconecteelcabledelabujíayhaga
masaconélcontraelmotorparaevitarunarranque
accidental.
•Compruebefrecuentementeloscomponentesdel
recogedoryelprotectordedescargaysustitúyalos
porpiezasrecomendadasporelfabricantecuando
seanecesario.
•Lascuchillasdelcortacéspedestánmuyaladas.
Envuelvalacuchillaolleveguantes,yextremelas
precaucionesalmanejarlascuchillas.
•Nocambielosajustesdelreguladordelmotorni
hagafuncionarelmotoraunavelocidadexcesiva.
•Reviseosustituyalaspegatinasdeseguridade
instruccionescuandoseanecesario.
4
Pegatinasdeseguridadeinstrucciones
Importante:Haypegatinasdeseguridadeinstruccionescolocadascercadezonasdepotencialpeligro.
Sustituyacualquierpegatinadañada.
Marcadelfabricante
1.Indicaquelacuchillahasidoidenticadacomopiezadel
fabricanteoriginaldelamáquina.
94-8072
104-7953
1.Advertencia–leaelManualdeloperadorsideseainformaciónsobrecómocargarlabatería;contieneplomo;notiraralabasura.
2.LeaelManualdeloperador.
112-8867
1.Bloquear2.Desbloquear
114-7982
1.Advertencia–leaelManualdeloperador.
2.Peligrodeobjetosarrojados–mantengaaotraspersonas
aunadistanciaprudencialdelamáquina.
3.Peligrodecorte/desmembramientodemanoopie,cuchilla
delcortacésped–retirelallavedecontactoylealas
instruccionesantesderealizarcualquiertareadeajusteo
mantenimiento.
4.Peligrodecorte/desmembramientodemanoopieporla
cuchilladelcortacésped–noseacerquealaspiezasen
movimiento.
5.Peligrodecorte/desmembramientodemanoopie,
cuchilladelcortacésped–nosieguelaspendienteshacia
arriba/abajo;sieguelaspendientesdetravés;pareelmotor
antesdeabandonarelpuestodeloperador,ymirehacia
atrásmientrasconduceenmarchaatrás.
5
Montaje
Importante:Retireydesechelahojaprotectorade
plásticoquecubreelmotor.
1
Instalacióndelagarradero
Nosenecesitanpiezas
Procedimiento
ADVERTENCIA
Sipliegaodespliegaelmanillardeforma
incorrecta,puedendañarseloscables,creandounas
condicionesdeoperacióninseguras.
•Nodañeloscablesalplegarodesplegarel
manillar.
•Siuncableestádañado,póngaseencontacto
conelServicioTécnicoAutorizado.
1.Retirelospomosdelmanillardelacarcasadel
cortacésped(Figura3).
Importante:Asegúresedequeloscables
quedanporfueradelospomosdelmanillaral
instalarelmanillar.
Figura3
2.Muevaelmanillaralaposicióndeoperación.
3.Instaleyaprietelospomosdelmanillarqueretiró
enelpaso1.
2
Llenadodelcárterdeaceite
Nosenecesitanpiezas
Procedimiento
Importante:Elcortacéspedsesuministrasin
aceiteenelmotor,peroincluyeunabotellade
aceite.Antesdearrancarelmotor,lleneelmotor
deaceite.
Capacidadmáxima:0,59l(20onzas),tipo:SAE30,
aceitedetergenteconclasicacióndeservicioAPISF,
SG,SH,SJ,SLosuperior.
Nota:Cuandoelcárterestévacío,vierta
aproximadamentetrescuartaspartesdelacapacidad
totaldeaceiteenelcárter,yluegohagalosiguiente:
1.Lleveelcortacéspedaunasupercienivelada.
2.Retirelavarillagirandoeltapónenelsentido
contrarioalasagujasdelrelojytirandodelmismo
(Figura4).
Figura4
1.Varilla
3.Limpielavarillaconunpañolimpio.
4.Insertelavarillaafondoeneltubodellenadode
aceite,luegoretírela.
5.Observeenlavarillaelniveldeaceite.
6
Nota:Sielniveldeaceiteestápordebajodela
marcaAñadirdelavarilla,viertaunapequeña
cantidaddeaceitelentamenteeneltubodellenado,
espere3minutos,yrepitalospasos3a5hastaqueel
nivellleguealamarcaLlenodelavarilla(Figura4).
Importante:Evitellenarelcárterdemasiado
yarrancarelmotor.Dreneelexcesodeaceite
hastaqueelniveldeaceitelleguealamarca
Llenodelavarilla.
6.Instalelavarillarmementeeneltubodellenado
deaceite.
Importante:
Cambieelaceitedelmotor
despuésdelasprimeras5horasdeoperación
,y
despuéscadaaño.ConsulteCómocambiarel
aceitedelmotor.
3
Cómocargarlabatería
Nosenecesitanpiezas
Procedimiento
Modelodearranqueeléctricosolamente
ConsulteCómocargarlabateríaenlasecciónde
Mantenimiento.
Elproducto
Figura5
1.Agarradero8.Palancadealturadecorte
(4)
2.Barradecontroldela
cuchilla
9.Filtrodeaire
3.Llavedecontacto
(modelosdearranque
eléctricosolamente)
10.Deectordedescarga
lateral
4.Tapóndeldepósitode
combustible
11.Palancadeensacadoa
demanda
5.Varilla/tapóndellenadode
aceite
12.Pomodelmanillar(2)
6.Conectordelavado(no
ilustrado)
13.Arrancadorderetroceso
7.Bujía
Figura6
1.Bolsaderecortes
3.Cargadordelabatería
(modelosdearranque
eléctricosolamente)
2.Conductodedescarga
lateral
7
Operación
Cómollenareldepósitode
combustible
PELIGRO
Lagasolinaesaltamenteinamableyexplosiva.
Unincendioounaexplosiónprovocado(a)porla
gasolinapuedecausarlequemadurasaustedya
otraspersonas.
•Paraevitarqueunacargaestáticaincendie
lagasolina,coloqueelrecipientey/oel
cortacéspeddirectamentesobreelsueloantesde
repostar,noenunvehículoosobreotroobjeto.
•Lleneeldepósitoenelexteriorcuandoelmotor
estéfrío.Limpiecualquierderrame.
•Nomanejegasolinasiestáfumando,nicercade
unallamadesnudaochispas.
•Almacenelagasolinaenunrecipiente
homologadoymanténgalafueradelalcancede
losniños.
Lleneeldepósitodecombustiblecongasolinanuevasin
plomo(de87octanosomás)adquiridaenunagasolinera
demarcareconocida(Figura7).
Nota:Nuncausemetanol,gasolinaquecontenga
metanologasolinaconmásdel10%deetanolporque
sepodríanproducirdañosenelsistemadecombustible.
Nomezcleaceiteconlagasolina.
Importante:Parareducirlosproblemasde
arranque,añadaestabilizadordecombustible
alcombustibledurantetodalatemporada,
mezclándolocongasolinacompradohacemenos
detreintadías.
Figura7
8
Vericacióndelniveldeaceite
delmotor
Intervalodemantenimiento:Cadavezqueseutilice
odiariamente
Nota:Capacidadmáxima:0,59l(20onzas),tipo:SAE
30,aceitedetergenteconclasicacióndeservicioAPI
SF,SG,SH,SJ,SLosuperior.
1.Lleveelcortacéspedaunasupercienivelada.
2.Retirelavarilla(Figura8).
Figura8
1.Varilla
3.Limpielavarillaconunpañolimpio.
4.Insertelavarillaafondoeneltubodellenadode
aceite,luegoretírela.
5.Observeenlavarillaelniveldeaceite.
Nota:Sielniveldeaceiteestápordebajodela
marcaAñadirdelavarilla,viertaunapequeña
cantidaddeaceitelentamenteeneltubodellenado,
espere3minutos,yrepitalospasos3a5hastaqueel
nivellleguealamarcaLlenodelavarilla(Figura8).
Importante:Evitellenarelcárterdemasiado
yarrancarelmotor.Dreneelexcesodeaceite
hastaqueelniveldeaceitelleguealamarca
Llenodelavarilla.
6.Instalelavarillarmementeeneltubodellenado
deaceite.
Ajustedelaalturadecorte
ADVERTENCIA
Alajustarlaalturadecorte,ustedpodríatocarla
cuchillaenmovimiento,loquepodríacausarle
graveslesiones.
•Pareelmotoryespereaquesedetengantodas
laspiezasenmovimiento.
•Nopongalosdedosdebajodelacarcasaal
ajustarlaalturadecorte.
CUIDADO
Sielmotorhaestadoenmarcha,elsilenciador
estarámuycalienteypuedecausarlequemaduras
graves.Manténgasealejadodelsilenciadorsiéste
estácaliente.
Ajustelaalturadecortesegúndesee.Ajustelasruedas
delanterasalamismaalturaquelastraseras(Figura9).
Nota:Paraelevarelcortacésped,muevalaspalancasde
alturadecortedelanterashaciaadelanteylaspalancas
dealturadecortetraserashaciaatrás.Parabajarel
cortacésped,muevalaspalancasdealturadecorte
delanterashaciaatrásylastraserashaciaadelante.
Figura9
1.Elevarelcortacésped2.Bajarelcortacésped
Nota:Losajustesdealturadecorteson:1pulg.
(25mm);1-3/8pulg.(35mm);1-3/4pulg.(44mm);
2-1/8pulg.(54mm);2-1/2pulg.(64mm);2-7/8pulg.
(73mm);3-1/4pulg.(83mm);3-5/8pulg.(92mm);
y4pulg.(102mm).
9
Cómoarrancarelmotor
1.Sujetelabarradecontroldelacuchillacontrael
manillar(Figura10).
Figura10
1.Barradecontroldelacuchilla
2.Girelallavedecontacto(Figura11)(modelosde
arranqueeléctricosolamente)otiredelarrancador
deretroceso(Figura12).
Nota:Cuandotiredelarrancadorderetroceso,debe
tirarsuavementehastaquenoteresistencia;luego
tireconfuerza(Figura12).Dejequelacuerdavuelva
lentamentealmanillar.
Figura11
Figura12
Nota:Sielcortacéspednoarrancadespuésde
variosintentos,póngaseencontactoconelServicio
TécnicoAutorizado.
Usodelatransmisión
autopropulsada
Paraactivarelsistemadeautopropulsión,simplemente
camineconlasmanossobreelmanillarsuperiorylos
codosjuntoalcuerpo,yelcortacéspedmantendrá
automáticamentesumismavelocidad(Figura13).
Figura13
Nota:Sielcortacéspednoruedalibrementehaciaatrás
despuésdeusarlaautopropulsión,dejelasmanosen
susitio,ydejequeelcortacéspedruedeunascuantas
pulgadas(unoscuantoscentímetros)haciaadelante
paradesengranarlatransmisióndelasruedas.También
puedeintentarponerlamanosobreelmanillarmetálico
situadojustodebajodelabarradeautopropulsióny
empujarelcortacéspedhaciaadelanteunpardepulgadas
(centímetros).Sielcortacéspednoruedafácilmente
haciaatrás,póngaseencontactoconelServicioTécnico
Autorizado.
10
Cómopararelmotor
Parapararelmotor,sueltelabarradecontroldela
cuchilla.
Nota:Retirelallavedecontactosidejaelcortacésped
sinsupervisar(modelosconarranqueeléctrico
solamente).
Importante:Cuandoustedsueltelabarrade
controldelacuchilla,elmotorylacuchilla
deberándetenerseen3segundosomenos.Sinose
parancorrectamente,dejedeusarelcortacésped
inmediatamenteypóngaseencontactoconun
ServicioTécnicoAutorizado.
Recicladodelosrecortes
Sucortacéspedvienepreparadodefábricaparareciclar,
esdecir,parapicarlosrecortesdehierbayhojasy
devolverlosalcésped.
Silabolsaderecortesestáinstaladaenelcortacésped,
ylapalancadeensacadoademandaestáenlaposición
deensacado,muevalapalancaalaposicióndereciclado
(consulteManejodelapalancadeensacadoademanda)
antesdereciclarlosrecortes.Sielconductodedescarga
lateralestáinstaladoenelcortacésped,retírelo(consulte
Cómoretirarelconductodedescargalateral)antesde
reciclarlosrecortes.
Ensacadodelosrecortes
Utilicelabolsaderecortessiusteddesearecogerlos
recortesdehierbayhojasdelcésped.
ADVERTENCIA
Silabolsaderecortesestádesgastada,pueden
arrojarsepequeñaspiedrasyotrosresiduos
similaresalazonadondeestáeloperadoruotra
persona,provocandolesionespersonalesgravesola
muertealoperadoroalaotrapersona.
Compruebefrecuentementelabolsaderecortes.Si
estádañada,instaleunabolsaderecambioToro
nueva.
Sielconductodedescargalateralestáinstaladoenel
cortacésped,retírelo(consulteCómoretirarelconducto
dedescargalateral)antesdeensacarlosrecortes.Sila
palancadeensacadoademandaestáenlaposiciónde
reciclado,muévalaalaposicióndeensacado(consulte
Manejodelapalancadeensacadoademanda).
ADVERTENCIA
Lacuchillaestámuyalada;cualquiercontactocon
lacuchillapuedecausarlesionespersonalesgraves.
Pareelmotoryespereaquesedetengantodaslas
piezasenmovimientoantesdeabandonarelpuesto
deloperador.
Instalacióndelabolsaderecortes
1.Levanteysujeteeldeectortrasero(Figura14).
Figura14
1.Muescas3.Pasadordelabolsade
recortes(2)
2.Deectortrasero
11
2.Instalelabolsaderecortes,asegurándosedequelos
pasadoresdelabolsadescansanenlasmuescasdel
manillar(Figura14).
3.Bajeeldeectortrasero.
Cómoretirarlabolsaderecortes
Pararetirarlabolsa,sigalosmismospasosensentido
inverso.
Funcionamientodelapalancade
ensacadoademanda
Lafuncióndeensacadoademandalepermiterecoger
oreciclarlosrecortesdehierbayhojasconlabolsade
recortesinstaladaenelcortacésped.
•Paraensacarlosrecortesdehierbayhojas,presione
haciadentroelbotóndelapalancadeensacadoa
demandaymuevalapalancahaciadelantehastaque
salgaelbotóndelapalanca(Figura15)
Figura15
1.Palancadeensacadoademanda(enlaposiciónde
ensacado)
•Parareciclarlosrecortesdehierbayhojas,presione
haciadentroelbotóndelapalancadeensacadoa
demandaymuevalapalancahaciaatráshastaque
salgaelbotóndelapalanca.
Importante:Paraasegurarunfuncionamiento
correcto,retirecualquierrecortedehierbay
otrosresiduosdelatapadeensacadoademanda
ydelhuecoadyacente(Figura16)antesde
moverlapalancadeensacadoademandadeuna
posiciónalaotra.
ADVERTENCIA
Lacuchillaestámuyalada;cualquiercontacto
conlacuchillapuedecausarlesionespersonales
graves.Silatapadedescargatraseraestá
abierta,puedenarrojarsepequeñaspiedrasy
otrosresiduossimilareshacialazonadondeestá
eloperadoruotrapersona,provocandolesiones
personalesgravesolamuertealoperadoroala
otrapersona.
Pareelmotoryespereaquesedetengantodas
laspiezasenmovimientoantesdelimpiarlatapa
deensacadoademandayelhuecoadyacente.
Figura16
1.Limpiaraquí
Descargalateraldelos
recortes
Utiliceladescargalateralalcortarhierbamuyalta.
Silabolsaderecortesestáinstaladaenelcortacésped,
ylapalancadeensacadoademandaestáenlaposición
deensacado,muevalapalancaalaposicióndereciclado
(consulteManejodelapalancadeensacadoademanda).
ADVERTENCIA
Lacuchillaestámuyalada;cualquiercontactocon
lacuchillapuedecausarlesionespersonalesgraves.
Pareelmotoryespereaquesedetengantodaslas
piezasenmovimientoantesdeabandonarelpuesto
deloperador.
12
Instalacióndelconductodedescarga
lateral
Levanteeldeectorlateraleinstaleelconductode
descargalateral(Figura17).
Figura17
Cómoretirarelconductodedescarga
lateral
Pararetirarelconductodedescargalateral,levanteel
deectorlateral,retireelconductodedescargalateraly
bajeeldeectordelconductodedescargalateral.
Consejosdeoperación
Consejosgeneralesdesiega
•Despejelazonadepalos,piedras,alambres,ramas
yotrosresiduosquepodríansergolpeadosporla
cuchilla.
•Evitegolpearobjetossólidosconlacuchilla.No
sieguenuncaporencimadeobjetoalguno.
•Sielcortacéspedgolpeaunobjetooempiezaa
vibrar,pareinmediatamenteelmotor,desconecte
elcabledelabujíaeinspeccioneelcortacéspeden
buscadedaños.
•Paraobtenerelmejorrendimiento,instaleuna
cuchillanuevaantesdequeempiecelatemporada
desiega.
•Sustituyalacuchillacuandoseaprecisoporuna
cuchilladerepuestoToro.
Cómocortarlahierba
•Cortesolamenteunterciodelahojadehierba
cadavez.Nocorteconunajusteinferiora54mm
(2-1/8pulg.)amenosquelahierbaseaescasa,oa
nalesdelotoñocuandoelritmodecrecimientode
lahierbaempiezaadecaer.ConsulteAjustedela
alturadecorte.
•Cuandocortehierbademásde15cm(6pulg.)
dealto,siegueprimerousandolaalturadecorte
másaltayandedespacio,luegosieguedenuevoa
unaalturamenorparaobtenerelmejoraspectode
césped.Silahierbaesdemasiadoalta,puedeatascar
elcortacéspedyhacerquesecaleelmotor.
•Sieguesolamentehierbauhojassecas.Lahierba
mojadaylashojasmojadastiendenapegarseal
suelo,ypuedenatascarelcortacéspedohacerquese
caleelmotor.
ADVERTENCIA
Lahierbamojadaolashojasmojadaspueden
causarlegraveslesionessiustedresbalaytoca
lacuchilla.Sieguesolamenteencondiciones
secas.
•Estéatentoalposibleriesgodeincendioen
condicionesmuysecas,sigatodaslasadvertencias
localesparacasosdeincendioymantengael
cortacéspedlibredehierbasecayresiduosdehojas.
•Alterneladireccióndecorte.Estoayudaadispersar
losrecortesentodoelcésped,dandounafertilización
máshomogénea.
•Sielaspectonaldelcéspednoessatisfactorio,
pruebea:
13

–Cambiarlacuchillaomandarlaaalar.
–Caminarmásdespaciomientrassiega.
–Elevarlaalturadecortedelcortacésped.
–Cortarelcéspedconmásfrecuencia.
–Solaparlospasillosdecorteenlugardecortarun
pasillocompletoencadapasada.
–Ajustarlaalturadecorteunamuescamenosen
lasruedasdelanterasqueenlastraseras.Por
ejemplo,ajustelasruedasdelanterasa54mm
(2-1/8pulg.)ylastraserasa64mm(2-1/2pulg.).
Cómocortarhojas
•Despuésdesegarelcésped,asegúresedequela
mitaddelcéspedseveatravésdelacoberturade
hojascortadas.Esposiblequetengaquehacermás
deunapasadaporencimadelashojas.
•Sihaymásde13cm(5pulg.)dehojasenelcésped,
ajustelaalturadecortedelasruedasdelanterasuna
muescaodosmásaltaqueladelasruedastraseras.
•Sieguemásdespaciosielcortacéspednocortalas
hojassucientementenas.
14
Mantenimiento
Nota:Losladosderechoeizquierdodelamáquinasedeterminandesdelaposiciónnormaldeloperador.
Calendariorecomendadodemantenimiento
Intervalodemanteni-
mientoyservicio
Procedimientodemantenimiento
Despuésdelasprimeras
5horas
•Cambieelaceitedelmotor.
Cadavezqueseutilice
odiariamente
•Compruebeelniveldeaceitedelmotor.
•Asegúresedequeelmotorseparaenelplazode3segundosdespuésdesoltarla
barradecontroldelacuchilla.
•Retirelosrecortesdehierbaylasuciedaddedebajodelacarcasa.
Cada25horas
•Cambieelltrodeaire;cámbieloconmásfrecuenciaencondicionesdemucho
polvo.
•Carguelabateríadurante24horas(modelosdearranqueeléctricosolamente).
Antesdelalmacenamiento
•Vacíeeldepósitodecombustibleantesdeefectuarreparaciones,segúnlas
instrucciones,yantesdelalmacenamientoanual.
Cadaaño
•Cambieelaceitedelmotor.
•Cambielacuchillaohagaquelaalen(másamenudosisedesalarápidamente).
•Limpieelsistemadelimpiezadeaire;límpieloconmásfrecuenciaencondiciones
demuchopolvo.Consulteelmanualdeloperadordesumotor.
•ConsulteenelManualdeloperadordelmotorcualquierprocedimientoadicional
demantenimientoanual.
Importante:ConsulteenelManualdeloperadordelmotorprocedimientosadicionalesdemantenimiento.
Nota:PuedeadquirirpiezasderepuestoenunServicioTécnicoAutorizado(vayaawww.toro.comparaencontrarel
distribuidormáscercano)oenwww .shoptoro.com.
Preparaciónparael
mantenimiento
1.Pareelmotoryespereaquesedetengantodaslas
piezasenmovimiento.
2.Desconecteelcabledelabujía(Figura18)antesde
realizarcualquierprocedimientodemantenimiento.
Figura18
3.Despuésderealizarel/losprocedimiento(s)de
mantenimiento,conecteelcabledelabujíaalabujía.
Importante:Antesdeinclinarelcortacésped
paracambiarelaceiteosustituirlacuchilla,
dejequesevacíeeldepósitodecombustible
conelusonormal.Siesimprescindible
inclinarelcortacéspedantesdequeseacabeel
combustible,utiliceunabombamanualpara
retirarelcombustible.Siemprecoloqueel
15
cortacéspeddeladoconelltrodeairehacia
arriba.
ADVERTENCIA
Alvolcarelcortacésped,puedehaberfugas
decombustible.Lagasolinaesinamabley
explosiva,ypuedecausarlesionespersonales.
Dejefuncionarelmotorhastaquenoquede
combustible,oretirelagasolinaconunabomba
demano;nuncautiliceunsifón.
Cambiodelltrodeaire
Intervalodemantenimiento:Cada25horas
1.Utiliceundestornilladorparaabrirlatapadelltro
deaire(Figura19).
2.Cambieelltrodeaire(Figura19).
3.Coloquelatapa.
Figura19
Cómocambiarelaceitedel
motor
Intervalodemantenimiento:Despuésdelasprimeras
5horas
Cadaaño
Hagafuncionarelmotorduranteunosminutosantesde
cambiarelaceiteparacalentarelaceite.Elaceitecaliente
uyemejorytransportamáscontaminantes.
1.Lleveelcortacéspedaunasupercienivelada.
2.ConsultePreparaciónparaelmantenimiento.
3.Retirelavarilla(Figura20).
16
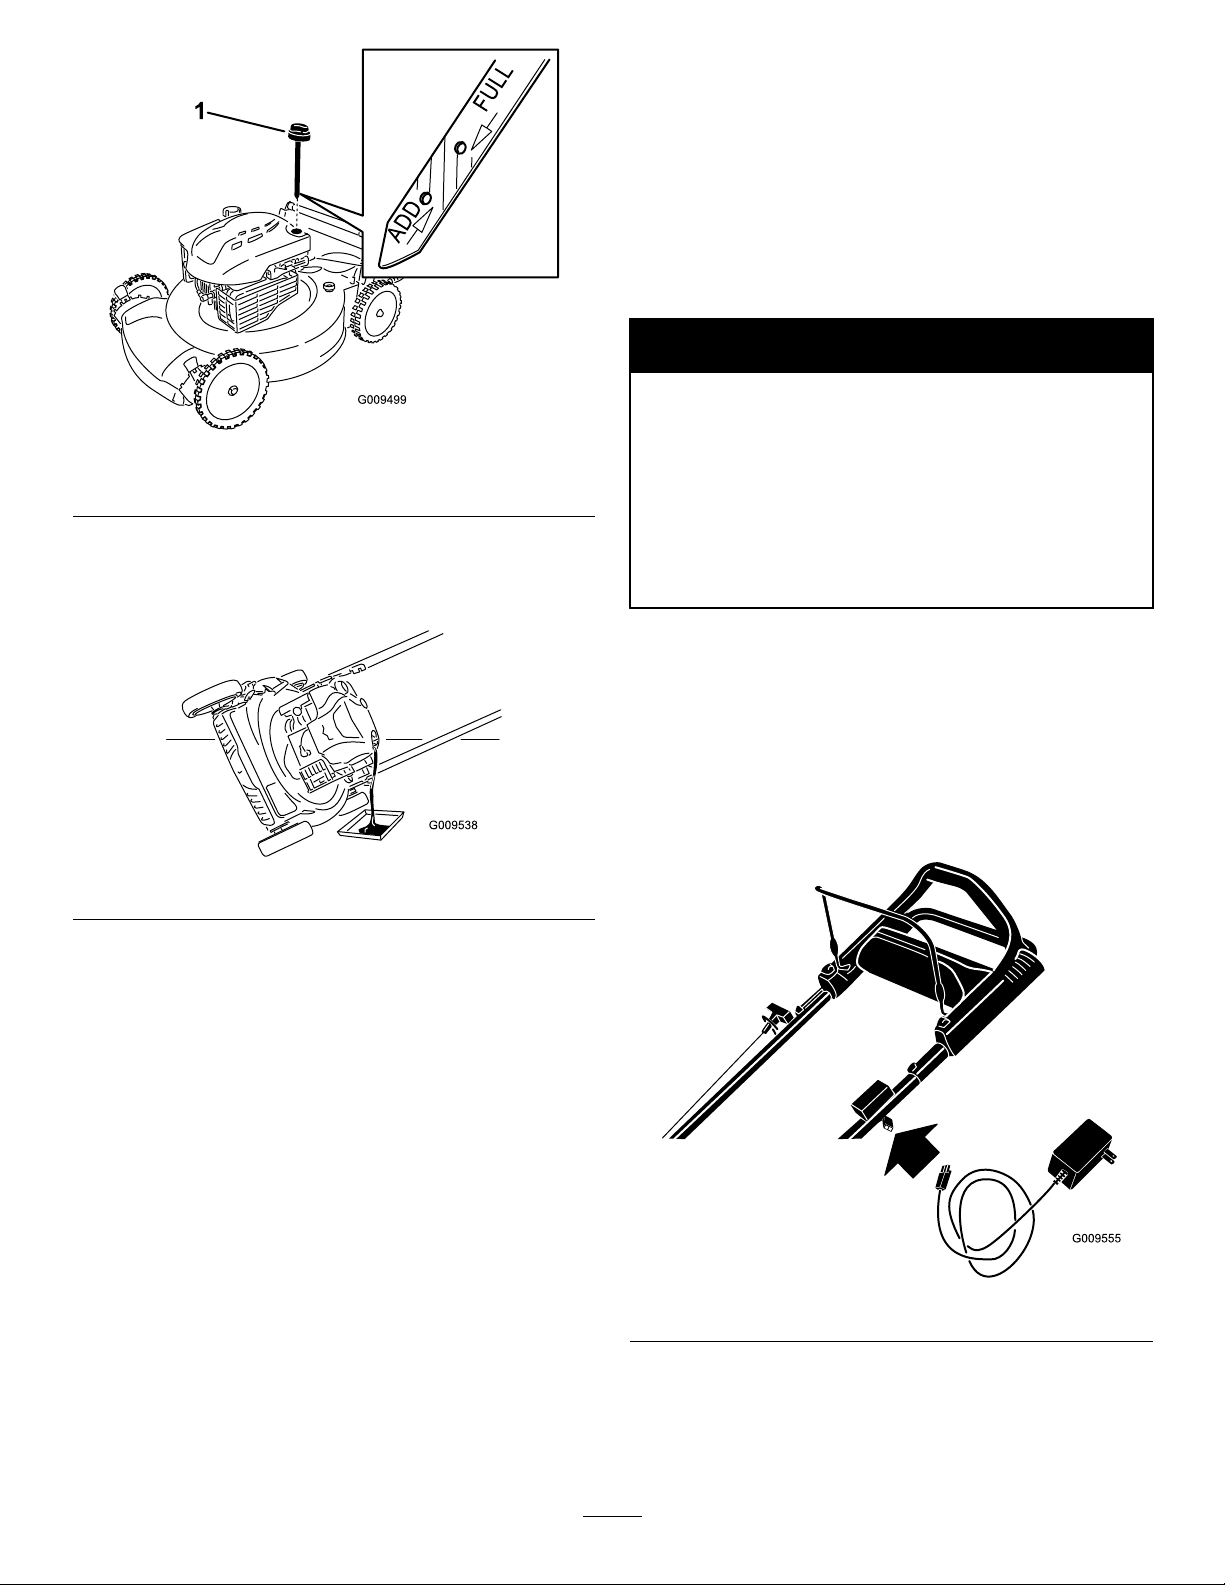
Figura20
1.Varilla
4.Coloqueelcortacéspeddeladoconelltrodeaire
haciaarribaparadrenarelaceiteusadoatravésdel
tubodellenadodeaceite(Figura21).
Figura21
5.Pongaelcortacéspeddepie.
6.Viertaaproximadamentetrescuartaspartesdela
capacidadtotaldeaceiteenelcárter.
7.Espere3minutosparaqueelaceiteseasiente.
8.Limpielavarillaconunpañolimpio.
9.Insertelavarillaafondoeneltubodellenadode
aceite,luegoretírela.
10.Observeenlavarillaelniveldeaceite.
Nota:Sielniveldeaceiteestápordebajodela
marcaAdddelavarilla,viertaunapequeñacantidad
deaceitelentamenteeneltubodellenadoyrepita
lospasos8a10hastaqueelnivellleguealamarca
Fulldelavarilla(Figura20).
Importante:Evitellenarelcárterdemasiado
yarrancarelmotor.Dreneelexcesodeaceite
hastaqueelniveldeaceitelleguealamarca
Llenodelavarilla.
11.Instalelavarillarmementeeneltubodellenado
deaceite.
12.Eliminecorrectamenteelaceiteusadoenuncentro
dereciclajehomologado.
Cómocargarlabatería
Intervalodemantenimiento:Cada25horas
Modelosdearranqueeléctricosolamente
ADVERTENCIA
CALIFORNIA
AdvertenciadelaPropuesta65
Losbornes,terminalesyotrosaccesorios
delabateríacontienenplomoycompuestos
deplomo,productosquímicosreconocidos
porelEstadodeCaliforniacomocausantes
decáncerydañosreproductivos.Láveselas
manosdespuésdemanejarelmaterial.
Carguelabateríadurante24horasinicialmente,luego
cadames(cada25arranques)osegúnseanecesario.
Utilicesiempreelcargadorenunazonaprotegidadela
intemperie,ycarguelabateríaatemperaturaambiente
(22°C/70°F)siemprequeseaposible.
1.Conecteelcargadoralarnésdecablesdel
cortacésped,situadodebajodelallavedecontacto
(Figura22).
Figura22
2.Conecteelcargadoraunatomadecorriente.
Nota:Cuandolabateríayanoseacapazdeadmitir
lacarga,recicleoeliminelabateríadeácido/plomo
segúnlanormativalocal.
17
Nota:Elcargadordelabateríapuedetenerunapantalla
LEDbicolorqueindicalosestadosdecargasiguientes:
•Unaluzrojaindicaqueelcargadorestácargando
labatería.
•Unaluzverdeindicaquelabateríaestátotalmente
cargadaoqueelcargadorestádesconectadodela
batería.
•Unaluzintermitentealternandoentrerojoyverde
indicaquelabateríaestácasitotalmentecargada.
Esteestadoduratansólounosminutoshasta
completarselacargadelabatería.
Cambiodelfusible
Modelosdearranqueeléctricosolamente
Silabateríanosecargaoelmotornofuncionaconel
motordearranqueeléctrico,esposiblequeelfusible
estéfundido.Cámbieloporunfusiblede40amperios,
tipoclavija.
1.Eleveeldeectortraseroylocaliceelcompartimento
delabatería(Figura23).
Figura23
1.Deectortrasero
3.Batería
2.Tornillo
4.Compartimientodela
batería
2.Limpiecualquierresiduodelazonadel
compartimentodelabatería.
3.Retireeltornilloquesujetaelcompartimentode
labatería,tiredelabateríahaciafueraylocaliceel
fusible(Figura24).
1
2
3
G017398
Figura24
1.Fusible
2.Portafusibles
4.Cambieelfusibledelportafusibles(Figura24).
Nota:Sucortacéspedvieneconunfusiblede
repuestoenelcompartimentodelabatería.
5.Instaleelcompartimentodelabateríaconeltornillo
queretiróenelpaso3.
6.Instalelacubiertasobreelcompartimentodela
batería.
7.Bajeeldeectortrasero.
Cómocambiarlacuchilla
Intervalodemantenimiento:Cadaaño
Importante:
Ustednecesitaráunallave
dinamométricaparainstalarlacuchilla
correctamente
.Sinodisponedeunallave
dinamométricaopreerenorealizareste
procedimiento,póngaseencontactoconelServicio
TécnicoAutorizado.
Examinelacuchillacadavezqueseacabelagasolina.
Silacuchillaestádañadaoagrietada,sustitúyala
inmediatamente.Siellodelacuchillaestáromoo
mellado,mandeaalarlacuchillaocámbiela.
ADVERTENCIA
Lacuchillaestámuyalada;cualquiercontactocon
lacuchillapuedecausarlesionespersonalesgraves.
Lleveguantesalrealizarelmantenimientodela
cuchilla.
1.ConsultePreparaciónparaelmantenimiento.
18
2.Coloqueelcortacéspeddeladoconelltrodeaire
haciaarriba.
3.Utiliceunbloquedemaderaparainmovilizarla
cuchilla(Figura25).
Figura25
4.Retirelacuchilla,conservandotodoslosherrajesde
montaje(Figura25).
5.Instalelacuchillanuevaytodoslosherrajesde
montaje(Figura26).
Figura26
Importante:Coloquelacuchillacon
losextremoscurvoshacialacarcasadel
cortacésped.
6.Utiliceunallavedinamométricaparaapretarel
pernodelacuchillaa82Nm(60pies-libra).
Importante:Unpernoapretadoa82Nm
(60pies-libra)quedamuyrme.Mientrassujeta
lacuchillaconunbloquedemadera,aplique
todasufuerzaalallaveyaprieteelperno
rmemente.Serámuydifícilapretaresteperno
demasiado.
Ajustedelcabledela
transmisiónautopropulsada
Cadavezqueinstaleunnuevocabledelatransmisión
autopropulsadaosilatransmisiónautopropulsada
estámalajustada,ajusteelcabledelatransmisión
autopropulsada.
1.Aojelatuercadelsoportedelcable(Figura27).
2.Tirehaciaabajodelacubiertadelcable(haciael
cortacésped)hastaeliminarlaholguraenelcable
(Figura27).
3.Aprietelatuercadelsoportedelcable.
Figura27
Laguraestásimplicadaenarasdemayorclaridad.
19
Limpiezadelcortacésped
Intervalodemantenimiento:Cadavezqueseutilice
odiariamente
ADVERTENCIA
Elcortacéspedpuedesoltarmaterialdedebajode
lacarcasa.
•Lleveprotecciónocular.
•Permanezcaenlaposicióndeoperación(detrás
delmanillar)cuandoelmotorestáenmarcha.
•Nopermitalapresenciadeotraspersonasen
lazona.
Paraobtenerresultadosóptimos,limpieelcortacésped
inmediatamentedespuésdehaberterminadolasiega.
1.Bajeelcortacéspedalaalturadecortemásbaja.
ConsulteAjustedelaalturadecorte.
2.Lleveelcortacéspedaunasupercieplana
pavimentada.
3.Lavelazonaqueestádebajodeldeectortrasero
pordondepasanlosrecortesensucaminodesdela
carcasahastalabolsaderecortes.
Nota:Lavelazonaconensacadoademandaen
laposicióntotalmentehaciaadelanteytotalmente
haciaatrás.
4.Introduzcaunamangueradejardínconectadaa
ungrifoeneloriciodelavadodelacarcazadel
cortacésped(Figura28).
Figura28
1.Oriciodelavado
5.Abraelgrifodelamanguera.
6.Arranqueelmotoryhágalofuncionarhastaqueno
salganmásrecortesdedebajodelacarcasa.
7.Pareelmotor.
8.Cierreelgrifoydesconectelamangueradel
cortacésped.
9.Arranqueelmotoryhágalofuncionarduranteunos
minutosparaquesesequelacarcasayevitarquese
oxide.
10.Espereaqueseenfríeelmotorantesdeguardarel
cortacéspedenunlugarcerrado.
20
Almacenamiento
Almaceneelcortacéspedenunlugarfresco,limpioy
seco.
Preparacióndelcortacésped
paraelalmacenamiento
ADVERTENCIA
Losvaporesdelagasolinapuedenexplosionar.
•Noguardelagasolinadurantemásde30días.
•Noguardeelcortacéspedenunlugarcerrado
cercadeunallamadesnuda.
•Dejequeseenfríeelmotorantesdeguardarlo.
1.Enelúltimorepostajedelaño,añadaestabilizador
alcombustiblesiguiendolasinstruccionesdel
fabricantedelmotor.
2.Desecheadecuadamentecualquiercombustible
sobrante.Recíclelosegúnlanormativalocal,o
utilíceloensuautomóvil.
Nota:Lapresenciadecombustibleviejoenel
depósitodecombustibleeslaprincipalcausade
dicultadesenelarranque.Noguardecombustible
sinestabilizadordurantemásde30días,yno
almacenecombustibleestabilizadodurantemásde
90días.
3.Hagafuncionarelcortacéspedhastaqueelmotorse
pareporhabersequedadosingasolina.
4.Arranqueelmotordenuevo.
5.Dejequefuncioneelmotorhastaquesepare.
Cuandoyanosepuedearrancarelmotor,está
sucientementeseco.
6.Desconecteelcabledelabujía.
7.Retirelabujía,añada30ml(1onza)deaceitea
travésdeloriciodelabujía,ytiredelacuerda
delarrancadorlentamentevariasvecesparaquese
distribuyaelaceiteporelcilindro,conelndeevitar
lacorrosiónduranteelperiododeinactividad.
8.Instalelabujíasinapretarla.
9.Aprietetodoslospernos,tuercasytornillos.
10.Carguelabateríadurante24horas,luegodesconecte
elcargadordelabateríayguardeelcortacéspeden
unazonasincalefacción.Siesnecesarioalmacenar
elcortacéspedenunlugarconcalefacción,debe
cargarlabateríacada90días(modelosdearranque
eléctricosolamente).
Cómoplegarelmanillar
ADVERTENCIA
Sipliegaodespliegaelmanillardeforma
incorrecta,puedendañarseloscables,creandounas
condicionesdeoperacióninseguras.
•Nodañeloscablesalplegarodesplegarel
manillar.
•Siuncableestádañado,póngaseencontacto
conelServicioTécnicoAutorizado.
1.Retirelallavedecontacto(modelodearranque
eléctricosolamente).
2.Aojelospomosdelmanillarhastaquepuedamover
librementelasecciónsuperiordelmismo.
3.Plieguehaciaadelantelasecciónsuperiordelmanillar
(verFigura29).
Importante:Asegúresedequeloscables
quedanporfueradelospomosdelmanillaral
plegarlasecciónsuperior.
Figura29
4.Paradesplegarelmanillar,sigalosmismospasosen
sentidoinverso.
Despuésdelalmacenamiento
1.Carguelabateríadurante24horas(modelosde
arranqueeléctricosolamente).
2.Conecteelcabledelabujía.
21

Notas:
22

Notas:
23

LaGarantíaTorodeCoberturaTotal
Recyclerde56cm(22pulgadas)
®
Unagarantíacompletade2años(Garantíalimitadade45díasparaelusocomercial)Picador/ensacadorde51cm(20pulgadas)
LaGarantíadeArranqueGTSdeToro
Cortacéspedesdirigidos
Unagarantíacompletade3años(noaplicablealusocomercial)
Condicionesyproductoscubiertos
TheT oroCompanyysualiado,T oroWarrantyCompany,bajounacuerdoentre
sí,prometenconjuntamenterepararelproductoToronombradoacontinuaciónque
hayasidousadoconpropósitosresidenciales*,sitienedefectosdematerialeso
manodeobraosidejadefuncionardebidoalfallodeuncomponente,osielmotor
ToroGTS(GuaranteedtoStart-GarantíadeArranque)noarrancaenelprimero
segundointento,siemprequesehayarealizadotodoelmantenimientorutinario
indicadoenelManualdeloperador.
Estagarantíacubreelcostedepiezasymanodeobra,perousteddebepagar
loscostesdetransporte.
Lossiguientesplazossonaplicablesdesdelafechadelacompra:
Productos
Periododegarantía
Recyclerde22pulgadasy
Picador/Ensacadorde20pulgadas
yAccesorios
Garantíacompletade2años
GTS(GuaranteedtoStart)Garantíacompletade3años
Motor
Garantíacompletade3años
Batería
Garantíacompletade1año
Garantíalimitadaparaelusocomercial*
LosproductosdegasolinaT oroutilizadosconpropósitoscomerciales,institucionales
odealquilerestángarantizadosdurante45díascontradefectosenmaterialeso
manodeobra.Loscomponentesquefallandebidoalusoydesgastenormalesno
estáncubiertosporestagarantía.
LaGarantíadearranqueT oroGTSnoesaplicablecuandoelproductoesusado
connescomerciales*.
Instruccionesparaobtenerasistenciabajolagarantía
SiustedcreequesuProductoTorotieneundefectodematerialesomanodeobra,o
siunadultodecapacidadnormalyanopuedearrancarelmotordesuproductocon
unoodosintentos,sigaesteprocedimiento:
1.PóngaseencontactoconcualquierDistribuidorAutorizadoT oroparaconcertar
elmantenimientoensusinstalaciones.Paralocalizarundistribuidorcercade
usted,consultelasPáginasAmarillastelefónicas(mireen"cortacéspedes")
ovisitenuestrositiowebenwww.Toro.com.T ambiénpuedellamaralos
númerosqueaparecenenelapartado3parausarelsistemadelocalización
deDistribuidoresT orolas24horasaldía.
2.Lleveelproductoysupruebadecompra(reciboofacturadeventa)al
Distribuidor.Eldistribuidordiagnosticaráelproblemaydeterminarásiestá
cubiertoporlagarantía.
3.SiporalgunarazónustednoestásatisfechoconelanálisisdelDistribuidoro
conlaasistenciarecibida,póngaseencontactoconnosotrosenladirección
siguiente:
CustomerCareDepartment,RLCDivision
TheToroCompany
8111LyndaleAvenueSouth
Bloomington,MN55420-1196
Teléfonogratuito:866-214-9807(clientesdeEE.UU.)
Teléfonogratuito:866-214-9808(clientesdeCanadá)
Responsabilidadesdelpropietario
UsteddebemantenersuProductoT orosiguiendolosprocedimientosde
mantenimientodescritosenelManualdeloperador.Dichomantenimientorutinario,
searealizadoporundistribuidoroporustedmismo,esporcuentadeusted.
Elementosycondicionesnocubiertos
Nohayotragarantíaexpresasalvolacoberturaespecialdesistemasdeemisiónyla
garantíasobremotoresenalgunosproductos.Estagarantíaexpresanocubre:
•Elcostedemantenimientoregular,servicioopiezas,comoporejemploltros,
combustible,lubricantes,cambiosdeaceite,bujías,ltrosdeaire,aladode
cuchillasocuchillasdesgastadas,ajustesdecables/acoplamientosoajustes
defrenosyembragues
•Cualquierproductoopiezaquehayasidomodicadoomalutilizadooque
hayanecesitadosersustituidooreparadodebidoaaccidenteofaltade
mantenimientoadecuado
•Reparacionesdebidasanoutilizarcombustiblefresco(compradohacemenos
deunmes)onoprepararadecuadamentelaunidadantesdecualquierperiodo
denoutilizaciónsuperioraunmes
•Costesderecogidayentrega
•Maluso,negligenciaoaccidentes
•Reparacionesointentosdereparaciónporpartedepersonasnopertenecientes
aunDistribuidorAutorizadoT oro
•Reparacionesoajustesparacorregirproblemasdearranquedebidosalo
siguiente:
–nosehanseguidolosprocedimientoscorrectosdemantenimiento
–lacuchilladelcortacéspedgiratoriohagolpeadounobjeto
–contaminantesenelsistemadecombustible
–combustibleincorrecto(encasodeduda,consulteelManualdeloperador)
–nosehadrenadoelsistemadecombustibleantesdeunperiodode
inactividadsuperioraunmes
•Condicionesdeoperaciónespecialesquepuedenrequerirmásdedosintentos
dearranque:
–primerarranquedespuésdeunperiodoextendidodeinactividadsuperior
atresmesesodealmacenamientoestacional
–arranqueabajatemperatura,porejemploaliniciodelaprimaveraoal
naldelotoño
–procedimientosdearranqueincorrectos-sitienedicultadalarrancar
suunidad,reviseelManualdeloperadorparaasegurarsedeque
estásiguiendolosprocedimientosdearranquecorrectos.Estopuede
ahorrarleunavisitainnecesariaalServicioTécnicoAutorizadoToro.
Condicionesgenerales
Todaslasreparacionescubiertasporestasgarantíasdebenserrealizadasporun
ServicioTécnicoTorousandopiezasderepuestoaprobadosporT oro.Lareparación
porunDistribuidorAutorizadoToroessuúnicoremediobajoestagarantía.
NiTheToroCompanyniToroWarrantyCompanysonresponsablesdedaños
indirectos,incidentalesoconsecuentesrespectoalusodelosproductos
Torocubiertosporestasgarantías,incluyendocualquiercosteogastoporla
provisióndeequiposdesustituciónoservicioduranteperiodosrazonables
demalfuncionamientoonoutilizaciónhastalaterminacióndereparaciones
bajoestasgarantías.
Algunosestadosnopermitenexclusionesdedañosincidentalesoconsecuentes,de
maneraquelasexclusionesarribacitadaspuedennoseraplicablesausted.
Estagarantíaleotorgaaustedderechoslegalesespecícos;esposiblequeusted
tengaotrosderechosquevaríandeunestadoaotro.
PaísesfueradeEstadosUnidosoCanadá
LosclientesquecompraronproductosT oroexportadosdelosEstadosUnidosoCanadádebenponerseencontactoconsuDistribuidorT oroparaobtenerpólizasdegarantía
parasupaís,provinciaoestado.Siporcualquierrazónustednoestásatisfechoconelservicioofrecidoporsudistribuidor,ositienedicultadenobtenerinformaciónsobrela
garantía,póngaseencontactoconelimportadorToro.Sifallantodoslosdemásrecursos,puedeponerseencontactoconnosotrosenToroWarrantyCompany.
*"Propósitoresidencial"signicaelusodelproductoenlamismaparcelaenqueseencuentrasuvivienda.Elusoenmásdeunlugar,oelusoinstitucionaloalquiler,se
consideracomousocomercialyseríaaplicablelagarantíadeusocomercial.
374-0254RevC