
Use & Care Guide
Manual de Uso y Cuidado
Kenmore_
Fer_abte
_sl_o_eF
40584126
Sears Brands Management Corporation
Hoffman Estates t IL 60179 U.S.A.
www.kenmore.com
www.sears.com
www.kmartcom
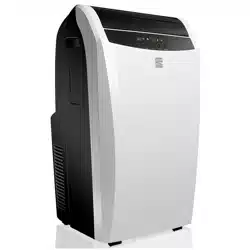
Read this guide. It will help you operate your new Kenmore Air Conditioner in the
safest and most effective way.
Keep this book and your sales check (receipt) in o safe place for future reference.
Kenmore One Year Limited Warranty When installed, operated and maintained according to all
supplied instructions, if this appliance fails due to a defect in material and workmanship within
one year from the date of purchase, call 1-800-4-MY-HOME ® to arrange for free repair, if this
appliance is ever used for other than private family purposes, this warranty applies for only 90
days from the date of purchase.
This warranty covers ONLY defects in material and workmanship, and will NOT pay for:
1. Expendable items that can wear out from normal use, including but not limited to filters, belts,
incandescent light bulbs and bags.
2. A service technician to instruct the user in correct product installation, operation or maintenance.
3. A service technician to clean or maintain this product.
4. Damage to or failure of this product if it is not installed, operated or maintained according to all
instructions supplied with the product.
5. Damage to or failure of this product resulting from accident, abuse, misuse or use for other than
its intended purpose.
6. Damage to or failure of this product caused by the use of detergents, cleaners, chemicals or
utensils other than those recommended in all instructions supplied with the product.
7. Damage to or failure of parts or systems resulting from unauthorized modifications made to this
product.
Disclaimer of implied warranties; limitation of remedies Customer's sole and exclusive remedy
under this limited warranty shall be product repair as provided herein. Implied warranties,
including warranties of merchantability or fitness for a particular purpose, are limited to one year
or the shortest period allowed by law. Sears shall not be liable for incidental or consequential
damages. Some states and provinces do not allow the exclusion or limitation of incidental or
consequential damages, or limitation on the duration of implied warranties of merchantability or
fitness, so these exclusions or limitations may not apply to you.
This warranty applies only while this appliance is used in the United States.
This warranty gives you specific legal rights, and you may also have other rights which vary from
state to state.
Sears Brands Management Corporation, Hoffman Estates, IL 60179
2
ReadallinstructionsinthisguidebeforeusingyourAirConditioner.Thisproductis
intendedforindoorresidentialuseonly,not for industrial or other commercial
applications. Use only with electrical wiring that is in good working order and
that meets applicable codes and ordinances. If you have any questions whether
your wiring is adequate, consult a qualified electrician.
While using your Air Conditioner, you should follow the IMPORTANT SAFETY
INSTRUCTIONS listed below. As part of those instructions, we have used the
word "_WARNING " to indicate the level of hazard: _.WARNING:
indicates a hazard which, if not avoided, could result in injury or death.
IMPORTANT INSTRUCTIONS
When using electrical appliances_ basic precautions should always be followed to
reduce the risk of fir% electric shock_ and injury to persons_ including the following:
1. Read all instructions before using this Air Conditioner.
2. Use this Air Conditioner only as described in this manual. Any other use not
recommended by the manufacturer may cause electrical shock_ fire_ or injury
to persons.
3. Do not operate the Air Conditioner with a damaged power cord or after the
Air Conditioner malfunctions or has been dropped in any manner.
4. This appliance is not intended for use by persons (including children) with
reduced physical_ sensory or mental capabilities_ or lack of experience and
knowledge_ unless they have been given supervision or instruction concerning
use of the appliance by a person responsible for their safety.
5. Do not place the Air Conditioner on a small_ unlevel_ uneven or any surface
which might allow unit to tip or fall.
6. For proper operation_ Air Conditioner should be placed on a smooth_
non combustible surface.
7. Always unplug Air Conditioner when not in use.
8. Do not operate Air Conditioner with any safety devices removed.
9. Do not run power cord under carpeting. Do not cover cord with throw rugs_
runners_ or the like. Arrange cord away from traffic area where it will not be
tripped over.
10. Avoid the use of extension cords due to risk of fire. If an extension cord must
be used_ the cord must be a minimum 14AWG and rated not lessthan 1875 watts.
11. Do not insert or allow any object to enter any openings on the Air Conditioner.
Doing so may cause electric shock and!or fire hazard.
12. This product is intended for indoor residential use only_not for industrial or
other commercial applications. This warranty is void if this product is ever
used for other than private household purposes.
13. You will need a level surface at least 6" (15.2 cm) from heat sources such as
ranges or heaters.
14. Do not block air openings or place Air Conditioner on a soft surface such as a
bed or sofa. 3
15.TheAirConditionershouldbeconnectedtoa 115V,60Hz,15-or20-amp
fused3pronggroundedoutlet.
16.Alwaysinsertthefilterssecurely.Cleanthemevery two weeks. Operation without
filters may cause failures.
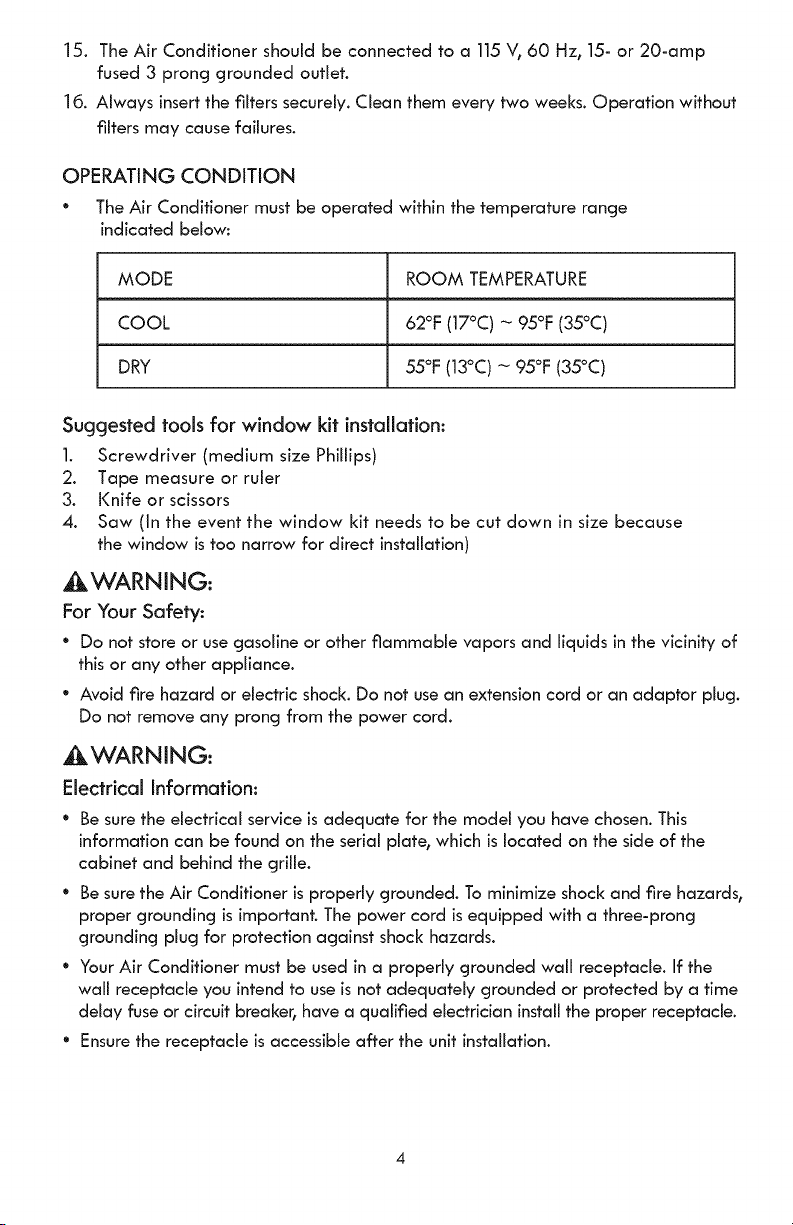
OPERATING CONDITION
o The Air Conditioner must be operated within the temperature range
indicated below:
MODE ROOM TEMPERATURE
COOL 62°F (17°C) - 95°F (35°C)
DRY 55°F (13°C) - 95°F (35°C)
Suggested tools for window kit installation:
1. Screwdriver (medium size Phillips)
2. Tape measure or ruler
3. Knife or scissors
4. Saw (in the event the window kit needs to be cut down in size because
the window is too narrow for direct installation)
`&WARNING:
For Your Safety:
Do not store or use gasoline or other flammable vapors and liquids in the vicinity of
this or any other appliance.
Avoid fire hazard or electric shock. Do not use an extension cord or an adaptor plug.
Do not remove any prong from the power cord.
,&WARNING:
Electrical information:
Be sure the electrical service is adequate for the model you have chosen. This
information can be found on the serial plafer which is located on the side of the
cabinet and behind the grille.
Be sure the Air Conditioner is properly grounded. To minimize shock and fire hazardsr
proper grounding is important. The power cord is equipped with a three-prong
grounding pbg for protection against shock hazards.
Your Air Conditioner must be used in a properly grounded wail receptacle. If the
wall receptacle you intend to use is not adequately grounded or protected by a time
delay fuse or circuit breaker_ have a qualified electrician install the proper receptacle.
Ensure the receptacle is accessible after the unit installation.
_,WARNING: SHOCK HAZARD
Never Jocate Air Conditioner where it may faJJ into a bathtub I sink l
flooded area I or any receptacJe or pooJ of water.
4_,WARNING: FiRE HAZARD
Air Conditioners have arcing or sparking parts inside. Do not use near cornbustibJe
rnateriaJs or flarnrnabJe gases or sources of heat. DO NOT USE in areas where
gasoNne I paint or flarnrnabJe rnateriaJs are used or stored. To prevent a possibJe
fire I do not bJock air intakes or exhaust in any manner. Do not insert or aJJow
foreign objects to enter any intakes or exhaust opening as this may cause an
eJectric shockl fire I or damage the fan.
_WARNING: HOT SURFACES
Do not touch Air Conditioner motor when in use. This motor is hot when in use. To
avoid burnsI do not Jet bare skin touch hot surfaces.
SAVE THESE INSTRUCTIONS!
OBSERVE ALL LOCAL CODES
AND ORDINANCES,
DO NOT, UNDER ANY CIRCUMSTANCES,
REMOVE THE POWER SUPPLY CORD
GROUND PRONG.
ELECTRICAL GROUND iS REQUIRED ON
THiS APPLIANCE
A 115-VOLT 60Hz, AC ONLY, 15A or 20A
FUSED AND PROPERLY GROUNDED
ELECTRICAL SUPPLY IS REQUIRED.
A time delay fuse or time delay circuit
breaker is recommended. Use a dedicated
circuit serving only this appliance.
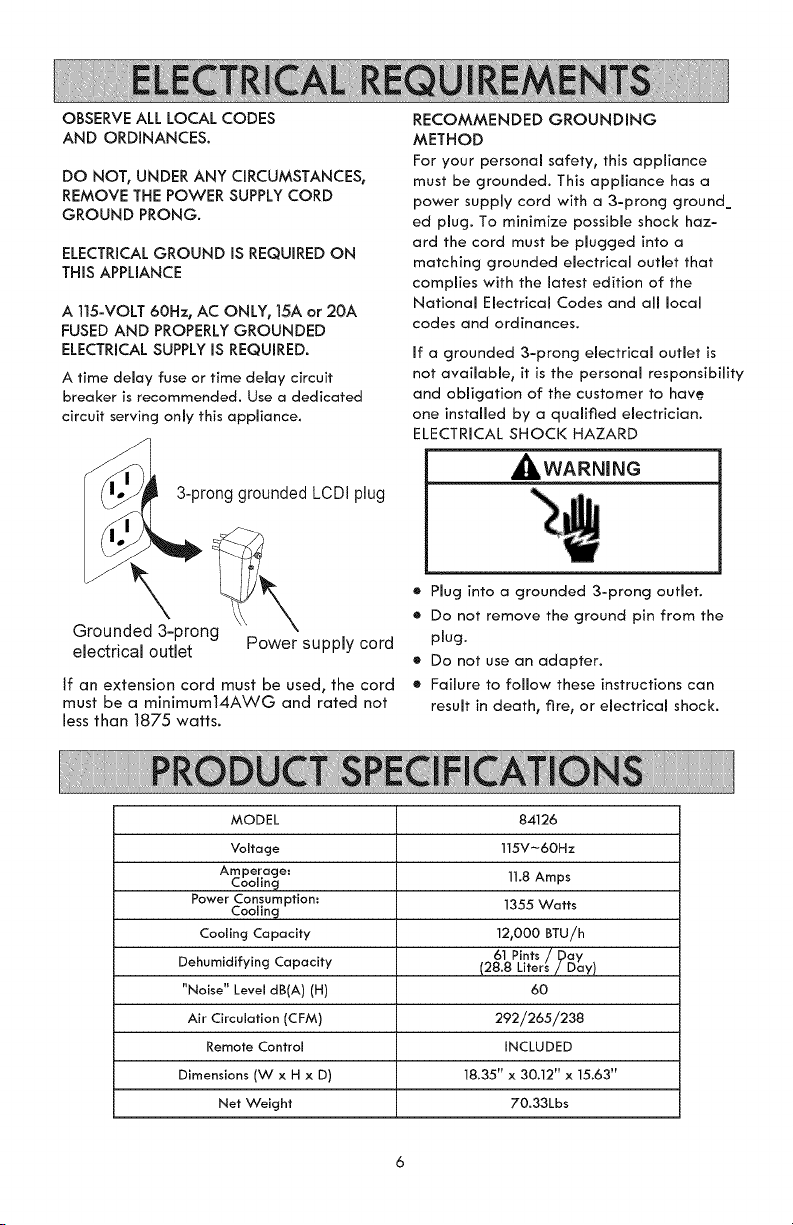
3-prong grounded LCDI plug
RECOMMENDED GROUNDING
METHOD
For your personal safety, this appliance
must be grounded. This appliance has a
power supply cord with a 3-prong ground_
ed plug. To minimize possible shock haz-
ard the cord must be plugged into a
matching grounded electrical outlet that
complies with the latest edition of the
National Electrical Codes and all local
codes and ordinances.
if a grounded 3-prong electrical outlet is
not available, it is the personal responsibility
and obligation of the customer to hav_
one installed by a qualified electrician.
ELECTRICAL SHOCK HAZARD
_WARNING
Grounded 3-prong
electrical outlet Power supply cord
If an extension cord must be used, the cord
must be a minimum14AWG and rated not
less than 1875 watts.
e Plug into a grounded 3-prong outlet.
• Do not remove the ground pin from the
plug.
e Do not use an adapter.
® Failure to follow these instructions can
result in death_ fire t or electrical shock.
MODEL
Voltage
Amperage:
Cooling
Power Consumption:
Cooling
Cooling Capacity
Dehumidifying Capacity
"Noise" Level dB(A) (H)
Air Circulation (CFM)
Remote Control
Dimensions (W x H x D)
Net Weight
84126
115V-60Hz
11.8 Amps
1355 Watts
12,000 BTU/h
6t Pints / Day
(28.8 Liters/Day)
6O
292/265/238
INCLUDED
18.35" x 30.12" x 15.63"
70.33Lbs
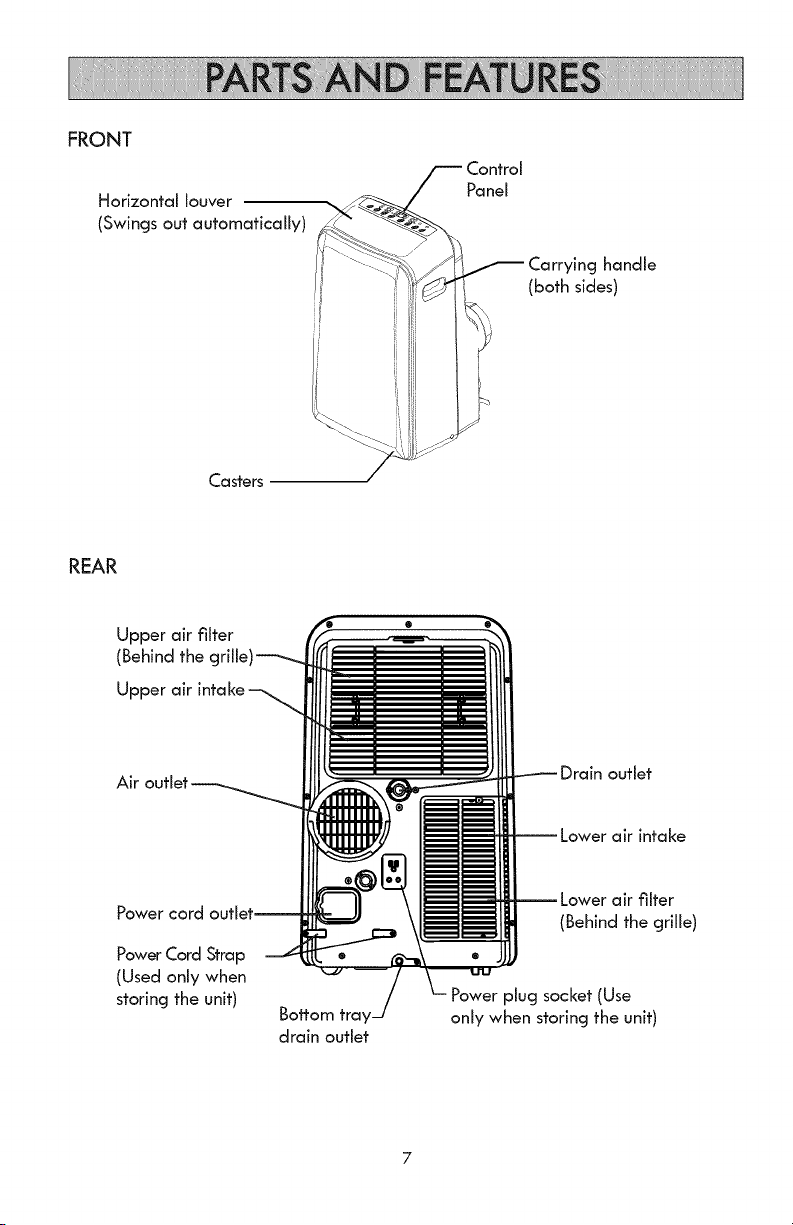
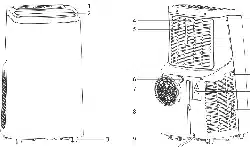
FRONT
Horizontal louver
(Swings out automatically)
Casters
Panel
i Carrying handle
(both sides)
L
REAR
Upper air filter
(Behind the
Upper air
outlet
air intake
Power cord
Power Cord Strap
(Used only when
storing the unit)
Bottom
drain outlet
air filter
(Behind the grille)
plug socket (Use
only when storing the unit)
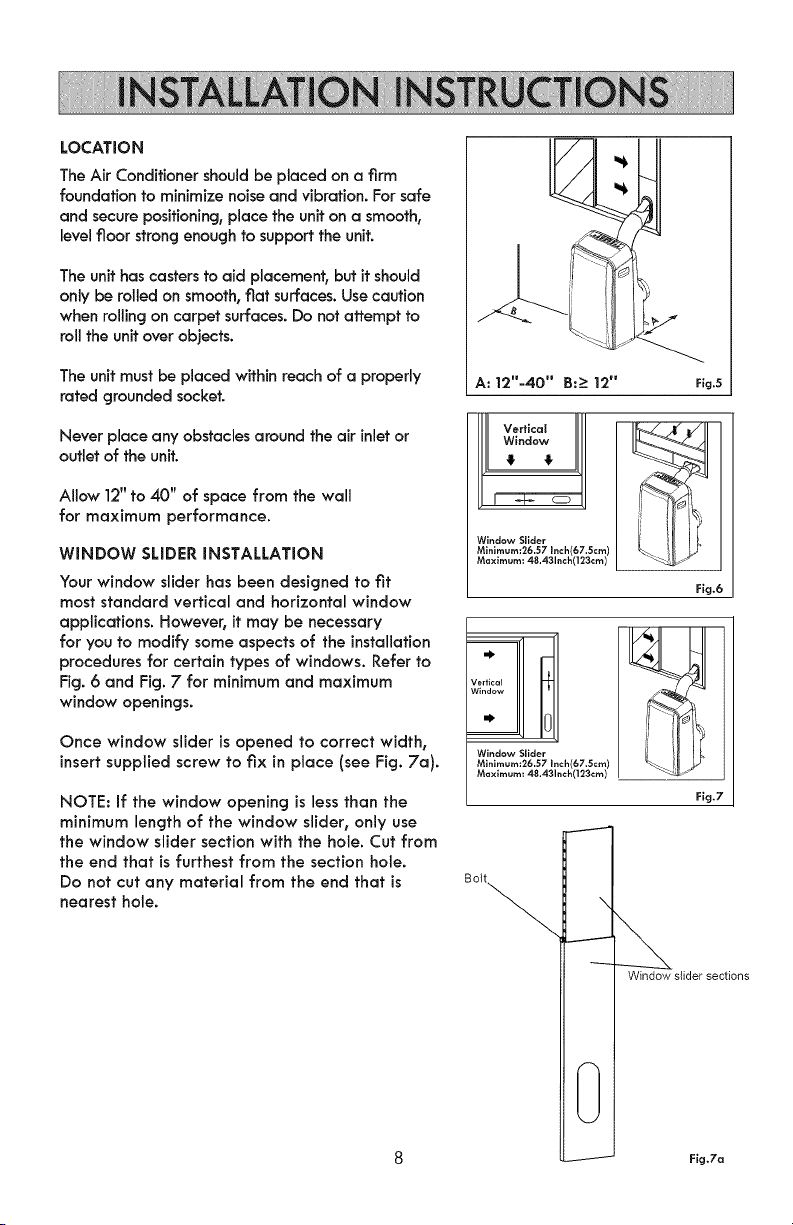
LOCATION
The Air Conditioner should be placed on a firm
foundation to minimize noise and vibration. For safe
and secure positioning, place the unit on a smooth,
level floor strong enough to support the unit.
The unit has casters to aid placement, but it should
only be rolled on smooth, flat surfaces. Use caution
when rolling on carpet surfaces. Do not attempt to
rolltheunitover objects.
The unit must be placed within reach of a properly
rated grounded socket.
Never place any obstacles around the air inlet or
outlet of the unit.
Allow 12" to 40" of space from the wall
for maximum performance.
WINDOW SLIDER INSTALLATION
Your window slider has been designed to fit
most standard vertical and horizontal window
applications. However, it may be necessary
for you to modify some aspects of the installation
procedures for certain types of windows. Refer to
Fig. 6 and Fig. 7 for minimum and maximum
window openings.
Once window slider is opened to correct width,
insert supplied screw to fix in place (see Fig. 7a).
NOTE: If the window opening is less than the
minimum length of the window slider, only use
the window slider section with the hole. Cut from
the end that is furthest from the section hole.
Do not cut any material from the end that is
nearest hole.
A: 12"-40" B:- 12"
Fig.5
I[[ Vertical
Window
4 €
Window Slider
Minlmum:26.57 Inch(67.Scm)
Maximum: 48.431nch(123cm)
Fig,6
Vertical _-
Window
•' 0
Window Slider
Minlmum:26.57 I ,(67.5cm)
Maximum: 48.43 (123cm)
Fig,7
Bolt
Window slider sections
Fig,7a
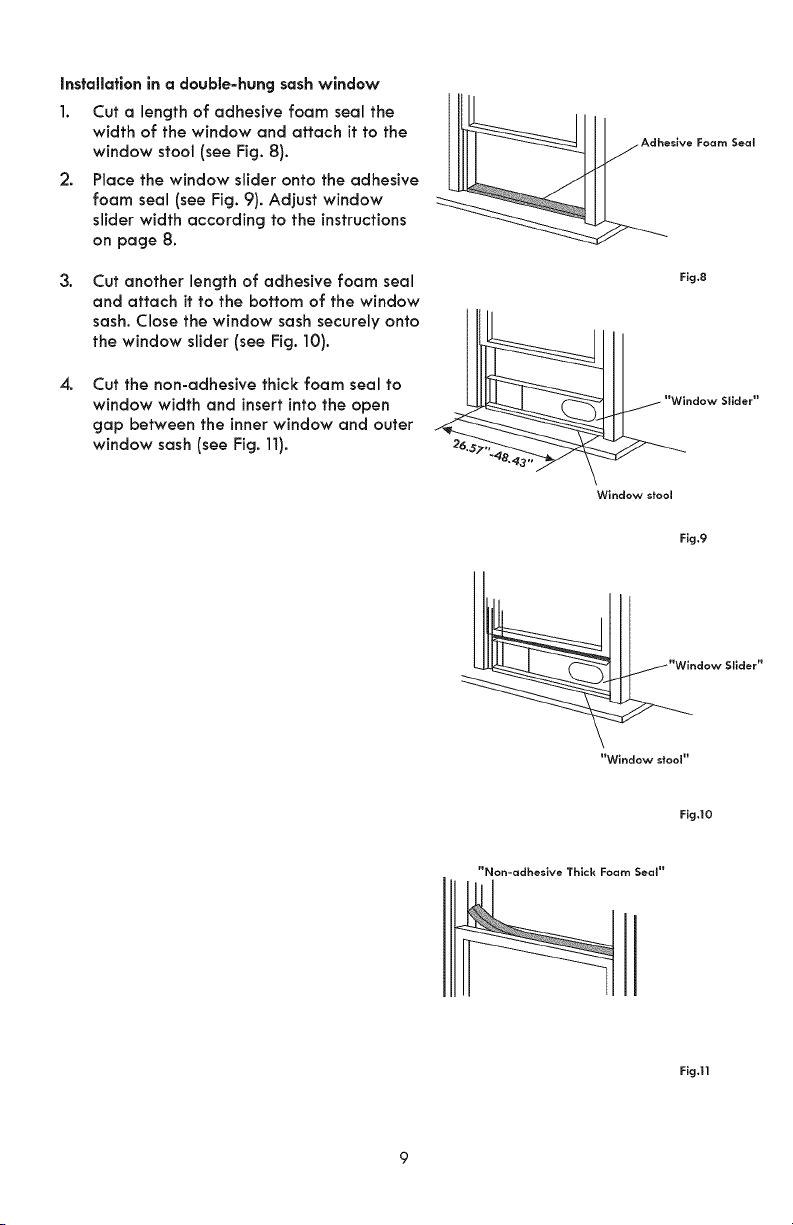
Installationin a double-hung sashwindow
1. Cut a length of adhesive foam seal the
width of the window and attach it to the
window stool (see Fig. 8).
2. Place the window slider onto the adhesive
foam seal (see Fig. 9). Adjust window
slider width according to the instructions
on page 8.
3.
Cut another length of adhesive foam seal
and attach it to the bottom of the window
sash. Close the window sash securely onto
the window slider (see Fig. 10).
4, Cut the non-adhesive thick foam seal to
window width and insert into the open
gap between the inner window and outer
window sash (see Fig.11).
iiie,,veFoamSea,
Fig.8
Window stool
Fig.9
"Window stool"
Fig.lO
"Non-adheslve Thick Foam Seal"
Fig.ll

Installation in a slidingsashwindow
2.
Cut a length of adhesive foam seal the
height of the window and attach it to
the window frame (see Fig. 12).
Place the window slider onto the adhesive
foam seal (see Fig. 13). Adjust window slider
height according to the instructions on page 8.
3.
4.
Cut another length of adhesive foam seal and
attach it to the window sash (see Fig. 13).
Close the window sash securely onto the
window slider (see Fig. 14).
"Window Silder"
Cut the non-adhesive thick foam seal to
window height and insert into the open
gap between the inner window and outer
window sash (see Fig. 15).
Fig.13
Fig.14
Fig.lS
10
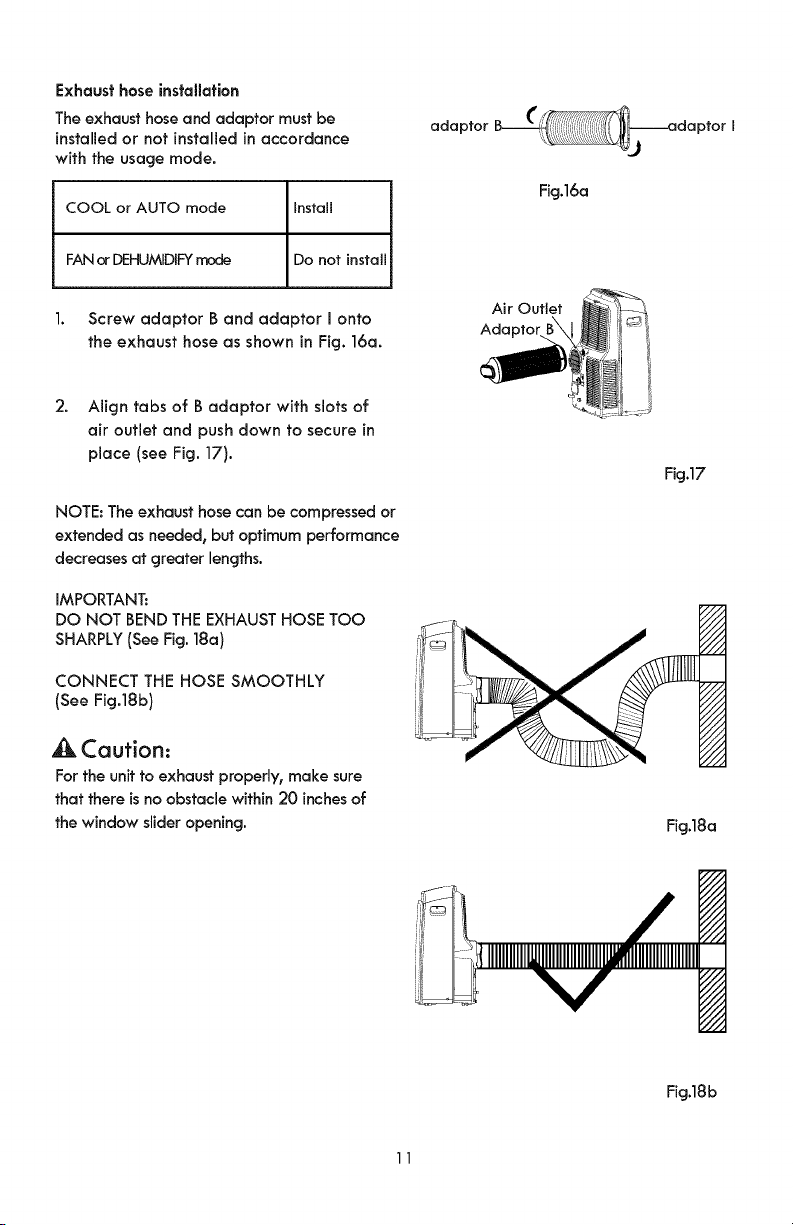
Exhausthose installation
The exhausthose and adaptor must be
installed or not installed in accordance
with the usage mode.
COOL or AUTO mode Install
adaptor
Fig.16a
FAN or DEHUMIDIFY mode Do not install
1. Screw adaptor B and adaptor I onto
the exhaust hose as shown inFig. 16a.
2. Align tabs of B adaptor with slotsof
air outlet and push down to secure in
place (see Fig. 17).
NOTE: The exhaust hose can be compressed or
extended as needed, but optimum performance
decreases at greater lengths.
IMPORTANT:
DO NOT BEND THE EXHAUST HOSE TOO
SHARPLY (See Fig. 18a)
CONNECT THE HOSE SMOOTHLY
(See Fig.18b)
Caution:
For the unit to exhaust properly, make sure
that there is no obstaclewithin 20 inches of
the window slider opening.
Air Outlet
Adaptor
Fig.17
i///
Fig.18a
/1//
////
f///
_,-//,
i111
////
r///
////
////
////
N
Fig.18b
11
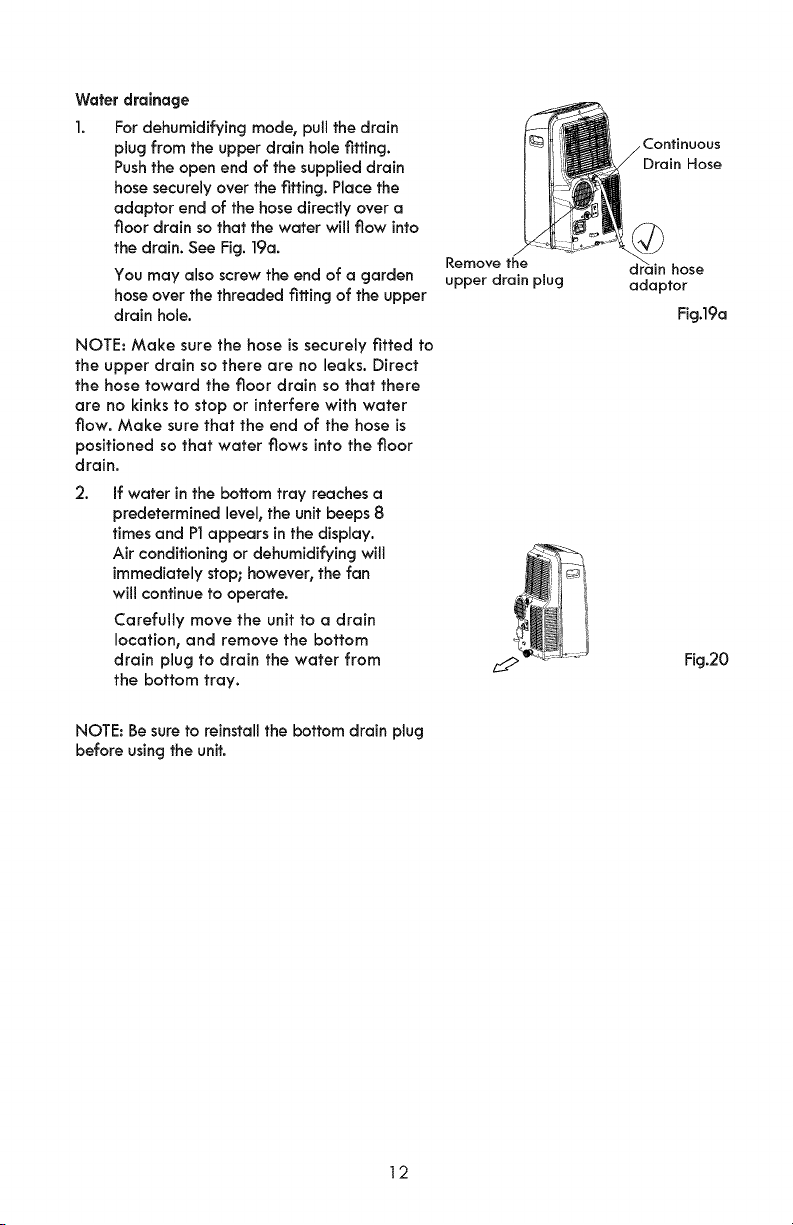
Waterdrainage
I. For dehumidifying mode, pull the drain
plug from the upper drain hole tiffing.
Push the open end of the supplied drain
hose securely over the tiffing. Place the
adaptor end of the hose directly over a
floor drain so that the water will flow into
the drain. See Fig. 19a.
You may also screw the end of a garden
hose over the threaded tiffing of the upper
drain hole.
NOTE: Make sure the hose is securely fitted to
the upper drain so there are no leaks. Direct
the hose toward the floor drain so that there
are no kinks to stop or interfere with water
flow. Make sure that the end of the hose is
positioned so that water flows into the floor
drain.
2.
If water in the bottom tray reaches a
predetermined level, the unit beeps 8
times and PI appears in the display.
Air conditioning or dehumidifying will
immediately stop; however, the fan
will continue to operate.
Carefully move the unit to a drain
location, and remove the bottom
drain plug to drain the water from
the bottom tray.
NOTE: Be sure to reinstall the bottom drain plug
before using the unit.
Remove the
upper drain plug
Continuous
Drain Hose
d_r_ainhose
adaptor
Fig.19a
Fig.20
12

CONTROL PANEL
POWER button with OPERATION
indicator
Power switch on/off.
SLEEPbuffen
Used to initiate the SLEEP
operation.
O
FAN buften
Press to select four different fan
speed settings: LOW, MED, Hi
and AUTO. An indicator light
will illuminate for each speed
setting.
O
O
O
UP(>) and DOWN (<) buften
Press to increase or decrease
temperature settings in 2°F (1°C) Ir_
increments from 62°F (17°C) to
88°F (30°C), or TIMER setting
from 0 to 24 hrs.
NOTE: Temperature can be displayed
in Fahrenheit or Celsius. To change
from one to the other, press and hold
the Up and Down buttons at the same
time for 3 seconds.
MODE buffen
Press this button to seJect the
operating mode in a sequence
that advances from AUTO to
COOL to DRY to FAN. An indicator
light will illuminate for each mode
setting.
TIMER buffen
Used to initiate the AUTO ON start
time and AUTO OFF stop time program,
in conjunction with the < & > buttons.
An indicator light will illuminate with
each setting.
SWING buffen
Press this button to begin continuous
up and down swing of fan louver
door. Press again to fix louver door
intoone position.
LED Display
Shows the set temperature in °C or
°F and the Auto-timer settings.
While in DRY and FAN modes, the
display shows the room temperature.
13
O TEMP SENSORfeature
NOTE:This feature can be activated from the remote control ONLY. The remote control
servesas a remote thermostat allowing for precise temperature control at its location.
To activate the TEMP SENSOR feature, point the remote control towards the unit and
press the TEMPSENSOR button. The remote display shows the actual temperature at it's
location. The remote control will send this signal to the Air Conditioner at intervals of
every 3 minutes until pressing the TEMP SENSOR button again.
if the unit does not receive the TEMP SENSOR signal during any 7 minute interval, the
unit will beep to indicatethe TEMPSENSORmode has ended.
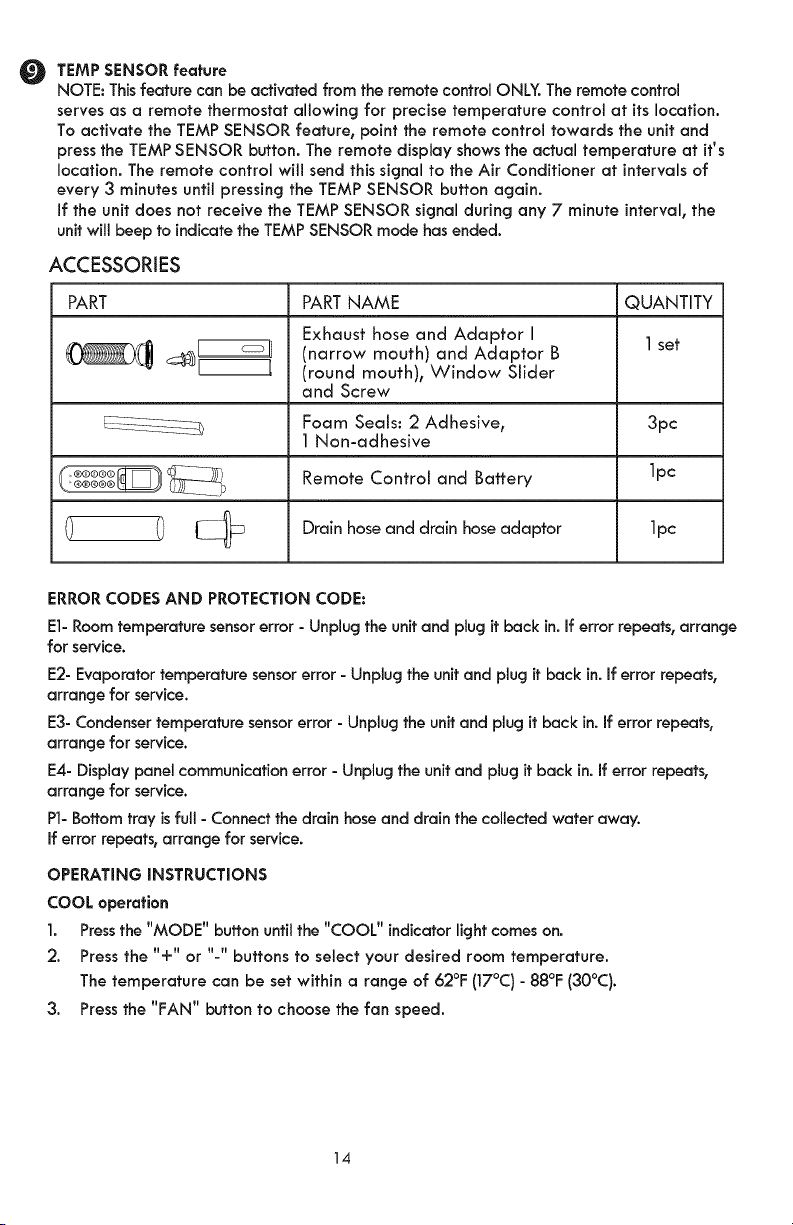
ACCESSORIES
PART PART NAME QUANTITY
Exhaust hose and Adaptor I 1 set
_(_ __ (narrow mouth)and Adaptor B
(round mouth), Window Slider
and Screw
Foam SeaLs: 2 Adhesive, 3pc
1 Non-adhesive
Remote Control and Battery 1pc
Drain hose and drain hose adaptor 1pc
ERROR CODES AND PROTECTION CODE:
El- Room temperature sensor error - Unplug the unffand plug ff back in. If error repeats, arrange
for service.
E2- Evaporator temperature sensor error - Unplug the unit and plug it back in. if error repeats,
arrange for service.
E3- Condenser temperature sensor error - Unplug the unit and plug it back in. If error repeats,
arrange for service.
E4- Display panel communication error - Unplug the unit and plug it back in. if error repeats,
arrange for service.
P1- Bottom tray is full - Connect the drain hose and drain the collected water away.
If error repeats, arrange for service.
OPERATING INSTRUCTIONS
COOL operation
1. Press the "MODE" buffon until the "COOL" indicator light comes on.
2. Press the "+" or "-" buffons to select your desired room temperature.
The temperature can be set within a range of 62°E (17°C) - 88°E (30°C).
3. Press the "FAN" button to choose the fan speed.
14
AUTO operation
1. When Air Conditioner is in AUTO mode, it will automatically choose cooling or fan-only
operation based on the set temperature point.
2. In AUTO mode you cannot manually set the fan speed.
FAN operation
1. Press the "MODE" button until the "FAN " indicator light comes on.
2. Press the "FAN " button to choose the fan speed. The temperature cannot be
adjusted.
3. In FAN mode, detach the exhaust hose from the air outlet in the back of the unit.
TIMER operation
1. With the unit on, press the Timer button. The Off light will indicate the Auto Stop
function may be programmed. Within 5 seconds press the UP or DOWN buttons to select
a period of time after which operation will stop. Press the Timer button twice. The On light
will indicate the Auto Start function may be programmed. Within 5 seconds press the UP or
DOWN buttons to select a period of time after which operation will resume.
2. With the unit off, press the Timer button. The On light will indicate the Auto Start
function may be programmed. Within 5 seconds press the UP or DOWN buffons to select
a period of time after which operation will start. Press the Timer button twice. The Off light
will indicate the Auto Stop function may be programmed. Within 5 seconds press the UP or
DOWN button to select a period of time after which operation will stop.
3. NOTES:
- Auto time changes in 0.5 hour increments up to 10 hours, then in 1 hour increments
up to 24 hours.
- Turning the unit ON or OFF or adjusting both timer settings to 0.0 will cancel the
Auto Start/Stop timer program.
- When a malfunction (El, E2, E3 or E4) occurs, Auto Start/Stop will also be cancelled.
SLEEP operation
Press the SLEEP button for the selected temperature setting to increase to 20 F (10 C)
warmer after 30 minutes, and another 20 F (1° C) warmer after another 30 minutes.
The warmer temperature will be maintained for 7 hours, at which time the unit will
return to the originally selected temperature.
NOTE: The SLEEP feature is not available in the FAN or DRY mode.
15
OTHERFEATURES
Auto-Restart
if there is a power failure, the unit will return to the same operating condition when the power
is restored.
Waif 3 minutes before resuming operation
3 minute compressor delay - Any time the compressor stops running for any reason, suchas when the
humidity set point has been reached, it will not restart again for a minimum of 3 minutes. This isa safety
design to prolong the life of the compressor.
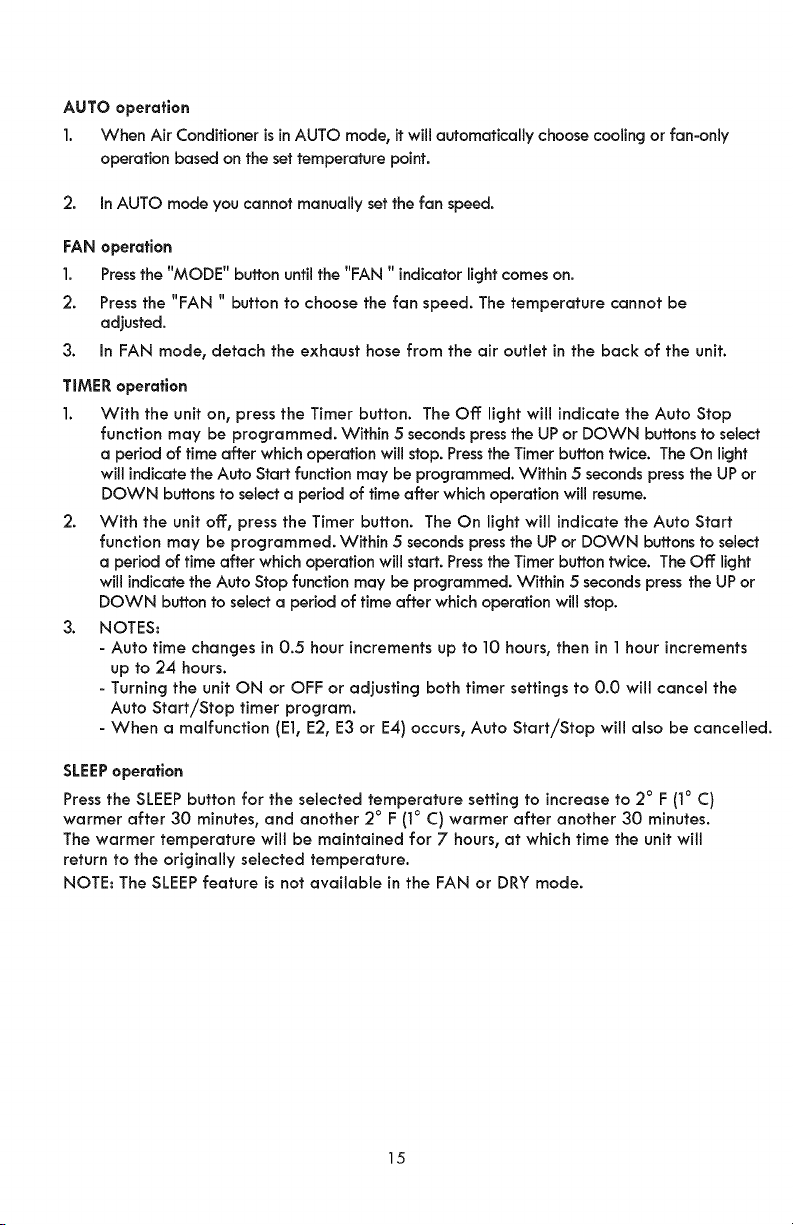
Air flow direction adjustment
° When the Power is ON, the louver opens fully.
Press the SWING button on the panel or
remote controller to inffiate the Auto swing feature.
° The louver will swing up and down automatically.
° Do not adjust the louver manually.
° if the SWING button is pressed again, the louver
will stop and stay in the current position.
Swing automatically
16

Location of the remote control.
Usethe remote control within a distance of 26 ft (8m)
from the appliance, pointing it towardsthe receiver.
Receptionis confirmed by a beep.
4kCAUTION:
Infrared Receiver
Window (Hidden)
° The Air Conditioner will not operate if curtains,
doors or other materials block the signals from the
remote control to the unit receiver.
° Prevent any liquid from falling into the remote control.
Do not expose the remote control to direct sunlight or heat.
° If the infrared signal receiver on the unit is exposed to direct sunlight, the Air
Conditioner may not function properly. Use curtains to prevent the sunlight from falling on
the receiver.
* If other electrical appliances react to the remote control, move the appliances out of
the range of the remote control signal.
Replacing batteries
The remote control is powered by two AA
batteries.
1. Remove the battery compartment cover
by pressing and sliding off.
2. Remove the old batteries and insert the new
batteries, placing the(+) and (-) ends correctly.
3. Reattach the cover by sliding it back into
position.
_ACAUTION:
° Do not mix old and new batteries or batteries of a different type.
° Do not leave the batteries in the remote control if it is not going to be used for 2 or
3 months.
* Do not throw batteries in household garbage; dispose of them at battery
collection stations or special garbage sites.
Remote control Specifications
MODEL RG36YiBGCEFU2
Rated Voltage 3.0 V (Two AAA batteries)
Signal Receiving Range 26 ft (8m)
Environment 23°F (-5°C) - 140°F (60°C)
17
@-
@-
@-
@-
@-
®
®
I
o
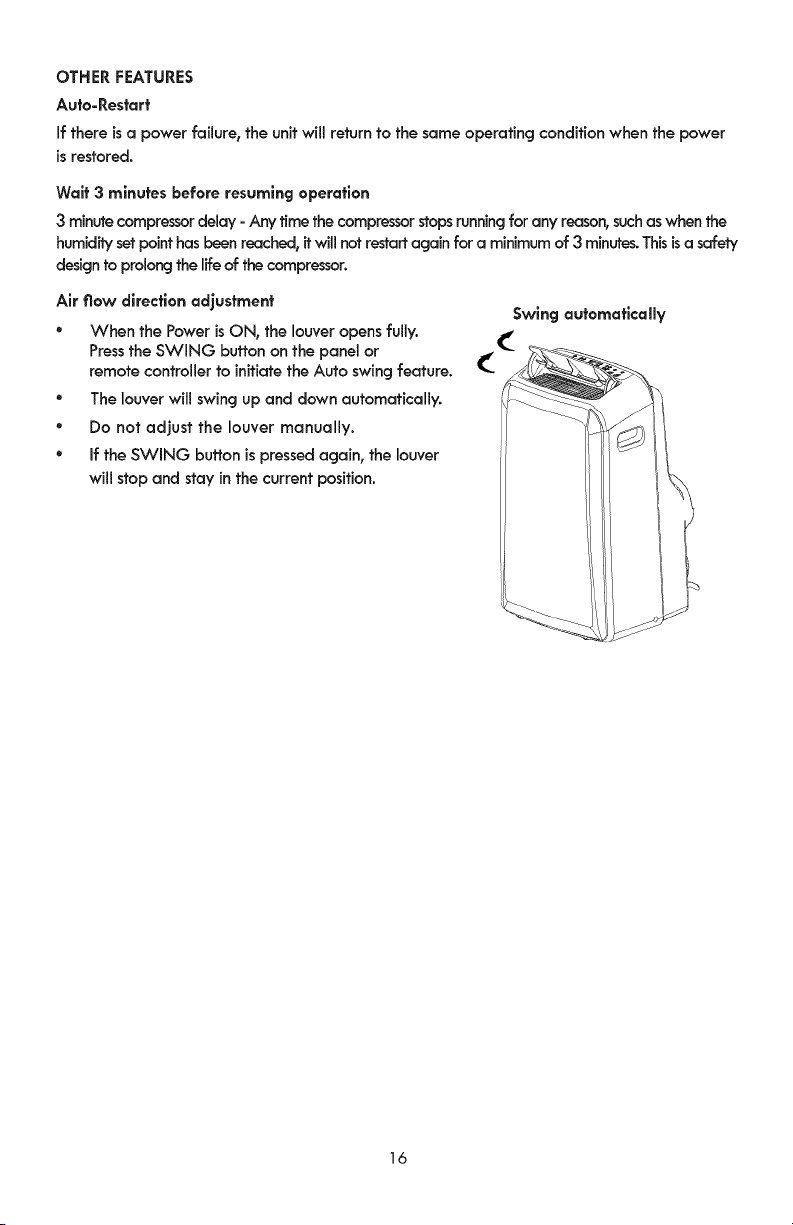
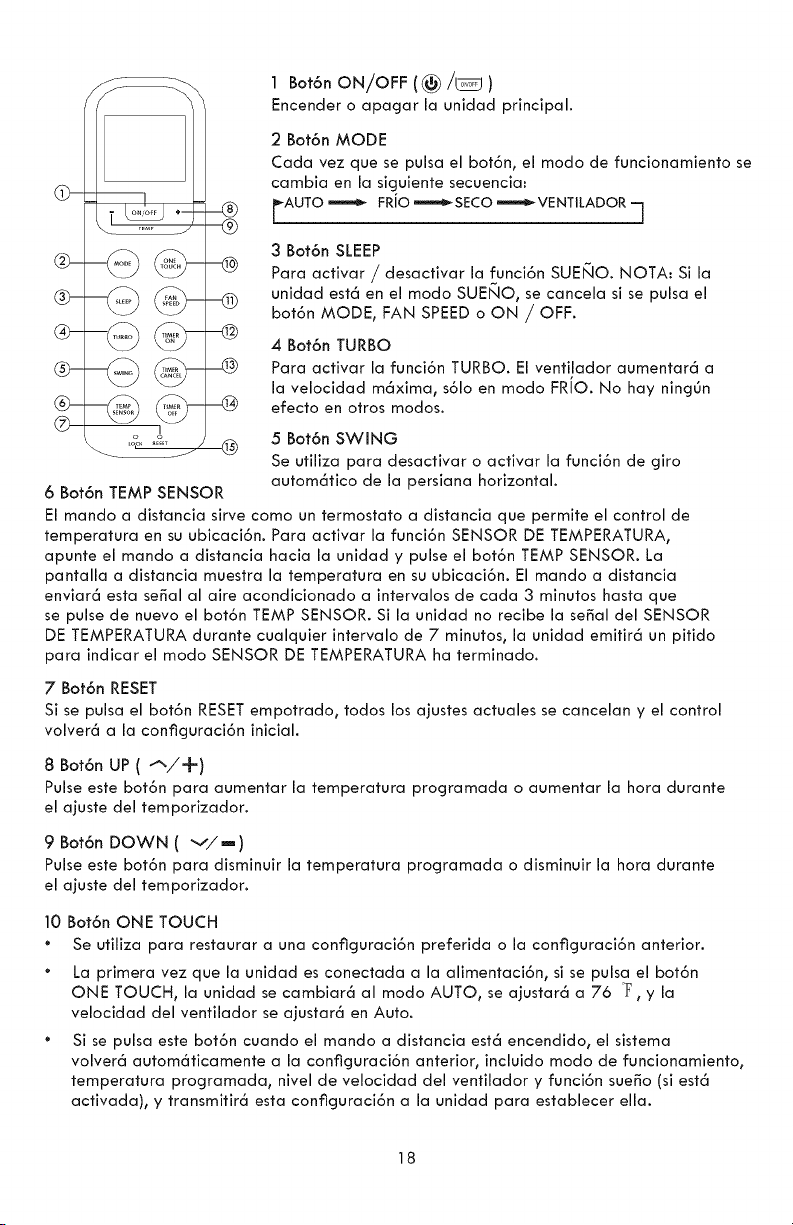
6 TEMP SENSOR Button
1 ON/OFF Button ( _/_ )
Turns the main unit on and off
2 MODE Button
Each time the button is pressed, the operating mode changes
in this sequence: FAUTO _-'_COOL _-'_DRY _ FAN "7
3 SLEEP Button
Enables/Disables the SLEEP function. NOTE: If the unit is in
SLEEP mode, it will be cancelled if the MODE, FAN SPEED or
ON/OFF buttons are pressed.
4 TURBO Button
Activates the TURBO function. The fan will increase to
maximum speed, in COOL mode only. There is no effect in
other modes.
5 SWING Button
Used to stop or start the horizontal louver auto swing function.
The remote control serves as a remote thermostat allowing for temperature control at its
location. To activate the TEMP SENSOR feature, point the remote control towards the unit
and press the TEMP SENSOR button. The remote display shows the temperature at its
location. The remote control will send this signal to the Air Conditioner at intervals of every
3 minutes until the TEMP SENSOR button is pressed again. If the unit does not receive the
TEMP SENSOR signal during any 7 minute interval, the unit will beep to indicate the TEMP
SENSOR mode has ended.
7 RESET Button
If the recessed RESET button is pressed, all current settings are cancelled and the control
will return to the initial settings.
8 UP Button ( "_/-k )
Push this button to increase the setting temperature or to increase the hour during Timer
setting.
9 DOWN Button ( v/m )
Push this button to decrease the setting temperature or to decrease the hour during Timer
setting.
10 ONE TOUCH Button
* Used to restore to a favorite setting or the previous settings.
The first time the unit is connected to power, if the ONE TOUCH button is pressed, the
unit will change to AUTO mode, set to 76°F, and the fan speed will be set to Auto.
If this button is pushed when remote controller is on, the system will automatically revert
back to the previous settings including operating mode, setting temperature, fan speed
level and sleep feature (if activated), and it will transmit these settings to the unit to set it.
If this button is pushed when remote controller is off, the system will automatically revert
back to the previous settings including operating mode, setting temperature, fan speed
level, but will disable the Sleep feature. The remote will not transmit the signals to the unit.
19
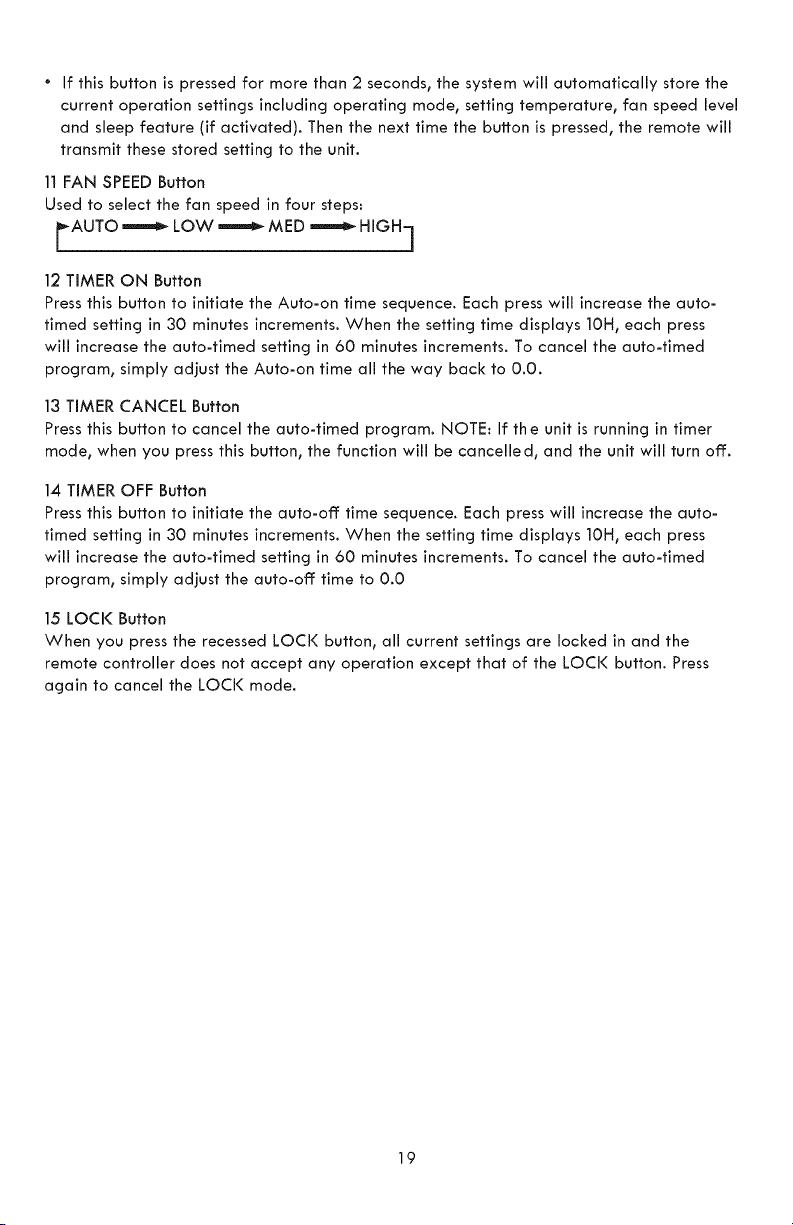
if this button is pressed for more than 2 seconds, the system will automatically store the
current operation settings including operating mode, setting temperature, fan speed level
and sleep feature (if activated). Then the next time the button is pressed, the remote will
transmit these stored setting to the unit.
11 FAN SPEED Button
Used to select the fan speed in four steps:
AUTO _LOW _ MED _ HIGH_
| !
12 TIMER ON Button
Press this button to initiate the Auto-on time sequence. Each press will increase the auto-
timed setting in 30 minutes increments. When the setting time displays 10H, each press
will increase the auto-timed setting in 60 minutes increments. To cancel the auto-timed
program, simply adjust the Auto-on time all the way back to 0.0.
13 TIMER CANCEL Button
Press this button to cancel the auto-timed program. NOTE: If the unit is running in timer
mode, when you press this button, the function will be cancelled, and the unit will turn off:.
14 TIMER OFF Button
Press this button to initiate the auto-off time sequence. Each press will increase the auto-
timed setting in 30 minutes increments. When the setting time displays 10H, each press
will increase the auto-timed setting in 60 minutes increments. To cancel the auto-timed
program, simply adjust the auto-off time to 0.0
15 LOCI( Button
When you press the recessed LOCi( button, all current settings are locked in and the
remote controller does not accept any operation except that of the LOCi( button. Press
again to cancel the LOCi( mode.
19
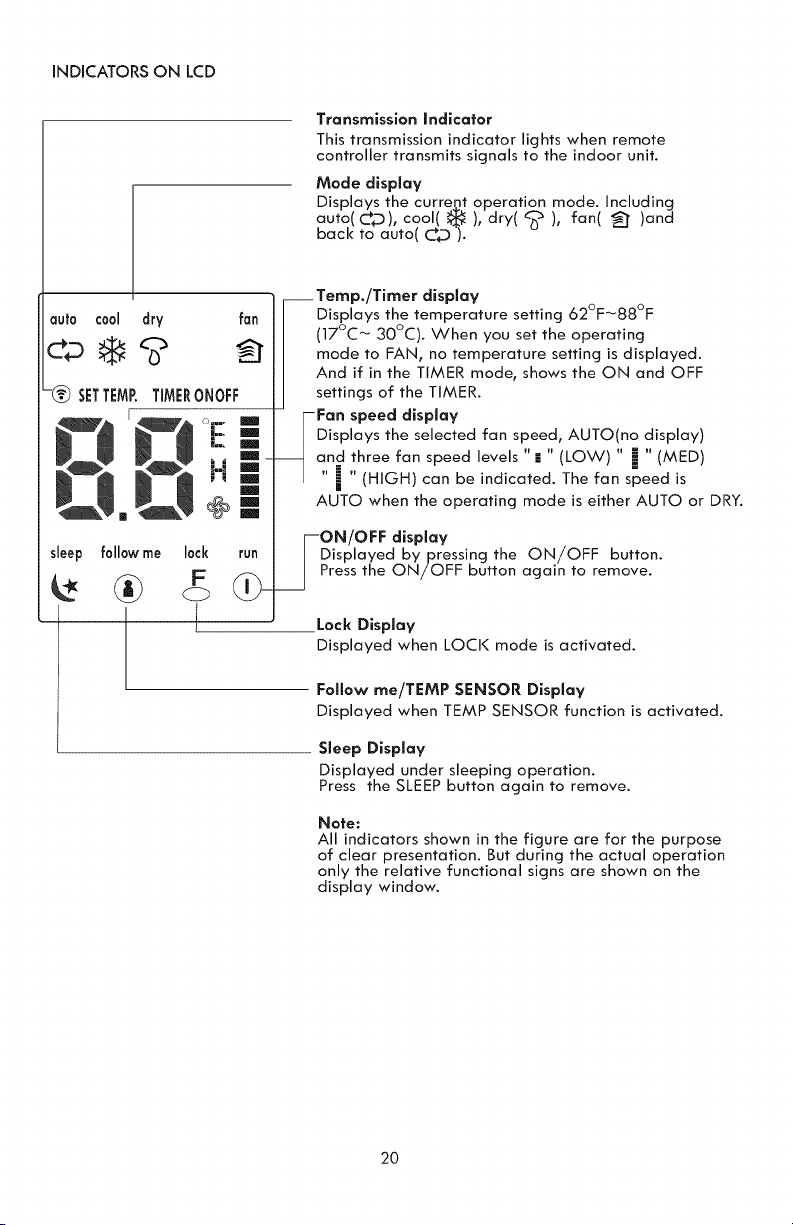
iNDiCATORSONLCD
Transmission Indicator
This transmission indicator lights when remote
controller transmits signals to the indoor unit.
Mode display
Displays the curregt operation mode. including
auto(Cp), cool( _ ), dry( _ ), fan( _" )and
back to auto( C_D ).
auto cool dry fan
-_) SETTEMRTIMERONOFF
sleep
__Temp./Timer display
Displays the temperature setting 62°F_88°F
(17°C _ 30°C). When you set the operating
mode to FAN, no temperature setting is displayed.
And if in the TIMER mode, shows the ON and OFF
settings of the TIMER.
Fan speed display
Displays the selected fan speed, AUTO(no display)
and three fan speed levels "= " (LOW) " i " (MED)
i | (HIGH) can be indicated. The fan speed is
AUTO when the operating mode is either AUTO or DRY.
follow me lock
F
L
run
--ON/OFF display
Displayed bypressing the ON/OFF button.
Press the ON/OFF button again to remove.
Lock Display
Displayed when LOCI< mode is activated.
Follow me/TEMP SENSOR Display
Displayed when TEMP SENSOR function is activated.
Sleep Display
Displayed under sleeping operation.
Press the SLEEP button again to remove.
Note:
All indicators shown in the figure are for the purpose
of clear presentation. But during the actual operation
only the relative functional signs are shown on the
display window.
2O
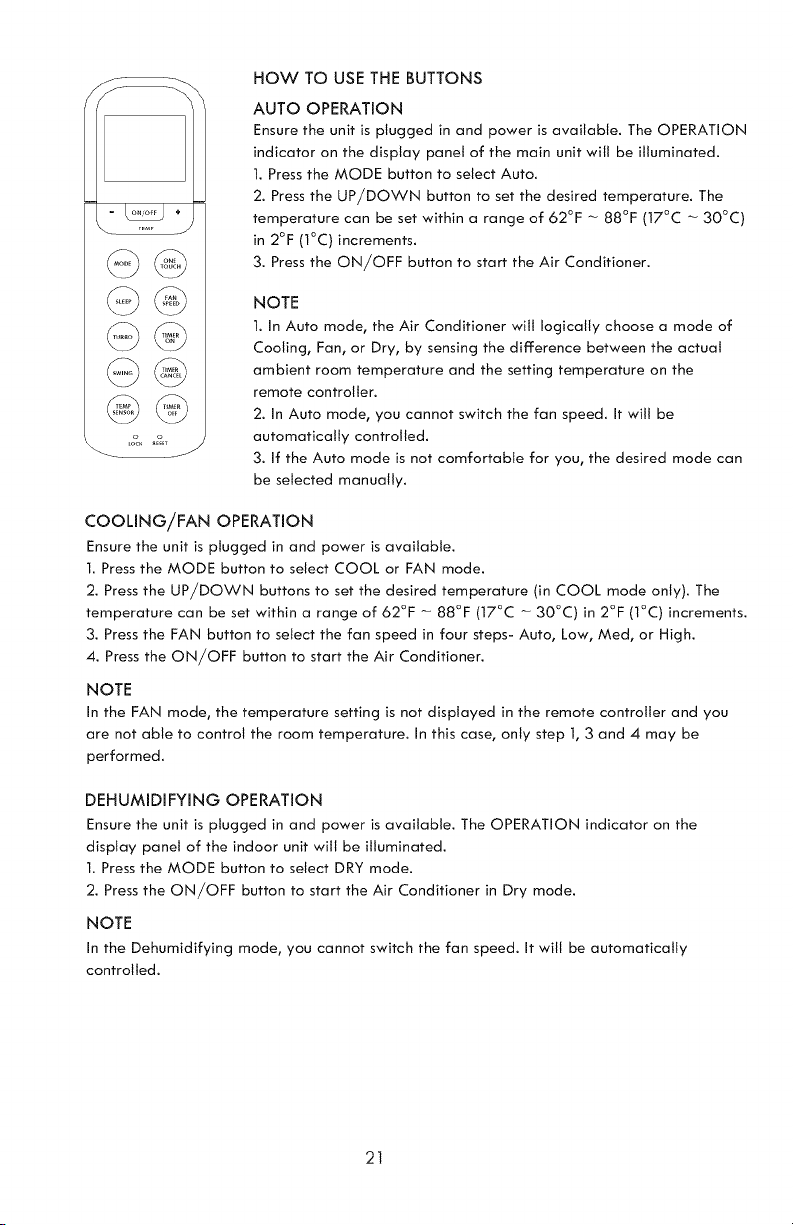
HOW TO USE THE BUTTONS
AUTO OPERATION
Ensure the unit is plugged in and power is available. The OPERATION
indicator on the display panel of the main unit will be illuminated.
1. Press the MODE button to select Auto.
2. Press the UP/DOWN button to set the desired temperature. The
temperature can be set within a range of 62°F - 88°F (17°C - 30°C)
in 2°F (1°C) increments.
3. Press the ON/OFF button to start the Air Conditioner.
NOTE
1. in Auto mode, the Air Conditioner will logically choose a mode of
Cooling, Fan, or Dry, by sensing the difference between the actual
ambient room temperature and the setting temperature on the
remote controller.
2. in Auto mode, you cannot switch the fan speed, it will be
automatically controlled.
3. if the Auto mode is not comfortable for you, the desired mode can
be selected manually.
COOLING/FAN OPERATION
Ensure the unit is plugged in and power is available.
I. Press the MODE button to select COOL or FAN mode.
2. Press the UP/DOWN buttons to set the desired temperature (in COOL mode only). The
temperature can be set within a range of 62°F - 88°F (17°C - 30°C) in 2°F (I°C) increments.
3. Press the FAN button to select the fan speed in four steps- Auto, Low, Med, or High.
4. Press the ON/OFF button to start the Air Conditioner.
NOTE
in the FAN mode, the temperature setting is not displayed in the remote controller and you
are not able to control the room temperature, in this case, only step I, 3 and 4 may be
performed.
DEHUMIDIFYING OPERATION
Ensure the unit Js plugged in and power is available. The OPERATION indicator on the
display panel of the indoor unit will be illuminated.
1. Press the MODE button to select DRY mode.
2. Press the ON/OFF button to start the Air Conditioner Jn Dry mode.
NOTE
in the Dehumidifying mode, you cannot switch the fan speed, it will be automatically
controlled.
21
SWING OPERATION
Use the SWING button to adjust the Up/Down airflow direction.
I. Press this button to begin continuous up and down swinging of fan louver door. Press again
to fix louver door into one position. NOTE: When the louver swings or moves to a position
which would adversely affect the cooling effect of the air conditioner, it will automatically
change the swing moving direction or position to prevent a problem.
TIMER OPERATION
Pressing the TIMER ON button will set the Auto-on time of the unit. Pressing the TIMER OFF
button will set the auto-off time of the unit.
TO SET THE AUTO-ON TIME:
1. Press the TIMER ON button. The remote controller shows TIMER ON, the last Auto-on setting
time and the symbol "h" will be shown on the LCD display area. Now it is ready to set the Auto
-on time to START the operation.
2. Push the TIMER ON button again to set desired Auto-on time. Each time you press the button,
the time increases by half an hour between 0 and 10 hours, and by one hour between 10 and
24 hours.
3. After setting the TIMER ON, there will be a one second delay before the remote controller
transmits the signal to the Air Conditioner. Then, after approximately another 2 seconds, the
symbol "h" wilt disappear and the set temperature witl re-appear on the LCD display window.
The set temperature will not appear in FAN mode.
TO SET THE AUTO-OFF TIME
1. Press the TIMER OFF button. The remote controller shows TIMER OFF, the last Auto-off setting
time and the symbol "h" will be shown on the LCD display area. Now it is ready to set the Auto-
off time to STOP the operation.
2. Push the TIMER OFF button again to set desired Auto-off time. Each time you press the button,
the time increases by half an hour between 0 and 10 hours, and by one hour between 10 and 24
hours.
3. After setting the TIMER OFF, there will be a one second delay before the remote controller
transmits the signal to the Air Conditioner. Then after approximately another 2 seconds, the symbol
"h" wilt disappear and the set temperature wilt re-appear on the LCD display window. The set
temperature wilt not appear in FAN mode.
TO CANCEL AUTO TIME
1. Press the TIMER CANCEL button to cancel the auto time.
22
7 f_
O.u h
TIMER ON
SET
START
OFF
6 HOURS LATER
STOP
SET 10 HOURS LATER
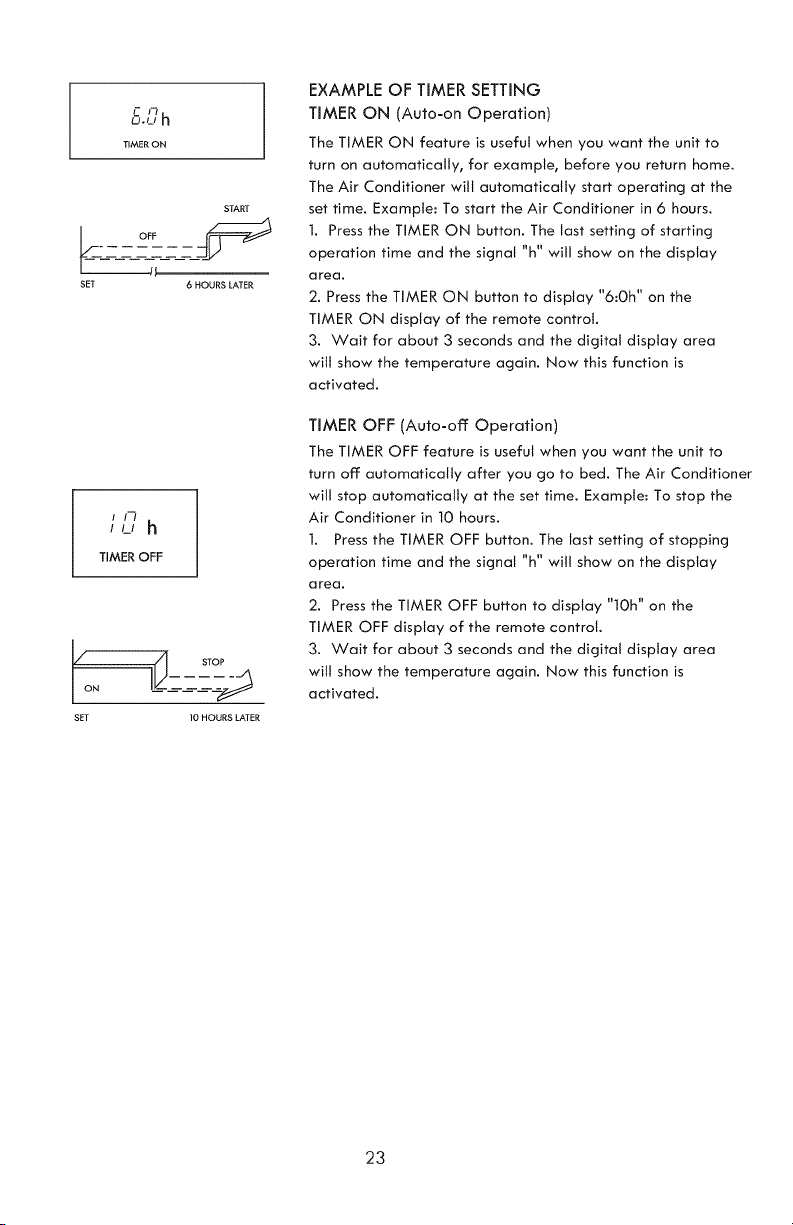
EXAMPLE OF TIMER SETTING
TIMER ON (Auto-on Operation)
The TIMER ON feature is useful when you want the unit to
turn on automatically, for example, before you return home.
The Air Conditioner will automatically start operating at the
set time. Example: To start the Air Conditioner in 6 hours.
1. Press the TIMER ON button. The last setting of starting
operation time and the signal "h" will show on the display
area.
2. Press the TIMER ON button to display "6:Oh" on the
TIMER ON display of the remote control.
3. Wait for about 3 seconds and the digital display area
will show the temperature again. Now this function is
activated.
TIMER OFF (Auto-off: Operation)
The TIMER OFF feature is useful when you want the unit to
turn off: automatically after you go to bed. The Air Conditioner
will stop automatically at the set time. Example: To stop the
Air Conditioner in 10 hours.
1. Press the TIMER OFF button. The last setting of stopping
operation time and the signal "h" will show on the display
a rea.
2. Press the TIMER OFF button to display "1Oh" on the
TIMER OFF display of the remote control.
3. Wait for about 3 seconds and the digital display area
will show the temperature again. Now this function is
activated.
23

! ! /
/
TIMER ON OFF
START
SFT 2 HOURS LATER I0 HOURS LATER
AFTER SETTING AFTER SETTING
TIMER ON OFF
START
SFT 2 HOURS LATER 5 HOURS LATER
AFTER SETTING AFTER SETTING
COMBINED TIMER (Setting both ON and OFF timers
simultaneously)
TIMER OFF---_TIMER ON
(On ---_Stop--_ Start operation)
This feature is useful when you want to stop the Air Conditioner
after you go to bed, and start it again in the morning when you
wake up or when you return home.
Example:
To stop the Air Conditioner 2 hours after setting and start it
again 10 hours after setting.
1. Press the TIMER OFF button.
2. Press the TIMER OFF button again to display 2.0h on the
TIMER OFF display.
3. Press the TIMER ON button.
4. Press the TIMER ON button again to display 10h on the
TIMER ON display.
5. Wait for the remote control to display the setting
temperature.
TIMER OFF-_TIMER ON
(On--_ Stop-_ Stop operation)
This feature is useful when you want to start the Air Conditioner
before you wake up and stop it after you leave the house.
Example: To start the Air Conditioner 2 hours after setting and
stop it 5 hours after setting.
1. Press the TIMER ON button.
2. Press the TIMER ON button again to display 2.Oh on the
TIMER ON display.
3. Press the TIMER OFF button.
4. Press the TIMER OFF button again to display 5.Oh on the
TIMER OFF display.
5. Wait for the remote control to display the setting
temperature.
CAUTION
The timer setting (TIMER ON or TIMER OFF) that occurs first
after the set time wilt be activated first.
24
(_J
©@
o o
LOCK RESET
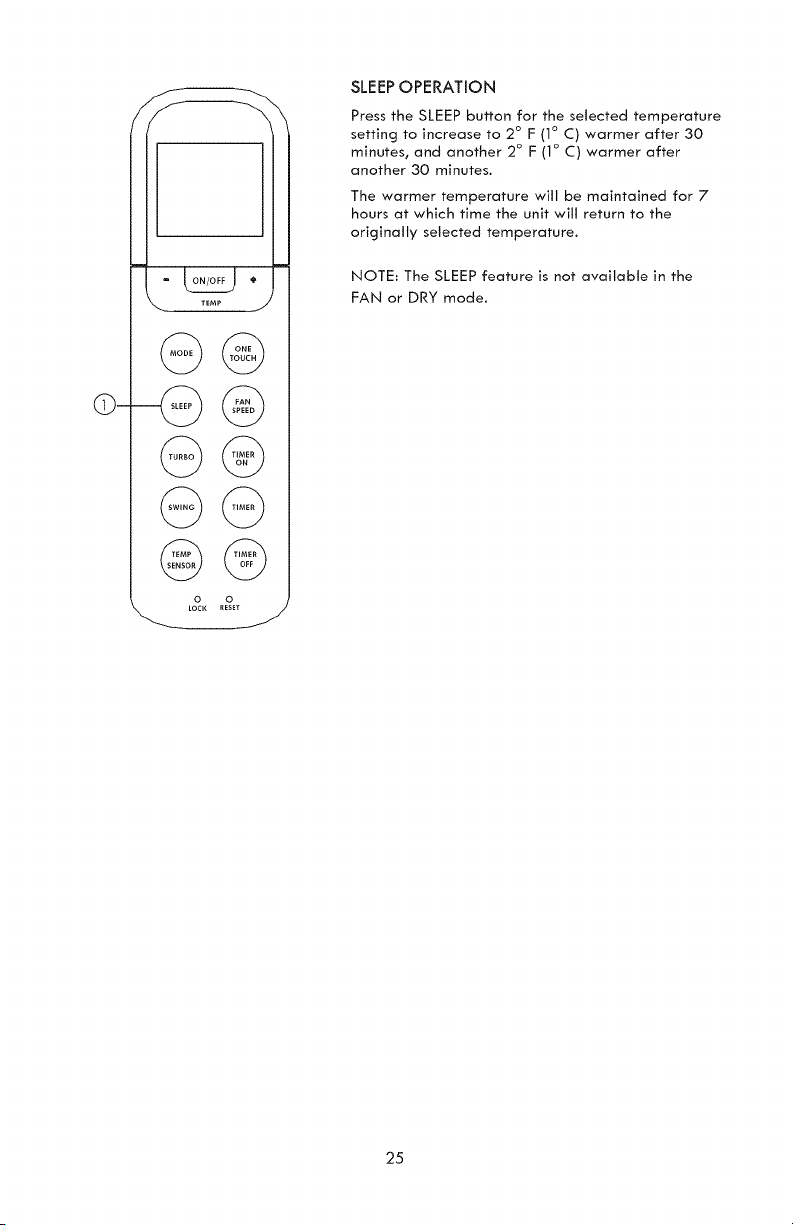
SLEEPOPERATION
Press the SLEEP button for the selected temperature
setting to increase to 2 ° F (1° C) warmer after 30
minutes, and another 2° F (1° C) warmer after
another 30 minutes.
The warmer temperature will be maintained for 7
hours at which time the unit will return to the
originally selected temperature.
NOTE: The SLEEP feature is not available in the
FAN or DRY mode.
25
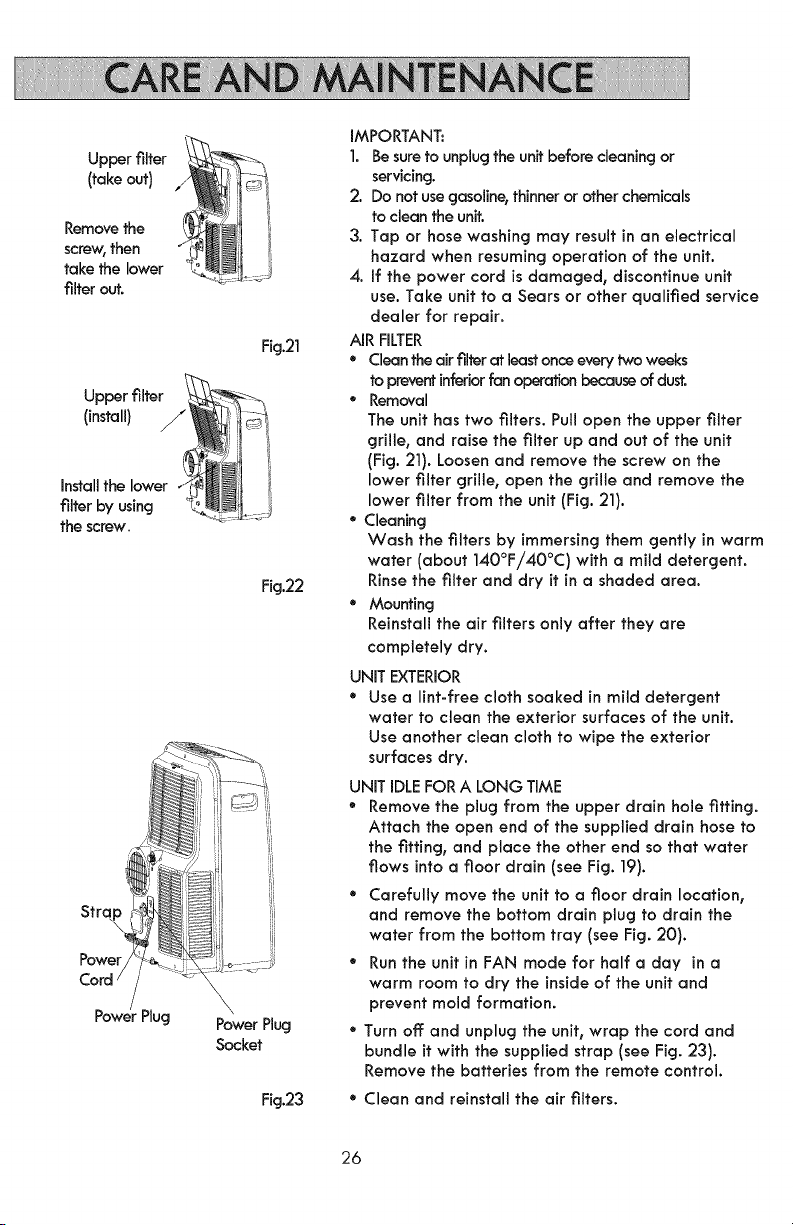
Upperfilter
(takeout)
Remove the
screw, then
take the lower
filter out.
Fig.21
Upper filter __-._
:i
s II
Install the lower _'/_m_L '
filter by using '_,,_._,___jdj _.i
the screw.
Fig.22
Socket
Fig.23
IMPORTANT:
1. Be sure to unplug the unit before cleaning or
servicing.
2. Do not use gasoline, thinner or other chemicals
tocleanthe unit.
3. Tap or hose washing may resultin an electrical
hazard when resuming operation of the unit.
4. If the power cord is damaged, discontinue unit
use. Take unit to a Sears or other qualified service
dealer for repair.
AIR FILTER
• Clean the air filter at least once every two weeks
to prevent inferior fan operation because of dust.
• Removal
The unit has two filters. Pull open the upper filter
grille, and raise the filter up and out of the unit
(Fig. 21). Loosen and remove the screw on the
lower filter grille, open the grille and remove the
lower filter from the unit (Fig. 21).
" Cleaning
Wash the filters by immersing them gently in warm
water (about 140°F/40°C) with a mild detergent.
Rinse the filter and dry it in a shaded area.
• Mounting
Reinstall the air filters only after they are
completely dry.
UNIT EXTERIOR
• Use o lint-free cloth soaked in mild detergent
water to clean the exterior surfaces of the unit.
Use another clean cloth to wipe the exterior
surfaces dry.
UNIT IDLE FOR A LONG TIME
• Remove the plug from the upper drain hole tiffing.
Attach the open end of the supplied droin hose to
the fitting, and place the other end so that water
flows into a floor drain (see Fig. 19).
• Carefully move the unit to a floor drain location,
and remove the bottom drain plug to drain the
water from the bottom tray (see Fig. 20}.
• Run the unit in FAN mode for half a day in a
warm room to dry the inside of the unit and
prevent mold formation.
• Turn off and unplug the unit, wrop the cord and
bundle itwith the supplied strap (see Fig. 23).
Remove the batteries from the remote control.
* Clean and reinstall the air filters.
26
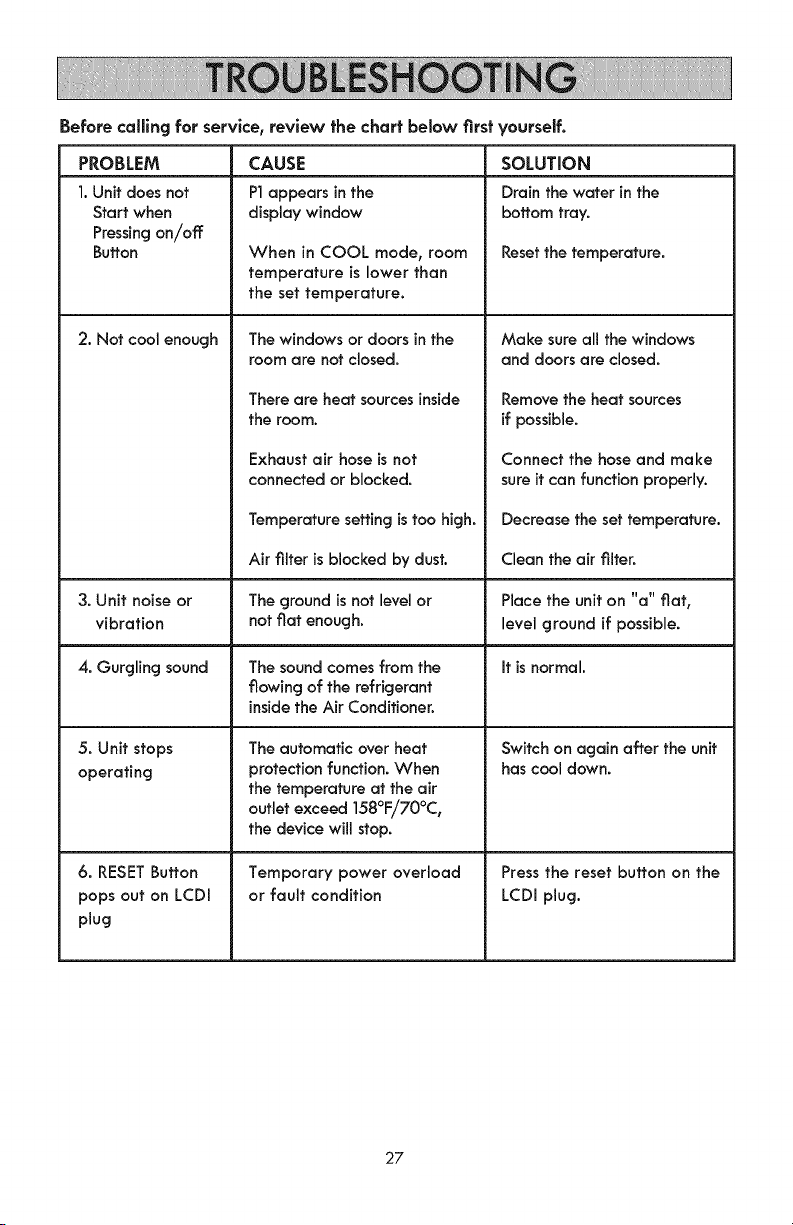
Before calllng for service, review the chart below Nrsf yourself,
PROBLEM
1.Unit does not
Start when
Pressingon/off
Buffon
2. Not cool enough
3. Unit noise or
vibration
4. Gurgling sound
5. Unit stops
operating
6. RESET Button
pops out on LCDI
plug
CAUSE
P1appears in the
display window
When in COOL mode, room
temperature is lower than
the set temperature.
The windows or doors in the
room are not closed.
There are heat sources inside
the room.
Exhaust air hose is not
connected or blocked.
Temperature setting is too high.
Air filter is blocked by dust.
The ground is not level or
not flat enough.
The sound comes from the
flowing of the refrigerant
inside the Air Conditioner.
The automatic over heat
protection function. When
the temperature at the air
outlet exceed 158°E/70°C,
the device will stop.
Temporary power overload
or fault condition
SOLUTION
Drain the water in the
bottomtray.
Resetthe temperature.
Make sure all the windows
and doors are closed.
Remove the heat sources
if possible.
Connect the hose and make
sure it can function properly.
Decrease the set temperature.
Clean the air filter.
Place the unit on "a" flat,
level ground if possible.
It is normal.
Switch on again after the unit
has cool down.
Press the reset button on the
LCDI plug.
27
[]Congratulationsonmakingasmartpurchase.Yournew I(enmore _ product is designed
and manufactured for years of dependable operation. But like all products, it may require
preventive maintenance or repair from time to time. That's when having a Master Protection
Agreement can save you money and aggravation.
The Master Protection Agreement also helps extend the life of your new product. Here's
what the Agreement _ includes:
D Parts and labor not just for repairing defects, but to help keep products operating
properly under normal use. Our coverage goes well beyond the product warranty.
No deductibles, no functional failure excluded from coverage-- real protection.
D Expert service by a force of more than 10,000 authorized Sears service technicians,
which means someone you can trust will be working on your product.
D Unlimited service calls and nationwide service, as often as you want us, whenever
you want us.
D "No-lemon" guarantee - replacement of your covered product if four or more product
failures occur within twelve months.
[] Product replacement if your covered product can't be fixed.
[] Annual Preventive Maintenance Check at your request - no extra charge.
[] Fast help by phone = we call it Rapid Resolution = phone sup-port from a Sears
representative on all products. Think of us as a "talking owner's manual."
[] Power surge protection against electrical damage due to power fluctuations.
[] $250 Food LossProtection annually for any food spoilage that is the result of
mechanical failure of any covered refrigerator or freezer.
[] Rental reimbursement if repair of your covered product takes longer than promised.
[] 25% discount off the regular price of any non-covered repair service and related
installed parts.
Once you purchase the Agreement, a simple phone call is all that it takes for you to schedule
service. You can call anytime day or night, or schedule a service appointment online.
The Master Protection Agreement is a risk free purchase. If you can-cel for any reason during
the product warranty period, we will provide a full refund. Or, a prorated refund anytime after
the product warranty period expires. Purchaseyour Master Protection Agree-ment today!
[] Some limitations and exclusionsapply. For pricesand additional informationin the U.S.A.
call 1-800-827-6655.
[] Coverage in Canada varies on some items. For full details call Sears Canada at
1-800-361-6665.
m Sears installation Service
For Sears professional installation of home appliances, garage door openers, water heaters,
and other major home items, in the U.S.A. or Canada call ]-800-4-MY-HOME '_.
28

Your Home
For troubleshooting, product manuals and expert advice:
www,managemylife,com
For repair - in your home - of all major brand appliances,
lawn and garden equipment, or heating and cooling systems,
no matter who made it, no matter who sold it !
For the replacement parts, accessories and
owner's manuals that you need to do-it-yourself.
For Sears professional installation of home appliances
and items like garage door openers and water heaters.
1-800-4-MY-HOME ® Call anytime, day or night
(1-800-469-4663) (U.S.A. and Canada)
TM
® Registered Trademark / ' Trademark of KCD IP, LLC in the United States, or Sears Brands, LLC in other countries
® Marca Registrada / TMMarca de Fabrica de KCD IP, LLC en Estados Unidos, o Sears Brands, LLC in otros paises
_TC
' Marque de commerce / MDMarque depos6e de Sears Brands, LLC

Use & Care Guide
Manual de Uso y Cuidado
Kenmore_
Fer_abte
_sl_o_eF
40584126
Sears Brands Management Corporation
Hoffman Estates t IL 60179 U.S.A.
www.kenmore.com
www.sears.com
www.kmartcom
Antes De Usar Su Nuevo AJre Acondicionado ................................................................. 2
Garanf_a ................................................................................................................................... 2
Instrucciones De Seguridad Importantes ....................................................................... 3-5
Requisitos El_ctricos ............................................................................................................... 6
Piezas Y CaracterBticas ....................................................................................................... 7
Instrucciones De Instataci6n ............................................................................................ 8-12
Operaci6n ......................................................................................................................... 13-16
Uso Del Mando A Disfancia ......................................................................................... 17-25
CuJdado Y MantenimJento ................................................................................................. 26
Soluci6n De Problemas ....................................................................................................... 27
Acuerdo Maestro De Protecci6n ...................................................................................... 28
Lea este manuak Esto le ayudar6 a operar su nuevo aire acondicionado
Kenmore de la manera m6s segura y efectiva.
Guarde este Nbro y su factura (re¢ibo) en un lugar seguro para futuras consultas.
Kenmore un a_o de garantia llmitada, Cuando instalado, operado y mantenido de acuerdo con
todas las instrucciones provistas, si el aparato falla debido a un defecto en material o mano de
obra durante un aSo desde la fecha de compra, Ilame al 1-800-4-MI-HOGAR para organizar
para la reparaci6n de forma gratuita. Si este aparato se utiliza para otros fines que no sean
privados de familia, esta garantia se aplica solamente 90 dias a partir de la fecha de compra.
Esta garantia cubre s61o defectos en material y mano de obra, y no pagar6:
1. Elementos fungibles que pueden gastarse par el usa normal, incluyendo, pero no limitado a
filtros, correas, bombillas de luz incandescente y bolsas.
2. Un t_cnico de servicio que instruya al usuario en instalaci6n, operaci6n o mantenimiento
correcto del producto.
3. Un t_cnico de servicio para limpiar o mantener este producto.
4. DaSo o falla en este producto si no est6 instalado, operado y mantenido de acuerdo con todas
las instrucciones suministradas con el producto.
5. DaSo o falla en este producto por accidente, abuso, real uso o uso para otro fin que no sea
previsto.
6. DaSo o falla en este producto causado por el uso de detergentes, limpiadores, productos
quimicos o utensilios diferentes de los recomendados en todas las instrucciones suministradas
con el producto.
7. DaSo o falla en piezas o sistemas causado por modificaciones no autorizadas hechas a este
producto.
Exenci6n de responsabiJidad de garantias implJcitas; Limitaci6n de remedios El 0nico y exclusivo
recurso del cliente baio esta garantia limitada ser6 la reparaci6n del producto como se describe
aqui.
Las garantias implicitas, incluyendo garantias de comerciabilidad o idoneidad para un prop6sito
particular, est6n limitadas a un aSo o al periodo m6s corto permitido por la ley. Sears no ser6
responsable par daSos incidentales o consecuentes. Algunos estados y provincias no permiten la
exclusi6n o limitaci6n de da5os incidentales o consecuentes, o la limitaci6n de la duraci6n de las
garantias implicitas de comerciabilidad o idoneidad, par Io que estas exclusiones o limitaciones
pueden no aplicarse en su caso. Esta garantia se aplica s61o mientras este producto se utiliza en
los Estados Unidos.
Esta garanfia le otorga derechos legales especificos, y usted tambi_n puede tener otros derechos
que varian seg6n el estado.
Sears Brands Management Corporation, Hoffman Estates, IL 60179
2
Leatodas[asinstruccionesenestemanualantesdeutilizarsuaireacondicionado.
Esteproductoest6 dise_ado s6io para uso domSstico del interior, no para uso
industrial o otras apiicaciones comerciaies. Use s6io con e[ cabieado ei_ctrico que
se encuentra en buen estado de funcionamiento y que cump[a con los c6dicjos y
recjiamentos aplicables. Si usted tiene aiguna pregunta si su cableado el_ctrico
sea adecuado, consu[te a un e[ectricista caNficado.
AI utilizar su aire acondicionador usted debe seguir las instrucciones de
seguridad importantes que se indican a continuaci6n. Como una parte de esas
instrucciones, se ha utilizado la palabra "_, ADVERTENCiA" para indicar el
nivel de peligro: _ ADVERTENCIA: indica un peligro que, si no evitarse, puede
provocar lesiones o muertes.
INSTRUCCIONES IMPORTANTES
Cuando se utilizan aparatos eiSctricos_ [as precauciones b6sicas siempre se deben
segu[r para reducir el riesgo de incendior descarga el&ctrica y [esiones a personas_
incluyendo [o sicjuiente:
.
2.
Lea todas las instrucciones antes de utilizar este aire acondicionado.
Utilice este aire acondicionado s61o como se describe en este manual.
Cua[quier otro uso no recomendado por el fabricante puede causar descarcja
e[Sctrica_ incendio o [esiones a personas.
3. No haga funcionar este aire acondicionado con un cable de alimentaci6n
da_ado o despuSs de[ ma[ funcionamiento de[ aire acondicionado o se ha
ca[do de a[cjuna manera.
4. Este aparato no est6 dise_ado para ser usado por personas (incluidos ni_os)
con capacidad f[sica_ sensorial o mental reducida, o a fa[ta de experiencia
y conocimiento, a menos que se les ha dado la supervisi6n o instrucci6n
acerca del e[ uso del aparato por una persona responsabie de su secjuridad.
5. No coloque el aire acondicionado en una superficie peque_a, desnivelada o
desigual, o cua[quier superficie que podria hacer que se vue[que o caicja.
6. Para un funcionamiento adecuado, el aire acondicionado debe co[ocarse
sobre una superficie lisa y no combustible.
7. Siempre desenchufe el aire acondicionado cuando no est8 en uso.
8. No utilice el aire acondicionado despuSs de retirado los dispositivos de
seguridad.
9. No co[oque e[ cable de a[imentaci6n debaio de a[fombra. No cubra el cable
con tapetes, a[fombras de pasi[[o o simi[ares. Coloque e[ cable leios del 6rea
de tr6fico de manera que no tropezar6 con el cable.
10. Evite e[ uso de cables de extensi6n debido al riesgo de incendio. Si un cable
de extensi6n necesita ser utilizador el cable debe ser al menos de14 AWG y
con una potencia nominal de no inferior a 1875 vatios.
11. No inserte ni permita que nincj6n obieto entre en cualquier abertura del aire
acondicionado. Si 1o hace, puede provocar descarcja e[Sctrica y/o riescjo de
incendio.
12.
Este producto est6 dise_ado s61o para uso domSstico de[ interior t no para uso
industrial o otras apiicaciones comerciales. Esta garantia no es v6iida si el
producto es utilizado alcjuna vez para prop6sitos que no sean de hocjar
privado.
Ustednecesitar6unasuperficieplanaa porIomenos6 "(15r2cm)defuentes
decalorcomocalentadores.
13.
14. Nobloqueeaberturasdeaireocoloqueel aire acondicionado sobre una
superficie blandar como una cama o sot6.
15. El aire acondicionado debe estar conectado a un tomacorriente a tierra tres
orificios_ 15 o 20 A con fusible_ 115 V y 60 Hz.
16. Inserte siempre el filtro correctamente. Limpielos cada dos semanas. La
operaci6n sin filtros puede causar fallos.
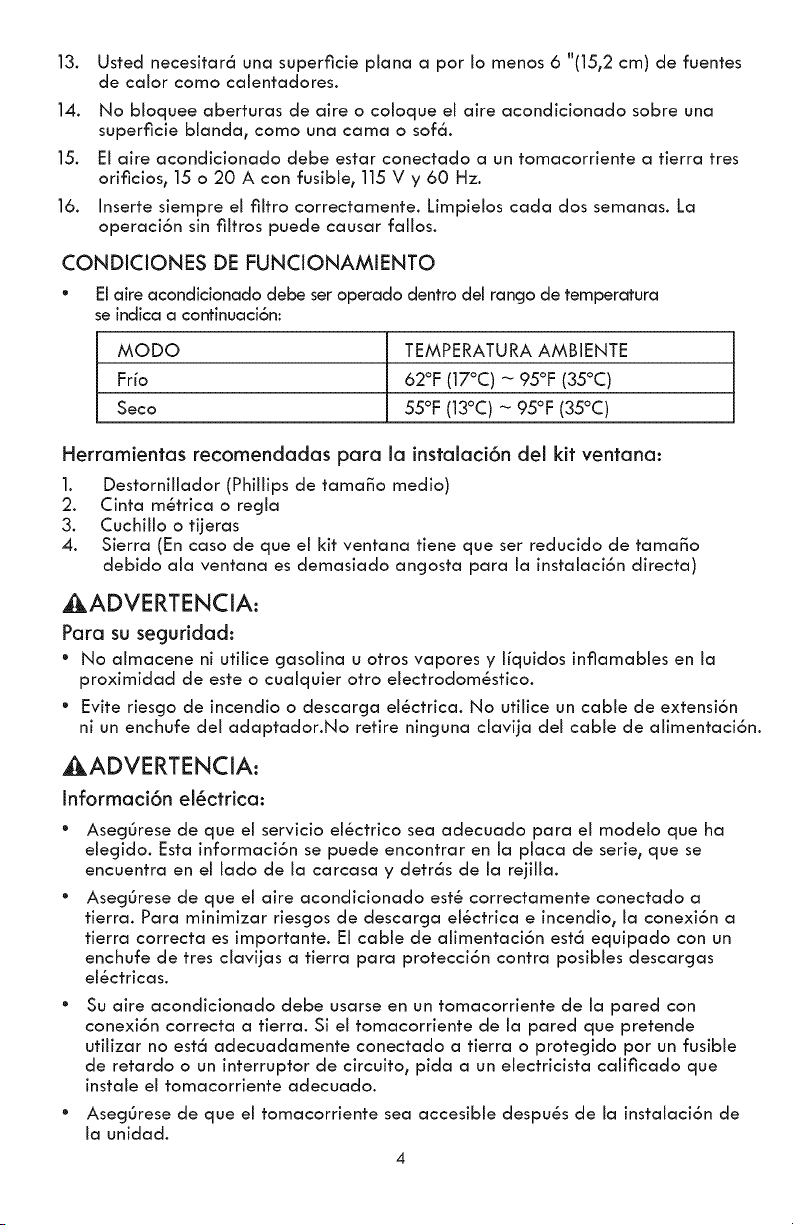
CONDICIONES DE FUNCIONAMIENTO
• El aJre a¢ondicionado debe ser operado dentro del rango de temperatura
se indica a continuaci6n:
MODO TEMPERATURA AMBIENTE
Frfo 62°F (17°C) - 95°F (35°C)
Seco 55°F (13°C) - 95°F (35°C)
Herramientas recomendadas para la instaiacJ6n del kit ventana:
1. DestorniJJador (Phillips de tamaBo medio)
2. Cinta mStrica o regJa
3. CuchiJJo o tijeras
4. Sierra (En caso de que el kit ventana tiene que ser reducido de tama_o
debido ala ventana es demasiado angosta para la instalaci6n directa)
,&,ADVERTENCIA:
Para su seguridad:
• No almacene ni utilice gasolina u otros vapores y Ifquidos inflamables en la
proximidad de este o cualquier otro electrodom&stico.
• Evite riesgo de incendio o descarcja elSctrica. No utilice un cable de extensi6n
ni un enchufe del adaptador.No retire ninguna clavija del cable de alimentaci6n.
_ADVERTENCIA:
Informaci6n el@ctrica:
AsegOrese de que el servicio el&ctrico sea adecuado para el modelo que ha
eJegido. Esta informaci6n se puede encontrar en la placa de serie_ que se
encuentra en eJ Jado de Ja carcasa y detr6s de Ja rejiJJa.
Asecj6rese de que el aire acondicionado est& correctamente conectado a
tierra. Para minimizar riesgos de descarga el&ctrica e incendiot la conexi6n a
tierra correcta es importante. El cable de alimentaci6n est6 equipado con un
enchufe de tres clavijas a tierra para protecci6n contra posibles descarcjas
el&ctricas.
Su aire acondicionado debe usarse en un tomacorriente de la pared con
conexi6n correcta a tierra. Si el tomacorriente de Ja pared que pretende
utilizar no est6 adecuadamente conectado a tierra o protegido por un fusible
de retardo o un interruptor de circuitor pida a un eJectricista calificado que
instale eJ tomacorriente adecuado.
Aseg6rese de que el tomacorriente sea accesible despu&s de la instalaci6n de
Ja unidad.
ADVERTENCIA: PELIGRO DE DESCARGA
Nunca coloque el aire acondicionado donde pueda caer en una ba_era I lavabo l
_rea inundada I o cualquier recipiente o estanque de acjua.
4_,ADVERTENCIA: PELIGRO DE INCENDIO
El aire acondicionado tiene partes que produzcan chispas o arcos en el interior.
No utilice el aire acondicionado cerca de materiales combustibles_ gases
infiamables o fuentes de calor. No Io use en 6reas donde cjasolina_ pintura o
materiales infiamables se utilicen o almacenen. Para evitar un posible incendio_
no cubra las entradas o salidas de aire de cuaiquiera manera. No inserte ni
permita que objetos extra_os penetren en rejiEias de ventilaci6n o abertura de
escape ya que esto puede causar descarcja elSctrica_ incendio o da_o al
ventilador.
_kADVERTENCIA: SUPERFiCiES CALIENTES
No toque el motor del aire acondicionado cuando est6 en uso. Este motor es
caliente cuando est6 en uso. Para evitar quemaduras_ no permita que la piel
desnuda toque superficies calientes.
iGUARDE ESTAS INSTRUCCIONES!
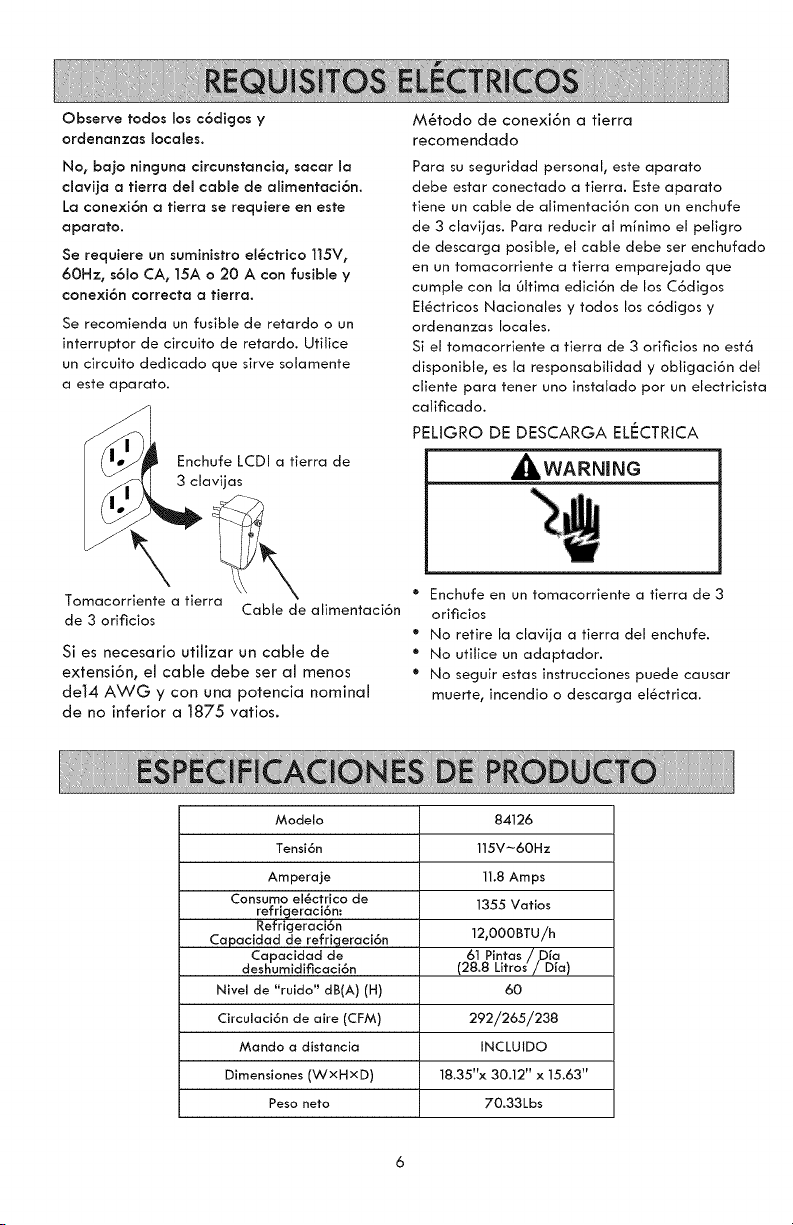
Observe todos los c6digos y
ordenanzas locales.
No, bajo nincjuna circunstancia, sacar la
clavija a fierra del cable de alimentaci6n.
La conexi6n a fierra se requiere en este
aparato.
Se requiere un suministro el_ctrico 115V,
60Hz, s61o CA, 15A o 20 A con fusible y
conexi6n correcta a fierra.
Se recomienda un fusible de retardo o un
interruptor de circuito de retardo. Utilice
un circuito dedicado que sirve solamente
a este aparato.
Enchufe LCDI a tierra de
3 clavijas
Tomacorriente a tierra
Cable de alimentaci6n
de 3 orificios
Si es necesario utilizar un cable de
extensi6n, el cable debe ser al menos
de14 AWG y con una potencia nominal
de no inferior a 1875 vatios.
M_todo de conexi6n a tierra
recomendado
Para su seguridad personal, este aparato
debe estar conectado a tierra. Este aparato
fiene un cable de alimentaci6n con un enchufe
de 3 clavijas. Para reducir al mfnimo el peligro
de descarga posible, el cable debe ser enchufado
en un tomacorriente a fierra emparejado que
cumpte con la Oltima edici6n de los C6digos
El_ctricos Nacionales y todos los c6digos y
ordenanzas locales.
Si el tomacorriente a tierra de 3 orificios no est6
disponible, es la responsabilidad y obligaci6n del
cliente para tener uno instalado por un electricista
calificado.
PELtGRO DE DESCARGA ELECTRtCA
_WARNING
• Enchufe en un tomacorriente a tierra de 3
orificios
• No retire la clavija a tierra del enchufe.
• No utitice un adaptador.
• No seguir estas instrucciones puede causar
muerte, incendio o descarga el_ctrica.
Modelo
Tensi6n
Amperaje
Consumo el_ctrlco de
refrlgeraci6n:
Refrlcjeraci6n
Capacldad de refrlgeraci6n
Capacldad de
deshumldificaci6n
Nivel de "ruldo" dB(A) (H)
Circulaci6n de aire (CFM)
Mando a dlstancla
Dimenslones (WxHxD)
Peso neto
84126
115V-60Hz
11.8 Amps
1355 Vafios
12,000BTU/h
61 Pintas/,Dja
(28.8 Litros/Dfa)
6O
292/265/238
INCLUIDO
18.35"x 30.12" x 15.63"
70.33Lbs
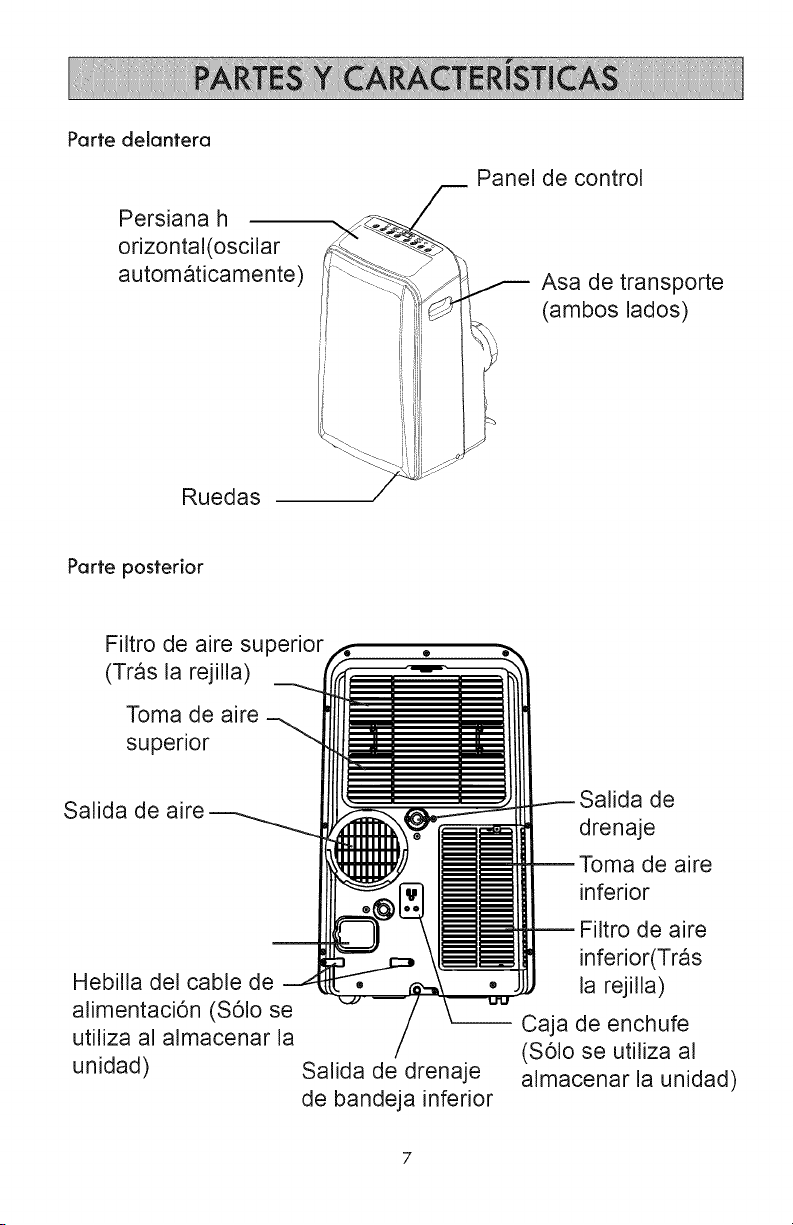
Parte delantera
Persiana h
orizontal(oscilar
automaticamente'
Panel de control
Asa de transporte
(ambos lados)
Ruedas
Parte posterior
FJltro de aire supenor
(Tras la rejilla)
Toma de aire
superior
Salida de aire
Hebilla del cable de
alimentaci6n (S61o se
utiliza al almacenar la
unidad)
Salida de drenaje
de bandeja inferior
Salida de
drenaje
Toma de aire
inferior
Filtro de aire
inferior(Tras
la rejilla)
Caja de enchufe
(S61o se utilJza al
almacenar la unJdad)
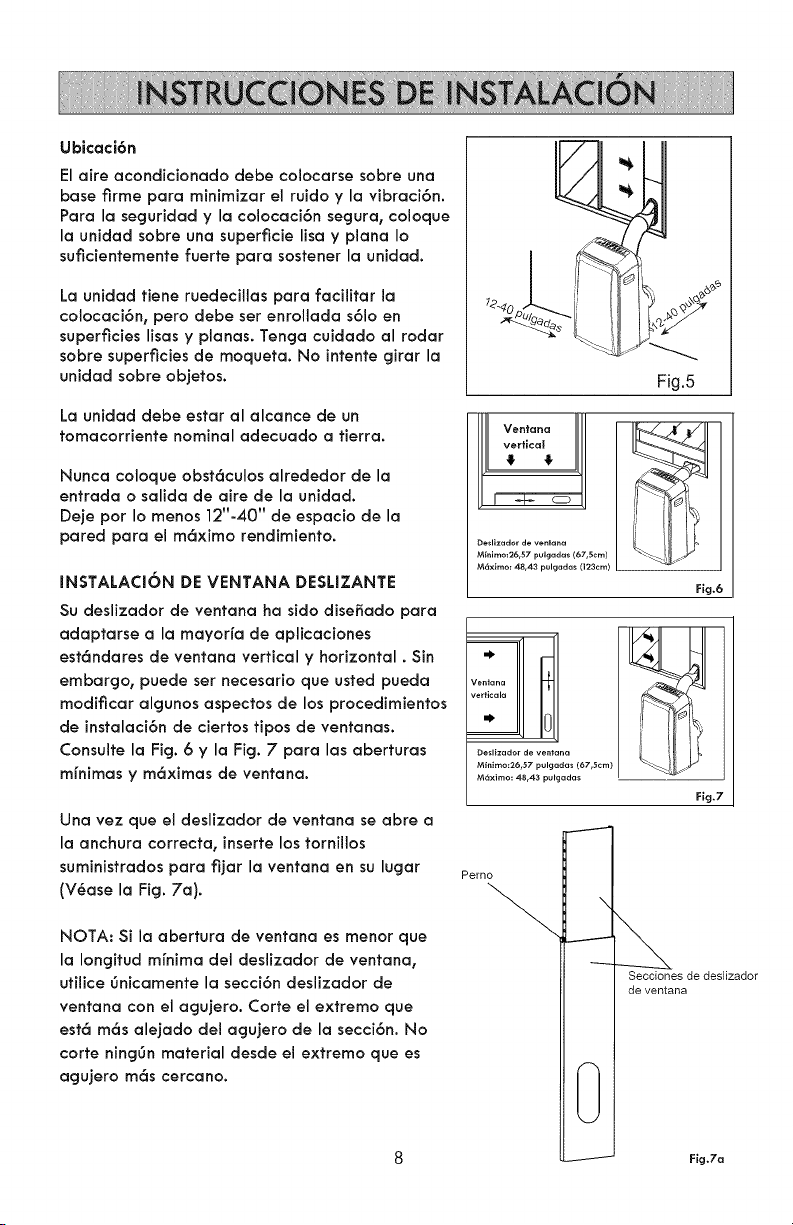
Ubicaci6n
El aire acondicionado debe colocarse sobre una
base firme para minimizar el ruido y la vibraci6n.
Para la seguridad y la colocaci6n segura, coloque
la unidad sobre una superficie lisa y plana Io
suficientemente fuerte para sostener la unidad.
La unidad tiene ruedecillas para facilitar la
colocaci6n, pero debe set enrollada s61oen
superficieslisas y planas. Tenga cuidado al rodar
sobre superficiesde moqueta. No intente girar la
unidadsobre objetos.
La unidad debe estar al alcance de un
tomacorriente nominal adecuado a tierra.
Nunca coloque obst6culos alrededor de la
entrada o salida de aire de la unidad.
Deje pot Io menos 12"-40" de espacio de la
pared para el m6ximo rendimiento.
INSTALACION DE VENTANA DESLIZANTE
Su desiizador de ventana ha sido disefiado para
adaptarse a la mayor[a de aplicaciones
est6ndares de ventana vertical y horizontal. Sin
embargo, puede ser necesario que usted pueda
modificar algunos aspectos de los procedimientos
de instalaci6n de ciertos tipos de ventanas.
Consulte la Fig. 6 y la Fig. 7 para las aberturas
mfnimas y m6ximas de ventana.
Una vez que el deslizador de ventana se abre a
la anchura correcta, inserte los tornillos
suministradospara fijar la ventana en su lugar
(V6ase la Fig. 7a).
NOTA: Si la abertura de ventana es menor que
la Iongitud mfnima del deslizador de ventana,
utilice gnicamente la secci6n deslizador de
ventana con el agujero. Corte el extremo que
est6 m6s alejado del agujero de la secci6n. No
corte ninggn material desde el extremo que es
agujero m6s cercano.
Fig.5
l! Ventana
verHcal
4 4
Desllzador de ventana
Mfnimo:26,57 pulgadas (67,5cm)
M6xlmo: 48,43 pulgadas (123cm)
Fig.6
÷
Ventana
veHicala
" 0
Desllzador de yen
Minlmo:26,57 pulg
M6ximo: 48,43 pu adas
Perno
Secciones de deslizador
de ventana
0
-------'- Fig.7a
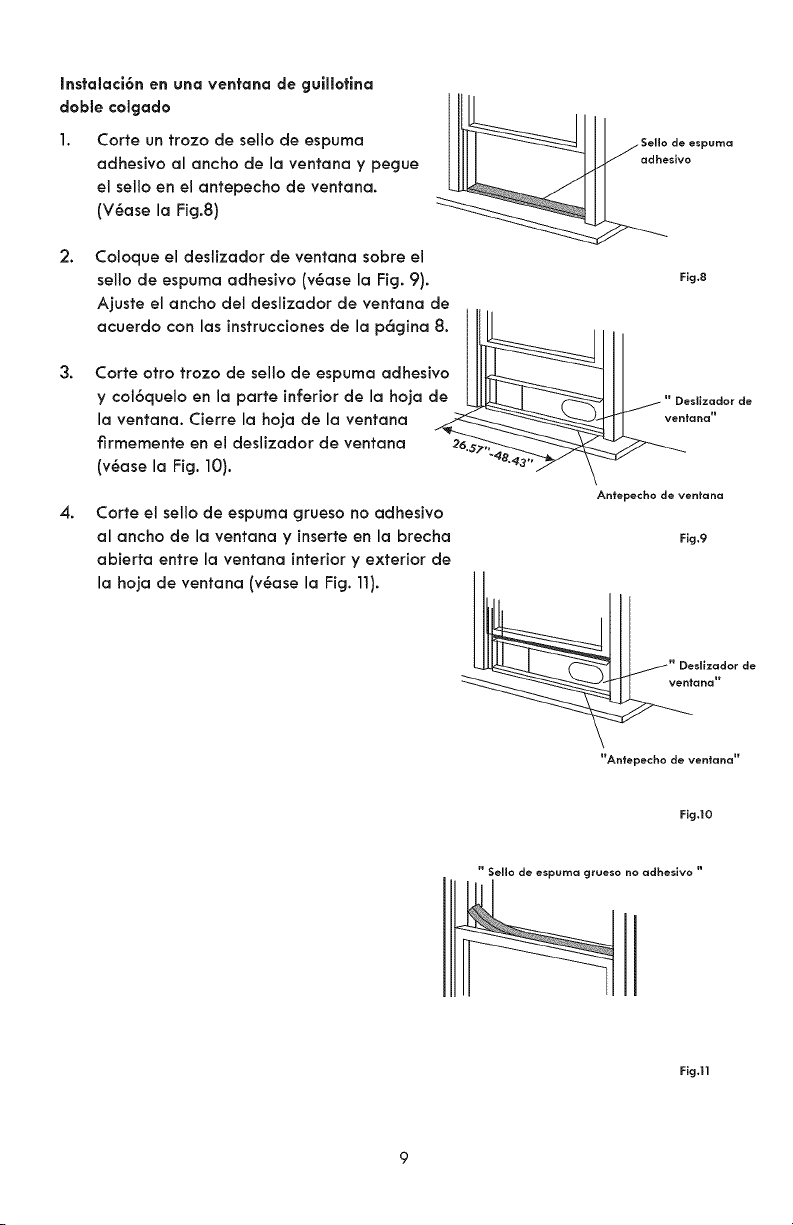
Instalaci6n en una ventana de guilletina
deble celgade
1.
2.
3.
4.
Corte un trozo de sello de espuma
adhesivo al ancho de la ventana y pegue
eJ sello en eJantepecho de ventana.
(V6ase la Ficj.8)
Coloque el deslizador de ventana sobre eJ
sello de espuma adhesivo (v6ase la Fig. 9).
Fig.8
Ajuste el ancho del deslizador de ventana de
acuerdo con las instrucciones de la p6gina 8. ""_k__ll_ j jL
Corte otto trozo de sello de espuma adhesivo
y col6quelo en la parte inferior de la hoja de i " Desllzadorde
la ventana. Cierre la hoja de la ventana ._ __ta.a"
firmernente en el deslizador de ventana 26.
(v6ase la Fig. 10).
Antepecho de ventana
Corte el seJlo de espuma grueso no adhesivo
al ancho de la ventana y inserte en la brecha
abierta entre la ventana interior y exterior de
la hoja de ventana (v6ase la Fig. 11).
Fig.9
Antepecho de ventana"
Fig.t0
" Sello de espuma grueso no adheslvo "
Fig.11
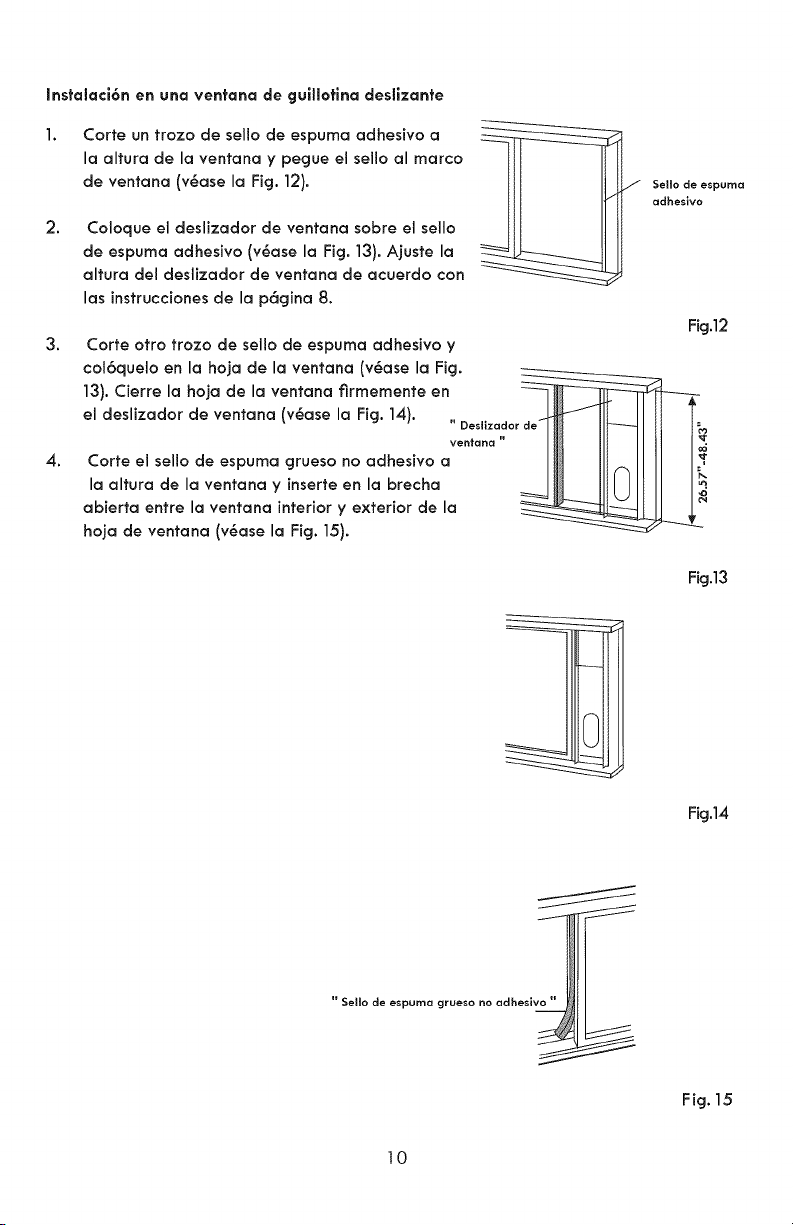
Instalaci6n en una ventana de guilletina deslizante
2.
Corte un froze de sello de espuma adhesive a
la altura de la ventana y pegue el sello al marco
de ventana (v6ase la Fig. 12).
Coloque ei deslizador de ventana sobre el sello
de espuma adhesive (v6ase la Fig. 13). Ajuste la
altura del deslizador de ventana de acuerdo con
las instruccionesde la p6gina 8.
Sello de espuma
adhesive
Fig.12
3. Corte otro trozo de sello de espuma adhesive y
13). Cierre la hoja de la ventana firmemente en
ventana " !1
4. Corte el sello de espuma grueso no adhesivo a
_,oo,_0ro_o,ovo°_o°oy,°_or_oo°,o_roc,o __ll_J IIII I_
abierta entre la ventana interiory exterior de la
hoja de ventana (v6ase la Fig. 15).
Fig.13
Fig.14
" Sello de espuma grueso no adheslv_l I
_1_
Fig. 15
10
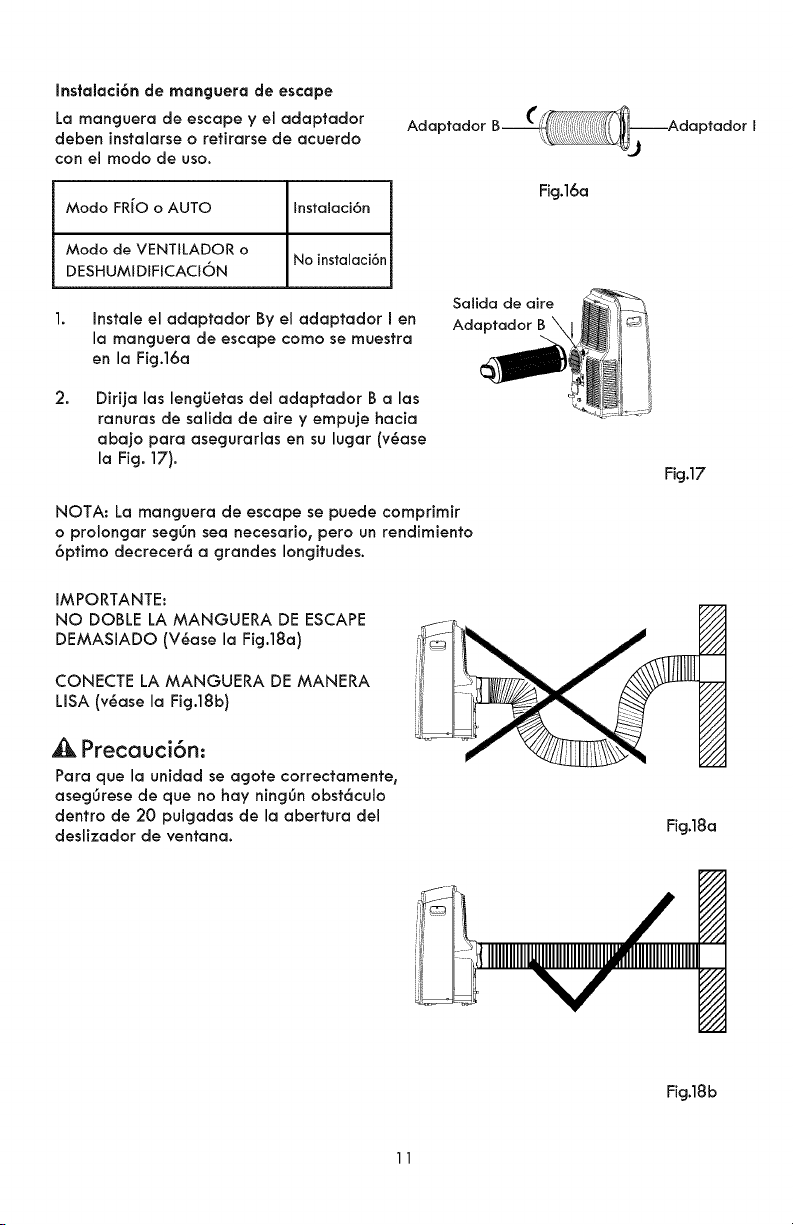
Instalaci6n de manguera de escape
La rnanguera de escape y eladaptador
deben instalarse o retirarse de acuerdo
con el modo de uso.
Adaptador
Modo FRiO o AUTO Instalaci6n
Modo de VENTILADOR o
DESHUMIDIFICACION No instalaci6n
1.
Fig.16a
Instale eJadaptador By eJadaptador I en
la manguera de escape como se muestra
en la Fig.16a
Salida de aire
Adaptador B
2.
Dirija las lengiJetas deJ adaptador B alas
ranuras de salida de aire y empuje hacia
abajo para asegurarlas en su lugar (v6ase
la Fig. 17).
NOTA: La manguera de escape se puede comprimir
o prolongar seggn sea necesario, pero un rendimiento
6ptimo decrecer6 a grandes longitudes.
IMPORTANTE:
NO DOBLE LA MANGUERA DE ESCAPE
DEMASIADO (V6ase la Fig.18a)
CONECTE LA MANGUERA DE MANERA
LISA (v6ase la Fig.18b)
Precauci6n:
Para que la unidad se agote correctamente,
asegOrese de que no hay ningOn obst6culo
dentro de 20 pulgadas de la abertura del
deslizador de ventana.
Fig.17
i///
/i-//
Fig.18a
Fig.18b
11
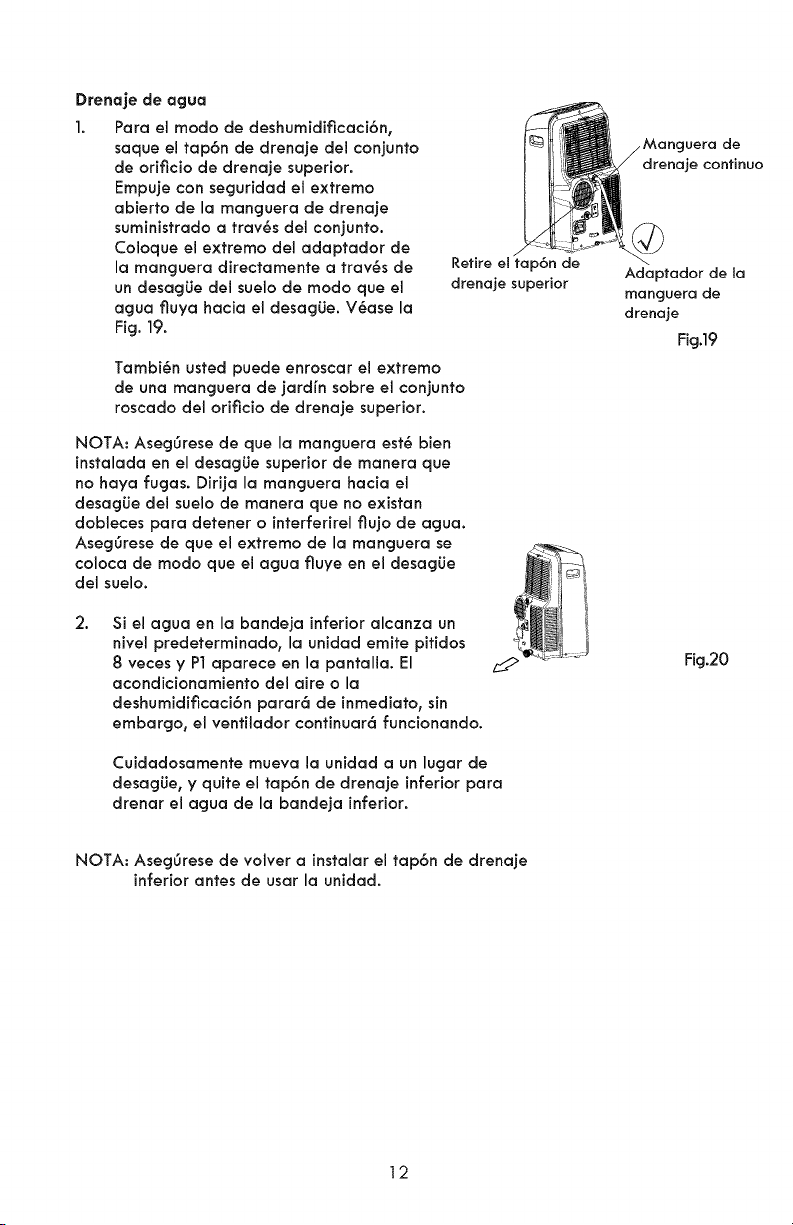
Drenaje de agua
1. Para el modo de deshumidificaci6n,
saque el tap6n de drenaje del conjunto
de orificio de drenaje superior.
Empuje con seguridad el extremo
abierto de la manguera de drenaje
suministrado a trav6s del conjunto.
Coloque el extremo del adaptador de
la manguera directamente a trav6s de
un desagLie del suelo de modo que el
agua fluya hacia eJ desagLie. V6ase la
Fig. 19.
Retire el tap6n de
drenaje superior
Tambi_n usted puede enroscar el extremo
de una manguera de jardfn sobre el conjunto
roscado del orificio de drenaje superior.
NOTA: Aseggrese de que la manguera est6 bien
instalada en el desagLie superior de manera que
no haya fugas. Dirija la manguera hacia el
desagLie del suelo de manera que no existan
dobleces para detener o interferirel flujo de agua.
Aseggrese de que el extremo de la manguera se
coloca de modo que el agua fluye en el desagLie
del suelo.
2.
Si el agua en la bandeja inferior alcanza un
nivel predeterminado, la unidad emite pitidos
8 veces y P1 aparece en la pantalla. El
acondicionamiento del aire o la
deshumidificaci6n parar6 de inmediato, sin
embargo, el venfilador continuar6 funcionando.
Cuidadosamente mueva la unidad a un lugar de
desagLie, y quite el tap6n de drenaje inferior para
drenar el agua de la bandeja inferior.
gera de
drenaje confinuo
Adaptador de la
manguera de
drenaje
Fig.19
Fig.20
NOTA: Aseg0rese de volver a instalar el tap6n de drenaje
inferior antes de usar la unidad.
12
PANEL DE CONTROL
@
@
O
O
O
O
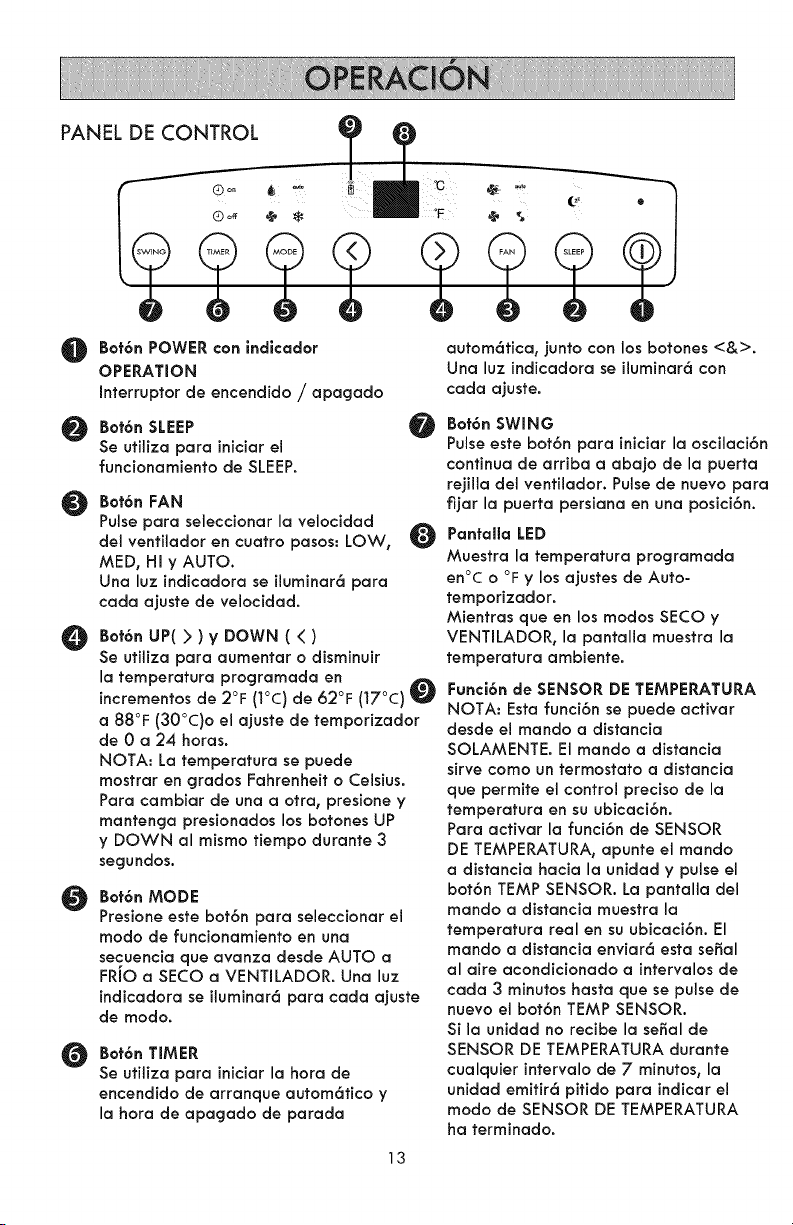
Bef6n POWER con indiceder
OPERATION
Interrupter de encendido / apagado
Bot6n SLEEP
Se utilize pare iniciar el
funcionamiento de SLEEP.
Bot6n FAN
Pulse pare seleccionar la velocidacl
del ventilador en cuatro pesos: LOW,
MED0 HI y AUTO.
Una luz indicadora se iluminar6 para
cada ajuste de velocidad.
Bet6n UP( } ) V DOWN ( { )
Se utilize pare aumentar o disminuir
la temperatura programada en
incrementos de 2°F (I°C) de 62°F (17°C)
a 88°F (30°C)o el ajuste de temporizador
de 0 a 24 horas.
NOTA: La temperature se puede
mostrar en grades Fahrenheit o Celsius.
Pare cambiar de una a otra, presione y
mantenga presionados los botones UP
y DOWN al mismo tiempo durante 3
segundos.
Bot6n MODE
Presione este bot6n pare seleccionar el
mode de funcionamiento en una
secuencia que avanza desde AUTO a
FRIO a SECO a VENTILADOR. Una luz
indicadora se iluminar6 pare cada ajuste
de mode.
Bet6n TIMER
Se utilize pare iniciar la hera de
encendido de arranque autom6tico y
la hera de apagado de parade
autom6tica, junto con los botones <&>.
Una luz indicadora se iluminar6 con
cada ajuste.
Bet6n SWING
Pulse este bot6n pare iniciar la oscilaci6n
continua de arriba a abajo de la puerta
rejilla del ventilador. Pulse de nuevo para
fijar la puerta persiana en una posici6n.
PantaIla LED
Muestra la temperature programada
en°C o °F y losajustes de Auto-
temporizador.
Mientras queen los modes SECO y
VENTILADOR, la pantalla muestra la
temperature ambiente.
Funci6nde SENSOR DE TEMPERATURA
NOTA: Estafunci6nse puede activar
desde elmando a distancia
SOLAMENTE. El mando a distancia
sirve come un termostato a distancia
que permite el control precise de la
temperature en su ubicaci6n.
Pare activar la funci6n de SENSOR
DE TEMPERATURA, apunte el mando
a distancia hacia la unidad y pulse el
bot6n TEMP SENSOR. La pantalla del
mando a distancia muestra la
temperature real en su ubicaci6n. El
mando a distancia enviar6 esta seBal
al aire acondicionado a intervalos de
cada 3 minutes haste que se pulse de
nuevo el bot6n TEMP SENSOR.
Si la unidad no recibe la seBal de
SENSOR DE TEMPERATURA durante
cualquier intervalo de 7 minutes, la
unidad emitir6 pitido pare indicar el
mode de SENSOR DE TEMPERATURA
ha terminado.
13
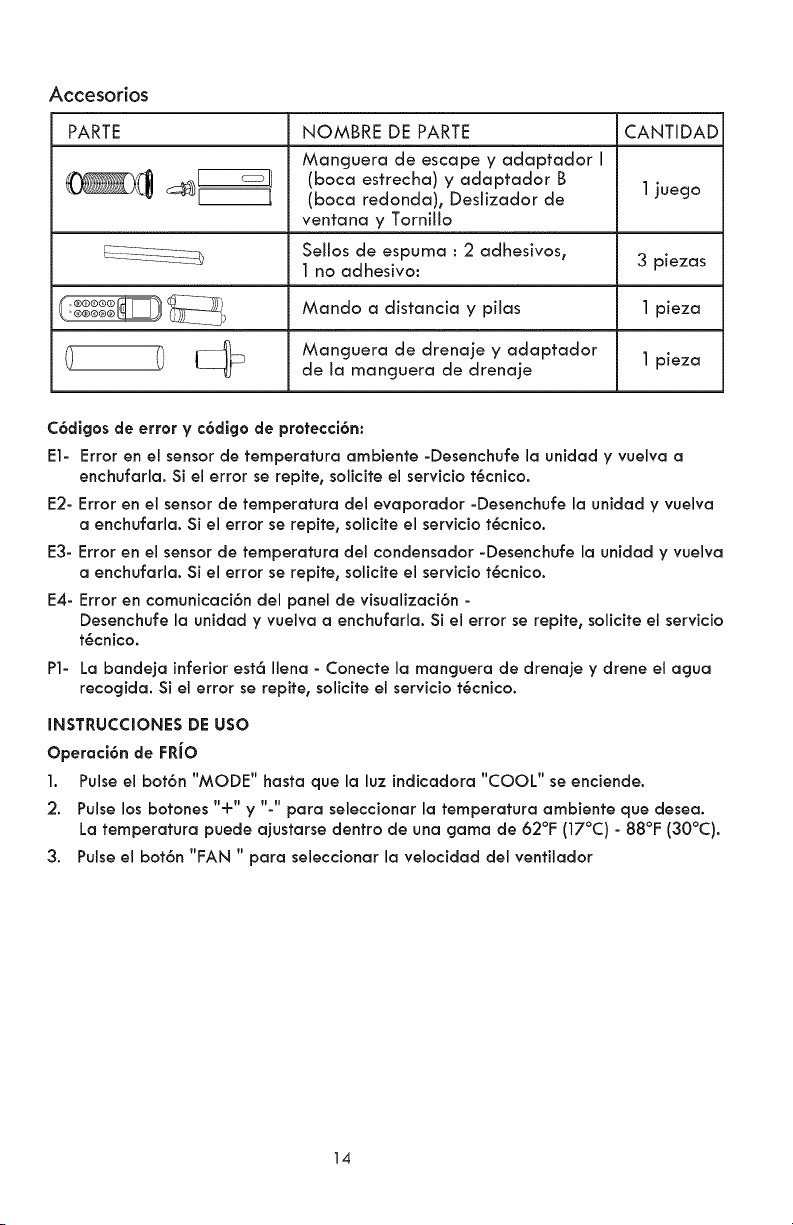
Accesorios
PARTE NOMBRE DE PARTE CANTIDAD
Manguera de escape y adaptador I
(boca estrecha) y adaptador B
__) (boca redonda), Deslizador de
1
juego
ventana y Tornillo
Sellos de espuma : 2 adhesivosr
1 no adhesivo:
Mando a distancia y pilas
Manguera de drenaje y adaptador
de la manguera de drenaje
3 piezas
1 pieza
1 pieza
C6digos de error y c6digo de protecci6n:
El- Error en el sensor de temperatura ambiente -Desenchufe la unidad y vuelva a
enchufarla. Si el errorse repite,soliciteelserviciot6cnico.
E2- Erroren el sensor de temperatura del evaporador -Desenchufe la unidad y vuelva
a enchufarla.Si el errorse repite,soliciteel serviciot6cnico.
E3- Erroren el sensor de temperatura del condensador -Desenchufe la unidad y vuelva
a enchufarla.Si el errorse repite,soliciteel serviciot6cnico.
E4- Erroren comunicaci6n del panel de visualizaci6n-
Desenchufe la unidad y vuelva a enchufarla. Si el error se repite, solicite el servicio
t6cnico.
P1- La bandeja inferior est6 Ilena - Conecte la manguera de drenaje y drene el agua
recogida. Si el error se repite, solicite el servicio t6cnico.
INSTRUCCIONES DE USO
Operaci6n de FRJO
1. Pulse el bot6n "MODE" basra que la luz indicadora "COOL" se enciende.
2. Pulse los botones "+" y "-" para seleccionar la temperatura ambiente que desea.
La temperatura puede ajustarse dentro de una gama de 62°F (17°C) - 88°F (30°C).
3. Pulse el bot6n "FAN " para seleccionar la velocidad del ventilador
14
Operaci6n de AUTO
1. Cuando el aire acondicionado est6 en el modo AUTO, se seleccionar6
autom6ticamente el funcionamiento de reffigeraci6n o s61oventilador a base de
la temperatura programada.
2. En el modo AUTO no se puede ajustar manualmente la velocidad del ventilador.
Operaci6n de Ventilador
1. Pulse el bot6n "MODE" hasta que el indicador "FAN" se enciende.
2. Pulse el bot6n "FAN" para seleccionar la velocidad del ventilador. La temperatura
no se puede ajustar.
3. En el modo VENTILADOR, desconecte la manguera de escape desde la salida de
aire en la parte posterior de la unidad.
Operaci6n de TEMPORIZADOR
1. Con la unidad encendida, pulse el bot6n Timer. La luz Off indicar6 que la funci6n
de parada autom6tica se puede programar. Dentro de 5 segundos, pulse el bot6n
UP o DOWN para seleccionar un perbdo de fiempo despu6s de que el
funcionamiento parar6. Pulse dos veces el bot6n Timer. La luz On indicar6 que la
funci6n de arranque autom6tico puede ser programada. Dentro de 5 segundos,
pulse el bot6n UP o DOWN para seleccionar un perbdo de tiempo tras el cual
volver6 a funcionar.
2. Con la unidad apagada, pulse el bof6n Timer. La luz On indicar6 que la funci6n
de arranque autom6fico puede ser programada. Dentro de 5 segundos, pulse el
bot6n UP o DOWN para seleccionar un perbdo de fiempo despu6s de que el
funcionamiento se iniciar6. Presione dos veces el bof6n Timer. La luz Off indicar6
que la funci6n de parada autom6tica se puede programar. Dentro de 5 segundo,
pulse el bot6n UP o DOWN para seleccionar un perfodo de tiempo tras el que el
funcionamiento parar6.
3. NOTAS:
- Cambios auto de fiempo en incrementos de 0,5 horas hasta 10 horas, y luego
en incrementos de 1 hora hasta 24 horas.
- El encendido o apagado de la unidad o ajuste de ambos temporizadores a 0,0
cancelar6 la configuraci6n de arranque autom6fico / parada autom6tica.
-Cuando se produce un fallo de funcionamiento (El, E2, E3 o E4), el arranque
autom6tico/parada autom6tica tambi_n se cancelar6.
Operaci6n de SUENO
Pulse el bot6n SLEEPpara la temperatura seleccionada para aumentar en 2 °F:(1°C)
m6s caliente despu6s de 30 minutos y otros 2 °F:(1°C) m6s caliente despu6s de otros
30 minutos.
La temperatura m6s caliente se mantiene durante 7 horas, y luego la unidad volver6
a la temperatura seleccionada originalmente.
NOTA: La funci6n SUEI_O no est6 disponible en el modo VENTILADOR o SECO.
15
OTRAS CARACTERiSTICAS
Aufe-Reinicie
Si hay un corte de electricidad, la unidad velvet6 a la misma condici6n de
funcionamiento cuando se restablece la alimentaci6n.
Espere 3 minutes antes de reanudar el funcienamienfe
Retardo de 3 minutes del compresor - Cada vez que el compresor deja de funcionar par
cualquier raz6n, tal come cuando se ha alcanzado la humedad programada, no se
reiniciar6 de nuevo durante un mfnimo de 3 minutos. Este es un disefio de seguridad para
prolongar la vida Otil del compresor.
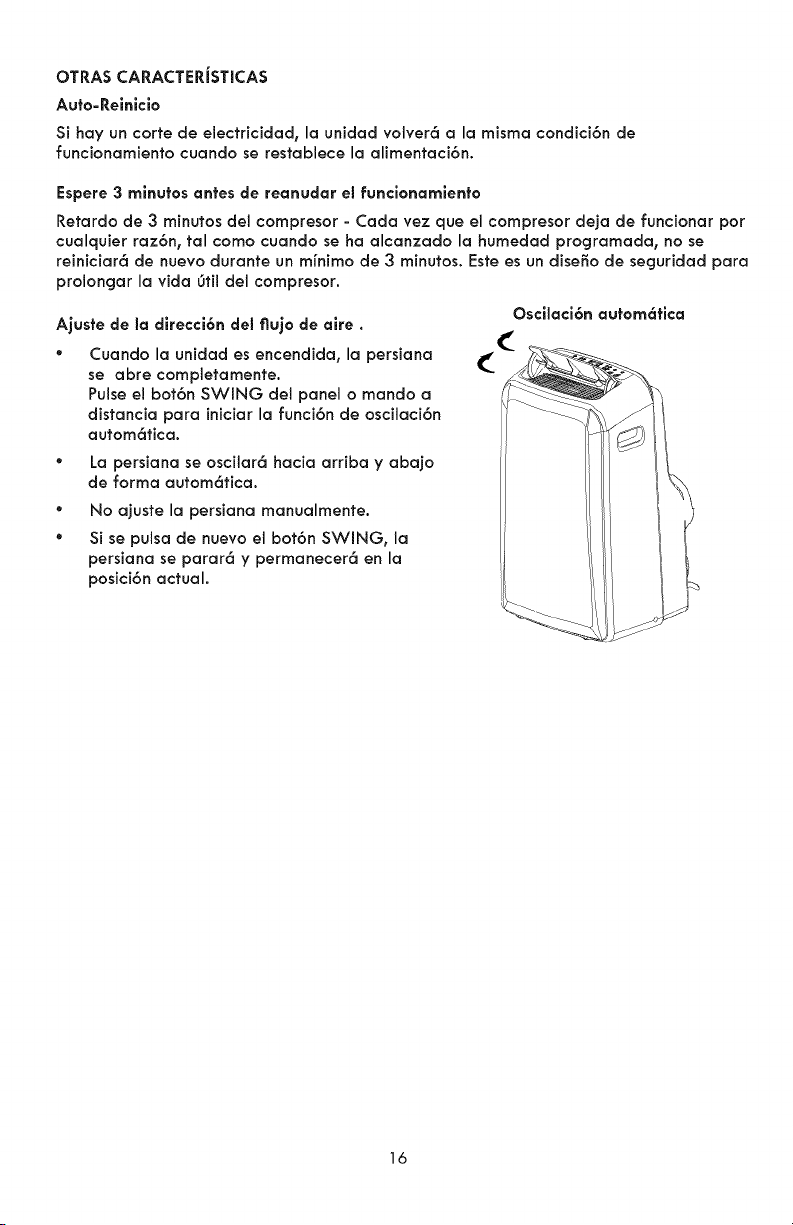
Ajusfe de la direcci6n del flujo de aire.
° Cuando la unidad es encendida, la persiana
se abre completamente.
Pulse el bot6n SWING del panel o mando a
distancia para iniciar la funci6n de oscilaci6n
autom6fica.
° La persiana se oscilar6 hacia arriba y abajo
de forma autom6fica.
®
®
No ajuste la persiana manualmente.
Si se pulsa de nuevo el bot6n SWING, Ja
persiana se parar6 y permanecer6 en la
posici6n actual.
Oscilaci6n autem6fica
16
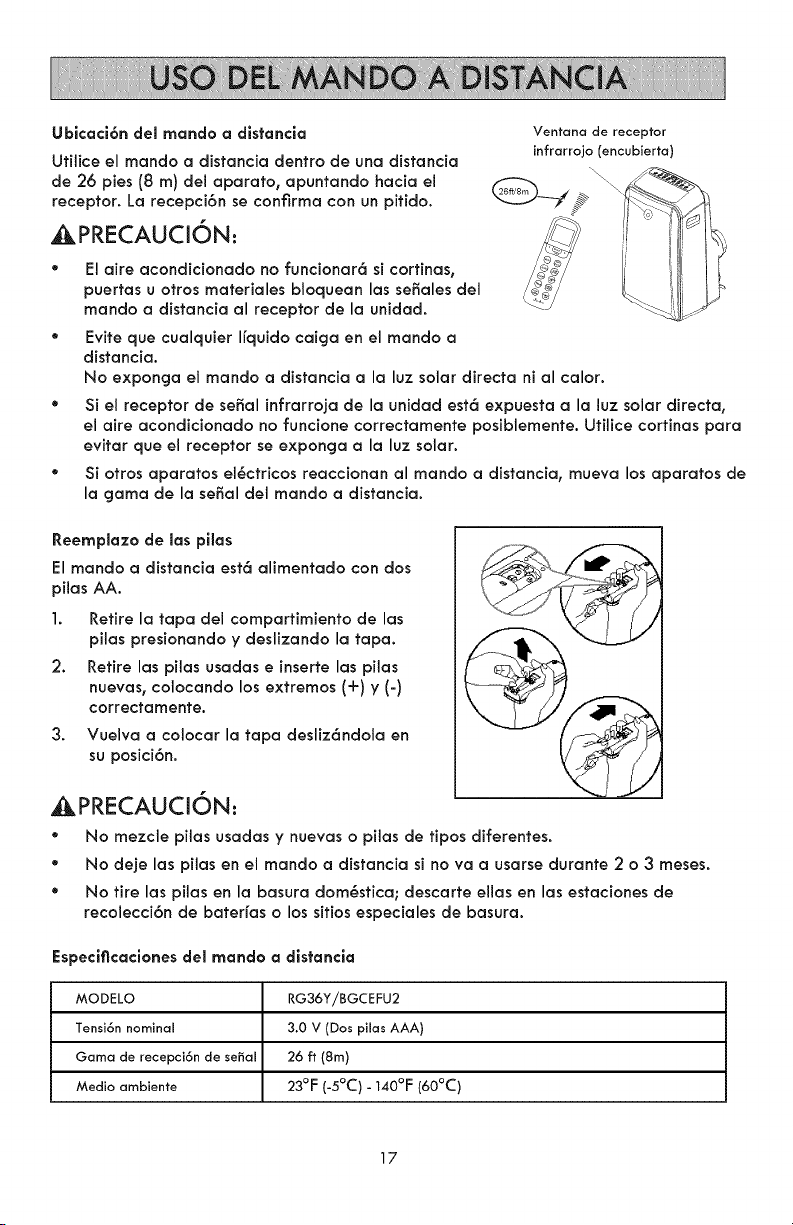
Ubicaci6n del mande a distancia
Utilice el mando a distancia dentro de una distancia
de 26 pies(8 m) del aparato, apuntando hacia el
receptor. La recepci6n se confirma con un pitido.
_PRECAUCION:
Ventana de receptor
infrarrojo (encubierta)
Elaireacondicionadono funcionar6sicortinas,
puertas u otros materiales bloquean las seriales dei
mando a distancia al receptor de la unidad.
° Evite que cualquier Ifquido caiga en el mando a
distancia.
No exponga el mando a distancia a la luz solar directa ni al calor.
° Si el receptor de serial infrarroja de la unidad est6 expuesta a la luz solar directa,
el aire acondicionado no funcione correctamente posiblemente. Utilice cortinas para
evitar que el receptor se exponga a la luz solar.
* Si otros aparatos el6ctricos reaccionan al mando a distancia, mueva los aparatos de
la gama de la serial del mando a distancia.
Reemplaze de las pilas
El mando a distancia est6 alimentado con dos
pilas AA.
1. Retire la tapa del compartimiento de las
pilas presionando y deslizando la tapa.
2. Retire las pilas usadas e inserte las pilas
nuevas, colocando los extremes (+) y (-)
correctamente.
3.
Vuelva a colocar la tapa desliz6ndola en
su posici6n.
_,PRECAUCI6N:
• No mezcle pilas usadas y nuevas o pilas de tipos diferentes.
• No deje las pilas en el mando a distancia si no va a usarse durante 2 o 3 meses.
° No tire las pilas en la basura dom6stica; descarte elias en las estaciones de
recolecci6n de baterfas o los sitios especiales de basura.
Especiflcacienesdel rnande a distancia
MODELO RG36YiBGCEFU2
Tensi6n nominal 3.0 V (Dos pilas AAA)
Gama de recepci6n de serial 26 ft (8m)
Media amblente 23°F (-5°C) - 140°F (60°C)
17
@-
®
®
6 Bot6n TEMP SENSOR
1 Bot6nON/OFF I
Encender o apagar la unidad principal.
2 Bot6n MODE
Cada vez que se pulsa el bot6n, el modo de funcionamiento se
cambia en la siguiente secuencia:
_AUTO '-m_ FRJO'-m_ SECO '-_ VFNTILADOR q
3 Bot6n SLEEP
Para activar / desactivar la funci6n SUEI_IO.NOTA: Si la
unidad est6 en el modo SUE_IO, se cancela si se pulsa el
bot6n MODE, FAN SPEEDo ON / OFF.
4 Bot6n TURBO
Para activar la funci6n TURBO. El ventilador aumentar6 a
la velocidad m6xima, s61o en modo FRiO. No hay ning6n
efecto en otros modos.
5 Bot6n SWING
Se utiliza para desactivar o activar la funci6n de giro
autom6tico de la persiana horizontal.
El mando a distancia sirve como un termostato a distancia que permite el control de
temperatura en su ubicaci6n. Para activar la funci6n SENSOR DE TEMPERATURA,
apunte el mando a distancia hacia la unidad y pulse el bot6n TEMP SENSOR. La
pantalla a distancia muestra la temperatura en su ubicaci6n. El mando a distancia
enviar6 esta sepal al aire acondicionado a intervalos de cada 3 minutos hasta que
se pulse de nuevo el bot6n TEMP SENSOR. Si la unidad no recibe la sepal del SENSOR
DE TEMPERATURA durante cualquier intervalo de 7 minutos, la unidad emitir6 un pitido
para indicar el modo SENSOR DE TEMPERATURA ha terminado.
7 Bot6n RESET
Si se pulsa el bot6n RESET empotrado, todos los ajustes actuales se cancelan y el control
volver6 a la configuraci6n inicial.
8 Bot6n UP (_,/-f')
Pulse este bot6n para aumentar la temperatura programada o aumentar la hora durante
el ajuste del temporizador.
9 Bot6n DOWN (v/m)
Pulse este bot6n para disrninuir la temperatura programada o disminuir la hora durante
el ajuste del temporizador.
10 Bot6n ONE TOUCH
Se utiliza para restaurar a una configuraci6n preferida o la configuraci6n anterior.
La primera vez que la unidad es conectada a la alimentaci6n, si se pulsa el bot6n
ONE TOUCH, la unidad se cambiar6 al modo AUTO, se ajustar6 a 76 °F, y la
velocidad del ventilador se ajustar6 en Auto.
Si se pulsa este bot6n cuando el mando a distancia est6 encendido, el sistema
volver6 autom6ticamente a la configuraci6n anterior, incluido modo de funcionamiento,
temperatura programada, nivel de velocidad del ventilador y funci6n sue_o (si est6
activada), y transmitir6 esta configuraci6n a la unidad para establecer ella.
18
Sisepulsaestebot6ncuando el mando a distancia est6 apagado, el sistema volver6
autom6ticamente a la configuraci6n anterior, incluido modo de funcionamiento,
temperatura programada, nivel de velocidad del ventilador, pero desactivar6 la
funci6n sue_o El mando a distancia no va a transmitir las se_ales a la unidad.
Si se pulsa este bot6n durante m6s de 2 segundos, el sistema almacenar6
autom6ticamente la configuraci6n actual de funcionamiento, incluyendo modo de
funcionamiento, temperatura programada, nivel de velocidad del ventilador y funci6n
sue_o (si est6 activada). Entonces la pr6xima vez que se pulsa el bot6n_ el mando a
distancia transmitir6 esta configuraci6n almacenada a la unidad.
11 Bot6n FAN SPEED
Se utiliza para seleccionar la velocidad del ventilador en cuatro pasos:
r AUTO _m_ LOw _m_ MED _ H'GH q
12 Bot6n TIMER ON
Pulse este bot6n para iniciar la secuencia de tiempo de arranque autom6tico. Cada
pulsaci6n incrementar6 el ajuste temporizado autom6tico en incrementos de 30 minutos.
Cuando el tiempo programado muestra ]OH, cada pulsaci6n incrementar6 el ajuste
temporizado autom6tico en incrementos de 60 minutos. Para anular el programa
temporizado autom6tico_ ajuste el tiempo de arranque autom6tico hasta el final volver
a 0,0.
13 Bot6n TIMER CANCEL
Pulse este bot6n para cancelar el programa temporizado autom6tico. NOTA: Si la
unidad est6 funcionando en modo de temporizador, al pulsar este bot6n, la funci6n se
cancelar6, y la unidad se apagar6.
14 Bot6n TIMER OFF
Pulse este bot6n para iniciar la secuencia de tiempo de parada autom6tica. Cada
pulsaci6n incrementar6 el ajuste temporizado autom6tico en incrementos de 30 minutos.
Cuando el tiempo programado muestra ]OH, cada pulsaci6n incrementar6 el ajuste
temporizado autom6tico en incrementos de 60 minutos. Para anular el programa
temporizado autom6tico, ajuste el tiempo de parada autom6tica a 0,0
15 Bot6n LOCi(
AI pulsar el bot6n LOCK empotrado, toda la configuraci6n actual se bloquea y el mando
a distancia no acepta ninguna operaci6n excepto la del bot6n LOCK. Pulse de nuevo para
cancelar el modo LOCK.
19
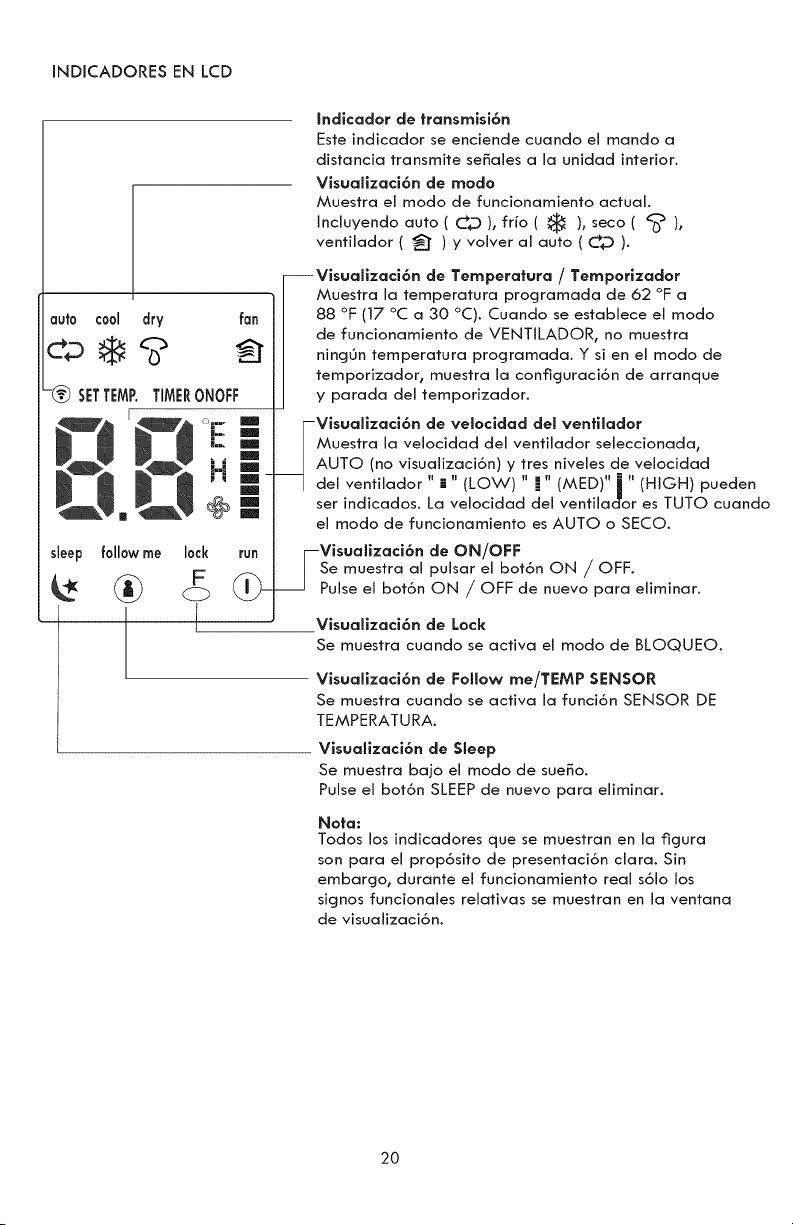
INDICADORESENLCD
{ndicador de transmisi6n
Este indicador se enciende cuando el mando a
distancia transmite se6ales a la unidad interior.
Visualizaci6n de modo
Muestra el modo de funcionamiento actual.
{ncluyendo auto ( C_D ), fifo ( _ ), seco ( _'_ ),
ventilador ( _t ) y volver al auto ( C_ ).
auto cool dry fan
s{eep
--Visualizaci6n de Temperatura / Temporizador
Muestra la temperatura programada de 62 °F a
88 °F (17 °C a 30 °C). Cuando se establece el rnodo
de funcionamiento de VENT{LADOR, no muestra
ning0n temperatura programada. Y si en el modo de
temporizador, muestra la conflguraci6n de arranque
y parada del temporizador.
-Visualizaci6n de ve{ocidad del venti{ador
Muestra la velocidad del ventilador seleccionada,
AUTO (no visua{izaci6n) y tres niveles de velocidad
del ventilador " i " (LOW) " m" (MED)" i " (H{GH) pueden
ser indicados. La velocidad del ventilac1"or es TUTO cuando
el modo de funcionamiento es AUTO o SECO.
followme 10ck
L
-Visualizaci6n de ON/OFF
Se muestra al pulsar el bot6n ON / OFF.
Pulse el bot6n ON / OFF de nuevo para eliminar.
Visualizaci6n de Lock
Se muestra cuando se activa el modo de BLOQUEO.
Visualizaci6n de Follow me/TEMP SENSOR
Se muestra cuando se activa la funci6n SENSOR DE
TEMPERATURA.
Visualizaci6n de Sleep
Se muestra bajo el modo de sue6o.
Pulse el bot6n SLEEP de nuevo para eliminar.
Nota:
Todos los indicadores que se muestran en la figura
son para el prop6sito de presentaci6n clara. Sin
embargo, durante el funcionamiento real s6{o los
signos funcionales relativas se muestran en la ventana
de visualizaci6n.
20
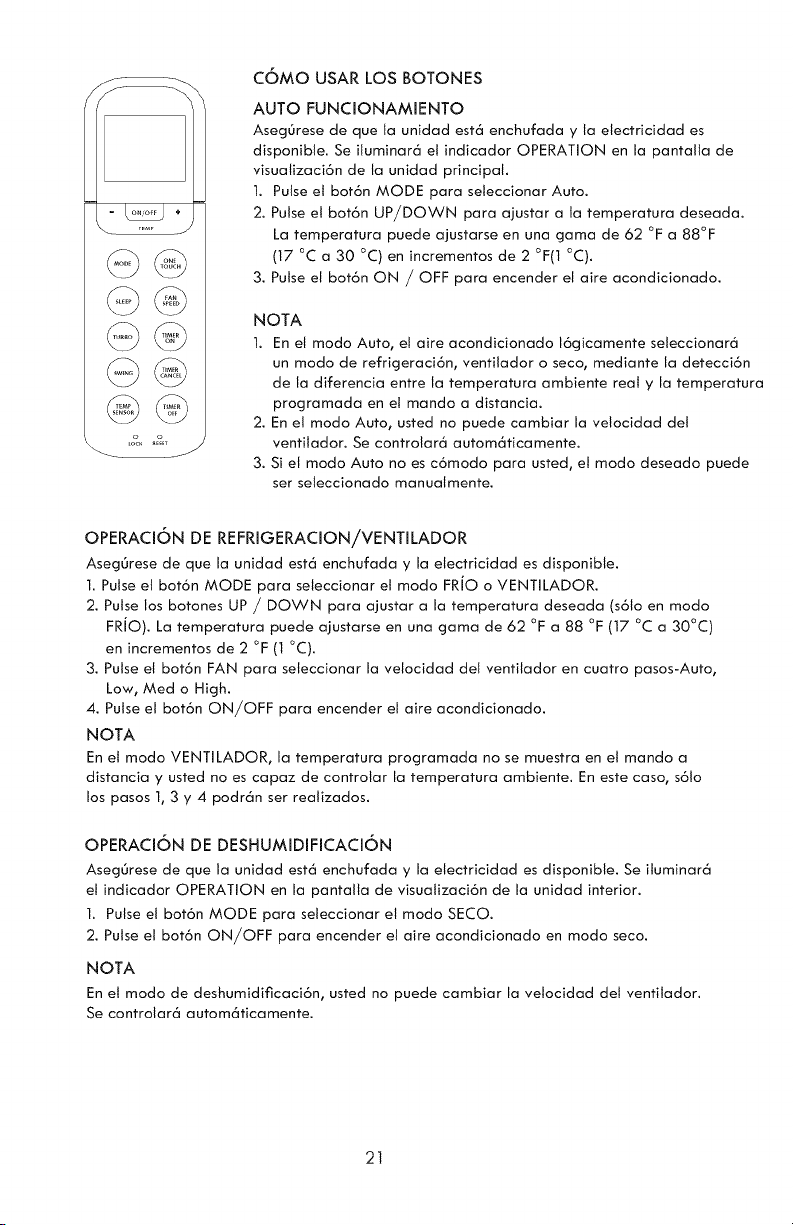
,%, _&T j
COMO USAR LOS BOTONES
AUTO FUNCIONAMIENTO
AsegL_rese de que Ja unidad est6 enchufada y Ja eJectricidad es
disponibJe. Se iJuminar6 el indicador OPERATION en la pantalJa de
visualizaci6n de Ja unidad principal.
1. Pulse el bot6n MODE para seleccionar Auto.
2. Pulse el bot6n UP/DOWN para ajustar a la temperatura deseada.
La temperatura puede ajustarse en una gama de 62 °F a 88°F
(17 °C a 30 °C) en incrementos de 2 °F(1 °C).
3. Pulse el bot6n ON / OFF para encender el aire acondicionado.
NOTA
1. En et modo Auto, el aire acondicionado 16gicamente seleccionar6
un modo de refrigeraci6n, ventilador o seco, mediante Ja detecci6n
de la diferencia entre la temperatura ambiente real y la temperatura
programada en el mando a distancia.
2. En el modo Auto, usted no puede cambiar la vetocidad det
ventilador. Se controlar6 autom6ticamente.
3. Si et modo Auto no es c6modo para usted, el modo deseado puede
ser seleccionado manualmente.
OPERACI6N DE REFRIGERACION/VENTILADOR
AsegOrese de que Ja unidad est6 enchufada y la eJectricidad es disponibJe.
I. Pulse eJ bot6n MODE para seJeccJonar el mode FRJO o VENTJLADOR.
2. Pulse los botones UP / DOWN para ajustar a la temperatura deseada (s61o en modo
FRIO). La temperatura puede ajustarse en una gama de 62 °F a 88 °F (17 °C a 30°C)
en incrementos de 2 °F (I °C).
3. Pulse eJ bot6n FAN para seJeccionar la veJocJdad deJ ventJJador en cuatro pasos-Auto,
Low, Med o High.
4. Pulse el bot6n ON/OFF para encender eJ aJre acondicJonado.
NOTA
En el mode VENTiLADOR, Ja temperatura programada no se muestra en eJ mando a
distancia y usted no es capaz de controlar la temperatura ambiente. En este case, s61o
los pasos 1, 3 y 4 podr6n ser reaJJzados.
OPERACI6N DE DESHUMIDIFICACI6N
AsegOrese de que Ja unidad est6 enchufada y la eJectricidad es disponible. Se iluminar6
el indicador OPERATION en la pantalla de visuatizaci6n de la unidad interior.
1. Pulse el bot6n MODE para seleccionar el modo SECO.
2. Pulse el bot6n ON/OFF para encender el aire acondicionado en modo seco.
NOTA
En el modo de deshumidificaci6n, usted no puede cambiar la veJocidad det ventitador.
Se controlar6 autom6ticamente.
21
Operaci6n de SWING
Utilice et bot6n SWING para ajustar la direcci6n del flujo de aire hacia arriba y abajo.
1.Pulse este bot6n para iniciar la continua oscilaci6n hacia arriba y abajo de la puerta persiana
del ventitador. Pulse de nuevo para fijar la puerta persiana en una posici6n.
Nota: Cuando la persiana oscila o se mueve a una posici6n que afecte negativamente et efecto
de enfriamiento del aire acondicionado, se cambiar6 autom6ticamente la direcci6n de movimiento
oscilante o la posici6n para evitar un problema.
OPERACI6N DE TEMPORIZADOR
La pulsaci6n deJ bot6n TIMER ON estabJecer6 el tiempo de arranque autom6tico de la unidad.
La putsaci6n del bot6n TIMER OFF establecer6 el tiempo de parada autom6tica de la unidad.
PARA ESTABLECER EL TIEMPO DE ARRANQUE AUTOMATICO:
1. Pulse et bot6n TIMER ON. El mando a distancia mostrar6 TIMER ON, el tiempo 01timamente
programado de arranque autom6tico y et sfmbolo "h" se mostrar6n en el 6rea de visualizaci6n
LCD. Ahora est6 listo para establecer el tiempo de arranque autom6tico para iniciar el
funcionamiento.
2. Pulse el bot6n TIMER ON de nuevo para establecer et tiempo deseado de arranque
autom6tico. Cada vez que se pulsa et bot6n, et tiempo se aumenta en media hora entre las 0 y
10 horas, yen una hora entre tas t0 y 24 horas.
3. Despu_s de establecer el TIMER ON, habr6 un retardo de un segundo antes de que el mando
a distancia transmita la serial al aire acondicionado. Entonces, despu_s de aproximadamente
otros 2 segundos, el sfmboto "h" desaparecer6 y la temperatura programada volver6 a aparecer
en la ventana de visualizaci6n LCD.
La temperatura programada no aparecer6 ba]o el modo VENTiLADOR.
PARA ESTABLECER EL TIEMPO DE PARADA AUTOMATICA:
1. Pulse el bot6n TIMER OFF. El mando a distancia mostrar6 TIMER OFF, el tiempo 01timamente
programado de parada autom6tica y el sfmboto "h" se mostrar6n en el 6rea de visualizaci6n
LCD. Ahora est6 listo para estabtecer el tiempo de parada autom6tica para parar el
funcionamiento.
2. Pulse el bot6n TIMER OFF de nuevo para establecer el tiempo deseado de parada autom6tica.
Cada vez que se pulsa el bot6n, el tiempo se aumenta en media hora entre las 0 y 10 horas, yen
una hora entre las 10 y 24 horas.
3. Despu_s de establecer el TIMER OFF, habr6 un retardo de un segundo antes de que et mando
a distancia transmita la serial at aire acondicionado. Entonces, despu6s de aproximadamente
otros 2 segundos, el sfmbolo "h" desaparecer6 y Ja temperatura programada volver6 a aparecer
en la ventana de visualizaci6n LCD. La temperatura programada no aparecer6 bajo el modo
VENTILADOR.
PARA CANCELAR EL TIEMPO AUTO
1. Pulse el bot6n TIMER CANCEL para cancetar el Tiempo Auto.
22
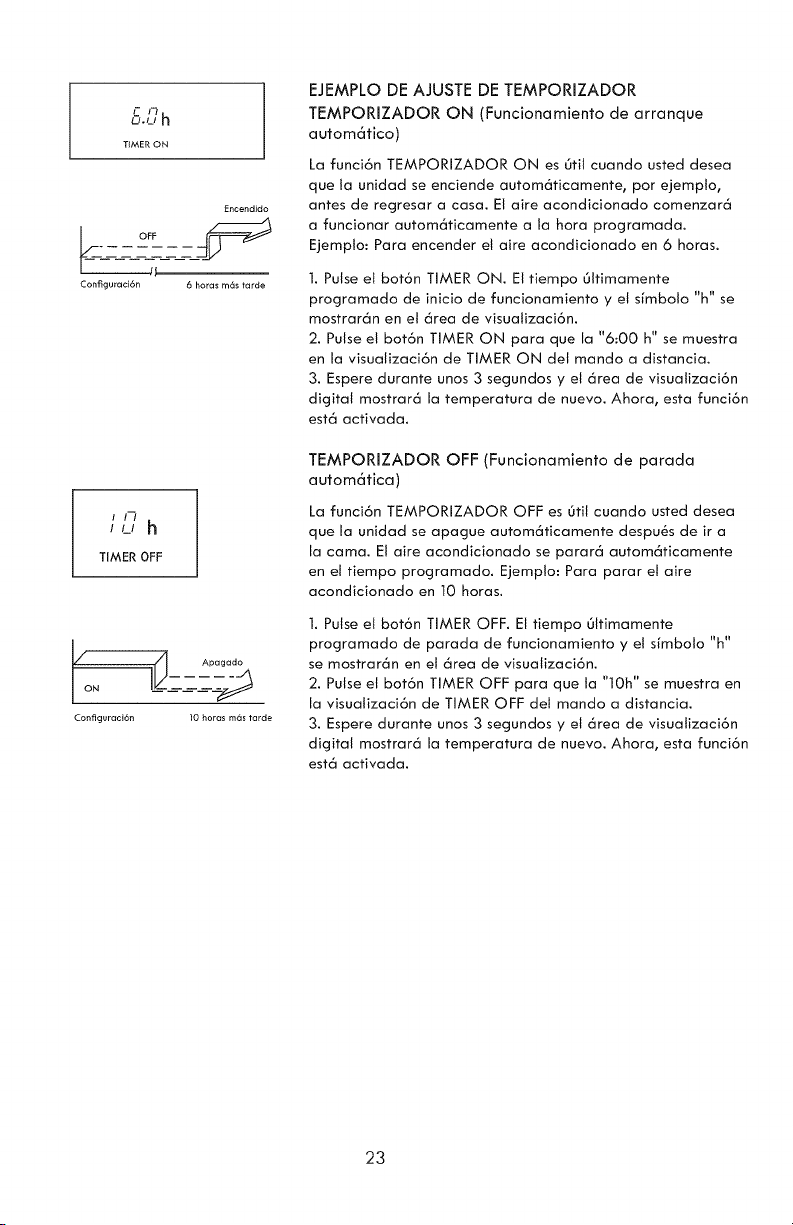
F P_
O.u h
T_MEfi_ON
Encendido
ConfiguracJdn 6 horas m6s tarde
//?h
TIMER OFF
Apagado
Configuracidn 10 horas mds tarde
EJEMPLO DE AJUSTE DE TEMPORIZADOR
TEMPORIZADOR ON (Funcionamiento de arranque
autom6tico)
La funci6n TEMPORIZADOR ON es 0til cuando usted desea
que la unidad se enciende autom6ticamente, por ejempto,
antes de regresar a casa. El aire acondicionado comenzar6
a funcionar autom6ticamente a la hora programada.
Ejempto: Para encender et aire acondicionado en 6 horas.
1. Pulse et bot6n TIMER ON. El tiempo Oltimamente
programado de inicio de funcionamiento y et sfrnbolo "h" se
mostrar6n en et 6rea de visuatizaci6n.
2. Pulse et bot6n TIMER ON para que la "6:00 h" se muestra
en la visualizaci6n de TIMER ON det mando a distancia.
3. Espere durante unos 3 segundos y et 6rea de visuatizaci6n
digital mostrar6 la temperatura de nuevo. Ahora, esta funci6n
est6 activada.
TEMPORIZADOR OFF (Funcionamiento de parada
autom6tica)
La funci6n TEMPORIZADOR OFF es Otil cuando usted desea
que la unidad se apague autom6ticamente despu_s de ira
la cama. El aire acondicionado se parar6 autom6ticamente
en el tiempo programado. Ejempto: Para parar el aire
acondicionado en 10 horas.
1. Pulse et bot6n TIMER OFF. El tiempo Oltimamente
programado de parada de funcionamiento y et sfrnbolo "h"
se mostrar6n en et 6rea de visualizaci6n.
2. Pulse el bot6n TIMER OFF para que ta "10h" se muestra en
la visuatizaci6n de TIMER OFF del mando a distancia.
3. Espere durante unos 3 segundos y et 6rea de visuatizaci6n
digital mostrar6 la temperatura de nuevo. Ahora, esta funci6n
est6 activada.
23
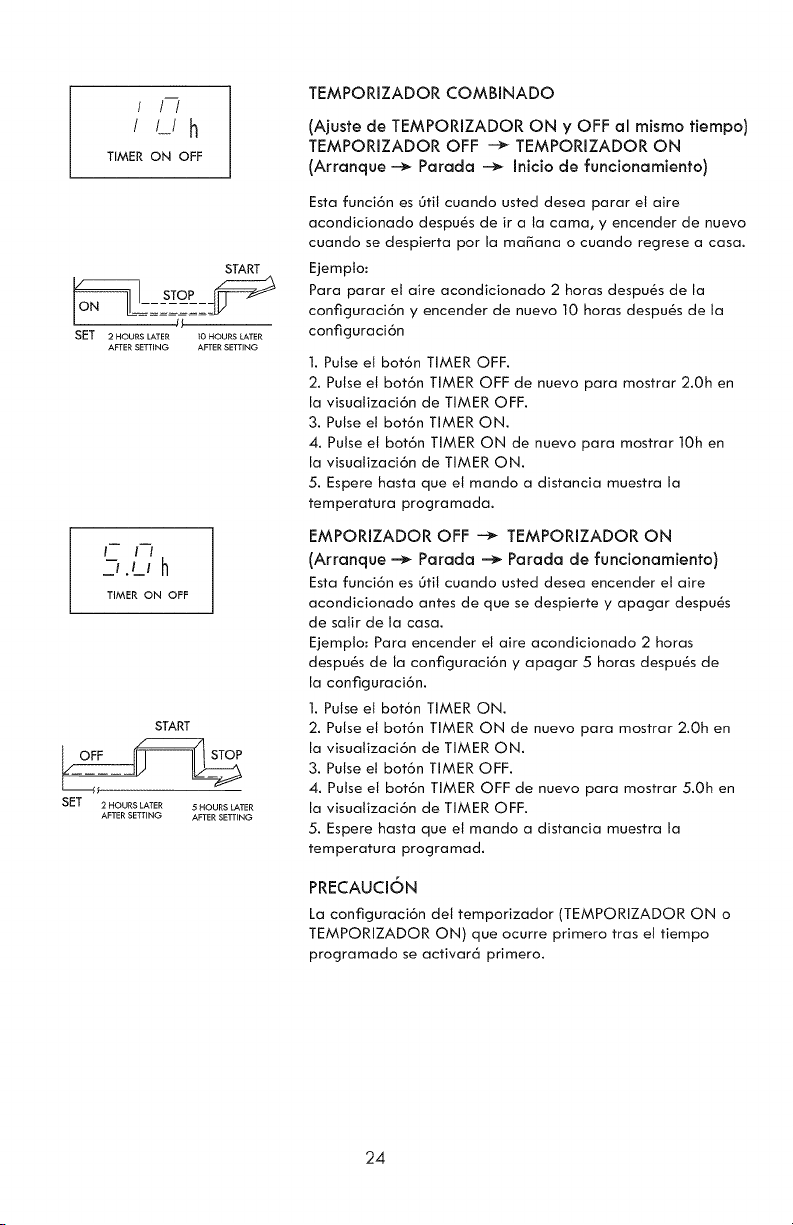
! ! /
/ L/h
TIMER ON OFF
START
SFT 2 HOURS LATER I0 HOURS LATER
AFTER SETTING AFTER SETTING
TIMER ON OFF
START
SFT 2 HOURS LATER 5 HOURS LATER
AFTER SETTING AFTER SETTING
TEMPORIZADOR COMBINADO
(Ajuste de TEMPORIZADOR ON y OFF al mismo tiempo)
TEMPORIZADOR OFF -_ TEMPORIZADOR ON
(Arranque --_ Parada -_ Inicio de funcionamiento)
Esta funci6n es Otit cuando usted desea parar et aire
acondicionado despu_s de ira la cama, y encender de nuevo
cuando se despierta por la manana o cuando regrese a casa.
Ejemplo:
Para parar el aire acondicionado 2 horas despu6s de la
configuraci6n y encender de nueve 10 horas despu_s de la
configuraci6n
I. Pulse et bot6n TIMER OFF.
2. Pulse el bot6n TIMER OFF de nuevo para mostrar 2.Oh en
Ja visualizaci6n de TIMER OFF.
3. Pulse el bet6n TIMER ON.
4. Pulse el bet6n TIMER ON de nuevo para mostrar 10h en
la visualizaci6n de TIMER ON.
5. Espere basra que eJ mando a distancia muestra la
temperatura pregramada.
EMPORIZADOR OFF -_ TEMPORIZADOR ON
(Arranque -_ Parada -_ Parada de funcionamiento)
Esta funci6n es 6til cuando usted desea encender el aire
acondicionado antes de que se despierte y apagar despu_s
de satir de la casa.
Ejempto: Para encender el aire acondicionado 2 horas
despu_s de la configuraci6n y apagar 5 horas despu_s de
la configuraci6n.
1. Pulse et bot6n TIMER ON.
2. Pulse el bot6n TIMER ON de nueve para mestrar 2.Oh en
la visuatizaci6n de TIMER ON.
3. Pulse el bot6n TIMER OFF.
4. Pulse et bot6n TIMER OFF de nuevo para mostrar 5.Oh en
la visuatizaci6n de TIMER OFF.
5. Espere hasta que et mando a distancia muestra la
temperatura pregramad.
PRECAUCION
La cenflguraci6n del temperizader (TEMPORIZADOR ON e
TEMPORiZADOR ON) que ocurre primero tras el tiempo
programado se activar6 primero.
24
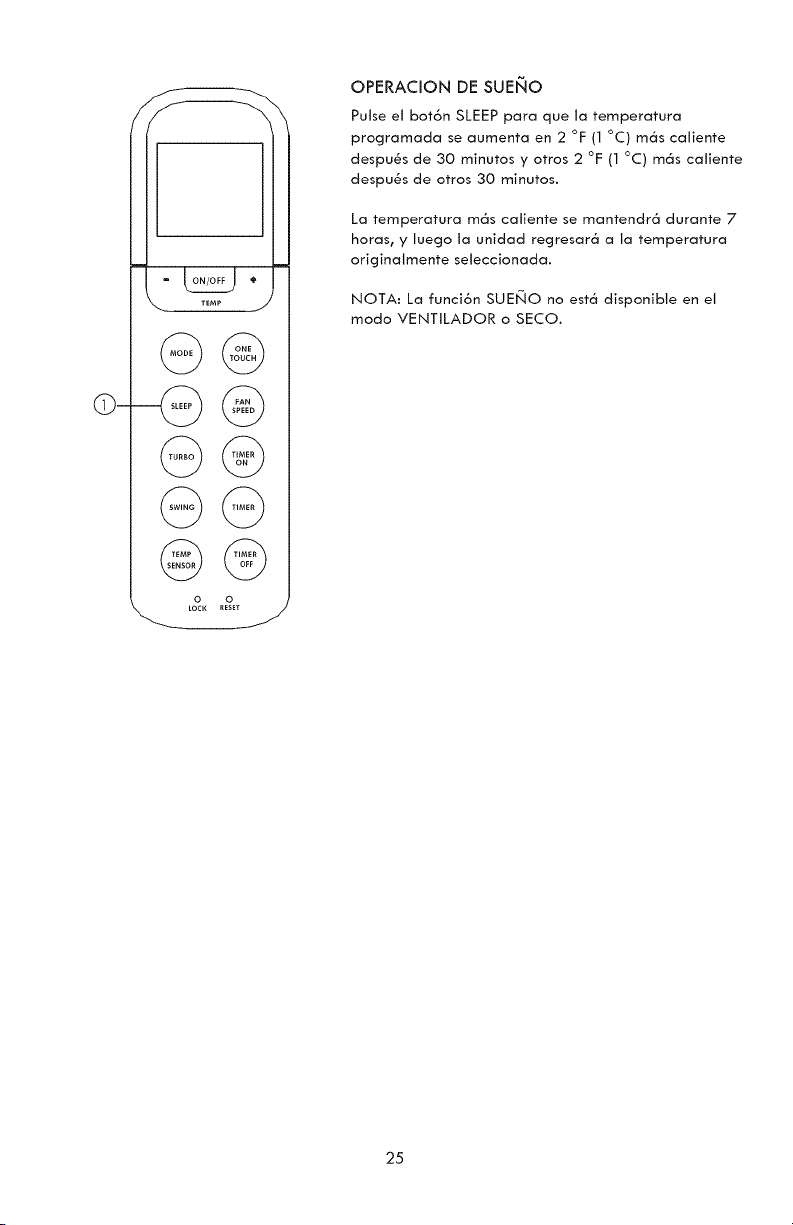
J
©@
o o
LOCK RESET
OPERACION DE SUENO
Pulse et bot6n SLEEP para que la temperatura
programada se aumenta en 2 °F (1 °C) m6s catiente
despu_s de 30 minutos y otros 2 °F (1 °C) m6s catiente
despu_s de otros 30 minutos.
La temperatura m6s catiente se mantendr6 durante 7
horas, y luego la unidad regresar6 a la temperatura
originatmente seteccionada.
NOTA: La funci6n SUENO no est6 disponibte en et
modo VENTILADOR o SECO.
25
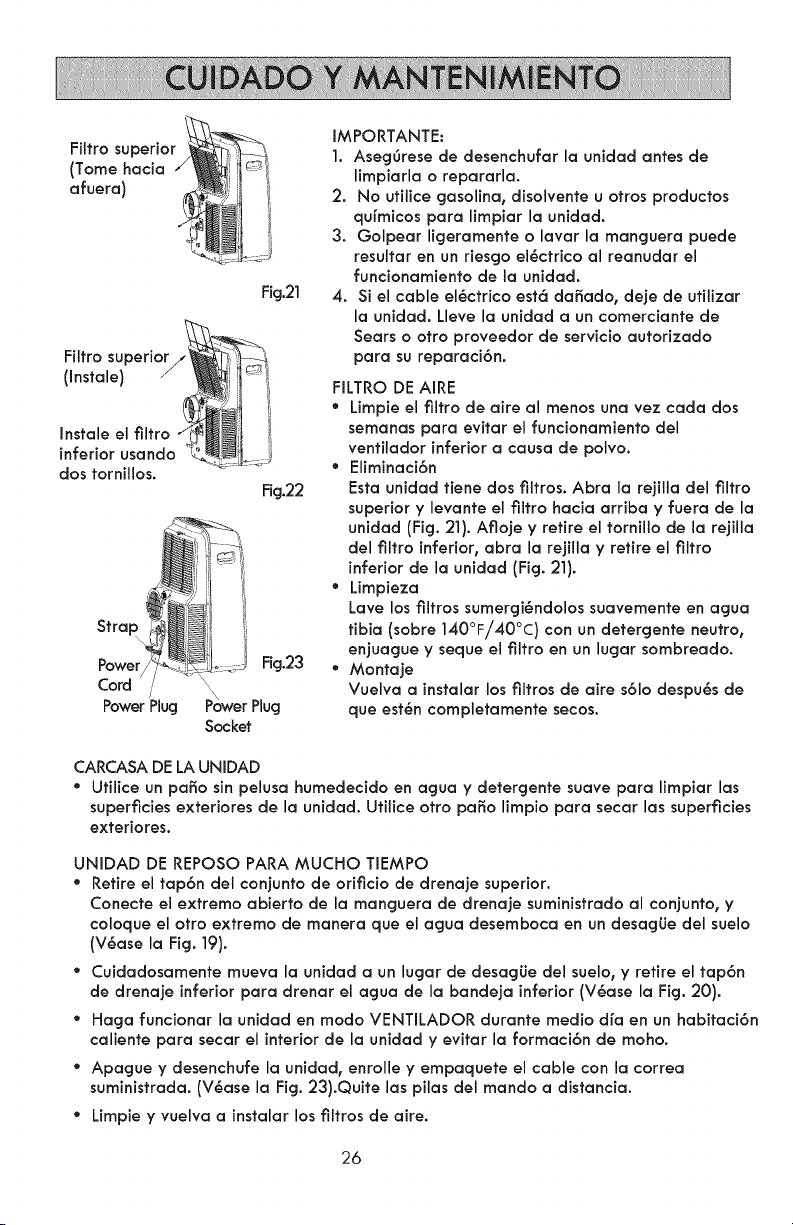
Filtrosuperior
(Tomehacia/ .....
afuera)
J I
Fig.21
Filtro superior/__
,o,,o,oI
Instale el filtro
inferior usando J
dos tornillos.
Fig.22
Strap
Power Fig.23
Cord /
Power Plug Power Plug
Socket
IMPORTANTE:
1. Aseggrese de desenchufar la unidad antes de
limpiarla o repararla.
2. No ufilice gasolina, disolvente u otros productos
qufmicos para limpiar la unidad.
3. Golpear ligeramente o lavar la manguera puede
resultar en un riesgo el6ctrico al reanudar el
funcionamiento de la unidad.
4. Si el cable el6ctrico est6 dafiado, deje de utilizar
la unidad. Lleve la unidad a un comerciante de
Sears o otro proveedor de servicio autorizado
para su reparaci6n.
FILTRO DE AIRE
• Limpie el filtro de aire al menos una vez cada dos
semanas para evitar el funcionamiento del
ventilador inferior a causa de polvo.
• Eliminaci6n
Esta unidad tiene dos filtros. Abra la rejilla del filtro
superior y levante el filtro hacia arriba y fuera de la
unidad (Fig.21).Afiojey retireel tornillode la rejilla
del filtro inferior, abra la rejilla y retire el filtro
inferior de la unidad (Fig. 21).
• Limpieza
Lave los filtros sumergi6ndolos suavemente en agua
tibia (sobre 140°F/40°C) con un detergente neutro,
enjuague y seque el filtro en un lugar sombreado.
• Montaje
Vuelva a instalar los filtros de aire s61o despu6s de
que est6n completamente secos.
CARCASA DE LA UNIDAD
* Utilice un paffo sin pelusa humedecido en agua y detergente suave para limpiar las
superficies exteriores de la unidad. Utilice otro paso limpio para secar las superficies
exteriores.
UNIDAD DE REPOSO PARA MUCHO TIEMPO
* Retire el tap6n del conjunto de orificio de drenaje superior.
Conecte el extremo abierto de la manguera de drenaje suministrado al conjunto, y
coloque el otro extremo de manera que el agua desemboca en un desagLie del sueJo
(V6ase la Fig. 19).
° Cuidadosamente mueva la unidad a un lugar de desag_Jedel suelo, y retire el tap6n
de drenaje inferior para drenar el agua de la bandeja inferior (V6ase la Fig. 20).
° Haga funcionar la unidad en modo VENTILADOR durante medio d[a en un habitaci6n
caliente para secar el interior de la unidad y evitar la formaci6n de moho.
° Apague y desenchufe la unidad, enrolle y empaquete el cable con la correa
suministrada. (V6ase la Fig. 23).Quite las pilas del mando a distancia.
* Limpie y vuelva a instalar los filtros de aire.
26
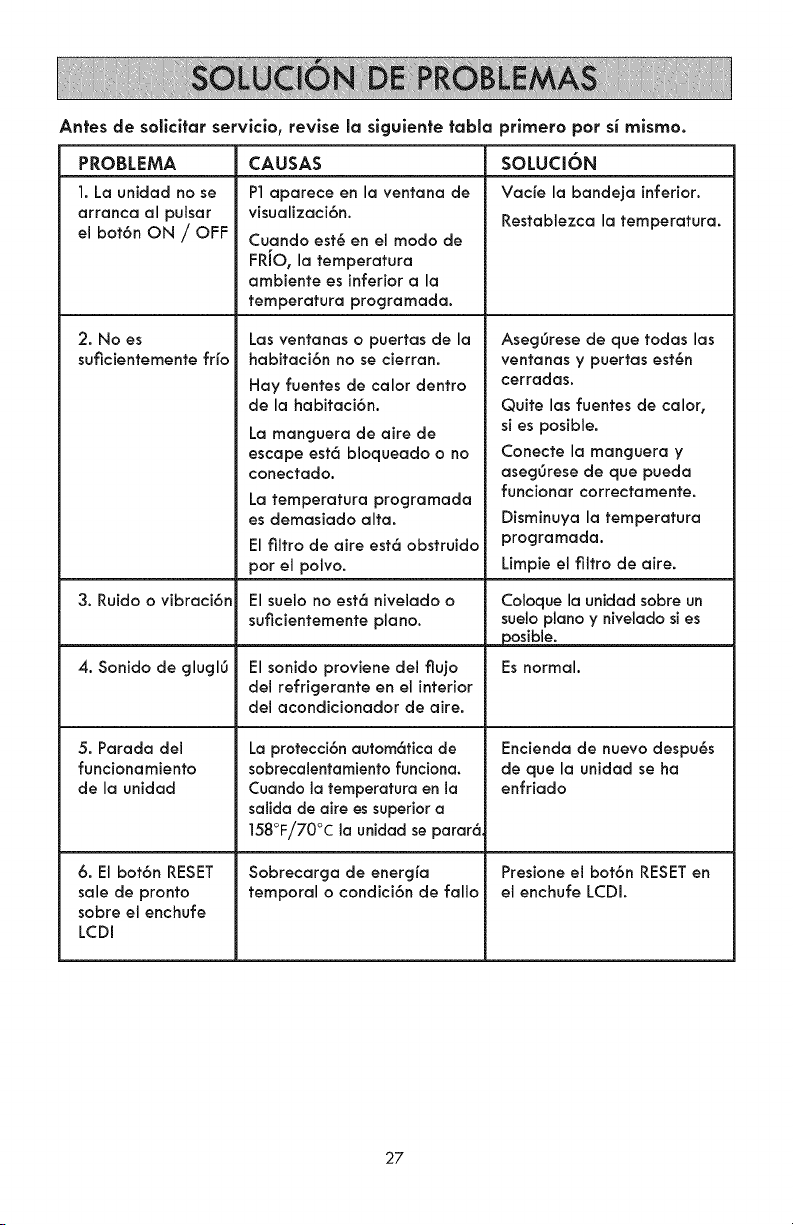
Antes de sollcltar servlclo, revise la slgulente tabla prlmero pot si mlsmoo
CAUSASPROBLEMA
1. La unidad no se
arranca al pulsar
el bot6n ON / OFF
2. No es
suficientemente fifo
3. Ruido o vibraci6n
4. Sonido de glugl6
5. Parada del
funcionamiento
de la unidad
6. El bot6n RESET
sale de pronto
sobre el enchufe
LCDI
P1aparece en la ventana de
visualizaci6n.
Cuando est6 en el modo de
FRiO, la temperatura
ambiente es inferior a la
temperatura programada.
Las ventanas o puertas de la
habitaci6n no se cierran.
Hay fuentes de calor dentro
de la habitaci6n.
La manguera de aire de
escape est6 bloqueado o no
conectado.
La temperatura programada
es demasiado alta.
El filtro de aire est6 obstruido
por el polvo.
El suelo no est6 nivelado o
suficientemente piano.
El sonido proviene del flujo
del refrigerante en el interior
del acondicionador de aire.
La protecci6n autom6tica de
sobrecalentamiento funciona.
Cuando la temperatura en la
salida de aire es superior a
158°F/70°C la unidad se parar6.
Sobrecarga de energfa
temporal o condici6n de fallo
SOLUa6N
Vacfe la bandeja inferior.
Restablezca la temperatura.
Aseg6rese de que todas las
ventanas y puertas est6n
cerradas.
Quite las fuentes de calor,
si es posible.
Conecte la manguera y
asegOrese de que pueda
funcionar correctamente.
Disminuya la temperatura
programada.
Limpie el filtro de aire.
Coloque la unidad sobre un
suelo piano y nivelado si es
posible.
Es normal.
Encienda de nuevo despu6s
de que la unidad se ha
enfriado
Presione el bof6n RESET en
el enchufe LCDI.
27
[]Congratulationsonmakingasmartpurchase.YournewI<enmore ®product is designed
and manufactured for years of dependable operation. But like all products, it may require
preventive maintenance or repair from time to time. That's when having a Master Protection
Agreement can save you money and aggravation.
The Master Protection Agreement also helps extend the life of your new product. Here's
what the Agreement* includes:
r21 Parts and labor not just for repairing defects, but to help keep products operating
properly under normal use. Our coverage goes well beyond the product warranty.
No deductibles, no functional failure excluded from coverage-- real protection.
r21 Expert service by a force of more than 10,000 authorized Sears service technicians,
which means someone you can trust will be working on your product.
r21 Unlimited service calls and nationwide service, as often as you want us, whenever
you want us.
r21 "No-lemon" guarantee - replacement of your covered product if four or more product
failures occur within twelve months.
[] Product replacement if your covered product can't be fixed.
[] Annual Preventive Maintenance Check at your request - no extra charge.
[] Fast help by phone - we call it Rapid Resolution - phone sup-port from a Sears
representative on all products. Think of us as a "talking owner's manual."
[] Power surge protection against electrical damage due to power fluctuations.
[] $250 Food Loss Protection annually for any food spoilage that is the result of
mechanical failure of any covered refrigerator or freezer.
[] Rental reimbursement if repair of your covered product takes longer than promised.
[] 25°/0 discount off: the regular price of any non-covered repair service and related
installed parts.
Once you purchasethe Agreement, a simple phone call is all that it takes for you to schedule
service. You can call anytime day or night, or schedule a service appointment online.
The Master Protection Agreement is a risk free purchase, if you can-cel for any reason during
the product warranty period, we will provide a full refund. Or, a prorated refund anytime after
the product warranty period expires.Purchase yourMaster Protection Agree-ment today!
[] Some limitations and exclusionsapply. For pricesand additional informationin the U.S.A.
call 1-800-827-6655.
[] Coverage in Canada varies on some items. For full details call Sears Canada at
1-800-361-6665.
[] Sears Installation Service
For Sears professional installation of home appliances, garage door openers, water heaters,
and other major home items, in the U.S.A. or Canada call ]-800-4-MY-HOME ®.
28

Your Home
For troubleshooting, product manuals and expert advice:
www,managemylife,com
For repair - in your home - of all major brand appliances,
lawn and garden equipment, or heating and cooling systems,
no matter who made it, no matter who sold it !
For the replacement parts, accessories and
owner's manuals that you need to do-it-yourself.
For Sears professional installation of home appliances
and items like garage door openers and water heaters.
1-800-4-MY-HOME ® Call anytime, day or night
(1-800-469-4663) (U.S.A. and Canada)
TM
® Registered Trademark / ' Trademark of KCD IP, LLC in the United States, or Sears Brands, LLC in other countries
® Marca Registrada / TMMarca de Fabrica de KCD IP, LLC en Estados Unidos, o Sears Brands, LLC in otros palses
_TC
' Marque de commerce / MDMarque depos6e de Sears Brands, LLC