Loading ...
Loading ...
Loading ...
- 9 -
06/2020
Copyright © 2020, Fast ČR, a.s.
Note:
Perform the rinsing process also when you have not used the espresso
machine for an extended period of time.
The pump will make anoise during the water dispensing process. This
is normal.
Brewing an espresso
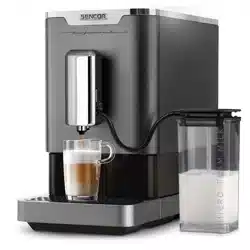
1. Place acup, mug or glass underneath the brewing head A8. Set the height of the
brewing head A8 by sliding it up or down depending on the size of your cup, mug
or glass – see figure F. If the cup or glass is too tall, you may remove the outer drip
tray A11. After removing the cup or glass, return the drip tray A11 to its place.
2. Press button B12
and the button will be backlit.
3. The espresso machine will automatically start the coffee grinding, dosing and
tamping process, and will dispense it.
4. As soon as the espresso machine has finished dispensing the coffee, it will
automatically switch to the stand-by mode.
Brewing latté macchiato / cappuccino
1. Set up the system for automatic frothing as described in section "Setting up the
system for automatic frothing".
2. Pour milk into the milk jug A13. Put on the lid A14 and ensure that it is firmly seated.
Note:
To achieve a rich and creamy foam, it is recommended to use properly
cooled milk (approx. 5°C) with aminimum fat content of 3%.
3. Place acup, mug or glass underneath the brewing head A8. Set the height of the
brewing head A8 by sliding it up or down depending on the size of your cup, mug
or glass – see figure F. If the cup or glass is too tall, you may remove the outer drip
tray A11. After removing the cup or glass, return the drip tray A11 to its place.
4. Press button B11
to brew a latté macchiato or button B10 to brew
acappuccino. Press button to confirm.
5. The espresso machine will automatically start the latté macchiato or cappuccino
brewing process.
6. As soon as the espresso machine has finished brewing the coffee, it will
automatically switch to the stand-by mode.
7. Disconnect the connecting tube A15 from the hole in the brewing head A8 and
place the milk in arefrigerator. To prevent milk from leaking out of the tube A15,
wind it around the lid A14 – see figure G.
Frothing milk
1. Set up the system for automatic frothing as described in section "Setting up the
system for automatic frothing".
2. Pour milk into the milk jug A13. Put on the lid A14 and ensure that it is firmly seated.
Note:
To achieve a rich and creamy foam, it is recommended to use properly
cooled milk (approx. 5°C) with aminimum fat content of 3%.
3. Place acup, mug or glass underneath the brewing head A8. Set the height of the
brewing head A8 by sliding it up or down depending on the size of your cup, mug
or glass – see figure F. If the cup or glass is too tall, you may remove the outer drip
tray A11. After removing the cup or glass, return the drip tray A11 to its place.
4. Press button B11
twice to brew alatté macchiato or button B10 to brew
acappuccino. Press button to confirm.
5. Press the button again when there is asufficient amount of frothed milk in the cup.
6. The espresso machine will then automatically switch to the standby mode.
7. Disconnect the connecting tube A15 from the hole in the brewing head A8 and
store the milk in arefrigerator. To prevent milk from leaking out of the tube A15,
wind it around the lid A14 – see figure G.
Dispensing hot water
1. Place acup, mug or glass underneath the brewing head A8. Set the height of the
brewing head A8 by sliding it up or down depending on the size of your cup, mug
or glass – see figure F. If the cup or glass is too tall, you may remove the outer drip
tray A11. After removing the cup or glass, return the drip tray A11 to its place.
2. Press button B9
twice. The button's backlight will be lit and the espresso
machine will start dispensing hot water.
3. The dispensing of hot water will stop automatically and the button'sbacklight will
turn off.
Note:
If you need to stop the dispensing of hot water sooner, press button B9
once and the water dispensing process will stop.
USER SETTINGS
Setting the amount of ground coffee
■ Use the ground coffee amount adjustment when the brewed coffee is too strong
or too weak.
■ Button B8
serves to adjust the amount of ground coffee.
■ Based on personal preferences, select the amount of ground coffee by repeatedly
pressing button B8
: small (approx. 7 g), medium (approx. 8 g) or large
(approx. 10 g).
Setting the dispensed coffee volume
■ The espresso machine enables the volume of dispensed coffee to be adjusted
according to your preferences. The settings you make will be saved to the memory
of the espresso machine.
1. Place acup, mug or glass underneath the brewing head A8.
2. Turn on the espresso machine by pressing button B7
.
3. Press the button of the beverage that you wish to brew: button B12
for
brewing avolume of espresso or button B11
for brewing alatté macchiato or
button B10
for brewing acappuccino. Press button to confirm.
4. As soon as the espresso machine starts dispensing frothed milk, hold down the
button of the selected beverage until the required volume of frothed milk pours
into the cup. Release the button, two beeps will be made and the volume of frothed
milk will be saved to the memory of the appliance.
5. When as the espresso machine starts dispensing coffee, hold down the button
of the selected beverage until the required volume of coffee pours into the cup.
Release the button, two beeps will be made and the volume of coffee will be saved
to the memory of the appliance.
Hot water settings
1. Place acup, mug or glass underneath the brewing head A8.
2. Turn on the espresso machine by pressing button B7
.
3. Press button B9
twice. The button will be backlit.
4. As soon as the espresso machine starts dispensing hot water, hold down button B9
until the required volume of hot water pours into the cup. Release the button
and the volume of hot water will be saved to the memory of the appliance.
Note:
To restore the default volume settings for dispensed coffee and hot water,
proceed according to the instructions in section "Setting the mode".
Setting the mode
■ The appliance can be set to an ECO mode, afast mode or the default factory settings.
In ECO mode, greater power savings are achieved. In the fast mode, the coffee is
prepared faster than with the default factory settings.
ECO mode Fast mode
Default
settings
Indicator light No Yes Yes
Pre-steam * Yes No Yes
Automatic shut-off time 10 minutes 30 minutes 20 minutes
Option to set the
dispensed coffee volume
Yes Yes Yes
*Note:
The pre-steam function means that the ground coffee is first steamed with
asmall amount of water. This will cause the coffee to swell and thereby
when it is subsequently fully steamed, its flavour will be developed fully,
and its aromatic compounds and essential oils will be fully extracted.
1. In the stand-by mode, press and hold down button B7
for 5 seconds. Button B7
will start flashing and at the same time other buttons will also be flashing or lit
depending on the mode that is set.
Cappuccino
button
Latté button
Espresso button
ECO mode Lit Flashing Flashing
Fast mode Flashing Lit Flashing
Default settings Flashing Flashing Lit
2. To set the ECO mode, press button B10
, to set the fast mode press button B11
and to reset to default settings, press button B12 . After setting amode, 2
beeps will be made. In the event that you attempt to set amode that is already set,
the appliance will not react to the button being pressed.
3. If you do not wish to change the mode settings, press button B7
once more,
or wait 5 seconds until the appliance automatically switches back to the stand-by
mode.
CLEANING AND MAINTENANCE
■ Disconnect the power plug from the power socket and allow the appliance to cool
down before cleaning it.
Warning:
For cleaning, do not use cleaning products with an abrasive effect,
solvents, etc. that could damage the appliance. No part of this
appliance is intended for washing in adishwasher.
Loading ...
Loading ...
Loading ...