ProPertormers
PIus
JBL
in
the
USA, 240
Crossways
park
West,
Woodburv
NY
11797
JBL
International,
8500 Balboa
Blvd.,
Northridge,
California
91329
H
A
Hu.-an
International
Company
0wner's
Manual
PNOPENFOBMEBS
PLUS
FIRST,
THE
PAPERWORK
PBOPEB
PUCEMENT
LOCATIONS
Before
proceeding,
be
sure to
putyour
sales
receipt
in
a
safe
place.
It
is necessary
for
proof
of
purchase,
warranty
repairs
and insurance purposes.
Also
fill
out
the enclosed
warranty
card
and
mail
it.
How
you
set
up
your
ProPerformer
Plus
System will
have
a
great
effect
on how
it
sounds.
Speakers
work
with,
or dreJrindered
by,
the
acoustics
of a room.
Their
proximity
to walls
and
corners
and
even
how
high
or low
they are
placed
on bookshelves
all have
marked
effects
on
performance.
One of
the major
advantages
of using
a
subwoofer
with
a
speaker
system
is that
it allows
optimum
placement
of the
left and
right
speakers
for
proper
stereo
imaging.
By
using a
properþ
placed
subwoofer
to
reproduce
deep
bass,
you
have more
flexibility
in where you
place
the main
speakers.
PLACEMENT
FOR
BEST
STEBEO
IMAÊING
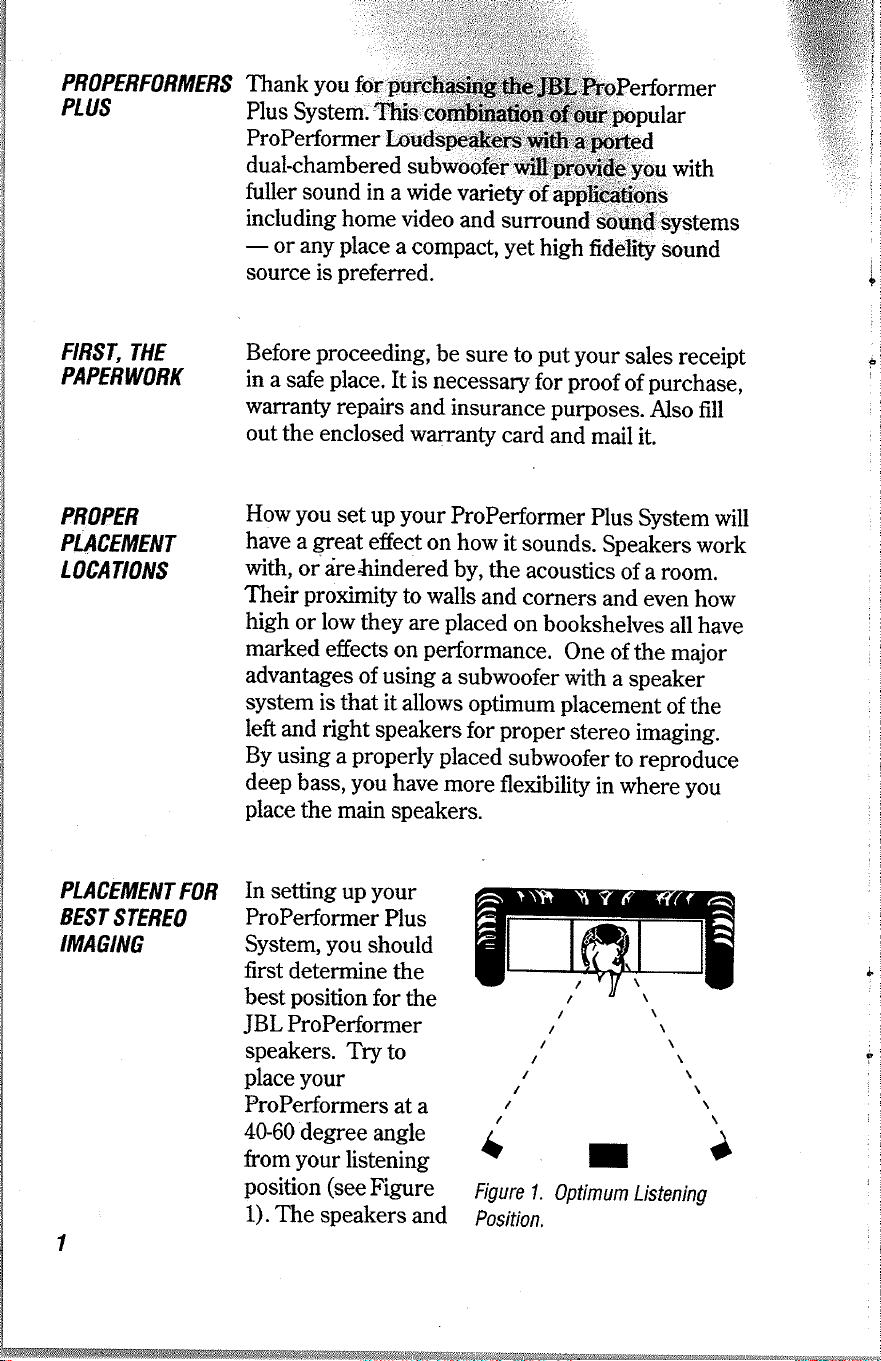
In
setting
up
your
ProPerformer
Plus
System,
you
should
first
determine
the
best
position
for the
JBLProPerformer
speakers.
Try
to
place
your
FroPerformers
at a
4G60
degree
angle
from
your
listening
position (see
Figure
1). The
speakers
and
your
listening position
should roughly
form
an
equilateral
triangle, with
the
speakers
placed
the
same
distance
from
each
other as from
your
listening
position.
This
means
that
if the
speakers
are
close
together
your
optimum
listening
point
is
relatively
close,
too.
Conversely,
if the
speakers
are
farther
away
from
you,
they
should also
be farther
apart
from
one
another.
Finally,
adjust
the way
the speakers
face
by
aiming
them
toward
an imaginary
point
slightly
in
front
of
your
listening
position
(see
Figure
2).
(
Figure
1.
Position.
I
PLACEMENf
FOB
BEET
TREBLE
I'ISPERSION
Figure
2. Possible
Locations
for
your
propertormer
plus
Svstem
Components.
Placing
your
JBL
ProPerformers
close
to
ear level
will
enhance
treble
performance.
Mounting
brackets
are
included
so
that
you
can
attach
the
properformers
to a
wall
or vertical
surface.
See
the
paragraphs
on
Mounting
Bracket
Instaliation
for
instructions
on
proper
wall
mounting.

PNOPENFOBMEBS
PLUS
FIRST,
THE
PAPERWORK
PBOPEB
PUCEMENT
LOCATIONS
Before
proceeding,
be
sure to
putyour
sales
receipt
in
a
safe
place.
It
is necessary
for
proof
of
purchase,
warranty
repairs
and insurance purposes.
Also
fill
out
the enclosed
warranty
card
and
mail
it.
How
you
set
up
your
ProPerformer
Plus
System will
have
a
great
effect
on how
it
sounds.
Speakers
work
with,
or dreJrindered
by,
the
acoustics
of a room.
Their
proximity
to walls
and
corners
and
even
how
high
or low
they are
placed
on bookshelves
all have
marked
effects
on
performance.
One of
the major
advantages
of using
a
subwoofer
with
a
speaker
system
is that
it allows
optimum
placement
of the
left and
right
speakers
for
proper
stereo
imaging.
By
using a
properþ
placed
subwoofer
to
reproduce
deep
bass,
you
have more
flexibility
in where you
place
the main
speakers.
PLACEMENT
FOR
BEST
STEBEO
IMAÊING
In
setting
up
your
ProPerformer
Plus
System,
you
should
first
determine
the
best
position
for the
JBLProPerformer
speakers.
Try
to
place
your
FroPerformers
at a
4G60
degree
angle
from
your
listening
position (see
Figure
1). The
speakers
and
your
listening position
should roughly
form
an
equilateral
triangle, with
the
speakers
placed
the
same
distance
from
each
other as from
your
listening
position.
This
means
that
if the
speakers
are
close
together
your
optimum
listening
point
is
relatively
close,
too.
Conversely,
if the
speakers
are
farther
away
from
you,
they
should also
be farther
apart
from
one
another.
Finally,
adjust
the way
the speakers
face
by
aiming
them
toward
an imaginary
point
slightly
in
front
of
your
listening
position
(see
Figure
2).
(
Figure
1.
Position.
I
PLACEMENf
FOB
BEET
TREBLE
I'ISPERSION
Figure
2. Possible
Locations
for
your
propertormer
plus
Svstem
Components.
Placing
your
JBL
ProPerformers
close
to
ear level
will
enhance
treble
performance.
Mounting
brackets
are
included
so
that
you
can
attach
the
properformers
to a
wall
or vertical
surface.
See
the
paragraphs
on
Mounting
Bracket
Instaliation
for
instructions
on
proper
wall
mounting.

The subwoofer's
ported,
dual-chamber
design
allows
you
to
vary
the bass
response,
depending on
where
you place
the subwoofer
in a room. With
the
ports
facing the middle of
the room,
you'll get
a
natural, open flat bass response
at
88
dB. With
the
subwoofer approximately
one foot
away from the
wall
and the
ports
facing
the
wall,
you'll get
a
stronger bass
response
(up
approximately
3 dB
at
50 to 200 Hz). And if the subwoofer
is
placed
in a
corner so that the
pofts
are
one foot away
from the
wall
on each side,
you'll
get
the strongest
bass
response
(up
approximately
6 dB at
50 to200Hz).
The key to
getting
the
sound
that
you
like
is
experimentation. The subwoofer's
main
advantage
is its flexibility and versatility.
You
can
"fine-tune"
the
system's sound by sliding
the subwoofer
toward of away from
the
wall
and
placing
the
ports
either facing into the room
or toward
a wall.
Take
advantage
of
this
to compensate
for individual
room
acoustics.
Keep in mind that
you'll
always
get
a stronger
bass
response from any
speaker or
subwoofer
placed
close to a surface in
the room
such
as a floor.
ceiling or
wall.
IMPOKIAN'T:
Do notplace
the
subwoofer
near or
above any heat-producing
source.
Also
do not
set
up the subwoofer in
such a way
that
the
ports
are
obstructed. Iæave
at least
3 inches
of
'breathing
room"
for the
ports.
The
JBL
ProPedormer
Plus
System makes
an
excellentvideo
extension
or surround
sound
system. In
particular, your
JBL
subwoofer
can
dramatically enhance video
soundtracks.
The
ProPerformer
speakers may
also
be wall-mounted
at
the
rear
of a room for
use as rear
channel
surround sound
sources.
The
speakers'
internal
SPECIALIZED
PLACEMENTS
CONNECTIONS
shielding
means
you
can
place
them
near
a
video
monitor
or VCR without
causing
picture
distortion
or
accidental
tape erasure.
However,
do
not
place
a TV,
video
monitor,
video
tapes or VCR
on the
subwoofer
enclosure.
CAUTION
: Before attempting
any speaker/amplifier
connections,
make
sure that
your
receiver/amplifier
is
switched
"off."
AIso
make
certain
that the
total
system's
nominal
impedance
is
no lower
than
that recommended
bv the
manufacturer
of
your
amplifier/receiver.
To
connect
your
ProPerformer
system
to
your
amplifier
or receiver,
you'll
need
four
sections
of
two-conductor
insulated
wire.
YourJBL
dealer
can
recommend
suitable cable.
We recommend
#16AWG
(16
gauge)
wire
as
a minimum
size.
If
your
speakers
are more
than
30 feet from
your
receiver
or
amplifier,
use larger
diameter wire,
#14
AWG
or #12
AWG
(the
larger
the wire
diameter,
the lower
the
gauge
number).
Separate
the two
conductors
at each
end
of each
piece
of
wire,
peeling
them
back about
one inch.
Strip
off
aboutl/2
inch
of insulation
from
each
conductor.
Gently
twist
the
wire
strands
to
assure
a tight
bundle
in
each
conductor wire
and make
sure
there
are
no
loose
strands.
Your
amp
or receiver
has
a
+
(red)
and
a
-
(black)
speaker
output
terminal.
The
ProPerformer
speakers
and
subwoofer
each have
corresponding
+
and
-
terminals
on their
back
sides.
It is
important
to hook
both
speakers
and
the subwoofer
up in
an
identical
manner,
red-to-red
and
black-to-black,
so that
they
are
"in
phase." (Hooking
them
up "out
of
phase"
results
in
a
thin
sound.)
Almost
all double-stranded
wire
has
a
means
of
differentiating
one
strand
from
the
other.
This
could
be a
different
color
conductor,
a strand
of
yarn
in
one
conductor,
or
ribs
on one
part
of
the
"
insulation.
IT DOES
NOT
MAKE
A}[Y
DIFFERENCE
WHICH
OF
THE TwO STRANDS
OF
WIRE
GO
TO
(+)
AND
(-)
ON
THE SPEAKERS/SUBWOOFER
A}TD
AMPLIFIER
AS LONG AS
THEY ARE ALL
DONE
IDENTICALLY.
IMPORIANT:
Make
sure that the
wire
conductors
do not
touch or short out. It only takes one little fine
piece
of
wire
out of
place
to cause
a
short.
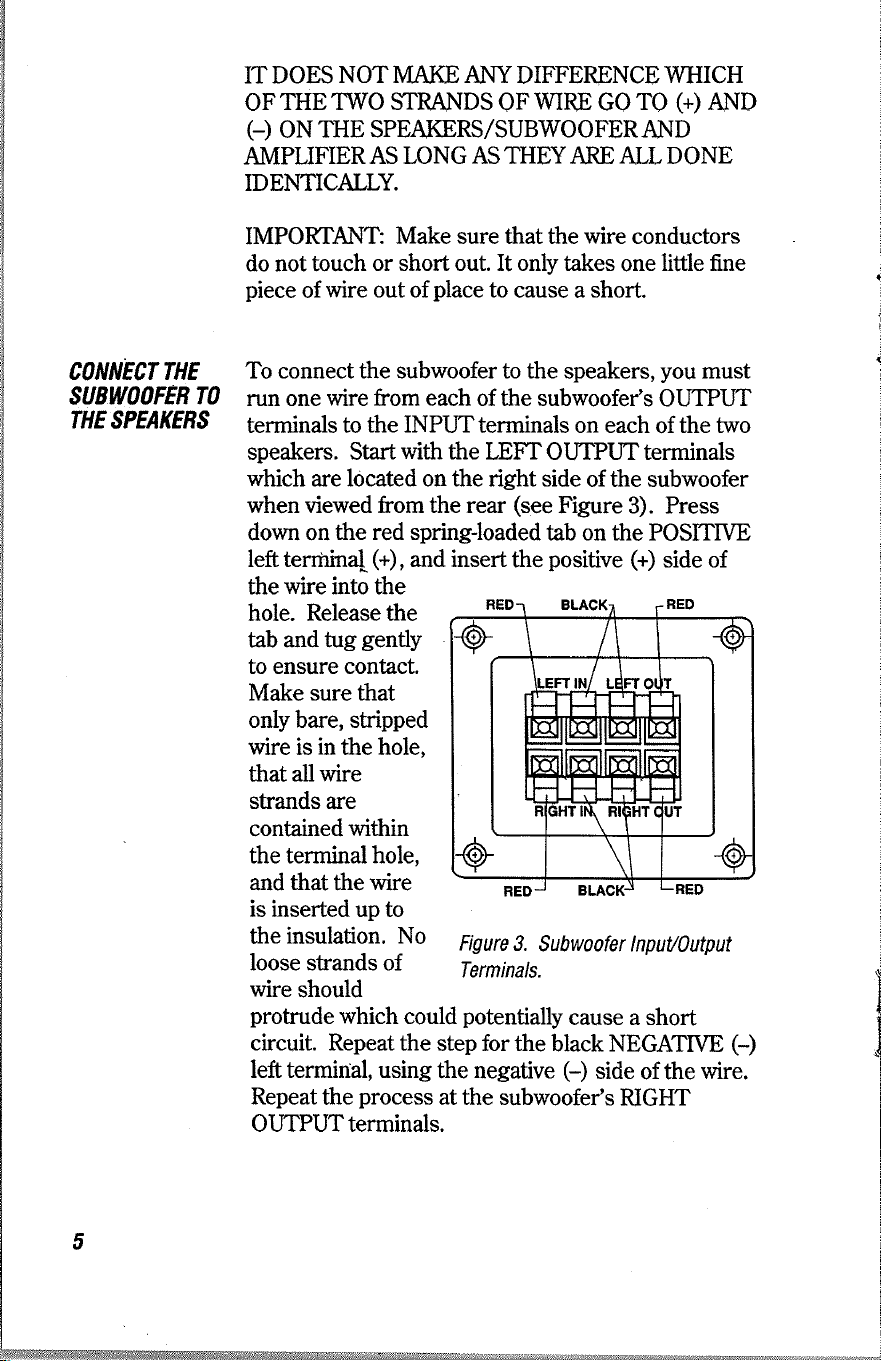
To connect the subwoofer to the speakers,
you
must
mn one
wire from each
of the subwoofer's
OLIPUT
terminals
to the INPUTterminals
on each of the two
speakers. Start
with
the
LEFT OUTPUT terminals
which
are located on the right side
of the subwoofer
when viewed from the rear
(see
Figure
3). Press
down
on the red spring-loaded
tab on the POSITME
left tenirina[
(+),
and insert
the
positive
(+)
side of
CONNECT THE
SUBWOOFEB TO
THE
TPEAKENS
the
wire into
the
hole. Release the
tab and
tug
gently
to ensure contact.
Make sure that
only bare, stripped
wire
is
in
the hole,
that all wire
strands are
contained within
the terminal hole,
and that the wire
is inserted
up to
the
insulation. No
loose strands of
wire
should
l
CONNECT THE
SUBWOOFER
TO
THE
NECEIVER/
AMPLIFIEB
Attach
the other ends
of the
wires
from the
subwoofer's
OUTPUT
terminals to
tlie input
of each
ProPerformer
speaker.
Make sure
that
you
att¿ch
the
wire from
the left
ouþut
to
the left speaker
and
the
right
ouþut to the right speaker.
MAKE
SURE TFIAT
THE RECETVER/AMPLIFIER
IS
SWTTCHED
OFF BEFORE CONNECTING
THE
SUBWOOFER AND
SPEAKERS.
Connect
the two
wires
to the
subwoofer's LEFT and
RIGHT INPUT
terminals
by repeating
the OUTPUTconnection
procedure
just
described. The INPUT
terminals
are
located
on the left
side of the subwoofer
when
viewed
from
the rear
(see
Figure 3).
Check for
tight
connections.
Connect
the other end
of the two
INPUT wires
to the
receiver/amplifier.
Connect
the LEFT wire's
POSITIVE
and NEGATIVE
sides
to the
corresponding
terminals
on the receiver/amplifi
ef s LEFT
SPEAKER
OUTPUT terminals.
Repeat
the step
at the
receiver/amplifier's
RIGHT
SPEAKER
OUTPUT
terminals.
Check all connections
thoroughly
for loose
wire
strands
and shorts. The
system
is now
ready
for
operation.
To
make sure
the system
is connected
properþ,
test
for
both
speaker
balance
and
phasing
as follows:
A.
Speaker Balance:
Turn
your
receiver/amplifier's
balance
control to the
extreme
LEFT
position.
You
should
hear
sound from
the left
speaker
only.
Next,
turn the
balance
control to
the
extreme
RIGHT
position,
and listen
for sound
from
the right
speaker
only.
If
you
hear
the
opposite
effect
during
this
test,
the speakers
may
not be
properþ
connected
to
the
subwoofer
or the
subwoofer
may
not
be
properþ
connected
to the
receiver/amplifier.
Inspect
the
subwoofer's
OUTPUT
connections
and
the wiring
to
the speakers,
and
make any
necessary
changes.
protrude
which could
potentially
cause a short
circuit. Repeat the
step for the
black NEGATIVE
(-)
left terminal, using the
negative
(-)
side
of the
wire.
Repeat
the
process
at the subwoofer's
RIGHT
OUTPUTterminals.
Figure
3.
Subwoofer lnpuU0utput
Terminals.
TEST
THE
SYSTEM
IT DOES
NOT
MAKE
A}[Y
DIFFERENCE
WHICH
OF
THE TwO STRANDS
OF
WIRE
GO
TO
(+)
AND
(-)
ON
THE SPEAKERS/SUBWOOFER
A}TD
AMPLIFIER
AS LONG AS
THEY ARE ALL
DONE
IDENTICALLY.
IMPORIANT:
Make
sure that the
wire
conductors
do not
touch or short out. It only takes one little fine
piece
of
wire
out of
place
to cause
a
short.
To connect the subwoofer to the speakers,
you
must
mn one
wire from each
of the subwoofer's
OLIPUT
terminals
to the INPUTterminals
on each of the two
speakers. Start
with
the
LEFT OUTPUT terminals
which
are located on the right side
of the subwoofer
when viewed from the rear
(see
Figure
3). Press
down
on the red spring-loaded
tab on the POSITME
left tenirina[
(+),
and insert
the
positive
(+)
side of
CONNECT THE
SUBWOOFEB TO
THE
TPEAKENS
the
wire into
the
hole. Release the
tab and
tug
gently
to ensure contact.
Make sure that
only bare, stripped
wire
is
in
the hole,
that all wire
strands are
contained within
the terminal hole,
and that the wire
is inserted
up to
the
insulation. No
loose strands of
wire
should
l
CONNECT THE
SUBWOOFER
TO
THE
NECEIVER/
AMPLIFIEB
Attach
the other ends
of the
wires
from the
subwoofer's
OUTPUT
terminals to
tlie input
of each
ProPerformer
speaker.
Make sure
that
you
att¿ch
the
wire from
the left
ouþut
to
the left speaker
and
the
right
ouþut to the right speaker.
MAKE
SURE TFIAT
THE RECETVER/AMPLIFIER
IS
SWTTCHED
OFF BEFORE CONNECTING
THE
SUBWOOFER AND
SPEAKERS.
Connect
the two
wires
to the
subwoofer's LEFT and
RIGHT INPUT
terminals
by repeating
the OUTPUTconnection
procedure
just
described. The INPUT
terminals
are
located
on the left
side of the subwoofer
when
viewed
from
the rear
(see
Figure 3).
Check for
tight
connections.
Connect
the other end
of the two
INPUT wires
to the
receiver/amplifier.
Connect
the LEFT wire's
POSITIVE
and NEGATIVE
sides
to the
corresponding
terminals
on the receiver/amplifi
ef s LEFT
SPEAKER
OUTPUT terminals.
Repeat
the step
at the
receiver/amplifier's
RIGHT
SPEAKER
OUTPUT
terminals.
Check all connections
thoroughly
for loose
wire
strands
and shorts. The
system
is now
ready
for
operation.
To
make sure
the system
is connected
properþ,
test
for
both
speaker
balance
and
phasing
as follows:
A.
Speaker Balance:
Turn
your
receiver/amplifier's
balance
control to the
extreme
LEFT
position.
You
should
hear
sound from
the left
speaker
only.
Next,
turn the
balance
control to
the
extreme
RIGHT
position,
and listen
for sound
from
the right
speaker
only.
If
you
hear
the
opposite
effect
during
this
test,
the speakers
may
not be
properþ
connected
to
the
subwoofer
or the
subwoofer
may
not
be
properþ
connected
to the
receiver/amplifier.
Inspect
the
subwoofer's
OUTPUT
connections
and
the wiring
to
the speakers,
and
make any
necessary
changes.
protrude
which could
potentially
cause a short
circuit. Repeat the
step for the
black NEGATIVE
(-)
left terminal, using the
negative
(-)
side
of the
wire.
Repeat
the
process
at the subwoofer's
RIGHT
OUTPUTterminals.
Figure
3.
Subwoofer lnpuU0utput
Terminals.
TEST
THE
SYSTEM
B.
Phasing:
With
the
balance
control
in
the
CENTER
position,
play
a
musical
passage
with
deep,
rich
bass
and
switch
the
balance
control
to
the
LEFT
and
then
RIGHT
position.
If the
system
produces
less
bass with
the
balance
control
in
the
CENTER
position
than it
does with
the
balance
in
the extreme
LEFT
or
RIGHT
position,
the
system
is
out of
phase.
This
means
that somewhere
in the
subwoofer's
connections,
a
positive
(+)
wire
or
terminal
has
been
incorrectly
connected
to
a negative
(-)
wire
or
terminal.
Inspect
the
subwoofer's
INpUT
connections
and
the wiring
to
the
receiver/amplifier,
and
make
any
necessary
changes.
Locate the
wall
stud
beneath
the wall.
Use
the
mounting
bracket
as
a template
to
mark
the
holes
with
a
pencil.
Be
sure the
bracket
is level.
Secure
using
four
#
8.x.I
Il4
panhead
wood
screws.
Mäke
sure
screws
are
ldrrg
enough
to
pass
through
wall
material
and
penetrate
wall
stud.
Att¿ch
the loudspeaker
to
the wall
bracket
by
sliding
the
insert
located
on the
rear
of the
speaker
into
the
wall
bracket
slot.
Attach
speaker
wire
prior
to installing
on
the wall
bracket.
The
JBI
ProPerformer
Plus
System
is
designed
to
handle
up to 100
watts
per
channel.
Using
more
power
than
this voids
your
warranty
and
can
lead
to
potential
damage.
If
you
intend
to
run
extension
speakers
from
your
amplifier
to another
room
in
addition
to
the
ProPerformers
Plus
System,
connect
them
to
the
amplifier's
second
speaker
output,
not
to the
subwoofer,
which
would
result
in
a
loss
of
bass
from
those
speakers.
To
clean
the
speakers
and
subwoofer,
dust
with
a
clean,
soft
cloth.
Never
use
cleaning
solvents
or
MOUNTINÊ
BNACKET
INSTALLATION
PBOPEBFORMEB
USE
ANI)
íIIAINTENANCE
TNOUBLE.
SHOOTINÊ
abrasives
on the
speakers
or the subwoofer,
and
never
place
the nozzle
of
a
vacuum
cleaner
anywhere
near
the
subwoofer
ports.
If
you
have
a
problem
with
your
system,
try
the
following
procedures
before
taking
your
speakers
or
subwoofer
in for
service.
Often, the
problem
will
be
in
a component
other
than the
subwoofer
or speakers.
Problem:
One speaker
does
not
play,
or
it sounds
distorted.
Procedure:
Turn
offthe receiver/amplifier,
and
check
all wiring.
l¡ok
carefuþ
for loose
wire
strands
causing
short circuits.
If the wiring
and
connections
seem
fine, reverse
the
subwoofer's
INPUT
connections:
Hook the
left INPUTup
to
the
receiver,/amplifier's
right
SPEAKER
OUTPUT,
and the
right
INPUTto
the receiver/amplifier's
left
SPEAKER
OUTPLIT. Turn
the receiver/amplifier
on, and
play
some
music
at a modest volume
level.
If
the speaker
that was
not working
properþ
now
sounds
fine, the
problem
is not in
the speakers
or subwoofer.
Check
the
receiver/amplifier
and
source
components.
Problem:
Neither
speaker
plays,
or both
sound
distorted.
Procedure:
Turn
offthe receiver/amplifier
and
disconnect
the
subwoofer
system.
This will
automatically
disconnect
the
speakers
as well.
Next,
connect the
subwoofer
system
to another
receiver/amplifier
known
to be
operating
properþ.
Play
the
system. If
the
problem
fails
to appear,
it is
the
original
receiver/amplifier
that
is at
fault.
Problem:
The
sound
goes
offand
on intermittentþ.
Procedure:
Check for
shorts
in the
subwoofer
and
speaker
wiring
that
may be
triggering
the
receiver/ampliûer's
protection
circuibry.
If
no short
is
found,
follow
the
procedure
for
the
preceding
problem.
Problem:
A
"howling"
sound
comes
out
of the
speakers
while
you
are
playing
records.
Procedure:
Increase
the
distance
between
the
subwoofer
and
turntable.
In
all likelihood,
the
problem
is acoustic
feedback.
Should
any unit
of
yourJBL
ProPerformer
plus
System
need
service,
please
return
it
to
the
dealer
from
whom
it was
purchased.
Bring
the
sales
receipt
or invoice
with
you.
You
can
obtain warranty
service
from
any
of
the
authorized
stations
listed
on the
enclosed
brochure.
Call
the
authorized
service
center
nearest
you
to
notiû
them
of
your
warranty
sewice
request
and
then
take
or ship
your
speakers
or
subwoofer
postage.prepaid
to
them.
For
your
own
protection,
we
suggest
you
insure
your
shipment
as damages
may
occur
and
are
not
covered
by
this warranty.
TO
OBTÅIN
WANNANfl
SEBVICE
l::i
¡i.
SPECIFICATIONS
o
Frequency
Response:
40
Hz
-
18
kHz
.
Recommended
Amplifier
Power:
10
to
100
watts
.
Nominal
Impedance:
8 Ohms
.
Sensitivity:
88
dB
.
IæftlRight Transducers:
4 1/2"
fiber
cone
o
Transducer
Dimensions
(H
x W
x
D):
6t/4"
x6"
x
5I/2"
¡
SubwooferTransducer:
8" dual
voice-coil,
polymer
laminated
cone
o
Subwoofer
Enclosure
Type:
Ported,
dual-chamber
o
Subwoofer
Dimensions
(H
x W
x D):
7 1/2"
x 20"
x 71
1/2"
o
Crossover
Frequency:
200
Hz
JBL
continually
engages
in
research
related
to
product
improvement.
New
materials, production
methods
and
design
refinements
are introduced
into
existing
products
without
notice
as
a routine
expression
of this
philosophy.
For
this reason,
any
currentJBlproduct
may
differ
in
some
respect
from
its
published
description
but will
always
equal
or
exceed
the
original
design
speciûcations
unless
otherwise
stated.
10

ProPertormers
PIus
JBL
in
the
USA, 240
Crossways
park
West,
Woodburv
NY
11797
JBL
International,
8500 Balboa
Blvd.,
Northridge,
California
91329
H
A
Hu.-an
International
Company
0wner's
Manual