Loading ...
Loading ...
Loading ...

- 8 -
10/2019
Copyright © 2019, Fast ČR, a.s.
EN
Stick blender
User'smanual
■ Prior to using this appliance, please read the user’smanual thoroughly, even in cases, when one has already familiarised themselves with previous use of similar types of
appliances. Only use the appliance in the manner described in this user’smanual. Keep this user’smanual in asafe place where it can be easily retrieved for future use. In the event
that you hand this appliance over to somebody else, make sure to also include this user’smanual.
■ Carefully unpack the appliance and take care not to throw away any part of the packaging before you find all its parts. We recommend saving the original cardboard box,
packaging material, purchase receipt and responsibility statement of the vendor or warranty card for at least the duration of the legal liability for unsatisfactory performance or
quality. In the event of transportation, we recommend that you pack the appliance in the original box from the manufacturer.
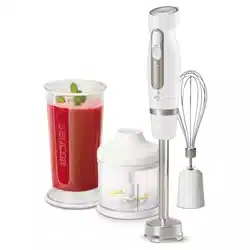
DESCRIPTION OF THE APPLIANCE AND ITS ACCESSORIES
A1 Speed control dial
A2 Normal speed switch
A3 High speed switch (turbo)
A4 Motor unit
A5 Removable blender stick attachment
A6 Blade assembly
It contains titanium-coated stainless steel blades
A7 Beaker, volume 700 ml
A8 Anti-slip base pad / lid
A9 Whisk attachment with gear system
A10 Whisk
A11 Chopper bowl lid with gear system
A12 Chopper with blade assembly
A13 Protective cover
A14 Chopper bowl, volume 500 ml
A15 Shaft
A16 Anti-slip base pad
B1 Help arrow
B2 “Unlocked” symbol
B3 “Locked” symbol
C1 Locking tabs
PURPOSE OF USE
STICK BLENDER ATTACHMENT
■ It is suitable for blending soft ingredients and liquids. It is used namely for preparing baby food, various types of milkshakes, sauces, spreads, etc.
WHISK
■ The whisk is suitable for preparing light batters or for whipping cream, egg whites, dessert creams, liquid sponge cake doughs, mayonnaise, etc. Do not use it to whip thick
doughs.
CHOPPER
■ It is suitable for chopping tougher foods such as meat, semi-hard or hard cheese, fruit and vegetables in their raw state, nuts, herbs, etc. Thanks to its special tabs, it is also suitable
for chopping harder foods such as ice cubes, coffee beans, nutmeg, cocoa beans.
BEFORE FIRST USE
■ Thoroughly wash all removable accessories that are intended to come into contact with food using warm water and aneutral kitchen detergent. Then rinse them with clean water
and allow them to dry naturally or wipe them thoroughly dry using afine wiping cloth.
■ Clean parts A9 and A11, which are equipped with agear system, only using adampened cloth. Take care that water does not enter into these parts.
Attention:
When cleaning blade assemblies A6 and A12, be very careful not to injure yourself on their sharp edges.
■ When cleaning the stick blender attachment A5, do not submerge the top end that connects to the motor unit A4 .
ATTACHING AND REMOVING BLENDING AND WHIPPING ATTACHMENTS
Attention:
Before attaching or removing attachments A5 or A9, make sure that the motor unit A4 is turned off and disconnected from the power socket and that the
rotating parts have come to acomplete stop. The parts of the attachments that are connected to the motor unit, must be thoroughly dry.
■ Depending on the activity, select attachment A5 or A9. Slide the selected attachment on to the motor unit A4 from underneath so that the arrow B1 on the rear side of the motor
unit points at the unlocked padlock symbol B2 on the attachment.
■ Turn the motor unit so that the arrow moves to the locked padlock symbol B3. The connection of both parts is accompanied by aclick.
■ To release the attachment from the motor unit, firmly grasp both parts and turn the motor unit so that the arrow points at the open padlock symbol. Pull both parts away from
each other.
ASSEMBLING AND DISASSEMBLING THE CHOPPER
■ Place the bowl A14 on an even and stable surface. Remove the protective cover A13 from the chopper A12, and seat the chopper on the central shaft A15 on the bottom of
the bowl.
■ Put the lid A11 on to the bowl so that the shaft of the chopper A12 slides into the central part of the lid so that the locking tabs C1 along the sides of the lid fit into the grooves
in the bowl. Turn the lid so that the tabs on the lid slide into the grooves. Correctly securing the lid is accompanied by aclick.
■ Attach the motor unit A4 to the lid A11 following the same procedure as described in chapter Attaching and removing attachments.
■ To remove them proceed in the reverse sequence to their assembly.
OPERATING THE APPLIANCE
■ Select the type of accessories that you wish to use, and assemble the appliance according to the instructions in the preceding chapters.
■ For blending, use the beaker A7 or another suitable container intended for coming into contact with food. The anti-slip base pad A8 also serves as alid for the beaker, when you
wish to use it for short term storage of food.
■ Do not overfill the beaker A7 and bowl A14 past the maximum level marks. This will prevent splattering the ingredients while they are processed.
■ When assembling the chopper, place the food into the bowl A14 only after placing the chopper A12, be on to the central shaft A15 at the bottom of the bowl. Do not fill the
bowl past the maximum level mark (MAX).
Loading ...
Loading ...