
Loading ...
Loading ...
Loading ...
05/2019
- 7 -
Copyright © 2019, Fast ČR, a.s.
EN
Bagged vacuum cleaner
User'smanual
■ Prior to using this appliance, please read the user’smanual thoroughly, even in cases
where you have previously familiarised yourself with the operation of similar types
of appliances. Only use the appliance in the manner described in this user’smanual.
Keep this user’smanual in asafe place where it can be easily retrieved for future use.
■ We recommend saving the original cardboard box, packaging material, purchase
receipt and responsibility statement of the vendor or warranty card for at least the
duration of the legal liability for unsatisfactory performance or quality. In the event of
transportation, we recommend that you pack the appliance in the original box from
the manufacturer.
DESCRIPTION OF THE APPLIANCE
A1 Top cover release button
A2 Flexible hose connection hole
A3 Dust bag compartment cover
A4 Inflow hole cover
A5 Accessory cover lid release button
A6 Accessory compartment cover
A7 Vacuum cleaner unit
A8 Automatic power cord winding
button
A9 Stop suction power and select
operating mode button
A10 Power cord
A11 Rear travel wheel
A12 On/Off button
A13 Display
A14 Washable outflow filter (is inserted
inthe grille)
A15 Washable outflow HEPA filter
A16 Removable grille
A17 Inflow filter
A18 Inflow filter grille
A19 Dust bag holder
A20 Dust bag
A21 Flexible hose with remote control
inthehandle
A22 Telescopic metal tube
A23 Turbo brush
A24 Suction power control
A25 Long flexible crevice nozzle
A26 Hard floor nozzle
A27 Mini turbo-brush
A28 Dusting brush
A29 Crevice nozzle
A30 Grooves for the horizontal parking
position
A31 Groove for the vertical parking
position (at the bottom of the
vacuum cleaner)
A32 Floor nozzle with an extensible
brush and DEEP cleaning and EASY
cleaning switch
A33 Flap for extending and retracting
thebrush
DESCRIPTION OF THE REMOTE CONTROL IN THE HANDLE
B1 Battery compartment cover
B2 Vacuum cleaner On/Off button
B3 Increase suction power button
B4 Decrease suction power button
B5 Flexible hose with mechanical
suction power control in the handle,
with an integrated brush
BEFORE FIRST USE
■ Before first use, take the appliance and its accessories out of the packaging material
and remove all promotional labels and stickers. Check that neither the appliance nor
any of its parts is damaged.
INTENDED USE OF THE ACCESSORIES
■ The combination floor nozzle A32 is suitable for vacuuming smooth hard floor areas
and carpets. When vacuuming carpets with ahigher pile, we recommend extending
the floor nozzle travel wheels A32. This makes movement over the vacuumed area
easier. When vacuuming smooth hard floor areas, heavy-duty carpets or carpets with
alow pile, you may leave the wheels retracted. Use flap A33 to extend and retract the
travel wheels. Floor nozzle A32 also has aswitch for extending out atravel roller. This
switch is located in the centre of the floor nozzle A32 and it has two positions - deep
cleaning and easy cleaning. The deep cleaning position (the travel roller is retracted)
is ideal for deep and thorough vacuuming of carpets. The easy cleaning position (the
travel roller is extended) makes movement over the vacuumed surface easier. We
recommend to slightly lift up the floor nozzle A32 when you wish to switch to the
easy cleaning position.
■ The hard floor nozzle A26 ensures perfect and yet gentle vacuuming of smooth
hard surfaces thanks to the brush being from 100 % natural bristles. It can be used
to vacuum floors that are sensitive to scratching such as wooden and floating floors,
tiles, linoleum, etc.
■ The mini turbo-brush A27 is an excellent helper for removing animal fur, hair, etc.,
while at the same time being suitable for vacuuming hard-to-reach places. Its use is
not limited to the home, and can be used for vacuuming the car. Use it to quickly
and effectively remove hair, animal fur and other materials from car seats, upholstery,
pillows and other textile surfaces.
■ The long flexible crevice nozzle A25 serves to vacuum very hard-to-reach places
anywhere in your car.
■ The crevice nozzle A29 can be used for vacuuming hard-to-reach places and the
dusting brush A28 is used for gently vacuuming various types of furniture.
PREPARING FOR USE
■ Make sure that the dust bar A20, inflow filter A17,outflow HEPA filter A15 and the
outflow filter A14 are properly installed.
■ Make sure that the dust bag compartment cover A3 and the accessory compartment
cover A6 are properly closed
■ Insert the end of the flexible hose A21 into the hole A2. Asecure connection of the
flexible hose A21 to the hole A2 is indicated by the locking clips located on the end of
the flexible hose A21 extending out.
Note:
When disassembling, it is necessary to simultaneously press both
locking clips at the end of the flexible hose A21 while at the same time
pulling the hose end A21 out of the hole A2.
■ Connect the telescopic tube A22 to the free end of the flexible hose A21. Asecure
connection of these parts is indicated by aclick.
■ Use the ring to set the ergonomic height of the telescopic tube A22. Pull the ring up or
down to release the extension lock on the telescopic tube A22. Set the desired length
of the telescopic tube A22 by sliding its inner part in or out. When the required length
is set, release the ring and pull on the outer tube. This will lock the inner slider in place.
■ Connect the required nozzle or brush to the free end of the telescopic tube A22. The
long flexible crevice nozzle A25, the mini turbo-brush A27, dusting brush A28 or
crevice nozzle A29 can be attached directly to the end of the flexible hose A21 (after
removing the telescopic tube A21).
INSERTING BATTERIES INTO THE REMOTE CONTROL IN THE
HANDLE
■ In order to use the remote control in the handle, it is necessary to install 2× 1.5V type-
AAA batteries. Remove the battery compartment cover and insert 2× new batteries
of the same type. Ensure that the correct polarity as marked inside the battery
compartment. Attach the battery compartment cover.
■ When not using the remote control in the handle for an extended period of time,
remove the batteries.
Note:
Always use new batteries of the same type. Never combine used and
new batteries or various types of batteries. When not using the vacuum
cleaner for an extended period of time, remove the batteries from the
remote control. Never put the batteries in afire, short circuit them or
damage them in any way. Dispose of them ecologically at the end of
their lifetime. Never throw batteries out with communal waste.
USING YOUR VACUUM CLEANER
■ Pull on the power plug to wind out the required length of the power cord and connect
it to apower socket.
Attention:
The yellow mark on the power cord indicates that it is close to
its end. The red mark indicate the very end of its length. Do not
attempt to pull the power cord past this mark.
■ To start the vacuum cleaner, press button A12 on the vacuum cleaner unit. After
turning on the vacuum cleaner, the display A13 will be lit. Using buttons A9 to set
the suction power depending on the intended use of the vacuum cleaner – see table
“Suction power table”.
■ When you have finished using it, turn off the vacuum cleaner by pressing the
button A12 on the vacuum cleaner unit. Disconnect the power cord from the power
socket. To wind the power cord back into the vacuum cleaner, press button A8. It is
recommended to hold the power cord with one hand when winding it up.
USING THE VACUUM CLEANER WITH THE REMOTE CONTROL
■ Pull on the power plug to wind out the required length of the power cord and connect
it to apower socket.
■ To start the vacuum cleaner, press button A12 on the vacuum cleaner unit. After
turning on the vacuum cleaner, the display A13 will be lit.
■ Hold down both suction power setting buttons A9 on the vacuum cleaner unit until
the symbols on the display start turning on intermittently. Then press button B2 to
turn on the remote control on the handle. This will pair the remote control with the
vacuum cleaner and the vacuum cleaner can then be controlled using the remote
control in the handle.
■ Using buttons B3 and B4, set the required suction power depending on the intended
use of the vacuum cleaner – see table “Suction power table”.
■ When you have finished using it, turn off the vacuum cleaner by pressing the button
B2. Disconnect the power cord from the power socket. To wind the power cord back
into the vacuum cleaner, press button A8. It is recommended to hold the power cord
with one hand when winding it up.
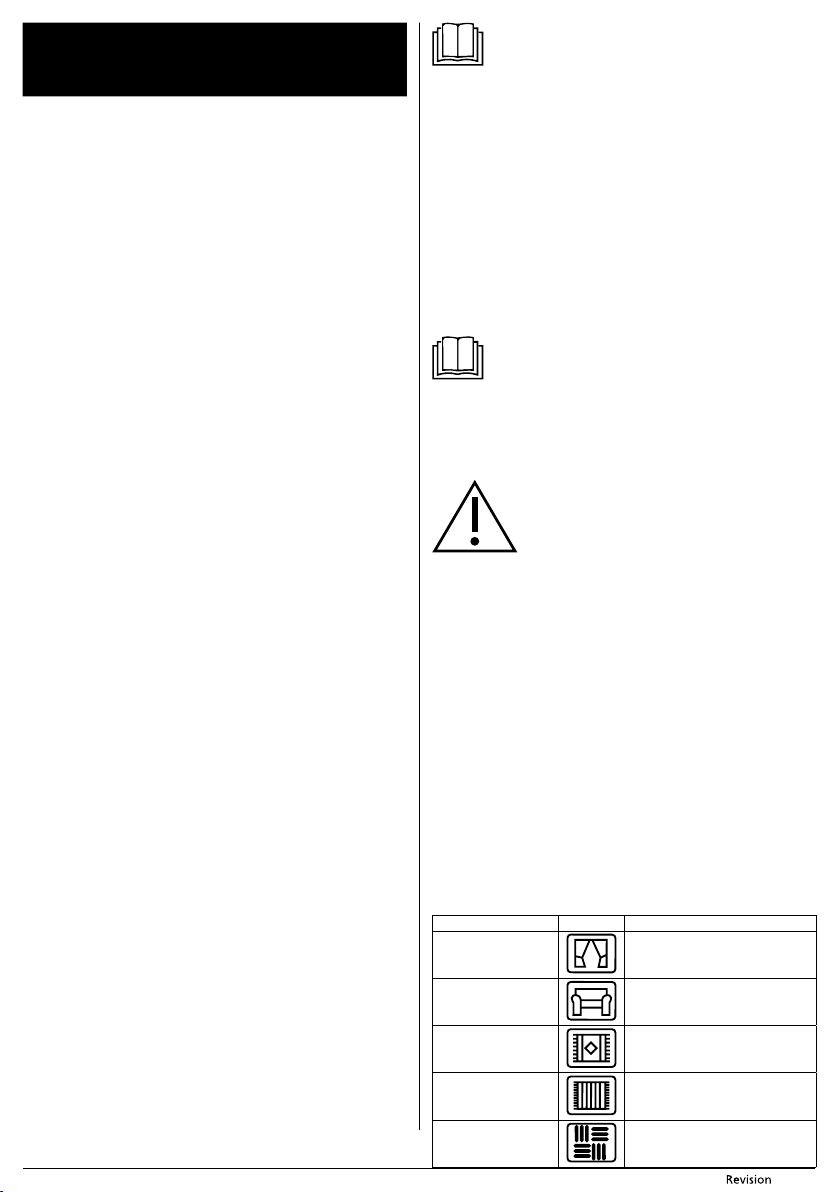
Suction power table
Suction power Icon Suitable for
1 – lowest power
Curtains and drapes
2 – medium-low power
Upholstery and furniture
3 – medium power
Rugs, mats and other loosely-placed
carpets
4 – medium-high power
Large-area carpets
5 – highest power
Smooth floor areas (wooden and floating
floors, vinyl, tiles, etc.)
Loading ...