Double Door, Double Drawer
Stainless Steel Free-Standing
Refrigerators
monogram.com
Consumer Information
Stainless Stee! Refrigerator
Introduction Your new Monogram refrigerator makes an eloquent statement of style, convenience and kitchen
planning flexibility. Whether you chose it for its purity of design, practical storage arrangements or
assiduous attention to detail-or for all of these reasons-you'll find that your Monogram refrigerator's
superior blend of form and function will delight you for years to come.
Theinformation on the following pages will help you operate and maintain your refrigerator properly.
If you have any other questions, visit our Website at: monogram.cam
Contents
Consumer Services
Important Phone Numbers .................. 27
Model and Serial Numbers .................... 5
Performance Data Sheet .................... 25
Problem Solver .......................... 20-2/4
Product Registration .......................... 3
Safety Instructions ........................ /4-7
State of California
Water Treatment Device Certificate .......... 26
Warranty .......................... Back Cover
Care and Cleaning
Cleaning-Outside and Inside ................ 18
Light Bulb Replacement ..................... 19
Moving ..................................... 18
Vacation .................................... !8
Operating Instructions
Automatic Icemaker ......................... 17
Additional Features .......................... 15
Crispers ..................................... 16
Internal Water Dispenser .................... 10
Other Controls ................................ 9
Performance Air Flow System ................. 8
Shelves and Bins ......................... 12-14
Temperature Controls ........................ 8
TurboCoolT"................................... 9
Water Filter ................................. 11
Before
using
your
refrigerator
Read this manual carefully. It isintended to help
you operate and maintain your new refrigerator
properly.
Keep it handy for answers to your questions.
If you don't understand something or need
more help, there is a list of toll-free consumer
service numbers included in the back section
of this manual.
OR
Visit our Website at: monogram.cam
Consumer Information
Stainless Stee! Refrigerator
Write
down
the model
& seria!
numbers
You'll see them on a label inside the fresh food
compartment at the top on the right side.
Please write these numbers on the Consumer
Product Ownership Registration Card included
with the packing material.
Before sending inthis card, please also write
these numbers here:
Model Number
Serial Number
Use these numbers in ang correspondence
or service calls concerning gour refrigerator.
Ifgou
received a
damaged
refrigerator
Immediatelg contact the dealer (or builder) that
sold gou the refrigerator.
Save time
& moneg
Before gou request service, check the Problem
Solver in the back of this manual.
It lists causes of minor operating problems that
gou can correct gourself.
Ifgou
need
service
Toobtain service, seethe Consumer Services
page in the back of this manual.
We're proud of our service and want gou to be
pleased. If for some reason gou are not happg
with the service gou receive, here are steps to
follow for further help.
For customers in the USA:
FIRST,contact the people who serviced gour
appliance. Explain whg gou are not pleased.
In most cases, this will solve the problem.
NEXT,if gou are still not pleased, write all
the details-including gour phone number-to:
Manager, Customer Relations
GEAppliances
Appliance Park
Louisville, KY/40225
For customers in Canada:
FIRST,contact the people who serviced gour
appliance. Explain whg gou are not pleased.
In most cases, this will solve the problem.
NEXT,if gou are still not pleased, write all
the details-including gour phone number to:
Manager, Consumer Relations
Mabe Canada Inc.
! Factorg Lane,Suite 510
moncton, N.B.E1C9M]
IMPORTANTSAFETYINSTRUCTIONS
READAND SAVETHESEINSTRUCTIONS
WARNING: Whenusingth sappliance,
always exercisebasicsafety precautions,including
thefollowing:
• Usethis appliance only for its intended purpose
asdescribed in this Owner's iVlanual.
• This refrigerator must be properly installed in
accordance with the Installation Instructions
before it is used.
Do not allow children to climb, stand or hang
on the shelves in the refrigerator. They could
damage the refrigerator and seriously injure
themselves.
Do not touch the cold surfaces in the freezer
compartment when hands are damp or wet.
Skin may adhere to these extremely cold surfaces.
Do not store or usegasoline or other flammable
vapors and liquids in the vicinity of this or any
other appliance.
In refrigerators with automatic icemakers,
avoid contact with moving parts of the ejector
mechanism, or with the heating element located
on the bottom ofthe icemaker.Donot place
fingers or handson the automatic icemaking
mechanism while the refrigerator isplugged in.
Keepfingers out of the "pinch point" areas:
clearances between the doors and between
the doors and cabinet are necessarily small.
Becareful closingdoors when children are
in the area.
Unplug your refrigerator before cleaning and
making repairs. NOTE:We strongly recommend
that any servicingbe performed by a qualified
individual.
Before replacing a burned-out light bulb,
the refrigerator should be unplugged in order
to avoid contact with a livewire filament.
(Aburned-out light bulb may breakwhen
being replaced.)
NOTE:Turningcontro!to OFFdoesnot remove
power to the lightcircuit.
Do not refreeze frozen foods which have thawed
completely.
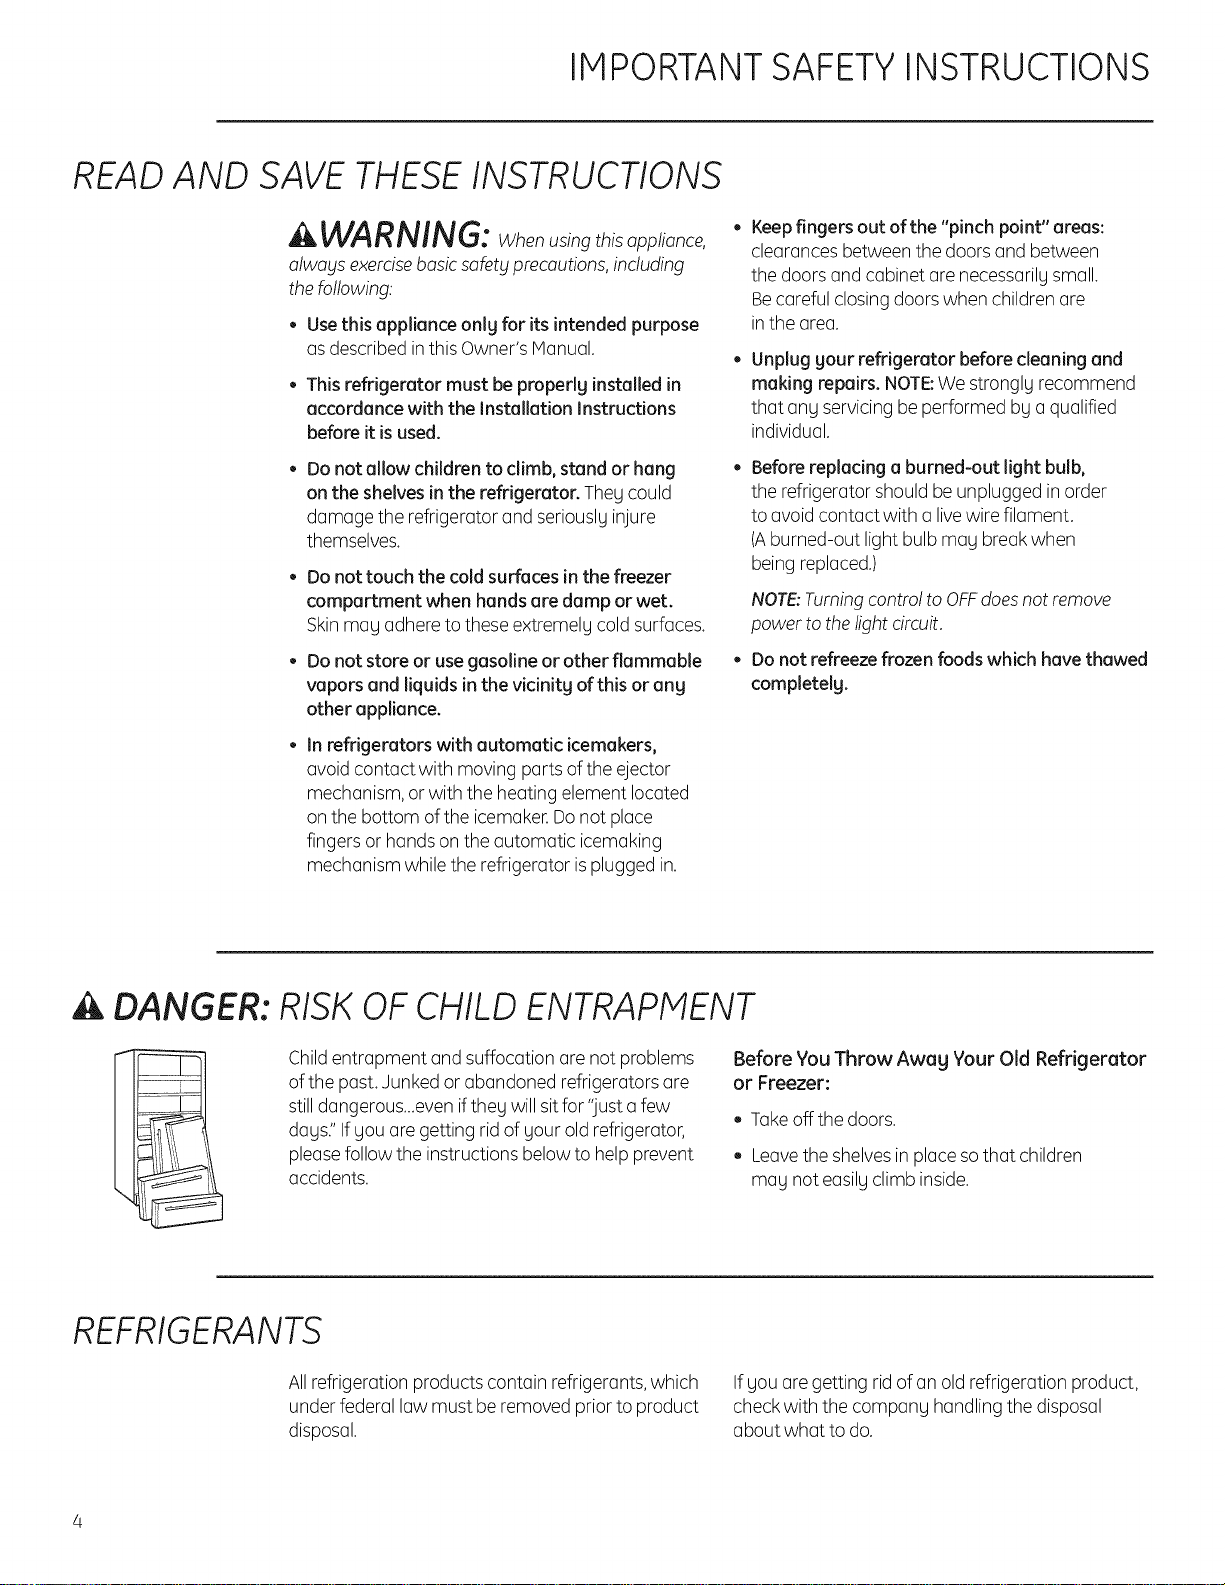
DANGER: RISKOFCHILD ENTRAPMENT
Childentrapment and suffocation are not problems
of the past.Junked or abandoned refrigerators are
still dangerous_.evenifthey will sitfor "justa few
days."Ifyou are getting rid of your old refrigerator,
pleasefollow the instructions below to help prevent
accidents.
Before You Throw Away Your Old Refrigerator
or Freezer:
, Takeoff the doors.
. Leavethe shelvesin place sothat children
may not easily climb inside.
REFRIGERANTS
All refrigeration products contain refrigerants,which
under federal law must be removed prior to product
disposal.
If you are getting rid ofan old refrigeration product,
checkwith the company handling the disposal
about what to do.
MESURESDESI CURITI IMPORTANTES
LIREETCONSERVERCESINSTRUCTIONS
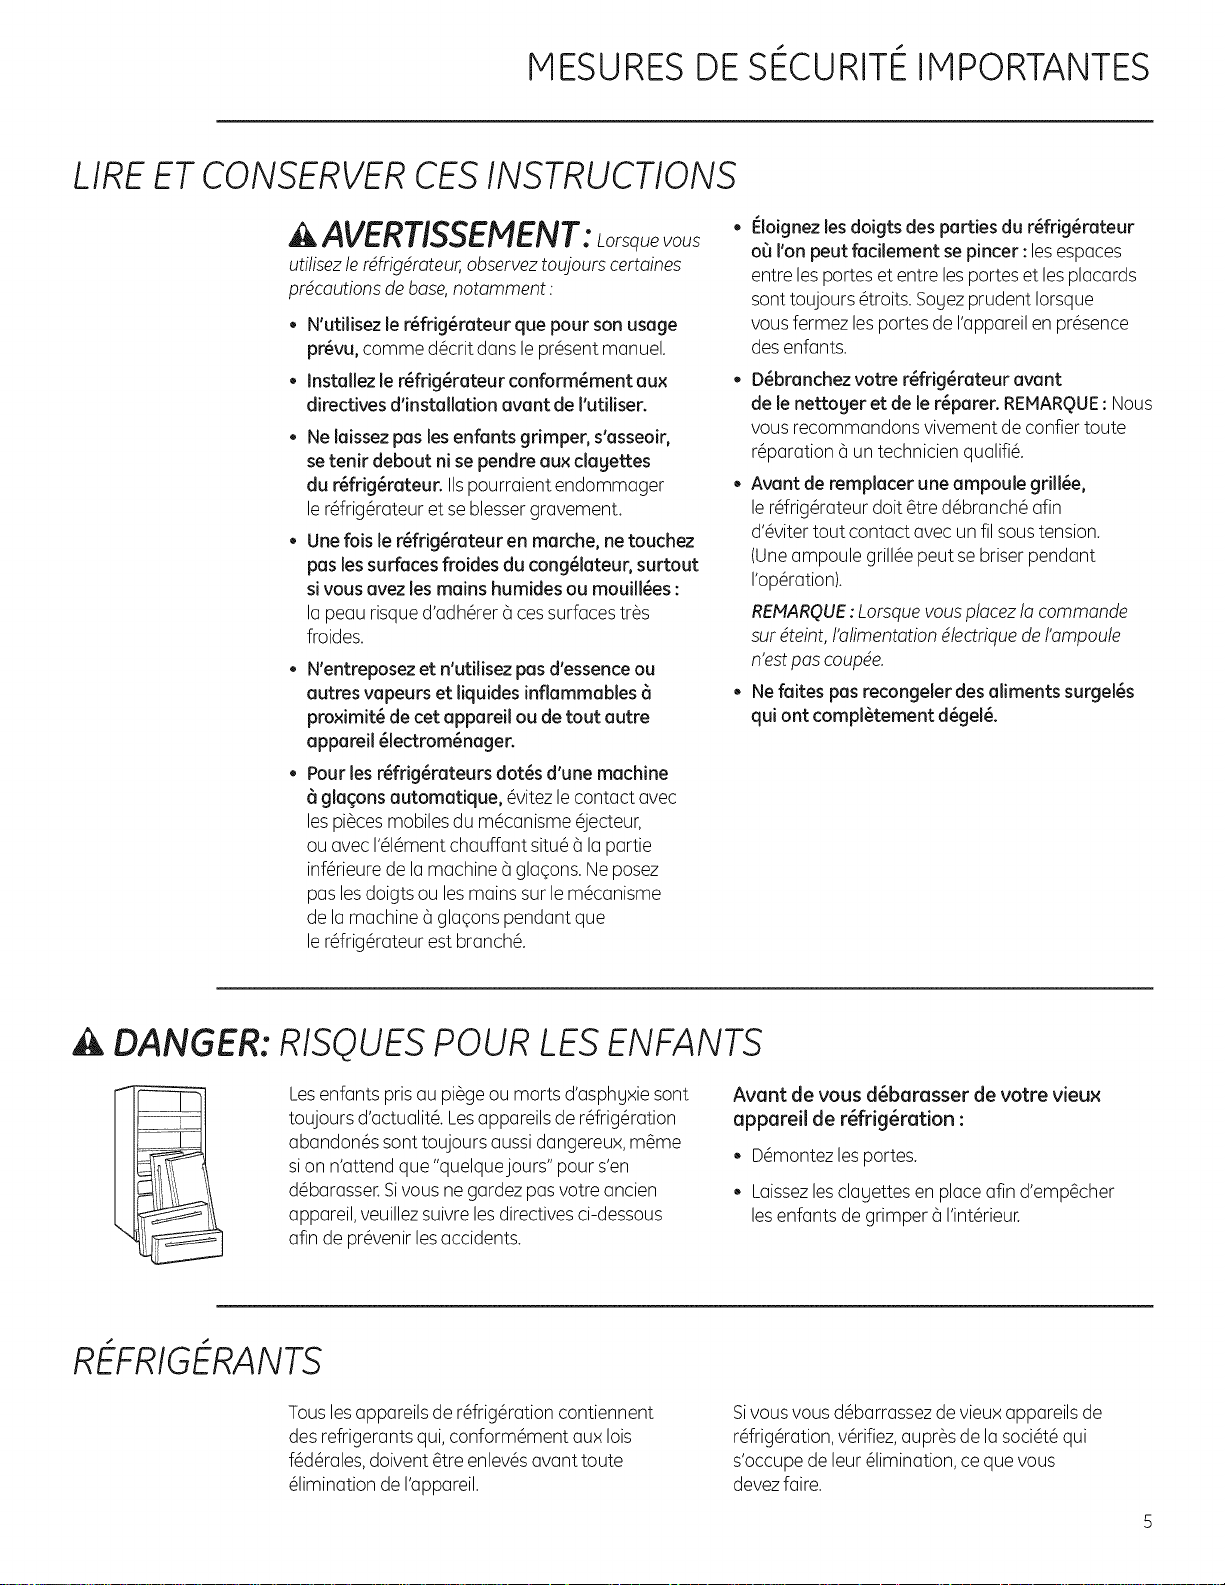
AVERTISSEMENT :Lorsquevous
utilisezle r_frig_mteur,observeztoujours certaines
prdcautionsde base,notamment :
• N'utilisez le r_frig_mteur que pour son usage
pr_vu, comme d_crit dans le pr@sentmanuel.
Installez le r_frig_rateur conform_ment au×
directives d'installation event de I'utiliser.
• Nelaissezpas lesenfants grimper, s'asseoir,
setenirdeboutni sependreauxclagettes
du r_frig_rateur. IIspourraient endommager
le rdrig@ateur etseblessergravement.
Unelois le r_frig_rateur en marche, netouchez
pas lessurfaces froides du cong_lateur, surtout
sivous avez les mains humides ou mouill_es :
la peau risqued'adh_rer _ cessurfaces tr_s
froides.
N'entreposez et n'utilisez pasd'essence ou
autres vapeurs et liquidesinflammables 6
proximit_ de cet appareil ou de tout autre
appareil _lectrom_nager.
Pour les r_frig_rateurs dot_s d'une machine
(_gla(_ons automatique, _vitez le contact avec
lespi_cesmobiles du m_canisme _jecteur,
ou avec I'_l_ment chauffant situ_ _ lapartie
inf@ieurede la machine _ glaqons.Neposez
pas lesdoigts ou lesmains sur lem_canisme
de la machine _ glaqons pendant que
le rdrig@ateur est branch&
Eloignez les doigts des parties du r(_frig_rateur
o6 I'on peut facilement se pincer: les espaces
entre lesportes et entre lesportes etles placards
sont toujours _troits.Sogezprudent Iorsque
vous fermez lesportes de I'appareilen presence
desenfants.
• D_branchez votre r_frig_rateur avant
de le nettoger et de le r_parer. REMARQUE:Nous
vous recommandons vivement de confier toute
r_paration _ un technicien qualifi&
• Avant de remplacer une ampoule grill_e,
le rdrig_rateur dolt _tred_branch_ afin
d'_viter tout contact avec un filsoustension.
(Uneampoule grill_e peut sebriser pendant
I'op@ation).
RENARQUE:Lorsquevousp!acezla commande
surdteint, !'alimentationdlectriquede/'ampoule
n'estpascouple.
• Nefaites pas recongeler desaliments surgel_s
qui ant compl_tement d_gel_.
DANGER: RISQUES POUR LESENFANTS
Lesenfants prisau pi@geou morts d'asphgxiesont
toujours d'actualit@.Lesappareilsde r@frig_ration
abandon_s sont toujours aussi dangereux,m@me
sion n'attend que"quelquejours" pour s'en
d_barasser.Sivous negardez pasvotre ancien
appareil,veuillezsuivrelesdirectivesci-dessous
afin de pr@venirlesaccidents.
Avant de vous d_barasser de votre vieux
appareil de r_frig_ration :
• D_montezlesportes.
• Laissezlesclagettes en placeafin d'emp_cher
lesenfants de grimper _ I'int@ieur.
RdLFRIGdLRANTS
Touslesappareils de rdrig_ration contiennent
desrefrigerants qui,conform@mentaux lois
f@d@ales,doivent @treenlev_savant toute
@liminationde I'appareil.
Sivous vous d_barrassezde vieux appareilsde
rdrig_ration, v@rifiez,aupr@sde lasoci@t@qui
s'occupede leur _limination, ceque vous
devezfaire.
IMPORTANTSAFETYINSTRUCTIONS
HOW TO CONNECT ELECTRICITY
Do not, under any circumstances, cut or remove
the third (ground) prong from the power cord.
For personal safety, this appliance must be
properly grounded.
Thepower cord ofthis appliance isequipped
with a 3-prong (grounding)plug which mates
with a standard 3-prong (grounding)wall outlet
to minimize the possibility of electricshock
hazard from this appliance.
Have thewall outlet and circuit checkedby
a qualified electricianto make surethe outlet
isproperly grounded.
Where a standard 2-prong wall outlet is
encountered, itisyour personal responsibility
and obligation to have it replacedwith a
properly grounded 3-prong wall outlet.
Therefrigerator shouldalways be plugged into
its own individual electrical outlet which has
a voltage rating that matches the rating plate.
Thisprovidesthe best performance and also
preventsoverloading housewiring circuits which
could cause a fire hazardfrom overheated wires.
Never unplug your refrigerator by pulling
on the power cord.Always grip plug firmly
and pull straight out from the outlet.
Repairor replaceimmediately all power cords
that have become frayed or otherwise damaged.
Donot usea cord that shows cracksor abrasion
damage along its length or at eitherend.
When moving the refrigerator away from the wall,
be careful notto rollover or damage the power cord.
USE OF EXTENSION CORDS
Because of potential safety hazards under
certain conditions, we strongly recommend
against the use of an extension cord.
However,ifyou must usean extensioncord, itis
absolutely necessarythat it be a UL-listed,3-wire
grounding type appliance extensioncord having
a grounding type plug and outlet and that
the electrical rating of the cord be 15 amperes
(minimum)and 120volts.
SAVETHESEINSTRUCTIONS
MESURESDESI CURITI IMPORTANTES
RACCORDEHENT 4LLECTRIOUE
Ne coupez nJretirez en aucun cas la troisJ_me
broche (mise 6 la terre) de la fiche du cordon
d'alimentation. Pour votre s_curit_, cet appareil
doit _tre correctement mis _ la terre.
Lecordon d'alimentation decet appareil est
muni d'une fiche6 3 broches (mise6 la terre)
qui sebranche dans une prisemural ordinaire
6 5 air,ales (mise6 laterre)pour r_duire au
minimum lesrisques du chocs_lectriques.
Faitesexaminer la prisede courant et le circuit
par un _lectricienqualifi_ pour vous assurer
que la priseestcorrectement mise 6 la terre.
Sila prisemurale est du tgpe standard 6 2 alv@oles,
il vous incombe de lafaire remplacer par une prise
6 5 alv_olescorrectement mise6 laterre.
La machine 6 glaqonsdoit toujours _tre
branch_ dans sapropre prisede courant,
dont latension nominale est identique
6 celleindiqu_e sur la plaque signal_tique.
Cetteprecaution est recommand_e pour garantir
un rendement optimum et _viter une surcharge des
circuits _lectriquesde la r6sidence,ce qui pourrait
crier un risqued'incendiepar surschauffe desills.
Ned_branchezjamais I'appareilen tirant lecordon
d'alimentation. Saisissezfermement la fiche
du cordon et tirez droit pour la retirerde la prise.
R_parezou remplacezimm_diatement tout cordon
effiloch_ ou endommag& N'utilisezpasun cordon
fendill_ou pr_sentant dessignesd'usure.
Lorsquevous d_placez I'appareildu mur,fakes
attention de ne pas lafaire foulersur le cordon
d'alimentation afin dene pasI'endommager.
CORDONS PROLONGATEURS
Nous vous recommandons fortement de ne pas
utiliser de cordons prolongateurs 6 cause des
risquespotentielsqu'ilspr_sententdanscertaines
conditions.
Toutefoissivous d_cidezd'utilisertout de m_me
un cordon prolongateur,il est absolument n_cessaire
qu'il s'agissed'un cordon 6 3 illsavec mise6 la terre
pour appareils_lectrom_nagers homologu_ UL
aux Etats-Unis)ou homologu6 CSA(auCanada),
pourvu d'une fiche etd'une prisemises6 la terre
de 15 amperes (minimum)et de 120volts.
CONSERVEZ CESDIRECTIVES
Operating Instructions
Stainless Stee! Refrigerator
Temperature
controls
rfJ
ii.................i
_:_ _:_:__:_:_ _:_!Jm/_
......il ,i,i
:_--Z !
i
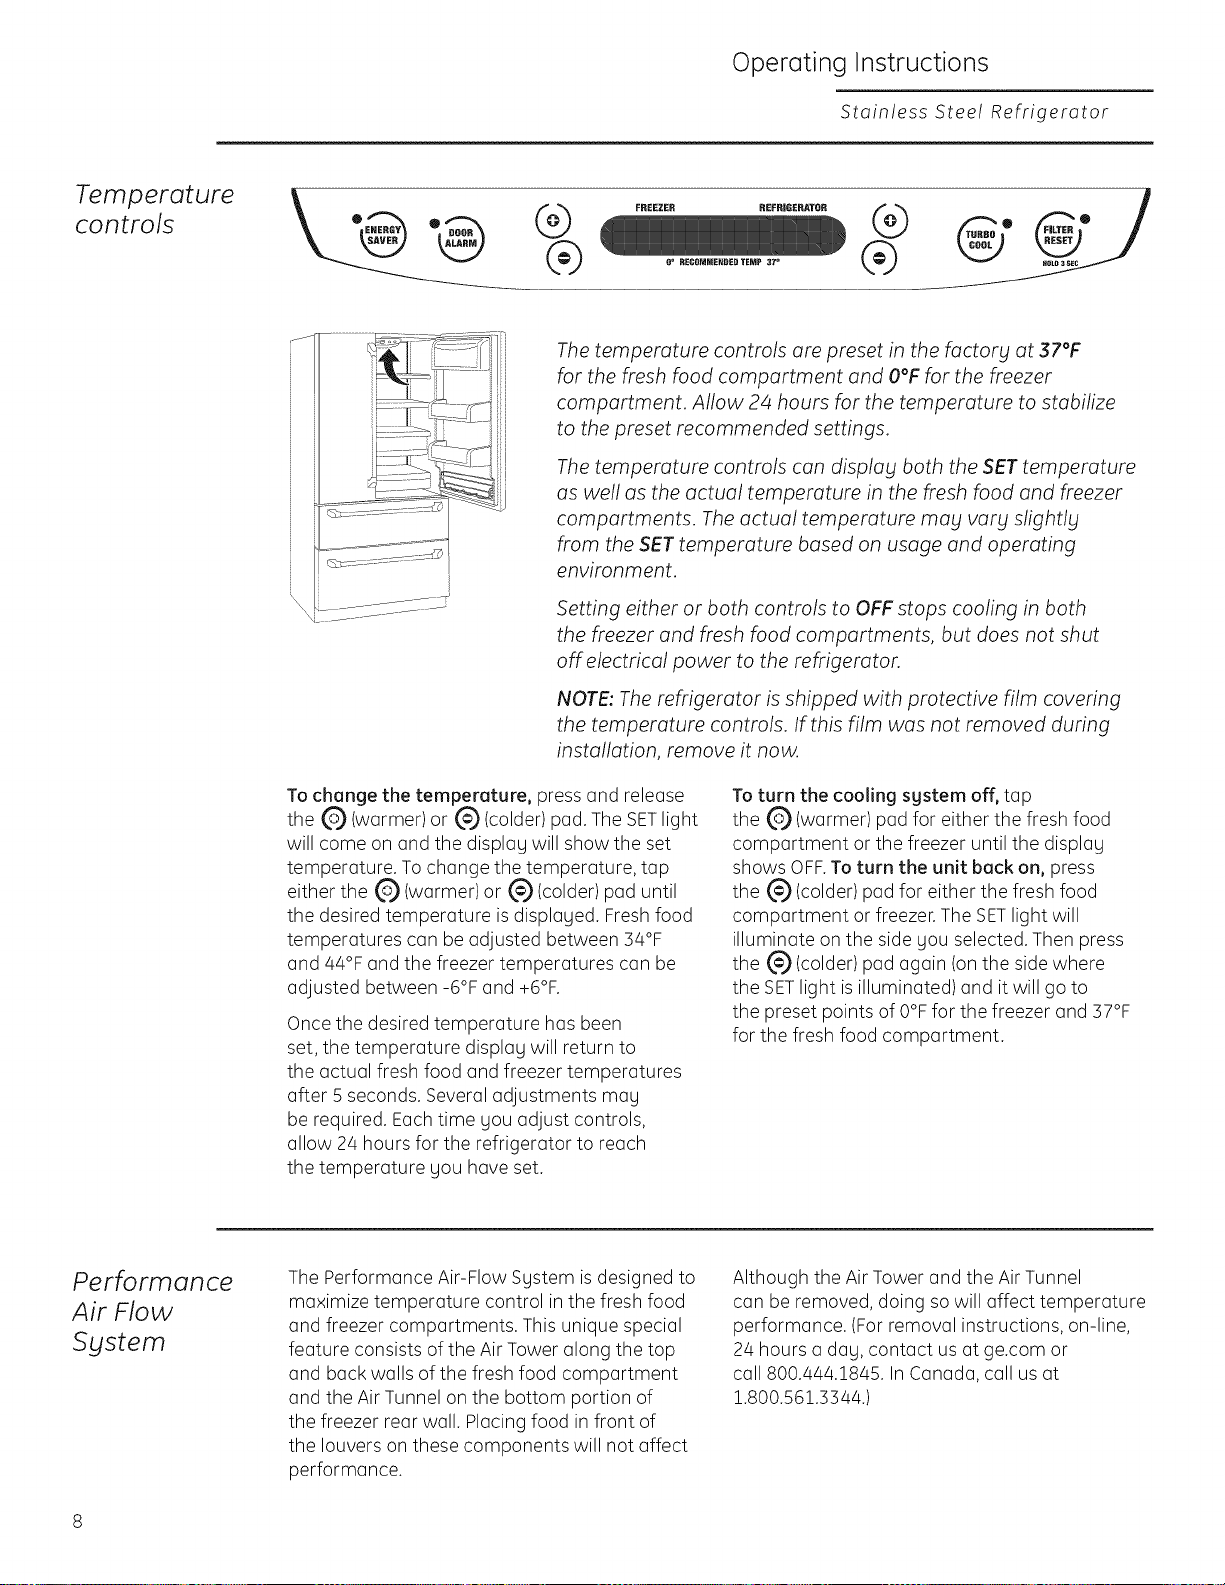
The temperature controls are preset in the factory at 37°F
for the fresh food compartment and O°F for the freezer
compartment. Allow 24 hours for the temperature to stabilize
to the preset recommended settings.
The temperature controls can display both the SETtemperature
as well as the actual temperature in the flesh food and freezer
compartments. The actual temperature may vary slightly
from the SET temperature based on usage and operating
environment.
Setting either or both controls to OFF stops cooling in both
the freezer and fresh food compartments, but does not shut
off electrical power to the refrigerator.
NOTE: The refrigerator is shipped with protective film covering
the temperature controls. If this film was not removed during
installation, remove it now.
To change the temperature, press Gnd release
the ($) (warmer) or @ (colder) pad. The SETlight
will come on and the displQgwill show the set
temperature. To chQngethe temperQture, tap
either the (_ (warmer) or (€)(colder) pod until
the desired temperature is displQged. Fresh food
temperatures con be adjusted between 34°F
and 44°F and the freezer temperatures can be
adjusted between -6°F and +6°F.
Once the desired temperQture hQsbeen
set, the temperature displQg will return to
the actuQI fresh food and freezer temperatures
after 5 seconds. Several adjustments m(]g
be required. EQchtime gou adjust controls,
allow 24 hours for the refrigerator to reQch
the temperature gou hQveset.
To turn the cooling sgstem off, tGp
the (6")(warmer) pod for either the fresh food
comportment or the freezer until the displag
shows OFF.To turn the unit back on, press
the ($) (colder) pod for either the fresh food
comportment or freezer.The SETlight will
illuminQte on the side gou selected. Then press
the @ (colder) pod agQin (on the side where
the SETlight is illuminQted) and it will go to
the preset points of 0°F for the freezer and 37°F
for the fresh food compartment.
Performance
Air Flow
Sgstem
The Performance Air-Flow Sgstem isdesigned to
maximize temperature control in the fresh food
and freezer comportments. This unique special
feQture consists of the Air Tower (]long the top
and bQckwalls of the fresh food comportment
and the Air Tunnel on the bottom portion of
the freezer reQrwall. Placing food in front of
the louvers on these components will not _ffect
performance.
Although the Air Tower and the Air Tunnel
can be removed, doing sowill _ffect temperature
performance. (For remowl instructions, on-line,
24 hours _ d_g, contact us at ge.com or
call 800.444.1845. In C_n_d_, call us _t
1.800.561.3344.)
Other Controls
Stainless Stee! Refrigerator
HOW
TurboCool TM
works
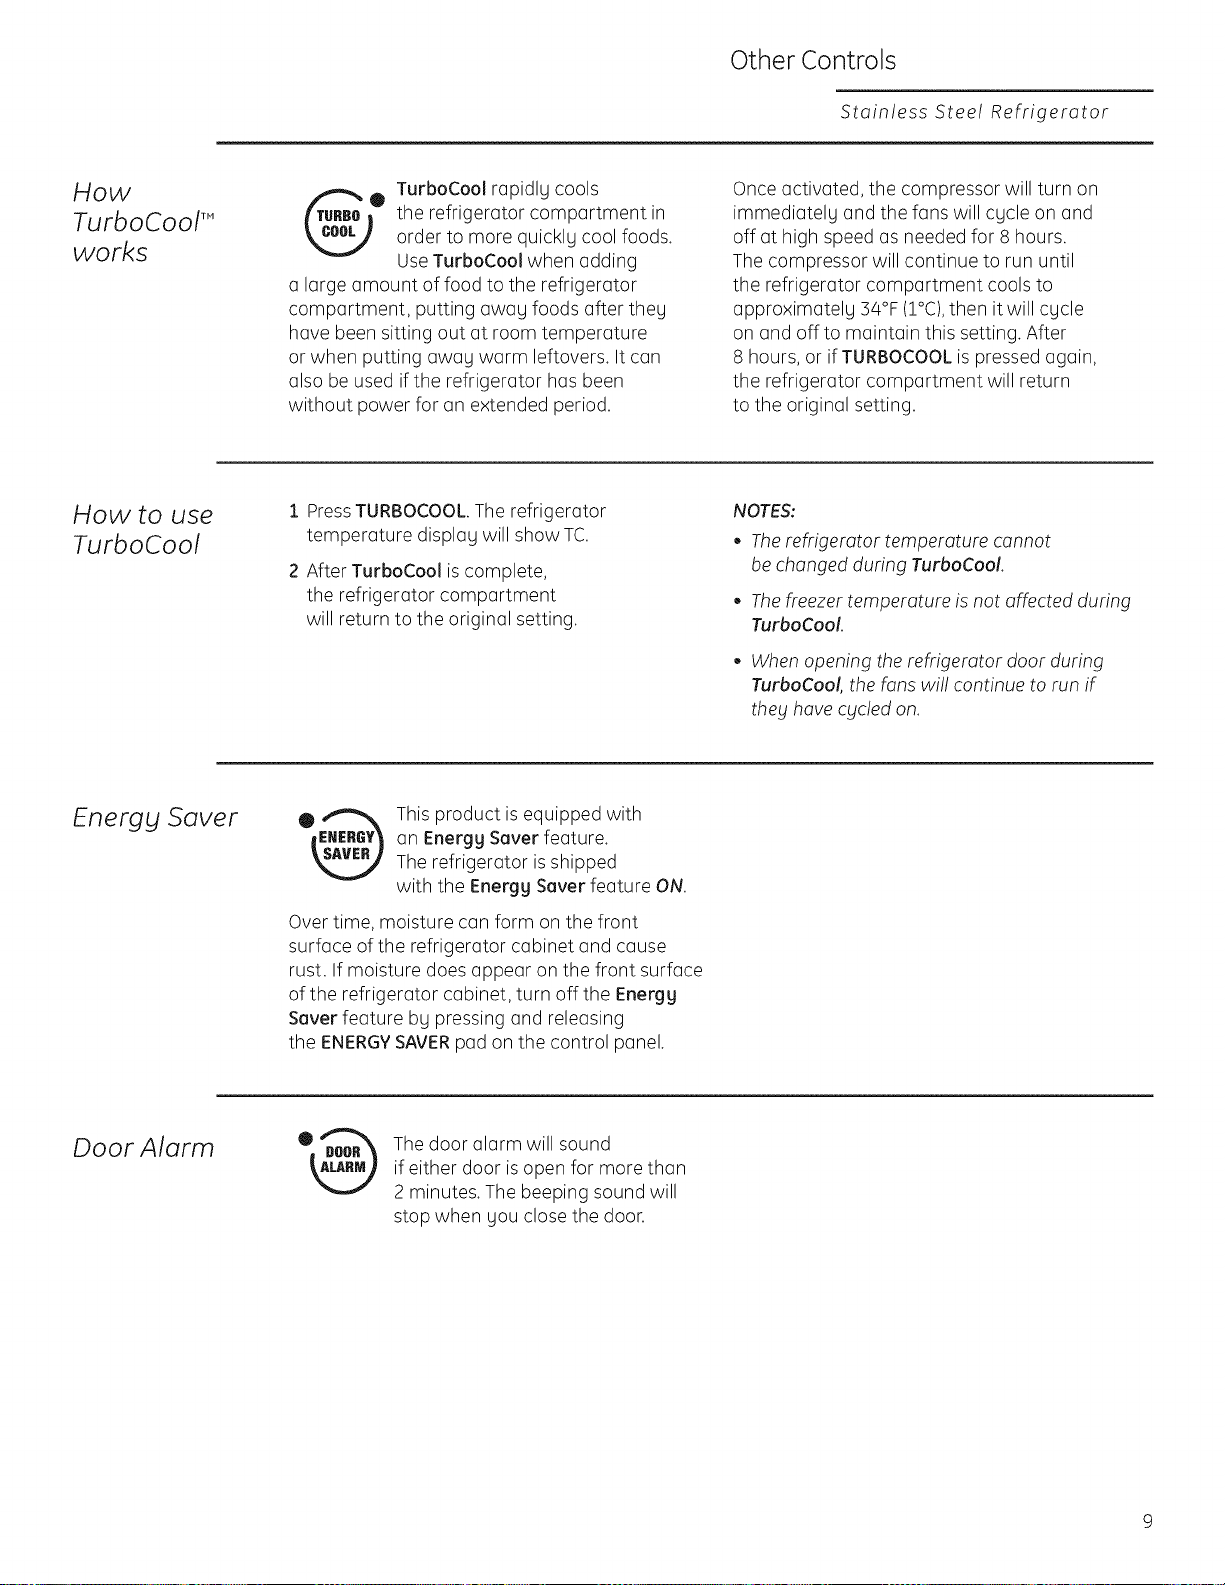
TurboCool rapidly cools
TURBO• the refrigerator compartment in
order to more quickly cool foods.
Use TurboCool when adding
a large amount of food to the refrigerator
compartment, putting away foods after they
have been sitting out at room temperature
or when putting away warm leftovers. It can
also be used if the refrigerator has been
without power for an extended period.
Once activated, the compressor will turn on
immediately and the fans will cycle on and
off at high speed as needed for 8 hours.
The compressor will continue to run until
the refrigerator compartment cools to
approximately 34°F (1°C),then it will cycle
on and off to maintain this setting. After
8 hours, or if TURBOCOOLis pressed again,
the refrigerator compartment will return
to the original setting.
How to use
TurboCool
1 PressTURBOCOOL The refrigerator
temperature display will show TC.
2 After TurboCool is complete,
the refrigerator compartment
will return to the original setting.
NOTES:
Therefrigerator temperature cannot
be changed during TurboCool.
• Thefreezer temperature is not affected during
TurboCool.
• When opening the refrigerator door during
TurboCool, the fans wi!! continue to run if
they have cycled on.
Energy Saver
This product is equipped with
an Energy Saver feature.
The refrigerator is shipped
with the Energy Sever feature ON.
Over time, moisture can form on the front
surface of the refrigerator cabinet and cause
rust. If moisture does appear on the front surface
of the refrigerator cabinet, turn offthe Energy
Sever feature by pressing and releasing
the ENERGYSAVERpad on the control panel.
Door Alarm
The door alarm will sound
if either door isopen for more than
2 minutes. The beeping sound will
stop when you close the door.
Internal Water Dispenser
Stainless Stee! Refrigerator
Internal Water
Dispenser
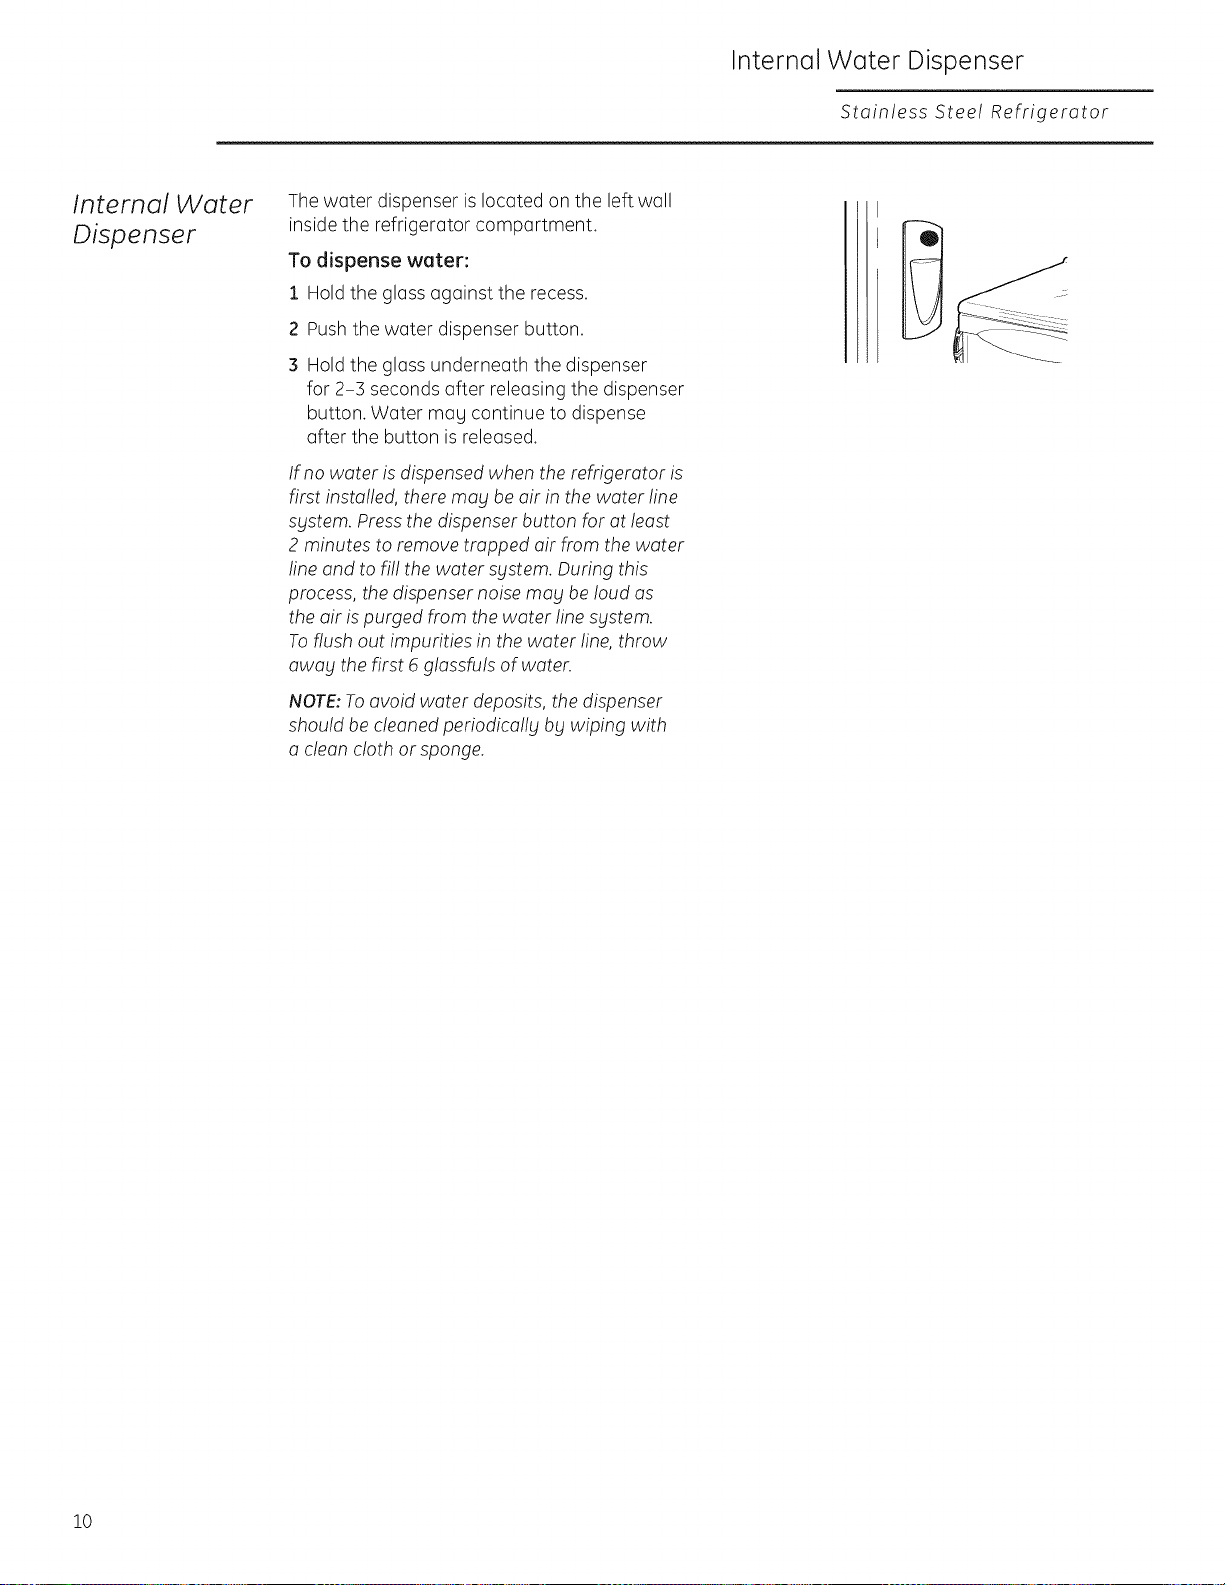
Thewater dispenser islocated on the left wall
inside the refrigerator compartment.
To dispense water:
1 Holdthe glass against the recess.
2 Pushthe water dispenser button.
3 Holdthe glass underneath the dispenser
for 2-3 seconds after releasing the dispenser
button. Water mag continue to dispense
after the button is released.
If no water is dispensed when the refrigerator is
first installed, there mag be air in the water line
sgstem. Press the dispenser button for at least
2 minutes to remove trapped air from the water
line and to fi!! the water sblstem.During this
process, the dispenser noise mall be loud as
the air ispurged from the water line sblstem.
Toflush out impurities in the water line, throw
awag the first 6 glassfuls of water.
NOTE:Toavoid water deposits, the dispenser
should be cleaned periodica!lg bg wiping with
a clean cloth or sponge.
10
Water Filter
Stainless Stee! Refrigerator
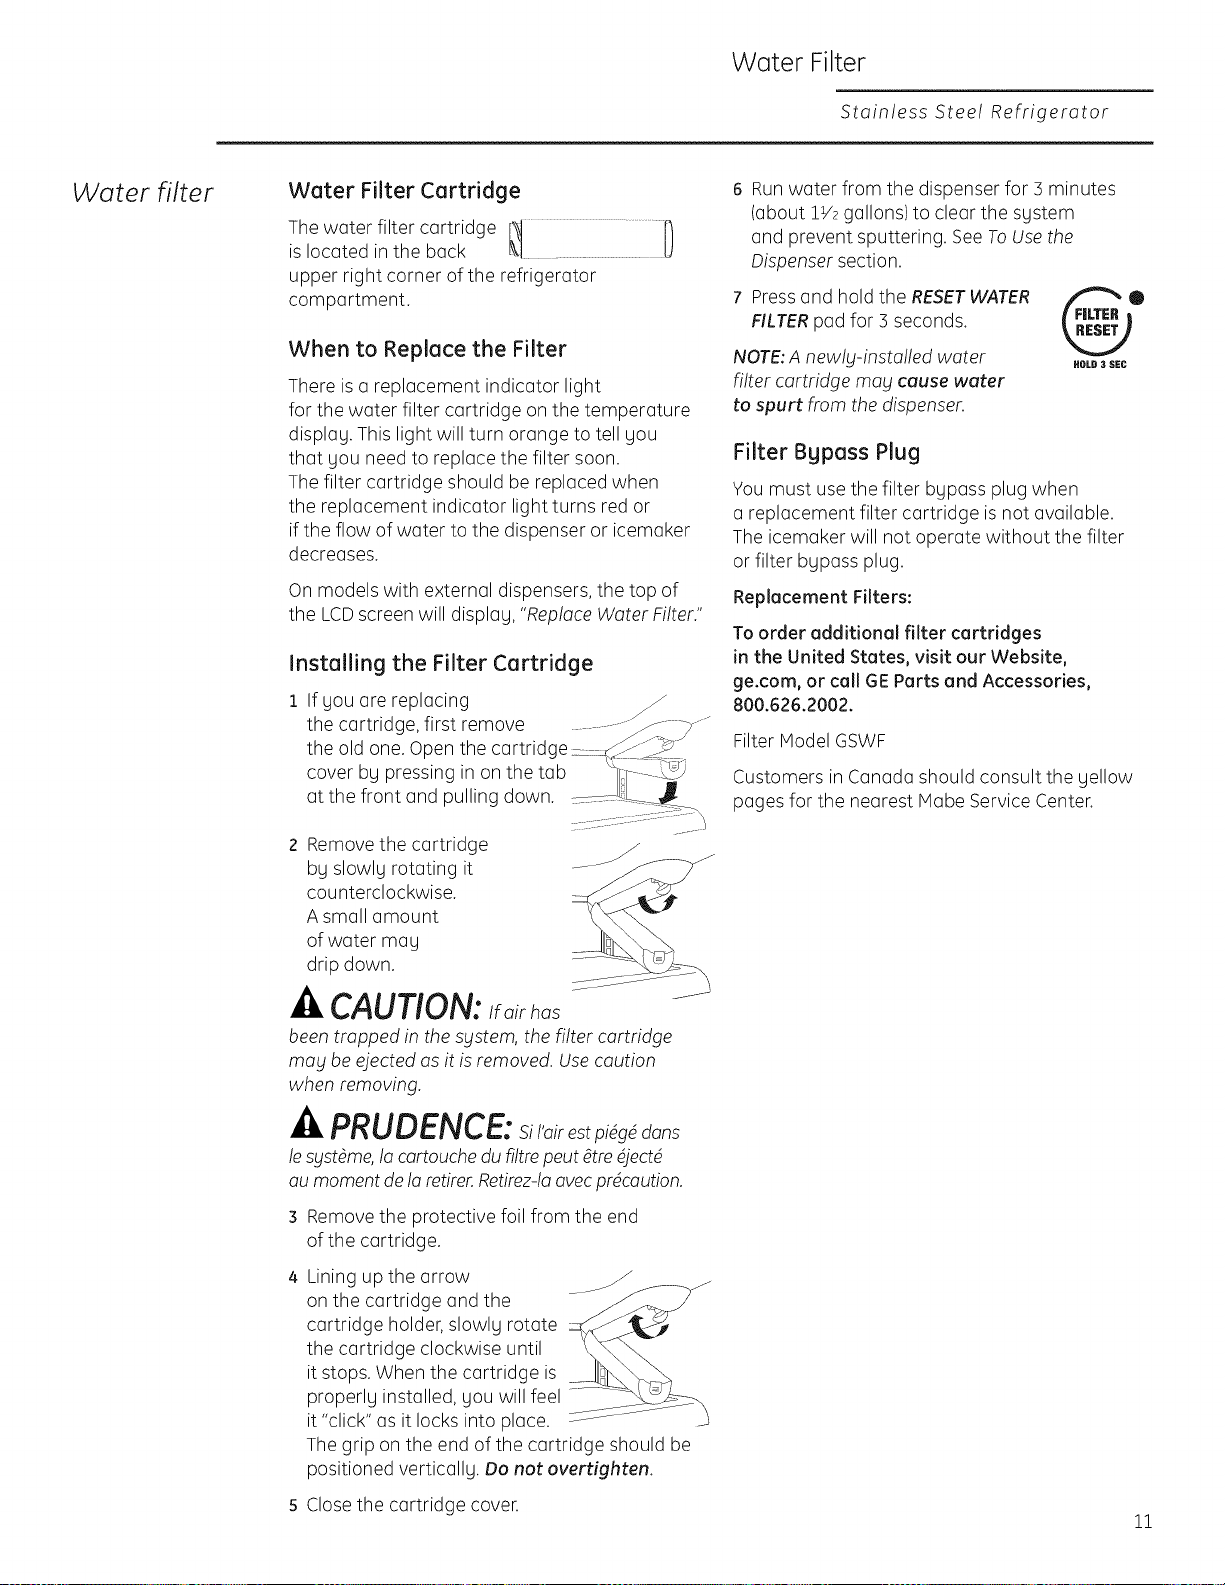
Water filter Water Filter Cartridge
Thewater filter cartridge _........... [)
is located in the back
upper right corner of the refrigerator
compartment.
When to Replace the Filter
There is a replacement indicator light
for the water filter cartridge on the temperature
display. This light will turn orange to tell you
that you need to replace the filter soon.
Thefilter cartridge should be replaced when
the replacement indicator light turns red or
if the flow of water to the dispenser or icemaker
decreases.
On models with external dispensers, the top of
the LCDscreen will display, "ReplaceWater Filter."
Installing the Filter Cartridge
If you are replacing
the cartridge, first remove ................
the old one. Open the cartridc
cover by pressing in on the tab
at the front and pulling down.
2 Removethe cartridge
by slowly rotating it .......
counterclockwise.
A small amount
of water may
drip down.
CAUTION: Ifairhas
been trapped in the sgstem, the filter cartridge
may be ejected as it is removed. Use caution
when removing.
PRUDENCE: si/'airest dons
lesyst_me,!acartouche du filtre peut _tre_ject_
au moment de!aretirer.Retirez-laavecprecaution.
3 Removethe protective foil from the end
of the cartridge.
Lining up the arrow _ ___,_
on the cartridge and the
cartridge holder, slowly rotate
the cartridge clockwise until
it stops. When the cartridge is
properly installed, you will feel
it "click" as it locks into place.
The grip on the end of the cartridge should be
positioned vertically. Do not overtighten.
6 Runwater from the dispenser for 3 minutes
(about 1V2gallons) to clear the system
and prevent sputtering. See ToUse the
Dispenser section.
7 Pressand hold the RESETWATER
FILTERpad for 3 seconds.
NOTE:A newly-installed water
filter cartridge may cause water
to spurt from the dispenser.
Filter Bypass Plug
You must use the filter bypass plug when
a replacement filter cartridge isnot available.
The icemaker will not operate without the filter
or filter bypass plug.
Replacement Filters:
To order additional filter cartridges
in the United States, visit our Website,
ge.com, or call GE Parts and Accessories,
800.626.2002.
Filter Model GSWF
Customers in Canada should consult the yellow
pages for the nearest Habe Service Center.
S Close the cartridge cover.
11
Shelves and Bins
Stainless Stee! Refrigerator
Rearranging
the shelves
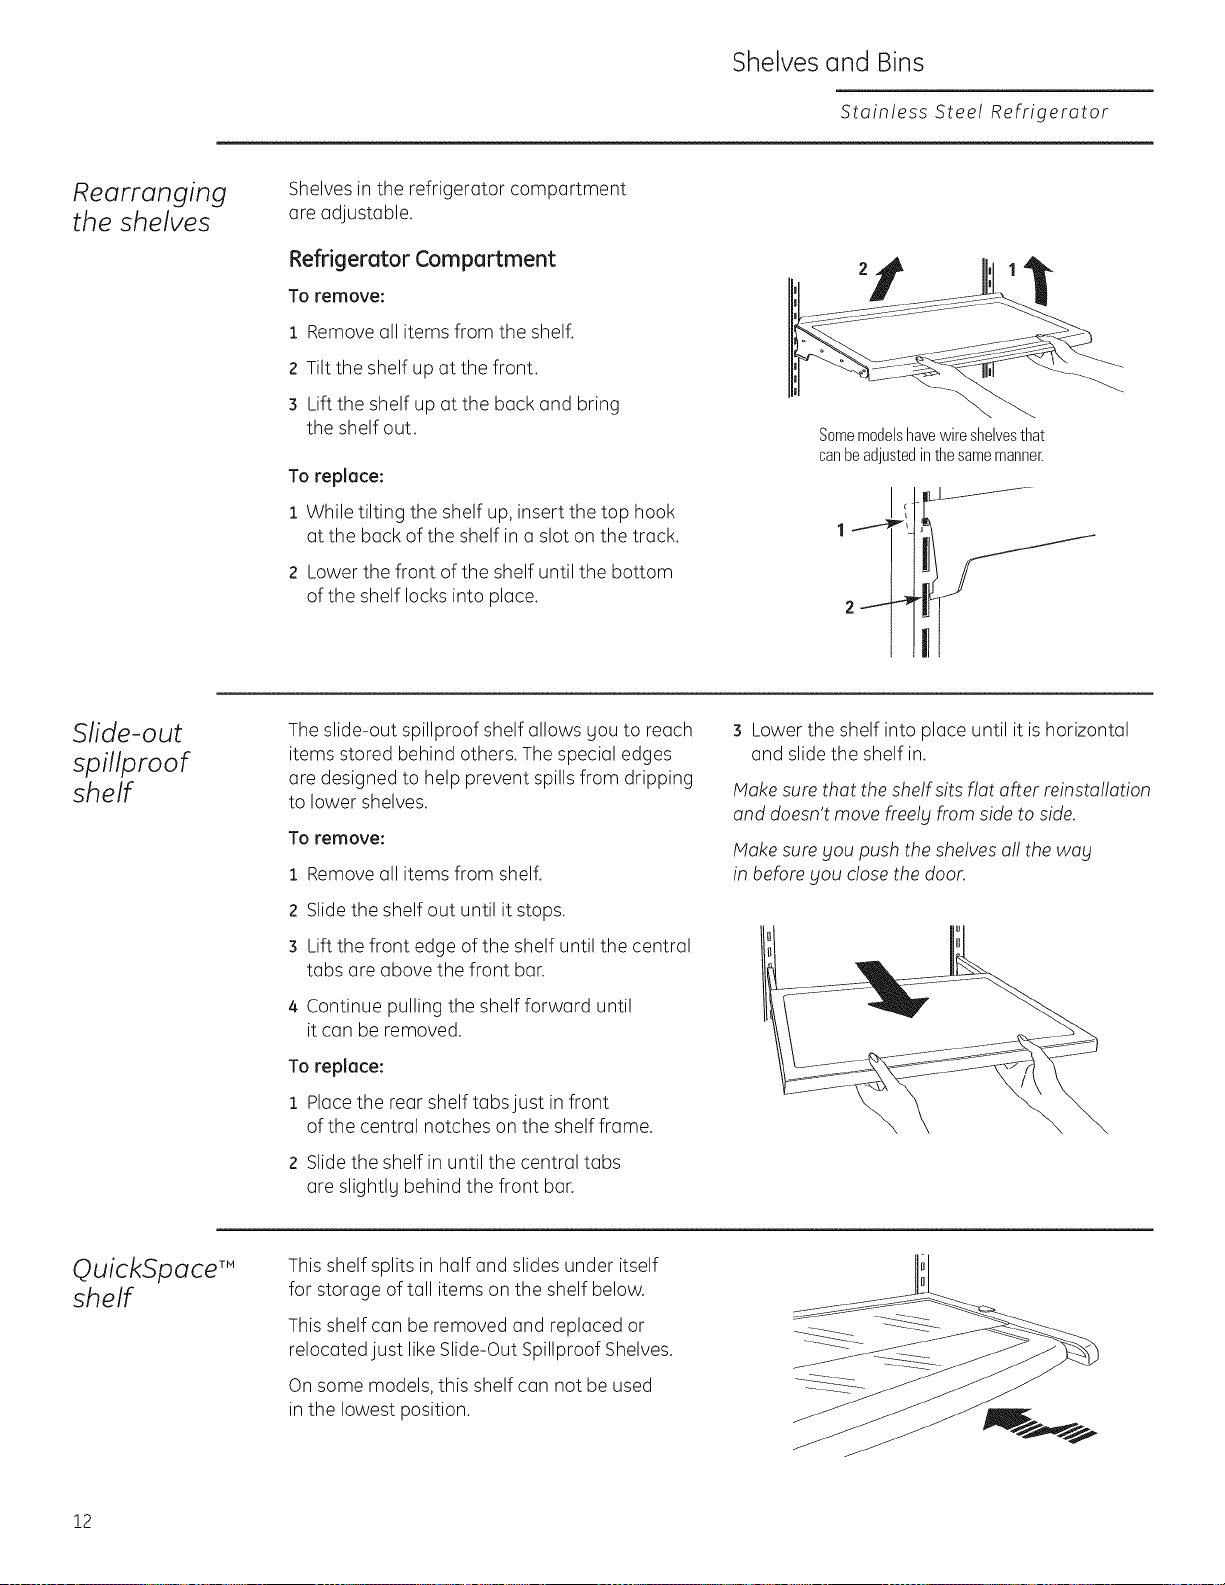
Shelves in the refrigerator compartment
are adjustable.
Refrigerator Compartment
To remove:
1 Removeall items from the shell
2 Tilt the shelf up at the front.
3 Lift the shelf up at the back and bring
the shelf out.
To replace:
1 While tilting the shelf up, insert the top hook
at the back of the shelf in a slot on the track.
2 Lower the front of the shelf until the bottom
of the shelf locks into place.
Somemodelshavewireshelvesthat
canbeadjustedinthesamemanner.
Slide-out
spillproof
shelf
The slide-out spillproof shelf allows Uouto reach
items stored behind others. The special edges
are designed to help prevent spills from dripping
to lower shelves.
To remove:
1 Removeall items from shelf.
2 Slide the shelf out until it stops.
s Lift the front edge of the shelf until the central
tabs are above the front bar.
4 Continue pulling the shelf forward until
it can be removed.
To replace:
1 Placethe rear shelf tabs just in front
of the central notches on the shelf frame.
2 Slide the shelf in until the central tabs
are slightlu behind the front bar.
3 Lower the shelf into place until it ishorizontal
and slide the shelf in.
Hake sure that the shelf sits flat after reinsta!lation
and doesn't move freely from side to side.
Hake sure you push the shelves al! the way
in before you close the door.
OuickSpace TM
shelf
This shelf splits in half and slides under itself
for storage of tall items on the shelf below.
This shelf can be removed and replaced or
relocated just like Slide-Out Spillproof Shelves.
On some models, this shelf can not be used
in the lowest position.
12
Shelves and Bins
Stainless Stee! Refrigerator
Basket
removal (top
drawer)
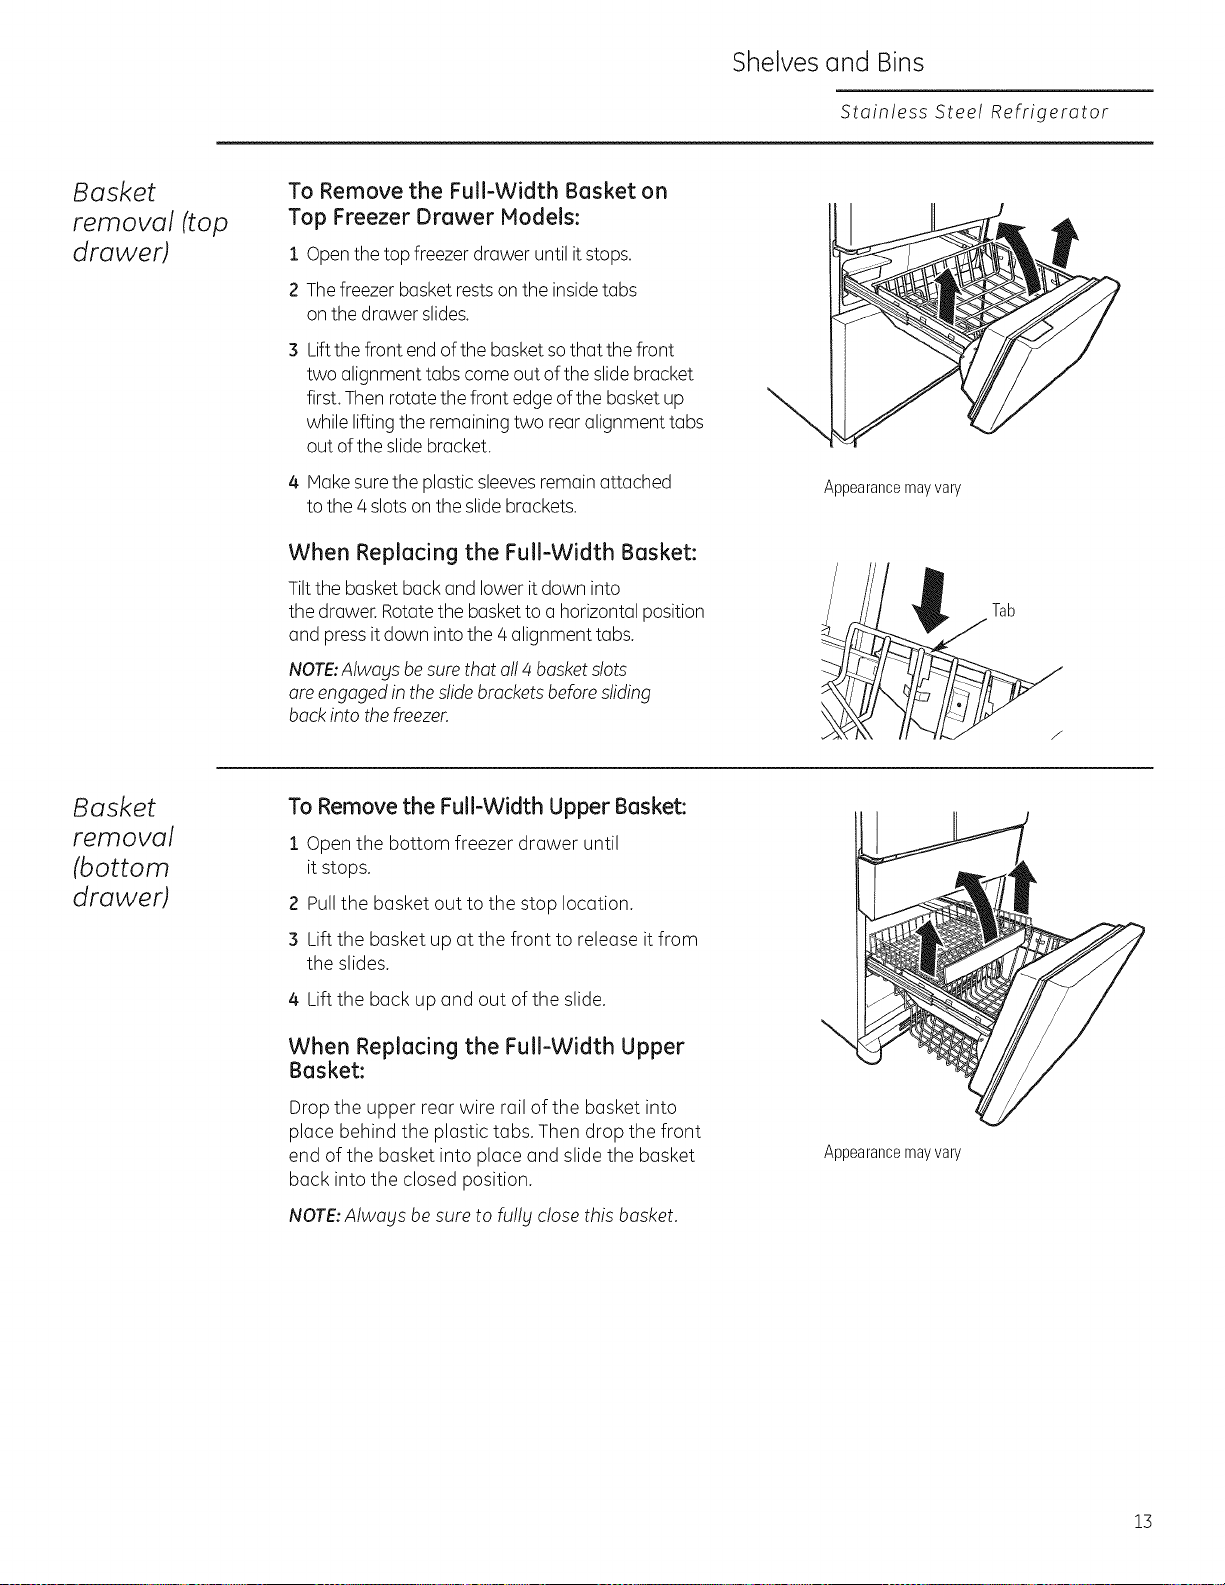
To Remove the Full-Width Basket on
Top Freezer Drawer Models:
1 Openthe top freezer drawer until itstops.
2 Thefreezer basket restson the insidetabs
on the drawer slides.
Liftthe front end ofthe basketsothat the front
two alignment tabs come out of the slidebracket
first. Thenrotate thefront edge ofthe basketup
while lifting the remainingtwo rear alignment tabs
out of the slidebracket.
4 Makesurethe plastic sleevesremain attached
to the 4 slotson the slidebrackets.
When Replacing the Full-Width Basket:
Tiltthe basket back and lower itdown into
the drawer. Rotatethe basketto a horizontal position
and pressit down into the 4 alignment tabs.
NOTE:Always besurethat a!!4 basketslots
are engagedin the slidebracketsbeforesliding
back into thefreezer.
Appearancemayvary
Tab
/
Basket
removal
(bottom
drawer)
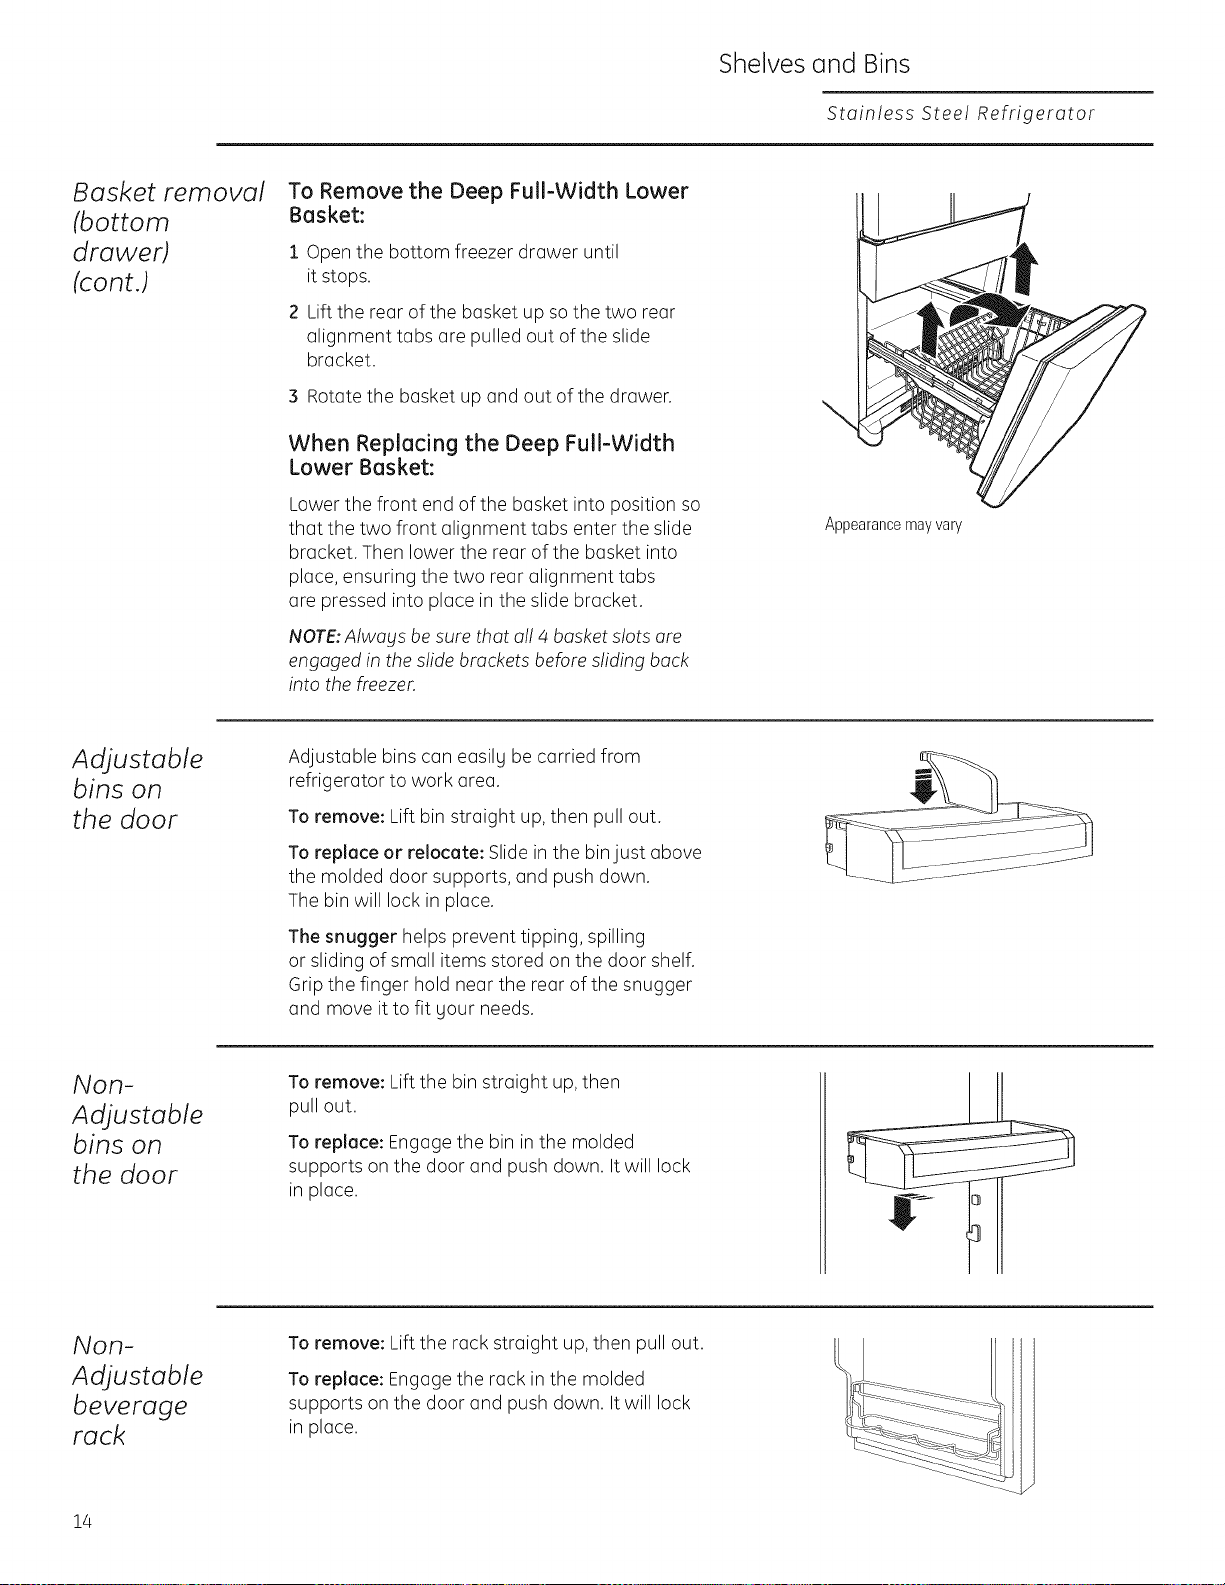
To Remove the Full-Width Upper Basket:
1 Open the bottom freezer drawer until
it stops.
2 Pullthe basket out to the stop location.
3 Lift the basket up at the front to release it from
the slides.
4 Lift the back up and out of the slide.
When Replacing the Full-Width Upper
Basket:
Drop the upper rear wire rail of the basket into
place behind the plastic tabs. Then drop the front
end of the basket into place and slide the basket
back into the closed position.
NOTE:Always be sure to fully close this basket.
Appearancemayvary
13
Shelves and Bins
Stainless Stee! Refrigerator
Basket removal
[bottom
drawer)
(cont.)
To Remove the Deep Full-Width Lower
Basket:
1 Open the bottom freezer drawer until
it stops.
2 Lift the rear of the basket up so the two rear
alignment tabs are pulled out of the slide
bracket.
3 Rotate the basket up and out of the drawer.
When Replacing the Deep Full-Width
Lower Basket:
Lower the front end of the basket into position so
that the two front alignment tabs enter the slide
bracket. Then lower the rear of the basket into
place, ensuring the two rear alignment tabs
are pressed into place in the slide bracket.
NOTE:Alwabls be sure that a!! 4 basket slots are
engaged in the slide brackets before sliding back
into the freezer.
Appearancemayvary
AdJustable
bins on
the door
Adjustable bins can easilu be carried from
refrigerator to work area.
To remove: Lift bin straight up, then pull out.
To replace or relocate: Slide in the bin just above
the molded door supports, and push down.
The bin will lock in place.
The snugger helps prevent tipping, spilling
or sliding of small items stored on the door shelf.
Grip the finger hold near the rear of the snugger
and move it to fit your needs.
Non-
AdJustable
bins on
the door
To remove: Lift the bin straight up,then
pull out.
To replace: Engage the bin in the molded
supports on the door and push down. It will lock
in place.
Non-
AdJustable
beverage
rack
To remove: Lift the rack straight up, then pull out.
To replace: Engage the rack in the molded
supports on the door and push down. It will lock
in place.
14
Additional Features
Stainless Stee! Refrigerator
Door
swing
clearances
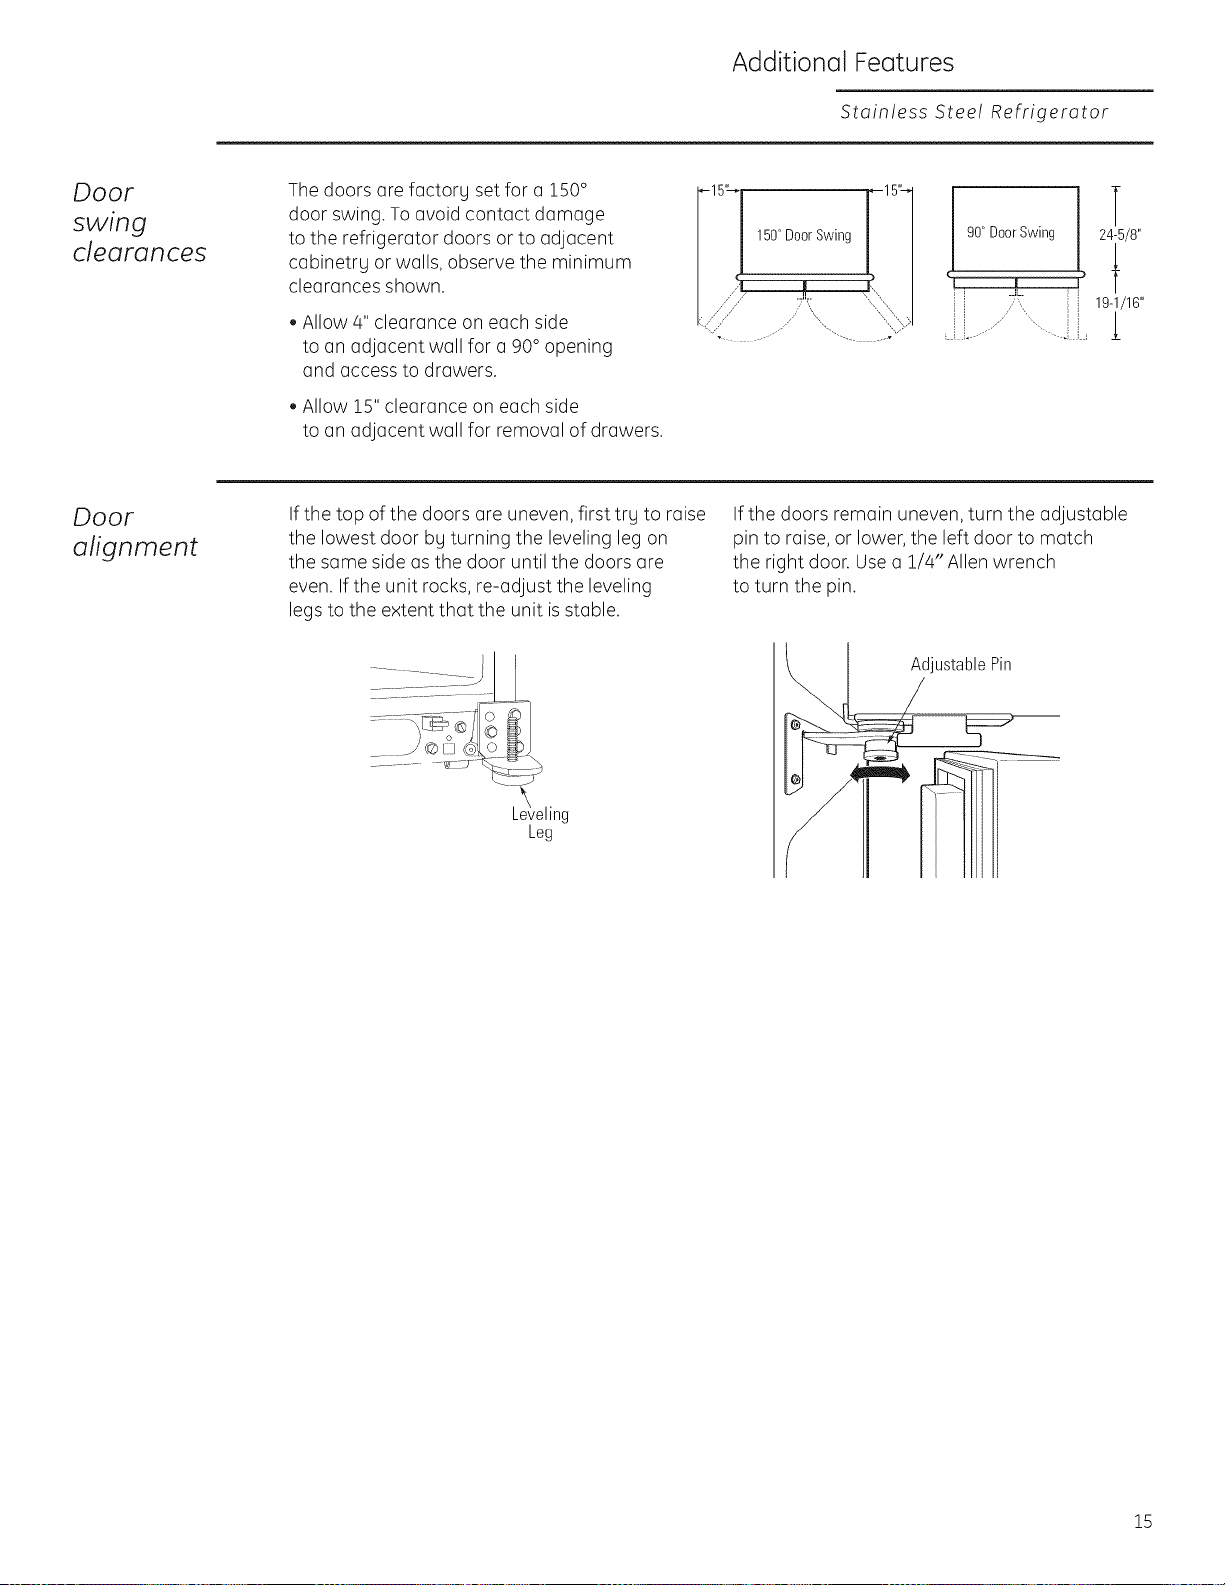
The doors are factorg set for a 150°
door swing. To avoid contact damage
to the refrigerator doors or to adjacent
cabinetrg or walls, observe the minimum
clearances shown.
• Allow 4" clearance on each side
to an adjacent wall for a 90° opening
and access to drawers.
• Allow 15" clearance on each side
to an adjacent wall for removal of drawers.
i5,,- r15,]
150°DoorSwing I_ /
<J bJ
'1 90°Door|Swing !_
T
24-5/8"
19-1/16"
!
Door
alignment
If the top of the doors are uneven, first trg to raise
the lowest door bg turning the leveling leg on
the same side as the door until the doors are
even. If the unit rocks, re-adjust the leveling
legs to the extent that the unit isstable.
If the doors remain uneven, turn the adjustable
pin to raise, or lower, the left door to match
the right door. Use a 1/4"Allen wrench
to turn the pin.
Adjustable Pin
Leg
15
Crispers and Pans
Stainless Steel Refrigerator
Fruit and
vegetable
crispers
Excesswater that may accumulate in the bottom
of the drawers should be wiped dry.
AdJustable
humiditg
crispers
Slide the control all the way to the HIGH setting
to provide high humidity recommended for most
vegetables.
Slide the control all the way to the LOW setting
to provide lower humidity levels recommended
for most fruits.
Convertible
meat pan
The convertible meat pan has its own cold air
duct to allow a stream of cold air from the freezer
compartment to flow to the pan.
The variable temperature control regulates
the air flow from the Climate Keeper.
Setthe control to the coldest setting to store
fresh meats.
..........._
Setthe control to Cold to convert the pan
to normal refrigerator temperature and provide
extra vegetable storage space. The cold air duct
is turned off. Variable settings between these
extremes can be selected.
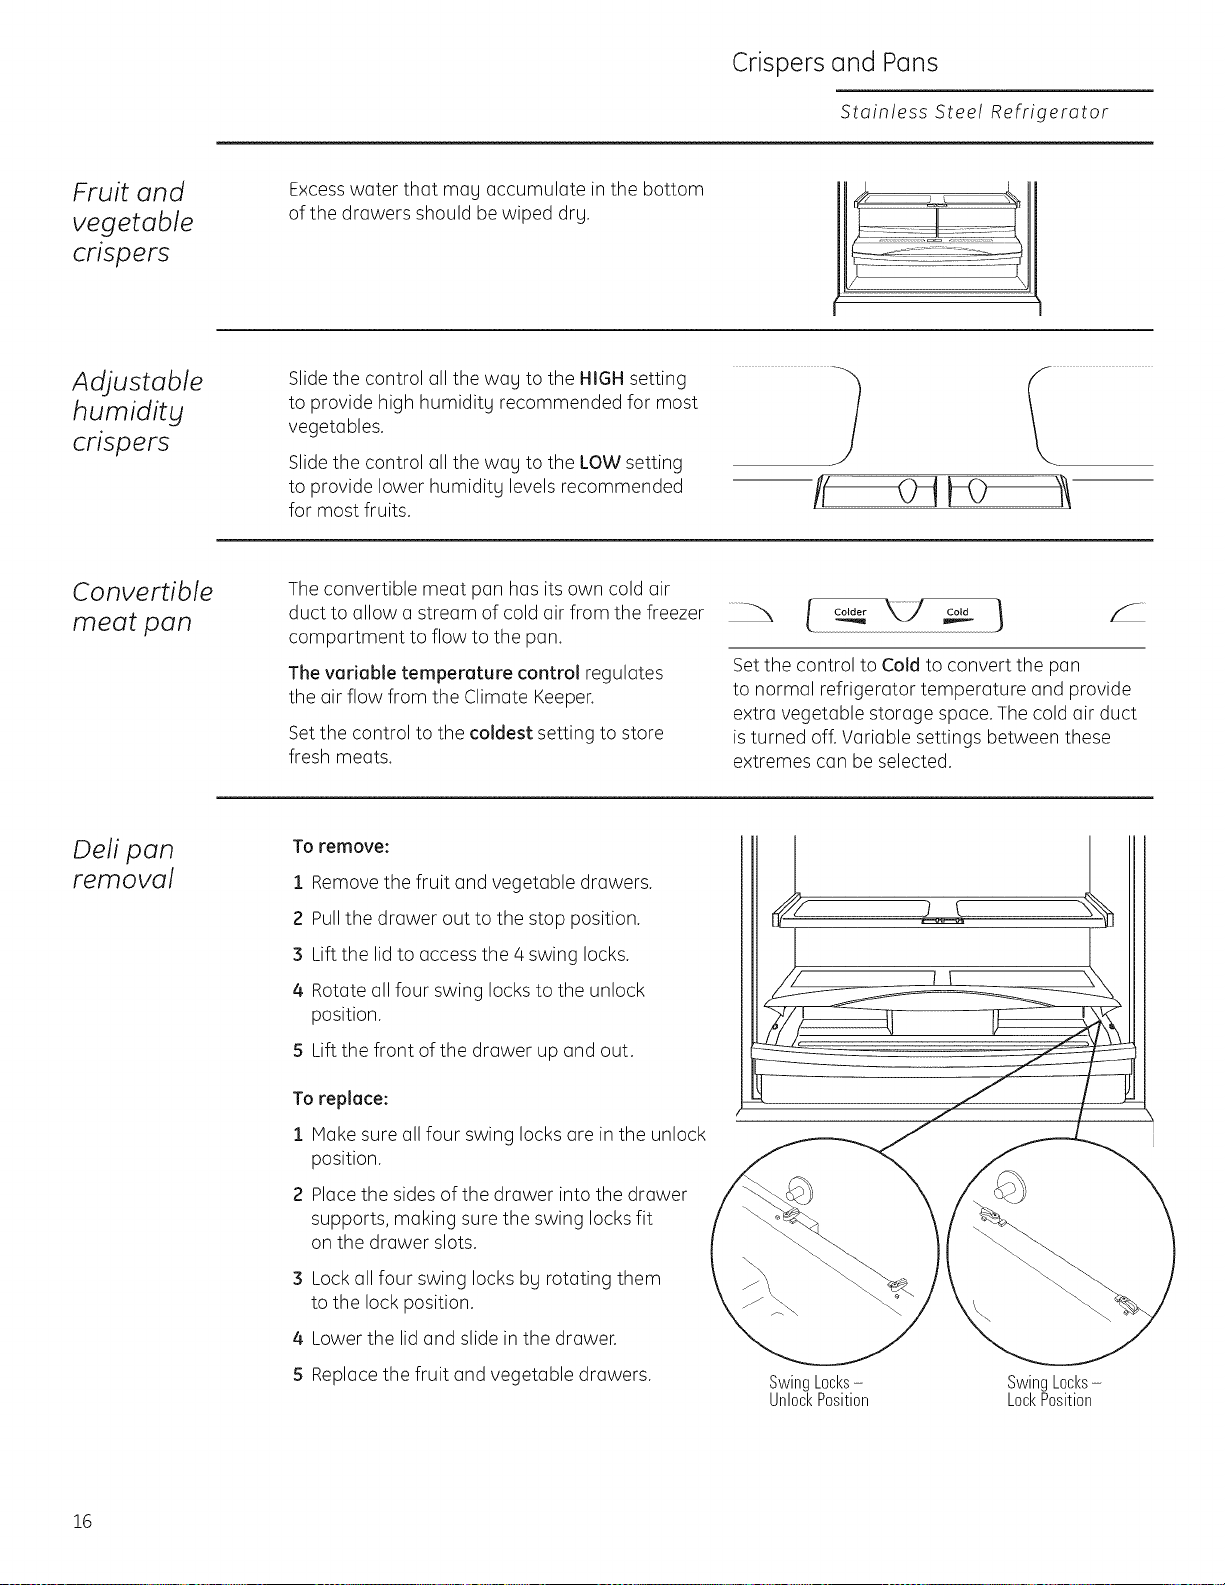
Deli pan
removal
To remove:
i Removethe fruit and vegetable drawers.
2 Pullthe drawer out to the stop position.
3 Lift the lid to access the 4 swing locks.
4 Rotate all four swing locks to the unlock
position.
5 Lift the front of the drawer up and out.
To replace:
1 Make sure all four swing locks are in the unlock
position.
2 Placethe sides of the drawer into the drawer
supports, making sure the swing locks fit
on the drawer slots.
4
5
Lock all four swing locks by rotating them
to the lock position.
Lower the lid and slide in the drawer.
Replace the fruit and vegetable drawers.
\
SwingLocks- SwingLocks-
UnlockPosition LockPosition
16
Automatic Icemaker
Stainless Stee! Refrigerator
Automatic
icemaker
NOTE: A newl£ installed refrigerator ma£ take 12 to 24 hours to begin making ice.
The icemaker will produce seven cubes
per cgcle-approximatelg 100-!30 cubes
in a 24-hour period, depending on freezer
compartment temperature, room temperature,
number of door openings and other use
conditions.
See below for how to access ice and reach
the power switch.
If the refrigerator is operated before
the water connection is made to the icemaker,
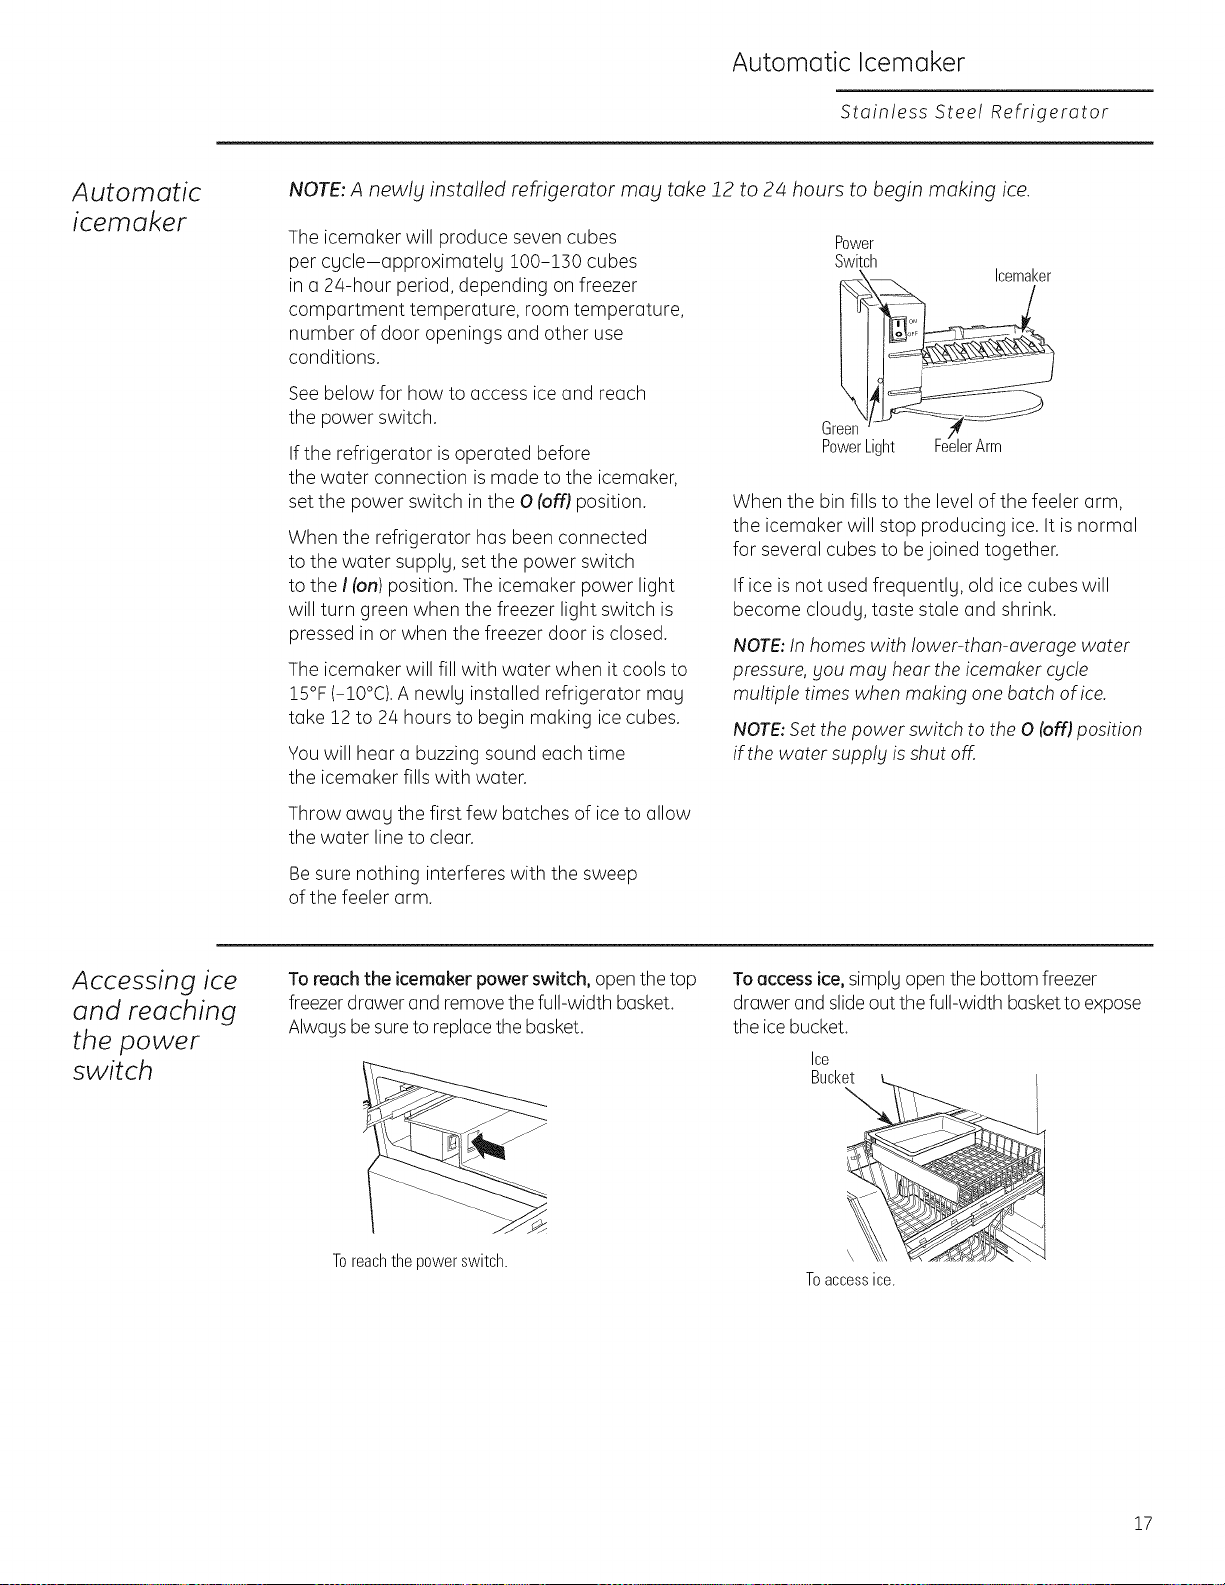
set the power switch in the O (offJ position.
When the refrigerator has been connected
to the water supplg, set the power switch
to the I (on) position. The icemaker power light
will turn green when the freezer light switch is
pressed in or when the freezer door isclosed.
The icemaker will fill with water when it cools to
!5°F (-10°C).A newlg installed refrigerator mag
take 12 to 24 hours to begin making icecubes.
You will hear a buzzing sound each time
the icemaker fills with water.
Throw awag the first few batches of ice to allow
the water line to clear.
Be sure nothing interferes with the sweep
of the feeler arm.
Power
Switch
_\_ Icemal<er
When the bin fills to the level of the feeler arm,
the icemaker will stop producing ice. It is normal
for several cubes to be joined together.
If ice is not used frequentlg, old ice cubes will
become cloudg, taste stale and shrink.
NOTE:In homes with lower-than-average water
pressure, gou mag hear the icemaker cgcle
multiple times when making one batch of ice.
NOTE:Set the power switch to the 0 (off) position
if the water supp!£ isshut off.
Accessing ice
and reaching
the power
switch
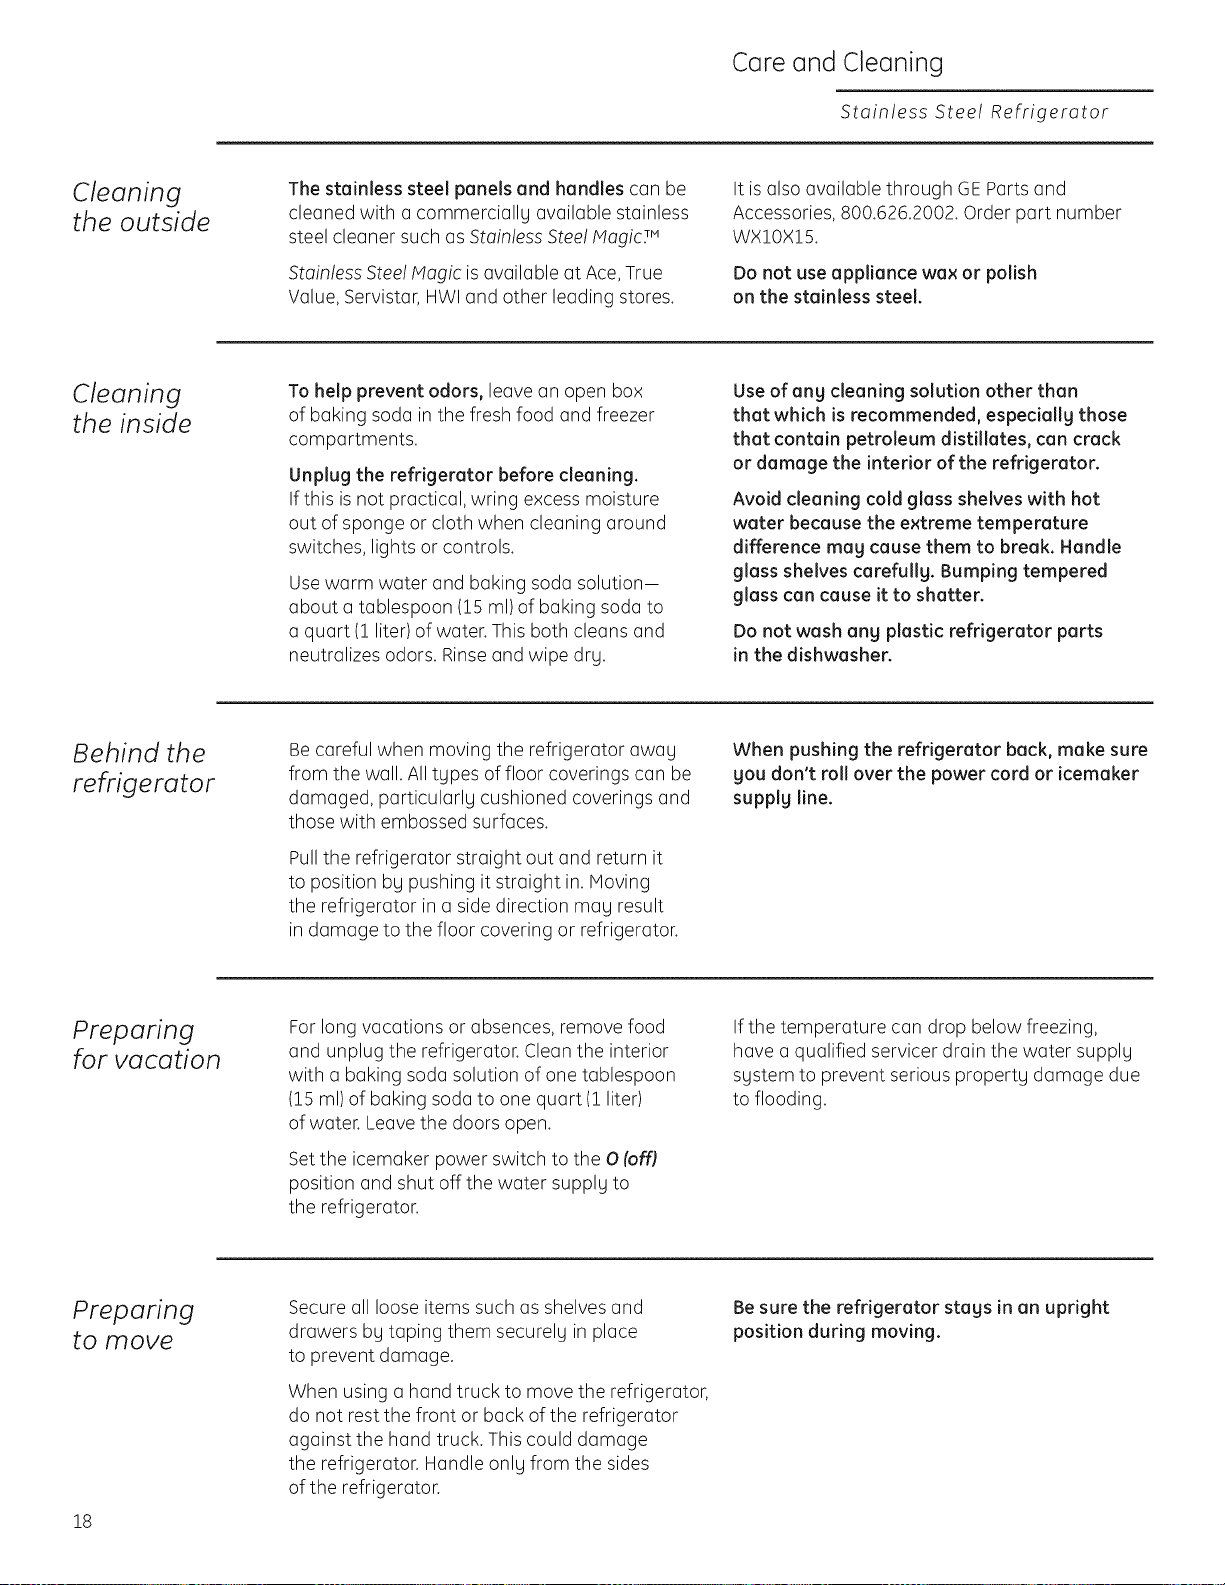
Toreach the icemaker power switch,open the top
freezerdrawer and removethe full-width basket.
Alwags be sureto replacethe basket.
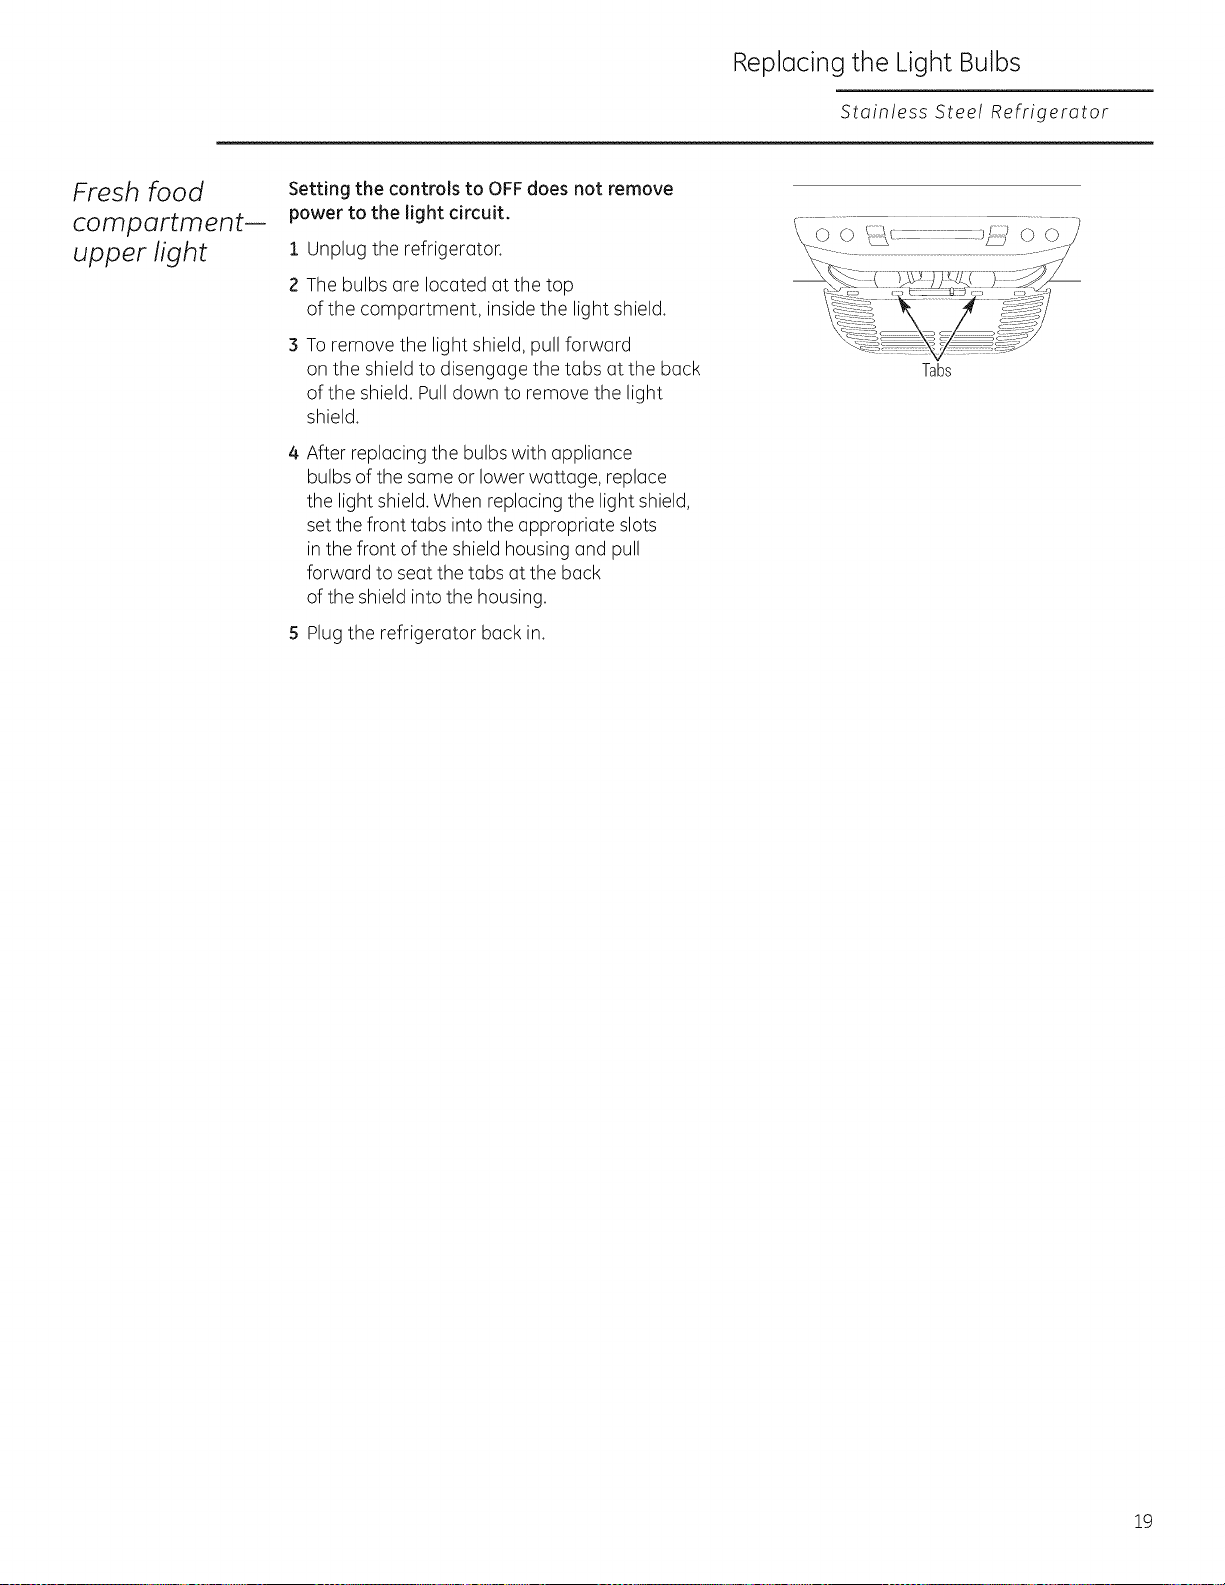
Toaccess ice, simplg open the bottom freezer
drawer and slideout the full-width basketto expose
the icebucket.
Ice
Bucket
Toreach the power switch.
Toaccessice.
17
Care and Cleaning
Stainless Stee! Refrigerator
Cleaning
the outside
The stainless steel panels and handles can be
cleaned with a commercially available stainless
steel cleaner such as Stainless Stee! MagicFn
Stainless Stee!Magic isavailable at Ace, True
Value, Servistar, HWIand other leading stores.
It is also available through GE Parts and
Accessories, 800.626.2002. Order part number
WX!OX!5.
Do not use appliance wax or polish
on the stainless steel.
Cleaning
the inside
To help prevent odors, leave an open box
of baking soda in the fresh food and freezer
compartments.
Unplug the refrigerator before cleaning.
If this is not practical, wring excess moisture
out of sponge or cloth when cleaning around
switches, lights or controls.
Use warm water and baking soda solution-
about a tablespoon (!5 ml)of baking soda to
a quart (1 liter) of water. This both cleans and
neutralizes odors. Rinse and wipe dry.
Use of any cleaning solution other than
that which is recommended, espeaallg those
that contain petroleum distillates, can crack
or damage the interior of the refrigerator.
Avoid cleaning cold glass shelves with hot
water because the extreme temperature
difference may cause them to break. Handle
glass shelves carefully. Bumping tempered
glass can cause it to shatter.
Do not wash any plastic refrigerator parts
in the dishwasher.
Behind the
refrigerator
Be careful when moving the refrigerator away
from the wall. All types of floor coverings can be
damaged, particularly cushioned coverings and
those with embossed surfaces.
Pull the refrigerator straight out and return it
to position by pushing it straight in. Moving
the refrigerator in a side direction may result
in damage to the floor covering or refrigerator.
When pushing the refrigerator back, make sure
you don't roll over the power cord or icemaker
supply line.
Preparing
for vacation
For long vacations or absences, remove food
and unplug the refrigerator. Clean the interior
with a baking soda solution of one tablespoon
(15 ml) of baking soda to one quart (1 liter)
of water. Leave the doors open.
Setthe icemaker power switch to the O {off]
position and shut off the water supply to
the refrigerator.
If the temperature can drop below freezing,
have a qualified servicer drain the water supply
system to prevent serious property damage due
to flooding.
Preparing
to move
18
Secure all loose items such as shelves and
drawers by taping them securely in place
to prevent damage.
When using a hand truck to move the refrigerator,
do not rest the front or back of the refrigerator
against the hand truck. This could damage
the refrigerator. Handle only from the sides
of the refrigerator.
Be sure the refrigerator stays in an upright
position during moving.
Replacing the Light Bulbs
Stainless Stee! Refrigerator
Fresh food
compartment--
upper light
Setting the controls to OFFdoes not remove
power to the light circuit.
1
2
Unplug the refrigerator.
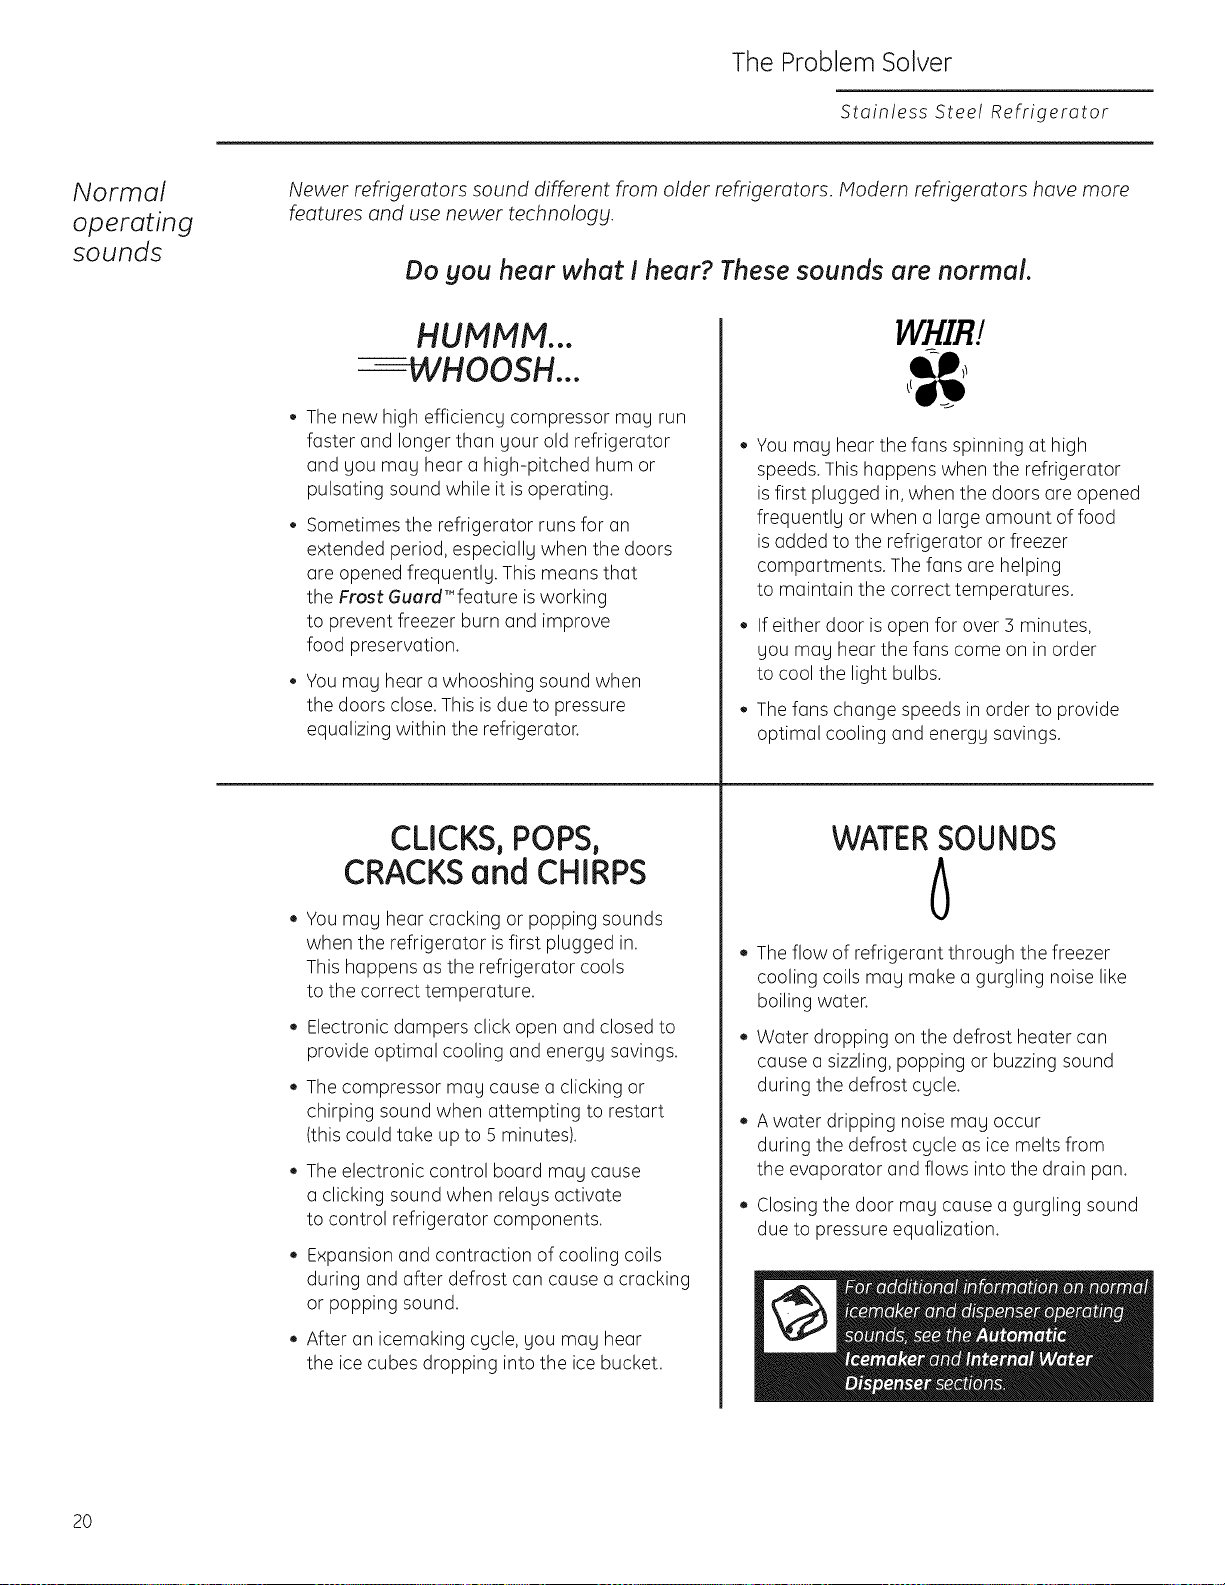
The bulbs are located at the top
of the compartment, inside the light shield.
Toremove the light shield, pull forward
on the shield to disengage the tabs at the back
of the shield. Pull down to remove the light
shield.
After replacing the bulbs with appliance
bulbs of the same or lower wattage, replace
the light shield. When replacing the light shield,
set the front tabs into the appropriate slots
in the front of the shield housing and pull
forward to seat the tabs at the back
of the shield into the housing.
5 Plugthe refrigerator back in.
Tabs
19
The Problem Solver
Stainless Stee! Refrigerator
Normal
operating
sounds
Newer refrigerators sound different from older refrigerators. Modern refrigerators have more
features and use newer technolog_t.
Do you hear what ! hear? These sounds are normal.
HUMMM...
--WHOOSH...
The new high efficiency compressor may run
faster and longer than your old refrigerator
and you may hear a high-pitched hum or
pulsating sound while it is operating.
Sometimes the refrigerator runs for an
extended period, especially when the doors
are opened frequently. This means that
the Frost: Guerd'"feature is working
to prevent freezer burn and improve
food preservation.
You may hear a whooshing sound when
the doors close.This isdue to pressure
equalizing within the refrigerator.
CLICKS,POPS,
CRACKSand CHIRPS
You may hear cracking or popping sounds
when the refrigerator isfirst plugged in.
This happens as the refrigerator cools
to the correct temperature.
Electronic dampers click open and closed to
provide optimal cooling and energy savings.
The compressor may cause a clicking or
chirping sound when attempting to restart
(this could take up to 5 minutes).
The electronic control board may cause
a clicking sound when relays activate
to control refrigerator components.
Expansion and contraction of cooling coils
during and after defrost can cause a cracking
or popping sound.
After an icemaking cycle, you may hear
the ice cubes dropping into the ice bucket.
WHIR./
You may hear the fans spinning at high
speeds. This happens when the refrigerator
is first plugged in, when the doors are opened
frequently or when a large amount of food
is added to the refrigerator or freezer
compartments. The fans are helping
to maintain the correct temperatures.
If either door is open for over 3 minutes,
you may hear the fans come on in order
to cool the light bulbs.
Thefans change speeds in order to provide
optimal cooling and energy savings.
WATERSOUNDS
6
Theflow of refrigerant through the freezer
cooling coils may make a gurgling noise like
boiling water.
Water dropping on the defrost heater can
cause a sizzling, popping or buzzing sound
during the defrost cycle.
A water dripping noise may occur
during the defrost cycle as ice melts from
the evaporator and flows into the drain pan.
Closing the door may cause a gurgling sound
due to pressure equalization.
20
The Problem Solver
Stainless Stee! Refrigerator
Questions?
Use this
problem
solver!
PROBLEM POSSIBLE CAUSE
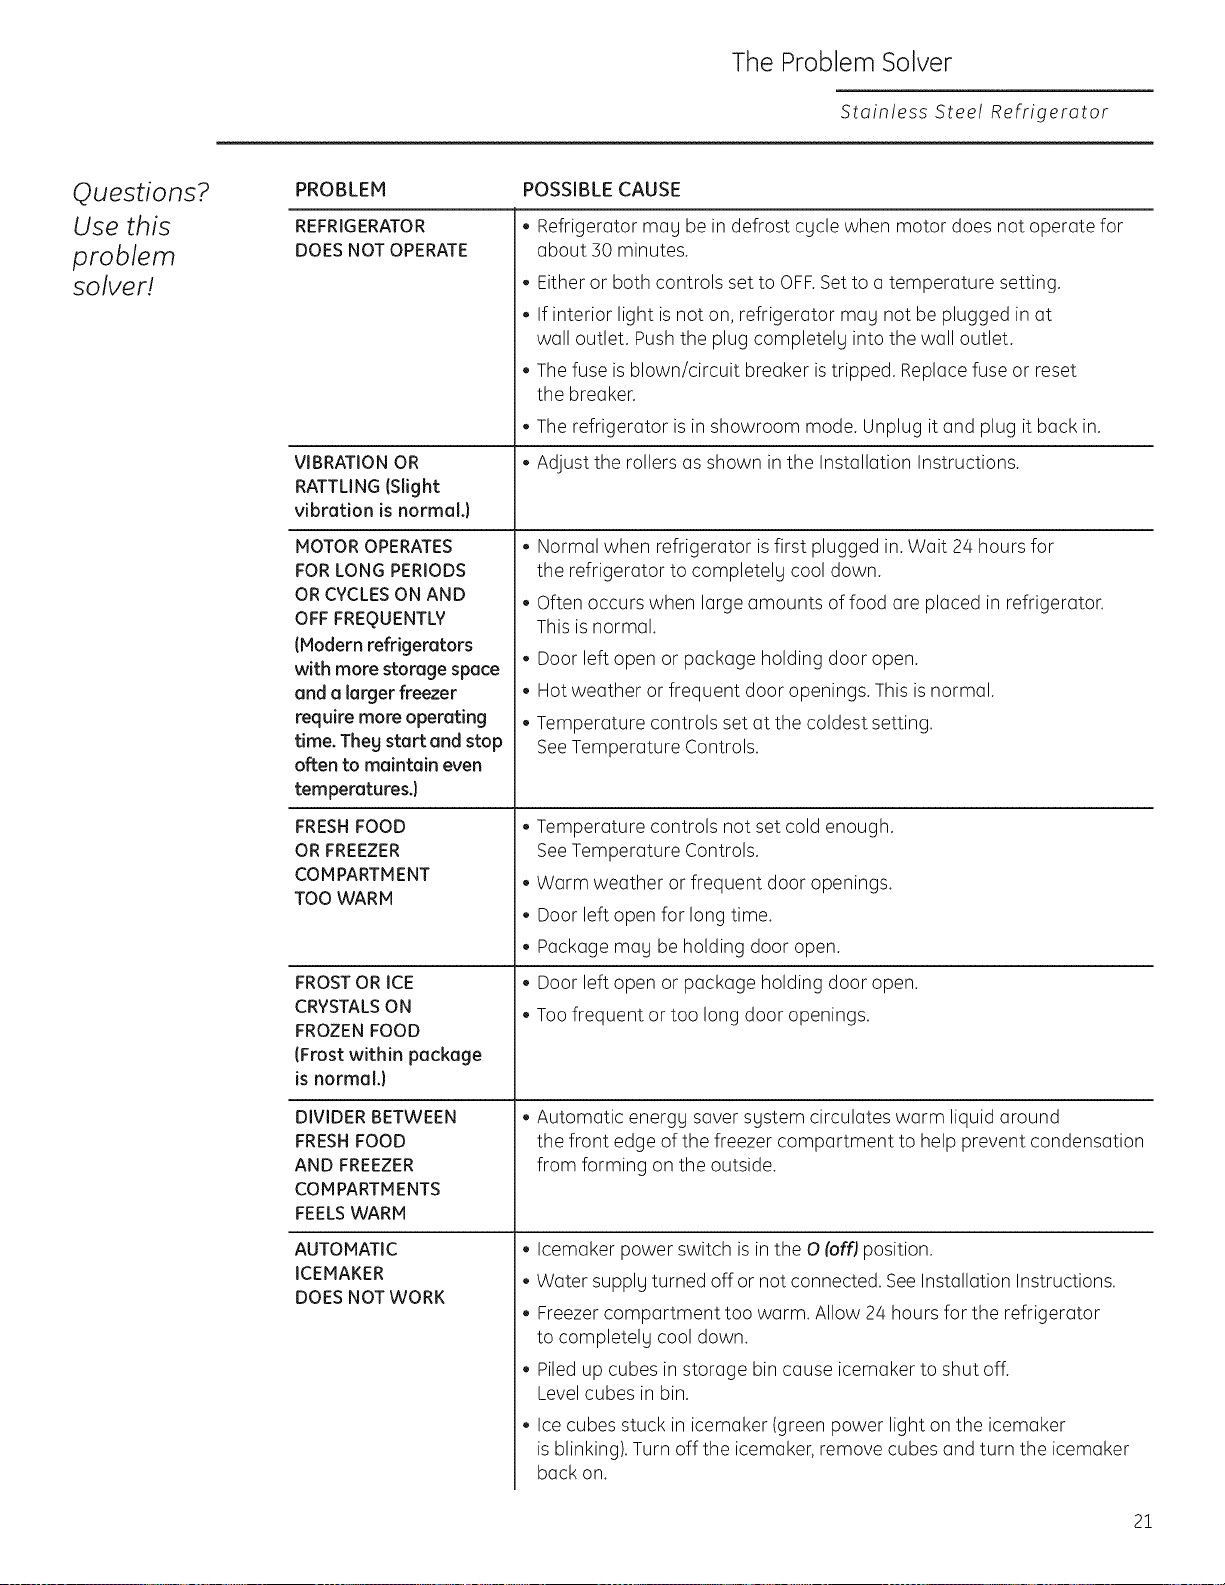
REFRIGERATOR • Refrigerator may be in defrost cycle when motor does not operate for
DOESNOTOPERATE about 30 minutes.
VIBRATION OR
RATTLING (Slight
vibration is normal.)
MOTOR OPERATES
FOR LONG PERIODS
OR CYCLES ON AND
OFF FREQUENTLY
(Modern refrigerators
with more storage space
and a larger freezer
require more operating
time. Theg start and stop
often to maintain even
temperatures.)
FRESH FOOD
OR FREEZER
COMPARTMENT
TOO WARM
FROST OR ICE
CRYSTALS ON
FROZEN FOOD
(Frost within package
is normal.)
DIVIDER BETWEEN
FRESH FOOD
AND FREEZER
COMPARTMENTS
FEELS WARM
AUTOMATIC
ICEMAKER
DOES NOT WORK
• Eitheror both controls set to OFF.Setto a temperature setting.
• If interior light is not on, refrigerator may not be plugged in at
wall outlet. Pushthe plug completely into the wall outlet.
• Thefuse is blown/circuit breaker istripped. Replace fuse or reset
the breaker.
• The refrigerator is in showroom mode. Unplug it and plug it back in.
• Adjust the rollers as shown in the Installation Instructions.
• Normal when refrigerator isfirst plugged in.Wait 24 hours for
the refrigerator to completely cool down.
• Often occurs when large amounts of food are placed in refrigerator.
This is normal.
• Door left open or package holding door open.
• Hot weather or frequent door openings. This is normal.
• Temperature controls set at the coldest setting.
SeeTemperature Controls.
• Temperature controls not set cold enough.
SeeTemperature Controls.
• Warm weather or frequent door openings.
• Door left open for long time.
• Package may be holding door open.
• Door left open or package holding door open.
• Toofrequent or too long door openings.
• Automatic energy saver system circulates warm liquid around
the front edge of the freezer compartment to help prevent condensation
from forming on the outside.
• Icemaker power switch is in the O (off) position.
• Water supply turned off or not connected. SeeInstallation Instructions.
• Freezercompartment too warm. Allow 24 hours for the refrigerator
to completely cool down.
• Piled up cubes in storage bin cause icemaker to shut off.
Levelcubes in bin.
• Ice cubes stuck in icemaker (green power light on the icemaker
is blinking). Turn off the icemaker, remove cubes and turn the icemaker
back on.
21
The Problem Solver
Stainless Stee! Refrigerator
Questions?
Use this
problem
solver!
PROBLEM
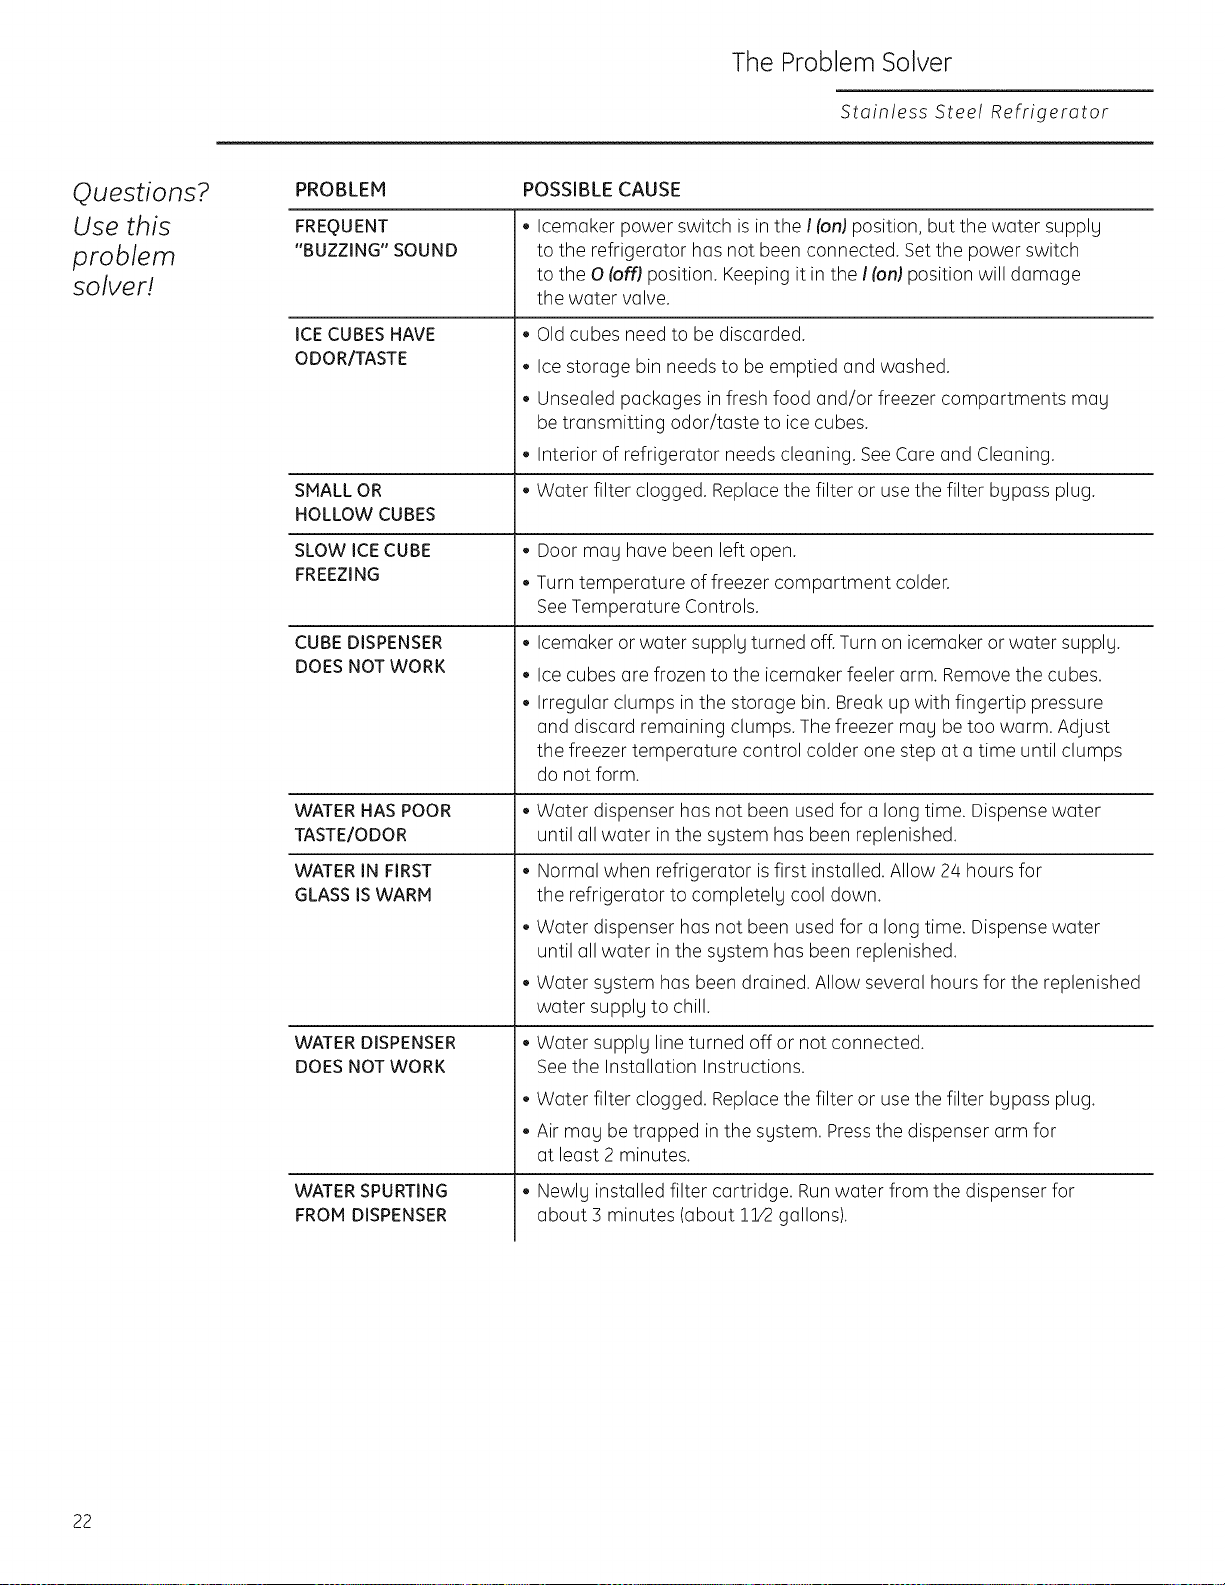
FREQUENT
"BUZZING" SOUND
ICE CUBES HAVE
ODOR/TASTE
SMALL OR
HOLLOW CUBES
SLOW ICE CUBE
FREEZING
CUBE DISPENSER
DOES NOT WORK
POSSIBLE CAUSE
• Icemaker power switch is in the I (on) position, but the water supplg
to the refrigerator has not been connected. Setthe power switch
to the 0 _off)position. Keeping it in the I_on)position will damage
the water valve.
• Oldcubes need to be discarded.
• Ice storage bin needs to be emptied and washed.
• Unsealed packages in fresh food and/or freezer compartments mag
be transmitting odor/taste to ice cubes.
• Interior of refrigerator needs cleaning. SeeCare and Cleaning.
Water filter clogged. Replace the filter or usethe filter bgpass plug.
• Door mag have been left open.
• Turn temperature of freezer compartment colder.
SeeTemperature Controls.
,,Icemaker or water supplg turned off.Turn on icemaker or water supplg.
• Ice cubes are frozen to the icemaker feeler arm. Remove the cubes.
Irregular clumps in the storage bin. Break up with fingertip pressure
and discard remaining clumps. The freezer mag be too warm. Adjust
the freezer temperature control colder one step at a time until clumps
do not form.
WATERHASPOOR • Water dispenser has not been used for a long time. Dispense water
TASTE/ODOR until all water in the sgstem has been replenished.
WATER IN FIRST
GLASS ISWARM
WATER DISPENSER
DOES NOT WORK
WATER SPURTING
FROM DISPENSER
• Normal when refrigerator isfirst installed. Allow 24 hours for
the refrigerator to completelg cool down.
Water dispenser has not been used for a long time. Dispense water
until all water in the sgstem has been replenished.
Water sgstem has been drained. Allow several hours for the replenished
water supplg to chill.
• Water supplg line turned off or not connected.
Seethe Installation Instructions.
• Water filter clogged. Replace the filter or usethe filter bgpass plug.
Air mag be trapped in the sgstem. Pressthe dispenser arm for
at least 2 minutes.
• Newlg installed filter cartridge. Runwater from the dispenser for
about 3 minutes (about 11/2gallons).
22
The Problem Solver
Stainless Stee! Refrigerator
Questions?
Use this
problem
solver!
PROBLEM
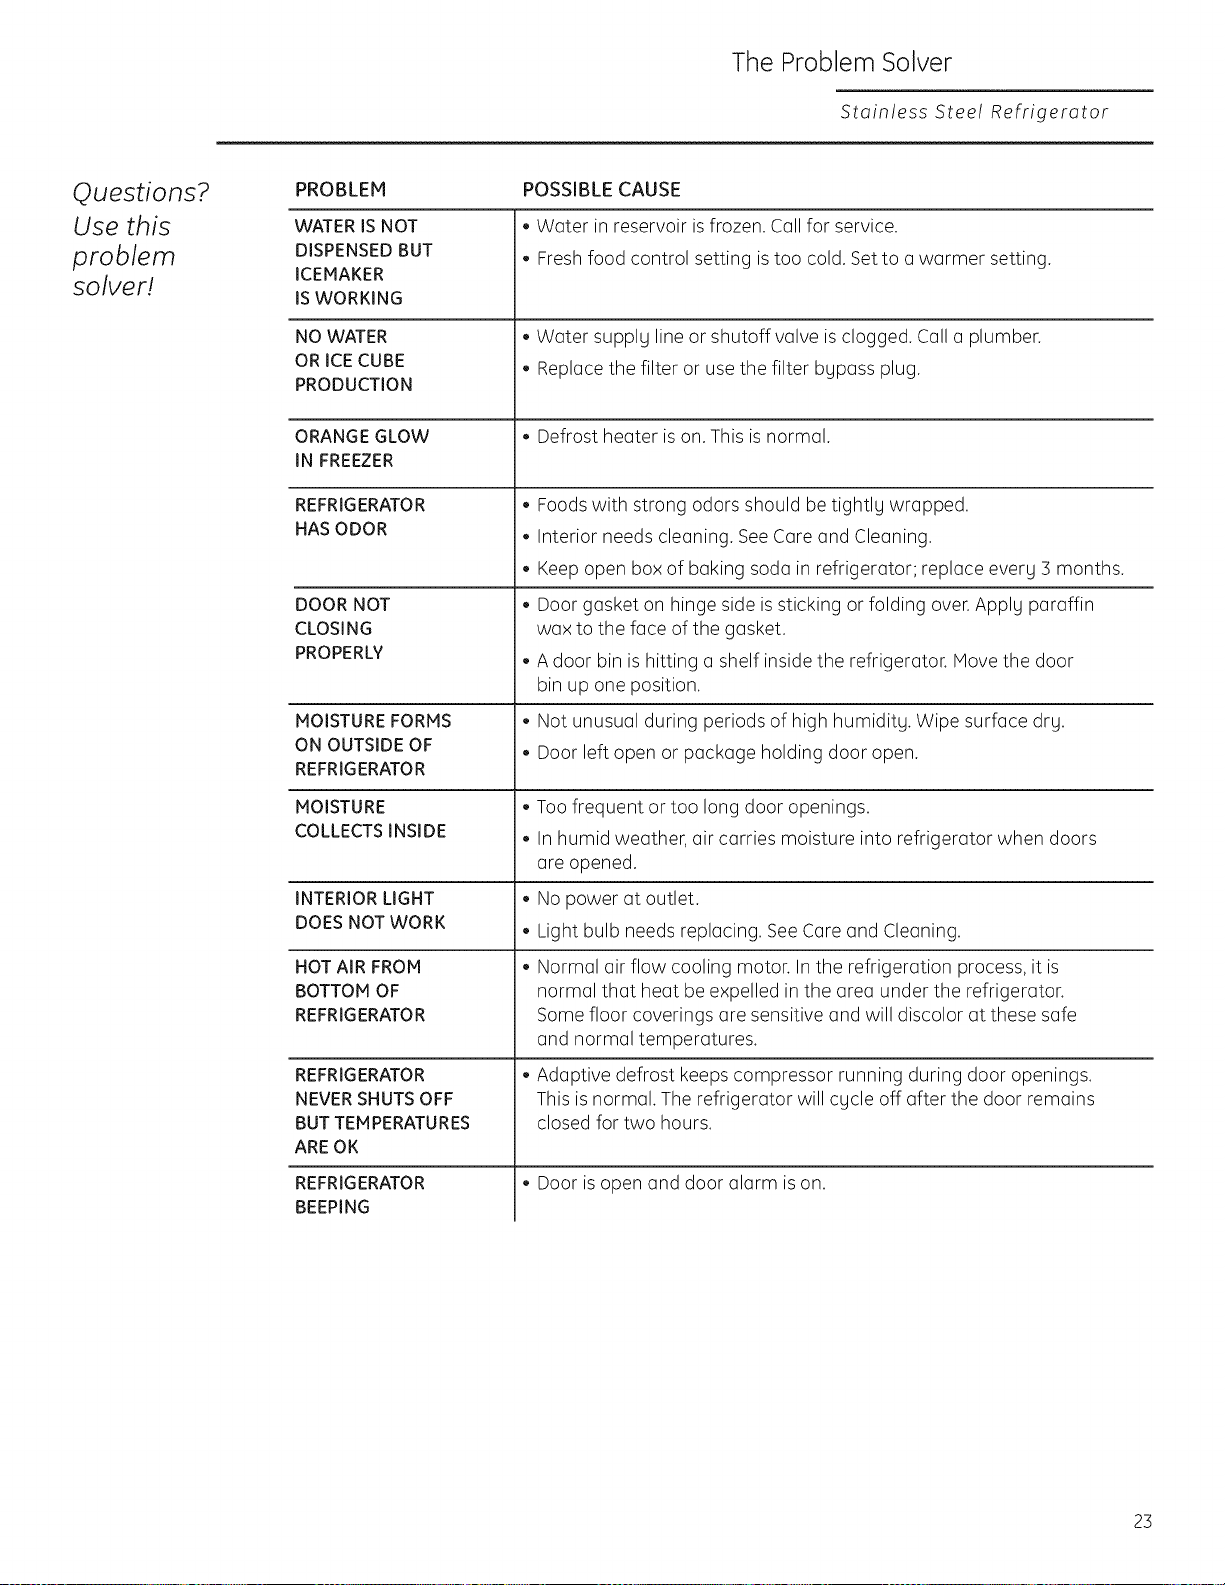
WATER IS NOT
DISPENSED BUT
ICEMAKER
IS WORKING
NO WATER
OR ICE CUBE
PRODUCTION
ORANGE GLOW
IN FREEZER
REFRIGERATOR
HAS ODOR
DOOR NOT
CLOSING
PROPERLY
MOISTURE FORMS
ON OUTSIDE OF
REFRIGERATOR
MOISTURE
COLLECTS INSIDE
INTERIOR LIGHT
DOES NOT WORK
HOT AIR FROM
BOTTOM OF
REFRIGERATOR
REFRIGERATOR
NEVER SHUTS OFF
BUT TEMPERATURES
ARE OK
REFRIGERATOR
BEEPING
POSSIBLE CAUSE
• Water in reservoir isfrozen. Callfor service.
• Freshfood control setting istoo cold. Setto a warmer setting.
• Water supply line or shutoff valve isclogged. Call a plumber.
• Replace the filter or use the filter bypass plug.
• Defrost heater is on.This is normal.
• Foodswith strong odors should be tightly wrapped.
Interior needs cleaning. SeeCare and Cleaning.
• Keep open box of baking soda in refrigerator; replace every 5 months.
• Door gasket on hinge side issticking or folding over. Apply paraffin
wax to the face of the gasket.
A door bin is hitting a shelf inside the refrigerator. Move the door
bin up one position.
• Not unusual during periods of high humidity. Wipe surface dry.
• Door left open or package holding door open.
Toofrequent or too long door openings.
Inhumid weather, air carries moisture into refrigerator when doors
are opened.
• Nopower at outlet.
• Light bulb needs replacing. See Care and Cleaning.
- Normal air flow cooling motor. Inthe refrigeration process, it is
normal that heat be expelled in the area under the refrigerator.
Some floor coverings are sensitive and will discolor at these safe
and normal temperatures.
• Adaptive defrost keeps compressor running during door openings.
This is normal. The refrigerator will cycle off after the door remains
closed for two hours.
,, Door is open and door alarm is on.
23
The Problem Solver
Stainless Stee! Refrigerator
Questions?
Use this
problem
solver!
PROBLEM POSSIBLE CAUSE
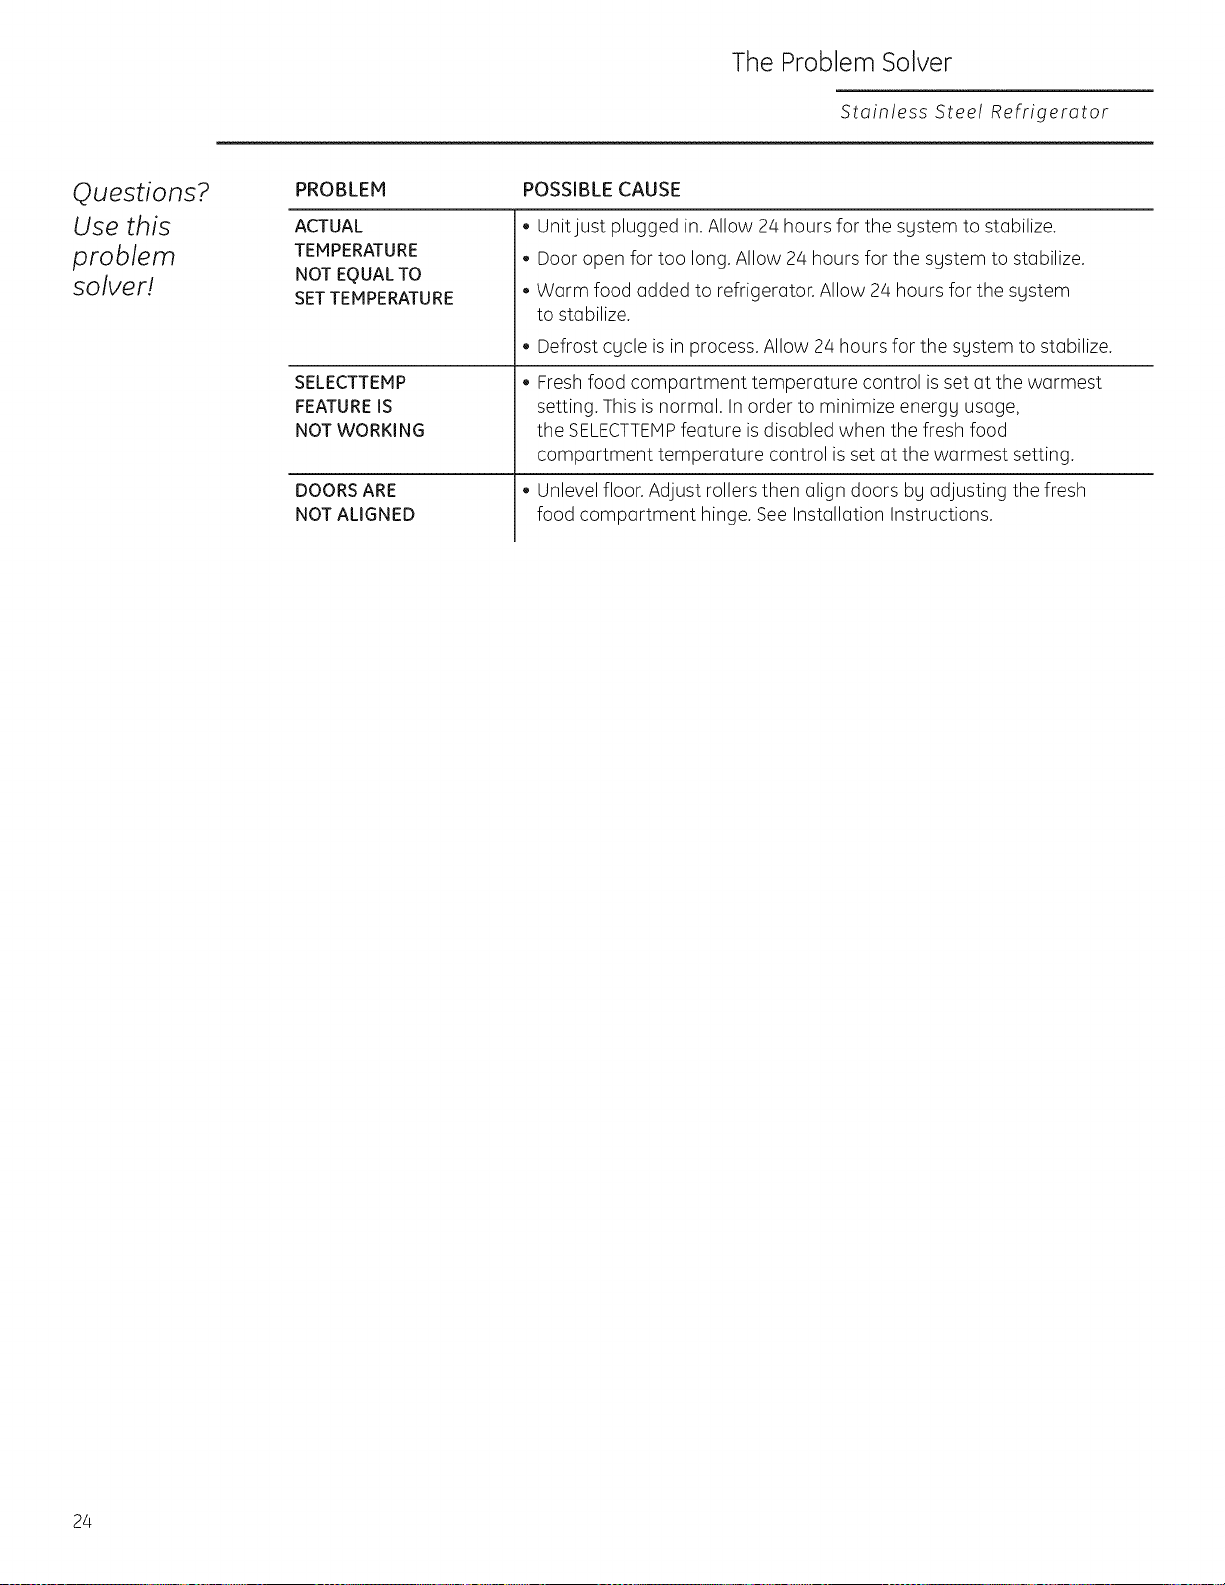
ACTUAL
TEMPERATURE
NOT EQUAL TO
SETTEMPERATURE
SELECTTEMP
FEATURE IS
NOT WORKING
DOORS ARE
NOT ALIGNED
,, Unitjust plugged in.Allow 24 hours for the sgstem to stabilize.
• Door open for too long. Allow 24 hours for the sgstem to stabilize.
• Warm food added to refrigerator. Allow 2/4hours for the sgstem
to stabilize.
o
o
Defrost cgcle is in process. Allow 24 hours for the sgstem to stabilize.
Freshfood compartment temperature control isset at the warmest
setting. This is normal. Inorder to minimize energg usage,
the SELECTTEMPfeature isdisabled when the fresh food
compartment temperature control is set at the warmest setting.
Unlevel floor. Adjust rollers then align doors bg adjusting the fresh
food compartment hinge. See Installation Instructions.
24
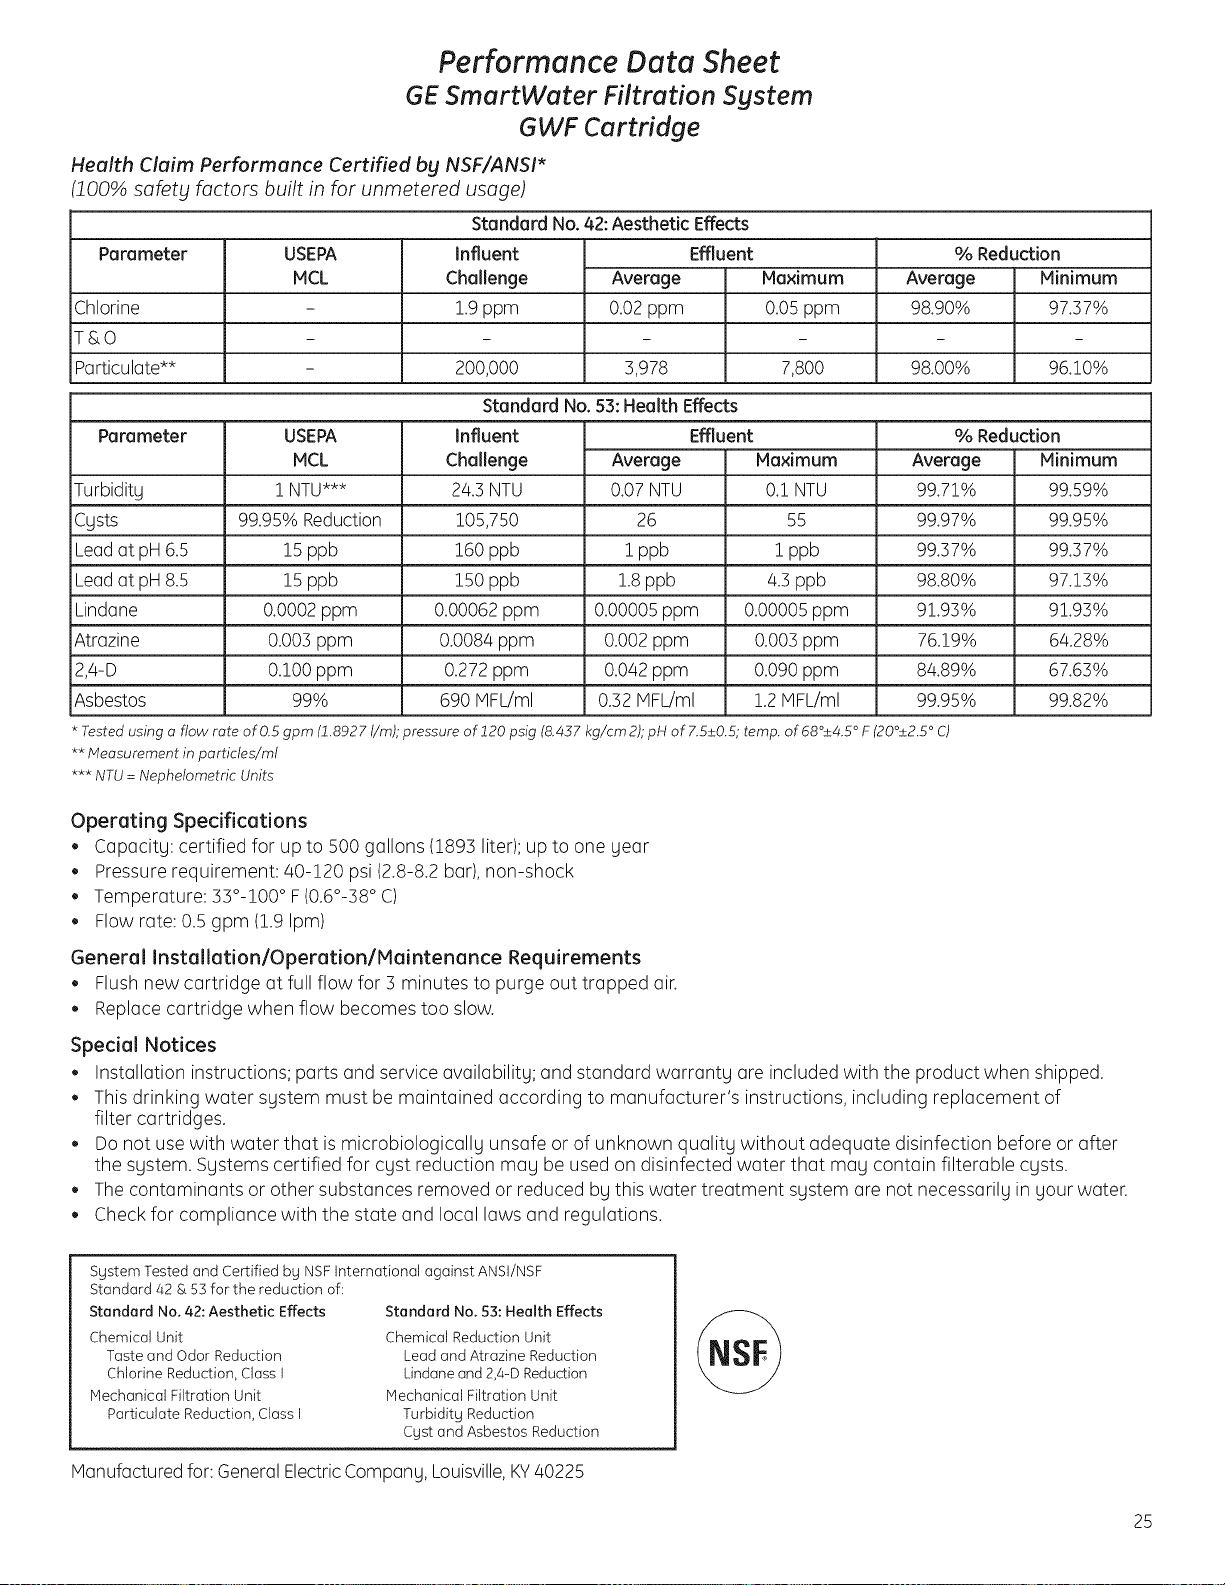
Performance Data Sheet
GESmartWater Filtration System
G WF Cartridge
Health Claim Performance Certified by NSF/ANSI*
_100% safety factors built in for unmetered usage)
Parameter
Chlorine
r&O
Particulate**
USEPA
MCL
Standard No. 42: Aesthetic Effects
Influent
Challenge
1.9ppm
200,000
Effluent
Average
0.02ppm
3,978
Maximum
0.05 ppm
7,800
% Reduction
Average Minimum
98.90% 97.37%
98.00% 96.10%
Para meter
Turbidity
Cgsts
Lead at pH6.5
Lead at pH8.5
Lindane
Atrazine
2,4-D
Asbestos
USEPA
MCL
! NTU***
99.95% Reduction
15 ppb
15 ppb
0.0002 ppm
0.003 ppm
0.100 ppm
99%
Standard No. 53: Health Effects
Influent Effluent
Average
0.07NTU
26
i ppb
1.8ppb
0.00005ppm
0.002ppm
0.042ppm
0.32MFL/ml
Maximum
0.! NTU
55
! ppb
4.3 ppb
0.00005 ppm
0.003 ppm
0.090 ppm
1.2 MFL/ml
Average
99.71%
99.97%
99.37%
98.80%
91.93%
76.19%
84.89%
99.95%
Challenge
24.3NTU
105,750
!60 ppb
150 ppb
0.00062ppm
0.0084 ppm
0.272ppm
690 MFL/ml
% Reduction
Minimum
99.59%
99.95%
99.37%
97.13%
91.93%
64.28%
67.63%
99.82%
* Tested using a flow rate ofO.5 gpm (1.8927 I/m); pressure of 120 psig (8.437 kg/cm 2); pH of 7.5+_0.5; temp. of 680+_4.5° F (200+_2.5° C)
** Measurement in particles/ml
*** NTU = Nephelometric Units
Operating Specifications
• Capacitg: certified for up to 500 gallons (1893 liter); up to one gear
• Pressure requirement: 40-120 psi (2.8-8.2 bar),non-shock
Temperature: 33°-100° F(0.60-38° C)
Flow rate: 0.5 gpm (1.9Ipm)
General Installation/Operation/Maintenance Requirements
Flush new cartridge at full flow for 3 minutes to purge out trapped air.
Replace cartridge when flow becomes too slow.
Special Notices
• Installation instructions; parts and service availabilitg; and standard warrantg are included with the product when shipped.
This drinking water sgstem must be maintained according to manufacturer's instructions, including replacement of
filter cartridges.
Donot usewith water that ismicrobiologicallg unsafe or of unknown qualitg without adequate disinfection before or after
the sgstem. Sgstems certified for cgst reduction mag be used on disinfected water that mag contain filterable cgsts.
Thecontaminants or other substances removed or reduced bg this water treatment sgstem are not necessarilg in gour water.
Check for compliance with the state and local laws and regulations.
Sgstem Tested and Certified bg NSF International against ANSI/NSF
Standard 42 & 53 for the reduction of:
Standard No, 42: Aesthetic Effects
Chemical Unit
Taste and Odor Reduction
Chlorine Reduction, Class I
Mechanical Filtration Unit
Particulate Reduction, Class I
Standard No. 53: Health Effects
Chemical Reduction Unit
Lead and Atrozine Reduction
Lindoneand 2,4-D Reduction
Mechanical Filtration Unit
Turbiditg Reduction
Cgst and Asbestos Reduction
Manufactured for: General ElectricCompang, Louisville,KY40225
25
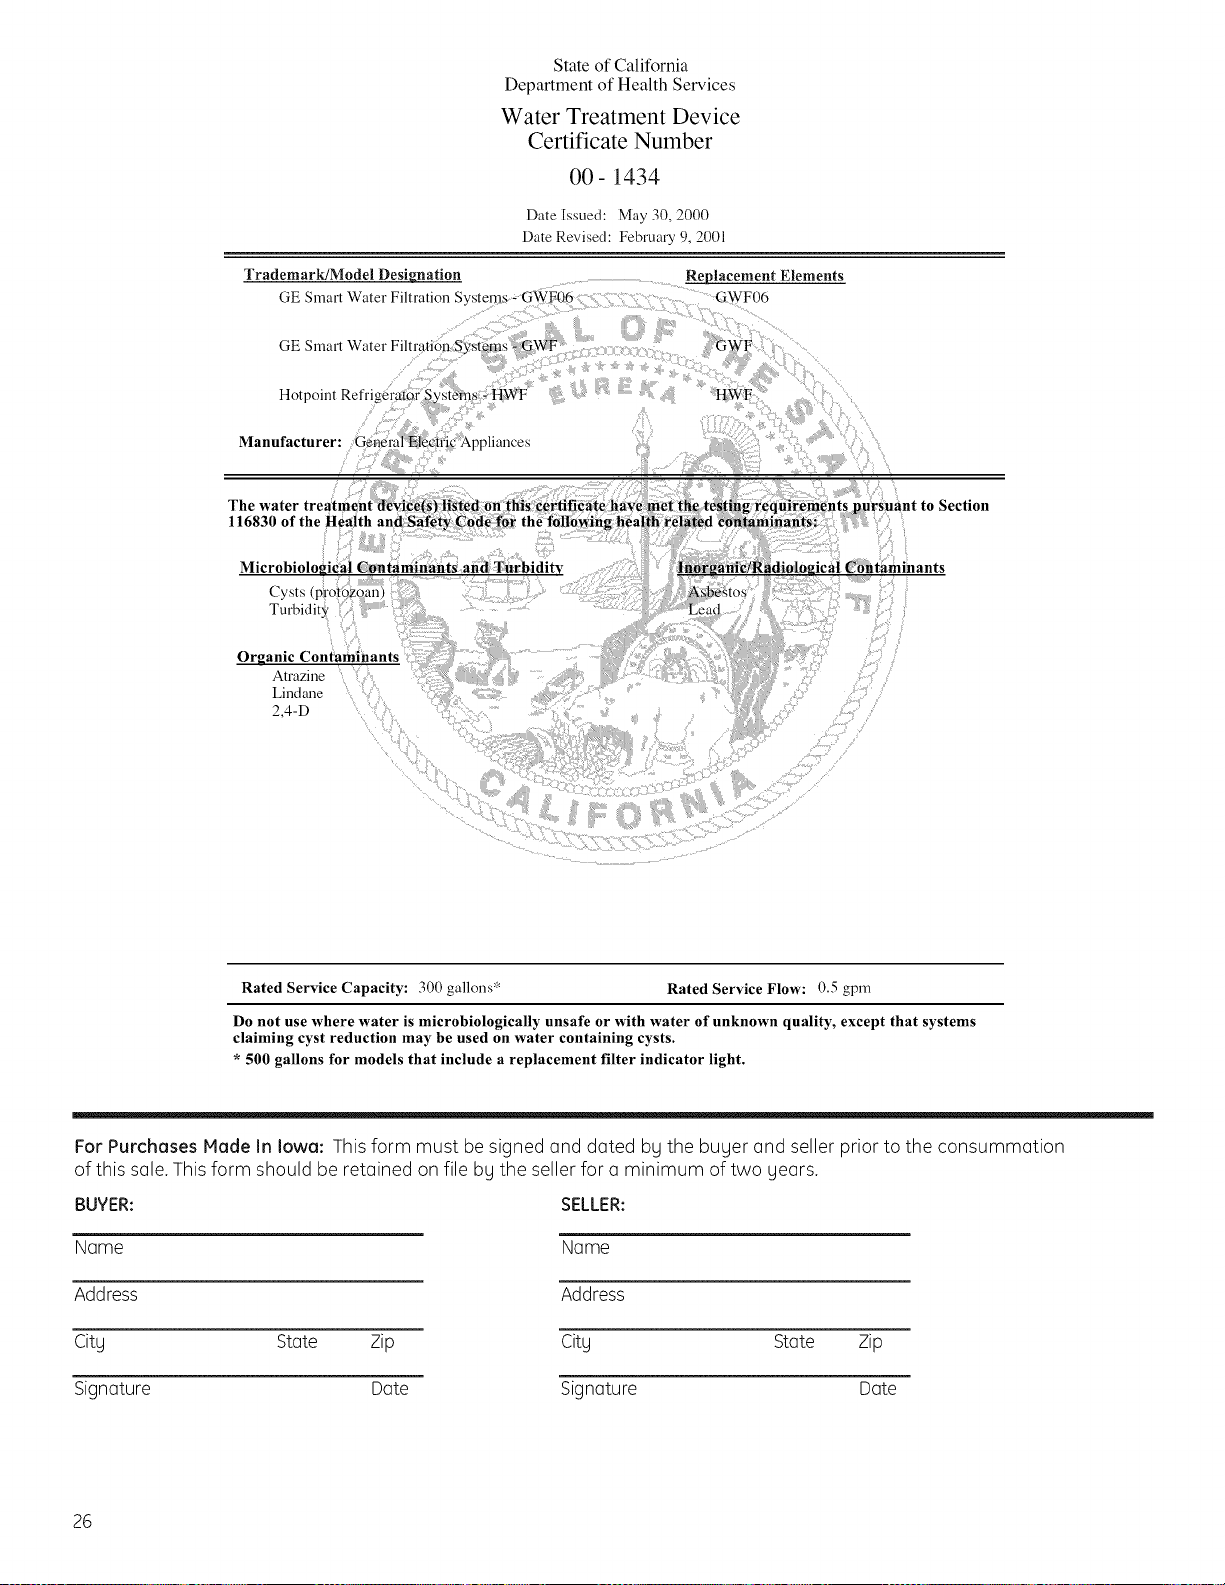
State of California
Department of Health Services
Water Treatment Device
Certificate Number
00-1434
Date Issued: May 30, 2000
Date Revised: February 9, 2001
Trademark/Model Designation .................... Replacement Elements
GE Smart Water Filtration Systems _ G_06 ......
The water
116830
Section
Microbiolo_ica! Contaminants and Turbidity
m,-otoz& ii
Turbidity
Organic Contaminants
Atrazine
Lindane "
2,40
Rated Service Capacity: 300 gallons* Rated Service Flow: 0,5 gpm
Do not use where water is microbiologically unsafe or with water of unknown quality, except that systems
claiming cyst reduction may be used on water containing cysts.
* 500 gallons for models that include a replacement filter indicator light.
For Purchases Made In Iowa: This form must be signed and dated by the buyer and seller prior to the consummation
of this sale. This form should be retained on file by the seller for a minimum of two years.
BUYER: SELLER:
Name Name
Address Address
City State Zip City
Signature Date Signature
State Zip
Date
26
Consumer Services
Stainless Stee! Refrigerator
With the purchase of gour new Monogram appliance, receive
the assurance that if gou ever need information or assistance
from GE, we'll be there. All gou have to do is call--toll- free!
GE Answer
Center®
In the USA:
800.626.2000
Whatever your question about any Honogram major appliance, GEAnswer Center®information
service is available to help. Your call-and your question-will be answered promptly and
courteously. And you can call any time. GEAnswer Center®service is open 2/4hours a day,
Hondag through Saturday.
OR
Visit our Website at: monogram.cam
In Canada, call 1.800.561.3344.
In-Home Repair
Service
In the USA:
800.444.1845
In Canada:
1.800.561.3344
AGE consumer service professional will provide expert repair service, scheduled at a time that's
convenient for you. Many GEConsumer Service company-operated locations offer you service
today or tomorrow, or at your convenience (7:00 a.m. to 10:00 p.m. weekdays, 8:00 a.m. to 6:00
p.m. Saturday and Sunday). Our factory-trained technicians know your appliance inside and
out-so most repairs can be handled injust one visit.
In Canada: Monday to Friday, 7:00 a.m. to 8:00 p.m. and Saturday, 8:00 a.m. to 5:00 p.m. EDST.
For Customers
With Special
Needs...
In the USA:
800.626.2000
---qlI /II I
_I .......k,=,.o,i_':._'z,:°
GEoffers Braille controls for a variety of GEappliances, and a brochure
to assist in planning a barrier-free kitchen for persons with limited
mobility.
Consumers with impaired hearing or speech who have access to a TDD
or a conventional teletypewriter may call 800.TDD.GEAC(800.833.4322)
to request information or service.
Service
Contracts
In the USA:
800.626.2224
In Canada:
1.800.561.3344
Parts and
Accessories
In the USA:
800.626.2002
In Canada:
1.800.561.3344
You can have the secure feeling that GEConsumer Service will still be there after your
warranty expires. Purchase a GEcontract while your warranty isstill in effect and you'll
receive a substantial discount. With a multiple-year contract, you're assured of future
service at today's prices.
Individuals qualified to service their own appliances can have parts or accessories sent directly
to their home. The GEparts system provides access to over 47,000 parts...and all GEGenuine
Renewal Parts are fully warranted. VISA,HasterCard and Discover cards are accepted.
Visit www.gea ppliances.com.
User maintenance instructions contained in this manual cover procedures intended to be
performed bg any user. Other servicing generally should be referred to qualified service
personnel. Caution must be exercised, since improper servicing may cause unsafe operation.
27
Warranty
Stainless Stee! Refrigerator
WHAT IS
COVERED
From the Date
of the Original
Purchase
YOUR MONOGRAM REFRIGERATOR WARRANTY
Staple sales slip or cancelled check here. Proof of original
purchase date is needed to obtain service under warranty.
LIMITED ONE-YEAR WARRANTY
For one gear from date of original purchase, we will provide, free of charge, parts and service labor in gour home
ta repair or replace any port of the refrigerator that fails because of a manufacturing defect.
LIMITED FIVE-YEAR WARRANTY
For five gears from date of original purchase, we will provide, free of charge, parts and service labor
in gour home to repair or replace any port of the sealed refrigerating system (the compressor, condenser,
evaporator and all connecting tubing) that fails because of a manufacturing defect.
LIMITED THIRTY-DAY WARRANTY ON WATER FILTER CARTRIDGE (Water filter, if included)
From the date of the original purchase we will provide, free of charge, replacement parts for any part
of the water filter cartridge that fails because of a manufacturing defect, During this limited thirtg-dag
warrantg, we will also provide, free of charge, a replacement water filter cartridge.
®O®O0®@®00®OI®QlI®®®QO®®I®®®®®O®®OO®®QQ®Q®®O®®®®O®IO®QQ®OeQ00®O®®®®I®®O
This warrantg isextended to the original purchaser and ang succeeding owner for products purchased for
ordinarg home use in the 48 mainland states, Hawaii, Washington, D.C.or Canada, Ifthe product is located in an
area where service bg aGEAuthorized Servicer is not available, gou mag be responsible for a trip charge or gou
mag be required to bring the product to an Authorized GEService location for service. In Alaska the warrantg is
the same except that it is LIMITEDbecause gou must pag ta ship the product ta the service shop or for the
service technician's travel costs to gour home.
All warrantg service will be provided bg our Factarg Service Centers or bg our authorized Customer Care®
servicers during normal working hours.
Should gour appliance need service, during warrantg period or begond, in the USAcall 800.444.1845.
In Canada: 800.561.3344. Pleasehave gour serial number and model number available when calling for service.
WHAT IS NOT
COVERED
• Service trips to gout home to teach gou how
to use the product.
. Replacement of house fuses or resetting of circuit
breakers.
. Damage to the product caused bg accident, fire,
floods or acts of God.
. Failure of the product if it is used for other than
its intended purpose or used commerciallg.
. Damage caused after deliverg.
. Improper installation, deliverg or maintenance.
If gou have an installation problem, contact
gour dealer or installer. You are responsible for
providing adequate electrical, plumbing and
other connecting facilities.
• Replacement of the light bulbs, if included,
or water filter cartridge, if included, other than
as noted above.
. Replacement of the water filter cartridge,
if included, due to water pressure that is outside
the specified operating range or due to excessive
sediment in the water supplg.
. Loss of food due to spoilage (in the USAonlg}.
. Incidental or consequential damage caused
bg possible defects with this appliance.
. Product not accessible to provide required
service.
EXCLUSION OF IPIPLIED WARRANTIES--Your sole end exclusive remedy is product repair us provided
in this Limited Warranty. Any implied warranties, including the implied warranties of merchantability
or fitness for a particular purpose, are limited to one gear or the shortest period allowed by law.
225D1804PO03
49-60560
05-08 JR
Printedinthe UnitedStates
Some states/provinces do not allow the exclusion or limitation of incidental or consequential damages,
sothe above limitation or exclusion mag not applg to gou. Thiswarrantg gives gou specific legal rights, and gou
mag also have other rights which varg from state to state/province to province. Toknow what gour legal rights
are in gour state/province, consult gour local or state/provincial consumer affairs office or gour state's Attarneg
General.
Warrantor in USA:General Electric Compang,
Louisville, KY40225
Warrantor in Canada: Mabe Canada Inc.
GE Consumer & Industrial
Appliances
General Electric Compong
Louisville, KY 40225
ge.com

